

HP StorageWorks 2/16, StorageWorks edge 2/16 product manager User Manual

hp StorageWorks
edge switch 2/16 product manager
user guide
Part Number: A7284-96003/AA-RS2KA-TE
First Edition (August 2002)
This guide provides an introduction and an overview of the hp
StorageWorks edge switch 2/16 Product Manager. It also
explains how to use edge 2/16 features to monitor, manage, and
configure the switch. Finally it describes how to use StorageWorks
edge switch 2/16 logs and maintenance features.

© Hewlett-Packard Company, 2002. All rights reserved.
Hewlett-Packard Company makes no warranty of any kind with regard to this material, including,
but not limited to, the implied warranties of merchantability and fitness for a particular purpose.
Hewlett-Packard shall not be liable for errors contained herein or for incidental or consequential
damages in connection with the furnishing, performance, or use of this material.
This document contains proprietary information, which is protected by copyright. No part of this
document may be photocopied, reproduced, or translated into another language without the prior
written consent of Hewlett-Packard. The information contained in this document is subject to change
without notice.
Microsoft, MS-DOS, Windows, and Windows 2000 are trademarks of Microsoft Corporation in the
U.S. and/or other countries.
All other product names mentioned herein may be trademarks of their respective companies.
Hewlett-Packard Company shall not be liable for technical or editorial errors or omissions contained
herein. The information is provided “as is” without warranty of any kind and is subject to change
without notice. The warranties for Hewlett-Packard Company products are set forth in the express
limited warranty statements accompanying such products. Nothing herein should be construed as
constituting an additional warranty.
Printed in the U.S.A.
edge switch 2/16 product manager user guide
First Edition (August 2002)
Part Number: A7284-96003/AA-RS2KA-TE

Contents
About This Guide
Intended Audience . . . . . . . . . . . . . . . . . . . . . . . . . . . . . . . . . . . . . . . . . . . . . . . . . . . . . .xiii
Related Documentation . . . . . . . . . . . . . . . . . . . . . . . . . . . . . . . . . . . . . . . . . . . . . . . . . .xiii
Document Conventions . . . . . . . . . . . . . . . . . . . . . . . . . . . . . . . . . . . . . . . . . . . . . . . . . . xiv
Symbols in Text . . . . . . . . . . . . . . . . . . . . . . . . . . . . . . . . . . . . . . . . . . . . . . . . . . . . . . . . xv
Symbols on Equipment . . . . . . . . . . . . . . . . . . . . . . . . . . . . . . . . . . . . . . . . . . . . . . . . . . xv
Rack Stability. . . . . . . . . . . . . . . . . . . . . . . . . . . . . . . . . . . . . . . . . . . . . . . . . . . . . . . . . .xvi
Getting Help. . . . . . . . . . . . . . . . . . . . . . . . . . . . . . . . . . . . . . . . . . . . . . . . . . . . . . . . . . .xvi
HP Technical Support . . . . . . . . . . . . . . . . . . . . . . . . . . . . . . . . . . . . . . . . . . . . . . . . . . xvii
HP Website . . . . . . . . . . . . . . . . . . . . . . . . . . . . . . . . . . . . . . . . . . . . . . . . . . . . . . . xvii
HP Authorized Reseller . . . . . . . . . . . . . . . . . . . . . . . . . . . . . . . . . . . . . . . . . . . . . . . . . xvii
Product Manager Overview
Managing the StorageWorks Edge Switch 2/16 . . . . . . . . . . . . . . . . . . . . . . . . . . . . . . 1–1
Management Menu Options. . . . . . . . . . . . . . . . . . . . . . . . . . . . . . . . . . . . . . . . . . . . . . 1–2
HAFM . . . . . . . . . . . . . . . . . . . . . . . . . . . . . . . . . . . . . . . . . . . . . . . . . . . . . . . . . . . 1–2
View Tabs . . . . . . . . . . . . . . . . . . . . . . . . . . . . . . . . . . . . . . . . . . . . . . . . . . . . . 1–2
Product Menu . . . . . . . . . . . . . . . . . . . . . . . . . . . . . . . . . . . . . . . . . . . . . . . . . . 1–2
Fabrics Menu. . . . . . . . . . . . . . . . . . . . . . . . . . . . . . . . . . . . . . . . . . . . . . . . . . . 1–3
View Menu. . . . . . . . . . . . . . . . . . . . . . . . . . . . . . . . . . . . . . . . . . . . . . . . . . . . 1–3
Configure Menu . . . . . . . . . . . . . . . . . . . . . . . . . . . . . . . . . . . . . . . . . . . . . . . . 1–3
Logs Menu . . . . . . . . . . . . . . . . . . . . . . . . . . . . . . . . . . . . . . . . . . . . . . . . . . . . 1–4
Maintenance Menu . . . . . . . . . . . . . . . . . . . . . . . . . . . . . . . . . . . . . . . . . . . . . . 1–4
Help. . . . . . . . . . . . . . . . . . . . . . . . . . . . . . . . . . . . . . . . . . . . . . . . . . . . . . . . . . 1–4
Product Manager . . . . . . . . . . . . . . . . . . . . . . . . . . . . . . . . . . . . . . . . . . . . . . . . . . . 1–4
View Tabs . . . . . . . . . . . . . . . . . . . . . . . . . . . . . . . . . . . . . . . . . . . . . . . . . . . . . 1–4
Product Menu . . . . . . . . . . . . . . . . . . . . . . . . . . . . . . . . . . . . . . . . . . . . . . . . . . 1–5
Configure Menu . . . . . . . . . . . . . . . . . . . . . . . . . . . . . . . . . . . . . . . . . . . . . . . . 1–5
Logs Menu . . . . . . . . . . . . . . . . . . . . . . . . . . . . . . . . . . . . . . . . . . . . . . . . . . . . 1–6
Maintenance Menu . . . . . . . . . . . . . . . . . . . . . . . . . . . . . . . . . . . . . . . . . . . . . . 1–6
edge switch 2/16 product manager user guide iii

Help Menu . . . . . . . . . . . . . . . . . . . . . . . . . . . . . . . . . . . . . . . . . . . . . . . . . . . . . 1–7
Product Manager Description. . . . . . . . . . . . . . . . . . . . . . . . . . . . . . . . . . . . . . . . . . . . . 1–7
Using the Product Manager . . . . . . . . . . . . . . . . . . . . . . . . . . . . . . . . . . . . . . . . . . . . . 1–10
Keyboard Navigation . . . . . . . . . . . . . . . . . . . . . . . . . . . . . . . . . . . . . . . . . . . . . . . 1–10
Using Dialog Boxes . . . . . . . . . . . . . . . . . . . . . . . . . . . . . . . . . . . . . . . . . . . . . . . . 1–10
Illustrations Used in this Manual . . . . . . . . . . . . . . . . . . . . . . . . . . . . . . . . . . . . . . 1–11
Logging Into the HAFM . . . . . . . . . . . . . . . . . . . . . . . . . . . . . . . . . . . . . . . . . . . . 1–11
Opening the Product Manager . . . . . . . . . . . . . . . . . . . . . . . . . . . . . . . . . . . . . . . . 1–13
Window Layout and Function . . . . . . . . . . . . . . . . . . . . . . . . . . . . . . . . . . . . . . . . 1–14
Menu Bar . . . . . . . . . . . . . . . . . . . . . . . . . . . . . . . . . . . . . . . . . . . . . . . . . . . . . 1–14
View Tabs . . . . . . . . . . . . . . . . . . . . . . . . . . . . . . . . . . . . . . . . . . . . . . . . . . . . 1–23
View Panel. . . . . . . . . . . . . . . . . . . . . . . . . . . . . . . . . . . . . . . . . . . . . . . . . . . . 1–23
Status Bar. . . . . . . . . . . . . . . . . . . . . . . . . . . . . . . . . . . . . . . . . . . . . . . . . . . . . 1–30
Closing the Product Manager. . . . . . . . . . . . . . . . . . . . . . . . . . . . . . . . . . . . . . . . . 1–32
User Rights. . . . . . . . . . . . . . . . . . . . . . . . . . . . . . . . . . . . . . . . . . . . . . . . . . . . . . . 1–32
User Rights for Specific Functions . . . . . . . . . . . . . . . . . . . . . . . . . . . . . . . . . 1–33
Backing Up and Restoring Product Manager Data. . . . . . . . . . . . . . . . . . . . . . . . . . . . 1–35
Restoring Data to the HAFM server . . . . . . . . . . . . . . . . . . . . . . . . . . . . . . . . . . . 1–36
Using QuikSync . . . . . . . . . . . . . . . . . . . . . . . . . . . . . . . . . . . . . . . . . . . . . . . . . . . 1–36
Monitoring and Managing the Switch
Hardware View. . . . . . . . . . . . . . . . . . . . . . . . . . . . . . . . . . . . . . . . . . . . . . . . . . . . . . . . 2–1
Identifying FRUs . . . . . . . . . . . . . . . . . . . . . . . . . . . . . . . . . . . . . . . . . . . . . . . . . . . 2–1
Monitoring Switch Operation . . . . . . . . . . . . . . . . . . . . . . . . . . . . . . . . . . . . . . . . . 2–1
Switch Status Table . . . . . . . . . . . . . . . . . . . . . . . . . . . . . . . . . . . . . . . . . . . . . . 2–2
Status Bar Status Indicator . . . . . . . . . . . . . . . . . . . . . . . . . . . . . . . . . . . . . . . . 2–4
Monitoring Hardware Operation . . . . . . . . . . . . . . . . . . . . . . . . . . . . . . . . . . . . . . . 2–4
Front View. . . . . . . . . . . . . . . . . . . . . . . . . . . . . . . . . . . . . . . . . . . . . . . . . . . . . 2–5
Rear View . . . . . . . . . . . . . . . . . . . . . . . . . . . . . . . . . . . . . . . . . . . . . . . . . . . . . 2–7
Obtaining Hardware Information. . . . . . . . . . . . . . . . . . . . . . . . . . . . . . . . . . . . . . . 2–7
Displaying FRU Information. . . . . . . . . . . . . . . . . . . . . . . . . . . . . . . . . . . . . . . 2–7
Displaying Port Information . . . . . . . . . . . . . . . . . . . . . . . . . . . . . . . . . . . . . . . 2–8
Displaying Switch Information . . . . . . . . . . . . . . . . . . . . . . . . . . . . . . . . . . . . 2–12
Using Menu Options . . . . . . . . . . . . . . . . . . . . . . . . . . . . . . . . . . . . . . . . . . . . . . . 2–14
Switch Menu . . . . . . . . . . . . . . . . . . . . . . . . . . . . . . . . . . . . . . . . . . . . . . . . . . 2–14
Port Menu . . . . . . . . . . . . . . . . . . . . . . . . . . . . . . . . . . . . . . . . . . . . . . . . . . . . 2–17
Port List View. . . . . . . . . . . . . . . . . . . . . . . . . . . . . . . . . . . . . . . . . . . . . . . . . . . . . . . . 2–21
Menu Options. . . . . . . . . . . . . . . . . . . . . . . . . . . . . . . . . . . . . . . . . . . . . . . . . . . . . 2–23
iv edge switch 2/16 product manager user guide

FRU List View. . . . . . . . . . . . . . . . . . . . . . . . . . . . . . . . . . . . . . . . . . . . . . . . . . . . . . . 2–24
Node List View . . . . . . . . . . . . . . . . . . . . . . . . . . . . . . . . . . . . . . . . . . . . . . . . . . . . . . 2–26
Menu Options . . . . . . . . . . . . . . . . . . . . . . . . . . . . . . . . . . . . . . . . . . . . . . . . . . . . 2–28
Displaying Node Properties. . . . . . . . . . . . . . . . . . . . . . . . . . . . . . . . . . . . . . . . . . 2–29
Performance View . . . . . . . . . . . . . . . . . . . . . . . . . . . . . . . . . . . . . . . . . . . . . . . . . . . . 2–31
Menu Options . . . . . . . . . . . . . . . . . . . . . . . . . . . . . . . . . . . . . . . . . . . . . . . . . . . . 2–31
Bar Graph Display. . . . . . . . . . . . . . . . . . . . . . . . . . . . . . . . . . . . . . . . . . . . . . . . . 2–32
Port Statistics . . . . . . . . . . . . . . . . . . . . . . . . . . . . . . . . . . . . . . . . . . . . . . . . . . . . . 2–32
Statistics Description. . . . . . . . . . . . . . . . . . . . . . . . . . . . . . . . . . . . . . . . . . . . 2–33
Troubleshooting Tips. . . . . . . . . . . . . . . . . . . . . . . . . . . . . . . . . . . . . . . . . . . . . . . 2–37
Button Functions . . . . . . . . . . . . . . . . . . . . . . . . . . . . . . . . . . . . . . . . . . . . . . . . . . 2–37
Port Operational States. . . . . . . . . . . . . . . . . . . . . . . . . . . . . . . . . . . . . . . . . . . . . . . . . 2–38
Link Incident Alerts . . . . . . . . . . . . . . . . . . . . . . . . . . . . . . . . . . . . . . . . . . . . . . . . . . . 2–40
Threshold Alerts. . . . . . . . . . . . . . . . . . . . . . . . . . . . . . . . . . . . . . . . . . . . . . . . . . . . . . 2–41
Configuring the Switch
Configure Identification. . . . . . . . . . . . . . . . . . . . . . . . . . . . . . . . . . . . . . . . . . . . . . . . . 3–1
Procedure. . . . . . . . . . . . . . . . . . . . . . . . . . . . . . . . . . . . . . . . . . . . . . . . . . . . . . . . . 3–1
Configure Operating Mode . . . . . . . . . . . . . . . . . . . . . . . . . . . . . . . . . . . . . . . . . . . . . . 3–2
Introduction . . . . . . . . . . . . . . . . . . . . . . . . . . . . . . . . . . . . . . . . . . . . . . . . . . . . . . . 3–2
Procedure. . . . . . . . . . . . . . . . . . . . . . . . . . . . . . . . . . . . . . . . . . . . . . . . . . . . . . . . . 3–3
Configure Operating Parameters . . . . . . . . . . . . . . . . . . . . . . . . . . . . . . . . . . . . . . . . . . 3–4
Procedure. . . . . . . . . . . . . . . . . . . . . . . . . . . . . . . . . . . . . . . . . . . . . . . . . . . . . . . . . 3–6
Configure Ports . . . . . . . . . . . . . . . . . . . . . . . . . . . . . . . . . . . . . . . . . . . . . . . . . . . . . . . 3–8
Procedure (Open Systems Mode) . . . . . . . . . . . . . . . . . . . . . . . . . . . . . . . . . . . . . 3–10
Procedure (S/390 Mode) . . . . . . . . . . . . . . . . . . . . . . . . . . . . . . . . . . . . . . . . . . . . 3–12
Configure Port Addresses (S/390 mode only). . . . . . . . . . . . . . . . . . . . . . . . . . . . 3–14
Parameters. . . . . . . . . . . . . . . . . . . . . . . . . . . . . . . . . . . . . . . . . . . . . . . . . . . . 3–14
Procedure . . . . . . . . . . . . . . . . . . . . . . . . . . . . . . . . . . . . . . . . . . . . . . . . . . . . 3–16
Manage Stored Address Configurations . . . . . . . . . . . . . . . . . . . . . . . . . . . . . . . . 3–17
Procedure . . . . . . . . . . . . . . . . . . . . . . . . . . . . . . . . . . . . . . . . . . . . . . . . . . . . 3–17
Configure SNMP . . . . . . . . . . . . . . . . . . . . . . . . . . . . . . . . . . . . . . . . . . . . . . . . . . . . . 3–19
Procedure. . . . . . . . . . . . . . . . . . . . . . . . . . . . . . . . . . . . . . . . . . . . . . . . . . . . . . . . 3–19
Configure Open Systems Management Server . . . . . . . . . . . . . . . . . . . . . . . . . . . 3–21
Procedure . . . . . . . . . . . . . . . . . . . . . . . . . . . . . . . . . . . . . . . . . . . . . . . . . . . . 3–21
Configure FICON Management Server. . . . . . . . . . . . . . . . . . . . . . . . . . . . . . . . . 3–21
Procedure . . . . . . . . . . . . . . . . . . . . . . . . . . . . . . . . . . . . . . . . . . . . . . . . . . . . 3–23
Configure Feature Key. . . . . . . . . . . . . . . . . . . . . . . . . . . . . . . . . . . . . . . . . . . . . . . . . 3–24
edge switch 2/16 product manager user guide v

Procedure . . . . . . . . . . . . . . . . . . . . . . . . . . . . . . . . . . . . . . . . . . . . . . . . . . . . . . . . 3–25
Configure Date and Time . . . . . . . . . . . . . . . . . . . . . . . . . . . . . . . . . . . . . . . . . . . . . . . 3–26
Procedure . . . . . . . . . . . . . . . . . . . . . . . . . . . . . . . . . . . . . . . . . . . . . . . . . . . . . . . . 3–26
Configure Threshold Alerts . . . . . . . . . . . . . . . . . . . . . . . . . . . . . . . . . . . . . . . . . . . . . 3–28
Procedures . . . . . . . . . . . . . . . . . . . . . . . . . . . . . . . . . . . . . . . . . . . . . . . . . . . . . . . 3–29
Create New Alert. . . . . . . . . . . . . . . . . . . . . . . . . . . . . . . . . . . . . . . . . . . . . . . 3–29
Modify an Alert . . . . . . . . . . . . . . . . . . . . . . . . . . . . . . . . . . . . . . . . . . . . . . . . 3–34
Activate or Deactivate Alerts . . . . . . . . . . . . . . . . . . . . . . . . . . . . . . . . . . . . . 3–34
Delete Alerts . . . . . . . . . . . . . . . . . . . . . . . . . . . . . . . . . . . . . . . . . . . . . . . . . . 3–35
Export Configuration Report . . . . . . . . . . . . . . . . . . . . . . . . . . . . . . . . . . . . . . . . . . . . 3–35
Procedure . . . . . . . . . . . . . . . . . . . . . . . . . . . . . . . . . . . . . . . . . . . . . . . . . . . . . . . . 3–36
Enable Web Server . . . . . . . . . . . . . . . . . . . . . . . . . . . . . . . . . . . . . . . . . . . . . . . . . . . . 3–36
Enable Telnet . . . . . . . . . . . . . . . . . . . . . . . . . . . . . . . . . . . . . . . . . . . . . . . . . . . . . . . . 3–37
Backing Up and Restoring Configuration Data . . . . . . . . . . . . . . . . . . . . . . . . . . . . . . 3–37
Using Logs
Using Logs . . . . . . . . . . . . . . . . . . . . . . . . . . . . . . . . . . . . . . . . . . . . . . . . . . . . . . . . . . . 4–1
Button Function . . . . . . . . . . . . . . . . . . . . . . . . . . . . . . . . . . . . . . . . . . . . . . . . . . . . 4–1
Expanding Columns. . . . . . . . . . . . . . . . . . . . . . . . . . . . . . . . . . . . . . . . . . . . . . . . . 4–2
Sorting Entries . . . . . . . . . . . . . . . . . . . . . . . . . . . . . . . . . . . . . . . . . . . . . . . . . . . . . 4–2
Audit Log . . . . . . . . . . . . . . . . . . . . . . . . . . . . . . . . . . . . . . . . . . . . . . . . . . . . . . . . . . . . 4–3
Event Log . . . . . . . . . . . . . . . . . . . . . . . . . . . . . . . . . . . . . . . . . . . . . . . . . . . . . . . . . . . . 4–4
Hardware Log. . . . . . . . . . . . . . . . . . . . . . . . . . . . . . . . . . . . . . . . . . . . . . . . . . . . . . . . . 4–6
Link Incident Log . . . . . . . . . . . . . . . . . . . . . . . . . . . . . . . . . . . . . . . . . . . . . . . . . . . . . . 4–7
Threshold Alert Log . . . . . . . . . . . . . . . . . . . . . . . . . . . . . . . . . . . . . . . . . . . . . . . . . . . . 4–8
Using Maintenance Features
Run Port Diagnostics . . . . . . . . . . . . . . . . . . . . . . . . . . . . . . . . . . . . . . . . . . . . . . . . 5–1
Swap Ports . . . . . . . . . . . . . . . . . . . . . . . . . . . . . . . . . . . . . . . . . . . . . . . . . . . . . . . . 5–1
Procedure. . . . . . . . . . . . . . . . . . . . . . . . . . . . . . . . . . . . . . . . . . . . . . . . . . . . . . 5–1
Collect Maintenance Data . . . . . . . . . . . . . . . . . . . . . . . . . . . . . . . . . . . . . . . . . . . . 5–2
Execute an IPL. . . . . . . . . . . . . . . . . . . . . . . . . . . . . . . . . . . . . . . . . . . . . . . . . . . . . 5–2
Set Online State . . . . . . . . . . . . . . . . . . . . . . . . . . . . . . . . . . . . . . . . . . . . . . . . . . . . 5–4
Manage Firmware Versions . . . . . . . . . . . . . . . . . . . . . . . . . . . . . . . . . . . . . . . . . . . 5–5
Enable E-Mail Notification . . . . . . . . . . . . . . . . . . . . . . . . . . . . . . . . . . . . . . . . . . . 5–5
Enable Call-Home Notification . . . . . . . . . . . . . . . . . . . . . . . . . . . . . . . . . . . . . . . . 5–6
Backup and Restore Configuration . . . . . . . . . . . . . . . . . . . . . . . . . . . . . . . . . . . . . 5–6
Backup. . . . . . . . . . . . . . . . . . . . . . . . . . . . . . . . . . . . . . . . . . . . . . . . . . . . . . . . 5–7
vi edge switch 2/16 product manager user guide

Restore . . . . . . . . . . . . . . . . . . . . . . . . . . . . . . . . . . . . . . . . . . . . . . . . . . . . . . . 5–8
Reset Configuration. . . . . . . . . . . . . . . . . . . . . . . . . . . . . . . . . . . . . . . . . . . . . . . . . 5–8
Procedure . . . . . . . . . . . . . . . . . . . . . . . . . . . . . . . . . . . . . . . . . . . . . . . . . . . . . 5–8
Product Manager Messages
Glossary
Index
Figures
1–1 Switch Management Components on LAN . . . . . . . . . . . . . . . . . . . . . . . . . . . 1–8
1–2 HAFM icon . . . . . . . . . . . . . . . . . . . . . . . . . . . . . . . . . . . . . . . . . . . . . . . . . . . 1–11
1–3 Main HAFM window (Product View) . . . . . . . . . . . . . . . . . . . . . . . . . . . . . . 1–12
1–4 Edge Switch 2/16 icon . . . . . . . . . . . . . . . . . . . . . . . . . . . . . . . . . . . . . . . . . . 1–13
1–5 Edge Switch 2/16 Product Manager window (Hardware View). . . . . . . . . . . 1–13
1–6 Port List View . . . . . . . . . . . . . . . . . . . . . . . . . . . . . . . . . . . . . . . . . . . . . . . . . 1–25
1–7 FRU List View . . . . . . . . . . . . . . . . . . . . . . . . . . . . . . . . . . . . . . . . . . . . . . . . 1–27
1–8 Node List View . . . . . . . . . . . . . . . . . . . . . . . . . . . . . . . . . . . . . . . . . . . . . . . . 1–28
1–9 Performance View. . . . . . . . . . . . . . . . . . . . . . . . . . . . . . . . . . . . . . . . . . . . . . 1–29
2–1 Monitoring Hardware Operation - Edge Switch 2/16 (Hardware View) . . . . . 2–5
2–2 FRU Properties dialog box . . . . . . . . . . . . . . . . . . . . . . . . . . . . . . . . . . . . . . . . 2–8
2–3 Port Properties dialog box. . . . . . . . . . . . . . . . . . . . . . . . . . . . . . . . . . . . . . . . . 2–9
2–4 Switch Properties dialog box . . . . . . . . . . . . . . . . . . . . . . . . . . . . . . . . . . . . . 2–13
2–5 Configure Date and Time Periodic Synchronization dialog box . . . . . . . . . . 2–15
2–6 Configure date and time manually . . . . . . . . . . . . . . . . . . . . . . . . . . . . . . . . . 2–16
2–7 Set Online State dialog box (Offline) . . . . . . . . . . . . . . . . . . . . . . . . . . . . . . . 2–16
2–8 Set Online State dialog box (Online) . . . . . . . . . . . . . . . . . . . . . . . . . . . . . . . 2–16
2–9 Bind WWN dialog box . . . . . . . . . . . . . . . . . . . . . . . . . . . . . . . . . . . . . . . . . . 2–19
2–10 Clear Threshold Alert(s) dialog box . . . . . . . . . . . . . . . . . . . . . . . . . . . . . . . . 2–21
2–11 Port List View . . . . . . . . . . . . . . . . . . . . . . . . . . . . . . . . . . . . . . . . . . . . . . . . . 2–21
2–12 FRU List View . . . . . . . . . . . . . . . . . . . . . . . . . . . . . . . . . . . . . . . . . . . . . . . . 2–25
2–13 Node List View . . . . . . . . . . . . . . . . . . . . . . . . . . . . . . . . . . . . . . . . . . . . . . . . 2–26
2–14 Node Properties dialog box. . . . . . . . . . . . . . . . . . . . . . . . . . . . . . . . . . . . . . . 2–29
2–15 Performance View. . . . . . . . . . . . . . . . . . . . . . . . . . . . . . . . . . . . . . . . . . . . . . 2–31
3–1 Configure Identification dialog box . . . . . . . . . . . . . . . . . . . . . . . . . . . . . . . . . 3–2
3–2 Set Online State dialog box (Currently Online) . . . . . . . . . . . . . . . . . . . . . . . . 3–3
3–3 Configure Operating Mode dialog box . . . . . . . . . . . . . . . . . . . . . . . . . . . . . . . 3–3
edge switch 2/16 product manager user guide vii

3–4 Set Online State dialog box (Online). . . . . . . . . . . . . . . . . . . . . . . . . . . . . . . . . 3–6
3–5 Configure Operating Parameters dialog box . . . . . . . . . . . . . . . . . . . . . . . . . . . 3–7
3–6 Configure Ports dialog box . . . . . . . . . . . . . . . . . . . . . . . . . . . . . . . . . . . . . . . 3–11
3–7 Configure Ports dialog box (S/390 Mode) . . . . . . . . . . . . . . . . . . . . . . . . . . . 3–13
3–8 Prohibited Port Connection Symbol . . . . . . . . . . . . . . . . . . . . . . . . . . . . . . . . 3–15
3–9 Configure Addresses dialog box . . . . . . . . . . . . . . . . . . . . . . . . . . . . . . . . . . . 3–16
3–10 Address Configuration Library dialog box . . . . . . . . . . . . . . . . . . . . . . . . . . . 3–18
3–11 Configure SNMP dialog box . . . . . . . . . . . . . . . . . . . . . . . . . . . . . . . . . . . . . . 3–20
3–12 Configure Open Systems Management Server dialog box . . . . . . . . . . . . . . . 3–21
3–13 Configure FICON Management Server dialog box. . . . . . . . . . . . . . . . . . . . . 3–24
3–14 Configure Feature Key dialog box . . . . . . . . . . . . . . . . . . . . . . . . . . . . . . . . . 3–25
3–15 Configure Date and Time Periodic Synchronization dialog box. . . . . . . . . . . 3–27
3–16 Configure Date and Time Manually . . . . . . . . . . . . . . . . . . . . . . . . . . . . . . . . 3–28
3–17 Configure Threshold Alerts dialog box. . . . . . . . . . . . . . . . . . . . . . . . . . . . . . 3–30
3–18 New Threshold Alerts dialog box - first screen. . . . . . . . . . . . . . . . . . . . . . . . 3–30
3–19 New Threshold Alerts dialog box - second screen . . . . . . . . . . . . . . . . . . . . . 3–31
3–20 New Threshold Alerts dialog box - third screen . . . . . . . . . . . . . . . . . . . . . . . 3–32
3–21 New Threshold Alerts dialog box - summary screen . . . . . . . . . . . . . . . . . . . 3–33
3–22 Configure Threshold Alerts dialog box - alerts activated . . . . . . . . . . . . . . . . 3–33
3–23 Export Configuration dialog box. . . . . . . . . . . . . . . . . . . . . . . . . . . . . . . . . . . 3–36
4–1 Save dialog box . . . . . . . . . . . . . . . . . . . . . . . . . . . . . . . . . . . . . . . . . . . . . . . . . 4–2
4–2 Audit Log. . . . . . . . . . . . . . . . . . . . . . . . . . . . . . . . . . . . . . . . . . . . . . . . . . . . . . 4–3
4–3 Event Log . . . . . . . . . . . . . . . . . . . . . . . . . . . . . . . . . . . . . . . . . . . . . . . . . . . . . 4–5
4–4 Hardware Log . . . . . . . . . . . . . . . . . . . . . . . . . . . . . . . . . . . . . . . . . . . . . . . . . . 4–6
4–5 Link Incident Log . . . . . . . . . . . . . . . . . . . . . . . . . . . . . . . . . . . . . . . . . . . . . . . 4–7
4–6 Threshold Alert Log . . . . . . . . . . . . . . . . . . . . . . . . . . . . . . . . . . . . . . . . . . . . . 4–9
5–1 Swap Ports dialog box. . . . . . . . . . . . . . . . . . . . . . . . . . . . . . . . . . . . . . . . . . . . 5–2
5–2 IPL Confirmation dialog box. . . . . . . . . . . . . . . . . . . . . . . . . . . . . . . . . . . . . . . 5–3
5–3 Set Online State dialog box (Offline) . . . . . . . . . . . . . . . . . . . . . . . . . . . . . . . . 5–4
5–4 Set Online State dialog box (Online). . . . . . . . . . . . . . . . . . . . . . . . . . . . . . . . . 5–5
5–5 Backup and Restore dialog box. . . . . . . . . . . . . . . . . . . . . . . . . . . . . . . . . . . . . 5–7
Tables
1–1 Operating Status - Status Bar and Switch Status. . . . . . . . . . . . . . . . . . . . . . . 1–31
1–2 User Rights for Product Manager Functions. . . . . . . . . . . . . . . . . . . . . . . . . . 1–33
2–1 Port States and Indicators . . . . . . . . . . . . . . . . . . . . . . . . . . . . . . . . . . . . . . . . 2–38
3–1 Available Code Pages . . . . . . . . . . . . . . . . . . . . . . . . . . . . . . . . . . . . . . . . . . . 3–23
A–1 HP StorageWorks Edge Switch 2/16 Product Manager Messages . . . . . . . . . A–1

This publication is part of a documentation suite that supports the hp StorageWorks
edge switch 2/16.
Intended Audience
This publication is intended for operators, data center administrators, and customer
support personnel who configure, operate, and maintain hp products.
Related Documentation
In addition to this guide, HP provides corresponding information:
• hp StorageWorks product in a SAN environment - planning guide for director
2/64, edge switch 2/16, and edge switch 2/32, A6534-96025/AA-RS2DA-TE
• hp StorageWorks SNMP reference guide for director 2/64, edge switch 2/16, and
edge switch 2/32, A6534-96026/AA-RQ7BB-TE
About This Guide
• hp StorageWorks CLI reference guide for director 2/64, edge switch 2/16, and
edge switch 2/32, A6534-96027/AA-RQ7AB-TE
• hp StorageWorks edge switch 2/32 installation guide,
A7283-96001/AA-RSTZA-TE
• hp StorageWorks edge switch 2/32 service manual, A7283-96002/AA-RS2GA-TE
• hp StorageWorks edge switch 2/32 product manager user guide,
A7283-96003/AA-RS2HA-TE
• hp StorageWorks edge switch 2/32 release notes, A7283-96004/AV-RSU0A-TE
• hp StorageWorks edge switch 2/32 flexport upgrade instructions,
A7290-96001/AA-RS33A-TE
• hp StorageWorks edge switch 2/16 installation guide,
A7284-96001/AA-RSU2A-TE
• hp StorageWorks edge switch 2/16 service manual, A7284-96002/AA-RS2JA-TE
• hp StorageWorks edge switch 2/16 product manager user guide,
A7284-96003/AA-RS2KA-TE
edge switch 2/16 product manager user guide xiii

About This Guide
• hp StorageWorks edge switch 2/16 release notes, A7284-96004/AV-RSU3A-TE
• hp StorageWorks edge switch rack mount installation instructions,
A7283-96004/AA-RT4MA-TE
• hp StorageWorks HAFM server installation guide, A6582-96001/AA-RT4KA-TE
• hp StorageWorks ha-fabric manager user guide, A6534-96024/AA-RS2CA-TE
• hp StorageWorks ha-fabric manager release notes, A6575-96004/AV-RQZJC-TE
• hp StorageWorks SFP transceiver installation instructions,
AA6534-96030/AA-RSS3A-TE.
Document Conventions
The conventions included in Table 1 apply.
Table 1: Document Conventions
Element Convention
Cross-reference links Blue text: Figure 1
Key names, menu items, buttons, and
dialog box titles
File names, application names, and text
emphasis
User input, command names, system
responses (output and messages)
Variables
Website addresses Sans serif font (http://thenew.hp.com)
Bold
Italics
Monospace font
COMMAND NAMES
unless they are case sensitive
Monospace, italic font
are uppercase
xiv edge switch 2/16 product manager user guide
Symbols in Text
These symbols may be found in the text of this guide. They have the following
meanings.
WARNING: Text set off in this manner indicates that failure to follow directions
in the warning could result in bodily harm or loss of life.
CAUTION: Text set off in this manner indicates that failure to follow directions could
result in damage to equipment or loss of information.
IMPORTANT: Text set off in this manner presents clarifying information or specific instructions.
NOTE: Text set off in this manner presents commentary, sidelights, or interesting points of
information.
About This Guide
Symbols on Equipment
These icons may be located on equipment in areas where hazardous conditions may
exist.
Any surface or area of the equipment marked with these symbols
indicates the presence of electrical shock hazards. Enclosed area
contains no operator serviceable parts.
WARNING: To reduce the risk of injury from electrical shock hazards, do
not open this enclosure.
Any RJ-45 receptacle marked with these symbols indicates a Network
Interface Connection.
WARNING: To reduce the risk of electrical shock, fire, or damage to the
equipment, do not plug telephone or telecommunications connectors into
this receptacle.
edge switch 2/16 product manager user guide xv
About This Guide
Any surface or area of the equipment marked with these symbols
indicates the presence of a hot surface or hot component. If this surface
is contacted, the potential for injury exists.
WARNING: To reduce the risk of injury from a hot component, allow the
surface to cool before touching.
Power Supplies or Systems marked with these symbols indicate the
equipment is supplied by multiple sources of power.
WARNING: To reduce the risk of injury from electrical shock,
remove all power cords to completely disconnect power from the
system.
Any product or assembly marked with these symbols indicates that the
component exceeds the recommended weight for one individual to
handle safely.
Rack Stability
WARNING: To reduce the risk of personal injury or damage to the equipment, be
sure that:
• The leveling jacks are extended to the floor.
• The full weight of the rack rests on the leveling jacks.
• The stabilizing feet are attached to the rack if it is a single rack installations.
• The racks are coupled together in multiple rack installations.
• A rack may become unstable if more than one component is extended for any
reason. Extend only one component at a time.
Getting Help
If you have a problem and have exhausted the information in this guide, you can get
further information and other help in the following locations.
WARNING: To reduce the risk of personal INJURY or damage to the
equipment, observe local occupational health and safety requirements
and guidelines for manual material handling.
xvi edge switch 2/16 product manager user guide

HP Technical Support
In North America, call the HP Technical Phone Support Center at
1-800-OK-COMPAQ. This service is available 24 hours a day, 7 days a week.
NOTE: For continuous quality improvement, calls may be recorded or monitored.
Outside North America, call the nearest HP Technical Support Phone Center.
Telephone numbers for world wide Technical Support Centers are listed on the HP
website. Access the HP website by logging on to the Internet at http://www.
Be sure to have the following information available before you call HP:
• Technical support registration number (if applicable)
• Product serial numbers
• Product model names and numbers
• Applicable error messages
• Add-on boards or hardware
About This Guide
hp.com
.
• Third-party hardware or software
• Operating system type and revision level
• Detailed, specific questions
HP Website
The HP website has latest information on this product as well as the latest drivers. You
can access the HP website by logging on to the Internet at
http://www.
hp.com/country/us/eng/prodserv/storage.html
HP Authorized Reseller
For the name of your nearest HP Authorized Reseller:
• In the United States, call 1-800-345-1518.
• In Canada, call 1-800-263-5868.
• Elsewhere, see the HP website for locations and telephone numbers.
.
edge switch 2/16 product manager user guide xvii


Product Manager Overview
This chapter is an introduction and overview of the hp StorageWorks edge switch 2/16
Product Manager application. It is intended as a quick reference for using features
available through the main Product Manager window.
Managing the StorageWorks Edge Switch 2/16
Three options are available for managing the switch through a user interface:
• The Product Manager application installed on an HAFM server. Access to the
Product Manager must be through the hp StorageWorks ha-fabric manager
(HAFM) application. These applications are installed on the HAFM server.
• The Embedded Web Server (EWS) interface. Using a browser-capable PC with an
internet connection to the switch, you can monitor and manage the switch through
the web server interface embedded in the switch firmware. The interface provides
a GUI similar to the Product Manager application, and supports switch
configuration, statistics monitoring, and basic operation.
1
To launch the web server interface, enter the switch’s IP address as the Internet
uniform resource locator (URL) into any standard browser. Enter a user name and
password at a the login screen. The browser then becomes a management console.
Refer to the web server interface online help for details on use.
NOTE: The default user name for the right to view status and other information is “operator.”
The default user name for the right to modify configuration data, perform maintenance tasks, or
perform other options is “administrator.” The default password for both user names is
“password.”
• The command line interface (CLI). The CLI allows you to access many HAFM
and Product Manager functions while entering commands during a Telnet session
with the switch. The primary purpose of the CLI is to automate management of a
large number of switches using scripts. The CLI is not an interactive interface; no
checking is done for pre-existing conditions and no prompts display to guide users
through tasks. Refer to the hp StorageWorks CLI reference guide for director 2/64,
edge switch 2/16, and edge switch 2/32 (A6534-96027/AA-RQ7AB-TE).
edge switch 2/16 product manager user guide 1–1

Product Manager Overview
• Management using simple network management protocol (SNMP). An SNMP
agent is implemented through the SDCM application that allows administrators on
SNMP management workstations to access switch management information using
any standard network management tool. Administrators can assign internet
protocol (IP) addresses and corresponding community names for up to six SNMP
workstations functioning as SNMP trap message recipients.
This manual provides details on the Product Manager application for the edge switch
2/16 only. This manual does not cover the Embedded Web Server Interface.
Management Menu Options
This user’s guide provides information on the edge switch 2/16 Product Manager
application only. Information on the HAFM application is provided in the hp
StorageWorks ha-fabric manager user guide (A6534-96024/AA-RS2CA-TE).
Following are lists of options available under menus in all applications. References
are provided to the correct publication for detailed information on these options.
HAFM
Following are options available through the HAFM. For more information, refer to
Chapter 3 of the hp StorageWorks ha-fabric manager user guide
(A6534-96024/AA-RS2CA-TE).
View Tabs
•Products
•Fabrics
Product Menu
•New
•Open
•Delete
•Modify
• Properties
• Logout
•Exit
1–2 edge switch 2/16 product manager user guide

Fabrics Menu
• Rename
• Persist Fabric Topology
• Unpersist Fabric Topology
• Export Fabric Topology
•Show Route
•Hide Route
•Show Zone Members
• Show View Port
• Show Fabric Tree
View Menu
•User Sessions
Product Manager Overview
•Zoom
—In
—Out
—Default
— Fit in View
• Layout Icons
• Circular
•Spring
• Center in Topology
• Clear ISL Alert
• Clear All ISL Alerts
• Enable Fly Over Display
Configure Menu
•Users
•Nicknames
edge switch 2/16 product manager user guide 1–3

Product Manager Overview
• Sessions
• SNMP Agent
• Activate Zone Set
• Zoning Library
• Advanced Zoning
Logs Menu
• Audit Log
• Event Log
• Session Log
• Product Status Log
•Fabric Log
Maintenance Menu
• Configure E-Mail
• Test Remote Notification
• Configure Ethernet Events
• Configure Call Home Event Notification
Help
• Contents
• About
Product Manager
Following are options available through the Product Manager application for your
switch. For more information on these options, refer to Menu Bar on page 1-14 in this
manual.
View Tabs
• Hardware
•Node List
1–4 edge switch 2/16 product manager user guide

•Port List
• Performance
•FRU List View
Product Menu
• Port (options available when port is selected)
— Port Properties
— Node Properties
— Port Technology
— Block Port
— Enable Beaconing
— Port Diagnostics
—Channel Wrap
Product Manager Overview
—Swap Ports
— Clear Link Incident Alert(s)
— Reset Port
— Port Binding
— Clear Threshold Alert(s)
— Display Options (Nickname and Worldwide Name)
•FRU
— FRU Properties (varies by type of FRU selected)
• Clear System Error Light
• Enable Unit Beaconing
• Properties
•Close
Configure Menu
• Identification
• Operating Mode
edge switch 2/16 product manager user guide 1–5

Product Manager Overview
• Operating Parameters
•Ports
• Addresses (S/390 mode only)
— Active
—Stored
• SNMP Agent
• Management Server
• Features
•Date/Time
• Threshold Alerts
• Export Configuration Report
• Enable Web Server
• Enable Telnet
Logs Menu
• Audit Log
• Event Log
• Hardware Log
• Link Incident Log
• Threshold Alert Log
Maintenance Menu
• Port Diagnostics
• Swap Ports (S/390 mode only)
• Data Collection
•IPL
• Set Online State
• Firmware Library
• Enable E-Mail Notification
1–6 edge switch 2/16 product manager user guide

• Enable Call Home
• Backup and Restore Configuration
• Reset Configuration
Help Menu
• Contents
• About
Product Manager Description
The Product Manager for the switch is a Java-based graphical user interfaces (GUI)
that provides in-depth management, configuration, and monitoring functions for
individual switches and their field-replaceable units (FRUs). Although the Product
Manager is accessed from the HAFM application, it is a separate application.
In contrast to the Product Manager, the HAFM enables administrators to monitor
operational status for all products and Fibre Channel fabrics managed by an HAFM
server. The HAFM also provides tools to administer user and product access to the
HAFM and Product Manager. Refer to the hp StorageWorks ha-fabric manager user
guide (A6534-96024/AA-RS2CA-TE)
Product Manager Overview
The Product Manager provides graphical views of switch hardware components and
displays of component status. By positioning the cursor on icons, graphics, panels,
and other visual elements in these views and clicking the left or right mouse button,
you can quickly manage and monitor the switch on your network.
Access the switch Product Manager by double-clicking any switch product icon on the
HAFM’s Products View or the Top olo gy tab of the Fabrics View.
You can install the HAFM and Product Manager applications on remote workstations,
as shown in Figure 1–1, using any standard web browser. For instructions, refer to the
appendix in the hp StorageWorks ha-fabric manager user guide
(A6534-96024/AA-RS2CA-TE) that pertains to the operating system of your
workstation.
edge switch 2/16 product manager user guide 1–7
Product Manager Overview
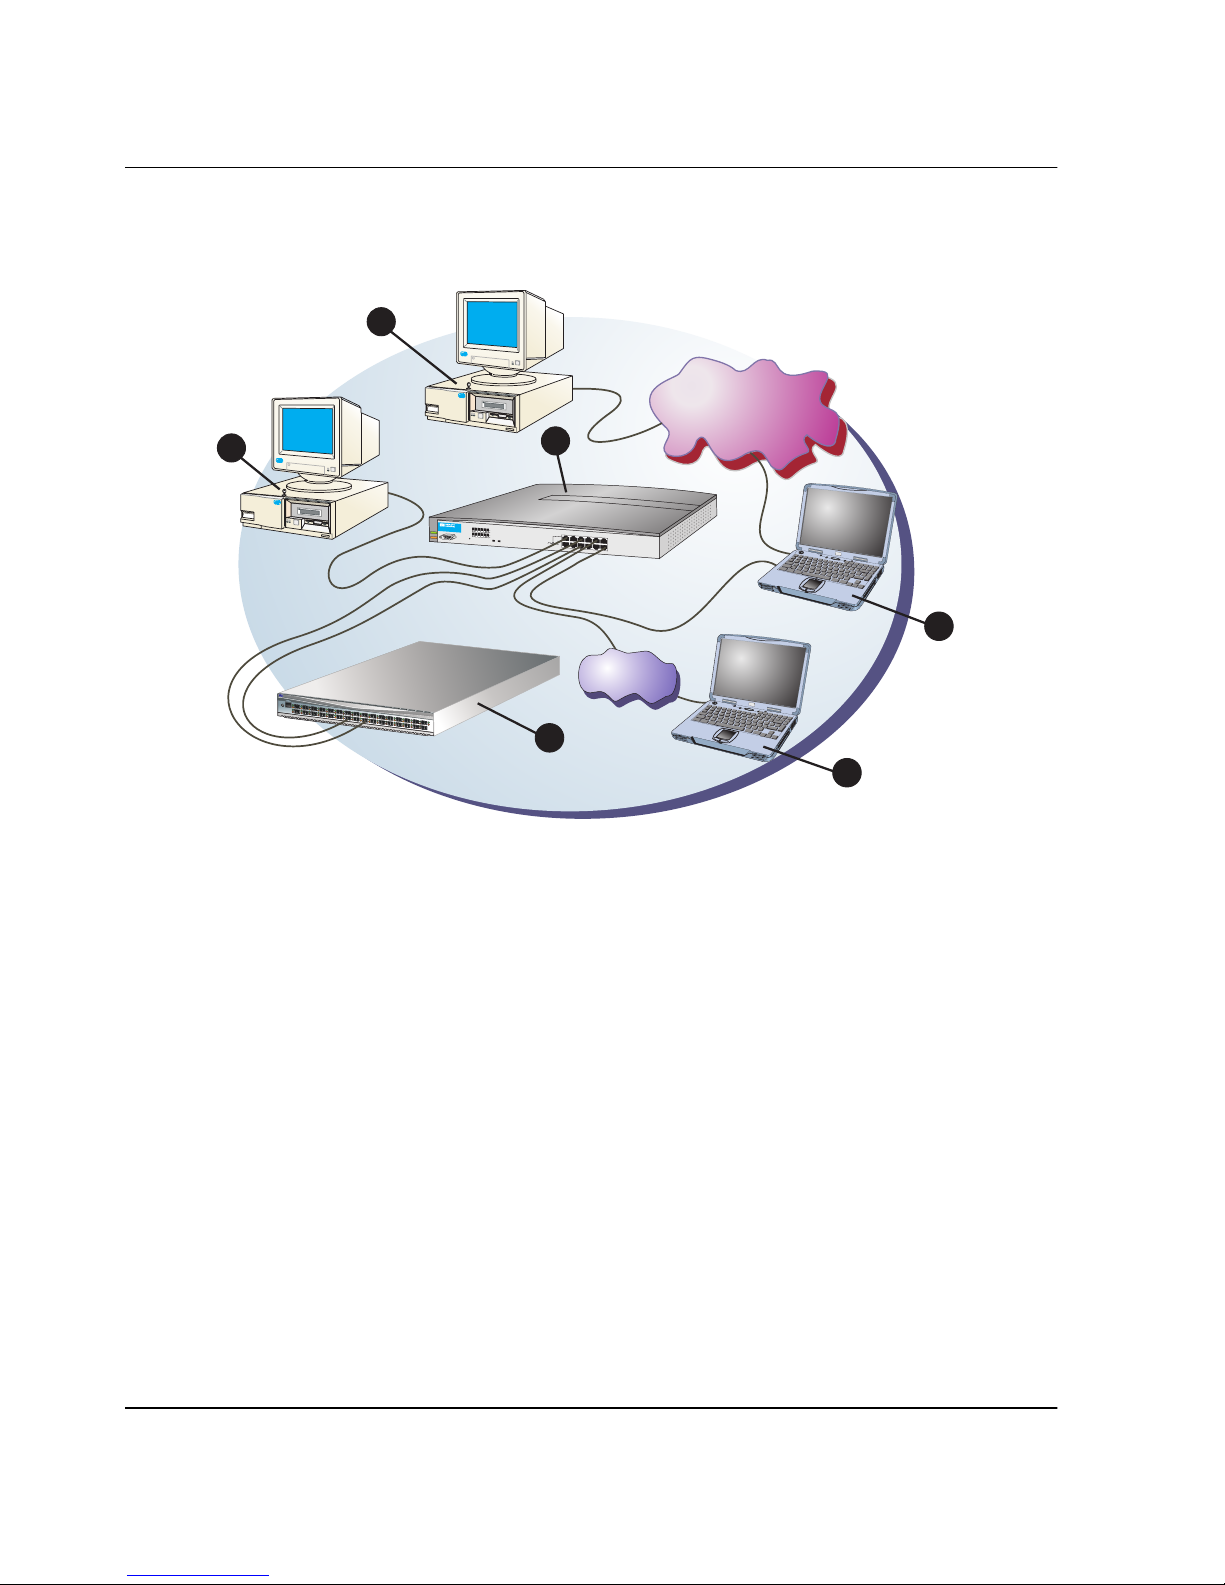
Figure 1–1 illustrates director management components.
1
S
t
o
r
a
g
e
W
o
r
k
s
d
i
r
e
c
t
o
r
2
/
6
4
1
0
/1
0
0
3
1
R
S
T
2
9
7
2
52
2
3
2
1
1
9
0
2
83
2
6
2
4
2
2
2
0
1
8
2
10/100 Mbps
10/100 Mbps
Corporate LAN
Corporate LAN
3
ProCurve10/100
1
2
3
Hub12
4
5
H
6
P
J
3
2
9
Link
4
A
100
7
8
9
10
Power
11
12
Link
100
Fault
Reset
Act
Col
1
2X
3X
Port1Only
4X
5X
6X
MDI-X
MDI
(out)
(in)
7X
8X
9X
10X
11X
12X
4
Internet
Connection
1
7
1
5
3
3579111
6
1
1
41
1
2
P
W
R
0
E
R
R
4681
02
6
1 SNMP management workstation
2 Remote user workstation
3 HP Ethernet hub
4 HAFM server
5 Web browser
6 Switch
Figure 1–1: Switch Management Components on LAN
5
SHR-2314b
1–8 edge switch 2/16 product manager user guide

Product Manager Overview
Using the Product Manager, you can:
• Back up and restore configuration data.
• Change operating mode between S/390 and open systems modes.
• Clear the system error indicator.
• Configure extended distance buffering for ports.
• Configure Fibre Channel operating parameters for the switch, such as BB_Credit,
R_A_TOV, E_D_TOV, preferred domain ID, switch priority, and rerouting delay.
• Configure individual ports with a port name describing the node attached to the
port.
• Configure keys for new features.
• Configure interoperability mode for open switch fabrics.
• Configure LIN alerts.
• Configure nickname to display instead of WWN for switch and attached nodes.
• Configure Port Binding.
• Configure port addresses (S/390 mode only)
• Configure SNMP trap recipients and community names.
• Configure Open Systems Management Server features (if installed)
• Configure the switch name, location, description, and contact person.
• Control individual Fibre Channel ports by blocking/unblocking operation,
enabling LIN alerts and WWN binding, setting data speeds, and running internal
and external loopback diagnostics.
• Display field replaceable unit (FRU) properties such as the FRU name, physical
position in the switch (chassis slot number), active failed state, part number, and
serial number.
• Display information for individual Fibre Channel ports, such as the port name,
port number, Fibre Channel address, operational state, type of port, and login data.
• Display information on nodes attached to ports.
• Display port performance and statistics.
• Display vital product data for the switch, such as the system name, description,
contact person, location, status, model number, firmware and EC level, and
manufacturer.
edge switch 2/16 product manager user guide 1–9

Product Manager Overview
• Enable beaconing for ports and the switch unit.
• Enable channel wrap mode (S/390 mode only).
• Monitor the operational status of the switch and each of its hardware
field-replaceable units.
• Perform an initial program load (IPL).
• Perform maintenance tasks for the switch including maintaining firmware levels,
administering the Call-Home feature, accessing the switch logs, and collecting
data to support failure analysis.
• Reset port operation.
• Run port diagnostics.
• Set the date and time on the switch.
• Swap addresses between ports (S/390 mode).
Using the Product Manager
This section provides a general overview of the Product Manager and its functions.
For details on performing specific tasks and using specific dialog boxes, refer to the
appropriate chapters in this manual.
Keyboard Navigation
Use standard keyboard navigation in dialog boxes. For example, use the Tab , arrow,
and backspace keys to move through dialog box fields and the Enter key to perform
default button functions.
Using Dialog Boxes
Buttons such as OK, Activate and Close or Cancel initiate functions in a dialog box.
There is a difference between the OK and Activate buttons. The OK button saves the
data you entered and closes the dialog box. The Activate button saves the data you
entered without closing the dialog box, unless there is a Close button in which case,
Activate saves the information without closing the box. There is also a difference
between the Close and Cancel buttons. The Close button closes the dialog box and
saves the data you entered. The Cancel button cancels the operation and closes the
dialog box without saving the information you entered.
1–10 edge switch 2/16 product manager user guide

Illustrations Used in this Manual
Figures containing HAFM and Product Manager screens in this manual are included
for illustration purposes only. These illustrations may not match exactly what you see
through your server or workstation. Title bars have been removed from the
illustrations and fields in the illustrations may contain different data than in screens
displayed on your system.
Logging Into the HAFM
To open the Product Manager, you must first log into the HAFM.
1. Perform one of the following steps:
• If you are using the HAFM server, the HAFM application automatically starts
when you power on or reboot the HAFM server. If you power on or reboot the
HAFM server and the HAFM login screen displays, skip to step 3 to log in.
• If you are using a remote user workstation, follow steps 2 through 5.
• If the HAFM window displays already, skip to Opening the Product Manager
on page 1-13.
Product Manager Overview
2. Perform one of the following steps if you are using a remote user workstation (a
network PC with a remote client installed) and the HAFM login screen or HAFM
window is not displayed. If the login screen is displayed, go to step 3.
• Start the HAFM and display the login screen by double-clicking the HAFM
icon on the desktop.
Figure 1–2: HAFM icon
The HAFM login screen displays.
• If the HAFM window is open (Figure 1–3) and you need to log in as another
user or access a different HAFM server, select Logout from the product menu
on the menu bar to display the login screen. Go to step 3.
3. When the HAFM login screen displays, enter your user name and password. The
default user name is Administrator and password is password unless changed by
your system administrator.
edge switch 2/16 product manager user guide 1–11
Product Manager Overview
NOTE: The default user name for the right to view status and other information is “operator.”
The default user name for the right to modify configuration data, perform maintenance tasks, or
perform other options is “administrator.” The default password for both user names is
“password.”
4. In the HAFM server box on the login screen select the HAFM server where you
want to connect. Note that if you are logging into an HAFM server locally,
localhost is the HAFM server name. Type in the network address of the server if it
is not in the list.
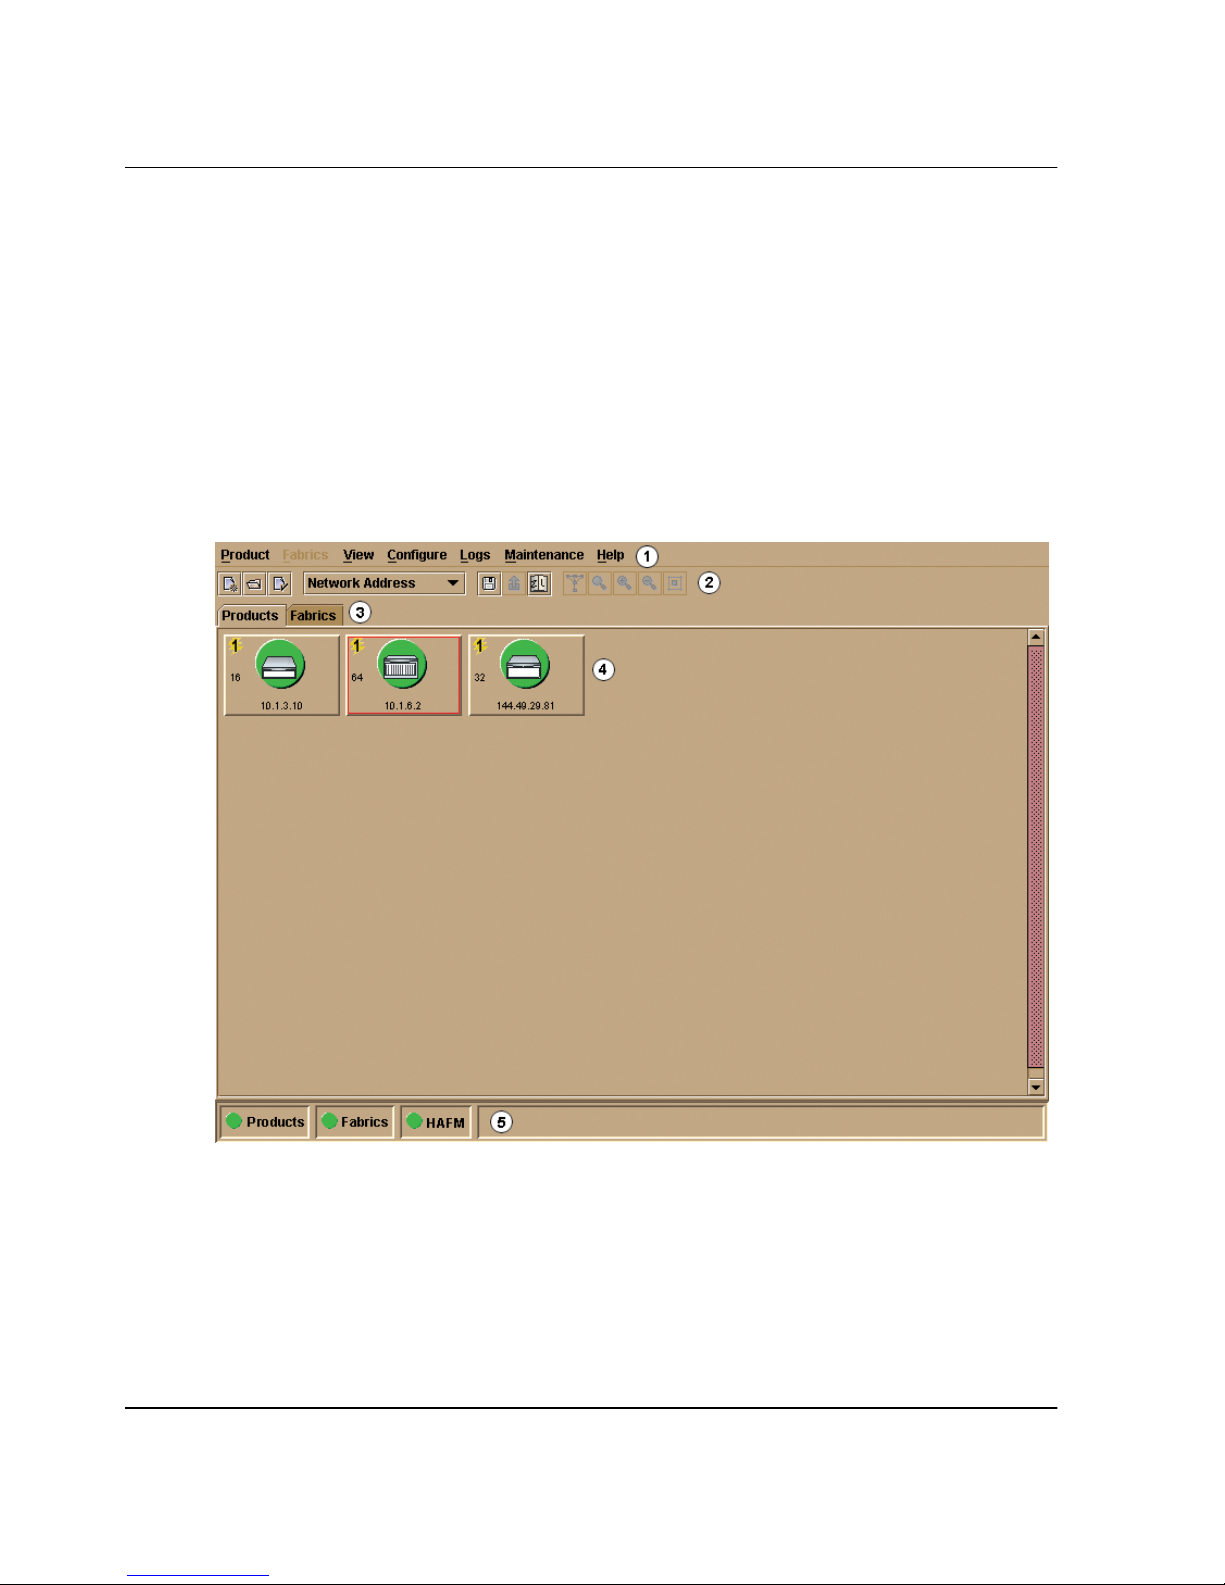
5. Click Activate or press the Enter key on your keyboard. The main HAFM window
displays showing the Product View.
1 Menu Bar
2 Too l B ar
3 View Tabs
Figure 1–3: Main HAFM window (Product View)
1–12 edge switch 2/16 product manager user guide
4 Main Panel
5 Status Panel
Opening the Product Manager
To open the Product Manager, double-click the product icon in the Product View or
right-click the icon and select Open.
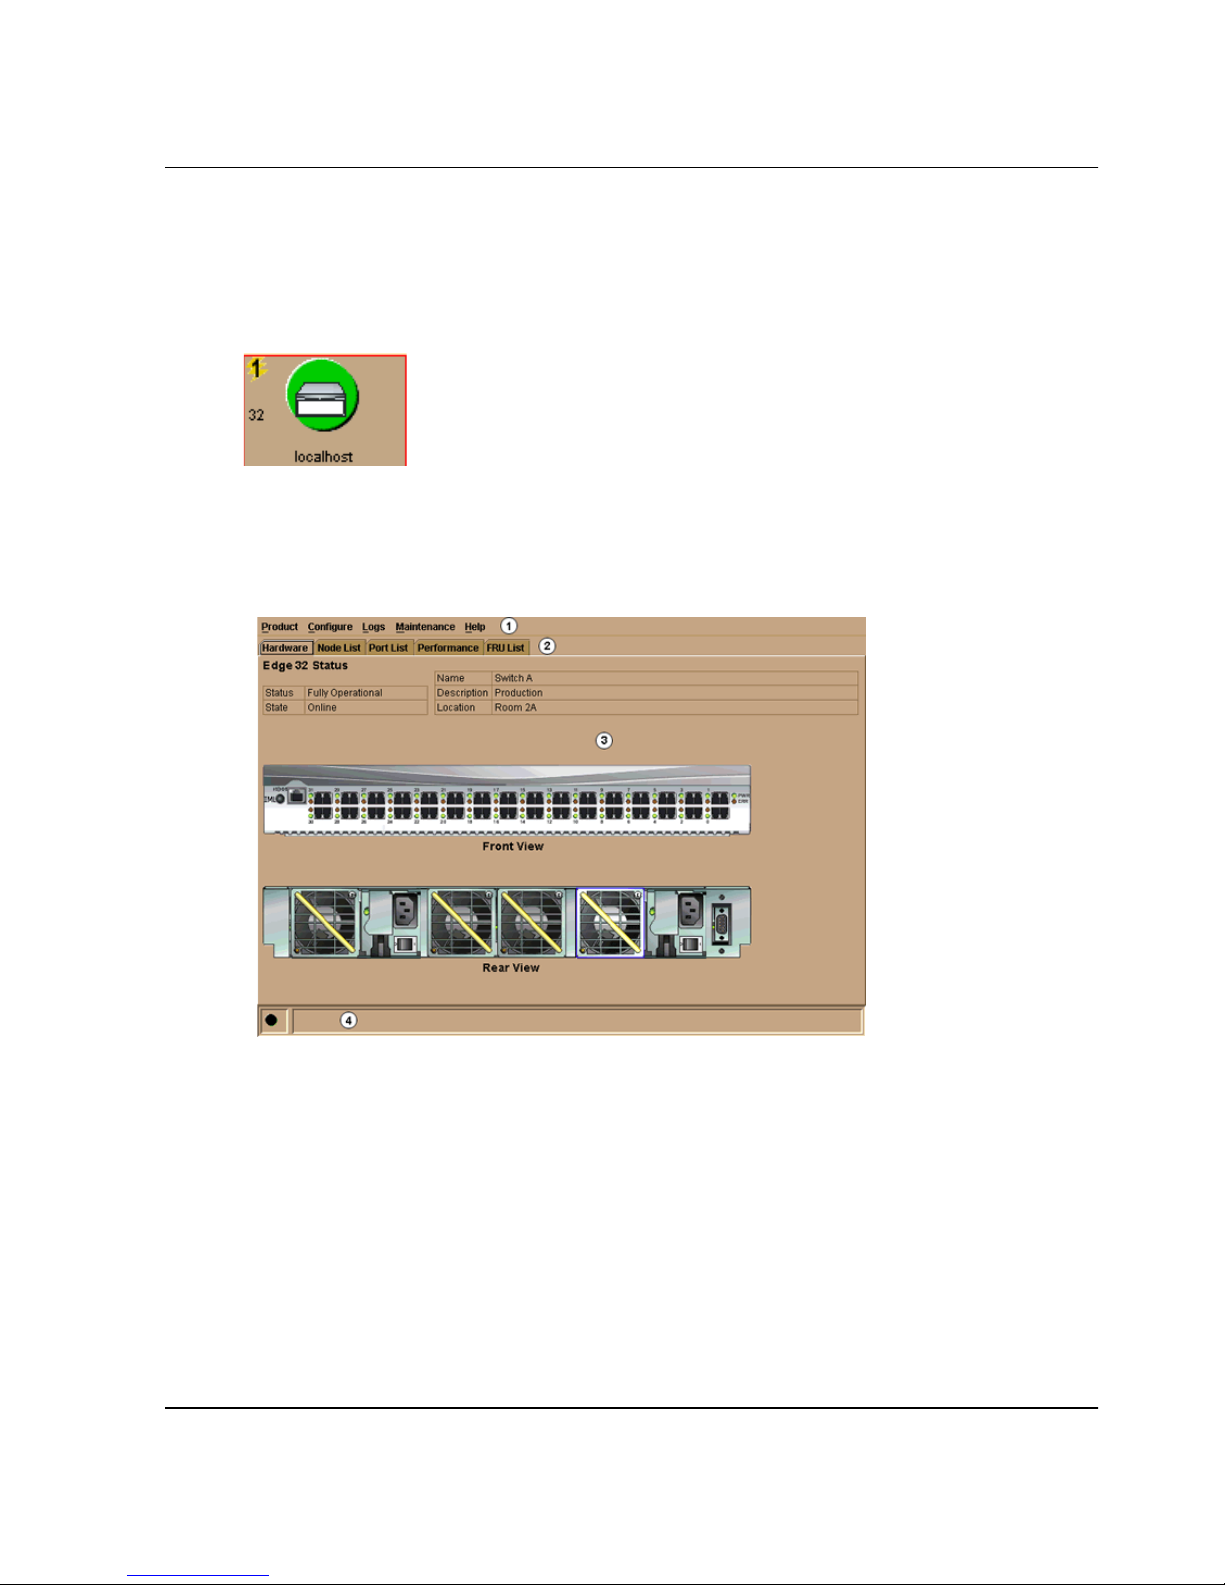
Figure 1–4: Edge Switch 2/16 icon
The Product Manager displays showing the default Hardware View. Figure 1–5 shows
the edge switch 2/16 Hardware View.
Product Manager Overview
1 Menu Bar
2 View Tabs
Figure 1–5: Edge Switch 2/16 Product Manager window (Hardware View)
NOTE: The HAFM window is still available as a separate window. You can drag the Product
Manager window away from the HAFM window and view both windows on your PC desktop or
minimize one or both of them to icons if desired. You can have a maximum of four Product
Manager windows open concurrently.
edge switch 2/16 product manager user guide 1–13
3 View Panel
4 Status Bar

Product Manager Overview
Window Layout and Function
The main Product Manager window is divided into four main areas as shown in
Figure 1–5 on page 1-13: menu bar, view tabs, view panel, and status bar. Use features
in these panels to configure switch operation, monitor performance, and access
maintenance features.
Menu Bar
The menu bar on the Product Manager window displays tabs for the following menus:
•Product
• Configure
•Logs
• Maintenance
•Help
Click one of the tabs to display a list of menu options. Click an option to open a dialog
box that allows you to perform configuration and maintenance tasks and view logs. If
a menu option contains a check box, click in the box to add a check mark and enable a
function. Click a check box containing a check mark to remove the check mark and
disable the function.
Product Menu
Select one of the following options from the Product menu.
Port
This provides a secondary port menu only when the Hardware View, Port List
View, or Performance View displays in the view panel. To use this menu for a
specific port, click a port in the Hardware View, a port’s row in the Port List View,
or a port’s bar graph in the Performance View. The menu contains options which
are identical to those that display when you right-click the port, port row, or port
bar graph in those views. For detail on these options refer to Port Menu on
page 2-17.
FRU
Click a power supply module or cooling fan module in the Hardware View only
and select FRU from the Product menu to display the FRU Properties menu
option. These displays the properties dialog box for the FRU. The FRU Properties
1–14 edge switch 2/16 product manager user guide

Product Manager Overview
dialog box can also be displayed when you double-click the FRU in the Hardware
View. For details on these options refer to Displaying FRU Information on
page 2-7.
Clear System Error Light
Select this to turn off the amber system error LED, located below the green power
LED on the switch front bezel.
Enable Unit Beaconing
Click the check box to toggle unit beaconing on or off. When the check box has a
check mark, unit beaconing is on, and the amber system error light on the switch
front bezel blinks to help users locate the actual unit in an equipment room. When
you click the check box to remove the check mark, unit beaconing is disabled and
the amber LED goes out. You can only enable beaconing if there are no system
errors (the system error light is off).
Properties
Click to display the Switch Properties dialog box. This dialog box contains the
switch name, description, location, and contact person configured through the
Configure Identification dialog box. Also included is other product information as
detailed in switch Properties. You can also display this dialog box by
double-clicking an area on the illustration in the Hardware View, away from a
hardware component.
Close
Select this option to close the Product Manager window.
Configure Menu
Click on the Configure menu on the menu bar to display a menu that lists the
following options. For detailed information on using these options, refer to Chapter 3,
Configuring the Switch.
Identification
Select this option to display the Configure Identification dialog box. Enter the
following information in this dialog box:
edge switch 2/16 product manager user guide 1–15

Product Manager Overview
— Name - Assign a product name. Note that you can set this name as the
nickname for the switch’s WWN, using the Set Name as Nickname checkbox.
The nickname then displays instead of the WWN in Product Manager views.
— Description - Assign a unique product description.
— Location - Describe the product’s location.
— Contact - Assign a contact either by name, phone number, or e-mail address.
NOTE: This information displays in the identification table at the top of the Hardware View and
in the HAFM Product View, if the Product View is configured to display names.
Operating Mode
NOTE: The switch must be offline before you change operating modes.
Select this option to display the Configure Operating Mode dialog box. Use this
dialog box to configure either S/390 or open systems mode, as well as
interoperability mode options. Open system or S/390 modes allow you to use
Product Manager menu options, dialog boxes, and features that are the most
useful when attaching to either IBM S/390 Enterprise servers or open systems
devices. If you enable open systems mode, you can then select the appropriate
interoperability mode to work with the multiswitch fabric. Refer to Configure
Operating Mode on page 3-2 for instructions.
NOTE: If the FICON Management Server feature is enabled, the default mode will be S/390.
You can only enable one Management Server feature at a time, either FICON Management
Server or Open Systems Management server.
Operating Parameters
Select this option to display the Configure Operating Parameters dialog box for
setting Fibre Channel operating parameters. In this dialog box, you can set
buffer-to-buffer credit (BB_Credit) from 1 to 60 (default is 16). You can also set
the resource allocation time-out value (R_A_TOV) and error detect time-out
value (E_D_TOV) in tenth-of-a-second increments, as well as other fabric
operating parameters, such as preferred domain ID (1 to 31) and switch priority
level (Principal, Default, or Never Principal). You must take the switch offline
through the Set Online State dialog box to configure these parameters. In addition,
you can also enable the rerouting delay feature. Refer to Configure Operating
Parameters on page 3-4 for more information on configuring the switch priority
and rerouting delay.
1–16 edge switch 2/16 product manager user guide
 Loading...