


HP StorageWorks
DLT VS160 Tape Drives
User Guide
Installation, Operating and Troubleshooting
information for DLT VS160 tape drives
Part number: A7569-90901
First edition: September 2005

Legal and notice information
© Copyright 2005 Hewlett-Packard Development Company, L.P.
Hewlett-Packard Company makes no warranty of any kind with regard to this material, including, but not limited to, the implied
warranties of merchantability and fitness for a particular purpose. Hewlett-Packard shall not be liable for errors contained herein or
for incidental or consequential damages in connection with the furnishing, performance, or use of this material.
This document contains proprietary information, which is protected by copyright. No part of this document may be photocopied,
reproduced, or translated into another language without the prior written consent of Hewlett-Packard. The information is provided
“as is” without warranty of any kind and is subject to change without notice. The only warranties for HP products and services are
set forth in the express warranty statements accompanying such products and services. Nothing herein should be construed as
constituting an additional warranty. HP shall not be liable for technical or editorial errors or omissions contained herein.
Microsoft, Windows, Windows NT, and Windows XP are U.S. registered trademarks of Microsoft Corporation.
UNIX
® is a registered trademark of The Open Group.
DLTtape, the DLTtape logo, Super DLTtape and the Super DLTtape logo are trademarks of Quantum Corporation registered in the
U.S.A. and other countries.
HP StorageWorks DLT VS160 Tape Drives User Guide

Contents
About this guide . . . . . . . . . . . . . . . . . . . . . . . . . . . . . . . . . . . . . . . . . 7
Related documentation . . . . . . . . . . . . . . . . . . . . . . . . . . . . . . . . . . . . . . . . . . . 7
Registering your tape drive . . . . . . . . . . . . . . . . . . . . . . . . . . . . . . . . . . . . . . . . 7
HP technical support . . . . . . . . . . . . . . . . . . . . . . . . . . . . . . . . . . . . . . . . . . . . 7
HP-authorized reseller . . . . . . . . . . . . . . . . . . . . . . . . . . . . . . . . . . . . . . . . . 8
Helpful web sites . . . . . . . . . . . . . . . . . . . . . . . . . . . . . . . . . . . . . . . . . . . . 8
Contents
1 Before you start . . . . . . . . . . . . . . . . . . . . . . . . . . . . . . . . . . . . . . 9
Which operating systems are supported? . . . . . . . . . . . . . . . . . . . . . . . . . . . . . . 9
How do I connect the drive to my server? . . . . . . . . . . . . . . . . . . . . . . . . . . . . . 10
Internal drives. . . . . . . . . . . . . . . . . . . . . . . . . . . . . . . . . . . . . . . . . . . . . . 10
External drives:. . . . . . . . . . . . . . . . . . . . . . . . . . . . . . . . . . . . . . . . . . . . . 10
Why is the SCSI bus type important? . . . . . . . . . . . . . . . . . . . . . . . . . . . . . . . . 10
How can I check the SCSI bus type and SCSI ID? . . . . . . . . . . . . . . . . . . . . . . . 11
Using the HP StorageWorks Tape CD-ROM . . . . . . . . . . . . . . . . . . . . . . . . . . . 11
Usage models . . . . . . . . . . . . . . . . . . . . . . . . . . . . . . . . . . . . . . . . . . . . . . . . 12
Other usage models . . . . . . . . . . . . . . . . . . . . . . . . . . . . . . . . . . . . . . . . . 13
2 Drivers and backup software. . . . . . . . . . . . . . . . . . . . . . . . . . . . 15
Install drivers. . . . . . . . . . . . . . . . . . . . . . . . . . . . . . . . . . . . . . . . . . . . . . . . . 15
Installing on Windows. . . . . . . . . . . . . . . . . . . . . . . . . . . . . . . . . . . . . . . . 15
Installing on UNIX. . . . . . . . . . . . . . . . . . . . . . . . . . . . . . . . . . . . . . . . . . . 15
Installing on IA64 . . . . . . . . . . . . . . . . . . . . . . . . . . . . . . . . . . . . . . . . . . . 15
Upgrade backup software . . . . . . . . . . . . . . . . . . . . . . . . . . . . . . . . . . . . . . . 15
3 Installing an internal DLT VS160 tape drive. . . . . . . . . . . . . . . . . . 17
Mounting bay . . . . . . . . . . . . . . . . . . . . . . . . . . . . . . . . . . . . . . . . . . . . . . . . 17
Air flow requirements . . . . . . . . . . . . . . . . . . . . . . . . . . . . . . . . . . . . . . . . 17
Check the drive’s SCSI ID . . . . . . . . . . . . . . . . . . . . . . . . . . . . . . . . . . . . . . . . 17
Prepare mounting bay . . . . . . . . . . . . . . . . . . . . . . . . . . . . . . . . . . . . . . . . . . 19
Attach mounting hardware . . . . . . . . . . . . . . . . . . . . . . . . . . . . . . . . . . . . . . . 20
HP ProLiant servers . . . . . . . . . . . . . . . . . . . . . . . . . . . . . . . . . . . . . . . . . . 20
Other servers . . . . . . . . . . . . . . . . . . . . . . . . . . . . . . . . . . . . . . . . . . . . . . 22
Install drive . . . . . . . . . . . . . . . . . . . . . . . . . . . . . . . . . . . . . . . . . . . . . . . . . . 23
Orientation . . . . . . . . . . . . . . . . . . . . . . . . . . . . . . . . . . . . . . . . . . . . . . . 23
Attach power and SCSI cables . . . . . . . . . . . . . . . . . . . . . . . . . . . . . . . . . . . . 24
Where should the SCSI terminator be? . . . . . . . . . . . . . . . . . . . . . . . . . . . . 24
Secure the drive . . . . . . . . . . . . . . . . . . . . . . . . . . . . . . . . . . . . . . . . . . . . . . 26
Mounting hardware used (HP ProLiant) . . . . . . . . . . . . . . . . . . . . . . . . . . . . 26
No mounting hardware used . . . . . . . . . . . . . . . . . . . . . . . . . . . . . . . . . . . 27
HP StorageWorks DLT VS160 Tape Drives User Guide 3

4 Installing an external DLT VS160 tape drive. . . . . . . . . . . . . . . . . . 29
Check the drive’s SCSI ID . . . . . . . . . . . . . . . . . . . . . . . . . . . . . . . . . . . . . . . 29
Connect the SCSI cable . . . . . . . . . . . . . . . . . . . . . . . . . . . . . . . . . . . . . . . . . 30
Why does the tape drive need a terminator? . . . . . . . . . . . . . . . . . . . . . . . . 31
Connect the power cable . . . . . . . . . . . . . . . . . . . . . . . . . . . . . . . . . . . . . . . . 32
5 Verify installation . . . . . . . . . . . . . . . . . . . . . . . . . . . . . . . . . . . . 33
6 Operating your tape drive. . . . . . . . . . . . . . . . . . . . . . . . . . . . . . 35
Front panel . . . . . . . . . . . . . . . . . . . . . . . . . . . . . . . . . . . . . . . . . . . . . . . . . 35
Front panel LEDs . . . . . . . . . . . . . . . . . . . . . . . . . . . . . . . . . . . . . . . . . . . 36
Eject button . . . . . . . . . . . . . . . . . . . . . . . . . . . . . . . . . . . . . . . . . . . . . . . 36
Loading and unloading . . . . . . . . . . . . . . . . . . . . . . . . . . . . . . . . . . . . . . . . . 37
Inserting cartridges. . . . . . . . . . . . . . . . . . . . . . . . . . . . . . . . . . . . . . . . . . 37
Removing cartridges. . . . . . . . . . . . . . . . . . . . . . . . . . . . . . . . . . . . . . . . . 38
Removing power from the drive . . . . . . . . . . . . . . . . . . . . . . . . . . . . . . . . . . . 38
Understanding LEDs . . . . . . . . . . . . . . . . . . . . . . . . . . . . . . . . . . . . . . . . . . . 39
At power on . . . . . . . . . . . . . . . . . . . . . . . . . . . . . . . . . . . . . . . . . . . . . . 39
Troublehooting the LEDs . . . . . . . . . . . . . . . . . . . . . . . . . . . . . . . . . . . . . . 40
Unload/Eject Button Functions . . . . . . . . . . . . . . . . . . . . . . . . . . . . . . . . . . . . 41
Emergency Reset . . . . . . . . . . . . . . . . . . . . . . . . . . . . . . . . . . . . . . . . . . . 41
Enter Code Update Mode . . . . . . . . . . . . . . . . . . . . . . . . . . . . . . . . . . . . . 42
7 Use the correct media . . . . . . . . . . . . . . . . . . . . . . . . . . . . . . . . . 43
Data cartridges. . . . . . . . . . . . . . . . . . . . . . . . . . . . . . . . . . . . . . . . . . . . . . . 43
Write-protecting cartridges. . . . . . . . . . . . . . . . . . . . . . . . . . . . . . . . . . . . . . . 44
Cleaning cartridges. . . . . . . . . . . . . . . . . . . . . . . . . . . . . . . . . . . . . . . . . . . . 45
Caring for cartridges. . . . . . . . . . . . . . . . . . . . . . . . . . . . . . . . . . . . . . . . . . . 45
8 Diagnostic Tools and Performance . . . . . . . . . . . . . . . . . . . . . . . . 47
Diagnostic tools . . . . . . . . . . . . . . . . . . . . . . . . . . . . . . . . . . . . . . . . . . . . . . 47
Troubleshooting with Library & Tape Tools . . . . . . . . . . . . . . . . . . . . . . . . . 47
Performance Assessment Tools . . . . . . . . . . . . . . . . . . . . . . . . . . . . . . . . . . . . 48
Optimizing performance . . . . . . . . . . . . . . . . . . . . . . . . . . . . . . . . . . . . . . 48
Is the tape drive on a dedicated SCSI bus? . . . . . . . . . . . . . . . . . . . . . . . . . 48
Can your system deliver the required performance? . . . . . . . . . . . . . . . . . . . 48
9 Troubleshooting . . . . . . . . . . . . . . . . . . . . . . . . . . . . . . . . . . . . . 51
General Procedure . . . . . . . . . . . . . . . . . . . . . . . . . . . . . . . . . . . . . . . . . . . . 51
Has the system just been installed? . . . . . . . . . . . . . . . . . . . . . . . . . . . . . . . 51
Are you using the correct media? . . . . . . . . . . . . . . . . . . . . . . . . . . . . . . . . 51
Has the drive been moved recently? . . . . . . . . . . . . . . . . . . . . . . . . . . . . . . 52
Has the operating system or backup software changed? . . . . . . . . . . . . . . . . 52
10 Replacing an internal tape drive. . . . . . . . . . . . . . . . . . . . . . . . . . 53
To disconnect your drive . . . . . . . . . . . . . . . . . . . . . . . . . . . . . . . . . . . . . . . . 53
To reconnect your tape drive . . . . . . . . . . . . . . . . . . . . . . . . . . . . . . . . . . . . . 53
4

A SCSI configuration guide. . . . . . . . . . . . . . . . . . . . . . . . . . . . . . .55
SCSI in HP StorageWorks DLT VS160 devices . . . . . . . . . . . . . . . . . . . . . . . . . 55
Daisy chaining devices . . . . . . . . . . . . . . . . . . . . . . . . . . . . . . . . . . . . . . . 55
SCSI terminology . . . . . . . . . . . . . . . . . . . . . . . . . . . . . . . . . . . . . . . . . . . . . 55
Setting up the SCSI bus . . . . . . . . . . . . . . . . . . . . . . . . . . . . . . . . . . . . . . . . . 56
SCSI ID numbers . . . . . . . . . . . . . . . . . . . . . . . . . . . . . . . . . . . . . . . . . . . 56
Identifying SCSI IDs. . . . . . . . . . . . . . . . . . . . . . . . . . . . . . . . . . . . . . . . . . . . 56
Setting the SCSI ID on HP StorageWorks DLT VS160 drives . . . . . . . . . . . . . . . . 57
SCSI termination . . . . . . . . . . . . . . . . . . . . . . . . . . . . . . . . . . . . . . . . . . . . . . 57
Internal drives . . . . . . . . . . . . . . . . . . . . . . . . . . . . . . . . . . . . . . . . . . . . . 58
External drives . . . . . . . . . . . . . . . . . . . . . . . . . . . . . . . . . . . . . . . . . . . . . 58
SCSI cables . . . . . . . . . . . . . . . . . . . . . . . . . . . . . . . . . . . . . . . . . . . . . . . . . 60
Cable length . . . . . . . . . . . . . . . . . . . . . . . . . . . . . . . . . . . . . . . . . . . . . . 60
Cable quality. . . . . . . . . . . . . . . . . . . . . . . . . . . . . . . . . . . . . . . . . . . . . . 60
Note on SE and LVD interfaces . . . . . . . . . . . . . . . . . . . . . . . . . . . . . . . . . 60
HP StorageWorks DLT VS160 Tape Drives User Guide 5

6

About this guide
This guide provides information about:
• Installing the HP StorageWorks DLT VS160 tape drive
• Using the HP StorageWorks DLT VS160 tape drive
• Troubleshooting the HP StorageWorks DLT VS160 tape drive
Related documentation
In addition to this guide, please refer to other documents for this product:
• ‘Start here’ poster for an overview of the installation information in this guide (available in
English, French, German and Japanese)
• UNIX Configuration Guide (available in English)
These and other HP documents can be found on the HP documents web site:
http://www.docs.hp.com
Registering your tape drive
Once you have installed and tested your HP StorageWorks DLT VS160 tape drive, please take a
few minutes to register your product. You can register via the web (www.register.hp.com
To ensure your registration is complete, there are a number of questions on the electronic form that
are mandatory. Other questions are optional. However, the more you feel able to complete, the
better HP can meet your needs.
.
).
HP technical support
Telephone numbers for worldwide technical support are listed on the HP support web site:
http://www.hp.com/support/
Collect the following information before calling:
• Technical support registration number (if applicable)
• Product serial numbers
• Product model names and numbers
• Applicable error messages
• Operating system type and revision level
• Detailed, specific questions
For continuous quality improvement, calls may be recorded or monitored.
HP strongly recommends that customers sign up online using the Subscriber's choice web site at
http://www.hp.com/go/e-updates
• Subscribing to this service provides you with e-mail updates on the latest product enhancements,
newest versions of drivers, and firmware documentation updates as well as instant access to
numerous other product resources.
.
.
HP StorageWorks DLT VS160 Tape Drives User Guide 7

• After signing up, you can quickly locate your products by selecting Business support and then
Storage under Product Category.
HP-authorized reseller
For the name of your nearest HP-authorized reseller:
• In the United States, call 1-800-345-1518.
• Elsewhere, visit the HP web site: http://www.hp.com
and telephone numbers.
Helpful web sites
For third-party product information, see the following HP web sites:
. Then click Contact HP to find locations
• http://www.hp.com
• http://www.hp.com/go/connect/
• http://www.hp.com/go/storage/
• http://www.hp.com/support/
• http://www.docs.hp.com
8
1Before you start
This guide describes how to install and operate the HP StorageWorks DLT VS160 tape drive. This is
an Ultra 160 SCSI device with a maximum burst transfer speed of 160 MB/second. It can write
uncompressed data at up to 8 MB/s (28.8 GB/hour) or compressed data at up to 16 MB/s
(57.6 GB/hour), assuming 2:1 compression.
For a detailed product specification, please refer to our World Wide Web site (www.hp.com).
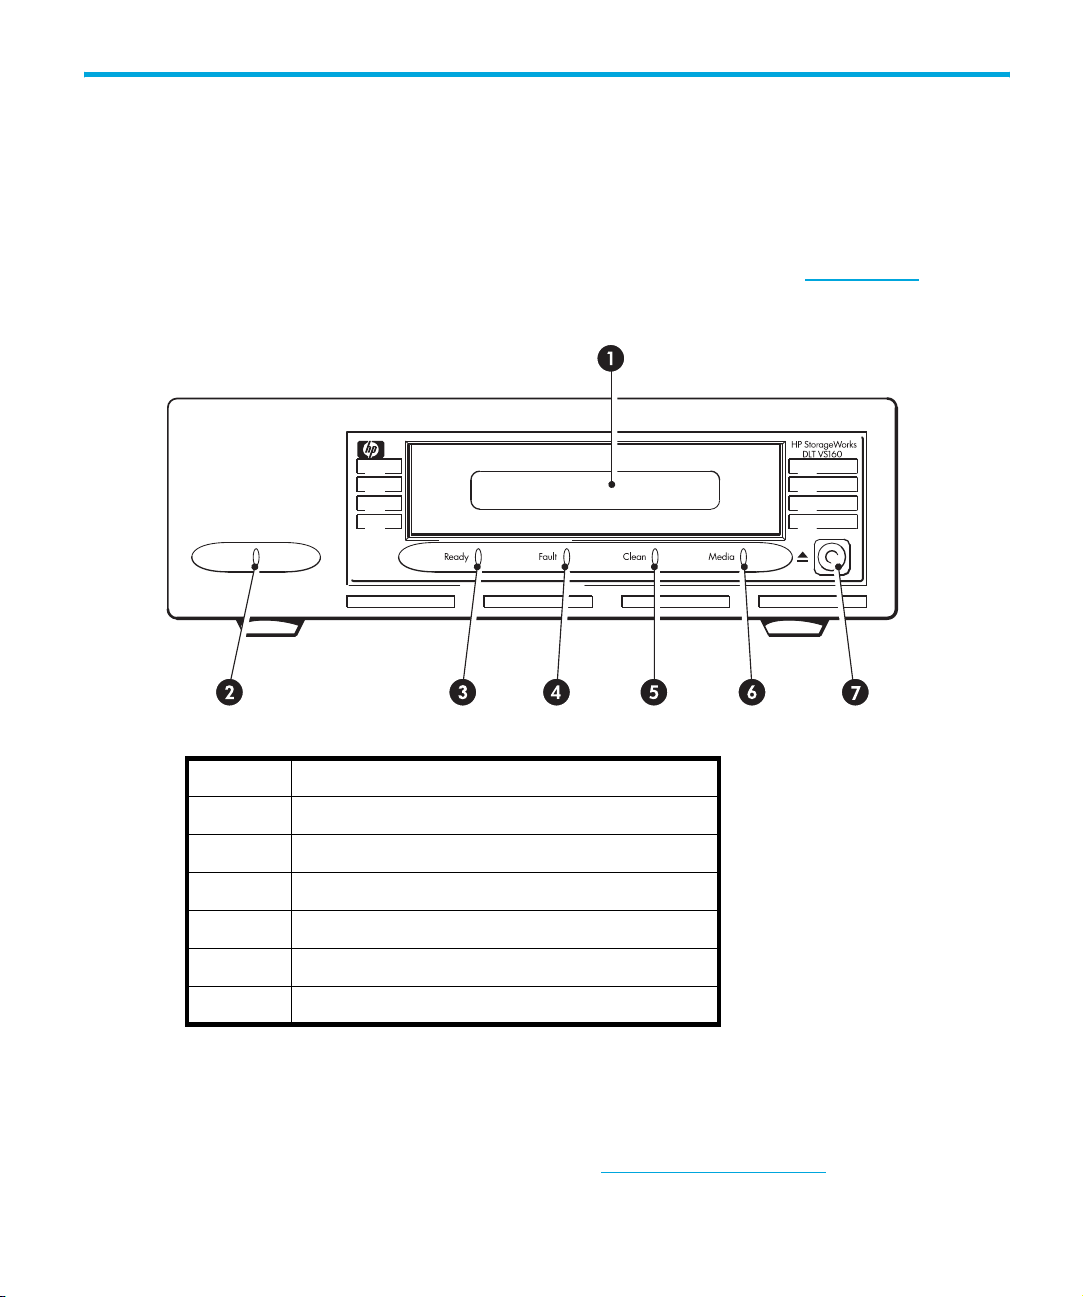
Figure 1 Front view of tape drive
1 Cartridge slot
2 Power LED (external drives only)
3Ready LED
4Fault LED
5Clean LED
6Media LED
7Eject button
Which operating systems are supported?
HP StorageWorks DLT VS160 drives can be connected to servers running under Windows®, NetWare,
HP-UX,
Compatibility” topic on our World Wide Web site (www.hp.com/go/connect
information about the operating system versions that are supported.
Linux and other major operating systems. Refer to the “HP StorageWorks Tape Software
HP StorageWorks DLT VS160 Tape Drives User Guide 9
) for the most recent

How do I connect the drive to my server?
The following guidelines apply:
• You will need a properly installed and configured SCSI host bus adapter (HBA) or a built-in SCSI
controller on your server and a suitably-rated SCSI cable.
drive should only be connected to an Ultra 160 or Ultra 320 host bus adapter or SCSI controller.
also ”Why is the SCSI bus type important?” on page 10.
• For optimum performance the drive should be the only device on the SCSI bus. Do not connect
more than two tape drives per SCSI controller.
• Always terminate the SCSI bus.
• Do not attach the drive to the same SCSI bus as your disk drive or to a RAID controller
you are connecting to a ProLiant server with a Smart Array 6i RAID controller)
Internal drives
The tape drive is installed into a spare drive bay in your server (or into an HP Rack-Mount Option
Kit) and is attached to the SCSI bus of the host server. Use an LVDS-compatible ribbon cable to
connect the tape drive to a spare 68-pin, high density (HD), wide SCSI connector on the host server.
For most servers we recommend that you use the terminated SCSI ribbon cable supplied with the
drive.
You need one industry-standard, 5¼-inch, half-height bay in which to install the
HP StorageWorks DLT VS160 tape drive.
For optimum performance your tape
See
(unless
.
See also ”Installing an internal DLT VS160 tape drive” on page 17
External drives:
Your tape drive is supplied with a 68-pin, wide, VHDCI-to-HD SCSI cable to attach to the host
server. See also ”Installing an external DLT VS160 tape drive” on page 29.
Check the usage models on ”Usage models” on page 12. This shows how the
HP StorageWorks DLT VS160 tape drive can be used in different system architectures.
Why is the SCSI bus type important?
The SCSI bus type determines the speed at which data can be transferred between devices on the
bus and the maximum length of cable that can be used. The drives support a burst transfer rate of
160 MB/sec. To benefit from this level of performance, it is important to ensure that the drives are
connected to a SCSI bus of a similar or higher specification. This means that you need:
• An Ultra160 or Ultra320 SCSI bus.
second; Ultra320 SCSI exceeds this.
• LVD-rated SCSI cabling and terminators. The LVD interface enables the data to be transferred at
the drive's maximum rate and provide a maximum cable length of 12 meters.
Ultra160 SCSI supports the maximum bus speed of 160 MB per
.
Before you start10

If you attach the drive to a lower specification SCSI bus, it may still work, but data will not be
transferred as quickly. For example, on a single-ended (SE) Ultra 2 SCSI bus the maximum burst
transfer speed of the drive is 40 MB/second and the maximum cable length is restricted to 3 meters.
NOTE: The drives are not compatible with high voltage differential (HVD) SCSI devices.
Table 1 Supported SCSI bus types
Ultra320 LVD Yes. This is a recommended configuration.
Do not daisy chain with Ultra320 devices.
Ultra160 LVD Yes. This is a recommended configuration.
Up to two devices may be daisy chained.
Ultra2 LVD Yes. This is acceptable for one DLT VS160 drive per bus.
Ultra wide LVD and
single-ended
Ultra narrow,
single-ended
High Voltage
Differential
These are not recommended configurations as they will restrict
performance.
No. This will severely restrict performance and you will need a suitable
cable or adapter.
No. The drive will not work and you may damage the drive or controller
How can I check the SCSI bus type and SCSI ID?
For many operating systems, you can install and run HP Library & Tape Tools from either the
HP StorageWorks Tape CD-ROM or www.hp.com/support/tapetools
SCSI configuration (see also ”Diagnostic tools” on page 47). This will provide information about the
SCSI bus and the SCSI IDs in use.
Using the HP StorageWorks Tape CD-ROM
The HP StorageWorks Tape CD-ROM is a central source of information about your tape drive with
utilities for getting the best performance from your tape drive.
Use the HP StorageWorks Tape CD-ROM to check installation, as described in this guide, and to
verify and troubleshoot performance after installation. It helps you to:
• Install your product, which includes access to drivers, an installation check, and performance
information and tools
• Learn about your product
• Register your product
• Buy media online
• Troubleshoot with HP Library & Tape Tools.
to check your server’s current
HP StorageWorks DLT VS160 Tape Drives User Guide 11

Usage models
HP StorageWorks DLT VS160 tape drives can be used in a stand-alone or network environment.
However, they should always be directly attached to a suitably-rated SCSI connector on the storage
server.
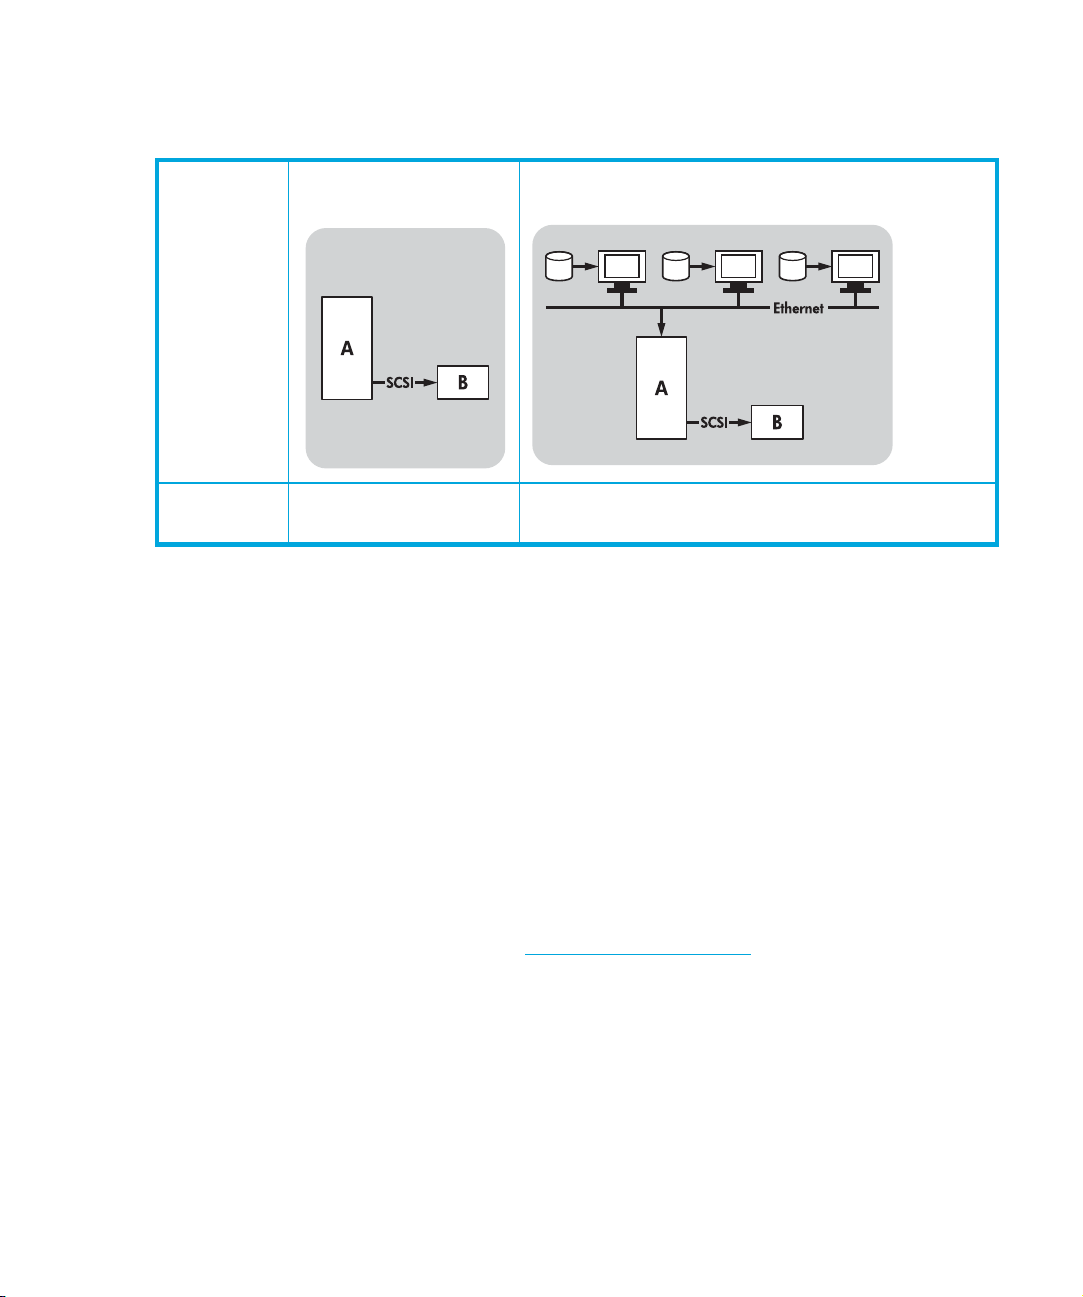
Figure 2 Usage model
AServer
BTape drive
Before you start12
The following table shows the recommended usage models and ”Optimizing performance” on
page 48 provides further information about factors that can affect performance.
Table 2 Recommended usage models
Direct Attach,
single storage server
DLT VS160
A RAID disk subsystem is recommended for all usage models.
A single disk, particularly a fast disk such as a 15K RPM drive, will also be sufficient for DLT VS160
tape drives, but be aware of other factors that can affect performance—such as, compressibility of
data, disk fragmentation and the number of files. See also ”Optimizing performance” on page 48.
You can use our free performance assessment tools, which are available stand-alone or integrated
into HP Library & Tape Tools, to check tape performance and test whether your disk subsystem can
supply data at the optimum transfer rate. You can also use these tools to calibrate your restore
performance and maximal tape performance with more compressible data.
Recommended Recommended, anything less than Gigabit Ethernet
Across the Network,
single storage server, multiple clients
may limit performance
Other usage models
The tape drive may work with other usage models, such as network attach storage (NAS) and
storage area networks (SAN), but HP does not currently provide technical support for installing and
using stand-alone DLT VS160 tape drives with these architectures. Similarly, connection to fibre
channel may be possible, if you purchase and install a fibre channel/SCSI bridge, but it is not
currently a supported option. Please check www.hp.com/go/connect
configurations.
for the latest supported
HP StorageWorks DLT VS160 Tape Drives User Guide 13

Before you start14

2 Drivers and backup software
Install drivers
Installing on Windows
The driver available from Microsoft update is acceptable, but the HP driver provides better support
for all the features of your new tape drive. It is regularly updated and is available on the HP
StorageWorks CD-ROM or on the HP Support web site at www.hp.com/support
Refer to the accompanying README file for specific installation instructions for Windows 2000,
Windows XP and Windows Server 2003 drivers.
NOTE: We recommend that you install drivers from the web link on the CD-ROM rather than the
Windows Hardware Installation Wizard, because you can also use HP Library & Tape Tools
software on the CD-ROM to verify that your installation is correct (see ”Troubleshooting with Library
& Tape Tools” on page 47). If you do not have internet access, you can also install drivers directly
from the HP StorageWorks Tape CD-ROM, but these may not be the latest versions available.
Installing on UNIX
The recommended backup applications use the operating system’s standard, built-in device drivers.
To upgrade drivers we recommend that you patch to the latest version of the operating system or
configure device files.
.
Installing on IA64
If you are installing on an IA64 system, such as an HP Integrity server, check
www.hp.com/go/connect
upgrades and drivers.
for the latest information on the availability of backup application
Upgrade backup software
It is important to check www.hp.com/go/connect for software compatibility and install any
recommended upgrades.
For optimum performance it is important to use a backup application that is appropriate for your
system’s configuration. In a direct attach configuration, where the tape drive is attached to a
standalone server, you can use backup software that is designed for a single server environment. In
network configurations you will need backup software that supports enterprise environments. HP,
Veritas, Legato, Yosemite and Computer Associates all provide suitable products. Further details
about these and other products that may be appropriate can be found on our connectivity web site.
HP StorageWorks DLT VS160 Tape Drives User Guide 15

1. Go to our connectivity web site: www.hp.com/go/connect and select tape backup.
2. Select software compatibility.
3. Select your combination of operating system and tape drive model in the table. A list of
supported backup applications is displayed.
4. Make sure you have a backup application that supports HP StorageWorks DLT VS160 tape
drives and download any upgrades or patches, if required.
Drivers and backup software16

3 Installing an internal DLT VS160 tape drive
If you are installing an external DLT VS160 tape drive, please refer to Chapter 4.
Mounting bay
You need one industry-standard, 5¼-inch, half-height bay in which to install the
HP StorageWorks DLT VS160 tape drive.
For many servers, no mounting tray or rails are required. Devices simply slide into the server’s
chassis and are fixed with screws. Other servers have built-in trays or rails.
Rail kits for a number of industry-standard servers may be available. For more details refer to:
www.hp.com/go/connect
Some servers use non-standard mounting rails and do not include spares. If this is the case with your
system, you will have to order these accessories from the server manufacturer before you can install
the tape drive.
Air flow requirements
The server must provide forced cooling and be capable of drawing 3 cfm (0.08 m3/minute or 5.1
3
m
/hour) of air through the tape drive at 40o C ambient operation. Always operate the tape drive
within an ambient air temperature of no more than 40
It is important to keep the cooling holes in the rear and the grill in the front of the tape drive clear of
any obstructions that may hinder the air flow and to ensure that all fans in your server are in place
and operational. Make sure that empty bays have the appropriate blanking plates installed so that
airflow is maintained.
.
o
C.
Check the drive’s SCSI ID
Your HP StorageWorks DLT VS160 drive is shipped with a default SCSI ID of 6. Each device on the
SCSI bus must have an unique SCSI ID number. The drive can be assigned any unused ID between
0 and 15. Do not use SCSI ID 7, which is reserved for the SCSI controller. SCSI ID 0 is typically
assigned to the boot disk and should also not be used unless the tape drive is on a dedicated SCSI
bus.
HP StorageWorks DLT VS160 Tape Drives User Guide 17

CAUTION: Static electricity can damage electronic components. Always wear an antistatic
wriststrap if possible. If not, to equalize the electromagnetic charges, touch a bare metal part of the
server (such as the back plate) before you remove the tape drive from its bag.
Figure 3 Checking the SCSI ID
1. Determine whether you need to change the SCSI ID from the default of 6.
For most operating systems you can run HP Library & Tape Tools to check your server’s current
SCSI configuration (see ”Diagnostic tools” on page 47). This will provide information about the
SCSI bus and the SCSI IDs in use. See also ”Troubleshooting with Library & Tape Tools” on
page 47.
2. Change the tape drive’s SCSI ID, if necessary.
The SCSI ID is set using jumpers on a set of pins at the rear of the drive, as shown in Figure 3.
Use tweezers or small pliers to move the jumpers to the pattern corresponding to the ID you
want. Spare jumpers are provided with the drive.
Installing an internal DLT VS160 tape drive18
Prepare mounting bay
WARNING! To avoid personal injury or damage to the server or tape drive, ensure that the server
is disconnected from the mains power supply while you install the drive.
CAUTION: Static electricity can damage electronic components. Always wear an antistatic
wriststrap if one is available. If not, after you have disconnected power from the server and removed
the cover, touch a bare metal part of the chassis. Similarly, touch a bare metal part of the drive
before installing it.
1. Assemble the necessary tools and materials:
• Phillips screwdriver
• Flat-bladed screwdriver (if your server uses slotted screws)
• Torx screwdriver (if your server uses torx screws)
• Your server manuals (for reference during installation)
2. Perform a normal system shutdown and turn off the server and any connected peripherals.
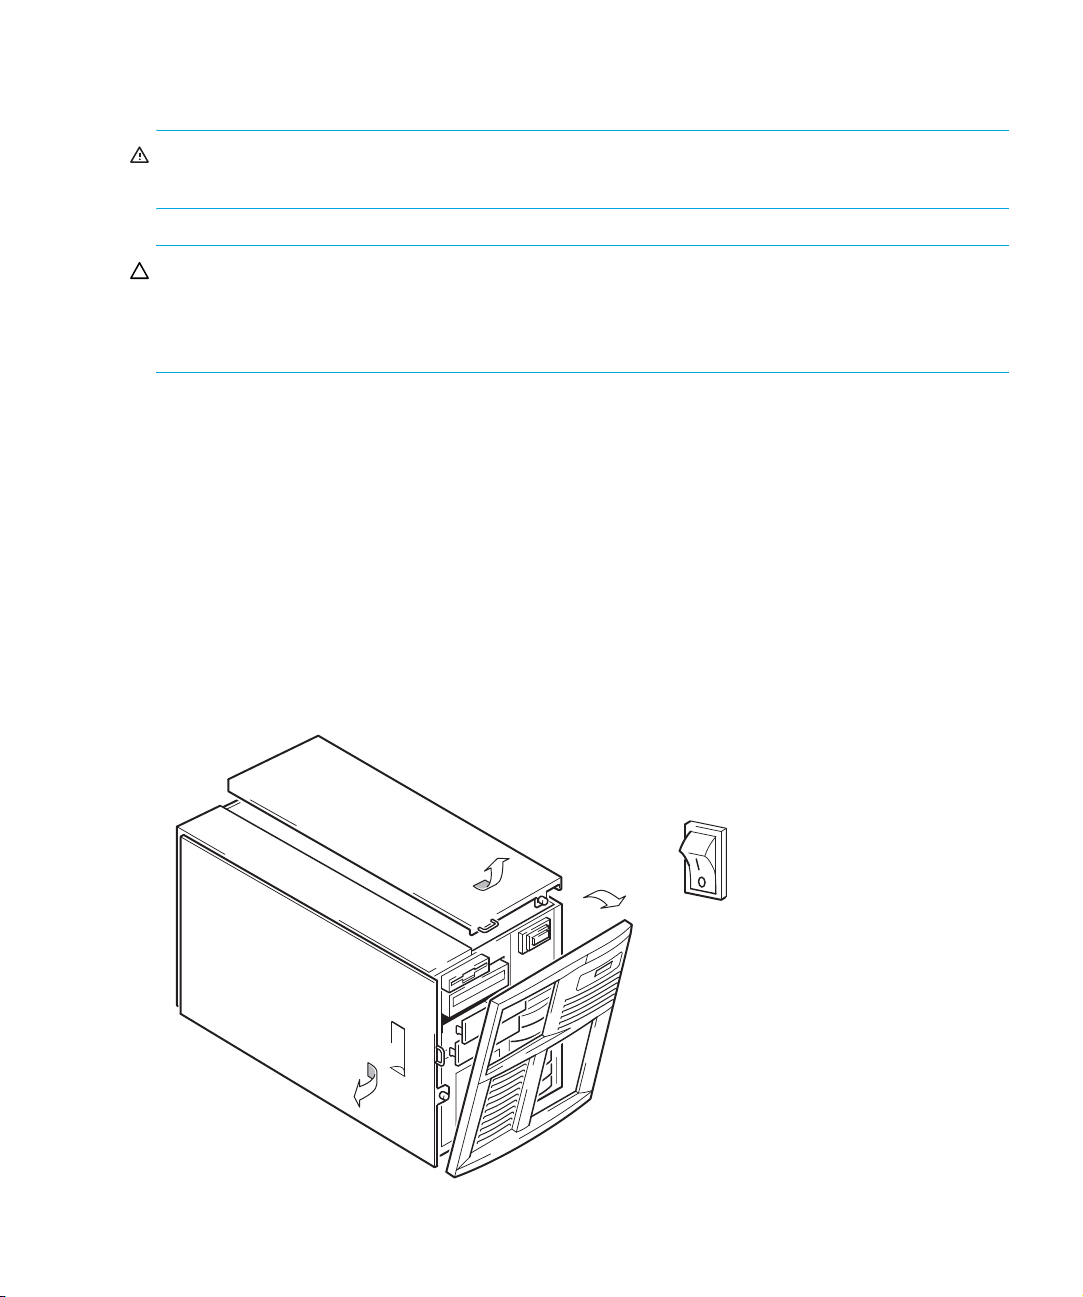
3. Remove the cover and front panel from the server, as detailed in your server’s documentation.
As you work inside the server, you may have to disconnect other signal cables or power cables
from other devices to maneuver the new drive into place. If you have to do this, make a note of
their position and connections so you can put them back correctly later.
Figure 4 Removing cover from typical ProLiant server
HP StorageWorks DLT VS160 Tape Drives User Guide 19

Figure 5 Removing cover from typical AlphaServer
4. Remove the filler panel from a spare 5¼-inch bay of your server, as described in your server’s
documentation. With some servers, such as the HP AlphaServer ES40, you must also remove the
half-height device divider.
5. You are now ready to install your tape drive.
Attach mounting hardware
If your server requires special rails or other hardware to install the tape drive, mount them on the
tape drive now.
If your server does not require special mounting hardware, proceed to ”Install drive” on page 23
now.
HP ProLiant servers
NOTE: If mounting hardware is supplied with your tape drive, it may not be exactly the same as
shown in the illustrations.
Different models of server require different mounting methods. The server may also incorporate a
locking mechanism to hold the tape drive in place. See ”Secure the drive” on page 26.
Please check your HP ProLiant server documentation to ascertain the correct method of mounting,
and to check whether mounting hardware is provided with the server.
Installing an internal DLT VS160 tape drive20

Mounting rails
Some HP ProLiant servers, such as ML530 and ML570, require mounting rails. These may be metal
or plastic rails attached to the server's drive bay filler panel.
Use a regular Phillips screwdriver to attach the appropriate rails. Use the M3 screws provided with
the tape drive as shown in Figure 6.
Figure 6 Attaching mounting rails in a typical HP ProLiant 530 or 570
Ensure you do use the M3 screws provided. The rails may be attached to the filler panel by screws
of a different thread/size type and these should not be used. If in doubt, refer to your HP ProLiant
server documentation.
Mounting screws
Other HP ProLiant server models, such as ML350 and ML370, only require the use of special
locating screws with no mounting rail.
Use a T8 Torx screwdriver to attach the appropriate screws. You may need to purchase the M3
screws separately. Position the screws, as shown in Figure 7.
HP StorageWorks DLT VS160 Tape Drives User Guide 21

Figure 7 Attaching locating screws in a typical HP ProLiant 350 or 370
1 M3 mounting screws for use with HP ProLiant ML350. These screws have a thicker
head than the general mounting screws.
2 M3 offset mounting screws for use with HP ProLiant ML370. These screws have a
thick offset piece and a thicker head than the general mounting screws.
Other servers
1. Attach the appropriate mounting hardware. Refer to the manufacturer’s documentation for
instructions.
• If you are installing on a server that requires a tray, place the tape drive in the tray.
• Some servers have snap-on mounting rails attached to the filler panel. These can be removed
and attached to the tape drive with screws.
Installing an internal DLT VS160 tape drive22

Install drive
1. Slide the tape drive into the open bay, aligning the tray or rails with the slots in the bay, as
shown in Figure 8.
Figure 8 Installing tape drive
If your server does not use mounting hardware, check that the holes in the chassis are aligned
with the holes in the side of the tape drive.
Do not secure the drive at this point because you may have to move the drive to get the cables
into place.
Orientation
The internal tape drive may be installed top side up, left side down or right side down. Do not install
it upside down. Check your server documentation to find out which orientations it supports.
HP StorageWorks DLT VS160 Tape Drives User Guide 23

Attach power and SCSI cables
To support the high performance of the tape drive it is important that you connect to a
recommended SCSI bus and use a suitably-rated SCSI cable, see ”Why is the SCSI bus type
important?” on page 10.
Electrical specifications are as follows.
Power consumption 15 Watts (average read/write operation)
Power requirements +5V @ 2.1A typical, +5V @ 2.1A maximum
+12V @ 0.7A typical, +12V @ 2.7A maximum
1. Check your server or HBA documentation to ensure that the SCSI bus and cabling supports up to
Ultra160 bus speeds. We recommend that you attach the SCSI ribbon cable supplied with the
tape drive to the SCSI host bus adapter.
2. Attach a spare power cable from the server's internal power supply to the power connector, as
shown in Figure 9.
3. Attach a spare connector on the server's built-in SCSI bus or HBA’s SCSI ribbon cable to the
SCSI connector of the drive, as shown in Figure 9.
4. If the drive is the last device on the SCSI chain, make sure that the SCSI cable is terminated
correctly. (The cable supplied with the tape drive is terminated correctly.)
Where should the SCSI terminator be?
Termination must be present at two and ONLY two positions on the SCSI bus—at the beginning of
the SCSI bus and at the end of the SCSI bus. Termination is normally enabled by default on the HBA
and most internal SCSI cables have a terminator attached. This will usually be a small, rectangular
block of plastic attached to the cable end and marked ‘SCSI Terminator’.
Therefore, assuming the HBA is the first device on the bus, you should check that the second
terminator is placed after the last device, as shown in Figure 9, item 1.
Installing an internal DLT VS160 tape drive24

Figure 9 Connecting power and SCSI cables
1 and 7 terminated SCSI cable
2 and 4 power cable
3 tape drive
5 server’s power supply
6 SCSI controller
HP StorageWorks DLT VS160 Tape Drives User Guide 25

Secure the drive
NOTE: The server latches and side views of your server model may not be exactly the same as
shown in the illustrations. Please refer also to you server documentation.
Mounting hardware used (HP ProLiant)
Ensure that you have used the correct mounting rails or locating screws, as described in ”Attach
mounting hardware” on page 20. The server also incorporates a locking mechanism to hold the
tape drive in place.
1. Push the server latch down to lock the tape drive into position, as shown in Figure 10.
Figure 10 Securing drive, mounting hardware used
1Plastic rail
2Server latch
2. Ensure blanking plates are in place over empty bays and replace the cover on the server.
Installing an internal DLT VS160 tape drive26

No mounting hardware used
1. Use the M3 screws provided with the tape drive. Check that the holes in the chassis are aligned
with the holes in the sides of the drive and use a regular Phillips screwdriver to secure the M3
screws, as shown in Figure 11.
Figure 11 Securing drive, no mounting hardware used
1 M3 screws, supplied with tape drive
2. Ensure blanking plates are in place over empty bays and replace the cover on the server.
HP StorageWorks DLT VS160 Tape Drives User Guide 27

Installing an internal DLT VS160 tape drive28

4 Installing an external DLT VS160 tape drive
If you are installing an internal DLT VS160 tape drive, please refer to Chapter 3.
Check the drive’s SCSI ID
Your HP StorageWorks DLT VS160 drive is shipped with a default SCSI ID of 6. Each device on the
SCSI bus must have an unique SCSI ID number. The drive can be assigned any unused ID between
0 and 15. Do not use SCSI ID 7, which is reserved for the SCSI controller. SCSI ID 0 is typically
assigned to the boot disk and should also not be used unless the tape drive is on a dedicated SCSI
bus.
Figure 12 Setting the SCSI ID
1. Determine whether you need to change the SCSI ID from the default of 6.
For many operating systems you can install and run HP Library & Tape Tools from the
HP StorageWorks Tape CD-ROM to check your server’s current SCSI configuration. This will
provide information about the SCSI bus and the SCSI IDs in use. (See also ”Troubleshooting with
Library & Tape Tools” on page 47.)
The UNIX Configuration Guide on the HP StorageWorks Tape CD-ROM also contains
instructions on how to determine the SCSI IDs of existing devices on UNIX servers.
HP StorageWorks DLT VS160 Tape Drives User Guide 29

2. Change the tape drive’s SCSI ID, if necessary.
Use a small screwdriver or a ball-point pen to press the indented SCSI ID selector buttons on the
rear panel (see Figure 13) until the required value is displayed. Do not use a pencil because
small bits of graphite could contaminate the drive.
NOTE: The server and the tape drive SCSI IDs are only checked at power-on. To change the SCSI
ID after installation, power down both the server and the tape drive, change the drive’s SCSI ID,
power up the tape drive, and then power up the server.
Connect the SCSI cable
A 68-pin, wide VHDCI-to-HD SCSI cable is provided to connect your HP StorageWorks DLT VS160
tape drive to a VHDCI SCSI port on an LVD SCSI bus. If your server has an HD SCSI port, you must
either purchase and install a VHDCI-to-HD adapter or use an HD-to-HD cable instead of the
supplied cable. Refer to our web site for recommended products: www.hp.com/go/connect
CAUTION: To avoid damaging the server or tape drive, ensure that both are powered off while
you attach the SCSI cable.
1. Make sure you are connecting to a recommended SCSI bus type. For optimum performance your
tape drive should only be connected to a SCSI bus that can transfer data at a rate that supports
the tape drive’s maximum burst transfer speed. See ”Why is the SCSI bus type important?” on
page 10. Do not connect the tape drive to a single-ended SCSI bus or to a RAID controller. For
optimum performance, we recommend that your HP StorageWorks DLT VS160 drive is installed
on a dedicated SCSI bus. If it is not, do not connect it to the same bus as your disk drive.
.
NOTE: The recommended connections support a maximum bus length of 12 meters.
However, if you daisy chain the tape drive with an Ultra device, cable length is restricted to 3
meters. Use a 1.8 meter cable to attach the initial unit and a 0.9 meter cable to daisy chain
the additional tape drive. Do not connect more than two tape drives per SCSI controller.
2. Perform a normal system shutdown and turn off the server and any connected peripherals.
3. Attach the VHDCI connection on the SCSI cable to the server’s external SCSI connector and
secure it by tightening the screws.
Installing an external DLT VS160 tape drive30

Figure 13 Connecting the SCSI cable
1SCSI terminator
4. Attach the HD connection on the SCSI cable to one of the SCSI connectors on the rear panel of
the tape drive and secure it by tightening the screws. (See Figure 13.)
5.
Connect the multimode terminator to the tape drive’s other SCSI connector and tighten the screws to
secure it. The multimode terminator detects whether the host bus adapter is SE or LVD and
automatically provides the appropriate termination.
Why does the tape drive need a terminator?
Terminators are essential, as they provide the correct voltages on the SCSI bus and prevent
unwanted signal reflections from interfering with data transfers. The rule is:
There must be termination at both physical ends of the bus and only at the ends.
Normally the HBA forms one end of the SCSI bus and provides termination. You, therefore, need to
ensure that the other end of the bus is terminated. If the tape drive is at the end of the SCSI bus, the
terminator must be attached to the tape drive.
If you want to attach additional devices to the SCSI bus after the tape drive, you will need to remove
the SCSI terminator and attach the next device to this SCSI connector. Make sure that you attach the
terminator to the last device in the chain.
HP StorageWorks DLT VS160 Tape Drives User Guide 31

Connect the power cable
No adjustment is needed. Electrical specifications are as follows.
Table 3 Electrical specificatons, external drives
Power consumption 15 Watts, average read/write operation
Power requirements 100–240 VAC
1. Make sure that the tape drive is switched OFF. The power switch is on the rear panel.
2. Plug the power cable securely into the socket on the rear panel of the drive.
3. Plug the other end of the power cable into the power outlet, see Figure 14.
Figure 14 Connecting the power cable
50-60 Hz, auto-ranging
0.7A maximum
1Power on/off switch
2Power cable
Installing an external DLT VS160 tape drive32

5 Verify installation
Once you have installed the drive hardware, check that drivers have been installed correctly and
you have the correct version of backup software, and verify that the tape drive is functioning
properly before you store your valuable data.
1. Switch on the tape drive and the server.
2. The tape drive will run its hardware self-test, which takes up to 25 seconds (with no cartridge
loaded).
panel” on page 35 for more information about front panel lights.
3. Install drivers.
On Windows systems, the Windows Hardare Installation wizard is displayed automatically. We
recommend that you close the wizard and install the drivers from the link on the HP
StorageWorks Tape CD-ROM.
• Insert the CD-ROM, select install your product and then select get drivers.
• You can also download drivers from
On UNIX systems, we recommend that you patch to the latest version of the operating system or
configure device files, as described in the UNIX Configuration Guide on the CD-ROM.
4. For all operating systems ensure that you have downloaded any upgrades necessary for your
backup application (see ”Upgrade backup software” on page 15).
Check www.hp.com/go/connect
upgrades.
5. Verify that the tape drive installation was successful.
For many operating systems you can run HP Library & Tape Tools from the HP StorageWorks
CD-ROM and use the diagnostic tests to check your installation. See also ”Diagnostic Tools and
Performance” on page 47 for more information about HP Library & Tape Tools, HP’s free
diagnostics and troubleshooting software.
If you encounter a problem during this verification procedure, turn to ”Troubleshooting” on
page 51 for help in diagnosing and fixing the problem.
6. You are now ready to carry out a backup and restore test to check that the drive can write data
to tape. Use a blank DLTtape VS1 cartridge.
Windows Backup or Unix native backup applications can be used to check basic tape drive
operation, but they may not support all the advanced features of your tape drive. We
recommend that you upgrade your software application before running this test.
If self-test passes, the green Ready LED remains on and the other LEDs are off. See ”Front
http://h18006.www1.hp.com/products/storageworks/tapecompatibility.html
.
for software compatibility and install any recommended
HP StorageWorks DLT VS160 Tape Drives User Guide 33

Verify installation34

6 Operating your tape drive
Front panel
Your HP StorageWorks VS160 tape drive has an Eject button and four LEDs (light emitting diodes)
on the front panel, which indicate drive status. The desktop model also has a green Power LED.
These LEDs provide useful troubleshooting information.
Figure 15 Front panel
1Cartridge slot
2 Power LED (external drives only)
3Ready LED
4Fault LED
5Clean LED
6Media LED
7Eject button
HP StorageWorks DLT VS160 Tape Drives User Guide 35

Front panel LEDs
There are four LEDs as illustrated in the diagram. (See Figure 15.)
Ready - far left, green
• On, green: power is on and the drive is ready for use
•
On, blinking: the drive is busy
• Off: no power to the tape drive
NOTE: On external drives, the Power LED also indicates that power is on.
Fault - left, amber
• On: internal firmware error
• Slow blink (1 per second): user-initiated write/read diagnostic failed
• Fast blink (3 per second): servo or mechanism error
Clean - right, amber
• On: cleaning is required
• Medium blink (2 per second): cleaning in progress
• Slow blink (1 per second): calibration error or permanent write/read error
Media - far right, green
• On: DLT1 (VS80) format DLTtape IV cartridge loaded (you can read, but not write to, this
cartridge)
• Slow blink: unsupported format or damaged cartridge
Eject button
Use the Eject button to eject the tape cartridge from the drive. When you press the button, the drive
completes any active writing of data to the tape, then ejects the cartridge. You can also use the eject
button to perform an emergency reset or to put the drive into code update mode, see ”Unload/Eject
Button Functions” on page 41.
Operating your tape drive36

Loading and unloading
Inserting cartridges
Figure 16 Inserting a cartridge
1Label area
2 Arrow indicates leading direction
1. Insert the DLTtape VS1 cartridge into the slot in front of the drive with the markings uppermost and
facing the drive door.
2. Apply gentle pressure until the drive takes the cartridge and loads it. (See Figure 16.)
3.
The Ready LED flashes green while the drive performs its load sequence. When the cartridge is ready
for use, the Ready LED shows steady green. (If the Media LED is also on, you have used a DLTtape 1V
(VS80) cartridge. See ”Use the correct media
” on page 43.)
HP StorageWorks DLT VS160 Tape Drives User Guide 37

Removing cartridges
CAUTION: Never try to remove a cartridge before it is fully ejected or power off the tape drive while
a cartridge is still loaded. Failure to remove a data cartridge may result in cartridge or tape drive
damage.
1. Press the Eject button on the front panel. When you press the button, the drive completes any active
writing of data to the tape, then ejects the cartridge.
NOTE: You can also use the eject button to perform an emergency reset or to put the drive
into code update mode, see ”Unload/Eject Button Functions” on page 41.
Figure 17 Ejecting a cartridge
1Eject button
2. The drive will complete its current task, rewind the tape to the beginning, and eject the cartridge.
The Ready LED will flash to indicate that the unload is still in progress and will show steady
green, when the cartridge is ready for removal.
Removing power from the drive
To ensure reliable operation, do not remove power from the drive during read, write, fast-search,
load and unload activities.
Operating your tape drive38

Understanding LEDs
At power on
The tape drive performs a power-on self-test whenever power is applied. The test takes between 25
seconds (no cartridge loaded) and several minutes (cartridge loaded).
• The LEDs illuminate one at a time, from left to right, starting with the Ready LED, next the Fault
LED, and finally the Clean LED, at approximately one second intervals.
• The Media LED illuminates very briefly and then all the LEDS go off. The Ready LED then blinks
for 10 to 15 seconds.
• If a data cartridge is not loaded, the Ready LED illuminates and POST is complete, the entire
process taking approximately 25 seconds.
• If a data cartridge is loaded, the Ready LED flashes while the tape drive mounts the data
cartridge, a process that can take several minutes.
• As POST completes, the tape drive makes a slight buzzing noise for several seconds. This noise
is normal.
• The tape drive is now ready to use.
HP StorageWorks DLT VS160 Tape Drives User Guide 39

Troublehooting the LEDs
Use the following table to interpret the front panel LED sequences and the appropriate action to
take, if any.
LED Sequence Cause Action required
All LEDs OFF.
Media blinking
slowly.
Media is ON.
Drive may not have power,
may be faulty or may have
been power cycled or reset
during a firmware upgrade.
The drive believes the current
tape or the tape just ejected is
faulty.
R
A DLT1 (VS80) format DLTtape
TM
IV
data cartridge is loaded.
Make sure the drive is switched on.The
external drive has a green Power LED.
Check the power cable connection and
replace the cable if necessary. You can
use the power cable from your monitor or
another device to check that the
connection is working.
If the power supply is present and all
LEDs remain off, power cycle or reset the
drive (see page 41). If it still fails, call for
service.
Make sure that you are using the correct
format cartridge; a DLT VS1 data cartridge
for read and write (or a DLT I /VS80 format
for read only) or a DLT VS160 cleaning
cartridge. (See also page 43.)
Check the cartridge for damage.
Load a new or known-good cartridge.
If the Media LED is still on, call for service.
Your tape drive can read, but not write to,
this data cartridge. If you attempt to write
to the cartridge, your backup application
will return a “Write Protected” message.
Clean is blinking
slowly.
Operating your tape drive40
The tape drive cannot read the
calibration tracks on the media
or has encountered a
permanent write or read error.
If the failure is the result of a calibration
error, the tape drive ejects the data
cartridge. If the failure is the result of a
permanent read/write error, the tape drive
does not eject the data cartridge. Try a
known-good data cartridge. If the condition
persists with a particular data cartridge,
discard or degauss that data cartridge. If
this error is repeatable with a known-good
data cartridge, try cleaning the tape drive.
If cleaning the tape drive does not help,
call for service.

LED Sequence Cause Action required
Clean is blinking
rapidly.
Clean is ON.
Fault is ON.
Fault is blinking
rapidly.
Cleaning is in progress.
Cleaning is required.
Internal firmware error.
Servo or mechanical error.
This is normal. Wait for cleaning to
complete.
The tape drive continues to function,
although you may encounter more soft error
rates. Clean your tape drive as soon as
possible.
Power cycle or reset the tape drive. Try the
operation again with a known-good data
cartridge. If the condition persists, contact
Support.
Power cycle or reset the tape drive. Try the
operation again with a known-good data
cartridge. If the condition persists, contact
Support.
Unload/Eject Button Functions
When you press and release the button within 6 seconds, the tape drive unloads and ejects the
data cartridge, as described in ”Removing cartridges” on page 38.
Emergency Reset
1. Hold the Eject button for 27 to 30 seconds and release it when all four LEDs are on solidly.
2. The tape drive performs a hard reset, behaving as if it has been powered off and then on. A
standard POST then occurs.
HP StorageWorks DLT VS160 Tape Drives User Guide 41

Enter Code Update Mode
If you have a firmware upgrade cartridge with a code level higher than the tape drive, the drive
recognizes this when it reads the cartridge and automatically loads the update. However, you can
also manually update the firmware, for example, if you want to revert to a specific firmware version.
NOTE: We recommend that you use HP Library & Tape Tools for all firmware and software
downloads.
1. Hold down the Eject button for 9 to 12 seconds and release it when the first two LEDs (Ready
and Fault) blink.
2. When the two outer LEDs (Ready and Media) blink, the tape drive is ready to accept a code
update data cartridge.
3. Insert the code update data cartridge within 15 seconds to update the firmware inside the tape
drive. If you do not load a code update data cartridge within 15 seconds, the tape drive returns
to normal operating mode.
Operating your tape drive42

7 Use the correct media
For best performance we recommend HP branded media. Order online at:
www.hp.com/go/storagemedia
Data cartridges
Always use HP DLTtape VS1 160 GB* tape cartridges with your tape drive. These are single-reel
cartridges that match your drive's format and are optimized for high capacity, throughput and
reliability.
Your DLT VS160 tape drive can read, but not write, DLTtape IV data cartridges previously written
with the DLT1/VS80 format. It is not compatible with any other DLT or SDLT tape formats. The Media
LED blinks as the tape drive attempts to load an unsupported cartridge and, when the tape load
process fails, the tape drive ejects the cartridge.
Table 4 Data cartridge compatibility
Type of cartridge Capacity Compatibility
.
DLTtape IV
DLTtape IV
(DLT1/VS80 format)
All other cartridges Not compatible.
* Capacity assumes 2:1 compression.
If your cartridge is ejected within a minute after loading, you have used the wrong media format or
the cartridge is damaged.
160 GB* read/write
80 GB* read only
The drive ejects degaussed or cartridges written
in any of the following types:
DLT III, DLT IIIXT,
DLT IV (except for cartridges written in VS80 format),
SDLT I and SDLT II
HP StorageWorks DLT VS160 Tape Drives User Guide 43

Write-protecting cartridges
If you want to protect the data on a cartridge from being altered or overwritten, you can
write-protect the cartridge.
Figure 18 Write protecting a cartridge
1 Write-protect icon
locked = cartridge write-protected, unlocked = cartridge write-enabled,
2 Write-protect switch
switch to left = cartridge write-enabled
switch to right = cartridge write-protected
If you move the write-protect switch during operation, the write-protect feature does not take effect
until after the current write operation completes.
• To write-protect a cartridge, slide the switch to the right. A “locked” icon appears on the switch,
indicating that the cartridge is protected.
• To write-enable a cartridge, slide the switch to the left. The “unlocked” icon appears on the
switch.
Use the correct media44

The indicator on the top of the data cartridge also points to the appropriate icon, indicating the
write-protected status. Figure 18 illustrates the location of the write-protect switch and indicator.
Write-protection will not prevent a cartridge being erased by bulk-erasure or degaussing.
Cleaning cartridges
You must use DLT VS160 CleaningTape with HP StorageWorks DLT VS160 tape drives. Most other
cleaning cartridges, such as CleaningTape III, will be ejected.
CAUTION: Do not use other format cartridges in your tape drive and do not use DLT VS160
CleaningTape cartridges in other format tape drives.
To clean the tape drive:
A DLT VS160 CleaningTape cartridge should only be used when the Clean LED is constantly lit or
when your backup software notifies you that the tape drive needs cleaning. Do not clean the tape
drive unless the tape drive specifically indicates cleaning is necessary.
For ordering information see www.hp.com/go/storagemedia
1. Insert the DLTVS160 CleaningTape cartridge, with the Front Slide Label Slot facing outward.
2. The drive will carry out its cleaning cycle and eject the cartridge on completion, which can take
between 1 (the first time that the cartridge is used) and 10 minutes (the 20
cartridge is used). During the cleaning cycle the Clean LED will blink rapidly.
3. Each DLT VS160 CleaningTape cartridge can be used up to 20 times. The cleaning cartridge
includes a label with 20 small boxes printed on it. Place a check mark in one of the boxes each
time you use the cleaning cartridge to clean the drive. Replace the cleaning cartridge when you
have checked all the boxes. If the cartridge has expired, it will not clean; it does not eject.
Caring for cartridges
If you experience any problems using HP branded cartridges, check:
• The cartridge case is intact and that it contains no splits, cracks or damage.
• The cartridge has been stored at the correct temperature and humidity. This prevents
condensation.
• The write-protect switch is fully operational. It should move from side to side with a positive click.
• The World Wide Web site for more detailed troubleshooting information:
www.hp.com/support
To ensure the longest possible life for your HP DLTtape VS1 data cartridges, follow these guidelines:
• Maintain clean and smoke-free operating and storage environments.
• Do not drop or strike a data cartridge. Excessive shock can displace the tape leader, making the
data cartridge unusable and possibly damaging your tape drive.
.
th
time that the
.
HP StorageWorks DLT VS160 Tape Drives User Guide 45

• Store your data cartridges in their plastic storage cases.
• Do not expose your data cartridges to direct sunlight or sources of heat, including portable
heaters and heating ducts.
• The operating temperature range for your data cartridges is 10
o
104
F). The storage temperature range is 16o C to 32o C (60o F to 90o F).
o
C to 40o C (50o F to
• If a data cartridge is exposed to temperatures outside the ranges specified above, stabilize the
data cartridge at room temperature for the same amount of time it was exposed to extreme
temperatures, up to 24 hours.
• Store your data cartridges in a dust-free environment in which relative humidity is always
between 20% and 80% (noncondensing). The ideal storage relative humidity is 40%.
• Do not place data cartridges near sources of electromagnetic energy or strong magnetic fields,
such as monitors, electric motors, speakers, or X-ray equipment. Exposure to electromagnetic
energy or magnetic fields can destroy data on data cartridges.
• Place identification labels only in the slide-in slot on the front of the data cartridge.
• Never use any type of adhesive labels or ‘sticky’ notes on data cartridges; they can become
dislodged inside the tape drive and entangled in the mechanism.
• Do not use graphite pencil, water-soluble felt pens, or other debris-producing writing instruments
on your labels. Never erase a label; replace it.
Use the correct media46

8 Diagnostic Tools and Performance
Diagnostic tools
HP Library & Tape Tools
HP StorageWorks Library & Tape Tools is the recommended diagnostic and support tool for your HP
tape storage product. It is available on the CD shipped with your product or as a free download
from the HP web site. It is supported on nearly all major operating systems.
See www.hp.com/support/tapetools
the tool.
for compatibility information, updates and the latest version of
Troubleshooting with Library & Tape Tools
1. From the HP StorageWorks CD, select troubleshoot.
This will allow you to run Library & Tape Tools in standard mode, either directly from the CD (no
installation on the server) or as an installation on your server. HP recommends installation of
Library & Tape Tools, so that it can be quickly accessed at any time. HP Support will also request
that you use Library & Tape Tools should you need to contact them in the future, so it is a good
idea to have it installed.
2. When Library & Tape Tools is first run, it will scan for HP tape drives and libraries on your system
and ask you to select the one to work with. At this time you can see the HBA configuration of
your server, how your devices are connected and the SCSI IDs of those devices.
3. Once you have selected your device you have a number of choices for troubleshooting.
• Device identification: shows part number, serial number and information about any cartridge
loaded
• Firmware upgrade: allows you to locate and upgrade to the latest firmware. You will need to
be connected to the internet for this.
• Run tests: allows you to run proactive tests on your drive, such as the drive assessment test,
which will verify the functionality of your drive in around 20 minutes. HP recommends
running this test before calling HP Support. You will need to provide a ‘trusted’ cartridge that
can be written to during this test.
• Generate a support ticket: this is a full dump of the drive logs along with interpretation and is
used by HP Support to learn about the condition of your drive. Most useful is the device
analysis section which is the output from approximately 20 rules forming a comprehensive
analysis of the health of your drive. These rules may give advice such as cleaning the head
or trying a different tape if issues are found. The support ticket can be sent to HP Support for
further analysis.
• Run the performance tests: the tests to measure the write/read performance of your tape
drive and the data generation rates of your disk subsystem are also integrated into Library &
Tape Tools. Use these tests to find the performance bottleneck in your system.
HP StorageWorks DLT VS160 Tape Drives User Guide 47

Performance Assessment Tools
NOTE: We strongly recommend that you check the information on our web site at
www.hp.com/support/pat
identify bottlenecks and take full advantage of the performance capabilities of the DLT VS160 tape
drive.
You can use our free, standalone performance assessment tools to check tape performance and test
whether your disk subsystem can supply data at the maximum transfer rate.
. This contains detailed support information that will enable you to
The tools are located online at www.hp.com/support/pat
& Tape Tools, which is available both online (www.hp.com/support/tapetools
supplied with your tape drive.
. They are also integrated into HP Library
Optimizing performance
Various factors can affect tape drive performance, particularly in a network environment or if the
drive is not on a dedicated bus. In nearly all cases when performance is not as expected, it is the
data rates of the disk subsystem that cause the bottleneck.
If your tape drive is not performing as well as expected
than expected—please
at www.hp.com/support
try the tools and consider the following points before contacting HP Support
.
—for example, if backup windows are longer
Is the tape drive on a dedicated SCSI bus?
We recommend that the tape drive is the only device on the SCSI bus. If it is not, ensure other
devices are LVD-compliant. If they are single-ended, the bus will switch to single-ended mode with a
lower transfer speed. There will also be restrictions on cable length.
Can your system deliver the required performance?
The HP StorageWorks DLT VS160 tape drive supports a burst transfer rate of 160 MB/s and can
write uncompressed data at up to 8 MB/s (28.8 GB/hour) or compressed data at up to 16 MB/s
(57.6 GB/hour), assuming 2:1 compression. However, to get this performance it is essential that
your whole system can deliver this performance. In most cases, the backup application will provide
details of the average time taken at the end of the backup.
) and on the CD-ROM
Typical areas where bottlenecks can occur are:
• Disk subsystem
A single spindle disk may not be able to deliver good data throughput at poor compression
ratios. Best practice to ensure good throughput is to utilize multiple disk spindles or data sources.
• System architecture
Be aware of the architecture of your data protection environment; the aggregation of multiple
client sources over a network provides a good way of delivering good performance, but
anything less than Gigabit Ethernet may limit performance. Some enterprise class backup
applications can be made to interleave data from multiple sources, such as clients or disks, to
keep the tape drive working at optimum performance.
Diagnostic Tools and Performance48

• Tape media type
The data cartridge should match the specification of the tape drive. Use DLT VS1 160 GB
cartridges. See also ”Data cartridges” on page 43.
• Data and file types
The type of data being backed up or restored can affect performance. Typically, small files incur
greater overhead in processing and access than large files. Equally, data that is not
compressible will always limit the speed at which the drive can write/read data. You will
achieve no more than native rates with uncompressible data.
Examples of files that compress well are plain text files, spreadsheets; those that compress poorly
are those that are either compressed as part of their format (such as, JPEG photographic files) or
stored as compressed (such as, .ZIP files or .gz/.Z files on Unix platforms).
HP StorageWorks DLT VS160 Tape Drives User Guide 49

Diagnostic Tools and Performance50

9Troubleshooting
Many users can use HP Library & Tape Tools to help them diagnose problems, see ”Diagnostic
tools” on page 47. We also recommend the detailed troubleshooting guide at
www.hp.com/go/support
General Procedure
If a problem occurs, the first step is to try to establish whether the problem lies with the cartridge, the
drive, the host server and connections, or the way the system is being operated.
Has the system just been installed?
There could be an installation problem:
1. Check through the information in the relevant installation chapter of this guide.
2. Check the power connectors and SCSI cabling.
3. Is the SCSI ID correctly set? Is there a SCSI system conflict? Has the SCSI bus been correctly
terminated? See also ”SCSI configuration guide” on page 55.
4. Are appropriate drivers and application software installed on the host?
5. Check the environmental conditions against the specified limits.
Table 5 Environmental specifications for DLT VS160 tape drives
for comprehensive troubleshooting information.
Temperature range Non-condensing humidity range
Operating
Storage -40° F to 150.8° F (-40° C to 66° C)
50° F to 104° F (10° C to 40° C) 20 to 80% RH
Are you using the correct media?
Are you using new cartridges or a different brand of cartridge? Have you been using the particular
cartridge for a very long time?
The problem could lie with the cartridge:
1. Check through the media chapter on page 43.
2. Check that you are using a DLTtape VSI cartridge.
3. Has the cartridge been write-protected, see ”Write-protecting cartridges” on page 44?
4. Clean the tape heads with the cleaning cartridge, see ”Cleaning cartridges” on page 45.
5. Has the cartridge been dropped? It is probably damaged. Discard it and use a new cartridge.
6. Try the operation again.
7. If the problem still occurs, try using a known-good cartridge.
8. If the problem is still there, the problem probably lies with the drive or the host server.
10 to 95% RH
HP StorageWorks DLT VS160 Tape Drives User Guide 51

Has the drive been moved recently?
Have any cables been disconnected and reconnected? Has the environment changed—unusually
hot, cold, damp or dry? Has there been dust or dirt near the drive. Have reasonable precautions
against static been taken?
The problem could lie with the drive:
1. Check the cables and connectors.
2. Clean the tape heads with the cleaning cartridge.
3. If the problem persists, check the environmental conditions against the specified limits, see table
above or refer to www.hp.com
. Perhaps move the drive to a more suitable site.
Has the operating system or backup software changed?
Has a new operating system been installed in the host server? Has new backup software been
installed?
The problem could lie with the host or the software. Consult the server’s operating manuals, the
software manual, or seek help from a service engineer.
Troubleshooting52

10 Replacing an internal tape drive
If your tape drive proves to be faulty and cannot be repaired and it is still covered by the original
warranty, it will be replaced.
To disconnect your drive
1. Unpack your replacement drive, and retain the packaging.
2. Power off the server and disconnect from the mains power supply.
3. Remove the cover from the server.
4. Observing normal anti-static precautions (see page 20) remove any screws that are holding the
tape drive in place.
5. Disconnect the drive from the server’s power and SCSI cables and slide it carefully out of the
mounting bay.
6. Put the drive into the packaging that contained the replacement drive.
7. Return the faulty drive to your local HP Service Center. Instructions on where to return faulty
drives will be shipped with the replacement drive.
NOTE: If you are not replacing the drive immediately, you should insert a blanking plate
into the empty bay. Replace the cover on the server and secure with screws, as appropriate.
To reconnect your tape drive
Follow the step-by-step instructions in this User Guide.
HP StorageWorks DLT VS160 Tape Drives User Guide 53

Replacing an internal tape drive54

A SCSI configuration guide
SCSI in HP StorageWorks DLT VS160 devices
The HP StorageWorks DLT VS160 tape drive has a burst transfer rate of 160 MB/sec and can write
uncompressed data at up to 8 MB/s (28.8 GB/hour) or compressed data at up to 16 MB/s
(57.6 GB/hour), assuming 2:1 compression. To benefit from this level of performance, it is important
to ensure that the drives are connected to a SCSI bus of a similar or higher specification. This means
that you need:
• An Ultra 160 or Ultra 320 SCSI host bus adapter. The tape drives may be daisy chained.
• Ultra 2 Wide SCSI supports a maximum bus speed of 80 MB per second and can also be used.
• LVD-rated SCSI cabling and terminators. The LVD interface enables the data to be transferred at
the drive's maximum rate and provides a maximum cable length of 12 meters.
If your SCSI bus does not meet the above specification, you could restrict the performance of the
drives and it could take longer to back up your data. For example, HP StorageWorks DLT VS160
tape drives will function on Ultra Wide SCSI buses, but this is not recommended because the
maximum bus speed drops to 40 MB/sec and maximum cable length may be restricted to 3 meters.
Daisy chaining devices
If you need to connect multiple devices to the bus, performance may be restricted if there are too
many devices on the bus that are accessed simultaneously. Connecting devices of lower SCSI
specification, such as Ultra2 or Ultra SCSI, may also restrict performance to your tape drive. Using
single-ended 8-Bit SCSI devices on the same bus is not recommended, as performance will be
severely impacted and complicated bus configuration is required to overcome bus termination
issues.
Make sure that the last device on the SCSI bus is terminated. We recommend that you do not attach
the tape drive to the same SCSI bus as the disk drive. See ”SCSI termination” on page 57 for more
information about terminating HP StorageWorks DLT VS160 tape drives.
SCSI terminology
SCSI is a bus interface; all the devices are connected to a single cable (some of this may be inside
and some outside the host server's case). The connection to the host itself is known as the Host Bus
Adapter (HBA). You can have several HBAs in a single server, each with its own SCSI bus: this is a
common arrangement in high-performance servers. Some host bus adapters (such as the LSI Logic
LSI22320-R) have more than one SCSI bus available on a single card.
Various terms are used when describing SCSI devices. These terms relate to the factors that affect
performance and cable length:
• The speed of the data bus, which may be Fast, Ultra, Ultra2, Ultra3, Ultra160 or Ultra320.
• The width of the data bus, which may be Narrow or Wide (8-Bit or 16-Bit).
HP StorageWorks DLT VS160 Tape Drives User Guide 55

• The voltage level of the interface, which may be single-ended (SE) or low voltage differential
(LVD).
Setting up the SCSI bus
Each device on a SCSI bus, including the SCSI host bus adapter (HBA), must be configured with a
unique ID (identifier). The SCSI bus must be terminated.
NOTE: HP recommends that a dedicated host bus adapter is used for the tape drive. A suitable
adapter is available from HP as an accessory (see www.hp.com/go/connect
SCSI ID numbers
For wide SCSI buses, the SCSI ID will be a number from 0 through 15, so a typical wide SCSI HBA
can accommodate up to fifteen other devices. (On narrow SCSI buses, the SCSI ID is a number from
0 through 7.)
Each device must have a unique SCSI ID. The drive can be assigned any unused ID between 0 and
15. Do not use SCSI ID 7, which is reserved for the SCSI controller. SCSI ID 0 is typically assigned to
the boot disk and should also not be used unless the tape drive is on a dedicated SCSI bus.
).
SCSI ID 7 is normally reserved for the HBA because it has the highest priority on the bus. On wide
buses, the priority runs from 7 (highest) to 0, then 15 down to 8 (lowest).
NOTE: As a general rule, avoid putting tape devices on the same bus as any hard disks.
Identifying SCSI IDs
If your server already has devices connected to the SCSI bus, you will need to know their IDs to
avoid any conflict with the new tape drive. Here are some methods of finding out the information:
• The fastest and easiest way is to run HP Library & Tape Tools from the HP StorageWorks
CD-ROM. HP Library & Tape Tools will check your SCSI configuration, including the SCSI
controller itself and any devices currently attached to it.
• Most servers display a list of SCSI devices and IDs during the boot-up process. This usually
scrolls past very fast. If you press the [Pause] key, you should be able to halt the scrolling and
view the list.
• On Windows systems you can use Device Manager.
SCSI configuration guide56

• If you have Novell NetWare installed, use its LIST DEVICES command.
If none of these is available to you, try the following sources of information:
• The details of all installed devices and settings may have been written down and stored with
your server's documentation (for newservers, this is often done by the supplier).
• Your HBA's documentation should tell you which settings it uses.
• Look at each device to find out its ID. This is usually easy with external devices. With internal
devices, you will probably need the help of the device's documentation to identify the SCSI ID
setting, which is usually set with jumpers.
Setting the SCSI ID on HP StorageWorks DLT VS160 drives
Note that host adapters check SCSI IDs only at power-on, so any changes will not take effect until
the host system is power-cycled.
• On internal HP StorageWorks tape drives, set the SCSI ID by attaching or removing jumpers at
the rear of the drive, see ”Check the drive’s SCSI ID” on page 17.
• On external HP StorageWorks tape drives, the ID is displayed on the rear panel and can be set
by pressing the little buttons above and below the number (using a ball point pen), see ”Check
the drive’s SCSI ID” on page 29.
SCSI termination
Terminators are essential, as they provide the correct voltages on the SCSI bus and prevent
unwanted signal reflections from interfering with data transfers. The rule is:
NOTE: There must be termination at both physical ends of the bus and only at the ends.
There are two main types of termination, active and passive. Active terminators reduce interference
and allow faster data throughput. On devices with high transfer speeds, such as
HP StorageWorks DLT VS160 devices, active termination is required, using an LVD or multimode
active terminator. (Multimode terminators allow both LVD and single-ended devices to be connected
to the same bus. They detect the type of bus and automatically supply the correct termination.)
Normally the HBA forms one end of the SCSI bus and provides termination. You only need to ensure
that the other end of the bus is terminated.
HP StorageWorks DLT VS160 Tape Drives User Guide 57

Internal drives
A suitably terminated LVD internal ribbon cable is supplied with the tape drive. The terminator is
usually a small, rectangular block of plastic attached to the cable end and marked ‘SCSI
Terminator’.
Figure 19 SCSI termination in internal drives
As long as this terminator is attached, you do not need to take any further action. However, if you
have other devices attached to the cable, make sure that they have termination removed or
disabled.
NOTE: If you have an internal and external device attached to the same SCSI bus, the HBA will be
in the middle of the cable and thus its termination must be disabled. See the host bus adapter's
documentation for details of how to do this.
External drives
All HP StorageWorks DLT VS160 external tape drives are supplied with the appropriate cable and
multimode terminator.
Make sure the terminator is firmly attached to a SCSI connector on the rear of the device when you
install it. Always use the supplied multimode terminator for proper operation.
SCSI configuration guide58

Figure 20 SCSI termination on a single tape drive
If you have more than one device on the SCSI bus, daisy chain them by connecting a cable from the
SCSI-OUT connector on the first device to the SCSI-IN connector on the second device and make
sure that the second device is terminated. (Always use an LVD-rated cable and an LVD-rated or
multimode terminator.)
Figure 21 SCSI termination in daisy-chained external drives
HP StorageWorks DLT VS160 Tape Drives User Guide 59

SCSI cables
Cables matter in SCSI systems. There are two factors to consider: cable length and cable quality.
Cable length
• For LVD SCSI the maximum length for a single device is 25 meters. For multiple devices, the
maximum combined internal/external length is 12 meters.
• If you have a combination of LVD and SE devices on the bus, the maximum cable length reverts
to the SE specification. See note on SE and LVD interfaces for more information.
• For best performance, keep lengths to a minimum, but avoid very short overall lengths (less than
0.5 meters).
Cable quality
• It is important to use good quality cables. Generally speaking, cable quality affects performance
and reliability. This is particularly true for external, shielded cables.
• Look after your SCSI cables. In particular, take care when connecting or disconnecting not to
damage the high-density connectors. Avoid putting excessive twists in external shielded cables,
as this can cause premature failure.
With internal devices
For HP StorageWorks DLT VS160 internal devices, you need a SCSI ribbon cable with the correct
termination. HP StorageWorks DLT VS160 tape drives have a 68-pin wide, high-density SCSI
connector. A suitable cable is supplied with the tape drive. If you are using an
HP StorageWorks DLT VS160 drive on an internal bus with other peripherals that run at Ultra160
speeds, it is important that a 68-pin LVD-compatible ribbon cable is used. Do not connect your tape
drive to lower-rated SCSI or to narrow SCSI.
With external devices
The cable provided with all HP StorageWorks DLT VS160 external tape drives will attach to a server
with a wide, very high density (VHDCI), LVDS SCSI connector.
If your server or host bus adapter is equipped with a high density (HD) wide SCSI connector, you
will need to order a 68-pin VHDCI-to-HD converter or 68-pin VHDCI-to-HD cable. See
www.hp.com/go/connect
.
Note on SE and LVD interfaces
SE and LVD define how the signals are transmitted along the cable.
• With single-ended (SE) SCSI, each signal travels over a single wire and each signal's value is
determined by comparing the signal to a paired ground wire. Signal quality tends to decrease
over longer cable lengths or at increased signal speed.
• With low voltage differential (LVD) signaling, signals travel along two wires and the difference in
voltage between the wire pairs determines the signal value. This enables faster data rates and
longer cabling with less susceptibility to noise than SE signaling and reduced power
consumption.
SCSI configuration guide60

If you use LVD SCSI devices on the same bus as single-ended devices this will switch the LVD SCSI
host adapter into single-ended mode and restrict cable length.
If you connect only LVD SCSI devices, the bus will operate in low voltage differential mode and the
appropriate Ultra speeds will be enabled. You can use a combination of Ultra devices. Each device
will operate at its optimum speed.
HP StorageWorks DLT VS160 Tape Drives User Guide 61

SCSI configuration guide62
 Loading...