

HP STORAGEWORKS DAT 40X6, SURESTORE DAT 24X6, SURESTORE DAT 40, STORAGEWORKS DAT 40 User Manual
Page 1

home page
hp learning products
http://www.hp.com/support/tape may have a later version
data protection
index of topics
contact hp
home page
before you start
tape drive operation
autoloader operation
cartridge care
cleaning
one-button disaster
recovery
specifications
diagnostics
troubleshooting
FAQs
SCSI configuration
UNIX configuration
ordering supplies
installing drivers
install
operate
tape drive
operate
autoloader
cartridges
troubleshoot
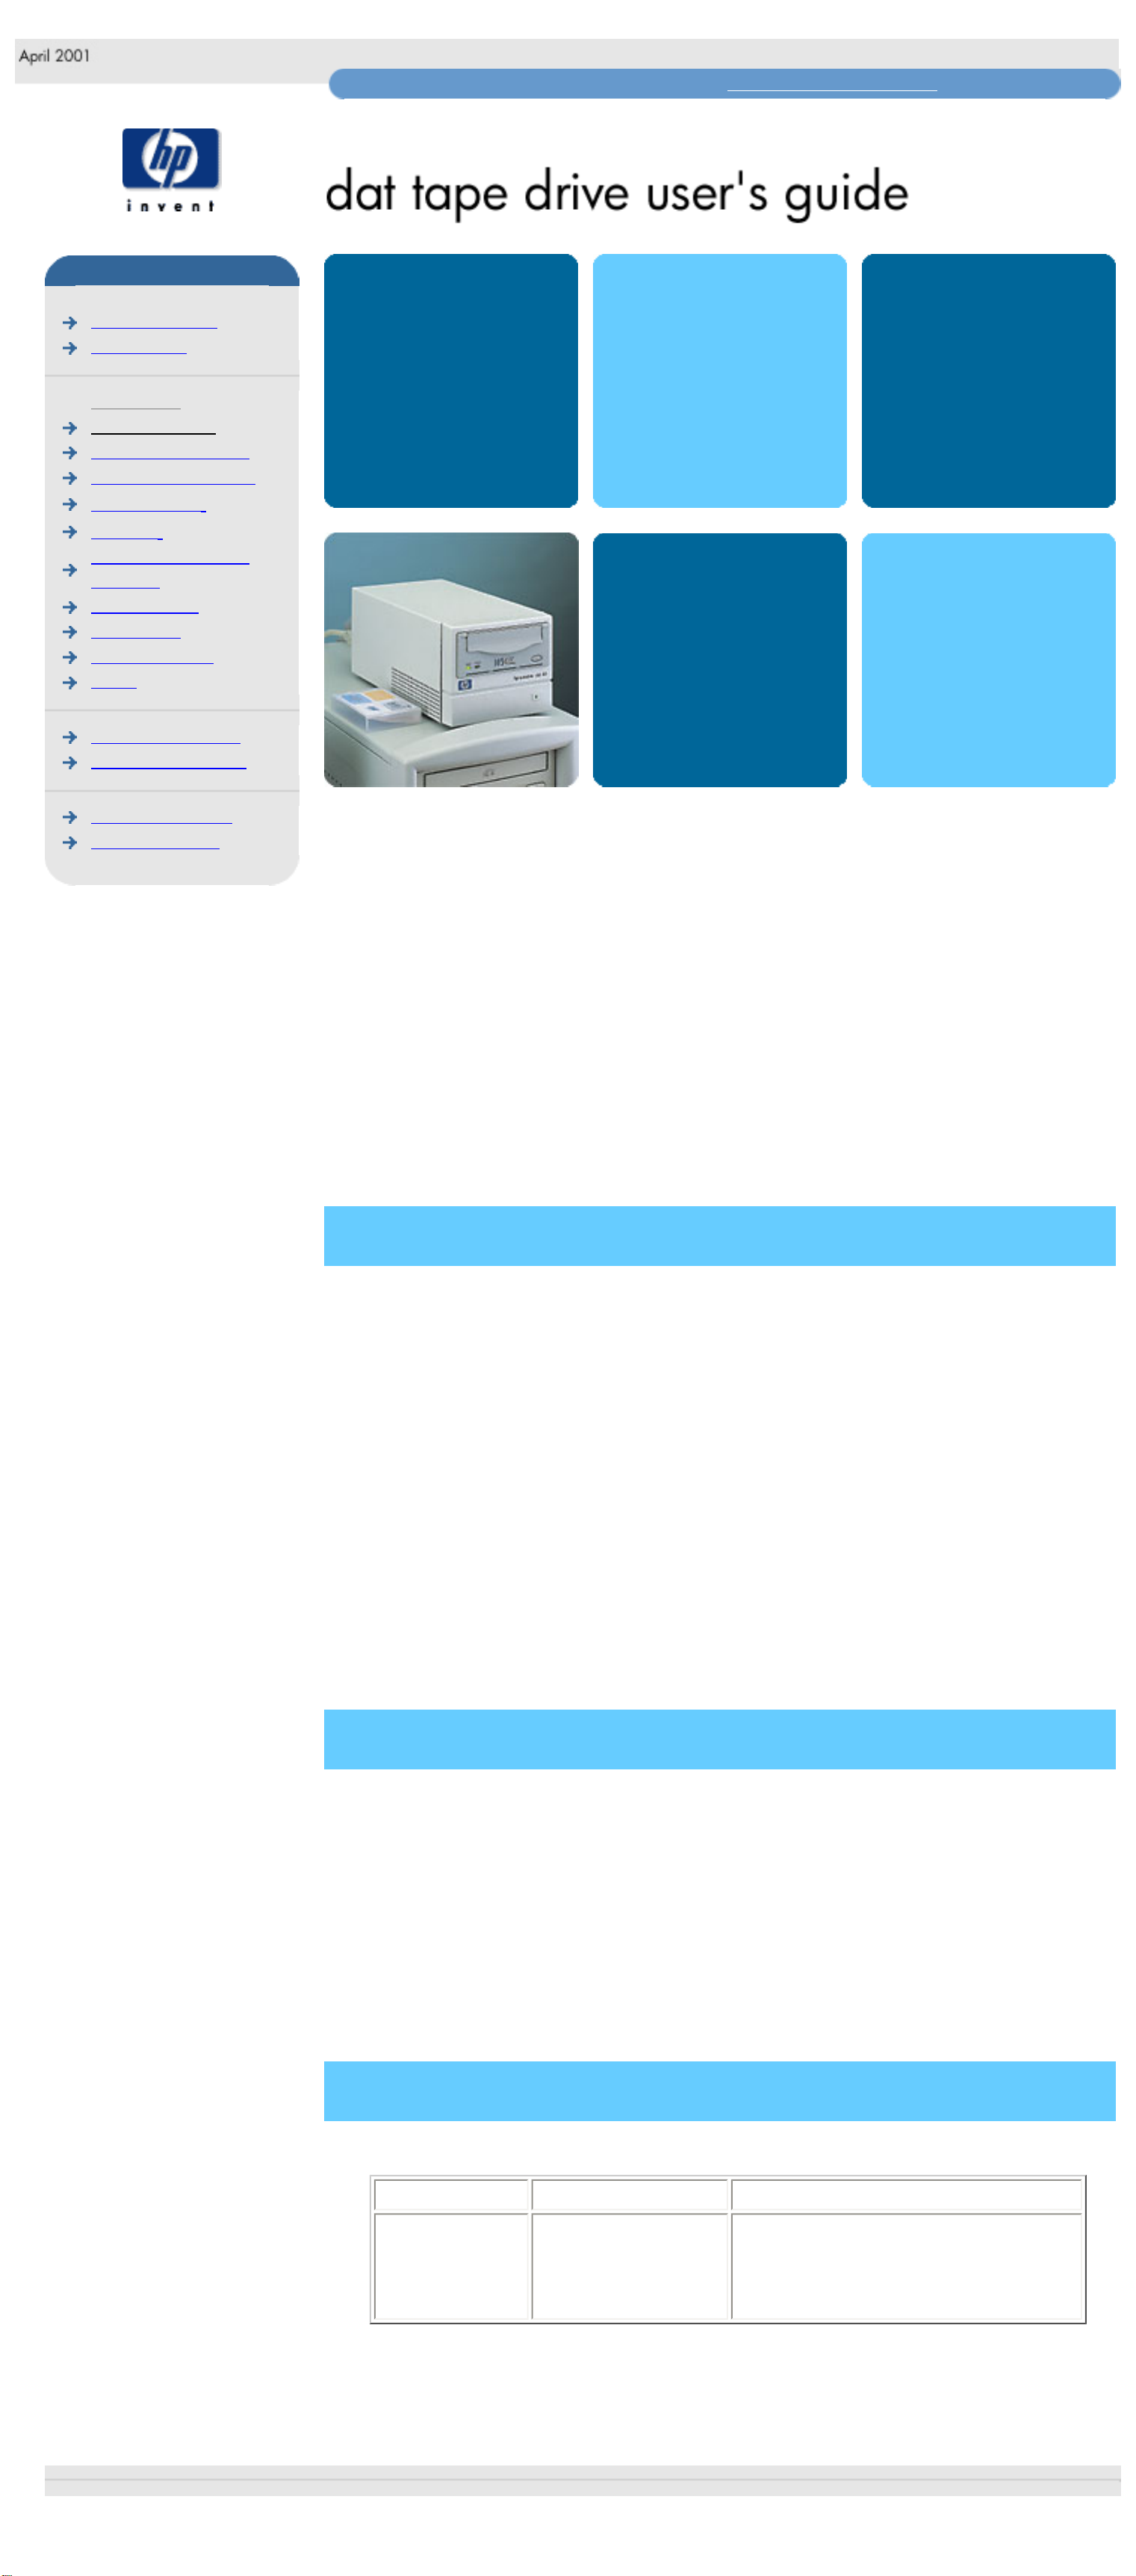
This is the User's Guide for HP Surestore DAT internal, external and removable
(rack-mounted) tape drives and autoloaders. It describes how to use HP
Surestore DAT tape drives and autoloaders.
To start, click on one of the above topics or select a topic from the navigation
pane on the left. For example, click on specifications for a detailed description of
the HP Surestore DAT tape drives and autoloaders.
Use the index of topics page to search for a particular topic.
Use the contact hp page to find out contact details for your nearest Customer
Care Center.
notice
The information contained in this document is subject to change without notice.
Hewlett-Packard makes no warranty of any kind with regard to the material,
including, but not limited to, the implied warranties of merchantability and
fitness for a particular purpose.
Hewlett-Packard shall not be liable for errors contained herein or direct, indirect,
special, incidental or consequential damages in connection with the furnishing,
performance, or use of this document.
This document contains propriety information which is protected by copyright. All
rights reserved. No part of this document may be photocopied, reproduced or
translated to another language without the prior written consent of HewlettPackard.
copyright
Copyright 1997-2001 Hewlett-Packard. All rights reserved.
Windows and Windows NT are U.S. registered trademarks of Microsoft Corp.
UNIX is a registered trademark of X/Open Company in the U.S. and other
countries.
Adobe and Acrobat are trademarkes of Adobe Systems Incorporated.
revision history
Edition Date Comments
1.0 April 2001 First edition of the HP Surestore
DAT user's guide in the new format.
Incorporates information from the
1999 guide with update notes.
© 1997-2001, Hewlett-Packard Company
file:///C|/Documents%20and%20Settings/topher.COL-SPRINGS/Desktop/Ultrium/pdf/document/home.htm [11/15/2001 1:24:52 PM]
Page 2

index
hp learning products
http://www.hp.com/support/tape may have a later version
data protection
index of topics
contact hp
home page
before you start
tape drive operation
autoloader operation
cartridge care
cleaning
one-button disaster
recovery
specifications
diagnostics
troubleshooting
FAQs
SCSI configuration
UNIX configuration
ordering supplies
installing drivers
index
contents of this section
a b c d e f g h i j l m
n o p r s t u v w
a
accessories, ordering See Ordering Information
addresses, customer support See Obtaining Service
AIX (IBM UNIX) See IBM AIX 3.2.5+
altitude, operating limits Choose your drive model from Specifications
amber light See Interpreting the Front Panel Lights for tape drives or Interpreting
the Autoloader Front Panel
America Online See Worldwide Online Services
anti-static protection See Installation Guide
applications, backup See Backup Software Requirements
archive life See Caring for Cartridges
Asia Pacific support numbers See Technical Support for Asia Pacific
AT&T mode See UNIX Glossary
autoloader
cleaning tape heads See Cleaning the Tape Heads
front panel lights See Front Panel Controls and Indicators
front panel messages See Front Panel Messages
random mode See Autoloader Modes of Operation
stacker mode See Autoloader Modes of Operation
autoloader option switch See Installation Guide
b
backup applications See Backup Software Requirements
backup driver software See Backup Software Requirements
backup failure See You Cannot Back Up or Restore
backup software See Backup Software Requirements
compatibility with HP One-Button Disaster Recovery See HP One-
Button Disaster Recovery
compatibility with TapeAlert See Backup Software Requirements
problems with See You Cannot Back Up or Restore
backups, scheduling See Choosing a Backup Strategy
backward compatibility See Cartridge Compatibility by Model
Berkeley mode See UNIX Glossary
Bertelsmann See Worldwide Online Services
BIOS See Computer Takes a Long Time to Boot Up
boot up stalls See Computer Boots, Then Halts
boot-up fails See Computer Does Not Boot Up
box contents See Installation Guide
c
cables available See Ordering Information
cable supplied with drive See Installation Guide
capacity, tape See Cartridge Compatibility by Model
care of cartridges See Caring for Cartridges
cartridges
archive life See Caring for Cartridges
available from HP See Ordering Information
capacity See Cartridge Compatibility by Model
care of See Caring for Cartridges
choosing See Choosing Cartridges
drive compatibility See Cartridge Compatibility by Model
excessive errors See Cleaning the Tape Heads
forcing ejection See Forcing Ejection for a Tape Drive or Forcing
Ejection for an Autoloader
jammed See Jammed Cartridge
labels See labels, cartridge
life See Caring for Cartridges
loading cartridges in a drive See Loading and Unloading a Cartridge
loading cartridges in a magazine See Loading a Magazine and
Cartridges
ordering See Ordering Information
storing See Caring for Cartridges
tape life See Caring for Cartridges
times used See Caring for Cartridges
unloading See Loading and Unloading a Cartridge
write-protecting See Write-Protecting Cartridges
certifications Choose your drive model from Specifications
changing SCSI ID See Installation Guide
Clean light See Interpreting the Front Panel Lights or Interpreting the Autoloader
Front Panel Lights
cleaning cartridges See Cleaning the Tape Heads
cleaning tape heads See Cleaning the Tape Heads
cleaning as part of backup routine See Cleaning as Part of Your Routine
Compaq UNIX systems See UNIX Configuration Guide: Compaq Systems
compatibility, backward See Cartridge Compatibility by Model
compression
available on HP tape drives Choose your drive model from
Specifications
definition See UNIX Glossary
CompuServe See Worldwide Online Services
computer problems See Problems with Your Computer
condensation See Caring for Cartridges
configuration switches, UNIX See Installation Guide
contacting HP See Obtaining Service
customer support See Obtaining Technical Support
d
DAT drive features Choose your drive model from Specifications
DAT cartridges
about See Choosing Cartridges
ordering See Ordering Information
data cartridges
about See Choosing Cartridges
ordering See Ordering Information
data compression Choose your drive model from Specifications
DDS
formats See Choosing Cartridges
formats supported See Cartridge Compatibility by Model
tape life See Caring for Cartridges
DDS logos See Choosing Cartridges
default SCSI ID See Installation Guide
device filenames
HP-UX See HP-UX Systems
IBM AIX See IBM AIX 3.2.5+
PC UNIX See PC-Based UNIX (SCO)
diagnosing problems See Troubleshooting or Diagnostics
Digital UNIX 4.x See UNIX Configuration Guide: Compaq Systems
disaster recovery See HP One-Button Disaster Recovery
drive
cannot back up or restore See You Cannot Back Up or Restore
capacity See Cartridge Compatibility by Model
designations Choose your drive model from Specifications
does not power up See Tape Drive Does Not Power Up
features Choose your drive model from Specifications
internal identification number Choose your drive model from
Specifications
lights See Interpreting the Front Panel Lights or Interpreting the
Autoloader Front Panel Lights
maintenance See Cleaning the Tape Heads
models Choose your drive model from Specifications
power requirements Choose your drive model from Specifications
returning for service See Returning your HP SureStore Tape Drive
specifications Choose your drive model from Specifications
switching on See Switching on the Drive
use instructions See Using Your Tape Drive
warranty See Warranty
driver software
available online See Worldwide Online Services
missing See You Cannot Back Up or Restore
e
Eject button (autoloader) See Eject Button
Eject button (DAT drives) See Loading and UnloadingTape Drives or Using HP
One-Button Disaster Recovery
ejecting a cartridge See Loading and Unloading a Cartridge
ejection, forced See Forcing Ejection for a Tape Drive or Forcing Ejection for an
Autoloader
electrical requirements Choose your drive model from Specifications
electromagnetic specifications Choose your drive model from Specifications
electrostatic discharge, protection against See Installation Guide
EMC certifications Choose your drive model from Specifications or see the
Regulatory Booklet
emergency recovery See HP One-Button Disaster Recovery
environmental specifications Choose your drive model from Specifications
equipment supplied with drive See Installation Guide
error condition signal See Error Condition Signal
error messages (autoloader) See Front Panel Messages
European support numbers See Technical Support for Europe
expired cleaning cartridges See Cleaning the Tape Heads
Express Exchange warranty See Warranty or Returning Your HP SureStore Tape
Drive
f
fast, wide SCSI See SCSI Configuration
fault condition See Troubleshooting
features of DAT drives Choose your drive model from Specifications
filemarks See UNIX Glossary
flashing light See Interpreting the Front Panel Lights for tape drives or Interpreting
the Autoloader Front Panel
forcing ejection See Forcing Ejection for a Tape Drive or Forcing Ejection for an
Autoloader
Form, Customer Service See Customer Service Form
formats, tape See Choosing Cartridges
frequency of backup See Choosing a Backup Strategy
frequency of cleaning See Cleaning the Tape Heads
frequently asked questions See Frequently Asked Questions
front panel See Interpreting the Front Panel Lights for tape drives or Interpreting
the Autoloader Front Panel
front panel messages (autoloader) See Front Panel Messages
FTP site See Worldwide Online Services
g
green light See Interpreting the Front Panel Lights for tape drives or Interpreting
the Autoloader Front Panel
h
hang during boot-up See Computer Boots, Then Halts
hard error See Error Condition Signal
head cleaner, automatic See Cleaning the Tape Heads
head cleaning See Cleaning the Tape Heads
high error rate See Cleaning the Tape Heads
host adapter, SCSI See Checking Installation Prerequisites
HP Instant Support See Diagnostics
HP One-Button Disaster Recovery See HP One-Button Disaster Recovery
HP part numbers See Ordering Information
HP service agreements See Service Agreements
HP-UX See HP-UX Systems
humidity specifications Choose your drive model from Specifications
i
IBM AIX See IBM AIX 3.2.5+
immediate mode See UNIX Glossary
infinite flush See UNIX Glossary
inserting a cartridge See Loading and Unloading a Cartridge
installation prerequisites See Checking Installation Prerequisites
installing your drive See Installation Guide
Internet sites See Worldwide Online Services
IRIX See Silicon Graphics IRIX
j
jammed cartridges See Jammed Cartridge
jumpers, SCSI ID See Installation Guide
l
labels, cartridge
autoloader Labeling Magazines
backup tapes See Labeling Cartridges
one label only See Caring for Cartridges
LEDs See Interpreting the Front Panel Lights for tape drives or Interpreting the
Autoloader Front Panel
life of DDS tape See Caring for Cartridges
lights See Interpreting the Front Panel Lights for tape drives or Interpreting the
Autoloader Front Panel
Load Cartridge button See Load Cartridge Button
loading cartridges See Loading and Unloading a Cartridge
logo, DDS See Choosing Cartridges
loose connections See Tape Drive Does Not Power Up and You Cannot Back Up
or Restore
LUN (logical unit number) See UNIX Glossary
m
magazine
ejecting See Ejecting the Magazine
labeling See Labeling Cartridges and Magazines
loading See Loading a Magazine and Cartridges
Magazine Present light See Magazine Present Light
major and minor numbers, HP-UX See HP-UX Systems
maintenance See Cleaning the Tape Heads
measurements Choose your drive model from Specifications
Media Caution light See Interpreting the Front Panel Lights
messages
autoloader See Front Panel Messages
TapeAlert monitoring utility See TapeAlert
model numbers Choose your drive model from Specifications
models, DAT drive Choose your drive model from Specifications
monitoring utility See TapeAlert
mounting rails See rail kits
n
narrow SCSI See Narrow and Wide, Fast and Ultra SCSI
non-operating limits Choose your drive model from Specifications
non-warranty service See Obtaining Service
North American support numbers See Technical Support for North and South
America
o
one-button disaster recovery See HP One-Button Disaster Recovery
online services See Worldwide Online Services
on-off switch See Switching on the Drive
operating instructions See Using Your Tape Drive or Using Your Autoloader
operating limits Choose your drive model from Specifications
Operator Attention Required light See Operator Attention Required Light
option switch, autoloader See Installation Guide
ordering parts and accessories See Ordering Information
out-of-warranty service See Obtaining Service
overwrite protection See Write-Protecting Cartridges
p
part numbers See Ordering Information
parts supplied with drive See Installation Guide
PC-based UNIX See PC-Based UNIX (SCO)
performance specifications Choose your drive model from Specifications
phone numbers See Obtaining Technical Support
physical specifications Choose your drive model from Specifications
power-cycling See Power-Cycling
power requirements Choose your drive model from Specifications
power switch See Switching on the Drive or Switching on the Autoloader
powering up drive See Switching on the Drive or Switching on the Autoloader
power-up failure See Tape Drive Does Not Power Up
prerequisites for installation See Checking Installation Prerequisites
problems
diagnosing See Troubleshooting
dirty tape heads See Cleaning the Tape Heads
during self-test See If There Are Problems During the Self-Test
error condition signal See Error Condition Signal
flashing lights See Interpreting the Front Panel Lights for tape drives
or
Interpreting the Autoloader Front Panel
frequently asked questions See Frequently Asked Questions
with computer See Problems with Your Computer
with tape drive See Problems with Your Tape Drive
product numbers See Ordering Information or Identifying which HP SureStore
DAT Product You Have
protection from overwriting See Write-Protecting Cartridges
putting in a cartridge See Loading and Unloading a Cartridge
r
radio interference certifications Choose your drive model from Specifications or
see the "Regulatory Information" booklet
rail kits available See Ordering Information
random mode
cleaning tape heads in See Cleaning the Tape Heads
definition See Autoloader Modes of Operation
regulatory information Choose your drive model from Specifications or see the
"Regulatory Information" booklet
removing a cartridge See Loading and Unloading a Cartridge
removable drives
about See Replacing a Removable Drive
removing See Replacing a Removable Drive
replacing See Replacing a Removable Drive
repairs See Returning your HP Surestore Tape Drive for Service
requirements for installation See Checking Installation Prerequisites
restore, failure See You Cannot Back Up or Restore
returning a drive for service See Returning your HP Surestore Tape Drive
s
safety certifications Choose your drive model from Specifications or see the
"Regulatory Information" booklet
scheduling backups See Choosing a Backup Strategy
SCO UNIX See PC-Based UNIX (SCO)
SCSI
about See What Is SCSI?
accessories available See Ordering Information
bus configuration See Setting Up the SCSI Bus
cables See Ordering Information or SCSI Cables
checking configuration See HP Library & Tape Tools
connection loose See Tape Drive Does Not Power Up and You
Cannot Back Up or Restore
driver software See You Cannot Back Up or Restore
LVD devices See Ultra2 and SE SCSI
narrow SCSI See Narrow and Wide, Fast and Ultra SCSI
planning the bus See Setting Up the SCSI Bus
SE devices See Ultra2 and SE SCSI
termination See SCSI Termination
ultra SCSI See Narrow and Wide, Fast and Ultra SCSI
wide SCSI See Narrow and Wide, Fast and Ultra SCSI
SCSI commands
cleaning tape heads in random mode See Cleaning the Tape Heads
SCSI IDs
about See SCSI ID Numbers
changing See Installation Guide for your model
conflicting See
You Cannot Back Up or Restore
default See Installation Guide for your model
identifying existing See
Identifying SCSI ID Numbers
planning See Setting Up the SCSI Bus
Select button See Select Button
self-test, autoloader
after installation See Switching on the Autoloader
error condition See Operator Attention Required Light
problems during See If There Are Problems During the Self-Test
self-test, drive
after installation See Switching on the Drive
error condition See Error Condition Signal
problems during See If There Are Problems During the Self-Test
service See Obtaining Service
service agreements See Service Agreements
Service Form See Customer Service Form
setting SCSI ID See Installation Guide
shelf life, cartridge See Caring for Cartridges
shipping safely See Returning your HP Surestore Tape Drive
shock survival Choose your drive model from Specifications
Silicon Graphics IRIX See Silicon Graphics IRIX
size of drive Choose your drive model from Specifications
software, backup See Backup Software Requirements
Solaris (Sun) See Sun Systems
specifications Choose your drive model from Specifications
stabilizing temperature See Caring for Cartridges
stacker mode
cleaning tape heads in See Cleaning the Tape Heads
definition See Autoloader Modes of Operation
storage capacity See Cartridge Compatibility by Model
storing cartridges See Caring for Cartridges
Sun UNIX systems See Sun Systems
supplies See Ordering Information
support telephone numbers See Obtaining Technical Support
switches, UNIX configuration See Installation Guide
switching on drive See Switching on the Drive or Switching on the Autoloader
t
Tape Activity light See Interpreting the Front Panel Lights or Interpreting the
Autoloader Front Panel
tape cartridges
about See Choosing Cartridges
ordering See Ordering Information
tape format See Choosing Cartridges
tape heads, cleaning See Cleaning the Tape Heads
Tape light See Interpreting the Front Panel Lights or Interpreting the Autoloader
Front Panel
TapeAlert See TapeAlert
tapes See Choosing Cartridges
technical support See Obtaining Technical Support or Customer Service Form
telephone numbers See Obtaining Technical Support
temperature limits Choose your drive model from Specifications
temperature, stabilizing See Caring for Cartridges
termination
problems with See Problems with Your Tape Drive
SCSI bus See SCSI Termination
testing your drive See Diagnostics
transfer rate Choose your drive model from Specifications
troubleshooting See Troubleshooting
turning on drive See Switching on the Drive or Switching on the Autoloader
u
ultra SCSI See Narrow and Wide, Fast and Ultra SCSI
UNIX systems
about See UNIX Configuration Guide
Compaq See Compaq Systems
Glossary See UNIX Glossary
HP-UX See HP-UX Systems
IBM AIX See IBM AIX 3.2.5+
PC UNIX See PC-Based UNIX (SCO)
SCO UNIX See PC-Based UNIX (SCO)
Silicon Graphics See Silicon Graphics IRIX
Sun See Sun Systems
Verifying installation See Verifying the Installation
Unload button See Loading and Unloading a Cartridge
unloading a cartridge See Loading and Unloading a Cartridge
upgrading firmware See Diagnostics
URL See Worldwide Online Services
US support numbers See Technical Support for North and South America
using the autoloader See Using Your Autoloader
using the drive See Using Your Tape Drive
v
verifying installation
Microsoft Windows systems See Diagnostics
Novell NetWare systems See Diagnostics
UNIX systems See Verifying the Installation
vibration limits Choose your drive model from Specifications
voltage requirements Choose your drive model from Specifications
w
warning signal See Interpreting the Front Panel Lights or Interpreting the
Autoloader Front Panel
warranty See Warranty
warranty service See Obtaining Service
weight of drive Choose your drive model from Specifications
wide SCSI See Narrow and Wide, Fast and Ultra SCSI
World Wide Web site See Worldwide Online Services
worn-out cartridges See Cleaning the Tape Heads
write-protected cartridges, unloading See Write-Protecting Cartridges
write-protection See Write-Protecting Cartridges
file:///C|/Documents%20and%20Settings/topher.COL-SPRINGS/Desktop/Ultrium/pdf/document/dds/user/reseller/eng/index.htm (1 of 2) [11/15/2001 1:24:56 PM]
Page 3

© 1997-2001, Hewlett-Packard Company
index
file:///C|/Documents%20and%20Settings/topher.COL-SPRINGS/Desktop/Ultrium/pdf/document/dds/user/reseller/eng/index.htm (2 of 2) [11/15/2001 1:24:56 PM]
Page 4
home page
hp learning products
http://www.hp.com/support/tape may have a later version
data protection
index of topics
contact hp
home page
before you start
tape drive operation
autoloader operation
cartridge care
cleaning
one-button disaster
recovery
specifications
diagnostics
troubleshooting
FAQs
SCSI configuration
UNIX configuration
ordering supplies
installing drivers
install
operate
tape drive
operate
autoloader
cartridges
troubleshoot
This is the User's Guide for HP Surestore DAT internal, external and removable
(rack-mounted) tape drives and autoloaders. It describes how to use HP
Surestore DAT tape drives and autoloaders.
To start, click on one of the above topics or select a topic from the navigation
pane on the left. For example, click on specifications for a detailed description of
the HP Surestore DAT tape drives and autoloaders.
Use the index of topics page to search for a particular topic.
Use the contact hp page to find out contact details for your nearest Customer
Care Center.
notice
The information contained in this document is subject to change without notice.
Hewlett-Packard makes no warranty of any kind with regard to the material,
including, but not limited to, the implied warranties of merchantability and
fitness for a particular purpose.
Hewlett-Packard shall not be liable for errors contained herein or direct, indirect,
special, incidental or consequential damages in connection with the furnishing,
performance, or use of this document.
This document contains propriety information which is protected by copyright. All
rights reserved. No part of this document may be photocopied, reproduced or
translated to another language without the prior written consent of HewlettPackard.
copyright
Copyright 1997-2001 Hewlett-Packard. All rights reserved.
Windows and Windows NT are U.S. registered trademarks of Microsoft Corp.
UNIX is a registered trademark of X/Open Company in the U.S. and other
countries.
Adobe and Acrobat are trademarkes of Adobe Systems Incorporated.
revision history
Edition Date Comments
1.0 April 2001 First edition of the HP Surestore
DAT user's guide in the new format.
Incorporates information from the
1999 guide with update notes.
© 1997-2001, Hewlett-Packard Company
file:///C|/Documents%20and%20Settings/topher.COL-SPRINGS/Desktop/Ultrium/pdf/document/dds/user/reseller/eng/home.htm [11/15/2001 1:24:57 PM]
Page 5
before you start
hp learning products
http://www.hp.com/support/tape may have a later version
data protection
index of topics
contact hp
home page
before you start
tape drive operation
autoloader operation
cartridge care
cleaning
one-button disaster
recovery
specifications
diagnostics
troubleshooting
FAQs
SCSI configuration
UNIX configuration
ordering supplies
installing drivers
before you start
contents of this section
pre-installation check list
installation
how to identify your model
computer and backup software requirements
computer systems
backup software
Windows NT and Novell Netware backup utilities
pre-installation check list
Before you install your HP Surestore DAT drive:
1. Check that your computer meets the requirements for installation.
2. Make a note of the model name, product number, and serial number of your
tape drive and record it on page 2 of the "Getting Started" guide.
3. Collect information about the SCSI configuration of your computer and any
other devices attached to it and decide how you are going to configure the
drive on the SCSI bus. If you are installing on a Windows NT 4, Windows
2000 or Novell NetWare system, you can use the HP Library & TapeTools
software provided on the HP Surestore Tape CD-ROM to do this. If you are
not familiar with how to configure a SCSI bus, you may also want to read
the
SCSI configuration information provided in this guide.
4. Select a free bay for an internal or a removable drive
or
Select a site for an external drive.
installation
The "Getting Started" guide provides detailed installation instructions.
Click below for a PDF version of the appropriate guide:
● HP Surestore DAT internal drives: Getting Started guide
● HP Surestore DAT internal autoloaders: Getting Started guide
● HP Surestore DAT external drives: Getting Started guide
● HP Surestore DAT external autoloaders: Getting Started guide
You need a copy of Adobe Acrobat Reader to read the PDF files. If you do not
have this software, you can link to Adobe's web site to download a free copy.
how to identify your model
The tape drive or autoloader has its model name on the front panel and its product
number and serial number on a label on its base, as shown below.
HP Surestore DAT 24 and DAT 24x6 models also have the DDS-3 logo on the
front panel. HP Surestore DAT 40 and DAT 40x6 models have the DDS-4 logo on
the front panel.
computer and backup software
The HP Surestore DAT drive has the following hardware and software
requirements:
computer systems
If you are installing the tape drive on a UNIX system, refer to the UNIX instructions
for further information about the systems supported and installation instructions.
For the latest list of operating systems that support HP Surestore DAT drives,
please consult our World Wide Web site (www.hp.com/go/connect).
HP Surestore DAT 24 and DAT 24x6 devices are fast narrow SCSI devices and
should be connected to a single-ended (SE) host bus adapter.
HP Surestore DAT 40 and DAT 40x6 devices are ultra wide SCSI devices. For
optimum performance the device should be connected to a low voltage differential
(LVD) SCSI host adapter. HP Surestore DAT 40 and DAT 40x6 devices may also
be connected to SE (single-ended) SCSI host adapters, but cable length will be
restricted to the SE rather than the LVD specification. If you would like more
information on SCSI specifications and configuring your SCSI bus, read the “SCSI
configuration” topic.
Your computer must have a properly installed and configured SCSI host adapter
or a SCSI controller on the motherboard (SCSI-2 or SCSI-3 compliant) with driver
software that supports the HP SureStore DAT drive. Connectivity information can
be found on our World Wide Web site: //www.hp.com/go/connect. Check the
server documentation for the specification of any built-in SCSI channels. Do not
connect to a RAID controller channel; these are for disk drives only. Consult your
supplier for further details.
For an internal drive or internal autoloader, you will need:
● A spare 5.25-inch, half-height bay in which to install the drive, or two
adjacent half-height bays for an autoloader. You can install an internal drive
into a 3.5-inch, half-height bay; use the special converter kit provided with
your tape drive.
● A SCSI ribbon cable with active termination (a terminator block).
The DAT 40i drive and DAT 40x6i autoloaders have a 68-pin wide SCSI
connector. If your computer uses narrow SCSI, you will need a cable or
adapter that enables you to connect a wide SCSI device (68 pins) into the
narrow SCSI bus (50 pins). This can be purchased from your supplier.
HP Surestore DAT 24i drives and DAT 24x6i autoloaders have a 50-pin
narrow SCSI connector. If your computer uses wide SCSI, you will need a
cable or adapter that enables you to connect a narrow SCSI device (50
pins) into the wide SCSI bus (68 pins). This is provided with your tape drive.
● Any special mounting tray or rails required to fix the drive into the empty
bay.
Check your 'Getting Started Guide' for details of which mounting hardware
is supplied with your tape drive or autoloader.
For external drives and autoloaders, the cable provided with DAT 24, DAT
24x6e, DAT 40e and DAT 40x6e products will attach to a computer with a wide
SCSI connector (68 pins). If the cable supplied with your drive is not appropriate
for your computer's external SCSI connector, you will need to order a new cable.
(See
ordering supplies.)
For removable drives, no SCSI cables are required to plug the drive into an HP
Surestore Tape Array 5300. However, cabling and terminators are required to
connect the tape array with the SCSI host. Refer to your HP Surestore Tape Array
5300 Getting Started Guide for further details.
backup software
You need backup software that supports the HP Surestore DAT drive. We
recommend using a backup application, which provides good memory
management and also supports other useful features, such as TapeAlert. HP,
Computer Associates, Veritas, Legato and Yosemite all provide suitable products
that have been tested with HP Surestore DAT drives. A TapeWare CD-ROM
containing backup software by Yosemite Technologies is supplied with your tape
drive. For the latest list of backup packages that support HP Surestore DAT
drives, please consult our World Wide Web site (www.hp.com/go/connect).
Details of how to best optimize your tape drive to achieve the maximum
performance with your chosen backup application can be obtained from our World
Wide Web Site (www.hp.com/support/dat).
Suitable backup applications will include driver software that establishes the
interface between the tape drive and the software. Applications usually recognize
tape drives by their manufacturers' ID string rather than their model number, so
check the table below for the appropriate reference.
Drive Model ID String
HP Surestore DAT 24 HP C1537A
HP Surestore DAT 24x6 HP C1557A
HP Surestore DAT 40
HP C5683A
HP Surestore DAT 40x6 HP C5713A
Windows NT and Novell NetWare backup
utilities
If you have Windows NT installed, it contains a built-in backup utility. Similarly,
you can use the SBACKUP utility provided with Novell NetWare. However, as
neither of these utilities supports HP One-Button Disaster Recovery and other
advanced capabilities for backup and restore, you may prefer to use the free
backup software provided on the Yosemite TapeWare CD-ROM. This software
provides full support for HP One-Button Disaster Recovery.
Before you can use the tape drive with these utilities, you must install the
appropriate driver. Install the tape drive hardware before installing the driver.
Drivers for Windows NT 3.51 and 4.0 and Novell NetWare 3.12, 4.10, and 4.11
are supplied on this HP Surestore Tape CD-ROM. Select the "Software" option on
the Welcome page to install the drivers for Windows Backup or NetWare
SBACKUP or you can follow the instructions for installing drivers provided in your
operating system documentation.
For detailed information about drivers, refer to the appropriate README file in the
DRIVERS directory on this CD. There is a separate sub-directory for each
operating system.
You can also find frequently asked questions in the installing drivers topic.
© 1997-2001, Hewlett-Packard Company
file:///C|/Documents%20and%20Settings/topher.COL-SPRINGS/Desktop/Ultrium/pdf/document/dds/user/reseller/eng/getstart.htm [11/15/2001 1:24:58 PM]
Page 6
operation
hp learning products
http://www.hp.com/support/tape may have a later version
data protection
index of topics
contact hp
home page
before you start
tape drive operation
the front panel lights
loading & unloading
replacing a
removable drive
backup strategy
autoloader operation
cartridge care
cleaning
one-button disaster
recovery
specifications
diagnostics
troubleshooting
FAQs
SCSI configuration
UNIX configuration
ordering supplies
installing drivers
tape drive operation
contents of this section
switching on the drive
if you have problems during self-
test
related topics
interpreting the front panel lights
loading and unloading
cartridges
replacing a removable drive
backup strategy
switching on the drive
Internal drives are powered on when you switch on your computer.
Removable drives are powered on when you switch on your tape array and
computer.
External drives
Switch on external drives using the power
switch on the rear panel, and then switch
on the computer.
if you have problems during self-test
If the Tape light goes off but the Media Caution light shows steady amber at the
end of the self-test, this indicates a fault condition:
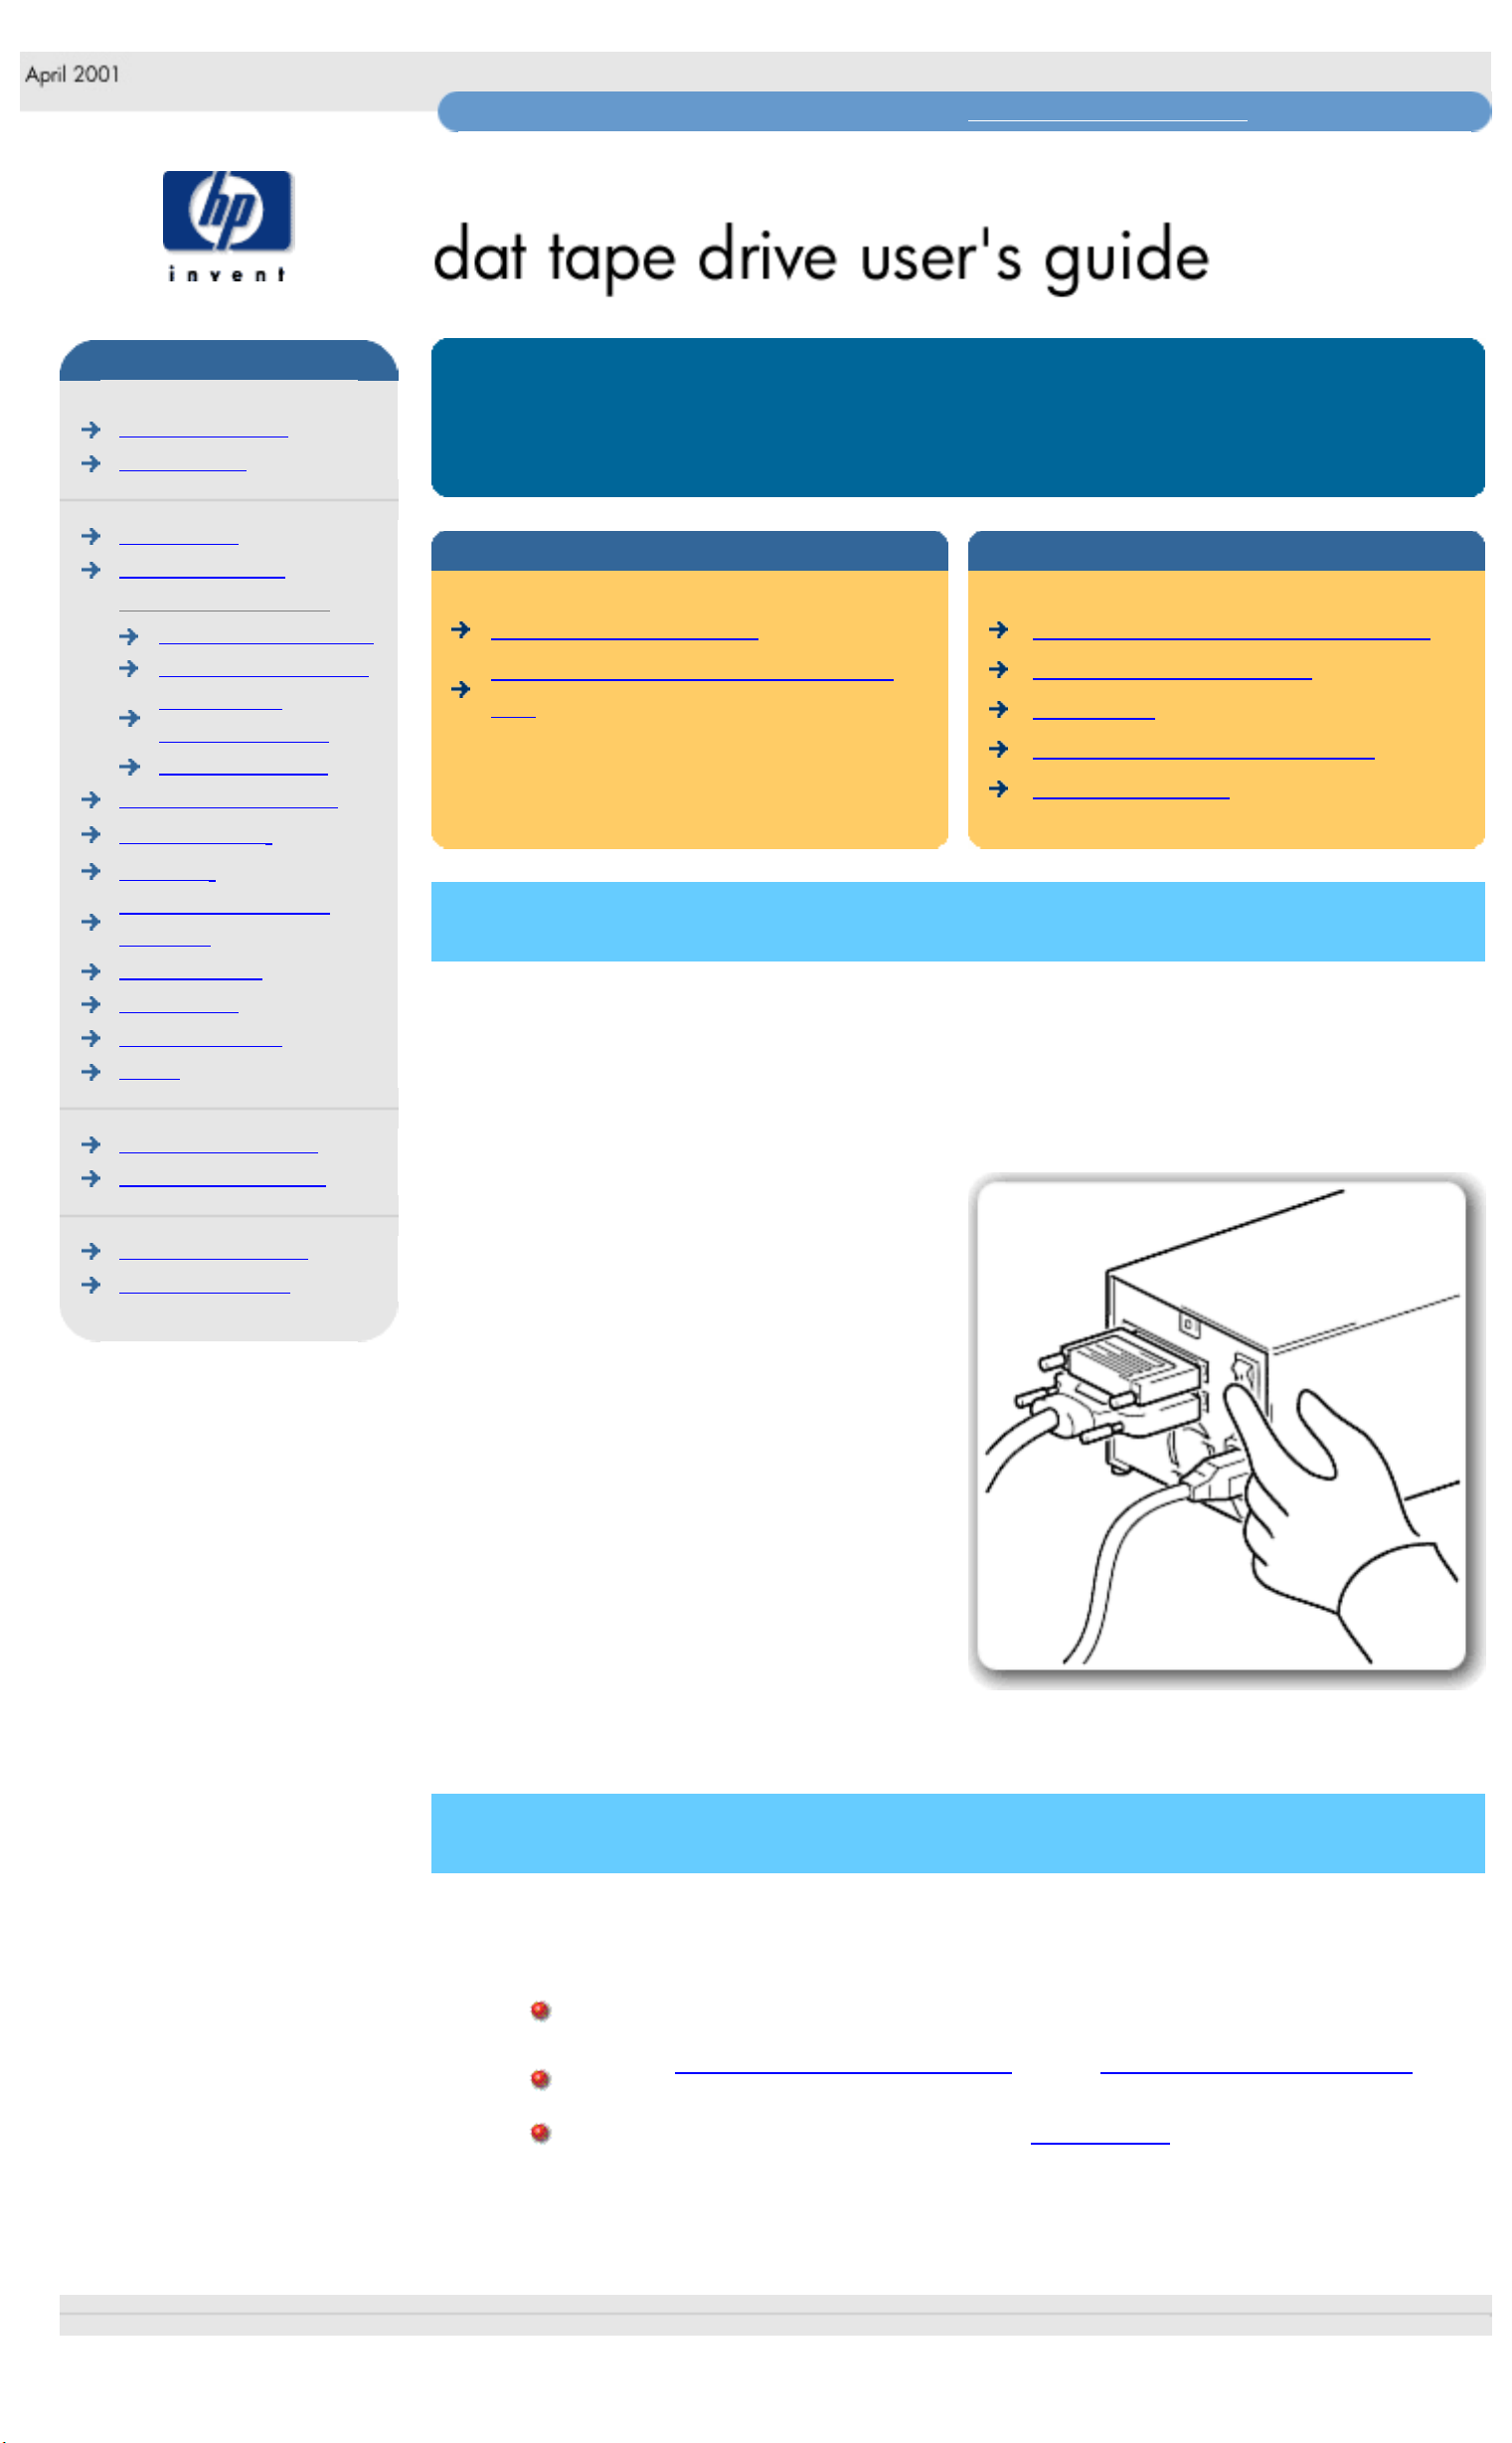
If you have just installed the drive, check the installation for loose
connections and repeat the self-test.
Try the troubleshooting procedures or run HP Library & Tape Tools
to determine what the problem is.
If the fault condition persists, call for assistance.
© 1997-2001, Hewlett-Packard Company
file:///C|/Documents%20and%20Settings/topher.COL-SPRINGS/Desktop/Ultrium/pdf/document/dds/user/reseller/eng/operate.htm [11/15/2001 1:24:59 PM]
Page 7

front panel lights
hp learning products
http://www.hp.com/support/tape may have a later version
data protection
index of topics
contact hp
home page
before you start
tape drive operation
the front panel lights
loading & unloading
replacing a
removable drive
backup strategy
autoloader operation
cartridge care
cleaning
one-button disaster
recovery
specifications
diagnostics
troubleshooting
FAQs
SCSI configuration
UNIX configuration
ordering supplies
installing drivers
the front panel lights
contents of this section
front panel lights
tape ready signal
tape loading signal
tape activity signal
media caution signal
error condition signal
OBDR mode signal
front panel lights
The front panel of your HP Surestore DAT drive has two lights (LEDs), Tape and
Clean, that indicate the status of the tape drive as described below.
Tape ready signal
Tape On, steady
Clean Off
The cartridge is loaded and the drive is
ready.
Tape loading signal
Tape On, flashing slowly
Clean Off
The cartridge is loading or unloading, or
self-test is in progress.
Tape activity signal
Tape On, flashing rapidly
Clean Off
The cartridge is loaded, activity is
occurring.
Media caution signal
Tape Off, or flashing rapidly
Clean On, flashing slowly
If the media caution signal is displayed:
● Wait for the current operation to finish, then insert a different tape and repeat
the operation that was being performed.
● If the media caution signal does not show this time, it indicates that the
original cartridge was nearing the end of its useful life. Copy any data you
want to keep from the original tape onto a new tape if possible, then discard
the old tape.
● If the media caution signal appears again with the second tape, the tape
heads need cleaning.
● If the media caution signal appears after using a cleaning cartridge, the
cleaning cartridge has probably expired and should be discarded.
Error condition signal
Tape
Off
Clean On, steady
HP Surestore DAT drives perform a
comprehensive self-test during powerup. If a hard error causes the self-test to
fail, the clean light changes to steady
amber. Run HP Library & Tape Tools to
help diagnose the problem.
OBDR mode signal
Tape
On, flashing slowly
Clean On, flashing slowly, alternating
with Tape LED
The tape drive is in disaster recovery
mode, restoring the operating system.
© 1997-2001, Hewlett-Packard Company
file:///C|/Documents%20and%20Settings/topher.COL-SPRINGS/Desktop/Ultrium/pdf/document/dds/user/reseller/eng/lights.htm [11/15/2001 1:25:00 PM]
Page 8

loading and unloading
hp learning products
http://www.hp.com/support/tape may have a later version
data protection
index of topics
contact hp
home page
before you start
tape drive operation
the front panel lights
loading & unloading
replacing a
removable drive
backup strategy
autoloader operation
cartridge care
cleaning
one-button disaster
recovery
specifications
diagnostics
troubleshooting
FAQs
SCSI configuration
UNIX configuration
ordering supplies
installing drivers
loading and unloading tape drives
contents of this section
to load a cartridge
internal drives
external drives
removable drives
to unload a cartridge
internal drives
external drives
removable drives
emergency unload
related topics
cartridge care
labeling and write-protecting
cartridges
replacing a removable drive
to load a cartridge
internal drives
Use the correct format HP DDS cartridge with your drive.
HP Surestore DAT drives are configured to detect DDS cartridges. Any cartridge
that is not DDS will be treated as write-protected. This means you will only be able
to read a non-DDS cartridge, not write to it.
hp surestore DAT 24i
hp surestore DAT 40i
1. HP Surestore DAT 24i drives
These drives do not have a cartridge door. Just Insert the cartridge into the
slot in front of the drive with the label uppermost.
HP Surestore DAT 40i drives
Slide the cartridge up under the lip of the cartridge door and insert it into the
slot with the label uppermost.
2. Apply gentle pressure on the rear of the cartridge until the drive takes the
cartridge and loads it.
Do not try to force the cartridge if it does not load properly. The drive will eject the
cartridge after about 10 seconds so you can load it again.
When you insert a cartridge, the drive performs a short load sequence. This takes
about 5 seconds, during which the Tape light flashes green. When the load
sequence is finished, the Tape light shows steady green.
external drives
Use the correct format HP DDS cartridge with your drive.
HP Surestore DAT drives are configured to detect DDS cartridges. Any cartridge
that is not DDS will be treated as write-protected. This means you will only be able
to read a non-DDS cartridge, not write to it.
hp surestore DAT 24e
hp surestore DAT 40e
1. HP Surestore DAT 24e drives
These drives do not have a cartridge door. Just Insert the cartridge into the
slot in front of the drive with the label uppermost.
HP Surestore DAT 40e drives
Slide the cartridge up under the lip of the cartridge door and insert it into the
slot with the label uppermost.
2. Apply gentle pressure on the rear of the cartridge until the drive takes the
cartridge and loads it.
Do not try to force the cartridge if it does not load properly. The drive will eject the
cartridge after about 10 seconds so you can load it again.
When you insert a cartridge, the drive performs a short load sequence. This takes
about 5 seconds, during which the Tape light flashes green. When the load
sequence is finished, the Tape light shows steady green.
removable drives
Use the correct format HP DDS cartridge with your drive.
HP Surestore DAT drives are configured to detect DDS cartridges. Any cartridge
that is not DDS will be treated as write-protected. This means you will only be able
to read a non-DDS cartridge, not write to it.
hp surestore DAT 24m
hp surestore DAT 40m
1. HP Surestore DAT 24i drives
These drives do not have a cartridge door. Just Insert the cartridge into the
slot in front of the drive with the label uppermost.
HP Surestore DAT 40i drives
Slide the cartridge up under the lip of the cartridge door and insert it into the
slot with the label uppermost.
2. Apply gentle pressure on the rear of the cartridge until the drive takes the
cartridge and loads it.
Do not try to force the cartridge if it does not load properly. The drive will eject the
cartridge after about 10 seconds so you can load it again.
When you insert a cartridge, the drive performs a short load sequence. This takes
about 5 seconds, during which the Tape light flashes green. When the load
sequence is finished, the Tape light shows steady green.
to unload a cartridge
internal drives
hp surestore DAT 24i
hp surestore DAT 40i
1. Press the Eject button on the front panel.
During the unload sequence the Tape light flashes green. The drive
completes any task it is currently performing, winds the tape to the
beginning and ejects the cartridge. The sequence can take up to 25
seconds for a write-enabled cartridge and 10 seconds for a write-protected
cartridge. The sequence may take longer if the tape needs to be rewound
first.
2. Remove the cartridge and store it in its plastic case.
external drives
hp surestore DAT 24e
hp surestore DAT 40e
1. Press the Eject button on the front panel.
During the unload sequence the Tape light flashes green. The drive
completes any task it is currently performing, winds the tape to the
beginning and ejects the cartridge. The sequence can take up to 25
seconds for a write-enabled cartridge and 10 seconds for a write-protected
cartridge. The sequence may take longer if the tape needs to be rewound
first.
2. Remove the cartridge and store it in its plastic case.
removable drives
hp surestore DAT 24m
hp surestore DAT 40m
1. Press the Eject button on the front panel.
During the unload sequence the Tape light flashes green. The drive
completes any task it is currently performing, winds the tape to the
beginning and ejects the cartridge. The sequence can take up to 25
seconds for a write-enabled cartridge and 10 seconds for a write-protected
cartridge. The sequence may take longer if the tape needs to be rewound
first.
2. Remove the cartridge and store it in its plastic case.
emergency unload
If you press the Eject button when the drive is busy, the drive may take some time
to respond because it will finish the task it is performing first. This ensures that no
data is lost. On rare occasions, however, a system or software fault may cause
the tape drive not to respond to an Unload request. In this situation, you can force
ejection.
There are two ways of doing this:
Press the Eject button three times within 5 minutes.
Hold the Eject button down for at least 15 seconds.
Following either of these actions, the drive waits until 35 seconds have passed
from the time of the first press, to give the normal eject procedure a chance to
proceed. After this period, it immediately releases the tape and ejects the
cartridge, regardless of what operation it was performing. The drive is then reset
as though you had turned the power off and then on again.
Caution: You may lose data if you force ejection of a cartridge. The tape may also
become unreadable because an EOD (End of Data) mark may not be properly
written.
© 1997-2001, Hewlett-Packard Company
file:///C|/Documents%20and%20Settings/topher.COL-SPRINGS/Desktop/Ultrium/pdf/document/dds/user/reseller/eng/load.htm [11/15/2001 1:25:01 PM]
Page 9

removable drives
hp learning products
http://www.hp.com/support/tape may have a later version
data protection
index of topics
contact hp
home page
before you start
tape drive operation
the front panel lights
loading & unloading
replacing a
removable drive
backup strategy
autoloader operation
cartridge care
cleaning
one-button disaster
recovery
specifications
diagnostics
troubleshooting
FAQs
SCSI configuration
UNIX configuration
ordering supplies
installing drivers
replacing a removable drive
contents of this section
overview
removing a drive
replacing a drive
overview
HP Surestore DAT removable drives can be removed and replaced without
powering down the tape array, providing they are not on the same SCSI bus.
If all drives in the tape array are powered up when the system is turned on, the
host will be aware of those drives. You can remove any of those drives and
replace it with another drive.
If a drive is not powered up or you place a drive in an empty slot after the system
has been powered up, the system will have to be reset before the host will
recognize the drive.
Removable drives allow modules to be replaced while powered up as long as no
data is being transmitted from the system to the module or to any other module
daisy-chained on the same SCSI bus (off-line hot-swap). The SCSI IDs are
controlled by the tape array, not by the drives themselves, so if you remove a
drive and replace it with another the ID will not change.
If your system is running HPUX, you should be aware of the following when
removing a drive:
● In Berkeley mode, the tape position will remain unchanged by a device
close operation
● In AT&T mode, a device close operation will cause the tape to be
repositioned just after the next tape filemark (the start of the next file).
removing a drive
1. Pull the extraction lever of the drive that
you want to replace so that it is in the
out position.
2. Using the extraction lever, pull the drive
carefully and firmly out of the tape
array.
replacing a drive
1. Ensure that the extractor lever on the
drive is in the out position, as shown in
the picture.
2. Lift the drive carefully.
3. Align the rear of the drive with the
guides on the side of the HP Surestore
Tape Array 5300.
4. Slide the drive along the guides until
the connectors on the back mate with
the connectors at the back of the
enclosure.
5. Push the extractor lever in until it locks
the drive in position.
© 1997-2001, Hewlett-Packard Company
file:///C|/Documents%20and%20Settings/topher.COL-SPRINGS/Desktop/Ultrium/pdf/document/dds/user/reseller/eng/remdrv.htm [11/15/2001 1:25:02 PM]
Page 10

choosing a backup strategy
hp learning products
http://www.hp.com/support/tape may have a later version
data protection
index of topics
contact hp
home page
before you start
tape drive operation
the front panel lights
loading & unloading
replacing a
removable drive
backup strategy
autoloader operation
cartridge care
cleaning
one-button disaster
recovery
specifications
diagnostics
troubleshooting
FAQs
SCSI configuration
UNIX configuration
ordering supplies
installing drivers
choosing a backup strategy
contents of this section
choice of strategy
the ten-tape cycle method
cleaning as part of your routine
extending your backup strategy
related topics
tape drive operation
autoloader operation
choice of strategy
How you organize backup depends very much on how frequently the data
changes, how extensive these changes are, and how valuable you consider the
information. What is essential is that you follow a routine, so that backup is regular
and trouble-free.
There are many systematic methods for backing up data on a regular basis. The
ten-tape cycle method recommended in this section is very simple to implement. It
also maintains several historical copies of the data so that even if one copy is lost
you have a high probability of recovering your lost data.
To ensure longevity of your tapes, it is important to follow the tape usage and
storage recommendations outlined in Caring for Cartridges. If you follow the
backup method described in this section, you should renew your tapes each year.
(Since no one tape should be used more than 100 times, annual renewal allows
for a number of restores in addition to backups.)
the ten-tape cycle method
The ten-tape cycle method uses a systematic approach to ensure data security. It
involves maintaining a daily, weekly and monthly backup. Every three months the
monthly tapes are recycled.
The advantages of this method are:
● Simplicity: It is very easy to recover data.
● Ease of Access: Data backed up any time over the preceding two months
can be easily found and restored.
number of tapes needed
If all the data you wish to back up in a single session will fit onto a single tape, ten
tapes are needed, plus any additional tapes you may require for archival storage
or file transfers.
If you require more than one tape per backup, you will need ten sets of tapes,
where a "set" is the smallest number of tapes that will hold a full backup.
Before making a backup, label the ten tapes as follows:
Monday Friday 1 Month 1
Tuesday Friday 2 Month 2
Wednesday Friday 3 Month 3
Thursday
In addition, record on the label the date when you first started using the tape, the
name of the system you are backing up, and the backup software used. If you
need more than one tape to perform a full daily backup, also record the tape
number (such as "Tape 1 of 2").
A sample label is shown below.
method
1. At the end of each Monday, Tuesday, Wednesday and Thursday, perform a
full backup to the tape labeled for that day.
2. At the end of the first, second and third Fridays of the month, perform a full
backup to the tape labeled for that day.
3. At the end of fourth Friday of the month, back up to the tape labeled for that
month.
4. At the end of the fourth month, recycle the monthly tapes; that is, back up to
the tape labeled "Month 1."
For additional security, place each of the Friday and monthly tapes in a fire-proof
safe or store them off-site.
cleaning as part of your routine
Cleaning the drive's tape heads regularly should be an important part of your data
security program. Build a cleaning cycle into your backup regime, so that it is not
ignored. Use the recommendations in Cleaning the Tape Heads as a guide for
how often to schedule head cleaning.
extending your backup strategy
You can extend the ten-tape backup routine in several ways:
● Use more monthly tapes. Twelve monthly tapes would give a backup
horizon of a whole year.
● Build in another more infrequent cycle. For example, you could have a set
of quarterly tapes used for a full backup on the last working day of each
quarter. These could then be archived indefinitely.
© 1997-2001, Hewlett-Packard Company
file:///C|/Documents%20and%20Settings/topher.COL-SPRINGS/Desktop/Ultrium/pdf/document/dds/user/reseller/eng/strategy.htm [11/15/2001 1:25:04 PM]
Page 11

operation-autoloaders
hp learning products
http://www.hp.com/support/tape may have a later version
data protection
index of topics
contact hp
home page
before you start
tape drive operation
autoloader operation
the front panel lights
front panel
messages
loading & unloading
modes of operation
cartridge care
cleaning
one-button disaster
recovery
specifications
diagnostics
troubleshooting
FAQs
SCSI configuration
UNIX configuration
ordering supplies
installing drivers
autoloader operation
contents of this section
switching on the autoloader
if you have problems during self-
test
power-cycling
related topics
interpreting the front panel lights
loading and unloading autoloaders
cartridges
localizing language display (DAT
40x6 only)
autoloader modes of operation
switching on the autoloader
External autoloaders: Switch on the
autoloader using the power switch on the
rear panel by pressing the side with the I
symbol down, and then switch on the
computer.
Internal autoloaders are powered on when you switch on your computer.
Wait for the autoloader to complete its self-test routine, during which the front
panel lights flash and the display shows the message Self Test. The HP
SureStore DAT 40x6 autoloader alternates this display with its serial number.
After a successful self-test, the lights stop go out and the autoloader displays the
message Insert Mag if there is no magazine loaded. If there is a magazine
loaded, the message will say Mag Loaded and the green Magazine Present light
(top) will be lit steadily.
if you have problems during self-test
If the Operator Attention
Required light (bottom)
shows steady amber at the
end of the self-test, this
indicates a fault condition:
● If you have just installed the
drive, check the installation for
loose connections and repeat the
self-test.
● Try the troubleshooting
procedures or run HP Library &
Tape Tools to determine what the
problem is.
● If the fault condition persists,
write down the message
displayed on the front panel and
call for service.
power-cycling
To ensure reliable operation, do not switch off power to the autoloader while it is
reading, writing, fast-searching, loading or unloading.
If the cartridge has just been unloaded from the drive (but has not been returned
to the magazine) when the autoloader is switched off, the cartridge will be taken
into the drive and threaded when the drive is next powered up.
© 1997-2001, Hewlett-Packard Company
file:///C|/Documents%20and%20Settings/topher.COL-SPRINGS/Desktop/Ultrium/pdf/document/dds/user/reseller/eng/operate2.htm [11/15/2001 1:25:05 PM]
Page 12

autoloader front panel
hp learning products
http://www.hp.com/support/tape may have a later version
data protection
index of topics
contact hp
home page
before you start
tape drive operation
autoloader operation
the front panel lights
front panel
messages
loading & unloading
modes of operation
cartridge care
cleaning
one-button disaster
recovery
specifications
diagnostics
troubleshooting
FAQs
SCSI configuration
UNIX configuration
ordering supplies
installing drivers
front panel lights
contents of this section
front panel controls and indicators
LCD display
magazine present light
tape activity light
OAR light
what to do if operator
attention is required
select button
load cartridge button
eject button
related topics
front panel messages
autoloader operation
modes of operation
front panel controls and indicators
The front panel of your HP Surestore DAT autoloader has a LCD display panel,
three lights (LEDs), and three buttons as described below.
LCD display
The LCD display shows status
information about the autoloader in
each of its five regions. Note that this
exact display can never occur; all
sections are showing at the same time
so that you can see where they are.
1. The ten-character dot matrix display provides information on the
autoloader's operating status and potential error conditions. See Front
Panel Messages for details of messages that can be displayed here.
2. The large numeral shows the number of the cartridge currently loaded in
the drive or the cartridge that you have selected by pressing the Select
button repeatedly.
3. "DC" is displayed when data compression is being used for writing. "WP" is
displayed when the cartridge is write-protected.
4. The six numbered boxes on the right of the display are individually lit to
show which magazine slots contain cartridges.
5. The display at the bottom of the display shows how much tape has been
used in the current partition. The more lines shown, the more tape has
been used. When all the lines show, the partition is full.
magazine present light (top)
This green light indicates the state of
the magazine:
● On indicates that a magazine is
loaded.
● Flashing indicates that a
magazine is in the process of
being loaded, checked, or
ejected.
● Off indicates that no magazine is
in the autoloader.
tape activity light (middle)
This green light indicates the activity of
the autoloader's internal tape drive:
● On indicates that a cartridge is
present in the drive.
● Fast flashing indicates that the
data is being read or written.
● Slow flashing indicates that a
cartridge is being loaded or
unloaded.
● Off indicates that there is no
cartridge in the drive.
OAR light (bottom)
The Operator Attention Required amber
light indicates warning conditions:
● On indicates that a serious
hardware error has occurred.
● Fast flashing (four times per
second) indicates that a firmware
upgrade is taking place.
● Medium flashing (twice per
second) indicates that the tape
cartridge or tape head needs
attention.
● Slow flashing indicates some
other error condition, see below.
what to do if operator attention is required
The following guidelines suggest what to do, if the OAR warning light sequence
requires operator attention:
● On indicates that a serious hardware error has occurred.
❍ If you have just installed the drive, check the installation for loose
connections and repeat the self-test.
❍ Try the troubleshooting procedures or run HP Library & Tape Tools
to determine what the problem is.
❍ If the fault condition persists, write down the message displayed on
the front panel and call for service.
● Medium flashing (twice per second) indicates one of the following
conditions:
❍ The tape cartridge is wearing out and should be replaced. The
"Worn Media" message will be displayed in this case. Copy any
data you wish to keep onto a new cartridge and discard the old
cartridge
or
❍ The tape heads need cleaning. The "Clean Me" message will be
displayed in this case. The HP Surestore DAT 40x6 autoloader also
displays the URL for our World Wide Web Support page. See
Cleaning the Tape Heads for further information.
● Slow flashing indicates one of the following conditions:
❍ The front panel door is open when it should not be. The "Close
Door" message will be displayed in this case.
❍ There is a cartridge in the tape drive, but no magazine is present.
The "Stray Tape" message will be displayed in this case. Load an
empty magazine to retrieve the cartridge.
❍ A hard fault condition has occurred. The message displayed will give
information about the type of error. Look up the message in Front
Panel Messages to determine what to do.
select button
The Select button allows you to select
any of the cartridges in the magazine
for loading. If you press the button
repeatedly, the number on the left of
the front panel display cycles through
the cartridges available in the
magazine.
load cartridge button
Press the Load Cartridge button to
load the selected cartridge from the
magazine into the drive and then put
the autoloader into stacker mode. In
stacker mode, the loaded cartridge is
used first; when it is full, or the host
computer sends an UNLOAD
command, the autoloader replaces it
with the cartridge from the next
highest numbered slot in the
magazine. See
Autoloader Modes of
Operation for more information on
stacker mode.
eject button
Press the Eject button to start the
unload process. The drive unloads
any cartridge that is currently loaded,
and the changer mechanism returns
the cartridge to the magazine. The
magazine is then ejected.
You can also use the Eject button to
force an ejection in an emergency.
See Forcing Ejection for more
information on when and why you
might do this.
Note: The host computer can disable
the Eject button by issuing a SCSI
PREVENT MEDIA REMOVAL
command.
© 1997-2001, Hewlett-Packard Company
file:///C|/Documents%20and%20Settings/topher.COL-SPRINGS/Desktop/Ultrium/pdf/document/dds/user/reseller/eng/lights2.htm [11/15/2001 1:25:06 PM]
Page 13

front panel messages
hp learning products
http://www.hp.com/support/tape may have a later version
data protection
index of topics
contact hp
home page
before you start
tape drive operation
autoloader operation
front panel lights
front panel
messages
loading & unloading
modes of operation
cartridge care
cleaning
one-button disaster
recovery
specifications
diagnostics
troubleshooting
FAQs
SCSI configuration
UNIX configuration
ordering supplies
installing drivers
front panel messages
contents of this section
front panel messages
status messages
error messages
information messages
hp surestore DAT 40x6 and
language selection
hp surestore DAT 40x6 number
codes
message codes
related topics
front panel controls and indicators
autoloader operation
modes of operation
front panel messages
The messages that can be displayed on the front panel can be divided into three
categories:
● Normal autoloader operating status messages
● Error messages
● Information messages
These types are described below. All the messages are listed in alphabetical
order below. The type of message is indicated by the letter S (Status), E (Error) or
I (Informational) in the Type column.
Note: the HP Surestore DAT 40x6 autoloader also displays the URL of our World
Wide Web Support page with certain messages.
status messages
The status messages that appear on the front panel inform you of activity in five
areas:
● The self-test
● Magazine activity -- if the magazine is being checked or ejected
● Cartridge activity -- if a cartridge is being loaded or unloaded, or if the
heads are being cleaned
● Tape activity -- reading, writing, searching, rewinding and so on
● Firmware upgrading
error messages
The front panel display can display a range of error messages relating to the
autoloader's operation. If a fault has been detected with the mechanism, or loss of
data may result, the error message may be accompanied by the Operator
Attention Required light being on or flashing. This is indicated in the OAR column
in the alphabetical list of messages below. Where possible, actions you can take
to recover from the error are also given.
information messages
Information messages are displayed when power is applied to the autoloader.
They indicate its identity, SCSI ID and configuration. They also tell you when you
have pressed the front panel buttons to confirm that the autoloader has
recognized the action.
hp surestore DAT 40x6 and language selection
HP Surestore DAT 40x6 models allow you to localize the LED display so that
messages are displayed in the desired language.
1. Switch on the autoloader and hold down the Select button on the front
panel for five seconds to access the Language? feature.
2. Press the Select button to scroll through the available languages. The
selected language is displayed in the LCD display.
If you select Numeric, messages will be displayed as numerical codes,
which are defined
below.
3. Press the Load button to store the selected language and exit the language
selection utility.
To exit the language selection facility without selecting a language, press the
Enter button. If the Select button is not pressed for two minutes, the drive will
automatically exit the language selection facility without selecting a language.
hp surestore DAT 40x6 and number codes
The HP SureStore DAT 40x6 autoloader has a language selection feature, which
allows you to localize the display for French, German, Spanish, Portuguese or
Japanese. If your language is not supported, you can select a Numerical code
instead and refer to the Messages section below for an explanation of the code.
The messages are in alphabetical order, but you can jump directly to the required
message by selecting the number from the following list:
0000 1001 2001 3001 4000 8000
1002 2002 3002 4001 8001
1003 2003 3003 4002 8002
1004 2006 3004 4003 8003
1006 2007 3005
8004
1007 2008
8006
1008 2009
8007
1009 2010
8008
1010
8009
1011
8010
1012
8012
1013
8013
1014
8014
1015
8015
1016
8016
1017
8017
1018
8018
1019
8019
1021
8020
1022
8021
1023
8022
1024
8023
8024
8025
8026
8027
message codes
The following abbreviations are used in the message listing below:
Type Column OAR Column
E Error message O OAR light is on
I Information message F OAR light is flashing
S Status message
The following list gives the messages that can be shown on the front panel display
in alphabetical order. Some of these messages only appear on HP Surestore DAT
40x6 autoloaders.
Number Message Type OAR Meaning
1019
At BOD
E O
A SPACE command encountered BOD
(Beginning of Data) unexpectedly. The
tape is now positioned at BOD.
1018
At EOD
E O
A READ or SPACE command
encountered the EOD (End of Data)
area unexpectedly. The tape is now
positioned at EOD.
8014
Bad Media
E F
A READ or SPACE command has failed
because the tape cartridge is not in
DDS format.
Action: Unload the cartridge and use a
DDS-certified (Media Recognition
System) cartridge. See Choosing
Cartridges.
8021
Cannot
Write NonMRS Tape
E F
A WRITE, WRITE FILEMARK or
ERASE command has been attempted
on a non-Media Recognition System
cartridge.
Action: Remove the cartridge and
replace with a Media Recognition
System cartridge. See Choosing
Cartridges.
8009
Clean Fail:
Check
Cleaning
Tape
E F
Cleaning failed, possibly due to an
expired cleaning tape.
Action: Use a new cleaning cartridge.
2001
Clean Me
E F
A high error rate has been detected
reading or writing.
Action: Insert a cleaning cartridge to
clean the tape heads, ensuring that
the tape in the cleaning cartridge has
not been used up. See Cleaning the
Tape Heads.
1008
Cleaning
S
A cleaning cartridge has been loaded
into the drive mechanism.
Config: xxy
I
This message is displayed for two
seconds during the power-up
sequence following the SCSI ID. "xx"
is the hex value of the configuration
switch setting on the underside of the
autoloader. "y" is the autoloader option
switch value set on the rear panel of
the autoloader.
2006
Close Door
E F
The front panel door is open. Any
autoloader motion will be delayed.
Action: This is probably caused by a
magazine that is partly inserted
through the door. Push the magazine
fully into the drive or remove it.
8002
Drive
Comms
Error
E O
The drive has stopped communicating
with the changer mechanism.
Action: Call for service.
8001
Drive Fault
E
The drive has detected an internal
error.
8004
Eject Fail
E F
An eject command has failed, either
after you pressed the Eject button or
after a host command.
Action: Try forcing ejection.
2010
Eject Mag
I
The Eject button has been pressed.
1015
Erase
S
The drive is erasing data from the
tape.
8000
Error X
E F
The mechanism has jammed. The
number X identifies the reason for the
jam.
Action: Press the Eject button to
attempt to recover the cartridge and
magazine. If the problem persists, note
the value of X and
call for service.
4003
ERROR: No
tape in slot
1
I
There is no tape in slot 1. HP OBDR
requires a tape in slot 1 from which it
can boot.
4001
ERROR:
Unable to
boot from
tape
I
The system cannot boot off the loaded
tape.
1023
ForceEject
I
A forced ejection is in progress (see
Forcing Ejection).
1014
Format
S
A SCSI command for generating a oneor two-partition tape is being executed,
or the drive is changing the size of the
partitions on an existing two-partition
tape.
FRU 1 Dead
E O
The controller board for the drive
mechanism in the autoloader has
failed its self-test.
Action: Call for service.
FRU 2 Dead
E O
The drive mechanism has failed its selftest
Action: Call for service.
3002
FW Check
S
Firmware upgrade data is being
checked for compatibility.
8024
FW Data Err
E F
The autoloader has failed to upgrade
the firmware because the new
firmware is corrupt.
Action: Obtain a good copy of the
firmware upgrade.
3003
FW
Program
S
The drive is being upgraded with the
new firmware.
3005
FW Tape
I
The tape loaded is a firmware upgrade
tape.
3001
FW
Upgrade
S
Firmware upgrade data is being read
from a cartridge.
8025
FW Read
Fail
E F
A firmware upgrade failed because of
an error in reading data from the
cartridge.
Action: Try again. If it still fails, call for
service.
8027
FW Tape
Write
Protected
E F
A firmware upgrade failed because the
cartridge is write-protected.
Action: Change the write-protect
switch on the cartridge and try again.
8026
FW Write
Fail
E F
A firmware upgrade failed because of
an error in writing a modified upgrade
count to the tape.
Action: Try again. If it still fails, call for
service.
Illegal FW
E F
The autoloader has failed to upgrade
the drive firmware because the new
firmware is incompatible.
Action: Obtain a correct version of the
firmware upgrade.
Illegal HW
E F
The autoloader has failed to upgrade
the drive firmware because the new
firmware is for incompatible hardware.
Action: Obtain a correct version of the
firmware upgrade.
2002
Insert Mag
S
The autoloader is waiting for you to
insert a magazine.
8003
Load Fail:
Try New
Tape
E F
A load command has failed, or a load
or change partitions command has
failed to read the system area of the
tape, which stores information about
tape usage.
Action: Use a new cartridge.
8007
Load Fail:
Press Eject
E F
A load command has failed, or a load
or change partitions command has
failed to read the system area of the
tape, which stores information about
tape usage.
Action: Press the Eject button.
1021
Load Lock
I
Manual loading is locked (Media
Removal Prevented).
2009
Load Tape
I
This is displayed when you press the
Load Cartridge button.
1003
Loading
S
Either a cartridge is being moved from
the magazine and placed into the drive
mechanism, or the drive is loading a
cartridge.
1016
Locate
S
The drive is moving the tape to a point
specified by the host.
1002
Mag Check
S
The autoloader is examining the
magazine to determine which slots are
occupied.
1001
Mag Eject
S
The autoloader is ejecting the
magazine.
1006
Mag Loaded
S
A magazine is present in the
autoloader, and the magazine check
has been carried out.
8005
Media
Removal
Prevented
E O
An eject command has been
attempted after a SCSI PREVENT
MEDIUM REMOVAL command has
been sent by the host.
Action: Try again when the media
removal prevention has been
removed. This can be achieved by the
host sending a SCSI ALLOW MEDIUM
REMOVAL command, or by resetting or
power-cycling the autoloader.
3004
New FW!!!!
S
The firmware upgrade process has
been successfully completed.
8016
No
EODmark
E F
The drive is trying to read what
appears to be a blank cartridge (one
with no DDS-format End of Data
pattern). This is probably a result of
power failure while writing.
4000
OBDR
Mode
I/S F
The drive has switched to HP OneButton Disaster Recovery mode and is
restoring the operating system.
1017
Partition
S
The drive is switching to the other
partition on a two-partition tape.
8017
Partition 1
too large
E O
A command to format the tape has
failed because the requested size for
partition 1 is too large.
Action: Try again with a smaller
partition 1 or, if possible, a longer tape.
2007
Press Eject
I
Press the EJECT button.
1009
Read
S
The drive is reading data from the
tape.
8012
Read Fail
E F
A read has failed. The host should
reposition and try again.
Read Only
S
Loaded cartridge is write-protected.
See the “Ready xxm” message.
Ready xxm
S
A cartridge has been loaded in the
DAT drive, and the drive is ready for
tape motion commands. "xxm" is the
length of the currently loaded
cartridge. For example, "Ready 125m"
will be displayed when a DDS-3
(125m) cartridge is loaded. If a writeprotected cartridge is loaded, the
"Ready xxm" message alternates
with the "Read Only" message.
1013
Rewind
S
The drive is rewinding the tape to the
beginning of the partition.
8020
SCSI Error
E O
A SCSI command error has been
detected.
Action: Check the SCSI interface
connection and try again.
SCSI ID:
x
I
This indicates the SCSI ID ("x") of the
autoloader. During the power-on
sequence, it is displayed for 2
seconds.
1012
Search <<
I
The drive is searching for a record,
filemark, setmark, or BOD (Beginning
of Data) towards the beginning of the
tape (in SCSI terms, it is responding to
a SPACE command with a negative
Count field).
1011
Search >>
I
The drive is searching for a record,
filemark, setmark, or EOD (End of
Data) towards the end of the tape (in
SCSI terms, it is responding to a
SPACE command with a positive Count
field).
1022
Select Lock
I
Tape Selection is locked (Media
Removal Prevented).
2008
Select Tape
I
This is displayed when you press the
Select button and for a short time after
the button is released.
0000
Self Test
S
The autoloader is performing its poweron self-test.
1007
SemiLoaded
S
A cartridge is in the drive but not
loaded (the tape has not been
threaded).
2003
Stray Tape:
Insert Empty
Mag
I
There is a cartridge in the tape drive,
but there is no magazine present to
put it in.
Action: Insert an empty magazine to
retrieve the cartridge.
8006
Tape Fault
E F
The cartridge in the drive is faulty,
possibly because the tape has
snapped, or the cartridge has an
invalid pattern of identification holes.
Action: Use a new cartridge and
ensure that it is Media Recognition
System. See Choosing Cartridges.
1024
Tape Full
E O
A READ, SPACE, WRITE or WRITE
FILEMARKS command encountered
EOP (End of Partition) unexpectedly.
When reading, this may mean the
required data is on the next cartridge
in the sequence.
8019
Tape has
DC data
E O
A READ command has encountered
compressed data on the tape, and the
drive is not currently configured to
decompress data. The host may have
disabled data compression, or
configuration switch 2 (on the
underside of the autoloader) may be
off so the host's ability to control the
drive's state is disabled.
Action: Check that the host has not
disabled data compression. Make sure
that switch 2 is on by reconfiguring the
drive using the configuration switches
on the underside of the autoloader.
8013
Tape
Position
Lost
E O
A WRITE, READ, SPACE or REWIND
command has failed to complete. The
tape is positioned on the far side of the
bad groups of data.
Action: Reposition and try again.
8008
Tape Stuck
E F
The cartridge is stuck in the drive.
Action: Try forcing ejection. If this fails,
call for service.
4002
Unable to
boot:
Cleaning
tape
I
The system cannot boot off a cleaning
tape.
1004
Unloading
S
Either the drive is unloading a
cartridge, or a cartridge is being
ejected from the drive and replaced in
the magazine.
8022
Upgrade Err
E F An error occurred upgrading.
8015
Worn Media
E F
A high error rate has been detected
while writing, suggesting that the
cartridge is nearing the end of its
useful life.
Action: Copy any data you wish to
keep from the cartridge onto a new
cartridge and discard the old cartridge.
1010
Write
x.y:1
S
The drive is writing data to tape.
"x.y:1" is the cumulative
compression ratio since power-on, or
since the compression ratio was last
cleared. For example, "Write 2.1"
means a compression ratio of 2.1:1.
The compression ratio is only
displayed after about 1 megabyte of
data has been written since power-on.
8010
Write Fail
E F
A WRITE, WRITE FILEMARK or
ERASE command has failed.
Action: Use a new cartridge.
8003
Write Fail:
Clean or
Use New
Tape
E F
The drive could not write to the tape.
The tape is possibly worn or damaged.
8018
Write
Protected
Tape
E F
A WRITE, WRITE FILEMARK or
ERASE command has been attempted
on a write-protected cartridge.
Action: Remove the cartridge and
change it to write-enabled.
8023
Wrong FW
E F
The upgrade firmware is not
compatible. The drive has not been
programmed.
© 1997-2001, Hewlett-Packard Company
file:///C|/Documents%20and%20Settings/topher.COL-SPRINGS/Desktop/Ultrium/pdf/document/dds/user/reseller/eng/messages.htm [11/15/2001 1:25:09 PM]
Page 14

modes of operation
hp learning products
http://www.hp.com/support/tape may have a later version
data protection
index of topics
contact hp
home page
before you start
tape drive operation
autoloader operation
the front panel lights
front panel
messages
loading & unloading
modes of operation
cartridge care
cleaning
one-button disaster
recovery
specifications
diagnostics
troubleshooting
FAQs
SCSI configuration
UNIX configuration
ordering supplies
installing drivers
autoloader modes of operation
contents of this section
types of mode
stacker mode
random mode
changing modes
types of mode
The HP Surestore DAT 24x6 and DAT 40x6 may be operated in either stacker or
random mode. Mode is initially determined by what happens after you insert a
magazine:
● If the host sends a command (MOVE MEDIUM) to move a cartridge from the
magazine to the drive, the autoloader goes into random mode.
● If you select a cartridge by pressing the Select button and then load it by
pressing the Load Cartridge button, the autoloader goes into stacker mode.
stacker mode
In stacker mode (also known as sequential mode), the autoloader simply uses the
cartridges sequentially from the magazine. When one cartridge is unloaded
(following a SCSI UNLOAD command), the autoloader automatically loads the
cartridge from the next highest numbered magazine slot.
You can select the first cartridge you want the autoloader to load by using the
Select and Load Cartridge buttons on the front panel.
random mode
In random (or changer) mode, the host computer controls the movement of
cartridges between magazine and drive. For example, suppose the cartridge from
slot 3 is currently loaded and you want to restore a particular file from a particular
backup. The software knows that the file is on tape 1, so the host instructs the
autoloader to replace cartridge 3 in the magazine and then loads cartridge 1 so
that it can restore the file. As a user, you may not even be aware that the cartridge
has been changed.
Use of random mode requires two things:
● The host computer must be able to support multiple LUNs (Logical Unit
Numbers), by which it identifies different devices at a single SCSI address,
so that it can send commands separately to the changer mechanism and
the DAT drive in the autoloader.
● The software must be able to provide the necessary functionality.
changing modes
The flowchart below shows how the autoloader moves between four states:
● Empty, when there is no magazine in the autoloader.
● Neutral, when a magazine has been inserted but no cartridges have been
moved to the DAT drive and no commands have been received to move a
cartridge. It is while the autoloader is in the neutral state that you can select
a cartridge for loading using the Select button.
● Stacker mode
● Random mode
The diagram is simplified. In particular, it does not show how the situation is
altered if the host computer cannot address multiple LUNs at a single SCSI
address.
© 1997-2001, Hewlett-Packard Company
file:///C|/Documents%20and%20Settings/topher.COL-SPRINGS/Desktop/Ultrium/pdf/document/dds/user/reseller/eng/modes.htm [11/15/2001 1:25:11 PM]
Page 15

cartridges
hp learning products
http://www.hp.com/support/tape may have a later version
data protection
index of topics
contact hp
home page
before you start
tape drive operation
autoloader operation
cartridge care
labeling and writeprotecting
cleaning
one-button disaster
recovery
specifications
diagnostics
troubleshooting
FAQs
SCSI configuration
UNIX configuration
ordering supplies
installing drivers
cartridge care
contents of this section
related topics
choosing cartridges
cartridge compatibility by model
caring for cartridges
using cartridges
storing cartridges
maximizing tape life
avoiding condensation
write-protecting cartridges
labeling cartridges
loading and unloading cartridges
ordering cartridges
choosing cartridges
Only rely on the best media to protect your valuable data. Thanks to HP's
rigorous testing programs, HP Surestore DDS data and cleaning cartridges are
the safest investment you can make.
HP is not only the leader in tape
backup but also the leading supplier
of DDS cartridges. HP DDS
cartridges are designed to meet the
exacting mechanical, environmental
and durability specifications of data
storage applications. They undergo
more than 600,000 hours of
rigorous testing and are designed to
withstand 2,000 passes or 100 full
backups. And because HP DDS
cartridges are inexpensive, they
give DAT the lowest overall cost of
ownership of all backup
technologies.
To avoid loss of data and damage to your drive, use only cartridges that bear the
DDS logo. DAT cartridges are for audio use and should not be used for data
storage. To identify data-grade tapes, look for the DDS logo on the cartridge.
Although the logo may be used by any media manufacturer whose tapes meet the
DDS specification, Hewlett-Packard recommends that you use HP DDS cartridges
with your HP tape drive. Hewlett-Packard cartridges have been designed and
tested to give maximum data reliability and mechanical durability. See ordering
supplies for part numbers and descriptions.
Order online at: www.hp.com/go/storagemedia.
Caution: Use only DDS cartridges in the
drive. Do not use cartridges labeled "DAT"
because the media is not certified and its
integrity cannot be guaranteed for data
storage purposes. DAT cartridges have a
different mechanical specification that can
cause them to jam in the mechanism. The
tape drive warranty does not cover damage
caused by the use of DAT cartridges.
cartridge compatibility by model
For optimum performance and storage capacity, use tape cartridges that match
your drive's format, and normally use only one cartridge per day.
● HP Surestore DAT 24 drives and DAT 24x6 autoloaders use DDS-3
cartridges.
● HP Surestore DAT 40 drives and DAT 40x6 autoloaders use DDS-4
cartridges.
HP Surestore DAT drives are backward compatible, however, which means that a
DDS-3 drive can read and write DDS-2 tapes, but a DDS-2 drive cannot use a
DDS-3 tape. The compatibility between drive models and cartridges is
summarized in the table below. However, please note that although HP Surestore
DAT drives and autoloaders are fully backward compatible, old tape formats are
more abrasive than later generations and using older tape formats can reduce the
life expectancy of the device. On an autoloader, if you must use older formats, do
not mix DDS-2 (120m) or DDS-3 (125m) with DDS-4 (150m) cartridges.
Cartridge Type:
DDS-1
90m
cartridges
DDS-2
120m
cartridges
DDS-3
125m
cartridges
DDS-4
150m
cartridges
Native Capacity:
2 GB 4 GB 12 GB
20 GB
Capacity Assuming 2:1
Compression:
4 GB 8 GB 24 GB
40 GB
HP Surestore DAT 24
HP Surestore DAT 40
HP Surestore DAT 24x6
read only
HP Surestore DAT 40x6
read only
caring for cartridges
Under optimum environmental conditions, Hewlett-Packard DDS-2, DDS-3 and
DDS-4 cartridges are currently specified to 2000 passes over any part of the tape.
In operational terms, this can be translated to about 100 backup operations.
Under severe environmental conditions, particularly where the tape drive is used
at very low humidity or if certain areas of the tape are accessed frequently, the
number of backup operations should be limited even further.
Caution: Ensure that only one label is stuck to the label area of the cartridge.
Never use non-standard labels, and never stick anything to the cartridge other
than in the label area.
using cartridges
Only use DDS cartridges in temperatures in the tape drive's
operating range from 5°C to 40°C (40°F to 104°F) and 20 to 80%
relative humidity (noncondensing).
If you expose cartridges to temperatures outside the operating
limits, stabilize them before you use them. To do this, leave the
cartridges in the operating environment for 24 hours.
Only use media for the recommended number of times (DDS-3
and DDS-4 = 100 times). Overuse of the tape will cause it to
degrade and possibly shed tape debris in the drive. Too many
new tapes can also cause wear of the drive as they are rougher
than used ones.
Use mostly the latest media type (for example, DDS-4 media for
an HP Surestore DAT 40x6 drive or autoloader).
Do not verify (DDS does read-after-write checking automatically)
Do not overload the computer during backups. Maximize the
transfer rate (run overnight with no other processes) and use
incremental backups if convenient.
Do not overuse your tape drive or autoloader—tape drives are
designed for approximately three hours of tape pulling per day,
not constant usage; autoloaders are designed for approximately
four hours—and clean the drive regularly.
Do not bulk erase DDS format cartridges.
storing cartridges
Tests show that data can successfully be stored on DDS cartridges for 30 years or
more if stored under proper conditions:
Store cartridges at temperatures -40°C and 45°C (-40°F and
113°F ) with a relative humidity between 5 and 95%.
Always keep the cartridges in a clean environment.
Always store cartridges in their plastic cases when not in use.
maximizing tape life
Do not touch the tape surface.
Do not attempt to clean the tape path or tape guides inside the
cartridge.
Do not leave cartridge tapes in excessively dry or humid
conditions.
Do not leave cartridges in direct sunlight or in places where
magnetic fields are present (for example, under telephones, next
to monitors or near transformers).
Do not drop cartridges or handle them roughly.
Stick labels onto the label area only.
See the insert included with the tape cartridge for storage
conditions.
avoiding condensation
Condensation can be a problem for tape drives and cartridges. To minimize the
chance of condensation, stay within the specifications for using and storing
cartridges above and observe the following guidelines:
1. Position the drive where the temperature is relatively stable -- away from
open windows, heat sources and doors.
2. Avoid leaving cartridges in severe temperature conditions, for example, in a
car standing in bright sunlight.
3. Avoid transferring data (reading from and writing to cartridges) when the
temperature is changing by more than 10°C (18°F) per hour.
4. If you bring a cold tape drive or tape cartridge into a warm room, allow time
for it to warm to room temperature before using it. For example, if you have
moved the drive from a cold car to a warm room, allow time for the drive to
reach room temperature (up to 24 hours if the temperature change is
extreme).
© 1997-2001, Hewlett-Packard Company
file:///C|/Documents%20and%20Settings/topher.COL-SPRINGS/Desktop/Ultrium/pdf/document/dds/user/reseller/eng/cart.htm [11/15/2001 1:25:13 PM]
Page 16

labeling and write-protecting
hp learning products
http://www.hp.com/support/tape may have a later version
data protection
index of topics
contact hp
home page
before you start
tape drive operation
autoloader operation
cartridge care
labeling and writeprotecting
cleaning
one-button disaster
recovery
specifications
diagnostics
troubleshooting
FAQs
SCSI configuration
UNIX configuration
ordering supplies
installing drivers
labeling and write-protecting cartridges
contents of this section
to write-protect a cartridge
to label a cartridge
to label a magazine
related topics
cartridge care
loading and unloading tape drives
loading and unloading autoloaders
to write-protect a cartridge
If you want to protect the data on a cartridge from being altered or overwritten, you
can write-protect the cartridge.
Caution: Write-protection will not prevent a cartridge being erased by bulk-erasure
or degaussing. Do not bulk erase DDS format cartridges. This will destroy prerecorded servo information and render the cartridge unusable.
To write-protect a cartridge, slide
the tab on the rear of the cartridge
so that the recognition hole is closed.
To write-enable a cartridge, slide the tab
back so that the hole is open, before
loading the cartridge into the drive.
to label a cartridge
Use HP DDS cartridges with your
drive. Never use non-standard labels,
and never stick anything to the
cartridge other than in the label areas,
as illustrated. Do not stick more than
one label onto each label area; extra
labels can cause the cartridges to jam
in the tape drive.
to label a magazine
Make sure that the magazine label is
stuck firmly in the recessed label area
on the side of the magazine, as
illustrated. If the label is stuck
somewhere other than in the label
area, the magazine may jam in the
mechanism.
Ensure that the corners of cartridge
and magazine labels stick firmly to the
surface and do not curl at their edges.
© 1997-2001, Hewlett-Packard Company
file:///C|/Documents%20and%20Settings/topher.COL-SPRINGS/Desktop/Ultrium/pdf/document/dds/user/reseller/eng/label.htm [11/15/2001 1:25:15 PM]
Page 17

cleaning
hp learning products
http://www.hp.com/support/tape may have a later version
data protection
index of topics
contact hp
home page
before you start
tape drive operation
autoloader operation
cartridge care
cleaning
one-button disaster
recovery
specifications
diagnostics
troubleshooting
FAQs
SCSI configuration
UNIX configuration
ordering supplies
installing drivers
cleaning
contents of this section
cleaning strategy
cleaning cartridge
cleaning the tape heads on a drive
cleaning the tape heads on an autoloader
manual method
automatic method
cleaning strategy
Cleaning the drive's tape heads regularly with a cleaning cartridge is important to
maintain the integrity of your backup data. For optimum performance and to
prevent the loss of data, HP recommends that you incorporate a cleaning cycle
into your backup routine.
As a general guideline, you should clean the tape heads after every fifth backup
cartridge. You should also clean the tape heads if the media caution signal
(flashing amber light) is displayed on a tape drive or the 'Clean Me' message is
displayed on an autoloader.
HP Surestore Tape DAT 24, DAT 40, DAT 24x6 and DAT 40x6 models all have
an internal head cleaner. The models also support TapeAlert, which will send a
message to your backup software when the tape heads need cleaning. You will
only get these messages if your backup software supports TapeAlert.
HP Surestore Tape DAT 40 and DAT 40x6 feature many improvements to keep
the tape path and heads as clean as possible. Therefore, they will require less
cleaning than previous models. However, we still recommend, as a general
guideline, cleaning the HP Surestore Tape DAT 40 and DAT 40x6 every fifth
backup.
cleaning cartridge
Use only an HP cleaning cartridge
(part number C5709A) to clean the
tape heads. Do not use swabs or
other means of cleaning the heads.
The cleaning cartridge uses a special
tape to clean the tape heads. A
cleaning cartridge can only be used 50
times or as instructed on the cartridge
packaging. Always place a check
mark in a box each time you use the
cartridge to clean the drive. Replace
the cleaning cartridge when all the
boxes are checked.
cleaning the tape heads on a drive
1. Insert a cleaning cartridge into the drive. The tape drive automatically loads
the cartridge and cleans the heads.
At the end of the cleaning cycle, the drive ejects the cartridge. The cleaning
cycle takes approximately 30-60 seconds. If the cleaning cartridge ejects in
less than 20 seconds, it has probably expired. In this case, discard the
cleaning cartridge and repeat the operation with a new one.
2. Remove the cleaning cartridge from the drive.
Note: The drive's TapeAlert feature will send a message to your backup
application when the tape heads need cleaning or a cleaning cartridge has expired.
cleaning the tape heads on an autoloader
In addition to regular cleaning, use a cleaning cartridge under the following
circumstances:
● When a "Clean Me" message is displayed on the front panel and the
Operator Attention Required light flashes amber.
● When your backup application warns you that the drive needs cleaning
(providing your backup application supports the TapeAlert feature).
Cleaning the tape heads on an HP SureStore DAT 24x6 and DAT 40x6 autoloader
can be performed manually by the user or automatically by the backup application.
manual method
1. Place a cleaning cartridge in any magazine slot and note the slot number.
2. Insert the magazine into the autoloader.
3. Press the Select button until the slot number where the cleaning cartridge is
located is displayed.
4. Press the Load Cartridge button to load the cleaning cartridge into the drive.
The drive will then automatically perform the cleaning cycle. The LCD
display will display the message "Cleaning" while the cartridge is in use.
5. Eject the magazine and mark the label on the cleaning cartridge to keep a
record of how many times it has been used.
automatic method
Certain backup applications that provide autoloader support have provision for
automatic use of the cleaning cartridge. In this case the cleaning cartridge is put in
a magazine slot (usually slot 6). The application can then be told that slot 6
contains the cleaning cartridge and also when it is to be used. The magazine is
then loaded in the usual way and the cleaning cartridge is used at intervals
programmed into the application.
© 1997-2001, Hewlett-Packard Company
file:///C|/Documents%20and%20Settings/topher.COL-SPRINGS/Desktop/Ultrium/pdf/document/dds/user/reseller/eng/clean.htm [11/15/2001 1:25:16 PM]
Page 18

one-button disaster recovery
hp learning products
http://www.hp.com/support/tape may have a later version
data protection
index of topics
contact hp
home page
before you start
tape drive operation
autoloader operation
cartridge care
cleaning
one-button disaster
recovery
using hp obdr
troubleshooting
specifications
diagnostics
troubleshooting
FAQs
SCSI configuration
UNIX configuration
ordering supplies
installing drivers
hp one-button disaster recovery
contents of this section
before you use hp obdr
what is hp obdr?
types of system disasters
related topics
latest connectivity and availability
information
firmware upgrades
troubleshooting information
using hp obdr
before you use hp obdr
HP One-Button Disaster Recovery is a standard feature on all HP Surestore DAT
tape drives. It is also available with the HP Surestore DAT 40x6 autoloader, but
not with the HP Surestore DAT 24x6 autoloader. However, it can only be used
with specific configurations.
● To check whether your system (hardware, operating system and backup
software) is OBDR-compatible, please refer to our World Wide Web site
www.hp.com/go/connect.
● To download firmware upgrades and find detailed troubleshooting
information, please refer to our World Wide Web site
www.hp.com/support/datOBDR.
Note: HP OBDR is not applicable to HP-UX and other non-Intel UNIX operating
systems, and it is not compatible with Intel-based Solaris systems.
If your system does not support HP One-Button Disaster Recovery, you can still
use your tape drive normally to back up and restore data. However, you must
remember to create a separate set of emergency recovery disks for your
operating system whenever you change your system configuration.
what is hp obdr
HP One-Button Disaster Recovery, OBDR, is the easiest-to-use disaster recovery
solution on the market. Using just the tape drive and the most recent backup
cartridge you can recover from hard disk failure, data corruption, viruses and likefor-like hardware replacement. The touch of one button restores the operating
system, configuration, applications and data files to their status at the time the
backup cartridge was made.
When you run HP One-Button Disaster Recovery, your tape drive goes through
the following sequence:
● It goes into a special disaster recovery mode that enables it to restore your
operating system and reboot. It acts like a bootable CDROM. (Your
system's ability to boot from CDROM is normally enabled by default. If you
have changed this setting, you will need to enable it again. Refer to your
system BIOS manual for further details.)
● It returns to normal tape drive mode and restores the data.
types of system disaster
HP One-Button Disaster Recovery allows you to recover from the following types
of system disaster:
● Hard disk failures, as long as the replacement hard disk is the same size or
larger than the original and uses the same interface (for example, replace a
SCSI hard disk with another SCSI disk)
● File corruption because of an operating system error
● File corruption because of an application software error
● Viruses that prevent you from booting your system correctly
● User errors that stop you from booting your system correctly
● Hardware failures where the server is replaced by an identical component
(for example: NetServer LC2000 (SCSI) is replaced with another NetServer
LC2000 of exactly the same configuration)
© 1997-2001, Hewlett-Packard Company
file:///C|/Documents%20and%20Settings/topher.COL-SPRINGS/Desktop/Ultrium/pdf/document/dds/user/reseller/eng/obdr.htm [11/15/2001 1:25:18 PM]
Page 19

using one-button disaster recovery
hp learning products
http://www.hp.com/support/tape may have a later version
data protection
index of topics
contact hp
home page
before you start
tape drive operation
autoloader operation
cartridge care
cleaning
one-button disaster
recovery
using hp obdr
troubleshooting
specifications
diagnostics
troubleshooting
FAQs
SCSI configuration
UNIX configuration
ordering supplies
installing drivers
using hp one-button disaster recovery
contents of this section
hp obdr with external drives
hp obdr with internal drives
hp obdr with removable drives
hp obdr with external autoloaders
(DAT 40x6 only)
hp obdr with internal autoloaders
(DAT 40x6 only)
related topics
latest connectivity and availability
information
firmware upgrades
troubleshooting
hp obdr with external drives
Check our World Wide Web site (www.hp.com/support/datOBDR) for the latest
information about firmware upgrades and troubleshooting before you use HP
OBDR.
1.Hold down the eject button.
Keeping the eject button pressed down,
power on your tape drive. This puts the
device into HP One-Button Disaster
Recovery mode when you power on. (If
there is a cartridge in the tape drive,
you can leave it there.)
Release the button as soon as the
amber and green LEDs flash
alternately.
2.Switch on your computer system.
3.If there is no cartridge in the tape drive,
immediately insert the latest one. This
activates the HP One-Button Disaster
Recovery process. Both LEDs will flash
alternately while the tape drive restores
your operating system to a state where
it can run a normal data restore.
4.Follow the on-screen instructions to set
up the operating system. Normally, you
can accept the default response to all
the prompts, for example just press
<Return>.
Once the operating system has been
set up and rebooted, the tape drive's
LED changes to constant green, and
you can remove the cartridge if you
wish.
5.You are now ready to run a normal data restore. Follow the normal process for
your restore application.
If the restore fails for any reason, refer to our Support web site.
hp obdr with internal drives
Check our World Wide Web site (www.hp.com/support/datOBDR) for the latest
information about firmware upgrades and troubleshooting before you use HP
OBDR.
1.Hold down the eject button. Keeping the
eject button pressed down, power on
your computer system. This puts the
device into HP One-Button Disaster
Recovery mode when you power on. (If
there is a cartridge in the tape drive,
you can leave it there.)
Release the button as soon as the
amber and green LEDs flash
alternately.
2.If there is no cartridge in the tape drive,
immediately insert the latest one. This
activates the HP One-Button Disaster
Recovery process. Both LEDs will flash
alternately while the tape drive restores
your operating system to a state where
it can run a normal data restore.
3.Follow the on-screen instructions to set
up the operating system. Normally, you
can accept the default response to all
the prompts, for example just press
<Return>.
Once the operating system has been
set up and rebooted, the tape drive's
LED changes to constant green, and
you can remove the cartridge if you
wish.
4.You are now ready to run a normal data restore. Follow the normal process for
your restore application.
If the restore fails for any reason, refer to our Support web site.
hp obdr with removable drives
Check our World Wide Web site (www.hp.com/support/datOBDR) for the latest
information about firmware upgrades and troubleshooting before you use HP
OBDR.
You use your backup software to assign which tape drive in the tape array will be
used for HP OBDR.
1.Hold down the eject button of the tape
drive that you have assigned for HP
OBDR. Keeping the eject button
pressed down, power on your tape rack
and computer system.
Release the button as soon as the
amber and green LEDs flash
alternately.
2.If there is no cartridge in the tape drive,
immediately insert the latest one. This
activates the HP One-Button Disaster
Recovery process. Both LEDs will flash
alternately while the tape drive restores
your operating system to a state where
it can run a normal data restore.
3.Follow the on-screen instructions to set
up the operating system. Normally, you
can accept the default response to all
the prompts, for example just press
<Return>.
Once the operating system has been
set up and rebooted, the tape drive's
LED changes to constant green, and
you can remove the cartridge if you
wish.
4.You are now ready to run a normal data restore. Follow the normal process for
your restore application.
If the restore fails for any reason, refer to our Support web site.
hp obdr with external autoloaders
HP OBDR is only available with HP Surestore DAT 40x6 autoloaders. Check our
World Wide Web site (www.hp.com/support/datOBDR) for the latest information
about firmware upgrades and troubleshooting before you use HP OBDR.
1.Hold down the eject button. Keeping the
eject button pressed down, power on
your autoloader. This puts the device
into HP One-Button Disaster Recovery
mode when you power on. (If there is a
magazine in the autoloader, you can
leave it there.)
Release the button as soon as the LCD
displays the message "OBDR Mode".
2.Switch on your computer system.
3.If there is no magazine in the
autoloader, immediately insert the
latest one. This activates the HP OneButton Disaster Recovery process. The
LCD displays the message "OBDR
Mode" (as described in step 1) while
the autoloader restores your operating
system to a state where it can run a
normal data restore..
Note: The cartridge in slot 1 of the
magazine is always used to restore
your operating system to a state where
it can run a normal data restore from
the most recent backup cartridge in the
magazine.
4.Follow the on-screen instructions to set
up the operating system. Normally, you
can accept the default response to all
the prompts, for example just press
<Return>.
Once the operating system has been
set up and rebooted, the LCD "OBDR
Mode" message disappears and the
Magazine Present and Tape Activity
LEDs changes to constant green.
5.You are now ready to run a normal data restore. Follow the normal process for
your restore application.
If the restore fails for any reason, refer to our Support web site.
hp obdr with internal autoloaders
HP OBDR is only available with HP Surestore DAT 40x6 autoloaders. Check our
World Wide Web site (
www.hp.com/support/datOBDR) for the latest information
about firmware upgrades and troubleshooting before you use HP OBDR.
1.Hold down the eject button. Keeping the
eject button pressed down, power on
your computer system. This puts the
device into HP One-Button Disaster
Recovery mode when you power on. (If
there is a magazine in the autoloader,
you can leave it there.)
Release the button as soon as the the
LCD displays the message "OBDR
Mode".
2.If there is no magazine in the
autoloader, immediately insert the latest
one. This activates the HP One-Button
Disaster Recovery process. The LCD
displays the message "OBDR Mode"
(as described in step 1) while the
autoloader restores your operating
system to a state where it can run a
normal data restore.
Note: The cartridge in slot 1 of the
magazine is always used to restore
your operating system to a state where
it can run a normal data restore from
the most recent backup cartridge in the
magazine.
3.Follow the on-screen instructions to set
up the operating system. Normally, you
can accept the default response to all
the prompts, for example just press
<Return>.
Once the operating system has been
set up and rebooted, the LCD "OBDR
Mode" message disappears and the
Magazine Present and Tape Activity
LEDs changes to constant green.
4.You are now ready to run a normal data restore. Follow the normal process for
your restore application.
If the restore fails for any reason, refer to our Support web site.
© 1997-2001, Hewlett-Packard Company
file:///C|/Documents%20and%20Settings/topher.COL-SPRINGS/Desktop/Ultrium/pdf/document/dds/user/reseller/eng/obdruse.htm [11/15/2001 1:25:20 PM]
Page 20

obdr troubleshooting
hp learning products
http://www.hp.com/support/tape may have a later version
data protection
index of topics
contact hp
home page
before you start
tape drive operation
autoloader operation
cartridge care
cleaning
one-button disaster
recovery
using hp obdr
troubleshooting
specifications
diagnostics
troubleshooting
FAQs
SCSI configuration
UNIX configuration
ordering supplies
installing drivers
troubleshooting hp one-button disaster
recovery
setting up the system
identifying your Adaptec card
enabling obdr on older systems
BIOS upgrades on older Kayaks
setting up early Adaptec cards
setting up early Symbios cards
supporting obdr on systems with
embedded RAID controllers
supporting obdr on hp surestore
DAT 40x6 autoloaders
using one-button disaster recovery
prompts you will see whilst
restoring the system
while restoring Windows NT
while restoring other OS
while restoring data
if the restoration process fails
cartridge damaged
NT file system corrupted
if the backup cartridge is ejected
restoring onto Windows NT3.51
systems
restoring onto RAID configurations
restoring onto servers with utility
partitions
identifying your Adaptec card
You can identify whether you have a REVA or REVB version of the Adaptec card
by looking at the markings on the large chip AIC-7880P. They should be similar to
the following:
ADAPTEC
AIC-7880P
BQEA831
xxxxxx
xxxxxxx
The first letter in this line identifies the revision of the
chip.
In this example, "BQEA831" means rev. B (from the first
letter).
enabling obdr on older systems
If you have:
● A system that was shipped prior to 1st May 1999
● An earlier version of the Adaptec or SCSI adapter card
you may still be able to enable Disaster Recovery, by upgrading the BIOS
firmware.
Caution
The next section describes how to upgrade BIOS. However, if you have any
concerns about carrying out this upgrade, contact HP Support who will be happy
to guide you through the process.
BIOS upgrades on older Kayaks
You will be able to upgrade the BIOS for older versions (shipped prior to 1st May
1999) of the following systems so that they provide full support for One-Button
Disaster Recovery:
● Kayak XA (kayakXA.exe)
● Kayak XU/XW (kayakXU.exe)
The HP Surestore Tape CD contains special BIOS upgrade programs for these
systems. Locate the appropriate BIOS upgrade program now, and follow these
instructions.
1. Insert a blank, formatted, bootable DOS floppy disk in the floppy disk drive.
(Note: You can only make suitable disks on DOS or Windows 95 systems.
You cannot create one from within Windows NT.)
2. The BIOS upgrades are specific to the model of computer. Run the correct
one for your system. Follow the on-screen instructions, which will guide you
through the process of setting-up the BIOS update on the floppy disk.
3. Reboot the system from the floppy disk and follow the instructions in the
README file on the floppy disk.
With very old versions of the Kayak (no LCD panel), you can enable Disaster
Recovery from the Adaptec BIOS Setup program, see next section.
Disaster Recovery is already enabled on obsolete versions of the NetServer E, LC
and LD series; for example, E40, E45, E50, LC, LC2, LDPrn.
setting up early Adaptec cards
It is highly recommended that you update your Adaptec card to the latest BIOS
revisions. The HP Surestore CDROM contains:
● v2.20 BIOS update for the AHA2940UW (2940uw.exe)
● v2.11 BIOS update or higher for the AHA2940U2W (2940u2w.exe)
Perform the upgrade by following these instructions:
1. Insert a blank, formatted, bootable DOS floppy disk in the floppy disk drive.
(Note: You can only make suitable disks on DOS or Windows 95 systems.
You cannot create one from within Windows NT.)
2. From the above list, click on the Adaptec card type you wish to upgrade,
and then follow the on-screen instructions which will guide you through the
process of setting-up the BIOS update on the floppy disk.
3. Reboot the system from the floppy disk and follow the instructions in the
README file on the floppy disk.
Adaptec SCSI cards with version 1.25 BIOS or above can support Disaster
Recovery, but this option is disabled by default. To enable disaster recovery, you
must run the built-in setup utility during the system's boot process:
1. Boot up the system.
2. When you see the Adaptec prompt for the adapter into which the tape drive
is plugged, press <Ctrl><A> to go into the Adaptec BIOS settings. This will
enter the Adaptec SCSI BIOS setup utility.
3. Select "Configure/View Host Adapter Settings".
4. Select "Advanced Configuration Options".
5. Ensure the following options are enabled:
i) Host Adapter BIOS
ii) BIOS Support for Bootable CD-ROM
iii) BIOS Support for Int13 Extensions
iv) Reset SCSI bus at IC Initialisation
Old versions of HP Kayak (no LCD panel): you must enable the Adaptec SCSI
BIOS for the 8-bit SCSI channel to which the tape drive should be attached:
1. Boot the system.
2. During the boot process, you will see the Adaptec prompt for the adapter
into which the tape drive is plugged. Press <Ctrl><A> immediately. This will
enter the Adaptec SCSI BIOS setup utility.
3. Go to the "Advanced " menu.
4. Select "Ultra SCSI (8-bit) and press <Enter>.
5. Enable the "Option ROM Scan" item.
6. Press <Esc> twice and select "Exit Saving Changes".
setting up early Symbios cards
Older versions of the Symbios SCSI host adapter:SYM-8751SPE require BIOS
upgrade to version 4.13.02. This enables One-Button Disaster Recovery on
systems with multiboot capability:
The HP Surestore Tape CD contains a special BIOS upgrade program for
Symbios cards (symbios.exe). Locate the appropriate BIOS upgrade program
now, and follow these instructions.
1. Insert a blank, formatted, bootable DOS floppy disk in the floppy disk drive.
(Note: You can only make suitable disks on DOS or Windows 95 systems.
You cannot create one from within Windows NT.)
2. The BIOS upgrades are specific to the model of computer. Run the correct
one for your system. Follow the on-screen instructions, which will guide you
through the process of setting-up the BIOS update on the floppy disk.
3. Reboot the system from the floppy disk and follow the instructions in the
README file on the floppy disk.
supporting obdr on systems with embedded RAID controllers
OBDR is not currently supported when the tape drive is attached directly to a
RAID controller. If your system includes an embedded RAID controller then you
must either disable the RAID on the SCSI interface to which the tape drive will be
attached, or use one of the supported plug-in SCSI cards. For example:
● On the Netserver LH3/LH4 you can disable one of the embedded RAID
channels so that it behaves like a standard non-RAID SCSI interface.
supporting obdr on hp surestore dat 40x6 autoloaders
Not all OBDR-capable software supports the HP Surestore DAT 40x6 autoloader.
Check our WorldWide Web site for up-to-date information.
prompts you will see whilst restoring the system
while restoring Windows NT
When the Windows NT Setup window is displayed you will be prompted to answer
a number of questions. Normally, you will be able to accept the default response
for each prompt - just press <Enter>.
The standard sequence is:
● Select Express Setup
● Select Overwrite to overwrite existing data on the hard disk. If the hard disk
is blank you will be prompted to format it, and select a format type (normally
NTFS). The backup software then copies files to the NT file system.
● Select <Enter> at the prompt to reboot.
● Your backup application should start automatically (in restore mode) once
the system has rebooted.
Please refer to the documentation supplied with Windows NT and your backup
software for a more detailed discussion of these prompts.
while restoring other operating systems
These prompts will vary according to the operating system. Please refer to the
documentation supplied with your operating system for exact details.
while restoring data
These prompts occur while your data is restored. They will vary according to the
backup application you are using. Please refer to any online Help or
documentation that is supplied with your restore software.
if the restoration process fails
The restore process may fail:
● If your backup cartridge is damaged
● If the NT file system has been corrupted
cartridge damaged
Use the last-but-one backup cartridge. You will be able to restore your system and
most of your data. You will have to recreate any data that was only written to the
damaged backup cartridge.
NT file system corrupted
Very occasionally, you may find that the NT file system has been corrupted. If this
happens, you will get error messages when NT Setup tries to copy files to the NT
file system. To correct the problem do this:
1. At the first Windows NT Setup prompt, select the Custom Setup option.
2. At the disk partition prompt, select the partition that you were using for the
system disk, and:
i. Click on 'D' to delete it,
ii. Click on <Enter> and 'L' to confirm deletion.
iii. Click on <Enter> to install (this automatically recreates the system
partition).
3. The remaining prompts are the same as those that occur during the
Express Setup.
Please refer to the Windows NT documentation for more detailed information. The
process will be similar for other operating systems, but refer to the supplied
documentation for a detailed description.
if the backup cartridge is ejected
You must use a cartridge that is OBDR-capable. If you try to insert a backup
cartridge that is not OBDR-capable, the tape drive will eject it automatically.
restoring onto Windows NT3.51 systems
HP One-Button Disaster Recovery can fail on NT3.51 systems, if:
● the SYSTEM partition (eg C: drive) is on a SCSI disk,
● AND other data partitions are on EIDE disks (eg D: drive).
If your system uses this configuration:
1. Open your PC and disconnect the power lead from the EIDE disk(s).
2. Recover the system disk using OBDR.
3. Shut down and power off your system.
4. Reconnect the power leads to the EIDE disk(s), and then reboot.
5. Partition the EIDE disk(s) as before
You will then be able to restore data to the EIDE disk(s) in the normal way, using
the backup software.
restoring onto RAID configurations
In order for Disaster Recovery to work, it must be able to see your system disk. If
you want to restore onto a hardware RAID configuration, you must set up the disk
RAID before you run Disaster Recovery. This ensures that the Disaster Recovery
program can see the system disk.
● Use the Config program on the server configuration CD that is supplied with
your system, for example the "NetServer Navigator CD" or the utility
partition if available, to configure and run RAID.
restoring onto servers with utility partitions
Disaster Recovery cannot currently recover server-specific utility partitions. If you
wish to restore your server utility partition, you must:
● First ensure that there is enough free (unpartitioned) space left on the
system disk to rebuild the utility partition after you have restored your
system using HP One-Button Disaster Recovery.
● Then use the Config program on the server configuration CD that is
supplied with your system, for example the "NetServer Navigator CD", to
recreate the utility partition.
© 1997-2001, Hewlett-Packard Company
file:///C|/Documents%20and%20Settings/topher.COL-SPRINGS/Desktop/Ultrium/pdf/document/dds/user/reseller/eng/obdtrbl.htm [11/15/2001 1:25:22 PM]
Page 21

features and specifications
hp learning products
http://www.hp.com/support/tape may have a later version
data protection
index of topics
contact hp
home page
before you start
tape drive operation
autoloader operation
cartridge care
cleaning
one-button disaster
recovery
specifications
DAT 24i
DAT 24e
DAT 24m
DAT 40i
DAT 40e
DAT 40m
DAT 24x6i
DAT 24x6e
DAT 40x6i
DAT 40x6e
diagnostics
troubleshooting
FAQs
SCSI configuration
UNIX configuration
ordering supplies
installing drivers
features and specifications
contents of this section
hp surestore dat tape drives
internal drives
external drives
removable drives
hp surestore dat autoloaders
internal autoloaders
external autoloaders
Choose your model by clicking on the picture or the text
hp surestore dat tape drives
internal drives
DAT 24i DAT 40i
external drives
DAT 24e DAT 40e
removable drives
DAT 24m DAT 40m
hp surestore dat autoloaders
internal autoloaders
DAT 24x6i DAT 40x6i
external autoloaders
DAT 24x6e DAT 40x6e
© 1997-2001, Hewlett-Packard Company
file:///C|/Documents%20and%20Settings/topher.COL-SPRINGS/Desktop/Ultrium/pdf/document/dds/user/reseller/eng/spec.htm [11/15/2001 1:25:25 PM]
Page 22

hp surestore dat24i
hp learning products
http://www.hp.com/support/tape may have a later version
data protection
index of topics
contact hp
home page
before you start
tape drive operation
autoloader operation
cartridge care
cleaning
one-button disaster
recovery
specifications
DAT 24i
DAT 24e
DAT 24m
DAT 40i
DAT 40e
DAT 40m
DAT 24x6i
DAT 24x6e
DAT 40x6i
DAT 40x6e
diagnostics
troubleshooting
FAQs
SCSI configuration
UNIX configuration
ordering supplies
installing drivers
hp surestore DAT 24i
contents of this section
features
specifications
physical specification
power requirements
performance
operating limits
non-operating limits
safety and electromagnetic compatibility
features
The HP Surestore DAT 24 combines capacity and performance with reliability and
low cost of ownership, making it the ideal choice for network backup. Your new
tape drive provides the following key features:
● Reliable DAT technology
● Capacity of 24 gigabytes on a single DDS-3 tape (assuming a 2:1 data
compression ratio)
● Built-in read-after-write verification for a high level of data integrity
● Compatibility with industry-standard DDS formats, allowing the use of low-
cost media
● Internal head cleaner that helps prevent head clogging
● Feed Forward Equalizer ensures maximum data integrity
● TapeAlert support for worry-free backup
● HP Library & TapeTools software to verify successful installation and
troubleshoot problems
● HP Instant Support for web-based problem identification, diagnosis and
resolution providing fast, easy-to-use online solutions to problems
● HP One-Button Disaster Recovery compatible
● Hardware data compression increases data storage capacity and data
transfer rate
● Low power consumption
specifications
physical specification
dimensions 150 mm (6.0 inches) W
41 mm (1.6 inches) H
158 mm (6.2 inches) D
weight 1.0 kg (2.3 lbs)
power requirements
power +5V ± 5% (100 mV maximum ripple) @
1.2A
+12V ± 10% (150 mV maximum ripple)
@ 0.1A
performance
interface Narrow SCSI-2
recording format
DDS-3, DDS-2, DDS-1 (DDS),
DDS-DC
media
DDS-3 (125 meter), DDS-2 (120 meter),
and DDS (60 and 90 meter) Media
Recognition System cartridges
capacity
24 GB on a DDS-3 cartridge (assuming
a data compression ratio of 2:1)
sustained transfer rate Typically 2 MB/s using DDS-3 with data
compression
burst transfer rate
3.0 MB/s (asynchronous)
10.0 MB/s (synchronous)
search speed 40 seconds average file access for any
part of a 125-meter tape
operating limits
temperature
5°C to 40°C (41°F to 104°F)
humidity 20 to 80 RH (non-condensing)
maximum wet bulb temperature 26°C (79°F)
operating altitude 0 to 4600 m (0 to 15,000 ft)
vibration 0.30 g peak
shock survival 5 g peak for 3 ms duration
non-operating limits
temperature
-40°C to 70°C (-40°F to 158°F)
humidity
5% to 95% RH
non-operating altitude
0 to 15200 m (0 to 50,000 ft)
vibration 2.41 g rms
shock survival 90 g for 3 ms duration
safety and electromagnetic compatibility
CSA Certification to C22.2, No. 950 Amd 4
UL Listed to UL 1950 Amd 4
TUV EN60950 (IEC 950)
CE Declaration of Conformity
C-TICK Approved (AS/NZS 3548)
RRL Approved (RRL MIC No. 1996-18)
Class 1 LED product (IEC 825-1)
© 1997-2001, Hewlett-Packard Company
file:///C|/Documents%20and%20Settings/topher.COL-SPRINGS/Desktop/Ultrium/pdf/document/dds/user/reseller/eng/dds24i.htm [11/15/2001 1:25:26 PM]
Page 23

hp surestore dat24e and 24eu
hp learning products
http://www.hp.com/support/tape may have a later version
data protection
index of topics
contact hp
home page
before you start
tape drive operation
autoloader operation
cartridge care
cleaning
one-button disaster
recovery
specifications
DAT 24i
DAT 24e
DAT 24m
DAT 40i
DAT 40e
DAT 40m
DAT 24x6i
DAT 24x6e
DAT 40x6i
DAT 40x6e
diagnostics
troubleshooting
FAQs
SCSI configuration
UNIX configuration
ordering supplies
installing drivers
hp surestore DAT 24e and 24eu
contents of this section
features
specifications
physical specification
power requirements
performance
operating limits
non-operating limits
safety and electromagnetic compatibility
features
The HP Surestore DAT 24 combines capacity and performance with reliability and
low cost of ownership, making it the ideal choice for network backup. Your new
tape drive provides the following key features:
● Reliable DAT technology
● Capacity of 24 gigabytes on a single DDS-3 tape (assuming a 2:1 data
compression ratio)
● Built-in read-after-write verification for a high level of data integrity
● Compatibility with industry-standard DDS formats, allowing the use of low-
cost media
● Internal head cleaner that helps prevent head clogging
● Feed Forward Equalizer ensures maximum data integrity
● TapeAlert support for worry-free backup
● HP Library & TapeTools software to verify successful installation and
troubleshoot problems
● HP Instant Support for web-based problem identification, diagnosis and
resolution providing fast, easy-to-use online solutions to problems
● HP One-Button Disaster Recovery compatible
● Hardware data compression increases data storage capacity and data
transfer rate
● Low power consumption
specifications
physical specification
dimensions 116 mm (4.5 inches) W
95 mm (3.7 inches) H
220 mm (8.6 inches) D
weight DAT 24e: 2.6 kg (5.7 lbs)
DAT 24eU: 1.95 kg (4.3 lbs) without
power supply
power requirements
power DAT 24e: 0.5A maximum
DAT 24eU: 0.8A maximum
100-240 VAC, automatically detected
50/60 Hz
performance
interface Narrow SCSI-2
recording format
DDS-3, DDS-2, DDS-1 (DDS),
DDS-DC
media
DDS-3 (125 meter), DDS-2 (120 meter),
and DDS (60 and 90 meter) Media
Recognition System cartridges
capacity
24 GB on a DDS-3 cartridge (assuming
a data compression ratio of 2:1)
sustained transfer rate Typically 2 MB/s using DDS-3 with data
compression
burst transfer rate
3.0 MB/s (asynchronous)
10.0 MB/s (synchronous)
search speed 40 seconds average file access for any
part of a 125-meter tape
operating limits
temperature
5°C to 40°C (41°F to 104°F)
humidity 20 to 80 RH (non-condensing)
maximum wet bulb temperature 26°C (79°F)
operating altitude 0 to 4600 m (0 to 15,000 ft)
vibration 0.21 g peak
shock survival 5 g peak for 3 ms duration
noise level
Less than 5.0 Bel sound power
non-operating limits
temperature
-40°C to 70°C (-40°F to 158°F)
humidity
5% to 95% RH
non-operating altitude
0 to 15200 m (0 to 50,000 ft)
vibration 2.10 g rms
shock survival 90 g for 3 ms duration
safety and electromagnetic compatibility
CSA Certification to C22.2, No. 950 Amd 4
UL Listed to UL 1950 Amd 4
GS Mark EN60950 (IEC 950)
NOM 1 NYCE
FCC Class B Certified
VCCI Class 2
C-TICK Approved (AS/NZS 3548)
RRL Approved (RRL MIC No. 1996-18)
Class 1 LED product (IEC 825-1)
© 1997-2001, Hewlett-Packard Company
file:///C|/Documents%20and%20Settings/topher.COL-SPRINGS/Desktop/Ultrium/pdf/document/dds/user/reseller/eng/dds24e.htm [11/15/2001 1:25:28 PM]
Page 24

hp surestore dat24m
hp learning products
http://www.hp.com/support/tape may have a later version
data protection
index of topics
contact hp
home page
before you start
tape drive operation
autoloader operation
cartridge care
cleaning
one-button disaster
recovery
specifications
DAT 24i
DAT 24e
DAT 24m
DAT 40i
DAT 40e
DAT 40m
DAT 24x6i
DAT 24x6e
DAT 40x6i
DAT 40x6e
diagnostics
troubleshooting
FAQs
SCSI configuration
UNIX configuration
ordering supplies
installing drivers
hp surestore DAT 24m
contents of this section
features
specifications
physical specification
power requirements
performance
operating limits
non-operating limits
safety and electromagnetic compatibility
features
The HP Surestore DAT 24 combines capacity and performance with reliability and
low cost of ownership, making it the ideal choice for network backup. Your new
tape drive provides the following key features:
● Reliable DAT technology
● Capacity of 24 gigabytes on a single DDS-3 tape (assuming a 2:1 data
compression ratio)
● Built-in read-after-write verification for a high level of data integrity
● Compatibility with industry-standard DDS formats, allowing the use of low-
cost media
● Internal head cleaner that helps prevent head clogging
● Feed Forward Equalizer ensures maximum data integrity
● TapeAlert support for worry-free backup
● HP Library & TapeTools software to verify successful installation and
troubleshoot problems
● HP One-Button Disaster Recovery compatible
● HP Instant Support for web-based problem identification, diagnosis and
resolution providing fast, easy-to-use online solutions to problems
● Hardware data compression increases data storage capacity and data
transfer rate
● Low power consumption
specifications
physical specification
dimensions 150 mm (6.0 inches) W
41 mm (1.6 inches) H
158 mm (6.2 inches) D
weight 1.0 kg (2.3 lbs)
power requirements
power +5V ± 5% (100 mV maximum ripple) @
1.2A
+12V ± 10% (150 mV maximum ripple)
@ 0.1A
performance
interface Narrow SCSI-2
recording format
DDS-3, DDS-2, DDS-1 (DDS),
DDS-DC
media
DDS-3 (125 meter), DDS-2 (120 meter),
and DDS (60 and 90 meter) Media
Recognition System cartridges
capacity
24 GB on a DDS-3 cartridge (assuming
a data compression ratio of 2:1)
sustained transfer rate Typically 2 MB/s using DDS-3 with data
compression
burst transfer rate
3.0 MB/s (asynchronous)
10.0 MB/s (synchronous)
search speed 40 seconds average file access for any
part of a 125-meter tape
operating limits
temperature
5°C to 40°C (41°F to 104°F)
humidity 20 to 80 RH (non-condensing)
maximum wet bulb temperature 26°C (79°F)
operating altitude 0 to 4600 m (0 to 15,000 ft)
vibration 0.30 g peak
shock survival 5 g peak for 3 ms duration
non-operating limits
temperature
-40°C to 70°C (-40°F to 158°F)
humidity
5% to 95% RH
non-operating altitude
0 to 15200 m (0 to 50,000 ft)
vibration 2.41 g rms
shock survival 90 g for 3 ms duration
safety and electromagnetic compatibility
CSA Certification to C22.2, No. 950 Amd 4
UL Listed to UL 1950 Amd 4
TUV EN60950 (IEC 950)
CE Declaration of Conformity
C-TICK Approved (AS/NZS 3548)
RRL Approved (RRL MIC No. 1996-18)
Class 1 LED product (IEC 825-1)
© 1997-2001, Hewlett-Packard Company
file:///C|/Documents%20and%20Settings/topher.COL-SPRINGS/Desktop/Ultrium/pdf/document/dds/user/reseller/eng/dds24m.htm [11/15/2001 1:25:30 PM]
Page 25

hp surestore dat40i
hp learning products
http://www.hp.com/support/tape may have a later version
data protection
index of topics
contact hp
home page
before you start
tape drive operation
autoloader operation
cartridge care
cleaning
one-button disaster
recovery
specifications
DAT 24i
DAT 24e
DAT 24m
DAT 40i
DAT 40e
DAT 40m
DAT 24x6i
DAT 24x6e
DAT 40x6i
DAT 40x6e
diagnostics
troubleshooting
FAQs
SCSI configuration
UNIX configuration
ordering supplies
installing drivers
hp surestore DAT 40i
contents of this section
features
specifications
physical specification
power requirements
performance
operating limits
non-operating limits
safety and electromagnetic compatibility
features
The HP Surestore DAT 40 combines capacity and performance with reliability and
low cost of ownership, making it the ideal choice for network backup. Your new
tape drive provides the following key features:
● Reliable DAT technology
● Capacity of 40 gigabytes on a single DDS-4 tape (assuming a 2:1 data
compression ratio)
● Built-in read-after-write verification for a high level of data integrity
● Compatibility with industry-standard DDS formats, allowing the use of low-
cost media
● Internal head cleaner that helps prevent head clogging
● PRML and Feed Forward Equalizer ensures maximum data integrity
● TapeAlert support for worry-free backup
● HP Library & TapeTools software to verify successful installation and
troubleshoot problems
● HP Instant Support for web-based problem identification, diagnosis and
resolution providing fast, easy-to-use online solutions to problems
● HP One-Button Disaster Recovery compatible
● Hardware data compression increases data storage capacity and data
transfer rate
● Low power consumption
● Ultra 2 Wide SCSI interface
specifications
physical specification
dimensions 150 mm (6.0 inches) W
41 mm (1.6 inches) H
158 mm (6.2 inches) D
weight 1.0 kg (2.3 lbs)
power requirements
power +5V ± 5% (100 mV maximum ripple) @
1.2A
+12V ± 10% (150 mV maximum ripple)
@ 0.1A
performance
interface
Ultra SCSI-2 (SE and LVDS)
recording format
DDS-4, DDS-3, DDS-2, DDS-1 (DDS),
DDS-DC
media
DDS-4 (150 meter), DDS-3 (125 meter),
DDS-2 (120 meter), and DDS (60 and
90 meter) Media Recognition System
cartridges
capacity
40 GB on a DDS-4 cartridge (assuming
a data compression ratio of 2:1)
sustained transfer rate Typically 6 MB/s using DDS-4 with data
compression
burst transfer rate
6.0 MB/s (asynchronous)
40.0 MB/s (synchronous)
search speed 50 seconds average file access for any
part of a 150-meter tape
operating limits
temperature
5°C to 40°C (41°F to 104°F)
humidity 20 to 80 RH (non-condensing)
maximum wet bulb temperature 26°C (79°F)
operating altitude 0 to 4600 m (0 to 15,000 ft)
vibration 0.30 g peak
shock survival 5 g peak for 3 ms duration
non-operating limits
temperature
-40°C to 70°C (-40°F to 158°F)
humidity
5% to 95% RH
non-operating altitude
0 to 15200 m (0 to 50,000 ft)
vibration 2.41 g rms
shock survival 90 g for 3 ms duration
safety and electromagnetic compatibility
CSA Certification to C22.2, No. 950 Amd 4
GOSH Approved
UL Listed to UL 1950 Amd 4
TUV EN60950 (IEC 950)
CE Declaration of Conformity
C-TICK Approved (AS/NZS 3548)
RRL Approved (RRL MIC No. 1996-18)
Class 1 LED product (IEC 825-1)
© 1997-2001, Hewlett-Packard Company
file:///C|/Documents%20and%20Settings/topher.COL-SPRINGS/Desktop/Ultrium/pdf/document/dds/user/reseller/eng/dds40i.htm [11/15/2001 1:25:32 PM]
Page 26

hp surestore dat40e
hp learning products
http://www.hp.com/support/tape may have a later version
data protection
index of topics
contact hp
home page
before you start
tape drive operation
autoloader operation
cartridge care
cleaning
one-button disaster
recovery
specifications
DAT 24i
DAT 24e
DAT 24m
DAT 40i
DAT 40e
DAT 40m
DAT 24x6i
DAT 24x6e
DAT 40x6i
DAT 40x6e
diagnostics
troubleshooting
FAQs
SCSI configuration
UNIX configuration
ordering supplies
installing drivers
hp surestore DAT 40e
contents of this section
features
specifications
physical specification
power requirements
performance
operating limits
non-operating limits
safety and electromagnetic compatibility
features
The HP Surestore DAT 40 combines capacity and performance with reliability and
low cost of ownership, making it the ideal choice for network backup. Your new
tape drive provides the following key features:
● Reliable DAT technology
● Capacity of 40 gigabytes on a single DDS-4 tape (assuming a 2:1 data
compression ratio)
● Built-in read-after-write verification for a high level of data integrity
● Compatibility with industry-standard DDS formats, allowing the use of low-
cost media
● Internal head cleaner that helps prevent head clogging
● PRML and Feed Forward Equalizer ensures maximum data integrity
● TapeAlert support for worry-free backup
● HP Library & TapeTools software to verify successful installation and
troubleshoot problems
● HP Instant Support for web-based problem identification, diagnosis and
resolution providing fast, easy-to-use online solutions to problems
● HP One-Button Disaster Recovery compatible
● Hardware data compression increases data storage capacity and data
transfer rate
● Low power consumption
● Ultra 2 Wide SCSI interface
specifications
physical specification
dimensions 116 mm (4.5 inches) W
95 mm (3.7 inches) H
220 mm (8.6 inches) D
weight 2.6 kg (5.7 lbs)
power requirements
power 0.5A maximum
100-240V AC, automatically detected,
50-60 Hz
performance
interface
Ultra SCSI-2 (SE and LVDS)
recording format
DDS-4, DDS-3, DDS-2, DDS-1 (DDS),
DDS-DC
media
DDS-4 (150 meter), DDS-3 (125 meter),
DDS-2 (120 meter), and DDS (60 and
90 meter) Media Recognition System
cartridges
capacity
40 GB on a DDS-4 cartridge (assuming
a data compression ratio of 2:1)
sustained transfer rate Typically 6 MB/s using DDS-4 with data
compression
burst transfer rate
6.0 MB/s (asynchronous)
40.0 MB/s (synchronous)
search speed 50 seconds average file access for any
part of a 150-meter tape
operating limits
temperature
5°C to 40°C (41°F to 104°F)
humidity 20 to 80 RH (non-condensing)
maximum wet bulb temperature 26°C (79°F)
operating altitude 0 to 4600 m (0 to 15,000 ft)
vibration 0.21 g peak
shock survival 5 g peak for 3 ms duration
noise level Less than 5.0 Bel sound power
non-operating limits
temperature
-40°C to 70°C (-40°F to 158°F)
humidity
5% to 95% RH
non-operating altitude
0 to 15200 m (0 to 50,000 ft)
vibration 2.10 g rms
shock survival 90 g for 3 ms duration
safety and electromagnetic compatibility
CSA Certification to C22.2, No. 950 Amd 4
GOSH Approved
UL Listed to UL 1950 Amd 4
TUV EN60950 (IEC 950)
GS Mark EN60950 (IEC 950)
NOM 1 NYCE
FCC Class B Certified
VCCI Class 2
CE Declaration of Conformity
C-TICK Approved (AS/NZS 3548)
RRL Approved (RRL MIC No. 1996-18)
Class 1 LED product (IEC 825-1)
BCIQ Approved
© 1997-2001, Hewlett-Packard Company
file:///C|/Documents%20and%20Settings/topher.COL-SPRINGS/Desktop/Ultrium/pdf/document/dds/user/reseller/eng/dds40e.htm [11/15/2001 1:25:34 PM]
Page 27

hp surestore dat40m
hp learning products
http://www.hp.com/support/tape may have a later version
data protection
index of topics
contact hp
home page
before you start
tape drive operation
autoloader operation
cartridge care
cleaning
one-button disaster
recovery
specifications
DAT 24i
DAT 24e
DAT 24m
DAT 40i
DAT 40e
DAT 40m
DAT 24x6i
DAT 24x6e
DAT 40x6i
DAT 40x6e
diagnostics
troubleshooting
FAQs
SCSI configuration
UNIX configuration
ordering supplies
installing drivers
hp surestore DAT 40m
contents of this section
features
specifications
physical specification
power requirements
performance
operating limits
non-operating limits
safety and electromagnetic compatibility
features
The HP Surestore DAT 40 combines capacity and performance with reliability and
low cost of ownership, making it the ideal choice for network backup. Your new
tape drive provides the following key features:
● Reliable DAT technology
● Capacity of 40 gigabytes on a single DDS-4 tape (assuming a 2:1 data
compression ratio)
● Built-in read-after-write verification for a high level of data integrity
● Compatibility with industry-standard DDS formats, allowing the use of low-
cost media
● Internal head cleaner that helps prevent head clogging
● PRML and Feed Forward Equalizer ensures maximum data integrity
● TapeAlert support for worry-free backup
● HP Library & TapeTools software to verify successful installation and
troubleshoot problems
● HP Instant Support for web-based problem identification, diagnosis and
resolution providing fast, easy-to-use online solutions to problems
● HP One-Button Disaster Recovery compatible
● Hardware data compression increases data storage capacity and data
transfer rate
● Low power consumption
● Ultra 2 Wide SCSI interface
specifications
physical specification
dimensions 150 mm (6.0 inches) W
41 mm (1.6 inches) H
158 mm (6.2 inches) D
weight 1.0 kg (2.3 lbs)
power requirements
power +5V ± 5% (100 mV maximum ripple) @
1.2A
+12V ± 10% (150 mV maximum ripple)
@ 0.1A
performance
interface
Ultra SCSI-2 (SE and LVDS)
recording format
DDS-4, DDS-3, DDS-2, DDS-1 (DDS),
DDS-DC
media
DDS-4 (150 meter), DDS-3 (125 meter),
DDS-2 (120 meter), and DDS (60 and
90 meter) Media Recognition System
cartridges
capacity
40 GB on a DDS-4 cartridge (assuming
a data compression ratio of 2:1)
sustained transfer rate Typically 6 MB/s using DDS-4 with data
compression
burst transfer rate
6.0 MB/s (asynchronous)
40.0 MB/s (synchronous)
search speed 50 seconds average file access for any
part of a 150-meter tape
operating limits
temperature
5°C to 40°C (41°F to 104°F)
humidity 20 to 80 RH (non-condensing)
maximum wet bulb temperature 26°C (79°F)
operating altitude 0 to 4600 m (0 to 15,000 ft)
vibration 0.30 g peak
shock survival 5 g peak for 3 ms duration
non-operating limits
temperature
-40°C to 70°C (-40°F to 158°F)
humidity
5% to 95% RH
non-operating altitude
0 to 15200 m (0 to 50,000 ft)
vibration 2.41 g rms
shock survival 90 g for 3 ms duration
safety and electromagnetic compatibility
CSA Certification to C22.2, No. 950 Amd 4
GOSH Approved
UL Listed to UL 1950 Amd 4
TUV EN60950 (IEC 950)
CE Declaration of Conformity
C-TICK Approved (AS/NZS 3548)
RRL Approved (RRL MIC No. 1996-18)
Class 1 LED product (IEC 825-1)
© 1997-2001, Hewlett-Packard Company
file:///C|/Documents%20and%20Settings/topher.COL-SPRINGS/Desktop/Ultrium/pdf/document/dds/user/reseller/eng/dds40m.htm [11/15/2001 1:25:36 PM]
Page 28

hp surestore dat24x6i
hp learning products
http://www.hp.com/support/tape may have a later version
data protection
index of topics
contact hp
home page
before you start
tape drive operation
autoloader operation
cartridge care
cleaning
one-button disaster
recovery
specifications
DAT 24i
DAT 24e
DAT 24m
DAT 40i
DAT 40e
DAT 40m
DAT 24x6i
DAT 24x6e
DAT 40x6i
DAT 40x6e
diagnostics
troubleshooting
FAQs
SCSI configuration
UNIX configuration
ordering supplies
installing drivers
hp surestore DAT 24x6i
contents of this section
features
specifications
physical specification
power requirements
performance
operating limits
non-operating limits
safety and electromagnetic compatibility
features
The HP SureStore DAT 24x6i is the ideal match for today's automated backup
applications. Automation reduces the risk of operator errors and saves valuable
time. The HP SureStore DAT 24x6i will meet the capacity needs of your growing
network. Using hardware data compression, it can store up to 24 GB on a single
tape in just over three hours. One magazine stores an entire week's worth of data.
Your new autoloader provides the following key features:
● Random access to to six cartridges in a compact, removable magazine
● Reliable DAT technology
● Compatibility with industry-standard DDS formats, allowing the use of low-
cost media
● Capacity of 24 gigabytes on a single DDS-3 tape (assuming a 2:1 data
compression ratio)
● Built-in read-after-write verification for a high level of data integrity
● Compatibility with industry-standard DDS formats, allowing the use of low-
cost media
● Internal head cleaner that helps prevent head clogging
● Feed Forward Equalizer ensures maximum data integrity
● TapeAlert support for worry-free backup
● HP Library & TapeTools software to verify successful installation and
troubleshoot problems
● HP Instant Support for web-based problem identification, diagnosis and
resolution providing fast, easy-to-use online solutions to problems
● Hardware data compression increases data storage capacity and data
transfer rate
● Low power consumption
specifications
physical specification
dimensions 150 mm (5.9 inches) W
85 mm (3.4 inches) H
210 mm (8.3 inches) D
weight 2.2 kg (4.85 lbs) without magazine
power requirements
power +5V ± 5% (100 mV maximum ripple) @
0.75A
+12V ± 10% (150 mV maximum ripple)
@ 2.0A
performance
interface
Narrow SCSI-2
recording format
DDS-3, DDS-2, DDS-1 (DDS),
DDS-DC
media
DDS-3 (125 meter), DDS-2 (120 meter),
and DDS (60 and 90 meter) Media
Recognition System cartridges
capacity
6x24 GB based on six DDS-3 cartridges
with average capacity of 24 GB per
cartridge (assuming a data compression
ratio of 2:1)
sustained transfer rate Typically 2 MB/s using DDS-3 with data
compression
burst transfer rate
3.0 MB/s (asynchronous)
10.0 MB/s (synchronous)
search speed 40 seconds average file access for any
part of a 125-meter tape
cartridge load/unload time
<14 seconds average
cartridge swap time
15 seconds average
operating limits
temperature
5°C to 40°C (41°F to 104°F)
humidity 20 to 80 RH (non-condensing)
maximum wet bulb temperature 26°C (79°F)
operating altitude 0 to 4600 m (0 to 15,000 ft)
vibration 0.21 g peak
noise level Less than 5.0 Bel sound power
non-operating limits
temperature
-40°C to 70°C (-40°F to 158°F)
humidity
5% to 95% RH
non-operating altitude
0 to 15200 m (0 to 50,000 ft)
vibration 0.21 g peak
shock survival 90 g for 3 ms duration
safety and electromagnetic compatibility
CSA Certification to C22.2, No. 950 Amd 4
UL Listed to UL 1950 Amd 4
GS Mark EN60950 (IEC 950)
TUV-EN 60950
CE Declaration of Conformity
C-TICK Approved (AS/NZS 3548)
RRL Approved (RRL MIC No. 1996-18)
© 1997-2001, Hewlett-Packard Company
file:///C|/Documents%20and%20Settings/topher.COL-SPRINGS/Desktop/Ultrium/pdf/document/dds/user/reseller/eng/dds24x6i.htm [11/15/2001 1:25:38 PM]
Page 29

hp surestore dat24x6e
hp learning products
http://www.hp.com/support/tape may have a later version
data protection
index of topics
contact hp
home page
before you start
tape drive operation
autoloader operation
cartridge care
cleaning
one-button disaster
recovery
specifications
DAT 24i
DAT 24e
DAT 24m
DAT 40i
DAT 40e
DAT 40m
DAT 24x6i
DAT 24x6e
DAT 40x6i
DAT 40x6e
diagnostics
troubleshooting
FAQs
SCSI configuration
UNIX configuration
ordering supplies
installing drivers
hp surestore DAT 24x6e
contents of this section
features
specifications
physical specification
power requirements
performance
operating limits
non-operating limits
safety and electromagnetic compatibility
features
The HP SureStore DAT 24x6e is the ideal match for today's automated backup
applications. Automation reduces the risk of operator errors and saves valuable
time. The HP SureStore DAT 24x6e will meet the capacity needs of your growing
network. Using hardware data compression, it can store up to 24 GB on a single
tape in just over three hours. One magazine stores an entire week's worth of data.
Your new autoloader provides the following key features:
● Random access to to six cartridges in a compact, removable magazine
● Reliable DAT technology
● Read and write compatible with DDS, DDS-2, and DDS-3 formats
● Capacity of 24 gigabytes on a single DDS-3 tape (assuming a 2:1 data
compression ratio)
● Built-in read-after-write verification for a high level of data integrity
● Compatibility with industry-standard DDS formats, allowing the use of low-
cost media
● Internal head cleaner that helps prevent head clogging
● Feed Forward Equalizer ensures maximum data integrity
● TapeAlert support for worry-free backup
● HP Library & TapeTools software to verify successful installation and
troubleshoot problems
● HP Instant Support for web-based problem identification, diagnosis and
resolution providing fast, easy-to-use online solutions to problems
● Hardware data compression increases data storage capacity and data
transfer rate
● Low power consumption
specifications
physical specification
dimensions 165 mm (6.5 inches) W
135 mm (5.3 inches) H
269 mm (10.6 inches) D
weight 4.8 kg (10.5 lbs) without magazine
power requirements
power 0.6A maximum
100-240 Vac, 50-60 Hz
performance
interface
Narrow SCSI-2
recording format
DDS-3, DDS-2, DDS-1 (DDS),
DDS-DC
media
DDS-3 (125 meter), DDS-2 (120 meter),
and DDS (60 and 90 meter) Media
Recognition System cartridges
capacity
6x24 GB based on six DDS-3 cartridges
with average capacity of 24 GB per
cartridge (assuming a data compression
ratio of 2:1)
sustained transfer rate Typically 2 MB/s using DDS-3 with data
compression
burst transfer rate
3.0 MB/s (asynchronous)
10.0 MB/s (synchronous)
search speed: 40 seconds average file access for any
part of a 125-meter tape
cartridge load/unload time
<14 seconds average
cartridge swap time
15 seconds average
operating limits
temperature
5°C to 40°C (41°F to 104°F)
humidity 20 to 80 RH (non-condensing)
maximum wet bulb temperature 26°C (78°F)
operating altitude
0 to 4600 m (0 to 15,000 ft)
vibration 0.21 g peak
noise level Less than 5.0 Bel sound power
non-operating limits
temperature
-40°C to 70°C (-40°F to 158°F)
humidity
5% to 95% RH
non-operating altitude 0 to 15,200 m (0 to 50,000 ft)
vibration 2.10 g rms
shock survival 90 g for 3 ms duration
safety and electromagnetic compatibility
CSA Certification to C22.2, No. 950 Amd 4
UL Listed to UL 1950 Amd 4
GS Mark EN60950 (IEC 950)
NOM 1 NYCE
FCC Class B Certified
VCCI Class 2
CE Declaration of Conformity CE 73/23/EEC Amended by (93/68/EEC)
C-TICK Approved (AS/NZS 3548)
RRL Approved (RRL MIC No. 1996-18)
© 1997-2001, Hewlett-Packard Company
file:///C|/Documents%20and%20Settings/topher.COL-SPRINGS/Desktop/Ultrium/pdf/document/dds/user/reseller/eng/dds24x6e.htm [11/15/2001 1:25:41 PM]
Page 30

hp surestore dat40x6i
hp learning products
http://www.hp.com/support/tape may have a later version
data protection
index of topics
contact hp
home page
before you start
tape drive operation
autoloader operation
cartridge care
cleaning
one-button disaster
recovery
specifications
DAT 24i
DAT 24e
DAT 24m
DAT 40i
DAT 40e
DAT 40m
DAT 24x6i
DAT 24x6e
DAT 40x6i
DAT 40x6e
diagnostics
troubleshooting
FAQs
SCSI configuration
UNIX configuration
ordering supplies
installing drivers
hp surestore DAT 40x6i
contents of this section
features
specifications
physical specification
power requirements
performance
operating limits
non-operating limits
safety and electromagnetic compatibility
features
The HP SureStore DAT 40x6i is the ideal match for today's automated backup
applications. Automation reduces the risk of operator errors and saves valuable
time. The HP SureStore DAT 40x6i will meet the capacity needs of your growing
network. Using hardware data compression, it can store up to 40 GB on a single
tape in just over three hours. One magazine stores an entire week's worth of data.
Your new autoloader provides the following key features:
● Random access to to six cartridges in a compact, removable magazine
● Reliable DAT technology
● Compatibility with industry-standard DDS formats, allowing the use of low-
cost media
● Capacity of 40 gigabytes on a single DDS-4 tape (assuming a 2:1 data
compression ratio)
● Built-in read-after-write verification for a high level of data integrity
● Internal head cleaner that helps prevent head clogging
● Feed Forward Equalizer ensures maximum data integrity
● TapeAlert support for worry-free backup
● HP Library & TapeTools software to verify successful installation and
troubleshoot problems
● HP Instant Support for web-based problem identification, diagnosis and
resolution providing fast, easy-to-use online solutions to problems
● Hardware data compression increases data storage capacity and data
transfer rate
● Low power consumption
● HP One-Button Disaster Recovery
● Localized LCD
● Ultra 2 Wide SCSI interface
specifications
physical specification
dimensions 150 mm (5.9 inches) W
85 mm (3.4 inches) H
210 mm (8.3 inches) D
weight 2.2 kg (4.85 lbs) without magazine
power requirements
power +5V ± 5% (100 mV maximum ripple) @
0.75A
+12V ± 10% (150 mV maximum ripple)
@ 2.0A
performance
interface
Ultra SCSI-2 (SE and LVDS)
recording format DDS-4, DDS-3 and DDS-2
media
DDS-4 (150 meter), DDS-3 (125 meter),
DDS-2 (120 meter) and DDS (90 meter
only) Media Recognition System
cartridges
capacity
6x40 GB based on six DDS-4 cartridges
with average capacity of 40 GB per
cartridge (assuming a data compression
ratio of 2:1)
sustained transfer rate Typically 6 MB/s using DDS-4 with data
compression
burst transfer rate
6.0 MB/s (asynchronous)
40.0 MB/s (synchronous)
search speed 50 seconds average file access for any
part of a 150-meter tape
cartridge load/unload time
<14 seconds average
cartridge swap time
15 seconds average
operating limits
temperature
5°C to 40°C (41°F to 104°F)
humidity 20 to 80 RH (non-condensing)
maximum wet bulb temperature 26°C (79°F)
operating altitude 0 to 4600 m (0 to 15,000 ft)
vibration 0.21 g peak
noise level Less than 5.0 Bel sound power
non-operating limits
temperature
-40°C to 70°C (-40°F to 158°F)
humidity
5% to 95% RH
non-operating altitude
0 to 15200 m (0 to 50,000 ft)
vibration 0.21 g peak
shock survival 2.10 g rms
safety and electromagnetic compatibility
CSA Certification to C22.2, No. 950 Amd 4
UL Listed to UL 1950 Amd 4
GS Mark EN60950 (IEC 950)
TUV-EN 60950
CE Declaration of Conformity
C-TICK Approved (AS/NZS 3548)
RRL Approved (RRL MIC No. 1996-18)
© 1997-2001, Hewlett-Packard Company
file:///C|/Documents%20and%20Settings/topher.COL-SPRINGS/Desktop/Ultrium/pdf/document/dds/user/reseller/eng/dds40x6i.htm [11/15/2001 1:25:43 PM]
Page 31

hp surestore dat40x6e
hp learning products
http://www.hp.com/support/tape may have a later version
data protection
index of topics
contact hp
home page
before you start
tape drive operation
autoloader operation
cartridge care
cleaning
one-button disaster
recovery
specifications
DAT 24i
DAT 24e
DAT 24m
DAT 40i
DAT 40e
DAT 40m
DAT 24x6i
DAT 24x6e
DAT 40x6i
DAT 40x6e
diagnostics
troubleshooting
FAQs
SCSI configuration
UNIX configuration
ordering supplies
installing drivers
hp surestore DAT 40x6e
contents of this section
features
specifications
physical specification
power requirements
performance
operating limits
non-operating limits
safety and electromagnetic compatibility
features
The HP SureStore DAT 40x6e is the ideal match for today's automated backup
applications. Automation reduces the risk of operator errors and saves valuable
time. The HP SureStore DAT 40x6e will meet the capacity needs of your growing
network. Using hardware data compression, it can store up to 40 GB on a single
tape in just over three hours. One magazine stores an entire week's worth of data.
Your new autoloader provides the following key features:
● Random access to to six cartridges in a compact, removable magazine
● Reliable DAT technology
● Compatibility with industry-standard DDS formats, allowing the use of low-
cost media
● Capacity of 40 gigabytes on a single DDS-4 tape (assuming a 2:1 data
compression ratio)
● Built-in read-after-write verification for a high level of data integrity
● Internal head cleaner that helps prevent head clogging
● Feed Forward Equalizer ensures maximum data integrity
● TapeAlert support for worry-free backup
● HP Library & TapeTools software to verify successful installation and
troubleshoot problems
● HP Instant Support for web-based problem identification, diagnosis and
resolution providing fast, easy-to-use online solutions to problems
● Hardware data compression increases data storage capacity and data
transfer rate
● Low power consumption
● HP One-Button Disaster Recovery
● Localized LCD
● Ultra 2 Wide SCSI interface
specifications
physical specification
dimensions 165 mm (6.5 inches) W
135 mm (5.3 inches) H
269 mm (10.6 inches) D
weight 4.8 kg (10.5 lbs) without magazine
power requirements
power 0.6A maximum
100-240 Vac, 50-60 Hz
performance
interface
Ultra SCSI-2 (SE and LVDS)
recording format DDS-4, DDS-3 and DDS-2
media
DDS-4 (150 meter), DDS-3 (125 meter),
DDS-2 (120 meter) and DDS (90 meter
only) Media Recognition System
cartridges
capacity
6x40 GB based on six DDS-4 cartridges
with average capacity of 40 GB per
cartridge (assuming a data compression
ratio of 2:1)
sustained transfer rate Typically 6 MB/s using DDS-4 with data
compression
burst transfer rate
6.0 MB/s (asynchronous)
40.0 MB/s (synchronous)
search speed 50 seconds average file access for any
part of a 150-meter tape
cartridge load/unload time
<14 seconds average
cartridge swap time
15 seconds average
operating limits
temperature
5°C to 40°C (41°F to 104°F)
humidity 20 to 80 RH (non-condensing)
maximum wet bulb temperature 26°C (79°F)
operating altitude 0 to 4600 m (0 to 15,000 ft)
vibration 0.21 g peak
noise level Less than 5.0 Bel sound power
non-operating limits
temperature
-40°C to 70°C (-40°F to 158°F)
humidity
5% to 95% RH
non-operating altitude
0 to 15200 m (0 to 50,000 ft)
vibration 2.10 g rms
shock survival 90 g for 3 ms duration
safety and electromagnetic compatibility
CSA Certification to C22.2, No. 950 Amd 4
UL Listed to UL 1950 Amd 4
GS Mark EN60950 (IEC 950)
NOM 1 NYCE
FCC Class B Certified
VCCI Class 2
CE Declaration of Conformity
C-TICK Approved (AS/NZS 3548)
RRL Approved (RRL MIC No. 1996-18)
© 1997-2001, Hewlett-Packard Company
file:///C|/Documents%20and%20Settings/topher.COL-SPRINGS/Desktop/Ultrium/pdf/document/dds/user/reseller/eng/dds40x6e.htm [11/15/2001 1:25:45 PM]
Page 32

diagnostics
hp learning products
http://www.hp.com/support/tape may have a later version
data protection
index of topics
contact hp
home page
before you start
tape drive operation
autoloader operation
cartridge care
cleaning
one-button disaster
recovery
specifications
diagnostics
tapealert
troubleshooting
FAQs
SCSI configuration
UNIX configuration
ordering supplies
installing drivers
diagnostics
contents of this section
diagnostic tools
which tool to use
hp instant support
hp library & tape tools diagnostic
utility
installing
using
compatibility
firmware upgrades
related topics
tapealert - status monitoring and
messaging standard
troubleshooting
faqs
installing drivers
diagnostic tools
HP offers a choice of diagnostic tools and web based support to meet your needs:
HP instant support is a web-based automated problem identification,
diagnosis and resolution tool that also incorporates seamless
transmission of hardware information and case history to HP Support
Specialists at any time you choose to contact HP directly.
HP instant support is available from: www.hp.com/go/instantsupport
HP Library & Tape Tools is a standalone diagnostics tool that provides a
number of utilities for getting information about your tape drive and
troubleshooting problems. It also gives advice to help you install your
product and maintain optimum performance throughout the product's life.
HP Library & Tape Tools is available from:
www.hp.com/support/tapetools
HP support web pages give details of common customer issues.
Access the HP support website at:
www.hp.com/go/support/dat
which tool to use
The table below will help you choose which tool to use:
HP instant
support
HP Library & Tape
Tools
HP support
web pages
What is it?
regularly
updated
regularly updated
regularly
updated
online web
based
downloadable from
the web
online
interactive standalone
When should
you use it?
If you: If you: If you:
can connect to
the web
can connect to the
web
can connect to
the web
want interactive
support
want to run
selective
diagnostics
want
summaries and
solutions to
common
customer
issues
want automated
diagnostics and
resolution
want to choose the
solution applied
hp instant support
HP Instant Support is a web-based problem identification, diagnosis and resolution
service providing fast, easy-to-use online solutions. The onboard "smart search"
tool identifies similar problems and provides a range of solutions and probability
statistics for each solution. HP Instant Support provides automated downloads of
software utilities and repair patches from the HP database and allows you to
transfer your case history electronically should you choose to contact HP directly.
You can determine the type and amount of support required. It will diagnose
desktop and mobile PC systems, workstations, servers, storage devices and
printers. HP Instant Support is a value-added service available from HP at no
charge.
HP Instant Support requires:
● Microsoft® Internet Explorer 4.0 or later, or Netscape Communicator® 4.6 or
later
● troubleshooting software (approximately 4 MB), which must be downloaded
from the Instant Support web page
No additional special software or hardware, or additional memory is required.
You can access HP Instant Support from:
● the product support web page (www.hp.com/support/dat)
● the instant support home page (www.hp.com/go/instantsupport)
Follow the onscreen instructions and download the HP Instant Support tuner.
Currently, HP Instant Support is only available in North America, Europe, Africa and
the Middle East (English only) and only for systems running on Windows NT 4.0 or
Windows 2000. The service will be expanded worldwide and across further
operating systems during 2001.
hp library & tape tools diagnostic utility
The HP Library & Tape Tools software provides a number of utilities for getting
information about your tape drive and troubleshooting problems. It includes the
following functionality:
Installation help and advice to help you install your product and
operate it correctly
A Discovery utility to find out what devices are attached to your
SCSI bus
An Identity utility to find out detailed information about individual
devices, for example the firmware version.
Tests to check that your drive is operating correctly.
A Firmware Update Utility that helps you find upgrade files for
your tape drive and performs the upgrade
A Support Ticket that generates detailed troubleshooting
information for support calls (if you are connected to the Internet,
you will be able to e-mail this information directly to your Support
Center)
Comprehensive Help that is topic sensitive, should you need
additional information for the screen currently displayed
Updates and the latest versions of this software are available from our World Wide
Web site: www.hp.com/support/tapetools
installing HP Library & Tape Tools
You can install HP Library & Tape Tools from this CD-ROM or from the web. The
installer on the CD-ROM includes the option to install all of the available firmware
files; on the web, the tool is distributed without firmware and firmware files are
downloaded separately. In either case, installation is simply a question of
selecting the required option and following the instructions on the screen.
If you do not want to install HP Library & Tape Tools onto your computer, you will
be able to run it directly from the CD-ROM. In this mode, it will not update or
generate any files on your system.
using HP Library & Tape Tools
HP Library and Tape Tools checks for the presence of a SCSI controller and its
driver software and identifies the SCSI IDs of existing SCSI devices. You can then
select the required device from the device list and run one of the diagnostic
utilities for that device by selecting the appropriate icon: Identity, Firmware, Test
or Support.
For ease of use, comprehensive online help is built into the software.
compatibility
There are HP Library & Tape Tools versions for:
Windows NT 4.0 (workstation and server)
Windows 2000 (professional and server)
Novell NetWare 5 or 5.1
firmware upgrades
You can update the firmware in HP Surestore DAT tape drives and autoloaders
either by downloading over the SCSI bus or by loading a firmware update tape.
Use HP Library & Tape Tools to download via SCSI. Any tape in the drive will be
ejected automatically before update. The green 'Ready' LED flashes during
firmware update for about 30 seconds and returns to the ON state when the
update is completed. In this time DO NOT RESET OR POWER CYCLE THE
DRIVE.
Note: If a corrupt or incompatible image is downloaded for firmware upgrade then
the Ready, Drive and Tape Error LEDs will flash until a tape load is started.
Firmware update tapes are only available from HP. Refer to the Hewlett-Packard
Support web site for update information (www.hp.com/support/dat). To update the
firmware from tape, just insert the firmware update tape into the drive. DO NOT
RESET OR POWER CYCLE THE DRIVE during firmware update.
© 1997-2001, Hewlett-Packard Company
file:///C|/Documents%20and%20Settings/topher.COL-SPRINGS/Desktop/Ultrium/pdf/document/dds/user/reseller/eng/diag.htm [11/15/2001 1:25:48 PM]
Page 33

diagnostics-tapealert
hp learning products
http://www.hp.com/support/tape may have a later version
data protection
index of topics
contact hp
home page
before you start
tape drive operation
autoloader operation
cartridge care
cleaning
one-button disaster
recovery
specifications
diagnostics
tapealert
troubleshooting
FAQs
SCSI configuration
UNIX configuration
ordering supplies
installing drivers
tapealert
contents of this section
TapeAlert
how it works
TapeAlert for OpenView
a new standard
summary
TapeAlert
Tape storage systems have a vital role to play in backing up essential data safely
and securely. Yet until now, there has been no reliable way to identify errors and
potential problems that may compromise their effectiveness or reliability.
Thanks to a new industry standard developed by Hewlett-Packard, however, that
situation has changed. TapeAlert is a tape drive status monitoring and messaging
utility that makes it easy to detect problems which could have an impact on
backup quality. From the use of worn-out tapes to defects in the drive hardware
TapeAlert provides easy-to-understand warnings of errors as they arise, and
suggests a course of action to remedy the problem.
To take advantage of TapeAlert, you need:
● TapeAlert-compatible tape drives
● TapeAlert-compatible backup software
Network administrators will also find it extremely valuable to have TapeAlert for
OpenView, which extends the benefits of TapeAlert across the network.
how it works
TapeAlert compatible tape drives - such as the latest DAT drives from HewlettPackard - are delivered with TapeAlert features built in as standard. The internal
TapeAlert firmware constantly monitors the drive hardware and the media,
checking for errors and potential difficulties. Any problems identified are flagged
on a new SCSI log page, where 64 bytes have been reserved for use by
TapeAlert.
After a backup has been completed, the TapeAlert-compatible backup application
will automatically read the drive's TapeAlert SCSI log page to check for any
problems. If an error is flagged, the backup software displays a clear warning
message on the user's screen, and adds the TapeAlert messages to its logs.
These messages are standard across all applications that support TapeAlert, and
are designed to give clear explanation of the problem and suggested resolution.
For example, a user attempting to backup onto a worn-out tape would encounter
the message:
WARNING: The tape cartridge has reached the end of its useful life:
1. Copy and data you need to another tape
2. Discard the old tape
Errors Monitored
TapeAlert currently checks for errors occurring in the following main categories:
● Drive recoverable read problems
● Drive recoverable write problems
● Drive unrecoverable read problems
● Drive unrecoverable write problems
● Drive hardware defects
● Worn-out media
● Expired cleaning tapes
● Wrong media used
● Abnormal error conditions
TapeAlert for OpenView
TapeAlert for OpenView allows you to bring all TapeAlert-compatible tape drives
on the network under the control of the network administrator. It integrates all the
features and functions of TapeAlert into HP's network management utility,
OpenView for Windows. As a result, tape drives can now be monitored and
controlled remotely in the same way as other network elements such as disk
drives and printers.
With TapeAlert for OpenView installed, error messages flagged by tape drives are
passed to the backup applications in the usual way. The software then forwards
the information to the network management console through the server's SNMP
interface.
An OpenView alarm is then activated on the management console, alerting the
network manager to the tape drives problem. The icon for the relevant server will
change colour, with the colour indicating the severity of the alarm as follows:
RED
Critical
YELLOW
Warning
BLUE
Information
TapeAlert for OpenView also provides a graphical view of the tape drives on the
selected server. Detailed configuration information is shown, together with a
history of previous errors recorded.
For each alarm, TapeAlert provides a brief description of the error, together with
the date and time of occurrence and an indication of severity. By clicking on the
"More Info" button, it is possible to drill down to details such as the device and
media involved, and suggestions for correcting the problem. For consistency and
convenience, the error messages are identical to those displayed locally by
TapeAlert.
As a result, it is easy for network managers to identify the source of problems
occurring on any TapeAlert-enabled drive on the network.
a new standard
TapeAlert has been developed by Hewlett-Packard as a proposed new standard
tape drive management. All new tape drives from Hewlett-Packard will be fully
compatible with TapeAlert, and many major manufacturers and software
companies are expected to adopt the standard. Software companies adopting the
standard currently include:
● Computer Associates Software
● Seagate Software
● Stac
● Legato
● Novastor
The TapeAlert standard has been designed
to allow easy integration into backup
applications from any software vendor.
Applications which comply fully with the
requirements for TapeAlert will be awarded
the use of the TapeAlert logo.
designed for the future
TapeAlert is an advanced technological standard which provides a comprehensive
range of state-of-the-art features and functions. However, it has also been
designed to allow considerable expansion and development in the future, as new
possibilities and opportunities open up.
summary
Reliable, high-quality backups are essential to safeguard the vast amount of data
stored on computer systems today. TapeAlert is an innovative standard that
enhances reliability by monitoring tape drives and associated media during backup
procedures.
Offering clear warnings of problems as they arise, TapeAlert allows users and
network managers to eliminate unnecessary errors and ensure that data integrity
and security is never compromised. Already gaining substantial support across the
industry, TapeAlert is set to become the established standard for tape drive
management.
© 1997-2001, Hewlett-Packard Company
file:///C|/Documents%20and%20Settings/topher.COL-SPRINGS/Desktop/Ultrium/pdf/document/dds/user/reseller/eng/tapalert.htm [11/15/2001 1:25:50 PM]
Page 34

troubleshooting
hp learning products
http://www.hp.com/support/tape may have a later version
data protection
index of topics
contact hp
home page
before you start
tape drive operation
autoloader operation
cartridge care
cleaning
one-button disaster
recovery
specifications
diagnostics
troubleshooting
obdr
troubleshooting
FAQs
SCSI configuration
UNIX configuration
ordering supplies
installing drivers
troubleshooting
contents of this section
help diagnosing the problem
general guidelines
troubleshooting
problems with the host
computer
computer does not boot up
computer boots then hangs
computer takes a long time to
recognize tape drive
computer boots, but does not
recognize drive
problems with the drive and
cartridge
tape drive does not power
up
LEDs are flashing
the application does not
recognize the tape drive
errors for which you cannot
find the cause
general use
you cannot backup or
restore
backups are slow
poor data compression
ratio
software compatibility
problems writing to tape
system crashes when
swapping removable drives
related topics
front panel lights (tape drives)
front panel lights (autoloaders)
front panel messages
(autoloaders)
hp library & tape tools
hp instant support
TapeAlert
firmware upgrades
hp obdr troubleshooting
help diagnosing the problem
If you experience problems using your tape drive after installation, use HP Library
& Tape Tools or HP Instant Support to help you diagnose the problem. HP Library
& Tape Tools is provided free of charge and is invaluable for solving problems
with both the SCSI bus and its attached devices. It will help resolve SCSI ID
numbers and also run some tests that may help you isolate problems.
HP instant support is a web-based problem identification, diagnosis and resolution
service providing fast, easy-to-use online solutions. You can access HP instant
support from www.hp.com/go/instantsupport.
You will also find troubleshooting information on the HP Support web site.
The HP Support web site contains links to:
● www.hp.com/support/dat takes you to HP’s Customer Care web site for a
wide range of up-to-date information about your product
● www.hp.com/cpso-support/guide/psd/cscinfo.html takes you to HP's world-
wide call center numbers
general guidelines
If you experience problems when using the tape drive, you need to isolate the
cause of the problem. For example, if you have just installed a new SCSI host bus
adapter and your system will not start, the cause of the problem is likely to be the
adapter.
When installing multiple items of hardware and software, we recommend that you
install each in turn and restart the system each time. Similarly if you have already
installed multiple devices and software and you experience problems, remove or
uninstall each in turn to establish which one is causing the problem.
Remember that the system recognizes devices during boot-up. If you swap or
connect a product when your system is running, you will need to reboot the
system. Rebooting the system will reset devices and will often resolve problems. It
is good practice to reboot every time you add a driver or install firmware.
troubleshooting
The first step in problem-solving is establishing whether the problem lies with the
cartridge, the drive, the host computer and its connections, or with the way the
system is being operated. If none of the following advice helps you solve the
problem, refer to our World Wide Web Customer Care pages
www.hp.com/support/dat or call for assistance.
problems with the host computer
Most modern SCSI host bus adapters locate and display attached devices when
the system is booting up. If the device is not detected at this stage, there is
probably a problem with the physical hardware: cables, termination, connections,
power or the HBA itself. Refer to the "SCSI" topic for a detailed discussion of
SCSI IDs, termination and cabling.
If your drive is found on system boot up but cannot be found in the operating
system, this is more likely to be a software problem.
computer does not boot up
Possible cause Potential solution
You have connected the tape drive
to an existing SCSI bus that has
other devices connected to it and
the SCSI address of your HP
Surestore DAT drive is identical to
the address used by another
device.
Make sure that each device on the SCSI
bus has a unique ID. We recommend that
the HP Surestore DAT tape drive is
connected to a dedicated host bus
adapter. Do not connect the drive to a disk
RAID controller as this is not supported.
You have installed an additional
SCSI host bus adapter and its
resources are clashing with an
existing adapter.
Remove the new host bus adapter and
check the server documentation
You have disconnected the power
or SCSI cable from the computer’s
boot disk during the drive
installation process.
Check that the cables to all devices are
firmly connected.
computer boots then hangs
Possible cause Potential solution
This might be caused by conflicts
in your hardware or software
configuration, such as two devices
with the same SCSI ID or improper
termination of the SCSI bus.
Make sure that each device connected to
the SCSI controller has a unique SCSI ID.
Check that the SCSI bus is actively
terminated. (Refer to the documentation for
your SCSI controller and any other SCSI
devices you may have.)
computer takes a long time to recognize the tape drive
Possible cause Potential solution
This can occur when the BIOS on a
host adapter card is enabled, but
there is no bootable SCSI device
connected to it.
You may be able to disable the host
adapter BIOS to resolve this problem.
Check the host adapter manual for
instructions on how to disable the BIOS.
Do not disable the BIOS for a SCSI
controller with a bootable hard disk
attached to it. Do not disable the BIOS if
you are using HP
One-Button Disaster Recovery.
computer boots, but does not recognize the tape drive
Possible cause Potential solution
The power or SCSI cable is not
connected properly.
Check that the cables to the tape drive are
firmly connected. Ensure that the SCSI
cable is LVDS-compliant and that it does
not have any bent pins. Replace, if
necessary. (See “Ordering Information”.)
The SCSI bus may not be
terminated correctly.
1. If your HP Surestore DAT drive is
the last or only device on the SCSI
bus, make sure the device is
properly terminated.
2. If your HP Surestore DAT drive is
not the last or only device on the
SCSI bus, check all SCSI cable
connections and make sure the last
device on the SCSI bus is
terminated.
The tape drive’s SCSI ID address
is not unique.
Identify the SCSI IDs of existing SCSI
devices by using HP Library & Tape Tools.
Change the drive's SCSI ID. Shut down
and turn off the host server or workstation;
turn off the desktop drive. Change the
drive's SCSI ID. Turn on the host server or
workstation and desktop drive.
External drives only: the tape drive
may have been switched on after
the computer was booted up. The
computer checks for SCSI devices
only at power-on.
Switch on the tape drive, then switch the
computer off and then on again.
The SCSI adapter may be
incorrectly configured.
Check the SCSI host adapter
configuration. Refer to the SCSI host
adapter manuals for instructions.
The SCSI cable may be loose. Check both ends of the SCSI cable, both
for the desktop and internal drives.
The SCSI terminator might be
loose or missing.
1. Make sure the terminator is properly
seated on the open SCSI connector
on the rear panel of the desktop
drive or on the last device on the
SCSI bus.
2. Make sure an LVD or SE terminator
is in place on the end of the SCSI
ribbon cable for the internal drive.
The SCSI terminator might not be
at the end of the SCSI bus or more
than two terminators might be
present on the SCSI bus.
Make sure the terminators are placed only
at each end of the SCSI bus - one at the
host adapter and one on the last device on
the bus, both internal and external.
The SCSI host adapter might be in
a defective expansion slot.
Move the SCSI host adapter to a different
expansion slot.
The SCSI bus might be too long. Make sure the total length of the SCSI bus
does not exceed the ANSI SCSI standard
of 3 meters (10 feet) for an SE bus, 12
meters (40 feet) for an LVD SCSI bus with
multiple devices, or 25 meters (82 feet) for
an LVD SCSI bus with a single device.
problems with the drive and cartridge
tape drive does not power up
Possible cause Potential solution
The power cable is not connected
properly.
Check that the cables to the tape drive are
firmly connected.
Make sure that the power cable is firmly
connected.
● For internal devices, try another
power connector.
● For external devices, you can use
the power cable from your monitor
or another device to check that the
connection is working.
If the power supply is present and all LEDs
remain off, call for assistance.
The self-test fails. If there is a cartridge in the drive, remove
it. Power down the drive and power it up
again. If the self-test still fails, call for
assistance.
LEDs are flashing
Possible cause Potential solution
Tape drives: If the Tape LED is off
and the Clean LED is flashing or on
constantly, there is a problem with
the media or drive.
See front panel lights.
Autoloaders: If the OAR LED is on,
operator attention is required.
There will also be a message on
the LCD.
See front panel lights and front panel
messages.
a cartridge is jammed in the drive mechanism
Possible cause Potential solution
A label may be poorly stuck on the
cartridge or in the wrong place,
causing it to jam.
Try forcing ejection. See the Forcing
Ejection topic for a drive or autoloader. If
this fails, call for
assistance.
errors for which you cannot find the cause
Possible cause Potential solution
The AC power source may not be
properly grounded.
(HP Surestore DAT external drive
only.)
1. Plug the HP Surestore DAT external
drive's power cable into a power
outlet on the same circuit as the host
server or workstation.
2. Plug the HP Surestore DAT external
drive's power cable into a different
power outlet.
general use
you cannot back up or restore
Possible cause Potential solution
The application does not support
the tape drive.
Use HP Library & Tape Tools to check that
the drive is installed properly. Refer to our
World Wide Web site
(www.hp.com/go/connect) for details of
backup applications that support the HP
Surestore DAT tape drive. Load any
service packs as necessary.
The appropriate driver software for
the tape drive or autoloader may
not be installed.
Check that a driver has been installed that
supports both your HP SureStore DAT
drive and your backup software. (See your
software documentation for details.) If not,
install the appropriate driver.
The appropriate ASPI driver for
your SCSI controller may not be
installed.
When you boot up the computer, check for
error messages that refer to SCSI devices
or ASPI drivers. Run HP Library & Tape
Tools to determine whether the SCSI
board is functioning properly. If it is not,
make sure that the correct ASPI driver for
your SCSI controller is installed.
Your backup software may have
encountered a problem.
Refer to the user documentation for your
backup software. This should contain a list
of error conditions and suggested
remedies.
The tape cartridge may be worn
out or defective.
Try using a different cartridge. If you have
been using the same cartridge for a long
time, copy the data on it to a new cartridge
and discard the old one.
The operator may not know how to
use your backup application,
especially if the operator is new or
has been away from the job for a
while.
Ask the person to repeat the operation
while you watch, to check that they are not
omitting some vital step.
The cartridge may not be the
correct format.
Check that you are using a DDS cartridge,
not a Digital Audio Tape (DAT) cartridge. If
you are using a different brand of cartridge,
it may not be of sufficient quality. See
Choosing Cartridges.
The drive may be used in an
unsuitable location or outside its
operating limits. If it is unusually
hot, cold, damp, dry, or dusty, the
tape drive may not perform well.
Check the environmental conditions
against the drive's specified limits. If they
are outside the limits, move the drive to a
more suitable site.
Clean the tape heads and try the operation
again.
A new operating system or
upgrade may have been installed
without the correct drivers for the
tape drive.
Install the correct driver software for the
operating system and tape drive.
backups are slow
Possible cause Potential solution
The backup is being performed
over a network.
Backing up across a network is likely to
reduce the speed of the backup. Try
backing up at a different time of day when
there is less network traffic.
Where possible, use a dedicated tape
drive directly attached to the computer
being backed up. Backing up local data
(that is data residing on disk drives
attached to the same machine as the tape
drive, but not necessarily on the same
SCSI bus) is almost always faster than
backing up over a network.
External tape drives can be moved and
attached to different servers.
The overall system is not capable
of providing data fast enough.
Tape drive performance will be impaired if
the server is slow or overloaded. Even if
the system is well specified, there can still
be bottlenecks that restrict overall
performance.
Ensure as few processes as possible are
running while a backup is being performed.
Backup operations and virus scans should
NOT be performed at the same time.
Information on optimizing performance is
given at //www.hp.com/support/dat
Disk drives are on the same SCSI
bus as the tape drive.
Disks tend to monopolize the SCSI bus
and should be set to a lower SCSI ID such
as 0 or 1. Ideally, the tape drive should be
on its own SCSI channel or bus (separate
from the disks being backed up).
The SCSI adapter is incorrectly set
up.
Check your SCSI adapter set-up and
ensure you have the latest drivers and
software patches installed.
Damaged or worn media. If the media is damaged, the tape drive
may perform many retries before
successfully writing or reading data. Try
using new media.
poor data compression ratio
Possible cause Potential solution
Data is already compressed or can
only be compressed to a small
degree.
Optimum tape drive performance is
normally quoted assuming that the data
can be compressed by a factor of two
(referred to as 2:1 compression). However,
some computer data is already
compressed and therefore cannot be
compressed further. Other data can only
be compressed by a small degree
depending on type.
It is not possible to improve the
compression of data.
Compression is disabled. Some backup software applications allow
compression to be turned on and off.
Ensure that it is turned on.
software compatibility
Possible cause Potential solution
It is unclear which software can be
used with the HP Surestore DAT
tape drive.
The HP Surestore DAT tape drive is widely
supported by most common backup
applications.
Refer to //www.hp.com/go/connect for the
latest information on compatability.
Existing software does not work
with the HP Surestore DAT tape
drive.
Older software may need to be updated.
Refer to //www.hp.com/go/connect for the
latest information on software downloads.
problems writing to tape
Possible cause Potential solution
The tape is write protected. Move the write protect tab out from the
write protected position. When in the write
protected position, the bright orange area
is exposed.
The wrong type of media is being
used.
Use only DDS cartridges in the drive. Do
not use cartridges labeled "DAT" because
the media is not certified and its integrity
cannot be guaranteed for data storage
purposes. DAT cartridges have a different
mechanical specification that can cause
them to jam in the mechanism. The tape
drive warranty does not cover damage
caused by the use of DAT cartridges.
system crashes when swapping removable drives
Possible cause Potential solution
Exchanging a tape drive installed in
a HP Surestore Tape Array 5300
enclosure has disrupted activity on
the SCSI bus.
Rack mounted tape drive modules must
only be extracted or swapped when the
SCSI bus is idle.
Even if the device being swapped is not
currently in operation, care must be taken
that there are not other devices on the bus
that are in use.
© 1997-2001, Hewlett-Packard Company
file:///C|/Documents%20and%20Settings/topher.COL-SPRINGS/Desktop/Ultrium/pdf/document/dds/user/reseller/eng/trouble.htm [11/15/2001 1:25:54 PM]
Page 35

frequently asked questions
hp learning products
http://www.hp.com/support/tape may have a later version
data protection
index of topics
contact hp
home page
before you start
tape drive operation
autoloader operation
cartridge care
cleaning
one-button disaster
recovery
specifications
diagnostics
troubleshooting
FAQs
SCSI configuration
UNIX configuration
ordering supplies
installing drivers
frequently asked questions
For further troubleshooting information, refer also to our Customer Support web
site:http://www.hp.com/support/dat
How often should I clean the
tape drive heads?
It depends on what model tape drive you have
and how many backup cartridges you use per
day. Refer to Cleaning the Tape Heads for
details. You should also clean the heads if the
Media Caution signal is displayed. Use only HP
cleaning cartridges to clean the heads.
What should I avoid when
positioning the tape drive?
Do not place the drive in a dirty environment,
for example, on the floor, near a busy walkway,
or near a door. Avoid locations subject to
sudden temperature changes, such as near an
outside door or window. For specific
environmental limits, refer to the specifications
for your tape drive model.
How many times can I use a
DDS cartridge?
The recommended maximum number of
passes over any single part of the tape is 2000.
In practical terms, this is equivalent to about
100 backup operations.
What types of tape
cartridges can I use with my
drive?
For optimum performance and storage
capacity, use tape cartridges that match your
drive's format. The HP Surestore DAT 24
works best with DDS-3 (125m) tapes, but it can
also use DDS-2 tapes. The HP Surestore DAT
40 works best with DDS-4 (150m) tapes, but it
can also use DDS-3 and DDS-2 tapes.
However, using older tape formats can reduce
the life expectancy of the device. See Choosing
Cartridges for more information.
How do I upgrade the
firmware?
You can update the firmware in HP Surestore
DAT tape drives either by downloading over the
SCSI bus or by loading a firmware update tape.
See Firmware Upgrades.
For how long can I archive
tapes?
Tests have shown that DDS cartridges will
preserve the integrity of stored data for at least
thirty years if proper storage conditions are
observed. See Storing Cartridges.
How many tapes do I need?
This depends on how much data you back up
and how often you back up. See Backup
Strategies for more information.
Can I use my cartridges with
future HP DDS-format
products?
Hewlett-Packard DDS-format products are
designed to be backward compatible, so they
will be able to read data previously recorded on
earlier DDS formats.
Can I do more than one
backup to a cartridge?
Yes, if your backup software allows it. Consult
the user documentation that came with your
backup software for instructions.
© 1997-2001, Hewlett-Packard Company
file:///C|/Documents%20and%20Settings/topher.COL-SPRINGS/Desktop/Ultrium/pdf/document/dds/user/reseller/eng/faq.htm [11/15/2001 1:25:56 PM]
Page 36

SCSI configuration
hp learning products
http://www.hp.com/support/tape may have a later version
data protection
index of topics
contact hp
home page
before you start
tape drive operation
autoloader operation
cartridge care
cleaning
one-button disaster
recovery
specifications
diagnostics
troubleshooting
FAQs
SCSI configuration
UNIX configuration
ordering supplies
installing drivers
SCSI configuration
contents of this section
SCSI in hp surestore dat devices
what is SCSI?
the standards
setting up the SCSI bus
SCSI ID numbers
identifying SCSI IDs
setting the SCSI ID on hp surestore dat drives
SCSI termination
internal drives
external drives
removable drives
SCSI cables
cable length
cable quality
with internal drives
with external drives
with removable drives
VHD connectors
note on SE and LVD interfaces
scsi in hp surestore dat devices
The HP Surestore DAT 40 drive and HP Surestore DAT 40x6 autoloader are
ultra wide, SCSI-2 compatible devices. They are designed to operate on a low
voltage differential (LVD) SCSI interface. They are not compatible with high
voltage differential SCSI devices.
The drives support a burst transfer rate of 40 MB/sec. To benefit from this level
of performance, it is important to ensure that the drives are connected to a SCSI
bus of a similar or higher specification. This means that you need:
● An Ultra Wide, Ultra2 Wide, Ultra160 or Ultra3 SCSI host bus
adapter. Ultra Wide SCSI supports the maximum bus speed of 40 MB
per second, Ultra2, Ultra160 and Ultra3 SCSI exceed this.
● LVD-rated SCSI cabling and terminators. The LVD interface enables
the data to be transferred at the drive's maximum rate and provides a
maximum cable length of 12 meters.
The HP Surestore DAT 24 drive and HP Surestore DAT 24x6 autoloader are
single-ended, fast SCSI-2 compatible devices. The drives support a burst
transfer rate of 20 MB/sec and should be used with a SCSI bus that meets the
Fast specification or higher. They are not compatible with high voltage
differential SCSI devices.
All HP Surestore DAT drives can be used with both LVD and single-ended host
bus adapters. However, for optimum performance, connect HP Surestore DAT
40 devices to an LVD SCSI bus.
We also recommend that the tape drive or autoloader is connected to a
dedicated host bus adapter. If you need to connect multiple devices to the bus,
performance will not be restricted as long as devices are of the same type (for
example, Ultra Wide SCSI). If one device is single-ended, all devices will be
treated as single-ended, which will restrict the maximum permissible length of
the cable and could restrict the performance of HP Surestore DAT 40 devices. It
could take longer to back up your data.
Make sure that the last device on the SCSI bus is terminated. Do not attach the
tape drive to the same SCSI bus as the disk drive. See the section on SCSI
termination for more information about terminating HP Surestore DAT tape
drives.
what is SCSI?
The Small Computer Systems Interface (SCSI) is popular because it offers a
fast and flexible method of connecting a variety of devices to a host computer.
The SCSI standards define both the physical connections between the devices
(cables and connectors) and the protocols devices use to communicate with
each other.
the standards
There have been three general standards:
SCSI-1, which is now obsolete
SCSI-2, which is very common, and still a current standard
SCSI-3, which is an emerging set of linked standards that define
much more than the simple bus systems used by the earlier versions.
SCSI-3 includes Fibre Channel, Wide SCSI, FireWire (IEE 1398),
Low Voltage Differential (LVD or LVDS), and Fast Serial SCSI. Some
of these standards are now being used on PC platforms
Another variant is ATAPI, which uses an EIDE physical bus to pass SCSI
protocols to connected devices. Technically, this is not part of the SCSI-3
standards, although some operating systems (notably Windows NT) manage
ATAPI devices as if they were fully SCSI.
SCSI is a backward-compatible standard, so that SCSI-2 and SCSI-3 devices
can almost always be made to work together.
SCSI is a bus interface: all the devices are connected to a single cable (some
of this may be inside and some outside the host computer's case). The
connection to the host itself is known as the Host Bus Adapter (HBA). You can
have several HBAs in a single computer, each with its own SCSI bus: this is a
common arrangement in high-performance servers. Some host bus adapters
(such as the Adaptec 3940W) have more than one SCSI bus available on a
single card.
Various terms are used when describing SCSI devices. These terms relate to
the factors that affect performance and cable length:
The speed of the data bus, which may be Fast, Ultra, Ultra2, Ultra3,
Ultra160 or Ultra320.
The width of the data bus, which may be Narrow or Wide.
The voltage level of the interface, which may be single-ended (SE) or
low voltage differential (LVD).
As described above, HP Surestore DAT 40 drives and DAT 40x6 autoloaders
are Ultra Wide SCSI devices designed to operate on a low voltage differential
SCSI interface. HP Surestore DAT 24 drives and DAT 24x6 autoloaders are
Fast SCSI devices designed to operate on a Fast SCSI interface.
setting up the SCSI bus
Each device on a SCSI bus, including the SCSI host bus adapter (HBA), must be
configured with a unique ID (identifier). The SCSI bus must be terminated.
Note: HP recommends that a dedicated host bus adapter is used for the tape
drive. A suitable adapter is available from HP as an accessory (see Ordering
Information).
SCSI ID numbers
For wide SCSI buses, the SCSI ID will be a number from 0 through 15, so a
typical wide SCSI HBA can accommodate up to fifteen other devices.
SCSI IDs are usually set on the device itself (sometimes via configuration
software), but some newer devices are capable of selecting an unused ID
automatically when powered-up (these are known as "SCAM" devices). HP
Surestore drives are SCAM-1 compliant. This means that the drive will return its
SCSI ID to the host bus adapter in response to a SCSI inquiry, but it will not allow
the adapter to change the SCSI ID.
SCSI ID 7 is normally reserved for the HBA because it has the highest priority on
the bus. On wide buses, the priority runs from 7 (highest) to 0, then 15 down to 8
(lowest).
Note: As a general rule, avoid putting tape devices on the same bus as any hard
disks.
identifying SCSI IDs
If your computer already has devices connected to the SCSI bus, you will need to
know their IDs to avoid any conflict with the new tape drive. Here are some
methods of finding out the information:
The fastest and easiest way is to run HP Library & Tape Tools from
this CD-ROM. HP Library & Tape Tools will check your SCSI
configuration, including the SCSI controller itself and any devices
currently attached to it.
Most computers display a list of SCSI devices and IDs during the
boot-up process. This usually scrolls past very fast. If you press the
[Pause] key, you should be able to halt the scrolling and view the list.
If you have an Adaptec host adapter in the computer, it may have
come with a Windows utility called SCSI Interrogator
(SHOWSCSI.EXE) which displays information about connected
devices.
If you have Windows NT installed, select SCSI Adapters from the
Control Panel, select a device in the Devices tab and click on
Properties to view information about the device, including its SCSI
ID.
If you have Novell NetWare installed, use its LIST DEVICES
command.
If none of these is available to you, try the following sources of information:
The details of all installed devices and settings may have been
written down and stored with your computer's documentation (for
new computers, this is often done by the supplier).
Your HBA's documentation should tell you which settings it uses.
Look at each device to find out its ID. This is usually easy with
external devices. With internal devices, you will probably need the
help of the device's documentation to identify the SCSI ID setting,
which is usually set with jumpers.
setting the scsi id on hp surestore dat drives
For all cases, see the Getting Started Guide that came with your tape drive for
more details. Note that host adapters check SCSI IDs only at power-on, so any
changes will not take effect until the host system is power-cycled.
On internal HP Surestore drives, set the SCSI ID by attaching or
removing jumpers at the rear of the drive.
On external HP Surestore drives, the ID is displayed on the rear
panel and can be set by pressing the little buttons above and below
the number.
On removable HP Surestore drives, the ID is set on the back of the
tape array.
SCSI termination
Terminators are essential, as they provide the correct voltages on the SCSI bus
and prevent unwanted signal reflections from interfering with data transfers. The
rule is:
There must be termination at both physical ends of the bus
and only at the ends.
There are two main types of termination, active and passive. Active terminators
reduce interference and allow faster data throughput. On devices with high
transfer speeds, such as HP Surestore DAT 40 and DAT 24 devices, active
termination is required. Multi-mode active terminators are used with ultra wide
LVD SCSI buses. These terminators detect the type of bus and automatically
supply the correct termination
Normally the HBA forms one end of the SCSI bus and provides termination.
You, therefore, need to ensure that the other end of the bus is terminated.
internal drives
Usually the internal SCSI cable in a
server has a number of SCSI
connectors along its length and a
terminator at the end farthest from the
host bus adapter. This will usually be a
small, rectangular block of plastic
attached to the cable end and marked
‘SCSI Terminator’.
As long as this terminator is attached,
you do not need to take any further
action. However, if you have other
devices attached to the cable, make
sure that they have termination
removed or disabled.
Note: If you have an internal and external device attached to the same SCSI
bus, the HBA will be in the middle of the cable and thus its termination must be
disabled. See the host bus adapter's documentation for details of how to do
this.
external drives
All HP Surestore DAT external tape drives and autoloaders are supplied with
the appropriate terminators.
Make sure the terminator is firmly attached to the SCSI-OUT connector on the
rear of the device when you install it. With the HP Surestore DAT 40 and DAT
40x6 always use the supplied multi-mode terminator for proper operation.
If you have more than one device on the SCSI bus, daisy-chain them by
connecting a cable from the SCSI-OUT connector on the first device to the SCSIIN connector on the second device and make sure that the second device is
terminated. (For HP Surestore DAT 40 devices, use an LVD-rated cable and an
LVD-rated multimode terminator.)
removable drives
For HP Surestore DAT removable tape drives, termination is provided by
connecting a terminator to the spare SCSI connector on the rear of the tape
array. There are two connectors for each bay in the tape array. It doesn't matter
which is used for SCSI-IN and SCSI-OUT.
If you have each removable drive in the tape array attached to a separate bus,
then, for each bay in use, you must attach a terminator to the spare connector
for each device.
If you are using the removable drives to mirror backups, you can daisy-chain
devices (but no more than two on each SCSI bus). Connect an LVD-rated cable
from the spare SCSI connector for the first device to one of the SCSI
connectors for the second device and attach the terminator to the spare SCSI
connector for the second device.
Refer to your tape array documentation for detailed instructions.
SCSI cables
Cables matter in SCSI systems. There are two factors to consider: cable length
and cable quality.
cable length
● For single-ended SCSI with Fast devices there is a maximum permissible
length of 6 meters for a single SCSI bus.
● For single-ended SCSI with Ultra devices the maximum permissible length
is 3 meters for four or fewer devices, and 1.5 meters for more than four
devices.
● For LVD SCSI the maximum length for a single device is 25 meters. For
multiple devices, the maximum combined internal/external length is 12
meters.
● If you have a combination of LVD and SE devices on the bus, the maximum
cable length reverts to the SE specification. See note on SE and LVD
interfaces for more information.
● For best performance, keep lengths to a minimum, but avoid very short
overall lengths (less than 0.5 meters).
cable quality
● It is important to use good quality cables. Generally speaking, cable quality
affects performance and reliability. This is particularly true for external,
shielded cables.
● Look after your SCSI cables. In particular, take care when connecting or
disconnecting not to damage the high-density connectors. Avoid putting
excessive twists in external shielded cables, as this can cause premature
failure.
with internal devices
For HP Surestore DAT internal devices, you need a SCSI ribbon cable with the
correct termination. HP Surestore DAT 40 and DAT 40x6 drives have a 68-pin
wide, high-density SCSI connector. If you are using an HP Surestore DAT drive
on an internal bus with other peripherals that run at Ultra or Ultra2 speeds, it is
important that a 68-pin LVD-compatible ribbon cable is used. If your computer
uses narrow SCSI, you will need a cable or adapter that enables you to connect a
wide SCSI device (68 pins) into the narrow SCSI bus (50 pins). This can be
purchased from your supplier.
HP Surestore DAT 24 and DAT 24x6 devices have a 50-pin narrow SCSI
connector. If your computer uses wide SCSI, you will need a cable or adapter that
enables you to connect a narrow SCSI device (50 pins) into the wide SCSI bus
(68 pins). This is provided with your tape drive.
with external devices
The cable provided with all HP Surestore DAT external tape drives and
autoloaders will attach to a computer with a wide LVDS SCSI connector (68 pins).
with VHD connector
If your server or host bus adapter is equipped with a very high density (VHD) wide
SCSI connector, you will need to order a 68-pin HD-to-VHD converter or 68-pin
HD-to-VHD cable. See Ordering Information.
with removable devices
For HP Surestore DAT removable tape drives, appropriate cables are provided
with the tape array.
note on SE and LVD interfaces
SE and LVD define how the signals are transmitted along the cable.
● With single-ended (SE) SCSI, each signal travels over a single wire and
each signal's value is determined by comparing the signal to a paired
ground wire. Signal quality tends to decrease over longer cable lengths or
at increased signal speed.
● With low voltage differential (LVD) signaling, signals travel along two
wires and the difference in voltage between the wire pairs determines the
signal value. This enables faster data rates and longer cabling with less
susceptibility to noise than SE signaling and reduced power consumption.
If you use LVD SCSI devices on the same bus bus as single-ended devices this
will switch the LVD SCSI host adapter into single-ended mode and restrict cable
length.
If you connect only LVD SCSI devices, the bus will operate in low voltage
differential mode and Ultra2 speeds will be enabled. You can use a combination of
Ultra and Ultra2 devices. Each device will operate at its optimum speed.
© 1997-2001, Hewlett-Packard Company
file:///C|/Documents%20and%20Settings/topher.COL-SPRINGS/Desktop/Ultrium/pdf/document/dds/user/reseller/eng/scsi.htm [11/15/2001 1:26:00 PM]
Page 37

ordering supplies
hp learning products
http://www.hp.com/support/tape may have a later version
data protection
index of topics
contact hp
home page
before you start
tape drive operation
autoloader operation
cartridge care
cleaning
one-button disaster
recovery
specifications
diagnostics
troubleshooting
FAQs
SCSI configuration
UNIX configuration
ordering supplies
installing drivers
ordering supplies
contents of this section
SCSI cables
identifying SCSI connections
external drives and autoloaders
internal drives and autoloaders
removable drives
SCSI terminators
external drives and autoloaders
removable drives
adapters
host bus adapters
SCSI cable adapters
rail kits
media
SCSI cables
identifying SCSI connections
HP Surestore DAT 24 tape drives and autoloaders are single-ended, fast SCSI-2
compatible devices. External drives have a 50-pin, low density bail SCSI
connector.
The HP Surestore DAT 40 drive and HP Surestore DAT 40x6 autoloader are ultra
wide, SCSI-2 compatible devices. External drives have a 68-pin, high density
screwlock (or thumbscrew) SCSI connector.
To determine the appropriate SCSI cable, you need to know what type of SCSI
port the host server has. Is it 8-bit (narrow) or 16-bit (wide), is it single-ended (SE)
SCSI or low voltage differential (LVD) SCSI, is it low density (LD), high density
(HD) or very high density (VHDCI)?
The following diagrams may help you identify the different types of SCSI
connector.
50-contact, centronics-type, ribbon
contact connector as used for Slow,
Fast or Ultra, 8-bit Narrow SCSI
applications, such as HP Surestore
DAT 24 devices.
68-pin high-density SCSI connector as
used for 16-bit Wide or Ultra Wide
SCSI devices, such as HP Surestore
DAT 40 devices.
68-contact, ribbon type connector,
known as the "VHDCI" SCSI
connector. (You need an adapter if
you want to use HP Surestore DAT
devices with a VHDCI connector.)
internal drives and autoloaders
No additional cables are supplied with HP Surestore DAT internal tape drive and
autoloaders. However, the following cables may be ordered:
hp surestore DAT 40 and DAT 40x6
Item Description
Part
Number
1.0 m internal
4 connector, 68-way, terminated, LVD/SE Ultra2
quality conductor
C7424A
hp surestore DAT 24 and DAT 24x6
Item Description
Part
Number
1.0 m internal SCSI cable, 4 connector, 50-way, terminated
C564461000
external drives and autoloaders
hp surestore DAT 40 and DAT 40x6
Should you require an additional cable of the same or different length for
connection to the same type of SCSI host, order one of the following:
Item Description
Part
Number
0.9 m external 68-pin high density to 68-pin high density,
LVD/SE Ultra2 quality conductor
C5741A
1.5 m external 68-pin high density to 68-pin high density,
LVD/SE Ultra2 quality conductor
C5742A
2.5 m external 68-pin high density to 68-pin high density,
LVD/SE Ultra2 quality conductor
C5743A
Should you require an additional cable for connection to a narrow (50 pin) low
density SCSI host, order the following:
Item Description
Part
Number
0.9 m external
SCSI cable, 68-pin high density to 50-pin high
density latch
C5679A
hp surestore DAT 24 and DAT 24x6
The following cables may be ordered:
Item Description
Part
Number
1.0 m external
SCSI cable, 50-pin HDLC to 50-pin LDBL K2286
1.0 m external SCSI cable, 50-pin LDBL to 50-pin LDBL M/M 92222B
1.0 m external SCSI cable, 50-pin HDTS to 50-pin LDBL M/M K2296
removable drives
No cables are supplied with the HP Surestore DAT removable tape drive.
However, you may need additional cables to connect from the HP Surestore Tape
Array 5300 to the host server, or to daisy chain the connections for two removable
drives on the rear of the tape array. The following cables may be ordered. Select
the appropriate one according to the SCSI specification of the host server:
Item Description
Part
Number
0.5 m high density, screw lock, 68-pin, multi mode,
LVD
C2978B
1.5 m high density, screw lock, 68-pin, multi mode,
LVD
C2979B
0.9 m high density, screw lock, 68-pin, multi mode,
LVD/FWD
C2911C
2.5 m high density, screw lock, 68-pin, multi mode,
LVD/FWD
C2924C
5.0 m
high density, screw lock, 68-pin, multi mode C7521A
10.0 m
high density, screw lock, 68-pin, multi mode C7522A
1.0 m very high density, screw lock, 68-pin/high
density, screw lock, 68-pin, LVD
C2361B
2.5 m very high density, screw lock, 68-pin/high
density, screw lock, 68-pin, LVD
C2362B
5.0 m very high density, screw lock, 68-pin/high
density, screw lock, 68-pin, LVD
C2365B
10.0 m very high density, screw lock, 68-pin/high
density, screw lock, 68-pin, LVD
C2363B
terminators
external drives and autoloaders
Should you require an additional terminator, order one of the following according
to the drive/autoloader model:
Model Description
Part
Number
DAT 40 and 40x6
devices
multimode (external, LVD, active) C5738A
DAT 24 and 24x6
devices
SCSI terminator (external single-ended, lowdensity, active)
K2291
removable drives
No terminators are supplied with the HP Surestore DAT removable tape drive.
However, you may need additional terminators to terminate the connection from
the HP Surestore Tape Array 5300 to the host server. The following terminators
may be ordered. Select the appropriate one according to the drive/autoloader
model:
Model Description
Part
Number
DAT 24 and 24x6
devices
SCSI terminator (single-ended, active) C2972A
DAT 40 and 40x6
devices
SCSI terminator (LVD, active) C2364A
adapters
host bus adapters
If you need to purchase a SCSI host bus adapter (HBA), refer to
http://www.hp.com/go/connect for the recommended HBA for your system. The
following orderable accessories are recommended for most systems:
Model Description
Part
Number
DAT 24 and 24x6
devices
SCSI ultra wide connect kit C7558B
DAT 40 and 40x6
devices
SCSI ultra 160 connect kit C7474A
SCSI cable adapters
If your system requires an additional SCSI cable adapter, order the following:
Model Description
Part
Number
DAT 24 and 24x6
internal devices
50-pin female to 68-pin female ribbon cable
adapter (for internal devices)
C5710A
DAT 40 and 40x6
internal devices
68-pin male to 50-pin male ribbon cable adapter
(for internal devices)
C7423A
All external drives
and autoloaders
68-pin HD to 68-pin VHDCI SCSI adapter (for
external devices)
C7434A
rail kits
The correct tray or rail kit is supplied with the drive or autoloader:
● For mounting an internal drive inside an HP L-series, HP E-series, Kayak,
Brio, Vectra or Compaq server.
● For mounting an internal autoloader inside an HP L-series or Compaq
server.
Should you require rail kits for mounting your drive in certain Dell servers, order
the following:
Item Description
Part
Number
Dell rail kit for Dell PowerEdge servers 2300, 4100, 4200 C5732A
Most other servers have all the required mounting hardware. If this is not the case
with your server, contact your system vendor.
media
The following media is recommended for use with HP Surestore DAT tape drives
and autoloaders:
Item Description
Part
Number
data cartridge
HP DDS-3, 24 GB*
C5708A
data cartridge
HP DDS-4, 40 GB*
C5718A
autoloader magazine DDS autoloader magazine (empty) C1571A
magazine preloaded
for DAT 24x6
DDS autoloader magazine preloaded with 5 HP
DDS-3 24 GB* cartridges and 1 HP DDS
cleaning cartridge
C1570A
magazine preloaded
for DAT 40x6
DDS autoloader magazine preloaded with 5 HP
DDS-4 40 GB* cartridges and 1 HP DDS
cleaning cartridge
C7436A
cleaning cartridge HP DDS cleaning cartridge C5709A
storage box DDS cartridge storage box (holds 12 cartridges) 92283L
* assumes 2:1 compression
© 1997-2001, Hewlett-Packard Company
file:///C|/Documents%20and%20Settings/topher.COL-SPRINGS/Desktop/Ultrium/pdf/document/dds/user/reseller/eng/order.htm [11/15/2001 1:26:03 PM]
Page 38

loading & unloading autoloader
hp learning products
http://www.hp.com/support/tape may have a later version
data protection
index of topics
contact hp
home page
before you start
tape drive operation
autoloader operation
the front panel lights
front panel
messages
loading & unloading
modes of operation
cartridge care
cleaning
one-button disaster
recovery
specifications
diagnostics
troubleshooting
FAQs
SCSI configuration
UNIX configuration
ordering supplies
installing drivers
loading and unloading autoloaders
contents of this section
loading a magazine and cartridges
ejecting the magazine
forcing ejection
related topics
interpreting the front panel lights
cartridges
localizing language display (DAT
40x6 only)
autoloader modes of operation
loading a magazine and cartridges
The autoloader is configured to use DDS cartridges. Any other cartridge will be
treated as write-protected; you will only be able to read it, not write to it. See
Choosing Cartridges for advice on which cartridges to use with your autoloader.
In order to maximize drive and media reliability, we recommend that you normally
use the autoloader to provide one week's backup per magazine. Ideally, use five
cartridges and one cleaning cartridge in each magazine (DDS-3 cartridges with
HP SureStore DAT 24x6 autoloaders and DDS-4 cartridges with HP SureStore
DAT 40x6 autoloaders). This allows you to perform a full backup, up to 40 GBytes
for DAT 40x6 models and 24 GBytes for DAT 24x6 models, each working day,
and ensures that the tape heads are cleaned once a week.
Note: For best performance and error-free operation, it is advisable to use only
one brand and type (tape length) of data cartridge in a magazine. Ideally, use only
HP's DDS-4 or DDS-3 cartridges. Do not mix DDS-1 (90m) with DDS-2 (120m),
DDS-3 (125m) or DDS-4 (150 meter) cartridges. It is perfectly acceptable to
include a cleaning cartridge in a magazine.
Place the required number of cartridges
in the magazine so that they point
towards the center of the magazine.
You can use any number of cartridges
from 1 to 6, and can place the
cartridges in any of the magazine slots.
However,for ease and speed of use,
start by using slot 1. During a stacker
mode backup, the drive will attempt to
load the first cartridge from slot 1.
1. Insert the magazine through the door in the front of the autoloader. Make
sure that the large arrow is uppermost and pointing towards the autoloader,
as shown below.
2. Apply steady pressure until the mechanism takes the magazine and pulls it
into the autoloader. The autoloader will then check which magazine slots
contain cartridges.
3. When the magazine check is complete, use either your backup software on
the host computer or the autoloader's front panel buttons to select and load
a cartridge from the magazine into the drive.
internal autoloaders
external autoloaders
The drive now performs a load sequence. This takes a maximum of 25 seconds
from the time the cartridge is inserted to the time the drive is ready to start acting
upon the next command from the host. The sequence is as follows:
● The drive mechanism threads the tape and checks the tape format (DDS or
audio). If the tape is blank, the drive leaves the tape at BOT (Beginning of
Tape) and awaits the next command.
● If the tape is in DDS format and is write-enabled, the drive performs write
and read tests. If the error rate is high, the Operator Attention Required light
illuminates and an error message may appear on the front panel display.
● The drive reads the tape log, which contains details of the history of the
tape.
● The drive rewinds to BOP (Beginning of Partition) and goes online, awaiting
a command from the host.
Depending on whether the host computer instructed the autoloader to load a
cartridge or you pressed the Load Cartridge button, the autoloader goes into one
of two modes of operation: random mode, where movement of cartridges is
controlled by the backup software, or stacker mode, where cartridges are loaded
in numerical order from the magazine. For more information, see Autoloader
Modes of Operation.
ejecting the magazine
1. To eject a magazine, press the Eject button.
2. The autoloader ejects the magazine.
internal autoloaders
external autoloaders
If one of the cartridges is still in the drive mechanism when you press the Eject
button, the autoloader performs the following sequence of actions first:
● The drive rewinds the tape and updates the tape log (unless the cartridge is
write-protected). It then ejects the cartridge from the drive mechanism.
● The changer mechanism replaces the cartridge in the magazine.
● The magazine is ejected.
Note: It is possible for the host computer to disable the Eject button by sending a
PREVENT MEDIA REMOVAL command via SCSI. This will remain in force until
either the host sends an ALLOW MEDIA REMOVAL command or the autoloader is
reset or power-cycled.
forcing ejection
If you press the Eject button when the autoloader is busy, it may be a long time
before the autoloader will respond to the request because it will finish the task it is
performing first. This ensures that the task is terminated in a controlled manner
and no data is lost.
However, if you need to unload a cartridge urgently, even at the risk of losing
data, you must force ejection.
Caution: You can lose data if you force ejection. The tape may also end up
invalidly formatted because an EOD (End of Data) mark might not be written.
Force ejection only as a last resort to recover a cartridge.
To force ejection:
Hold the Eject button down for at least five seconds (usually between 5 and 10
seconds). The autoloader responds as follows:
● The front panel display will show "Force Eject."
● The autoloader waits 35 seconds to give the normal eject procedure a
chance to occur.
● Once this time has elapsed, if there is a cartridge loaded in the drive it is
immediately unloaded, regardless of what operation the drive was
performing. The cartridge is then returned to its slot in the magazine, and
the drive is reset as though the power had been cycled.
Because the forced ejection may interrupt any operation, it is possible that
the drive will not write an EOD (End of Data) mark before the cartridge is
ejected. This will cause loss of data and leave the cartridge with an invalid
format.
● If no cartridge is loaded in the drive, the autoloader assumes that you want
to eject the magazine. Following the 35-second pause, it does this. The
autoloader is then reset as though power had been cycled.
Note: A forced ejection will abort any SCSI operations that may be in progress on
the autoloader and overrides any SCSI PREVENT MEDIA REMOVAL in effect.
© 1997-2001, Hewlett-Packard Company
file:///C|/Documents%20and%20Settings/topher.COL-SPRINGS/Desktop/Ultrium/pdf/document/dds/user/reseller/eng/load2.htm [11/15/2001 1:26:05 PM]
Page 39

how to contact hp
hp learning products
http://www.hp.com/support/tape may have a later version
data protection
contact hp
americas
europe
asia pacific
warranty
customer service
form
obtaining technical support
contents of this section
before calling for service or support
obtaining service
contacting hp
hp service agreements
returning your tape drive for service
worldwide online services
before calling for service or support
If you need help, your dealer has the latest information regarding HP products and services
and can provide support under HP's comprehensive menu of reseller services. If your
dealer is not able to help, you can obtain support from HP directly either through online
services or by telephone.
Before calling for service or support:
Check that your HP Surestore Tape Drive is installed correctly
Check the printed Getting Started Guide and the troubleshooting advice
in this online User's Guide
Check HP Instant Support - this is a web-based problem identification,
diagnosis and resolution service providing fast, easy-to-use online
solutions. You can access HP Instant Support from
www.hp.com/go/instantsupport
When calling HP Customer Support, please be prepared to work with the HP support
specialists to resolve your problem. This may involve downloading software from the web
and performing appropriate diagnostic on your drive if appropriate, aided by the service
agent.
obtaining service
Please use the Customer Service Form to collect the details that our Customer Service
Representative will need to help solve your problem.
During the warranty period: HP provides a free telephone support service during the
warranty period. Contact your local HP dealer or the appropriate HP technical support
contact for your area, by selecting the region required from the navigational buttons in the
left hand pane. Obtain the telephone number from the list of countries supplied. You will
be connected to a responsive team waiting to help you.
After the warranty period: If you require support after your warranty has expired, you
can receive support for a fee through the same telephone numbers. The fee is charged on a
per incident basis. Alternatively, you can contact your local HP dealer who will be able to
advise you and arrange for service.
contacting hp
A full listing of HP's service and support centres worldwide can be found at
http://www.hp.com/cposupport/mail_support.html
If you do not have internet access, click on the appropriate region from the side navigation
bars for a list of contact numbers correct at time of printing.
hp service agreements
HP offers a number of service agreements to meet your needs. Contact your local dealer or
nearest HP office for further information.
returning your tape drive for service
Your HP Surestore tape drive comes with a 24-hour Express Exchange warranty (not
available in all countries).
Before returning an HP Surestore tape drive, call the Customer Support Center for your
area. When you call, make sure that you have the following information available:
The product name and serial number (see label on the back of the
appliance server)
Date of purchase
A description of the product fault
A contact name for details of the failure
A contact telephone number
Your shipping address
The telephone service agent will verify that the unit is faulty and will make sure that a
replacement unit is sent to you within 24 hours. When you receive the replacement unit,
remove it from the packaging and use the packaging material for returning the faulty unit.
All shipment costs are prepaid by HP.
When returning the drive to HP, any damage caused as a result of inadequate packaging is
your responsibility. Use the original packing materials whenever possible.
worldwide online services
HP offers electronic services that give you a fast, interactive way to access information
and help on setup, configuration, installation and operation of your product. The online
services are available on the World Wide Web and FTP, as well as the country-specific
resources listed later in this section.
World Wide Web
Product and support information are available from HP's web site on the Internet at
http://www.hp.com/go/tape
FTP
Product and support information are available from our FTP site on the Internet at
ftp.hp.com/pub/information_storage/surestore
America Online
Download support documents and discuss issues in user forums. Find us with keyword
hpstor.
© 2000, Hewlett-Packard Company
file:///C|/Documents%20and%20Settings/topher.COL-SPRINGS/Desktop/Ultrium/pdf/document/common/contact/eng/conhome.htm [11/15/2001 1:26:08 PM]
Page 40

americas
hp learning products
http://www.hp.com/support/tape may have a later version
data protection
contact hp
americas
europe
asia pacific
warranty
customer service form
north and south america
contents of this section
check the web for up to date contact information
hp support in north america
canada
united states
hp support in south america
argentina
brazil
colombia
guatemala
chile
mexico
puerto rico
venezuela
check the web for up to date information
If you have internet access, click on the URL below:
http://www.hp.com/cposupport/mail_support.html
From time to time, telephone numbers and addresses may change; accessing
contact details over the web will ensure you have the latest information.
If you do not have internet access, refer below for a list of contact numbers correct
at time of printing:
hp support in north america
Customers in North America can contact HP on the telephone support lines listed,
by country, below.
canada
Telephone
905-206-4663
Hours of operation: 8.00
a.m. to 8:00 p.m.
Monday through Friday
905-206-4663
Horaires de disponibilité :
Lundi - Vendredi, 8 h 00 20 h 00
united states
Telephone
(970) 635-1500
Hours of operation: 6.00
a.m. to 6:00 p.m. MST
Monday through Friday
hp support in south america
Customers in South America can contact HP on the telephone support lines listed,
by country, below.
argentina
Telephone
0810 555 5520 (from
within Argentina)
(5411) 4778 8380
(outside Argentina)
Hours of operation: 8:30
a.m. to 7:30 p.m. Monday
through Friday
0810 555 5520
(5411) 4778 8380
Horas de atención: Lunes
a Viernes de 8:30 a
19:30 h
brazil
Telephone
Great São Paulo: (11)
3747-7799
Other regions: 0800
157751
Hours of operation: 8:00
a.m. to 7:00 p.m. Monday
through Friday
Grande São Paulo: (11)
3747-7799
Demais regiões: 0800
157751
horãrio de
funcionamento: Prévendas Televendas : 2a
a 6a feira das 08 às 22h
Sábado das 09 às 18h
Pós-vendas: 2a a 6a feira
das 08 às 19h
chile
Telephone
800 22 5547
Hours of operation: 9:00
a.m. to 6:00 p.m. Monday
through Friday
800 22 5547
Horas de atención: Lunes
a Viernes de 9:00 a
18:00 h
colombia
Telephone
9 800 91477
Hours of operation: 9:00
a.m. to 6:00 p.m. Monday
through Friday
9 800 91477
Horas de atención: Lunes
a Viernes de 9:00 a
18:00 h
guatemala
Telephone
800 999 5305
Hours of operation: 9:00
a.m. to 6:00 p.m. Monday
through Friday
Saturdays from 9:00 a.m.
to 1.00 p.m.
800 999 5305
Horas de atención: Lunes
a Viernes de 9:00 a
18:00 h
mexico
Mexico City
Telephone
52-58-9922
Hours of operation: 8:30
a.m. to 22:00 p.m.
Monday through Friday
9:00 a.m. to 14:00 p.m.
on Saturday
Outside Mexico City
Telephone
01-800-472 6684
Hours of operation: 8:30
a.m. to 22:00 p.m.
Monday through Friday
9:00 a.m. to 14:00 p.m.
on Saturday
52-58-9922
Horas de atención: Lunes
a Viernes de 8:30 a
22:00 h
01-800-472 6684
Horas de atención: Lunes
a Viernes de 8:30 a
22:00 h
puerto rico
Telephone
1 877 2320 589
Hours of operation: 9:00
a.m. to 5:00 p.m. Monday
through Friday
1 877 2320 589
Horas de atención: Lunes
a Viernes de 9:00 a
17:00 h
venezuela
Telephone
800 47 777 (Caracas 207
8488)
Hours of operation: 8:00
a.m. to 5:00 p.m. Monday
through Friday
800 47 777 (Caracas 207
8488)
Horas de atención: Lunes
a Viernes de 8:00 a
19:00 h
© 2000, Hewlett-Packard Company
file:///C|/Documents%20and%20Settings/topher.COL-SPRINGS/Desktop/Ultrium/pdf/document/common/contact/eng/americas.htm [11/15/2001 1:26:11 PM]
Page 41

europe
hp learning products
http://www.hp.com/support/tape may have a later version
data protection
contact hp
americas
europe
asia pacific
warranty
customer service
form
europe, middle east and africa
contents of this section
check the web for up to date contact information
hp support in europe, middle east & africa
austria
norway
belgium (dutch)
poland
belgium (french)
portugal
czech republic
russian federation (moscow)
denmark
russian federation (st petersburg)
finland
russian federation (ukraine)
france
south africa (inside RSA)
germany
south africa (outside RSA)
greece
spain
hungary
sweden
ireland
switzerland
israel
turkey
italy
united arab emirates
netherlands
united kingdom
other european countries - english
check the web for up to date information
If you have internet access, click on the URL below:
http://www.hp.com/cposupport/mail_support.html
From time to time, telephone numbers and addresses may change; accessing contact
details over the web will ensure you have the latest information.
If you do not have internet access, refer below for a list of contact numbers correct at time
of printing:
hp support in europe, middle east & africa
There is no charge for technical support during the warranty period (unless otherwise
stated). A per-incident charge applies after the warranty period.
Customers in Europe, the Middle East and Africa can contact HP on the telephone support
lines listed, by country, below.
austria
Telephone +43 (0)810 00 6080
Hours of operation: 8:30 to
18:00
Monday through Friday
+43 (0)810 00 6080
Geschäftszeiten: Montag -
Freitag, 08.30 - 18.00 Uhr
belgium (dutch)
Telephone +32 (0)2 626 88 06
Hours of operation: 8:00 to
18:00
Monday through Thursday
belgium (french)
Telephone +32 (0)2 626 88 07
Hours of operation: 8:30 to
18:00
Monday through Friday
+32 (0)2 626 88 07
Horaires de disponibilité:
Lundi - Vendredi , 8 h 30 18 h 00
czech republic
Telephone +42 (0)2 6130 7310
Hours of operation: 8:00 to
18:00
Monday to Thursday,
8.00 to 16:30
Friday
denmark
Telephone +45 39 29 4099
Hours of operation: 8:30 to
18:00
Monday through Friday
finland
Telephone +358 (0)203 47 288
Hours of operation: 8:30 to
18:00
Monday through Friday
france
Telephone +33 (0)1 43 62 34 34
Hours of operation: 8:30 to
18:00
Monday through Friday
+33 (0)1 43 62 34 34
Horaires de disponibilité:
Lundi - Vendredi , 8 h 30 18 h 00
germany
Telephone +49 (0)180 52 58 143
Hours of operation: 8:30 to
18:00
Monday through Friday
+49 (0)180 52 58 143
Geschäftszeiten: Montag -
Freitag, 08.30 - 18.00 Uhr
greece
Telephone +30 (0)1 619 64 11
Hours of operation: 9:00 to
17:00
Monday through Friday
hungary
Telephone +36 (0)1 382 1111
Hours of operation: 8:30 to
18:00
Monday through Friday
ireland
Telephone +353 (0)1 662 5525
Hours of operation: 8:30 to
18:00
Monday through Friday
israel
Telephone +972 (0)9 952 4848
Hours of operation: 9:00 to
18:00
Sunday through Thursday
italy
Telephone +39 (0)2 264 10350
Hours of operation: 8:30 to
18:00
Monday through Friday
+39 02 264 10350
Orario d'apertura: Lunedì-
Venerdì, 8:30 - 18:00
netherlands
Telephone +31 (0)20 606 8751
Hours of operation: 8:30 to
18:00
Monday through Friday
norway
Telephone +47 22 11 6299
Hours of operation: 8:30 to
18:00
Monday through Friday
poland
Telephone +48 22 519 06 00
Hours of operation: 8:00 to
17:00
Monday through Friday
portugal
Telephone +351 21 317 6333
Hours of operation: 8:30 to
18:00
Monday through Friday
+351 21 317 6333
Horário de operação:
Segunda - Sexta, 8:30 17:00
russian federation (moscow)
Telephone +7 095 797 3520
Hours of operation: 9:00 to
18:00
Monday through Friday
russian federation (st petersburg)
Telephone +7 812 346 7997
Hours of operation: 9:00 to
18:00
Monday through Friday
russian federation (ukraine)
Telephone +7 (380-44) 490-3520
Hours of operation: 9:00 to
18:00
Monday through Friday
south africa (inside RSA)
Telephone 086 000 1030
Hours of operation: 8:00 to
17:00
Monday through Friday
south africa (outside RSA)
Telephone +27-11 258 9301
Hours of operation: 8:00 to
17:00
Monday through Friday
spain
Telephone +34 902 321 123
Hours of operation: 8:30 to
18:00
Monday through Friday
+34 902 321 123
Horas de atención: Lunes a
Viernes de 8:30 a 18:00 h
sweden
Telephone +46 (0) 8 619 2170
Hours of operation: 8:30 to
18:00
Monday through Friday
switzerland
Telephone +41 (0) 848 80 11 11
Hours of operation: 8:30 to
18:00
Monday through Friday
turkey
Telephone +90 (0)212 221 69 69
Hours of operation: 8:30 to
18:00
Monday through Friday
united arab emirates
Telephone 971 4 883 8454
Hours of operation: 8:30 to
18:00
Monday through Friday
For customers in: UAE,
Bahrain, Qatar, Saudi
Arabia, Jordan, Palestine,
Egypt, Yemen, Lebanon,
Kuwait and Oman
(languages supported English and Arabic)
united kingdom
Telephone +44 (0)207 512 52 02
Hours of operation: 8:30 to
18:00
Monday through Friday
other european countries (english)
Telephone +44 (0)207 512 52 02
Hours of operation: 8:30 to
18:00
Monday through Friday
© 2000, Hewlett-Packard Company
file:///C|/Documents%20and%20Settings/topher.COL-SPRINGS/Desktop/Ultrium/pdf/document/common/contact/eng/europe.htm [11/15/2001 1:26:14 PM]
Page 42

asia pacific
hp learning products
http://www.hp.com/support/tape may have a later version
data protection
contact hp
americas
europe
asia pacific
warranty
customer service form
asia pacific
contents of this section
check the web for up to date contact information
hp support in asia pacific
australia
malaysia
china (PRC)
new zealand
hong kong
philippines
india
singapore
indonesia
taiwan
japan
thailand
korea, republic of
vietnam
check the web for up to date information
If you have internet access, click on the URL below:
http://www.hp.com/cposupport/mail_support.html
From time to time, telephone numbers and addresses may change; accessing
contact details over the web will ensure you have the latest information.
If you do not have internet access, refer below for a list of contact numbers correct
at time of printing:
hp support in asia pacific
Customers in Asia Pacific region can contact HP on the telephone support lines
listed, by country, below.
australia
Telephone
(03) 8877 8000
Hours of operation: 9.00
a.m. to 5:00 p.m.
Monday through Friday
Spare parts
1800 670 054
Hours of operation: 9:00
a.m. to 5:00 p.m.
Monday through Friday
china (PRC)
Telephone
+86 (0)10 6564 5959
Hours of operation: 8:30
to 17:30
Monday through Friday
hong kong
Telephone
800 96 7729
Hours of operation: 8:30
to 17:30
Monday through Friday
india
Telephone
+91 11 682 6035
Hours of operation: 9:30
a.m to 5:30 p.m
Monday through Friday
indonesia
Telephone
+62 (21) 350 3408
Hours of operation: 8:00
a.m to 5:00 p.m.
Monday through Friday
japan
Telephone
+81 3 3335 8333
Hours of operation: 9:00
to 12:00 and 13.00 to
17:00
Monday through Friday
korea, rupublic of
within Seoul only
Telephone
+82 (2) 3270 0700
Hours of operation: 9:00
a.m. to 6:00 p.m.
Monday through Friday.
9:00 a.m. to 1:00 p.m on
Saturdays
outside Seoul only
Telephone
080 999 0700
Hours of operation: 9:00
a.m. to 6:00 p.m.
Monday through Friday.
9:00 a.m. to 1:00 p.m on
Saturdays
malaysia
Telephone
+60 (3) 295 2566
Hours of operation: 8:30
a.m. to 5:30 p.m.
Monday through Friday
new zealand
Telephone
+64 (9) 356 6640
Hours of operation: 9:00
a.m. to 5:30 p.m.
Monday through Friday
philippines
Telephone
+63 (2) 867 3351
Hours of operation: 8:30
a.m. to 5:30 p.m.
Monday through Friday
singapore
Telephone
+65 272 5300
Hours of operation: 8:30
a.m. to 5:30 p.m
Monday through Friday
taiwan
Telephone
+886 (2) 2717 0055
Hours of operation: 8:30
a.m. to 5:30 p.m.
Monday through Friday
thailand
Telephone
+66 (2) 661 4000
Hours of operation: 8:30
a.m. to 5:30 p.m.
Monday through Friday
vietnam
Telephone
+84 (0) 8823 4530
Hours of operation: 8:00
a.m. to 5:00 p.m.
Monday through Friday
8.00 a.m to 12:00 p.m on
Saturday
© 2000, Hewlett-Packard Company
file:///C|/Documents%20and%20Settings/topher.COL-SPRINGS/Desktop/Ultrium/pdf/document/common/contact/eng/asiap.htm [11/15/2001 1:26:16 PM]
Page 43

warranty
hp learning products
http://www.hp.com/support/tape may have a later version
data protection
contact hp
americas
europe
asia pacific
warranty
customer service form
warranty
contents of this section
warranty conditions
exclusions
limitations
limited warranty statement for USA, Canada, Australia and New Zealand
warranty conditions
This warranty gives you specific legal rights. You may also have other rights which
vary according to where you are located.
Hewlett-Packard warrants its Surestore tape drives against defects in materials
and workmanship for a period of three years, either from the date of delivery or,
where the purchase price includes installation by Hewlett-Packard, from the date
of installation. If a new HP Surestore tape drive is purchased as a component of
an HP computer system, the tape drive warranty is automatically upgraded to the
system warranty.
You are entitled to:
automatic three-year, next day unit exchange
system matching warranty on HP systems (internal, external and
removable units), when purchased as a component of that
system. The system matching period is applicable for the period
of the host system standard warranty only. The tape drive
warranty reverts to unit exchange for the remainder of its standard
warranty, if applicable, after the host warranty expires.
free technical call center assistance during the product support
life (does not include telephone call cost)
Further information is available via the web at: www.hp.com/support/tapewarranty
During the first three years, the unit exchange program (not available in all
countries) allows you to receive a replacement unit by next-day delivery upon
verification of a faulty tape drive. Hewlett-Packard will, at its option, either repair or
replace products that prove to be defective. Should Hewlett-Packard be unable to
repair or replace the product within a reasonable period of time, a refund of the
purchase price may be given upon return of the product.
If you choose not to use unit exchange, your HP Surestore tape drive must be
serviced by one of the authorized repair depots within the country in which it was
originally purchased. You must prepay shipping charges (together with all duty
and taxes) for products returned for service. Except for products returned to you
from another country, Hewlett-Packard will pay for return of products to you. If the
drive is repaired by an authorized dealer, you will need to negotiate the method
and cost of returning the drive with the dealer.
exclusions
The warranty on your HP SureStore tape drive does not apply to defects resulting
from:
improper or inadequate maintenance by the customer
Customer-supplied software or interfaces
Unauthorized modification or misuse
Use of unsupported media
Operation outside the environmental specifications for the product
Improper site preparation and maintenance
limitations
Any implied warranty of merchantability or fitness is limited to the three-year
duration of this written warranty. Some states or provinces do not allow limitations
on how long an implied warranty lasts, so limitations or exclusions may not apply
to you.
limited warranty statement for USA, Canada, Australia and New Zealand
HP warrants to you, the end-user customer, that HP hardware, accessories and
supplies will be free from defects in materials and workmanship after the date of
purchase, for the period specified above. If HP receives notice of such defects
during the warranty period, HP will, at its option, either repair or replace products
which prove to be defective. Replacement products may be either new or likenew.
1. HP warrants to you that HP software will not fail to execute its programming
instructions after the date of purchase, for the period specified above, due
to defects in material and workmanship when properly installed and used. If
HP receives notice of such defects during the warranty period, HP will
replace software media which does not execute its programming
instructions due to such defects.
2. HP does not warrant that the operation of HP products will be uninterrupted
or error free. If HP is unable, within a reasonable time, to repair or replace
any product to a condition as warranted, you will be entitled to a refund of
the purchase price upon prompt return of the product.
3. HP products may contain remanufactured parts equivalent to new in
performance or may have been subject to incidental use.
4. Warranty does not apply to defects resulting from (a) improper or
inadequate maintenance or calibration, (b) software, interfacing, parts or
supplies not supplied by HP, (c) unauthorized modification or misuse, (d)
operation outside of the published environmental specifications for the
product, or (e) improper site preparation or maintenance.
5. HP MAKES NO OTHER EXPRESS WARRANTY OR CONDITION
WHETHER WRITTEN OR ORAL. TO THE EXTENT ALLOWED BY LOCAL
LAW, ANY IMPLIED WARRANTY OR CONDITION OF
MERCHANTABILITY, SATISFACTORY QUALITY, OR FITNESS FOR A
PARTICULAR PURPOSE IS LIMITED TO THE DURATION OF THE
EXPRESS WARRANTY SET FORTH ABOVE. Some countries, states or
provinces do not allow limitations on the duration of an implied warranty, so
the above limitation or exclusion might not apply to you. This warranty gives
you specific legal rights and you might also have other rights that vary from
country to country, state to state, or province to province.
6. TO THE EXTENT ALLOWED BY LOCAL LAW, THE REMEDIES IN THIS
WARRANTY STATEMENT ARE YOUR SOLE AND EXCLUSIVE
REMEDIES. EXCEPT AS INDICATED ABOVE, IN NO EVENT WILL HP
OR ITS SUPPLIERS BE LIABLE FOR LOSS OF DATA OR FOR DIRECT,
SPECIAL, INCIDENTAL, CONSEQUENTIAL (INCLUDING LOST PROFIT
OR DATA), OR OTHER DAMAGE, WHETHER BASED IN CONTRACT,
TORT, OR OTHERWISE. Some countries, states or provinces do not allow
the exclusion or limitation of incidental or consequential damages, so the
above limitation or exclusion may not apply to you.
FOR CONSUMER TRANSACTIONS IN AUSTRALIA AND NEW ZEALAND: THE
WARRANTY TERMS CONTAINED IN THIS STATEMENT, EXCEPT TO THE
EXTENT LAWFULLY PERMITTED, DO NOT EXCLUDE, RESTRICT OR
MODIFY AND ARE IN ADDITION TO THE MANDATORY STATUTORY RIGHTS
APPLICABLE TO THE SALE OF THIS PRODUCT TO YOU.
Consumer Warranty Sept 16/97
© 2000, Hewlett-Packard Company
file:///C|/Documents%20and%20Settings/topher.COL-SPRINGS/Desktop/Ultrium/pdf/document/common/contact/eng/warranty.htm [11/15/2001 1:26:19 PM]
Page 44

customer service form
hp learning products
http://www.hp.com/support/tape may have a later version
data protection
contact hp
americas
europe
asia pacific
warranty
customer service form
customer service form
contents of this section
contact information
tape drive information
computer system information
SCSI bus configuration
backup information
information about the problem
Please complete the following information about your system and the problem you
are having before you call the HP Customer Support Center. You can print this
form and fill in the necessary information before you call, or you can print and fax
the completed form to the Customer Service Center.
contact information
Company or Organization:
Contact Person/Title:
(e.g., Mr. John Smith,
Network Administrator)
Contact Telephone Number:
Fax Number:
E-Mail Address:
Mailing Address:
tape drive information
Model Name:
(example:
HP Surestore Ultrium 230i)
Model Number:
(example: HP C1555B)
Serial Number:
Firmware Revision:
Date Purchased:
Date of Last Cleaning:
How many times has cleaning tape been used?
computer system information
Computer Make and Model:
(example:
HP NetServer E-series)
Processor and Clock Speed:
(example: Pentium 550)
Amount of RAM:
(example: 64 MB)
Number of SCSI Controllers:
Computer Operating System/Release
(example:
Novell NetWare 4.0, Windows NT 3.51, HP-UX 10.0)
Operating System Patches Installed:
(example: Service Pack 4)
Number of Hard Disks/Size/Partitions:
(example:
Disk 1: 1.2 GB, 1 partition
Disk 2: 1.8 GB, 2 partitions)
Logical or Physical Mapping of Disks:
(example:
Disk 1 = C:/, Disk 2 = S:/)
SCSI bus configuration
Host Adapter Make and Model
(example:
Adaptec AHA-2940)
SCSI bus
(narrow or wide)
SCSI ID Device Termination
Internal /
External
Devices' Bus
Type
..
............... ............. ............... ...............
..
............... ............. ............... ...............
..
............... ............. ............... ...............
..
............... ............. ............... ...............
..
............... ............. ............... ...............
..
............... ............. ............... ...............
..
............... ............. ............... ...............
7
SCSI Controller ............. ............... ...............
EXAMPLE
SCSI ID Device Termination
Internal /
External
Devices' Bus
Type
0 Hard disk No Internal
Narrow /
Single-ended
1 CD-ROM No Internal
Narrow /
Single-ended
3
Tape Drive
(HP C1533A)
No Internal
Narrow /
Single-ended
5
Tape Drive
(DLT7000)
Yes External
Wide /
Single-ended
7 SCSI Controller Automatic HBA
Wide /
Single-ended
backup information
Backup Application Name and Version or Release:
Are you using HP One
Button Disaster Recovery?
Do you back up user data only?
Do you back up system information separately?
(example:
Windows registry files,
NetWare NDS or bindery files)
information about the problem
Light Pattern During Problem:
Any Audible Signals:
Error Messages/Code Generated:
Does the problem occur every time you try the operation?
Does the problem occur if you use another backup device?
What type of media are you using?
(Brand, Capacity, Batch No.)
Can you read the problem tape cartridge on another drive?
What result do you get when you try a new cartridge?
If you have an autoloader, are all cartridges affected the same way?
Have you run any kind of diagnostics program, such as TapeAssure?
What result was reported?
Detailed Description of Problem:
© 2000, Hewlett-Packard Company
file:///C|/Documents%20and%20Settings/topher.COL-SPRINGS/Desktop/Ultrium/pdf/document/common/contact/eng/csf.htm [11/15/2001 1:26:22 PM]
 Loading...