

Page 1

HP StorageWorks
D2D
nl
HP
Backup System
D2D4004 and HP D2D4009
User Guide
Par t number: E H938-90924
hird edition: September 2008
T
Page 2

Legal and notice information
© Copyright 2008 Hewlett-Packard Development Company, L.P.
Confidential computer software. Valid license from HP required for possession, use or copying. Consistent with FAR 12.211 and
12.212, Commercial Computer Software, Computer Software Documentation, and Technical Data for Commercial Items are
licensed to the U.S. Government u nder vendor’s standard commercial license.
The information contained herein is subject to change without notice. The only warranties for HP products and services are set forth
in the express warranty statements accompanying such products and services. Nothing herein should be construed as constituting
an additional warranty. HP shall not be liable for technical or editorial errors or omissions contained herein.
Linear Tape-Open, LTO, LTO Logo, Ultrium and Ultrium Logo are trademarks of Quantum Corp, H P and IBM in the US, other
countries or both.
Patented under one or more of U.S. Patents Nos. 5,003,307; 5,016,009; 5,463,390; 5,506,580; held by Hi/fn, Inc.
Microsoft, Windows, Windows N T, and Windows XP are U.S. registered trademarks of Microsoft Corporation.
Intel and Itanium are trademarks or registered trademarks of Intel Corporation or its subsidiaries in the United States and other
countries.
AMD is a registered trademark of Advanced Micro Devices, Inc.
Page 3

Contents
Aboutthisguide ......................... 11
Intendedaudience..................................... 11
Relateddocumentation................................... 11
Documentconventionsandsymbols ............................. 11
HPtechnicalsupport.................................... 12
Customerselfrepair .................................... 12
Productwarranties..................................... 12
RegisteringyourHPD2DBackupSystem ........................... 12
Subscriptionservice .................................... 13
HPwebsites........................................ 13
Documentationfeedback .................................. 13
1Beforeyoustart......................... 15
Overview......................................... 15
Optionaltapeattach.................................... 16
Softwareandhardwarerequirements............................. 16
Terminology ....................................... 17
Autoloaders...................................... 17
Backupdevicesandslots................................ 17
Emulationtypes .................................... 17
FibreChannel..................................... 17
HostsonanEthernetnetwork .............................. 18
HostsonanFCnetwork ................................ 19
Import/ExportandCopy ................................ 19
iSCSI ........................................ 19
Libraries ....................................... 19
Mailslots(import/exportelements)............................ 20
Physicaltapedrives .................................. 20
RAID......................................... 20
Storagecapacity ..................................... 20
Physicalstorage.................................... 20
Taperotationstrategies................................. 20
Datadeduplication .................................... 21
Technologytypes ................................... 21
DatadeduplicationandtheHPD2D ........................... 21
BenefitsofHPD2Ddeduplication ............................ 21
Deduplicationandcompression ............................. 22
Taperotationexamplewithdatadeduplication....................... 22
Retentionpolicy.................................. 22
Dataparameters.................................. 22
Typicalsavings .................................. 22
2ConnectingandinstallingtheHPD2DBackupSystem ........ 25
Installingtherailkit .................................... 25
Overview....................................... 25
Kitcontents...................................... 25
Importantsafetyinformation............................... 25
Installationguidelines ................................. 25
Mountingtheserver .................................. 26
Connectingthehardware.................................. 29
D2D Backup SystemHP D2D4004 and HP D2D4009
3
Page 4

Supported Ethernet configurations .............................. 30
Ethernetnetworkconnection............................... 30
IPv4andIPv6networkprotocols........................... 30
Dualnetworkports................................. 30
DHCPandstaticIPaddressing............................ 30
HPD2DonaGigabitEthernetnetwork........................ 30
PoweringontheHPD2D .................................. 32
Software installation, discovery and configuration ....................... 32
InstallationwizardforWindowsusers........................... 32
RunningtheInstallationwizard............................ 33
Recommendedwebbrowsersettings ............................. 35
InternetExplorer7.X .................................. 36
InternetExplorer6.X.................................. 36
MozillaFirefox1.5andFirefox2.X............................ 36
3Attachingaphysicaltapedrive(optional).............. 37
HardwarerequirementsforTapeAttach............................ 37
Tapedriveinstallationoverview ............................... 37
Removingthetopcover................................... 38
InstallingtheHBA ..................................... 38
RemovingthePCICage................................. 39
Removingtheslotcover................................. 40
InstallingthePCIeCard................................. 41
ReinstallingthePCICage................................ 42
Replacingthetopcover................................... 43
Connectinganexternalorrackmounttapedrive ........................ 44
4 Advanced installation ...................... 45
Manualdriverinstallation.................................. 45
HPLTOTapedriver .................................. 45
Mediumchangerdriver................................. 45
UsingDHCPtodiscovertheHPD2DBackupSystem(IPv4only).................. 46
UsingtheDiscoveryEnginetodiscovertheHPD2DBackupSystem(IPv4only) ........... 46
Beaconmode..................................... 47
If the HP D2D Backup System is new and not yet configured ................. 47
If the HP D2D Backup System has been configuredincorrectly ................ 47
Ifthenetworksetuphasbeenchanged .......................... 47
UsingtheconsoletodiscovertheHPD2DBackupSystem(IPv4andIPv6) ............. 47
Toconnectthesystemconsole.............................. 47
iSCSIInitiator....................................... 49
ManualiSCSIinitiatorinstallation ............................ 50
TheiSCSIInitiatorandAuthentication........................... 50
TheMicrosoftiSCSIInitiator............................... 51
Generaltab.................................... 51
Discoverytab................................... 53
Targetstab.................................... 54
PersistentTargetstab................................ 56
BoundVolumes/Devicestab............................. 57
LinuxandUNIXiSCSIinitiators ............................... 57
5HPD2DBackupSystemsandFibreChannel............. 59
FibreChanneltopologies.................................. 59
Zoning.......................................... 59
FibreChannelconnection.................................. 60
Fibre Channel (Configuration)................................ 61
To edit the FC configuration............................... 61
FibreChannel(Status) ................................... 61
Devicessection .................................... 62
4
Page 5

Librarysection..................................... 62
6LEDs.............................. 63
FrontpanelLEDs...................................... 63
HarddriveLEDs.................................... 63
RearpanelLEDs...................................... 64
FibreChannelcardLEDs .................................. 65
Beaconmode....................................... 66
7TheWebManagementInterface.................. 67
WhatistheWebManagementinterface?........................... 67
ToruntheWebManagementInterface............................ 67
Summary(Home) ..................................... 68
Statusicons...................................... 69
Devices (Configuration)................................... 69
Emulationtypesfortapedevices............................. 70
Libraries, slots and storage capacity . . . . . . . . . . . . . . . . . . . . . . . . . . . 71
Userrecommendations............................... 71
Toviewdevicedetails ................................. 71
Toeditdevicedetails.................................. 71
Tocreateanewdevice................................. 72
Todeleteadevice................................... 73
Cartridges (Configuration) ................................. 74
Emptyslots...................................... 75
Todeleteacartridge.................................. 76
Towriteprotectacartridge ............................... 76
Toeditmaximumsize ................................. 76
Tocreateacartridge.................................. 76
Network (Configuration) .................................. 77
Network configuration ................................. 77
Toeditnetworksettings............................... 77
Resettingnetworksettingstofactorydefaults........................ 78
Beaconmode..................................... 79
Fibre Channel (Configuration)................................ 79
Email Alerts (Configuration)................................. 79
To configureMicrosoftExchangeServer.......................... 80
Disk(Status)........................................ 81
Diskusage ...................................... 82
RAID(Status) ....................................... 82
RAIDstatus...................................... 83
Physicaldisks..................................... 83
iSCSI(Status) ....................................... 84
FibreChannel(Status) ................................... 84
Log(Status)........................................ 84
TapeAttachpages..................................... 85
Admin(Settings)...................................... 85
Resettingthepassword................................. 86
Shutdown(Settings) .................................... 86
Firmware(Settings)..................................... 87
Backup(Settings) ..................................... 89
To generate the configuration file............................. 89
To upload the configuration file ............................. 90
Support(Settings) ..................................... 90
License(Settings) ..................................... 90
To apply the license key . . . . . . . . . . . . . . . . . . . . . . . . . . . . . . . . 91
8 Export, import and copy using an attached tape drive . . . . . . . . 93
RequirementsforconnectingatapedrivetotheHPD2D..................... 93
D2D Backup SystemHP D2D4004 and HP D2D4009
5
Page 6

Anoteaboutterminology.................................. 93
Archivingmethods..................................... 94
Cartridgecopy .................................... 94
WhyusetheCopyfunctionality?........................... 95
WhenwouldCopybeused? ............................ 95
Whenisitnecessarytorestorefromacopiedcartridge? ................ 95
DisadvantagesofCopy............................... 96
Cartridgeexport.................................... 96
WhyusetheExportfunctionality? .......................... 97
WhenwouldExportbeused?............................ 97
WhenwouldIrestorefromanexportedcartridge? ................... 97
DisadvantagesofExport .............................. 98
Compression ..................................... 98
Cartridgeimport.................................... 98
Tapespanning .................................... 99
UsingtheWebManagementinterfacetocopy/export/importcartridges ............. 99
Configuration(TapeAttach)............................... 99
Addingtapedrivestothelist ............................ 99
Upgrading tape drive firmware ........................... 100
Copy/Export/Import(TapeAttach)............................ 100
Tocopytoattachedtapedrive............................ 100
Toexporttoattachedtapedrive........................... 101
Toimportfromattachedtapedrive.......................... 102
Status(TapeAttach) .................................. 103
Tocancelajob .................................. 103
Ifanerroroccurs ................................. 104
Schedule(TapeAttach)................................. 104
Tocreateaschedule................................ 104
Toview,editordeleteexistingschedules ....................... 106
JobHistory(TapeAttach)................................ 106
9Copyusingatapedriveattachedtothehost ............ 109
Requirements ....................................... 109
Tapedrivessupported ................................. 109
Archivefromhosttotapeprocess .............................. 109
Furtherinformation................................... 110
Compression ....................................... 110
10Restoreprocesses ....................... 111
Restorescenarios ..................................... 111
RestoringfromtheHPD2DBackupSystem........................... 112
Restoreanddeduplication.................................. 112
ReconnectingtotheHPD2Dafterhostfailure ......................... 112
11 Troubleshooting . . . . .................... 117
Connectingthehardware.................................. 117
ConnectingtotheHPD2Dfromthebackupapplication..................... 117
Connectingtothenetwork ................................. 117
Performance ....................................... 118
Network ....................................... 118
WebManagementInterfaceerrorsandwarnings........................ 118
DiskRAIDerrorsandwarnings ............................. 118
Networkwarnings................................... 119
Systemstate...................................... 119
PowerOn/OffProblems .................................. 119
HPD2Dshutsdownautomatically ............................ 119
HPD2Ddoesnotbootupcorrectly............................ 119
HP D2D System Health LED is flashingRED ........................ 120
6
Page 7

HPD2Dbootsupcorrectly,butcannotbeseenonthenetwork................ 120
CannotconnecttoWebManagementInterface ........................ 120
HPD2Disnotvisibleonthenetwork........................... 120
CannotlogintotheWebManagementInterface...................... 120
CannotauthenticateaniSCSIsession............................. 120
IftheHPD2DBackupSystemrunsoutofdiskspace ...................... 120
HP D2D configurationproblems ............................... 121
Icannotseeanewlycreateddevice ........................... 121
I cannot see additional slots from the backup application . . . . . . . . . . . . . . . . . . 121
Upgradelicenses ..................................... 121
CanItransfertheLicenseToUsetoadifferentHPD2D?................... 121
Morediskspresentthanarelicensed........................... 121
Replacementofhardware.................................. 121
Eventlogdisplays‘InvalidBIOSAssemblyname’...................... 121
RAIDbatterybackupstatus ............................... 121
IftheRAIDbatteryfails................................. 121
12Harddiskreplacement ..................... 123
RAID6.......................................... 123
HowdoIknowadiskhasfailed? .............................. 123
Ifyouhaveasystemconsole .............................. 125
Ifyouhaveemailalerts................................. 126
TheEventLog..................................... 126
Replacingtheharddisk................................... 127
EmailalertsandLog.................................. 129
Ifyouhaveasystemconsole .............................. 129
Ifseveraldisksfail..................................... 130
Replacingthedisks .................................. 131
InitializingRAID.................................... 132
Createcartridges ................................. 132
13 Capacity Upgrade . . ..................... 133
Anoverviewofthecapacityupgradeprocess ......................... 133
Installingtheupgradekit .................................. 133
Summary and R A ID pages after adding disks . . . . . . . . . . . . . . . . . . . . . . . 135
About the Capacity Licence . . . . . . . . . . . . . . . . . . . . . . . . . . . . . . . . . 136
ApplyingtheLTU ..................................... 136
CompletingtheRAIDexpansion............................... 137
Index .............................. 141
D2D Backup SystemHP D2D4004 and HP D2D4009
7
Page 8

Figures
1
FrontviewoftheHPD2DBackupSystem...................... 15
2
Rear view of the
3
Device configurationwithonehost ........................ 18
4
Device configurationwithmultiplehosts ...................... 19
5
Datastoredafterdeduplication.......................... 21
6
Space saving
7
Attachtherailstotherackcolumns ........................ 27
8
Insert the H
9
CTObracketlocation .............................. 28
10
SecuretheHPD2Dtotherack .......................... 29
11
Networkandpowerconnectors.......................... 29
12
Connecti
13
Connectingtoadedicatedbackupnetwork..................... 32
14
PoweringontheHPD2DBackupSystem...................... 32
15
Removingthetopcover ............................. 38
16
RemovingthePCIcage ............................. 39
17
Removingtheslotcover(fullheight) ........................ 40
18
Removing the slot cover (low profile)........................ 41
ngtoabusinessserveronthemainnetwork ................ 31
HPD2DBackupSystem...................... 16
withdeduplication ......................... 23
PD2Dserverintotherack ....................... 28
19
InstallingthePCIecard(fullheight) ........................ 41
20
InstallingthePCIecard(inthelowprofileslot) ................... 42
21
ReinstallingthePCIcage............................. 42
22
23
24
25
26
27
28
29
30
31
32
33
ringthePCIcage.............................. 43
Secu
Replacingthetopcover ............................. 43
SystemconsoleconnectionsontheHPD2D..................... 48
Systemconsolescreen.............................. 49
CSIInitiatordownloadpage .......................... 50
iS
Generaltab(iSCSI)............................... 52
HAPsecret.................................. 53
C
Discoverytab(iSCSI) .............................. 53
Addtargetportal................................ 54
Targetstab(iSCSI) ............................... 55
AdvancedsettingsCHAP ............................ 56
PersistentTargetstab(iSCSI) ........................... 57
8
Page 9

34
Front view of the
HPD2DBackupSystem...................... 63
35 DriveLEDs................................... 64
36
RearpanelLEDs ................................ 65
37
Cartridgecopy................................. 95
38
Cartridgeexport ................................ 97
39
Cartridgeimport ................................ 98
40
Archiving to
DriveLEDs................................... 123
41
42
Summary pag
43
Identifyingthefaileddisk(s) ........................... 125
44
System con
45
Logshowingdiskfailure............................. 127
46
Disknumbering ................................ 127
47
Removingtheharddrive............................. 128
48
Installi
49
RAIDrebuilding ................................ 129
50
SystemconsoleduringRAIDrebuild........................ 130
51
Statusshowingmultiplediskfailure ........................ 131
52
RAIDshowingthreediskfailures ......................... 131
53
DevicespageawaitingRAIDinitialization ..................... 131
54
55
56
mconsoleafterthreedisksarereplaced.................... 132
Syste
Disknumbering ................................ 134
Remov
tape................................ 110
ewithRAIDstatuswarning...................... 124
soleshowingfaileddisks........................ 126
ngareplacementharddisk......................... 128
ingtheharddriveblank .......................... 134
57
Installingaharddisk .............................. 135
58
Summarypageafteraddingdisks......................... 135
59
RAIDpageafteraddingdisks .......................... 136
60
Summarypageafterexpansionpromptingforreboot ................ 138
61
RAIDafterexpansionandreboot ......................... 139
D2D Backup SystemHP D2D4004 and HP D2D4009
9
Page 10

Tables
1 Documentconventions.............................. 11
2
3
4
5
Datadeduplicationsavings,example1 ...................... 23
FCcardLEDs ................................. 65
Summarypagelayout.............................. 68
Deviceparameters(tophalfofthepage)...................... 70
6 Device param
7
Cartridge parameters . . . . . . . . . . . . . . . . . . . . . . . . . . . . . . 75
8
Network par
9
Networkportparameters ............................ 78
10
Emailparameters................................ 80
11
Physicaldiskparameters............................. 83
12
Jobscheduleparameters............................. 106
13 Restorescenarios................................ 111
eters ............................... 72
ameters . . . . . . . . . . . . . . . . . . . . . . . . . . . . . . 78
10
Page 11

About this guide
This guide provides information about:
• Installing the HP StorageWorks D2D Backup System
• Using the HP StorageWorks D2D Backup System
• Troubleshooting the HP StorageWorks D2D B ackup System
Intended audi
This guide is intended for users who install, operate and maintain the HP StorageWorks D2D Backup
System.
ence
Related documentation
In addition to this guide, the following document provides related information:
• ‘Start here’poster foranoverviewofthe installation informationinthisguide (available in
English, French, German and Japanese)
You can find these documents from the Manuals page of the HP Business Support Center website:
ttp://www.hp.com/support/manuals
h
In the Storage section, click Storage Solutions and then select your product.
ttp://www.hp.com/support/manuals
h
Document conventions and symbols
Table 1 Docu
Convention
Blue text: Table 1
Blue, unde
Bold text
ment conventions
rlined text: h
ttp://www.hp.com website addresses
Element
Cross-reference links and e-mail addresses
• Keys that are pressed
•
Text typed into a GUI element, such as a box
GUI elements that are clicked or selected, such as
•
menu
and list items, buttons, tabs, and check boxes
Italic text Text emphasis
ace
Monosp
Monospace, italic text
Monospace, bold text
text
• File and directory names
System output
•
Code
•
Commands, their arguments, and argument values
•
• Code variables
Command variables
•
Emphasized monospace text
D2D Backup SystemHP D2D4004 and HP D2D4009
11
Page 12

WARNING!
Indicates that failure to follow directions could result in bodily harm or death.
CAUTION:
Indicates that failure to follow directions could result in damage to equipment or data.
IMPORTANT:
Provides clarif
NOTE:
Provides additional information.
ying information or specific instructions.
HP technical support
For worldwide technical support information, see the HP support website:
h
ttp://www.hp
Before contacting HP, collect the following information:
• Product model names and numbers
• Technical supp
• Product serial numbers
• Error messages
• Operating sys
• Detailed questions
.com/support
ort registration number (if applicable)
tem type and revision level
Customer self repair
HP customer self repair (CSR) programs allow you to repair your StorageWorks product. If a CSR
part needs replacing, HP ships the part directly to you so that you can install it at your convenience.
Some parts do not qualify for CSR. Your HP-authorized service provider will determine whether a repair
can be accomplished by CSR.
For more information about CSR, contact your local service provider. For North America, see the CSR
website:
ttp://www.hp.com/go/selfrepair
h
Product warranties
For informa
h
tion about HP StorageWorks product warranties, see the warranty information website:
ttp://www
.hp.com/go/storagewarranty
Registering your HP D2D Backup System
Once you have installed and tested your HP D2D Backup System please take a few minutes to register
your product. You can register via the web (h
12
About this guide
ttp://www.register.hp.com).
Page 13

To ensure your registration is complete, there are a number of questions on the electronic form that are
mandatory. Other questions are optional. However, the more you feel able to complete, the better HP
can
meet your needs.
Subscription service
HP recommends that you register your product at the Subscriber’s Choice for Business website:
ttp://www.hp.com/go/e-updates
h
After registering, you will receive e-mail notification of product enhancements, new driver versions,
firmware updates, a nd other product resources.
HP websites
For additional information, see the following H P websites:
ttp://www.hp.com
• h
• http://www.hp.com/go/ebs
• http://www.hp.com/go/connect
• http://www.hp.com/go/storage
• http://www.hp.com/service_locator
• http://www.hp.com/support/manuals
• http://www.hp.com/support/downloads
Documentation feedback
your feedback.
HP welcome
To make comments and suggestions about product documentation, please send a message to
storagedocs.feedback@hp.com. All submissions become the property of HP.
s
D2D Backup SystemHP D2D4004 and HP D2D4009
13
Page 14

14
About this guide
Page 15
1 Before you start
In this chapter:
• “Overview” on page 15
•
“Optional tape at tach”onpage16
•
“Software and hardware requirements” on page 16
• “Terminology” on page 17
•
“Storage capacity” on page 20
• “Data deduplication” on page 21
Overview
The HP StorageWorks D2D Backup System is an iSCSI or Fibre Channel disk-based storage appliance
that
tape device is configured as an Ultrium Tape Library or Autoloader. An emulation type is selected during
initial configuration and this determines the m aximum number of drives and the maximum number of
slots
MSL2024 Tape Library, which provides a loader with one drive and 24 slots.
es up to 16 tape devices, which can be used to back up host network servers or PCs. Each
emulat
that may be configuredfor thedevice. Thedefault configuration emulates the HP StorageWorks
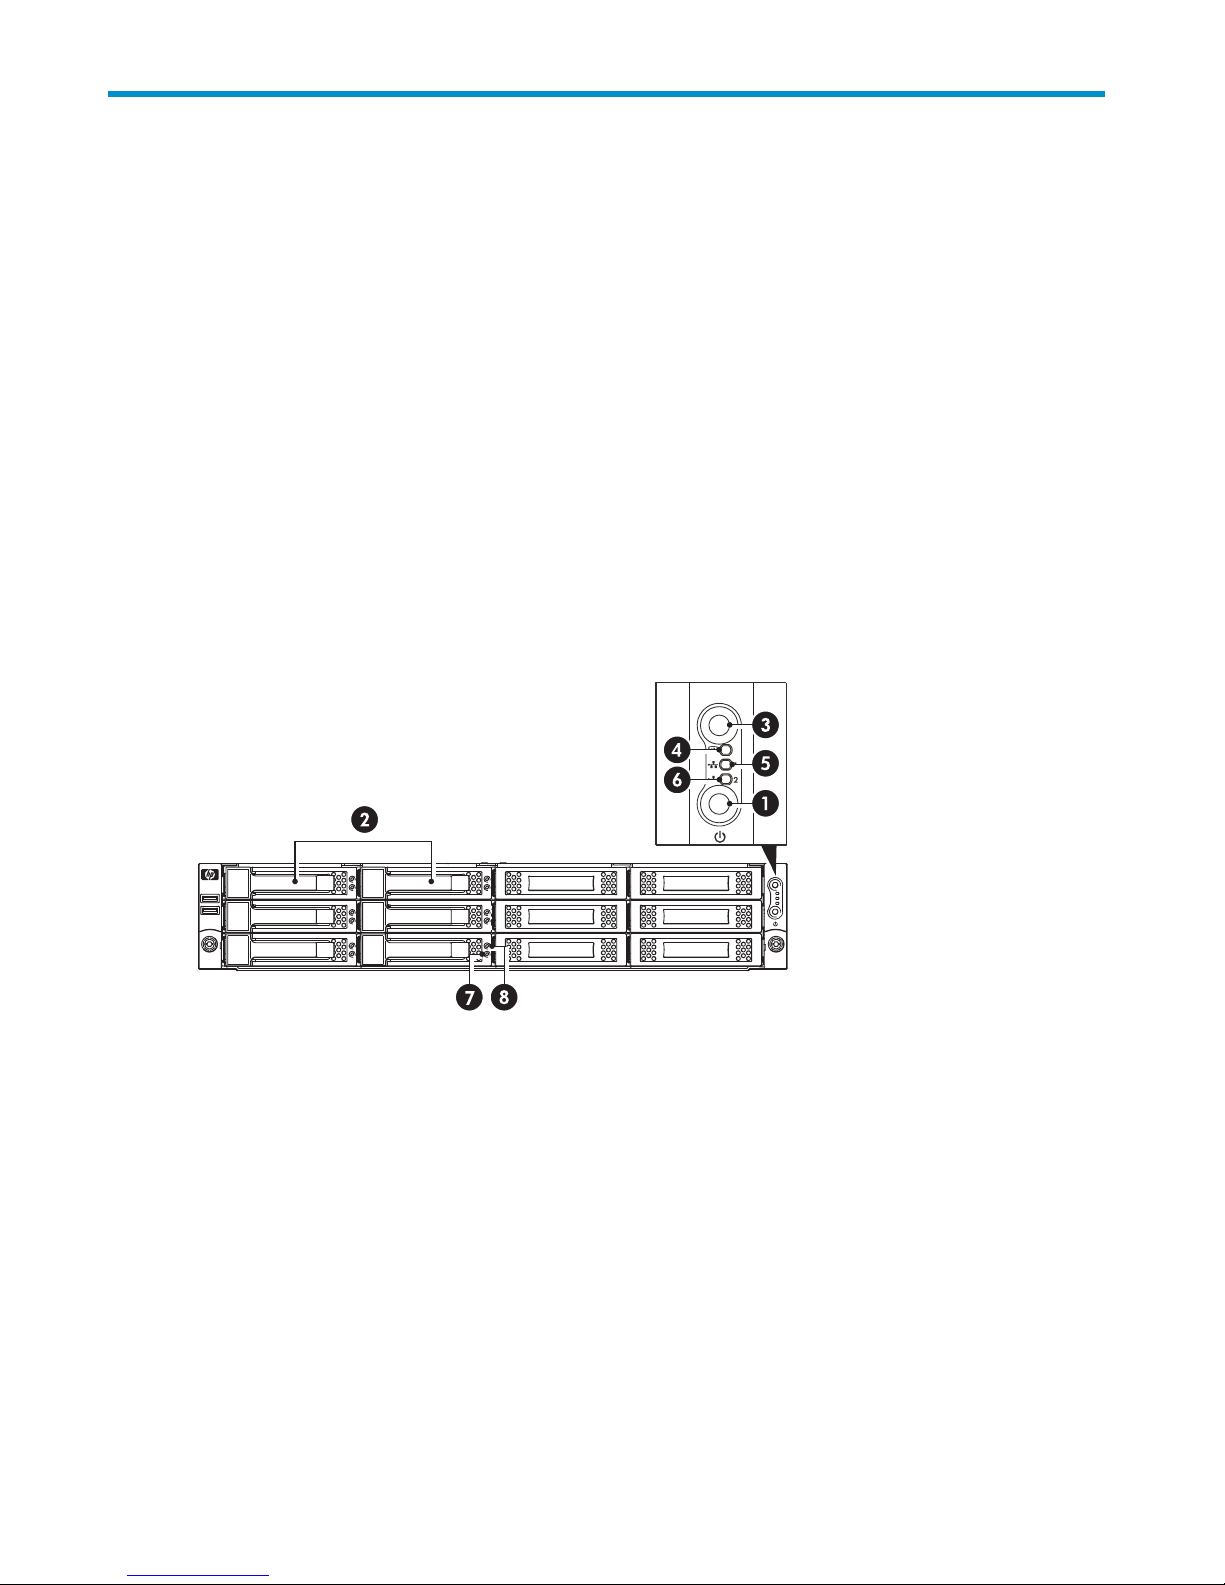
1. Powe
2. Hot plug drives
3. HP D2D Beacon LED
4. System Health LED 8. Disk Beacon LED
Figure 1 Front view of the HP D2D Backup System
rOnbutton/LED
5.
LAN Port 1 LED
6.
LAN Port 2 LED
D i s k On l i n e LE D
7.
D2D Backup SystemHP D2D4004 and HP D2D4009
15
Page 16
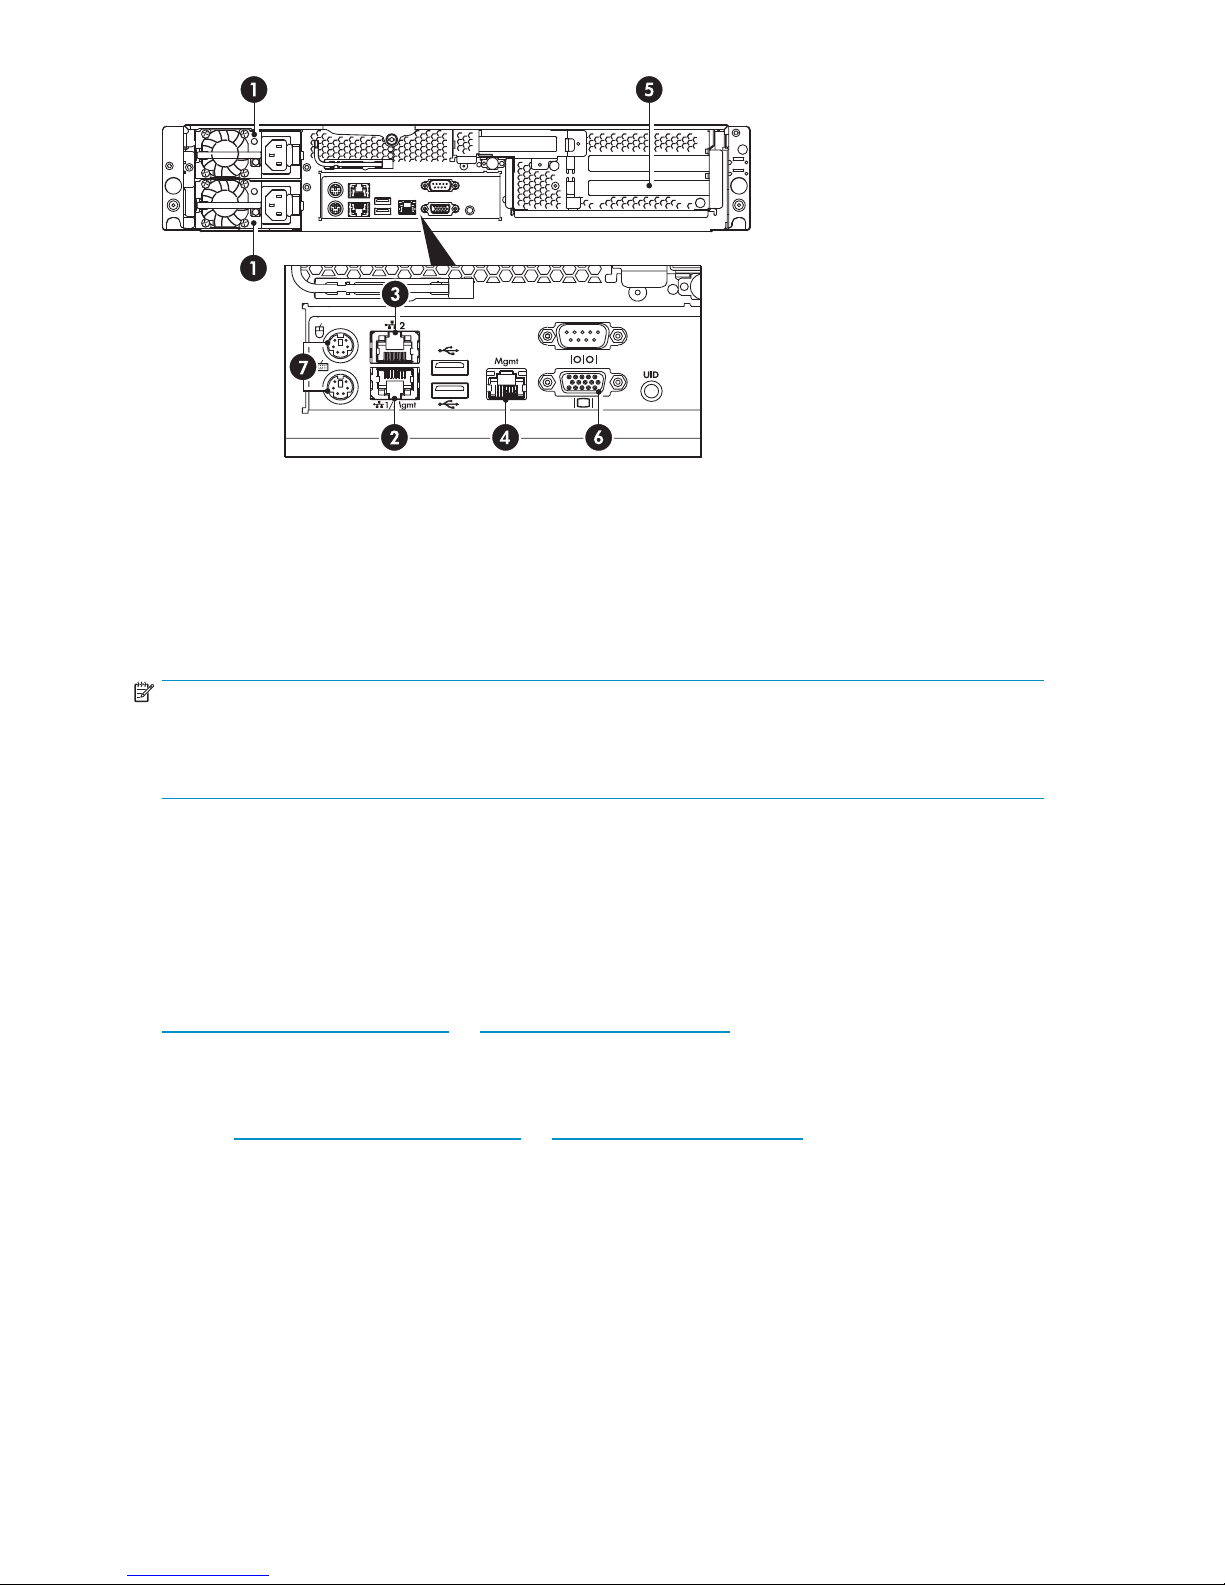
1. Power supply cable sockets (two) 5. PCIe slots (two full and one low profile)
2. LAN port 1
3. LAN port 2
4. Management LAN port (Do not connect to this port)
view of the HP D2D B a ckup System
Figure 2 Re
NOTE:
OnefullPCIeslothas aP400 controller card pre-installed. Theother slot is availablefor optional Tape
Attach. If you have the Fibre Channel product, a FC card will be pre-installed in the other full PCIe slot.
You must in
ar
stall the Tape Attach card in the low profile slot.
6. VGA p ort for system console monitor
7. PS/2 ports for system console keyboard and mouse
Optional tape attach
An external or rackmount Ultrium Tape Drive may be attached directly to the HP D2D Backup System,
allowing the user to store backups offsite. Both SAS and SCSI tape drives are supported and require
installation of a host bus adapter (HBA). External tape drives may be half-height or full-height. Rackmount
tape
drives are installed in a rackmount enclosure, such as a 1U Rack, 3U Rack or a TapeArray.
To find out which Ultrium Tape Drive models and HBAs are supported, refer to
ttp://www.hp.com/go/connect or http://www.hp.com/go/ebs.
h
Software and hardware requirements
Refer to http:/ /www.hp.com/go/connect or http://www.hp.com/go/ ebs for the latest connectivity
and compatibility information.
• When connecting to a Fibre Channel network, the HP D2D Backup System is supplied with the
correct FC card pre-installed. Cables are not supplied;
• When connecting to an Ethernet network, the HP D2D Backup System should be connected to a
Gigabit Ethernet network. 10 0 Base-T Ethernet will limit per formance; 10 Base-T Ethernet will
severely limit performance.
• For backup and restore you need software that supports tape autoloaders and libraries. This
software resides on the host, not the HP D2D B a ckup System. The device may be used with the
major backup applications from HP, Symantec, EMC, Computer Associates and others.
16
Before you start
Page 17

Terminology
Autoloaders
An autoloader is a backup device that has a single tape drive and multiple storage slots. (A library has
multiple tape drives, see “Libraries” o n page 19.) Each storage slot contains a cartridge that can be
allocated to a specific backup task; for example, one cartridge can hold Monday’s data, another can
hold Tuesday’s data, and so on. In this way, backup applications are able to implement tape rotation
strategies that accommod ate differing backup requirements for daily, weekly, monthly, yearly backups.
Backup device
Backup device
the
A number of emulation t ypes are available; you select the appropriate one for your data protection
strategy during initial configuration and when you subsequently create a device. The default configuration
is
an HP Stora
slots. (Oth
“Devices (C
When you con
select det
LTO-2 defa
of a tape library with multiple slots, each containing a 200, 400 or 800 GB cartridge. Both tape
spanning and, more importantly, flexible tape rotation strategies are possible.
sand slots
HP D2D Backup System which, as in tape terminology, is referred to a s slots or cartridges.
ermines the amount of physical disk space that is made available for each configured slot.
Emulation types
HP D2D products emulate a range of physical Tape Autoloaders or Tape Libraries. Supported emulation
types are listed below:
• HP 1x8 G2 Autoloader
• HP MSL2024 Library
• HP MSL4048 Library
• HP D2DBS Library
If it is supported by your backup application, HP D2DBS Library is the preferred emulation type to be
used because it does not emulate any physical library types in existence and is clearly identifiable as a
D2D device. It is the most flexible emulation type available; however, backup application support varies
by
software vendor. See also “Emulation types f or tape devices” on page 70.
appear to the host as locally-attached tape devices, but physically, they use disk space on
s
geWorks MSL2024 Tape Library with one attached Ultrium LTO-3 Tape Drive and 24
emulation types, such as MSL4048, allow for a greater number of drives and slots, see
er
onfiguration)” on page 69.)
figure your HP D2D Backup System with a tape library, the drive emulation type that you
ults to 200 GB, LTO-3 defaults to 400 GB and LTO-4 defaults to 800 GB. This is the equivalent
Fibre C
hannel
Fibre Channel supports network connectivity over fibre optic cabling or copper wiring. It has a different
set of standards and network connection protocol to Ethernet and different configuration requirements.
The FC version of the HP D2D Backup System m ay be connected to both a Fibre Channel SAN and an
Ethernet (as an iSCSI device) network. The FC connection is used only to transfer backup data from the
the HP D2D. Access to the H P D2D Web Management interface is always across an Ethernet
o
host
t
connection. See also “HP D2D Backup Systems and Fibre Channel”onpage 59.
NOTE:
It is not possible to upgrade an iSCSI HP D2D to FC; the iSCSI product can only be configured with iSCSI
ces.
devi
D2D Backup SystemHP D2D4004 and HP D2D4009
17
Page 18
HostsonanEthe
Each emulated backup device is uniquely mapped to an individual host; this is the network server or
PC that you wish to back up.
• The backup devi
• The backup device is accessed and managed from the backup software running on the host.
• The backup device is not visible to other devices on the network.
• Multiple serv
Figure 3 on pa
on
Host 1. The
specify the n
hosts. The H
wizard automatically generates a library for each host. The user may specify the number of slots during
installation.
umber
P
rnet network
appears to the host as a locally-attached tape autoloader or library.
ce
ers may not back up to a single backup device.
18 shows a configuration with a single host. The Installation wizard has been run
ge
HP D2D
D2D Backup System c an be used to back up a maximum of sixteen hosts. The Installation
Backup System automatically generates a library for the host. The user may
of s lots during installation. Figure 4 on page 19 shows a configuration with three
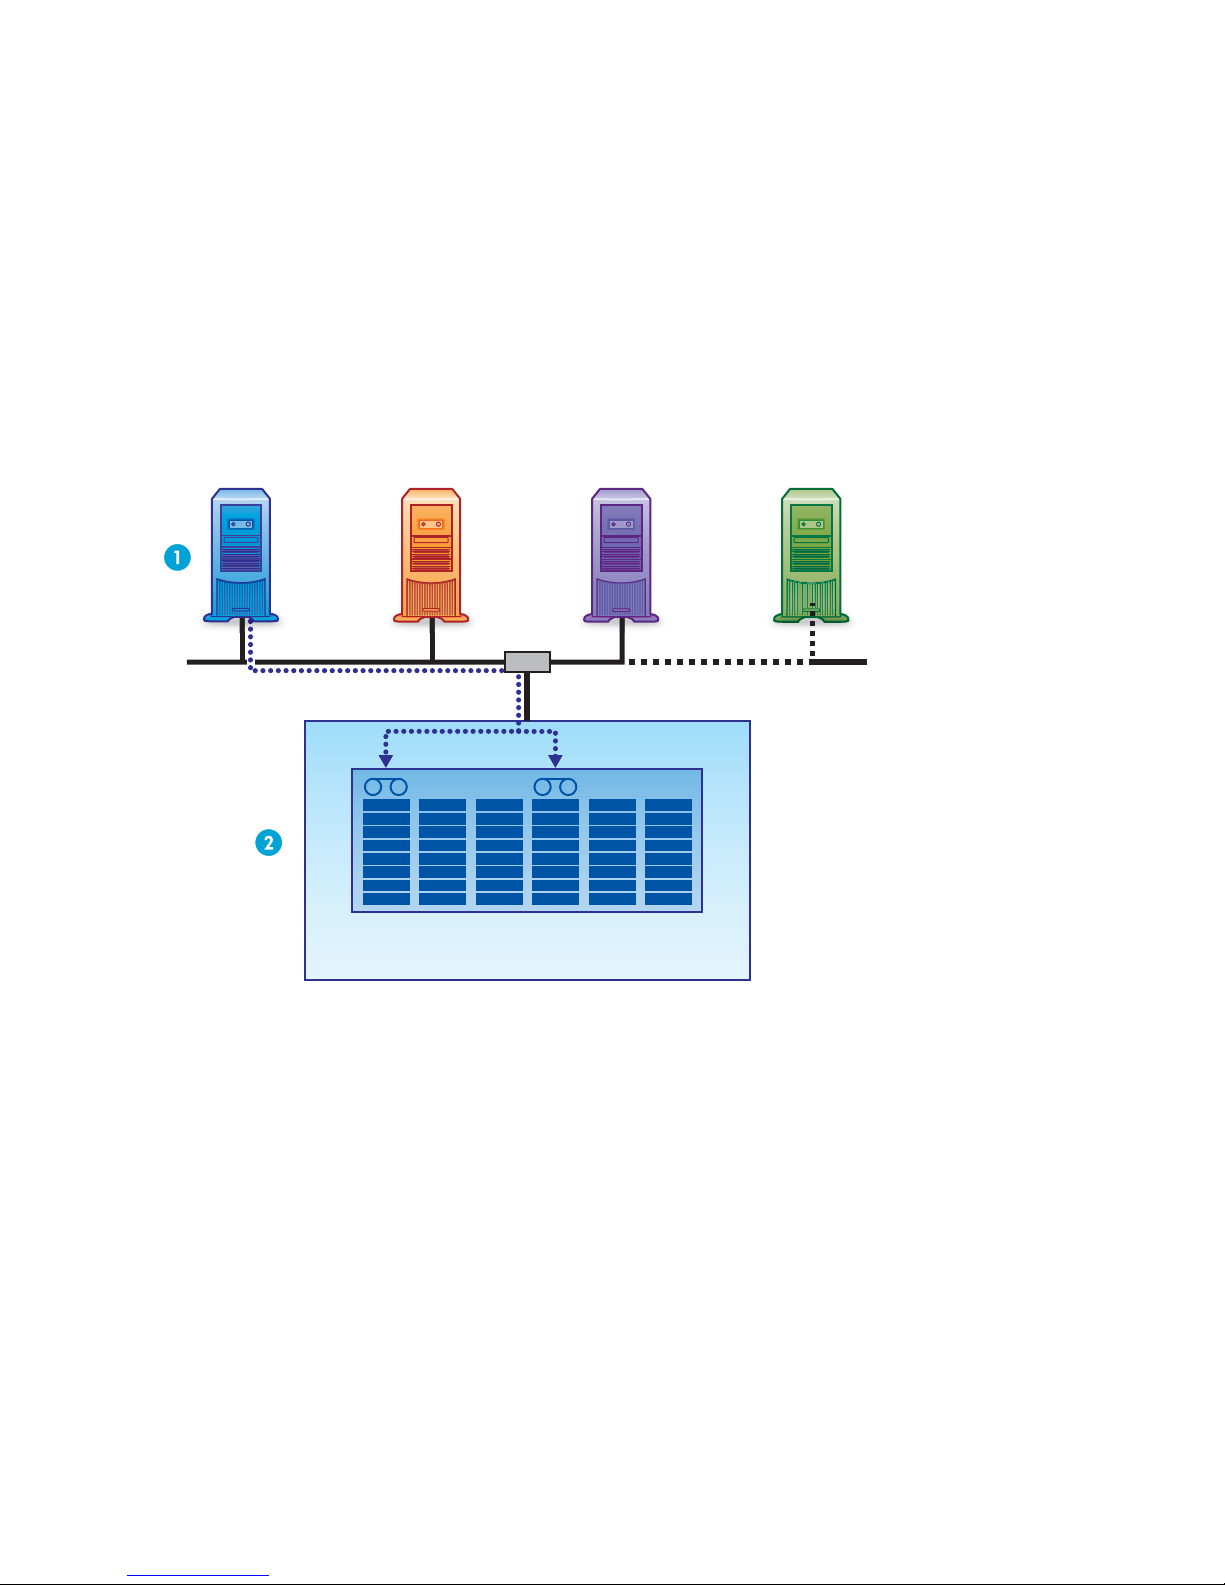
Host3Host2 Host4 onwards Host1
LAN
Library 1
HP StorageWorks D2D Backup System
Figure
3Deviceconfiguration with one h ost
• By default, only onedeviceisvisible to thehost, thelibrary that hasbeenconfigured for it during
installation. Data from each host goes to its corresponding library.
• Each b ackup device is visible only to the host for which it has been configured.
• Ahost
fewe
18
may have multiple devices configured for it on the HP D2D Backup System, but this means
hosts may be connected (not illustrated).
r
Before you start
Page 19
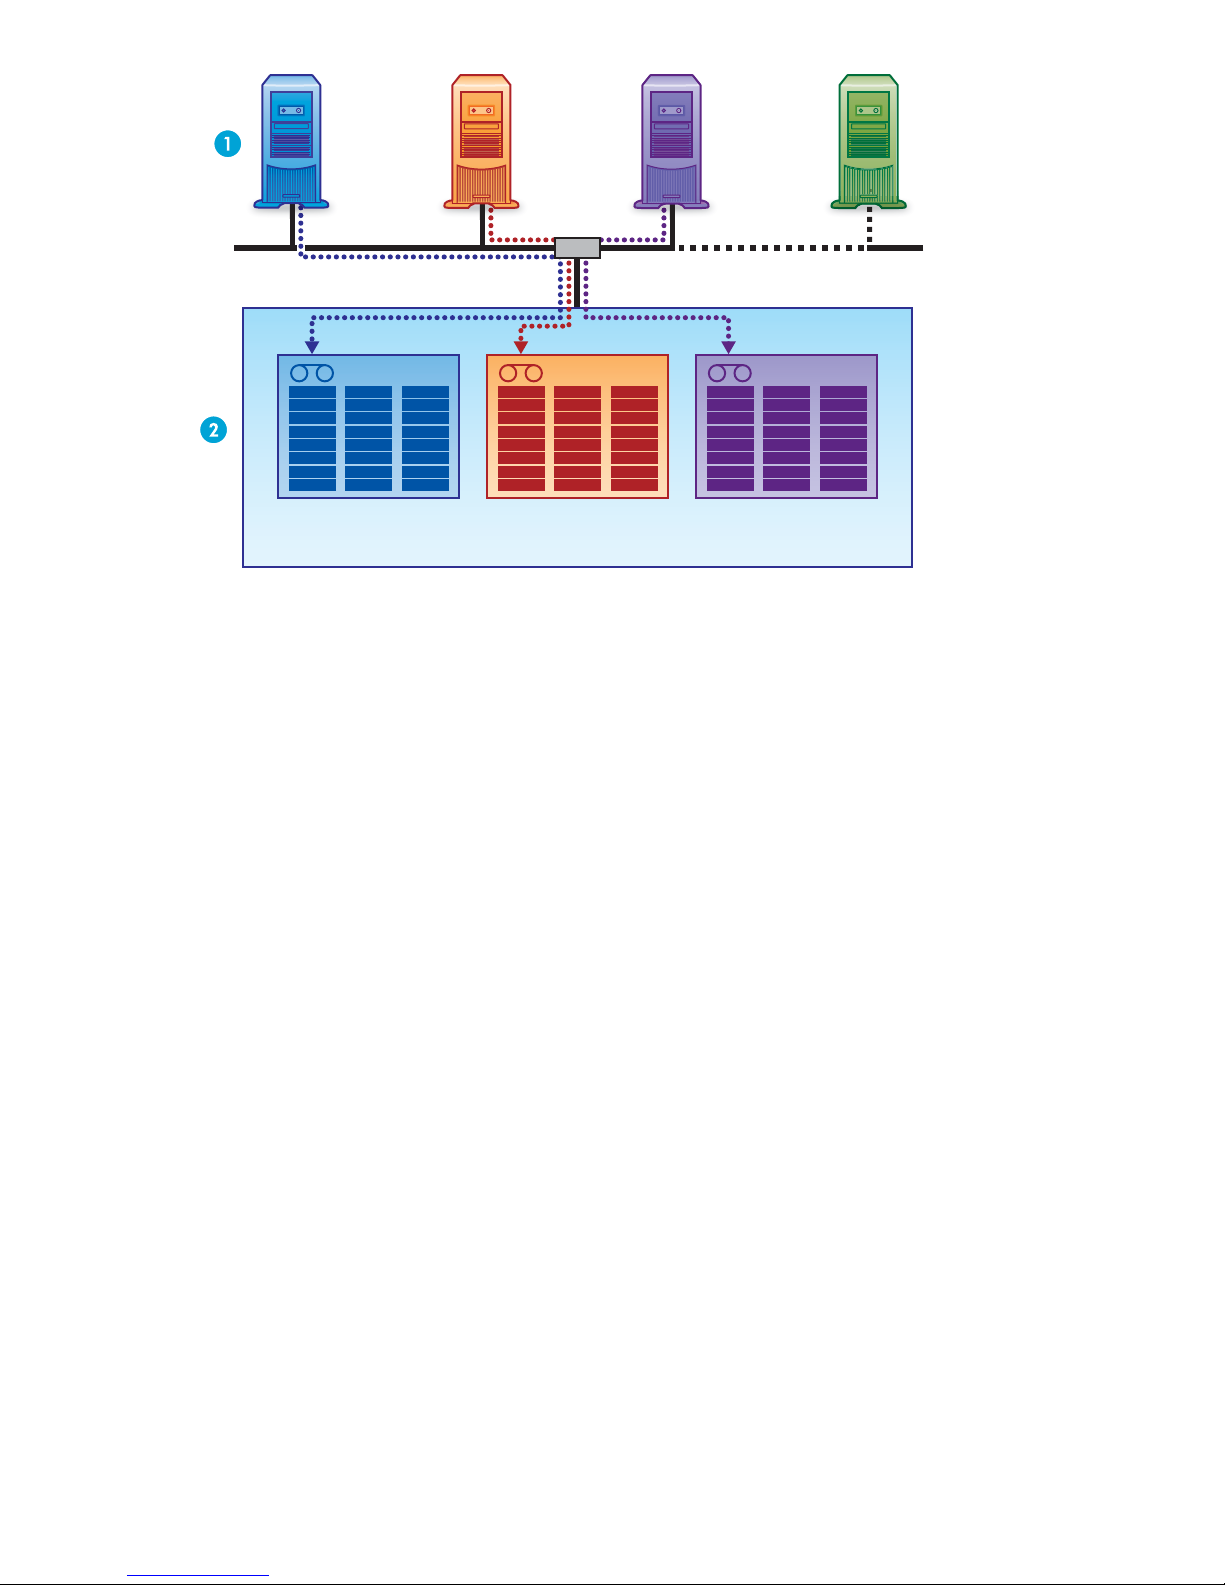
Library 1 Library 2 Library 3
HP StorageWorks D2D Backup System
Figure 4 Device configuration with multiple hosts
Host4 onwards Host1 Host2 Host3
LAN
Hosts on a
nFCnetwork
The h ost is the net work server o r PC that you wish to back up.
Library devices on the HP D2D cannot be created for a specific host during installation. When you create
a
library using the Web Management interface you assign it to a FC port (port 1 or port 2) and the
then be visible on the FC SAN. When you log in, you log in to the switch to which the host
library w
is connected, which means that the library is visible to all other devices on the SAN. You can zone
your network so that only specific devices have access to it, but generally it is visible to all. See also
“HP D2D B
ill
ackupSystems andFibre Channel” on page 59.
Import/Export and Copy
If you attach a supported, physical tape drive directly to your HP D2D Backup System, you will be
able to copy or export data to the physical tape drive so that backups can be stored offsite. This is an
important requirement for Disaster Recovery strategies. The main difference between copy and export
is that
copied data remains on the HP D2D Backup System; exported data is removed from it, but can
be
imported easily when required. These functions are grouped under the Tape Attach section of the
Web Interface. Please see “Export, import and copy to an attached tape drive” on page 9 3 for more
details about working with Tape Attach.
iSCSI
On an Ethernet network the HP D2D Backup System is configured as an iSCSI device. This
means that the HP D2D Backup System plugs directly into the network, but it presents devices as
directly-attached SCSI autoloaders to host machines. In order to function, it requires an iSCSI initiator.
On
“Connecting and installing the HP D2D Backup System” on page 25. For more information about
iSCSI, see “Advanced installation” on page 45. Linux and UNIX users should also refer to the “UN IX
Configuration Guide” on the HP StorageWorks Tape CD-ROM for more information.
ndows systems, this is normally downloaded by the Installation wizard, as described in
Wi
Libraries
A tape library is also a backup device that has multiple drives and multiple storage slots. Each storage
slot
contains a cartridge. The difference between an autoloader and a library is that a library ca n
D2D Backup SystemHP D2D4004 and HP D2D4009
19
Page 20

support multiple tape drives whereas an autoloader only has one tape drive. This provides considerable
storage capacity and full support for tape rotation strategies. (It may be necessary to upgrade your
backup application to support libraries.)
Mail slots (import/export elements)
Amail slot isa
import and exp
Backup applic
Export job, a
term borrowed from tape terminology to identify a dedicated slot that is used specifically to
ort cartridges. They are sometimes called import/export elements by backup applications.
ations that support this feature move cartridges from the mail slot when the user runs an
look for cartridges in the mail slot when the user runs an Import job.
nd
Physical tape drives
A physical tape drive is a tape drive that is attached to the HP D2D Backup System or the host computer,
so that data
with the tape drive device that is attached to the library device on the HP D2D Backup System (see
“Devices (Configuration)” on page 69.)
can be moved from the HP D2D Backup System and stored offsite. (It should not be confused
RAID
RAID stands for Redundant Array of Inexpensive (or Independent) Devices, which is a data storage
scheme that divides data among multiple hard drives, increasing data reliability and throughput. The
HP D2D
capacity
disk is re
Backup System is a RAID 6 device, which offers the best combination of data protection and
for disk arrays. It provides protection against double disk failures and failures while a single
building. The failed disk should be replaced as soon as possible.
Storage capacity
Physical storage
The physical storage capacity of the HP D2D Backup System is 4.5 TB (6 x 750 G B ) or 9.0 TB (12 x
750 GB). However, in order to ensure a high level of data integrity, the disks use RAID 6 protection.
This reduces the available capacity but ensures that, in the event of a disk failure in the device, there
will be no data loss.
Actual
• 3 TB for the 6–disk HP D2D Backup System
• 7.5 TB for the 12–disk HP D2D B ackup System
Data de
backups and means that more histories of data can be stored and retained for longer on each library.
See also “ Da ta deduplication” on page 21.
storage c apacity is approximately:
duplication is enabled by default for each library device. This eliminates duplicate data from
If you have the 6–disk model, it is possible to extend disk space by purchasing and installing the 6–disk
extension pack. This more than doubles the storage capacity. Other options for creating space are:
your backup jobs to see if you can reduce the size of backup or retention time.
• Revie
• Use the backup application job settings to overwrite or erase data.
• Export cartridges to physical tape.
w
Tape rotation strategies
Tape rotation strategies determine when backups are run, the number of cartridges that are required and
how they are reused. The HP D2D Backup System is a very flexible device that can easily be incorporated
into
most tape rotation strategies. If your organization does not yet have a tape rotation strategy in place,
see “Tape rotation example with deduplication” on page 22 for example configurations.
20
Before you start
Page 21
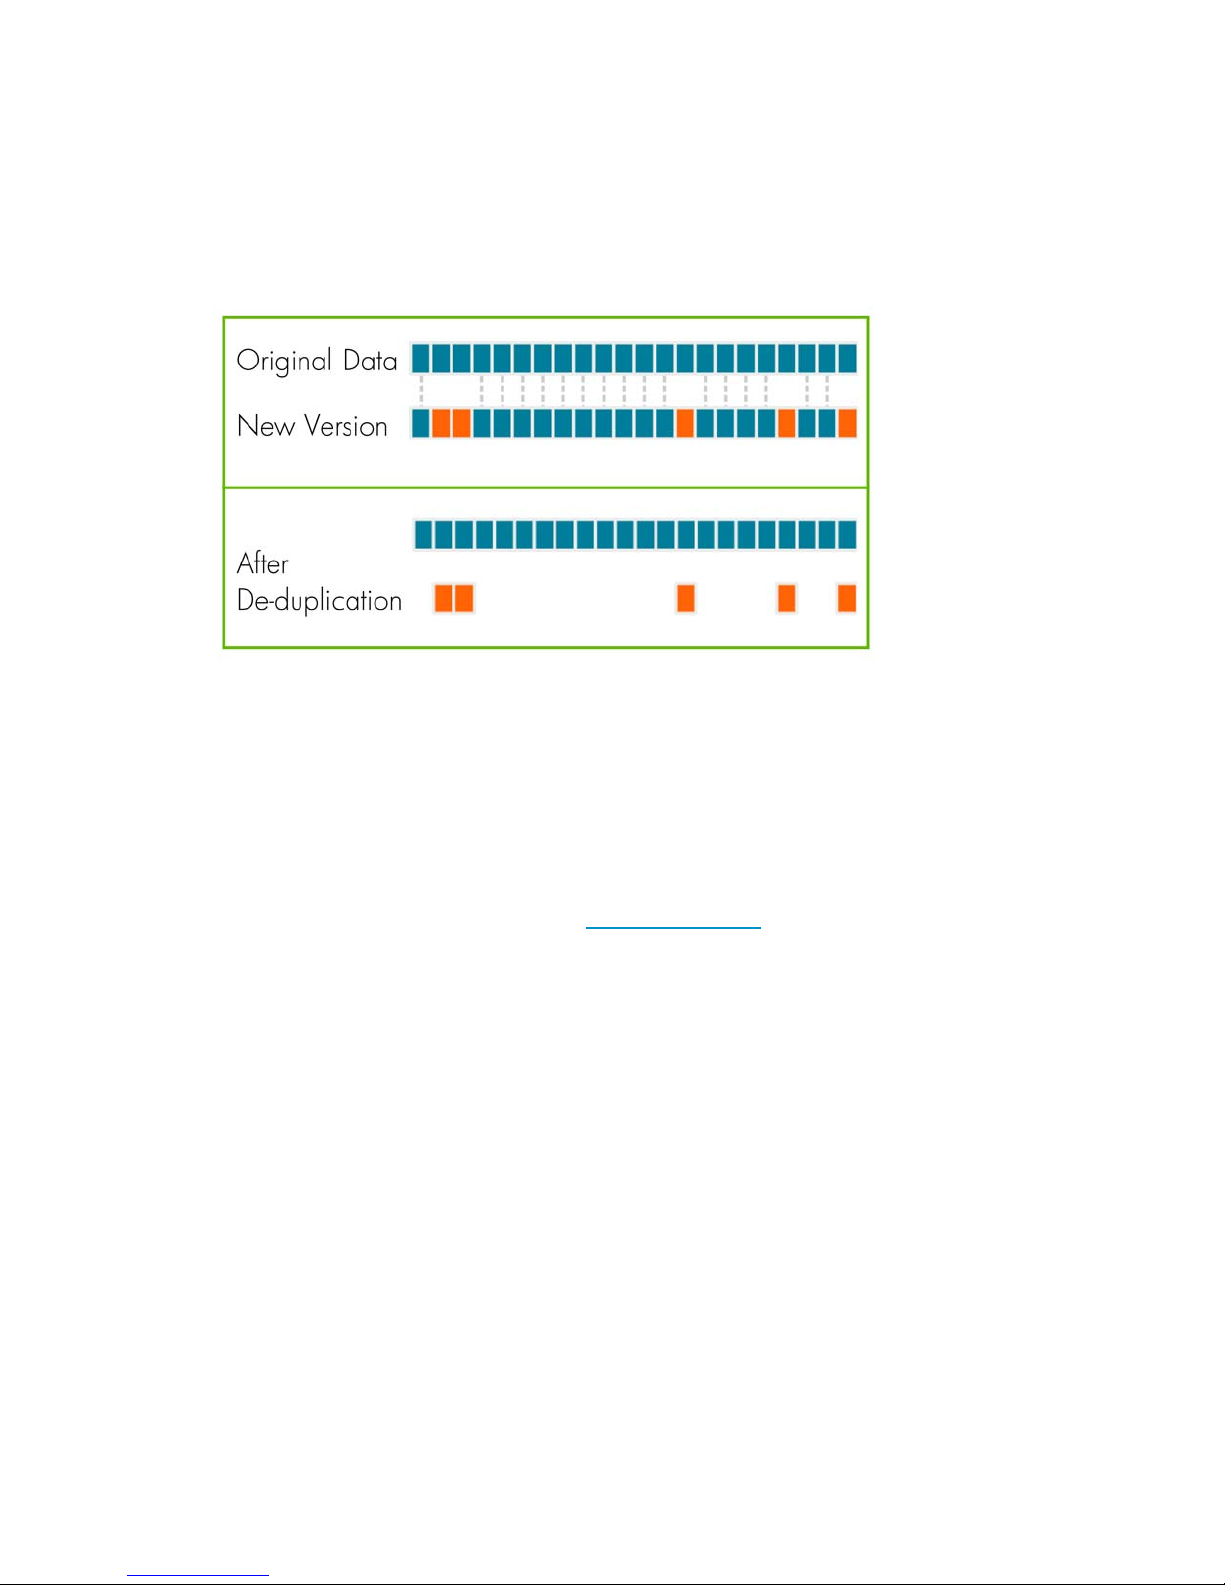
Data deduplicat
ion
Data deduplica
previously sto
rather than storing the duplicate data sets. This removes, or “deduplicates,” the redundant blocks. The
key part of this is that the data deduplication is being done at the block level and not at the file level
which reduces the volume of data stored significantly.
Figure 5 Data stored after deduplication
tion compares blocks of data being written to the backup device with data blocks
red on the device. If duplicate data is found, a pointer is established to the original data,
In actual practice, data deduplication is often used in conjunction with other forms of data reduction such
as
conventional data compression to offer the greatest reduction in data volume stored.
Technology types
There are a number of technology types that use different deduplication algorithms. The HP D2D applies
on-the-fly de duplication to chunks of backup data as they are written to the unit. It does not matter which
application was used to create the backup. For further information about deduplication techniques and
relative benefits, refer to the white papers at h
Data deduplication a nd the HP D2D
deduplication is applied per library device. When you configure the library, it defaults to deduplication
enabled. If you disable it, deduplication cannot be selectively applied to any data on the library device.
Compression is also disabled, if deduplication is disabled.
A library is associated with a host server and deduplication allows a greater amount of backup history
to be stored for that host. A larger number of full b a ckups can be achieved, which makes possible a
rotation strategy with a longer retention history. It does not increase the number of host servers that
may be connected. The deduplication factor that has been applied to a library device is calculated
and
displayed on the Web Interface. This figure is dynamic, it updates automatically as more data is
written to the library.
Benefits of HP D2D deduplication
The main benefit is that it is possible to store more data and retain data for longer on each cartridge
within a library. The host using the library device has access to a greater depth of historical data
that
would otherwise have been archived offline.
Deduplication:
• Provides efficient use of storage capacity by eliminating duplicate data
ttp://www.hp.com.
D2D Backup SystemHP D2D4004 and HP D2D4009
21
Page 22

• Reduces disk expenditures by reducing storage space required. You can get more backups for each
host on the samesizeofstorage (HPD2D device)
• Prolongs disk data retention periods
• Reduces the volume of data that must be sent across a WAN for remote backups, replication, and
disaster recovery – reducing both risk and operational costs
Deduplication and compression
Compression is applied as part of deduplication. You can expect 1.6:1 compression even on the first
backup where n o (or only a small amount of) deduplication can occur. If you disable deduplication, see
“Devices (Co
nfiguration)” on page 69, no compression is applied to data on that device.
Tape rotation example with data deduplication
The two most significant factors affecting the deduplication ratio for backup are:
• How long do you retain the data?
• How much data changes between backups?
The following example shows projected savings for a 1 TB file server backup.
Retention policy
• 1 week, daily incrementals (5)
• 6 months, weekly fulls (25)
Data parameters
• Data compression rate = 2:1
• Daily change rate = 1% (10% of data in 10% of files)
Typical savings
The following table illustrates a reduction of approximately 11:1 in data stored. In practice, assuming
1.25 TB is available for backup for this library, this mea n s:
• Without data deduplication: only two weeks of data retention is possible before it is necessary to
archive
• With data deduplication: even af ter six months less than 1.25 TB of disk space has been used.
The following table illustrates how this affects the space required to store the data over 25 weeks. The
figures are used to generate the graph shown af ter the table.
data offline.
22
Before you start
Page 23
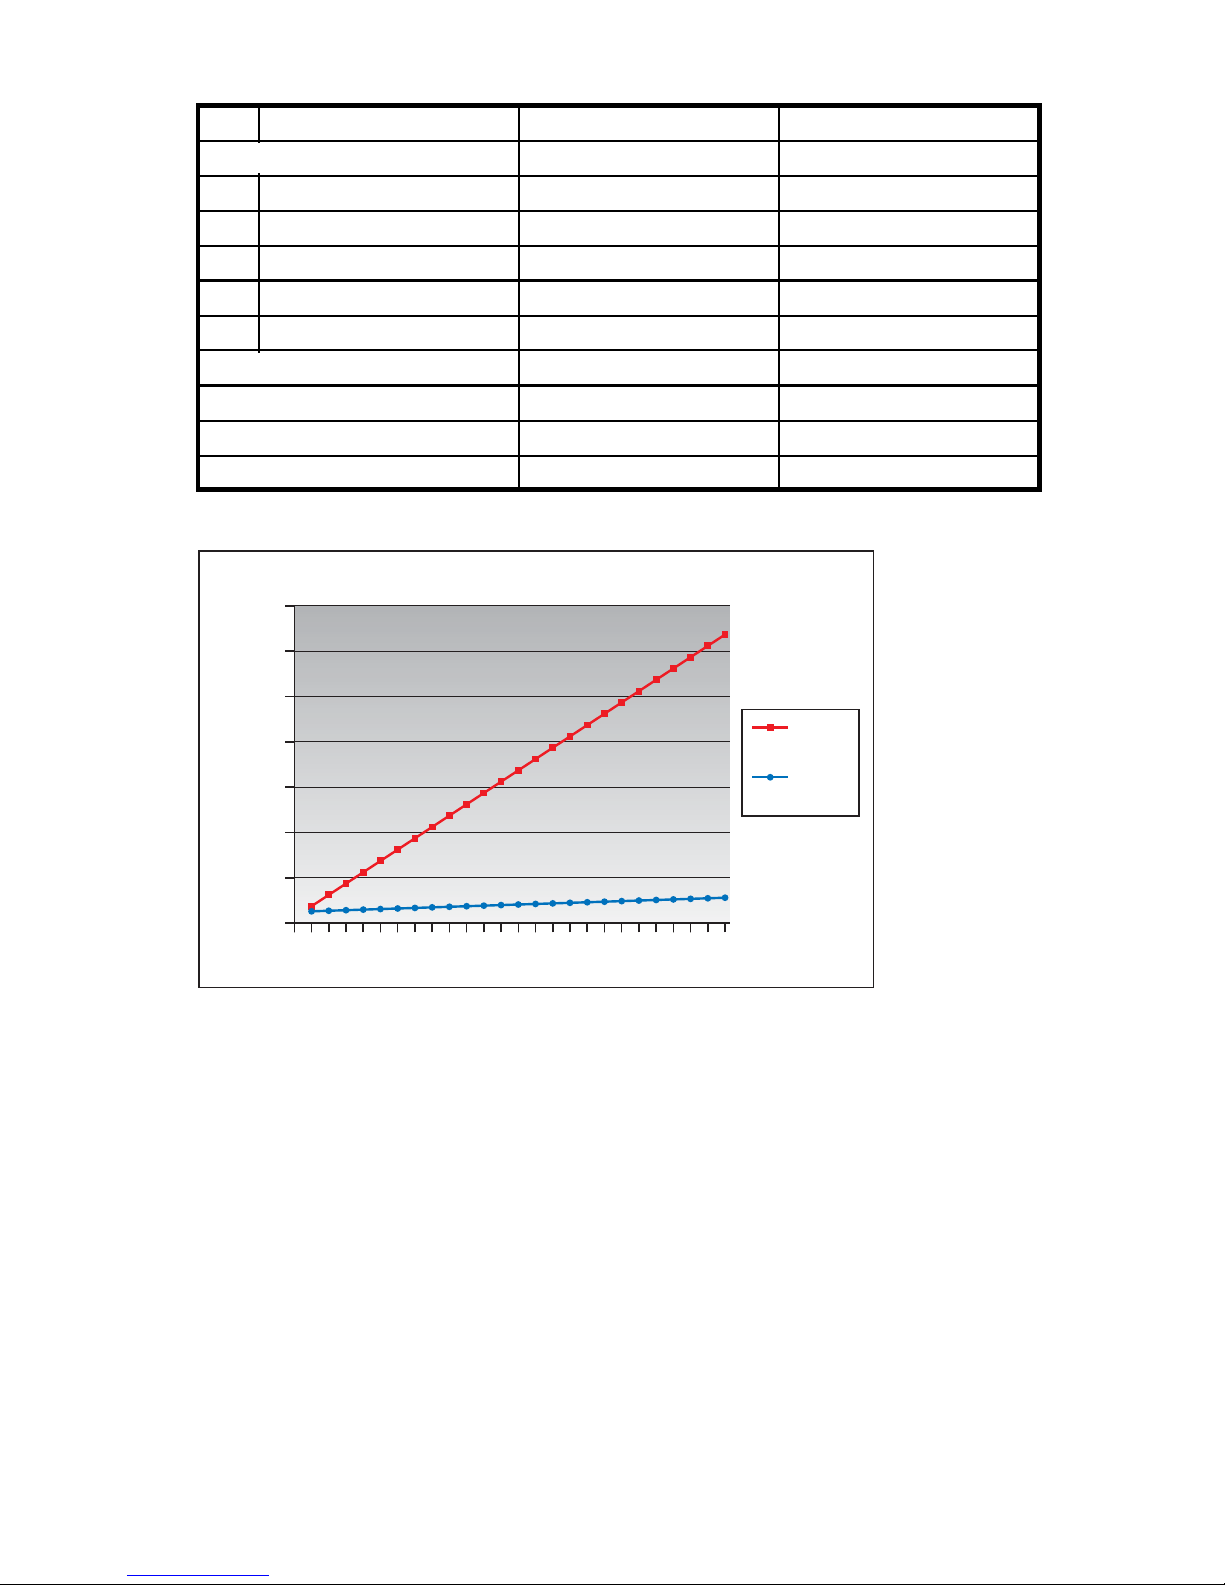
Table 2 Data deduplication savings, example 1
1st daily full backup
1st daily incremental backup
2nd daily incr
emental backup
3rd daily incremental backup
4th dai ly incremental backup
5th dai ly incremental backup
2nd weekly full backup
3rd weekly full backup
25th weekly full backup
Data stored nor
mally
Data stored wit
500 GB 500 GB
50 GB 5 GB
50 GB 5 GB
50 GB 5 GB
50 GB 5 GB
50 GB 5 GB
500 GB 25 GB
500 GB 25 GB
500 GB 25 GB
hdeduplication
TOTAL 12,750 GB 1,125 GB
Space saving with deduplication
14000
12000
10000
8000
6000
Space in GB
4000
Without
Dedupe
With
Dedupe
2000
0
123456789 10 11 12 13 14 15 16 17 18 19 20 21 22 23 24 25
End of week
Figure 6 Space saving with deduplication
D2D Backup SystemHP D2D4004 and HP D2D4009
23
Page 24

24
Before you start
Page 25

2 Connecting and installing the HP
D2D
In this chapter:
•
“Installing the rail kit” on page 25
•
“Connecting the hardware”onpage 29
•
“Supported network configurations”onpage 30
•
“Powering on the HP D2D” on page 32
•
“Software installation, discovery and configuration” on page 32
•
“Web browser settings” on page 35
Installing
Overview
This section contains instructions for installing HP rack rails into square and round hole racks for the
HP D2D
Kit contents
• Two rack rails (left and right)
• Mounting hardware for square and round hole racks
• Two tie wr
Backup System
the
rail kit
(1U) and HP D2D (2U) Backup Systems.
aps
NOTE:
If mounting the HP D2D into threaded hole or telco racks, please see h
purchase mounting hardware.
Important safety information
See also the Safety Booklet on the HP StorageWorks CD-ROM.
CAUTION:
Electrostatic discharge (ESD) can damage electronic components. Be sure you are properly grounded
(earthed) before beginning any installation procedure.
Installation guidelines
This installation is to be performed by qualified individuals who have knowledge of the procedures,
precautions, and hazards associated with equipment containing hazardous electrical circuits.
ttp://www.racksolutions.com to
D2D Backup SystemHP D2D4004 and HP D2D4009
25
Page 26

WARNING!
These rails, when installed, form only a shelf for the server to rest on. The server is not attached to the rail
by any other means. Use extreme caution when pulling the server out from the rack; it can slip and
fall, causing dam age to the server or injury. HP is not responsible for any damage or injury caused by
the mishandling of the server.
WARNING!
Ensure that the rack is level and stable before working on the rack. Be sure the leveling jacks (feet) extend
to
the floor and that the full weight of the rack rests firmly on the floor.
WARNING!
Ensure that the rack has anti-tip measures in place. Such measures may include floor-bolting, anti-tip
feet, ballast, or a combination of these as specified by the rack manufacturer and applicable codes.
WARNING!
Ensure that sufficient personnel are on hand to support the product(s) during the installation process. Use
of
the appropriate lifting device is recommended as an installation aid.
WARNING!
Always load the rack from the bottom up. Load the heaviest items in the rack first . This mak es the rack
bottom-heavy and helps prevent it from becoming unstable.
WARNING!
Do not overload the branch circuit that provides power to the rack. The total rack load should not
exceed 80 percent of the branch circuit rating.
Mounting the server
1. Position left and right rack rails at the desired ’U’ position in the rack.
NOTE:
Therails canbeadjustedto fitthe rack.
2. Secure rack rails to the front and back rack columns using screws. Make sure that the shoulders
of
the screws fit inside the square or round holes of the rack.
NOTE:
If installing rails into a square hole rack, use larger-sized shoulder screws and pins for mounting. If
installing rails into a round hole rack, use smaller-sized shoulder screws and pins for mounting.
26
Connecting and installing the HP D2D Backup System
Page 27
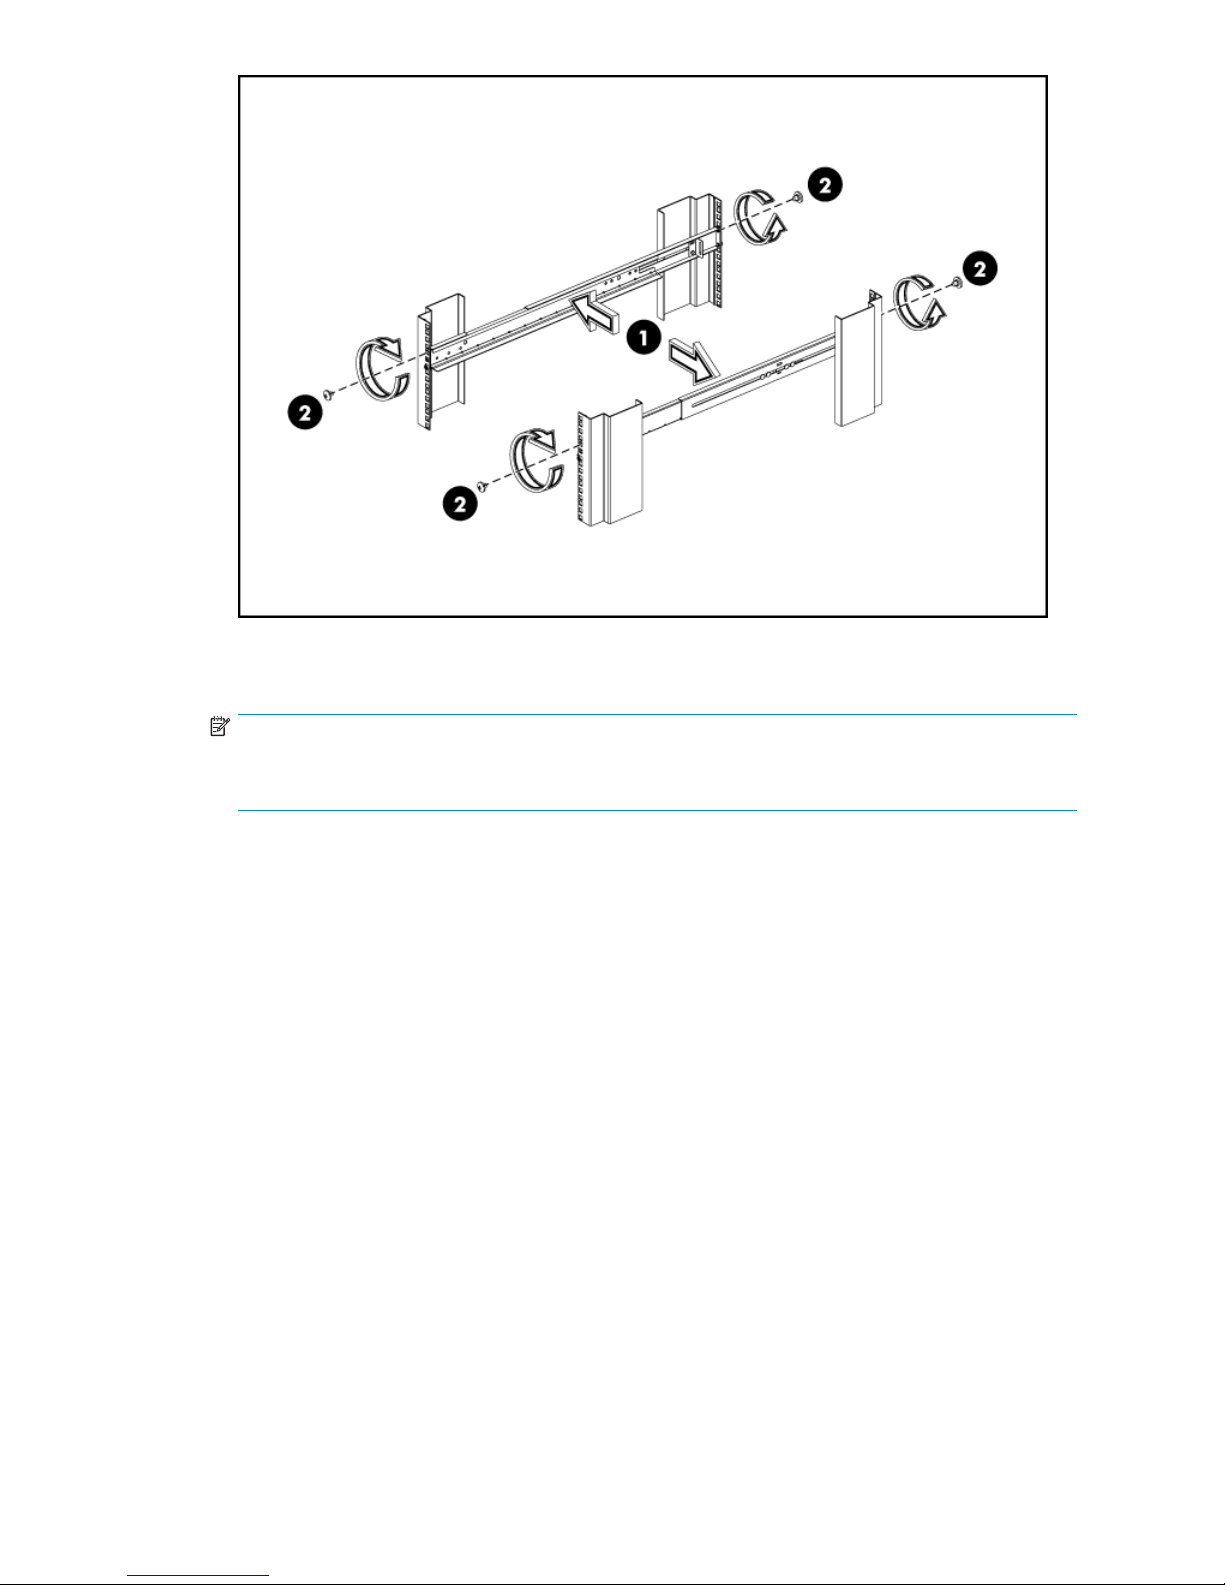
Figure 7 Att ach the rails to th e rack columns
3. Slide the HP D2D into position on the rails.
NOTE:
The rear ends of the rails have a CTO bracket that must overlap the chassis tab in order to secure the
HP
D2D to the rails.
D2D Backup SystemHP D2D4004 and HP D2D4009
27
Page 28
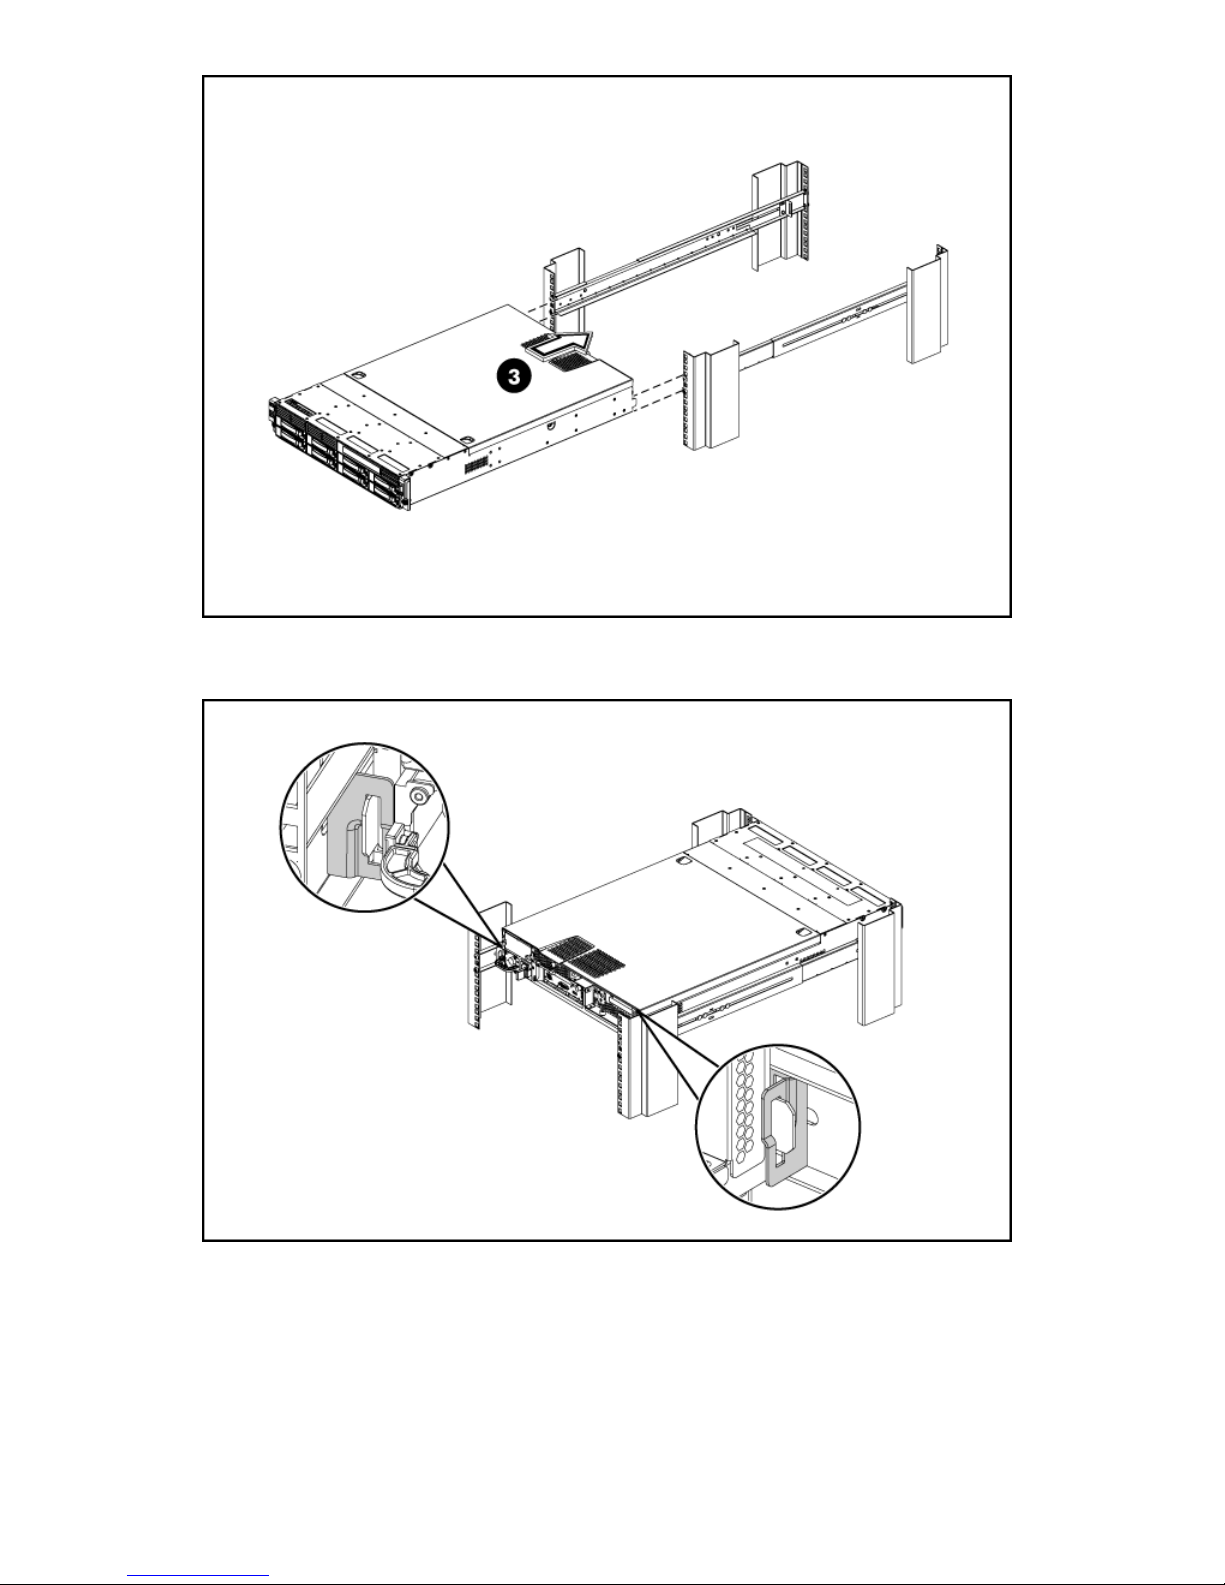
Figure 8 Insert the HP D2D server into t he rack
Figure 9 CTO bracket location
4. Secure the HP D2D to the rack rails using thumbscrews on the front bezel.
28
Connecting and installing the HP D2D Backup System
Page 29
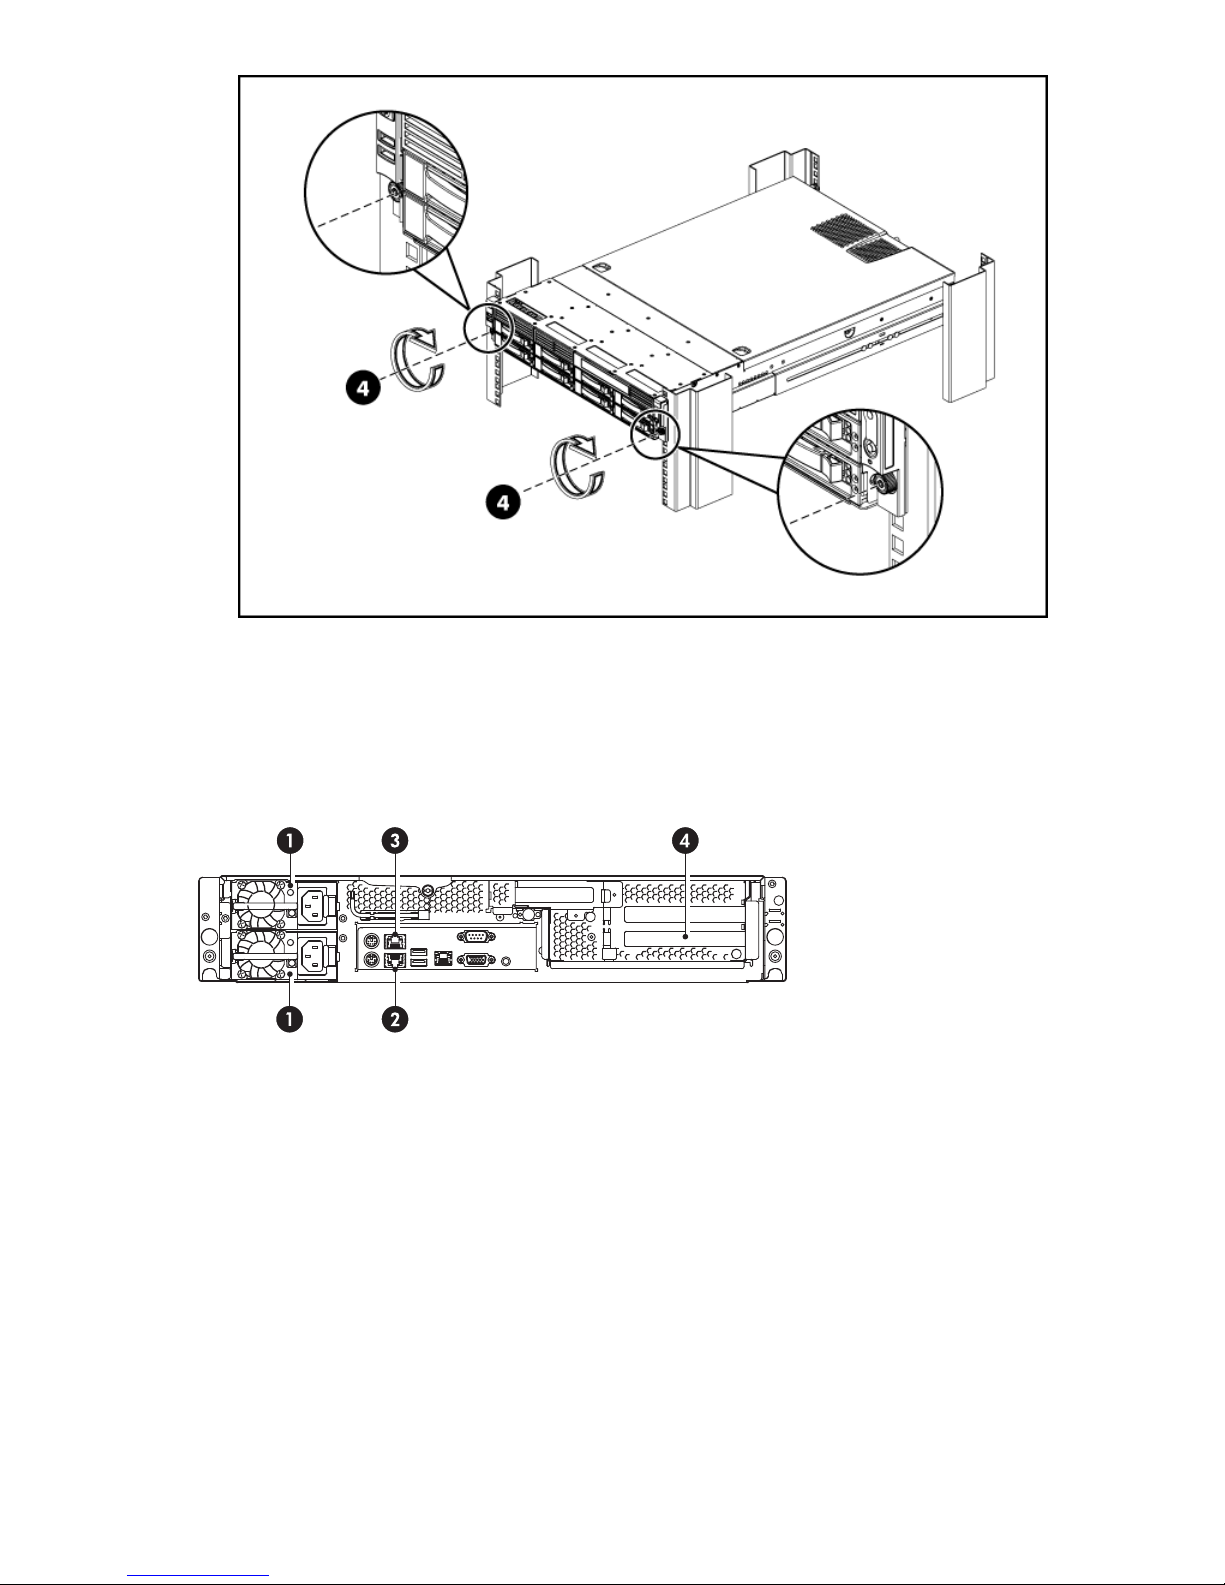
Figure 10 Secure the HP D2D to the rack
5. Using the holes provided in the rear rack rails, install tie wraps and route external cable as
required.
Connecting the hardware
1. Power connectors
3. LAN port 2 connector
Figure 11 Network and power connectors
1. Use the supplied power cord to connect the HP D2D Backup System to the main power supply. This
HP-approved cord is appropriate for your specificgeographicregion.
The HP D2D Backup System has a redundant power supply. Make sure that both power cords
are connected.
For detailed safety information, see the Safety Guide on the HP StorageWorks CD-ROM.
2. Use any CAT-5E network cable (also supplied with the product) to connect to a Gigabit network
switch. 100 Base-T Ethernet will limit performance; 10 Base-T Ethernet will severely limit performance.
There are two LAN por ts. LAN Port 1 should always be connected because this is the port that the
Web Management Interface uses. (See also “Dual network ports”onpage30.)
2. LAN port 1 connector, must be connected
4. Fibre Channel card with optical ports
D2D Backup SystemHP D2D4004 and HP D2D4009
29
Page 30

NOTE:
The Web Management Interface is used to configure devices and it requires an Ethernet connection.
LAN Port 1 (the lower LAN port on the rear of the HP D2D) must always be connected, even if you are
using the FC ports to back up and restore data to the HP D2D.
NOTE:
The HP D2D also supports direct connection of a monitor and keyboard. Please refer to
“Using the system console to discover the HP D2D” on page 47 for more information about this.
Supported Ethernet configurations
Ethernet network connection
IPv4 and IPv6 network protocols
The HP D2D supports both IPv4 and IPv6. Setup and configuration will default to I Pv4, if the
network is configured to support it. On an IPv6–only network, it is normally sufficient to enter
the
IPv6 MAC Address (found on the label on the top of the unit) when running the Installation
Wizard. However, if this does not work, you can use the system console, as described in
“Using the system console to discover the HP D2D” on page 47.
Dual network ports
The two physical network ports provide three network configuration modes:
• Single Por
is
used (Port 1).
• Dual Port Configuration : The HP D2D is connected to two different networks. Both network ports are
used. If dual port configuration is required, the networks must be on different sub-nets.
• High Avai
network ports are used, but the two ports are bound together.
Single port configuration is the default mode, but it may easily be changed from the Web Management
Interface. The High Availability mode is the recommended option, because it provides port failover and
increased bandwidth, but the network switch must support port bonding.
tConfiguration: The H P D2D is connected to one network only; only one network port
lability Dual Port Configuration: The HP D2D is connected to a single network. Both
DHCP and static IP addressing
DHCP network addressing is enabled by default as long as you are connecting the HP D2D as an IPv4
device; this means that an IP address and other network settings are assigned automatically when you
connect the HP D2D Backup System to an IPv4 network that has a DHCP server. If preferred, you can use
static IP addressing and assign settings manually during the installation process. If you are connecting to
an IPv6–only network,itisnormallysufficient to enter the IPv6 MAC Address (found on the label on the
top
of the unit) when running the Installation Wizard.
The HP D2D Backup System should be on the same logical and physical net work as the host machine
connecting to it. This is normally the case because, typically, the HP D2D Backup System is connected to
the
same Gigabit network switch as the host machines backing up to it.
HP D2DonaGigabitEthernetnetwork
TheHPD2D Backup System is connected to aspareport onanexistingGigabitnetwork switch.
30
Connecting and installing the HP D2D Backup System
Page 31

This may be your main network, which is also used to connect a number of different types of devices,
r
such as PCs, servers, workstations and printers, or a dedicated backup network that is used solely
for clients that need to be backed up.
The configuration, illustrated in Figure 12 on page 31, is the simplest and most common configuration,
assuming that Gigabit networking is already in place, and requires no additional hardware. The only
disadvantage to the configuration is that a high volume of traffic may impact network performance during
backup and backups may take longer to complete. However, if backups are scheduled to run outside of
normal business hours, the volume of data trafficisunlikelytobeaproblem.
Server
Supplied cable
Server
Switch
LAN
Serve
HP StorageWorks D2D
Backup System
Figure 12 Connecting to a business server on the main network
In some environments, backup data is kept separate from day-to-day office network traffic, as illustrated
in
Figure 13 on page 32. There is a separate, dedicated IP network for all hosts that ne ed data to be
backed up.
D2D Backup SystemHP D2D4004 and HP D2D4009
31
Page 32

Server Server Serve
r
LAN
Switch
Supplied cable
Figure 13 Connecting to a dedicated ba c kup network
P owering on the HP D2D
Pressthe Power onbuttononthe frontofyourHPD2D Backup System. The normal boot sequence
takes approximately 2 minutes. On power up the HP D2D Backup System runs its fans at high speed
for app roximately 10 seconds before returning to normal speed.
Storage Network
HP StorageWorks D2D
Backup System
Figure 1
1. Power On button
4Poweringonthe HP D2DBackupSystem
Software installation, discovery and configuration
There a re three stages to installation:
• Install all the required drivers
• Discover the HP D2D Backup System on the network and configure net work settings, if required
• Install an iSCSI Initiator, if required, and set up the iSCSI base configuration
UNIX and Linux users should download the latest patches for their operating system and refer to the
“UNIX Configuration Guide” on the HP StorageWorks CD-ROM for configuration instructions.
Installation wizard for Windows users
For Windows users, the recommended way to set up the HP D2D Backup System network is to run the
Installation wizard from the HP StorageWorks CD
for the first time.
32
Connecting and installing the HP D2D Backup System
-ROM, particularly if you are configuring the host
Page 33

The HP D2D Backup System can be used to back up a maximum of sixteen hosts. You should run the
Installation wizard on each host that will provide a source of data for backup. The wizard configures the
software components needed to connect from the host and use the HP D2D Backup System. The host
may be a server, workstation or PC.
Running the Installation wizard
NOTE:
necessary administrative rights on the host to run the Installation wizard successfully
You must h ave t
and
the host sh
iSCSI Initiator.
1. Insert the CD-ROM supplied with your HP D2D Backup System into the host machine. It should launch
automatically. If it does not, locate the D2DInstallationWizard.exe file and run it manually.
2. Select Start the wizard and follow the onscreen instructions to step through the installation, normally
by
pressing Next.
The Installation wizard will, if possible, configure all the software components required for setup and
use of the HP D2D Backup System. Use the Wizard help if you need more information.
• Install drivers: These allow your system to recognize the tape medium changer and drive
he
ould be connected to the Internet in case it is necessary to download the Microsoft
devices created on the HP D2D Backup System.
• Discover network devices: This allows you to locate your HP D2D Backup System on the
network and configure network settings. If you have multiple devices on your network, a list
is
displayed so that you can select the required HP D2D Backup System.
D2D Backup SystemHP D2D4004 and HP D2D4009
33
Page 34

When the configuration page for the device is displayed, DHCP is enabled by default
for IPv4 networks. If you wish to use static IP addressing, d isable DHCP and enter the
IP
address d etails.
TIP:
If more than one HP D2D Backup System is being configured at the same time, it may be useful
to physically identify a D2D device. Use Beacon mode to flash the LED on the selected device.
For IPv6–only networks you must enter the MAC address of the HP D2D. You will find
the
MAC address on the label on the top of the unit. The wizard translates the MAC
address into a valid IPv6 address for your network. If it is unable to do this, refer to
“Using the system console to discover the HP D2D” on page 47.
• Create desktop shortcut to the Web Management Interface.
• Create baselibrary device on theHPD2D:
If
you a re configuring the HP D2D as an iSCSI device, this step retrieves and installs the
Microsoft iSCSI initiator, connects this host to the HP D2D Backup System and creates
34
Connecting and installing the HP D2D Backup System
Page 35

and configures a library. If you are configuring the HP D2D as an FC device, this step
is notrelevantand is omitted. This meansthatno baselibrary device is createdfor
the
host; you must do this after installation from the Web Manag em ent Interface, see
“To create a new device” on page 72.
3. Run the Installation wizard on any other hosts that are to be backed up—sixteen is the maximum. On
running the wizard on subsequent hosts, you only need to select the HP D2D Backup System; its
network settings have already been assigned.
The HP D2D Backup System does not appear as a device u nder My Computer and it is not mapped
to a drive letter (although it can be seen as a tape drive (1) and medium changer (2)from Device
Manager). Use a backup application on the host machine to back up and restore data.
Recommended web browser settings
The web browser used to communicate with the D2D Backup System must have Active Scripting or
JavaScript enabled. If it does not, some of the browser buttons may not be displayed.
D2D Backup SystemHP D2D4004 and HP D2D4009
35
Page 36

Internet Explorer 7.X
1. Click on the Tools button located in the upper right part of the screen (next to the gear icon).
2. Select Interne
3. Click on the Security tab.
4. Click on the Custom Level... but ton.
5. Set the option
6. Click Yes.
7. Refresh the page.
tOptions.
Active scripting to Enable and click OK.
Internet Explorer 6.X
1. Select Tools from the top menu.
2. Select Internet Options.
3. Click on the Security tab.
4. Click on the Custom Level.
5. Scroll down until you see the section labeled Scripting.
6. Under Active scripting select Enable and click OK.
Mozilla Firefox 1.5 and Firefox 2.X
from the Tools menu.
1. Select Op
2. Click on Content.
3. Check the box next to Enable JavaScript.
4. Click OK
5. Refresh the page.
tions
.
36
Connecting and installing the HP D2D Backup System
Page 37

3Attaching aphysicaltapedrive
(optional)
In this chapter:
•
“Hardware requirements” on page 37
•
“Tape drive installation overview” on page 37
•
“Removing the covers”onpage 38
•
“Installing the H BA” on page 38
•
“Replacing the cover” on page 43
• “Connecting an external or rackmount tape drive”onpage44
Hardware r
A tape drive may be attached directly to your HP D2D Backup System, a llowing you to store backups
offsite.
To use this facility you need:
• An HP Stor
• A host bus adapter, HBA, for the tape drive connection (because there are no embedded SAS or SCSI
• Please refer to h
Please
about t
equirements for Tape Attach
ageWorks Ultrium tape drive. This should be an external drive or a 1U or 3U rackmount
for internal tape drives. The appropriate cables for the rackmount shelf must be used. Both
enclosur
SAS and SCSI half-height and full-height tape drives are supported.
ports).
supported host bus adapters and tape drives. No additional drivers are required for recommended
HBAs and tape drives; they are included in the HP D2D Backup System firmware.
e
You must purchase and install the HBA before connecting the tape drive.
ttp://www.hp.com/go/connect or http://www.hp.com/go/ebs for a list of all
refer to “Export, import and copy to an attached tape drive” on page 93 for more information
ransferring data to the tape drive.
Tape drive installation overview
Before connecting a tape drive, you must install an HBA. The instructions in this chapter provide the
following information that is specific to the HP D2D Backup System.
1. If you have already powered up the HP D2D Backup System, power it down and disconnect the
cables before you start; each step is expanded in separate sections after the summary below.
2. Remove the top cover from the HP D2D Backup System.
3. Install the HBA.
4. Replace the top cover on the HP D2D Backup System.
5. Connect an external or rackmount tape drive.
D2D Backup SystemHP D2D4004 and HP D2D4009
37
Page 38

Removing the top cover
1. If you are insta
powered on the H
are no backup or restore jobs in p rogress and that no future jobs are scheduled to start whilst the
system is shut down. Select Shutdown on the Web Management interface and click Power Off to
power down the HP D2D Backup System safely.
2. Disconnect the network cable(s) and the power cord(s) from the HP D2D Backup System.
NOTE:
If you have the FC product, disconnect all cables connecting the FC card to the Fibre
Channel Switch.
3. You need to remove the top cover before you can remove or replace a server component.
• Loosen the captive screw (1) on the rear panel with a T-15 screwdriver.
• Slide the cover (2) approximately 1.25 cm (0.5 in) toward the rear of the unit and then lift the
cover to detach it from the chassis.
• Lift the top cover away from the chassis. (3)
lling the tape drive as part of the initial installation, go to step 3. If you have already
PD2D Backup System,itmustbe shutdown before you start. Make sure there
Figure 15 Removing the top cover
Installing the HBA
There are three PCIe expansion slots on the system board; two full height and one low profile slot. One
full height PCIe slot already has a P400 controller card installed. You may purchase and install either a
full-height or low profile PCIe card for Tape Attach.
38
Attaching a physical tape drive (optional)
Page 39

NOTE:
If you have the FC product, the FC card is already pre-installed in the other full-height PCIe slot. There is
only one spare low profile slot. This is the slot into which you must install the HBA for Tape Attach. If the
HBA that you purchase has a full-height bracket, you must first replace it with a half-height bracket (supplied
with the recommended HBA).
NOTE:
The drawings illustrate how to install the Tape Attach HBA only; the pre-installed P400 card or FC card is
not
shown.
Removing the PCI Cage
1. Loosen thetwo captivescrewsthat securethe PCIcagetothe chassiswithaT-15 screwdriver.
2. Lift the PCI cage away from the chassis.
Figure 16 Removing the PCI cage
NOTE:
The pre-installed P400 card has a cable connecting it to the system board. It may be
easier to disconnect this cable while you are installing the new HBA. The same applies
to theFCcard, if youhavethe FC model.
D2D Backup SystemHP D2D4004 and HP D2D4009
39
Page 40

Removing the sl
1. Loosen the screw that secures the slot cover to the chassis. On the FC model, the HBA must be
installed in t
or the
NOTE:
Before instal
(supplied wi
2. Remove the slot cover on the PCI cage.
CAUTION:
Do not discard the slot cover. If the expansion board is removed in the future, the slot cover
must be reinstalled to maintain proper cooling.
ot cover
low profile slot. On the iSCSI model it may be installed in either the spare full-height
he
low profi
le
ling in
th the
slot.
the low profile slot ensure that the HBA is fitted with a low profile bracket
recommended HBA, if not already fitted).
Figure 17 Removing the slot cover (full height)
40
Attaching a physical tape drive (optional)
Page 41

Figure 18 Removing the slot cover (low profile)
Installing thePCIeCard
1. Slide the
press the board to seat it properly in the slot.
2. Tighten the screw that secures the card to the PCI cage.
Figure 19 Installing the PCIe card (full height)
expansion board into the slot, aligning the board with its matching connector. Firmly
D2D Backup SystemHP D2D4004 and HP D2D4009
41
Page 42

Figure 20 Installing thePCIecard(in thelow profile slot)
Reinstalling the PCI Cage
1. Align the PCI cage to the system board expansion slot, and then press it down to ensure full
connecti
NOTE:
Be sure to
on to the
reconnect any cables that you disconnected when you removed the PCI cage.
system board.
Figure 21 Reinstalling the PCI cage
2. Tighten the two captive screws to secure the PCI c a ge to the chassis.
42
Attaching a physical tape drive (optional)
Page 43

Figure 22 Securing the PCI cage
Replacing the top cover
cover to the chassis and then slide it toward the front panel to position it into place.
1. Align the t
2. Once the cover is attached to the chassis, tighten the captive screw on the rear panel with a T-15
screwdriver.
op
Figure 23 Replacing the top cover
3. Reconnect the network cable(s) and the power cord(s).
NOTE:
If y o u have the FC product, reconnect all cables connecting the FC card to Fibre Channel
ch.
swit
D2D Backup SystemHP D2D4004 and HP D2D4009
43
Page 44

Connecting an e
NOTE:
You can only connect an external or rackmount tape drive, if you have already installed a recommended
HBA.
Connect the external or rackmount tape drive, as described in the documentation accompanying the
tape d rive. Refer to the “User Guide” that is supplied with the tape drive for more detailed information
about
tape drive usage and LED troubleshooting.
NOTE:
If you are conne cting to a 1U or 3U rackmount enclosure for internal tape drives, the appropriate cables
for the rackmount shelf must be used. Please refer to the rack documentation for further details.
xternal or rackmount tape drive
44
Attaching a physical tape drive (optional)
Page 45

4 Advanced install ation
The Installation wizard is the recommended way to install the HP D2D Backup System, b ut it is possible
to install it manually. You may also need to run phases independently when troubleshooting. This
chapter describes:
•
“Manual driver installation” on page 45
•
“Using DHCP to discover the HP D2D (IPv4 only)” on page 46
•
“Using the Discovery Engine to discover the HP D2D (IPv4 only)” on page 46
•
“Using the system console to discover the HP D2D” on page 47
•
“The Microsoft iSCSI Initiator” on page 51
•
“Linux and UNIX iSCSI initiators” on page 5 7
Manual driver installation
are required; an HP LTO Tape driver and a medium changer driver.
Two driver
NOTE:
Certain backup applications require you to use their own drivers for both the tape device and medium
changer. For many applications these will be installed automatically during the software installation
process. If the backup software is already installed, you may need to manually update the drivers after
installi
s
ng the
HP D2D Backup System.
HP LTO Tape driver
The HP LTO Tape driver must be installed to allow your system to recognize the Ultrium tape devices
createdby the HP D2DBackupSystem.
Tape drivers can be installed from the drivers directory on the HP StorageWorks CD-ROM, where they
are supplied as an installer application and as driver files for manual installation. Also check the HP
website for driver updates at h
Thetapedrive is confi gurable as an LTO-2, LTO-3 or LTO-4 device. This is the default behavior of the tape
drive and there is no need and no way to change it on the HP D2D Backup System. It is important not to
confuse emulation type with cartridge size. Emulation type is totally independent from cartridge size. The
HP D2 D Backup System allows you to pick whatever cartridge size you like (up to 800 GB).
Medium changer driver
No additional medium changer driver is required because Microsoft Windows provides a suitable
generic driver and all backup applications provide their own changer drivers.
ttp://www.hp.com/support.
D2D Backup SystemHP D2D4004 and HP D2D4009
45
Page 46

Using DHCP to dis
only)
NOTE:
DHCP discovery is only supported if you are installing the HP D2D as an IPv4 iSCSI network device. If
youare installing theunitasanIPv6–only iSCSInetwork device,DHCPdiscovery is notsupported.
If you are connecting the HP D2D Backup System to an IPv4 network that has a DHCP server, DHCP
addressing is enabled by default. The IP address and other network settings are assigned automatically
when you conne ct the HP D2D Backup System to the network. You only need to know the name of the HP
D2D
Backup System to complete the installation and create a base library configuration. The name is in
the
format D2DBS-<serial number> and can be found on the label on the front of the unit.
In theweb browser typein: D2DBS-<s erial number>
NOTE:
Depending on network settings, you may need to enter the full domain path.
Once the HP D2D Backup System has been discovered on the network, you must configure an iSCSI
Initiatoronthe host,sothatthe librarydevices on theHPD2D arevisible to thebackupapplication. See
also“The Microsoft iSCSI Initiator” on page 51.
cover the HP D2D Backup System (IPv4
Using the Discovery Engine to discover the HP D2D Backup
System (IPv4 only)
If your network does not have a DHCP server, the Discovery Engine allows you to locate the HP
D2D Backup System on your network and assign network settings, such as the IP address. It is the
recommended way to locate and configure the HP D2D Backup System on your network, if you are using
static IP addressing for an IPv4 iSCSI network device. It also allows you to select your required base
configuration and specify the number of slots for a library.
TheDiscovery Engine canberun as part ofthe Installation wizard or as astandaloneutility from theHP
StorageW
orks Tape CD-ROM.
46
Advanced installation
Page 47

Beacon mode
The HP D2D Backup System supports a Beacon LED sequence, which helps a user identify which unit is
being confi gured, if several are c onnected to the network. See also “LEDs” on page 63.
If the HP D2D Backup System is new and not yet configured
When installing the HP D2D Backup System for the first time, this step must be completed successfully
before you can connect from your host. Select the appropriate HP D2D Backup System from the list
and
make a note of its IP address because you will need this when you configure the iSCSI Initiator,
see also “Discovery tab”onpage 53.
If the HP D2D Backup System has been configured incorrectly
If you cannot connect to the HP D2D Backup System using the Web Management interface, it may
have been configured incorrectly. Run the Discovery Engine to check the IP add ress of the HP D2D
Backup System and, if necessary, select it again from the list of available HP D2D Backup Systems.
If you still cannot connect to it, check that you have configured the iSCSI Initiator correctly, see also
“Discovery tab” on page 53.
If the network setup has been changed
If the network infrastructure changes, you may need to update the HP D2D Backup System network
settings to allow hosts to continue to connect. Run the Discovery Engine and change the network settings
in accordance with your new infrastructure.
You c an also use the Web Management Interface to modify these settings directly on the HP D2D Backup
System, aslongasthisisdonebeforethe infrastructure changes are made.
Once the network settings of the HP D2D Backup System have been changed, you must also change the
iSCSI Initiator for each host.
Using the console to discover the HP D2D Backup System
(IPv4
To connect the system console
and IPv6)
If you do not use the Installation Wizard or it fails, you can connect the system console directly to the
unit in
1. Connect the monitor cable to the VGA port on the rear of the unit.
order to find out the IP address.
D2D Backup SystemHP D2D4004 and HP D2D4009
47
Page 48

2. Connect the keyboard cable to the PS/2 ports on the rear of the unit. Do not connect anything to
the
USB ports.
Figure 24 System console connections on the HP D2D
1 and 2. PS/2 ports for system console keyboard and mouse
3. VGA port for system console monitor
3. Power on the HP D2D and allow it to b oot up until the console screen is displayed (see example
below). Select the Network... o ption from the left-hand Menu.
48
Advanced installation
Page 49

Figure 25 System console screen
4. Locate the IP address for the port(s) and make a note of it.
5. Use an iSCSI Initiator to enable the host to connect to devices on the HP D2D, see also
“iSCSI Initiator” on page 49. In the web browser on the host machine, type in the I P address of
the
HP D2D to connect to it.
iSCSI Initiator
NOTE:
If you have a FC product, you may confi gure it to have amixture of FC andiSCSI attached devices.
If
you are configuring y our HP D2D to have iSCSI devices (for hosts attached via the LAN ports), this
section is relevant. However, if you are confi guring it to have only FC network devices (attached via
the
FC ports), it is not necessary; you use the Web Management interface to c reate FC devices, see
“To create a new device” on page 72.
iSCSI is a protocol for sending SCSI commands via Ethernet. It defines how SCSI packets are translated
to Ethernet packets and connects to the required devices. An iSCSI initiator may be hardware or software
andshouldberunning on each host. Ifthe host does not haveaniSCSI initiator, it will notbeableto
connect to the library configured on the HP D2D Backup System and will not be able to perform backups.
D2D Backup SystemHP D2D4004 and HP D2D4009
49
Page 50

The HP D 2D Backup System supports the Microsoft software iSCSI initiator which ca n be retrieved
from the Microsoft website.
Figure 26 iSCSI Initiator download page
1,amd 64
2,ia 64
3,x86
Use with amd ® 64-bit processors and with Intel ® em64t processors, when
running a 64-bit version of the Windows operating system.
Use with ia-64 processors, such as Itanium and HP Integrity.
Use with 32-bit processors or 64-bit processors running 32-bit Windows, such as
Windows XP and Server 2003.
If you download the wrong version, it will not install. The simplest way of ensuring you download
the
correct version is to run the Installation wizard from the HP StorageWorks CD-ROM because it
automatically checks which is the appropriate version for your host.
NOTE:
The Microsoft Vista operating system includes the Microsoft iSCSI Initiator. It can be run from the Control
Panel in Classic Mode.
Manual iSCSI initiator installation
The Installation wizard could fail for the following reasons:
• The host machine does not have an internet connection
• Firewall restrictions prevent this process
• Microsoft has relocated the iSCSI initiator files to a different address on its website.
• The process times out due to a slow connection
• The maximum number of drives/libraries have been configured on the HP D2D
If the process fails:
1. On a machine that supports an external internet connection, go to the Microsoft website and
search on "iSCSI initiator"
2. Select the result that takes you to the Download page and choose the download tha t is appropriate
foryourhost.
3. Download the iSCSI initiator and install it on the host, accepting all the default settings.
The iSCSI Initiator and Authentication
Authentication is not required for the HP D2D, but it is suppor ted for those companies that have an IT
policy that requires them to use authentication
fields on the iSCSI Initiator and also ensure that
Management Interface. This enables the Initia
target device to log into the Initiator.
The authentication method supported on D2D products is C H AP. It relies on a "secret" known only to
the
target and initiator. The size of the CHAP s
50
Advanced installation
If this is the case, you will need to configure the necessary
.
corresponding information is supplied in the Web
the
torto log into thetargetdeviceonthe HP D2Dand the
ecret is between 12 and 16 characters, and must be
Page 51

entered in exactly the same format in both the Web Management Interface and the iSCSI initiator.
An ’Authentication Failure’ message will occur if the same ’secret’ and ’user name’ information are
not
entered into the iSCSI Initiator screen and the Web Management Interface. Further details on
authentication and CHAP can be found within standard iSCSI protocol documentation.
The recommended process if you wish to enable authentication is:
1. Create the devices on the Web Ma nagem ent Interface.
2. Set up the Targets in the iSCSI Initiator.
3. Connect to the devices using the CHAP user name and secret that you configured on the Targets tab.
The Microsoft iSCSI Initiator
iSCSI initiator contains a number of tabs. This section describes the information that must
The Microsof
be
a
comprehensive description of all the tabs; please download the “User Guide” from the Microsoft
website for
General tab
You do not normally need to make any changes on the General tab. The Initiator Node Name is
generated automatically, which guarantees that it will be unique on your network.
provided in order to connect the host to a d evice on the HP D2D Backup System. It does not provide
t
more information.
D2D Backup SystemHP D2D4004 and HP D2D4009
51
Page 52

Figure 27 General tab (iSCSI)
NOTE:
When you use the Web Management Interface to create an additional device for your host, you must
provide the iSCSI Initiator Name.This is the Initiator Node Name found on the General tab.
Authentication
If you wish to use mutual authentication (where target authentication is also required), click Sec ret on the
General tab and enter the appropriate string at the prompt.
NOTE:
IPSec Tunnel Mode is not currently supported on HP D2D products.
52
Advanced installation
Page 53

Figure 28 CHAP secret
The CHAP secret may be between 12 and 16 alphanumeric characters a nd should be exactly the same
string as you enter on the Web Management interface in the Target CHAP Secret field on the Devices
page. (See “D evice parameters”onpage 72.)
Discovery tab
Figure 29 Discovery tab (iSCSI)
Click Add to enter target portals that will enable discovery of the device.
D2D Backup SystemHP D2D4004 and HP D2D4009
53
Page 54

Figure 30 Add target portal
You must enter the IP address or fully qualified domain name of the HP D2D Backup System (for example,
myhpd2d.mydomain.com)toadd it as a targetportalfor thehostonthe Discovery tab. Do not change
the
Targets tab
This tab contains a list of all available devices.
• If this is t
• If target devices have already been configured for the host in the past, they appear in the list;
When you r
the
must log
will be a
NOTE:
If you are using mutual CHAP authentication, you set up the details when you log on to the target.
If you are using a dual port configuration, there will be two IP addresses in separate subnets for each
device. The iSCSI initiator will return both IP addresses as possible login addresses. If the default choice
does not work you can select a specific port. High Availability dual ports return a single IP address. See
also “Dual network ports”onpage 30.
Port; it should be 3260.
first time that the iSCSI Initiator has been configured and the Installation wizard has
he
not
(the
been ru
n, it will automatically create a library with the appropriate number of target devices
defau
lt is one
loader and one tape drive).
no more are created.
un the
priate targets for your host. Remember that each library has at least two devices and you
appro
iSCSI Initiator manually, new devices have a status of Inactive. You must log on to
onto each one separately. If the emulation type you have selected allows more drives, there
target device for each drive.
54
Advanced installation
Page 55

Figure 31 Targets tab (iSCSI)
We recom
option in the Lo g On... dialog.
Authentication
When the Log On to Target prompt is d isplayed click on Advanced...
mend that you also select the Automatically restore this connection when the system boots
D2D Backup SystemHP D2D4004 and HP D2D4009
55
Page 56

Enable CHA P logon information and enter the secret in the Target Secret box. This should be the same
string as you entered for the Initiator CHAP Secret on the Devices page of the Web Management
Interface. The User Name should match the Initiator CHAP User Name on the D evices page.
Figure 32 Advanced settings CHAP
If you want to use mutual authentication, which means that the target must also log on to the Initiator,
make sure that the Perform mutual authentication box is checked. You must also provide the
Target User Name and Secret on the Devices page in the Web Management Interface. See also
“Devices (Configuration)” on page 69.
Persistent Targets tab
The Persistent Targets tab shows the targets that have been configured to restore automatically on reboot.
During initial configuration, it is for information only. However, if you want to stop the host automatically
connecting to a device, you must select the device on this tab and Remove it. To disconnect the device
without rebooting, go back to the Targets tab, select the device, click Details and log off.
56
Advanced installation
Page 57

Persistent Targets tab (iSCSI)
Figure 3
3
Bound Volumes/Devices tab
No configuration is required on the Bound Volumes/Devices tab.
UNIX iSCSI i nitiators
Linux a
nd
An iSCSI initiator is embedded in the operating system. Please refer to the “UNIX Con figuration Guide”
on the
latest operating system patches before you configure your system.
HP StorageWorks Tape CD-ROM for fur ther information. Make sure that you have downloaded the
D2D Backup SystemHP D2D4004 and HP D2D4009
57
Page 58

58
Advanced installation
Page 59

5 HP D2D Backup Systems and
Fibre Channel
In this chapter:
• “Fibre Channel topologies” on page 59
• “Zoning” on page 59
•
“Fibre Channel connection” on page 60
•
“Fibre Channel (Configuration)”onpage 61
•
“Fibre Channel (Status)”onpage 61
Fibre Channel topologies
The HP D2D Backup System supports a s w itched fabric fibre channel topology.
A switched fabric topology allows nodes to talk directly to each other through temporarily established
direct conn
for each communication between nodes. Because of this, switched fabric topologies provide significantly
more performance and scalability than arbitrated loop topologies.
Switched fabric configurations are implemented with Fibre Channel switches. Switches may be cascaded
or
meshed together to form larger fabrics.
ections with a library on the HP D2D Backup System. This provides simultaneous bandwidth
NOTE:
Other topologies will be supported at a later date. Please refer to h
h
ttp://www.hp.com/go/ebs for the latest information.
Zoning
Due to complexities in multi-hosting tape devices on SANs, it is best to make use of zoning tools
to help keep the backup/restore environment simple and less susceptible to the effects of changing
or problematic SANs.
Zoning provides a way for servers, disk arrays, and tape libraries to only see what hosts and targets they
need to
• Limiting unnecessary discoveries on the HP D2D Backup System
• Reducing stress on the HP D2D Backup System and its library devices by polling agents
• Reducing the time it takes to debug and resolve anomalies in the backup/restore environment
• Reducing the potential for conflict with untested third-party products
Zoning may not always be required for configurations that are already small or simple. Typically the
bigger the SAN is, the more zoning is needed. HP recommends the following for determining how
and
• Small fabric (16 ports or less)—may not need zoning.
• Small to medium fabric (16 - 128 ports)—use host-centric zoning. Host-centric zoning is
ttp://www.hp.com/go/connect or
see and use. The benefits of zoning include but are not limited to:
when to use zoning.
implemented by creating a specific zone for each server or host, and adding only those storage
elements to be utilized by that host. Host-centric zoning prevents a server from detecting any other
devices on the SAN or including other servers, and it simplifies the device discovery process.
D2D Backup SystemHP D2D4004 and HP D2D4009
59
Page 60

• Disk and tape o n the same pair of HBAs is s upported along with the coexistence of array
multipath software (no multipath to tape or library devices on the HP D2D Backup System, b ut
coexistence of the multipath software and tape devices).
• Large fabric (128 p orts or more)—use host-centric zoning and split disk and tape targets.
Splitting d isk and tape targets from being in the same zone together will help to keep the HP D2D
Backup System free from discovering disk controllers which it doesn’t need to see. For optimal
performance, where p ractical, dedicate HBAs for disk and tape.
NOTE:
Overlapping zones are supported.
Fibre Channel connection
Backup and restore is supported over both Ethernet networks and Fibre Channel SAN. However, the Web
Management Interface always requires an Ethernet connection. If you have the FC product, you must also
connect to LAN port 1 and should run the Installation wizard to connect to and discover your HP D 2D
Backup System and to create a library device on the HP D2D before you can start to back up from the FC
host. The FC product is supplied with the correct FC card pre-installed. It does not include FC cables.
1.
Connect to LAN Port 1, as described in “Ethernet connection” on page 30.
2. UseaFC Multimode50/125(preferred) or 62.5/125 cabletoconnect theport(s) on theFC
card in the HP D2D to the Fibre Channel Switch.
3. Theswitchmusthaveamulti-mode4Gbstransceiver.
4. Run the Installation wizard, as described in “Software installation, discovery and
configuration” on page 32.
5. Run the Web Management Interface and create at least one library device. B e sure to
select one of the FC ports in the Port drop-down. For information about the other fields, see
“To create a new device” on page 72.
60
HP D2D Backup Systems and Fibre Channel
Page 61

6. Configure zones on the FC Fabric/Switch.
7. Thelibrary device(s)shouldnow be visibletothe host. Itmay be necessary to performasystem
re-scan.
Fibre Channel (Configuration)
There is a page on the Web Management Interface that allows you to view and edit Fibre Channel SAN
settings, if necessary. It shows FC settings for each port on the FC card.
To edit the FC configuration
Click Edit to make the fields editable for each port. Make the required changes and click Update.
default is Auto, which is the recommended option. For users who wish to fixthe
• Speed: T
speed, other available values are 1G (not recommended), 2G and 4G.
• Topology: The default is Auto, which is the recommended option. Loop, where the HP D2D
Backup System simulates a large number of FC devices, and N_Port, when a single host creates
many de
(N_Port ID Virtualisation).
he
vices on the link, are also supported. N_Port requires the switch port to support NPIV
Fibre Channel (Status)
This page shows the details for all the FC devices that are configured on the HP D2D Backup System.
Select a library in the Devices list to view the connection details for the library’s media changer and
drive(s).
This page is ma inly for information and is useful in troubleshooting. It cannot be edited.
D2D Backup SystemHP D2D4004 and HP D2D4009
61
Page 62

Devices section
The details in this section reflect settings that were configured for this library when it was created on
the
Devices page or when the Fibre Channel was configured. These settings can only be edited on the
appropriate Configuration page. If the Connection field for all devices on the same port is showing Not
Connected, check the physical FC connection. Examine the FC switch for visibility of the devices. Some
uration changes may be necessary or the configuration may not be supported.
config
Library section
There is a row for each device associated with the library. The Device Type determines the number of
drives.
• The Port ID is three hexadecimal numbers and is known as the FC address by some manufacturers.
If the
device is not connected, this field will be b lank.
• The Port Type describes the nature of the connection and should match the Topology details.
• The Number of logins is the number of hosts currently with an active logical connection to this
device. To be used at least one active connection is required. Too large a number indicates that
the
device has been zoned inappropriately and could cause issues.
62
HP D2D Backup Systems and Fibre Channel
Page 63

6LEDs
In this chapter:
•
“Front panel LEDs” on page 63
•
“Rear panel LEDs ” on page 64
•
“Fibre Channel card LEDs” on page 65
•
“Beacon mode” on page 66
Front panel LEDs
Figure 34 F
1. HP D2D Beacon LED
2. System Health LED
3. and 4. LAN port LEDS
5. Power On button/LED
Hard drive LEDs
The status of hard drives installed in the server is indicated by the drive activity LED indicator located on
the
front panel of the server.
ront view of the HP D2D Bac kup System
Steady blue: identifies the un it
Steady gre
Flashing red: fault with the power supply, such as
power supply or fan failure
Flashing green: network connection
Off: no ne
Steady green: Power connected, device ready to use
Steady amber: Device switched off or in hibernation
with power connected
Off: No p
en: Hardware is performing correctly
twork connection or network not configured
ower connected
D2D Backup SystemHP D2D4004 and HP D2D4009
63
Page 64

Figure 35 Drive LEDs
1. Disk beacon LED
2. Disk Online LED Steady green: Online, no activity
Rear panel LEDs
The LAN port on the rear panel has two LED indicators that allow monitoring of network activity.
Steady blue: identifies a specific disk within the unit
Flashing green: Ongoing disk activity
Steady amber: Disk has failed.
Flashing amber: Predictive disk failure
Off: No network connection.
64
LEDs
Page 65

Figure 36 Rear panel LEDs
1. LAN network speed LED indicator
2. LAN activity status LED ind icator Flashing green: Ongoing network data activity.
Fibre Ch
If you have the Fibre Channel version of the HP D2D, there are three LEDs adjacent to each FC port.
Table 3 FC card LEDs
Yellow LED
Off Off Off Power Off (OK)
On On On
Flashing Flashing Flashing
Alternately flashing Alternately flashing Alternately flashing Firmware fault (OK)
annel
card LEDs
Green LE
D
Steady green: The LAN connection is using 10
Mbps/100 Mbps link.
Steady amber: The LAN connection is using a GbE
link.
Off: No c o
nnection.
Off: No network data activity or no connection.
y
Amber LED
Activit
Poweronbeforeorafter firmware
initialization. Awaiting HBA
firmware initiali zation.
Power o
initia
nafter firmware
lization. Link not initialized.
Off Off
On
Off
On
nl
Flashing
nl
Flashing
Off Off
On
nl
Flashing
Off
Connected at 1 Gb/s
nl
Activity at 1 Gb/s (OK)
Connected at 2 Gb/s
nl
Activity at 2 Gb/s (OK)
Connected at 4 Gb/s
nl
Activity at 4 Gb/s (OK)
D2D Backup SystemHP D2D4004 and HP D2D4009
65
Page 66

Beacon mode
The HP D2D Backup System supports a Beacon LED sequence, which helps a user identify which unit is
being configured, if several are connected to the network. There is also a Beacon LED on the individual
disks so that you can identify a specific disk within the HP D2D.
Use the Network
Backup System.
switch off Beacon Mode, it will continue for 5 minutes. See also “Network (Configuration)” on page 77.
You can also switch Beacon mode on and off by pressing the LED on the front panel.
Use the RAID page of the Web Management Interface to turn Beacon Mode on and off for a specific
disk. This turns the Beacon LED on the disk solid blue. See also “R AID (Status)” on page 82.
page of the Web Management Interface to turn Beacon Mode on and off for the HP D2D
This turns the Beacon LED on the front and the rear of the HP D2D solid blue. If you do not
66
LEDs
Page 67

7 The Web Management Interface
In this chapter:
•
“Web man agement interface” on page 67
•
“To run the Web Management Interface”onpage 67
•
“Summary (Home)”onpage 68
•
“Devices (Configuration)” on page 69
•
“Cartridges (Configuration)” on page 74
• “Network (Configuration)” on page 77
• “Email Alerts (Configuration)” on page 79
•
“Disk (Status)” on page 81
•
“iSCSI (Status)”onpage 84
•
“Log (Status)” on page 84
•
“Shutdown (Set tings)” on page 86
•
“Admin (Settings)” on page 85
•
“Firmware (Settings)”onpage 87
•
“Support (Settings)” on page 90
•
“License (Settings)”onpage 90
What is the Web Management interface?
TheWeb Management Interfaceisthe main interface for:
• Monitoring the status and health of the HP D2D Backup System and all configured backup devices
• Changi
drives
• Managing movement of data to and from a physical tape drive attached to the HP D2D (if
one
ng the
,for a host
has been installed)
number of cartridge slots or creating additional libraries, or standalone tape
To run the Web Management Interface
There are two ways of logging on:
• From the hostserverorPC: Use the desktop shortcut created by the Installation wizard.
• From any machine connected to the network: TheHPD2D uses asecurenetwork connection.
Enter https:// followed by the IP a ddress or fully qualified domain name (for example,
myhpd2d.mydomain.com) of the HP D2D Backup System into the web browser.
NOTE:
If you use http: in the URL, you are automatically forwarded to the https: secure network connection.
The Web Management Interface displays the Login prompt:
The Login is Administrator with an initial password of Admin.
D2D Backup SystemHP D2D4004 and HP D2D4009
67
Page 68

Both names are case sensitive. The password can subsequently be changed from the Settings/Admin
menu option, see “Admin (Settings)”onpage 85.
Only one active session is supported. You cannot connect to an HP D2D if somebody else is logged into
the
Web Management Interface. However, you can click Force Login to disconnect an active session.
After a period of 20 minutes of user inactivity the session will time out and return to the Login screen.
NOTE:
The web browser used to communicate with the D2D Backup System must have Active Scripting
or
JavaScript enabled. If it does not, some of the browser buttons may not be displayed. See
“Web browser settings” on page 35.
Summary (Home)
Whenever you log in, the Summary pageisdisplayed. Itisalso accessedfrom Home in the navigation
bar.
Use this page:
• To display information about your H P D2D Backup System and the backup devices that have
been configured for it.
• To monitor system health and status.
• To display status information about any physical tape drives that are attached directly to the
D2D
Backup System.
Table 4 Summary page layout
1
Navigation bar
2
68
nd
Help a
The Web Management Interface
logout
Select the appropriate option from the top bar.
The Help option opens the help pages. This is a context sensitive link that
displays help that is appropriate to the currently selected page.Logout closes
your session on the HP D2D Backup System. If somebody else logs in, you
will be automatically logged out.
Page 69

3
4
Status icons
D2D Backup System
information
Status deta
ils
Indicates a healthy system or system component. Everything is OK and the system is working
correctly.
This section provides the information that identifies your HP D2D Backup
System. It shows the IP Address, Name, Network Name and Serial Number
of the HP D2D Backup System. It also shows how long the HP D2D has
been running.
This section provides details about overall system status and the status of
system components. Additional information is provided if the status is not
OK. See also “Status icons”onpage 69.
ocated
Disk Space All
for the numbe
commits 3GBofphysicaldiskspace. Cartridge Data Usage shows how
much user data has been backed up to unit. See also “Libraries, slots and
storage capacity”onpage 71.
RAID and RAI
with the RAI
Disk Licens
and have not yet provided the licensing information. If you have just installed
the 6–disk upgrade, the additional disks cannot be expanded into the RAID
array without the license, see “License (Settings)”onpage 90.
If a tape d
is also di
Dstatus.
ing
rive is connected directly to the HP D2D Backup System, its status
splayed in this section with a link to job history.
indicates the amount of space that has been allocated
r
of cartridges created on the unit. Each slot configured
D
battery are the first place to look to identify any problems
will show a warning message if you have the 12–disk version
Indicates a warning state. Something needs attention but it is not critical to the successful operation
of
the device. For example, a disk may h ave failed or disks may be installed but not licensed.
Indicates a critical state. Something needs attention and should be investigated immediately.
Devices (Configuration)
If possible, a default library is created automatically when a new host connects to the HP D2D Backup
Use this page to view and configure the default library and to create additional devices, if
.
System
ed, for the h ost.
requir
If there are more than six devices, use the arrow key (under the list of devices) to display more devices.
NOTE:
If the HP D2D is connected to a Fibre Channel network, it is not possible to create a default library for
automatically during installation. Use this page to create and configure devices that can be
hos
t
the
accessed by the host.
D2D Backup SystemHP D2D4004 and HP D2D4009
69
Page 70

Thetop half of thepage shows thealist of devicesavailable on theHPD2D Backup System. Summary
information is provided for each device, as follows:
Table 5 De
vice parameters (top half of the page)
Name
Cartridges
Connection
Device Type
Port
This is the name that is used to identify that device (library or autoloader). You may
like to enter a name that identifies the host or backup job with which it is associated.
he
This is t
Emulati
If a device is shown as not connected, this indicates that the iSCSI Initiator on the
host has not logged on. For more information, see “Targets tab”onpage 54.
With a FC device, this field shows the connection status of the FC link and its speed
(down, 1G, 2G, 4G).
This is the emulation type used by the backup software. It is selected during
installation or when you create a device.
This identifies the port to which the host is connected for backup and restore. The
number of
configuration.
There
conne
ports are connected, you willbe able tochoosewhich onewillbeusedtotransfer
backup data to and from the host in the drop-down menu. If only one port is
connected, there will be only one LAN port choice (port 1).
you have the FC model, there are also two F C ports on the pre-installed FC card
If
and additional choices for transferring backup data in the Port drop-down menu.
number of cartridges available on the device, which is determined by the
on
Type selected when the device was created.
ports available in the drop-down menu depends upon your network
are two LAN ports on the rear of the HP D2D. LAN port 1 must always be
cted to install the software and run the Web Management Interface. If both
Emulation types for tape devices
HP D2D products emulate a range of physical tape devices, these are either Tape Autoloaders or Tape
Libraries. Supported emulation types are listed below:
70
The Web Management Interface
Page 71

• HP 1x8 G2 Autoloader: This is a single Ultrium tape drive autoloader with a maximum of 24 cartridge
slots. It should be used for simple rotation schemes where a single backup job is to run at a time.
This emulation type is widely supported by backup applications.
• HP MSL2024 Library: This is a tape library d evice with a maximum of two embedded Ultrium tape
drives and 24 cartridge slots. It should be used when implementing rotation schemes which involve
simultaneous backup jobs to t wo devices. This emulation type is widely supported by backup
applications.
• HP MSL4048 Library: This is a tape library device with a maximum of four embedded Ultrium tape
drives and 48 cartridge slots. It should be used when implementing rotation schemes which involve
simultaneous backup jobs to more than two devices or those that use a large number of cartridges
devices. This emulation type is widely supported by backup applications.
• HP D2DBS Library: This is a tape library device with a maximum of four embedded Ultrium tape drives
and
96 cartridge slots. If it is supported by your backup application, this is the preferred emulation
type to be used because it does not emulate any physical library types in existence and is, therefore,
clearly identifiable as a D2D device. It is the most flexible emulation type available; however, backup
application support varies by software vendor.
NOTE:
Symantec prefer their customers to use this emulation type with BackupExec and Netbackup.
Libraries, slots and storage capacity
Each slot configured commits 3 GB of physical disk space, regardless of what value has been configured
for the ma ximum cartridge size. This ensures that there is always sufficient space to flush buffers and there
is
never data in memory that cannot be written to cartridge. The remainder of the configured maximum
capacity is used only as needed, but the initial 3 GB is permanently committed. Therefore, only configure
the
number of slots that you actually require. If you configure a MSL G3 Series (2x24) with 24 cartridges,
you should be aware that you have committed 72 GB of disk space — even when no data is written.
Only do this,ifyou aresureall slotswillbeused.
User recommendations
To avoid over-allocation of disk space and the possibility of running out of disk space for non-user data:
• Only configure the libraries that you need
• Only configure the number of cartridges that you are likely to need
You can add cartridges at a later date to expand the system and remove individual blank cartridges
from a library without deleting the whole library, but cannot remove cartridges that have been written to.
See “Cartridges (Configuration)” on page 74.
To view device details
Click on a device in the top half of the page to view its details in the bottom half of the page,
where you can also edit and delete details. There are three tabs with device information. See
“Device parameters”onpage 72.
To edit device details
1. Select the device in the list to display its details and then click on Edit.
D2D Backup SystemHP D2D4004 and HP D2D4009
71
Page 72

2. Amend details as appropriate and click Update to apply them. The information for the
World Wide Names tab is generated automatically and cannot be changed. See also
“Device parameters” on page 72.
To create a new device
1. To create a new device for the host, click on Create library.
2. Enter the appropriate details in the Libraries tab and click Create.There is also a tab you to
enable and
tab must match the information that you have configured in the iSCSI Initiator itself. (See also
“Device parameters” on page 72 below.)
Table 6 Device parameters
configure iSCSI Authentication, if this is required. Any information you enter on this
Libraries tab
Library Name
Emulation Type
Drive Emulation
Total No of Cartridge
Slots:
This is the name that is used to identify that device. You may like to enter a name
that identifies the host or backup job with which it is associated.
This is the emulation type used by the backup software. The HP D2D supports the
following emulation types: HP 1x8 G2 Autoloader (1x8), HP MSL Library (2x24),
HP
MSL Library (4x24). and HP D2DBS Library (4x48).
The emulation type determines how many embedded drives a nd cartridge slots are
le. For example, if you select HP MSL G3 Series (2x24), the device will
availab
emulate
of
for further details.
By selecting a drive emulation type, HP LTO–2, 3 or 4, you set only the default
capacity of the cartridges within the library device. (LTO-2 = 200 GB, LTO-3 = 400
GB, LTO-4 = 800 GB.) It does not affect the ability of the backup application to
write to the device and tape cartridge capacities can be increased at any time (but
not
number, see “To edit maximum cartridge size”onpage 76.
This is where you define the number of slots that you require for your tape rotation
strategy. The number of slots available depends upon the Emulation Type that you
have selected. Each slot will be assigned a cartridge whose capacity is appropriate
to
You can change the maximum size of the cartridge as long as it is blank. This
means that you can only change the value immediately after the device is created
and before it has been accessed by the backup application. See “To edit maximum
cartridge size” on page 76.
an
MSL 2024 Library with two embedded tape drives and a possible total
tridge slots. Consult your backup application technical support information
24 car
decreased), as long as the cartridge is blank, regardless of the drive generation
the Drive Emulation type.
mber of
Nu
Deduplication:
72
drives:
The Web Management Interface
e
number of drives is determined by the Emulation Type that you have selected.
Th
Data deduplication is enabled by default for the library device. If you disable this
checkbox, you switch off deduplication for all data that is written to the device.
Compression will also be disabled.
Page 73

Port:
iSCSI Initiator Name:
(iSCSI devices only)
World Wide Names tab
This identifies the network port on the HP D2D to which the device is connected.
The choices in the drop-down menu depend upon your network configuration. There
are up to two iSCSI ports (this depends upon your network mode, see “Network
Parameters” on page 78) and two FC ports if you have the FC model. FC users may
choose to connect the device to an iSCSI or a FC port..
See also “Supported network configurations”onpage 30.
This is the Initiator Node Name of the host that will back up to this device. It
is
provided automatically for the default library that is created when you run the
Installation wizard on a host for a firsttime. Butyou must enteritmanuallyifyou are
creating a new device on this page. If you are using the Microsoft iSCSI Initiator, you
can find the na
Node Name
me
by running the iSCSI Initiator on the host and copying the Initiator
from the General tab. See “Manual driver installation”onpage 45.
Device Name
Device Serial Number
World Wide Node
Name
iSCSI Authentication tab (iSCSI devices only)
Require initiator to
logon
Initiator CHAP User
Name
Initiator CHAP Secret
Target required to
logon
to initiator
Target required to
logon
to initiator
This is the device name, such as Medium Changer or Drive 1. There will be an entry
for each drive that is appropriate for the selected emulation type.
ique
This is a un
HP D2D
This is provided during manufacturing for all possible devices.
Check thi
rCHAPusernameand secret.
Initiato
This should be the same CHA P user name that you configure for the target on
iSCSI Initiator. (On the Microsoft iSCSI Initiator, this is the User Name as it is
the
configured on the Targets tab in the Log On to Target Advanced Settings.)
This should be the same CHAP secret that you con figure for the target on the iSCSI
Initiator. (On the MicrosoftiSCSI Initiator, this is the TargetSecretas itisconfigured
on the
Targets tab in the Log On to Target Advanced Settings.)
his
Check t
must
target
ame
user n
Check this box if you require mutual CHAP authentication, which means that the
target must also log on to the initiator. You must also provide the target CHAP
user nam e and secret. On the iSCSI Initiator you must also ma ke sure that mutual
authentication is enabled. (On the Microsoft iSCSI Initiator, make sure Perform
mutual authentication is checked on the Targets tab in the Log On to Target
Advanced Settings.)
serial number for the device. It is generated automatically by the
annot be edited.
and c
s
box if you require the initiator to logon. You must also provide the
box if you require mutual CHAP authentication, which means that the
also log on to the initiator. You must also provide the target CHAP
and secret.
Target CHAP User
Name
Target CHAP Secret
E:
NOT
more information about configuring the Microsoft iSCSI Initiator see
For
eMicrosoft iSCSIInitiator” on page 51.
“Th
This may be a ny meaningful CHAP user name. It does not need to match any
informationonthe iSCSI Initiator.
This should be the same CHAP Secret that you configure for the target on the iSCSI
Ini
the
To delete a device
Select the required device and then click on Delete in the Details section to delete it. You will be prompted
to
confirm that this is what you wish to do.
tiator. (On the Microsoft iSCSI Initiator, this is the Secret as it is configured from
General tab.)
D2D Backup SystemHP D2D4004 and HP D2D4009
73
Page 74

WARNING!
All data on the device will be deleted. The library’s deduplication store is also deleted. It may take up to
15 minutes to delete all the files and free space on the HP D2D.
Cartridges (Configuration)
Usethispageto view and configure cartridge settings. The number of slots configured on the Devices
page for a library determines the number of cartridge rows that are available to edit on this page.
74
The Web Management Interface
Page 75

Table 7 Cartridge parameters
Location
Bar Code:
Used Size:
Max Size:
Write Protected:
The Location column identifies e
cartridge. There are three typ
• Slot n:
•
•
A bar code is an 8–digit, alphanumeric, unique identifier for a cartridge within
the
if
requested. The backup application may also choose to assign its own internal
identifier to the cartridge but, if it does so, it cannot assign this identifier to the
Cartridge bar code.
Bar codes are generated automatically but may be edited by the user. If you
choose to edit the bar code:
•
• It should
This shows the actual used capacity in MB or GB. If this is Blank,the cartridge
may be removed, see below.
This defaults to the appropriate capacity for the drive emulation type selected on
the
The maximum value allowed is 800 GB.
This is a check box that allows you to enable (checked) and disable (unchecked)
writeprotection, seebelow.
which is one of the stan
Mail slot: which is a dedicate
for exporting to or importing from physical tape. Cartridges can only be moved
into the mail slot by the backup application on the host machine.
Tape drive: which is only populated when there is activity on a cartridge.
HP D2D Backup System. Bar codes are shared with the backup application,
It must be unique and must not start with the letters “CLN” or “DG” because
these are reserved designations for cleaning and diagnostic cartridges.
be a minimum of 4 characters. Valid ASCII characters are A-Z, a-z,
0–9, space and hyphen. Anything less than 8 characters will be appended
with space characters.
Devices tab. This value may be changed if the Used Size is Blank, see below.
ach element of the library that is available to hold a
es of
element:
dard library slots
d
slot that is used to hold a cartridge that is ready
Last Written:
Delete All:
Empty slots
Empty slots are slots that contain no cartridges; all the fields contain dashes or hyphens.
• Tape drive row: A library consists of two devices; a tape drive and changer device. This location
refers to the tape drive element of the library. It is only populated when the backup application on
thehostiswrit
• Mail slot row: This location refers to the slot that is used for importing and exporting data.
It is only populated:
• When the backup
• Or when the Web
• Numbered slo
has moved data to the mail slot for export.
Once a mail slot or numbered slot is empty, a Create icon is available in the far right column to create
anew, blank c
This tells you when the cartridge was last written to and is useful when identifying
data for copying or exporting.
This allows you to mark a cartridge for deletion, which may free up space on the HP
D2D. If deduplicat
data will be cleare
not
be freed up. Del
has been run. Housekeeping is a function that runs automatically when the disks
are not being accessed. It is not under user control.
ion is enabled on the library, only the space occupied by unique
d. Spacethatcontainsblocksreferencedfromanother slot,will
etion does not happen immediately; only after housekeeping
ing to or reading from the library.
application on the host moves data into it for export to a tape drive
attached to the H P D2D Backup System. Once the export has been run successfully from the
Web Interface, the slot becomes empty again.
Interface is used to import data from a tape drive attached to the HP
D2D. The backup application on the host is used to move the data back into a numbered
slot
and the mail slot becomes empty again.
trow: Thisslotisempty aftera Delete operation or after the backup app lication
artridge. See “To create a cartridge”onpage 76.
D2D Backup SystemHP D2D4004 and HP D2D4009
75
Page 76

To delete a cartr
If the Used Size
right-hand col
unique data wi
idge
cartridge is Blank, you will be able to remove it. Click on the Delete icon in the
of a
umn. If the Used Size is not Blank, you can still remove it but only space that is occupied by
freed up.
ll be
To write protect a cartridge
Click Edit for the appropriate cartridge. Check the Write Protected check box for the cartridge. Your
backup application will not be able to write any more data to it.
To edit maximum size
The only times you can resize cartridges are when you first create a library or when you add slots and
they are blank. Once the cartridges are made available to the backup application, it formats them ready
for use and they are no longer blank, even if you have not yet written data to them. Similarly, the erase
function on most backup applications does not return the cartridge to a completely b lank state.
The Max Size defaults to the appropriate capacity for the drive emulation type selected on the Devices
tab, but if the Used Size is Blank, you can edit this value. The maximum value allowed is 800 GB.
Click Edit for the appropriate slot. Select a value from the drop-down menu and click Update.
NOTE:
The maximum size indicates the physical disk space available for that slot; it will only be committed
when data is written to it. Changing the maximum space does not affect actual disk usage or save
disk space, but may be useful if you know you will be moving data to a physical tape with a smaller
cartridge capacity.
To create a cartridge
Slotsthatare emptyhaveanextra icon,called Create.
• If you use the Create icon on an empty slot, the backup application needs to inventory it (add it to
its
database or catalog) before it can access it.
• If you use the Create icon on an empty mail slot, you can use the backup application to move
theblank,new cartridgetoanempty cartridgeslot, without having to run an inventory. This
saves some processing time.
You may need to restart your services to see the new cartridges.
76
The Web Management Interface
Page 77

NOTE:
When you import a cartridge, you need an empty mail slot and an empty cartridge to which the backup
application can move the imported data. Therefore, you may wish to leave a slot whose cartridge has
been exported empty, rather than creating a new cartridge. Or to create a slot, edit the Total No Of
Cartridge Slots on the Devices page, see “To edit device details”onpage 71.
Network (Configuration)
This page is used to view and edit network settings. It is also used to turn Beacon Mode on and off.
Network configuration
The details in this section reflect the IP settings that were specified during installation. The HP D2D Backup
System supportsDHCP for IPv4 networks andthisisturnedonbydefault.
You may need to edit the details if there is a conflict in the IP address, or you move the host to a different
network node. Be aware that any changes you make to the network settings could affect how you
connect again to the HP D2D Backup System. For example, if you change the IP address, you must use
the
new a ddress to log in from a web browser.
To edit network settings
1. Click Edit to make the details editable.
2. Make the required changes and click Update.
D2D Backup SystemHP D2D4004 and HP D2D4009
77
Page 78

3. You must now reconnect to the HP D 2 D Backup System using the new settings.
• If you have changed the IP address, you must use the new address to log in from a web
browser.
• You will also need to edit the iSCSI Initiator on all hosts that are connected
to the HP D2D Backup System, if you change the IP address. Se e also
“The Microsoft iSCSI Initiator”onpage 51.
Table 8 Network parameters
This is where you define thenetwork mode,which maybesingleport, dual port or
Network Mode:
high availability dual-port bonding. The selection you make determines the number
of net work port tabs in the lower half of this page an d the ports available on the
Devices page. See also “Dual network ports” on page 30.
Network Name:
Use DHCP Gateway
Default Gateway:
DNS Server Name
1/2/3:
This is the name of the HP D2D Backup System. You can use the network name,
instead of the IP address, to log on to the Web Management Interface.
is
This option
while the ot
address for
This is the node that connects the HP D2D Backup System to the network that is
servicing the web pages. (Static IP addressing only.)
These are the DNS IP addresses. When using DHCP these may be obtained
automatically. Ask your network administrator to advise what you should enter.
available if you have dual ports configured and one port is static
her
uses DHCP. Check this box to select the DHCP allocated Gateway IP
the
static port rather than the Default Gateway.
Table 9 Network port parameters
Check or uncheck the box to enable or disable this feature. If DHCP is turned off,
you must manually specify all the network settings for the HP D2D Backup System. If
DHCP:
IP Address:
tMask:
Subne
DHCP is turned on, the majority of the net work settings are obtained automatically.
However, even when DHCP is on, the Network Name must be specified. Other
parameters,suchasDomainNameand DNSServerAddress,becomeoptional.
You can override the automatic settings and enter your own values, if required,
but
this is not usually necessary.
This is the I P address for the device. The HP D2D Backup System supports both
dynamic (DHCP) and static IP addressing. The IP Address must be unique on the
network. If you are using static IP addressing, you must also provide the subnet
mask, default gateway and, optionally, domain name.
This determines the subnet to which the IP address belongs. (Static IP addressing
only.)
Domain Name:
This is the group of devices on the network to which the HP D2D Backup System
belongs. (Static IP addressing only.)
Resetting network settings to factory defaults
There are some conditions in which a previously configured d evice may fail to be discovered on a
network and, therefore, m ay be unreachable if the network parameters are invalid for the network to
which the device is attached. In this case, it may be necessary to reset the networking parameters
and device name to factory defaults.
eset the network settings:
To r
1. Ensure that there are no backup or restore jobs in progress to the device.
78
The Web Management Interface
Page 79

2. Press the Power On button on the front of the HP D2D Backup System three times in quick succession
to
reset it.
After approximately 5 seconds, the HP D2D Backup System will begin its reboot sequence.
NOTE:
The HP D2D Backup System will be reset to factory networking settings and the Administrator password
will be reset to Admin. No user data will be lost. Network configuration defaults to Sing le Port
configuration, so you may need to edit the settings on this page.
3. After the reboot, the device will be in DHCP mode and also available for discovery using the
Installation wizard provided on the StorageWorks CD.
Beacon mode
Beacon mode flashes the LEDs on the HP D2D Backup System. It is useful if you have several HP D2D
Backup Systems on your network and want to confirm which unit is being configured.
• Click Turn Beacon On to a ctivate beacon mode.
• If you do not switch off Beacon Mode from the Network page, it will continue for 5 minutes.
Fibre Channel (Configuration)
See “Fibre Channel (Configuration)” on page 61.
Email Alerts (Configuration)
This page is used to set up details of the email servers that will be used to route messages about the HP
D2D Backup System and to specify up to eight email recipients. Messages are generated if a disk fails or
reaches its threshold capacity, if the system reboots, if there are network problems or if there is a critical
hardware failure. Email alerts are also generated for tape attach activities, when there is a separate
tape drive connected to the HP D2D Backup System and the user is importing data from it, copying or
exporting data to it, or scheduling tasks to carry out these activities.
The HP StorageWorks D2D Backup System uses Simple Mail Transfer Protocol (SMTP), which is the
established standard for transferring mail over the internet. Microsoft Exchange has a virtual SMTP
server available which can be used to receive these emails and forward onward if necessary. UNIX
and
Linux operating systems have a Sendmail program included. Sendmail uses the SMTP protocol to
receiveand,if necessary,forward e-mail messages.
To configure email settings, the HP D2D Backup System must be on the same network as an SMTP
server that it can use.
• Click Edit to make the fields editable. Make changes, a s appropriate and click Update.
• Once you have created a recipient’s email address, use the Test button to make sure emails can
be
sent successfully.
D2D Backup SystemHP D2D4004 and HP D2D4009
79
Page 80

Table 10 E
mail parameters
To con
SMTP Ser ver:
Username and
Password:
Sender’s Email
Account:
Recipient’s Email
Address 1/2/3../8:
This is the IP address of the email server.
l
Some emai
aUsernam
the
prev
This is the email account to which the email will be attributed in the recipient’s
inbox. The account must exist on the email server. For example, you may like to
create an account called “MyD2D@MyServer.com”.
This is the email address of the person who should receive the message. Up to eight
email addres ses may be specified. You mayonlyenter one address perline. Once
you have configured an email recipient, there is a Test button that you can use to
sendatest email to thespecified address.
servers require authentication to send email alerts. If required, enter
e
and a Password here that are valid on the SMTP server entered in
ious box.
figure Microsoft Exchange Server
NOTE:
Please refer to the “UNIX Configuration Guide” on the CD-ROM for information abut configuring
SMTP
with UNIX and Linux.
It is important to check the SMTP server’s security configuration parameters to ensure that the Sender’s
Email Account can be recognized. Security configuration parameters are found within the SMTP virtual
server’s property pages. To view or modify them:
1. Open the Exchange Management console.
2. Click on Servers and then the server you wish to configure.
3. Click on Protocols and then SMTP.
80
The Web Management Interface
Page 81

4. You will see the default virtual SMTP server. Right click on this and select Properties.
5. Select the Access Control tab and then select Authe ntication.
6. TheHPD2D Backup System maybeusedwithone of the following settings:
• Anonymous Authentication (anyone can log on, you do not need to provide a Username and
Password when you configure email alerts)
• Basic Aut hentication, where a user name and password are required and should be provided
when you configure email alerts
NOTE:
Integrated Windows Authentication is not supported with the HP D2D Backup System.
If your SMTP Server requires this form of authentication and you have a spare network
port, we recommend that you create a new virtual SMTP server, allowing connection only
to the HP D2D Backup System. In this instance, you may lock the SMTP server to use
only the HP D2D Backup System’s IP address and authentication may safely be set to
anonymous for the dedicated SMTP server.
Disk (Status)
This page provides information about total disk usage and the devices making use of the HP D2D.
Use it to check how individual devices are using the total disk space and when the total disk space
is reaching capacity.
D2D Backup SystemHP D2D4004 and HP D2D4009
81
Page 82

Disk usage
This section shows you how much disk space has been used.
Total Disk Usage: The green area is the amount of disk space committed.
The system will send warning messages to email recipients that the disks are reaching capacity. The Disk
Usage icon on the Summary page will also indicate that disk space is running out.
If
you have the 6–disk model, you can expand capacity by purchasing and installing the 6–disk upgrade
kit. Other options for creating space, if the disks start to get full, include:
• Review your backup jobs to see if you can reduce the size of backup or retention time.
• Use the backup application job settings to overwrite or erase data.
• Export a cartr idge to tape, see “Using the Web Management interface to copy/export/import
cartridges” on page 99.
RAID (Status)
This page provides information about the RAID status, and the status of the physical disks.
Use it to identify disks that may be failing or disks that are approaching capacity. You ca n also use it to
beacon a disk within the HP D2D. The Beacon LED on the front of the individual disk is solid blue.
82
The Web Management Interface
Page 83

NOTE:
Even on six–disk systems, there is a row for each disk in the optional capacity upgrade kit. These
entrieshavethe message“not detected”.
RAID status
In normal operation, this shows green, OK.
If one or more disks fail, it shows a failed icon.
Physical disks
This section provides information about the physical disks. If you need to replace a disk, it is very
important to obtain the serial number and the physical location of the failed disk from this page before
you replace it.
Table 11 Physical disk parameters
Disk:
Description:
Serial No:
FW Version:
Size:
State:
Beacon:
This indicates the physical location of the disk and is useful if you need to replace a
disk. Always double check against the serial number after removing a disk.
This is the product number of the disk.
This is the serial number of the disk. Always make a note of this before replacing
afailed disk.
This is the firmware version of the disk. It may be useful for troubleshooting and
when replacing a disk.
This is 750 GB.
This indicates the state of the disk. Green indicates OK, red indicates a failed disk.
Check this box to beacon the LED on the front of the disk. This helps you identify
the
disk that needs attention.
D2D Backup SystemHP D2D4004 and HP D2D4009
83
Page 84

iSCSI (Status)
This page shows
There are three tabs: Media Chang er iSCSI details, Drive iSCSI Details and Active Connections. Click on
a
device to select it and display the associated iSCSI i nformation.
NOTE:
The Active Connections tab displays information about open iSCSI sessions. If all sessions are inactive
(not connecte
This page is mainly for information and is useful in troubleshooting. It cannot be edited.
If a device is showing as not connected, this indicates that the iSCSI Initiator on the host has
not
logged on. Log on using the iSCSI Initiator and set the device as a Persistent Target for that
host. This ensures that it will automatically log on again whenever the host is rebooted. See
“The Microsoft iSCSI Initiator” on page 51.
iSCSI details for all the devices that are configuredonthe HP D2DBackupSystem.
the
d), this tab is not displayed.
Fibre Channel (Status)
See “Fibre Channel (Status)” on page 61.
Log (Status)
This page presents a time and date-stamped list of significant system events. The most recent information
is
shown at the top of the list. The icons identify whether the messages are information, error or warning
messages.
The Log is maintained even if the HP D2D Backup System is power cycled. Use the Clear Log button
to
clear the log.
84
The Web Management Interface
Page 85

Tape At tach pages
These pages allow you to manage copy, export and import activities between the
HP D2D
“Export, impor t and copy to an attached tape drive” on page 93.
Backup System and an attached tape drive. They are described in detail in
Admin (Settings)
This page allows you to manage the Administrator’s password and amend the date and time settings.
When you first log on the Administrator user has a password of Admin. For security reasons, you
to change this.
may wis
h
The HP D
manually.
• Click Edit to make the fields editable.
• Make t
2D does not make any automatic adjustments for daylight saving time. You must edit the time
required changes and click Update to apply the changes (or Cancel to discard them).
he
D2D Backup SystemHP D2D4004 and HP D2D4009
85
Page 86

Resetting the password
If you forget your password, you can reset the HP D2D Backup System as follows:
NOTE:
Resetting the password will reset the networking settings to the factory defaults and reset the Administrator
password to Admin.No user data will be lost.
1. Make sure nobody is using the HP D2D Backup System before you attempt the reset.
2. Press the Power button on the front of the HP D2D Backup System three times in quick succession.
Approximately 5 seconds later the HP D2D Ba ckup System will reboot.
3. Use the device discovery tool on the HP StorageWorks CD-ROM to re-configure the network settings
of the HP D2D Backup System.
Shutdown (Settings)
This option allows you to shut down the HP D2D Backup System cleanly. It is the only recommended
way of powering off the device. If you remove the power in any other way and a host is carrying out a
backup or restore, you may lose or corrupt data.
Click Power Off and Yes to confirm.
86
The Web Management Interface
Page 87

WARNING!
Before shutting down always ensure that there are no backup or restore jobs in progress and that no
future jobs are scheduled to start whilst the system is shut down. If hosts do not automatically reconnect
to the HP D2D Backup System when it restarts, you must reconnect manually from the iSCSI Initiator on
each host
,see “Targets tab”onpage 54.
Firmware (Settings)
This page provides information about the firmware version of your HP D2D Backup System and allows
you to upgrade the firmware.
IMPORTANT:
Once you have upgraded your firmware, you will not be able to revert to the earlier version. Always read
the
Release Notes accompanying the firmware upgrade c arefully to check that the upgrade is compatible
with your configuration.
D2D Backup SystemHP D2D4004 and HP D2D4009
87
Page 88

1. Check htt
the
p://www.hp.com/support for the latest firmware (you can do this by selecting the link on
Firmware page) and download it to your hard disk.
2. Read the Release Notes accompanying the firmware upgrade and confirm that it is compati ble with
your D2D confi guration. You will notbeabletorevert toearlier firmware after running the upgrade.
3. Select Firmware from the Web Management Interface and click Upgrade.
4. Make sure that there are no backup or restore jobs in progress and that no future jobs are scheduled
to startwhilstthe firmware is upgrading. Click Yes.
5. Click Browse... and locate the uploa d file that you have just downloaded.
88
The Web Management Interface
Page 89

6. Click Upload to upgrade the firmware. A progress meter is displayed while the upgrade takes
place. The system will reboot once it has been updated. Configuration information and data ar e
unaffected by this process.
WARNING!
Once you have started to upgrade the firmware, it is important that you allow it to
complete. Do not attempt to cancel the upgrade process, or power off the machine.
Backup (Settings)
It is possible to save the HP D2D’s configuration file by downloading it to the host system or emailing
it
to the email recipients as a file. If the HP D2D is repaired or replaced, the configuration file can be
uploaded to restore the following confi guration parameters:
• network settings
• medium changer and tape device configuration
• initiator names
• email alert settings
• tape attach schedules and settings
• World Wide Names
• Library serial numbers
To generate the configuration fi le
1. Click on Generate to create the configuration file.
2. At theprompt, select alocationtosavethe file.
D2D Backup SystemHP D2D4004 and HP D2D4009
89
Page 90

To upload the configuration file
Configuration files can only be uploaded if there are no devices and libraries con figured on the HP D2D.
1. Click on Upload D2D Configuration File to create the configuration file.
2. At the prompt, locate the D2D configuration file.
Support (Settings)
If you have problems, HP Support will ask you to generate a support ticket to help with troubleshooting.
It
provides a log of everything that has happened on your system.
NOTE:
Please ensure that your browser security settings allow files to be transferred from the HP D2D Backup
System to your host machine.
1. Use this page to Generate a support ticket.
2. At the prompt, save the file to disk.
License (Settings)
Licensing is used to enable optional product functionality, such as extra disk capacity or other future
features. If you have purchased a feature that requires a license, you will receive a license entitlement
certificate with your product. This is a paper document that contains all the information you need to
obtain
the
instructions on the web. (Users without Internet access may use the contact numbers provided with the
entitlement certificate.)
90
your unique License to Use key (LTU). If you have Internet access, you can obtain the LTU key from
HP Webware site by connecting to the web a d d ress specified on the certificate and following the
The Web Management Interface
Page 91

You will be required to enter the product’s serial number when you request a License to Use key.
The H P D2D is supplied with either six or twelve hot-plug RAID disks.
• The 12–d isk version includes a license certificate for the additional disks and is supplied ready to use.
However, warning status messages will be displayed u ntil you apply the LTU key. Also, to ensure
that HP
System, and to ensure you can re-apply the license if you subsequently need to repair or replace
your HP D2D, HP strongly recommends that you follow the instructions on the license certificate to
register the additional disks.
• If you extend the capacity of the 6–disk model by purchasing and installing an additional set of six
disks, you will receive a license certificate. You must register the additional disks and will not be able
to use them until you enter the License to Use key in the Web Management Interface.
See also “Capacity upgrade” on page 133.
Customer Support has complete information about the disk status of your HP D2D Backup
To apply the license key
1. Obtain the u nique License to Use key, as instructed on the License Entitlement Certificate. This is
normally from the HP Licensing website at http://www.webware.hp.com. We recommend that you
select the option to save the license to a .DAT file.
2. Select the
3. Select th
unique License to Use key or, if you saved it to a .DAT file, upload it. The key is specifictothe HP
D2D
License page From the Web Management Interface to display a list of licensable features.
feature that you wish to license and click in the checkbox to enable it. Either enter the
e
Backup System and cannot be transferred.
D2D Backup SystemHP D2D4004 and HP D2D4009
91
Page 92

NOTE:
If you are expanding the RAID from a 6–disk to a 12–disk system, you will be prompted to reboot your
system. See also See also “Capacity upgrade”onpage 133.
92
The Web Management Interface
Page 93

8 Export, import and copy using
an
attached tape drive
If your organization’s backup strategy also requires the ability to archive backed-up data for offsite
storage, there are two ways of achieving this:
• Attach an HP Ultrium tape drive directly to the HP D2D Backup System and use the copy,
export and import facilities in the Web Management Interface to transfer data manually or to
schedule jobs.
• Attach a supported tape drive to a host machine on the storage net work. If your backup
application supports the copying of data between devices, you can then use the backup
application to move data from the HP D2D Backup System to physical tape. This option is
described in “Copy using a tape drive a ttached to the host” on page 109.
In this chapter:
•
“Requirements for connecting a tape drive to the HP D2D”onpage93
•
“A note about terminology”onpage93
•
“Archiving methods” on page 94
•
“Using the Web Management interface to copy/export/import cartridges”onpage 99
NOTE:
Always refer to h
drive models are supported.
ttp://www.hp.com/go/connect or http://www.hp.com/go/ebs to find out which tape
Requirements for connecting a tape drive to the HP D2D
To use this facility you need:
• A tape drive, such as an HP StorageWorks Ultrium device. This should be an external or rack-mount
tape drive. Both SAS and SCSI tape drives are supported.
• A host bus adapter, HBA, for the tape drive connection (because there are no embedded SAS or SCSI
ports). You must purchase and install the HBA before connecting the tape drive.
Please refer to h
supported host bus adapters and tape drives. For instructions on attaching the tape drive, please refer to
“Attaching a physical tape drive” on page 37.
NOTE:
Physical tape drives attached to the HP D 2D Backup System can only be accessed by the HP D2D Backup
System, using the Tape Attach pages. They do not appear as attached network devices to the host system.
ttp://www.hp.com/go/connect or http://www.hp.com/go/ebs for a list of all
A note about terminology
Within this guide:
refers to the process that moves the cartridge from the HP D2D Backup System to the attached
• Expor
t
physical tape drive.
D2D Backup SystemHP D2D4004 and HP D2D4009
93
Page 94

• Import refers to the process that returns the cartridge from the attached tape drive to the HP D2 D
Backup System.
• Copy refers to the process that creates an additional copy of the cartridge on the physical tape drive.
Backup applications may use similar terminology to describe the processes for transferring data to a
slot
where it can be exported to a backup device and for restoring it to the application’s database or
catalog after loss or failure. Please refer to the white papers on h
clarification.
Archiving methods
Two methods are provided for archiving data to the directly attached tape device, these are Copy
and Export.
• Copy retains the data cartridge on the HP D2D Backup system and creates an exact copy onto a
physical cartridge in the attached tape drive.
• Export remo
been succe
Each method has advantages and disadvantages, as described in more detail below.
NOTE:
As a general recommendation, Copy is the easier of the two options to use because it does not remove
the data from the HP D2D Backup system and can be managed completely from the Web Management
Interface. Only use the Export option, if you need to free up some disk sp ace. Export (and Import)require
addition
al
ves the data cartridge from the library on the HP D2D Backup System once data has
ssfully copied to the physical cartridge in the attached tape drive.
steps in the backup application.
ttp://www.hp.com/support for further
Cartridge copy
The backup application on the host is used to back up data to a cartridge on the library device (or to a
standalone tape drive device) in the HP D2D Backup System. The Web Management Interface on the HP
D2D
Backup System is used to Copy the cartridge from the HP D2D Backup System to the at tached tape
drive, leaving the data on the HP D2D Backup System so that it is available for quick restore.
94
Export, import and copy using an attached tape drive
Page 95

Step 1
Use backup application on
host to write to cartridge.
1
2
3
4
5
6
7
8
Library
HP StorageWorks D2D Backup System
Figure 37 Cartridge copy
Whyuse theCopyfunctionality?
Copy creates two instances of the same cartridge; one stored on the HP D2D, the other o n physical tape.
Logically these are the same cartridge and the backup application has no awareness that there are two
copies. If data from this cartridge is required for restore, the backup application will always restore the
data from the HP D2D if it is available. The physical cartridge is, therefore, an additional copy that will
be
required only if the HP D2D is not available.
Step 2
Use HP D2D Web
Management Interface to
copy to tape drive.
1
2
3
4
5
6
7
8
Library
HP StorageWorks D2D Backup System
Physical
Tape Drive
Cartridge
When would Copy be used?
Cartridge copies are likely to be appropriate when the user wishes to use the HP D2D Backup System for
all
foreseeable restore processes but requires an additional offsite copy for insurance or data security
purposes. This may mean that weekly, monthly and yearly cartridges are copied. Weekly and monthly
physical cartridges may be rotated; the cartridges on the HP D2D Ba ckup System are overwritten after a
period of time. Yearly cartridges may be kept indefinitely. Clear labeling of the cartridges in this case is
essential because the backup application may overwrite the cartridge on the HP D2D Backup System
and, therefore, lose any knowledge of the existence of the physical tape cartridge.
When
is it necessary to restore from a copied cartridge?
are three situations where it may b e necessary to restore from the copied cartridge:
e
Ther
• The cartridge stored in the library device o n the HP D2D is overwritten (accidentally) by the
backup application. The backup application database is updated to reflect the new contents of
the
cartridge and all knowledge of the old data is lost. If the backup administrator becomes
re that this has happened, it is possible to import the physical cartridge back into the HP D2D
awa
tem, from where its data can be "imported" back into the application database for restore, if
sys
required. In this case, because the backup application has overwritten the database entry for the
cartridge, some external knowledge of what is on the copied cartridge is required in order to be
able to
• Th
from the Web Management interface. The physical copy of the cartridge is the only copy now in
existence. The backup application is still aware of the cartridge’s existence because it was not
aware of the loss of the D2D system. The backup administrator has two options; if there is no
required restore at this point, the administrator can deploy a new HP D2D system or create a new
ibrary on the existing D 2 D and then import any copied cartridges back into the n ew device for
l
decide whether the data on the c opied cartridge is useful.
whole HP D2D Backup System or a complete library on the HP D2D is accidentally removed
e
D2D Backup SystemHP D2D4004 and HP D2D4009
95
Page 96

use with restores at a later date. If a restore is urgently required, the administrator can put the
copied cartridge into a physical tape drive attached to the host and restore directly from that. In
either case, the backup application is aware of the cartridge’s existence.
• Both the D2D system and the host are lost. In this case, the physical cartridge copy (as long as it
was a full system backup) can be used for disaster recovery onto new or repaired server hardware
using a tape device at tached to the host server.
Disadvantages of Copy
1. Data is left o
cartridge.
2. It is possible for the backup application to overwrite the cartridge on the HP D2D Backup System
and
thus become unaware of the data that has been c opied to the physical cartridge.
Cartridge export
The backup application on the host is used to back up data to a slot on the library device (or to a
standalone tape drive device) in the HP D2D Backup System. It is also used to m ove the data from the slot
into the
The Web Manage ment interface on the HP D2D is used to Export cartridge data from the mail slot on the
HP D2D
the
mail slot.) Export removes the data and frees up disk space on the HP D2D Backup System and is useful
for long term archival (for example in a yearly tape in a rotation scheme). If restore is needed, data
can be imported (or moved back) into the HP D2D Backup System. Export is not recommended with
deduplicating libraries as it does very little to free up disk space, which is the prime reason for export.
(Space is only freedup, if achunk of dataisnolonger referenced by any cartridges.)
mail slot. This creates an empty slot where the data was moved.
Backup System to the attached tape drive. After a successful export, the data is removed from
HP D 2D Backup System and the mail slot becomes empty. (If the export fails, the data remains in the
the HP D2D Backup System; no disk space is freed by copying to physical
n
CAUTION:
Do not export cartridges that the backup application uses on a frequent basis as part of a rotation
strategy because it will not be able to write to the empty slot.
96
Export, import and copy using an attached tape drive
Page 97

Step 1
Use backup application on host
to move cartridge to mail slot.
1
2
3
4
5
6
7
8
Library
HP StorageWorks D2D Backup System
Figure 38 Cartridge export
Why use the Export functionality?
The main reason for using Export is to create more space on the HP D2D Backup System. If deduplication
is enabled
creating offsite backups, because it is controlled solely from the Web Management Interface and will not
impact any tape rotation strategy. Export involves use of the b ackup application. It is directly analogous
to moving a cartridge in a physical library to a mail slot (impor t/export element) so that the backup
administrator can take it offsite or put it into a firesafe. Only a single copy of the cartridge exists. It is on
physic
fully a
the
cartridge to be moved back into the library.
on the library device or if space is not an issue, Copy is the recommended method for
tape and no longer on the cartridge in the HP D2D B ackup System. The backup application is
al
ware that the car tridge location is now offsite, so cannot overwrite it without explicitly asking for
Mail
Step 2
Use HP D2D Web Management
Interface to export to tape drive.
Physical
1
slot
2
3
4
5
6
7
8
Library
HP StorageWorks D2D Backup System
Mailslot
Tape Drive
Cartridge
The main advantage of Export is that it frees up disk space on the HP D2D Backup System if deduplication
is disabled on the library device. However, care must be taken to ensure that future backups do not fail.
For example, if a weekly backup tape is "exported", it will not be available for append or overwrite
time it is required. Depending on the backup application configuration it maybepossibleto
xt
the
ne
ly create a new blank cartridge in the library for use the next time a weekly backup is required,
simp
ver, in some configurations it will be necessary to re-import the physical copy in order for the next
howe
to occur successfully.
up
back
When would Export be used?
Cartridge exports are likely to be used when the user wishes to free up space on a library device where
deduplication is disabled on the HP D2D Backup System by exporting to physical tape a cartridge that
is
used infrequently. For example, if a rotation scheme uses twelve monthly tapes, it is safe to export a
monthly tape from two months ago because it will not now be required (except for infrequent restores)
for another ten months. The same applies to yearly tapes which may never be required again as they
are kept forever.
When would I restore from an exported cartridge?
Restoring from an "exported" cartridge has a higher likelihood than from a copied cartridge, because
the data
required, the backup application will ask for the cartridge to be re-imported into the HP D2D before it can
be
no longer resides on the HP D2D Backup System. If a restore from an "exported" cartridge is
used for restore. Exported cartridges may also be used for disaster recovery, as with copied cartridges.
D2D Backup SystemHP D2D4004 and HP D2D4009
97
Page 98

Disadvantages o
fExport
1. Restores may take longer if a physical cartridge is required for the restore.
2. Backup applications may require the exported cartridge for the next job in their rotation scheme.
Compression
When you are moving data from the HP D2D to physical tape, it is important to be aware that the
cartridge maximum size is the native size (without compression). HP StorageWorks tape drives apply
hardware compression, therefore, the data from the HP D2D Backup System is likely to require less space
on a
physical tape cartridge. When moving data to a p hysical cartridge for off-site storage, there is no
need for concern if the data seems to utilize less space.
The capacity quoted for physical media assumes that the tape drive will be able to compress your data
and reduce the file sizes by 50%, but this can be achieved only if your d ata is not already compressed.
Forexample,JPEGpictures, movies,music or ZIP files, are already in compressed formats: spreadsheets,
text files, high-resolution graphics are not. Most users have a mixture of compressed and uncompressed
data and seldom achieve 50% compression.
Some users may choose to enable software compression from their backup application to increase
the
storage space available to the backup application, but this can make backup jobs slower to run.
However, once software compression has been applied, the data is not further compressed when it is
exported to a physical tape directly attached to the HP D 2 D Backup System. This ensures that the user
knows exactly how much physical cartridge space is required for export or copy.
Cartridge import
TheWeb interfaceonthe HP D2Disusedto Import cartridge data from the attached tape drive to the
mail slot
on the
HP D2D Backup System. The backup application on the host is used to move the data
from the mail slot back into one of the library slots.
Physical
Tape Drive
Cartridge
Step 1
Use HP D2D Web Management
Interface to import from tape
drive.
Mailslot
HP StorageWorks D2D Backup System
1
2
3
4
5
6
7
8
Library
Step 2
Use backup application on host
to move the mail slot cartridge
back to autoloader slot.
1
Mailslot
HP StorageWorks D2D Backup System
2
3
4
5
6
7
8
Library
Figure 39 Cartridge import
When you import a cartridge:
• If it is less than 200 GB, the cartridge Max Size is set to 200 GB.
• If it is over 200 GB, the cartridge Max Size is set to 400 GB.
• If it is over 400 GB, the cartridge Max Size is se
98
Export, import and copy using an attached tape drive
tto 800 GB.
Page 99

• Cartridges over 800 GB are not writeable.
The Used Size is always reported correctly.
Tape spanning
Spanning of mul
supported. Th
the
physical c
System can b e copied or exported at a time; it is not possible to select multiple slots and copy them to
asinglephysical cartridge.
tiple physical cartridges from a single cartridge in the HP D2D Backup System is not
e data
artridge on the attached tape drive. Data from only one cartridge on the HP D2D Backup
from the cartridge on the HP D2D Backup System must not exceed the capacity of
Using the Web Management interface to copy/export/import
cartridges
TheTapeAttachweb pagesallowyou to configure attached tape drives, run jobs manually or schedule
them, view status and job history.
Configuration (Tape Attach)
This page allows you to view physical tape drives that are attached to the HP D2D Backup System. It
shows you the Vendor Name, Product ID, serial number and information about any cartridge loaded.
Click Select next to a specific tape drive to display more information about its serial number and
firmware re
also displ
vision. If there is a c artridge loaded in the tape drive, its bar code and cartridge size are
ayed (these fields have hyphens if no cartridge is loaded).
ng tape drives to the list
Addi
subsequently attach an additional external tape drive after power on, click Rescan to add it
u
If yo
to
the list of devices.
D2D Backup SystemHP D2D4004 and HP D2D4009
99
Page 100

Upgrading tape drive firmware
Firmware for supported HP Ultrium tape drives may also be updated from this page. Please refer to
http://www.hp.com/support for details of the latest firmware foryourHPUltrium Tape Driveand
download requi
red files to a location on your host machine before you use this page.
Copy/Export/Import (Tape Attach)
This page allows you to initiate a manual export/import or copy operation.
To copy to attached tape drive
A copy operation may be performed upon any non blank cartridge in any numbered slot in a library
device. The cartridge data is copied from the HP D2D Backup System to the physical tape drive.
1. In theWeb interfaceselect Copy/Export/Import , locate the cartridge that you wish to copy in the
Cartridge list and click on the Copy button next to it.
splays the Setup page. (Or reports an error if no tape drives are currently at tached to the HP
This di
D2D
Backup System.)
100
Export, import and copy using an attached tape drive
 Loading...