

Page 1
Page 2

Page 3

HP Network ScanJet 5 Scanner
Administrator’s Guide
Page 4

© Copyright Hewlett-Packard
Company 1997
All Rights Reserved.
Reproduction, adaptation, or
translation without prior written
permission is prohibited, except
as allowed under the copyright
laws.
Publication number
C1306-90913
Second edition, October 1997
Trademarks
PaperPort™ is a trademark of
Visioneer, Inc. in the United
States and other countries.
Microsoft® and Windows® are
U.S. registered trademarks of
Microsoft Corporation.
Lotus® and Lotus 1-2-3® are
U.S. registered trademarks of
Lotus Corporation.
Adobe Photoshop™ is a
trademark of AdobeSystems,
Inc., which may be registered in
certain jurisdictions.
OmniPage Limited Edition®
and OmniPage Lite® are
registered trademarks of the
Caere Corporation.
All other products mentioned
herein may be trademarks of
their respective companies.
Warranty
The information contained in
this document is subject to
change without notice.
Hewlett-Packard makes no
warranty of any kind with
regard to this material,
including, but not limited to,
the implied warranties of
merchantability and fitness for
a particular purpose.
Hewlett-Packard shall not be
liable for errors contained herein
or for incidental or consequential
damage in connection with the
furnishing, performance, or use
of this material.
NOTE TO U.S.
GOVERNMENT USERS:
RESTRICTED RIGHTS
COMMERCIAL COMPUTER
SOFTWARE: “Use, duplication
or disclosure by the Government
is subject to restrictions as set
forth in subparagraph (c) (1) (ii)
of the Rights in Technical Data
Clause at DFARS 52.227-7013.”
Material scanned by this product
may be protected by
governmental laws and other
regulations, such as copyright
laws. The customer is solely
responsible for complying with
all such laws and regulations.
FCC Radio Frequency
Interference Statement for
Models C1307A, C1308A,
C1309A, C1310A
Note: This equipment has been
tested and found to comply with
the limits for a Class Adigital
device, pursuant to Part 15 of
FCC rules. These limits are
designed to provide reasonable
protection against harmful
interference when the equipment
is operated in a commercial
environment. This equipment
generates, uses, and can radiate
radio frequency energy and, if
not installed and used in
accordance with the instruction
manual, may cause harmful
interference to radio
communications. Operation of
this equipment in a residential
area is likely to cause harmful
interference, in which case the
user will be required to correct
the interference at his own
expense.
Note: Changes or modifications
to this equipment not expressly
approved by Hewlett-Packard
may cause harmful interference
and void the user’s authority to
operate the equipment.
4 EN
Page 5

Guide to Installing Your HP Network
ScanJet 5 Scanner
This manual provides you, as the network administrator, the information
you need to set up and maintain the network scanner environment.
Information included here complements the information provided in the
following:
• HP Network ScanJet 5 Scanner Getting Started Guide, which provides
instructions for setting up the scanner and installing the network
software.
• HP Network ScanJet 5 Scanner User’s Guide, which provides users
with instructions on how to use the scanner and the scanner software.
• HP Network ScanJet 5 Scanner Online Help, which provides detailed
instructions for all administrative functions regarding the scanner, in
addition to online Help for troubleshooting scanner administrative
software problems.
EN 5
Page 6

6 EN
Page 7

CONTENTS
Guide to Installing Your HP Network ScanJet 5 Scanner . . . . . . . . 5
1 Introducing the HP Network ScanJet 5 Scanner
Overview . . . . . . . . . . . . . . . . . . . . . . . . . . . . . . . . . 9
HP Network ScanJet 5 Scanner Features . . . . . . . . . . . . . . . 11
HP Network ScanJet 5 Scanner Components . . . . . . . . . . . . . 12
HP Network ScanJet 5 Scanner Package Contents . . . . . . . . . . 14
2 Initial Software Configuration
Overview . . . . . . . . . . . . . . . . . . . . . . . . . . . . . . . . 15
Using the HP JetAdmin Software . . . . . . . . . . . . . . . . . . . 17
Configuring the Network Environment . . . . . . . . . . . . . . . . 19
Adding Users . . . . . . . . . . . . . . . . . . . . . . . . . . . . . . 21
Adding Printers . . . . . . . . . . . . . . . . . . . . . . . . . . . . 23
Configuring Fax Servers and Adding Fax Destinations . . . . . . . . 25
Adding Distribution Lists . . . . . . . . . . . . . . . . . . . . . . . 27
3 Scanner Maintenance
Other Scanner Functions . . . . . . . . . . . . . . . . . . . . . . . . 29
HP JetAdmin Software Maintenance Procedures . . . . . . . . . . . 30
Backing Up the Scanner Configuration . . . . . . . . . . . . . . 30
Restoring the Scanner Configuration . . . . . . . . . . . . . . . . 31
Replicating the Scanner Configuration . . . . . . . . . . . . . . . 31
Displaying the Activity Log . . . . . . . . . . . . . . . . . . . . 32
Displaying the Events Log . . . . . . . . . . . . . . . . . . . . . 32
Displaying Accounting Information . . . . . . . . . . . . . . . . 32
Re-initializing the Scanner . . . . . . . . . . . . . . . . . . . . . 33
Resetting the Scanner . . . . . . . . . . . . . . . . . . . . . . . . 33
Upgrading the Scanner . . . . . . . . . . . . . . . . . . . . . . . 34
Cleaning the Scanner . . . . . . . . . . . . . . . . . . . . . . . . . 35
Replacing the Delivery Guide Sheet . . . . . . . . . . . . . . . . . . 36
Replacing the Lower Rollers . . . . . . . . . . . . . . . . . . . . . . 37
4 Troubleshooting and Error Messages
Overview . . . . . . . . . . . . . . . . . . . . . . . . . . . . . . . . 39
Scanner Troubleshooting . . . . . . . . . . . . . . . . . . . . . . . 40
Scanner is not Working . . . . . . . . . . . . . . . . . . . . . . . 40
Control Panel is not Working . . . . . . . . . . . . . . . . . . . . 40
Scanned Image Quality is Poor . . . . . . . . . . . . . . . . . . . 40
Scanner Overheats . . . . . . . . . . . . . . . . . . . . . . . . . 40
Clearing Paper Jams . . . . . . . . . . . . . . . . . . . . . . . . . . 41
Control Panel Error Messages . . . . . . . . . . . . . . . . . . . . . 45
EN Contents-7
Page 8

Internal Errors . . . . . . . . . . . . . . . . . . . . . . . . . . . 45
Network Errors . . . . . . . . . . . . . . . . . . . . . . . . . . . 48
Scanner Errors . . . . . . . . . . . . . . . . . . . . . . . . . . . 56
Transaction Log Error Messages . . . . . . . . . . . . . . . . . . . 57
Administrative Software Troubleshooting . . . . . . . . . . . . . . 61
Administrative Software Error Messages . . . . . . . . . . . . . . . 62
HP JetAdmin Software Errors . . . . . . . . . . . . . . . . . . . 62
Fax Server Errors . . . . . . . . . . . . . . . . . . . . . . . . . . 68
E-Mail Errors . . . . . . . . . . . . . . . . . . . . . . . . . . . . 69
HP Network ScanJet 5 Utility Error Messages . . . . . . . . . . . . 72
PaperPort Software Troubleshooting . . . . . . . . . . . . . . . . . 77
Installation Problems . . . . . . . . . . . . . . . . . . . . . . . . 77
Printing Problems . . . . . . . . . . . . . . . . . . . . . . . . . 78
Fax Problems . . . . . . . . . . . . . . . . . . . . . . . . . . . . 78
OCR Problems . . . . . . . . . . . . . . . . . . . . . . . . . . . 78
Import and Export File Problems . . . . . . . . . . . . . . . . . 79
Missing E-Mail Links . . . . . . . . . . . . . . . . . . . . . . . 80
PaperPort Software Error Messages . . . . . . . . . . . . . . . . . 82
A Specifications
HP ScanJet 5 Scanner Specifications . . . . . . . . . . . . . . . . . 87
Environmental Ranges . . . . . . . . . . . . . . . . . . . . . . . 88
German Noise Declaration . . . . . . . . . . . . . . . . . . . . . 88
B Warranty and Support Information
Hewlett-Packard Warranty Statement . . . . . . . . . . . . . . . . . 91
Hardware Service during the Warranty Period . . . . . . . . . . . 92
Hardware Service after the Warranty Period . . . . . . . . . . . . 92
Replacement Parts and Accessories . . . . . . . . . . . . . . . . . . 93
Take a look at all HP Support has to offer! . . . . . . . . . . . . . . 94
Customer Support Options Worldwide . . . . . . . . . . . . . . . 96
HP Sales and Service Offices . . . . . . . . . . . . . . . . . . . . . 97
Contents-8 EN
Page 9

Introducing the HP Network ScanJet 5 Scanner
Overview
The HP Network ScanJet 5 scanner converts black and white
documents, drawings, and photographs into an electronic form and
sends them to users’computers, to e-mail addresses, to fax numbers (if
one of the supported LAN fax products is installed on your network),
and to printers. Anyone can use the public destination list displayed at
the scanner control panel to send scanned documents to any destination
on the list. The network administrator creates and maintains this public
destination list. The list can include combinations of users, user groups,
and fax numbers.
Registered users (who you have added to the public destination list and
who have access to HP Network ScanJet 5 Utility) can create their own
private destination lists. These private destination lists can include
automatic workflows, which allow users to scan documents directly to
specified applications on their computers. Users can then print the
scanned documents, send them as e-mail attachments, or use
PaperPort™ software for HP by Visioneer to annotate, organize, and
distribute the scanned documents.
1
EN Introducing the HP Network ScanJet 5 Scanner 9
Page 10

HP JetAdmin software can be used in the following client environments:
Note On Novell NetWare: You can only run the HP JetAdmin software on
Windows® 95 and NT.
On Windows NT: You can only run the HP JetAdmin software on an NT
client or on an NT server.
On LAN Server: You can only run the HP JetAdmin software on
Windows 95.
• Windows 95, with IPX NetWare and Microsoft shells, or Microsoft®
TCP/IP (32 bit)
• Windows NT 3.51 and 4.0, with IPX NetWare and Microsoft shells, or
Microsoft TCP/IP (32 bit)
The following file servers are supported by the HP Network ScanJet 5
scanner:
• Novell NetWare 3.1x, with IPX
• Novell NetWare 4.x NDS, with IPX
• Windows NT 3.51 and 4.0, with TCP/IP
• IBM LAN Server 3.0 and 4.0
Windows NT and LAN Server environments must have network scanner
services installed and running on one server in each domain.
The HP Network ScanJet 5 scanner can be configured to run under
multiple protocols. In order to configure the scanner, at least one of the
protocols must also be running on your PC. For example, if your PC
runs only IPX protocol, then the scanner must also run at least IPX.
Before the scanner can be used, it must be connected to the network at
the scanner control panel, as described in the Getting Started Guide.You
can then configure the scanner, as described in this guide, using
JetAdmin. To do this, you must have supervisor access to at least one
network environment.
10 Introducing the HP Network ScanJet 5 Scanner EN
Page 11

HP Network ScanJet 5 Scanner Features
Performance
• 15 ppm at 1 bit/pixel
• Grayscale definition: 1, 4, and 8 bits/pixel
• 300 dpi optical resolution up to 1200 dpi interpolated
• Comes with embedded Optical Character Recognition (OCR) software
• Supports image scanning, e-mail, LAN fax, and groupware software
• Uses G4 and Packbits compression to reduce disk space requirements
Paper Handling
• Supports multiple paper sizes
• Letter 8.5 x 11 in. (216 x 279 mm)
• A4 210 x 297 mm (8.3 x 11.7 inches)
• Legal 8.5 x 14 in. (216 x 356 mm)
• Holds up to 50 pages in Automatic Document Feeder (ADF)
• Scans text, graphics, and photos
Software
• User software
• HP Network ScanJet 5 Utility allows user to define destinations and
user scanner settings.
• PaperPort software can be installed by users to receive, view, and
manipulate documents scanned with the Network ScanJet 5 scanner.
• Administrator software
• HP JetAdmin software allows network administrators to quickly
configure scanners and their associated users pools, print queues,
faxes, and distribution lists.
• Recipient software
• PaperPort Viewer software allows recipients of scanned documents,
who don’t have PaperPort software, to view the documents.
1
Scanner
Introducing the
Interface Support
• Ethernet (also supports 10Base-T and 10Base-2/BNC)
• Token Ring (RJ-45 and DB9 connectors)
• 100Base-VG (also supports 10Base-T Ethernet)
• 100Base-TX (also supports 10Base-T Ethernet)
EN Introducing the HP Network ScanJet 5 Scanner 11
Page 12
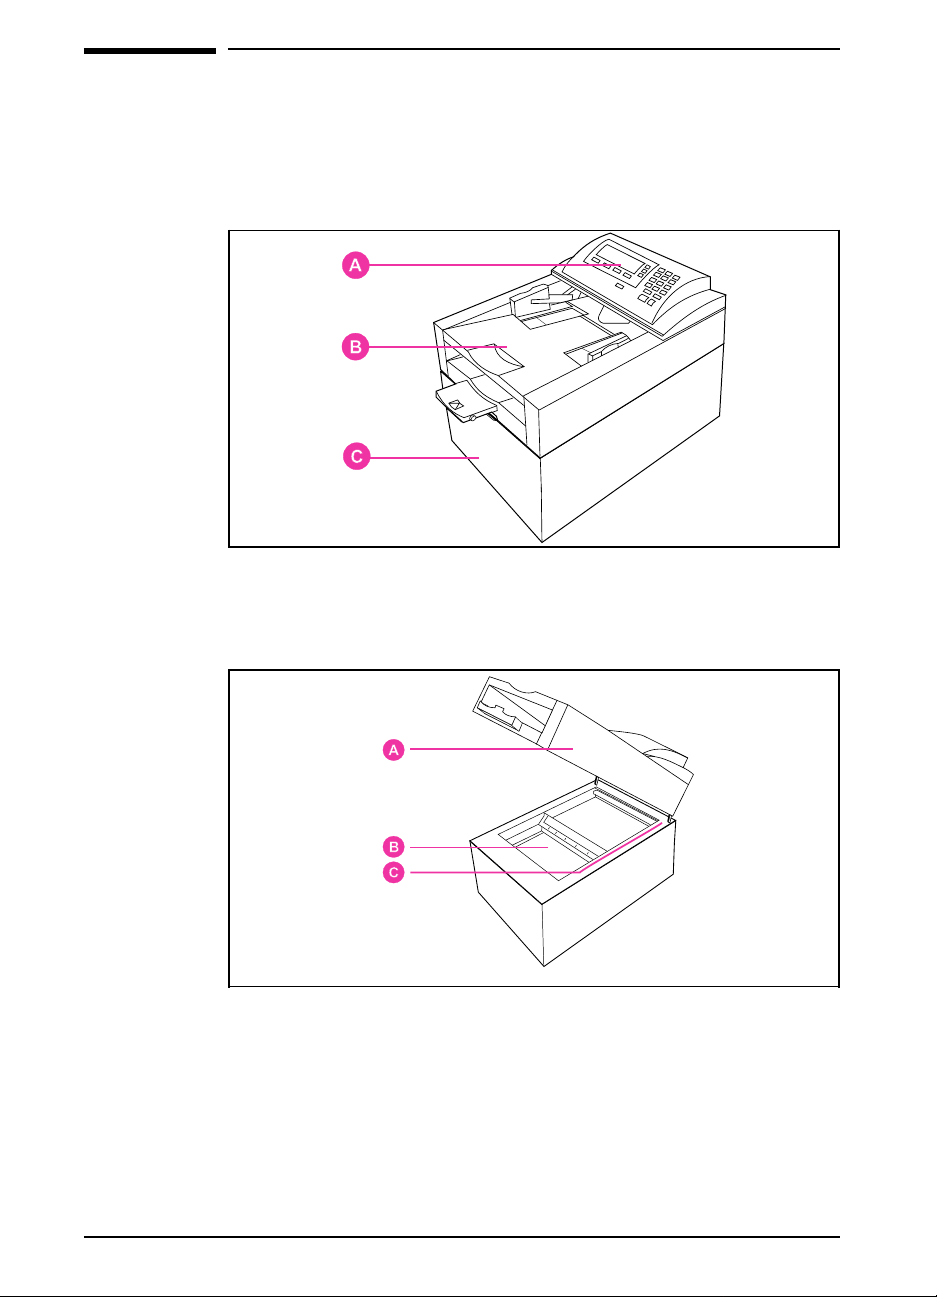
Figure 1
HP Network ScanJet 5 Scanner
Components
The following illustrations identify the components of the scanner.
A Control Panel
B Automatic Document Feeder (ADF)
C Scanner Unit
Figure 2
A ADF
B Scanner Glass
C Document Setmark
12 Introducing the HP Network ScanJet 5 Scanner EN
Page 13
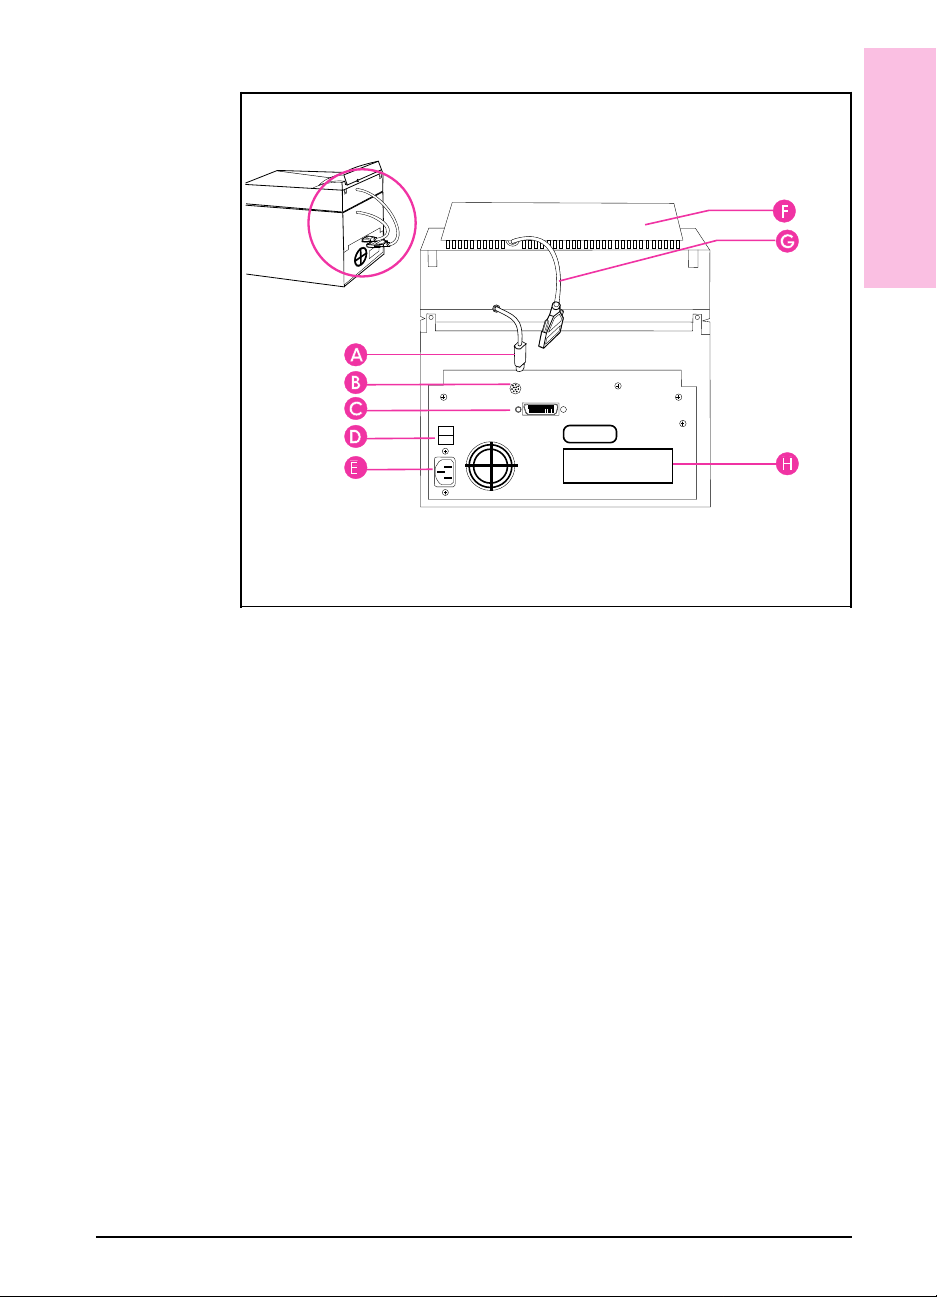
Figure 3
A ADF Connector Cable
B ADF Connector Socket
C Control Panel Connector Socket
D Scanner Power Switch
E Scanner Power Connector Socket
F Control Panel
G Control Panel Connector Cable
H LAN Connector (10BASE-T or Token Ring)
1
Scanner
Introducing the
EN Introducing the HP Network ScanJet 5 Scanner 13
Page 14
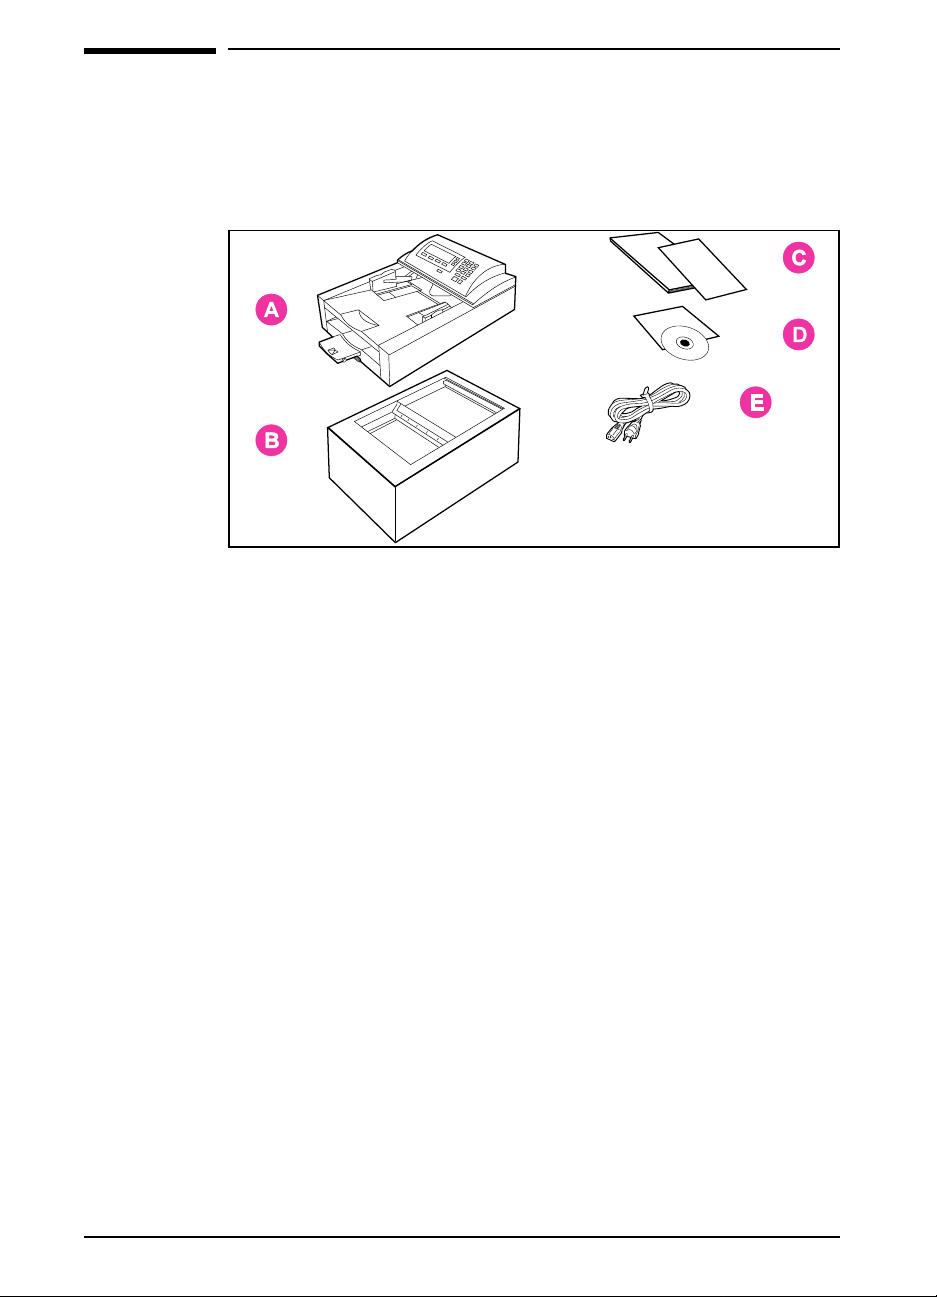
Figure 4
HP Network ScanJet 5 Scanner Package
Contents
The following illustrations identify the package contents of the scanner.
A Automatic Document Feeder
B Scanner
C Documentation
D CD-ROM
E Scanner Power Cord
14 Introducing the HP Network ScanJet 5 Scanner EN
Page 15

Initial Software Configuration
Overview
As the network administrator, you configure the scanner and the scanner
network environment and add users, printers, fax numbers and
distribution lists to create a public destination list for the scanner. You
use the HP Network ScanJet 5 administrative software, which is part of
the HP JetAdmin software, to perform these functions.
A scanner can be configured for a specific server, domain, or an entire
network. The HP Network ScanJet 5 scanner operates in the following
network environments:
• Novell NetWare 3.1x, with IPX
• Novell NetWare 4.x NDS, with IPX
• Windows NT 3.51 and 4.0, with TCP/IP
• IBM LAN Server 3.0 and 4.0
2
Note In NT and LAN Server environments, a scanner service (daemon) must
be installed and running on a server in each domain.
The HP Network ScanJet 5 scanner client software, HP Network
ScanJet 5 Utility, operates in the following environments:
• Windows 3.1x, with IPX NetWare shell, or Microsoft TCP/IP
• Windows for Workgroups 3.11, with IPX NetWare shell, or Microsoft
TCP/IP
• Windows 95, with IPX NetWare and Microsoft shells, or Microsoft
TCP/IP (32 bit)
• Windows NT 3.51 and 4.0 with IPX NetWare and Microsoft shells, or
Microsoft TCP/IP (32 bit)
EN Initial Software Configuration 15
Page 16

In order to configure and use the scanner, the following conditions must
be met:
• You must have supervisor privileges on at least one of the network
environments.
• The scanner must be physically connected to the network at the control
panel, as described in the Getting Started Guide.
• You must specify the protocol stack and the frame type in the
Configuration menu at the control panel, as described in the Getting
Started Guide.
• You must configure the scanner on at least one network environment, as
described in this chapter.
• At least one destination must be added to the public destination list (or a
fax server must be configured), as described later in this chapter.
Destinations are selected from a pool of resources available for the
network environments configured for the selected scanner. Once a
destination is added, it appears in the public destination list displayed at
the scanner control panel. Using HP Network ScanJet 5 Utility,
registered users can select destinations from the public list and include
them in their private destination lists.
16 Initial Software Configuration EN
Page 17

Using the HP JetAdmin Software
HP JetAdmin software runs on the following:
• Novell NetWare: only on Windows 95 and NT
• Windows NT: only on an NT client or an NT server
• LAN Server: only on Windows 95
You configure the scanner starting from the main window of the HP
JetAdmin software. First connect to a network environment (with
supervisor status). In Windows 95, start the HP JetAdmin software by
double-clicking the HP JetAdmin icon in the Windows Control Panel; in
Windows NT 3.51 or 4.0, double-click the HP JetAdmin icon in the HP
LaserJet program group. The main window is displayed, listing all
configured scanners, printers, plotters, and copiers.
Note If you think a device is missing from the list, press the [F5] key to
update (refresh) the window.
All devices are listed in the HP JetAdmin software main window under
the following types:
• IPX name
• TCP/IP name
2
Configuration
Initial Software
To select the preferred name, from the Options menu, choose
Preferences. On the default protocol tab of the Preferences dialog box,
select the desired name in the Default Name box:
• If you select IPX, the scanner is named with the bindery name (which is
the MAC/address displayed in the configuration menu at the control
panel).
• If you select TCP/IP, the scanner is named with the network name
defined in the DNS server, or (if this is not named) with the scanner IP
address.
In the Options menu, you can determine the mode in which you want to
work:
• Interview mode (the default), where you answer questions and configure
information in the order you are asked.
• Expert mode, where you enter information on the tabs of the
Configuration dialog box, in the order you choose.
To switch to Expert mode, choose Interview mode from the Options
menu. Although the instructions provided here are in Expert mode, the
information you enter is the same regardless of the mode you choose.
EN Initial Software Configuration 17
Page 18

To begin scanner configuration
1 From the JetAdmin software main window, select the scanner you want
to modify.
Note If you don’t see the scanner listed, press the [F5] key to refresh (update)
the window.
2 From the Device menu, choose Modify, or click the Modify icon on the
toolbar. The Configuration for HP Network ScanJet 5 Scanner dialog
box appears.
3 Enter information on the tabs of the Configuration dialog box.
4 Click OK to close the dialog box (or Finish if you are in Interview
mode). The changes take effect.
Note
The information included in this chapter describes how to configure the
scanner initially. Please refer to online Help for information regarding
how to maintain the configuration.
Now that you have installed the scanner software, you will need to use
the HP JetAdmin software to connect the scanner to the network.
To complete the scanner configuration
1 In the Configuration dialog box, click the General tab.
2 In the Description box, type a description of the scanner, such as its
location or an explanation of the model. This field is optional. The
description appears in the main window of the JetAdmin software. The
scanner name is shown here and cannot be changed.
18 Initial Software Configuration EN
Page 19

Configuring the Network Environment
The network environments on which the selected scanner is currently
configured are listed on the Networks tab, under Configured Network
Environments.
Note You may not need to enter any information on this tab, since the network
environment (such as an NT domain name, a LAN server domain name,
a NetWare 3.1x server name, or an NDS tree name) is added
automatically to the list when the first resource (user, user group, print
queue, or fax server link) belonging to that environment is added to the
public destination list.
The Synchronize Time With box displays the network environment with
which the scanner’s internal time is synchronized.
To configure additional environments
1 On the Networks tab, click Change to display the Network
Environments dialog box.
2 In the Available box, select a network environment with which you want
the scanner to work. This list shows all available networks for which the
scanner has not yet been configured and for which you have supervisor
access privileges. Only networks using the same protocol stack as the
scanner are displayed.
3 Click Add. The network environment is added to the Configured box.
The first environment added becomes the environment with which the
scanner’s internal time is synchronized, unless you specify otherwise.
4 Click OK.
If you have added a NetWare 4.x NDS network environment, the
appropriate dialog box appears.
2
Configuration
Initial Software
To select a server in an NDS network environment
1 In the NetWare NDS Network Environment dialog box, enter the
Scanner NDS Context, which defines the context where the scanner
object is created in the NDS tree.
2 Select the Scanner Server, which is the name of the server used by the
scanner.
If you have added an NT environment or a LAN Server environment,
the HP JetAdmin software displays a dialog box with the current
settings.
EN Initial Software Configuration 19
Page 20

To view or change properties for a network environment
1 On the Networks tab, click Change.
2 In the Configured box of the Network Environments dialog box, select
the environment for which you want to change information and click
Properties.
For information regarding changing or deleting network environments,
see the online Help.
You can do the following:
• For NDS environments, you can change the Scanner Server if you’ve
logged in with supervisor access.
• For NT environments, you can change the reference to the server
currently running the network scanner service.
• For LAN Server environments, you can view the current settings.
• For NetWare 3.x environments, no settings are needed.
See the readme file for information about multiple-domain environments.
20 Initial Software Configuration EN
Page 21

Adding Users
Add users to the public destination list shown at the scanner control
panel using the Users tab of the Configuration dialog box. The Control
Panel Users box on this tab displays the user destinations that are
currently configured for the selected scanner.
Note An entire user group for a specified network can be added as a
distribution list, as described in “Adding Distribution Lists” later in this
chapter.
To add users to the control panel destinations list
1 On the Users tab of the Configuration dialog box, click Change to
display the Users dialog box. The Available Users box lists,by network
type, all available network users who have not yet been added to the
public destination list. (Network types include NT domain, LAN Server,
NetWare 3.x, and NDS.)
Tip Before adding users, make sure the default settings described in steps 2,
3, and 4 are correct. These settings will be applied to all users you add in
this dialog box. Changing the default settings does not affect user
destinations that have already been added.
2
Configuration
Initial Software
2 In the Naming Convention box, select a default naming convention that
will apply to all users added in this dialog box. The naming convention
defines how the user is identified in the destination list. The following
naming conventions are available:
• User name—The name used to identify the user on the network. This
is the default.
• Full name—The network full name associated with the network
user.
• Ask each time—Stipulates that you will be asked to enter a name in
the User Properties dialog box every time a user destination is created.
3 In the User Rights box, assign a default user permission.
• Receive only—Allows the user to receive only documents from HP
Network ScanJet 5 scanners.
• Full access—Allows the user to receive documents and also to send
to any destination on any network environment currently supported
by the network scanner.
EN Initial Software Configuration 21
Page 22

4 Identify the default workarea root location by typing a path, or use the
[...] (Browse) button to enter the path. The workarea root is the parent
directory to where individual users’ workareas will be stored.The user
workarea is the directory used by the scanner to temporarily store
scanned data. Each user has just one workarea; if a user has already been
assigned a workarea because he or she is using multiple scanners, this
location is automatically used.
5 In the Available Users box, for each network type, click the leftmost
icon (the plus or minus sign) to expand or collapse the list.
6 Add a user from the list by selecting a user name and then clicking Add.
The name appears in the Control Panel Users list. If this is the first user
to be added to an NDS or NT environment, you will be prompted for
more information, as described previously under “Configuring the
Network Environment.”
7 If you have selected Ask Each Time for the Naming Convention, you
will be asked to select a user name to display at the scanner control
panel. This will also happen whenever a naming conflict occurs.
8 When you have finished adding users to the Control Panel Users list,
click OK.
To change the name displayed at the scanner control panel, the user
rights, or the workarea for a specific user, select the user name in the
Control Panel Users box in the Users dialog box and click Properties.
In the User Properties dialog box, make the appropriate changes and
click OK.
For more information about maintaining user destinations, see the online
Help.
22 Initial Software Configuration EN
Page 23

Adding Printers
Printer destinations, available using the Copy function at the scanner
control panel, are configured on the Printers tab of the Configuration
dialog box. The printers can be direct network printers that are
physically connected to the network or print queues that are logical
printers configured on a server.
To configure a direct network printer
TCP/IP must be selected as the protocol stack on the scanner before you
can configure a direct network printer.
1 On the Printers tab of the Configuration dialog box, click Direct
Network Printers to display the Direct Network Printers dialog box.
2 Under Current Settings, click New.
3 In the Control Panel Name box, type a unique name that will identify
the printer at the scanner control panel.
4 In the Printer Address box, type the IP address.
5 In the Printer Type box, select a printer class (model name) that will
allow the scanner to optimize the print quality.
6 Click Apply. The printer name appears in the Control Panel Printers list.
2
Configuration
Initial Software
EN Initial Software Configuration 23
Page 24

To configure a print queue
1 On the Printers tab of the Configuration dialog box, click Print Queues
to display the Print Queues dialog box. The print queues that can be
added to the scanner control panel appear, by network environment, in
the AvailablePrint Queues box.
Note Before adding print queues, make sure the default settings described in
steps 2 and 3 are correct. These settings apply to all print queues you
add in this dialog box. Changing the default settings affects only print
queues added after the change.
2 In the Naming Convention box, select a default naming convention that
will apply to all print queues added in this dialog box. The naming
convention defines how the printer is identified in the destination list.
The following naming conventions are available:
• Print queue name—The name used to identify the print queue on
the network. This is the default.
• Ask each time—You will be asked to enter a name in the Print queue
Properties dialog box every time a print queue destination is created.
3 In the Printer Type box, select a printer class (model name) that allows
the scanner to optimize print quality. The default is None.
4 In the Available Print Queues box, for each network type, click the
leftmost icon (the plus or minus sign) to expand or collapse the list.
5 Add print queues by selecting a print queue in the Available Print
Queues box and clicking Add. The print queue name is displayed in the
Control Panel Print Queues box.
6 If you have selected Ask Each Time for the Naming Convention, you
will be asked to enter a print queue name to display at the scanner
control panel. This will also happen whenever a naming conflict occurs.
7 When you have finished adding print queues to the Control Panel Print
Queues list, click OK. The network environment to which the print
queue belongs is automatically added, if it has not previously been
added.
24 Initial Software Configuration EN
Page 25

Configuring Fax Servers and Adding Fax
Destinations
Configure installed fax servers and fax destinations through the Faxes
tab of the Configuration dialog box.
A fax server must be configured and then selected for the scanner before
a user can scan a document to a fax destination.
See the HP Network ScanJet 5 Scanner web page
(http://www.hp.com/go/network-scanning) or contact an authorized HP
dealer for the most updated list of supported LAN fax servers.
For information regarding maintaining fax server and fax destination
information, see the online Help.
The following procedure is an example you can use for a configuration
reference.
To configure and then select a LAN fax server
1 In the Fax Server box on the Faxes tab, click Configure to display the
Lan Fax Configuration dialog box.
2 In the Supported Lan Fax Product box, select the vendor for the LAN
fax that is connected to the network.
3 Click Configure to display the Fax Server Selection dialog box.
4 In the Available Network Servers box, select the network server to
supply the first part of the Fax Server Directory location.
5 In the Fax Server Directory box, type the server and directory where the
fax system files are stored, or click Browse to locate the directory.
6 In the Scanner ID box, type the ID for the scanner, if appropriate. For
Biscom servers, this is the name used in the Biscom administration
software to define the print queue associated with the scanner.
7 Click OK. The Lan Fax Configuration dialog box is once again
displayed.
2
Configuration
Initial Software
EN Initial Software Configuration 25
Page 26

To specify fax transmission options
1 On the Faxes tab, in the Fax Server box, click Configure.
2 In the Lan Fax Configuration dialog box, in the Supported LAN Fax
Products box, select the vendor for the LAN fax that is connected to the
network.
3 In the Fax Option box, click Advanced to display the Fax Transmission
Advanced Options dialog box.
4 In the Transmission Options box, enter the number of retries and the
retry rate, and select the maximum transmission speed and the
resolution. Select ECM to enable the Error Connection Module, which
checks the fax for accuracy every few thousand pixels. ECM takes
longer than manual transmission, but results in clearer fax images.
5 In the File Format box, select the file format in which the faxes will be
transmitted.
Note This option is not available for all LAN fax products.
6 If the fax server does not support sending notifications to users, select
Diable Notification To Users.
7 If the scanner is connected to a network printer, select Enable
Transaction Report Printing; in the Selected Printer box, you can select a
printer to print the fax transaction reports.
8 When you’ve finished configuring the server, click OK.
To add new fax destinations
1 On the Faxes tab of the Configuration dialog box, in the Control Panel
Faxes box, click Change to display the Faxes dialog box.
2 Under Current Settings, click New.
3 In the Control Panel Name box, type a name for the fax destination, as it
will appear on the scanner control panel.
4 In the Fax Number box, type the fax number for the new fax destination.
Use the format specified by your fax server.
5 In the Retry box, type the number of attempts that should be made to
dial the fax destination before canceling the request.
6 In the Accounting Code box, enter the accounting name you’ve
associated with the fax destination. This is optional. If left empty,
JetAdmin uses the accounting information entered for the fax server.
7 Click Apply to confirm the fax destination. The fax destination is
displayed in the Control Panel Faxes list.
26 Initial Software Configuration EN
Page 27

Adding Distribution Lists
You can create distribution lists consisting of an entire network user
group or of a custom combination of users and fax destinations, and add
them to the public destination list. Distribution lists are displayed and
configured from the Distributions tab.
For information regarding maintaining distribution lists, see the online
Help.
To create a distribution from a network user group
1 On the Distributions tab, click Change to display the Distributions
dialog box. The user groups that can be added as a distribution list to the
public destination list are displayed, by network environment, in the
Available User Groups box. Only user groups belonging to networks for
which you have supervisor privilege are listed.
Tip Before adding a user group, make sure the default settings, described in
steps 2 and 3, are correct. These settings will apply to all users and
distribution lists you add in this dialog box.
2 In the Naming Convention box, select a default naming convention that
will apply to all user groups added in this dialog box. The naming
convention defines how the user group is identified in the destination
list. The following naming conventions are available:
• User group name—The name used to identify the user group in the
network. This is the default.
• Ask each time—You will be asked to enter a name in the
Distribution Properties dialog box every time a user group
distribution is added.
3 In the User Defaults box, select Ask Each Time if you want to display
the User Properties dialog box for every network user who has not
previously been added to the user pool.
4 Select a user group from the Available User Groups list and click Apply.
The user group name appears in the Control Panel Distributions box.
5 If you have selected Ask Each Time for the Naming Convention, the
Distribution Properties dialog box is displayed whenever a naming
conflict occurs. Enter a new name for the distribution list in this dialog
box.
6 If you have selected Ask Each Time under User Defaults, the User
Properties dialog box appears whenever a user included in the user
group has not already been added through the Users tab. Add user
properties.
7 When you have finished adding user groups to the Control Panel
Destinations list, click OK.
2
Configuration
Initial Software
EN Initial Software Configuration 27
Page 28

Note If the network to which the selected user group belongs has not been
added to the scanner environment, it will automatically be added at this
time.
To add a custom distribution list
1 On the Distributions tab, click Change to display the Distributions
dialog box.
2 In the Distributions dialog box, click New to display the Distribution
Properties dialog box. All user and fax destinations belonging to the
scanner are listed in the Available Destinations box.
3 In the Control Panel Name box, type a name by which the distribution
list will be identified on the scanner control panel.
4 In the Available Destinations box, select a destination to be included in
the distribution list and click Add. The destination is displayed in the
Included Destinations list.
5 When you have finished adding the destinations to be included in the
distribution list, click OK.
28 Initial Software Configuration EN
Page 29

Scanner Maintenance
Other Scanner Functions
Once the scanner is configured and operational, you can perform
backups, view reports, reset configuration parameters, and upgrade the
firmware, as described in this chapter.
In addition, this chapter contains procedures for cleaning and
maintaining the scanner itself. For details on ordering, see “Replacement
Parts and Accessories” in Appendix B.
3
EN Scanner Maintenance 29
Page 30

HP JetAdmin Software Maintenance
Procedures
The HP JetAdmin software provides you with tools to quickly perform
scanner maintenance. For each of the procedures described on the
following pages, you’ll need to first select the scanner in the HP
JetAdmin software and then select the procedure on the Tools tab of the
Properties dialog box.
To get to the Tools tab
1 Connect to a network environment (with supervisor status) and start the
HP JetAdmin software. The main window appears, listing all configured
scanners, printers, plotters, and copiers.
2 Select the scanner for which you want to perform a maintenance
procedure.
3 From the Device menu, choose Properties.
4 In the Properties dialog box, click the Tools tab.
Backing Up the Scanner Configuration
It’s a good idea to back up your scanner configuration on a frequent and
regular basis. Always do a backup before product exchange.
To back up the scanner configuration
1 On the Tools tab of the Properties dialog box, click the Backup icon.
2 In the Commands box, click Backup.
3 In the Backup dialog box, specify the directory in which the backup
should be placed.
4 Click OK. The message Backup in progress is displayed until
the backup is completed. You can click Abort at any time to cancel the
backup. The message Scanner backup was successfully
completed is displayed at the end of the process.
To check the results of the backup, refer to the Events Log.
30 Scanner Maintenance EN
Page 31

Restoring the Scanner Configuration
You can restore a backup of previously saved configuration data to a
selected scanner. Because you can choose a target scanner that is
different from the original one, this procedure can be used when
replacing a scanner. The new scanner must first be connected to the
network and configured from the scanner control panel, as described in
the HP Network ScanJet 5 Getting Started Guide.
To restore the scanner configuration
1 On the Tools tab of the Properties dialog box, click the Backup icon.
2 In the Commands box, click Restore/Exchange.
3 In the Restore dialog box, enter the directory in which the backup is
stored.
4 Click OK. The directory you specified is checked to make sure the file
exists. The restore procedure is canceled if files are missing. A message
warns that the restore procedure overwrites the current configuration of
the scanner.
5 Click OK. Messages are displayed to indicate when the restore is in
progress and when it is completed.
To check the results of the restoration, refer to the Events Log.
Replicating the Scanner Configuration
3
Scanner
Maintenance
You can replicate (copy) the configuration of one scanner to another,
providing a simple method for aligning the configurations of multiple
scanners. Of course, the first scanner must already have been configured
from the scanner control panel.
To replicate the scanner configuration
1 On the Tools tab of the Properties dialog box, click the Backup icon.
2 In the Commands box, click Replicate.
3 In Source Scanner box of the Replicate Scanner dialog box, select the
scanner from which the configuration will be copied. The Target
Scanner box displays the name of the currently selected scanner.
4 Click OK. The message “Scanner replicate in progress” appears both for
the download from the source scanner and for the upload to the target
scanner. The message “Scanner replicate successfully completed”
appears at the end of the process. You can abort the operation at any time
prior to its completion.
To check the results of the replication, refer to the Events Log.
EN Scanner Maintenance 31
Page 32

Displaying the Activity Log
The activity log displays the last 128 activities logged for the currently
selected scanner. For each activity, the log displays the date, time, user,
activity, and destination.
To display the activity log
1 On the Tools tab of the Properties dialog box, click the Reports icon.
2 In the Commands box, click View Activity Log.
3 To save the log to a file, click Save to File.
4 To clear all log entries, click Clear Log.
5 When you have finished viewing the log, click OK.
Displaying the Events Log
The events log displays the last 128 internal scanner events (such as
errors and failures) logged for the currently selected scanner. For each
event, the log includes the date, time, event, and description.
To display the events log
1 On the Tools tab of the Properties dialog box, click the Reports icon.
2 In the Commands box, click View Events Log.
3 To save the log to a file, click Save to File.
4 To clear all log entries, click Clear Log.
5 When you have finished viewing the log, click OK.
Displaying Accounting Information
The accounting report displays the following totals for each configured
user: distributed documents, distributed pages, scanned documents,
scanned pages, faxed documents, faxed pages, total number of scanned
pages, and date and time of the last time the user accessed the scanner.
To display the accounting information
1 On the Tools tab of the Properties dialog box, click the Reports icon.
2 In the Commands box, click Accounting.
3 To save the accounting information to a file, click Save to File.
4 To reset the currently selected user accounts, click Reset Accounts.
5 When you have finished viewing the accounting information, click OK.
32 Scanner Maintenance EN
Page 33

Re-initializing the Scanner
You can re-initialize (reboot) the currently selected scanner remotely if
you have supervisor privileges on at least one of the network
environments configured in the scanner.
To re-initialize the scanner
1 On the Tools tab of the Properties dialog box, click the Reset icon.
2 In the Commands box, click Re-initialize.
3 When the message Re-initialize the scanner is displayed,
click OK.
Resetting the Scanner
Caution Resetting the scanner will erase all scanner configuration information.
You will need to reconfigure the scanner after a reset.
You can restore the original factory defaults on the selected scanner, You
can resterasing all data stored on the scanner’s internal hard disk. Since
all the scanner data distributed on the network file servers is cleared, you
must have supervisor access for each of the servers. Only those network
environments currently running and on which you have supervisor
access will be cleared.
3
Scanner
Maintenance
To reset the scanner
1 On the Tools tab of the Properties dialog box, click the Reset icon.
2 In the Commands box, click Reset to Factory Defaults.
3 When the message This will erase ALL data from the
selected scanner. Reset scanner to factory
defaults? is displayed, click OK.
EN Scanner Maintenance 33
Page 34

Upgrading the Scanner
You can upgrade the firmware for the selected scanner (or restore the
firmware to the previous version). You must have supervisor privileges
on the network environments for which the scanner is configured, and
the scanner must be fully configured in order to be upgraded.
To upgrade the scanner
1 On the Tools tab of the Properties dialog box, click the Upgrade icon.
2 In the Commands box, click Firmware Upgrade to display the Upgrade
dialog box.
3 In the FW Image box, type the location of the firmware (for new
upgrades, usually a floppy drive) or click Browse to locate the firmware.
4 In the Network Environments box, select the network environment you
want to use in the upgrade. This box lists all network environments on
which the scanner has been configured and for which you have
supervisor privilege.
5 Click OK.
To check the results of the upgrade, refer to the Event Log.
34 Scanner Maintenance EN
Page 35

Cleaning the Scanner
You’ll occasionally want to clean your scanner, as described in the
following procedure.
Caution Always turn off the scanner and unplug all power cords before cleaning.
To clean the scanner
1 With a clean, soft cloth and a mild detergent, wipe off the outside of the
scanner.
2 Dry the scanner with a clean, soft cloth.
3 Open the ADF. (If you remove the ADF, be sure to disconnect the cables
first.)
4 Open the delivery guide by grasping the small plastic handles on either
side of the delivery guide and pulling down.
5 Use a clean, soft, dry cloth to wipe the inside surface of the delivery
guide sheet.
6 Close the delivery guide and wipe its outside surface with the cloth.
3
Scanner
Maintenance
EN Scanner Maintenance 35
Page 36

Replacing the Delivery Guide Sheet
Replace the delivery guide sheet if the
scanning quality is still poor after cleaning
(if, for example, vertical black lines
appear on the paper).
To replace the delivery guide
sheet
1 Lift up the ADF.
2 Open the delivery guide by grasping
the small plastic handles on either
side of the delivery guide and pulling
down.
3 Remove the used delivery guide sheet.
4 Install the new delivery guide sheet
by aligning its holes with the small
plastic spindles on the delivery guide
and pressing down.
Note
Make sure that the free end of the clear
guide is tucked behind the white padded
sheet.
36 Scanner Maintenance EN
Page 37

Replacing the Lower Rollers
Replace the lower rollers if they are worn
(if, for example, you are picking up
multiple sheets of paper).
To replace the lower rollers
1 Lift up the control panel.
2 Press down on the plastic cover
located behind the right hand roller,
and pull the cover towards you.
3 Move the rollers to the right and
remove the rollers and roller bar.
4 Install new lower rollers by inserting
the left side into the matching bar in
the scanner.
3
Scanner
Maintenance
EN Scanner Maintenance 37
Page 38

5 Replace the plastic cover, putting the
bottom feet in place first.
38 Scanner Maintenance EN
Page 39

Troubleshooting and Error Messages
Overview
This chapter describes problems that can occur during the scanning
process, including error messages you may encounter, that can originate
from several sources:
• At the scanner. Most of the messages displayed on the control panel of
the scanner are status or information messages. However, error
messages, requiring some action to be taken before scanning can
proceed, are also displayed. These messages, together with
recommended actions, are described in this chapter.
• In the user software. Messages are displayed in HP Network ScanJet 5
Utility when an error occurs while the user is performing some function
connected with scanning. If the user is using the PaperPort software as
their inbox, problems may occur and error messages may be displayed
in connection with this software. Solutions to HP Network ScanJet 5
Utility and PaperPort software problems and error messages can be
found both in this document and in the HP Network ScanJet 5 Scanner
User’s Guide.
• In the administrative software. Error messages are displayed in
JetAdmin when an error occurs during an administrative process.
Solutions to these problems can be found later in this chapter.
4
EN Troubleshooting and Error Messages 39
Page 40

Scanner Troubleshooting
If you have problems with the scanner, proceed as described in the
following paragraphs.
Scanner is not Working
Make sure of the following:
• The power cord is connected securely to the scanner and is plugged into
an electrical outlet.
• The scanner is turned on.
• The scanner is connected to the network.
• The scanner is unlocked. If you try to scan a document when the scanner
is locked, it will emit a harsh, grinding sound.
If these conditions are met, turn the scanner off, wait 30 seconds, and
turn the scanner back on to reset it.
Control Panel is not Working
Make sure of the following:
• The power cord is plugged into an electrical outlet.
• The control panel is correctly connected to the network box.
• Check the control panel contrast. You can change the contrast using the
arrow keys.
If the problem persists, call HP Support Services.
Scanned Image Quality is Poor
If scanned pages are blank, white, or have repeated patterns, first make
sure that a page is not already on the scanner glass. Then check to see if
the rollers, scanner glass, or delivery guide are dirty or need
replacement, as described in “Scanner Maintenance” in Chapter 3.
Scanner Overheats
The scanner automatically shuts off if environmental conditions cause it
to overheat. If this happens, switch the on/off switch to off, wait for the
scanner to cool down, and switch on the scanner to operate.
40 Troubleshooting and Error Messages EN
Page 41

Clearing Paper Jams
When you have a paper jam, the scanner
control panel displays an error message
directing you to where it occurred: the
start of a page, the end of a page, or inside
the ADF. Use one of the following
procedures to clear the paper jam.
To clear jams at the start of a
page
1 Open the ADF cover.
2 Remove the jammed paper.
3 Close the ADF cover securely.
4 The control panel prompts you to do
• Reinsert the paper and press the [Go]
• Stop scanning and save your data by
• Stop scanning without saving your
one of the following:
button to continue scanning.
pressing [Stop].
data by pressing [Abort].
EN Troubleshooting and Error Messages 41
4
Troubleshooting
Page 42

To clear jams at the end of a page
1 Open the ADF cover, and lift up the
document tray.
2 Remove the jammed paper.
3 Close the document tray and the ADF
cover securely.
4 The control panel prompts you to do
one of the following:
• Reinsert the paper and press [Go] to
continue scanning.
• Stop scanning and save your data by
pressing [Stop].
• Stop scanning without saving your
data by pressing [Abort].
42 Troubleshooting and Error Messages EN
Page 43

To clear jams inside the ADF
1 Open the ADF cover.
2 Lift up the ADF unit.
3 Open the delivery guide by grasping
the small plastic handles on either
side of the delivery guide and pulling
down.
4 Remove the jammed paper.
EN Troubleshooting and Error Messages 43
4
Troubleshooting
Page 44

5 Close the delivery guide sheet by
aligning its holes with the small
plastic spindles on the delivery guide
and pressing down.
6 Close the document tray and the ADF
cover securely.
7 The control panel prompts you to do
one of the following:
• Reinsert the paper and press [Go] to
continue scanning.
• Stop scanning and save your data by
pressing [Stop].
• Stop scanning without saving your
data by pressing [Abort].
44 Troubleshooting and Error Messages EN
Page 45

Control Panel Error Messages
Error messages displayed at the control panel are identified by a
number, which HP Support Service uses to resolve the problem, if
necessary. In some cases a second number, further identifying the
problem, will also be included.
Internal Errors
Error Message Error Description Actions
— Self-test Error: XY The control panel is not working.
If the error is OD, a key was
pressed during the control panel
boot and it is a warning message.
— Self-test
Initializing...Wait
10
Internal Error
HP Network ScanJet
5Halted
11
Internal Error
Internal Memory
Error
12
Internal Error
OutofMemory
The message is displayed
continuously. The control panel is
working but something is wrong
with the connection.
Internal information in temporary
storage cannot be accessed.
Internal memory error. Powercycle the scanner.
Internal memory error. If the error message is displayed
Power cycle the scanner.
Call HP Support Service.
Check if the cable is properly
plugged-in.
If the error persists, call HP
Support Service.
Power cycle the scanner.
If the error persists, call HP
Support Service.
If the error persists, call HP
Support Service.
just after booting, too many
destinations or print queues are
defined. In the HP JetAdmin
software,remove some of the
destinations from the scanner
configuration and reset the scanner.
4
Troubleshooting
If message is displayed when a
user is selected, the user has too
many destinations defined. Use the
HP Network ScanJet 5 Utility to
remove private destinations, then
use the Reinitialize option under
the Tools tab to reset the scanner.
EN Troubleshooting and Error Messages 45
Page 46

Error Message Error Description Actions
13
Internal Error
Communication Error
14
Internal Error
Control Panel Error
15
Internal Error
HP Network ScanJet
5 halted
16
Internal Error
Internal Memory
Error
65-66
Internal Error
HP Network ScanJet
5 halted
The control panel is working but
something is wrong with the
connection.
The control panel LCD is not
working.
There is a connection problem
with the scanner.
Internal memory error. Power cycle the scanner.
Bad internal behavior. Power cycle the scanner.
Check if the cable connecting the
control panel is properly plugged-in.
Powercycle the scanner.
If the error persists, call HP
Support Service.
Powercycle the scanner.
If the problem persists, call HP
Support Services.
Powercycle the scanner.
Check if all cables are properly
plugged in.
If the problem persists, call HP
Support Service.
If the problem persists, call HP
Support Service.
If the problem persists, call HP
Support Service.
70, 71, 72
Internal Error
Configuration Error
73
Internal Error
Internal Disk Error.
Press any key...
The internal configuration
information is not accessible
The internal message information
for the language you’ve chosen
cannot be accessed.
Try to reconfigure the scanner
If the problem persists, call HP
Support Service.
You can continue to use the
scanner, which will display the
messages in English.
Try to change the scanner
language.
If the problem persists, call HP
Support Service.
.
46 Troubleshooting and Error Messages EN
Page 47

Error Message Error Description Actions
74
Internal Error
Internal Disk Error.
Press any key ...
The internal message information
for the language you’ve chosen is
corrupted.
You can continue to use the
scanner, which will display the
messages partially in the language
you’ve chosen and partially in
English.
Try to change the scanner
language.
If the problem persists, call HP
Support Service.
EN Troubleshooting and Error Messages 47
4
Troubleshooting
Page 48

Network Errors
Error Message Error Description Actions
101
Rebooting...
102
Control Panel
Locked...
103
Too Many Fax
Numbers Entered
Press any key...
104
No Users Found
Press any key...
105
No Destinations
Found
Press any key…
106
No Printers Found
Press any key...
Please wait. The network scanner
is rebooting.
The scanner is in a configuration
phase.
The scanner reached the
maximum allowed number of
temporary fax numbers.
The scanner has been correctly
initialized, but the destination pool
is empty (not an error).
Note: This could happen after a
restorefromanoldbackupif
destinations were removed from
the network after the date of the
old backup.
No action is required. The scanner
has received a reset command
from the HP JetAdmin software.
When the reboot finishes, the
scanner will be ready for use
again.
No action is required. The scanner
has received a configuration
command from the HP JetAdmin
software.When configuration
finishes, the scanner will be ready
for use again.
No action is required.
Add missing
users/destinations/printers to the
scanner.
In the HP JetAdmin software,
configure the scanner and create
a list of users/destinations/printers.
If the problem persists,
unconfigure the scanner and
configure it again from scratch.
If the problem persists, call HP
Support Service.
107
No Prv Destinations
Found
Press any key...
108
Destination Locked
<User Name>(err)
The private destinations related to
the user validated at the control
panel have not been previously
configured.
The selected destination has the
workarea locked.
Check that the user has correctly
configured private destinations.
Install the HP Network ScanJet 5
Utility on the user’s computer, then
configure the user’s private
destinations.
If the problem persists, call HP
Support Service.
Use the HP Network ScanJet 5
Utility to unlock the workarea.
48 Troubleshooting and Error Messages EN
Page 49

Error Message Error Description Actions
109
Invalid Destination
<User Name>(err)
110
Protocol Stack
Unconfigured
Press any key ...
111
Printer not found
<Printer Name>(err)
112
Send to User Error
<User Name>(err)
The user corresponding to the
selected destination is no longer
defined in the configuration. The
job has been canceled.
The correct Protocol Stack must
be selected before exiting the
special menus.
The print queue selected as the
scanning destination cannot be
found.The job has been canceled.
The HP Network ScanJet 5
scanner detected an error while
sending a job to the user. The job
has been canceled.
Use the HP JetAdmin software to
reconfigure the destination name
in the user pool.
At the scanner control panel,
select the correct Protocol Stack.
Use the HP JetAdmin software to
configure the printer.
Check if the maximum available
disk space for the workarea owner
has been reached.
Check if the server disk is full.
Check the LAN cable.
Check if the HP Network ScanJet
5 scanner has create and write
permissions in the workarea
owned by the selected destination.
If the user workarea is configured
in an NT or LAN Server
environment, check if the HP
Network ScanJet 5 scanner
service (daemon) is still active.
If the destination is an e-mail
address, check if the HP Network
ScanJet 5 Scanner service
(daemon) has been upgraded to
e-mail functionality.
Check if the network scanner
object still exists in the server
bindery.
EN Troubleshooting and Error Messages 49
4
Troubleshooting
Page 50

Error Message Error Description Actions
115
Internal Error
Out of Memory
(err)
120, 121, 122, 123
Internal Error
Internal Disk
Error(err)
HP Network ScanJet
5 halted
124
Network Error
Prv Destinations
Access Error
(err)
Internal memory error. If this message appears just after
booting, there are too many public
destinations or print queues
defined. Run the HP JetAdmin
softwaretoremovesome
destinations, then turn the scanner
off and on.
If the error message appears
when the user is selected, the
user has too many destinations
defined. Use the HP Network
ScanJet 5 Utility to remove some
private destinations, then use the
Reinitialize option under the Tools
tab to reset the scanner.
If the problem persists, call HP
Support Service.
An error has occurred in opening,
reading, or writing a file on the
network scanner internal hard
disk, or the file is corrupted.
A user’s private destinations list is
configured in a wrong format.
Reboot the scanner.
If the problem persists, call HP
Support Service.
Run the HP Network ScanJet 5
Utility to reconfigure the user’s
private destinations list.
If the problem persists, call HP
Support Service.
130
Fax Server Not
Found
131
Error Sending Fax
132
Network Error
The fax server destination could
not be found.
The scanner detected an error
while sending data to the fax
server.
The scanner detected an error
while receiving notification from
the fax server.
Verify the installation match
between the fax server and the HP
Network ScanJet 5 scanner.
Verify that the HP Network
ScanJet 5 scanner configuration is
correct.
Use the HP JetAdmin software to
verify the status of the fax server .
Verify that the HP Network
ScanJet 5 scanner configuration is
correct.
Use the HP JetAdmin software to
verify the status of the fax server .
50 Troubleshooting and Error Messages EN
Page 51

Error Message Error Description Actions
133
General User
Disabled
Press any key ...
134
Fax Server Disabled
Press any key ...
135
Too Many
Destinations
Please Deselect
Some of Them
Press any key ...
140
Network Error
Network Load
Error(err)
HP Network ScanJet
5 halted
The scanner is working, but the
general user or fax server is
disabled.
There are too many destinations
selected on the scanner’s control
panel.
An error occurred while loading or
connecting to the network stack
(Ethernet), or there was a problem
accessing the ring (Token Ring),
or there was a problem initializing
the TCP/IP stack.
Use the HP JetAdmin software to
configure the general user or fax
server.
Deselect some destinations.
Check the LAN cable.
Check if the server is available.
If the workarea is configured in an
NT or LAN Server environment,
check if the HP Network ScanJet
5 scanner service (daemon) is still
active.
If the problem persists, call HP
Support Service.
141
Network Error
NetWare Init Error
(err)
HP Network ScanJet
5 halted
142
Network Error
SNMP Init Error (err)
HP Network ScanJet
5 halted
143
Network Error
SAP Init Error (err)
HP Network ScanJet
5 halted
EN Troubleshooting and Error Messages 51
An error occurred during the
NetWare protocol initialization.
An error occurred while initializing
SNMP or when MIB was
registered.
An error occurred while initializing
SAP.
Turn the scanner off and on.
If the problem persists, call HP
Support Service.
Call HP Support Service.
Call HP Support Service.
4
Troubleshooting
Page 52

Error Message Error Description Actions
144
Network Error
Log Init Error (err)
Press any key...
145
Network Error
Diagnostic Failed
(err)
HP Network ScanJet
5 halted
146
Network Error
Network Card
Changed
NW ScanJet 5 halted
150
Network Error
Password Not
Found(err)
Press any key...
There was a problem while
initializing the logging file recorded
on the scanner’s hard disk.This
does not affect other scanner
functions.
There was an error running a
diagnostic on the scanner network
interface.
The network card has been
changed; this is an invalid
operation.
The scanner cannot get the user’s
password from the server.
Run the HP JetAdmin software
and clear the event log and the
activity log.
Restart the scanner.
If the problem persists, call HP
Support Service.
Power cycle the scanner.
If the problem persists, call HP
Support Service.
Send the HP Network ScanJet 5
scanner to the Repair Center to
have the network card changed.
Check that the user has correctly
configured his or her password.
If the problem persists, call HP
Support Service.
151
Network Error
Download Private
Error(err)
Press any key...
152
Network Error
User Not
Reachable(err)
155
Network Error
Time Sync Error (err)
Press any key...
There is a problem reading the
private user files from the server,
or the server is not available.
An error occurred while the
scanner was synchronizing the
date and time with the server.
Try the operation again.
Check the LAN cable.
Check if the server is available.
If the user workarea is configured
in an NT or LAN Server
environment, check if the HP
Network ScanJet 5 scanner
service (daemon) is still active.
Check the LAN cable.
Check if the time server is
available.
Check if the server date and time
clock is working correctly.
In the HP JetAdmin software,
check that the time server is
configured correctly.
52 Troubleshooting and Error Messages EN
Page 53

Error Message Error Description Actions
156
Internal Error
No Unique File Name
Press any key ...
160
Open Remote File
Error
<File Name>(err)
A unique file name for the scanner
document could not be created.
This problem occurs if the server
clock has been set to a value back
in time.
An error has occurred in creating
or opening a file on the server
disk. This happens when a file
cannot be created in the
destination workarea.
Check if the server date and time
are set correctly.
Check if the maximum available
disk space for the workarea owner
has been reached.
Check if the workarea associated
with the selected destination still
exists on the server disk.
Check if the specified path exists.
Check if the server disk is full.
Check if the HP Network ScanJet
5 has create and write
permissions in the specified path.
If the user workarea is configured
in a NetWare server, check if the
trustees have been removed. Add
them using NetWare tools or use
HP JetAdmin software to reassign
to the user the same network
environment.
If the server in which the user has
been configured is in an NT or
LAN Server environment, check if
the HP Network ScanJet 5
scanner service (daemon) is
active.
161
Read Remote File
Error
<File Name>(err)
EN Troubleshooting and Error Messages 53
An error occurred in reading the
specified file on the server disk.
If the server in which the user has
been configured is in an NT or
LAN Server environment, check if
the HP Network ScanJet 5
scanner service (daemon) is
active.
Check if the HP Network ScanJet
5 scanner has the correct
permissions in the specified path.
4
Troubleshooting
Page 54

Error Message Error Description Actions
162
Write Remote File
Error (File
Name>(err)
170
Transport
Connection Error
<Server
Identifier>(err)
An error occurred in writing the
specified file on the server disk.
The HP Network ScanJet 5
scanner detected an error while
trying to connect to the server
specified.
Check if the maximum available
disk space for the workarea owner
has been reached.
Check if the workarea associated
with the selected destination still
exists on the server disk.
Check if the server disk is full.
If the server in which the user has
been configured is in an NT or
LAN Server environment, check if
the HP Network ScanJet 5
scanner service (daemon) is
active.
Check if the HP Network ScanJet
5 scanner has write permissions
in the path specified.
Try the connection again.
Check the LAN cable.
Check if the server is running and
can be reached.
Check if the server address is
configured correctly.
Check if the network scanner
object still exists in the network
environment in which the
destination is configured.
If the server in which the user has
been configured is in an NT or
LAN Server environment, check if
the HP Network ScanJet 5
scanner service (daemon) is
active.
If the problem persists, reboot the
HP Network ScanJet 5 scanner.
54 Troubleshooting and Error Messages EN
Page 55

Error Message Error Description Actions
171
Transport
Disconnection Error
<Server
Identifier>(err)
172
Scanner Validation
Error <Server
Identifier>(err)
173
Connection Timed
Out
<Object Name>(err)
174
Net Channel Full
<Object Name>(err)
The HP Network ScanJet 5
scanner detected an error while it
was trying to disconnect from the
server.
The HP Network ScanJet 5
scanner detected an error during
validation from the server.
The connection between the HP
Network ScanJet 5 scanner and
the named object was cut off
during transmission for some
unknown reason or because the
channel was busy.
Check the LAN cable.
Check if the server is running and
can be reached.
Try the connection again.
Check if the HP Network ScanJet
5 scanner is configured correctly
in the server.
There might be heavy traffic on
the LAN. Try sending the
document again.
Check the LAN cable.
Check if the server is running and
can be reached.
If the server in which the user has
been configured is in an NT or
LAN Server environment, check if
the HP Network ScanJet 5
scanner service (daemon) is
active.
If the problem persists, reboot the
HP Network ScanJet 5 scanner.
175
No Data on Channel
<Object Name>(err)
176
Network Error
Network
Environment Failure
(err)
EN Troubleshooting and Error Messages 55
The connection between the HP
Network ScanJet 5 scanner and
the named object was cut off while
waiting for data for a long time on
the channel.
The HP Network ScanJet 5
scanner detected an error while
trying to access a network
resource database on the scanner.
Use the Reinitialize option under
the Tools tab to reset the HP
Network ScanJet 5 scanner.
If the problem persists, call HP
Support Service.
Use the Reinitialize option under
the Tools tab to reset the HP
Network ScanJet 5 scanner.
If the problem persists, call HP
Support Service.
4
Troubleshooting
Page 56

Scanner Errors
Error Message Error Description Actions
201
Scanner Error
HP Network ScanJet
5 halted
202
Scanner Error
Scanner not
connected
203
Scanner Error
No Paper Feeder
204
Paper Jam!
Open the cover &
remove paper
205
Scanner Error
HP Network ScanJet
5 halted
An error has occurred initializing
the scanner.
Communication problems exist
with the scanner.
The Automatic Document Feeder
(ADF) cable is not connected to
the scanner base.
The ADF detects a paper jam. See “To Clear Paper Jams” at the
The scanner element failed to
return to home position.
Power cycle the scanner.
If the problem persists call HP
Support Service.
Power cycle the scanner.
If the problem persists call HP
Support Service.
Do the following:
1.Verify that the ADF is properly
connected to the scanner base.
2. Power cycle the scanner.
If the problem persists call HP
Support Services.
Note: You can still use the flatbed
to scan.
beginning of this chapter.
If the problem persists call HP
Support Services.
Power cycle the scanner.
If the problem persists call HP
Support Service.
206
Scanner Error
HP Network ScanJet
5 halted
208
Internal Error
HP Network ScanJet
5 halted
209
Cover open!
Check the ADF
cover.
211
Internal Error
HP Network ScanJet
5 halted
The lamp did not achieve the
required intensity for proper
scanning.
Internal memory error. Power cycle the scanner.
The ADF cover is open. Close the ADF cover securely.
Internal memory error. Power cycle the scanner.
Power cycle the scanner.
If the problem persists call HP
Support Service.
If the problem persists call HP
Support Service.
If the problem persists call HP
Support Services.
If the problem persists call HP
Support Service.
56 Troubleshooting and Error Messages EN
Page 57

Transaction Log Error Messages
Error Message Error Description Actions
14
Internal Error
Control Panel Error
108
Destination Locked
<User Name>(err)
109
Invalid Destination
<User Name>(err)
111
Printer Not Found
<Printer Name>(err)
The control panel LCD is not
working.
The destination workarea is locked. In the Network ScanJet 5 Utility,
The selected destination no longer
belongs to the network user group.
The scanning job has been
canceled.
The print queue selected as the
scanning destination cannot be
found.The scanning job has been
canceled.
Powercycle the scanner.
If the problem persists, call HP
Support Service.
unlock the workarea.
In the HP JetAdmin software,
remove the destination name from
the scanner user pool and power
cycle or remotely reset the
scanner.
Run the administrative software for
the network on which the print
queue has been configured to see
if the print queue has been
canceled. If so, create the print
queue again and use the HP
JetAdminsoftwaretoassignthe
print queue to the scanner.
If the printer is a network printer,
check to see if the printer is busy
(the scanner cannot send a job to
the printer if it is busy),and run
theHPJetAdminsoftwaretomake
sure the printer is correctly
configured on the scanner.
4
Troubleshooting
IfyouareworkingwithaNetWare
print queue, run the NetWare
command PCONSOLE to check if
the network scanner has been
removed from the list of the queue
users.If it has, in the HP JetAdmin
software, reassign the print queue
to the HP Network ScanJet 5
scanner.
EN Troubleshooting and Error Messages 57
Page 58

Error Message Error Description Actions
112
Send To User Error
<User Name>(err)
The scanner detected an error
while sending data to a user. The
scanning job has been canceled.
Check the LAN cable.
Check if the workarea associated
with the selected destination still
exists on the server disk.
Check if the server disk is full.
Check if the maximum available
disk space for the workarea owner
has been reached.
Check if the scanner has create
and write permissions in the
workarea owned by the selected
destination.
If the user workarea is configured
in an NT or LANServer
environment, check if the HP
Network ScanJet 5 scanner
service (daemon) is still active.
If the destination is an e-mail
address, check if the HP Network
ScanJet 5 Scanner servic
(daemon) has been upgraded to
e-mail functionality.
130
Fax Server Not
Found
131
Error Sending Fax
132
Network Error
Fax Server
Notification Error
156
Internal Error
No Unique File
Name.
Press any key ...
The fax server destination cannot
be found.
An error has been detected while
sending data to or receiving data
from a fax server.
The scanner cannot generate a
unique filename for a document.
Verify that the fax server
installation matches the scanner
fax server configuration in the HP
JetAdmin software.
In the HP JetAdmin software,
verify that the scanner fax server
configuration is correct.
In the administrative software for
the fax server,verify its status.
Check if the server date and time
are set correctly.This error
happens if the server clock has
beensettoavaluebackintime.
58 Troubleshooting and Error Messages EN
Page 59

Error Message Error Description Actions
160
Open Remote File
Error
<File Name>(err)
161
Read Remote File
Error
<File Name>(err)
162
Write Remote File
Error
<File Name>(err)
An error has occurred in opening,
reading,orwritingafileonthe
server disk. This error occurs
when a file cannot be created in
the destination workarea.
Check if the workarea associated
with the selected destination still
exists on the server disk.
Check if the specified path exists.
Check if the server disk is full.
Check if the maximum available
disk space for the workarea owner
has been reached.
Check if the scanner has create
and write permissions in the
workarea owned by the selected
destination.
If the user workarea is configured
in a NetWare server environment,
check if trustees have been
removed.If so, add them using
NetWare tools or, using the HP
JetAdmin software, reassign the
user to the same network
environment.
If the user workarea is configured
in an NT or LANServer
environment, check if the HP
Network ScanJet 5 scanner
service (daemon) is still active.
170
Transport
Connection Error
<Server
Identifier>(err)
EN Troubleshooting and Error Messages 59
The scanner detected an error
while trying to contact the
specified server.
Try scanning again.
Check the LAN cable.
Check if the server is running.
Check the connection to the
server.
Check if the server address is
configured correctly.
If the user workarea is configured
in an NT or LANServer
environment, check if the HP
Network ScanJet 5 scanner
service (daemon) is still active.
4
Troubleshooting
Page 60

Error Message Error Description Actions
171
Transport
Disconnection Error
<Server
Identifier>(err)
172
Scanner V alidation
Error
<Server
Identifier>(err)
173
Connections Timed
Out
<Object Name>(err)
174
Net Channel Full
<Object Name>(err)
175
No Data On Channel
<Object Name>(err)
The scanner detected an error
while trying to disconnect from the
server.
The scanner detected an error
whiletryingtobevalidatedbythe
server.
The scanner detected an error
while trying to send a document or
get data from a server.
Check the LAN cable.
Check if the server is running.
Check the connection to the
server.
Try scanning the document again.
Check that the scanner is
configured correctly in the server.
Check if there is heavy traffic on
the LAN. If so, retry when traffic is
lighter.
Check the LAN cable.
Check if the server is running.
If the user workarea is configured
in an NT or LANServer
environment, check if the HP
Network ScanJet 5 scanner
service (daemon) is still active.
If the problem persists, reboot the
scanner.
60 Troubleshooting and Error Messages EN
Page 61

Administrative Software Troubleshooting
This section contains some solutions to problems you may encounter
when configuring the HP Network ScanJet 5 scanner in the HP
JetAdmin software.
A new HP Network ScanJet 5 scanner does not appear on the HP
JetAdmin software main window.
If you are connected to a new, configured network scanner on the LAN,
select Refresh from the HP JetAdmin software View menu (or use the
[F5] key). The new scanner should automatically appear in the HP
JetAdmin software main screen. If it does not appear, check the
following:
• Make sure your desktop and the scanner are not isolated.
• Make sure that the desktop in which the HP JetAdmin software is
running is configured with the same network protocols (at least one) that
were configured through the scanner’s control panel during setup.
Your network environment doesn’t appear on the available list in
the network environment window.
• Make sure your desktop is not isolated.
• Make sure that at least one supported server is running on the network.
• Make sure that you have supervisor privileges in the network
environment.
• Make sure the same protocol required to support the network
environment is configured at the scanner control panel.
No users appear in the Users configuration page.
• Make sure your desktop is not isolated.
• Make sure that at least one supported server is running on the network.
• Make sure that you have supervisor privileges on the server in which the
users are configured.
• If you cannot add a specific user listed in the Available Users box, make
sure the HP Network Scanner Service (daemon) has been correctly
installed on the server.
• Make sure the same protocol required to support the network
environment is configured at the scanner control panel.
4
Troubleshooting
EN Troubleshooting and Error Messages 61
Page 62

Administrative Software Error Messages
The errors in this section are divided into two groups: HP JetAdmin
software errors and fax errors.
HP JetAdmin Software Errors
Error Message Error Description Actions
Not enough memory
to continue the
operation
The domain
controller of an
expected domain is
not responding
An expected
sharename does not
exist anymore
The sharename is
not valid
The system cannot
communicate with
the network
There is not enough memory
either to run HP JetAdmin
software or to perform a specific
action.
The NT or LANServer domain
controller is not responding.
The sharepoint of an NT or
LANServer domain is not
responding.
The application is running on a
system that is not properly
configured to communicate on the
expected networks.
Free as much memory as possible
by closing other applications and
try again.
Restart the HP JetAdmin software.
Check the LAN cable.
Make sure the domain controller is
available.
Make sure that the network
configuration of your LAN has not
changed during your HP JetAdmin
software session.
Check the LAN cable.
Make sure that the network is
accessible from the PC running
the HP JetAdmin software.
Make sure that the network
configuration of your LAN has not
changed during your HP JetAdmin
software session.
Make sure the network is
accessible from the computer
running the HP JetAdmin software.
Make sure the network protocols
needed for the HP JetAdmin
software are installed (TCP/IP or
NetWare).
62 Troubleshooting and Error Messages EN
Page 63

Error Message Error Description Actions
Attempt to receive
from the selected
transport failed
(err) Invalid transport
Attempted function
on a connection with
an invalid transport
selected
Hardware failure The application is running on a
The application is
not properly installed
Unknown error A system (unknown) error has
The application is running on a
system that is not properly
configured to communicate on the
expected networks, or the network
is not working.
system that has internal problems.
The application is not properly
installed.
been detected during network
operations.
Check the LAN cable.
Check the LAN cable.
Make sure that the network is
accessible from the computer
running JetAdmin.
Make sure that the network
configuration of your LAN has not
changed during your HP JetAdmin
software session.
Make sure the system is properly
configured to communicate on the
expected networks.
Restart the HP JetAdmin software.
Reinstall the HP JetAdmin
software.
Check the LAN cable.
Make sure the network is
accessible from the computer
running the HP JetAdmin software.
Retry the failed operation.
Make sure that the scanner is
connected to the LAN.
Make sure that the server is still
active.
Make sure the server is still
available.
Can not find the
network scanner
service in this
network environment
EN Troubleshooting and Error Messages 63
The HP JetAdmin software is not
able to communicate with an NT
or LANServer server.
Make sure the server is up and
running.
Make sure the NP Network
Scanner Service (daemon) is
installed on the server.
Make sure the computer running
the HP JetAdmin software is the
active TCP/IP protocol.
4
Troubleshooting
Page 64

Error Message Error Description Actions
Server not
responding
The scanner is busy
and cannot answer
the request
The scanner is
remotely managed
and cannot receive
commands
The scanner does
not respond
A connection could
not be established
with the specified
scanner
Cannot access the
firmware image
The selected server is not
responding during the requested
operation.
The scanner is busy at the
moment (the scanner is probably
in use).
The scanner is not available. Check the LAN cable.
Wait a few seconds and retry
Check the LAN cable.
Make sure the server is still active.
Makesuretheserverisavailable.
Verify that someone is using the
scanner.
Wait for a few minutes and then try
again.
Reset the scanner.
Check that the scanner is on and
running correctly.
Try the operation again.
Reset the scanner.
Unable to
communicate with
the scanner
Cannot create the
directory on the
selected server
Firmware image is
incomplete or
corrupted
The directory to store the upgrade
on the server cannot be created.
The HP JetAdmin software cannot
find .VER files, some files listed in
the VER file is missing, or there is
invaliddatainthe.VERfile.
Check if the server’s disk is full.
Check that the HP JetAdmin
software is running and you are
logged on to the network with full
privileges
Check if the server is on.
Call HP for a new copy of the
firmware image.
64 Troubleshooting and Error Messages EN
Page 65

Error Message Error Description Actions
IPX was needed and
not present on the
system
SPX was needed
and not present on
the system
The NetWare client
shell was not found
You are running and
older NetX shell on
Windows 3.1
File copy error The firmware image cannot be
The workarea
location already
exists and can be
used by another
user.Confirm to use
the typed directory
location
Unable to find out
the workarea
location for the user
The HP JetAdmin software cannot
find the specified network.
HP JetAdmin software internal
error.
HP JetAdmin software internal
error.
transferred to the server.
The directory already exists,
perhaps because another user
workarea is in the same location.
The HP JetAdmin software cannot
find the specified user’s workarea.
Try the operation again.
Restart the HP JetAdmin software.
Reboot the computer.
See the HP JetAdmin software
documentation.
See the HP JetAdmin software
documentation.
Check if the server’s disk is full.
Check if the server is on.
If possible, assign a different
workarea for each user.
Check if the server is available.
Check if you are running the HP
JetAdmin software with supervisor
access to the server.
Make sure the user workarea still
exists on the server.If not, manual
create the workarea on the server.
Cannot access the
firmware image
Unable to perform
the operation
EN Troubleshooting and Error Messages 65
If the firmware image is on a
floppy, there are problems with the
drive.
If the firmware image is saved on
a network, you do not have
sufficient rights to access the
image.
The HP JetAdmin software is not
able to perform the requested
operation.
Check that the floppy is correctly
inserted in the drive.
Check the permissions for the
administrator for the directory
where the firmware image has
been copied.
No action required.
4
Troubleshooting
Page 66

Error Message Error Description Actions
Cannot configure
network environment
Cannot configure the
destination
Cannot set the
network environment
for the time
synchronization
Cannot load the list
of printer type
supported by the
scanner
Backup data
incomplete or
corrupted. Restore
not started.
An error has occurred during a
configuration operation.
The HP JetAdmin software is not
able to set the identifier for time
synchronization on the scanner.
The HP JetAdmin software is not
able to get the printer type list from
the scanner.
The backup data is corrupted.You
cannot restore the backup data.
Check the LAN cable.
Make sure that the server is still
available.
Make sure that the scanner is still
available.
After clearing the error, re-do the
operation.
Check the LAN cable.
Make sure the scanner is still
available.
Retry the operation.
Restart the scanner.
No action required.
No action required.
Following network
environments cannot
be restored
Following network
environmentswill not
be cleaned
Log not saved
User accountings
have not been saved
The reported network
environments cannot be restored
at this time.
The listed network environments
cannot be cleaned at this time.
The selected log file has not been
saved to the specified destination.
Make sure you have supervisor
privileges on all the networks you
want to restore.
Make sure all the networks you
want to restore are still configured
on the LAN.
Make sure you have supervisor
access to the network
environment you want to clean.
Make sure the specified path
exists.
Make sure you have enough disk
space to save the data.
Make sure you have supervisor
access to the network
environments.
66 Troubleshooting and Error Messages EN
Page 67

Error Message Error Description Actions
This network
environment is not
responding and
cannot be cleaned
up.
Cannot create the
user workarea
The scanner server
currently selected for
the network is no
longer valid. Please
change the network
environment
configuration
The listed network environments
are not available.The cleanup
operation failed.
The HP JetAdmin software cannot
create the workarea for the
specified user.
The scanner server currently
selected for the network
environment is no longer valid; it
may be because:
• It is not responding (a possible
network problem).
• In an NT or LAN Server
environment, the network
scanner service (daemon) has
not been found on the server.
• In an NDS environment, no
connection with supervisor
rights has been found on the
server.
Check the LAN cable.
Make sure the network
environment is available.
Make sure you have supervisor
access to the network
environments.
Check the LAN cable.
Make sure the server is still
available.
Make sure you have supervisor
access to the network
environments.
Make sure the specified path is
correct.
Choose Modify and then enter the
network page; double-click the
network environment; from the
property window,select another
server from the available list; click
OK.
In NDS, log on to the server and
then re-enter information in the
Modify Properties screen.
4
Troubleshooting
EN Troubleshooting and Error Messages 67
Page 68

Fax Server Errors
Error Message Error Description Actions
The Scanner ID
doesn’t match the
value used in the
Biscom FaxCom
configuration. Check
the FaxCom
configuration
The Castelle
FaxPress unit you
selected does not
have a software
version able to
support the ScanJet
5. Check the version
number and contact
Castelle
Some fax
transmissionsaren’t
processed from the
fax server.Verify the
status of the fax
server and repeat
this test. If the
problem persists
delete pending fax
transmissionsby
resetting the scanner.
The Scanner ID doesn’t match the
value used in the Biscom FaxCom
configuration.
The Castelle FaxPress software
version does not support the HP
Network ScanJet 5 scanner.
Some fax transmissions are not
being processed by the fax server.
Verify that the Scanner ID is
correct.
Verify, using the Biscom
administrationsoftware, that a
user with a name that matches the
Scanner ID exists.
Try to set the Scanner ID again.
Verify that an HPFSCAN directory
exists under the Castelle\<serial#>
directory.If the directory does not
exist, perform an upgrade of the
Castelle unit.
Wait until all pending fax jobs
should have been sent, and then
click the Troubleshooting button
again.
If the problem persists, use the
Reinitialize option on the Tools
tab to reset the scanner to remove
pending fax jobs.
An HPFSCAN
directory could not
be found in the path
you specified.The
LAN Fax Option will
be disabled
Error setting the fax
workarea
Error configuring the
fax environment
AN HPFSCAN directory could not
be found in the path you specified.
The fax service isn’t working. HP
JetAdmin software isn’t able to set
the fax workarea.
The fax service isn’t working. HP
JetAdmin software had problems
communicating with the scanner.
Verify that the Fax Server
Directory is correct.
Check the network environment
for the correct fax workarea and
repeat the operation.
Check the scanner for proper
operation and repeat the operation.
68 Troubleshooting and Error Messages EN
Page 69

Error Message Error Description Actions
Warning: unable to
get the fax
environment
The fax server configuration is
wrong or not available.
Reconfigure the fax server.
E-Mail Errors
Error Message Error Description Actions
Connection to SMTP
gateway could not
be established.
Connection to SMTP
mailer failed.Will try
again later.
Could not add
message to Internet
E-mail message
queue.
Could not allocate
memory for MIME
headers.
The software is not
communicating with the e-mail
gateway.
The software is not
communicating with the e-mail
gateway.
TheSMTPgatewayrefusedto
accept the message.
Multimedia Internet Mail Extension
(MIME) is the defined format for
attachments to e-mail messages
on the Internet.
Verify that the SMTP gateway
address is correctly specified.
Verify that the SMTP service on
the gateway is running.
Verify that the SMTP address is
correct.
Verify that the gateway server is
up and running.
Add the message again later.
Reduce the number of pages you
are sending.
If you are using a distribution list,
limit the number of users.
Could not allocate
SMTP receive buffer.
Could not convert
attachments to
specified file format.
Could not create
new mail event!
Internet E-mail is
being disabled.
Could not create
output file while
converting
attachment.
Could not open
attachment file while
sending data to
SMTP gateway.
EN Troubleshooting and Error Messages 69
The buffer for SMTP
communication is not available.
.PDF format is the default.TIFF
format is also supported.
The operating system could not
provide enough resources.
Internet e-mail service could not
create a TIFF or .PDF file.
The.PDForTIFFfileismissingor
damaged.
Memory is low.Add more memory
or increase the size of the page.
The disk may be full.
Restart service.
Reboot the server.
The disk may be full.
Resend the message.
The disk may be full.
4
Troubleshooting
Page 70

Error Message Error Description Actions
Could not send
message headers to
SMTP gateway.
E-mail address
rejected by gateway
Internet E-mail
message could not
be delivered.
Internet E-mail
message is too large.
Invalid file format The file format specified for an
No file type specified
- using PDF as
default.
The header specifies such
information as To:,From:, Subject:.
An SMTP address specified within
an Internet e-mail address was
rejected by the SMTP gateway.
Message could not successfully
be given to the SMTP gateway.
The message exceed the size
limitations defined for Internet
e-mail.
e-mail address is either unknown
or not supported.
PDF format is the Adobe Portable
Document Format. It allows
multiple pages to be stored in a
single file.
Resend the message.
Thediskmaybefull.
Reduce the number of message
recipients.
Verify the e-mail address.
Verify the e-mail address.
Verify that the SMTP gateway is
working correctly.
Separate the information into
more than one e-mail message.
Verify that the file format is of a
valid type.
You will need the Adobe PDF
viewer to read a PDF document.
This viewer is availablefree from
Adobe.
No language type
specified - using
English as default.
No memory for new
SMTP Address
structure.
No memory for new
SMTP Attachment
structure.
No memory for new
SMTP Envelope
structure.
No SMTP gatewa y
specified. Internet
E-mail subsystem
will not be available.
The user may specified a
language type for the header and
address information.
Memory is low. Add more memory.
Memory is low. Add more memory.
Memory is low. Add more memory.
The /S parameter was not
specified when the service was
started.
When no language is specified,
English is the default. If English is
not the language of choice, specify
another language.
Increase the size of the page file.
Increase the size of the page file.
Increase the size of the page file.
Verify the /S parameter
information. Verify that the /S
parameter specifies a valid TCP/IP
address and a fully qualified
domain name.
70 Troubleshooting and Error Messages EN
Page 71

Error Message Error Description Actions
Outofmemoryin
Internet E-mail
subsystem.
Param does not start
with-or/.
Parm unrecognized. The parpameter is not defined
SMTP gateway
rejected an address.
SMTP gateway not
found on newtwork.
SMTP gateway not
specified on
command line.
TCP/IP address of
SMTP gateway not
found.
Memory is low. Add more memory.
The parameter is not identified
with a /.
correctly
The Simple Mail Transfer Protocol
(SMTP) is the defined protocol for
E-mail messages on the Internet.
This address format is
user@destination.
The software was unable to find
the SMTP gatewayon the network.
SMTP gateway must be specified
for e-mail functionality to work.
The /S parameter is not a valid
TCP/IP address nor fully qualified
domain name.
Increase the size of the page file.
Verify the format of the parameter.
Verify the parameter information.
Verify that the e-mail address is
correct.
Verify the gateway address.
Check the connection to the
gateway.
Specify SMTP gateway or TCP/IP
address on command line using /S.
Verify the TCP/IP address.
There was an error
starting the Internet
E-mail subsystem.
Too many retries for
message.
Transaction failed.
Resetting connection.
Unable to locate
FROM:field.
Unable to parse
HPSIF.DAT file.
EN Troubleshooting and Error Messages 71
Internet e-mail will not be available. See the accompanying messages
for more information.
The software failed to deliver the
message to the gateway.
There has been a communication
failure.
Thesoftwaremustbeabletoread
the information in the FROM: field
before it can process the message.
Thesoftwaremustbeabletoread
the information in the FROM: field
before it can process the message.
Verify that the gateway is up and
running.
Network traffic is too high. Try
again.
Verify that the client software is
generating the HPSIF.DAT file in
the user work area.
Verify that the FROM: field is
specified.
Verify that the client software is
generating the Hpsif.dat file in the
user work area.
Verify that the FROM: field is
specified.
4
Troubleshooting
Page 72

HP Network ScanJet 5 Utility Error
Messages
Error Message Error Description Actions
Not all addresses
could be imported.
Total imported
<number>. Do you
want to see the log
file?
Bad private
destinations.
Bad scanner
destinations.
The import procedure could not be
completed for one of the following
reasons:
The maximum number of e-mail
destinations has been reached.
Thee-maillinesyntaxisnot
correct. The line has been skipped.
The e-mail address is already
present.
There is a problem accessing the
user’s workarea on the server.
There is a problem accessing the
user’s workarea on the server.
AnswerYes and look in the log file
for the reason why the addresses
could not be imported.
Check if the server is available.
Make sure the selected workarea
name is correct.
Make sure the user workarea still
exists on the server.If not, manual
create the workarea on the server .
Check if the server is available.
Check if you are running the HP
JetAdmin software with supervisor
access to the server.
Make sure the selected workarea
name is correct.
Make sure the user workarea still
exists on the server.If not,
manually create the workarea on
the server.
Cannot access
private data into
workarea.
There is a problem accessing the
user’s workarea on the server.
Check if the required network
connection is still available (using
Windows File Manager or
Windows Explorer.
Check the workarea’s integrity.
72 Troubleshooting and Error Messages EN
Page 73

Error Message Error Description Actions
Cannot access
document.
Cannot report errors. The service you are trying to
Cannot write data
into user’s workarea.
There is a problem accessing the
user’s workarea on the server.
access does not start.
There is a problem accessing the
user’s workarea on the server.
Check if the server is available.
Check if you are running the HP
JetAdmin software with supervisor
access to the server.
Make sure the selected workarea
name is correct.
Make sure the user workarea still
exists on the server.If not,
manually create the workarea on
the server .
Make sure the software is installed
correctly.
Make sure there are enough
system resources available to run
the software.
Check if the server is available.
Check if you are running the HP
JetAdmin software with supervisor
access to the server.
Make sure the selected workarea
name is correct.
Make sure the user workarea still
exists on the server.If not, manual
create the workarea on the server.
Could not create this
inbox.
Could not initialize
the networking
services.
Could not initialize
Visioneer PaperPort.
Automatic Workflows
will not be available.
EN Troubleshooting and Error Messages 73
The HP Network ScanJet 5 Utility
could not create the inbox.
The service you are trying to
access does not start.
The service you are trying to
access does not start.
Check to make sure system
resources are not low.
Make sure the software is installed
correctly.
Make sure there are enough
system resources available to run
the software.
Make sure the software is installed
correctly.
Make sure there are enough
system resources available to run
the software.
4
Troubleshooting
Page 74

Error Message Error Description Actions
Could not open the
file.Please verify it is
not used by other
applications.
A document was
receivedfor an
automatic workflow
which does not exist.
E-mail address
already present.
E-mail functionality
is not enabled.
E-mail will not be
available.
The error reporting
service could not be
initialized.
The file could not be opened.
The file may be in use by another
application.
The file maybe corrupt.
The user does not have rights to
access the file.
The HP Network ScanJet 5 Utility
was unable to complete the
automatic workflow link.
The user is creating an e-mail
address with the same Internet
address as an existing e-mail
destination.
The currently selected user is a
Novell NetWare user.
The service you are trying to
access does not start.
Close the file or the application
that is using it.
Verify the rights to access the file.
Make sure the link has not been
deleted from the PaperPort
software.
Type a unique Internet address for
the e-mail destination.
Select Change user from the
Options menu and select a user
belonging to a Windows NT
domain.
Make sure the software is installed
correctly.
Make sure there are enough
system resources available to run
the software.
Your fax document
could not be
successfully sent to
its destination.
The file conversion
service was unable
to be initialized.
The following
component can’t be
found.
Your fax document was not sent. Wait a few minutes and resend
your fax document.
Make sure the fax server is
configured correctly on the
scanner in the HP JetAdmin
software.
The service you are trying to
access does not start.
The HP Network ScanJet 5 Utility
cannot find a needed .DLL.
Make sure the software is installed
correctly.
Make sure there are enough
system resources available to run
the software.
Check if the software has been
correctly installed.
74 Troubleshooting and Error Messages EN
Page 75

Error Message Error Description Actions
General network
error.
An inbox with this
name already exists.
Please choose a
different name.
Invalid data
Invalid pages
The new password
could not be
confirmed. Please
make sure the
confirmation
password exactly
matches the new
password.
No private data
available.
There is a problem accessing the
network.
The user is creating an inbox with
the same name as an existing
inbox.
Data from the scanner is
corrupted.
The password in the New box is
different from the password in the
Confirm box.
There is a problem accessing the
user’s workarea on the server.
Make sure the network
connections are present and the
server is accessible.
Type a unique name for the inbox.
Check that the scanner was not
turned off during transmission.
Check that the scanner is working
properly.
Check that the network is working
properly.
Type the password in the New
box, and then type the same
password in the Confirm box.
Check if the server is available.
Check if you are running the HP
JetAdmin software with supervisor
access to the server.
Make sure the selected workarea
name is correct.
Make sure the user workarea still
exists on the server.If not, manual
create the workarea on the server.
There are no valid
network users
available.Please
connect to a valid
network user and
runthisprogram
again. Do you want
to see the log file?
EN Troubleshooting and Error Messages 75
The user is connected as an
unsupported network user.
Select Yes and check in the log
file why the found users have not
been accepted as valid.
Connect as a valid user.
Check the connection(s).
4
Troubleshooting
Page 76

Error Message Error Description Actions
There are no valid
network users
available.Please
connect to a valid
network user and
run this program
again. <Error
Description>
Unable to show the
log file.
User’s workarea is in
an incorrect state.
The network user is connected but
is not a valid user.
An error is occuring while trying to
show the file.
There is a problem accessing the
user’s workarea on the server.
Connect as a valid user.
Check the connection.
See <Error description>.
Verify the file is not being used by
another application. If it is in use,
close the application.
Verify the WRITE.EXE application
is available on your PC under the
SYSTEM32 directory.
Check if the server is available.
Check if you are running the HP
JetAdmin software with supervisor
access to the server.
Make sure the selected workarea
name is correct.
Make sure the user workarea still
exists on the server.If not,
manually create the workarea on
the server.
76 Troubleshooting and Error Messages EN
Page 77

PaperPort Software Troubleshooting
This section provides solutions to some common problems you may
encounter while using the PaperPort software in a 16-bit environment.
The problems are grouped into the following topics:
• Installation problems
• Printing problems
• Fax problems
• OCR problems
• Import and export file problems
• Missing e-mail links
Installation Problems
Windows fails to restart.
If Windows fails to restart when you choose Restart Windows at the
end of the installation, the installation has not been successful and
PaperPort software will not work. This includes cases in which the
system “hangs” or “freezes” or exits to DOS. Try running the
installation program again. If the problem occurs again, quit Windows.
Then, at the DOS prompt, change to the Windows system directory by
typing CD C:\WINDOWS, and press [Enter], then type PPUPDATE,
and press [Enter]. This completes the installation.
Not enough disk space.
PaperPort software requires at least 8 MB of available disk space to be
installed. After you select the PaperPort software and data directories,
the installation program checks that your computer has enough available
disk space. Try deleting unnecessary files or archiving older data to
floppy disks or some other medium, if you need more disk space.
EN Troubleshooting and Error Messages 77
4
Troubleshooting
Page 78

Printing Problems
Highlighted annotations are opaque when printed on HP LaserJet 4
printers.
The LaserJet 4 printer driver has two graphics modes: HP-GL/2 and
Raster. If you are using Win 3.1x, double-click the printer icon in the
Control Panel; then change the graphic mode to Raster. If you are using
Win 95, change to Raster mode in the Graphics Tab, under Properties in
Printer Settings. For more information on changing the graphics mode
on your computer, see the documentation that came with Windows.
Images are reduced in size.
If necessary, PaperPort software automatically reduces the size of the
image to fit it on the page. For example, if you scan an 8.5- x 11-inch
(21.59- x 27.94-cm) page, then the image in PaperPort software will be
8.5 x 11 inches (21.59 x 27.94 cm) from edge to edge. However, most
printers cannot print right up to the edge of the paper. To get the image
to fit into this printable area, you must slightly reduce the size of the
image.
Fax Problems
“Import Fax for WinFax PRO 4.0” does not appear in the File menu.
Check your WIN.INI file for the line Fax Path=<path> under the
section[winfax], and then check this path for the file STATUS.FTM.
If either is missing, try reinstalling WinFax PRO.
Fax link doesn’t work.
In the PaperPort Preferences, click the Fax category and make sure that
the correct fax driver is selected. Once the correct fax driver has been
selected, the fax software will start when you drop an item onto the Fax
Link icon. If the fax software still does not start, try reinstalling it.
OCR Problems
The OCR link starts the wrong word processor.
You must configure the word processor links, specifying the correct
output word processor, by choosing Preferences from the Edit menu
and then select the word processing icon under Category.
78 Troubleshooting and Error Messages EN
Page 79

A high percentage of incorrect characters appears in an item that
was converted with the OCR link.
The accuracy of the OCR link depends in large part on the quality, size,
and structure of the original document and on the quality of the scan
itself. To obtain the best possible results when using the OCR link,
choose a scan setting specific to text and do the following:
• Process only pages that have crisp, clear text. Letters that have gaps, that
“bleed” along their edges, or that touch other letters will not work well
with the OCR link. Note that underlining and text that is close to
non-text items, such as graphics, will also degrade OCR results.
• Process only pages that contain 9-point text or larger.
• Adjust the Image setting to get the densest, clearest letters without any
“bleeding” along their edges.
• Straighten pages either by rescanning the pages or by using the
Straighten Page command.
Import and Export File Problems
Exported files expand in size when opened in a paint program.
Many paint programs ignore the dpi resolution information in BMP,
PCX, and TIFF files. These programs assume that the resolution of the
file is the same as the current screen resolution. Because these files
actually contain more information than the screen can display, they grow
in size. The following are some possible solutions:
• Instead of using the Export command, you can open the item in Page
View, cut out the information, and then paste it into the program you
want to use or into a new file in a paint program.
• You can also open the file in a graphics program that accurately reads
the dpi resolution contained in the file.
Unable to import a file.
Check whether the file you want to import is saved in an appropriate
format, such as BMP, PCX, or TIFF. If it is none of these formats, select
the appropriate file type you want and try importing the file again.
You can also try opening the file in a paint program and saving it as a
BMP file under a new file name. Then try opening the new file in the
PaperPort software.
EN Troubleshooting and Error Messages 79
4
Troubleshooting
Page 80

Missing E-Mail Links
Lotus Notes link icon does not appear.
The link to Lotus Notes requires the file NOTES.EXE. The path to this
file must be typed in the LOTUS.INI file.
To make sure that the Lotus Notes icon appears, do the following:
1 Check that the file LOTUS.INI exists in your Windows directory. (If not,
skip steps 2 and 3.)
2 Check this file for the line Notes=<path>.
3 Check this path for the NOTES.EXE file. If either is missing, try
reinstalling your Notes client.
4 Check your WIN.INI file for the [Mail] section. Make sure that there
is a key entry of SMI=1.
In some cases, Lotus Notes may be configured so that the PaperPort
software cannot find the files SM1.DLL or NOTES.EXE. In
MAXOPTS.INI (in the c:\PAPRPORT directory), add the following line
in the section [Lotus Notes Mail Link] specifying the path to
NOTES.EXE:
AppFile=c:\NOTES\NOTE.EXE
Lotus cc:Mail link icon does not appear.
Contact your e-mail system administrator. The link to Lotus cc:Mail
requires a Lotus cc:Mail file called VIM (Virtual Interface for
Messaging).
Note VIM files were not shipped with Lotus cc:Mail versions prior to 2.0, but
they can be downloaded from the cc:Mail forum on CompuServe and
from the Lotus cc:Mail bulletin board service (BBS).
Check for the following:
• If the VIM files are installed but the cc:Mail link still does not appear,
check your WIN.INI file for the line SMI=1 in the section [Mail] and
the entry Program Path=<path> in the section [cc:Mail].
• Check this directory path for the presence of these VIM files:
CCEDIT.DLL, CCUTIL.DLL, VIM.DLL, SMI.DLL, CCSMI.DLL,
CHARSET.DLL, COMDLG.DLL, MAILENG.DLL, MEMAN.DLL.
CDVIM.DLL, VERINFO, and README.TXT.
If any of these files are missing, then cc:Mail has not been properly
installed in this directory. Try re-installing it.
80 Troubleshooting and Error Messages EN
Page 81

Microsoft Mail link icon does not appear.
The Microsoft Mail link requires the file MAPI.DLL. Check the
following items to verify this file is in the correct place:
• Make sure that the path to this file, which is usually C:\MSMAIL, is
included in the path statement in your AUTOEXEC.BAT file.
• The WIN.INI file must include the line MAPI=1 in the [Mail] section.
Note Installing Novell GroupWise will overwrite MAPI.DLL, making
MSMail unavailable.
WordPerfect Office link icon does not appear.
To correct this problem, perform the following steps:
1 Make sure that the file WPC.INI in your Windows directory contains the
entry WPOF=<path>\ofwin.exe (where <path> represents the
location of OFWIN.EXE) in the [AppServer] section.
2 Make sure that the file WIN.EXE is in the specified path. If it is not,
check with your network or system administrator.
Note If Novell GroupWise has been installed, the WordPerfect Office link will
disappear. Novell GroupWise is an upgrade to the WordPerfect Office.
Da Vinci eMAIL link icon does not appear.
To correct this problem, perform the following steps:
1 From the Edit menu, choose Preferences. The PaperPort Preferences
dialog box appears.
2 Click the Da Vinci icon in the Category area.
3 Enter the path for the Da Vinci EMAINWIN.EXE file.
4 Run Da Vinci eMAIL at least once on your computer before running
PaperPort software so that the link icon appears.
EN Troubleshooting and Error Messages 81
4
Troubleshooting
Page 82

PaperPort Software Error Messages
When a problem occurs, the PaperPort software displays a message that
indicates the type of problem. This chapter explains what to do if you
see one of these messages.
Message Category Recommended Action
An unsuccessful application exit
has left Windows in an unstable
state.You should restart
Windows.
PaperPort cannot arrange your
Desktop because system
resources are low.Please close
one or more applications and try
again.
PaperPort cannot create a
calibration file.Your disk may be
full or read-only.
PaperPort cannot paste because
the clipboard image is larger
than the current page.
General This can occur if your computer “hangs” or
“crashes” while the PaperPort software is
running, or if some other error occurs. Try
restarting Windows.Although you can
continue to work in Windows, you will not
be able to scan or start the PaperPort
software again until you restart Windows.
Desktop Quit any other applications that are
running. If there are any items in your
Startup program group, remove them,
restart Windows, and try again. Note that
some applications do not release all the
memory or resources that they use even
when you exit them. Restarting Windows
with no applications in your Startup group
can give you maximum memory a nd
resources.
General Make sure that your disk is not full. The
calibration file requires up to 100K of disk
space.(Note that you should have at least
1 MB of free disk space to use the
PaperPort software.) In addition, check
that you have read/write access to the
drive containing the PaperPort program
directory.
General The image that you have cut or copied to
the Clipboard is larger than the item on
which you are trying to paste.Try copying
a smaller image to the Clipboard. If you
have a large image to paste, divide it into
sections and copyand paste each section
in turn. When pasting to a PaperPort item,
the PaperPort software enables you to
position the paste precisely before
committing it.
82 Troubleshooting and Error Messages EN
Page 83

Message Category Recommended Action
PaperPort cannot read page <N>
of the file <file name> because
the page is damaged.
PaperPort is out of available
system memory. Please close
some other application(s) and
select Retry to proceed, or select
Cancel to close PaperPort.
There is not enough available
memory to complete this
operation. Please see PaperPort
Help or the Troubleshooting
section of your User’s Guide.
Disk and File An item or a page in a stack can be
damaged if your computer is shut down
while the PaperPort software is running or
if the PaperPort software is shut down in
any way other than by a normal exit.
Attempt to repair this file by running
MAXFIX.EXE.Then follow the instructions
on the screen.
Memory These errors can be caused by low
memory,insufficient system resources, or
too few file handles.You should have at
least 4 MB of available memory (8 MB or
more to use OCR) and 50 % of your
system resources. Note that your
computer should have 8 MB of physical
RAM (not virtual memory) to use the OCR
link.
To make more memory, resources, or file
handles available, try the following:
•Create a permanent swap file in the
PaperPort cannot receive printed
pages.System memory may be
low .Try exiting from other
applications.
Virtual Memory section of the 386
Enhanced Control Panel. Use the size
suggested in the dialog box. Make sure
you have at least 20 MB of available
space on the selected drive.
•Quit any other applications that are
running. If there are any items in your
Startup program group, remove them
and restart Windows.
•If you are using a computer with less
than 6 MB of physical memory, limit the
SmartDrive cache for Windows to 256K
or 128K. To do this, edit your
AUTOEXEC.BAT file. Change the
second number in the line
DEVICE=CKSMARTDRV.EXE to 256 or
128.
•Before Windows starts, check the
amount of memory available by typing
MEM at the DOS prompt. The largest
executable program size should be at
least 450K. If it isn’t, see your DOS and
Windows documentation for information
about optimizing memory.
•Try increasing by 20 the line FILES= in
your CONFIG.SYS file to increase the
number of file handles. Then restart your
computer.
4
Troubleshooting
EN Troubleshooting and Error Messages 83
Page 84

Message Category Recommended Action
PaperP ort cannot use the file
<file name> because it is
damaged.You can run
MAXFIX.EXE to repair this file.
PaperPort cannot use the link
<link name> because it is either
damaged or incompatible with
the current software version.
PaperPort has detected that the
support file MAXLINK.DLL has
been overwritten by a recently
installed link. Please install
PaperPort again to install the
correct MAXLINK.DLL.
PaperPort is busy and cannot be
closed right now.Please wait
until the current operation has
finished, or close all PaperPort
dialogs and try again.
PaperP ort is currently busy and
cannot accept the printed item.
Please close any open
PaperPort dialog boxes before
trying again.
PaperP ort is currently busy and
cannot complete this operation.
Please close any open
PaperPort dialogs before trying
again.
Please specify the name of your
Fax software before using the
Fax link.
Disk and File An item or a page in a stack can be
damaged if your computer is shut down
while the PaperPort software is running or
if the PaperPort software is shut down in
any way other than by a normal exit.
Attempt to repair this file by running
MAXFIX.EXE. Then followthe instructions
on the screen.
Link Try reinstalling the linked application.If the
problem persists, contact HP to see if an
update is available for the link.
Link If you install a supported linked
application that has an older version of
MAXLINK.DLL, it may overwrite the newer
version in the PaperPort directory.
Reinstall the PaperPort software and the
correct version of this file will be properly
installed.
General The PaperPort software is busy
processing. Wait one or more minutes,
and then try quitting the PaperPort
software again.
General Close any open PaperPort dialog boxes
and try again.
General Close any open PaperPort dialog boxes
and try again.
Link You must select the fax software driver by
choosing Preferences from the Edit
menu and under Category select the Fax
or generic fax icon.
84 Troubleshooting and Error Messages EN
Page 85

Message Category Recommended Action
The Desktop file is either
damaged or missing. PaperPort
will continue with a new Desktop.
The image data being unpacked
is damaged.
The system is too busy to accept
a page from your scanner.
Please scan this page again.
This item contains one or more
annotations that cannot be
displayed by this version of
PaperPort.
Too many files were found.
Please enter a different starting
directory or file name and try the
search again.
Your OCR software was not able
to process the selected pages.
Destination has rejected the
document
Desktop The desktop file contains information you
need for accessing the items on the
Desktop.If this file is damaged, you may
be able to fix it with the MAXFIX utility.
Run MAXFIX.EXE and then follow the
instructions on the screen.
The desktop file can be damaged if your
computer is shut down while the
PaperPort software is running, or if the
PaperPort software is shut down in any
way other than by a normal exit.If the
PaperPort software can restore the
desktop file, it will continue normally.
Otherwise, please contact HP Technical
Support for help.
General If you get this message while scanning,
try scanning the item again. If you get this
message while importing a file, the file
may be damaged or there may be a disk
error.You can run a disk diagnostic utility
to investigate this or run MAXFIX.EXE.
Then follow the instructions on the screen.
General Your computer was busy doing something
else, so the scanner could not talk with
the PaperPort software. In most cases,
scanning again will succeed. If not, quit
other and try scanning again.
General The item contains one or more
annotations created by a later version of
the PaperPort software than the one you
are using. You can view all the annotations
supported in your version by upgrading
your copy. To upgrade your copy of the
PaperPort software, contact HP.
General The PaperPort software found more files
than it can display. Enter a different search
criteria that will limit the search to a
smaller number of files.
Link This error can be caused by a
low-memory condition or a problem with
the OCR software. For more information
about making more memory available,
see the memory messages in this chapter.
General The target application cannot handle the
current document. Specify a different
format for the target application.
4
Troubleshooting
EN Troubleshooting and Error Messages 85
Page 86

Message Category Recommended Action
Document failed General The document cannot be sent to the
target application.
Check if the link is still available.
Check the document format.
Check your system resources.
Try again.
Can’t register with the network
component
Destination is busy General The target application is not ready to
Destination is not valid Link The selected link is not valid. Check if the
General SSNET failed to start.Make sure the
user’s networking software is installed and
operating correctly.
receive documents.
Waita few minutes and then retry.
Close the target application and retry.
target link is still available.
86 Troubleshooting and Error Messages EN
Page 87

Specifications
HP ScanJet 5 Scanner Specifications
Feature Specification
Scanner Type Flatbed
Maximum Document Size 216 x 297 mm (8.5 x 11.7 inches)
Scanning Element Charged-coupled device
Light Source Xenon lamp
Interface LAN: Ethernet or Token Ring
Optical Resolution 300 dpi
Scanning Speed (text mode) 15 pages per minute
Image Processing Options Text, Photo, Text & Photo
A
AC Line Voltage 100–240 VAC, 50–60 Hz
Power Consumption 70 W maximum
Weight About 15.2 kg
ADF Capacity 50 page maximum
Duty Cycle 10,000 pages per month
EN Specifications 87
Page 88

Environmental Ranges
Temperature
Operating 10 to 40oC (50 to 104oF)
Storage - 30 to 60oC (-22 to 140oF)
Humidity
Operating 10 to 80% noncondensing (10 to 32.5oC)
10 to 45% noncondensing (32.5 to 40oC)
Storage 10 to 85% (0 to 40oC)
10 to 50% (40 to 60oC)
Caution The operating environment should be stable, with no abrupt changes in
temperature or humidity, or your scanner may be damaged. If the
scanner is moved from a cold to a warm environment, wait
approximately two hours before using the scanner.
German Noise Declaration
Geräuschemission
LpA <70 dB
am Arbeitsplatz
normaler Betrieb
nach EN 27779
Die Daten sind die Ergebnisse von Typprüfungen.
88 Specifications EN
Page 89

EN Specifications 89
A
Specifications
Page 90

90 Specifications EN
Page 91

Warranty and Support Information
Hewlett-Packard Warranty Statement
HP Network ScanJet 5 Scanner
One-Year Limited Warranty
1 HP warrants HP hardware, accessories and supplies against defects in
materials and workmanship for the period specified above. If HP
receives notice of such defects during the warranty period, HP will, at its
option, either repair or replace products which prove to be defective.
2 HP warrants that HP software will not fail to execute its programming
instructions, for the period specified above, due to defects in material
and workmanship when properly installed and used. If HP receives
notice of such defects during the warranty period, HP will replace
software media which does not execute its programming instructions
due to such defects.
3 HP does not warrant that the operation of HP products will be
uninterrupted or error free. HP products may contain remanufactured
parts equivalent to new in performance or may have been subject to
incidental use. If HP is unable, within a reasonable time, to repair or
replace any product to a condition as warranted, customer will be
entitled to a refund of the purchase price upon prompt return of the
product.
4 The warranty period begins on the date of delivery or on the date of
installation if installed by HP. If customer schedules or delays HP
installation more than 30 days after delivery, warranty begins on the 31st
day from delivery.
5 Warranty does not apply to defects resulting from (a) improper or
inadequate maintenance or calibration, (b) duty cycle abuse (see note
below), (c) software, interfacing, parts or supplies not supplied by HP,
(d) unauthorized modification or misuse, (e) operation outside of the
published environmental specifications for the product, or (f) improper
site preparation or maintenance.
B
NOTE: Operation of the scanner beyond the limit of its nominal duty cycle
(scanning greater than the equivalent of 10,000 pages per month) shall
be deemed scanner abuse and all repairs thereafter are to be billed on a
time-and-materials basis.
EN Warranty and Support Information 91
Page 92

6 THE ABOVE WARRANTIES ARE EXCLUSIVE AND NO OTHER
WARRANTY, WHETHER WRITTEN OR ORAL, IS EXPRESSED
OR IMPLIED. HP SPECIFICALLY DISCLAIMS THE IMPLIED
WARRANTIES OF MERCHANTABILITY AND FITNESS FOR A
PARTICULAR PURPOSE.
7 HP will be liable for damage to tangible property per incident up to the
greater of $300,000 or the actual amount paid for the product that is the
subject of the claim, and for damages for bodily injury or death, to the
extent that all such damages are determined by a court of competent
jurisdiction to have been directly caused by a defective HP product.
8 THE REMEDIES IN THIS WARRANTY STATEMENT ARE
CUSTOMER’S SOLE AND EXCLUSIVE REMEDIES. EXCEPT AS
INDICATED ABOVE, IN NO EVENT WILL HP BE LIABLE FOR
LOSS OF DATA OR FOR DIRECT, SPECIAL, INCIDENTAL,
CONSEQUENTIAL (INCLUDING LOST PROFIT), OR OTHER
DAMAGE, WHETHER BASED IN CONTRACT, TORT, OR
OTHERWISE.
Hardware Service during the Warranty Period
To maintain the warranty, you must have your scanner serviced by an
authorized repair depot in the country of original purchase. You may
return your scanner to a Hewlett-Packard Dealer Repair Center or a
designated Hewlett-Packard Repair Center. See the following pages for
a list of designated Hewlett-Packard Repair Centers. Please contact your
Hewlett-Packard Dealer Repair Center for instructions before returning
your scanner for service. If you return your scanner to a designated
Hewlett-Packard Field Repair Center for service, you must prepay all
shipping charges, duty, and taxes. Except for products returned to the
customer from another country, Hewlett-Packard shall pay for return
shipment of products to the customer.
Hardware Service after the Warranty Period
If your hardware fails after the warranty period, contact an authorized
Hewlett-Packard Dealer Repair Center or a designated Hewlett-Packard
Repair Center. If you have a Hewlett-Packard Maintenance Agreement,
request service under your agreement.
92 Warranty and Support Information EN
Page 93

Replacement Parts and Accessories
You can order replacement parts for your HP Network ScanJet 5 scanner
by contacting your sales representative or your Hewlett-Packard dealer.
You can order any of the parts below directly by calling:
Country Telephone Number
USA and Canada (970) 339-7009
United Kingdom (+44) 1429 865511
Germany (+44) 1429 863353
France (+44) 1429 863343
Italy (+44) 1429 520013
Spain (+44) 1429 520012
Item Part Number
English Administrator’s and User’s Guides C1306-99000
French Administrator’s and User’s Guides C1306-99001
B
Support
Warranty and
German Administrator’s and User’s Guides C1306-99002
Italian Administrator’s and User’s Guides C1306-99003
Spanish Administrator’s and User’s Guide C1306-99004
Replacement CD-ROM (full set) C1306-13603
Delivery guide FB3-0308-000CN
Lower rollers FF3-4710-000CN
EN Warranty and Support Information 93
Page 94

Take a look at all HP Support has to offer!
Thank you for your purchase. Along with your product, you receive a
variety of support services from Hewlett-Packard and our support
partners designed to give you the results you need, quickly and
professionally.
Online Services: for 24-hour
access to information over
your modem, we suggest
these services.
Obtaining Software:
For U.S. and Canada:
For Asia-Pacific Countries:
For Australia, New Zealand,
and India:
WorldWide WebURL—Printer drivers, updated HP printer software, plus product and
support information can be obtained from the following URLs:
in the U.S..: http://www.hp.com in Europe: http://www2.hp.com
Printer drivers can be obtained from the following sites:
in Japan: ftp://www.jpn.hp.com/drivers/ in Korea: http://www.hp.co.kr
in Taiwan: http://www.hp.com.tw or from a local driver website of http://www.dds.com.tw
HP Bulletin Board Service—Our electronic download service provides convenient
access to HP printer drivers, updated HP printer software, product information, and
troubleshooting hints. Set your communication software to N,8,1 and dial or use:
in the U.S. and Canada: (1) (208) 344-1691 in Taiwan: (886) (2) 923-3233
in Korea: HITEL or CHOLIAN (Go HPK) in Australia: (61) (3) 9890-0276
in New Zealand: (64) (9) 356-3660 in China: (86) (10) 6261-4172
European Bulletin Board Service numbers are listed at http://www2.hp.com.
America OnLine—(America OnLine/Bertelsmann is available in France, Germany,and
the UK)—Printer drivers, updated HP printer software, and support documentation are
available to help answer questions on HP products. Use Keyword HP to start your tour or
call (1) (800) 827-6364 and ask for representative #1118 to subscribe.
CompuServe—Printer drivers, updated HP printer software, and interactive sharing of
technical information with other members are available on CompuServe’s HP User’s
forums (GO HP), or call (1) (800) 524-3388 and ask for representative #51 to subscribe.
(CompuServe is also available in the UK, France, Belgium, Switzerland, Germany, and
Austria.)
Phone: (1) (970) 339-7009 Mail: Hewlett-Packard Company
Fax: (1) (970) 330-7655 P.O. Box 1754
Greeley, CO 80632 USA
Contact Fulfill Plus at (65) 740-4477 (Hong Kong, Indonesia, Malaysia, Philippines, or
Singapore). For Korea, call (82) (2) 3270-0805 or (82) (2) 3270-0893.
For Australia and New Zealand, call (61) (2) 565-6099.For India, call (91) (11) 682-6035.
For European English:
HP Direct Ordering for
Accessories and Supplies
HP Support Assistant
CD-ROM:
HP Service Information: To locate HP-authorized dealers, call (1) (800) 243-9816 (U.S.) or (1) (800) 387-3867
HP Service Agreements: Call (1) (800) 835-4747 (U.S.) or (1) (800) 268-1221 (Canada).
Call (44) (142) 986-5511.
Call (1) (800) 538-8787 (U.S.) or (1) (800) 387-8164 (Canada).
This support tool offers a comprehensive online information system designed to provide
technical and product information on HP products.Tosubscribe to this quarterly service
in the U.S.or Canada, call (1) (800) 457-1762.In Hong Kong, Indonesia, Malaysia, or
Singapore, call Fulfill Plus at (65) 740-4477.
(Canada).
94 Warranty and Support Information EN
Page 95

HP FIRST: HP FIRST Fax will deliver detailed troubleshooting information on common software and troubleshooting tips
for your HP product. Call from any touch-tone phone and request up to three documents per call. These documents will
be sent to the fax of your choice.
Australia
Austria
Belgium (Dutch)
Belgium (French)
Canada
China
Denmark
English (outside of UK)
Finland
France
Germany
Hong Kong
Hungary
India
Indonesia
Italy
Japan
(61) (3) 9272-2627
(43) (1) 0660-8128
(32) (2) 0800-11906
(32) (2) 0800-17043
(1) (800) 333-1917
(86) (10) 6505-5280
(45) 8001-0453
(31) (20) 681-5792
(358) (9) 0800-13134
(33) (146) 0800-905900
(49) (13) 081-0061
(852) 2506-2422
(36) (1) 252-4647
(91) (11) 682-6035
(62) (21) 352-2044
(39) (2) 1678-59020
(81) (3) 3335-8622
Korea
Malaysia
Netherlands
New Zealand
Norway
Philippines
Portugal
Singapore
Spain
Sweden
Switzerland (French)
Switzerland (German)
Taiwan
Thailand
United Kingdom
United States
(82) (2) 769-0543
(60) (3) 298-2478
(31) (20) 0800-222420
(64) (9) 356-6642
(47) 800-11319
(65) 291-7951
(351) (1) 0505-313342
(65) 275-7251
(34) (90) 099-3123
(46) (2) 079-5743
(41) (1) 0800-551526
(41) (1) 0800-551527
(886) (2) 719-5589
(66) (2) 661-3511
(44) (134) 0800-960271
(1) (800) 333-1917
B
Support
Warranty and
EN Warranty and Support Information 95
Page 96

Customer Support Options Worldwide
In addition to the phone numbers listed below, this chapter contains
worldwide sales and service addresses and phone numbers.
Customer Support & Product
Repair Assistance for the
U.S. and Canada:
European Customer Support Center Language and In-Country Options Available
HP provides a free telephone support service during the warranty period. By calling a telephone number listed below, you
will be connected to a responsive team waiting to help you. If you require support after your warranty has expired, you can
receive support for a fee through the same telephone number. The fee is charged on a per-incident basis. When calling
HP, please have the following information ready: product name and serial number, date of purchase, and description of the
problem.
Danish: Denmark (45) 3929-4099
Dutch: Belgium (32) (2) 626-8806
Netherlands (31) (20) 606-8751
English: Ireland (353) (1) 662-5525
UK (44) (171) 512-5202
International (44) (171) 512-5202
Finnish: Finland (358) (9) 0203-47288
French: Belgium (32) (2) 626-8807
France (33) (45) 043-9853
Switzerland (41) (84) 880-1111
If you require support after your warranty has expired or additional product repair services, or if your country is not listed
below, see “Worldwide HP Sales and Service Offices” in appendix E.
Argentina
Australia
Brazil
Canada
China
Czech Republic
Greece
Hong Kong
Hungary
India
Indonesia
Japan
Korea
Call (1) (208) 323-2551 Monday through Friday from 6 am to 6 pm (Mountain Time)
free of charge during the Warranty Period. However, your standard long-distance phone
charges still apply.
Post-warranty telephone assistance is available to answer your product questions. Call
(1) (900) 555-1500 ($2.50* per minute, U.S.only) or call (1) (800) 999-1148 ($25* per
call, Visa or MasterCard, U.S. and Canada).
a support technician. *Prices subject to change.
Open Monday through Friday 8:30 to 18:00 CET
(54) (1) 781-4059
(54) (1) 781-4069
(61) (3) 272-8000
(55) (11) 709-1444
(1) (208) 323-2551
(86) (10) 6261-4174
(86) (10) 6261-4175
(86) (10) 6261-4176
(86) (10) 6262-5666
(42) (2) 471-7321
(30) (1) 689-6411
(852) 800-7729
(36) (1) 343-0310
(91) (11) 682-6035
(91) (11) 682-6069
(62) (21) 350-3408
(81) (3) 3335-8333
(82) (2) 3270-0700; outside
Seoul, call (82) (80) 999-0700
Have your serial number ready when calling.
Charges begin only when you connect with
German: Austria (43) (1) 0660-6386
Germany (49) (180) 525-8143
Italian: Italy (39) (2) 264-10350
Norwegian: Norway (47) 2211-6299
Portuguese: P ortugal (351) (1) 441-7199
Spanish: Spain (34) (90) 232-1123
Swedish: Sweden (46) (8) 619-2170
In-country Support Numbers
Malaysia
México D.F.
México Guadalajara
México Monterey
Middle East/Africa
New Zealand
Philippines
Poland
Portugal
Russia
Singapore
Switzerland
Taiwan
Thailand
Turkey
(60) (3) 295-2566
(52) (5) 326-4600
(52) (3) 669-9500
(52) (83) 378-4240
(41) (22) 780-7111
(64) (9) 356-6640
(63) (2) 894-1451
(48) (22) 37-5065
(351) (1) 301-7330
(7) (95) 923-5001
(65) 272-5300
(41) (1) 753-7111
(886) (2) 717-0055
(66) (2) 661-4011
(66) (2) 661-4012
(90) (1) 224-5925
96 Warranty and Support Information EN
Page 97

HP Sales and Service Offices
Before calling an HP Sales and Service office, be sure to contact the
appropriate Customer Support Center numbers listed in the previous
table. To find a service-authorized HP dealer in the U.S., call (800)
752-0900. To find a service-authorized HP dealer outside of the U.S.,
contact one of the following offices:
B
Support
Warranty and
Before calling an HP Sales and
Service office, be sure to contact
the appropriate Customer Support
Center number listed on the
previous pages.
Austria:
Hewlett-Packard GmbH
Lieblgasse 1
A-1222 Vienna
Phone: (43) (1) 25000-555
Fax: (43) (1) 25000-500
Canada:
Hewlett-Packard (Canada) Ltd.
17500 TransCanada Highway
South Service Road
Kirkland, Québec H9J 2X8
Phone: (1) (514) 697-4232
Fax: (1) (514) 697-6941
Hewlett-Packard (Canada) Ltd.
5150 Spectrum Way
Mississauga, Ontario L4W 5G1
Phone: (1) (905) 206-4725
Fax: (1) (905) 206-4739
Argentina:
Hewlett-Packard Argentina S.A.
Montañeses 2140/50/60
1428 Buenos Aires
Phone: (54) (1) 787-7100
Fax: (54) (1) 787-7213
Belgium:
Hewlett-Packard Belgium S.A.NV
Boulevard de la Woluwe-Woluwedal
100-102
B-1200 Brussels
Phone: (32) (2) 778-31-11
Fax: (32) (2) 763-06-13
China:
China Hewlett-PackardCo. Ltd.
Level5, West Wing Office
China WorldTradeCenter
No.1,JianGuoMenWaiAvenue
Beijing 100004
Phone: (86) (10) 6505-3888,
ext.5450
Fax: (86) (10) 6505-1033
Hardware Repair Center and
Extended Warranty Support
Phone: (86) (10) 6262-5666
ext.6101 or 6102
(86) (10) 6261-4167
Australia:
Hewlett-Packard Australia Ltd.
31-41 Joseph Street
Blackburn, VIC 3130
Phone: (61) (3) 272-2895
Fax: (61) (3) 898-7831
Hardware Repair Center
Phone: (61) (3) 272-8000
Extended Warranty Support
Phone: (61) (3) 272-2577
Customer Information Center
Phone: (61) (3) 272-8000
Brazil:
Edisa Hewlett-Packard S.A.
Av. Do Contorno, 6321, 12° andar
30110-110, Belo Horizonte, MG
Phone: (55) (31) 221-8845
Fax: (55) (31) 221-8836
Czech Republic:
Hewlett-Packard s.r. o.
Novodvorská 82
CZ-14200 Praha 4
Phone: (42) (2) 613-07111
Fax: (42) (2) 471-7611
EN Warranty and Support Information 97
Page 98

Denmark:
Hewlett-Packard A/S
Kongevejen25
DK-3460 Birkerød
Denmark
Phone: (45) 99-1000
Fax: (45) 4281-5810
France:
Hewlett-Packard France
42 Quai du Point du Jour
F-92659 Boulogne Cedex
Phone: (33) (146) 10-1700
Fax: (33) (146) 10-1705
Hungary:
Hewlett-Packard Magyarország Kft.
Erzsébet királyné útja 1/c.
H-1146 Budapest
Phone: (36) (1) 343-0550
Fax: (36) (1) 122-3692
Hardware Repair Center
Phone: (36) (1) 343-0312
Customer Information Center
Phone: (36) (1) 343-0310
Japan:
Hewlett-Packard Japan, Ltd.
3-29-21 T akaido-higashi
Suginami-ku, Tokyo168
Phone: (81) (3) 3335-8333
Fax: (81) (3) 3335-8338
Hardware Repair Center
Phone: (81) (4) 7355-6660
Fax: (81) (4) 7352-1848
Far East Region:
Hewlett-Packard Asia Pacific Ltd.
17-21/F Shell Tower,Times Square
1 Matheson Street, Causeway Bay
Hong Kong
Phone: (852) 2599-7777
Fax: (852) 2506-9244
Hardware Repair Center and
Extended Warranty Support
Phone: (852) 2599-7000
Customer Information Center
Phone: (852) 2599-7066
Germany:
Hewlett-Packard GmbH
Herrenberger Strasse 130
71034 Böblingen
Phone: (49) (180) 532-6222
(49) (180) 525-8143
Fax: (49) (180) 531-6122
India:
Hewlett-Packard India Ltd.
Paharpur Business Centre
21 Nehru Place
New Delhi 110 019
Phone: (91) (11) 647-2311
Fax: (91) (11) 646-1117
Hardware Repair Center and Extended
Warranty Support
Phone: (91) (11) 642-5073
(91) (11) 682-6042
Korea:
Hewlett-Packard Korea
25-12, SHP House
Yoido-dong, Youngdeungpo-ku
Seoul 150-010
Phone: (82) (2) 769-0114
Fax: (82) (2) 784-7084
Hardware Repair Center
Phone: (82) (2) 3270-0700
(82) (2) 707-2174
(DeskJet)
(82) (2) 3270-0710
(Hardware)
Finland:
Hewlett-Packard Oy
Piispankalliontie 17
FIN-02200 Espoo
Phone: (358) (9) 887-21
Fax: (358) (9) 887-2477
Greece:
Hewlett-Packard Hellas
62, Kifissias Avenue
GR-15125 Maroussi
Phone: (30) (1) 689-6411
Fax: (30) (1) 689-6508
Italy:
Hewlett-Packard Italiana SpA
ViaGiuseppediVittorio,9
Cernusco Sul Naviglio
I-20063 (Milano)
Phone: (39) (2) 921-21
Fax: (39) (2) 921-04473
Latin American Headquarters:
5200 Blue Lagoon Drive
Suite 950
Miami, FL 33126
USA
Phone: (1) (305) 267-4220
Extended Warranty Support
Phone: (82) (2) 3770-0365
(Bench)
(82) (2) 769-0500 (Onsite)
México, D.F.:
Hewlett-Packard de México, S.A.de
C.V.
Prolongación Reforma No. 700
Lomas de Santa Fe
01210 México, D.F.
Phone: (52) (5) 326-4600
Fax: (52) (5) 326-4274
México, Guadalajara:
Hewlett-Packard de México, S.A. de
C.V.
Monte Morelos No.299
Fracc.Loma Bonita
45060 Guadalajara, Jal.
Phone: (52) (3) 669-9302
Fax: (52) (3) 669-9560
México Monterrey:
Hewlett-Packard de México, S.A. de
C.V.
Batallón de San Patricio 111
Piso 23-Torre Comercial América
Colonia del Valle
66269 Garza Garcia, Nuevo León
Phone: (52) (8) 368-5100
Fax: (52) (8) 356-7498
98 Warranty and Support Information EN
Page 99

Middle East/Africa:
ISB HP Response Center
Hewlett-Packard S.A.
RuedeVeyrot39
P. O. B ox 36 4
CH-1217Meyrin-Geneva
Switzerland
Phone: (41) (22) 780-4111
Norway:
Hewlett-Packard Norge A/S
Postboks 60 Skøyen
Drammensveien 169
N-0212 Oslo
Phone: (47) 2273-5600
Fax: (47) 2273-5610
Russia:
AO Hewlett-Packard
Business Complex Building #2
129223, Moskva, Prospekt Mira
VVC
Phone: (7) (95) 928-6885
Fax: (7) (95) 974-7829
Netherlands:
Hewlett-Packard Nederland BV
Startbaan 16
NL-1187 XR Amstelveen
Postbox 667
NL-1180 AR Amstelveen
Phone: (31) (20) 547-6911
Fax: (31) (20) 547-7755
Poland:
Hewlett-Packard Polska
ul.Newelska 6
PK-01-447 Warszawa
Phone: (48) (22) 375-065
Fax: (48) (22) 374-783
Singapore:
H-P Singapore (Pte), Ltd.
150 Beach Road #29-00
GatewayWest
Singapore 0718
Phone: (65) 291-9088
Fax: (65) 292-7089
Hardware Repair Center and
Customer Information Center
Phone: (65) 272-5300
New Zealand:
Hewlett-Packard (NZ) Limited
Ports of Auckland Building
Princes Wharf,Quay Street
P.O . B ox 38 6 0
Auckland
Phone: (64) (9) 356-6640
Fax: (64) (9) 356-6620
Hardware Repair Center and
Extended Warranty Support
Phone: (64) (9) 0800-733547
Customer Information Center
Phone: (64) (9) 0800-651651
Portugal:
Hewlett-Packard Portugal
Rua Gregório Lopes
Lote 1732B
P-1400 Lisboa
Phone: (351) (1) 301-7330
Fax: (351) (1) 301-7345
Spain:
Hewlett-Packard Española, S.A.
Carretera de la Coruña km 16.500
E-28230 Las Rozas, Madrid
Phone: (34) (1) 626-1600
Fax: (34) (1) 626-1830
B
Support
Warranty and
Extended Warranty Support
Phone: (65) 374-3173
Sweden:
Hewlett-Packard Sverige AB
Skalholtsgatan 9
S-164 97 Kista
Phone: (46) (8) 444-2000
Fax: (46) (8) 444-2666
EN Warranty and Support Information 99
Switzerland:
Hewlett-Packard (Schweiz) AG
In der Luberzen 29
CH-8902 Urdorf/Zürich
Phone: (41) (1) 753-7111
Fax: (41) (1) 753-7700
Taiwan:
Hewlett-PackardTaiwanLtd.
8th Floor
337, Fu-Hsing North Road
Taipei, 10483
Phone: (886) (2) 712-0404
Fax: (886) (2) 715-3107
Hardware Repair Center:
(886) (2) 717-9673 (North Taiwan)
(886) (4) 327-0153 (Central Taiwan)
(886) (8) 073-3733 (South Taiwan)
Extended Warranty Support
Phone: (886) (8) 021-1666
Page 100

Thailand:
Hewlett-Packard (Thailand) Ltd.
11th Floor Pacific Place
140 Sukhumvit Road
Bangkok 10110
Phone: (66) (2) 254-6720
Fax: (66) (2) 254-6731
Hardware Repair Center and
Extended Warranty Support
Phone: (66) (2) 661-3900
ext.6001 or 6002
Customer Information Center
Phone: (66) (2) 661-3900
ext.3211
Venezuela:
Hewlett-Packard de VenezuelaS.A.
Los Ruices Norte
3ATransversal
Edificio Segre Caracas 1071
Phone: (58) (2) 239-4244
Fax: (58) (2) 239-3080
Turkey:
Hewlett-Packard Company
Bilgisayar VeÖlçüm Sistemleri AS
19 Mayis Caddesi Nova
Baran Plaza Kat: 12
80220 Sisli-Istanbul
Phone: (90) (212) 224-5925
Fax: (90) (212) 224-5939
United Kingdom:
Hewlett-Packard Ltd.
Cain Road
Bracknell
Berkshire RG12 1HN
Phone: (44) (134) 436-9222
Fax: (44) (134) 436-3344
100 Warranty and Support Information EN
 Loading...