

Page 1

HP ScanJet Pro 4500 fn1 Network Scanner
EN
Installation Guide
ZHCN
安装指南
ID
Panduan Pemasangan
ScanJet Pro 4500 f1
KO
설치 설명서
TH
ZHTW
安裝指南
www.hp.com/support
ES
Lea esto primero
1
Page 2
1
2
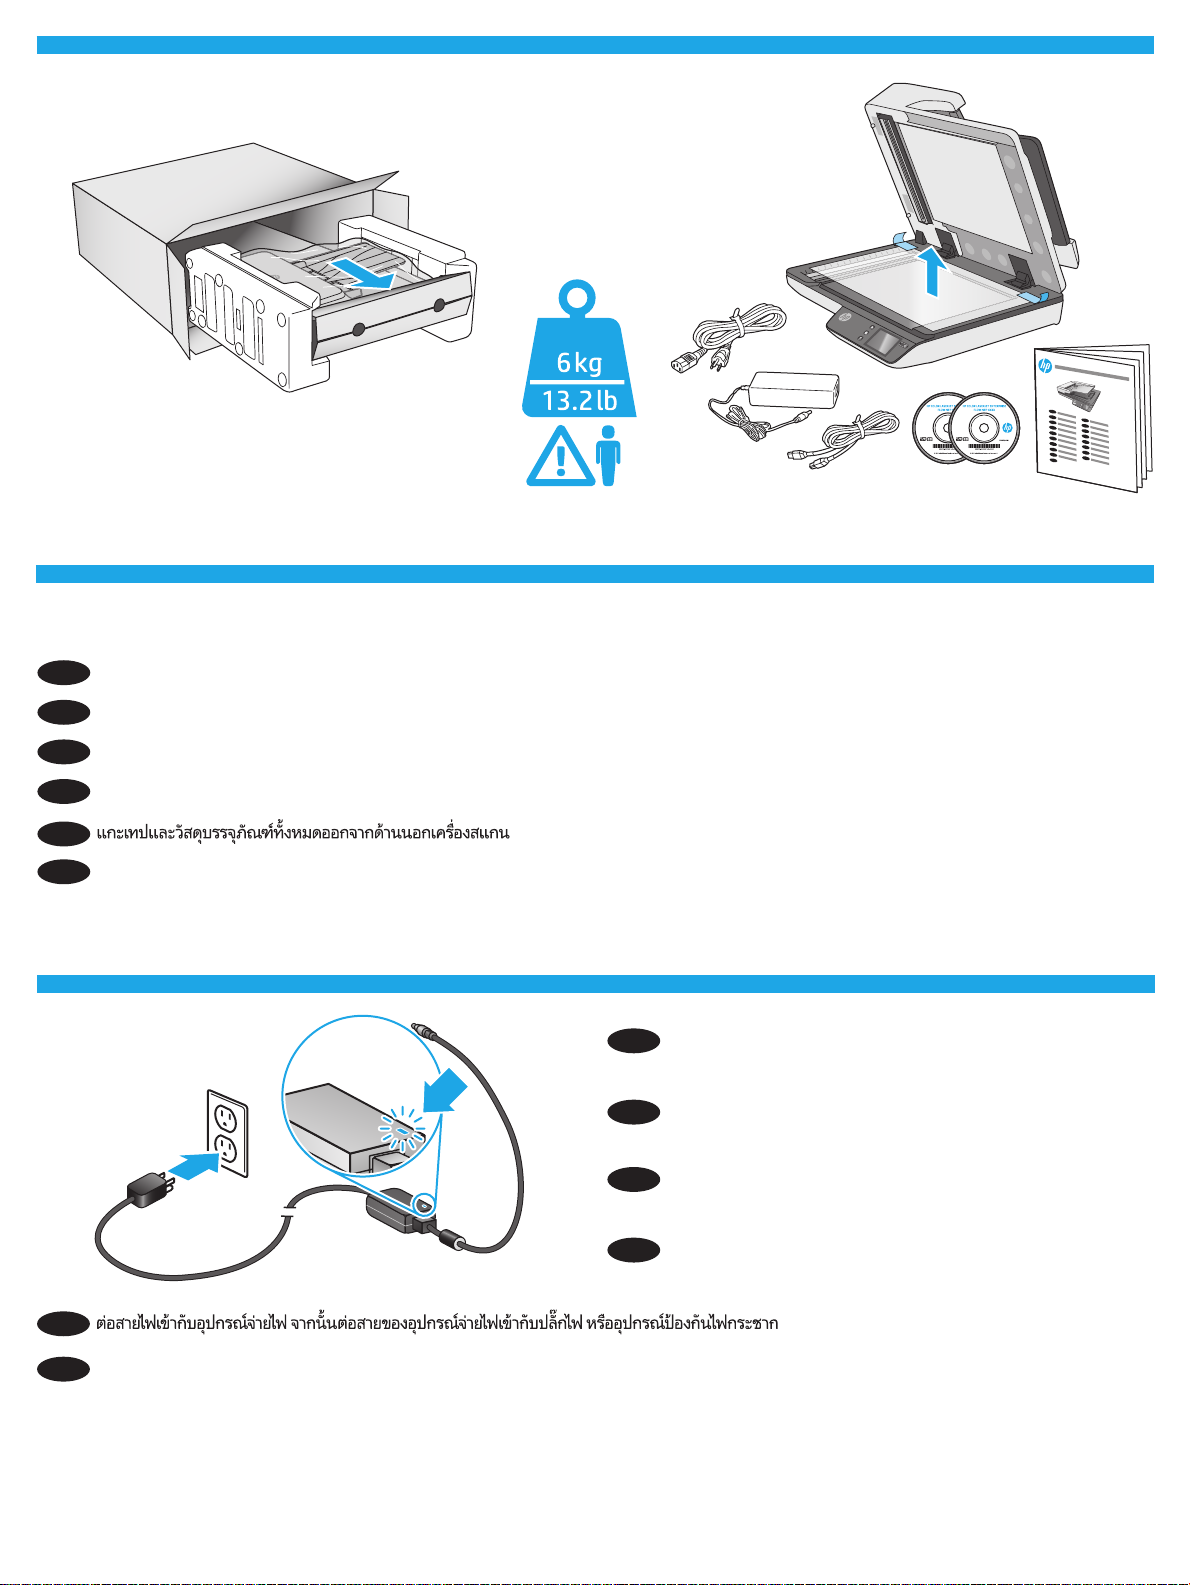
Remove all tape and packing material from outside the scanner.
EN
ZHCN
ZHTW
3
从扫描仪外部取下所有胶带和包装材料。
Lepas semua perekat dan materi kemasan dari bagian luar pemindai.
ID
스캐너 외부의 테이프와 포장재를 모두 제거합니다.
KO
TH
請取下掃描器外面所有的膠帶與包裝材料。
Connect the power cable to the power supply and connect the
EN
power supply cable into a power outlet or surge protector.
ZHCN
把电源线连接到电源上并且把供电电缆接入电源
插座或电涌保护器。
Sambungkan kabel daya ke catu daya, lalu sambungkan kabel
ID
catu daya ke stopkontak atau pelindung daya.
전원 케이블을 전원 공급 장치에 연결하고 전원 공급 케이블을
KO
전원 콘센트 또는 충격 전압 흡수기에 연결합니다.
TH
將電源線連接到電源供應器,並將電源供應器纜線連接到電源插座或突波保護器。
ZHTW
2
Page 3

4
ZHTW
TH
如果綠色 LED 亮起,則將電源供應器插到裝置背面 (1),然後
按電源按鈕 (2)。
If the green LED is on, plug the power supply into the back of the
EN
device (1) and then press the Power button (2).
ZHCN
如果绿色 LED 亮起,将电源插入设备背面 (1),然
后按电源按钮 (2)。
Jika LED hijau menyala, sambungkan catu daya ke bagian
ID
belakang perangkat (1), lalu tekan tombol Daya (2).
LED가 녹색이면 전원 공급 장치를 장치 뒷면(1)에 연결한 다음
KO
전원 버튼(2)을 누릅니다.
5
�
��
Windows®: Do not connect the USB cable until prompted during the software installation in the next step.
EN
OS X: Connect the USB cable now.
ZHCN
Windows®:直到软件安装过程的下一步中出现提示后,再连接 USB 电缆。
OS X:现在连接 USB 电缆。
Windows®: Jangan sambungkan kabel USB hingga diminta selama penginstalan perangkat lunak berlangsung pada langkah berikutnya.
ID
OS X: Sambungkan kabel USB sekarang.
Windows®: 다음 단계에서 소프트웨어를 설치하는 동안 메시지가 나타날 때까지 USB 케이블을 연결하지 마십시오.
KO
OS X: USB 케이블을 지금 연결하십시오.
TH
Windows®:請勿連接 USB 纜線,直到下一步驟中的軟體安裝期間出現提示。
ZHTW
OS X:立即連接 USB 纜線。
3
Page 4

6
To connect to a network, connect the network cable now.
EN
CAUTION: Do not connect the USB cable now.
If the scanner does not display the network address on the Home
screen, manually congure the address on the control panel.
To manually congure the IP address, do the following:
1. Touch Settings on the home screen.
2. Touch Connectivity and select Wired Network (LAN).
3. Type the IP address into the address line of a Web browser
to open the Embedded Web Server. For more information
about accessing the Embedded Web Server go to
www.hp.com/support.
NOTE: Go to the Networking tab to obtain network information
and change settings.
要连接到网络,现在请连接网线。
ZHCN
小心:现在请勿连接 USB 电缆。
如果扫描仪不在主屏幕上显示网络地址,则在控
制面板上手动配置该地址。要手动配置 IP 地址,
请执行以下操作:
1. 轻触主屏幕上的“设置”。
2. 轻触“连接”,然后选择“有线网络 (LAN)”。
3. 在 Web 浏览器的地址行中键入 IP 地址以打开内
嵌式 Web 服务器。有关访问内嵌式 Web 服务器
的详细信息,请访问 www.hp.com/support。
注:转到“联网”选项卡以获取网络信息并更新
设置。
네트워크에 연결하려면 지금 네트워크 케이블을 연결합니다.
KO
주의: 아직 USB 케이블을 연결하지 마십시오.
스캐너의 홈 화면에 네트워크 주소가 표시되지 않는 경우,
제어판에서 수동으로 주소를 구성합니다. 수동으로 IP 주소를
구성하려면 다음과 같이 하십시오.
1. 홈 화면에서 설정을 누릅니다.
2. 연결을 누르고 유선 네트워크(LAN)를 선택합니다.
3. 웹 브라우저의 주소 입력란에 IP 주소를 입력하여 내장 웹
서버를 엽니다. 내장 웹 서버에 액세스하는 방법에 대한 자세한
내용은 www.hp.com/support를 참조하십시오.
참고: 네트워킹 탭으로 이동하여 네트워크 정보를 입수하고
설정을 변경합니다.
TH
Untuk menyambung ke jaringan, sambungkan kabel jaringan
ID
sekarang.
PERHATIAN: Jangan sambungkan kabel USB sekarang.
Jika pemindai tidak menampilkan alamat jaringan di layar Awal,
kongurasikan alamat di panel kontrol secara manual. Untuk
mengkongurasi alamat IP secara manual, lakukan langkah
berikut:
1. Sentuh Pengaturan di layar awal.
2. Sentuh Konektivitas, lalu pilih Jaringan Berkabel (LAN).
3. Masukkan alamat IP pada baris alamat di browser web
untuk membuka Server Web Tertanam. Untuk informasi
selengkapnya tentang cara mengakses Server Web Tertanam,
kunjungi www.hp.com/support.
CATATA N: Buka tab Jaringan untuk memperoleh informasi
jaringan dan mengubah pengaturan.
若要連接至網路,請立即連接網路纜線。
ZHTW
注意:請勿現在連接 USB 纜線。
如果描掃器沒有在主畫面顯示網路位址,請在控制面板手動設
定位址。若要手動設定 IP 位址,請執行以下操作:
1. 點選主畫面上的「Settings」(設定)。
2. 點選「Connectivity」(連線),然後選擇「Wired Network
(LAN)」(有線網路 (LAN))。
3. 將 IP 位址鍵入 Web 瀏覽器的位址行,開啟內嵌式
Web 伺服器。如需存取內嵌式 Web 伺服器的詳細資訊,
請前往 www.hp.com/support。
附註:移至「Networking」(網路)標籤以取得網路資訊並變
更設定。
4
Page 5

7
ZHCN
1. Install the scanner software from the CD. Follow the on-screen instructions.
EN
2. Install the optional Windows software (HP Scan, Readiris Pro for OCR, Cardiris for business cards, and PaperPort for personal document
management) from their respective CDs.
1. 从 CD 安装扫描仪软件。 按照屏幕上的说明进行操作。
2. 从各自 CD 安装可选的 Windows 软件(HP Scan、Readiris Pro for OCR、用于名片的 Cardiris 和用于个人文档
管理的 PaperPort)。
1. Instal perangkat lunak pemindai dari CD. Ikuti petunjuk di layar.
ID
2. Instal perangkat lunak opsional Windows (HP Scan, Readiris Pro untuk OCR, Cardiris untuk kartu nama, dan PaperPort untuk pengelolaan
dokumen pribadi) dari masing-masing CD.
1. CD의 스캐너 소프트웨어를 설치합니다. 화면의 지시에 따릅니다.
KO
2. 옵션인 Windows 소프트웨어(HP Scan, OCR용 Readiris Pro, 명함용 Cardiris 및 개인 문서 관리용 PaperPort)를 각각의 CD에서 설치합니다.
TH
1. 從光碟安裝掃描器軟體。 依照螢幕上的指示進行。
ZHTW
2. 從其各自光碟安裝選用的 Windows 軟體(HP Scan、適用於 OCR 的 Readiris Pro、適用於名片的 Cardiris 以及適用於個人文件管理的
PaperPort)。
5
Page 6

8
Download and install the scanner software for your Mac from www.hp.com/support.
EN
1. Go to www.hp.com/support, select the country/region, and then click Download drivers.
2. Enter a scanner name or product number and then click Go.
3. If necessary, select the correct driver language and operating system.
4. In the Driver – Product Installation Software area click the Download button next to the driver package to download.
ZHCN
从 www.hp.com/support 下载并安装用于 Mac 的扫描仪软件。
1. 访问 www.hp.com/support,选择国家/地区,然后单击下载驱动程序。
2. 输入扫描仪名称或产品编号,然后单击搜索。
3. 如有必要,选择正确的驱动程序语言和操作系统。
4. 在“驱动程序 - 产品安装软件”区域中,单击要下载的驱动器包旁的“下载”按钮。
Download dan instal perangkat lunak pemindai untuk Mac Anda dari www.hp.com/support.
ID
1. Buka www.hp.com/support, pilih negara/kawasan, lalu klik Download drivers (Download driver).
2. Masukkan nama pemindai atau nomor produk, lalu klik Go (Buka).
3. Jika perlu, pilih sistem operasi dan bahasa driver yang benar.
4. Pada Area Driver – Perangkat Lunak Penginstalan Produk, klik tombol Download di samping paket driver yang akan di-download.
www.hp.com/support에서 Mac용 스캐너 소프트웨어를 다운로드하고 설치합니다.
KO
1. www.hp.com/support로 이동하고 국가/지역을 선택한 다음 드라이버 다운로드를 클릭합니다.
2. 스캐너 이름 또는 제품 번호를 입력한 후 이동을 클릭합니다.
3. 필요한 경우 적합한 드라이버 언어 및 운영 체제를 선택합니다.
4. 드라이버 – 제품 설치 소프트웨어 영역에서 다운로드할 드라이버 패키지 옆에 있는 다운로드 버튼을 클릭합니다.
TH
ZHTW
從 www.hp.com/support 下載並安裝適用於您的 Mac 的掃描器軟體。
1. 前往 www.hp.com/support,選擇國家/地區,然後按一下 Download drivers(下載驅動程式)。
2. 輸入掃描器名稱或產品編號,然後按一下 Go(搜尋)。
3. 如有必要,請選擇正確的驅動程式語言和作業系統。
4. 在「Driver – Product Installation Software」(驅動程式 – 產品安裝軟體)區域中,按一下要下載的驅動程式套件旁邊的
Download(下載)按鈕。
6
Page 7

9
ZHCN
For more information, refer to the scanner User Guide, or visit www.hp.com/support.
EN
有关详细信息,请参阅扫描仪《用户指南》,或访问 www.hp.com/support。
Untuk informasi selengkapnya, lihat Panduan Pengguna pemindai, atau kunjungi www.hp.com/support.
ID
자세한 내용은 스캐너 사용 설명서를 참조하거나 www.hp.com/support를 방문하십시오.
KO
TH
ZHTW
如需詳細資訊,請參閱掃描器的《使用指南》,或者造訪 www.hp.com/support。
7
Page 8

www.hp.com
Printed in China
中国印刷
Printed on recycled paper
© Copyright 2015 HP Development Company, L.P.
Reproduction, adaptation or translation without prior written permission
is prohibited, except as allowed under the copyright laws.
The information contained herein is subject to change without notice.
The only warranties for HP products and services are set forth in the
express warranty statements accompanying such products and services.
Nothing herein should be construed as constituting an additional
warranty. HP shall not be liable for technical or editorial errors or
omissions contained herein.
Edition 1, 11/2015
Trademark Credits
Windows® is a U.S. registered trademark of Microsoft Corporation.
OS X is a trademark of Apple Inc., registered in the U.S. and other
countries.
Regulatory Information
Additional regulatory information about your scanner can be found in the
Warranty and Legal Guide.
Regulatory Model Identication Number: For regulatory identication
purposes your product is assigned a Regulatory Model Number. The
Regulatory Model Number for your product is SHNGD-1401-01. This
regulatory number should not be confused with the marketing name
(HP ScanJet Pro 4500 fn1 Network Scanner) or product number (L2749A).
© Copyright 2015 HP Development Company, L.P.
未经事先书面许可,严禁进行任何形式的复制、改编或
翻译,除非版权法另行允许。
此处包含的信息如有更改,恕不另行通知。
HP 产品和服务附带的保修声明中明确规定了此类产品
和服务的所有保修事项。不得将本文的任何内容视为构
成附加保修。HP 不对本文档中的技术错误、编辑错误
或遗漏承担责任。
Edition 1, 11/2015
商标说明
Windows® 是 Microsoft Corporation 在美国的注册商标。
OS X 是 Apple Inc. 在美国和其他国家/地区的注册商标。
管制信息
可在《保修和法律指南》中找到有关扫描仪的其他管制
信息。
管制型号识别码: 出于管制识别的用途,向本产品
分配了一个管制型号。您的产品的管制型号识别码为
SHNGD-1401-01。不应将此管制型号与市场行销名称
(HP ScanJet Pro 4500 fn1 网络扫描仪)或产品编号
(L2749A) 混淆。
8
 Loading...