

Page 1
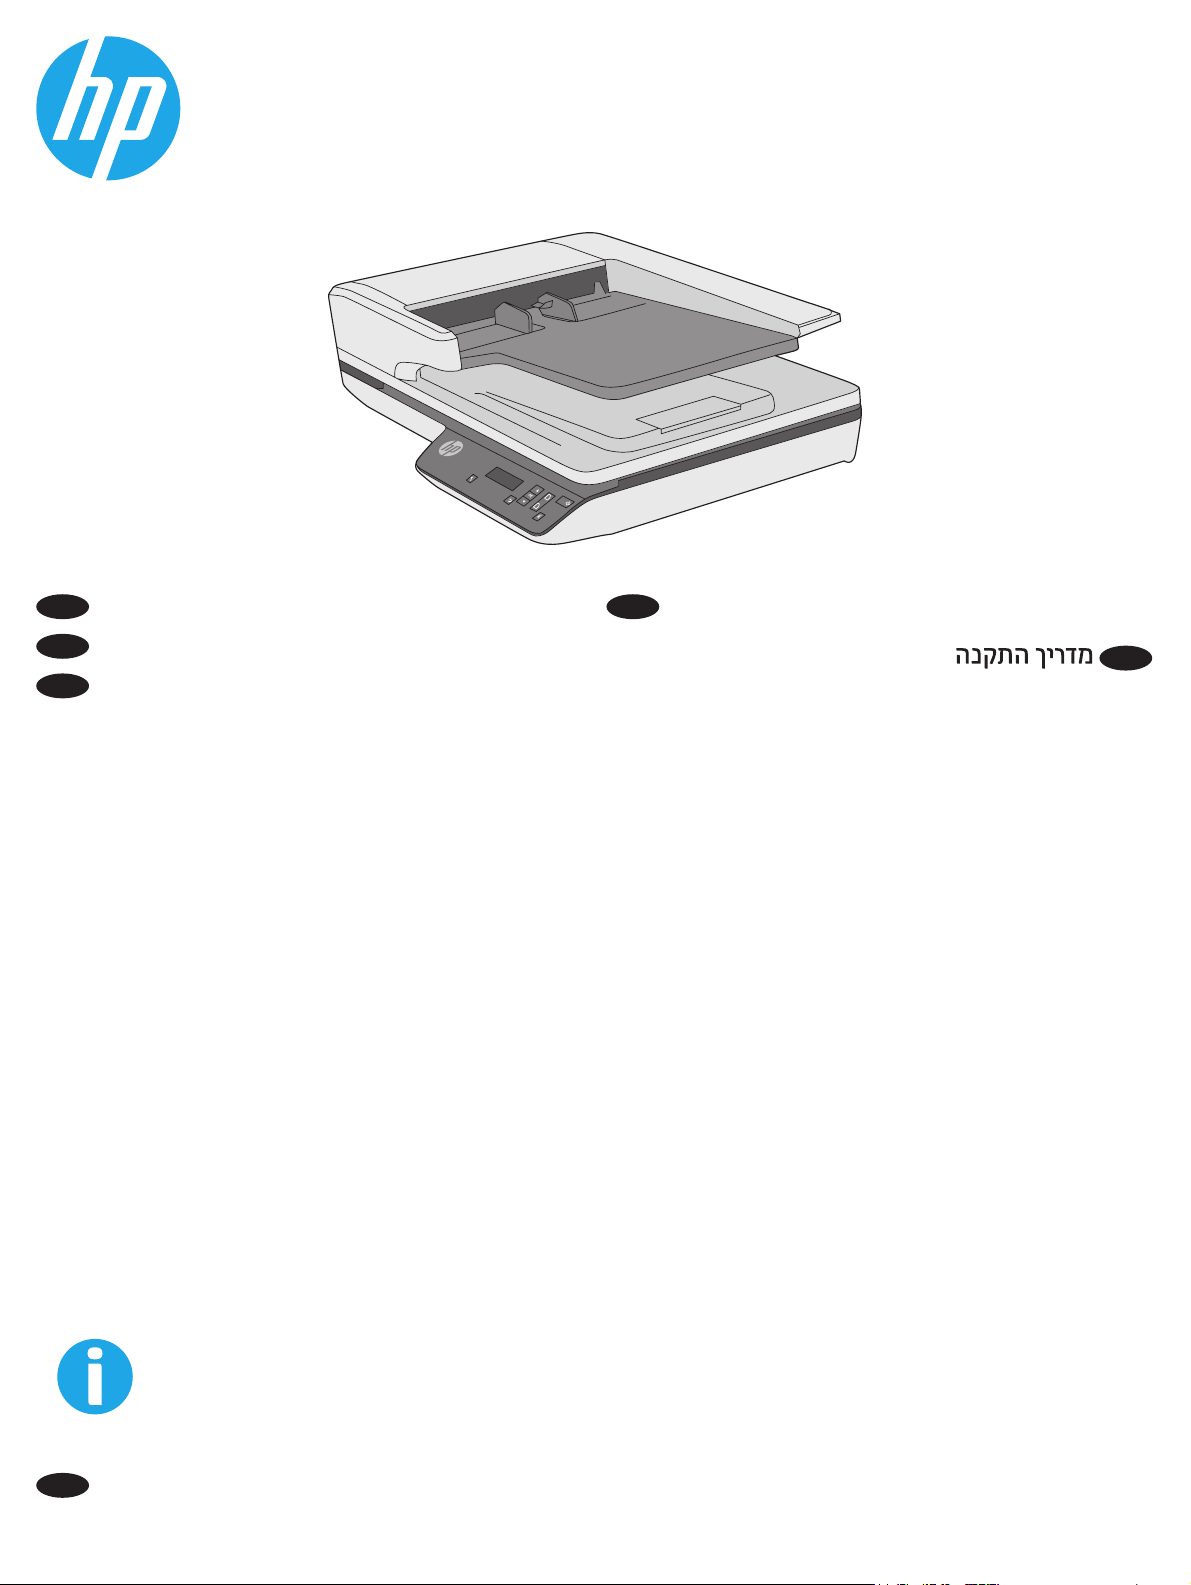
HP ScanJet Pro 3500 f1 Flatbed Scanner
EN
Installation Guide
FR
Guide d’installation
ES
Guía de instalación
PT
Guia de instalação
HE
www.hp.com/support
ES
Lea esto primero
Page 2
2013 Hewlett-Packard Development Company, L.P.
HP COLOR LASERJET ENTERPRISE
FLOW MFP XXXX
www.hp.com
2013 Hewlett-Packard Development Company, L.P.
HP COLOR LASERJET ENTERPRISE
FLOW MFP XXXX
www.hp.com
2013 Hewlett-Packard Development Company, L.P.
HP COLOR LASERJET ENTERPRISE
FLOW MFP XXXX
www.hp.com
2013 Hewlett-Packard Development Company, L.P.
HP COLOR LASERJET ENTERPRISE
FLOW MFP XXXX
www.hp.com
1
2
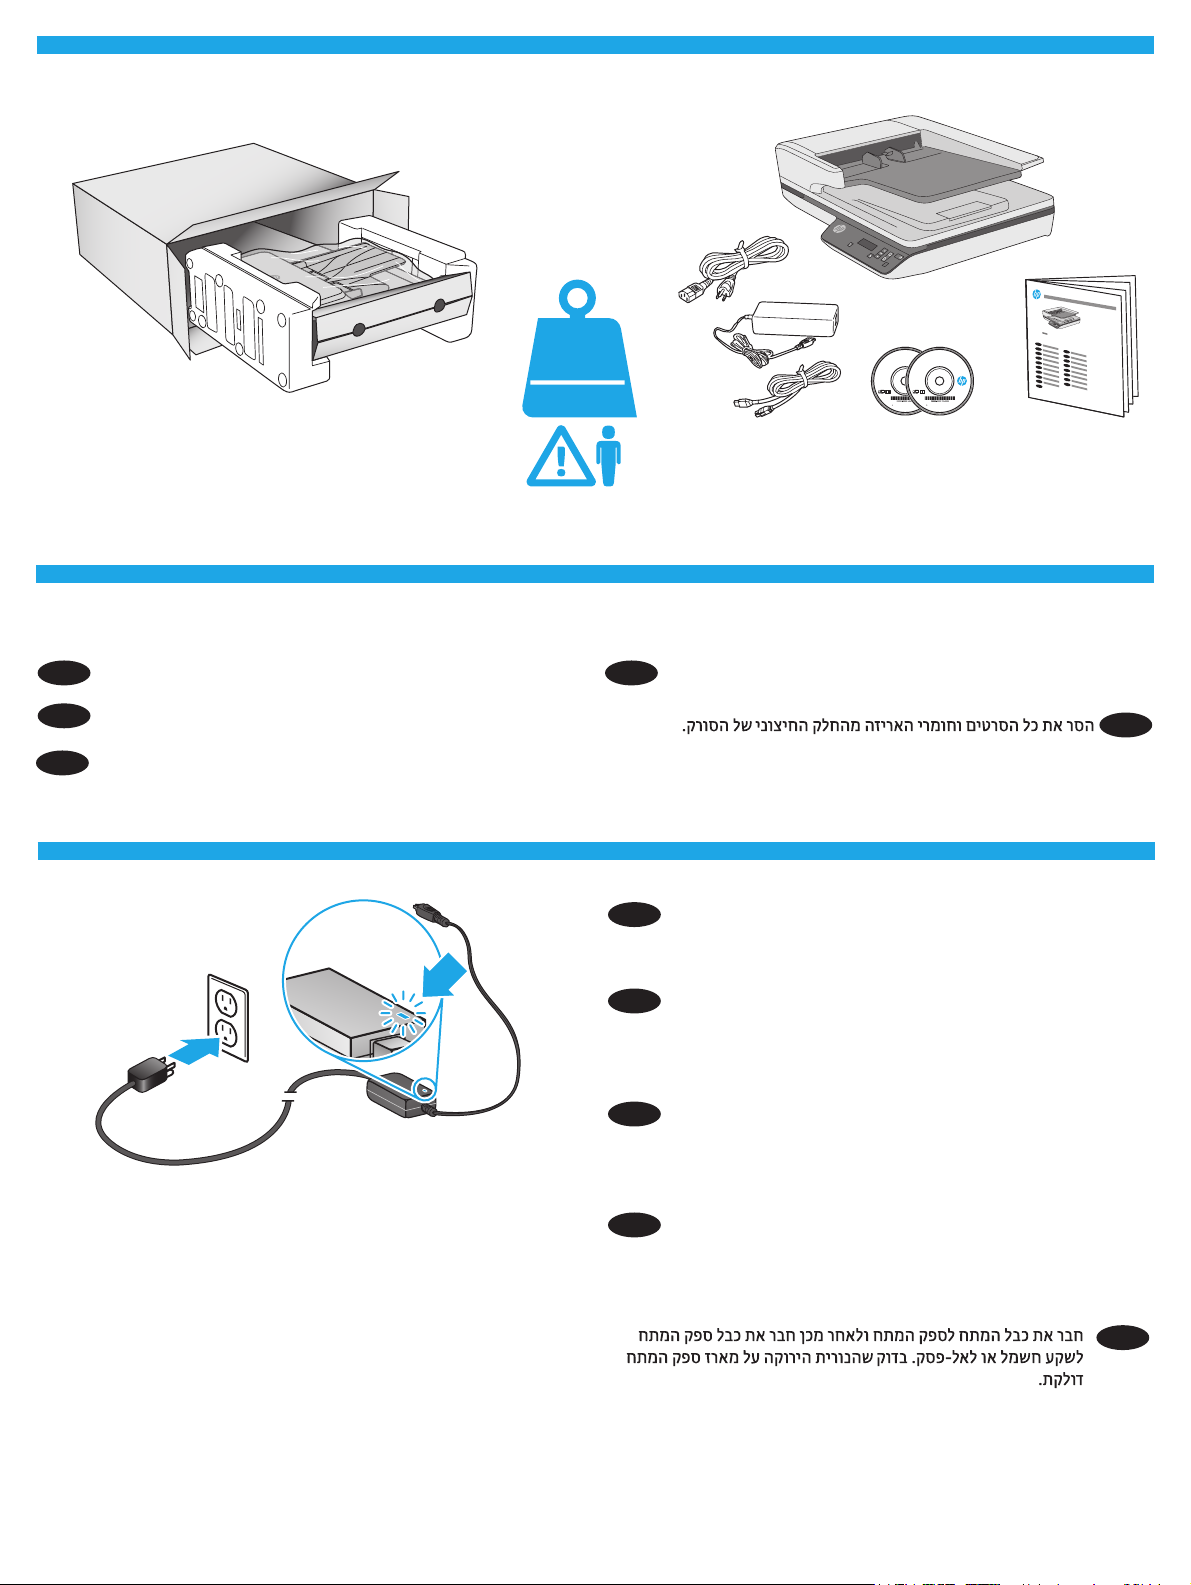
5.58 kg
12.3 lb
Remove all tape and packing material from outside the scanner.
EN
Retirez le ruban adhésif et les matériaux d'emballage présents à
FR
l'extérieur du scanner.
Retire toda la cinta y el material de embalaje del exterior del
ES
escáner.
3
Remova todas as tas e o material de embalagem da parte
PT
externa do scanner.
Connect the power cable to the power supply and connect the
EN
power supply cable into a power outlet or surge protector. Check
that the green LED on the power supply case is on.
Branchez le câble à l'alimentation puis branchez le câble
FR
d'alimentation à une prise ou à un dispositif de protection contre
les surtensions. Vériez que le voyant vert situé sur le bloc
d'alimentation est allumé.
Conecte el cable a la fuente de alimentación y, seguidamente,
ES
enchufe el cable de la fuente de alimentación a un tomacorriente
o protector de sobrevoltaje. Compruebe que el indicador LED
verde de la carcasa del sistema de alimentación esté encendido.
Conecte a fonte de alimentação ao cabo correspondente e
PT
conecte esse cabo a uma tomada elétrica ou estabilizador.
Verique se o LED verde na caixa da fonte de alimentação está
aceso.
HE
HE
2
Page 3
OK
1
2
4
5
5
5
5
5HE5HE55555555555555555555555
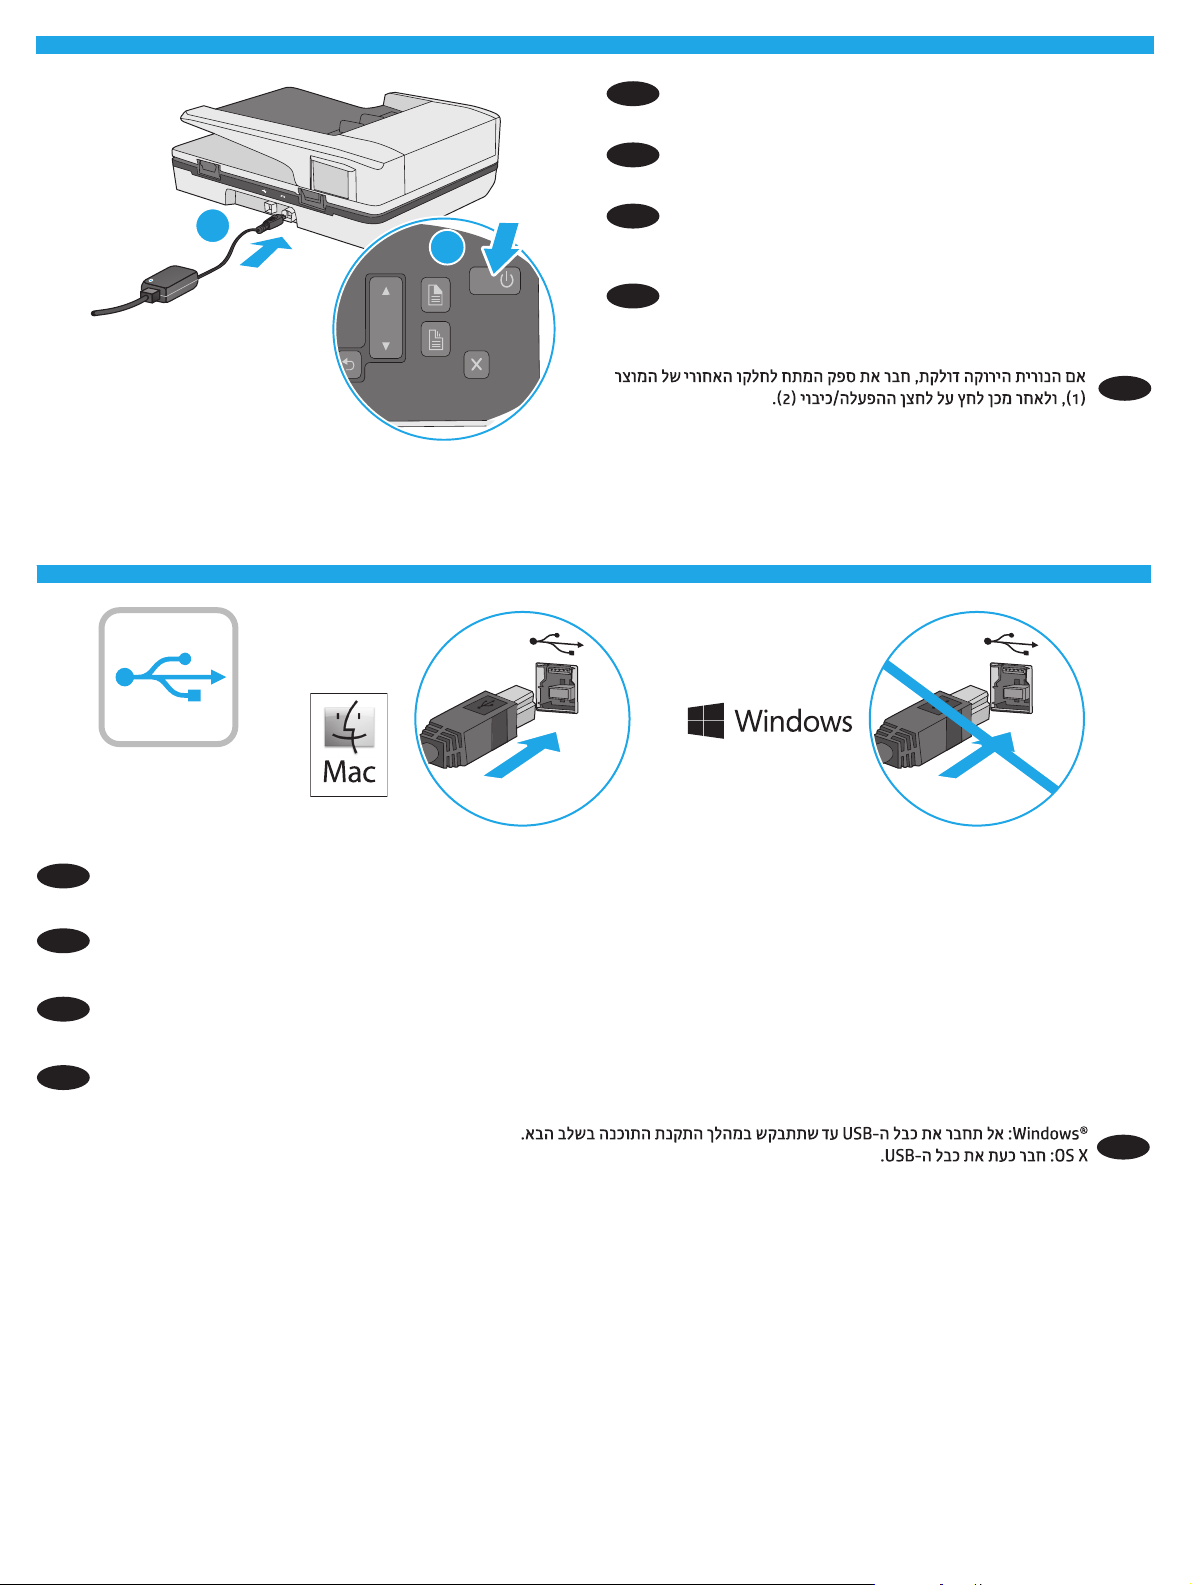
If the green LED is on, plug the power supply into the back of the
EN
device (1) and then press the Power button (2).
Si le voyant vert est allumé, branchez l'alimentation au dos de
FR
l'appareil (1) puis appuyez sur le bouton Power(2).
Si el indicador LED verde está encendido, conecte la fuente de
1
2
ES
alimentación en la parte posterior del dispositivo (1) y pulse el
botón de encendido (2).
Se o LED verde estiver aceso, conecte a fonte de alimentação à
PT
parte de trás do dispositivo (1) e pressione o botão Liga/desliga
(2).
Windows®: Do not connect the USB cable until prompted during the software installation in the next step.
EN
OS X: Connect the USB cable now.
Windows®: ne branchez pas le câble USB tant que vous n'y êtes pas invité durant l'installation du logiciel à l'étape suivante.
FR
OS X: branchez le câbleUSB maintenant.
Windows®: No conecte el cable USB hasta que se le indique durante la instalación del software en el siguiente paso.
ES
OS X: conecte ahora el cable USB.
Windows®: Não conecte o cabo USB até que seja solicitado a fazê-lo durante a instalação do software na próxima etapa.
PT
OS X: Conecte o cabo USB agora.
3
Page 4

6
6
6
6
676
67767676767676767676767676767676767676767676
1. Install the scanner software from the CD. Follow the on-screen instructions.
EN
2. Install the optional Windows software (HP Scan, Readiris Pro for OCR, Cardiris for business cards, and PaperPort for personal document
management) from their respective CDs.
1. Installation du logiciel d’installation du scanner à l’aide du CD. Suivez les instructions aichées à l’écran.
FR
2. Installez le logiciel optionnel Windows (HP Scan, Readiris Pro pour la ROC, Cardiris pour les cartes professionnelles, et PaperPort pour la gestion des documents personnels) à l’aide de leurs CD respectifs.
1.Instale el software del escáner desde el CD. Siga las instrucciones que se muestran en la pantalla.
ES
2. Instale el software opcional de Windows (HP Scan, Readiris Pro para OCR, Cardiris para tarjetas de negocio y PaperPort para administración
de documentos personales) desde sus respectivos CD.
1. Instale o software do scanner usando o CD. Siga as instruções na tela.
PT
2. Instale o software Windows opcional (HP Scan, Readiris Pro para OCR, Cardiris para cartões de visita e PaperPort para gerenciamento de
documentos pessoais) a partir de seus respectivos CDs.
HE
7
7
7
7
7
7
Download and install the scanner software for your Mac from www.hp.com/support.
EN
1. Go to www.hp.com/support, select the country/region, and then click Drivers & Downloads.
2. Enter a product name or number and then click Go.
3. Select the Driver language, and then select an operating system.
4. In the Driver – Product Installation Software area click the Download button next to the driver package to download.
Téléchargez et installez le logiciel de numérisation pour votre Mac sur www.hp.com/support.
FR
1. Rendez-vous sur www.hp.com/support, sélectionnez votre pays/région, puis cliquez sur Pilotes et téléchargements.
2. Entrez une référence ou un numéro de produit puis cliquez sur Aller.
3. Sélectionnez la langue du pilote, puis choisissez un système d’exploitation.
4. Dans le champ Pilote – Logiciel d’installation du produit, cliquez sur le bouton Télécharger à côté du pack de pilote à télécharger.
Descargue e instale el programa del escáner para su Mac desde www.hp.com/support.
ES
1. Vaya a www.hp.com/support, seleccione el país/la región y luego haga clic en Controlador y descargas.
2. Escriba el nombre del producto o número y luego haga clic en Ir.
3. Seleccione el idioma del controlador y luego seleccione el sistema operativo.
4. En el área del Controlador - Software de instalación del producto, haga clic en el botón Descargar que se encuentra al lado del paquete del
controlador para descargas.
Baixe e instale o software do scanner para seu Mac a partir de www.hp.com/support.
PT
1. Acesse www.hp.com/support, escolha o país/região e, em seguida, clique em Drivers e Downloads.
2. Digite o nome ou número de um produto e clique em Ok.
3. Selecione o idioma do driver e então selecione um sistema operacional.
4. Na área Driver – Software de instalação do produto, clique no botão Download próximo do pacote de driver para baixar.
HE
4
Page 5

8
For more information, refer to the scanner User Guide, or visit www.hp.com/support.
EN
Pour plus d’informations, reportez vous au guide d’utilisation du scanner ou rendez-vous sur le site www.hp.com/support.
FR
Para obtener más información, consulte el Manual del usuario del escáner o visite www.hp.com/support.
ES
Para mais informações, consulte o Guia do Usuário do scanner ou acesse www.hp.com/support.
PT
HE
5
Page 6

6
Page 7

7
Page 8

www.hp.com
© 2015 Copyright HP Development Company, L.P.
Reproduction, adaptation or translation without prior written permission
is prohibited, except as allowed under the copyright laws.
The information contained herein is subject to change without notice.
The only warranties for HP products and services are set forth in the
express warranty statements accompanying such products and services.
Nothing herein should be construed as constituting an additional
warranty. HP shall not be liable for technical or editorial errors or
omissions contained herein.
Edition 1, 9/2015
Trademark Credits
Windows® is a U.S. registered trademark of Microsoft Corporation.
© 2015 Copyright HP Development Company, L.P.
La reproduction, l'adaptation ou la traduction sans autorisation écrite
préalable est interdite, sauf dans le cadre des lois sur le droit d'auteur.
Les informations contenues dans ce document peuvent être modiées
sans préavis.
Les seules garanties pour les produits et servicesHP sont décrites
dans les déclarations de garantie expresses accompagnant ces mêmes
produits et services. Les informations contenues dans ce document ne
constituent en aucun cas une garantie supplémentaire. HP ne pourra
être tenu responsable des erreurs ou omissions de nature technique ou
rédactionnelle qui pourraient subsister dans le présent document.
Édition 1, 9/2015
Regulatory Information
Additional regulatory information about your scanner can be found in the
Warranty and Legal Guide.
Regulatory Model Identication Number: For regulatory identication
purposes your product is assigned a Regulatory Model Number. The
Regulatory Model Number for your product is SHNGD-1401-00. This
regulatory number should not be confused with the marketing name
(HP ScanJet Pro 3500 f1 Flatbed Scanner) or product number (L2741A).
Informations réglementaires
Des informations légales supplémentaires concernant votre scanner sont
disponibles dans le guide de garantie et de dispositions légales.
Numéro d'identication de modèle légal: An de permettre son
identication sur le plan juridique, un numéro de modèle légal a été
attribué à votre produit. Le numéro de modèle légal de votre produit est
SHNGD-1401-00. Ce numéro légal est diérent de l'appellation marketing
(scanner de documents à plat HP ScanJet Pro 3500 f1) et du numéro du
produit (L2741A).
Crédits concernant les marques
Windows® est une marque déposée de Microsoft Corporation aux États-
Unis.
*L2741-90019*
*L2741-90019*
L2741-90019
 Loading...