

Page 1
hp scanjet
2300c or 3500c series
hp scanjet
2300c 3500c
hp scanjet
2300c 3500c
hp scanjet
2300c 3500c
user's manual
Page 2

Page 3

hp scanjet 2300c or 3500c series
English
user’s manual
Page 4

copyright information
© Copyright Hewlett-Packard Company 2002
All rights reserved. Reproduction, adaptation, or translation without prior written permission
is prohibited, except as allowed under copyright laws.
This product incorporates Adobe's PDF technology, which contains an implementation of
LZW licensed under U.S. Patent 4,558,302.
trademark credits
Adobe and the Acrobat logo are either registered trademarks or trademarks
of Adobe Systems Incorporated in the United States and/or other countries.
Microsoft and Windows are registered trademarks of Microsoft Corporation.
All other product names mentioned herein may be trademarks of their
respective companies.
warranty
The information contained in this document is subject to change without notice.
Hewlett-Packard makes no warranty of any kind with respect to this information. HEWLETTPACKARD SPECIFICALLY DISCLAIMS THE IMPLIED WARRANTY OF MERCHANTABILITY
AND FITNESS FOR A PARTICULAR PURPOSE.
Hewlett-Packard shall not be liable for any direct, indirect, incidental, consequential, or
other damage alleged in connection with the furnishing or use of this information.
The TWAIN Toolkit is distributed as is. The developer and distributors of the TWAIN Toolkit
expressly disclaim all implied, express or statutory warranties including, without limitation,
the implied warranties of merchantability, noninfringement of third party rights and fitness
for a particular purpose. Neither the developers nor the distributors will be liable for
damages, whether direct, indirect, special, incidental, or consequential, as a result of the
reproduction, modification, distribution or other use of the TWAIN Toolkit.
NOTICE TO U.S. GOVERNMENT USERS: RESTRICTED RIGHTS COMMERCIAL COMPUTER
SOFTWARE: “Use, duplication, or disclosure by the Government is subject to restrictions as
set forth in subparagraph (c) (1) (ii) of the Rights in Technical Data Clause at DFARS 52.227-
7013.”
Material scanned by this product may be protected by governmental laws and other
regulations, such as copyright laws. The customer is solely responsible for complying with
all such laws and regulations.
product restricted material
This HP product contains the following materials that might require special handling at endof-life:
• mercury in the fluorescent lamp in the scanner/transparent materials adapter/liquid
crystal display (< 5 mg)
• lead in solder
For recycling information, you can contact http://www.hp.com/go/recycle, your local
authorities, or the Electronics Industries Alliance at http://www.eiae.org.
For information about HP’s environmental stewardship program, see the “Warranty and
Specifications” section of the electronic Help for your scanner.
Page 5

contents
English
install the scanner. . . . . . . . . . . . . . . . . . . . . . . . . . . . 1
before you begin . . . . . . . . . . . . . . . . . . . . . . . . . . . . . . . 1
check the box contents . . . . . . . . . . . . . . . . . . . . . . . . . 1
install the software and connect the scanner . . . . . . . . . . . . . 2
install the software first (Windows and Macintosh) . . . . . . 2
connect the scanner first (Windows only) . . . . . . . . . . . . 2
connect the optional TMA (hp scanjet 3500c series only) . . . . 3
scanner overview . . . . . . . . . . . . . . . . . . . . . . . . . . . . 4
how to use the scanner. . . . . . . . . . . . . . . . . . . . . . . . 5
select items to scan . . . . . . . . . . . . . . . . . . . . . . . . . . . . . . 5
preview and modify scanned images. . . . . . . . . . . . . . . . . . 6
e-mail a scan . . . . . . . . . . . . . . . . . . . . . . . . . . . . . . . . . . 6
print copies . . . . . . . . . . . . . . . . . . . . . . . . . . . . . . . . . . . 7
create a photo show and save it on CD . . . . . . . . . . . . . . . . 8
scan slides or negatives . . . . . . . . . . . . . . . . . . . . . . . . . . . 8
change button settings . . . . . . . . . . . . . . . . . . . . . . . . . . . . 8
contents
installation problems - hp scanjet 2300c or
3500c series. . . . . . . . . . . . . . . . . . . . . . . . . . . . . . . 11
scanner is not working. . . . . . . . . . . . . . . . . . . . . . . . . . . 11
scanner initialization failed. . . . . . . . . . . . . . . . . . . . . . . . 12
scanner still does not work properly. . . . . . . . . . . . . . . . . . 12
uninstall the software . . . . . . . . . . . . . . . . . . . . . . . . . . . . 13
hp support . . . . . . . . . . . . . . . . . . . . . . . . . . . . . . . . 14
find hp help on the web . . . . . . . . . . . . . . . . . . . . . . . . . . 14
contact hp customer support . . . . . . . . . . . . . . . . . . . . . . . 15
obtain support in the United States . . . . . . . . . . . . . . . 15
obtain support worldwide . . . . . . . . . . . . . . . . . . . . . . 16
iii
Page 6
1
before you begin
Make sure that you have a universal serial bus interface connection (USB port) on
your computer and that your computer is running Microsoft
later or Macintosh OS 9 or later. (Macintosh support is available for the HP
Scanjet 3500c series only.)
install the scanner
Windows 98 or
USB port
check the box
contents
1
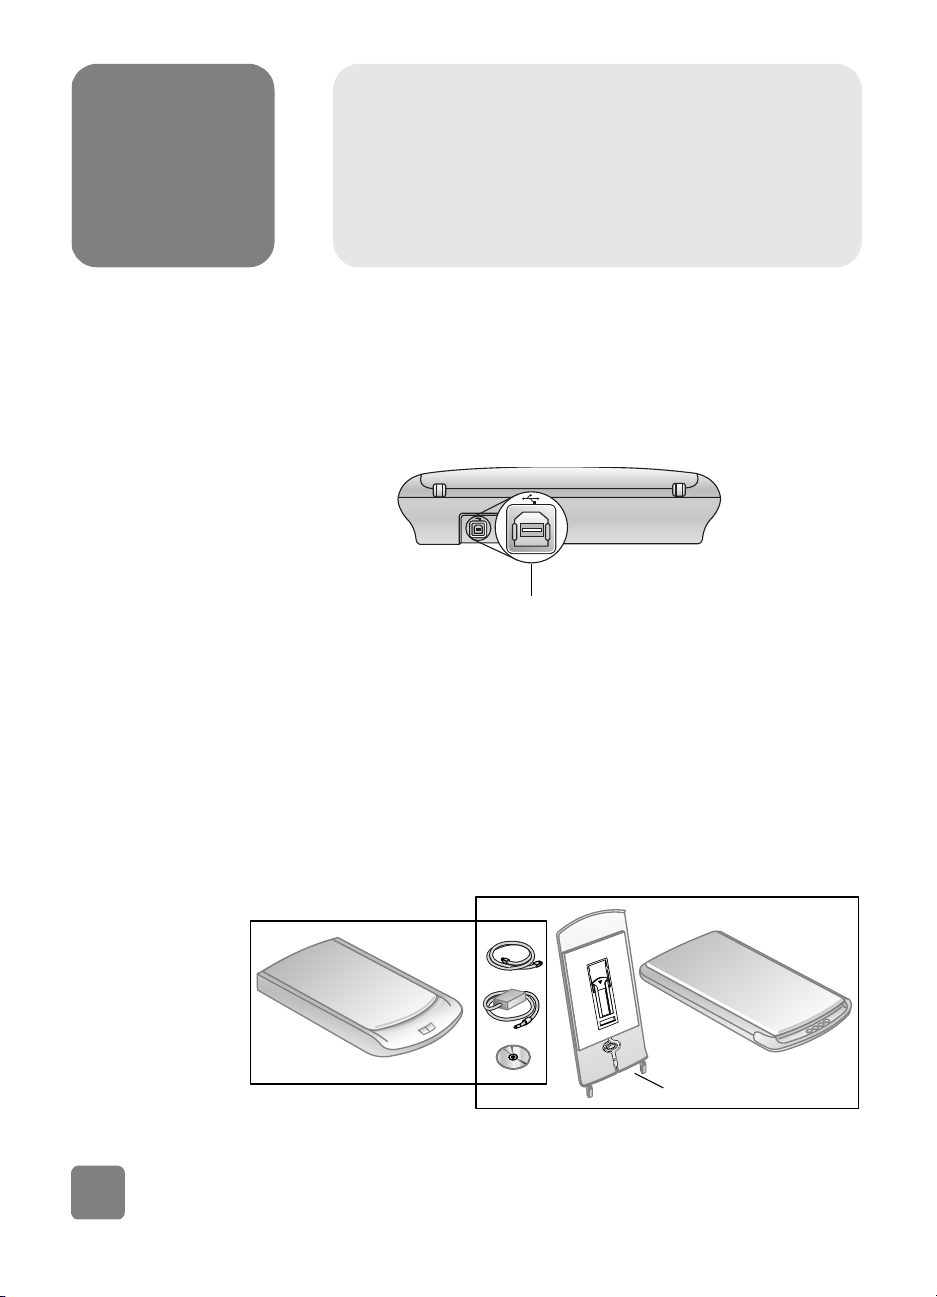
Your scanner box should contain the following items:
• HP Scanjet 2300c or 3500c series digital flatbed scanner
•HPPhoto & Imaging software CD-ROM
• USB cable
•Power cable
• Transparent materials adapter (TMA) (some models of the HP Scanjet
3500c series only)
HP Scanjet 3500c series scanner
HP Scanjet 2300c scanner
TMA (some models only)
install the scanner
Page 7

install the software and connect the scanner
Set up your scanner in one of two ways: either install the software first or connect
the scanner first. It is recommended that you install the software first, especially
on a Macintosh computer.
If you experience difficulty installing your scanner, see installation
problems - hp scanjet 2300c or 3500c series
on page 11.
English
install the
software first
(Windows and
Macintosh)
1 Close all open programs on your computer.
2 Locate the HP Photo & Imaging software CD-ROM that is appropriate for
your English and operating system and insert it into your computer.
3 For a Microsoft Windows computer: Follow the instructions on the screen.
Or, if the installation program does not start automatically:
a. On the Start menu, click Run.
b. Type: x:setup.exe (where x is the letter of the CD-ROM drive).
For a Macintosh computer (HP Scanjet 3500c series only): Double-click the
Installation Read Me file on the CD-ROM and follow the instructions.
4 If the instructions prompt you to shut down your computer, do so.
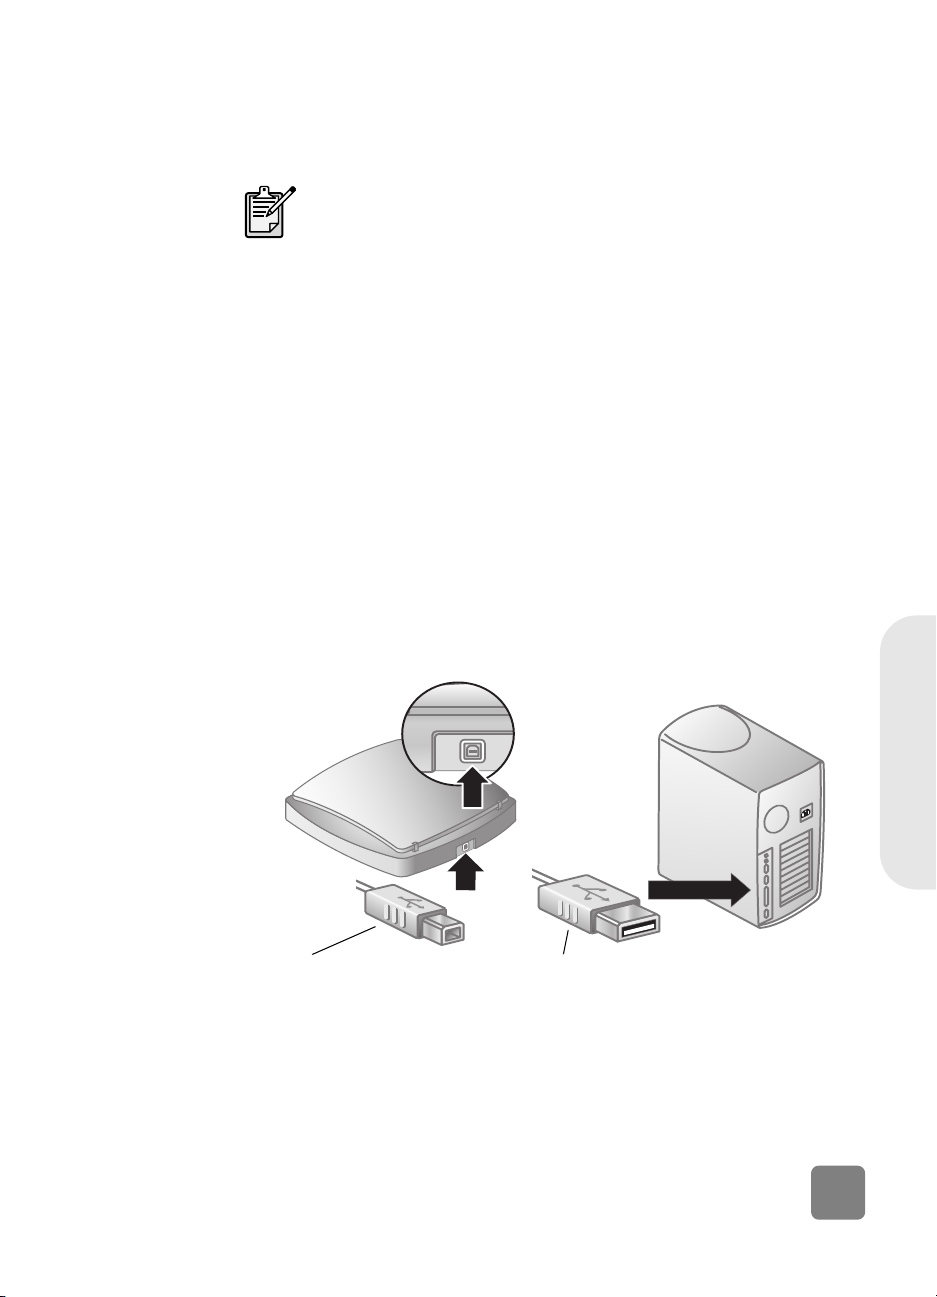
5 Connect the USB cable between the USB port on the scanner and the USB
port on the computer.
6 Connect the power cable between the scanner and a surge protector or a
grounded wall outlet that is easy to reach. This turns on the scanner.
7 If necessary, turn your computer on again.
connect the
scanner first
(Windows
only)
install the scanner
connect USB cable to scanner connect USB cable to computer
1 Make sure that your computer is on and that the operating system is
running.
2 Connect the USB cable between the USB port on the scanner and the USB
port on the computer.
2
Page 8

3 Connect the power cable between the scanner and a surge protector or a
grounded wall outlet that is easy to reach. This turns on the scanner.
4 Follow the prompts in the New Hardware Found wizard.
5 Insert the HP Photo & Imaging software CD-ROM and click Next. If the
wizard prompts you for a drive letter, select your CD-ROM drive.
6 In the HP Scanjet installation program, follow the instructions.
7 After installation is complete, another HP installation program starts. You
can install additional software, register your scanner, and find additional
help. To see if your scanner came with additional software, click Install
software and follow the prompts.
connect the optional TMA (hp scanjet 3500c series only)
Your scanner might have a transparent materials adapter (TMA) to scan 35 mm
slides or negatives.
• If your scanner has a TMA, connect the TMA cable to its port on the
scanner.
3
install the scanner
Page 9

scanner overview
This section describes the buttons on the front panel of the scanner and available
accessories.
Your scanner might have all or only some of these features.
Button or accessory Description
E-MAIL button Scans the item using settings optimized for e-mail
CAN button Scans your original item to the HP Scanning
S
2
English
and sends the scan to your e-mail software (if the
software is supported).
software, where you can preview or change the
scanned image.
scanner overview
OPY button Scans the item and sends it to a printer to make
C
copies.
M
EMORIES DISC CREATOR button Scans the item to the Memories Disc Creator
software, where you can create a photo show on a
CD, along with background music and titles.
HP Scanjet transparent materials
adapter (TMA) (HP Scanjet 3500c
series only)
Scans slides or negatives to the HP Scanning
software, where you can preview or change the
scanned image.
4
Page 10

3
You can start your scanner projects in one of two ways: from the scanner buttons
or from the HP Photo & Imaging software. The scanner buttons offer shortcuts to
some of the software functions. Start from the software when you want more
options and control or if your scanner model does not have all the buttons.
The procedures in this section use the default button settings. For more information
about changing the settings for one or more buttons, see change button settings.
select items to scan
Follow these guidelines when you select items to scan.
items for the scanner glass
The scanner glass can be used to scan a wide range of items, from business cards
and photos to fabric and artwork.
how to use the scanner
For more information about using the software, see the HP Photo
& Imaging software Help.
Avoid placing items with sharp edges in the scanner. Doing so can
damage the scanner.
Before placing an item on the scanner glass, make sure the item is free of wet
glue, correction fluid, or other substances that can be transferred to the glass.
items for the transparent materials adapter
The HP Scanjet transparent materials adapter (TMA) is available with the
HP Scanjet 3500c series. You can use the TMA to scan:
•35 mm negatives
•35 mm slides
5
how to use the scanner
Page 11

preview and modify scanned images
If your scanner has a SCAN button ( ), you can use it to scan pictures and
documents.
When you press the S
software you can preview and make changes to the scanned image before you
send it to the HP Photo & Imaging Gallery.
to scan a picture
1 Close the HP Copying software if it is open on your computer.
2 Place the original face down on the scanner glass and close the lid.
3 Press the S
4 Follow the instructions on your computer screen. The HP Scanning software
scans the item with settings optimized for pictures.
to scan a document
To scan a document, use the HP Photo & Imaging software. On the Start menu,
point to Programs, point to Hewlett-Packard, point to your scanner, and click hp
photo & imaging director. In the Director, click Scan Document. You can also
change the setting for the S
optimized for documents. For more information, see change button settings.
CAN button, the HP Scanning software opens. Within the
CAN button on the front panel of the scanner.
CAN button so that it regularly scans using settings
English
e-mail a scan
For Macintosh see
HP Precisionscan
Pro Help.
Macintosh OS 9: Choose Apple Help Center from the Finder
Help menu. Then choose HP Precisionscan Pro Help.
Macintosh OS X: Ch oose Mac He lp fr om the Find er He lp me nu.
Then click the question mark on the bottom-left corner of the Mac
Help window and choose HP Precisionscan Pro Help.
If your scanner has an E-MAIL button ( ), you can e-mail a scan directly from
your scanner. You must also have an Internet connection and a supported e-mail
program.
The HP Photo & Imaging software supports many popular e-mail
programs. If your e-mail program is supported, it opens
automatically when you try to e-mail a scan. If you are using an
unsupported e-mail program, the scanner cannot scan items
directly into an e-mail message. In this case, save the scan to a file,
and then attach it to your e-mail message.
1 Close the HP Scanning software and the HP Copying software if they are
open on your computer.
2 Place the original face down on the scanner glass and close the lid.
3 Press the E-MAIL button on the scanner. The scanner scans the item using
default settings optimized for e-mail.
how to use the scanner
6
Page 12

4 Follow the instructions on your computer screen. If your e-mail program is
supported, a screen appears where you can address and compose a
message.
You can also e-mail a scan from the software. For more information, see the
HP Photo & Imaging software Help.
For Macintosh see
HP Precisionscan
Pro Help.
Macintosh OS 9: Choose Apple Help Center from the Finder
Help menu. Then choose HP Precisionscan Pro Help.
Macintosh OS X: Ch oose Mac He lp fr om the Find er He lp me nu.
Then click the question mark on the bottom-left corner of the Mac
Help window and choose HP Precisionscan Pro Help.
to select original type for e-mail
If the software prompts you for an original type, you have two choices: Picture or
Document. The scanner uses optimized scan settings for your item depending on
your choice. Use the following guidelines to determine the best original type for
your needs.
If your original
consists of
Text, or both text and
graphics
A printed photograph
or image
If you need to save the item as a file type other than JPG or PDF,
scan and save the item by using the HP Scanning software.
Select this original
type
Document Adobe® Portable
Picture Joint Photographic
Receive this type of
output
Document Format (PDF)
file
Experts Group (JPG) file
print copies
7
to change the original type
If the software does not prompt you for an original type, you can change the
setting for the E-
MAIL button so that it regularly scans using settings optimized for
either documents or pictures. For more information, see change button settings.
If your scanner has a COPY button ( ), you can scan an item and send it
directly to a printer to make copies.
1 Close the HP Scanning software if it is open on your computer.
2 Place the original face down on the scanner glass and close the lid.
3 Press the C
OPY button on the scanner. The software scans the item using
default settings optimized for printing.
4 A message appears that shows the copy progress.
how to use the scanner
Page 13

If you want to reduce or enlarge the copies, lighten or darken them, or
change printer settings, click Cancel in the copy progress dialog box. You
can then make changes to settings in the HP Copying software.
You can also make copies from the HP Copying software. For more information,
see the HP Photo & Imaging software Help.
For Macintosh see
HP Precisionscan
Pro Help.
Macintosh OS 9: Choose Apple Help Center from the Finder
Help menu. Then choose HP Precisionscan Pro Help.
Macintosh OS X: Ch oose Mac He lp fr om the Find er He lp me nu.
Then click the question mark on the bottom-left corner of the Mac
Help window and choose HP Precisionscan Pro Help.
create a photo show and save it on CD
Some scanners have a MEMORIES DISC CREATOR button ( ).
If you have a read/write CD drive and writable CDs, you can use your scanner
to create personalized photo shows with music and titles. Then you can watch the
photo show on your television using a compatible DVD player. You can also make
photo reprints from the CD.
1 Close the HP Scanning software and the HP Copying software if they are
open on your computer.
2 Place the original face down on the scanner glass and close the lid.
3 Press the M
EMORIES DISC CREATOR button on the scanner and follow the
instructions on the computer screen.
You can also create photo shows and save them on CD from the software. For
more information, see the HP Photo & Imaging software Help.
scan slides or negatives
On an HP Scanjet 3500c series scanner, you can use the optional HP Scanjet
transparent materials adapter (TMA) to scan slides or negatives. To do so, use the
HP Scanning software rather than the scanning buttons.
For more information about the TMA, see TMA - hp scanjet 3500c series in
the HP Photo & Imaging software Help.
English
For Macintosh see
HP Precisionscan
Pro Help.
change button settings
When you use the scanner buttons, the scanner uses settings optimized for the
destination, such as e-mail, that is associated with that button. Examples of
settings include resolution, size, and output type. Settings are applied to all items
scanned with that button until you change the settings again.
how to use the scanner
Macintosh OS 9: Choose Apple Help Center from the Finder
Help menu. Then choose HP Precisionscan Pro Help.
Macintosh OS X: Ch oose Mac He lp fr om the Find er He lp me nu.
Then click the question mark on the bottom-left corner of the Mac
Help window and choose HP Precisionscan Pro Help.
8
Page 14

If one of your scanner buttons is not listed here, its settings cannot be changed.
To change the settings for the current item only, you might want to
scan using the HP Photo & Imaging software instead.
You change button settings from the Director, which is the main window that you
use to reach the many functions of the HP Photo & Imaging software.
to open the director
•On the Start menu, point to Programs, point to Hewlett-Packard, point to
your scanner, and click hp photo & imaging director.
change
settings for the
E-MAIL button
change
settings for the
SCAN button
For Macintosh see
HP Precisionscan
Pro Help.
If your scanner has an E-MAIL button, you change its settings in two places: in
Button Settings and in E-mail Settings.
1 Open the Director, and on the Settings menu, click Button Settings.
2 Click the E-mail Button tab, and change the settings.
3 Return to the Director, and on the Settings menu, click E-mail Settings.
4 Click the Scan Document tab, Scan Picture tab, or Program tab, and change
the settings.
If your scanner has a SCAN button, use the following procedure to change its
settings.
1 Open the Director, and on the Settings menu, click Button Settings.
2 Click the Scan Button tab, and change the settings.
Macintosh OS 9: Choose Apple Help Center from the Finder
Help menu. Then choose HP Precisionscan Pro Help.
Macintosh OS X: Ch oose Mac He lp fr om the Find er He lp me nu.
Then click the question mark on the bottom-left corner of the Mac
Help window and choose HP Precisionscan Pro Help.
to scan to another program
You can make your scans go directly to a program other than the HP Scanning
software. When you press the S
program you have selected (for example, a word-processing program).
On a Windows computer:
1 Open the Director, and on the Settings menu, click Button Settings.
2 On the Scan Button tab, in the Destination box, specify the destination to
which you want to send your scan.
3 Change other settings as required, and then click OK.
If you want your scans to go directly to the selected destination, on the Scan
Button tab, make sure the Show Preview check box is cleared.
CAN button, your scans go to the destination
9
how to use the scanner
Page 15

to change
settings for the
COPY button
If your scanner has a COPY button, the software will remember the settings you
chose the last time you used the HP Copying software.
•Open the Director, click Make Copies, and then change the settings.
English
how to use the scanner
10
Page 16

4
This chapter contains solutions to common installation problems. For solutions to
usage problems or maintenance issues, such as cleaning the scanner glass, see
“troubleshooting” in the HP Photo & Imaging software Help.
scanner is not working
• First, check your computer:
– Make sure your computer meets the minimum system requirements that
are listed on the scanner box.
– If you do not have enough hard-disk space, remove unnecessary files or
install the software on a different disk drive.
• On a Microsoft® Windows® computer, if you receive a message such as
“Destination Directory Is Invalid” or “Program Folder Is Invalid” during
installation, do one of the following:
– Type a valid destination folder name. The destination folder cannot
contain the following characters: /, \, :, ?, *, <, >, “, or |.
– Find a valid folder using the Browse button.
• Check the cables:
– Check that the power cable is securely connected between the scanner
and a live electrical outlet or surge protector.
– If the power cable is connected to a surge protector, make sure the
surge protector is plugged into an outlet and turned on.
– Make sure you use the USB cable that was included with the scanner.
Another USB cable might not be compatible with the scanner.
– Check that the USB cable is securely connected between the scanner
and the computer.
– Disconnect the power cable from the scanner and turn off the computer.
After 30 seconds, reconnect the power cable to the scanner and then
turn on the computer, in that order.
– On a Macintosh computer (HP Scanjet 3500c series only), use the
Apple System Profiler to make sure the scanner is connected to the
computer correctly.
installation problems - hp
scanjet 2300c or 3500c series
11
installation problems - hp scanjet 2300c or 3500c series
Page 17

• Test the scanner hardware (HP Scanjet 2300c only):
a. Disconnect the USB cable and the power cable from the scanner. Make
sure the power cable is still connected to the power source.
b. Press the S
power cable back into the scanner.
The scanner lamp should turn on, and the carriage in the scanner
should move forward and backward.
c. To end the test, unplug the power cable.
If the scanner lamp does not turn on or the carriage does not move, a
problem exists with the scanner hardware. Contact HP Customer Support.
scanner initialization failed
• If you receive a message that the scanner initialization failed, or if the
HP Scanning software stops working after it has been functioning properly,
try the following procedures.
a. Close the HP Scanning software if it is open.
b. Make sure that the cables connecting the computer and the HP scanner
are securely fastened.
c. Turn the scanner off by unplugging the power cord. Turn the scanner
back on by plugging the power cord in.
d. Turn the computer off and then on again.
• If the scanner still fails to initialize, run the Repair utility (Windows
computers only) as described in the next topic, scanner still does not work
properly.
CAN and COPY buttons at the same time, while plugging the
English
scanner still does not work properly
• If the scanner stops scanning or the buttons no longer work as they should,
a software conflict might exist on your computer. You might need to reinstall
the HP Photo & Imaging software. To do this, run the Repair utility
(Windows computers only).
a. Click Start, point to Settings, and then click Control Panel (in Windows
XP, click Start, and then click Control Panel).
b. Click Add/Remove Programs, and then select the HP Photo & Imaging
software.
c. Click Change (or Add/Remove, depending on your version of
Windows).
d. Follow the instructions on the computer screen, and then click Repair.
• If this does not work, install the scanner on another computer. This will help
determine if the problem is related to the first computer or to the scanner.
• If the scanner still does not work, contact HP Customer Support.
If the troubleshooting information you need is not shown here, see the HP Photo
& Imaging software ReadMe file for the most recent information, or review the
troubleshooting section in the electronic Help.
installation problems - hp scanjet 2300c or 3500c series
12
Page 18

uninstall the software
The Uninstall option of the setup program allows you to remove the scanning
software from your computer.
for Windows computers
1 Click Start, point to Settings, and then click Control Panel (in Windows XP,
click Start, and then click Control Panel).
2 Click Add/Remove Programs, and then select the HP Photo & Imaging
software.
3 Click Change (or Add/Remove, depending on your version of Windows).
4 Follow the instructions on the computer screen, and then click Remove.
for Macintosh computers (hp scanjet 3500c series only)
1 Unplug the scanner and restart the computer. (If you do not unplug the
scanner and restart the computer before you uninstall the software, some
files are not removed from your computer during uninstallation.)
2 Insert the HP Photo & Imaging CD-ROM into your computer’s CD-ROM
drive. (If the HP Photo & Imaging CD-ROM window does not appear,
double-click the icon for the CD-ROM.)
3 Double-click the Installer, and then follow the instructions on the screen.
4 When the main installation dialog box appears, select Uninstall from the
pull-down menu.
5 Click Uninstall, and then follow the instructions on the computer screen.
13
installation problems - hp scanjet 2300c or 3500c series
Page 19

hp support
For warranty and specifications, see the electronic Help for your scanner.
For regulatory information, see the regulatory_supplement.htm file on the CDROM that came with your scanner.
find hp help on the web
HP provides several resources on the Web to provide help with your scanner.
These Web services are free and available to you 24 hours a day, 7 days a week.
visiting hp
websites
hp product support
Visit http://www.hp.com/cposupport/loc/regional.html, select your region, and
then type your scanner model in the “quick find” box, to find information about
the following topics:
• setting up and using your scanner
• downloading drivers
• solving a problem
•ordering
•warranty
5
English
hp support
hp scanjet website
Visit http://www.hp.com and click “products and services” for the following
information:
• Tips for using your scanner more effectively and creatively
• HP Scanjet driver updates and software
accessibility website
Customers with disabilities can get help by visiting http://www.hp.com/hpinfo/
community/accessibility/prodserv/.
hp assistance
If you cannot find an answer to your question by using the websites listed above,
visit http://www.hp.com/cposupport/mail_support.html. From there, you can
discover how to contact HP by using e-mail, the telephone, and other methods.
14
Page 20

contact hp customer support
Before contacting HP Customer Support, please see find hp help on the web. The
website services described in that section are free and available to you around
the clock. If you don’t find what you need on the Web, please contact
HP Customer Support.
You can contact HP by telephone or mail for support and service for your scanner.
Prices, availability, and hours of support are subject to change without notice.
how hp can
help
Hewlett-Packard's support hotline can help resolve problems with:
•setup
• installation
• configuration
•operation
For questions relating to operating systems or network configurations, contact
your point of purchase or internal support department. For help with non-HP
hardware or software, please contact the manufacturer of the other product.
before you call
Please try the following steps before you call HP Customer Support:
• Review the “installation problems” chapter in the user’s manual; for
additional troubleshooting, see the “troubleshooting” module in the HP
Photo & Imaging software Help.
• Review the troubleshooting information on the HP product support website.
when you call
If possible, be at the computer where the scanner is installed and have the
following information ready when you call:
• serial number (found on the back or bottom of your scanner or under the
scanner glass)
• product name (found on the scanner lid)
• date of purchase
obtain support
in the United
States
15
free telephone support for 90 days
Within 90 days of your purchase, telephone support is provided to you free of
charge. If this is a long distance call for you, long distance charges will apply.
Call (208) 323-2551.
Our support staff is available from 6 am to 10 pm Mountain Time, Monday
through Friday, and 9 am to 4 pm on Saturday.
hp support
Page 21

after the first 90 days
Call (208) 323-2551.
Charges are $25.00 per issue, charged to your credit card.
If you think your HP product might need service, call HP Customer Support, which
can help determine if service is required.
obtain support
worldwide
hewlett-packard upgraded warranty statement
You can buy an extended, comprehensive warranty for your HP product, but you
must do so within 180 days of purchasing the product.
Upgrade your standard factory warranty to three years with the HP SupportPack.
Service coverage begins on product purchase date and the pack must be
purchased within the first 180 days of product purchase. HP will determine the
hardware service offering based upon the outcome of system self-test programs
run by the customer through the initial call to HP Customer Support. If during your
technical support call it is determined that your product needs replacement, then
HP will ship you this replacement product the next business day free of charge.
This warranty upgrade offers maximized uptime and productivity, the convenience
of door-to-door pickup and delivery, with all packaging and freight prepaid by
HP.
Available in the US only. For more information call 1-888-999-4747 or visit http:/
/www.homeandoffice.hp.com and select “warranty upgrades” under “product
support.”
Telephone support is free for one year in Asia and the South Pacific, and for 30
days in the Middle East and Africa.
For phone support in Europe, please check for the details and conditions of phone
support in your country or district by consulting the website http://www.hp.com/
cposupport/mail_support.html, and clicking on “contact HP.”
Alternatively, you can ask your dealer or call HP at the phone number listed in
this document. For English support in Europe, contact +44 (0) 207 512 52 02.
English
hp support
Algeria +212 22404747
Argentina 0-810-555-5520
Australia 03 8877 8000
Austria 43 (0) 810 00 6080
Belgium Flemish: +32 (0)2 626 8806
French: +32 (0)2 626 8807
Brazil (11) 3747 7799 (greater São Paulo)
0800 157 751 (outside greater São Paulo)
Canada 905 206-4663
16
Page 22

Chile 800 22 5547 (Post-sales Business Computing)
800 360 999 (Post-sales Home Computing)
China +86 (0) 10 6564 5959
Colombia +9 800 114 726
Czech Republic +42 (0)2 6130 7310
Denmark +45 39 29 4099
Egypt +202 7956222
Finland +358 (0)203 47 288
France +33 (0)1 43 62 34 34
Germany +49 (0)180 52 58 143 (DM .24/min, Euro .12/min)
Greece +30 1 60 73 603
Guatemala 1 800 999 5105
Hong Kong +85 (2) 3002 8555
Hungary +36 (0)1 382 1111
India +91 11 682 6035
Indonesia +62 (21) 350 3408
Ireland +353 (0)1 662 5525
17
Israel +972 (0)9 952 48 48
Italy +39 02 264 10350
Japan +81 3 5344 7181
Korea, Republic of +82 (2) 3270 0700
080-999-0700 (outside Seoul and Kyung Ki only)
Malaysia 60 (3) 295 2566 (Penang)
03 2695 2566 (Outside Penang)
Mexico 52 58 9922 (Mexico City)
01-800-472-6684 (outside Mexico City)
Morocco +212 22404747
Netherlands +31 (0)20 606 8751
New Zealand +64 (9) 356 6640
Norway +47 22 11 6299
Peru 0 800 10111
Philippines +63 (2) 867 3551
hp support
Page 23

Poland +48 22 865 98 00
Portugal +351 21 3176333
Puerto Rico 1 877 232 0589
Romania +40 1 315 44 42
01 3154442 (local)
Russian Federation +7 095 797 3520 (Moscow)
+7 812 346 7997 (St. Petersburg)
Singapore +65 272 5300
English
South Africa 086 000 1030 (inside RSA)
Spain +34 902 321 123
Sweden +46 (0)8 619 2170
Switzerland +41 (0)848 80 11 11
Taiwan 0 800-01 0055
Thailand +66 (2) 661 4000 (Bangkok)
Tunisia +212 22404747
Turkey +90 216 579 7171
Ukraine +7 (380-44) 490-3520
United Arab Emirates 971 4 883 8454
United Kingdom and
English internationally
United States (208) 323-2551
Venezuela 0800 4746 8368
Viet Nam +84 (0)8 823 4530
+27-11 258 9301 (outside RSA)
+44 (0)207 512 52 02
hp support
18
Page 24

19
hp support
Page 25

hp scanjet 2300c
또는
3500c
시리즈
한국어
사용
설명서
Page 26

저작권 정보
© Copyright Hewlett-Packard Company 2002
All rights reserved. ,
.
4,558,302 LZW Adobe
PDF .
상표 크레디트
Adobe Acrobat Adobe Systems Incorporated
.
Microsoft Windows Microsoft Corporation .
.
보증
.
Hewlett-Packard
.
Hewlett-Packard .
HEWLETT-
PACKARD 는 특정 목적의 시장성 및 적합성에 대한 어떠한 암시적 보증도 하지 않
습니다 .
TWAIN " " . TWAIN
, ,
. TWAIN ,
, , ,
.
미국 정부 사용자에 대한 사용권 고지 사항 : 사용 권한이 제한된 상업용 컴퓨터
소프트웨어 :
(c) (1) (ii) ."
. .
" , DFARS 52.227-7013
제품에 들어있는 특수 처리 요구 물질
HP .
• / /
(< 5 mg)
•
(http://www.eiae.org)
HP " "
.
http://www.hp.com/go/recycle,
.
EIA
Page 27

차례
스캐너 설치 . . . . . . . . . . . . . . . . . . . . . . . . . . . . . . . . 1
시작하기 전에 . . . . . . . . . . . . . . . . . . . . . . . . . . . . . . . . . 1
내용물 확인 . . . . . . . . . . . . . . . . . . . . . . . . . . . . . . . . 1
소프트웨어 설치 및 스캐너 연결 . . . . . . . . . . . . . . . . . . . . 2
소프트웨어 우선 설치의 경우 (Windows 및 Macintosh) . . 2
스캐너 우선 설치의 경우 (Windows 에만 해당 ) . . . . . . . 2
옵션 TMA 연결 (hp scanjet 3500c 시리즈에만 해당 ) . . . . . . 3
스캐너 개요 . . . . . . . . . . . . . . . . . . . . . . . . . . . . . . . . 4
스캐너 사용 방법 . . . . . . . . . . . . . . . . . . . . . . . . . . . . 5
스캔할 항목 선택 . . . . . . . . . . . . . . . . . . . . . . . . . . . . . . . 5
스캔한 이미지 미리보기 및 수정 . . . . . . . . . . . . . . . . . . . . 6
스캔한 내용을 이메일로 보내기 . . . . . . . . . . . . . . . . . . . . . 6
복사본 출력 . . . . . . . . . . . . . . . . . . . . . . . . . . . . . . . . . . . 7
사진 앨범을 만들어 CD 에 저장 . . . . . . . . . . . . . . . . . . . . . 8
슬라이드 또는 음화 스캔 . . . . . . . . . . . . . . . . . . . . . . . . . . 8
단추 설정 변경 . . . . . . . . . . . . . . . . . . . . . . . . . . . . . . . . . 8
설치 문제 - hp scanjet 2300c 또는 3500c 시리즈 . . . 11
스캐너가 작동하지 않는 경우. . . . . . . . . . . . . . . . . . . . . . 11
스캐너를 초기화할 수 없는 경우 . . . . . . . . . . . . . . . . . . . 12
스캐너가 계속 제대로 작동하지 않는 경우 . . . . . . . . . . . . 12
소프트웨어 제거. . . . . . . . . . . . . . . . . . . . . . . . . . . . . . . 13
hp 기술 지원 . . . . . . . . . . . . . . . . . . . . . . . . . . . . . . 14
hp 도움말 웹사이트 . . . . . . . . . . . . . . . . . . . . . . . . . . . . 14
hp 고객 지원 서비스 . . . . . . . . . . . . . . . . . . . . . . . . . . . . 15
미국에서의
지원 내용 . . . . . . . . . . . . . . . . . . . . . . . . . . . . . . . . . 15
기타 지역에서의 지원 내용. . . . . . . . . . . . . . . . . . . . . 16
한국어
차례
iii
Page 28

1
시작하기 전에
스캐너 설치
컴퓨터에 USB 인터페이스 연결이 가능한 USB 포트가 있어야 하며 Microsoft®
Windows® 98 이상 또는 Macintosh OS 9 이상이 설치되어 있어야 합니다 .
Macintosh 는 HP Scanjet 3500c 시리즈에서만 지원합니다 .
USB 포트
내용물 확인
1
스캐너 상자에는 다음과 같은 항목이 포함되어 있습니다 .
• HP Scanjet 2300c 또는 3500c 시리즈 디지털 평판 스캐너
•HP사진 및 이미지 소프트웨어 CD-ROM
•USB 케이블
• 전원 케이블
• 투명 재료 어댑터 (TMA) (HP Scanjet 3500c 시리즈의 일부 모델에만 해당 )
HP Scanjet 3500c 시리즈 스캐너
HP Scanjet 2300c 스캐너
TMA( 일부 모델만 해당 )
스캐너 설치
Page 29

소프트웨어 설치 및 스캐너 연결
스캐너를 설치할 때는 소프트웨어를 먼저 설치하는 것이 좋지만 스캐너를 먼저 연
결할 수도 있습니다 . 그러나 특히 Macintosh 컴퓨터의 경우에는 소프트웨어를 먼
저 설치하는 것이 좋습니다 .
소프트웨어
우선 설치의
경우 (Windows
및 Macintosh)
스캐너를 설치하는 데 어려움이 있으면
scanjet 2300c 또는 3500c 시리즈를
1 컴퓨터에 열려 있는 모든 프로그램을 닫습니다 .
해당 언어와 운영 체제에 적합한 HP 사진 및 이미지 소프트웨어 CD-ROM 을
2
컴퓨터에 넣습니다 .
3
Microsoft Windows 컴퓨터 : 화면에 표시되는 지침을 따릅니다 . 설치 프로그
램이 자동으로 시작되지 않는 경우에는 다음을 수행합니다 .
a. 시작 메뉴에서 실행을 누릅니다 .
b. x:setup.exe 를 입력합니다 . 여기에서 x 는 CD-ROM 드라이브의 문자
입니다 .
Macintosh 컴퓨터 (HP Scanjet 3500c 시리즈에만 해당 ): CD-ROM에서 설치
ReadMe 파일을 더블 클릭한 다음 지침을 따릅니다 .
4
컴퓨터를 종료하라는 메시지가 표시되면 컴퓨터를 종료합니다 .
5
스캐너의 USB 포트와 컴퓨터의 USB 포트를 USB 케이블로 연결합니다 .
6
서지 보호기 또는 스캐너 가까이에 있는 벽의 콘센트에 스캐너를 전원 케이
블로 연결합니다 . 스캐너가 켜집니다 .
7
필요한 경우 컴퓨터를 다시 켭니다 .
11쪽의 설치 문제 - hp
참조하십시오
.
한국어
스캐너 우선
설치의 경우
(Windows 에만
해당 )
스캐너 설치
USB 케이블을 스캐너에 연결 USB 케이블을 컴퓨터에 연결
1
컴퓨터가 켜져 있고 운영 체제가 실행 중인지 확인합니다 .
2
스캐너의 USB 포트와 컴퓨터의 USB 포트를 USB 케이블로 연결합니다 .
2
Page 30

3
서지 보호기 또는 스캐너 가까이에 있는 벽의 콘센트에 스캐너를 전원 케이
블로 연결합니다 . 스캐너가 켜집니다 .
4
새 하드웨어 발견 마법사의 안내를 따릅니다 .
5
HP 사진 및 이미지 소프트웨어 CD-ROM 을 넣고 다음을 누릅니다 . 마법사에
서 드라이브 문자를 확인하는 메시지가 표시되면 해당 CD-ROM 드라이브를
선택합니다 .
6
HP Scanjet 설치 프로그램의 지침을 따릅니다 .
7
설치가 끝나면 다른 HP 설치 프로그램이 시작됩니다 . 추가 소프트웨어를
설치하고 스캐너를 등록하고 추가 도움말을 찾을 수 있습니다 . 스캐너에
소프트웨어가 추가로 제공되는지 확인하려면 소프트웨어 설치를 누르고
설치 프로그램의 지침을 따릅니다 .
옵션
TMA
연결
(hp scanjet 3500c
스캐너에 35 mm 슬라이드나 음화를 스캔하는 투명 재료 어댑터 (TMA) 를 장착할
수 있습니다 .
• 스캐너에 TMA 가 있으면 TMA 케이블을 스캐너의 해당 포트에 연결합니다 .
시리즈에만 해당
)
3
스캐너 설치
Page 31

스캐너 개요
이 단원에서는 스캐너의 전면 패널에 있는 단추 및 사용 가능한 부속품에 대해
설명합니다 .
2
스캐너에 따라서는 이러한 기능의 일부가 없을 수도 있습니다
단추 또는 부속품 설명
이메일 단추 이메일에 사용할 이미지용으로 최적화된 설정을 통
스캔 단추 스캔한 이미지를 미리보거나 변경할 수 있는
복사 단추 항목을 스캔하고 프린터로 전송하여 복사본을 만듭
메모리 디스크 작성기 단추 배경 음악과 제목이 포함된 사진 앨범
HP Scanjet 투명 재료
(HP Scanjet 3500c
어댑터
시리즈에만 해당
(TMA)
해 항목을 스캔하고 소프트웨어가 지원되는 경우 스
캔한 내용을 이메일 소프트웨어로 전송합니다
스캐닝 소프트웨어로 원본 항목을 스캔합니다
니다
.
있는 메모리 디스크 작성기 소프트웨어로 항목을
스캔합니다
스캔한 이미지를 미리보거나 변경할 수 있는
스캐닝 소프트웨어로 슬라이드 또는 음화를 스캔
)
합니다
.
.
.
.
HP
.
CD를 만들 수
HP
한국어
스캐너 개요
4
Page 32

3
스캐너 사용 방법
스캐너 단추 또는 HP 사진 및 이미지 소프트웨어를 사용하여 스캐너 프로젝트를
시작할 수 있습니다 . 일부 소프트웨어 기능에 대한 바로 가기로 스캐너 단추를
사용할 수 있습니다 . 더 많은 옵션 및 제어를 원하거나 사용 중인 스캐너 모델에
단추 일부가 없는 경우 소프트웨어를 통해 프로젝트를 시작합니다 .
이 단원에서는 기본 단추 설정을 사용한 절차를 설명합니다 . 단추의 설정을 변경
하는 방법에 대한 자세한 내용은 단추 설정 변경을 참조하십시오 .
스캔할 항목 선택
다음 지침에 따라 스캔할 항목을 선택합니다 .
스캐너 유리를 사용하는 항목
스캐너 유리를 사용하면 명함이나 사진에서 직물 및 도판에 이르기까지 다양한
항목을 스캔할 수 있습니다 .
스캐너 유리에 항목을 놓기 전에 끈적한 접착제 , 수정액 또는 유리에 묻을 수
있는 기타 물질이 없는지 확인합니다 .
재료
투명
HP Scanjet 3500c 시리즈에 제공되는 HP Scanjet 투명 재료 어댑터 (TMA) 를 사용
하면 다음과 같은 항목을 스캔할 수 있습니다 .
•35 mm 음화
•35 mm 슬라이드
소프트웨어를 사용하는 방법에 대한 자세한 내용은
이미지 소프트웨어 도움말을 참조하십시오
모서리가 날카로운 항목을 스캐너 위에 놓으면 스캐너가 손상될 수
있습니다. 스캐너 위에 이러한 물체를 놓지 마십시오
어댑터를 사용하는 항목
HP사진 및
.
.
5
스캐너 사용 방법
Page 33

스캔한 이미지 미리보기 및 수정
스캐너에 스캔 단추 ()가 있으면 이 단추를 사용하여 그림과 문서를 스캔할
수 있습니다 .
스캔 단추를 누르면 HP 스캐닝 소프트웨어가 열립니다 . 스캔한 이미지를 HP
사진 및 이미지 갤러리에 전송하기 전에 이 소프트웨어에서 이미지를 미리보고 수
정할 수 있습니다 .
스캔하려면
그림을
1 컴퓨터에 HP 복사 소프트웨어가 열려 있으면 이를 닫습니다 .
스캐너 유리 위에 원본 앞면을 아래로 놓고 덮개를 덮습니다 .
2
3
스캐너의 전면 패널에 있는 스캔 단추를 누릅니다 .
4
컴퓨터 화면의 지침을 따릅니다 . HP 스캐닝 소프트웨어에서 그림에 최적화
된 설정을 사용하여 항목을 스캔합니다 .
스캔하려면
문서를
문서를 스캔하려면 HP 사진 및 이미지 소프트웨어를 사용합니다 . 시작 메뉴에서
프로그램을 가리킨 다음 Hewlett-Packard 를 가리키고 사용 중인 스캐너를 가
리킨 다음 hp 사진 및 이미지 관리자를 누릅니다 . 관리자에서 문서 스캔을 누릅
니다 .
스캔 단추의 설정을 변경하여 문서에 최적화된 설정을 사용하여 스캔할 수도
있습니다 . 보다 자세한 내용은 단추 설정 변경을 참조하십시오 .
Macintosh의 경우
HP Precisionscan
도움말을 참조
Pro
하십시오
Macintosh OS 9:
선택한 다음
Macintosh OS X:
다
.
. Mac
Precisionscan Pro
도움말 메뉴에서
Finder
HP Precisionscan Pro
도움말 창의 왼쪽 아래에 있는 물음표를 누른 다음
도움말 메뉴에서
Finder
도움말을 선택합니다
Apple Help Center를
도움말을 선택합니다
도움말을 선택합니
Mac
.
.
한국어
HP
스캔한 내용을 이메일로 보내기
스캐너에 이메일 단추 ()가 있으면 스캔한 내용을 스캐너에서 바로 이메일로
보낼 수 있습니다 . 이 경우 인터넷이 연결되어 있어야 하며 지원되는
이메일 프로그램이 있어야 합니다 .
이미지 소프트웨어는 널리 사용되는 대부분의 이메일
.
스캐너 사용 방법
HP 사진 및
프로그램을 지원합니다. 사용 중인 이메일 프로그램이 지원되는 경
우 스캔한 내용을 이메일로 보내려고 시도할 때 해당 프로그램이 자
동으로 열립니다. 지원되지 않는 이메일 프로그램을 사용하는 경우
항목을 스캔하여 이메일 메시지로 바로 전송할 수 없습니다. 이 경
우에는 스캔한 내용을 파일로 저장한 다음 이를 이메일 메시지에 첨
부합니다
1
컴퓨터에 HP 스캐닝 소프트웨어와 HP 복사 소프트웨어가 열려 있으면 이를
닫습니다 .
2
스캐너 유리 위에 원본 앞면을 아래로 놓고 덮개를 덮습니다 .
3
스캐너에 있는 이메일 단추를 누릅니다 . 이메일에 최적화된 기본 설정을
사용하여 항목을 스캔합니다 .
6
Page 34

4
컴퓨터 화면의 지침을 따릅니다. 사용 중인 이메일 프로그램을 스캐너에서 지
원하는 경우 주소를 입력하고 메시지를 작성할 수 있는 화면이 나타납니다 .
소프트웨어에서 스캔한 내용을 이메일로 보낼 수 있습니다 . 보다 자세한
내용은 HP 사진 및 이미지 소프트웨어 도움말을 참조하십시오
도움말 메뉴에서
Macintosh의 경우
HP Precisionscan
도움말을 참조
Pro
하십시오
.
Macintosh OS 9:
선택한 다음
Macintosh OS X:
다음
Mac
Precisionscan Pro
Finder
HP Precisionscan Pro
도움말 창의 왼쪽 아래에 있는 물음표를 누르고
도움말 메뉴에서
Finder
도움말을 선택합니다
도움말을 선택합니다
.
Apple Help Center를
도움말을 선택한
Mac
.
이메일에 사용할 원본 형식을 선택하려면
원본 형식을 확인하는 메시지가 표시되면 그림 또는 문서 중에서 선택할 수 있습
니다 . 스캐너에서는 사용자의 선택에 따라 해당 항목에 대해 최적화된 스캔 설정
을 사용합니다 . 다음 지침에 따라 가장 적합한 원본 형식을 결정합니다 .
원본 구성 선택할 원본 형식 출력 형식
문자 또는 문자와 그래픽 문서
인쇄된 사진 또는 이미지 그림
Adobe® PDF(Portable
Document Format)
JPG(Joint Photographic
Experts Group)
파일
파일
.
HP
복사본 출력
원본
형식을 변경하려면
항목을
JPG 또는 PDF
스캐닝 소프트웨어를 사용하여 항목을 스캔하고 저장합니다
HP
이외의 파일 형식으로 저장해야 하는 경우
.
원본 형식을 확인하는 메시지가 표시되지 않는 경우 이메일 단추의 설정을 변경
하여 문서 또는 그림에 최적화된 설정을 사용하여 스캔할 수 있습니다 . 보다 자세
한 내용은 단추 설정 변경을 참조하십시오 .
스캐너에 복사 단추 ()가 있으면 항목을 스캔하고 프린터로 바로 전송하여
복사본을 인쇄할 수 있습니다 .
1 컴퓨터에 HP 스캐닝 소프트웨어가 열려 있으면 이를 닫습니다 .
스캐너 유리 위에 원본 앞면을 아래로 놓고 덮개를 덮습니다 .
2
3
스캐너에 있는 복사 단추를 누릅니다 . 인쇄에 최적화된 기본 설정을 사용하
여 항목을 스캔합니다 .
4
복사가 진행 중임을 보여주는 메시지가 나타납니다 .
복사본을 확대 및 축소하거나 밝기를 조절하거나 프린터 설정을 변경하려면
복사 진행률 대화 상자에서 취소를 누른 다음 HP 복사 소프트웨어에서
설정을 변경할 수 있습니다 .
7
스캐너 사용 방법
Page 35

HP 복사 소프트웨어를 사용하여 복사할 수도 있습니다 . 보다 자세한 내용은
HP 사진 및 이미지 소프트웨어 도움말을 참조하십시오
Macintosh의 경우
HP Precisionscan
도움말을 참조
Pro
하십시오
.
Macintosh OS 9:
선택한 다음
Macintosh OS X:
다음
Precisionscan Pro
사진 앨범을 만들어 CD 에 저장
일부 스캐너에는 메모리 디스크 작성기 단추 ()가 있습니다 .
읽기 / 쓰기 CD 드라이버와 쓰기 가능한 CD 가 있는 경우 스캐너를 사용하여
음악과 제목이 포함된 개인 사진 앨범을 만들 수 있습니다 . 호환되는 DVD 플레이
어를 사용하여 텔레비전에서 이 앨범을 볼 수 있으며 CD 에서 사진을 다시 인쇄할
수도 있습니다 .
1
컴퓨터에 HP 스캐닝 소프트웨어와 HP 복사 소프트웨어가 열려 있으면 이를
닫습니다 .
2
스캐너 유리 위에 원본 앞면을 아래로 놓고 덮개를 덮습니다 .
3
스캐너에 있는 메모리 디스크 작성기 단추를 누르고 컴퓨터 화면의 지침을
따릅니다 . 소프트웨어을 사용하여 사진 앨범을 만들고 저장할 수도 있습니
다 . 보다 자세한 내용은 HP 사진 및 이미지 소프트웨어 도움말을 참조하십
시오 .
슬라이드 또는 음화 스캔
HP Scanjet 3500c 시리즈 스캐너에서는 선택적인 HP Scanjet 투명 재료 어댑터
(TMA) 를 사용하여 슬라이드 또는 음화를 스캔할 수 있습니다 . 이 경우 스캐너의
단추가 아닌 HP 스캐닝 소프트웨어를 사용합니다 .
TMA 에 대한 보다 자세한 내용은 HP 사진 및 이미지 소프트웨어 도움말에서 TMA
- hp scanjet 3500c 시리즈를 참조하십시오 .
.
도움말 메뉴에서
Finder
HP Precisionscan Pro
도움말 창의 왼쪽 하단에 있는 물음표를 누르고
Mac
도움말 메뉴에서
Finder
도움말을 선택합니다
Apple Help Center를
도움말을 선택합니다
Mac
.
도움말을 선택한
.
HP
한국어
단추 설정 변경
스캐너 사용 방법
Macintosh의 경우
HP Precisionscan
도움말을 참조
Pro
하십시오
.
Macintosh OS 9:
선택한 다음
Macintosh OS X:
다음
Precisionscan Pro
HP Precisionscan Pro
도움말 창의 왼쪽 아래에 있는 물음표를 누르고
Mac
Finder
도움말 메뉴에서
Finder
도움말을 선택합니다
Apple Help Center를
도움말을 선택합니다
Mac
.
도움말을 선택한
.
HP
도움말 메뉴에서
스캐너 단추를 사용하는 경우 스캐너에서는 해당 단추에 연결된 이메일과 같이
대상에 최적화된 설정을 사용합니다 . 설정의 예로는 해상도 , 크기 및 출력 형식
등이 있습니다 . 이러한 설정은 사용자가 설정을 다시 변경하기 전까지
8
Page 36

해당 단추로 스캔하는 모든 항목에 적용됩니다 . 이 설명서에 나와 있지 않은
스캐너 단추는 해당 설정을 변경할 수 없습니다 .
이메일 단추
설정 변경
현재 항목에 대해서만 설정을 변경하려면
트웨어를 대신 사용할 수 있습니다
.
HP사진 및
이미지 소프
HP 사진 및 이미지 소프트웨어의 여러 가지 기능을 제어하는 데 사용하는 주요
창인 관리자에서 단추 설정을 변경합니다 .
관리자를
열려면
• 시작 메뉴에서 프로그램을 가리킨 다음 Hewlett-Packard 를 가리키고 사
용 중인 스캐너를 가리킨 다음 hp 사진 및 이미지 관리자를 누릅니다 .
Macintosh의 경우
HP Precisionscan
도움말을 참조
Pro
하십시오
.
Macintosh OS 9: Finder
선택한 다음
Macintosh OS X: Finder
다음
Precisionscan Pro
HP Precisionscan Pro
도움말 창의 왼쪽 아래에 있는 물음표를 누르고
Mac
도움말 메뉴에서
도움말을 선택합니다
도움말 메뉴에서
도움말을 선택합니다
Apple Help Center를
도움말을 선택한
Mac
.
스캐너에 이메일 단추가 있는 경우 단추 설정 및 이메일 설정에서 해당 설정을
변경할 수 있습니다 .
1
관리자를 열고 설정 메뉴에서 단추 설정을 누릅니다 .
2
이메일 단추 탭을 누르고 설정을 변경합니다 .
3
관리자로 돌아온 다음 설정 메뉴에서 이메일 설정을 누릅니다 .
4
문서 스캔 탭 , 그림 스캔 탭 또는 프로그램 탭을 누르고 설정을 변경
합니다 .
.
HP
스캔 단추
설정 변경
9
스캐너에 스캔 단추가 있는 경우 다음 절차를 통해 스캔 단추의 설정을 변경할 수
있습니다 .
1
관리자를 열고 설정 메뉴에서 단추 설정을 누릅니다 .
2
스캔 단추 탭을 누르고 설정을 변경합니다 .
내용을 다른 프로그램에 전송하려면
스캔한
HP 스캐닝 소프트웨어 이외의 다른 프로그램에 스캔한 내용을 직접 보낼 수 있습
니다 . 스캔 단추를 누를 때 스캔한 내용을 워드 프로세서와 같은 선택한 대상 프
로그램으로 보낼 수 있습니다 .
Windows 를 사용하는 컴퓨터의 경우
1
관리자를 열고 설정 메뉴에서 단추 설정을 누릅니다 .
2
스캔 단추 탭의 대상 상자에 스캔한 내용을 전송할 대상을 지정합니다 .
3
필요한 다른 설정을 변경한 다음 확인을 누릅니다 .
스캔한 내용을 선택한 대상으로 직접 보내려면 스캔 단추 탭에서 미리보기
표시 확인란의 선택을 해제합니다 .
스캐너 사용 방법
Page 37

복사 단추
설정 변경
스캐너에 복사 단추가 있는 경우 소프트웨어에서는 사용자가 HP 복사 소프트웨어
를 통해 마지막으로 선택한 설정을 사용합니다 .
• 관리자를 열고 복사를 누른 다음 설정을 변경합니다 .
한국어
스캐너 사용 방법
10
Page 38

설치 문제
또는
4
본 장에서는 일반적인 설치 문제를 다룹니다 . 스캐너 유리 청소와 같은 사용관련
문제 또는 유지보수 문제에 대한 내용은 HP 사진 및 이미지 소프트웨어 도움말에
서 " 문제 해결 " 을 참조하십시오 .
스캐너가 작동하지 않는 경우
• 우선 컴퓨터를 점검합니다 .
– 사용하고 있는 컴퓨터가 스캐너 상자에 표시된 최소 시스템 요구 사항에
맞는지 확인합니다 .
– 하드 디스크 공간이 부족한 경우 필요 없는 파일을 제거하거나 소프트웨
어를 다른 디스크 드라이브에 설치합니다 .
• Microsoft® Windows® 를 사용하는 컴퓨터에서 " 대상 디렉터리가 잘못되었
습니다 " 또는 " 프로그램 폴더가 잘못되었습니다 " 와 같은 메시지가 나타나
면 다음 중 하나를 수행합니다 .
– 올바른 대상 폴더 이름을 입력합니다 . 대상 폴더 이름에는 /, \, :, ?, *,
<, >, “ 또는 | 등의 문자가 포함될 수 없습니다 .
– 찾아보기 단추를 사용하여 유효한 폴더를 찾습니다 .
• 케이블을 확인합니다 .
– 스캐너와 콘센트 또는 서지 보호기가 전원 케이블로 올바르게 연결되어
있는지 확인합니다 .
– 케이블이 서지 보호기에 연결되어 있는 경우 서지 보호기가 콘센트에
연결되어 있고 켜져 있는지 확인합니다 .
– 스캐너와 함께 제공되는 USB 케이블을 사용하는지 확인합니다 . 다른
USB 케이블은 이 스캐너와 호환되지 않을 수 있습니다 .
– 스캐너와 컴퓨터가 USB 케이블로 올바르게 연결되어 있는지 확인합니다 .
– 스캐너에서 전원 케이블을 빼고 컴퓨터를 끕니다 . 30 초 후에 전원 케이
블을 스캐너에 연결한 다음 컴퓨터를 켭니다 .
–Macintosh 컴퓨터 (HP Scanjet 3500c 시리즈에만 해당 ) 의 경우 스캐너
가 컴퓨터에 올바르게 연결되어 있는지 확인하려면 Apple System Profiler
을 사용합니다 .
- hp scanjet 2300c
3500c
시리즈
11
설치 문제
- hp scanjet 2300c 또는 3500c
시리즈
Page 39

• 스캐너 하드웨어를 테스트합니다 (HP Scanjet 2300c 에만 해당 ).
a. 스캐너에서 USB 케이블과 전원 케이블을 뺍니다 . 전원 케이블은 콘센트
에 계속 연결되어 있어야 합니다 .
b. 전원 케이블을 스캐너에 다시 연결하면서 스캔 단추와 복사 단추를 동시
에 누릅니다 .
스캐너 램프가 켜지고 스캐너 캐리지가 앞뒤로 움직여야 합니다 .
c. 테스트를 끝내려면 전원 케이블을 뺍니다 .
스캐너 램프가 켜지지 않거나 캐리지가 움직이지 않으면 스캐너 하드웨어에
문제가 있는 것이므로 HP 고객으뜸지원센터에 문의하십시오 .
스캐너를 초기화할 수 없는 경우
• 스캐너 초기화 오류 메시지가 표시되거나 올바르게 작동하던 HP 스캐닝
소프트웨어가 동작을 멈추면 다음 절차를 시도합니다 .
a. HP 스캐닝 소프트웨어가 열려 있으면 이를 닫습니다 .
b. HP 스캐너와 컴퓨터를 연결하고 있는 케이블이 단단히 고정되어 있는지
확인합니다 .
c. 전원 코드를 뽑아 스캐너를 끕니다 . 전원 코드를 다시 꽂아 스캐너를 켭
니다 .
d. 컴퓨터를 껐다가 다시 켭니다 .
• 여전히 스캐너를 초기화할 수 없으면 다음의 " 스캐너가 계속 제대로 작동하
지 않는 경우 " 항목에 제시하는 설명에 따라 복구 유틸리티를 실행합니다
(Windows 를 사용하는 컴퓨터에만 해당 ).
스캐너가 계속 제대로 작동하지 않는 경우
• 스캐너가 스캐닝을 멈추거나 단추가 올바르게 작동하지 않는 경우 컴퓨터에
서 발생한 소프트웨어 충돌이 원인일 수 있으므로 HP 사진 및 이미지 소프트
웨어를 다시 설치해야 합니다 . 복구 유틸리티를 실행합니다 (Windows 를
사용하는 컴퓨터에만 해당 ).
a. 시작을 누르고 설정을 가리킨 다음 제어판을 누릅니다 (Windows XP 의
경우 시작을 누른 다음 제어판을 누릅니다 ).
b. 프로그램 추가/제거를 누른 다음 HP 사진 및 이미지 소프트웨어를 선
택합니다 .
c. 변경 ( 사용하고 있는 Windows 의 버전에 따라서는 추가/제거 ) 을 누릅
니다 .
d. 컴퓨터 화면의 지시를 따른 다음 복구를 누릅니다 .
• 이 방법으로 문제를 해결할 수 없으면 스캐너를 다른 컴퓨터에 설치합니다 .
이렇게 하면 문제가 첫 번째 컴퓨터에 관련된 것인지 스캐너에 관련된 것인
지 판단할 수 있습니다 .
• 스캐너가 여전히 작동하지 않으면 HP 고객으뜸지원센터에 문의하십시오 .
문제 해결에 필요한 정보가 이 설명서에 나와 있지 않으면 HP 사진 및 이미지
소프트웨어의 ReadMe 파일에서 가장 최신 정보를 참조하거나 전자 도움말의
문제 해결 부분을 검토합니다 .
한국어
설치 문제 - hp scanjet 2300c 또는 3500c 시리즈
12
Page 40

소프트웨어 제거
설치 프로그램의 제거 옵션을 사용하면 컴퓨터에서 스캐닝 소프트웨어를 제거할
수 있습니다 .
Windows
1
시작을 누르고 설정을 가리킨 다음 제어판을 누릅니다 (Windows XP 의 경우
시작을 누른 다음 제어판을 누릅니다 ).
2
프로그램 추가/제거를 누른 다음 HP 사진 및 이미지 소프트웨어를 선택합
니다 .
3
변경 ( 사용하고 있는 Windows의 버전에 따라서는 추가/제거 ) 을 누릅니다 .
4
컴퓨터 화면의 지시를 따른 다음 제거를 누릅니다 .
Macintosh
1
스캐너의 플러그를 뽑고 컴퓨터를 다시 시작합니다( 소프트웨어를 제거하기
전에 스캐너의 플러그를 뽑고 컴퓨터를 다시 시작하지 않으면 제거 작업을
수행하는 동안 일부 파일이 컴퓨터에서 제거되지 않습니다 ).
2
HP 사진 및 이미지 CD-ROM 을 컴퓨터의 CD-ROM 드라이브에 넣습니다 (HP
사진 및 이미지 CD-ROM 창이 나타나지 않으면 CD-ROM 아이콘을 더블
클릭합니다 ).
3
설치를 더블 클릭한 다음 화면의 지침을 따릅니다 .
4
주 설치 대화 상자가 나타나면 풀다운 메뉴에서 제거를 선택합니다 .
5
제거를 누른 다음 컴퓨터 화면의 지침을 따릅니다 .
컴퓨터
컴퓨터
(hp scanjet 3500c
시리즈에만 해당
)
13
설치 문제 - hp scanjet 2300c 또는 3500c 시리즈
Page 41

기술 지원
hp
hp
도움말 웹사이트
hp 웹사이트
방문
5
보증 및 사양에 대한 내용은 스캐너의 전자 도움말을 참조하십시오 .
규정 정보에 대한 내용은 스캐너와 함께 제공되는 CD-ROM 에서
regulatory_supplement.htm 파일을 참조하십시오 .
HP 는 스캐너를 사용하는 데 도움이 되는 여러 가지 정보를 웹에서 제공합니다 .
이러한 웹 서비스는 무료로 제공되며 언제라도 이용할 수 있습니다 .
한국어
hp 제품 지원
http://www.hp.com/cposupport/loc/regional.html 에서 해당 지역을 선택한 다음
" 제품 검색 " 상자에 스캐너 모델을 입력하면 , 다음 항목에 대한 정보를 찾을 수
있습니다 .
• 스캐너 설치 및 사용
• 드라이버 다운로드
• 문제 해결
• 주문
• 보증
hp scanjet 웹사이트
http://www.hp.com 에서 " 제품 및 솔루션 " 을 누르면 다음 정보를 볼 수 있습
니다 .
• 스캐너를 보다 효율적으로 사용하기 위한 팁
•HPScanjet 드라이버 업데이트 및 소프트웨어
accessibility 웹사이트
장애가 있는 사용자는 웹사이트 http://www.hp.com/hpinfo/community/
accessibility/prodserv/ 에서 도움을 받을 수 있습니다 .
hp 지원
위에 언급한 웹사이트에서 문제를 해결할 수 없는 경우 http://www.hp.com/
cposupport/mail_support.html 에 나와 있는 이메일 , 전화 또는 기타 방법으로 HP
에 직접 문의할 수 있습니다 .
hp기술
지원
14
Page 42

고객 지원 서비스
hp
HP 고객으뜸지원센터에 연락하기 전에
기에 소개된 웹사이트 서비스는 24 시간 무료로 사용할 수 있습니다 . 필요한 내용
을 웹에서 찾을 수 없는 경우 HP 고객으뜸지원센터에 문의해주십시오 .
전화 또는 우편으로 HP 에 연락하여 스캐너에 대한 지원과 서비스를 받을 수 있습
니다 . 지원 시간 , 비용 및 지원 가능 여부는 사전 통보 없이 변경될 수 있습니다 .
도움말 웹사이트를 참조하십시오 . 여
hp
hp 지원 내용
미국에서의
지원 내용
Hewlett-Packard 의 지원 핫라인을 통해 다음 문제에 대한 도움을 받을 수 있습니
다 .
• 설정
• 설치
• 구성
• 작동
운영 체제 및 네트워크 구성에 관련된 사항은 구입처 또는 국내 지원 부서에 문의
하십시오 . HP 제품이 아닌 하드웨어 또는 소프트웨어에 대한 지원은 해당 제조업
체에 문의하십시오 .
문의하기
문의할
전에
HP 고객으뜸지원센터에 연락하기 전에 다음 사항을 먼저 확인하십시오 .
• 이 사용자 설명서의 " 설치 문제 " 장을 살펴봅니다 . 추가 문제 해결에 대한
내용은 HP 사진 및 이미지 소프트웨어 도움말의 " 문제 해결 " 장을 참조하십
시오 .
•HP 제품 지원 웹사이트에서 문제 해결에 대한 정보를 확인합니다 .
경우
가능하다면 스캐너가 설치된 컴퓨터를 실행시킨 상태에서 다음 정보를 준비하고
문의합니다 .
• 일련 번호 ( 스캐너의 뒷면이나 바닥 또는 스캐너 유리 아래에 있습니다 )
• 제품 이름 ( 스캐너 덮개에 있습니다 )
• 구입 날짜
15
일간 무료 전화 지원
90
제품 구매 후 90 일 동안 무료로 전화 지원을 제공합니다 . 장거리 전화의 경우 장
거리 전화 요금이 부과됩니다 .
전화 (208) 323-2551
월요일부터 금요일까지는 미국 산지 표준 시간으로 오전 6 시에서 오후 10 시까지 ,
토요일에는 오전 9 시에서 오후 4 시까지 지원 서비스를 받을 수 있습니다 .
구매
이후
90일
전화 (208) 323-2551
한 건당 비용 $25.00 가 신용 카드로 청구됩니다 .
HP 제품에 서비스가 필요하다고 판단될 경우 HP 고객으뜸지원센터로 문의하면
서비스가 필요한지 여부를 확인할 수 있습니다 .
hp 기술 지원
Page 43

hewlett-packard
업그레이드 보증서
HP 제품에 대한 기간 연장 종합 보증은 제품 구입 후 180 일 이내에 신청해야 합
니다 .
HP SupportPack 을 통해 표준 제조 보증을 3 년으로 업그레이드하십시오 . 서비스
적용은 제품 구입일부터 시작되며 이 지원 팩은 제품 구입 후 180 일 이내에 구입
해야 합니다 . HP 는 사용자가 HP 고객으뜸지원센터에 문의하면 시스템 자체 테스
트 프로그램의 결과에 기반하여 어떠한 하드웨어 서비스가 제공되는지를 확인합
니다 . 기술지원 문의 과정에서 제품을 교환해야 한다고 판단되면 HP 에서는 바로
다음 근무일에 새 제품을 무료로 발송합니다 . 이 보증 업그레이드를 통해 최대한
의 가동 시간과 생산성 및 택배 서비스를 제공받을 수 있으며 모든 비용은 HP 에
서 부담합니다 .
이 서비스는 미국에서만 제공합니다 . 보다 자세한 내용은 1-888-999-4747 로 전
화하거나 웹사이트
http://www.homeandoffice.hp.com
에서 " 제품 지원 " 의 " 보
증 업그레이드 " 를 참조하십시오 .
기타 지역에서
의 지원 내용
아시아 및 남태평양 지역에서는 전화 지원을 1 년간 무료로 제공하고 중동 및 아
프리카에서는 30 일간 무료로 지원합니다 ( 한국의 경우 , 자세한 사항은 HP 고객
으뜸지원센터로 문의하여 확인해주십시오 ).
유럽에서의 전화 지원에 대한 내용은 웹사이트
mail_support.html
에서 “HP 연락처 ” 를 눌러 해당 국가 또는 지역의 세부 사항 및
http://www.hp.com/cposupport/
조건을 참조하십시오 .
또한 구입처에 문의하거나 다음 표에 나와 있는 전화 번호로 HP 에 문의할 수 있
습니다 . 유럽에서의 영어 지원은 +44 (0) 207 512 52 02 로 연락하십시오 .
과테말라
그리스
남아프리카 공화국
네덜란드
노르웨이
뉴질랜드
덴마크
독일
러시아 연방
루마니아
1 800 999 5105
+30 1 60 73 603
086 000 1030 ( RSA)
+27-11 258 9301 ( RSA 이외 지역)
+31 (0)20 606 8751
+47 22 11 6299
+64 (9) 356 6640
+45 39 29 4099
+49 (0)180 52 58 143 (DM .24/min, Euro .12/min)
+7 095 797 3520 (
+7 812 346 7997 (
+40 1 315 44 42
01 3154442 (지역)
모스크바
뻬쩨르부르그
)
)
한국어
hp 기술 지원
말레이시아
60 (3) 295 2566 (페낭)
03 2695 2566 (페낭 이외 지역)
16
Page 44

멕시코 52 58 9922 ( 멕시코 시티 )
모로코
미국
베네수엘라
베트남
01-800-472-6684 ( 멕시코 시티 이외 지역 )
+212 22404747
(208) 323-2551
0800 4746 8368
+84 (0)8 823 4530
벨기에 네덜란드어 : +32 (0)2 626 8806
브라질 (11) 3747 7799 ( 상파울루 )
스웨덴
스위스
스페인
싱가폴
아랍에미리트
아르헨티나
아일랜드
알제리
영국 및 국제 영어
오스트레일리아
오스트리아
우크라이나
이스라엘
이탈리아
이집트
인도
인도네시아
일본
중국
체코 공화국
칠레
불어 : +32 (0)2 626 8807
0800 157 751 ( 상파울루 외의 지역 )
+46 (0)8 619 2170
+41 (0)848 80 11 11
+34 902 321 123
+65 272 5300
971 4 883 8454
0-810-555-5520
+353 (0)1 662 5525
+212 22404747
+44 (0)207 512 52 02
03 8877 8000
43 (0) 810 00 6080
+7 (380-44) 490-3520
+972 (0)9 952 48 48
+39 02 264 10350
+202 7956222
+91 11 682 6035
+62 (21) 350 3408
+81 3 5344 7181
+86 10 6564 5959
+42 (0)2 6130 7310
800 22 5547 (Post-sales Business Computing)
800 360 999 (Post-sales Home Computing)
17
hp 기술 지원
Page 45

캐나다
콜롬비아
타이완
태국 +66 (2) 661 4000 ( 방콕 )
터키
튀니지
페루
포르투갈
폴란드
푸에르토리코
프랑스
핀란드
필리핀
한국
헝가리
홍콩
905 206-4663
+9 800 114 726
0 800-01 0055
+90 216 579 7171
+212 22404747
0 800 10111
+351 21 3176333
+48 22 865 98 00
1 877 232 0589
+33 (0)1 43 62 34 34
+358 (0)203 47 288
+63 (2) 867 3551
+82 (2) 3270 0700
080-999-0700 ( 서울 / 경기 이외 지역만 가능 )
+36 (0)1 382 1111
+85 (2) 3002 8555
한국어
hp 기술 지원
18
Page 46

19
hp support
Page 47

hp scanjet 2300c 或 3500c
系列
繁體㆗文
使用手冊
Page 48

版權資訊
© Copyright Hewlett-Packard Company 2002
保留所有權利。 除非事先經過書面授權同意,否則不得在著作權法同意的範圍外從事翻
印、改寫或翻譯等行為。
此產品融合了 Adobe 的 PDF 技術,而該技術中使用了美國專利法 4,558,302 中許可使用
的 LZW 技術。
商標信用
Adobe 和 Acrobat 標誌是 Adobe Systems Incorporated 在美國和 / 或其他國
家的商標或註冊商標。
Microsoft 和 Windows 是微軟公司的註冊商標。
這裡提到的所有其他產品名稱皆為各自公司的商標。
擔保
本文件中包含的資訊如經增刪,恕不另行通知。
Hewlett-Packard 對此處相關資訊不做任何形式的擔保。 HEWLETT-PACKARD 特此聲明:
對特殊用途的可售性和適用性不做隱含擔保。
Hewlett-Packard 對因提供或使用本資料而導致的直接、間接、偶發、衍生損害或其它損
害,不負任何法律責任。
TWAIN Toolkit 按原樣銷售。 TWAIN Toolkit 的研發者和銷售商明確強調不作任何隱含、
明確或法定的擔保,包括但不限於為特殊用途的可售性、第三者權利和適用性的隱含擔
保。 研發者或銷售商對由於翻印、修改、銷售或其他因使用 TWAIN Toolkit 而導致的直
接、間接、特殊、偶發、衍生的損害,皆不負法律責任。
注意事項 ( 美國政府使用者適用 ): 商用電腦軟體限制權利: 「政府使用、複製或公開本
軟體均受 DFARS 52.227-7013 中 「科技資料的權利」條款的子條款 (c) (1) (ii) 的限制。」
本產品掃瞄的材料可能受到政府法律和其他法規保護,如著作權法。 客戶全權負責遵守
上述所有法律及法規。
產品限制的材料
本 HP 產品包含以下材料,在不敷使用後需要特別的處理:
• 掃瞄器內的螢光掃瞄燈 / 透明材料配接器 / 液晶螢幕中的汞 (< 5 毫克 )
• 焊接內的鉛
如需回收資訊,您可以造訪 http://www.hp.com/go/recycle、與您當地的主管機構聯
繫,或造訪電子工業協會 (Electronics Industries Alliance) 網站,網址是:
http://www.eiae.org。
如需 HP 環境管理計劃的資訊,請參閱掃瞄器上電子說明文件中的 「保固與規格」部分。
Page 49

目錄
安裝掃瞄器
開始前. . . . . . . . . . . . . . . . . . . . . . . . . . . . . . . . . . . . . . . 1
安裝軟體並連接掃瞄器 . . . . . . . . . . . . . . . . . . . . . . . . . . . 2
連接選購的 TMA ( 僅適用 hp scanjet 3500c 系列 ). . . . . . . . 3
掃瞄器概觀
如何使用掃瞄器
選擇要掃瞄的項目. . . . . . . . . . . . . . . . . . . . . . . . . . . . . . . 5
預覽及修改掃瞄的影像 . . . . . . . . . . . . . . . . . . . . . . . . . . . 6
將掃瞄結果以電子郵件寄出 . . . . . . . . . . . . . . . . . . . . . . . . 6
影印 . . . . . . . . . . . . . . . . . . . . . . . . . . . . . . . . . . . . . . . . 7
建立相片展示並儲存在光碟上 . . . . . . . . . . . . . . . . . . . . . . 8
掃瞄幻燈片或負片. . . . . . . . . . . . . . . . . . . . . . . . . . . . . . . 8
變更按鈕設定值 . . . . . . . . . . . . . . . . . . . . . . . . . . . . . . . . 9
安裝問題
掃描器無法運作 . . . . . . . . . . . . . . . . . . . . . . . . . . . . . . . 11
掃描器起始失敗 . . . . . . . . . . . . . . . . . . . . . . . . . . . . . . . 12
掃描器仍然無法正常運作. . . . . . . . . . . . . . . . . . . . . . . . . 12
解除安裝軟體 . . . . . . . . . . . . . . . . . . . . . . . . . . . . . . . . . 12
hp
支援
在網路上尋找 hp 說明 . . . . . . . . . . . . . . . . . . . . . . . . . . . 14
聯絡 hp 客戶支援 . . . . . . . . . . . . . . . . . . . . . . . . . . . . . . 15
. . . . . . . . . . . . . . . . . . . . . . . . . . . . . . . . 1
檢查包裝盒內物品 . . . . . . . . . . . . . . . . . . . . . . . . . . . . 1
先安裝軟體 (Windows 與 Macintosh). . . . . . . . . . . . . . . 2
先連接掃瞄器 ( 僅適用 Windows) . . . . . . . . . . . . . . . . . 2
. . . . . . . . . . . . . . . . . . . . . . . . . . . . . . . . 4
. . . . . . . . . . . . . . . . . . . . . . . . . . . . . 5
- hp scanjet 2300c 或 3500c
. . . . . . . 11
系列
. . . . . . . . . . . . . . . . . . . . . . . . . . . . . . . . . . 14
在美國取得支援. . . . . . . . . . . . . . . . . . . . . . . . . . . . . 15
在全世界取得支援 . . . . . . . . . . . . . . . . . . . . . . . . . . . 16
繁體中文
目錄
iii
Page 50

1
開始前
安裝掃瞄器
請確認您的電腦中有通用串列匯流排介面連線 (USB 連接埠 ) 且您的電腦正在執
行 Microsoft
(Macintosh 支援僅在 HP Scanjet 3500c 系列才能使用。)
Windows 98 或更新版本,或 Macintosh OS 9 或更新版本。
USB 連接埠
檢查包裝盒內
物品
1
您的掃瞄器包裝盒應該包含下列項目:
• HP Scanjet 2300c 或 3500c 系列數位平台式掃瞄器
•HP相片和影像軟體光碟片
•USB 電纜
• 電源電纜
• 透明材料配接器 (TMA) ( 僅適用 HP Scanjet 3500c 系列的某些型號 )
HP Scanjet 3500c 系列掃瞄器
HP Scanjet 2300c 掃瞄器
TMA ( 僅適用某些型號 )
安裝掃瞄器
Page 51
安裝軟體並連接掃瞄器
利用兩種方式之一安裝您的掃瞄器: 先安裝軟體或先連接掃瞄器。 建議您先安
裝軟體,尤其使用 Macintosh 電腦時。
先安裝軟體
(Windows 與
Macintosh)
如果您安裝掃瞄器時遇到困難,請參閱第 11 頁的 「安裝問題
hp scanjet 2300c 或 3500c
1 請關閉您電腦上所有開啟中的程式。
2 找到適用您所使用之語言與作業系統的 HP 相片和影像軟體光碟片並將之
插入您的電腦。
3 針對
針對 Microsoft Windows 電腦
針對針對
裝程式未自動啟動時:
a. 在開始功能表上,按一下執行。
b. 鍵入: x:setup.exe ( 此處 x 為代表光碟機的字母 )。
針對
針對 Macintosh 電腦
針對針對
片中的 Installation Read Me 檔案並遵照指示執行。
4 如果指示提示您關閉電腦,請照作。
5 連接掃瞄器 USB 連接埠與電腦 USB 連接埠間的 USB 電纜。
6 連接掃瞄器與避雷保護器或就近接的帶地線牆插座間的電源電纜。 如此即
可開啟掃瞄器。
7 如有需要,請重新開啟您的電腦。
電腦 ( 僅適用
電腦電腦
系列」。
電腦: 遵照螢幕上的指示執行。 或者,若安
電腦電腦
僅適用 HP Scanjet 3500c 系列
僅適用僅適用
-
系列 ): 按兩下光碟
系列系列
先連接掃瞄器
(
僅適用
Windows)
安裝掃瞄器
將 USB 電纜連接至掃瞄器 將 USB 電纜連接至電腦
1 請確定您的電腦是開啟的且作業系統正在執行中。
2 連接掃瞄器 USB 連接埠與電腦 USB 連接埠間的 USB 電纜。
3 連接掃瞄器與避雷保護器或就近的帶地線牆插座間的電源電纜。 如此即可
開啟掃瞄器。
4 遵照 「找到新硬體」精靈的提示執行。
繁體中文
2
Page 52

5 插入 HP 相片和影像軟體光碟片並按一下下一步。 如果精靈提示您需要一
個磁碟機字母,請選擇您的光碟機。
6 在 HP Scanjet 安裝程式中,請遵照指示執行。
7 安裝完成後,另一個 HP 安裝程式會啟動。 您可以安裝其他軟體、將您的
掃瞄器註冊及尋找其他說明。 若要查看您的掃瞄器是否隨附其他軟體,請
按一下 Install software ( 安裝軟體 ) 並遵照提示執行。
連接選購的
TMA (
僅適用
您的掃瞄器可能有透明材料配接器 (TMA),可掃瞄 35 公釐幻燈片或負片。
• 如果您的掃瞄器有 TMA,請將 TMA 電纜連接至掃瞄器的連接埠。
hp scanjet 3500c
系列
)
3
安裝掃瞄器
Page 53

掃瞄器概觀
本章節將描述掃瞄器前面板的按鈕和可使用附件。
按鈕或附件 描述
電子郵件
電子郵件按鈕 使用針對電子郵件進行最佳化的設定來掃瞄項目,
電子郵件電子郵件
掃瞄
掃瞄按鈕 將原件掃瞄至 HP 掃瞄軟體,在軟體中您可以預覽
掃瞄掃瞄
2
您的掃瞄器可能會有下列全部或部分的功能。
並將掃瞄結果傳送此至您的電子郵件軟體 ( 如果支
援該軟體 )。
或變更掃瞄的影像。
掃瞄器概觀
影印
影印按鈕 掃瞄項目並傳送至列表機以進行影印。
影印影印
記憶光碟製作
記憶光碟製作按鈕 將項目掃瞄至記憶光碟製作軟體,您可以用此軟體
記憶光碟製作記憶光碟製作
HP Scanjet 透明材料配接器 (TMA)
( 僅限於 HP Scanjet 3500c 系列 )
在光碟上建立相片展示,並加上背景音樂和標題。
將幻燈片或負片掃瞄至 HP 掃瞄軟體中,在軟體中
您可以預覽或變更掃瞄的影像。
4
繁體中文
Page 54

3
您可以利用兩種方式之一開始您的掃瞄器專案:從掃瞄器按鈕或是從 HP 相片
和影像軟體。掃瞄器按鈕提供某些軟體功能的快速鍵。當您想要其他選項和控
制, 或是您的掃瞄器型號沒有全部的按鈕時,請從軟體開始進行。
本章節中的程序使用預設按鈕設定值。如需其他關於變更一或多個按鈕設定值
的資訊,請參閱
選擇要掃瞄的項目
當您選擇要掃瞄的項目時請依照下列指南。
在掃瞄器玻璃板上掃瞄的項目
掃瞄器玻璃板可以用於掃瞄大範圍的項目,從名片、相片到布料及美術品。
如何使用掃瞄器
變更按鈕設定值
如需其他關於使用軟體的資訊,請參閱 HP 相片和影像軟體說
明。
避免將邊緣銳利的物品放置在掃瞄器上。放置這類物品會傷害掃
瞄器。
。
在放置物品於掃瞄器玻璃上時,請確定物品沒有未乾的膠水、修正液或其他會
附著在玻璃板上的物質。
在透明材料配接器上掃瞄的項目
HP Scanjet 透明材料配接器 (TMA) 可用於 HP Scanjet 3500c 系 列。您 可 以 使 用
TMA 來掃瞄:
•35 公釐負片
•35 公釐幻燈片
5
如何使用掃瞄器
Page 55

預覽及修改掃瞄的影像
若您的掃瞄器有掃瞄
當您按下掃瞄
更掃瞄的影像,然後再將其傳送到 HP 相片和影像藝廊。
掃瞄相片
1 關閉 HP 影印軟體 ( 若在您的電腦中已開啟 )。
2 請將原稿的正面朝下放置在掃瞄器玻璃板上並關閉蓋板。
3 按下掃瞄器前面板上的掃瞄
4 請遵照電腦螢幕上的指示執行。HP 掃瞄軟體會使用最佳化的相片設定值
掃瞄按鈕時,會開啟 HP 掃瞄軟體。在此軟體中,您可以先預覽及變
掃瞄掃瞄
來掃瞄物品。
掃瞄按鈕 (),您可以用來掃瞄相片及文件。
掃瞄掃瞄
掃瞄按鈕。
掃瞄掃瞄
掃瞄文件
若要掃瞄文件,請使用 HP 相片和影像軟體。在開始功能表上,點選
Hewlett-Packard,再點選您的掃瞄器,再按一下 hp
理員中,按一下
掃瞄文件
件的最佳化設定值。如需更多資訊,請參閱
如需 Macintosh 作
業系統的資訊,請
參閱
「HP Precisionscan
Pro 說明」。
將掃瞄結果以電子郵件寄出
若您的掃瞄器有電子郵件
送出掃瞄結果。您也必須有網際網路連線及支援的電子郵件程式。
1 關閉 HP 掃瞄軟體及 HP 影印軟體 ( 若在您的電腦中已開啟 )。
2 請將原稿的正面朝下放置在掃瞄器玻璃板上並關閉蓋板。
3 按下掃瞄器上的電子郵件
掃瞄項目。
4 依照電腦畫面上的指示執行。若您的電子郵件程式受支援,會出現一個可
讓您填寫地址和撰寫訊息的畫面。
電子郵件按鈕 (),您可以直接從您的掃瞄器以電子郵件傳
電子郵件電子郵件
HP 相片和影像軟體支援許多常用的電子郵件程式。若您的電子
郵件程式受支援,在您嘗試以電子郵件寄出掃瞄結果時就會自動
開啟。若您用的是不受支援的電子郵件程式,掃瞄器就無法直接
將項目掃瞄進電子郵件訊息中。在此情形下,請將掃瞄結果儲存
為檔案,然後附加到您的電子郵件訊息上。
、
程式集
相片和影像管理員
。您也可以變更掃瞄
Macintosh OS 9: 從「Finder 輔助說明」功能表上選擇
Apple 的 「輔助說明中心」。然後選擇 「HP Precisionscan Pro
說明」。
Macintosh OS X: 從「Finder 輔助說明」功能表上選擇
「Mac 輔助說明」。然後按一下 「Mac 輔助說明」視窗左下角
的問號並選擇 「HP Precisionscan Pro 說明」。
電子郵件按鈕。掃瞄器會使用最佳化的電子郵件預設值來
電子郵件電子郵件
掃瞄按鈕的設定值使其固定地使用文
掃瞄掃瞄
變更按鈕設定值
。
。在管
繁體中文
如何使用掃瞄器
6
Page 56

您也可以從軟體中以電子郵件寄出掃瞄結果。如需更多資訊,請參閱 HP 相片
和影像軟體說明。
如需 Macintosh 作
業系統的資訊,請
參閱
「HP Precisionscan
Pro 說明」。
Macintosh OS 9: 從「Finder 輔助說明」功能表上選擇
Apple 的 「輔助說明中心」。然後選擇 「HP Precisionscan Pro
說明」。
Macintosh OS X: 從「Finder 輔助說明」功能表上選擇
「Mac 輔助說明」。然後按一下 「Mac 輔助說明」視窗左下角
的問號並選擇 「HP Precisionscan Pro 說明」。
選擇用於電子郵件的原稿類型
若軟體要您提供原稿類型,您有兩種選擇:相片或文件。掃瞄器會根據您的選
擇使用最佳化的項目掃瞄設定值。請使用下列的指南來決定您需要的最佳原稿
類型。
如果您的原稿包含 選擇此原稿類型 接收此輸出類型
文字、或是文字及圖形 文件 Adobe® 可攜式文件格式
(PDF) 檔案
列印的相片或影像 相片 聯合圖像專家組 (JPG) 檔
案
若您需要將項目儲存成 JPG 或 PDF 之外的檔案類型,請使用 HP
掃瞄軟體掃瞄並儲存該項目。
變更原稿類型
若軟體未叫您提供原稿類型,您可以變更電子郵件
電子郵件按鈕的設定值,使其固定地
電子郵件電子郵件
使用文件的最佳化設定值進行掃瞄。如需更多資訊,請參閱變更按鈕設定值。
影印
7
若您的掃瞄器有影印
影印按鈕 (),您可以掃瞄項目並直接傳送到印表機進行影
影印影印
印。
1 關閉 HP 掃瞄軟體 ( 若在您的電腦中已開啟 )。
2 請將原稿的正面朝下放置在掃瞄器玻璃板上並關閉蓋板。
3 按下掃瞄器上的影印
影印按鈕。軟體會使用最佳化的列印預設設定值來掃瞄該
影印影印
項目。
4 顯示影印進度的訊息會出現。
若您要縮小或放大影印、將影印變亮或變暗,或變更印表機設定值,請按
一下 「影印進度」對話方塊中的取消
取消。您可以變更 HP 影印軟體中的設定
取消取消
值。
如何使用掃瞄器
Page 57

您也可以從 HP 影印軟體進行影印。如需更多資訊,請參閱 HP 相片和影像軟
體說明。
如需 Macintosh 作
業系統的資訊,請
參閱
「HP Precisionscan
Pro 說明」。
Macintosh OS 9: 從「Finder 輔助說明」功能表上選擇
Apple 的 「輔助說明中心」。然後選擇 「HP Precisionscan Pro
說明」。
Macintosh OS X: 從「Finder 輔助說明」功能表上選擇
「Mac 輔助說明」。然後按一下 「Mac 輔助說明」視窗左下角
的問號並選擇 「HP Precisionscan Pro 說明」。
建立相片展示並儲存在光碟上
某些掃瞄器有記憶光碟製作
若您有可讀 / 寫光碟機及可寫入的光碟,您可以使用您的掃瞄器建立含有音樂
和標題的個人化相片展示。然後您就可以使用相容的 DVD 播放器在電視上觀
賞相片展示。您也可以從光碟上重印相片。
1 關閉 HP 掃瞄軟體及 HP 影印軟體 ( 若在您的電腦中已開啟 )。
2 請將原稿的正面朝下放置在掃瞄器玻璃板上並關閉蓋板。
3 按一下掃瞄器上的記憶光碟製作
您也可以建立相片展示並將相片展示從軟體儲存到光碟。如需更多資訊,請參
閱 HP 相片和影像軟體說明。
記憶光碟製作按鈕 ()。
記憶光碟製作記憶光碟製作
掃瞄幻燈片或負片
在 HP Scanjet 3500c 系列掃瞄器上,您可以使用選購的 HP Scanjet 透明材料配
接器 (TMA) 來掃瞄幻燈片或負片。如果要這麼做,請使用 HP 掃瞄軟體代替掃
瞄按鈕。
如需更多關於 TMA 的詳細資訊,請參閱 HP 相片和影像軟體說明中的 TMA -
hp scanjet 3500c 系列
系列。
系列系列
記憶光碟製作按鈕,然後依照電腦螢幕上的指示執行。
記憶光碟製作記憶光碟製作
如何使用掃瞄器
如需 Macintosh 作
業系統的資訊,請
參閱
「HP Precisionscan
Pro 說明」。
Macintosh OS 9: 從「Finder 輔助說明」功能表上選擇
Apple 的 「輔助說明中心」。然後選擇 「HP Precisionscan Pro
說明」。
Macintosh OS X: 從「Finder 輔助說明」功能表上選擇
「Mac 輔助說明」。然後按一下 「Mac 輔助說明」視窗左下角
的問號並選擇 「HP Precisionscan Pro 說明」。
8
繁體中文
Page 58

變更按鈕設定值
當您使用掃瞄器按鈕時,掃瞄器會使用適用於與該按鈕相關的目的地 ( 例如電
子郵件 ) 的最佳化設定值。設定值的範例包括解析度、大小和輸出類型。設定
值套用至使用該按鈕掃瞄的所有項目,一直到您再次變更設定值為止。
若您的掃瞄器按鈕其中之一未在此列出,則其設定值無法變更。
您可從管理員變更按鈕設定值,其為您用來取得 HP 相片和影像軟體多種功能
的主要視窗。
開啟管理員
• 在開始功能表上,點選
若只需變更目前項目的設定值,您可能要改用 HP 相片和影像軟
體進行掃瞄。
、Hewlett-Packard,點選您的掃瞄器,再按
程式集
一下 hp
相片和影像管理員
。
變更電子郵件
按鈕的設定值
變更掃瞄按鈕
的設定值
如需 Macintosh 作
業系統的資訊,請
參閱
「HP Precisionscan
Pro 說明」。
若您的掃瞄器有電子郵件
值及電子郵件設定值
1 開啟管理員,並在
2 按一下
3 回到管理員,並在
4 按一下
若您的掃瞄器有掃瞄
1 開啟管理員,並在
2 按一下
掃瞄至其他程式
您可以直接掃瞄至 HP 掃瞄軟體之外的程式。當您按下掃瞄
結果會發送到您選取的目的地程式 ( 例如,文字處理程式 )。
電子郵件按鈕
掃瞄文件
掃瞄按鈕
Macintosh OS 9: 從「Finder 輔助說明」功能表上選擇
Apple 的 「輔助說明中心」。然後選擇 「HP Precisionscan Pro
說明」。
Macintosh OS X: 從「Finder 輔助說明」功能表上選擇
「Mac 輔助說明」。然後按一下 「Mac 輔助說明」視窗左下角
的問號並選擇 「HP Precisionscan Pro 說明」。
電子郵件按鈕,您可以從兩個地方變更其設定值:在
電子郵件電子郵件
。
功能表上按一下
設定值
標籤,並變更設定值。
功能表上按一下
設定值
標籤,
掃瞄相片
掃瞄按鈕,請使用下列程序變更其設定值。
掃瞄掃瞄
設定值
標籤並變更其設定值。
標籤,或是程式標籤並變更設定值。
功能表上按一下
按鈕設定值
電子郵件設定值
按鈕設定值
按鈕設定
。
。
。
掃瞄按鈕時,您的掃瞄
掃瞄掃瞄
9
如何使用掃瞄器
Page 59

在在在在 Windows 電腦上:
1 開啟管理員,並在設定值功能表上按一下按鈕設定值。
2 在掃瞄按鈕標籤上的目的地方塊上指定您要傳送掃瞄結果的目的地。
3 依需要變更其他的設定值,並按一下確定。
若您想要將掃瞄結果直接發送到選取的目的地,請確定掃瞄按鈕標籤上的
顯示預覽核取方塊已清除。
電腦上:
電腦上:電腦上:
變更影印按鈕
的設定值
若您的掃瞄器有影印
的設定值。
• 開啟管理員,按一下影印,然後變更設定值。
影印按鈕,軟體會記得您最後一次使用 HP 影印軟體時所選擇
影印影印
繁體中文
如何使用掃瞄器
10
Page 60

4
本章包含一般安裝問題的解決方案。如需有關使用問題或維護問題的解決方案
( 例如:清潔掃描器玻璃板 ),請參閱 HP 相片和影像軟體說明內的 「疑難排
解」。
掃描器無法運作
• 首先,請檢查您的電腦:
• 在安裝 Microsoft® Windows® 系統的電腦上,若您在安裝期間收到如
• 檢查電纜:
• 測試掃描器硬體 ( 僅適用 HP Scanjet 2300c ):
安裝問題
3500c
或
– 請確定您的電腦符合列於本掃描器包裝盒上的最小系統需求。
– 若您沒有足夠的硬碟空間,請移除不需要的檔案或在不同的磁碟機安
裝本軟體。
「無效的目的地目錄」或 「無效的程式資料夾」等訊息,請進行下列操作
之一:
– 鍵入一個有效的目的地資料夾名稱。目的地資料夾不能包含下列字元:
/、 \、 :、 ?、 *、<、>、" 或 |。
– 使用瀏覽按鈕尋找有效的資料夾。
– 請檢查電源電纜是否已牢牢連接在掃描器與具流通電流的電源插座或
避雷保護器之間。
– 若電源電纜連接至避雷保護器,請確定該避雷保護器已插入至電源插
座中且已開啟。
– 請確定您所使用的是本掃描器隨附的 USB 電纜。其他的電纜可能與本
掃描器不相容。
– 請檢查 USB 電纜是否已牢牢連接在掃描器與電腦之間。
– 請依序將電源電纜從掃描器上拔掉,並關閉電腦。30 秒之後,重新連
接掃描器電源電纜,並開啟電腦。
– 使用 Macintosh 電腦時 ( 僅適用 HP Scanjet 3500c 系列 ),請使用「蘋
果系統設置」來確認掃描器是否正確連接到電腦上。
a. 請從掃描器拔掉 USB 電纜及電源電纜。請確定電源電纜仍然連接至電
源。
b. 在將電源電纜插回至掃描器時,請同時按下掃瞄
掃瞄燈應開啟,且掃描器上的光學成像頭應會前後移動。
c. 若要結束測試,請拔下電源電纜的插頭。
- hp scanjet 2300c
系列
掃瞄及影印
影印按鈕。
掃瞄掃瞄
影印影印
11
安裝問題
- hp scanjet 2300c 或 3500c
系列
Page 61

若掃瞄燈未開啟或成像頭未移動,表示掃瞄器硬體發生問題。請聯絡
「HP 客戶支援」。
掃描器起始失敗
• 若您收到掃瞄器起始失敗的訊息,或若 HP 掃瞄軟體在正常運作一段時後
停止運作,請嘗試進行下列程序。
a. 若 HP 掃瞄軟體已開啟,請將之關閉。
b. 請確定連接電腦與 HP 掃瞄器的電纜已牢牢連接。
c. 請拔下電源線以關閉掃瞄器。再將電源線插回以再次開啟掃瞄器。
d. 請關閉電腦,然後重新開機。
• 若掃瞄器仍然無法起始,請依照下一個主題的說明,即
,執行修復公用程式 ( 僅適用 Windows 電腦 )。
常運作
掃描器仍然無法正常運作
• 若掃瞄器停止掃瞄或掃瞄器上的按鈕不再具有應可使用的功能,那麼您的
電腦上可能存在軟體衝突的問題。您可能需要重新安裝 HP 相片和影像軟
體。若要這麼做,請執行修復公用程式 ( 僅適用 Windows 電腦 )。
a. 按一下開始,指向設定,然後按一下
一下開始,然後按一下
b. 按一下新增/
c. 按一下變更 ( 或
d. 請遵照電腦螢幕上的指示執行,然後按一下修復。
• 如果掃瞄器仍無法運作,請將掃瞄器安裝在另一台電腦上。這將有助於判
定問題是否與第一台電腦或是掃瞄器有關。
• 若掃瞄器仍然無法運作,請聯絡 「HP 客戶支援」。
若您所需的疑難排解資訊未顯示於此,請參閱 HP 相片和影像軟體的 「Read
Me」檔案,以取得最新資訊,或檢視電子說明文件中疑難排解的章節。
移除程式
新增/移除
( 在 Windows XP 中,按
控制台
)。
控制台
,然後選擇 HP
,視您的 Windows 版本而定 )。
相片和影像
掃描器仍然無法正
軟體。
解除安裝軟體
針對
安裝問題
- hp scanjet 2300c 或 3500c
安裝程式的 「Uninstall」 ( 解除安裝 ) 選項可讓您將掃瞄軟體自您的電腦中移
除。
Windows
1 按一下開始,指向設定,然後按一下
2 按一下新增/
3 按一下變更 ( 或
4 請遵照電腦螢幕上的指示執行,然後按一下移除 ( 或新增/
,然後按一下
開始
電腦
系列
控制台
移除程式
新增/移除
( 在 Windows XP 中,按一下
控制台
)。
,然後選擇 HP
,視您的 Windows 版本而定 )。
相片和影像
軟體。
移除
)。
12
繁體中文
Page 62

針對 Macintosh 電腦 ( 僅適用 hp scanjet 3500c 系列 )
1 將掃描器的插頭拔出,並重新啟動電腦。( 解除安裝軟體之前,若您沒有拔
出掃描器插頭並重新啟動電腦,則在解除安裝過程中,部分檔案將無法自
您的電腦中移除。)
2 將 HP 相片和影像軟體的光碟片插入您的光碟機。( 若 HP 相片和影像光碟
片視窗未顯示,請在光碟片圖示上按兩下。)
3 按兩下 「安裝程式」,接著遵照螢幕上的指示執行。
4 當主要安裝對話方塊出現時,請從下拉式功能表上選擇 Uninstall ( 解除安
裝 )。
5 按一下 Uninstall ( 解除安裝 ),然後遵照電腦螢幕上的指示執行。
13
安裝問題 - hp scanjet 2300c 或 3500c 系列
Page 63

hp
支援
5
如需保固及規格說明的資訊,請參閱掃描器的電子說明文件。
如需法規資訊,請參閱掃描器隨附光碟片中的 regulatory_supplement.htm 檔
案。
在網路上尋找
造訪
hp
網站
hp
hp scanjet
無障礙網站
hp
說明
HP 在網路上提供許多資源以幫助您使用掃描器。 這些免費的網路服務提供您
一天 24 小時,一個星期七天的服務。
產品支援
請造訪 http://www.hp.com/cposupport/loc/regional.html 網站,選擇您所在
的地區,然後在 「quick find」 ( 快速尋找 ) 方塊內鍵入您的掃描器型號,以尋
找有關下列主題的資訊:
• 設定及使用掃描器
• 下載驅動程式
• 解決問題
• 訂購
• 保固
請造訪 http://www.hp.com 網站,按一下「products and services」( 產品及服
務 ) 以取得下列資訊:
• 有效且靈活操作掃描器之提示
•HPScanjet 驅動程式更新版本及軟體
有使用障礙的客戶,可造訪 http://www.hp.com/hpinfo/community/
accessibility/prodserv/ 網站以取得協助。
網站
繁體中文
hp
支援
hp
協助
如果您使用上面列出的網站仍找不到您問題的答案,請造訪 http://
www.hp.com/cposupport/mail_support.html 網站。在此網站中,您可以發現
如何利用電子郵件、電話或其他方法與 HP 聯絡。
14
Page 64

聯絡 hp 客戶支援
聯絡 「HP 客戶支援」前,請先參閱
服務都是免費的且隨時可以利用。如果您無法在網路上找到所需的說明,請聯
絡「HP 客戶支援」。
您可以透過電話或電子郵件與 HP 聯絡,以取得掃描器支援與服務。服務的價
格、可用性和時間皆可變更而不需事先通知。
在網路上尋找
hp 說明。在該章描述的網路
hp
如何協助您
在美國取得支
援
Hewlett-Packard 支援諮詢電話可以幫助解決與下列事項有關的問題:
• 設定
• 安裝
• 組態
• 操作
如有與作業系統或網路組態相關的問題,請聯絡當地經銷商或內部支援部門。
如需有關非 HP 硬體或軟體的說明,請聯絡其他產品製造商。
在您來電前
在您致電 「HP 客戶支援」前,請先嘗試下列步驟:
• 請檢視使用手冊內的 「安裝問題」章節;如有其他疑難排解的問題,請參
閱 HP 相片和影像軟體說明內的 「疑難排解」單元。
• 請檢視 HP 產品支援網站上的疑難排解資訊。
當您來電時
當您來電時,如果可能的話,請在安裝該掃描器的電腦旁,並準備下列資訊:
• 序號 ( 在掃描器的背面或下面或掃描器玻璃板下 )
• 產品名稱 ( 在掃描器蓋板上 )
• 購買日期
90
日內免付費電話支援
購買日起 90 日內,您可以獲得免付費的電話支援服務。如果此電話為長途電
話,此筆電話費用需要計費。
請打 (208) 323-2551。
我們的支援人員於星期一至星期五的上午六點到下午十點 ( 山地標準時間 ),及
星期六的上午九點到下午四點為您提供服務。
15
購買日起
90
日後
請打 (208) 323-2551。
每個問題的洽詢費用為 $25.00 ( 以信用卡付款 )。
如果您發覺您的 HP 產品可能需要服務時,請聯絡 「HP 客戶支援」,我們將為
您確認是否確實需要服務。
hp 支援
Page 65

hewlett-packard 升級保固聲明
您可以為您的 HP 產品購買綜合性的延長保固,但您必須在購買日起的 180 日
內購買。
使用 HP SupportPack (HP 技術支援包 ),將標準原廠保固升級為三年。服務涵
蓋範圍從產品購買日算起,技術支援包亦需於購買日起 180 日內購買完畢。
HP 會依據客戶首次致電 「HP 客戶支援」時執行系統自我測試程式的結果,來
決定是否提供硬體服務。如果您來電請求的技術支援結果顯示必須更換您的產
品,那麼 HP 將會於下一個工作天郵寄一個免費的替換產品。此保固升級將盡
最大可能地保證我們提供的按戶取貨、送達的服務便利、高效。另外,所有包
裝和郵寄費用皆由 HP 負擔。
此服務只限於美國地區。如需更多資訊,請打 1-888-999-4747 或造訪 http://
www.homeandoffice.hp.com,並在 「product support」 ( 產品支援 ) 下選擇
「warranty upgrades」 ( 保固升級 ) 選項。
在全世界取得
支援
亞洲地區輿南太平洋地區電話支援可一年免費;中東及非洲地區則為 30 天。
至於歐洲地區的電話支援,請洽詢 http://www.hp.com/cposupport/
mail_support.html 網站,並按一下 「contact HP」 ( 聯絡 HP),以查詢所處國家
或地區電話支援的細節及情形。
或者,您也可以向您的經銷商查詢或藉本文件中列出的各國或地區的電話號碼
與 HP 聯絡。如需歐洲地區的英語服務,請打 +44 (0) 207 512 52 02。
土耳其
中國
丹麥
巴西 (11) 3747 7799 ( 大聖保羅地區 )
日本
比利時 法蘭德斯語: +32 (0)2 626 8806
以色列
加拿大
台灣
瓜地馬拉
匈牙利
印尼
印度
西班牙
+90 216 579 7171
+86 10 6564 5959
+45 39 29 4099
0800 157 751 ( 大聖保羅地區以外 )
+81 3 5344 7181
法語: +32 (0)2 626 8807
+972 (0)9 952 48 48
905 206-4663
0 800-01 0055
1 800 999 5105
+36 (0)1 382 1111
+62 (21) 350 3408
+91 11 682 6035
+34 902 321 123
繁體中文
hp
支援
16
Page 66

希臘
委內瑞拉
波多黎各
波蘭
法國
芬蘭
阿拉伯聯合大公國
阿根廷
阿爾及利亞
+30 1 60 73 603
0800 4746 8368
1 877 232 0589
+48 22 865 98 00
+33 (0)1 43 62 34 34
+358 (0)203 47 288
971 4 883 8454
0-810-555-5520
+212 22404747
俄羅斯聯邦 +7 095 797 3520 ( 莫斯科 )
南非 086 000 1030 ( 南非共和國內 )
南韓
突尼西亞
美國
英國和全球英文支援
香港
哥倫比亞
埃及
挪威
泰國 +66 (2) 661 4000 ( 曼谷 )
烏克蘭
祕魯
紐西蘭
馬來西亞 60 (3) 295 2566 ( 檳城 )
捷克共和國
荷蘭
+7 812 346 7997 ( 聖彼得堡 )
+27-11 258 9301 ( 南非共和國外 )
+82 (2) 3270 0700
080-999-0700 ( 只限漢城及京畿道以外的地區 )
+212 22404747
(208) 323-2551
+44 (0)207 512 52 02
+85 (2) 3002 8555
+9 800 114 726
+202 7956222
+47 22 11 6299
+7 (380-44) 490-3520
0 800 10111
+64 (9) 356 6640
03 2695 2566 ( 檳城以外 )
+42 (0)2 6130 7310
+31 (0)20 606 8751
17
智利 800 22 5547 ( 商用電腦售後服務 )
800 360 999 ( 家用電腦售後服務 )
hp 支援
Page 67

菲律賓
越南
奧地利
愛爾蘭
新加坡
瑞士
瑞典
義大利
葡萄牙
+63 (2) 867 3551
+84 (0)8 823 4530
43 (0) 810 00 6080
+353 (0)1 662 5525
+65 272 5300
+41 (0)848 80 11 11
+46 (0)8 619 2170
+39 02 264 10350
+351 21 3176333
德國 +49 (0)180 52 58 143 (0.24 馬克 / 分鐘,0.12 歐元
摩洛哥
墨西哥 52 58 9922 ( 墨西哥市 )
澳大利亞
羅馬尼亞
/ 分鐘 )
+212 22404747
01-800-472-6684 ( 墨西哥市以外 )
03 8877 8000
+40 1 315 44 42
01 3154442 ( 當地 )
繁體中文
hp
支援
18
Page 68

19
hp support
Page 69

hp scanjet 2300c 或 3500c
系列
使用手册
简体中文
Page 70

版权信息
© 版权所有 2002 年惠普公司 (Hewlett-Packard Company)
保留所有权力
本产品包含 Adobe 公司的 PDF 技术 该技术使用了美国专利法 4,558,302 中许可使用的
LZW 技术
除非版权法许可 严禁未经事先书面许可 复制 改编或翻译本手册
商标注册
Adobe 和 Acrobat 徽标是 Adobe Systems Incorporated 在美国和 / 或其他国
家的注册商标或商标
Microsoft 和 Windows 是 Microsoft Corporation 的注册商标
本手册提及的所有其他产品名称均为其各自公司的商标
保证
本文档所含内容如有修改 恕不另行通知
惠普公司对本资料不作任何形式的保证 并特别声明不为特定目的的适销性和适用性作
任何默示保证
对由供给 使用本资料而引起的任何直接 间接 偶然 继发损坏或其他的损坏 惠普
公司不承担任何责任
TWAIN Toolkit 按原样供应 TWAIN Toolkit 的开发商和经销商公开声明对该产品不作任
何默示
适用性
然或继发的损坏
美国政府用户注意 商用计算机软件的限制性权利 政府使用 复制或公布本产品中
的信息
款的子节 (c) (1) (ii) 的限制
本产品扫描的资料可能受政府法律和其他法规的保护 如版权法 由客户全权负责遵守
所有此类法律和法规
明示或法定保证 包括但不限于用于特定目的的适销性 第三方权利的侵害和
对由复制 修改 经销或使用 TWAIN Toolkit 而引起的直接 间接 特殊 偶
不管是开发商还是经销商均不负任何责任
受 DFARS 52.227-7013 中 Rights in Technical Data 技术数据中的权利 条
产品限制材料
此 HP 产品的使用寿命终结时 其中所含的以下材料需要进行特别处理
• 扫描仪 / 透明材料适配器 / 液晶显示屏荧光灯中所含的汞 (< 5 mg)
• 焊料中的铅
有关回收信息
或访问电子工业协会的网站 http://www.eiae.org
有关惠普环保工程 (environmental stewardship program) 的信息 请参见扫描仪电子版帮
助中
您可以访问 http://www.hp.com/go/recycle 站点 与当地主管部门联系
保修和技术规格 的内容
Page 71

目录
安装扫描仪 . . . . . . . . . . . . . . . . . . . . . . . . . . . . . . . . 1
开始安装前 . . . . . . . . . . . . . . . . . . . . . . . . . . . . . . . . . . . 1
检查盒内物品 . . . . . . . . . . . . . . . . . . . . . . . . . . . . . . . 1
安装软件和连接扫描仪 . . . . . . . . . . . . . . . . . . . . . . . . . . . 2
先安装软件
先连接扫描仪
连接透明材料适配器选件 仅限 hp scanjet 3500c 系列 . . 3
Windows 和 Macintosh . . . . . . . . . . . . . 2
仅限 Windows . . . . . . . . . . . . . . . . . 2
扫描仪总览 . . . . . . . . . . . . . . . . . . . . . . . . . . . . . . . . 4
使用扫描仪 . . . . . . . . . . . . . . . . . . . . . . . . . . . . . . . . 5
选择扫描的项目 . . . . . . . . . . . . . . . . . . . . . . . . . . . . . . . . 5
预览并修改已扫描的图像. . . . . . . . . . . . . . . . . . . . . . . . . . 6
将扫描结果通过电子邮件发送 . . . . . . . . . . . . . . . . . . . . . . 6
复印 . . . . . . . . . . . . . . . . . . . . . . . . . . . . . . . . . . . . . . . . 7
制作一个照片集并保存到 CD . . . . . . . . . . . . . . . . . . . . . . . 8
扫描幻灯片或负片. . . . . . . . . . . . . . . . . . . . . . . . . . . . . . . 8
更改按钮设置 . . . . . . . . . . . . . . . . . . . . . . . . . . . . . . . . . . 8
目录
安装中的问题 - hp scanjet 2300c 或 3500c 系列 . . . . 11
扫描仪不工作 . . . . . . . . . . . . . . . . . . . . . . . . . . . . . . . . . 11
扫描仪初始化失败. . . . . . . . . . . . . . . . . . . . . . . . . . . . . . 12
扫描仪仍无法正常工作 . . . . . . . . . . . . . . . . . . . . . . . . . . 12
卸载软件 . . . . . . . . . . . . . . . . . . . . . . . . . . . . . . . . . . . . 12
hp 支持 . . . . . . . . . . . . . . . . . . . . . . . . . . . . . . . . . . 13
在 web 上寻找 hp 的帮助 . . . . . . . . . . . . . . . . . . . . . . . . 13
联系 hp 客户支持 . . . . . . . . . . . . . . . . . . . . . . . . . . . . . . 14
在美国国内获得支持 . . . . . . . . . . . . . . . . . . . . . . . . . 14
在全球各地获得技术支持 . . . . . . . . . . . . . . . . . . . . . . 15
简体中文
iii
Page 72

1
开始安装前
安装扫描仪
确保您的计算机上有通用串行总线接口 USB 端口 并且运行的是
Microsoft
Macintosh 仅支持 HP Scanjet 3500c 系列
Windows 98 或更新版本 或 Macintosh OS 9 或更新版本
USB 端口
检查盒内物品
1
您的扫描仪盒中应含有下列物品
• HP Scanjet 2300c 或 3500c 系列数字平板扫描仪
•HP 照片及成像软件 CD
•USB 电缆
• 电源电缆
• 透明材料适配器 (TMA)
HP Scanjet 2300c 扫描仪
仅限 HP Scanjet 3500c 系列的某些型号
HP Scanjet 3500c 系列扫描仪
透明材料适配器
仅限某些型号
安装扫描仪
Page 73

安装软件和连接扫描仪
可以用两种方法中的其中一种安装扫描仪 先安装软件或先连接扫描仪 建议
您先安装软件 尤其是在 Macintosh 计算机上
先安装软件
Windows 和
Macintosh
如果在安装扫描仪时遇到困难 请参见第
题 - hp scanjet 2300c 或 3500c 系列
1 关闭计算机上所有打开的程序
2 找到适合您的语言和操作系统的 HP 照片及成像软件 CD
机中
3 对于 Microsoft Windows 计算机
装程序不自动启动
a. 在开始菜单上 单击运行
b. 键入
对于 Macintosh 计算机 仅限 HP Scanjet 3500c 系列 双击 CD 上的
Installation Read Me 文件并按照说明操作
4 如果提示您关闭计算机
5 用 USB 电缆将扫描仪的 USB 端口与计算机的 USB 端口相连
6 用电源电缆将扫描仪与电涌保护器或易于插接并带接地的壁装插座相连
这将开启扫描仪
7 如有必要
x:setup.exe
请照做
再次开启您的计算机
按照屏幕上的说明操作 或者 如果安
其中 x 是光驱的盘符
11
页的
安装中的问
将其插入计算
先连接扫描仪
仅限
Windows
安装扫描仪
将 USB 电缆连接到扫描仪 将 USB 电缆连接到计算机
1 确保您的计算机已开启并且正在运行操作系统
2 用 USB 电缆将扫描仪的 USB 端口与计算机的 USB 端口相连
3 用电源电缆将扫描仪与电涌保护器或易于插接并带接地的壁装插座相连
这将开启扫描仪
4 按照
找到新硬件 向导中的提示操作
简体中文
2
Page 74

5 插入 HP 照片及成像软件 CD 并单击下一步
符
请选择您的 CD 驱动器
6 在 HP Scanjet 安装程序中
7 安装完毕后
的扫描仪并查找更多帮助信息
请单击 Install software 安装软件 并按照提示操作
另一个 HP 安装程序会启动 您可以安装其他软件 注册您
请按照说明操作
要了解您的扫描仪是否随附有其他软件
如果向导提示需要驱动盘
连接透明材料适配器选件 仅限 hp scanjet 3500c 系列
您的扫描仪可能带有透明材料适配器 (TMA) 以便扫描 35 mm 的幻灯片或负
片
• 如果您的扫描仪带有透明材料适配器 请将透明材料适配器电缆与其在扫
描仪上的端口连接
3
安装扫描仪
Page 75

扫描仪总览
本章介绍扫描仪前面板上的按钮及可用的附件
按钮或附件 说明
电子邮件
2
您的扫描仪可能具有以下全部或部分功能
按钮 使用为电子邮件做了优化的设置扫描项目
扫描结果发送到您的电子邮件软件中
该软件
然后将
如果支持
扫描仪总览
按钮 将原件扫描到
扫描
或修改扫描得到的图像
按钮 扫描项目并将其发送到打印机以进行打印
复印
存储磁盘创建程序
HP Scanjet
仅限
HP Scanjet 3500c
按钮 将项目扫描到存储磁盘创建程序软件中
透明材料适配器
(TMA)
系列
件您可以在
集
将幻灯片或负片扫描到
其中预览或修改扫描的图像
扫描软件中
HP
上创建带有背景音乐和标题的照片
CD
扫描软件中 您可以在
HP
您可以在其中预览
通过该软
简体中文
4
Page 76

3
使用扫描仪
您可以用以下两种方法中的一种开始使用扫描仪 从扫描仪的按钮开始操作或
从 HP 照片及成像软件开始操作 扫描仪按钮提供了软件功能的某些快捷方
式
如果您需要更多的选项和进行更多的控制或您的扫描仪型号未包括所有的
按钮 则可以从软件开始操作
本章中的步骤使用的是默认的按钮设置 有关更改一个或多个按钮设置的详细
信息
请参见更改按钮设置
选择扫描的项目
在选择扫描的项目时 请遵循以下原则
适合在扫描仪玻璃板上扫描的项目
扫描仪玻璃板可用来扫描多种项目
在将物品放在扫描仪上之前 请确保物品上没有未干的胶水 修正液或其他可
以粘到玻璃板上的物质
适合在透明材料适配器上扫描的项目
HP Scanjet 透明材料适配器 (TMA) 随 HP Scanjet 3500c 系列提供
透明材料适配器扫描
• 35 mm 负片
• 35 mm 幻灯片
有关使用软件的详细信息 请参见
助
从名片 照片到织物和美术作品
不要将边沿很锋利的物品放在扫描仪上 这样做会损坏扫描仪
照片及成像软件的 帮
HP
您可以使用
5
使用扫描仪
Page 77

预览并修改已扫描的图像
如果您的扫描仪有扫描按钮 ()您可以用该按钮扫描图片和文档
按下扫描按钮时 HP 扫描软件打开 在将扫描图像发送到 HP 照片及图像图库
之前 您可以在软件中预览并进行修改
扫描图片
1 如果已经在计算机上打开 HP 复制实用程序
2 将图片的一侧朝下
3 按下扫描仪前面板上的扫描按钮
4 按照计算机屏幕上的说明操作
对图片进行扫描
扫描文档
要扫描文档
Hewlett-Packard
器中 单击扫描文档 您还可以更改扫描按钮的设置 这样在通常情况下 扫
描仪就使用针对文档进行优化的设置进行扫描
钮设置
请使用 HP 照片及成像 在开始菜单中 指向程序 指向
请将其关闭
面向扫描仪玻璃板并合上盖板
HP 扫描软件使用为图片做了优化的设置
指向您的扫描仪 然后单击 HP 照片及图像控制器 在控制
有关详细信息 请参见更改按
与
Macintosh
的信息
HP Precisionscan
Pro Help
请参见
相关
Macintosh OS 9: 从 Finder Help
Center
Macintosh OS X: 从 Finder Help
后单击
Pro Help
将扫描结果通过电子邮件发送
如果您的扫描仪有电子邮件按钮 ()您可以将扫描结果通过电子邮件直接
发送出去 您还必须能连接到因特网 并有一个扫描仪支持的电子邮件程序
照片及成像软件支持多种常见的电子邮件程序
HP
支持您的电子邮件程序
它会自动打开 如果软件不支持您使用的电子邮件程序 则扫描
仪不能将项目直接扫描进电子邮件的信件中
扫描结果保存到文件
1 如果计算机上打开了 HP 扫描软件和 HP 复制实用程序
2 将原稿的一侧朝下
3 按下扫描仪上的电子邮件按钮
对项目进行扫描
4 按照计算机屏幕上的说明操作
一个屏幕 您可以在其中填写地址 编辑信件
然后选择
Mac Help
HP Precisionscan Pro Help
窗口左下脚的问号
当您试图用电子邮件发送扫描结果时
在这种情况下 将
然后将该文件粘贴到电子邮件的信件中
面向扫描仪玻璃板并合上盖板
扫描仪用为电子邮件做了优化的默认设置
如果软件支持您的电子邮件程序 会出现
菜单中选择
菜单中选择
并选择
HP Precisionscan
如果该软件
请将其关闭
Apple Help
Mac Help
然
简体中文
使用扫描仪
6
Page 78

您也可以从软件通过电子邮件发送扫描结果 有关详细信息 请参见 HP 照片
及成像软件的
帮助
与
Macintosh
的信息
HP Precisionscan
Pro Help
相关
请参见
Macintosh OS 9: 从 Finder Help
Center
Macintosh OS X: 从 Finder Help
后单击
Pro Help
然后选择
Mac Help
HP Precisionscan Pro Help
窗口左下脚的问号
菜单中选择
菜单中选择
并选择
HP Precisionscan
Apple Help
Mac Help
选择用于电子邮件的原稿类型
如果软件提示您选择原稿类型
您有两个选择 图片或文档 根据您的选择
扫描仪使用针对您的项目进行了优化的设置 使用以下指导原则确定最符合您
需要的原稿类型
如果您的原稿包括 选择该原稿类型 收到该类型的输出结果
文本或图文混排 文档
打印出的图像 图片 联合图像专家组
如果您想将项目保存为
扫描软件扫描和保存该项目
HP
JPG 或 PDF
Adobe®
(PDF)
以外的其他文件类型
可移植文档格式
文件
(JPG)
文件
用
更改原稿类型
如果软件没有提示您选择原稿类型
您可以更改电子邮件按钮的设置 这样在
通常情况下 扫描仪将使用为文档或图片做了优化的设置进行扫描 有关详细
信息
请参见更改按钮设置
然
复印
7
如果您的扫描仪有复印按钮 ()您可以扫描该物品后直接发送到打印机进
行复印
1 如果计算机上打开了 HP 扫描软件
2 将原稿的一侧朝下
3 按下扫描仪上的复印按钮
面向扫描仪玻璃板并合上盖板
软件用为打印做了优化的默认设置对项目进行
请将其关闭
扫描
4 会出现一条显示复印进程的信息
如果您想缩小或放大复印件 或使其变亮或变暗 或修改打印机设置 单
击复印进程对话框中的取消
您可以在 HP 复制实用程序中修改设置
使用扫描仪
Page 79

您也可以用 HP 复制实用程序进行复印 有关详细信息 请参见 HP 照片及成
像软件的帮助
与
Macintosh
的信息
HP Precisionscan
Pro Help
请参见
相关
制作一个照片集并保存到 CD
某些扫描仪有存储磁盘创建程序按钮 ()
如果您有可进行读 / 写操作的 CD 驱动器和可写的 CD 您可以用扫描仪制作
配有音乐和标题的个人照片集 然后 您可以用兼容的 DVD 播放机在电视上
观看照片集
您也可以从 CD 上再次打印照片
1 如果计算机上打开了 HP 扫描软件和 HP 复制实用程序
2 将原稿的一侧朝下
3 按下扫描仪上的存储磁盘创建程序按钮
操作
您还可以用软件创建照片集并保存到 CD 上 有关详细信息 请参见 HP 照片
及成像软件的帮助
扫描幻灯片或负片
在 HP Scanjet 3500c 系列扫描仪上 您可以使用 HP Scanjet 透明材料适配器
(TMA) 选件扫描幻灯片或负片 要做到这一点 使用 HP 扫描软件而不要使用
扫描按钮
有关透明胶片材料适配器的详细信息 请参见 HP 照片及成像软件帮助中的透
明材料适配器 - hp
- hp scanjet 3500c
- hp- hp
从
Macintosh OS 9:
Center
Macintosh OS X:
后单击
Pro Help
然后选择
Mac Help
Finder Help
HP Precisionscan Pro Help
从
Finder Help
窗口左下脚的问号
面向扫描仪玻璃板并合上盖板
scanjet 3500c 系列中的内容
scanjet 3500cscanjet 3500c
菜单中选择
菜单中选择
并选择
Apple Help
Mac Help
HP Precisionscan
然
请将其关闭
并按照计算机屏幕上的说明进行
更改按钮设置
使用扫描仪
与
Macintosh
的信息
HP Precisionscan
Pro Help
相关
请参见
Macintosh OS 9:
Center
Macintosh OS X:
后单击
Pro Help
然后选择
Mac Help
从
Finder Help
HP Precisionscan Pro Help
从
Finder Help
窗口左下脚的问号
菜单中选择
菜单中选择
并选择
HP Precisionscan
Apple Help
Mac Help
然
当您使用扫描仪按钮时 扫描仪使用为与按钮相关的目的做了优化的设置 如
电子邮件 设置的内容包括分辨率 大小和输出类型 除非您再次更改设置
这些设置将被应用到用该按钮扫描的所有内容中
8
简体中文
Page 80

如果未列出其中某个扫描仪按钮 则不能更改其设置
更改电子邮件
按钮的设置
要只更改用于当前项目的设置 您可以改用
扫描
照片及成像进行
HP
您可从控制器修改按钮设置 该窗口是您使用 HP 照片及成像软件诸多功能的
主窗口
打开控制器
• 在开始菜单中
指向程序 指向 Hewlett-Packard 指向您的扫描仪 然后
单击 HP 照片及图像控制器
与
Macintosh
的信息
HP Precisionscan
Pro Help
相关
请参见
Macintosh OS 9:
Center
Macintosh OS X:
后单击
Pro Help
然后选择
Mac Help
从
Finder Help
HP Precisionscan Pro Help
从
Finder Help
窗口左下脚的问号
菜单中选择
菜单中选择
并选择
HP Precisionscan
Apple Help
Mac Help
如果扫描仪有电子邮件按钮 您可以在两个地方更改设置 在按钮设置和电子
邮件设置中
1 打开控制器
2 单击电子邮件按钮标签
3 返回控制器
4 单击扫描文档标签 扫描图片标签或程序标签
在设置菜单中 单击按钮设置
并更改设置
在设置菜单中 单击电子邮件设置
并更改设置
然
更改扫描按钮
的设置
9
如果扫描仪有扫描按钮 用以下步骤更改设置
1 打开控制器
2 单击扫描按钮标签
在设置菜单中 单击按钮设置
并更改设置
扫描到其他程序
您可以将扫描结果直接发送到其他程序
按钮时
您的扫描结果直接发送到您选定的目标程序 例如字处理程序
在 Windows 计算机上
1 打开控制器
2 在扫描按钮标签上
3 根据需要修改其他设置
在设置菜单中 单击按钮设置
在目的地框中 指定您想将扫描结果发送到的目标
然后单击确定
如果您希望将扫描结果直接发送到选定的目标 在扫描按钮标签上 确保
显示预览复选框被清除
而不是 HP 扫描软件 当您按下扫描
使用扫描仪
Page 81

更改复印按钮
的设置
如果扫描仪有复印按钮 软件将记住您最后一次使用 HP 复制实用程序时选择
的设置
• 打开控制器 单击制作副本 然后更改设置
使用扫描仪
简体中文
10
Page 82

4
扫描仪不工作
安装中的问题
或
2300c
本章包括安装中常见问题的解决方法 有关使用中出现问题的解决方法或有关
维护事项 如清洗扫描仪玻璃板 请参见 HP 照片及成像软件帮助中的 故障
排除
• 首先 检查您的计算机
– 请确保您的计算机满足扫描仪包装盒上列出的最低的系统要求
– 如果硬盘空间不足 删除不需要的文件或将软件安装在其他磁盘驱动
器上
• 在一台 Microsoft® Windows® 计算机上 如果您在安装过程中得到诸如
目标目录无效 或 程序文件夹无效 等信息 请进行以下操作
– 输入有效的目标文件夹的名称
号
/ \ : ? * < > “ 或 |
– 用浏览按钮寻找有效的文件夹
• 检查电缆
– 请检查连接扫描仪和带电插座或电涌保护器的电源电缆连接牢固
– 如果电源电缆连接到电涌保护器 确保电涌保护器插入了某个插座并
已经接通
– 请一定使用随扫描仪提供的 USB 电缆 其他 USB 电缆可能与扫描仪不
兼容
– 确保扫描仪和计算机之间的 USB 电缆连接牢固
– 断开扫描仪的电源电缆并关闭计算机 30 秒后 将电源电缆重新连接
到扫描仪并开启计算机 请一定按此顺序操作
– 在 Macintosh 计算机上 仅限 HP Scanjet 3500c 系列 使用 Apple
System Profiler 确保扫描仪已正确的连接到计算机
• 测试扫描仪的硬件 仅限 HP Scanjet 2300c
a. 断开扫描仪的 USB 电缆和电源电缆 确保电源电缆仍与电源相连
b. 在将电源电缆插回到扫描仪时 同时按下扫描和复印按钮
扫描仪灯开启 图像光度头应前后移动
c. 要终止测试 请拔下电源电缆
如果扫描仪灯不能开启或图像光度头不能移动 则扫描仪的硬件有问题
请与 HP 客户支持联系
3500c
- hp scanjet
系列
目标文件夹的名称中不能包括以下符
11
安装中的问题
- hp scanjet 2300c 或 3500c
系列
Page 83

扫描仪初始化失败
• 如果您收到扫描仪初始化失败的信息 或在正确操作扫描仪后 HP 扫描软
件停止工作 请尝试以下步骤
a. 如果 HP 扫描软件已打开 请将其关闭
b. 请确保连接计算机和 HP 扫描仪的电缆已妥善固定
c. 拔下电源电缆 以关闭扫描仪 将电源电缆插上 再次打开扫描仪
d. 关闭计算机 然后再开启
• 如果扫描仪仍无法初始化 请按照下一主题扫描仪仍无法正常工作中所描
述的方法
扫描仪仍无法正常工作
• 如果扫描仪停止扫描或按钮不按照正常方式工作 则您的计算机上可能存
在软件冲突 您可能需要重新安装 HP 照片及成像软件 要做到这一点
运行修复实用程序 仅限 Windows 计算机
a. 单击开始 指向设置 然后单击控制面板 在 Windows XP 中 单击
开始
b. 单击添加 / 删除程序 然后选择 HP 照片及成像软件
c. 单击更改 或添加 / 删除 视 Windows 的版本而定
d. 按照计算机屏幕上的说明操作 然后单击 Repair 修复
• 如果仍不奏效 则在其他计算机上安装扫描仪 这将帮助您确定问题是出
在第一台计算机上还是扫描仪上
• 如果扫描仪仍不能工作 请与 HP 客户支持联系
如果此处未显示您需要的排除故障信息 请参见 HP 照片及成像软件的
ReadMe 文件了解最新的信息 或查看电子帮助文档中的故障排除部分
运行修复实用程序 仅限 Windows 计算机
然后单击控制面板
卸载软件
安装程序的 Uninstall 卸载 选项使您能从计算机删除扫描软件
对于 Windows 计算机
1 单击开始
始
2 单击添加 / 删除程序
3 单击更改
4 按照计算机屏幕上的说明操作
对于 Macintosh 计算机 仅限 hp scanjet 3500c 系列
1 拨下扫描仪插头并重新启动计算机
头并重新启动计算机 则在卸载过程中 可能会从计算机上删除一些文件
2 将 HP 照片及成像软件 CD 插入计算机的 CD-ROM 驱动器
HP 照片及成像软件 CD-ROM 窗口 请双击 CD-ROM 的图标
3 双击安装程序
4 当出现主安装对话框时
5 单击 Uninstall
安装中的问题 - hp scanjet 2300c 或 3500c 系列
指向设置 然后再单击控制面板 在 Windows XP 中 单击开
然后再单击控制面板
或添加 / 删除 视 Windows 的版本而定
然后再选择 HP 照片及成像软件
然后单击删除 或添加 / 删除
如果您不在卸载软件前拔下扫描仪插
如果未出现
简体中文
然后按照屏幕上的说明操作
从下拉菜单中选择 Uninstall 卸载
卸载 然后按照计算机屏幕上的说明操作
12
Page 84

5
支持
hp
有关保证和技术规格 请参见扫描仪的电子帮助
有关法规信息 参见随扫描仪提供的 CD-ROM 上的 regulatory_supplement.htm
文件
web
在
访问
网站
上寻找
hp web
hp
的帮助
HP 在 Web 上提供多种资源 提供关于扫描仪的帮助 Web 服务是免费的
每周 7 天 每天 24 小时随时提供
hp 产品支持
访问 http://www.hp.com/cposupport/loc/regional.html
在
quick find 快速查询 框中输入您扫描仪的型号 查找关于以下主题的
信息
• 设置和使用扫描仪
• 下载驱动程序
• 解决问题
• 订货
• 保修
hp scanjet web 站点
访问 http://www.hp.com 并单击
解以下信息
• 更加富有成效的使用扫描仪的技巧
•HPScanjet 驱动程序更新件和软件
易用 web 站点
伤残人士可访问 http://www.hp.com/hpinfo/community/accessibility/
prodserv/ 获得帮助
products and services 产品和服务 了
选择您的地区 然后
13
hp 帮助
如果您使用以上列出的 web 站点没有找到问题的答案
www.hp.com/cposupport/mail_support.html
电子邮件 电话和其他方法与 HP 联系的信息
请访问 http://
在该站点 您可以找到如何用
hp
支持
Page 85

联系 hp 客户支持
在联系 HP 客户支持之前 请参见在 web 上寻找 hp 的帮助 此处提供的 web
站点服务是免费的 随时提供 如果您在 Web 上没找到需要的内容 请联系
HP 客户支持
您可以通过电话或电子邮件联系 HP 获得关于扫描仪的支持和服务 价格
供货情况 支持时间如有变更 恕不另行通知
如何提供
hp
帮助
Hewlett-Packard 的支持热线可帮助您解决以下问题
• 设置
• 安装
• 配置
• 操作
有关操作系统或网络配置的问题
系
致电前
在致电 HP 客户支持前
• 查看使用手册的 安装中的问题 一章 有关其他排除故障的信息 请参
• 查看 HP 产品支持 web 站点上的排除故障信息
致电时
如果可能 在打电话时 站在安装扫描仪的计算机旁 准备好以下信息
• 序列号 可在扫描仪后部或底部或扫描仪玻璃板下找到
• 产品名称 可在扫描仪盖板上找到
• 购买日期
请与您购买产品的商家或内部支持部门联
如需要有关非 HP 硬件或软件的帮助 请与该产品的制造商联系
请尝试以下步骤
见 HP 照片及成像软件帮助中的
故障排除 内容
在美国国内获
得支持
hp 支持
90 天免费电话支持
在购买产品 90 天内
支付长途话费
拨打 (208) 323-2551
我们的支持人员会在周一到周五的早 6 点到晚 10 点以及周六的早 9 点到晚 4
点
山地时间 为您提供服务
90 天以后
拨打 (208) 323-2551
每个问题收费 25.00 美元 从您的信用卡扣除
如果您认为您的 HP 产品需要服务 请致电 HP 客户支持 他们能帮助您确定
是否需要服务
提供免费的电话支持 如果您拨打的是长途电话 则需
简体中文
14
Page 86

惠普公司关于更完善的保修服务的声明
您可以为您的 HP 产品购买时间更长
更加完善的保修服务 但您必须在购买
本产品后 180 天内购买
使用 HP SupportPack HP 技术支持包 将标准的出厂保修期更新为 3 年 服
务自产品购买之日起计算 技术支持包必须在购买产品后的 180 天内购买 通
过客户与 HP 客户支持的首次通话并根据客户运行的系统自检程序结果
决定提供何种硬件服务 如果在技术支持通话时确定您的产品需要更换 则
HP 将在下一个工作日为您免费奉送更换的产品
此项更新的保修条款将尽最
大可能地保证我们对客户的门到门取货 交货变得高效 方便 所有包装费和
运费由 HP 预付
只在美国境内提供 有关详细内容 请拨打 1-888-999-4747 或访问
http://www.homeandoffice.hp.com
下选择 warranty upgrades
保修升级
在 product support 产品技术支持 项
由 HP
在全球各地获
得技术支持
在亚洲和南太平洋地区提供一年的免费电话技术支持 在中东和非洲提供 30
天的免费电话技术支持
有关欧洲的电话技术支持 请访问网站 http://www.hp.com/cposupport/
mail_support.html 并单击 contact HP 联系 HP 查看您所在国家或地区的
电话技术支持的详细内容和条款
您也可以咨询您的经销商或拨打本文档中列出的各国或地区的 HP 电话号码
在欧洲的英文技术支持 请拨打 +44 (0) 207 512 52 02
阿尔及利亚
阿根廷
阿拉伯联合酋长国
埃及
爱尔兰
奥地利
澳大利亚
巴西
比利时 荷兰语
秘鲁
波多黎各
波兰
丹麦
+212 22404747
0-810-555-5520
971 4 883 8454
+202 7956222
+353 (0)1 662 5525
43 (0) 810 00 6080
03 8877 8000
(11) 3747 7799
0800 157 751
+32 (0)2 626 8806
法语
+32 (0)2 626 8807
0 800 10111
1 877 232 0589
+48 22 865 98 00
+45 39 29 4099
大圣保罗以外地区
大圣保罗
15
hp 支持
Page 87

德国
+49 (0)180 52 58 143
0.12 欧元/
分钟
德国马克/分钟
0.24
俄罗斯联邦
法国
菲律宾
芬兰
哥伦比亚
韩国
荷兰
加拿大
捷克共和国
罗马尼亚
马来西亚
美国
摩洛哥
墨西哥
+7 095 797 3520
+7 812 346 7997 (
+33 (0)1 43 62 34 34
+63 (2) 867 3551
+358 (0)203 47 288
+9 800 114 726
+82 (2) 3270 0700
080-999-0700
+31 (0)20 606 8751
905 206-4663
+42 (0)2 6130 7310
+40 1 315 44 42
01 3154442
60 (3) 295 2566
03 2695 2566
(208) 323-2551
+212 22404747
52 58 9922
01-800-472-6684
圣彼得堡
仅限汉城和京畿道以外地区
本地
槟城以外地区
墨西哥城
莫斯科
)
槟城
墨西哥城以外地区
hp 支持
南非
挪威
葡萄牙
日本
瑞典
瑞士
台湾
泰国
突尼斯
土耳其
危地马拉
086 000 1030
+27-11 258 9301
+47 22 11 6299
+351 21 3176333
+81 3 5344 7181
+46 (0)8 619 2170
+41 (0)848 80 11 11
0 800-01 0055
+66 (2) 661 4000
+212 22404747
+90 216 579 7171
1 800 999 5105
南非共和国
南非共和国以外国家和地区
曼谷
简体中文
16
Page 88

委内瑞拉
乌克兰
西班牙
希腊
香港特区
新加坡
新西兰
匈牙利
以色列
意大利
印度
印度尼西亚
英国及国际英语服务
越南
0800 4746 8368
+7 (380-44) 490-3520
+34 902 321 123
+30 1 60 73 603
+85 (2) 3002 8555
+65 272 5300
+64 (9) 356 6640
+36 (0)1 382 1111
+972 (0)9 952 48 48
+39 02 264 10350
+91 11 682 6035
+62 (21) 350 3408
+44 (0)207 512 52 02
+84 (0)8 823 4530
智利 800 22 5547
中国
800 360 999 家用机售后服务
+86 10 6564 5959
商用机售后服务
17
hp 支持
Page 89

Page 90

www.hp.com
Q2707-90407
 Loading...