

Page 1
Getting Familiar With Your HP VPN
Server Appliance SA3400/SA3450
1
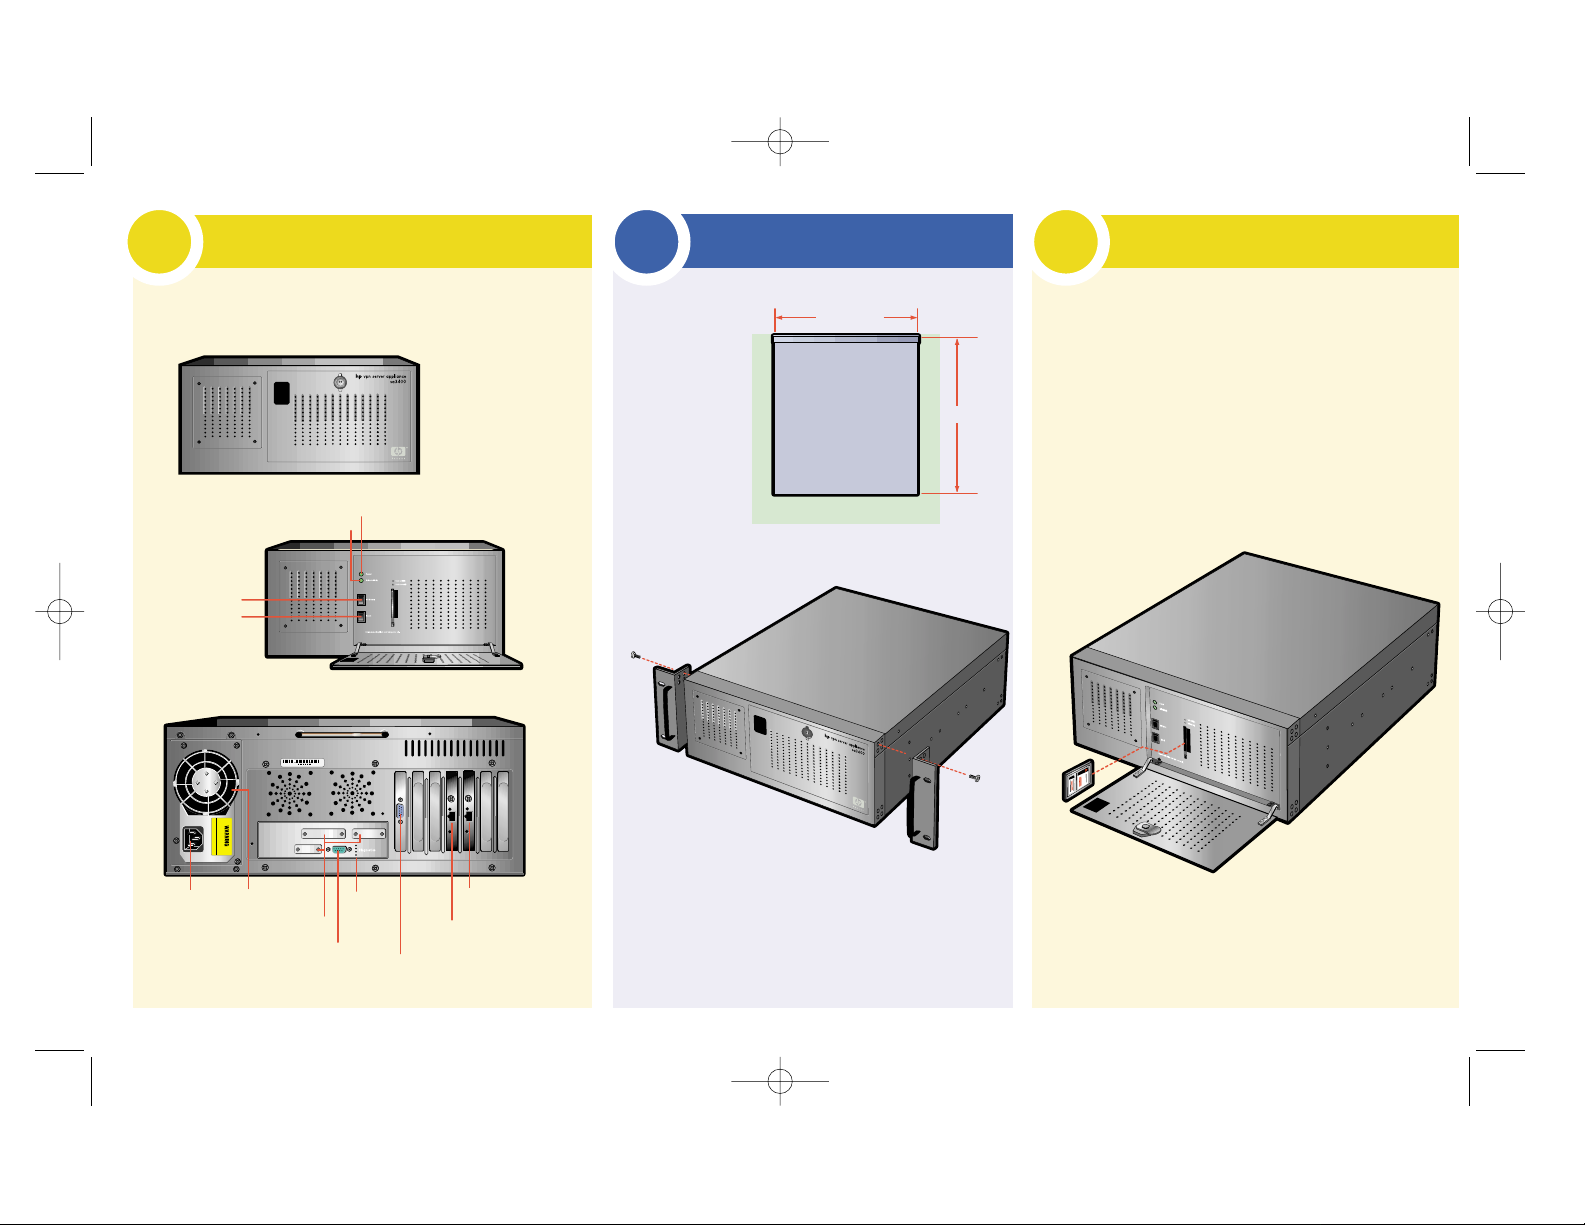
Look over your Hewlett-Packert VPN Server Appliance SA3400/
SA3450. Each item in the back is specifically labeled.
Mounting Options
2
Refer to the
diagrams for
mounting the
VPN device in
a stationary
rack mount.
2 inch min. clear space (3 sides)
Top View
16.75 inches
18.5 inches
Cooling FanAC Cord
E1 10/100
Ethernet Interface
E0 10/100
Ethernet Interface
Console Port
DB-9
Async0
Async0 Port
Port Covers
Diagnostic
Lights
Installing the Flash Card
3
The flash card comes preinstalled in the VPN device.
Before you turn the VPN device on, make sure the flash
card is fully engaged in the device.
To reinstall the flash card:
1
Open the front panel of the device by twisting the
lock mechanism clockwise.
2
Insert the flash card vertically into the device, with the
label oriented to the right.
3
Close the front panel, and secure the panel by twisting
the lock mechanism counterclockwise.
Power Switch
Reset Switch
Power LED
Drive Activity LED
HP sa3400/sa3450.qxp 2/28/01 10:06 AM Page 2
Front
Screws
(8 places)
Mounting Brackets
Placed at Front
Page 2
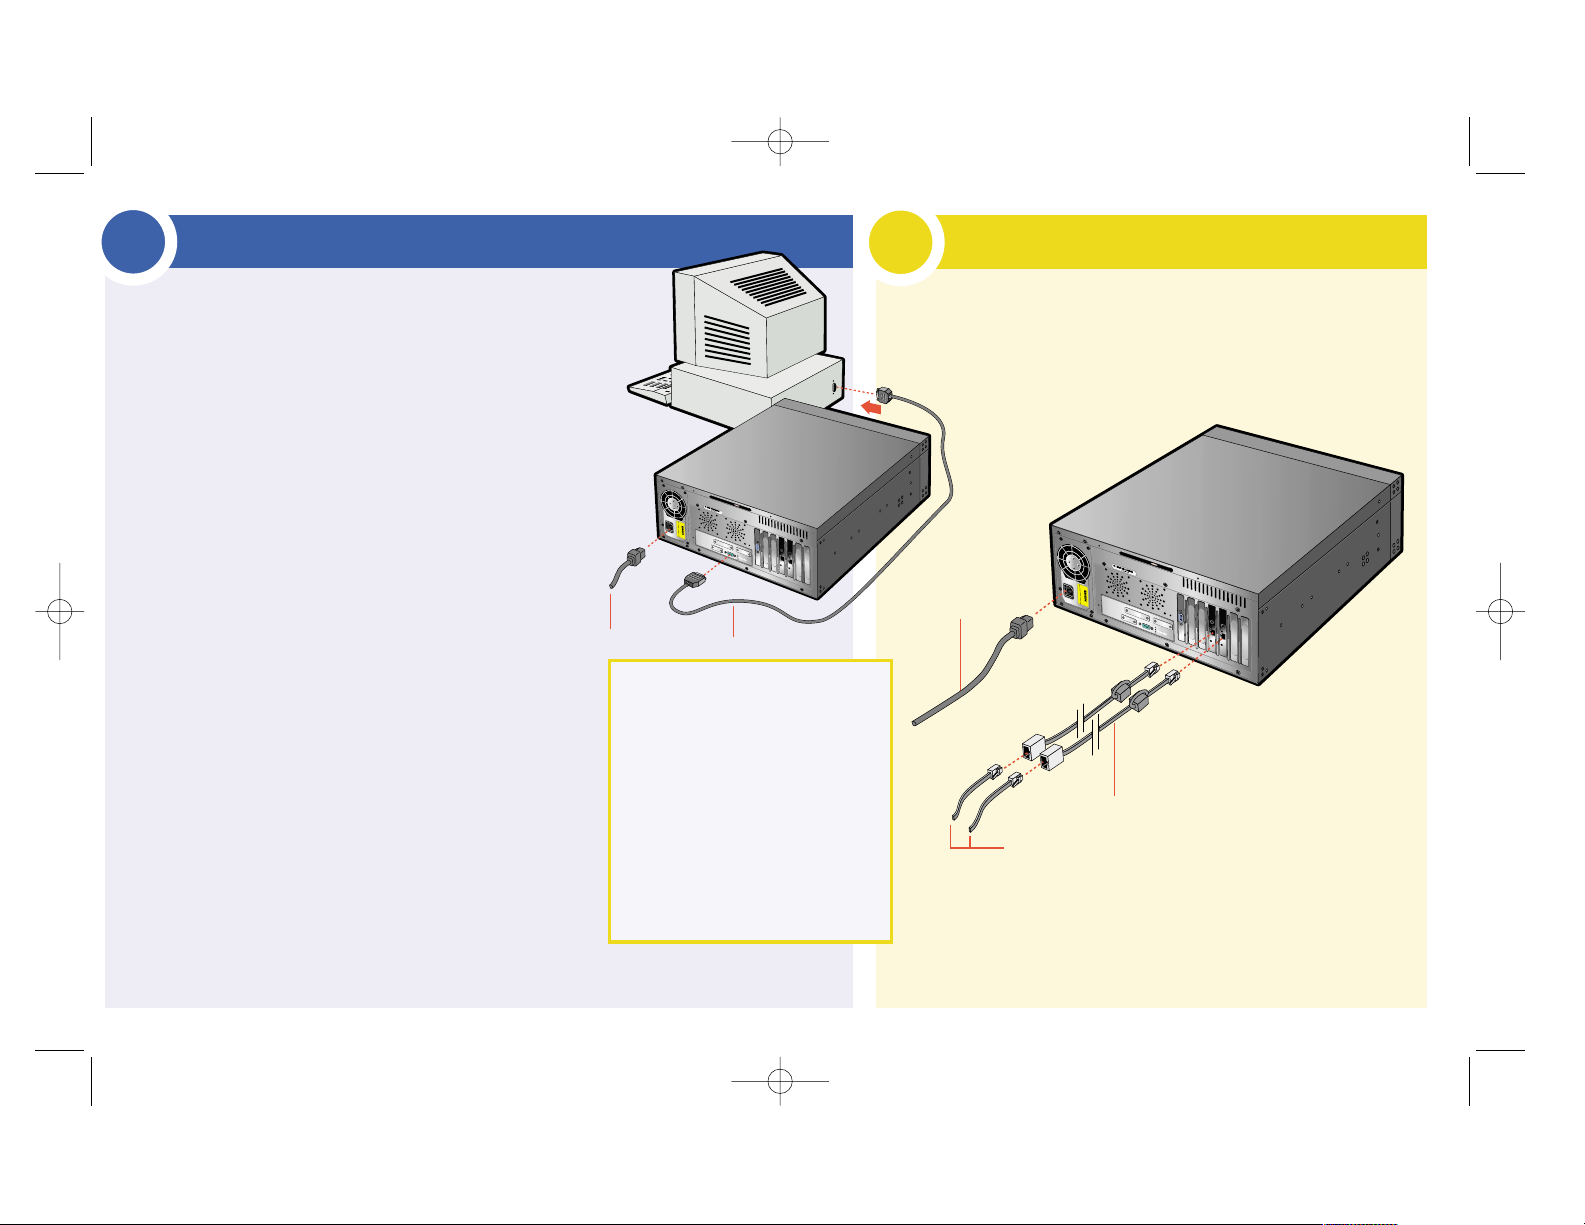
Connecting the Device to the Network
5
1
Connect the supplied DB-9 console cable to the console port of the VPN device
and to the COM port on your PC. Make a note of the communication port
number on your PC.
2
Plug in the power cable appropriate for use in your country.
3
Turn on the VPN device by setting the power switch to the1(one)
position.
4
Configure and run your terminal emulation program (such as HyperTerminal*),
to create an active console session, using the following settings:
• 96 • No parity • No hardware flow control
• 8 bits • 1 stop bit
5
In the console window, select Transfer, then Capture Text.
6
In the File menu, select Save.
7
In the Save in and File name fields, select the folder and file name
under which you want to store your session file.
8
Click Save.
9
Press Enter three times. Licensing text appears with a prompt. Press
the space bar or press Enter to scroll through the license agreement.
To accept the license agreement terms, press Y.
A name-and-state prompt appears:
hostname:SAFE>
10
Wait 60 seconds as the device changes from safe mode to normal
mode.
11
At the name-and-state prompt, enter
enable
.
12
At the name-and-state prompt, enter
admin
.
13
At the name-and-state prompt, enter
setup
.
The system prompts you for the host name.
14
Enter a name up to eight characters long. For example,
vpn1
.
The system displays a series of prompts and, in square brackets,
examples of responses.
15
Respond to the prompts (shown at right) by entering the
appropriate information and pressing Enter.
Note: When the system prompts you to enter the time zone, enter
the time zone with respect to Greenwich Mean Time. For example,
to set the time zone for Boston, enter
timezone est 5 edt
.
This completes the initial hardware setup. Remove the console cable from the VPN device.
AC Power Cord
(to top)
10/100 Ethernet
Shielded Ethernet Cables
Once you have connected your VPN device to the network behind your
firewall, configure the device using Hewlett-Packard SA3000 Series VPN
Manager included on the CD-ROM. Follow the instructions in the
Installation Guide for installing the VPN Manager.
Performing the Initial Hardware Setup
To connect the VPN device to the network:
1
Turn the device off before connecting network cables.
2
Connect the supplied Ethernet cables to the Ethernet interfaces.
3
Connect your Ethernet LAN cables to the shielded cables.
4
Turn the device on.
4
Bridge Mode On (Y/N) [n]:
Enter int E0 IP Address [0.0.0.0]:
Enter int E0 IP Subnet Mask [255.0.0.0]:
Enter int E1 IP Address [0.0.0.0]:
Enter int E1 IP Subnet Mask [255.0.0.0]:
Enter Default Gateway [0.0.0.0 | interface no]:
Enter Manager Password [password]:
Enter time zone [GMT]:
Enter year [2000]:
Enter month [9]:
Enter day [1]:
Enter hour [16]:
Enter minute [28]:
Enter second [1]:
Do you wish to save configuration to flash? [y]:
Console Port
AC Power Cord
To COM Port
HP sa3400/sa3450.qxp 2/28/01 10:06 AM Page 3
Page 3

Hardware Specifications
Hardware
•933-MHz Intel Pentium®MMX-based
motherboard; 8-MB PC Card
- SA3400: 128-MB RAM
- SA3450: 512-MB RAM
•300W PSU, heat sink, and fan
(for Pentium CPUs)
•ATA flash drive
•PCI-based 10/100 Mbps Ethernet cards
•PCI-based serial card; V.35 or X.21 support;
two synchronous serial interfaces per card
(DCE and DTE) (optional)
•PCI-based encr yption-assist card
(SA3450 only)
•DB9 male-to-female null modem cable
Interfaces
•IEEE 802 Ethernet
•10BaseT/100BaseTX (10/100 Mbps)
•RS-232 interface for administration
Electrical
•Maximum current: 4.6–2.3 Amps
•Maximum power consumption: 300 watts
•Line Voltage: 100–240 VAC
•Frequency: 50/60 Hz
•Heat Output: 1023 BTUs/hr
Physical
•19" rack-mount kit
•Height: 7" (17.78 cm)
•Width: 16.75" (42.54 cm)
•Depth: 18.5" (46.9 cm)
Environmental
•Altitude: Up to 15,000 ft. (4,572 m)
•Operating temperature: 5°F–104°F
(10°C–40°C)
•Storage temperature: 32°F–122°F
(0°C–50°C)
•Relative humidity: 20%–80%,
noncondensing
EMC
•FCC Part 15 (USA) Class B
•ICES-003 (Canada) Class B
•EN 55022 (Europe) Class B
•AS/NZS 3548 (Australia) Class B
•VCCI, V3/93.01 (Japan) Class B
•EN 55024 (Europe)
Technical information in this document is subject
to change without notice.
© Copyright 2001 Hewlett-Packard Company.
All rights reserved.
Reproduction, adaptation, or translation without
prior written permission is prohibited except as
allowed under the copyright laws.
Printed in U.S.A., February 2001
HP: 5971-0882
P/N: A53754-001
Technical support: www.hp.com/serverappliances/support
HP sa3400/sa3450.qxp 2/28/01 10:06 AM Page 4
Page 4

5917-0882
hp
vpn
server
appliance
model
sa3400/sa3450
hardware
installation
map
HP sa3400/sa3450.qxp 2/28/01 10:06 AM Page 5
 Loading...