

Page 1

Red Hat Directory Server 8.0
Administrator's Guide
Page 2

Red Hat Directory Server 8.0
Page 3

Red Hat Directory Server 8.0: Administrator's Guide
Copyright © 2008 Red Hat, Inc.
Copyright © 2008 Red Hat. This material may only be distributed subject to the terms and conditions set forth in the
Open Publication License, V1.0 or later with the restrictions noted below (the latest version of the OPL is presently
available at http://www.opencontent.org/openpub/).
Distribution of substantively modified versions of this document is prohibited without the explicit permission of the
copyright holder.
Distribution of the work or derivative of the work in any standard (paper) book form for commercial purposes is
prohibited unless prior permission is obtained from the copyright holder.
Red Hat and the Red Hat "Shadow Man" logo are registered trademarks of Red Hat, Inc. in the United States and other
countries.
All other trademarks referenced herein are the property of their respective owners.
The GPG fingerprint of the security@redhat.com key is:
CA 20 86 86 2B D6 9D FC 65 F6 EC C4 21 91 80 CD DB 42 A6 0E
1801 Varsity Drive
Raleigh, NC 27606-2072
USA
Phone: +1 919 754 3700
Phone: 888 733 4281
Fax: +1 919 754 3701
PO Box 13588
Research Triangle Park, NC 27709
USA
Page 4

Red Hat Directory Server 8.0
Page 5

Preface .................................................................................................................. xvii
1. Directory Server Overview ........................................................................... xvii
2. Example and Default References .................................................................xviii
3. Document Conventions ...............................................................................xviii
4. Related Information .......................................................................................xx
1. General Red Hat Directory Server Usage ................................................................ 1
1. Directory Server File Locations ....................................................................... 1
2. LDAP Tool Locations ...................................................................................... 4
3. Starting and Stopping Servers ........................................................................ 4
3.1. Starting and Stopping Directory Server from the Console ....................... 5
3.2. Starting and Stopping Directory Server from the Command Line ............ 5
3.3. Starting and Stopping Administration Server ......................................... 6
4. Starting the Directory Server Console .............................................................. 7
4.1. Logging into Directory Server ............................................................... 8
4.2. Changing Login Identity ....................................................................... 8
4.3. Viewing the Current Console Bind DN .................................................. 9
5. Changing Directory Server Port Numbers ........................................................ 9
6. Creating a New Directory Server Instance ......................................................11
7. Configuring the Directory Manager .................................................................12
2. Creating Directory Entries ......................................................................................15
1. Managing Entries from the Directory Console .................................................15
1.1. Creating a Root Entry .........................................................................15
1.2. Creating Directory Entries ...................................................................16
1.3. Modifying Directory Entries .................................................................18
1.4. Deleting Directory Entries ...................................................................23
2. Managing Entries from the Command-Line .....................................................24
2.1. Providing Input from the Command-Line ..............................................24
2.2. Creating a Root Entry from the Command-Line ....................................25
2.3. Adding Entries Using LDIF ..................................................................26
2.4. Adding and Modifying Entries Using ldapmodify ...................................26
2.5. Deleting Entries Using ldapdelete ........................................................29
2.6. Using Special Characters ...................................................................31
3. Tracking Modifications to Directory Entries .....................................................31
4. LDIF Update Statements ...............................................................................32
4.1. Adding an Entry Using LDIF ................................................................34
4.2. Renaming an Entry Using LDIF ...........................................................35
4.3. Modifying an Entry Using LDIF ............................................................36
4.4. Deleting an Entry Using LDIF ..............................................................40
4.5. Modifying an Entry in an Internationalized Directory ..............................41
5. Maintaining Referential Integrity .....................................................................41
5.1. How Referential Integrity Works ..........................................................41
5.2. Using Referential Integrity with Replication ..........................................42
5.3. Enabling/Disabling Referential Integrity ................................................43
5.4. Modifying the Update Interval ..............................................................43
5.5. Modifying the Attribute List ..................................................................44
3. Configuring Directory Databases ............................................................................47
v
Page 6

Red Hat Directory Server 8.0
1. Creating and Maintaining Suffixes ..................................................................47
1.1. Creating Suffixes ................................................................................48
1.2. Maintaining Suffixes ...........................................................................54
2. Creating and Maintaining Databases ..............................................................56
2.1. Creating Databases ............................................................................56
2.2. Maintaining Directory Databases .........................................................61
2.3. Database Encryption ..........................................................................64
3. Creating and Maintaining Database Links .......................................................69
3.1. Configuring the Chaining Policy ...........................................................69
3.2. Creating a New Database Link ............................................................75
3.3. Chaining Using SSL ...........................................................................86
3.4. Maintaining Database Links ................................................................86
3.5. Database Links and Access Control Evaluation ....................................87
3.6. Advanced Feature: Tuning Database Link Performance ........................89
3.7. Advanced Feature: Configuring Cascading Chaining ............................93
4. Using Referrals ...........................................................................................106
4.1. Starting the Server in Referral Mode ..................................................106
4.2. Setting Default Referrals ...................................................................107
4.3. Creating Smart Referrals ..................................................................108
4.4. Creating Suffix Referrals ...................................................................110
4. Populating Directory Databases ...........................................................................113
1. Importing Data ............................................................................................113
1.1. Importing a Database from the Console .............................................114
1.2. Initializing a Database from the Console ............................................115
1.3. Importing from the Command-Line ....................................................116
2. Exporting Data ............................................................................................119
2.1. Exporting Directory Data to LDIF Using the Console ...........................121
2.2. Exporting a Single Database to LDIF Using the Console .....................122
2.3. Exporting to LDIF from the Command-Line ........................................122
3. Backing up and Restoring Data ....................................................................124
3.1. Backing up All Databases .................................................................124
3.2. Backing up the dse.ldif Configuration File ...........................................126
3.3. Restoring All Databases ...................................................................126
3.4. Restoring a Single Database .............................................................128
3.5. Restoring Databases That Include Replicated Entries .........................129
3.6. Restoring the dse.ldif Configuration File .............................................129
5. Managing Entries with Roles, Class of Service, and Views ....................................131
1. Using Roles ................................................................................................131
1.1. About Roles .....................................................................................131
1.2. Managing Roles Using the Console ...................................................133
1.3. Managing Roles Using the Command-Line ........................................139
1.4. Using Roles Securely .......................................................................142
2. Assigning Class of Service ..........................................................................143
2.1. About CoS .......................................................................................144
2.2. Managing CoS Using the Console .....................................................149
2.3. Managing CoS from the Command-Line ............................................153
2.4. Creating Role-Based Attributes .........................................................160
vi
Page 7

2.5. Access Control and CoS ...................................................................162
3. Using Views ................................................................................................162
3.1. Creating Views in the Console ..........................................................163
3.2. Deleting Views from the Directory Server Console ..............................164
3.3. Creating Views from the Command Line ............................................164
3.4. Deleting Views from the Command Line ............................................165
4. Using Groups .............................................................................................165
4.1. Managing Static Groups ...................................................................165
4.2. Managing Dynamic Groups ...............................................................167
6. Managing Access Control ....................................................................................169
1. Access Control Principles ............................................................................169
1.1. ACI Structure ...................................................................................169
1.2. ACI Placement .................................................................................170
1.3. ACI Evaluation .................................................................................170
1.4. ACI Limitations .................................................................................170
2. Default ACIs ...............................................................................................171
3. Creating ACIs Manually ...............................................................................172
3.1. The ACI Syntax ................................................................................173
3.2. Defining Targets ...............................................................................173
3.3. Defining Permissions ........................................................................180
4. Bind Rules ..................................................................................................184
4.1. Bind Rule Syntax ..............................................................................185
4.2. Defining User Access - userdn Keyword ............................................186
4.3. Defining Group Access - groupdn Keyword ........................................190
4.4. Defining Role Access - roledn Keyword .............................................190
4.5. Defining Access Based on Value Matching ........................................191
4.6. Defining Access from a Specific IP Address .......................................196
4.7. Defining Access from a Specific Domain ............................................197
4.8. Defining Access at a Specific Time of Day or Day of Week .................198
4.9. Defining Access Based on Authentication Method ..............................199
4.10. Using Boolean Bind Rules ...............................................................201
5. Creating ACIs from the Console ...................................................................202
5.1. Displaying the Access Control Editor .................................................203
5.2. Creating a New ACI ..........................................................................204
5.3. Editing an ACI ..................................................................................209
5.4. Deleting an ACI ................................................................................210
6. Viewing ACIs ..............................................................................................210
7. Get Effective Rights Control .........................................................................211
7.1. Using Get Effective Rights from the Command-Line ...........................212
7.2. Using Get Effective Rights from the Console ......................................215
7.3. Get Effective Rights Return Codes ....................................................215
8. Logging Access Control Information .............................................................216
9. Access Control Usage Examples .................................................................216
9.1. Granting Anonymous Access ............................................................217
9.2. Granting Write Access to Personal Entries .........................................219
9.3. Restricting Access to Key Roles ........................................................222
9.4. Granting a Group Full Access to a Suffix ............................................224
vii
Page 8

Red Hat Directory Server 8.0
9.5. Granting Rights to Add and Delete Group Entries ...............................225
9.6. Granting Conditional Access to a Group or Role .................................227
9.7. Denying Access ...............................................................................229
9.8. Setting a Target Using Filtering .........................................................232
9.9. Allowing Users to Add or Remove Themselves from a Group ..............232
9.10. Defining Permissions for DNs That Contain a Comma ......................234
9.11. Proxied Authorization ACI Example .................................................234
10. Advanced Access Control: Using Macro ACIs .............................................235
10.1. Macro ACI Example ........................................................................235
10.2. Macro ACI Syntax ..........................................................................237
11. Access Control and Replication ..................................................................241
12. Compatibility with Earlier Releases .............................................................241
7. Managing User Accounts and Passwords .............................................................243
1. Managing the Password Policy ....................................................................243
1.1. Configuring the Password Policy .......................................................243
1.2. Setting User Passwords ....................................................................255
1.3. Password Change Extended Operation .............................................255
1.4. Configuring the Account Lockout Policy .............................................257
1.5. Managing the Password Policy in a Replicated Environment ...............259
1.6. Synchronizing Passwords .................................................................260
2. Inactivating Users and Roles .......................................................................261
2.1. Inactivating User and Roles Using the Console ..................................262
2.2. Inactivating User and Roles Using the Command-Line ........................262
2.3. Activating User and Roles Using the Console .....................................263
2.4. Activating User and Roles Using the Command-Line ..........................263
3. Setting Resource Limits Based on the Bind DN .............................................264
3.1. Setting Resource Limits Using the Console ........................................264
3.2. Setting Resource Limits Using the Command-Line .............................265
8. Managing Replication ..........................................................................................267
1. Replication Overview ...................................................................................267
1.1. What Directory Units Are Replicated ..................................................267
1.2. Read-Write and Read-Only Replicas .................................................267
1.3. Suppliers and Consumers .................................................................268
1.4. Changelog .......................................................................................268
1.5. Replication Identity ...........................................................................268
1.6. Replication Agreement .....................................................................269
1.7. Compatibility with Earlier Versions of Directory Server ........................269
2. Replication Scenarios ..................................................................................270
2.1. Single-Master Replication .................................................................270
2.2. Multi-Master Replication ...................................................................271
2.3. Cascading Replication ......................................................................274
3. Creating the Supplier Bind DN Entry .............................................................275
4. Configuring Single-Master Replication ..........................................................276
4.1. Configuring the Read-Write Replica on the Supplier Server .................277
4.2. Configuring the Read-Only Replica on the Consumer .........................278
4.3. Create the Replication Agreement .....................................................280
5. Configuring Multi-Master Replication ............................................................285
viii
Page 9

5.1. Configuring the Read-Write Replicas on the Supplier Servers .............286
5.2. Configuring the Read-Only Replicas on the Consumer Servers ...........289
5.3. Setting up the Replication Agreements ..............................................291
5.4. Preventing Monopolization of the Consumer in Multi-Master Replication 297
6. Configuring Cascading Replication ...............................................................298
6.1. Configuring the Read-Write Replica on the Supplier Server .................299
6.2. Configuring the Read-Only Replica on the Consumer Server ..............300
6.3. Configuring the Read-Only Replica on the Hub ..................................302
6.4. Setting up the Replication Agreements ..............................................305
7. Configuring Replication from the Command Line ...........................................311
7.1. Configuring Suppliers from the Command Line ...................................311
7.2. Configuring Consumers from the Command Line ...............................315
7.3. Configuring Hubs from the Command Line .........................................316
7.4. Configuring Replication Agreements from the Command Line .............317
7.5. Initializing Consumers Online from the Command Line .......................321
8. Making a Replica Updatable ........................................................................322
9. Deleting the Changelog ...............................................................................322
9.1. Removing the Changelog .................................................................323
9.2. Moving the Changelog to a New Location ..........................................323
10. Initializing Consumers ...............................................................................323
10.1. When to Initialize a Consumer .........................................................324
10.2. Online Consumer Initialization Using the Console .............................324
10.3. Initializing Consumers Online Using the Command Line ....................325
10.4. Manual Consumer Initialization Using the Command Line .................326
10.5. Filesystem Replica Initialization .......................................................327
11. Forcing Replication Updates ......................................................................329
11.1. Forcing Replication Updates from the Console .................................330
11.2. Forcing Replication Updates from the Command-Line .......................330
12. Replicating Account Lockout Attributes .......................................................331
13. Replication over SSL .................................................................................332
14. Replicating o=NetscapeRoot for Administration Server Failover ...................333
15. Replication with Earlier Releases ...............................................................335
16. Using the Retro Changelog Plug-in .............................................................336
16.1. Enabling the Retro Changelog Plug-in .............................................337
16.2. Trimming the Retro Changelog ........................................................338
16.3. Searching and Modifying the Retro Changelog .................................339
16.4. Retro Changelog and the Access Control Policy ...............................339
17. Monitoring Replication Status .....................................................................339
17.1. Monitoring Replication Status from the Directory Server Console .......339
17.2. Monitoring Replication Status from Administration Express ...............340
18. Solving Common Replication Conflicts ........................................................342
18.1. Solving Naming Conflicts ................................................................343
18.2. Solving Orphan Entry Conflicts ........................................................346
18.3. Solving Potential Interoperability Problems .......................................346
19. Troubleshooting Replication-Related Problems ...........................................347
9. Extending the Directory Schema ..........................................................................353
1. Overview of Extending Schema ...................................................................353
ix
Page 10

Red Hat Directory Server 8.0
2. Managing Attributes ....................................................................................353
2.1. Viewing Attributes ............................................................................353
2.2. Creating Attributes ...........................................................................355
2.3. Editing Attributes ..............................................................................356
2.4. Deleting Attributes ............................................................................356
3. Managing Object Classes ............................................................................357
3.1. Viewing Object Classes ....................................................................357
3.2. Creating Object Classes ...................................................................359
3.3. Editing Object Classes ......................................................................360
3.4. Deleting Object Classes ....................................................................361
4. Turning Schema Checking On and Off .........................................................362
10. Managing Indexes .............................................................................................363
1. About Indexes .............................................................................................363
1.1. About Index Types ...........................................................................363
1.2. About Default, System, and Standard Indexes ...................................364
1.3. Overview of the Searching Algorithm .................................................367
1.4. Approximate Searches .....................................................................369
1.5. Balancing the Benefits of Indexing .....................................................369
2. Creating Indexes .........................................................................................371
2.1. Creating Indexes from the Server Console .........................................372
2.2. Creating Indexes from the Command-Line .........................................373
2.3. Creating Browsing Indexes from the Server Console ..........................377
2.4. Creating Browsing Indexes from the Command-Line ..........................377
3. Deleting Indexes .........................................................................................381
3.1. Deleting Indexes from the Server Console .........................................382
3.2. Deleting Indexes from the Command-Line .........................................382
3.3. Deleting Browsing Indexes from the Server Console ...........................385
3.4. Deleting Browsing Indexes from the Command-Line ...........................385
4. Managing Indexes .......................................................................................387
4.1. Indexing Performance ......................................................................388
4.2. Search Performance .........................................................................388
4.3. Backwards Compatibility and Migration ..............................................390
5. Attribute Name Quick Reference Table .........................................................390
11. Managing SSL ..................................................................................................393
1. Introduction to TLS/SSL in the Directory Server ............................................393
1.1. Enabling SSL: Summary of Steps ......................................................393
1.2. Command-Line Functions for Start TLS .............................................394
2. Obtaining and Installing Server Certificates ...................................................395
2.1. Step 1: Generate a Certificate Request ..............................................396
2.2. Step 2: Send the Certificate Request .................................................399
2.3. Step 3: Install the Certificate .............................................................400
2.4. Step 4: Trust the Certificate Authority ................................................401
2.5. Step 5: Confirm That The New Certificates Are Installed .....................402
3. Using certutil ...............................................................................................402
3.1. Creating Directory Server Certificates through the Command Line .......402
3.2. certutil Usage ...................................................................................405
4. Starting the Server with TLS/SSL Enabled ....................................................405
x
Page 11

4.1. Enabling TLS/SSL Only in the Directory Server ..................................406
4.2. Enabling TLS/SSL in the Directory Server, Administration Server, and
Console .................................................................................................408
4.3. Creating a Password File for the Directory Server ..............................410
4.4. Creating a Password File for the Administration Server .......................411
5. Setting Security Preferences ........................................................................412
5.1. Available Ciphers .............................................................................412
5.2. Selecting the Encryption Cipher ........................................................414
6. Using Certificate-Based Authentication .........................................................415
6.1. Setting up Certificate-Based Authentication ........................................416
6.2. Allowing/Requiring Client Authentication ............................................416
7. Configuring LDAP Clients to Use SSL ..........................................................417
12. Managing SASL ................................................................................................421
1. Authentication Mechanisms .........................................................................421
2. SASL Identity Mapping ................................................................................422
3. Configuring SASL Identity Mapping from the Console ....................................424
4. Configuring SASL Identity Mapping from the Command-Line .........................426
5. Configuring Kerberos ..................................................................................426
5.1. Realms ............................................................................................427
5.2. Configuring the KDC Server ..............................................................427
5.3. Example: Configuring an Example KDC Server ..................................428
5.4. Configuring SASL Authentication at Directory Server Startup ..............429
13. Monitoring Server and Database Activity .............................................................431
1. Viewing and Configuring Log Files ...............................................................431
1.1. Defining a Log File Rotation Policy ....................................................431
1.2. Defining a Log File Deletion Policy ....................................................433
1.3. Access Log ......................................................................................433
1.4. Error Log .........................................................................................435
1.5. Audit Log .........................................................................................437
2. Manual Log File Rotation .............................................................................438
3. Monitoring Server Activity ............................................................................438
3.1. Monitoring the Server from the Directory Server Console ....................439
3.2. Monitoring the Directory Server from the Command Line ....................443
4. Monitoring Database Activity ........................................................................445
4.1. Monitoring Database Activity from the Directory Server Console ..........445
4.2. Monitoring Databases from the Command Line ..................................448
5. Monitoring Database Link Activity .................................................................451
14. Monitoring Directory Server Using SNMP ...........................................................453
1. About SNMP ...............................................................................................453
2. Configuring the Master Agent .......................................................................454
3. Configuring the Subagent ............................................................................454
3.1. Subagent Configuration File ..............................................................454
3.2. Starting the Subagent .......................................................................455
3.3. Testing the Subagent .......................................................................456
4. Configuring SNMP Traps .............................................................................456
5. Configuring the Directory Server for SNMP ...................................................457
6. Using the Management Information Base .....................................................457
xi
Page 12

Red Hat Directory Server 8.0
6.1. Operations Table ..............................................................................458
6.2. Entries Table ...................................................................................460
6.3. Entity Table .....................................................................................460
6.4. Interaction Table ..............................................................................461
15. Tuning Directory Server Performance .................................................................463
1. Tuning Server Performance .........................................................................463
2. Tuning Database Performance ....................................................................464
2.1. Optimizing Search Performance ........................................................464
2.2. Tuning Transaction Logging ..............................................................466
2.3. Changing the Location of the Database Transaction Log ....................466
2.4. Changing the Database Checkpoint Interval .......................................467
2.5. Disabling Durable Transactions .........................................................468
2.6. Specifying Transaction Batching .......................................................468
3. Miscellaneous Tuning Tips ..........................................................................468
3.1. Avoid Creating Entries Under the cn=config Entry in the dse.ldif File ....469
16. Administering Directory Server Plug-ins ..............................................................471
1. Server Plug-in Functionality Reference .........................................................471
1.1. 7-Bit Check Plug-in ...........................................................................471
1.2. ACL Plug-in .....................................................................................471
1.3. ACL Preoperation Plug-in .................................................................472
1.4. Binary Syntax Plug-in .......................................................................472
1.5. Boolean Syntax Plug-in ....................................................................473
1.6. Case Exact String Syntax Plug-in ......................................................473
1.7. Case Ignore String Syntax Plug-in .....................................................474
1.8. Chaining Database Plug-in ...............................................................474
1.9. Class of Service Plug-in ....................................................................475
1.10. Country String Syntax Plug-in ..........................................................475
1.11. Distinguished Name Syntax Plug-in .................................................476
1.12. Generalized Time Syntax Plug-in .....................................................476
1.13. Integer Syntax Plug-in ....................................................................477
1.14. Internationalization Plug-in ..............................................................477
1.15. ldbm Database Plug-in ....................................................................478
1.16. Legacy Replication Plug-in ..............................................................478
1.17. Multi-Master Replication Plug-in ......................................................479
1.18. Octet String Syntax Plug-in .............................................................479
1.19. CLEAR Password Storage Plug-in ...................................................480
1.20. CRYPT Password Storage Plug-in ..................................................480
1.21. NS-MTA-MD5 Password Storage Plug-in .........................................481
1.22. SHA Password Storage Plug-in .......................................................482
1.23. SSHA Password Storage Plug-in .....................................................482
1.24. Postal Address String Syntax Plug-in ...............................................483
1.25. PTA Plug-in ...................................................................................483
1.26. Referential Integrity Postoperation Plug-in ........................................484
1.27. Retro Changelog Plug-in .................................................................485
1.28. Roles Plug-in .................................................................................486
1.29. Space Insensitive String Syntax Plug-in ...........................................486
1.30. State Change Plug-in ......................................................................487
xii
Page 13

1.31. Telephone Syntax Plug-in ...............................................................488
1.32. UID Uniqueness Plug-in ..................................................................488
1.33. URI Plug-in ....................................................................................489
2. Enabling and Disabling Plug-ins ...................................................................490
17. Using the Pass-through Authentication Plug-in ....................................................491
1. How Directory Server Uses PTA ..................................................................491
2. PTA Plug-in Syntax .....................................................................................492
3. Configuring the PTA Plug-in .........................................................................495
3.1. Turning the Plug-in On or Off ............................................................496
3.2. Configuring the Servers to Use a Secure Connection .........................496
3.3. Specifying the Authenticating Directory Server ...................................496
3.4. Specifying the Pass-through Subtree .................................................497
3.5. Configuring the Optional Parameters .................................................498
4. PTA Plug-in Syntax Examples .....................................................................499
4.1. Specifying One Authenticating Directory Server and One Subtree .......499
4.2. Specifying Multiple Authenticating Directory Servers ...........................500
4.3. Specifying One Authenticating Directory Server and Multiple Subtrees 500
4.4. Using Non-Default Parameter Values ................................................500
4.5. Specifying Different Optional Parameters and Subtrees for Different
Authenticating Directory Servers ..............................................................501
18. Using the Attribute Uniqueness Plug-in ...............................................................503
1. Overview of the Attribute Uniqueness Plug-in ................................................503
2. Attribute Uniqueness Plug-in Syntax .............................................................504
3. Creating an Instance of the Attribute Uniqueness Plug-in ...............................506
4. Configuring Attribute Uniqueness Plug-ins ....................................................507
4.1. Viewing Plug-in Configuration Information ..........................................507
4.2. Configuring Attribute Uniqueness Plug-ins from the Directory Server
Console .................................................................................................508
4.3. Configuring Attribute Uniqueness Plug-ins from the Command-Line ....509
5. Attribute Uniqueness Plug-in Syntax Examples .............................................511
5.1. Specifying One Attribute and One Subtree .........................................511
5.2. Specifying One Attribute and Multiple Subtrees ..................................511
6. Replication and the Attribute Uniqueness Plug-in ..........................................512
6.1. Simple Replication Scenario .............................................................512
6.2. Multi-Master Replication Scenario .....................................................513
19. Synchronizing Red Hat Directory Server with Microsoft Active Directory ...............515
1. About Windows Sync ..................................................................................515
2. Configuring Windows Sync ..........................................................................518
2.1. Step 1: Configure SSL on Directory Server ........................................518
2.2. Step 2: Configure the Active Directory Domain ...................................519
2.3. Step 3: Select or Create the Sync Identity ..........................................520
2.4. Step 4: Install and Configure the Password Sync Service ....................521
2.5. Step 5: Configure the Directory Server Database for Synchronization ..524
2.6. Step 6: Create the Synchronization Agreement ..................................525
2.7. Step 7: Begin Synchronization ..........................................................527
3. Using Windows Sync ...................................................................................527
3.1. Synchronizing Users .........................................................................528
xiii
Page 14

Red Hat Directory Server 8.0
3.2. Synchronizing Groups ......................................................................530
3.3. Deleting Entries ................................................................................531
3.4. Resurrecting Entries .........................................................................532
3.5. Manually Updating and Resynchronizing Entries ................................532
3.6. Checking Synchronization Status ......................................................533
3.7. Modifying the Sync Agreement ..........................................................533
4. Schema Differences ....................................................................................534
4.1. Password Policies ............................................................................534
4.2. Groups ............................................................................................534
4.3. Values for street and streetAddress ...................................................534
4.4. Contraints on the initials attribute .......................................................535
5. Password Sync Service ...............................................................................535
5.1. Modifying Password Sync .................................................................535
5.2. Starting and Stopping the Password Sync Service ..............................535
5.3. Uninstalling Password Sync Service ..................................................536
6. Troubleshooting ..........................................................................................536
A. LDAP Data Interchange Format ...........................................................................539
1. About the LDIF File Format ..........................................................................539
2. Continuing Lines in LDIF .............................................................................540
3. Representing Binary Data ............................................................................541
3.1. Standard LDIF Notation ....................................................................541
3.2. Base-64 Encoding ............................................................................541
4. Specifying Directory Entries Using LDIF .......................................................542
4.1. Specifying Domain Entries ................................................................542
4.2. Specifying Organizational Unit Entries ...............................................544
4.3. Specifying Organizational Person Entries ...........................................545
5. Defining Directories Using LDIF ...................................................................546
5.1. LDIF File Example ............................................................................548
6. Storing Information in Multiple Languages ....................................................549
B. Finding Directory Entries .....................................................................................551
1. Finding Entries Using the Directory Server Console ......................................551
2. Using ldapsearch ........................................................................................552
2.1. Using Special Characters .................................................................553
2.2. ldapsearch Command-Line Format ....................................................553
2.3. Commonly Used ldapsearch Options .................................................554
2.4. ldapsearch Examples .......................................................................556
3. LDAP Search Filters ....................................................................................559
3.1. Search Filter Syntax .........................................................................560
4. Searching an Internationalized Directory .......................................................563
4.1. Matching Rule Filter Syntax ..............................................................564
4.2. Supported Search Types ..................................................................567
4.3. International Search Examples ..........................................................568
C. LDAP URLs .......................................................................................................571
1. Components of an LDAP URL .....................................................................571
2. Escaping Unsafe Characters .......................................................................573
3. Examples of LDAP URLs .............................................................................573
D. Internationalization .............................................................................................577
xiv
Page 15

1. About Locales .............................................................................................577
2. Identifying Supported Locales ......................................................................578
3. Supported Language Subtypes ....................................................................580
4. Troubleshooting Matching Rules ..................................................................581
Glossary ................................................................................................................583
Index .....................................................................................................................601
xv
Page 16

xvi
Page 17

Preface
Red Hat Directory Server (Directory Server) is a powerful and scalable distributed directory
server based on the industry-standard Lightweight Directory Access Protocol (LDAP). Directory
Server is the cornerstone for building a centralized and distributed data repository that can be
used in your intranet, over your extranet with your trading partners, or over the public Internet to
reach your customers.
This Administrator's Guide describes all of the administration tasks you need to perform to
maintain Directory Server.
1. Directory Server Overview
Directory Server provides the following key features:
• Multi-master replication — Provides a highly available directory service for both read and
write operations. Multi-master replication can be combined with simple and cascading
replication scenarios to provide a highly flexible and scalable replication environment.
• Chaining and referrals — Increases the power of your directory by storing a complete logical
view of your directory on a single server while maintaining data on a large number of
Directory Servers transparently for clients.
• Roles and classes of service — Provides a flexible mechanism for grouping and sharing
attributes between entries in a dynamic fashion.
• Improved access control mechanisms — Provides support for macros that dramatically
reduce the number of access control statements used in the directory and increase the
scalability of access control evaluation.
• Resource-limits by bind DN — Grants the power to control the amount of server resources
allocated to search operations based on the bind DN of the client.
• Multiple databases — Provides a simple way of breaking down your directory data to simplify
the implementation of replication and chaining in your directory service.
• Password policy and account lockout — Defines a set of rules that govern how passwords
and user accounts are managed in the Directory Server.
• TLS and SSL — Provides secure authentication and communication over the network, using
the Mozilla Network Security Services (NSS) libraries for cryptography.
The major components of Directory Server include the following:
• An LDAP server — The LDAP v3-compliant network daemon.
• Directory Server Console — A graphical management console that dramatically reduces the
effort of setting up and maintaining your directory service.
xvii
Page 18

Preface
• SNMP agent — Can monitor the Directory Server using the Simple Network Management
Protocol (SNMP).
2. Example and Default References
There are differences between the command, directory, and file locations in Red Hat Enterprise
Linux, Sun Solaris, and HP-UX Directory Server installations. Locations for other platforms are
listed in Section 1, “Directory Server File Locations”. These differences impact the
documentation in two ways:
• The file locations used in the examples or referenced in the procedures are the default
locations on Red Hat Enterprise Linux.
• The default commands used in the examples are also the default commands on Red Hat
Enterprise Linux.
There is another important consideration with the Directory Server tools. The LDAP tools
referenced in this guide are Mozilla LDAP, installed with Directory Server in the
/usr/dir/mozldap directory on Red Hat Enterprise Linux (directories for other platforms are
listed in Chapter 1, General Red Hat Directory Server Usage).
However, Red Hat Enterprise Linux systems also include LDAP tools from OpenLDAP in the
/usr/bin directory. It is possible to use the OpenLDAP commands as shown in the examples,
but you must use the -x argument to disable SASL, which OpenLDAP tools use by default.
3. Document Conventions
Certain words in this manual are represented in different fonts, styles, and weights. This
highlighting indicates that the word is part of a specific category. The categories include the
following:
Courier font
Courier font represents commands, file names and paths, and prompts .
When shown as below, it indicates computer output:
Desktop about.html logs paulwesterberg.png
Mail backupfiles mail reports
bold Courier font
Bold Courier font represents text that you are to type, such as: service jonas start
If you have to run a command as root, the root prompt (#) precedes the command:
xviii
Page 19

Document Conventions
# gconftool-2
italic Courier font
Italic Courier font represents a variable, such as an installation directory:
install_dir/bin/
bold font
Bold font represents application programs and text found on a graphical interface.
When shown like this: OK , it indicates a button on a graphical application interface.
Additionally, the manual uses different strategies to draw your attention to pieces of information.
In order of how critical the information is to you, these items are marked as follows:
Note
A note is typically information that you need to understand the behavior of the
system.
Tip
A tip is typically an alternative way of performing a task.
Important
Important information is necessary, but possibly unexpected, such as a
configuration change that will not persist after a reboot.
Caution
A caution indicates an act that would violate your support agreement, such as
recompiling the kernel.
xix
Page 20

Preface
Warning
A warning indicates potential data loss, as may happen when tuning hardware
for maximum performance.
4. Related Information
This manual describes how to administer the Directory Server and its contents. The instructions
for installing the various Directory Server components are contained in the Red Hat Directory
Server Installation Guide.
The document set for Directory Server also contains the following guides:
• Red Hat Directory Server Release Notes - Contains important information on new features,
fixed bugs, known issues and workarounds, and other important deployment information for
this specific version of Directory Server.
• Red Hat Directory Server Configuration, Command, and File Reference - Provides reference
information on the command-line scripts, configuration attributes, and log files shipped with
Directory Server.
• Red Hat Directory Server Installation Guide - Contains procedures for installing your Directory
Server as well as procedures for migrating from a previous installation of Directory Server.
For the latest information about Directory Server, including current release notes, complete
product documentation, technical notes, and deployment information, see the Red Hat Directory
Server documentation site at http://www.redhat.com/docs/manuals/dir-server/.
xx
Page 21

Chapter 1.
General Red Hat Directory Server
Usage
Red Hat Directory Server product includes a directory service, an administration server to
manage multiple server instances, and a Java-based console to manage server instances
through a graphical interface. This chapter provides an overview of the basic tasks for
administering a directory service.
The Directory Server is a robust, scalable server designed to manage an enterprise-wide
directory of users and resources. It is based on an open-systems server protocol called the
Lightweight Directory Access Protocol (LDAP). Directory Server runs the ns-slapd daemon on
the host machine. The server manages the directory databases and responds to client requests.
Directory Server 8.0 is comprised of several components, which work in tandem:
• The Directory Server is the core LDAP server daemon. It is compliant with LDAP v3
standards. This component includes command-line server management and administration
programs and scripts for common operations like export and backing up databases.
• The Directory Server Console is the user interface that simplifies managing users, groups,
and other LDAP data for your enterprise. The Console is used for all aspects of server
management, including making backups; configuring security, replication, and databases;
adding entries; and monitoring servers and viewing statistics.
• The Administration Server is the management agent which administers Directory Server
instances. It communicates with the Directory Server Console and performs operations on the
Directory Server instances. It also provides a simple HTML interface and online help pages.
Most Directory Server administrative tasks are available through the Directory Server Console,
but it is also possible to administer the Directory Server by manually editing the configuration
files or by using command-line utilities.
1. Directory Server File Locations
Red Hat Directory Server 8.0 conforms to the Filesystem Hierarchy Standards. For more
information on FHS, see the FHS homepage, http://www.pathname.com/fhs/. The files and
directories installed with Directory Server are listed in the tables below for each supported
platform.
In the file locations listed in the following tables, instance is the server instance name that was
given during setup. By default, this is the leftmost component of the fully-qualified host and
domain name. For example, if the hostname is ldap.example.com, the instance name is ldap
by default.
The Administration Server directories are named the same as the Directory Server directories,
1
Page 22

Chapter 1. General Red Hat Directory Server Usage
only instead of the instance as a directory name, the Administration Server directories are
named admin-serv. For any directory or folder named slapd-instance, substitute admin-serv,
such as /etc/dirsrv/slapd-example and /etc/dirsrv/admin-serv.
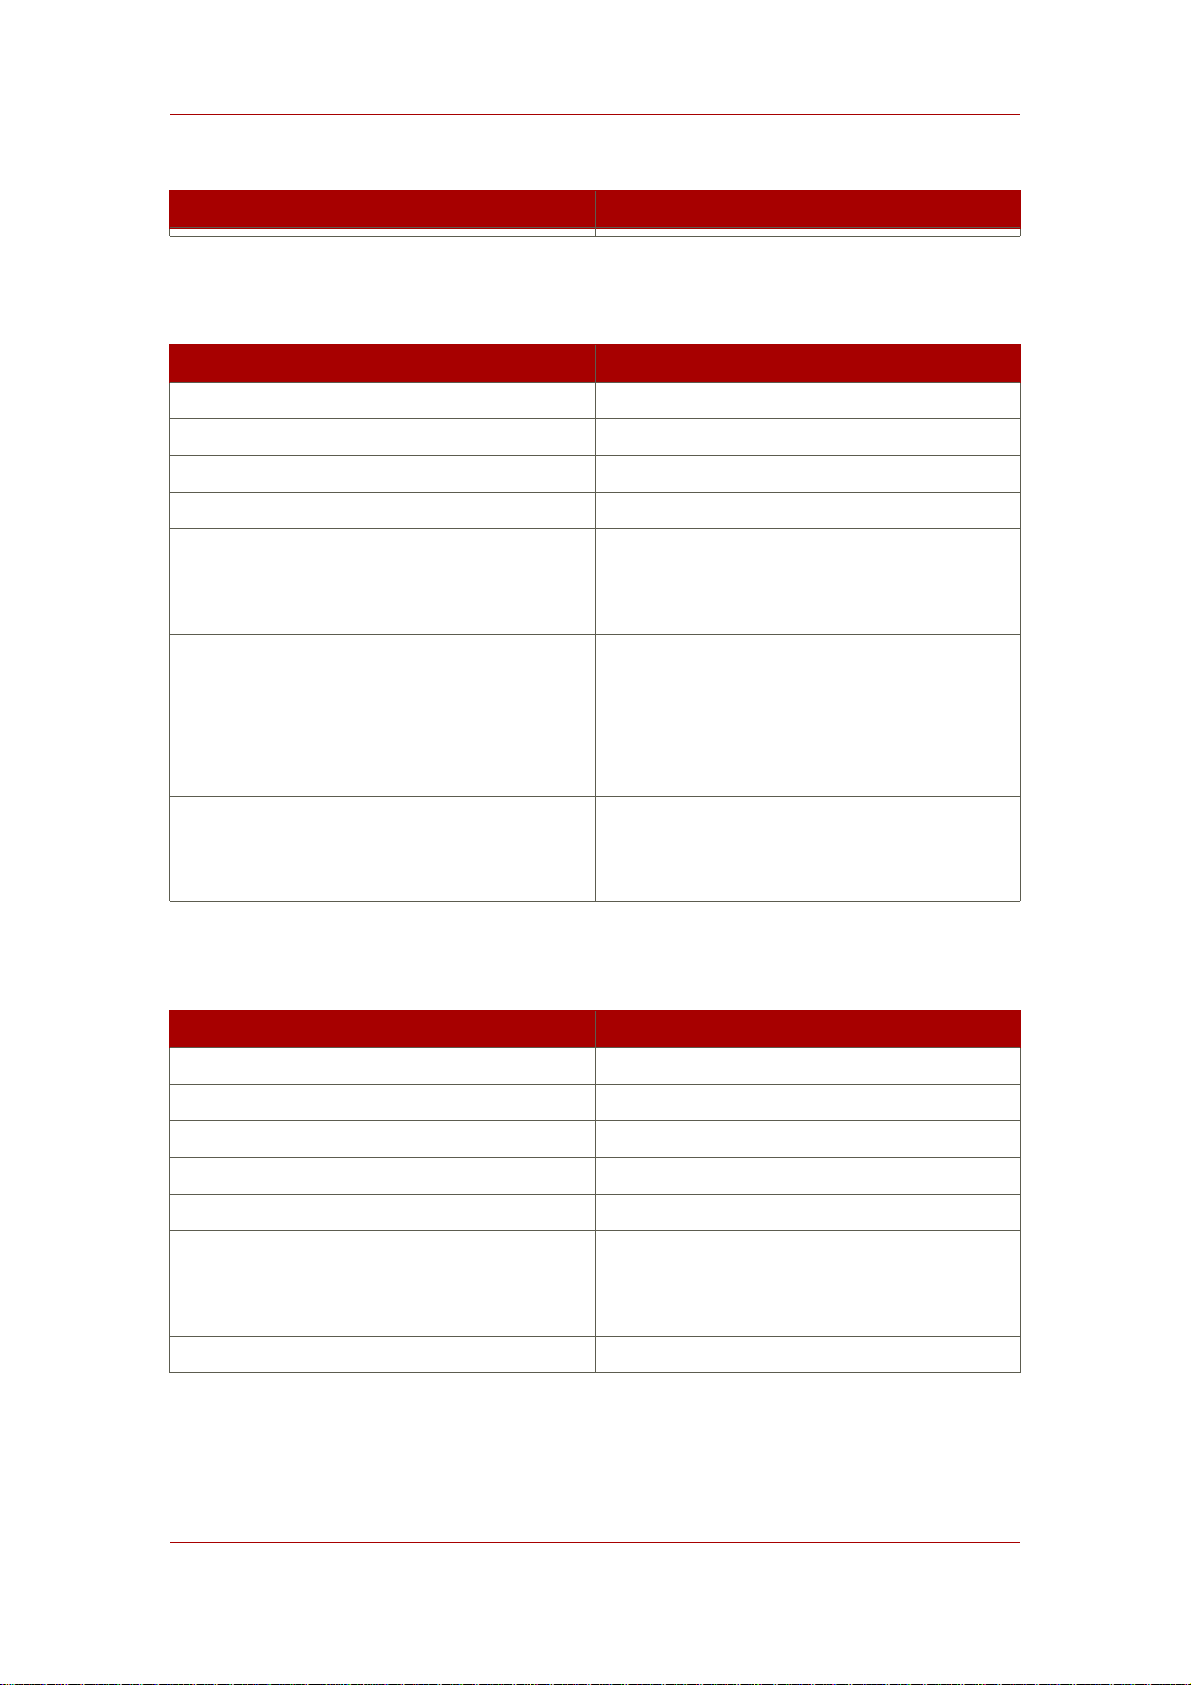
File or Directory Location
Log files /var/log/dirsrv/slapd-instance
Configuration files /etc/dirsrv/slapd-instance
Instance directory /usr/lib/dirsrv/slapd-instance
Database files /var/lib/dirsrv/slapd-instance
Runtime files
/var/lock/dirsrv/slapd-instance
/var/run/dirsrv/slapd-instance
Initscripts
/etc/rc.d/init.d/dirsrv and
/etc/sysconfig/dirsrv
/etc/rc.d/init.d/dirsrv-admin and
/etc/sysconfig/dirsrv-admin
Tools
/usr/bin/
/usr/sbin/
Table 1.1. Red Hat Enterprise Linux 4 and 5 (x86)
File or Directory Location
Log files /var/log/dirsrv/slapd-instance
Configuration files /etc/dirsrv/slapd-instance
Instance directory /usr/lib64/dirsrv/slapd-instance
Database files /var/lib/dirsrv/slapd-instance
Runtime files
/var/lock/dirsrv/slapd-instance
/var/run/dirsrv/slapd-instance
Initscripts
/etc/rc.d/init.d/dirsrv and
/etc/sysconfig/dirsrv
Tools
2
/etc/rc.d/init.d/dirsrv-admin and
/etc/sysconfig/dirsrv-admin
/usr/bin/
/usr/sbin/
Page 23
LDAP Tool Locations
File or Directory Location
Table 1.2. Red Hat Enterprise Linux 4 and 5 (x86_64)
File or Directory Location
Log files /var/log/dirsrv/slapd-instance
Configuration files /etc/dirsrv/slapd-instance
Instance directory /usr/lib/sparc9/dirsrv/slapd-instance
Database files /var/lib/dirsrv/slapd-instance
Runtime files
/var/lock/dirsrv/slapd-instance
/var/run/dirsrv/slapd-instance
Initscripts
/etc/rc.d/init.d/dirsrv and
/etc/default/dirsrv
/etc/rc.d/init.d/dirsrv-admin and
/etc/default/dirsrv-admin
Tools
/usr/bin/
/usr/sbin/
Table 1.3. Sun Solaris 9 (sparc)
File or Directory Location
Log files /var/opt/log/dirsrv/slapd-instance
Configuration files /etc/opt/dirsrv/slapd-instance
Instance directory /opt/dirsrv/slapd-instance
Database files /var/opt/dirsrv/slapd-instance
Runtime files /var/opt/dirsrv/instance
Binaries
/opt/dirsrv/bin/
/opt/dirsrv/sbin/
Libraries /opt/dirsrv/lib/
Table 1.4. HP-UX 11i (IA64)
3
Page 24

Chapter 1. General Red Hat Directory Server Usage
2. LDAP Tool Locations
Red Hat Directory Server uses Mozilla LDAP tools — such as ldapsearch, ldapmodify, and
ldapdelete — for command-line operations. The MozLDAP tools are installed with Directory
Server.
Platform Directory Location
Red Hat Enterprise Linux 4 i386 /usr/lib/mozldap6
Red Hat Enterprise Linux 4 x86_64 /usr/lib64/mozldap6
Red Hat Enterprise Linux 5 i386 /usr/lib/mozldap
Red Hat Enterprise Linux 5 x86_64 /usr/lib64/mozldap
Sun Solaris /usr/lib/sparcv9/mozldap
HP-UX /opt/dirsrv/bin
For all Red Hat Directory Server guides and documentation, the LDAP tools used in the
examples, such as ldapsearch and ldapmodify, are the Mozilla LDAP tools. For most Linux
systems, OpenLDAP tools are already installed in the /usr/bin/ directory. These OpenLDAP
tools are not supported for Directory Server operations. For the best results with the Directory
Server, make sure the path to the Mozilla LDAP tools comes first in the PATH or use the full path
and file name for every LDAP operation.
However, these OpenLDAP tools can be used for Directory Server operations with certain
cautions:
• The output of the other tools may be different, so it may not look like the examples in the
documentation.
• The OpenLDAP tools require a -x argument to disable SASL so that it can be used for a
simple bind, meaning the -D and -w arguments or an anonymous bind.
• The OpenLDAP tools' arguments for using TLS/SSL and SASL are quite different than the
Mozilla LDAP arguments. See the OpenLDAP documentation for instructions on those
arguments.
3. Starting and Stopping Servers
The Directory Server is running when the setup-ds-admin.pl script completes. Avoid stopping
and starting the server to prevent interrupting replication, searches, and other server operations.
• If the Directory Server has SSL enabled, you cannot restart the server from the Console; you
must use the command-line. It is possible to restart without being prompted for a password;
see Section 4.3, “Creating a Password File for the Directory Server” for more information.
• Rebooting the host system can automatically start the ns-slapd process. The directory
4
Page 25

Starting and Stopping Directory Server from
provides startup or run command (rc) scripts. On Red Hat Enterprise Linux, use the
chkconfig command to enable the Directory Server and Administration Server to start on
boot. On Solaris, the commands are already set up in the /etc/rc.d directories to start up
the servers at boot time. For HP-UX, check the operating system documentation for details on
adding these scripts.
3.1. Starting and Stopping Directory Server from the Console
1. Start the Directory Server Console.
/usr/bin/redhat-idm-console -a http://localhost:9830
2. In the Tasks tab, click Start the Directory Server, Stop the Directory Server, or Restart
the Directory Server.
When the Directory Server is successfully started or stopped from the Directory Server Console,
the server displays a message box stating that the server has either started or shut down.
3.2. Starting and Stopping Directory Server from the Command Line
5
Page 26

Chapter 1. General Red Hat Directory Server Usage
There are two ways to start, stop, or restart the Directory Server:
• There are scripts in the instance directories. For example:
/usr/lib/dirsrv/slapd-instance/start-slapd
/usr/lib/dirsrv/slapd-instance/restart-slapd
/usr/lib/dirsrv/slapd-instance/stop-slapd
• The Directory Server service can also be stopped and started using system tools on Red Hat
Enterprise Linux and Solaris. For example, Linux uses the service tool:
service dirsrv {start|stop|restart} instance
NOTE
The service name for the Directory Server process on Red Hat Enterprise Linux
is dirsrv.
Solaris uses /etc/init.d:
/etc/init.d/dirsrv {start|stop|restart} instance
The Directory Server instance name can be specific in both the start|stop|restart-slapd
and system scripts. If an instance name is not given, the start or stop operation applies to all
instances on the machine.
3.3. Starting and Stopping Administration Server
There are two ways to start, stop, or restart the Administration Server:
• There are scripts in the /usr/sbin directory.
/usr/sbin/start|stop|restart-ds-admin
• The Administration Server service can also be stopped and started using system tools on Red
Hat Enterprise Linux and Solaris. For example, on Red Hat Enterprise Linux, the command is
service:
service dirsrv-admin {start|stop|restart}
6
Page 27

the Console
NOTE
The service name for the Administration Server process on Red Hat Enterprise
Linux is dirsrv-admin.
On Solaris, the service is init.d:
/etc/init.d/dirsrv-admin {start|stop|restart}
4. Starting the Directory Server Console
There is a simple script to launch the Directory Server Console. On Red Hat Enterprise Linux
and Solaris, run the following:
/usr/bin/redhat-idm-console
HP-UX has a different location for the script:
/opt/dirsrv/bin/redhat-idm-console
NOTE
Make sure that the correct JRE — the program called java — is set in the PATH
before launching the Console. Run the following to see if the Java program is in
the PATH and to get the version and vendor information:
java -version
When the login screen opens, you are prompted for the username, password, and
Administration Server location. It is possible to send the Administration Server URL and port
with the start script. For example:
/usr/bin/redhat-idm-console -a http://localhost:9830
The a option is a convenience, particularly if you are logging into a Directory Server for the first
time. On subsequent logins, the URL is saved. If you do not pass the Administration Server port
number with the redhat-idm-console command, then you are prompted for it at the Console
7
Page 28

Chapter 1. General Red Hat Directory Server Usage
login screen.
4.1. Logging into Directory Server
After starting the Directory Server Console, a login screen opens, requiring the username and
password for the user logging in and the URL for the Administration Server instance being
access. The user logged in at the Console is the user who is binding to Directory Server. This
determines the access permissions granted and allowed operations while access the directory
tree. The user account used to log into the Directory Server Console can make significant
differences in the access; for example, the Directory Manager has access to every user and
configuration entry in Directory Server, while the admin entry created during installation has
access to only configuration entries, not user entries. Regular user accounts are more limited.
To bind to, or log into, the Directory Server, supply a username and password at the login box.
4.2. Changing Login Identity
At any time during a session, you can log in as a different user, without having to restart the
Console. To change the login identity, do the following:
1. In the Directory Server Console, select the Tasks tab.
2. Click Log on to the Directory Server as a New User.
8
Page 29

3. A login dialog box appears.
Viewing the Current Console Bind DN
Enter the full distinguished name of the entry with which to bind to the server. For example, to
bind as user Barbara Jensen, enter her full DN in the login box:
cn=Barbara Jensen, ou=People,dc=example,dc=com
4.3. Viewing the Current Console Bind DN
To see the bind DN that is currently logged into the Directory Server Console, click the login
icon in the lower-left corner of the window. The current bind DN appears next to the login icon.
Figure 1.1. Viewing the Bind DN
5. Changing Directory Server Port Numbers
The standard and secure LDAP port numbers used by Directory Server can be changed
through the Directory Server Console or by changing the value of the nsslapd-port or
nsslapd-secureport attribute under the cn=config entry in the dse.ldif.
NOTE
Modifying the standard or secure port numbers for a Configuration Directory
9
Page 30

Chapter 1. General Red Hat Directory Server Usage
Server, which maintains the o=NetscapeRoot subtree should be done through
the Directory Server Console.
Changing the configuration directory or user directory port or secure port numbers has the
following repercussions:
• The Directory Server port number must also be updated in the Administration Server
configuration.
• If there are other Directory Server instances that point to the configuration or user directory,
update those servers to point to the new port number.
To modify a Directory Server LDAP or LDAPS port for either a user or a configuration directory,
do the following:
1. In the Directory Server Console, select the Configuration tab, and then select the top entry
in the navigation tree in the left pane.
2. Select the Settings tab in the right pane.
3. Enter the port number for the server to use for non-SSL communications in the Port field.
The default value is 389.
4. Enter the port number for the server to use for SSL communications in the Encrypted Port
field.
The encrypted port number must not be the same port number used for normal LDAP
communications. The default value is 636.
5. Click Save.
6. The Console returns a warning, You are about to change the port number for the
Configuration Directory. This will affect all Administration Servers that use this directory and
you'll need to update them with the new port number. Are you sure you want to change the
port number? Click Yes.
7. Then a dialog appears, reading that the changes will not take effect until the server is
restarted. Click OK.
10
NOTE
Do not restart the Directory Server at this point. If you do, you will not be able to
make the necessary changes to the Administration Server through the Console.
Page 31

Creating a New Directory Server Instance
8. Open the Administration Server Console.
9. In the Configuration tab, select the Configuration DS tab.
10.In the LDAP Port field, type in the new LDAP port number for your Directory Server instance.
11.Check the Secure Connection box if this is a secure port.
NOTE
If you try to save these changes at this step, you will get a warning box that
reads, Invalid LDAP Host/LDAP Port, can not connect. Click OK, and ignore this
warning.
12.In the Tasks tab of the Directory Server Console, click Restart Directory Server. A dialog to
confirm that you want to restart the server. Click Yes.
13.Open the Configuration DS tab of the Administration Server Console and select Save.
A dialog will appear, reading The Directory Server setting has been modified. You must
shutdown and restart your Administration Server and all the servers in the Server Group for
the changes to take effect. Click OK.
14.In the Tasks tab of the Administration Server Console, click Restart Admin Server. A dialog
opens reading that the Administration Server has been successfully restarted. Click Close.
NOTE
You must close and reopen the Console before you can do anything else in the
Console. Refresh may not update the Console, and, if you try to do anything, you
will get a warning that reads Unable to contact LDAP server.
6. Creating a New Directory Server Instance
Additional instances can be created through the Directory Server Console or using the
setup-ds.pl script. For information on using the setup-ds.pl script, see the Directory Server
Installation Guide. To create an instance using the Directory Server Console, do the following:
1. In the Red Hat Console window, select Server Group in the navigation tree, and then
right-click.
2. From the pop-up menu, select Create Instance and then Directory Server.
11
Page 32

Chapter 1. General Red Hat Directory Server Usage
The Create New Instance dialog box is displayed.
3. Enter a unique identifier for the server in the Server Identifier field.
NOTE
This name must only have alphanumeric characters, a dash (-), or an
underscore (_).
4. Enter the a port number for LDAP communications in the Network port field.
5. Enter the suffix managed by this new instance of the directory in the Base Suffix field.
6. Enter a DN for the Directory Manager in the Root DN field.
For information on the role and privileges of the Directory Manager entry, refer to Section 7,
“Configuring the Directory Manager”.
7. Enter the password for this user in the Password for Root DN field, and confirm it.
8. Enter the user ID for the Directory Server daemon in the Server Runtime User ID field.
9. Click OK.
A status box appears to confirm that the operation was successful. To dismiss it, click OK.
7. Configuring the Directory Manager
The Directory Manager is the privileged database administrator, comparable to the root user in
UNIX. Access control does not apply to the Directory Manager entry; likewise, limits on
searches and other operations do not apply. The Directory Manager entry is created during
installation; the default DN is cn=Directory Manager. The password for this user is defined in
the nsslapd-rootdn attribute.
To change the Directory Manager DN and password and the encryption scheme used for this
password, do the following:
1. Log in to the Directory Server Console as Directory Manager.
If you are already logged in to the Console, change the bind DN, as described in Section 4.2,
“Changing Login Identity”.
2. In the Directory Server Console, select the Configuration tab, and then select the top entry
in the navigation tree in the left pane.
3. Select the Manager tab in the right pane.
12
Page 33

Configuring the Directory Manager
4. Enter the new distinguished name for the Directory Manager in the Root DN field.
The default value is cn=Directory Manager.
5. From the Manager Password Encryption pull-down menu, select the storage scheme you
want the server to use to store the password for Directory Manager.
6. Enter the new password, and confirm it.
7. Click Save.
13
Page 34

14
Page 35

Chapter 2.
Creating Directory Entries
This chapter discusses how to use the Directory Server Console and the ldapmodify and
ldapdelete command-line utilities to modify the contents of your directory.
Entries stored in Active Directory can be added to the Directory Server through Windows Sync;
see Chapter 19, Synchronizing Red Hat Directory Server with Microsoft Active Directory for
more information on adding or modifying synchronized entries through Windows User Sync.
1. Managing Entries from the Directory Console
You can use the Directory tab and the Property Editor on the Directory Server Console to
add, modify, or delete entries individually.
To add several entries simultaneously, use the command-line utilities described in Section 1,
“Managing Entries from the Directory Console”.
• Section 1.1, “Creating a Root Entry”
• Section 1.2, “Creating Directory Entries”
• Section 1.3, “Modifying Directory Entries”
• Section 1.4, “Deleting Directory Entries”
NOTE
You cannot modify your directory unless the appropriate access control rules
have been set. For information on creating access control rules for your
directory, see Chapter 6, Managing Access Control.
1.1. Creating a Root Entry
Each time you create a new database, you associate it with the suffix that will be stored in the
database. The directory entry representing that suffix is not automatically created.
To create a root entry for a database, do the following:
NOTE
For information on starting the Directory Server Console, see Section 4, “Starting
the Directory Server Console”.
15
Page 36

Chapter 2. Creating Directory Entries
1. In the Directory Server Console, select the Configuration tab.
2. Create a new database, as explained in Section 2, “Creating and Maintaining Databases”.
3. In the Directory tab, right-click the top object representing the Directory Server, and choose
New Root Object.
The secondary menu under New Root Object displays a list of suffixes that do not have a
corresponding entry.
4. Choose the suffix corresponding to the entry to create.
The New Object window opens.
5. In the New Object window, select the object class corresponding to the new entry.
The object class you select must contain the attribute you used to name the suffix. For
example, if you are creating the entry corresponding to the suffix
ou=people,dc=example,dc=com, then you can choose the organizationalUnit object
class or another object class that allows the ou attribute.
6. Click OK in the New Object window.
The Property Editor for the new entry opens. You can either accept the current values by
clicking OK or modify the entry, as explained in Section 1.3, “Modifying Directory Entries”.
1.2. Creating Directory Entries
Directory Server Console offers several predefined templates for creating directory entries.
Templates are available for the following types of entries:
• User
• Group
• Organizational Unit
• Role
• Class of Service
Table 2.1, “Entry Templates and Corresponding Object Classes” shows what type of object
class is used for each template.
Template Object Class
User inetOrgPerson
Group groupOfUniqueNames
Organizational Unit organizationalUnit
16
Page 37
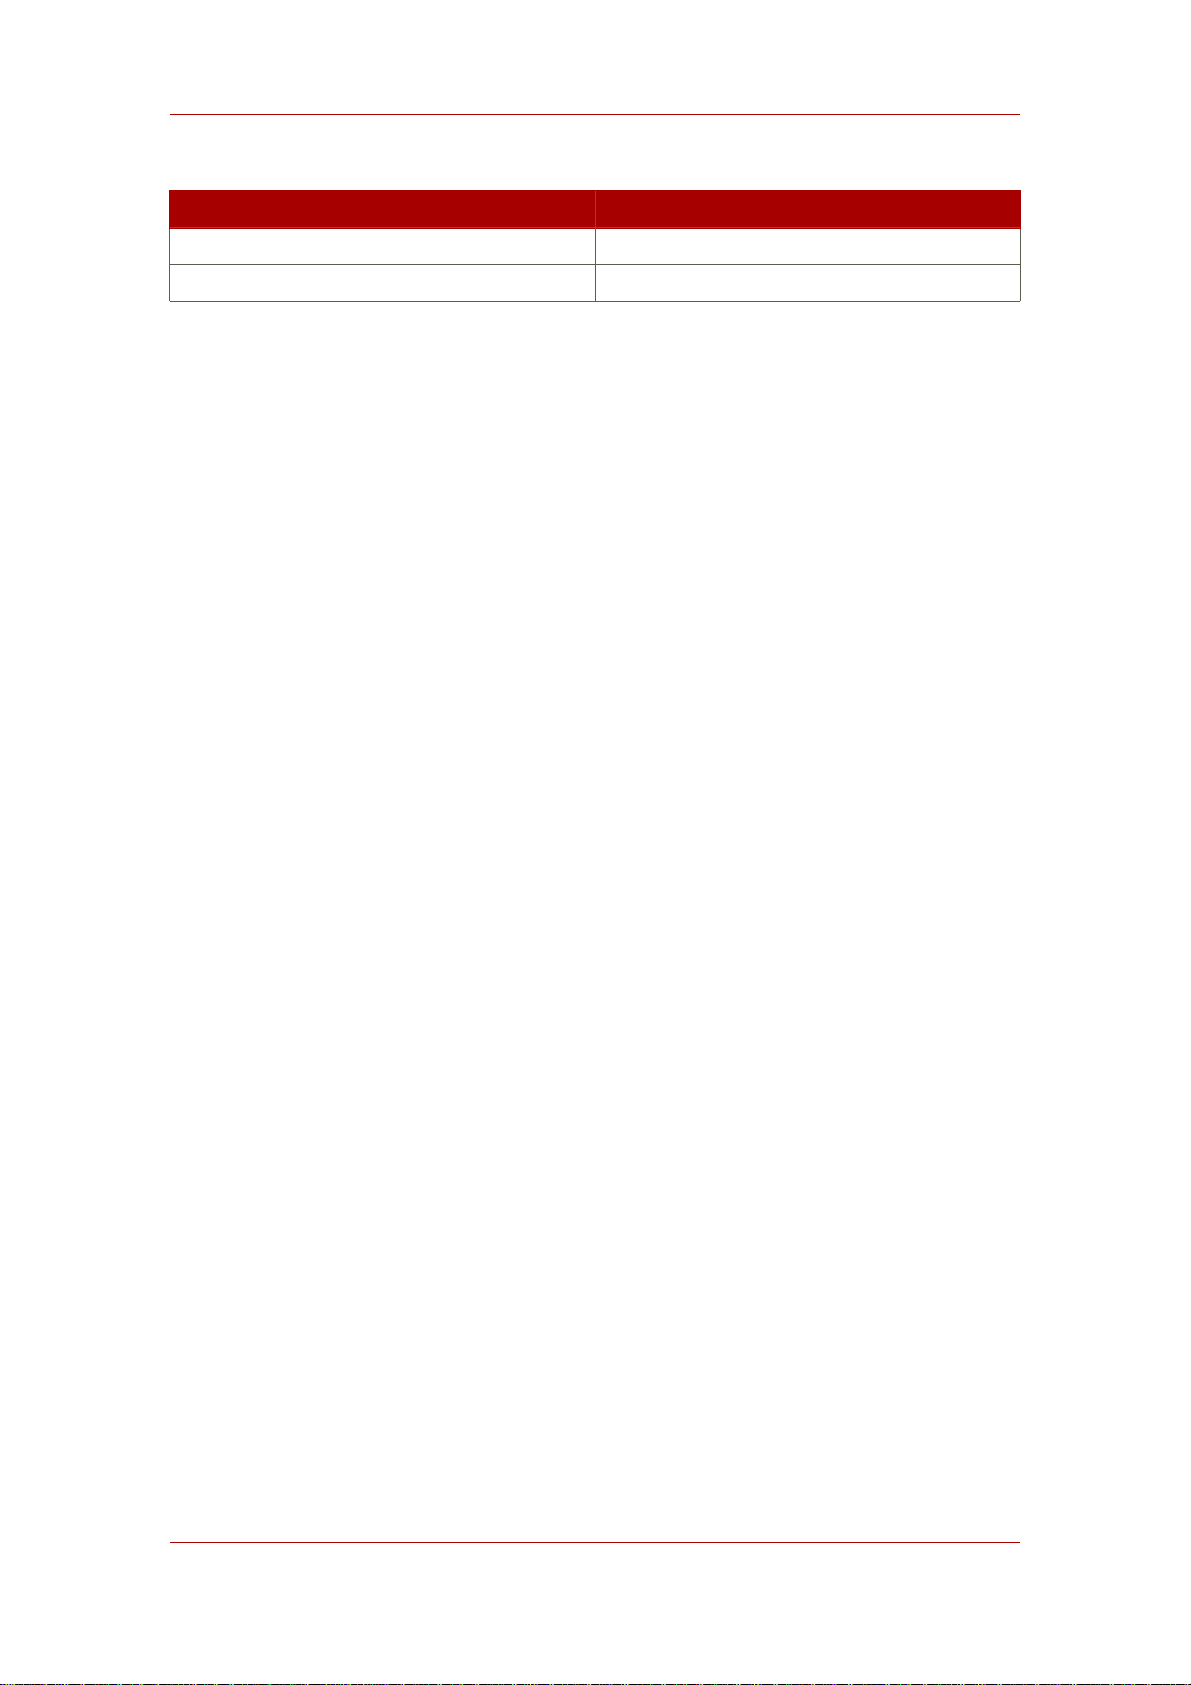
Creating Directory Entries
Template Object Class
Role nsRoleDefinition
Class of Service cosSuperDefinition
Table 2.1. Entry Templates and Corresponding Object Classes
These templates contain fields representing all the mandatory attributes and some of the
commonly used optional attributes. To create an entry using one of these templates, refer to
Section 1.2.1, “Creating an Entry Using a Predefined Template”. To create any other type of
entry, refer to Section 1.2.2, “Creating Other Types of Entries”.
1.2.1. Creating an Entry Using a Predefined Template
1. In the Directory Server Console, select the Directory tab.
For information on starting the Directory Server Console, see Section 4, “Starting the
Directory Server Console”.
2. In the left pane, right-click the main entry to to add the new entry, and select the type of entry:
User, Group, Organizational Unit, Role, Class of Service, or Other.
The corresponding Create window opens.
3. Supply values for all of the mandatory attributes (identified by an asterisk) and, if you want,
for any of the optional attributes.
4. The Create window does not provide fields for all optional attributes. To display the full list of
attributes, click the Advanced button.
In the Property Editor (described in Section 1.3, “Modifying Directory Entries”), select any
additional attributes, and fill in the attribute values.
5. Click OK to save the entry. The new entry opens in the right pane.
1.2.2. Creating Other Types of Entries
1. In the Directory Server Console, select the Directory tab.
For information on starting the Directory Server Console, see Section 4, “Starting the
Directory Server Console”.
2. In the left pane, right-click the main entry under which to add the new entry, and select
Other.
The New Object window opens.
17
Page 38

Chapter 2. Creating Directory Entries
3. In the object class list, select an object class to define the new entry.
4. Click OK.
If you selected an object class related to a type of entry for which a predefined template is
available, the corresponding Create window opens, as described in Section 1.2.1, “Creating
an Entry Using a Predefined Template”.
In all other cases, the Property Editor opens. It contains a list of mandatory attributes for the
selected object class.
5. Supply a value for all the listed attributes.
• Some fields are empty, but some might have a placeholder value such as New. Fill in all
attributes with a meaningful value for the entry.
• Some object classes can have several naming attributes. Select the naming attribute to
use to name the new entry.
• Open the Property Editor to add optional attributes, as described in Section 1.3,
“Modifying Directory Entries”.
6. Click OK to save the new entry. The new entry opens in the right pane.
1.3. Modifying Directory Entries
Modifying directory entries in Directory Server Console uses a dialog window called the
Property Editor. The Property Editor contains the list of object classes and attributes
belonging to an entry and can be used to edit the object classess and attributes belonging to
that entry:
• Add and remove object classes
• Add and remove an attribute
• Add and remove an attribute value
• Add an attribute subtype
This section describes how to start the Property Editor and use it to modify an entry's attributes
and attribute values.
1.3.1. Displaying the Property Editor
The Property Editor can be opened in several ways:
• From the Directory tab, by right-clicking an entry, and selecting Properties from the pop-up
menu.
18
Page 39

Modifying Directory Entries
• From the Directory tab, by double-clicking an entry
• From the Create... entry templates, by clicking the Advanced button (as in Section 1.2.1,
“Creating an Entry Using a Predefined Template”)
• From the New Object window, by clicking OK (as in Section 1.2.2, “Creating Other Types of
Entries”)
1.3.2. Adding an Object Class to an Entry
To add an object class to an entry, do the following:
1. In the Directory tab of the Directory Server Console, right-click the entry to modify, and
select Advanced from the pop-up menu.
Alternatively, double-click the entry to open the Property Editor, and click the Advanced
button.
2. Select the object class field, and click Add Value.
The Add Object Class window opens. It shows a list of object classes that can be added to
the entry.
3. Select the object class to add, and click OK.
The selected object class appears in the list of object classes in the Advanced Property
Editor. To dismiss the Add Object Class window, click Cancel.
4. Click OK in the Advanced Property Editor when you have finished editing the entry, then
click OK to close the Property Editor.
1.3.3. Removing an Object Class
To remove an object class from an entry, do the following:
1. In the Directory tab of the Directory Server Console, right-click the entry to modify, and
select Advanced from the pop-up menu.
Alternatively, double-click the entry to open the Property Editor opens, and click the
Advanced button.
2. Click the text box that shows the object class to remove, and then click Delete Value.
3. Click OK in the Advanced Property Editor, then click OK to save the changes and close the
Property Editor.
1.3.4. Adding an Attribute to an Entry
19
Page 40
Chapter 2. Creating Directory Entries
Before you can add an attribute to an entry, the entry must contain an object class that either
requires or allows the attribute. refer to Section 1.3.2, “Adding an Object Class to an Entry” and
Chapter 9, Extending the Directory Schema for more information.
Add an attribute to an entry as follows:
1. In the Directory tab of the Directory Server Console, right-click the entry to modify, and
select Advanced from the pop-up menu.
Alternatively, double-click the entry to open the Property Editor, and then click the
Advanced button.
2. Click Add Attribute. The Add Attribute dialog box opens.
3. Select the attribute to add from the list, and click OK.
The Add Attribute window is dismissed, and the selected attribute appears in the list of
attributes in the Advanced Property Editor.
4. Type in the value for the new attribute in the field to the right of the attribute name.
5. Click OK in the Advanced Property Editor to save the attribute to the entry and close the
Advanced Property Editor.
Click OK to close the Property Editor.
NOTE
If the attribute you want to add is not listed, add the object class containing the
attribute first, then add the attribute. See Section 1.3.2, “Adding an Object Class
to an Entry” for instructions on adding an object class.
1.3.5. Adding Very Large Attributes
The configuration attribute nsslapd-maxbersize sets the maximum size limit for LDAP
requests. The default configuration of Directory Server sets this attribute at 2 megabytes. LDAP
add or modify operations will fail when attempting to add very large attributes that result in a
request that is larger than 2 megabytes.
To add very large attributes, first change the setting for the nsslapd-maxbersize configuration
attribute to a value larger than the largest LDAP request you will make.
When determining the value to set, consider all elements of the LDAP add and modify
operations used to add the attributes, not just the single attribute. There are a number of
different factors to considerin, including the following:
20
Page 41

Modifying Directory Entries
• The size of each attribute name in the request
• The size of the values of each of the attributes in the request
• The size of the DN in the request
• Some overhead; usually 10 kilobytes is sufficient
One common issue that requires increasing the nsslapd-maxbersize setting is using attributes
which hold CRL values, such as certificateRevocationList, authorityRevocationList,
and deltaRevocationList.
For further information about the nsslapd-maxbersize attribute and for information about
setting this attribute, see the section "nsslapd-maxbersize (MaximumMessage Size)" in chapter
2, "Core Server Configuration Reference," in Red Hat Directory Server Configuration,
Command, and File Reference.
1.3.6. Adding Attribute Values
Multi-valued attributes allow multiple value for one attribute to be added to an entry. To add an
attribute value to a multi-valued attribute:
1. In the Directory tab of the Directory Server Console, right-click the entry to modify, and
select Advanced from the pop-up menu.
Alternatively, double-click the entry to open the Property Editor, and click the Advanced
button.
2. Select the attribute to which to add a value, and then click Add Value. A new blank text field
opens in the right column.
3. Type in the new attribute value.
4. Click OK in the Advanced Property Editor to close the Advanced Property Editor, then
click OK again to close the Property Editor.
1.3.7. Removing an Attribute Value
To remove an attribute value from an entry, do the following:
1. In the Directory tab of the Directory Server Console, right-click the entry to modify, and
select Advanced from the pop-up menu.
Alternatively, double-click the entry to open the Property Editor, and click the Advanced
button.
2. Click the text box of the attribute value to remove, and click Delete Value.
21
Page 42

Chapter 2. Creating Directory Entries
To remove the entire attribute and all its values from the entry, select Delete Attribute from
the Edit menu.
3. Click OK to close the Advanced Property Editor, then click OK to close the Property
Editor.
1.3.8. Adding an Attribute Subtype
There are three different kinds of subtypes to attributes which can be added to an entry:
language, binary, and pronunciation.
1.3.8.1. Language Subtype
Sometimes a user's name can be more accurately represented in characters of a language
other than the default language. For example, a user, Noriko, has a name in Japanese and
prefers that her name be represented by Japanese characters when possible. You can select
Japanese as a language subtype for the givenname attribute so that other users can search for
her name in Japanese as well as English. For example:
givenname;lang-ja
To specify a language subtype for an attribute, add the subtype to the attribute name as follows:
attribute;lang-subtype:attribute value
attribute is the attribute being added to the entry and subtype is the two character abbreviation
for the language. The supported language subtypes are listed in Table D.2, “Supported
Language Subtypes”.
Only one language subtype can be added per attribute instance in an entry. To assign multiple
language subtypes, add another attribute instance to the entry, and then assign the new
language subtype. For example, the following is illegal:
cn;lang-ja;lang-en-GB:value
Instead, use:
cn;lang-ja:ja-value
cn;lang-en-GB:value
1.3.8.2. Binary Subtype
Assigning the binary subtype to an attribute indicates that the attribute value is binary, such as
user certificates (usercertificate;binary).
22
Page 43

Deleting Directory Entries
Although you can store binary data within an attribute that does not contain the binary subtype
(for example, jpegphoto), the binary subtype indicates to clients that multiple variants of the
attribute type may exist.
1.3.8.3. Pronunciation Subtype
Assigning the pronunciation subtype to an attribute indicates that the attribute value is a
phonetic representation. The subtype is added to the attribute name as attribute;phonetic.
This subtype is commonly used in combination with a language subtype for languages that have
more than one alphabet, where one is a phonetic representation.
This subtype is useful with attributes that are expected to contain user names, such as cn or
givenname. For example, givenname;lang-ja;phonetic indicates that the attribute value is
the phonetic version of the user's Japanese name.
1.3.8.4. Adding a Subtype to an Attribute
To add a subtype to an entry, do the following:
1.
In the Directory tab of the Directory Server Console, right-click the entry to modify, and
select Properties from the pop-up menu.
Alternatively, double-click the entry to open the Property Editor.
2. Click Add Attribute. The Add Attribute dialog box opens.
3. Select the attribute to add from the list.
4. To assign a language subtype to the attribute, select the subtype from the Language
drop-down list.
Assign one of the other two subtypes, binary or pronunciation, from the Subtype drop-down
list.
5. Click OK to close the Add Attribute window, then click OK again to close the Property
Editor.
1.4. Deleting Directory Entries
To delete entries using the Directory Server Console, do the following:
1. In the Directory Server Console, select the Directory tab.
For information on starting the Directory Server Console, see Section 4, “Starting the
Directory Server Console”.
2. Right-click the entry to delete in the navigation tree or in the right pane. To select multiple
23
Page 44

Chapter 2. Creating Directory Entries
entries, use Ctrl or Shift.
3. Select Delete from the Edit menu.
WARNING
The server deletes the entry or entries immediately. There is no way to undo the
delete operation.
2. Managing Entries from the Command-Line
The command-line utilities allow you to manipulate the contents of your directory. They can be
useful to write scripts to perform bulk management of the directory or to test the Directory
Server. For example, you might want to ensure that it returns the expected information after you
have made changes to access control information.
With command-line utilities, information can be provided directly from the command-line or
through an LDIF input file.
• Section 2.1, “Providing Input from the Command-Line”
• Section 2.2, “Creating a Root Entry from the Command-Line”
• Section 2.3, “Adding Entries Using LDIF”
• Section 2.4, “Adding and Modifying Entries Using ldapmodify”
• Section 2.5, “Deleting Entries Using ldapdelete”
• Section 2.6, “Using Special Characters”
NOTE
You cannot modify your directory unless the appropriate access control rules
have been set. For information on creating access control rules for your
directory, see Chapter 6, Managing Access Control.
2.1. Providing Input from the Command-Line
When you provide input to the ldapmodify and ldapdelete1utilities directly from the
command-line, you must use LDIF statements. For detailed information on LDIF statements,
24
Page 45

Creating a Root Entry from the
see Section 4, “LDIF Update Statements”.
The ldapmodify and ldapdelete utilities read the statements that you enter in exactly the
same way as if they were read from a file. When all of the input has been entered, enter the
character that the shell recognizes as the end of file (EOF) escape sequence. The utility then
begins operations based on the supplied inputs.
While the EOF escape sequence depends on the type of machine, the EOF escape sequence
almost always control-D (^D).
For example, to input some LDIF update statements to ldapmodify, you would do the following:
ldapmodify -D bindDN -w password -h hostname
dn: cn=Barry Nixon, ou=people, dc=example,dc=com
changetype: modify
delete: telephonenumber
add: manager
manager: cn=Harry Cruise, ou=people, dc=example,dc=com
^D
When adding an entry from the command line or from LDIF, make sure that an entry
representing a subtree is created before new entries are created under that branch. For
example, to place an entry in a People subtree, create an entry representing that subtree before
creating entries within the subtree. For example:
dn: dc=example,dc=com
dn: ou=People, dc=example,dc=com
...People subtree entries. ...
dn: ou=Group, dc=example,dc=com
...Group subtree entries. ...
2.2. Creating a Root Entry from the Command-Line
The ldapmodify command-line utility can be used to create a new root entry in a database. For
example:
ldapmodify -a -D bindDN -w password
The ldapmodify utility binds to the server and prepares it to add an entry. The new root object
can then be added, as follows:
dn: Suffix_Name
1
The LDAP tools referenced in this guide are Mozilla LDAP, installed with Directory Server in the
/usr/lib/mozldap directory on Red Hat Enterprise Linux 5 i386; directories for other platforms are listed in
Section 2, “LDAP Tool Locations”. However, Red Hat Enterprise Linux systems also include LDAP tools from
OpenLDAP. It is possible to use the OpenLDAP commands as shown in the examples, but you must use the -x
argument to disable SASL and allow simple authentication.
25
Page 46

Chapter 2. Creating Directory Entries
objectclass: newobjectclass
The DN corresponds to the DN of the root or sub-suffix contained by the database. The
newobjectclass value depends upon the type of object class you are adding to the database.
You may need to specify additional required attributes depending on the type of root object
being added.
NOTE
You can use ldapmodify to add root objects only if you have one database per
suffix. If you create a suffix that is stored in several databases, you must use the
ldif2db utility with the -noption parameter to specify the database that will hold
the new entries. For information, see Section 1.3, “Importing from the
Command-Line”.
2.3. Adding Entries Using LDIF
You can use an LDIF file to add multiple entries or to import an entire database. To add entries
using an LDIF file and the Directory Server Console:
1. Define the entries in an LDIF file.
LDIF files are described in Appendix A, LDAP Data Interchange Format.
2. Import the LDIF file from the Directory Server Console.
See Section 1.1, “Importing a Database from the Console” for information about LDIF file
formats. When you import the LDIF file, select Append to database in the Import dialog box
so that the server will only import entries that do not currently exist in the directory.
You can also add entries described in an LDIF file from the command-line using the
ldapmodify command with the -f option.
2.4. Adding and Modifying Entries Using ldapmodify
The ldapmodify1command can add and modify entries in an existing Directory Server
database. The ldapmodify command opens a connection to the specified server using the
supplied distinguished name and password and modifies the entries based on LDIF update
statements contained in a specified file. Because ldapmodify uses LDIF update statements,
ldapmodify can do everything that ldapdelete can do.
Consider the following when using ldapmodify:
• If the server detects an attribute or object class in the entry that is not known to the server,
26
Page 47

Command-Line
then the modify operation will fail when it reaches the erroneous entry. All entries that were
processed before the error was encountered will be successfully added or modified. If you run
ldapmodify with the -c option (do not stop on errors), all correct entries processed after the
erroneous entry will be successfully added or modified.
•
If a required attribute is not present, the modify operation fails. This happens even if the
offending object class or attribute is not being modified.
NOTE
To create the root entry a database suffix (such as dc=example,dc=com) using
ldapmodify, you must bind to the directory as the Directory Manager.
2.4.1. Adding Entries Using ldapmodify
Typically, to add the entries using ldapmodify, specify the DN and password to bind to the
Directory Server, the port and host of the Directory Server, and the LDIF file to use. For
example:
ldapmodify -a -D "cn=Directory Manager" -w King-Pin -h cyclops -p 845 -f
new.ldif
This ldapmodify example has the following values:
• The entries to be created are specified in the file new.ldif. (In this example, the LDIF
statements in the new.ldif file do not specify a change type. They follow the format defined
in Section 1, “About the LDIF File Format”.)
• The Directory Manager is a database administrator who has the authority to modify the
entries, and its password is King-Pin.
• The hostname is cyclops.
• The server uses port number 845.
Table 2.2, “ldapmodify Parameters Used for Adding Entries” describes the ldapmodify
parameters used in the example.
Parameter Name Description
-a Specifies that the modify operation will add
new entries to the directory.
-D Specifies the distinguished name with which
27
Page 48
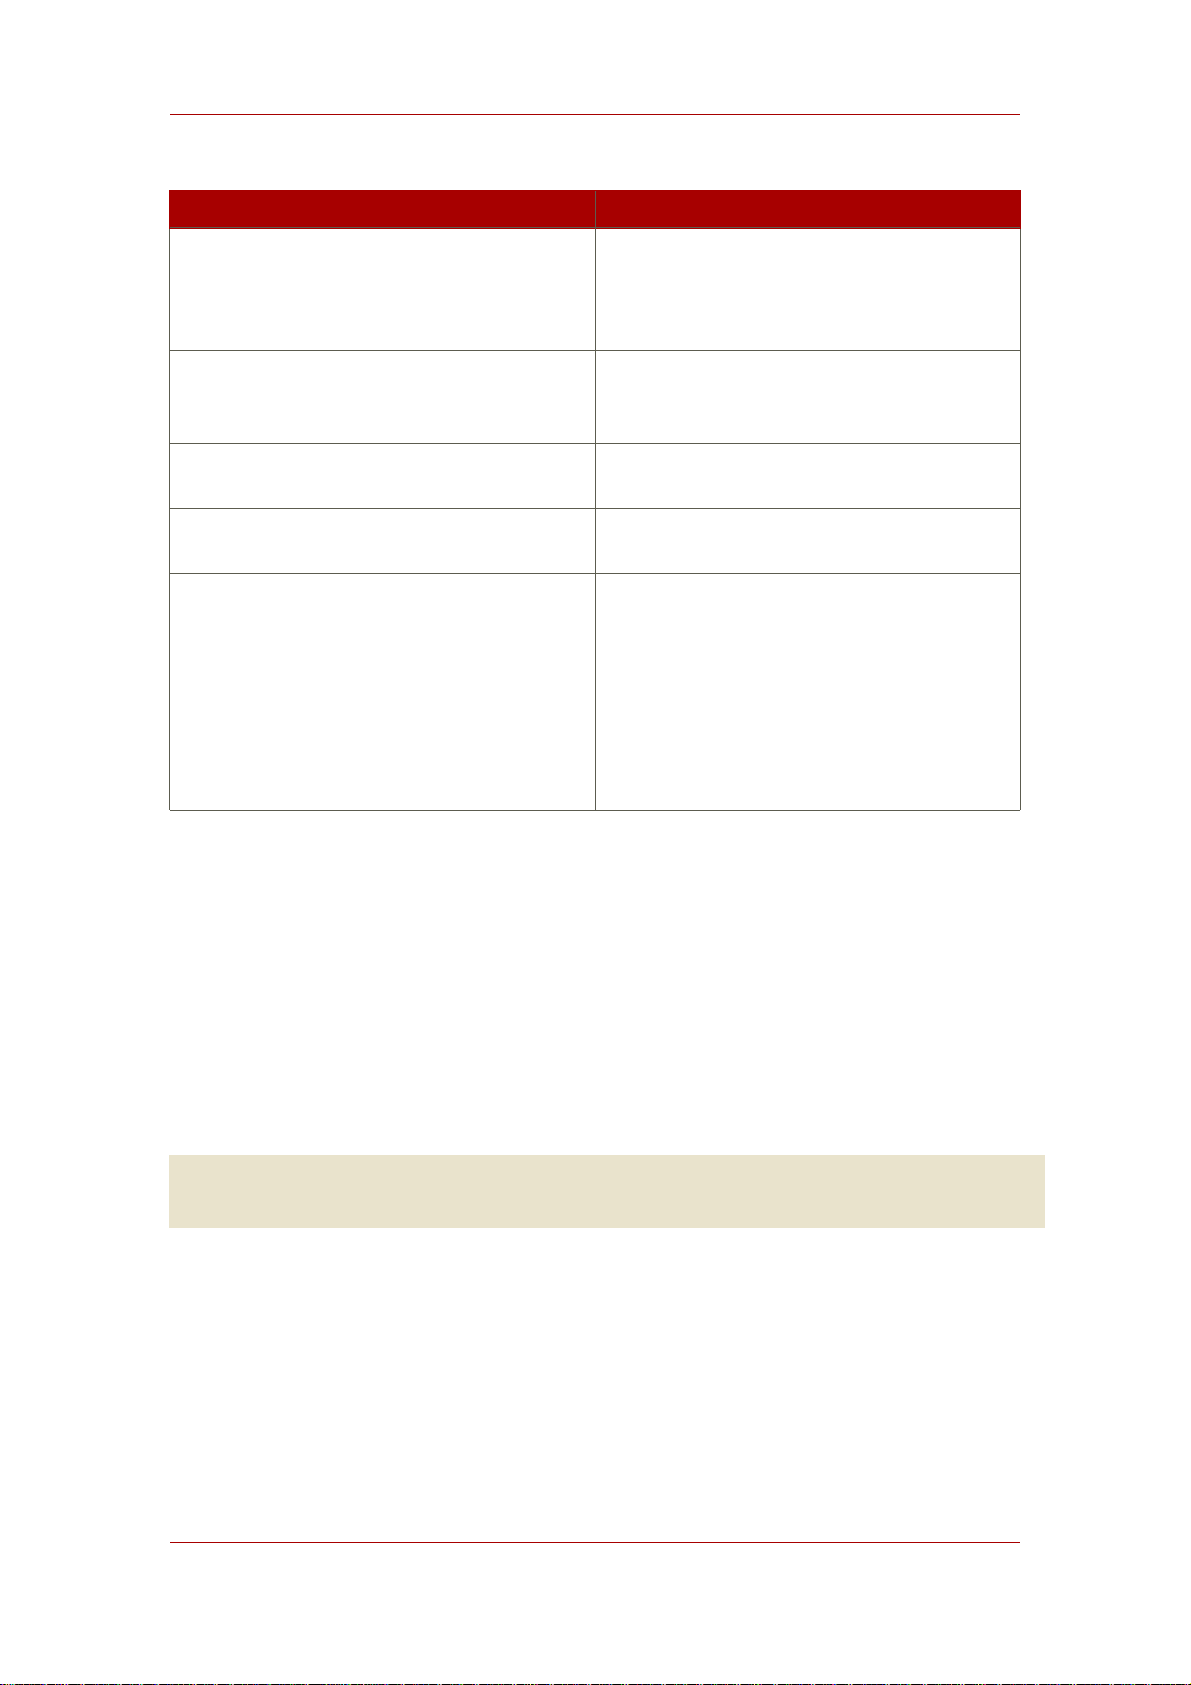
Chapter 2. Creating Directory Entries
Parameter Name Description
to authenticate to the server. The value must
be a DN recognized by the Directory Server,
and it must also have the authority to modify
the entries.
-w Specifies the password associated with the
distinguished name specified in the -D
parameter.
-h Specifies the name of the host on which the
server is running.
-p Specifies the port number that the server
uses.
-f Optional parameter that specifies the file
containing the LDIF update statements used
to define the modifications. If you do not
supply this parameter, the update statements
are read from stdin. For information on
supplying LDIF update statements from the
command-line, refer to Section 2.1, “Providing
Input from the Command-Line”.
Table 2.2. ldapmodify Parameters Used for Adding Entries
For full information on ldapmodify parameters, see the Directory Server Configuration,
Command, and File Reference.
2.4.2. Modifying Entries Using ldapmodify
Typically, to edit entries using ldapmodify, specify the DN and password to bind to the
Directory Server, the port and host of the Directory Server, and the LDIF file to use, as when
adding entries with ldapmodify. For example:
ldapmodify -D "cn=Directory Manager" -w King-Pin -h cyclops -p 845 -f
modify_statements
This ldapmodify example has the following values:
• The entries to modify are specified in the file modify_statements. Before the entries can be
modified, you must first create the modify_statements file with the appropriate LDIF update
statements; LDIF update statements are described in Section 4, “LDIF Update Statements”.
• The bind DN is cn=Directory Manager, which has permissions to edit any entry in the
database, and the password is King-Pin.
28
Page 49
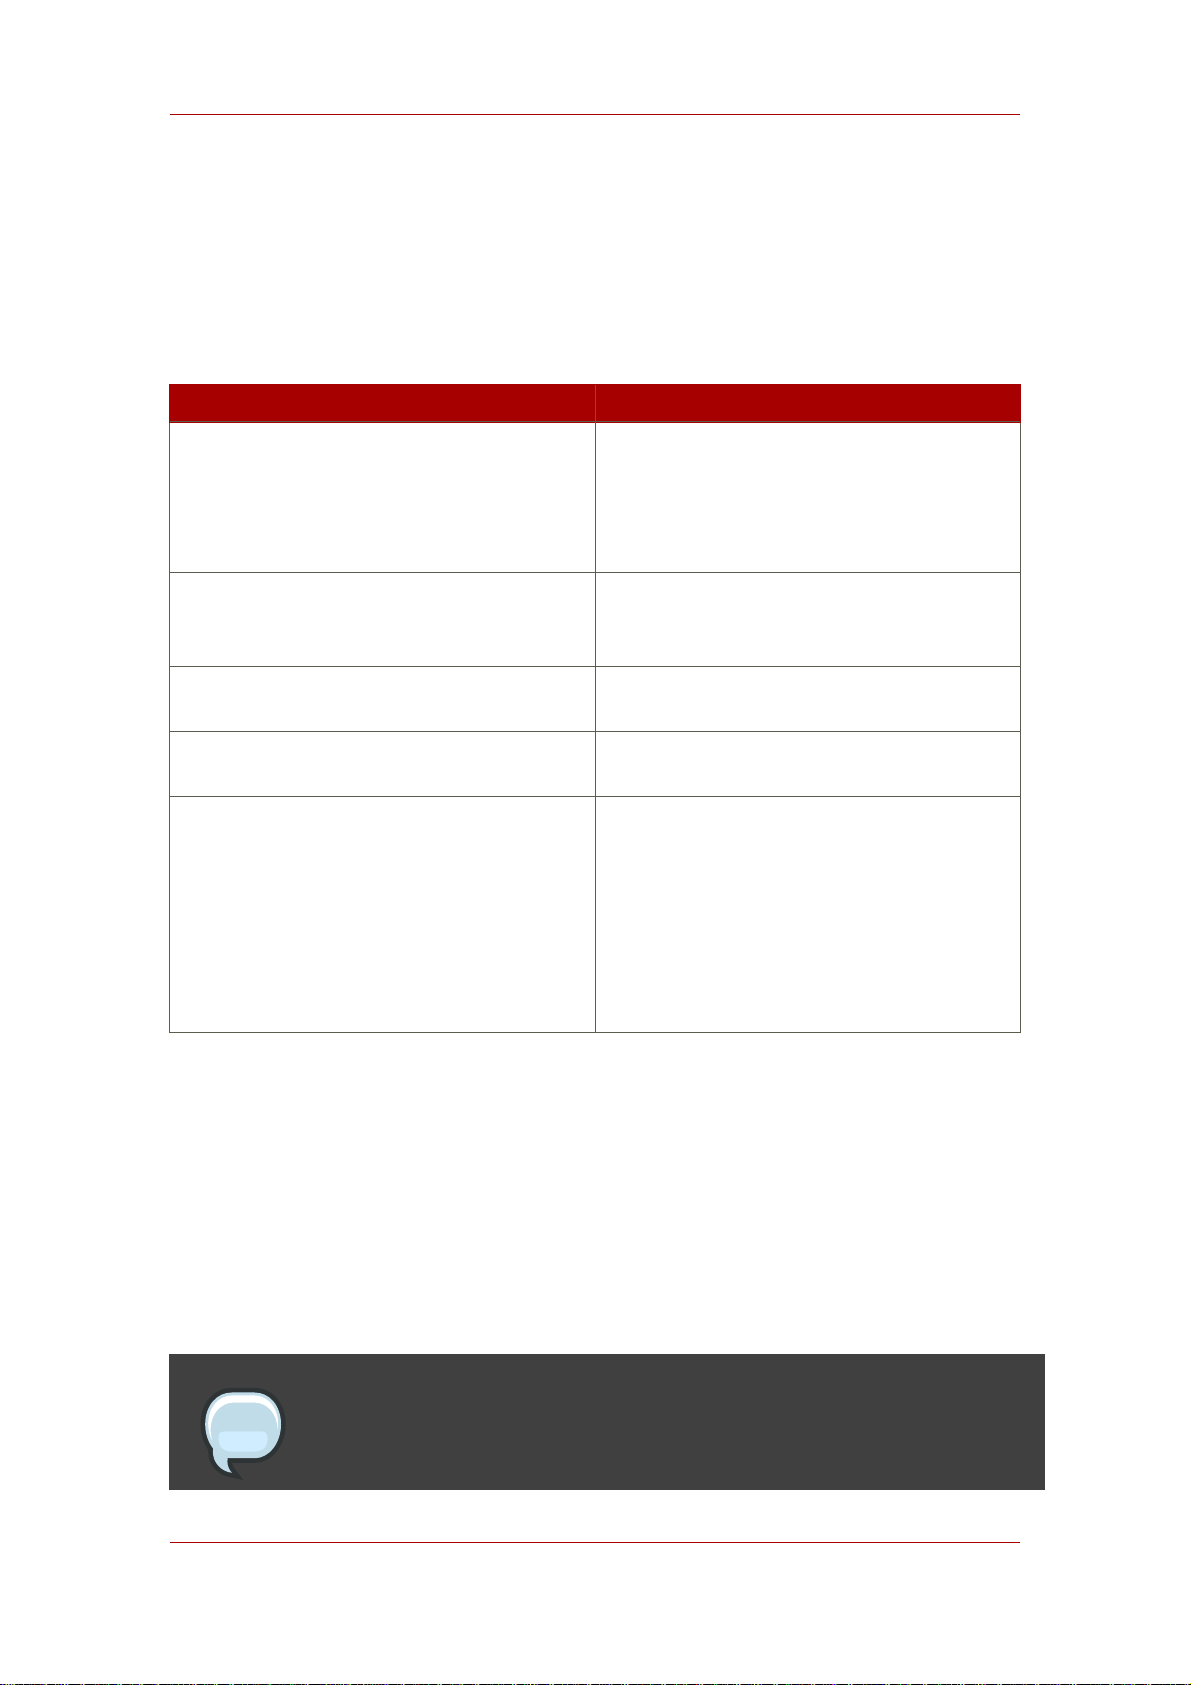
Deleting Entries Using ldapdelete
• The hostname is cyclops.
• The server uses port number 845.
Table 2.3, “ldapmodify Parameters Used for Modifying Entries” describes the ldapmodify
parameters used in the example.
Parameter Name Description
-D Specifies the distinguished name with which
to authenticate to the server. The value must
be a DN recognized by the Directory Server,
and it must also have the authority to modify
the entries.
-w Specifies the password associated with the
distinguished name specified in the -D
parameter.
-h Specifies the name of the host on which the
server is running.
-p Specifies the port number that the server
uses.
-f Optional parameter that specifies the file
containing the LDIF update statements used
to define the modifications. If you do not
supply this parameter, the update statements
are read from stdin. For information on
supplying LDIF update statements from the
command-line, refer to Section 2.1, “Providing
Input from the Command-Line”.
Table 2.3. ldapmodify Parameters Used for Modifying Entries
For full information on ldapmodify parameters, see the Directory Server Configuration,
Command, and File Reference.
2.5. Deleting Entries Using ldapdelete
The ldapdelete command-line utility opens a connection to the specified server using the
provided distinguished name and password and deletes the specified entry or entries.
NOTE
You can only delete entries at the end of a branch. You cannot delete entries that
29
Page 50

Chapter 2. Creating Directory Entries
are branch points in the directory tree.
For example, of the following three entries, only the last two entries can be deleted.
ou=People,dc=example,dc=com
cn=Paula Simon,ou=People,dc=example,dc=com
cn=Jerry O'Connor,ou=People,dc=example,dc=com
The entry that identifies the People subtree can be deleted only if there are not any entries
below it. To delete ou=People,dc=example,dc=com, you must first delete Paula Simon and
Jerry O'Connor's entries and all other entries in that subtree.
Like ldapmodify, running ldapdelete requires the DN and password to bind to the Directory
Server, the port and host of the Directory Server, and the DNs of the entries to delete. For
example:
ldapdelete -D "cn=Directory Manager" -w King-Pin -h cyclops -p 845
"cn=Robert
Jenkins,ou=People,dc=example,dc=com" "cn=Lisa
Jangles,ou=People,dc=example,dc=com"
This ldapdelete example has the following values:
• The entries tp delete have the DNs cn=Robert Jenkins,ou=People,dc=example,dc=com
and cn=Lisa Jangles, ou=People,dc=example,dc=com.
• The bind DN is the Directory Manager, which has permission to delete every entry in the
database, and a password of King-Pin.
• The hostname is cyclops.
• The server uses port number 845.
Table 2.4, “ldapdelete Parameters Used for Deleting Entries” describes the ldapdelete
parameters used in the example:
Parameter Name Description
-D Specifies the distinguished name with which
to authenticate to the server. The value must
be a DN recognized by the Directory Server,
and it must also have the authority to modify
the entries.
-w Specifies the password associated with the
30
Page 51
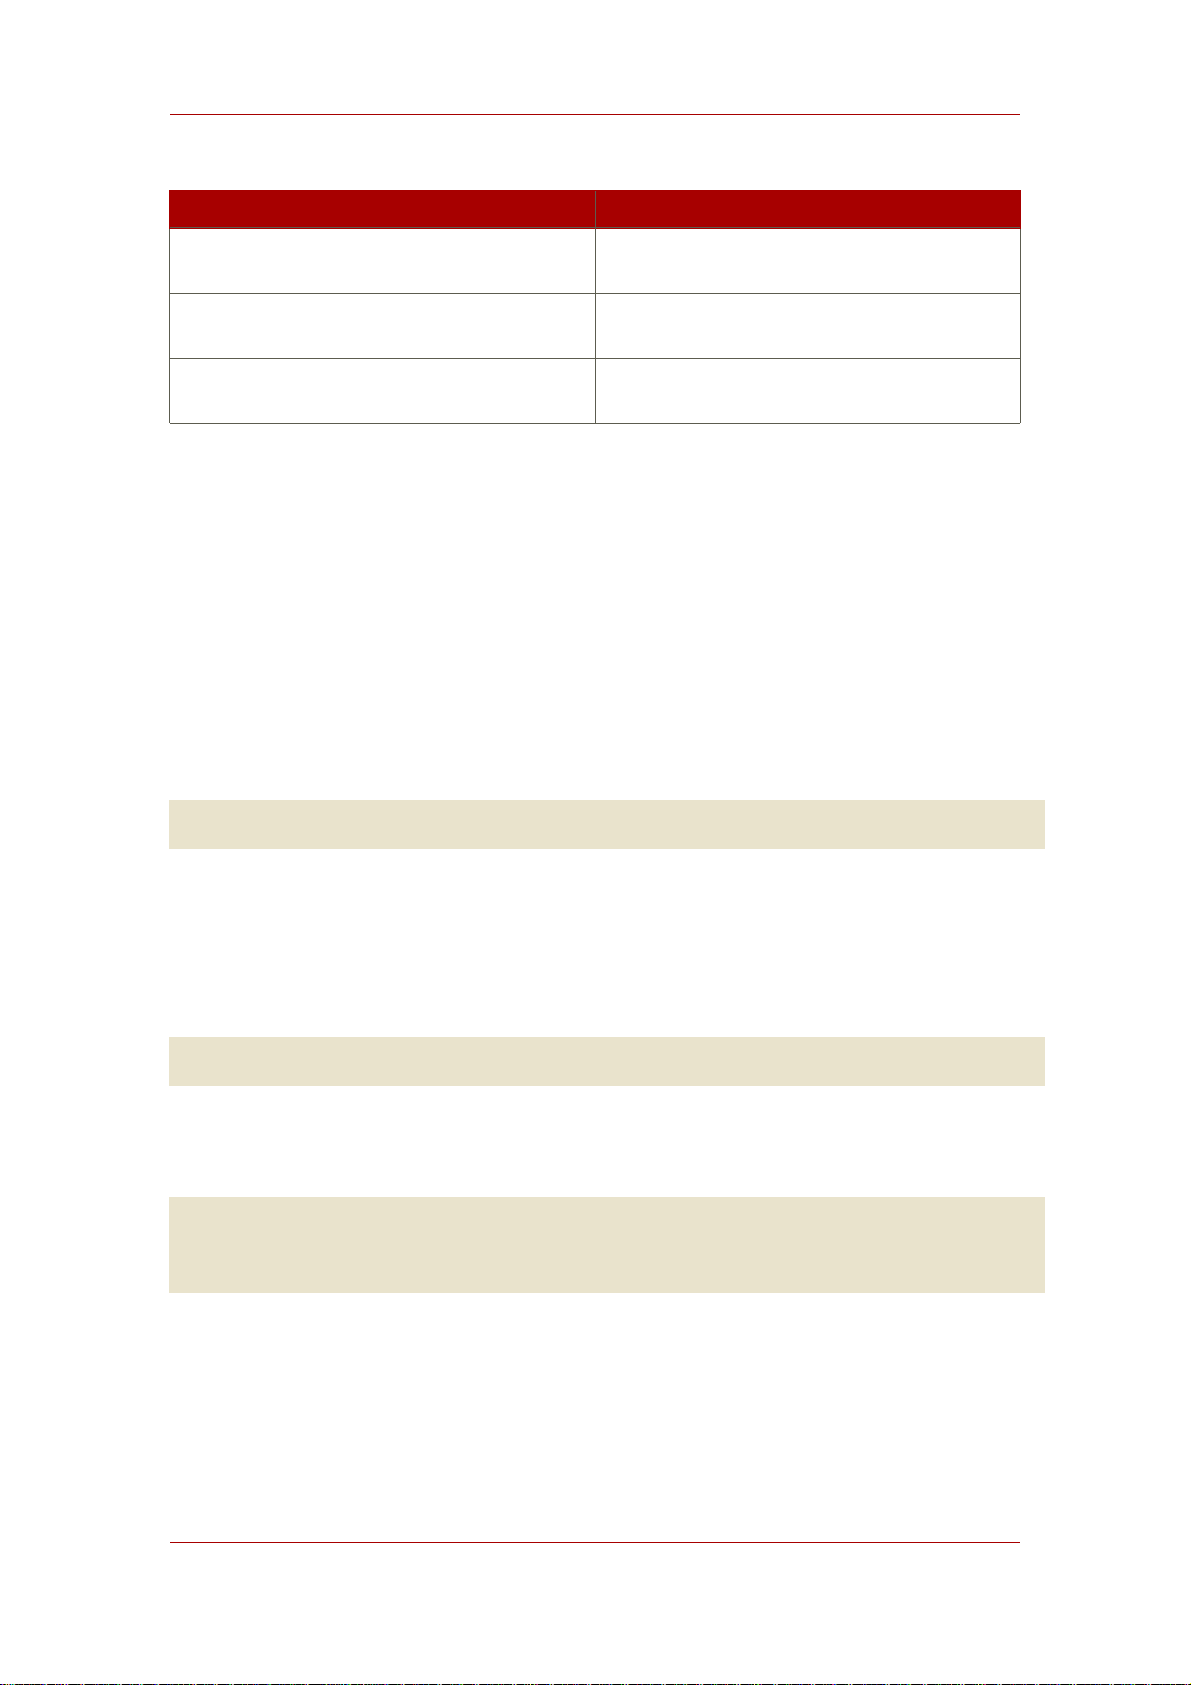
Using Special Characters
Parameter Name Description
distinguished name specified in the -D
parameter.
-h Specifies the name of the host on which the
server is running.
-p Specifies the port number that the server
uses.
Table 2.4. ldapdelete Parameters Used for Deleting Entries
For full information on ldapdelete parameters, see the Directory Server Configuration,
Command, and File Reference.
2.6. Using Special Characters
When using the Directory Server command-line client tools, you may need to specify values that
contain characters that have special meaning to the command-line interpreter, such as space (
), asterisk (*), or backslash (\). When this situation occurs, enclose the value in quotation marks
(""). For example:
-D "cn=Barbara Jensen,ou=Product Development,dc=example,dc=com"
Depending on the command-line utility, use either single or double quotation marks; see your
operating system documentation for more information.
Additionally, if a DN contains commas, you must escape the commas with a backslash (\). For
example:
-D "cn=Patricia Fuentes,ou=people,o=example.com Bolivia\,S.A."
To delete user Patricia Fuentes from the example.com Bolivia, S.A. tree, use the following
command:
ldapdelete -D "cn=Directory Manager" -w King-Pin -h cyclops -p 845
"cn=Patricia
Fuentes,ou=People,o=example.com Bolivia\,S.A."
3. Tracking Modifications to Directory Entries
You can configure the server to maintain special attributes for newly created or modified entries:
• creatorsName. The distinguished name of the person who initially created the entry.
31
Page 52
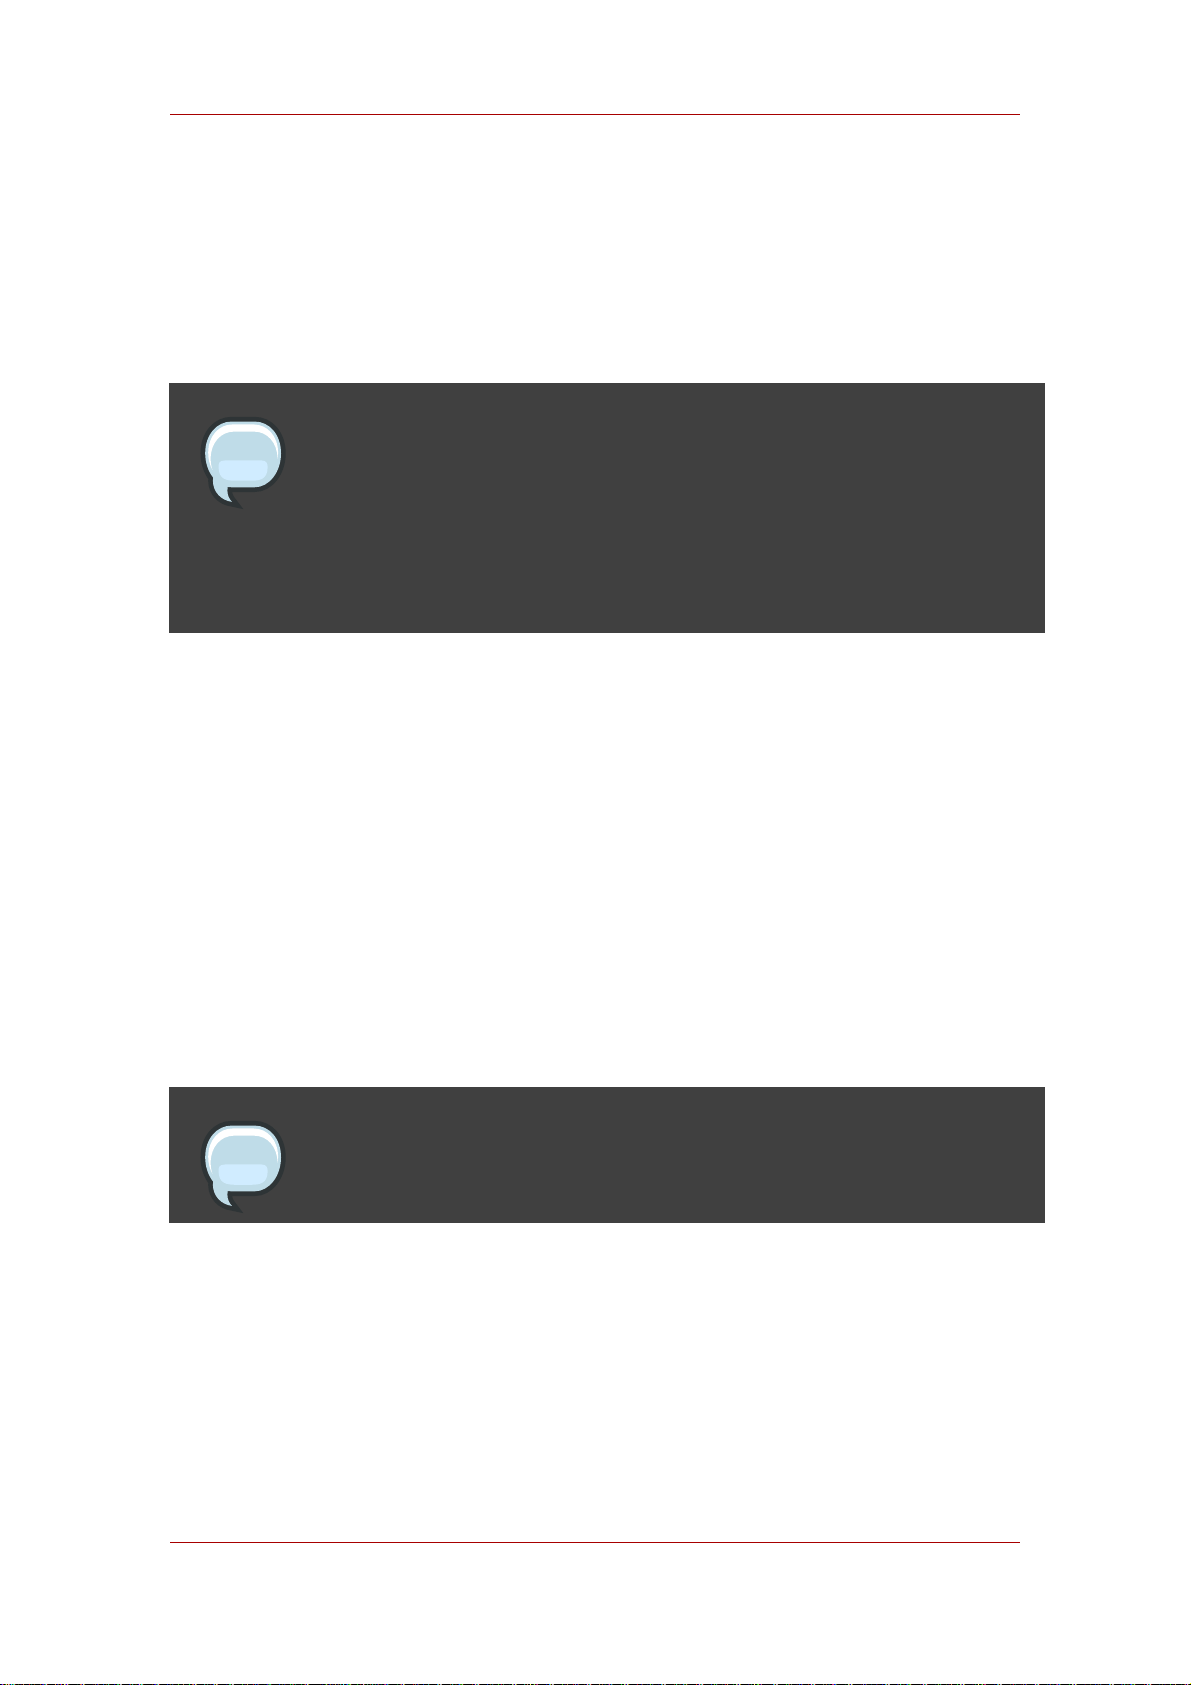
Chapter 2. Creating Directory Entries
• createTimestamp. The timestamp for when the entry was created in GMT (Greenwich Mean
Time) format.
• modifiersName. The distinguished name of the person who last modified the entry.
• modifyTimestamp. The timestamp for when the entry was last modified in GMT format.
NOTE
When a database link is used by a client application to create or modify entries,
the creatorsName and modifiersName attributes do not reflect the real creator
or modifier of the entries. These attributes contain the name of the administrator
who is granted proxy authorization rights on the remote server. For information
on proxy authorization, see Section 3.2.2.2, “Providing Bind Credentials”.
Do the following to enable the Directory Server to track when entries are created or modified:
1. In the Directory Server Console, select the Configuration tab, and then select the top entry
in the navigation tree in the left pane.
2. Select the Settings tab in the right pane.
3. Select the Track Entry Modification Times checkbox.
The server adds the creatorsName, createTimestamp, modifiersName, and
modifyTimestamp attributes to every newly created or modified entry.
4. Click Save.
5. Open the Tasks tab, and click Restart Directory Server.
NOTE
The Directory Server must be restarted for the changes to take effect.
4. LDIF Update Statements
LDIF update statements define how ldapmodify changes the directory entry. In general, LDIF
update statements contain the following information:
• The DN of the entry to be modified.
32
Page 53

LDIF Update Statements
•
A changetype that defines how a specific entry is to be modified (add, delete, modify,
modrdn).
• A series of attributes and their changed values.
A change type is required unless ldapmodify is run with the -a parameter. If you specify the -a
parameter, then an add operation (changetype: add) is assumed. However, any other change
type overrides the -a parameter.
If you specify a modify operation (changetype: modify), a change operation is required that
indicates how the entry should be changed.
If you specify changetype: modrdn, change operations are required that specify how the
relative distinguished name (RDN) is to be modified. A distinguished name's RDN is the
left-most value in the DN. For example, the distinguished name
uid=ssarette,dc=example,dc=com has an RDN of uid=ssarette.
The general format of LDIF update statements is as follows:
dn: distinguished_name
changetype: changetype_identifier
change_operation_identifier: list_of_attributes
-
change_operation_identifier: list_of_attributes
-
A dash (-) must be used to denote the end of a change operation if subsequent change
operations are specified. For example, the following statement adds the telephone number and
manager attributes to the entry:
dn: cn=Lisa Jangles,ou=People,dc=example,dc=com
changetype: modify
add: telephonenumber
telephonenumber: (408) 555-2468
add: manager
manager: cn=Harry Cruise,ou=People,dc=example,dc=com
In addition, the line continuation operator is a single space. Therefore, the following two
statements are identical:
dn: cn=Lisa Jangles,ou=People,dc=example,dc=com
dn: cn=Lisa Jangles,
ou=People,
dc=example,dc=com
33
Page 54

Chapter 2. Creating Directory Entries
The following sections describe the change types in detail.
4.1. Adding an Entry Using LDIF
changetype: add adds an entry to the directory. When you add an entry, make sure to create
an entry representing a branch point before you try to create new entries under that branch.
That is, to place an entry in a People and a Groups subtree, then create the branch point for
those subtrees before creating entries within the subtrees. For example:
dn: dc=example,dc=com
changetype: add
objectclass: top
objectclass: organization
o: example.com
dn: ou=People, dc=example,dc=com
changetype: add
objectclass: top
objectclass: organizationalUnit
ou: People
ou: Marketing
dn: cn=Pete Minsky,ou=People,dc=example,dc=com
changetype: add
objectclass: top
objectclass: person
objectclass: organizationalPerson
objectclass: inetOrgPerson
cn: Pete Minsky
givenName: Pete
sn: Minsky
ou: People
ou: Marketing
uid: pminsky
dn: cn=Sue Jacobs,ou=People,dc=example,dc=com
changetype: add
objectclass: top
objectclass: person
objectclass: organizationalPerson
objectclass: inetOrgPerson
cn: Sue Jacobs
givenName: Sue
sn: Jacobs
ou: People
ou: Marketing
uid: sjacobs
dn: ou=Groups,dc=example,dc=com
changetype: add
objectclass: top
objectclass: organizationalUnit
ou: Groups
dn: cn=Administrators,ou=Groups,dc=example,dc=com
34
Page 55

Renaming an Entry Using LDIF
changetype: add
objectclass: top
objectclass: groupOfNames
member: cn=Sue Jacobs,ou=People,dc=example,dc=com
member: cn=Pete Minsky,ou=People,dc=example,dc=com
cn: Administrators
dn: ou=example.com Bolivia\, S.A.,dc=example,dc=com
changetype: add
objectclass: top
objectclass: organizationalUnit
ou: example.com Bolivia\, S.A.
dn: cn=Carla Flores,ou=example.com Bolivia\,S.A.,dc=example,dc=com
changetype: add
objectclass: top
objectclass: person
objectclass: organizationalPerson
objectclass: inetOrgPerson
cn: Carla Flores
givenName: Carla
sn: Flores
ou: example.com Bolivia\, S.A.
uid: cflores
4.2. Renaming an Entry Using LDIF
changetype: modrdn changes an entry's relative distinguished name (RDN). An entry's RDN is
the left-most element in the distinguished name. The RDN for cn=Barry
Nixon,ou=People,dc=example,dc=com is cn=Barry Nixon, and the RDN for
ou=People,dc=example,dc=com is ou=People. A changetype: modrdn operation changes that
left-most value in an entry's DN.
The modrdn change type only changes teh RDN; it cannot change other parts of a DN. For
example, the entry cn=Sue Jacobs,ou=People,dc=example,dc=com can be changed to
cn=Susan Jacobs,ou=People,dc=example,dc=coma, but it cannot be modified to be cn=Sue
Jacobs,ou=old employees,dc=example,dc=com.
The following command renames Sue Jacobs to Susan Jacobs:
dn: cn=Sue Jacobs,ou=Marketing,dc=example,dc=com
changetype: modrdn
newrdn: cn=Susan Jacobs
deleteoldrdn: 0
Because deleteoldrdn is 0, this example retains the existing RDN as a value in the new entry.
The resulting entry would therefore have a common name (cn) attribute set to both Sue Jacobs
and Susan Jacobs, in addition to all the other attributes included in the original entry. However,
using the following command causes the server to delete cn=Sue Jacobs, so that only
cn=Susan Jacobs remains in the entry:
35
Page 56

Chapter 2. Creating Directory Entries
dn: cn=Sue Jacobs,ou=Marketing,dc=example,dc=com
changetype: modrdn
newrdn: cn=Susan Jacobs
deleteoldrdn: 1
4.2.1. A Note on Renaming Entries
The modrdn change type cannot move an entry to a completely different subtree. To move an
entry to a completely different branch, you must create a new entry in the alternative subtree
using the old entry's attributes, and then delete the old entry.
Also, for the same reasons that you cannot delete an entry if it is a branch point, you cannot
rename an entry if it has any children. Doing so would orphan the children in the tree, which is
not allowed by the LDAP protocol. For example, of the following three entries, only the last two
entries can be renamed:
ou=People,dc=example,dc=com
cn=Paula Simon,ou=People,dc=example,dc=com
cn=Jerry O'Connor,ou=People,dc=example,dc=com
The entry that identifies the People subtree can be renamed only if no other entries exist below
it.
4.3. Modifying an Entry Using LDIF
changetype: modify can add, replace, or remove attributes or attribute values in an entry.
When you specify changetype: modify, you must also provide a change operation to indicate
how the entry is to be modified. Change operations can be as follows:
•
add:attribute
Adds the specified attribute or attribute value. If the attribute type does not currently exist for
the entry, then the attribute and its corresponding value are created. If the attribute type
already exists for the entry, then the specified attribute value is added to the existing value. If
the particular attribute value already exists for the entry, then the operation fails, and the
server returns an error.
•
replace:attribute
The specified values are used to entirely replace the attribute's values. If the attribute does
not already exist, it is created. If no replacement value is specified for the attribute, the
attribute is deleted.
•
delete:attribute
36
Page 57

Modifying an Entry Using LDIF
The specified attribute is deleted. If more than one value of an attribute exists for the entry,
then all values of the attribute are deleted in the entry. To delete just one of many attribute
values, specify the attribute and associated value on the line following the delete change
operation.
This section contains the following topics:
• Section 4.3.1, “Adding Attributes to Existing Entries Using LDIF”
• Section 4.3.2, “Changing an Attribute Value Using LDIF”
• Section 4.3.3, “Deleting All Values of an Attribute Using LDIF”
• Section 4.3.4, “Deleting a Specific Attribute Value Using LDIF”
4.3.1. Adding Attributes to Existing Entries Using LDIF
Using changetype: modify with the add operation cam add an attribute and an attribute value
to an entry. For example, the following LDIF update statement adds a telephone number to the
entry:
dn: cn=Barney Fife,ou=People,dc=example,dc=com
changetype: modify
add: telephonenumber
telephonenumber: 555-1212
The following example adds two telephone numbers to the entry:
dn: cn=Barney Fife,ou=People,dc=example,dc=com
changetype: modify
add: telephonenumber
telephonenumber: 555-1212
telephonenumber: 555-6789
The following example adds two telephonenumber attributes and a manager attribute to the
entry:
dn: cn=Barney Fife,ou=People,dc=example,dc=com
changetype: modify
add: telephonenumber
telephonenumber: 555-1212
telephonenumber: 555-6789
add: manager
manager: cn=Sally Nixon,ou=People,dc=example,dc=com
37
Page 58

Chapter 2. Creating Directory Entries
The following example adds a jpeg photograph to the directory. To add this attribute to the
directory, use the -b parameter, which indicates that ldapmodify should read the referenced
file for binary values if the attribute value begins with a slash:
dn: cn=Barney Fife,ou=People,dc=example,dc=com
changetype: modify
add: jpegphoto
jpegphoto: /path/to/photo
You can also add a jpeg photograph to the directory using the following standard LDIF notation:
jpegphoto: < file:/path/to/photo
Using the standard notation means that the -b parameter does not need to be used
withldapmodify. However, you must add version:1 to the beginning of the LDIF file or with
LDIF update statements. For example:
ldapmodify -D userDN -w user_password
version: 1
dn: cn=Barney Fife,ou=People,dc=example,dc=com
changetype: modify
add: userCertificate
userCertificate;binary:< file: BarneysCert
NOTE
Standard LDIF notation can only be used with the ldapmodify command, not
with other command-line utilities.
4.3.2. Changing an Attribute Value Using LDIF
changetype: modify with the replace operation changes all values of an attribute in an entry.
For example, the following LDIF update statement changes Barney's manager from Sally Nixon
to Wally Hensford:
dn: cn=Barney Fife,ou=People,dc=example,dc=com
changetype: modify
replace: manager
manager: cn=Wally Hensford, ou=People, dc=example,dc=com
If the entry has multiple instances of the attribute, then to change one of the attribute values,
you must delete the attribute value first and then add the replacement value. For example, this
entry has two telephone nubmers:
38
Page 59

Modifying an Entry Using LDIF
cn=Barney Fife,ou=People,dc=example,dc=com
objectClass: inetOrgPerson
cn: Barney Fife
sn: Fife
telephonenumber: 555-1212
telephonenumber: 555-6789
To change the telephone number 555-1212 to 555-4321, use the following LDIF update
statement:
dn: cn=Barney Fife,ou=People,dc=example,dc=com
changetype: modify
delete: telephonenumber
telephonenumber: 555-1212
add: telephonenumber
telephonenumber: 555-4321
The entry is now as follows:
cn=Barney Fife,ou=People,dc=example,dc=com
objectClass: inetOrgPerson
cn: Barney Fife
sn: Fife
telephonenumber: 555-6789
telephonenumber: 555-4321
4.3.3. Deleting All Values of an Attribute Using LDIF
changetype: modify with the delete operation deletes an attribute from an entry. If the entry
has more than one instance of the attribute, you must indicate which of the attributes to delete.
For example, the following LDIF update statement deletes all instances of the
telephonenumber attribute from the entry, regardless of how many times it appears in the entry:
dn: cn=Barney Fife,ou=People,dc=example,dc=com
changetype: modify
delete: telephonenumber
To delete just a specific instance of the telephonenumber attribute, simply delete that specific
attribute value, as described in the next section.
4.3.4. Deleting a Specific Attribute Value Using LDIF
Running changetype: modify with the delete operation can delete a single value for an
attribute value from an entry, as well as deleting all instances of the attribute. For example,
consider the following entry:
39
Page 60

Chapter 2. Creating Directory Entries
cn=Barney Fife,ou=People,dc=example,dc=com
objectClass: inetOrgPerson
cn: Barney Fife
sn: Fife
telephonenumber: 555-1212
telephonenumber: 555-6789
To delete the 555-1212 telephone number from this entry, use the following LDIF update
statement:
dn: cn=Barney Fife,ou=People,dc=example,dc=com
changetype: modify
delete: telephonenumber
telephonenumber: 555-1212
Barney's entry then becomes:
cn=Barney Fife,ou=People,dc=example,dc=com
objectClass: inetOrgPerson
cn: Barney Fife
sn: Fife
telephonenumber: 555-6789
4.4. Deleting an Entry Using LDIF
changetype: delete is the change type which deletes an entire entry from the directory.
NOTE
You can only delete leaf entries. Therefore, when you delete an entry, make sure
that no other entries exist under that entry in the directory tree. That is, you
cannot delete an organizational unit entry unless you have first deleted all the
entries that belong to the organizational unit.
For example, of the following three entries, only the last two entries can be deleted:
ou=People,dc=example,dc=com
cn=Paula Simon,ou=People,dc=example,dc=com
cn=Jerry O'Connor,ou=People,dc=example,dc=com
The entry that identifies the People subtree can be deleted only if no other entries exist below it.
The following LDIF update statements can be used to delete person entries:
dn: cn=Pete Minsky,ou=People,dc=example,dc=com
40
Page 61

Modifying an Entry in an Internationalized
changetype: delete
dn: cn=Sue Jacobs,ou=People,dc=example,dc=com
changetype: delete
CAUTION
Do not delete the suffix o=NetscapeRoot. The Administration Server uses this
suffix to store information about installed Directory Servers. Deleting this suffix
could force you to reinstall the Directory Server.
4.5. Modifying an Entry in an Internationalized Directory
If the attribute values in the directory are associated with languages other than English, the
attribute values are associated with language tags. When using the ldapmodify command-line
utility to modify an attribute that has an associated language tag, you must match the value and
language tag exactly or the modify operation will fail.
For example, to modify an attribute value that has a language tag of lang-fr, include lang-fr
in the modify operation, as follows:
dn: bjensen,dc=example,dc=com
changetype: modify
replace: homePostalAddress;lang-fr
homePostalAddress;lang-fr: 34 rue de Seine
5. Maintaining Referential Integrity
Referential integrity is a database mechanism that ensures relationships between related
entries are maintained. In the Directory Server, the referential integrity can be used to ensure
that an update to one entry in the directory is correctly reflected in any other entries that may
refer to the updated entry.
For example, if a user's entry is removed from the directory and referential integrity is enabled,
the server also removes the user from any groups of which the user is a member. If referential
integrity is not enabled, the user remains a member of the group until manually removed by the
administrator. This is an important feature if you are integrating the Directory Server with other
products that rely on the directory for user and group management.
5.1. How Referential Integrity Works
When the Referential Integrity Plug-in (see Section 1.26, “Referential Integrity Postoperation
Plug-in”) is enabled, it performs integrity updates on specified attributes immediately after a
delete or rename operation. By default, the Referential Integrity Plug-in is disabled.
41
Page 62

Chapter 2. Creating Directory Entries
NOTE
The Referential Integrity Plug-in should only be enabled on one supplier replica
in a multi-master replication environment to avoid conflict resolution loops. When
enabling the plug-in on servers issuing chaining requests, be sure to analyze
performance resource and time needs, as well as your integrity needs. Integrity
checks can be time-consuming and draining on memory and CPU.
Whenever a user or group entry is deleted or renamed in the directory, the operation is logged
to the referential integrity log file (/var/log/dirsrv/slapd-instance_name). After a specified
time, known as the update interval, the server performs a search on all attributes for which
referential integrity is enabled and matches the entries resulting from that search with the DNs
of deleted or modified entries present in the log file. If the log file shows that the entry was
deleted, the corresponding attribute is deleted. If the log file shows that the entry was changed,
the corresponding attribute value is modified accordingly.
By default, when the Referential Integrity Plug-in is enabled, it performs integrity updates on the
member, uniquemember, owner, and seeAlso attributes immediately after a delete or rename
operation. However, the behavior of the Referential Integrity Plug-in can be configured to suit
the needs of the directory in several different ways:
• Record referential integrity updates in the replication changelog.
• Modify the update interval.
• Select the attributes to which to apply referential integrity.
• Disable referential integrity.
All attributes used in referential integrity must be indexed for presence and equality; not
indexing those attributes results poor server performance for modify and delete operations. See
Section 2, “Creating Indexes” for more information about checking and creating indexes.
5.2. Using Referential Integrity with Replication
There are certain limitations when using the Referential Integrity Plug-in in a replication
environment:
• Never enable it on a dedicated consumer server (a server that contains only read-only
replicas).
• Never enable it on a server that contains a combination of read-write and read-only replicas.
• It is possible to enable it on a supplier server that contains only read-write replicas.
42
Page 63

Directory
• With multi-master replication, enable the plug-in on just one supplier.
If the replication environment satisfies the all of those condition, you can enable the Referential
Integrity Plug-in.
1. Enable the Referential Integrity Plug-in as described in Section 5.3, “Enabling/Disabling
Referential Integrity”.
2. Configure the plug-in to record any integrity updates in the changelog.
3. Ensure that the Referential Integrity Plug-in is disabled on all consumer servers.
NOTE
Because the supplier server sends any changes made by the Referential
Integrity Plug-in to consumer servers, it is unnecessary to run the Referential
Integrity Plug-in on consumer servers.
5.3. Enabling/Disabling Referential Integrity
You can enable or disable referential integrity as follows:
1. Start the Directory Server Console. See Section 4, “Starting the Directory Server Console”.
2. Select the Configuration tab.
3. Expand the Plugins folder in the navigation tree, and select Referential Integrity
Postoperation Plug-in from the list.
The settings for the plug-in are displayed in the right pane.
4. Check the Enable plugin checkbox to enable the plug-in; clear it to disable it.
5. Click Save.
6. For your changes to be applied, go to the Tasks tab, and select Restart the Directory
Server.
5.4. Modifying the Update Interval
By default, the server makes referential integrity updates immediately after a delete or a modrdn
operation. To reduce the impact this operation has on your system, increase the amount of time
between updates. Although there is no maximum update interval, the following intervals are
commonly used:
43
Page 64

Chapter 2. Creating Directory Entries
• Update immediately
• 90 seconds
• 3600 seconds (updates occur every hour)
• 10,800 seconds (updates occur every 3 hours)
• 28,800 seconds (updates occur every 8 hours)
• 86,400 seconds (updates occur once a day)
• 604,800 seconds (updates occur once a week)
To modify the update interval, do the following:
1. Start the Directory Server Console. See Section 4, “Starting the Directory Server Console”.
2. Select the Configuration tab.
3. Expand the Plugins folder in the navigation tree, and select the Referential Integrity
Postoperation Plug-in.
The settings for the plug-in are displayed in the right pane.
4. In the arguments list, replace the value in the first text box with the appropriate time interval.
5. Click Save.
6. For your changes to be applied, go to the Tasks tab, and click Restart the Directory Server.
5.5. Modifying the Attribute List
By default, the Referential Integrity Plug-in is set up to check for and update the member,
uniquemember, owner, and seeAlso attributes. You can add or delete attributes to be updated
through the Directory Server Console, such as adding the nsroledn attribute if roles are being
used.
NOTE
44
Keep in mind that any attribute specified in the Referential Integrity Plug-in
parameter list must have equality indexing on all databases. Otherwise, the
plug-in scans every entry of the databases for matching the deleted or modified
DN, degrading performance severely. If you add an attribute, ensure that it is
indexed in all the backends.
Page 65
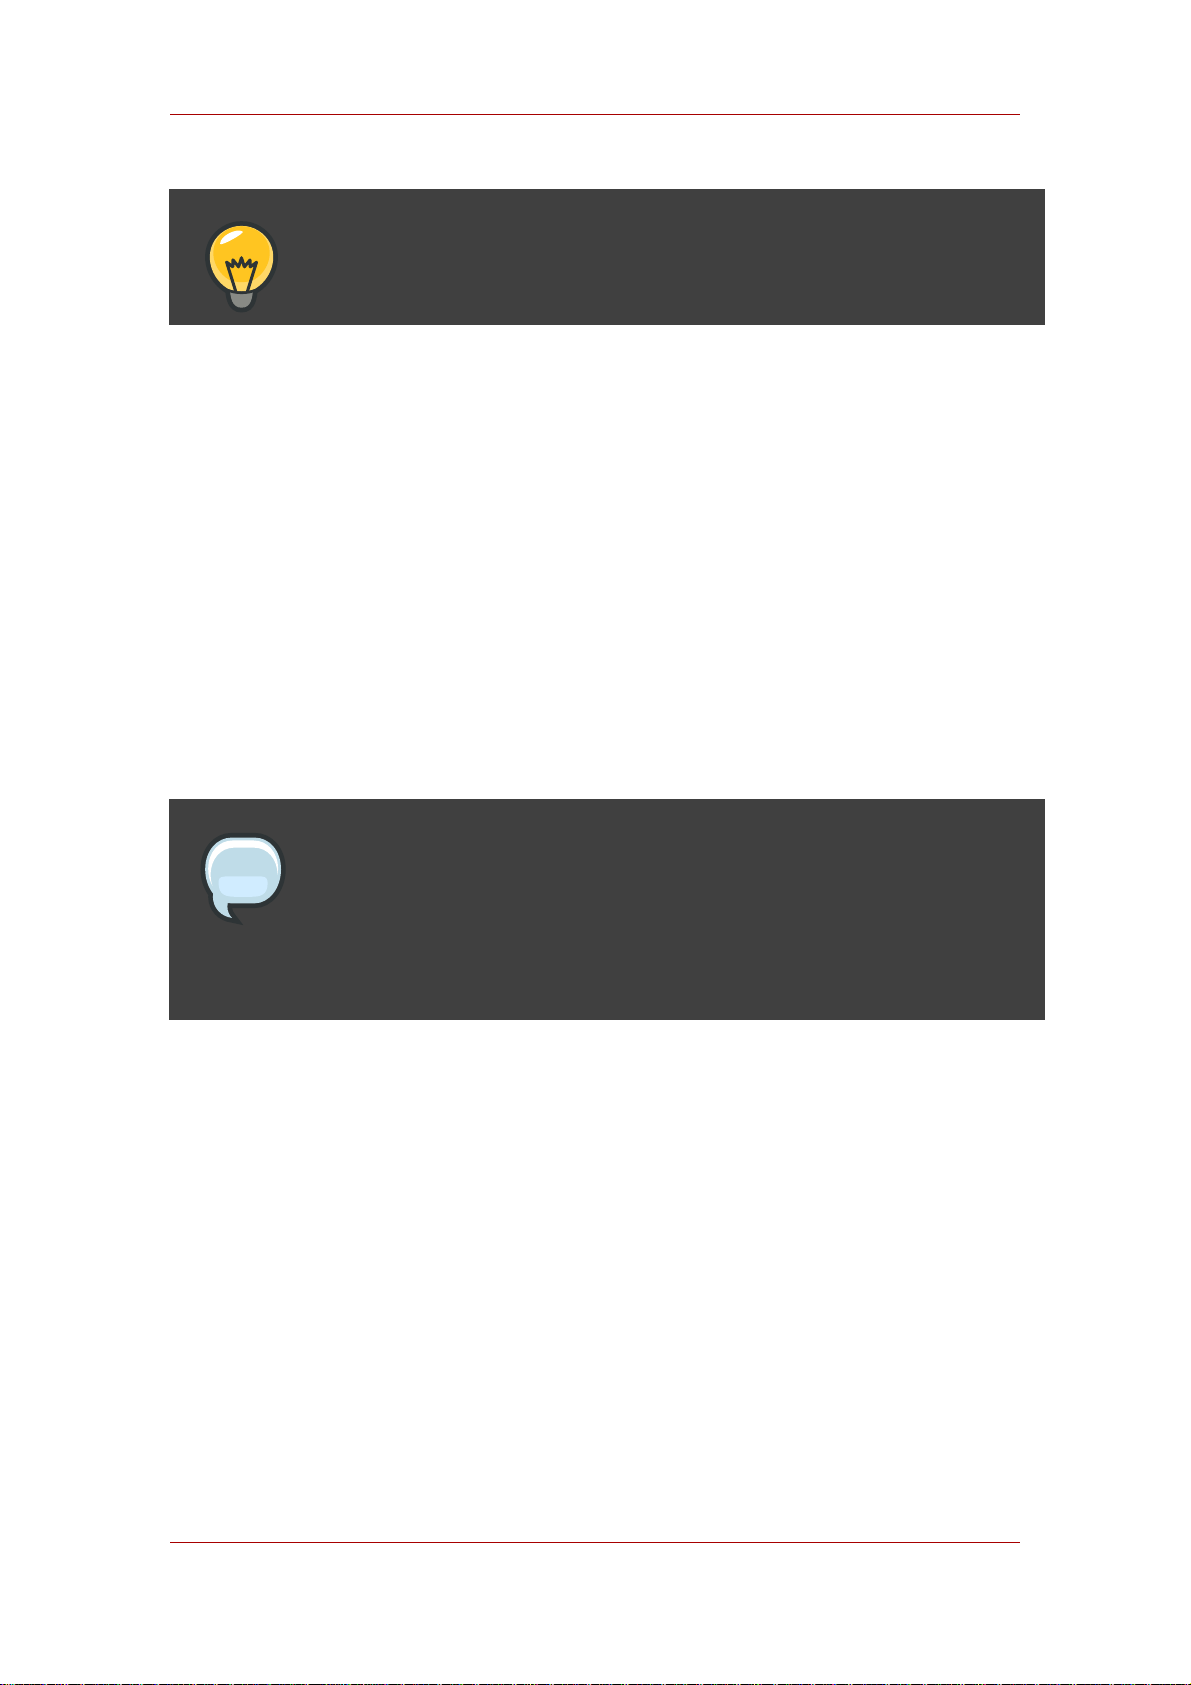
Modifying the Attribute List
TIP
Improve the performance by removing any unused attributes from the list.
1. Start the Directory Server Console. See Section 4, “Starting the Directory Server Console”.
2. Select the Configuration tab.
3. Expand the Plugins folder in the navigation tree, and select the Referential Integrity
Postoperation Plug-in.
The settings for the plug-in are displayed in the right pane.
4. In the Arguments section, use the Add and Delete buttons to modify the attributes in the list.
5. Click Save.
6. For your changes to be applied, go to the Tasks tab, and select Restart the Directory
Server.
NOTE
All attributes used in referential integrity must be indexed for presence and
equality; not indexing those attributes results poor server performance for modify
and delete operations. See Section 2, “Creating Indexes” for more information
about checking and creating indexes.
45
Page 66

46
Page 67
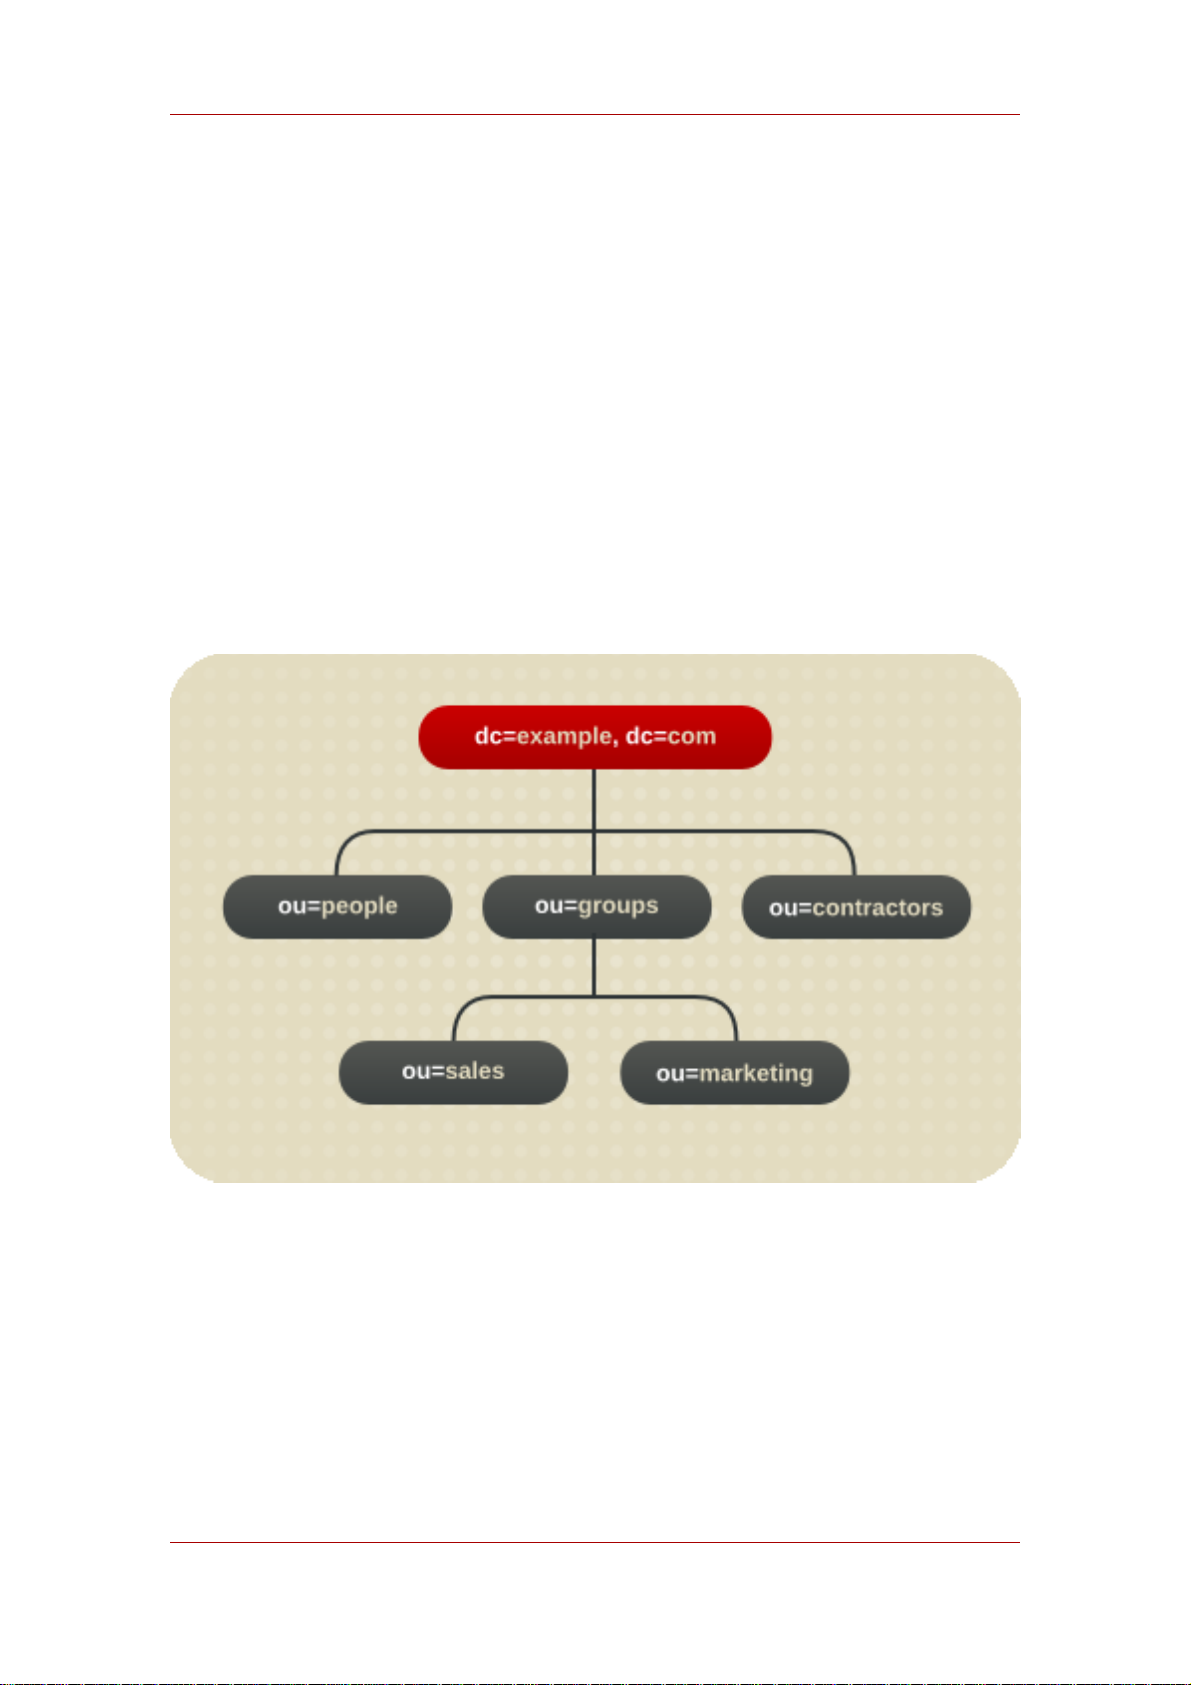
Chapter 3.
Configuring Directory Databases
The directory is made up of databases, and the directory tree is distributed across the
databases. This chapter describes how to create suffixes, the branch points for the directory
tree, and how to create the databases associated with each suffix. This chapter also describes
how to create database links to reference databases on remote servers and how to use
referrals to point clients to external sources of directory data.
1. Creating and Maintaining Suffixes
Different pieces of the directory tree can be stored in different databases, and then these
databases can be distributed across multiple servers. The directory tree contains branch points
called nodes. These nodes may be associated with databases. A suffix is a node of the
directory tree associated with a particular database. For example, a simple directory tree might
appear as illustrated in Figure 3.1, “A Sample Directory Tree with One Root Suffix”.
Figure 3.1. A Sample Directory Tree with One Root Suffix
The ou=people suffix and all the entries and nodes below it might be stored in one database,
the ou=groups suffix on another database, and the ou=contractors suffix on yet another
database.
This section describes creating suffixes on Directory Server and associating them with
databases.
47
Page 68
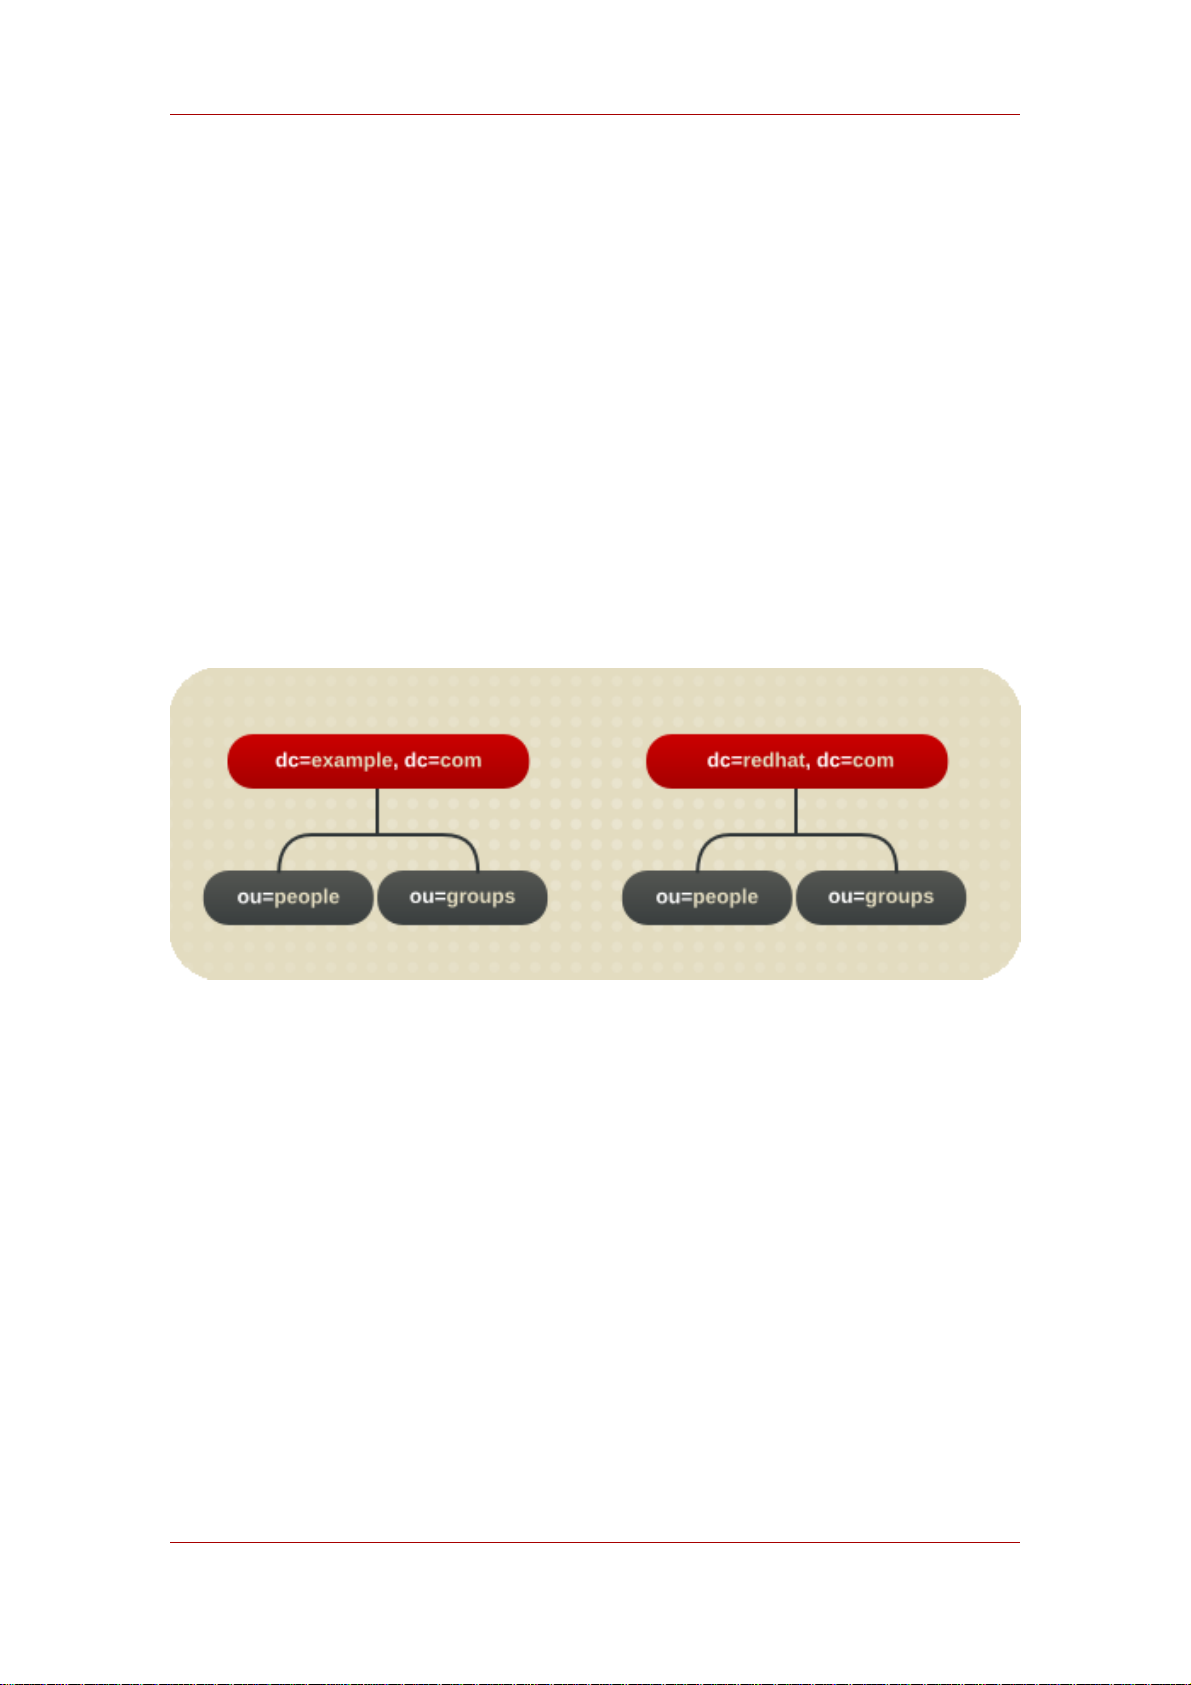
Chapter 3. Configuring Directory Databases
• Section 1.1, “Creating Suffixes”
• Section 1.2.1, “Using Referrals in a Suffix”
1.1. Creating Suffixes
Both root and sub suffixes can be created to organize the contents of the directory tree. A root
suffix is the parent of a sub suffix. It can be part of a larger tree designed for the Directory
Server. A sub suffix is a branch underneath a root suffix. The data for root and sub suffixes are
contained by databases.
A directory might contain more than one root suffix. For example, an ISP might host several
websites, one for example.com and one for redhat.com. The ISP would create two root
suffixes, one corresponding to the dc=example,dc=com naming context and one corresponding
to the dc=redhat,dc=com naming context, as shown in Figure 3.2, “A Sample Directory Tree
with Two Root Suffixes”.
Figure 3.2. A Sample Directory Tree with Two Root Suffixes
It is also possible to create root suffixes to exclude portions of the directory tree from search
operations. For example, Example Corporation wants to exclude their European office from a
search on the general Example Corporation directory. To do this, they create two root suffixes.
One root suffix corresponds to the general Example Corporation directory tree,
dc=example,dc=com, and one root suffix corresponds to the European branch of their directory
tree, l=europe,dc=example,dc=com. From a client application's perspective, the directory tree
looks as illustrated in Figure 3.3, “A Sample Directory Tree with a Root Suffix Off Limits to
Search Operations”.
48
Page 69
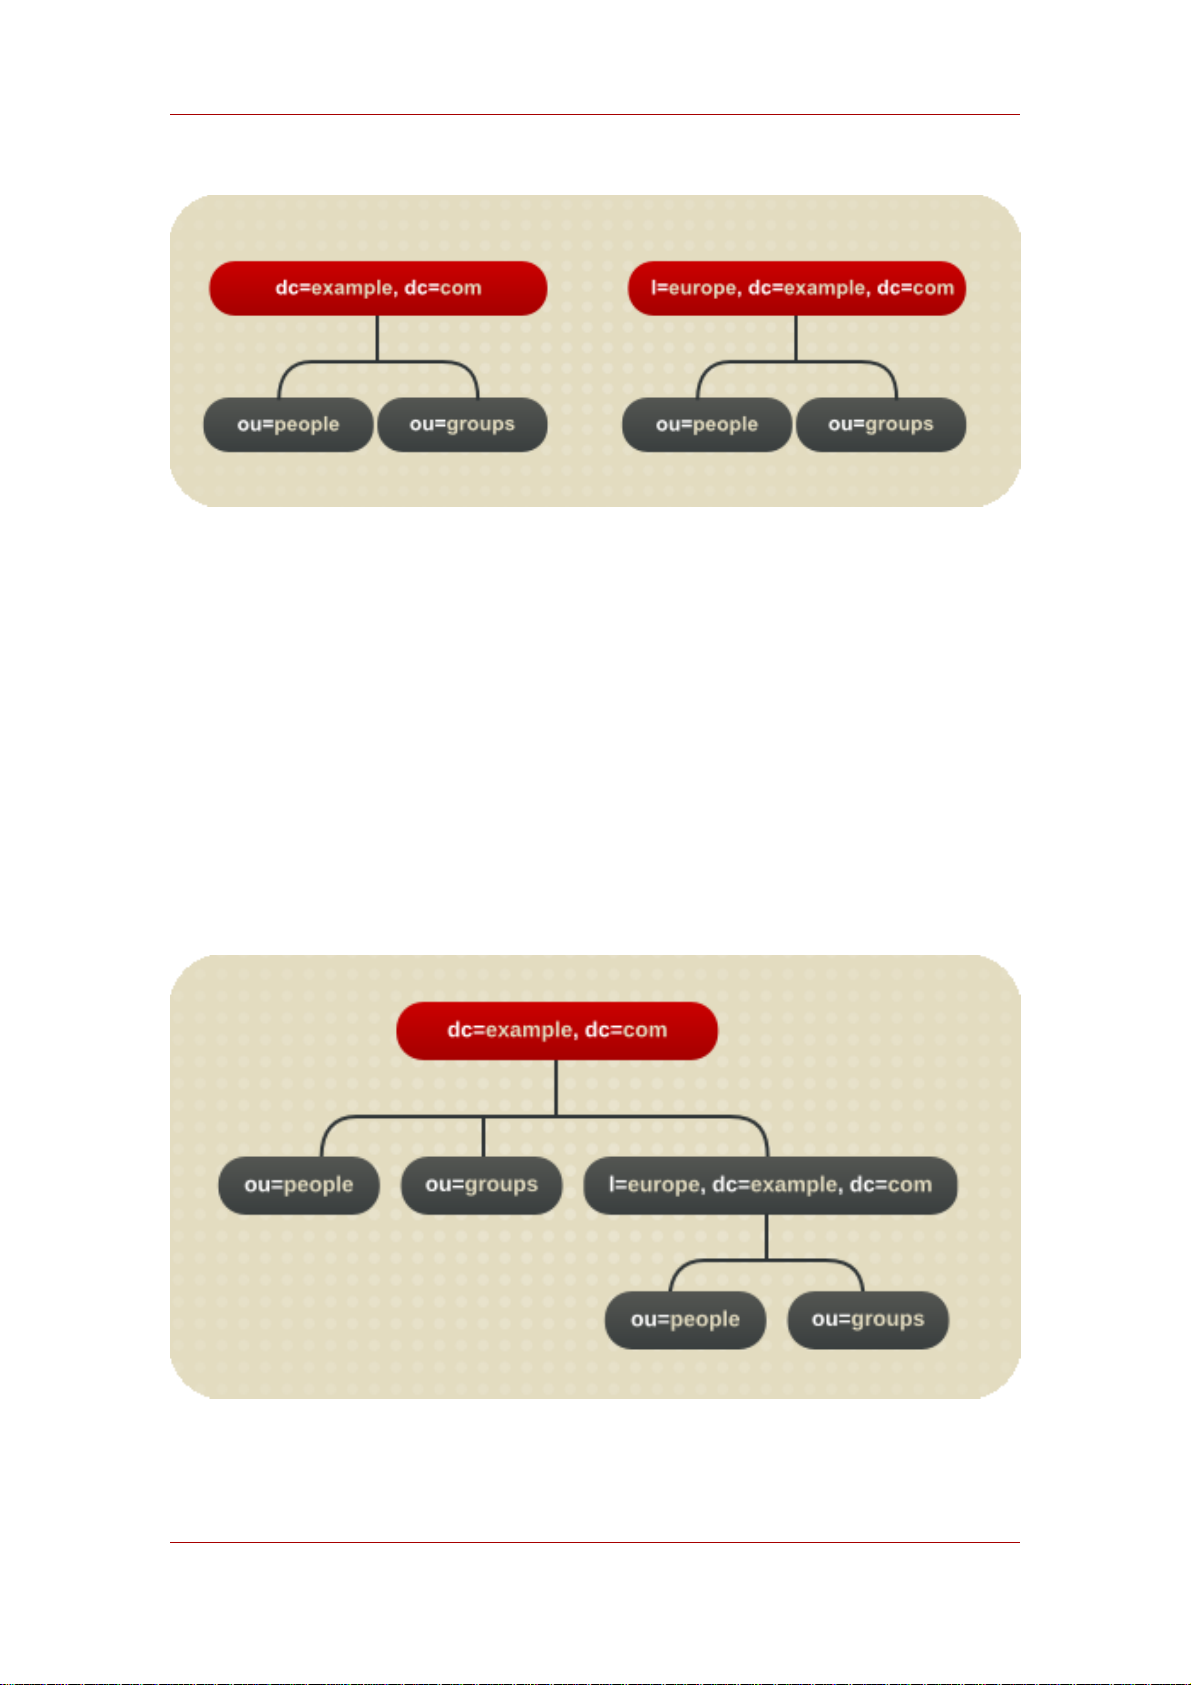
Creating Suffixes
Figure 3.3. A Sample Directory Tree with a Root Suffix Off Limits to Search
Operations
Searches performed by client applications on the dc=example,dc=com branch of Example
Corporation's directory will not return entries from the l=europe,dc=example,dc=com branch of
the directory, as it is a separate root suffix.
If Example Corporation decides to include the entries in the European branch of their directory
tree in general searches, they make the European branch a sub suffix of the general branch. To
do this, they create a root suffix for Example Corporation, dc=example,dc=com, and then create
a sub suffix beneath it for their European directory entries, l=europe,dc=example,dc=com.
From a client application's perspective, the directory tree appears as illustrated in Figure 3.4, “A
Sample Directory Tree with a Sub Suffix”.
Figure 3.4. A Sample Directory Tree with a Sub Suffix
49
Page 70

Chapter 3. Configuring Directory Databases
This section describes creating root and sub suffixes for the directory using either the Directory
Server Console or the command-line.
• Section 1.1.1, “Creating a New Root Suffix Using the Console”
• Section 1.1.2, “Creating a New Sub Suffix Using the Console”
• Section 1.1.3, “Creating Root and Sub Suffixes from the Command-Line”
1.1.1. Creating a New Root Suffix Using the Console
1. In the Directory Server Console, select the Configuration tab.
2. Right-click Data in the left navigation pane, and select New Root Suffix from the pop-up
menu.
The Create new root suffix dialog box is displayed.
3. Enter a unique suffix in the New suffix field.
The suffix must be named with dc naming conventions, such as dc=example,dc=com.
4. Select the Create associated database automatically to create a database at the same
time as the new root suffix, an enter a unique name for the new database in the Database
name field, such as example2. The name can be a combination of alphanumeric characters,
dashes (-), and underscores (_). No other characters are allowed.
Deselect the checkbox to create a database for the new root suffix later. This option specifies
a directory where the database will be created. The new root suffix will be disabled until a
database is created.
5. Click OK.
The suffix appears automatically under the Data tree in the left navigation pane.
1.1.2. Creating a New Sub Suffix Using the Console
1. In the Directory Server Console, select the Configuration tab.
2. Under the Data in the left navigation pane, select the suffix under which to add a new sub
suffix. Right-click the suffix, and select New Sub Suffix from the pop-up menu.
The Create new sub suffix dialog box is displayed.
3. Enter a unique suffix name in the New suffix field. The suffix must be named in line with dc
naming conventions, such as ou=groups.
50
Page 71

Creating Suffixes
The root suffix is automatically added to the name. For example, it the sub suffix ou=groups
is created under the dc=example,dc=com suffix, the Console automatically names it
ou=groups,dc=example,dc=com.
4. Select the Create associated database automatically checkbox to create a database at the
same time as the new sub suffix, and enter a unique name for the new database in the
Database name field, such as example2. The name can be a combination of alphanumeric
characters, dashes (-), and underscores (_). No other characters are allowed.
Deselect the checkbox to create a database for the new sub suffix later. The new sub suffix
will be disabled until a database is created.
5. Click OK.
The suffix appears automatically under its root suffix in the Data tree in the left navigation
pane.
1.1.3. Creating Root and Sub Suffixes from the Command-Line
Use the ldapmodify command-line utility to add new suffixes to the directory configuration file.
The suffix configuration information is stored in the cn=mapping tree,cn=config entry.
NOTE
Avoid creating entries under the cn=config entry in the dse.ldif file. The
cn=config entry in the simple, flat dse.ldif configuration file is not stored in the
same highly scalable database as regular entries. As a result, if many entries,
particularly entries that are likely to be updated frequently, are stored under
cn=config, performance will suffer.
1. Add a new root suffix to the configuration file using the ldapmodify utility.
ldapmodify -a -h example1 -p 389 -D "cn=directory manager" -w secret
ldapmodify binds to the server and prepares it to add an entry to the configuration file.
1
2. Create the root suffix entry. For example:
dn: cn="dc=example,dc=com",cn=mapping tree,cn=config
objectclass: top
1
objectclass: extensibleObject
The LDAP tools referenced in this guide are Mozilla LDAP, installed with Directory Server in the
objectclass: nsMappingTree
/usr/lib/mozldap directory on Red Hat Enterprise Linux 5 i386; directories for other platforms are listed in
nsslapd-state: backend
Section 2, “LDAP Tool Locations”. However, Red Hat Enterprise Linux systems also include LDAP tools from
OpenLDAP. It is possible to use the OpenLDAP commands as shown in the examples, but you must use the -x
nsslapd-backend: UserData
argument to disable SASL and allow simple authentication.
cn: dc=example,dc=com
51
Page 72
Chapter 3. Configuring Directory Databases
3. Create a sub suffix for groups under this root suffix using ldapmodify to add the sub suffix
entry:
dn: cn=ou=groups,dc=example,dc=com,cn=mapping tree,cn=config
objectclass: top
objectclass: extensibleObject
objectclass: nsMappingTree
nsslapd-state: backend
nsslapd-backend: GroupData
nsslapd-parent-suffix: "dc=example,dc=com"
cn: ou=groups,dc=example,dc=com
NOTE
To maintain suffixes using the Directory Server Console, respect the same
spacing used to name the root and sub suffixes in the command line. For
example, if a root suffix is named ou=groups ,dc=example,dc=com, with two
spaces after groups, any sub suffixes created under this root will need to specify
two spaces after ou=groups, as well.
The following table describes the attributes used to configure a suffix entry:
Attribute Name Value
dn Defines the DN for the suffix. The DN is
contained in quotes. The value entered takes
the form
cn="dc=domain,dc=com",cn=mapping
tree, cn=config. This attribute is required.
cn Defines the relative DN (RDN) of the entry.
This attribute is required.
objectclass Tells the server that the entry is root or sub
suffix entry. It always takes the value
nsMappingTree. This attribute is required.
nsslapd-state Determines how the suffix handles
operations. This attribute takes the following
values:
• backend: The backend (database) is used
to process all operations.
52
Page 73

Creating Suffixes
Attribute Name Value
• disabled: The database is not available for
processing operations. The server returns a
No such search object error in response to
requests made by client applications.
• referral: A referral is returned for
requests made to this suffix.
• referral on update: The database is
used for all operations except update
requests, which receive a referral.
The default value is disabled.
nsslapd-referral Defines the LDAP URL of the referral to be
returned by the suffix. This attribute can be
multi-valued, with one referral per value. This
attribute is required when the value of the
nsslapd-state attribute is referral or
referral on update.
nsslapd-backend Gives the name of the database or database
link used to process requests. This attribute
can be multi-valued, with one database or
database link per value. See Section 3,
“Creating and Maintaining Database Links” for
more information about database links. This
attribute is required when the value of the
nsslapd-state attribute is set to backend or
referral on update.
nsslapd-distribution-plugin Specifies the shared library to be used with
the custom distribution function. This attribute
is required only when more than one
database is specified in the nsslapd-backend
attribute. See Section 2, “Creating and
Maintaining Databases” for more information
about the custom distribution function.
nsslapd-distribution-funct Specifies the name of the custom distribution
function. This attribute is required only when
more than one database is specified in the
nsslapd-backend attribute. See Section 2,
“Creating and Maintaining Databases” for
more information about the custom
distribution function.
nsslapd-parent-suffix Provides the DN of the parent entry for a sub
53
Page 74

Chapter 3. Configuring Directory Databases
Attribute Name Value
suffix. By default, this attribute is not present,
which means that the suffix is regarded as a
root suffix. For example, to create a sub suffix
names o=sales,dc=example,dc=com under
the root suffix dc=example,dc=com, add
nsslapd-parent-suffix:
"dc=example,dc=com" to the sub suffix.
Table 3.1. Suffix Attributes
1.2. Maintaining Suffixes
This section describes the following procedures:
• Section 1.2.1, “Using Referrals in a Suffix”
• Section 1.2.2, “Enabling Referrals Only During Update Operations”
• Section 1.2.3, “Disabling a Suffix”
• Section 1.2.4, “Deleting a Suffix”
1.2.1. Using Referrals in a Suffix
Referrals can be used to point a client application temporarily to a different server. For example,
adding a referral to a suffix so that the suffix points to a different server allows the database
associated with the suffix is taken off-line for maintenance without affecting the users of the
Directory Server database.
To set referrals in a suffix, do the following:
1. In the Directory Server Console, select the Configuration tab.
2. Under Data in the left pane, select the suffix for which to add a referral.
3. Click the Suffix Settings tab, and select the Return Referrals for all Operations radio
button.
4. Click the Referrals tab. Enter an LDAP URL in the Enter a new referral field, or click
Construct to be guided through the creation of an LDAP URL. Appendix C, LDAP URLs has
more information about the structure of LDAP URLs.
5. Click Add to add the referral to the list.
You can enter multiple referrals. The directory will return the entire list of referrals in response
54
Page 75

Maintaining Suffixes
to requests from client applications.
6. Click Save.
1.2.2. Enabling Referrals Only During Update Operations
It is possible to configure the directory to redirect update and write requests made by client
applications to a read-only database. For example, there may be a local copy of directory data,
and that data should be available company-wide for searches but not for updates. Enabling
referrals for that Directory Server only for update requests means that when a client application
asks to update an entry, the client is referred to the server that owns the data, where the
modification request can proceed.
To enable referrals only during update operations, do the following:
1. In the Directory Server Console, select the Configuration tab.
2. Under Data in the left pane, click the suffix to which to add a referral.
3. Click the Suffix Settings tab, and select the Return Referrals for Update Operations radio
button.
4. Click the Referrals tab. Enter an LDAP URL in the Enter a new referral field, or click
Construct to be guided through the creation of an LDAP URL.
For more information about the structure of LDAP URLs, refer to the Appendix.
5. Click Add to add the referral to the list.
You can enter multiple referrals. The directory will return the entire list of referrals in response
to requests from client applications.
6. Click Save.
1.2.3. Disabling a Suffix
Sometimes, a database may need taken down for maintenance, but the data the database
contains is not replicated. Rather than returning a referral, disable the suffix responsible for the
database.
Once a suffix is disabled, the contents of the database related to the suffix are invisible to client
applications when they perform LDAP operations such as search, add, and modify.
To disable a suffix, do the following:
1. In the Directory Server Console, select the Configuration tab.
55
Page 76

Chapter 3. Configuring Directory Databases
2. Under Data in the left navigation pane, click the suffix to disable.
3. Click the Suffix Setting tab, and deselect the Enable this suffix checkbox.
4. Click Save.
The suffix is no longer enabled.
1.2.4. Deleting a Suffix
CAUTION
Deleting a suffix also deletes all database entries and replication information
associated with that suffix.
1. In the Directory Server Console, select the Configuration tab.
2. Under Data in the left navigation pane, select the suffix to delete.
3. Select Delete from the Object menu.
Alternatively, right-click the suffix and select Delete from the pop-up menu.
4. Select Delete this suffix and all of its sub suffixes to remove all the suffix and every suffix
below it.
Select Delete this suffix only to remove only this particular suffix, not its sub suffixes.
5. Click OK.
2. Creating and Maintaining Databases
After creating suffixes to organizing the directory data, create databases to contain that
directory data. Databases are used to store directory data.
2.1. Creating Databases
The directory tree can be distributed over multiple Directory Server databases. There are two
ways to distribute data across multiple databases:
• One database per suffix. The data for each suffix is contained in a separate database.
56
Page 77

Creating Databases
Three databases are added to store the data contained in separate suffixes.
This division of the tree corresponds to three databases.
Database one contains the data for ou=people plus the data for dc=example,dc=com, so that
57
Page 78

Chapter 3. Configuring Directory Databases
clients can conduct searches based at dc=example,dc=com. Database two contains the data
for ou=groups, and database three contains the data for ou=contractors.
• Multiple databases for one suffix.
Suppose the number of entries in the ou=people branch of the directory tree is so large that
two databases are needed to store them. In this case, the data contained by ou=people could
be distributed across two databases.
DB1 contains people with names from A-K, and DB2 contains people with names from L-Z. DB3
contains the ou=groups data, and DB4 contains the ou=contractors data.
Custom distribution plug-in distributes data from a single suffix across multiple databases.
Contact Red Hat Professional Services for information on how to create distribution logic for
Directory Server.
2.1.1. Creating a New Database for an Existing Suffix Using the
Console
1. In the Directory Server Console, select the Configuration tab.
2. In the left pane, expand Data, then click the suffix to which to add the new database.
3. Right-click the suffix, and select New Database from the pop-up menu.
The Create New Database dialog box is displayed.
4. In the Create New Database dialog box, enter a unique name for the database, such as
example2. The database name can be a combination of alphanumeric characters, dashes
(-), and underscores (_). No other characters are allowed.
58
Page 79

Creating Databases
5. In the Create database in field, enter the path to the directory to store the new database.
Alternatively, click Browse to locate a directory on the local machine.
By default, the directory stores the new database in the
/var/lib/dirsrv/slapd-instance_name/db directory.
6. Click OK. Click Yes in the confirmation dialog to create the new database.
2.1.2. Creating a New Database for a Single Suffix from the
Command-Line
Use the ldapmodify command-line utility to add a new database to the directory configuration
file. The database configuration information is stored in the cn=ldbm
database,cn=plugins,cn=config entry.
For example, add a new database to the server example1:
1. Run ldapmodify:
ldapmodify -a -h example1 -p 389 -D "cn=directory manager" -w secret
1
The ldapmodify utility binds to the server and prepares it to add an entry to the configuration
file.
2. Create the entry for the new database.
dn: cn=UserData,cn=ldbm database,cn=plugins,cn=config
objectclass: extensibleObject
objectclass: nsBackendInstance
nsslapd-suffix: ou=people,dc=example,dc=com
The entry added corresponds to a database named UserData that contains the data for the
root or sub suffix ou=people,dc=example,dc=com.
3. Create a root or sub suffix, as described in Section 1.1.3, “Creating Root and Sub Suffixes
from the Command-Line”. The database name, given in the DN attribute, must correspond
with the value in the nsslapd-backend attribute of the suffix entry.
2.1.3. Adding Multiple Databases for a Single Suffix
A single suffix can be distributed across multiple databases. However, to distribute the suffix, a
custom distribution function has to be created to extend the directory. For more information on
creating a custom distribution function, contact Red Hat Professional Services.
59
Page 80

Chapter 3. Configuring Directory Databases
NOTE
Once entries have been distributed, they cannot be redistributed. The following
restrictions apply:
• The distribution function cannot be changed once entry distribution has been
deployed.
• The LDAP modrdn operation cannot be used to rename entries if that would
cause them to be distributed into a different database.
• Distributed local databases cannot be replicated.
• The ldapmodify operation cannot be used to change entries if that would
cause them to be distributed into a different database.
Violating these restrictions prevents Directory Server from correctly locating and
returning entries.
After creating a custom distribution logic plug-in, add it to the directory.
The distribution logic is a function declared in a suffix. This function is called for every operation
reaching this suffix, including subtree search operations that start above the suffix. A distribution
function can be inserted into a suffix using both the Console and the command-line.
2.1.3.1. Adding the Custom Distribution Function to a Suffix Using the Directory Server Console
1. In the Directory Server Console, select the Configuration tab.
2. Expand Data in the left navigation pane. Select the suffix to which to apply the distribution
function.
3. Select the Databases tab in the right window.
4. Click Add to associate additional databases with the suffix.
The Database List dialog box is displayed. Select a database from the list, and click OK.
5. Enter the path to the distribution library in the Distribution library field, or click Browse to
locate a distribution library on the local machine.
6. Enter the name of the distribution function in the Function name field.
7. Click Save.
60
Page 81

Maintaining Directory Databases
2.1.3.2. Adding the Custom Distribution Function to a Suffix Using the
Command-Line
1. Run ldapmodify.
ldapmodify -p 389 -D "cn=directory manager" -w secret -h us.example.com
2. Add the following attributes to the suffix entry itself, supplying the information about the
custom distribution logic:
nsslapd-backend: Database1
nsslapd-backend: Database2
nsslapd-backend: Database3
nsslapd-distribution-plugin: /full/name/of/a/shared/library
nsslapd-distribution-funct:distribution-function-name
The nsslapd-backend attribute specifies all of the databases associated with this suffix. The
nsslapd-distribution-plugin attribute specifies the name of the library that the plug-in
uses. The nsslapd-distribution-funct attribute provides the name of the distribution
function itself.
For more information about using the ldapmodify command-line utility, see Section 2.4,
“Adding and Modifying Entries Using ldapmodify”.
1
2.2. Maintaining Directory Databases
This section describes jobs associated with maintaining directory databases. It includes the
following procedures:
• Section 2.2.1, “Placing a Database in Read-Only Mode”
• Section 2.2.2, “Deleting a Database”
• Section 2.2.3, “Configuring Transaction Logs for Frequent Database Updates”
2.2.1. Placing a Database in Read-Only Mode
When a database is in read-only mode, you cannot create, modify, or delete any entries. One of
the situations when read-only mode is useful is for manually initializing a consumer or before
backing up or exporting data from the Directory Server. Read-only mode ensures a faithful
image of the state of these databases at a given time.
The Directory Server Console and the command-line utilities do not automatically put the
directory in read-only mode before export or backup operations because this would make your
61
Page 82

Chapter 3. Configuring Directory Databases
directory unavailable for updates. However, with multi-master replication, this might not be a
problem.
• Section 2.2.1.1, “Making a Database Read-Only Using the Console”
• Section 2.2.1.2, “Making a Database Read-Only from the Command Line”
• Section 2.2.1.3, “Placing the Entire Directory Server in Read-Only Mode”
2.2.1.1. Making a Database Read-Only Using the Console
To place a database in read-only mode from the Directory Server Console, do the following:
1. In the Directory Server Console, select the Configuration tab.
2. Expand Data in the left pane. Expand the suffix containing the database to put in read-only
mode.
3. Select the database to put into read-only mode.
4. Select the Database Settings tab in the right pane.
5. Select the database is read-only checkbox.
6. Click Save.
The change takes effect immediately.
Before importing or restoring the database, ensure that the databases affected by the operation
are not in read-only mode.
To disable read-only mode, open the database up in the Directory Server Console again and
uncheck the database is read-only checkbox.
2.2.1.2. Making a Database Read-Only from the Command Line
To manually place a database into read-only mode, do the following:
1. Run ldapmodify.
1
ldapmodify -p 389 -D "cn=directory manager" -w secret -h us.example.com
2. Change the read-only attribute to on
dn: cn=database_name,cn=ldbm database,cn=plugins,cn=config
changetype: modify
replace: nsslapd-readonly
62
Page 83
Maintaining Directory Databases
nsslapd-readonly: on
NOTE
By default, the name of the database created at installation time is userRoot.
2.2.1.3. Placing the Entire Directory Server in Read-Only Mode
If the Directory Server maintains more than one database and all databases need to be placed
in read-only mode, this can be done in a single operation.
WARNING
This operation also makes the Directory Server configuration read-only;
therefore, you cannot update the server configuration, enable or disable plug-ins,
or even restart the Directory Server while it is in read-only mode. Once read-only
mode is enabled, it cannot cannot be undone from the Console; you must modify
the configuration files.
NOTE
If Directory Server contains replicas, do not use read-only mode because it will
disable replication.
To put the Directory Server in read-only mode, do the following:
1. In the Directory Server Console, select the Configuration tab, and then select the top entry
in the navigation tree in the left pane.
2. Select the Settings tab in the right pane.
3. Select the Make Entire Server Read-Only checkbox.
4. Click Save, and then restart the server.
2.2.2. Deleting a Database
Deleting a database deletes the configuration information and entries for that database only, not
63
Page 84

Chapter 3. Configuring Directory Databases
the physical database itself.
1. In the Directory Server Console, select the Configuration tab.
2. In the left navigation pane, locate the database to delete, and select it.
3. From the Object menu, select Delete.
Alternatively, right-click the database and select Delete from the pop-up menu.
The Deleting Database confirmation dialog box is displayed.
4. Click Yes to confirm the deletion.
Once deleted, the database no longer appears in the right pane.
2.2.3. Configuring Transaction Logs for Frequent Database Updates
When the server is going to be asked to perform frequent database updates (LDAP adds,
modifies, replication), the database transaction log files should be configured to be on a
different disk than the primary database files.
1. Open the configuration directory.
cd /etc/dirsrv/slapd-instance_name
2. Edit the dse.ldif file, and change the nsslapd-db-logdirectory directive for the new log
file path:
nsslapd-db-logdirectory: /home3/exampledb-slapd-01-txnlogs
This directive goes on the same entry that has the dbcache size. Storing these files on a
separate physical disk improves performance because the disk heads don't thrash moving
between the log files and the data files.
2.3. Database Encryption
The Directory Server offers a number of mechanisms to secure access to sensitive data, such
as access control rules to prevent unauthorized users from reading certain entries or attributes
within entries and SSL to protect data from eavesdropping and tampering on untrusted
networks. However, if a copy of the server's database files should fall into the hands of an
unauthorized person, they could potentially extract sensitive information from those files.
Because information in a database is stored in plain text, some sensitive information, such as
government identification numbers or passwords, may not be protected enough by standard
access control measures.
64
Page 85
Database Encryption
For highly sensitive information, this potential for information loss could present a significant
security risk. In order to remove that security risk, Directory Server allows portions of its
database to be encrypted. Once encrypted, the data are safe even in the event that an attacker
has a copy of the server's database files.
Database encryption allows attributes to be encrypted in the database. Both encryption and the
encryption cipher are configurable per attribute per backend. When configured, every instance
of a particular attribute, even index data, is encrypted for every entry stored in that database.
NOTE
To enable database encryption on an attribute with existing stored data, export
the database to LDIF first, then make the configuration change, then re-import
the data to the database. The server does not enforce consistency between
encryption configuration and stored data; therefore, pay careful attention that all
existing data are exported before enabling or disabling encryption.
Indexed attributes may be encrypted, and database encryption is fully compatible with indexing.
The contents of the index files that are normally derived from attribute values are also encrypted
to prevent an attacker from recovering part or all of the encrypted data from an analysis of the
indexes.
Since the server pre-encrypts all index keys before looking up an index for an encrypted
attribute, there is some effect on server performance for searches that make use of an
encrypted index, but the effect is not serious enough that it is no longer worthwhile to use an
index.
2.3.1. Encryption Keys
In order to use database encryption, the server must be configured for SSL and have SSL
enabled because database encryption uses the server's SSL encryption key and the same PIN
input methods as SSL. The PIN must either be entered manually upon server startup or a PIN
file must be used.
Randomly generated symmetric cipher keys are used to encrypt and decrypt attribute data. A
separate key is used for each configured cipher. These keys are wrapped using the public key
from the server's SSL certificate, and the resulting wrapped key is stored within the server's
configuration files. The effective strength of the database encryption is never higher than the
strength of the server's SSL key used for wrapping. Without access to the server's private key, it
is not possible to recover the symmetric keys from the wrapped copies.
CAUTION
65
Page 86
Chapter 3. Configuring Directory Databases
There is no mechanism for recovering a lost key. Therefore, it is especially
important to back up the server's certificate database safely. If the server's
certificate were lost, it would not be possible to decrypt any encrypted data
stored in its database.
CAUTION
If the SSL certificate is expiring and needs to be renewed, export the encrypted
backend instance before the renewal. Update the certificate, then re-import the
exported LDIF file.
2.3.2. Encryption Ciphers
The encryption cipher is configurable on a per-attribute basis and must be selected by the
administrator at the time encryption is enabled for an attribute. Configuration can be done
through the Console or through the command-line.
The following ciphers are supported:
• Advanced Encryption Standard (AES)
• Triple Data Encryption Standard (3DES)
All ciphers are used in Cipher Block Chaining mode.
Once the encryption cipher is set, it should not be changed without exporting and re-importing
the data.
2.3.3. Configuring Database Encryption from the Console
1. In the Console, open the Directory Server.
2. Open the Configuration tab, and select the Data node.
3. In the Data node, select the backend to edit, such as dc=example,dc=com.
4. Next, select the root to edit, such as o=userRoot.
5. Select the Attribute Encryption tab.
6. Hit the Add Attribute button, and a list of attributes will appear. Select the attribute to
encrypt.
66
Page 87

Database Encryption
NOTE
For existing attribute entries to be encrypted, the information must be exported,
then re-imported. See Section 2.3.5, “Exporting and Importing an Encrypted
Database”.
7. Select which encryption cipher to use.
8. Repeat steps 6 and 7 for every attribute to encrypt. Then hit Save.
To remove encryption from attributes, select them from the list of encrypted attributes in the
Attribute Encryption table, and hit the Delete button, then hit Save to apply the changes. Any
deleted attributes have to be manually re-added after saving.
2.3.4. Configuring Database Encryption Using the Command-Line
1. Run the ldapmodify command1:
ldapmodify -a -p 389 -D "cn=directory manager" -w secret -h us.example.com
2. Add an encryption entry for the attribute being encrypted. For example, this entry encrypts
the telephoneNumber attribute with the AES cipher:
dn: cn=telephoneNumber,cn=encrypted attributes,cn=Database1,cn=ldbm
database,cn=plugins,cn=config
objectclass: top
objectclass: nsAttributeEncryption
cn: telephoneNumber
nsEncryptionAlgorithm: AES
3. For existing attributes in entries to be encrypted, the information must be exported, then
re-imported. See Section 2.3.5, “Exporting and Importing an Encrypted Database”.
For more information on database encryption configuration schema, refer to "Database
Attributes under cn=attributeName,cn=encrypted attributes,cn=database_name,cn=ldbm
database,cn=plugins,cn=config" in the Directory Server Configuration, Command, and File
Reference.
2.3.5. Exporting and Importing an Encrypted Database
Exporting and importing encrypted databases is similar to exporting and importing regular
databases. However, the encrypted information must be decrypted when it is exported to LDIF,
67
Page 88
Chapter 3. Configuring Directory Databases
then re-encrypted when it is imported to the database. Using the -E option when running the
db2ldif and ldif2db scripts will decrypt the data on export and re-encrypt it on import.
1. Export the data using the db2ldif script, as follows:
db2ldif -n Database1 -E -a /path/to/output.ldif -s "dc=example,dc=com" -s
"o=userRoot"
See Section 2.3, “Exporting to LDIF from the Command-Line” for more information.
2. Make any configuration changes.
3. Re-import the data using the ldif2db script, as follows:
ldif2db -n Database1 -E -i /path/to/output.ldif
See Section 1.3, “Importing from the Command-Line” for more information.
NOTE
When enabling encryption for data that is already present in the the database,
several additional security concerns arise:
• It is possible for old, unencrypted data to persist in the server's database page
pool backing file, even after a successful re-import with encryption. To remove
this data, stop the server and delete the db/guardian file, then re-start the
server. This will force recovery, a side-effect of which is deleting the backing
file. However, it is possible that the data from the deleted file could still be
recovered from the hard drive unless steps are taken to overwrite the disk
blocks that it occupied.
• After enabling encryption and importing data, be sure to delete the LDIF file
because it contains plain text values for the now-encrypted data. Ensure that
the disk blocks that it occupied are overwritten.
• The unencrypted data previously stored in the server's database may persist
on disk after a successful re-import with encryption. This is because the old
database files are deleted as part of the import process. Ensure that the disk
blocks that those files occupied are overwritten.
68
• Data stored in the server's replication log database is never encrypted;
therefore, care should be taken to protect those files if replication is used.
Page 89

Creating and Maintaining Database Links
• The server does not attempt to protect unencrypted data stored in memory.
This data may be copied into a system page file by the operating system. For
this reason, ensure that any page or swap files are adequately protected.
3. Creating and Maintaining Database Links
Chaining means that a server contacts other servers on behalf of a client application and then
returns the combined results. Chaining is implemented through a database link, which points to
data stored remotely. When a client application requests data from a database link, the
database link retrieves the data from the remote database and returns it to the client.
Section 5, “Monitoring Database Link Activity” covers how to monitor database link activity.
• Section 3.1, “Configuring the Chaining Policy”
• Section 3.2, “Creating a New Database Link”
• Section 3.3, “Chaining Using SSL”
• Section 3.4, “Maintaining Database Links”
• Section 3.5, “Database Links and Access Control Evaluation”
• Section 3.6, “Advanced Feature: Tuning Database Link Performance”
• Section 3.7, “Advanced Feature: Configuring Cascading Chaining”
3.1. Configuring the Chaining Policy
These procedures describe configuring how Directory Server chains requests made by client
applications to Directory Servers that contain database links. This chaining policy applies to all
database links created on Directory Server.
3.1.1. Chaining Component Operations
A component is any functional unit in the server that uses internal operations. For example,
plug-ins are considered to be components, as are functions in the front-end. However, a plug-in
may actually be comprised of multiple components (for example, the ACI plug-in).
Some components send internal LDAP requests to the server, expecting to access local data
only. For such components, control the chaining policy so that the components can complete
their operations successfully. One example is the certificate verification function. Chaining the
LDAP request made by the function to check certificates implies that the remote server is
trusted. If the remote server is not trusted, then there is a security problem.
69
Page 90

Chapter 3. Configuring Directory Databases
By default, all internal operations are not chained and no components are allowed to chain,
although this can be overridden.
Additionally, an ACI must be created on the remote server to allow the specified plug-in to
perform its operations on the remote server. The ACI must exist in the suffix assigned to the
database link.
The following table lists component names, the potential side-effects of allowing them to chain
internal operations, and the permissions they need in the ACI on the remote server:
Component Name Description Permissions
ACI plug-in This plug-in implements
access control. Operations
used to retrieve and update
ACI attributes are not chained
because it is not safe to mix
local and remote ACI
attributes. However, requests
used to retrieve user entries
may be chained by setting the
chaining components
attribute,
nsActiveChainingComponents:
cn=ACI
Plugin,cn=plugins,cn=config.
Resource limit component This component sets server
limits depending on the user
bind DN. Resource limits can
be applied on remote users if
the resource limitation
component is allowed to
chain. To chain resource limit
component operations, add
the chaining component
attribute,
nsActiveChainingComponents:
cn=resource
limits,cn=components,cn=config.
Read, search, and compare
Read, search, and compare
Certificate-based
authentication checking
component
70
This component is used when
the SASL-external bind
method is used. It retrieves
the user certificate from the
database on the remote
server. Allowing this
component to chain means
certificate-based
Read, search, and compare
Page 91

Configuring the Chaining Policy
Component Name Description Permissions
authentication can work with
a database link. To chain this
component's operations, add
the chaining component
attribute,
nsActiveChainingComponents:
cn=certificate-based
authentication,cn=components,cn=config.
Referential Integrity plug-in This plug-in ensures that
updates made to attributes
containing DNs are
propagated to all entries that
contain pointers to the
attribute. For example, when
an entry that is a member of a
group is deleted, the entry is
automatically removed from
the group. Using this plug-in
with chaining helps simplify
the management of static
groups when the group
members are remote to the
static group definition. To
chain this component's
operations, add the chaining
component attribute,
nsActiveChainingComponents:
cn=referential integrity
postoperation,cn=plugins,cn=config.
Read, write, search, and
compare
Attribute Uniqueness plug-in This plug-in checks that all
the values for a specified uid
attribute are unique (no
duplicates). If this plug-in is
chained, it confirms that the
uid attribute values are
unique even on attributes
changed through a database
link. To chain this
component's operations, add
the chaining component
attribute,
nsActiveChainingComponents:
cn=attribute
uniqueness,cn=plugins,cn=config
Read, search, and compare
71
Page 92

Chapter 3. Configuring Directory Databases
Table 3.2. Components Allowed to Chain
NOTE
The following components cannot be chained:
• Roles plug-in
• Password policy component
• Replication plug-ins
• Referential Integrity plug-in
When enabling the Referential Integrity plug-in on servers issuing chaining
requests, be sure to analyze performance, resource, and time needs as well as
integrity needs. Integrity checks can be time-consuming and draining on memory
and CPU. For further information on the limitations surrounding ACIs and
chaining, see Section 1.4, “ACI Limitations”.
After modifying the components allowed to chain, restart the server in order for the modification
to take effect.
3.1.1.1. Chaining Component Operations Using the Console
1.
In the Directory Server Console, select the Configuration tab.
2. Expand Data in the left pane, and click Database Link Settings.
3. Select the Settings tab in the right window. To add a component to the Components
allowed to chain list, click Add.
The Select Components to Add dialog box displays. Select a component from the list, and
click OK.
4. To delete a component from the list, select it, and click Delete.
5. Click Save.
6. Restart the server in order for the change to take effect.
After allowing the component to chain, create an ACI in the suffix on the remote server to which
the operation will be chained. For example, this creates an ACI for the Referential Integrity
72
Page 93

Configuring the Chaining Policy
plug-in:
aci: (targetattr "*")(target="ldap:///ou=customers,l=us,dc=example,dc=com")
(version 3.0; acl "RefInt Access for chaining"; allow
(read,write,search,compare) userdn = "ldap:///cn=referential integrity
postoperation,cn=plugins,cn=config";)
3.1.1.2. Chaining Component Operations from the Command-Line
1. Specify components to include in chaining using the nsActiveChainingComponents attribute
in the cn=config,cn=chaining database,cn=plugins,cn=config entry of the
configuration file.
For example, to allow the referential integrity component to chain operations, add the
following to the database link configuration file:
nsActiveChainingComponents: cn=referential integrity
postoperation,cn=components,cn=config
See Table 3.2, “Components Allowed to Chain” for a list of the components which can be
chained.
2. Restart the server for the change to take effect.
service dirsrv restart instance
2
3. Create an ACI in the suffix on the remote server to which the operation will be chained. For
example, this creates an ACI for the Referential Integrity plug-in:
aci: (targetattr "*")(target="ldap:///ou=customers,l=us,dc=example,dc=com")
(version 3.0; acl "RefInt Access for chaining"; allow
(read,write,search,compare) userdn = "ldap:///cn=referential
integrity postoperation,cn=plugins,cn=config";)
3.1.2. Chaining LDAP Controls
It is possible to not chain operation requests made by LDAP controls. By default, requests made
by the following controls are forwarded to the remote server by the database link:
• Virtual List View (VLV). This control provides lists of parts of entries rather than returning all
entry information.
• Server-side sorting. This control sorts entries according to their attribute values.
2
The command to restart the Directory Server on platforms other than Red Hat Enterprise Linux is described in
Section 3, “Starting and Stopping Servers”.
73
Page 94

Chapter 3. Configuring Directory Databases
• Managed DSA. This controls returns smart referrals as entries, rather than following the
referral, so the smart referral itself can be changed or deleted.
• Loop detection. This control keeps track of the number of times the server chains with another
server. When the count reaches the configured number, a loop is detected, and the client
application is notified. For more information about using this control, see Section 3.7.5,
“Detecting Loops”.
NOTE
Server-side sorting and VLV controls are supported only when a client
application request is made to a single database. Database links cannot support
these controls when a client application makes a request to multiple databases.
3.1.2.1. Chaining LDAP Controls Using the Console
1. In the Directory Server Console, select the Configuration tab.
2. Expand the Data folder in the left pane, and click Database Link Settings.
3. Select the Settings tab in the right window. To add an LDAP control to the list, click Add.
The Select control OIDs to add dialog box displays. Select the OID of a control to add to
the list, and click OK.
4. To delete a control from the list, select it from the LDAP controls forwarded to the remote
server list, and click Delete.
5. Click Save.
3.1.2.2. Chaining LDAP Controls from the Command-Line
Alter the controls that the database link forwards by changing the nsTransmittedControls
attribute of the cn=config,cn=chaining database, cn=plugins,cn=config entry. For
example, to forward the virtual list view control, add the following to the database link entry in
the configuration file:
nsTransmittedControls: 2.16.840.1.113730.3.4.9
In addition, if clients of the Directory Server create their own controls and their operations
should to be chained to remote servers, add the OID of the custom control to the
nsTransmittedControls attribute.
74
Page 95

Creating a New Database Link
The LDAP controls which can be chained and their OIDs are listed in the following table:
Control Name OID
Virtual list view (VLV) 2.16.840.1.113730.3.4.9
Server-side sorting 1.2.840.113556.1.4.473
Managed DSA 2.16.840.1.113730.3.4.2
Loop detection 1.3.6.1.4.1.1466.29539.12
Table 3.3. LDAP Controls and Their OIDs
For more information about LDAP controls, refer to the LDAP C-SDK documentation at
http://www.mozilla.org/directory.
3.2. Creating a New Database Link
The basic configuration of the database link involves the following information:
• Suffix information. A suffix is created in the directory tree that is managed by the database
link, not a regular database. This suffix corresponds to the suffix on the remote server that
contains the data.
• Bind credentials. When the database link binds to a remote server, it impersonates a user,
and this specifies the DN and the credentials for each database link to use to bind with
remote servers.
• LDAP URL. This supplies the LDAP URL of the remote server to which the database link
connects.
• List of failover servers. This supplies a list of alternative servers for the database link to
contact in the event of a failure. This configuration item is optional.
3.2.1. Creating a New Database Link Using the Console
To create a new database link using the Directory Server Console:
1. In the Directory Server Console, select the Configuration tab.
2. Right-click Data in the left navigation pane, and select New Root Suffix or New Sub Suffix
from the pop-up menu.
A Create New Suffix dialog box is displayed.
3. Enter the name of the suffix on the remote server to which to chain the suffix in the New
suffix field.
75
Page 96

Chapter 3. Configuring Directory Databases
The suffix must be named in line with dc naming conventions, such as dc=example,dc=com.
4. Deselect the Create associated database automatically checkbox.
The checkbox must not be selected because a database link cannot be added to a suffix that
is associated with a database. This suffix is used only by the database link.
5. Click OK.
The suffix appears automatically under Data in the left navigation pane.
6. In the left pane, right-click the new suffix, and select New Database Link from the pop-up
menu.
The Create New Database Link dialog box is displayed.
7. Enter the name of the new database link in the Database link name field, such as
examplelink1. The name can be a combination of alphanumeric characters, dashes (-), and
underscores (_). No other characters are allowed.
8. Enter the DN used by the database link to bind to the remote server in the Bind DN field,
such as cn=dblink.
9. Enter the password used by the database link to bind to the remote server in the Password
field.
10.Select the Use a secure LDAP connection between servers checkbox for the database
link to use SSL to communicate to the remote server.
11.Enter the name of the remote server in the Remote server field. Enter the server port
number used for the bind in the Remote server port field. The default port number is 389.
The default SSL port number is 636.
12.Enter the name of a failover server in the Failover Server(s) field, and specify a port number
in the Port field. The default port number is 389. The default SSL port number is 636. Click
Add to add the failover server to the list.
There can be multiple failover servers specified. If the primary remote server fails, the
database link contacts the first server in the Failover Servers list. If it fails, it contacts the next
in the list, and so on.
13.Click OK to create the new database link. Click OK to dismiss the success dialog box that
appears after the database link has been created.
The new database link appears under the suffix in the left navigation pane.
76
Page 97

Creating a New Database Link
TIP
The Console provides a checklist of information that needs to be present on the
remote server for the database link to bind successfully. To view this checklist,
click the new database link, and click the Authentication tab. The checklist
appears in the Remote server checklist box.
3.2.2. Creating a Database Link from the Command-Line
1. Use the ldapmodify command-line utility to create a new database link from the
command-line. The new instance must be located in the cn=chaining
database,cn=plugins,cn=config entry.
ldapmodify -a -p 389 -D "cn=directory manager" -w secret -h us.example.com
2. Specify the configuration information for the database link:
dn: cn=examplelink,cn=chaining database,cn=plugins,cn=config
objectclass: top
objectclass: extensibleObject
objectclass: nsBackendInstance
nsslapd-suffix: ou=people,dc=example,dc=com suffix being chained
nsfarmserverurl: ldap://people.example.com:389/ LDAP URL to remote server
nsmultiplexorbinddn: cn=proxy admin,cn=config bind DN
nsmultiplexorcredentials: secret bind password
cn: examplelink
Default configuration attributes are contained in the cn=default config, cn=chaining
database,cn=plugins,cn=config entry. These configuration attributes apply to all database
links at creation time. Changes to the default configuration only affect new database links. The
default configuration attributes on existing database links cannot be changed.
Each database link contains its own specific configuration information, which is stored with the
database link entry itself, cn=database_link, cn=chaining database,cn=plugins,cn=config.
For more information about configuration attributes, refer to the Directory Server Configuration,
Command, and File Reference.
• Section 3.2.2.1, “Providing Suffix Information”
• Section 3.2.2.2, “Providing Bind Credentials”
• Section 3.2.2.3, “Providing an LDAP URL”
77
Page 98
Chapter 3. Configuring Directory Databases
• Section 3.2.2.4, “Providing a List of Failover Servers”
• Section 3.7.6, “Summary of Cascading Chaining Configuration Attributes”
• Section 3.2.2.6, “Database Link Configuration Example”
3.2.2.1. Providing Suffix Information
Use the nsslapd-suffix attribute to define the suffix managed by the database link. For
example, for the database link to point to the people information for a remote site of the
company, enter the following suffix information:
nsslapd-suffix: l=Zanzibar,ou=people,dc=example,dc=com
The suffix information is stored in the cn=database_link, cn=chaining
database,cn=plugins,cn=config entry.
NOTE
After creating the database link, any alterations to the nsslapd-nsslapd-suffix
attribute are applied only after the server containing the database link is
restarted.
3.2.2.2. Providing Bind Credentials
For a request from a client application to be chained to a remote server, special bind credentials
can be supplied for the client application. This gives the remote server the proxied authorization
rights needed to chain operations. Without bind credentials, the database link binds to the
remote server as anonymous.
Providing bind credentials involves the following steps:
1. On the remote server, do the following:
• Create an administrative user for the database link.
For information on adding entries, see Chapter 2, Creating Directory Entries.
• Provide proxy access rights for the administrative user created in step 1 on the subtree
chained to by the database link.
For more information on configuring ACIs, see Chapter 6, Managing Access Control
2. On the server containing the database link, use ldapmodify to provide a user DN for the
database link in the nsMultiplexorBindDN attribute of the cn=database_link, cn=chaining
78
Page 99
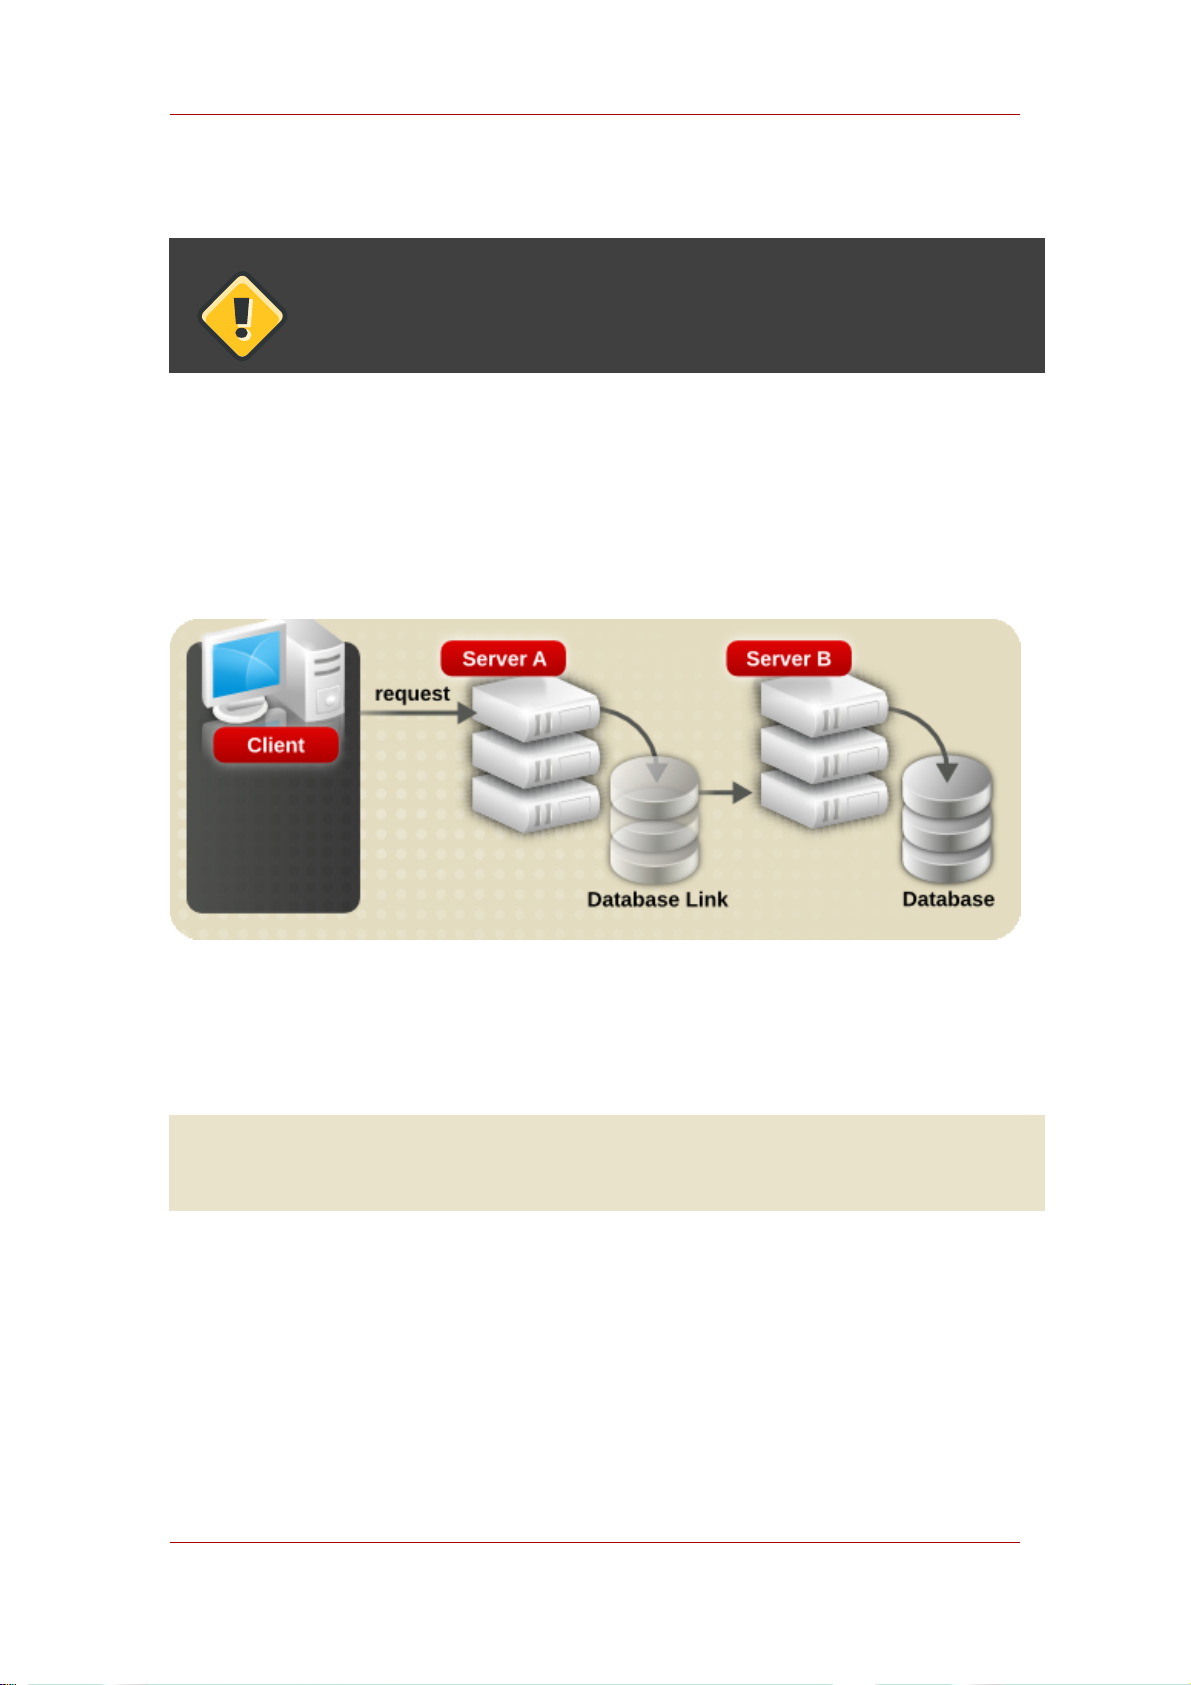
Creating a New Database Link
database,cn=plugins,cn=config entry.
CAUTION
The nsMultiplexorBindDN cannot be that of the Directory Manager.
Use ldapmodify to provide a user password for the database link in the
nsMultiplexorCredentials attribute of the cn=database_link, cn=chaining
database,cn=plugins,cn=config entry.
For example, a client application sends a request to server A. Server A contains a database link
that chains the request to a database on server B.
The database link on server A binds to server B using a special user as defined in the
nsMultiplexorBindDN attribute and a user password as defined in the
nsMultiplexorCredentials attribute. In this example, server A uses the following bind
credentials:
nsMultiplexorBindDN: cn=proxy admin,cn=config
nsMultiplexorCredentials: secret
79
Page 100

Chapter 3. Configuring Directory Databases
Server B must contain a user entry corresponding to the nsMultiplexorBindDN, and set the
proxy authentication rights for this user. To set the proxy authorization correctly, set the proxy
ACI as any other ACI.
CAUTION
Carefully examine access controls when enabling chaining to avoid giving
access to restricted areas of the directory. For example, if a default proxy ACI is
created on a branch, the users that connect via the database link will be able to
see all entries below the branch. There may be cases when not all of the
subtrees should be viewed by a user. To avoid a security hole, create an
additional ACI to restrict access to the subtree.
For more information on ACIs, see Chapter 6, Managing Access Control. For more information
about the proxy authentication control, refer to the LDAP C-SDK documentation at
http://www.mozilla.org/directory.
NOTE
When a database link is used by a client application to create or modify entries,
the attributes creatorsName and modifiersName do not reflect the real creator
or modifier of the entries. These attributes contain the name of the administrative
user granted proxied authorization rights on the remote data server.
3.2.2.3. Providing an LDAP URL
On the server containing the database link, identify the remote server that the database link
connects with using an LDAP URL. Unlike the standard LDAP URL format, the URL of the
80
 Loading...