

Page 1
HP Photosmart R930 series
Digital Camera
English
Page 2
Legal and notice information
© Copyright 2007 Hewlett-Packard Development Company, L.P.
The information contained herein is subject to change without notice. The
only warranties for HP products and services are set forth in the express
warranty statements accompanying such products and services. Nothing
herein should be construed as constituting an additional warranty. HP shall
not be liable for technical or editorial errors or omissions contained herein.
Windows® is a U.S. registered trademark of Microsoft Corporation.
SD Logo is a trademark of its proprietor.
Disposal of waste equipment by users in private households
in the European Union
This symbol on the product or on its packaging indicates that this
product must not be disposed of with your other household waste.
Instead, it is your responsibility to dispose of your waste equipment by
handing it over to a designated collection point for the recycling of waste
electrical and electronic equipment. The separate collection and recycling
of your waste equipment at the time of disposal will help to conserve
natural resources and ensure that it is recycled in a manner that protects
human health and the environment. For more information about where you
can drop off your waste equipment for recycling, please contact your local
city office, your household waste disposal service or the shop where you
purchased the product.
For future reference, enter the following information:
•
Model number: _________
•
Serial number: _________
•
Purchase date: _________
English
Page 3
Contents
1 Getting started
Accessing the electronic User Guide.......................4
Camera top, side, and back ....................................6
Camera front and bottom.........................................7
2 Setting up your camera
Install the battery......................................................9
Charge the battery....................................................9
Turn on the camera................................................10
Choose the language.............................................10
Set the region.........................................................10
Set the date and time.............................................10
Install and format an optional memory card...........11
Install the software.................................................12
Windows...........................................................12
Macintosh.........................................................13
Using the Touch Screen interface..........................13
3 Taking pictures and recording video clips
Take a picture.........................................................15
Record a video clip.................................................15
4 Reviewing and deleting images and video clips
Review images and video clips..............................17
Delete an image.....................................................17
5 Transferring and printing images
Transfer images.....................................................18
Print images from the camera................................18
6 Camera quick reference.......................................20
3
English
Page 4
1 Getting started
This printed Quick Start Guide provides the information
you need to get started using the essential features of
your camera. For detailed information about camera
features, see the electronic User Guide (see Accessing
the electronic User Guide on page 4).
Quick Start Guide
Electronic User Guide
This printed guide will help
you to:
• Start using your
camera quickly
• Install the
HP Photosmart
Software
• Become familiar with
your camera's basic
features
The electronic User Guide
includes:
• Descriptions of all the
camera features
• Battery information,
including:
• Extending battery
life
• A description of the
power indicator
icons
• Troubleshooting
• Getting assistance
from HP
• Camera specifications
Accessing the electronic User
Guide
The electronic User Guide is on the HP Photosmart
Software CD.
4 HP Photosmart R930 series Digital Camera
English
Page 5

To view the User Guide:
1. Insert the HP Photosmart Software CD into the CD
drive of your computer.
2. Click View User Guide on the main page of the
installation screen.
The electronic User Guide is also copied to your computer
when you install the HP Photosmart Software. To view the
User Guide after it has been installed on your computer:
• On Windows: Open the HP Solution Center and
click help.
• On Macintosh: Open the HP Device Manager and
select Camera User Guide from the Information and
Settings pop-up menu.
Getting assistance
• For tips and tools to help you use your camera more
effectively, visit www.hp.com. From here, click on
Learn About: Digital Photography (English Only).
• For product support including firmware, software, and
driver updates, visit www.hp.com/support.
• For help with the HP Photosmart Software, see the
software's online help.
Getting started 5
English
Page 6

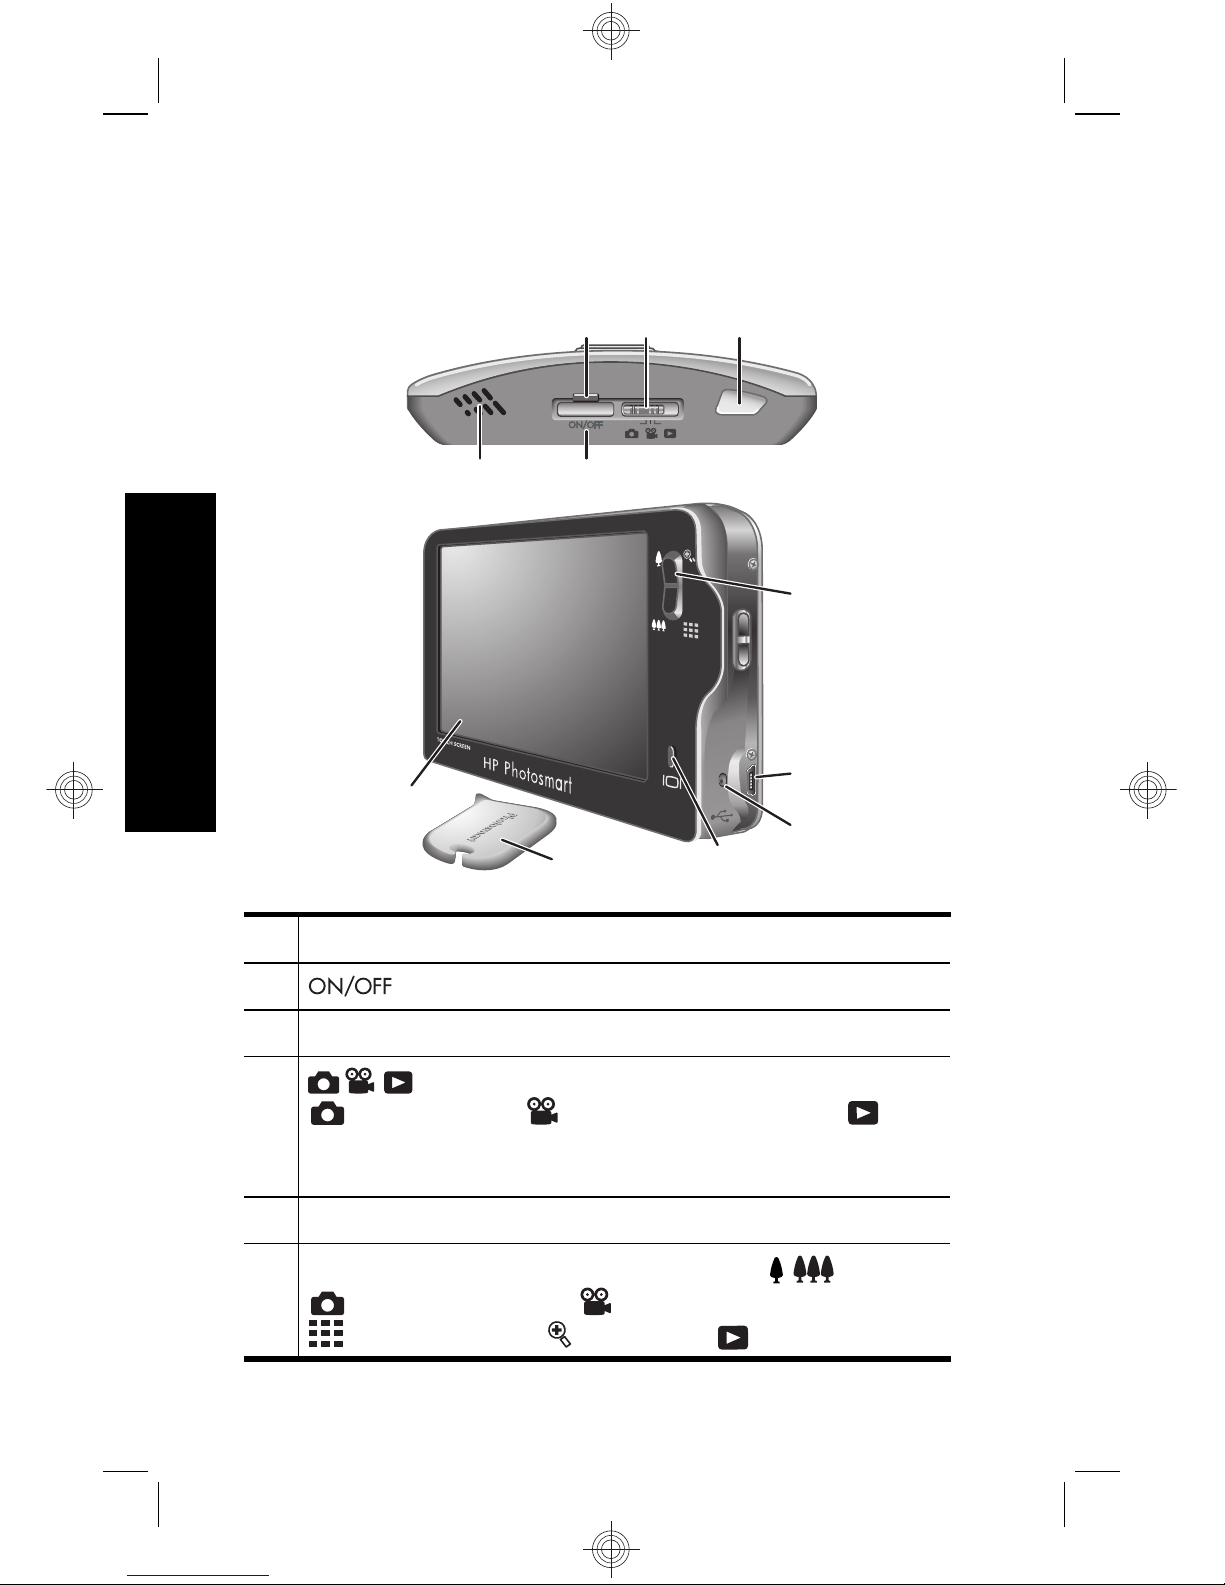
Camera top, side, and back
3 5
1 2
4
6
7
8
9
10
11
1 Speaker.
2 button.
3 Power light.
4 selector—Switches between Picture
Capture,
Video Record, and Playback
(see Picture Capture, Video Record, and Playback
on page 20).
5 Shutter button.
6
Zoom lever—Accesses / Zoom while in
Picture Capture or Video Record; accesses
Thumbnails and Magnify while in
Playback.
6 HP Photosmart R930 series Digital Camera
English
Page 7
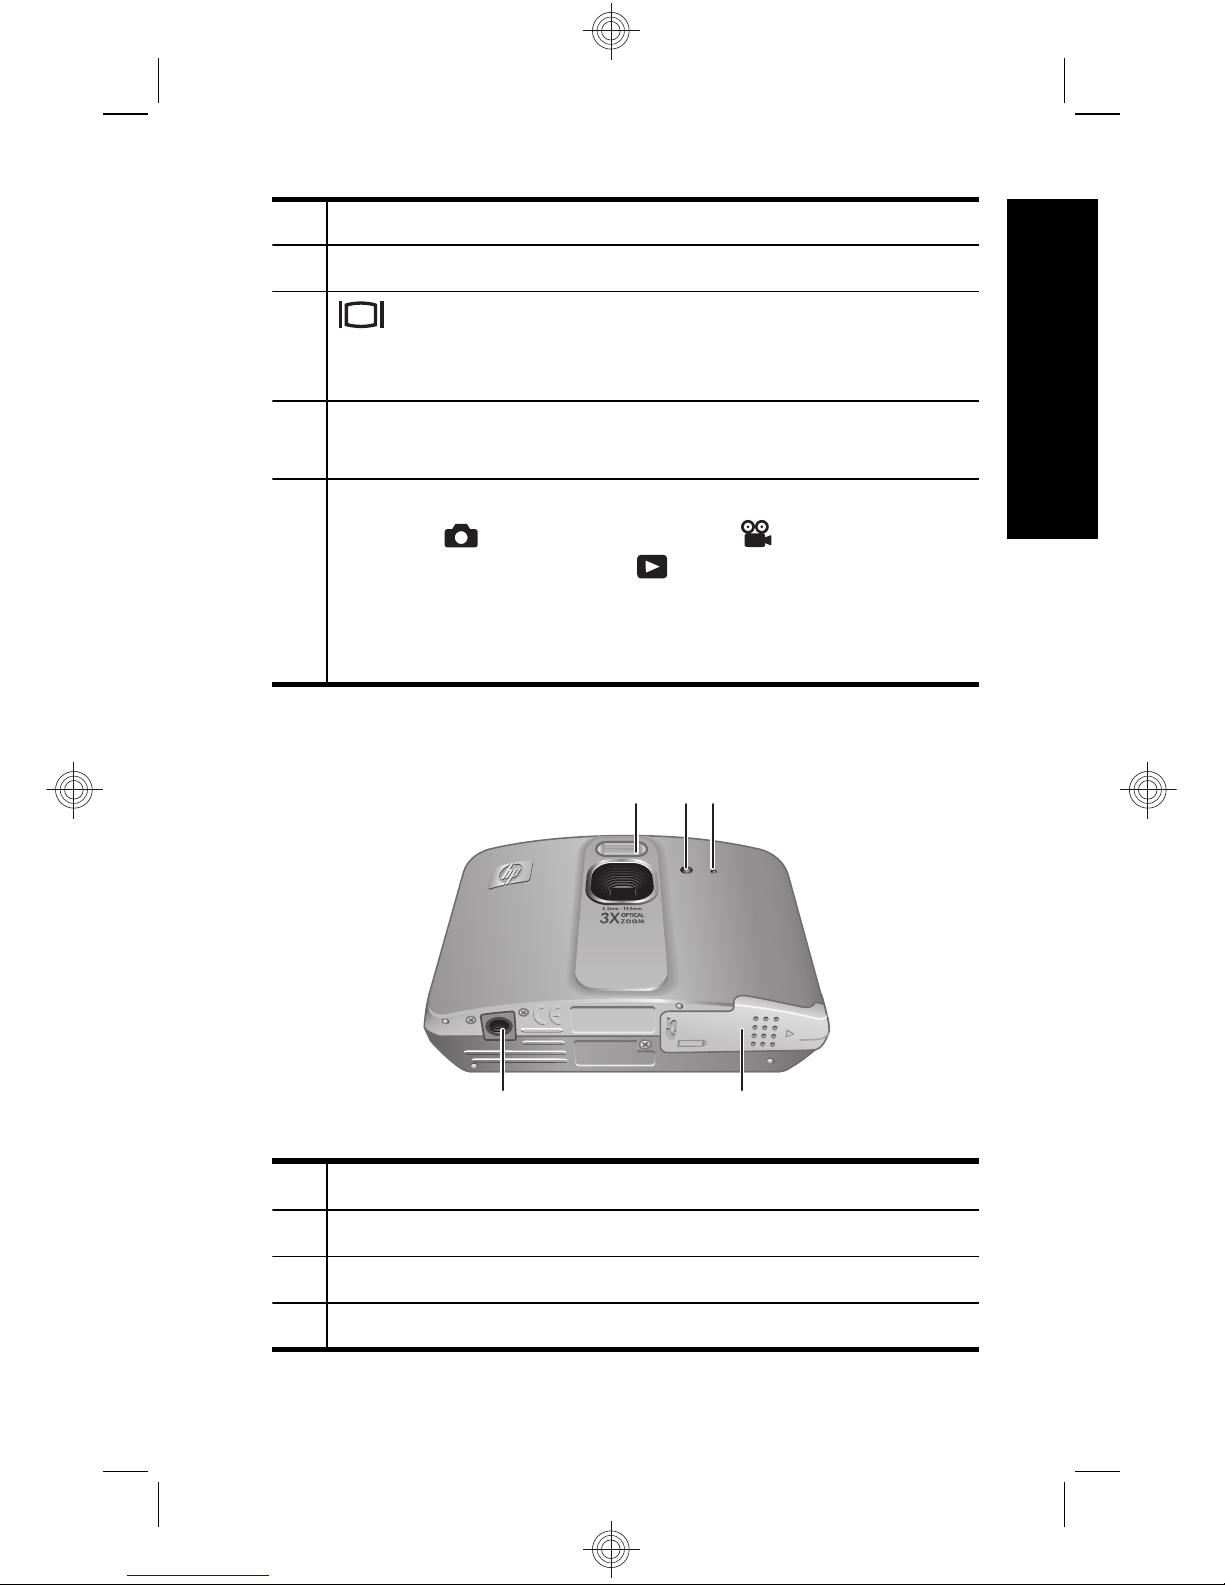
7 USB connector.
8 Battery Charging light.
9 Overlay button—Turns Touch Screen Image
Display overlays on and off (see Using the Touch
Screen interface on page 13).
10 Stylus (see Using the Touch Screen interface on
page 13).
11 Touch Screen Image Display—Frames images
when in
Picture Capture or Video Record,
reviews images when in
Playback, and provides
a Touch Screen interface for camera operations
(see Using the Touch Screen interface on
page 13).
Camera front and bottom
1 32
5 4
1 Flash.
2 Self-Timer/Focus Assist light.
3 Microphone.
4 Battery/Memory Card door.
Getting started 7
English
Page 8
5 Tripod mount.
8 HP Photosmart R930 series Digital Camera
English
Page 9
2 Setting up your camera
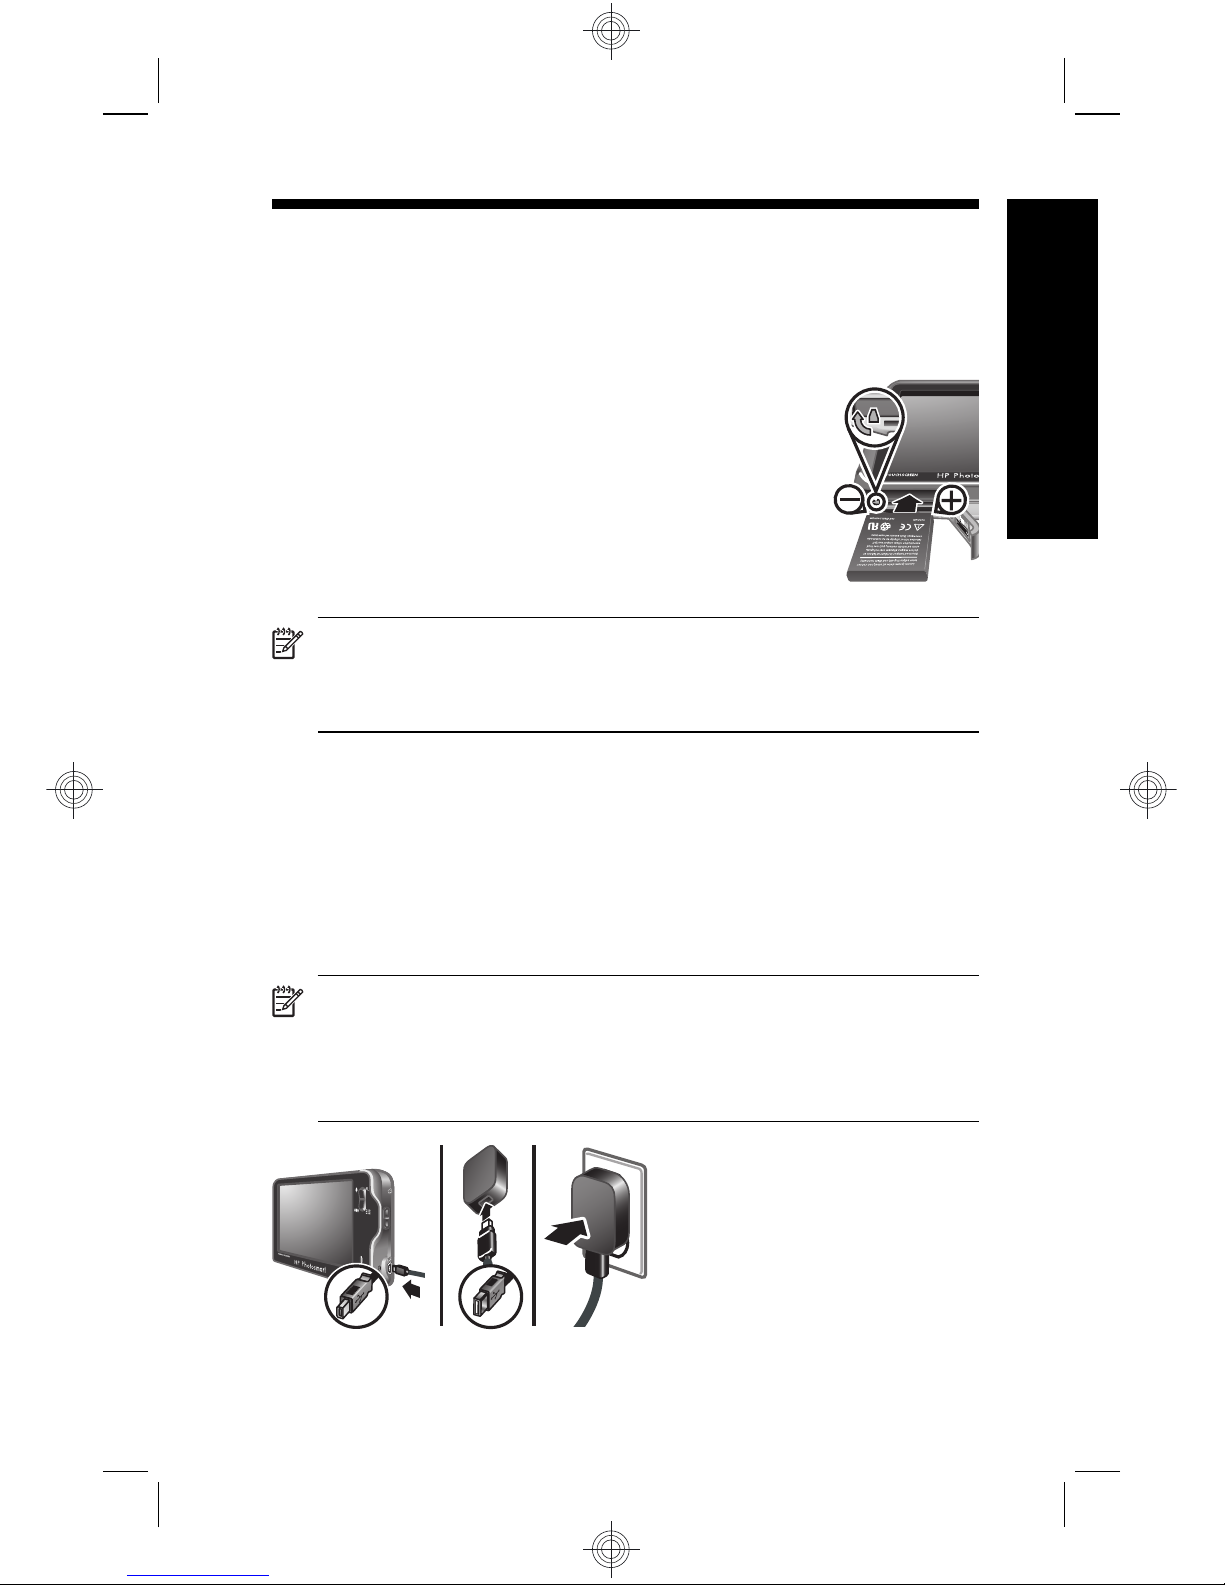
Install the battery
1. Open the Battery/Memory Card door by
sliding the door latch as indicated on the
Battery/Memory Card door.
2. Insert the battery in the larger slot,
pushing the battery in until the latch
catches.
3. Close the Battery/Memory Card door.
NOTE: Fully charge the battery before using it the
first time. Turn off the camera before removing the
battery.
To remove the battery, move the battery latch as shown
until the battery springs free.
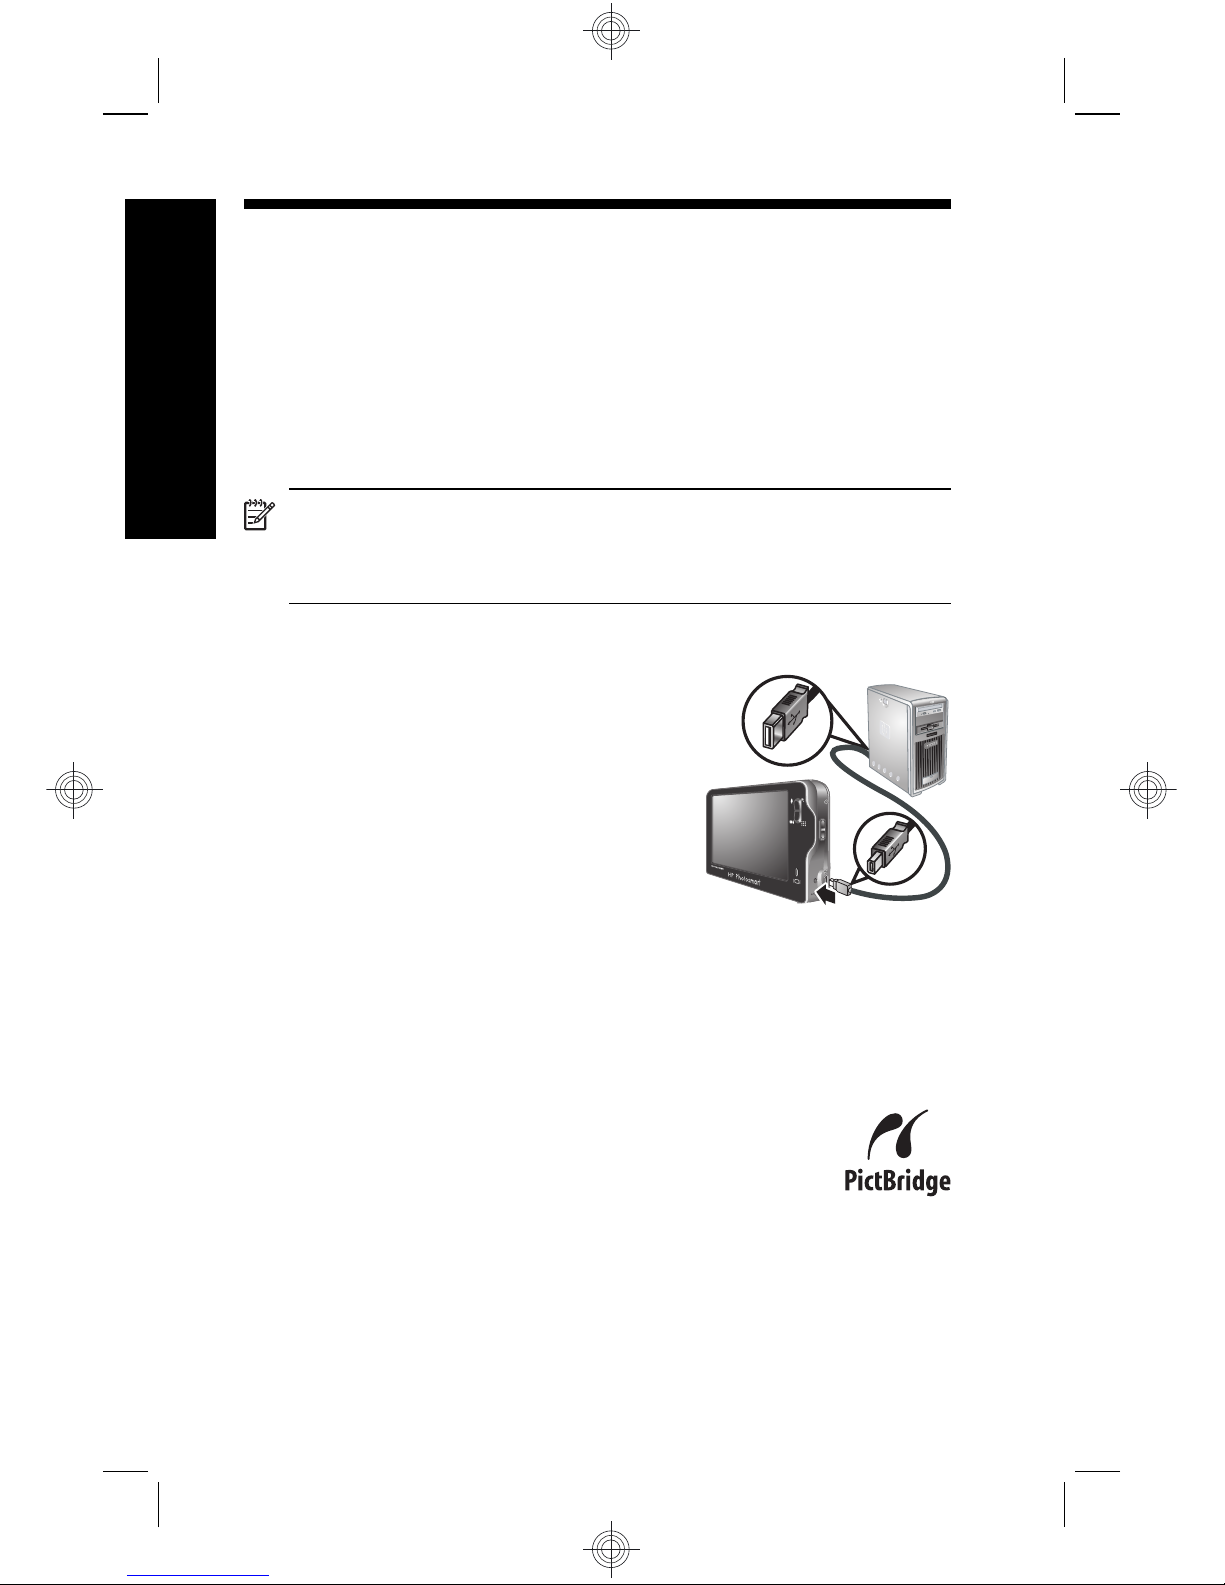
Charge the battery
You can charge the battery in the camera, using the USB
cable and power adapter.
NOTE: Your camera uses a rechargeable
HP Photosmart R07 Lithium Ion battery (L1812A/
L1812B). Do not charge any other battery in the
camera or optional quick recharger.
Setting up your camera 9
English
Page 10
1. Plug the small end of the USB cable into the camera,
and the large end into the power adapter, as shown.
2. Plug the power adapter into an electrical outlet.
The camera’s blinking Battery Charging light indicates
that the battery is charging. The battery is fully charged
when the light stays on solid (approximately 2-3 hours).
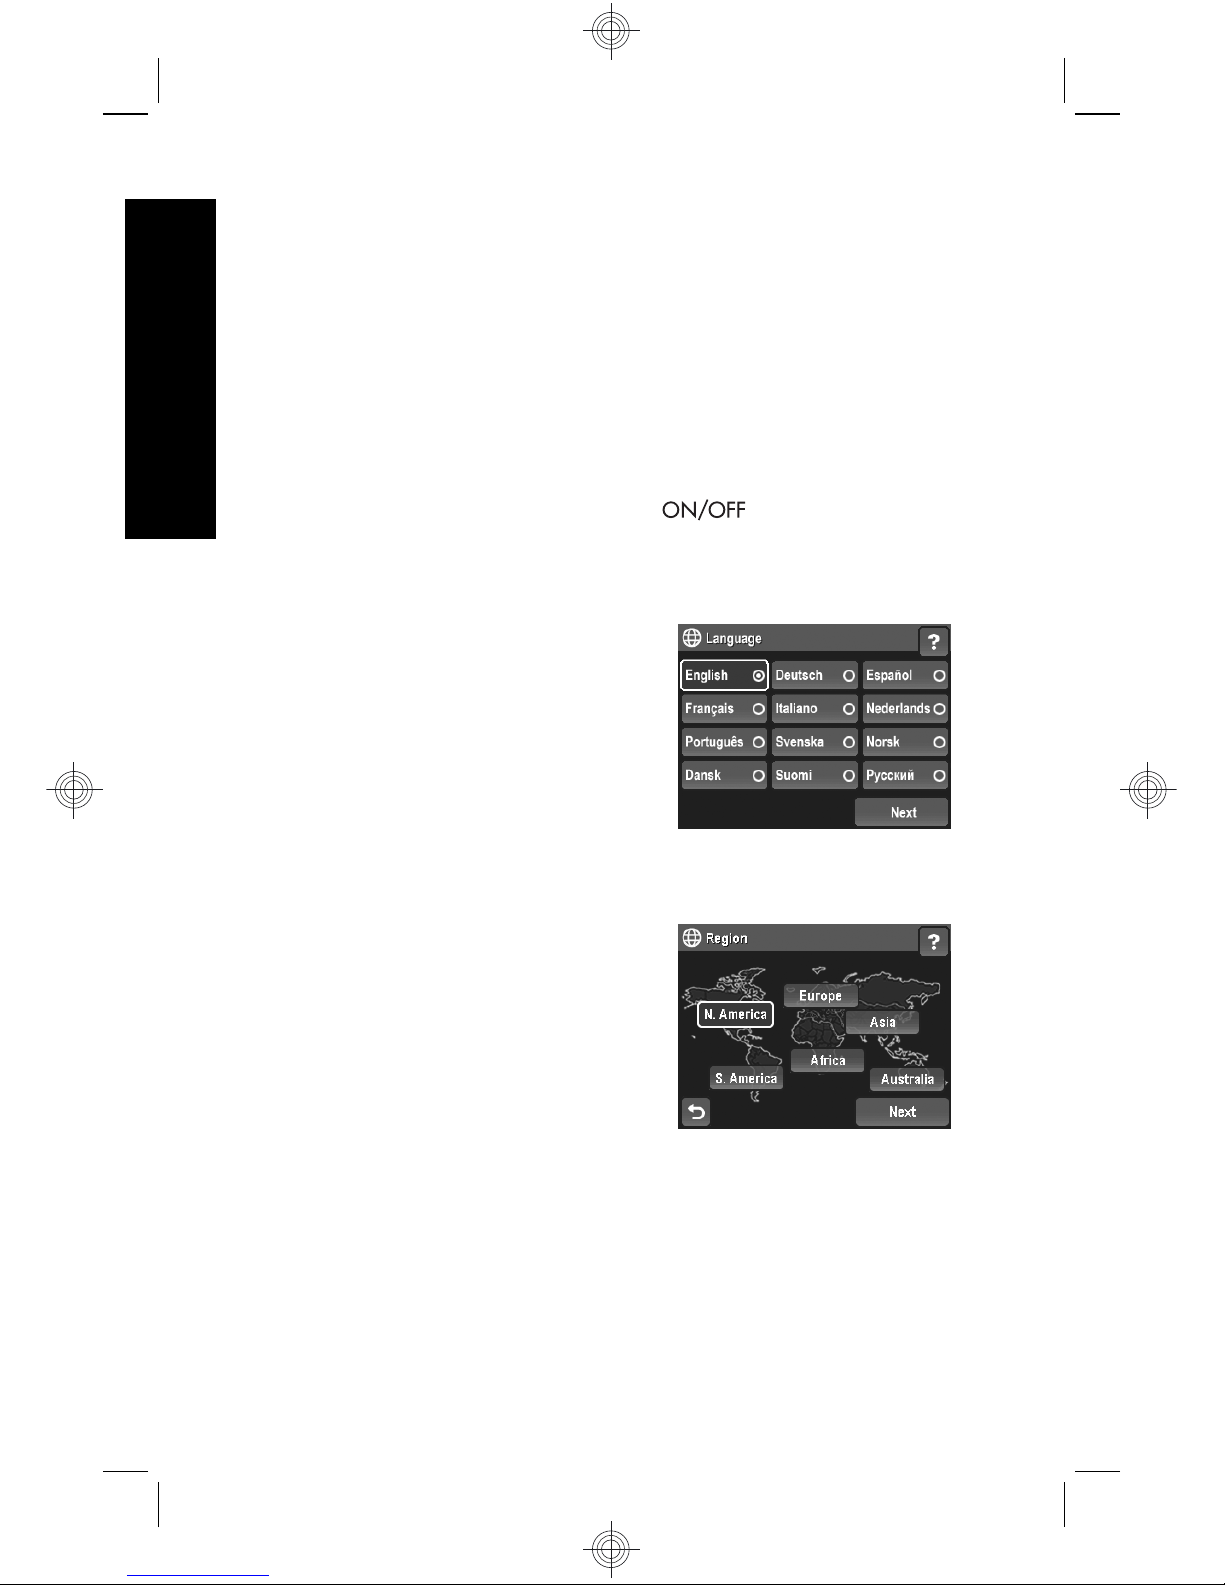
Turn on the camera
To turn on the camera, press the button.
Choose the language
1. Using your finger or the
stylus, touch the language
that you want.
2. Touch Next to confirm your
choice and display the
Region screen.
Set the region
Along with the language setting,
the region setting determines the
default date format.
1. Touch the region you want.
2. Touch Next to confirm your
choice and display the Date &
Time screen.
Set the date and time
Accurately setting the date and time will help you locate
images once you have uploaded them to your computer,
10 HP Photosmart R930 series Digital Camera
English
Page 11
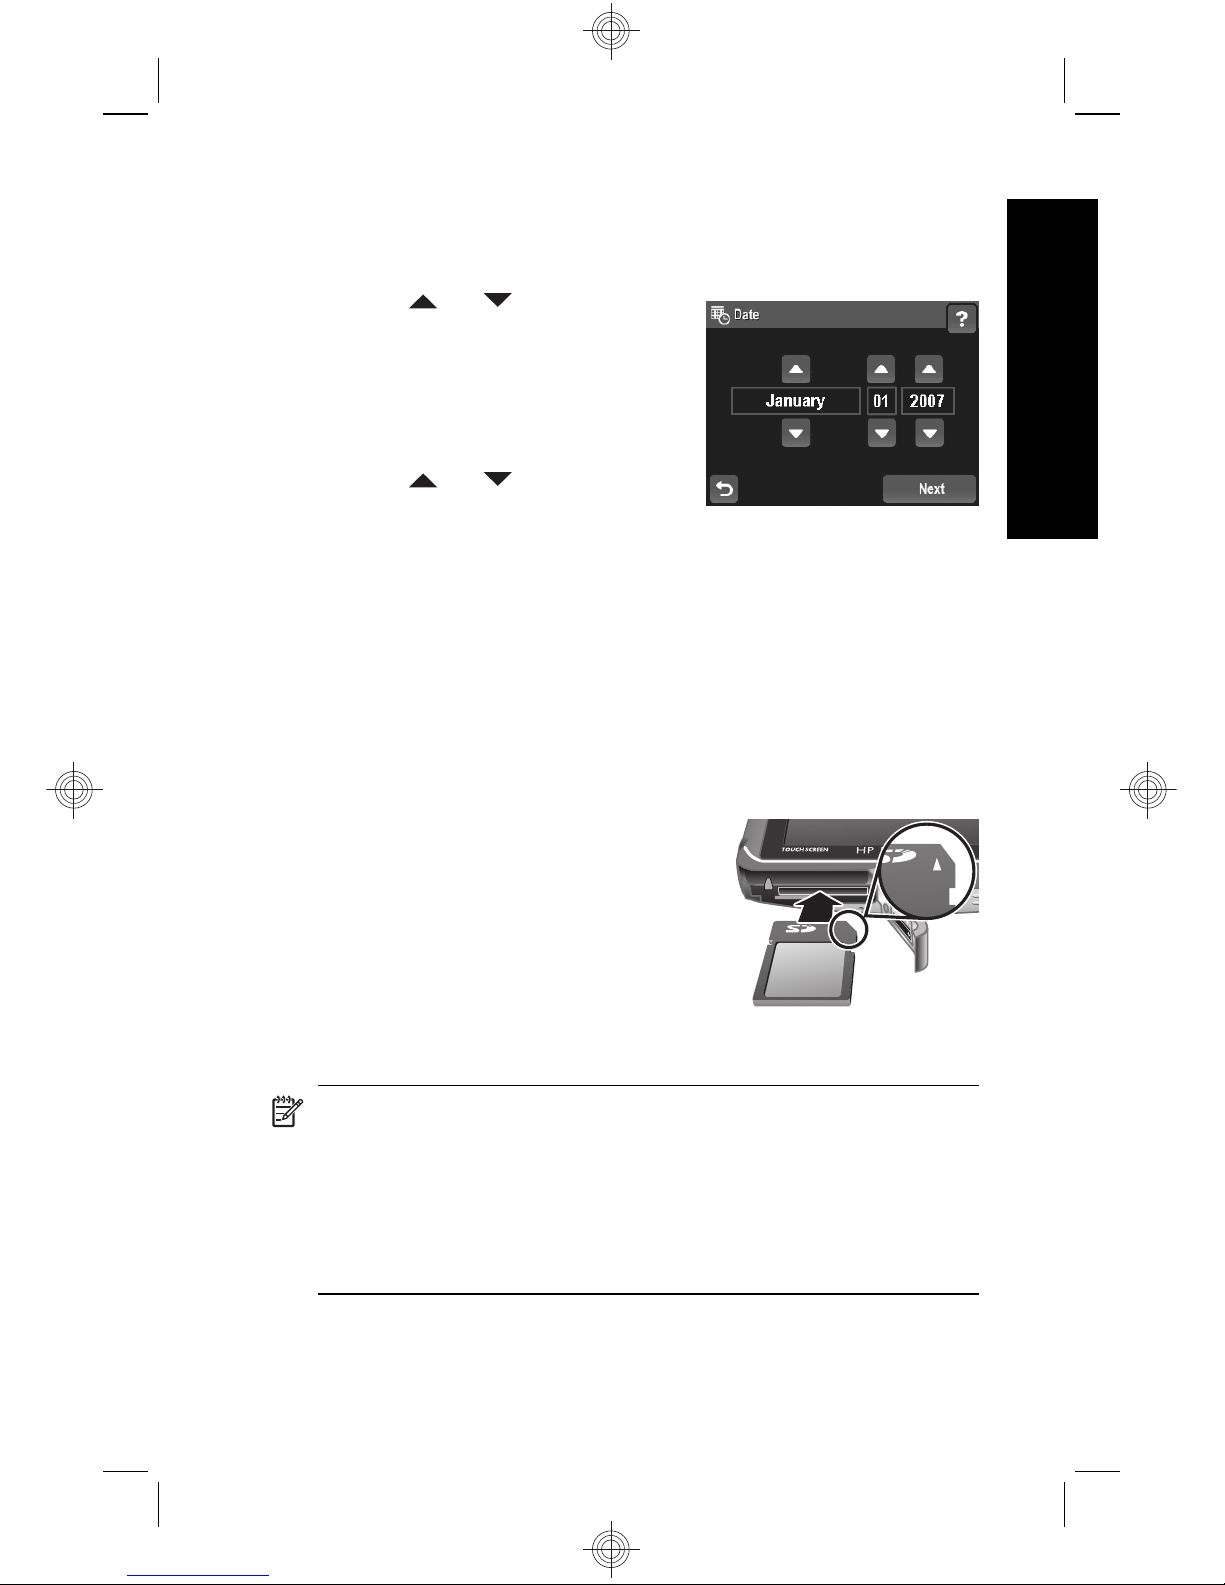
and will ensure that images are accurately marked if you
use the date and time imprint feature.
1.
Touch
or to adjust the
month, date, and year.
2. Touch Next to confirm your
settings and display the
Time screen.
3.
Touch
or to adjust the
time.
4. When all settings are correct, touch Done.
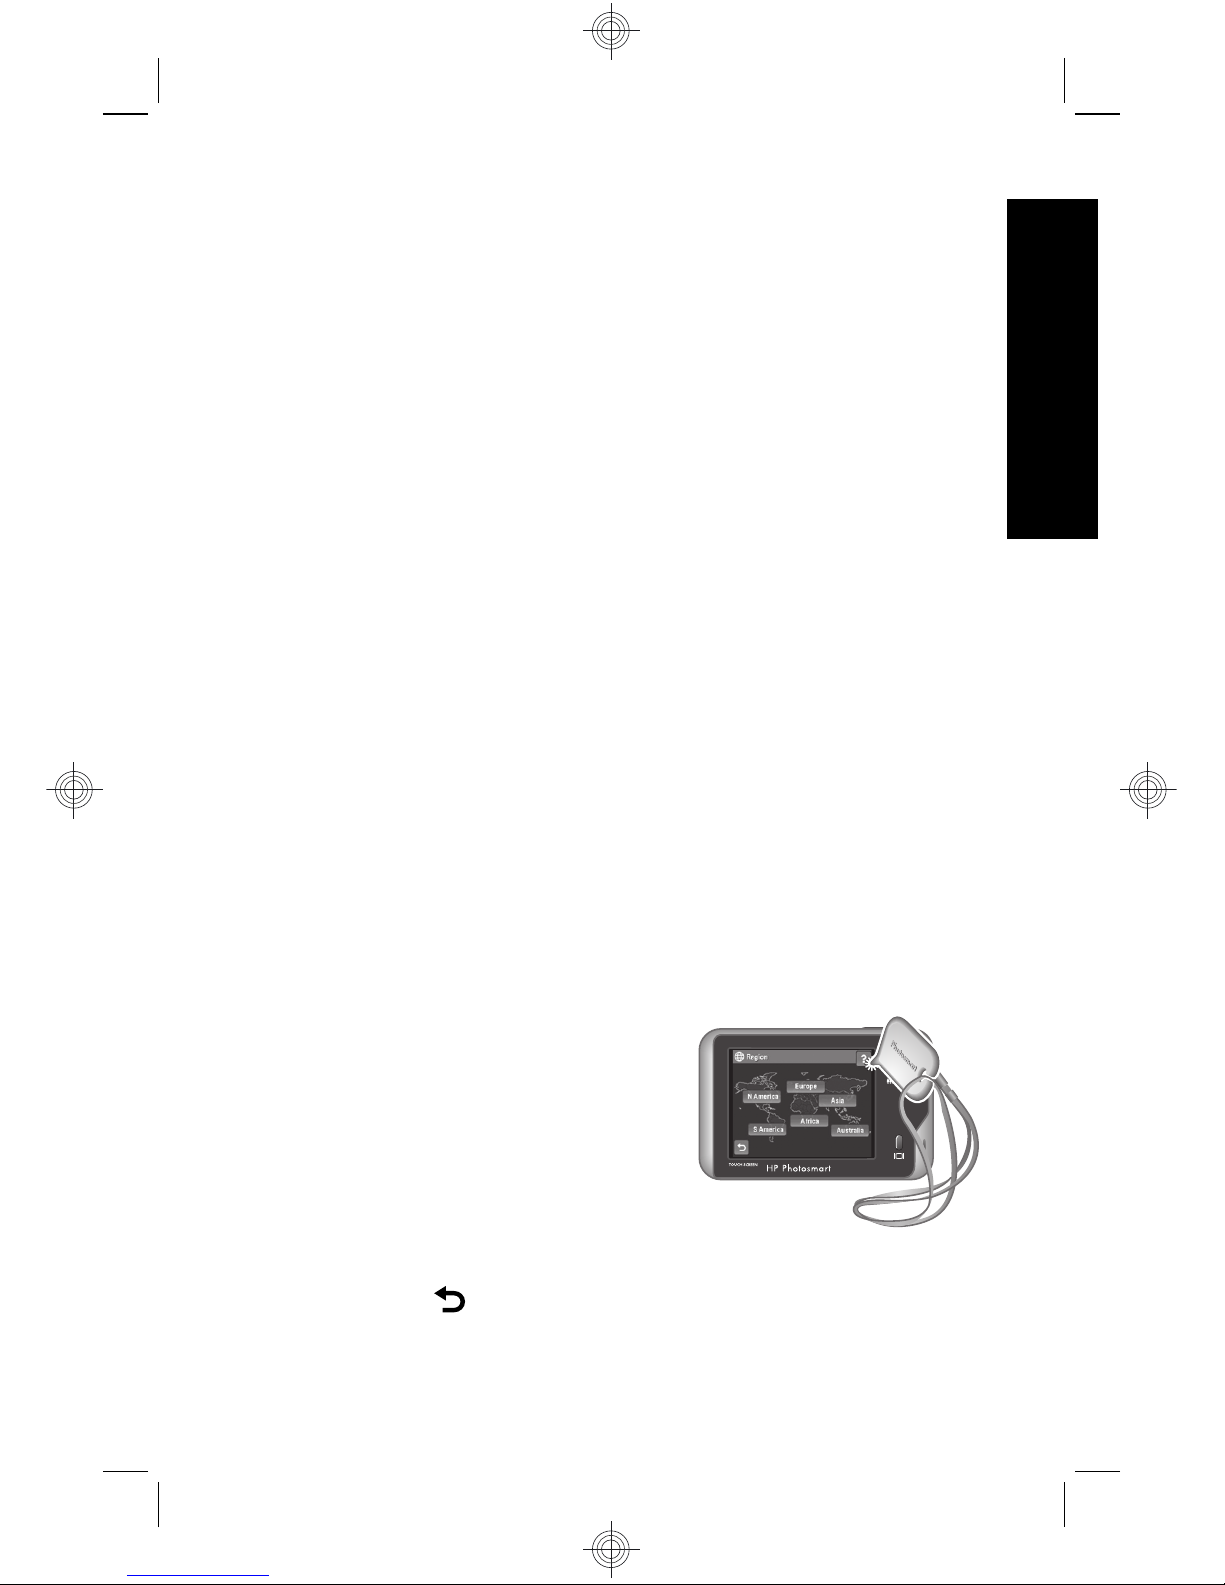
Install and format an optional
memory card
This camera supports standard, high speed, and high
capacity Secure Digital (SD and SDHC) memory cards,
32MB to 8GB.
1. Turn off the camera and open
the Battery/Memory Card door.
2. Insert the optional memory card
in the smaller slot as shown.
Make sure the memory card
snaps into place.
3. Close the Battery/Memory Card
door and turn on the camera.
NOTE: When you turn on your camera with a
memory card installed, the camera indicates the
number of images you can store on the memory card
at the current Image Quality setting. This camera
supports storing a maximum of 1999 images on a
memory card.
Setting up your camera 11
English
Page 12

Always format new memory cards before first use.
Formatting removes all images from the memory card, so
make sure to transfer existing images before formatting.
1. With the camera turned on, slide
to .
2.
Touch
to display the Delete menu.
3. Touch
to display Format Card, then touch Format
Card.
4. Touch Yes to format the card.
Once you install a memory card, all new images and video
clips are stored on the card, rather than in internal
memory.
To use internal memory and view images stored there,
turn the camera off, then remove the memory card.
Install the software
The HP Photosmart Software provides features for
transferring images and video clips to your computer, as
well as features for modifying stored images (remove red
eyes, rotate, crop, resize, and more).
To install the HP Photosmart Software, your computer
must meet the system requirements as stated on the
camera packaging. To learn about Windows Vista support
for your camera, see www.hp.com/go/windowsvista
(English only).
If you have trouble installing or using the HP Photosmart
Software, see the Hewlett-Packard Technical Support
website for more information: www.hp.com/support.
Windows
1. Close all programs and temporarily disable any virus
protection software.
12 HP Photosmart R930 series Digital Camera
English
Page 13
2. Insert the HP Photosmart Software CD into the CD
drive and follow the on-screen instructions. If the
installation window does not appear, click Start,
click Run, type D:\Setup.exe, where D is the letter of
your CD drive, then click OK.
3. When the software has finished installing, re-enable
virus protection software.
Macintosh
1. Insert the HP Photosmart Software CD into the CD
drive.
2. Double-click the CD icon on the computer desktop.
3. Double-click the installer icon, then follow the on-
screen instructions.
Once installation is complete and you have restarted your
computer, System Preferences automatically opens to
the HP Photosmart Camera settings. You may change
settings so the HP Photosmart Software starts
automatically when you connect your camera to your
Macintosh (for more information, click the help button on
the HP Photosmart Camera settings dialog).
Using the Touch Screen interface
This camera features a Touch
Screen interface that allows you
to access camera menus and
many camera features.
To use the Touch Screen:
• Touch a rounded-corner
touch button (as shown) or
menu item on the Touch Screen. For example,
touching
exits the current screen or menu.
Setting up your camera 13
English
Page 14

• Whenever you are framing an image or video clip, you
can turn off the Touch Screen overlay to view the
display more clearly. Press
to turn off the touch
buttons. Press
again to turn on the touch buttons.
NOTE: Overlay items on the Touch Screen vary
based on the task you are performing.
To reduce smudging and minimize the risk of scratching
the Touch Screen, use the stylus that came with your
camera. For additional tips and information about the
Touch Screen, see the electronic User Guide.
14 HP Photosmart R930 series Digital Camera
English
Page 15
3 Taking pictures and
recording video clips
Slide to either to take pictures or to to
record video clips.
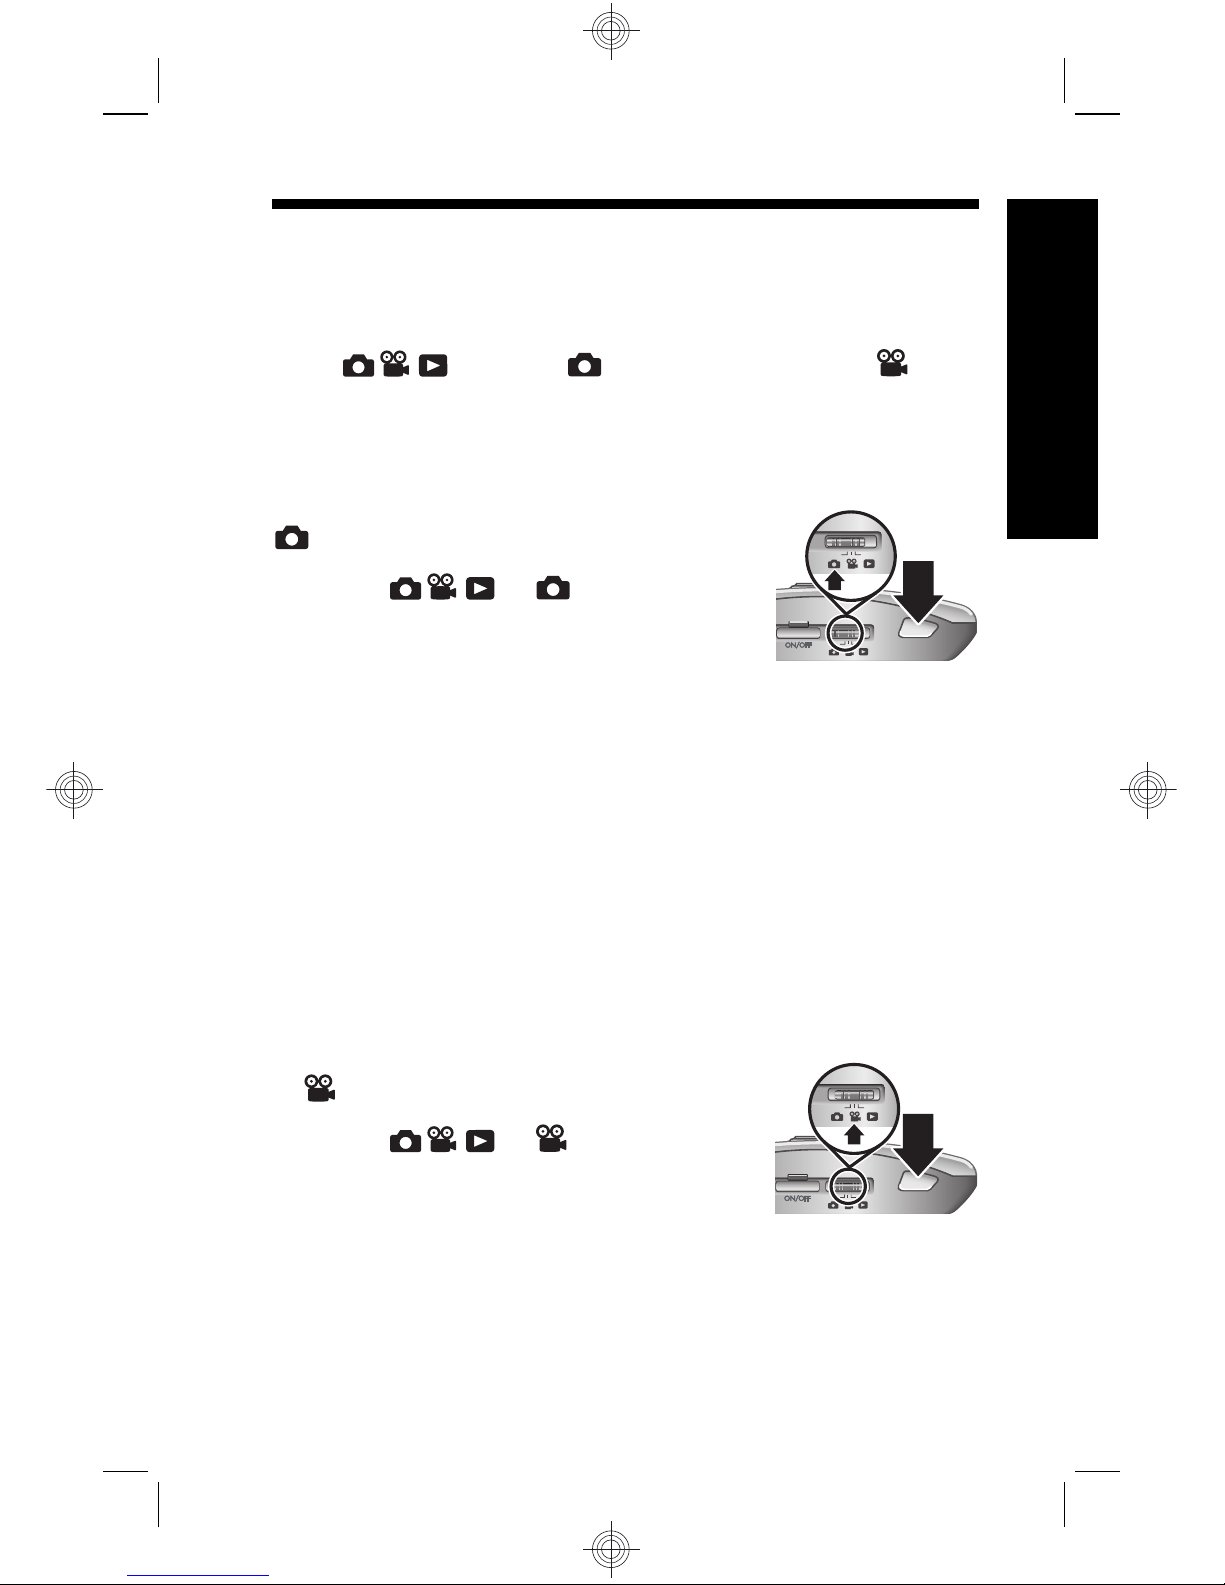
Take a picture
You can take a picture when you are in
Picture Capture.
1. Slide
to .
2. Frame the subject in the Image
Display.
3. Press the Shutter button halfway down to measure
and lock the focus and exposure. The focus brackets
in the Image Display turn solid green when focus is
locked.
4. Press the Shutter button all the way down to take the
picture.
After you have taken a picture, the camera displays it
briefly in the Image Display.
Record a video clip
You can record a video when you are
in
Video Record.
1. Slide
to .
2. Frame the subject in the Image
Display.
3. Press the Shutter button halfway down to measure
focus and exposure. The focus brackets in the Image
Display turn solid green when focus is locked.
Taking pictures and recording video clips 15
English
Page 16

4. Press the Shutter button all the way down and
release to begin recording video.
5. To stop recording video, press and release the
Shutter button again.
After you have recorded a video clip, the camera displays
it briefly in the Image Display.
16 HP Photosmart R930 series Digital Camera
English
Page 17
4 Reviewing and deleting
images and video clips
Review images and video clips
You can review images and video clips in Playback.
1. Slide
to .
2. Touch
or to scroll through your images and video
clips. To play a video clip, touch
in the center of
the displayed video frame.
Delete an image
You can delete individual images during Playback:
1. Slide
to .
2. Touch
or to select an image or video clip.
3.
Touch
to display the Delete menu.
4. Touch This Image.
Reviewing and deleting images and video clips 17
English
Page 18
5 Transferring and printing
images
Transfer images
Use this procedure to transfer images and video clips to
your computer.
NOTE: Transferring a large number of high-
resolution images from a memory card to your
computer may take up to two hours.
1. Turn off the camera.
2. Connect the camera and
computer using the USB cable
that came with your camera.
3. Turn on the camera. When the
Image Display indicates that the
camera is connected to the
computer, follow the
instructions on the computer
screen to transfer the images. If you have installed the
HP Photosmart Software and need more information,
see the Help feature in the HP Photosmart Software.
Print images from the camera
You can connect the camera to any PictBridgecertified printer to print images.
1. Check that the printer is turned on, there is
paper in the printer, and there are no printer
error messages.
18 HP Photosmart R930 series Digital Camera
English
Page 19
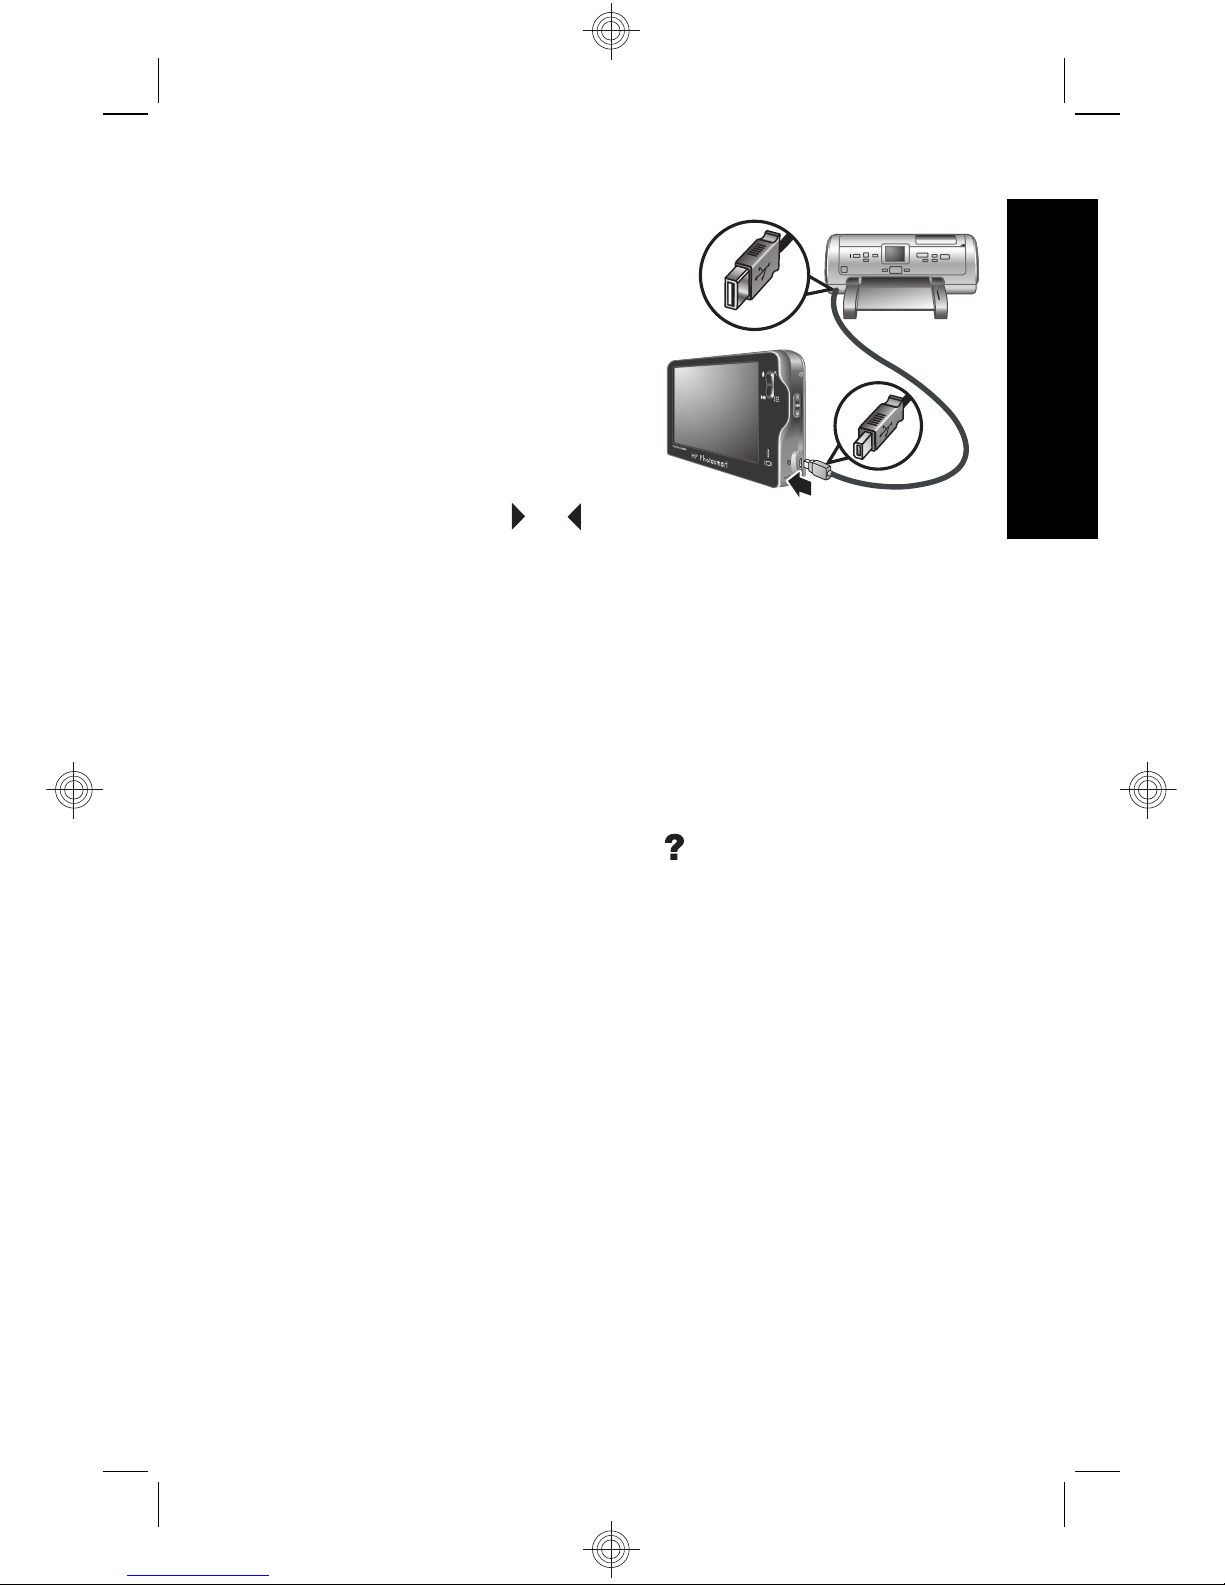
2. Turn off the camera, then
connect the camera and
printer using the USB
cable that came with your
camera.
3. Turn on the camera.
4. When the camera is
connected to the printer,
the Image Display shows
an image. Use
or to
select the image you want to print.
5. Touch Print.
6. Printing... displays on the selected image in the
Image Display to indicate that the image is being
printed.
7. After the printer has printed the image, disconnect the
camera from the printer.
To learn about other printing options, see either the
electronic User Guide or touch
on your camera Image
Display.
Transferring and printing images 19
English
Page 20
6 Camera quick reference
Use this chapter as a quick reference to camera features.
To learn more about these camera features, refer to the
electronic User Guide or on-camera Help.
Picture Capture, Video Record, and Playback
•
Picture Capture allows you to frame pictures in
the Image Display and take pictures. To activate
Picture Capture, slide to .
•
Video Record allows you to frame videos in the
Image Display and record videos. To activate
Video Record, slide to .
•
Playback allows you review and delete images
and video clips. To activate
Playback, slide
to .
Camera Menus
Menus allow you to adjust camera settings, work with
images, and access camera help.
• Within a menu, select an item by touching it. If you see
, this indicates additional menu options. Touch
to see the additional items.
• To save changes and exit the menu, touch the button
in the bottom right corner of the Touch Screen (for
example, Save).
• To access camera help, touch
.
• To cancel or exit a menu, touch
at any time.
Picture Capture Menu—Allows you to adjust camera
settings that affect the characteristics of future images you
capture with your camera. To access this menu, slide
20 HP Photosmart R930 series Digital Camera
English
Page 21
to , then touch Menu. You can select from the
following options:
• Shooting Mode (Auto Mode, Close-Up, Theatre,
Panorama Right, Panorama Left, Landscape,
Portrait, Action, Night Portrait, Beach, Snow, Sunset)
• Flash Setting
•Self-Timer
• Steady Photo
• Adaptive Lighting
• Image Quality
•Burst
•Tag
• Date & Time Imprint
• Exposure Compensation
• Exposure Bracketing
• White Balance
• ISO Speed
• AE Metering
• Camera Setup
Video Record Menu—Allows you to adjust camera
settings that affect the characteristics of future video clips
you record with your camera. To access this menu,
slide
to , then touch Menu. You can select
from the following options:
• Video Quality
•Self-Timer
•Tag
• Exposure Compensation
• White Balance
Camera quick reference 21
English
Page 22
• AE Metering
• Camera Setup
Playback Menu—Allows you to work with images. To
access this menu, slide
to , then touch
Menu. You can select from the following options:
• Design Gallery (Remove Red Eyes, Rotate, Apply
Artistic Effects, Enhance Photos, Modify Color, Add
Borders, Crop)
• Photosmart Express (Print, Share, Buy Prints Online)
•Tag
• View Slideshow
•Stitch Panorama
• Move Images to Card
• Camera Setup
Camera Setup Menu—Allows you to change the
camera's behavior. To access this menu, touch Menu
from
, , or , then touch Camera Setup. You
can select from the following options:
• Display Brightness
• Camera Sounds
• Display Timeout
• Touch Screen Alignment
• Digital Zoom
• Remembered Settings
• Date & Time
• USB Configuration
• Language
Camera Help Menu—Provides descriptions of camera
features and picture-taking tips. To access this menu,
22 HP Photosmart R930 series Digital Camera
English
Page 23

touch from any menu, then touch More topics. You can
select from the following options:
• Top Ten Tips
• Camera Accessories
• Camera Buttons
• Aligning the Touch Screen
• Using Shooting Modes
• Using Design Gallery
• Using Photosmart Express
• Printing Images
• Recording Video Clips
• Reviewing Pictures and Video
• Tagging Images
• Deleting Images
• Transferring Images
• Managing Batteries
• Getting Assistance
• Tour Camera Features
• Camera Shortcuts
• About
Camera quick reference 23
English
Page 24

24 HP Photosmart R930 series Digital Camera
English
Page 25
HP Photosmart R930-serien
digitalkamera
Svenska
Page 26
Juridiska meddelanden
© Copyright 2007 Hewlett-Packard Development Company, L.P.
Informationen i detta dokument kan komma att bli inaktuell utan
föregående meddelande. De enda garantierna för HP:s produkter och
tjänster beskrivs i uttalandena om uttryckt garanti som medföljer sådana
produkter och tjänster. Ingenting i detta dokument skall anses utgöra en
utökning av sådan garanti. HP ansvarar inte för tekniska eller redaktionella
fel eller utelämnad information i detta dokument.
Windows® är ett USA-registrerat varumärke tillhörande Microsoft
Corporation.
SD-logotypen är ett varumärke tillhörande sin ägare.
Kassering av uttjänt utrustning från användare i privathushåll
i Europeiska unionen
Den här symbolen på en produkt eller dess förpackning talar om
att produkten inte får kasseras med det övriga hushållsavfallet. Du
ansvarar för att kassera uttjänt utrustning genom att lämna in den på en
angiven insamlingsplats för återvinning av elektrisk och elektronisk
utrustning. Särskild insamling och återvinning av uttjänt utrustning som
kasseras hjälper till att bevara naturtillgångarna och ser till att utrustningen
återvinns på ett sätt som skyddar människors hälsa och miljö. Om du
önskar mer information om var du kan lämna in uttjänt utrustning för
återvinning, kontakta det lokala stadskontoret, din sophämtningstjänst
eller försäljaren av produkten.
Anteckna följande information för framtida referens:
•
Modellnummer: _________
•
Serienummer: _________
•
Inköpsdatum: _________
Svenska
Page 27

Innehåll
1 Komma igång
Komma åt den elektroniska
användarhandboken...............................................28
Kamerans ovansida, sida och baksida...................30
Kamerans fram- och undersida..............................31
2 Förbereda kameran
Installera batteriet...................................................32
Ladda batteriet.......................................................32
Slå på kameran......................................................33
Välja språk..............................................................33
Ställa in region........................................................33
Ställa in datum och tid............................................33
Installera och formatera ett minneskort
(tillval).....................................................................34
Installera programvaran.........................................35
Windows...........................................................35
Macintosh.........................................................36
Använda pekskärmen.............................................36
3 Ta bilder och spela in videoklipp
Ta en bild................................................................38
Spela in ett videoklipp............................................38
4 Granska och radera bilder och videoklipp
Granska bilder och videoklipp................................40
Radera en bild........................................................40
5 Överföra och skriva ut bilder
Överföra bilder........................................................41
Skriva ut bilder från kameran.................................41
6 Snabbreferens för kameran.................................43
27
Svenska
Page 28
1 Komma igång
I den här tryckta startguiden finner du den information du
behöver för att börja använda de viktigaste funktionerna
på kameran. Detaljerad information om kamerans
funktioner finns i den elektroniska användarhandboken
(se Komma åt den elektroniska användarhandboken
på sidan 28).
Startguide
Elektronisk
användarhandbok
I den här tryckta guiden får
du hjälp att:
• Snabbt börja använda
kameran
• Installera
HP Photosmartprogramvaran
• Bekanta dig med
kamerans
grundfunktioner
Den elektroniska
användarhandboken
innehåller:
• Beskrivningar av alla
kamerans funktioner
• Batteriinformation,
inklusive:
• Hur du förlänger
batteriets driftstid
• En beskrivning av
strömindikatorerna
•Felsökning
• Att få hjälp från HP
• Kameraspecifikationer
Komma åt den elektroniska
användarhandboken
Den elektroniska användarhandboken finns på
HP Photosmart Software CD.
28 HP Photosmart R930-serien digitalkamera
Svenska
Page 29

Så här visar du användarhandboken:
1. Sätt in HP Photosmart Software CD i datorns CD-
enhet.
2. Klicka på Visa användarhandbok på huvudsidan på
installationsskärmen.
Dessutom kopieras den elektroniska
användarhandboken till datorn när du installerar
HP Photosmart-programvaran. Så här visar du
användarhandboken när den har kopierats till datorn:
• På en Windows-dator: Öppna HP Lösningscenter
och klicka på hjälp.
• På en Macintosh-dator: Öppna HP Device
Manager och välj Användarhandbok för kamera i
menyn Information och inställningar.
Att få hjälp
•På www.hp.com hittar du tips och hjälpmedel för att
använda kameran mer effektivt. Härifrån klickar du
på Learn About: Digital Photography (endast på
engelska).
• Om du vill ha produktsupport inklusive uppdateringar
av fast programvara, programvara och drivrutiner,
besök www.hp.com/support.
• Om du behöver hjälp med HP Photosmartprogramvaran, gå till programvarans online-hjälp.
Komma igång 29
Svenska
Page 30
Kamerans ovansida, sida och
baksida
3 5
1 2
4
6
7
8
9
10
11
1 Högtalare.
2 -knapp.
3 Strömlampa.
4 -väljare — Används för att växla mellan
Bildtagning, Videoinspelning och
Uppspelning (se Bildtagning, Videoinspelning och
Uppspelning på sidan 43).
5 Slutarknapp.
6
Zoom-reglage — Används för att nå / Zoom i
Bildtagning eller Videoinspelning samt
Miniatyrer och Förstora i Uppspelning.
30 HP Photosmart R930-serien digitalkamera
Svenska
Page 31

7 USB-uttag.
8 Batteriladdningslampa.
9 Överlägg-knapp — Visar respektive döljer
pekskärmsöverlägget (se Använda pekskärmen på
sidan 36).
10 Pekdon (se Använda pekskärmen på sidan 36).
11 Pekskärm — Används för att rama in motiv i
Bildtagning eller
Videoinspelning och granska
bilder i
Uppspelning samt utgör ett
pekgränssnitt för kamerafunktioner (se Använda
pekskärmen på sidan 36).
Kamerans fram- och undersida
1 32
5 4
1 Blixt.
2 Självutlösar-/fokuseringslampa.
3 Mikrofon.
4 Batteri-/minneskortfack.
5 Stativfäste.
Komma igång 31
Svenska
Page 32

2 Förbereda kameran
Installera batteriet
1. Öppna batteri-/minneskortfacket
genom att skjuta spärren åt sidan enligt
symbolen på luckan.
2. Sätt i batteriet i det större facket och
tryck in det tills det fastnar i spärren.
3. Stäng luckan till batteri-/
minneskortfacket.
Anmärkning Innan du använder batteriet första
gången måste du se till att det är fulladdat. Stäng av
kameran innan du tar ut batteriet.
När du ska ta ut batteriet trycker du på batterispärren
enligt illustrationen tills batteriet lossnar.
Ladda batteriet
Du kan ladda batteriet i kameran med hjälp av USBkabeln och nätadaptern.
Anmärkning Din kamera använder ett
laddningsbart HP Photosmart R07 litiumjonbatteri
(L1812A/L1812B). Ladda ingen annan typ av batteri i
kameran eller snabbladdaren (tillval).
32 HP Photosmart R930-serien digitalkamera
Svenska
Page 33

1. Anslut USB-kabelns lilla kontakt till kameran och den
stora kontakten till nätadaptern enligt illustrationen.
2. Anslut nätadaptern till ett eluttag.
Den blinkande batteriladdningslampan på kameran
indikerar att batteriet håller på att laddas. När
batteriladdningslampan börjar lysa med fast sken är
batteriet fulladdat (efter ca 2-3 timmar).
Slå på kameran
Slå på skrivaren genom att trycka på .
Välja språk
1. Tryck på önskat språk med
fingret eller pekdonet.
2. Tryck på Nästa för att
bekräfta dina inställningar
och visa bilden Region.
Ställa in region
Tillsammans med inställningen
av språk avgör inställningen av
region vilket datumformat som
ska vara standard.
1. Tryck på önskad region.
2. Tryck på Nästa för att
bekräfta dina inställningar
och visa bilden Datum och tid.
Ställa in datum och tid
Om du ställer in korrekt datum och tid kan du lätt hitta dina
bilder när du fört över dem till din dator, och bilderna
Förbereda kameran 33
Svenska
Page 34

kommer att ha korrekt märkning om du använder
funktionen för datum- och tidsstämpel.
1.
Tryck på
eller om du vill
ändra inställningen av
månad, datum och år.
2. Tryck på Nästa för att
bekräfta dina inställningar
och visa bilden Tid.
3.
Tryck på
eller om du vill
ändra inställningen av tid.
4. När alla inställningar är korrekta trycker du på Klar.
Installera och formatera ett
minneskort (tillval)
Denna kamera stöder Secure Digital-minneskort (SD och
SDHC) av både standard-, höghastighets- och
högkapacitetstyp med 32 MB till 8 GB.
1. Stäng av kameran och öppna
batteri-/minneskortfacket.
2. Sätt i minneskortet i det mindre
av facken (se bilden).
Kontrollera att minneskortet
snäpper fast ordentligt.
3. Stäng luckan till batteri-/
minneskortfacket och slå på kameran.
Anmärkning När du slår på kameran med ett
minneskort installerat, visar kameran det antal bilder
som du kan lagra på minneskortet vid den nuvarande
inställningen av Bildkvalitet. Kameran stöder lagring
av maximalt 1999 bilder på ett minneskort.
34 HP Photosmart R930-serien digitalkamera
Svenska
Page 35

Formatera alltid nya minneskort innan du använder dem
första gången. Vid formateringen tas alla bilder bort från
minneskortet. Se därför till att överföra eventuella bilder
innan du formaterar minneskortet.
1. När kameran är påslagen skjuter du
till .
2.
Tryck på
för att visa menyn Radera.
3. Tryck på
för att visa Formatera kort och tryck
sedan på Formatera kort.
4. Tryck på Ja så formateras kortet.
När du installerar ett minneskort lagras alla nya bilder och
videoklipp på kortet i stället för i internminnet.
Du måste ta bort minneskortet om du vill använda
kamerans internminne och visa bilder som sparats där.
Installera programvaran
HP Photosmart-programvaran har funktioner för att
överföra foton och videoklipp till datorn, och även
funktioner för att redigera sparade bilder (ta bort röda
ögon, rotera, beskära, ändra storlek med mera).
För att du ska kunna installera HP Photosmartprogramvaran måste din dator uppfylla de systemkrav
som anges på kameraförpackningen. Om du vill veta mer
om Windows Vista-stöd för kameran, se www.hp.com/
go/windowsvista (endast på engelska).
Om du får problem med att installera eller använda
HP Photosmart-programvaran finns mer information på
Hewlett-Packards webbplats för teknisk support:
www.hp.com/support.
Windows
1. Stäng alla program och inaktivera tillfälligt alla
eventuella antivirusprogram.
Förbereda kameran 35
Svenska
Page 36

2. Sätt i HP Photosmart Software CD i datorns CD-enhet
och följ anvisningarna på skärmen. Om
installationsbilden inte visas klickar du på Start, Kör
och skriver D:\Setup.exe, där D motsvarar
enhetsbokstaven för din CD-enhet. Klicka sedan på
OK.
3. När installationen av programmet är klar ska du
återaktivera antivirusprogrammet.
Macintosh
1. Sätt i HP Photosmart Software CD i datorns CD-
enhet.
2. Dubbelklicka på CD-ikonen på datorns skrivbord.
3. Dubbelklicka på installationsikonen och följ sedan
anvisningarna på skärmen.
När installationen är klar och du har startat om datorn,
öppnas Systeminställningar automatiskt med
inställningarna för HP Photosmart-kamera. Du kan
ändra inställningarna så att HP Photosmartprogramvaran startar automatiskt när du ansluter
kameran till din Macintosh (om du vill veta mer, klickar du
på hjälpknappen i dialogrutan med inställningar för
HP Photosmart-kamera).
Använda pekskärmen
Den här kameran har ett
pekskärmsgränssnitt med vars
hjälp du kan komma åt kamerans
menyer och dess många
funktioner.
Så här använder du
36 HP Photosmart R930-serien digitalkamera
Svenska
Page 37

pekskärmen:
• Tryck på en knapp med rundade hörn (se bilden) eller
ett menyalternativ på pekskärmen. Om du till exempel
trycker på
lämnar du den aktuella bilden eller
menyn.
• När du riktar in kameran mot ett motiv för att ta en bild
eller filma ett videoklipp kan du stänga av
pekskärmsöverlägget så att bilden syns tydligare.
Tryck på
om du vill dölja pekknapparna. Tryck på
igen om du vill visa pekknapparna på nytt.
Anmärkning Pekskärmsöverlägget ser olika ut
beroende på vilken uppgift du håller på med.
Om du vill undvika fläckar och minimera risken för repor
bör du använda det pekdon som medföljde kameran. Om
du vill ha ytterligare tips och information om pekskärmen,
gå till den elektroniska användarhandboken.
Förbereda kameran 37
Svenska
Page 38

3 Ta bilder och spela in
videoklipp
Skjut till antingen om du vill ta bilder eller
om du vill spela in videoklipp.
Ta en bild
Du kan ta en bild när kameran är
inställd på
Bildtagning.
1. Skjut
till .
2. Rama in motivet på bildskärmen.
3. Tryck ned slutarknappen
halvvägs för att mäta och låsa fokuseringen och
exponeringen. Fokusramarna på bildskärmen blir
gröna med heldragna linjer när fokus är låst.
4. Tryck ned slutarknappen helt och hållet för att ta
bilden.
När du tagit en bild visas den en kort stund på kamerans
bildskärm.
Spela in ett videoklipp
Du kan spela in en video i läget
Videoinspelning.
1. Skjut
till .
2. Rama in motivet på bildskärmen.
3. Tryck ned slutarknappen till
hälften så att fokus och exponering mäts och låses.
Fokusramarna på bildskärmen blir gröna med
heldragna linjer när fokus är låst.
38 HP Photosmart R930-serien digitalkamera
Svenska
Page 39

4. Tryck ned slutarknappen hela vägen och släpp den
så startar videoinspelningen.
5. När du vill avsluta inspelningen trycker du ned
slutarknappen och släpper den igen.
När du spelat in ett videoklipp visas det en kort stund på
kamerans bildskärm.
Ta bilder och spela in videoklipp 39
Svenska
Page 40

4 Granska och radera bilder
och videoklipp
Granska bilder och videoklipp
Du kan granska bilder och videoklipp i läget
Uppspelning.
1. Skjut
till .
2. Navigera genom bilder och videoklipp genom att
trycka på
eller . Om du vill spela upp ett videoklipp
trycker du på
i mitten av den visade videorutan.
Radera en bild
Du kan radera enskilda bilder i läget Uppspelning:
1. Skjut
till .
2. Välj bilder eller videoklipp genom att trycka på
eller
.
3.
Tryck på
för att visa menyn Radera.
4. Tryck på Denna bild.
40 HP Photosmart R930-serien digitalkamera
Svenska
Page 41

5 Överföra och skriva ut
bilder
Överföra bilder
Använd den här proceduren när du vill överföra bilder och
videoklipp till datorn.
Anmärkning Att överföra ett stort antal bilder med
hög upplösning från ett minneskort till datorn kan ta
upp till två timmar.
1. Stäng av kameran.
2. Anslut kameran till datorn med
hjälp av den USB-kabel som
medföljde kameran.
3. Slå på kameran. När du får en
indikation på bildskärmen om
att kameran är ansluten till
datorn ska du överföra bilderna
genom att följa anvisningarna
på datorskärmen. Om du har installerat
HP Photosmart-programvaran och behöver mer
information kan du gå till hjälpfunktionen i
HP Photosmart-programvaran.
Skriva ut bilder från kameran
Du kan ansluta kameran direkt till en
PictBridge-certifierad skrivare och skriva ut
stillbilder.
1. Kontrollera att skrivaren är påslagen, att
det finns papper i den och att det inte visas några
felmeddelanden om skrivaren.
Överföra och skriva ut bilder 41
Svenska
Page 42

2. Stäng av kameran och
anslut den sedan till
datorn med hjälp av den
USB-kabel som medföljde
kameran.
3. Slå på kameran.
4. När kameran är ansluten
till skrivaren visar
bildskärmen en bild.
Använd
eller för att
välja den bild du vill skriva ut.
5. Tryck på Skriv ut.
6. Skriver ut... visas på den valda bilden på bildskärmen
för att indikera att bilden håller på att skrivas ut.
7. När skrivaren har skrivit ut bilden ska du koppla bort
kameran från skrivaren.
Om du vill veta mer om andra utskriftsalternativ, gå
antingen till den elektroniska användarhandboken eller
tryck på
på kamerans bildskärm.
42 HP Photosmart R930-serien digitalkamera
Svenska
Page 43

6 Snabbreferens för
kameran
Använd det här kapitlet som en snabbreferens för
kamerafunktionerna. Mer information om kamerans
funktioner finns i den elektroniska användarhandboken
eller i kamerahjälpen.
Bildtagning, Videoinspelning och Uppspelning
•Med
Bildtagning kan du ta bilder med hjälp av
bildskärmen. Du aktiverar
Bildtagning genom att
skjuta
till .
•Med
Videoinspelning kan du spela in videoklipp
med hjälp av bildskärmen. Du aktiverar
Videoinspelning genom att skjuta
till .
•I
Uppspelning kan du granska och radera bilder
och videoklipp. Du aktiverar
Uppspelning genom
att skjuta
till .
Kameramenyer
Med hjälp av menyer kan du justera
kamerainställningarna, arbeta med bilder och nå
kamerahjälpen.
• Du väljer ett menyalternativ genom att trycka på det.
Om det visas en
betyder det att det finns fler
menyalternativ. Tryck på
om du vill se dessa
alternativ.
• Om du vill spara ändringarna och lämna menyn
trycker du på knappen i det nedre högra hörnet av
pekskärmen (exempelvis Spara).
• Om du vill nå kamerahjälpen trycker du på
.
• Om du villa avbryta eller lämna en meny kan du när
som helst trycka på
.
Snabbreferens för kameran 43
Svenska
Page 44

Bildtagningsmeny — Låter dig justera
kamerainställningar som påverkar egenskaperna hos de
bilder som du kommer att ta med kameran i
fortsättningen. Du når denna meny genom att skjuta
till och sedan trycka på Meny. Du kan välja
bland följande alternativ:
• Fotograferingsläge (Auto-läge, Närbild, Teater,
Panorama höger, Panorama vänster, Landskap,
Porträtt, Rörelse, Nattporträtt, Strand, Snö,
Solnedgång)
• Blixtinställning
• Självutlösare
• Bildstabilisering
• Anpassad belysning
• Bildkvalitet
• Bildserie
•Märkning
• Datum- och tidsstämpel
• Kompensation för exponering
• Exponeringsvariation
• Vitbalans
• ISO-hastighet
• AE-mätning
• Kamerakonfiguration
Videoinspelningsmeny — Låter dig justera
kamerainställningar som påverkar egenskaperna hos de
videoklipp som du kommer att spela in med kameran i
fortsättningen. Du når denna meny genom att skjuta
till och sedan trycka på Meny. Du kan välja
bland följande alternativ:
• Videokvalitet
44 HP Photosmart R930-serien digitalkamera
Svenska
Page 45

• Självutlösare
•Märkning
• Kompensation för exponering
• Vitbalans
• AE-mätning
• Kamerakonfiguration
Uppspelningsmeny — Låter dig arbeta med bilderna.
Du når denna meny genom att skjuta
till och
sedan trycka på Meny. Du kan välja bland följande
alternativ:
• Design Gallery (Ta bort röda ögon, Rotera, Använd
effekter, Förbättra foton, Modifiera färg, Lägg till
ramar, Beskär)
• Photosmart Express (Skriv ut, Dela, Beställ kopior
online)
•Märkning
• Visa bildspel
• Sammanfoga panorama
• Flytta bilder till minneskortet
• Kamerakonfiguration
Kamerakonfigurationsmeny — Låter dig ändra
kamerans funktionssätt. Du når denna meny genom att
trycka på Meny från
, eller och därefter välja
Kamerakonfiguration. Du kan välja bland följande
alternativ:
• Ljusstyrka på skärmen
• Kameraljud
• Tidsgräns för bildskärm
• Pekskärmsjustering
• Digital zoom
Snabbreferens för kameran 45
Svenska
Page 46

• Ihågkomna inställningar
• Datum och tid
• USB-konfiguration
• Språk
Kamerahjälpmeny — Ger beskrivningar av kamerans
funktioner samt fotograferingstips. Du når denna meny
genom att trycka på
från valfri meny och därefter trycka
på Fler alternativ. Du kan välja bland följande alternativ:
• Tio bästa tipsen
• Kameratillbehör
• Kameraknappar
• Justera pekskärmen
• Använda fotograferingslägen
• Använda Design Gallery
• Använda Photosmart Express
• Skriva ut bilder
• Spela in videoklipp
• Granska bilder och video
• Märka bilder
• Radera bilder
• Överföra bilder
• Batterihantering
• Att få hjälp
• Rundtur bland kamerans funktioner
• Genvägar i kameran
•Om
46 HP Photosmart R930-serien digitalkamera
Svenska
Page 47

HP Photosmart R930
digitalkameraserien
Dansk
Page 48

Juridiske bemærkninger
© Copyright 2007 Hewlett-Packard Development Company, L.P.
Oplysningerne i dette dokument kan ændres uden varsel. De eneste
garantier for HP-produkter og -tjenester er anført i den udtrykkelige garanti
der følger med sådanne produkter og tjenester. Intet i dette dokument bør
fortolkes således at det udgør en ekstra garanti. HP kan ikke gøres
ansvarlig for tekniske eller redaktionelle fejl eller undladelser i dette
dokument.
Windows® er et amerikansk registreret varemærke tilhørende Microsoft
Corporation.
SD-logoet er et varemærke tilhørende dets ejer.
Bortskaffelse af brugt udstyr fra private husholdninger i EU
Dette symbol på produktet eller emballagen betyder at produktet
ikke må smides ud sammen med det almindelige
husholdningsaffald. Det er dit ansvar at bortskaffe udstyret ved at
indlevere det på en genbrugsstation for elektrisk udstyr. Ved at indlevere
og genbruge udstyret når det skal bortskaffes, hjælper du med at bevare
naturlige ressourcer og sikre at det genbruges på en måde som ikke
skader folkesundheden og miljøet. Du kan få flere oplysninger om hvor du
kan aflevere udstyret til genbrug, hos de lokale myndigheder, den lokale
genbrugsstation eller i butikken hvor du købte produktet.
Skriv følgende informationer ned, så du har dem hvis du skulle få
brug for dem senere:
•
Modelnummer: _________
•
Serienummer: _________
•
Købsdato: _________
Dansk
Page 49

Indhold
1 Sådan kommer du i gang
Sådan åbner du den elektroniske
brugervejledning.....................................................51
Kameraets overside, side og bagside....................52
Kameraets forside og underside............................53
2 Konfiguration af kameraet
Sådan sætter du batteriet i.....................................55
Opladning af batteriet.............................................55
Sådan tænder du for kameraet..............................56
Valg af sprog..........................................................56
Indstilling af område...............................................56
Indstilling af dato og klokkeslæt.............................56
Isætning og formatering af hukommelseskort........57
Installation af softwaren..........................................58
Windows...........................................................59
Macintosh.........................................................59
Brug af den trykfølsomme skærm..........................60
3 Om at tage billeder og optage videoklip
Sådan tager du billeder..........................................61
Sådan optager du et videoklip................................61
4 Visning og sletning af billeder og videoklip
Sådan ser du billeder og videoklip.........................63
Sådan sletter du et billede......................................63
5 Overførsel og udskrivning af billeder
Overførsel af billeder..............................................64
Udskrivning af billeder fra kameraet.......................64
6 Oversigt over kameraets funktioner...................66
49
Dansk
Page 50

1 Sådan kommer du i gang
Denne opsummerende vejledning indeholder de
oplysninger du skal bruge for at komme i gang med at
bruge kameraets væsentligste funktioner. Der er mere
detaljerede oplysninger om kameraets funktioner i den
elektroniske brugervejledning (se Sådan åbner du den
elektroniske brugervejledning på side 51).
Den opsummerende
vejledning
Den elektroniske
brugervejledning
I denne trykte vejledning er
der oplysninger om:
• Hvordan du hurtigt
kommer i gang med at
bruge kameraet
• Installation af
HP Photosmartsoftwaren
• Kameraets
grundliggende
funktioner
I den elektroniske
brugervejledning er der:
• Beskrivelser af alle
kameraets funktioner
• Oplysninger om
batteriet, bl.a:
• Forlængelse af
batterilevetiden
• En beskrivelse af
batteriindikatorerne
• Oplysninger om
fejlretning
• Beskrivelse af hvordan
man får hjælp af HP
• Oplysninger om
kameraets
specifikationer
50 HP Photosmart R930 digitalkameraserien
Dansk
Page 51

Sådan åbner du den elektroniske
brugervejledning
Den elektroniske brugervejledning findes på cd'en
med HP Photosmart-softwaren.
Sådan får du vist brugervejledningen:
1. Sæt cd'en med HP Photosmart-softwaren i
computerens cd-rom-drev.
2. Klik på Vis brugervejledning i installations-cd'ens
hovedskærmbillede.
Den elektroniske brugervejledning overføres også til
computeren når du installerer HP Photosmart-softwaren.
Sådan får du vist brugervejledningen når den er overført
til computeren:
• Windows: Åbn HP Solution Center, og klik derefter
på Hjælp.
• Macintosh: Åbn HP Device Manager, og vælg
Brugervejledning i genvejsmenuen Oplysninger og
indstillinger.
Sådan får du hjælp
•På www.hp.com er der gode råd og værktøjer til at
bruge kameraet mere effektivt. På dette website skal
du klikke på Learn About: Digital Photography
(siden findes kun på engelsk).
•På www.hp.com/support kan du finde hjælp til
produkter, herunder firmware-, driver- og
softwareopdateringer.
• Der er oplysninger om hvordan HP Photosmartsoftwaren bruges, i den elektroniske hjælp.
Sådan kommer du i gang 51
Dansk
Page 52

Kameraets overside, side og
bagside
3 5
1 2
4
6
7
8
9
10
11
1 Højtaler.
2 (knap).
3 Strømindikator.
4 Funktionsomskifter - skifter mellem
Fotografering, Videooptagelse og
Afspilning (se Fotografering, videooptagelse og
afspilning på side 66).
5 Udløser.
6
Zoom (knap) - aktiverer / zoomfunktionen når
kameraet er indstillet til
Fotografering eller
Videooptagelse; aktiverer Miniaturer og
52 HP Photosmart R930 digitalkameraserien
Dansk
Page 53

Forstør når kameraet er indstillet til
Afspilning.
7 Usb-stik.
8 Battteriopladningsindikator.
9 Ikoner (knap) - slår visningen af ikoner på det
trykfølsomme display til og fra (se Brug af den
trykfølsomme skærm på side 60).
10 Pen (se Brug af den trykfølsomme skærm på
side 60).
11 Trykfølsomt display - når kameraet er indstillet til
Fotografering eller Videooptagelse, kan
det bruges som søger, når kameraet er indstillet
til
Afspilning, kan du se billederne på det, og
endelig bruges det til at betjene kameraet (se Brug
af den trykfølsomme skærm på side 60).
Kameraets forside og underside
1 32
5 4
1 Blitz.
2 Indikator for selvudløseren/fokuseringshjælpelyset.
Sådan kommer du i gang 53
Dansk
Page 54

3 Mikrofon.
4 Dæksel til batteriet/hukommelseskortet.
5 Stativgevind.
54 HP Photosmart R930 digitalkameraserien
Dansk
Page 55

2 Konfiguration af kameraet
Sådan sætter du batteriet i
1. Åbn dækslet til batterihuset/
hukommelseskortet ved at skubbe
låsen som vist på dækslet.
2. Sæt batteriet i det største af rummene,
og skub indtil det falder i hak.
3. Luk dækslet til batterihuset/
hukommelseskortet.
Bemærk! Du bør lade batteriet helt op inden det
tages i brug. Husk at slukke kameraet inden du fjerner
batteriet igen.
Når du vil fjerne batteriet, skal du skubbe låsen som vist
på dækslet, så batteriet stikker ud, og det kan tages ud af
batterihuset.
Opladning af batteriet
Du kan lade batteriet op mens det sidder i kameraet, vha.
usb-kablet og strømadapteren.
Bemærk! Der bruges et genopladeligt
HP Photosmart R07-litium-ion-batteri (L1812A/
L1812B) i kameraet. Lad ikke andre batterier op i
kameraet eller lynopladeren.
Konfiguration af kameraet 55
Dansk
Page 56

1. Sæt usb-kablets lille stik i kameraet og det store stik i
strømadapteren, som vist.
2. Slut strømadapteren til en stikkontakt.
Når kameraets batteriindikator blinker, betyder det at
batteriet lades op. Når indikatoren lyser permanent, er
batteriet ladet helt op (efter ca. 2-3 timer).
Sådan tænder du for kameraet
Tryk på for at tænde for kameraet.
Valg af sprog
1. Du kan bruge en finger eller
pennen til at trykke på det
ønskede sprog.
2. Tryk på Næste for at
bekræfte valget og se
indstillingen af Område.
Indstilling af område
Indstillingerne for sprog og
område er afgørende for
datoformatet.
1. Tryk på det ønskede område.
2. Tryk på Næste for at
bekræfte valget og se
indstillingen af Dato og
klokkeslæt.
Indstilling af dato og klokkeslæt
Hvis du indstiller dato og klokkeslæt nøjagtigt, vil det være
nemmere at finde de enkelte billeder når du har overført
dem til computeren. Samtidig er du sikker på at billederne
56 HP Photosmart R930 digitalkameraserien
Dansk
Page 57

påtrykkes det rigtige tidspunkt og klokkeslæt, hvis du
bruger den funktion.
1.
Tryk på
eller for at
indstille måned, dato og
årstal.
2. Tryk på Næste for at
bekræfte valget og gå til
indstillingen af Klokkeslæt.
3.
Tryk på
eller for at
indstille klokkeslættet.
4. Når er færdig med at justere indstillingerne, skal du
trykke på Udført.
Isætning og formatering af
hukommelseskort
Kameraet understøtter både almindelige, High Speed- og
High Capacity-hukommelseskort af typen SD og SDHC
(Secure Digital) mellem 32 MB og 8 GB.
1. Sluk kameraet, og åbn dækslet
til batterihuset/
hukommelseskortet.
2. Sæt hukommelseskortet, der
købes separat, i det mindste af
rummene, som vist. Sørg for at
hukommelseskortet falder i hak.
3. Luk dækslet til batterihuset/hukommelseskortet, og
tænd for kameraet.
Konfiguration af kameraet 57
Dansk
Page 58

Bemærk! Når du tænder kameraet, og der sidder et
hukommelseskort i det, vises det hvor mange billeder
der er plads til på kortet hvis du tager dem med de
nuværende indstillinger for billedkvaliteten. Du kan
højst gemme 1999 billeder på et hukommelseskort
med dette kamera.
Et nyt hukommelseskort skal altid formateres inden det
bruges første gang. Under formateringen slettes alle
billeder på hukommelseskortet, så du skal sørge for først
at overføre dem til computeren.
1. Tænd kameraet, og skub
hen på .
2.
Tryk på
for at åbne menuen Slet.
3. Tryk på
indtil Formatér kortet er markeret, og tryk
så på Formatér kortet.
4. Tryk på Ja for at formatere kortet.
Når du har sat et hukommelseskort i kameraet, gemmes
nye billeder og videoklip på det og ikke i den interne
hukommelse.
Hvis du vil benytte den interne hukommelse eller se de
billeder der evt. er gemt der, skal du først slukke kameraet
og tage hukommelseskortet ud.
Installation af softwaren
HP Photosmart-softwaren rummer funktioner til at
overføre billeder og videoklip til computeren og til at
redigere billeder med (fjerne røde øjne, rotere og beskære
billeder, ændre billedstørrelsen m.v.).
For at kunne installere HP Photosmart-softwaren, skal din
computer opfylde systemkravene, der er angivet på
kameraets emballage. Der er oplysninger om
58 HP Photosmart R930 digitalkameraserien
Dansk
Page 59

understøttelse af Windows Vista på www.hp.com/go/
windowsvista (siden findes kun på engelsk).
Hvis du har problemer med at installere eller bruge
HP Photosmart-softwaren, kan du få hjælp på HP's
website for teknisk support: www.hp.com/support.
Windows
1. Luk alle programmer, og deaktiver antivirus-
softwaren midlertidigt.
2. Sæt cd’en med HP Photosmart-softwaren i
computerens cd-rom-drev, og følg anvisningerne på
skærmen. Hvis installationsprogrammet ikke startes
automatisk, skal du klikke på Start, derefter på Kør,
skrive D:\Setup.exe, hvor D er bogstavbetegnelsen
for dit cd-rom-drev, og endelig klikke på OK.
3. Når softwaren er installeret, skal du huske at aktivere
antivirus-softwaren igen.
Macintosh
1. Sæt cd'en med HP Photosmart-softwaren i cd-rom-
drevet.
2. Dobbeltklik på cd-ikonet på computerens skrivebord.
3. Dobbeltklik på installationsikonet, og følg
anvisningerne på skærmen.
Når installationen er gennemført, og du har genstartet
computeren, åbnes indstillingerne for kameraet
automatisk i Systemindstillinger. Indstillingerne kan
ændres så HP Photosmart-softwaren startes automatisk
når kameraet sluttes til computeren (hvis du vil have flere
oplysninger, kan du klikke på Hjælp i dialogboksen med
indstillingerne for kameraet).
Konfiguration af kameraet 59
Dansk
Page 60

Brug af den trykfølsomme skærm
Dette kamera har en trykfølsom
skærm som bruges til at åbne
kameraets menuer og betjene
mange andre af kameraets
funktioner.
Sådan bruges den trykfølsomme
skærm:
• Tryk på en af knapperne med afrundende hjørner
(som vist) eller et menupunkt på displayet. Hvis du fx
trykker på
, lukkes det viste skærmbillede eller den
viste menu.
• Hvis du bruger displayet som søger når du tager et
billede eller optager et videoklip, kan du slå visningen
af ikonerne på displayet fra, så du bedre kan se
motivet. Tryk på
når du vil skjule knapperne m.v.
på displayet. Tryk på
en gang til når du vil se
knapperne igen.
Bemærk! Knapperne og ikonerne der vises på
displayet, vil variere alt efter hvad du er i gang med.
Hvis du bruger pennen som fulgte med kameraet, undgår
du at displayet bliver ridset og fedtet. Der er flere tip og
oplysninger om den trykfølsomme skærm i den
elektroniske brugervejledning.
60 HP Photosmart R930 digitalkameraserien
Dansk
Page 61

3 Om at tage billeder og
optage videoklip
Skub hen på enten hvis du vil tage billeder,
eller
hvis du vil optage et videoklip.
Sådan tager du billeder
Når kameraet er indstillet til
Fotografering, kan du tage
billeder.
1. Skub
hen på .
2. Sørg for at motivet vises på
displayet.
3. Tryk udløseren halvvejs ned for at måle og låse
afstandsindstillingen og eksponeringstiden. De
firkantede parenteser på displayet bliver grønne når
afstanden er låst.
4. Tryk udløseren helt ned for at tage billedet.
Når du har taget billedet, vises det kort på displayet.
Sådan optager du et videoklip
Når kameraet er indstillet til
Videooptagelse, kan du optage
videoklip.
1. Skub
hen på .
2. Sørg for at motivet vises på
displayet.
3. Tryk udløseren halvvejs ned for at låse
afstandsindstillingen og eksponeringstiden. De
firkantede parenteser på displayet bliver grønne når
afstanden er låst.
Om at tage billeder og optage videoklip 61
Dansk
Page 62

4. Tryk udløseren helt ned og slip den igen, så starter
videooptagelsen.
5. Når du vil stoppe videooptagelsen, skal du atter trykke
på udløseren og slippe den igen.
Når du har optaget videoklippet, vises det kort på
displayet.
62 HP Photosmart R930 digitalkameraserien
Dansk
Page 63

4 Visning og sletning af
billeder og videoklip
Sådan ser du billeder og videoklip
Du kan se billeder og videoklip når kameraet er indstillet
til
Afspilning.
1. Skub
hen på .
2. Tryk på
eller for at gennemse de enkelte billeder
og videoklip. Hvis du vil afspille et videoklip, skal du
trykke på
midt i det viste billede fra videoen.
Sådan sletter du et billede
Du kan slette billeder når kameraet er indstillet til
Afspilning:
1. Skub
hen på .
2. Tryk på
eller for at vælge et billede eller videoklip.
3.
Tryk på
for at åbne menuen Slet.
4. Tryk på Dette billede.
Visning og sletning af billeder og videoklip 63
Dansk
Page 64

5 Overførsel og udskrivning
af billeder
Overførsel af billeder
Du kan bruge følgende metode til at overføre billeder og
videoklip til computeren.
Bemærk! Det kan tage op til 2 timer at overføre
mange billeder med høj opløsning fra
hukommelseskortet til computeren.
1. Sluk kameraet.
2. Slut kameraet til computeren
vha. det medfølgende usbkabel.
3. Tænd for kameraet. Når du kan
se på displayet at der er
etableret forbindelse mellem
kameraet og computeren, skal
du blot følge anvisningerne på
computerskærmen for at overføre billederne. Hvis du
har installeret HP Photosmart-softwaren, er der flere
oplysninger i hjælpen til den.
Udskrivning af billeder fra
kameraet
Kameraet kan sluttes til alle PictBridgekompatible printere, så billederne kan
udskrives.
1. Kontroller at printeren er tændt, at der er
papir i skuffen, og at der ingen fejlmeddelelser er.
64 HP Photosmart R930 digitalkameraserien
Dansk
Page 65

2. Sluk for kameraet, og slut
det til printeren vha. det
medfølgende usb-kabel.
3. Tænd for kameraet.
4. Når kameraet er sluttet til
printeren, vises der et
billede på displayet. Tryk
på
eller for at vælge
det billede der skal
udskrives.
5. Tryk på Udskriv.
6. På displayet står der Udskriver... oven på det valgte
billede som tegn på at det udskrives.
7. Når billedet er udskrevet, kan du afbryde forbindelsen
mellem kameraet og printeren.
Du kan læse mere om de muligheder der findes for
udskrivning, i den elektroniske brugervejledning og ved at
trykke på
på displayet.
Overførsel og udskrivning af billeder 65
Dansk
Page 66

6 Oversigt over kameraets
funktioner
Dette kapitel kan bruges til hurtigt at danne sig et overblik
over kameraets funktioner. Hvis du vil vide mere om disse
funktioner, kan du kigge i den elektroniske
brugervejledning eller i kameraets indbyggede hjælp.
Fotografering, videooptagelse og afspilning
• Når kameraet er indstillet til
Fotografering, kan
du bruge displayet til at stille ind på motivet.
Fotografering aktiveres ved at skubbe
hen på .
• Når kameraet er indstillet til
Videooptagelse, kan
du bruge displayet til at stille ind på motivet.
Videooptagelse aktiveres ved at skubbe
hen på .
• Når indstillingen
Afspilning er aktiveret, kan du se
og slette billeder og videoklip.
Afspilning
aktiveres ved at skubbe
hen på .
Kameramenuer
I menuerne kan du ændre kameraets indstillinger,
bearbejde billederne og aktivere kameraets
hjælpefunktion.
• Du vælger et menupunkt i en menu ved at trykke på
det. Hvis du ser
, betyder det at der er flere
menupunkter. Tryk på
hvis du vil se de andre
punkter.
• Hvis du vil gemme ændringerne og lukke menuen,
skal du trykke på knappen i det nederste højre hjørne
af displayet (fx Gem).
• Hvis du har brug for hjælp, kan du trykke på
.
66 HP Photosmart R930 digitalkameraserien
Dansk
Page 67

• Du lukker menuen ved at trykke på .
I menuen
Fotografering kan du justere de
kameraindstillinger der påvirker hvordan billederne
kommer til at se ud. Du åbner menuen ved at skubbe
hen på og derefter trykke på Menu. Du kan
vælge mellem følgende muligheder:
• Optagefunktioner (Automatisk, Nærbillede, Teater,
Panorama (fra venstre mod højre), Panorama (fra
højre mod venstre), Landskab, Portræt, Action,
Natportræt, Strand, Sne og Solnedgang).
• Blitzindstilling
• Selvudløser
• Billedstabilisering
• Belysningstilpasning
• Billedkvalitet
• Billedserie
•Mærkning
• Trykt dato og klokkeslæt
• Eksponeringskompensation
• Eksponeringsvariation
• Hvidbalance
• ISO-hastighed
• AE-måling
• Konfiguration
I menuen
Videooptagelse kan du justere de
kameraindstillinger der påvirker hvordan de videoklip som
optages fremover, kommer til at se ud. Du åbner menuen
ved at skubbe
hen på og derefter trykke på
Menu. Du kan vælge mellem følgende muligheder:
• Videokvalitet
Oversigt over kameraets funktioner 67
Dansk
Page 68

• Selvudløser
•Mærkning
• Eksponeringskompensation
• Hvidbalance
• AE-måling
• Konfiguration
I menuen
Afspilning kan du arbejde med billederne.
Du åbner menuen ved at skubbe
hen på og
derefter trykke på Menu. Du kan vælge mellem følgende
muligheder:
• Design (Fjern røde øjne, Roter, Anvend kunstneriske
effekter, Forbedring af billederne, Farveændring,
Tilføj ramme, Beskæring)
• Photosmart Express (Udskriv, Deling, Bestil billeder
online)
•Mærkning
• Se lysbilledshow
• Saml panoramasekvensen
• Flyt billeder til kort
• Konfiguration
I menuen
Konfiguration kan du ændre den måde
kameraet fungerer på. Du åbner menuen ved at trykke
på Menu mens kameraet er indstillet til enten
, eller
, og derefter trykke på Konfiguration. Du kan vælge
mellem følgende muligheder:
• Displayets lysstyrke
• Kameralyde
• Sluk displayet efter:
• Kalibrering af trykfølsom skærm
•Digital zoom
68 HP Photosmart R930 digitalkameraserien
Dansk
Page 69

• Gemte indstillinger
• Dato og klokkeslæt
• Usb-konfiguration
•Sprog
I menuen
Hjælp kan du finde beskrivelser af kameraets
funktioner og gode råd om at tage billeder. Du kan åbne
den fra alle menuer ved at trykke på
og derefter Flere
emner. Du kan vælge mellem følgende muligheder:
• Ti gode råd
• Kameratilbehør
• Kameraets knapper
• Kalibrering af den trykfølsomme skærm
• Brug af optagefunktioner
• Brug af menuen Design
• Brug af Photosmart Express
• Udskrivning af billeder
• Optagelse af videoklip
• Gennemsyn af billeder og videoklip
• Mærkning af billeder
• Sletning af billeder
• Overførsel af billeder
• Håndtering af batterier
• Sådan får du hjælp
• Gennemgang af kameraets funktioner
• Kameragenveje
•Om
Oversigt over kameraets funktioner 69
Dansk
Page 70

70 HP Photosmart R930 digitalkameraserien
Dansk
Page 71

Digitalkamera i HP Photosmart
R930-serien
Norsk
Page 72

Juridiske merknader
© Copyright 2007 Hewlett-Packard Development Company, L.P.
Informasjonen i dette dokumentet kan endres uten forvarsel. De eneste
garantiene for produkter og tjenester fra HP er angitt i garantierklæringene
som følger med slike produkter eller tjenester. Ingenting i dette
dokumentet kan tolkes som en tilleggsgaranti. HP er ikke
erstatningsansvarlig for tekniske eller andre typer feil eller utelatelser i
dette dokumentet.
Windows® er et registrert varemerke i USA for Microsoft Corporation.
SD-logoen er et varemerke for eieren.
Avhending av gammelt utstyr av brukere i private
husholdninger i Den europeiske union
Dette symbolet på produktet eller emballasjen indikerer at
produktet ikke må kastes sammen med husholdningsavfall. I
stedet er det ditt ansvar å avhende det gamle utstyret ved å levere det til
en miljøstasjon eller et utpekt innsamlingssted for resirkulering av gammelt
elektrisk og elektronisk utstyr. Særskilt innsamling og resirkulering av det
gamle utstyret ved avhending vil bidra til bevaring av naturressurser og
sørge for at utstyret blir resirkulert på en måte som beskytter folkehelsen
og miljøet. Ta kontakt med kommunale myndigheter,
renovasjonsselskapet der du bor eller forretningen hvor du kjøpte
produktet for å få mer informasjon om hvor du skal levere det gamle
utstyret til resirkulering.
Fyll ut disse opplysningene slik at du har dem tilgjengelig:
•
Modellnummer: _________
•
Serienummer: _________
•
Kjøpsdato: _________
Norsk
Page 73

Innhold
1 Komme i gang
Åpne den elektroniske brukerhåndboken...............74
Kameraets topp, side og bakside...........................76
Kameraets front og underside................................77
2 Klargjøre kameraet
Sette inn batteriet...................................................79
Lade batteriet.........................................................79
Slå på kameraet.....................................................80
Velge språk............................................................80
Angi region.............................................................80
Angi dato og klokkeslett.........................................80
Installere og formatere ekstra minnekort................81
Installere programvare...........................................82
Windows...........................................................82
Macintosh.........................................................83
Bruke berøringsgrensesnittet.................................83
3 Ta bilder og gjøre videoopptak
Ta bilder.................................................................85
Gjøre videoopptak..................................................85
4 Se på og slette bilder og videoklipp
Se på bilder og videoopptak...................................87
Slette bilder............................................................87
5 Overføre og skrive ut bilder
Overføre bilder.......................................................88
Skrive ut bilder fra kameraet..................................88
6 Hurtigreferanse for kamera.................................90
73
Norsk
Page 74

1 Komme i gang
Denne trykte hurtigreferansen inneholder informasjonen
du trenger for å komme i gang og bruke de viktigste
funksjonene til kameraet. Du finner detaljert informasjon
om kamerafunksjoner i den elektroniske brukerhåndboken (se Åpne den elektroniske brukerhåndboken
på side 74).
Hurtigreferanse
Elektronisk
brukerhåndbok
Den trykte håndboken vil
hjelpe deg med følgende:
• Komme raskt i gang
med å bruke kameraet
• Installere
HP Photosmartprogramvaren
• Gjør deg kjent med
kameraets
grunnleggende
funksjoner
Den elektroniske
brukerhåndboken
inneholder:
• Beskrivelser av alle
kamerafunksjoner
• Batteriinformasjon,
inkludert:
• forlenget driftstid
• en beskrivelse av
strømindikatorikonene
• Problemløsing
• Få hjelp fra HP
• Kameraspesifikasjoner
Åpne den elektroniske
brukerhåndboken
Den elektroniske brukerhåndboken finnes på
HP Photosmart Software CD.
74 Digitalkamera i HP Photosmart R930-serien
Norsk
Page 75

Slik åpner du brukerhåndboken:
1. Sett inn HP Photosmart Software CD i datamaskinens
CD-stasjon.
2. Klikk på Vis brukerhåndbok på hovedsiden til
installeringsbildet.
Den elektroniske brukerhåndboken blir også kopiert til
datamaskinen når du installerer HP Photosmartprogramvaren. Slik åpner du brukerhåndboken etter at
den er installert på datamaskinen:
• Windows: Åpne HP Løsningssenter og klikk på
Hjelp.
• Macintosh: Åpne HP Device Manager og velg
Camera User Guide (kameraets brukerhåndbok) fra
lokalmenyen Information and Settings (informasjon
og innstillinger).
Få hjelp
• Du finner tips og verktøy for mer effektiv bruk av
kameraet på nettstedet www.hp.com. Her velger
du Learn About: Digital Photography (bare på
engelsk).
• Når det gjelder produktstøtte, inkludert oppdateringer
av fastvare, programvare og drivere, se
www.hp.com/support.
• Se programvarens elektroniske hjelp for å få hjelp til
HP Photosmart-programvaren.
Komme i gang 75
Norsk
Page 76

Kameraets topp, side og bakside
3 5
1 2
4
6
7
8
9
10
11
1 Høyttaler
2 -knapp
3 Strømlampe
4 -velger - Veksler mellom
Fotografering, Videoopptak og
Avspilling (se Fotografering, Videoopptak og
Avspilling på side 90).
5 Lukker-knapp
6
Zoom-spak - Gir tilgang til / Zoom-funksjonen
i
Fotografering- og Videoopptak-modus,
gir tilgang til funksjonene
Miniatyrer og
Forstørr i Avspilling-modus.
76 Digitalkamera i HP Photosmart R930-serien
Norsk
Page 77

7 USB-kontakt
8 Batteriladelampe
9 Overlegg-knapp - Slår overlegg på
berøringsskjermen på og av (se Bruke
berøringsgrensesnittet på side 83).
10 Penn (se Bruke berøringsgrensesnittet på
side 83)
11 Berøringsskjerm - Finner utsnittet for bilder i
Fotografering- og Videoopptak-modus,
viser bilder i
Avspilling-modus og sørger for et
berøringsgrensesnitt for betjening av kameraet
(se Bruke berøringsgrensesnittet på side 83).
Kameraets front og underside
1 32
5 4
1 Blits
2 Selvutløser/fokushjelpelampe
3 Mikrofon
4 Batteri-/minnekortdeksel
Komme i gang 77
Norsk
Page 78

5 Feste for stativ
78 Digitalkamera i HP Photosmart R930-serien
Norsk
Page 79

2 Klargjøre kameraet
Sette inn batteriet
1. Åpne batteri-/minnekortdekselet ved å
skyve dekselsperren som angitt på
batteri-/minnekortdekselet.
2. Sett batteriet i det største sporet, og
skyv det inn til det smekker på plass.
3. Lukk batteri-/minnekortdekselet.
Merk Sørg for å fullade batteriet før du tar det i bruk.
Slå kameraet av før du tar ut batteriet.
Når du skal ta ut batteriet, beveger du batterisperren i
angitt retning til batteriet frigjøres.
Lade batteriet
Du kan lade batteriet i kameraet ved å bruke USB-kabelen
og strømadapteren.
Merk Kameraet bruker et oppladbart HP Photosmart
R07 litiumionbatteri (L1812A/L1812B). Ikke lade noe
annet batteri i kameraet eller hurtigladeren
(tilleggsutstyr).
Klargjøre kameraet 79
Norsk
Page 80

1. Koble den lille enden av USB-kabelen i kameraet og
den store enden i strømadapteren, som vist.
2. Koble strømadapteren til en stikkontakt.
En blinkende batteriladelampe på kameraet indikerer at
batteriet lades. Batteriet er fulladet når ladelampen lyser
(etter ca. 2 til 3 timer).
Slå på kameraet
Trykk på -knappen for å slå kameraet på.
Velge språk
1. Berør språket du ønsker med
fingeren eller pennen.
2. Berør Neste for å bekrefte
valget og vise Region-
skjermbildet.
Angi region
Sammen med Språk-innstillingen
bestemmer Region-innstillingen
standardformatet for datoer.
1. Berør regionen du ønsker.
2. Berør Neste for å bekrefte
valget og vise Dato og
klokkeslett-skjermbildet.
Angi dato og klokkeslett
En nøyaktig innstilling av dato og klokkeslett vil gjøre det
enklere å finne bilder når du har overført dem til
80 Digitalkamera i HP Photosmart R930-serien
Norsk
Page 81

datamaskinen, og vil sørge for at de er nøyaktig merket
hvis du bruker dato- og tidsstempelfunksjonen.
1.
Berør
eller for å endre
dag, måned og år.
2. Berør Neste for å bekrefte
innstillingene og vise
Klokkeslett-skjermbildet.
3.
Berør
eller for å endre
klokkeslettet.
4. Når alle innstillingene er riktige, berører du Ferdig.
Installere og formatere ekstra
minnekort
Dette kameraet støtter standard, høyhastighets og
høykapasitets Secure Digital-minnekort (SD og SDHC)
fra 32 MB til 8 GB.
1. Slå kameraet av og åpne
batteri-/minnekortdekselet.
2. Sett inn det ekstra minnekortet i
det lille sporet, som vist. Sørg
for at minnekortet smekker på
plass.
3. Lukk batteri-/minnekortdekselet
og slå kameraet på.
Merk Når du slår på kameraet og har satt inn et
minnekort, angir kameraet hvor mange bilder du kan
lagre på minnekortet med gjeldende Bildekvalitet-
innstilling. Dette kameraet støtter lagring av
maksimalt 1999 bilder på et minnekort.
Nye minnekort må alltid formateres før de brukes første
gang. Formatering fjerner alle bilder fra minnekortet, så
Klargjøre kameraet 81
Norsk
Page 82

pass på at du overfører eksisterende bilder før du
formaterer.
1. Skyv
til mens kameraet er slått på.
2.
Berør
for å vise Slett-menyen.
3. Berør
til å vise Formater kort, og berør deretter
Formater kort.
4. Berør Ja for å formatere kortet.
Når du setter inn et minnekort, blir alle nye bilder og
videoopptak lagret på kortet og ikke i internminnet.
Hvis du vil bruke internminnet og se på bilder som er lagret
der, slår du kameraet av og tar ut minnekortet.
Installere programvare
HP Photosmart-programvaren inneholder funksjoner for
å overføre bilder og videoklipp til datamaskinen, og
funksjoner for å endre lagrede bilder (fjerne røde øyne,
rotere, beskjære, endre størrelse og så videre).
For at du skal kunne installere HP Photosmartprogramvaren må datamaskinen oppfylle systemkravene
som er angitt på kameraets emballasje. Du kan lese om
Windows Vista-støtten for kameraet på nettstedet
www.hp.com/go/windowsvista (bare på engelsk).
Hvis du har problemer med å installere eller bruke
HP Photosmart-programvaren, finner du mer informasjon
på Hewlett-Packards nettsted for teknisk støtte:
www.hp.com/support.
Windows
1. Lukk alle programmer og deaktiver eventuell
antivirusprogramvare midlertidig.
82 Digitalkamera i HP Photosmart R930-serien
Norsk
Page 83

2. Sett inn HP Photosmart Software CD i CD-stasjonen,
og følg veiledningen på skjermen. Hvis installeringsvinduet ikke vises, klikker du på Start og Kjør,
skriver D:\Setup.exe (der D er bokstaven til CDstasjonen) og klikker på OK.
3. Når programvaren er ferdig installert, aktiverer du
antivirusprogramvaren igjen.
Macintosh
1. Sett inn HP Photosmart Software CD i CD-stasjonen.
2. Dobbeltklikk på CD-ikonet på datamaskinens
skrivebord.
3. Dobbeltklikk på ikonet til installeringsprogrammet, og
følg veiledningen på skjermen.
Når installeringen er fullført og du har omstartet
datamaskinen, åpnes Systeminnstillinger automatisk
med innstillingene for HP Photosmart-kamera. Du kan
endre innstillingene slik at HP Photosmart-programvaren
startes automatisk når du kobler kameraet til Macintoshmaskinen (klikk på Hjelp i dialogboksen med innstillinger
for HP Photosmart-kamera for å få mer informasjon).
Bruke berøringsgrensesnittet
Dette kameraet har et
berøringsgrensesnitt som gir
deg tilgang til kameraets menyer
og mange kamerafunksjoner.
Slik bruker du
berøringsskjermen:
• Berør en berøringsknapp
med avrundede hjørner (som vist) eller et menyvalg
på berøringsskjermen. Du går for eksempel ut av det
aktuelle skjermbildet eller menyen ved å berøre
.
Klargjøre kameraet 83
Norsk
Page 84

• Når du finner utsnittet for et bilde eller videoklipp, kan
du slå av berøringsskjermoverlegget for å få et
tydeligere bilde på skjermen. Trykk på
for å slå av
berøringsknappene. Trykk på
igjen for å slå på
berøringsknappene.
Merk Overleggselementene på berøringsskjermen
varierer alt etter hva du holder på med.
Bruk pennen som fulgte med kameraet, for å unngå
flekker og redusere faren for riper i berøringsskjermen til
et minimum. Du finner flere tips og mer informasjon om
berøringsskjermen i den elektroniske brukerhåndboken.
84 Digitalkamera i HP Photosmart R930-serien
Norsk
Page 85

3 Ta bilder og
gjøre videoopptak
Skyv til enten for å ta bilder eller til for å
ta opp videoklipp.
Ta bilder
Du kan ta bilder når kameraet er i
Fotografering-modus.
1. Skyv
til .
2. Finn utsnittet på bildeskjermen.
3. Trykk Lukker-knappen halvveis
ned for å måle og låse fokus og eksponering.
Fokusklammene på bildeskjermen lyser grønt når
fokus er låst.
4. Trykk Lukker-knappen helt ned for å ta bildet.
Når du har tatt et bilde, viser kameraet det et kort øyeblikk
på bildeskjermen.
Gjøre videoopptak
Du kan ta opp video når
Videoopptak er valgt.
1. Skyv
til .
2. Finn utsnittet på bildeskjermen.
3. Trykk Lukker-knappen halvveis
ned for å måle fokus og eksponering.
Fokusklammene på bildeskjermen lyser grønt når
fokus er låst.
4. Trykk Lukker-knappen helt ned og slipp den for å
starte videoopptaket.
Ta bilder og gjøre videoopptak 85
Norsk
Page 86

5. Du stopper videoopptaket ved å trykke på og slippe
Lukker-knappen igjen.
Når du har tatt opp et videoklipp, viser kameraet det et
kort øyeblikk på bildeskjermen.
86 Digitalkamera i HP Photosmart R930-serien
Norsk
Page 87

4 Se på og slette
bilder og videoklipp
Se på bilder og videoopptak
Du kan se på bilder og videoklipp ved Avspilling.
1. Skyv
til .
2. Berør
eller for å bla gjennom bildene og
videoklippene. Hvis du vil spille av et videoklipp,
berører du
midt på det viste videobildet.
Slette bilder
Du kan slette enkeltbilder ved Avspilling:
1. Skyv
til .
2. Berør
eller for å velge et bilde eller videoklipp.
3.
Berør
for å vise Slett-menyen.
4. Berør Dette bildet.
Se på og slette bilder og videoklipp 87
Norsk
Page 88

5 Overføre og
skrive ut bilder
Overføre bilder
Bruk denne fremgangsmåten for å overføre bilder og
videoklipp til datamaskinen.
Merk Overføring av et stort antall bilder med høy
oppløsning fra et minnekort til datamaskinen kan ta
opptil to timer.
1. Slå kameraet av.
2. Koble kameraet til
datamaskinen med USBkabelen som fulgte med
kameraet.
3. Slå kameraet på. Når
bildeskjermen viser at kameraet
er koblet til datamaskinen,
følger du veiledningen på
dataskjermen for å overføre bildene. Hvis du har
installert HP Photosmart-programvaren og trenger
mer informasjon, bruker du hjelpefunksjonen i
HP Photosmart-programvaren.
Skrive ut bilder fra kameraet
Du kan koble kameraet til en PictBridgesertifisert skriver for å skrive ut bilder.
1. Kontroller at skriveren er slått på, at det er
papir i skriveren og at den ikke viser
feilmeldinger.
88 Digitalkamera i HP Photosmart R930-serien
Norsk
Page 89

2. Slå kameraet av og koble
det til skriveren ved hjelp
av USB-kabelen som
fulgte med kameraet.
3. Slå kameraet på.
4. Når kameraet er koblet til
skriveren, viser
bildeskjermen et bilde.
Berør
eller for å velge
bildet du vil skrive ut.
5. Berør Skriv ut.
6. Teksten Skriver ut... vises over det valgte bildet på
bildeskjermen for å angi at bildet blir skrevet ut.
7. Når skriveren har skrevet ut bildet, kobler du kameraet
fra skriveren.
Hvis du vil vite mer om andre utskriftsvalg, kan du se i den
elektroniske brukerhåndboken eller
på kameraets
bildeskjerm.
Overføre og skrive ut bilder 89
Norsk
Page 90

6 Hurtigreferanse
for kamera
Bruk dette kapitlet som en hurtigreferanse til kameraets
funksjoner. Du kan lære mer om disse kamerafunksjonene i den elektroniske brukerhåndboken eller
kameraets hjelp.
Fotografering, Videoopptak og Avspilling
•
Fotografering gir deg mulighet til å finne utsnittet
for bilder på bildeskjermen og ta bilder. Du aktiverer
Fotografering ved å skyve til .
•
Videoopptak gir deg mulighet til å finne utsnittet
for video på bildeskjermen og ta opp video. Du
aktiverer
Videoopptak ved å skyve til
.
•
Avspilling gir deg mulighet å se på og slette bilder
og videoklipp. Du aktiverer
Avspilling ved å skyve
til .
Kameraets menyer
Via menyene kan du endre kamarainnstillinger, arbeide
med bilder og bruke kameraets hjelpefunksjon.
• Du gjør valg på menyene ved å berøre dem. Hvis du
ser
, angir det at det finnes flere menyvalg. Berør
for å få frem flere valg.
• Når du skal lagre endringer og avslutte menyen,
berører du knappen nede i høyre hjørne av
berøringsskjermen (for eksempel Lagre).
• Hvis du ønsker hjelp til kameraet, berører du
.
• Hvis du vil avbryte eller gå ut av en meny, berører du
når som helst.
90 Digitalkamera i HP Photosmart R930-serien
Norsk
Page 91

Fotograferingsmeny - Gir deg mulighet til å endre
kamerainnstillinger som har betydning for egenskapene
til bilder du tar med kameraet etterpå. Du åpner denne
menyen ved å skyve
til , og berører Meny. Du
kan velge blant følgende alternativer:
• Fotograferingsmodus (Autom. modus, Nærbilde,
Teater, Panorama høyre, Panorama venstre,
Landskap, Portrett, Bevegelse, Nattportrett, Strand,
Snø, Solnedgang)
• Blitsinnstilling
• Selvutløser
• Bildestabilisering
• Tilpasset lyssetting
• Bildekvalitet
• Bildeserie
• Merkelapp
• Dato- og tidsstempel
• Eksponeringskompensasjon
• Alternative eksponeringer
• Hvitbalanse
• ISO-hastighet
• AE-måling
• Kameraoppsett
Videoopptaksmeny - Gir deg mulighet til å endre
kamerainnstillinger som har innvirkning på egenskapene
til videoklippene du skal ta opp med kameraet. Du åpner
denne menyen ved å skyve
til , og berører
Meny. Du kan velge blant følgende alternativer:
• Videokvalitet
• Selvutløser
Hurtigreferanse for kamera 91
Norsk
Page 92

•Merkelapp
• Eksponeringskompensasjon
• Hvitbalanse
• AE-måling
• Kameraoppsett
Avspillingsmeny - Gir deg mulighet til å arbeide med
bilder. Du åpner denne menyen ved å skyve
til
, og berører Meny. Du kan velge blant følgende
alternativer:
• Designgalleri (Fjern røde øyne, Roter, Bruk
kunstneriske effekter, Forbedre fotografier, Endre
farger, Legg til rammer, Beskjær)
• Photosmart Express (Skriv ut, Del, Kjøp papirbilder
online)
•Merkelapp
• Vis lysbildevisning
• Sett sammen panorama
• Flytt bilder til kort
• Kameraoppsett
Oppsettmeny - Gir deg mulighet til å tilpasse
kameraets virkemåte. Du åpner denne menyen ved å
berøre Meny fra
, eller og deretter
Kameraoppsett. Du kan velge blant følgende
alternativer:
• Skjermens lysstyrke
• Kameralyd
• Skjermutkobling
• Justering av berøringsskjerm
•Digital zoom
• Lagrede innstillinger
92 Digitalkamera i HP Photosmart R930-serien
Norsk
Page 93

• Dato og klokkeslett
• USB-konfigurasjon
•Språk
Hjelpemeny - Inneholder beskrivelser av
kamerafunksjoner og tips om å ta bilder. For å få tilgang
til denne menyen berører du
fra en hvilken som helst
meny, og deretter Flere emner. Du kan velge blant
følgende alternativer:
• De beste tipsene
• Kameratilbehør
• Kameraknapper
• Justere berøringsskjermen
• Bruke fotograferingsmodi
• Bruke Designgalleri
• Bruke Photosmart Express
• Skrive ut bilder
• Ta opp videoklipp
• Se gjennom bilder og video
• Merke bilder
• Slette bilder
• Overføre bilder
• Håndtere batterier
• Få hjelp
• Om kamerafunksjonene
• Kamerasnarveier
•Om
Hurtigreferanse for kamera 93
Norsk
Page 94

94 Digitalkamera i HP Photosmart R930-serien
Norsk
Page 95

HP Photosmart R930 -sarjan
digitaalikamera
Suomi
Page 96

Oikeudelliset ilmoitukset
© Copyright 2007 Hewlett-Packard Development Company, L.P.
Tämän asiakirjan sisältämät tiedot voivat muuttua ilman
ennakkoilmoitusta. HP:n tuotteiden ja palveluiden takuut määritellään
niiden mukana toimitettavissa rajoitetun takuun lausekkeissa. Mikään
tässä mainittu ei muodosta kattavampaa lisätakuuta. HP ei ole vastuussa
tämän aineiston teknisistä tai toimituksellisista virheistä eikä puutteista.
Windows® on Microsoft Corporationin Yhdysvalloissa rekisteröity
tavaramerkki.
SD-logo on omistajansa tavaramerkki.
Yksityiskotien jätteiden hävitys Euroopan unionin alueella
Tämä symboli tuotteessa tai sen pakkauksessa kertoo, että
tuotetta ei saa hävittää kotitalousjätteen joukossa. Sen sijaan
käyttäjän velvollisuus on hävittää tuote toimittamalla se
tarkoitukseen osoitettuun sähkö- tai elektroniikkajätteen
kierrätyspisteeseen. Hävitettävän laitteen keräys ja kierrätys
hävitysaikana auttaa säästämään luonnonvaroja ja takaamaan, että laite
kierrätetään tavalla, joka suojelee ihmisten terveyttä ja ympäristöä.
Lisätietoja paikoista, jonne hävitettävä laite voidaan jättää kierrätettäväksi,
saa kunnasta, jätehuoltopalvelusta huolehtivasta yrityksestä tai
myymälästä, josta tuote on ostettu.
Kirjoita seuraavat tiedot tulevia tarpeita varten:
•
Mallinumero: _________
•
Sarjanumero: _________
•
Ostopäivä: _________
Suomi
Page 97

Sisältö
1 Aloitus
Sähköisen käyttöoppaan käyttäminen....................98
Kameran yläosa, sivu ja takaosa..........................100
Kameran etupuoli ja pohja....................................101
2 Kameran ottaminen käyttöön
Akun asentaminen................................................103
Akun lataaminen...................................................103
Virran kytkeminen kameraan................................104
Kielen valitseminen..............................................104
Alueen määrittäminen..........................................105
Päivämäärän ja kellonajan asettaminen...............105
Valinnaisen muistikortin asentaminen ja
alustaminen..........................................................106
Ohjelmiston asentaminen.....................................107
Windows.........................................................107
Macintosh.......................................................108
Kosketusnäytön käyttäminen...............................108
3 Kuvien ottaminen ja videoleikkeiden
tallentaminen
Kuvan ottaminen..................................................110
Videoleikkeen tallentaminen.................................110
4 Kuvien ja videoleikkeiden katselu ja poistaminen
Kuvien ja videoleikkeiden katselu.........................112
Kuvan poistaminen...............................................112
5 Kuvien siirtäminen ja tulostaminen
Kuvien siirtäminen................................................113
Kuvien tulostaminen kamerasta...........................113
6 Kameran pikaohje..............................................115
97
Suomi
Page 98

1 Aloitus
Tämä painettu Pikaopas sisältää tietoja kamerasi
tärkeimmistä ominaisuuksista, joiden avulla voit aloittaa
käytön. Yksityiskohtaisia tietoja kameran ominaisuuksista
löydät sähköisestä käyttöoppaasta (katso Sähköisen
käyttöoppaan käyttäminen, sivu 98).
Pikaopas
Sähköinen käyttöopas
Tämän painetun oppaan
avulla voit
• aloittaa kameran
käytön nopeasti
• asentaa
HP Photosmart -ohjelm
iston
• tutustua kamerasi
perustoimintoihin.
Sähköinen käyttöopas
sisältää seuraavat osat:
• Kaikkien kameran
toimintojen kuvaukset
• Akkutiedot, mukaan
lukien
• Akun keston
pidentäminen
• Virran merkkivalo-
kuvakkeiden
kuvaus
• Vianmääritys
• Avun saaminen HP:ltä
• Kameran tekniset
tiedot
Sähköisen käyttöoppaan
käyttäminen
Sähköinen käyttöopas on HP Photosmart Software
CD -levyllä.
98 HP Photosmart R930 -sarjan digitaalikamera
Suomi
Page 99

Käyttöoppaan lukeminen:
1. Aseta HP Photosmart Software CD -levy tietokoneen
CD-asemaan.
2. Napsauta asennusikkunan pääsivulla olevaa Lue
käyttöopas -painiketta.
Sähköinen käyttöopas kopioituu myös tietokoneellesi,
kun asennat HP Photosmart -ohjelmiston. Tietokoneelle
asennetun käyttöoppaan lukeminen:
• Windows: Avaa HP:n ratkaisukeskus ja valitse
ohje.
• Macintosh: Avaa HP:n laitehallinta ja valitse Tiedot
ja asetukset -ponnahdusvalikosta Kameran
käyttöopas.
Avun saaminen
• Vihjeitä ja työkaluja kameran tehokkaampaan
käyttöön saat sivustosta www.hp.com. Valitse sieltä
linkki Learn About: Digital Photography (vain
englanniksi).
• Jos tarvitset tuotetukea, mukaan lukien
laiteohjelmiston, ohjelmiston ja ajurien päivitykset,
siirry osoitteeseen www.hp.com/support.
• HP Photosmart -ohjelmiston käyttöön liittyviä ohjeita
löydät ohjelmiston online-ohjeesta.
Aloitus 99
Suomi
Page 100

Kameran yläosa, sivu ja takaosa
3 5
1 2
4
6
7
8
9
10
11
1 Kaiutin
2 -painike
3 Virran merkkivalo
4 -valitsin - Vaihtaa Kuvanotto-,
Videontallennus- ja
Toisto-valikkojen välillä
(katso Kuvanotto, videon tallennus ja toisto,
sivu 115).
5 Suljinpainike
6
Zoomikytkin - Siirtyy / Zoomaa-toimintoon,
kun kamera on
Kuvanotto- tai
Videontallennus-tilassa; siirtyy
100 HP Photosmart R930 -sarjan digitaalikamera
Suomi
 Loading...