

Page 1

HP Photosmart R817/R818
Digital Camera with HP Instant Share
User’s Manual
Page 2

Page 3

Legal and notice information
© Copyright 2005 Hewlett-Packard Development Company, L.P.
The information contained herein is subject to change without notice. The only
warranties for HP products and services are set forth in the express warranty
statements accompanying such products and services. Nothing herein should
be construed as constituting an additional warranty. HP shall not be liable for
technical or editorial errors or omissions contained herein.
Windows® is a U.S. registered trademark of Microsoft Corporation.
SD Logo is a trademark of its proprietor.
Disposal of Waste Equipment by Users in Private Households in the European
Union
This symbol on the product or on its packaging indicates that this
product must not be disposed of with your other household waste.
Instead, it is your responsibility to dispose of your waste equipment by
handing it over to a designated collection point for the recycling of
waste electrical and electronic equipment. The separate collection and
recycling of your waste equipment at the time of disposal will help to conserve
natural resources and ensure that it is recycled in a manner that protects
human health and the environment. For more information about where you can
drop off your waste equipment for recycling, please contact your local city
office, your household waste disposal service or the shop where you
purchased the product.
For future reference, please enter the following information:
Model Number (on the front of the camera)
Serial Number (10-digit number on the
bottom of the camera)
Date the camera was purchased
Printed in China
Page 4

Page 5

Contents
1 Getting Started . . . . . . . . . . . . . . . . . . . . . . 11
Setup . . . . . . . . . . . . . . . . . . . . . . . . . . . . . . . 13
1 Install the Camera Dock Insert
(Optional). . . . . . . . . . . . . . . . . . . . . . . 13
2 Attach the Wrist Strap . . . . . . . . . . . . . . 13
3 Install the Battery . . . . . . . . . . . . . . . . . . 14
4 Charge the Battery. . . . . . . . . . . . . . . . . 15
5 Turn on the Camera . . . . . . . . . . . . . . . . 16
6 Choose the Language. . . . . . . . . . . . . . . 16
7 Set the Region . . . . . . . . . . . . . . . . . . . . 16
8 Set the Date and Time . . . . . . . . . . . . . . 17
9 Install and Format a Memory Card. . . . . . 18
10 Install the Software. . . . . . . . . . . . . . . . . 19
Windows® . . . . . . . . . . . . . . . . . . . . . . 19
Macintosh. . . . . . . . . . . . . . . . . . . . . . . 20
User’s Manual on the CD . . . . . . . . . . . . 20
Interactive User’s Guide on the CD . . . . . 21
Camera Parts . . . . . . . . . . . . . . . . . . . . . . . . . . 22
Back of the Camera. . . . . . . . . . . . . . . . . . . 22
Front and Bottom of the Camera . . . . . . . . . . 25
Top of the Camera . . . . . . . . . . . . . . . . . . . 26
Camera Cradle. . . . . . . . . . . . . . . . . . . . . . 27
Camera States . . . . . . . . . . . . . . . . . . . . . . . . . 28
Camera Menus . . . . . . . . . . . . . . . . . . . . . . . . 28
Viewing the On-Camera Demo . . . . . . . . . . . . . 30
5Contents
Page 6

2 Taking Pictures and Recording Video Clips. . . 31
Using Live View . . . . . . . . . . . . . . . . . . . . . . . . 31
Taking Still Pictures . . . . . . . . . . . . . . . . . . . . . . 33
Recording Audio with Still Pictures . . . . . . . . . 34
Orientation Sensor . . . . . . . . . . . . . . . . . . . . . . 34
Recording Video Clips. . . . . . . . . . . . . . . . . . . . 35
Auto Focus . . . . . . . . . . . . . . . . . . . . . . . . . . . . 37
Focusing on the Subject . . . . . . . . . . . . . . . . 37
Optimizing Focus . . . . . . . . . . . . . . . . . . . . 38
For the Normal Focus Range . . . . . . . . . . 38
For Macro and Super Macro
Focus Ranges. . . . . . . . . . . . . . . . . . . . . 39
Using Focus Lock . . . . . . . . . . . . . . . . . . . . . 40
Optimizing Exposure . . . . . . . . . . . . . . . . . . 40
Other Recommendations. . . . . . . . . . . . . . . . 41
Using the Focus Range Settings. . . . . . . . . . . . . . 42
Using Manual Focus . . . . . . . . . . . . . . . . . . 43
Using Zoom . . . . . . . . . . . . . . . . . . . . . . . . . . . 44
Optical Zoom . . . . . . . . . . . . . . . . . . . . . . . 45
Digital Zoom. . . . . . . . . . . . . . . . . . . . . . . . 45
Zoom and Focus . . . . . . . . . . . . . . . . . . . . . 46
Setting the Flash . . . . . . . . . . . . . . . . . . . . . . . . 47
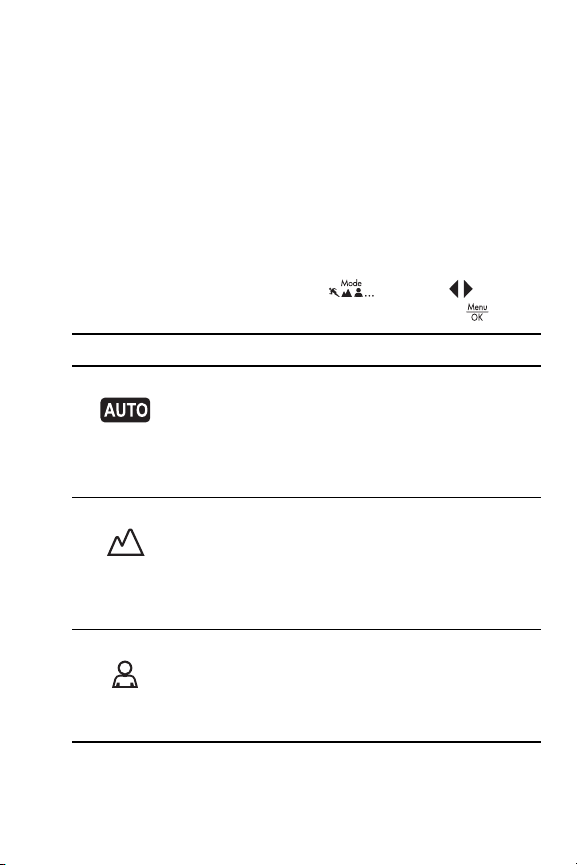
Using the Shooting Modes . . . . . . . . . . . . . . . . . 49
Noise Reduction for Long Exposures. . . . . . . . 52
Using Panorama Mode . . . . . . . . . . . . . . . . 52
Taking a Panoramic Sequence
of Pictures . . . . . . . . . . . . . . . . . . . . . . . 53
Using the Manual Shooting Mode . . . . . . . . . 55
Using My Mode . . . . . . . . . . . . . . . . . . . . . 56
Selecting and Saving Preferred Settings
in My Mode . . . . . . . . . . . . . . . . . . . . . 56
Using the My Mode Saved Settings
Sub-Menu . . . . . . . . . . . . . . . . . . . . . . . 57
Using the Self-Timer Settings . . . . . . . . . . . . . . . . 59
6
HP Photosmart R817/R818 User’s Manual
Page 7

Using the Burst Setting. . . . . . . . . . . . . . . . . . . . 61
Using the Capture Menu . . . . . . . . . . . . . . . . . . 62
EV Compensation . . . . . . . . . . . . . . . . . . . . 63
Adaptive Lighting . . . . . . . . . . . . . . . . . . . . 64
Bracketing . . . . . . . . . . . . . . . . . . . . . . . . . 66
Image Quality. . . . . . . . . . . . . . . . . . . . . . . 68
Video Quality . . . . . . . . . . . . . . . . . . . . . . . 70
White Balance . . . . . . . . . . . . . . . . . . . . . . 72
Manual White Balance. . . . . . . . . . . . . . 73
Auto Focus Area . . . . . . . . . . . . . . . . . . . . . 74
AE Metering . . . . . . . . . . . . . . . . . . . . . . . . 75
ISO Speed . . . . . . . . . . . . . . . . . . . . . . . . . 76
Color. . . . . . . . . . . . . . . . . . . . . . . . . . . . . 77
Saturation . . . . . . . . . . . . . . . . . . . . . . . . . 78
Sharpness . . . . . . . . . . . . . . . . . . . . . . . . . 79
Contrast. . . . . . . . . . . . . . . . . . . . . . . . . . . 80
Date & Time Imprint. . . . . . . . . . . . . . . . . . . 81
Help for the Menu Options. . . . . . . . . . . . . . 82
3 Reviewing Images and Video Clips . . . . . . . . 83
Using Playback . . . . . . . . . . . . . . . . . . . . . . . . 83
Playback and Audio Clips . . . . . . . . . . . . . . 85
Total Images Summary Screen . . . . . . . . . . . 85
Saving Frames from Video Clips . . . . . . . . . . 86
Viewing Thumbnails . . . . . . . . . . . . . . . . . . 86
Magnifying Images . . . . . . . . . . . . . . . . . . . 87
Using the Playback Menu . . . . . . . . . . . . . . . . . 88
Delete . . . . . . . . . . . . . . . . . . . . . . . . . . . . 90
Remove Red Eyes . . . . . . . . . . . . . . . . . . . . 91
Image Advice . . . . . . . . . . . . . . . . . . . . . . . 92
Image Info . . . . . . . . . . . . . . . . . . . . . . . . . 92
Stitch Panorama . . . . . . . . . . . . . . . . . . . . . 94
Rotate . . . . . . . . . . . . . . . . . . . . . . . . . . . . 95
Record Audio . . . . . . . . . . . . . . . . . . . . . . . 96
Contents
7
Page 8

4 Transferring and Printing Images . . . . . . . . . . 97
Transferring Images to a Computer . . . . . . . . . . . 97
Printing Images Directly from the Camera. . . . . . . 99
Printing Panoramas . . . . . . . . . . . . . . . . . . . . . 102
5 Using HP Instant Share. . . . . . . . . . . . . . . . 103
Using the HP Instant Share Menu . . . . . . . . . . . 104
Setting Up Online Destinations in the Camera . . 106
Sending Individual Images to Destinations . . . . . 108
Sending All Images to Destinations . . . . . . . . . . 110
6 Using the Setup Menu . . . . . . . . . . . . . . . . 113
Display Brightness. . . . . . . . . . . . . . . . . . . . . . 114
Camera Sounds . . . . . . . . . . . . . . . . . . . . . . . 115
Focus Assist Light . . . . . . . . . . . . . . . . . . . . . . 116
Instant Review. . . . . . . . . . . . . . . . . . . . . . . . . 117
Digital Zoom . . . . . . . . . . . . . . . . . . . . . . . . . 118
Date & Time . . . . . . . . . . . . . . . . . . . . . . . . . . 119
USB Configuration . . . . . . . . . . . . . . . . . . . . . 120
TV Configuration. . . . . . . . . . . . . . . . . . . . . . . 121
Language. . . . . . . . . . . . . . . . . . . . . . . . . . . . 122
Move Images to Card . . . . . . . . . . . . . . . . . . . 123
Reset Settings . . . . . . . . . . . . . . . . . . . . . . . . . 124
7 Troubleshooting and Support . . . . . . . . . . . 125
Resetting the Camera. . . . . . . . . . . . . . . . . . . . 126
Formatting a Memory Card Using a Computer
(Windows) . . . . . . . . . . . . . . . . . . . . . . . . . . . 127
HP Image Zone Software . . . . . . . . . . . . . . . . . 127
Macintosh System Requirements . . . . . . . . . 128
Windows System Requirements . . . . . . . . . . 128
HP Image Zone Express . . . . . . . . . . . . . . . 129
8
HP Photosmart R817/R818 User’s Manual
Page 9

Using Your Camera without Installing the
HP Image Zone Software. . . . . . . . . . . . . . . . . 130
Transferring Images to a Computer without
HP Image Zone Software . . . . . . . . . . . . . . 130
Connecting Your Camera as a
Digital Camera . . . . . . . . . . . . . . . . . . 131
Connecting Your Camera as a
Disk Drive . . . . . . . . . . . . . . . . . . . . . . 131
Transferring Images Using
Other Devices . . . . . . . . . . . . . . . . . . . 132
Problems and Solutions . . . . . . . . . . . . . . . . . . 134
Error Messages on the Camera . . . . . . . . . . . . 148
Error Messages on the Computer . . . . . . . . . . . 160
Getting Assistance . . . . . . . . . . . . . . . . . . . . . 162
HP Accessibility Website . . . . . . . . . . . . . . 162
HP Photosmart Website . . . . . . . . . . . . . . . 162
Support Process . . . . . . . . . . . . . . . . . . . . 162
Phone Support . . . . . . . . . . . . . . . . . . . . . 163
Phone Support Worldwide . . . . . . . . . . . . . 165
A Managing Batteries . . . . . . . . . . . . . . . . . . 167
Top Points About Batteries . . . . . . . . . . . . . . . . 167
Extending Battery Life . . . . . . . . . . . . . . . . 168
Safety Precautions for Using Batteries . . . . . 169
Power Indicators. . . . . . . . . . . . . . . . . . . . . . . 170
Battery Performance . . . . . . . . . . . . . . . . . . . . 171
Number of Shots per Battery . . . . . . . . . . . . . . 172
Recharging the Lithium Ion Battery . . . . . . . . . . 173
Safety Precautions for Recharging
Lithium Ion Batteries. . . . . . . . . . . . . . . . . . 174
B Purchasing Camera Accessories . . . . . . . . . 175
Contents
9
Page 10

C Caring for Your Camera . . . . . . . . . . . . . . 179
Basic Camera Care. . . . . . . . . . . . . . . . . . . . . 179
Cleaning the Camera . . . . . . . . . . . . . . . . . . . 180
Cleaning the Camera Lens . . . . . . . . . . . . . 181
Cleaning the Camera Body and
Image Display. . . . . . . . . . . . . . . . . . . . . . 181
D Specifications . . . . . . . . . . . . . . . . . . . . . . 183
Memory Capacity . . . . . . . . . . . . . . . . . . . . . . 189
Image Quality . . . . . . . . . . . . . . . . . . . . . . 190
Video Quality . . . . . . . . . . . . . . . . . . . . . . 190
10
HP Photosmart R817/R818 User’s Manual
Page 11

1 Getting Started
Congratulations on your purchase of the HP Photosmart
R817/R818 digital camera and welcome to the world of
digital photography!
This manual explains the HP Real Life technologies and other
camera features you can use to ensure great results while
enjoying the photographic experience.
The HP Photosmart R817/R818 digital camera features a
full set of exclusive HP Real Life technologies that make it
easy to take brilliant digital photos. They are:
• In-camera red-eye removal—Identify and remove red
eyes from the people in your images (see page 91).
•HP adaptive lighting technology—Automatically bring out
details lost in shadows (see page 64).
• Panorama with in-camera stitching—Use the Panorama
modes to capture up to five consecutive pictures and stitch
them into a single image on your camera (see
• Print from video—Take high-quality video with VGA at 30
frames per second and easily select any frame to save as
a still image. HP enhances the video frame for better
prints up to 4 x 6 inches (see
•HP Image Advice—Provides tips to help you take better
pictures (see page 92).
Other camera features included in your R817/R818 are:
• 15 shooting modes—Choose a preset shooting mode for
best exposure for common scenes, or define your own
shooting mode with your most frequently-used settings
page 49).
(see
page 86).
page 94).
Getting Started
11
Page 12
• Interactive User’s Guide (English only)—Guides you
through the most common features on your camera (see
page 21).
•HP Instant Share—Easily select still images in your
camera to automatically send to a variety of destinations
such as e-mail addresses, online albums, or a printer the
next time your camera is connected to a computer.
Recipients can view the images without the burden of
large file attachments (see
page 103).
• Direct print—Print directly from your camera to any
PictBridge-certified printer without having to connect to
your computer (see page 99).
•On-camera Help—Use on-screen instructions for help on
using camera features (see page 30).
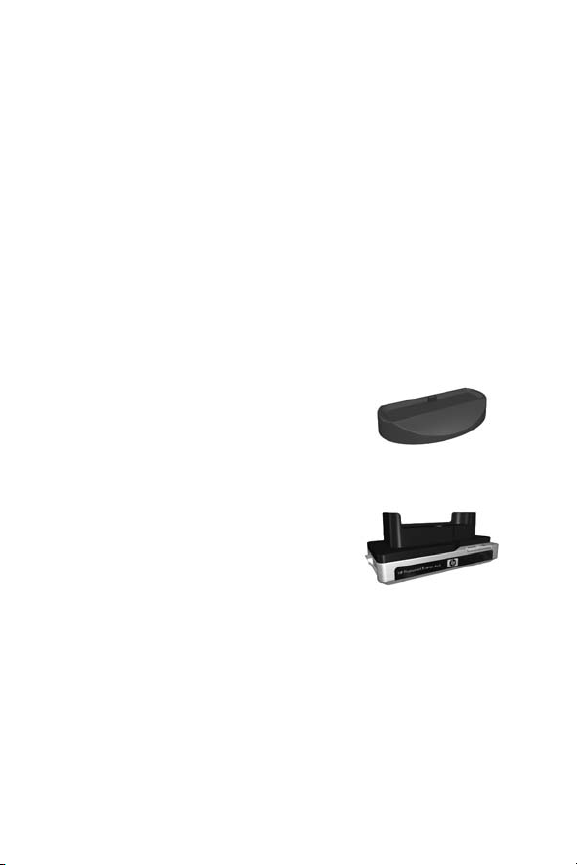
•Cradle/Dock—Your R817/R818
digital camera comes with either a
cradle or dock. The cradle recharges
your Lithium Ion camera battery and
allows you to easily transfer images
to a computer or send images to a printer.
The HP Photosmart R-series dock
additionally allows you to view
images on a television, and recharge
a spare Lithium Ion battery in the
dock base, while recharging the
Lithium Ion battery in the camera. The dock can also be
purchased separately.
See Purchasing Camera Accessories on page 175 for
information about other accessories for your
HP Photosmart R817/R818 camera, including underwater
housing, batteries, memory cards, camera cases, quick
rechargers, and more.
12
HP Photosmart R817/R818 User’s Manual
Page 13
Setup
To locate a part on your camera while following the
instructions in this section, see Camera Parts on page 22.
1. Install the Camera Dock Insert (Optional)
If you buy the HP Photosmart
R-series dock, you will notice one or
more dock inserts included in the box
with the dock. When setting up the dock
for use with this camera, make sure you
use the dock insert with the yellow tag.
Follow the instructions in the dock User’s Manual to connect
the dock insert to the camera dock.
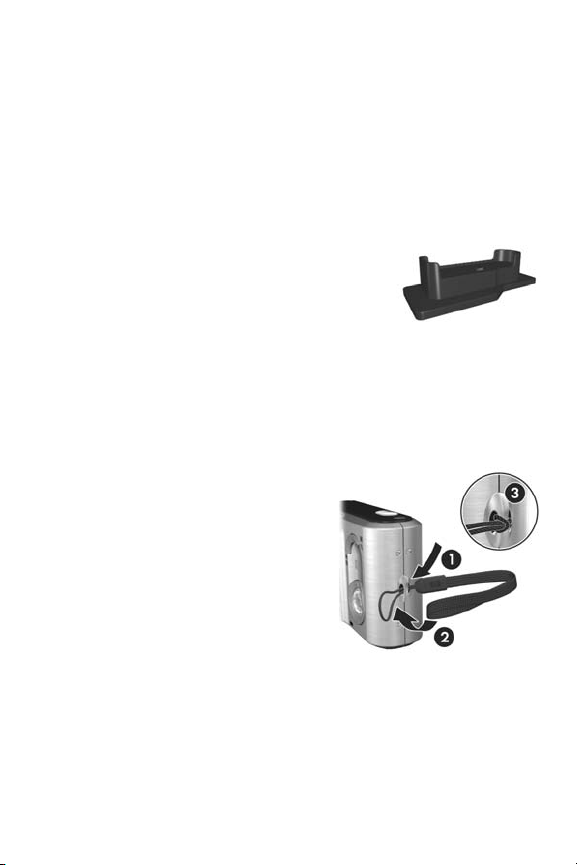
2. Attach the Wrist Strap
Attach the wrist strap to the wrist
strap mount on the side of the
camera.
Getting Started
13
Page 14

3. Install the Battery
Your camera uses a rechargeable HP Photosmart R07 Lithium
Ion battery (L1812A/L1812B).
1. Open the Battery/
Memory card door on
the bottom of the
camera by sliding the
door latch as indicated
on the Battery/Memory
card door.
2. Insert the battery in the
larger slot as shown, and push the battery in until the
latch catches.
3. Close the Battery/Memory card by pushing the door
down until it snaps into place.
To remove the battery from the camera, first turn the camera
off. Open the Battery/Memory card door and release the
battery latch to allow the battery to be partially ejected, then
pull the battery from the slot.
See page 171 for information about battery performance
with this camera. For the number of shots expected for each
battery based on usage, see page 172. For hints on
optimizing battery performance, see Appendix A, Managing
Batteries, starting on page167.
NOTE: The rechargeable battery that was shipped with your
camera may be partially charged. You should fully
charge it before using it the first time (see page 15).
14
HP Photosmart R817/R818 User’s Manual
Page 15

4. Charge the Battery
You can charge a battery in the camera (explained here) or
in the extra battery bay of the camera dock or in the
HP Photosmart quick recharger (see Purchasing Camera
Accessories on page 175).
1. Plug the power cord into the HP AC power adapter. If
more than one power cord is in the box, use the cord that
is appropriate for power outlets in your country or region.
Plug the other end of the power cord into an electrical
outlet.
2. Attach the thin cord from the
HP AC power adapter to the
cradle as shown.
3. Place the camera in the
cradle. The Power light on the
back of the camera starts
blinking to show that the
battery is charging.
When the Power light stops blinking, the battery is fully
charged. Recharging usually takes 4-6 hours in the camera.
You can continue using the camera while the battery is
recharging.
NOTE: The camera may get warm while the battery is
charging, as well as after prolonged use under battery
power. This is normal.
Getting Started
15
Page 16
5. Turn on the Camera
Turn the camera on by sliding the switch to the right
then releasing it.
The lens extends and the Power light to the left of the
switch turns on solid blue. The HP logo also displays on the
Image Display as the camera powers up.
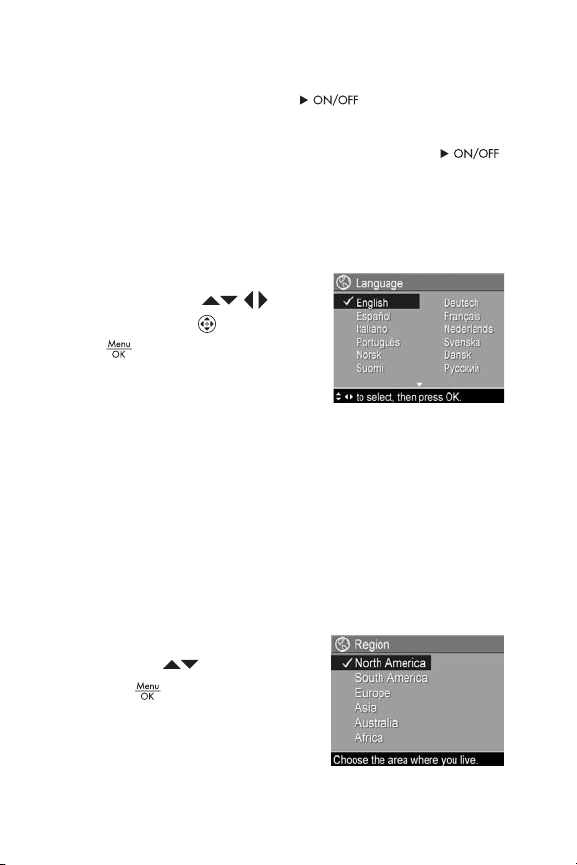
6. Choose the Language
1. Scroll to the language that you
want by using the buttons
on the Controller .
2. Press to select the highlighted
language.
TIP: If you need to change the
language later, use the Language setting in the Setup
menu (see page 122).
7. Set the Region
After choosing a language, you are prompted to choose the
continent where you live. The Language and Region settings
determine the default date format and the format of the video
signal for displaying camera images on a television (see
page 121).
1. Scroll to the region that you want
by using the buttons.
2. Press the button to select the
highlighted region.
16
HP Photosmart R817/R818 User’s Manual
Page 17
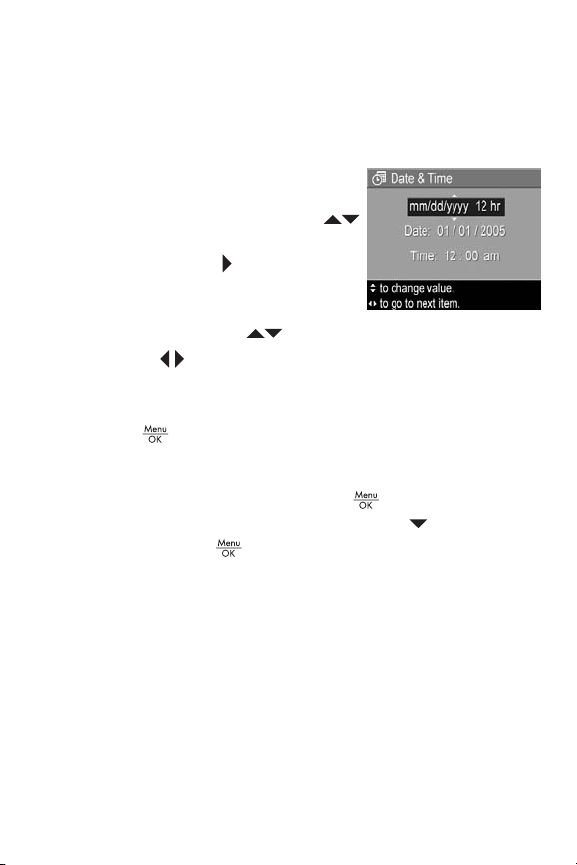
8. Set the Date and Time
The camera has a clock that records the date and time at
which you take each picture. You can also choose to have
the date and time imprinted on the image (see page 81).
1. The first item highlighted is the
date and time format. If you want
to change the format, use the
buttons. If the date and time format
is correct, press to move to the
Date.
2. Adjust the value of the highlighted
selection using the buttons.
3. Use the buttons to move to the other selections.
4. Repeat Steps 2 and 3 until the date and time are set
correctly.
5. Press when you have entered the proper values for
the date and time. A confirmation screen appears,
asking if the correct date and time have been set. If the
date and time are correct, press
If the date and time are incorrect, press to highlight
No, then press . Repeat steps 1 through 5 to set the
correct date and time.
Date and time information is recorded in the image
properties, which you can see in Playback when the
Playback Menu (see page 88) or HP Instant Share Menu
(see page 104) is displayed, when viewing Image Info (see
page 92) and when viewing the image on your computer.
TIP: If you need to change the date and time settings later,
you can do this with the Date & Time setting in the Setup
Menu (see page 119).
to select Yes.
Getting Started
17
Page 18
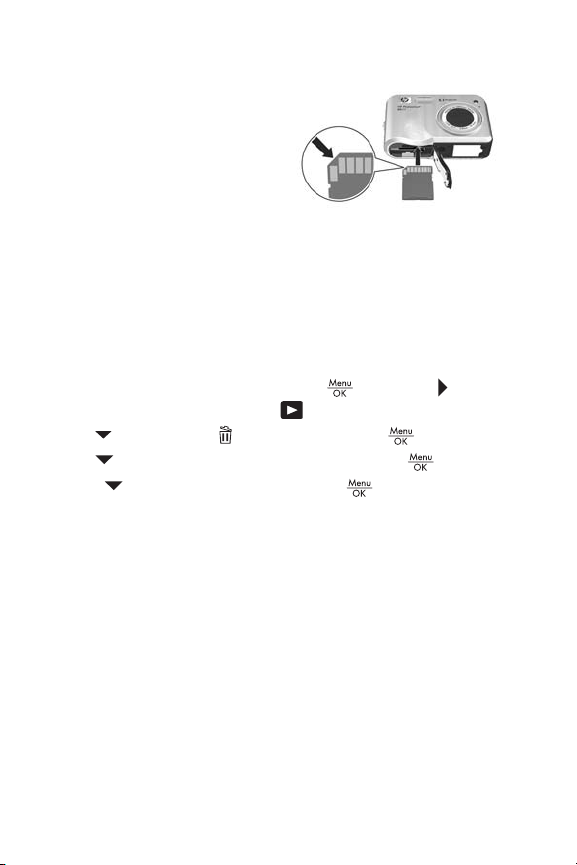
9. Install and Format a Memory Card
1. Always turn off the camera
and wait for the Power and
Memory lights to turn off,
then open the Battery/
Memory card door.
2. Insert the memory card in
the small slot above the battery as shown. Make sure the
memory card snaps into place.
3. Close the Battery/Memory card door and turn on the
camera.
To help prevent corrupted cards and images, you should
format memory cards before you use them for the first time.
1. With the camera turned on, press , then use to
move to the Playback Menu .
2. Use to highlight Delete, then press .
3. Use to highlight Format Card, then press .
4. Press to highlight Yes, then press to format the
card. When the camera has completed formatting, the
Total Images Summary screen displays (see page 85).
Once installed, new images and video clips are stored on
the memory card, not in internal memory. For information
about supported memory cards, see Storage on page 185.
To use internal memory and view images stored there,
remove the memory card (turn off the camera, open the
Battery/Memory card door, and press down on the top edge
of the card to free it). You can also transfer the images from
internal memory to a memory card (see page 123).
NOTE: You can also format a memory card using your
computer (see page 127).
18
HP Photosmart R817/R818 User’s Manual
Page 19

10. Install the Software
The HP Image Zone software allows you to transfer images
to a computer and configure the HP Instant Share Menu on
the camera.
If you do not install the HP Image Zone software, you can still
use the camera but certain features will be affected. For
details, see Using Your Camera without Installing the
HP Image Zone Software on page 130.
If you have trouble installing or using the HP Image Zone
software, see the HP Customer Support website:
www.hp.com/support for more information.
Windows®
To install the HP Image Zone software, your computer must
have a minimum of 64MB of RAM, Windows 2000, XP, 98,
98 SE, or Me, and Internet Explorer 5.5 Service Pack 2 or
higher. Internet Explorer 6 is recommended. If your computer
meets these requirements, the installation process installs the
full version of HP Image Zone; if not, the process installs
HP Image Zone Express (see page 127).
1. Close all programs and temporarily disable any virus
protection software running on your computer so that
HP Image Zone will install more quickly.
2. Insert the HP Image Zone software CD into the CD drive
of your computer and follow the on-screen instructions. If
the installation screen does not appear, click Start, click
Run, type D:\Setup.exe, where D
drive, then click OK.
3. When the HP Image Zone software has finished
installing, re-enable any virus protection software you
disabled in Step 1.
is the letter of your CD
Getting Started
19
Page 20

Macintosh
To install the HP Image Zone software, your Macintosh must
have built-in USB, 128MB of physical RAM, Mac OSX
v.10.2 or later, and 250MB of available disk space.
1. Close all programs and temporarily disable any virus
protection software running on your computer so that
HP Image Zone will install more quickly.
2. Insert the HP Image Zone software CD into the CD drive
of your computer.
3. Double-click the CD icon on the computer desktop.
4. Double-click the installer icon, and then follow the on-
screen instructions.
5. When the HP Image Zone software has finished
installing, re-enable any virus protection software you
disabled in Step 1.
User’s Manual on the CD
A copy of this camera User’s Manual in different languages
is located on the HP Image Zone software CD. To view your
camera User’s Manual:
1. Insert the HP Image Zone software CD into the CD drive
of your computer.
2. View the User’s Manual:
• On Windows: Click View User’s Manual on the Main
page of the CD installation screen to view the User’s
Manual.
• On Macintosh: Look in the readme file in the docs
folder of the HP
User’s Manual in your language.
Image Zone software CD to locate the
20
HP Photosmart R817/R818 User’s Manual
Page 21

Interactive User’s Guide on the CD
The Interactive User's Guide (English only) will guide you
through the most-used features of your camera and provide
basic digital photography tips.
•Windows: Install and run the tutorial from your software
CD.
•Macintosh: Access the tutorial from the Devices tab of
HP Image Zone.
Getting Started
21
Page 22
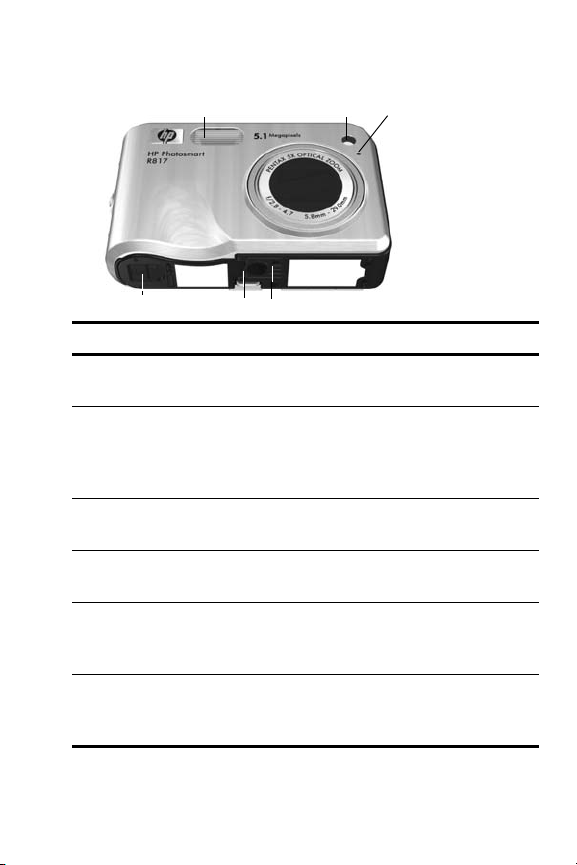
Camera Parts
Refer to the pages in parentheses after the part names in the
following tables for more information about those parts.
Back of the Camera
123
4
13
1112
10
#Name Description
1 Speaker • Plays camera sounds and audio clips.
2Power light •Solid—Camera is on.
•Blinking slowly—Camera is either off
or in sleep state and is charging the
battery.
•Off—Camera is off.
3 switch
(see page 16)
22
HP Photosmart R817/R818 User’s Manual
Allows you to turn the camera power on
and off.
789
5
6
Page 23
#Name Description
4 Zoom lever
(see page 44)
5 Wrist strap mount
(see page 13)
6
Controller with
and
buttons
7
8Memory light
button Allows you to display camera menus,
• Zoom Out—While taking still
pictures, allows you to zoom out the
lens to the wide angle position.
• Thumbnails—While in Playback,
allows you to view still images and the
first frames of video clips arranged in a
matrix of nine thumbnail images per
screen.
• Zoom In—While taking still
pictures, allows you to zoom in the lens
to the telephoto position.
• Magnify—While in Playback,
allows you to magnify a still image.
Allows you to attach a wrist strap to the
camera.
Allows you to scroll through menus and
images on the Image Display.
select menu options, and confirm certain
actions on the Image Display.
•Blinking —Camera is processing
images. You can take a picture when
the blinking stops.
•Solid—Camera is recording video.
•Off—Camera is not processing
images.You can take pictures
immediately.
Getting Started
23
Page 24
#Name Description
9 Live
View/Playback
button
10 /
Self-Timer/Burst
button (see
pages 59, 61)
11
/MF Focus
button (see
page 42)
12
Flash button
(see page 47)
13 Image Display
(see page 31)
• If Live View is displayed, allows you to
switch to Playback.
• If Playback is displayed, allows you to
switch to Live View.
• If the Image Display is off, but the
camera is on, allows you to turn the
Image Display on.
• If a menu is open in the Image Display,
allows you to close the menu.
• Allows you to access the on-camera
demo (see
Select between the Timer Off, Self-Timer,
Self-Timer - 2 Shots, and Burst settings.
Select between the Normal, Macro, Super
Macro, Infinity, and Manual Focus
settings.
Select between the Auto, Red-Eye, Flash
Off, Flash On, and Night flash settings.
Frame pictures and video clips using Live
View and review them afterward in
Playback, and to view all the menus.
page 30).
24
HP Photosmart R817/R818 User’s Manual
Page 25
Front and Bottom of the Camera
1 2
56
4
#Name Description
1Flash
(see page 47)
2Self-Timer/Focus
Assist light (see
page 59)
3Microphone (see
page 34)
4 Tripod mount Allows you to mount the camera on a
5 Cradle mount Allows you to connect the camera to the
6Battery/Memory
card door (see
pages 14, 18)
Provides additional light to improve
picture-taking.
Blinks during Self-Timer or Self-Timer -
2 shots countdown, or in low light
situations when Focus Assist is on. Also
turns on briefly when a picture is taken.
Records audio clips that are attached to
still images and video clips.
tripod.
cradle or dock, providing access to AC
power and USB connectivity.
Allows access to insert and remove the
battery and an optional memory card.
3
Getting Started
25
Page 26
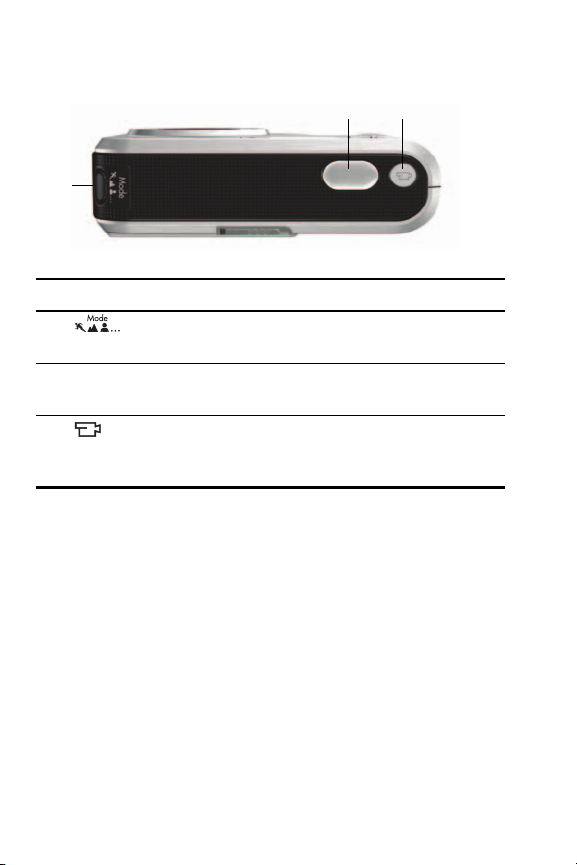
Top of the Camera
1
#Name Description
1 button
(see page 49)
2 Shutter button
(see page 33)
3
Video
button
(see page 35)
Accesses shooting mode options for still
pictures.
Allows you to focus and take a picture, and to
record audio clips.
Starts and stops recording a video clip.
23
26
HP Photosmart R817/R818 User’s Manual
Page 27
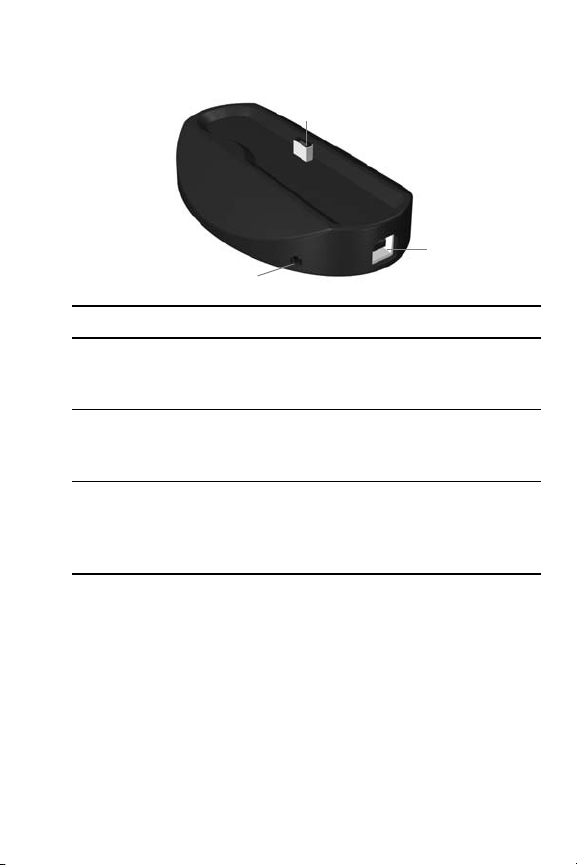
Camera Cradle
3
#Name Description
1 Camera
mount/
connector
2USB
connector (see
pages 97, 99)
3 Power adapter
connector
Allows you to place the camera in the cradle,
which provides access to AC power and USB
connectivity.
Allows you to connect a USB cable from the
camera to a USB-enabled computer or any
PictBridge-certified printer.
Allows you to connect the HP AC power
adapter to the camera to either operate the
camera on AC power, or recharge a Lithium
Ion battery in the camera.
1
2
Getting Started
27
Page 28
Camera States
Your camera has two main states that allow you to complete
certain tasks, each state having an associated menu you can
use to adjust camera settings or perform tasks in that state.
See the following section, Camera Menus.
Live View—Allows you to take still pictures and record
video clips. See Chapter 2, Taking Pictures and Recording
Video Clips, starting on page 31.
Playback—Allows you to review the still images and
video clips that you capture. See Chapter 3, Reviewing
Images and Video Clips, starting on page 83.
To switch between Live View and Playback states, press
.
TIP: If you are in Playback or a menu and want to take a
picture, quickly press the Shutter button halfway down
and release it. The camera switches to Live View.
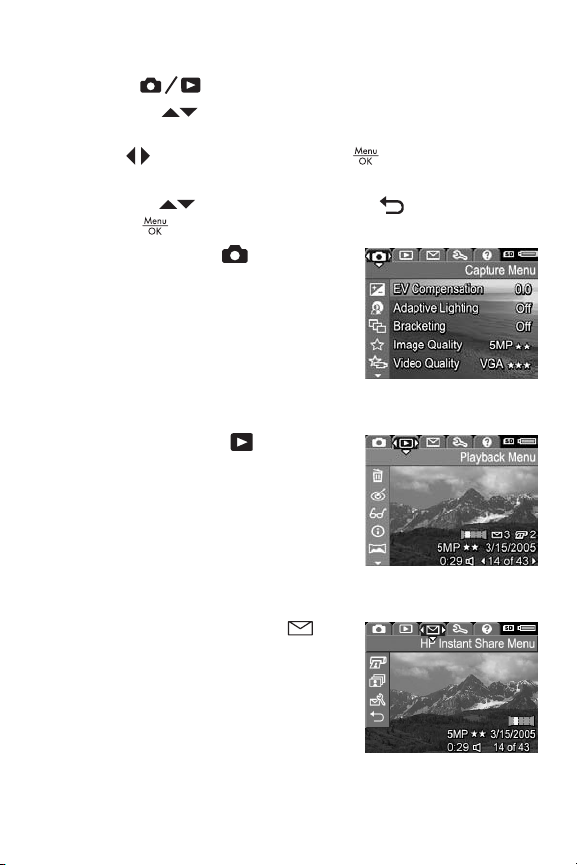
Camera Menus
Your camera has five menus that, when accessed, appear in
the Image Display.
To access the menus, press when in Live View or
Playback, then use the buttons to move to the menu you
want. To select a menu option, use the buttons to
highlight it, then press to display the menu option’s submenu and modify the settings.
TIP: In the Capture and Setup Menus, you can modify
settings by highlighting the menu option and using the
buttons to change the setting.
28
HP Photosmart R817/R818 User’s Manual
Page 29
To exit a menu, do one of the following:
• Press .
• Use the buttons to scroll to the menu tabs at the top
of the screen. You can then select another menu by using
the buttons or you can press to exit the menus
and return to Live View or Playback.
• Use the buttons to scroll to the EXIT option and
press .
The Capture Menu lets you
specify settings for taking a picture
such as image quality, special
lighting and exposure, ISO speed,
color settings, and imprinting the
date and time on the images. See
Using the Capture Menu on
page 62.
The Playback Menu lets you
obtain tips to help you take better
pictures, delete images, remove red
eyes, display information about an
image, stitch panoramic sequences,
rotate images, and record audio.
See Using the Playback Menu on
page 88.
The HP Instant Share Menu lets
you select images to be sent to
printers, e-mail addresses, and
other online services the next time
you connect the camera to a
computer. See Using the HP Instant
Share Menu on page 104.
Getting Started
29
Page 30
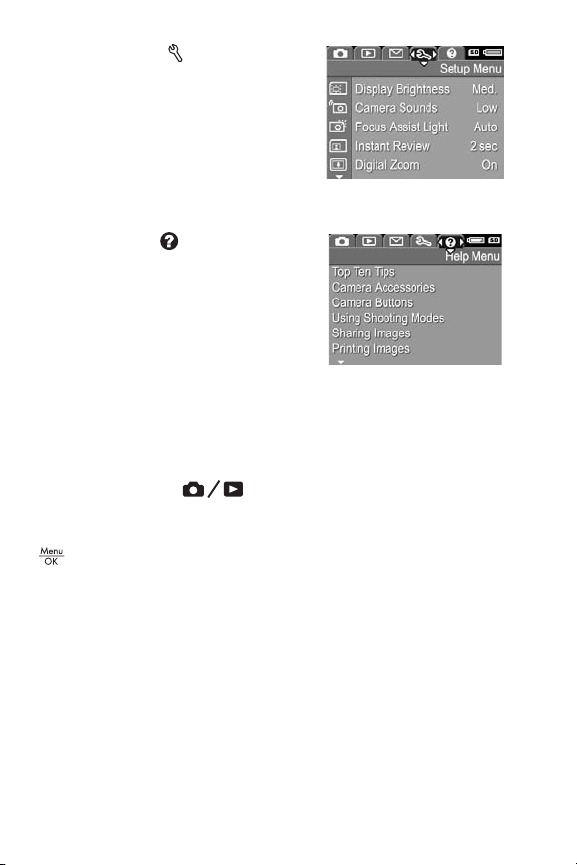
The Setup Menu lets you modify
configuration settings such as
display brightness, date and time,
language, and TV setting, among
others. It also allows you to move
images from the internal memory to
a memory card. See Chapter 6,
Using the Setup Menu, starting on page 113.
The Help Menu provides helpful
information and tips on topics such
as battery life, camera buttons,
recording audio, and reviewing
images you have taken.
Viewing the On-Camera Demo
This camera has a slideshow of its major features. You can
display the slideshow at any time by turning the camera on
and holding down for approximately three seconds.
The Image Display goes black for a moment before the
slideshow starts. To exit the slideshow at any time, press
.
30
HP Photosmart R817/R818 User’s Manual
Page 31

2 Taking Pictures and
Recording Video Clips
Using Live View
The Image Display allows you to frame pictures and video
clips using Live View. To activate Live View when the Image
Display is off, press until appears in the upper
left corner of the Image Display.
TIP: To conserve battery life, the Image Display shuts down
during periods of inactivity. To re-activate the Image
Display, press .
The following table describes the information displayed in
Live View when camera settings are at their defaults and a
memory card is installed. If you change camera settings,
their icons also display in the Live View screen.
Taking Pictures and Recording Video Clips
31
Page 32

3
1
2
4
5
6
7
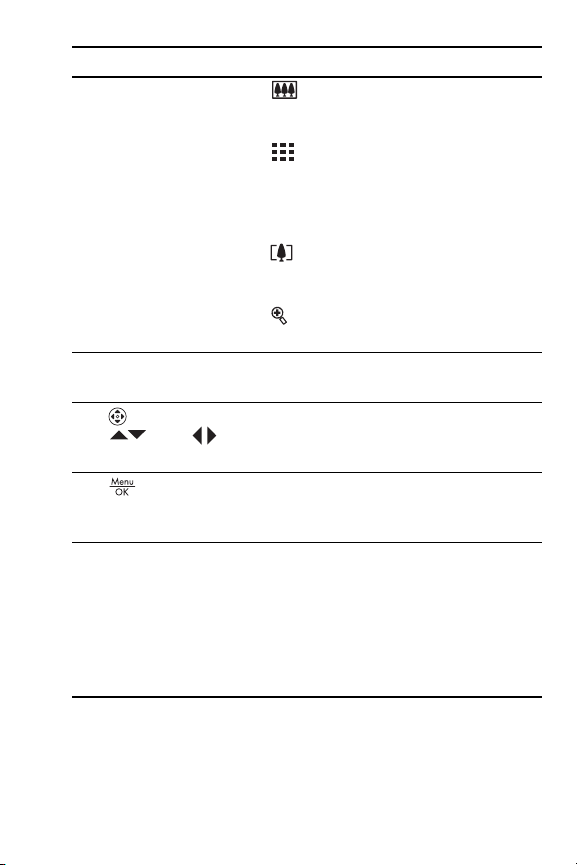
#Icon Description
1
Displays for the first few seconds to indicate the
camera is in Live View.
2
3
Indicates that a memory card is installed.
• Battery level indicator, when using battery power
or
(see
page 170).
• AC power indicator when using the HP AC power
adapter with either the cradle or HP
Photosmart
R-series dock.
4 12 Pictures remaining count based on the current Image
Quality setting and space remaining in memory.
5 5MP Image resolution setting; default is 5MP (see
page 68).
6
7
Compression setting; default is (see page 68).
Focus brackets (see Auto Focus on page 37).
32
HP Photosmart R817/R818 User’s Manual
Page 33

Taking Still Pictures
You can take a picture almost any time the camera is on,
regardless of what is shown on the Image Display.
1. Press until appears in
the upper left corner of the Image
Display, then frame the subject for
your picture.
2. Hold the camera steady and press
the Shutter button halfway down to
measure and lock the focus and
exposure. The focus brackets in the Image Display turn
solid green when focus is locked (see
3. Press the Shutter button all the way down to take the
picture. You may hear a shutter click when the camera
takes the picture (see
TIP: Hold the camera with both hands when pressing the
Shutter button to reduce camera shake and prevent blurry
pictures.
TIP: To remove a memory card after taking pictures, turn the
camera off and wait a few seconds before removing the
card to ensure images are fully stored.
The captured image appears in Instant Review (see
page 117) on the Image Display. During the first second,
green focus brackets display if the image is in focus and red
brackets if not. To delete the image, press , then select This
Image in the Delete sub-menu.
TIP: You can change the length of time images are displayed
in Instant Review (see page 117).
You can use Playback (see page 83) to review the pictures
you have taken.
Camera Sounds on page 115).
page 37).
Taking Pictures and Recording Video Clips
33
Page 34

Recording Audio with Still Pictures
You can attach an audio clip to a still picture while you are
taking a picture (as explained in this section) or add or
delete an audio clip after the picture is taken (as explained
in Record Audio on page 96).
To record audio while taking a picture:
1. After you have pressed the Shutter button, continue
holding it down to record the audio clip. An audio
counter and
recording.
2. To stop recording audio, release the Shutter button;
otherwise, the audio continues recording up to 60
seconds or until the camera runs out of memory.
NOTE: To record audio in Panorama mode, or with the Self-
Timer, Self-Timer - 2 Shots, Burst, or Bracketing settings,
use the method described on page 96.
appear on the Image Display during
Orientation Sensor
A device in the camera determines whether you are holding
the camera horizontally or vertically when taking a still
picture. The camera automatically rotates the image to its
proper orientation when saving the file.
TIP: You can manually rotate still images using the Rotate
option (see page 95).
NOTE: The orientation sensor is not used when recording
video clips, nor in the Panorama or Document shooting
modes.
34
HP Photosmart R817/R818 User’s Manual
Page 35

Recording Video Clips
1. Press until appears in the upper left corner
of the Image Display, then frame the subject.
2. To start recording, press and
release the Video button. A
video counter, , REC, and
instructions for ending the video
appear on the Image Display. The
camera may emit a sound to
indicate that recording has begun
Camera Sounds on page 115).
(see
3. To stop recording video, press and release the Video
button; otherwise, the video continues recording until the
camera runs out of memory.
NOTE: If you have a slow memory card, the video clip may
end before you press the Video button. Either set your
video quality to a lower setting (see page 70) or purchase
a memory card marked High Performance, Pro, Ultra, or
High-Speed.
After recording stops, the last frame of the video clip
appears in Instant Review (see page 117). To delete the
video clip, press , then select This Image from the Delete
sub-menu. You can also use Playback (see page 83) to
review or delete video clips or extract frames from them (see
page 86). You cannot, however, change the audio after you
have recorded a video clip.
NOTE: If you use Self-Timer or Self-Timer - 2 Shots (see page
58) while recording video clips, the camera records only
one video clip.
Taking Pictures and Recording Video Clips
35
Page 36

NOTE: Motor noise from optical zooming may be recorded
in the audio portion of the video clip. For best audio
quality, set optical zoom (see page 45) before recording
the video clip.
NOTE: Digital Zoom, Bracketing, and Burst mode do not
apply when recording video clips.
36
HP Photosmart R817/R818 User’s Manual
Page 37
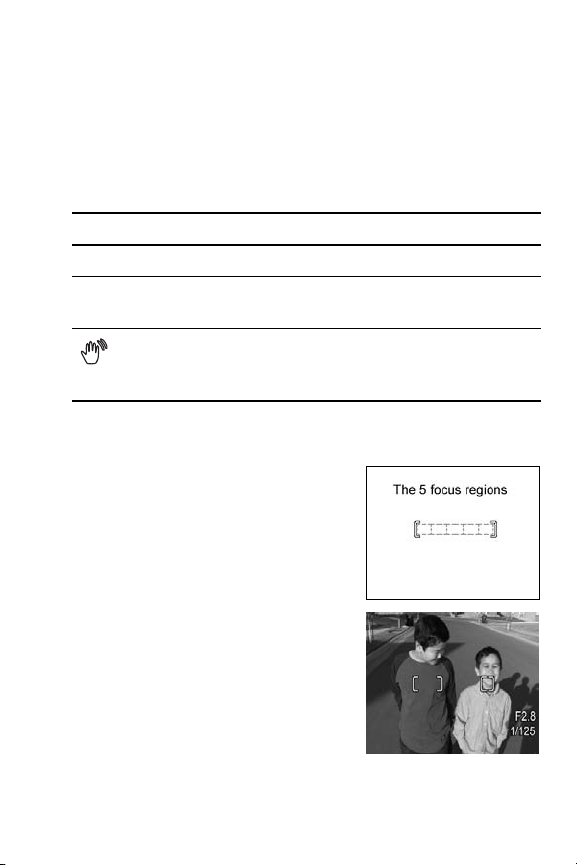
Auto Focus
When you press the Shutter button halfway down, the
camera automatically measures and locks the focus and
exposure. This is called auto focus. The following table
describes the indicators in the Image Display when you auto
focus:
Indicator Possible Solutions
Green focus brackets The camera has found focus.
Red focus brackets The camera cannot find focus (see
Optimizing Focus on page 38).
(shaking
hand icon)
Focusing on the Subject
When the camera is set to its default
Multi focus area setting (see
page 74), it uses the five focus
regions within the focus brackets,
shown at right, to determine focus.
When you press the Shutter button
halfway down, the camera
searches for focus starting from the
closest distance. When it finds focus
in one region, it then examines
other focus regions, displaying
those in focus as green brackets. In
the image to the right, the camera
has found focus in regions one, two, and five.
The camera has determined that the scene
requires a long exposure (see Optimizing
Exposure on page 40)
Taking Pictures and Recording Video Clips
37
Page 38

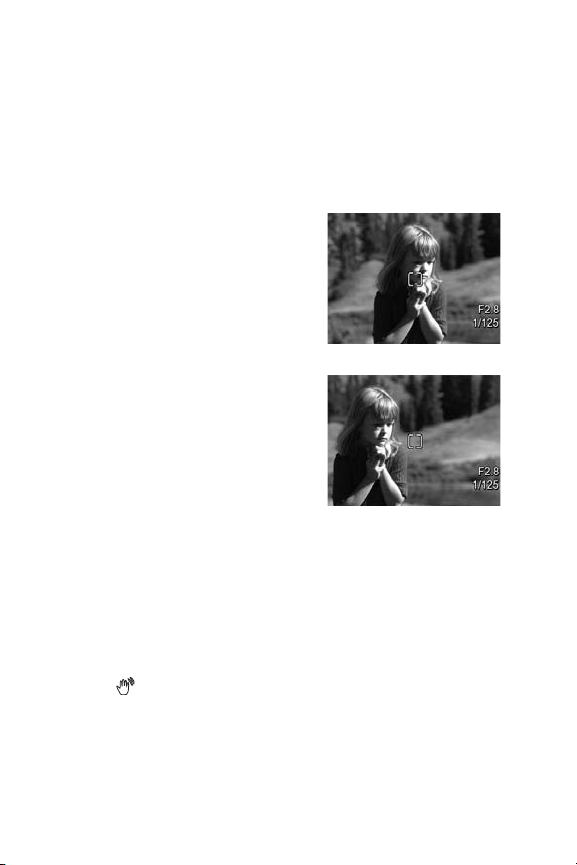
As a result, the Multi focus area setting is useful when
subjects you want in focus are slightly off-center.
If the camera keeps focusing on the
wrong subject, set Auto Focus Area
to Spot (see page 74), which
focuses on only the center focus
area. Then use Focus Lock (see
page 40) to focus specifically on
your subject.
Optimizing Focus
When the camera cannot auto focus, the focus brackets turn
red. This indicates the picture may be out of focus because
the subject is out of the focus range or the scene has low
contrast (that is, the scene is dark or the subject is a single
color with no crisp edges).
For the Normal Focus Range
If the camera is set to Normal Focus (see page 42) and
the camera cannot focus, the camera will still take the
picture. Try releasing the Shutter button, reframing the
subject, and then pressing the Shutter button halfway down
again. If the focus brackets are still red, release the Shutter
button and try one of the following:
• If the scene has low contrast, use Focus Lock (see
page 40) and aim at a point on the subject that has more
colors or crisp edges.
• If the subject is too close (less than 500 mm or 20 in),
move farther away from the subject or use the Macro
or Super Macro focus range (see page 42).
• If the solutions above do not improve the focus, try using
Manual Focus
(see page 43).
38
HP Photosmart R817/R818 User’s Manual
Page 39

For Macro and Super Macro Focus Ranges
If the camera is set to Macro or Super Macro and
cannot focus, the Live View screen displays an error message
and the camera will not take the picture.
If the subject for the picture is not within the Macro
(120 mm to 1 m or 4.7 to 39.4 in) or Super Macro (30
to 200 mm or 1.2 to 7.9 in) range, try one of the following:
• Move the camera within the Macro or Super
Macro range.
• Set the camera to the Normal Focus range (see
page 42).
• In low contrast scenes, use Focus Lock (see page 40) and
aim at a point on the subject that has more colors or crisp
edges.
• If the solutions above do not improve the focus, use
Manual Focus (see page 43).
Taking Pictures and Recording Video Clips
39
Page 40
Using Focus Lock
Focus Lock allows you to focus on a subject that is not in the
center of the picture, or to capture action shots more quickly
by pre-focusing in the area where the action will occur. You
can also use Focus Lock to help achieve focus in low light or
low contrast situations.
1. Frame the subject for your
picture, or a higher contrast or
brighter object, within the focus
brackets.
2. Press the Shutter button halfway
down to lock the focus and
exposure.
3. Continue to hold the Shutter
button halfway down while you
re-frame or adjust your subject
for proper positioning.
4. Press the Shutter button all the
way down to take the picture.
Optimizing Exposure
When you press the Shutter button halfway down to auto
focus, the camera also measures the light level to set the
proper exposure and displays the exposure settings (Fnumber and shutter speed) in the Image Display. If the
camera determines the scene will require a very long
exposure, (shaking hand icon) appears. The camera will
take the picture, but it will likely be blurry. Try one of the
following:
• Set the flash to Auto or Flash On (see page 47) to
increase the lighting.
40
HP Photosmart R817/R818 User’s Manual
Page 41

• Set the camera on a tripod or stable surface.
• Turn on more light.
• If the scene is backlit or the subject is very dark or light
compared to the background, set AE Metering to Spot
page 75).
(see
• Use a Self-Timer setting. Follow the instructions in Using
the Self-Timer Settings on page 59, but press the Shutter
button all the way down and remove your hands from the
camera. The camera waits 10 seconds before locking
focus and exposure, eliminating any possibility of you
shaking the camera.
Other Recommendations
If an image does not appear to be in proper focus or
exposure when you review it in Playback, use Image Advice
(see page 92) to help you determine how to correct the
problem for similar images in the future. If you can retake an
image, you can follow the suggestions in Image Advice to
improve the image you capture.
Because focus and exposure are crucial to good images, you
might find these other topics useful:
• Problems and solutions for blurry, dark, light, or grainy
images in
143 and pages 149 to 150
• Using the Focus Range Settings on page 42
• Auto Focus Area on page 74
• AE Metering on page 75
• Using Manual Focus on page 43
Troubleshooting and Support, pages 139 to
Taking Pictures and Recording Video Clips
41
Page 42

Using the Focus Range Settings
To select a focus range setting, press MF, use the
buttons to highlight the desired focus range, then press .
Setting Description
Normal Focus Use when taking pictures of subjects greater than
500 mm (20 in) away. Normal Focus is limited to
a range of 500 mm (20 in) to infinity. This is the
default focus setting.
Macro
Super Macro Use when taking close-up pictures of subjects
Infinity
Manual Focus Allows you to step manually through the full focus
Use when taking close-up pictures of subjects
between 120 mm to 1 m (4.7 to 39.4 in) away.
You can use optical zoom with Macro. With this
setting, the camera will not take a picture if it
cannot find focus (see page 39).
between 30 and 200 mm (1.2 to 7.9 in). Zoom is
not available in Super Macro. With this setting, the
camera will not take a picture if it cannot find
focus (see page 39).
Use when taking pictures of distant objects and
landscapes. Focus is limited to a small region near
infinity.
range. Use the buttons to adjust the focus.
You can determine the focus by observing the
image in the Live View screen (see page 43).
42
HP Photosmart R817/R818 User’s Manual
Page 43

Using Manual Focus
You may want to use Manual Focus in the following cases:
• In low light conditions when auto focus may have a
difficult time gaining the proper focus.
• After auto focus, when you want to lock the focus for
speed and repeatability for the next pictures you take. In
Normal Focus, press the Shutter button halfway down to
find the best focus. Release the Shutter button and switch
to Manual Focus. The focus is locked at that distance until
you adjust it manually or switch to another focus setting.
• When you want to fine-tune focus of very close-up
subjects.
To use Manual Focus:
1. In Live View, press MF, use
the buttons to highlight ,
then press . A focus meter
and a magnified view appear to
help you adjust focus. The
magnified view displays for two
seconds after you adjust focus.
2. Use the buttons to adjust the focus.
NOTE: If you are in Manual shooting mode and the
magnified view is not displayed, press the buttons
to select aperture and shutter speed settings. To adjust the
focus, press MF, then use the buttons.
TIP: To find the best focus position, adjust the focus so that
the image looks like it is in focus. Next, press until the
image begins to blur, then press until the image
begins to blur. Set the focus position halfway between the
locations where the image began to blur.
Taking Pictures and Recording Video Clips
43
Page 44

Using Zoom
Your camera has both optical and digital zoom. Optical
zoom works like the zoom on a traditional film camera,
where physical lens elements move inside the camera to
make the subject of your picture appear closer.
After you have extended the lens fully using optical zoom,
the camera employs digital zoom. You can use digital zoom
when you have exhausted optical zoom and want to capture
only a portion of the scene in the Image Display. Digital
zoom uses no moving lens parts.
When you use zoom, a zoom indicator appears on the
Image Display. The green marker indicates the zoom position
and moves left or right as you press and .
Zoom Indicator Description
Displays for Normal, Manual, and Infinity focus
settings when digital zoom is enabled (see
page 118). The white bar indicates the crossover
point from optical to digital zoom.
Displays for the Macro focus setting when digital
zoom is enabled (see page 118). The thick white
bar indicates the crossover point between optical
and digital zoom.
Displays for Normal, Manual, and Infinity focus
settings when digital zoom is disabled (see
page 118).
Displays for Macro focus setting when digital
zoom is disabled (see page 118). The white bar
to the right indicates the disabled digital zoom
area.
44
HP Photosmart R817/R818 User’s Manual
Page 45

Optical Zoom
Optical zoom moves the lens between wide angle (1x) and
telephoto (5x).
While in Live View, press and on
the Zoom lever. A zoom indicator (see
page 44) appears as you zoom in or
out.
Digital Zoom
After you have extended the lens fully using optical zoom,
the camera employs digital zoom, displaying a yellow frame
around the scene. You can use digital zoom to eliminate
unwanted portions of the scene.
1. While in Live View, press on the Zoom lever to
optically zoom to the maximum level, then release the
lever.
2. Press and hold until the
image you want to capture fills
the yellow frame. If you zoom in
too far, press
indicator (see page 44) appears
on the Image Display as you
zoom in and out, and the
resolution number on the right side of the screen indicates
the resolution at which the image will be captured.
3. When the image you want fills the yellow frame, press the
Shutter button halfway down to lock focus and exposure,
and then press it all the way down to take the picture.
. A zoom
Taking Pictures and Recording Video Clips
45
Page 46

4. To return to optical zoom, press until digital zooming
stops. Release , then press it again.
NOTE: Digital zoom reduces the resolution of an image, so
your picture may be more grainy than the same image
taken with optical zoom. When you need higher quality,
limit the use of digital zoom.
NOTE: Digital zoom is not available while recording video
clips, in the Panorama modes, nor in the Super Macro
focus setting.
Zoom and Focus
The more you zoom in on the subject of your picture, the
more small movements of the camera are magnified (this is
called camera shake). If appears when you press the
Shutter button halfway down, you are moving the camera or
the scene needs more light; the picture will likely be blurry.
Try holding the camera closer to your body or against a
steady object, or set the camera on a tripod or stable
surface. Also try turning on the flash or turning on lights to
add more light to the scene.
TIP: Increasing ISO Speed (see page 76) can help reduce
camera shake, but can result in increased noise in your
images.
Also, when the camera is in Normal, Manual, or Infinity
focus range settings, the zoom indicator has a notch. When
the green marker is to the right of the notch, be sure that your
subject is within the Normal focus range (see page 42);
otherwise the picture will likely be blurry.
46
HP Photosmart R817/R818 User’s Manual
Page 47

Setting the Flash
To select a flash setting, press , use the buttons to
highlight the desired flash mode, then press .
Setting Description
Auto Flash (Default) The camera measures the light level and uses
the flash if necessary.
Red-Eye
The camera measures the light level and uses the flash
with red-eye reduction (see page 48) if necessary.
Flash On The camera always uses flash. If the light is behind
Flash Off
Night
your subject, use this setting to increase the light on the
front of your subject. This is called fill-flash.
The camera does not use flash. Use this setting to
capture poorly lit subjects beyond the flash range or to
capture existing-light scenes. Exposure times may be
increased, so set the camera on a tripod or stable
surface to avoid blurry images from camera shake.
The camera uses the flash with red-eye reduction (see
page 48) if necessary to illuminate objects in the
foreground, then continues to expose as if the flash had
not been used, to gather the light. Exposure times may
be increased, so set the camera on a tripod or stable
surface to avoid blurry images from camera shake.
If the Flash setting is anything other than the default, the icon
for the setting appears in the Live View screen. The Flash
setting remains in effect until it is changed again, or you turn
the camera off. To save changed settings, use My Mode (see
page 56).
Taking Pictures and Recording Video Clips
47
Page 48

NOTE: The flash is not available in Panorama, Sunset,
Document, or Theatre shooting modes, with the Burst
setting, nor while recording video clips.
Red Eye
The red-eye phenomenon is caused by light from the flash
reflecting off the subjects’ eyes, which sometimes makes a
human's eyes appear red or an animal’s eyes appear green
or white in the captured image. When you use a flash setting
with red-eye reduction, the camera flashes quickly up to three
times to minimize the subject’s pupils, thus reducing the effect
of the red-eye phenomenon, before the camera uses the main
flash. It will take longer to take a picture using red-eye
reduction, because the shutter is delayed for the additional
flashes. Therefore, make sure your subjects wait for the
additional flashes.
TIP: You can also remove red eyes in pictures you have
already taken (see page 91).
48
HP Photosmart R817/R818 User’s Manual
Page 49
Using the Shooting Modes
Shooting modes allow you to optimize ISO speed, F-number
(aperture), and shutter speed. Some shooting modes (such as
Action, Landscape, and Sunset) predefine these settings for
certain types of scenes, allowing you to take pictures quickly
when you do not have the time to specify the settings
yourself. Others (such as Aperture Priority, Shutter Priority,
and Manual) let you specify settings, allowing you complete
control for difficult scenes or for special effects.
To select a shooting mode, press , use the buttons
to highlight the desired shooting mode, then press .
Setting Description
Auto Mode (Default) Use this mode when you need to take a
good shot quickly, and do not have time to select a
special shooting mode. Auto Mode works well for
most shots in normal situations. The camera
automatically selects the best F-number (aperture),
ISO speed, and shutter speed for the scene.
Landscape
Portrait
Use this mode for scenes with deep perspective,
such as mountains or city skylines, so that the
foreground and background are in focus. The
camera combines a higher F-number for better
depth of field with higher saturation for a more
vivid effect.
Use this mode for pictures that have one or more
people as their primary subject. The camera
combines a smaller F-number to blur the
background, with lower sharpness for a more
natural effect.
Taking Pictures and Recording Video Clips
49
Page 50
Setting Description
Theatre Use this mode to capture images at school
programs, concerts, or indoor sporting events.
Theatre mode optimizes shutter speed and
exposure for properly focused and illuminated
results. Flash, focus assist light, and camera sounds
are set to Off. AE Metering and ISO Speed are
disabled (see pages 47, 75, 76, 115, and 116).
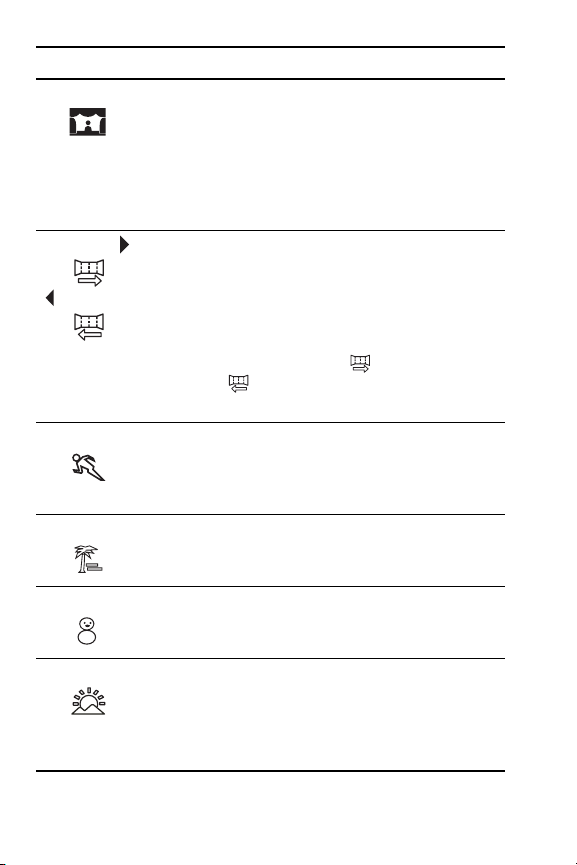
Panorama
Panorama
Action
Beach Use this mode to capture scenes at the beach. This
Snow Use this mode to capture scenes in snow. This
Sunset Use this mode to capture outdoor scenes at sunset.
Use these modes for grand landscapes, such as
mountain ranges, or group pictures where you
need to capture a wide shot that one image cannot
capture. These modes allow you to capture a series
of overlapping frames for stitching into one, large
panoramic image. You can capture the frames
either left to right (Panorama ) or right to left
(Panorama ) (see page 52). Flash is set to Flash
Off in this mode.
Use this mode to capture sporting events, moving
cars, or any scene where you want to stop the
action. The camera uses fast shutter speeds to stop
motion.
mode allows you to capture bright beach scenes,
with a good balance of highlights and shadows.
mode allows you to capture bright snow scenes,
preserving the correct brightness of the snow.
This mode starts the focus at infinity and sets the
flash to Off. This mode improves the saturation of
sunset colors and retains the warmth of the scene
with a bias towards the orange colors of the sunset.
50
HP Photosmart R817/R818 User’s Manual
Page 51

Setting Description
Document Use this mode for shooting flat, textual, or
graphical pieces. This mode uses a high contrast
setting and a low saturation setting, with flash set
to Off and the orientation sensor turned off.
Aperture
Priority
Shutter
Priority
Manual Use this mode when you want control over both
My Mode
Use this mode when you want specific control over
the aperture (for example, using a lower F-number
to blur the background or a higher F-number for
more depth of field). This mode lets you select the Fnumber (aperture) setting using
while the camera selects the best shutter speed. If
the image will be over- or under-exposed more than
0.5 stops, the F-number, shutter speed, and
exposure meter arrow turn red. Adjust the F-number
until these items turn white.
Use this mode when you want specific control over
the shutter speed (for example, using a faster
shutter speed to freeze a fast-moving subject or a
slower shutter speed to capture the appearance of
motion). This mode lets you select the shutter speed
using the
best F-number. If the image will be over- or underexposed more than 0.5 stops, the F-number, shutter
speed, and exposure meter arrow turn red. Adjust
shutter speed until these items turn white.
F-number and shutter speed (see page 55). EV
Compensation (see page 63) is disabled in this
mode.
Use this customizable shooting mode when you
want to select, save, and then repeatedly use a
group of preferred settings (see page 56).
buttons, while the camera selects the
the buttons,
Taking Pictures and Recording Video Clips
51
Page 52

NOTE: The shooting modes do not apply when you are
recording video clips.
If the shooting mode setting is anything other than the
default, the icon for the setting appears in the Live View
screen.
The shooting mode remains in effect until it is changed
again, or until you turn the camera off. To save changed
settings, use My Mode (see pages 56 and 57).
Noise Reduction for Long Exposures
At longer shutter speeds, the camera requires additional time
to reduce the noise (grainy look) in the image. In these
cases, the exposure will seem to take twice as long as
expected. As a result, you may not be able to take pictures
back-to-back as quickly, but you are assured images free of
noise.
Using Panorama Mode
Panorama mode allows you to take a sequence of 2–5
pictures that can be stitched together to capture a scene too
wide to fit into a single picture. In Panorama mode, each
picture you take is added to the panorama until you end the
sequence or have taken the fifth picture in the sequence. You
can then stitch your panoramic sequence together with the
Stitch Panorama option (see page 94) on the camera.
Alternatively, you can transfer the images in the panoramic
sequence to your computer using HP Image Zone (see
page 97) for automatic stitching and then viewing or
printing.
NOTE: Digital zoom is not available in Panorama mode.
52
HP Photosmart R817/R818 User’s Manual
Page 53

Taking a Panoramic Sequence of Pictures
1. Press , use the buttons
to select either Panorama
(left to right) or Panorama
(right to left), then press .
2. Press the Shutter button to take
the first picture in the panoramic
sequence. After Instant Review,
the camera switches to Live View
with
the Image Display.
3. Position the camera to take the
second picture. Use the transparent overlay of the first
image superimposed on one third of the Live View screen
to align your second picture with the first.
4. Press the Shutter button to take
the second picture. After Instant
Review, the camera switches to
Live View with
displayed in the Image Display.
The transparent overlay of the
previous image is superimposed
on one third of the Live View screen to enable you to
align your third picture.
5. Continue adding more pictures to the panorama, or press
sequence ends automatically after the fifth picture.
or displayed in
or
to end the panoramic sequence. The panoramic
Taking Pictures and Recording Video Clips
53
Page 54

You can stitch a panoramic sequence during Instant Review
(see page 117) by pressing , then selecting Stitch Now in
the Panorama Options sub-menu. This displays a preview of
the stitched panorama and another sub-menu. You can use
to magnify the stitched panorama and pan around it
using the buttons. To return the stitched panorama
to its normal size, press until the sub-menu displays. To
save the stitched panorama, select Save Stitching.
NOTE: When you select Save Stitching, the camera creates
a still image of the stitched panorama. The panorama
sequence is unaffected.
You can also delete the panoramic sequence by selecting
Delete Entire Sequence from the Panorama Options submenu.
NOTE: When stitching on-camera, individual images in the
sequence that are larger than 2MP are temporarily
resized in memory to 2MP (images in the sequence are
retained at their original size). As a result, panoramic
sequences stitched on the camera may be of lower
resolution. To stitch a panorama at the resolution at which
you took the panoramic sequence, transfer the panoramic
sequence of images to your computer, which
automatically stitches the sequence into a single
panorama image. This requires the full version of the
HP Image Zone software (see Transferring Images to a
Computer on page 97 and HP Image Zone Software on
page 127).
54
HP Photosmart R817/R818 User’s Manual
Page 55

Using the Manual Shooting Mode
Manual mode lets you specify both F-number (aperture) and
shutter speed. Use Manual mode when you want complete
control over aperture and shutter speed.
Changes you make in Manual shooting mode are reflected
in Aperture Priority and Shutter Priority modes. For example,
if you change the F-number to f/8, it will be f/8 in Aperture
Priority mode. Similarly, changes you make in Aperture
Priority and Shutter Priority modes are reflected in Manual
shooting mode.
1. Press , use the buttons
to highlight , then press .
2. Press the buttons to switch
between F-number and shutter
speed.
3. Use the buttons to adjust the
value of the selected option. The
arrow on the exposure meter indicates the amount of overor under- exposure. If the image will be over- or underexposed more than three stops, the F-number, shutter
speed, and exposure meter arrow turn red. Adjust either
the F-number or shutter speed until these items turn white.
4. When you are done, you can take a picture using these
settings (see
NOTE: If you are using Manual Focus (see page 43), press
MF to display the magnified screen. You can then use
the buttons to adjust focus. When the magnified
screen times out, you can use the buttons to switch
between F-number and shutter speed.
The Manual mode settings remain in effect until they are
changed again, even when you turn the camera off.
page 33).
Taking Pictures and Recording Video Clips
55
Page 56
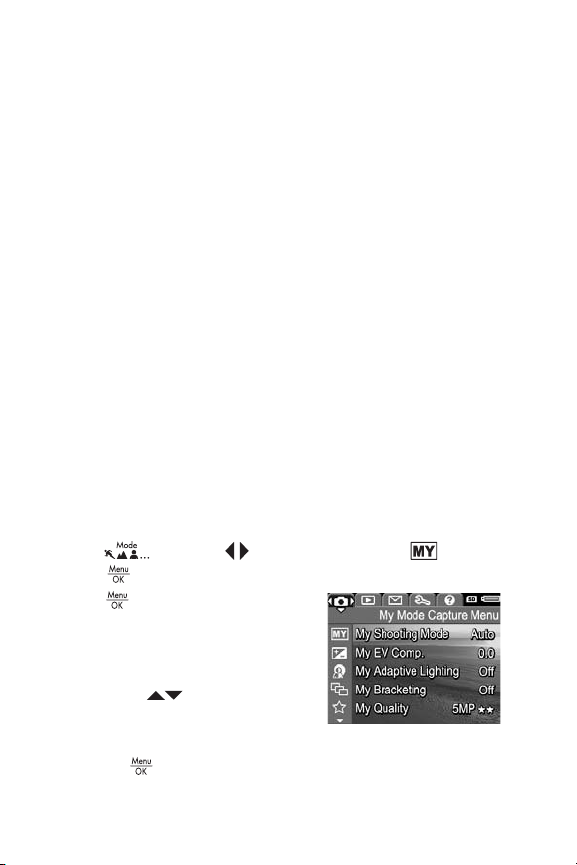
Using My Mode
My Mode is a customizable shooting mode that allows you to
select, save, and reuse a group of preferred settings. You can
specify a shooting mode (see page 49), Capture menu
options (see page 62), and which settings persist in My
Mode.
Use this mode if you frequently take pictures of the same type
of subject or scene and want the camera set to the same
settings each time. For example, you may often take action
pictures of your child playing soccer outdoors on sunny days.
You could select and save Action as the shooting mode and
Sun as the White Balance setting in My Mode, then set your
camera to the My Mode shooting mode every time you take
similar pictures.
The settings in My Mode are independent from all other
shooting mode settings. My Mode settings are saved when
you turn the camera off.
Selecting and Saving Preferred Settings in My Mode
1. Press , use the buttons to highlight , then
press .
2. Press to display the
My Mode Capture Menu.
3. To change the setting for a menu
option:
a. Use the buttons to scroll
to a menu option in the My
Mode Capture Menu.
b. Press . The sub-menu for that menu option
displays.
56
HP Photosmart R817/R818 User’s Manual
Page 57

c. Use the buttons to highlight the new setting you
want for that menu option.
d. Press to select that setting and return to the
My Mode Capture Menu.
4. Repeat Step 3 for each menu option setting you want to
change.
5. When you have finished changing settings, press
to exit the My Mode Capture Menu. If you exit to
Live View, and the icons for the settings you selected
for My Mode are displayed.
Selected settings are automatically saved and remain set
in My Mode.
6. To change any of the settings you selected in My Mode,
repeat steps 1 through 5.
Using the My Mode Saved Settings Sub-Menu
The My Mode Saved Settings sub-menu allows you to specify
which settings are saved in My Mode and which settings
return to their defaults when you turn the camera off. You can
also specify that the camera start in My Mode instead of
Auto Mode each time you turn the camera on.
1. Press , use the buttons to highlight , then
press .
2. Use the buttons to scroll to the My Mode Saved
Settings menu option and press . The My Mode
Saved Settings sub-menu displays. The options with check
marks in the My Mode Saved Settings sub-menu will be
saved in My Mode any time you turn the camera off.
Taking Pictures and Recording Video Clips
57
Page 58

3. To specify that a setting return to its default when you turn
the camera off or to specify that the camera start in My
Mode each time you turn the camera on:
a. Use the buttons to scroll to the setting.
b. Press to either remove the check mark next to a
setting so it will return to its default setting when you
turn the camera off, or toggle the Start in My Mode
setting to Yes.
4. Repeat Step 3 for each setting you want to change.
5. Press to return to the My Mode Capture Menu.
6. To exit the My Mode Capture Menu, press .
58
HP Photosmart R817/R818 User’s Manual
Page 59

Using the Self-Timer Settings
The Self-Timer setting allows you to take an image or video
clip 10 seconds after pressing either the Shutter or Video
button.
1. Secure the camera to a tripod or set it on a stable
surface.
2. Press , use the buttons to highlight Self-Timer
or Self-Timer - 2 Shots , then press .
3. Frame the subject in the Image Display (see page 31).
4. The next steps depend on whether you are taking one or
two still pictures, or recording a video clip.
For Still Pictures:
a. Press the Shutter button halfway down. The camera
measures and then locks the focus and exposure, then
holds these settings until it takes the picture.
b. Press the Shutter button all the way down. A 10-
second countdown appears on the screen and the SelfTimer/Focus Assist light blinks until the camera takes
the picture. If you set the camera to Self-Timer - 2
Shots, the Self-Timer/Focus Assist light blinks for a few
more seconds until the second picture is taken.
TIP: If you immediately press the Shutter button all the way
down, the camera locks focus and exposure just before
the end of the countdown. This is useful when one or
more subjects will enter the scene during the countdown.
TIP: You cannot record audio with a still picture when using
the self-timer settings, but you can add an audio clip later
(see page 96).
Taking Pictures and Recording Video Clips
59
Page 60

For Video Clips:
To start recording video, press the Video button and
then release it. A 10-second countdown appears on the
Image Display and the Self-Timer/Focus Assist light blinks
until the camera starts recording the video.
To stop recording, press the Video button again;
otherwise, the video continues recording until the camera
runs out of memory.
For a few seconds after recording stops, remains in
the Image Display.
NOTE: With either the Self-Timer or the Self-Timer - 2 Shots
setting, only one video clip is recorded after the
countdown.
The Self-Timer setting resets to the default Timer Off setting
after the picture or video clip is taken.
60
HP Photosmart R817/R818 User’s Manual
Page 61

Using the Burst Setting
Burst allows you to take two or more pictures (depending on
available memory space) as quickly as possible when you
press and hold the Shutter button all the way down.
1. Press , use the buttons to highlight Burst ,
then press .
2. Frame the subject and press the Shutter button halfway
down to lock the focus and exposure. Then press the
Shutter button all the way down and hold it. The camera
takes pictures as quickly as possible until you release the
Shutter button or the camera runs out of memory.
The Image Display remains off during the burst capture. After
the burst images have been taken, each image appears one
at a time in Instant Review (see page 117). You can delete
the images during Instant Review by pressing , then
selecting Entire Burst Sequence in the Delete sub-menu.
The Burst setting remains in effect until it is changed again,
or until it resets to the default Timer Off setting when you turn
the camera off. To save changed settings, use My Mode (see
page 56).
NOTE: The Burst setting is not available while recording
video clips nor in Panorama or Document shooting
modes. You also cannot record audio when using the
Burst setting, but you can add an audio clip later (see
page 96). Also, the flash is not available while using the
Burst setting.
NOTE: If you have set Bracketing (see page 66) with Burst,
the camera captures a set of three images using the
settings you specified in Bracketing.
Taking Pictures and Recording Video Clips
61
Page 62

Using the Capture Menu
The Capture Menu allows you to adjust various camera
settings that affect the characteristics of the images and
video clips you capture.
To display the Capture Menu, press if Live View is on. If
Live View is not on, press , then press . For
information about selecting menu options, setting option
properties, and exiting menus, see Camera Menus on
page 28.
TIP: To retain preferred settings, use My Mode (see
page 56).
62
HP Photosmart R817/R818 User’s Manual
Page 63

EV Compensation
You can use EV (Exposure Value) Compensation to override
the camera’s automatic exposure setting. EV Compensation
is useful in scenes that contain many light objects (like a
white object against a light background) or many dark
objects (like a black object against a dark background).
Such scenes could turn out gray without the use of EV
Compensation. For a scene with many light objects, increase
the EV Compensation to a positive number. For a scene with
many dark objects, decrease the EV Compensation.
TIP: To see the effect varying EV Compensation settings
might have on a scene, use the Exposure option in
Bracketing (see page 66).
1. In the Capture Menu (see page 62), select EV
Compensation.
2. Use the buttons to change
the EV setting in incremental
steps from -3.0 to +3.0. The
new setting is applied to the
scene behind the menu, so you
can see the setting’s effect.
3. Press to save the setting.
If the setting is anything other than the default (0.0), the
value appears next to the icon. The setting remains in
effect until it is changed again, or until you turn the camera
off. To save changed settings, use My Mode (see page 56).
TIP: You can view the results of EV Compensation settings
using the Exposure option in Bracketing (see page 66).
NOTE: EV Compensation is not available with the Manual
shooting mode.
Taking Pictures and Recording Video Clips
63
Page 64

Adaptive Lighting
This setting balances the relationship between bright and
dark areas in a picture, preserving gentle contrasts but
reducing harsh contrasts. When used with a flash, Adaptive
Lighting can brighten areas that a flash wouldn’t reach. Here
is an example of how Adaptive Lighting can enhance an
image:
Without Adaptive Lighting:
Adaptive Lighting is useful in situations like these:
• Outdoor scenes with a mixture of sun and shade
• Cloudy days when there is a lot of glare from the sky
• Indoor scenes that use flash photography (to soften or
even out the effect of the flash)
• Backlit scenes where the subject is too far away for the
flash to reach, or is severely backlit (for example, in front
of a window)
You can use Adaptive Lighting with or without flash, but it is
not recommended as a replacement for flash. Unlike the
flash, Adaptive Lighting does not affect exposure settings, so
brightened areas may appear noisy or grainy, and indoor or
night images may be blurry if taken without a flash or a
tripod.
64
HP Photosmart R817/R818 User’s Manual
With Adaptive Lighting:
Page 65
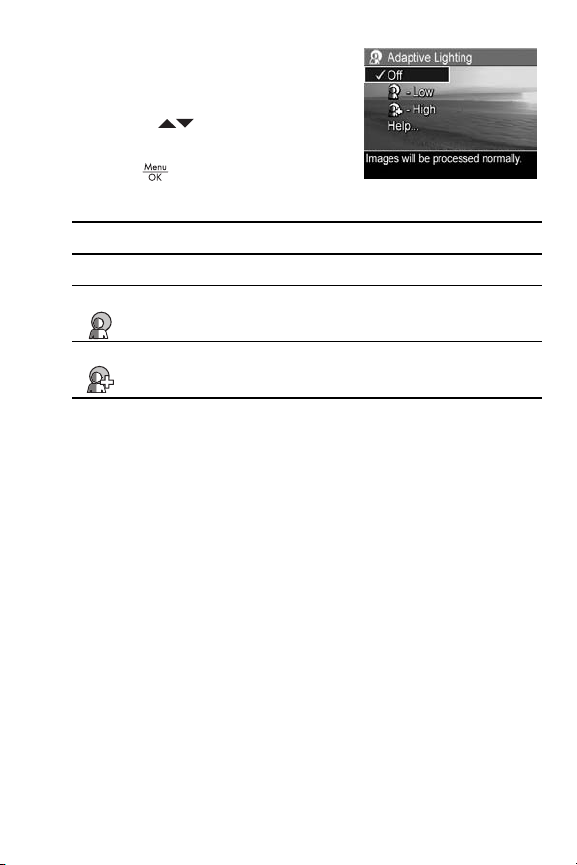
1. In the Capture Menu (see
page 62), select Adaptive
Lighting.
2. Use the buttons to highlight
a setting.
3. Press to save the setting.
Setting Description
Off (Default) Processes the image as normal.
Low
Gently brightens the dark regions of the image without
changing brightly lit areas.
High
Greatly brightens the dark regions of the image without
changing brightly lit areas significantly.
If the new setting is anything other than the default, the icon
for the setting appears in the Live View screen.
Except in My Mode (see page 56), Adaptive Lighting
remains in effect until it is changed again, even when you
turn the camera off.
TIP: You can view the results of Adaptive Lighting settings
using the Adaptive Lighting option in Bracketing (see
page 66).
NOTE: When Adaptive Lighting is turned on, the camera
takes slightly longer to store an image in memory, since
the image is being processed more before storing it.
NOTE: The Adaptive Lighting setting does not apply when
recording video clips, when Bracketing is set to Adaptive
Lighting, nor in Panorama modes.
Taking Pictures and Recording Video Clips
65
Page 66

Bracketing
This setting allows you to create a set of images with a single
press of the Shutter button, with each image set to a different
value, based upon the Bracketing option selected. Use
Bracketing when you want to try variations on an image. For
example, using the Color option, you could capture a single
scene in color, in black and white, and in sepia for an oldfashioned look.
1. In the Capture Menu (see page 62), select Bracketing.
2. Use the buttons to highlight
a Bracketing option. If you select
Exposure, use the buttons to
select a value (0.3, 0.7, or 1.0).
3. Press to save the setting.
4. Press the Shutter button all the
way down one time to take the
entire 3–shot sequence.
NOTE: Using Flash with Bracketing may result in a delay
between the three shots, depending on lighting. Using
Self-Timer - 2 Shots with Bracketing results in a single
sequence of three shots, the first of which is taken after a
10-second delay.
After the set of images has been taken, each image appears
in Instant Review (see page 117). To delete the set of
images, press , then select Entire Bracketing Sequence in
the Delete sub-menu.
NOTE: Bracketing does not apply in the Panorama modes,
nor while recording video clips. Burst is ignored when
using Bracketing.
66
HP Photosmart R817/R818 User’s Manual
Page 67

Setting Description
Off (Default) Bracketing is off.
Adaptive
Lighting
Exposure The camera takes the first image at the value set for
Color The camera takes one image, then processes and
The camera takes one image, then processes and
saves it with adaptive lighting settings (see page 64)
in the following order: Off, Low, High.
EV Compensation (see page 63) and the next two
under- and over-exposed by the value selected. For
example, if you set Exposure to 0.3 and EV
Compensation is set to 0.0, the first image is taken at
0.0, the second at -0.3, and the third at +0.3.
Exposure values cannot exceed the range of EV
Compensation (-3.0 to 3.0). For example, if you set
Exposure to 1.0 and EV Compensation is set to 2.33,
the three images are taken at 2.33, 1.33, and 3.0.
saves it with three different color settings (see
page 77) in the following order: Full Color, Black &
White, Sepia.
If the Bracketing setting is anything other than the default, the
icon for the setting displays in the Live View screen.
The Bracketing setting remains in effect until it is changed
again, or until you turn the camera off. To save changed
settings, use My Mode (see page 56).
Taking Pictures and Recording Video Clips
67
Page 68
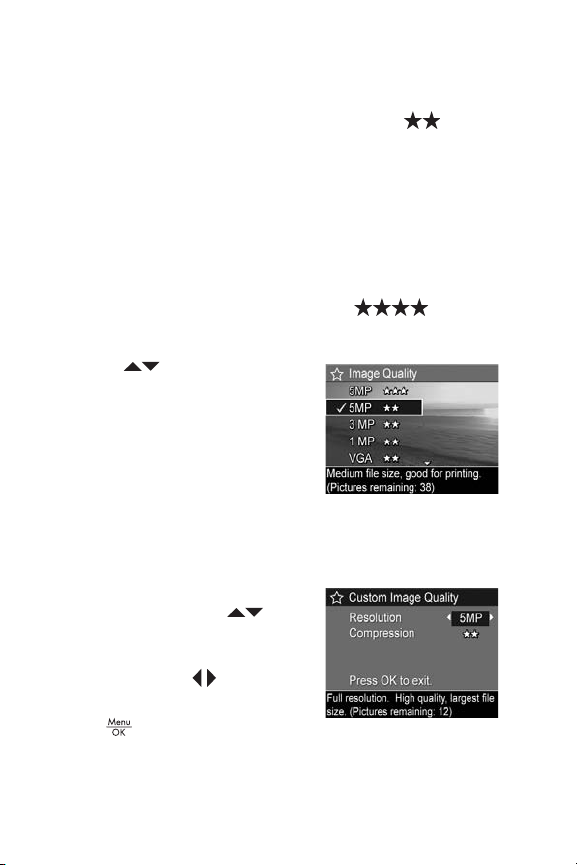
Image Quality
The Image Quality setting identifies both resolution (for
example, 5MP) and compression (for example, ) for
images. (To set the resolution and compression for video
clips, see page 70.) The higher the number of megapixels,
the higher the resolution; and the more stars, the lower the
compression. For the VGA setting, the resolution is 640 by
480 pixels.
If you plan to enlarge an image to a size larger than 27.9 by
35.6 cm (11 by 14 in) or print a cropped image at that size
or larger, select Custom... and then 5MP .
1. In the Capture Menu (see page 62), select Image Quality.
2. Use the buttons to
highlight a pre-defined setting
or the Custom... menu option.
The Pictures remaining count at
the bottom of the screen
updates as you highlight each
setting. See
on page 189 for information about how the Image
Quality setting affects the number of images that can be
saved in internal memory.
3. If you selected the Custom...
menu option, use the
buttons to move between the
Resolution and Compression
options, and the buttons to
specify a setting.
4. Press to save the setting.
Memory Capacity
68
HP Photosmart R817/R818 User’s Manual
Page 69
Setting Description
5MP
Produces very high quality images but uses the most
memory. Useful for enlarging or printing images up to
27.9 by 35.6 cm (11 by 14 in) or larger.
5MP
(Default) Produces high quality images, but uses less
memory than the 5MP
for printing images up to 27.9 by 35.6 cm (11 by
14 in).
3MP
Produces high-quality images, but uses less memory
than the 5MP settings above. Useful for printing images
up to 20.3 by 25.4 cm (8 by 10 in).
1MP
Produces memory-efficient images. Useful for printing
images up to 10.2 by 15.2 cm (4 by 6 in).
VGA
Produces memory-efficient, but lowest quality, images.
Useful for sending images via e-mail or posting them to
the Internet.
Custom... Allows you to specify a custom combination of
resolution (5MP, 3MP, 1MP, VGA) and compression.
• —Most compression; most memory-efficient;
lowest quality
• —Medium compression
• —Minimal compression; higher quality
• —Least compression; least memory
efficient; highest quality
setting above. Useful
The Image Quality setting appears in the Live View screen.
Except in My Mode (see page 56), Image Quality remains in
effect until it is changed again, even when you turn the
camera off.
Taking Pictures and Recording Video Clips
69
Page 70
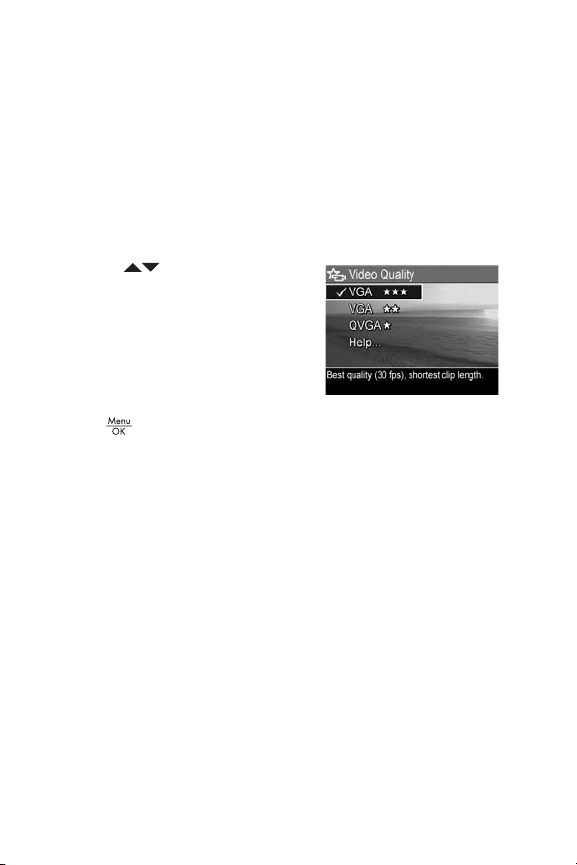
Video Quality
This setting allows you to select the resolution, compression,
and frames per second (fps) for video clips. (To set the
resolution and compression for still images, see page 68.)
Video Quality settings allow you to balance the need for
video clips suitable for extracting individual frames against
the need to capture longer clips.
1. In the Capture Menu (see page 62), select Video Quality.
2. Use the buttons to
highlight a setting. See Memory
Capacity on page 189 for
information about how the
settings affect the number of
images that can be saved in
internal memory.
3. Press to save the setting.
70
HP Photosmart R817/R818 User’s Manual
Page 71

Setting Description
VGA
(Default) Captures 640 by 480 pixel frames at 30 fps
with low compression. Produces very high quality video
clips but uses the most memory. Useful for outdoor
action video clips or printing individual video frames up
to 10.2 by 15.2 cm (4 by 6 in).
VGA
Captures 640 by 480 pixel frames at 24 fps, with
medium compression. Produces high quality video clips
and uses less memory than VGA . Useful for
indoor video clips or printing individual video frames
up to 7.6 by 12.7 cm (3 by 5 in).
QVGA
Captures 320 by 240 pixel frames at 30 fps, with high
compression. Useful for capturing longer video clips.
This setting is not recommended for printing individual
video frames.
The resolution and compression settings appear in the Image
Display when you are recording video clips. Except in My
Mode (see page 56), Video Quality remains in effect until it
is changed again, even when you turn the camera off.
Taking Pictures and Recording Video Clips
71
Page 72
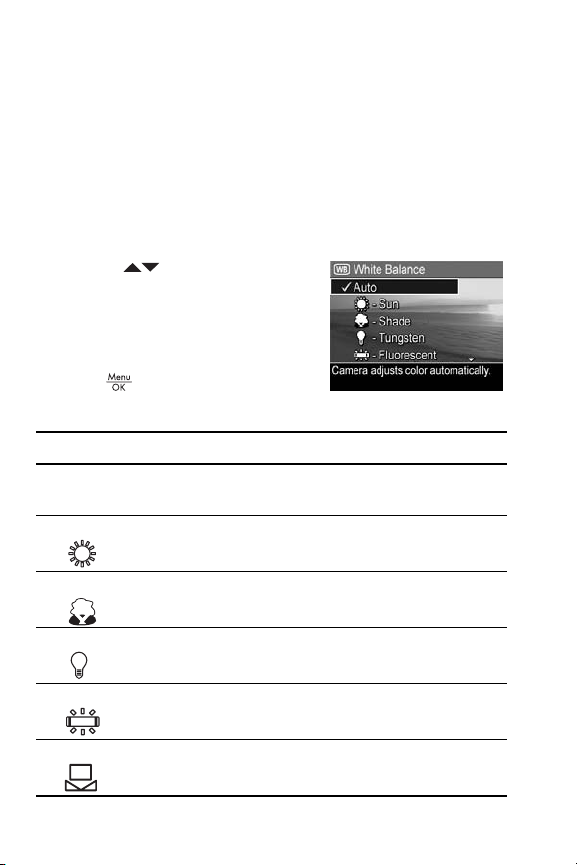
White Balance
Different lighting conditions cast different colors. This setting
allows the camera to compensate for this, reproducing colors
more accurately and ensuring that whites appear white in
the final image. You can also adjust the white balance to
produce creative effects. For example, the Sun setting
produces a warmer look to the image.
1. In the Capture Menu (see page 62), select White Balance.
2. Use the buttons to highlight
a setting. The new setting is
applied to the Live View screen
behind the menu, so you can see
the effect of each setting.
3. Press to save the setting.
Setting Description
Auto (Default) Automatically identifies and corrects for
Sun
Shade
Tungsten
Fluorescent
scene illuminance.
Balances color assuming the subject is outdoors under
sunny or bright cloudy conditions.
Balances color assuming the subject is outdoors in
shade, in dark cloudy conditions, or at dusk.
Balances color based on incandescent or halogen
lighting (typically found in homes).
Balances color based on fluorescent lighting.
Manual
Calculates a custom White Balance based on your
target subject (see the following subsection).
72
HP Photosmart R817/R818 User’s Manual
Page 73

If the new setting is anything other than the default, the icon
for the setting appears in the Live View screen.
The White Balance setting remains in effect until it is changed
again, or until you turn the camera off. To save changed
settings, use My Mode (see page 56).
Manual White Balance
If you select Manual, the Manual
White Balance screen displays. The
Live View portion of the screen
shows the color tint from the
previous Manual White Balance
setting.
To change the Manual White Balance setting:
1. Point the camera at a white or gray target (such as a
piece of paper), making sure that the entire screen
encompasses the white or gray target.
2. Press the Shutter button (the camera will not take a
picture). The camera calculates a custom White Balance
setting.
3. If needed, repeat steps 1 and 2 until you get the desired
Manual White Balance setting.
4. When you are satisfied with the Manual setting you have
made, press to save the setting.
TIP: To restore the previous Manual White Balance setting,
press without pressing the Shutter button.
Taking Pictures and Recording Video Clips
73
Page 74

Auto Focus Area
This setting allows you to select between a wide, multi-zone
focus region and a spot focus region. See Focusing on the
Subject on page 37 for examples of Multi and Spot focus.
1. In the Capture Menu (see
page 62), select Auto Focus
Area.
2. Use the buttons to highlight
a setting.
3. Press to save the setting.
Setting Description
Multi (Default) Use this setting for general-purpose picture
taking or to focus on a subject not in the center of the
scene. The camera searches for focus in each of five
zones, starting from the closest distance.
Spot
Use this setting with Focus lock (see page 40) if the
camera keeps focusing on the wrong subject. The
camera uses a small area in the center of the scene
region to focus.
If the new setting is anything other than the default, the icon
for the setting appears in the Live View screen.
The Auto Focus setting remains in effect until it is changed
again, or until you turn the camera off. To save changed
settings, use My Mode (see page 56).
NOTE: Auto Focus Area does not apply in Manual Focus.
74
HP Photosmart R817/R818 User’s Manual
Page 75

AE Metering
This setting allows you to specify which region of a scene the
camera uses to calculate the exposure.
1. In the Capture Menu (see
page 62), select AE Metering.
2. Use the buttons to highlight
a setting.
3. Press to save the setting.
Setting Description
Average
Center-
Weighted
If the new setting is anything other than the default, the icon
for the setting appears in the Live View screen.
The AE Metering setting remains in effect until it is changed
again, or until you turn the camera off. To save changed
settings, use My Mode (see page 56).
NOTE: AE Metering is not available with the Theatre
Calculates exposure using the entire scene. Useful when
you want everything in the picture to be used equally
when calculating exposure.
(Default) Calculates exposure using a large area in the
center of the scene. Useful when the subject of the
picture is in the center of the scene. Exposure will be
based more on the subject than its surroundings.
Spot
Calculates exposure using a small area in the center of
the scene. Useful in backlit scenes or when the subject
is very dark or light compared to the rest of the scene.
Portions of the image may be over- or under-exposed.
For best results, use Focus Lock (see page 39) with Spot.
shooting mode.
Taking Pictures and Recording Video Clips
75
Page 76

ISO Speed
This setting adjusts the sensitivity of the camera to light.
When ISO Speed is set to the default Auto setting, the
camera selects the best ISO speed for the scene.
Lower ISO speeds capture images with the least amount of
grain (or noise), but result in slower shutter speeds. If taking
a picture in low light conditions without a flash at ISO 100 or
below, use a tripod.
Higher ISO numbers allow faster shutter speeds, and can be
used when taking pictures in dark areas without a flash, or
when taking pictures of fast moving objects. Higher ISO
speeds produce pictures with more grain (or noise) and,
therefore, can be of lower quality.
1. In the Capture Menu (see
page 62), select ISO Speed.
2. Use the buttons to highlight
a setting.
3. Press to save the setting and
return to the Capture Menu.
If the new setting is anything other than the default, the icon
for the setting will appear in the Live View screen.
The ISO Speed setting remains in effect until it is changed
again, or until you turn the camera off. To save changed
settings, use My Mode (see page 56).
NOTE: The ISO Speed setting does not apply in Theatre
mode nor when recording video clips.
76
HP Photosmart R817/R818 User’s Manual
Page 77

Color
This setting allows you to select the color in which your
images will be captured.
1. In the Capture Menu (see page 62), select Color.
2. Use the buttons to highlight
a setting. The new setting is
applied to the Live View screen
behind the menu, so you can
see the effect of each setting.
3. Press to save the setting.
Setting Description
Full Color (Default) Images are captured in full-color. The image
can be changed to Black & White or Sepia later
using the HP Image Zone software.
Black &
White
Sepia Images are captured in brown colors to provide an
The Color setting remains in effect until it is changed again,
or until you turn the camera off. To save changed settings,
use My Mode (see page 56).
TIP: You can see the effect the Color settings have on a
single image by using Color Bracketing (see page 66).
Images are captured in grayscale. The image cannot
be changed to Full Color later.
aged or old-fashioned look. The image cannot be
changed to Full Color later.
Taking Pictures and Recording Video Clips
77
Page 78

Saturation
This setting allows you to determine how saturated the colors
will be in your pictures.
1. In the Capture Menu (see
page 62), select Saturation.
2. Use the buttons to highlight
a setting.
3. Press to save the setting.
Setting Description
Low
Mutes colors to give a softer, more natural look to the
subject.
Medium (Default) Colors will be normally saturated.
Emphasizes more vivid colors in a scene. Outdoor
High
landscape photography can use high saturation to create
skies that are more blue, or sunsets that are more orange.
If the new setting is anything other than the default, the icon
for the setting appears in the Live View screen.
The Saturation setting remains in effect until it is changed
again, even when you turn the camera off.
78
HP Photosmart R817/R818 User’s Manual
Page 79

Sharpness
This setting allows you to set how sharp the fine detail will be
in your images.
1. In the Capture Menu (see
page 62), select Sharpness.
2. Use the buttons to highlight
a setting.
3. Press to save the setting.
Setting Description
Low
Produces softer edges with less grain (or noise). Use this
setting for taking portrait pictures with softer, more
natural edges.
Medium (Default) Produces edges with normal sharpness.
High
Produces more pronounced edges. This setting may be
helpful for outdoor landscapes, but the images will
contain more grain (or noise).
If the new setting is anything other than the default, the icon
for the setting appears in the Live View screen.
The Sharpness setting remains in effect until it is changed
again, even when you turn the camera off.
NOTE: The Sharpness setting does not apply when
recording video clips.
Taking Pictures and Recording Video Clips
79
Page 80
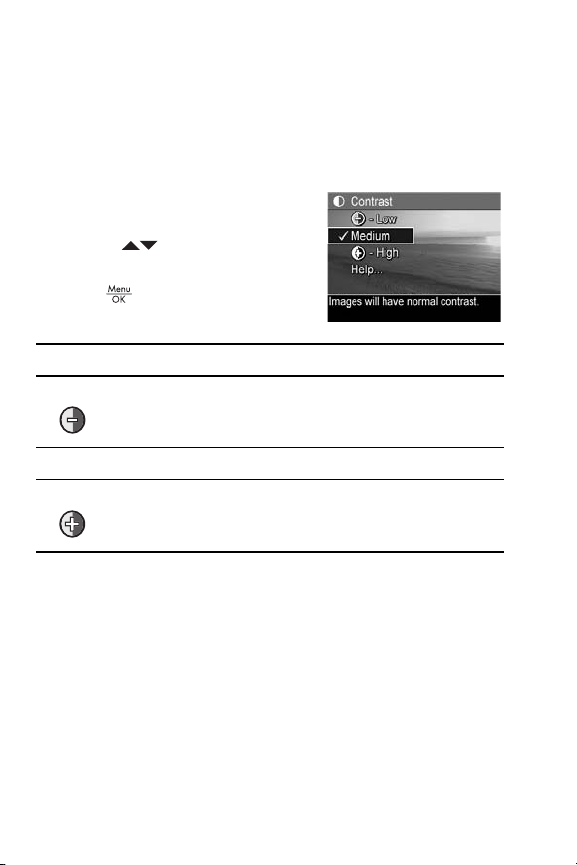
Contrast
This setting allows you to control how much contrast there will
be between the dark and light colors in your captured
images, including the amount of detail there will be in the
highlights and shadows within the images.
1. In the Capture Menu (see
page 62), select Contrast.
2. Use the buttons to highlight
a setting.
3. Press to save the setting.
Setting Description
Low Images have less contrast. Dark and light colors in the
image are less distinct, and highlights and shadows
have more detail.
Medium (Default) Images have normal contrast.
High
Images have more contrast. Dark and light colors in the
image are more distinct, and highlights and shadows
have less detail.
If the new setting is anything other than the default, the icon
for the setting appears in the Live View screen.
The Contrast setting remains in effect until it is changed
again, even when you turn the camera off.
NOTE: The Contrast setting does not apply when recording
video clips.
80
HP Photosmart R817/R818 User’s Manual
Page 81

Date & Time Imprint
This setting imprints either the date or the date and time the
image was captured. The Date & Time Imprint setting:
• Affects only images taken after you have set it.
• Is permanent. You cannot remove it from an image.
• Rotates with the image (see page 88).
TIP: Verify that the date and time setting is correct before
using this feature (see page 119).
1. In the Capture Menu (see
page 62), select Date & Time
Imprint.
2. Use the buttons to highlight
a setting.
3. Press to save the setting.
Setting Description
Off (Default) No date or time imprinted on the image.
Date Only
Date & Time
Date permanently imprinted in the lower left corner
of the image.
Date and time permanently imprinted in the lower
left corner of the image.
If the new setting is anything other than the default, the icon
for the setting appears in the Live View screen.
The Date & Time Imprint setting remains in effect until it is
changed again, even when you turn the camera off.
NOTE: The Date & Time Imprint setting does not apply when
recording video clips, nor in the Panorama modes.
Taking Pictures and Recording Video Clips
81
Page 82

Help for the Menu Options
Help is the last option in each of the
Capture Menu sub-menus. The Help
option provides information about
that Capture Menu option and its
settings. For example, if you press
when Help is highlighted in the
White Balance sub-menu, the White
Balance Help screen is displayed, as shown.
Use the buttons to scroll through the Help screens. To
exit Help and return to the sub-menu, press .
82
HP Photosmart R817/R818 User’s Manual
Page 83

3 Reviewing Images and
Video Clips
Playback allows you to review images and video clips, save
frames from video clips (see page 86), view thumbnails of
images (see page 86), or magnify images (see page 87) so
you can take a closer look at them. Through the Playback
Menu, you can delete images and video clips, remove red
eyes from still images, rotate images, get image advice,
display image information, record audio clips and attach
them to existing images, and stitch panoramic sequences oncamera (see page 88).
Using Playback
1. Press until appears in the upper left corner of
the Image Display. The most recently taken or reviewed
image or video clip appears.
2. Use the buttons to scroll through your images and
video clips.
For panoramic sequences, you can preview, magnify, and
stitch the individual images in a panoramic sequence into
one image (see
A video clips displays the first frame for 2 seconds, then
plays automatically. Pressing pauses the video.
3. To switch to Live View, press .
During Playback, the Image Display also indicates
additional information about each image or video clip. The
following table describes this information.
page 94).
Reviewing Images and Video Clips
83
Page 84
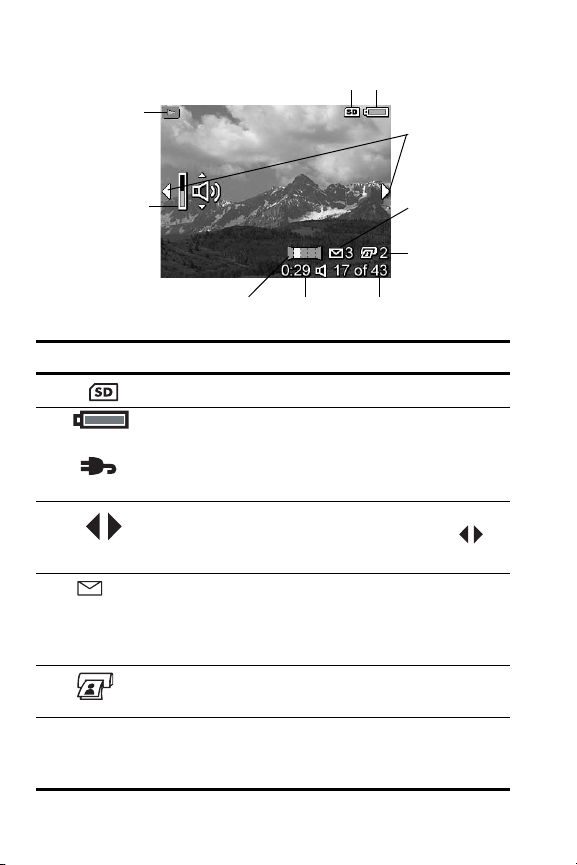
10
1
2
3
9
4
5
8
#Icon Description
1
2
3
4 3 Indicates this image has been selected to be sent to
5
6 17 of 43 Shows the number of this image or video clip out of
Indicates that a memory card is installed.
• Power indicator, such as this full battery level
or
indicator (see
• AC power when using the HP AC power adapter
with the cradle or HP
Displays for the first few seconds to indicate you can
scroll through images or video clips using the
buttons.
a destination using HP Instant Share (see
page 103). The number to the right of the icon
indicates the quantity of destinations selected.
2 Indicates this image has been selected for printing 2
copies using HP Instant Share (see page 103).
the total number of images and video clips stored in
memory.
7
page 170).
Photosmart R-series dock.
6
84
HP Photosmart R817/R818 User’s Manual
Page 85
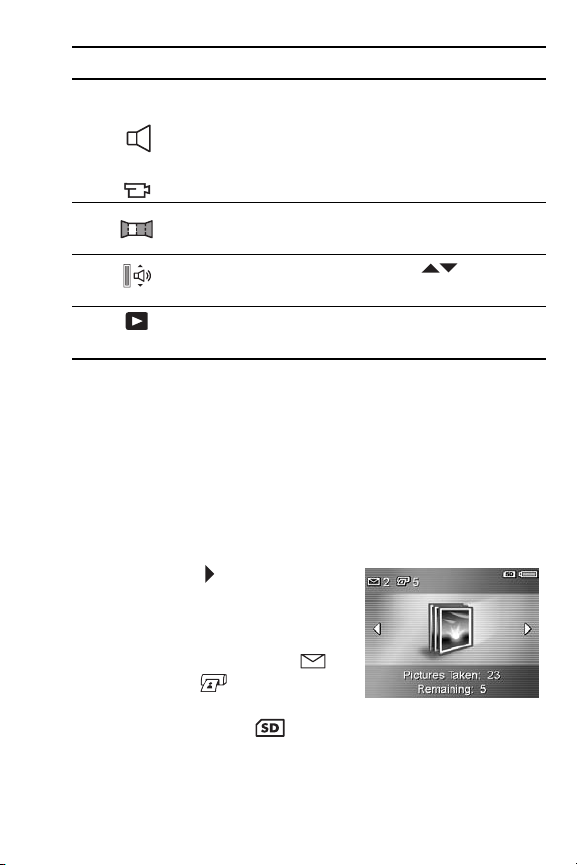
#Icon Description
7 0:29
8
9
10
• Shows the recorded length of this audio or
video clip.
• Indicates this image has an audio clip attached.
or
• Indicates this is a video clip.
Indicates this image is the second image in a
panoramic sequence taken in Panorama mode.
Indicates the audio level. Press the buttons to
adjust the audio level.
Displays for the first few seconds to indicate the
camera is in Playback.
Playback and Audio Clips
You can add an audio clip to an existing still image while in
Playback, as well as review audio clips already associated
with still images and video clips. See Record Audio on
page 96.
Total Images Summary Screen
When you press while viewing
the last image, the Total Images
Summary screen appears. Counters
indicate the total number of images
selected for HP Instant Share
and for printing . Icons in the
upper right corner indicate an
installed memory card ( ) and power remaining (see
page 170
).
Reviewing Images and Video Clips
85
Page 86

Saving Frames from Video Clips
When a video clip is playing, you can pause it and save a
frame as a still image at two times the resolution of the video
clip.
1. During video playback, press to pause the video.
2. Use the buttons to move backward or forward a
frame at a time.
3. Press to save the displayed frame.
4. Press to resume playing the video clip.
Viewing Thumbnails
You can view still images and the first frames of video clips
arranged in a matrix of nine thumbnails per screen.
1. While in Playback (see
page 83), press Thumbnails
(same as Zoom Out on the
Zoom lever) view thumbnails of
up to nine images and video clip
frames. A yellow border
surrounds the current image or
video clip frame.
2. Use the and buttons to scroll through the
thumbnails.
3. Press to exit Thumbnail. The current image or video
clip displays in full view on the Image Display.
At the bottom of each thumbnail, icons identify information
for the image.
86
HP Photosmart R817/R818 User’s Manual
Page 87

Magnifying Images
This feature is for viewing purposes only; it does not
permanently alter the image.
1. While in Playback (see
page 83), press (same as
on the Zoom lever). The currently
displayed image is magnified
2x.
2. Use the and buttons to
pan around the magnified
image.
3. Use and to increase or decrease the
magnification.
4. Press to return to Playback.
NOTE: You can magnify only still images; video clips cannot
be magnified.
Reviewing Images and Video Clips
87
Page 88
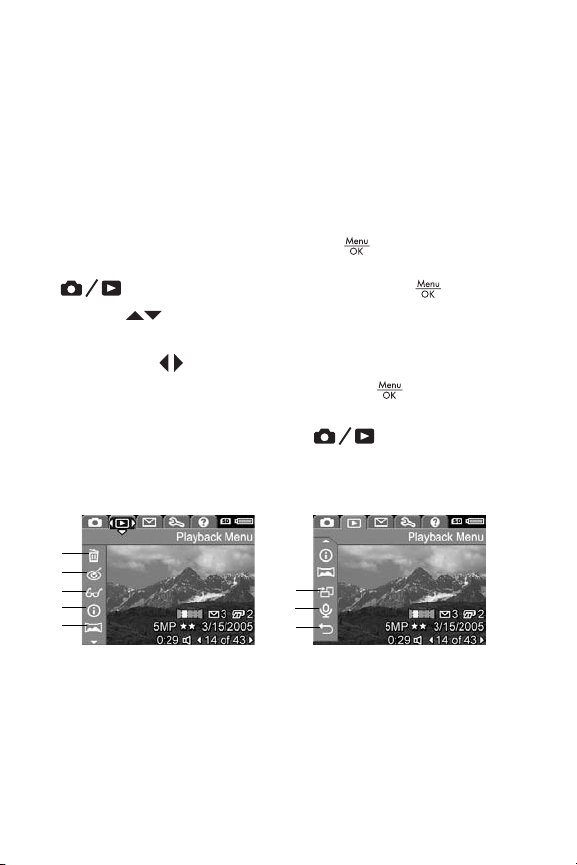
Using the Playback Menu
The Playback Menu allows you to delete/undelete images or
video clips, remove red eyes from images, format internal
memory or a memory card, view image advice, display
image capture information, rotate images, record audio and
attach it to an image, and stitch a panoramic sequence incamera.
1. To display the Playback Menu, press while you are in
Playback. If you are not currently in Playback, press
until you are in Playback, then press .
2. Use the buttons to highlight the option you want.
3. Move to the image or video clip you want to use by
pressing the buttons.
4. Select the highlighted option by pressing , then follow
the on-screen instructions.
5. To exit the Playback Menu, press . For other ways
to exit the menu, see page 28.
The following table summarizes the Playback Menu options.
1
2
3
4
5
6
7
8
88
HP Photosmart R817/R818 User’s Manual
Page 89
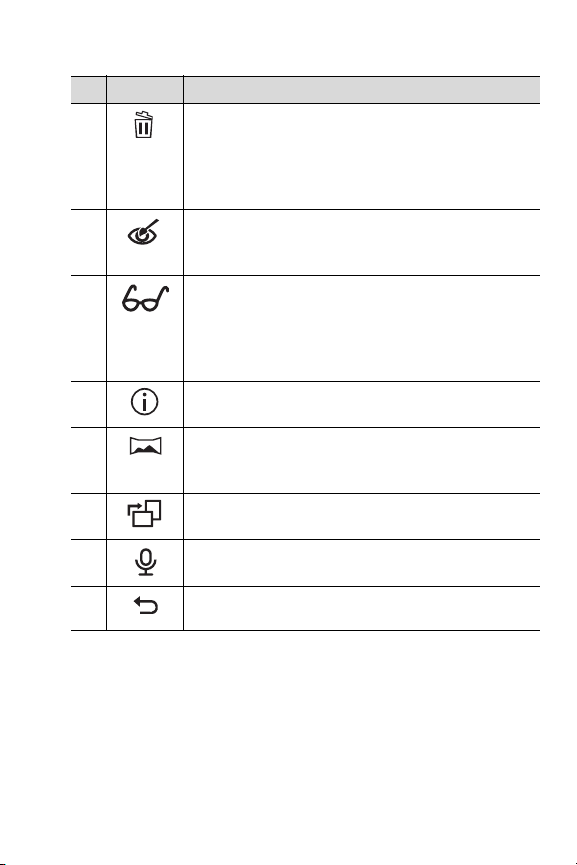
# Icon Description
1 Delete—Allows you to delete the current image, an
entire panoramic sequence, or all images and
video clips. Also allows you to format the internal
memory or memory card or undelete the last
deleted image (see page 90).
2 Remove Red Eyes—Corrects the red effect which
3 Image Advice—Provides an analysis of the image
4 Image Info—Allows you to view all the settings
5 Stitch Panorama—Allows you to preview, magnify,
6 Rotate—Rotates the currently displayed still image
7 Record Audio—Records an audio clip to attach to
8 EXIT—Exits the Playback Menu.
appears in the eyes of human subjects in still
images (see page 91).
which identifies problems with focus, exposure,
and so forth. Also provides recommendations for
improving similar images in the future (see
page 92).
used when capturing this image (see page 92).
or stitch together a panoramic sequence (see
page 94).
in 90 degree increments (see page 95).
this still image (see page 96).
Reviewing Images and Video Clips
89
Page 90

Delete
In the Playback Menu (see
page 88), when you select Delete,
the Delete sub-menu displays. Use
the buttons to highlight an
option, then press .
The Delete sub-menu provides the
following options:
•Cancel—Returns you to the Playback Menu without
deleting the currently displayed image or video clip.
• This Image—Deletes the currently displayed image or
video clip.
• Entire Panoramic Sequence—If the current image is part
of a panoramic sequence, deletes all images associated
with the panoramic sequence. A stitched panoramic
image is not affected if you delete individual images in
the sequence.
• All Images (in Memory/on Card)—Deletes all images and
video clips either in internal memory, or on the memory
card.
• Format (Memory/Card)—Deletes all images, video clips,
and files in internal memory or on the memory card, and
then formats the internal memory or memory card.
• Undelete Last—Recovers the most recently deleted image.
(This option is only displayed after a Delete operation has
been performed.) If you perform another operation after a
delete, the deleted image is no longer recoverable.
90
HP Photosmart R817/R818 User’s Manual
Page 91

NOTE: When one shot from the center of a panoramic
sequence is deleted, all of the panorama tags for that
panoramic sequence are removed. Each image becomes
an individual still image. If you delete an image from the
beginning or end of the panorama, and at least 2 images
remain, the panoramic sequence is preserved.
Remove Red Eyes
In the Playback Menu (see page 88), when you select
Remove Red Eyes, the camera processes the current still
image to remove red eyes from the subjects.
The red-eye removal process takes a
few seconds, after which the
corrected image displays with green
boxes around corrected areas,
along with the Remove Red Eyes
sub-menu:
•Save Changes—Saves the red
eye changes (overwriting the original image) and returns
to the Playback Menu.
•View Changes—Displays a magnified view of the image
with green boxes around the corrected areas. You can
zoom in and pan around the image in this view. To return
to the Remove Red Eyes Menu, press
•Cancel—Returns to the Playback Menu without saving the
red eye changes.
NOTE: Remove Red Eyes is only available for still images
taken with a flash.
.
Reviewing Images and Video Clips
91
Page 92

Image Advice
In the Playback Menu (see page 88), when you select Image
Advice, the camera analyzes the image for focus, exposure,
and so forth.
If improvements can be made for
similar images taken in the future,
an analysis lists the issue and
recommended solutions. Image
Advice lists up to two issues.
To exit the Image Advice screen,
press .
NOTE: Image Advice is not available for video clips, nor for
images extracted from video clips.
Image Info
In the Playback Menu (see page 88), when you select Image
Info, the Image Info screen shows the settings used when
capturing the currently displayed image or video clip.
7
1
2
3
4
5
6
92
HP Photosmart R817/R818 User’s Manual
8
9
10
Page 93

#Description
1 Shutter speed and F-number (aperture).
2 ISO Speed and EV Compensation setting.
3 Non-default shooting mode (see page 49), Focus setting (see
page 42), and Flash setting (see page 47).
4All non-default Capture Menu settings.
5 Histogram displaying, left to right, the distribution of dark,
mid-range, and light pixels in the captured image.
6Zoom indicator.
7 Displays only when a memory card is installed.
8 File name of the image.
9File size of the image.
10 The information in the first and third rows in the bottom, right
corner of the image is the same information that is provided in
the Playback Menu view of the image. The second row
identifies the resolution and compression, date, and time at
which the image was taken.
Reviewing Images and Video Clips
93
Page 94

Stitch Panorama
In the Playback Menu (see page 88), when an image from a
panoramic sequence is displayed and you select Stitch
Panorama, the camera displays a stitched view of the
panoramic sequence. You can then preview, magnify, or
create a permanently stitched panoramic sequence.
When stitching on-camera, images in the sequence larger
than 2MP are temporarily resized in memory to 2MP
(images in the sequence are retained at their original size).
As a result, panoramic sequences stitched on-camera may
be of lower resolution. To stitch a panorama at the resolution
at which you took the panoramic sequence, transfer the
panoramic sequence of images to your computer using the
full version of the HP Image Zone software (see page 97).
You can transfer a stitched panorama to a computer without
the HP Image Zone software (see page 130). The original
panoramic sequence remains in the internal memory or
memory card.
1. Use the buttons to scroll to
one of the images in a
panoramic sequence of images.
2. Select Stitch Panorama and
press to assemble the
panorama.
3. After the panorama is
assembled, use to magnify
the stitched panorama and pan
around it using the
buttons. To return to the menu,
press until the sub-menu
displays.
94
HP Photosmart R817/R818 User’s Manual
Page 95

4. Use the buttons to highlight an option in the sub-
menu, then press .
The sub-menu has the following options:
• Save Stitching—Creates a stitched panoramic
sequence. After the camera creates the stitched
panorama, it returns to the Playback Menu.
• Cancel—Cancels the stitching sub-menu and returns to
Playback.
Rotate
In the Playback Menu (see page 88), when you select
Rotate, the camera displays a sub-menu that allows you to
rotate the image in 90-degree increments.
1. In the Playback Menu, select
Rotate.
2. Use the buttons to rotate the
image clockwise or counterclockwise. The image rotates in
the Image Display.
3. Press to save the image in
the new orientation.
NOTE: Rotate is not available for
video clips, for still images that
are part of a panoramic
sequence, nor for stitched
panoramic images.
Reviewing Images and Video Clips
95
Page 96

Record Audio
You can attach an audio clip to a still picture while you are
taking a picture (see page 34) or add an audio clip after it is
taken (as explained in this section). You can also use the
method in this section to replace an audio clip already
attached to an image.
1. In the Playback Menu (see page 88), select Record
Audio. Audio recording starts immediately after you select
this menu option.
2. To stop recording, press ; otherwise the audio
continues to record for up to 60 seconds or until the
camera runs out of memory, whichever comes first.
NOTE: You can attach audio clips to individual images in a
panoramic sequence. When you stitch the panoramic
sequence (on-camera or on-computer), no audio is
attached to the stitched image. You can, however, add
audio to a stitched panorama as described above.
If the currently displayed image already has an audio clip
attached to it, the Record Audio sub-menu displays instead
when you select Record Audio.
• Keep Current Clip—Retains the current audio clip and
returns to the Playback Menu.
•Record New Clip—Records new audio clip, replacing the
previous audio clip.
• Delete Clip—Deletes the current audio clip and returns to
the Playback Menu.
TIP: You can adjust the volume of the audio playback by
pressing the buttons.
NOTE: Record Audio is not available for video clips.
96
HP Photosmart R817/R818 User’s Manual
Page 97

4 Transferring and
Printing Images
Transferring Images to a Computer
TIP: You can also perform this task using either a memory
card reader (see page 132) or the HP Photosmart R-series
dock (see the dock User’s Manual).
1. Confirm the following:
•Either the HP Image Zone software or the HP Image
Zone Express software (Windows only) is installed on
your computer (see
computer with no HP Image Zone software installed on
it, see page 130.
• If images on the camera are selected for printing or for
HP Instant Share destinations, make sure the computer
is connected to a printer and/or the Internet.
2. Your camera came with a
USB cable. Attach the USB
cable’s flat end to the
computer.
3. Attach the other end to the
cradle or the HP Photosmart
R-series dock and place the
camera in the cradle or the
dock.
page 19). To transfer images to a
Transferring and Printing Images
97
Page 98

4. Turn on the camera.
• On Windows: The HP Image Transfer and Quick Print
software provides the transfer functionality. In the
Transfer and Print Images screen, click:
• Transfer to copy images to your computer.
• Transfer with Quick Print to copy the images to
your computer and select images to print.
The images are transferred to the computer. If you
have marked images for HP Instant Share destinations
(see pages 108 and 110), the images are sent. If you
clicked Transfer with Quick Print, the HP Image
Transfer and Quick Print software displays a series of
screens, allowing you to select an image, specify its
print options, and begin printing. When the Image
Action Summary screen appears on the computer, you
can disconnect the camera from the computer.
If you are transferring a panoramic sequence of
images to a Windows computer, the full version of the
Image Zone software must be installed to
HP
automatically stitch the images in the panoramic
sequence together during image transfer (see
HP Image Zone Software on page 127).
• On Macintosh: Image capture or iPhoto provides the
transfer functionality. Follow the information presented
on screen to transfer the images from your camera. If
you have marked images for HP
Instant Share
destinations (see pages 108 and 110), the
HP Photosmart Camera Actions screen notifies you
when the images are ready to process. Click Continue
to send the images to their destinations. When the
transfer is complete, you can disconnect the camera
from the computer.
98
HP Photosmart R817/R818 User’s Manual
Page 99
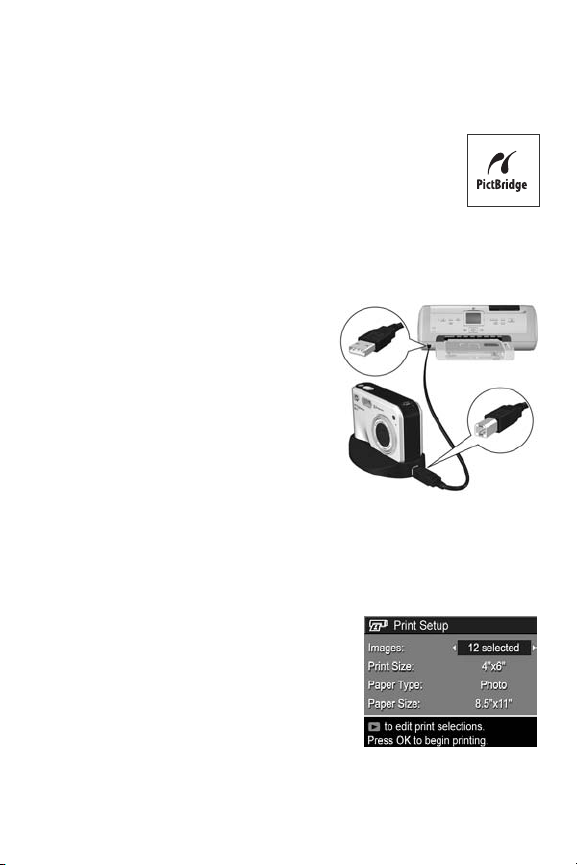
Printing Images Directly from the Camera
You can connect the camera using the cradle or
dock to any PictBridge-certified printer to print still
images and frames saved from a video clip (see
page 86). To determine if your printer is
PictBridge-certified, look for the PictBridge logo.
1. Check that the printer is turned on, there is paper in the
printer, and there are no printer error messages.
2. Connect the larger, flat end
of the USB cable to the
corresponding connector on
the PictBridge-certified
printer.
TIP: The PictBridge connector is
usually located on the front of
the printer.
3. Attach the other connector to
the cradle or dock.
4. Set the camera’s USB Configuration setting to Digital
Camera (see page 120), then place the camera in the
cradle or dock.
5. When the camera is connected
to the printer, a Print Setup menu
displays on the camera. If you
already selected images to print
using the camera’s HP
Share Menu, the number of
images selected is shown.
Otherwise, Images: ALL is displayed.
Instant
Transferring and Printing Images
99
Page 100

6. To change the settings in the Print Setup menu, use the
buttons on the camera to select a menu option, then
use the buttons on the camera to change the setting.
7. When the settings are correct, press to begin
printing.
After connecting the camera to the printer, you can print
either all images in the camera (see page 110) or just
selected images (see page 108). However, printing directly
from the camera has the following limitations:
• A set of images marked as a panoramic sequence print
as individual pictures. For information about printing
entire panoramas, see
page 102.
• To print panoramas stitched on camera, transfer the
stitched panoramas to your computer (see
page 97).
Alternatively, if your printer can print panoramas and has
a memory card slot, insert the memory card and print
directly from the printer (see your printer manual for
instructions).
• You can print frames saved from video clips (see
page 86), but you cannot print video clips directly from
the camera. If your printer has a memory card slot and
can print video clips, you can insert the memory card
directly in the printer’s memory card slot and print the
video clip. See your printer’s manual for more
information.
To avoid these limitations, use the HP Image Zone software
(see page 127).
NOTE: If you connect the camera to a non-HP printer and
encounter problems with printing, contact your printer
manufacturer. HP does not provide customer support for
non-HP printers.
100
HP Photosmart R817/R818 User’s Manual
 Loading...