

Page 1

HPE ProLiant DL580 Gen10 Server User Guide
Abstract
This document is for the person who installs, administers, and troubleshoots HPE server systems.
Hewlett Packard Enterprise assumes that you are qualified in the servicing of computer
equipment, and trained in recognizing hazards in products with hazardous energy levels.
Part Number: 878778-003
Published: March 2018
Edition: 3
Page 2

©
Copyright 2017, 2018 Hewlett Packard Enterprise Development LP
Notices
The information contained herein is subject to change without notice. The only warranties for Hewlett Packard
Enterprise products and services are set forth in the express warranty statements accompanying such
products and services. Nothing herein should be construed as constituting an additional warranty. Hewlett
Packard Enterprise shall not be liable for technical or editorial errors or omissions contained herein.
Confidential computer software. Valid license from Hewlett Packard Enterprise required for possession, use,
or copying. Consistent with FAR 12.211 and 12.212, Commercial Computer Software, Computer Software
Documentation, and Technical Data for Commercial Items are licensed to the U.S. Government under
vendor's standard commercial license.
Links to third-party websites take you outside the Hewlett Packard Enterprise website. Hewlett Packard
Enterprise has no control over and is not responsible for information outside the Hewlett Packard Enterprise
website.
Acknowledgments
Microsoft® and Windows® are either registered trademarks or trademarks of Microsoft Corporation in the
United States and/or other countries.
Linux® is the registered trademark of Linus Torvalds in the U.S. and other countries.
Red Hat® is a registered trademark of Red Hat, Inc. in the United States and other countries.
Page 3

Contents
Component identification........................................................................... 7
Front panel components......................................................................................................................7
Universal media bay components...........................................................................................10
Drive bay numbering...............................................................................................................10
Front panel LEDs and buttons...........................................................................................................12
UID button functionality...........................................................................................................14
Front panel LED power fault codes........................................................................................ 14
Systems Insight Display LEDs................................................................................................15
Systems Insight Display combined LED descriptions.............................................................16
Drives................................................................................................................................................ 18
NVMe drive components and LEDs........................................................................................18
SAS/SATA drive components and LEDs.................................................................................18
Drive guidelines...................................................................................................................... 19
Rear panel components.................................................................................................................... 20
Rear panel LEDs............................................................................................................................... 22
Power supply LEDs .......................................................................................................................... 22
Fan bay numbering............................................................................................................................23
System board components................................................................................................................24
Processor, heatsink, and socket components........................................................................ 25
DIMM slot locations................................................................................................................ 25
Drive cage backplane identification...................................................................................................27
HPE 12G SAS Expander Card port numbering.................................................................................29
Riser board components................................................................................................................... 29
Operations..................................................................................................32
Power up the server.......................................................................................................................... 32
Power down the server......................................................................................................................32
Extending the server from the rack....................................................................................................32
Removing the server from the rack................................................................................................... 33
Removing the bezel...........................................................................................................................33
Accessing the Systems Insight Display.............................................................................................34
Removing a hot-plug SAS or SATA drive.......................................................................................... 34
Removing an NVMe drive..................................................................................................................35
Removing the access panel.............................................................................................................. 36
Installing the access panel................................................................................................................ 37
Installing the primary PCIe riser cage................................................................................................38
Removing a PCIe riser cage..............................................................................................................39
Removing the air baffle......................................................................................................................40
Installing the air baffle........................................................................................................................41
Removing the fan cage......................................................................................................................42
Installing the fan cage........................................................................................................................43
Removing the fan cage holders.........................................................................................................44
Installing fan cage holders.................................................................................................................45
Removing the processor mezzanine tray.......................................................................................... 45
Removing the 2P pass-through performance board..........................................................................46
Setup...........................................................................................................48
HPE support services........................................................................................................................48
Contents 3
Page 4

Setup overview..................................................................................................................................48
Operational requirements....................................................................................................... 49
Server warnings and cautions................................................................................................ 51
Rack warnings........................................................................................................................ 51
Electrostatic discharge............................................................................................................52
Server box contents................................................................................................................53
Installing hardware options ....................................................................................................53
Installing the server into the rack............................................................................................53
Configuring the server............................................................................................................ 54
Operating system....................................................................................................................54
Installing or deploying an operating system............................................................................55
Registering the server.............................................................................................................55
Installing hardware options...................................................................... 56
Hewlett Packard Enterprise product QuickSpecs..............................................................................56
Installing a Systems Insight Display.................................................................................................. 56
Installing an eight-bay SFF HDD/SSD drive cage............................................................................. 58
Installing an eight-bay NVMe SSD drive cage...................................................................................62
Installing a six-bay SFF HDD/two-bay NVMe SSD (Premium) cage.................................................64
Installing a universal media bay........................................................................................................ 67
Installing a two-bay SFF (Premium) drive cage.................................................................................69
Installing a hot-plug SAS or SATA drive............................................................................................ 74
Installing an NVMe drive....................................................................................................................75
Installing an internal USB drive......................................................................................................... 77
Installing a 4-port NVMe mezzanine card..........................................................................................78
Installing a butterfly PCIe riser cage..................................................................................................80
Riser board options........................................................................................................................... 82
Installing a riser board into the primary PCIe riser cage.........................................................83
Installing a riser board into the butterfly PCIe riser cage........................................................ 85
Expansion slot options.......................................................................................................................86
Processor-to-PCIe slot assignment........................................................................................ 86
Installing an expansion board.................................................................................................87
Installing the HPE 12G SAS Expander Card.......................................................................... 88
Installing a GPU card..............................................................................................................91
Installing a controller...............................................................................................................94
Installing a FlexibleLOM adapter.......................................................................................................97
Processor options..............................................................................................................................98
Identifying the processor type.................................................................................................98
Installing a processor..............................................................................................................99
Installing a processor mezzanine tray............................................................................................. 102
Memory options...............................................................................................................................103
DIMM population information................................................................................................103
HPE SmartMemory speed information................................................................................. 103
DIMM label identification.......................................................................................................104
Installing a DIMM..................................................................................................................105
Installing the 2P pass-through performance board..........................................................................107
Installing a Smart Storage Battery...................................................................................................108
Installing an intrusion detection switch............................................................................................ 110
HPE Trusted Platform Module 2.0 Gen10 option.............................................................................111
Overview............................................................................................................................... 111
HPE Trusted Platform Module 2.0 Guidelines...................................................................... 112
Installing and enabling the HPE TPM 2.0 Gen10 Kit............................................................ 113
4 Contents
Cabling......................................................................................................118
Page 5

HPE ProLiant Gen10 DL Servers Storage Cabling Guidelines....................................................... 118
Cable matrix.....................................................................................................................................118
NVMe drive cable matrix.......................................................................................................120
Universal media bay cabling............................................................................................................128
Front panel USB port cabling.......................................................................................................... 129
Power switch module/Systems Insight Display module cabling...................................................... 129
SFF HDD drive cage cabling...........................................................................................................130
NVMe SSD drive cage cabling........................................................................................................ 130
12G SAS expander cabling............................................................................................................. 133
HPE Smart Storage Battery cabling................................................................................................ 134
Software and configuration utilities.......................................................135
Server mode....................................................................................................................................135
Product QuickSpecs........................................................................................................................135
Active Health System Viewer.......................................................................................................... 135
Active Health System............................................................................................................135
HPE iLO 5........................................................................................................................................136
iLO Federation......................................................................................................................137
iLO Service Port....................................................................................................................137
iLO RESTful API...................................................................................................................138
RESTful Interface Tool..........................................................................................................138
iLO Amplifier Pack................................................................................................................ 138
Intelligent Provisioning.....................................................................................................................138
Intelligent Provisioning operation..........................................................................................139
Management Security......................................................................................................................139
Scripting Toolkit for Windows and Linux..........................................................................................140
UEFI System Utilities.......................................................................................................................140
Selecting the boot mode ......................................................................................................140
Secure Boot..........................................................................................................................141
Launching the Embedded UEFI Shell ..................................................................................142
HPE Smart Storage Administrator...................................................................................................142
USB support.................................................................................................................................... 143
External USB functionality.................................................................................................... 143
Redundant ROM support.................................................................................................................143
Safety and security benefits..................................................................................................143
Keeping the system current.............................................................................................................143
Updating firmware or system ROM.......................................................................................143
Drivers.................................................................................................................................. 146
Software and firmware..........................................................................................................146
Operating system version support........................................................................................ 147
HPE Pointnext Portfolio........................................................................................................ 147
Proactive notifications...........................................................................................................147
Troubleshooting.......................................................................................148
Troubleshooting resources..............................................................................................................148
NMI functionality..............................................................................................................................148
Replacing the system battery.................................................................149
Specifications.......................................................................................... 151
Environmental specifications...........................................................................................................151
System Inlet Temperature, Extended Ambient Operating Support.......................................152
Contents 5
Page 6

Mechanical specifications................................................................................................................152
Power supply specifications............................................................................................................ 152
HPE 800W Flex Slot Platinum Hot Plug Low Halogen Power Supply.................................. 153
HPE 1600W Flex Slot Platinum Hot Plug Low Halogen Power Supply................................ 153
Websites................................................................................................... 155
Support and other resources................................................................. 156
Accessing Hewlett Packard Enterprise Support.............................................................................. 156
Accessing updates.......................................................................................................................... 156
Customer self repair........................................................................................................................ 157
Remote support...............................................................................................................................157
Warranty information....................................................................................................................... 157
Regulatory information.................................................................................................................... 158
Documentation feedback.................................................................................................................158
6 Contents
Page 7
Component identification
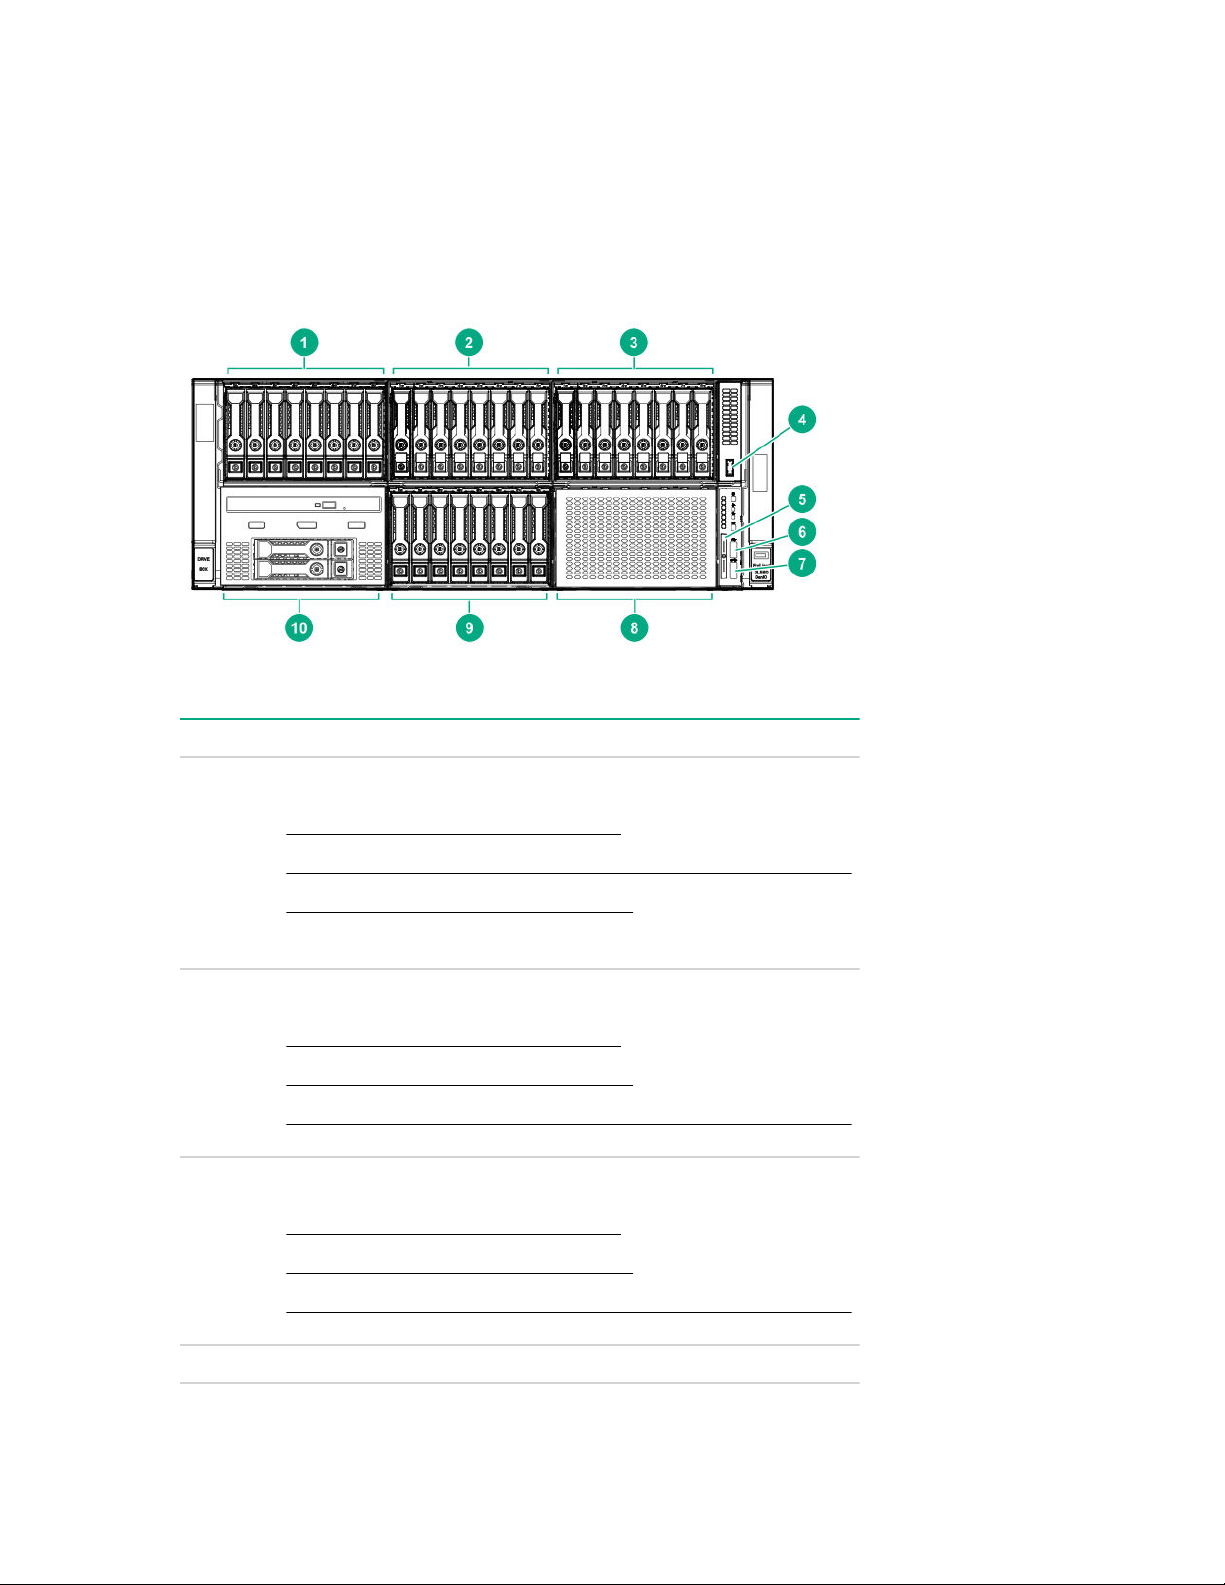
Front panel components
Server with power module
Item Description
1 Box 1 — Supported options:
• Eight-bay SFF HDD/SSD drive cage
• Six-bay SFF HDD/Two-bay NVMe SSD (Premium) drive cage
• Eight-bay SFF NVMe SSD drive cage (with only four NVMe
drives installed)
2 Box 2 — Supported options:
• Eight-bay SFF HDD/SSD drive cage
• Eight-bay SFF NVMe SSD drive cage
• Six-bay SFF HDD/Two-bay NVMe SSD (Premium) drive cage
3 Box 3 — Supported options:
• Eight-bay SFF HDD/SSD drive cage
• Eight-bay SFF NVMe SSD drive cage
• Six-bay SFF HDD/Two-bay NVMe SSD (Premium) drive cage
4 Front USB 3.0 port
Table Continued
Component identification 7
Page 8
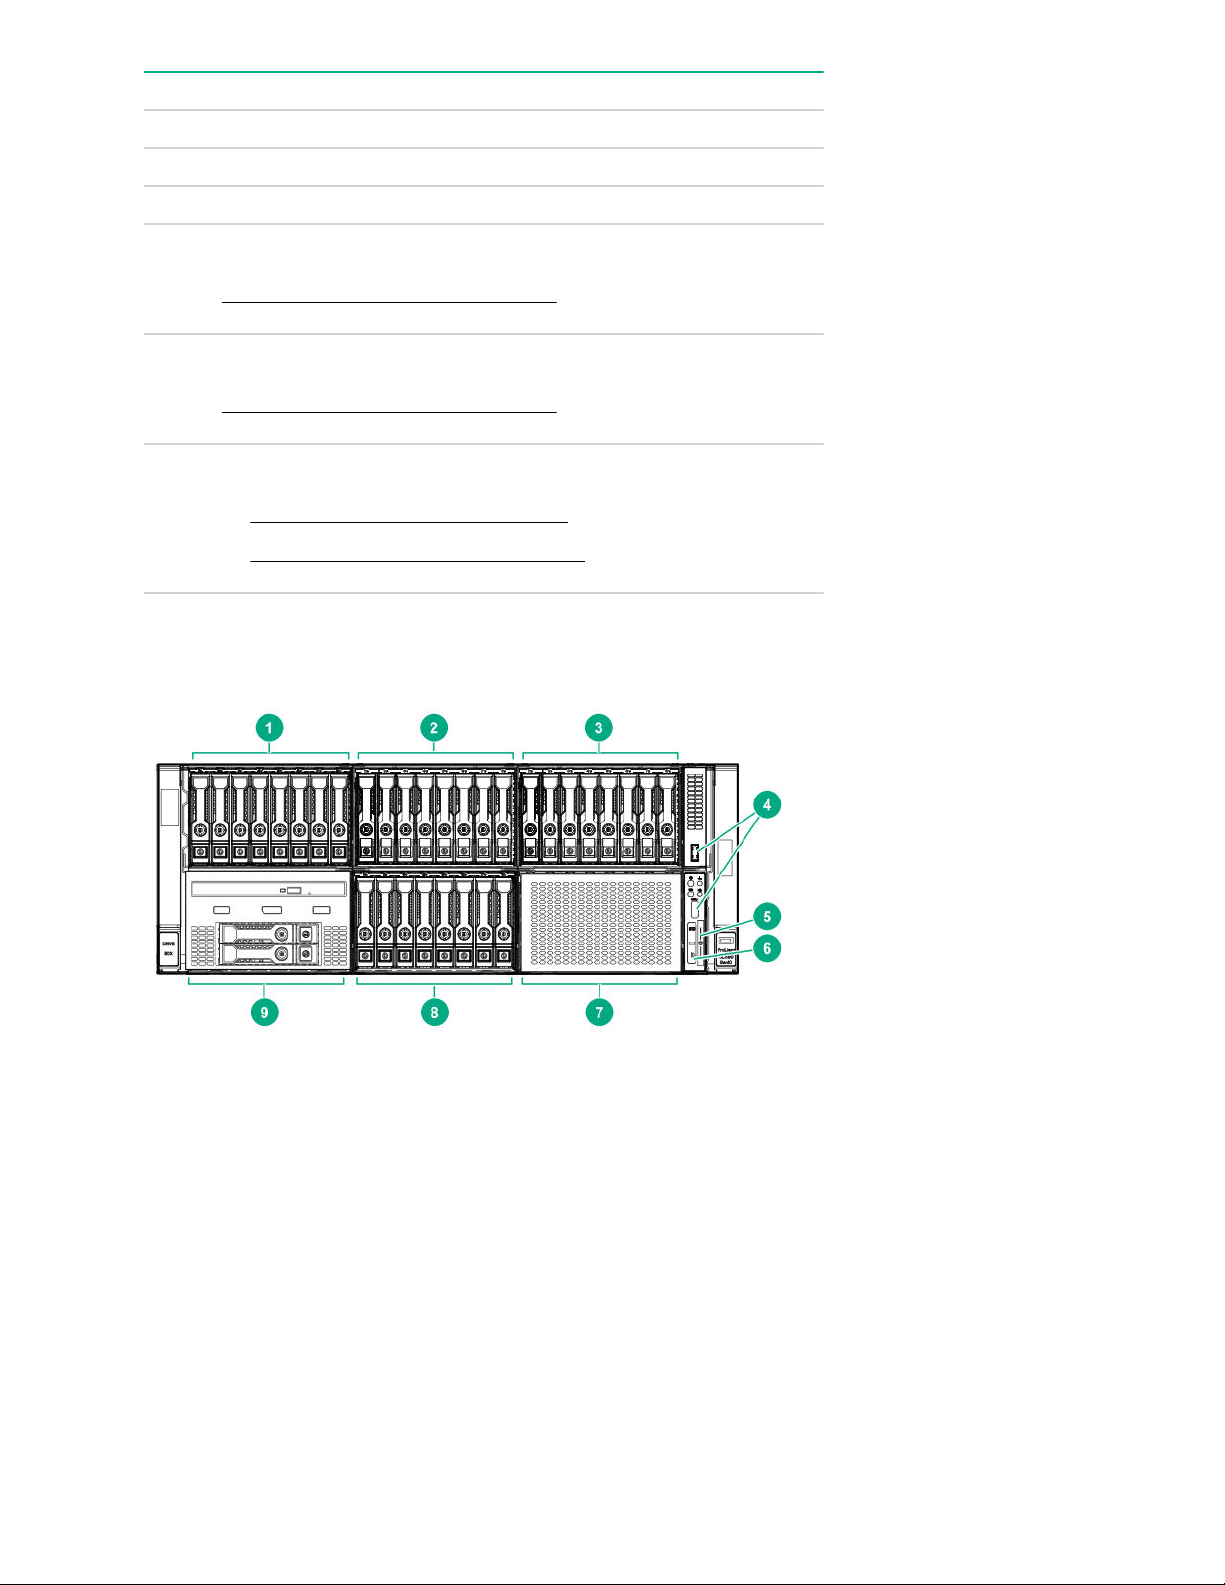
Item Description
5 Serial number and iLO information pull tab
6 iLO Service Port (169.254.1.2)
7 Front USB 3.0 port
8 Box 6 — Supported option:
Eight-bay SFF HDD/SSD drive cage
9 Box 5 — Supported option:
Eight-bay SFF HDD/SSD drive cage
10 Box 4 — Supported options:
• Universal media bay components
• Eight-bay SFF HDD/SSD drive cage
Server with optional Systems Insight Display Module
8 Component identification
Page 9

Item Description
1 Box 1 — Supported options:
• Eight-bay SFF HDD/SSD drive cage
• Six-bay SFF HDD/Two-bay NVMe SSD (Premium) drive cage
• Eight-bay SFF NVMe SSD drive cage (with only four NVMe
drives installed)
2 Box 2 — Supported options:
• Eight-bay SFF HDD/SSD drive cage
• Eight-bay SFF NVMe SSD drive cage
• Six-bay SFF HDD/Two-bay NVMe SSD (Premium) drive cage
3 Box 3 — Supported options:
• Eight-bay SFF HDD/SSD drive cage
• Eight-bay SFF NVMe SSD drive cage
• Six-bay SFF HDD/Two-bay NVMe SSD (Premium) drive cage
4 Front USB 3.0 ports (2)
5 Serial number and iLO information pull tab
6 Systems Insight Display Module
7 Box 6 — Supported option:
Eight-bay SFF HDD/SSD drive cage
8 Box 5 — Supported option:
Eight-bay SFF HDD/SSD drive cage
9 Box 4 — Supported options:
• Universal media bay components
• Eight-bay SFF HDD/SSD drive cage
Component identification 9
Page 10
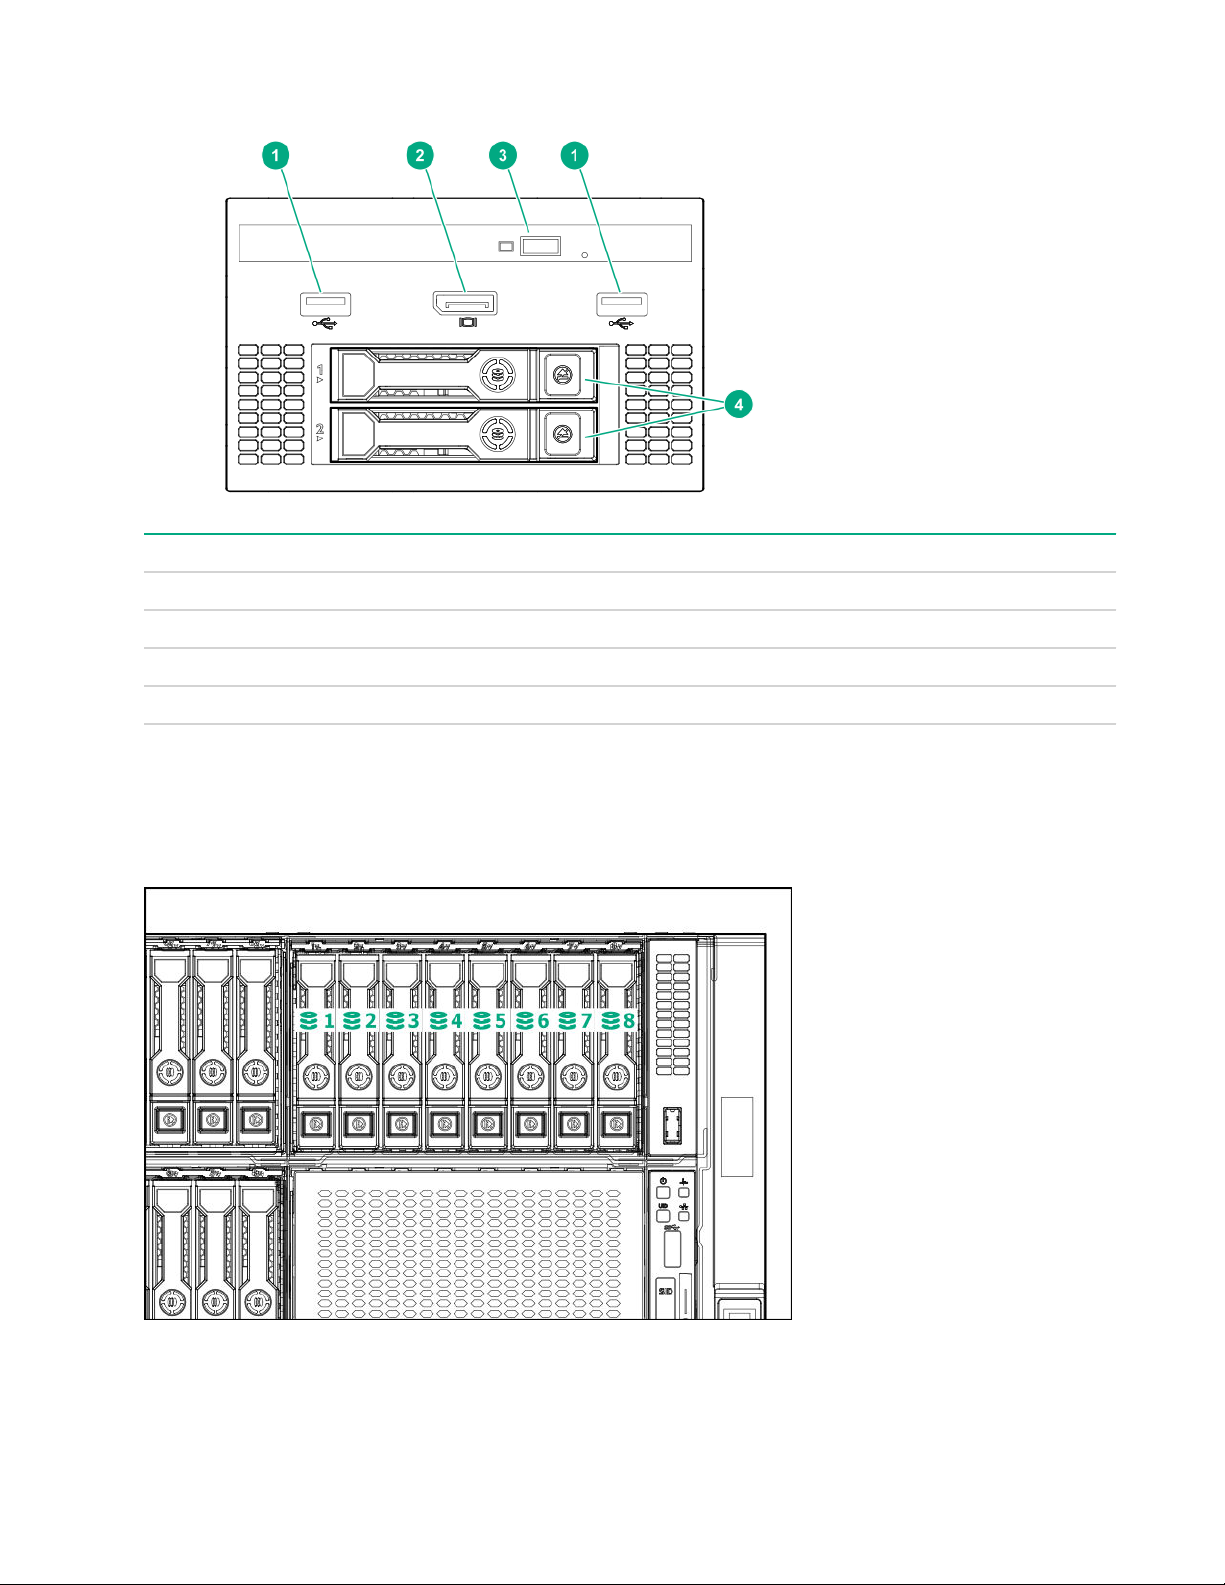
Universal media bay components
Item Description
1 USB 2.0 port
2 Video display port
3 Optical disk drive (optional)
4 Drives (optional) *
* Requires the two-bay SFF (Premium) drive cage.
Drive bay numbering
Eight-bay SFF HDD/SSD drive cage
10 Universal media bay components
Page 11
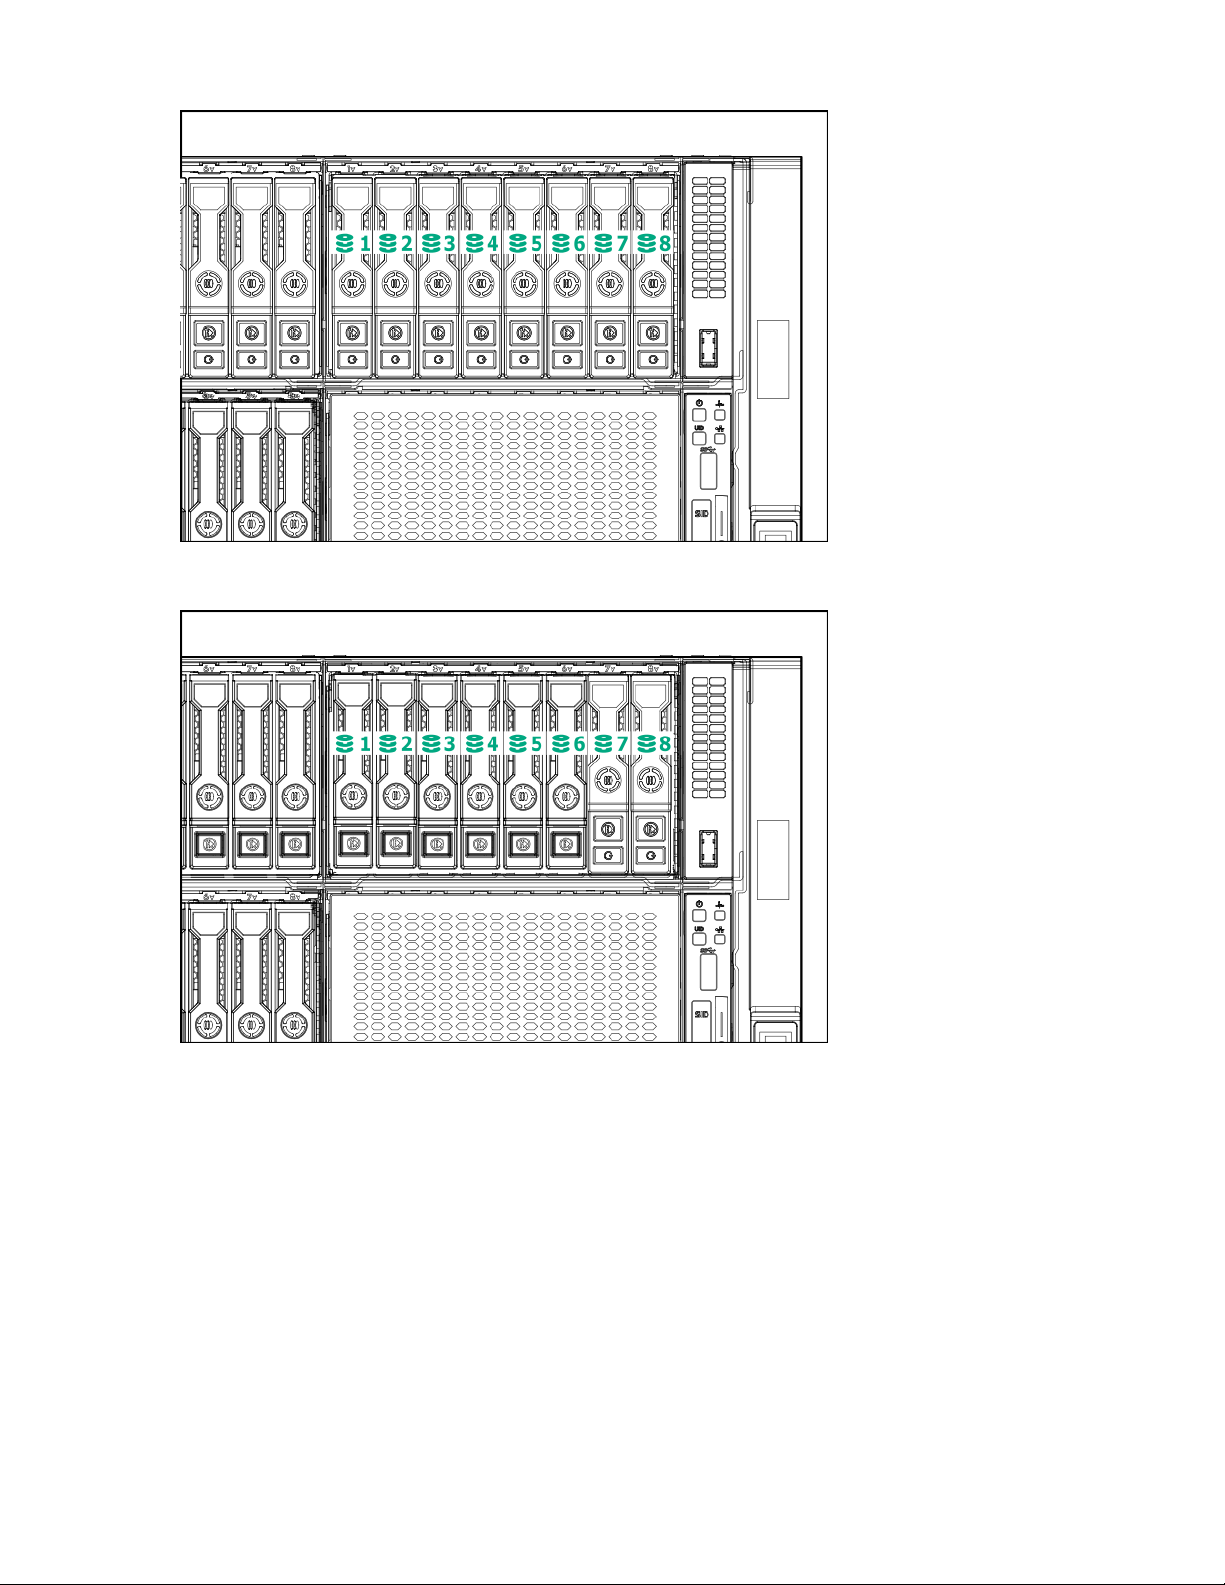
Eight-bay SFF NVMe drive cage
Six-bay SFF HDD/Two-bay NVMe SSD (Premium) drive cage
Component identification 11
Page 12
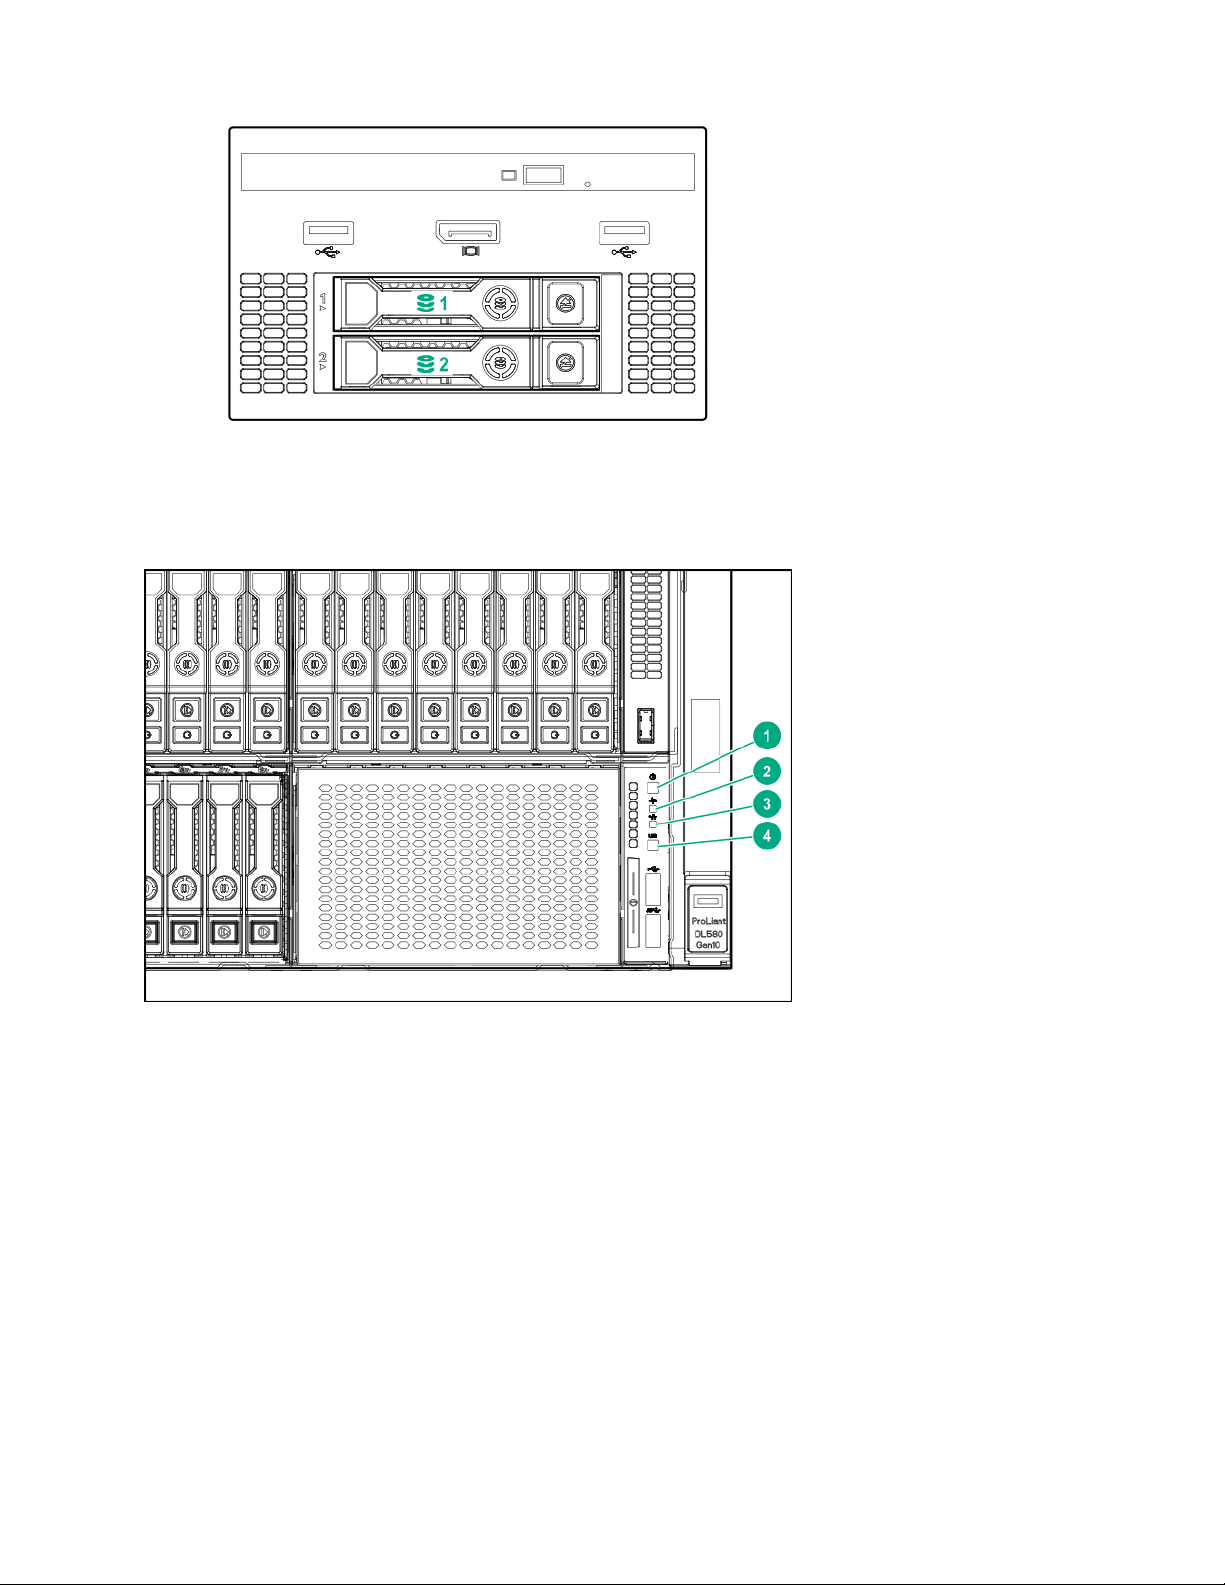
Two-bay SFF (Premium) drive cage
Front panel LEDs and buttons
Power switch module
12 Front panel LEDs and buttons
Page 13
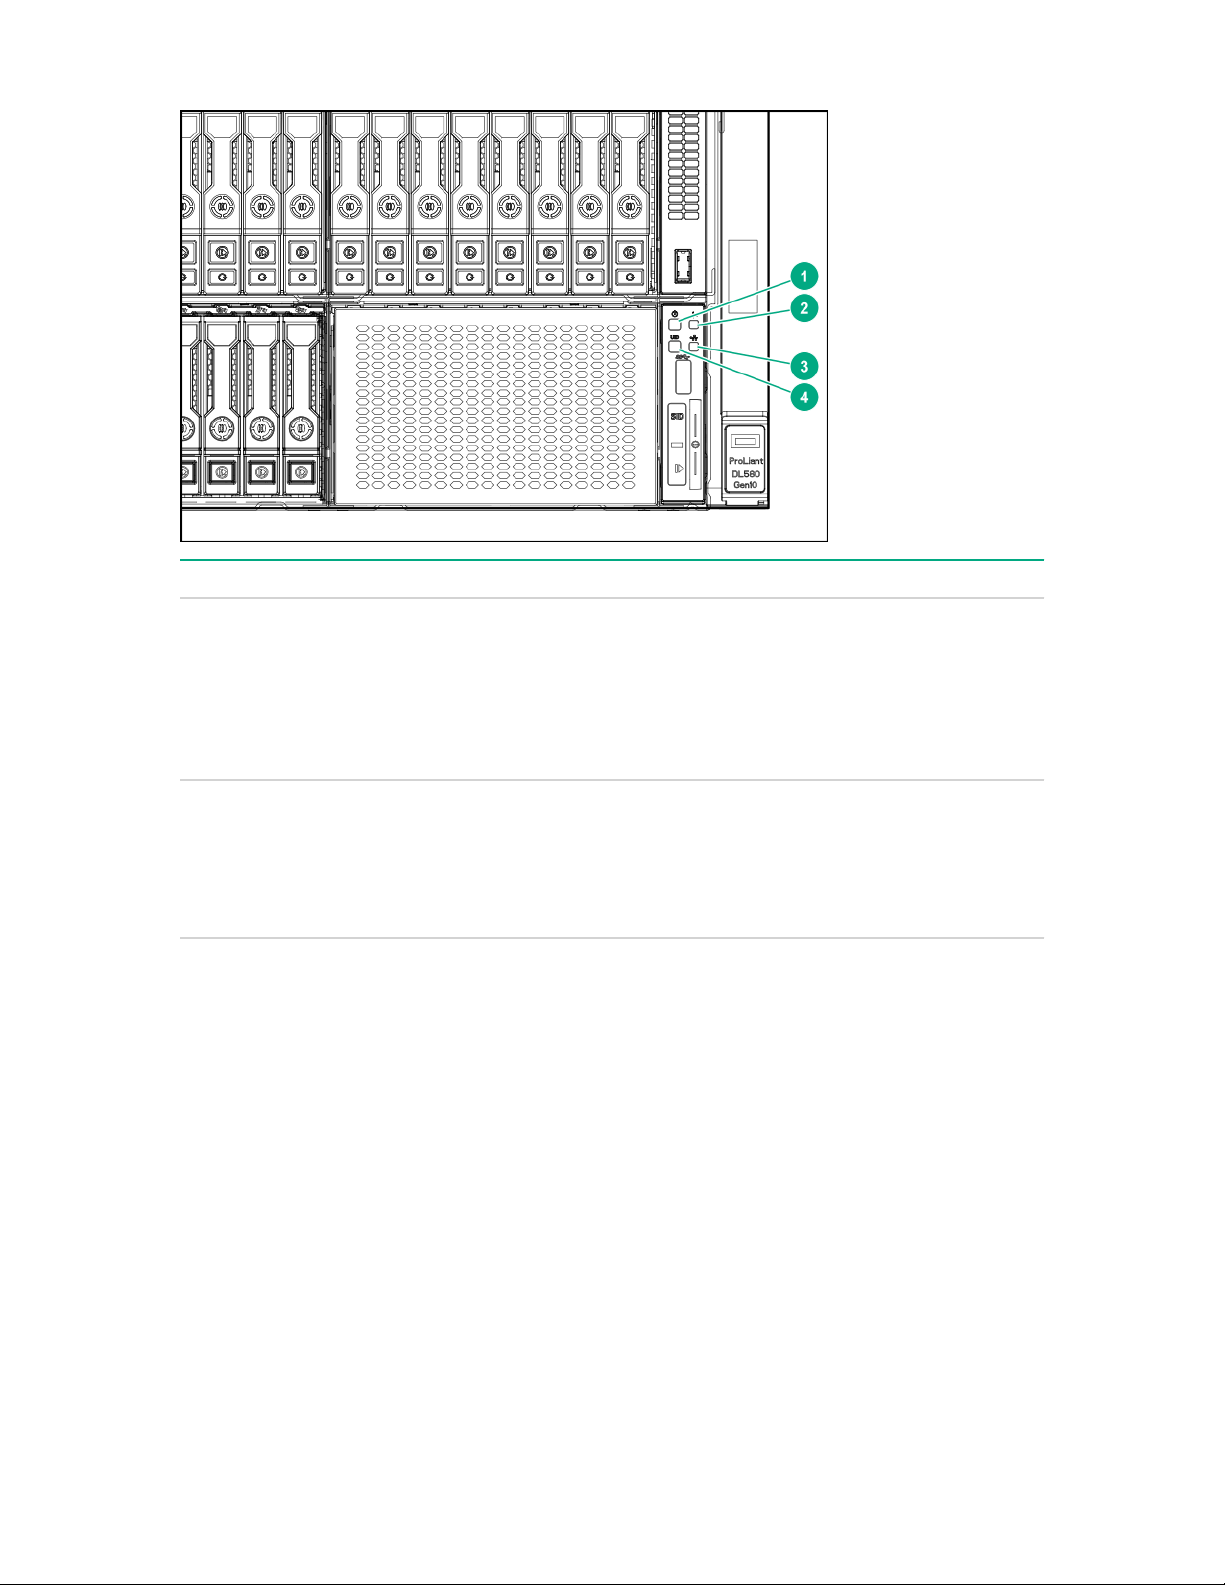
Systems Insight Display module (optional)
Item Description Status
1 Power On/Standby button and
system power LED
2 Health LED
1
1
Solid green = System on
Flashing green (1 Hz/cycle per sec) = Performing
power on sequence
Solid amber = System in standby
Off = No power present
2
Solid green = Normal
Flashing green (1 Hz/cycle per sec) = iLO is rebooting.
Flashing amber = System degraded
Flashing red (1 Hz/cycle per sec) = System critical
3
Table Continued
Component identification 13
Page 14

Item Description Status
3 NIC status LED
1
Solid green = Link to network
Flashing green (1 Hz/cycle per sec) = Network active
Off = No network activity
4 UID button/LED
1
Solid blue = Activated
Flashing blue:
• 1 Hz/cycle per sec = Remote management or
firmware upgrade in progress
• 4 Hz/cycle per sec = iLO manual reboot sequence
initiated
• 8 Hz/cycle per sec = iLO manual reboot sequence
in progress
• 1 fast flash and then off for 3 seconds = iLO Service
Port status is Complete
• 4 medium flashes and then off for 1 second = iLO
Service Port status is Busy
• 8 fast flashes and then off for 1 second = iLO
Service Port status is Error
Off = Deactivated
1
When all four LEDs described in this table flash simultaneously, a power fault has occurred.
2
Facility power is not present, power cord is not attached, no power supplies are installed, power supply
failure has occurred, or the power button cable is disconnected.
3
If the health LED indicates a degraded or critical state, review the system IML or use iLO to review the
system health status.
UID button functionality
The UID button can be used to display the Server Health Summary when the server will not power on. For
more information, see the latest HPE iLO User Guide on the Hewlett Packard Enterprise website.
Front panel LED power fault codes
The following table provides a list of power fault codes, and the subsystems that are affected. Not all power
faults are used by all servers.
Subsystem LED behavior
System board 1 flash
Processor 2 flashes
Memory 3 flashes
Riser board PCIe slots 4 flashes
FlexibleLOM 5 flashes
14 UID button functionality
Table Continued
Page 15
Subsystem LED behavior
Removable HPE Smart Array SR Gen10 controller 6 flashes
System board PCIe slots 7 flashes
Power backplane or storage backplane 8 flashes
Power supply 9 flashes
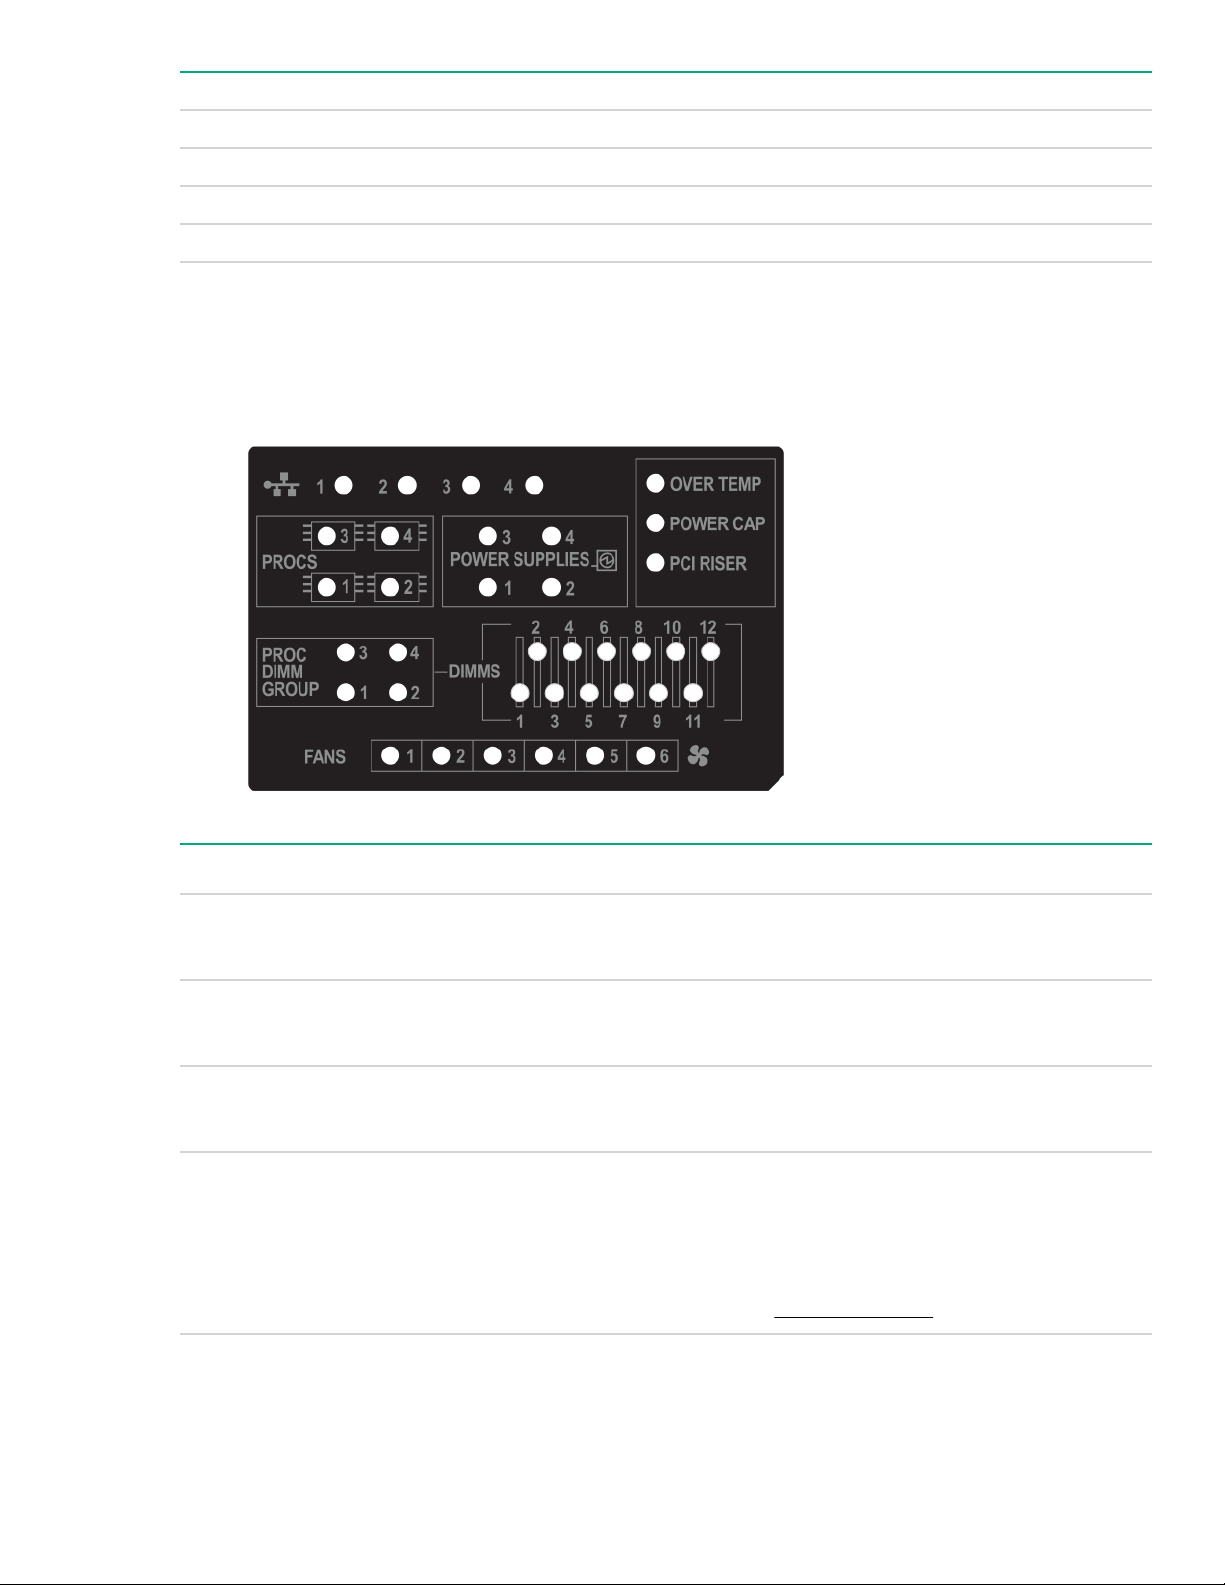
Systems Insight Display LEDs
The Systems Insight Display LEDs represent the system board layout. The display enables diagnosis with the
access panel installed.
Description Status
Processor LEDs
DIMM LEDs
Fan LEDs
NIC LEDs
Off = Normal
Amber = Failed processor
Off = Normal
Amber = Failed DIMM or configuration issue
Off = Normal
Amber = Failed fan or missing fan
Off = No link to network
Solid green = Network link
Flashing green = Network link with activity
If power is off, the front panel LED is not active. For
status, see Rear panel LEDs on page 22.
Table Continued
Systems Insight Display LEDs 15
Page 16

Description Status
Power supply LEDs
PCI riser LED
Over temp LED
Proc DIMM Group LED
Power cap LED
When the health LED on the front panel illuminates either amber or red, the server is experiencing a health
event. For more information on the combination of these LEDs, see Systems Insight Display combined
LED descriptions on page 16.
Off = Normal
Solid amber = Power subsystem degraded, power
supply failure, or input power lost.
Off = Normal
Amber = Incorrectly installed PCI riser cage
Off = Normal
Amber = High system temperature detected
Off = Normal
Amber = Failed DIMM or configuration issue
Off = System is in standby, or no cap is set.
Solid green = Power cap applied
Systems Insight Display combined LED descriptions
The combined illumination of the following LEDs indicates a system condition:
• Systems Insight Display LEDs
• System power LED
• Health LED
Systems Insight Display
LED and color
Processor (amber) Red Amber
Processor (amber) Amber Green Processor in socket X is in a pre-
Health
LED
System
power LED
Status
One or more of the following
conditions may exist:
• Processor in socket X has failed.
• Processor X is not installed in the
socket.
• Processor X is unsupported.
• ROM detects a failed processor
during POST.
failure condition.
DIMM (amber) Red Green One or more DIMMs have failed.
16 Systems Insight Display combined LED descriptions
Table Continued
Page 17

Systems Insight Display
LED and color
DIMM (amber) Amber Green DIMM in slot X is in a pre-failure
Over temp (amber) Amber Green The Health Driver has detected a
Over temp (amber) Red Amber The server has detected a hardware
PCI riser (amber) Red Green The PCI riser cage is not seated
Fan (amber) Amber Green One fan has failed or has been
Fan (amber) Red Green Two or more fans have failed or been
Health
LED
System
power LED
Status
condition.
cautionary temperature level.
critical temperature level.
properly.
removed.
removed.
Power supply (amber) Red Amber
Power supply (amber) Amber Green
One or more of the following
conditions may exist:
• Only one power supply is installed
and that power supply is in
standby.
• Power supply fault
• System board fault
One or more of the following
conditions may exist:
• Redundant power supply is
installed and only one power
supply is functional.
• AC power cord is not plugged into
redundant power supply.
• Redundant power supply fault
• Power supply mismatch at POST
or power supply mismatch through
hot-plug addition
Power cap (off) — Amber Standby
Power cap (green) — Flashing
green
Power cap (green) — Green Power is available.
Power cap (flashing amber) — Amber Power is not available.
Waiting for power
Component identification 17
Page 18
IMPORTANT:
If more than one DIMM slot LED is illuminated, further troubleshooting is required. Test each bank of
DIMMs by removing all other DIMMs. Isolate the failed DIMM by replacing each DIMM in a bank with a
known working DIMM.
Drives
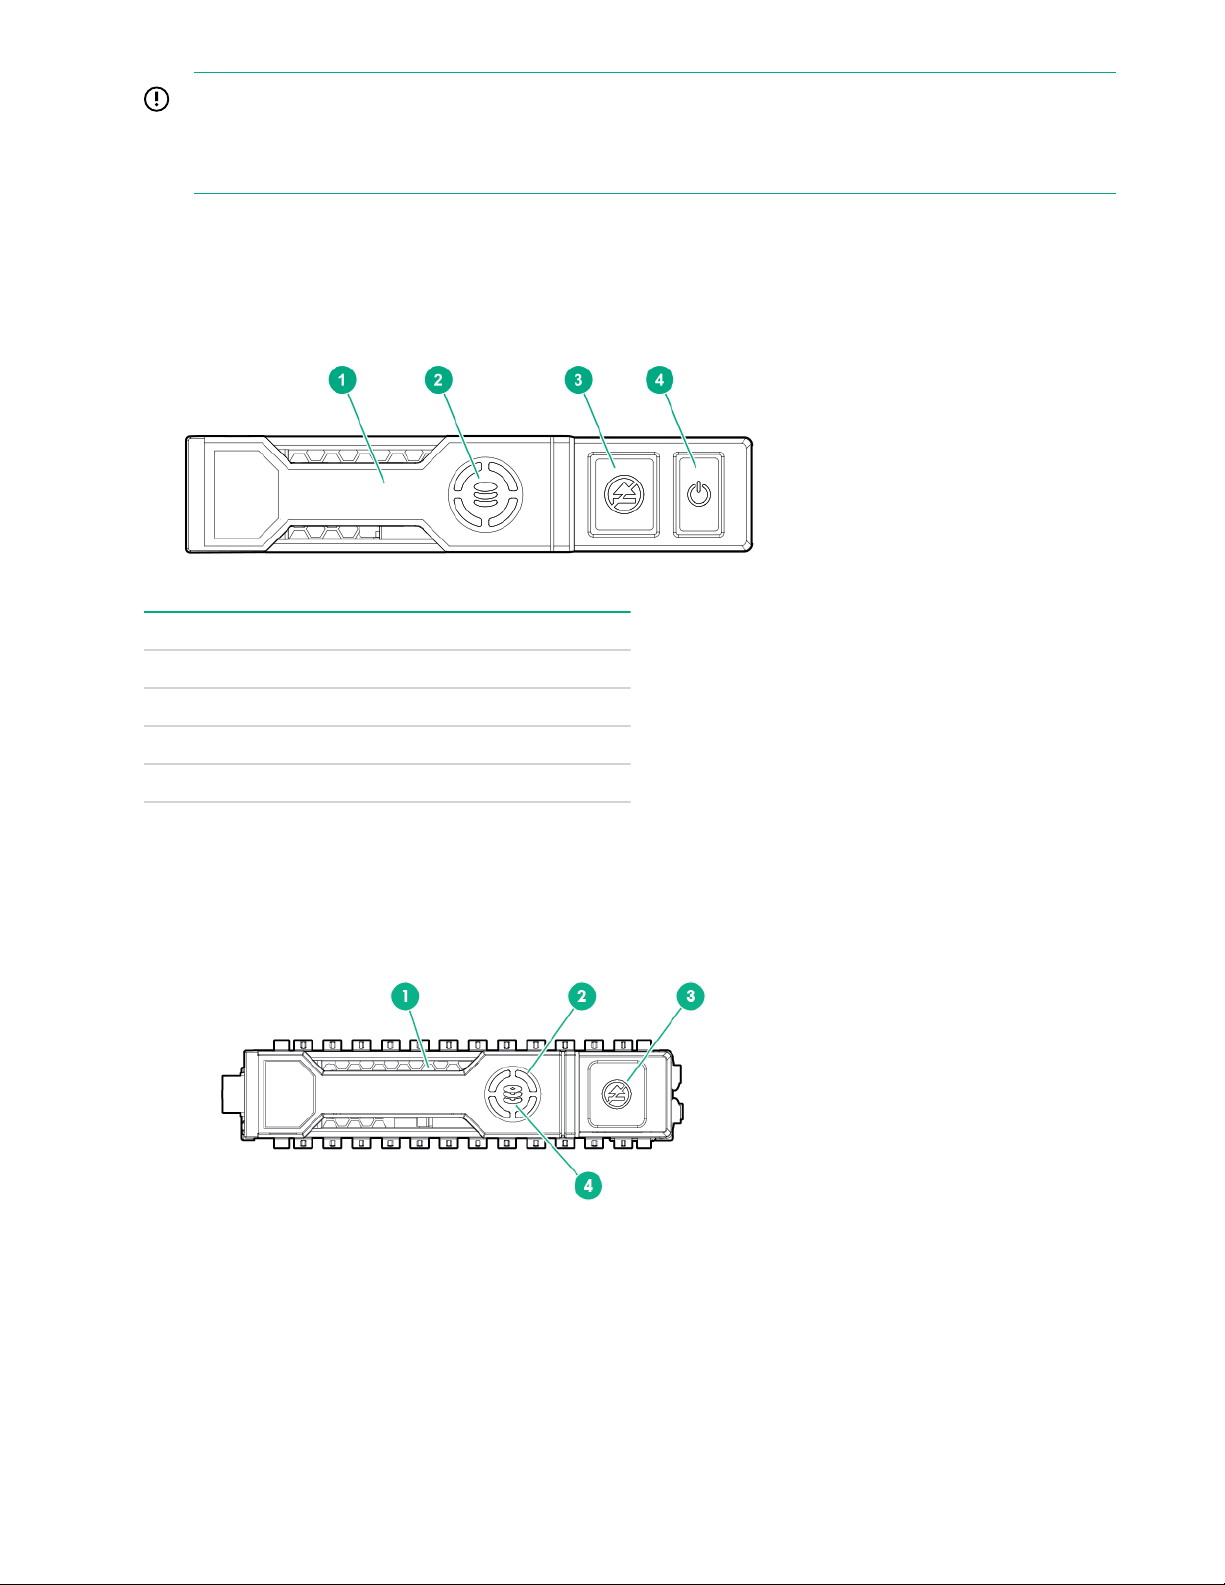
NVMe drive components and LEDs
Item Description
1 Release lever
2 Activity ring
3 Do Not Remove LED
4 Power On/Off button
1
Do not remove an NVMe SSD from the drive bay while the Do Not Remove button LED is flashing. The Do
Not Remove button LED flashes to indicate that the device is still in use. Removal of the NVMe SSD before
the device has completed and ceased signal/traffic flow can cause loss of data.
1
SAS/SATA drive components and LEDs
18 Drives
Page 19
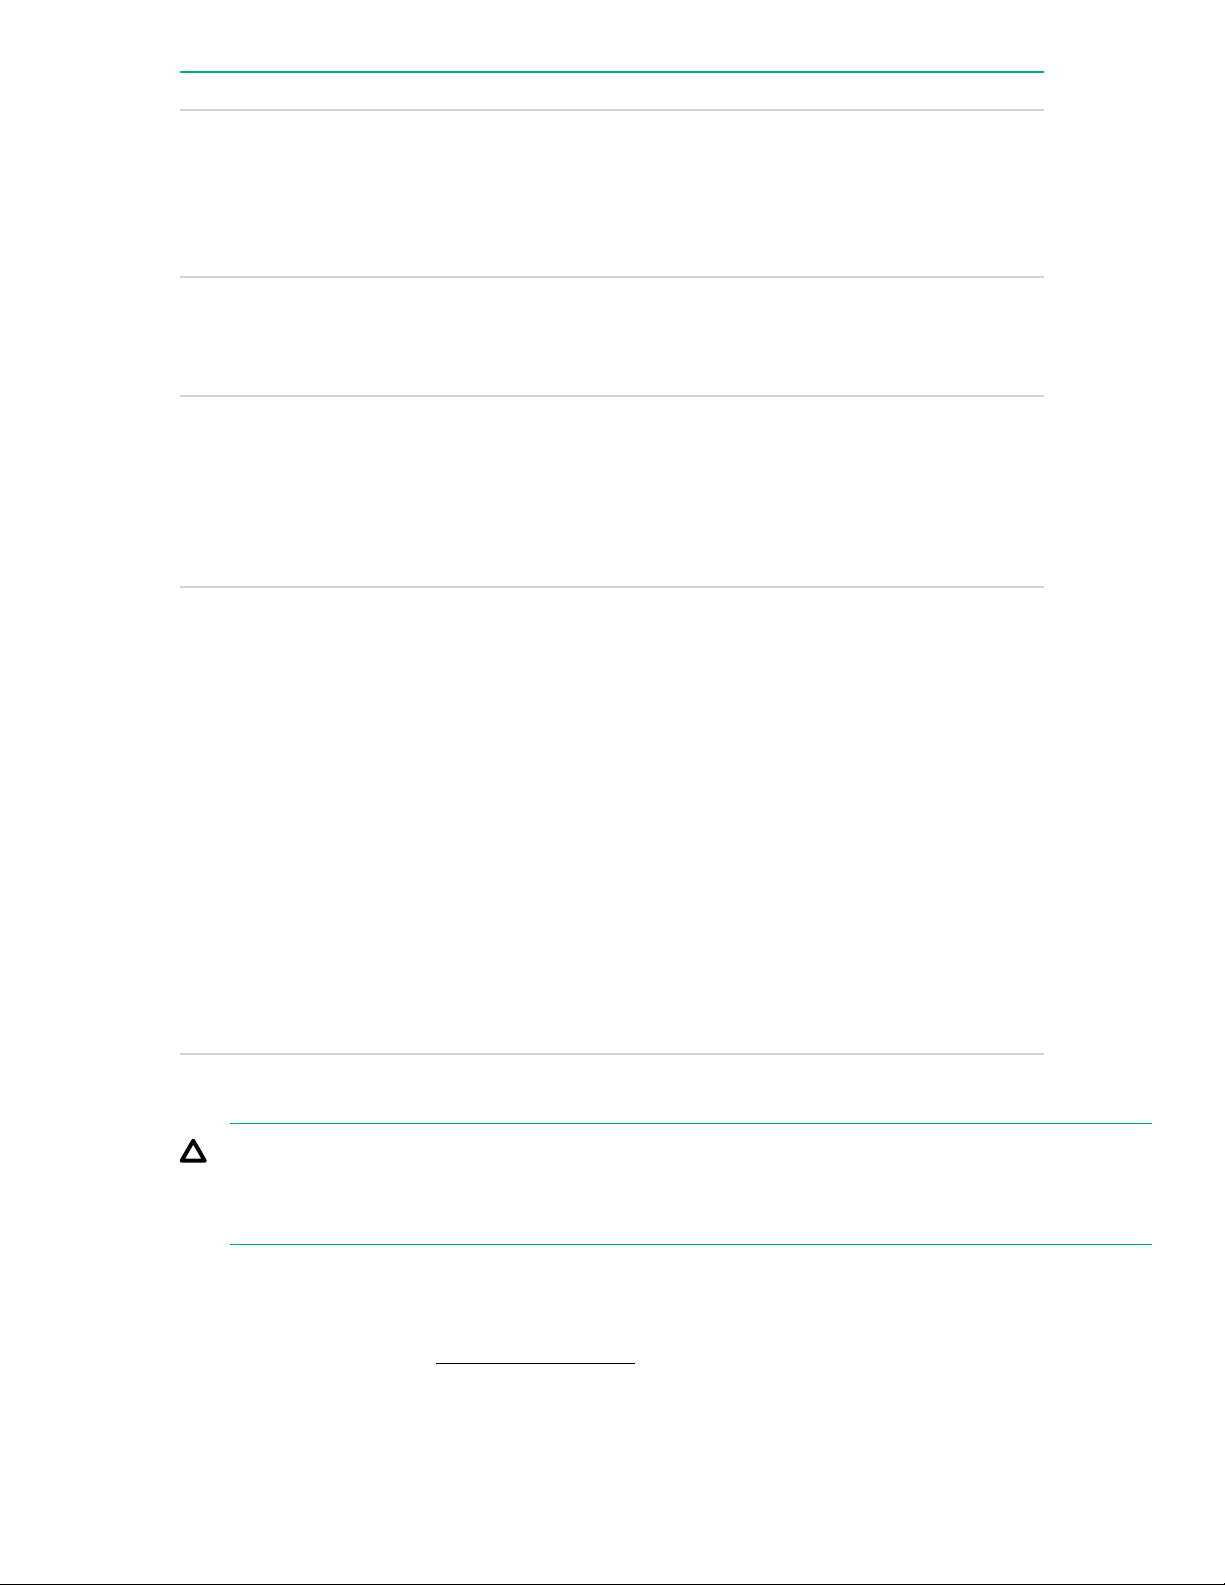
Item Description Status
1 Locate
• Solid blue = The drive is being identified by a host
application.
• Flashing blue = The drive carrier firmware is being
updated or requires an update.
2 Activity ring LED
• Rotating green = Drive activity.
• Off = No drive activity.
3 Do not remove LED
• Solid white = Do not remove the drive. Removing
the drive causes one or more of the logical drives to
fail.
• Off = Removing the drive does not cause a logical
drive to fail.
4 Drive status LED
• Solid green = The drive is a member of one or more
logical drives.
Drive guidelines
CAUTION:
Do not remove an NVMe SSD from the drive bay while the Do Not Remove button LED is flashing. The
Do Not Remove button LED flashes to indicate the device is still in use. Removal of the NVMe SSD
before the device has completed and ceased signal/traffic flow can cause loss of data.
Depending on the configuration, this server supports SAS, SATA, and NVMe drives.
• Flashing green = The drive is rebuilding or
performing a RAID migration, strip size migration,
capacity expansion, or logical drive extension, or is
erasing.
• Flashing amber/green = The drive is a member of
one or more logical drives and predicts the drive will
fail.
• Flashing amber = The drive is not configured and
predicts the drive will fail.
• Solid amber = The drive has failed.
• Off = The drive is not configured by a RAID
controller.
Observe the following general guidelines:
• For drive numbering, see Drive bay numbering on page 10.
• The NVMe SSD is a PCIe bus device. Do not remove a device attached to a PCIe bus without allowing it
to first complete and cease the signal/traffic flow.
Drive guidelines 19
Page 20
• The system automatically sets all device numbers.
• If only one hard drive is used, install it in the bay with the lowest device number.
• Drives must be the same capacity to provide the greatest storage space efficiency when drives are
grouped into the same drive array.
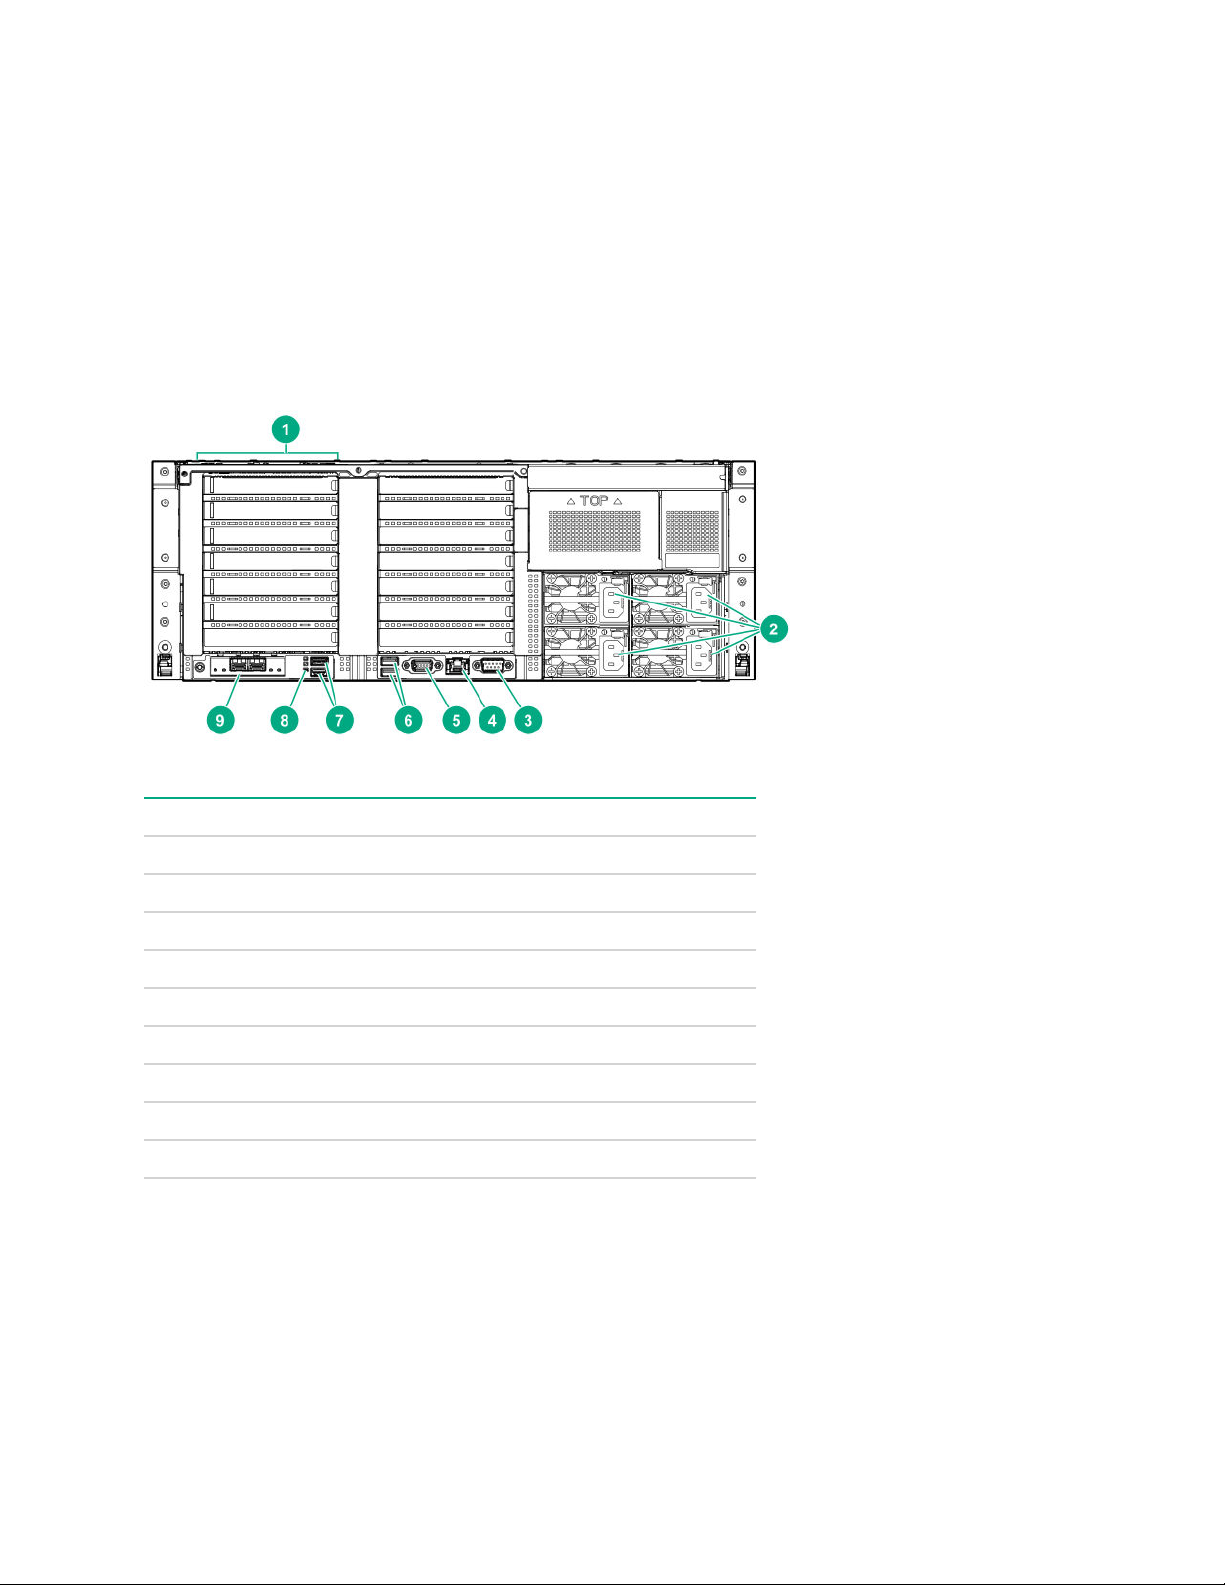
Rear panel components
Rear panel (standard)
Item Description
1 Primary PCIe riser slots 1-7
2 Power supplies (4)
3 Serial port
4 iLO Management Port
5 Video port
6 Rear USB 2.0 ports (2)
7 Rear USB 3.0 ports (2)
8 UID LED
9 FlexibleLOM (optional)
20 Rear panel components
Page 21
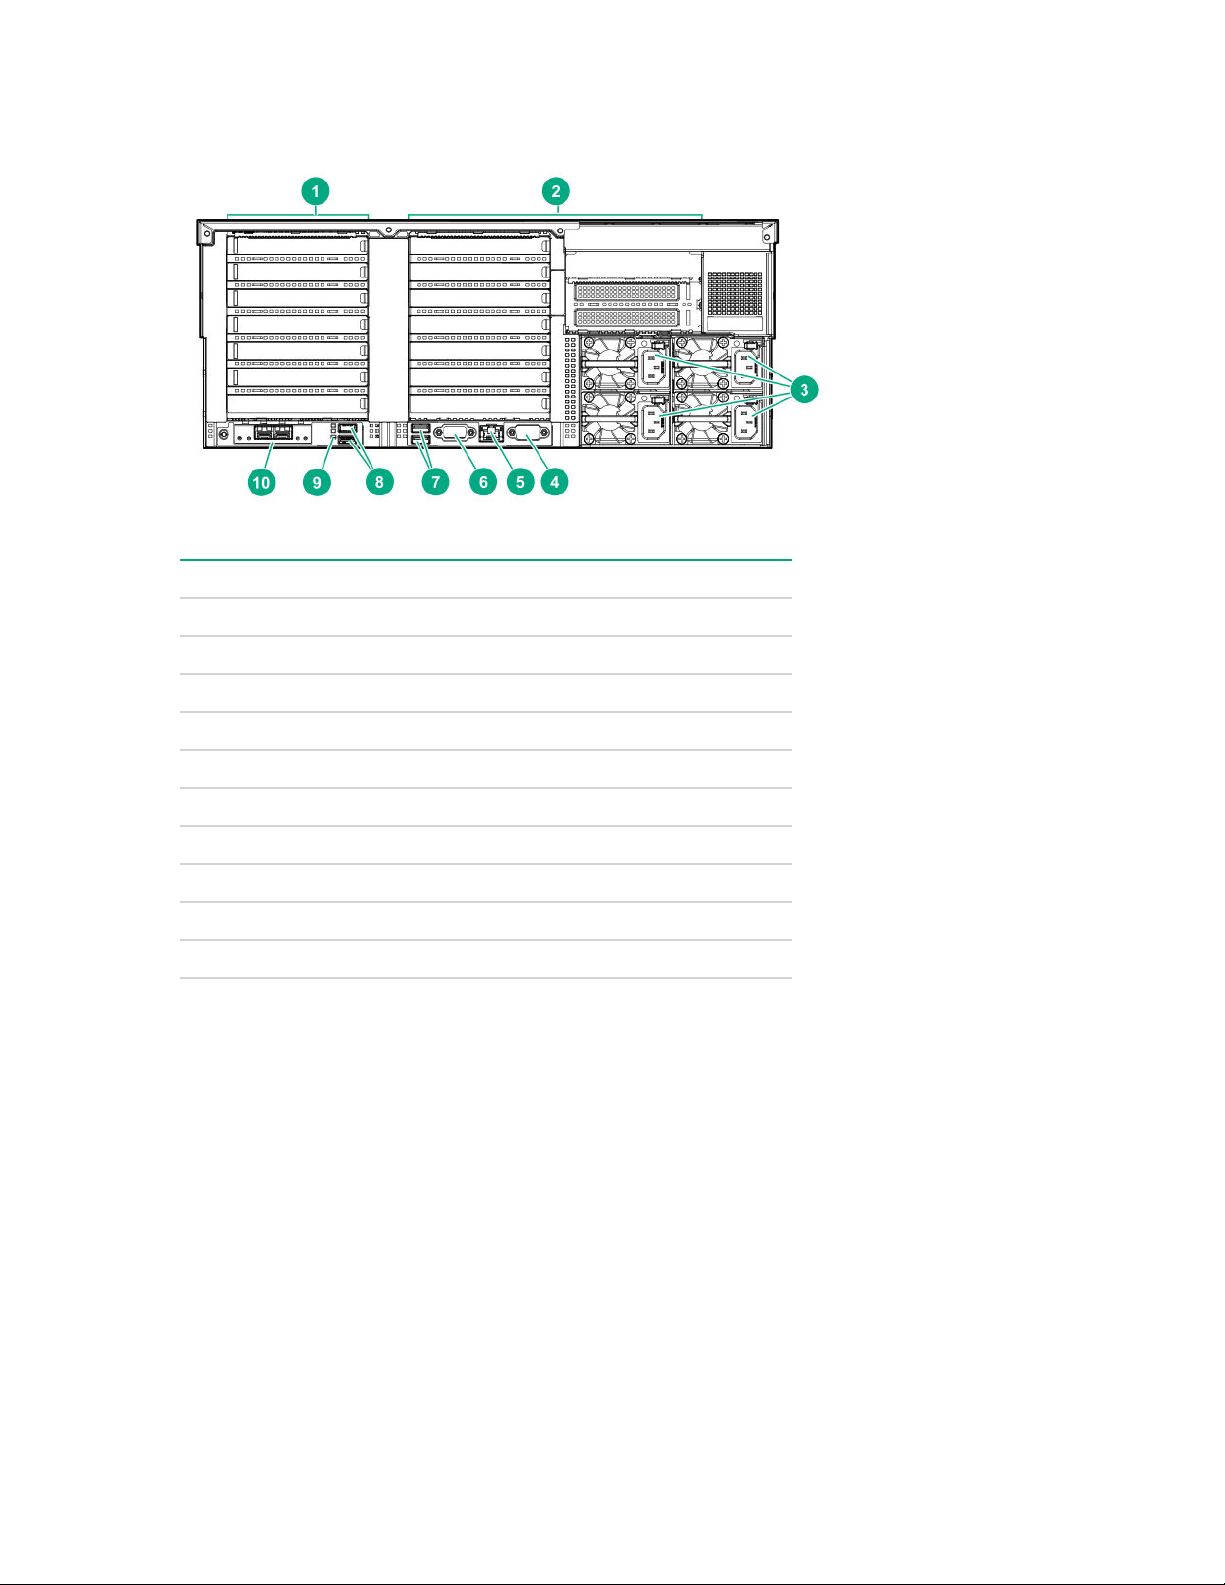
Rear panel with optional butterfly riser cage
Item Description
1 Primary PCIe riser slots 1-7
2 Butterfly PCIe riser slots 8-16 (Optional)
3 Power supplies (4)
4 Serial port
5 iLO Management Port
6 Video port
7 Rear USB 2.0 ports (2)
8 Rear USB 3.0 ports (2)
9 UID LED
10 FlexibleLOM (optional)
Component identification 21
Page 22
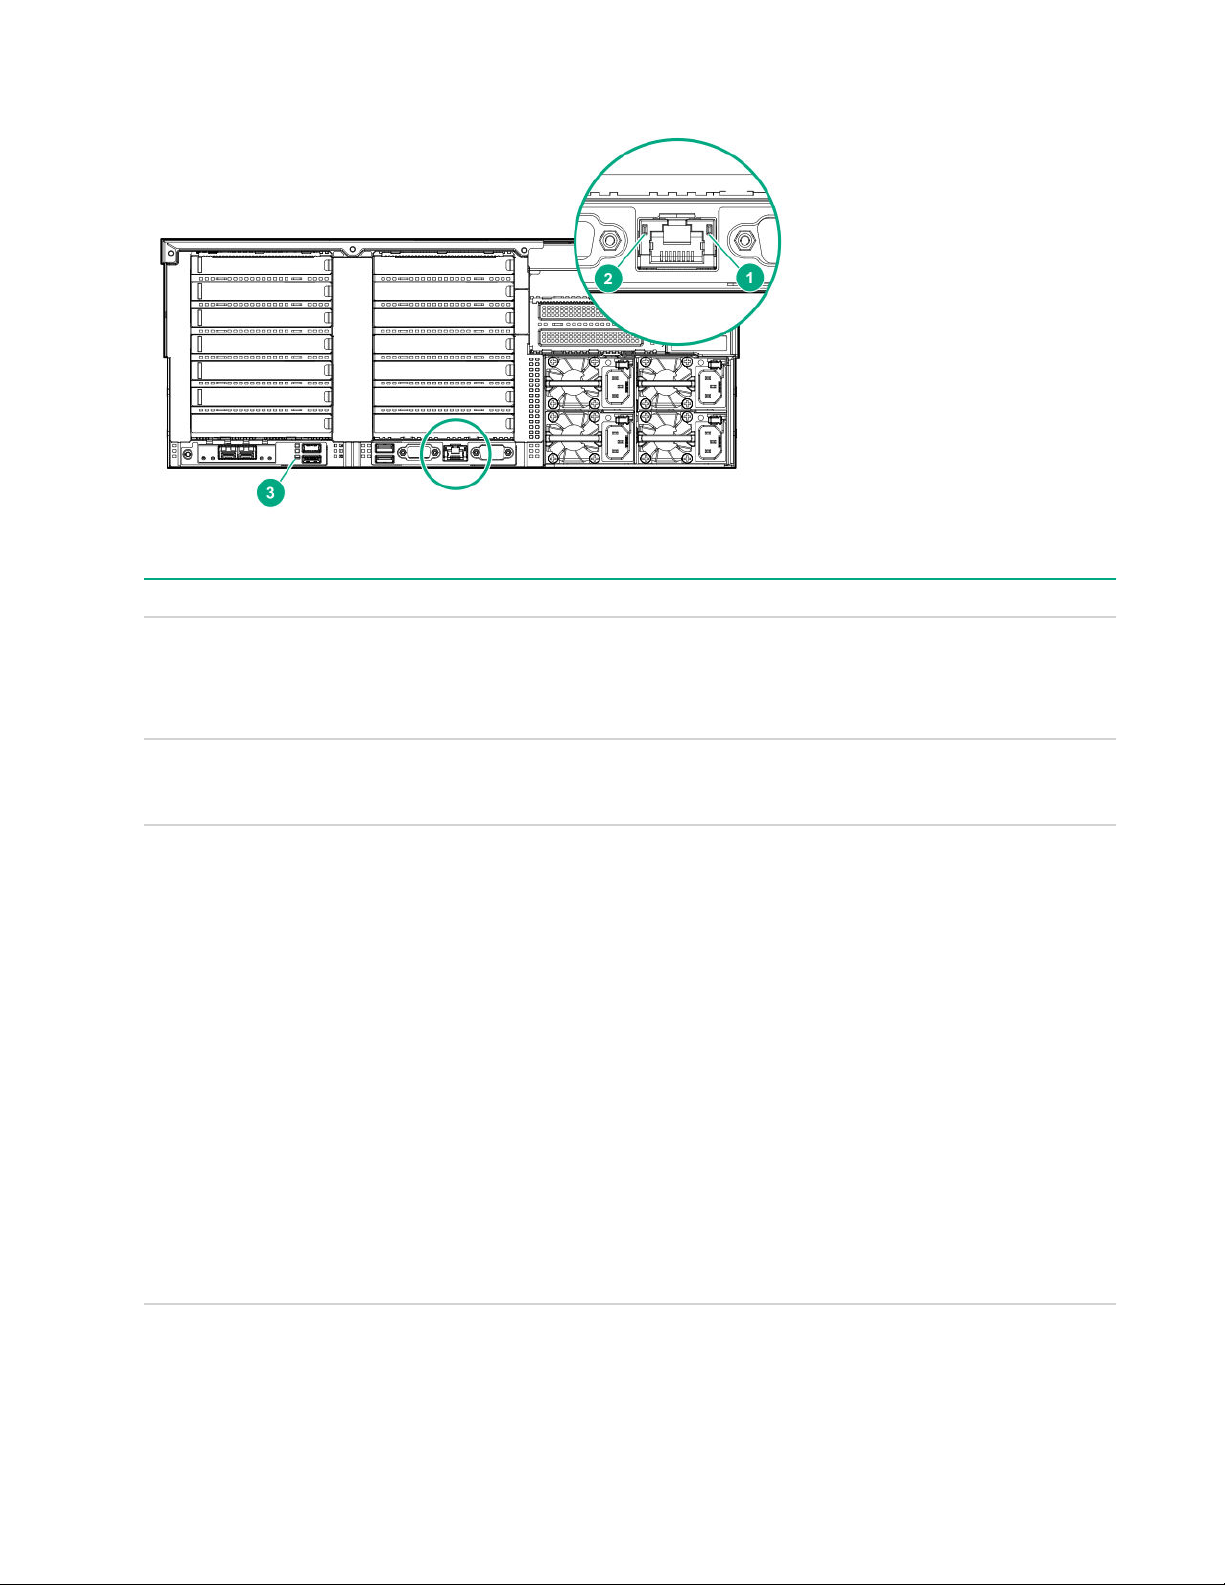
Rear panel LEDs
Item Description Status
1 Activity LED
2 Link LED
3 UID LED
Off = No network activity
Solid green = Link to network
Flashing green = Network activity
Off = No network link
Green = Network link
Solid blue = Activated
Flashing blue:
• 1 Hz/cycle per sec = Remote management or firmware upgrade in
progress
• 4 Hz/cycle per sec = iLO manual reboot sequence initiated
• 8 Hz/cycle per sec = iLO manual reboot sequence in progress
• 1 fast flash and then off for 3 seconds = iLO Service Port status is
Complete
• 4 medium flashes and then off for 1 second = iLO Service Port
status is Busy
• 8 fast flashes and then off for 1 second = iLO Service Port status is
Error
Power supply LEDs
The power supply LED is located on each power supply.
22 Rear panel LEDs
Off = Deactivated
Page 23
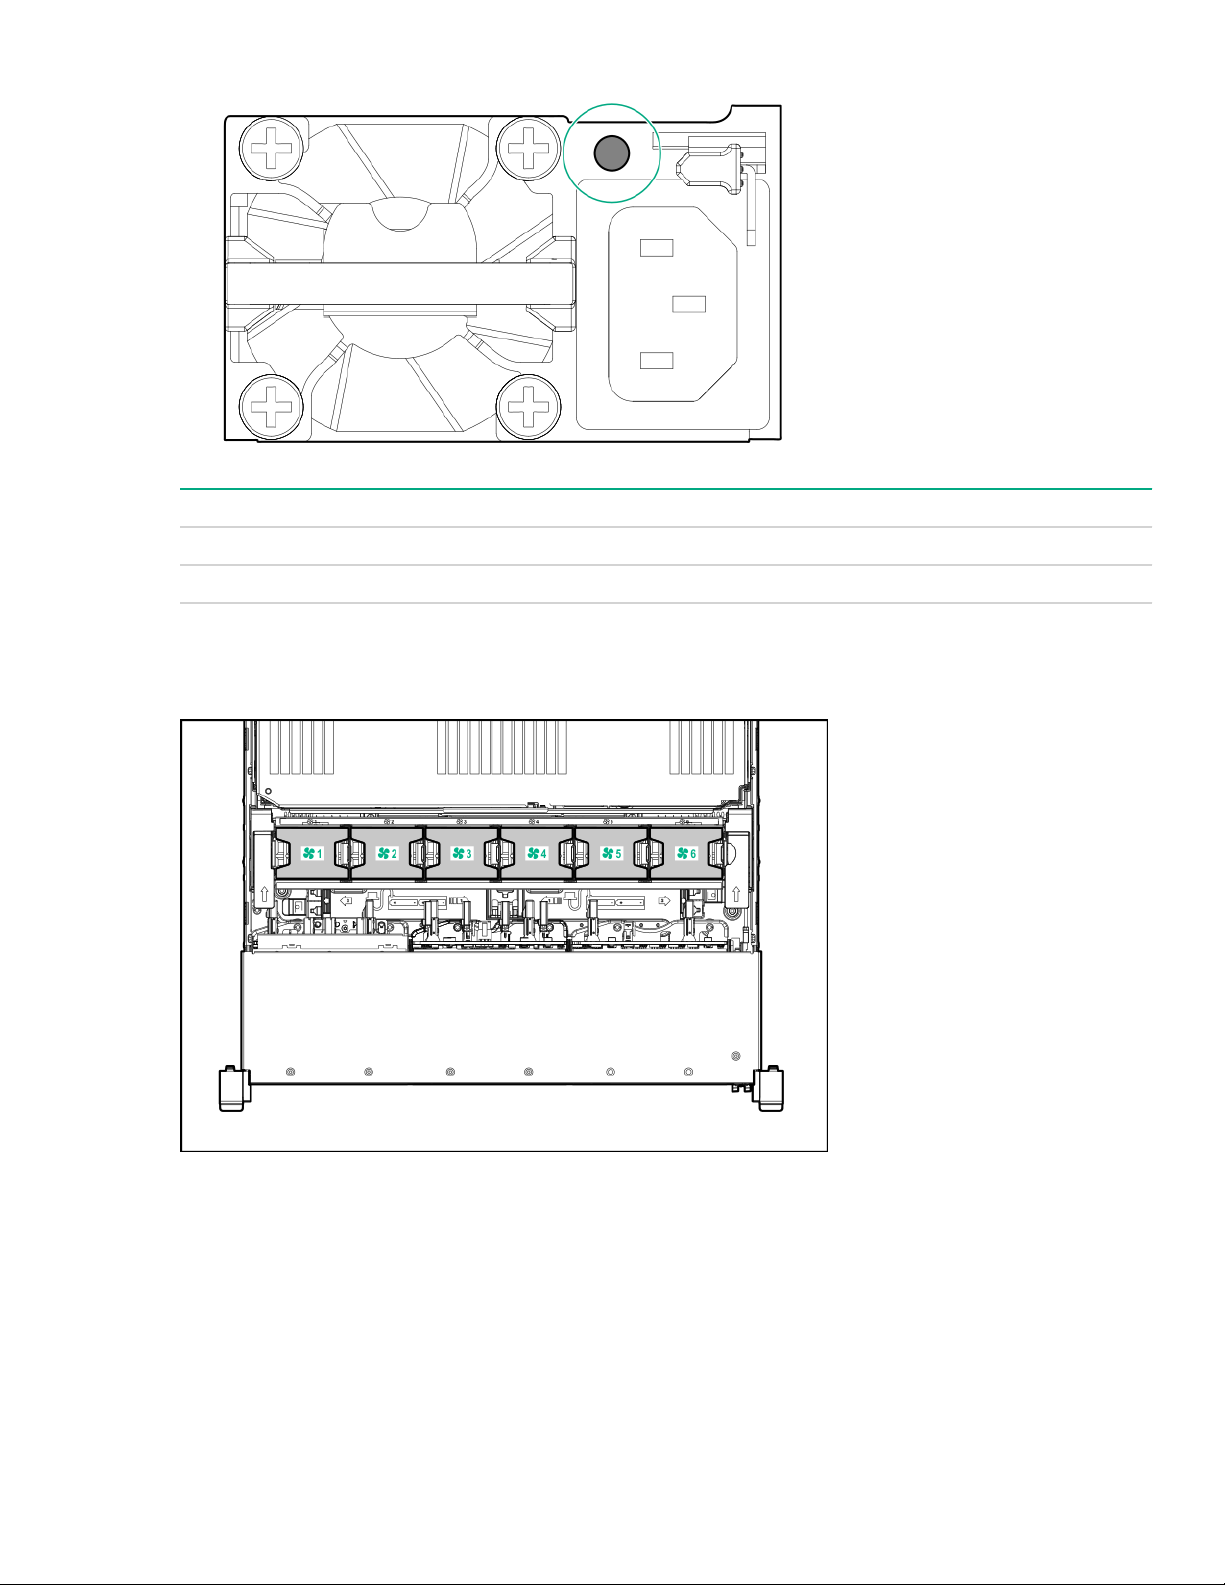
LED Status Description
Off System is off or power supply has failed.
Solid Green Normal
Fan bay numbering
The server requires 12 fans, with two fans per bay.
Fan bay numbering 23
Page 24
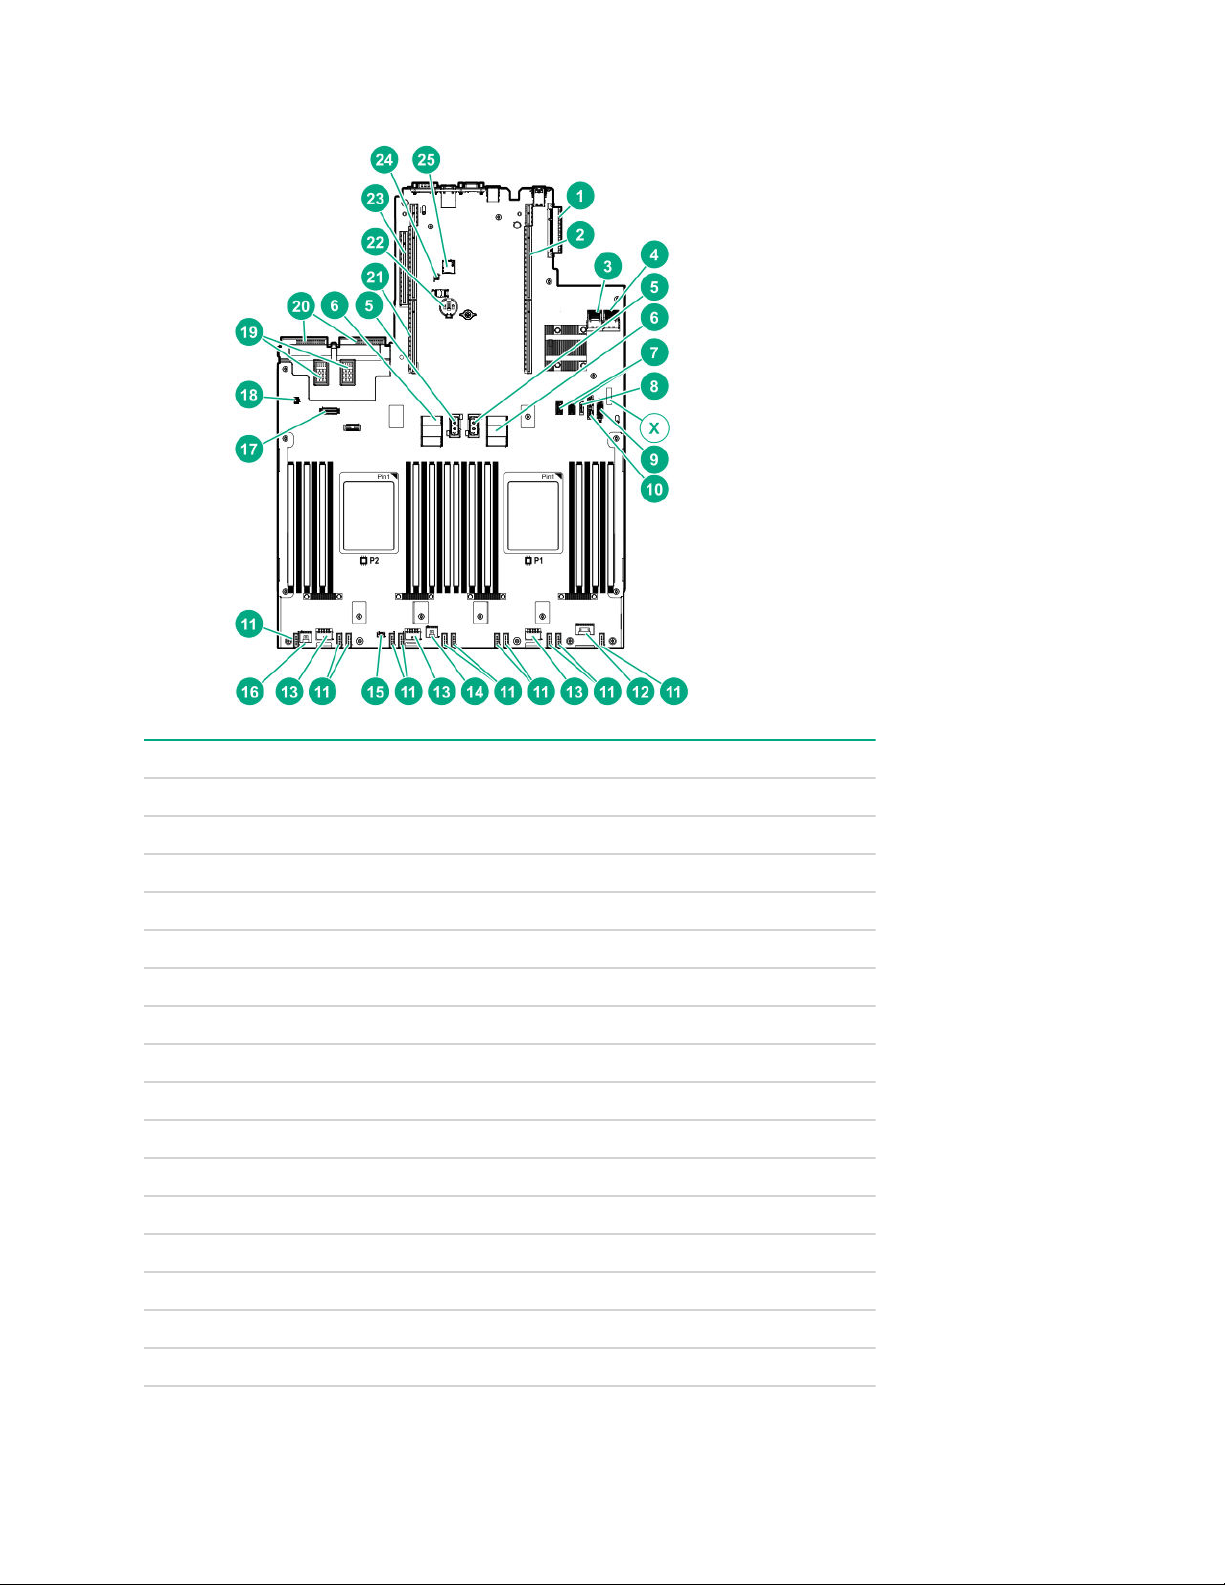
System board components
Item Description
1 FlexibleLOM connector
2 Primary PCIe riser connector (processor 1 required)
3 x4 SATA port 1
4 x4 SATA port 2
5 Upper processor mezzanine connector — Power (2)
6 Upper processor mezzanine connector — Signals (2)
7 USB 3.0 (2)
8 x1 SATA port
X System maintenance switch
9 Front USB 3.0 and iLO Service Port connector
10 x1 SATA port / Optical Drive port
11 Fan connectors (12)
12 Front power switch connector
13 Drive backplane power connectors (3)
14 HPE Smart Storage Battery connector 1 (system board)
15 Optional 2SFF HDD x1 SATA board sideband connector
24 System board components
Table Continued
Page 25
Item Description
16 HPE Smart Storage Battery connector 2 (processor mezzanine board)
17 Universal media bay USB/Display port connector
18 Intrusion detection switch connector
19 Power supply connectors (PS3, PS4)
20 Power supply connectors (PS1, PS2)
21 Secondary PCIe riser connector (processor 2 required)
22 System battery
23 Tertiary PCIe riser connector (processor 2 required)
24 TPM connector
25 microSD connector
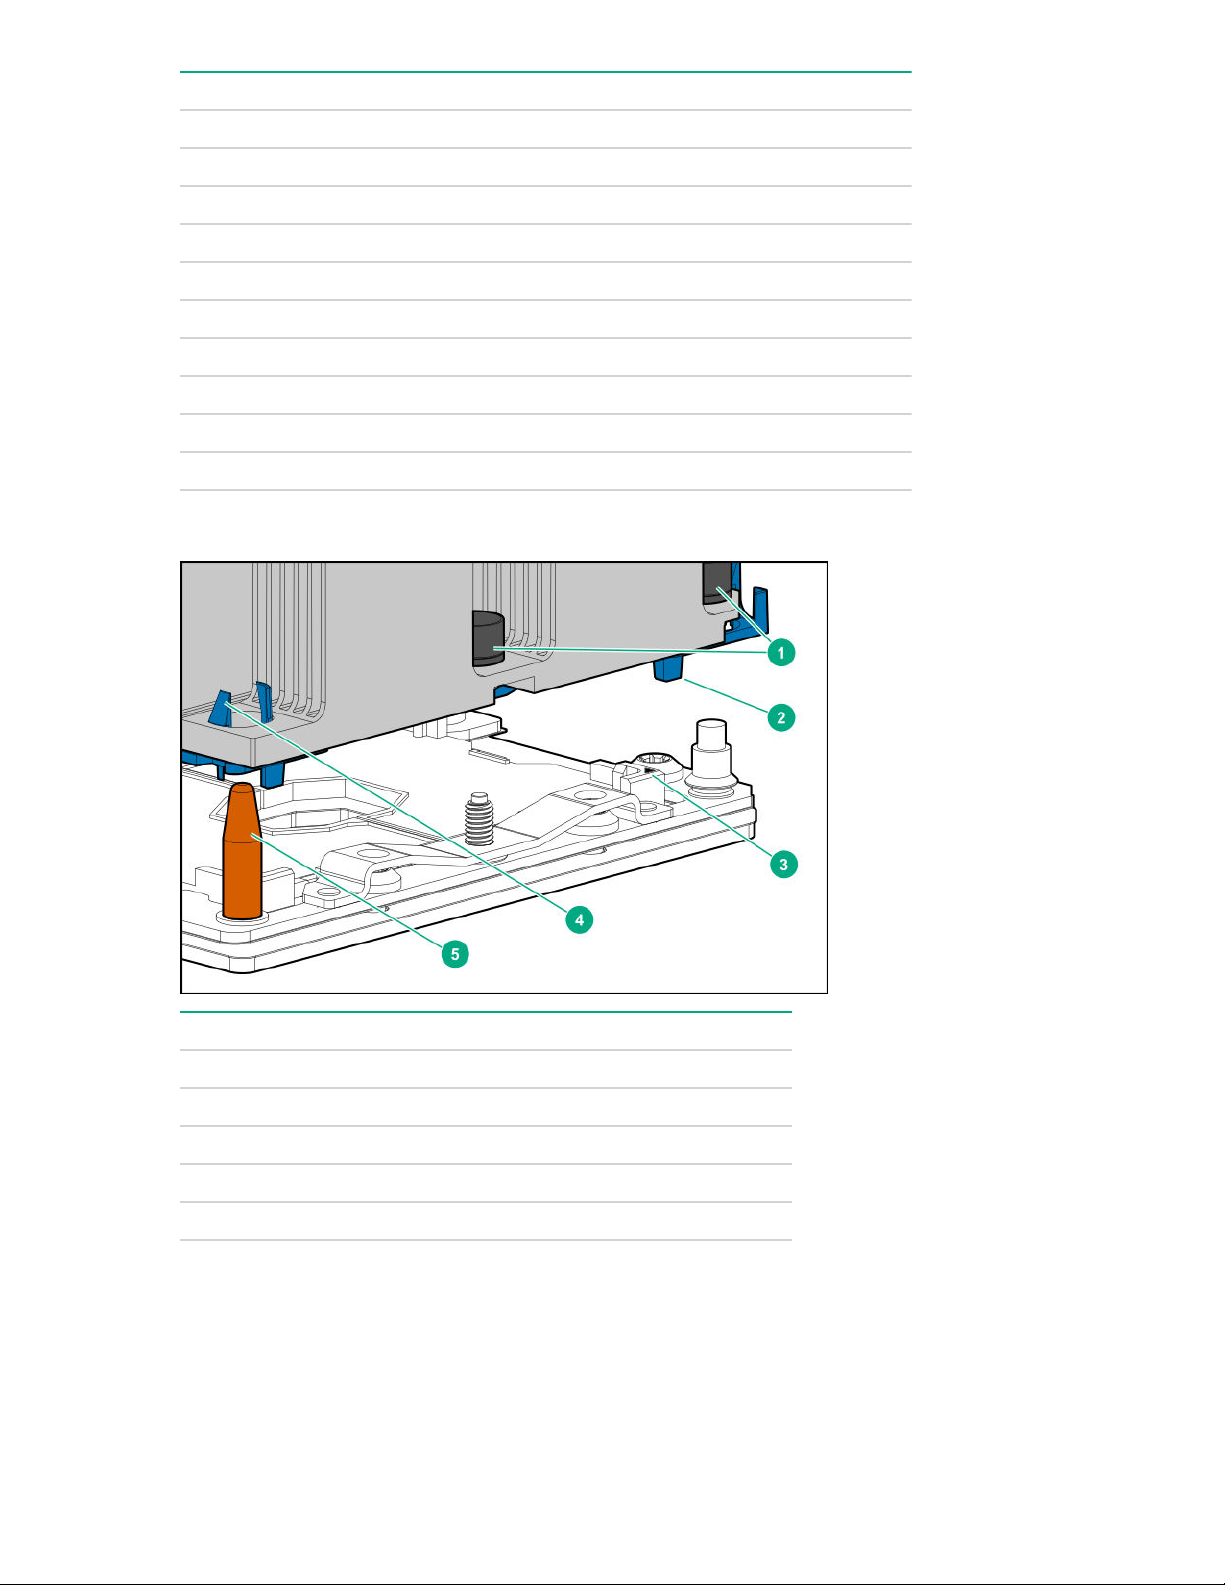
Processor, heatsink, and socket components
Item Description
1 Heatsink nuts
2 Processor carrier
3 Pin 1 indicator
4 Heatsink latch
5 Alignment post
1
Symbol also on the processor and frame.
DIMM slot locations
DIMM slots are numbered sequentially (1 through 12) for each processor on the system and mezzanine
boards.
1
Processor, heatsink, and socket components 25
Page 26
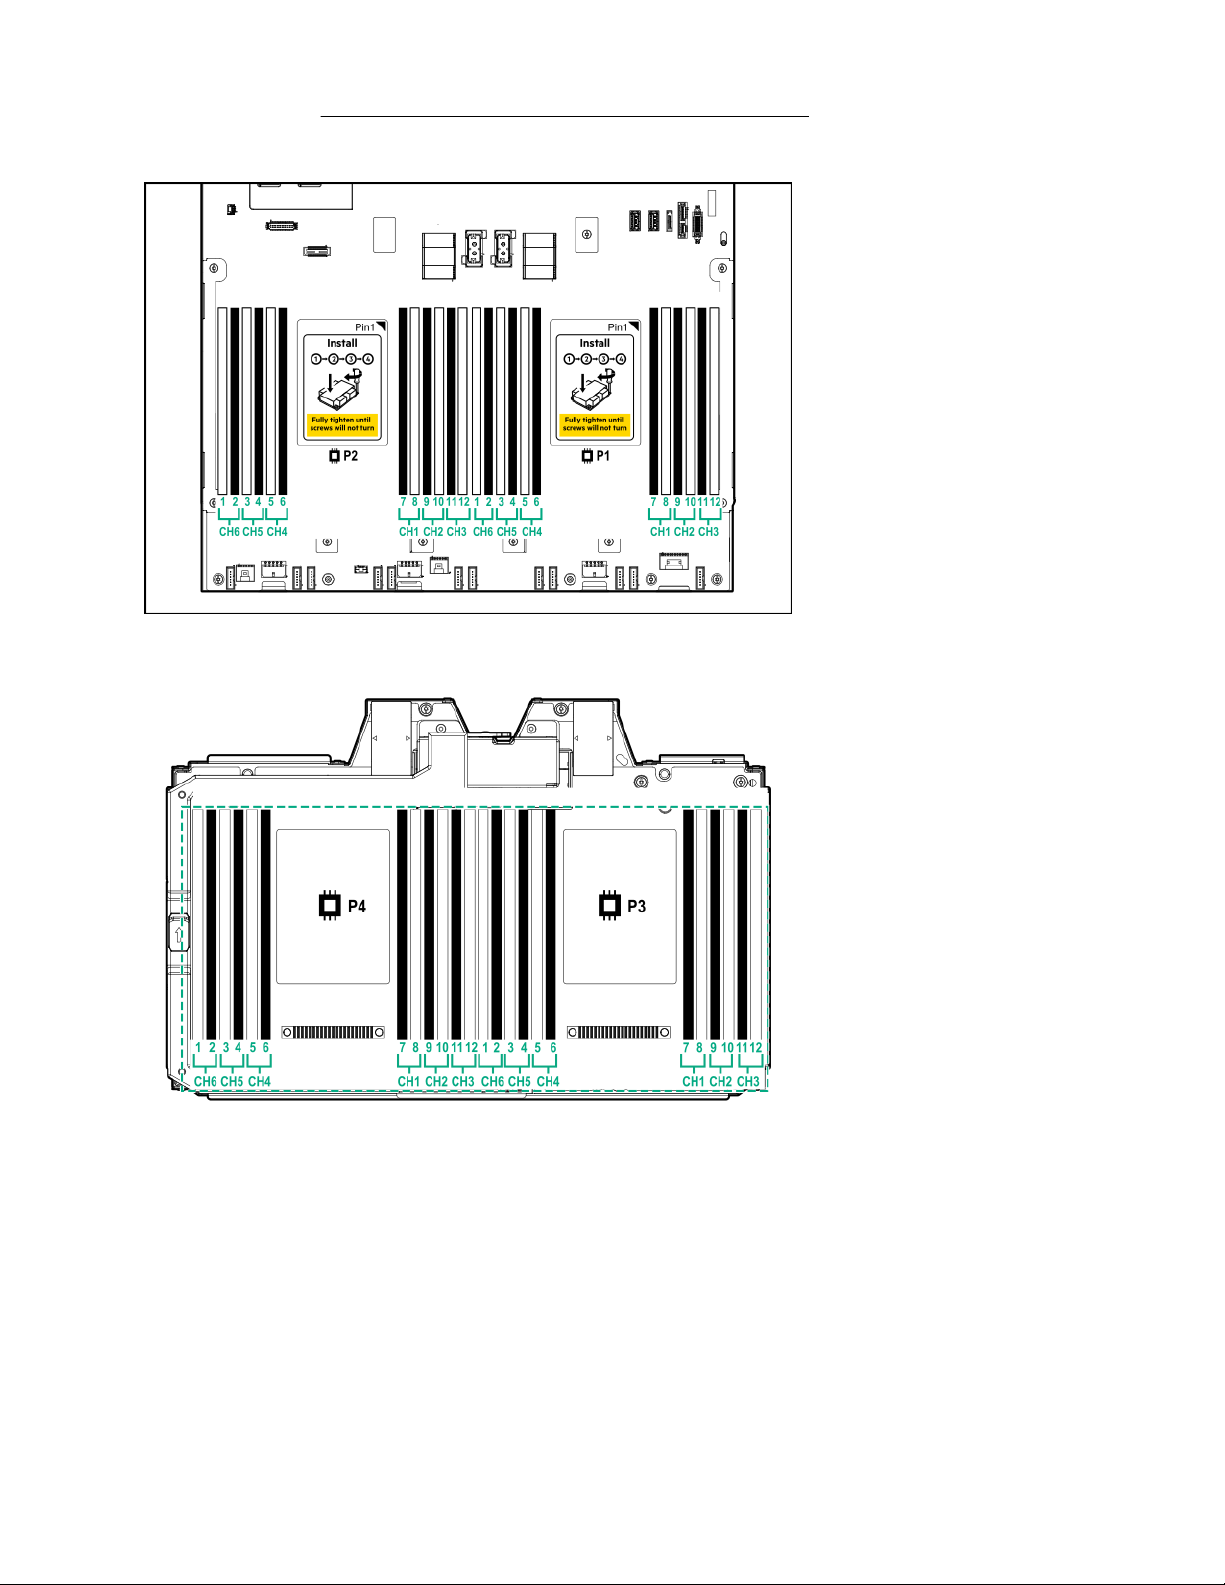
For specific DIMM population information, see the DIMM population guidelines on the Hewlett Packard
Enterprise website (http://www.hpe.com/docs/memory-population-rules).
System board DIMM slots
Processor mezzanine board DIMM slots
26 Component identification
Page 27
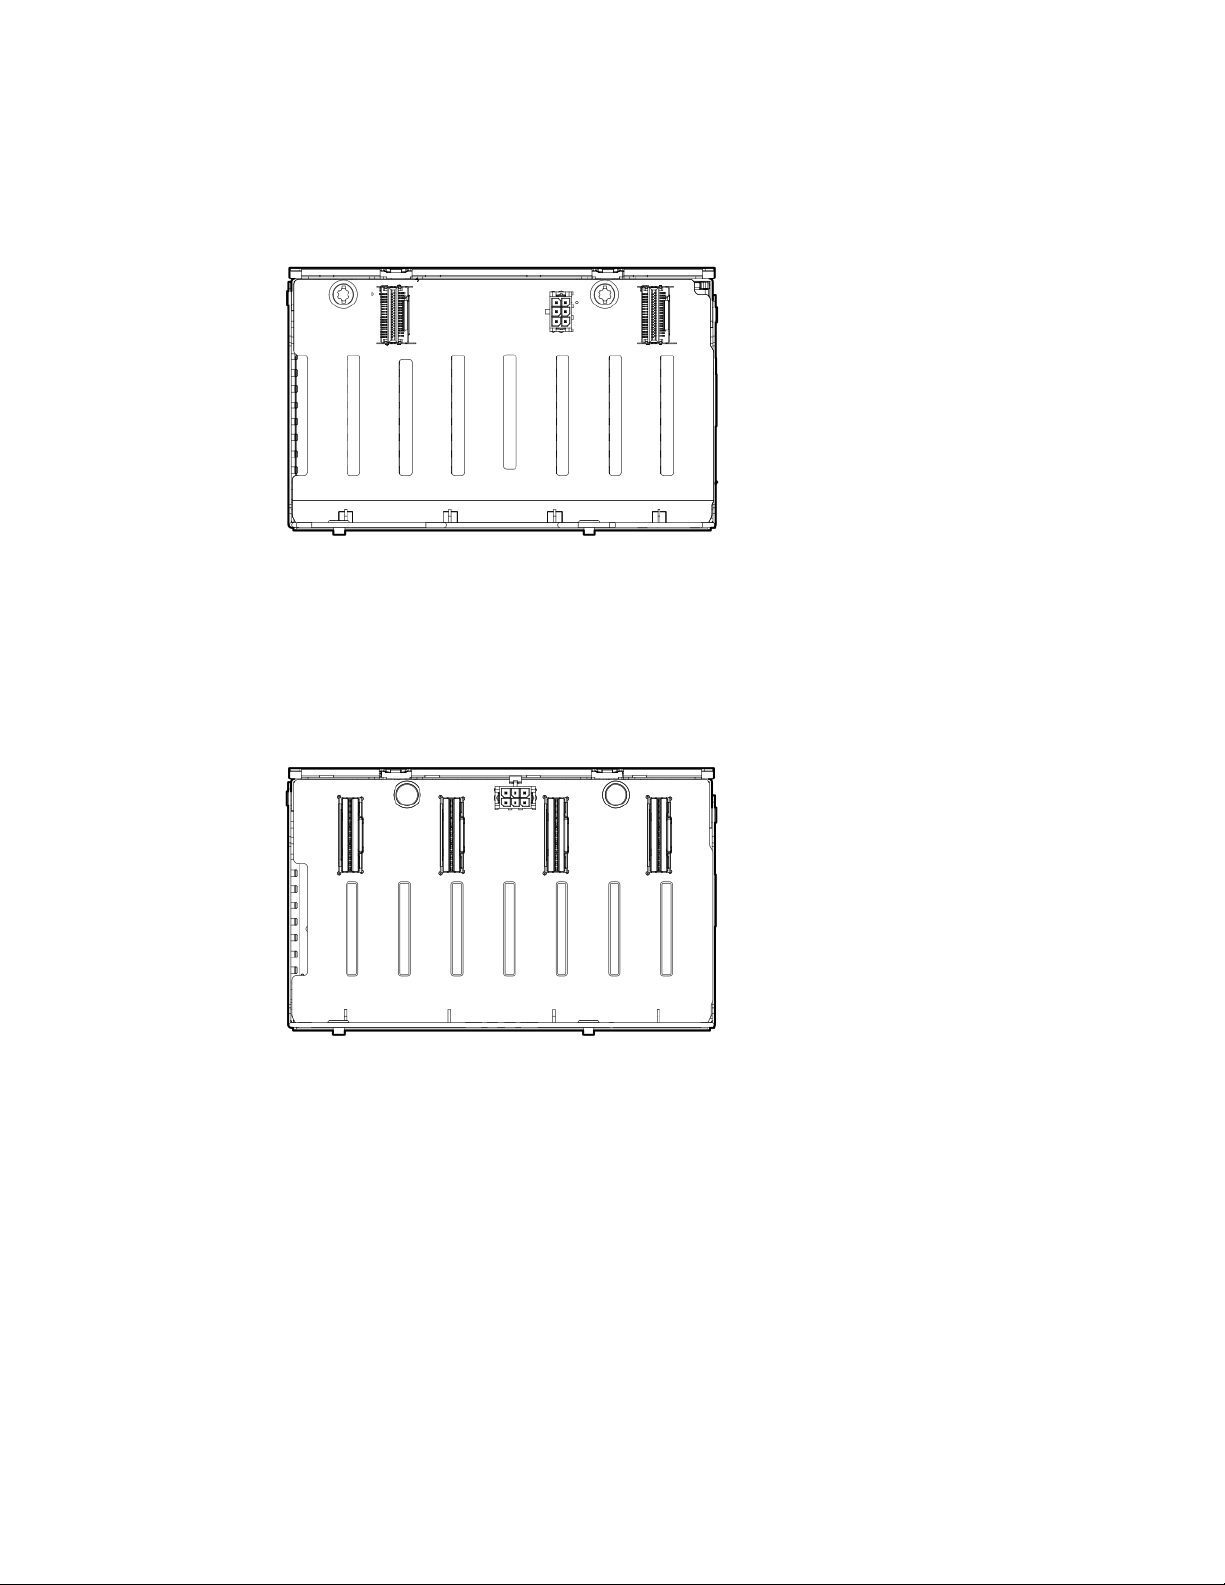
Drive cage backplane identification
Eight-bay SFF HDD/SSD drive cage backplane
Eight-bay SFF NVMe SSD drive cage backplane
Drive cage backplane identification 27
Page 28
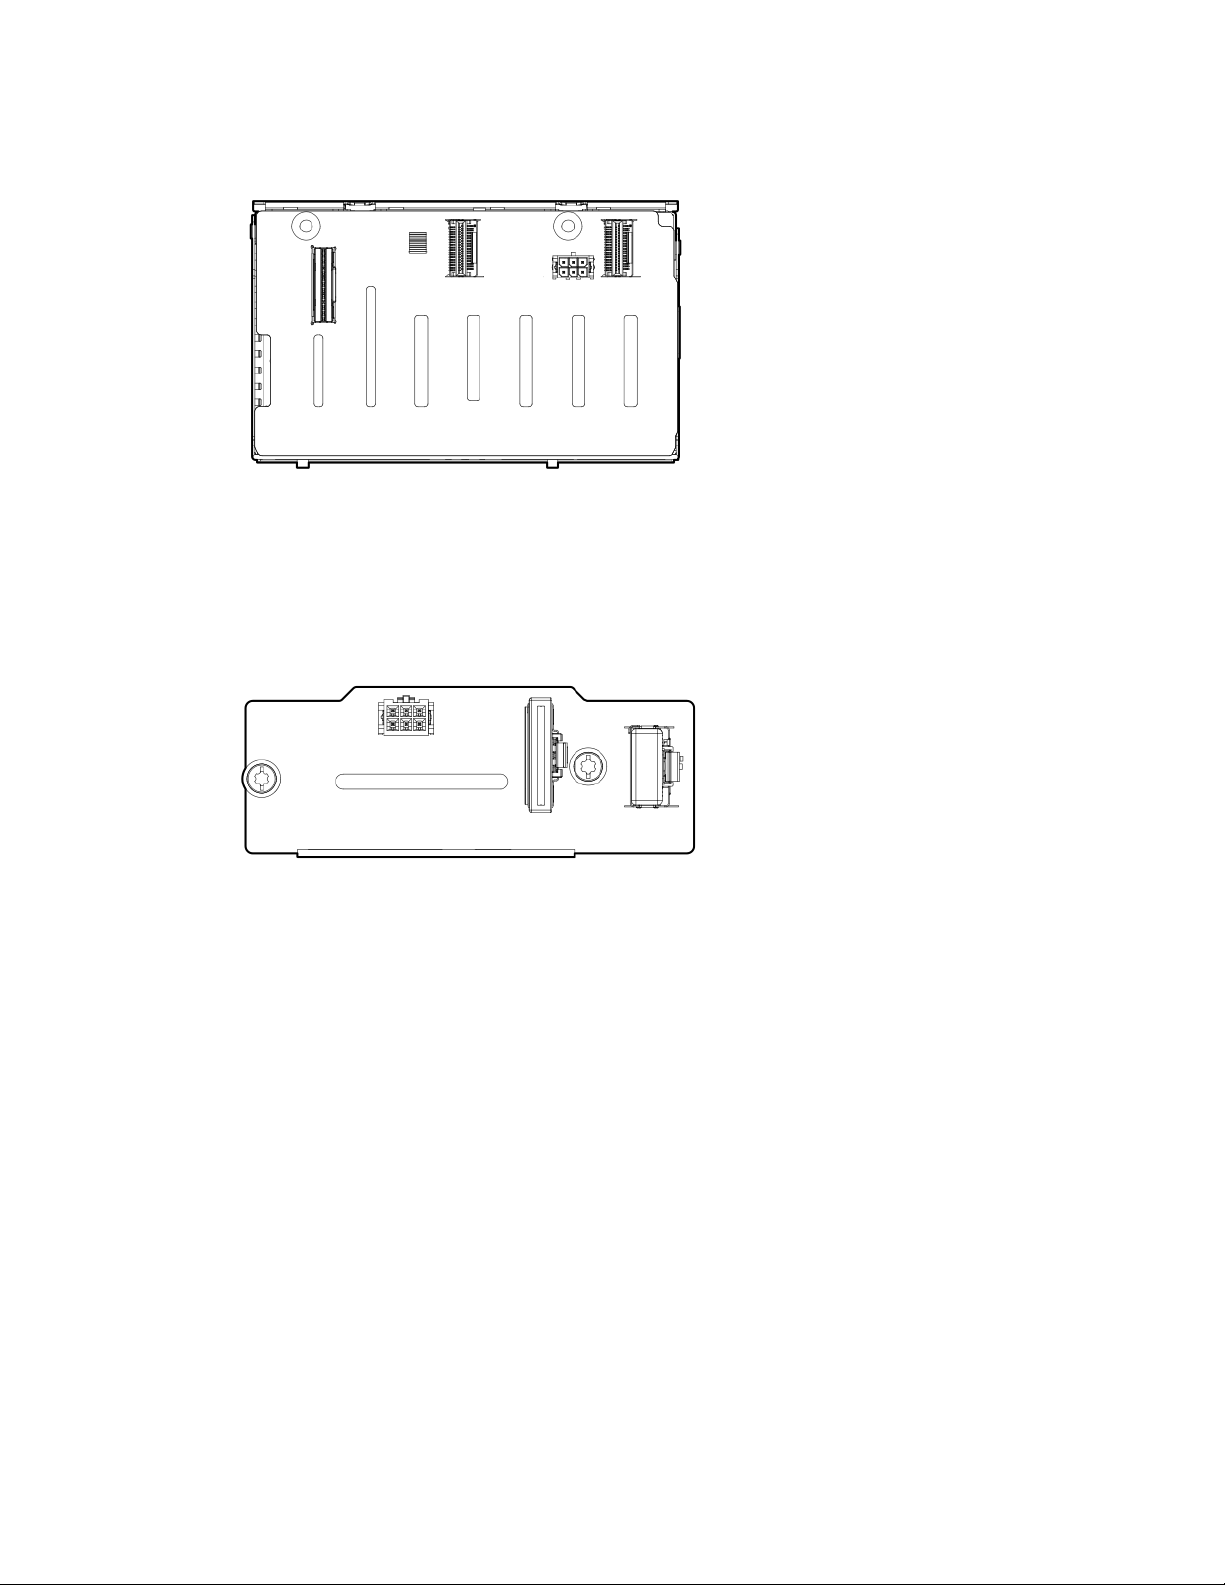
Two-bay NVMe/Six-bay SFF HDD (Premium) drive cage backplane
Two-bay SFF (Premium) drive cage backplane
28 Component identification
Page 29
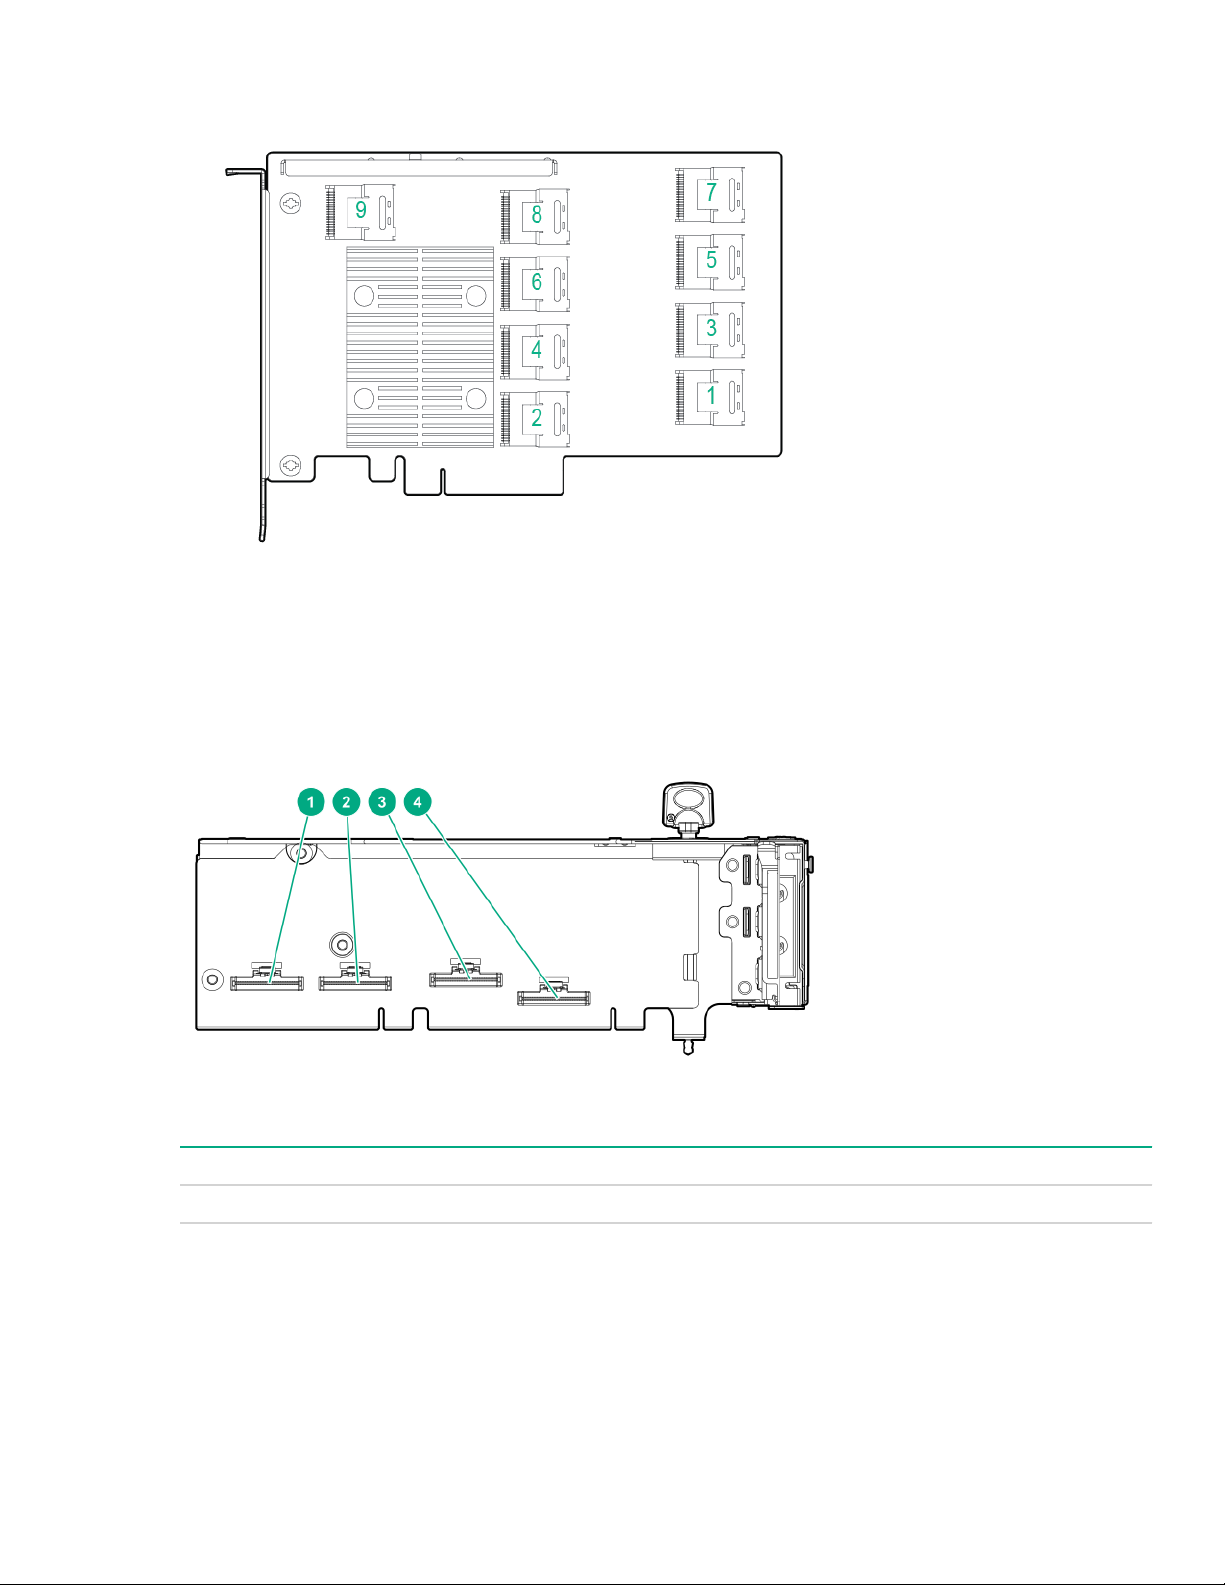
HPE 12G SAS Expander Card port numbering
Riser board components
4-port Slimline riser
Item Description
1–4 x8 Slimline NVMe connectors
HPE 12G SAS Expander Card port numbering 29
Page 30
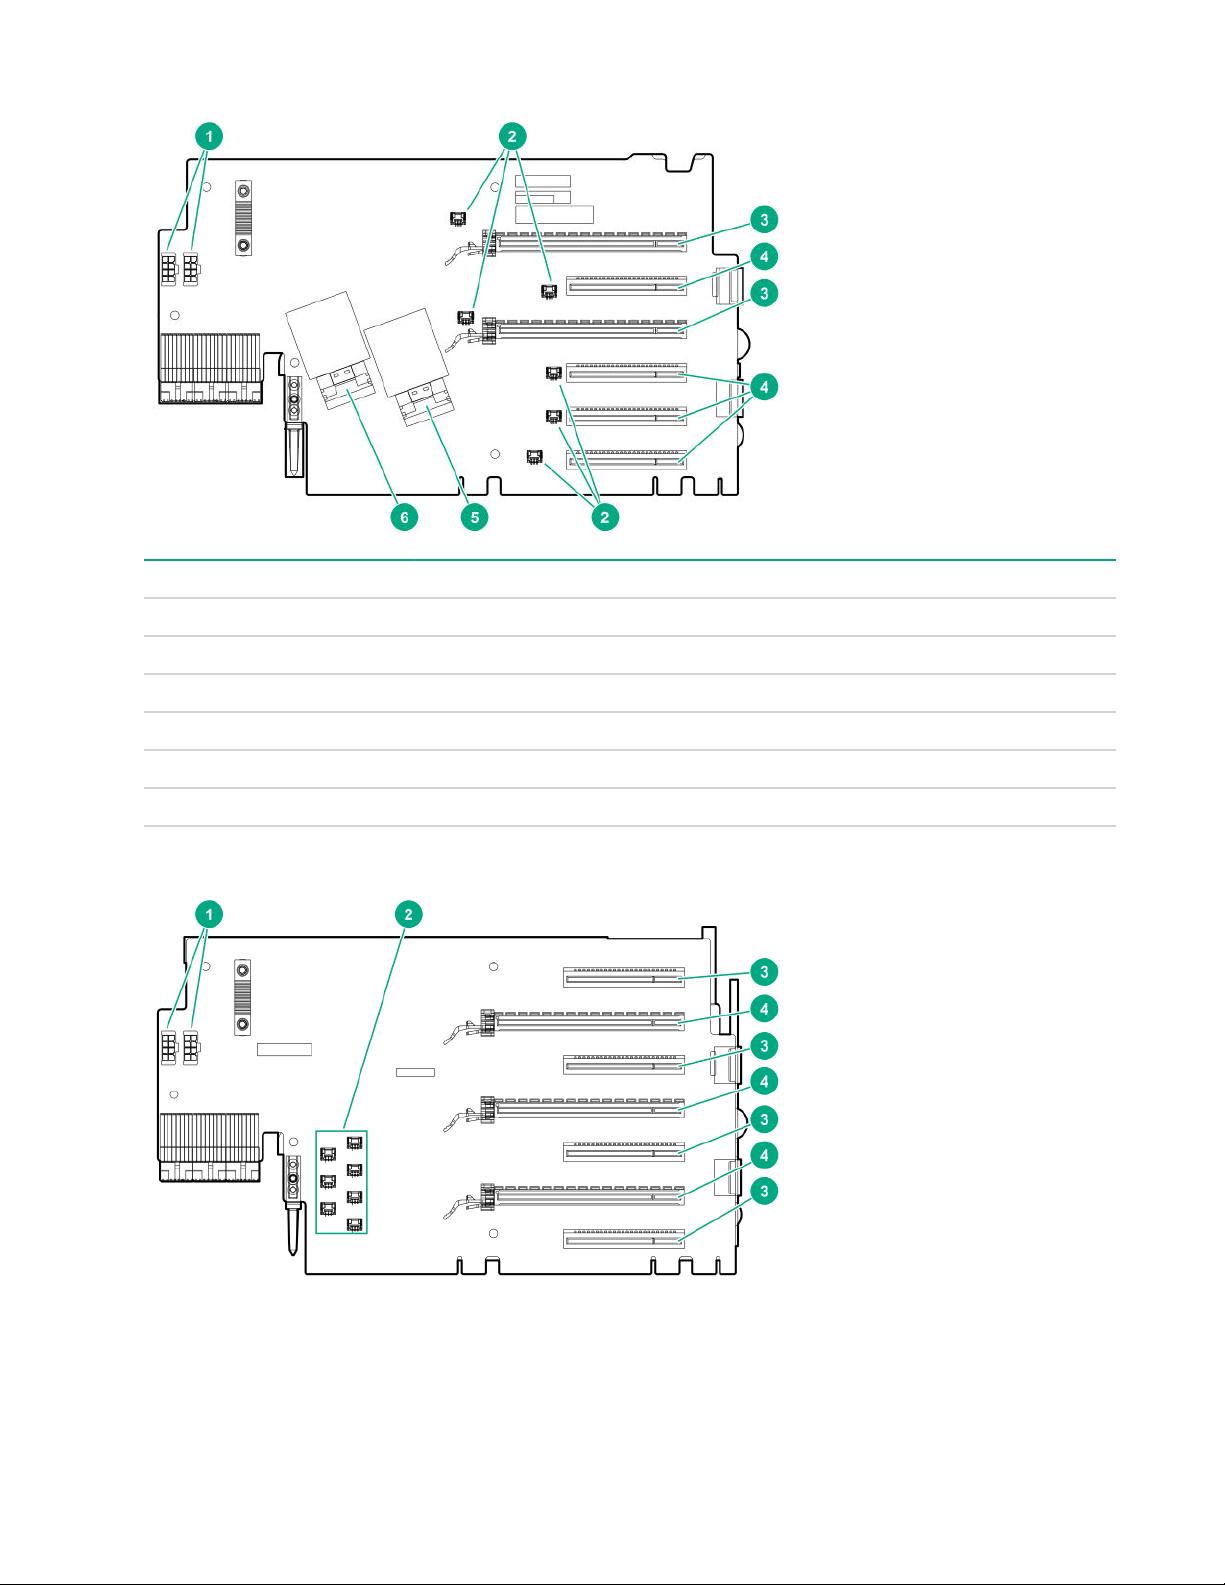
6-slot riser board
Item Description
1 GPU power connectors (2)
2 Smart Array cache backup power connectors (6)
3 x16 connectors (2)
4 x8 connectors (4)
5 NVMe slimline connector J4
6 NVMe slimline connector J3
7-slot riser board
30 Component identification
Page 31
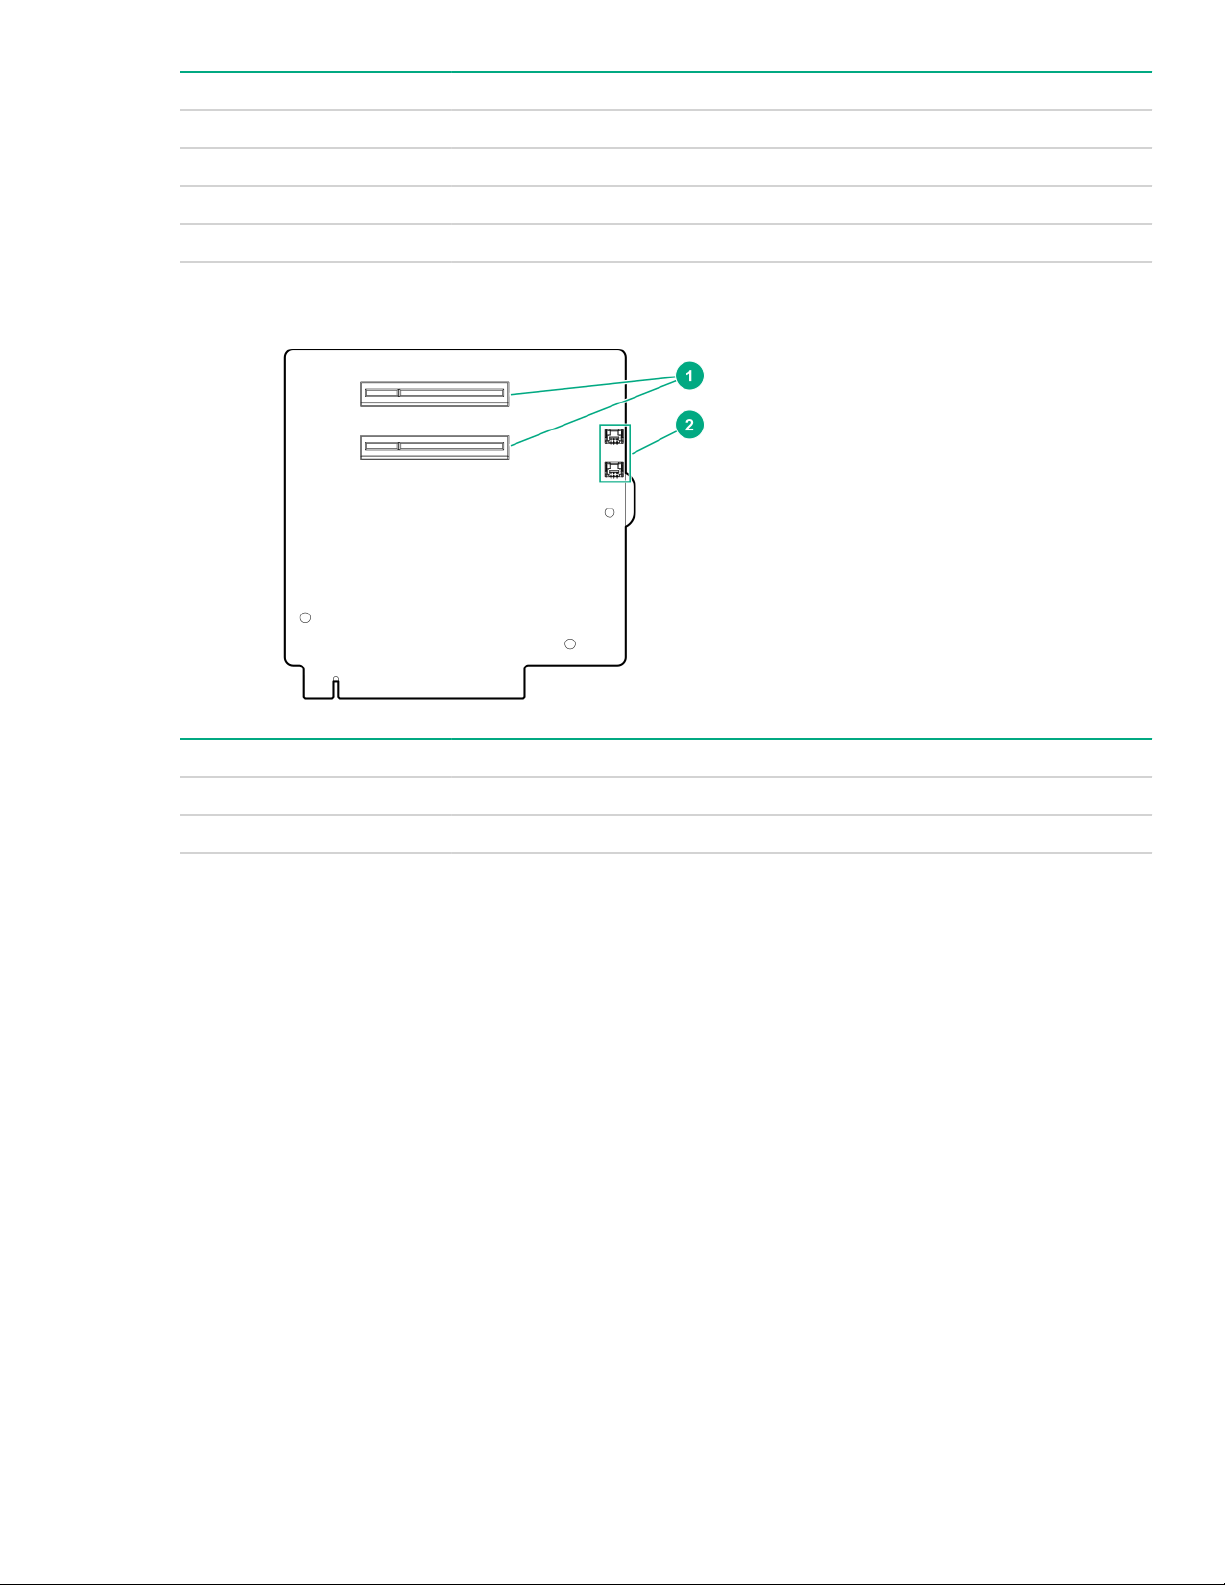
Item Description
1 GPU power connectors (2)
2 Smart Array cache backup power connectors (7)
3 x8 connectors (4)
4 x16 connectors (3)
Tertiary riser board
Item Description
1 x8 connectors (2)
2 Smart Array cache backup power connectors
Component identification 31
Page 32
Operations
Power up the server
Procedure
To power up the server, press the Power On/Standby button.
Power down the server
Before powering down the server for any upgrade or maintenance procedures, perform a backup of critical
server data and programs.
IMPORTANT:
When the server is in standby mode, auxiliary power is still being provided to the system.
To power down the server, use one of the following methods:
• Press and release the Power On/Standby button.
This method initiates a controlled shutdown of applications and the OS before the server enters standby
mode.
• Press and hold the Power On/Standby button for more than 4 seconds to force the server to enter standby
mode.
This method forces the server to enter standby mode without properly exiting applications and the OS. If
an application stops responding, you can use this method to force a shutdown.
• Use a virtual power button selection through iLO.
This method initiates a controlled remote shutdown of applications and the OS before the server enters
standby mode.
Before proceeding, verify that the server is in standby mode by observing that the system power LED is
amber.
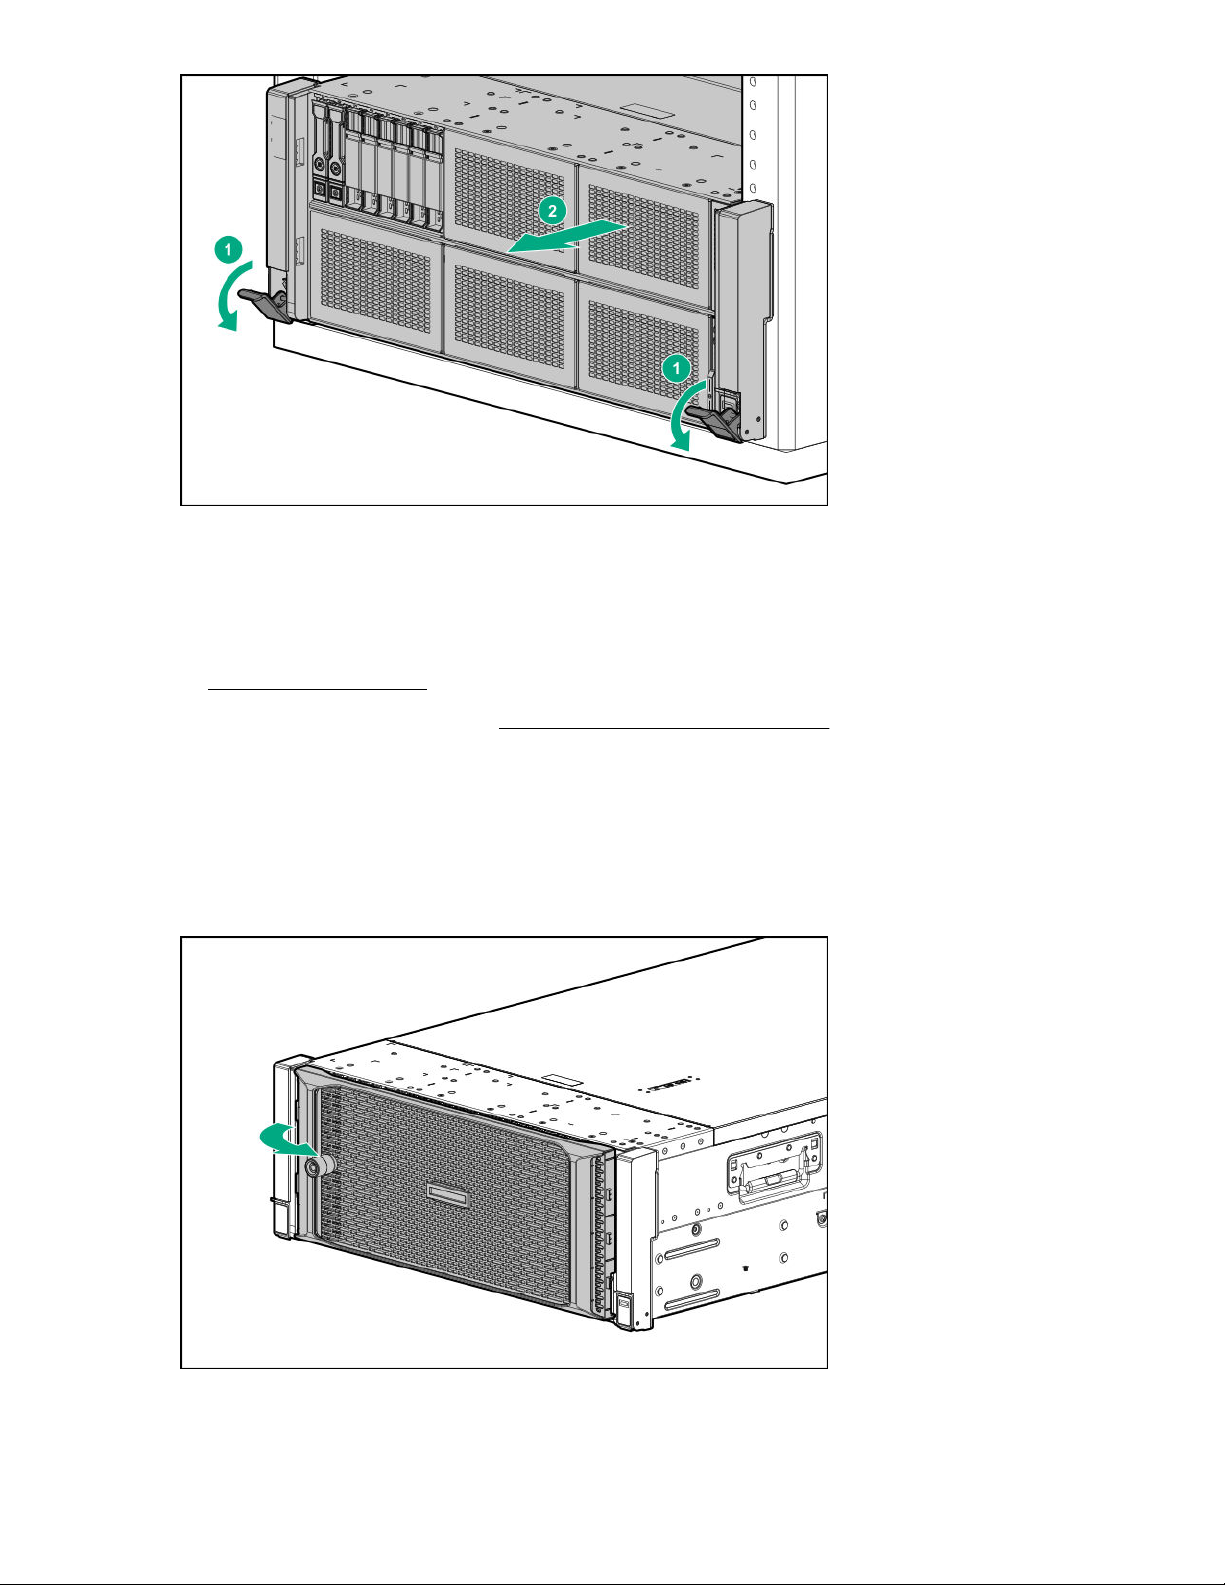
Extending the server from the rack
WARNING:
To reduce the risk of personal injury or equipment damage, be sure that the rack is adequately stabilized
before extending anything from the rack.
Procedure
Pull down the quick release levers on each side of the server, and then extend the server from the rack.
32 Operations
Page 33
Removing the server from the rack
Procedure
1. Power down the server on page 32.
2. Extend the server from the rack (Extending the server from the rack on page 32).
3. Disconnect the cabling and remove the server from the rack.
For more information, see the documentation that ships with the rack mounting option.
4. Place the server on a sturdy, level surface.
Removing the bezel
Removing the server from the rack 33
Page 34
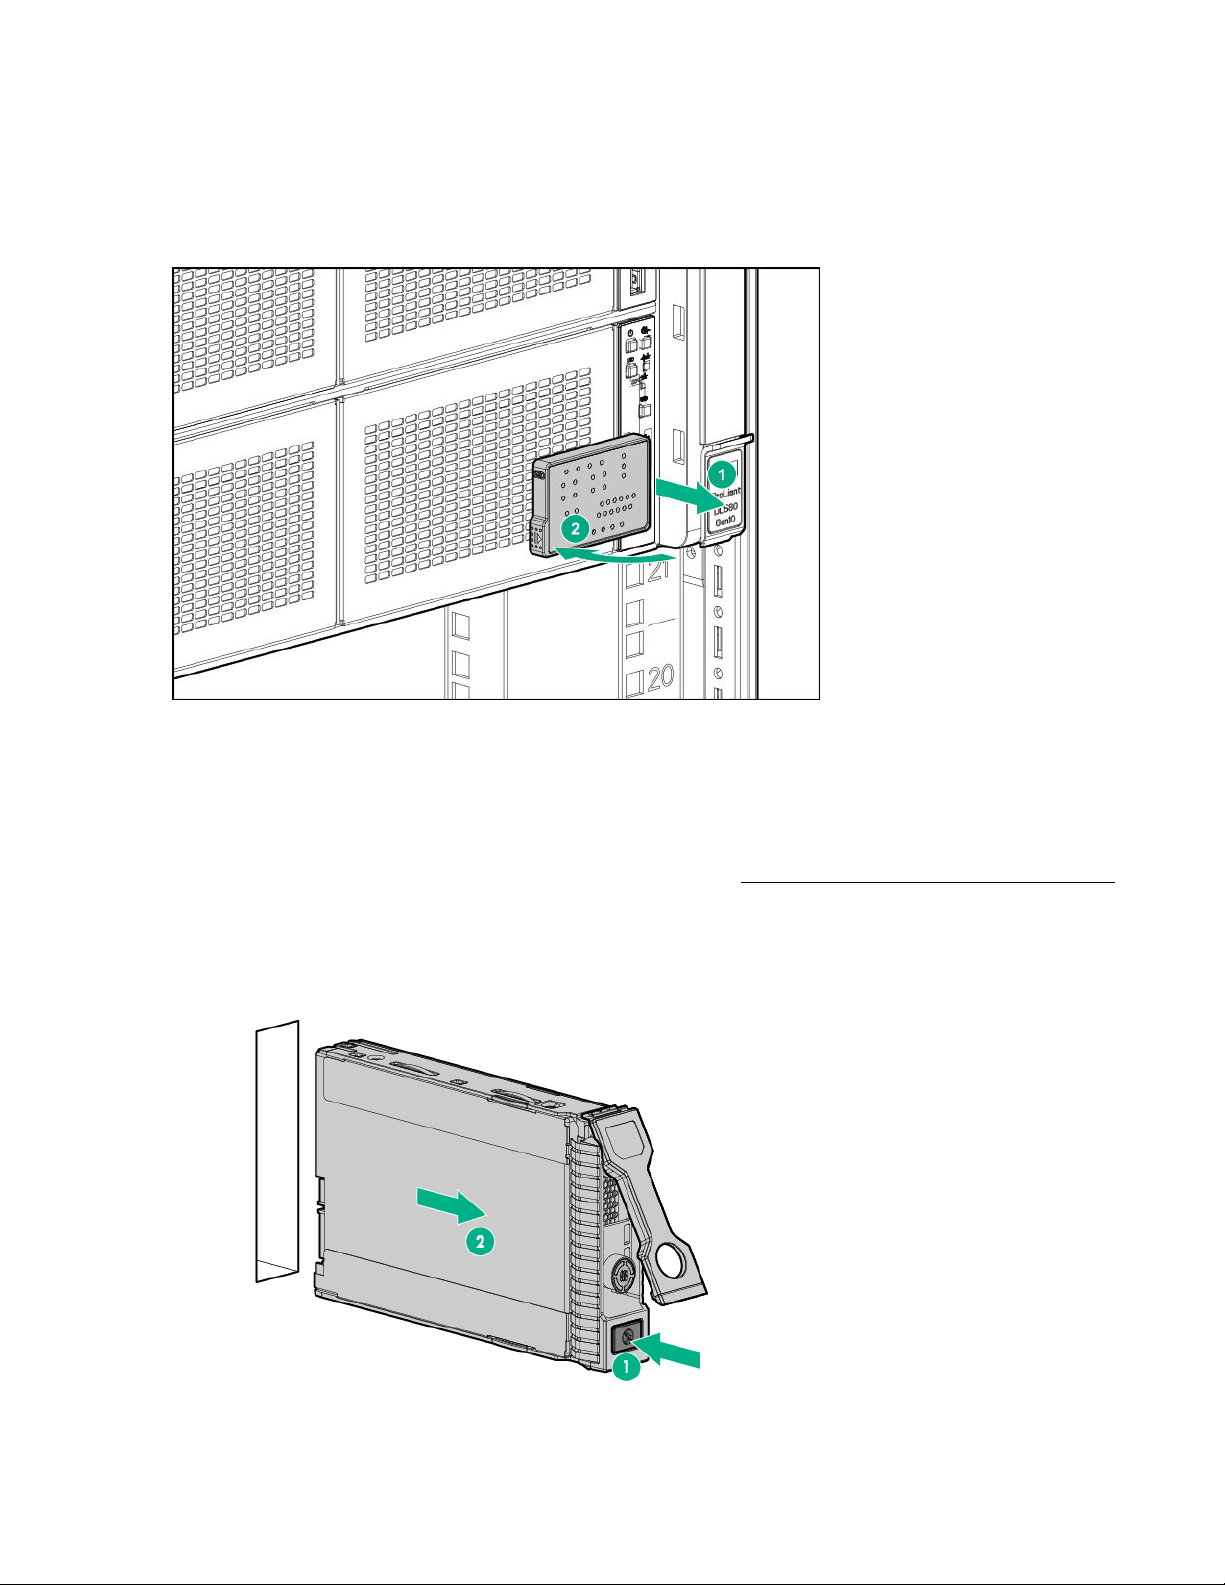
Accessing the Systems Insight Display
Procedure
1. Press and release the panel.
2. Pull out the display to fully extend it, and then rotate the display to view the LEDs.
Removing a hot-plug SAS or SATA drive
Procedure
1. Determine the status of the drive from the drive LED definitions (SAS/SATA drive components and LEDs
on page 18).
2. Back up all data on the drive.
3. Remove the drive.
34 Accessing the Systems Insight Display
Page 35
Removing an NVMe drive
Procedure
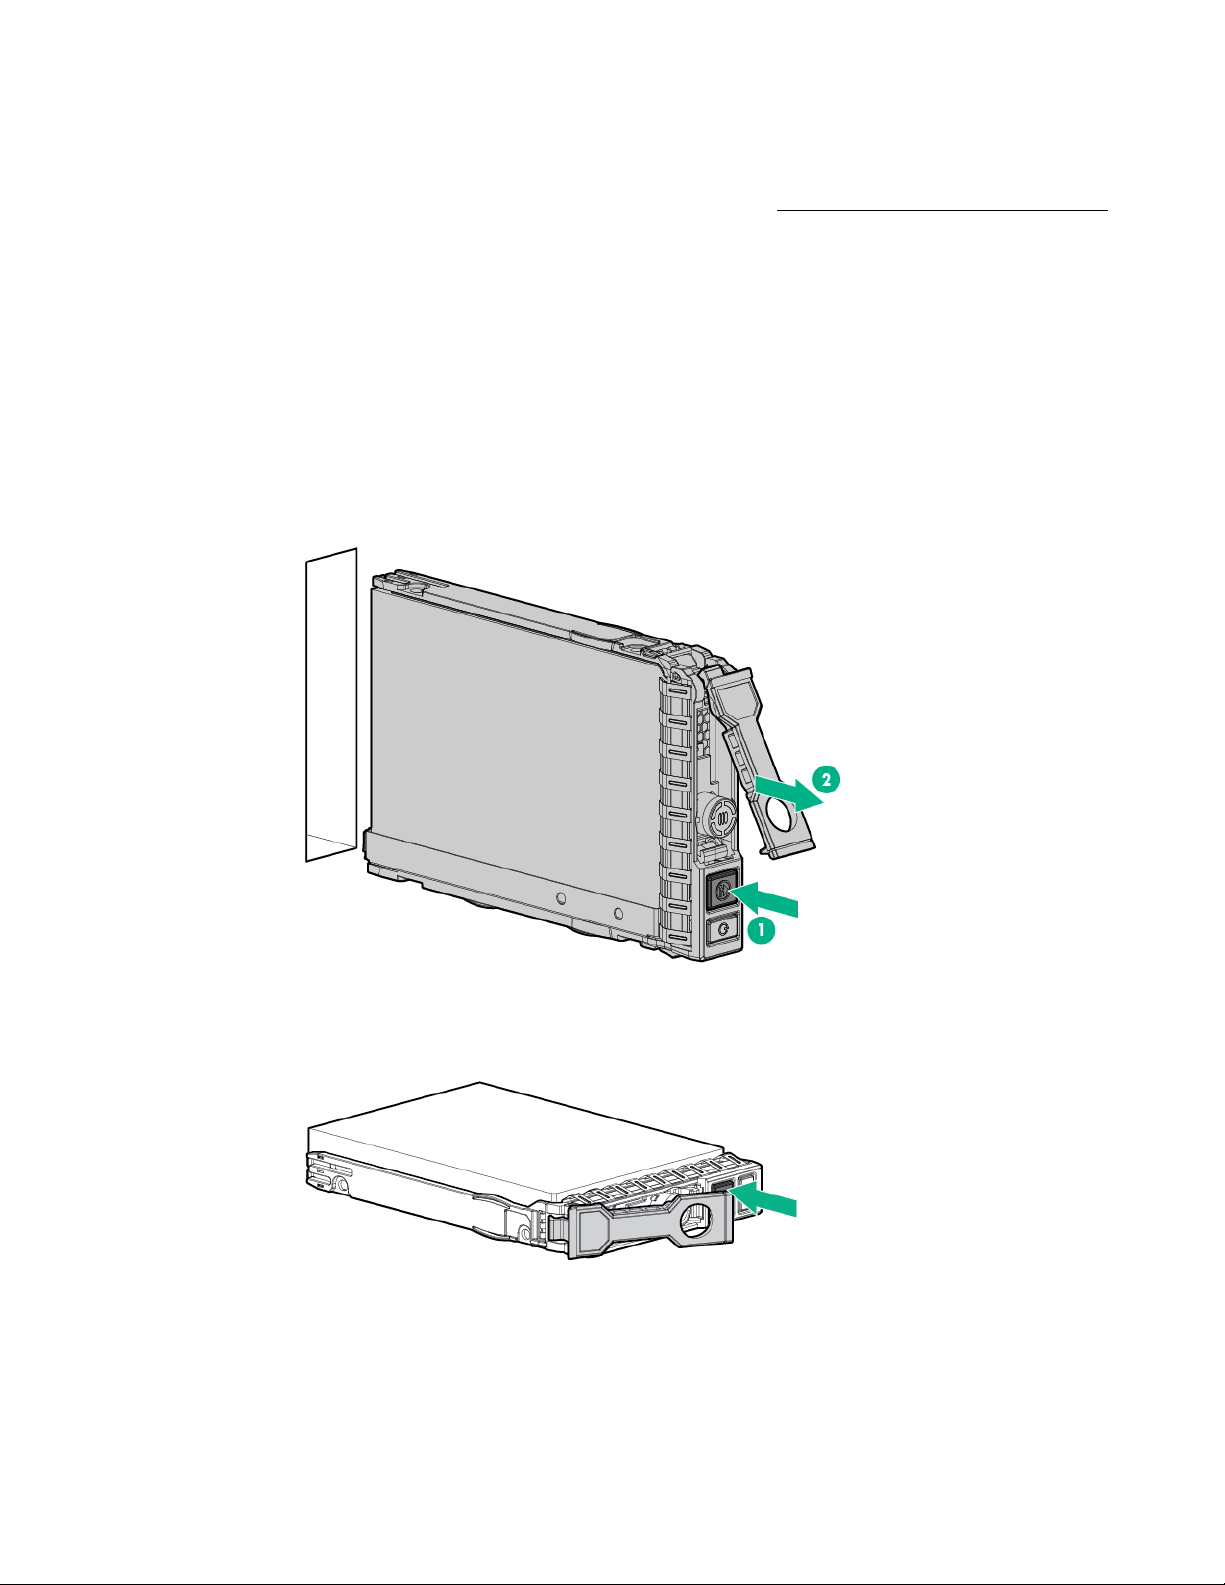
1. Determine the status of the drive from the drive LED definitions (NVMe drive components and LEDs on
page 18).
2. Back up all server data.
3. Remove the drive:
a. Push the Power button.
The Do Not Remove button will illuminate and flash. Do not press the button while it is illuminated.
b. When the flashing stops and the icon on the button is no longer illuminated or flashing, press the Do
Not Remove button to release the release lever.
c. Pull the release lever to disengage the drive from the backplane, and slide the drive out of the drive
bay.
4. Prepare the replacement drive.
5. Install the drive.
Removing an NVMe drive 35
Page 36
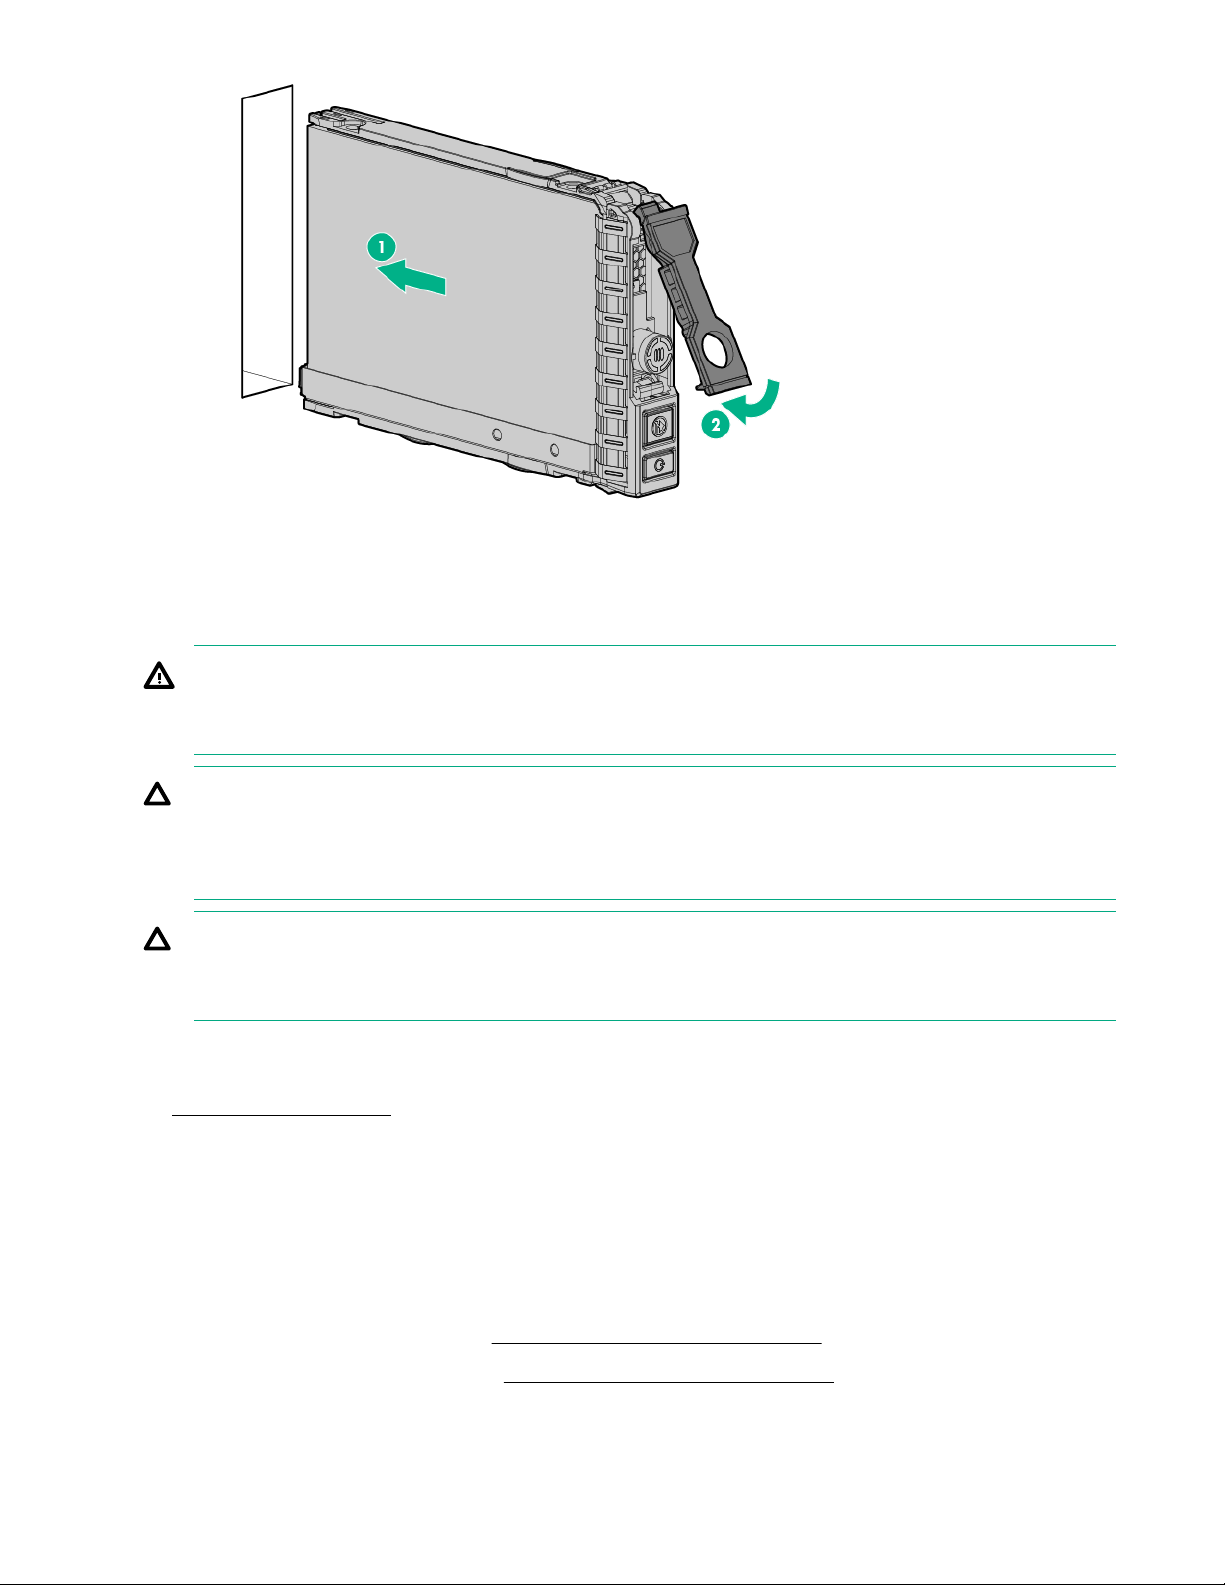
6. Observe the LED status of the drive.
Removing the access panel
WARNING:
To reduce the risk of personal injury from hot surfaces, allow the drives and the internal system
components to cool before touching them.
CAUTION:
To prevent damage to electrical components, take the appropriate anti-static precautions before
beginning any installation, removal, or replacement procedure. Improper grounding can cause
electrostatic discharge.
CAUTION:
Do not operate the server for long periods with the access panel open or removed. Operating the server
in this manner results in improper airflow and improper cooling that can lead to thermal damage.
Procedure
1. Power down the server on page 32.
2. Remove all power:
a. Disconnect each power cord from the power source.
b. Disconnect each power cord from the server.
3. Do one of the following:
• Extend the server from the rack (Extending the server from the rack on page 32).
• Remove the server from the rack (Removing the server from the rack on page 33).
36 Removing the access panel
Page 37
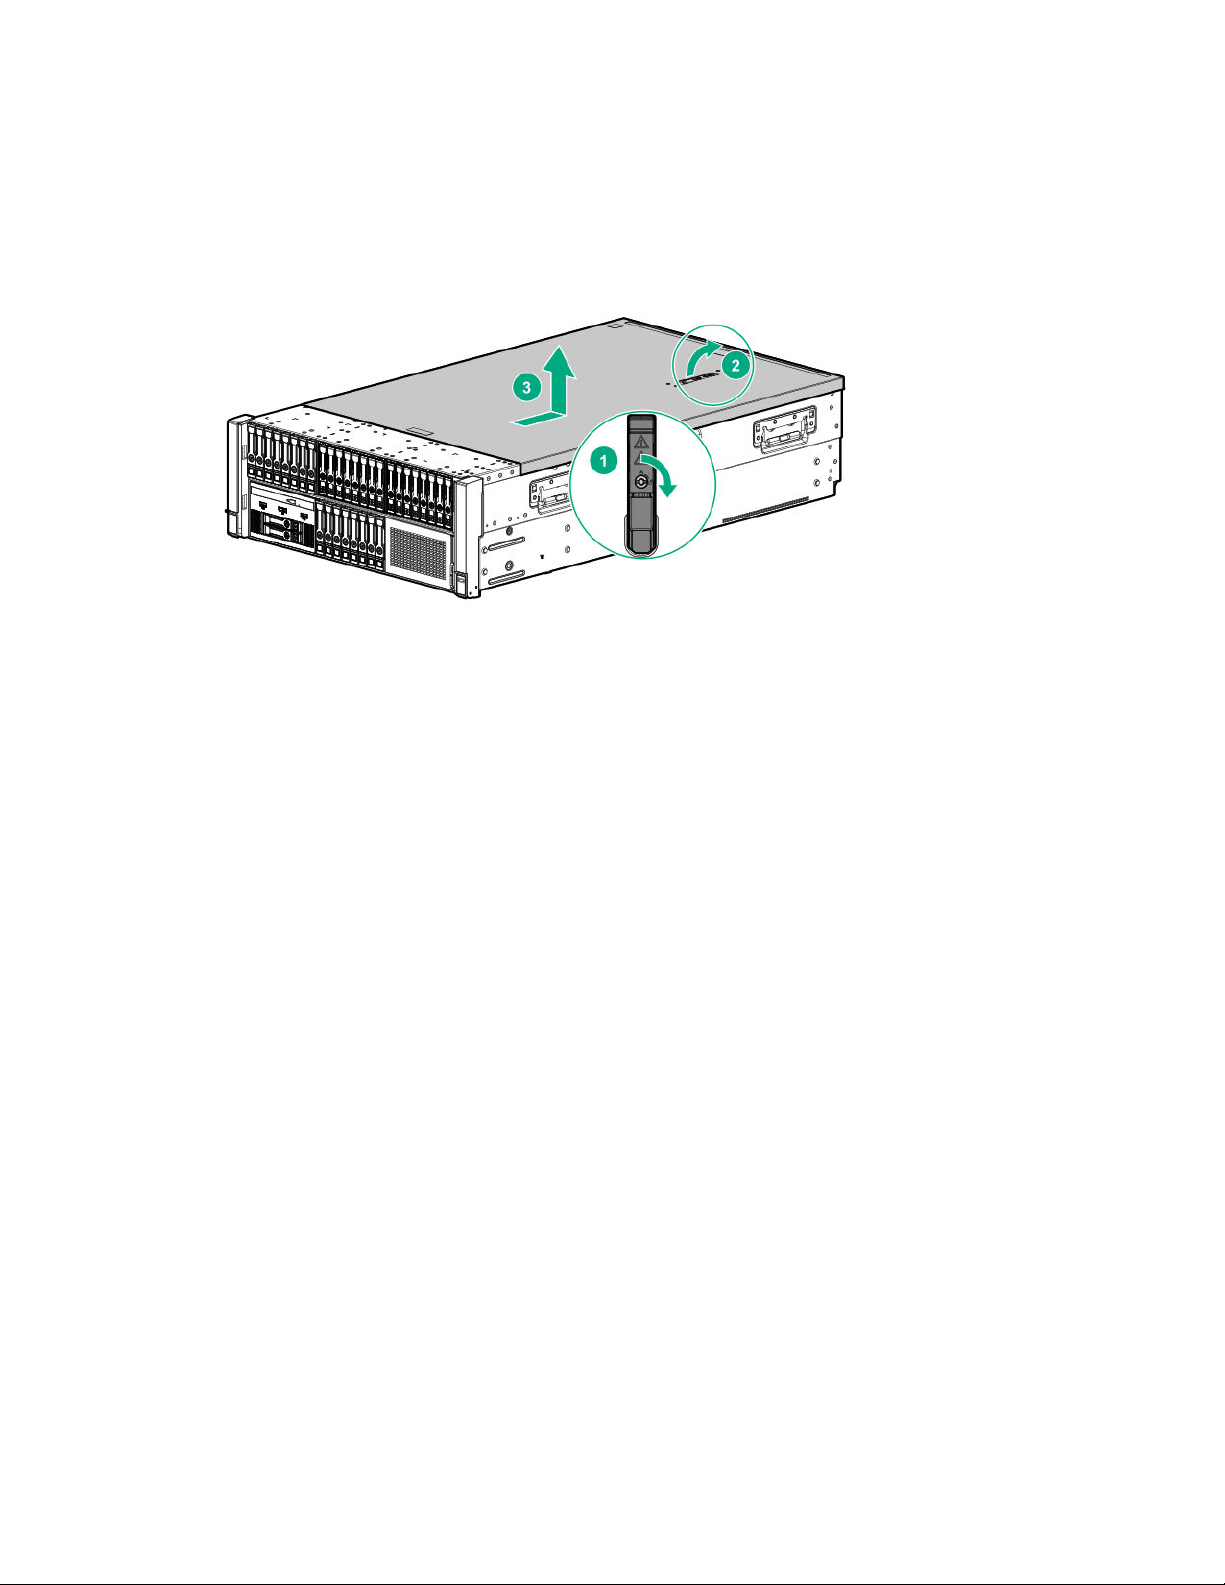
4. If the locking latch is locked, use a T-15 Torx screwdriver to unlock the latch.
5. Open the locking latch.
The access panel slides back, releasing it from the chassis.
6. Lift and remove the access panel.
Turn the access panel over to locate the server label. This label provides convenient access to component
identification and LED status indicators.
Installing the access panel
Procedure
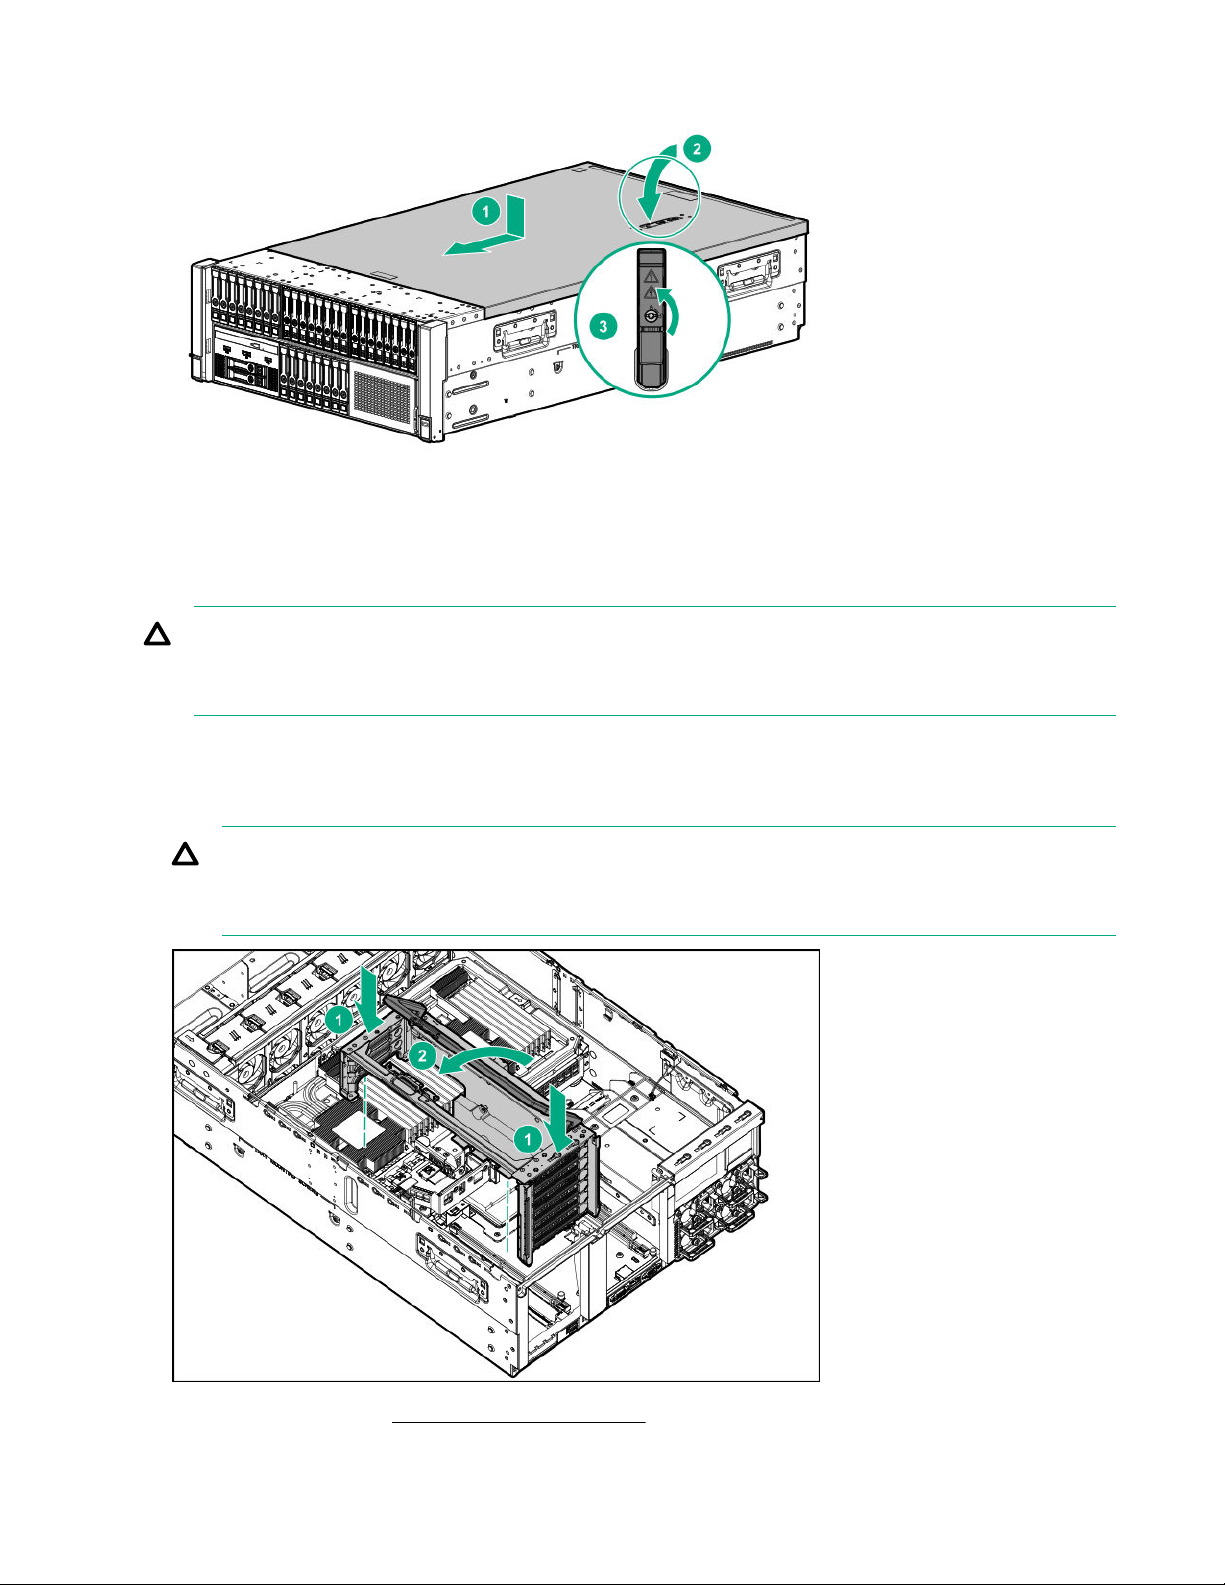
1. Place the access panel on top of the server with the latch open.
Allow the panel to extend past the rear of the server approximately 1.25 cm (0.5 in).
2. Push down on the latch.
The access panel slides to a closed position.
3. Tighten the security screw on the latch.
Installing the access panel 37
Page 38
Installing the primary PCIe riser cage
CAUTION:
To prevent damage to the server or expansion boards, power down the server and remove all AC power
cords before removing or installing the PCIe riser cage.
Procedure
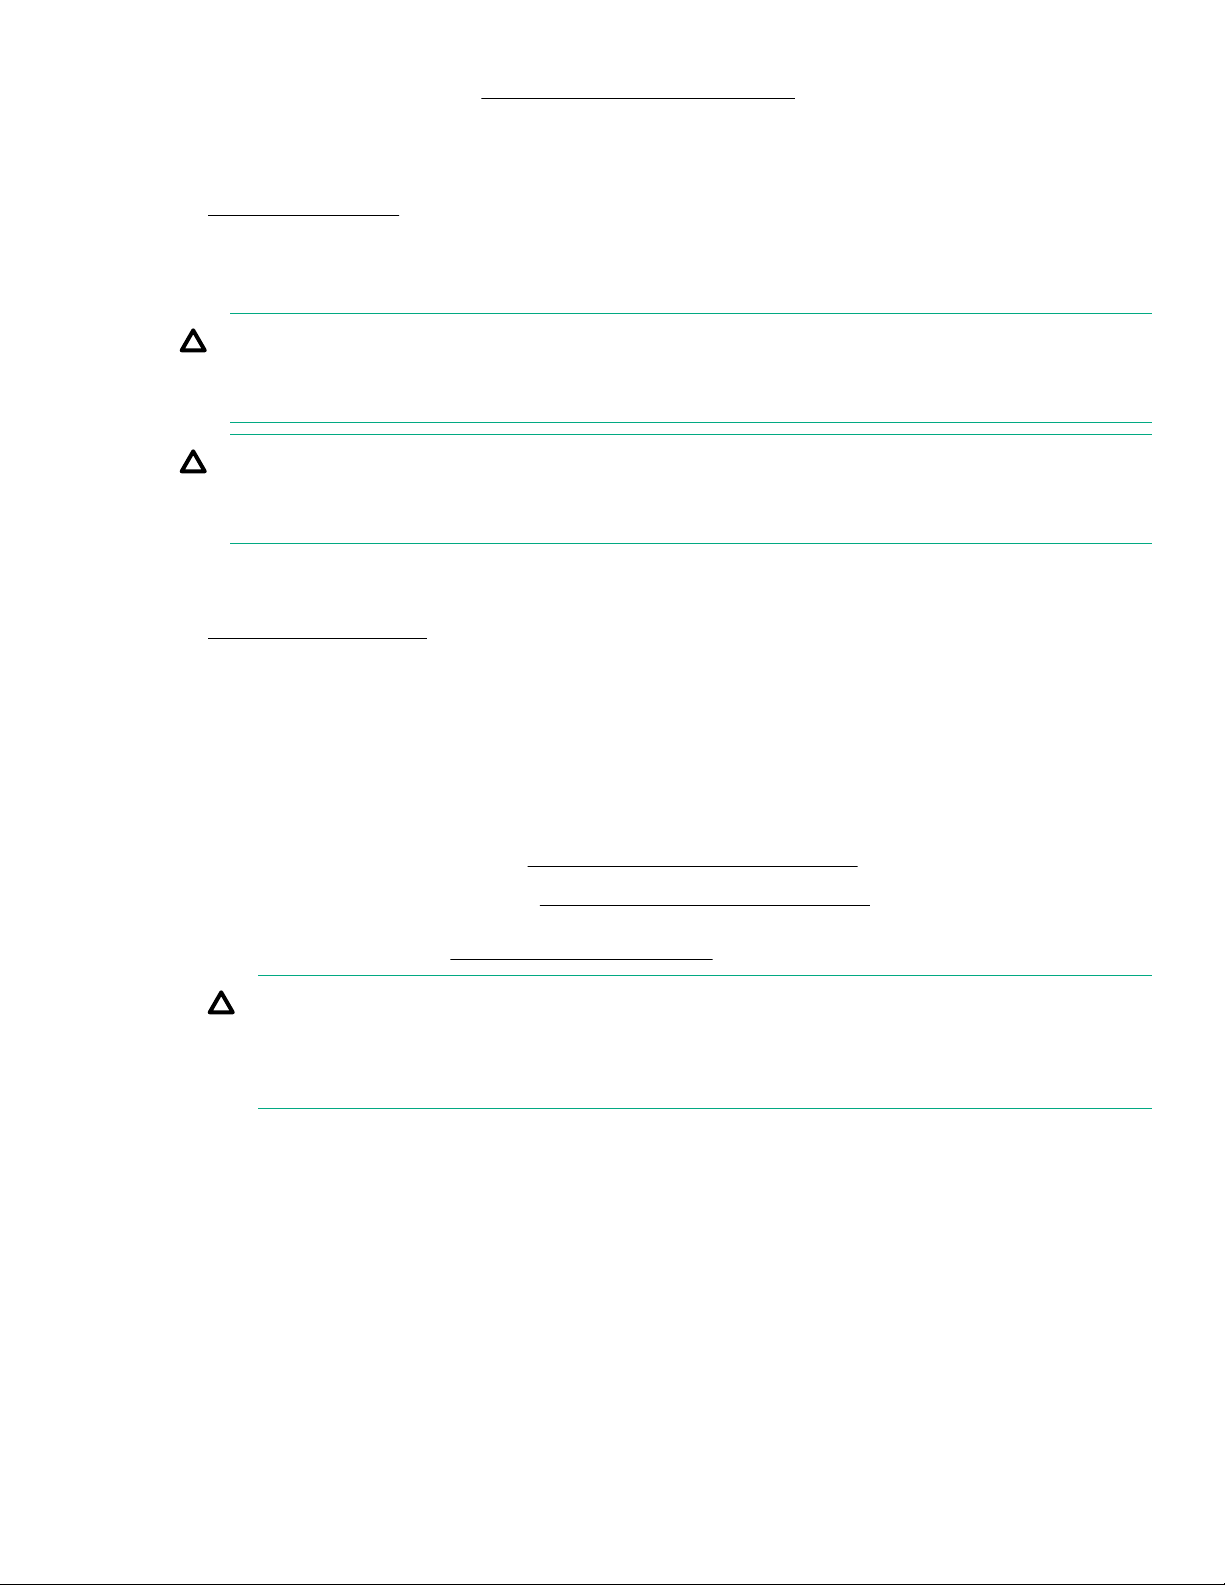
1. Install the primary PCIe riser cage.
CAUTION:
To avoid damaging the connectors, always install the air baffle into the server before installing the
riser cages.
2. Install the access panel (Installing the access panel on page 37).
38 Installing the primary PCIe riser cage
Page 39
3. Install the server into the rack (Installing the server into the rack on page 53).
4. Connect each power cord to the server.
5. Connect each power cord to the power source.
6. Power up the server on page 32.
Removing a PCIe riser cage
CAUTION:
To prevent damage to the server or expansion boards, power down the server and remove all AC power
cords before removing or installing the PCIe riser cage.
CAUTION:
To avoid damaging the connectors, always install the air baffle into the server before installing the riser
cages.
Procedure
1. Power down the server on page 32.
2. Remove all power:
a. Disconnect each power cord from the power source.
b. Disconnect each power cord from the server.
3. Do one of the following:
• Extend the server from the rack (Extending the server from the rack on page 32).
• Remove the server from the rack (Removing the server from the rack on page 33).
4. Remove the access panel (Removing the access panel on page 36).
CAUTION:
Do not operate the server for long periods with the access panel open or removed. Operating the
server in this manner results in improper airflow and improper cooling that can lead to thermal
damage.
5. Disconnect all cables attached to the expansion boards in the PCIe riser cage.
6. Remove the riser cage:
• Primary riser cage
Removing a PCIe riser cage 39
Page 40
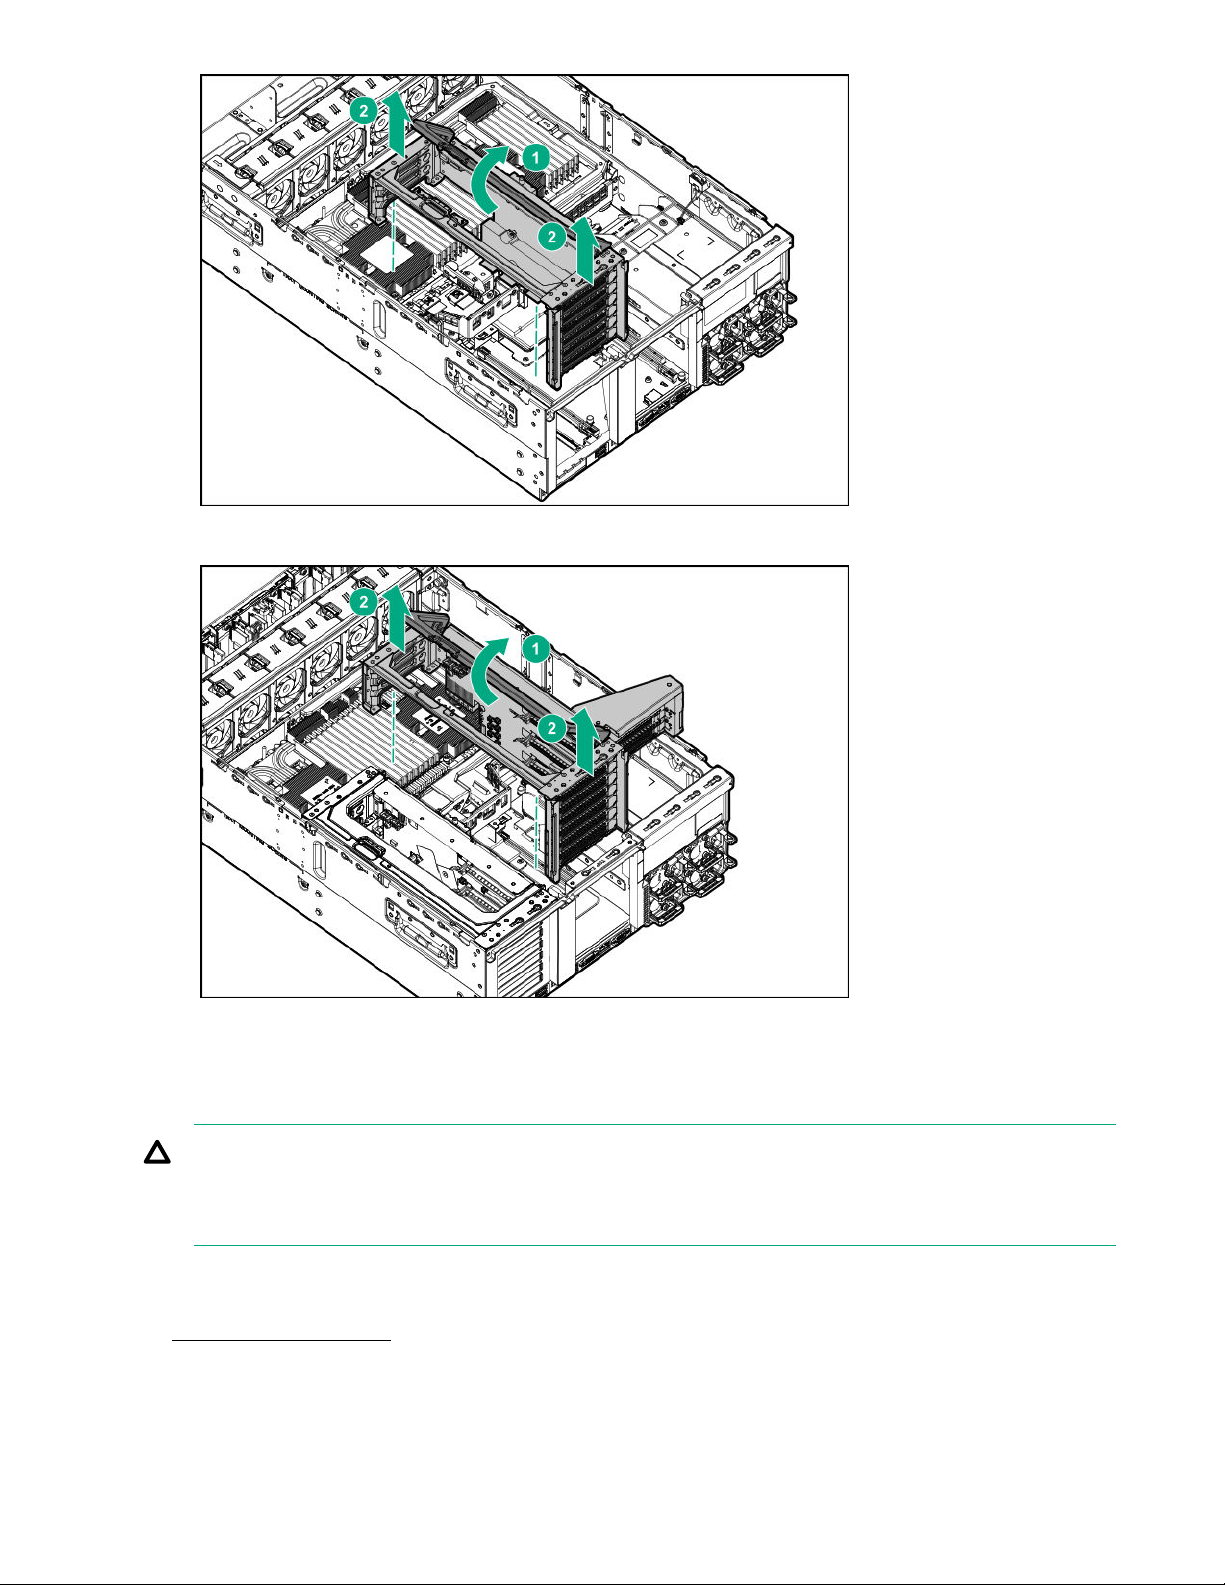
• Butterfly riser cage
Removing the air baffle
CAUTION:
For proper cooling do not operate the server without the access panel, baffles, expansion slot covers, or
blanks installed. If the server supports hot-plug components, minimize the amount of time the access
panel is open.
Procedure
1. Power down the server on page 32.
2. Remove all power:
40 Removing the air baffle
Page 41
a. Disconnect each power cord from the power source.
b. Disconnect each power cord from the server.
3. Do one of the following:
• Extend the server from the rack (Extending the server from the rack on page 32).
• Remove the server from the rack (Removing the server from the rack on page 33).
4. Remove the access panel (Removing the access panel on page 36).
CAUTION:
Do not operate the server for long periods with the access panel open or removed. Operating the
server in this manner results in improper airflow and improper cooling that can lead to thermal
damage.
5. Remove the primary PCIe riser cage (Removing a PCIe riser cage on page 39).
6. If installed, remove the butterfly riser cage (Removing a PCIe riser cage on page 39).
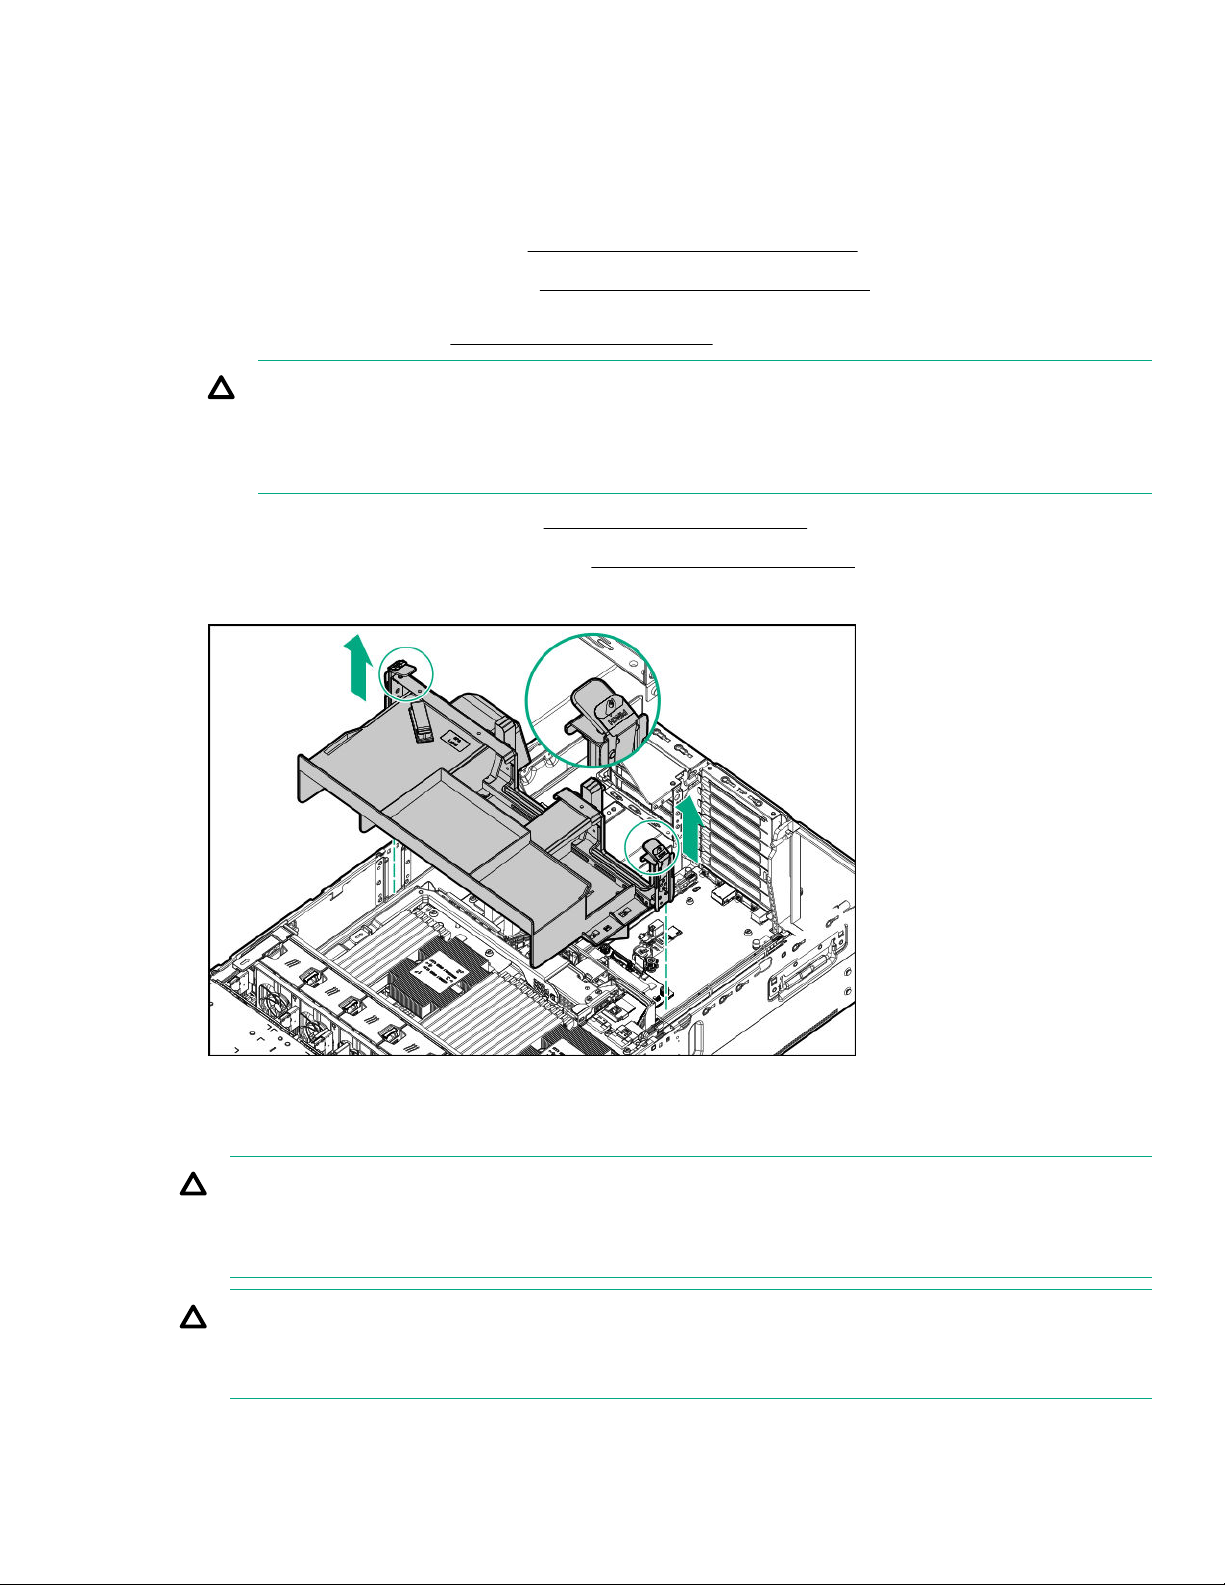
7. Remove the air baffle.
Installing the air baffle
CAUTION:
For proper cooling do not operate the server without the access panel, baffles, expansion slot covers, or
blanks installed. If the server supports hot-plug components, minimize the amount of time the access
panel is open.
CAUTION:
To avoid damaging the connectors, always install the air baffle into the server before installing the riser
cages.
Installing the air baffle 41
Page 42
Procedure
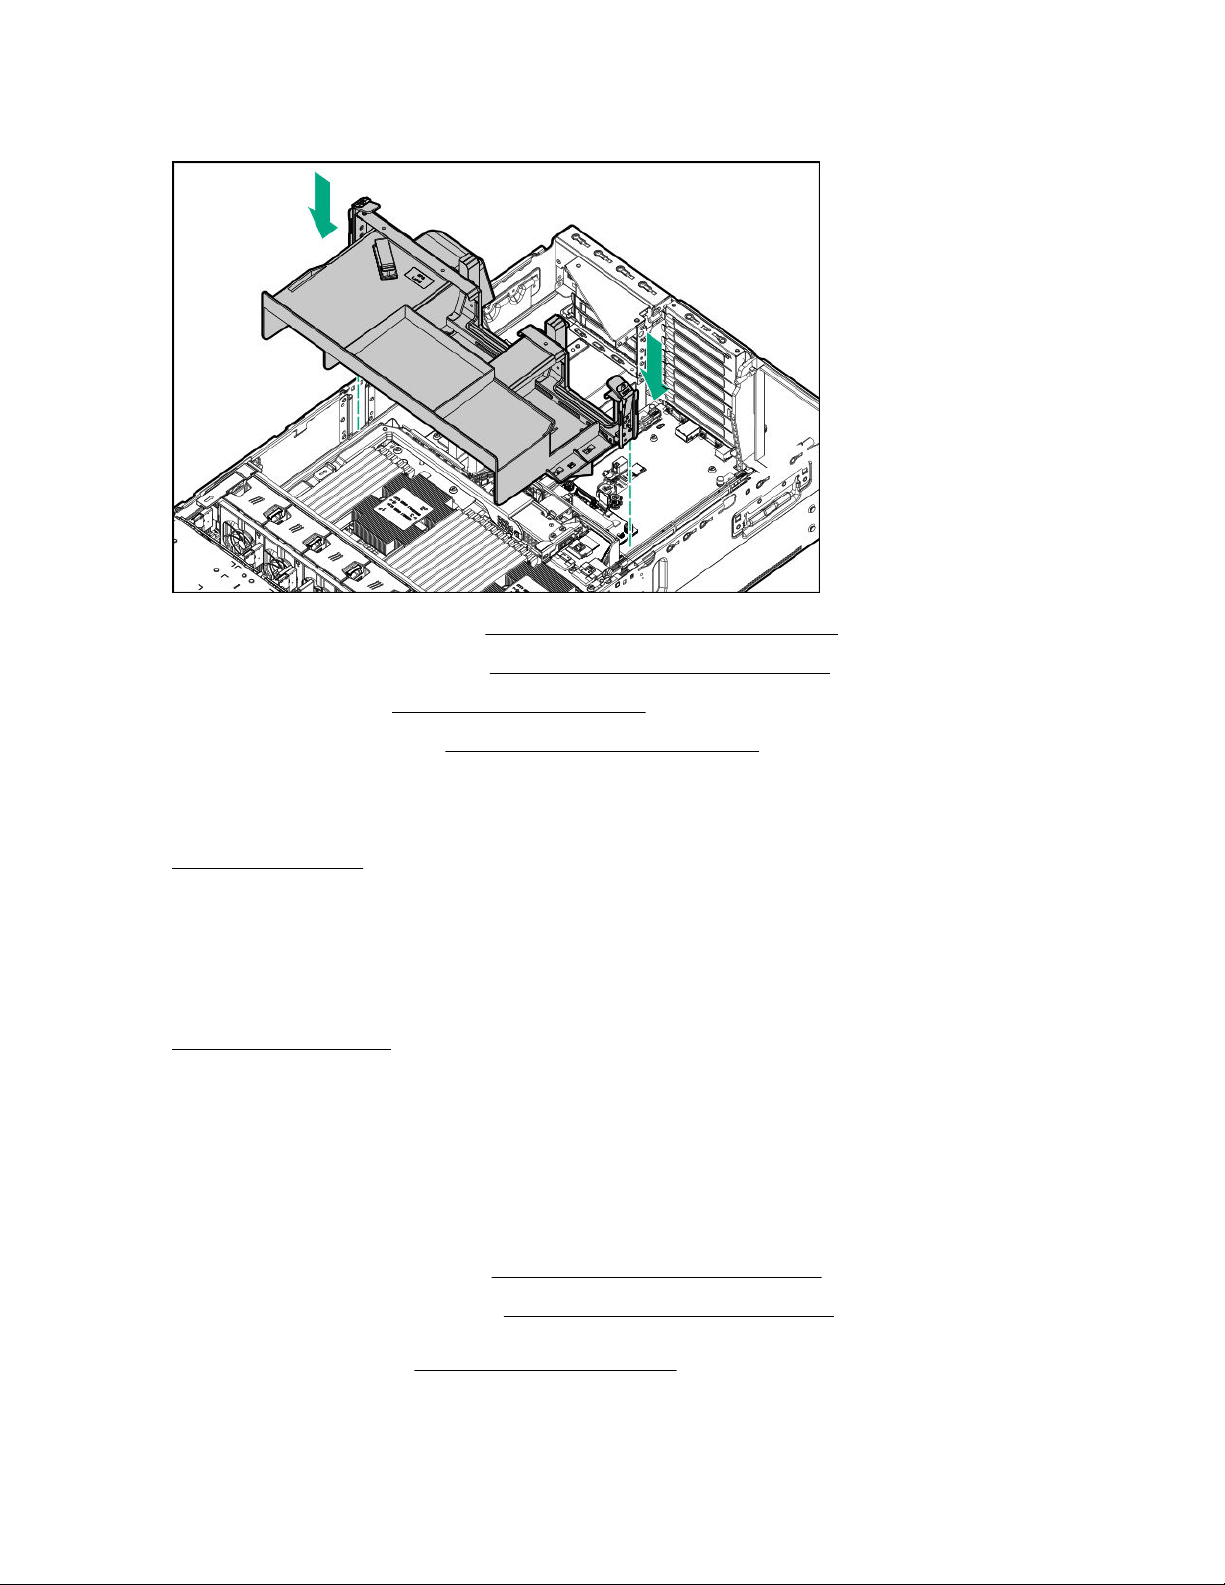
1. Install the air baffle.
2. Install the primary PCIe riser cage (Installing the primary PCIe riser cage on page 38).
3. Install the butterfly PCIe riser cage (Installing a butterfly PCIe riser cage on page 80).
4. Install the access panel (Installing the access panel on page 37).
5. Install the server into the rack (Installing the server into the rack on page 53).
6. Connect each power cord to the server.
7. Connect each power cord to the power source.
8. Power up the server on page 32.
Removing the fan cage
Procedure
1. Power down the server on page 32.
2. Remove all power:
a. Disconnect each power cord from the power source.
b. Disconnect each power cord from the server.
3. Do one of the following:
• Extend the server from the rack (Extending the server from the rack on page 32).
• Remove the server from the rack (Removing the server from the rack on page 33).
4. Remove the access panel (Removing the access panel on page 36).
42 Removing the fan cage
Page 43
CAUTION:
Do not operate the server for long periods with the access panel open or removed. Operating the
server in this manner results in improper airflow and improper cooling that can lead to thermal
damage.
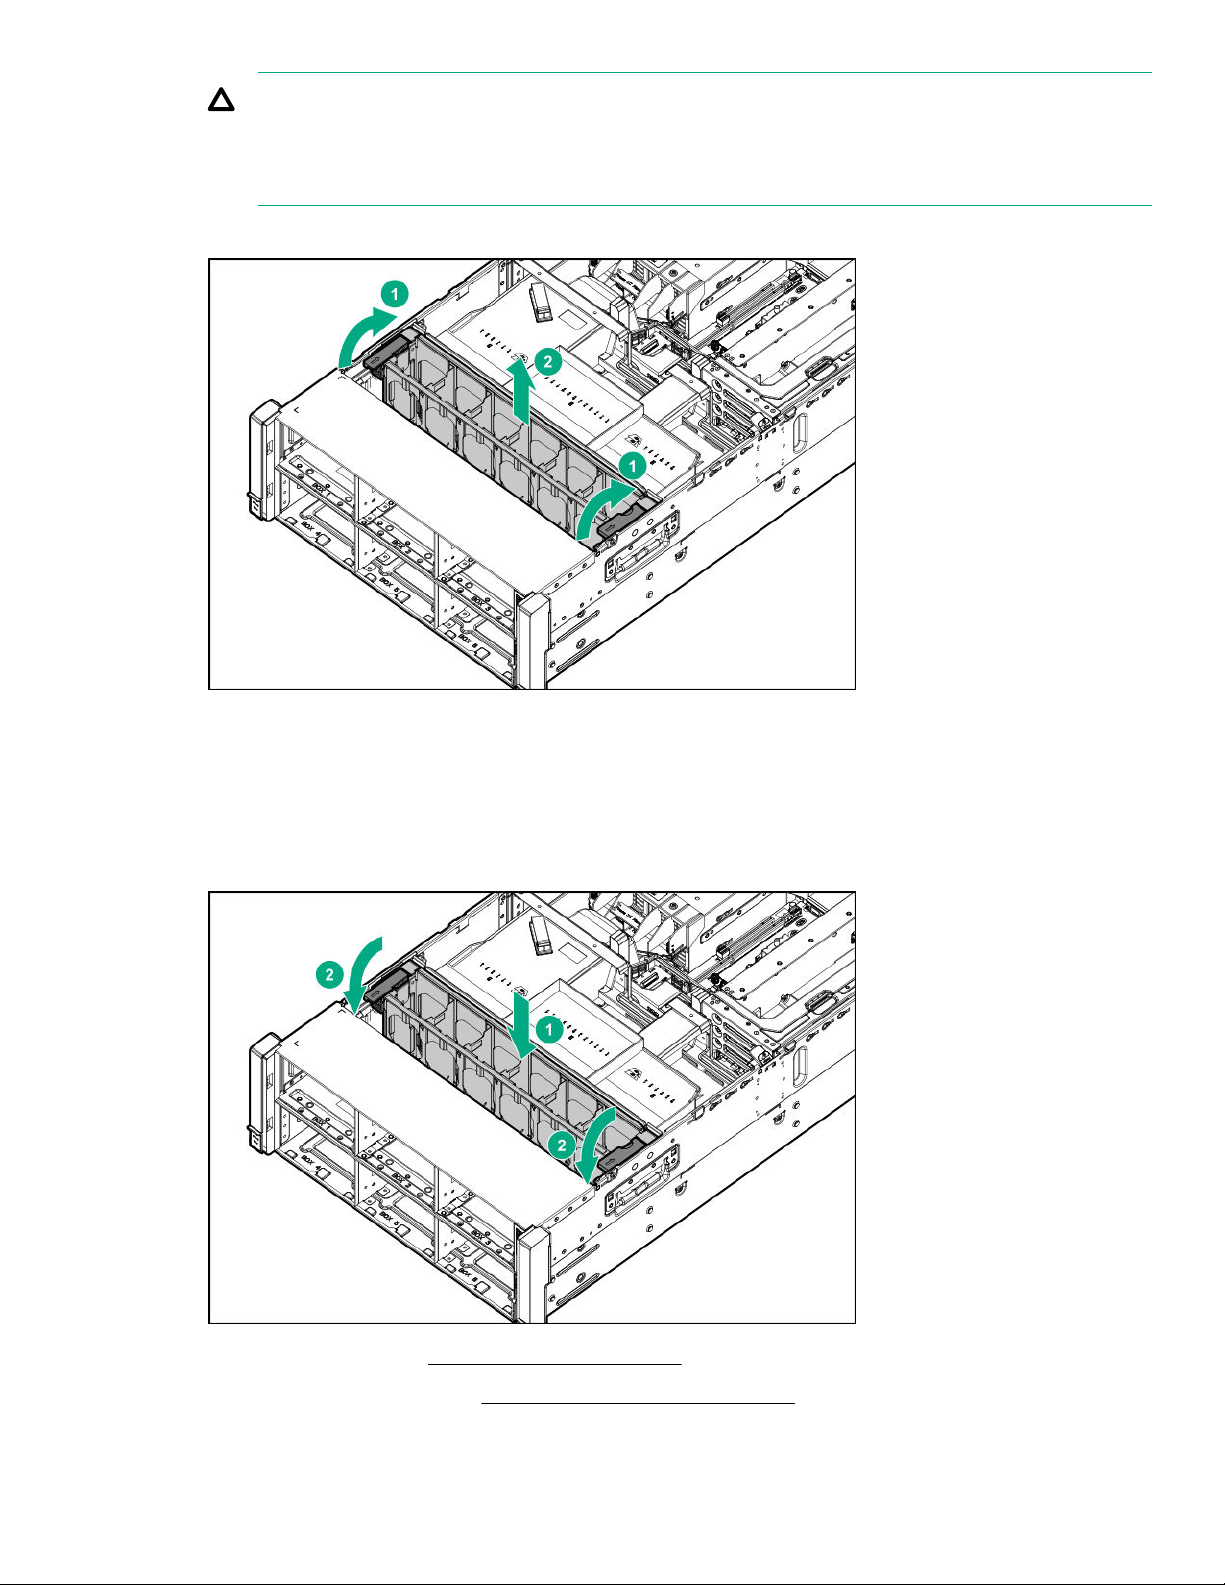
5. Remove the fan cage.
Installing the fan cage
Procedure
1. Install the fan cage.
2. Install the access panel (Installing the access panel on page 37).
3. Install the server into the rack (Installing the server into the rack on page 53).
Installing the fan cage 43
Page 44
4. Connect each power cord to the server.
5. Connect each power cord to the power source.
6. Power up the server on page 32.
Removing the fan cage holders
Procedure
1. Power down the server on page 32.
2. Remove all power:
a. Disconnect each power cord from the power source.
b. Disconnect each power cord from the server.
3. Do one of the following:
• Extend the server from the rack (Extending the server from the rack on page 32).
• Remove the server from the rack (Removing the server from the rack on page 33).
4. Remove the access panel (Removing the access panel on page 36).
CAUTION:
Do not operate the server for long periods with the access panel open or removed. Operating the
server in this manner results in improper airflow and improper cooling that can lead to thermal
damage.
5. Remove the fan cage (Removing the fan cage on page 42).
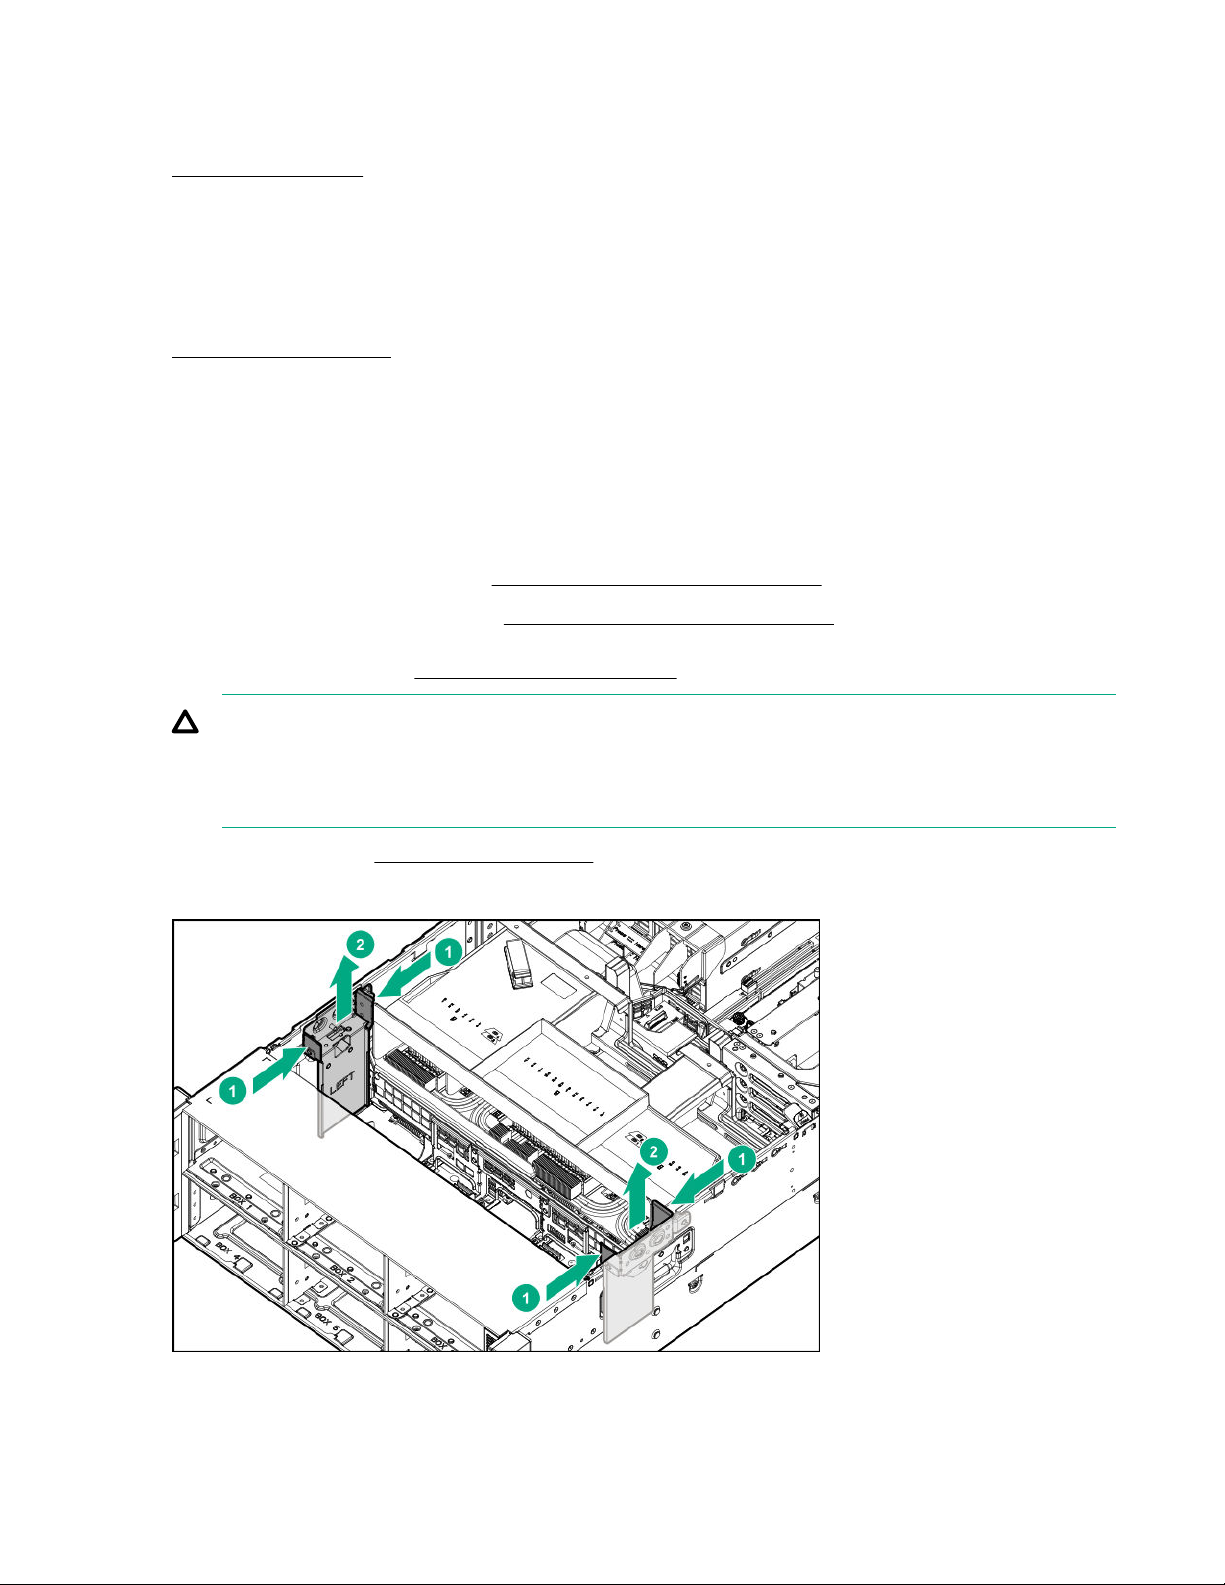
6. Remove the fan cage holders.
44 Removing the fan cage holders
Page 45
Installing fan cage holders
Procedure
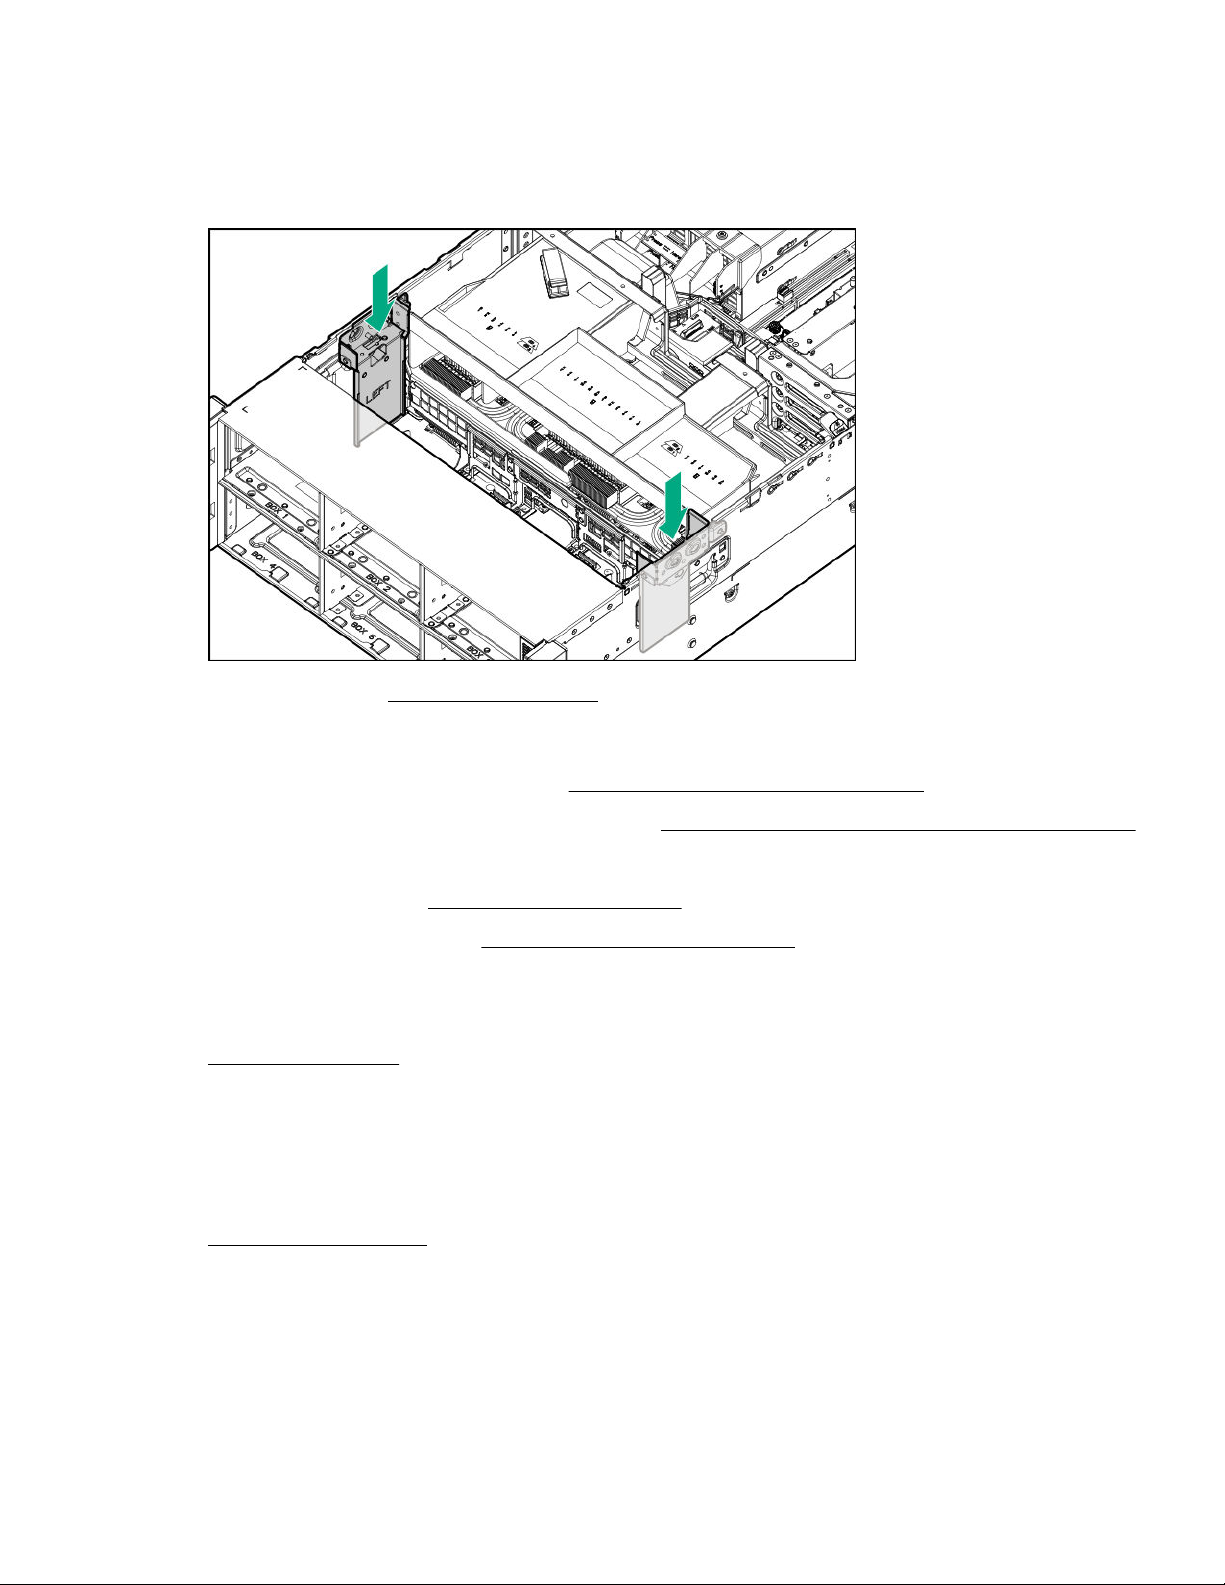
1. Install the fan cage holders.
2. Install the fan cage (Installing the fan cage on page 43).
3. If removed, do the following:
• Install the processor mezzanine tray (Installing a processor mezzanine tray on page 102).
• Install the 2P pass-through performance board (Installing the 2P pass-through performance board
on page 107).
4. Install the access panel (Installing the access panel on page 37).
5. Install the server into the rack (Installing the server into the rack on page 53).
6. Connect each power cord to the server.
7. Connect each power cord to the power source.
8. Power up the server on page 32.
Removing the processor mezzanine tray
Procedure
1. Power down the server on page 32.
2. Remove all power:
a. Disconnect each power cord from the power source.
b. Disconnect each power cord from the server.
3. Do one of the following:
Installing fan cage holders 45
Page 46
• Extend the server from the rack (Extending the server from the rack on page 32).
• Remove the server from the rack (Removing the server from the rack on page 33).
4. Remove the access panel (Removing the access panel on page 36).
CAUTION:
Do not operate the server for long periods with the access panel open or removed. Operating the
server in this manner results in improper airflow and improper cooling that can lead to thermal
damage.
5. Remove the primary PCIe riser cage (Removing a PCIe riser cage on page 39).
6. If installed, remove the butterfly riser cage (Removing a PCIe riser cage on page 39).
7. Remove the air baffle (Removing the air baffle on page 40).
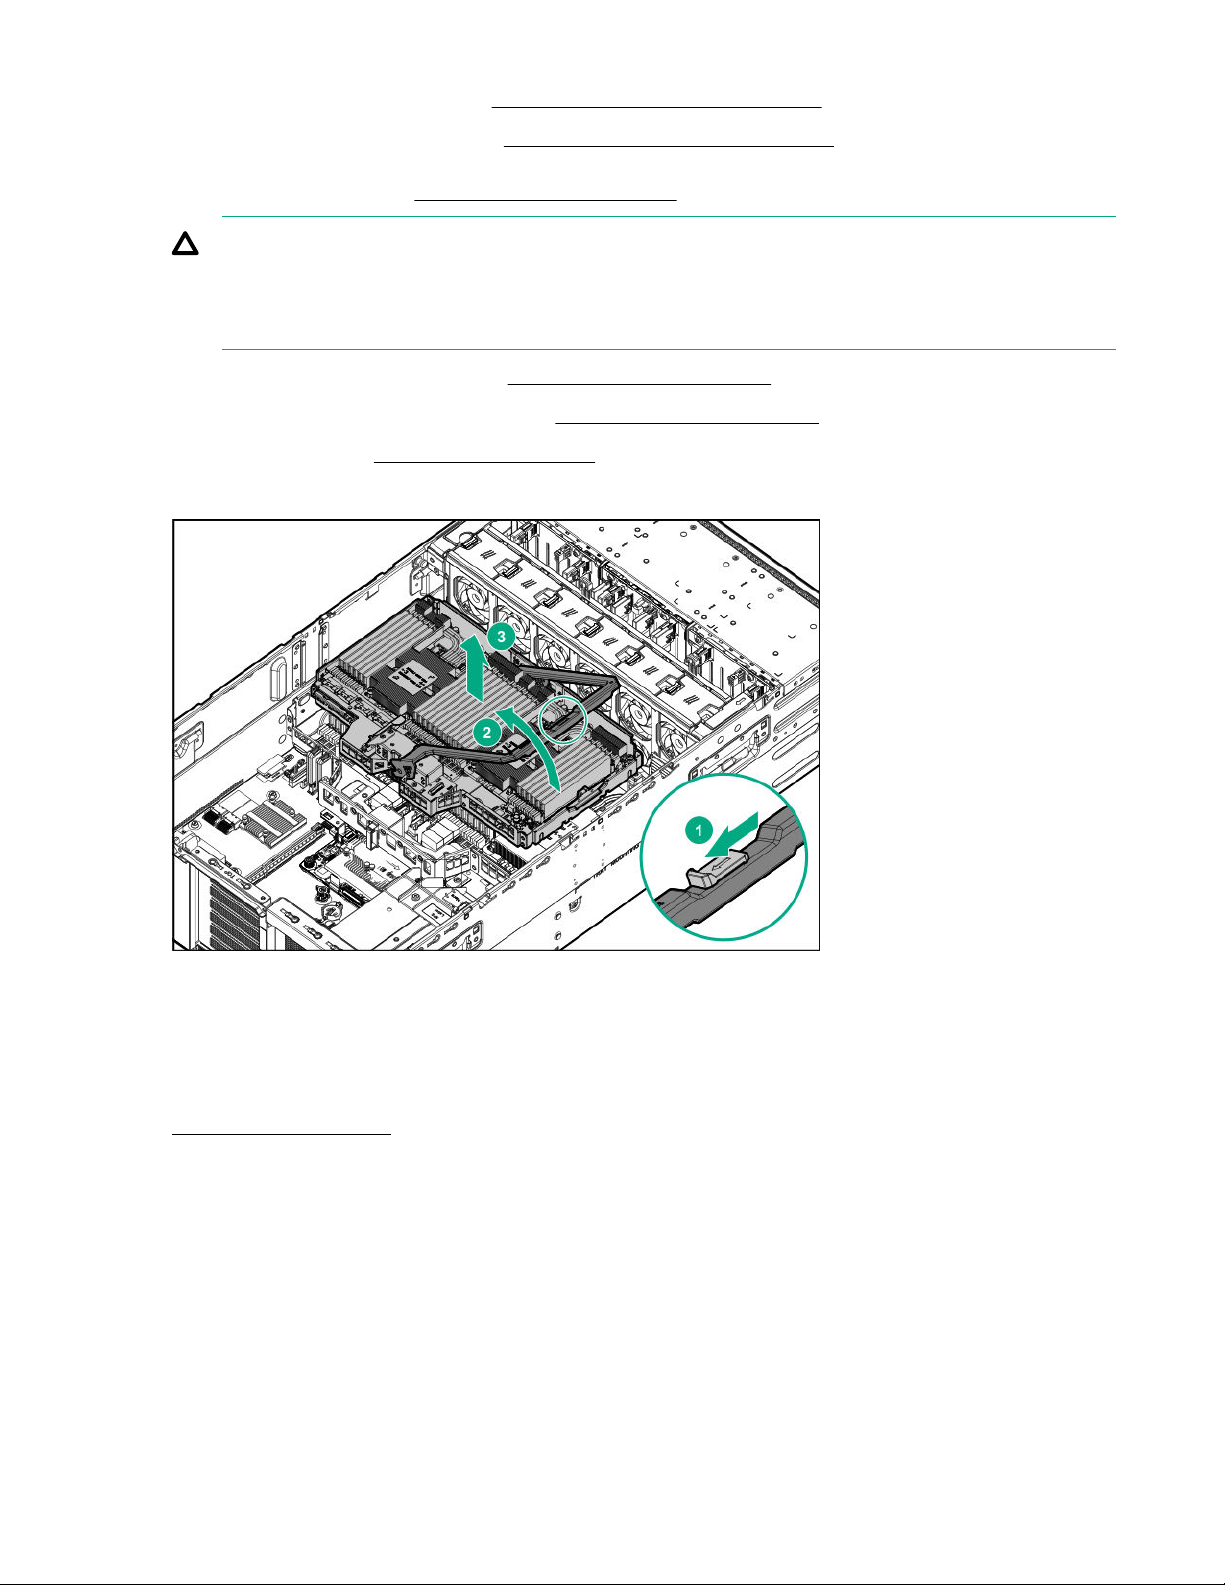
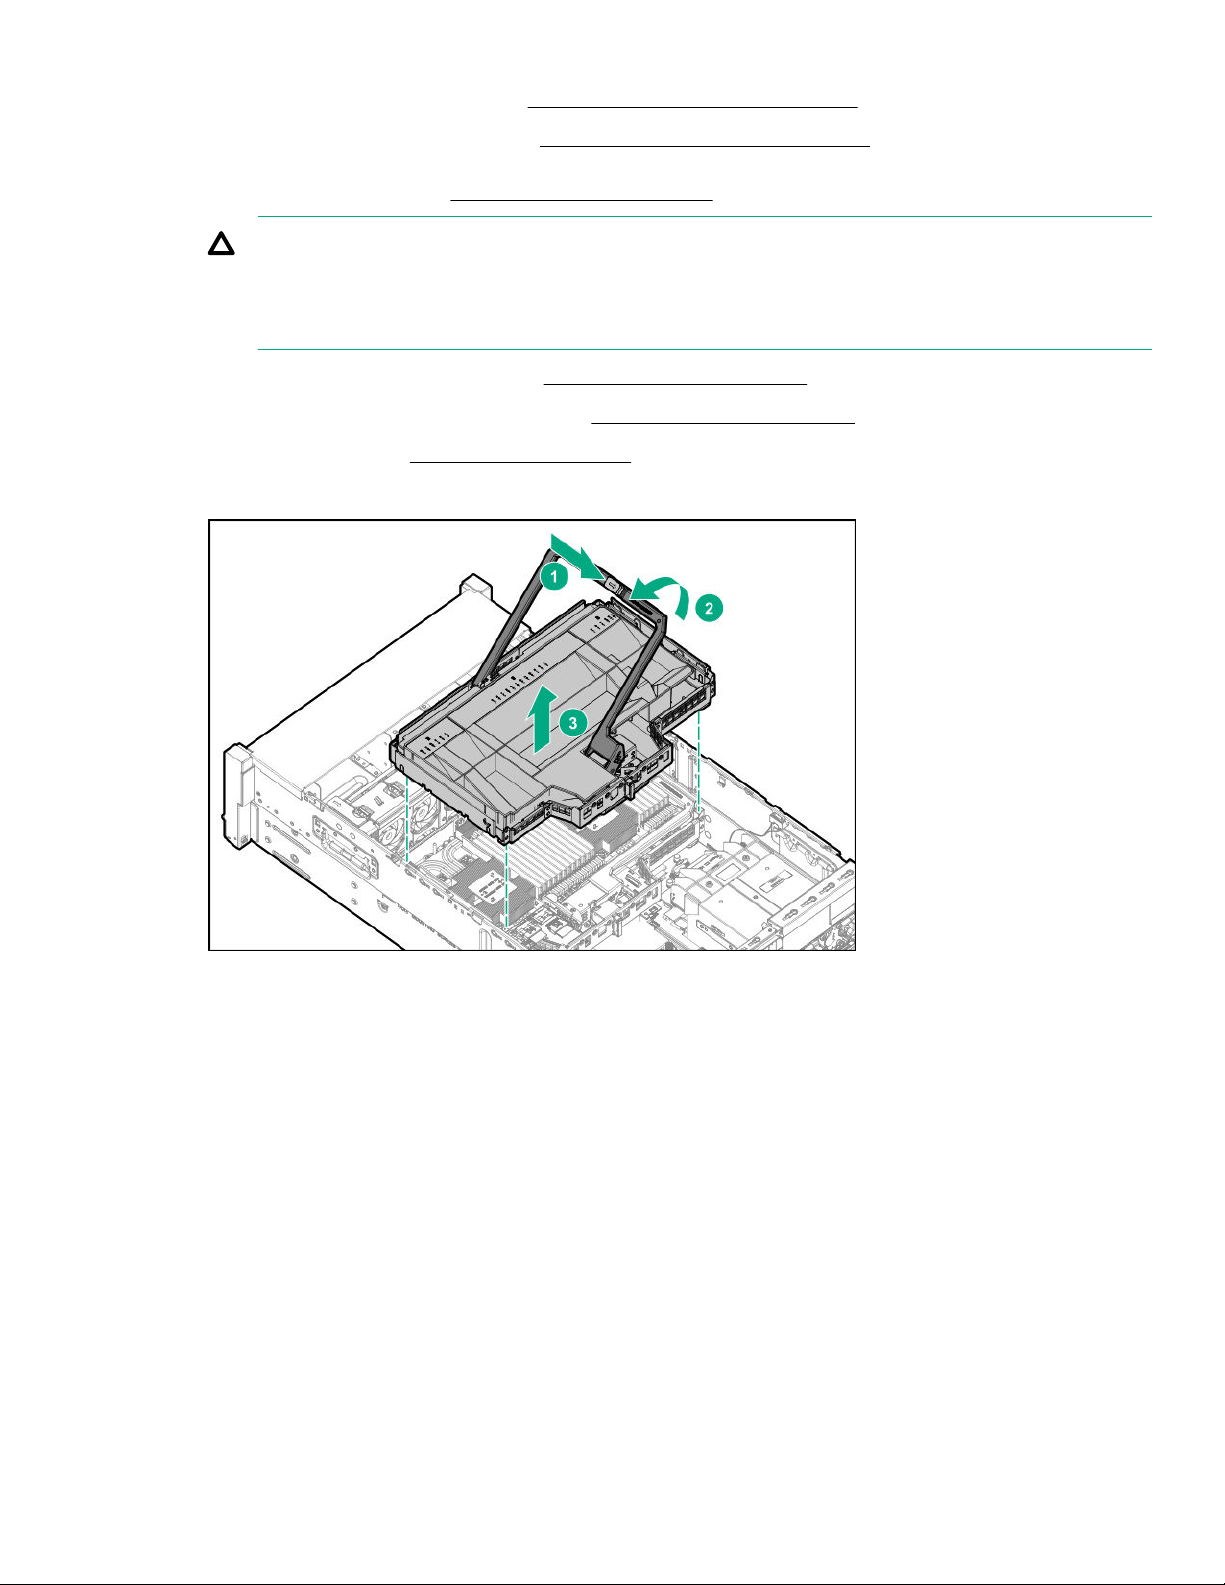
8. Remove the processor mezzanine tray.
Removing the 2P pass-through performance board
Procedure
1. Power down the server on page 32.
2. Remove all power:
a. Disconnect each power cord from the power source.
b. Disconnect each power cord from the server.
3. Do one of the following:
46 Removing the 2P pass-through performance board
Page 47
• Extend the server from the rack (Extending the server from the rack on page 32).
• Remove the server from the rack (Removing the server from the rack on page 33).
4. Remove the access panel (Removing the access panel on page 36).
CAUTION:
Do not operate the server for long periods with the access panel open or removed. Operating the
server in this manner results in improper airflow and improper cooling that can lead to thermal
damage.
5. Remove the primary PCIe riser cage (Removing a PCIe riser cage on page 39).
6. If installed, remove the butterfly riser cage (Removing a PCIe riser cage on page 39).
7. Remove the air baffle (Removing the air baffle on page 40).
8. Remove the pass-through board.
Operations 47
Page 48

Setup
HPE support services
Delivered by experienced, certified engineers, HPE support services help you keep your servers up and
running with support packages tailored specifically for HPE ProLiant systems. HPE support services let you
integrate both hardware and software support into a single package. A number of service level options are
available to meet your business and IT needs.
HPE support services offer upgraded service levels to expand the standard product warranty with easy-tobuy, easy-to-use support packages that will help you make the most of your server investments. Some of the
HPE support services for hardware, software or both are:
• Foundation Care – Keep systems running.
◦ 6-Hour Call-to-Repair
◦ 4-Hour 24x7
◦ Next Business Day
• Proactive Care – Help prevent service incidents and get you to technical experts when there is one.
◦ 6-Hour Call-to-Repair
◦ 4-Hour 24x7
◦ Next Business Day
• Startup and implementation services for both hardware and software
• HPE Education Services – Help train your IT staff.
For more information on HPE support services, see the
Setup overview
Procedure
1. Review the operational requirements for the server (Operational requirements on page 49).
2. Read the following safety notices, warnings, and cautions:
• Server warnings and cautions (Server warnings and cautions on page 51)
• Rack warnings (Rack warnings on page 51)
• Electrostatic discharge (Electrostatic discharge on page 52)
3. Verify the contents in the server box (Server box contents on page 53).
Hewlett Packard Enterprise website.
4. Install hardware options (Installing hardware options on page 56).
5. Install the server into a rack (Installing the server into the rack on page 53).
6. Configure the server (Configuring the server on page 54).
48 Setup
Page 49
7. Install or deploy an operating system (Operating system on page 54).
8. Register your server (Registering the server on page 55).
Operational requirements
Space and airflow requirements
To allow for servicing and adequate airflow, observe the following space and airflow requirements when
deciding where to install a rack:
• Leave a minimum clearance of 63.5 cm (25 in) in front of the rack.
• Leave a minimum clearance of 76.2 cm (30 in) behind the rack.
• Leave a minimum clearance of 121.9 cm (48 in) from the back of the rack to the back of another rack or
row of racks.
Hewlett Packard Enterprise servers draw in cool air through the front door and expel warm air through the
rear door. Therefore, the front and rear rack doors must be adequately ventilated to allow ambient room air to
enter the cabinet, and the rear door must be adequately ventilated to allow the warm air to escape from the
cabinet.
CAUTION:
To prevent improper cooling and damage to the equipment, do not block the ventilation openings.
When vertical space in the rack is not filled by a server or rack component, the gaps between the components
cause changes in airflow through the rack and across the servers. Cover all gaps with blanking panels to
maintain proper airflow.
CAUTION:
Always use blanking panels to fill empty vertical spaces in the rack. This arrangement ensures proper
airflow. Using a rack without blanking panels results in improper cooling that can lead to thermal
damage.
The 9000 and 10000 Series Racks provide proper server cooling from flow-through perforations in the front
and rear doors that provide 64 percent open area for ventilation.
CAUTION:
When using a Compaq branded 7000 series rack, install the high airflow rack door insert (PN 327281B21 for 42U rack, PN 157847-B21 for 22U rack) to provide proper front-to-back airflow and cooling.
CAUTION:
If a third-party rack is used, observe the following additional requirements to ensure adequate airflow
and to prevent damage to the equipment:
• Front and rear doors—If the 42U rack includes closing front and rear doors, you must allow 5,350 sq
cm (830 sq in) of holes evenly distributed from top to bottom to permit adequate airflow (equivalent to
the required 64 percent open area for ventilation).
• Side—The clearance between the installed rack component and the side panels of the rack must be
a minimum of 7 cm (2.75 in).
Operational requirements 49
Page 50
Temperature requirements
To ensure continued safe and reliable equipment operation, install or position the system in a well-ventilated,
climate-controlled environment.
The maximum recommended ambient operating temperature (TMRA) for most server products is 35°C
(95°F). The temperature in the room where the rack is located must not exceed 35°C (95°F).
CAUTION:
To reduce the risk of damage to the equipment when installing third-party options:
• Do not permit optional equipment to impede airflow around the server or to increase the internal rack
temperature beyond the maximum allowable limits.
• Do not exceed the manufacturer’s TMRA.
Power requirements
Installation of this equipment must comply with local and regional electrical regulations governing the
installation of information technology equipment by licensed electricians. This equipment is designed to
operate in installations covered by NFPA 70, 1999 Edition (National Electric Code) and NFPA-75, 1992 (code
for Protection of Electronic Computer/Data Processing Equipment). For electrical power ratings on options,
refer to the product rating label or the user documentation supplied with that option.
WARNING:
To reduce the risk of personal injury, fire, or damage to the equipment, do not overload the AC supply
branch circuit that provides power to the rack. Consult the electrical authority having jurisdiction over
wiring and installation requirements of your facility.
CAUTION:
Protect the server from power fluctuations and temporary interruptions with a regulating uninterruptible
power supply. This device protects the hardware from damage caused by power surges and voltage
spikes and keeps the system in operation during a power failure.
Electrical grounding requirements
The server must be grounded properly for proper operation and safety. In the United States, you must install
the equipment in accordance with NFPA 70, 1999 Edition (National Electric Code), Article 250, as well as any
local and regional building codes. In Canada, you must install the equipment in accordance with Canadian
Standards Association, CSA C22.1, Canadian Electrical Code. In all other countries, you must install the
equipment in accordance with any regional or national electrical wiring codes, such as the International
Electrotechnical Commission (IEC) Code 364, parts 1 through 7. Furthermore, you must be sure that all
power distribution devices used in the installation, such as branch wiring and receptacles, are listed or
certified grounding-type devices.
Because of the high ground-leakage currents associated with multiple servers connected to the same power
source, recommends the use of a PDU that is either permanently wired to the building’s branch circuit or
includes a nondetachable cord that is wired to an industrial-style plug. NEMA locking-style plugs or those
complying with IEC 60309 are considered suitable for this purpose. Using common power outlet strips for the
server is not recommended.
50 Temperature requirements
Page 51
Server warnings and cautions
WARNING:
This server is heavy. To reduce the risk of personal injury or damage to the equipment:
• Observe local occupational health and safety requirements and guidelines for manual material
handling.
• Get help to lift and stabilize the product during installation or removal, especially when the product is
not fastened to the rails. Hewlett Packard Enterprise recommends that a minimum of two people are
required for all rack server installations. If the server is installed higher than chest level, a third
person may be required to help align the server.
• Use caution when installing the server in or removing the server from the rack; it is unstable when
not fastened to the rails.
WARNING:
To reduce the risk of personal injury from hot surfaces, allow the drives and the internal system
components to cool before touching them.
WARNING:
To reduce the risk of personal injury, electric shock, or damage to the equipment, remove the power
cord to remove power from the server. The front panel Power On/Standby button does not completely
shut off system power. Portions of the power supply and some internal circuitry remain active until
AC/DC power is removed.
CAUTION:
Protect the server from power fluctuations and temporary interruptions with a regulating uninterruptible
power supply. This device protects the hardware from damage caused by power surges and voltage
spikes and keeps the system in operation during a power failure.
CAUTION:
Do not operate the server for long periods with the access panel open or removed. Operating the server
in this manner results in improper airflow and improper cooling that can lead to thermal damage.
Rack warnings
WARNING:
To reduce the risk of personal injury or damage to the equipment, be sure that:
• The leveling jacks are extended to the floor.
• The full weight of the rack rests on the leveling jacks.
• The stabilizing feet are attached to the rack if it is a single-rack installation.
• The racks are coupled together in multiple-rack installations.
• Only one component is extended at a time. A rack may become unstable if more than one
component is extended for any reason.
Server warnings and cautions 51
Page 52
WARNING:
To reduce the risk of personal injury or equipment damage when unloading a rack:
• At least two people are needed to safely unload the rack from the pallet. An empty 42U rack can
weigh as much as 115 kg (253 lb), can stand more than 2.1 m (7 ft) tall, and might become unstable
when being moved on its casters.
• Never stand in front of the rack when it is rolling down the ramp from the pallet. Always handle the
rack from both sides.
WARNING:
To reduce the risk of personal injury or damage to the equipment, adequately stabilize the rack before
extending a component outside the rack. Extend only one component at a time. A rack may become
unstable if more than one component is extended.
WARNING:
When installing a server in a telco rack, be sure that the rack frame is adequately secured at the top and
bottom to the building structure.
Electrostatic discharge
Be aware of the precautions you must follow when setting up the system or handling components. A
discharge of static electricity from a finger or other conductor may damage system boards or other staticsensitive devices. This type of damage may reduce the life expectancy of the system or component.
To prevent electrostatic damage:
• Avoid hand contact by transporting and storing products in static-safe containers.
• Keep electrostatic-sensitive parts in their containers until they arrive at static-free workstations.
• Place parts on a grounded surface before removing them from their containers.
• Avoid touching pins, leads, or circuitry.
• Always be properly grounded when touching a static-sensitive component or assembly. Use one or more
of the following methods when handling or installing electrostatic-sensitive parts:
◦ Use a wrist strap connected by a ground cord to a grounded workstation or computer chassis. Wrist
straps are flexible straps with a minimum of 1 megohm ±10 percent resistance in the ground cords. To
provide proper ground, wear the strap snug against the skin.
◦ Use heel straps, toe straps, or boot straps at standing workstations. Wear the straps on both feet when
standing on conductive floors or dissipating floor mats.
◦ Use conductive field service tools.
◦ Use a portable field service kit with a folding static-dissipating work mat.
If you do not have any of the suggested equipment for proper grounding, have an authorized reseller
install the part.
For more information on static electricity or assistance with product installation, contact an authorized reseller.
52 Electrostatic discharge
Page 53
Server box contents
The server shipping box contains the following contents:
• A server
• A power cord
• Rack-mounting hardware
• Documentation
Installing hardware options
Install any hardware options before initializing the server. For options installation information, refer to the
option documentation. For server-specific information, see Installing hardware options on page 56.
Installing the server into the rack
CAUTION:
Always plan the rack installation so that the heaviest item is on the bottom of the rack. Install the
heaviest item first, and continue to populate the rack from the bottom to the top.
Procedure
1. Install the server and cable management arm into the rack. For more information, see the installation
instructions that ship with the rack.
2. Connect peripheral devices to the server.
WARNING:
To reduce the risk of electric shock, fire, or damage to the equipment, do not plug telephone or
telecommunications connectors into RJ-45 connectors.
3. Connect the power cord to the rear of the server.
4. Secure the cables to the cable management arm.
IMPORTANT:
When using cable management arm components, be sure to leave enough slack in each of the
cables to prevent damage to the cables when the server is extended from the rack.
5. Connect the power cord to the AC power source.
Server box contents 53
Page 54

WARNING:
To reduce the risk of electric shock or damage to the equipment:
• Do not disable the power cord grounding plug. The grounding plug is an important safety feature.
• Plug the power cord into a grounded (earthed) electrical outlet that is easily accessible at all
times.
• Unplug the power cord from the power supply to disconnect power to the equipment.
• Do not route the power cord where it can be walked on or pinched by items placed against it. Pay
particular attention to the plug, electrical outlet, and the point where the cord extends from the
server.
Configuring the server
When the server is powered on, the POST screen is displayed. Use the following options to configure the
server:
• System utilities (F9)
Use this option to configure UEFI, RBSU, or other boot settings.
• Intelligent Provisioning (F10)
Use this option to configure drives, access Smart Storage Administrator, or begin installing or deploying an
operating system.
• Boot order (F11)
Use this option to select a boot device.
• Network boot (F12)
Use this option to PXE boot the server from the network.
Operating system
This ProLiant server does not ship with provisioning media. Everything required to manage and install the
system software and firmware is preloaded on the server.
To operate properly, the server must have a supported operating system. Attempting to run an unsupported
operating system can cause serious and unpredictable results. For the latest information on operating system
support, see the Hewlett Packard Enterprise website.
Failure to observe UEFI requirements for ProLiant Gen10 servers can result in errors installing the operating
system, failure to recognize boot media, and other boot failures. For more information on these requirements,
see the HPE UEFI Requirements on the Hewlett Packard Enterprise website.
To install an operating system on the server, use one of the following methods:
• Intelligent Provisioning—For single-server deployment, updating, and provisioning capabilities. For more
information, see Installing the operating system with Intelligent Provisioning on page 55.
• Insight Control server provisioning—For multiserver remote OS deployment, use Insight Control server
provisioning for an automated solution. For more information, see the Insight Control documentation on
the Hewlett Packard Enterprise website.
54 Configuring the server
Page 55

For additional system software and firmware updates, download the Service Pack for ProLiant from the
Hewlett Packard Enterprise website. Software and firmware must be updated before using the server for
the first time, unless any installed software or components require an older version.
For more information, see Keeping the system current on page 143.
For more information on using these installation methods, see the Hewlett Packard Enterprise website.
Installing the operating system with Intelligent Provisioning
Procedure
1. Connect the Ethernet cable between the network connector on the server and a network jack.
2. Press the Power On/Standby button.
3. During server POST, press F10.
4. Complete the initial Preferences and Registration portion of Intelligent Provisioning.
5. At the 1 Start screen, click Configure and Install.
6. To finish the installation, follow the onscreen prompts. An Internet connection is required to update the
firmware and systems software.
Installing or deploying an operating system
Before installing an operating system, observe the following:
• Be sure to read the HPE UEFI requirements for ProLiant servers on the Hewlett Packard Enterprise
website. If UEFI requirements are not met, you might experience boot failures or other errors when
installing the operating system.
• Update firmware before using the server for the first time, unless software or components require an older
version. For more information, see "Keeping the system current on page 143."
• For the latest information on supported operating systems, see the Hewlett Packard Enterprise website.
• The server does not ship with OS media. All system software and firmware is preloaded on the server.
Registering the server
To experience quicker service and more efficient support, register the product at the Hewlett Packard
Enterprise Product Registration website.
Installing the operating system with Intelligent Provisioning 55
Page 56
Installing hardware options
Before powering on the server for the first time, install all hardware options.
Hewlett Packard Enterprise product QuickSpecs
For more information about product features, specifications, options, configurations, and compatibility, see the
product QuickSpecs on the Hewlett Packard Enterprise website (
Installing a Systems Insight Display
Prerequisites
Before installing this option, be sure that you have the following:
• The components included with the hardware option kit
• T-10 Torx screwdriver
Procedure
1. Power down the server on page 32.
http://www.hpe.com/info/qs).
2. Remove all power:
a. Disconnect each power cord from the power source.
b. Disconnect each power cord from the server.
3. Do one of the following:
• Extend the server from the rack (Extending the server from the rack on page 32).
• Remove the server from the rack (Removing the server from the rack on page 33).
4. Remove the access panel (Removing the access panel on page 36).
CAUTION:
Do not operate the server for long periods with the access panel open or removed. Operating the
server in this manner results in improper airflow and improper cooling that can lead to thermal
damage.
5. Remove the primary PCIe riser cage (Removing a PCIe riser cage on page 39).
6. If installed, remove the butterfly riser cage (Removing a PCIe riser cage on page 39).
7. Remove the air baffle (Removing the air baffle on page 40).
8. Remove the fan cage (Removing the fan cage on page 42).
9. If installed, remove the processor mezzanine tray (Removing the processor mezzanine tray on page
45).
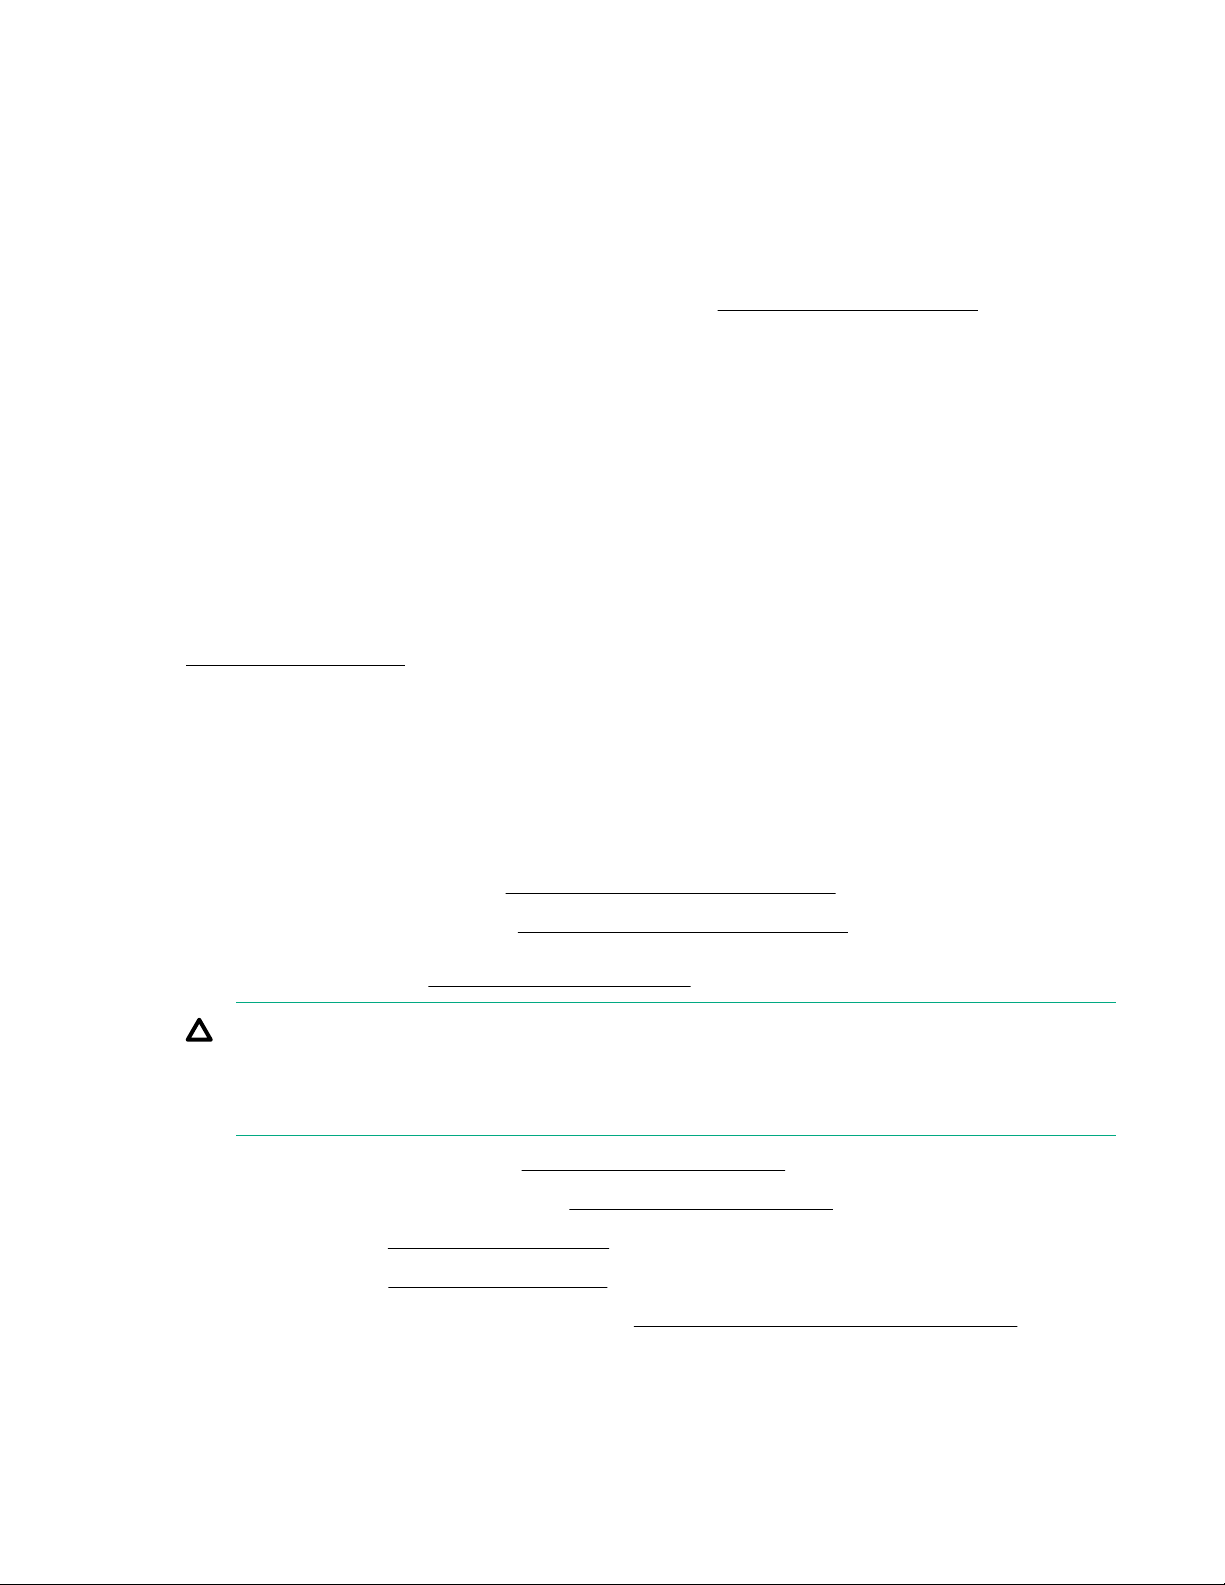
10. Remove the cabled power switch module. Retain the T-10 screw for later use.
56 Installing hardware options
Page 57
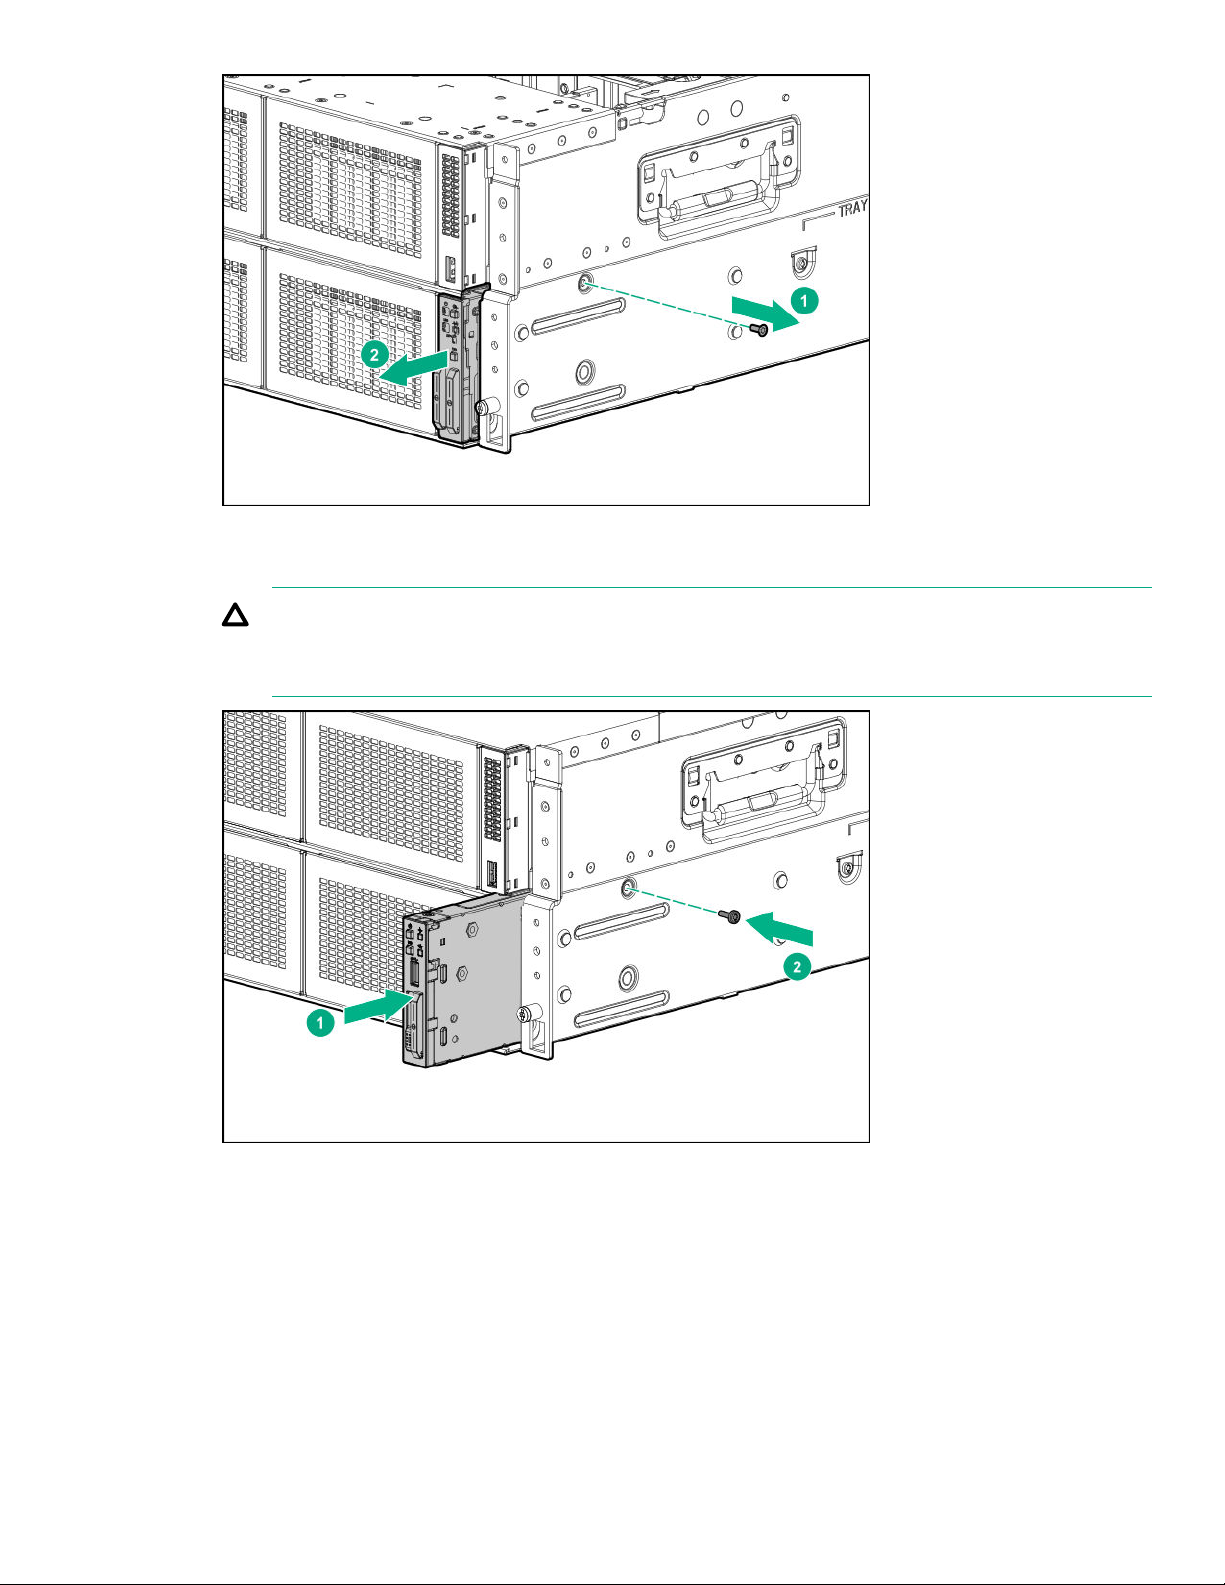
11. Route the cable through the opening in the front of the server, and then install the SID power switch
module. Secure the module using the existing screw.
CAUTION:
When routing cables, always be sure that the cables are not in a position where they can be
pinched or crimped.
12. Cable the SID module to the system board.
Installing hardware options 57
Page 58
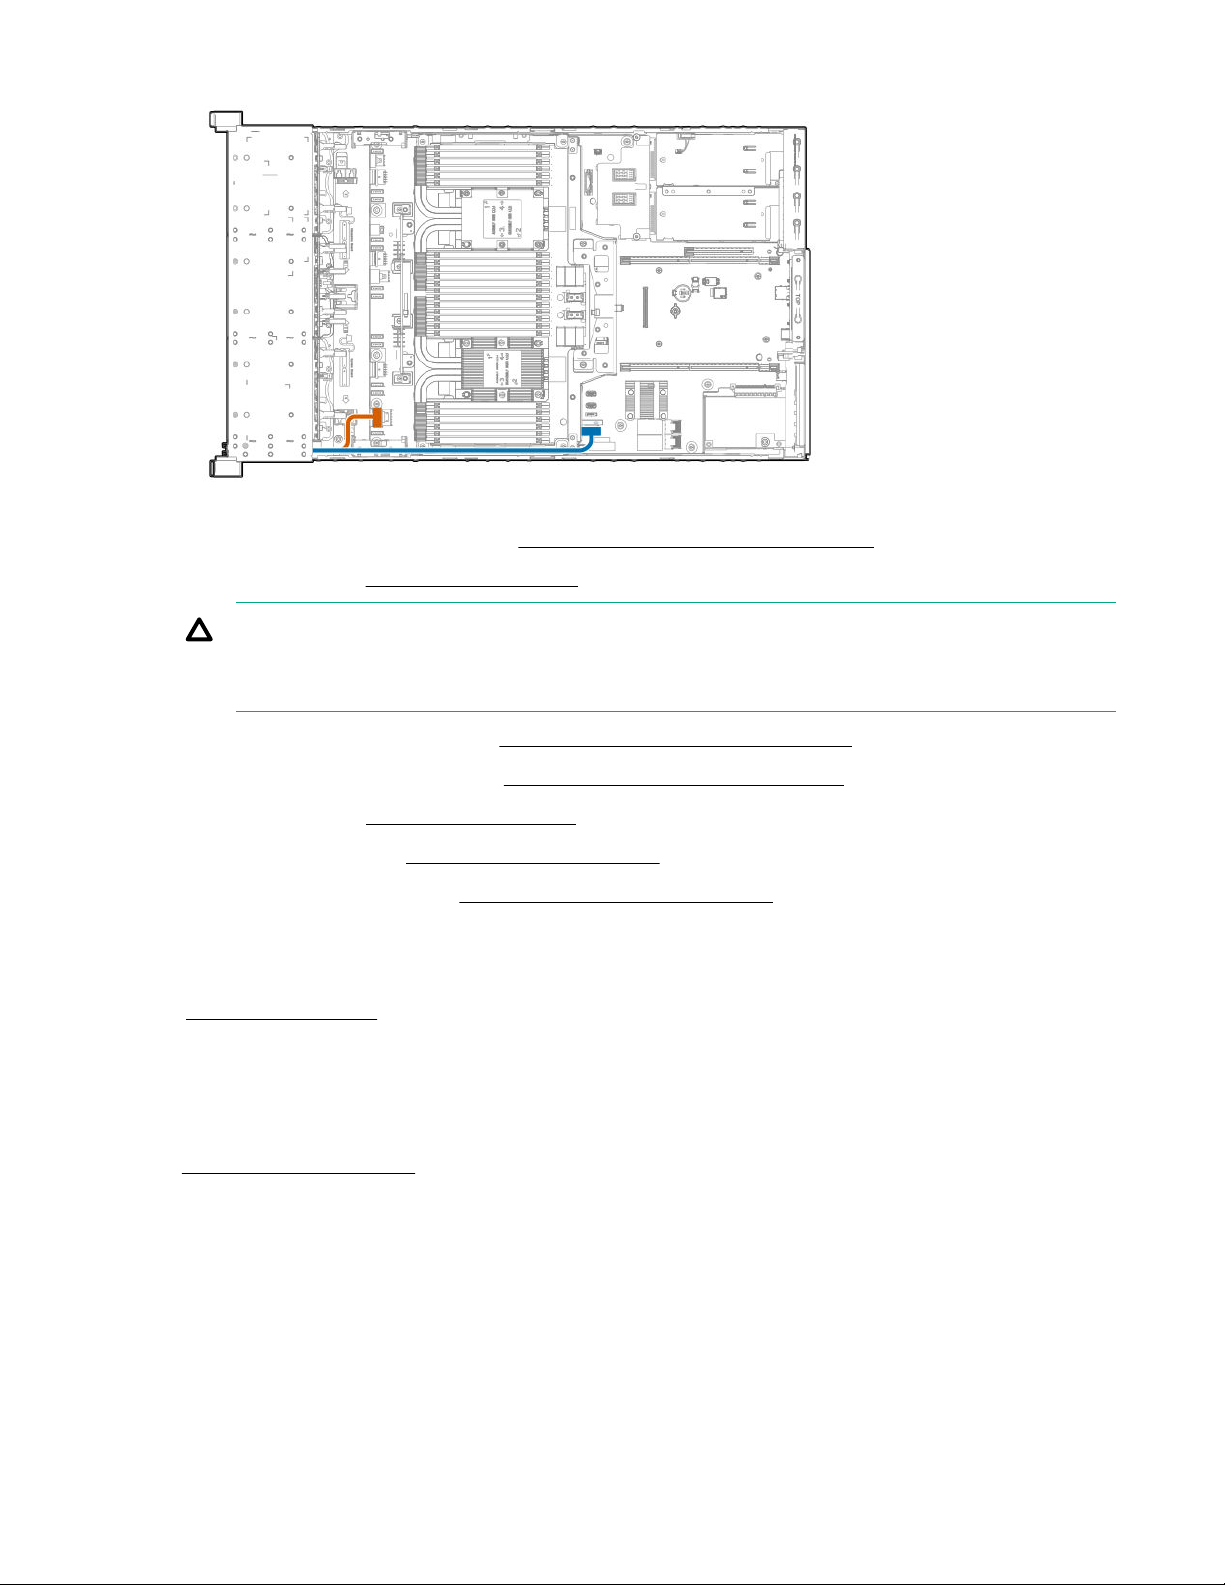
13. Install the processor mezzanine tray (Installing a processor mezzanine tray on page 102).
14. Install the air baffle (Installing the air baffle on page 41).
CAUTION:
To avoid damaging the connectors, always install the air baffle into the server before installing the
riser cages.
15. Install the primary PCIe riser cage (Installing the primary PCIe riser cage on page 38).
16. Install the butterfly PCIe riser cage (Installing a butterfly PCIe riser cage on page 80).
17. Install the fan cage (Installing the fan cage on page 43).
18. Install the access panel (Installing the access panel on page 37).
19. Install the server into the rack (Installing the server into the rack on page 53).
20. Connect each power cord to the server.
21. Connect each power cord to the power source.
22. Power up the server on page 32.
Installing an eight-bay SFF HDD/SSD drive cage
The eight-bay SFF HDD/SSD drive cage can be installed in any drive box in the server. For more information,
see Front panel components on page 7.
Prerequisites
Before installing this option, be sure that you have the following:
• T-10 Torx screwdriver
• The components included with the hardware option kit
58 Installing an eight-bay SFF HDD/SSD drive cage
Page 59
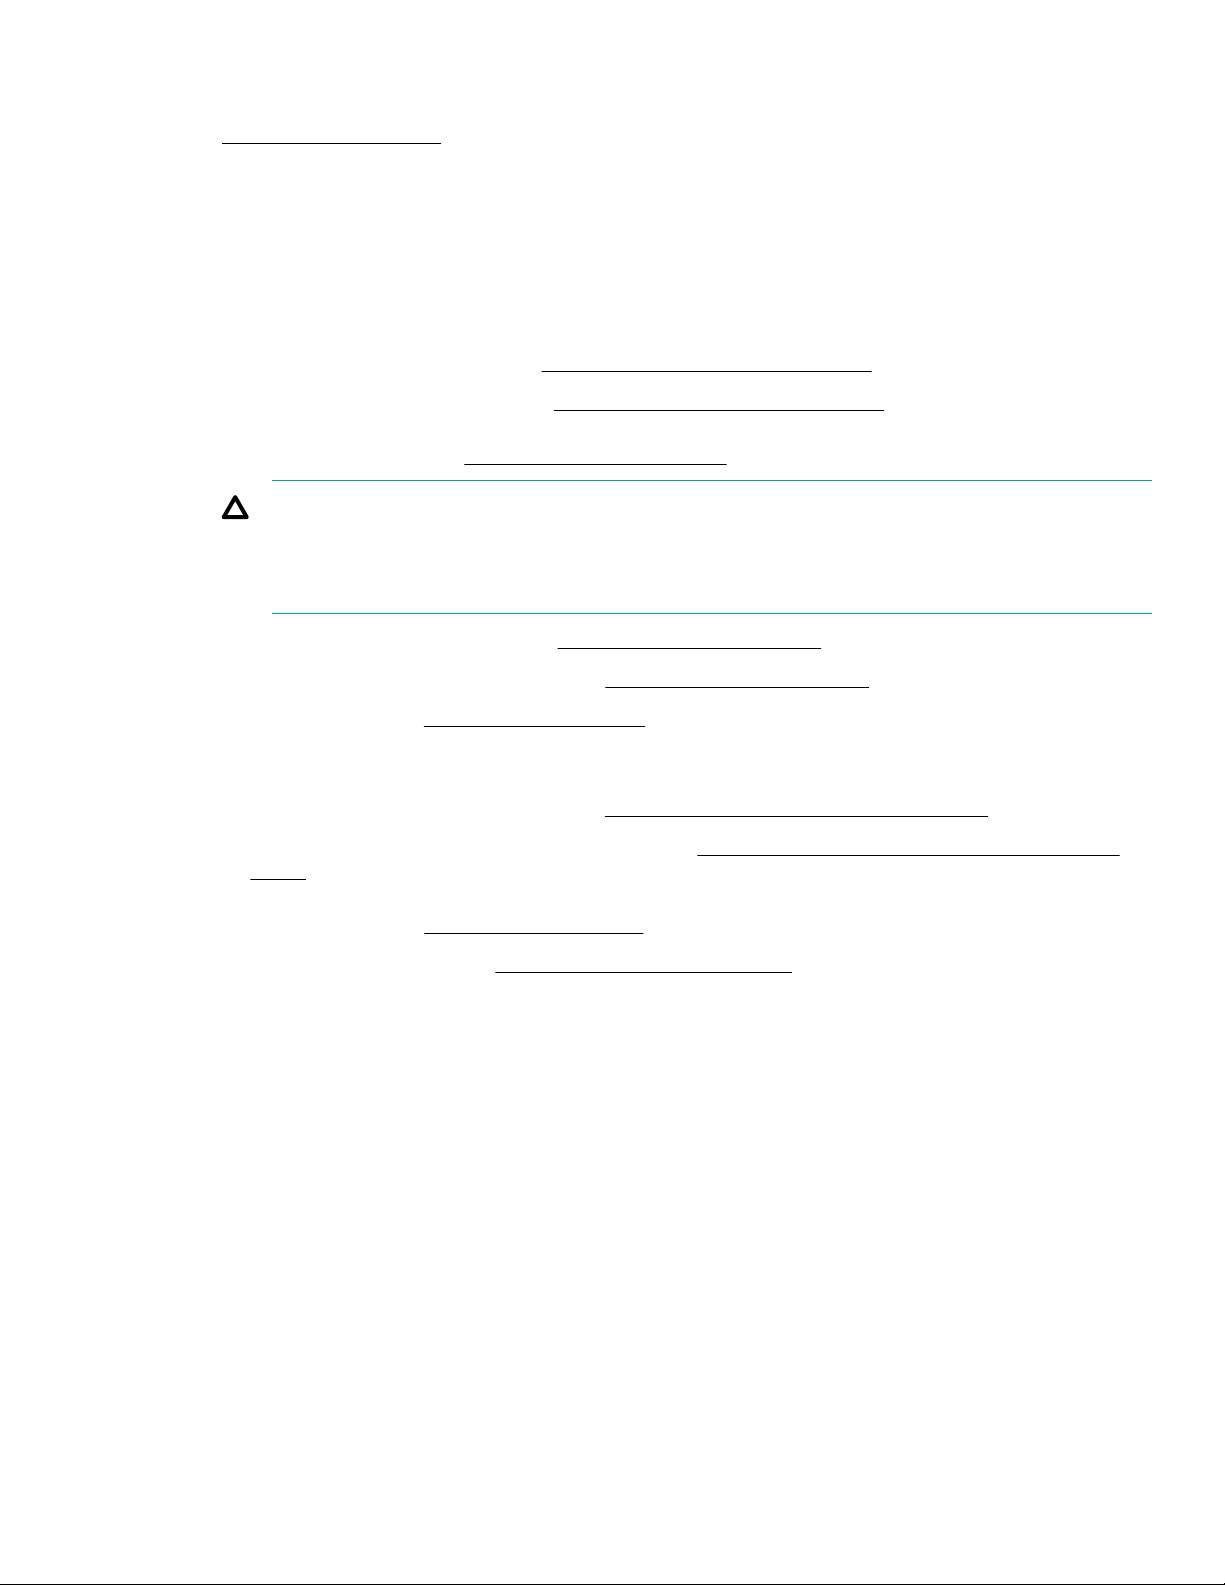
Procedure
1. Power down the server on page 32.
2. Remove all power:
a. Disconnect each power cord from the power source.
b. Disconnect each power cord from the server.
3. Do one of the following:
• Extend the server from the rack (Extending the server from the rack on page 32).
• Remove the server from the rack (Removing the server from the rack on page 33).
4. Remove the access panel (Removing the access panel on page 36).
CAUTION:
Do not operate the server for long periods with the access panel open or removed. Operating the
server in this manner results in improper airflow and improper cooling that can lead to thermal
damage.
5. Remove the primary PCIe riser cage (Removing a PCIe riser cage on page 39).
6. If installed, remove the butterfly riser cage (Removing a PCIe riser cage on page 39).
7. Remove the air baffle (Removing the air baffle on page 40).
8. If installed, do one of the following:
• Remove the processor mezzanine tray (Removing the processor mezzanine tray on page 45).
• Remove the 2P pass-through performance board (Removing the 2P pass-through performance
board on page 46).
9. Remove the fan cage (Removing the fan cage on page 42).
10. Remove the fan cage holders (Removing the fan cage holders on page 44).
11. Remove the drive bay blank.
Installing hardware options 59
Page 60
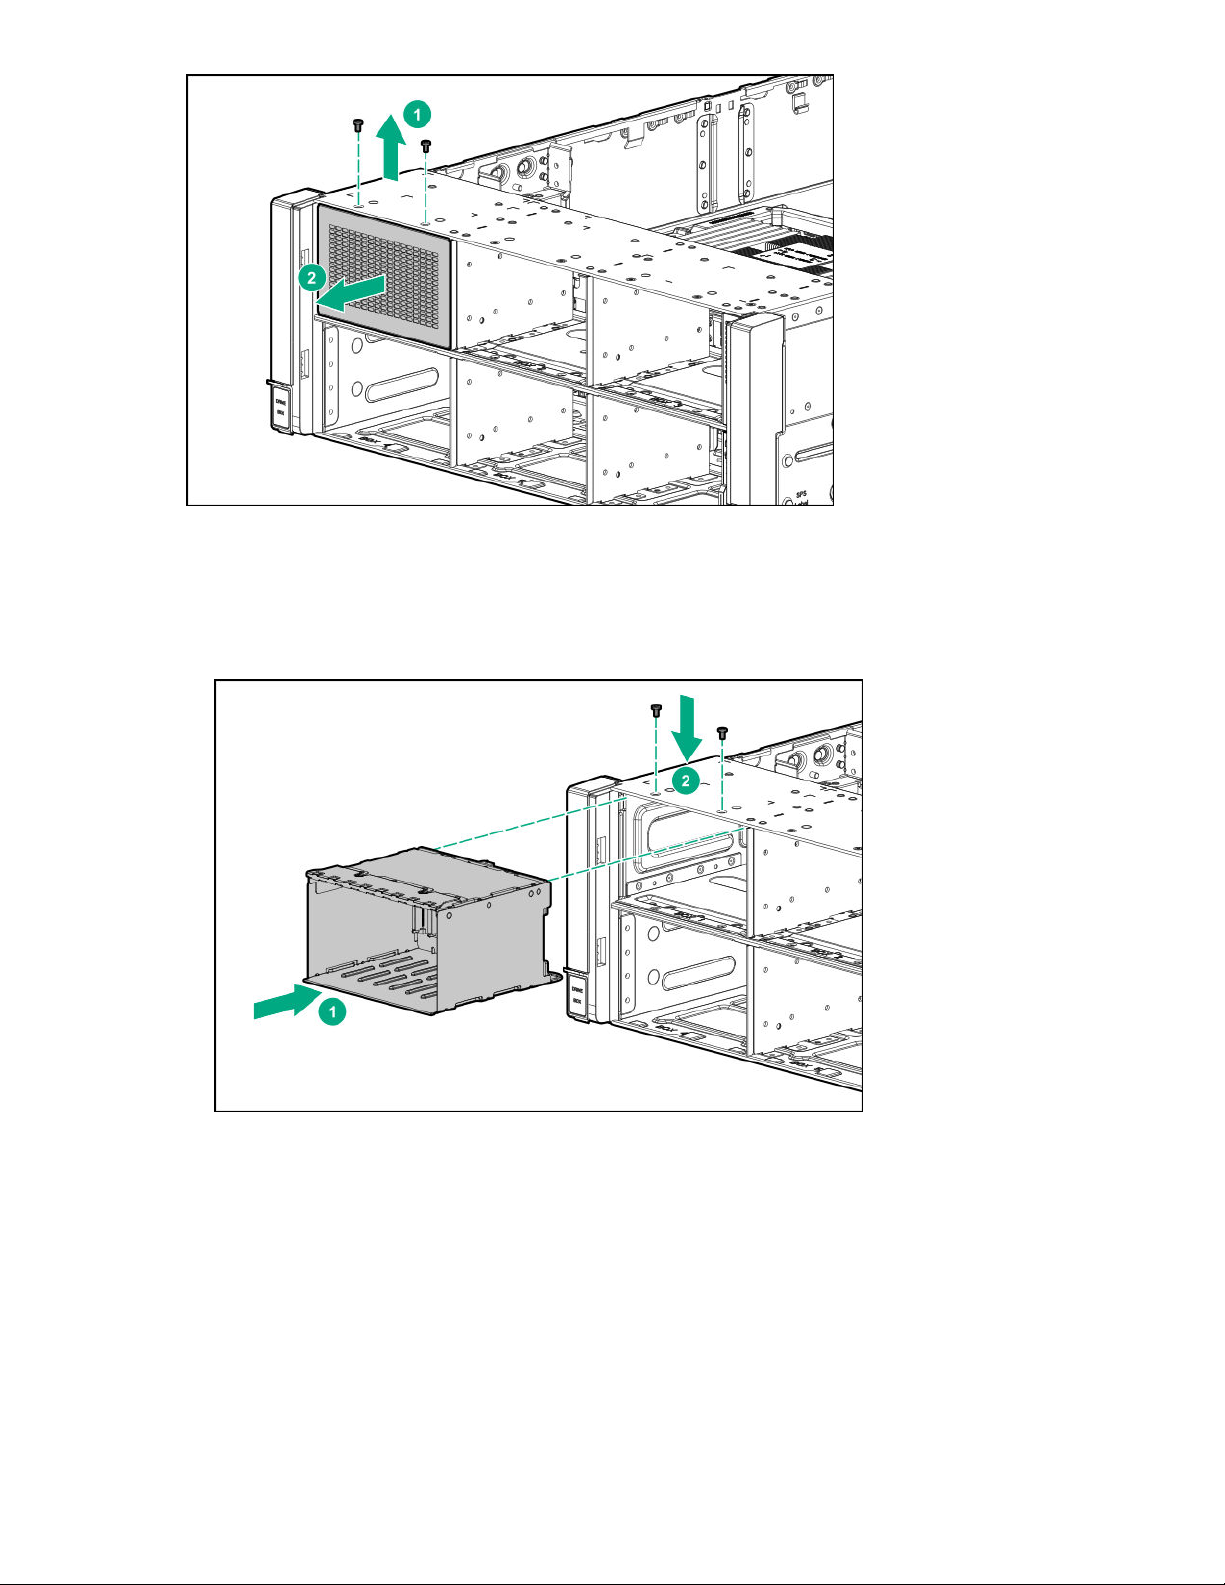
12. If drive blanks are installed in the drive cage assembly, remove the drive blanks. Retain the drive blanks
for use in empty drive bays.
13. Install the drive cage.
• Drive boxes 1–3 (box 1 shown)
• Drive boxes 4–6 (box 4 shown)
60 Installing hardware options
Page 61
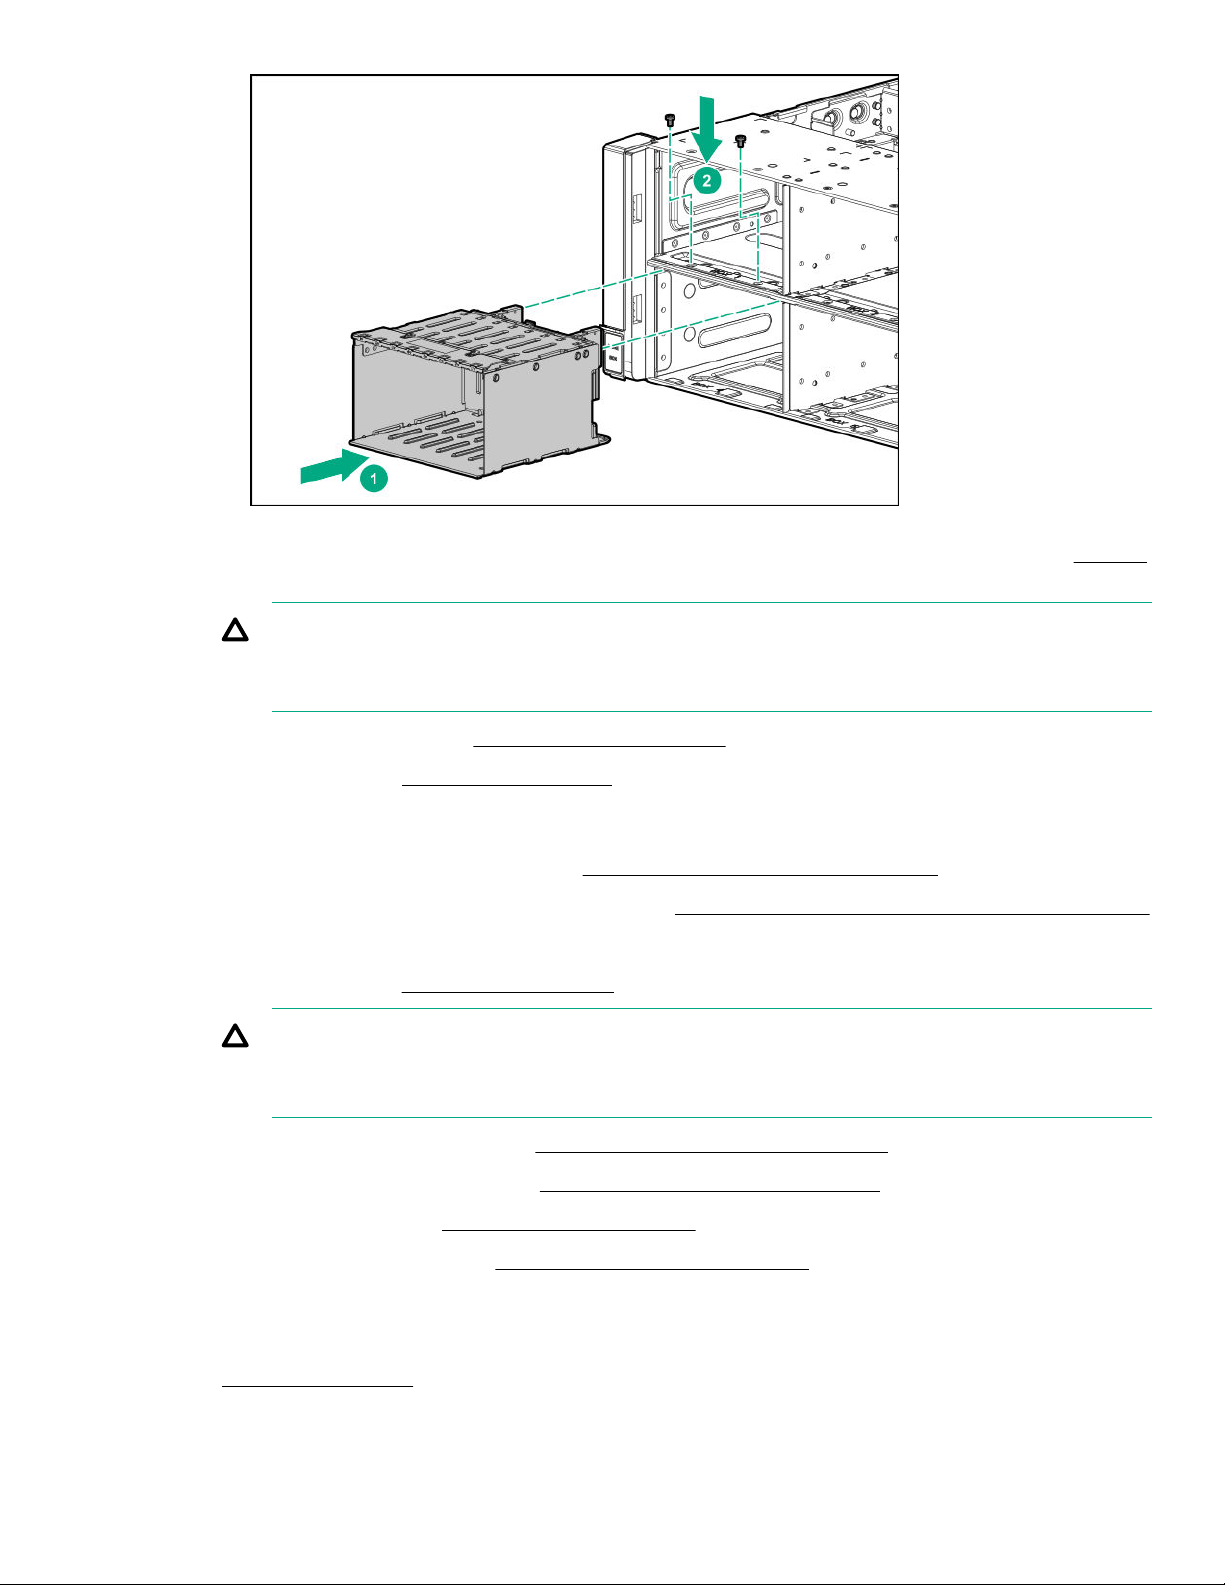
14. Route and connect the cables depending on the server configuration. For more information, see Cabling
on page 118.
CAUTION:
When routing cables, always be sure that the cables are not in a position where they can be
pinched or crimped.
15. Install the fan cage holders (Installing fan cage holders on page 45).
16. Install the fan cage (Installing the fan cage on page 43).
17. If removed, do one of the following:
• Install the processor mezzanine tray (Installing a processor mezzanine tray on page 102).
• Install the 2P pass-through performance board (Installing the 2P pass-through performance board
on page 107).
18. Install the air baffle (Installing the air baffle on page 41).
CAUTION:
To avoid damaging the connectors, always install the air baffle into the server before installing the
riser cages.
19. Install the primary PCIe riser cage (Installing the primary PCIe riser cage on page 38).
20. Install the butterfly PCIe riser cage (Installing a butterfly PCIe riser cage on page 80).
21. Install the access panel (Installing the access panel on page 37).
22. Install the server into the rack (Installing the server into the rack on page 53).
23. Connect each power cord to the server.
24. Connect each power cord to the power source.
25. Power up the server on page 32.
Installing hardware options 61
Page 62

Installing an eight-bay NVMe SSD drive cage
The eight-bay NVMe SSD drive cage can be installed in drive boxes 1–3.
• A minimum of four NVMe drives can be installed in the drive cage.
• When installed in drive box 1, only four NVMe drives can be installed in the drive cage.
For more information on valid NVMe drive configurations and cabling, see NVMe drive cable matrix on page
120.
Prerequisites
Before installing this option, be sure that you have the following:
• T-10 Torx screwdriver
• The components included with the hardware option kit
Procedure
1. Power down the server on page 32.
2. Remove all power:
a. Disconnect each power cord from the power source.
b. Disconnect each power cord from the server.
3. Do one of the following:
• Extend the server from the rack (Extending the server from the rack on page 32).
• Remove the server from the rack (Removing the server from the rack on page 33).
4. Remove the access panel (Removing the access panel on page 36).
CAUTION:
Do not operate the server for long periods with the access panel open or removed. Operating the
server in this manner results in improper airflow and improper cooling that can lead to thermal
damage.
5. Remove the primary PCIe riser cage (Removing a PCIe riser cage on page 39).
6. If installed, remove the butterfly riser cage (Removing a PCIe riser cage on page 39).
7. Remove the air baffle (Removing the air baffle on page 40).
8. If installed, do one of the following:
• Remove the processor mezzanine tray (Removing the processor mezzanine tray on page 45).
• Remove the 2P pass-through performance board (Removing the 2P pass-through performance
board on page 46).
9. Remove the fan cage (Removing the fan cage on page 42).
10. Remove the fan cage holders (Removing the fan cage holders on page 44).
62 Installing an eight-bay NVMe SSD drive cage
Page 63
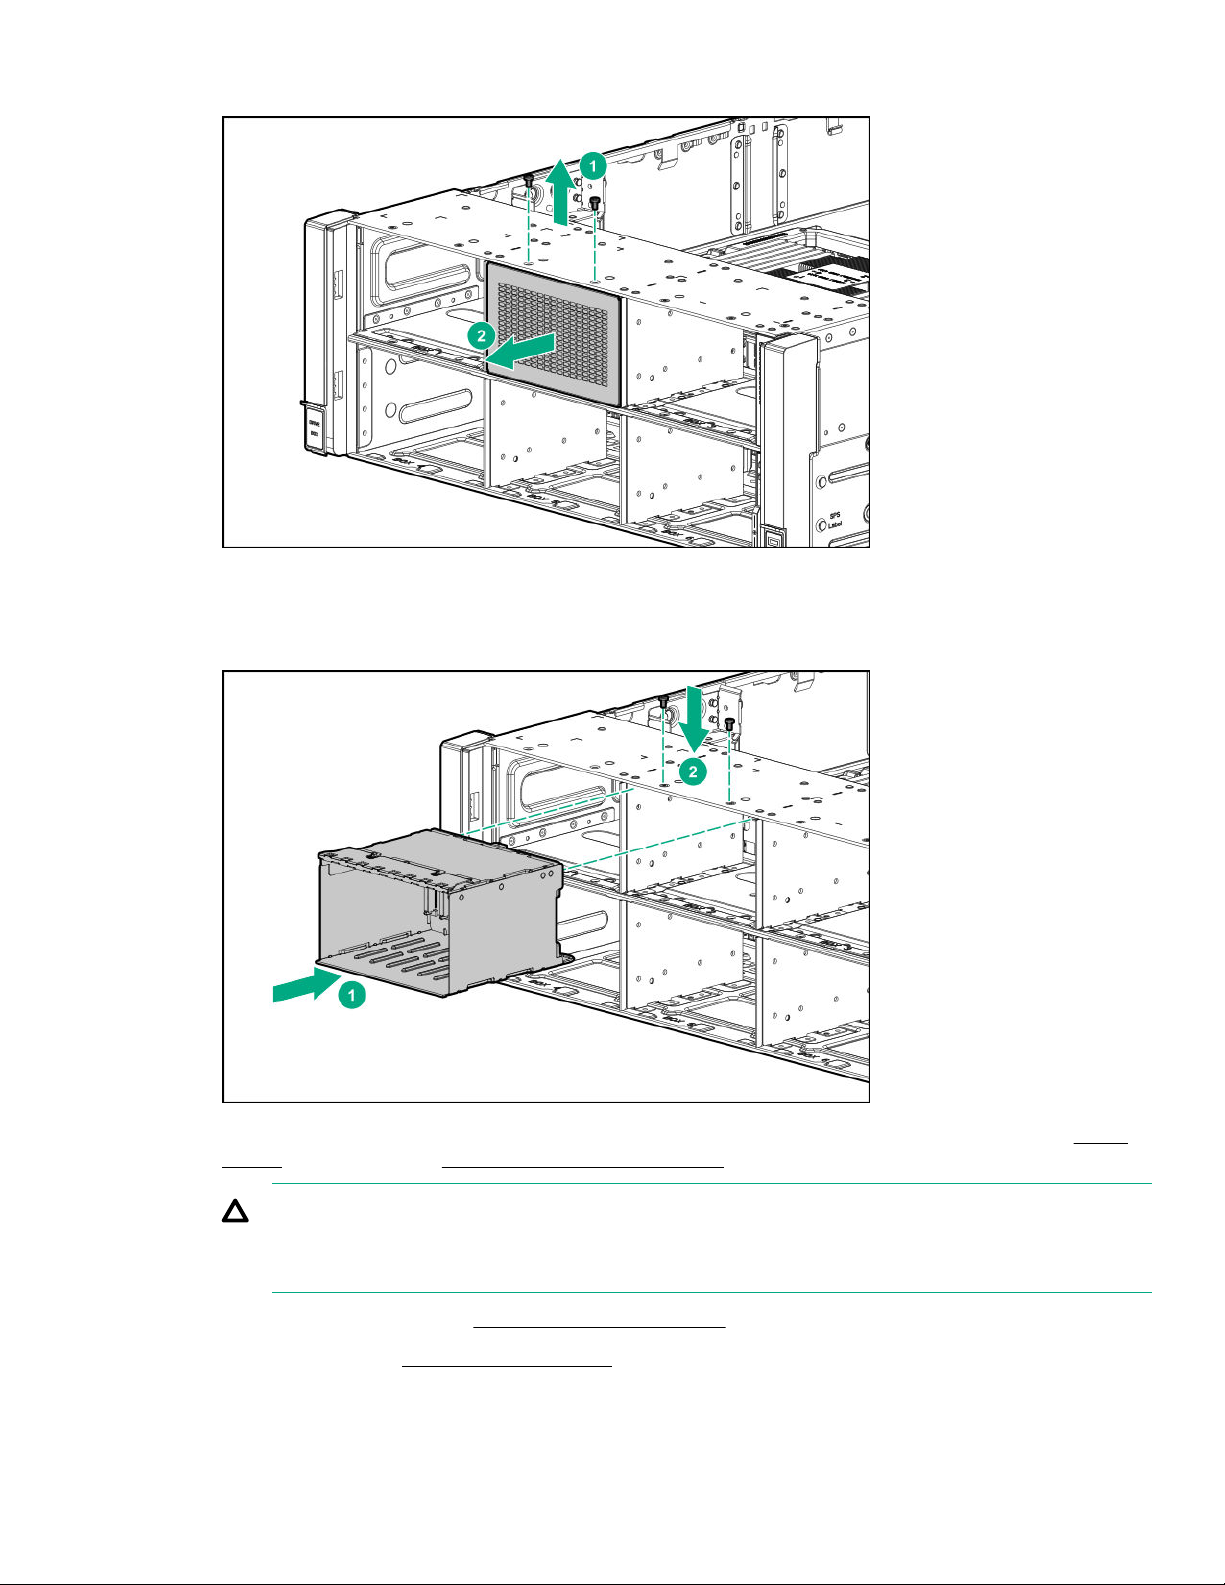
11. Remove the drive bay blank.
12. If drive blanks are installed in the drive cage assembly, remove the drive blanks. Retain the drive blanks
for use in empty drive bays.
13. Install the drive cage.
14. Route and connect the cables depending on the server configuration. For more information, see Cable
matrix on page 118 and NVMe SSD drive cage cabling on page 130.
CAUTION:
When routing cables, always be sure that the cables are not in a position where they can be
pinched or crimped.
15. Install the fan cage holders (Installing fan cage holders on page 45).
16. Install the fan cage (Installing the fan cage on page 43).
17. If removed, do one of the following:
Installing hardware options 63
Page 64

• Install the processor mezzanine tray (Installing a processor mezzanine tray on page 102).
• Install the 2P pass-through performance board (Installing the 2P pass-through performance board
on page 107).
18. Install the air baffle (Installing the air baffle on page 41).
CAUTION:
To avoid damaging the connectors, always install the air baffle into the server before installing the
riser cages.
19. Install the primary PCIe riser cage (Installing the primary PCIe riser cage on page 38).
20. Install the butterfly PCIe riser cage (Installing a butterfly PCIe riser cage on page 80).
21. Install the access panel (Installing the access panel on page 37).
22. Install the server into the rack (Installing the server into the rack on page 53).
23. Connect each power cord to the server.
24. Connect each power cord to the power source.
25. Power up the server on page 32.
Installing a six-bay SFF HDD/two-bay NVMe SSD (Premium) cage
The two-bay NVMe SSD/six-bay SFF HDD (Premium) drive cage can be installed in the following drive boxes
in the server. For more information, see Front panel components on page 7.
• Drive box 1
• Drive box 2
• Drive box 3
Prerequisites
Before installing this option, be sure that you have the following:
• T-10 Torx screwdriver
• The components included with the hardware option kit
Procedure
1. Power down the server on page 32.
2. Remove all power:
a. Disconnect each power cord from the power source.
b. Disconnect each power cord from the server.
3. Do one of the following:
64 Installing a six-bay SFF HDD/two-bay NVMe SSD (Premium) cage
Page 65
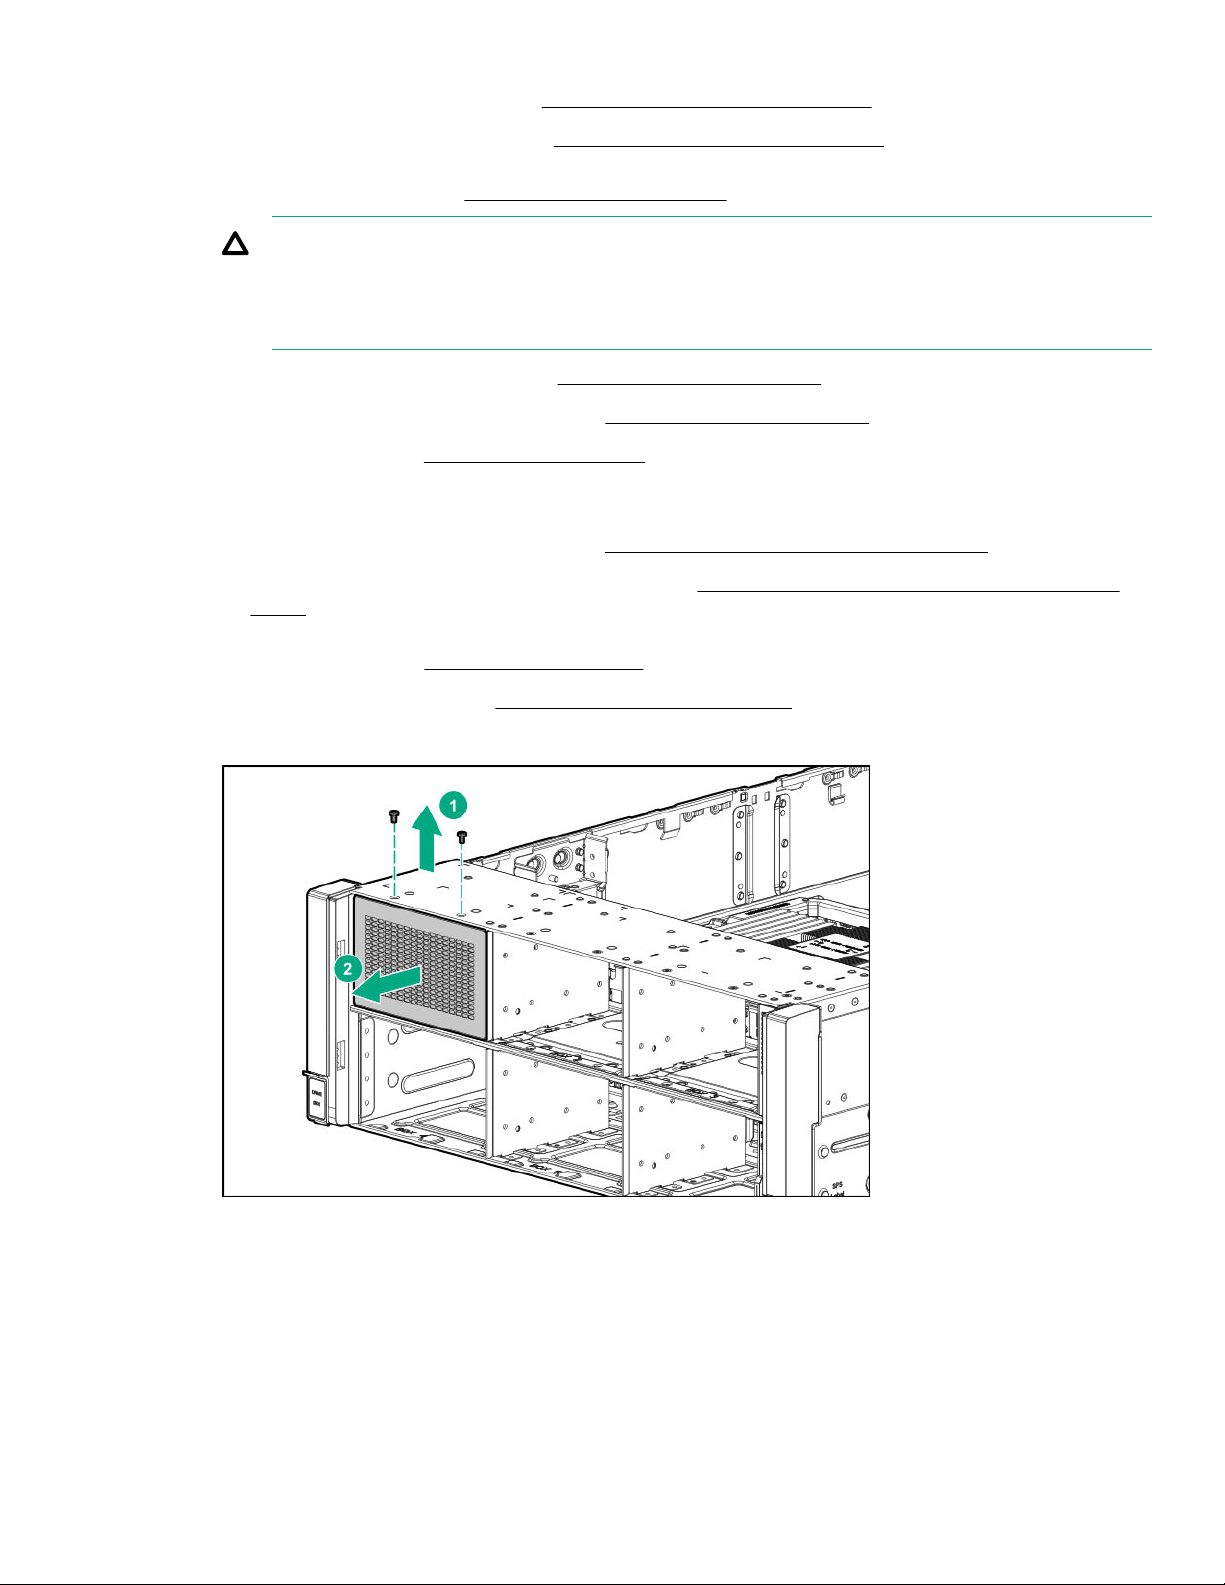
• Extend the server from the rack (Extending the server from the rack on page 32).
• Remove the server from the rack (Removing the server from the rack on page 33).
4. Remove the access panel (Removing the access panel on page 36).
CAUTION:
Do not operate the server for long periods with the access panel open or removed. Operating the
server in this manner results in improper airflow and improper cooling that can lead to thermal
damage.
5. Remove the primary PCIe riser cage (Removing a PCIe riser cage on page 39).
6. If installed, remove the butterfly riser cage (Removing a PCIe riser cage on page 39).
7. Remove the air baffle (Removing the air baffle on page 40).
8. If installed, do one of the following:
• Remove the processor mezzanine tray (Removing the processor mezzanine tray on page 45).
• Remove the 2P pass-through performance board (Removing the 2P pass-through performance
board on page 46).
9. Remove the fan cage (Removing the fan cage on page 42).
10. Remove the fan cage holders (Removing the fan cage holders on page 44).
11. Remove the drive bay blank.
12. If drive blanks are installed in the drive cage assembly, remove the drive blanks. Retain the drive blanks
for use in empty drive bays.
13. Install the drive cage.
Installing hardware options 65
Page 66
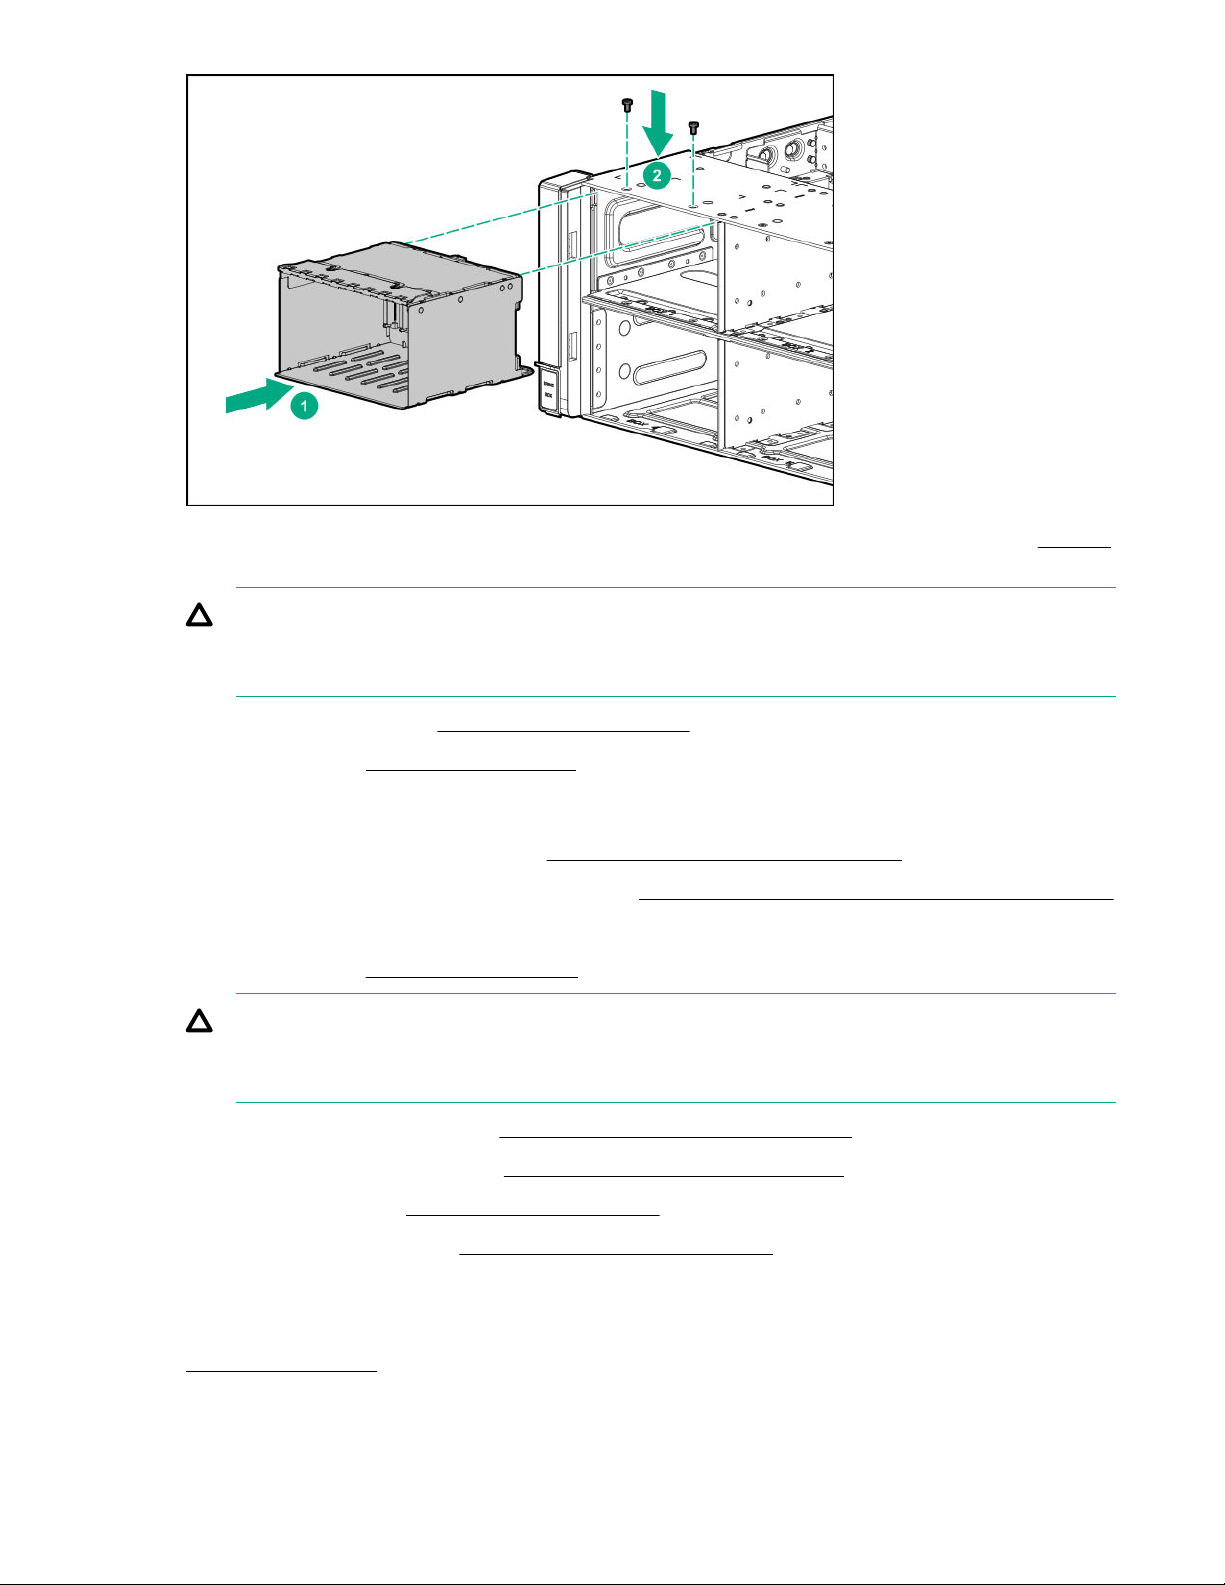
14. Route and connect the cables depending on the server configuration. For more information, see Cabling
on page 118.
CAUTION:
When routing cables, always be sure that the cables are not in a position where they can be
pinched or crimped.
15. Install the fan cage holders (Installing fan cage holders on page 45).
16. Install the fan cage (Installing the fan cage on page 43).
17. If removed, do one of the following:
• Install the processor mezzanine tray (Installing a processor mezzanine tray on page 102).
• Install the 2P pass-through performance board (Installing the 2P pass-through performance board
on page 107).
18. Install the air baffle (Installing the air baffle on page 41).
CAUTION:
To avoid damaging the connectors, always install the air baffle into the server before installing the
riser cages.
19. Install the primary PCIe riser cage (Installing the primary PCIe riser cage on page 38).
20. Install the butterfly PCIe riser cage (Installing a butterfly PCIe riser cage on page 80).
21. Install the access panel (Installing the access panel on page 37).
22. Install the server into the rack (Installing the server into the rack on page 53).
23. Connect each power cord to the server.
24. Connect each power cord to the power source.
25. Power up the server on page 32.
66 Installing hardware options
Page 67

Installing a universal media bay
The universal media bay can only be installed in drive box 4. For more information, see Front panel
components on page 7.
Prerequisites
Before installing this option, be sure that you have the following:
• The components included with the hardware option kit
• T-10 Torx screwdriver
Procedure
1. Power down the server on page 32.
2. Remove all power:
a. Disconnect each power cord from the power source.
b. Disconnect each power cord from the server.
3. Do one of the following:
• Extend the server from the rack (Extending the server from the rack on page 32).
• Remove the server from the rack (Removing the server from the rack on page 33).
4. Remove the access panel (Removing the access panel on page 36).
CAUTION:
Do not operate the server for long periods with the access panel open or removed. Operating the
server in this manner results in improper airflow and improper cooling that can lead to thermal
damage.
5. Remove the primary PCIe riser cage (Removing a PCIe riser cage on page 39).
6. If installed, remove the butterfly riser cage (Removing a PCIe riser cage on page 39).
7. Remove the air baffle (Removing the air baffle on page 40).
8. If installed, do one of the following:
• Remove the processor mezzanine tray (
• Remove the 2P pass-through performance board (Removing the 2P pass-through performance
board on page 46).
9. Remove the fan cage (Removing the fan cage on page 42).
Removing the processor mezzanine tray on page 45).
10. Remove the fan cage holders (Removing the fan cage holders on page 44).
11. Remove the drive bay blank from box 1.
Installing a universal media bay 67
Page 68
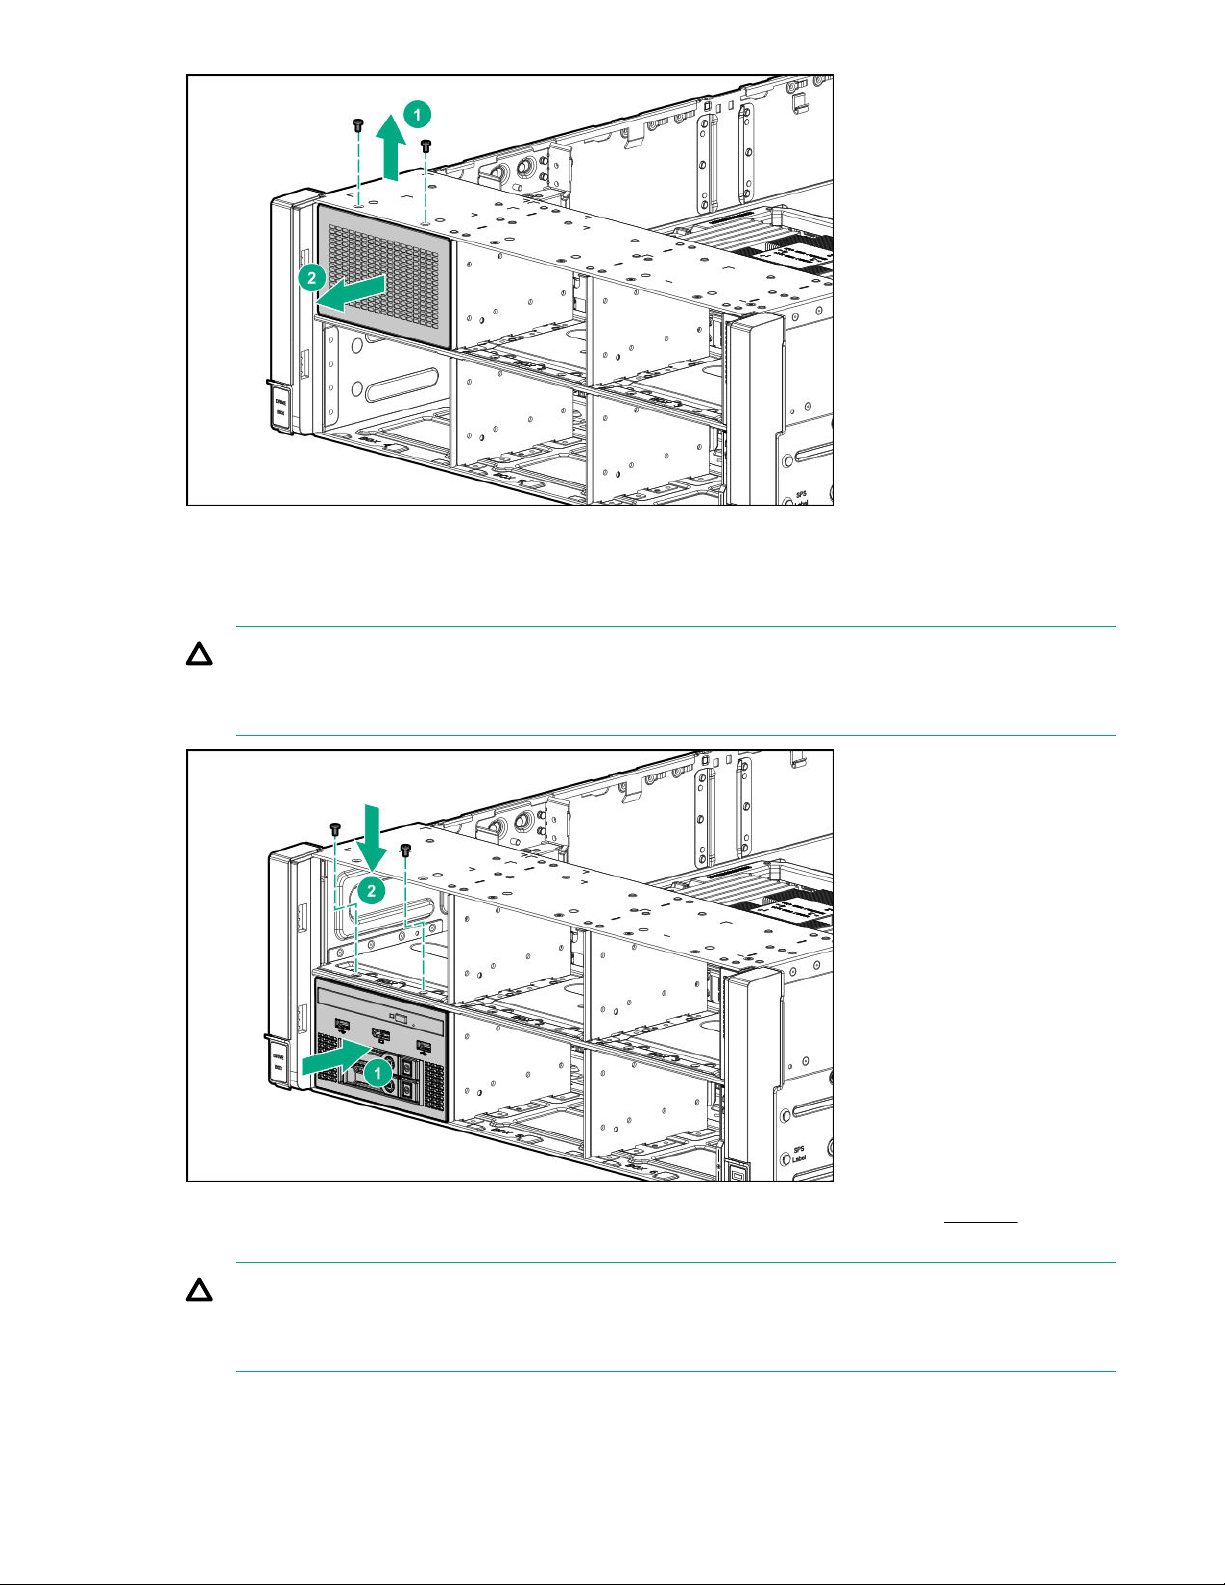
12. If drive blanks are installed in the drive cage assembly, remove the drive blanks. Retain the drive blanks
for use in empty drive bays.
13. Route the cables through the opening, and then install the universal media bay.
CAUTION:
When routing cables, always be sure that the cables are not in a position where they can be
pinched or crimped.
14. Connect the cables depending on the server configuration. For more information, see Cabling on page
118.
CAUTION:
When routing cables, always be sure that the cables are not in a position where they can be
pinched or crimped.
15. Install the drive bay blank into box 1.
68 Installing hardware options
Page 69
16. Install the fan cage holders (Installing fan cage holders on page 45).
17. Install the fan cage (Installing the fan cage on page 43).
18. If removed, do one of the following:
• Install the processor mezzanine tray (Installing a processor mezzanine tray on page 102).
• Install the 2P pass-through performance board (Installing the 2P pass-through performance board
on page 107).
19. Install the air baffle (Installing the air baffle on page 41).
CAUTION:
To avoid damaging the connectors, always install the air baffle into the server before installing the
riser cages.
20. Install the primary PCIe riser cage (Installing the primary PCIe riser cage on page 38).
21. Install the butterfly PCIe riser cage (Installing a butterfly PCIe riser cage on page 80).
22. Install the access panel (Installing the access panel on page 37).
23. Install the server into the rack (Installing the server into the rack on page 53).
24. Connect each power cord to the server.
25. Connect each power cord to the power source.
26. Power up the server on page 32.
Installing a two-bay SFF (Premium) drive cage
Prerequisites
Before installing this option, be sure that you have the following:
• T-10 Torx screwdriver
• The components included with the hardware option kit
The front bay installation requires a universal media bay to be installed (Installing a universal media bay on
page 67).
Procedure
1. Power down the server on page 32.
2. Remove all power:
a. Disconnect each power cord from the power source.
b. Disconnect each power cord from the server.
3. Do one of the following:
Installing a two-bay SFF (Premium) drive cage 69
Page 70
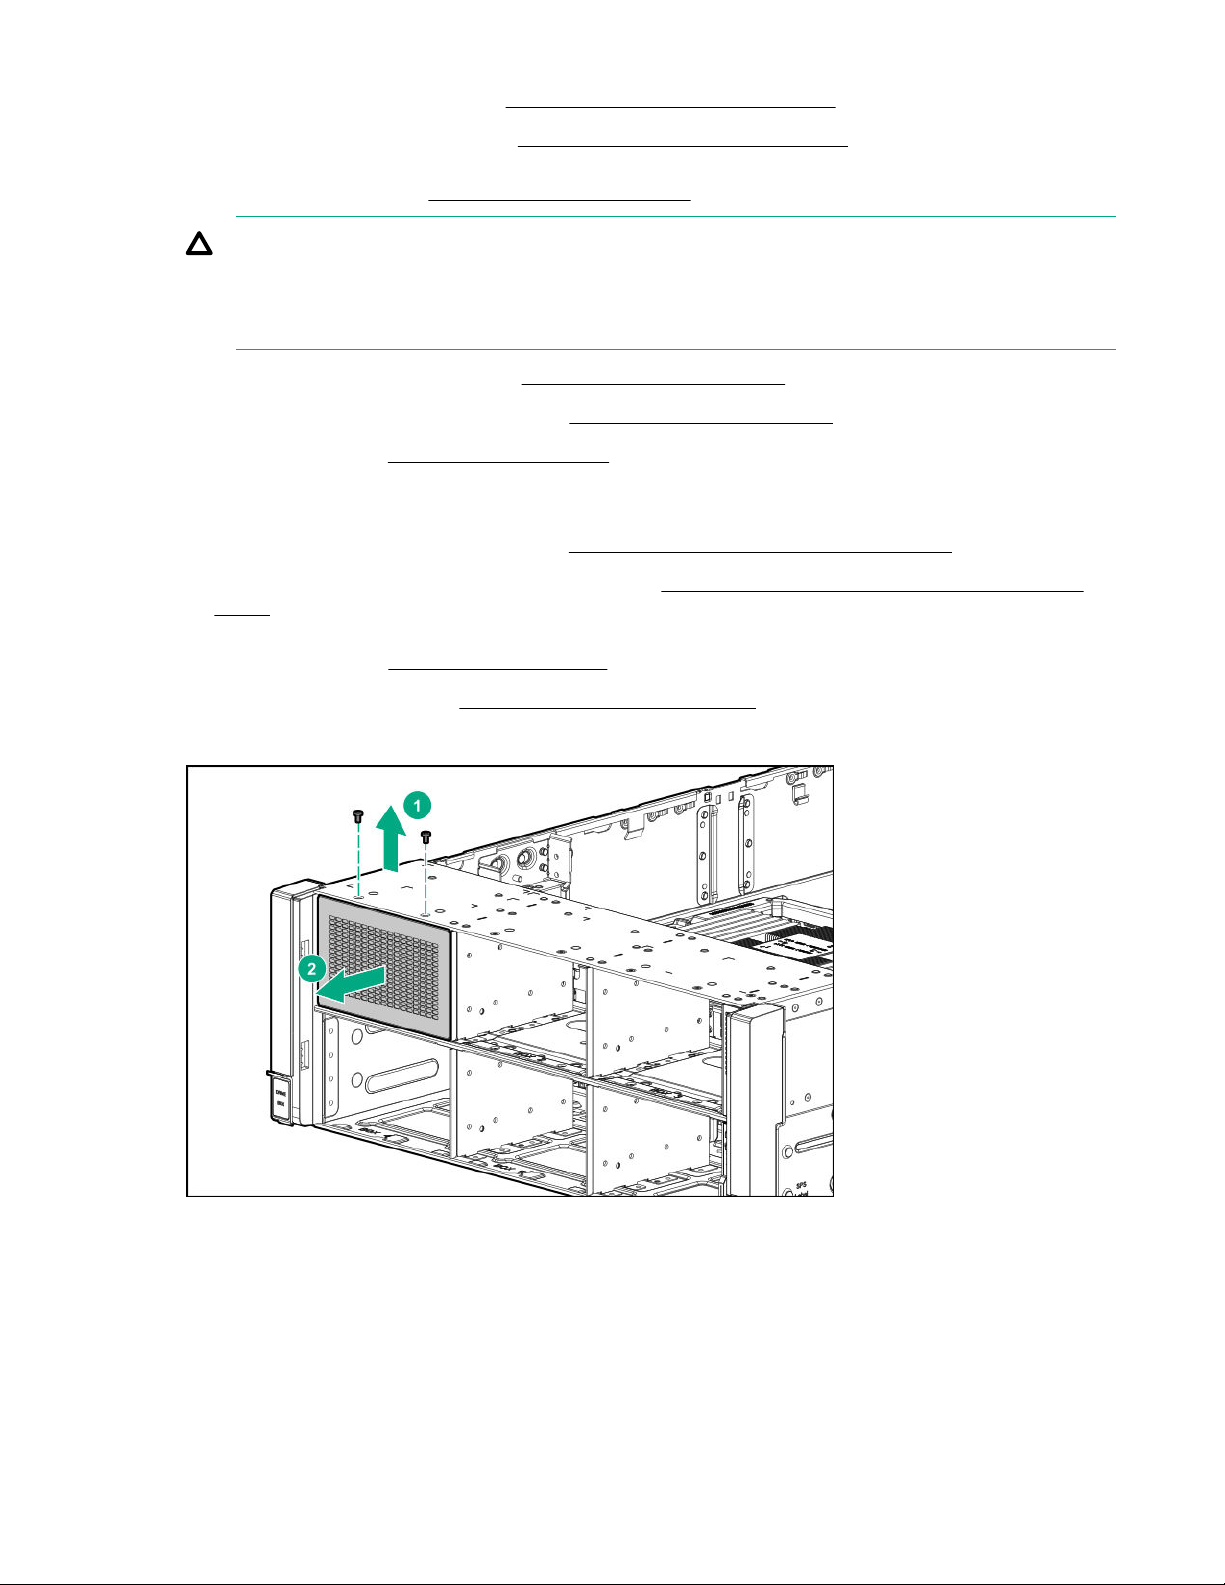
• Extend the server from the rack (Extending the server from the rack on page 32).
• Remove the server from the rack (Removing the server from the rack on page 33).
4. Remove the access panel (Removing the access panel on page 36).
CAUTION:
Do not operate the server for long periods with the access panel open or removed. Operating the
server in this manner results in improper airflow and improper cooling that can lead to thermal
damage.
5. Remove the primary PCIe riser cage (Removing a PCIe riser cage on page 39).
6. If installed, remove the butterfly riser cage (Removing a PCIe riser cage on page 39).
7. Remove the air baffle (Removing the air baffle on page 40).
8. If installed, do one of the following:
• Remove the processor mezzanine tray (Removing the processor mezzanine tray on page 45).
• Remove the 2P pass-through performance board (Removing the 2P pass-through performance
board on page 46).
9. Remove the fan cage (Removing the fan cage on page 42).
10. Remove the fan cage holders (Removing the fan cage holders on page 44).
11. Remove the drive bay blank from box 1.
70 Installing hardware options
Page 71
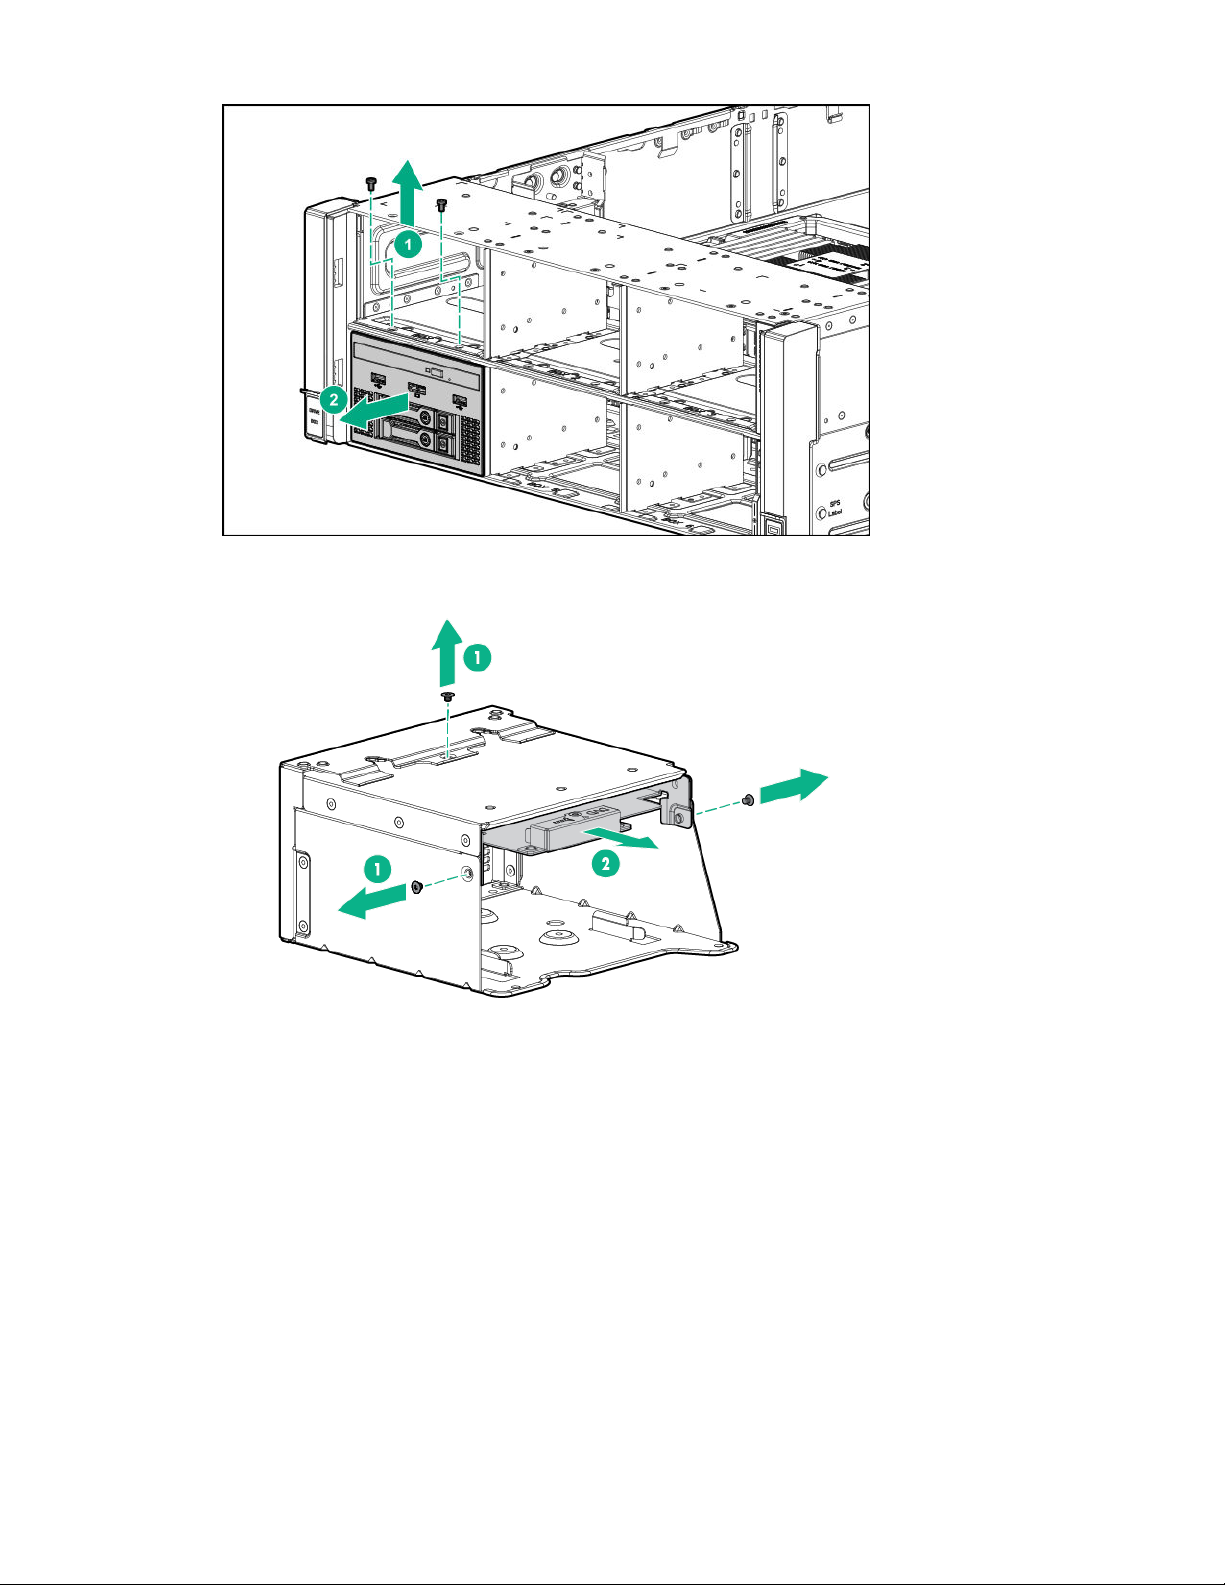
12. If installed in the server, remove the universal media bay.
13. Remove the optical disk drive tray from the universal media bay.
14. Remove the SFF drive blank from the universal media bay.
Installing hardware options 71
Page 72
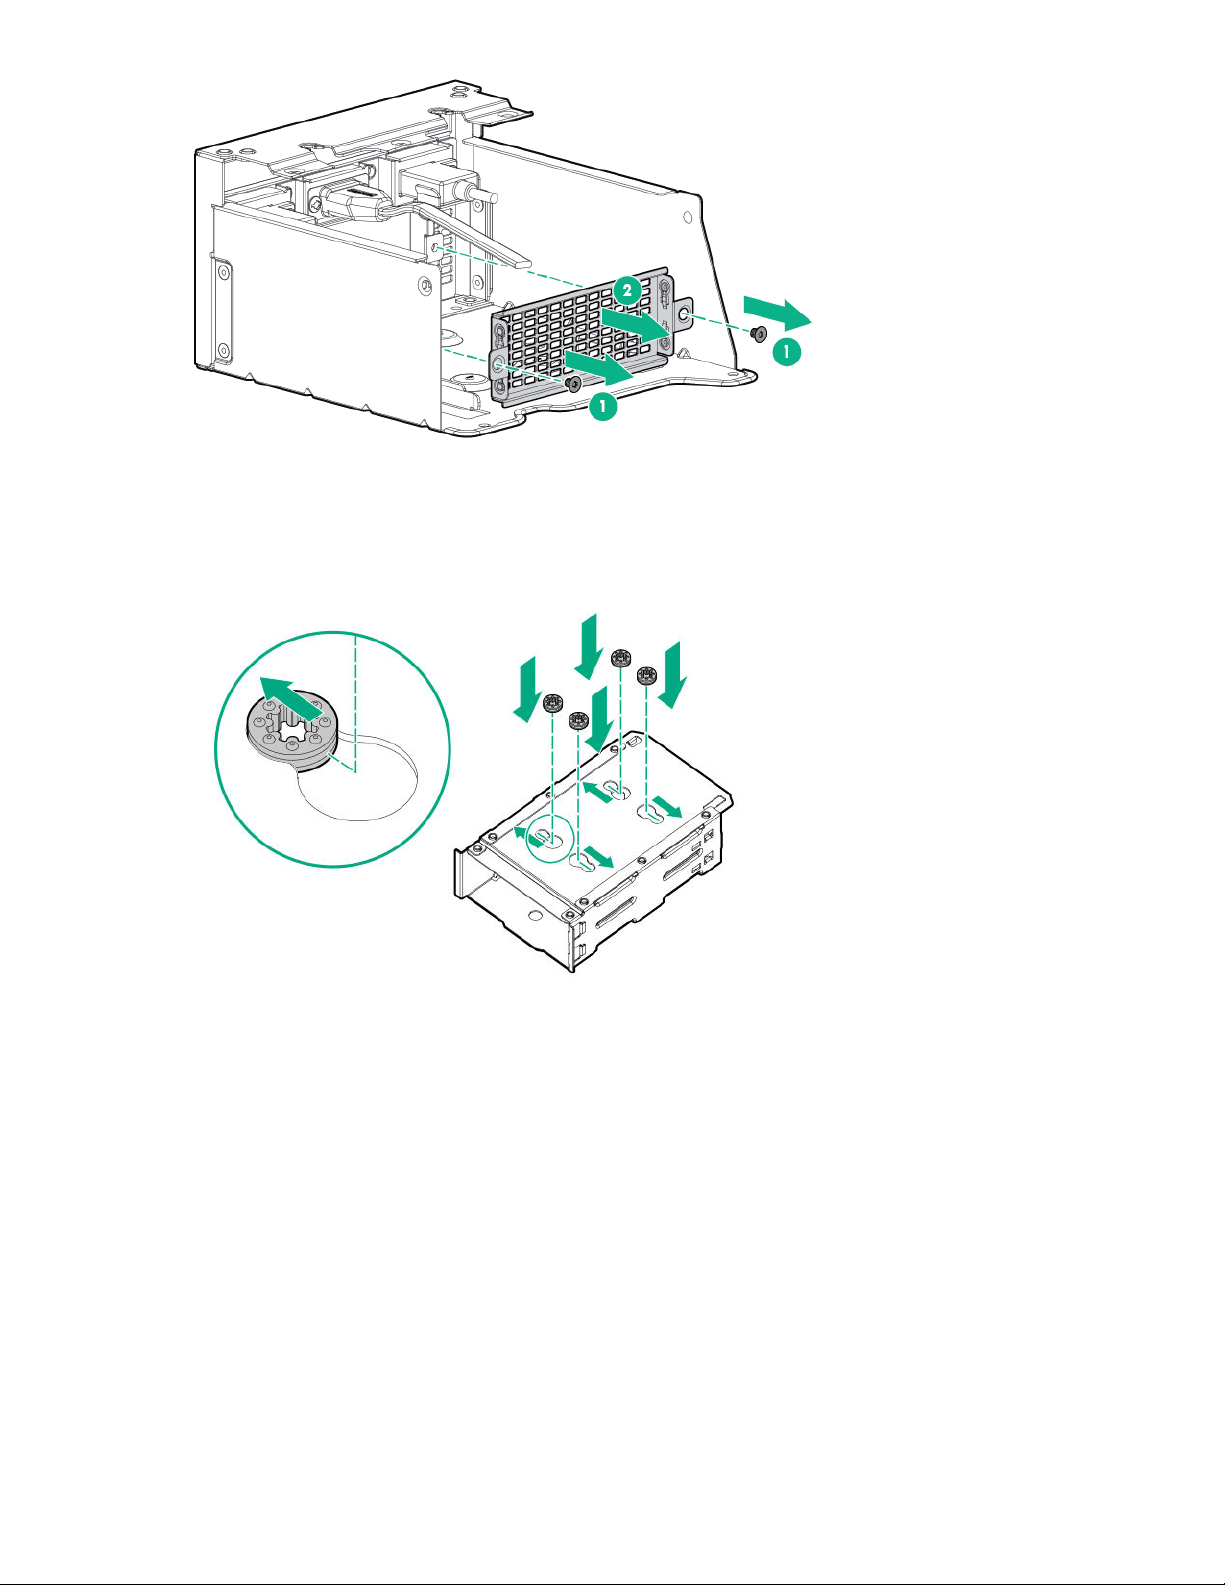
15. Install the grommets onto the underside of the drive cage.
16. Install the drive cage into the universal media bay.
72 Installing hardware options
Page 73
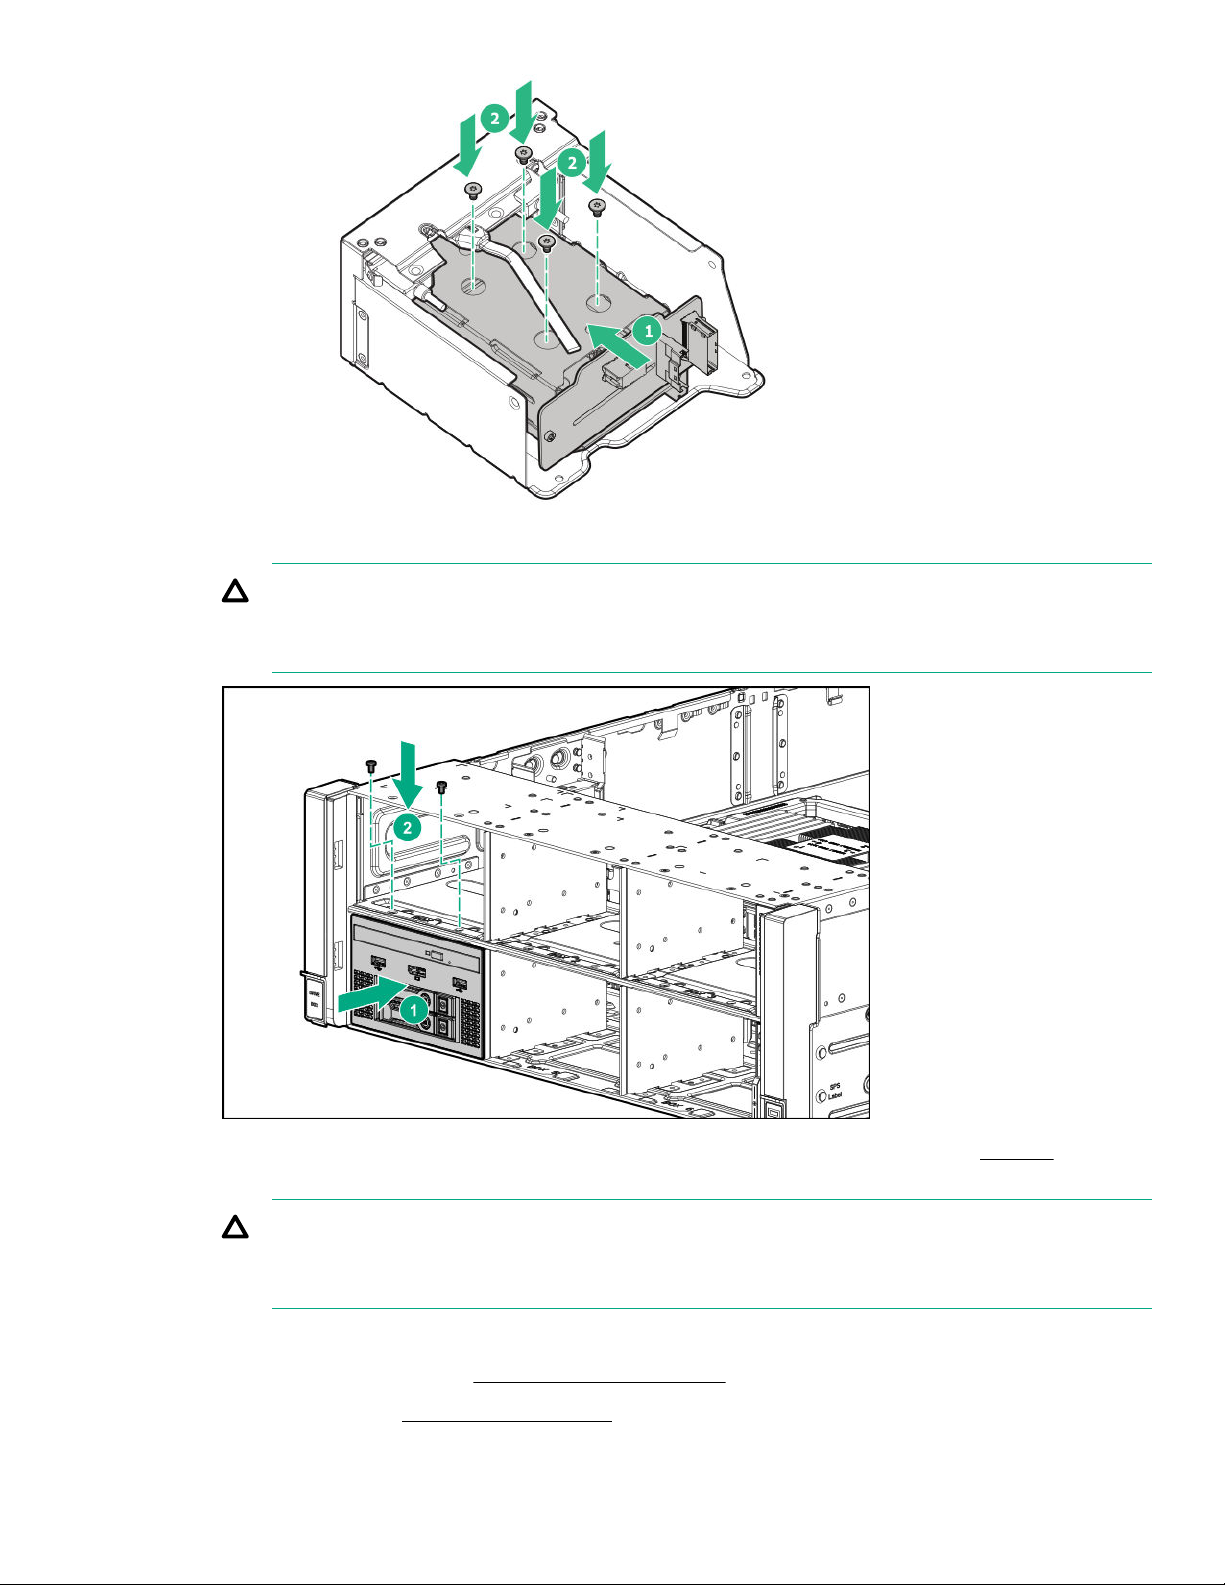
17. Route the cables through the opening, and then install the universal media bay.
CAUTION:
When routing cables, always be sure that the cables are not in a position where they can be
pinched or crimped.
18. Connect the cables depending on the server configuration. For more information, see Cabling on page
118.
CAUTION:
When routing cables, always be sure that the cables are not in a position where they can be
pinched or crimped.
19. Install the drive bay blank into box 1.
20. Install the fan cage holders (Installing fan cage holders on page 45).
21. Install the fan cage (Installing the fan cage on page 43).
Installing hardware options 73
Page 74
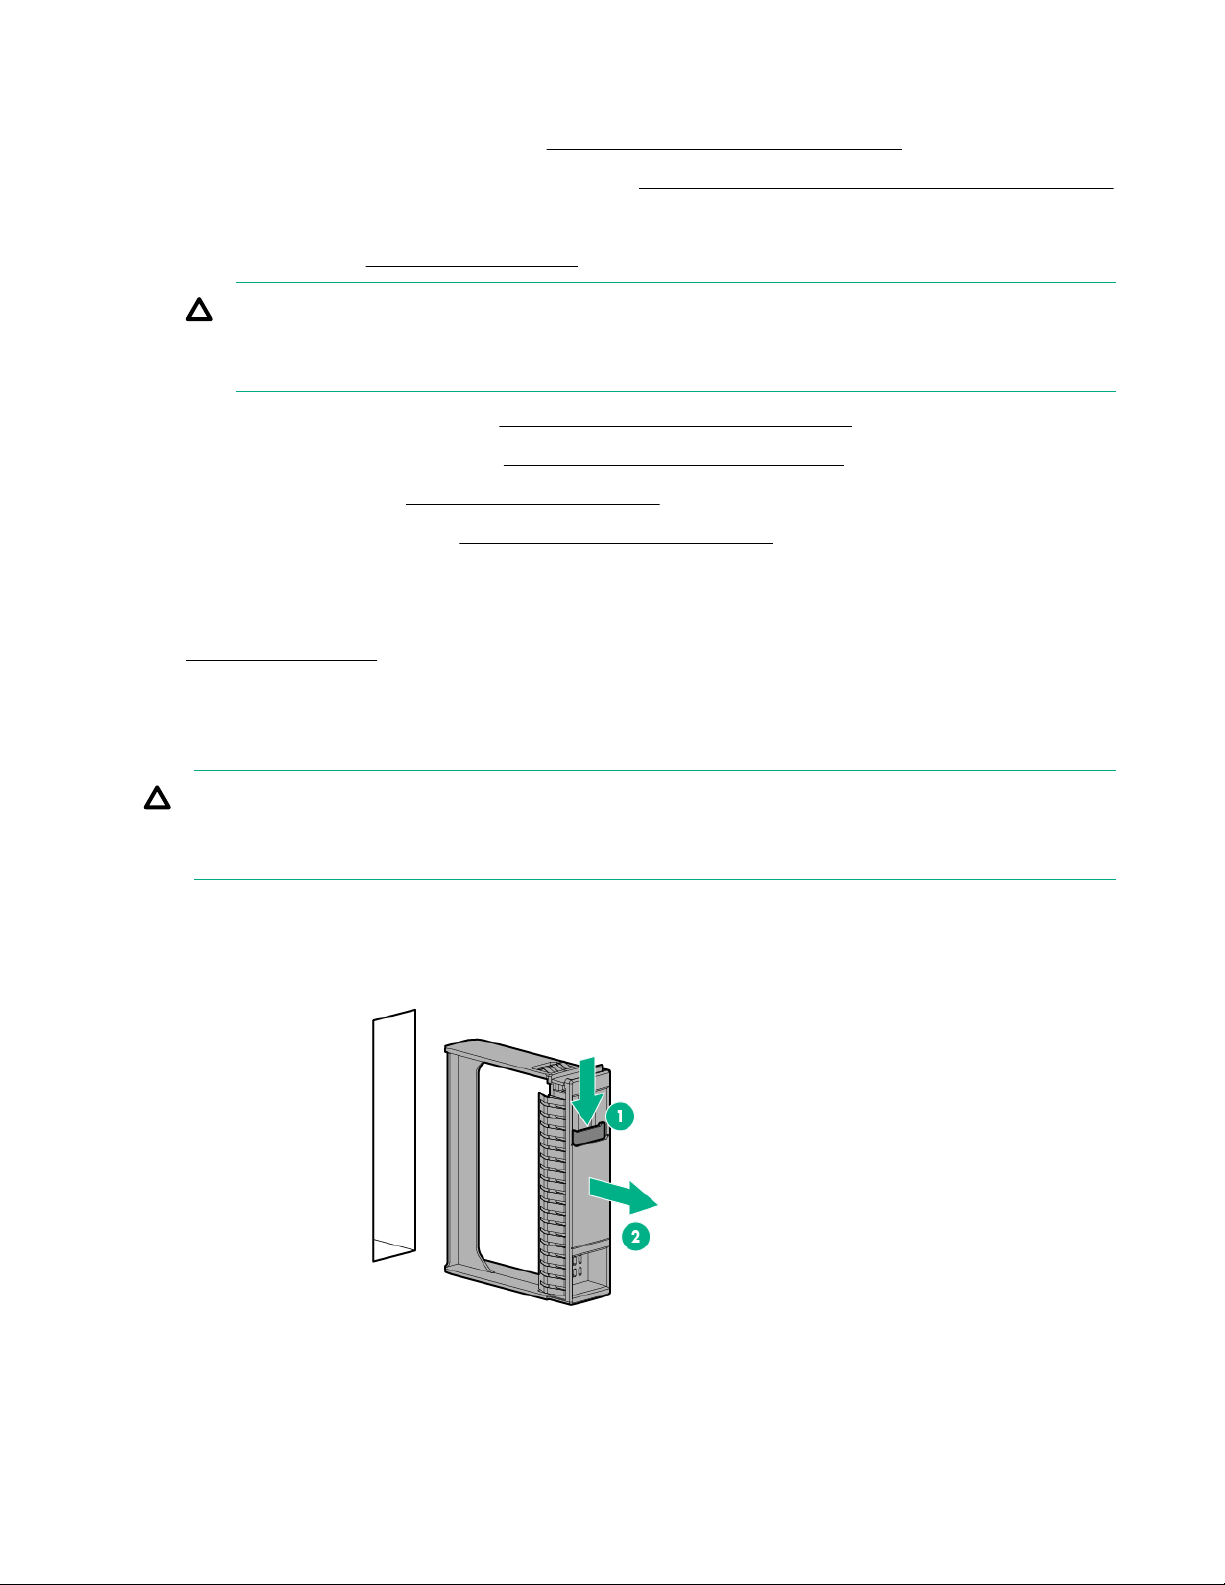
22. If removed, do one of the following:
• Install the processor mezzanine tray (Installing a processor mezzanine tray on page 102).
• Install the 2P pass-through performance board (Installing the 2P pass-through performance board
on page 107).
23. Install the air baffle (Installing the air baffle on page 41).
CAUTION:
To avoid damaging the connectors, always install the air baffle into the server before installing the
riser cages.
24. Install the primary PCIe riser cage (Installing the primary PCIe riser cage on page 38).
25. Install the butterfly PCIe riser cage (Installing a butterfly PCIe riser cage on page 80).
26. Install the access panel (Installing the access panel on page 37).
27. Install the server into the rack (Installing the server into the rack on page 53).
28. Connect each power cord to the server.
29. Connect each power cord to the power source.
30. Power up the server on page 32.
Installing a hot-plug SAS or SATA drive
CAUTION:
To prevent improper cooling and thermal damage, do not operate the server unless all device bays are
populated with either a component or a blank.
Procedure
1. Remove the drive blank.
2. Prepare the drive.
74 Installing a hot-plug SAS or SATA drive
Page 75
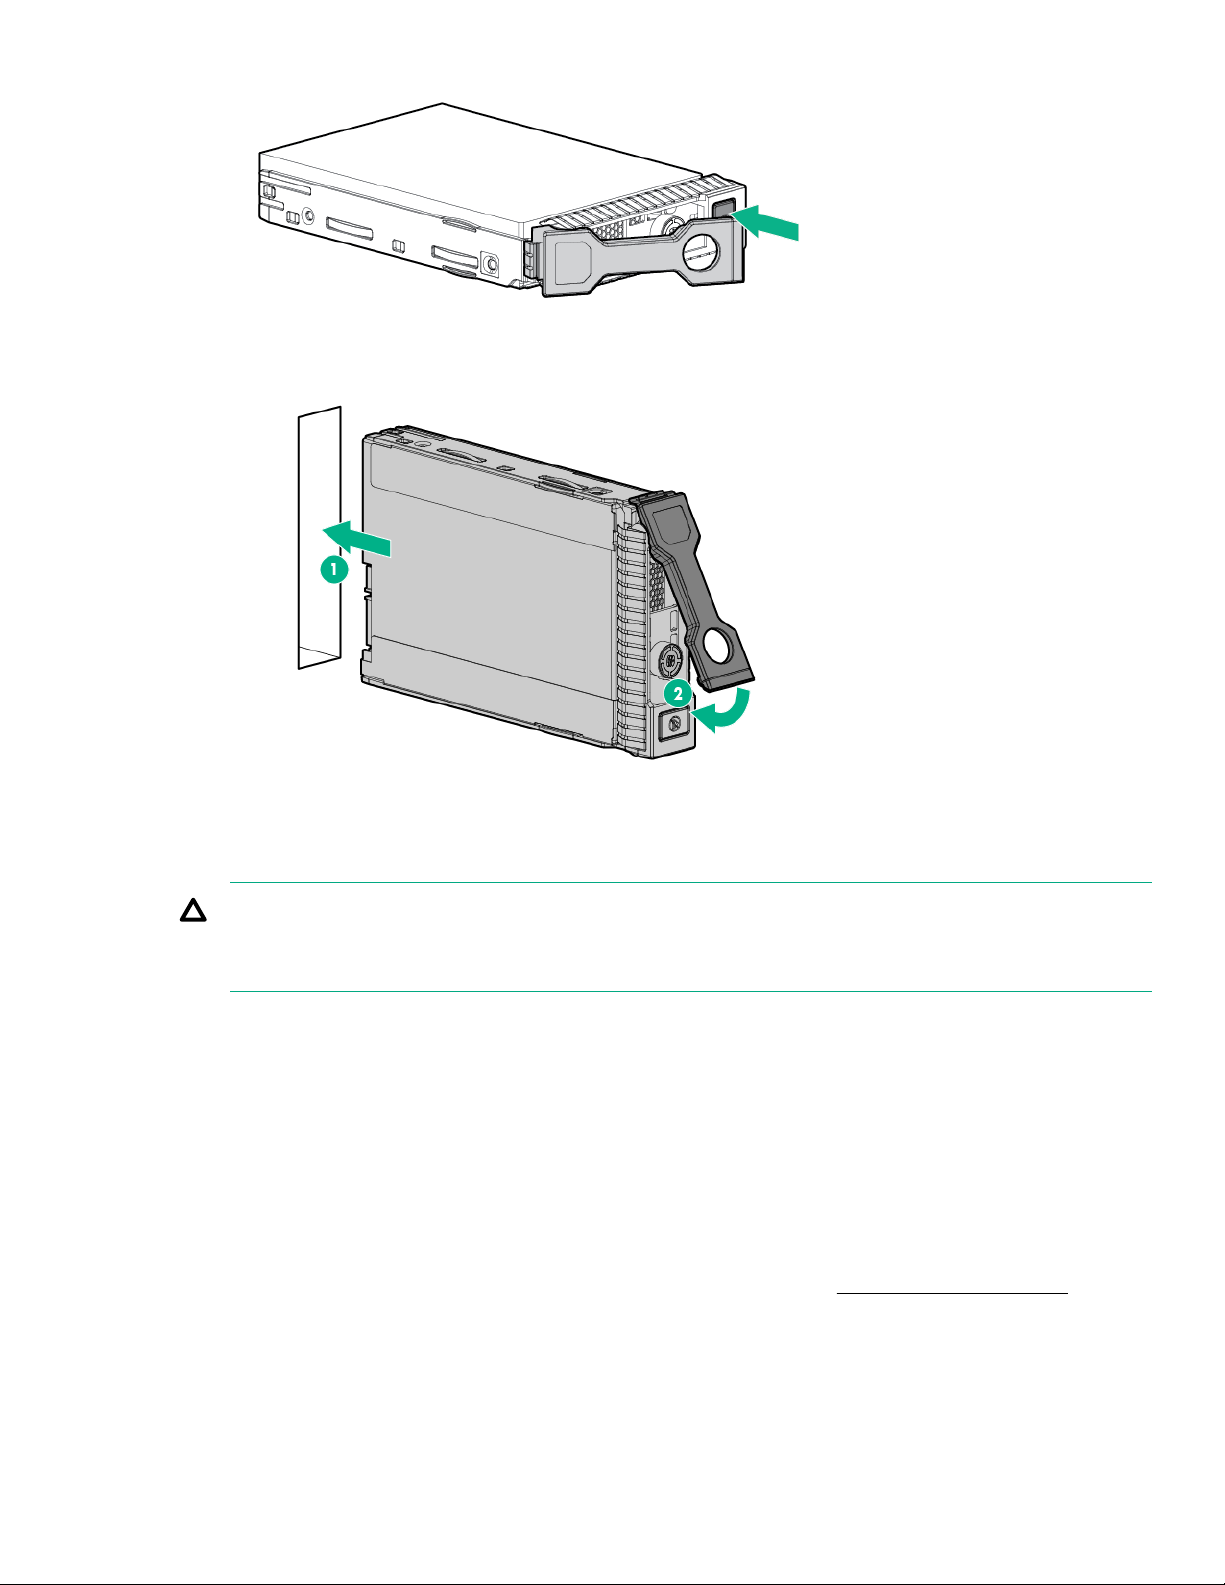
3. Install the drive.
Installing an NVMe drive
CAUTION:
To prevent improper cooling and thermal damage, do not operate the server unless all device bays are
populated with either a component or a blank.
The server supports installation of up to 20 NVMe drives, depending on the drive cage configuration. Observe
the following population guidelines:
• Install a minimum of four NVMe drives in the eight-bay NVMe drive cage.
• Two-drive configurations are supported in the following drive cages:
◦ Six-bay HDD/two-bay NVMe (Premium) drive cage
◦ Two-bay SFF (Premium) drive cage in the universal media bay
For more information on valid NVMe drive configurations and cabling, see NVMe drive cable matrix on page
120.
Procedure
1. Remove the drive blank.
Installing an NVMe drive 75
Page 76
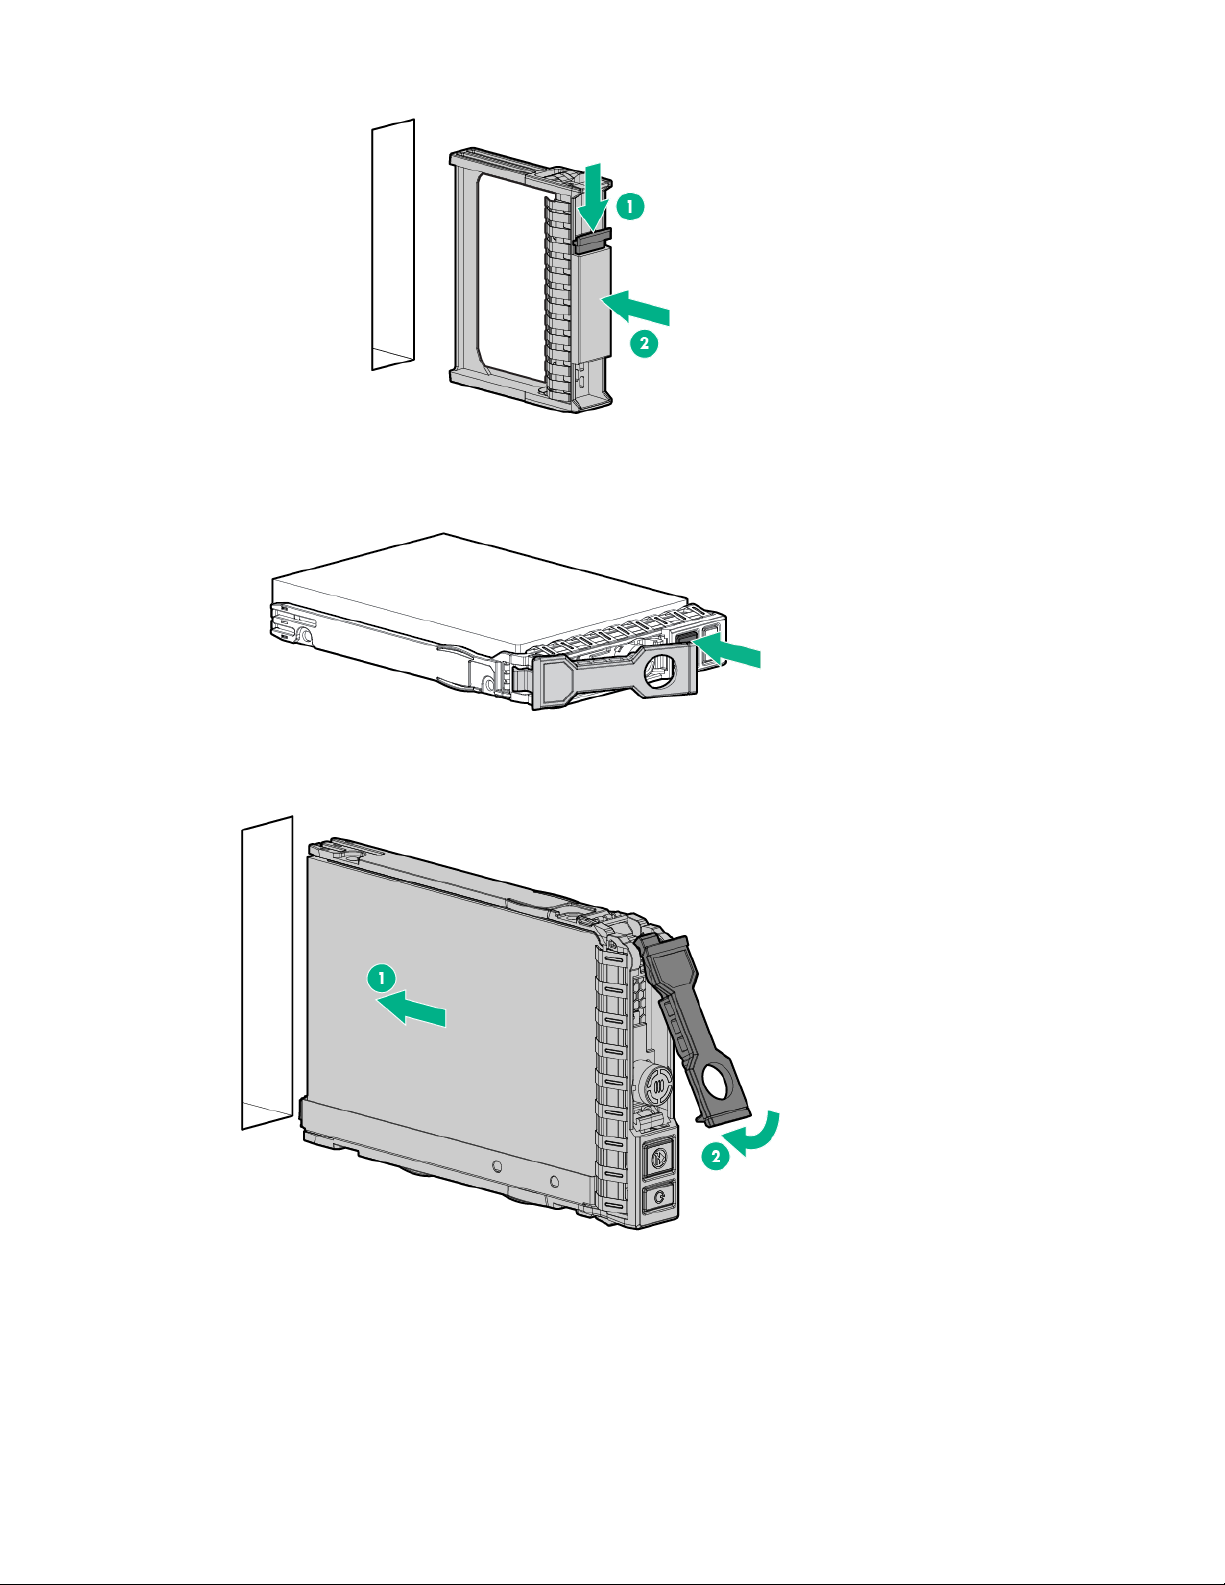
2. Prepare the drive.
3. Install the drive.
4. Observe the LED status of the drive.
76 Installing hardware options
Page 77
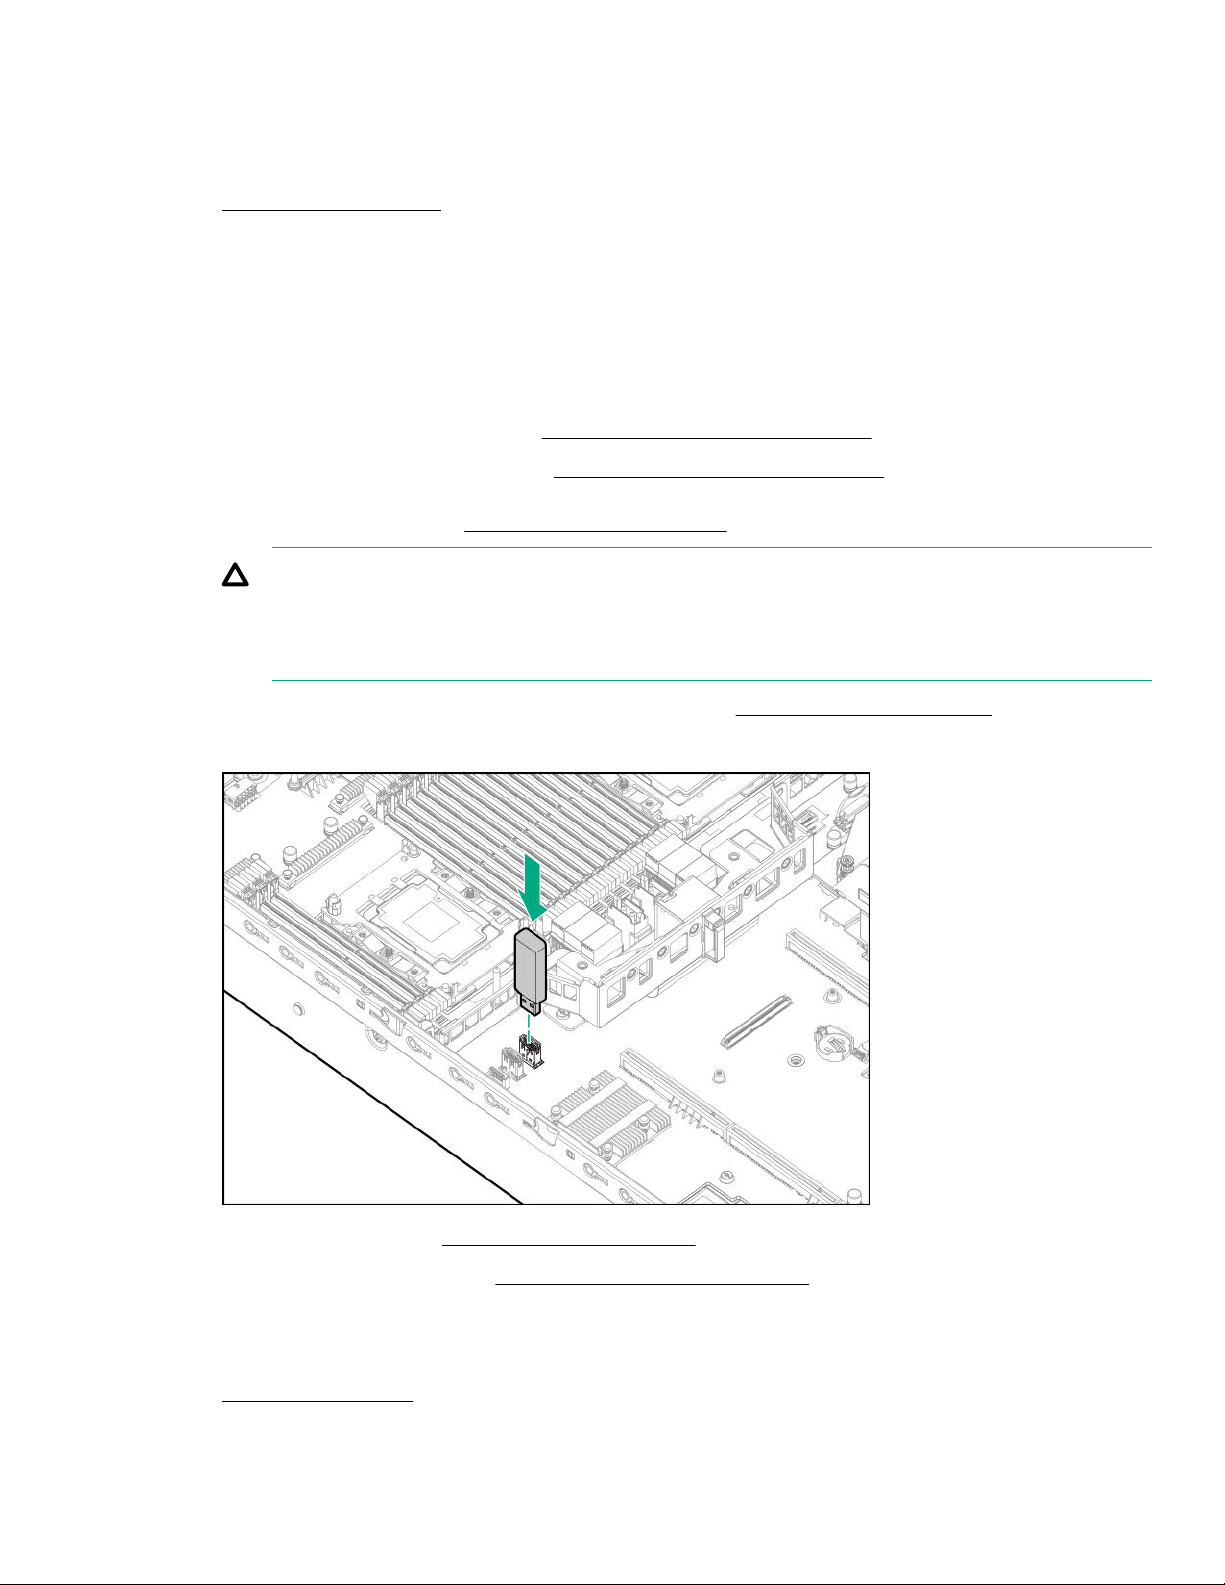
Installing an internal USB drive
Procedure
1. Power down the server on page 32.
2. Remove all power:
a. Disconnect each power cord from the power source.
b. Disconnect each power cord from the server.
3. Do one of the following:
• Extend the server from the rack (Extending the server from the rack on page 32).
• Remove the server from the rack (Removing the server from the rack on page 33).
4. Remove the access panel (Removing the access panel on page 36).
CAUTION:
Do not operate the server for long periods with the access panel open or removed. Operating the
server in this manner results in improper airflow and improper cooling that can lead to thermal
damage.
5. Locate the internal USB connectors on the system board (System board components on page 24).
6. Install the USB drive.
7. Install the access panel (Installing the access panel on page 37).
8. Install the server into the rack (Installing the server into the rack on page 53).
9. Connect each power cord to the server.
10. Connect each power cord to the power source.
11. Power up the server on page 32.
Installing an internal USB drive 77
Page 78
Installing a 4-port NVMe mezzanine card
Prerequisites
Before installing this option, be sure that you have the following:
• The components included with the hardware option kit
• A T-10 Torx screwdriver might be needed to unlock the access panel.
• A primary riser PCIe riser cage with a 4-port NVMe riser card installed.
Procedure
1. Power down the server on page 32.
2. Remove all power:
a. Disconnect each power cord from the power source.
b. Disconnect each power cord from the server.
3. Do one of the following:
• Extend the server from the rack (Extending the server from the rack on page 32).
• Remove the server from the rack (Removing the server from the rack on page 33).
4. Remove the access panel (Removing the access panel on page 36).
CAUTION:
Do not operate the server for long periods with the access panel open or removed. Operating the
server in this manner results in improper airflow and improper cooling that can lead to thermal
damage.
5. Remove the primary PCIe riser cage (Removing a PCIe riser cage on page 39).
NOTE:
If you are not installing a new primary PCIe riser cage that has a 4-port NVMe riser card installed, be
sure to remove the riser card from the existing primary PCIe riser cage, and replace it with a 4-port
NVMe riser card.
6. If installed, remove the butterfly riser cage (Removing a PCIe riser cage on page 39).
7. Remove the air baffle (Removing the air baffle on page 40).
8. If installed, remove the processor mezzanine tray (Removing the processor mezzanine tray on page
45).
9. Remove the fan cage (Removing the fan cage on page 42).
10. Remove the fan cage holders (Removing the fan cage holders on page 44).
11. Install the bracket.
78 Installing a 4-port NVMe mezzanine card
Page 79
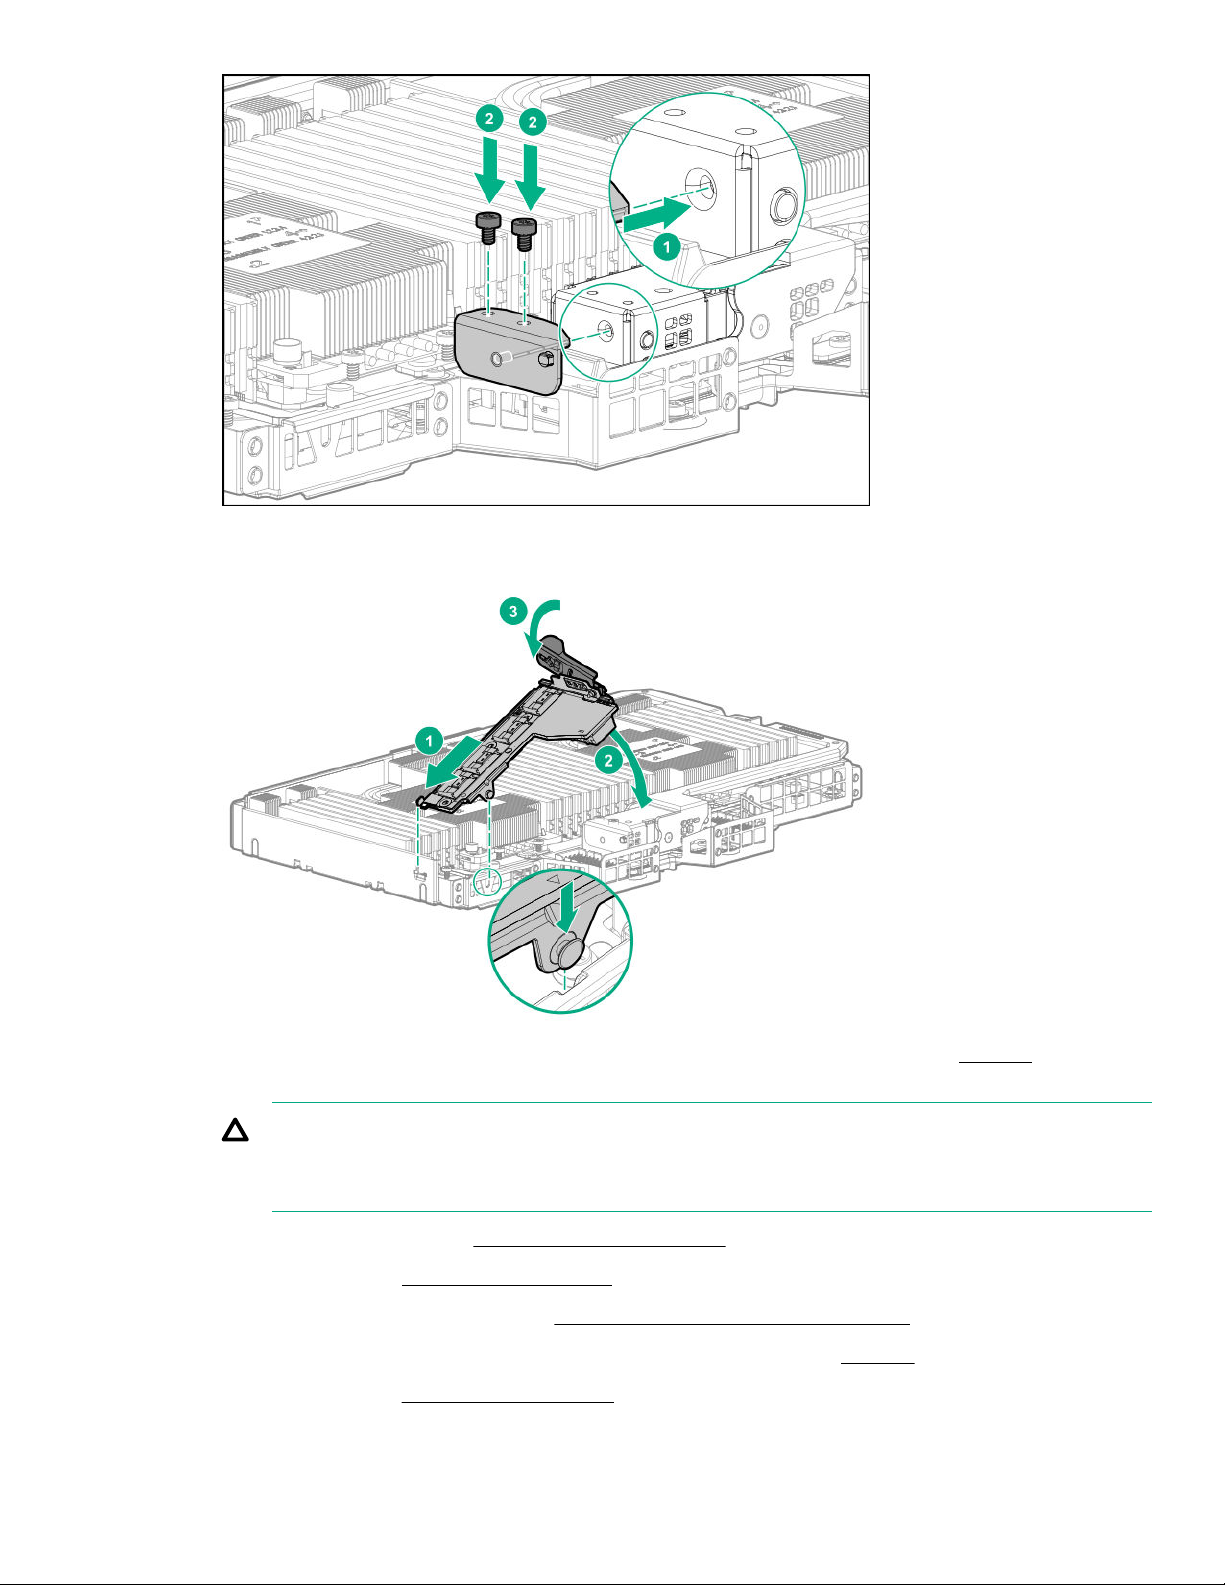
12. Install the mezzanine card. Listen for a click to indicate that the card is fully installed when the handle is
closed.
13. Route the cables depending on the server configuration. For more information, see Cabling on page
118.
CAUTION:
When routing cables, always be sure that the cables are not in a position where they can be
pinched or crimped.
14. Install the fan cage holders (Installing fan cage holders on page 45).
15. Install the fan cage (Installing the fan cage on page 43).
16. Install the processor mezzanine tray (Installing a processor mezzanine tray on page 102).
17. Connect the cables to the mezzanine card. For more information, see Cabling on page 118.
18. Install the air baffle (Installing the air baffle on page 41).
Installing hardware options 79
Page 80
CAUTION:
To avoid damaging the connectors, always install the air baffle into the server before installing the
riser cages.
19. Install a primary PCIe riser cage with a 4-port NVMe riser card installed (Installing the primary PCIe
riser cage on page 38).
20. Install the butterfly PCIe riser cage (Installing a butterfly PCIe riser cage on page 80).
21. Install the access panel (Installing the access panel on page 37).
22. Install the server into the rack (Installing the server into the rack on page 53).
23. Connect each power cord to the server.
24. Connect each power cord to the power source.
25. Power up the server on page 32.
Installing a butterfly PCIe riser cage
CAUTION:
To prevent damage to the server or expansion boards, power down the server and remove all AC power
cords before removing or installing the PCI riser cage.
Prerequisites
Before installing this option, be sure that you have the following:
• The components included with the hardware option kit
• A T-10 Torx screwdriver might be needed to unlock the access panel.
Procedure
1. Power down the server on page 32.
2. Remove all power:
a. Disconnect each power cord from the power source.
b. Disconnect each power cord from the server.
3. Do one of the following:
• Extend the server from the rack (
• Remove the server from the rack (Removing the server from the rack on page 33).
4. Remove the access panel (Removing the access panel on page 36).
Extending the server from the rack on page 32).
80 Installing a butterfly PCIe riser cage
Page 81
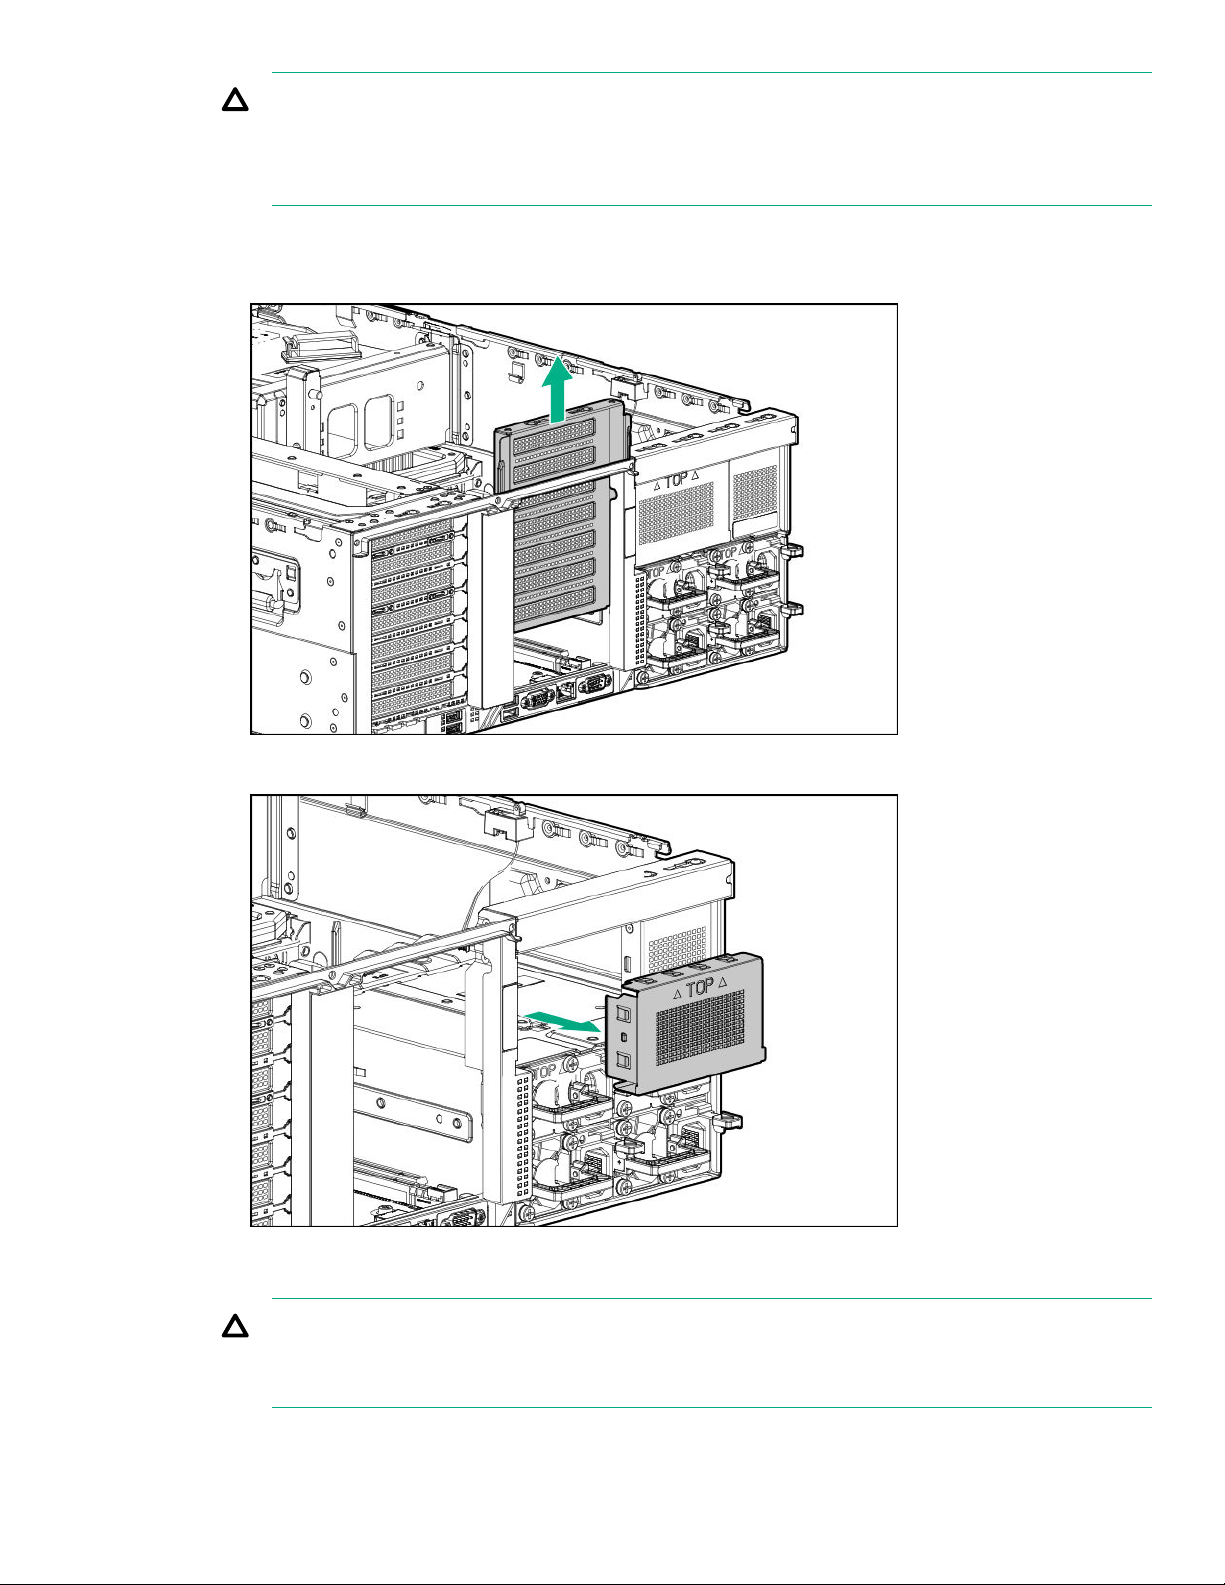
CAUTION:
Do not operate the server for long periods with the access panel open or removed. Operating the
server in this manner results in improper airflow and improper cooling that can lead to thermal
damage.
5. Remove the butterfly riser cage blanks.
a. Remove the secondary slot blank.
b. Remove the tertiary slot blank.
6. Install the riser cage.
CAUTION:
To avoid damaging the connectors, always install the air baffle into the server before installing the
riser cages.
Installing hardware options 81
Page 82
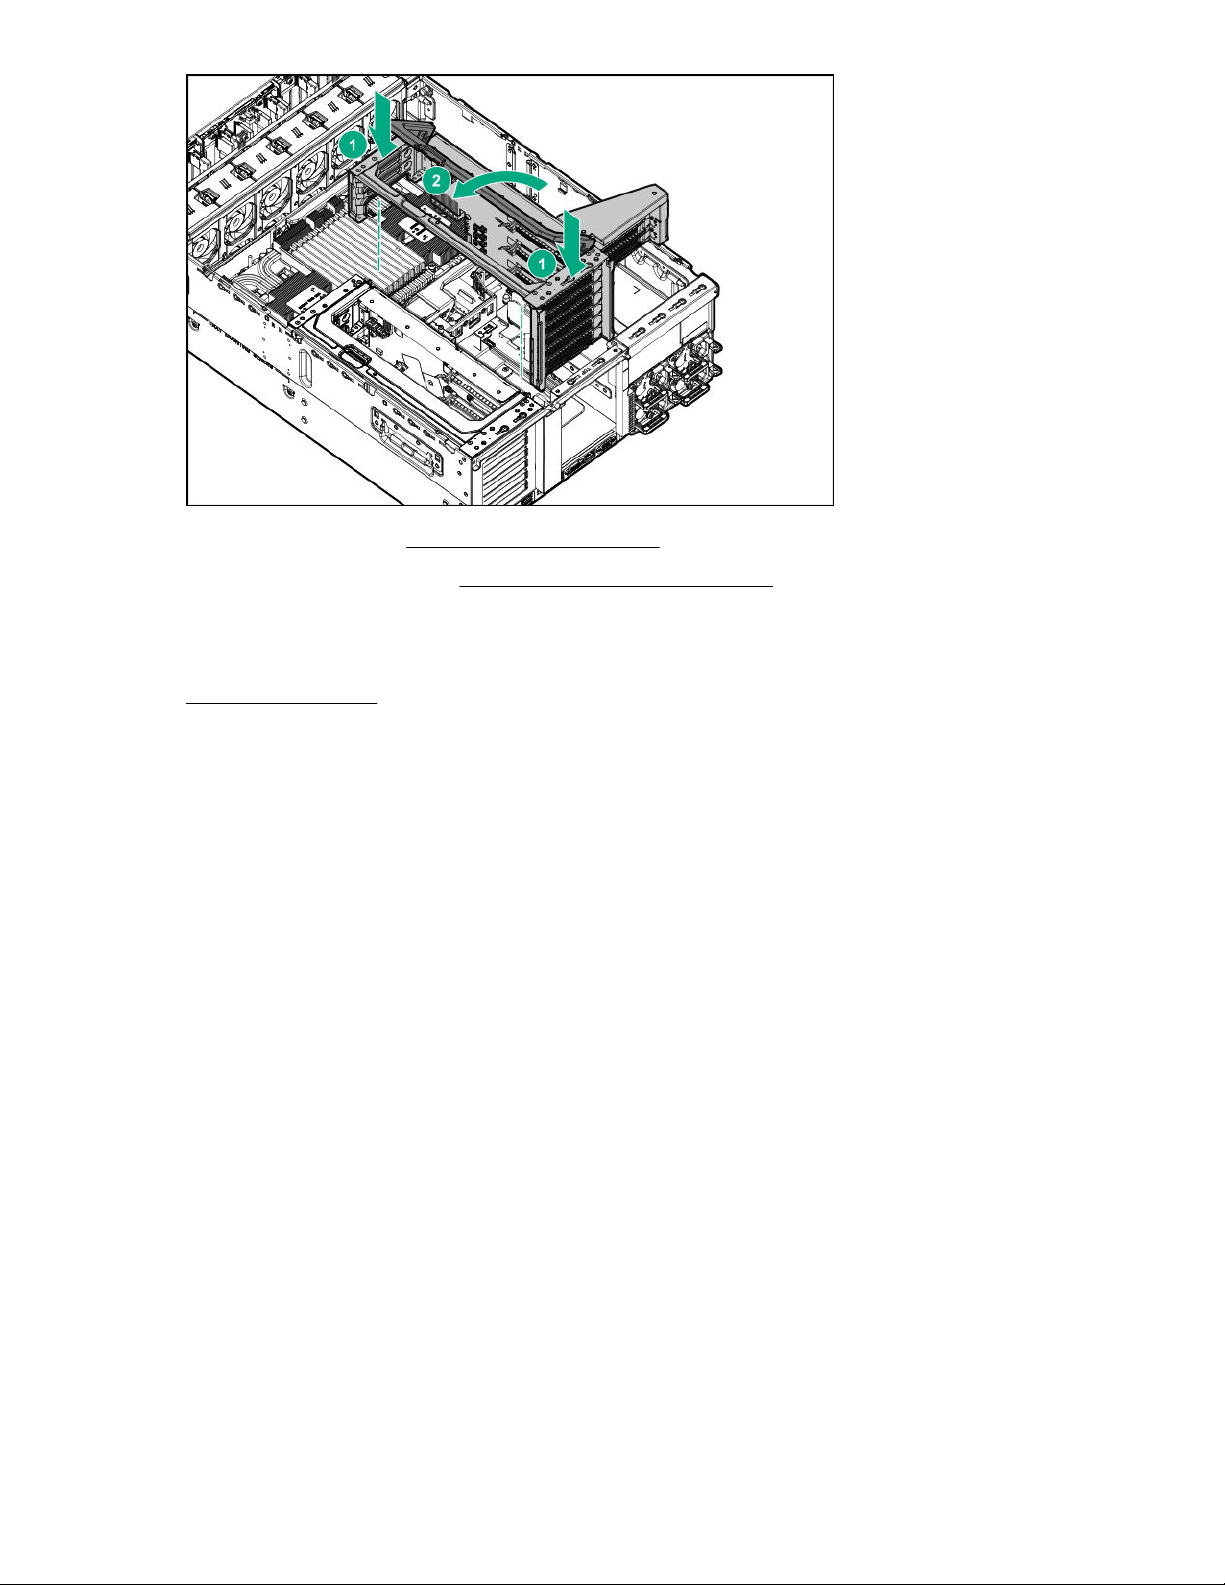
7. Install the access panel (Installing the access panel on page 37).
8. Install the server into the rack (Installing the server into the rack on page 53).
9. Connect each power cord to the server.
10. Connect each power cord to the power source.
11. Power up the server on page 32.
Riser board options
The server supports two PCIe riser cages that can be configured with different riser boards.
Primary PCIe riser cage
The primary PCIe riser cage supports installation of the following riser boards:
• Six-slot riser board with four x8, two x16, and two x8 Slimline NVMe connections.
• Seven-slot riser board with four x8 and three x16 connections.
• Four-port riser board with four x8 Slimline NVMe connections.
Butterfly PCIe riser cage (Secondary PCIe slot)
The butterfly PCIe riser cage supports installation of the following riser boards in the secondary PCIe slot:
• Six-slot riser board with four x8, two x16, and two x8 Slimline NVMe connections.
• Seven-slot riser board with four x8 and three x16 connections.
Butterfly PCIe riser cage (Tertiary PCIe slot)
The butterfly PCIe riser cage supports installation of a two-slot riser board with two x8 connections in the
tertiary PCIe slot.
82 Riser board options
Page 83
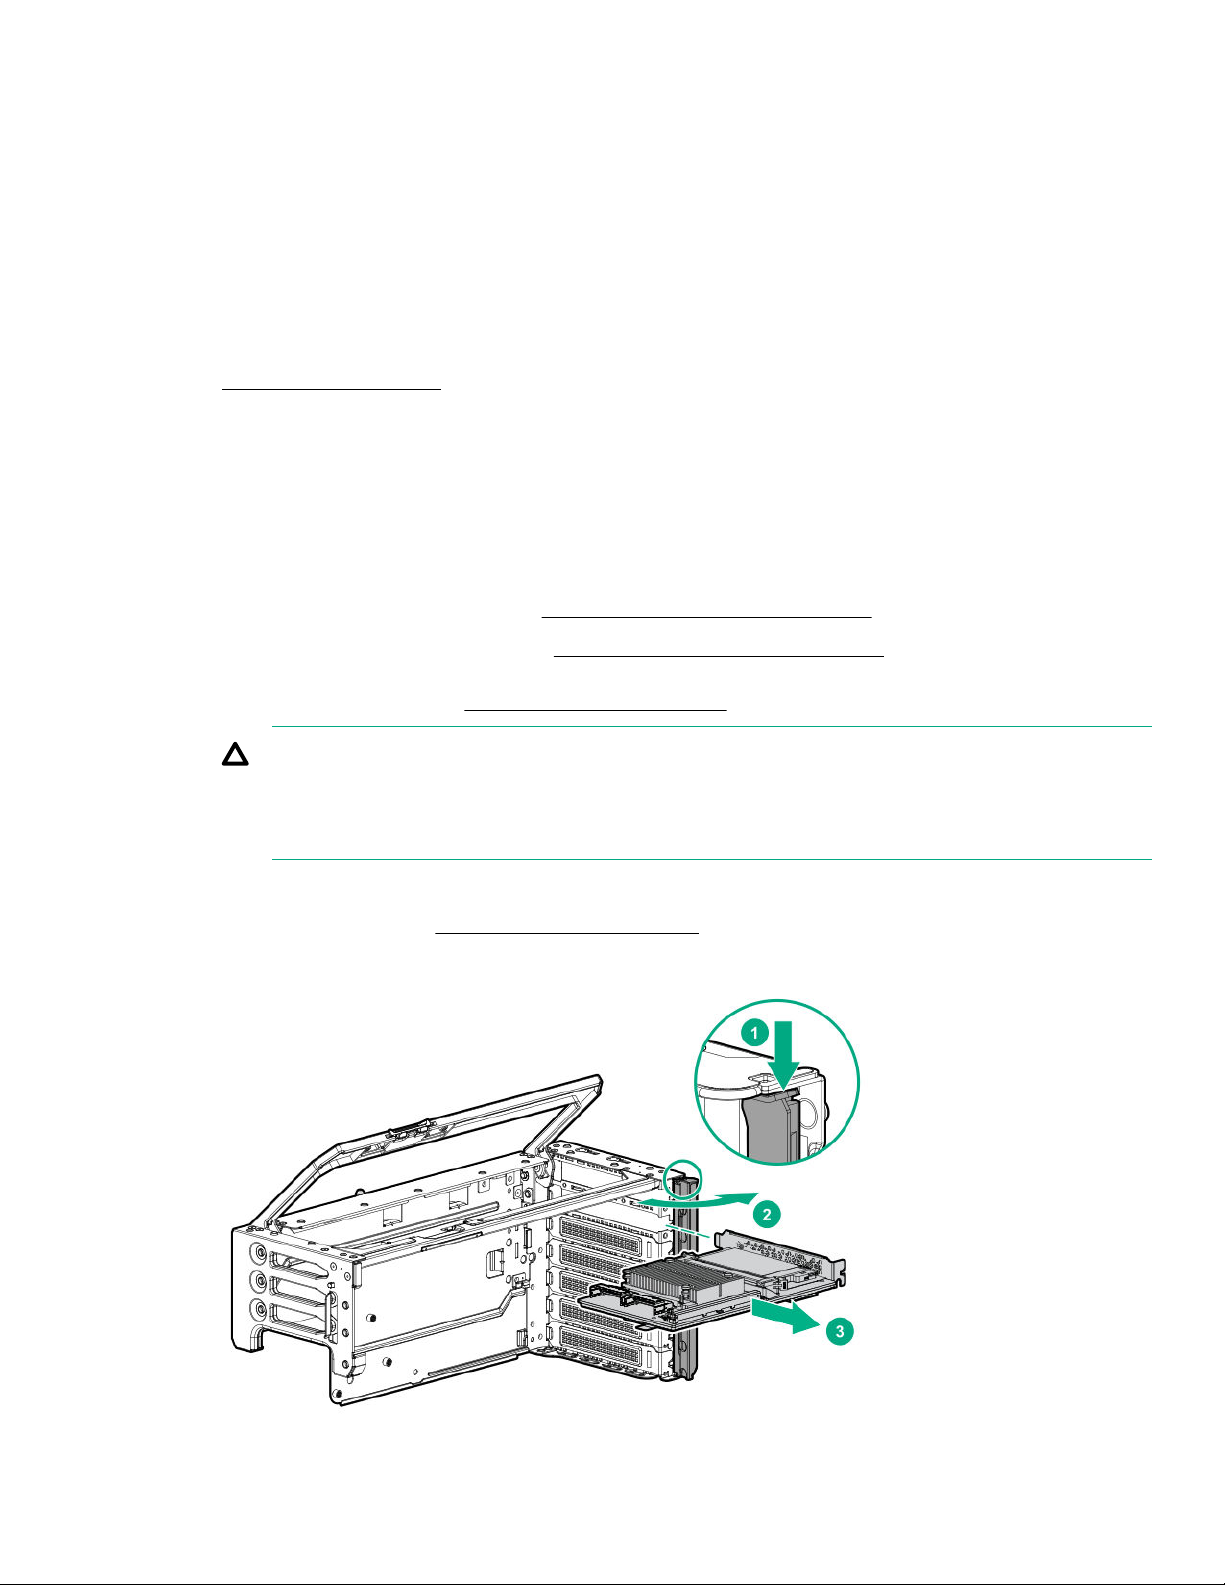
Installing a riser board into the primary PCIe riser cage
Prerequisites
Before installing this option, be sure that you have the following:
• T-10 Torx screwdriver
• The components included with the hardware option kit
Procedure
1. Power down the server on page 32.
2. Remove all power:
a. Disconnect each power cord from the power source.
b. Disconnect each power cord from the server.
3. Do one of the following:
• Extend the server from the rack (
• Remove the server from the rack (Removing the server from the rack on page 33).
4. Remove the access panel (Removing the access panel on page 36).
CAUTION:
Do not operate the server for long periods with the access panel open or removed. Operating the
server in this manner results in improper airflow and improper cooling that can lead to thermal
damage.
5. Disconnect all cables attached to the expansion boards in the PCIe riser cage.
6. Remove the riser cage (Removing a PCIe riser cage on page 39).
7. If installed, remove any expansion boards installed on the riser board.
Extending the server from the rack on page 32).
Installing a riser board into the primary PCIe riser cage 83
Page 84
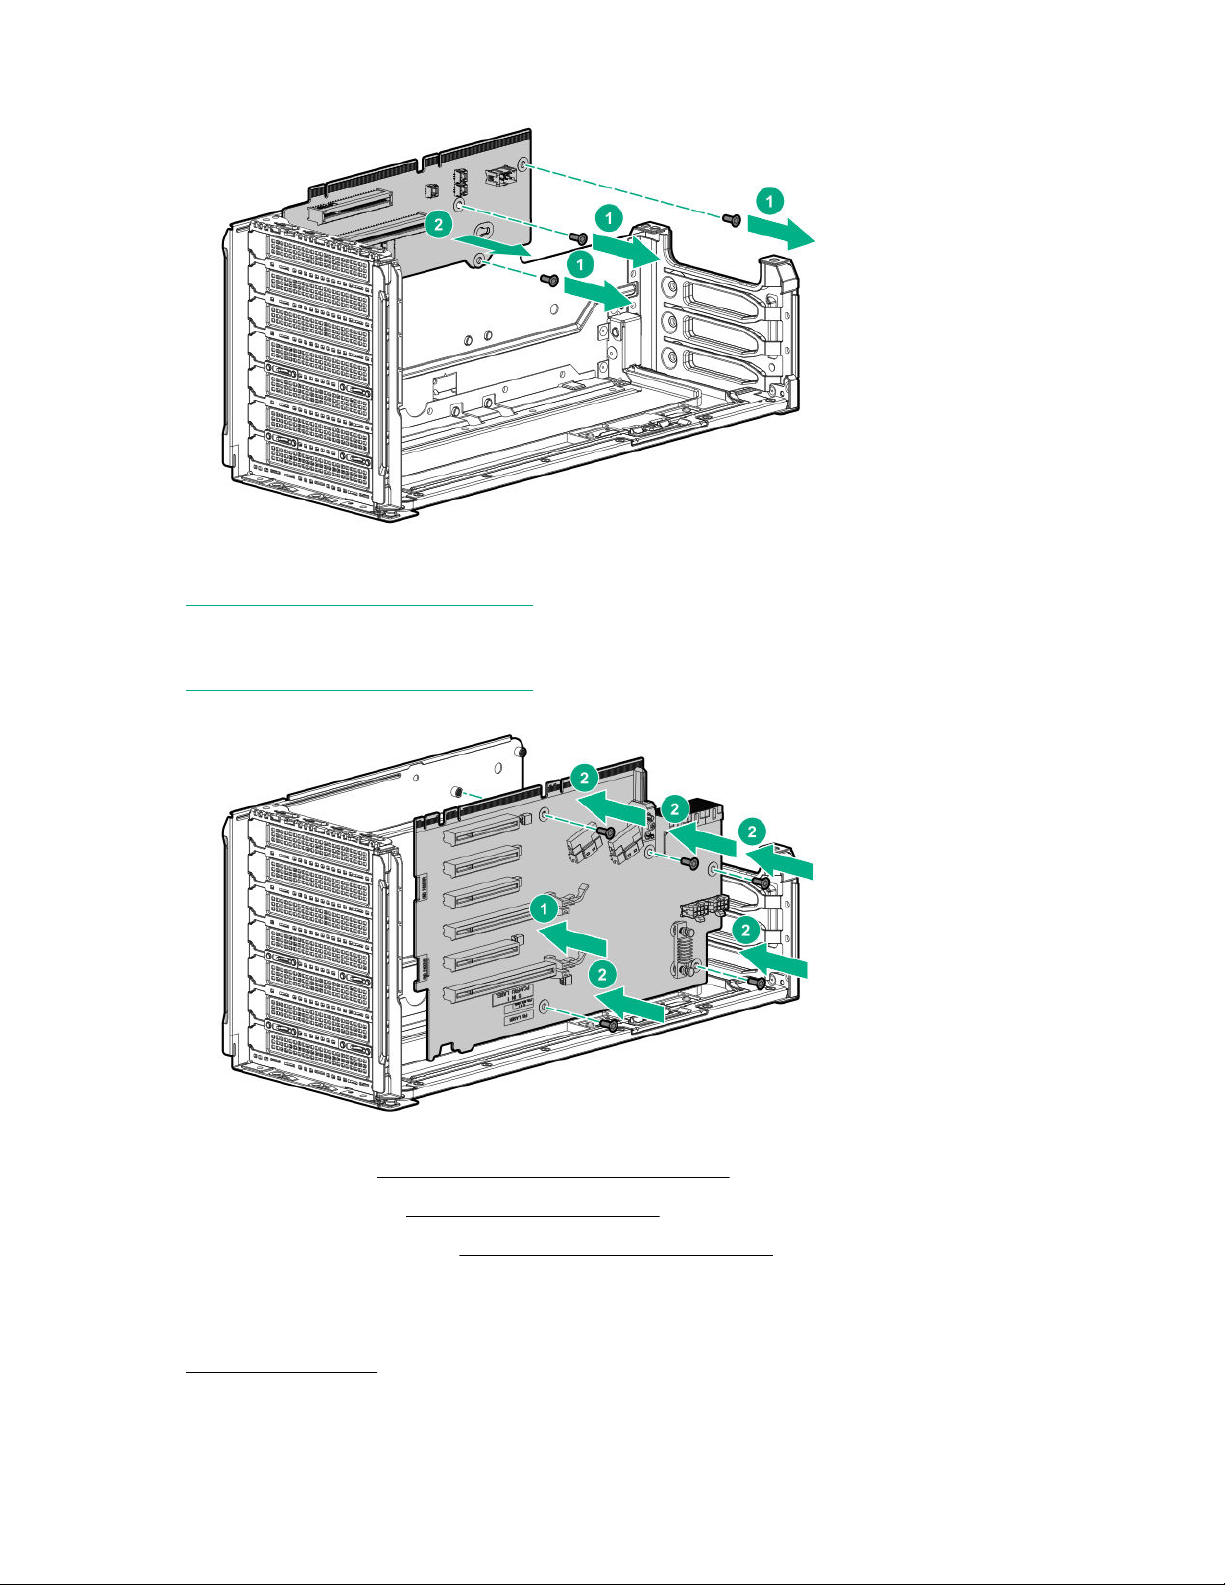
8. Remove the riser board installed in the riser cage.
9. Align the screw holes on the riser board with the holes on the riser cage, and then install the riser board.
NOTE:
Your riser board might appear different.
10. Install the riser cage (Installing the primary PCIe riser cage on page 38).
11. Install the access panel (Installing the access panel on page 37).
12. Install the server into the rack (Installing the server into the rack on page 53).
13. Connect each power cord to the server.
14. Connect each power cord to the power source.
15. Power up the server on page 32.
84 Installing hardware options
Page 85
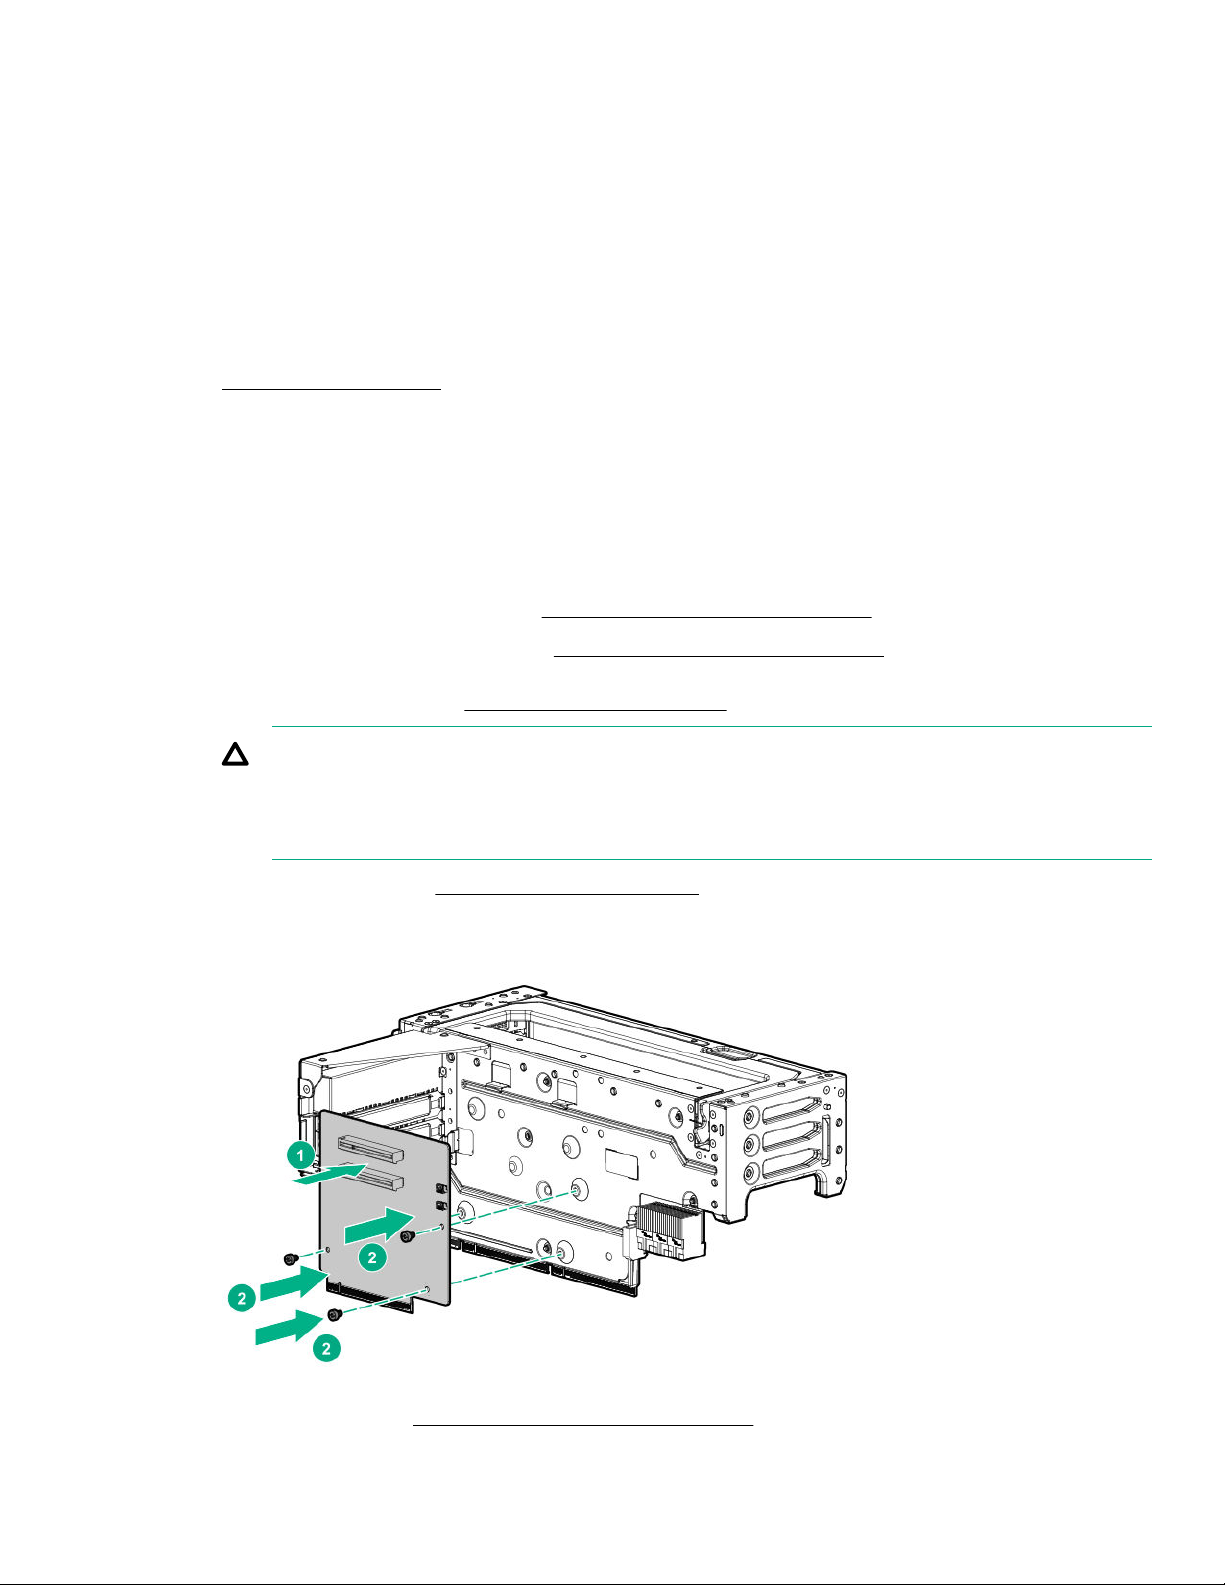
Installing a riser board into the butterfly PCIe riser cage
Prerequisites
Before installing this option, be sure that you have the following:
• A T-10 Torx screwdriver might be needed to unlock the access panel.
• The components included with the hardware option kit
Procedure
1. Power down the server on page 32.
2. Remove all power:
a. Disconnect each power cord from the power source.
b. Disconnect each power cord from the server.
3. Do one of the following:
• Extend the server from the rack (
• Remove the server from the rack (Removing the server from the rack on page 33).
4. Remove the access panel (Removing the access panel on page 36).
CAUTION:
Do not operate the server for long periods with the access panel open or removed. Operating the
server in this manner results in improper airflow and improper cooling that can lead to thermal
damage.
5. Remove the riser cage (Removing a PCIe riser cage on page 39).
6. Install the riser board.
Extending the server from the rack on page 32).
7. Install the riser cage (Installing a butterfly PCIe riser cage on page 80).
Installing a riser board into the butterfly PCIe riser cage 85
Page 86
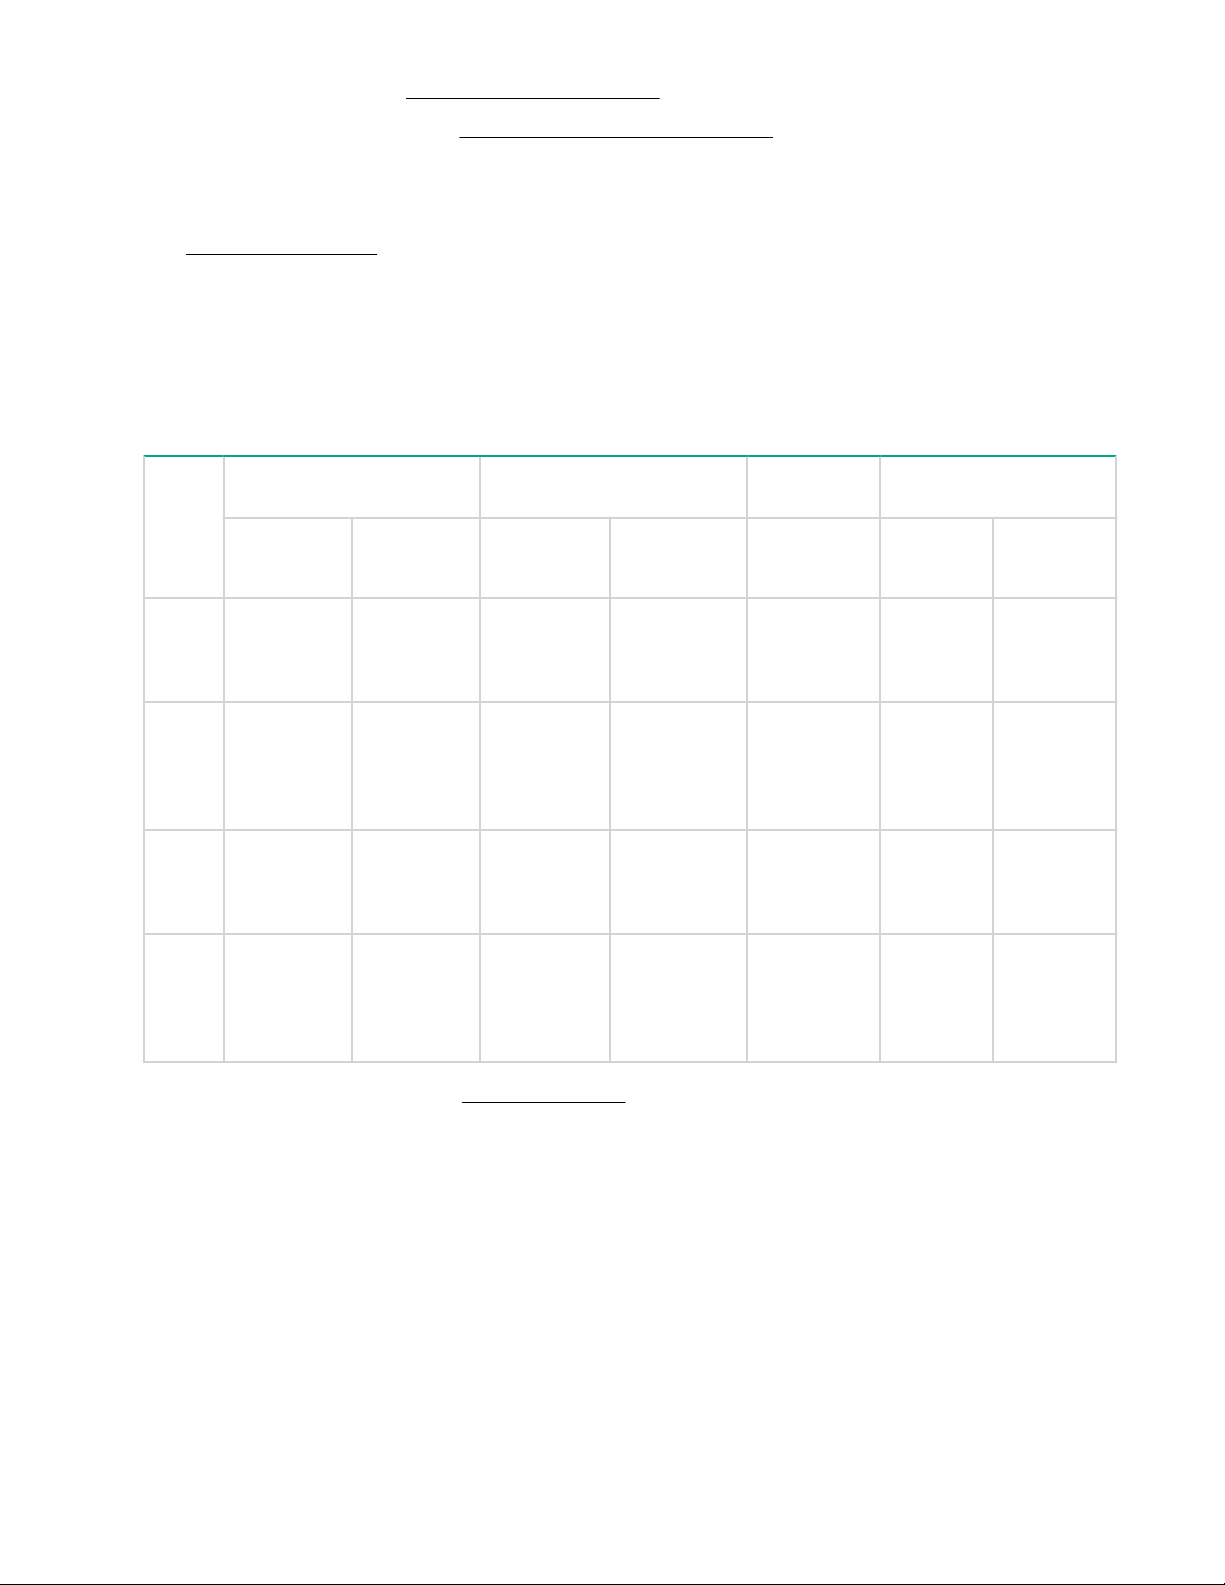
8. Install the access panel (Installing the access panel on page 37).
9. Install the server into the rack (Installing the server into the rack on page 53).
10. Connect each power cord to the server.
11. Connect each power cord to the power source.
12. Power up the server on page 32.
Expansion slot options
Processor-to-PCIe slot assignment
The PCIe slots are mapped to specific processors, as described in the following table.
Proc Primary riser Secondary riser Tertiary
riser
7-slot PCIe
1 Slots 5, 6, 7 Slots 5, 6, 7
2 — — Slots 12, 13,14Slots 12, 13,
3 Slots 1, 2, 3,4Slots 2, 3, 4
4 — — Slots 8, 9,
6-slot
+ NVMe
+ 2 NVMe
(J4)*
+ 2 NVMe
(J3)*
7-slot PCIe
— — — 8 NVMe —
— — — — 8 NVMe
10, 11
6-slot
+ NVMe
14
+ 2 NVMe
(J3)*
Slots 9, 10,
11
+ 2 NVMe
(J4)*
2-slot PCIe
Slots 15, 16 — —
— — —
Primary 8x2 NVMe
riser
NVMe
slim
NVMe
Mezz
* To locate the J3 and J4 ports, see 6-slot riser board on page 30.
For example, PCIe slot 8 is operational when:
• The 7-slot PCIe riser board is installed in the butterfly riser cage.
• Processor 4 is installed.
86 Expansion slot options
Page 87
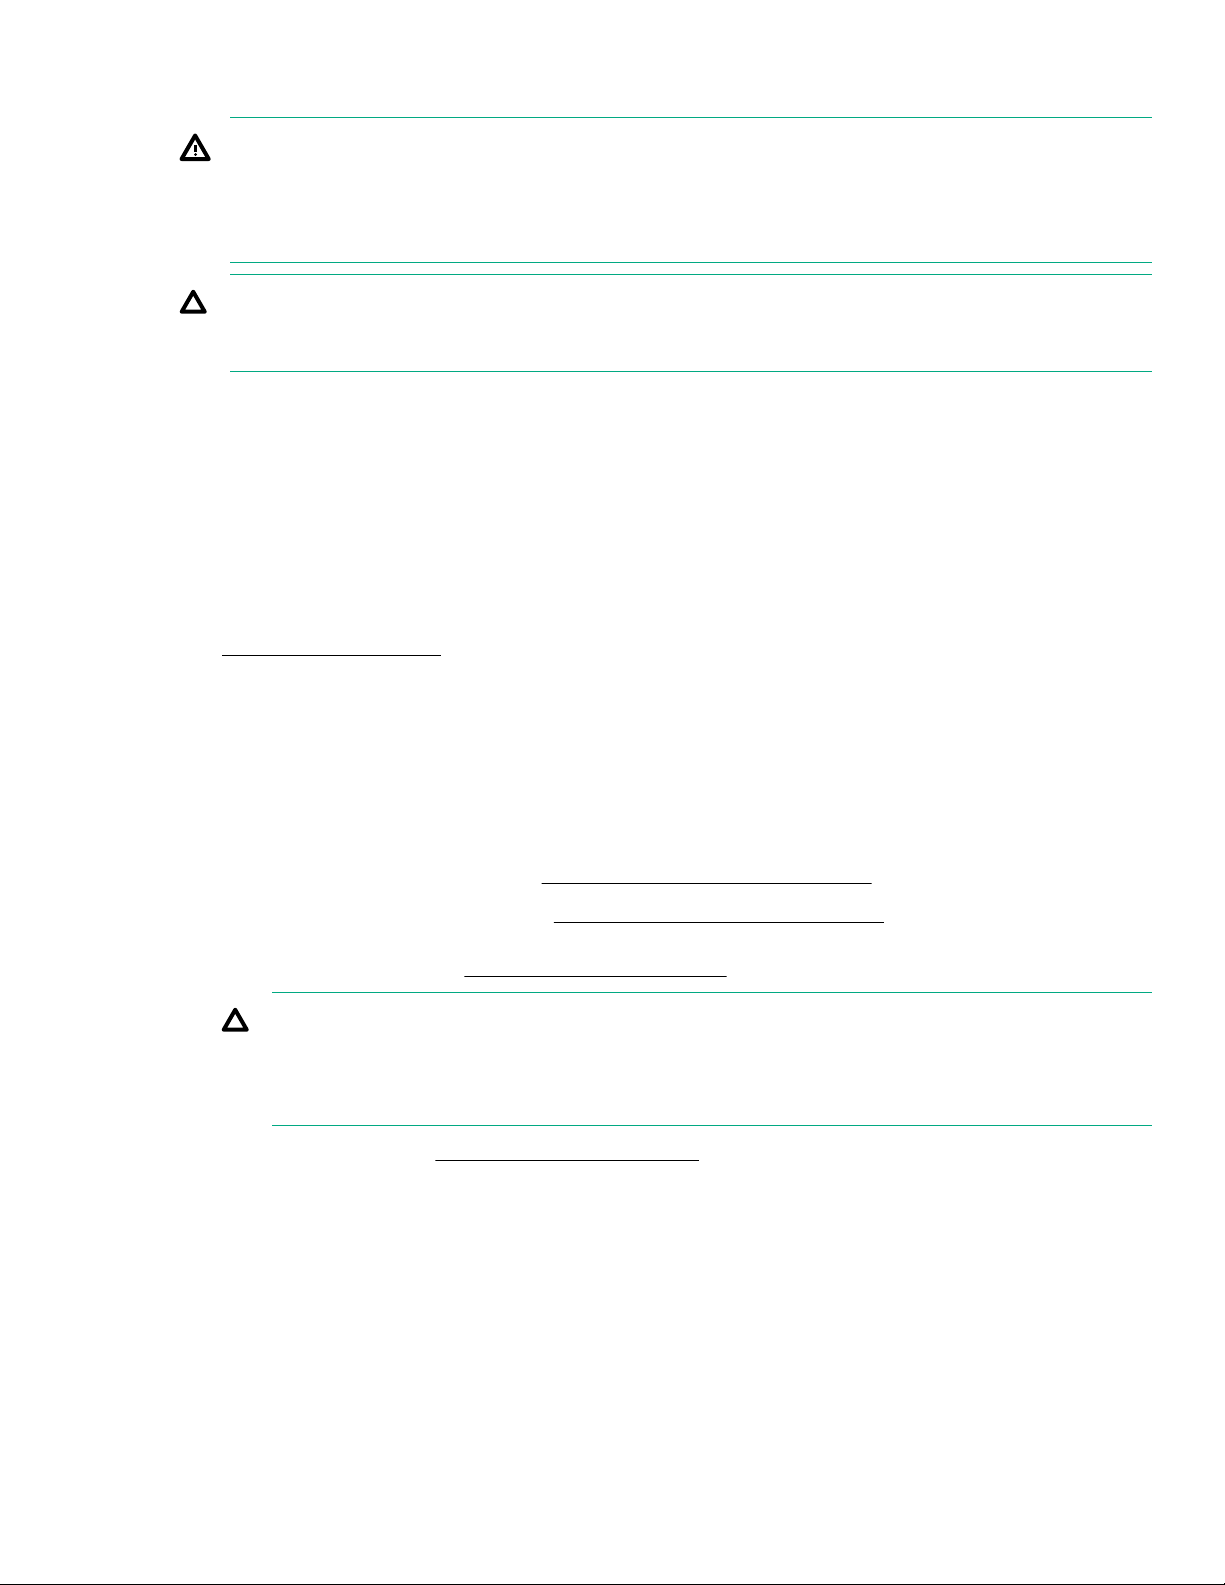
Installing an expansion board
WARNING:
To reduce the risk of personal injury, electric shock, or damage to the equipment, remove power from
the server by removing the power cord. The front panel Power On/Standby button does not shut off
system power. Portions of the power supply and some internal circuitry remain active until AC power is
removed.
CAUTION:
To prevent improper cooling and thermal damage, do not operate the server unless all PCI slots have
either an expansion slot cover or an expansion board installed.
Prerequisites
Before installing this option, be sure that you have the following:
• The components included with the hardware option kit
• T-10 Torx screwdriver
Procedure
1. Power down the server on page 32.
2. Remove all power:
a. Disconnect each power cord from the power source.
b. Disconnect each power cord from the server.
3. Do one of the following:
• Extend the server from the rack (Extending the server from the rack on page 32).
• Remove the server from the rack (Removing the server from the rack on page 33).
4. Remove the access panel (Removing the access panel on page 36).
CAUTION:
Do not operate the server for long periods with the access panel open or removed. Operating the
server in this manner results in improper airflow and improper cooling that can lead to thermal
damage.
5. Remove the riser cage (Removing a PCIe riser cage on page 39).
6. Remove the expansion slot blank from the riser cage.
The primary PCIe riser cage is shown.
Installing an expansion board 87
Page 88
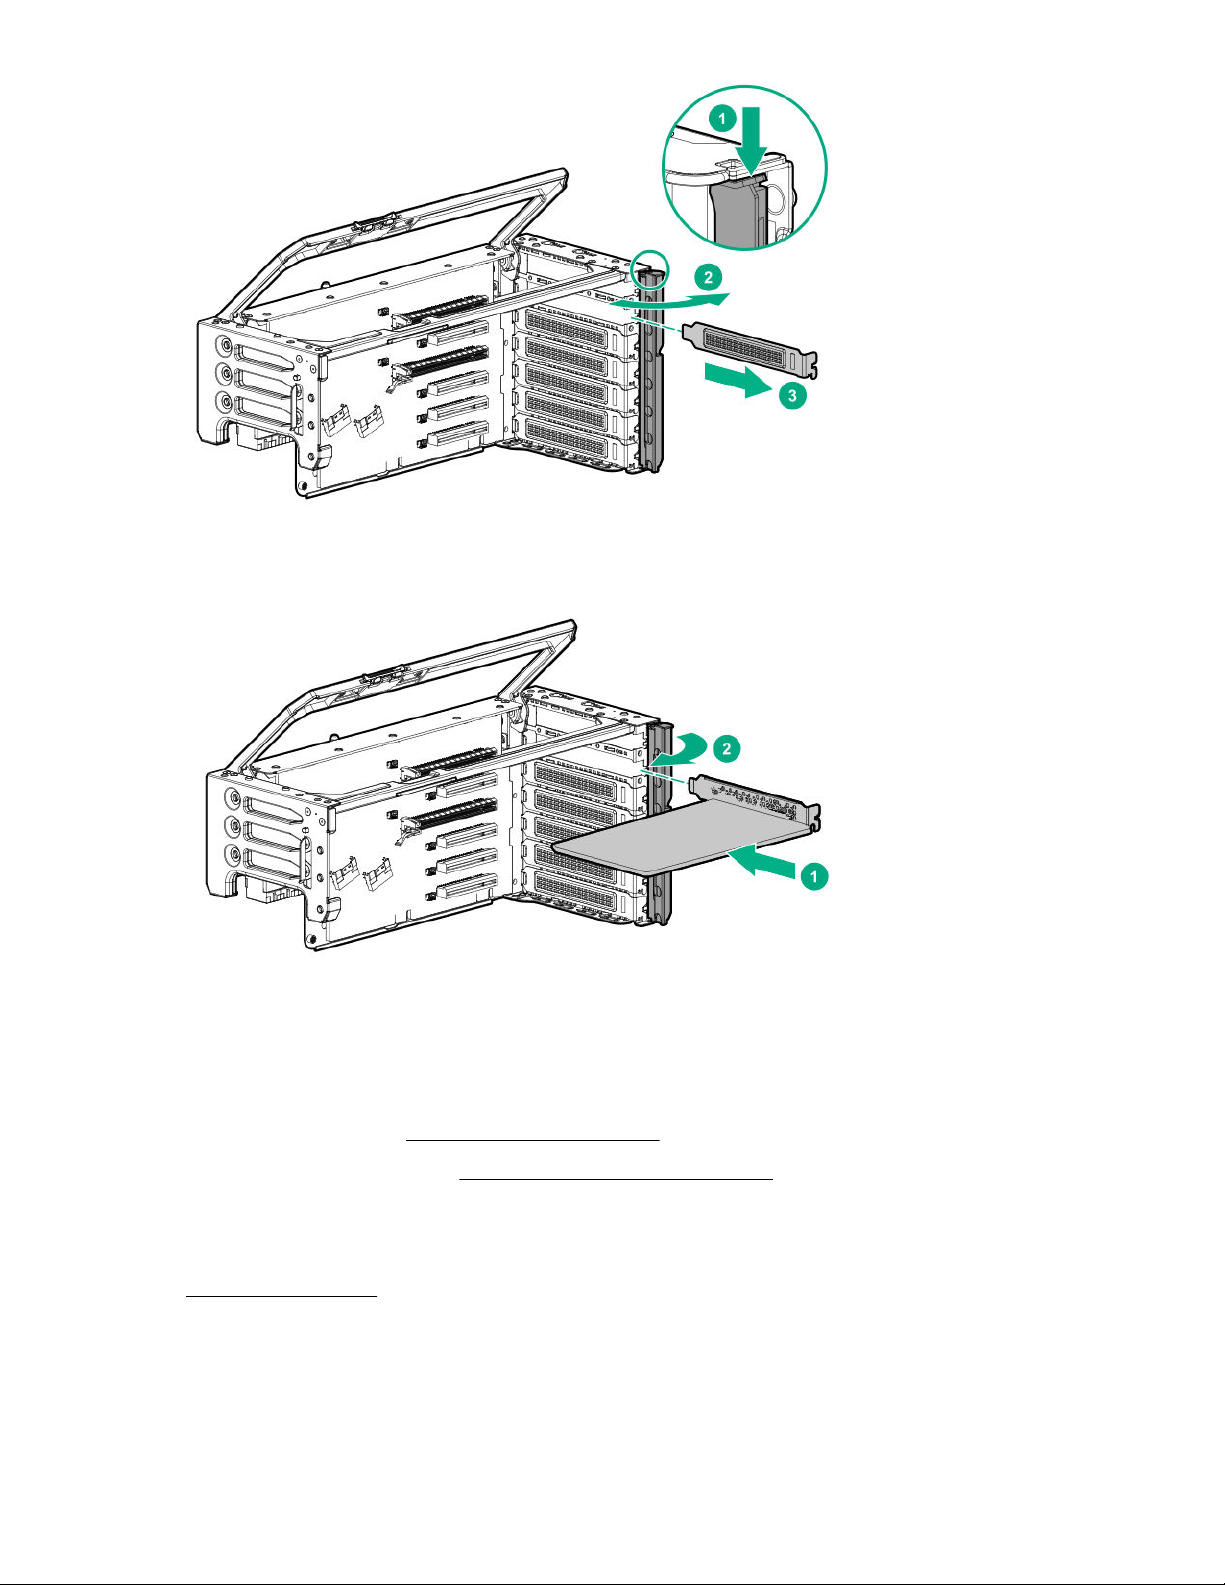
7. Install the expansion board into the PCI riser cage.
8. Install the riser cage.
9. Connect any required internal or external cables to the expansion board. See the documentation that
ships with the expansion board.
10. Install the access panel (Installing the access panel on page 37).
11. Install the server into the rack (Installing the server into the rack on page 53).
12. Connect each power cord to the server.
13. Connect each power cord to the power source.
14. Power up the server on page 32.
Installing the HPE 12G SAS Expander Card
Hewlett Packard Enterprise recommends installing the SAS expander card in the following locations:
88 Installing the HPE 12G SAS Expander Card
Page 89
• 24-drive configuration—Install the expander card into slot 5 of the primary riser cage. A SAS controller
must be installed in slot 6.
• 48-drive configuration—Install the expander cards into slot 5 of the primary riser cage, and into slot 15 of
the butterfly riser cage. SAS controllers must be installed in slots 6 and 16.
To ensure that cables are connected correctly, observe the labels on the cable and component connectors.
Be sure that you have the latest firmware for the controllers and the expander card. To download the latest
firmware, see the Hewlett Packard Enterprise website (http://www.hpe.com/support/hpesc).
WARNING:
To reduce the risk of personal injury, electric shock, or damage to the equipment, remove power from
the server by removing the power cord. The front panel Power On/Standby button does not shut off
system power. Portions of the power supply and some internal circuitry remain active until AC power is
removed.
CAUTION:
To prevent improper cooling and thermal damage, do not operate the server unless all PCI slots have
either an expansion slot cover or an expansion board installed.
Prerequisites
• The components included with the hardware option kit
• Cables for each drive box
• A SAS controller for each expander
Procedure
1. Power down the server on page 32.
2. Remove all power:
a. Disconnect each power cord from the power source.
b. Disconnect each power cord from the server.
3. Do one of the following:
• Extend the server from the rack (Extending the server from the rack on page 32).
• Remove the server from the rack (Removing the server from the rack on page 33).
4. Remove the access panel (Removing the access panel on page 36).
CAUTION:
Do not operate the server for long periods with the access panel open or removed. Operating the
server in this manner results in improper airflow and improper cooling that can lead to thermal
damage.
5. Remove the riser cage (Removing a PCIe riser cage on page 39).
6. Remove the expansion slot blank from slot 5 (primary riser cage) or slot 15 (butterfly riser cage).
Installing hardware options 89
Page 90
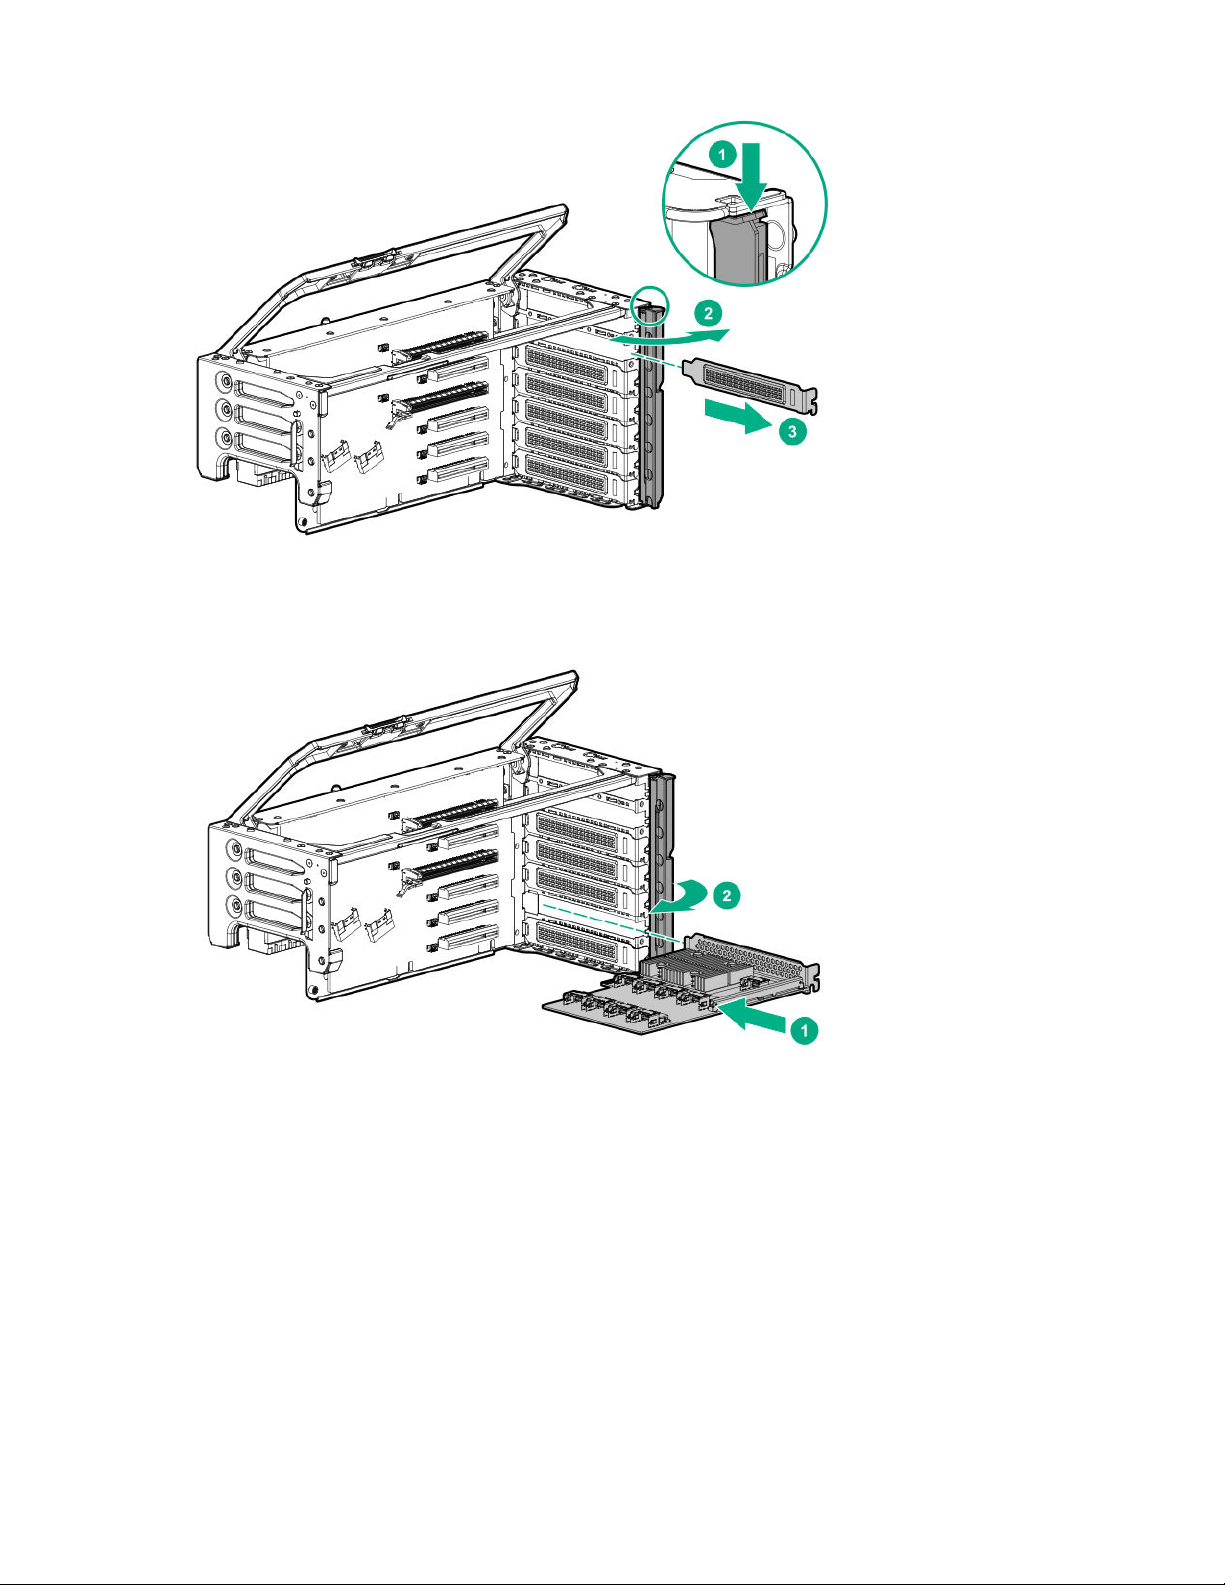
The primary PCIe riser cage is shown.
7. Using the labels on each cable, connect the cables to the SAS expander.
8. Install the 12G SAS expander card into expansion slot 5 or slot 15.
9. Install the riser cage.
10. Using the labels on the cables to determine the correct connections, connect the cables from ports 3 and
4 of the SAS expander card to the corresponding SAS controller in slot 6 or 16.
11. Connect the cables from the SAS expander card to the drive backplanes.
a. Route the cables from the upper drive box backplanes (boxes 1–3) to the SAS expander card in the
butterfly riser cage.
90 Installing hardware options
Page 91
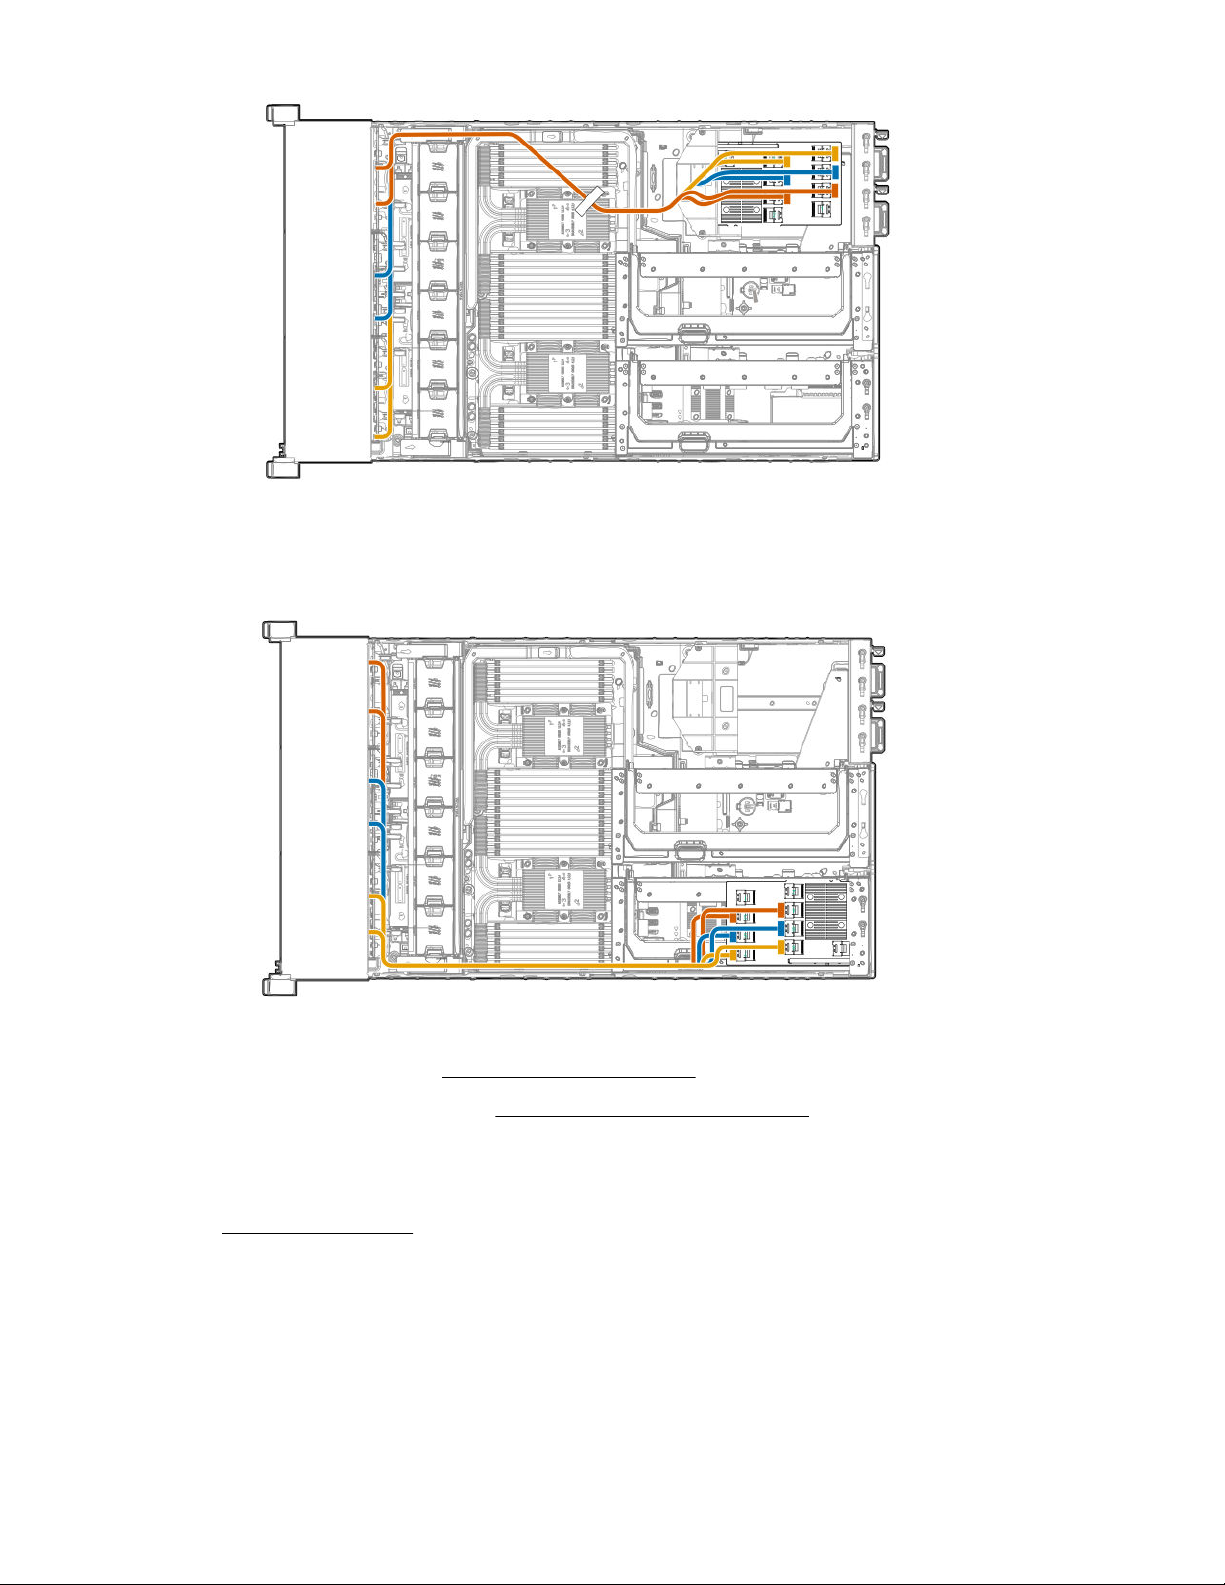
b. Route the cables from the lower drive box backplanes (boxes 4–6) to the SAS expander card in the
primary riser cage.
12. Install the access panel (Installing the access panel on page 37).
13. Install the server into the rack (Installing the server into the rack on page 53).
14. Connect each power cord to the server.
15. Connect each power cord to the power source.
16. Power up the server on page 32.
Installing a GPU card
Up to four double wide GPU cards can be installed in the following locations:
Installing a GPU card 91
Page 92
• Primary riser cage, slots 2 and 4.
• Butterfly riser cage, slots 9 and 11.
WARNING:
To reduce the risk of personal injury, electric shock, or damage to the equipment, remove power from
the server by removing the power cord. The front panel Power On/Standby button does not shut off
system power. Portions of the power supply and some internal circuitry remain active until AC power is
removed.
CAUTION:
To prevent improper cooling and thermal damage, do not operate the server unless all PCI slots have
either an expansion slot cover or an expansion board installed.
Prerequisites
Before installing this option, be sure that you have the following:
• The components included with the hardware option kit
• T-30 Torx screwdriver
• A T-10 Torx screwdriver might be needed to unlock the access panel.
• One cable kit supports up to three GPU cards. Install a second GPU cable kit if installing more than three
GPU cards in the server.
Procedure
1. Power down the server on page 32.
2. Remove all power:
a. Disconnect each power cord from the power source.
b. Disconnect each power cord from the server.
3. Do one of the following:
• Extend the server from the rack (Extending the server from the rack on page 32).
• Remove the server from the rack (Removing the server from the rack on page 33).
4. Remove the access panel (Removing the access panel on page 36).
CAUTION:
Do not operate the server for long periods with the access panel open or removed. Operating the
server in this manner results in improper airflow and improper cooling that can lead to thermal
damage.
5. Remove the riser cage (Removing a PCIe riser cage on page 39).
6. Install the extender bracket onto the GPU card.
92 Installing hardware options
Page 93
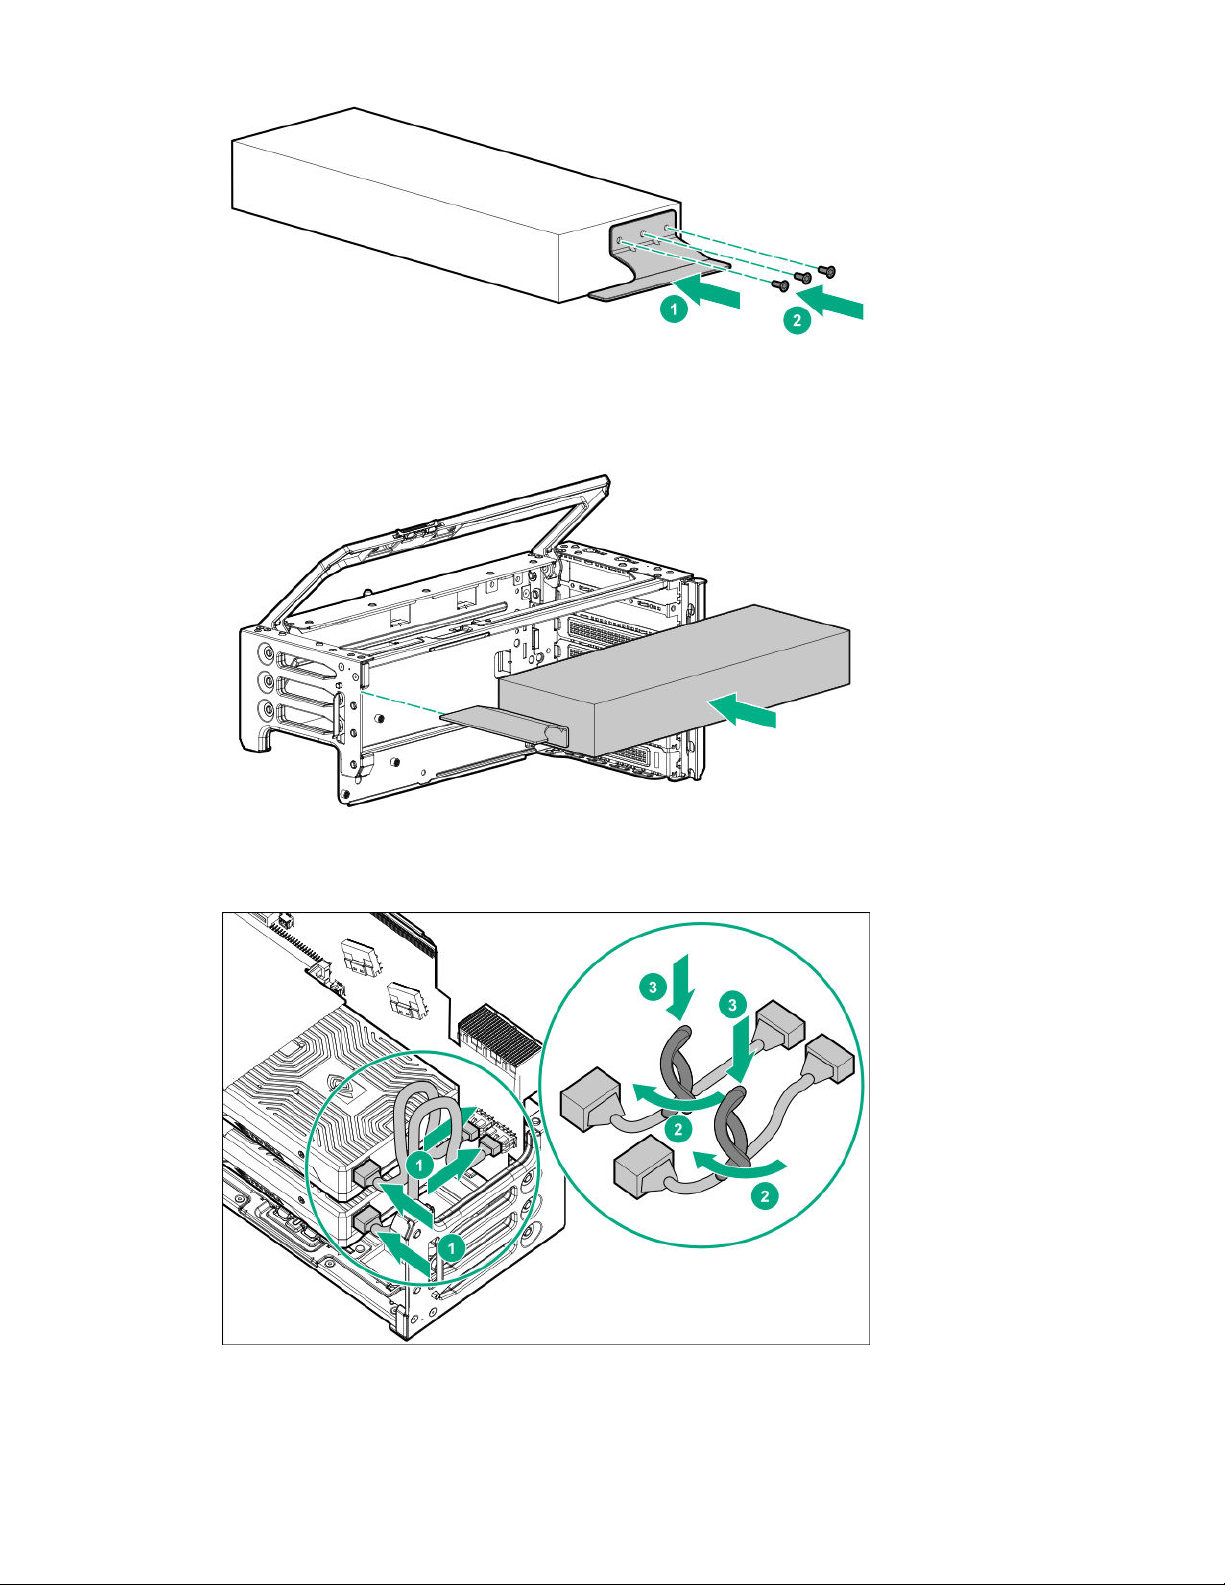
7. Install the GPU card into the riser cage.
8. Connect the GPU power cables to the riser board, and loop the excess cable.
9. Tuck the looped cables between the GPU cards and the riser cage.
Installing hardware options 93
Page 94
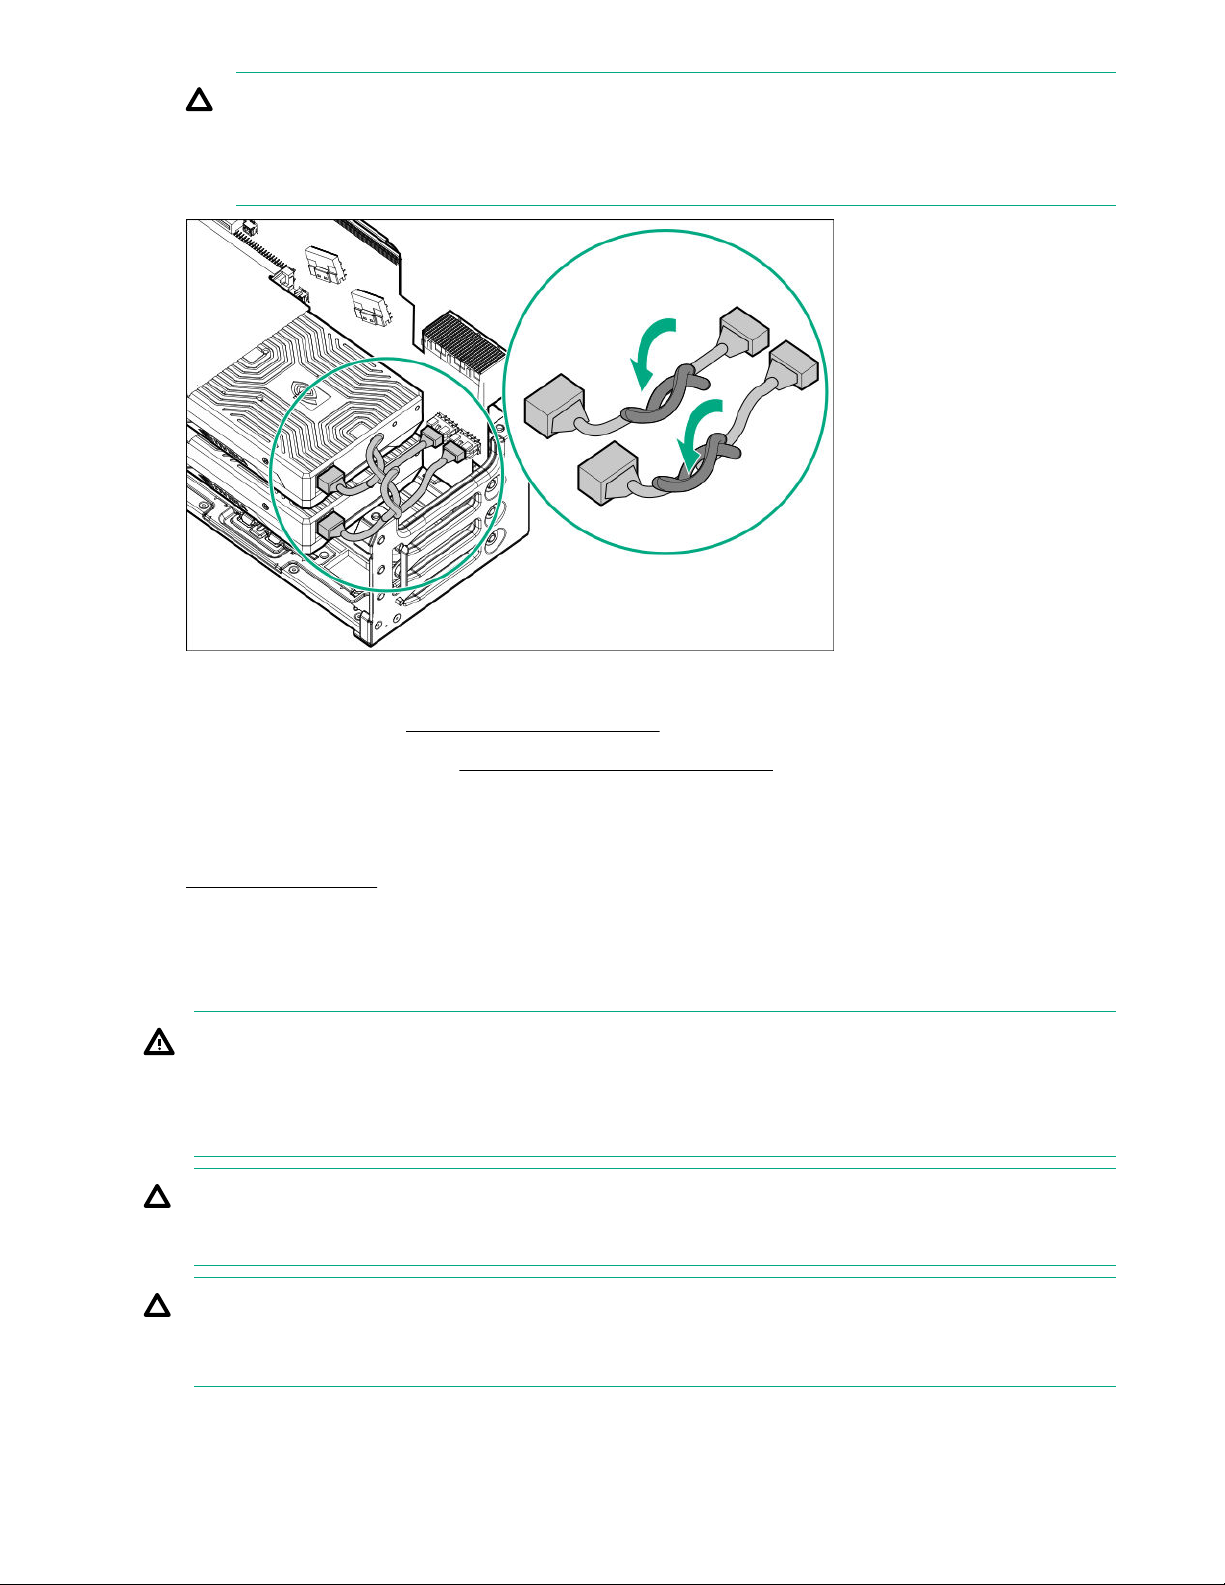
CAUTION:
Before installing the riser cage into the server, be sure that the power cables are routed and
secured between the GPU card and the riser cage. Improper routing can result in damage to the
cables and connectors.
10. Install the riser cage.
11. Install the access panel (Installing the access panel on page 37).
12. Install the server into the rack (Installing the server into the rack on page 53).
13. Connect each power cord to the server.
14. Connect each power cord to the power source.
15. Power up the server on page 32.
The installation is complete.
Installing a controller
WARNING:
To reduce the risk of personal injury, electric shock, or damage to the equipment, remove power from
the server by removing the power cord. The front panel Power On/Standby button does not shut off
system power. Portions of the power supply and some internal circuitry remain active until AC power is
removed.
CAUTION:
To prevent improper cooling and thermal damage, do not operate the server unless all PCI slots have
either an expansion slot cover or an expansion board installed.
CAUTION:
Hewlett Packard Enterprise recommends performing a backup of all server data before installing or
removing a controller or adapter.
Before installing the controller, observe the following requirements:
94 Installing a controller
Page 95
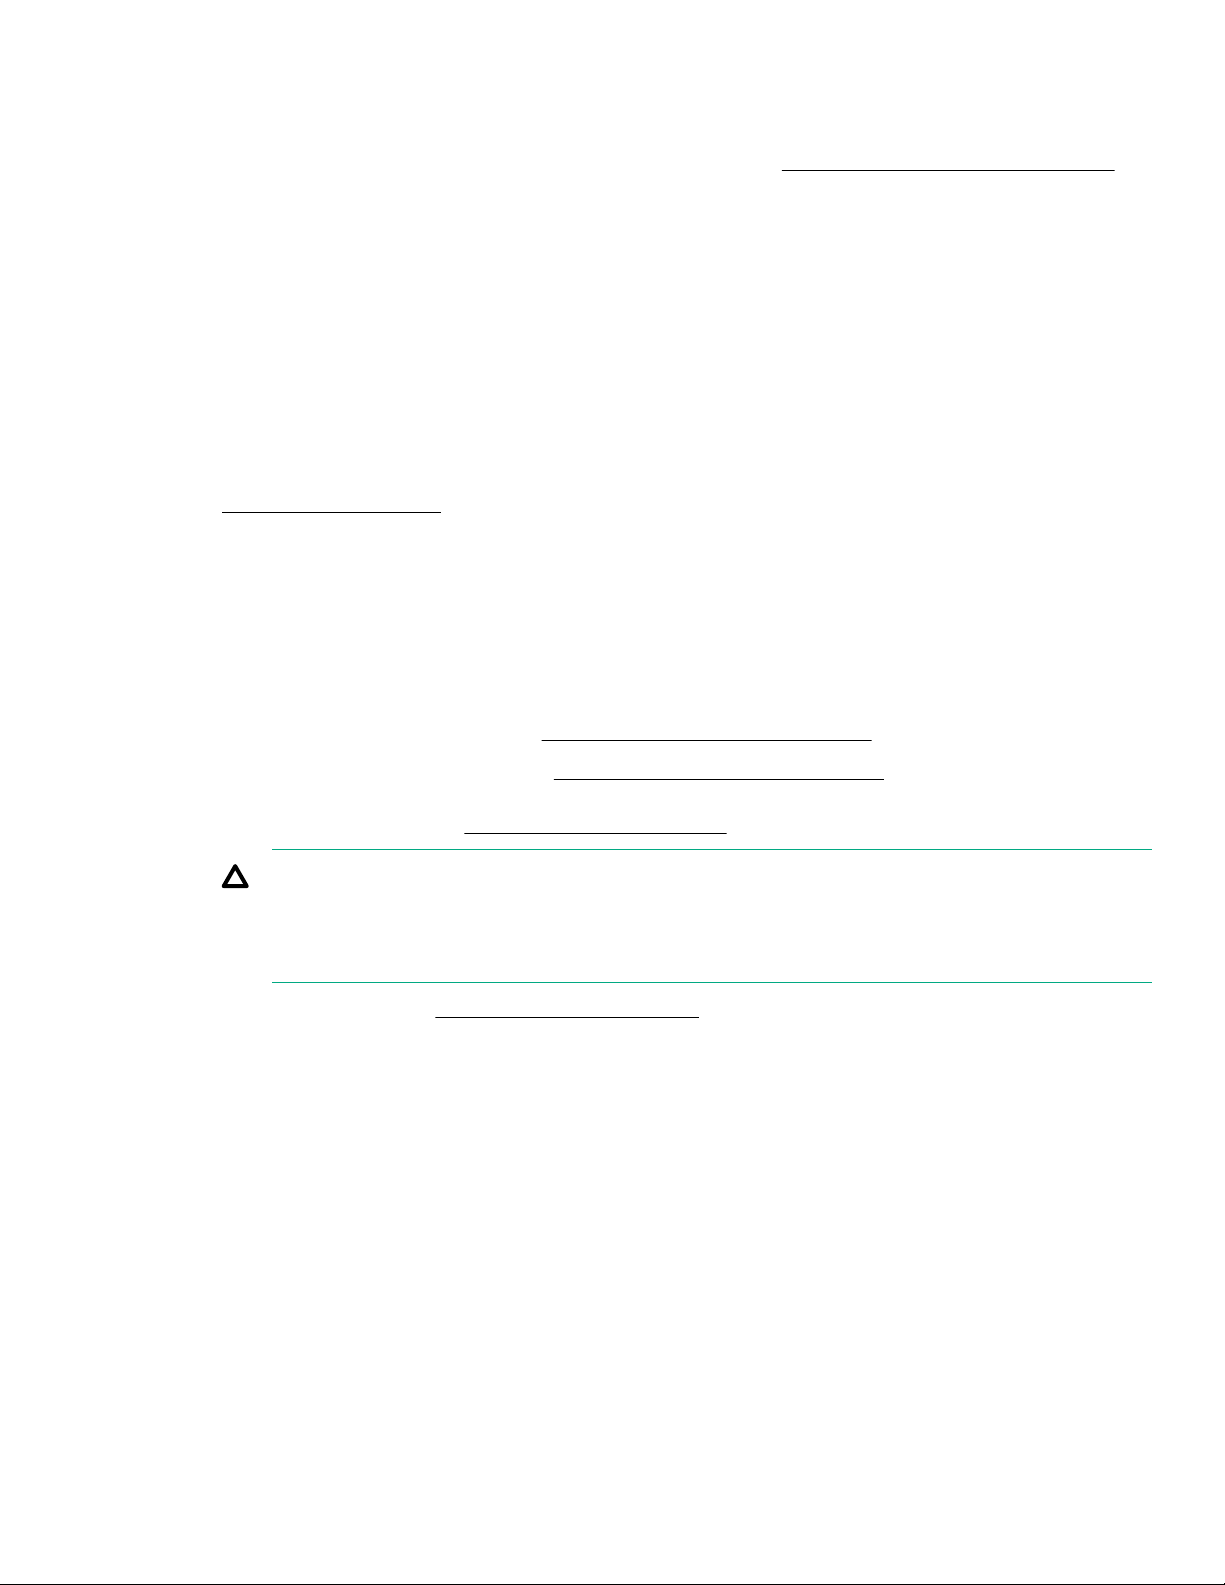
• To ensure that cables are connected correctly, observe the labels on the cable and component connectors.
• Be sure that you have the latest firmware for the controllers, HBAs, and the expander card. To download
the latest firmware, see the Hewlett Packard Enterprise website (http://www.hpe.com/support/hpesc).
Prerequisites
Before installing this option, be sure that you have the following:
• The components included with the hardware option kit
• T-10 Torx screwdriver
Procedure
1. Back up all server data.
2. Power down the server on page 32.
3. Remove all power:
a. Disconnect each power cord from the power source.
b. Disconnect each power cord from the server.
4. Do one of the following:
• Extend the server from the rack (Extending the server from the rack on page 32).
• Remove the server from the rack (Removing the server from the rack on page 33).
5. Remove the access panel (Removing the access panel on page 36).
CAUTION:
Do not operate the server for long periods with the access panel open or removed. Operating the
server in this manner results in improper airflow and improper cooling that can lead to thermal
damage.
6. Remove the riser cage (Removing a PCIe riser cage on page 39).
7. Remove the expansion slot blank from the riser cage.
The primary PCIe riser cage is shown.
Installing hardware options 95
Page 96
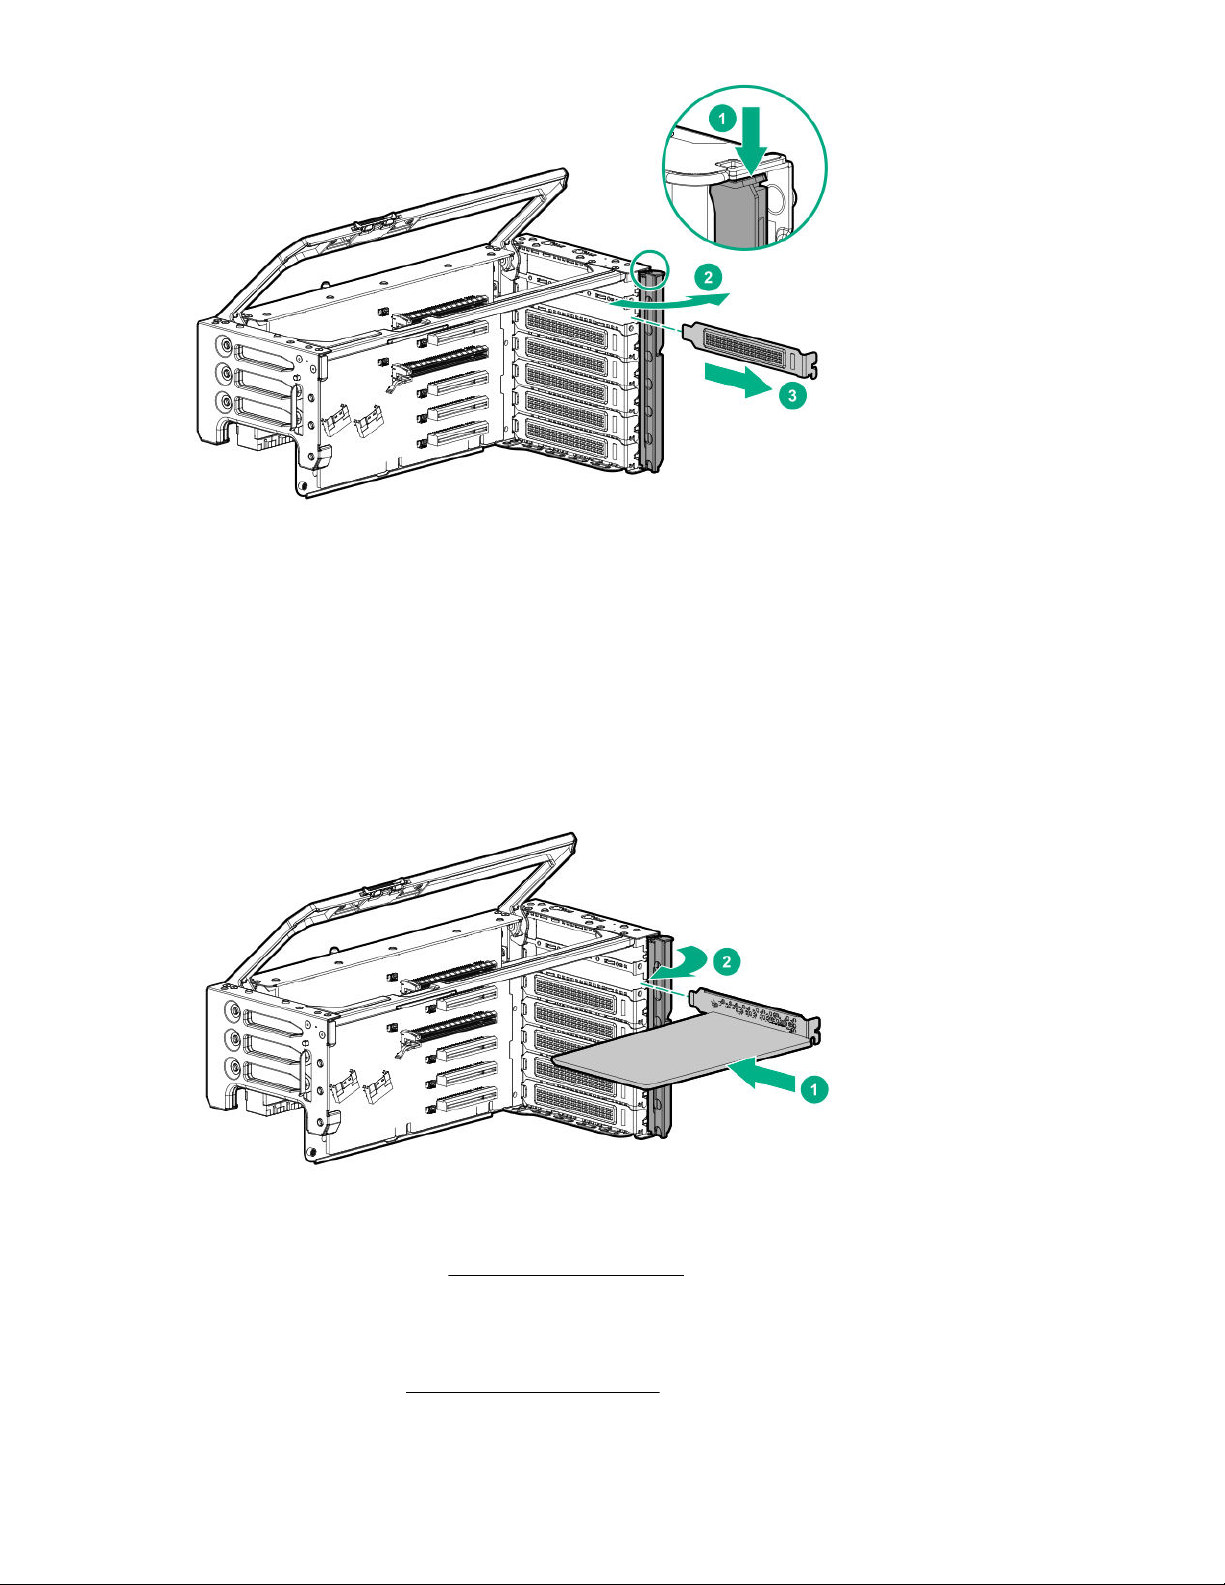
8. Install the controller into the PCI riser cage.
Your controller might appear different.
• 24-drive configuration—Install the SAS controller in slot 6. The SAS expander card must be installed
into slot 5 of the primary riser cage.
• 48-drive configuration—Install the SAS controllers in slots 6 and 16. Install SAS expander cards into
slot 5 of the primary riser cage, and into slot 15 of the butterfly riser cage.
9. If present, connect the Smart Array cache backup power cable to the Smart Array cache backup power
connector on the riser board (Riser board components on page 29).
10. Install the riser cage.
11. Connect storage devices to the controller.
12. Install the access panel (Installing the access panel on page 37).
96 Installing hardware options
Page 97
13. Install the server into the rack (Installing the server into the rack on page 53).
14. Connect each power cord to the server.
15. Connect each power cord to the power source.
16. Power up the server on page 32.
Installing a FlexibleLOM adapter
Prerequisites
Before installing this option, be sure that you have the following:
• The components included with the hardware option kit
• A T-10 Torx screwdriver might be needed to unlock the access panel.
Procedure
1. Power down the server on page 32.
2. Remove all power:
a. Disconnect each power cord from the power source.
b. Disconnect each power cord from the server.
3. Do one of the following:
• Extend the server from the rack (Extending the server from the rack on page 32).
• Remove the server from the rack (Removing the server from the rack on page 33).
4. Remove the access panel (Removing the access panel on page 36).
CAUTION:
Do not operate the server for long periods with the access panel open or removed. Operating the
server in this manner results in improper airflow and improper cooling that can lead to thermal
damage.
5. Remove the primary PCIe riser cage (Removing a PCIe riser cage on page 39).
6. Install the FlexibleLOM adapter.
Installing a FlexibleLOM adapter 97
Page 98
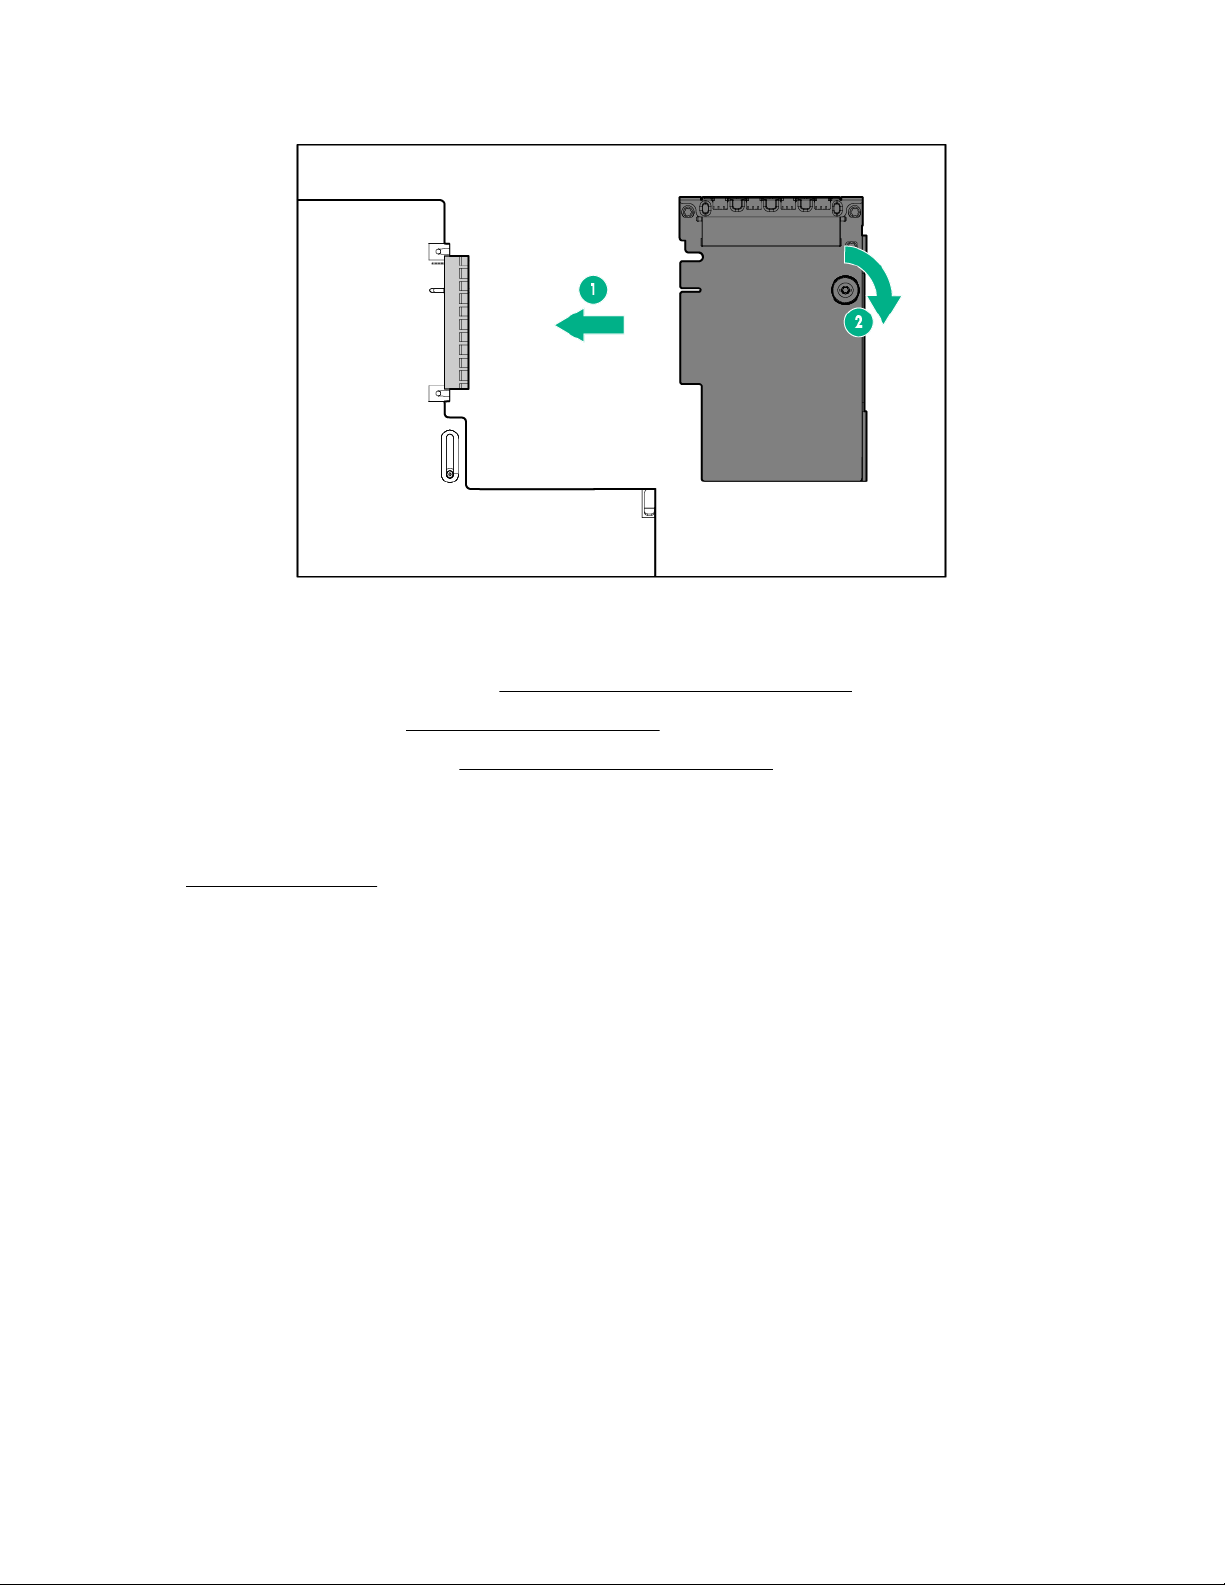
7. Install the primary PCIe riser cage (Installing the primary PCIe riser cage on page 38).
8. Install the access panel (Installing the access panel on page 37).
9. Install the server into the rack (Installing the server into the rack on page 53).
10. Connect each power cord to the server.
11. Connect each power cord to the power source.
12. Power up the server on page 32.
Processor options
Identifying the processor type
The processor type installed in the server is briefly displayed during POST. To view this information and
additional processor specifications, do the following:
Procedure
1. Reboot the server.
The server restarts and the POST screen appears.
2. Press F9.
The System Utilities screen appears.
3. Select System Information | Processor Information.
The Processor Information screen shows detailed information about the processors installed in the server.
98 Processor options
Page 99
4. Press Esc until the main menu is displayed.
5. Select Reboot the System to exit the utility and resume the boot process.
Installing a processor
The server supports installation of 1–4 processors.
NOTE:
Single-processor configurations are supported in servers with only a six-slot riser installed in the primary riser
cage.
Hewlett Packard Enterprise recommends identifying the processor heatsink module components (Processor,
heatsink, and socket components on page 25) before performing this procedure.
Prerequisites
Before installing this option, be sure that you have the following:
• The components included with the hardware option kit
• T-30 Torx screwdriver
• A T-10 Torx screwdriver might be needed to unlock the access panel.
Procedure
1. Observe the following alerts:
CAUTION:
When handling the heatsink, always hold it along the top and bottom of the fins. Holding it from the
sides can damage the fins.
CAUTION:
To avoid damage to the processor or system board, only authorized personnel should attempt to
replace or install the processor in this server.
CAUTION:
To prevent possible server malfunction and damage to the equipment, multiprocessor
configurations must contain processors with the same part number.
CAUTION:
If installing a processor with a faster speed, update the system ROM before installing the
processor.
To download firmware and view installation instructions, see the Hewlett Packard Enterprise
Support Center website.
CAUTION:
THE CONTACTS ARE VERY FRAGILE AND EASILY DAMAGED. To avoid damage to the socket
or processor, do not touch the contacts.
2. Power down the server on page 32.
Installing a processor 99
Page 100
3. Remove all power:
a. Disconnect each power cord from the power source.
b. Disconnect each power cord from the server.
4. Do one of the following:
• Extend the server from the rack (Extending the server from the rack on page 32).
• Remove the server from the rack (Removing the server from the rack on page 33).
5. Remove the access panel (Removing the access panel on page 36).
CAUTION:
Do not operate the server for long periods with the access panel open or removed. Operating the
server in this manner results in improper airflow and improper cooling that can lead to thermal
damage.
6. Remove the primary PCIe riser cage (Removing a PCIe riser cage on page 39).
7. If installed, remove the butterfly riser cage (Removing a PCIe riser cage on page 39).
8. Remove the air baffle (Removing the air baffle on page 40).
9. If installed, remove the processor mezzanine tray (Removing the processor mezzanine tray on page
45).
10. Install the processor heatsink assembly:
a. Locate the Pin 1 indicator on the processor carrier and the socket.
b. Align the processor heatsink assembly with the heatsink alignment pins and gently lower it down until
it sits evenly on the socket.
The heatsink alignment pins are keyed. The processor heatsink assembly will only install one way.
Your heatsink may look different than the one shown.
100 Installing hardware options
 Loading...