

Page 1

HP ProLiant BL20p Generation 3 Server
Blade
Setup and Installation Guide
July 2004 (Third Edition)
Part Number 307158-003
Page 2

© Copyright 2003, 2004 Hewlett-Packard Development Company, L.P.
The information contained herein is subject to change without notice. The only warranties for
HP products and services are set forth in the express warranty statements accompanying such
products and services. Nothing herein should be construed as constituting an additional
warranty. HP shall not be liable for technical or editorial errors or omissions contained herein.
Intel and Pentium are registered trademarks of Intel Corporation or its subsidiaries in the U.S.
and other countries and are used under license.
Microsoft, Windows, and Windows NT are U.S. registered trademarks of Microsoft
Corporation.
Java is a U.S. trademark of Sun Microsystems, Inc.
Linux is a U.S. registered trademark of Linus Torvalds.
HP ProLiant BL20p Generation 3 Server Blade Setup and Installation Guide
July 2004 (Third Edition)
Part Number 307158-003
Page 3

Contents
About This Guide
Audience Assumptions..................................................................................................... vii
Important Safety Information........................................................................................... vii
Symbols on Equipment .................................................................................................... vii
Rack Stability .................................................................................................................... ix
Symbols in Text.................................................................................................................ix
Related Documents..............................................................................................................x
Getting Help ........................................................................................................................x
Technical Support.........................................................................................................x
HP Website ................................................................................................................. xi
Authorized Reseller .................................................................................................... xi
Reader’s Comments .......................................................................................................... xi
Chapter 1
Server Blade Component Identification
LEDs................................................................................................................................ 1-1
Server Blade Front Panel .......................................................................................... 1-1
Hot-Plug SCSI Hard Drive .......................................................................................1-3
Power Button................................................................................................................... 1-6
System Switches.............................................................................................................. 1-7
NMI Switch............................................................................................................... 1-7
System Maintenance Switch..................................................................................... 1-8
System Settings Switch............................................................................................. 1-8
Identifying System Board Components........................................................................... 1-9
Identifying Local I/O Cable Connectors ....................................................................... 1-10
HP ProLiant BL20p Generation 3 Server Blade Setup and Installation Guide iii
Page 4

Contents
Chapter 2
Server Blade Operations
Powering Up the Server Blade.........................................................................................2-1
Powering Down the Server Blade....................................................................................2-2
Chapter 3
Server Blade Setup
Accessing Internal Server Blade Components................................................................. 3-1
Removing the Server Blade Access Panel.................................................................3-2
Removing a Server Blade Blank......................................................................................3-3
Installing a Server Blade..................................................................................................3-3
Removing a Server Blade from a Server Blade Enclosure ..............................................3-5
Chapter 4
Hardware Options Installation
Processors and Heatsinks.................................................................................................4-1
Installation and Upgrade Requirements ....................................................................4-2
Removing a Processor and Heatsink.........................................................................4-2
Installing a Processor ................................................................................................4-3
Hot-Plug SCSI Hard Drives and Blanks..........................................................................4-5
Removing Hard Drive Blanks ...................................................................................4-5
SCSI ID Numbers......................................................................................................4-6
Removing Hot-Plug SCSI Hard Drives.....................................................................4-6
Installing Hot-Plug SCSI Hard Drives ......................................................................4-7
Memory............................................................................................................................4-9
DIMM Installation Guidelines ..................................................................................4-9
Installing DIMMs......................................................................................................4-9
Smart Array 6i 128-MB Battery-Backed Write Cache Enabler.....................................4-11
HP ProLiant BL20p G3 Dual Port Fibre Channel Adapter ...........................................4-14
Chapter 5
Server Blade Configuration and Utilities
Software and Utilities ......................................................................................................5-1
Integrated Lights-Out Advanced Management .........................................................5-2
Redundant ROM Support..........................................................................................5-5
Remote ROM Flash...................................................................................................5-6
ROMPaq Utility ........................................................................................................5-7
ROM-Based Setup Utility .........................................................................................5-7
iv HP ProLiant BL20p Generation 3 Server Blade Setup and Installation Guide
Page 5

Option ROM Configuration for Arrays Utility....................................................... 5-10
Network-Based PXE Deployment .......................................................................... 5-10
HP Systems Insight Manager.................................................................................. 5-13
Diagnostics Utility .................................................................................................. 5-13
Automatic Server Recovery-2................................................................................. 5-14
Integrated Management Log................................................................................... 5-15
Configuration and Deployment Overview .................................................................... 5-18
Static IP Bay Configuration.................................................................................... 5-18
Deployment Methods.............................................................................................. 5-26
Chapter 6
Connecting Local I/O Devices
Connecting to a Server Blade through iLO ..................................................................... 6-1
Connecting Directly to a Server Blade using Video and USB Devices .......................... 6-4
Directly Accessing a Configured Server Blade with Local Keyboard, Video, and
Mouse........................................................................................................................ 6-5
Directly Accessing a Server Blade with Local Media Devices ................................ 6-6
Appendix A
Server Blade Troubleshooting
Server Blade Error Messages ......................................................................................... A-1
When the Server Blade Does Not Start .......................................................................... A-2
Server Blade Diagnostic Steps................................................................................. A-4
Power Converter Module LED .............................................................................. A-11
System Maintenance Switch Procedures ............................................................... A-12
Problems After Initial Boot .......................................................................................... A-16
Contents
Appendix B
Battery Replacement
System Board Battery Replacement................................................................................B-1
Appendix C
Regulatory Compliance Notices
Regulatory Compliance Identification Numbers.............................................................C-1
Federal Communications Commission Notice................................................................C-1
Modifications............................................................................................................C-1
Cables........................................................................................................................C-2
Canadian Notice (Avis Canadien)...................................................................................C-2
HP ProLiant BL20p Generation 3 Server Blade Setup and Installation Guide v
Page 6

Contents
European Union Notice .................................................................................................. C-2
Japanese Notice............................................................................................................... C-2
Korean Notice................................................................................................................. C-3
BSMI Notice................................................................................................................... C-3
Battery Replacement Notice ........................................................................................... C-3
Appendix D
Electrostatic Discharge
Preventing Electrostatic Damage....................................................................................D-1
Grounding Methods ........................................................................................................D-2
vi HP ProLiant BL20p Generation 3 Server Blade Setup and Installation Guide
Page 7
This guide provides step-by-step instructions for installation, and reference
information for operation, troubleshooting, and future upgrades for the HP ProLiant
BL20p Generation 3 server blade.
Audience Assumptions
This guide is for the person who installs, administers, and troubleshoots servers. HP
assumes you are qualified in the servicing of computer equipment and trained in
recognizing hazards in products with hazardous energy levels.
Important Safety Information
Before installing this product, read the Important Safety Information document
included with the server.
About This Guide
Symbols on Equipment
The following symbols may be placed on equipment to indicate the presence of
potentially hazardous conditions:
WARNING: This symbol, in conjunction with any of the following symbols,
indicates the presence of a potential hazard. The potential for injury exists if
warnings are not observed. Consult the documentation for specific details.
HP ProLiant BL20p Generation 3 Server Blade Setup and Installation Guide vii
Page 8
About This Guide
Weight in kg
Weight in lb
This symbol indicates the presence of hazardous energy circuits or electric
shock hazards. Refer all servicing to qualified personnel.
WARNING: To reduce the risk of injury from electric shock hazards, do not
open this enclosure. Refer all maintenance, upgrades, and servicing to
qualified personnel.
This symbol indicates the presence of electric shock hazards. The area
contains no user or field serviceable parts. Do not open for any reason.
WARNING: To reduce the risk of injury from electric shock hazards, do not
open this enclosure.
This symbol on an RJ-45 receptacle indicates a network interface connection.
WARNING: To reduce the risk of electric shock, fire, or damage to the
equipment, do not plug telephone or telecommunications connectors into this
receptacle.
This symbol indicates the presence of a hot surface or hot component. If this
surface is contacted, the potential for injury exists.
WARNING: To reduce the risk of injury from a hot component, allow the
surface to cool before touching.
These symbols, on power supplies or systems, indicate that the
equipment is supplied by multiple sources of power.
WARNING: To reduce the risk of injury from electric shock,
remove all power cords to completely disconnect power from the
system.
This symbol indicates that the component exceeds the recommended
weight for one individual to handle safely.
WARNING: To reduce the risk of personal injury or damage to the
equipment, observe local occupational health and safety requirements
and guidelines for manual material handling.
viii HP ProLiant BL20p Generation 3 Server Blade Setup and Installation Guide
Page 9

Rack Stability
WARNING: To reduce the risk of personal injury or damage to the equipment,
be sure that:
• The leveling jacks are extended to the floor.
• The full weight of the rack rests on the leveling jacks.
• The stabilizing feet are attached to the rack if it is a single-rack installation.
• The racks are coupled together in multiple-rack installations.
• Only one component is extended at a time. A rack may become unstable if
more than one component is extended for any reason.
Symbols in Text
These symbols may be found in the text of this guide. They have the following
meanings.
WARNING: Text set off in this manner indicates that failure to follow directions
in the warning could result in bodily harm or loss of life.
About This Guide
CAUTION: Text set off in this manner indicates that failure to follow directions could
result in damage to equipment or loss of information.
IMPORTANT: Text set off in this manner presents essential information to explain a concept
or complete a task.
NOTE: Text set off in this manner presents additional information to emphasize or supplement
important points of the main text.
HP ProLiant BL20p Generation 3 Server Blade Setup and Installation Guide ix
Page 10

About This Guide
Related Documents
For additional information on the topics covered in this guide, refer to the following
documentation:
• HP ProLiant BL System Best Practices Guide
• HP ProLiant BL System Common Procedures Guide
• HP ProLiant BL p-Class System Hardware Installation and Configuration Poster
• White Paper: HP ProLiant BL p-Class System Overview and Planning
• HP ROM-Based Setup and Utility User Guide
• HP Integrated Lights-Out User Guide
• HP ProLiant BL p-Class System Maintenance and Service Guide
• HP ProLiant Servers Troubleshooting Guide
• HP ProLiant BL20p Generation 3 Server Blade QuickSpecs
• HP StorageWorks Booting Windows Systems from a Storage Area Network
Getting Help
If you have a problem and have exhausted the information in this guide, you can get
further information and other help in the following locations.
Technical Support
In North America, call the HP Technical Support Phone Center at
1-800-HP-INVENT (1-800-474-6836). This service is available 24 hours a day,
7 days a week. For continuous quality improvement, calls may be recorded or
monitored. Outside North America, call the nearest HP Technical Support Phone
Center. Telephone numbers for worldwide Technical Support Centers are listed on
the HP website,
x HP ProLiant BL20p Generation 3 Server Blade Setup and Installation Guide
www.hp.com.
Page 11

Be sure to have the following information available before you call HP:
• Technical support registration number (if applicable)
• Product serial number
• Product model name and number
• Applicable error messages
• Add-on boards or hardware
• Third-party hardware or software
• Operating system type and revision level
HP Website
The HP website has information on this product as well as the latest drivers and flash
ROM images. You can access the HP website at www.hp.com.
Authorized Reseller
About This Guide
For the name of the nearest authorized reseller:
• In the United States, call 1-800-345-1518.
• In Canada, call 1-800-263-5868.
• Elsewhere, see the HP website for locations and telephone numbers.
Reader’s Comments
HP welcomes your comments on this guide. Please send your comments and
suggestions by e-mail to ServerDocumentation@hp.com.
HP ProLiant BL20p Generation 3 Server Blade Setup and Installation Guide xi
Page 12

Server Blade Component Identification
LEDs
The system contains several sets of LEDs that indicate the status and settings of
hardware components. Use the following sections to determine the location and
functions of LEDs on these components:
• • ProLiant BL20p Generation 3 server blade front panel
Hot-plug SCSI hard drive
Server Blade Front Panel
Seven LEDs on the front of the server blade indicate server status. Use Figure 1-1
and Table 1-1 to identify LED locations and functions.
1
HP ProLiant BL20p Generation 3 Server Blade Setup and Installation Guide 1-1
Page 13
Server Blade Component Identification
Figure 1-1: ProLiant BL20p G3 server blade front panel
LEDs
Table 1-1: ProLiant BL20p G3 Server Blade Front Panel LEDs
Item LED Description Status
1 Unit identification
(UID)
2 Health Green = Normal status
1-2 HP ProLiant BL20p Generation 3 Server Blade Setup and Installation Guide
Blue = Flagged
Blue flashing = Management mode
Off = No remote management
Flashing = Booting
Amber = Degraded status
Red = Critical status
continued
Page 14

Server Blade Component Identification
Table 1-1: ProLiant BL20p G3 Server Blade Front Panel LEDs continued
Item LED Description Status
3 NIC 1*
4 NIC 2*
5 NIC 3*
6 NIC 4*
7 Power Green = On
*Actual NIC numeration depends on factors such as which operating system
is installed on the server.
Hot-Plug SCSI Hard Drive
Each hot-plug SCSI hard drive has three LEDs located on the front of the drive. The
LEDs provide activity, online, and fault status for each corresponding drive when
configured as a part of an array and attached to a powered-on Smart Array controller.
Their behavior may vary depending on the status of other drives in the array. Use
Figure 1-2 and Table 1-2 to identify LED locations and functions.
Green = Linked to network
Green flashing = Network activity
Off = No activity
Amber = Standby (power available)
Off = Unit off
HP ProLiant BL20p Generation 3 Server Blade Setup and Installation Guide 1-3
Page 15
Server Blade Component Identification
WARNING: Before removing a hard drive, read the hot-plug hard drive
replacement section in the HP ProLiant Servers Troubleshooting Guide.
•
The first LED indicates drive activity status (1), where on indicates activity and
off indicates no activity by the drive.
•
The second LED indicates online status (2), where flashing indicates an active
online condition and off indicates an inactive online condition.
•
The third LED indicates fault status (3), where flashing indicates fault-process
activity and off indicates a no-fault-process activity.
Figure 1-2: Hot-plug SCSI hard drive LEDs
1-4 HP ProLiant BL20p Generation 3 Server Blade Setup and Installation Guide
Page 16

Server Blade Component Identification
Table 1-2: Hot-Plug SCSI Hard Drive LED Status Combinations
(1) Activity (2) Online (3) Fault Description
On Off Off
On Flashing Off
Flashing Flashing Flashing
Off Off Off OK to replace the drive online if a predictive failure alert
Off Off On OK to replace the drive online.
Do not remove the drive. Removing a drive during
this process causes data loss.
The drive is being accessed and is not configured as
part of an array.
Do not remove the drive. Removing a drive during
this process causes data loss.
The drive is rebuilding or undergoing capacity
expansion.
Do not remove the drive. Removing a drive during
this process causes data loss.
The drive is part of an array being selected by the Array
Configuration Utility.
-OrThe Options ROMPaq is upgrading the drive.
is received and the drive is attached to an array
controller.
The drive is not configured as part of an array.
-OrIf this drive is part of an array, a powered-on controller
is not accessing the drive.
-OrThe drive is configured as an online spare.
The drive has failed and has been placed offline.
continued
HP ProLiant BL20p Generation 3 Server Blade Setup and Installation Guide 1-5
Page 17
Server Blade Component Identification
Table 1-2: Hot-Plug SCSI Hard Drive LED Status Combinations continued
(1) Activity (2) Online (3) Fault Description
Off On Off OK to replace the drive online if a predictive failure alert
is received, provided that the array is configured for fault
tolerance and all other drives in the array are online.
The drive is online and configured as part of an array.
On or
flashing
On Off OK to replace the drive online if a predictive failure alert
is received, provided that the array is configured for fault
tolerance and all other drives in the array are online.
The drive is online and being accessed.
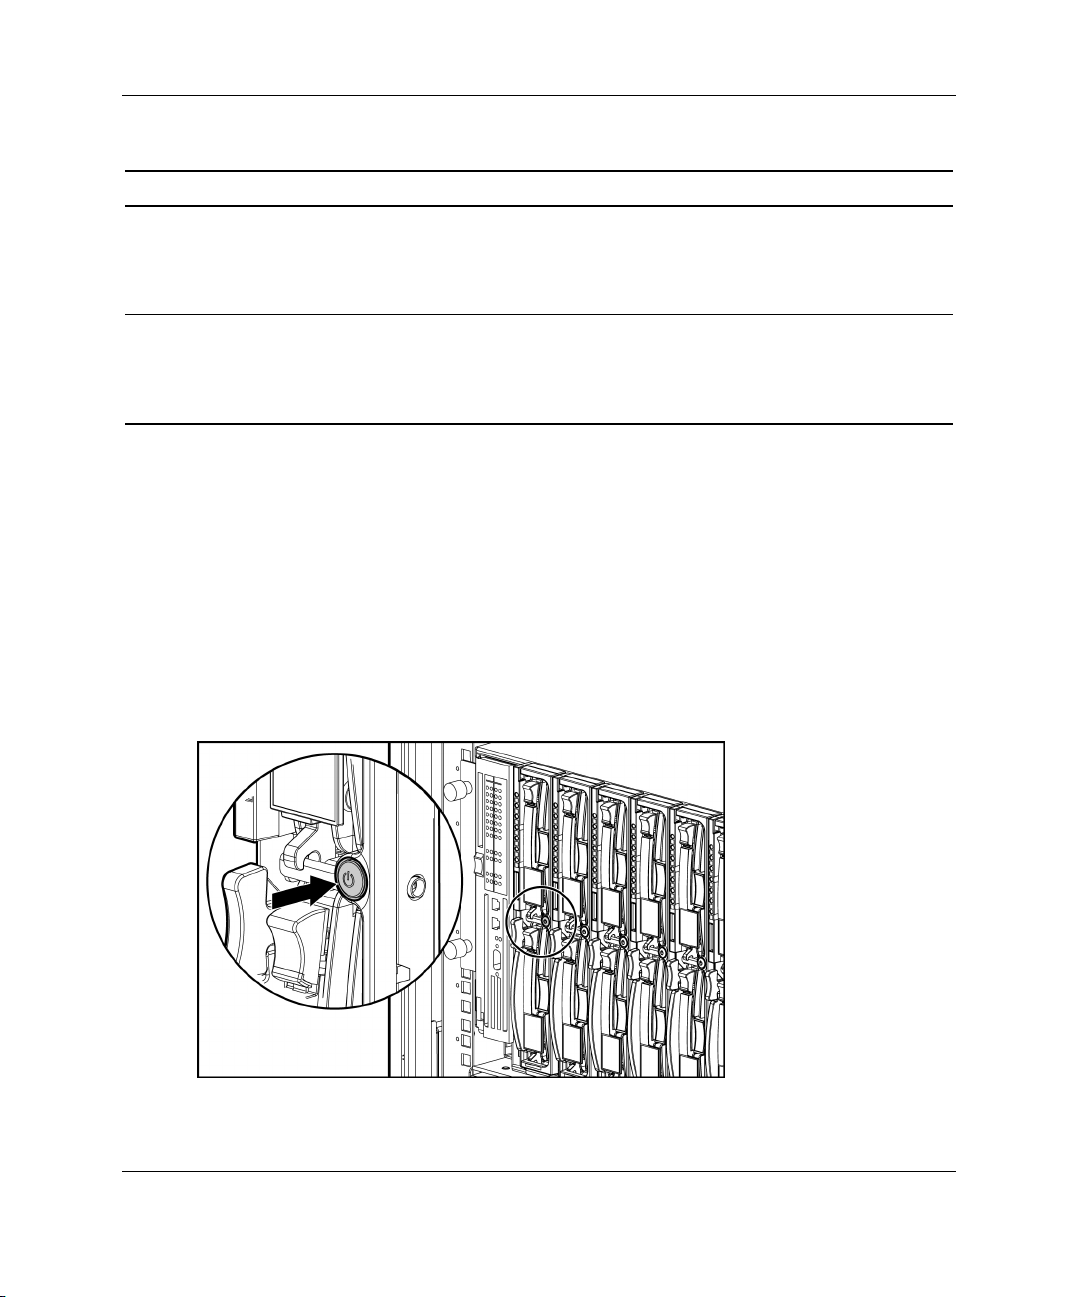
Power Button
Setting the server blade power button to the standby position removes power from
most areas of the server blade. This process may take 30 seconds, during which time
some internal circuitry remains active.
IMPORTANT: To remove power completely, remove the server blade from the server blade
enclosure.
Use Figure 1-3 to identify the button location.
Figure 1-3: Power button
1-6 HP ProLiant BL20p Generation 3 Server Blade Setup and Installation Guide
Page 18
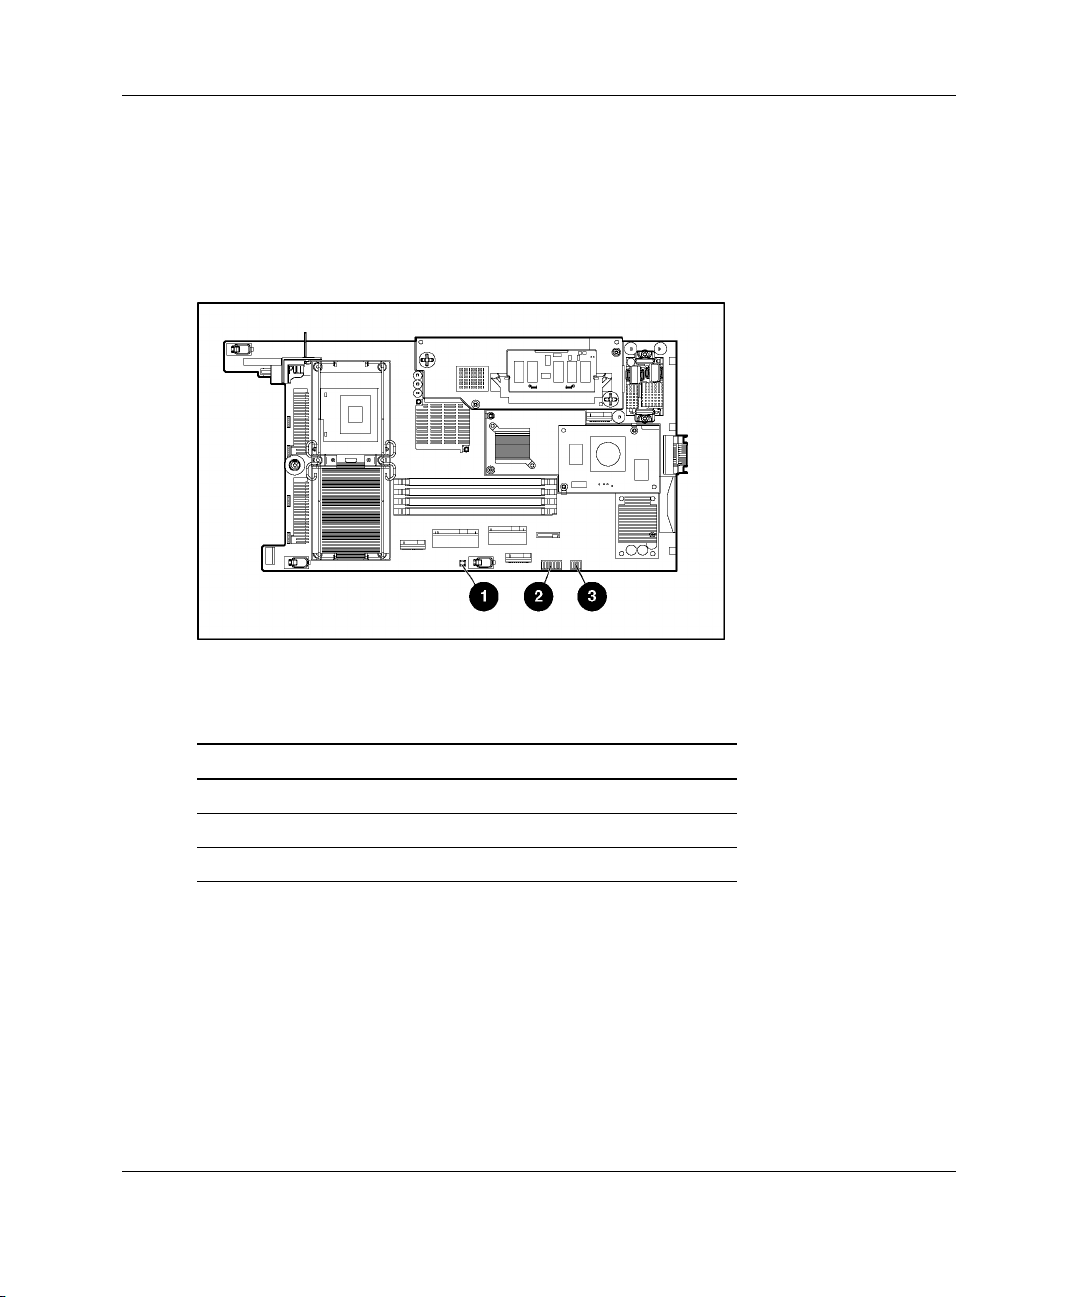
System Switches
System switches enable you to change certain settings or to perform advanced
diagnostic procedures. Use Figure 1-4 and Table 1-3 to identify switch locations and
functions.
Figure 1-4: Server blade switches
Server Blade Component Identification
Table 1-3: Server Blade Switches
Item Description
1 NMI switch
2 System maintenance switch (SW2)
3 System settings switch (SW1)
NMI Switch
The non-maskable interrupt (NMI) switch is for use by trained service personnel
only. Refer to the HP ProLiant BL p-Class System Maintenance and Service Guide
for more information.
HP ProLiant BL20p Generation 3 Server Blade Setup and Installation Guide 1-7
Page 19

Server Blade Component Identification
System Maintenance Switch
The system maintenance switch (SW2) is an eight-position switch that implements
protection and override functions. The default position is off. For the proper system
maintenance switch settings, refer to Table 1-4 or refer to the labels attached to the
inside of the server access panel.
Table 1-4: System Maintenance Switch (SW2) Settings
Position Description On/Off Function
1 iLO Security
Override
2 Configuration
lock
3 Reserved The default is OFF.
4 Reserved The default is OFF.
5 Password
Disable
6 Reset
Configuration
7 Reserved The default is OFF.
8 Reserved The default is OFF.
System Settings Switch
The system settings switch (SW1) is a four-position switch with all four settings
reserved. The default setting for all four positions is off.
Off = iLO Security is enabled.
On = Overrides iLO security function.
Off = System configuration can be modified.
On = System configuration is locked and
cannot be modified.
Off = Power-on password is enabled.
On = Power-on password is disabled.
Off = Normal.
On = ROM treats the system configuration
as invalid.
1-8 HP ProLiant BL20p Generation 3 Server Blade Setup and Installation Guide
Page 20
Server Blade Component Identification
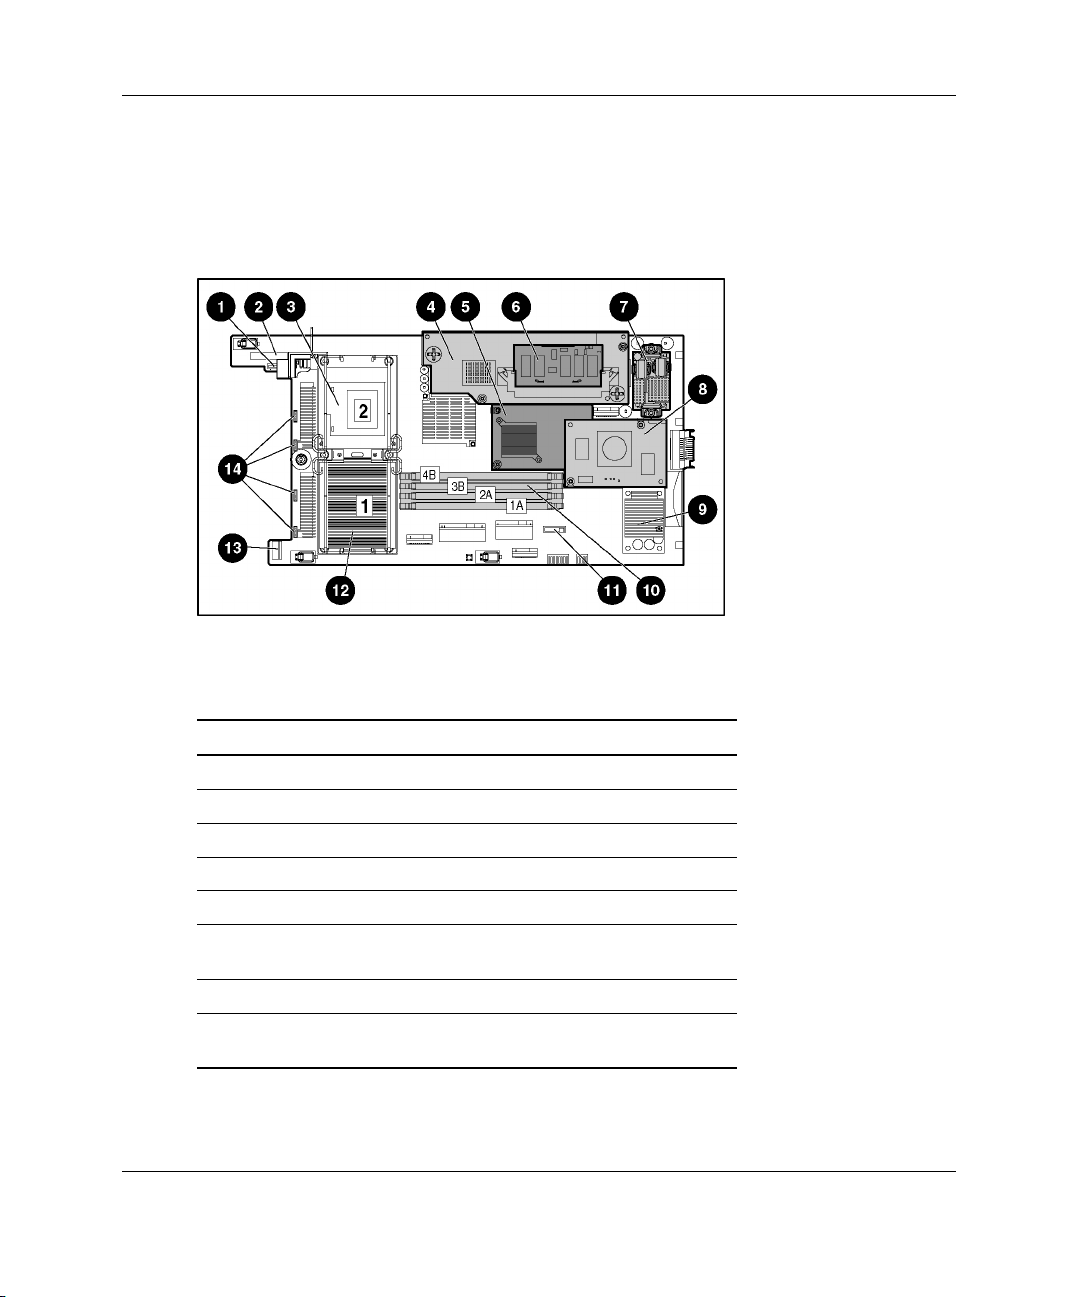
Identifying System Board Components
Use Figure 1-5 and Table 1-5 to identify the system board components and
connectors.
Figure 1-5: System board components and connectors
Table 1-5: System Board Components and Connectors
Item Description
1 Power button/LED board connector
2 SCSI backplane board connector 1
3 Processor socket 2
4 Smart Array 6i Controller
5 Standard NIC Mezzanine card
6 Smart Array 6i 128-MB Battery-Backed Write Cache
Enabler (Optional)
7 Power converter module
8 HP ProLiant BL20p G3 Dual Port Fibre Channel
adapter (Optional)
continued
HP ProLiant BL20p Generation 3 Server Blade Setup and Installation Guide 1-9
Page 21

Server Blade Component Identification
Table 1-5: System Board Components and Connectors continued
Item Description
9 DC filter module
10 DIMM slots (4)
11 System Battery
12 Processor socket 1 (populated)
13 SCSI backplane board connector 2
14 Fan connectors
Identifying Local I/O Cable Connectors
Use Figure 1-6 and Table 1-6 to identify the local I/O cable connectors.
Figure 1-6: Local I/O Cable Connectors
1-10 HP ProLiant BL20p Generation 3 Server Blade Setup and Installation Guide
Page 22

Server Blade Component Identification
Table 1-6: Local I/O cable connectors
Item Connector Name Connector Description
1 Server blade connector Attaches to the I/O port on the front
of the server blade.
2 Video connector Provides video capability.
3 USB connector 1 Provides USB connection enabling
direct connection to the server
blade.
4 USB connector 2 Provides USB connection enabling
direct connection to the server
blade.
5 Serial connector Requires a null modem serial cable
and enables trained personnel to
perform advanced diagnostic
procedures.
6 iLO RJ-45 (10/100
Ethernet) connector
Provides an Ethernet connector
through which you can access the
server blade iLO interface from a
client device.
HP ProLiant BL20p Generation 3 Server Blade Setup and Installation Guide 1-11
Page 23

Server Blade Operations
Powering Up the Server Blade
By default, server blades are set to power up automatically when installed in a server
blade enclosure. If you changed this setting, use one of the following methods to
power up the server blade:
• Power button
— A momentary press initiates a power-up request. The system detects if power
is available from the power subsystem to power on the server blade. If power
is available, then the server blade powers on.
— A long press, 5 or more seconds, initiates a power-up override. The server
blade is powered on without detecting available power.
CAUTION: Always observe iLO alerts before initiating a power-up override to
prevent a hot-plug power supply fault and possible loss of system power. Refer
to the HP Integrated Lights-Out User Guide for more information.
NOTE: You may choose to perform a power-up override to power up a server blade and
to override the power-up request function when the management modules are not in use
and when you know that sufficient power is available.
2
• Virtual power button features through the iLO remote console
— A momentary power-up selection
— A hold power-up selection
HP ProLiant BL20p Generation 3 Server Blade Setup and Installation Guide 2-1
Page 24

Server Blade Operations
For more information about iLO, refer to Chapter 5, “Server Blade Configuration and
Utilities.”
Powering Down the Server Blade
The ProLiant BL20p Generation 3 server blade can be powered down in either of the
following ways:
•
Use the virtual power button feature in the iLO remote console to power down
the server blade from a remote location. Be sure that the server blade is in
standby mode by observing that the power LED is amber. For iLO information
and procedures, refer to the HP Integrated Lights-Out User Guide.
Press the power button on the front of the server blade. Be sure that the server
•
blade is in standby mode by observing that the power LED is amber. This
process may take 30 seconds, during which time some internal circuitry remains
active.
IMPORTANT: To remove power completely form the server blade, remove the server blade
from the server blade enclosure.
2-2 HP ProLiant BL20p Generation 3 Server Blade Setup and Installation Guide
Page 25
Server Blade Setup
Accessing Internal Server Blade Components
WARNING: To reduce the risk of electric shock, do not power up the server
blade with the access panel removed.
WARNING: To reduce the risk of personal injury from hot surfaces, allow the
internal system components to cool before touching them.
CAUTION: Electrostatic discharge can damage electronic components. Properly
ground yourself before beginning any installation procedure. Refer to Appendix D,
“Electrostatic Discharge,” for more information.
IMPORTANT: If the server blade is not installed in the server blade enclosure or is not
receiving power through the diagnostic station, begin with step 4.
3
1. Identify the proper server blade in the server blade enclosure.
2. Remove power from the server blade. Refer to “Powering Down the Server
Blade” in Chapter 2, “Server Blade Operations.”
CAUTION: After you press the release button, the server blade is unlocked from
the server blade enclosure. Use both hands to support the server blade when
you remove it from the rack.
3. Remove the server blade from the server blade enclosure. Refer to “Removing a
Server Blade from a Server Blade Enclosure” in this chapter.
HP ProLiant BL20p Generation 3 Server Blade Setup and Installation Guide 3-1
Page 26
Server Blade Setup
4. Place the server blade on a flat, level surface.
5. Remove the access panel. Refer to “Removing the Server Blade Access Panel” in
this chapter.
Removing the Server Blade Access Panel
WARNING: To reduce the risk of personal injury from hot surfaces, allow the
internal system components to cool before touching them.
CAUTION: Electrostatic discharge can damage electronic components. Properly
ground yourself before beginning any installation procedure. Refer to Appendix D,
“Electrostatic Discharge,” for more information.
WARNING: To reduce the risk of electric shock, do not power up the server
blade with the access panel removed.
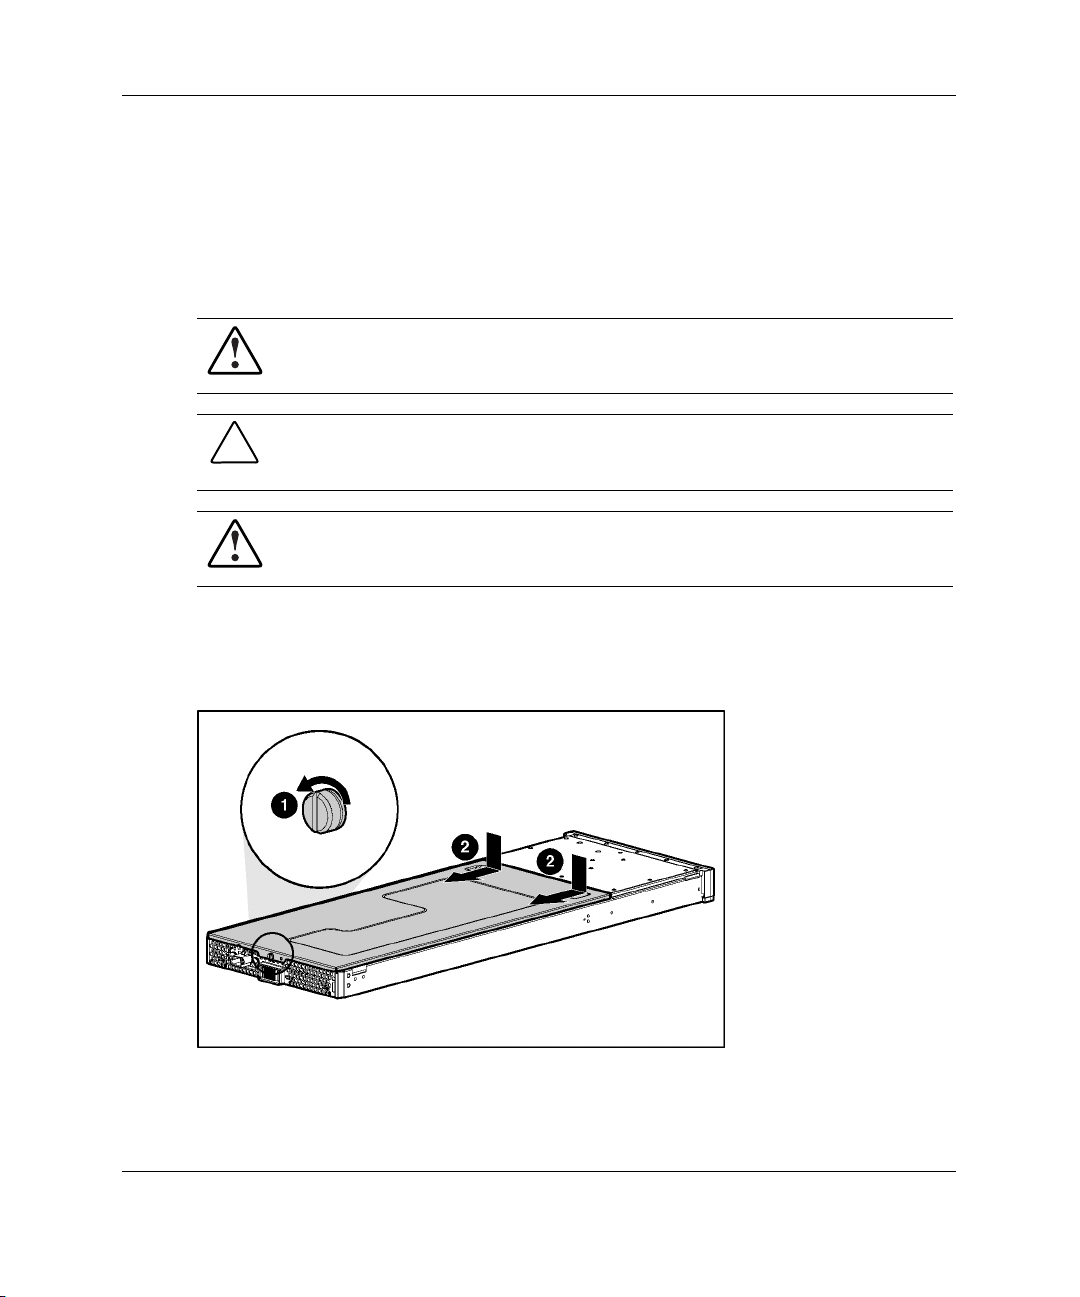
1. Loosen the thumbscrew on the rear of the server blade (1).
2. Slide the access panel about 1 cm (3/8 in) toward the rear of the unit and lift the
panel to remove it (2).
Figure 3-1: Removing the access panel
3-2 HP ProLiant BL20p Generation 3 Server Blade Setup and Installation Guide
Page 27
To install the access panel, reverse the removal procedure.
Removing a Server Blade Blank
CAUTION: Always populate the server blade enclosure bays with either a server
blade or a server blade blank. Unpopulated bays can lead to improper cooling and
thermal damage.
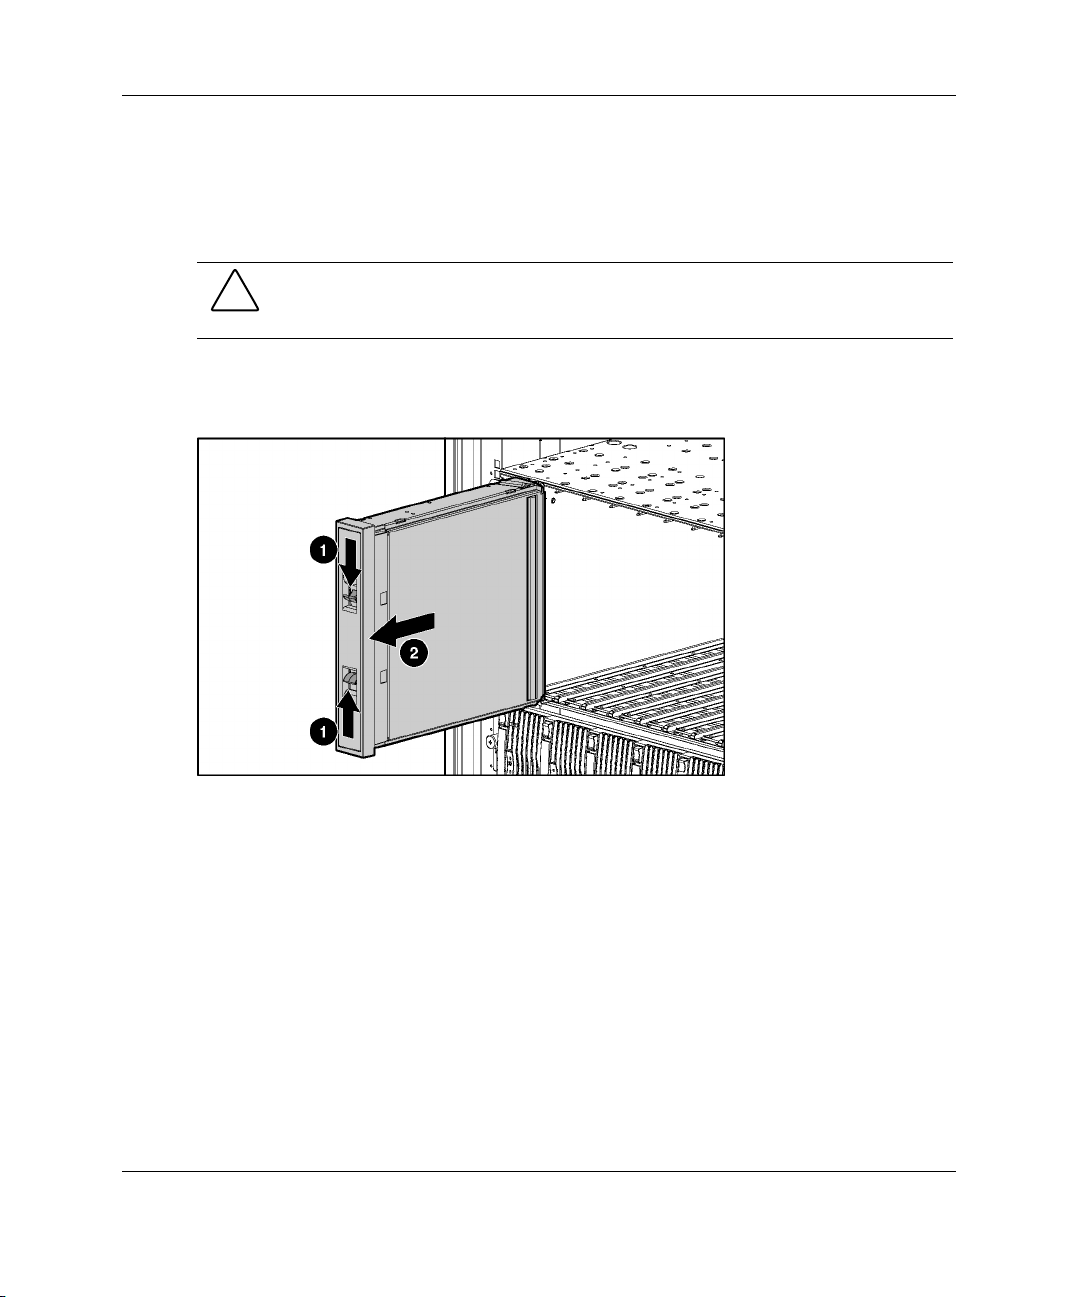
1. Press the release buttons (1).
2. Slide the server blade blank out of the bay (2).
Server Blade Setup
Figure 3-2: Removing a server blade blank
NOTE: Store the server blade blank for future use.
Installing a Server Blade
Before installing server blades for the first time, define the hardware configuration
and server blade deployment process. Refer to Chapter 5, “Server Blade
Configuration and Utilities.”
HP ProLiant BL20p Generation 3 Server Blade Setup and Installation Guide 3-3
Page 28
Server Blade Setup
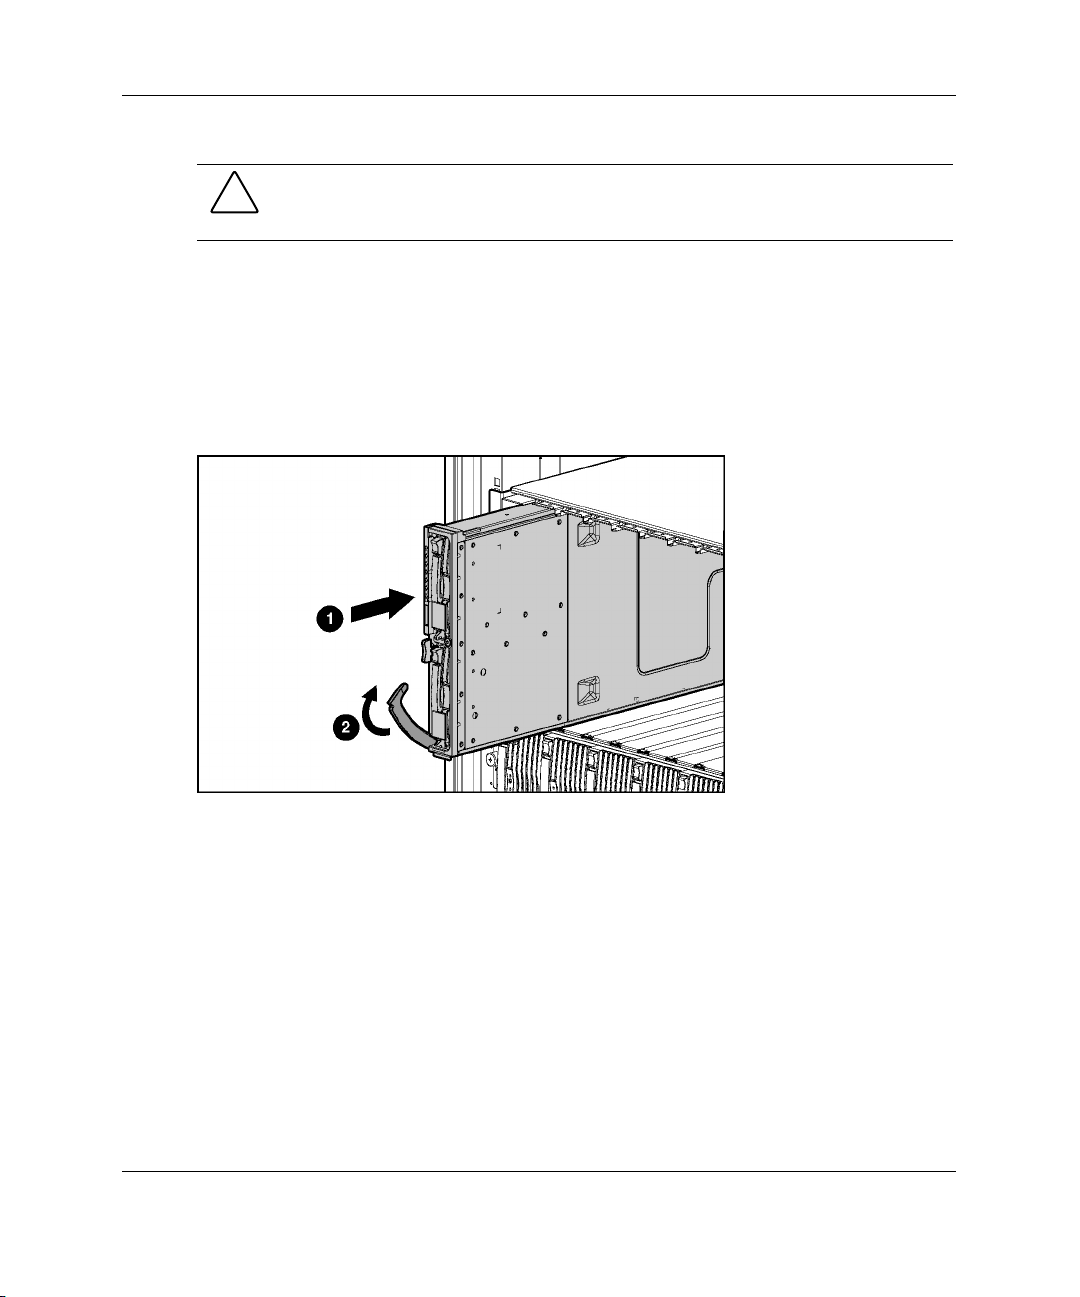
1. Align the keyed end of the server blade with the guide at the end of a bay on the
server blade enclosure.
IMPORTANT: The server blade is keyed to fit only one way in the bay. If the server blade
does not slide easily into the bay, be sure that the server blade is oriented properly.
2. Install the server blade by sliding the server blade fully into the bay (1).
3. Close the ejector lever (2).
CAUTION: Always populate the server blade enclosure bays with either a server
blade or server blade blank. Unpopulated bays can lead to improper cooling and
thermal damage.
Figure 3-3: Installing a server blade
3-4 HP ProLiant BL20p Generation 3 Server Blade Setup and Installation Guide
Page 29
Server Blade Setup
Removing a Server Blade from a Server Blade Enclosure
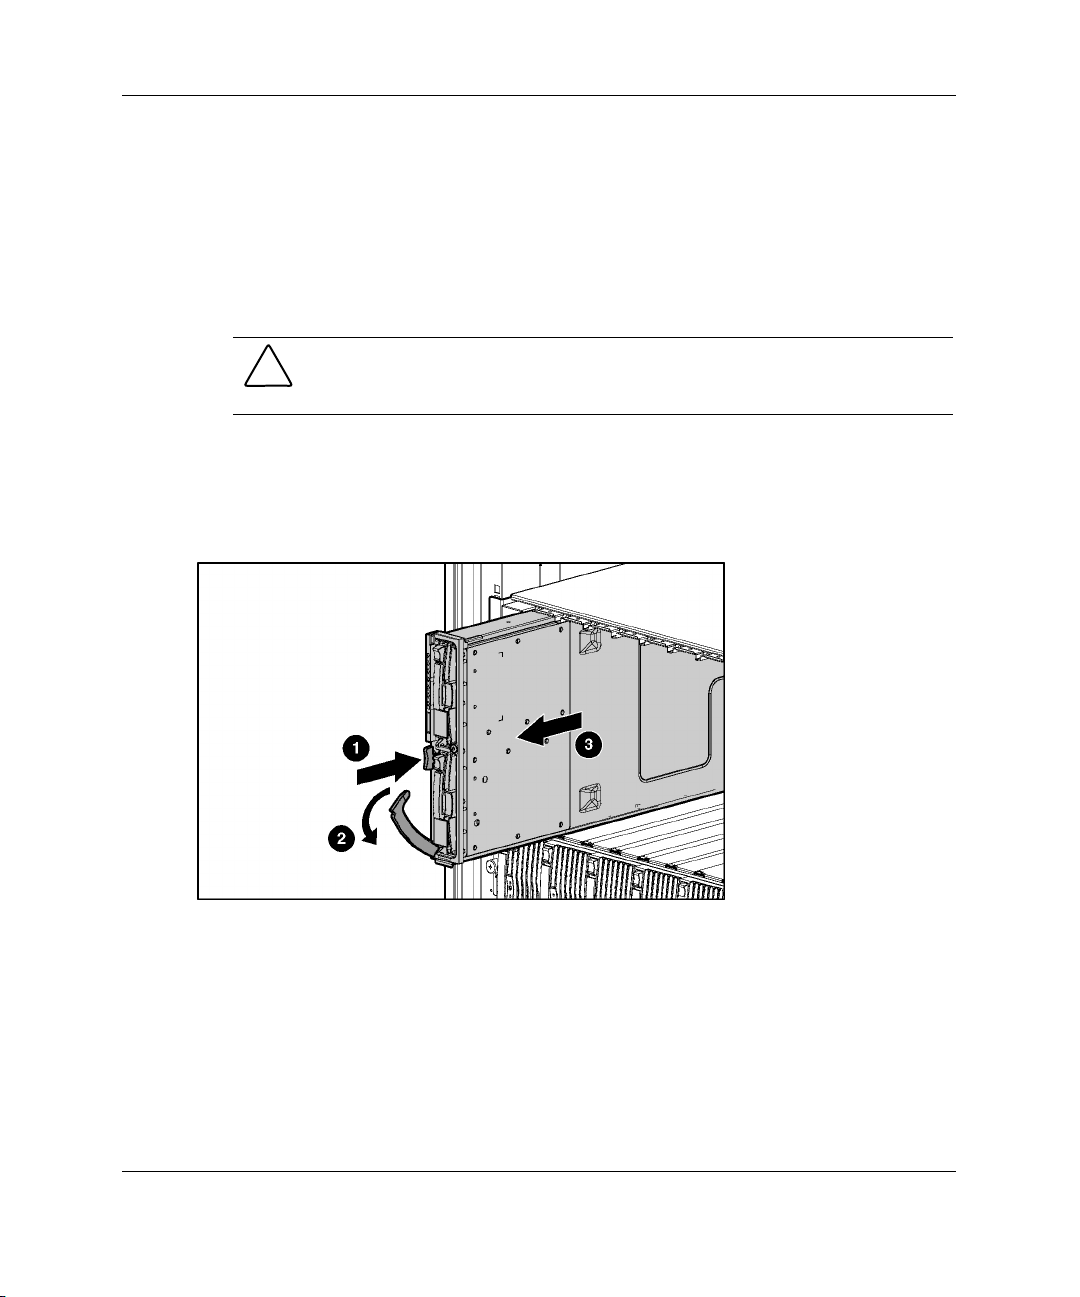
1. Press the release button (1).
CAUTION: After you press the release button, the server blade is unlocked from
the server blade enclosure. Use both hands to support the server blade when
you remove it from the rack.
2. Open the release lever (2).
3. Grasp the lever and slide the server blade from the server blade enclosure (3).
Place a hand under the server blade to support it as you remove it from the server
blade enclosure.
Figure 3-4: Removing a server blade
HP ProLiant BL20p Generation 3 Server Blade Setup and Installation Guide 3-5
Page 30
Hardware Options Installation
Processors and Heatsinks
The ProLiant BL20p G3 server blade ships with one or two processors.
WARNING: To reduce the risk of personal injury from hot surfaces, allow the
internal system components to cool before touching them.
WARNING: This documentation assumes that the server blade is in a rack and
not receiving power from a diagnostic station. If using a diagnostic station, be
sure to disconnect the server blade from the diagnostic station before
installing a processor.
CAUTION: Properly ground yourself before beginning any installation procedure.
Electrostatic discharge can damage electronic components.
4
CAUTION: Handle the processor with care. Do not bend or damage the pins
beneath the processor.
HP ProLiant BL20p Generation 3 Server Blade Setup and Installation Guide 4-1
Page 31

Hardware Options Installation
Installation and Upgrade Requirements
Observe the following requirements before installing a processor in the server blade:
• • Before installing a processor in the server, processor socket 1 must always be
populated. If the processor is missing from socket 1, the system will not power
on.
If processors of differing speeds are installed, each processor matches the speed
of the slowest processor.
Removing a Processor and Heatsink
For information on accessing internal server blade components, refer to “Accessing
Internal Server Blade Components” in Chapter 3, “Server Blade Setup.”
IMPORTANT: The heatsink is not reusable and must be discarded if removed from the
processor after application.
Figure 4-1: Unlatching the heatsink locking levers and
removing the heatsink
4-2 HP ProLiant BL20p Generation 3 Server Blade Setup and Installation Guide
Page 32

Figure 4-2: Removing the processor
Installing a Processor
IMPORTANT: The processor and heatsink are designed to fit one way into the socket. Align
the arrow on the processor with the arrow on the processor socket.
IMPORTANT: Be sure that the processor locking lever is open before installing the processor
into the socket.
Hardware Options Installation
HP ProLiant BL20p Generation 3 Server Blade Setup and Installation Guide 4-3
Page 33

Hardware Options Installation
Figure 4-3: Installing a processor
CAUTION: Be sure that the processor locking lever is closed. Do not force the lever
closed after the processor installation; it should close without resistance. Forcing the
lever closed may result in damage to the processor and its socket, requiring
replacement of the system board.
Figure 4-4: Removing the thermal interface media cover
4-4 HP ProLiant BL20p Generation 3 Server Blade Setup and Installation Guide
Page 34

Hardware Options Installation
CAUTION: After the cover is removed, do not touch the thermal interface media.
IMPORTANT: The heatsink is not reusable and must be discarded if removed from the
processor after application.
Figure 4-5: Installing a heatsink
Hot-Plug SCSI Hard Drives and Blanks
Removing Hard Drive Blanks
CAUTION: Always populate drive bays with either a hard drive or blank. Proper
airflow can only be maintained when the bays are populated. Unpopulated drive bays
can lead to improper cooling and thermal damage.
NOTE: Port-colored items indicate hot-plug components.
HP ProLiant BL20p Generation 3 Server Blade Setup and Installation Guide 4-5
Page 35

Hardware Options Installation
Figure 4-6: Removing a hard drive blank
NOTE: Store the hard drive blank for future use.
To install a hard drive blank, simply align the blank with the empty bay and slide the
blank into the bay until the locking button engages.
SCSI ID Numbers
The server blade hot-plug SCSI hard drives have unique SCSI IDs that the system
automatically sets. The IDs number from top to bottom on each server blade.
IMPORTANT: Always populate hard drive bays starting with SCSI ID 0 (the top bay).
Removing Hot-Plug SCSI Hard Drives
Before removing hot-plug SCSI hard drives, back up all server data on the hard drive.
CAUTION: Before removing a hot-plug SCSI hard drive, use the LEDs to
determine the status of the drive. Refer to the “Hot-Plug SCSI Hard Drive”
section in Chapter 1, “Server Blade Component Identification.”
4-6 HP ProLiant BL20p Generation 3 Server Blade Setup and Installation Guide
Page 36

Hardware Options Installation
CAUTION: If you are replacing a drive that is part of an array, refer to the
HP ProLiant Servers Troubleshooting Guide.
Figure 4-7: Removing a hot-plug SCSI hard drive
Installing Hot-Plug SCSI Hard Drives
1. Remove the existing hard drive blank or SCSI hard drive from the bay. Refer to
“Removing Hard Drive Blanks” or “Removing Hot-Plug SCSI Hard Drives” in
this chapter.
HP ProLiant BL20p Generation 3 Server Blade Setup and Installation Guide 4-7
Page 37

Hardware Options Installation
2. Insert the hot-plug SCSI hard drive. Be sure the drive seats firmly into the
connector on the SCSI backplane (1).
3. Close the ejector lever (2).
Figure 4-8: Installing a hot-plug SCSI hard drive
4. If you replaced a hard drive, restore the server blade data from the backup.
5. Use the hot-plug SCSI hard drive LEDs to identify the status of the installed
drive. For more information about LEDs, refer to “Hot-Plug SCSI Hard Drive” in
Chapter 1, “Server Blade Component Information.”
6. Resume normal server blade operations.
4-8 HP ProLiant BL20p Generation 3 Server Blade Setup and Installation Guide
Page 38

Memory
You can expand system memory by installing synchronous DDR DIMMs. A
ProLiant BL20p G3 server blade supports up to four PC2-3200 ECC registered DDR
SDRAM DIMMs.
DIMM Installation Guidelines
You must observe the following guidelines when installing additional memory:
•
Install only PC2-3200 registered DDR, 3.3-V, 72-bit wide, ECC DIMMs in the
server blade.
•
Install identical DIMMs as pairs only, starting with DIMM socket 1, bank A.
•
Populate both slots in a bank at the same time: DIMMs 1 and 2 reside in bank A,
and DIMMs 3 and 4 reside in bank B.
NOTE: The server blade ships with at least two DIMMs installed in DIMM slots 1A
and 2A.
CAUTION: Use only HP DIMMs. DIMMs from other sources are known to
adversely affect data integrity.
Hardware Options Installation
Installing DIMMs
Before installing DIMMs, review the “DIMM Installation Guidelines” section in this
chapter.
WARNING: To reduce the risk of personal injury from hot surfaces, allow the
internal system components to cool before touching them.
CAUTION: Electrostatic discharge can damage electronic components. Properly
ground yourself before beginning any installation procedure. Refer to Appendix D,
“Electrostatic Discharge,” for more information.
HP ProLiant BL20p Generation 3 Server Blade Setup and Installation Guide 4-9
Page 39
Hardware Options Installation
1. Access the internal server blade components. Refer to “Accessing Internal Server
Blade Components” in Chapter 3, “Server Blade Setup.”
2. Open the DIMM slot latches.
3. Align the key slot in the bottom edge of the DIMM with the tab in the DIMM
slot.
IMPORTANT: DIMMs do not seat if turned the wrong way.
4. Insert the DIMM into the DIMM slot (1).
5. Press down firmly. When the DIMM seats fully in the slot, the latches close (2).
Figure 4-9: Installing a DIMM
6. Repeat steps 2 through 5 to install the second DIMM.
7. Reinstall the access panel. Refer to “Accessing Internal Server Blade
Components” in Chapter 3, “Server Blade Setup.”
4-10 HP ProLiant BL20p Generation 3 Server Blade Setup and Installation Guide
Page 40

Hardware Options Installation
Smart Array 6i 128-MB Battery-Backed Write Cache Enabler
The optional Battery-Backed Write Cache Enabler provides the system with a means
for storing and saving data in the event of an unexpected system shutdown.
To access the internal server blade components, refer to “Accessing Internal Server
Blade Components” in Chapter 3, “Server Blade Setup.”
Figure 4-10: Removing the Smart Array 6i Controller
HP ProLiant BL20p Generation 3 Server Blade Setup and Installation Guide 4-11
Page 41

Hardware Options Installation
NOTE: Before removing the battery from the carrier, be sure to unwrap the cable.
Figure 4-11: Removing the battery from the plastic
carrier
NOTE: After removing the battery from the plastic carrier, discard the carrier and the cable.
The only items required for use with the HP ProLiant BL20p Generation 3 server blade are the
battery and the 128-MB Battery-Backed Write Cache Enabler.
4-12 HP ProLiant BL20p Generation 3 Server Blade Setup and Installation Guide
Page 42

Figure 4-12: Installing the battery onto the Smart
Array 6i 128-MB Battery-Backed Write Cache Enabler
Hardware Options Installation
Figure 4-13: Installing the Smart Array 6i 128-MB
Battery-Backed Write Cache Enabler onto the Smart
Array 6i controller
HP ProLiant BL20p Generation 3 Server Blade Setup and Installation Guide 4-13
Page 43
Hardware Options Installation
Figure 4-14: Installing the Smart Array 6i controller
To reinstall the access panel, refer to “Accessing Internal Server Blade Components”
in Chapter 3, “Server Blade Setup.”
HP ProLiant BL20p G3 Dual Port Fibre Channel Adapter
An optional dual port Fibre Channel (FC) adapter enables FC support for clustering
capabilities and SAN connection when used in conjunction with the RJ-45 Patch
Panel 2 or any other interconnect that supports a SAN connection. Refer to “SAN
Configuration Overview” in Chapter 5, “Server Blade Configuration and Utilities”
for more information about connecting to the SAN.
4-14 HP ProLiant BL20p Generation 3 Server Blade Setup and Installation Guide
Page 44
Hardware Options Installation
To remove the access panel, refer to “Accessing Internal Server Blade Components”
in Chapter 3, “Server Blade Setup.”
Figure 4-15: Installing the FC adapter
HP ProLiant BL20p Generation 3 Server Blade Setup and Installation Guide 4-15
Page 45

Server Blade Configuration and Utilities
This chapter contains information about server blade deployment methods, hardware
configuration, and the software to accomplish these tasks.
Software and Utilities
The following utilities and support tools are available for use in configuring and
deploying the server blade:
•
Integrated Lights-Out Advanced (iLO Advanced) Management
•
Redundant ROM Support
•
ROMPaq Utility
•
ROM-Based Setup Utility (RBSU)
•
Option ROM Configuration for Arrays (ORCA) Utility
5
•
Network-based PXE Deployment
•
HP Systems Insight Manager (HP SIM)
•
Diagnostics Utility
•
Automatic Server Recovery (ASR-2)
•
Integrated Management Log (IML)
HP ProLiant BL20p Generation 3 Server Blade Setup and Installation Guide 5-1
Page 46

Server Blade Configuration and Utilities
HP also offers the following software components:
•
Health and Wellness Driver and IML Viewer
•
iLO Advanced Management Interface Driver
•
Rack Infrastructure Interface Service
•
Management Agents
For Microsoft® Windows® operating system users, these items are included in the
ProLiant Support Pack for Microsoft Windows, available from the ProLiant BL
p-Class system product page at
h18002.www1.hp.com/support/files/server/us/index.html
Linux operating system users can download these components from the HP website:
www.hp.com/products/servers/linux/
For information on how to use these components with a Linux operating system,
refer to the HP website:
http://h18000.www1.hp.com/products/servers/linux/documentation.html#howtos
Integrated Lights-Out Advanced Management
Integrated Lights-Out Advanced (iLO Advanced) is a standard component of selected
ProLiant server blades. The iLO Advanced subsystem provides server health and
remote server blade manageability. The iLO Advanced features are accessed from a
network client device using a supported web browser. In addition to other features,
iLO Advanced provides keyboard, mouse, and video (text and graphics) capability
for a server blade, regardless of the state of the host operating system or host server
blade.
iLO includes an intelligent microprocessor, secure memory, and a dedicated network
interface. This design makes iLO independent of the host server blade and its
operating system. iLO provides remote access to any authorized network client, sends
alerts, and provides other server blade management functions.
5-2 HP ProLiant BL20p Generation 3 Server Blade Setup and Installation Guide
Page 47

Server Blade Configuration and Utilities
Using a supported web browser, you can:
•
Remotely access the console of the host server blade, including all text mode and
graphics mode screens with full keyboard and mouse controls.
•
Remotely power up, power down, or reboot the host server blade.
•
Remotely boot a host server blade to a virtual diskette image to perform a ROM
upgrade or to install an operating system.
•
Send alerts from iLO Advanced regardless of the state of the host server blade.
•
Access advanced troubleshooting features provided by iLO Advanced.
•
Launch a web browser, use Simple Network Management Protocol (SNMP)
alerting, and diagnose the server blade using HP SIM.
•
Configure static IP bay settings for the dedicated iLO management NICs on each
server blade in an enclosure for faster deployment.
The server blade must be properly cabled for iLO connectivity. Connect to the server
blade with one of the following methods:
•
Through an existing network (in the rack): This method requires you to install the
server blade in its enclosure and assign it an IP address (manually or using
DHCP).
•
Through the server blade I/O port
— In the rack: This method requires you to connect the local I/O cable to the
I/O port and a client PC. Using the static IP address listed on the local I/O
cable label and the initial access information on the front of the server blade,
you can access the server blade with the iLO Advanced Remote Console. For
local I/O cabling instructions, refer to Chapter 6, “Connecting Local I/O
Devices.”
— Out of the rack, with the diagnostic station: This method requires you to
power the server blade with the optional diagnostic station and connect to an
external computer using the static IP address and the local I/O cable. For
cabling instructions, refer to the documentation that ships with the diagnostic
station or to the Documentation CD.
HP ProLiant BL20p Generation 3 Server Blade Setup and Installation Guide 5-3
Page 48

Server Blade Configuration and Utilities
• Through the server blade rear panel connectors (out of the rack, with the
diagnostic station): This method enables you to configure a server blade out of
the rack by powering the blade with the diagnostic station and connecting to an
existing network through a hub. The IP address is assigned by a DHCP server on
a network.
iLO ROM-Based Setup Utility
The iLO ROM-Based Setup Utility (iLO RBSU) is the recommended method to
configure and set up iLO. The iLO RBSU is designed to assist you with setting up
iLO on a network and is not intended for continued administration.
To run iLO RBSU:
1. Restart or power up the server blade.
2. Press the F8 key when prompted during the Power-On Self-Test (POST). The
iLO RBSU runs.
3. Enter a valid iLO user ID and password with the appropriate iLO privileges
(Administer User Accounts, Configure iLO Settings).
4. Make and save any necessary changes to the iLO configuration.
5. Exit iLO RBSU, when finished.
HP recommends using the static IP bay configuration feature on iLO or DNS/DHCP
with iLO to simplify installation. If DNS/DHCP cannot be used, use one of the
following procedures to disable DNS/DHCP and to configure the IP address and the
subnet mask:
1. Log into iLO using the DNS/DHCP IP address.
2. At the Administration screen, enter a valid iLO user ID and password with the
appropriate iLO privileges.
3. Select Network Settings and enter the appropriate information.
or
1. Restart or power up the server blade.
2. Press the F8 key when prompted during the POST. The iLO RBSU runs.
5-4 HP ProLiant BL20p Generation 3 Server Blade Setup and Installation Guide
Page 49

3. Enter a valid iLO user ID and password with the appropriate iLO privileges
(Administer User Accounts, Configure iLO Settings).
NOTE: Use the arrow keys to highlight selections.
4. Select Network, DNS/DHCP, press the Enter key, and then select DHCP
Enable. Press the spacebar to turn off DHCP. Be sure that DHCP Enable is set to
Off and save the changes.
5. Select Network, NIC and TCP/IP, press the Enter key, and type the appropriate
information in the IP Address, Subnet Mask and Gateway IP Address fields.
6. Save the changes. The iLO system automatically resets to use the new setup
when you exit the iLO RBSU.
Redundant ROM Support
Server blades enable you to upgrade or configure the ROM safely with redundant
ROM support. The server blade has a 4-MB ROM that acts as two, separate 2-MB
ROMs. In the standard implementation, one ROM contains the current ROM
program version, while the other ROM contains a backup version.
Server Blade Configuration and Utilities
Safety and Security Benefits
When you flash the system ROM, ROMPaq writes over the older ROM and saves the
current ROM as a backup, enabling you to switch easily to the backup ROM version
if the new ROM becomes corrupted for any reason. This feature protects the previous
ROM version, even if you experience a power failure while flashing the ROM.
Access to Redundant ROM Settings
To access the redundant ROM:
1. Access RBSU by pressing the F9 key during power up when the prompt displays.
2. Select Advanced Options.
3. Select ROM Selection.
4. Select one of the ROM banks as the system ROM.
HP ProLiant BL20p Generation 3 Server Blade Setup and Installation Guide 5-5
Page 50

Server Blade Configuration and Utilities
5. Press the Enter key.
6. Press the Esc key to exit the current menu or press the F10 key to exit RBSU.
7. Restart the server blade.
When the server blade boots, the system identifies whether the current ROM bank is
corrupt. If a corrupt ROM is detected, the system boots from the backup ROM and
alerts you through POST or IML that the ROM bank is corrupt.
If both the current and backup versions of the ROM are corrupt, you must return the
system board for a service replacement. Refer to the HP ProLiant BL p-Class System
Maintenance and Service Guide and contact an HP authorized reseller.
Remote ROM Flash
The system contains individual firmware for various components.
The ProLiant BL20p G3 server blade contains:
•
Server blade system ROM
•
Smart Array 6i memory module ROM
•
iLO ROM
The server blade and power enclosures contain:
•
Server blade management module ROM
•
Power management module ROM
Using the Smart Components for Remote ROM Flash with the Remote Deployment
Utility (RDU) console application, Remote ROM Flash enables you to upgrade the
firmware (BIOS) on a server blade from a remote location.
If a power loss occurs during a firmware upgrade, redundant ROM support enables
data recovery.
5-6 HP ProLiant BL20p Generation 3 Server Blade Setup and Installation Guide
Page 51

ROMPaq Utility
Flash ROM enables you to upgrade the firmware (BIOS) with system or option
ROMPaq utilities.
To upgrade the BIOS:
Server Blade Configuration and Utilities
1. Download the latest ROMPaq at
2. Follow the instructions and create a bootable diskette.
IMPORTANT: You can use the iLO Virtual Media applet to create the image file. Refer to
the “Integrated Lights-Out Advanced Management” section in this chapter. If you use this
method, omit step 3.
3. Access the server blade through the iLO Remote Console. Refer to the
HP ProLiant BL p-Class System Hardware Configuration and Installation
Poster.
4. Insert the virtual diskette.
5. Use the iLO virtual power button to power the server blade off and then on, and
to set the blade to boot from the diskette image you created in step 2.
The ROMPaq Utility checks the system and provides a choice (if more than one
exists) of available ROM revisions. By default, the oldest ROM version is updated.
This procedure is the same for both system and option ROMPaq utilities.
If a power loss occurs during a firmware upgrade, redundant ROM support enables
data recovery.
ROM-Based Setup Utility
NOTE: Most of the features in RBSU are not required in the setup of the server blade. The
options in this utility are designed to assist with specific server blade configuration issues.
www.hp.com/support.
RBSU performs configuration activities and enables you to view server blade
configuration information. The server blade ships pre-configured, and changes are
not required unless you want to change the default settings.
HP ProLiant BL20p Generation 3 Server Blade Setup and Installation Guide 5-7
Page 52

Server Blade Configuration and Utilities
To navigate RBSU, use the following keys:
•
To access RBSU, use the iLO Remote Console and press the F9 key when
prompted during power up.
•
To navigate the menu system, use the arrow keys.
•
To make selections, press the Enter key.
RBSU automatically saves settings when you press the Enter key. The utility does
not prompt you for confirmation of settings before you exit the utility. To change a
selected setting, you must select a different setting and press the Enter key.
Table 2-1 contains the default settings for options in primary RBSU menus.
Table 5-1: RBSU Default Settings
Menu/Option Default Setting
System Options
OS Selection
Embedded Serial Port
Virtual Serial Port
Integrated Diskette Controller
Embedded NIC PXE Support Port 1 PXE Enabled
USB Control USB Enabled
USB 2.0 Control Enabled
Standard Boot Order (IPL) *
Boot Controller Order Smart Array 6i
Server Availability
ASR Status Enabled
ASR Timeout 10 minutes
Thermal Shutdown Enabled
*The default boot order is CD-ROM drive, diskette drive, hard
drive, and network, respectively.
continued
5-8 HP ProLiant BL20p Generation 3 Server Blade Setup and Installation Guide
Page 53

Server Blade Configuration and Utilities
Table 5-1: RBSU Default Settings continued
Menu/Option Default Setting
Wake-on LAN Enabled
POST Speed Up Enabled
POST F1 Prompt Enabled
Power Button Enabled
Server Passwords
Set Power-On Password Disabled
Set Admin Password Disabled
BIOS Serial Console & EMS
BIOS Serial Console Port Auto
BIOS Serial Console Baud Rate 9600
EMS Console COM 1; IRQ 4
BIOS Interface Mode Auto
Server Asset Text
Server Info Text
Administrator Info Text
Service Contact Text
Custom Post Message Disabled
Advanced Options
MPS Table Mode AutoSet Table
ROM Selection Use Current ROM
Erase Non-Volatile Memory Disabled
Erase NVRAM/Boot Disk Disabled
NMI Debug Button Enabled
Processor Hyper-Threading Enabled
continued
HP ProLiant BL20p Generation 3 Server Blade Setup and Installation Guide 5-9
Page 54

Server Blade Configuration and Utilities
Table 5-1: RBSU Default Settings continued
Menu/Option Default Setting
Virtual Install Disk Disabled
Serial Number
Product ID
HW Prefetcher Enabled
Adjacent Sector Prefetch Enabled
Utility Language English
Option ROM Configuration for Arrays Utility
The Option ROM Configuration for Arrays (ORCA) utility is a menu-driven utility
that does not require a CD and can be started when the server blade is booting. This
utility enables users to perform the following functions:
•
Create, configure, and/or delete logical drives
•
Specify RAID levels
•
Assign online spares
•
Set interrupts and the boot controller order
To run ORCA, press the F8 key from the iLO Remote Console when the server blade
is booting.
Network-Based PXE Deployment
For each server blade that you are deploying, the PXE server must be connected to
the NIC designated for PXE. The server blade defaults PXE functions to NIC 1, but
any of the four NICs can be designated for PXE in RBSU. For NIC connector
locations on RJ-45 patch panels and interconnect switches, refer to the HP ProLiant
BL20p Generation 3 Server Blade Overview card included with the server blade.
To deploy an operating system to multiple server blades, you can install a Preboot
eXecution Environment (PXE) deployment server on a network.
5-10 HP ProLiant BL20p Generation 3 Server Blade Setup and Installation Guide
Page 55

Server Blade Configuration and Utilities
PXE is a component of the Intel® Wired for Management (WfM) specification. The
PXE model enables server blades to load and execute a network bootstrap program
(NBP) from a PXE server and to execute a pre-configured image. The image can be
an operating system image created by software utilities or a boot diskette image. This
feature enables a user to configure a server blade and install an operating system over
a network.
When a PXE-enabled client boots, it obtains an IP address from a dynamic host
configuration protocol (DHCP) server. The client obtains the name of the NBP from
the appropriate boot server. Then, the client uses trivial file transfer protocol (TFTP)
to download the NBP from the boot server and executes the image.
Deployment Infrastructure
To establish a network-based PXE deployment infrastructure, you must provide the
following software and minimum hardware:
• Client PC (administrative workstation)
— Intel Pentium III or higher processor (700 MHz or greater recommended)
— 128 MB of RAM
— Microsoft Windows 2000 Professional or Microsoft Windows XP operating
system
— Microsoft Internet Explorer 5.5 or above with 128-bit encryption
— Ethernet NIC with 10/100 RJ-45 connector
— TCP/IP networking and an IP address compatible with one of the following
the iLO Diagnostic Port IP address or an assigned DHCP or static IP address
— CD-ROM drive and/or diskette drive
— Any of the following Java Runtime Environment versions:
1.3.1_02
1.3.1_07
1.3.1_08
HP ProLiant BL20p Generation 3 Server Blade Setup and Installation Guide 5-11
Page 56

Server Blade Configuration and Utilities
1.4.1 for Windows users only
1.4.2 for Linux users only
Access the Java Runtime Environment versions at
http://java.sun.com/products/archive/index.html
•
DHCP server (IP address assignment)
— Pentium or Pentium II 200-MHz or faster processor
— 64 MB of RAM
— 64 MB of free hard drive space
— 10 Mb/s network adapter
•
PXE deployment server (storing boot images)
— Intel Pentium III or higher processor (500 MHz recommended)
— 256 MB of RAM
— 10 Mb/s network adapter
— CD-ROM drive
•
NFS repository server (only required for Red Hat Linux deployment)
— Red Hat Linux 7.2 operating system installed
— Network connection
— CD-ROM drive
— NFS installed
— 1.5 GB of available disk space
•
Windows repository server (only required for Windows deployment)
— Windows 2000 or Windows 2003 operating system installed
— Network connection
— CD-ROM drive
— 1.5 GB of available disk space
5-12 HP ProLiant BL20p Generation 3 Server Blade Setup and Installation Guide
Page 57

Server Blade Configuration and Utilities
— TCP/IP networking and an IP address compatible with one of the following:
the iLO Diagnostic Port IP address or an assigned DHCP or static IP address
— CD-ROM drive and/or diskette drive
— Any of the following Java Runtime Environment versions:
1.3.1_02
1.3.1_07
1.3.1_08
1.4.1 for Windows users only
1.4.2 for Linux users only
Access the Java Runtime Environment versions at
http://java.sun.com/products/archive/index.html
• Network server with an operating system installed
HP Systems Insight Manager
HP SIM provides comprehensive management of the ProLiant BL20p G3 server
blades, maximizing system availability and optimizing IT staff efficiency. HP SIM
allows systems administrators to quickly identify hardware failures, isolate and
update systems running out-of-date system software, and easily access onboard
management resources. In addition, HP SIM provides visualization support for the
ProLiant BL20p G3 server blades that allows you to quickly view the configuration
of the server blades within a server blade enclosure and speeds access to the
HP Insight Management Agents, Version Control Agents, and iLO remote console.
Diagnostics Utility
Refer to the RBSU user guide and run the internal diagnostics before performing the
following procedure.
HP ProLiant BL20p Generation 3 Server Blade Setup and Installation Guide 5-13
Page 58

Server Blade Configuration and Utilities
To run Diagnostics Utility:
1. Download the latest Diagnostics Utility from the HP website:
www.hp.com/servers/smartstart
2. Follow the instructions and create a bootable diskette. For more information,
refer to “Creating the Boot Diskette” in this chapter.
IMPORTANT: You can use the iLO Virtual Media applet to create the image file. Refer to
the “Integrated Lights-Out Advanced Management” section in this chapter. If you use this
method, omit step 3.
3. Access the server blade through the iLO Remote Console. Refer to the
HP ProLiant BL p-Class System Hardware Configuration and Installation
Poster.
4. Insert the virtual diskette.
5. Use the iLO virtual power button to power the server blade off and then on, and
to set the blade to boot from the diskette image you created in step 2.
The server blade boots from the downloaded image and runs the Diagnostics Utility.
Automatic Server Recovery-2
ASR-2 is a feature that causes the system to restart when a catastrophic operating
system error occurs, such as a blue-screen or kernel panic. A system fail-safe timer,
the ASR-2 timer, starts when the System Management driver, also known as the
Health Driver, is loaded. When the operating system is functioning properly, the
system periodically resets the timer. However, when the operating system fails, the
timer expires and restarts the server blade.
ASR-2 increases server blade availability by restarting the server blade within
10 minutes after a system hang or shutdown. At the same time, the HP SIM console
notifies you by sending a message to a designated pager number that ASR-2 has
restarted the system. You can disable ASR-2 from the HP SIM console or RBSU.
5-14 HP ProLiant BL20p Generation 3 Server Blade Setup and Installation Guide
Page 59

Integrated Management Log
The IML records hundreds of events and stores them in an easy-to-view form. The
IML time-stamps each event with 1-minute granularity.
Events listed in the IML are categorized as one of four event severity levels:
•
Status — indicates that the message is informational only
•
Repaired — indicates that corrective action was taken
•
Caution — indicates a non-fatal error condition occurred
•
Critical — indicates a component failure has occurred
Viewing the Log
You can view recorded events in the IML in several ways, including the following:
•
From within the iLO Web pages
•
From within the HP SIM
•
From within the Survey Utility
Server Blade Configuration and Utilities
•
From within operating system specific IML viewers
— For Windows 2000, Event Viewer, or HP IML Viewer
— For Linux operating systems, HP IML Viewer Application
NOTE: You can only view the list from the Recovery/Integrated Management Log screen.
Viewing the Event List
To view the event list:
1. From HP SIM, select the appropriate server blade, then select View Device Data.
The selected server blade appears with buttons around its perimeter.
2. Click Recovery.
HP ProLiant BL20p Generation 3 Server Blade Setup and Installation Guide 5-15
Page 60

Server Blade Configuration and Utilities
3. Select Integrated Management Log.
4. If a failed component has been replaced, select the event from the list, then select
Mark Repaired.
Printing the Event List
To print the event list:
1. From HP SIM, select the appropriate server blade. The selected server blade
appears with buttons around its perimeter.
2. Click Configuration.
3. Click Recovery.
4. Click Print.
List of Events
The event list displays the affected components and the associated error messages.
Though the same basic information displays, the format of the list may differ
depending on whether you view it from within HP SIM or from within Survey
Utility.
Table 5-2 identifies the event types (affected components) and associated event
messages for server blades.
Table 5-2: Server Blade Event Messages
Event Type Event Message
Machine Environment
Fan failure System Fan Failure (Fan X, Location)
Overheat condition System Overheating (Zone X, Location)
5-16 HP ProLiant BL20p Generation 3 Server Blade Setup and Installation Guide
continued
Page 61

Table 5-2: Server Blade Event Messages continued
Event Type Event Message
Server Blade Configuration and Utilities
Main Memory
Correctable error
threshold exceeded
Corrected Memory Error threshold passed (System Memory)
Corrected Memory Error threshold passes (Memory Module
Processor
Correctable error
threshold exceeded
Uncorrectable error Processor Uncorrectable internal error (Slot X, Socket X)
PCI Bus Error
Power Subsystem
System configuration
battery low
Automatic Server
Recovery
System lockup ASR Lockup Detected: Cause
Operating System
Event Type Event Message
Corrected Memory Error threshold passed (Slot X, Memory
Module X)
unknown)
Processor Correctable Error threshold passed (Slot X, Socket X)
PCI Bus Error (Slot X, Bus X, Device X, Function X)
Real-Time Battery Clock Failing
System crash Blue Screen Trap: Cause [NT®]
Kernel Panic: Cause [Linux]
Automatic operating
system shutdown
HP ProLiant BL20p Generation 3 Server Blade Setup and Installation Guide 5-17
Automatic Operating System Shutdown Initiated Due to Fan Failure
Automatic Operating System Shutdown Initiated Due to Overheat
Condition
Fatal Exception (Number X, Cause)
Page 62

Server Blade Configuration and Utilities
Configuration and Deployment Overview
Integrated Lights-Out Advanced (iLO Advanced) can be a helpful debugging tool in
the configuration and deployment progress. HP recommends using iLO Advanced to
follow the process. Refer to the “Integrated Lights-Out Advanced Management”
section in this chapter for connection instructions.
It is useful to set up and configure a server blade iLO as an initial step to deployment.
Several ways exist to assign an IP address to iLO:
•
Static IP bay configuration
•
DHCP
•
Manual static IP address assignment
Static IP Bay Configuration
Static IP bay configuration, implemented using the new Static IP Bay Settings on the
BL p-Class tab, eases the initial deployment of an entire enclosure, or the subsequent
deployment of blades within an existing enclosure. While the preferred method for
assigning IP addresses to each server blade iLO is through DHCP and DDNS, these
protocols are not always available on non-production networks.
Static IP bay configuration automates the first step of BL p-Class blade deployment
by enabling the iLO management processor in each blade slot to obtain a predefined
IP address without relying on DHCP. iLO is immediately accessible for server
deployment using Virtual Media and other remote administration functions.
Static IP bay configuration uses the Static IP Bay Configuration addressing method
which allows you to assign IP addresses to each iLO based on slot location in the
respective server enclosure. By providing a set of IP addresses in the enclosure, you
gain the advantages of a static IP bay configuration, without requiring each individual
iLO to be configured locally.
5-18 HP ProLiant BL20p Generation 3 Server Blade Setup and Installation Guide
Page 63

Using the iLO static IP bay configuration will:
•
Help avoid the costs of a DHCP infrastructure to support the blade environment.
•
Provide easier setup with automatic iLO address generation for all or a few
selected bays.
iLO Hardware and Firmware Requirements
•
An updated EEPROM on the power back plane to support the multi-record
format
•
A server blade management module must be present and functioning properly
•
The iLO IPMI stack must be initialized
•
The iLO should be initialized and functioning
•
The most current version of iLO firmware to support this feature
User requirements
•
Users must have the Configure iLO Settings privilege
Server Blade Configuration and Utilities
•
The network must function properly
Configuring a ProLiant BL p-Class Blade Enclosure
To configure a BL p-Class blade enclosure using static IP bay addressing, you must:
1. Install a server blade in bay 1 of the BL p-Class enclosure. The server blade does
not need to be configured or have an operating system installed. The server blade
must be configured before installing any additional blades in the enclosure.
2. Connect a client device to the front-panel iLO port of the blade using the local
I/O cable. The local I/O cable connects to the I/O port on the front of the server
blade. This will enable the static 192.168.1.1 for the iLO web interface.
3. Configure the enclosure setting. Using the iLO web interface, select the
BL p-Class tab to access the Enclosure Static IP Settings. The BL p-Class tab
provides a user interface for configuring the enclosure-level static IP addresses.
HP ProLiant BL20p Generation 3 Server Blade Setup and Installation Guide 5-19
Page 64

Server Blade Configuration and Utilities
HP recommends selecting a reasonable starting IP address, with the last digit(s)
of the address corresponding to the bay number of each blade (example:
192.168.100.1 through 192.168.100.16), the user can build an easy-to-remember
numbering system.
4. Reset Bay #1, if necessary. The blade in Bay #1 must only be reset if you intend
the blade to use a Static IP Bay Configuration address by marking the feature
enable mask for Bay #1. Before resetting the blade, you must browse to the
Network Settings page, select Enable Static IP Settings and press Apply. This
will force the blade to reboot and use the newly assigned enclosure static IP.
If multiple enclosures are deployed at the same time, the process can be repeated
easily by moving a single blade to Bay #1 of each enclosure to perform the
configuration.
Configuring Static IP Bay Settings
Static IP bay settings, available on the BL p-Class tab, allow you to configure and
deploy the blade server.
The Enable Static IP Bay Configuration Settings checkbox, available on the Network
Settings tab (not shown), allows you to enable or disable Static IP Bay Configuration.
The new Enable Static IP Bay Configuration Settings option, is only available on
blade servers. When Static IP Bay Configuration is enabled, all fields except iLO
Subsystem Name are disabled. Only Static IP Bay Configuration or DHCP can be
enabled at one time. Disabling both Static IP Bay Configuration and DHCP will
signal iLO to use a user defined IP address. The Enable Static IP Bay Configuration
Settings option will remain disabled if the infrastructure does not support Static IP
Bay Configuration. Refer to Figure 5-1 for the Static IP Bay Configuration screen.
5-20 HP ProLiant BL20p Generation 3 Server Blade Setup and Installation Guide
Page 65

Server Blade Configuration and Utilities
Figure 5-1: Static IP Bay Configuration screen
HP ProLiant BL20p Generation 3 Server Blade Setup and Installation Guide 5-21
Page 66

Server Blade Configuration and Utilities
Standard Configuration Parameters
Beginning IP Address (Bay 1)—Assigns the starting IP address. All IP addresses
must be valid addresses.
Ending IP Address (Bay 16)—Assigns the ending IP address. All IP addresses must
be valid addresses.
Subnet Mask
—Assigns the subnet mask for the default gateway. This field may be
filled in if either Static IP Bay Configuration or DHCP is enabled. The entire IP
address range must conform to the subnet mask.
Gateway IP Address
—Assigns the IP address of the network router that connects
the Remote Insight subnet to another subnet where the management PC resides. This
field may be filled in if either Static IP Bay Configuration or DHCP is enabled.
Advanced Configuration Parameters
Domain Name—Allows you to assign the name of the domain in which the iLO will
participate.
Primary DNS Server—Assigns a unique DNS server IP address on your network.
Secondary DNS Server—Assigns a unique DNS server IP address on your network.
Tertiary DNS Server—Assigns a unique DNS server IP address on your network.
Primary WINS Server—Assigns a unique WINS server IP address on your
network.
Secondary WINS Server—Assigns a unique WINS server IP address on your
network.
Static Route #1, #2, and #3 (destination gateway)—Use one of these parameters to
assign the appropriate static route destination and gateway IP address on your
network. The default IP values are 0.0.0.0 and 0.0.0.0, where the first IP address
corresponds to the destination IP, and the second IP address corresponds to the
gateway IP.
5-22 HP ProLiant BL20p Generation 3 Server Blade Setup and Installation Guide
Page 67

Server Blade Configuration and Utilities
Enable iLO IP Address Assignment
To configure the BL p-Class server blades for IP address assignment:
•
Check bays (1 through 16) to select the appropriate BL p-Class server blades.
•
Click Enable All to select all server blades.
•
Click Clear All to clear all previous selections.
Click Apply after making the selection.
Moving the Blade or Downgrading the iLO Firmware
If it becomes necessary to move the blade to a new enclosure, or change the iLO
firmware, the following can occur:
•
If the rack does not support Static IP Bay Configuration and Static IP Bay
Configuration is enabled, the blade will revert to DHCP addressing
automatically.
•
If the blade is downgraded with Static IP Bay Configuration enabled, the IP
address setting will become static. If you want to use DHCP, you must re-enable
DHCP through the iLO web interface or use an XML script.
Remote Insight Command Language
Several new XML commands have been added to the Remote Insight Command
Language (RIBCL) structure to support reading and writing of Static IP Bay
Configuration in scripting. The new RIBCL commands must be scripted within a
RACK_INFO command block. The new attributes are:
•
MOD_ISIP_SETTINGS modifies the Static IP Bay Configuration settings. This
command is only valid inside a RACK_INFO block. The logged-in user must
have the configure iLO privilege. This attribute must appear inside the
RACK_INFO command block with MODE = “write.”
HP ProLiant BL20p Generation 3 Server Blade Setup and Installation Guide 5-23
Page 68

Server Blade Configuration and Utilities
• SLOT_ENABLE MASK enables the use of Static IP Bay Configuration
addressing. The attribute MASK is a 16-bit number. Each bit represents a slot in
the enclosure. If the bit is set, that particular slot will be assigned to use the Static
IP Bay Configuration settings. The least significant bit (LSB) represents slot 1.
For example, the MASK=“0x0001” will only allow slot 1 to use Static IP Bay
Configuration. This number can be either a hexadecimal number or a decimal
number. This command must appear inside the MOD_ISIP_SETTINGS block.
• • ISIP_ENABLE is used to enable or disable the use of Static IP Bay
Configuration. This attribute must appear inside the
MOD_NETWORK_SETTINGS command block. The possible values are “Y” or
“N.” It is case insensitive. This attribute is only applicable on blade servers.
GET_ISIP_SETTINGS requests the respective iLO’s Static IP Bay
Configuration settings. This attribute must appear inside the RACK_INFO
command block. The RACK_INFO command block may be set to read or write.
RIBCL Examples
Getting Static IP Bay Configuration Settings
<RIBCL VERSION="2.0">
<LOGIN USER_LOGIN="Admin" PASSWORD="password">
<RACK_INFO MODE="write">
<GET_ISIP_SETTINGS/ >
</RACK_INFO>
</LOGIN>
</RIBCL>
Modifying Static IP Bay Configuration Settings
<RIBCL VERSION="2.0">
<LOGIN USER_LOGIN="Admin" PASSWORD="password"> <RACK_INFO
MODE="write">
<MOD_ISIP_SETTINGS>
<SLOT_ENABLE MASK="0x3FE"/>
<IP_ADDRESS VALUE="16.100.222.111"/>
<SUBNET_MASK VALUE="255.255.252.0"/>
<GATEWAY_IP_ADDRESS VALUE="16.100.222.1"/>
<DOMAIN_NAME VALUE="sum.won.here.now"/>
<PRIM_DNS_SERVER VALUE="16.11.1.111"/>
5-24 HP ProLiant BL20p Generation 3 Server Blade Setup and Installation Guide
Page 69

Server Blade Configuration and Utilities
<SEC_DNS_SERVER VALUE=""/>
<TER_DNS_SERVER VALUE=""/>
<PRIM_WINS_SERVER VALUE="16.22.2.222"/>
<SEC_WINS_SERVER VALUE=""/>
<STATIC_ROUTE_1 DEST="16.33.3.33"
GATEWAY="16.100.11.11"/>
<STATIC_ROUTE_2 DEST="" GATEWAY=""/>
<STATIC_ROUTE_3 DEST="" GATEWAY=""/>
</MOD_ISIP_SETTINGS>
</RACK_INFO>
</LOGIN>
</RIBCL>
Modify Network Settings to enable Static IP Bay Configuration
<RIBCL VERSION="2.0">
<LOGIN USER_LOGIN="Admin" PASSWORD="password">
<RIB_INFO MODE="write">
<MOD_NETWORK_SETTINGS>
<ISIP_ENABLE VALUE="Yes"/>
</MOD_NETWORK_SETTINGS>
</RIB_INFO>
</LOGIN>
</RIBCL>
Refer to the HP Integrated Lights-Out User Guide for information on DHCP and the
manual setting of IP addresses.
HP ProLiant BL20p Generation 3 Server Blade Setup and Installation Guide 5-25
Page 70

Server Blade Configuration and Utilities
Deployment Methods
Four primary deployment methods are supported:
IMPORTANT: To deploy a server blade without the RDP, you must create a bootable diskette
or image of a bootable diskette.
•
PXE Deployment
•
CD-ROM Deployment
•
Diskette image deployment
•
Boot from SAN
PXE Deployment
PXE enables server blades to load an image over the network from a PXE server,
then execute it in memory. The first NIC on the server blade is the default PXE boot
NIC, but any of the other NC series NICs can be configured to boot PXE. Refer to
“Network-Based PXE Deployment” in this chapter for more information.
NOTE: Actual NIC numeration depends on factors, including the operating system installed on
the server.
HP recommends using one of the following methods for PXE deployment:
•
HP ProLiant Essentials RDP
•
SmartStart Scripting Toolkit
HP ProLiant Essentials Rapid Deployment Pack
RDP is the recommended method for automatically deploying the server blade with
little user intervention.
The HP ProLiant Essentials RDP software is the preferred method for rapid, highvolume server blade deployments. The RDP software integrates two powerful
products: Altiris eXpress Deployment Solution and the ProLiant Integration Module.
5-26 HP ProLiant BL20p Generation 3 Server Blade Setup and Installation Guide
Page 71

Server Blade Configuration and Utilities
The Altiris eXpress Deployment Server Console has an intuitive graphical user
interface that provides simplified drag-and-drop server deployment using either
imaging or scripting. The console also has advanced features for blade servers. The
user can view blade servers in a physical tree view according to their
Rack\Enclosure\Bay settings. The Deployment Server can detect when a blade is
ripped out and replaced with a new blade. The user can configure the Deployment
Server to automatically replay all deployment jobs on the new blade.
If you purchased the RDP with the blade enclosure, follow the instructions on the
Quick Start Guide, included in the kit, to register and install the software.
For product information and the latest RDP documentation, go to
www.hp.com/servers/rdp
SmartStart Scripting Toolkit
The HP SmartStart Scripting Toolkit radically simplifies high-volume server
deployment, enabling thousands of servers to be deployed quickly and easily. The
SmartStart Scripting Toolkit consists of a set of modular utilities that are used to
create a set of configuration data files, which are combined using a script or batch file
to provide an automated installation process.
The basic steps necessary to use the SmartStart Scripting Toolkit are:
1. Generate the server profile from a previously configured server.
2. Create a script (batch) file that reads in server configuration files to configure the
server hardware and install the server operating system.
3. Build the server configuration diskette that initiates the automated deployment
process.
For details, download the latest version of the SmartStart Scripting Toolkit from
www.hp.com/servers/sstoolkit and refer to the SmartStart Scripting Toolkit User
Guide.
HP ProLiant BL20p Generation 3 Server Blade Setup and Installation Guide 5-27
Page 72

Server Blade Configuration and Utilities
CD-ROM Deployment
CD-ROM Deployment involves using a bootable CD that executes script to configure
the hardware and install the operating system. After the operating system is
configured, the server blade can access the network to locate the scripts and files
necessary for deployment.
The server blade should be connected to a network before beginning the deployment
process. Connect to the server blade with one of the following methods:
•
Through an existing network (in the rack)
This method requires you to install the server blade in its enclosure and assign it
an IP address (manually or using DHCP).
•
Through an existing network (out of the rack, with the diagnostic station)
This method enables you to configure a server blade out of the rack by powering
the blade with the diagnostic station and connecting to an existing network
through a hub. The IP address is assigned by a DHCP server on a network.
Other methods are available for connecting to the ProLiant BL20p G3 server blade,
but they do not provide the network accessibility required to deploy the server. Refer
to “Integrated Lights-Out Advanced Management” in this chapter for information
about these additional methods.
NOTE: For more information about these hardware and cabling configurations, refer to the
HP ProLiant BL p-Class System Hardware Configuration and Installation Poster and the
documentation that ships with the diagnostic station.
Server blades have two mechanisms for using the CD-ROM:
•
iLO Virtual CD-ROM
•
USB CD-ROM
5-28 HP ProLiant BL20p Generation 3 Server Blade Setup and Installation Guide
Page 73

Server Blade Configuration and Utilities
iLO Virtual CD-ROM
To perform a boot CD deployment:
1. Do one of the following:
— Insert the boot CD into the client PC from which you are running the iLO
Remote Console.
— Use iLO Advanced to create an image file of the boot CD.
— Copy the image of the boot CD to a location on the network or the client PC
hard drive.
2. Remotely access the server blade through iLO Advanced. Refer to “Integrated
Lights-Out Advanced Management” in this chapter.
3. Click the Virtual Devices tab.
4. Select Virtual Media.
5. Use the Virtual Media applet to select the local CD or image file and connect the
Virtual CD to the server blade.
6. Use the iLO Virtual Power Button feature to reboot the server blade.
7. After the server blade boots, follow the normal network installation procedure for
an operating system.
USB CD-ROM
SmartStart simplifies the deployment process and facilitates loading the operating
system. However, SmartStart does not prevent you from loading the operating system
and drivers manually. For more information on SmartStart, refer to the HP website:
www.hp.com/servers/smartstart
To perform a boot CD deployment:
1. Connect a USB CD-ROM drive to the server blade using the local I/O cable.
2. Insert the boot CD into the CD-ROM.
HP ProLiant BL20p Generation 3 Server Blade Setup and Installation Guide 5-29
Page 74

Server Blade Configuration and Utilities
3. Reboot the server blade.
4. After the server blade boots, follow the normal installation procedure for an
operating system.
Diskette Image Deployment
Diskette Image Deployment involves creating a DOS-based network-enabled boot
diskette that will execute a script that configures the hardware and installs the
operating system. The diskette gets the server blade on the network where it can
access the scripts and files necessary for deployment. This implies a deployment
infrastructure that may include an administrator workstation, PXE server, Microsoft
Windows file share, or a Linux file share.
The server blade must be connected to a network before beginning the deployment
process. Connect to the server blade with one of the following methods:
• • Through an existing network (in the rack)
This method requires you to install the server blade in its enclosure and assign it
an IP address (manually or using DHCP).
Through an existing network (out of the rack, with the diagnostic station)
This method enables you to configure a server blade out of the rack by powering
the blade with the diagnostic station and connecting to an existing network
through a hub. The IP address is assigned by a DHCP server on a network.
Other methods are available for connecting to the ProLiant BL20p G3 server blade,
but they do not provide the network accessibility required to deploy the server. Refer
to “Integrated Lights-Out Advanced Management” in this chapter for information
about these additional methods.
NOTE: For more information about these hardware and cabling configurations, refer to the
HP ProLiant BL p-Class System Hardware Configuration and Installation Poster and the
documentation that ships with the diagnostic station.
Creating the Boot Diskette
The SmartStart Scripting Toolkit provides the tools and information for creating a
diskette that will configure the hardware and install the operating system.
5-30 HP ProLiant BL20p Generation 3 Server Blade Setup and Installation Guide
Page 75

Server Blade Configuration and Utilities
For details, download the latest version of the SmartStart Scripting Toolkit from
www.hp.com/servers/sstoolkit and refer to the SmartStart Scripting Toolkit User
Guide.
It is also possible to configure the hardware manually using RBSU through the iLO
Advanced remote console. With this method, the diskette would be more generic and
would integrate into an existing network OS installation process. Refer to the
“Integrated Lights-Out Advanced Management” section in this chapter.
For the most current information about operating system support on server blades,
refer to the operating system support matrix, available on the HP website:
www.hp.com/products/servers/platforms
then navigate to the OS support for ProLiant BL p-Class server blades.
IMPORTANT: The ProLiant BL20p G3 server blade has the ability to connect to a SAN using
the optional FC adapter. You can preconfigure the SAN HBA driver Smart Components in the
ProLiant Support Pack. Refer to the HP ProLiant Support Pack User Guide or “SAN
Configuration Overview” in this chapter for more information.
Using the Boot Diskette
Server blades have two mechanisms for using the diskette: iLO Virtual Floppy and
PXE.
iLO Virtual Floppy Deployment
To perform a boot diskette deployment:
1. Do one of the following:
— Insert the boot diskette into the client PC from which you are running the
iLO Remote Console.
— Use iLO Advanced to create an image file of the boot diskette.
— Copy the image of the boot diskette to a location on the network or the client
PC hard drive.
2. Remotely access the server blade through iLO Advanced. Refer to “Integrated
Lights-Out Advanced Management” in this chapter.
HP ProLiant BL20p Generation 3 Server Blade Setup and Installation Guide 5-31
Page 76

Server Blade Configuration and Utilities
3. Click the Virtual Devices tab.
4. Select Virtual Media.
5. Use the Virtual Media applet to select the local diskette or image file and connect
the Virtual Disk to the server blade.
6. Use the iLO Virtual Power Button feature to reboot the server blade.
7. After the server blade boots, follow the normal network installation procedure for
an operating system.
SAN Configuration Overview
The ProLiant BL20p G3 server blade delivers FC support for SAN implementations
and clustering capabilities. The ProLiant BL20p G3 server blade uses an optional FC
adapter for redundant SAN connectivity and is optimized for HP StorageWorks. In
addition, the server blade is also compatible with certain third-party SAN products.
Refer to the HP ProLiant BL20p Generation 3 Dual Port Fibre Channel Adapter
Installation Instructions for installation requirements and instructions.
For optimal SAN connectivity, verify that:
•
The HP ProLiant BL20p G3 server blade has the FC adapter installed, and that it
is correctly installed in the server blade enclosure. Refer to the HP ProLiant
BL20p Generation 3 Dual Port Fibre Channel Adapter Installation Instructions
•
A Fibre-capable interconnect is installed in the enclosure. Refer to the
documentation that shipped with the interconnect option
The enclosure management module firmware is up-to-date. Refer to the ProLiant
•
BL p-Class support site on
•
The server blade is properly cabled to a supported SAN
•
SAN storage drivers are loaded. Refer to supporting white papers and to
www.hp.com/servers/rdp.
www.hp.com
For SAN configuration information for the server blade, consult the SAN Design
Reference Guide located on the HP website:
h18006.www1.hp.com/storage/saninfrastructure.html
5-32 HP ProLiant BL20p Generation 3 Server Blade Setup and Installation Guide
Page 77

Connecting Local I/O Devices
Use the local I/O cable to perform some server blade configuration and diagnostic
procedures.
Connecting to a Server Blade through iLO
To connect to iLO using the local I/O cable, you must have the following:
• • A client PC with a 10/100 Ethernet RJ-45 connector
A network cable with RJ-45 connectors
To connect directly to iLO:
IMPORTANT: Do not connect the local I/O cable to a hub. All server blades have the same IP
address through the I/O port. Multiples on a hub make the server blades indistinguishable on
the network. Refer to “Integrated Lights-Out Advanced Management” in Chapter 5, “Server
Blade Configuration and Utilities” for the default server blade IP address.
6
HP ProLiant BL20p Generation 3 Server Blade Setup and Installation Guide 6-1
Page 78

Connecting Local I/O Devices
1. Connect one end of the RJ-45 network cable to the local I/O cable (1).
2. Connect the other end of the network cable to the 10/100 Ethernet RJ-45
connector on the client PC (2).
Figure 6-1: Connecting an RJ-45 network cable
IMPORTANT: Before removing the local I/O cable, completely log out of the current iLO
session. Do not remove the local I/O cable when the Unit Identification (UID) LED is blinking.
6-2 HP ProLiant BL20p Generation 3 Server Blade Setup and Installation Guide
Page 79
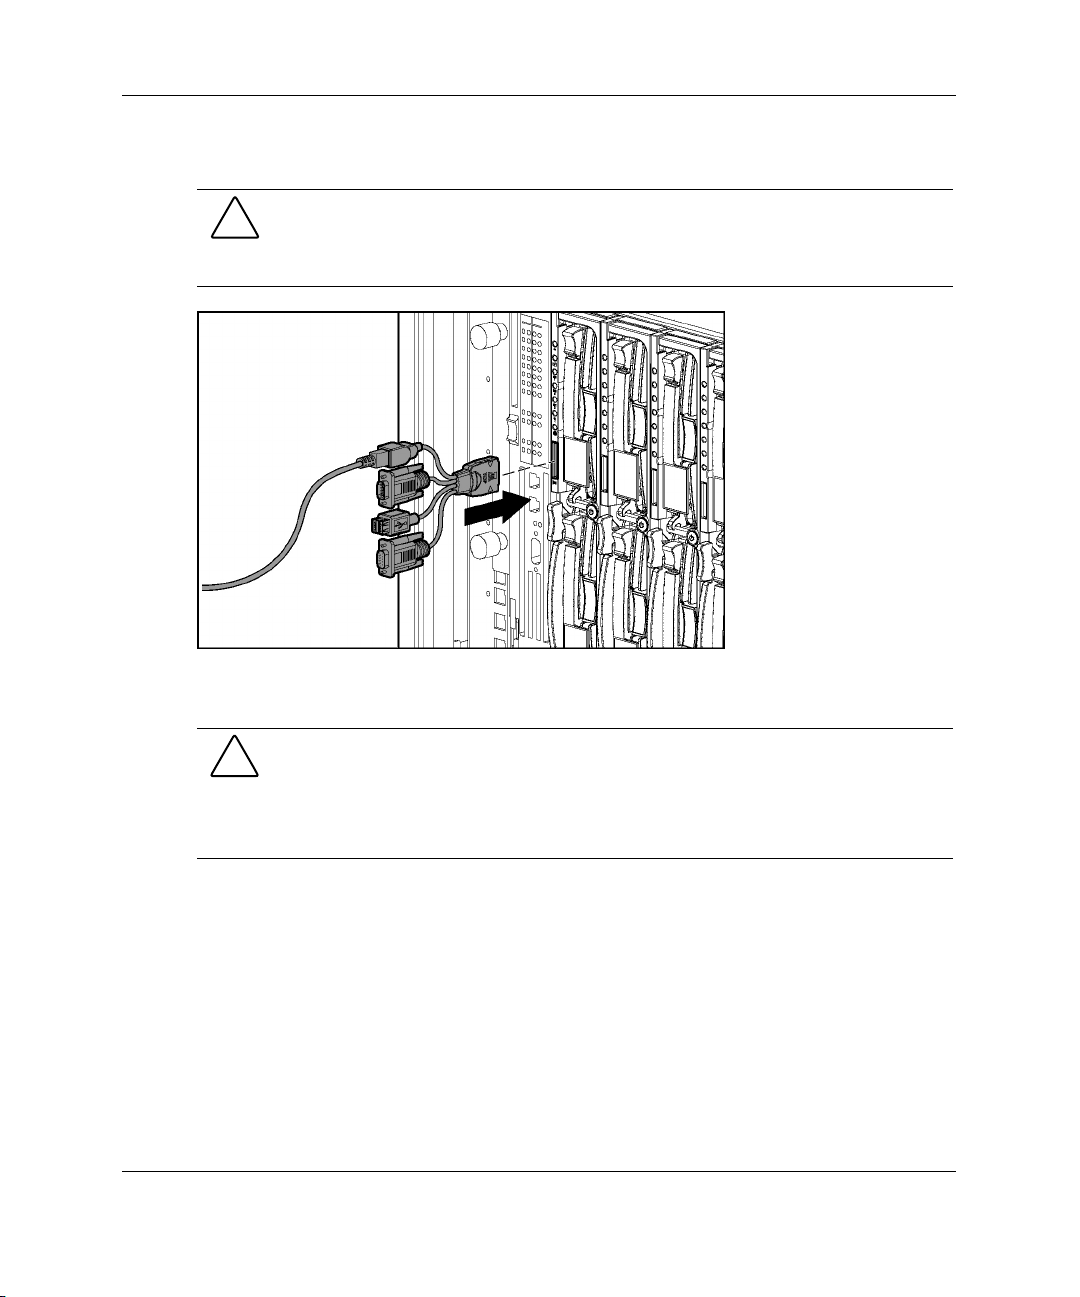
Connecting Local I/O Devices
3. Connect the local I/O cable to the I/O port on the server blade.
CAUTION: Disconnect the local I/O cable from the port when not in use. The port
and connector do not provide a permanent connection. Rear iLO connector
performance degrades when the local I/O cable is in use, even when the iLO
connector on the cable is not in use.
Figure 6-2: Connecting the local I/O cable to a server
blade
CAUTION: On the local I/O cable, the locking buttons are located on the sides of the
server blade connector.
Always be sure to squeeze the locking buttons on the server blade connector before
disconnecting the local I/O cable from the I/O port. Failure to do so can result in
damage to the equipment.
HP ProLiant BL20p Generation 3 Server Blade Setup and Installation Guide 6-3
Page 80

Connecting Local I/O Devices
Connecting Directly to a Server Blade using Video and USB Devices
To connect directly to the server blade, use the local I/O cable and any of the
following USB devices:
•
Monitor
•
USB Hub
•
USB Keyboard
•
USB Mouse
•
USB CD-ROM
•
USB Floppy
The devices can be connected to the local I/O cable in various configurations. Two of
the possible configurations are detailed in the following sections.
6-4 HP ProLiant BL20p Generation 3 Server Blade Setup and Installation Guide
Page 81

Connecting Local I/O Devices
Directly Accessing a Configured Server Blade with Local Keyboard, Video, and Mouse
CAUTION: Disconnect the local I/O cable from the port when not in use. The port
and connector do not provide a permanent connection. Rear iLO connector
performance degrades when the local I/O cable is in use, even when the iLO
connector on the cable is not in use.
NOTE: For this setup, a hub is not necessary to connect directly to the blade. If you need
additional connections, use the second setup.
1. Connect the video connector to a monitor (1).
2. Connect a USB mouse to the USB connector (2).
3. Connect a USB keyboard to the USB connector (3).
4. Connect the local I/O cable to the server blade (4).
Figure 6-3: Directly accessing a server blade with
keyboard, video, and mouse
HP ProLiant BL20p Generation 3 Server Blade Setup and Installation Guide 6-5
Page 82

Connecting Local I/O Devices
Directly Accessing a Server Blade with Local Media Devices
Use the following setup to configure a server blade or load software updates or
patches using a CD-ROM such as the SmartStart CD or a floppy drive:
CAUTION: Disconnect the local I/O cable from the port when not in use. The port
and connector do not provide a permanent connection. Rear iLO connector
performance degrades when the local I/O cable is in use, even when the iLO
connector on the cable is not in use.
1. Connect the local I/O cable to the server blade (1).
2. Connect a monitor to the video connector (2).
3. Connect a USB hub to a USB connector (3).
6-6 HP ProLiant BL20p Generation 3 Server Blade Setup and Installation Guide
Page 83

Connecting Local I/O Devices
4. Connect the following to the USB hub:
a. USB CD-ROM (4) and/or a USB diskette drive
b. USB keyboard (5)
c. USB mouse (6)
NOTE: HP recommends the use of a USB hub when connecting a USB floppy and/or USB
CD-ROM drive to the server blade. This provides more available connections.
Figure 6-4: Directly connecting local media devices to
the server blade using a USB hub
HP ProLiant BL20p Generation 3 Server Blade Setup and Installation Guide 6-7
Page 84

Server Blade Troubleshooting
Server Blade Error Messages
Use POST error messages to assist in troubleshooting and performing basic
diagnostic functions in the server blade.
POST error messages are displayed in the following locations:
•
Integrated Management Log (IML)
•
iLO POST log
•
iLO Remote Console
For a complete listing of error messages and other troubleshooting information, refer
to the HP ProLiant Servers Troubleshooting Guide provided on the Documentation
www.hp.com/support.
CD or
A
For information on LEDs and switches specific to the server blade, refer to
Chapter 1, “Server Blade Component Identification.”
For information about general troubleshooting techniques, diagnostic tools, error
messages, and preventative maintenance, refer to the HP ProLiant Servers
Troubleshooting Guide on the Documentation CD.
HP ProLiant BL20p Generation 3 Server Blade Setup and Installation Guide A-1
Page 85

Server Blade Troubleshooting
When the Server Blade Does Not Start
This section provides systematic instructions on what to try and where to go for help
for the most common problems encountered during initial POST. The server blade
must first complete this test each time you power up, before it can load the operating
system and start running software applications.
IMPORTANT: Always be sure that you have adequate system power applied to all the rack
components before troubleshooting the server blade. You may need to add more hot-plug
power supplies if you are installing additional server blades. If you have a power problem, refer
to the HP ProLiant BL p-Class System Setup and Installation Guide and the HP ProLiant BL
p-Class System Overview and Planning white paper.
If the server blade does not start:
1. Be sure that the server blade is fully seated in the server blade enclosure.
2. Verify that power is applied to the server blade enclosure.
3. Be sure that power is applied to the server blade:
a. Check the status using the power on/standby LED. For the location and
explanation of the power on/standby LED, refer to the “Server Blade Front
Panel” section in Chapter 1, “Server Blade Component Identification.”
b. Check the server blade management modules and power management
modules for proper cabling and power configuration switch settings.
c. The server blade is configured to power up upon insertion. However, if you
changed that setting, be sure that the Power On/Standby button was pressed
firmly.
NOTE: A long press, 5 or more seconds, initiates a power-up override. The system is
forced to power up the server blade without detecting available power.
4. If the system does not complete POST or start loading an operating system:
a. Use the iLO remote console, the video connection provided through the local
I/O cable connectors, or the iLO system status page to identify POST
messages. Refer to the HP Integrated Lights-Out User Guide.
b. Refer to the HP ProLiant Servers Troubleshooting Guide.
A-2 HP ProLiant BL20p Generation 3 Server Blade Setup and Installation Guide
Page 86

Server Blade Troubleshooting
5. Be sure the server blade is not rebooting repeatedly:
a. Be sure that the system is not rebooting due to a problem that initiates an
ASR-2 reboot.
ASR-2 is defaulted to restart the server blade automatically, loading the
operating system. If a critical error occurs, ASR-2 logs the error in the IML
and restarts the server blade.
For more information, refer to the HP ProLiant Servers Troubleshooting
Guide.
b. Use the iLO remote console or the video connection provided through the
local I/O cable connectors to identify a possible thermal event.
6. Restart the server blade. If the server blade does not restart, proceed to the
“Server Blade Diagnostic Steps” section in this appendix.
7. Check the server blade for the following normal power-up sequence to be sure
that the system meets the minimal hardware requirements and is powered up
during normal operations:
a. The power on/standby LED changes from standby (amber) to on (solid
green).
b. The fans start up.
c. The health LED flashes during the POST process; it changes to solid green if
POST is successful.
8. View the iLO remote console or the video connection provided through the local
I/O cable connectors for the following boot messages to be sure the system meets
the minimal hardware requirements and is powered up during normal operations:
a. ProLiant logo
b. Memory test
c. ROM information
d. Copyright information
e. Processor initialization
HP ProLiant BL20p Generation 3 Server Blade Setup and Installation Guide A-3
Page 87

Server Blade Troubleshooting
f. iLO initialization
g. Array controller initialization
h. PXE initialization
9. The operating system loads to complete the boot process.
If the server blade completes POST and attempts to load the operating system, refer
to the “Problems After Initial Boot” section in this appendix.
Server Blade Diagnostic Steps
If the server blade does not power up, or powers up but does not complete POST,
answer the questions in Table A-1 to determine appropriate actions based on the
symptoms observed. According to the answers you give, you are directed to the
appropriate table that immediately follows.
Table A-1: Diagnostic Steps
Question Action
Question 1: Is the server blade power
on/standby LED illuminated?
Question 2: Is the server blade power
on/standby LED green?
Question 3: Is the server blade health LED solid
green?
Question 4: Is the iLO remote console
displaying error information?
A-4 HP ProLiant BL20p Generation 3 Server Blade Setup and Installation Guide
If yes, continue to question 2.
If no, refer to Table A-2.
If yes, continue to question 3.
If no, refer to Table A-3.
If yes, continue to question 4.
If no, refer to Table A-4.
If yes, use the POST messages for further
diagnosis. Refer to Table A-5 for details.
If no, refer to Table A-5.
Page 88

Server Blade Troubleshooting
Table A-2: Is the Server Blade Power on/standby LED Illuminated?
Answer Possible Reasons Possible Solutions
No A broken connection exists
between the server blade enclosure
and server blade.
The power enclosure is not
powered on.
The system may have experienced
a short.
Either or both of the power modules
may be failed or not fully seated.
Do the following:
1. Verify that power is applied to the
infrastructure.
2. Remove the server blade from the
server blade enclosure.
3. Check the connectors on the rear of
the server blade and on the interior
of the server blade enclosure for
damage.
If the power on/standby LED is still not
illuminated, do one of the following:
• Use the optional diagnostic station
to power the server blade and use
the iLO remote console to continue
your diagnosis. Refer to “Power
Converter Module LED” in this
appendix.
• Move the server blade into a
different slot to determine if the
server blade or the server blade
enclosure is the source of the
problem.
• Contact an authorized service
provider for replacement parts and
service.
Yes If the power on/standby LED is
illuminated, refer to Table A-3.
Note: For LED locations and functions, refer to Chapter 1, “Server Blade Component Identification.”
For cabling configurations, refer to the cabling and powering up section in the HP ProLiant BL
p-Class System Setup and Installation Guide.
HP ProLiant BL20p Generation 3 Server Blade Setup and Installation Guide A-5
Page 89

Server Blade Troubleshooting
Table A-3: Is the Server Blade Power on/standby LED Green?
Answer Possible Reasons Possible Solutions
No, it is amber Power On/Standby button has not
been pressed firmly.
The standard NIC mezzanine
card or Smart Array 6i controller
is unseated.
Management modules are not
properly cabled.
A broken connection exists
between the following:
• Power converter module and
system board
• System board and SCSI
backplane
• SCSI backplane and power
button/LED board
The power converter module,
system board, SCSI backplane,
and/or power button/LED board
may need to be replaced.
1. With the system powered down,
remove the access panel.
2. Be sure that the proper connections
exist among the power converter
module, system board, SCSI
backplane, and power button/LED
board.
3. Reseat the standard NIC mezzanine
card or Smart Array 6i controller.
4. Reinstall the access panel.
5. Reinstall the server blade.
Firmly press the Power On/Standby
button. A long press (5 or more seconds)
initiates a power-up override. The system
is forced to power up the server blade
without detecting available power.
Verify proper management module
cabling.
Restart the server blade through the iLO
Virtual Power button feature.
If the power on/standby LED is still not
green, and if the server blade health LED
is amber or red, refer to Table A-4.
Use the optional diagnostic station to
power the server blade and use the iLO
remote console to continue your diagnosis.
Refer to “Power Converter Module LED” in
this appendix.
Yes If the power on/standby LED is green, refer
to Table A-4.
Note: For LED locations and functions, refer to Chapter 1, “Server Blade Component Identification.”
A-6 HP ProLiant BL20p Generation 3 Server Blade Setup and Installation Guide
Page 90

Server Blade Troubleshooting
Table A-4: Is the Server Blade Health LED Solid Green?
Answer Possible Reasons Possible Solutions
No, it is amber. A processor is in pre-failure
condition.
A DIMM is in pre-failure condition.
One memory bank is valid, but
another bank is missing a DIMM.
One memory bank is valid, but
another bank has mismatched
DIMMs installed.
One memory bank is valid, but
another bank has an unsupported
DIMM type installed.
Do the following:
1. Remove the server blade from the
server blade enclosure.
2. With the system powered down,
remove the access panel.
3. Visually inspect the system for
damage.
4. Reseat or replace processors
and/or DIMMs.
5. Be sure that the proper connections
exist among the power converter
module, system board, SCSI
backplane, and power button/LED
board.
6. Verify that DIMMs are installed in
pairs.
7. Reinstall the access panel.
8. Reinstall and power up the server
blade.
continued
HP ProLiant BL20p Generation 3 Server Blade Setup and Installation Guide A-7
Page 91

Server Blade Troubleshooting
Table A-4: Is the Server Blade Health LED Solid Green? continued
Answer Possible Reasons Possible Solutions
If the health LED is still not solid green,
do one of the following:
• Use the optional diagnostic station
to power the server blade and use
the iLO remote console to continue
the diagnosis. Refer to “Power
Converter Module LED” in this
appendix.
• Use the optional diagnostic station
to power the server blade and use
the local I/O cable connectors to
continue the diagnosis. Refer to
“Power Converter Module LED” in
this appendix.
Contact an authorized service provider
for replacement parts and service.
continued
A-8 HP ProLiant BL20p Generation 3 Server Blade Setup and Installation Guide
Page 92

Server Blade Troubleshooting
Table A-4: Is the Server Blade Health LED Solid Green? continued
Answer Possible Reasons Possible Solutions
No, it is flashing
green.
The server blade is still in POST. If
the flashing continues after
1 minute, the following conditions
may apply:
• Nonvolatile RAM (NVRAM)
may be corrupted.
• The system ROM may be
corrupted.
• Both the system ROM and
redundant ROM may be
corrupted.
Wait for the server blade to complete
POST.
Clear the system configuration. Refer to
the “Clearing the System Configuration”
section in this appendix.
Switch to the redundant ROM. Refer to
the “Accessing the Redundant ROM”
section in this appendix.
If the health LED is still not solid green,
do one of the following:
• Use the optional diagnostic station
to power the server blade and use
the iLO remote console to continue
the diagnosis.
• Use the optional diagnostic station
to power the server blade and use
the local I/O cable connectors to
continue the diagnosis.
• Use the iLO system status page to
help determine the problem.
• Contact an authorized service
provider for replacement parts and
service.
continued
HP ProLiant BL20p Generation 3 Server Blade Setup and Installation Guide A-9
Page 93

Server Blade Troubleshooting
Table A-4: Is the Server Blade Health LED Solid Green? continued
Answer Possible Reasons Possible Solutions
No, it is red A processor has failed.
Processor 1 is not installed.
A processor is an unsupported
type.
Processors are mismatched
(speed and/or type).
A PPM has failed.
A DIMM has experienced a
multibit error.
No valid memory is available in
the system. Populated banks
have mismatched DIMMs.
No valid memory is available in
the system. Populated banks
have missing DIMMs.
No valid memory is available in
the system. Populated banks
have unsupported DIMM types.
One or both fans have failed.
An overtemperature condition has
occurred.
Do the following:
1. Remove the server blade from the server
blade enclosure.
2. With the system powered down, remove
the access panel.
3. Visually inspect the system for damage.
4. Add or replace processors, DIMMs,
and/or the fans.
5. Verify the proper connections among the
power converter module, system board,
SCSI backplane, and the power
button/LED board.
6. Reinstall and power up the server blade.
If the health LED is still not solid green, do
one of the following:
• Use the optional diagnostic station to
power the server blade and use the iLO
remote console to continue the
diagnosis.
• Use the optional diagnostic station to
power the server blade and use the local
I/O cable connectors to continue the
diagnosis.
• Use the iLO system status page to help
determine the problem.
• Contact an authorized service provider
for replacement parts and service.
Yes If the health LED is green, refer to Table A-5.
Note: For LED locations and functions, refer to Chapter 1, “Server Blade Component Identification.”
For cabling configurations, refer to the cabling and powering up section in the HP ProLiant BL
p-Class System Setup and Installation Guide.
A-10 HP ProLiant BL20p Generation 3 Server Blade Setup and Installation Guide
Page 94

Server Blade Troubleshooting
Table A-5: Is the iLO Remote Console Displaying Error Information?
Answer Solution
No An iLO problem exists. Refer to the HP Integrated Lights-Out User Guide that
ships with the server blade.
Yes Error and event logs are available for diagnosis. Determine the next action by
observing POST progress and error messages. Use the iLO system status
page or use the local I/O cable connectors to help determine the problem. Refer
to the HP ProLiant Servers Troubleshooting Guide for a complete description of
POST error messages.
Power Converter Module LED
The power converter module LED (CR25) can be located through the rear of the
server blade when the server blade is laying on a flat surface and receiving power
from a diagnostic station.
WARNING: To reduce the risk of shock or injury from high-current electrical
energy, do not remove the server blade access panel while the server blade is
connected to the diagnostic station.
Powering the server blade with the access cover removed is a service
operation and must only be performed by trained service personnel.
HP ProLiant BL20p Generation 3 Server Blade Setup and Installation Guide A-11
Page 95
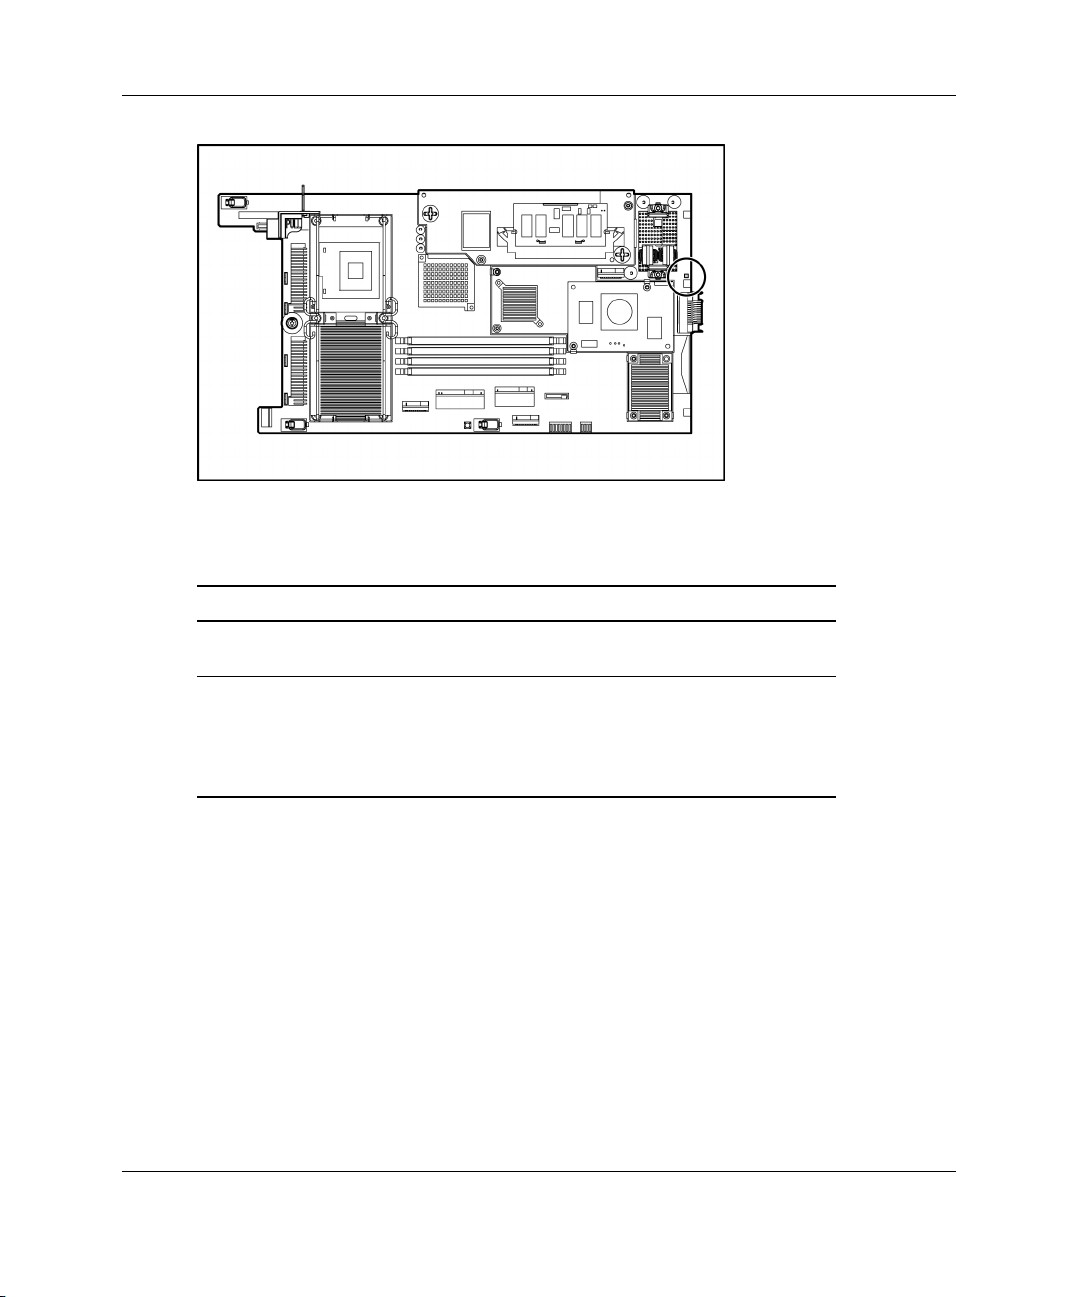
Server Blade Troubleshooting
Figure A-1: Power converter module LED location
Table A-6: Power Converter Module Troubleshooting Table
Status Description
On The power is good and the power converter modules are
working.
Off The power converter modules are not fully seated and must be
reseated.
or
The power converter modules have failed and must be replaced.
System Maintenance Switch Procedures
When you perform troubleshooting steps, this guide may instruct you to perform the
following procedures:
• • Clear the system configuration.
Access the redundant ROM.
IMPORTANT: Do not perform these procedures until directed to do so by the troubleshooting
tables in this appendix.
A-12 HP ProLiant BL20p Generation 3 Server Blade Setup and Installation Guide
Page 96

Server Blade Troubleshooting
To complete these procedures, you must change physical settings on the system
maintenance switch (SW2). For switch locations and positions, refer to Chapter 1,
“Server Blade Component Identification.”
HP ProLiant BL20p Generation 3 Server Blade Setup and Installation Guide A-13
Page 97

Server Blade Troubleshooting
Clearing the System Configuration
To clear the system configuration:
1. Power down the server blade using one of the following procedures:
— Press the Power On/Standby button on the front of the server blade.
— Use the virtual power button feature in the iLO remote console.
2. Disconnect the server blade from all power sources using one of the following
procedures:
— Remove the server blade from the server blade enclosure and set it on a flat,
level surface.
— Disconnect the server blade from the diagnostic station.
3. Remove the access panel. Refer to the “Accessing Internal Server Blade
Components” section in Chapter 3, “Server Blade Setup.”
4. Change position 6 of SW2 to on.
5. Install the access panel. Refer to the “Accessing Internal Server Blade
Components” section in Chapter 3, “Server Blade Setup.”
6. Connect the server blade to system power using one of the following procedures:
— Install the server blade in the server blade enclosure.
— Connect the server blade to the diagnostic station.
7. Power up the server blade using one of the following procedures:
— Press the Power On/Standby button on the front of the server blade.
— Use the virtual power button feature in the iLO remote console.
8. Wait for the POST message that prompts you to change the switch setting:
Maintenance switch detected in the "On" position.
Power off the server and turn switch to the "Off" position.
9. Repeat steps 1 through 3.
A-14 HP ProLiant BL20p Generation 3 Server Blade Setup and Installation Guide
Page 98

10. Change position 6 of SW2 to off.
11. Repeat steps 5 through 7.
IMPORTANT: When the server blade boots after NVRAM is cleared, a delay of up to
2 minutes is normal. During this delay, the system appears non-functional. Do not attempt
any procedures during the delay.
Accessing the Redundant ROM
If the system ROM is corrupted, you can set the system to use the backup version or
redundant ROM.
To use the redundant ROM:
1. Power down the server blade using one of the following procedures:
— Press the Power On/Standby button on the front of the server blade.
— Use the virtual power button feature in the iLO remote console.
2. Disconnect the server blade from all power sources using one of the following
procedures:
Server Blade Troubleshooting
— Remove the server blade from the server blade enclosure and set it on a flat,
level surface.
— Disconnect the server blade from the diagnostic station.
3. Remove the access panel. Refer to the “Accessing Internal Server Blade
Components” section in Chapter 3, “Server Blade Setup.”
4. Change positions 1, 5, and 6 of SW2 to on.
5. Install the access panel. Refer to the “Accessing Internal Server Blade
Components” section in Chapter 3, “Server Blade Setup.”
6. Connect the server blade to system power using one of the following procedures:
— Install the server blade in the server blade enclosure.
— Connect the server blade to the diagnostic station.
HP ProLiant BL20p Generation 3 Server Blade Setup and Installation Guide A-15
Page 99

Server Blade Troubleshooting
7. Power up the server blade using one of the following procedures:
— Press the Power On/Standby button on the front of the server blade.
— Use the virtual power button feature in the iLO remote console.
As soon as the server blade powers up, it emits two beeps.
8. Repeat steps 1 through 3.
9. Change positions 1, 5, and 6 of SW2 to off.
10. Repeat steps 5 through 7.
If both the current and backup versions of the ROM are corrupt, you must return the
system board for a service replacement. Refer to the HP ProLiant BL p-Class System
Maintenance and Service Guide and contact an authorized reseller.
Problems After Initial Boot
Once the server blade has passed POST, you may still encounter errors, such as an
inability to load the operating system. Reinstall the operating system and use the
documentation that ships on the HP ProLiant Essentials Rapid Deployment Pack CD
or refer to the software problems section in the HP ProLiant Servers Troubleshooting
Guide for more information.
Refer to the HP ProLiant Servers Troubleshooting Guide for the following:
•
Information you need to collect when diagnosing software problems and to
provide when contacting support
•
Instructions on how to upgrade the operating system and its drivers
•
Information about available recovery options and advice on minimizing
downtime.
A-16 HP ProLiant BL20p Generation 3 Server Blade Setup and Installation Guide
Page 100

Battery Replacement
System Board Battery Replacement
When the server blade no longer automatically displays the correct date and time,
you may need to replace the battery that provides power to the real-time clock. Under
normal use, battery life is usually about 5 to 10 years. Use an HP 540-mAh, lithium,
3-V replacement battery (spare P/N 234556-001).
To install a new battery:
1. Access the internal server blade components. Refer to the “Accessing Internal
Server Blade Components” section in Chapter 3, “Server Blade Setup.”
B
HP ProLiant BL20p Generation 3 Server Blade Setup and Installation Guide B-1
 Loading...