

Page 1

HP Pavilion Plasma HDTV User’s Guide
HP Pavilion PL5000N 50-Inch (127-Centimeter) Plasma High-Definition Television
HP Pavilion PL4200N 42-Inch (106-Centimeter) Plasma High-Definition Television
Before connecting, operating, or adjusting this product, please read these instructions completely.
Please keep this manual for future reference.
Page 2

The only warranties for HP products and services are set forth in the
express warranty statements accompanying such products and
services. Nothing herein should be construed as constituting an
additional warranty. HP shall not be liable for technical or editorial
errors or omissions contained herein.
HP assumes no responsibility for the use or reliability of its software
on equipment that is not furnished by HP.
This document contains proprietary information that is protected by
copyright. No part of this document may be photocopied,
reproduced, or translated to another language without the prior
written consent of HP.
Hewlett-Packard Company
P.O. Box 4010
Cupertino, CA 95015-4010
USA
Copyright © 2005 Hewlett-Packard Development Company, L.P.
Manufactured under license from Dolby Laboratories. Dolby and the
double-D symbol are trademarks of Dolby Laboratories.
HDMI, the HDMI logo, and High-Definition Multimedia Interface are
trademarks or registered trademarks of HDMI Licensing LLC.
SD logo is a trademark.
BBE and BBE symbol are registered trademarks of BBE Sound, Inc.
CableCard is a trademark of Cable Television Laboratories, Inc.
HP supports lawful use of technology and does not endorse or
encourage the use of our products for purposes other than those
permitted by copyright law.
The information in this document is subject to change without notice.
ii HP Pavilion Plasma HDTV User’s Guide
Page 3
The lightning flash with
arrow-head within a
triangle is intended to tell
the user that parts inside
the product are a risk of
electric shock to persons.
WARNING: To reduce the risk of electric shock, do not remove cover
or back. No user-serviceable parts inside. Refer servicing to qualified
service personnel.
The exclamation point
within a triangle is
intended to tell the user that
important operating and
servicing instructions are
included with this user’s
guide.
WARNING: To reduce the risk of fire or electric shock, do not expose this apparatus to rain
or moisture. Do not place liquid containers (flower vase, cups, cosmetics, etc.)
above the set (including on shelves above, etc.).
WARNING: 1) To prevent electric shock, do not remove cover. No user-serviceable parts inside. Refer
servicing to qualified service personnel.
2) Do not remove the grounding pin on the power plug. This apparatus is equipped with a threepin grounding-type power plug. This plug will only fit a grounding-type power outlet. This is a
safety feature. If you are unable to insert the plug into the outlet, contact an electrician. Do
not defeat the purpose of the grounding plug.
Note:
Do not allow a still picture to be displayed for an extended period, as this can cause a permanent afterimage
to remain on the Plasma Television. Examples of still pictures include logos, video games, computer images,
teletext, and images displayed in 4:3 mode.
Manufactured under license from Dolby Laboratories.
“Dolby” and the double-D symbols are trademarks of Dolby Laboratories.
HDMI, the HDMI logo, and High-Definition Multimedia Interface are trademarks or registered trademarks of HDMI
Licensing LLC.
License description: To view the license information for software used in this product, press the Menu button
and select Set up, About, License. (See “About” on page 54.)
This product incorporates copyright protection technology that is protected by U.S. patents and other intellectual
property rights. Use of this copyright protection technology must be authorized by Macrovision Corporation and is
intended for home and other limited viewing uses only unless otherwise authorized by Macrovision. Reverse
engineering or disassembly is prohibited.
U.S. Patents Nos. 4,631,603; 4,577,216; 4,819,098; 4,907,093; 6,381,747; and 6,516,132.
iii
Page 4
SD logo is a trademark.
Manufactured under license from BBE Sound, Inc.
Licensed by BBE Sound, Inc., under USP 5510752, and 5736897.
BBE and BBE symbol are registered trademarks of BBE Sound, Inc.
CableCARD™ CableCard is a trademark of Cable Television Laboratories, Inc.
Important Safety Instructions
1 Read these instructions.
2 Keep these instructions.
3 Heed all warnings.
4 Follow all instructions.
5 Do not use this apparatus near water.
6 Clean only with a dry cloth.
7 Do not block any ventilation openings. Install in
accordance with the manufacturer’s instructions.
8 Do not install near any heat sources such as
radiators, heat registers, stoves, or other
apparatuses (including amplifiers) that produce
heat.
9 Do not defeat the safety purpose of the polarized
or grounding-type plug. A polarized plug has two
blades with one wider than the other. A grounding
type plug has two blades and a third groundingprong. The wide blade or the third prong are
provided for your safety. If the provided plug does
not fit into your outlet, consult an electrician for
replacement of the obsolete outlet.
10 Protect the power cord from being walked on or
pinched particularly at plugs, convenience
receptacles, and the point where they exit from
the apparatus.
11 Only use attachments/accessories specified by
the manufacturer.
12 Use only with the cart, stand,
tripod, bracket, or table specified
by the manufacturer, or sold with
the apparatus. When a cart is
used, use caution when moving the
cart/apparatus combination to
avoid injury from tip-over.
13 Unplug this apparatus during lightning storms or
when unused for long periods of time.
14 Refer all servicing to qualified service personnel.
Servicing is required when the apparatus has
been damaged in any way, such as power-supply
cord or plug is damaged, liquid has been spilled
or objects have fallen into the apparatus, the
apparatus has been exposed to rain or moisture,
does not operate normally, or has been dropped.
15 To prevent electric shock, ensure the grounding
pin on the AC cord power plug is securely
connected.
iv HP Pavilion Plasma HDTV User’s Guide
Page 5

FCC Statement
This equipment has been tested and found to comply with the limits for a Class B digital device, pursuant to Part 15 of the
FCC Rules. These limits are designed to provide reasonable protection against harmful interference in a residential
installation. This equipment generates, uses, and can radiate radio frequency energy and, if not installed and used in
accordance with the instructions, may cause harmful interference to radio communications. However, there is no guarantee
that interference will not occur in a particular installation. If this equipment does cause harmful interference to radio or
television reception, which can be determined by turning the equipment off and on, the user is encouraged to try to correct
the interference by one or more of the following measures:
■ Reorient or relocate the receiving antenna.
■ Increase the separation between the equipment and receiver.
■ Connect the equipment into an outlet on a circuit different from that to which the receiver is connected.
■ Consult HP or an experienced radio/TV technician for help.
This device complies with Part 15 of the FCC rules. Operation is subject to the following two conditions: (1) This device
may not cause harmful interference, and (2) this device must accept any interference received, including interference that
may cause undesired operation.
FCC Caution:
To assure continued compliance and reduce possible undesirable interference, the provided ferrite cores
must be used when connecting this plasma television to video equipment; maintain at least 40 cm
spacing to other peripheral devices. Refer to instructions:
■ “Attaching the ferrite core” on page 8.
■ “Connecting a PC” on page 17.
■ “TV Front Panel” on page 19.
Any changes or modifications not expressly approved by responsible party may cause harmful
interference and could void the user’s authority to operate this device.
RESPONSIBLE PARTY:
Hewlett-Packard Company
Digital TV Solutions
Attn: Product Regulations Manager
10435 N. Tantau Avenue
CAC 07, MS 4295
Cupertino, CA 95014
USA
CANADIAN NOTICE:
This Class B digital apparatus complies with
Canadian ICES-003.
Regulatory and Safety
Information
WARNING: The TV is heavy; be sure to use
ergonomically correct lifting procedures when
moving the TV.
Additional safety information
This product has not been evaluated for connection
to an “IT” power system (an AC distribution system
with no direct connection to earth, according to
IEC 60950).
AC Power Safety Warning
WARNING:
power cord is your main AC disconnecting device and
must be easily accessible at all times. For your safety, the
power cord provided with your TV has a grounded plug.
Always use the power cord with a properly grounded
wall outlet, to avoid the risk of electrical shock.
Install the TV near an AC outlet. The AC
v
Page 6
WARNING:
Do not operate the TV with the cover
removed.
WARNING:
The TV is not user serviceable. To prevent
damage to the TV, have a qualified person repair or
replace it.
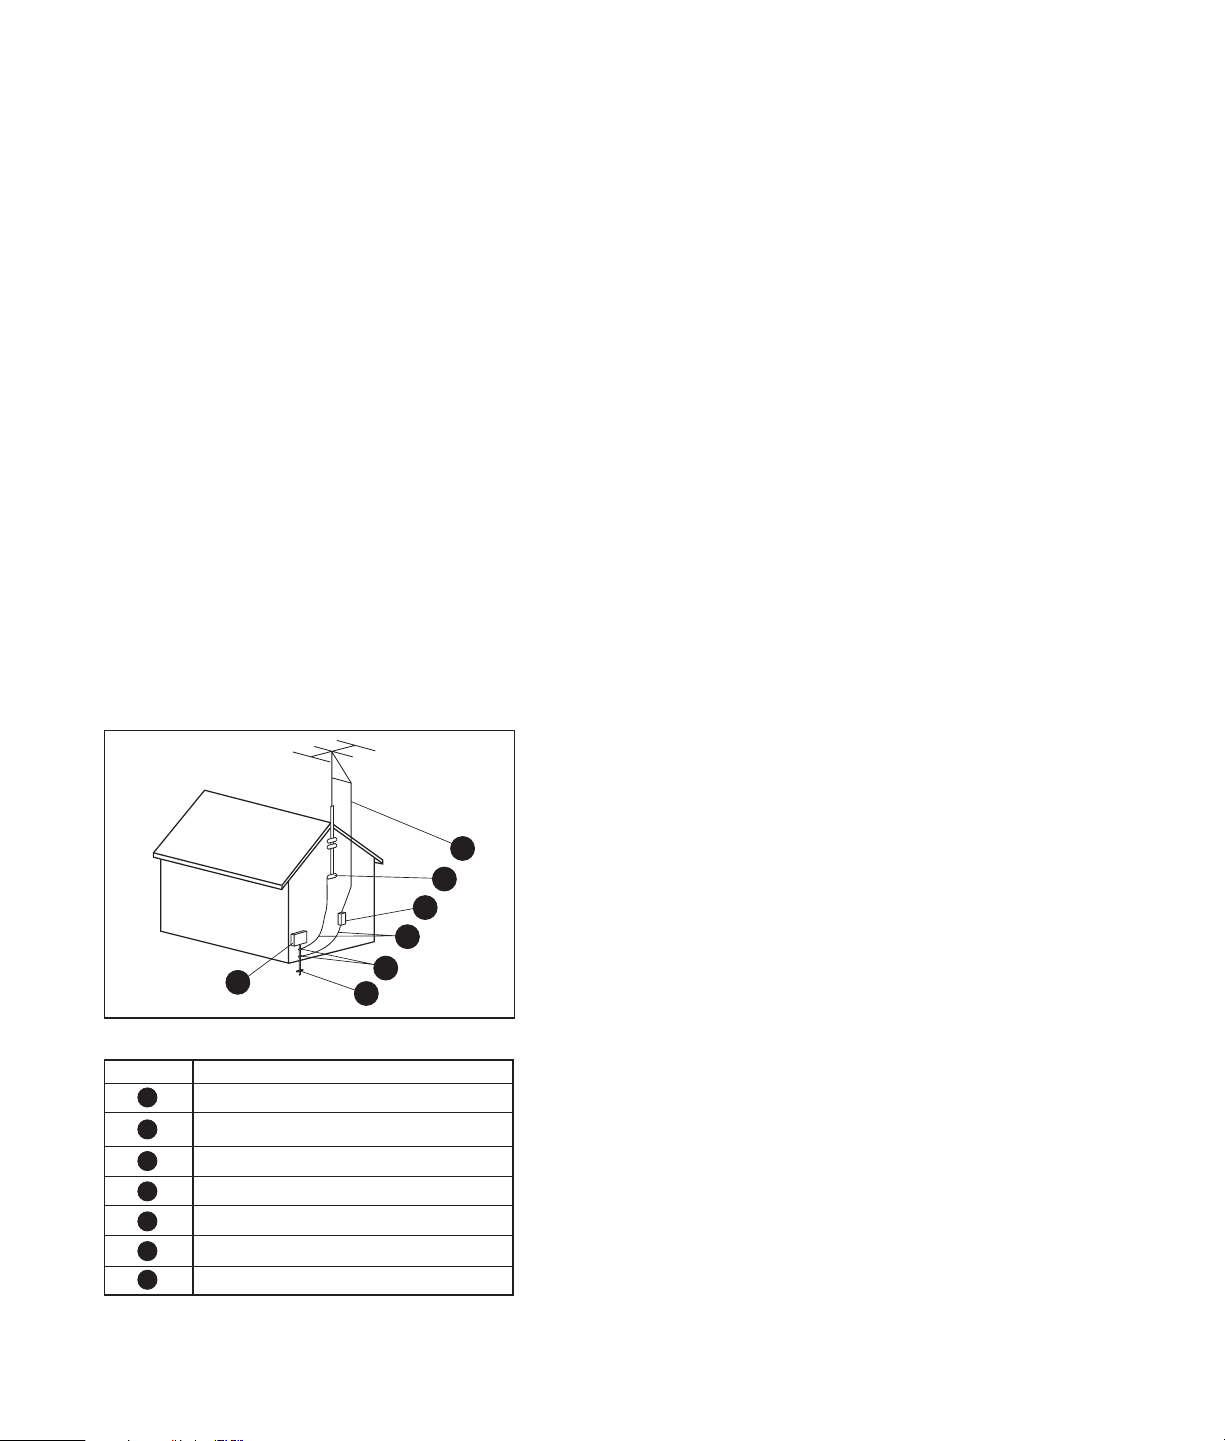
TV Antenna Connectors Protection
External television antenna grounding
WARNING:
For your safety, always unplug the TV from
its power source and from any telecommunications
systems (such as CATV, SAT, or any other peripheral)
before performing any service procedures. Failure to do
so may result in personal injury or equipment damage.
Hazardous voltage levels are inside the TV.
If an outside antenna or cable system is connected to
the product, be sure the antenna or cable system is
electrically grounded so as to provide some protection
against voltage surges and built-up static charges.
Article 810 of the National Electrical Code, ANSI/
NFPA 70, provides information with regard to proper
Lightning Protection
For added protection of any product during a lightning
storm, or when it is left unattended and unused for long
periods of time, unplug the product from the wall outlet
and disconnect the antenna or cable system. This will
prevent damage to the product from lightning and
power line surges.
7
6
5
4
3
2
Antenna Grounding
Reference
1
2
3
4
5
6
7
1
Antenna Grounding
Grounding Component
Electric Service Equipment
Power Service Grounding Electrode System
(NEC Art 250, Part H)
Ground Clamps
Grounding Conductors (NEC Section 810-21)
Antenna Discharge Unit (NEC Section 810-20)
Ground Clamp
Antenna Lead in Wire
electrical grounding of the mast and supporting
structure, grounding of the lead-in wire to an antennadischarge unit, size of grounding conductors, location
of antenna-discharge unit, connection to grounding
electrodes, and requirements for the grounding
electrode.
Power lines
An outside antenna system should not be located in the
vicinity of overhead power lines or other electric light
or power circuits, or where it can fall into such power
lines or circuits.
WARNING: When installing an outside antenna
system, extreme care should be taken to keep from
touching such power lines or circuits as contact with
them could be fatal.
Dear HP Customer
Welcome to the HP family of customers. We hope that
you will have many years of enjoyment from your new
Plasma TV.
To obtain maximum benefit from your set, read these
instructions before making any adjustments, and retain
them for future reference.
Retain your purchase receipt, and record the product
number and serial number of your set in the space
provided on the last page of these instructions.
vi HP Pavilion Plasma HDTV User’s Guide
Page 7

Table of Contents
Important Safety Instructions ..........iv
FCC Statement .....................................................v
Regulatory and Safety Information ..........................v
Safety Precautions .......................... 1
Cleaning and Maintenance .................................. 3
Accessories ..................................... 4
Attaching the Pedestal .................... 5
Assembling and Setting Up the TV ......................... 5
Installing ........................................ 7
Receiver Location................................................. 7
Optional External Equipment................................. 7
Installing Remote Control Batteries ......................... 7
Installing Cable Binding .................. 8
Connecting...................................... 9
Connecting the Antenna....................................... 9
Connecting the CableCard ................................. 10
Connecting HDMI.............................................. 11
Connecting a Set-top Box or DVD........................ 13
Connecting the Video Input................................. 14
Connecting the Amplifier.................................... 15
Connecting Program Out.................................... 16
Connecting a PC ............................................... 17
Turning the TV On or Off............... 18
TV Front Panel................................................... 19
Using the First Time Setup..............25
Language ......................................................... 25
Clock ...............................................................26
Auto Program.................................................... 28
Watching TV Programs ..................29
Aspect Controls ................................................. 29
Viewing Split Screens......................................... 31
Using the Onscreen
Navigation Menus .........................33
Using the Menus............................34
Picture .............................................................. 34
Audio...............................................................39
Timer................................................................ 41
Setup ...............................................................43
Lock ................................................................. 56
Using the Photo Viewer .................63
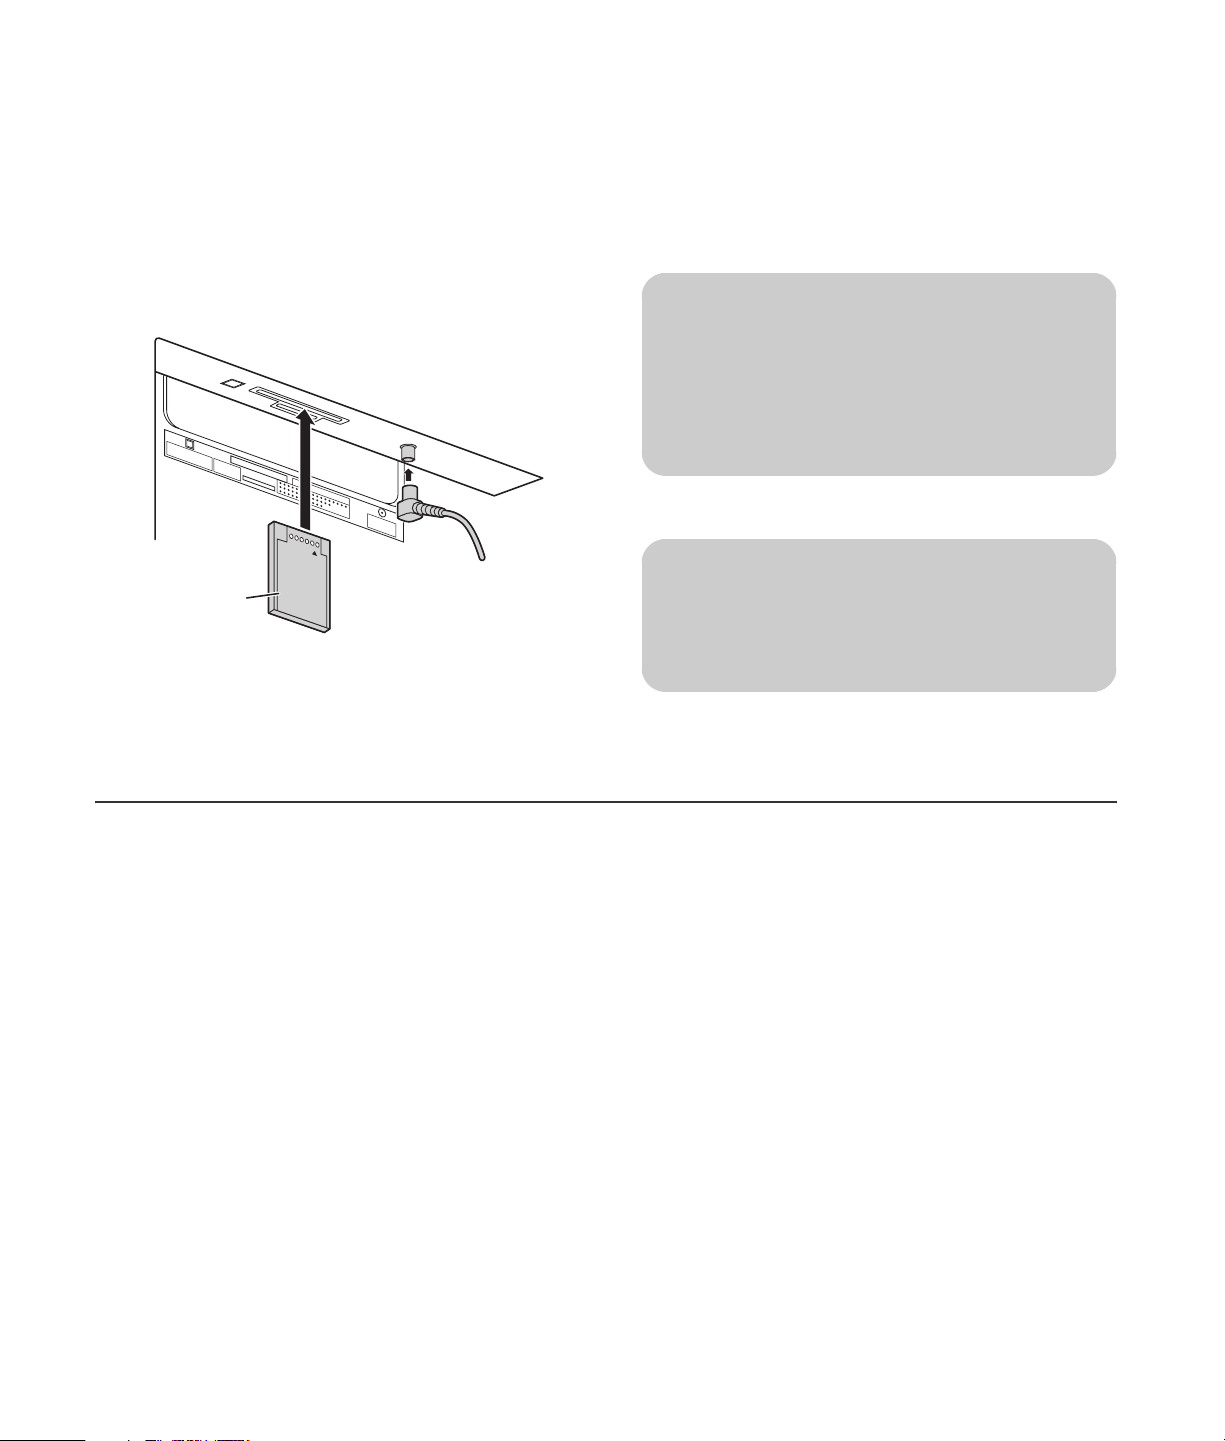
Inserting and Removing a Card ...........................63
Compatible Card Type and Card Size .................65
JPEG Thumbnail.................................................65
Operating Peripheral Equipment....69
Programming the remote control code .................. 69
Mode Operational Key Chart.............................. 78
Video/Component/HDMI Input
Signals ..........................................80
Specifications ................................81
Table of Contents
Using the Remote Control.............. 20
Troubleshooting Chart ...................83
Plasma Display Panel ......................................... 85
Table of Contents vii
Page 8

viii HP Pavilion Plasma HDTV User’s Guide
Page 9

Safety Precautions
w
SMALL PARTS CAN PRESENT CHOKING
HAZARD IF ACCIDENTALLY SWALLOWED.
KEEP SMALL PARTS AWAY FROM YOUNG
CHILDREN.
DISCARD UNNEEDED SMALL PARTS AND
OTHER OBJECTS, INCLUDING PACKAGING
MATERIALS AND PLASTIC BAGS/SHEETS TO
PREVENT THEM FROM BEING PLAYED WITH
BY YOUNG CHILDREN, CREATING THE
POTENTIAL RISK OF SUFFOCATION.
Setup
Do not place the Plasma TV on sloped or
unstable surfaces.
■ The Plasma TV may fall off or tip over.
Do not place any objects on top of the
Plasma TV.
■ If water spills onto the Plasma TV or foreign
objects get inside it, a short-circuit may occur
which could result in fire or electric shock. If any
foreign objects get inside the Plasma TV, please
consult an Authorized Service Center.
Do not cover the ventilation holes.
■ Doing so may cause the Plasma TV to overheat,
which can cause fire or damage to the Plasma TV.
If using the pedestal, leave a space of
15/16 inch (10 cm) or more at the top,
3
left, and right; 2
at the bottom; and 2
3/8 inch (6 cm) or more
3/4 inch (7 cm) or
more at the rear. If using some other
method for setup, leave a space of
15/16 inch (10 cm) or more at the
3
top, bottom, left, and right; and
3/4 inch (1.9 cm) or more at the rear.
Avoid installing this product near
electronic equipment that is readily
affected by electromagnetic waves.
■ It may cause interference in image, sound, etc. In
particular, keep video equipment away from this
product.
Heat sources
■ This product should be situated away from heat
sources such as fireplaces, chimneys, radiators,
heat registers, stoves, or other products (including
amplifiers).
AC Power Supply Cord
The Plasma TV is designed to operate on
120 Vv, 50/60 Hz.
Securely insert the power cord plug as
far as it will go, and use the clamp to
secure it. (See “AC cord” on page 8.)
■ If the plug is not fully inserted, heat may be
generated which could cause fire. If the plug is
damaged or the wall socket plate is loose, they
should not be used.
Safety Precautions
Do not handle the power cord plug with
wet hands.
■ Doing so may cause electric shocks.
Safety Precautions 1
Page 10

Do not do anything that might damage
the power cable. When disconnecting the
power cable, hold the plug, not the
cable.
■ Do not make any modifications to, place heavy
objects on, place near hot objects, heat, bend,
twist, or forcefully pull the power cable. Doing so
may cause damage to the power cable which can
cause fire or electric shock. If damage to the cable
is suspected, have it repaired at an Authorized
Service Center.
If the Plasma TV will not be used for a
long period of time, unplug the power
cord from the wall outlet.
If problems occur during use
If a problem occurs (such as no picture or
no sound), or if smoke or an abnormal
odor is detected from the Plasma TV,
unplug the power cord immediately.
■ Continued use of the TV under these conditions
might cause fire or permanent damage to the unit.
Have the TV evaluated at an Authorized Service
Center. Service to the TV by any unauthorized
personnel is strongly discouraged due to its high
voltage dangerous nature.
If water or foreign objects get inside the
Plasma TV, if the Plasma TV is dropped,
or if the cabinet becomes damaged,
disconnect the power cord plug
immediately.
■ A short may occur, which could cause fire.
Contact an Authorized Service Center for any
repairs that need to be made.
When using the Plasma TV
Do not bring your hands, face, or objects
close to the ventilation holes of the
Plasma TV.
■ The top of the Plasma TV is usually very hot due to
the high temperature of exhaust air being released
through the ventilation holes. Burns or personal
injuries can happen if any body parts are brought
too close. Placing any object near the top of the
TV could also result in heat damage to the object
as well as to the TV if its ventilation holes are
blocked.
Be sure to disconnect all cables before
moving the Plasma TV.
■ Moving the TV with its cables attached might
damage the cables which, in turn, can cause fire
or electric shock.
Disconnect the power plug from the wall
outlet as a safety precaution before
carrying out any cleaning.
■ Electric shocks can result if this is not done.
Clean the power cable regularly to
prevent it from becoming dusty.
■ Built-up dust on the power cord plug can increase
humidity which might damage the insulation and
cause fire. Unplug the cord from the wall outlet
and clean it with a dry cloth.
This Plasma TV radiates infrared rays;
therefore, it may affect other infrared
communication equipment.
Install your infrared sensor in a place
away from direct or reflected light from
your Plasma TV.
2 HP Pavilion Plasma HDTV User’s Guide
Page 11

Cleaning and Maintenance
The front of the display panel has been specially treated. Wipe the panel surface gently using
only a cleaning cloth or a soft, lint-free cloth.
■ Do not scratch or hit the surface of the panel with fingernails or other hard objects. Furthermore, avoid contact
with volatile substances such as insect sprays, solvents, and thinner; otherwise, the quality of the surface may be
adversely affected.
If the cabinet becomes dirty, wipe it with a soft, dry cloth.
■ Do not allow any detergent to come into direct contact with the surface of the plasma TV.
If water droplets get inside the unit, operating problems may result.
■ Avoid contact with volatile substances such as insect sprays, solvents, and thinner; otherwise, the quality of the
cabinet surface may be adversely affected or the coating may peel off. Furthermore, do not leave it for long
periods in contact with articles made from rubber or PVC.
n
Do not allow a picture to be displayed for
an extended period, as this can cause a
permanent afterimage to remain on the
Plasma TV.
Examples of still pictures include logos,
video games, computer images, teletext,
and images displayed in 4:3 mode.
n
Image Retention Protection: If still image
data is displayed for more than a few
minutes, the image retention prevention
function activates automatically and the
image disappears. Change the image or
change the input source to see an image.
Safety Precautions
Safety Precautions 3
Page 12
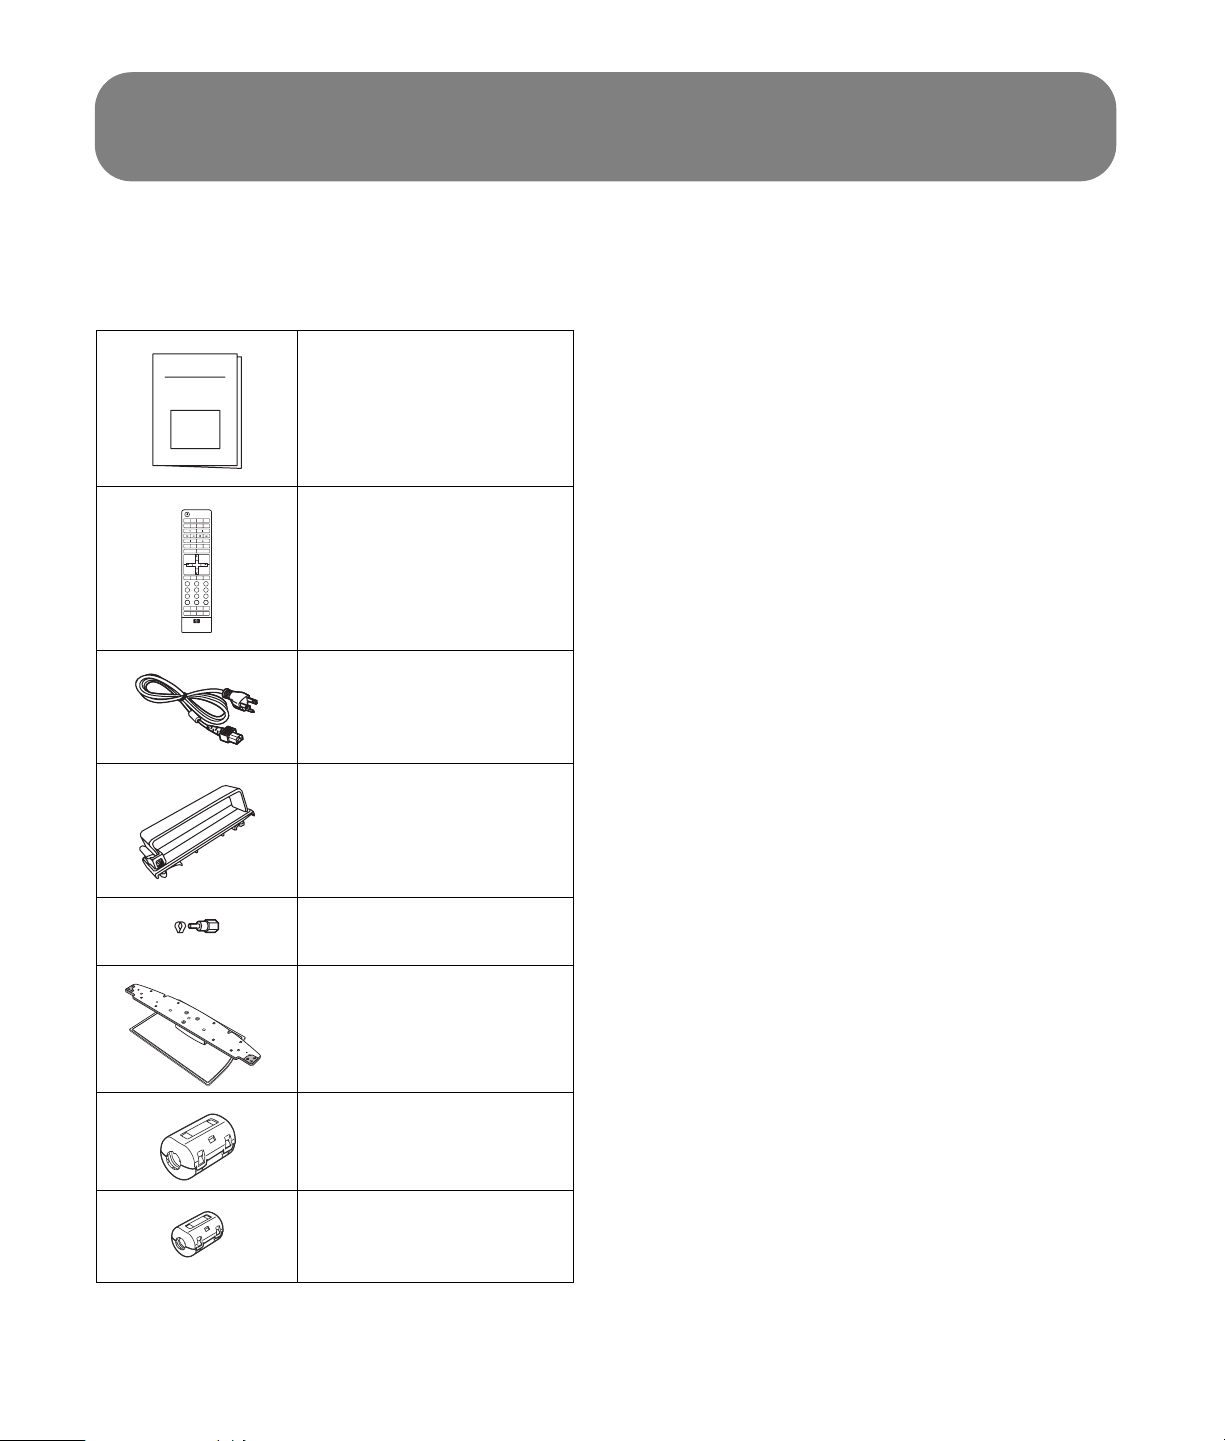
Accessories
Check that you have the Accessories and items listed in
the table.
Documentation
TV DVD STB PVR
AUX VCR AUDIO HP
DAY -- SOURCE
DAY +
EXIT
VOL
+
SELECT
VOL
-
INFOMUTE GUIDE FAV
1
4
7
.
SPLIT SWAP
RECALL SAP BBE
RETURN
23
5
8 9
0
PHOTO
Remote control
MENU
CH
+
PAGE+
PAGE
-
CH
-
6
LAST
ASPECT
SLEEP
AC cord
Cable clamp (2)
F-type antenna adapter
(for 5C-2V)
Pedestal and parts
Large size ferrite core
Small size ferrite core gray
Small size ferrite core
white (4)
4 HP Pavilion Plasma HDTV User’s Guide
Page 13
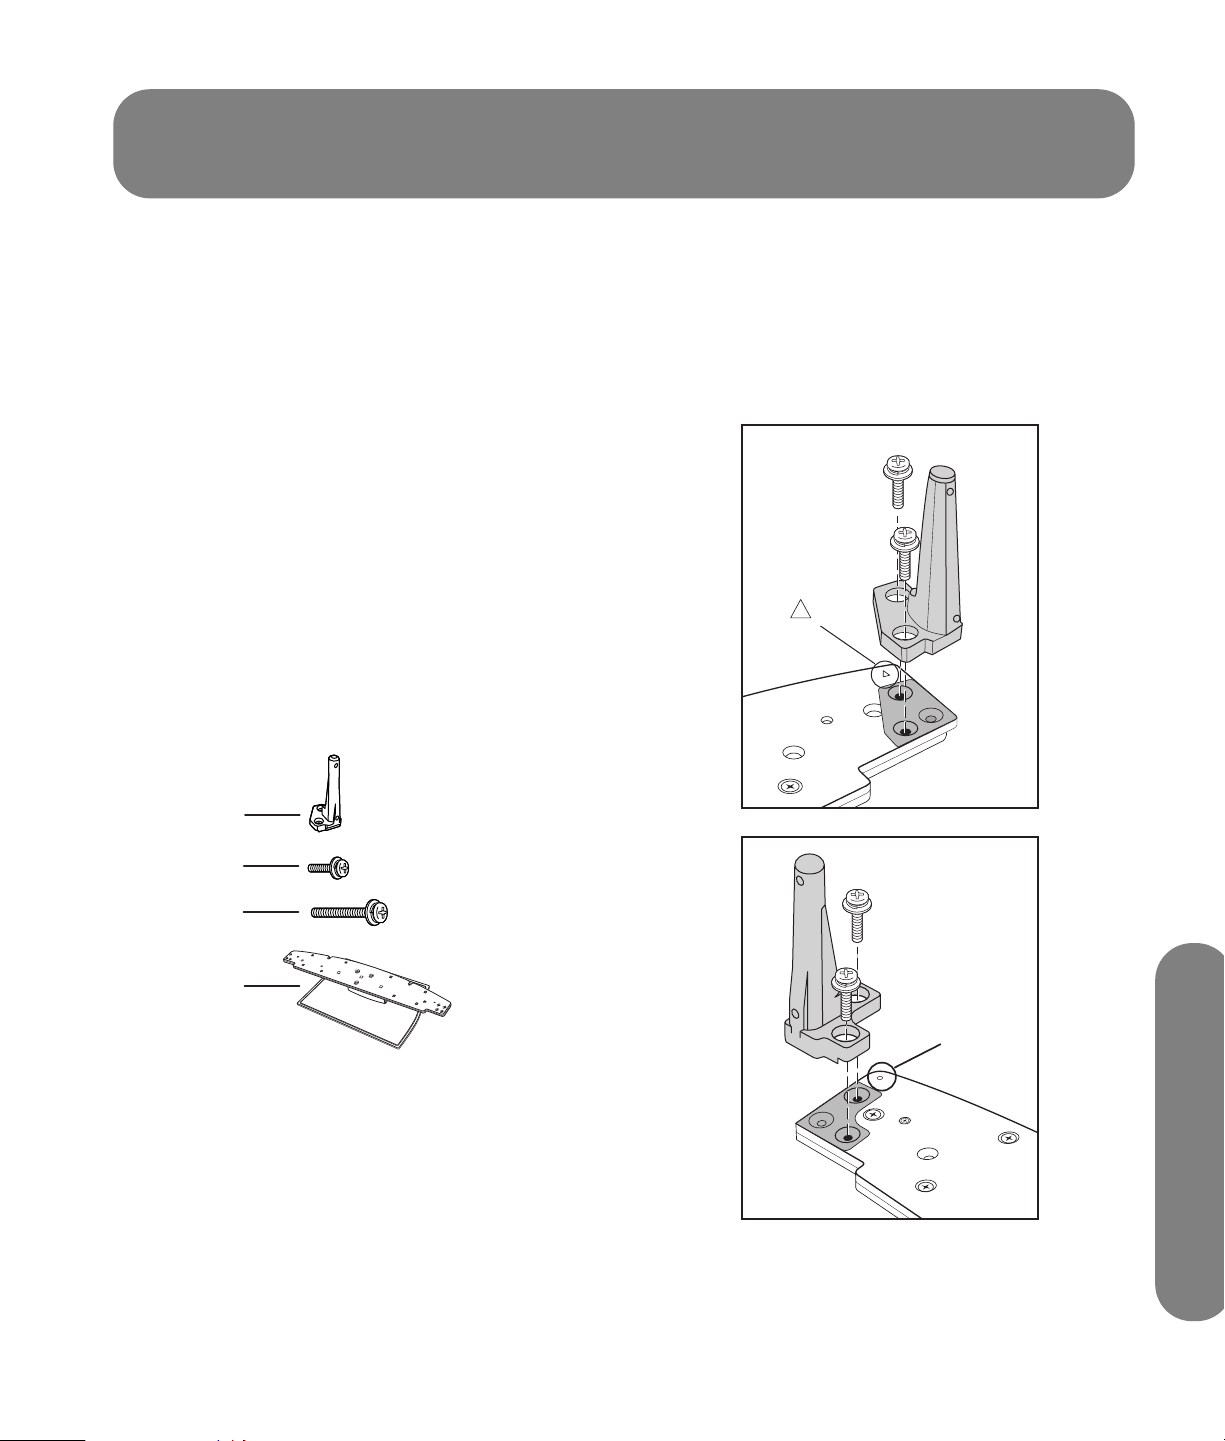
Attaching the Pedestal
Assembling and Setting
Up the TV
Points to note during installation:
■ Select a location for the TV that has easy access to
the AC power receptacle.
■ Provide adequate ventilation so that the
temperature around the television does not rise
above 40° C (104° F). If there is insufficient
movement of air inside the display, heat may build
up inside the television and fire may result. For
ventilation spacing specifics, refer to the
information listed under “Setup” on page 1.
■ Due to the size and weight of the display and the
pedestal, it is recommended that a minimum of
two people assemble and move the TV.
Accessories for pedestal assembly
A
Assembling the pedestal
Match each pole (A) to the mark (a circle or a triangle)
on the pedestal (D). When facing the front of the
pedestal, the right mark is a triangle and the left mark
is a circle. Insert two short screws (B) for each pole.
“ “
B
C
D
A: Pole (2)
B: Short screw (4)
C: Long screw (4)
D: Pedestal (1)
“O”
Attaching the Pedestal
Attaching the Pedestal 5
Page 14
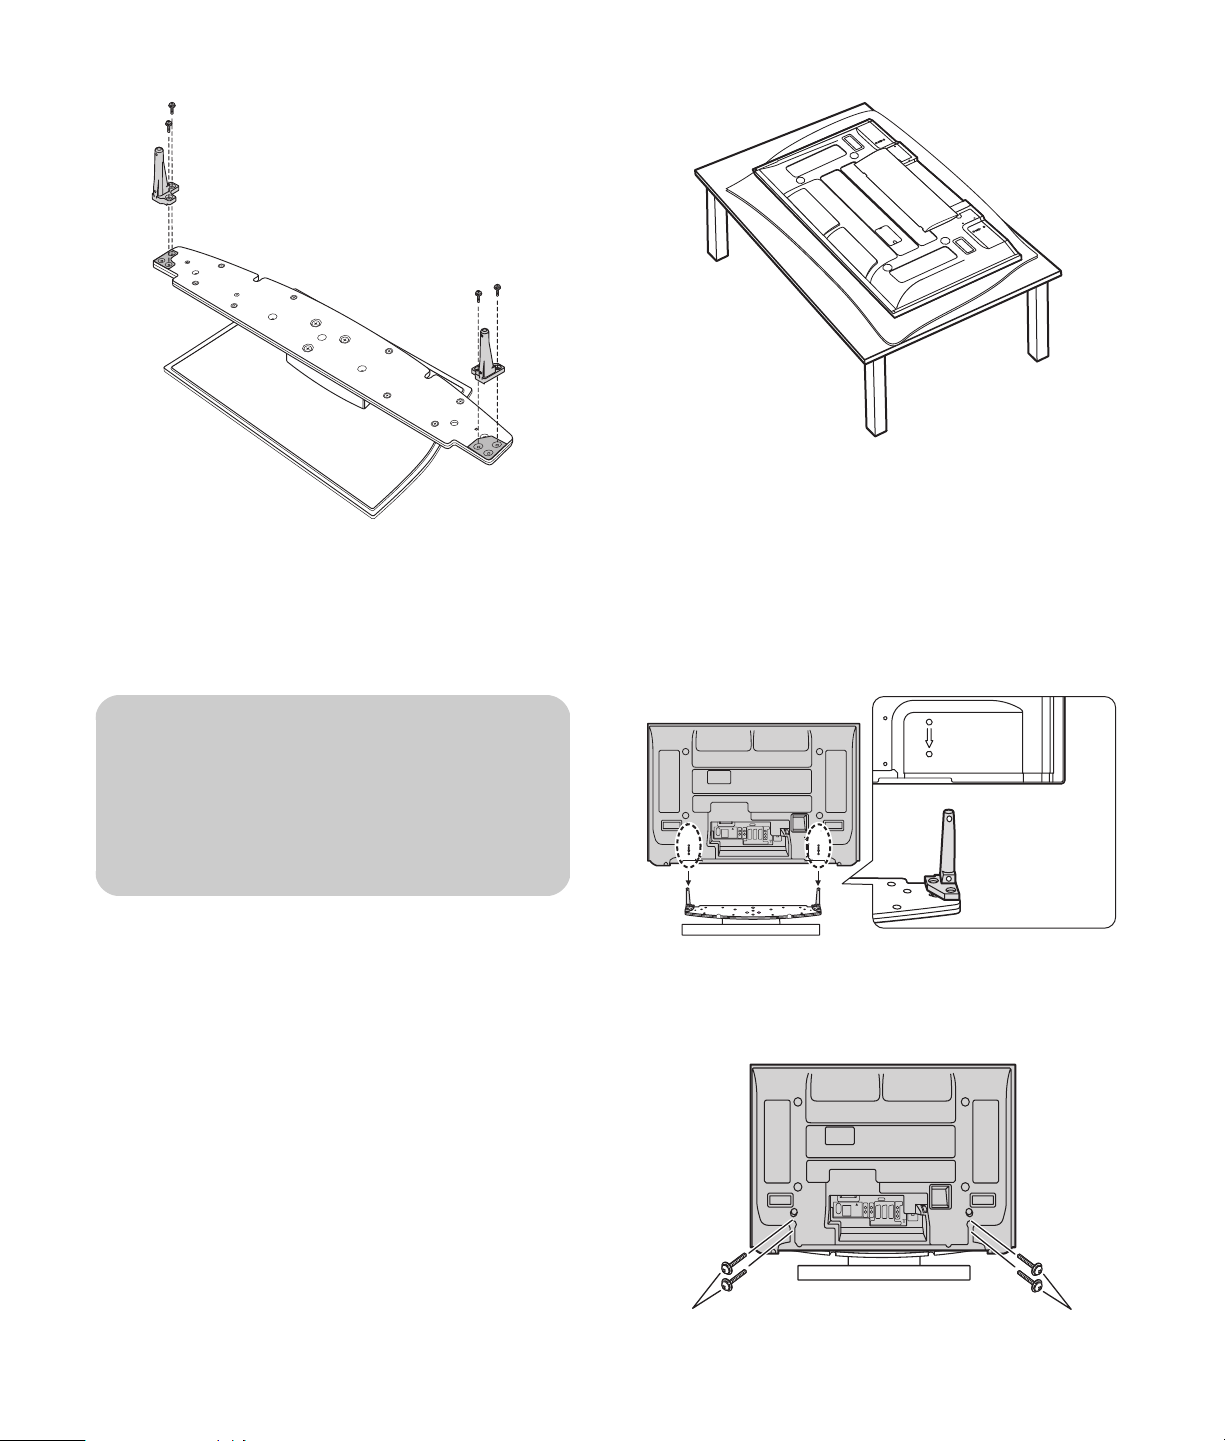
Attaching the pedestal
These steps attach the pedestal to the TV. To remove the
pedestal, perform these steps in reverse order.
c
CAUTION: Never place the television or
the display unit with the glass screen
facing downward, unless it is protected
with pads.
1 Position the TV display unit and the pedestal:
2 Lower the TV display unit onto the pedestal poles,
matching the marks:
Hold the display with the back toward you. Align
the holes in the display bottom with the poles of
the pedestal, matching the stamped marks on the
back of the display with the pedestal marks.
Gently lower the display onto the pedestal,
inserting the poles into the display.
■ Put a pad or clean cloth on a smooth, stable
table. Put the display unit with the glass screen
facing downward on the pad.
■ Position the pedestal with the back (thick part
of stand base) toward you on a stable table or
on the floor.
6 HP Pavilion Plasma HDTV User’s Guide
3 Insert two long screws (C, see figure under
“Assembling the Pedestal”) for each pole into the
back of the display.
Page 15

Installing
Receiver Location
This unit is intended to be used with the stand. Consult
your dealer for available options. Position for
comfortable viewing. Avoid placing where sunlight or
other bright light (including reflections) will fall on the
screen.
Use of some types of fluorescent lighting can reduce
remote control transmitter range.
Adequate ventilation is essential to prevent internal
component failure. Keep away from areas of excessive
heat or moisture.
Optional External
Equipment
The video and audio connections between components
can be made with shielded video and audio cables.
For best performance, video cables should utilize
75-ohm coaxial shielded wire. Cables are available
from your dealer or electronic supply store.
Before you purchase any cables, be sure you know
what type of output and input connectors your various
components require. Also determine the length of
cable you will need.
Installing Remote Control
Batteries
1 Open the cover.
2 Install the batteries and replace the cover.
Note the correct polarity (+ and –).
n
Replace used batteries with alkaline
batteries for longer life.
c
CAUTION: Incorrect installation can cause
battery leakage and corrosion that will damage
the remote control transmitter.
Observe the following precautions:
■ Batteries should always be replaced as a set.
Always use new batteries when replacing the
old set.
■
Do not combine a used battery with a new one.
■ Do not mix battery types (example: “zinc
carbon” with “alkaline”).
■ Do not attempt to charge, short-circuit,
disassemble, heat, or burn used batteries.
■ Battery replacement is necessary when
remote control acts sporadically or stops
operating the TV set.
■
When not using the remote for a long period of
time, remove the batteries to prevent damage
or injury from possible battery leakage.
■
Do not try to recharge batteries that are not
intended to be recharged: they can overheat
and rupture. Follow the battery manufacturer’s
directions for the batteries you are using.
Installing
Installing 7
Page 16
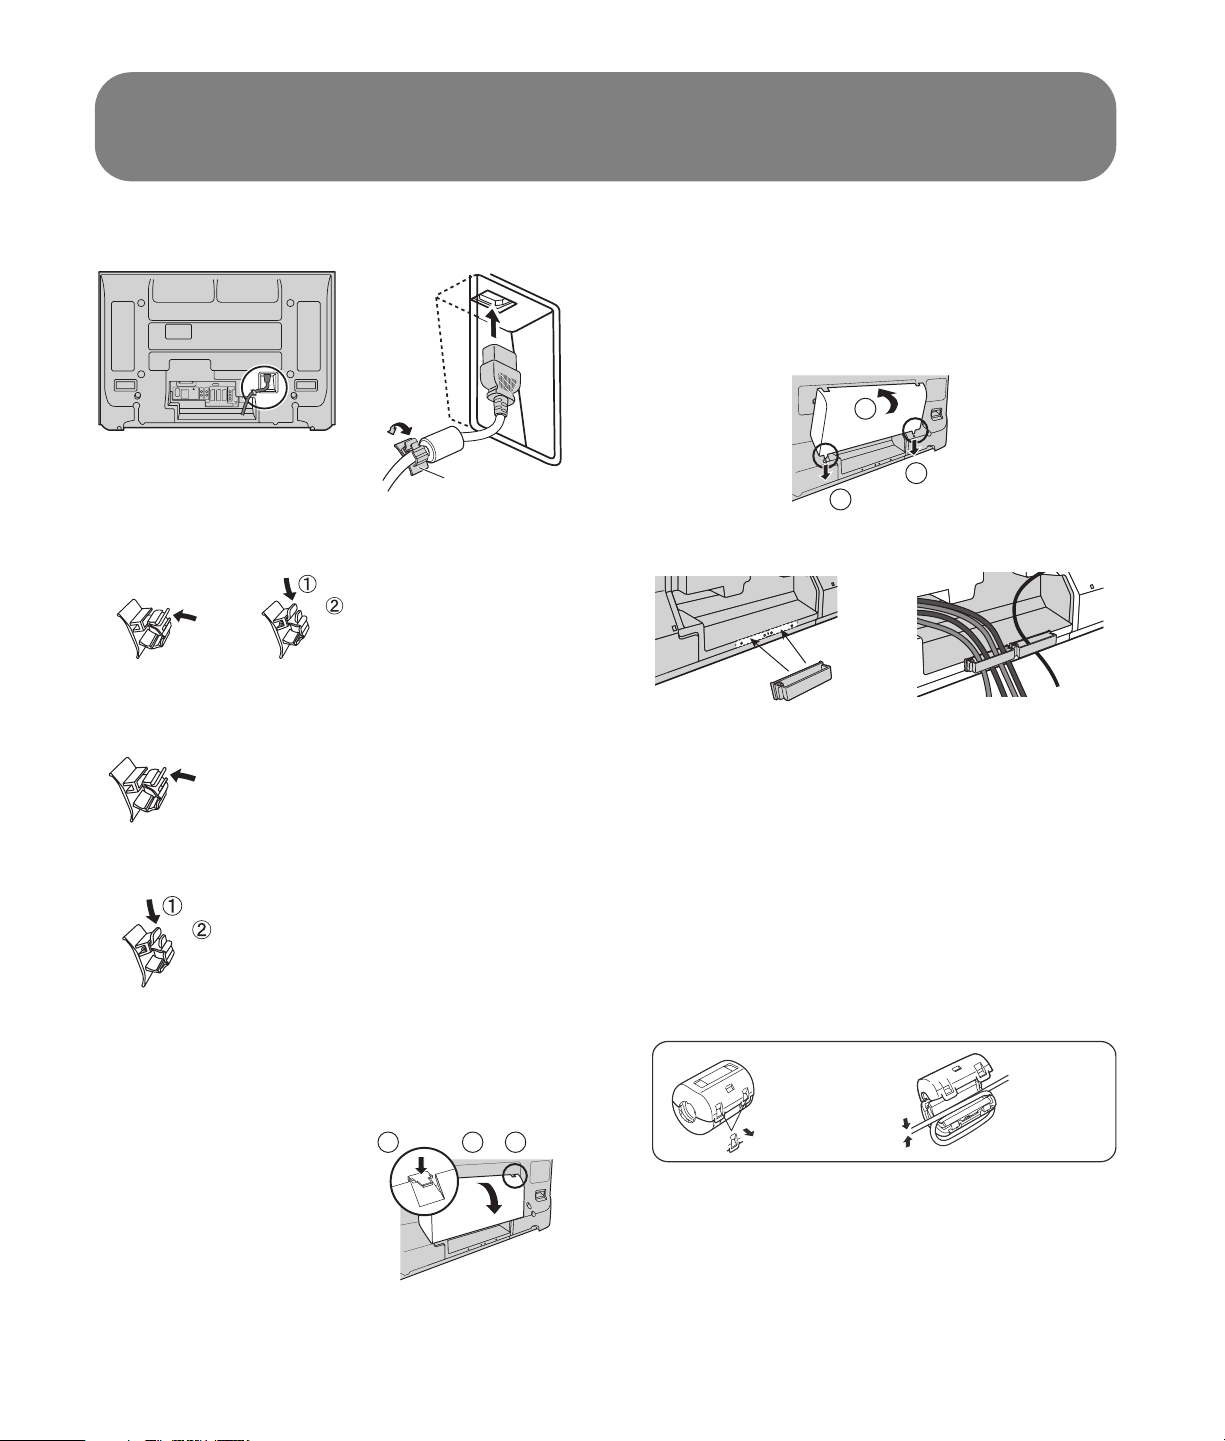
Installing Cable Binding
AC cord
Clamp
Close Open
Closing
Close by pushing in till a clicking
sound is heard.
Clamp
Attaching
1 Insert the claws (at two points) at the bottom end.
2 Push until it clicks.
2
1
1
Cable clamp
To avoid interference appearing on the screen, do not
bundle the antenna cable and AC cord together.
Releasing
Pull down while drawing the knob.
Cable cover
Removing
1 Push down hooks and
pull the cover slightly
toward yourself to
disengage the claws (at
two points).
2 Slowly pull out in the
downward direction.
8 HP Pavilion Plasma HDTV User’s Guide
Attaching the ferrite core
Be sure to choose the appropriate size of ferrite core
(large or small) and to route the cable (winding or
straight though) as indicated by the connection
diagram. See:
■ “Connecting a PC” on page 17.
■ “TV Front Panel” on page 19.
1
121
Pull back the
tabs (in two
places) to
open.
2
Put the cable
in and close.
Page 17
Connecting
n
Cables and connectors are not supplied
with this set.
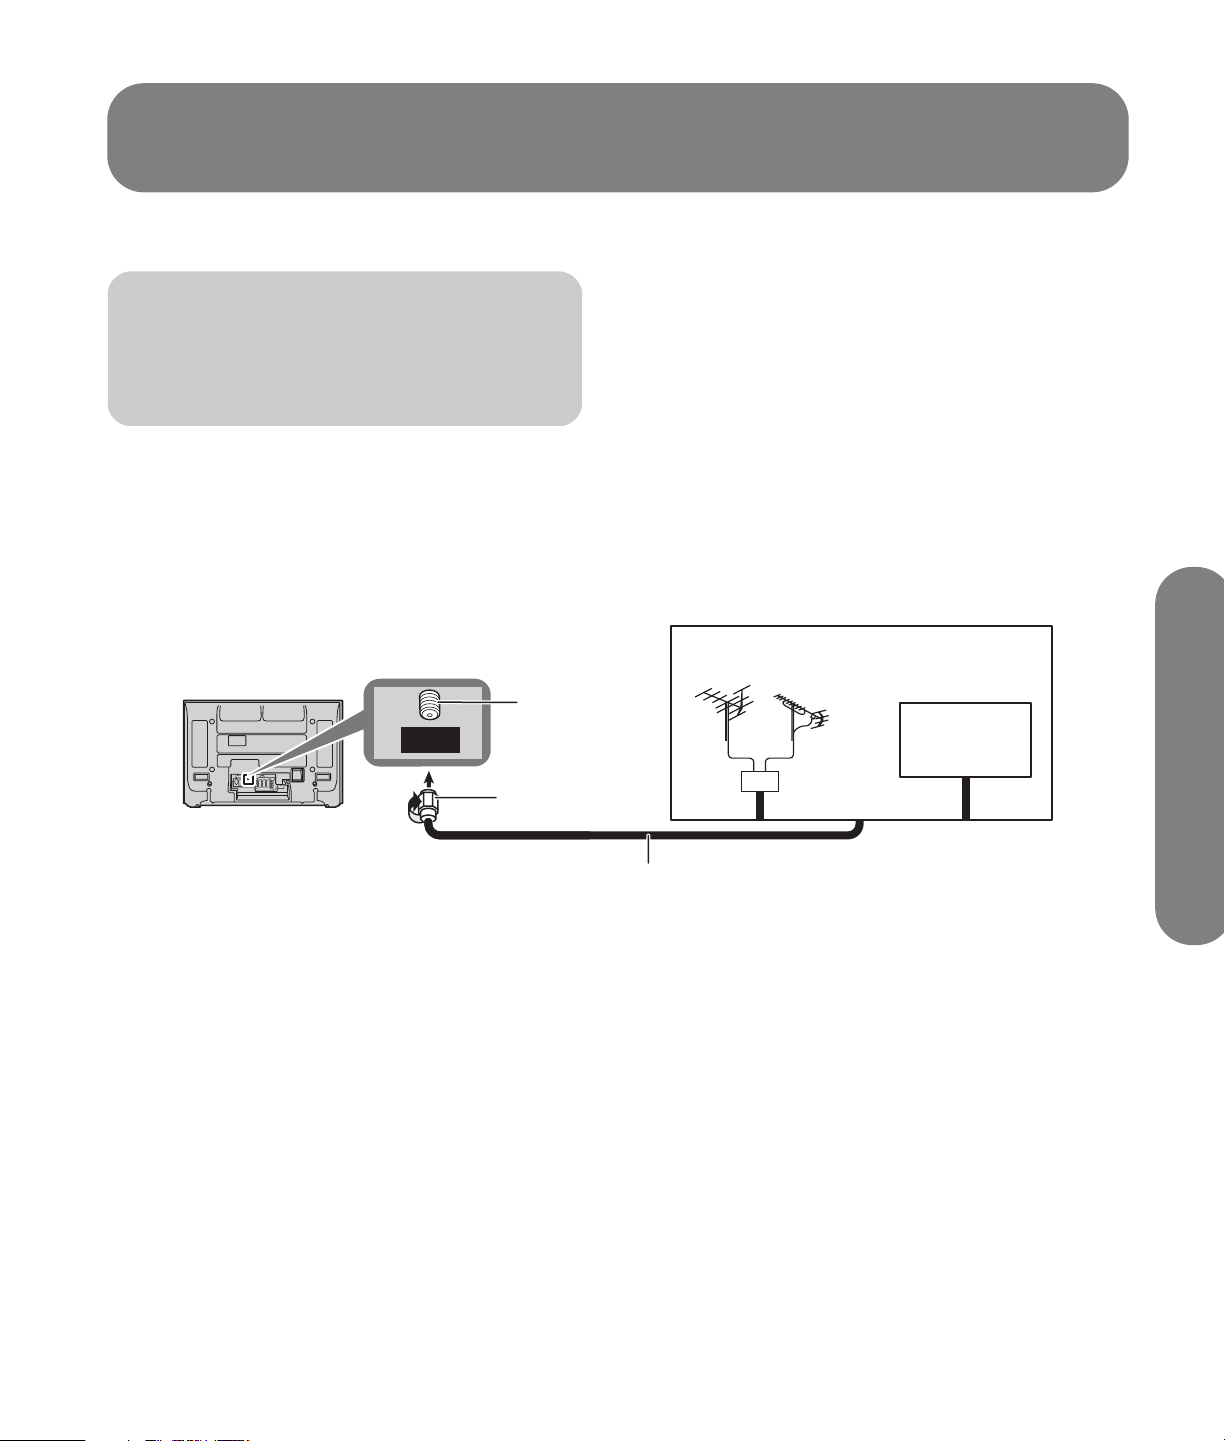
Connecting the Antenna
The RF input mode must be set to Antenna. For more
information, see “Auto Program” on page 28 or “Auto
program” on page 45.
Back of the TV
ANT
ANTENNA
Cable In
Antenna
terminal
F-type antenna
connector
75-ohm coaxial cable
(5C-2V or higher specification)
Home antenna
UHFVHF
Mixer
Or
Incoming
cable signal
Connecting
Connecting 9
Page 18
Connecting the CableCard
CableCard allows you to tune digital and highdefinition cable channels through the cable.
Consult your cable company on the availability of
CableCard.
1 Connect the cable antenna to ANT connector.
Back of the TV
DIGITAL
AUDIO OUT
SER V
I
CE
O
NLY
Upper side of the card
Cable
CAR
T
M
D
ANTENNA
C
able
In
P
I
NSER T TH IS
OD MODUL
END
E
2 Turn the TV on, see “Turning the TV On or Off” on
page 18.
4 Insert the CableCard (with upper side facing you)
into CableCard slot on the back of the TV.
Follow the onscreen messages.
n
If you experience keyboard or remote
control function hang-up when using the
CableCard, unplug the TV and plug it back
in, turn it on, and try the controls again.
c
CAUTION: Insert only a CableCard into the
CableCard slot.
3 Set the input source to TV, see “TV Front Panel” on
page 19.
10 HP Pavilion Plasma HDTV User’s Guide
Page 19
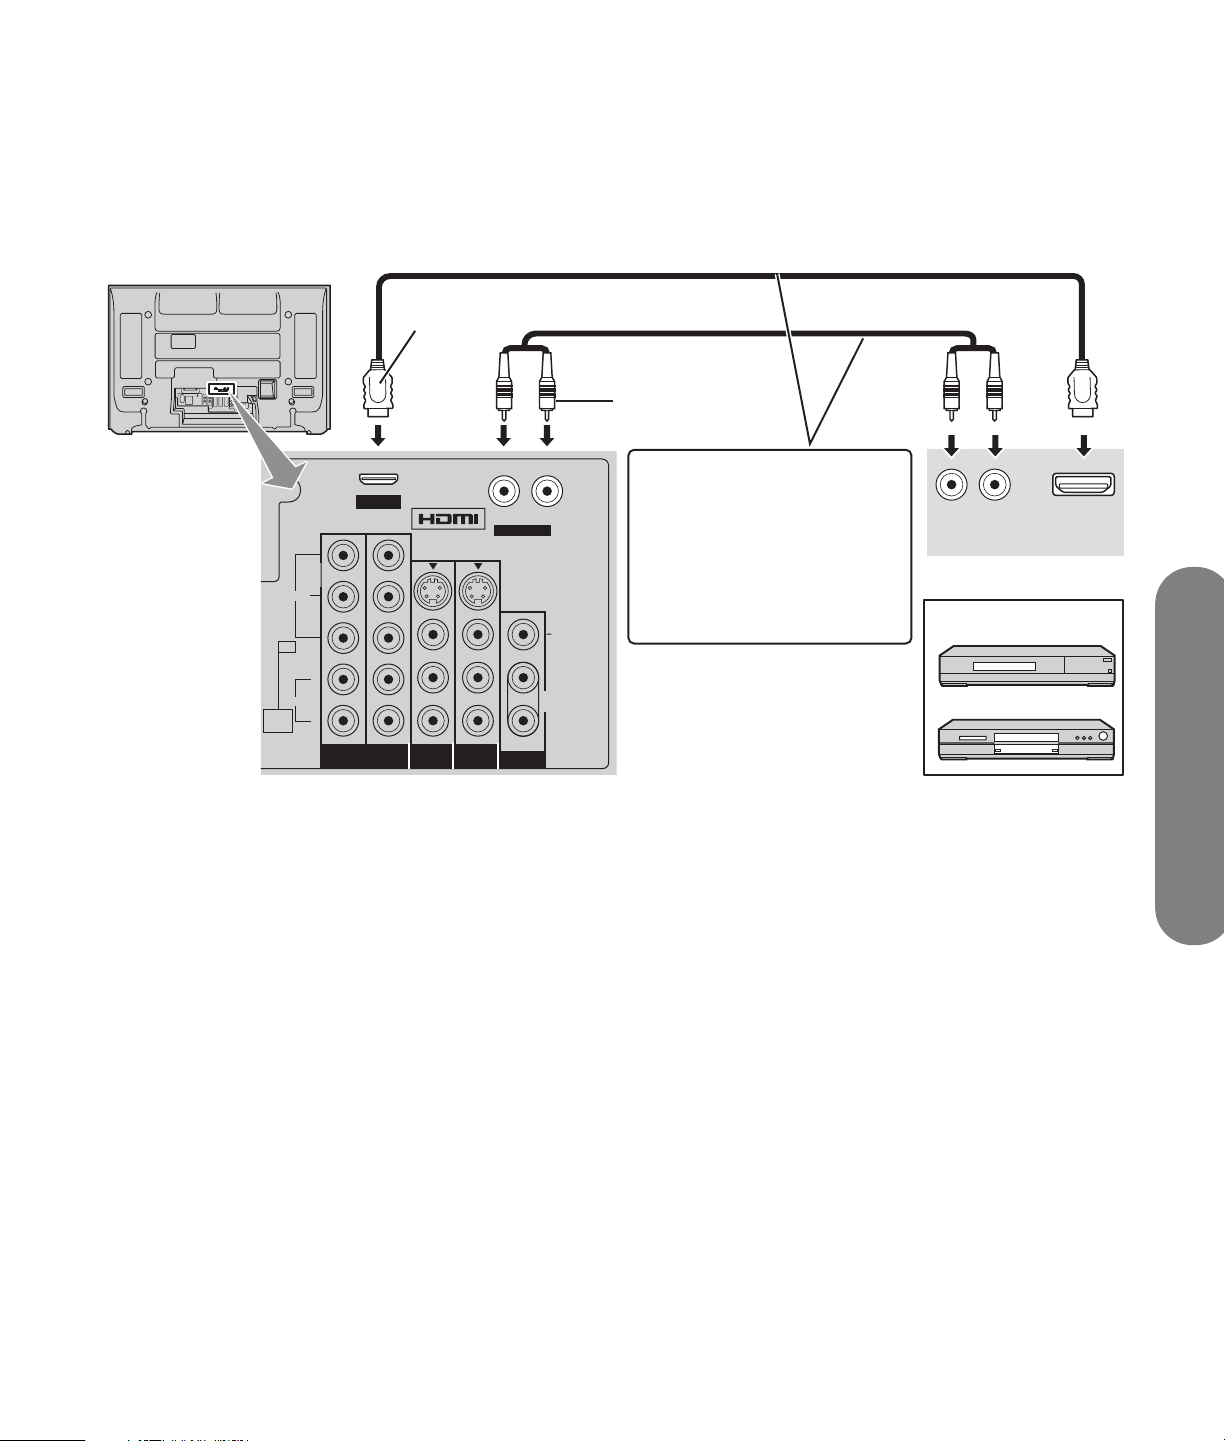
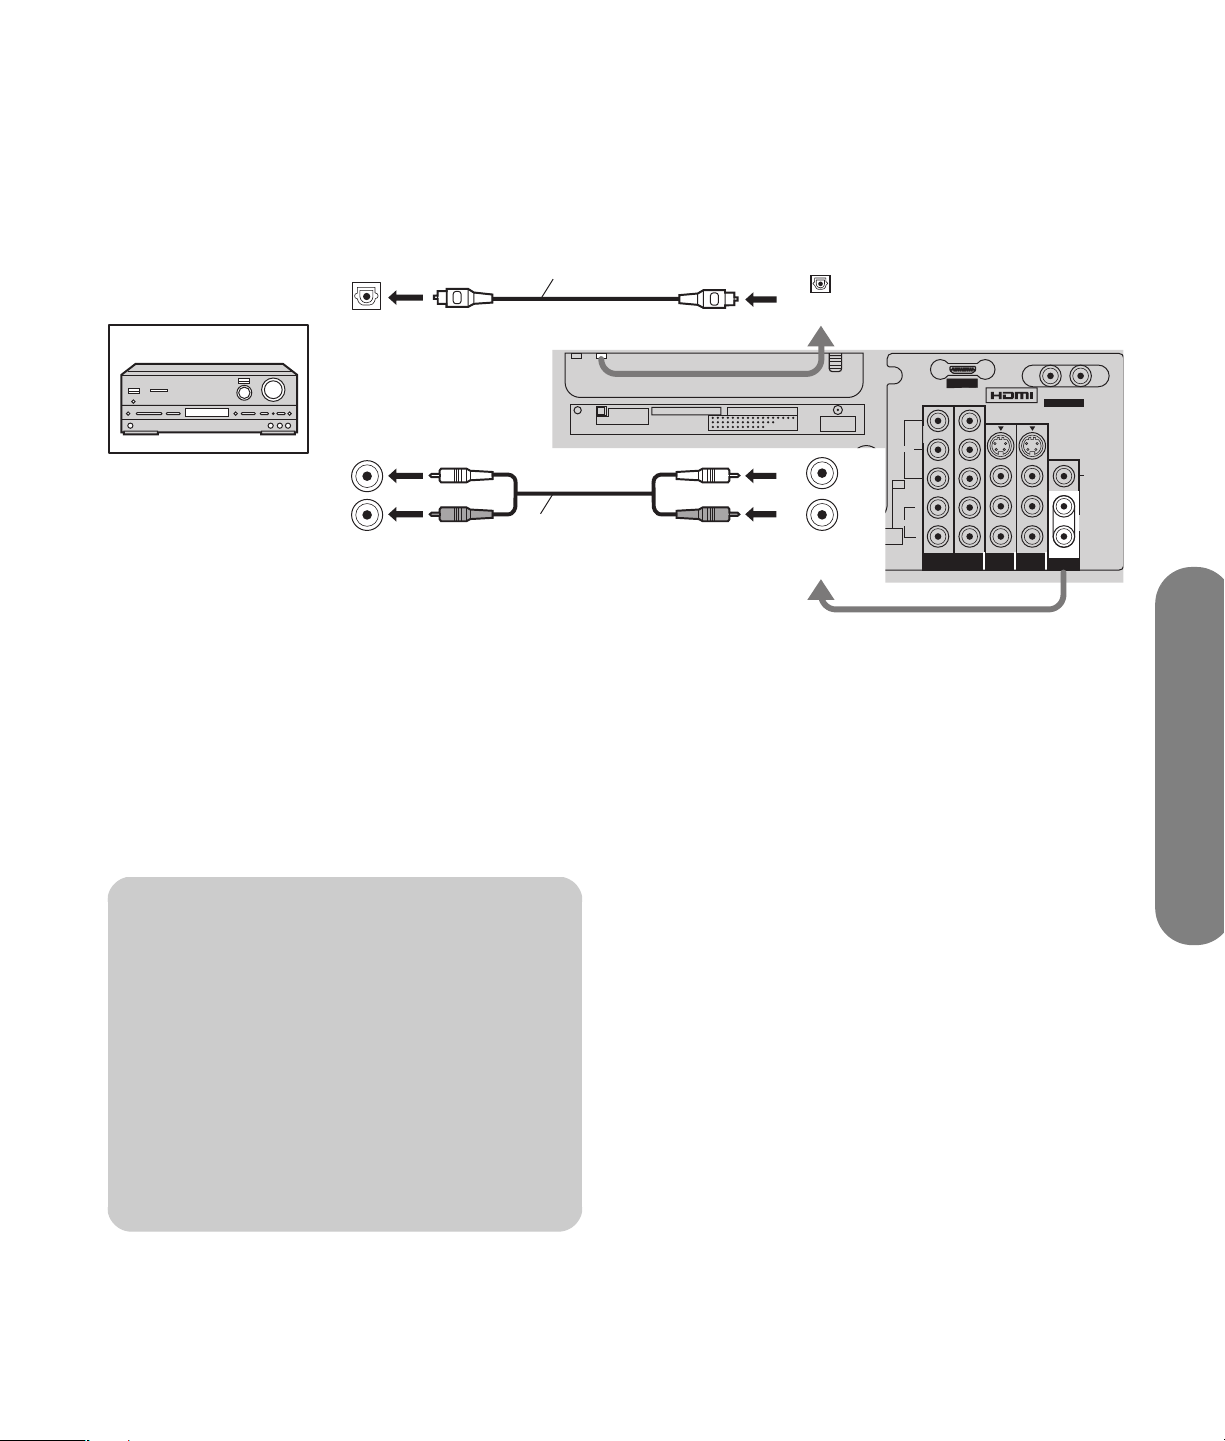
Connecting HDMI
High Definition Multimedia Interface (HDMI) is an alldigital consumer electronics A/V interface. The HDMI
terminal supports both video and audio information.
HDMI cable
AV IN
R L
AUDIO IN
AUDIO
IN
VIDEO
PC
AUDIO
AV I N
Y
Y
P
B
P
R
L
R
12
COMPONENT VIDEO
INPUT
Y
P
B
P
R
INPUT 2 INPUT 1
R L
AUDIO IN
S VIDEO
VIDEO
L
R
TO AUDIO AMP
PROGOUT
You can connect an EIA/CEA-861/861B†-compliant
consumer electronic device, such as a set-top box or
DVD player with HDMI or DVI output terminal, to the
HDMI input terminal. Select the HDMI In audio setting
in the audio menu; see “Other Adjust” on page 40.
HDMI cable
(For use with DVI-HDMI
cables or adapter)
Audio cable
• If connecting with an HDMI cable,
it is not necessary to connect an
audio cable.
• If connecting to equipment that has
only a DVI output terminal, DVI or
HDMI adapter cables and an
audio cable are necessary.
‡
• Select the audio setting in HDMI In.
LR
AUDIO
OUT
HDMI signal out
Set-top Box
DVD player
HDMI
OUT
†
EIA/CEA-861/861B profiles compliance covers profiles for
transmission of uncompressed digital video including high
bandwidth digital content protection.
‡
HDMI-DVI conversion cable or adapter (purchase separately).
Consult your consumer electronics dealer for availability details.
Connecting
Connecting 11
Page 20

Compatible Video Signal
Vertical
No. of Dots
Signals
1080i 1920 x 1080i 59.94/60
720p 1280 x 720p 59.94/60
(H x V)
Scanning
Frequency (Hz)
480p 720 x 480p,
640 x 480p
480i 720 (1440) x
480i
59.94/60,
59.94/60
59.94/60
n
This input terminal is not intended for use
with PCs.
1080i and 720p signals are reformatted
for viewing on your plasma display.
Compatible sampling frequency of the audio signal
through HDMI (PCM): 48 kHz/44.1 kHz/32 kHz
n
■ This HDMI connector is Type A.
■ If you connect equipment without a
digital output terminal, connect to the
Component Video, S-video, or Video
input terminal on the TV. In this case the
picture is displayed as an analog signal.
12 HP Pavilion Plasma HDTV User’s Guide
Page 21
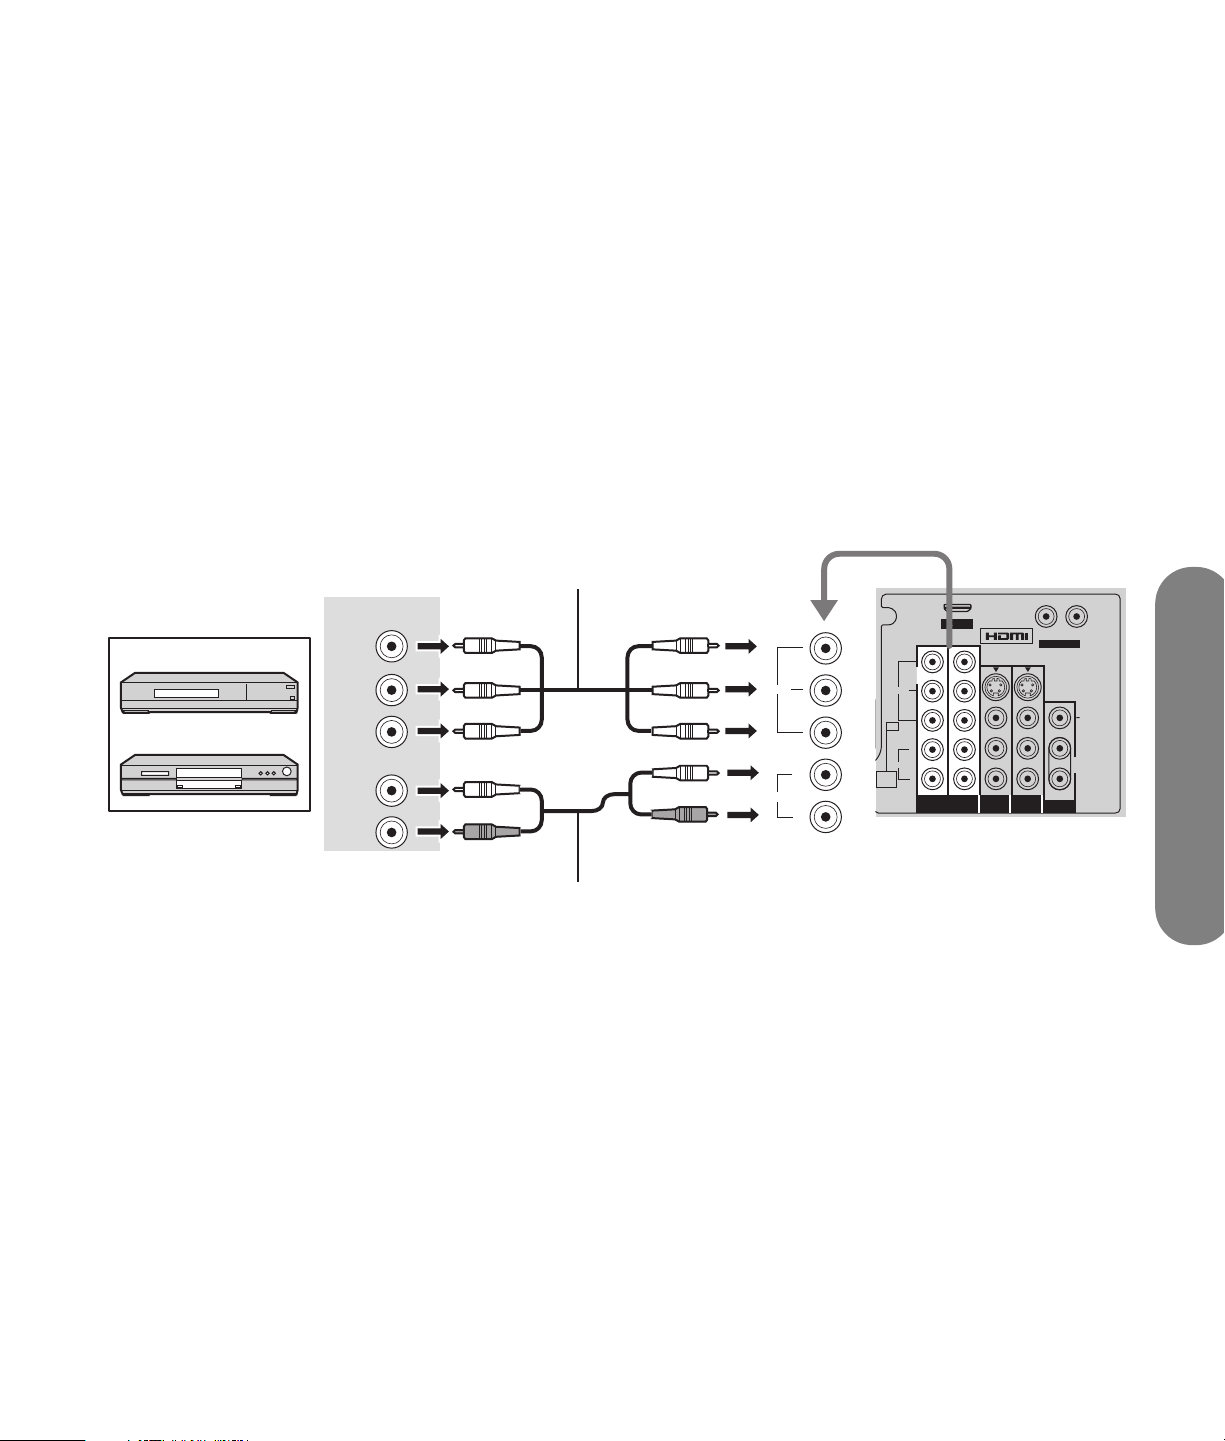
Connecting a Set-top Box or DVD
This TV is capable of displaying 1080i, 720p, 480p,
and 480i DTV signals when connected to a DTV tuner
set-top box (STB). This TV also utilizes a progressive
scan doubler, which de-interlaces the NTSC signal and
progressively scans the image.
■ To view DTV programs, connect the STB to the
component video input terminals (Y, Pb, Pr) of the
TV. Component color inputs provide luminance
and separate color signal.
■ Set the output of the STB to either 1080i, 720p,
480p, or 480i. All signals are converted and
output to the display.
■ A DTV signal must be available in your area.
Component video cable
COMPONENT
VIDEO OUT
Set-top box
DVD player
Y
PB
PR
AUDIO OUTPUT
L
R
Audio cable
Y
PB
VIDEO
L
AUDIO
R
VIDEO
PR
PC
AUDIO
AUDIO
AUDIO
IN
COMPONENT VIDEO
INPUT
Back of the TV
AV IN
Y
Y
Y
PBPRPB
PR
L
R
12
COMPONENT VIDEO
INPUT
INPUT 2 INPUT 1
R L
AUDIO IN
S VIDEO
L
R
TO AUDIO AMP
PROGOUT
VIDEO
Connecting
Connecting 13
Page 22
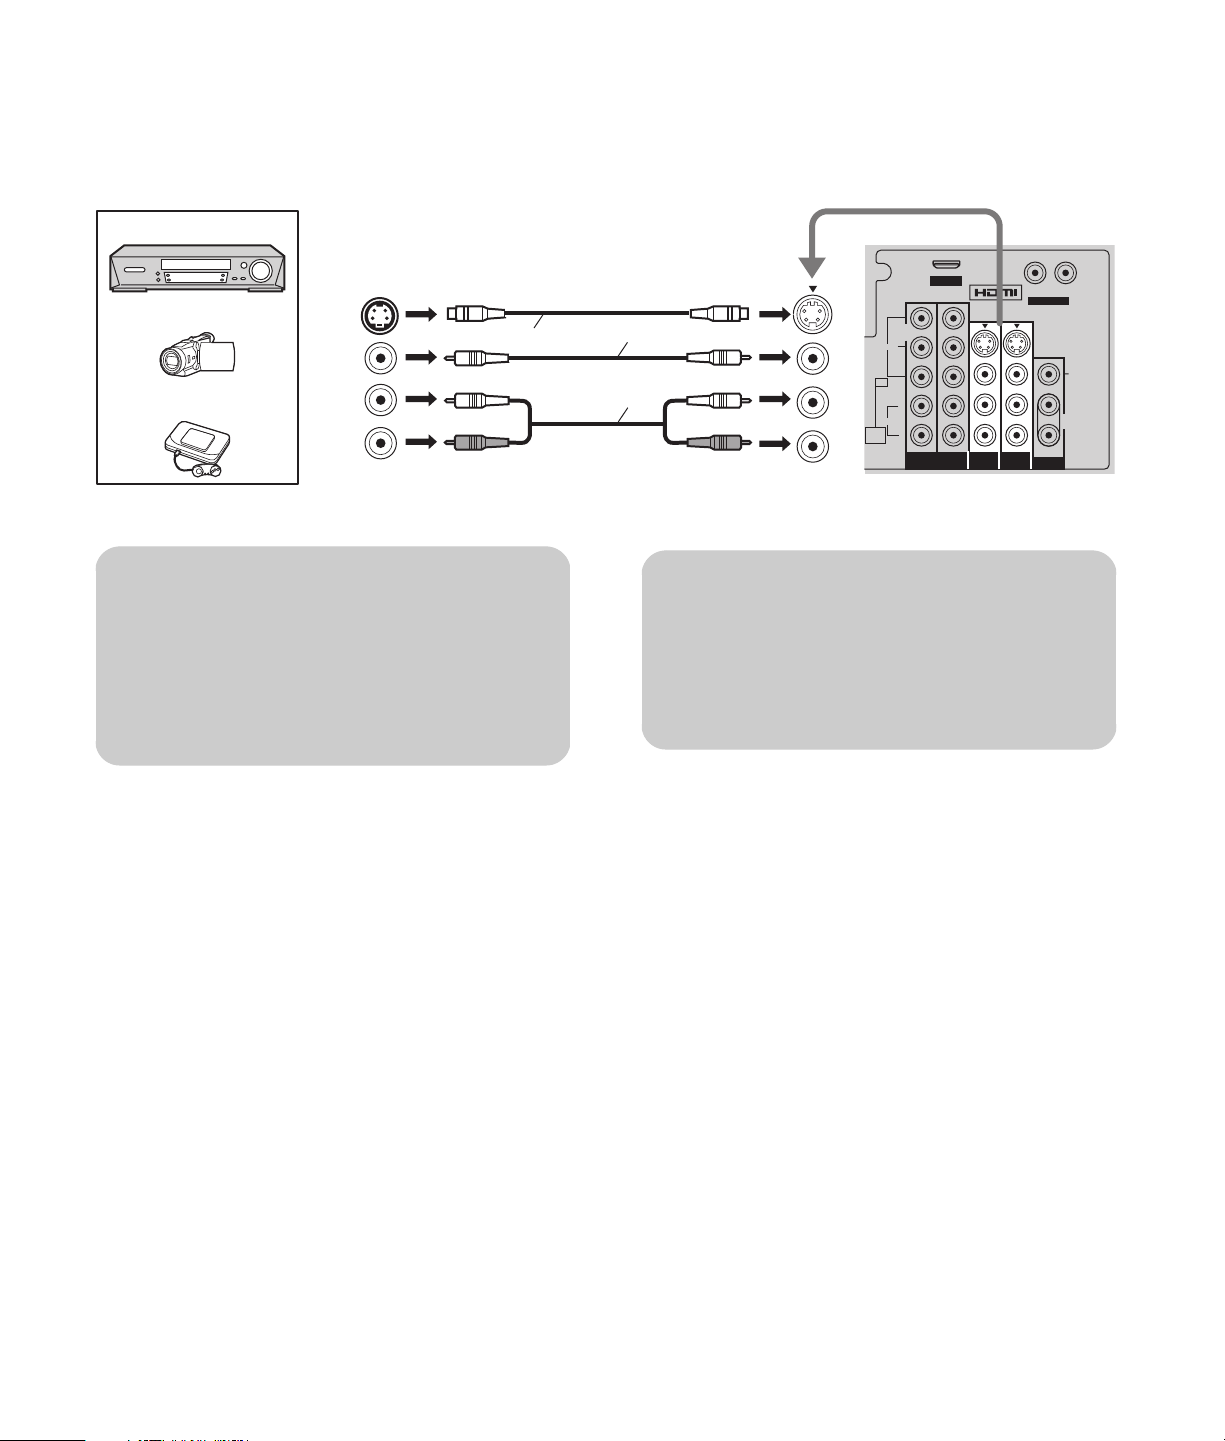
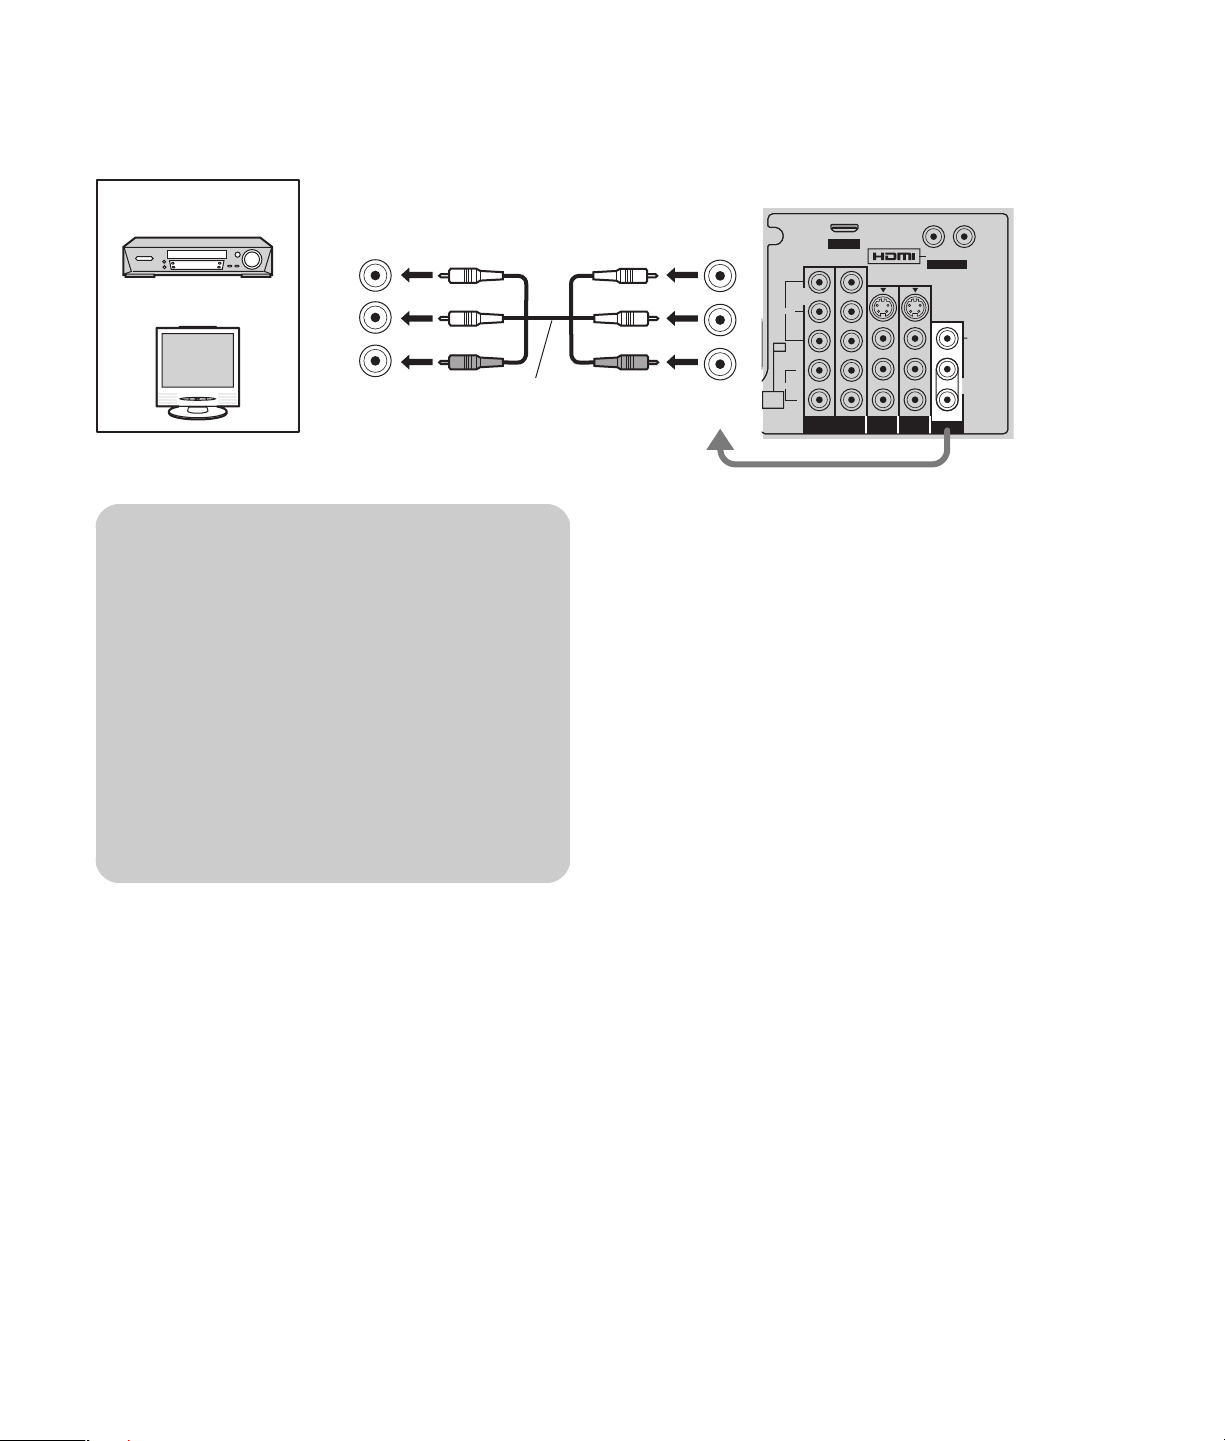
Connecting the Video
Input
VCR
Back of the TV
Camcorder
Video game console
S-VIDEO
OUT
VIDEO
OUT
AUDIO
OUT
S-video cable or video cable
L
R
n
The S-video input overrides the composite
video signal when the S-video cable is
connected.
Connect either S-video cable or video cable.
Connect one video cable
Audio cable
IMPORTANT: You can also use Input 3 on
the front of the TV to connect a camcorder
or video game console. See “TV Front
Panel” on page 19.
Input 1/2
AUDIO
IN
!
VIDEO
PC
AUDIO
AV IN
Y
Y
PR
L
R
12
COMPONENT VIDEO
INPUT
R L
INPUT 2 INPUT 1
AUDIO IN
S VIDEO
L
R
TO AUDIO AMP
PROGOUT
VIDEO
Y
PBPRPB
14 HP Pavilion Plasma HDTV User’s Guide
Page 23
Connecting the Amplifier
AV I N
R L
AUDIO IN
S VIDEO
VIDEO
L
R
Y
VIDEO
AUDIO
PBPRPB
PR
Y
Y
PROGOUTCOMPONENT VIDEO
INPUT
12
INPUT 2 INPUT 1
TO AUDIO AMP
CableCARD
TM
ANTENNA
Cable In
DIGITAL
AUDIO OUT
AUDIO
IN
PC
For a full home theater sound experience, an external
Dolby Digital* decoder and a multichannel amplifier
must be connected to the Digital Audio Out terminal on
the TV.
OPTICAL IN
(TOS Link)
Amplifier
Or
AUDIO INPUT
L
R
∗ Dolby Digital 5.1 channel surround sound delivers digital-quality
sound. Dolby Digital provides five discrete full bandwidth channels
for front left, front right, center, surround left, and surround right, plus
a Low Frequency Effect (LFE) subwoofer channel.
Optical digital audio cable
Audio cable
DIGITAL
AUDIO OUT
L
R
OUTPUT
AUDIO OUT
Back of the TV
L
R
1 Select Off for Speakers in the Audio menu; see
“Speakers” under “Other Adjust” on page 40.
2 Adjust the amplifier volume to the desired level.
n
Depending on your DVD player and DVD-
audio software, the copyright protection
function may operate and disable optical
output.
External speakers cannot be connected
directly to Output terminals.
With an ATSC channel, the output from
Digital Audio Out is Dolby Digital. With
an NTSC channel, the output is PCM.
Connecting
Connecting 15
Page 24
Connecting Program Out
See your equipment manual for instructions.
VCR
DVD recorder
VIDEO
INPUT
Monitor
AUDIO
INPUT
L
R
AV cable
n
When a device (STB, DVD, etc.) is connected
to the HDMI terminal (see “Connecting
HDMI” on page 11), only audio signals
output. No video signals output.
When receiving digital channel signals, all
digital formats are down-converted to
composite NTSC video for output through
the Program Out terminals.
OUTPUT
Back of the TV
VIDEO
PC
L
AUDIO
AUDIO
R
IN
12
COMPONENT VIDEO
Y
Y
PR
INPUT
AV I N
R L
INPUT 2 INPUT 1
AUDIO IN
S VIDEO
L
R
TO AUDIO AMP
PROGOUT
VIDEO
Y
PBPRPB
Some programs contain copyright
protection signals to prevent recording.
16 HP Pavilion Plasma HDTV User’s Guide
Page 25
Connecting a PC
C
)
ess
an
)
o
g
.
pter
y)
ess
an
)
GB
cable
ess
an
)
b
)
Connect a cable that matches the audio output terminal on the PC
P
Conversion
ada
(if necessar
L
th
4 in. (10 cm
Ferrite core (small size
Audi
AV IN
R L
AUDIO IN
SERVICE ONLY
Y
Y
ANT
DIGITAL
AUDIO OUT
SERVICE ONLY
B
B
P
P
S VIDEO
VIDEO
PR
PR
PC
L
AUDIO IN
AUDIO
R
IN
12
COMPONENT VIDEO
INPUT 1
INPUT 2
OUTPUT
INPUT
R
PC
Ferrite core (large size
L
th
4 in. (10 cm
L
th
4 in. (10 cm
Stereo plu
PC
15-pin D-su
Notes
■ PC signals that can be input have a horizontal
scanning frequency of 15 to 110 kHz and vertical
scanning frequency of 48 to 120 Hz. (However,
the image will not be displayed properly if the
signals exceed 1200 lines.)
■ Do not set the horizontal and vertical scanning
frequencies for PC signals that are above or
below the specified frequency range listed in the
table. The maximum resolution range:
Resolution
Model
PL4200N 768 x 768 1024 x 768
PL5000N 1024 x 768 1366 x 768
4:3 16:9
Connecting
■ If the display resolution exceeds these maximums,
it may not be possible to show fine detail with
sufficient clarity.
■ Some PC models cannot be connected to the set.
■ There is no need to use an adapter for PCs with
DOS/V-compatible 15-pin D-sub terminal.
■ Additional equipment and cables shown are not
supplied with this set.
Connecting 17
Page 26
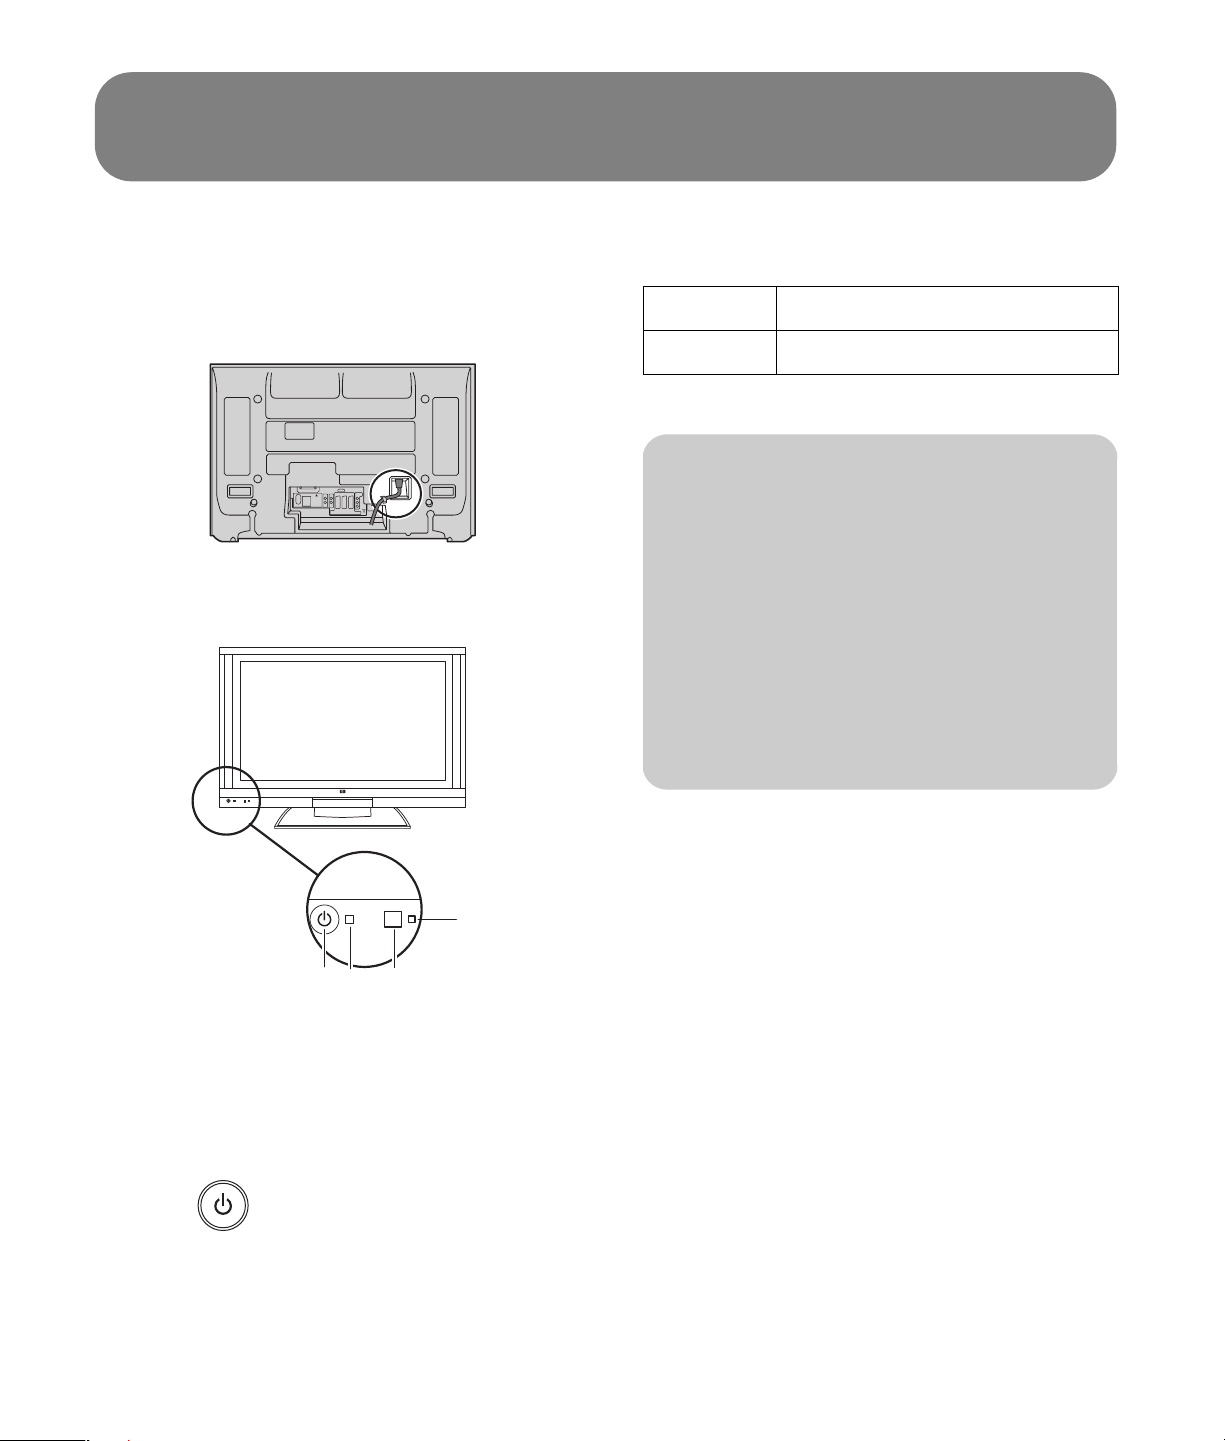
Turning the TV On or Off
1 Connect the AC cord plug to the plasma TV.
Fix the power cord plug securely with the clamp
(see “Installing Cable Binding” on page 8).
2 Connect the plug to the wall outlet.
3 Press the Power button (A) on front of this unit.
Power status indicator
Power on Red
Power off No light
n
The TV still consumes some power as long
as the power cord is inserted into the wall
outlet.
The first time setup screen is displayed only
the first time you turn the power on after
purchase.
If you wish to change the settings of these
items later, select them with the Setup
menu, see “Setup” on page 43.
D
B C
A
A: Power button
B: Power status indicator
C: Remote control sensor
D: Ambient Light Adaptation (A.L.A.) sensor
(See “A.L.A.” on page 35.)
4 Press (on the remote control or the TV) to
turn the TV on or off.
18 HP Pavilion Plasma HDTV User’s Guide
Page 27
TV Front Panel
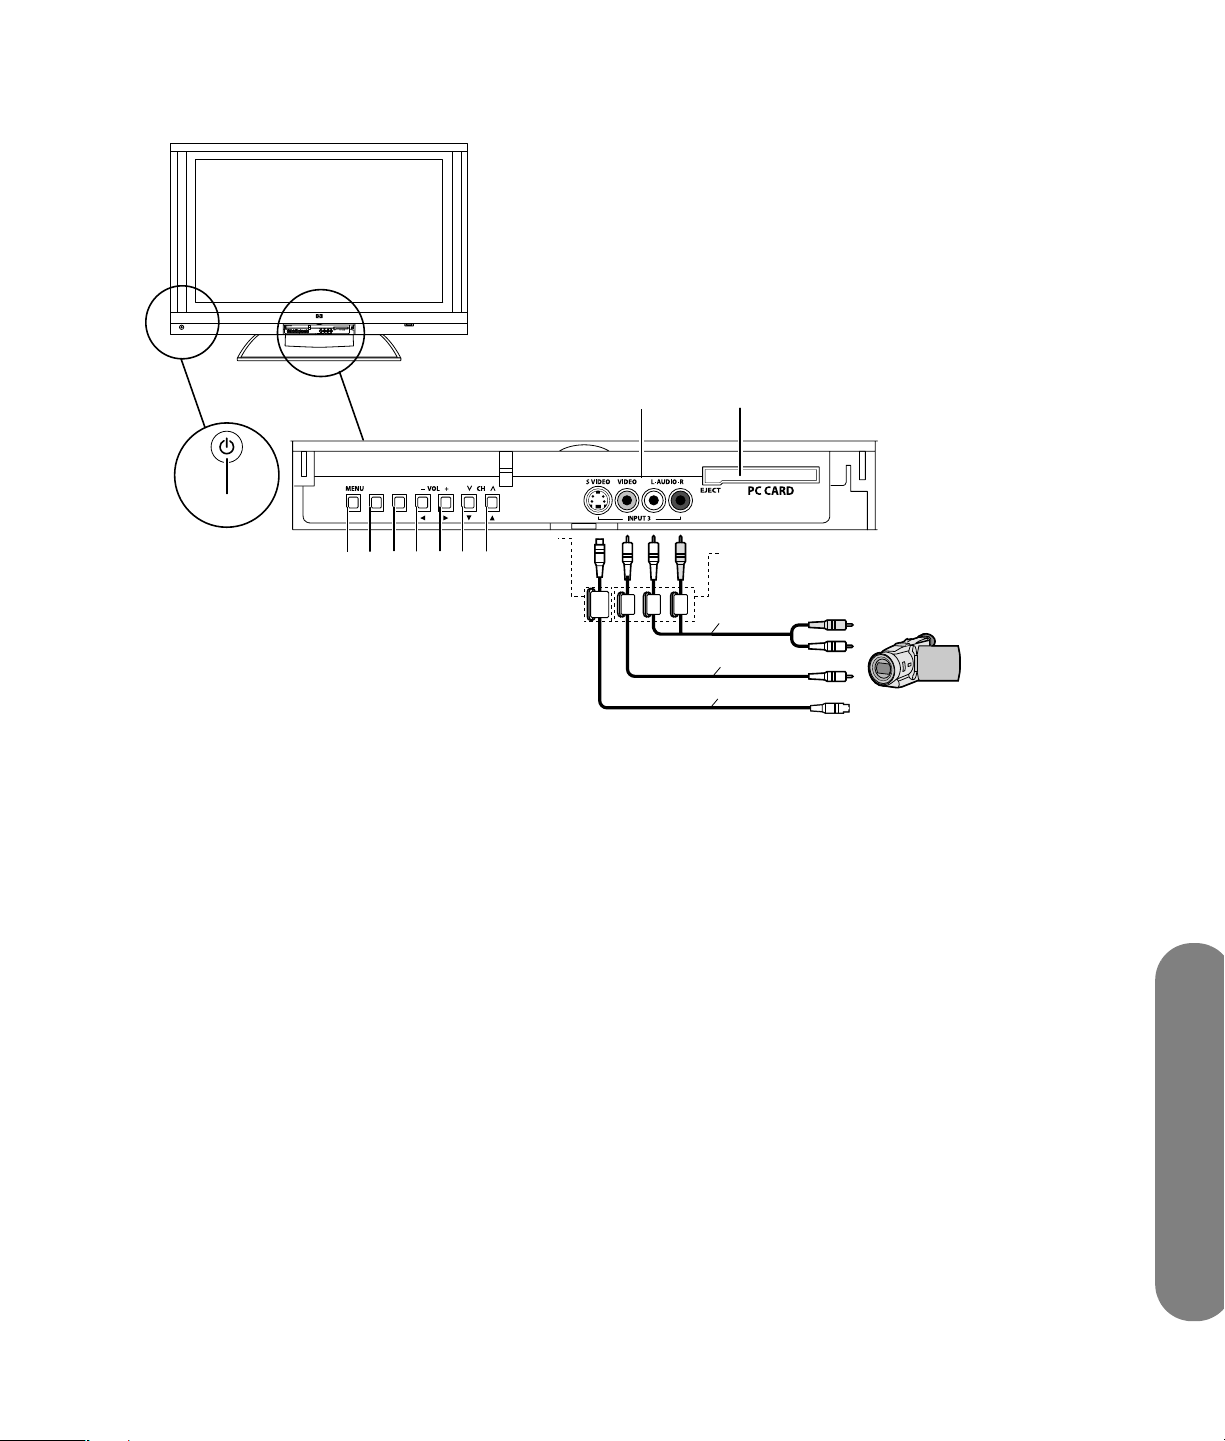
SOURCE
SEL
A
D E F GH
B C
A: Power button
Press to turn the TV main power on/off.
B: Menu button
Press to open the onscreen display (OSD) menu.
C: SEL button
Press to choose the current menu or option.
D: Source
Change the input source.
E: Volume down
Lower volume, or move left in menu.
F: Volume up
Increase volume, or move right in menu.
J
L
K
M
N
Q
O
P
H: Channel up
Increase channel, or move up in menu.
J: Video Input 3 connectors
Connect a camcorder or other device using either
S-video or Video; the audio connectors are shared.
K: PC Card slot
L: Large size ferrite core
M: Small size ferrite core (white)
N: Audio cable (with left and right plugs)
O: Video cable
P: S-video cable
Q: Camcorder or other source device
G: Channel down
Lower channel, or move down in menu.
Turning the TV On or Off
Turning the TV On or Off 19
Page 28
Using the Remote Control
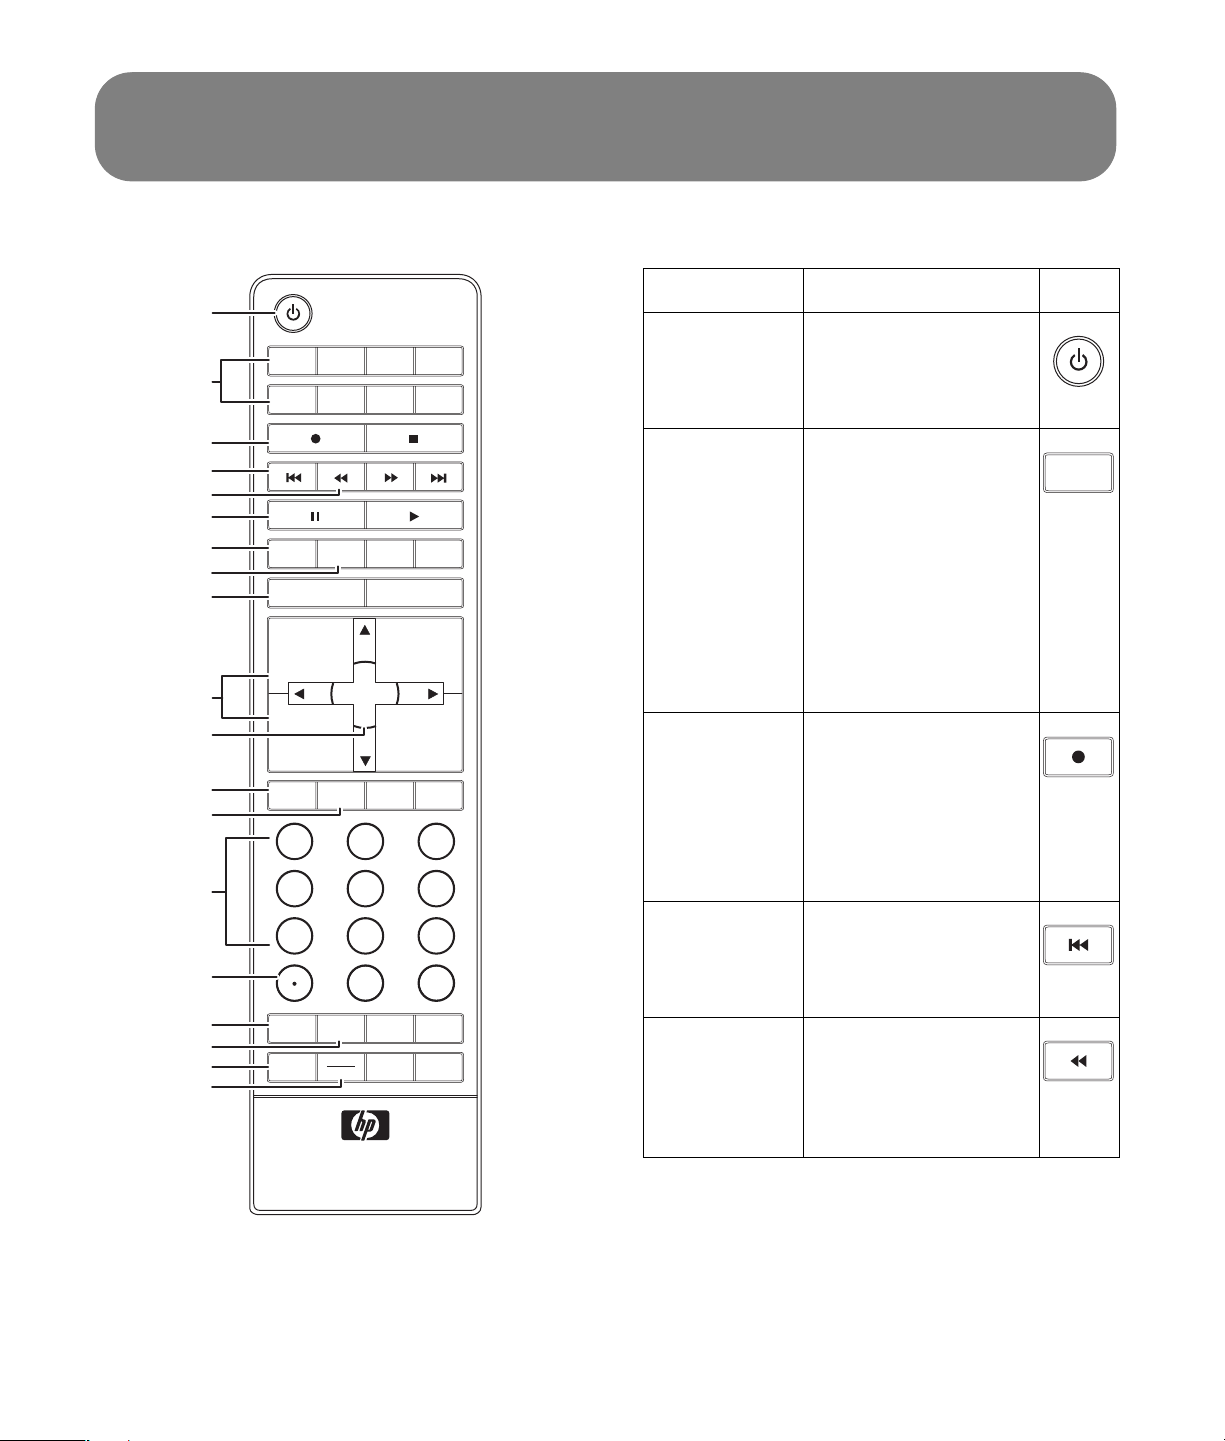
A
J
Name Description Icon
APower Press Power to turn on
TV DVD STB PVR
B
AUX VCR AUDIO
HP
or off the TV or the
selected home
entertainment device.
C
D
E
F
G
H
I
DAY
-
EXIT MENU
DAY +
RETURN
SOURCE
B TV, DVD,
STB, PVR,
AUX,
VCR,
Audio, or
HP
Press one of these
buttons once to select
a home entertainment
device to control. To
program the remote
control to operate with
a home entertainment
TV
device, see
VOL
+
SELECT
K
L
M
N
O
P
Q
R
S
VOL
-
INFOMUTE GUIDE FAV
1
45
7
SPLIT
SWAP
RECALL BBE
SAP
MTS
CH
+
PAGE+
PAGE
-
CH
-
23
6
8 9
PHOTO
LAST
ASPECT
SLEEP
0
“Programming the
remote control code”
on page 69.
CRecord Press Record to start
recording from the
selected recordable
home entertainment
device (VCR, DVD
recorder, HP MCPC, or
HP DEC).
DSkip
backward
Press Skip backward
to go back to the
beginning of the
current chapter (DVD).
ERewind Press Rewind to rewind
the selected home
entertainment device
(VCR, DVD, HP MCPC,
or HP DEC).
20 HP Pavilion Plasma HDTV User’s Guide
Page 29

Name Description Icon
Name Description Icon
FPause Press Pause to pause
the selected home
entertainment device
(VCR, DVD, HP MCPC,
or HP DEC).
GDay – Press Day – to go back
one day in the
program guide.
HDay + Press Day + to go
forward one day in the
program guide.
I Exit Press Exit to exit out of
the selected home
entertainment device’s
menu or submenu.
JVol Press + Vol (– Vol) to
raise (or lower) the
sound.
DAY
DAY +
EXIT
VOL
+
-
VOL
O . (Period) Press . (period) to enter
a period or dash for a
subchannel number of
a digital channel. For
example, channel
123.1 or 4–1.
-
PSplit Press Split to view two
input sources.
SPLIT
QSwap Press Swap to
exchange the two
SWAP
input sources.
RRecall Press Recall to display
or remove the channel
RECALL
Using the Remote Control
banner.
SSAP/MTS Press SAP/MTS to
select an available
SAP
MTS
secondary audio
program.
KSelect Press Select after
entering a channel
number.
Press Select to choose
the current menu
option.
LMute Press Mute to turn
sound off or on.
MInfo Press Info to view a
channel banner
containing information
on your current
program.
NKeypad Press the keypad
(0 – 9) to directly
select channels.
SELECT
MUTE
INFO
1
Using the Remote Control 21
Page 30

TV DVD STB PVR
AUX VCR AUDIO
DAY
-
EXIT MENU
VOL
+
VOL
-
1
RETURN
DAY +
SELECT
INFOMUTE GUIDE FAV
23
PAGE+
PAGE
HP
SOURCE
CH
-
CH
+
-
Name Description Icon
TStop Press Stop to stop the
selected home
entertainment device.
T
U
V
W
X
Y
Z
USkip
forward
VFast-
forward
Press Skip forward to
skip to the beginning
of the next chapter
(DVD).
Press Fast-forward to
fast-forward the
selected home
entertainment device
(VCR, DVD, HP MCPC,
or HP DEC).
AA
WPlay
Press Play to start
playing the selected
home entertainment
AB
AC
AD
XSource Press Source to display
device (VCR, DVD, HP
MCPC, or HP DEC).
all input sources.
SOURCE
45
SWAP
SAP
MTS
8 9
0
PHOTO
7
SPLIT
RECALL BBE
6
LAST
ASPECT
SLEEP
AE
AF
AG
AH
AI
Y Return Press Return to return
to the previous menu.
ZMenu Press Menu to open the
onscreen display
(OSD).
Press Menu again to
return to your display.
RETURN
MENU
22 HP Pavilion Plasma HDTV User’s Guide
Page 31

Name Description Icon
Name Description Icon
AA CH Press CH + (or CH –)
to select the next
higher (or lower)
channel.
Press CH+ (or CH –) to
page up or down in
the program guide.
AB Up/
down/
left/right
Press the arrow keys to
move the cursor in the
menu screens.
arrows
AC Fav Press Fav to display
channels you
programmed as your
favorites.
AD Guide Press Guide to display
the program guide of
your selected home
entertainment device.
CH
PAGE+
PAGE
-
CH
FAV
GUIDE
AE Last Press Last to recall the
+
previous channel you
were viewing.
LAST
-
AF Aspect Press Aspect to change
the dimensions of your
display. Your options
depend on what is
currently viewed.
AG Photo Press Photo to open the
photo viewer.
AH Sleep Press Sleep to set the
timer in this order: 30,
60, or 90 minutes.
AI BBE Press BBE to turn
TruSurround on
and off.
ASPECT
PHOTO
SLEEP
BBE
Using the Remote Control
Using the Remote Control 23
Page 32

Using the remote control with
HP MCPC and HP DEC PCs
The remote control is already programmed to work
with Media Center on HP MCPC and HP DEC PCs.
HP button Description Icon
Menu Press Menu to open
Media Center.
MENU
1 Press the HP button on the remote
control to select the HP MCPC or HP
DEC as the controlled device.
2 Point the remote control at the HP MCPC or HP
DEC remote control sensor and press the buttons
you want to use.
:
HP button Description Icon
Record Press Record to start
recording.
Stop Press Stop to stop the
recording or playback.
Skip
backward
Skip
forward
Rewind Press Rewind to rewind
Press Skip backward
to go back 30 seconds
in the program.
Press Skip forward to
go forward 30
seconds in the
program.
the program or song.
HP
Select Press Select to choose
the current menu
option.
Up/down/
left/right
arrows
Press the arrow keys to
move the cursor in the
menu screens.
Vol Press + Vol (– Vol) to
raise (or lower) the
sound.
Mute Press Mute to turn
sound off or on.
Info Press Info to view
information on your
current program.
Guide Press Guide to display
the program guide.
Keypad Press the keypad
(0 – 9) to directly
select channels.
SELECT
VOL
+
-
VOL
MUTE
INFO
GUIDE
1
Fastforward
Press Fast-forward to
fast-forward the
program or song.
Pause Press Pause to pause
the program or song.
Play
Press Play to view the
program or listen to the
song.
Exit
Press Exit to go back
one submenu.
24 HP Pavilion Plasma HDTV User’s Guide
EXIT
Page 33

Using the First Time Setup
Language
Language
Language
Language
The first time setup menu is displayed on screen when
the set is turned on for the first time. Follow the menus
and procedures for setting up the features.
You can also adjust the settings in the Setup menu
(see “Setup” on page 43).
Language
You may select the language to be used for the
Onscreen display.
SELECT
SELECT
SELECT
Press to select Language.
Press to display the Language screen.
Press to select English, Español, or Français.
Press to move the cursor to .
Press to go to the previous screen.
First time setup
Language
Clock
Auto program
English
English
Using the First Time Setup
Using the First Time Setup 25
Page 34

Clock
Press to select Clock.
SELECT
Press to display the clock adjust screen.
Mode
Press to select Mode.
SELECT
Press to select Manual or Auto.
Manual: Registers the time set by the user.
Auto: Updates the clock time by extracting time information from the
digital broadcast.
Date
Valid when Mode is set to manual.
Press to select Date.
SELECT
Press and release immediately to change the day; press and hold to
change the month.
First time setup
Language
Clock
Auto program
Clock
Mode
Date
Time
Time zone
DST
Clock
Mode
Date
Time
Time zone
DST
Manual
4 / 1 / 2005
9 : 43 AM
Manual
4 / 1 / 2005
9 : 43 AM
EST
On
EST
On
Time
Valid when Mode is set to manual.
Press to select Time.
SELECT
Press to adjust Time.
If the button is held, the speed of change increases.
26 HP Pavilion Plasma HDTV User’s Guide
Clock
Mode
Date
Time
Time zone
DST
Manual
4 / 1 / 2005
9 : 43 AM
EST
On
Page 35

Time zone
Valid when Mode is set to Auto.
Press to select Time zone.
SELECT
Press to select your zone.
AST EST CST MST PST AKST HST NST
Daylight saving
Valid when Mode is set to Auto.
Press to select DST (daylight saving).
SELECT
Press to select On or Off.
Clock
Mode
Date
Time
Time zone
DST
Clock
Mode
Date
Time
Time zone
DST
Manual
4 / 1 / 2005
9 : 43 AM
EST
On
Manual
4 / 1 / 2005
9 : 43 AM
EST
On
Using the First Time Setup 27
Using the First Time Setup
Page 36

Auto Program
Auto program is not available while the CableCard is
inserted.
You can scan all (analog and digital) channels. If
needed, follow the menus and procedures displayed on
screen for setting up the features.
You can also adjust the settings in Set up menu.
1
2
3
4
SELECT
SELECT
SELECT
Press to select Auto program.
Press to select Auto program.
Press to select ANT In.
Press to select Cable or Antenna.
Press to select Mode.
Press to select All or Analog.
First time setup
Language
Clock
Auto program
Auto program
ANT In
Mode
Start scan
Auto program
ANT In
Mode
Start scan
Cable
All
Cable
All
Press to select Start scan.
SELECT
Press to start.
Channels available for reception will be set automatically.
To make a channel available that has been located by auto scan, in the Manual
program mode, move the cursor to Apply, and press Select.
To exit the menu screen
Press
RETURN
28 HP Pavilion Plasma HDTV User’s Guide
Auto program
ANT In
Mode
Start scan
Now scanning analog channel ...
Progress
Cable
All
Page 37

Watching TV Programs
1 Press the TV button to operate the TV set with the
remote control.
TV
2 Press the Power button to turn on the TV.
3 Press the Channel button to select desired
channel.
CH
+
PAGE+
PAGE
-
CH
-
■ You can also use the direct program number
selection buttons.
4 Press the Volume button to select the desired
volume level.
VOL
+
-
VOL
n
The channel number and volume level
remain the same even after the TV is
turned off.
Power consumption can be reduced if the
volume level is lowered.
Aspect Controls
These let you choose the aspect depending on the
format of the received signal and your preference.
Press the Aspect button to change the aspect mode.
ASPECT
n
The available aspect modes depend on the
receiving signal.
■ For 480i, 480p (4:3), and 480p (16:9),
choose 4:3, Zoom, Full, or Just mode.
■ For 1080i and 720p, choose Full
mode only.
Watching TV Programs
Watching TV Programs 29
Page 38

Mode Picture Explanation
4:3 Displays a 4:3 picture at its standard 4:3 size with
4 : 3
4
gray side bars. (It may create an afterimage on screen
if displayed for a prolonged period of time.)
3
Zoom Expands a 4:3 picture uniformly (width and height) to
4
Zoom
16
full screen width and then repositions the picture
vertically. (Recommended for letterbox. This will show
3
Full Displays a picture at full screen size. (Recommended
Just Stretches the right and left edges of a 4:3 picture to fill
4
3
4
16
Full
16
Just
9
picture at full screen size.)
for anamorphic pictures.)
9
the screen, and the center of the screen has aspect
correction applied. The size of the picture depends on
3 9
the original signal. (Recommended for regular TV
viewing.)
30 HP Pavilion Plasma HDTV User’s Guide
Page 39

Viewing Split Screens
Press to display two screens.
Press the button (while the two screens are
displayed) to return to normal viewing.
SPLIT
Video12
Subpicture
Main picture
SPLIT
n
This TV has one tuner. When the main and
subwindows are both in TV mode, you see
the same channel in both windows.
The split screen shows the TV channel in the main
picture and a video input in the sub picture. Press the
Source button to change or select the input.
■ Audio is from the Main picture only.
■ Split cannot show the HDMI input or the PC input.
■ To reduce the occurrences of afterimages, in the
Other Adjust (Setup) menu set the Side Bar to
Bright. See “Side Bar” on page 53.
Watching TV Programs
Watching TV Programs 31
Page 40

Changing the viewing condition
Press to change the viewing mode.
ASPECT
Picture out of picture mode Picture and picture mode
2
Press to SWAP both pictures.
SWAP
Video1
Video12 Video1 2
ASPECT
Video12
32 HP Pavilion Plasma HDTV User’s Guide
Page 41

Using the Onscreen Navigation Menus
DAY --
DAY +
EXIT
VOL
+
SELECT
VOL
-
INFOMUTE GUIDE FAV
Press to return to previous menu.
RETURN
Press button to display the main menu.
MENU
RETURN
MENU
PAGE+
PAGE
SOURCE
CH
+
-
CH
-
Press to select.
Press to enter each
adjust screen.
For the main menu entries:
■ See “Picture” on page 34.
■ See “Audio” on page 39.
■ See “Timer” on page 41.
■ See “Lock” on page 56 to set the secret number
and parental controls.
■ See “Using the Photo Viewer” on page 63 to use
the memory card reader.
■ See “Setup” on page 43.
■ See “Language” on page 25.
■ See “Clock” on page 26.
■ See “Input labels” on page 49.
■ See “Program channel” on page 44 for automatic
or manual channel scan.
■ See “CC (closed caption)” on page 50.
■ See “Other Adjust (setup)” on page 52.
■ See “About” on page 54.
Using the Onscreen Navigation Menus
Using the Onscreen Navigation Menus 33
Page 42

Using the Menus
Picture
Press the Menu button to display the Main menu.
Press to select Picture.
SELECT
Press to enter submenu.
Picture 1/2
Default
Pic. mode
Picture
Brightness
Color
Tint
Sharpness
Picture 2/2
Color Temp
Color Mng.
A.L.A.
Zoom Adjust
PC Adjust
Other Adjust
Set
Standard
+30
0
0
0
+10
Cool
Off
Off
Default / Picture / Brightness / Color / Tint / Sharpness / Color Temp /
Color Mng. / A.L.A.
SELECT
Press to select the submenu.
Press to adjust the submenu.
Picture 1/2
Default
Pic. mode
Picture
Brightness
Color
Tint
Sharpness
Set
Standard
+30
+10
0
0
0
Picture 2/2
Color Temp
Color Mng.
A.L.A.
Zoom Adjust
PC Adjust
Other Adjust
Cool
Off
Off
34 HP Pavilion Plasma HDTV User’s Guide
Page 43

Picture Menu Function
Default Resets all picture adjustments to factory default settings.
Picture Adjusts white areas of picture.
Brightness Adjusts dark areas of picture.
Color Adjusts desired color intensity.
Tint Adjusts natural flesh tones.
Sharpness Adjusts clarity of outline detail.
Color Temp
(Temperature)
Color Mng.
(Color management)
A.L.A.
(Ambient Light
Adaptation)
Increases or decreases warm (red) and cool (blue) colors to suit personal preferences.
Setting this to On enables vivid color adjustment automatically.
Setting A.L.A. to on automatically senses the ambient light conditions and adjusts the
image brightness and gradation accordingly to optimize contrast.
Pic. Mode
Choose the preset picture mode that best suits the
program you are viewing. This feature also affects
Color Temp setting.
Press to select Pic. mode.
SELECT
■ Vivid (default): Provides enhanced picture
contrast and sharpness for viewing in a
well-lit room.
■ Standard: Recommended for normal viewing
conditions with subdued room lighting.
■ Cinema: For watching movies in a darkened
room. It provides a soft, film-like picture.
Press to select the picture mode.
n
Each mode has its own picture settings
(Picture, Brightness, Color, Tint, and
Sharpness).
A.L.A.
Choose Ambient Light Adaptation (A.L.A.) to optimize
contrast by sensing the ambient light conditions and
then automatically adjusting the image brightness and
gradation.
Using the Menus
Using the Menus 35
Page 44

Zoom Adjust
Adjust the Zoom position.
It works when Aspect mode is Zoom.
SELECT
SELECT
Other Adjust
SELECT
Press to select the
Zoom Adjust
menu.
Press to display the Zoom Adjust
screen.
Press to
Press to
adjust V-Position.
adjust Size
■ V-Position: Adjust the vertical
.
position.
■ Size: Adjust the vertical size.
Press to select
Press to display
Other Adjust.
other Adjust
menu.
Picture 1/2
Default
Pic. mode
Picture
Brightness
Color
Tint
Sharpness
Picture 1/2
Default
Pic. mode
Picture
Brightness
Color
Tint
Sharpness
Picture 2/2
0
0
0
Color Temp
Color Mng.
A.L.A.
Zoom Adjust
PC Adjust
Other Adjust
Set
Standard
+30
+10
n
To return to the default setting, press the
Select button.
Picture 2/2
Set
Standard
+30
+10
0
0
0
Color Temp
Color Mng.
A.L.A.
Zoom Adjust
PC Adjust
Other Adjust
Cool
Cool
Off
Off
Off
Off
Press to select the submenu.
SELECT
Press to
select or adjust the submenu.
36 HP Pavilion Plasma HDTV User’s Guide
Other Adjust
Video NR
3D Y/C Filter
Color Matrix
MPEG NR
Black Level
Off
Off
SD
Off
Dark
Page 45

Other Adjust Menu Explanations
Video NR Reduces noise, commonly called snow. Leave off when receiving a strong signal.
3D Y/C Filter Minimizes noise and cross-color in the picture.
Color Matrix Select SD or HD:
■ SD: When the input signal is a normal TV system (NTSC).
■ HD: When the input signal is a high-definition system (ATSC).
Displays 480p input signals in natural color from digital equipment adapters
connected to Component Video Input (Y, Pb, Pr) terminals.
Select HD or SD to adjust color parameters automatically for HD (high definition) or
SD (standard definition).
Notes:
■ This feature is available only with 480p signal and not available with regular
TV (NTSC) programming.
MPEG NR Reduces noise from DVD, STB, or other device.
Black Level Select Dark or Light.
Valid only for external input signals.
Using the Menus 37
Using the Menus
Page 46

PC Adjust
Press to select
PC Adjust
.
Press to display the PC Adjust
SELECT
screen.
During RGB / PC input signal.
PC Adjust 1/2
Default
Sync
Dot Clock
H-Position
V-Position
■ Sync Select H & V to have the H and V sync
On G
No
0
0
0
PC Adjust 2/2
Clock Phase
Input Resolution
VGA
signals input from the HD/VD connector. Select
On G to use a synchronized signal on the Video
G signal, which is input from the G connector.
■ Dot Clock Adjusts picture if it appears vertically
striped, flickers partially, or is blurred.
H-Pos Adjust the horizontal position.
SELECT
Picture 1/2
Default
Pic. mode
Picture
Brightness
Color
Tint
Sharpness
0
Picture 2/2
Set
Standard
+30
0
0
0
+10
Color Temp
Color Mng.
A.L.A.
Zoom Adjust
PC Adjust
Other Adjust
Clock Phase (RGB/PC in mode) Eliminate the
flickering and distortion.
■ Input Resolution Switches to wide display.
Input signal switched from VGA to WBGA. Input
signal switched from XGA to WXGA.
■ H-Frequency/V-Frequency (Displays the
frequencies of the PC signal currently being
adjusted)
Displays the H (Horizontal)/V (Vertical)
frequencies.
Display range: Horizontal15–110 kHz
48–120 H
H-Frequency
V-Frequency
48.6
60.3
kHz
Hz
Cool
Off
Off
V-Pos Adjust the vertical position.
SELECT
38 HP Pavilion Plasma HDTV User’s Guide
n
Adjustment details are memorized
separately for different input signal
formats. (Adjustments for component
signals are memorized for 525 (480) / 60i ·
60p, 625 (575) / 50i · 50p, 1125 (1080) /
60i · 50i · 24p · 25p · 30p · 24sF, 1250
(1080) / 50i, 750 (720) / 60p · 50p each,
and RGB/PC/DVI signals are memorized
for each frequency.)
Page 47

n
If a Cue or Rew signal from a VCR or DVD
player is received, the picture position
shifts up or down. This picture position
movement cannot be controlled by the
Picture Pos/Size function.
Audio
Press the Menu button to display the Main menu.
n
If adjusting the Picture V-Pos/V-Size in Auto
with Full mode, the adjustment is not
memorized. When exiting the mode, the
screen returns to the former adjustment.
Press to select Audio.
SELECT
Press to enter submenu.
Default / Bass / Treble / Balance
Press to select Default, Bass, Treble, or Balance.
SELECT
Press to adjust the submenu.
Audio
Default
Bass
Treble
Balance
Other Adjust
Audio
Default
Bass
Treble
Balance
Other Adjust
Set
+ 7
+ 7
0
Using the Menus
Set
+ 7
+ 7
0
0
Default: Reset Bass, Treble, and Balance adjustments
to factory default settings.
Bass: Increase or decrease the bass response.
Treble: Increase or decrease the treble response.
Balance: Emphasize the left/right speaker volume.
Using the Menus 39
Page 48

Other Adjust
1
Press to select Other Adjust.
SELECT
Press to display the submenu.
2
Press to select submenu.
SELECT
Press to select or adjust the submenu.
AI Sound: Equalize overall volume levels across all
channels. AI sound is not available in Video input
mode; see “Connecting the Video Input” on page 14.
n
AI Sound is Off when Speakers is set to Off.
Audio
Default
Bass
Treble
Balance
Other Adjust
Other Adjust
AI Sound
BBE VIVA 3D
BBE
Surround
Speakers
HDMI In
Audio Leveler
Set
+ 7
+ 7
0
0
On
On
On
Off
On
Auto
0
n
Surround is Off when Speakers is set to Off.
Speakers: This feature is used to turn TV speakers
On or Off; see “Connecting the Amplifier” on
page 15.
BBE VIVA 3D: Provides a musically accurate natural
3D image with hi-fi sounds. The clarity of the sound is
improved by BBE while the width, depth, and height of
the sound image are expanded by BBE's proprietary
3D sound processing. BBE VIVA 3D is compatible with
all TV programs including news, music, dramas,
movies, sports, and electronic games. BBE VIVA 3D
enhances the surround sound effect, while maintaining
the clarity of dialogue.
BBE: Sound technology enhances speech intelligibility
and restores the dynamic range of musical passages to
provide outstanding natural sound.
Surround: Enhances audio response when listening
to stereo.
■ On: For stereo audio.
■ Off: For monaural audio.
40 HP Pavilion Plasma HDTV User’s Guide
■ On: TV speakers operate normally.
■ Off: TV speakers off.
n
AI Sound, Surround, and Audio Leveler are
not available when Speakers is set to Off.
Page 49

HDMI In: Set this option when using HDMI; see
Timer
Sleep
“Connecting HDMI” on page 11. This feature lets you
switch between digital audio input (audio signal is
taken from the HDMI In connector) and analog audio
input (audio is taken from the HDMI R/L Audio In
connectors when using a DVI-HDMI adapter or cable).
Choose:
Audio Leveler: The audio leveler monitors the
difference in audio levels between input signals from
external equipment and minimizes the change in
output volume that can occur when switching input
signals.
■ Auto: automatically selects the audio signal.
■ Digital: selects Digital input only.
■ Analog: selects Analog input only.
Timer
Select Timer to turn the TV on and off at selected times
and on selected days. Press the Menu button to display
the Main menu.
Press to select
Press to enter the submenu.
SELECT
Timer
.
n
Audio Leveler is not available when the
items Speakers is set to Off.
Timer
Sleep
Timer 1
Timer 2
Timer 3
Timer 4
Timer 5
Using the Menus
Sleep timer
SELECT
SELECT
Press to select Sleep.
Press to enter the Sleep set screen.
Press to select off time (minutes).
Sleep
Sleep
60
0
30 60 90
Using the Menus 41
Page 50

Timer set
The clock must be set before On time/Off time settings
can be made.
Channel
1
2
Day
SELECT
Press to select Timer 1 – Timer 5.
SELECT
Press to enter the Timer adjust screen.
Press to select CH.
SELECT
Press to set CH.
Press to select Day.
Press to select appropriate day setting.
Timer
Sleep
Timer 1
Timer 2
Timer 3
Timer 1
CH
Day
On time
Off time
Set
Timer 1
CH
Day
On time
Off time
Set
310 - 1
EVR FRI
10:00 AM
11:00 AM
On
310 - 1
EVR FRI
10:00 AM
11:00 AM
On
Selectable day items: Sun, Mon, Tue, Wed, Thu,
Fri, Sat, Mon-Fri, Sat-Sun, Daily, Evr Sun, Evr Mon,
Evr Tue, Evr Wed, Evr Thu, Evr Fri, Evr Sat.
On time/Off time
Perform the following operations for both On time and
Off time.
Press to select On time / Off time.
SELECT
Press to select hour (AM or PM) and minutes of On time/
Off time.
42 HP Pavilion Plasma HDTV User’s Guide
Timer 1
CH
Day
On time
Off time
Set
310 - 1
EVR FRI
10:00 AM
11:00 AM
On
Page 51

Set
Press to select Set.
SELECT
Press to select On or Off.
n
The TV automatically turns off after 90
minutes when turned on by the timer. This
operation is canceled if the Off time is
selected or if a key is pressed.
To return to the previous screen
Press to return.
Setup
RETURN
Timer 1
CH
Day
On time
Off time
Set
310 - 1
EVR FRI
10:00 AM
11:00 AM
On
n
When the power to the TV set is disrupted
due to a power outage or similar problem,
the off-timer is deactivated, and the TV is in
standby mode even after power is
restored.
Press the Menu button to display the Main menu.
Press to select
Setup
.
Press to enter the submenu.
SELECT
Setup
CH list
Language
Clock
Program channel
Input labels
CC
Setup
Other adjust
About
Reset
Fav.
Using the Menus
Using the Menus 43
Page 52

CH list
SELECT
Language
SELECT
Clock
SELECT
Press to select CH list.
Press to select Fav. or All.
Press to select Language.
Press to display the Language screen.
Press to select Clock.
Press to display the Clock screen.
Setup
CH list
Language
Clock
Program channel
Input labels
CC
Setup
CH list
Language
Clock
Program channel
Input labels
CC
Setup
CH list
Language
Clock
Program channel
Input labels
CC
Fav.
Fav.
Fav.
Program channel
1
Press to select Program channel.
SELECT
44 HP Pavilion Plasma HDTV User’s Guide
Press to enter the Program channel menu.
Setup
CH list
Language
Clock
Program channel
Input labels
CC
Fav.
Page 53

2
Press to select submenus.
SELECT
Press to set enter submenu.
Auto and Signal meter cannot be selected while the
CableCard is inserted.
Auto program
Automatically scans all available channels.
Auto program is not available while the CableCard is
inserted.
1
Press to select ANT In.
SELECT
Press to select Cable or Antenna.
2
Program channel
Auto
Manual
Signal meter
Auto program
ANT In
Mode
Start scan
Cable
All
Press to select Mode.
SELECT
Press to select All or Analog.
All: Analog and digital
Analog: Analog only
3
Press to select Start scan.
SELECT
To make a channel available that has been located by
auto scan, in the Manual program mode, move the
cursor to Apply, and press Select.
Press to start.
After Auto program is complete, the unit returns to
Manual program mode.
Auto program
ANT In
Mode
Start scan
Auto program
ANT In
Mode
Start scan
Now scanning analog channel ...
Progress
Cable
All
Cable
All
Using the Menus 45
Using the Menus
Page 54

Manual program
To add or delete channels from channels list manually:
SELECT
Program edit
1
SELECT
2
Press to select Manual.
Press to enter the Manual program screen.
Press to select Edit.
Press to enter the Edit mode.
Program channel
Auto
Manual
Signal meter
CH
1
2
3
4
5
6
7
8
9
10
Caption Favorite Add
- - -
- - -
- - -
- - -
- - -
- - -
- - -
- - -
- - -
Edit
Apply
- - -
2
- - -
- - -
- - -
- - -
- - -
- - -
- - -
- - -
No
Yes
No
No
No
No
No
No
No
No
Press to select the desired preset channel line.
SELECT
3
Press to move cursor to Apply.
RETURN
Press to select edit area: Caption, Favorite, Add.
Press to enter the preset screen. Refer to next page for adjustment details.
4
SELECT
Press to enter your program.
46 HP Pavilion Plasma HDTV User’s Guide
Page 55

Edit (caption)
1
2
3
4
SELECT
SELECT
SELECT
Press to select Preset.
Press to select Broadcast station.
Press to select Caption detail.
Press to display the Caption input screen.
Press to move cursor to Caption.
Press to enter input field.
Caption select
Preset
Caption detail
Apply
----
5
SELECT
SELECT
Press to select the character to input/change.
Using the Menus
Press to move to the next character. You can repeat this for up to seven characters.
Press to enter your selection.
Press to move cursor to Apply.
Press to enter Caption.
Using the Menus 47
Page 56

Edit (favorite)
1
Press to select Favorite.
Press to select favorite number.
SELECT
2
Press the up arrow button to highlight Apply.
3
SELECT
Edit (Add)
To register/delete channels in Program channel:
SELECT
Press to enter Favorite and return to Edit screen.
Press to select Yes or No.
Favorite
Favorite
Apply
12
Signal meter
(For digital channels only)
Displays the signal strength of the ATSC digital channel
in antenna.
Signal meter is not available while the CableCard is
inserted.
1
Press to select Signal meter.
SELECT
Press to display Signal meter.
48 HP Pavilion Plasma HDTV User’s Guide
Program channel
Auto
Manual
Signal meter
Page 57

2
SELECT
Press to tune desired channel.
n
The signal meter works only for digital
signals input with the antenna.
Input labels
To label video input connections for onscreen display.
1
Press to select Input labels.
Press to select desired channel.
SELECT
Press to enter the submenu field.
Signal meter
CH
Signal strength
Current
Peak level
Setup
CH list
Language
Clock
Program channel
Input labels
CC
Fav.
2 - 1
85 %
85 %
Using the Menus
2
Press to select the Video input.
Press to select the input label.
SELECT
To skip the input, select Skip. The input is skipped
when you press the Source button on the remote
control or TV.
Selectable input labels: Skip, VCR, DVD, Cable,
DBS, PVR, Game, Aux.
Input labels
Comp. 1
Comp. 2
HDMI
Video 1
Video 2
Video 3
Input labels
PC
SKIP
SKIP
DVD
AUX
SKIP
SKIP
SKIP
Using the Menus 49
Page 58

CC (closed caption)
The television includes a built-in decoder that is
capable of providing a visual display of the audio
portion. The program viewed must provide closed
captioning (CC) for the television to display it.
CC mode
Press to select Mode.
SELECT
Press to select the setting.
Off: Recommended mode when closed captioning is not
being used.
On: To display closed captioning.
n
The closed captioning is not displayed
when you use HDMI connection and PC
inputs.
n
■ To control the closed caption of an analog
connected home entertainment device,
use the closed captions On/Off controls
for that home entertainment device.
■ The CC mode setting of the TV will not
affect the analog input.
■ If a digital program is being output in
analog format, the CC data will also be
output in analog format.
■ If digital connected equipment is used for
input, CC should be set to On on either
the connected equipment or the TV.
■ If CC is set to On on both the connected
equipment and the TV, captions from
each unit will overlap.
CC
Mode
Analog
Digital
Digital setting
CC reset
Primary
Off
CC1
50 HP Pavilion Plasma HDTV User’s Guide
Page 59

Analog
Choose the closed caption service of analog
broadcasting.
Press to select Analog.
SELECT
■ CC1: For video-related information that can be
Press to select the setting.
displayed (up to four lines of script on the screen,
where it does not disturb the relevant parts of the
picture). Script can be in any language.
■ CC2/CC3/CC4: Other modes used for video-
related information.
Digital
The Digital CC menu lets you configure the way you
choose to view the digital captioning.
Press to select Digital.
SELECT
Press to select the setting.
CC
Mode
Analog
Digital
Digital setting
CC reset
■ T1: Blanks out a large portion of the picture on
Off
CC1
Primary
the television screen and displays program guide
or any other information currently being
transmitted.
■ T2/T3/T4: Other modes that display information
and blank out a large portion of the picture of the
TV screen.
CC
Mode
Analog
Digital
Digital setting
CC reset
Off
CC1
Primary
Using the Menus
■ Settings: Primary, Second, Service 3, Service 4,
Service 5, Service 6.
Digital setting
Selecting digital broadcast service and viewing
formats.
1
Press to select Digital setting.
SELECT
Press to enter the Digital setting menu.
CC
Mode
Analog
Digital
Digital setting
CC reset
Primary
Off
CC1
Using the Menus 51
Page 60

2
Press to select the submenu.
Press to select the submenu.
SELECT
■ Size: Automatic, Normal, Small, Large
■ Font: Automatic, Default, Mono-serif, Prop-serif, Mono, Prop,
Casual, Cursive, Small caps
■ Style: Automatic, None, Raised, Depressed, Uniform, Drop
shadow
■ Foreground: The color of the font (Automatic, Black, White,
Red, Green, Blue, Yellow, Magenta, Cyan)
■ Fore Opacity: The opacity of the font (Automatic, Transparent,
Translucent, Solid, Flashing)
■ Background: The color of the text box (Automatic, Black,
White, Red, Green, Blue, Yellow, Magenta, Cyan)
■ Back Opacity: The opacity of the text box (Automatic,
Transparent, Translucent, Solid, Flashing)
■ Outline: The outline of the text (if selected under style)
(Automatic, Black, White, Red, Green, Blue, Yellow,
Magenta, Cyan)
Digital setting
Size
Automatic
Font
Automatic
Style
Automatic
Digital setting
Foreground
Automatic
Fore opacity
Automatic
Background
Automatic
Digital setting
Back opacity
Automatic
Outline
Automatic
CC reset
Reset the CC settings.
Press to select CC reset.
SELECT
Press to reset CC settings.
Other Adjust (setup)
Setup
CH list
Language
Clock
Program channel
Input labels
CC
Fav.
Setup
Other adjust
About
Reset
Other Adjust
Auto Power On
Side Bar
CC
Mode
Analog
Digital
Digital setting
CC reset
Primary
Off
CC1
Off
Off
52 HP Pavilion Plasma HDTV User’s Guide
Page 61

Auto Power On
Press to select Auto Power On.
SELECT
Press to select Set or Off.
Select Set to power the TV on at the same time as the
cable box or other connected components are
powered on.
n
The sleep timer and on/off timer will not
function if Auto Power On is set.
Side Bar
Do not display a picture in 4:3 mode for an extended
period, as this can cause an afterimage to remain on
either or both sides of the display field.
To reduce the risk of such an afterimage, change the
brightness of the side bars.
Other Adjust
Auto Power On
Side Bar
Off
Press to select Side bar.
SELECT
Side bar
4:3
Screen
display
Press to select Off, Dark, Mid, Bright.
afterimages
n
To reduce the occurrence of afterimages,
set the Side Bar to Bright.
Other Adjust
Auto Power On
Side Bar
Off
Bright
n
The side bar may flash (alternate black/
white) depending on the picture. Using
Cinema mode reduces such flashing, see
“Pic. Mode” on page 35.
Using the Menus
Using the Menus 53
Page 62

About
Display the TV set version, software license, and
CableCard information.
Press to select About.
SELECT
Press to display the About screen.
Press to select Version, License, or CableCard.
SELECT
Press to display Version, License, or CableCard.
CableCard
This menu is used to provide information when a
CableCard is inserted into the CableCard slot on the
back of the television. CableCard is not accessible
without inserting a CableCard into the CableCard slot.
To receive the features offered by your cable company,
you may have to subscribe to those services.
Setup
CH list
Language
Clock
Program channel
Input labels
CC
Fav.
Setup
Other adjust
About
Reset
About
Version
License
CableCARD
off
n
Contact your cable company regarding
availability of the CableCard. The
CableCard is needed to receive premium
digital services (where available) through
the cable input. You may also be able to
order call-ahead pay-per-view events.
54 HP Pavilion Plasma HDTV User’s Guide
Page 63

Reset
1
Press to select Reset.
Press to display the Password screen.
SELECT
2
Enter your password by pressing the number keys
on the remote control to reset the Setup settings.
Enter password.
----
The confirmation screen is displayed.
Setup
CH list
Language
Clock
Program channel
Input labels
CC
Setup
Other adjust
About
Reset
Fav.
3 Select Yes, and press Select.
n
Performing a Reset clears all items set with
Setup, such as channel settings. Use Reset
with care.
Using the Menus
Using the Menus 55
Page 64

Lock
1 Press the Menu button to display the Main menu.
Press to select Lock.
SELECT
2 Enter your password by pressing the number keys
Press to display the Input password screen.
on the remote control to reset the Setup settings.
Enter password.
----
Lock
Mode
Channel
Program
Change password
Off
3 Create a four-digit password to enter the Lock
menu.
5 After entering your password for the first time,
Create password changes to Enter password.
Create password.
----
n
Use a code that is easy to remember and
record it in a safe place.
4 Enter a four-digit password.
23
1
5
8 9
0
6
LAST
4
7
56 HP Pavilion Plasma HDTV User’s Guide
n
If you forget your secret code, the TV must
be serviced by a qualified technician to
clear the Lock setup.
Page 65

Lock mode
Select Lock mode to prevent viewing of video games,
VCR tapes, channels, and Video modes.
Press to select Mode.
SELECT
Press to select the setting.
Off: Turns off Lock set functions.
All: All channels are locked regardless of the rating level.
Game: Locks out CH 3, CH 4, and Video inputs.
CH: Locks out specific analog and digital channels. Password is required to
view any of the locked channels.
Channel (block channel selection)
Select up to seven (1–7) channels to be blocked out.
These channels are blocked out regardless of the
program rating.
1
Press to select Channel.
SELECT
Press to display the channel block screen.
Lock
Mode
Channel
Program
Change password
Lock
Mode
Channel
Program
Change password
Off
Off
Using the Menus
2
SELECT
Press to select CH 1 – CH 7.
Press to select the desired block channel.
Channel lock
CH 1
CH 2
CH 3
CH 4
CH 5
CH 6
CH 7
3 - 0
Using the Menus 57
Page 66

Blocking a program
This television incorporates V-Chip technology to block the viewing of movies and television programs according to the
rating category. There are four content advisory categories: MPAA (Motion Picture Association of America), U.S. TV
Program, Canadian English ratings, and Canadian French ratings. These categories are used as guidelines for
blocking programs.
The default mode for the Lock category is the Unlocked state.
1
Press to select Program.
Press to enter Program menu.
SELECT
2
Press to select MPAA, U.S. TV, C.E.L.R., or C.F.L.R.
Press to enter the block program.
SELECT
MPAA: for U.S. movie ratings
U.S.TV: for U.S. TV program ratings
C.E.L.R.: for Canadian English ratings
C.F.L.R.: for Canadian French ratings
3
Press to highlight the desired rating
level.
Lock
Mode
Channel
Program
Change password
Program lock
MPAA
U.S.TV
C.E.L.R.
C.F.L.R.
Monitor out
CH
On
SELECT
4
Press to select Monitor out.
SELECT
Press to select On or Off.
Monitor out: On turns on the monitor terminal output
for programs that have been set to Blocked.
Off turns off the monitor terminal output for programs
that have been set to Blocked.
58 HP Pavilion Plasma HDTV User’s Guide
n
The Off rating is independent of other
ratings.
n
When placing a block on a specific age
based rating level, the Off rating and any
other more restrictive ratings are blocked.
Page 67

U.S. movie ratings chart
NR No rating (Not Rated) and NA (Not Applicable) programs. Movie has not been rated or rating does
not apply.
G General audiences. All ages admitted.
PG Parental guidance suggested. Some material may not be suitable for children.
PG-13 Parents strongly cautioned. Some material may be inappropriate for children under 13.
R Restricted. Under 17 requires accompanying parent or adult guardian.
NC-17 No one 17 and under admitted.
X Adults only.
U.S. TV programs ratings chart
The TV parental guidelines have seven levels of agebased ratings that can be selected. These seven levels
are split into two age-based groups: youth age-based
ratings and guidance age-based ratings. Some of
.
AgeBased
Group
NR
(Not
AgeBased
Ratings
TV-NR
Possible
Content
Selections Description
■ Viewable
■ Blocked
rated)
Yout h TV-Y
TV-Y7
■ Viewable
■ Blocked
■ FV blocked
■ Viewable
■ Blocked
these age-based ratings can also have content based
ratings, denoted as D (dialog), L (language), S (sex),
and V (violence). The table below shows the agebased ratings selection.
Not rated. See CAUTION under “Canadian French ratings
chart” on page 61.
All children. The themes and elements in this program are
specifically designed for a very young audience, including
children from ages 2 to 6.
Directed to older children. Themes and elements in this
program may include mild physical or comedic violence, or
may frighten children under the age of 7.
Using the Menus
Using the Menus 59
Page 68

AgeBased
Group
AgeBased
Ratings
Possible
Content
Selections Description
Guidance TV-G
TV-PG
TV-14
TV-MA
■ Viewable
■ Blocked
■ D, L, S, V
(All selected)
■ Any combination
L, S, V
of D,
■ D, L, S, V
(All selected)
■ Any combination
L, S, V
of D,
■ L, S, V
(All selected)
■ Any combination
L, S, V
of
FV: Fantasy/cartoon violence
V: Violence
S: Sex
Canadian English Ratings Chart
General audience. It contains little or no violence, no strong
language, and little or no sexual dialogue or situations.
Parental guidance suggested. The program may contain
infrequent coarse language, limited violence, some
suggestive sexual dialogue and situations.
Parents strongly cautioned. This program may contain
sophisticated themes, sexual content, strong language, and
more intense violence.
Mature audiences only. This program may contain mature
themes, profane language, graphic violence, and explicit
sexual content.
L: Offensive language
D: Dialogue with sexual content
E Exempt programming includes: news, sports, documentaries, and other information programming, talk
shows, music videos, and variety programming.
C Programming intended for children under age 8. No offensive language, nudity, or sexual content.
C8+ Programming generally considered acceptable for children 8 years and over. No profanity, nudity, or
sexual content.
G General programming, suitable for all audiences.
PG Parental guidance suggested. Some material may not be suitable for children.
14+ Programming contains themes or content that may not be suitable for viewers under the age of 14.
Parents are strongly cautioned to exercise discretion in permitting viewing by pre-teens and
early teens.
18+ 18+ years old. Programming restricted to adults. Contains constant violence or scenes of extreme
violence.
60 HP Pavilion Plasma HDTV User’s Guide
Page 69

Canadian French ratings chart
E Exempt programming.
G Programming intended for audience of all ages. Contains no violence, or the violence content is
minimal or is depicted appropriately.
8 ans+ 8+ general, not recommended for young children. Programming intended for a broad audience but
contains light or occasional violence. Adult supervision recommended.
13 ans+ Programming may not be suitable for children under the age of 13. Contains either a few violent
scenes or one or more sufficiently violent scenes to affect them. Adult supervision strongly
suggested.
16 ans+ Programming may not be suitable for children under the age of 16. Contains frequent scenes of
violence or intense violence.
18 ans+ Programming restricted to adults. Contains constant violence or scenes of extreme violence.
c
CAUTION: The V-Chip system that is used in
this set is capable of blocking NR programs
(non rated, not applicable, and none) as
FCC Rules Section15.120(e)(2). If the option
of blocking NR programs is chosen,
unexpected and possibly confusing results
may occur, and you may not receive
emergency bulletins or any of the
following types of programming:
■ Emergency bulletins (such as EAS
messages, weather warnings, and
others)
■ Locally originated programming: news,
political, public service announcements,
religious, sports, weather
Blocking messages
Various blocking messages are displayed onscreen
depending upon the type of blocking you have
selected in the Lock menu.
n
Entering the password overrides the block
condition. However, the ratings selection is
retained.
Message Possible Cause
Game locked The Source button was
pressed when the Game Lock
had been selected.
Channel
locked
All locked Lock All is selected.
Program
locked
Tuned to the designated
channel when the Channel
Lock had been selected.
Tuned to CH 3 or CH 4 when
the Game Lock had been
selected.
Received program that
exceeds the Blocked Program
rating level.
Using the Menus
Using the Menus 61
Page 70

Change password
Lock
SELECT
Press to select Change password.
Press to enter the Input Password screen.
Mode
Channel
Program
Change password
Enter new password.
Enter new password,
again.
CH
----
----
62 HP Pavilion Plasma HDTV User’s Guide
Page 71

Using the Photo Viewer
Still image data (such as JPEGs) made with a digital
camera or digital video camera can be played back
using an SD card or PC Card.
Displayable image formats: Baseline JPEG 160 x
120 – 2560 x 1920 pixels (sub-sampling 4:4:4, 4:2:2,
or 4:2:0).
Displayable number of folders: Max 100
Inserting and Removing a Card
1 Press Menu to display the Main Menu screen.
Press to select Memory Card.
Press to display the photo viewer.
SELECT
2
Press to select SD Card or PC Card.
Press to enter the photo viewer.
SELECT
JPEG thumbnail
SD CARD
S
PC CARD
Total 8
Info
No. 102-0006
Date 01/01/2000
Pixel 2048x1536
SELECT
102-0002 102-0003
102-0001
102-0004 102-0005 102-0006
102-0007 102-0008
Using the Photo Viewer
Using the Photo Viewer 63
Page 72

SD card slot
y.
ace to
.
p
directio
of mark.
Inserting the card:
If the Eject button does not pop out
Label-side
upward
Insert card
until it clicks.
Removing the card:
Push the center
of the card.
PC Card slot
Turn off the TV before inserting or removing a
PC Card.
Inserting the card
Holding both
edges securely, insert
carefull
Push in the PC Card again, and then push the Eject
button again.
n
If PC Card adapter is used, remove it
together with the card.
w
WARNING: As with any small object, SD
cards can be swallowed by young children.
Do not allow children to handle the SD
card.
Terminal f
the depth
PC Card or adapter,
label-side u
Removing the card
1 Push the Eject button to pop out the button.
2 Push the Eject button again to eject the card.
64 HP Pavilion Plasma HDTV User’s Guide
Align the
c
n
CAUTION: Always insert card in the correct
direction. Failure to do so may result in
damage to the card and this unit.
The SD card is a precision device. Do not
subject a card to excessive pressure or
strong impacts.
Page 73

Compatible Card Type
l
and Card Size
SD card slot
■ SD card (1GB)
■ miniSD Card* (128MB)
* miniSD Card requires miniSD adapter.
PC card slot
■ SD card (1 GB)
■ miniSD Card (128 MB)
■ CompactFlash (1 GB)
■ SmartMedia (128 MB)
■ Memory Stick (128 MB)
■ xD Picture Card (128 MB)
■ Flash ATA (128 MB)
■ Memory Stick Pro (1 GB)
The cards require standard PC card adapter. (Some
PC card adapters may not be compatible.)
■ Always insert a card in the correct direction and
orientation. Failure to do so may result in damage
to the card and this unit.
■ Do not subject the card to excessive pressure or
strong impacts.
■ Electrical interference, electrostatic discharges,
and malfunctions of the unit or card may all result
in data loss or damage to the card.
■ Stored data should be periodically backed up as
a protection against data corruption, data loss, or
device malfunction.
n
Image Retention Protection: If still image
data is displayed for more than a few
minutes, the image retention prevention
function activates automatically and the
image disappears. Change the image or
change the input source to see an image.
JPEG Thumbnail
n
■ This function is not compatible with hard
disk type cards (Micro Drive, Mobile type
hard disk, etc).
■ Memory cards are not supplied with this
television.
■ When both an SD card and PC Card are
inserted in the slot, the SD card has the
priority.
Card data protection
■ Do not remove the card while the unit is
accessing the information. Such action may
corrupt the images, damage the memory card,
or the unit itself.
■ Before inserting or removing the PC card, make
sure that the TV is turned off. Otherwise, it may
damage the unit.
■ Do not touch the terminals on the back of the SD
card/PC Card.
The screen below is displayed automatically when a
card is inserted. If “Is memory card in?” appears,
check whether a card is inserted. If not, turn the unit
power off, correctly insert a card, then turn the unit
back on. Now, place unit into photo viewer mode.
number of JPEG images on the inserted card is displayed.
Tota
“Accessing” is displayed while data is read.
Index Area
JPEG images contained on the inserted card are
displayed for viewing.
JPEG thumbnail
Total 8
Info
No. 102-0006
Date 01/01/2000
Pixel 2048x1536
SELECT
Navigation Area
Operational buttons are displayed graphically.
Selected picture information is displayed.
No.: Image number or file name is displayed.
Date: Date of recording is displayed.
Pixel: Screen resolution is displayed.
102-0002 102-0003
102-0001
102-0004 102-0005 102-0006
102-0007 102-0008
Using the Photo Viewer
Using the Photo Viewer 65
Page 74

n
Depending on the JPEG type, Info contents
may not be displayed correctly.
n
File names are not displayed correctly if:
■ More than eight characters are used.
■ Spaces and special symbols are used.
Use care when changing file names.
n
■ Only JPEG files can be displayed.
■ Up to 9,999 JPEG files can be displayed.
■ If images have duplicate numbers, none
of the images will be displayed.
■ Depending on the JPEG type, it may not
be displayed normally.
Card warning messages
If there is a problem with the card or card data, the
following messages appear.
Message Description
Is memory
card in?
No file. The card may not contain image
A card may not be inserted, or the
card format may not be
supported. (Use SD cards
formatted in a digital camera.)
data, or all images on the card
may be incompatible.
Single play mode
Press to move cursor to desired file
in index area.
SELECT
Press to display file in full
screen size.
JPEG thumbnail
Total 8
Info
No. 102-0006
Date 01/01/2000
Pixel 2048x1536
SELECT
102-0002 102-0003
102-0001
102-0004 102-0005 102-0006
102-0007 102-0008
Navigation display
Pressing Recall while in single play mode displays or
removes the Navigation Area screen.
Index area operation
Press to select icon.
SELECT
Press to display full-size file preview.
66 HP Pavilion Plasma HDTV User’s Guide
SELECT
Navigation Area
Page 75

Changing an image:
Press to change displayed image.
SELECT
displayed.
Press : The next image is
displayed.
Rotating an image:
Press : The previous image is
Press to rotate the image 90° at
atime.
SELECT
Press : Each press right rotates
image 90°.
Press : Each press left rotates
image 90°.
n
Rotation settings are not written to the
file and are canceled when photo viewer
is exited.
Picture adjustment
Press with single play mode displayed to
RETURN
return to the JPEG thumbnail mode.
Slide show mode
1
Press during Single Play Mode.
SELECT
2
Press to select each item.
SELECT
Press to set each item.
Single setting menu
When menu is pressed, the Picture adjust menu is
displayed.
Picture Adjustment
Picture 1/2
Default
Pic. mode
Picture
Brightness
Color
Tint
Sharpness
Standard
Set
+30
0
0
0
+10
Press Return to exit the Picture menu.
Exiting single play mode
Pressing return during single play mode allows you to
exit the mode.
Single setting
Mode
Disp. time
Repeat
Single
1
Off
Setting Description
Mode Set to Single/Slide to view single
images or perform a slide show.
Disp. Time You can set how many seconds each
image is displayed in Slide mode.
Repeat Turn the slide show Repeat function
on or off.
Using the Photo Viewer 67
Using the Photo Viewer
Page 76

3 Press to start slide show.
RETURN
Example:
Example:
If the card file hierarchy is displayed on the PC as
shown below.
If the display mode is set to Slide, Disp. time is set
to 5 seconds, and Repeat is Off.
Displayed
5 seconds
5 seconds
StopDisplayed
4 Press Select during a slide show to stop it. The
submenu is displayed.
Navigation display
Pressing Recall during slide show mode allows you to
display or remove the Navigation Area.
SELECT
Navigation Area
ROOT
DCIM
100_HPXX
P1000001.jpg
P1000002.jpg
P1000003.jpg
P1000004.jpg
101_HPXX
P1010001.jpg
P1010002.jpg
P1010003.jpg
P1010004.jpg
DCIM folder
The digital camera creates this folder automatically.
100_HPXX folder
Folder names consist of a three-digit folder number
followed by five arbitrary characters. Digital camera
images are stored within these folders.
JPEG files in the 100_HPXX folder are displayed when
a card, which is structured as shown, is inserted.
Exit slide show mode
Pressing Return during slide show mode allows you to
exit the mode.
Press with slide show mode displayed to
RETURN
return to the Card Menu Screen.
Folders and files
Digital cameras that are compliant with DCF
specifications use folders with a specific structure. The
following diagram shows an example of the folder
structure.
68 HP Pavilion Plasma HDTV User’s Guide
n
The folder name may vary according to the
digital camera being used.
n
When a directory or file is created, only the
characters A-Z, a-z, 0-9, and _ are used.
Two-byte characters or other special codes
are not used.
P1000001.JPG: DCF file
File names consist of four arbitrary characters followed
by a four-digit file number. DCF files are image files
(normally JPEG files) that have been taken by a digital
camera.
Page 77

Operating Peripheral Equipment
Programming the remote
control code
Your HP remote control is programmable. You can
program the remote control to operate other home
entertainment devices such as your VCR, DVD player,
audio receiver, or set-top box. Manufacturer codes for
compatible brands are listed at the end of this chapter.
If the brand of your device is not listed, see “Searching
for the device code” on page 69.
Programming the device code
The following steps describe how to program a device
button if your brand is listed.
1 Turn on the TV. Turn on the device you would like
to program.
n
Read steps 2 through 4 completely before
proceeding. Highlight or write down the
codes and device you wish to program
before performing step 2.
n
If the device button did not blink twice,
repeat steps 2 through 4, entering either
the same code or the next code if provided.
5 Aim the remote control at the device, and press
the Power button once. The device should turn off.
If it does not respond, repeat steps 2 through 4,
trying each code for your brand until you find one
that works. If it still does not work, try searching
for the code; see “Searching for the device code”
on page 69.
n
If the device does not have a Power button,
press Play.
6 Repeat steps 1 through 5 for each device you
want to control with the remote control.
Searching for the device code
Operating Peripheral Equipment
2 Hold down a device button on the remote control
for 5 seconds until the device button blinks, and
then release the device button. The device button
blinks one more time and then remains lit.
3 Locate the brand of your device and manufacturer
codes (see the listing that follows).
4 Enter the first four-digit code. If the code is
accepted, the device button flashes twice. If the
code is not accepted, the device button flashes
three times.
If your device does not respond to the remote control
after trying all codes listed for your brand, or if your
brand is not listed at all, try searching for your code.
1 Turn on your home entertainment device.
2 Hold down a device button on the remote control
for 5 seconds until the device button blinks, and
then release the device button. The device button
blinks one more time and then remains lit.
3 Enter 1, 1, 1, 1, and the device button blinks once
and then remains lit.
Operating Peripheral Equipment 69
Page 78

4 Press and release the Power button once on the
remote control. Wait until the device button stops
blinking. Continue to press and release the Power
button, waiting each time for the device button to
stop blinking, until the home entertainment device
turns off.
n
Each time you press the Power button it
tries a different code. Be sure to wait until
the device button stops blinking before
pressing the Power button again. You may
need to press the Power button several
times before the correct code is found.
Manufacturer codes
The following charts include manufacturer codes for
these home entertainment devices:
5 Once the home entertainment device turns off,
press the Select button on the remote control to
save the code.
■ DVD/VCR combo
■ Home Theater In a Box
■ VCR
■ DVD
■ Cable Box
■ Satellite box
■ Satellite Receiver/Recorder
■ Amplifier
■ Audio cassette
■ Audio system
■ Phono
■ Receiver/tuner
■ PVR
DVD/VCR combo manufacturer codes
Brand Code Brand Code Brand Code
GoVideo 0026, 0028,
0068, 0070
Hitachi 0025, 0067 Samsung 0031, 0017 Zenith 0027, 0069
JVC 0000, 0010 Sanyo 0022, 0063
Home Theater in a Box manufacturer codes
Brand Code Brand Code
Bose 0010, 0071 Philips 0022
Onkyo 0086 Toshiba 0025
70 HP Pavilion Plasma HDTV User’s Guide
Page 79

VCR manufacturer codes
Brand Code Brand Code Brand Code
Admiral 0073, 0074, 0101 Daytron 0067, 0083, 0102 JC Penney 0046, 0047, 0048,
Aiko 0056 Denon 0088 Jensen 0057, 0058, 0068
Aiwa 0055 Dimensia 0043, 0112 JVC 0000, 0019, 0046,
Akai 0044, 0045, 0068,
Audiovox 0051 Emerson 0044, 0049, 0051, 0052,
Bell &
Howell
Broksonic 0023, 0049 Fuji 0045, 0053 LG 0051
Calix 0051 Funai 0055, 0095 Lloyds 0077, 0095, 0105
Canon 0053, 0054 Garrard 0055 Logik 0059, 0085
Capehart 0067, 0083 GE 0040, 0043, 0050, 0053,
Carver 0060, 0110 GoVideo 0021, 0024, 0026, 0028,
CCE 0056, 0059 Goldstar 0046, 0051, 0079, 0090,
Citizen 0050, 0051, 0052,
ColorTyme 0046, 0096 Harman
Craig 0050, 0051, 0059,
Curtis
Mathes
Daewoo 0052, 0055, 0056,
0069, 0080, 0093
0048 Fisher 0048, 0089, 0105 Kodak 0051, 0053
0056, 0095
0085, 0090, 0105
0043, 0046, 0050,
0053, 0054, 0077,
0079, 0112
0067, 0083, 0102
Electrohome 0051, 0090 Kenwood 0046, 0047, 0048,
0053, 0055, 0061, 0069,
0087, 0090, 0106
0054, 0070, 0079, 0112
0034, 0079, 0081, 0085,
0086
0092
Gradiente 0055, 0090 Marantz 0046, 0047, 0048,
Kardon
Harwood 0059 Memorex 0033, 0048, 0050,
Hitachi 0025, 0036, 0037, 0057,
JBL 0098 MGN 0079
0046, 0110 Matsushita 0053
0058, 0065, 0068, 0070,
0088
KLH 0059
LXI 0051
Magnasonic 0085, 0090, 0102
Magnavox 0008, 0053, 0054,
MGA 0061, 0069
0049, 0050, 0051,
0053, 0054, 0057,
0058, 0059, 0060,
0065, 0079, 0085,
0088, 0090
0047, 0048, 0068,
0071, 0087, 0088
0068, 0071, 0077
0060, 0064, 0085, 0110
0053, 0060, 0077,
0092, 0110
0051, 0053, 0055,
0064, 0073, 0074,
0088, 0090, 0091,
0097, 0105
Operating Peripheral Equipment
Operating Peripheral Equipment 71
Page 80

VCR manufacturer codes (Continued)
Brand Code Brand Code Brand Code
Minolta 0057, 0058, 0065,
Mitsubishi 0003, 0005, 0006,
Montgomery
War d
Motorola 0053, 0073, 0074 Proton 0085 Signature 2000 0097, 0101
MTC 0050, 0085 Quasar 0053, 0054 Singer 0053, 0059, 0072,
Multitech 0050, 0055, 0059 Radio Shack 0051, 0062, 0074, 0090 Sony 0007, 0045, 0063,
NEC 0046, 0047, 0048,
Nikko 0051 Radix 0051 Sylvania 0030, 0032, 0053,
Noblex 0050 RCA 0012, 0016, 0043, 0044,
Olympus 0053 Realistic 0048, 0050, 0051, 0052,
Optimus 0051, 0073, 0074,
Optonica 0062 Runco 0064 Tatung 0068
Orion 0087, 0090, 0106 Samsung 0029, 0031, 0035, 0039,
Panasonic 002, 004, 009,
Pentax 0057, 0058, 0065,
Philco 0053, 0054, 0060,
Philips 0017, 0018, 0053,
0088
0057, 0058, 0061,
0069, 0071, 0090
0073, 0074 Proscan 0043, 0112 Signature 0073, 0074
0068, 0071, 0077,
0092
0090, 0094
020, 053, 054,
066, 085, 105
0070, 0077, 0088
0088, 0106
0060, 0062, 0110
Pioneer 0047, 0057, 0071, 0075,
Portland 0067, 0083 Shintom 0045, 0058, 0059, 0085
Radio Shack/
Realistic
Ricoh 0072, 0076 Tashiko 0051
Sansui 0047, 0068, 0071, 0085 Technics 0053, 0066
Sanyo 0022, 0048, 0050, 0089,
Scott 0049, 0052, 0061, 0090 Toshiba 0010, 0011, 0052,
Sears 0048, 0051, 0053, 0057,
0078, 0104
0048, 0050, 0051, 0053,
0054, 0055, 0062, 0073
0050, 0053, 0057, 0058,
0065, 0070, 0078, 0079,
0088, 0107, 0108, 0112
0053, 0054, 0055, 0062,
0073, 0074, 0079, 0090,
0094, 0097, 0105
050, 052, 079, 095
0097, 0105
0058, 0065, 0077, 0088,
0089, 0090, 0097, 0105
Sharp 0014, 0015, 0062,
STS 0053, 0065
Symphonic 0055, 0077, 0095, 0105
Tandy 0048
Teac 0055, 0068, 0107
Teknika 0051, 0053, 0055, 0090
Totevision 0050, 0051, 0090
0073, 0074, 0091,
0094, 0101
0076, 0085
0080, 0082, 0084,
0098, 0099
0054, 0055, 0060,
0061, 0110
0057, 0061, 0069,
0100, 0102, 0105, 0109
72 HP Pavilion Plasma HDTV User’s Guide
Page 81

VCR manufacturer codes (Continued)
Brand Code Brand Code Brand Code
Unitec 0095 Video
Unitech 0050 Wards 0050, 0051, 0052, 0053,
Vec tor
Research
0046, 0047, 0052,
0077
Concepts
White
Westinghouse
DVD manufacturer codes
Brand Code Brand Code Brand Code
Aiwa 0073 Hitachi 0065, 0067 Pioneer 0027, 0032
0046, 0047, 0052, 0069,
0077
0055, 0057, 0058, 0059,
0062, 0065, 0073, 0074,
0079, 0090, 0091, 0094,
0105, 0108, 0110
0095 Zenith 0027, 0038, 0045,
XR-1000 0053, 0055, 0059
Yamaha 0046, 0047, 0048,
0068, 0077
0064, 0072, 0076, 0093
Apex 0000, 0001,
Irradio 0092 Proscan 0005, 0099
0003, 0004,
0016, 0028,
0029, 0030
Audiovox 0074 JVC 0007, 0010,
Qwestar 0057
0011, 0012,
0013
Blaupunkt 0078 Kenwood 0097, 0100 RCA 0005, 0024, 0038
Bose 0062, 0071 Koss 0093 Sampo 0058
Broksonic 0045 Magnavox 0020, 0035 Samsung 0006, 0017, 0033,
0041
Clarion 0046 Marantz 0085 Sansui 0060
Classic 0047 Memorex 0087 Sanyo 0059, 0063
Daewoo 0079, 0080 Mintek 0053 Sharp 0014, 0031
Denon 0075, 0095,
0096
Mitsubishi 0088, 0089,
0090, 0091
Sherwood 0061
Emerson 0048, 0049 NAD 0048, 0081 Sony 0015, 0018, 0034,
0039
Fisher 0050, 0076 Nakamichi 0054 Sylvania 0049, 0072, 0077
Funai 0049, 0064 Norcent 0055, 0056 Techwood 0083
GE 0005, 0051,
0102
Onkyo 0082, 0086 Toshiba 0019, 0026, 0040,
0042
Operating Peripheral Equipment
GoVideo 0068, 0070 Oritron 0057 Yamaha 0084, 0098
GPX 0052 Panasonic 0008, 0036,
Zenith 0069, 0094
0037
Harman
Kardon
0066 Philips 0002, 0009,
0021, 0022,
0023, 0043
Operating Peripheral Equipment 73
Page 82

Miscellaneous video manufacturer codes
Type Brand Code Type Brand Code
DVR Philips 0042 PVR TiVo 0111
Digital network recorder Sony 0041
Cable box manufacturer codes
Brand Code Brand Code Brand Code
ABC 0000, 0001,
0002, 0030
Archer 0006, 0007 Movie Time 0039 Signature 0000
Cableview 0003 NEC 0033 Sprucer 0029
Contec 0034 NSC 0039 Standard
Eastern 0035 Oak 0034, 0041 Starcom 0012, 0030
GE 0000 Panasonic 0027, 0029 Stargate 0012
Gemini 0012, 0013 Philips 0008, 0009, 0010,
General
Instruments
Hamlin 0036, 0037,
Hitachi 0000 RCA 0003, 0029, 0032 Viewstar 0017, 0034,
Jerrold 0000, 0012,
0000, 0032 Pioneer 0021, 0022 United Cable 0030
0038, 0040,
0044
0015, 0016,
0026, 0030,
0032
Motorola 0031 Scientific
Atlanta
Component
Tocom 0001, 0015
0011, 0013, 0017,
0018, 0019, 0020
Proscan 0000 Universal 0004, 0006,
Realistic 0006 Zenith 0028
0002, 0023,
0024, 0025
0042, 0043
0007
0039
Magnavox 0017 Samsung 0022
74 HP Pavilion Plasma HDTV User’s Guide
Page 83

Satellite box manufacturer codes
Brand Code Brand Code Brand Code
Alphastar 0073 Hughes 0068 Samsung 0051, 0073
Chaparral 0069 Janeil 0067 Sony 0052, 0079
DirecTV 0046 JVC 0060 Star Choice 0076
Drake 0072 Mitsubishi 0047 Star Trak 0066
Echostar 0071 Panasonic 0050, 0056 STS 0065
Express Vu 0075 Philips 0045 Toshiba 0053, 0074
Fujitsu 0067 Proscan 0077, 0078 Uniden 0061, 0062
GE 0049, 0077,
0078
General Instruments 0063, 0064 RCA 0077, 0078
Hitachi 0068 Realistic 0059
Radio Shack 0063, 0064 Zenith 0054, 0067
Satellite receiver/recorder codes
Brand Code Brand Code
Philips 0057 Sony 0080
RCA 0055 Zenith 0058
Amplifier manufacturer codes
Brand Code Brand Code
Kenwood 0048 Pioneer 0041
Yamaha 0001, 0053 RCA 0069
Operating Peripheral Equipment
Operating Peripheral Equipment 75
Page 84

Audio cassette manufacturer codes
Brand Code Brand Code Brand Code
Aiwa 0039 Onkyo 0055 RCA 0070
Curtis Mathes 0041 Optimus 0041, 0047 Sansui 0057
Denon 0052 Panasonic 0015, 0050 Sanyo 0044
Fisher 0042, 0049 Philips 0013 Sherwood 0047
GE 0070 Pioneer 0018, 0041,
0045
Kenwood 0048, 0056 Proscan 0070 Technics 0050
NAD 0040 Quasar 0050 Yamaha 0053
Nakamichi 0054 Radio Shack 0047
Sony 0043
Audio system manufacturer codes
Brand Code Brand Code Brand Code
Aiwa 0039 Nakamichi 0054 Scientific Atlanta 0067
Carver 0051 Panasonic 0015, 0016 Sony 0043
Curtis Mathes 0041 Philips 0013, 0014 Starcom 0066
Denon 0052 Pioneer 0018, 0041 Technics 0050
Harman Kardon 0046 RCA & Dimensia 0031, 0032,
Jerrold 0066,
0068
Kenwood 0048,
0056
Sansui 0057
Sanyo 0044
0033, 0034,
0035
Yamaha 0053
Miscellaneous audio manufacturer codes
Type Brand Code Type Brand Code
Digital audio tape Sony 0043 Receiver/amplifier Yamaha 0001
Tuner Philips 0022 TV/VCR/tuner combo Panasonic 0012
Phono manufacturer codes
Brand Code Brand Code
Kenwood 0048 Sony 0043
Pioneer 0041 Yamaha 0053
76 HP Pavilion Plasma HDTV User’s Guide
Page 85

Receiver/tuner manufacturer codes
Brand Code Brand Code Brand Code
Aiwa 0017, 0036,
0039
Bose 0010 Marantz 0019 RCA 0071, 0072
Carver 0051 McIntosh 0058 Sansui 0057
Curtis Mathes 0041 NAD 0040 Sanyo 0042, 0044
Denon 0006, 0026,
0027, 0052
Fisher 0042, 0044,
0049
Gradiente 0062 Nikko 0063 Sony 0000, 0024, 0043
Harman Kardon 0008, 0038,
0046
Hitachi 0059 Optimus 0041, 0047 Toshiba 0025
JBL 0038 Panasonic 0009, 0012, 0016,
Jensen 0061 Philips 0014 Zenith 0065
JVC 0007, 0030 Pioneer 0004, 0023, 0041,
Kenwood 0005, 0028,
0048, 0056
Luxman 0064 Radio Shack 0047
Nakamichi 0054 Sharp 0060
NEC 0040 Sherwood 0047
Onkyo 0003, 0021, 0055 Technics 0002, 0020, 0050
Yamaha 0048, 0053
0029, 0050
0045
Quasar 0050
Operating Peripheral Equipment
PVR manufacturer codes
Brand Code Brand Code
Philips 0001, 0004 TiVo 0002
Sony 0000, 0005 Zenith 0003
Operating Peripheral Equipment 77
Page 86

Mode Operational Key Chart
This chart defines which keys are operational after
programming (if needed), while in the selected remote
control mode: DTV, CABLE, VCR, DVD, and so on.
Key Name DTV Mode Cable Mode
Power Power
Navigation Up/Down Cable Channel Up/Down
OK –
SELECT
Navigation Right/Left –
DTV Menu –
MENU
Program Info –
RECALL
1
4
7
EXIT
23
6
5
8 9
LAST
0
Exit Electronic Program Guide –
Select Channel Select Channel
Info Electronic Program Guide –
78 HP Pavilion Plasma HDTV User’s Guide
Page 87

KEY
NAME
VCR
Mode
DVD/CD Mode AUX Mode
RCVR
Mode(DVD) (CD) (PVR) (VCR2) (Tape)
Power Power Power Power Power Power Power
SOURCE
1
4
7
MUTE
SELECT
MENU
RECALL
EXIT
23
5
8 9
0
TV Mute TV Mute RCVR Mute TV Mute RCVR Mute RCVR Mute RCVR Mute
TV Input SW – – – TV Input SW – RCVR Input
– Navigation
Up/Down
Volume –/+ Navigation
Right/Left
Next/
Previous
Track
RCVR Volume
–/+
Navigation
Up/Down
Navigation
Right/Left
––Tuner +/–
Volume –/+ Volume –/+ RCVR
SW
Volume –/+
–––––––
–– – PVR MENU– – –
Onscreen
VCR Display
DVD Display Time Format – Onscreen VCR
Display
––
–– – Exit PVR Menu– – –
– 1.... AV1
6
LAST
2.... AV2
3.... AV3
4.... AV4
5.... CD
6.... Tuner
7.... Phono
8.... Tape
9.... AUX
Select Channel – – 1.... AV1
2.... AV2
3.... AV3
4.... AV4
5.... CD
6.... Tuner
7.... Phono
8.... Tape
9.... AUX
Operating Peripheral Equipment
PAGE+
PAGE
CH
CH
VCR
Rew/FF
Skip Search
Rew/FF
Search
Rew/FF
– VCR Rew/FF Tape Rew/FF Surround +/–
Play Play Play Play Play Play –
Pau se Still/Pause Pa use Pause Paus e Pause –
Stop Stop Stop – Stop Stop –
VCR Record – – PVR Record VCR Record Tape Record –
+
-
VCR
Channel
Up/Down
– – PVR Channel Up/
Down
VCR Channel
Up/Down
–Rcvr
Center +/–
-
Operating Peripheral Equipment 79
Page 88

Video/Component/HDMI Input Signals
AUDIO
IN
VIDEO
PC
AUDIO
HDMI input
AV IN
Y
Y
Y
PB
PB
PR
PR
L
R
12
INPUT
COMPONENT
input
INPUT 2 INPUT 1
VIDEO
input
R L
AUDIO IN
S VIDEO
VIDEO
TO AUDIO AMP
PROGOUTCOMPONENT VIDEO
Video input
Signal
Name
Horizontal
Frequency
(kHz)
1 NTSC 15.73 59.94/60
Vertical
Frequency
(Hz)
PC RGB
input
Applicable input signals (*)
Horizontal
Signal Name
Frequency (kHz)
1 525 (480) /60i 15.73 59.94/60 Yes Yes No
Vertical
Frequency (Hz) Component HDMI PC
2 525 (480) /60p 31.47 59.94/60 Yes Yes No
3 750 (720) /60p 45.00 59.94/60 Yes Yes No
4 1125 (1080) /60i 33.75 59.94/60 Yes Yes No
5 640 x 400 /70 31.47 70.08 No No Yes
6 640 x 680 /60 31.47 59.94 No No Yes
n
Signals without these horizontal and
vertical frequencies may not be displayed
properly.
80 HP Pavilion Plasma HDTV User’s Guide
Page 89

Specifications
PL 4200N PL5000N
Power source 120Vv, 50/60 Hz 120Vv, 50/60 Hz
Power consumption
Maximum 410 W 535 W
Stand-by condition 0.6 W (with CableCard: 22.0 W) 0.6 W (with CableCard: 22.0 W)
Plasma display panel Drive method: AC type 42-inch,
16:9 aspect ratio
Screen size
(W x H x Diagonal)
Dimensions
(W x H x D)
Mass (weight) 90.39 lb. (41 kg) 119 lb. (54 kg)
Channel capability-
ATSC/NTSC
Sound speaker Woofer 3.1 in. (8 cm) x2, Tweeter 0.63in. (1.6 cm) x 2.9 in. (7.3 cm) x 4
Audio output 26 W [8 W + 8 W, 5 W + 5 W] (10% THD)
Features 3D Y/C Filter
Operating conditions
36.2 in. (92 cm)
20.4 in. (51.8 cm)
41.6 in. (105.6 cm)
44.8 in. (113.8 cm)
28.7 in. (73.1 cm)
5.4 in. (13.75 cm)
VHF/UHF : 2-69, CATV:1–135
HDMI
Closed Caption
■ Temperature: 32° F – 104° F (0° C – 40° C)
■ Humidity: 20% – 80% (non-condensing)
V-Chip
Drive method: AC type 50-inch,
16:9 aspect ratio
43.5 in. (110.6 cm)
24.5 in. (62.2 cm)
50 in. (126.9 cm)
52.2 in. (132.7 cm)
33.2 in. (84.4 cm)
5.4 in. (13.75 cm)
™
Cable Card
Slot
Specifications
Specifications 81
Page 90

PL 4200N PL5000N
Connection terminals
AV Input 1- 2 Video
AV Prog. Out Video
Component Video
Input1-2
HDMI
Digital Audio Out PCM/Dolby Digital, Fiber Optic
All specifications represent the typical specifications
provided by HP’s component manufacturers; actual
performance may vary either higher or lower.
(Phono Jack Type)
S-Video
(Mini DIN 4-pin)
Audio L-R
(Phono Jack Type x2)
(Phono Jack Type)
Audio L-R
(Phono Jack Type x 2)
Y
PB / PR
Audio L-R
(Phono Jack Type x 2)
HDMI type A Connector
Audio L-R
(Phono Jack Type x 2)
1.0 Vp-p (75 Ω)
Y: 1.0 Vp-p (75 Ω), C: 0.286 Vp-p (75 Ω)
0.5 Vrms
1.0 Vp-p (75 Ω)
0.5 Vrms
1.0 Vp-p (including synchronization)
± 0.35 Vp-p
0.5 Vrms
0.5 Vrms
n
Design and specifications are subject to
change without notice. Weight and
dimensions shown are approximate.
82 HP Pavilion Plasma HDTV User’s Guide
Page 91

Troubleshooting Chart
Refer to this section if you are having viewing, picture,
or sound problems with your TV.
Symptoms
SolutionsVideo Audio
Snowy video Noisy audio
Multiple image Noisy audio
Interference Noisy audio
Normal video No audio
No video with
Noisy audio
snow
■ Adjust the antenna location and connection.
■ Adjust the antenna location and connection.
■ Check the antenna lead-in cable.
■ Move the television away from electrical appliances,
lights, vehicles, and medical equipment.
■ Check to see if the volume is set at the minimum.
■ Verify that Mute mode is not set.
■ Check the speaker connection.
■ Check all audio inputs.
■ Change the channel.
■ Set input setup properly.
■ Check the antenna cables.
Troubleshooting Chart 83
Troubleshooting Chart
Page 92

Symptoms
SolutionsVideo Audio
No video No audio
No color Normal audio
Digitalization of
Audio break up
image or image
freeze up
■ Check to see if the TV power cord is plugged into a
power outlet.
■ Try another channel in case of station trouble.
■ Ensure the remote control codes are properly
programmed.
■ Check cable connections.
■ Adjust brightness and audio controls.
■ Press the Source button to select the correct input
source.
■ Make sure a PC is not connected with an HDMI
input.
■ Unplug any HDMI connections and plug them
back in.
■ Adjust the color settings.
■ Change the channel.
■ Reposition the ATSC (digital) antenna.
■ Check signal meter. If the signal is weak, add a
signal booster to boost the signal strength.
Normal video Wrong audio
Black box on
Normal audio
screen
Normal video Normal audio
Intermittent Remote Control Operation
84 HP Pavilion Plasma HDTV User’s Guide
■ Verify that the audio mode is set to stereo or mono,
not SAP.
■ Check to see if there is a problem with the audio
setting for HDMI. If so, use analog audio.
■ Make sure the audio input matches the output. For
example, set the audio of HDMI to linear PCM.
■ Verify that the CC (Closed Caption) Analog settings
are set to something other than T1, T2, T3, or T4.
■ Replace the remote control batteries.
Page 93

Plasma Display Panel
Hewlett-Packard
Symptoms Check
Some parts of the screen do not
light up.
An afterimage appears.
Hewlett-Packard
Whirring sounds can be heard from
the display unit.
■ The plasma display panel is manufactured using an
extremely high level of precision technology;
however, sometimes some parts of the screen may be
missing picture elements or have luminous spots. This
is not a malfunction.
■ Do not allow a still picture to be displayed for an
extended period, as this can cause a permanent
afterimage to remain on the Plasma TV.
Examples of still pictures include logos, video games,
computer images, teletext and images displayed in
4:3 mode.
Note:
The permanent afterimage on the plasma TV resulting
from fixed image use is not an operating defect and as
such is not covered by the warranty. This product is not
designed to display fixed images for extended periods
of time.
■ The TV is fitted with a cooling fan to dissipate heat
generated during normal use. The rotating fan may
cause a whirring sound, but it is not a malfunction.
Troubleshooting Chart
Troubleshooting Chart 85
Page 94

Customer’s record
The product number and serial number of this product
can be found on the back cover of the television. You
should note this serial number in the space provided
below and retain this user’s guide, plus your purchase
receipt, as a permanent record of your purchase to aid
in identification in the event of theft or loss, and for
warranty service purposes.
Product Number: ________________________________
Serial Number:__________________________________
 Loading...