

Page 1

HP Photosmart Wireless B109 series
Windows Help
Page 2

HP Photosmart Wireless B109 series
Page 3

Page 4

Contents
1 HP Photosmart Wireless B109 series Help............................................................................3
2 Finish setting up the HP Photosmart
Add the HP Photosmart to a network.........................................................................................5
Set up a USB connection.........................................................................................................10
3 Get to know the HP Photosmart
Printer parts..............................................................................................................................11
Control panel features..............................................................................................................12
4 How do I?.................................................................................................................................13
6Print
Print documents........................................................................................................................21
Print photos..............................................................................................................................22
Print envelopes.........................................................................................................................28
Print on specialty media...........................................................................................................28
Print a Web page......................................................................................................................29
7Scan
Scan to a computer..................................................................................................................33
Scan to a memory card............................................................................................................34
8Copy
Copy text or mixed documents.................................................................................................37
9 Reprint photos........................................................................................................................41
10 Save photos............................................................................................................................43
11 Maintain the HP Photosmart
Check the estimated ink levels.................................................................................................45
Replace the cartridges..............................................................................................................46
Order ink supplies.....................................................................................................................48
Cartridge warranty information.................................................................................................48
Print and evaluate a print quality report....................................................................................49
Contents
12 Solve a problem
HP support................................................................................................................................53
Setup troubleshooting...............................................................................................................54
Print troubleshooting.................................................................................................................60
Print quality troubleshooting.....................................................................................................65
Memory card troubleshooting...................................................................................................65
Scan troubleshooting................................................................................................................67
Copy troubleshooting................................................................................................................68
Errors........................................................................................................................................69
1
Page 5

14 Technical information
Notice......................................................................................................................................101
Cartridge chip information......................................................................................................101
Specifications.........................................................................................................................102
Environmental product stewardship program.........................................................................103
Regulatory notices..................................................................................................................108
Regulatory wireless statements..............................................................................................110
Index............................................................................................................................................115
Contents
2
Page 6

1 HP Photosmart Wireless B109
series Help
For information about the HP Photosmart, see:
•“
Finish setting up the HP Photosmart” on page 5
Get to know the HP Photosmart” on page 11
•“
How do I?” on page 13
•“
Print” on page 21
•“
Scan” on page 33
•“
Copy” on page 37
•“
Reprint photos” on page 41
•“
Save photos” on page 43
•“
Maintain the HP Photosmart” on page 45
•“
Technical information” on page 101
•“
HP Photosmart Wireless B109 series
Help
HP Photosmart Wireless B109 series Help 3
Page 7

HP Photosmart Wireless B109 series
Help
Chapter 1
4 HP Photosmart Wireless B109 series Help
Page 8

2 Finish setting up the
HP Photosmart
• Add the HP Photosmart to a network
Set up a USB connection
•
Add the HP Photosmart to a network
•“WiFi Protected Setup (WPS)” on page 5
Wireless with a router (infrastructure network)” on page 6
•“
Wireless without a router (ad hoc connection)” on page 7
•“
WiFi Protected Setup (WPS)
To connect the HP Photosmart to a wireless network using WiFi Protected Setup (WPS),
you will need the following:
A wireless 802.11 network that includes a WPS-enabled wireless router or access
point.
A desktop computer or laptop with either wireless networking support, or a network
interface card (NIC). The computer must be connected to the wireless network that
you intend to install the HP Photosmart on.
To connect the HP Photosmart using WiFi Protected Setup (WPS)
1. Do one of the following:
Use Push Button (PBC) method
a. Set up wireless connection.
On Home Screen, press button next to Scan.
Press button next to Wireless Menu.
Press button next to WPS.
Press button next to Push Button.
Press corresponding button on WPS-enabled router or other networking
device.
Press OK.
b. Install software.
NOTE: The product begins a timer for approximately two minutes in which the
corresponding button on the networking device needs to be pressed.
Use PIN method
a. Set up wireless connection.
On Home Screen, press button next to Scan.
Press button next to Wireless Menu.
Finish setting up the HP Photosmart 5
Finish setting up the HP Photosmart
Page 9
Chapter 2
Press button next to WPS.
Press button next to PIN.
The device displays a PIN.
Enter the PIN on WPS-enabled router or other networking device.
Press OK.
b. Install software.
NOTE: The product begins a timer for approximately two minutes in which the
PIN needs to be entered on the networking device.
2. View the animation for this topic.
Related topics
“
Install the software for a network connection” on page 9
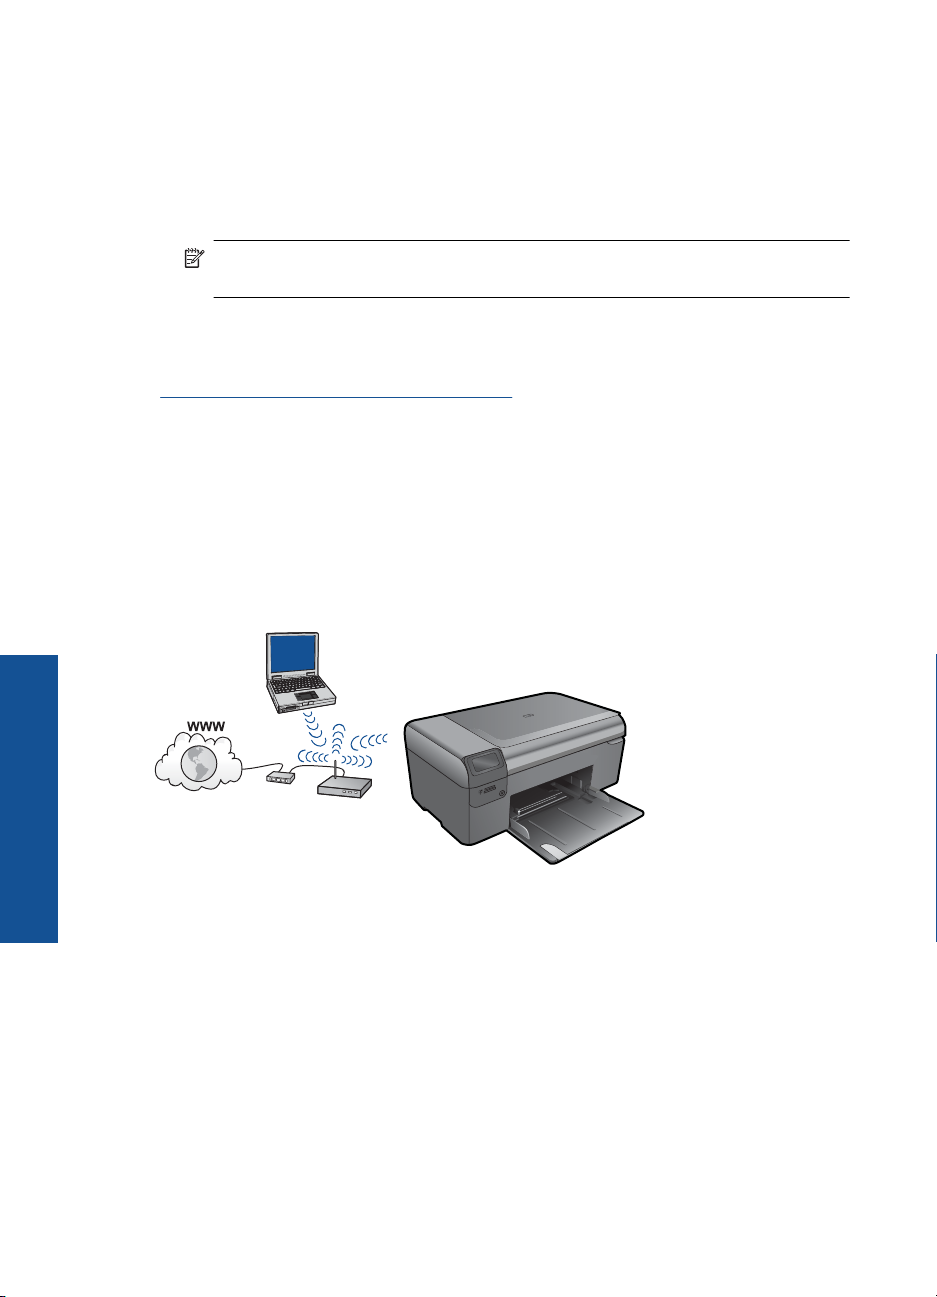
Wireless with a router (infrastructure network)
The HP Photosmart Software CD and included USB setup cable provide an easy way to
connect the HP Photosmart to your wireless network.
For optimal performance and security in your wireless network, HP recommends you use
a wireless router or access point (802.11) to connect the product and the other network
elements. When network elements are connected through a wireless router or access
point, this is called an infrastructure network.
Finish setting up the HP Photosmart
To connect the HP Photosmart to an integrated wireless WLAN 802.11 network, you will
need the following:
A wireless 802.11 network that includes a wireless router or access point.
A desktop computer or laptop with either wireless networking support, or a network
interface card (NIC). The computer must be connected to the wireless network that
you intend to install the HP Photosmart on.
Broadband Internet access (recommended) such as cable or DSL.
If you connect the HP Photosmart on a wireless network that has Internet access, HP
recommends that you use a wireless router (access point or base station) that uses
Dynamic Host Configuration Protocol (DHCP).
Network name (SSID).
WEP key or WPA Passphrase (if needed).
6 Finish setting up the HP Photosmart
Page 10

To connect the product
1. Insert the product Software CD in the computer CD-ROM drive.
2. Follow the instructions on the screen.
When you are prompted, connect the product to the computer using the USB setup
cable included in the box. The product will attempt to connect to the network. If the
connection fails, follow the prompts to correct the problem, and then try again.
3. When the setup is finished, you will be prompted to disconnect the USB cable and
test the wireless network connection. Once the product connects successfully to the
network, install the software on each computer that will use the product over the
network.
Related topics
“
Install the software for a network connection” on page 9
Wireless without a router (ad hoc connection)
Use this section if you want to connect the HP Photosmart to a wireless-capable computer
without using a wireless router or access point.
There are two methods you may use to connect the HP Photosmart to your computer
using an ad hoc wireless network connection. Once connected, you can install the
HP Photosmart software.
▲ Turn on the wireless radio for the HP Photosmart and the wireless radio on your
computer. On your computer, connect to the network name (SSID) hpsetup, which
is the default ad hoc network created by the HP Photosmart.
OR
▲ Use an ad hoc network profile on your computer to connect to the product. If your
computer is not currently configured with an ad hoc network profile, consult the Help
file for your computer Operating System for the proper method to create an ad hoc
profile on your computer. Once the ad hoc network profile has been created, insert
the installation CD that came with the product and install the software. Connect to the
ad hoc network profile you created on your computer.
NOTE: An ad hoc connection can be used if you do not have a wireless router or
access point but do have a wireless radio on your computer. However, an ad hoc
connection may result in a lower level of network security and possibly reduced
performance when compared to an infrastructure network connection using a wireless
router or access point.
Add the HP Photosmart to a network 7
Finish setting up the HP Photosmart
Page 11

Chapter 2
To connect the HP Photosmart to a Windows computer with an ad hoc connection, the
computer must have a wireless network adapter and an ad hoc profile. Create a network
profile for a Windows Vista or Windows XP computer using the directions below.
NOTE: If you have an operating system other than Windows Vista or Windows XP,
HP recommends that you use the configuration program that came with your wireless
LAN card. To find the configuration program for your wireless LAN card, access your
computer's list of programs.
To create a network profile
NOTE: The product comes configured with a network profile with hpsetup as the
network name (SSID). However, for security and privacy HP recommends you create
a new network profile on your computer as described here.
1. In the Control Panel, double-click Network Connections.
2. On the Network Connections window, right-click the Wireless Network
Connection. If you see Enable on the pop-up menu, select it. Otherwise, if you see
Disable on the menu, the wireless connection is already enabled.
3. Right-click the Wireless Network Connection icon, and then click Properties.
4. Click the Wireless Networks tab.
5. Select the Use Windows to configure my wireless network settings check box.
6. Click Add, and then do the following:
a.In Network name (SSID) box, type in a unique network name of your choice.
Finish setting up the HP Photosmart
NOTE: The network name is case sensitive, so it is important to remember
any uppercase (capital) and lowercase (small) letters.
b. If there is a Network Authentication list, select Open. Otherwise, go to the next
step.
c.In the Data encryption list, select WEP.
d. Make sure that the check box is not selected next to The key is provided for me
automatically. If it is selected, click the check box to clear it.
e.In the Network key box, type a WEP key that has exactly 5 or exactly 13
alphanumeric (ASCII) characters. For example, if you enter 5 characters, you
might enter ABCDE or 12345. Or, if you enter 13 characters, you might enter
ABCDEF1234567. (12345 and ABCDE are examples only. Select a combination
of your choosing.)
Alternatively, you can use HEX (hexadecimal) characters for the WEP key. A HEX
WEP key must be 10 characters for 40 bit encryption, or 26 characters for 128 bit
encryption.
f.In the Confirm network key box, type the same WEP key you typed in the
previous step.
NOTE: You must remember the exact uppercase (capital) and lowercase
(small) letters. If you enter your WEP key incorrectly on the product, the
wireless connection will fail.
g. Write down the WEP key exactly as you typed it, including uppercase and
lowercase letters.
8 Finish setting up the HP Photosmart
Page 12

h. Select the check box for This is a computer-to-computer (ad hoc) network;
wireless access points are not used.
i. Click OK to close the Wireless network properties window, and then click OK
again.
j. Click OK again to close the Wireless Network Properties Connection window.
To connect the product
1. Insert the product Software CD in the computer CD-ROM drive.
2. Follow the instructions on the screen.
When you are prompted, connect the product to the computer using the USB setup
cable included in the box. The product will attempt to connect to the network. If the
connection fails, follow the prompts to correct the problem, and then try again.
3. When the setup is finished, you will be prompted to disconnect the USB cable and
test the wireless network connection. Once the product connects successfully to the
network, install the software on each computer that will use the product over the
network.
Related topics
“
Install the software for a network connection” on page 9
Install the software for a network connection
Use this section to install the HP Photosmart software on a computer connected to a
network. Before you install the software, make sure you have connected the
HP Photosmart to a network. If the HP Photosmart has not been connected to a network,
follow the onscreen instructions during the software installation to connect the product to
the network.
NOTE: If your computer is configured to connect to a series of network drives, make
sure that your computer is currently connected to these drives before installing the
software. Otherwise, the HP Photosmart software installer might try to use one of the
reserved drive letters and you will not be able to access that network drive on your
computer.
NOTE: Installation time can range from 20 to 45 minutes depending on your
operating system, the amount of available space, and the processor speed of your
computer.
To install the Windows HP Photosmart Software on a networked computer
1. Quit all applications running on your computer.
2. Insert the Windows CD that came with the product into the CD-ROM drive on your
computer and follow the onscreen instructions.
NOTE: If the HP Photosmart is not connected to a network, when prompted,
connect the product to the computer using the USB setup cable included in the
box. The product will then attempt to connect to the network.
3. If a dialog box about firewalls appears, follow the instructions. If you see firewall pop-
up messages, you must always accept or allow the pop-up messages.
Add the HP Photosmart to a network 9
Finish setting up the HP Photosmart
Page 13

Chapter 2
4. On the Connection Type screen, select an appropriate option, and then click Next.
The Searching screen appears as the Setup program searches for the product on
the network.
5. On the Printer Found screen, verify that the printer description is correct.
If more than one printer is found on the network, the Printers Found screen appears.
Select the product you want to connect.
6. Follow the prompts to install the software.
When you have finished installing the software, the product is ready for use.
7. To test your network connection, go to your computer and print a self-test report to
the product.
Set up a USB connection
The HP Photosmart supports a rear USB 2.0 High Speed port for connection to a
computer.
If you use a USB cable to connect the HP Photosmart to a computer on a network, you
can set up printer sharing on your computer. This enables other computers on the network
to print to the HP Photosmart, using your computer as the host.
The host computer (your computer, connected directly to the HP Photosmart by a USB
cable) has full software functionality. Other computers, which are referred to as the
clients, have access only to the print features. HP recommends up to 5 computers for
the best performance. You must perform other functions from the host computer or from
the control panel on the HP Photosmart.
Finish setting up the HP Photosmart
To connect the product with the USB cable
▲ Refer to the setup instructions that came with your product for information on
connecting to a computer with a USB cable.
NOTE: Do not connect the USB cable to the product until you are prompted to
do so.
To enable printer sharing on a Windows computer
▲ Refer to the user guide that came with your computer or see the Windows onscreen
Help.
10 Finish setting up the HP Photosmart
Page 14
3 Get to know the HP Photosmart
• Printer parts
Control panel features
•
Printer parts
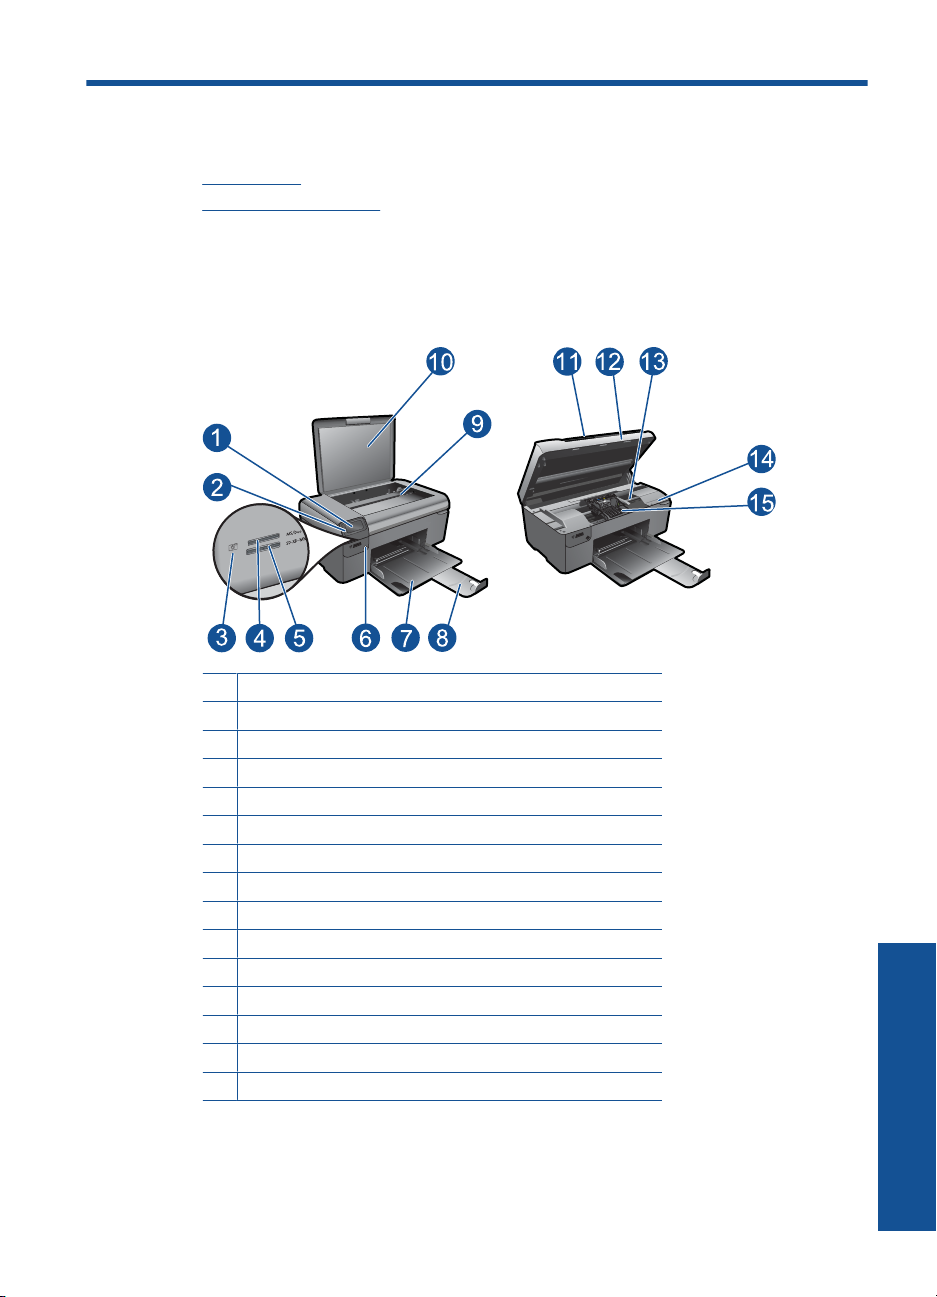
• Front and top views of the HP Photosmart
1 Color graphics display (also referred to as the display)
2 Control panel
3 Photo light
4 Memory card slot for Memory Stick cards
5 Memory card slot for Secure Digital cards
6 On button
7 Paper tray
8 Paper tray extender (also referred to as the tray extender)
9 Glass
10 Lid-backing
11 Lid
12 Cartridge door
13 Cartridge access area
14 Model number location
15 Printhead assembly
• Rear view of the HP Photosmart
Get to know the HP Photosmart
Get to know the HP Photosmart 11
Page 15
Chapter 3
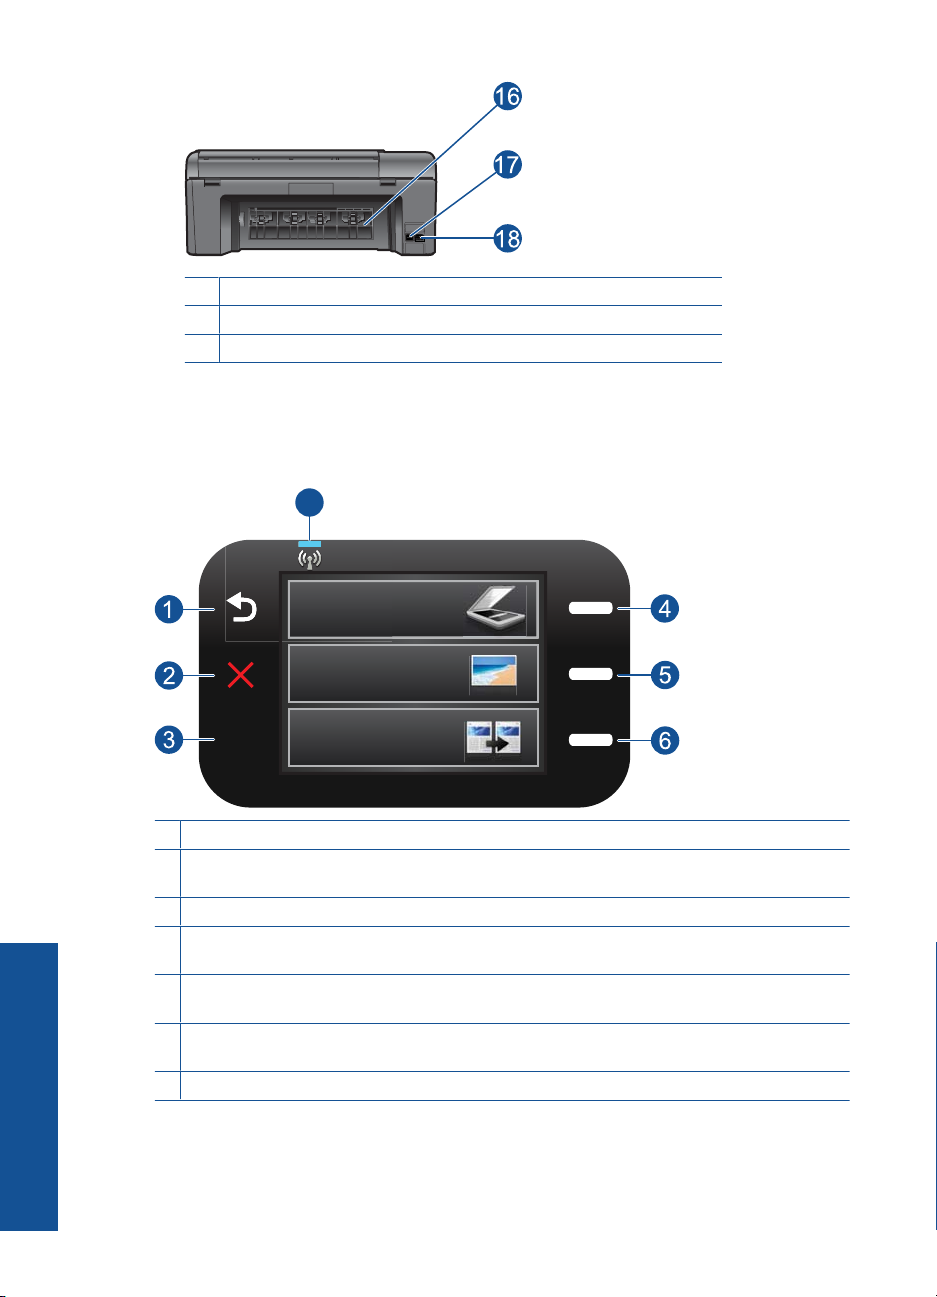
16 Rear door
17 Rear USB port
18 Power connection (Use only with the power adapter supplied by HP.)
Control panel features
Figure 3-1 Control panel features
7
2.
1 Back: Returns to the previous screen.
2 Cancel: Stops the current operation, restores default settings, and clears the current photo
selection.
3 OK: Selects a menu setting, value, or photo.
4 Scan: From the Home screen, opens the Scan Menu. When viewing screens other than the
Get to know the HP Photosmart
12 Get to know the HP Photosmart
Home screen, selects options related to the current display.
5 Photo: From the Home screen, opens the Photo Menu. When viewing screens other than the
Home screen, selects options related to the current display.
6 Copy: From the Home screen, opens the Copy Menu. When viewing screens other than the
Home screen, selects options related to the current display.
7 Wireless network indicator light: Indicates that the wireless radio is on.
Page 16

4 How do I?
This section contains links to commonly performed tasks, such as printing photos,
scanning, and making copies.
“Print photos from a memory card”
•
on page 24
“Print on specialty media” on page 28
•
“Save photos” on page 43
•
“Load media” on page 17
•
“Replace the cartridges” on page 46
•
“Scan to a computer” on page 33
•
“Scan to a memory card” on page 34
•
How do I?
How do I? 13
Page 17

Chapter 4
How do I?
14 How do I?
Page 18

5 Paper basics
You can load many different types and sizes of paper in the HP Photosmart, including
letter or A4 paper, photo paper, transparencies, and envelopes.
This section contains the following topics:
•“
Recommended papers for photo printing” on page 15
Recommended papers for printing” on page 16
•“
Load media” on page 17
•“
Information on paper” on page 19
•“
Recommended papers for photo printing
If you want the best print quality, HP recommends using HP papers that are specifically
designed for the type of project you are printing.
Depending on your country/region, some of these papers might not be available.
HP Advanced Photo Paper
This thick photo paper features an instant-dry finish for easy handling without smudging.
It resists water, smears, fingerprints, and humidity. Your prints have a look and feel
comparable to a store-processed photo. It is available in several sizes, including A4, 8.5
x 11 inch, 10 x 15 cm (4 x 6 inch) (with or without tabs), 13 x 18 cm (5 x 7 inch), and two
finishes - glossy or soft gloss (satin matte). It is acid-free for longer lasting documents.
HP Everyday Photo Paper
Print colorful, everyday snapshots at a low cost, using paper designed for casual photo
printing. This affordable, photo paper dries quickly for easy handling. Get sharp, crisp
images when you use this paper with any inkjet printer. It is available in semi-gloss finish
in several sizes, including A4, 8.5 x 11 inch, and 10 x 15 cm (4 x 6 inch) (with or without
tabs). For longer-lasting photos, it is acid-free.
Paper basics
HP Photo Value Pack
HP Photo Value Packs conveniently package original HP cartridges and HP Advanced
Photo Paper to save you time and take the guesswork out of printing affordable
professional photos with your HP Photosmart. Original HP inks and HP Advanced Photo
Paper have been designed to work together so your photos are long lasting and vivid,
print after print. Great for printing out an entire vacation’s worth of photos or multiple prints
to share.
To order HP papers and other supplies, go to
choose your country/region, follow the prompts to select your product, and then click one
of the shopping links on the page.
NOTE: At this time, some portions of the HP Web site are available in English only.
www.hp.com/buy/supplies. If prompted,
Paper basics 15
Page 19

Chapter 5
Recommended papers for printing
If you want the best print quality, HP recommends using HP papers that are specifically
designed for the type of project you are printing.
Depending on your country/region, some of these papers might not be available.
HP Advanced Photo Paper
This thick photo paper features an instant-dry finish for easy handling without smudging.
It resists water, smears, fingerprints, and humidity. Your prints have a look and feel
comparable to a store-processed photo. It is available in several sizes, including A4, 8.5
x 11 inch, 10 x 15 cm (4 x 6 inch) (with or without tabs), 13 x 18 cm (5 x 7 inch), and two
finishes - glossy or soft gloss (satin matte). It is acid-free for longer lasting documents.
HP Everyday Photo Paper
Print colorful, everyday snapshots at a low cost, using paper designed for casual photo
printing. This affordable, photo paper dries quickly for easy handling. Get sharp, crisp
images when you use this paper with any inkjet printer. It is available in semi-gloss finish
in several sizes, including A4, 8.5 x 11 inch, and 10 x 15 cm (4 x 6 inch) (with or without
Paper basics
tabs). For longer-lasting photos, it is acid-free.
HP Brochure Paper or HP Superior Inkjet Paper
These papers are glossy-coated or matte-coated on both sides for two-sided use. They
are the perfect choice for near-photographic reproductions and business graphics for
report covers, special presentations, brochures, mailers, and calendars.
HP Premium Presentation Paper or HP Professional Paper
These papers are heavy two-sided matte papers perfect for presentation, proposals,
reports, and newsletters. They are heavyweight for an impressive look and feel.
HP Bright White Inkjet Paper
HP Bright White Inkjet Paper delivers high-contrast colors and sharp text. It is opaque
enough for two-sided color usage with no show-through, which makes it ideal for
newsletters, reports, and flyers. It features ColorLok Technology for less smearing, bolder
blacks, and vivid colors.
HP Printing Paper
HP Printing Paper is a high-quality multifunction paper. It produces documents that look
and feel more substantial than documents printed on standard multipurpose or copy
paper. It features ColorLok Technology for less smearing, bolder blacks, and vivid colors.
It is acid-free for longer lasting documents.
HP Office Paper
HP Office Paper is a high-quality multifunction paper. It is suitable for copies, drafts,
memos, and other everyday documents. It features ColorLok Technology for less
smearing, bolder blacks, and vivid colors. It is acid-free for longer lasting documents.
16 Paper basics
Page 20

HP Iron-On Transfers
HP Iron-on Transfers (for color fabrics or for light or white fabrics) are the ideal solution
for creating custom T-shirts from your digital photos.
HP Premium Inkjet Transparency Film
HP Premium Inkjet Transparency Film makes your color presentations vivid and even
more impressive. This film is easy to use and handle, and dries quickly without smudging.
HP Photo Value Pack
HP Photo Value Packs conveniently package original HP cartridges and HP Advanced
Photo Paper to save you time and take the guesswork out of printing affordable
professional photos with your HP Photosmart. Original HP inks and HP Advanced Photo
Paper have been designed to work together so your photos are long lasting and vivid,
print after print. Great for printing out an entire vacation’s worth of photos or multiple prints
to share.
ColorLok
HP recommends plain papers with the ColorLok logo for printing and copying of everyday
documents. All papers with the ColorLok logo are independently tested to meet high
standards of reliability and print quality, and produce documents with crisp, vivid color,
bolder blacks, and dry faster than ordinary plain papers. Look for papers with the ColorLok
logo in a variety of weights and sizes from major paper manufacturers.
Paper basics
To order HP papers and other supplies, go to www.hp.com/buy/supplies. If prompted,
choose your country/region, follow the prompts to select your product, and then click one
of the shopping links on the page.
NOTE: At this time, some portions of the HP Web site are available in English only.
Load media
1. Do one of the following:
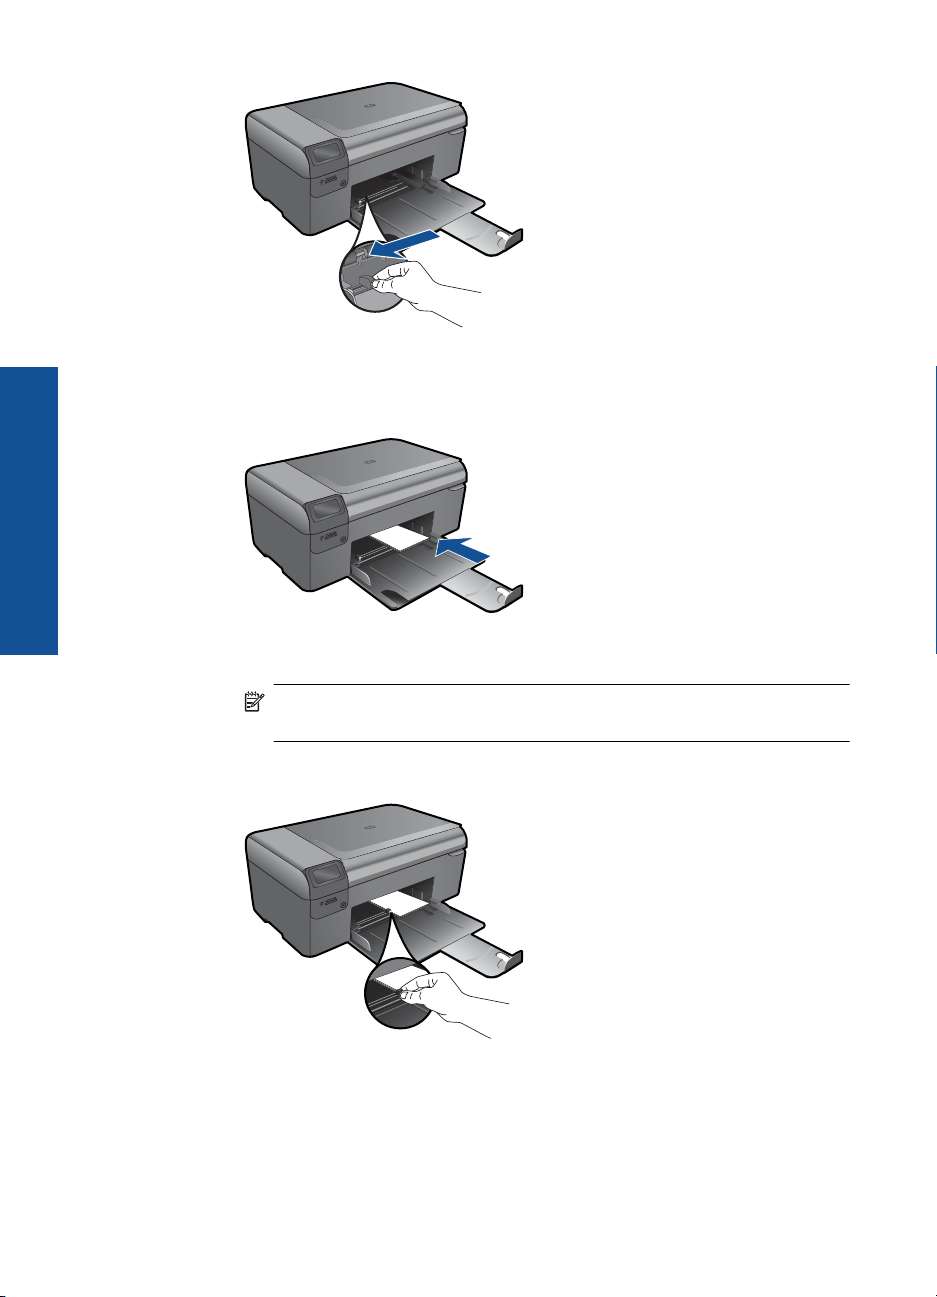
Load small-size paper
a. Lower paper tray.
Slide paper-width guide outwards.
Load media 17
Page 21
Paper basics
Chapter 5
b. Load paper.
Insert stack of photo paper into paper tray with short edge forward and print
side down.
Slide stack of paper forward until it stops.
NOTE: If the photo paper you are using has perforated tabs, load photo
paper so that tabs are closest to you.
Slide paper-width guide inward until it stops at edge of paper.
Load full-size paper
a. Lower paper tray.
Slide paper-width guide outwards.
18 Paper basics
Page 22
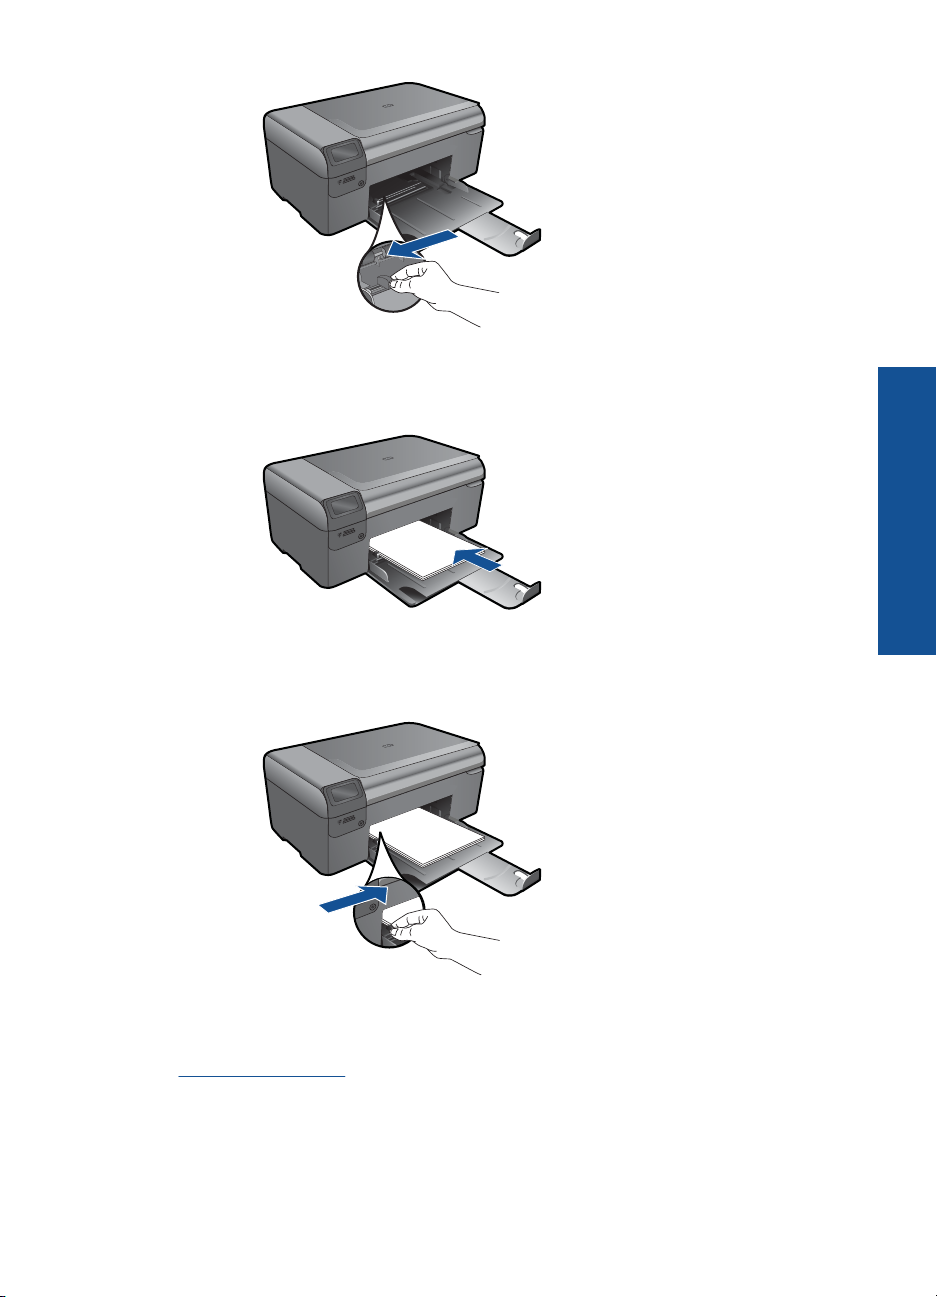
b. Load paper.
Insert stack of paper into paper tray with short edge forward and print side
down.
Slide stack of paper forward until it stops.
Slide paper-width guide inward until it stops at edge of paper.
2. View the animation for this topic.
Related topics
Information on paper” on page 19
“
Information on paper
The HP Photosmart is designed to work well with most paper types. Test a variety of
paper types before buying a large quantity. Find a paper type that works well and is easy
Paper basics
Information on paper 19
Page 23

Paper basics
Chapter 5
to purchase. HP papers are designed for the best quality results. In addition, follow these
tips:
• Do not use paper that is too thin, that has a slick texture, or that stretches easily. It
can feed incorrectly through the paper path, causing paper jams.
• Store photo media in its original packaging inside a resealable plastic bag on a flat
surface in a cool, dry place. When you are ready to print, remove only the paper you
plan to use immediately. When you have finished printing, return any unused photo
paper to the plastic bag.
• Do not leave unused photo paper in the paper tray. The paper might start to curl,
which might reduce the quality of your printouts. Curled paper can also cause paper
jams.
• Always hold photo paper by the edges. Fingerprints on photo paper can reduce print
quality.
• Do not use paper that is heavily textured. It can cause graphics or text to print
improperly.
• Do not combine different paper types and paper sizes in the paper tray; the entire
stack of paper in the paper tray must be the same size and type.
• For best results, do not allow printed photos to stack up in the paper tray.
• Store printed photos under glass or in a storage book to prevent bleeding over time
from high humidity.
20 Paper basics
Page 24

6Print
“Print documents” on page 21
“Print photos” on page 22
“Print envelopes” on page 28
“Print on specialty media” on page 28
“Print a Web page” on page 29
Related topics
Load media” on page 17
•“
Recommended papers for photo printing” on page 15
•“
Recommended papers for printing” on page 16
•“
Print documents
Most print settings are automatically handled by the software application. You need to
change the settings manually only when you change print quality, print on specific types
of paper or transparency film, or use special features.
To print from a software application
1. Make sure you have paper loaded in the paper tray.
2. On the File menu in your software application, click Print.
3. Make sure the product is the selected printer.
4. If you need to change settings, click the button that opens the Properties dialog box.
Depending on your software application, this button might be called Properties,
Options, Printer Setup, Printer, or Preferences.
NOTE: When printing a photo, you must select options for the specific photo
paper and photo enhancement.
Print 21
Page 25
Chapter 6
5. Select the appropriate options for your print job by using the features available in the
Advanced, Printing Shortcuts, Features, and Color tabs.
TIP: You can easily select the appropriate options for your print job by choosing
one of the predefined print tasks on the Printing Shortcuts tab. Click a type of
print task in the Printing Shortcuts list. The default settings for that type of print
task are set and summarized on the Printing Shortcuts tab. If necessary, you
can adjust the settings here and save your custom settings as a new printing
shortcut. To save a custom printing shortcut, select the shortcut and click Save
As. To delete a shortcut, select the shortcut and click Delete.
6. Click OK to close the Properties dialog box.
7. Click Print or OK to begin printing.
Related topics
Recommended papers for printing” on page 16
•“
Load media” on page 17
•“
View the print resolution” on page 31
•“
Printing shortcuts” on page 31
•“
Set the default print settings” on page 32
•“
Stop the current job” on page 99
•“
Print photos
•“Print photos saved on your computer” on page 22
Print photos from a memory card” on page 24
•“
Print photos saved on your computer
To print a photo on photo paper
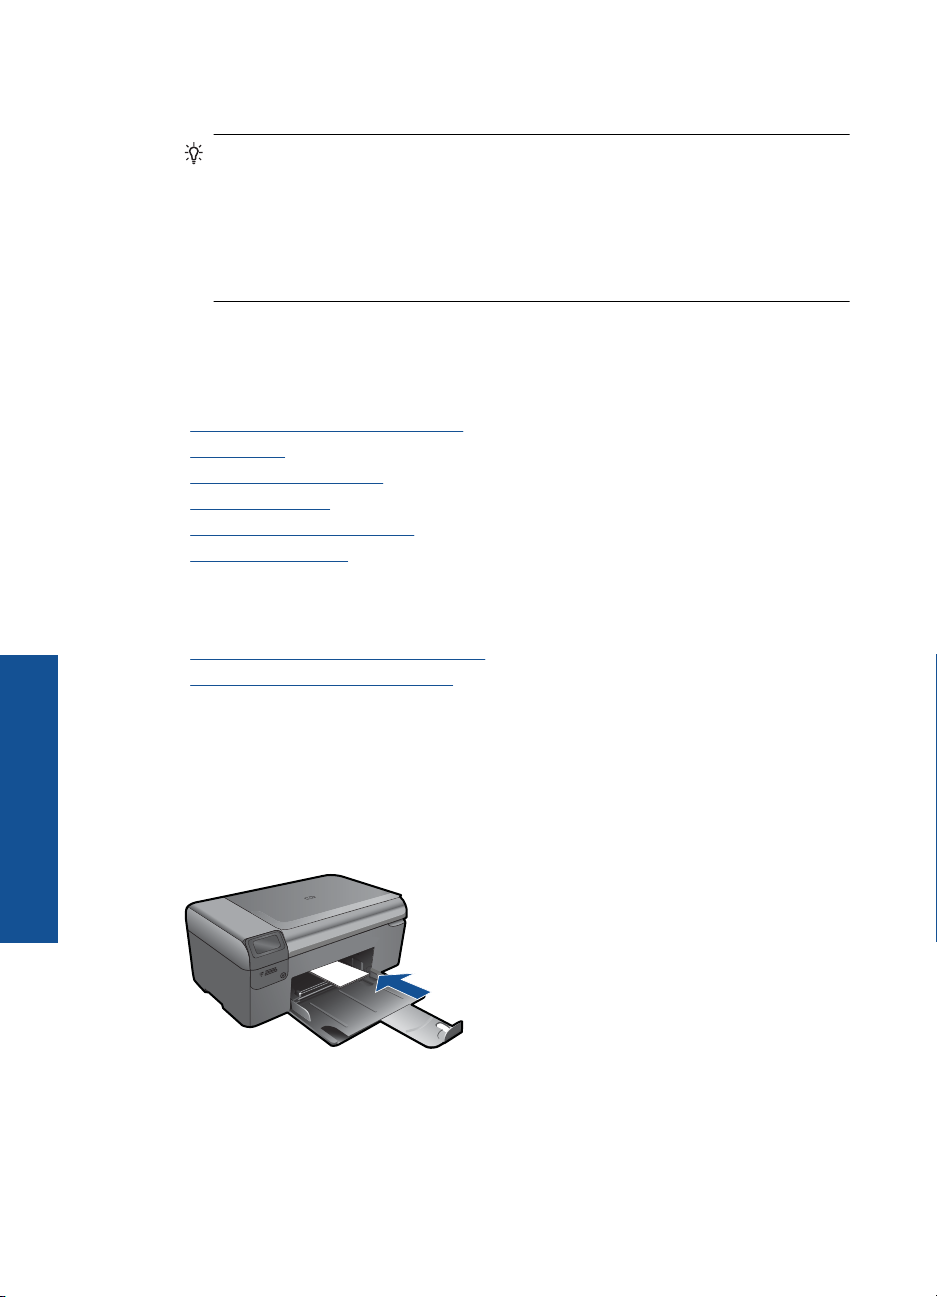
1. Remove all paper from the paper tray.
2. Place the photo paper print side down on the right side of the paper tray.
Print
3. Slide the paper-width guide inward until it stops at the edge of the paper.
4. On the File menu in your software application, click Print.
5. Make sure the product is the selected printer.
22 Print
Page 26

6. Click the button that opens the Properties dialog box.
Depending on your software application, this button might be called Properties,
Options, Printer Setup, Printer, or Preferences.
7. Click the Features tab.
8. In the Basic Options area, from the Paper Type drop-down list, select More. Then,
select the appropriate photo paper type.
9. In the Resizing Options area, from the Size drop-down list, select More. Then, select
the appropriate paper size.
If the paper size and paper type are not compatible, the printer software displays an
alert and allows you to select a different type or size.
10. (Optional) Select the Borderless printing check box if it is not already checked.
If the borderless paper size and paper type are not compatible, the product software
displays an alert and allows you to select a different type or size.
11. In the Basic Options area, select a high print quality, such as Best, from the Print
Quality drop-down list.
NOTE: To achieve the highest dpi resolution, you can use the Maximum dpi
setting with supported types of photo paper. If Maximum dpi is not listed in the
Print quality drop-down list, you can enable it from the Advanced tab. For more
information, see “
Print using Maximum dpi” on page 30.
12. In the HP Real Life Technologies area, click the Photo fix drop-down list and select
from the following options:
• Off: applies no HP Real Life Technologies to the image.
• Basic: enhances low-resolution images; moderately adjusts image sharpness.
13. Click OK to return to the Properties dialog box.
14. Click OK, and then click Print or OK in the Print dialog box.
NOTE: Do not leave unused photo paper in the paper tray. The paper might start to
curl, which could reduce the quality of your printout. For best results, do not allow
printed photos to stack up in the paper tray.
Related topics
Recommended papers for photo printing” on page 15
•“
Load media” on page 17
•“
Print using Maximum dpi” on page 30
•“
View the print resolution” on page 31
•“
Printing shortcuts” on page 31
•“
Set the default print settings” on page 32
•“
Stop the current job” on page 99
•“
Print photos 23
Print
Page 27
Chapter 6
Print photos from a memory card
1. Do one of the following:
Print photo on small-size paper
a. Load paper.
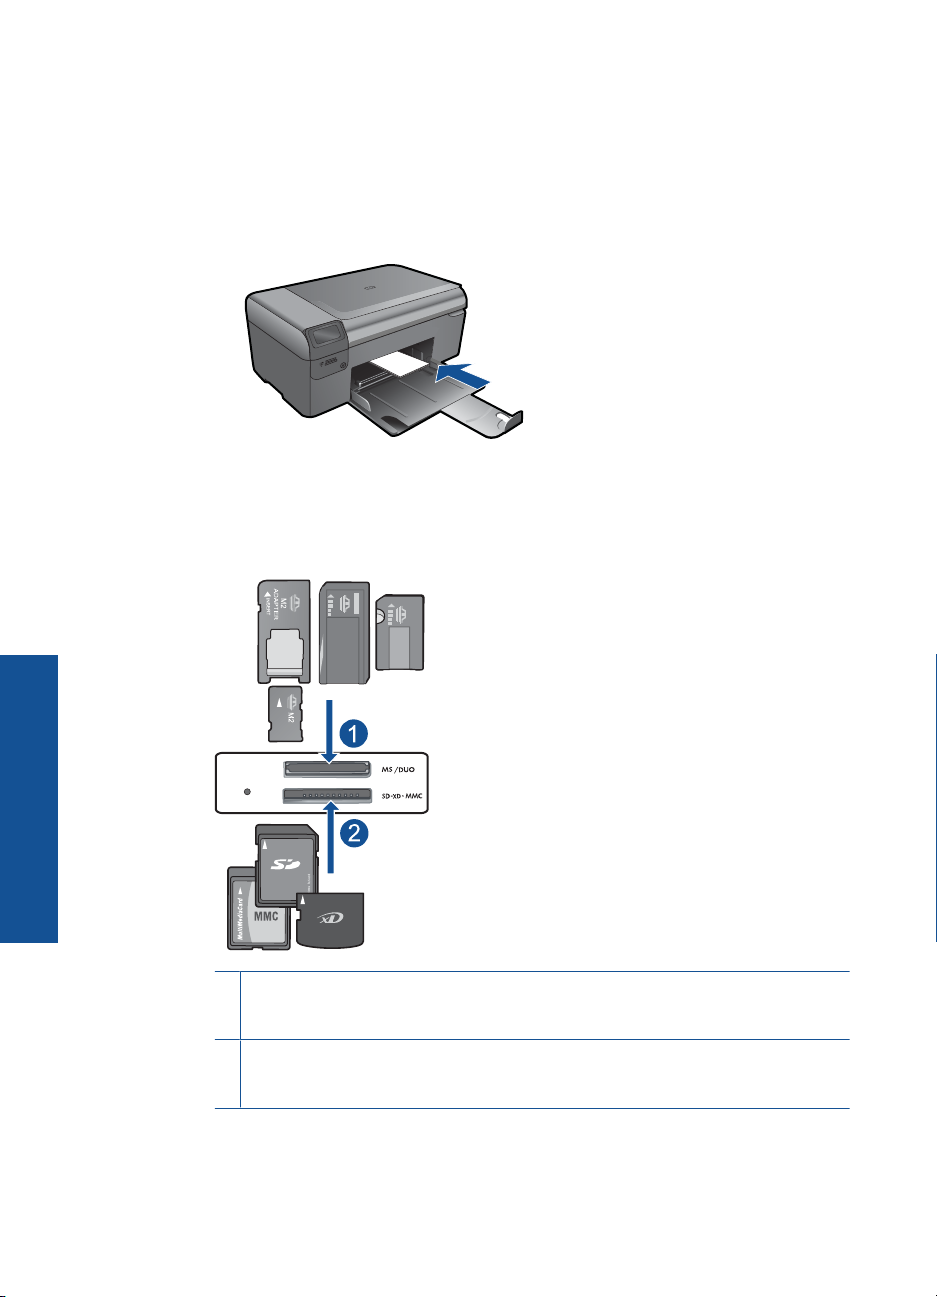
Load up to 10 x 15 cm (4 x 6 inch) photo paper in paper tray.
b. Select project type.
Press button next to Photo on Home screen.
Press button next to Memory Card Print.
c. Insert memory device.
Print
24 Print
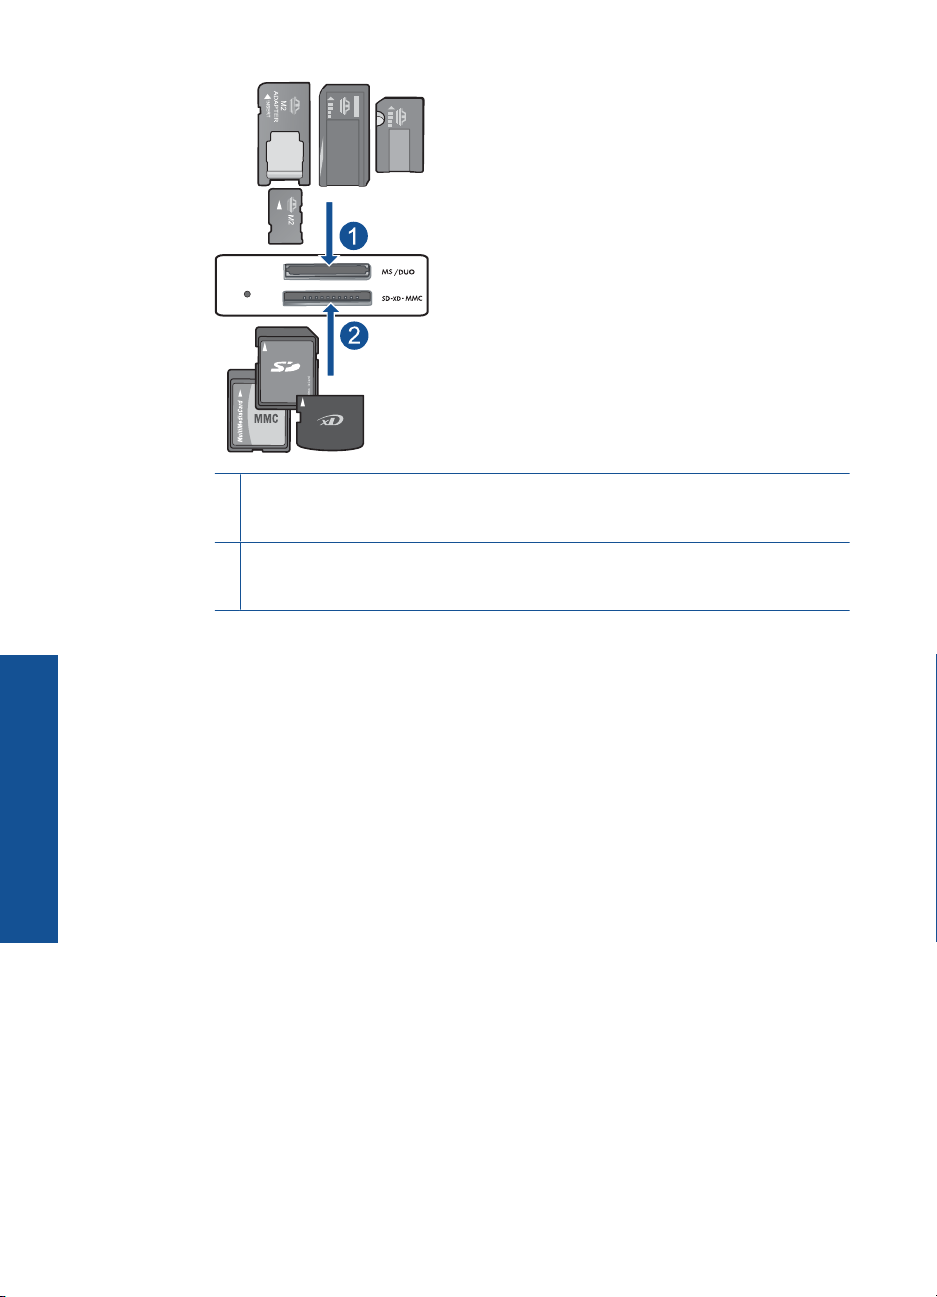
1 Memory Stick, Memory Stick Pro, Memory Stick Select, Memory Stick Magic Gate,
Memory Stick Duo or Pro Duo (adapter optional), Memory Stick Pro-HG Duo (adapter
optional), or Memory Stick Micro (adapter required)
2 MultiMediaCard (MMC), MMC Plus, Secure MultiMedia Card, MMC Mobile (RS-MMC;
adapter required), Secure Digital (SD), Secure Digital Mini, Secure Digital High
Capacity (SDHC), TransFlash MicroSD Card (adapter required)
Page 28
d. Select photo.
Press button next to Select.
Press OK.
Press button next to Prints to increase number of copies.
e. Print photo.
Press OK.
Print photo on full-size paper
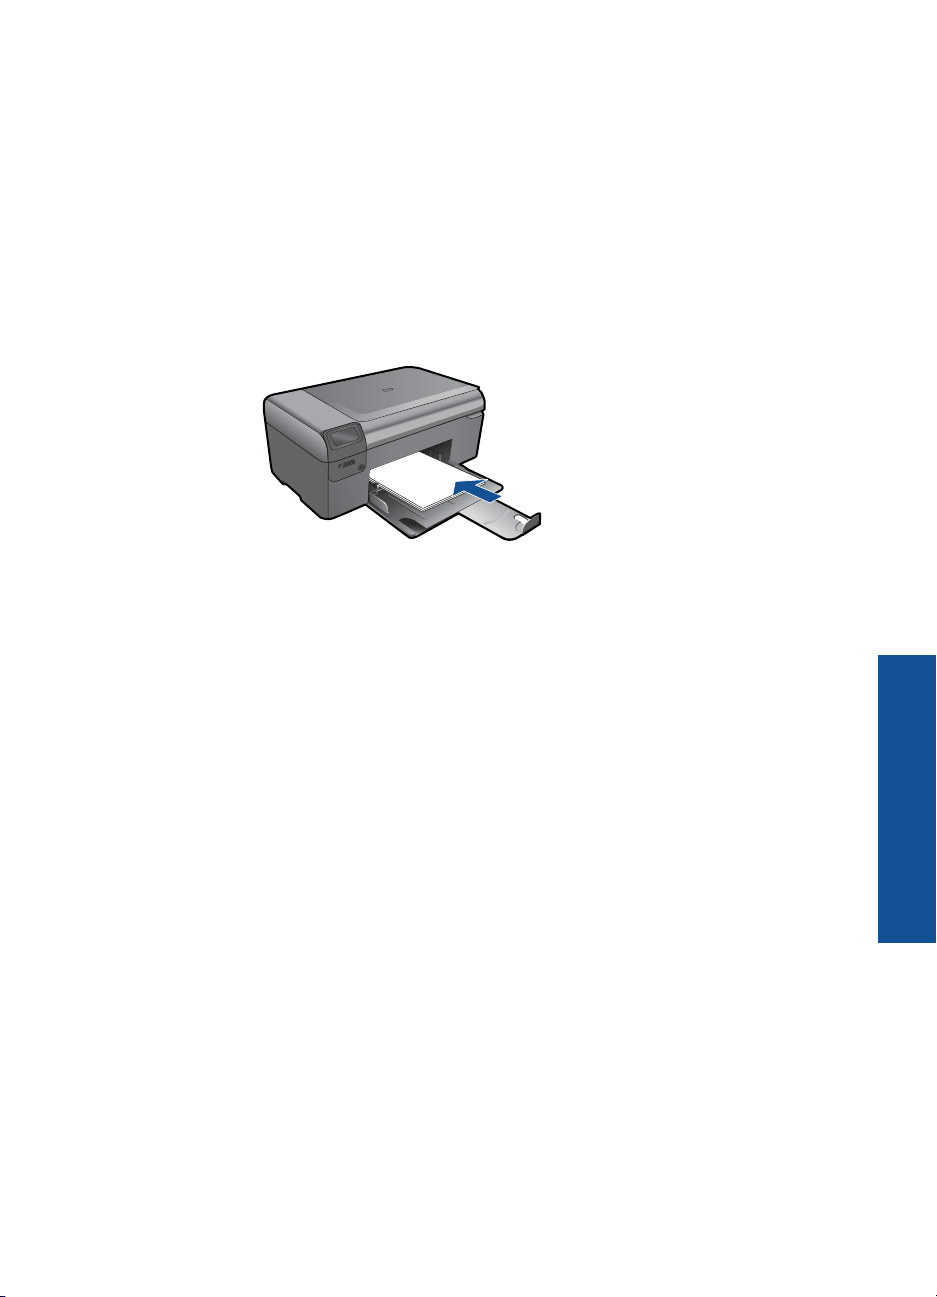
a. Load paper.
Load full-size photo paper in paper tray.
b. Select project type.
Press button next to Photo on Home screen.
Press button next to Memory Card Print.
c. Insert memory device.
Print photos 25
Print
Page 29
Chapter 6
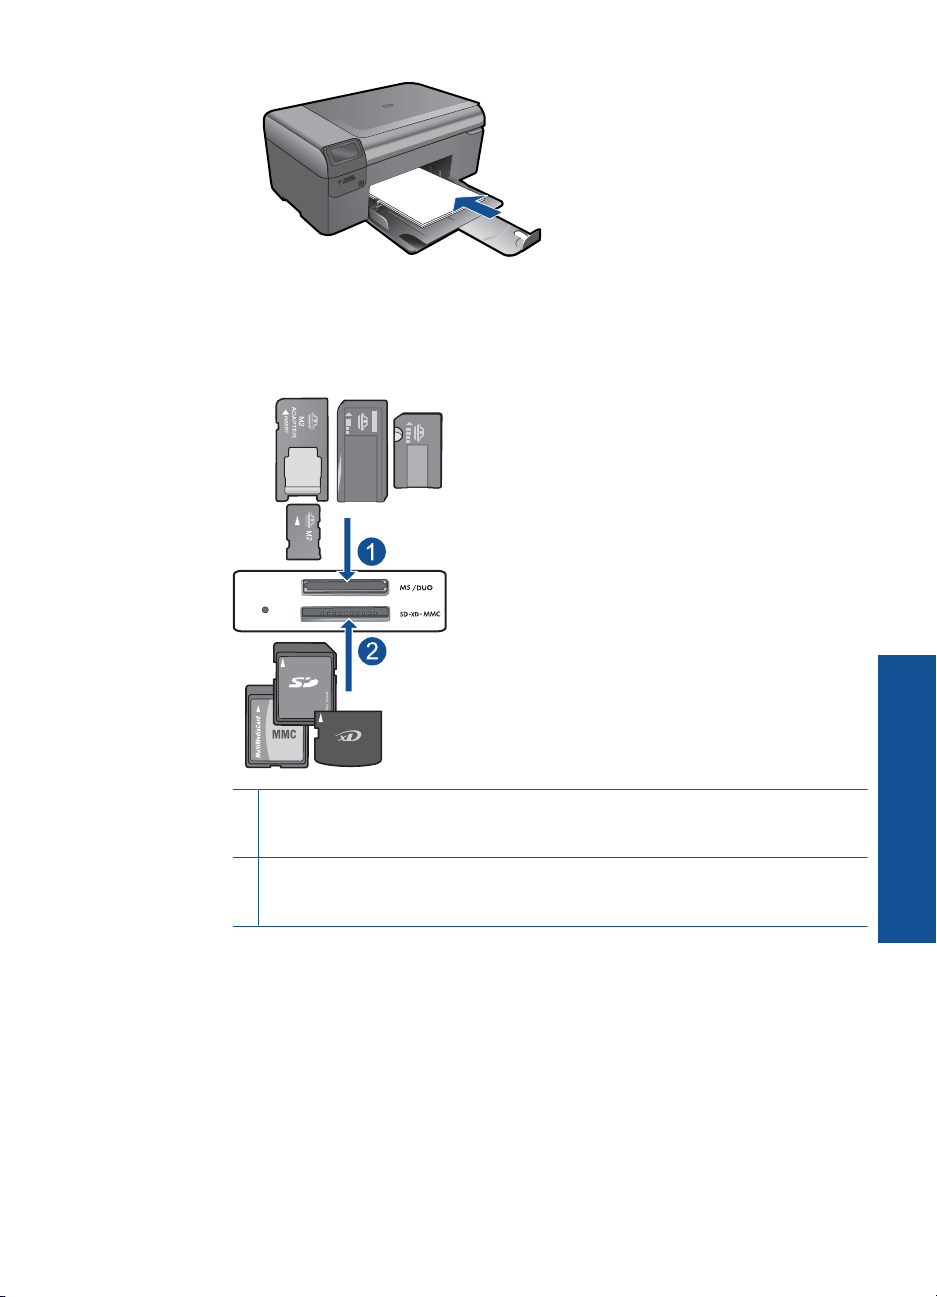
1 Memory Stick, Memory Stick Pro, Memory Stick Select, Memory Stick Magic Gate,
Memory Stick Duo or Pro Duo (adapter optional), Memory Stick Pro-HG Duo (adapter
optional), or Memory Stick Micro (adapter required)
2 MultiMediaCard (MMC), MMC Plus, Secure MultiMedia Card, MMC Mobile (RS-MMC;
adapter required), Secure Digital (SD), Secure Digital Mini, Secure Digital High
Capacity (SDHC), TransFlash MicroSD Card (adapter required)
Print
d. Select photo.
Press button next to Select.
Press OK.
Press button next to 4 x 6 Photo until size changes to 8.5 x 11 Photo.
Press button next to Prints to increase number of copies.
e. Print photo.
Press OK.
Print passport photos
a. Load paper.
Load full-size photo paper in paper tray.
26 Print
Page 30
b. Select project type.
Press button next to Photo on Home screen.
Press button next to Passport Photo Print.
c. Insert memory device.
1 Memory Stick, Memory Stick Pro, Memory Stick Select, Memory Stick Magic Gate,
Memory Stick Duo or Pro Duo (adapter optional), Memory Stick Pro-HG Duo (adapter
optional), or Memory Stick Micro (adapter required)
2 MultiMediaCard (MMC), MMC Plus, Secure MultiMedia Card, MMC Mobile (RS-MMC;
adapter required), Secure Digital (SD), Secure Digital Mini, Secure Digital High
Capacity (SDHC), TransFlash MicroSD Card (adapter required)
Print
d. Select photo.
Press button next to Select.
Press OK.
Press button next to Prints to increase number of copies.
e. Print photo.
Press OK.
2. View the animation for this topic.
Print photos 27
Page 31

Chapter 6
Related topics
Recommended papers for photo printing” on page 15
•“
Stop the current job” on page 99
•“
Print envelopes
With the HP Photosmart, you can print on a single envelope, a group of envelopes, or
label sheets designed for inkjet printers.
To print a group of addresses on labels or envelopes
1. Print a test page on plain paper first.
2. Place the test page on top of the label sheet or envelope, and hold both up to the
light. Check the spacing for each block of text. Make adjustments as needed.
3. Load the labels or envelopes into the paper tray.
CAUTION: Do not use envelopes with clasps or windows. They can get stuck in
the rollers and cause paper jams.
4. Slide the paper-width guide inward against the stack of labels or envelopes until the
guide stops.
5. If you are printing on envelopes, do the following:
a. Display the print settings, and click the Features tab.
b. In the Resizing Options area, click the appropriate envelope size in the Size list.
6. Click OK, and then click Print or OK in the Print dialog box.
Related topics
Paper basics” on page 15
•“
View the print resolution” on page 31
•“
Printing shortcuts” on page 31
•“
Set the default print settings” on page 32
•“
Stop the current job” on page 99
•“
Print on specialty media
Print
To reverse an image for iron-on transfers
1. On the File menu in your software application, click Print.
2. Make sure the product is the selected printer.
3. Click the button that opens the Properties dialog box.
Depending on your software application, this button might be called Properties,
Options, Printer Setup, Printer, or Preferences.
4. Click the Features tab.
5. In the Paper Type drop-down list, click More, and then select HP Iron-on Transfer
from the list.
6. If the selected size is not what you want, click an appropriate size in the Size list.
7. Click the Advanced tab.
28 Print
Page 32

8. In the Features area, select the Mirror Image check box.
9. Click OK, and then click Print or OK in the Print dialog box.
NOTE: To prevent jams, manually feed the iron-on transfer sheets into the paper
tray one sheet at a time.
To print on transparencies
1. Load the transparency into the paper tray.
2. On the File menu in your software application, click Print.
3. Make sure you have selected the correct printer.
4. Click the button that opens the Properties dialog box.
Depending on your software application, this button might be called Properties,
Options, Printer Setup, Printer, or Preferences.
5. Click the Features tab.
6. In the Basic Options area, click the appropriate transparency type in the Paper
Type list.
TIP: If you want to make notations on the back of the transparencies and erase
them later without scratching the original, click the Advanced tab, and select the
Mirror Image check box.
7. In the Resizing Options area, click an appropriate size in the Size list.
8. Click OK, and then click Print or OK in the Print dialog box.
NOTE: The product automatically waits for transparencies to dry before
releasing them. Ink dries slower on film than on plain paper. Make sure you allow
enough time for the ink to dry before handling the transparency.
Related topics
Paper basics” on page 15
•“
View the print resolution” on page 31
•“
Printing shortcuts” on page 31
•“
Set the default print settings” on page 32
•“
Stop the current job” on page 99
•“
Print a Web page
You can print a Web page from your Web browser on the HP Photosmart.
If you use Internet Explorer 6.0 or higher for Web browsing, you can use HP Smart Web
Printing to ensure simple, predictable web printing with control over what you want and
how you want it printed. You can access HP Smart Web Printing from the toolbar in
Internet Explorer. For more information about HP Smart Web Printing, see the help file
provided with it.
Print
Print a Web page 29
Page 33

Chapter 6
To print a Web page
1. Make sure you have paper loaded in the paper tray.
2. On the File menu in your Web browser, click Print.
The Print dialog box appears.
3. Make sure the product is the selected printer.
4. If your Web browser supports it, select the items on the Web page that you want to
include in the printout.
For example, in Internet Explorer, click the Options tab to select options such as As
laid out on screen, Only the selected frame, and Print all linked documents.
5. Click Print or OK to print the Web page.
TIP: To print Web pages correctly, you might need to set your print orientation to
Landscape.
Print using Maximum dpi
Use maximum dpi mode to print high-quality, sharp images.
To get the most benefit from maximum dpi mode, use it to print high-quality images such
as digital photographs. When you select the maximum dpi setting, the printer software
displays the optimized dots per inch (dpi) that the HP Photosmart printer will print. Printing
in maximum dpi is supported on the following paper-types only:
• HP Premium Plus Photo Paper
• HP Premium Photo Paper
• HP Advanced Photo Paper
• Photo Hagaki cards
Printing in maximum dpi takes longer than printing with other settings and requires a large
amount of disk space.
Print
30 Print
To print in Maximum dpi mode
1. Make sure you have paper loaded in the paper tray.
2. On the File menu in your software application, click Print.
3. Make sure the product is the selected printer.
4. Click the button that opens the Properties dialog box.
Depending on your software application, this button might be called Properties,
Options, Printer Setup, Printer, or Preferences.
5. Click the Advanced tab.
6. In the Features area, select the Enable maximum dpi setting check box.
7. Click the Features tab.
8. In the Paper Type drop-down list, click More, and then select the appropriate paper
type.
9. In the Print Quality drop-down list, click Maximum dpi.
NOTE: To find out what dpi the product will print based on the paper type and
print quality settings you selected, click Resolution.
10. Select any other print settings that you want, and then click OK.
Page 34

Related topics
View the print resolution” on page 31
“
View the print resolution
The printer software displays the print resolution in dots per inch (dpi). The dpi varies
according to the paper type and print quality that you select in the printer software.
To view the print resolution
1. On the File menu in your software application, click Print.
2. Make sure the product is the selected printer.
3. Click the button that opens the Properties dialog box.
Depending on your software application, this button might be called Properties,
Options, Printer Setup, Printer, or Preferences.
4. Click the Features tab.
5. In the Paper Type drop-down list, select the type of paper that you have loaded.
6. In the Print Quality drop-down list, select the appropriate print quality setting for your
project.
7. Click the Resolution button to view the print resolution dpi for the paper type and
print quality combination you selected.
Printing shortcuts
Use printing shortcuts to print with print settings that you use often. The printer software
has several specially designed printing shortcuts that are available in the Printing
Shortcuts list.
NOTE: When you select a printing shortcut the appropriate printing options are
automatically displayed. You can leave them as is, change them, or create your own
shortcuts for commonly used tasks.
Use the Printing Shortcuts tab for the following print tasks:
• General Everyday Printing: Print documents quickly.
• Photo Printing-Borderless: Print to the top, bottom, and side edges of 10 x 15 cm
(4 x 6 inch) and 13 x 18 cm (5 x 7 inch) HP Photo Papers.
• Paper-saving Printing: Print two-sided documents with mutliple pages on same
sheet to reduce paper usage.
• Photo Printing-With White Borders: Print a photo with a white border around the
edges.
• Fast/Economical Printing: Produce draft-quality printouts quickly.
• Presentation Printing: Print high-quality documents, including letters and
transparencies.
• Two-sided (Duplex) Printing: Print two-sided pages with the HP Photosmart
manually.
Printing shortcuts 31
Print
Page 35

Chapter 6
To create a printing shortcut
1. On the File menu in your software application, click Print.
2. Make sure the product is the selected printer.
3. Click the button that opens the Properties dialog box.
Depending on your software application, this button might be called Properties,
Options, Printer Setup, Printer, or Preferences.
4. Click the Printing Shortcuts tab.
5. In the Printing Shortcuts list, click a printing shortcut.
The print settings for the selected printing shortcut are displayed.
6. Change the print settings to those you want in the new printing shortcut.
7. Click Save as and type a name for the new printing shortcut, and then click Save.
The printing shortcut is added to the list.
To delete a printing shortcut
1. On the File menu in your software application, click Print.
2. Make sure the product is the selected printer.
3. Click the button that opens the Properties dialog box.
Depending on your software application, this button might be called Properties,
Options, Printer Setup, Printer, or Preferences.
4. Click the Printing Shortcuts tab.
5. In the Printing Shortcuts list, click the printing shortcut that you want to delete.
6. Click Delete.
The printing shortcut is removed from the list.
NOTE: Only the shortcuts that you have created can be deleted. The original HP
shortcuts cannot be deleted.
Set the default print settings
If there are settings that you frequently use for printing, you might want to make them the
default print settings so they are already set when you open the Print dialog box from
within your software application.
Print
32 Print
To change the default print settings
1. In the HP Solution Center, click Settings, point to Print Settings, and then click
Printer Settings.
2. Make changes to the print settings, and click OK.
Page 36
7 Scan
•“Scan to a computer” on page 33
Scan to a memory card” on page 34
•“
Scan and reprint photos” on page 41
•“
Scan to a computer
To scan to a computer
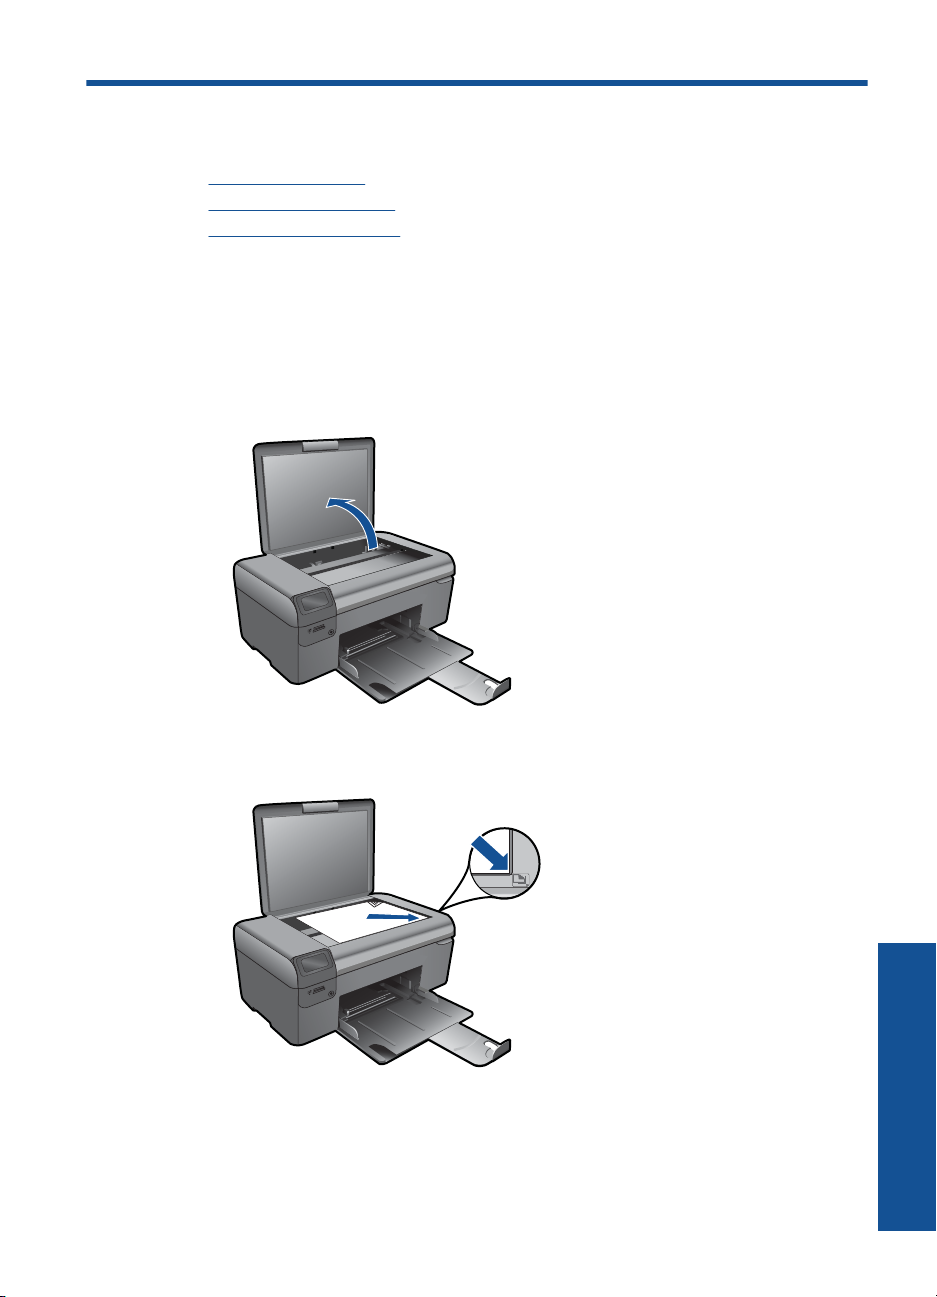
1. Load original.
a. Lift lid on product.
b. Load original print side down on right front corner of glass.
Scan
Scan 33
Page 37
Chapter 7
c.Close lid.
2. Start scan.
a. Press button next to Scan on Home screen.
b. Press button next to Scan to PC.
If product is network-connected, a list of available computers appears. Select
computer to which you want to transfer to start the scan.
3. View the animation for this topic.
Related topics
“
Stop the current job” on page 99
Scan to a memory card
To save a scan to a memory card
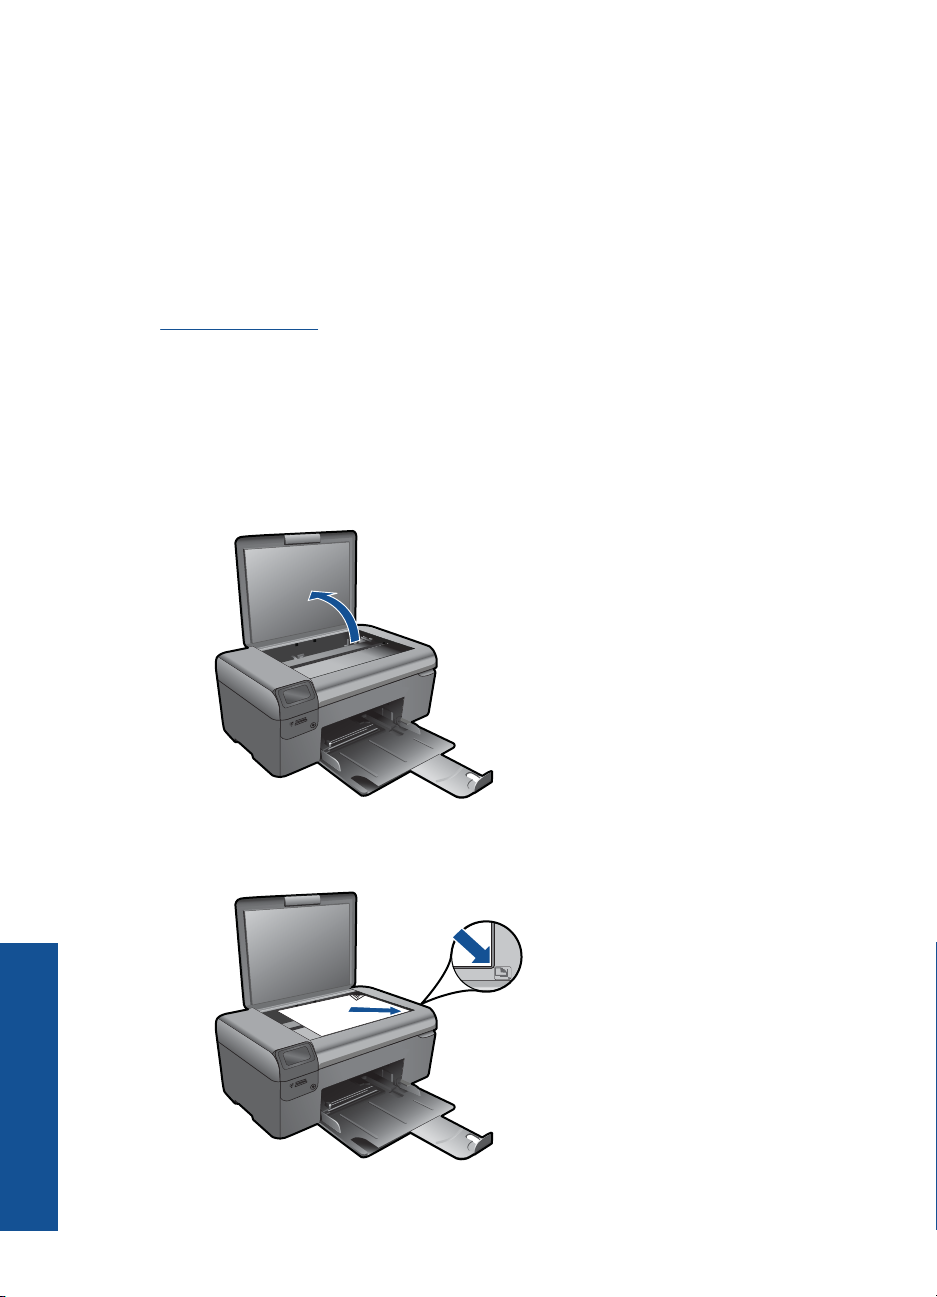
1. Load original.
a. Lift lid on product.
Scan
34 Scan
b. Load original print side down on right front corner of glass.
Page 38
c.Close lid.
2. Select Scan.
a. Press button next to Scan on Home screen.
b. Press button next to Scan to Memory Card.
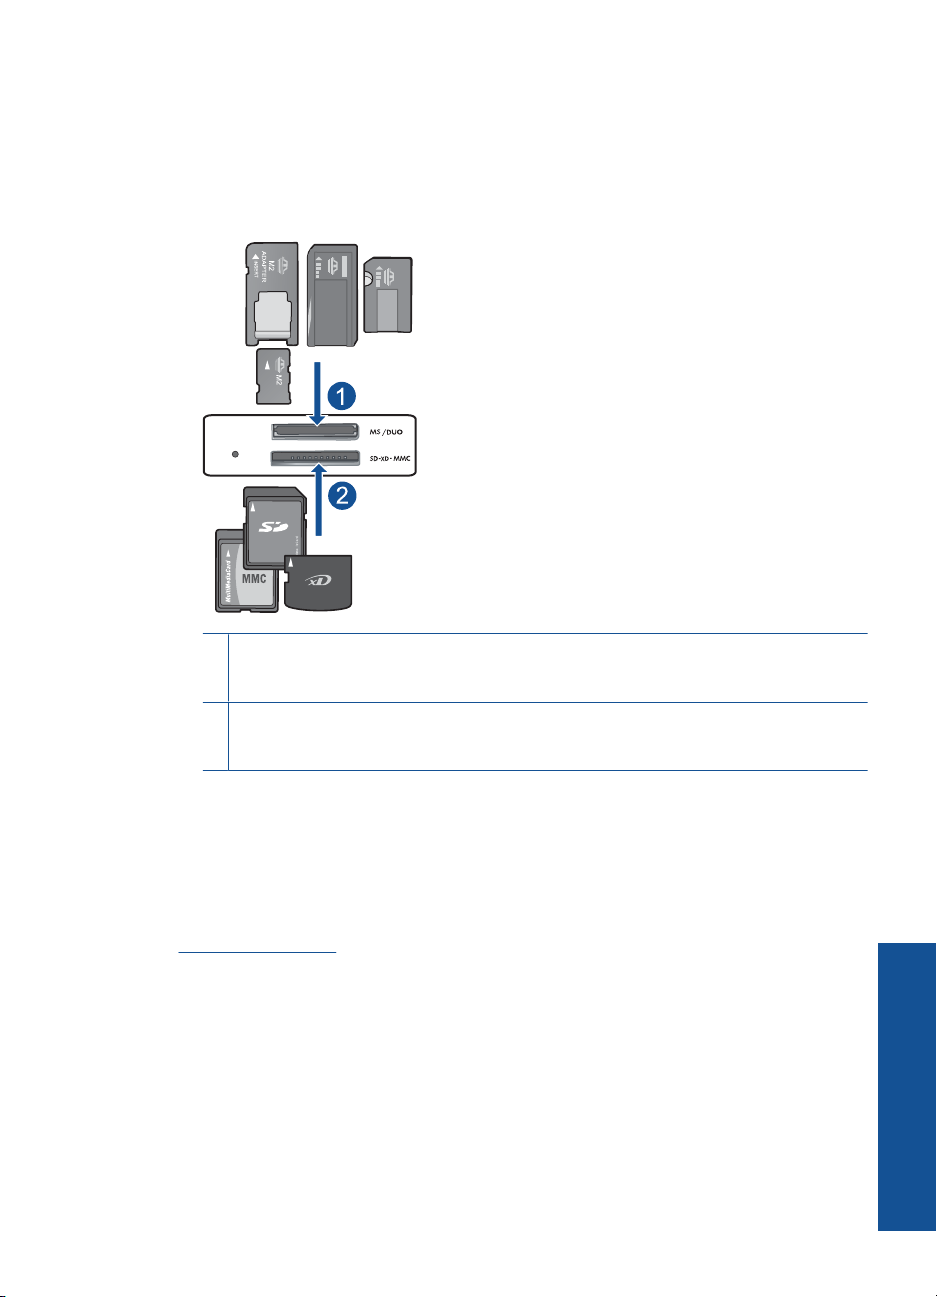
3. Insert memory device.
1 Memory Stick, Memory Stick Pro, Memory Stick Select, Memory Stick Magic Gate,
Memory Stick Duo or Pro Duo (adapter optional), Memory Stick Pro-HG Duo (adapter
optional), or Memory Stick Micro (adapter required)
2 MultiMediaCard (MMC), MMC Plus, Secure MultiMedia Card, MMC Mobile (RS-MMC;
adapter required), Secure Digital (SD), Secure Digital Mini, Secure Digital High Capacity
(SDHC), TransFlash MicroSD Card (adapter required)
4. Start scan.
▲ Press button next to Scan to Memory Card.
5. View the animation for this topic.
Related topics
Stop the current job” on page 99
“
Scan
Scan to a memory card 35
Page 39

Chapter 7
Scan
36 Scan
Page 40
8Copy
•“Copy text or mixed documents” on page 37
Copy photos (reprint)” on page 41
•“
Copy text or mixed documents
Copy text or mixed documents
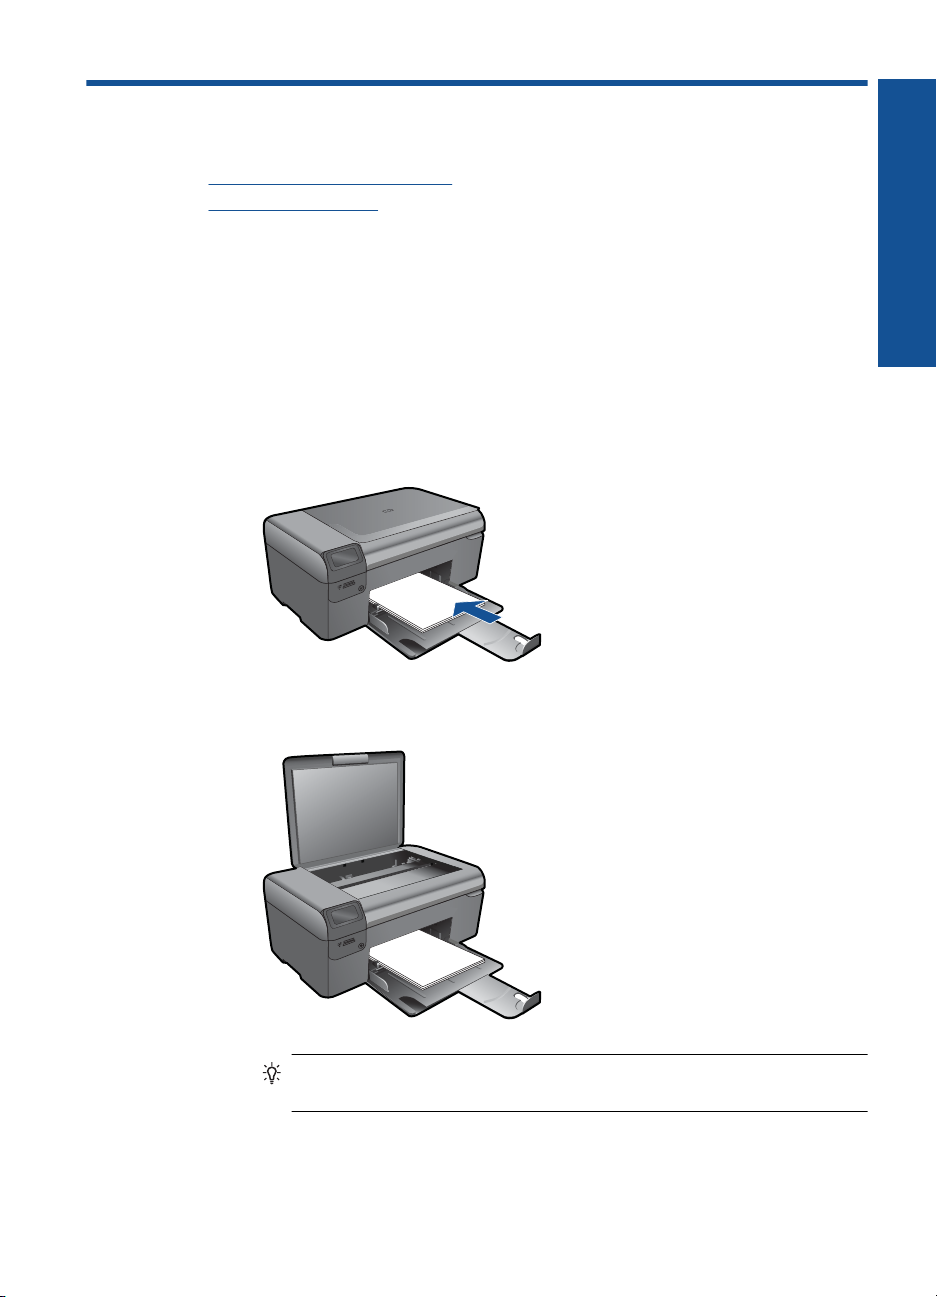
1. Do one of the following:
Make a black and white copy
a. Load paper.
Load full-size paper in paper tray.
b. Load original.
Lift lid on product.
Copy
TIP: To make copies of thick originals, such as books, you can remove
the lid.
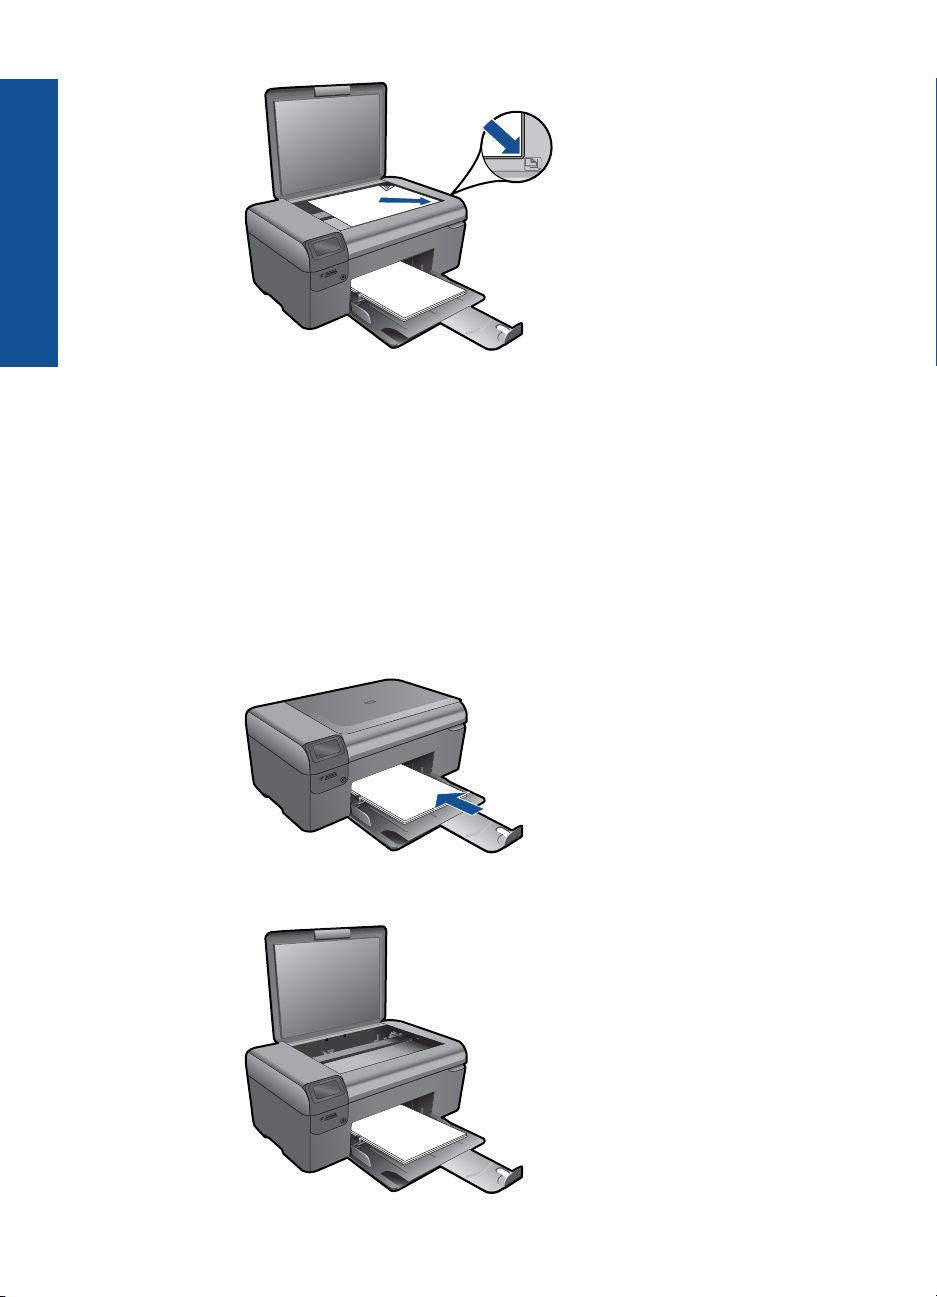
Load original print side down on right front corner of glass.
Copy 37
Page 41
Copy
Chapter 8
Close lid.
c.Select Copy.
Press button next to Copy.
Press button next to Black Copy.
Press button next to Actual Size.
Press button next to Copies to increase number of copies.
d. Start copy.
Press OK.
Make a color copy
a. Load paper.
Load full-size paper in paper tray.
38 Copy
b. Load original.
Lift lid on product.
Page 42
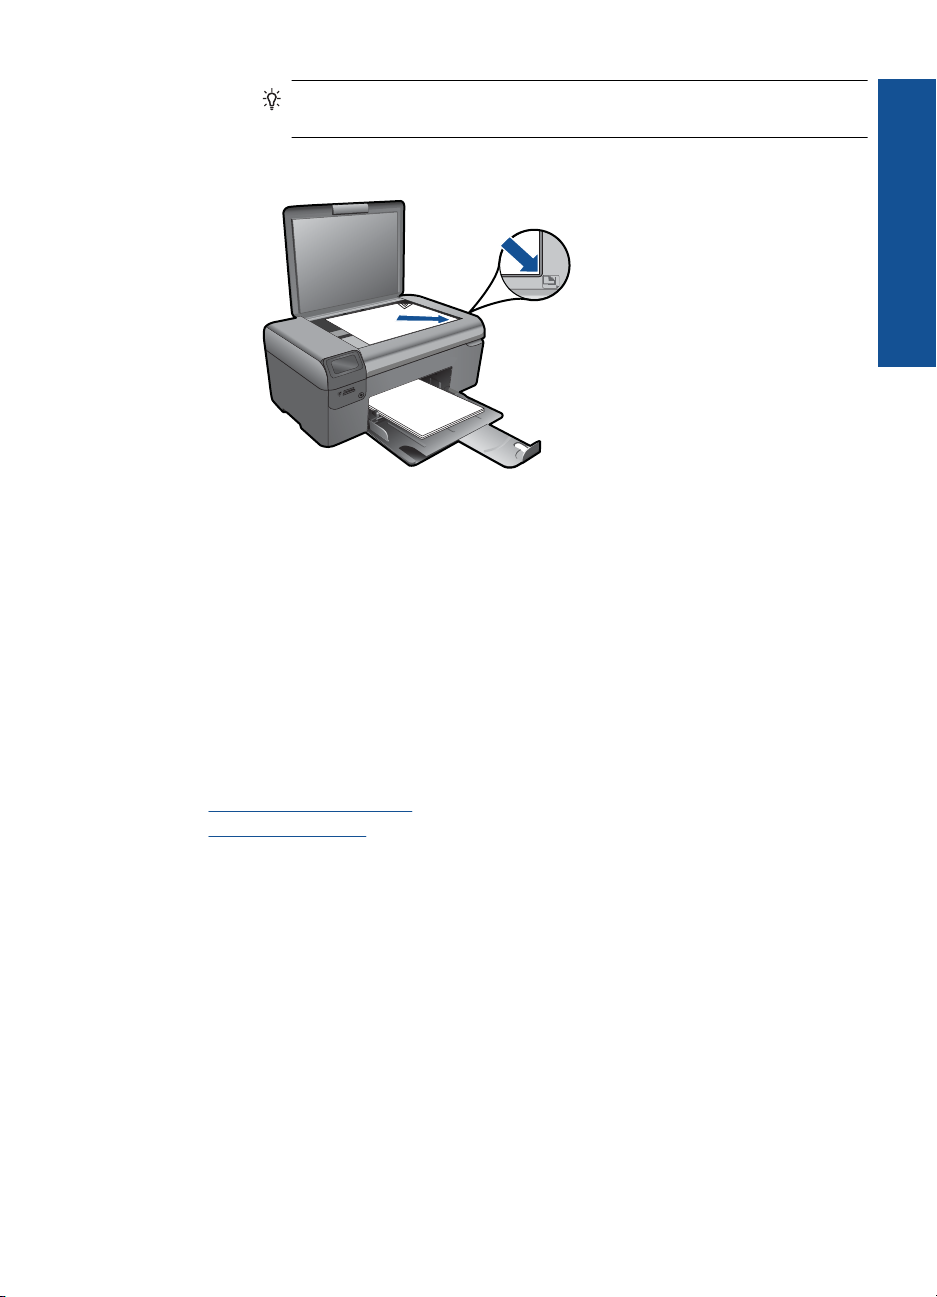
TIP: To make copies of thick originals, such as books, you can remove
the lid.
Load original print side down on right front corner of glass.
Close lid.
c. Select Copy.
Press button next to Copy.
Press button next to Color Copy.
Press button next to Actual Size.
Press button next to Copies to increase number of copies.
d.Start copy.
Press OK.
2. View the animation for this topic.
Copy
Related topics
Change the copy settings” on page 39
•“
Stop the current job” on page 99
•“
Change the copy settings
To set the paper size from the control panel
1. Press the button next to Copy.
2. Select the copy type.
3. Press the button next to 8.5 x 11 Plain.
To set the copy size from the control panel
1. Press the button next to Copy.
2. Select the copy type.
3. Press the button next to Actual Size.
Change the copy settings 39
Page 43

Copy
Chapter 8
To set the number of copies from the control panel
1. Press the button next to Copy.
2. Select the copy type.
3. Press the button next to Copies to increase the number of copies.
40 Copy
Page 44
9 Reprint photos
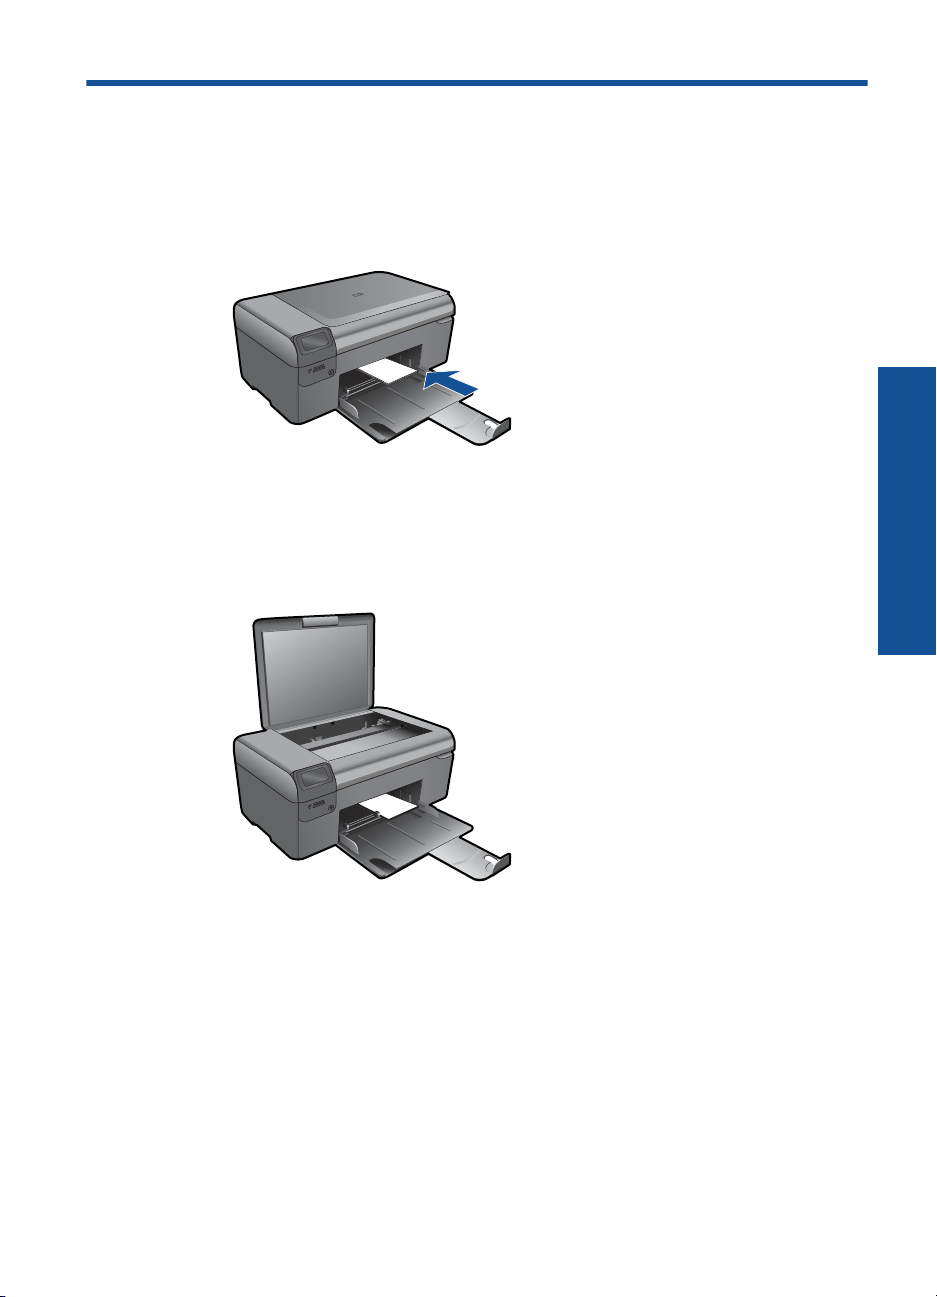
To reprint an original photo
1. Load paper.
▲ Load up to 13 x 18 cm (5 x 7 inch) photo paper in paper tray.
2. Select project type.
a. Press button next to Photo on Home screen.
b. Press button next to Photo Original Reprint.
3. Load original.
a. Lift lid on product.
Reprint photos
b. Load original print side down on right front corner of glass.
Reprint photos 41
Page 45

Reprint photos
Chapter 9
c.Close lid.
d.Press OK.
4. Reprint photo.
a.Press OK.
b. Press button next to Prints to increase number of copies.
c.Press OK.
5. View the animation for this topic.
Related topics
Stop the current job” on page 99
“
42 Reprint photos
Page 46

10 Save photos
You can use the HP Photosmart Software installed on your computer to transfer photos
from a memory card to your computer’s hard drive for advanced photo editing, sharing
photos online, and printing from your computer.
Before transferring photos to your computer, you need to remove the memory card from
your digital camera and insert it in the appropriate memory card slot on the
HP Photosmart.
NOTE: The HP Photosmart must be connected to a computer that has the
HP Photosmart Software installed on it.
To save photos
1. Insert your memory card into the appropriate slot on the product.
The software opens on your computer.
2. Follow the onscreen prompts on your computer to save the photos to your computer.
NOTE: Only images that were not previously saved are copied to your computer.
Save photos 43
Save photos
Page 47

Chapter 10
Save photos
44 Save photos
Page 48

11 Maintain the HP Photosmart
• Check the estimated ink levels
Replace the cartridges
•
Order ink supplies
•
Cartridge warranty information
•
Print and evaluate a print quality report
•
Check the estimated ink levels
You can easily check the ink supply level to determine how soon you might need to
replace a cartridge. The ink supply level shows an estimate of the amount of ink remaining
in the cartridges.
NOTE: If you have installed a refilled or remanufactured cartridge, or a cartridge that
has been used in another printer, the ink level indicator might be inaccurate or
unavailable.
NOTE: Ink level warnings and indicators provide estimates for planning purposes
only. When you receive a low-ink warning message, consider having a replacement
cartridge available to avoid possible printing delays. You do not have to replace the
cartridges until the print quality is unacceptable.
NOTE: Ink from the cartridges is used in the printing process in a number of different
ways, including in the initialization process, which prepares the product and cartridges
for printing, and in printhead servicing, which keeps print nozzles clear and ink flowing
smoothly. In addition, some residual ink is left in the cartridge after it is used. For more
information, see
www.hp.com/go/inkusage.
To check the ink levels from the HP Photosmart Software
1. In the HP Solution Center, click Settings, point to Print Settings, and then click
Printer Toolbox.
NOTE: You can also open the Printer Toolbox from the Print Properties dialog
box. In the Print Properties dialog box, click the Features tab, and then click the
Printer Services button.
The Printer Toolbox appears.
2. Click the Estimated Ink Level tab.
The estimated ink levels for the ink cartridges appear.
Related topics
“
Order ink supplies” on page 48
Maintain the HP Photosmart 45
Maintain the HP Photosmart
Page 49
Chapter 11
Replace the cartridges
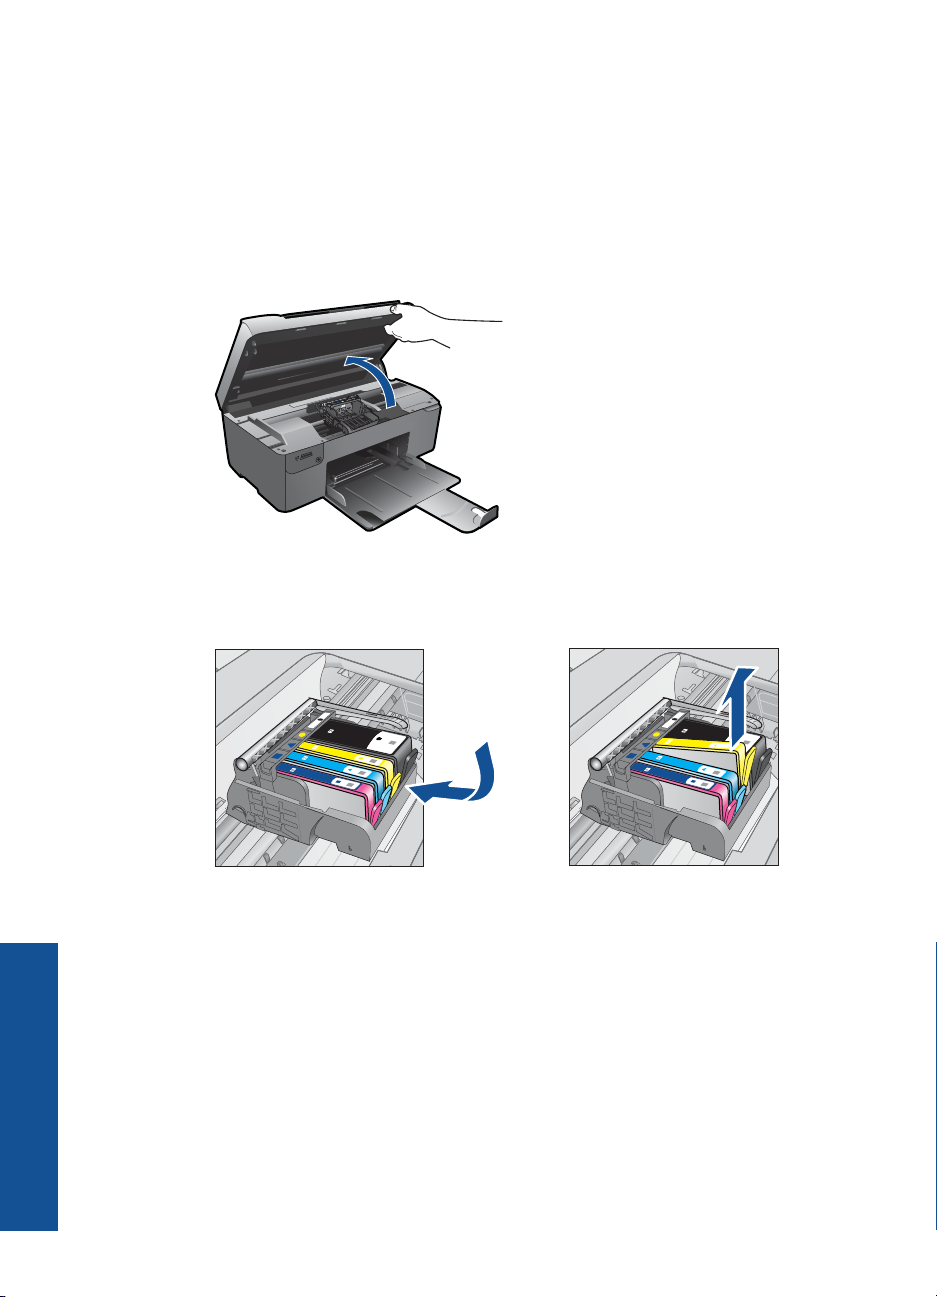
To replace the cartridges
1. Check that power is on.
2. Remove cartridge.
a. Open cartridge access door.
Wait for print carriage to move to center of product.
b. Press tab on cartridge, then remove it from slot.
3. Insert new cartridge.
a. Remove cartridge from packaging.
Maintain the HP Photosmart
46 Maintain the HP Photosmart
Page 50
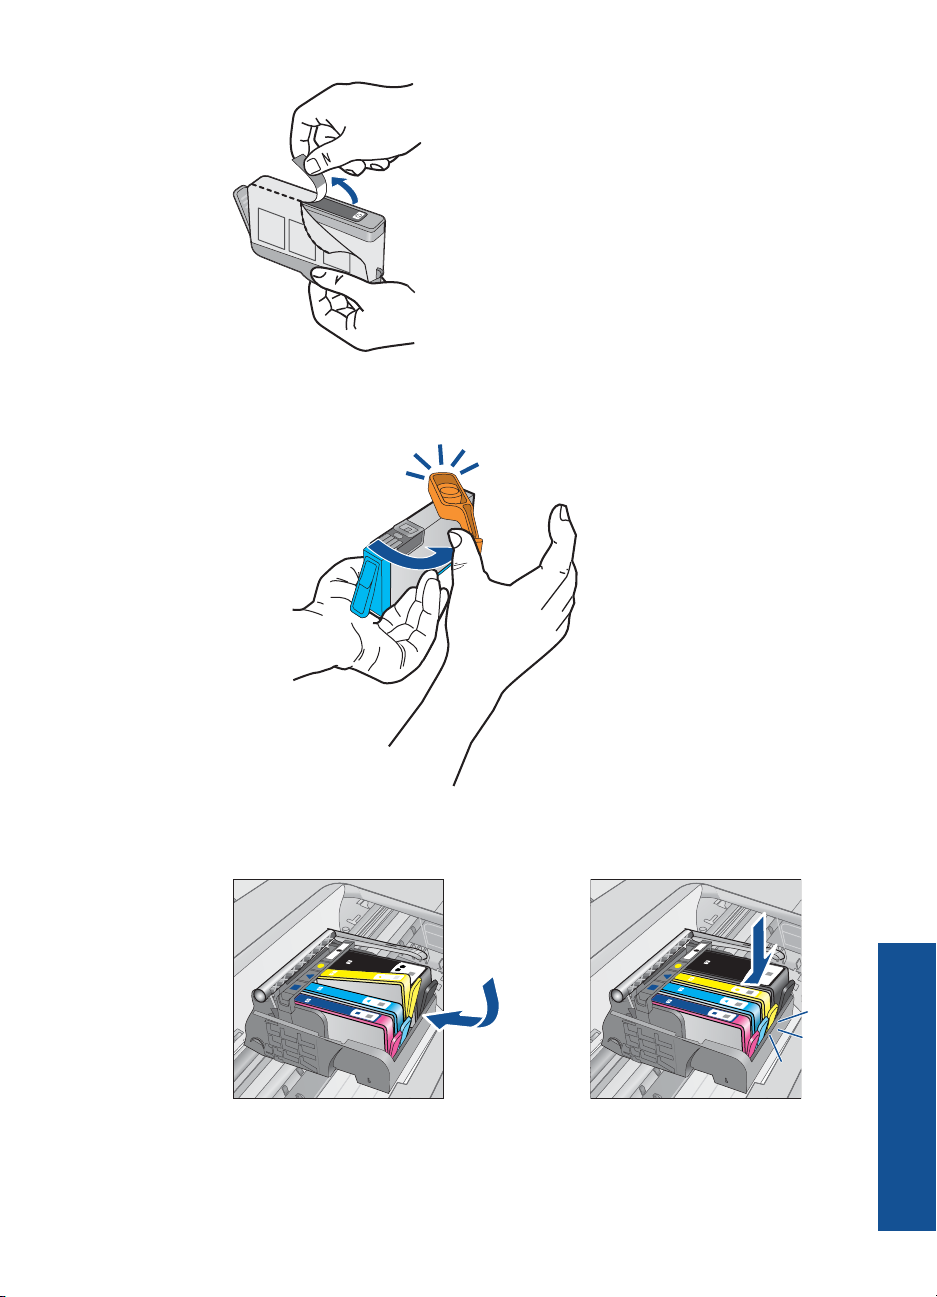
b. Twist orange cap to snap it off. A forceful twist may be required to remove cap.
c. Match color icons, then slide cartridge into slot until it clicks into place.
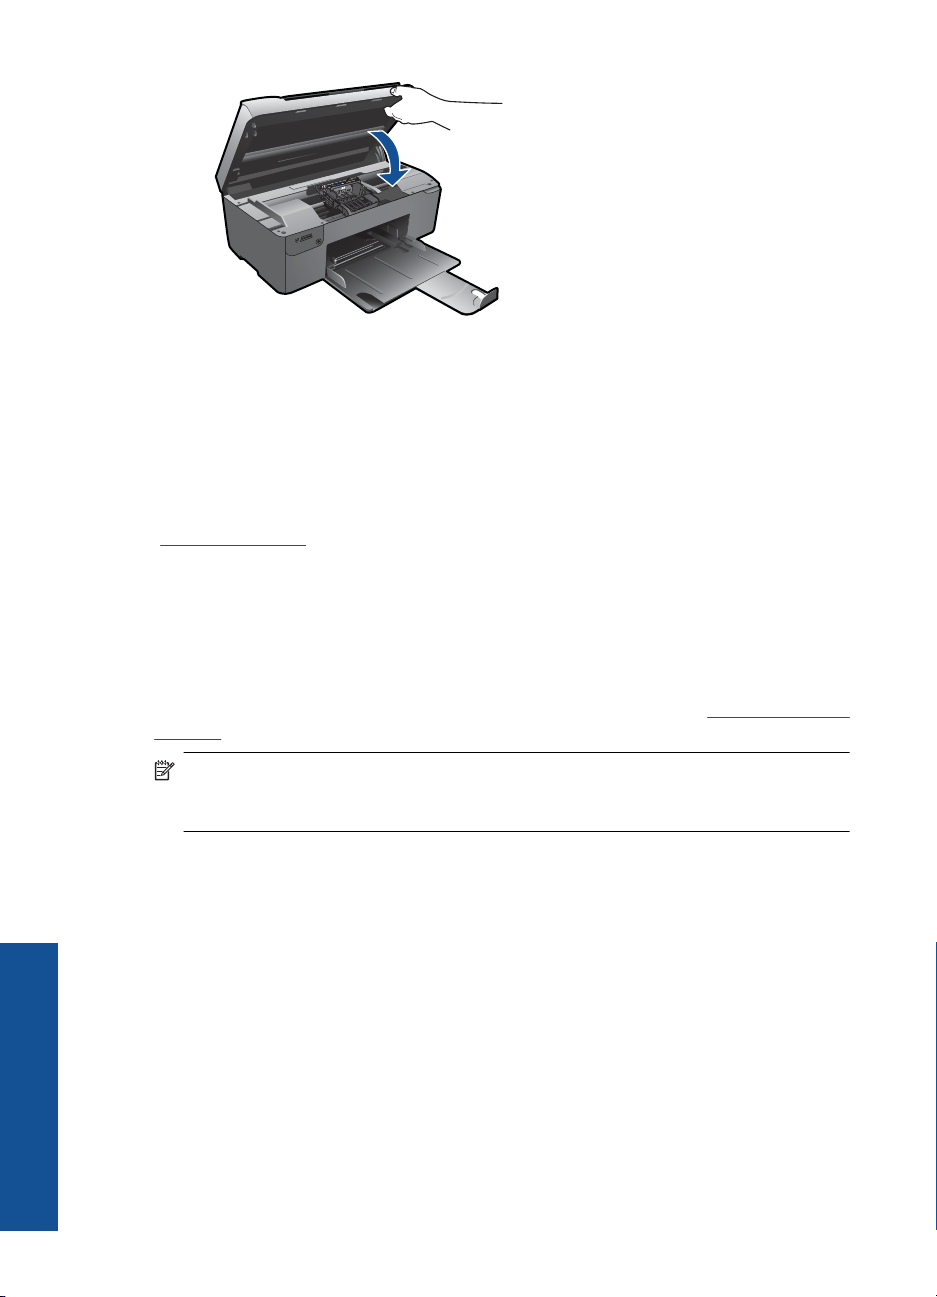
d. Close cartridge door.
Maintain the HP Photosmart
Replace the cartridges 47
Page 51
Chapter 11
4. Align cartridges.
a. When prompted, press OK to print cartridge alignment page.
b. Load page print side down on right front corner of glass, and then press OK to
scan page.
c. Remove alignment page and recycle or discard it.
5. View the animation for this topic.
Related topics
Order ink supplies” on page 48
“
Order ink supplies
To learn which HP supplies work with your product, order supplies online, or create a
printable shopping list, open HP Solution Center, and select the online shopping feature.
Cartridge information and links to online shopping also appear on ink alert messages. In
addition, you can find cartridge information and order online by visiting
supplies.
NOTE: Ordering cartridges online is not supported in all countries/regions. If it is not
supported in your country/region, contact a local HP reseller for information about
purchasing cartridges.
Cartridge warranty information
The HP cartridge warranty is applicable when the product is used in its designated HP
printing device. This warranty does not cover HP ink products that have been refilled,
remanufactured, refurbished, misused, or tampered with.
Maintain the HP Photosmart
During the warranty period the product is covered as long as the HP ink is not depleted
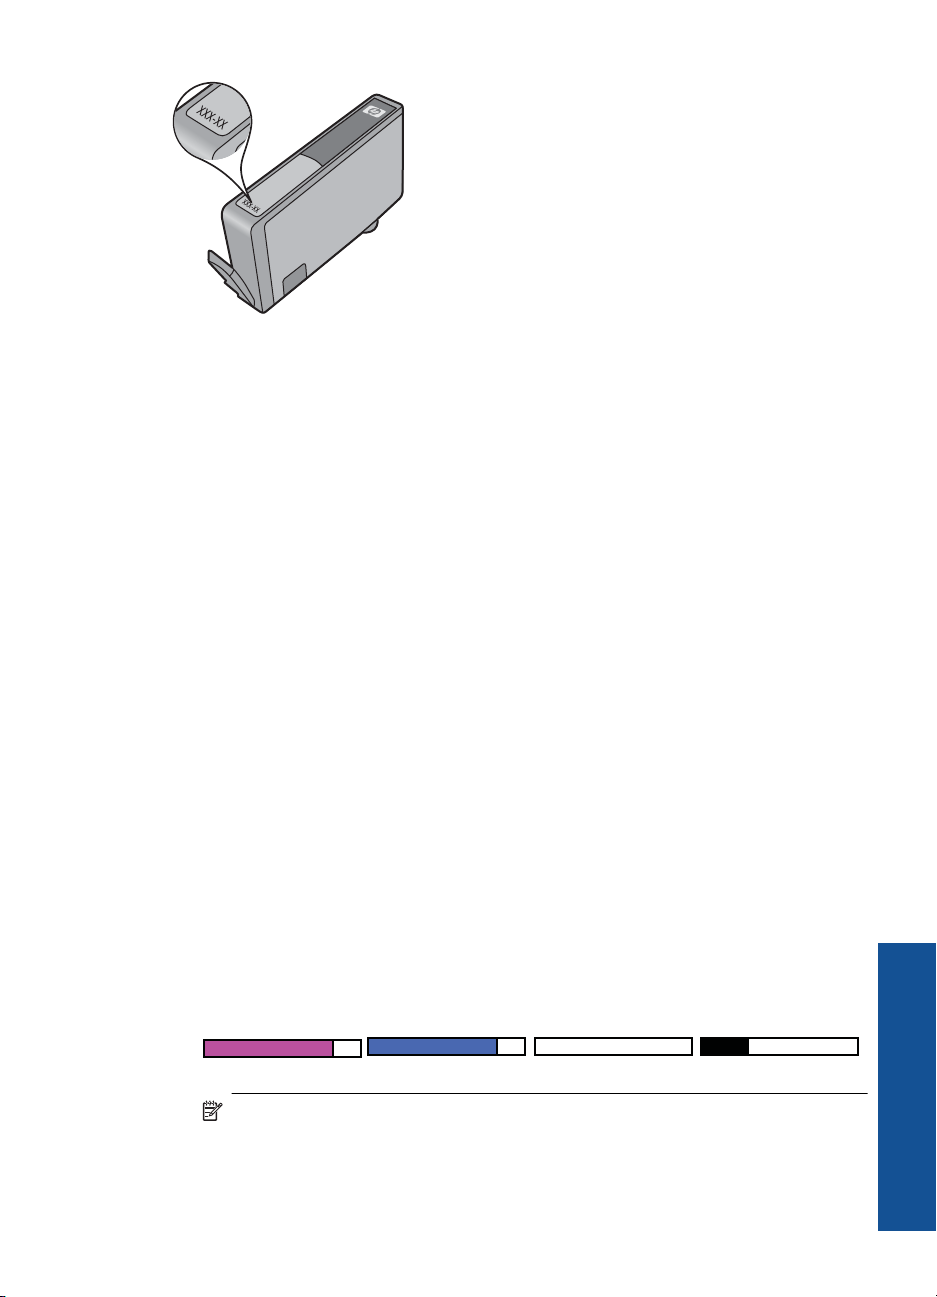
and the end of warranty date has not been reached. The end of warranty date, in YYYY/
MM/DD format, may be found on the product as indicated:
www.hp.com/buy/
48 Maintain the HP Photosmart
Page 52
For a copy of the HP Limited Warranty Statement, see the printed documentation that
came with the product.
Print and evaluate a print quality report
Print quality issues can occur for a variety of reasons. You might be using the wrong
software settings or printing a poor quality source file, or there might be a problem with
the printing system in the HP Photosmart. If you are unhappy with the quality of your
prints, you can print a print quality report to help you determine if the printing system is
working properly.
To print a print quality report
1. Load letter or A4 unused plain white paper into the paper tray.
2. Press the top-left, bottom-left, top-left, and top-left buttons in sequence.
The Engineering Menu appears.
3. Press OK to select Manufacturing Menu.
4. Press OK to select reports menu.
5. Press OK to select print-mech tap tests.
6. Press the top-right button until the code displayed changes to 72.
7. Press OK.
The product prints a print quality report that you can use to diagnose print quality
issues.
To evaluate the print quality report
1. Check the ink levels shown on the page. If a cartridge shows very low ink levels and
you find the print quality unacceptable, consider replacing that ink cartridge. Print
quality typically deteriorates as cartridges run out of ink.
NOTE: If the print quality report is not legible, you can check the estimated ink
levels from the control panel or HP Photosmart Software.
Print and evaluate a print quality report 49
Maintain the HP Photosmart
Page 53
Chapter 11
NOTE: Ink level warnings and indicators provide estimates for planning
purposes only. When you receive a low-ink warning message, consider having a
replacement cartridge available to avoid possible printing delays. You do not need
to replace the ink cartridges until print quality becomes unacceptable.
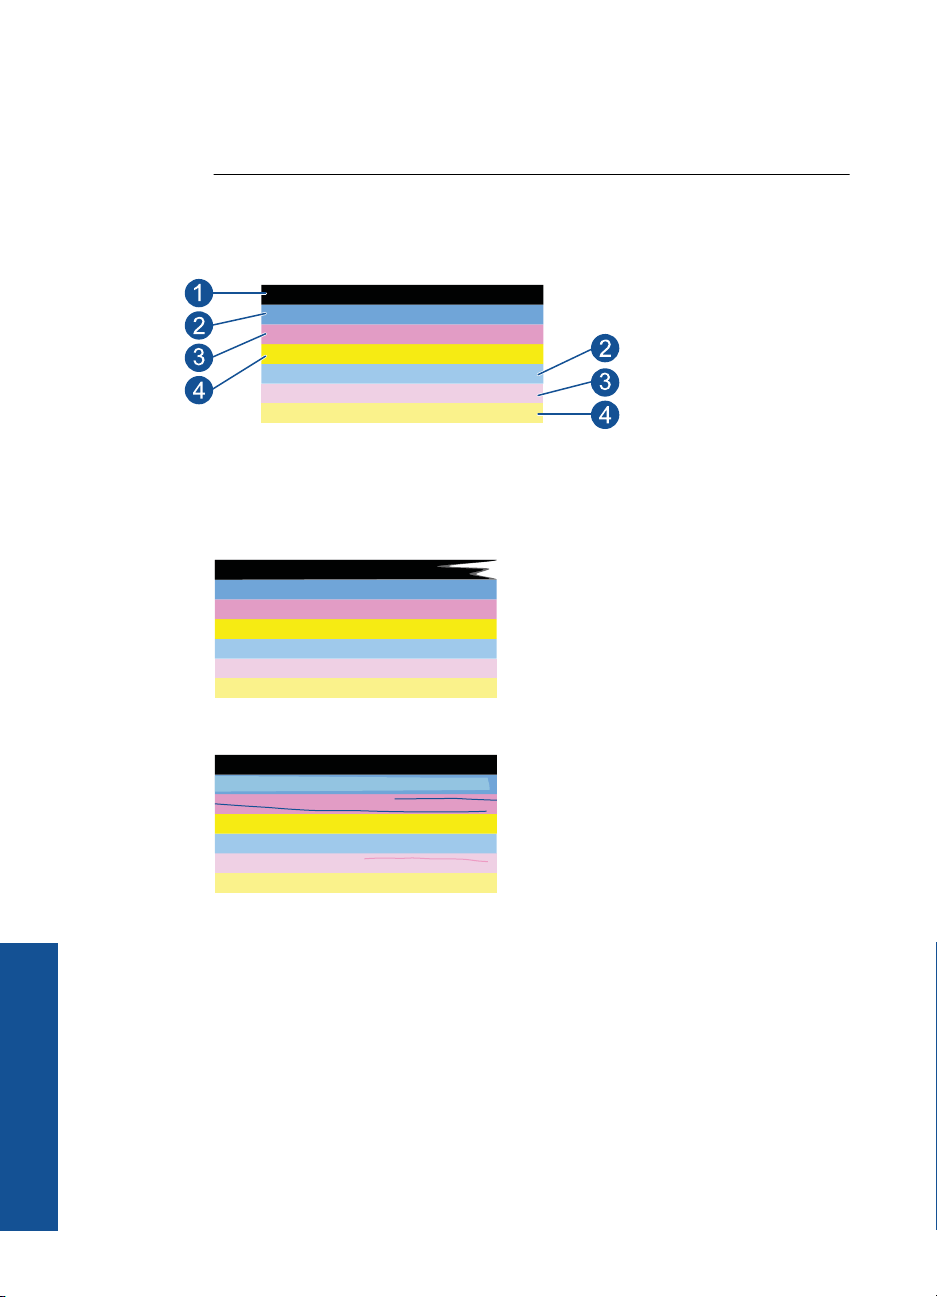
2. Look at the color bars in the middle of the page. The bars should be solid, have sharp
edges, and extend with uniform color all the way across the page.
Figure 11-1 Color bars - expected result
• If any of the color bars are irregularly streaked, lighter on one side, or contain one
or more streaks of a different color, refer to the following steps.
Figure 11-2 Color bars - irregularly streaked or faded bar (top bar)
Figure 11-3 Color bars - color mixing (yellow bar contains magenta streaks)
◦ Check the estimated ink levels in the cartridges.
◦ Check if the cartridge corresponding to the streaked bar has the orange tab
removed.
Maintain the HP Photosmart
◦ Reinstall the cartridge and make sure all of the cartridges are properly
installed.
50 Maintain the HP Photosmart
Page 54
◦ Clean the printhead, and then print this diagnostic page again.
◦ If cleaning the printhead does not solve this print quality issue, replace the
cartridge corresponding to the streaked bar.
NOTE: If replacing the cartridge does not solve this print quality issue,
contact HP support for service.
• If any of the color bars show regular white streaks, refer to the following steps.
◦ If line 11 on the diagnostic page reads PHA TTOE = 0, align the printer.
◦ If line 11 on the diagnostic page shows a different value or aligning does not
help, clean the printhead.
NOTE: If cleaning the printhead does not solve this print quality issue,
contact HP support for service.
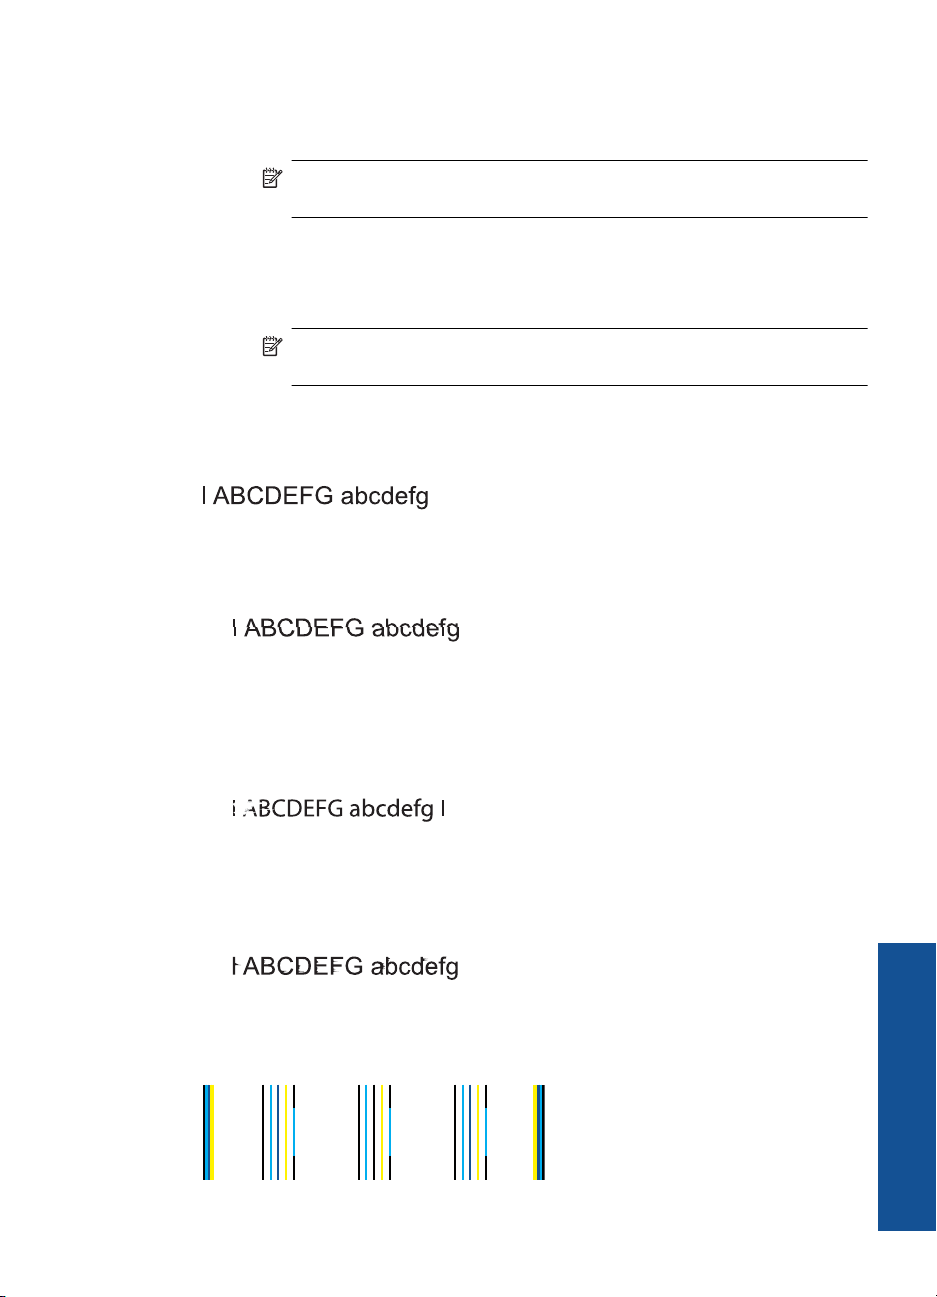
3. Look at the large text above the alignment pattern. The type should be sharp and
clear.
Figure 11-4 Sample text area - expected result
• If the type is jagged, align the printer, and then print this diagnostic page again.
Figure 11-5 Sample text area - jagged text
• If the text is uneven and ragged at one end, clean the printhead, and then print
this diagnostic page again. If this occurs right after a new cartridge is installed,
the automatic device servicing routines may solve the problem in a day or so.
Figure 11-6 Sample text area - uneven ink distribution
• If the text is smeared, check if the paper is curled, clean the printhead, and then
print this diagnostic page again.
Figure 11-7 Sample text area - streaks or smears
4. Look at the alignment pattern above the color bars. The lines should be straight and
sharp.
Figure 11-8 Alignment pattern - expected result
Print and evaluate a print quality report 51
Maintain the HP Photosmart
Page 55

Chapter 11
If the lines are jagged, align the printer, and then print this diagnostic page again.
Figure 11-9 Alignment pattern - jagged lines
NOTE: If aligning the printer does not solve this print quality issue, contact HP
support for service.
If you do not see any defects on the print quality report, then the printing system is working
correctly. There is no reason to replace supplies or have the product serviced, because
they are functioning properly. If you still have a print quality problem, here are some other
things you can check:
• Check the paper.
• Check the print settings.
• Make sure your image has sufficient resolution.
• If the problem seems confined to a band near the edge of your printout, use the
software you installed with the product or another software application to rotate the
image 180 degrees. The problem might not appear on the other end of the print.
Maintain the HP Photosmart
52 Maintain the HP Photosmart
Page 56

12 Solve a problem
This section contains the following topics:
HP support
•
Setup troubleshooting
•
Print troubleshooting
•
Print quality troubleshooting
•
Memory card troubleshooting
•
Scan troubleshooting
•
Copy troubleshooting
•
Errors
•
HP support
• HP support by phone
Additional warranty options
•
HP support by phone
Phone support options and availability vary by product, country/region, and language.
This section contains the following topics:
•
Phone support period
Placing a call
•
After the phone support period
•
Solve a problem
Phone support period
One year of phone support is available in North America, Asia Pacific, and Latin America
(including Mexico). To determine the duration of phone support in Europe, the Middle
East, and Africa, go to
Placing a call
Call HP support while you are in front of the computer and the product. Be prepared to
provide the following information:
• Product name (HP Photosmart Wireless B109 series)
• Model number (located near the cartridge access area)
www.hp.com/support. Standard phone company charges apply.
Solve a problem 53
Page 57

[[[[[
Chapter 12
Solve a problem
• Serial number (located on the back or bottom of the product)
• Messages that appear when the situation occurs
• Answers to these questions:
◦ Has this situation happened before?
◦ Can you re-create it?
◦ Did you add any new hardware or software to your computer at about the time
that this situation began?
◦ Did anything else occur prior to this situation (such as a thunderstorm, product
was moved, etc.)?
For the list of support phone numbers, visit
www.hp.com/support.
After the phone support period
After the phone support period, help is available from HP at an additional cost. Help may
also be available at the HP online support Web site:
HP dealer or call the support phone number for your country/region to learn more about
support options.
Additional warranty options
Extended service plans are available for the HP Photosmart at additional costs. Go to
www.hp.com/support, select your country/region and language, then explore the services
and warranty area for information about the extended service plans.
Setup troubleshooting
This section contains setup troubleshooting information for the product.
Many issues are caused when the product is connected to the computer using a USB
cable before the product software is installed on the computer. If you connected the
54 Solve a problem
www.hp.com/support. Contact your
Page 58

product to your computer before the software installation screen prompted you to do so,
you must follow these steps:
Troubleshooting common setup issues
1. Disconnect the USB cable from the computer.
2. Uninstall the software (if you have already installed it).
For more information, see “
Uninstall and reinstall the software” on page 59.
3. Restart your computer.
4. Turn off the product, wait one minute, then restart it.
5. Reinstall the HP Photosmart software.
CAUTION: Do not connect the USB cable to the computer until prompted by the
software installation screen.
This section contains the following topics:
•
The product will not turn on
After setting up the product, it does not print
•
The wrong measurements are showing in menus on the display
•
The registration screen does not appear
•
Uninstall and reinstall the software
•
The product will not turn on
Try the following solutions if there are no light indications, no noise, and no movement
from the product when you turn it on.
•
Solution 1: Check the power cord
Solution 2: Reset the product
•
Solution 3: Press the On button more slowly
•
Solution 4: Contact HP to replace the power supply
•
Solution 5: Contact HP support for service
•
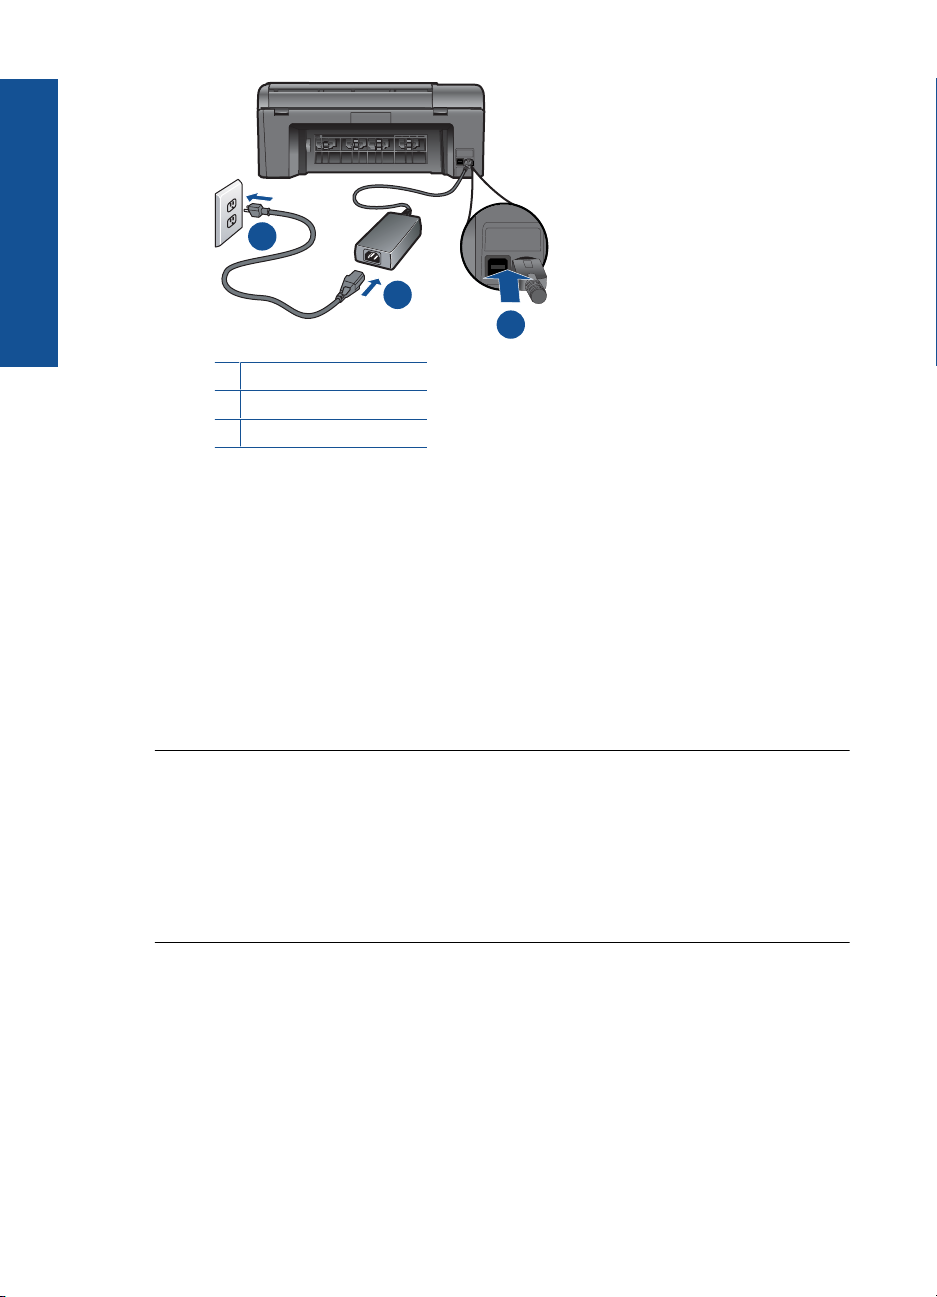
Solution 1: Check the power cord
Solution:
• Make sure you are using the power cord that came with the product.
• Make sure the power cord is firmly connected to both the product and the power
adapter. Plug the power cord into a power outlet, surge protector, or power strip.
Solve a problem
Setup troubleshooting 55
Page 59
Chapter 12
Solve a problem
1 Power connection
2 Power cord and adapter
3 Power outlet
• If you are using a power strip, make sure the power strip is turned on. Or, try
plugging the product directly into a power outlet.
• Test the power outlet to make sure it is working. Plug in an appliance that you
know works, and see if the appliance has power. If not, then there might be a
problem with the power outlet.
• If you plugged the product into a switched outlet, make sure the outlet is switched
on. If it is switched on but still does not work, then there might be a problem with
the power outlet.
Cause: There was a problem with the power cord or the power supply.
If this did not solve the issue, try the next solution.
Solution 2: Reset the product
Solution: Turn off the product, and then unplug the power cord. Plug the power
cord back in, and then press the On button to turn on the product.
Cause: The product experienced an error.
If this did not solve the issue, try the next solution.
Solution 3: Press the On button more slowly
Solution: The product might not respond if you press the On button too quickly.
Press the On button once. It might take a few minutes for the product to turn on. If
you press the On button again during this time, you might turn the product off.
56 Solve a problem
Page 60

CAUTION: If the product still does not turn on, it might have a mechanical failure.
Unplug the product from the power outlet.
Contact HP support for service.
Go to:
www.hp.com/support. If prompted, choose your country/region, and then
click Contact HP for information on calling for technical support.
Cause: You pressed the On button too quickly.
If this did not solve the issue, try the next solution.
Solution 4: Contact HP to replace the power supply
Solution: Contact HP support to request a power supply for the product.
Go to:
www.hp.com/support.
If prompted, choose your country/region, and then click Contact HP for information
on calling for technical support.
Cause: The power supply was not intended for use with this product.
If this did not solve the issue, try the next solution.
Solution 5: Contact HP support for service
Solution: If you have completed all of the steps provided in the previous solutions
and are still having a problem, contact HP support for service.
Go to:
www.hp.com/support.
If prompted, choose your country/region, and then click Contact HP for technical
support.
Cause: You might need assistance to enable the product or software to function
properly.
After setting up the product, it does not print
Try the following solutions to resolve the issue. Solutions are listed in order, with the most
likely solution first. If the first solution does not solve the problem, continue trying the
remaining solutions until the issue is resolved.
•
Solution 1: Press the On button to turn on the product
Solution 2: Set your product as the default printer
•
Solution 3: Check the connection between the product and computer
•
Solve a problem
Solution 1: Press the On button to turn on the product
Solution: Look at the display on the product. If the display is blank and the On
button is not lit, the product is turned off. Make sure the power cord is firmly connected
to the product and plugged into a power outlet. Press the On button to turn on the
product.
Setup troubleshooting 57
Page 61
Chapter 12
Solve a problem
Cause: The product might not have been turned on.
If this did not solve the issue, try the next solution.
Solution 2: Set your product as the default printer
Solution: Check your computer documentation to change your product to be the
default printer.
Cause: You sent the print job to the default printer, but this product was not the
default printer.
If this did not solve the issue, try the next solution.
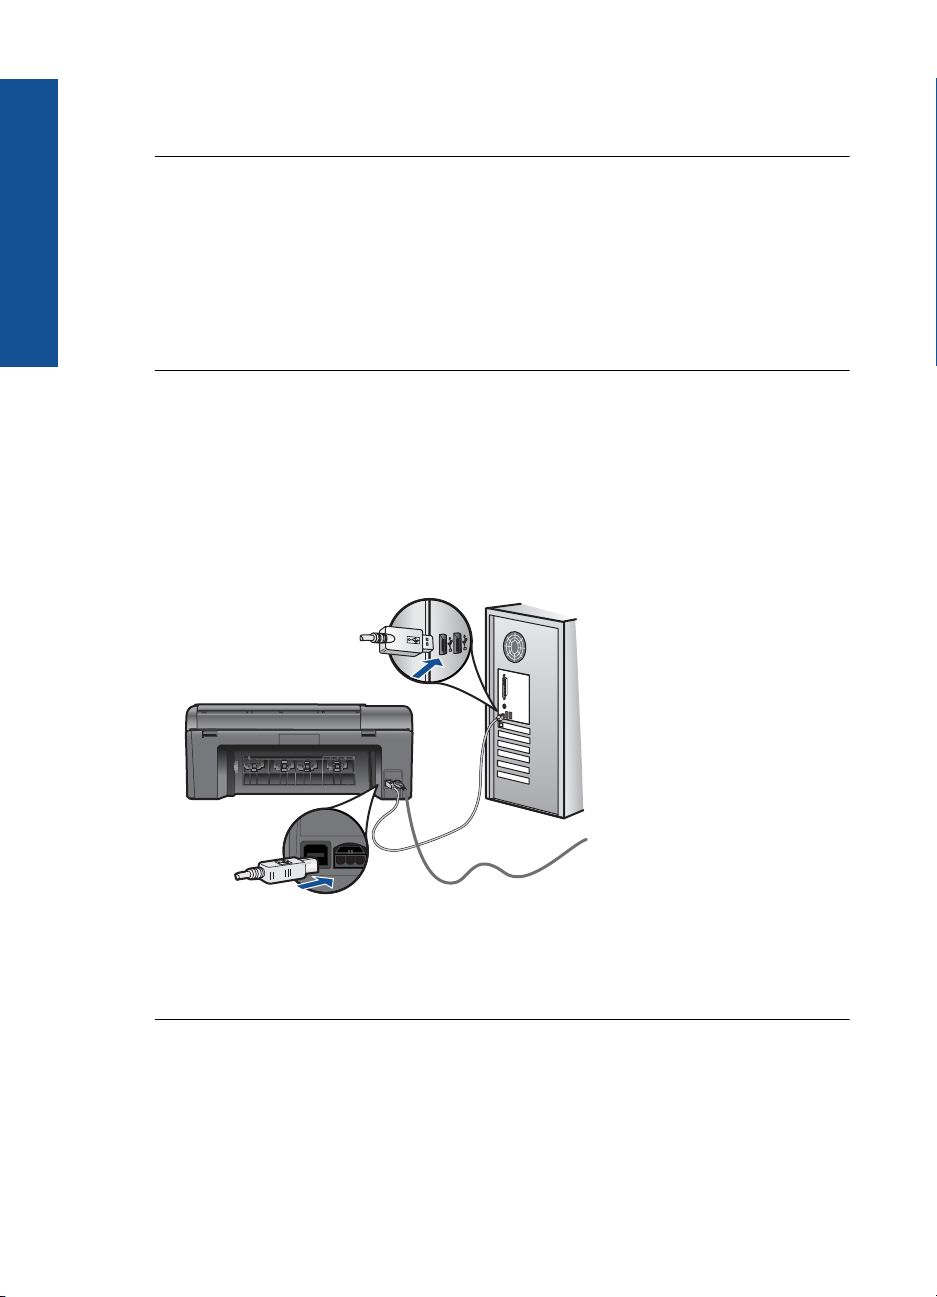
Solution 3: Check the connection between the product and computer
Solution: Check the connection from the product to your computer. Verify that the
USB cable is securely plugged into the USB port on the back of the product. Make
sure the other end of the USB cable is plugged into a USB port on your computer.
After the cable is connected properly, turn off the product and then on again. If the
product is connected to the computer through a wireless connection, make sure that
the connection is active and the product is turned on.
For more information on setting up the product and connecting it to your computer,
see the setup instructions that came with the product.
Cause: The product and computer were not communicating with each other.
58 Solve a problem
Page 62

The wrong measurements are showing in menus on the display
Solution: Change the language setting.
To set your language and country/region
1. Press the button next to Copy on the Home screen.
The Copy Menu appears.
2. Press the top-right, middle-left, and bottom-left buttons in sequence.
The Basic Settings menu appears.
3. Press the button next to Set Language.
4. Press the buttons next to the up arrow or down arrow icons on the display to scroll
through the languages. When the language you want to use is highlighted, press
OK.
5. When prompted, press the button next to Yes for confirmation.
The Basic Settings menu reappears.
6. Press the button next to Set Region.
7. Press the buttons next to the up arrow or down arrow icons on the display to scroll
through the countries/regions. When the country/region you want to use is
highlighted, press OK.
8. When prompted, press the button next to Yes for confirmation.
Cause: You might have selected the incorrect country/region when setting up the
product. The country/region you select determines the paper sizes shown on the
display.
Solve a problem
The registration screen does not appear
Solution: You can access the registration (Sign up now) screen from the Windows
taskbar by clicking Start, pointing to Programs or All Programs, HP, Photosmart
Wireless B109n series, and then clicking Product Registration.
Cause: The registration screen did not launch automatically.
Uninstall and reinstall the software
If your installation is incomplete, or if you connected the USB cable to the computer before
prompted by the software installation screen, you might need to uninstall and then
reinstall the software. Do not simply delete the HP Photosmart application files from your
computer. Make sure to remove them properly using the uninstall utility provided when
you installed the software that came with the HP Photosmart.
To uninstall and reinstall the software
1. Disconnect the product from your computer.
2. On the Windows taskbar, click Start, Settings, Control Panel (or just Control
Panel).
3. Double-click Add/Remove Programs (or click Uninstall a program).
Setup troubleshooting 59
Page 63

Chapter 12
Solve a problem
4. Select HP Photosmart All-in-One Driver Software, and then click Change/
Remove.
Follow the onscreen instructions.
5. Restart your computer.
NOTE: It is important that you disconnect the product before restarting your
computer. Do not connect the product to your computer until after you have
reinstalled the software.
6. Insert the product CD-ROM into your computer’s CD-ROM drive and then start the
Setup program.
NOTE: If the Setup program does not appear, locate the setup.exe file on the
CD-ROM drive and double-click it.
NOTE: If you no longer have the installation CD, you can download the software
from
www.hp.com/support.
7. Follow the onscreen instructions and the setup instructions that came with the
product.
When the software installation is complete, the HP Digital Imaging Monitor icon appears
in the Windows system tray.
Print troubleshooting
Try the following solutions to resolve the issue. Solutions are listed in order, with the most
likely solution first. If the first solution does not solve the problem, continue trying the
remaining solutions until the issue is resolved.
•
Check cartridges
Check paper
•
Check product
•
Check the print settings
•
Reset the product
•
Contact HP support for service
•
60 Solve a problem
Page 64

Check cartridges
Follow these steps.
•
Step 1: Make sure you are using genuine HP ink cartridges
Step 2: Check the ink levels
•
Step 1: Make sure you are using genuine HP ink cartridges
Solution: Check to see if your ink cartridges are genuine HP ink cartridges.
HP recommends that you use genuine HP ink cartridges. Genuine HP ink cartridges
are designed and tested with HP printers to help you easily produce great results,
time after time.
NOTE: HP cannot guarantee the quality or reliability of non-HP supplies. Product
service or repairs required as a result of using a non-HP supply will not be covered
under warranty.
If you believe you purchased genuine HP ink cartridges, go to:
www.hp.com/go/anticounterfeit
Cause: Non-HP ink cartridges were being used.
Step 2: Check the ink levels
Solution: Check the estimated ink levels in the cartridges.
NOTE: Ink level warnings and indicators provide estimates for planning
purposes only. When you receive a low-ink warning message, consider having a
replacement cartridge available to avoid possible printing delays. You do not need
to replace the cartridges until print quality becomes unacceptable.
Solve a problem
Check paper
Follow these steps.
•
•
Step 1: Use the correct paper type
For more information, see:
Check the estimated ink levels” on page 45
“
Cause: The ink cartridges might have insufficient ink.
Step 1: Use the correct paper type
Step 2: Load the stack of paper correctly
Solution: HP recommends that you use HP papers or any other paper type that is
appropriate for the product. Make sure only one type of paper is loaded at a time.
Always make sure the paper you are printing on is flat. For best results when printing
images, use HP Advanced Photo Paper.
Cause: The paper type was incorrect or more than one type of paper was loaded.
Print troubleshooting 61
Page 65

Chapter 12
Solve a problem
Check product
Step 2: Load the stack of paper correctly
Solution: Remove the stack of paper from the paper tray, reload the paper, and
then slide the paper-width guide inward until it stops at the edge of the paper.
NOTE: Do not leave unused photo paper in the paper tray. The paper might start
to curl, which could reduce the quality of your printout. For best results, do not
allow printed photos to stack up in the paper tray.
For more information, see:
“
Load media” on page 17
Cause: The paper was loaded incorrectly.
Follow these steps.
•
Step 1: Align the printer
Step 2: Clean the printhead
•
Step 1: Align the printer
Solution: Aligning the printer can help ensure excellent print quality.
To align the printer from the HP Photosmart Software
1. Load letter, A4, or legal unused plain white paper into the paper tray.
2. In the HP Solution Center, click Settings.
3. In the Print Settings area, click Printer Toolbox.
The Printer Toolbox appears.
4. Click the Device Services tab.
5. Click Align the Printer.
6. When prompted, ensure plain white letter or A4 paper is loaded in the paper tray,
then press OK.
The product prints an alignment sheet.
7. Load the page print side down on the right front corner of the glass, and then
press OK to scan the page.
When the On button stops flashing, the alignment is complete and the page can
be removed. Recycle or discard the page.
Cause: The printer needed to be aligned.
62 Solve a problem
NOTE: You can also open the Printer Toolbox from the Print Properties
dialog box. In the Print Properties dialog box, click the Features tab, and
then click Printer Services.
NOTE: If you have colored paper loaded in the paper tray when you align
the print cartridges, the alignment will fail. Load unused plain white paper into
the paper tray, and then try the alignment again.
Page 66

Step 2: Clean the printhead
Solution: If the previous step did not resolve the issue, try cleaning the printhead.
To clean the printhead from the HP Photosmart Software
1. Load letter, A4, or legal unused plain white paper into the paper tray.
2. In the HP Solution Center, click Settings.
3. In the Print Settings area, click Printer Toolbox.
NOTE: You can also open the Printer Toolbox from the Print Properties
dialog box. In the Print Properties dialog box, click the Features tab, and
then click Printer Services.
The Printer Toolbox appears.
4. Click the Device Services tab.
5. Click Clean the printhead.
6. Follow the prompts until you are satisfied with the quality of the output, and then
click Done.
There are two stages of cleaning. Each stage lasts about two minutes, uses one
sheet of paper, and uses an increasing amount of ink. After each stage, review
the quality of the printed page. You should only initiate the next phase of cleaning
if the print quality is poor.
If print quality still seems poor after you complete both stages of cleaning, try
aligning the printer. If print quality problems persist after cleaning and aligning,
contact HP support.
After cleaning the printhead, print a print quality report. Evaluate the print quality
report to see if the print quality problem still exists.
For more information, see:
“
Print and evaluate a print quality report” on page 49
Cause: The printhead needed to be cleaned.
Solve a problem
Check the print settings
Solution: Try the following:
• Check the print settings to see if the color settings are incorrect.
For example, check to see if the document is set to print in grayscale. Or, check
to see if advanced color settings such as saturation, brightness, or color tone, are
set to modify the appearance of colors.
• Check the print quality setting and make sure it matches the type of paper loaded
in the product.
You might need to choose a lower print quality setting if colors are running into
each other. Or, choose a higher setting if you are printing a high-quality photo,
and then make sure photo paper such as HP Advanced Photo Paper is loaded in
the paper tray. For information on using the maximum dpi mode, see “
Print using
Maximum dpi” on page 30.
• Make sure the margin settings for the document do not exceed the printable area
of the product.
Print troubleshooting 63
Page 67

Chapter 12
Solve a problem
To select a print speed or quality
1. Make sure you have paper loaded in the paper tray.
2. On the File menu in your software application, click Print.
3. Make sure the product is the selected printer.
4. Click the button that opens the Properties dialog box.
Depending on your software application, this button might be called Properties,
Options, Printer Setup, Printer, or Preferences.
5. Click the Features tab.
6. In the Paper Type drop-down list, select the type of paper that you have loaded.
7. In the Print Quality drop-down list, select the appropriate quality setting for your
project.
NOTE: To find out what dpi the product will print based on the paper type
and print quality settings you selected, click Resolution.
To check your margin settings
1. Preview your print job before sending it to the product.
In most software applications, click the File menu, and then click Print Preview.
2. Check the margins.
The product uses the margins you have set in your software application, as long
as they are greater than the minimum margins the product supports. For more
information about setting margins in your software application, see the
documentation that came with the software.
3. Cancel the print job if the margins are not satisfactory, and then adjust the margins
in your software application.
Cause: The print settings were not set correctly.
Reset the product
Solution: Turn off the product, and then unplug the power cord. Plug the power
cord back in, and then press the On button to turn on the product.
Cause: The product experienced an error.
Contact HP support for service
Solution: If you have completed all of the steps provided in the previous solutions
and are still having a problem, contact HP support for service.
Go to:
If prompted, choose your country/region, and then click Contact HP for technical
support.
Cause: You might need assistance to enable the product or software to function
properly.
64 Solve a problem
www.hp.com/support.
Page 68

Print quality troubleshooting
Use this section to solve these print quality problems:
•
Photo printouts are hazy, blurry, or have inaccurate color
Photo printouts are hazy, blurry, or have inaccurate color
Solution: For best photo color quality, do not allow printouts to stack on top of
photos in the paper tray.
Cause: When printouts are stacked on top of a photo before the ink is completely
dry, some color distortion may occur in the photo.
Memory card troubleshooting
Use this section to solve these memory card problems:
•
The product does not read the memory card
The photos on the memory card do not transfer to my computer
•
The product does not read the memory card
Try the following solutions to resolve the issue. Solutions are listed in order, with the most
likely solution first. If the first solution does not solve the problem, continue trying the
remaining solutions until the issue is resolved.
•
Step 1: Insert the memory card properly
Step 2: Remove the additional memory card
•
Step 3: Reformat the memory card in your digital camera
•
Solve a problem
Step 1: Insert the memory card properly
Solution: Turn the memory card so that the label faces up and the contacts are
facing the product, and then push the card forward into the appropriate slot until the
Photo light turns on.
After the memory card has been inserted properly, the Photo light will blink for a few
seconds, and then remain lit.
Cause: The memory card was inserted backwards or upside down.
If this did not solve the issue, try the next solution.
Step 2: Remove the additional memory card
Solution: You can insert only one memory card at a time.
If more than one memory card is inserted, an error message will appear on the display.
Remove the additional memory card to resolve the problem.
Cause: You had inserted more than one memory card.
Memory card troubleshooting 65
Page 69

Chapter 12
If this did not solve the issue, try the next solution.
Step 3: Reformat the memory card in your digital camera
Solution: Check the computer screen for an error message telling you that the
Solve a problem
images on the memory card are corrupted.
If the file system on the card is corrupt, reformat the memory card in your digital
camera. For more information, see the documentation that came with your digital
camera.
CAUTION: Reformatting the memory card will delete any photos stored on the
card. If you have previously transferred the photos from your memory card to a
computer, try printing the photos from the computer. Otherwise, you will need to
retake any photos you might have lost.
Cause: The memory card file system was corrupted.
The photos on the memory card do not transfer to my computer
Try the following solutions.
•
Solution 1: Install the product software
Solution 2: Check the connection from the product to your computer
•
Solution 1: Install the product software
Solution: Install the product software that came with the product. If it is installed,
restart your computer.
To install the product software
1. Insert the product CD-ROM into your computer’s CD-ROM drive and then start
the Setup program.
2. When prompted, click Install More Software to install the product software.
3. Follow the onscreen instructions and the setup instructions that came with the
product.
Cause: The product software was not installed.
If this did not solve the issue, try the next solution.
Solution 2: Check the connection from the product to your computer
Solution: Check the connection from the product to your computer. Verify that the
USB cable is securely plugged into the USB port on the back of the product. Make
sure the other end of the USB cable is plugged into a USB port on your computer.
After the cable is connected properly, turn off the product and then on again. If the
product is connected to the computer through a wireless connection, make sure that
the connection is active and the product is turned on.
66 Solve a problem
Page 70
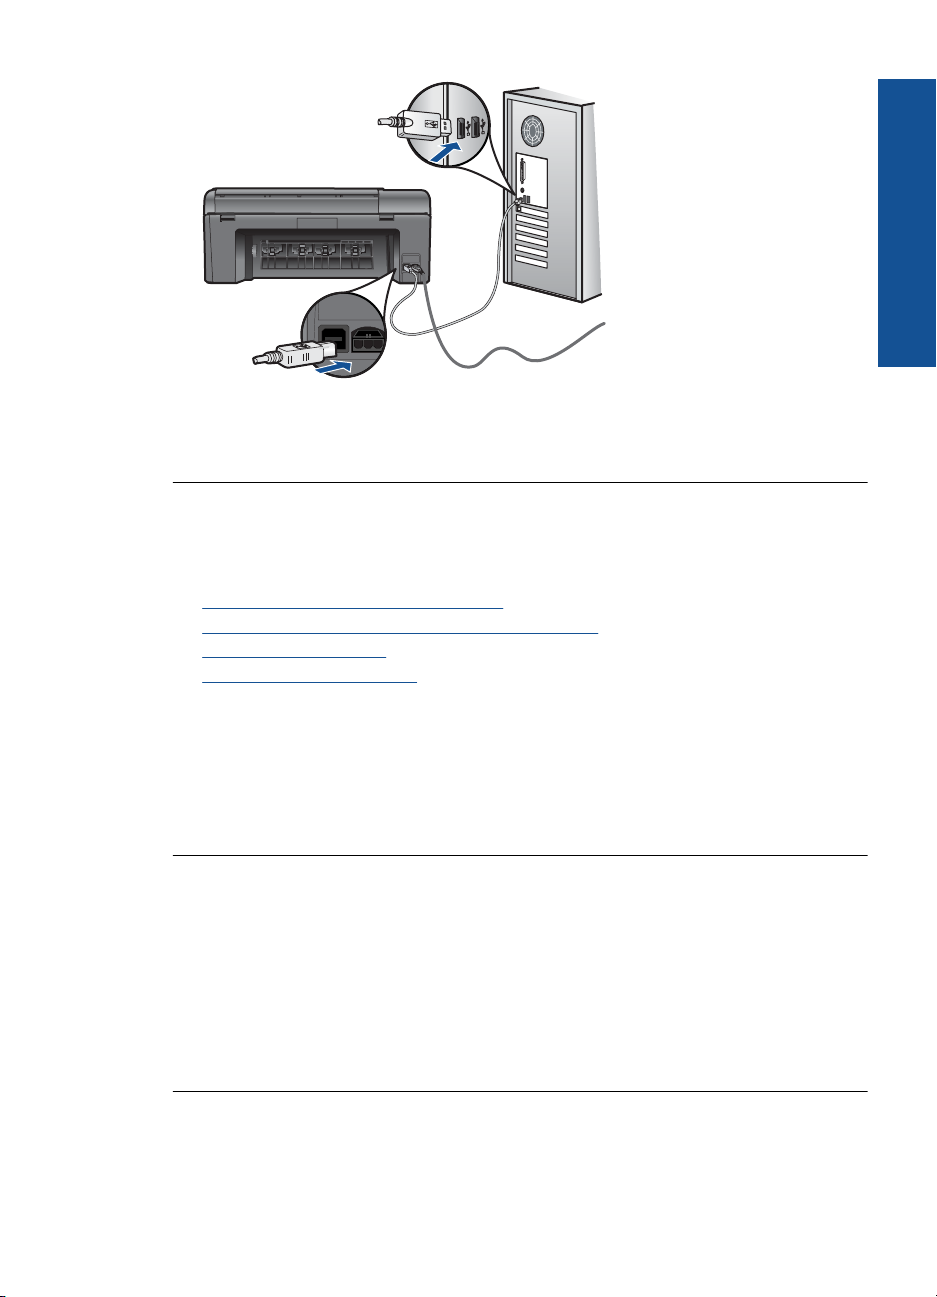
For more information on setting up the product and connecting it to your computer,
see the setup instructions that came with the product.
Cause: The product was not properly connected to the computer.
Scan troubleshooting
Use this section to solve these scan problems:
•
Scanned image is incorrectly cropped
Scanned image shows dotted lines instead of text
•
Text format is incorrect
•
Text is incorrect or missing
•
Scanned image is incorrectly cropped
Solution: The autocropping feature in the software crops anything that is not part
of the main image. Sometimes this might not be what you want. In that case, turn off
autocropping in the software and crop the scanned image manually, or not at all.
Cause: The software was set to automatically crop scanned pictures.
Scanned image shows dotted lines instead of text
Solution: Make a black-and-white copy of the original and then scan the copy.
Cause: If you used the Text image type to scan text that you planned to edit, the
scanner might not have recognized color text. The Text image type scans at 300 x 300
dpi, in black and white.
If you scanned an original that has graphics or artwork surrounding the text, the
scanner might not have recognized the text.
Solve a problem
Text format is incorrect
Solution: Some applications cannot handle framed text formatting. Framed text is
one of the scan document settings in the software. It maintains complex layouts, such
Scan troubleshooting 67
Page 71

Chapter 12
as multiple columns from a newsletter, by putting the text in different frames (boxes)
in the destination application. In the software, select the correct format so that the
scanned text layout and formatting are retained.
Cause: The scan document settings were incorrect.
Solve a problem
Text is incorrect or missing
Try the following solutions to resolve the issue. Solutions are listed in order, with the most
likely solution first. If the first solution does not solve the problem, continue trying the
remaining solutions until the issue is resolved.
•
Solution 1: Adjust the brightness in the software
Solution 2: Clean the glass and lid
•
Solution 3: Select the correct OCR language
•
Solution 1: Adjust the brightness in the software
Solution: Adjust the brightness in the software, and then rescan the original.
Cause: The brightness was not set correctly.
If this did not solve the issue, try the next solution.
Solution 2: Clean the glass and lid
Solution: Turn off the product, unplug the power cord, and use a soft cloth to wipe
the glass and the back of the document lid.
Cause: Debris might have been stuck on the glass or on the back of the document
lid. This can cause poor-quality scans.
If this did not solve the issue, try the next solution.
Solution 3: Select the correct OCR language
Solution: Select the correct OCR language in the software.
NOTE: If you are using HP Photosmart Essential, the Optical Character
Recognition (OCR) software might not be installed on your computer. To install
the OCR software, you must re-insert the software disk and select OCR under the
Custom installation options.
Cause: The scan document settings were not set to the correct optical character
recognition (OCR) language. The OCR language tells the software how to interpret
the characters it sees in the original image. If the OCR language does not match the
language in the original, the scanned text might be incomprehensible.
Copy troubleshooting
Use this section to solve these copy problems:
68 Solve a problem
Page 72

• Resize to Fit is not working as expected
Resize to Fit is not working as expected
Try the following solutions.
Solution 1: Scan, enlarge, and then print a copy
•
Solution 2: Wipe the glass and the back of the document lid
•
Solution 1: Scan, enlarge, and then print a copy
Solution: Resize to Fit can only enlarge the original up to the maximum percentage
allowed by your model. For example, 200% might be the maximum enlargement
percentage allowed by your model. Enlarging a passport photo by 200% might not
enlarge it enough for it to fit a full-size page.
If you want to make a large copy of a small original, scan the original into the computer,
resize the image in the HP scanning software, and then print a copy of the enlarged
image.
NOTE: Do not use the product to copy onto envelopes or other papers it does
not support. For more information on recommended media, see “
papers for printing” on page 16.
Cause: You were trying to increase the size of an original that was too small.
If this did not solve the issue, try the next solution.
Solve a problem
Recommended
Solution 2: Wipe the glass and the back of the document lid
Solution: Turn off the product, unplug the power cord, and then use a soft cloth to
wipe the glass and the back of the document lid.
Cause: Debris might have been stuck on the glass or on the back of the document
lid. The product interprets anything it detects on the glass as part of the image.
Errors
This section contains the following categories of messages about your product:
•
Product messages
File messages
•
General user messages
•
Paper messages
•
Ink cartridge and printhead messages
•
Product messages
The following is a list of product-related error messages:
•
Firmware revision mismatch
Memory is full
•
Errors 69
Page 73

Chapter 12
Solve a problem
• Scanner failure
Improper shutdown
•
Missing HP Photosmart Software
•
Firmware revision mismatch
Solution: Contact HP support for service.
Go to:
www.hp.com/support.
If prompted, choose your country/region, and then click Contact HP for information
on calling for technical support.
Cause: The revision number of the product firmware did not match the revision
number of the software.
Memory is full
Solution: Try making fewer copies at a time.
Cause: The document you were copying exceeded the memory of the product.
Scanner failure
Solution: Turn off the product and then turn it on again. Restart your computer and
then try to scan again.
If the problem persists, try plugging the power cord directly into a power outlet rather
than a surge protector or power strip. If the problem continues, contact HP support.
Go to
www.hp.com/support. If prompted, choose your country/region, and then click
Contact HP for information on calling for technical support.
Cause: The product was busy or an unknown cause interrupted your scan.
Improper shutdown
Solution: Press the On button to turn the product on and off.
Cause: The last time the product was used, it was not turned off properly. If the
product is turned off by turning off the switch on a power strip or by using a wall switch,
the product can be damaged.
Missing HP Photosmart Software
Try the following solutions.
•
Solution 1: Install the HP Photosmart Software
Solution 2: Check the connection from the product to your computer
•
70 Solve a problem
Page 74
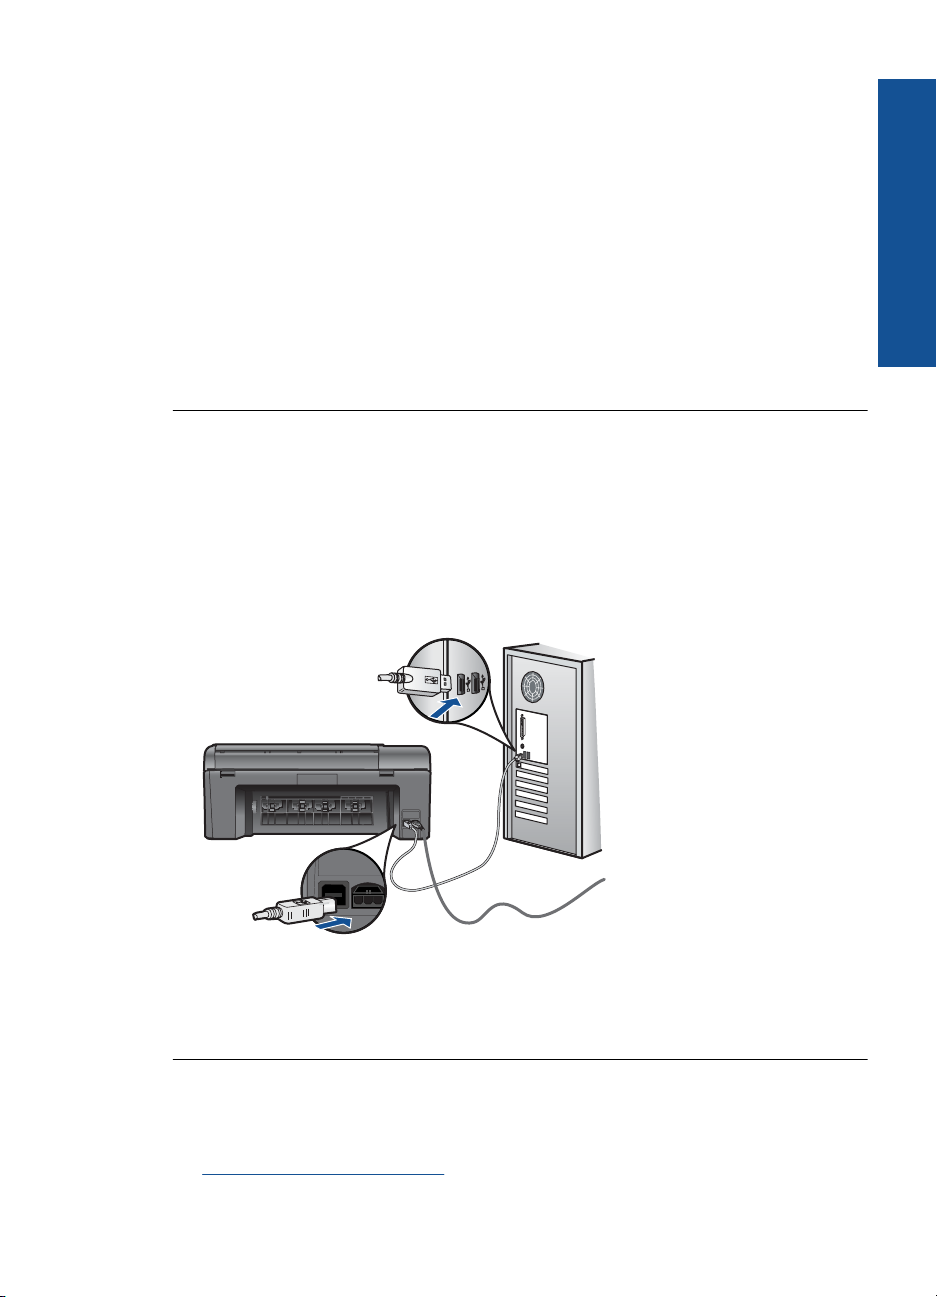
Solution 1: Install the HP Photosmart Software
Solution: Install the product software that came with the product. If it is installed,
restart your computer.
To install the product software
1. Insert the product CD-ROM into your computer’s CD-ROM drive and then start
the Setup program.
2. When prompted, click Install More Software to install the product software.
3. Follow the onscreen instructions and the setup instructions that came with the
product.
Cause: The HP Photosmart Software was not installed.
If this did not solve the issue, try the next solution.
Solution 2: Check the connection from the product to your computer
Solution: Check the connection from the product to your computer. Verify that the
USB cable is securely plugged into the USB port on the back of the product. Make
sure the other end of the USB cable is plugged into a USB port on your computer.
After the cable is connected properly, turn off the product and then on again. If the
product is connected to the computer through a wireless connection, make sure that
the connection is active and the product is turned on.
Solve a problem
For more information on setting up the product and connecting it to your computer,
see the setup instructions that came with the product.
Cause: The product was not properly connected to the computer.
File messages
The following is a list of file-related error messages:
•
Error reading or writing the file
Errors 71
Page 75

Chapter 12
Solve a problem
• Unreadable files. NN files could not be read
Photos not found
•
File not found
•
Invalid file name
•
Supported file types for the product
•
File corrupted
•
Error reading or writing the file
Solution: Check to see if you have the right folder and file name.
Cause: The product software could not open or save the file.
Unreadable files. NN files could not be read
Solution: Reinsert the memory card in the product. If this does not work, retake the
photos with your digital camera. If you already transferred the files to your computer,
try printing those files by using the product software. The copies might not be
damaged.
Cause: Some of the files on the inserted memory card or attached storage device
were damaged.
Photos not found
Try the following solutions.
•
Solution 1: Reinsert the memory card
Solution 2: Print photos from the computer
•
Solution 1: Reinsert the memory card
Solution: Reinsert the memory card. If this does not work, retake the photos with
your digital camera. If you already transferred the files to your computer, try printing
those files by using the product software. The copies might not be damaged.
Cause: Some of the files on the inserted memory card or attached storage device
were damaged.
If this did not solve the issue, try the next solution.
Solution 2: Print photos from the computer
Solution: Take some photos with your digital camera, or if you previously saved
photos on your computer, you can print them using the product software.
Cause: No photos were found on the memory card.
File not found
Solution: Close some applications and try the task again.
72 Solve a problem
Page 76

Cause: There was not enough available memory on your computer to create a print
preview file.
Invalid file name
Solution: Make sure that you are not using any invalid symbols in the file name.
Cause: The file name you entered was invalid.
Supported file types for the product
The product software only recognizes JPG and TIF images.
File corrupted
Try the following solutions.
•
Solution 1: Reinsert the memory card in the product
Solution 2: Reformat the memory card in your digital camera.
•
Solution 1: Reinsert the memory card in the product
Solution: Reinsert the memory card. If this does not work, retake the photos with
your digital camera. If you already transferred the files to your computer, try printing
those files by using the product software. The copies might not be damaged.
Cause: Some of the files on the inserted memory card or attached storage device
were damaged.
If this did not solve the issue, try the next solution.
Solve a problem
Solution 2: Reformat the memory card in your digital camera.
Solution: Check the computer screen for an error message telling you that the
images on the memory card are corrupted.
If the file system on the card is corrupt, reformat the memory card in your digital
camera.
CAUTION: Reformatting the memory card will delete any photos stored on the
card. If you have previously transferred the photos from your memory card to a
computer, try printing the photos from the computer. Otherwise, you will need to
retake any photos you might have lost.
Cause: The memory card file system was corrupted.
General user messages
The following is a list of messages related to common user errors:
•
Memory card error
Cannot crop
•
Errors 73
Page 77

Chapter 12
Solve a problem
• Out of disk space
Card access error
•
Use only one card at a time
•
Card is inserted incorrectly
•
Card is damaged
•
Card is not fully inserted
•
Memory card error
Try the following solutions to resolve the issue. Solutions are listed in order, with the most
likely solution first. If the first solution does not solve the problem, continue trying the
remaining solutions until the issue is resolved.
•
Solution 1: Remove all but one memory card
Solution 2: Remove the memory card and reinsert it correctly
•
Solution 3: Push the memory card all the way forward
•
Solution 1: Remove all but one memory card
Solution: Remove all but one memory card. The product reads the remaining
memory card and displays the first photo stored on the memory card.
Cause: There were two or more memory cards inserted into the product at the same
time.
If this did not solve the issue, try the next solution.
Solution 2: Remove the memory card and reinsert it correctly
Solution: Remove the memory card and reinsert it correctly. The label of the
memory card faces up and should be readable as you insert it into the slot.
Cause: You had inserted the memory card backwards or upside down.
If this did not solve the issue, try the next solution.
Solution 3: Push the memory card all the way forward
Solution: Remove the memory card and reinsert it in the memory card slot until it
stops.
Cause: You had not fully inserted the memory card.
Cannot crop
Try the following solutions.
•
Solution 1: Close some applications or restart your computer
Solution 2: Empty the Recycle Bin on your desktop
•
74 Solve a problem
Page 78

Solution 1: Close some applications or restart your computer
Solution: Close all unnecessary applications. This includes applications that run in
the background, such as screensavers and virus checkers. (If you turn off your virus
checker, remember to turn it back on after you finish.) Try restarting your computer
to clear the memory. You might need to purchase more RAM. Refer to the
documentation that came with your computer.
Cause: The computer did not have enough memory.
If this did not solve the issue, try the next solution.
Solution 2: Empty the Recycle Bin on your desktop
Solution: Empty the Recycle Bin on your desktop. You might also need to remove
files from the hard disk; for example, delete temporary files.
Cause: For scanning, there must be at least 50 MB of space available on your
computer's hard disk.
Out of disk space
Solution: Empty the Recycle Bin on your desktop. You might also need to remove
files from the hard disk; for example, delete temporary files.
Cause: The computer did not have enough memory.
Card access error
Solution: Remove the memory card and reinsert it in the memory card slot until it
stops.
Cause: You had not fully inserted the memory card.
Use only one card at a time
Solution: You can insert only one memory card at a time.
If more than one memory card is inserted, an error message will appear on the display.
Remove the additional memory card to resolve the problem.
Cause: There were two or more memory cards inserted into the product at the same
time.
Solve a problem
Card is inserted incorrectly
Solution: Turn the memory card so that the label faces up and the contacts are
facing the product, and then push the card forward into the appropriate slot until the
Photo light turns on.
After the memory card has been inserted properly, the Photo light will blink for a few
seconds, and then remain lit.
Errors 75
Page 79

Chapter 12
Solve a problem
Cause: You had inserted the memory card backwards or upside down.
Card is damaged
Solution: Reformat your memory card in your camera or format your memory card
in a computer by selecting the FAT format. For more information, see the
documentation that came with your digital camera.
CAUTION: Reformatting the memory card will delete any photos stored on the
card. If you have previously transferred the photos from your memory card to a
computer, try printing the photos from the computer. Otherwise, you will need to
retake any photos you might have lost.
Cause: You may have formatted the card on a Windows XP computer. By default,
Windows XP will format a memory card of 8 MB or less and 64 MB or more with the
FAT32 format. Digital cameras and other devices use the FAT (FAT16 or FAT12)
format and cannot recognize a FAT32 formatted card.
Card is not fully inserted
Solution: Turn the memory card so that the label faces up and the contacts are
facing the product, and then push the card forward into the appropriate slot until the
Photo light turns on.
After the memory card has been inserted properly, the Photo light will blink for a few
seconds, and then remain lit.
Cause: You had not fully inserted the memory card.
Paper messages
The following is a list of paper-related error messages:
•
Paper upside down
Paper orientation error
•
Ink is drying
•
Paper upside down
Solution: Load paper in the paper tray print side down.
Cause: Paper in the paper tray was upside down.
Paper orientation error
Solution: Insert paper into the paper tray with the short edge forward and the print
side down. Slide the paper forward until it stops.
Cause: Paper in the paper tray was in landscape orientation.
76 Solve a problem
Page 80
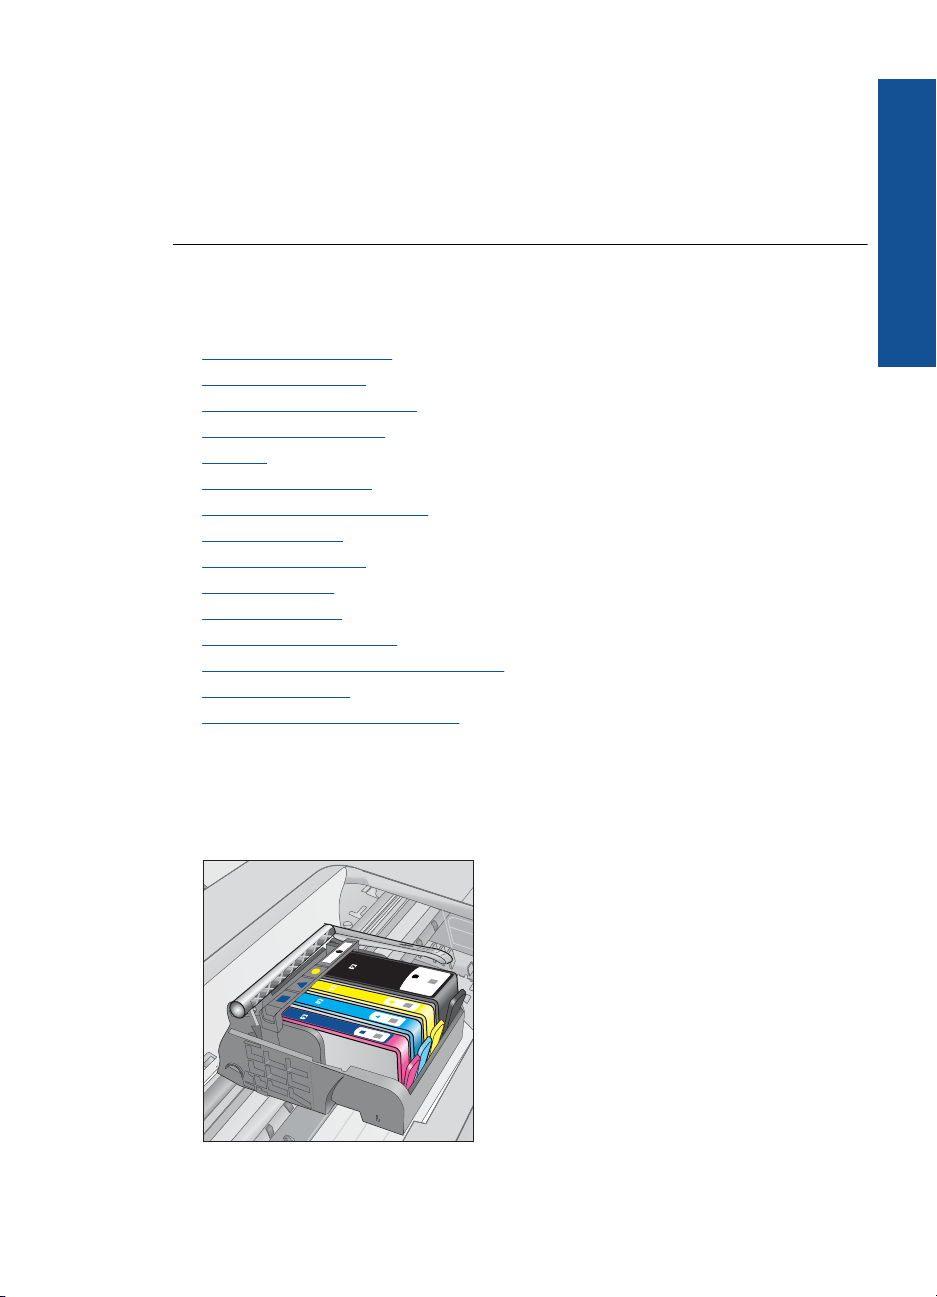
Ink is drying
Solution: Leave the sheet in the paper tray until the message disappears. If it is
necessary to remove the printed sheet before the message disappears, carefully hold
the printed sheet on the underside or the edges, and place it on a flat surface to dry.
Cause: Transparencies and some other media require a drying time that is longer
than normal.
Ink cartridge and printhead messages
The following is a list of printhead and ink cartridge error messages:
•
Cartridges in wrong slot
General printer error
•
Incompatible ink cartridges
•
Incompatible printhead
•
Ink alert
•
Ink cartridge problem
•
Ink service capacity warning
•
Ink system failure
•
Check ink cartridges
•
Install cartridges
•
Non-HP cartridge
•
Original HP ink depleted
•
Previously used genuine HP cartridge
•
Printhead problem
•
Problem with printer preparation
•
Solve a problem
Cartridges in wrong slot
Solution: Remove and reinsert the indicated ink cartridges into the correct slots by
matching color of cartridges to color and icon for each slot.
Errors 77
Page 81

Chapter 12
Solve a problem
Printing cannot occur without one of each type of ink cartridge inserted into the correct
slot.
For more information, see:
“
Replace the cartridges” on page 46
Cause: The indicated ink cartridges were inserted into the wrong slots.
General printer error
Try the following solutions.
•
Solution 1: Reset the product
Solution 2: Contact HP support
•
Solution 1: Reset the product
Solution: Turn off the product, and then unplug the power cord. Plug the power
cord back in, and then press the On button to turn on the product.
Cause: The product experienced an error.
If this did not solve the issue, try the next solution.
Solution 2: Contact HP support
Solution: Write down the error code provided in the message, and then contact HP
support. Go to:
www.hp.com/support
If prompted, choose your country/region, and then click Contact HP for information
on calling for technical support.
Cause: There was a problem with the product.
Incompatible ink cartridges
Try the following solutions.
•
Solution 1: Check to see if the ink cartridges are compatible
Solution 2: Contact HP support
•
Solution 1: Check to see if the ink cartridges are compatible
Solution: Check to make sure you are using the correct ink cartridges for your
product. For a list of compatible ink cartridges, see the printed documentation that
came with the product.
If you are using ink cartridges that are not compatible with the product, replace the
indicated ink cartridges with ink cartridges that are compatible.
CAUTION: HP recommends that you do not remove an ink cartridge until a
replacement is ready to install.
78 Solve a problem
Page 82

If it appears that you are using the correct ink cartridges, proceed to the next solution.
For more information, see:
•“
Order ink supplies” on page 48
Replace the cartridges” on page 46
•“
Cause: The indicated ink cartridges were not intended for use in this product as it
was currently configured.
If this did not solve the issue, try the next solution.
Solution 2: Contact HP support
Solution: Contact HP support for service.
Go to:
www.hp.com/support.
If prompted, choose your country/region, and then click Contact HP for information
on calling for technical support.
Cause: The ink cartridges were not intended for use in this product.
Incompatible printhead
Solution: Contact HP support for service.
Go to:
www.hp.com/support.
If prompted, choose your country/region, and then click Contact HP for information
on calling for technical support.
Cause: The printhead was not intended for use in this product, or it was damaged.
Ink alert
Solution: When you receive an Ink Alert message, you do not need to replace the
indicated ink cartridge. However, the amount of ink might be low enough to cause
poor print quality. Follow any prompts on the display to continue.
CAUTION: HP recommends that you do not remove an ink cartridge until a
replacement is ready to install.
Solve a problem
If you have installed a refilled or remanufactured cartridge, or a cartridge that has
been used in another product, the ink level indicator might be inaccurate or
unavailable.
Ink level warnings and indicators provide estimates for planning purposes only. When
you receive an ink alert message, consider having replacement ink cartridges
available to avoid possible printing delays. You do not need to replace the ink
cartridges until print quality becomes unacceptable.
For more information, see:
“
Replace the cartridges” on page 46
Errors 79
Page 83
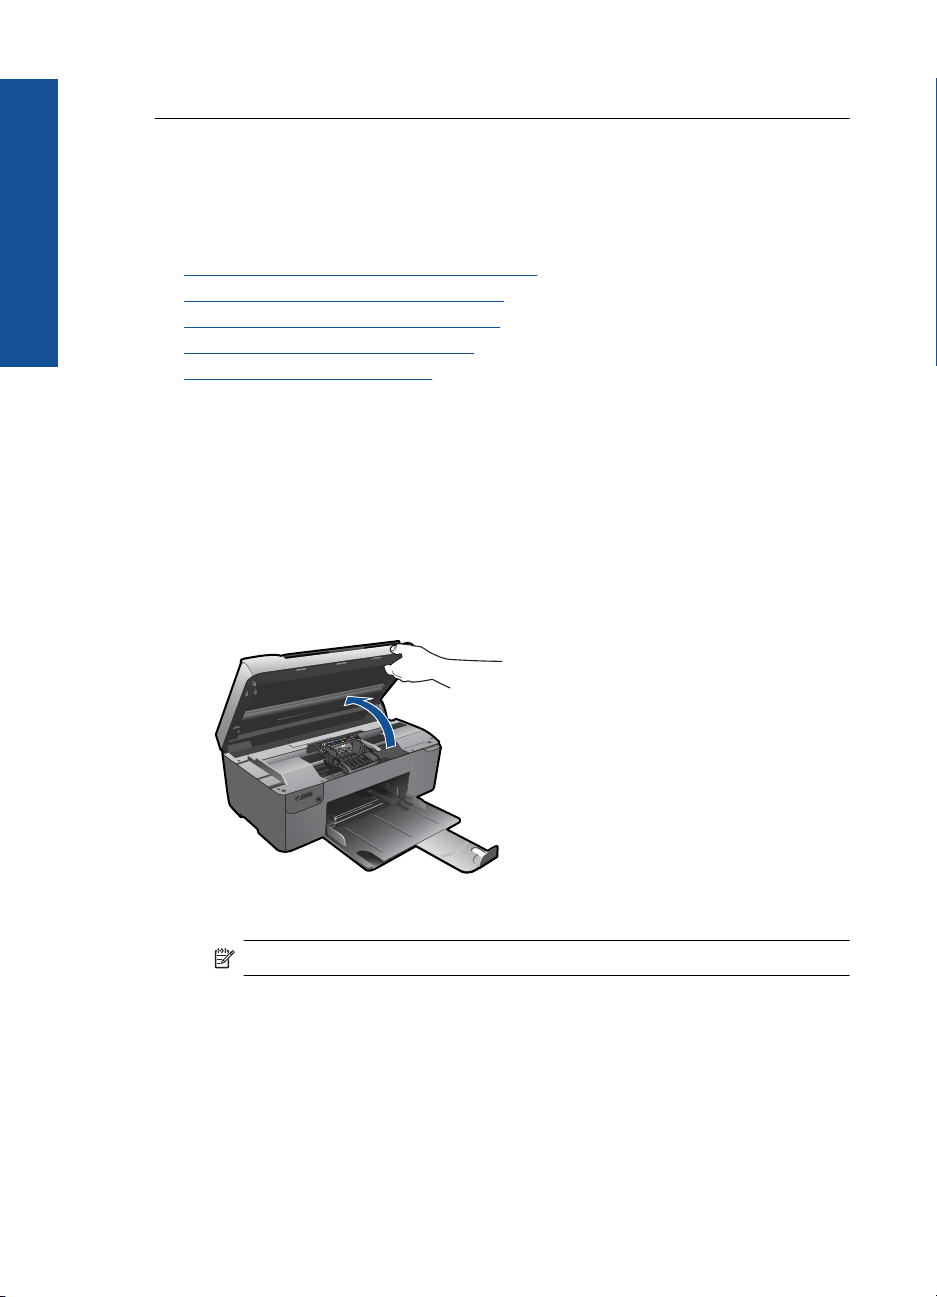
Chapter 12
Solve a problem
Cause: The indicated ink cartridges did not have enough ink to print properly.
Ink cartridge problem
Try the following solutions to resolve the issue. Solutions are listed in order, with the most
likely solution first. If the first solution does not solve the problem, continue trying the
remaining solutions until the issue is resolved.
•
Solution 1: Install the ink cartridges correctly
Solution 2: Close the print carriage latch
•
Solution 3: Clean the electrical contacts
•
Solution 4: Replace the ink cartridge
•
Solution 5: Contact HP support
•
Solution 1: Install the ink cartridges correctly
Solution: Make sure all of the ink cartridges are properly installed. Refer to the
following steps to resolve this error.
To make sure the ink cartridges are properly installed
1. Make sure the product is turned on.
2. Open the ink cartridge access door by lifting from the front right of the product,
until the door locks into place.
The print carriage moves to the center of the product.
3. Make sure the ink cartridges are installed in the correct slots.
Match the shape of the icon and color of the ink cartridge with the slot that has
the same shaped icon and color.
80 Solve a problem
NOTE: Wait until the print carriage stops moving before proceeding.
Page 84
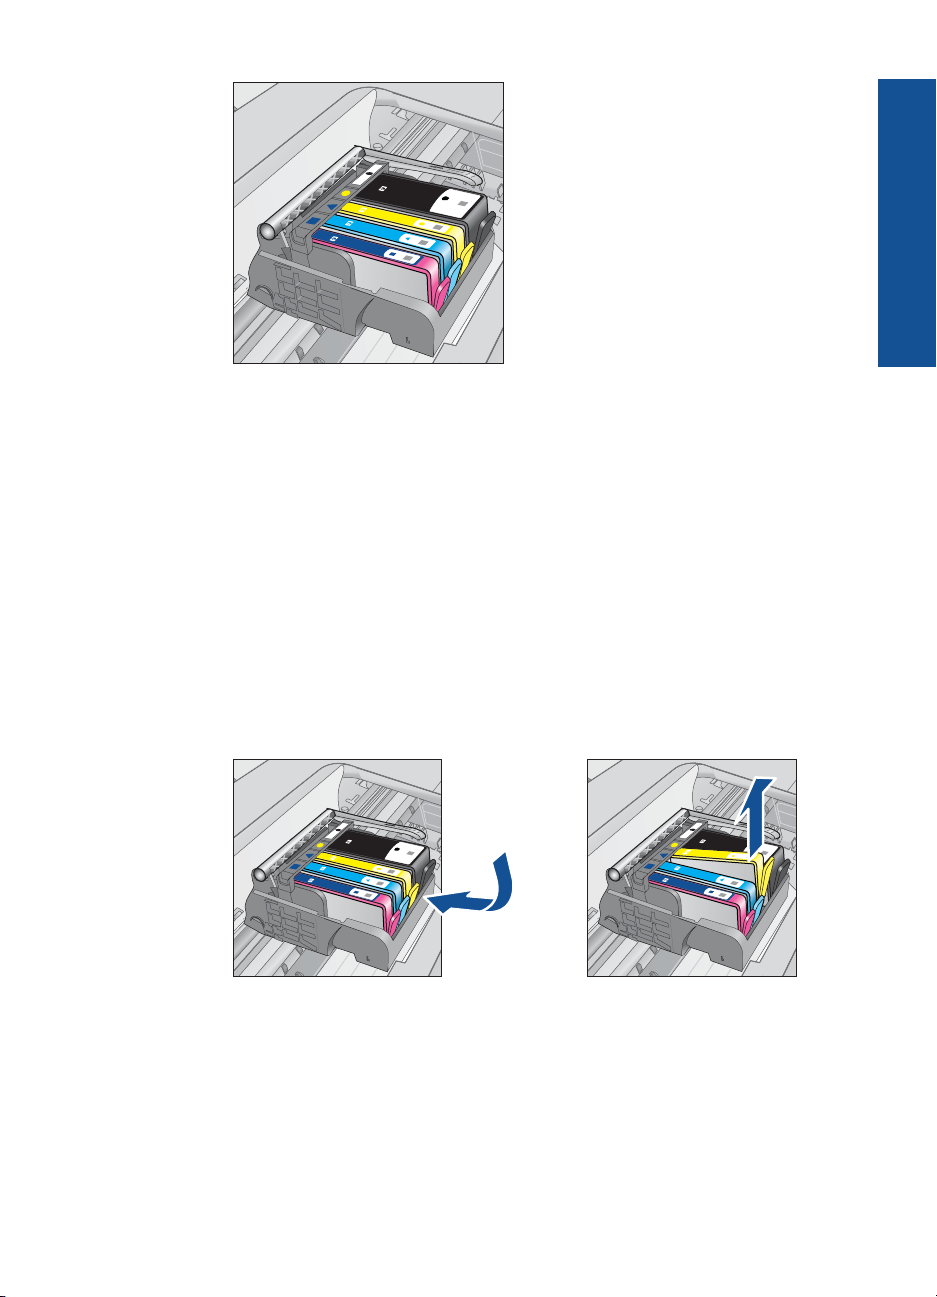
4. Run your finger along the top of the ink cartridges to locate any cartridges that
are not snapped completely down.
5. Press down on any cartridges that are sticking up.
They should snap down into place.
6. If an ink cartridge was sticking up and you were able to snap it back down into
place, close the ink cartridge access door and check if the error message has
gone away.
• If the message has gone away, stop troubleshooting here. The error has been
resolved.
• If the message has not gone away, proceed to the next step.
• If none of the ink cartridges were sticking up, proceed to the next step.
7. Locate the ink cartridge that is indicated in the error message, and then press the
tab on the ink cartridge to release it from the slot.
Solve a problem
8. Press the ink cartridge back down into place.
The tab should make a snapping noise when the ink cartridge is correctly seated.
If the ink cartridge did not make a snapping noise, the tab might need to be
readjusted.
9. Remove the ink cartridge from the slot.
10. Gently bend the tab away from the ink cartridge.
Errors 81
Page 85
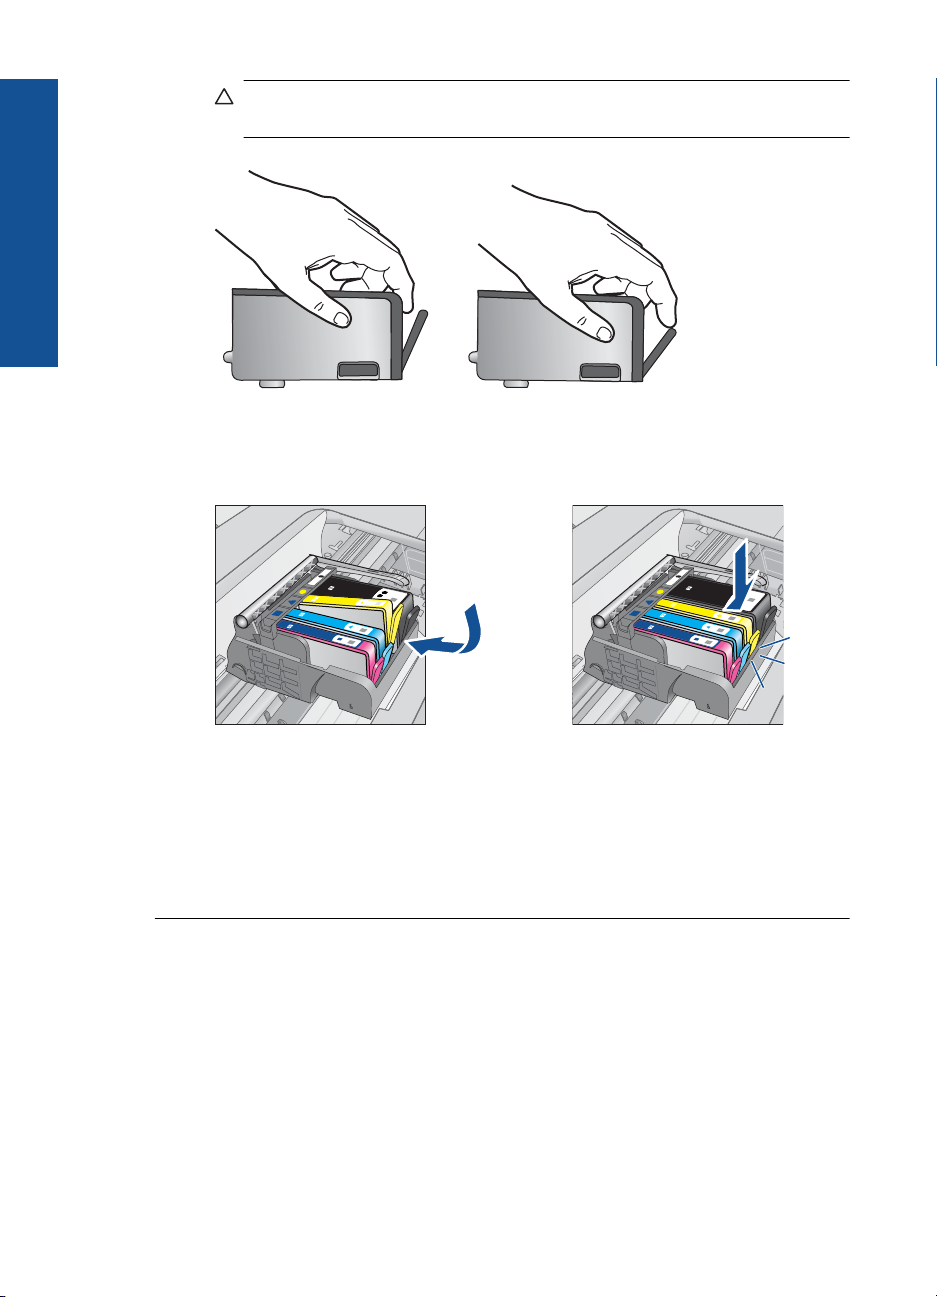
Chapter 12
Solve a problem
CAUTION: Be careful not to bend the tab out more than about 1.27 cm
(0.5 inches).
11. Reinstall the ink cartridge.
It should now snap down into place.
12. Close the ink cartridge access door, and check if the error message has gone
away.
13. If you still receive the error message, turn the product off, and then on again.
Cause: The indicated ink cartridges were not installed correctly.
If this did not solve the issue, try the next solution.
Solution 2: Close the print carriage latch
Solution: Lift the latch handle and carefully lower it to make sure that the latch
securing the printhead is securely closed. Leaving the latch handle raised can result
in incorrectly seated ink cartridges and problems printing. The latch must remain down
in order to correctly install the ink cartridges.
82 Solve a problem
Page 86
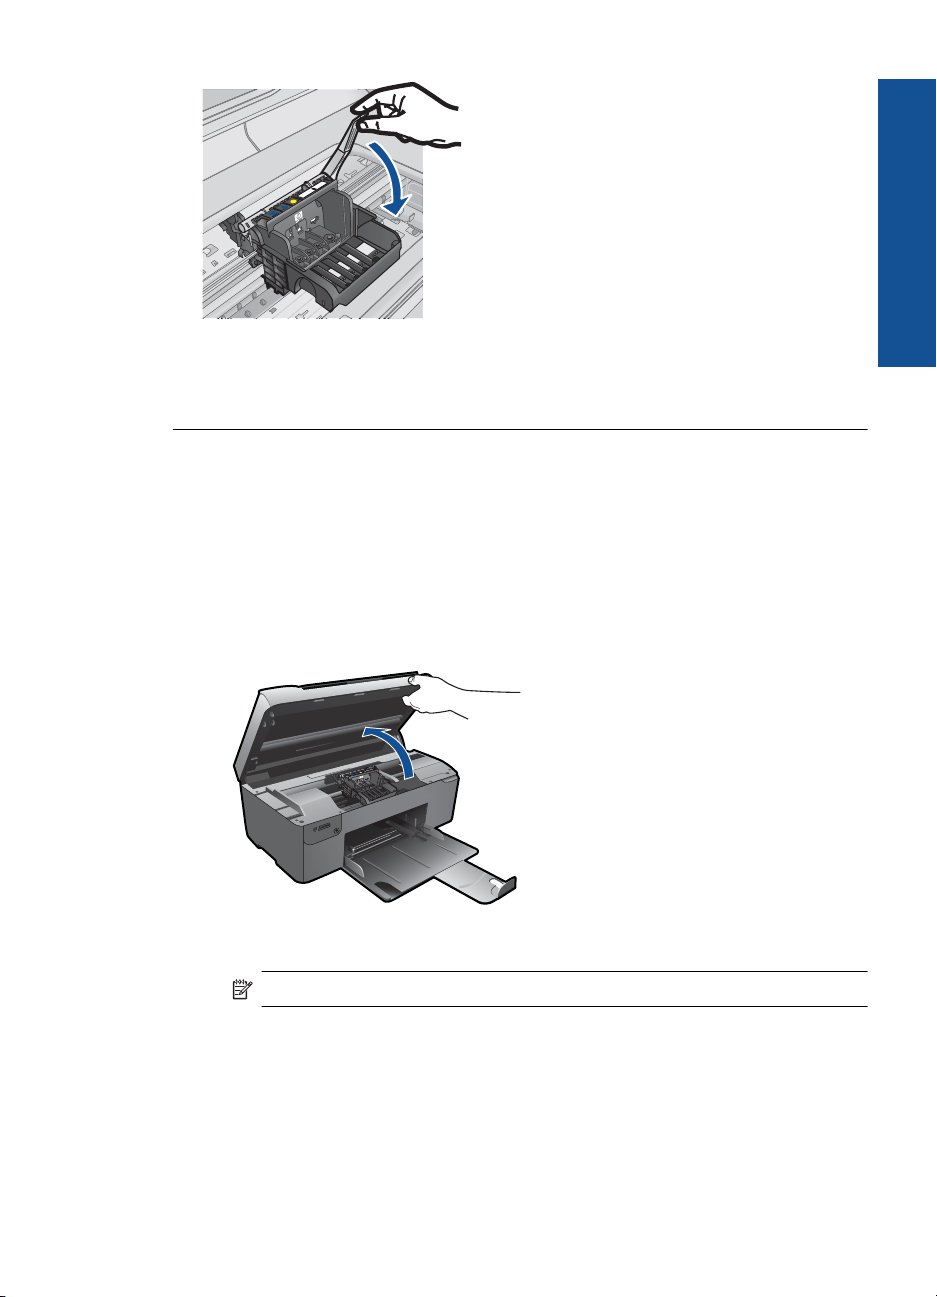
Cause: The print carriage latch was not closed properly.
If this did not solve the issue, try the next solution.
Solution 3: Clean the electrical contacts
Solution: Clean the cartridge electrical contacts.
To clean the electrical contacts
1. Make sure the product is turned on.
2. Open the cartridge access door by lifting the blue access handles on the side of
the product, until the door locks into place.
Solve a problem
The print carriage moves to the center of the product.
NOTE: Wait until the print carriage stops moving before proceeding.
3. Locate the ink cartridge that is indicated in the error message, and then press the
tab on the ink cartridge to release it from the slot.
Errors 83
Page 87
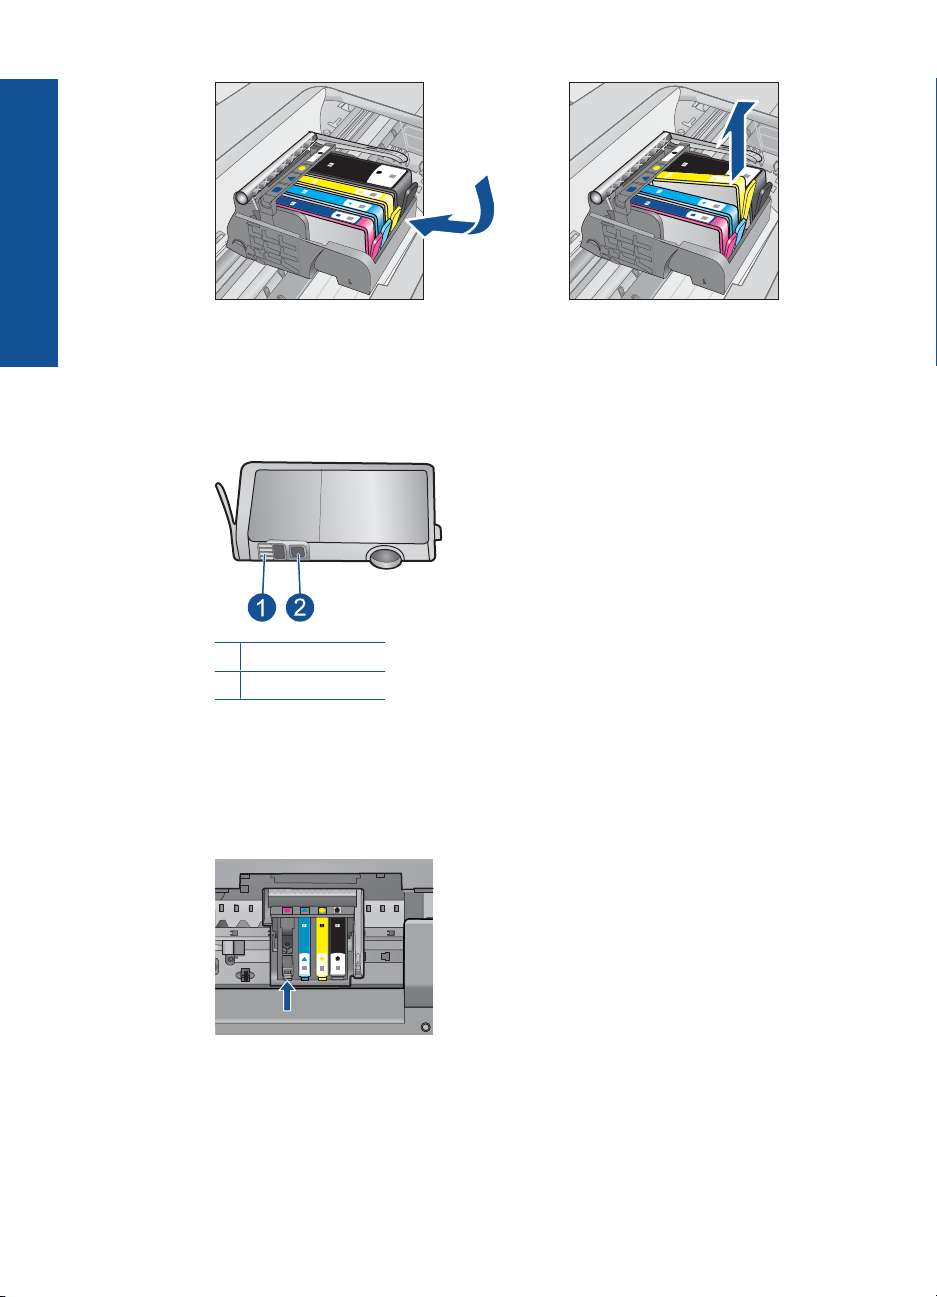
Chapter 12
Solve a problem
4. Hold the ink cartridge by its sides with the bottom pointing up and locate the
electrical contacts on the ink cartridge.
The electrical contacts are four small rectangles of copper or gold-colored metal
on the bottom of the ink cartridge.
1 Ink window
2 Electrical contacts
5. Wipe the contacts with a dry swab or lint-free cloth.
6. On the inside of the product, locate the contacts in the printhead.
The contacts look like a set of four copper or gold-colored pins positioned to meet
the contacts on the ink cartridge.
7. Use a dry swab or lint-free cloth to wipe the contacts.
8. Reinstall the ink cartridge.
84 Solve a problem
Page 88
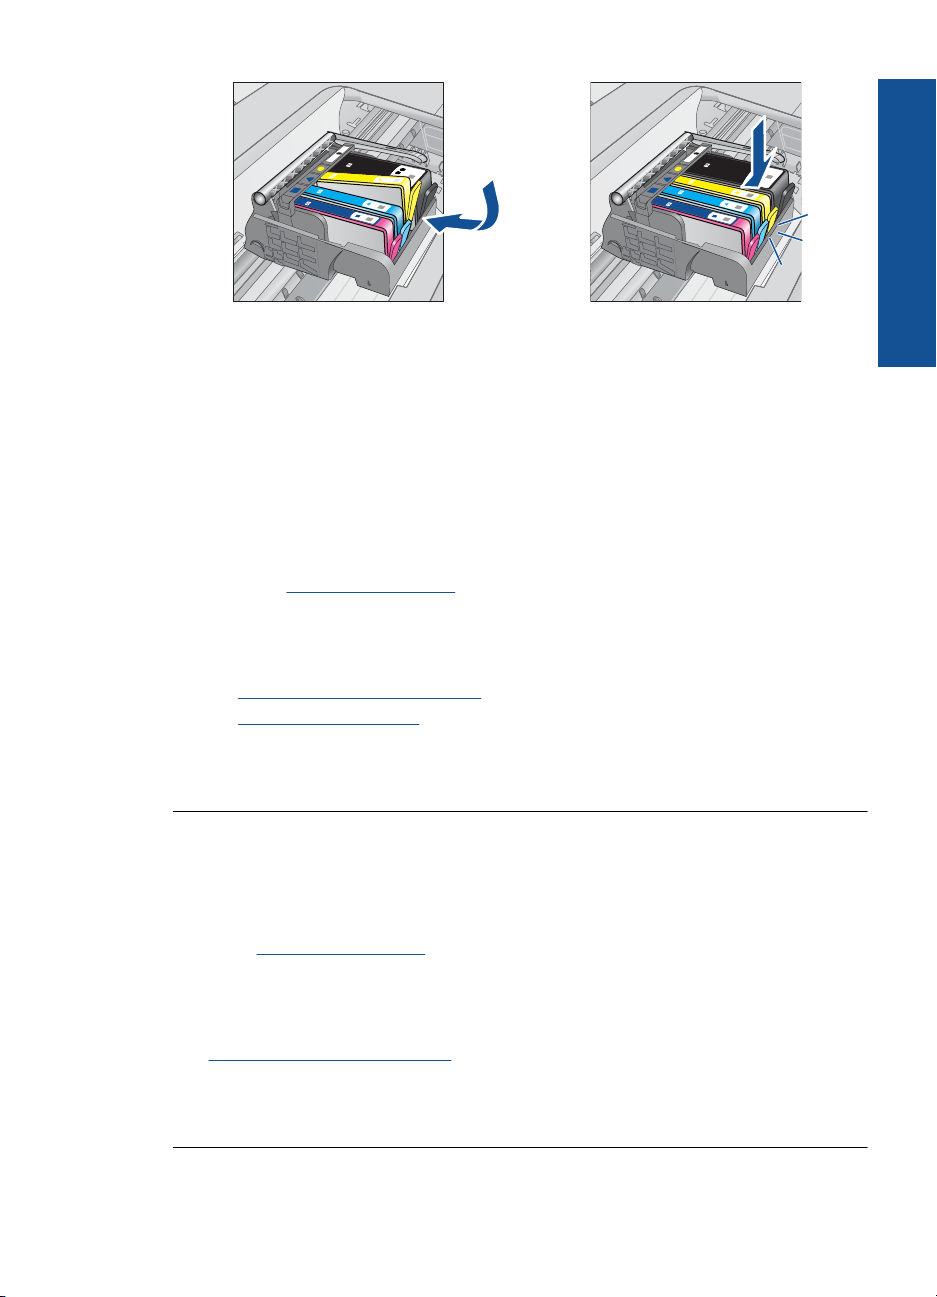
9. Close the ink cartridge door, and check if the error message has gone away.
10. If you still receive the error message, turn the product off, and then on again.
If you still receive this message after cleaning the cartridge contacts, you might have
a damaged cartridge.
Check to see if your cartridge is still under warranty and the end of warranty date has
not been reached.
• If the end of warranty date has been reached, purchase a new ink cartridge.
• If the end of warranty date has not been reached, contact HP support for service
or replacement.
Go to:
www.hp.com/support.
If prompted, choose your country/region, and then click Contact HP for
information on calling for technical support.
For more information, see:
•“
Cartridge warranty information” on page 48
Replace the cartridges” on page 46
•“
Cause: The electrical contacts needed to be cleaned.
If this did not solve the issue, try the next solution.
Solution 4: Replace the ink cartridge
Solution: Replace the indicated ink cartridge.
If your cartridge is still under warranty, contact HP support for service or replacement.
Go to:
www.hp.com/support.
If prompted, choose your country/region, and then click Contact HP for information
on calling for technical support.
For more information, see:
“
Cartridge warranty information” on page 48
Cause: The indicated ink cartridges were defective.
If this did not solve the issue, try the next solution.
Solve a problem
Errors 85
Page 89

Chapter 12
Solve a problem
Solution 5: Contact HP support
Solution: Contact HP support for service.
Go to:
www.hp.com/support.
If prompted, choose your country/region, and then click Contact HP for information
on calling for technical support.
Cause: The product had a problem.
Ink service capacity warning
Solution: If you are going to move or transport the product after receiving this
message, make sure you keep it upright and do not tip it on its side to avoid ink
leakage.
Printing can continue, but ink system behavior might change.
Cause: The product has nearly maximized the ink service capacity.
Ink system failure
Solution: Turn off the product, unplug the power cord, and wait 10 seconds. Then,
plug the power cord back in and turn on the product.
If you continue to receive this message, write down the error code provided in the
message on the product display, and then contact HP support. Go to:
www.hp.com/support
If prompted, choose your country/region, and then click Contact HP for information
on calling for technical support.
Cause: The printhead or the ink delivery system failed and the product can no
longer print.
Check ink cartridges
Try the following solutions to resolve the issue. Solutions are listed in order, with the most
likely solution first. If the first solution does not solve the problem, continue trying the
remaining solutions until the issue is resolved.
•
Solution 1: Install all four ink cartridges
Solution 2: Make sure the ink cartridges are installed correctly
•
Solution 3: Contact HP support
•
Solution 1: Install all four ink cartridges
Solution: Make sure all of the ink cartridges are inserted.
For more information, see:
“
Replace the cartridges” on page 46
Cause: One or more of the ink cartridges were not installed.
86 Solve a problem
Page 90
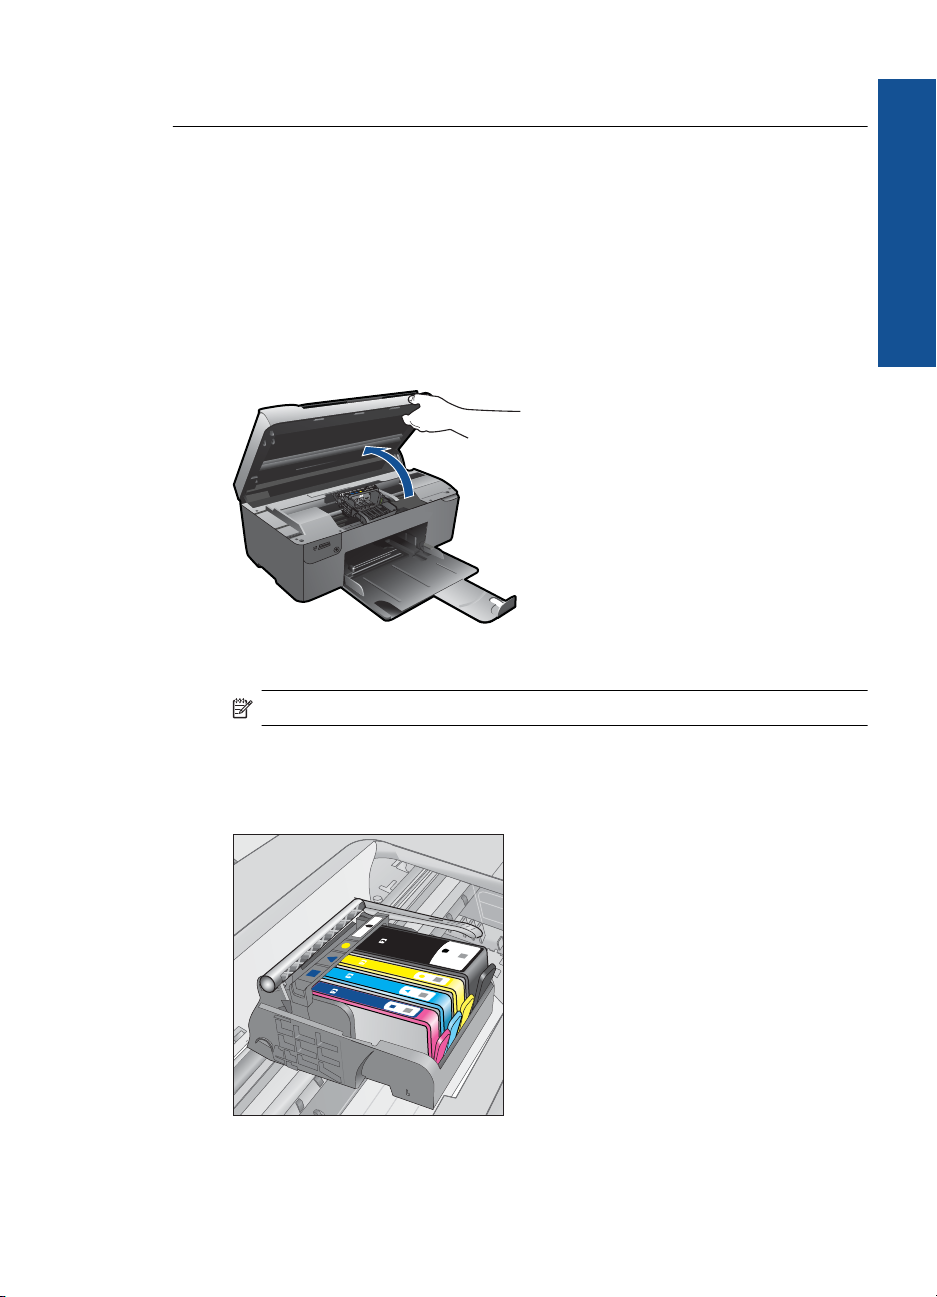
If this did not solve the issue, try the next solution.
Solution 2: Make sure the ink cartridges are installed correctly
Solution: Make sure all of the ink cartridges are properly installed. Refer to the
following steps to resolve this error.
To make sure the ink cartridges are properly installed
1. Make sure the product is turned on.
2. Open the ink cartridge access door by lifting from the front right of the product,
until the door locks into place.
The print carriage moves to the center of the product.
Solve a problem
NOTE: Wait until the print carriage stops moving before proceeding.
3. Make sure the ink cartridges are installed in the correct slots.
Match the shape of the icon and color of the ink cartridge with the slot that has
the same shaped icon and color.
Errors 87
Page 91
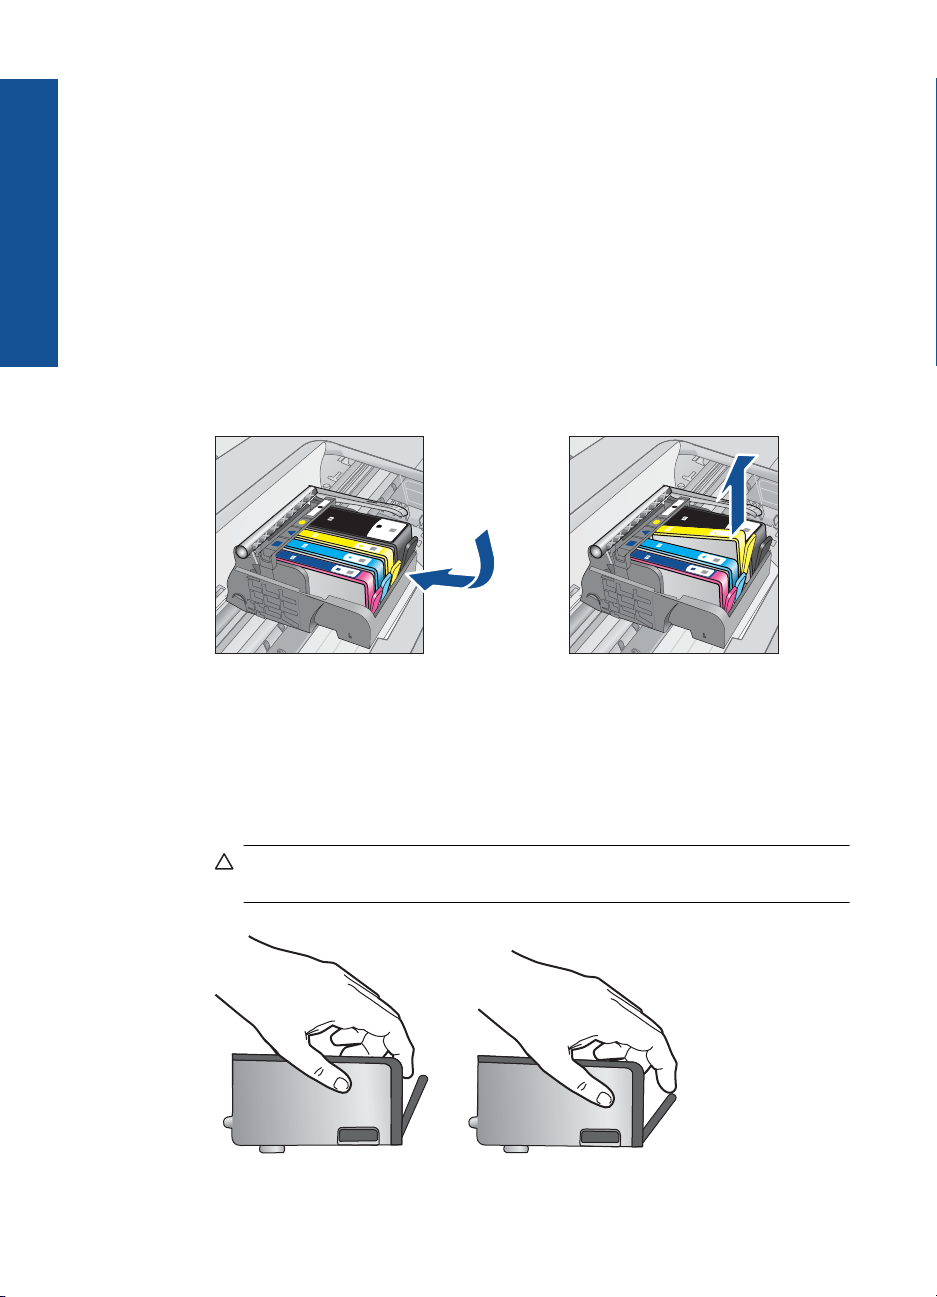
Chapter 12
Solve a problem
4. Run your finger along the top of the ink cartridges to locate any cartridges that
are not snapped completely down.
5. Press down on any cartridges that are sticking up.
They should snap down into place.
6. If an ink cartridge was sticking up and you were able to snap it back down into
place, close the ink cartridge access door and check if the error message has
gone away.
• If the message has gone away, stop troubleshooting here. The error has been
resolved.
• If the message has not gone away, proceed to the next step.
• If none of the ink cartridges were sticking up, proceed to the next step.
7. Locate the ink cartridge that is indicated in the error message, and then press the
tab on the ink cartridge to release it from the slot.
8. Press the ink cartridge back down into place.
The tab should make a snapping noise when the ink cartridge is correctly seated.
If the ink cartridge did not make a snapping noise, the tab might need to be
readjusted.
9. Remove the ink cartridge from the slot.
10. Gently bend the tab away from the ink cartridge.
88 Solve a problem
CAUTION: Be careful not to bend the tab out more than about 1.27 cm
(0.5 inches).
Page 92
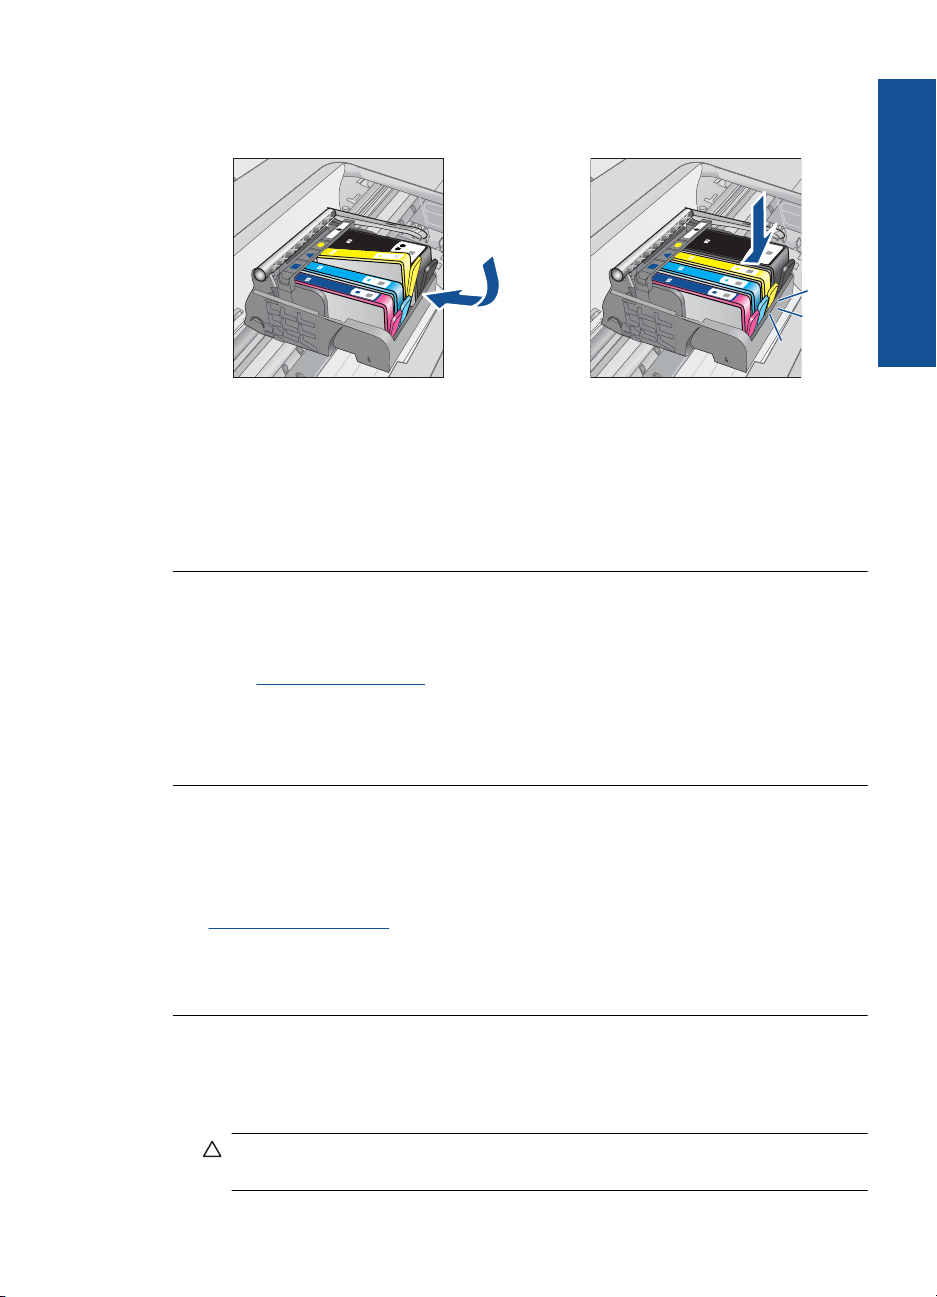
11. Reinstall the ink cartridge.
It should now snap down into place.
12. Close the ink cartridge access door, and check if the error message has gone
away.
13. If you still receive the error message, turn the product off, and then on again.
Cause: The ink cartridges were not installed properly.
If this did not solve the issue, try the next solution.
Solution 3: Contact HP support
Solution: Contact HP support for service.
Go to:
www.hp.com/support.
If prompted, choose your country/region, and then click Contact HP for information
on calling for technical support.
Cause: There was a problem with the ink cartridges.
Solve a problem
Install cartridges
Solution: Make sure all of the ink cartridges are inserted.
For more information, see:
“
Replace the cartridges” on page 46
Cause: One or more of the ink cartridges were not installed.
If this did not solve the issue, try the next solution.
Non-HP cartridge
Solution: Follow the prompts on the display to continue, or replace the indicated
ink cartridges.
CAUTION: HP recommends that you do not remove an ink cartridge until a
replacement is ready to install.
Errors 89
Page 93

Chapter 12
Solve a problem
HP recommends that you use genuine HP ink cartridges. Genuine HP ink cartridges
are designed and tested with HP printers to help you easily produce great results,
time after time.
NOTE: HP cannot guarantee the quality or reliability of non-HP supplies. Printer
service or repairs required as a result of using a non-HP supply will not be covered
under warranty.
If you believe you purchased genuine HP ink cartridges, go to:
www.hp.com/go/anticounterfeit
For more information, see:
“
Replace the cartridges” on page 46
Cause: The product detected non-HP ink.
Original HP ink depleted
Solution: Follow the prompts on the display to continue, or replace the indicated
ink cartridges.
Check the print quality of the current print job. If it is not satisfactory, try cleaning the
printhead to see if that improves the quality.
Information about ink levels will not be available.
CAUTION: HP recommends that you do not remove an ink cartridge until a
replacement is ready to install.
HP recommends that you use genuine HP ink cartridges. Genuine HP ink cartridges
are designed and tested with HP printers to help you easily produce great results,
time after time.
NOTE: HP cannot guarantee the quality or reliability of non-HP supplies. Printer
service or repairs required as a result of using a non-HP supply will not be covered
under warranty.
If you believe you purchased genuine HP ink cartridges, go to:
www.hp.com/go/anticounterfeit
For more information, see:
“
Replace the cartridges” on page 46
Cause: The original HP ink in the indicated ink cartridges was depleted.
90 Solve a problem
Page 94

Previously used genuine HP cartridge
Solution: Check the print quality of the current print job. If it is not satisfactory, try
cleaning the printhead to see if that improves the quality.
To clean the printhead from the HP Photosmart Software
1. Load letter, A4, or legal unused plain white paper into the paper tray.
2. In the HP Solution Center, click Settings.
3. In the Print Settings area, click Printer Toolbox.
NOTE: You can also open the Printer Toolbox from the Print Properties
dialog box. In the Print Properties dialog box, click the Features tab, and
then click Printer Services.
The Printer Toolbox appears.
4. Click the Device Services tab.
5. Click Clean the printhead.
6. Follow the prompts until you are satisfied with the quality of the output, and then
click Done.
There are two stages of cleaning. Each stage lasts about two minutes, uses one
sheet of paper, and uses an increasing amount of ink. After each stage, review
the quality of the printed page. You should only initiate the next phase of cleaning
if the print quality is poor.
If print quality still seems poor after you complete both stages of cleaning, try
aligning the printer. If print quality problems persist after cleaning and aligning,
contact HP support.
Follow the prompts on the display or computer screen to continue.
Solve a problem
NOTE: HP recommends that you do not leave the ink cartridge outside of the
printer for an extended period of time. If a used cartridge is installed, check the
print quality. If it is not satisfactory, run the cleaning procedure from the toolbox.
Cause: The genuine HP ink cartridge was previously used in some other product.
Printhead problem
Try the following solutions.
•
Solution 1: Reinstall the printhead
Solution 2: Contact HP support
•
Solution 1: Reinstall the printhead
Solution: Check to make sure the printhead is installed and the ink cartridge access
door is closed.
Reinstall the printhead.
To reinstall the printhead
1. Make sure that the product is turned on.
2. Open the ink cartridge door.
Errors 91
Page 95
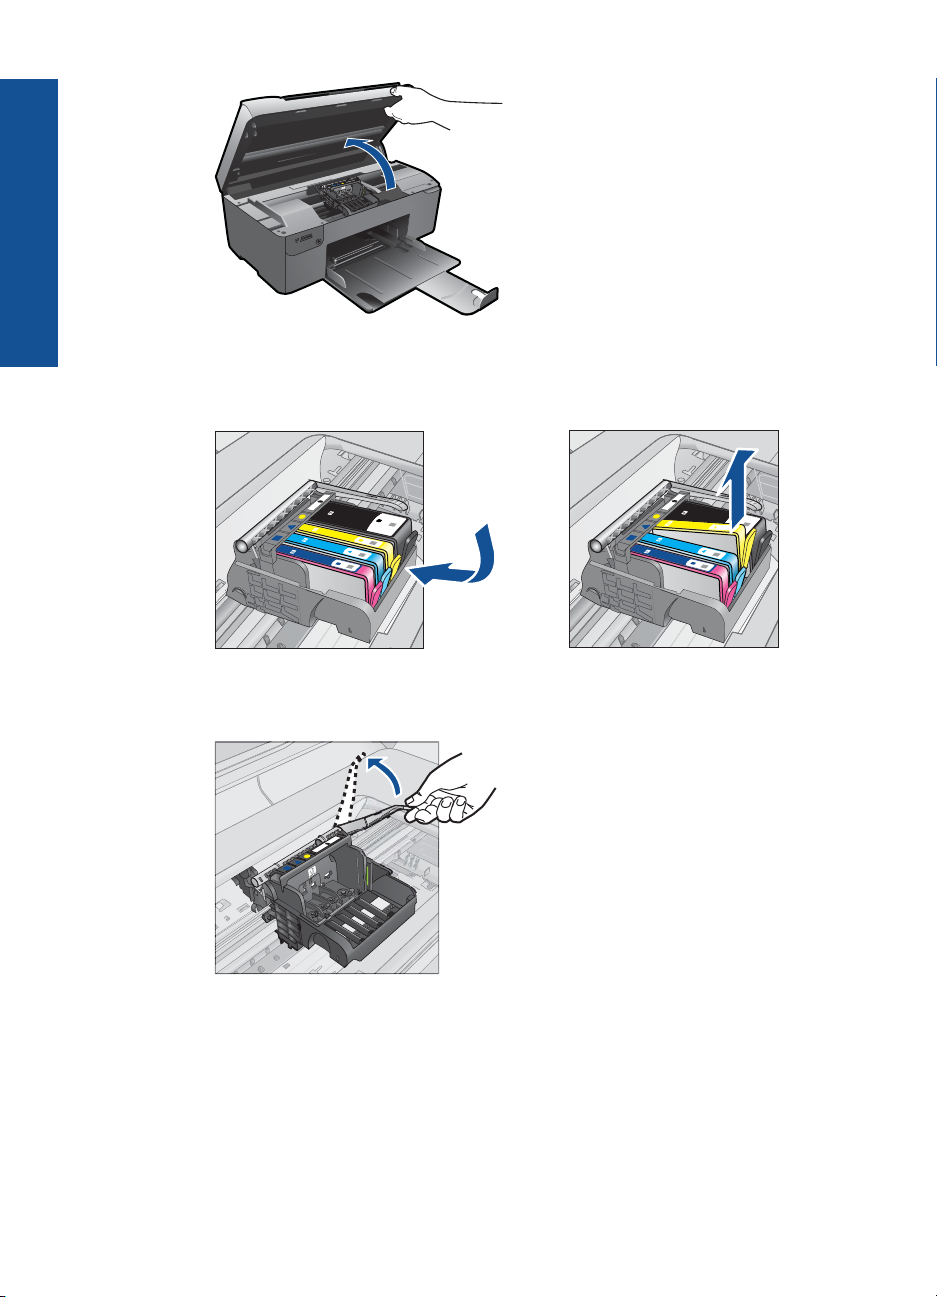
Chapter 12
Solve a problem
3. Remove all of the ink cartridges and place them on a piece of paper with the ink
opening pointing up.
4. Lift the latch handle on the print carriage until it stops.
5. Remove the printhead by lifting it straight up.
92 Solve a problem
Page 96
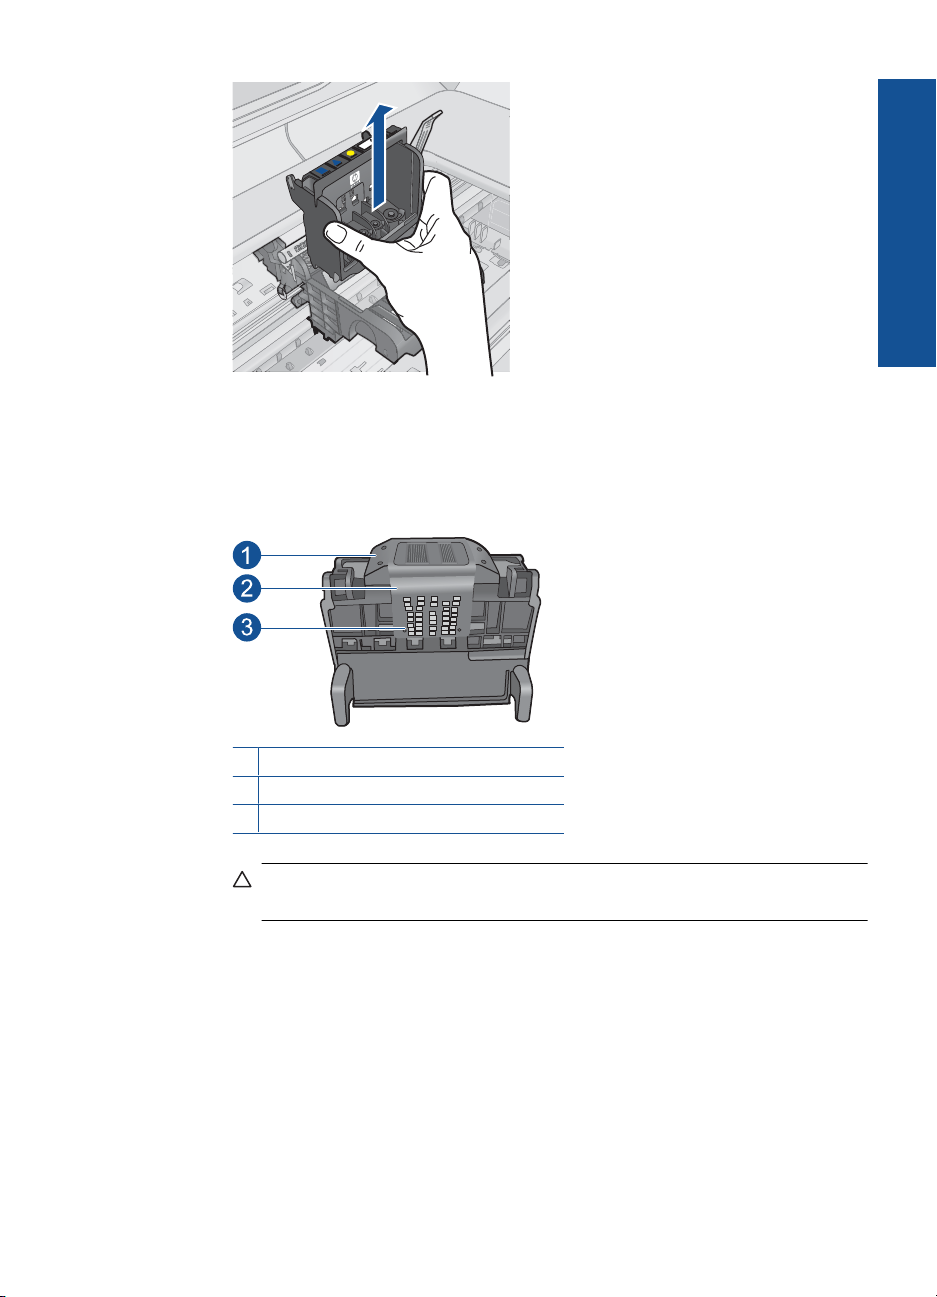
6. Clean the printhead.
There are three areas of the printhead that need to be cleaned: the plastic ramps
on both sides of the ink nozzles, the edge between the nozzles and the electrical
contacts, and the electrical contacts.
1 Plastic ramps on the sides of the nozzles
2 Edge between nozzles and contacts
3 Electrical contacts
CAUTION: Touch the nozzle and the electrical contact areas only with
cleaning materials and not with your finger.
Solve a problem
To clean the printhead
a. Lightly dampen a clean, lint-free cloth and wipe the electrical contact area
from the bottom to the top. Do not go past the edge between the nozzles and
the electrical contacts. Clean until no new ink shows on the cloth.
Errors 93
Page 97
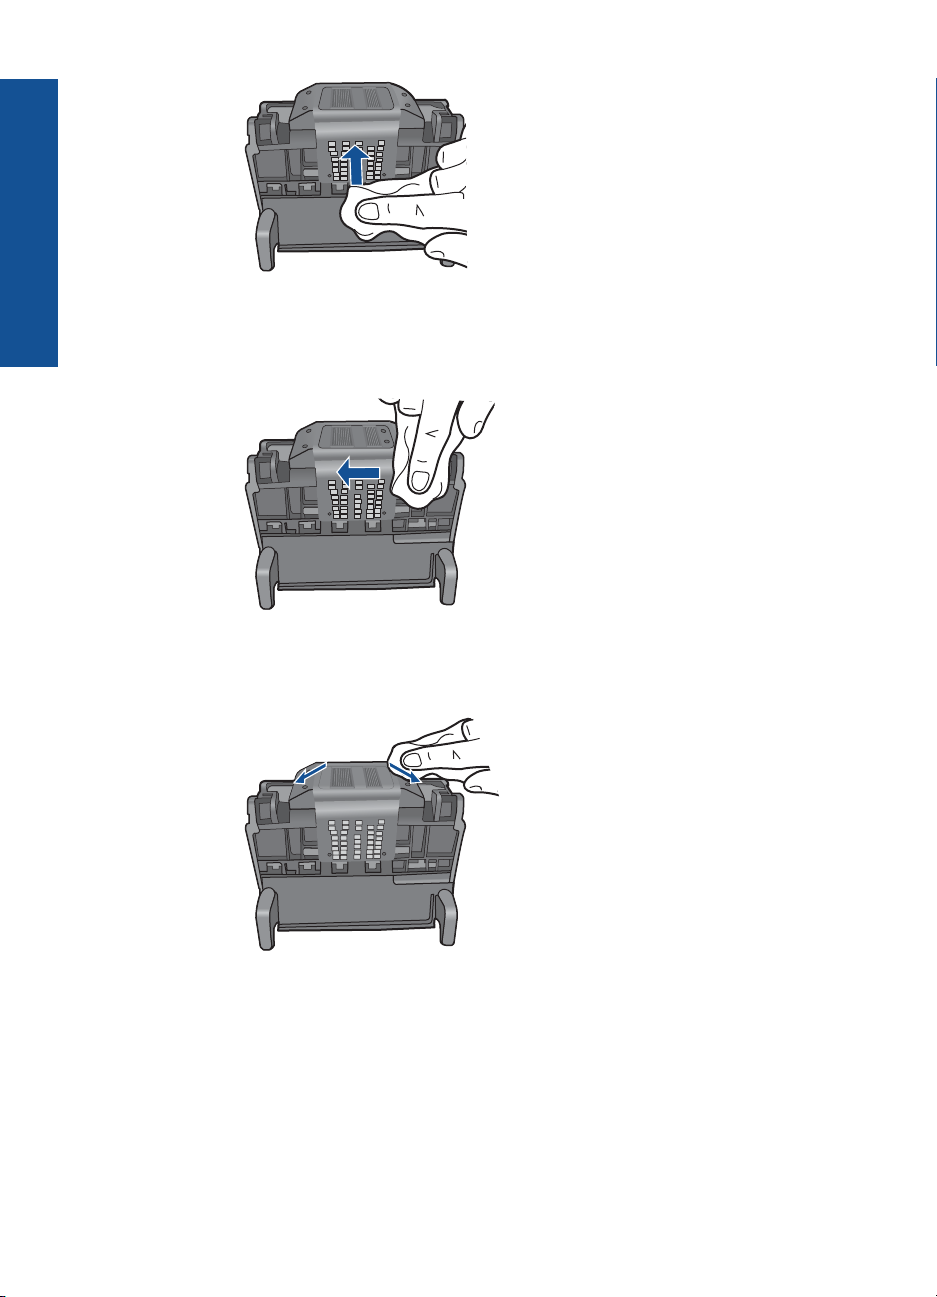
Chapter 12
Solve a problem
b. Use a fresh, lightly dampened, lint-free cloth to wipe any accumulated ink and
debris from the edge between the nozzles and the contacts.
c. Use a fresh, lightly dampened, lint-free cloth to wipe the plastic ramps on both
sides of the nozzles. Wipe away from the nozzles.
d. Wipe the previously cleaned areas dry with a dry lint-free cloth before
proceeding to the next step.
7. Clean the electrical contacts inside the product.
To clean the electrical contacts in the product
a. Lightly dampen a clean, lint-free cloth with bottled or distilled water.
b. Clean the electrical contacts in the product by wiping with the cloth from top
to bottom. Use as many fresh, clean cloths as necessary. Clean until no ink
shows on the cloth.
94 Solve a problem
Page 98
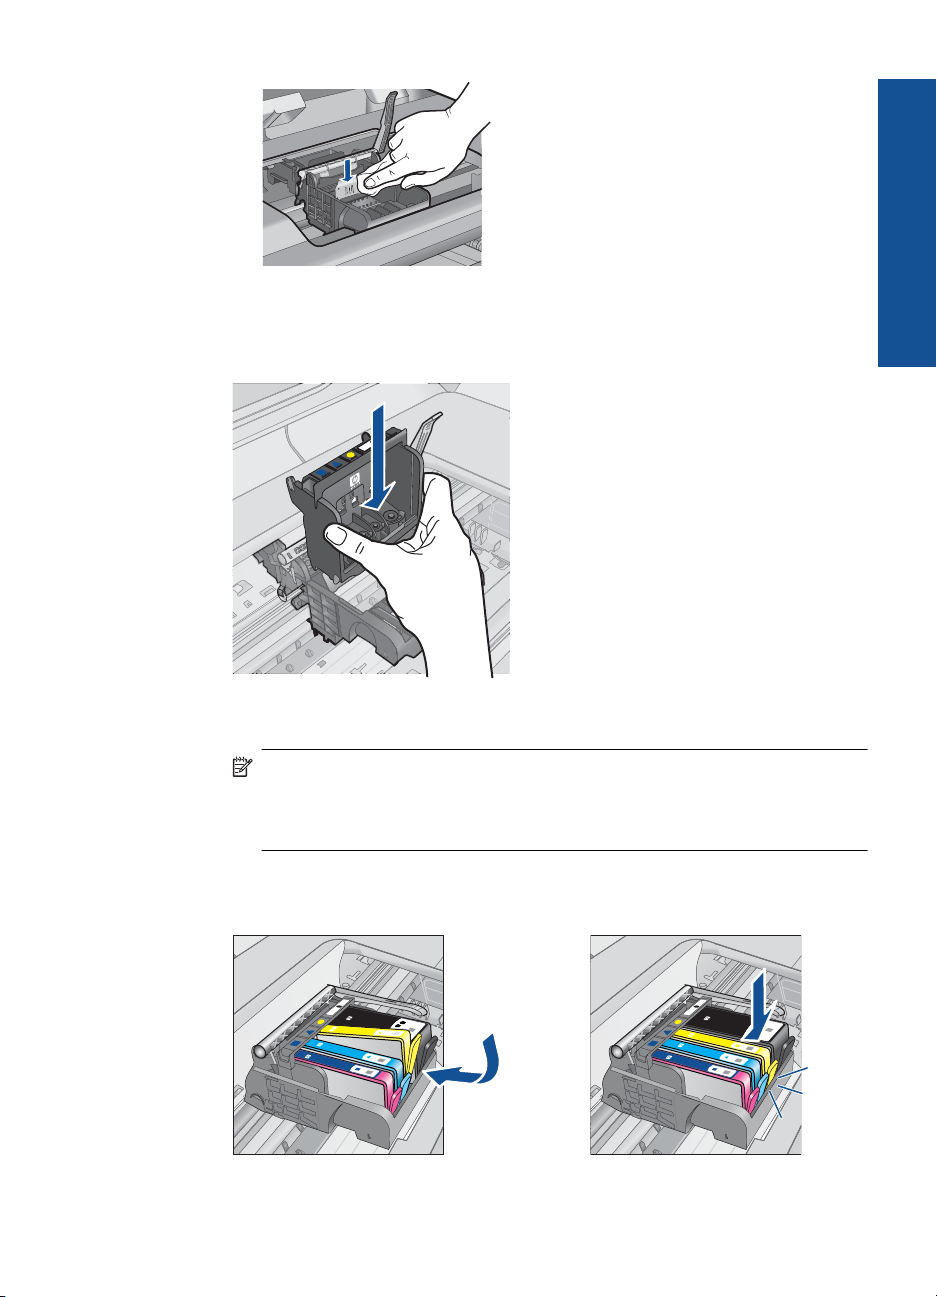
c. Wipe the area dry with a dry lint-free cloth before proceeding to the next step.
8. Make sure the latch handle is raised, and then reinsert the printhead.
9. Carefully lower the latch handle.
NOTE: Make sure you lower the latch handle before reinserting the ink
cartridges. Leaving the latch handle raised can result in incorrectly seated ink
cartridges and problems printing. The latch must remain down in order to
correctly install the ink cartridges.
10. Using the colored shaped icons for help, slide the ink cartridge into the empty slot
until it clicks into place and is seated firmly in the slot.
Solve a problem
Errors 95
Page 99
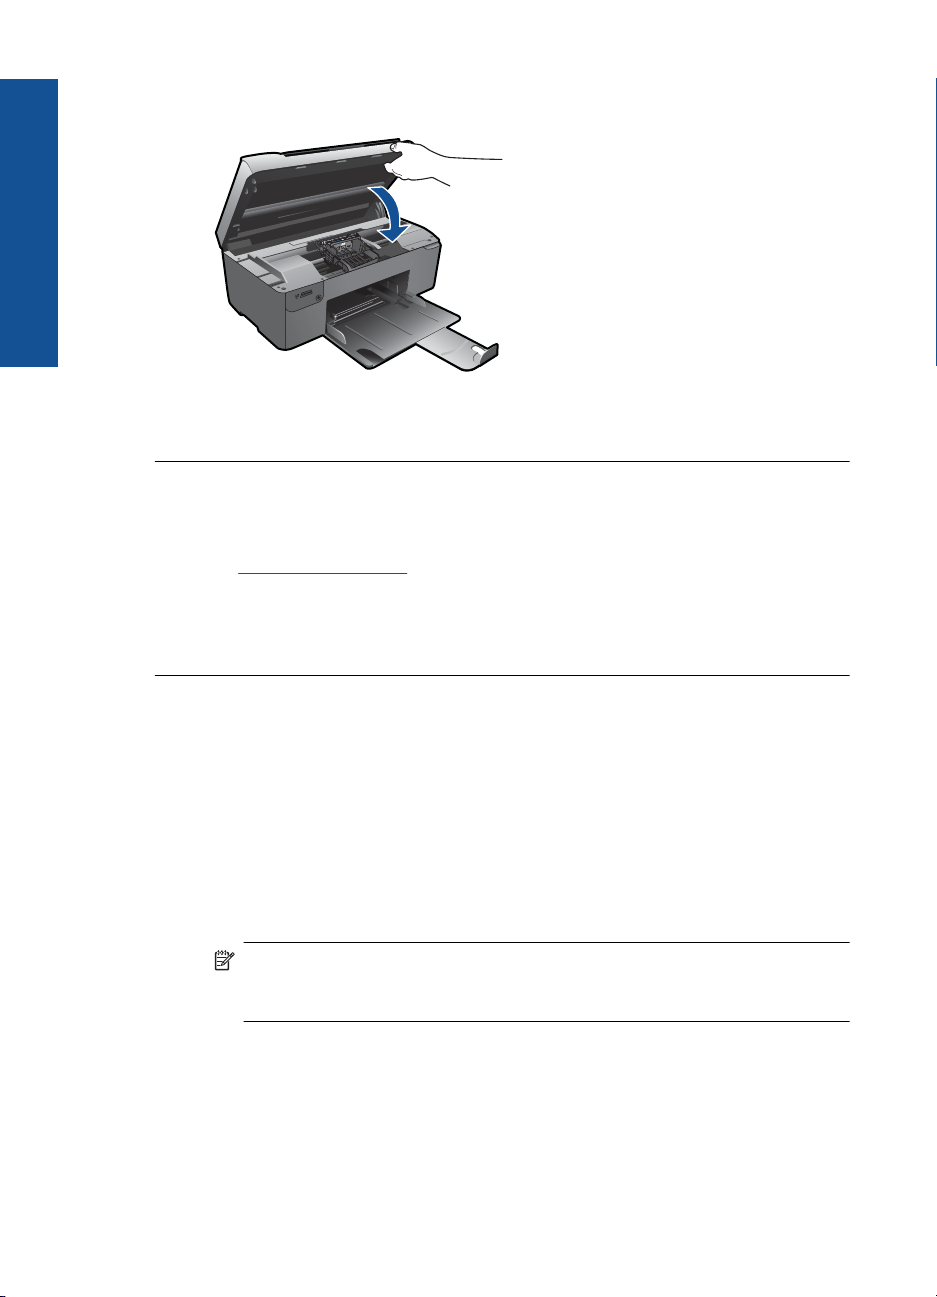
Chapter 12
Solve a problem
11. Close the ink cartridge door.
Cause: There was a problem with the printhead.
If this did not solve the issue, try the next solution.
Solution 2: Contact HP support
Solution: Contact HP support for service.
Go to:
www.hp.com/support.
If prompted, choose your country/region, and then click Contact HP for information
on calling for technical support.
Cause: There was a problem with the printhead.
Problem with printer preparation
Solution: Check the print quality of the current print job. If it is not satisfactory, it
could mean the internal clock failed and the product was not able to service the
printhead as scheduled. Try cleaning the printhead to see if that improves the quality.
To clean the printhead from the HP Photosmart Software
1. Load letter, A4, or legal unused plain white paper into the paper tray.
2. In the HP Solution Center, click Settings.
3. In the Print Settings area, click Printer Toolbox.
The Printer Toolbox appears.
4. Click the Device Services tab.
96 Solve a problem
NOTE: You can also open the Printer Toolbox from the Print Properties
dialog box. In the Print Properties dialog box, click the Features tab, and
then click Printer Services.
Page 100

5. Click Clean the printhead.
6. Follow the prompts until you are satisfied with the quality of the output, and then
click Done.
There are two stages of cleaning. Each stage lasts about two minutes, uses one
sheet of paper, and uses an increasing amount of ink. After each stage, review
the quality of the printed page. You should only initiate the next phase of cleaning
if the print quality is poor.
If print quality still seems poor after you complete both stages of cleaning, try
aligning the printer. If print quality problems persist after cleaning and aligning,
contact HP support.
Cause: The product was turned off improperly.
Solve a problem
Errors 97
 Loading...