

Page 1
EN
Start Here
1
2
FR
Commencez ici
EN
USB cable users : Do not connect the USB cable until
prompted.
FR
À l’attention des utilisateurs de câble USB :
ne connectez pas le câble USB avant d’y être invité.
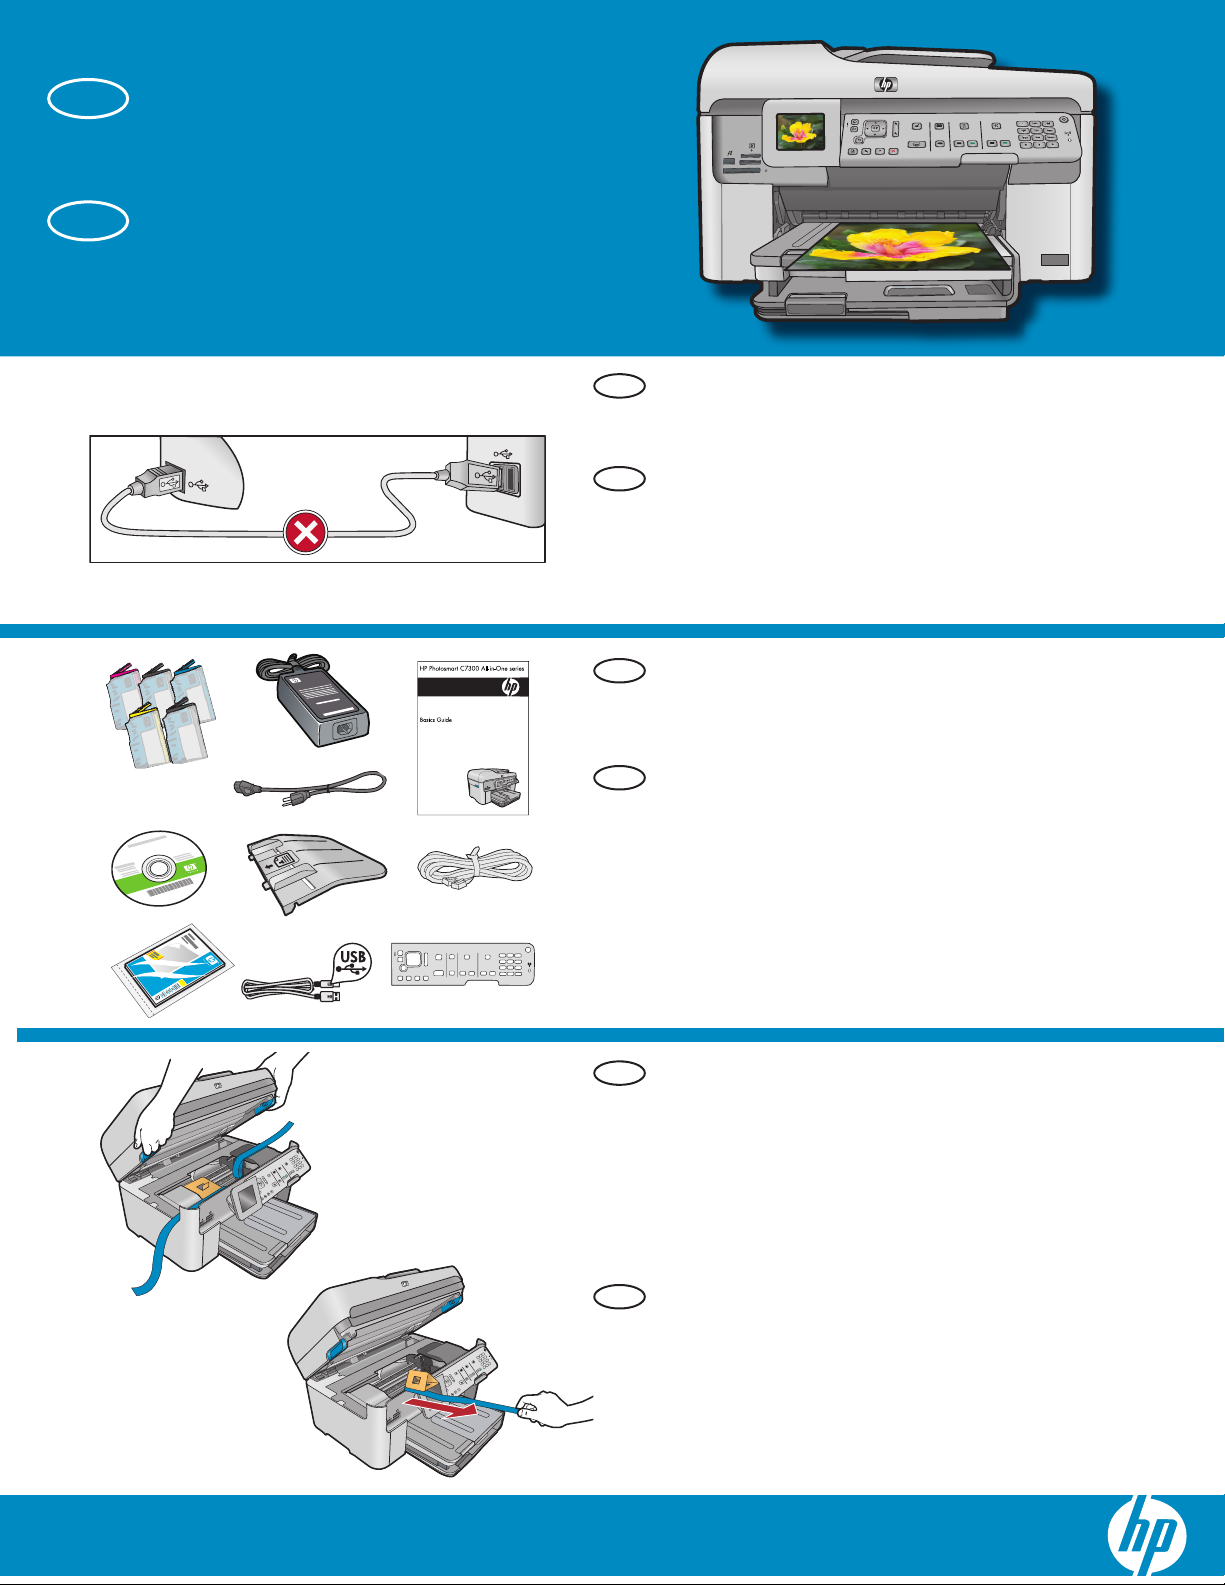
EN
Verify the box contents. The contents of your box
may differ.
*May be included
FR
Vérifi ez le contenu du carton. Le contenu du carton
peut varier.
*Peut être inclus
3
* *
b
c
EN
FR
Remove all tape from the front and back of
a.
the device. Adjust the display and remove its
protective fi lm.
Open the device as shown in graphic b.
b.
Remove the tape and the cardboard restraint
c.
from inside the device.
Enlevez tous les rubans adhésifs à l’avant et à
a.
l’arrière de l’appareil. Ajustez l’écran et retirez
son fi lm protecteur.
Ouvrez l’appareil comme indiqué dans la fi gure b.
b.
Retirez le ruban adhésif et le carton de protection
c.
de l’intérieur de l’appareil.
HP Photosmart Premium Fax All-in-One Series–C309
/ HP Photosmart Premium Fax Tout-en-un série–C309
Page 2
4
EN
a
FR
b
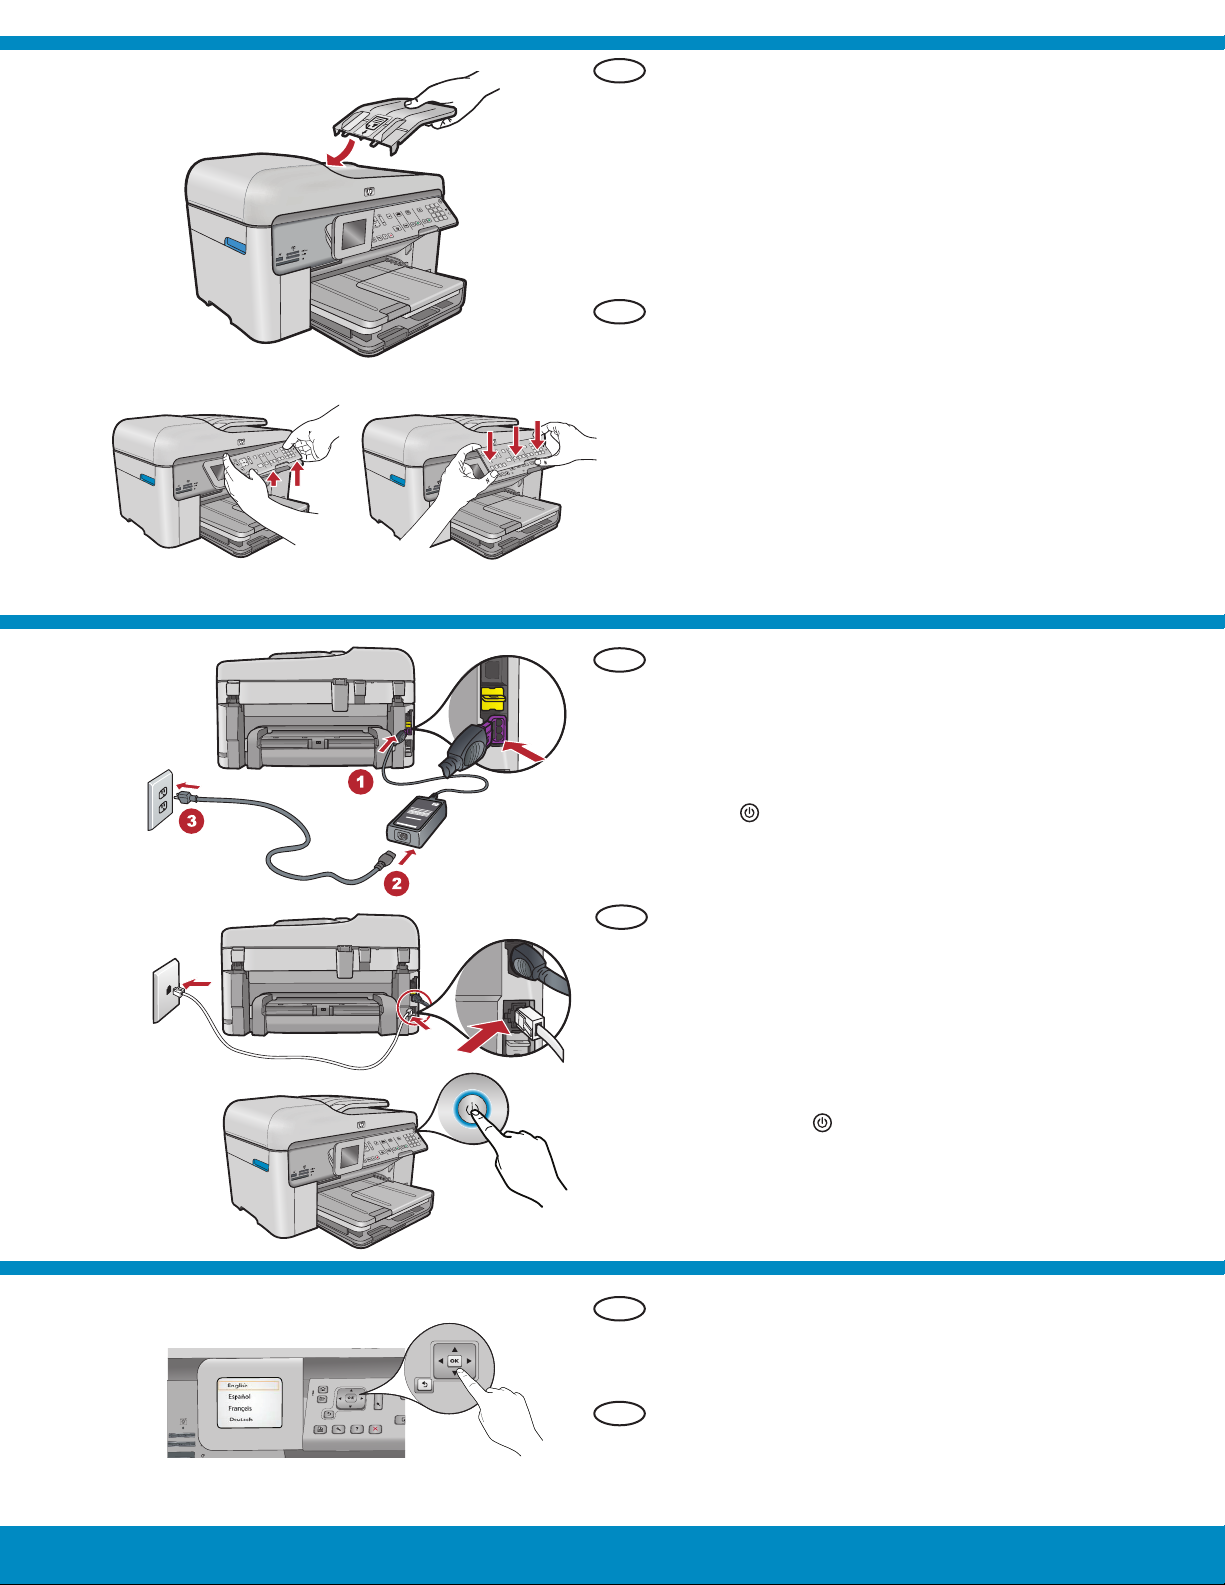
Install the Document Feeder Tray, lining up the tabs
a.
on the edge with the slots in the device. Insert the
tabs into the slots until they snap into place.
If you need to remove the control panel faceplate,
b.
pull up on the right edge of the faceplate. To install
a new faceplate, position it over the buttons on
the device. Press down fi rmly on all edges of the
faceplate until it snaps into place. Make sure all
buttons are visible and not blocked.
Installez le bac d’alimentation de document,
a.
en alignant les ergots avec les fentes de l’appareil.
Insérez les ergots dans les fentes jusqu’à ce qu’ils
s’enclenchent convenablement.
Si vous avez besoin d’enlever le cache du
b.
panneau de confi guration, soulevez le bord
droit du cache. Pour installer un nouveau cache,
positionnez-le au-dessus des boutons de l’appareil.
Appuyez fermement sur tous les bords du cache
jusqu’à ce qu’il s’enclenche . Assurez-vous que
tous les boutons sont bien visibles et qu’ils ne
sont pas bloqués.
5
EN
a.
a
FR
b
c
Connect the power cord and adapter.
b.
Connect one end of the supplied phone cord
to the port labelled 1-LINE and the other to
a wall jack.
See the Onscreen Help for information on other
fax setup options.
c.
Press
NOTE: Pay attention to the helpful messages and
animations in the display during the setup process.
Connectez le cordon d’alimentation
a.
et l’adaptateur.
Branchez une extrémité du cordon téléphonique
b.
au port 1-LINE et l’autre extrémité à une prise
téléphonique murale.
Consultez l’écran d’aide pour obtenir des
informations sur les autres options de confi guration
du télécopieur.
Appuyez sur pour mettre le périphérique
c.
HP Tout-en-un sous tension.
REMARQUE : soyez attentif aux messages
et aux animations d’aide à l’écran lors de
la confi guration.
to turn on the HP All-in-One.
6
2 • HP Photosmart Premium Fax All-in-One Series–C309
EN
If a prompt appears, use the arrows to select your
language, then press OK to confi rm. Select your
country/region, then press OK to confi rm.
FR
Si un message apparaît, utilisez les fl èches pour
sélectionner votre langue et appuyez sur OK pour
confi rmer. Sélectionnez votre pays/région puis
appuyez sur OK pour confi rmer.
/ HP Photosmart Premium Fax Tout-en-un série–C309
Page 3
7
EN
a
b
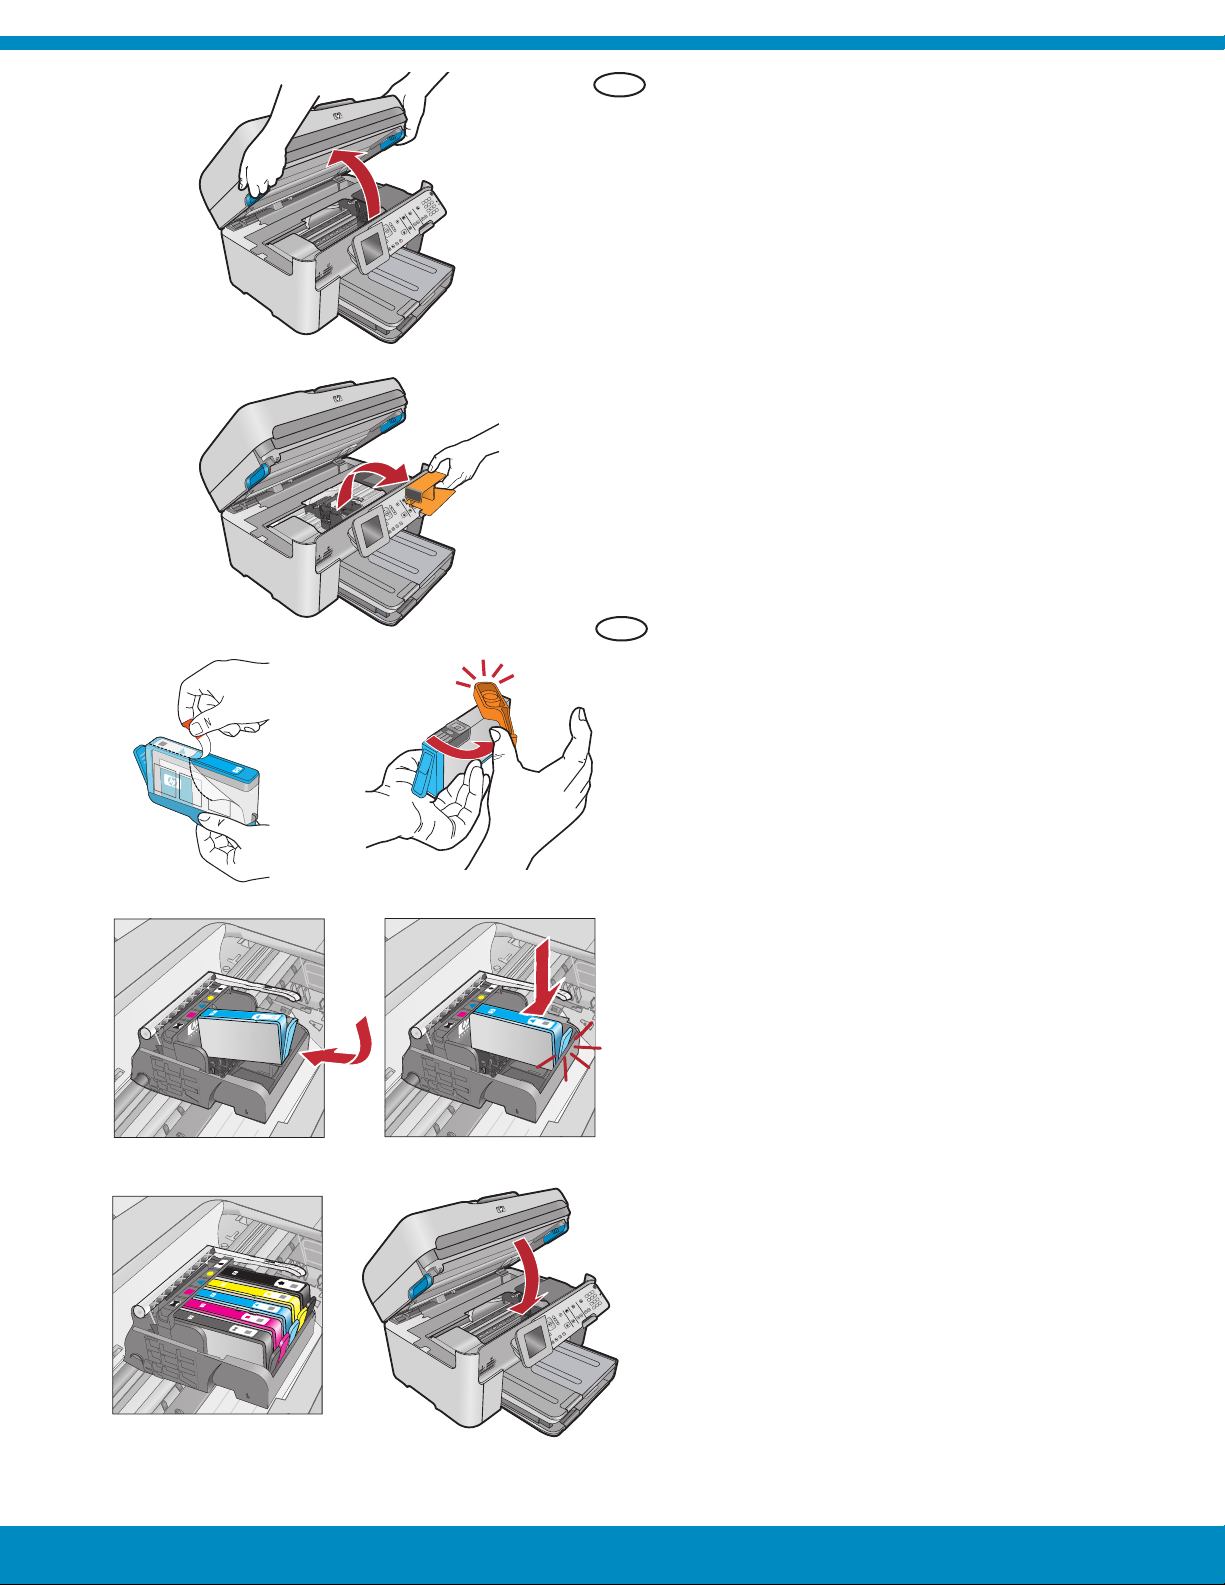
Open the ink cartridge access door.
a.
Remove the orange plastic carriage restraint and
b.
discard or recycle.
Prepare the ink cartridges. First, remove the plastic
c.
wrap by pulling the orange tab. Then twist the
orange cap on the cartridge to snap it off.
Turn the ink cartridge over, slide it into the
d.
appropriate slot, then press down until it clicks
into place.
Repeat steps c and d for all ink cartridges.
e.
Close the ink cartridge access door.
f.
The initialization process begins, which takes
several minutes. It is normal for the device to
make noise during this process. While the
initialization process continues, proceed to
the next step to load paper.
FR
c
d
Ouvrez la trappe d’accès à la cartouche d’encre.
a.
Enlevez le plastique orange de protection
b.
du chariot et jetez-le ou recyclez-le.
Préparez les cartouches d’encre. Enlevez d’abord
c.
l’emballage en plastique en tirant la languette
orange. Tournez ensuite le capuchon orange
sur la cartouche pour la sortir.
Retournez la cartouche d’encre, insérez-la dans
d.
l’emplacement approprié puis appuyez vers le bas
jusqu’à ce qu’elle se mette en place en émettant
un bruit.
Répétez les étapes c et d pour toutes les
e.
cartouches d’encre.
Fermez la trappe d’accès à la cartouche d’encre.
f.
Le processus d’initialisation commence. Il dure
quelques minutes. Il est normal que l’appareil
émette du bruit pendant cette opération.
Pendant le processus d’initialisation,
procédez au chargement du papier.
e
HP Photosmart Premium Fax Tout-en-un série–C309 /
f
HP Photosmart Premium Fax All-in-One Series–C309 • 3
Page 4

EN
a
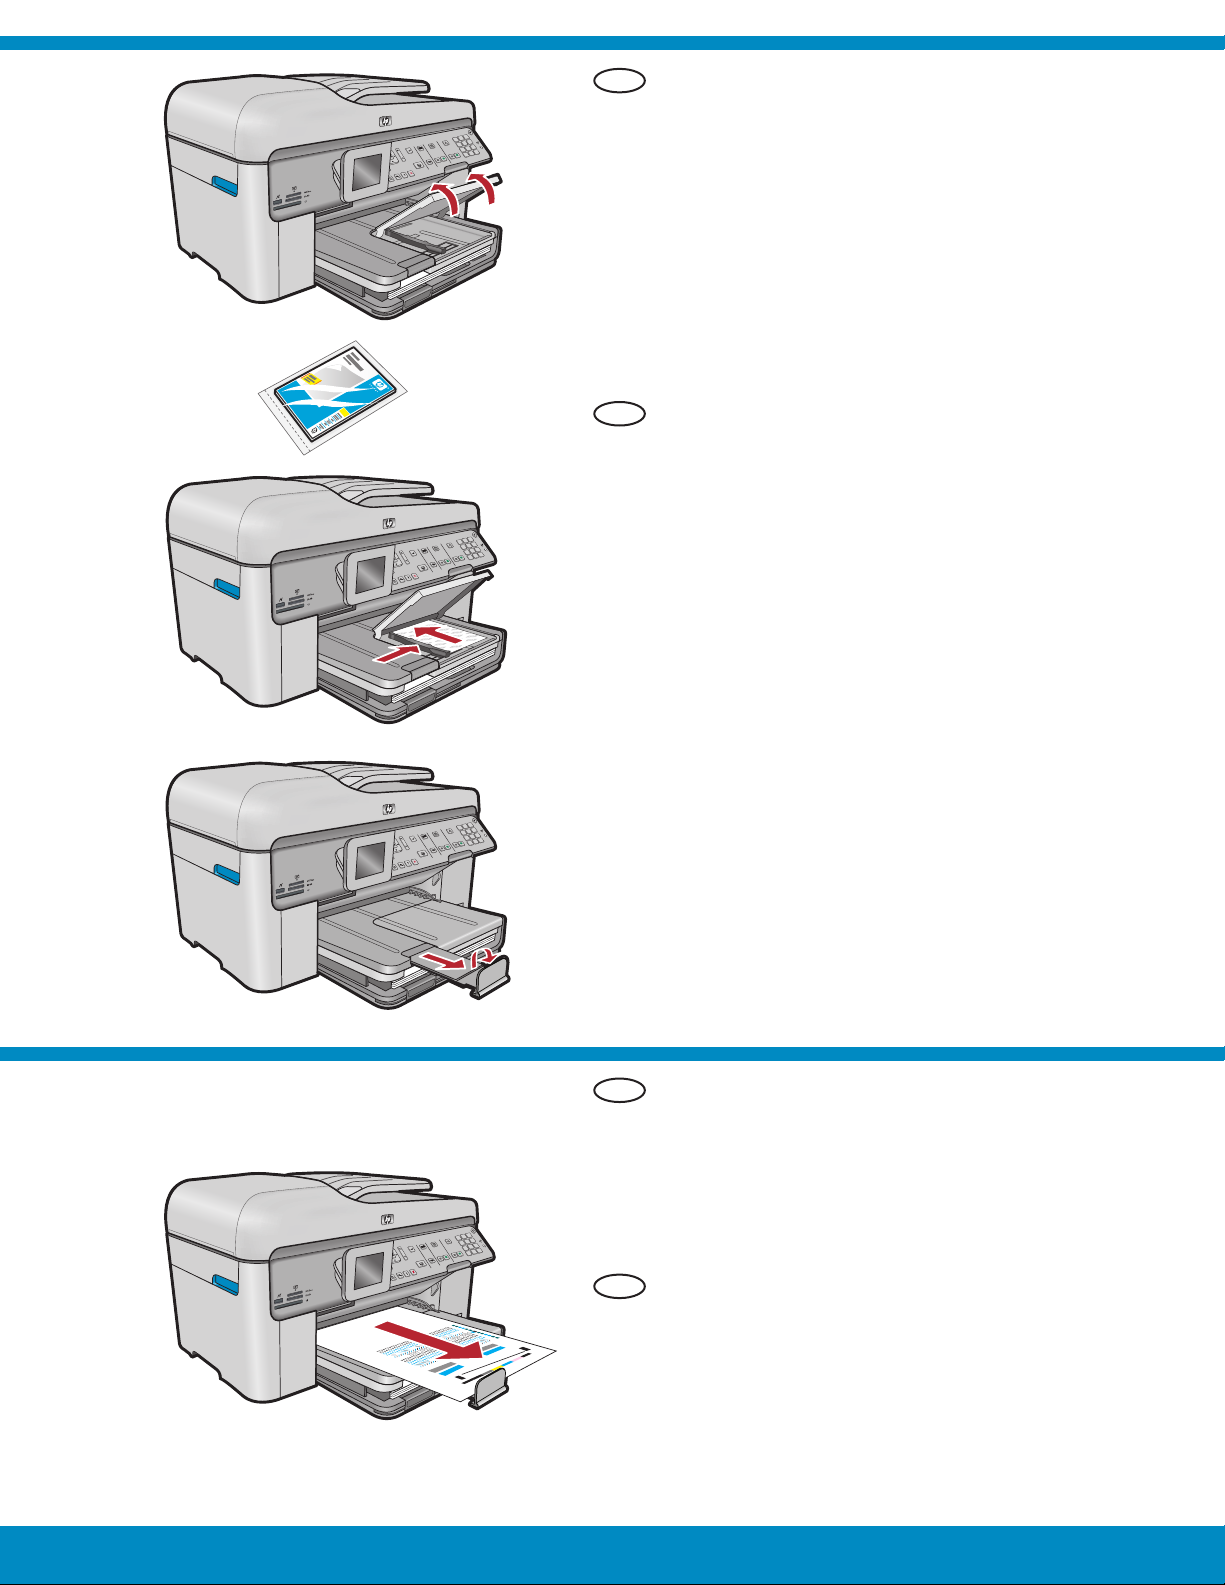
Lift the output tray.
a.
Slide the paper-width guide to the left.
b.
Insert plain white paper into the main tray
c.
and adjust the paper guide.
Lower the output tray.
d.
Ouvrez le bac de sortie.
a.
FR
Faites glisser le guide de largeur du papier vers
b.
la gauche.
Insérez du papier blanc dans le bac principal
b
c.
et ajustez la position du guide papier.
Abaissez le bac de sortie.
d.
c
d
4 • HP Photosmart Premium Fax All-in-One Series–C3098/ HP Photosmart Premium Fax Tout-en-un série–C309
Page 5
9
EN
If you have photo paper, load it into the photo tray.
Lift the photo tray lid.
a.
a
FR
b
Load photo paper with the glossy side down in
b.
the photo tray. Slide the paper guide against the
photo paper.
Lower the photo tray lid.
c.
Pull out the tray extender and lift up the
d.
paper catch.
Si vous avez du papier photo, chargez-le maintenant
dans le bac photo.
Relevez le capot du bac photo.
a.
Chargez le papier photo côté brillant vers le bas
b.
dans le bac photo. Faites glisser les guides papier
contre le papier photo.
Abaissez le capot du bac photo.
c.
Tirez l’extension du bac et soulevez le bac
d.
de récupération de papier.
10
d
EN
FR
After you have loaded paper, press the OK button,
a.
then wait a few minutes while the alignment page
is printed.
After the alignment page is printed, alignment is
b.
complete. Press the OK button. Discard or recycle
the alignment page.
Après avoir chargé le papier, appuyez sur
a.
la touche OK puis attentez quelques minutes,
le temps que la page d’alignement s’imprime.
Lorsque la page d’alignement est imprimée,
b.
l’alignement est terminé. Appuyez sur le bouton
OK . Jetez ou recyclez la page d’alignement.
HP Photosmart Premium Fax Tout-en-un série–C309 /
HP Photosmart Premium Fax All-in-One Series–C309 • 5
Page 6

11
A - USB B - Ethernet
EN
Choose only ONE connection type (A - USB, B - Ethernet/Wired, or C - Wireless (802.11))
FR
Sélectionnez UN SEUL type de connexion (A - USB, B - Ethernet/Wired, ou C - Wireless (802.11))
C - Wireless
(802.11)
A - USB
EN
Use the instructions in Section A if you want to connect the
HP All-in-One directly to one computer. (Do not connect the
USB cable until section A) . Equipment needed: USB cable.
FR
Suivez les instructions de la Section A pour connecter, si vous
le souhaitez, le périphérique HP Tout-en-un directement à un
ordinateur. (Ne connectez pas le câble USB avant la section A) .
Équipement requis : câble USB.
B - Ethernet
EN
FR
C - Wireless (802.11)
EN
Use the instructions in Section B if you want an Ethernet cable
connection between the HP All-in-One and your network.
Equipment needed: router and Ethernet cable.
Suivez les instructions de la Section B pour établir une connexion
par câble Ethernet entre HP Tout-en-un et votre réseau.
Équipement requis : routeur et câble Ethernet.
Use the instructions in Section C if you want a wireless
(802.11 b or g) connection between the HP All-in-One
and your network. Equipment needed: wireless router.
FR
Suivez les instructions de la Section C pour établir une connexion
sans fi l (802.11b ou 802.11g) entre HP Tout-en-un et votre réseau.
Équipement requis : routeur sans fi l.
6 • HP Photosmart Premium Fax All-in-One Series–C309
/ HP Photosmart Premium Fax Tout-en-un série–C309
Page 7

A - USB
Mac: Windows:
EN EN
FR FR
Turn on your computer, login if necessary, and
a.
then wait for the desktop to appear. Insert the
green CD and follow the onscreen instructions.
IMPORTANT : If the startup screen does not
appear, double-click My Computer , double-click
the CD-ROM icon with the HP logo, and then
double-click setup.exe .
Allumez l’ordinateur, connectez-vous si nécessaire
a. IMPORTANT : achetez le câble USB
et attendez que le bureau s’affi che. Insérez le
CD-ROM vert et suivez les instructions à l’écran.
IMPORTANT : si l’écran de démarrage ne s’affi che
pas, double-cliquez sur l’icône Poste de travail ,
puis sur l’icône du CD-ROM ayant le logo HP,
puis sur le fi chier setup.exe .
IMPORTANT : Purchase a USB cable
separately if it is not included.
Connect the USB cable to the port on the
a.
back of the HP All-in-One, and then to any
USB port on the computer.
séparément s’il n’est pas inclus.
Connectez le câble USB au port situé
a.
à l’arrière du périphérique HP Tout-en-un,
puis à n’importe quel port USB de
l’ordinateur.
EN EN
IMPORTANT: Purchase a USB cable separately if it is
not included.
Once the USB prompt appears, connect the USB
b.
cable to the port on the back of the HP All-in-One,
and then to any USB port on the computer.
Follow the onscreen instructions to complete the
c.
software installation.
Go to page 15 to explore features of your
d.
HP All-in-One.
FR FR
IMPORTANT : achetez un câble USB séparément
si aucun n’est inclus.
Une fois l’invite USB affi chée, connectez le câble
b.
USB au port situé à l’arrière du périphérique
HP Tout-en-un, puis à n’importe quel port USB
de l’ordinateur.
Suivez les instructions affi chées à l’écran pour
c.
installer le logiciel.
Allez à la page 15 pour découvrir les
d.
fonctionnalités de votre périphérique HP Tout-en-un.
HP Photosmart Premium Fax All-in-One Series–C309 • 7HP Photosmart Premium Fax Tout-en-un série–C309 /
Insert the green CD.
b.
Double-click the HP Photosmart CD icon
c.
on the desktop.
Double-click the HP Installer icon.
d.
Follow the onscreen instructions.
Complete the Setup Assistant screen.
e.
When you are fi nished, go to page 15
f.
to explore your HP All-in-One.
Insérez le CD vert .
b.
Double-cliquez sur l’icône du CD
c.
HP Photosmart du bureau.
Double-cliquez sur l’icône de HP Installer .
d.
Suivez les instructions affi chées à l’écran.
Renseignez l’écran Assistant
e.
de confi guration .
Lorsque vous avez terminé, allez à la
f.
page 15 pour découvrir les fonctionnalités
de votre périphérique HP Tout-en-un.
Page 8

EN FR
USB Troubleshooting
EN
Problem: (Windows) The Microsoft Add Hardware screen appears.
Action: Cancel all screens. Unplug the USB cable, and then insert
the green HP All-in-One CD. Refer to Section A .
Problème : (Windows) l’écran Microsoft Ajout de matériel s’affi che.
FR
Action : cliquez sur Annuler sur tous les écrans affi chés. Débranchez le
câble USB, puis introduisez le CD-ROM vert du logiciel HP Tout-en-un.
Reportez-vous à la Section A .
EN
Problem: (Windows only) You did not see the screen prompting
you to connect the USB cable.
Action: Cancel all screens. Remove, and then re-insert the green
HP All-in-One CD. Refer to Section A .
Dépannage USB
www.hp.com/support
FR
Problème : (Windows uniquement) L’écran vous invitant à connecter
le câble USB ne s’est pas affi ché.
Action : cliquez sur Annuler sur tous les écrans affi chés. Retirez le
CD-ROM vert du logiciel HP Tout-en-un, puis introduisez-le à nouveau.
Reportez-vous à la Section A .
EN
Problem: (Windows only) The Device Setup Has Failed To Complete
screen appears.
Action: Unplug the device and plug it in again. Check all connections.
Make sure the USB cable is plugged into the computer. Do not plug
the USB cable into a keyboard or a non-powered USB hub. Refer to
Section A .
FR
Problème : (Windows uniquement) L’écran La confi guration
du périphérique ne s’est pas achevée s’affi che.
Action : débranchez le périphérique et rebranchez-le. Vérifi ez toutes les
connexions. Assurez-vous que le câble USB est branché à l’ordinateur.
Ne branchez pas le câble USB sur un clavier ni sur un concentrateur
USB non doté de sa propre alimentation. Reportez-vous à la Section A .
8 • HP Photosmart Premium Fax All-in-One Series–C309 / HP Photosmart Premium Fax Tout-en-un série–C309
Page 9

B - Ethernet
b
EN
Locate your Ethernet/network cable.
a.
Remove the yellow plug from the back of
b.
the device.
Connect one end of the Ethernet/network cable
c.
to the Ethernet port on the back of the device.
Connect the other end of the Ethernet/network
d.
cable to the router (not in the Internet port).
Go to Section D of this Setup Guide to install
e.
your software.
Important: Your computer and the HP All-in-One must be on
c
the same active, working network.
If you are using a DSL or cable modem, make sure you do not
connect the Ethernet/network cable from the HP All-in-One to
the cable modem. Connect it to the router only.
d
FR
Repérez votre câble Ethernet/réseau.
a.
Retirez la prise jaune à l’arrière du périphérique.
b.
Connectez une extrémité du câble Ethernet/réseau
c.
au port Ethernet situé à l’arrière du périphérique.
Connectez l’autre extrémité du câble Ethernet/
d.
réseau au routeur (pas sur le port Internet).
Allez à la Section D Guide de confi guration pour
e.
installer votre logiciel.
Important : votre ordinateur et le périphérique HP Tout-en-un
doivent se trouver sur le même réseau actif en cours de
fonctionnement.
Si vous utilisez un modem ADSL ou câble, assurez-vous de
ne pas connecter le câble Ethernet/réseau du périphérique
HP Tout-en-un au modem câble. Connectez-le uniquement
au routeur.
HP Photosmart Premium Fax All-in-One Series–C309 • 9HP Photosmart Premium Fax Tout-en-un série–C309 /
Page 10

C1 - Wireless (802.11)
EN
Locate and write down your wireless router settings:
a.
Network Name (also called SSID): _________________________________________
WEP key/WPA Passphrase (if needed): _____________________________________
IMPORTANT : You must have this information available to continue with your wireless setup. HP provides
a web-based tool called the Wireless Network Assistant [URL: www.hp.com/go/networksetup (English
only)] that can help retrieve this information for some systems. If the Wireless Network Assistant is unable
to retrieve your network information, you must consult the documentation for your wireless router, the router
manufacturer, or the person who originally setup your wireless network.
FR
Localisez et notez les paramètres de votre routeur sans fi l :
a.
Nom réseau (SSID) : _____________________________________________________
Clé WEP/Mot de passe WPA (si nécessaire) : _______________________________
IMPORTANT : vous devez disposer de ces informations pour poursuivre la confi guration de
votre routeur sans fi l. HP fournit un outil basé sur le Web appelé Assistant réseau sans fi l
[URL : www.hp.com/go/networksetup (en anglais uniquement)] où vous pouvez récupérer ces informations
pour certains systèmes. Si l’assistant réseau sans fi l ne parvient pas à récupérer vos informations réseau,
consultez la documentation de votre routeur sans fi l et contactez le fabricant ou la personne qui
a initialement confi guré votre routeur sans fi l.
EN
b.
Press the Setup button on the HP All-in-One.
c.
Press
Press until Wireless Setup Wizard is highlighted, and then press OK . In a few moments, a list of detected
d.
until Network is highlighted, and then press OK . The Network Menu appears.
networks appears on the display.
FR
Appuyez sur la touche Setup de votre périphérique HP Tout-en-un.
b.
Appuyez sur
c.
Appuyez sur pour mettre Assistant de confi guration sans fi l en surbrillance, puis appuyez sur OK .
d.
pour mettre Réseau en surbrillance, puis appuyez sur OK . Le menu Réseau s’affi che.
Après quelques instants, la liste des réseaux détectés s’affi che à l’écran.
10 • HP Photosmart Premium Fax All-in-One Series–C309 / HP Photosmart Premium Fax Tout-en-un série–C309
Page 11

C2 - Wireless (802.11)
EN
Do one of the following:
e.
Press
•
If the network name that you wrote down does not appear in the list, press the right arrow to refresh the
•
to highlight the name of the network that you wrote down earlier.
list or enter the name manually. Press until Enter New Network Name (SSID) is highlighted, and then
press OK . Then use the visual keyboard to enter the network name. Use the Visual Keyboard Tips that
follow if necessary.
If your network uses security, a prompt appears for the WEP key or WPA passphrase. Both are case
f.
sensitive. Use the visual keyboard to enter the WEP key or WPA passphrase, as requested.
Note : If your router provides 4 WEP keys, make sure you use the fi rst one.
Follow the prompts on the display to complete the network setup.
g.
FR
Procédez de l’une des manières suivantes.
e.
Appuyez sur pour mettre en surbrillance le nom du réseau que vous avez préalablement noté.
•
Si le nom que vous avez noté n’apparaît pas dans la liste, cliquez sur la fl èche de droite pour actualiser
•
la liste ou entrez le nom manuellement. Appuyez sur pour mettre Saisir un nouveau nom de réseau
(SSID) en surbrillance, puis appuyez sur OK . Utilisez ensuite le clavier visuel pour saisir le nom du réseau.
Si nécessaire, utilisez les conseils relatifs au clavier visuel suivants.
Si votre réseau utilise des paramètres de sécurité, vous êtes invité à entrer la clé WEP ou le mot de
f.
passe WPA. Ces paramètres sont sensibles à la casse. Saisissez la clé WEP ou le mot de passe WPA
sur le clavier visuel.
Remarque : si votre routeur fournit 4 clés WEP, veillez à utiliser la première d’entre elles.
Suivez les invites qui s’affi chent à l’écran pour terminer la confi guration réseau.
g.
EN
Visual keyboard tips:
To Select: use Arrow keys to highlight, and then press OK .
•
For mistakes: Select Clear .
•
For lowercase: Select abc
•
For numbers: Select 12 3
•
For symbols: Select .@!
•
When you are fi nished: Highlight Done , and then press OK .
•
FR
Conseils relatifs au clavier visuel :
Pour effectuer une sélection : utilisez les fl èches pour mettre
•
l’élément en surbrillance, puis appuyez sur OK .
En cas d’erreur : sélectionnez Effacer .
•
Pour les caractères en minuscules : sélectionnez abc
•
Pour les nombres : sélectionnez 12 3
•
Pour les symboles : sélectionnez .@!
•
Lorsque vous avez terminé : mettez Terminer en surbrillance,
•
puis appuyez sur OK .
EN
FR
Go to Section D of this Setup Guide to install your software. h.
Allez à la Section D Guide de confi guration pour installer
h.
votre logiciel.
HP Photosmart Premium Fax All-in-One Series–C309 • 11HP Photosmart Premium Fax Tout-en-un série–C309 /
Page 12

/
D1 - Ethernet/ Wireless (802.11)
Windows: Mac:
EN
FR
Turn on your computer, login if necessary,
a.
and then wait for the desktop to appear.
Insert the green CD and follow the onscreen
b.
instructions.
IMPORTANT: If the startup screen does not
appear, double-click My Computer , double-click
the CD-ROM icon with the HP logo, and then
double-click setup.exe .
On the Connection Type screen, make sure
c.
to select through the network .
Your fi rewall software may provide prompts
d.
warning you that HP software is attempting to
access your network. You should respond so
that access is always allowed. Then continue
with the HP software installation.
Note : Anti-virus and anti-spyware applications
may slow down or block software installation
and may need to be disabled. Remember to
turn them back on again following installation.
Allumez l’ordinateur, connectez-vous si
a.
nécessaire et attendez que le bureau s’affi che.
Insérez le CD-ROM vert et suivez les instructions
b.
à l’écran.
IMPORTANT : si l’écran de démarrage
ne s’affi che pas, double-cliquez sur l’icône
Poste de travail , puis sur l’icône du CD-ROM
ayant le logo HP, puis sur le fi chier setup.exe .
Dans l’écran Type de connexion , veillez
c.
à sélectionner Par le réseau .
Votre logiciel pare-feu peut générer d’autres
d.
invites vous informant que le logiciel HP
tente d’accéder à votre réseau. Nous vous
recommandons de répondre de manière
à toujours autoriser l’accès. Poursuivez
ensuite l’installation du logiciel HP.
Remarque : les applications antivirus et
anti-logiciels espions peuvent ralentir ou bloquer
l’installation du logiciel ; il se peut que vous
deviez les désactiver. Pensez à les réactiver
à l’issue de l’installation.
EN
FR
Turn on your computer, login if necessary,
a.
and then wait for the desktop to appear.
Insert the green CD.
b.
Double-click the HP Photosmart CD icon
c.
on the desktop.
Double-click the HP Installer icon.
d.
Follow the onscreen instructions.
Complete the Setup Assistant Screen.
e.
Allumez l’ordinateur, connectez-vous
a.
si nécessaire et attendez que le bureau
s’affi che.
Insérez le CD vert .
b.
Double-cliquez sur l’icône du CD
c.
HP Photosmart du bureau.
Double-cliquez sur l’icône de HP Installer .
d.
Suivez les instructions affi chées à l’écran.
Renseignez l’écran Assistant
e.
de confi guration .
12 • HP Photosmart Premium Fax All-in-One Series–C309 / HP Photosmart Premium Fax Tout-en-un série–C309
Page 13

/
D2 - Ethernet/ Wireless (802.11)
EN FR
If you have additional computers on your
network, install the HP All-in-One software
on each computer.
Follow the onscreen instructions. Make sure that
you choose the connection types between the
network and your HP All-in-One (not between
your computer and the network).
EN FR
Network Troubleshooting
EN
Problem: After you run the Wireless Setup Wizard from the HP All-in-One control panel, the HP All-in-One
cannot connect to the network.
Action:
Run the Wireless Network Test. You can run this diagnostic test directly from the Wireless Setup Wizard or
•
from the HP All-in-One front panel Network Menu. In the Network Menu, scroll down and select Wireless
Network Test. After the test runs, a report is printed that lists any problems detected with your wireless
network, along with recommendations on how you can correct it.
There may be inference from other devices preventing the HP All in One from connecting. Any wireless
•
device that uses 2.4GHZ can cause interference (including microwaves). Make sure these devices are
not in use during the HP All in One installation.
Your wireless router may need to be reset. Turn off your wireless router for 30 seconds and then turn
•
it back on. Then run the Wireless Setup Wizard on your HP All in One.
FR
Problème : si vous lancez l’ assistant de confi guration sans fi l depuis le panneau de commande HP Tout-en-un,
ce dernier ne peut pas se connecter au réseau.
Action :
Exécutez le test de réseau sans fi l. Vous pouvez exécuter ce test diagnostic directement depuis l’assistant
•
de confi guration sans fi l ou depuis le menu Réseau du panneau de commande HP Tout-en-un. Dans le
menu Réseau, faites défi ler la fenêtre vers le bas et sélectionnez Test de réseau sans fi l. Après l’exécution
du test, un rapport qui répertorie tous les problèmes rencontrés avec votre réseau sans fi l est imprimé,
accompagné des recommandations pour les corriger.
Il peut y avoir des interférences provenant d’autres périphériques empêchant HP Tout-en-un de
•
se connecter. Tout appareil sans fi l utilisant le 2,4 GHZ est susceptible de causer des interférences
(notamment, les micro-ondes). Veillez à ne pas faire fonctionner ces appareils durant l’installation
de HP Tout-en-un.
Vous aurez peut-être besoin de réinitialiser votre routeur sans fi l. Pour cela, éteignez-le durant
•
30 secondes, puis rallumez-le. Exécutez ensuite l’assistant de confi guration sans fi l sur votre
HP Tout-en-un.
Si vous disposez d’ordinateurs supplémentaires sur le
réseau, installez le logiciel HP Tout-en-un sur chaque
ordinateur.
Suivez les instructions affi chées à l’écran.
Assurez-vous de choisir le type de connexion
entre le réseau et le périphérique HP Tout-en-un
(et non entre l’ordinateur et le réseau).
Dépannage du réseau
www.hp.com/support
HP Photosmart Premium Fax All-in-One Series–C309 • 13HP Photosmart Premium Fax Tout-en-un série–C309 /
Page 14

www.hp.com/support
EN
Problem: While you install the HP All-in-One software, you see the error message Printer Not Found .
Action:
The HP All in One may not be connected to your network. For a wireless connection, make sure you have
•
run the Wireless Setup Wizard from the HP All-in-One front panel before continuing with the software
installation. You can also run the Wireless Network Test from the HP All-in-One front panel to verify the
wireless connection between your HP All-in-One and your wireless network. Both are accessed from the
front panel Network Menu.
For a wired Ethernet connection, check all cable connections between the HP All in One, the router,
•
and your computer.
Try temporarily disabling any fi rewall, anti-spyware, or anti-virus software you may be currently running
•
on your computer.
Refer to the Onscreen Help for your HP All-in-One for additional network troubleshooting help.
•
FR
Problème : lors de l’installation du logiciel HP Tout-en-un, le message d’erreur Imprimante introuvable
s’affi che.
Action :
Le périphérique HP Tout-en-un n’est peut-être pas connecté à votre réseau. Dans le cas d’une connexion
•
sans fi l, veillez à exécuter l’assistant de confi guration sans fi l depuis le panneau de commande
HP Tout en-un avant de poursuivre l’installation du logiciel. Vous pouvez aussi exécuter le test de réseau
sans fi l depuis le panneau avant de votre HP Tout-en-un pour vérifi er la connexion sans fi l entre votre
HP Tout-en-un et votre réseau sans fi l. Les deux sont accessibles depuis le menu Réseau du panneau
de commande.
Dans le cas d’une connexion Ethernet câblée, vérifi ez toutes les connexions par câble reliant
•
HP Tout-en-un, le routeur et votre ordinateur.
Faites un essai en désactivant temporairement tout logiciel pare-feu, anti-logiciels espions ou antivirus
•
qui s’exécute sur votre PC.
Reportez-vous à l’écran d’aide de votre HP Tout-en-un pour obtenir de l’aide sur d’autres
•
problèmes réseau.
14 • HP Photosmart Premium Fax All-in-One Series–C309 / HP Photosmart Premium Fax Tout-en-un série–C309
Page 15

EN
Problem: You see the error message Invalid WEP key or Invalid WPA passphrase when you run the
Wireless Setup Wizard.
Action: You may have typed the WEP key or WPA passphrase or Network Name (if entering it manually)
incorrectly. They are case sensitive and must be typed exactly. Make sure there are no blank spaces at the
beginning or end.
FR
Problème : le message d’erreur clé WEP non valide ou mot de passe WPA non valide s’affi che lors
du lancement de l’assistant de confi guration sans fi l.
Action : vous avez dû saisir la clé WEP, le mot de passe WPA ou le nom de réseau incorrectement
(s’il à été saisi manuellement). Ces informations sont sensibles à la casse et doivent être saisies
précisément. Assurez-vous qu’il n’y a pas d’espace vide au début ou à la fi n.
EN FR
Explore the features
EN FR
Now that your HP Photosmart software
program is installed on your computer, you can
try out one of the features on the HP All-in-One.
EN FR
Print Photos
Découverte des fonctionnalités
Une fois le logiciel HP Photosmart installé sur
votre ordinateur, vous pouvez tester l’une des
fonctionnalités du périphérique HP Tout-en-un.
Imprimez des photos
EN
You can print photos from a memory card or a
connected camera using the menus on the display.
FR
Vous pouvez imprimer des photos depuis une carte
mémoire ou depuis un appareil photo connecté en
utilisant les menus de l’écran.
HP Photosmart Premium Fax All-in-One Series–C309 • 15HP Photosmart Premium Fax Tout-en-un série–C309 /
Page 16

EN FR
Quick Forms
Formulaires rapides
EN
The Quick Forms feature gives you instant access
to useful forms such as checklists, graph paper,
calendars, even notebook paper. Begin by pressing
the Quick Forms button on the control panel.
FR
La particularité des formulaires rapides est de vous
donner accès aux formulaires utiles comme les listes
de tâches, les calendriers, ou même les documents
du bloc-notes. Commencez en cliquant sur le bouton
Formulaires rapides du panneau de confi guration.
EN FR
Print CDs
Imprimer des CD
EN
Using HP software, you can customize photos or text
and print onto a printable CD. See the Basics Guide
for details.
FR
En utilisant le logiciel HP, vous pouvez personnaliser
les photos, les textes et imprimer sur des CD
adaptés. Reportez-vous au guide d’utilisation
pour plus de détails.
© 2008 Hewlett-Packard Development Company, L.P.
Printed in () Printed in ()
*CC334-90119*
*CC334-90119*
*CC334-90119*
 Loading...