

Page 1

2
www.hp.com/cposupport/loc/regional.html
See your Basics Guide for more information on
printing your digital photos and using your printer.
In some countries this guide is in CD format instead
of print.
See your Software Setup & Product Support booklet
for instructions on installing the software for this
printer on your computer or to find information on
contacting HP.
See your HP Photosmart Printer Help for information
on using this printer with your computer, including
saving photos from a memory card to the computer.
Printed in Germany 06/02 • Printed on recycled paper
© 2002 Hewlett-Packard Company
Windows is a registered trademark of Microsoft Corporation
Macintosh is a registered trademark of Apple Computer, Inc.
1
unpack your printer
a. Printer
b. Power adapter
c. Faceplates
d. Print cartridge (HP #57)
e. Software and Printer Help on CD
f. Setup Guide
g. Software Setup & Product Support booklet
h. Basics Guide
i. Sample photo paper
j. Sample index cards
hp photosmart
230
setup
guide
*Q3000-90154* Q3000-90154
installation
installatie-
gids
attach the faceplate
1. Select the faceplate that shows the language you want to
use.
2. Position the printer so it is facing you.
3. Hold the faceplate in position above the printer, slightly
angled away from you.
4. Slide the rear tabs into the rear of the recessed area.
5. Bend the sides of the faceplate very slightly, and snap in
the side and front tabs.
(a)
(f)
(i)
(h)
(j)
(e) (g)
(d)
(b)
3
connect the power adapter
Make sure you place the printer at least 25 cm (10 inches)
away from any obstruction to allow space for the paper to
move during printing.
1. Insert the round end of the power adapter (a) into the
power adapter connection on the back of your printer.
2. Connect the adapter plug (b) for your area to the power
adapter.
3. Plug the power adapter (c) into a working electrical outlet.
Important: Make sure the power adapter cord does not block
the rear paper path (d).
(c)
(a)
(d)
(b)
(c)
déballez votre imprimante
a. Imprimante
b. Adaptateur secteur
c. Façades
d. Cartouche d’impression (HP n° 57)
e. CD-ROM contenant le logiciel et l’aide en ligne
f. Guide d’installation
g. Brochure Configuration du logiciel et assistance produit
h. Guide des fonctions de base
i. Echantillon de papier photo
j. Echantillon de planches-contact
de printer uitpakken
a. Printer
b. Netadapter
c. Frontjes
d. Inktpatroon (HP #57)
e. Software en Help bij printer op cd-rom
f. Installatiegids
g. Boekje Software-installatie & productondersteuning
h. Beknopte handleiding
i. Voorbeeldfotopapier
j. Voorbeeldindexkaarten
fixez la façade
1. Choisissez la façade correspondant à votre langue de
travail.
2. Placez-vous face à l’imprimante.
3. Maintenez la façade au-dessus de l’imprimante,
légèrement inclinée vers l’avant.
4. Insérez les onglets arrière de la façade dans les encoches
prévues à cet effet.
5. Courbez très légèrement les bords de la façade et
enclenchez les onglets avant et latéraux.
het frontje bevestigen
1. Neem het frontje met de taal die u wilt gebruiken.
2. Plaats de printer met de voorzijde naar u gericht.
3. Houd het frontje, enigszins van u af gericht, boven de
printer.
4. Schuif de achterste nokjes in de achterzijde van het
verzonken gedeelte.
5. Buig het frontje licht om aan de zijkanten en schuif de
nokjes aan de zijkant en de voorkant op hun plaats.
branchez l’adaptateur secteur
Assurez-vous que votre imprimante soit au moins située à
25 cm de tout obstacle susceptible de gêner la trajectoire du
papier lors de l’impression.
1. Insérez l’extrémité arrondie de l’adaptateur secteur (a)
dans la prise réservée à cet effet, à l’arrière de
l’imprimante.
2. Enclenchez l’adaptateur (b) propre à votre pays sur
l’adaptateur secteur.
3. Branchez l’adaptateur secteur (c) sur une prise de courant
en bon état de marche.
Important : Assurez-vous que le cordon d’alimentation de
l’adaptateur secteur ne bloque pas la trajectoire du papier à
l’arrière de l’imprimante (d).
de netadapter aansluiten
Plaats de printer minimaal 25 cm bij andere objecten
vandaan, zodat er voldoende ruimte is voor het papier.
1. Steek het ronde eind van de netadapter (a) in de hiervoor
bestemde aansluiting achter op de printer.
2. Steek de adapterstekker (b) voor uw gebied in de
netadapter.
3. Steek de netadapter (c) in een werkend stopcontact.
Belangrijk: zorg ervoor dat het snoer van de netadapter de
papierbaan aan de achterzijde (d) niet blokkeert.
www.hp.com/cposupport/loc/regional.html
Pour de plus amples informations sur les procédures
d’impression de vos photos numériques et sur l’utilisation
de votre imprimante, consultez le Guide des fonctions de
base. Dans certains pays, ce guide n’est pas disponible
au format papier mais sur CD-ROM.
Pour savoir comment installer le logiciel de l’imprimante
sur votre ordinateur ou comment contacter hp, reportezvous à la brochure Configuration du logiciel et
assistance produit.
Consultez l’aide en ligne de l’imprimante hp photosmart
pour de plus amples informations sur l’utilisation de cette
imprimante avec votre ordinateur et notamment sur la
procédure à suivre pour enregistrer les photos d’une
carte mémoire sur un ordinateur.
Imprimé en Allemagne 02/06 •Imprimé sur papier recyclé
© 2002 Hewlett-Packard Company
Windows est une marque déposée de Microsoft Corporation.
Macintosh est une marque déposée d’Apple Computer, Inc.
www.hp.com/cposupport/loc/regional.html
Raadpleeg de Beknopte handleiding voor meer
informatie over het afdrukken van digitale foto's en
het gebruik van de printer. In sommige landen wordt
deze handleiding alleen op cd-rom geleverd.
Raadpleeg het boekje Software-installatie & product-
ondersteuning voor aanwijzingen over het installeren
van de software voor de printer op uw computer of
voor informatie over het contact opnemen met HP.
Raadpleeg de Help bij de HP Photosmart-printer
voor informatie over het gebruik van de printer bij
uw computer, bijvoorbeeld voor het op de computer
opslaan van foto's vanaf een geheugenkaart.
Gedrukt in Duitsland, juni 2002 • Gedrukt op gerecycled papier
© 2002 Hewlett-Packard Company
Windows is een geregistreerd handelsmerk van Microsoft Corporation
Macintosh is een geregistreerd handelsmerk van Apple Computer, Inc.
Page 2
install the print cartridge
1. Open the print cartridge package. Pull the pink pull-tab
(a) to remove the clear tape from the print cartridge. Do
not remove the copper contacts.
2. Open the print cartridge door (b) by pulling the door
down.
3. Insert the print cartridge (c) into the print cartridge cradle
with the copper contacts (d) facing toward the inside of
the printer and the ink nozzles facing down.
4. Push the print cartridge into the cradle until you feel it
snap into place.
5. Close the print cartridge door.
Important: Your printer works only with the HP #57 tri-
color print cartridge. Do not use any other print cartridge.
print your first photo
1. Place a few sheets of photo paper in the paper tray (a)
with the glossy side up and the tab closest to the inside of
the printer.
2. Move the paper width guide (b) close to the edge of the
paper.
3. Insert a memory card that contains digital camera photos
into the correct memory card slot (c).
Note: Push the memory card into the printer until it
stops—it does not insert all the way into the printer. The
memory card light (d) flashes while the printer reads the
memory card.
4. When the memory card light stops flashing and remains
on, press the Print button (e). The first photo on the
memory card prints at 10 x 15 cm (4 x 6 inch).
7
5
ZOOM
CANCEL
MENU
COPIES
SIZE
OK
MENU
CANCEL
PRINT
(b)
(c)
Do not touch the
ink nozzles or the
copper contacts!
6
turn your printer on
1. Press the Power button (a) on the top of the printer. The
Select Language menu appears on the LCD (b).
2. Using the Up or Down arrow (c), highlight your language.
Press the OK button (d).
3. Press the Up arrow to highlight Yes and press the OK
button. The Select Country/Region menu appears on the
LCD.
4. Using the Up or Down arrow, highlight your country or
region. Press the OK button.
5. Press the OK button to print a calibration page on the
previously loaded index card.
Ne touchez ni les
buses d’encre ni les
contacts en cuivre !
Raak de
inktsproeiers
en de koperen
contactpunten
niet aan!
4
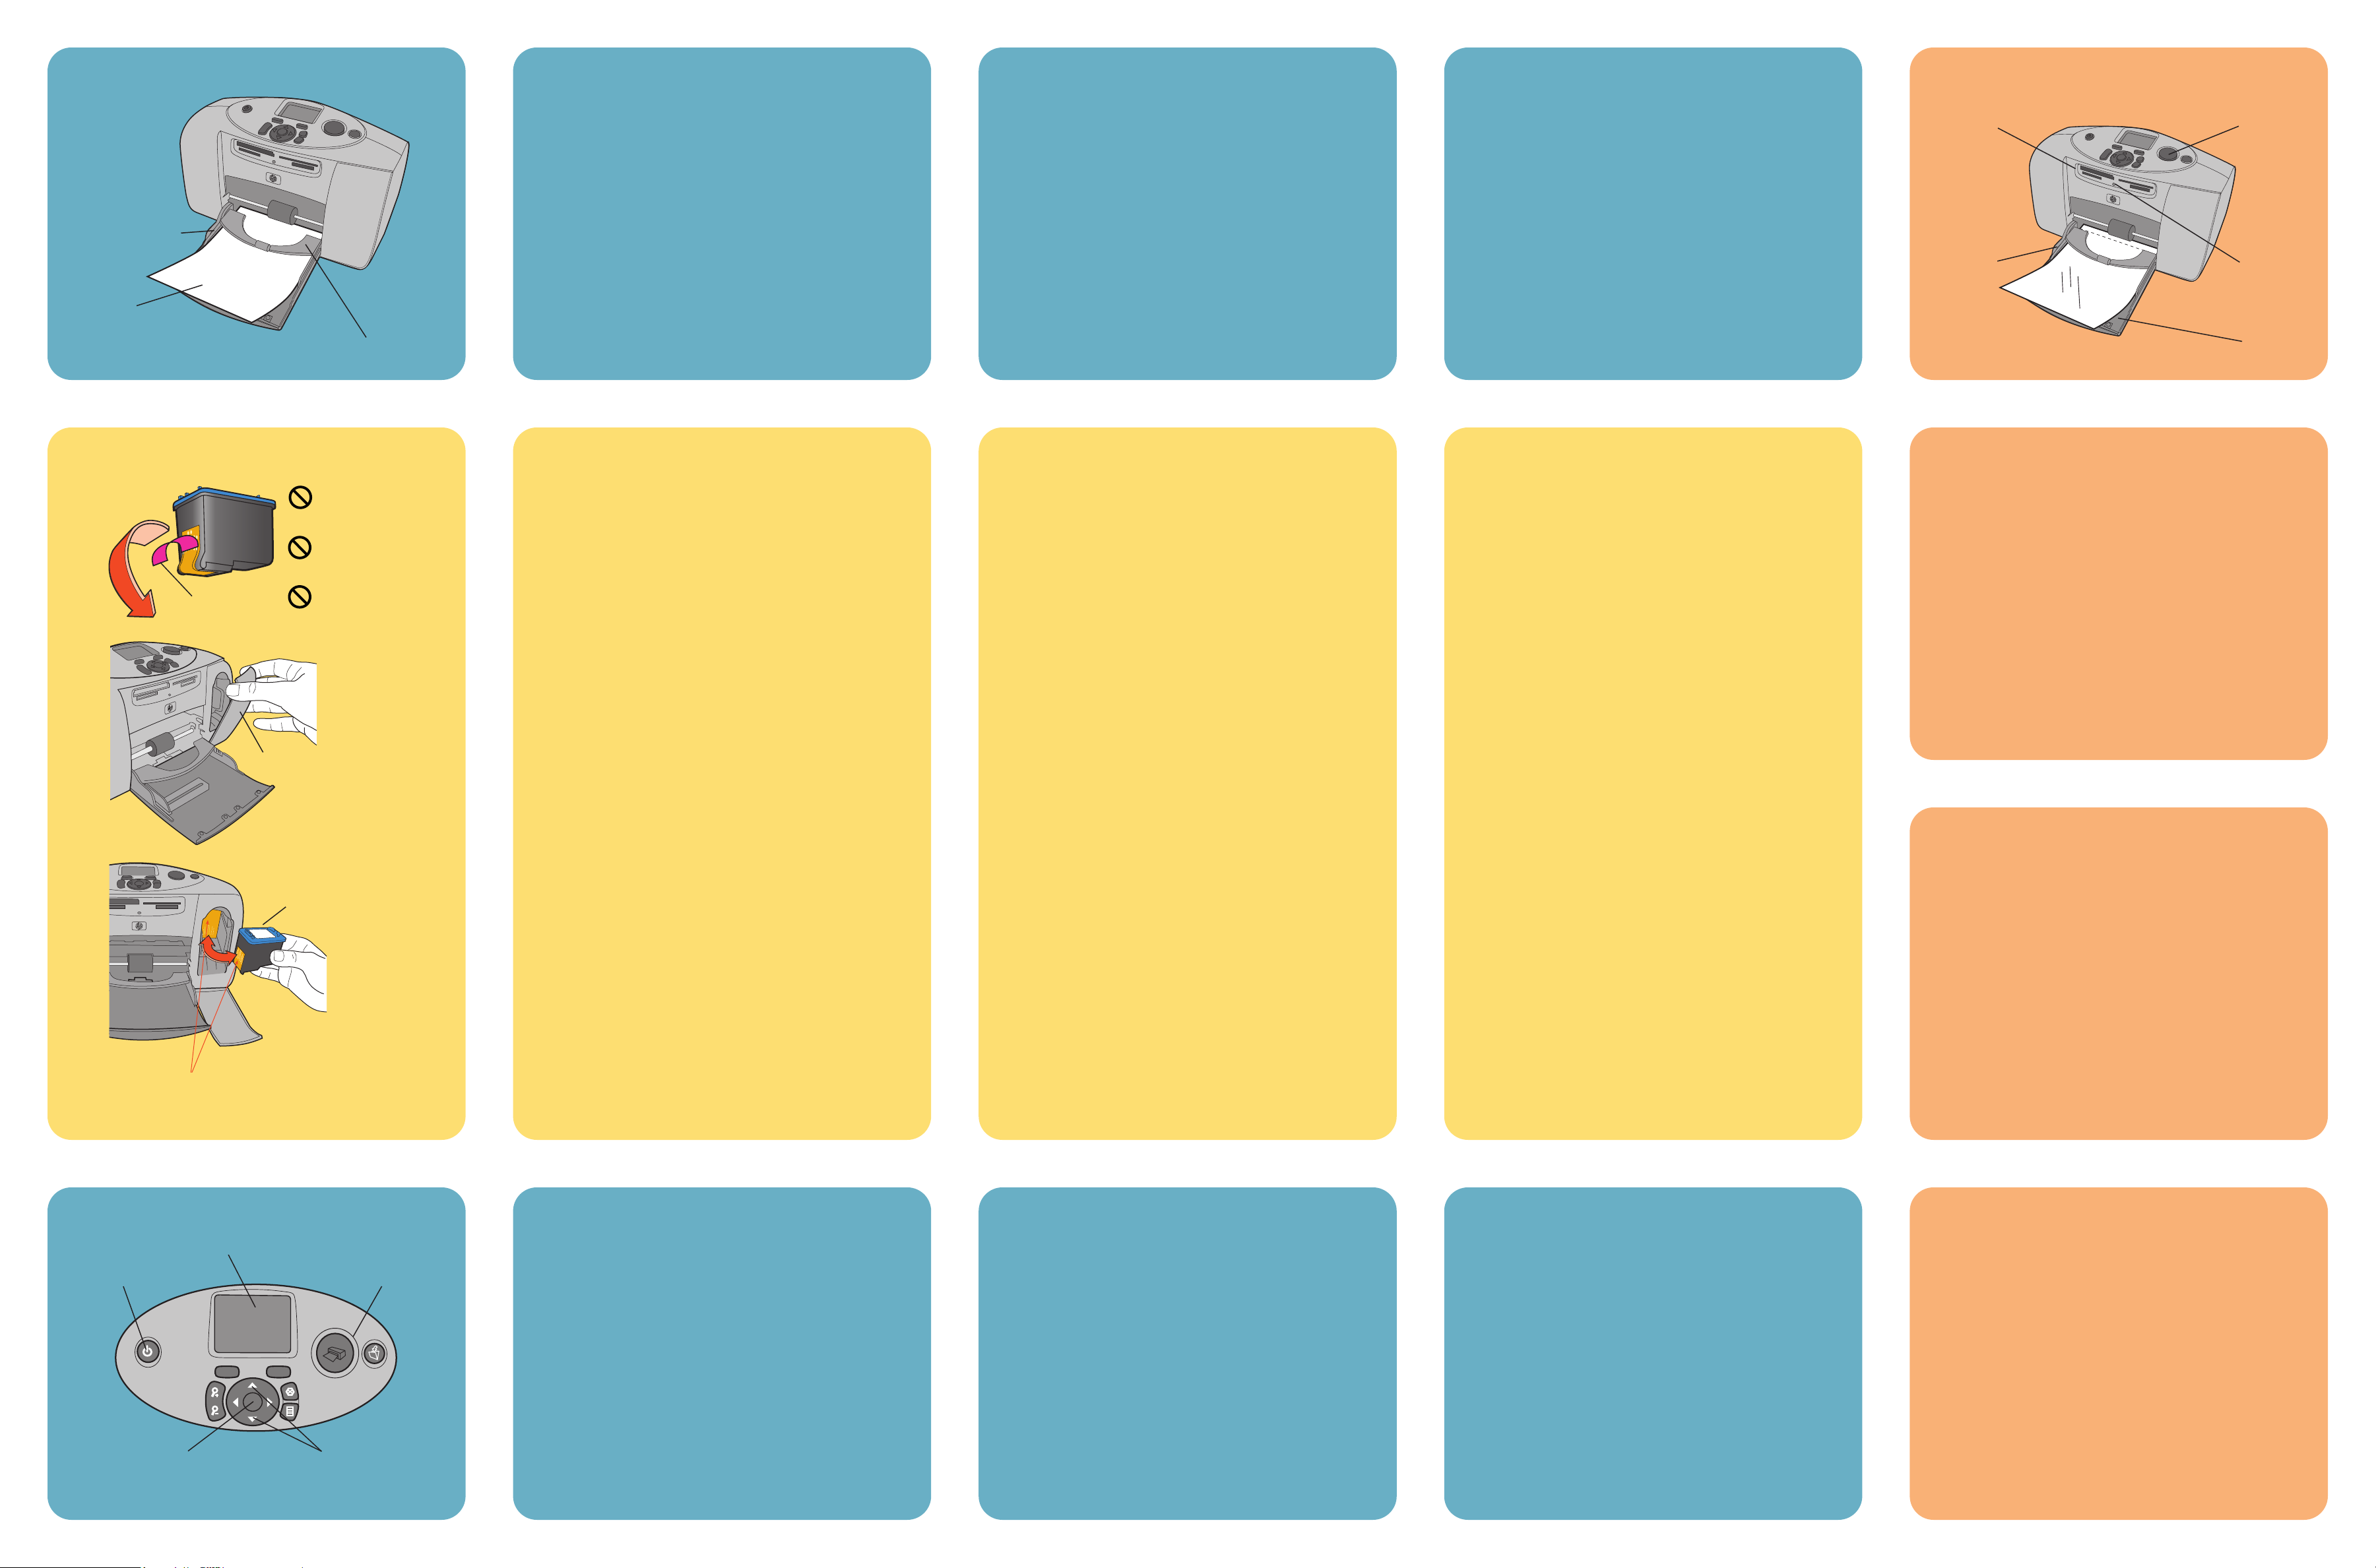
load an index card
Note: The index card will be used to print a calibration page
in step 6.
1. Open the paper tray door.
2. Place an index card from the sample pack on the paper
tray (a) and slide the card underneath the output guide
(b).
3. Move the paper width guide (c) to fit close to the left edge
of the index card without bending the card.
(c)
(b)
(a)
(a) (e)
(c)
(b)
(a)
(e)
(d)
(c)
(b)
(a)
(d)
(d)
imprimez votre première photo
1. Placez quelques feuilles de papier photo dans le bac
papier (a), la face brillante orientée vers le haut et l’onglet
inséré au maximum dans l’imprimante.
2. Réglez le guide de largeur du papier (b) contre le bord
des feuilles.
3. Insérez une carte mémoire contenant des photos
numériques dans le logement réservé à cet effet (c).
Remarque : Poussez la carte mémoire dans l’imprimante
jusqu’à ce qu’elle bute ; elle ne s’insère pas entièrement
dans l’imprimante. Le voyant de la carte mémoire (d)
clignote pendant que l’imprimante lit la carte mémoire.
4. Lorsque le voyant de la carte mémoire cesse de clignoter
et reste allumé, appuyez sur le bouton Imprimante (e). La
première photo de la carte mémoire s’imprime au format
10x15cm.
uw eerste foto afdrukken
1. Plaats enkele vellen fotopapier in de papierlade (a) met
de glanzende zijde naar boven en de tab het dichts bij
de binnenkant van de printer.
2. Schuif de papierbreedtegeleider (b) dicht tegen de rand
van het papier aan.
3. Plaats een geheugenkaart met digitale foto's in de juiste
geheugenkaartsleuf (c).
Opmerking: duw de geheugenkaart in de printer tot deze
stopt. De kaart gaat niet helemaal de printer in. De
indicator voor de geheugenkaart (d) knippert terwijl de
printer de kaart leest.
4. Wanneer de indicator stopt met knipperen en blijft
branden, drukt u op de knop Afdrukken (e). De eerste
foto op de geheugenkaart heeft een afmeting van
10 x 15 cm.
chargez une planche-contact
Remarque : La planche-contact sera utilisée pour imprimer une
page d’étalonnage à l’étape 6.
1. Ouvrez le volet du bac papier.
2. Placez une des planches-contact fournies dans le bac
papier (a) et faîtes-la glisser sous le guide de sortie (b).
3. Réglez le guide de largeur du papier (c) contre le bord de
la planche-contact, sans faire plier cette dernière.
een indexkaart plaatsen
Opmerking: de indexkaart wordt gebruikt voor het afdrukken
van een kalibratiepagina in stap 6.
1. Open de klep van de papierlade.
2. Plaats een indexkaart uit het voorbeeldpakket in de
papier-lade (a) en schuif de kaart onder de uitvoergeleider
(b).
3. Schuif de papierbreedtegeleider (c) dicht tegen de
linkerzijde van de indexkaart aan zonder de kaart te
buigen.
installez la cartouche d’impression
1. Déballez la cartouche d’impression. Tirez sur la languette
rose (a) pour retirer la bande adhésive de la cartouche.
Ne retirez pas les contacts en cuivre.
2. Ouvrez le volet de la cartouche d’impression (b) en le
tirant vers le bas.
3. Insérez la cartouche d’impression (c) dans le berceau
réservé à cet effet, les contacts en cuivre (d) tournés vers
l’intérieur de l’imprimante et les buses d’encre vers le bas.
4. Poussez la cartouche dans le berceau jusqu’à ce qu’elle
s’enclenche.
5. Fermez le volet de la cartouche d’impression.
Important : Votre imprimante ne fonctionne qu’avec la
cartouche trichromique HP n°57. N’utilisez aucune autre
cartouche d’impression.
de inktpatroon installeren
1. Open het pak met de inktpatroon. Verwijder de door-
zichtige tape van de inktpatroon door aan het roze lipje
(a) te trekken. Verwijder de koperkleurige contactpunten
niet.
2. Open het vak met de inktpatroon door de klep (b) omlaag
te trekken.
3. Plaats de inktpatroon (c) in de houder met de koperen
contactpunten (d) naar de binnenkant van de printer
gericht en de inktsproeiers naar beneden gericht.
4. Duw de inktpatroon in de houder totdat de inktpatroon op
zijn plaats klikt.
5. Sluit het vak met de inktpatroon.
Belangrijk: u kunt voor deze printer alleen de driekleurige
inktpatroon HP #57 gebruiken. Gebruik geen andere
inktpatroon.
allumez votre imprimante
1. Appuyez sur le bouton Alimentation (a) situé sur la façade
de l’imprimante. Le menu de sélection de la langue
apparaît sur l’écran LCD (b).
2. A l’aide des flèches Haut ou Bas (c), sélectionnez votre
langue. Appuyez sur OK (d).
3. Appuyez sur la flèche Haut pour sélectionner Oui, puis
appuyez sur OK. Le menu de sélection de votre
pays/région s’affiche sur l’écran LCD.
4. A l’aide des flèches Haut ou Bas, sélectionnez votre pays
ou votre région. Appuyez sur OK.
5. Appuyez sur le bouton OK pour imprimer une page
d’étalonnage sur la planche-contact chargée.
de printer inschakelen
1. Druk op de knop Aan/Uit (a) boven op de printer. Het
menu Taal verschijnt op het LCD-scherm (b).
2. Markeer uw taal met de pijl omhoog of de pijl omlaag
(c). Druk op de knop OK (d).
3. Druk op de pijl omhoog om de optie Ja te markeren en
druk op de knop OK. Het menu Land/regio selecteren
verschijnt op het LCD-scherm.
4. Markeer uw land of regio met de pijl omhoog of de pijl
omlaag. Druk op de knop OK.
5. Druk op de knop OK om een kalibratiepagina af te
drukken op de indexkaart die u eerder hebt geladen.
 Loading...