

Page 1

hp photosmart 100
photo printing
guide
Page 2

Page 3

contents
1 welcome..............................................................................1
finding information............................................................................................. 2
viewing the onscreen user’s guide........................................................................ 3
2 getting started .....................................................................5
quick reference.................................................................................................. 5
front and back of printer ............................................................................. 10
front of printer with paper tray open............................................................. 11
control panel ............................................................................................. 12
LCD.......................................................................................................... 13
LCD icons ................................................................................................. 14
setting up your printer....................................................................................... 17
unpacking your printer................................................................................ 17
connecting the power adapter ..................................................................... 18
turning the printer on or off ......................................................................... 19
loading paper ........................................................................................... 20
installing or removing the print cartridge....................................................... 22
contents
i
Page 4

contents
ii
3 printing from memory cards...............................................26
types of memory cards supported .......................................................................26
inserting a memory card....................................................................................27
inserting a CompactFlash memory card .........................................................28
inserting a SmartMedia memory card............................................................29
inserting a Memory Stick memory card..........................................................30
reading the memory card status..........................................................................31
using the setup LCD ..........................................................................................33
printing your photos..........................................................................................35
selecting the photo size ...............................................................................36
selecting photos to print...............................................................................37
selecting the number of copies......................................................................41
examples...................................................................................................42
printing an index page......................................................................................44
canceling a print job.........................................................................................46
clearing print settings ........................................................................................46
4 printing from DPOF files.....................................................47
printing from a DPOF file...................................................................................47
Page 5

exiting DPOF mode.......................................................................................... 49
returning to DPOF mode ................................................................................... 49
5 care and maintenance........................................................50
transporting your printer ................................................................................... 50
storing your printer and supplies........................................................................ 52
storing your printer..................................................................................... 52
storing the print cartridge............................................................................ 52
storing paper............................................................................................. 52
cleaning your printer ........................................................................................ 53
printing a test page.......................................................................................... 53
6 troubleshooting..................................................................55
reading the status indicators.............................................................................. 55
printer light ............................................................................................... 56
memory card light...................................................................................... 57
status LCD................................................................................................. 58
interpreting error conditions .............................................................................. 60
printer problems......................................................................................... 60
memory card problems............................................................................... 61
contents
iii
Page 6

print cartridge problems ..............................................................................64
paper problems ..........................................................................................65
other printing problems .....................................................................................66
getting additional help ......................................................................................70
specifications .........................................................................71
iv
contents
copyright and trademarks ......................................................72
index.....................................................................................73
Page 7

1welcome
Thank you for purchasing an HP PhotoSmart 100 printer! With your new, easy-to-use,
compact photo printer you can:
• Print beautiful photos from your digital camera’s memory card without a computer.
• Print an index page that shows all the photos on your digital camera’s memory card.
• Print 4x6 in. photos quickly and easily.
To begin setting up your printer, see “setting up your printer” on page 17.
This guide describes how to use your new printer without connecting it to a computer. It
includes a quick reference to get you acquainted with your new printer, and plenty of
detailed printing and troubleshooting information.
You can connect your printer to your computer to save your photos to the hard drive,
enhance your photos, share your photos with friends and family via email, and use your
photos in creative projects. For information on using your printer with a computer, see the
Onscreen User’s Guide included on the HP PhotoSmart printer software CD.
welcome
1
Page 8

finding information
Setup Guide Follow the instructions to quickly and easily set up your printer
Photo Printing Guide
(you are here!)
welcome
Onscreen User’s
Guide
Services and
Support booklet
Use this guide to learn about using your printer without
connecting it to a computer
Use this guide, included on the printer software CD, to learn
about using your printer with a computer
Use this booklet to learn about the printer’s warranty, review
regulatory information, and find out where to get help if you
need it
2
Page 9

viewing the onscreen user’s guide
Note: You must have Adobe® Acrobat® Reader® version 4.0 or later installed to view the
Onscreen User’s Guide. If you do not have Acrobat Reader, you will be asked to
install it from the HP PhotoSmart CD before you can view the Onscreen User’s
Guide.
To view the Onscreen User’s Guide:
1. Insert the HP PhotoSmart CD into your computer’s CD-ROM drive.
2. In Windows Explorer or My Computer, select the CD-ROM drive.
welcome
3. Open the
4. Open the
5. Double-click the file:
printer.
acrobat
folder and then open the folder for your language.
pdf
folder.
hphphoto.pdf
, then click the photo of the HP PhotoSmart 100
3
Page 10

welcome
4
Page 11
2 getting started
quick reference
To print... Use this paper...
borderless photos glossy photo paper, with tab
4x6.5 in.
photos with a border glossy photo paper, without tab
4x6 in.
test and calibration pages plain index cards
4x6 in.
getting started
5
Page 12

There is a difference between index cards and index pages
index card = card-weight paper
Use plain, 4x6 in. index cards for
printing test pages.
There is a difference between paper size and photo size
paper size = 4x6 in.
This is the only size of paper your printer can
use.
photo size = 4x6 in., Wallet, or Thumbnail
You have the choice of printing your photos in any of
these sizes.
index page = a print showing numbered
“thumbnails” of the photos on your memory
card
Print an index page to help you select which
photos you want to print.
getting started
6
Page 13

Printing photos is easy! Load photo paper, install the print cartridge, insert a camera
memory card containing photos, then...
Ready...
Tab
Use u
to move
the cursor to the
area where you
want to change a
setting. Try it!
X
Scroll Up (+) or Scroll Down (-)
Use
to scroll
through the available choices for each setting.
getting started
7
Page 14
Set...
4x6 in.
Wallet
Thumbnail
1. Set photo size When the cursor is
blinking under this
area, use
and
Scroll Up (+)
Scroll Down (-)
pick the size you
want your photos.
2. Press u
move to the next
area.
to
Tab
to
3. Set photos to print -
Scroll Up (+) or
Use
Scroll Down (-)
to scroll
to the number of the
photo you want to
print. Then press
Print
Tip:
also choose to
print a range
of photos, or
multiple
copies.
.
getting started
You can
8
Page 15

Print!
P
ress the
button and enjoy
X
your photos!
Print
getting started
9
Page 16

front and back of printer
getting started
Front view
Paper tray door Print cartridge door
Control panel
Back view
Rear paper path
Power adapter connection
Important: Make sure the rear paper path is clear of any obstructions.
USB port
10
Page 17
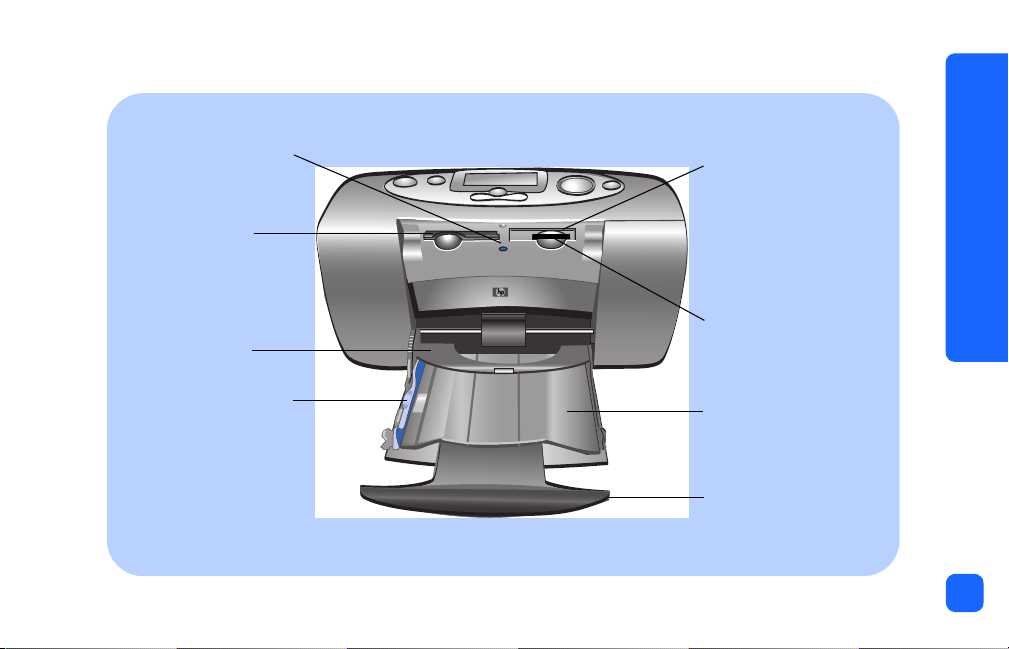
front of printer with paper tray open
Memory card light
CompactFlash
memory card
slot
Output guide
getting started
SmartMedia memory
card slot
Memory Stick
memory card slot
Paper width guide
Paper tray
Paper tray extension
11
Page 18
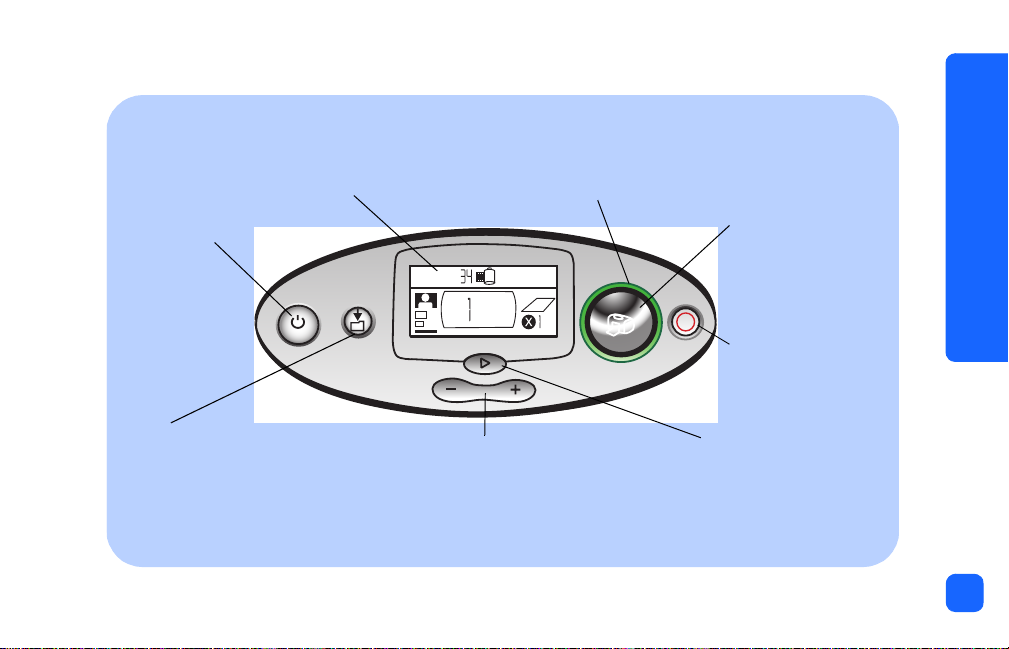
control panel
LCD
Read this window to see the
Power
Press this button
to turn the printer
on or off
Save
Press this button to save photo and
other files from a memory card to
the computer’s hard drive when
you have the printer connected to
a computer
status of your printer and the
current print settings
Printer light
If this light is green, the printer is on
(blinking means the printer is busy); if this
light is red, the printer needs attention
Scroll Up (+)/Scroll Down (-)
Press and hold these buttons
to scroll through print settings
as you are selecting them
Print
Press this button to
start printing the
selected photos from
a memory card
X
Cancel
Press this button to
stop printing or reset
the print settings
Tab
u
Press this button to move
from one section to the next
when selecting print settings
getting started
12
Page 19
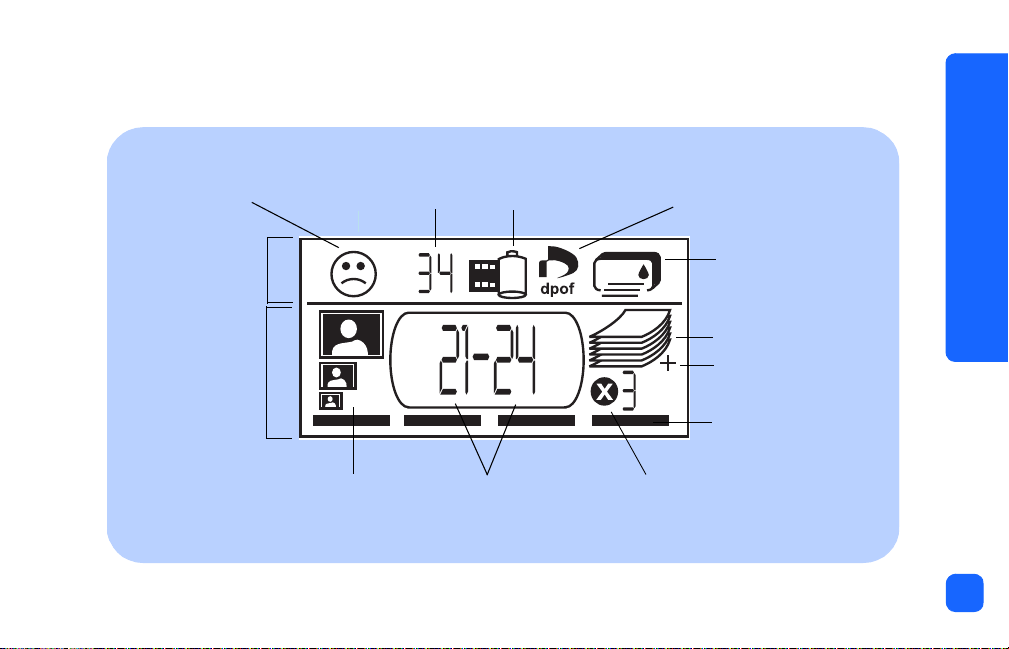
LCD
Note: The LCD icons are described on the following pages.
getting started
Attention icon
Status LCD
Setup LCD
Number of photos
Photo Size section Choose Photos section Copies section
Memory Card icon
DPOF icon
Paper and Print
Cartridge icon
Paper Count icon
More Paper icon
Cursor
13
Page 20
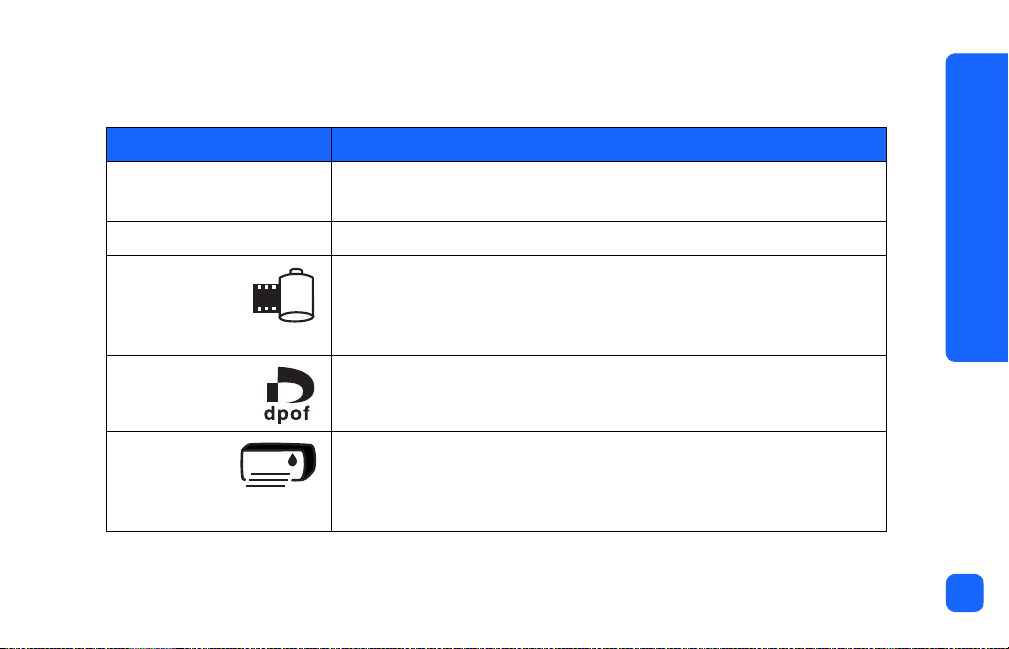
LCD icons
The icons on the top portion of the LCD indicate the status of different printer areas.
Icon Description
Attention icon Indicates something is wrong and the printer needs attention.
Number of photos Indicates the number of photos available on the memory card.
////
getting started
Memory Card
icon
DPOF icon Indicates a digital print order format (DPOF) file is on the memory
Paper and
Print
Cartridge
icon
Indicates a memory card is inserted. If you inserted a memory card
and this icon does not appear, the memory card may not be inserted
correctly. If the icon is blinking, there is a problem with the memory
card.
card.
Indicates the status of the paper and print cartridge. If the ink drop is
blinking, there is a problem with the print cartridge. If the paper
section (the lines at the bottom of the icon) is blinking, there is a
problem with the paper.
14
Page 21

The bottom portion of the LCD is where you select the photo size, photo number or range,
and number of copies to be printed.
Tip:
Section/Icon Description
Photo Size section These three icons indicate the selected photo size. As you move through the
Choose Photos section This section indicates the photo number or range of photos to be printed.
Copies section This section indicates the number of copies of each photo to print.
Cursor The cursor appears below the section you are working in. When you press
Tab
Use u
Down (-)
4x6 in.
Wallet
Thumbnail
to move from one section to the next, left to right. Use
to change settings within a section.
photo size selections, the corresponding icon displays to indicate the
currently selected photo size.
Tab
, the cursor moves to the next section
u
.
Scroll Up (+) or Scroll
getting started
15
Page 22
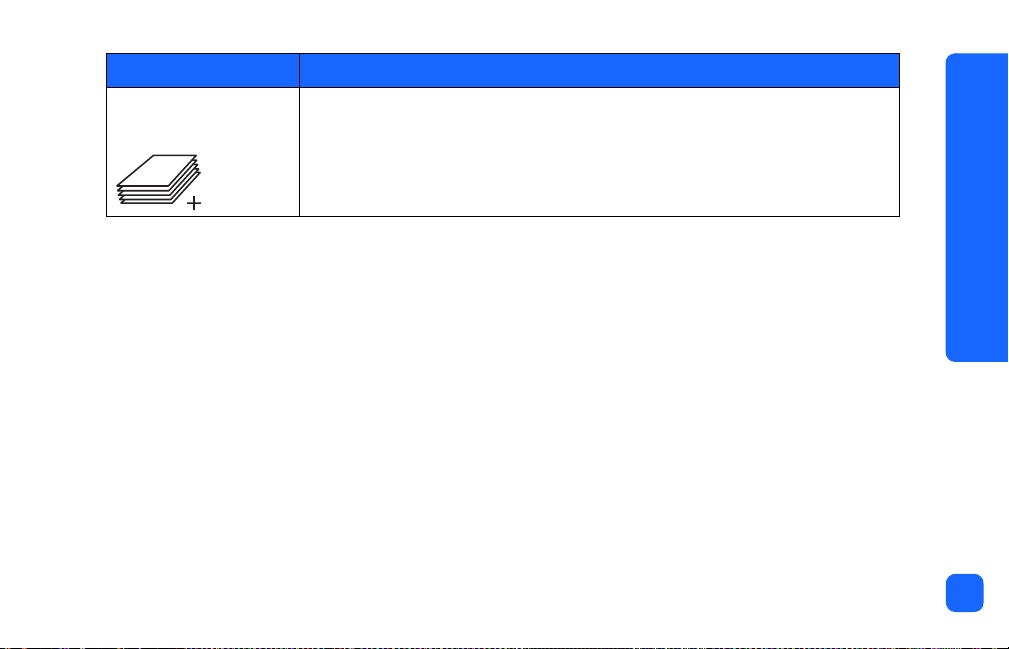
Section/Icon Description
Paper Count icon
More Paper icon
The Paper Count icon shows the number of sheets of paper needed to
complete the print job with the current settings. The maximum number of
pages the paper stack can show is six. If the print job requires more than six
pages, the More Paper icon appears next to the paper stack.
getting started
16
Page 23
setting up your printer
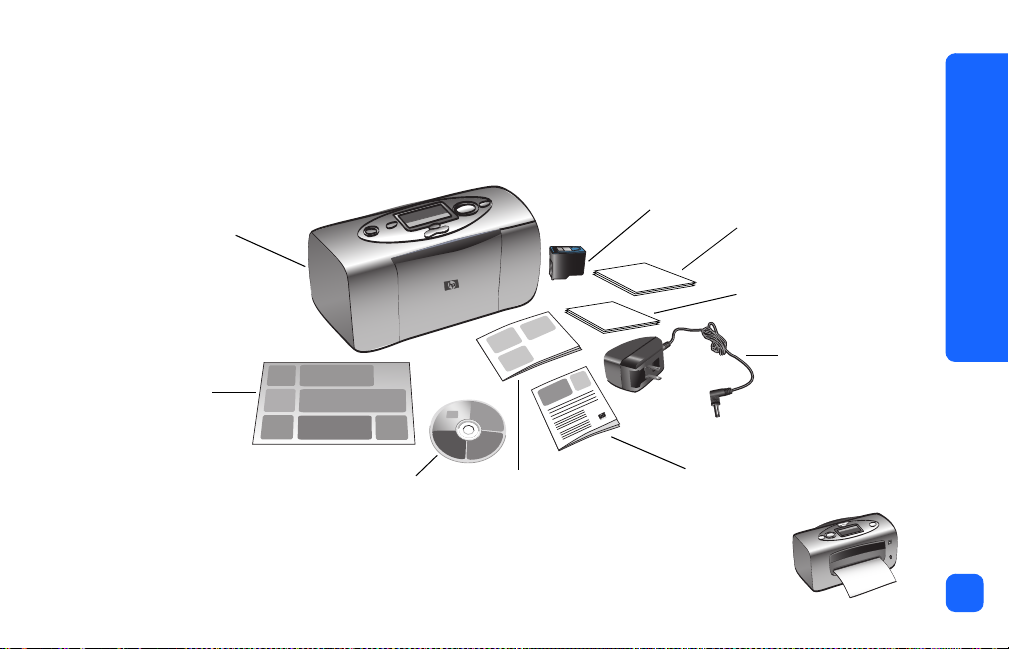
unpacking your printer
Make sure you have the following items:
Print cartridge
Printer
Setup Guide
Software and Onscreen
User’s Guide on CD
Photo Printing Guide
HP #57
Services and Support booklet
Important: Place the printer on a flat, stable surface. Make sure you place
the printer at least 10 inches away from a wall or any obstruction
to allow space for the paper to move during printing.
Sample index cards
Sample photo paper
getting started
Power adapter
17
Page 24

connecting the power adapter
1. Insert the small end of the power adapter into the power
adapter connection on the back of the printer. Make sure
it is connected firmly.
2. Unfold the two metal prongs on the power adapter.
3. Plug the power adapter into a working electrical outlet.
Important: Make sure the power adapter cord does not
block the rear paper path.
Rear paper
path
2.
getting started
1.
3.
18
Page 25

turning the printer on or off
Press the
The Printer light (around the outside of the
Power
button on the top of the printer.
Print
button) turns green when the printer is turned
on. The printer takes about 10 seconds to power up.
Power button
getting started
Print button
X
Printer light
19
Page 26

loading paper
You can print color photos on 4x6 in. photo paper (with or without a tear-off tab), plain
paper, or index cards. Use HP custom photo paper for the best output quality. HP papers
can be found at most computer and office supply stores or on the Web at:
www.hpshopping.com
Your printer supports the following paper types:
Name or type Size Use for
(U.S. only).
getting started
HP premium plus photo
paper, glossy
plain index cards 4x6 in. Print cartridge calibration pages, test pages, draft prints,
other brands of photo
paper
4x6.5 in. with
.5 in. tab
4x6 in. Photos and index pages
Medium- to high-resolution snapshots, photo album prints,
photos to archive, and borderless prints
children’s projects, and photo index pages (to conserve
photo paper)
Note that borderless printing requires HP photo paper or
HP premium plus photo paper
Note: As it prints, the printer pulls the paper straight through the paper slot, out the back,
and then through to the front again. Be sure the rear paper path of the printer is at
least 10 inches away from any obstruction.
20
Page 27
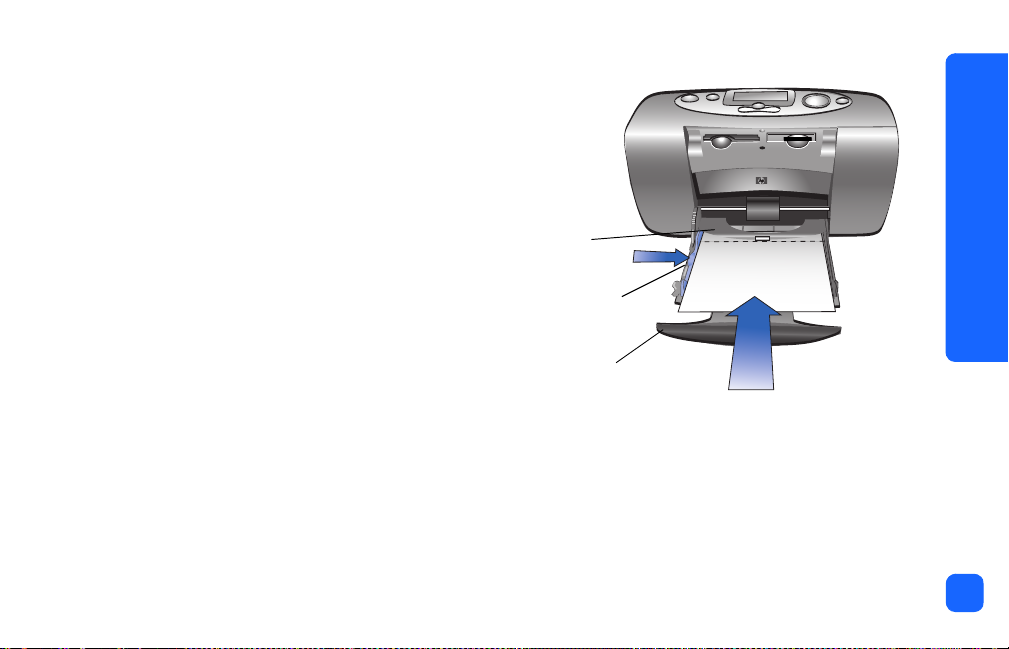
To load paper:
1. Open the paper tray door.
2. Pull the paper tray extension toward you
(away from the inside of the printer) until it is
fully extended.
3. Place a stack of paper on the paper tray and
slide it underneath the output guide.
Output
guide
• The printer prints on the side of the
paper that is facing up. If you are using
photo paper, load the paper with the
glossy side up
. If you are using tabbed
paper, load the paper into the tray so
tab feeds into the printer first
the
.
Pap er wi dth
guide
Paper tray
extension
• Load no more than 20 sheets of photo paper or index cards.
• Use one type and size of paper at a time. Do not mix paper types or sizes in the
paper tray.
4. Move the paper width guide on the paper tray to fit close to the left edge of the paper
without bending the paper. This allows the paper to feed into the printer correctly so
that your photos will print straight.
getting started
21
Page 28

installing or removing the print cartridge
To get the best performance from your printer, use only genuine HP factory-filled print
cartridges.
Caution: Make sure you are using the correct print cartridge (HP #57). Damage to the printer or
cartridge resulting from the modification or refilling of HP print cartridges is specifically
excluded from HP warranty coverage.
You can install and remove the print cartridge while the printer is either on or off. When you
insert a new print cartridge, the printer automatically prints a calibration page. To conserve
photo paper, you can print the calibration page on an index card.
Note: If the printer is off when you change the print cartridge, the calibration page prints
when you turn the printer on.
getting started
22
Page 29

To install the print cartridge:
1. Take the new print cartridge out of its package and pull the
plastic tape
.
pink tab
to remove the clear
Note: Do NOT touch the ink nozzles or the copper contacts on the print cartridge.
Touching these parts may cause print cartridge failure.
Copper contacts
Ink nozzles
2. Open the print cartridge door by pulling the door down.
getting started
23
Page 30

3. Place the print cartridge in the print cartridge cradle with the copper contacts facing
toward the inside of the printer and the ink nozzles facing down.
Copper contacts
4. Push the print cartridge into the print cartridge cradle
until you feel it snap into place.
5. Close the print cartridge door.
After you insert the print cartridge, the printer
automatically prints a calibration page (if the printer is off,
the calibration page prints when you turn the printer on).
The calibration page verifies that the print cartridge is
installed correctly.
getting started
24
Page 31

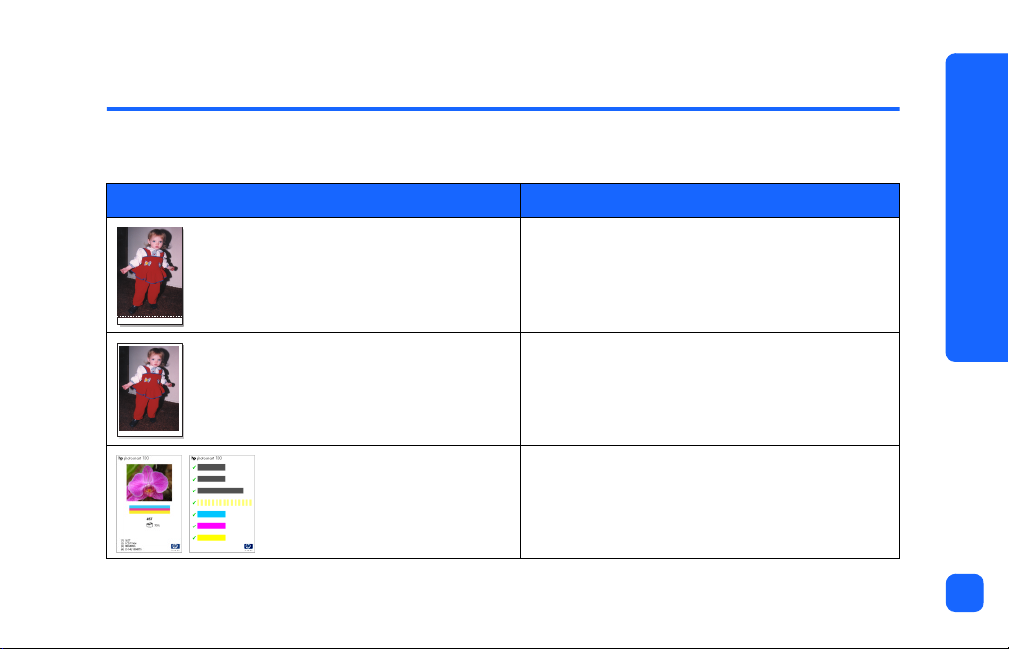
Gray bars
These print while the print cartridge is
being calibrated.
Yellow bars
These finish the calibration.
Cyan, magenta and yellow bars
These should be solid and the correct
color. If any of the bars are not correct,
print a test page to check the print
cartridge.
Calibration page
To remove the print cartridge:
1. Open the print cartridge door.
2. Push down and pull outward on the top of the print cartridge to unsnap it from the print
cartridge cradle.
3. Remove the print cartridge from the printer.
getting started
25
Page 32

3 printing from memory cards
types of memory cards supported
printing from memory cards
The printer can read
cards. These cards are manufactured by several vendors and are available in a variety of
storage capacities. You can purchase memory cards where you purchased your digital
camera or at most computer supply stores.
Caution: Using another type of memory card may damage the memory card or the printer.
Note: The IBM Microdrive™ and other Microdrive memory cards are not supported.
CompactFlash™ Type I
CompactFlash
SmartMedia
or II,
SmartMedia
Memory Stick
™, or
Memory Stick
™ memory
26
Page 33

inserting a memory card
There are three different memory card slots on your printer. The memory card slot you use
depends on the type of memory card you have.
Caution: Do not remove the memory card from the printer while the card is being read or written to
(the memory card light is blinking). This may damage the printer, the memory card, or the
information on the memory card.
Note: Do not use more than one memory card slot at a time.
printing from memory cards
CompactFlash
memory card slot
Memory card
light
SmartMedia
memory card slot
Memory Stick
memory card slot
27
Page 34

inserting a CompactFlash memory card
Open the paper tray door. Insert the memory card into the
hole side placed into the printer first. If there is an
arrow
sure the arrow is pointing towards the slot and facing
Note: Inserting a CompactFlash memory card incorrectly can damage the memory card,
the information on the memory card, or the printer. If you insert the card upside
down, the Memory Card light, Memory Card icon, and red Printer light all begin
blinking. Remove the card and re-insert it properly.
Pin holes
left
card slot with the card’s pin-
on the memory card’s label, make
up
.
printing from memory cards
28
Page 35

inserting a SmartMedia memory card
Open the paper tray door. Insert the memory card into the
of the card with the notch on the corner, and make sure the metal contacts on the card are
down
facing
Note: If you insert the card upside down, the Memory Card light, Memory Card icon, and
.
red Printer light all begin blinking. Remove the card and re-insert it properly.
top right
card slot. Insert the end
printing from memory cards
29
Page 36

inserting a Memory Stick memory card
Memory Stick
bottom right
card slot. Insert the
Open the paper tray door. Insert the memory stick into the
end of the memory stick that has the metal contacts, and be sure the contacts are facing
down
so that you see the arrow on the top of the memory stick.
Note: If the Memory Card light does not start blinking, you may have inserted the card
upside down. Remove the card and re-insert it properly.
32
M
G
printing from memory cards
30
Page 37

reading the memory card status
When you insert a memory card, the green memory card light starts blinking and the
Memory Card icon appears in the Status LCD. The printer reads the memory card to
determine the number of photos. The amount of time this takes depends on how many
photos are on the memory card (it may take several minutes).
When the printer finishes reading the card, the memory card light remains on, the number
of photos appears in the Status LCD, and the current printer settings appear in the Setup
LCD. You are now ready to print your photos.
Caution: Do not remove the memory card from the printer while the memory card is in use (the
memory card light is blinking). This may damage the printer, the memory card, or the
information on the memory card.
printing from memory cards
31
Page 38

Memory Card iconNumber of photos
Status LCD
Setup LCD
When you insert the memory card, the printer is set to print one copy of the first photo on the
memory card at 4x6 in.
printing from memory cards
32
Page 39

using the setup LCD
The Setup LCD is divided into four sections and indicates the current printer settings. The
cursor (located at the bottom of the Setup LCD) indicates the currently selected section.
printing from memory cards
Photo Size section
Choose to print
photos in 4x6 in.,
wallet, or thumbnail
size
Cursor
Appears below the
selected section
Choose Photos section
Choose a single photo or the beginning
of a range of photos you want to print
Copies section
Choose the number
of copies you want
to print
Choose Photos section
Choose the end of a range
of photos you want to print
33
Page 40

To change printer settings:
• Press u
Tab
to move from one section to the next in the Setup LCD.
printing from memory cards
• Press
Scroll Up (+)
u
Tab
Scroll Down (-)
or
Scroll Down (-) Scroll Up (+)
to change settings within a section.
X
34
Page 41

printing your photos
Printing beautiful photos from your new printer is easy! All it takes is a memory card from a
digital camera and five easy steps:
1. Insert the memory card into the printer (see “inserting a memory card” on page 27). The
cursor is positioned in the
2. Select the size for the printed photos.
Photo Size
section of the Setup LCD.
printing from memory cards
•Use
Scroll Up (+)
Scroll Down (-)
or
to select the photo size.
3. Select which photo you want to print. (If you want to print a range of photos, see
“selecting a range of photos to print” on page 39.)
• Press u
• Press
Tab
to position the cursor in the
Scroll Up (+)
Scroll Down (-)
or
Choose Photos
section.
until the number of the photo you want to print is
shown in the Setup LCD.
35
Page 42

4. Select how many copies you want to print.
• Press u
Tab
twice to position the cursor in the
Copies
printing from memory cards
section.
• Press
Scroll Up (+)
repeatedly until the number of copies you want to print is shown in
the Setup LCD.
5. Press
Print
.
Note: For more information on selecting the printer settings, see the following sections.
selecting the photo size
The Photo Size section has three icons indicating the selected photo size.
4x6 in.
Wallet (2.5x3.25 in.)
Thumbnail (0.7 x 0.9 in.) for an index page
Note: In a print job, all photos print at the same size. To print photos at different sizes,
start another print job.
36
Page 43

To select the size of the photo:
1. Use u
Tab
to position the cursor in the
Photo Size
inserted the memory card, the cursor is already in the
section of the Setup LCD. If you just
Photo Size
section.
printing from memory cards
2. Use
Scroll Up (+)
Photo Size
section
Cursor
Scroll Down (-)
or
to select the photo size.
selecting photos to print
The printer assigns a photo number to each photo on the memory card. Due to differing
numbering schemes, and how some digital cameras handle re-numbering of photos when
photos are deleted, the photo numbers assigned by the printer may not match those shown
on your camera’s LCD. For this reason, it is always best to print an index page before
printing your photos, so that you will be using the printer’s photo numbers to select the
correct photos for printing.
37
Page 44

selecting a single photo to print
To select a single photo to print:
printing from memory cards
1. Use u
LCD.
2. Use
Tip:
Tab
to position the cursor in the first part of the
Scroll Up (+)
Scroll Down (-)
or
to select the photo to print.
Choose Photos
To get to the desired photo faster, press and hold down either
Scroll Down
(-)
to activate auto-repeat. This allows you to reach the desired photo
number without having to repeatedly press the button.
section of the Setup
Scroll Up (+) or
38
Page 45

selecting a range of photos to print
You can print a sequence of photos in one print job. For example, you can print photos
numbered 21 to 24.
To select a range of photos to print:
printing from memory cards
1. Use u
LCD.
2. Use
Scroll Up (+)
number 21).
3. Press u
Tab
to position the cursor in the first part of the
Scroll Down (-)
or
Tab
to move the cursor to the second part of the
to select the first photo to print (for example, photo
Choose Photos
Choose Photos
section of the Setup
section.
39
Page 46

4. Use
Scroll Up (+)
Scroll Down (-)
or
(for example, photo number 24).
to select the last photo in the range of photos to print
printing from memory cards
Choose Photos section
(use both parts when selecting a range)
Cursor
40
Page 47

selecting the number of copies
To select the number of copies to print:
Tab
1. Use u
to position the cursor in the
Copies
section of the Setup LCD.
printing from memory cards
2. Use
Scroll Up (+)
Scroll Down (-)
or
to select the number of copies to print.
Note: Copies of a range of photos are printed as sets. For example, 3 copies of
photos 1–3 print in this order: 1,2,3; 1,2,3; 1,2,3.
Paper Count icon
More Paper icon
Number of copies
Cursor
Copies section
41
Page 48

Copies
The
section of the LCD has three icons:
• The number shows the number of copies selected to print. The default is 1.
• The Paper Count icon shows the number of sheets of paper needed to complete the print
job with the current settings. As you increase the number of copies the number of sheets
increases accordingly.
• The More Paper icon appears next to the Paper Count icon when the print job requires
more than six sheets of paper.
examples
To print only the last photo on a memory card:
1. Insert the memory card into the printer.
2. Press
Scroll Up (+) or Scroll Down (-)
to select the size of your photo.
printing from memory cards
3. Press u
4. Press
5. Press
Tab
once to move to the
Scroll Down (-)
Print
.
once to select the last photo on the memory card.
Choose Photos
section.
42
Page 49

To print all photos on a memory card:
1. Insert the memory card into the printer.
printing from memory cards
2. Press
3. Press u
4. Press
5. Press
Scroll Up (+) or Scroll Down (-)
Tab
twice to move the cursor to the second part of the
Scroll Down (-)
Print
.
to select the last photo on the memory card.
to select the size of your photos.
To print two copies of photos 4-6 in wallet size:
1. Insert the memory card into the printer.
2. Press
3. Press u
4. Press
5. Press u
6. Press
7. Press u
8. Press
9. Press
Scroll Down (-)
Tab
to position the cursor in the first part of the
Scroll Up (+)
Tab
to position the cursor in the second part of the
Scroll Up (+)
Tab
to position the cursor in the
Scroll Up (+)
Print
.
to select wallet size prints.
three times to select “4” as the first photo to be printed.
twice to select “6” as the last photo to be printed.
Copies
to select “2” as the number of copies.
section.
Choose Photos
Choose Photos
Choose Photos
section.
section.
section.
43
Page 50

printing an index page
An index page shows thumbnail views of the photos stored on the memory
card. The index page can print 28 images per page. Depending on the
number of photos on the memory card, an index page may be several
pages long.
Note: Because of the large number of images, an index page can take
longer to print than a regular photo.
The photo number appears in the lower left corner of each thumbnail
image on the index page. Use the photo number to select photos to print.
Note: This number may be different from the number associated with the
photo on your digital camera. If you add or delete photos from a
memory card, reprint the index page to see the new photo
numbers.
To print an index page:
1. Insert the memory card into the printer.
printing from memory cards
2. In the
icon).
Photo Size
section of the Setup LCD, scroll down to thumbnail size (the bottom
44
Page 51

3. Select the range of photos to print:
• To print all photos on the memory card: press u
second part of the
Choose Photos
section, then press
Tab
twice to position the cursor in the
Scroll Down (-)
to scroll to the last
photo on the memory card.
• If you want to print an index page that does not include all photos on the memory
card: press u
Tab
once to position the cursor in the first part of the
Choose Photos
section then select the range of photos to print.
4. If you want to print more than one copy of the index page, set the number of copies.
printing from memory cards
5. Press
Print
.
Thumbnail size
45
Page 52

canceling a print job
printing from memory cards
To stop printing, press
• The partially printed page ejects from the printer.
• The settings on the control panel reflect the cancelled print job.
Cancel
.
Cancel
X
clearing print settings
To clear the print settings, press
restores the default settings: 4x6 in., print first photo on the memory card, and print one
copy.
Cancel
when the printer is not busy printing or saving. This
46
Page 53

4 printing from DPOF files
Most digital cameras allow you to choose which photos to print while you are reviewing the
photos using the camera’s LCD. Your selections are stored in a digital print order format
(DPOF) file. This file tells the printer which photos to print, the size of each photo, and how
many of each photo to print.
printing from a DPOF file
Note: When you print from a DPOF file, you will not be able to use the control panel to
choose the photo size, range, or number of copies. This is because the DPOF file
created by the camera specifies these settings. If the DPOF file specifies “standard”
for the photo size, the photo will print at 4x6 in.; if it specifies “index” for the photo
size, the photo will print at thumbnail size.
printing from DPOF files
47
Page 54

To print from a DPOF file:
1. Use your digital camera to create a DPOF file on the memory card.
Note: The settings you can use when creating a DPOF file are specific to your
camera. See your digital camera’s documentation for information on creating a
DPOF file.
2. Insert the memory card into your printer. For details, see “inserting a memory card” on
page 27.
The printer automatically recognizes the DPOF file on the memory card.
• The DPOF icon appears in the Status LCD
to indicate a DPOF file is on the memory
card.
• DPOF appears in the Photo Size section to
indicate that the photo size (standard or
index) will be read from the DPOF file.
printing from DPOF files
• DPOF appears in the
Choose Photos
section to indicate the photos to be printed
will be read from the DPOF file.
3. On the control panel, press
Print
.
48
Page 55

exiting DPOF mode
To print photos from the memory card that are not part of the DPOF file, exit DPOF mode.
When you exit DPOF mode, the other photos on the card are accessible.
To exit DPOF mode:
printing from DPOF files
1. Press u
2. Use
3. Continue with your selections and print your photos.
Tab, Scroll Up (+)
Photo Size
Scroll Up (+)
section.
or
Scroll Down (-)
, or
Scroll Down (-)
to exit DPOF mode. The cursor will be in the
to select the photo size.
returning to DPOF mode
When there is a DPOF file on the inserted memory card, DPOF appears as an additional
selection in the Photo Size section.
To return to DPOF mode:
•Use
Scroll Up (+)
Scroll Down (-)
or
in the
Photo Size
section to select DPOF.
49
Page 56

5 care and maintenance
Your printer requires little maintenance. Transport your printer with care, keep it clean and
in good condition, and keep the print cartridge inside the printer at all times.
transporting your printer
Your printer can travel with you. Be sure to always carry the printer upright.
To transport your printer:
care and maintenance
1. Press
2. Remove all paper from the paper tray.
3. Push the paper tray extension all the way in towards the printer.
4. Close the paper tray door.
Power
to turn off the printer.
Note: Make sure the printer completes its power-down cycle before you disconnect
the power. This allows the printer to cap the print cartridge correctly.
50
Page 57

5. Unplug the power adapter and fold the two metal prongs back into the power adapter.
6. If your printer was connected to your computer, disconnect the USB printer cable from
the computer.
Note: When transporting your printer, do not remove the print cartridge.
When transporting your printer, make sure to bring the following items with you:
• Paper
• Power adapter
• Memory card containing photos, or your digital camera
• Extra HP #57 print cartridges (if you plan to print a lot of photos)
Note: If you are going to connect your printer to a computer, make sure to also bring your
USB printer cable and printer software CD.
care and maintenance
51
Page 58

storing your printer and supplies
storing your printer
Your printer is built to withstand short or long periods of inactivity. Close the paper tray door
when the printer is not in use. Store the printer out of direct sunlight and in a place that does
not have temperature extremes (such as indoors).
storing the print cartridge
Always transport and store the used print cartridge inside the printer. The printer caps the
print cartridge to keep the ink fresh longer.
Make sure the printer completes its power-down cycle before you disconnect the power. This
allows the printer to cap the print cartridge correctly.
If the printer and print cartridge have been unused for a month or more, print a test page to
clean the print cartridge before using it. See below for details.
storing paper
Store photo paper in its original packaging on a level surface in a cool, dry location.
care and maintenance
52
Page 59

cleaning your printer
To clean the outside of the printer, use a cloth that has been lightly moistened with water.
Important: Do not use cleaners or soaps as they may damage the printer’s finish.
printing a test page
The test page is used to diagnose print cartridge problems. Printing it also cleans the print
cartridge. You should print a test page any time you suspect something is wrong with your
print cartridge—the print cartridge cleaning that happens when you print the test page can
resolve many print quality problems.
You can print the test page up to three times, each time completing a more thorough print
cartridge cleaning.
Note: To conserve photo paper, you can print the test page on an index card.
To print a test page using the control panel:
1. If there is a memory card in any of the card slots, remove the memory card.
2. On the control panel, press and hold
a test page.
Print
for a few seconds. The printer begins to print
care and maintenance
53
Page 60

3. Check the print quality of the test page. If it appears that the print cartridge needs
additional cleaning, you can print up to two more test pages—each successive test
page gives a more thorough print cartridge cleaning.
care and maintenance
Image print quality
If this looks good, your
photos should print well
Diagnostic information
To be used when working
with HP Customer Support
Ink nozzle quality
If there are white streaks
in these color bars, try
cleaning the print
cartridge
Estimated ink level
Use this to determine
when you should buy a
new print cartridge
54
Page 61

6 troubleshooting
Your printer is designed to be reliable and easy to use. If there is a problem, look in this
section to find a solution quickly.
Note: Before you begin, make sure the power adapter between your printer and the
electrical outlet is securely plugged in and the power source is turned on.
reading the status indicators
There are several indicators that show the printer status in a variety of situations. These
indicators can help you diagnose problems quickly and easily. If you suspect a problem
check the:
•Printer light
•Memory Card light
• Status LCD
These indicators are described in the following sections.
troubleshooting
55
Page 62

printer light
This light, encircling the
Print
button, can be green or red. If the light is green, it can be
either solid or blinking. If the printer light is red, it will be blinking.
X
Color State Meaning
Green Solid Printer power is on
Green Blinking Printer is busy
Red Blinking The printer needs attention
troubleshooting
Printer light
Print button
56
Page 63

memory card light
This green light is located between the memory card slots on the front of the printer. It is only
visible when the paper tray door is open.
Memory Card light
State Meaning
On - solid A memory card is in one of the slots, but it is not being accessed
On - blinking The memory card is being accessed
Off There are no memory cards in the slots
Caution: Do not remove the memory card from the printer while the card is being read or written to
(the memory card light is blinking). This may damage the printer, the memory card, or the
information on the memory card.
troubleshooting
57
Page 64

status LCD
Status LCD
The
specific printer parts.
displays icons that indicate the general printer status as well as the status of
troubleshooting
Number of photos DPOF iconMemory Card icon
Attention icon
Section Description State Meaning
/
Attention icon Blinking There is a problem and the printer needs
attention.
Number of photos Solid The number of photos on the memory card.
Number of photos Blinking There are no photos on the memory card, or
there is a problem with the photos on the
memory card.
Memory card icon Solid A memory card is inserted.
Paper and Print
Cartridge icon
58
Page 65

Section Description State Meaning
Memory Card icon Blinking There is a problem with the memory card.
DPOF icon Solid There is a DPOF (digital print order format) file
on the memory card.
Paper icon Blinking There is a problem with the paper.
Print Cartridge icon Blinking There is a problem with the print cartridge.
troubleshooting
59
Page 66

interpreting error conditions
Any time the printer has an error and needs attention, the Printer light blinks red. Read the status LCD
for an indication of the type of error.
printer problems
Status LCD Problem Solution
/
Blinking
The printer may be
out of memory.
OR
There may be too
many files on the
memory card.
OR
One of the photos on
the memory card may
be too large to
process.
1. Press Cancel.
2. If necessary, turn the printer off, wait for it to power down,
and then turn it on.
3. Try the print job again.
troubleshooting
60
Page 67

memory card problems
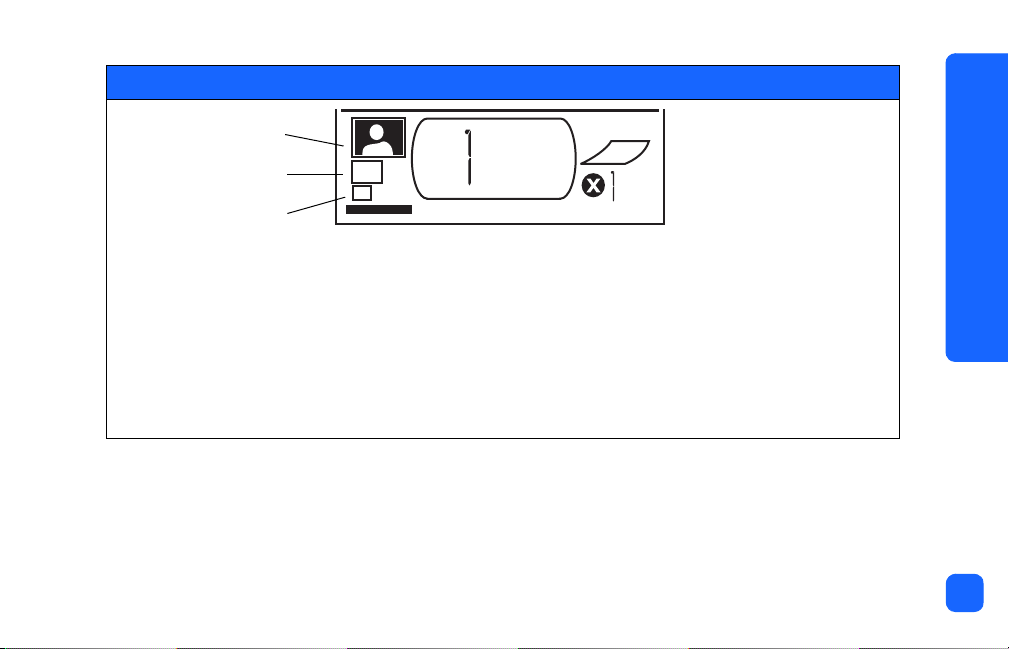
Status LCD Memory card light Problem Solution
Number of
photos shows
000
Blinking The memory card is
inserted incorrectly.
There is more than one
memory card inserted.
Blinking, then solid The memory card is
empty.
OR
The memory card
contains only
unrecognized file
formats.
Remove the memory card from the slot
and re-insert it correctly. For more
information, see “inserting a memory
card” on page 27.
1. Remove the unwanted memory
card.
2. Set up your print job.
3. Press Print.
Use Windows Explorer or My
Computer to access the files on the
memory card.
OR
1. Remove the memory card from the
slot.
2. Insert a memory card that contains
photos in a recognized file format.
troubleshooting
61
Page 68

Status LCD Memory card light Problem Solution
/
/
Number of
corrupt photos
flashes next to
Memory Card
icon
Blinking The printer cannot
read the memory
card—it may be
damaged or
unformatted.
Blinking Multiple photos in the
print job are corrupt
(the print job is
canceled).
• Remove the memory card from the
slot.
Try the following methods of reading
the files on the card. If none of these
work, you will need to use another
memory card.
• If you have the printer connected
to a computer, you can save the
file from the memory card to your
computer, and then print the file
from your software application.
• Format the memory card.
• Connect the camera to the PC to
download the file.
1. Print an index page and note
which photos are corrupt.
2. Set up your print job, making sure
you have not included the corrupt
photos.
3. Press Print.
troubleshooting
62
Page 69

Status LCD Memory card light Problem Solution
/
Corrupt photo
number flashes
next to
Memory Card
icon
LCD shows
HP 100
Blinking The printer cannot
read the selected
photo (the photo may
be corrupt or in a
format the printer does
not recognize).
Off (no light) The memory card was
not inserted fully.
1. Remove the memory card from the
slot.
2. If you have the printer connected
to a computer, you can save the
photo from the memory card to
your computer and then print the
photo from your software
application.
Push the memory card further into the
memory card slot.
troubleshooting
63
Page 70

print cartridge problems
Status LCD Problem Solution
Print cartridge is missing. Install the correct HP print cartridge (# 57)
into the printer.
You may have forgotten to remove the
plastic tape from the print cartridge.
The copper contacts on the print
cartridge are not connecting with the
contacts inside the printer.
An incorrect print cartridge is installed. Remove the incorrect print cartridge and
The print cartridge may be low on ink
(the Printer light does not blink).
Remove the plastic tape from the print
cartridge and re-insert the cartridge. For
more information, see “installing or
removing the print cartridge” on page 22.
1. Remove the print cartridge.
2. Make sure there is not any debris on
the copper contacts.
3. Re-insert the print cartridge.
insert the correct HP print cartridge (#57).
For more information, see “installing or
removing the print cartridge” on page 22.
Print a test page to see how much ink is left
in the print cartridge, and to evaluate the
print quality. If needed, replace the print
cartridge.
troubleshooting
64
Page 71

paper problems
Status LCD Problem Solution
/
Paper has jammed.
OR
The printer picked up multiple sheets of
paper.
The printer is out of paper. 1. Place more paper in the paper tray.
The printer could not pick up the paper
from the paper tray.
1. Pull the paper out of the paper path.
2. Make sure the paper width guide fits
close to the edge of the paper without
bending the paper.
3. Press Print to continue printing.
2. Press Print to continue printing.
• Make sure the paper width guide is
close to the left edge of the paper
without bending the paper.
• Make sure there are no more than 20
sheets of paper in the paper tray.
• Make sure there is not more than one
type and size of paper in the paper
tray.
troubleshooting
65
Page 72

other printing problems
If you are having problems with your printouts and there is no error condition shown on the
printer, there could be a problem that the printer does not detect.
Problem Possible cause Solution
My photo did not
come out of the
printer.
There may be a paper jam. 1. Pull the paper out of the paper path.
2. Make sure the paper width guide fits close
to the edge of the paper without bending
the paper.
3. Press Print to continue printing.
Power may be off or there may
be a loose connection.
You may not have any paper
in the paper tray.
A problem may exist with the
print cartridge.
The printer may still be
processing information.
• Make sure the printer power is on.
• Make sure that all cable connections are
secure.
Check that paper is loaded correctly in the
paper tray.
Try printing a test page. If necessary, replace
the print cartridge.
Be patient. The printer needs time to finish
processing the information.
troubleshooting
66
Page 73

Problem Possible cause Solution
The printer light is
flashing but nothing is
printing.
Paper falls to the floor
after printing.
My photo printed at
an angle or is off
center.
The printer may be processing
information.
The paper tray extension may
not be fully extended.
The paper may not be loaded
correctly.
OR
The paper size may be
incorrect.
Be patient. The printer needs time to finish
processing the information.
Gently pull out the paper tray extension.
• Make sure the paper is correctly oriented
in the paper tray.
• Make sure the paper width guide is close
to the left edge of the paper without
bending the paper.
• Make sure you selected the correct paper
size in your software application Printer
Properties (if you are printing from a
computer).
troubleshooting
67
Page 74

Problem Possible cause Solution
My photo came out
blank.
The print cartridge may be out
of ink.
You may have forgotten to
remove the plastic tape from
the print cartridge.
You may have previously
begun a print job and then
canceled it.
Print a test page to see how much ink is left in
the print cartridge, and to evaluate the print
quality. If needed, replace the print cartridge.
Make sure you have removed the protective
plastic tape from the print cartridge. For more
information, see “installing or removing the
print cartridge” on page 22.
If you cancel a print job before the job prints,
the printer ejects a blank or partially printed
page before continuing with the next job.
troubleshooting
68
Page 75

Problem Possible cause Solution
Print quality is poor.
OR
Colors do not print
correctly.
You may be running out of ink. Print a test page.
If you are running out of ink, replace the print
cartridge.
You may not be using the best
paper type.
You may be printing on the
wrong side of the paper.
You may need to clean the
print cartridge.
• Make sure you are using a type of paper
intended for the printer.
• Choose paper that is specifically designed
for the output you want. For example, to
print photos, use photo paper rather than
plain paper.
See “loading paper” on page 20 for more
information about supported paper types.
Make sure the paper is loaded with the HP
logo side down (print side is up).
Print a test page to clean the print cartridge.
See “printing a test page” on page 53.
troubleshooting
69
Page 76

getting additional help
We hope you found this troubleshooting guide helpful. If your problem persists, see the
Services and Support booklet that came with your printer, or visit www.hp.com/photosmart.
troubleshooting
70
Page 77

specifications
Dimensions 8.8 x 4.7 x 9.1 in.
Interface USB 1.1
Media sizes 4x6 in. with and without tab
Media types HP Premium Plus Photo Paper 4x6.5 in. with .5 in. tab, 9-mil weight
Index cards 4x6 in.
Memory card compatibility CompactFlash Type I and II, SmartMedia, Memory Stick
Paper tray capacity 20 sheets
Print cartridge One tri-color cartridge (HP #57)
Prints color Yes
Print languages PCL3C+, PML
Print technology Drop on-demand thermal inkjet printing
Resolution Up to 2400x1200 dpi
Speed Approximately 2 minutes per page
Technology, color PhotoREt III, ColorSmart III
Weight 2.9 lbs
specifications
71
Page 78

copyright and trademarks
© Copyright 2001 Hewlett-Packard Company
All rights are reserved. No part of this document may be photocopied, reproduced, or translated to
another language without the prior written consent of Hewlett-Packard Company.
The information contained in this document is subject to change without notice. Hewlett-Packard shall
not be liable for errors contained herein or for consequential damages in connection with the
furnishing, performance, or use of this material.
Adobe, Acrobat, and Reader are registered trademarks of Adobe Systems, Inc.
HP, the HP logo, and PhotoSmart are property of Hewlett-Packard Company.
Microsoft and Windows are registered trademarks of Microsoft Corporation.
Mac, the Mac logo, and Macintosh are registered trademarks of Apple Computer, Inc.
IBM is a registered trademark and Microdrive is a trademark of International Business Machines
Corporation.
Pentium is a registered trademark of Intel Corporation.
CompactFlash, CF, and the CF logo are trademarks of the CompactFlash Association (CFA).
Memory Stick is a registered trademark of Sony Corporation.
SmartMedia is a trademark of the SSFDC Forum.
Other brands and their products are trademarks or registered trademarks of their respective holders.
copyright and trademarks
72
Page 79

index
Symbols
(-) button 34
(+) button 34
(+) icon 16
Numerics
4x6 in. photo size 36
A
Adapter
connecting power 18
Assistance
viewing the Onscreen User’s Guide 3
Attention icon 14, 58
Automatic print cartridge alignment 22
B
Blinking
Attention icon 58
memory card icon 59
memory card light 57
number of photos 58
paper icon 59
print cartridge icon 59
printer light 56
Buttons
Cancel 12, 46
Power 12, 19
Print 12
Save 12
Scroll Down (-) 12, 34
Scroll Up (+) 12, 34
Tab 12, 34
index
73
Page 80

74
C
Cable
power 18
Calibration page 24
Camera files
DPOF 47
index
Camera memory cards
see memory cards
Cancel button
location 12
what it does 46
Canceling
a print job 46
print settings 46
Card slot light
see memory card light
Card slots
see memory card slots
Care and maintenance 50
CD-ROM
Onscreen User’s Guide 3
viewing user’s guide 3
Choose Photos
section of LCD 15, 33
Cleaning
printer 53
Clearing print settings 46
CompactFlash
inserting the memory card 28
Connecting
power adapter 18
Control panel
buttons 12
icons 13
LCD 13
location 10
quick reference 12
Copies
section of LCD 15, 33
selecting how many to print 41
Page 81

Copper contacts on print cartridge 23
Cursor in LCD 15
Customer support
see Services and Support booklet
D
Default
printer settings 32
Digital Print Order Format
see DPOF
Documentation
viewing the onscreen user’s guide 3
DPOF
icon on LCD 14, 58
printing from 47
F
Film icon
see memory card icon
Flashing lights 55
I
IBM Microdrive 26
Icons
Attention 14, 58
DPOF 14
location on LCD 13
Memory Card 14
More Paper 16, 42
Paper and Print Cartridge 59
Paper Count 16, 42
Printer Status 14
quick reference 14
Images
see photos
Index cards
described 6
Index page
described 6
for selecting photos 44
printing 44
index
75
Page 82

76
Ink
see print cartridge
Inserting
CompactFlash memory card 28
memory cards 27
Memory Stick memory card 30
paper 21
index
print cartridge 23
SmartMedia memory card 29
Installing
print cartridge 23
L
LCD
Attention icon 58
changing the settings 34
Choose Photos section 15
Copies section 15
cursor 15
icons quick reference 14
location of icons 13
meaning of status icons 58
Memory Card icon 31
More Paper icon 42
number of copies 41
Paper Count icon 16, 42
Photo Size section 15
quick reference 13
status icons 58
Light
memory card 27, 31, 57
printer 19, 56
Page 83

Loading
paper 21
print cartridge 23
Location of printer 17
M
Maintenance 50
Maximum amount of paper to load 21
Media types and sizes 20
Memory card light
location 11, 27
what it means 57
Memory card slots
CompactFlash 27
Memory Stick 27
SmartMedia 27
Memory cards
IBM Microdrive 26
icon on LCD 14
indicator light 31
inserting 27
inserting CompactFlash 28
inserting Memory Stick 30
inserting SmartMedia 29
location of slots 11
status icon on LCD 31
troubleshooting problems 61
Memory Stick
inserting the memory card 30
Microdrive memory cards 26
More Paper icon 16, 42
Moving the printer 50
N
Number of copies 41
index
77
Page 84

78
O
On/off switch 12
Onscreen User’s Guide 3, 17
Opening
paper tray door 21
print cartridge door 23
index
Output guide
how to use 21
location 11
P
Paper
getting it to feed in straight 21
how much to use 21
loading 21
storing 52
supported types 20
tabbed 21
troubleshooting problems 65
where to buy 20
which side faces up 21
Paper and Print Cartridge icon 59
Paper Count icon 42
Paper tray
door 10, 21
extension 11, 21
inserting paper 21
Paper width guide
adjusting 21
location 11
Pen
see print cartridge
Photo paper
loading 21
type to use 20
Photo size
default 32
section of LCD 15, 33
selecting 36
Page 85

Photos
number on LCD 14
printing 35
printing all on a memory card 43
printing one at a time 38
printing several at a time 39
printing the last one taken 42
Power
adapter 10, 18
button 12, 19
connecting 18
turning on and off 19
Print button
location 12
what it does 36
Print cartridge
calibration page 24
copper contacts 23
diagnosing problems 53
ink nozzles 23
inserting 23
nozzles 23
removing 25
removing the tape 23
storing 52
troubleshooting problems 64
what kind to buy 22
Print cartridge door
location 10
opening 23
Print settings
clearing 46
default 32
selecting on the control panel 34
index
79
Page 86

80
Printer
calibration page 24
changing the settings 34
cleaning 53
light 19, 56
setting up 17
specifications 71
index
status icon on LCD 14, 58
storing 52
test page 53
transporting 50
turning on and off 19
where to place 17
Printer parts
buttons 12
control panel 12
LCD 13
memory card slots 27
paper tray 21
print cartridge door 23
what comes in the box 17
Printing
all photos on a memory card 43
calibration page 22
canceling 46
copies 41
from DPOF files 47
index page 44
last photo taken 42
multiple copies 41
photos from the control panel 35
range of photos 39
single photo 38
stopping 46
test page from the control panel 53
Problems
memory cards 61
paper 65
photo quality 66
print cartridge 64
Proof sheet
see Index page
Page 87

Q
Quick reference
control panel 12
front and back of printer 10
front of printer with paper tray open 11
LCD 13
LCD icons 14
R
Rear paper path
location 10
Red light on printer 56
Removing
print cartridge 25
S
Save button
location 12
Scroll Down (-) button
how to use 34
location 12
Scroll Up (+) button
how to use 34
location 12
Selecting
number of copies 41
photo size 36
photos to print 37
Services and Support booklet 17
Setup
connecting power 18
installing the print cartridge 23
loading paper 21
Setup LCD
Choose Photos section 33
Copies section 33
icons 15
Photo Size section 33
Sheets of paper
how many to load 21
SmartMedia
inserting the memory card 29
index
81
Page 88

82
Specifications 71
Status
LCD icons 58
of memory card 31
Stopping printing 46
Storing
paper 52
index
print cartridge 52
printer 52
T
Tab button
how to use 34
location 12
Tabbed paper
loading 21
Tape
removing from print cartridge 23
Technical support
see Services and Support booklet
Test page
printing from the control panel 53
Thumbnail photo size 36
Transporting your printer 50
Troubleshooting
memory card light 57
memory card problems 61
paper problems 65
print cartridge problems 64
printer light 56
reading the status LCD 58
viewing the Onscreen User’s Guide 3
U
Unpacking 17
USB
port 10
User’s Guide
Onscreen 3
User’s guide
viewing onscreen 3
Page 89

W
Wallet photo size 36
index
83
Page 90

84
index
Page 91

Page 92

Printed on recycled paper
Printed in Singapore, 8/01
ENERGY STAR® is a U.S. registered mark.
As an ENERGY STAR
Company has determined that this product meets
the ENERGY STAR
guidelines for energy efficiency.
www.hp.com
©2001 Hewlett-Packard Company
C8441-90158
®
partner, Hewlett-Packard
®
 Loading...