

Page 1

HP Pavilion Plasma TV User’s Guide
HP Pavilion PE4200N 42-Inch (106-Centimeter) Plasma Television
Before connecting, operating, or adjusting this product, please read these instructions completely.
Please keep this User’s Guide for future reference.
Page 2

The only warranties for HP products and services are set forth in the
express warranty statements accompanying such products and
services. Nothing herein should be construed as constituting an
additional warranty. HP shall not be liable for technical or editorial
errors or omissions contained herein.
HP assumes no responsibility for the use or reliability of its software
on equipment that is not furnished by HP.
This document contains proprietary information that is protected by
copyright. No part of this document may be photocopied,
reproduced, or translated to another language without the prior
written consent of HP.
Hewlett-Packard Company
P.O. Box 4010
Cupertino, CA 95015-4010
USA
Copyright © 2005 Hewlett-Packard Development Company, L.P.
Manufactured under license from Dolby Laboratories. Dolby, and the
double-D symbol are trademarks of Dolby Laboratories.
HDMI, the HDMI logo and High-Definition Multimedia Interface are
trademarks or registered trademarks of HDMI Licensing LLC.
This product incorporates copyright protection technology that is
protected by method claims of certain U.S. patents and other
intellectual property rights owned by Macrovision Corporation and
other rights owners. Use of this copyright protection technology must
be authorized by Macrovision Corporation, and is intended for
home and other limited viewing uses only unless otherwise
authorized by Macrovision Corporation. Reverse engineering or
disassembly is prohibited. Apparatus Claims of U. S. Patent Nos.
4,631,603, 4,577,216, 4,819,098, 4,907,093, 6,381,747, and
6,516,132.
HP supports lawful use of technology and does not endorse or
encourage the use of our products for purposes other than those
permitted by copyright law.
The information in this document is subject to change without notice.
Page 3

The lightning flash
with arrow-head
within a triangle is
intended to tell the
user that parts
inside the product
WARNING: To reduce the risk of electric shock, do not remove cover
or back. No user-serviceable parts inside. Refer servicing to qualified
service personnel.
are a risk of electric
shock to persons.
The exclamation
point within a
triangle is intended
to tell the user that
important operating
and servicing
instructions are in
this user’s guide.
WARNING: To reduce the risk of fire or electric shock, do not expose this apparatus to rain
or moisture. Do not place liquid containers (flower vase, cups, cosmetics, etc.)
above the set (including on shelves above, etc.).
WARNING: 1) To prevent electric shock, do not remove cover. No user-serviceable parts inside. Refer
servicing to qualified service personnel.
2) Do not remove the grounding pin on the power plug. This apparatus is equipped with a three
pin grounding-type power plug. This plug will only fit a grounding-type power outlet. This is a
safety feature. If you are unable to insert the plug into the outlet, contact an electrician. Do not
defeat the purpose of the grounding plug.
NOTE: Do not allow a still picture to be displayed for an extended period, as this can cause a
permanent afterimage to remain on the Plasma Television. Examples of still pictures include
logos, video games, computer images, teletext and images displayed in 4:3 mode.
Manufactured under license from Dolby Laboratories.
“Dolby” and the double-D symbols are trademarks of Dolby Laboratories.
HDMI, the HDMI logo and High-Definition Multimedia Interface are
trademarks or registered trademarks of HDMI Licensing LLC.
License description: To view the license information for software used in this product, press the Menu
button and select Set up, About, License. (See “About” on page 47.)
iii
Page 4

Important Safety Instructions
1 Read these instructions.
2 Keep these instructions.
3 Heed all warnings.
4 Follow all instructions.
5 Do not use this apparatus near water.
6 Clean only with dry cloth.
7 Do not block any ventilation openings. Install in accordance with the manufacturer’s instructions.
8 Do not install near any heat sources such as radiators, heat registers, stoves, or other apparatus (including
amplifiers) that produce heat.
9 Do not defeat the safety purpose of the polarized or grounding-type plug. A polarized plug has two blades with
one wider than the other. A grounding type plug has two blades and a third grounding-prong. The wide blade or
the third prong are provided for your safety. If the provided plug does not fit into your outlet, consult an electrician
for replacement of the obsolete outlet.
10 Protect the power cord from being walked on or pinched particularly at plugs, convenience receptacles, and the
point where they exit from the apparatus.
11 Only use attachments/accessories specified by the manufacturer.
12 Use only with the cart, stand, tripod, bracket, or table specified by the manufacturer, or sold with the
apparatus. When a cart is used, use caution when moving the cart/apparatus combination to avoid
injury from tip-over.
13 Unplug this apparatus during lightning storms or when unused for long periods of time.
14 Refer all servicing to qualified service personnel. Servicing is required when the apparatus has been damaged in
any way, such as power-supply cord or plug is damaged, liquid has been spilled or objects have fallen into the
apparatus, the apparatus has been exposed to rain or moisture, does not operate normally, or has been dropped.
15 To prevent electric shock, ensure the grounding pin on the AC cord power plug is securely connected.
iv HP Pavilion Plasma TV User’s Guide
Page 5

FCC Statement
This equipment has been tested and found to comply with the limits for an Other Class B digital device, pursuant
to Part 15 of the FCC Rules. These limits are designed to provide reasonable protection against harmful
interference in a residential installation. This equipment generates, uses, and can radiate radio frequency energy
and, if not installed and used in accordance with the instructions, may cause harmful interference to radio
communications. However, there is no guarantee that interference will not occur in a particular installation. If this
equipment does cause harmful interference to radio or television reception, which can be determined by turning
the equipment off and on, the user is encouraged to try to correct the interference by one of the following
measures:
■ Reorient or relocate the receiving antenna.
■ Increase the separation between the equipment and receiver.
■ Connect the equipment into an outlet on a circuit different from that to which the receiver is connected.
■ Consult HP or an experienced radio/TV technician for help.
FCC Caution:
To Assure continued compliance, use only shielded interface cables when connecting TV to
peripheral devices. Any changes or modifications not expressly approved by responsible
party may cause harmful interference and could void the user’s authority to operate this
device.
RESPONSIBLE PARTY:
Hewlett-Packard Company
Digital TV Solutions
Attn: Product Regulations Manager
10435 N. Tantau Avenue
CAC 07, MS 4295
Cupertino, CA 95014
USA
CANADIAN NOTICE:
This Class B digital apparatus complies with Canadian ICES-003.
Regulatory and Safety
Information
WARNING: The TV is heavy; be sure to use
ergonomically correct lifting procedures when moving
the TV.
Additional Safety Information
This product has not been evaluated for connection to
an “IT” power system (an AC distribution system with
no direct connection to earth, according to
IEC 60950).
AC Power Safety Warning
WARNING: Install the TV near an AC outlet. The AC
power cord is your main AC disconnecting device and
must be easily accessible at all times. For your safety,
the power cord provided with your TV has a grounded
plug. Always use the power cord with a properly
grounded wall outlet, to avoid the risk of electrical
shock.
WARNING: Do not operate the TV with the cover
removed.
v
Page 6
WARNING: The TV is not user serviceable. To prevent
damage to the TV, have a qualified person repair or
replace it.
WARNING: For your safety, always unplug the
TV from its power source and from any
telecommunications systems (such as CATV, SAT, or
any other peripheral) before performing any service
procedures. Failure to do so may result in personal
injury or equipment damage. Hazardous voltage levels
are inside the TV.
7
6
5
4
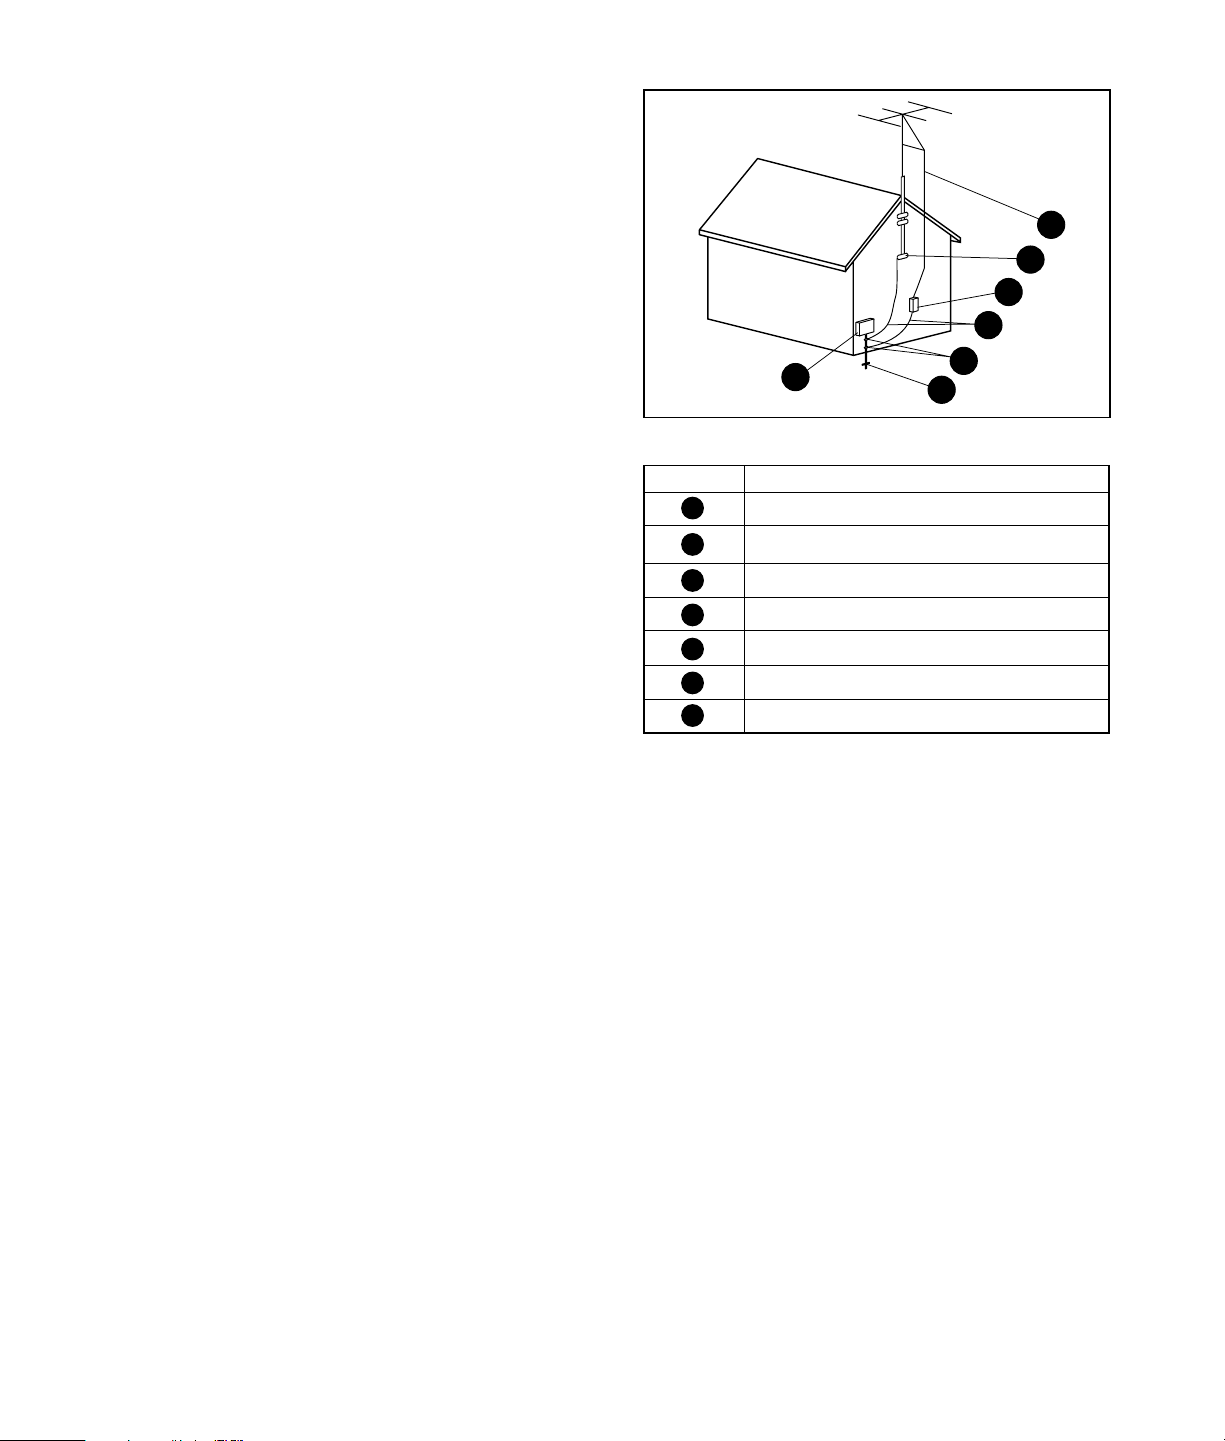
TV Antenna Connectors
Protection
External Television Antenna Grounding
If an outside antenna or cable system is connected to
the product, be sure the antenna or cable system is
electrically grounded so as to provide some protection
against voltage surges and built-up static charges.
Article 810 of the National Electrical Code,
ANSI/NFPA 70, provides information with regard to
proper electrical grounding of the mast and supporting
structure, grounding of the lead-in wire to an antennadischarge unit, size of grounding conductors, location
of antenna-discharge unit, connection to grounding
electrodes, and requirements for the grounding
electrode.
Lightning Protection
For added protection of any product during a lightning
storm, or when it is left unattended and unused for long
periods of time, unplug the product from the wall outlet
and disconnect the antenna or cable system. This will
prevent damage to the product from lightning and
power line surges.
Power Lines
An outside antenna system should not be located in the
vicinity of overhead power lines or other electric light
or power circuits, or where it can fall into such power
lines or circuits.
3
Antenna Grounding
Reference
1
2
3
4
5
6
7
1
Antenna Grounding
Grounding Component
Electric Service Equipment
Power Service Grounding Electrode System
(NEC Art 250, Part H)
Ground Clamps
Grounding Conductors (NEC Section 810-21)
Antenna Discharge Unit (NEC Section 810-20)
Ground Clamp
Antenna Lead in Wire
2
Dear HP Customer
Welcome to the HP family of customers. We hope that
you will have many years of enjoyment from your new
Plasma TV.
To obtain maximum benefit from your set, please read
these instructions before making any adjustments, and
retain them for future reference.
Retain your purchase receipt, and record the product
number and serial number of your set in the space
provided on the last page of these instructions.
WARNING: When installing an outside antenna
system, extreme care should be taken to keep from
touching such power lines or circuits as contact with
them could be fatal.
vi HP Pavilion Plasma TV User’s Guide
Page 7

Table of Contents
Important Safety Instructions ..........iv
FCC Statement................................. v
Regulatory and Safety Information ...........................v
Safety Precautions .......................... 1
Set up ........................................................... 1
AC Power Supply Cord ................................... 1
If problems occur during use ............................1
When using the Plasma TV .............................. 2
Cleaning and maintenance.................................... 2
Accessories ..................................... 3
Attaching the Pedestal .................... 4
Assembling and setting up the TV ...........................4
Assembling the Pedestal .................................. 4
Attaching the Pedestal ..................................... 5
Installing ........................................ 6
Receiver Location.................................................. 6
Optional External Equipment.................................. 6
Remote Control Battery Installation..........................6
Installing Cable Binding .................. 7
Cable Cover ..................................................7
AC cord ........................................................ 7
Cable Clamp ................................................. 8
Connecting...................................... 9
Connecting the Antenna ........................................ 9
Connecting a Cable Box ....................................... 9
Connecting HDMI............................................... 10
Connecting a Set-top Box or DVD.........................12
Connecting the Video Input.................................. 12
Connecting the Amplifier ..................................... 13
Connecting Program Out..................................... 14
Turning the TV On or Off................15
TV Buttons..........................................................16
Using the Remote Control ..............17
HP MCPC and HP DEC PCs ...........................20
Using the First Time Setup..............21
Language ..........................................................21
Clock ................................................................22
Auto program.....................................................23
Watching TV Programs ..................24
VHF and UHF.....................................................24
Cable TV ...........................................................24
Aspect Controls ..................................................25
Using the Onscreen Navigation
Menu.............................................26
Using the Menus............................27
Picture ...............................................................27
Default/Pic. mode/Picture/Brightness/Color/Tint/
Sharpness/Color Temp/Color Mng.................28
Pic. mode.....................................................29
Zoom Adjust.................................................29
Other Adjust (Picture).....................................30
Audio................................................................31
Default/Bass/Treble/Balance.........................31
Other Adjust (Audio) .....................................32
Timer.................................................................34
Sleep Timer ..................................................35
Timer set ......................................................35
Table of Contents
Table of Contents vii
Page 8

Setup ................................................................ 37
CH list.........................................................37
Language .................................................... 37
Clock .......................................................... 38
Program channel .......................................... 38
Input labels .................................................. 42
CC (closed caption) ...................................... 43
Other Adjust (setup) ...................................... 46
About.......................................................... 47
Reset........................................................... 48
Lock.................................................................. 48
Lock Mode................................................... 49
Channel (block channel selection)................... 50
Blocking a program ...................................... 50
Customer Caution......................................... 53
Blocking Messages ....................................... 54
Change password ........................................ 54
Operating Peripheral Equipment ... 55
Programming the remote control code ...................55
Programming the device code ........................55
Searching for the device code ........................56
Mode Operational Key Chart...............................64
Video/Component/HDMI Input
Signals.......................................... 66
Specifications................................ 67
Troubleshooting Chart ................... 68
viii HP Pavilion Plasma TV User’s Guide
Page 9

Safety Precautions
AC Power Supply Cord
w
Keep unneeded small parts and other
objects out of the reach of small children.
These objects can be accidentally
swallowed. Also, be careful about
packaging materials and plastic sheets.
Set up
Do not place the Plasma TV on sloped or
unstable surfaces.
■ The Plasma TV may fall off or tip over.
Do not place any objects on top of the
Plasma TV.
■ If water spills onto the Plasma TV or foreign
objects get inside it, a short-circuit may occur
which could result in fire or electric shock. If any
foreign objects get inside the Plasma TV, please
consult an Authorized Service Center.
Do not cover the ventilation holes.
■ Doing so may cause the Plasma TV to overheat,
which can cause fire or damage to the Plasma TV.
If using the pedestal, leave a space of
3 15/16 inch (10 cm) or more at the top,
left and right, 2 3/8 inch (6 cm) or more at
the bottom, and 2 3/4 inch (7 cm) or more
at the rear. If using some other method for
setup, leave a space of 3 15/16 inch (10 cm)
or more at the top, bottom, left and right,
and 3/4 inch (1.9 cm) or more at the rear.
Avoid installing this product near electronic
equipment that is readily affected by
electromagnetic waves.
■ It may cause interference in image, sound, etc. In
particular, keep video equipment away from this
product.
The Plasma TV is designed to operate on
120 Vv , 50/60 Hz.
Securely insert the power cord plug as far as
it will go, and use the clamp to secure it. (See
“AC cord” on page 7.)
■ If the plug is not fully inserted, heat may be
generated which could cause fire. If the plug is
damaged or the wall socket plate is loose, they
should not be used.
Do not handle the power cord plug with wet
hands.
■ Doing so may cause electric shocks.
Do not do anything that might damage the
power cable. When disconnecting the power
cable, hold the plug, not the cable.
■ Do not make any modifications to, place heavy
objects on, place near hot objects, heat, bend,
twist, or forcefully pull the power cable. Doing so
may cause damage to the power cable which can
cause fire or electric shock. If damage to the cable
is suspected, have it repaired at an Authorized
Service Center.
If the Plasma TV will not be used for a long
period of time, unplug the power cord from
the wall outlet.
If problems occur during use
If a problem occurs (such as no picture or no
sound), or if smoke or an abnormal odor is
detected from the Plasma TV, unplug the
power cord immediately.
■ Continued use of the TV under these conditions
might cause fire or permanent damage to the unit.
Have the TV evaluated at an Authorized Service
Center. Service to the TV by any unauthorized
personnel is strongly discouraged due to its high
voltage dangerous nature.
Safety Precautions
Safety Precautions 1
Page 10

If water or foreign objects get inside the
Plasma TV, if the Plasma TV is dropped, or if
the cabinet becomes damaged, disconnect
the power cord plug immediately.
■ A short may occur, which could cause fire.
Contact an Authorized Service Center for any
repairs that need to be made.
When using the Plasma TV
Do not bring your hands, face, or objects
close to the ventilation holes of the
Plasma TV.
Be sure to disconnect all cables before
moving the Plasma TV.
■ Moving the TV with its cables attached might
damage the cables which, in turn, can cause fire
or electric shock.
Disconnect the power plug from the wall
outlet as a safety precaution before carrying
out any cleaning.
■ Electric shocks can result if this is not done.
Clean the power cable regularly to prevent it
from becoming dusty.
■ Top of the Plasma TV is usually very hot due to the
high temperature of exhaust air being released
through the ventilation holes. Burns or personal
injuries can happen if any body parts are brought
too close. Placing any object near the top of the
TV could also result in heat damage to the object
as well as to the TV if its ventilation holes are
blocked.
Cleaning and maintenance
The front of the display panel has been
specially treated. Wipe the panel surface
gently using only a cleaning cloth or a soft,
lint-free cloth.
■ Do not scratch or hit the surface of the panel with
fingernails or other hard objects. Furthermore,
avoid contact with volatile substances such as
insect sprays, solvents, and thinner; otherwise, the
quality of the surface may be adversely affected.
If the cabinet becomes dirty, wipe it with a
soft, dry cloth.
■ Built-up dust on the power cord plug can increase
humidity which might damage the insulation and
cause fire. Unplug the cord from the wall outlet
and clean it with a dry cloth.
This Plasma TV radiates infrared rays;
therefore, it may affect other infrared
communication equipment. Install your
infrared sensor in a place away from direct
or reflected light from your Plasma TV.
n
Do not allow a still picture to be displayed
for an extended period, as this can cause a
permanent afterimage to remain on the
Plasma TV.
Examples of still pictures include logos,
video games, computer images, teletext,
and images displayed in 4:3 mode.
■ Do not allow any detergent to come into direct
contact with the surface of the Plasma TV. If water
droplets get inside the unit, operating problems
may result.
■ Avoid contact with volatile substances such as
insect sprays, solvents and thinner; otherwise, the
quality of the cabinet surface may be adversely
affected or the coating may peel off. Furthermore,
do not leave it for long periods in contact with
articles made from rubber or PVC.
2 HP Pavilion Plasma TV User’s Guide
n
Image Retention Protection: If still image
data is displayed for more than a few
minutes, the image retention prevention
function activates automatically and the
image disappears. Change the image or
change the input source to see an image.
Page 11

Accessories
Check that you have the Accessories and items listed in
this table
Documentation
TV DVD STB PVR
AUX VCR HP
AUDIO
MUTE
RETURN
FAV
EXIT MENU
VOL CH
+
SELECT
VOL
-
23
1
5
4
8 9
7
0
SAP
RECALL ASPECT
MTS
Remote control
SOURCE
+
CH
-
6
LAST
SLEEP
Pedestal and parts
AC cord
Cable clamp (2)
F-Type antenna adapter
(for 5C-2V)
Accessories 3
Accessories
Page 12

Attaching the Pedestal
Assembling and setting
up the TV
Points to note during installation:
■ Select a location for the TV that has easy access to
the AC power receptacle.
■ Provide adequate ventilation so that the
temperature around the television does not rise
above 40° C (104° F). If there is insufficient
movement of air inside the display, heat may build
up inside the television and fire may result. For
ventilation spacing specifics, refer to the
information listed under “Set up” on page 1.
■ Due to the size and weight of the display and the
pedestal, it is recommended that a minimum of
two people assemble and move the TV.
Accessories for pedestal assembly
A
Assembling the Pedestal
Match each pole (A) to the mark (a circle or a triangle)
on the pedestal (D). When facing the front of the
pedestal, the right mark is a triangle and the left mark
is a circle. Insert two short screws (B) for each pole.
“ “
B
C
D
A: Pole (2)
B: Short screw (4)
C: Long screw (4)
D: Stand
4 HP Pavilion Plasma TV User’s Guide
“O”
Page 13

2 Lower the TV display unit onto the pedestal poles,
matching the marks:
Hold the display with the back toward you. Align
the holes in the display bottom with the poles of
the pedestal, matching the stamped marks on the
back of the display with the pedestal marks.
Gently lower the display onto the pedestal,
inserting the poles into the display.
Attaching the Pedestal
These steps attach the pedestal to the TV. To remove the
pedestal, perform these steps in reverse order.
c
CAUTION: Never place the television or the
display unit with the glass screen facing
downward, unless it is protected with pads.
1 Position the TV display unit and the pedestal:
■ Put a pad or clean cloth on a smooth, stable
table. Put the display unit with the glass screen
facing downward on the pad.
■ Position the pedestal with the back (thick part
of stand base) toward you on a stable table or
on the floor.
Attaching the Pedestal
3 Insert two long screws (C, see figure under
“Assembling the Pedestal”) for each pole into the
back of the display.
Attaching the Pedestal 5
Page 14

Receiver Location
Installing
This unit is intended to be used with the stand. Consult
your dealer for available options. Position for
comfortable viewing. Avoid placing where sunlight or
other bright light (including reflections) will fall on the
screen. Use of some types of fluorescent lighting can
reduce remote control transmitter range.
Adequate ventilation is essential to prevent internal
component failure. Keep away from areas of excessive
heat or moisture.
Optional External
Equipment
The video and audio connections between components
can be made with shielded video and audio cables.
For best performance, video cables should utilize
75-Ohm coaxial shielded wire. Cables are available
from your dealer or electronic supply store.
Before you purchase any cables, be sure you know
what type of output and input connectors your various
components require. Also determine the length of
cable you will need.
Remote Control Battery
Installation
1 Open the cover.
2 Install the batteries and replace the cover.
Note the correct polarity (+ and –).
n
Replace used batteries with alkaline
batteries for longer life.
w
CAUTION: Incorrect installation can cause
battery leakage and corrosion that will
damage the remote control transmitter.
Observe the following precautions:
■ Batteries should always be replaced as a
set. Always use new batteries when
replacing the old set.
■ Do not combine a used battery with a
new one.
■ Do not mix battery types (example: ”zinc
carbon” with ”alkaline”).
■ Do not attempt to charge, short-circuit,
disassemble, heat, or burn used
batteries.
■ Battery replacement is necessary when
remote control acts sporadically or stops
operating the TV set.
■ When not using the remote for a long
period of time, remove the batteries to
prevent damage or injury from possible
battery leakage.
■ Do not try to recharge batteries that are
not intended to be recharged: they can
overheat and rupture. Follow the battery
manufacturer’s directions for the
batteries you are using.
6 HP Pavilion Plasma TV User’s Guide
Page 15

Installing Cable Binding
Cable Cover
Removing
1 Push down hooks and pull the cover slightly
towards yourself to disengage the claws (at two
points).
2 Slowly pull out in the downward direction.
121
Attaching
1 Insert the claws (at two points) at the bottom end.
AC cord
1 Connect power plug to the socket of the main
body.
2 Fix the clamp.
Clamp
Clamp
Close Open
2 Push until it clicks.
2
1
1
n
Cables and connectors are not supplied
with this set.
Installing Cable Binding
Installing Cable Binding 7
Page 16

Closing
Cable Clamp
Close by pushing in until a clicking
sound is heard.
Releasing
To avoid interference appearing on the screen, do not
bundle the antenna cable and AC cord together.
Pull down while drawing the knob.
8 HP Pavilion Plasma TV User’s Guide
Page 17

Connecting
Connecting the Antenna
The Ant In mode must be set to Antenna. For more information, see “Auto program” on page 23 or “Auto program” on
page 38.
Back of the TV
ANT
ANT
Antenna Terminal
F-type Antenna Connector
Connecting a Cable Box
■ For reception of cable channels (01–135),
connect the cable supplied by your local cable
company. The Ant In mode must be set to Cable
see “Auto program” on page 23 or “Auto
program” on page 38.
Connecting a cable box:
Back of the TV
ANT
ANT
(5C-2V or higher specification
VHF Antenna UHF Antenna
75-Ohm Coaxial Cable
(5C-2V or higher specification)
■ Certain cable systems offset some channels to
reduce interference or view Premium (scrambled)
channels. A cable converter box is required for
proper reception. Check with your local cable
company for its compatibility requirements.
■ Set the TV channel to CH3 or CH4 when using this
connection.
Incoming 75-Ohm Cable
from Cable Company
OUTPUT
INPUT
CABLE BOX
Mixer
Connecting 9
Connecting
Page 18

Connecting a cable box and VCR:
Back of the TV
(5C-2V or higher specification
ANT
ANT
ANT OUTPUT
Connecting HDMI
High Definition Multimedia Interface (HDMI) is an
all-digital consumer electronics A/V interface. The
HDMI terminal supports both video and audio
information.
HDMI cable
OUTPUT
ANT INPUT
Incoming 75-Ohm Cable
from Cable Company
INPUT
CABLE BOX
VCR
You can connect an EIA/CEA-861/861B
†
-compliant
consumer electronic device, such as a set-top box or
DVD player with HDMI or DVI output terminal, to the
HDMI input terminal. Select the HDMI In audio setting
in the audio menu; see “Other Adjust (Audio)” on
page 32.
HDMI cable
AV IN
R L
AUDIO IN
AV IN
Y
Y
Y
PB
VIDEO
AUDIO
†
EIA/CEA-861/861B profiles compliance covers profiles for
PB
PR
L
R
12
COMPONENT VIDEO
INPUT
PR
INPUT 2 INPUT 1
R L
AUDIO IN
S VIDEO
L
R
TO AUDIO AMP
PROGOUT
transmission of uncompressed digital video including high
bandwidth digital content protection.
‡
HDMI-DVI conversion cable: purchase separately. Consult your
consumer electronics dealer for availability details.
VIDEO
(For use with DVI-HDMI
cables or adapter)
Audio cable
• If connecting with an HDMI cable,
it is not necessary to connect an
audio cable.
• If connecting to equipment that has
only a DVI output terminal, DVI or
HDMI adapter cables and an
audio cable are necessary.
‡
• Select the audio setting in HDMI In.
LR
AUDIO
OUT
HDMI signal out
Set-top Box
DVD player
HDMI
OUT
10 HP Pavilion Plasma TV User’s Guide
Page 19

Compatible VIDEO Signal
Vertical
No. of dots
(HxV)
1080i 1920x1080i 59.94/60
720p 1280x720p 59.94/60
scanning
frequency (Hz)
480p 720x480p
640x480p
480i 720(1440)x480i 59.94/60
59.94/60
59.94/60
n
This input terminal is not intended for use
with computers.
1080i and 720p signals are re-formatted
for viewing on your plasma display.
Compatible sampling frequency of Audio signal
through HDMI (.PCM): 48 kHz/44.1 kHz/32 kHz
n
■ This HDMI connector is Type A.
■ If you connect equipment without a
digital output terminal, connect to the
Component Video, S-video, or Video
input terminal on the TV so you can enjoy
an analog signal.
Connecting 11
Connecting
Page 20

Connecting a Set-top Box or DVD
This TV is capable of receiving 1080i, 720p, 480p,
and 480i DTV signals when connected to a DTV Tuner
set-top box (STB). This TV also utilizes a progressive
scan doubler, which de-interlaces the NTSC signal and
progressively scans the image.
Component Video cable
COMPONENT
VIDEO OUT
Set-top Box
DVD player
Y
P
B
P
R
AUDIO OUTPUT
L
R
■ To view DTV programs, connect the STB to the
component video input terminals (Y, P
B, PR) of the
TV. Component color inputs provide luminance
and separate color signal.
■ Set the output of the STB to either 1080i, 720p,
480p, or 480i. All signals are converted to 480p
format and output to the display.
■ A DTV signal must be available in your area.
Back of the TV
Y
VIDEO
AUDIO
COMPONENT VIDEO
PB
PR
L
R
INPUT
VIDEO
AUDIO
L
R
AV IN
Y
Y
PR
12
COMPONENT VIDEO
INPUT
Y
PBPRPB
INPUT 2 INPUT 1
R L
AUDIO IN
S VIDEO
L
R
TO AUDIO AMP
PROGOUT
VIDEO
Audio cable
Connecting the Video Input
VCR
Camcorder
Video game console
S-VIDEO
OUT
VIDEO
OUT
AUDIO
OUT
S-video cable or video cable
L
R
Audio cable
Connect one video cable
INPUT 1 / 2
VIDEO
AUDIO
L
R
AV IN
Y
Y
PR
12
COMPONENT VIDEO
INPUT
Back of the TV
Y
PBPRPB
INPUT 2 INPUT 1
R L
AUDIO IN
S VIDEO
L
R
TO AUDIO AMP
PROGOUT
VIDEO
12 HP Pavilion Plasma TV User’s Guide
Page 21

n
SERVICE ONLY
ANT
R L
AUDIO IN
S VIDEO
VIDEO
L
R
Y
VIDEO
AUDIO
PBPRPB
PR
Y
Y
PROGOUTCOMPONENT VIDEO
INPUT
12
INPUT 2 INPUT 1
TO AUDIO AMP
DIGITAL
AUDIO OUT
The S-video input overrides the composite
video signal when S-video cable is
connected. Connect either S-video cable or
video cable.
Connecting the Amplifier
For a full home theater sound experience, an external
Dolby Digital* decoder and a multichannel amplifier
must be connected to the Digital Audio Out terminal on
the TV.
OPTICAL IN
Amplifier
AUDIO INPUT
L
R
Optical digital audio cable
or
Audio cable
Procedure
1 Select Off for Speakers Off in Audio menu (see
“Speakers” under “Other Adjust (Audio)” on
page 32).
2 Adjust the amplifier volume to the desired level.
*Dolby Digital 5.1 channel surround sound delivers digital-quality
sound. Dolby Digital provides five discrete full bandwidth channels
for front left, front right, center, surround left and surround right, plus
a LFE (Low Frequency Effect) subwoofer channel.
DIGITAL
AUDIO OUT
Back of the TV
L
R
OUTPUT
AUDIO OUT
L
R
n
■ Depending on your DVD player and
DVD-audio software, the copyright
protection function may operate and
disable optical output.
■ External speakers cannot be connected
directly to Output terminals.
■ With an ATSC channel, the output from
the Digital Audio Out is Dolby Digital.
With an NTSC channel, the output is PCM.
Connecting
Connecting 13
Page 22

Connecting Program Out
See your equipment manual for instructions.
VCR
DVD recorder
VIDEO
INPUT
Monitor
AUDIO
INPUT
L
R
AV cable
n
■ When a device (STB, DVD, etc.) is
connected to the HDMI terminal (see
“Connecting HDMI” on page 10), only
audio signals output. No video signals
output.
■ When receiving digital channel signals,
all digital formats are down-converted to
composite NTSC video for output through
Program Out terminals.
■ Some programs contain copy protection
signals to prevent recording.
OUTPUT
VIDEO
AUDIO
L
R
Back of the TV
AV IN
Y
Y
Y
PBPRPB
PR
12
COMPONENT VIDEO
INPUT
INPUT 2 INPUT 1
R L
AUDIO IN
S VIDEO
L
R
TO AUDIO AMP
PROGOUT
VIDEO
14 HP Pavilion Plasma TV User’s Guide
Page 23

Turning the TV On or Off
1 Connect the AC cord plug to the plasma TV.
Fix the power cord plug securely with the clamp
(see “Installing Cable Binding” on page 7).
AV IN
R L
AUDIO IN
Y
Y
ANT
DIGITAL
AUDIO OUT
SERVICE ONLY
P
P
B
B
S VIDEO
VIDEO
PR
PR
L
AUDIO IN
R
12
COMPONENT VIDEO
INPUT 1 INPUT 2OUTPUT
INPUT
2 Connect the plug to the wall outlet.
3 Press POWER button (A) on front of this unit.
First time setup is displayed on screen. (Refer to
“Using the First Time Setup” on page 21 for
operation.)
First time setup
Language
Clock
Auto program
4 Press (on remote control or TV) to turn the TV
on or off.
Power status indicator
Power on Red
Power off No Light
n
The TV will still consume some power as
long as the power cord is inserted into the
wall outlet.
Turning the TV On or Off
B
A
A: Power button
B: Power status indicator
C: Remote control sensor
C
n
The first time setup screen is displayed only
the first time you turn the power on after
purchase.
If you wish to change the settings of these
items later, select them with the Setup
menu. (See “Setup” on page 37.)
Turning the TV On or Off 15
Page 24

TV Buttons
A
A: Power button
Press to turn the TV main power on/off.
B: TV/Video
Change the input mode.
C: Volume down
Lower volume, or move left in menu.
B C D E F
D: Volume up
Increase volume, or move right in menu.
E: Channel down
Lower channel, or move down in menu.
F: Channel up
Increase channel, or move up in menu.
16 HP Pavilion Plasma TV User’s Guide
Page 25

Using the Remote Control
Name Description Icon
G
H
K
M
N
O
A
APower
Press Power to turn on
or off the TV or the
TV DVD STB PVR
B
AUX VCR HP
AUDIO
BTV, DVD,
C
D
E
F
STB, PVR,
AUX,
VCR,
AUDIO,
or HP
MUTE
FAV
RETURN
SOURCE
selected home
entertainment device.
Press one of these
buttons once to select a
home entertainment
device to control. To
program the remote
control to operate with
a home entertainment
TV
device, see
J
EXIT MENU
“Programming the
remote control code”
VOL CH
+
SELECT
L
VOL
-
CH
+
on page 55.
CRecord Press Record to start
recording from the
selected recordable
-
home entertainment
device (VCR, DVD
recorder, HP MCPC, or
HP DEC).
1
4
23
5
6
DSkip
backward
Press Skip backward to
go back to the
beginning of the
Using the Remote Control
current chapter (DVD).
7
8 9
ERewind Press Rewind to rewind
0
LAST
the selected home
entertainment device
(VCR, DVD, HP MCPC,
or HP DEC).
RECALL ASPECT
P
SAP
MTS
SLEEP
FPause Press Pause to pause
the selected home
entertainment device
(VCR, DVD, HP MCPC,
or HP DEC).
Using the Remote Control 17
Page 26

Name Description Icon
A
TV DVD STB PVR
B
C
D
E
F
G
H
J
AUX VCR HP
MUTE
EXIT MENU
FAV
AUDIO
RETURN
SOURCE
GMute Press Mute to turn
sound off or on.
HFav Press Fav to display
channels you
programmed as your
favorites.
JExit
Press Exit to exit out of
the selected home
entertainment device’s
menu or submenu.
MUTE
FAV
EXIT
KVol Press + Vol (– Vol) to
VOL
VOL CH
+
+
raise (or lower) the
sound.
VOL
SELECT
L Select Press Select after
CH
-
entering a channel
K
L
-
+
-
VOL
SELECT
number.
Press Select to choose
the current menu
1
23
option.
M
N
O
4
7
RECALL ASPECT
P
5
8 9
0
SAP
MTS
6
LAST
SLEEP
18 HP Pavilion Plasma TV User’s Guide
M Keypad Press the keypad
(0–9) to directly select
channels.
N. (Period) Press . (period) to enter
a period or dash for a
subchannel number of
a digital channel. For
example, channel
123.1 or 4–1.
ORecall Press Recall to display
or remove the channel
banner.
PSAP/MTS Press SAP/MTS to
select an available
secondary audio
program.
1
RECALL
SAP
MTS
Page 27

TV DVD STB PVR
A
AUX VCR
MUTE
EXIT MENU
FAV
AUDIO
RETURN
HP
SOURCE
Q
R
S
T
U
V
W
Name Description Icon
QStop Press Stop to stop the
selected home
entertainment device.
RSkip
forward
Press Skip forward to
skip to the beginning of
the next chapter (DVD).
SFast-
forward
Press Fast-forward to
fast-forward the
selected home
entertainment device
(VCR, DVD, HP MCPC,
or HP DEC).
VOL CH
+
SELECT
VOL
-
1
45
7
RECALL ASPECT
23
8 9
0
SAP
MTS
CH
6
LAST
SLEEP
+
-
X
Y
Z
A
AB
TPlay Press Play to start
playing the selected
home entertainment
device (VCR, DVD, HP
MCPC, or HP DEC).
USource Press Source to display
all input sources.
VReturn Press Return to return to
the previous menu.
WMenu Press Menu to open
the onscreen
display (OSD).
SOURCE
RETURN
MENU
Using the Remote Control
Using the Remote Control 19
Page 28

Name Description Icon
:
Name Description Icon
XCH Press CH + (or CH –) to
select the next higher
CH
(or lower) channel.
CH
YUp/
down/
left/right
Press the arrow keys to
move the cursor in the
menu screens.
arrows
ZLast Press Last to recall the
previous channel you
LAST
were viewing.
AA Sleep Press Sleep to set the
timer in this order:
SLEEP
30, 60, or 90 minutes.
AB Aspect Press Aspect to change
the dimensions of your
ASPECT
display. Your options
depend on what is
currently viewed.
HP MCPC and HP DEC PCs
The remote control is already programmed to work
with Media Center on HP MCPC and HP DEC PCs.
1 Press the HP button on the remote
control to select the HP MCPC or HP
DEC as the controlled device.
2 Point the remote control at the HP MCPC or HP
DEC remote control sensor and press the buttons
you want to use.
HP
+
-
Record Press Record to start
recording the TV display.
Stop Press Stop to stop the
recording or playback.
Skip
backward
Press Skip backward to
go back 30 seconds in
the program.
Skip
forward
Press Skip forward to go
forward 30 seconds in
the program.
Rewind Press Rewind to rewind
the program or song.
Fastforward
Press Fast-forward to fastforward the program or
song.
Pause Press Pause to pause the
program or song.
Play
Press Play to view the
program or listen to the
song.
Menu Press Menu to open
Media Center.
MENU
Select Press Select to choose the
current menu option.
SELECT
Mute Press Mute to turn sound
off or on.
MUTE
20 HP Pavilion Plasma TV User’s Guide
Info Press Info to view
information on your
current program.
Guide Press Guide to display
the program guide.
Keypad
Press the keypad (0 ~ 9)
to directly select channels.
INFO
GUIDE
1
Page 29

Using the First Time Setup
Language
Language
Language
Language
The first time setup menu is displayed on screen when
the set is turned on for the first time. Follow the menus
and procedures for setting up the features. You can
also adjust the settings in the Setup menu (see “Setup”
on page 37).
Language
Allows you to select the language used for onscreen
displays.
SELECT
SELECT
SELECT
Press to select Language.
Press to display Language screen.
Press to select English, Español or Français.
Press to move the cursor to .
Press to go to previous screen.
First time setup
Language
Clock
Auto program
English
English
Using the First Time Setup
Using the First Time Setup 21
Page 30

Clock
Press to select Clock.
SELECT
Press to display the clock adjust screen.
Mode
Press to select Mode.
SELECT
Press to select Manual or Auto.
Manual: Registers the time set by user.
Auto: Updates the clock time by extracting time information
from the digital broadcast.
Date
Valid when Mode is set to manual.
Press to select Date.
SELECT
Press and release immediately to change the day; press and
hold to change the month.
First time setup
Language
Clock
Auto program
Clock
Mode
Date
Time
Time zone
DST
Clock
Mode
Date
Time
Time zone
DST
Manual
4 / 1 / 2005
9 : 43 AM
EST
On
Manual
4 / 1 / 2005
9 : 43 AM
EST
On
Time
Valid when Mode is set to manual.
Press to select Time.
SELECT
Press to adjust Time.
If the button is held, the speed of change increases.
Time zone
Valid when Mode is set to Auto.
Press to select Time zone.
SELECT
Press to select your zone.
AST EST CST MST PST AKST HST NST
22 HP Pavilion Plasma TV User’s Guide
Clock
Mode
Date
Time
Time zone
DST
Clock
Mode
Date
Time
Time zone
DST
Manual
4 / 1 / 2005
9 : 43 AM
EST
On
Manual
4 / 1 / 2005
9 : 43 AM
EST
On
Page 31

Daylight saving
Valid when Mode is set to Auto.
Press to select DST (daylight saving).
SELECT
Press to select On or Off.
Auto program
You can scan all (analog and digital) channels. If
needed, follow the menus and procedures displayed on
screen for setting up the features.
You can also adjust the settings in Set up menu.
1
SELECT
2
SELECT
Press to select ANT In.
Press to select Cable or Antenna.
Press to select Mode.
Press to select All or Analog.
Clock
Mode
Date
Time
Time zone
DST
Auto program
ANT In
Mode
Start scan
Auto program
ANT In
Mode
Start scan
Manual
4 / 1 / 2005
9 : 43 AM
EST
On
Cable
All
Cable
All
3
SELECT
Press to select Start scan.
Press to start. Channels available for reception will be set automatically.
To exit the menu screen
Press
EXIT
Auto program
ANT In
Mode
Start scan
Now scanning analog channel ...
Progress
Cable
All
Using the First Time Setup 23
Using the First Time Setup
Page 32

Watching TV Programs
TV DVD STB PVR
AUX VCR HP
MUTE
EXIT MENU
VOL CH
+
VOL
-
AUDIO
RETURN
FAV
SELECT
SOURCE
CH
VHF and UHF
1 Press to operate the TV set with the
remote control.
2 Press to turn on the TV.
n
■ The channel number and volume level
remain the same even after the TV is
turned off.
■ Power consumption can be reduced if the
volume level is lowered.
Cable TV
+
-
TV
Make sure that registration with cable TV provider and
connection of equipment are completed.
1 Select TV channel 3 or 4.
2 Press to operate the cable box with the
remote control.
CH
CH
STB
+
-
3 Press to turn the cable box on.
Point the remote control towards the
cable box.
3 Press to select desired channel.
You can also use the direct program
number selection buttons.
4 Select the desired volume level.
24 HP Pavilion Plasma TV User’s Guide
CH
CH
+
-
+
VOL
VOL
n
To operate other manufacturer’s product
-
see “Programming the remote control
code” on page 55.
Page 33

Aspect Controls
These let you choose the aspect depending on the
format of the received signal and your preference.
Press to change the aspect mode.
ASPECT
The available aspect modes depend on the
receiving signal.
■ For 480i, 480p (4:3), and 480p (16:9),
choose 4:3, Zoom, Full, or Just mode.
■ For 1080i and 720p, choose Full
mode only.
Mode Picture Explanation
4:3
Zoom
4
4 : 3
4
Displays a 4:3 picture at its standard 4:3 size with
gray side bars. (It may create an after-image on screen
3
16
Zoom
3
if displayed for a prolonged period of time.)
Expands a 4:3 picture uniformly (width and height) to
full screen width and then repositions the picture
vertically. (Recommended for letterbox. This will show
9
picture at full screen size.)
n
Watching TV Programs
Full
Just
4
3
4
3 9
Full
Just
16
16
Displays a picture at full screen size. (Recommended
for anamorphic pictures.)
9
Stretches the right and left edges of a 4:3 picture to fill
the screen, and the center of the screen has aspect
correction applied. The size of the picture depends on
the original signal. (Recommended for regular TV
viewing.)
Watching TV Programs 25
Page 34

Using the Onscreen Navigation Menu
Press to change selection.
Press to enter each adjust
SELECT
TV
RETURN
Press to return to previous menu.
screen.
Press button to display main menu.
MENU
For the main menu entries:
■ See “Picture” on page 27.
■ See “Audio” on page 31.
■ See “Timer” on page 34.
■ See “Lock” on page 48.
■ See “Setup” on page 37.
■ See “Language” on page 21.
■ See “Clock” on page 22.
■ See “Program channel” on page 38.
■ See “Input labels” on page 42.
■ See “CC (closed caption)” on page 43.
■ See “Other Adjust (setup)” on page 46.
■ See “About” on page 47.
26 HP Pavilion Plasma TV User’s Guide
Page 35

Using the Menus
Picture
Press the Menu button to display the Main menu.
Press to select Picture.
SELECT
Press to enter sub-menu.
Picture 1/2
Default
Pic. mode
Picture
Brightness
Color
Tint
Sharpness
Picture 2/2
Color Temp
Color Mng.
Zoom Adjust
Other Adjust
Set
Standard
+30
0
0
0
+10
Cool
Off
Using the Menus
Using the Menus 27
Page 36

Default/Pic. mode/Picture/Brightness/Color/Tint/Sharpness/
Color Temp/Color Mng.
SELECT
Press to select the sub menu.
Press to adjust the sub menu.
Picture 1/2
Default
Pic. mode
Picture
Brightness
Color
Tint
Sharpness
Picture 2/2
Color Temp
Color Mng.
Zoom Adjust
Other Adjust
Item Explanations
Default Resets all picture adjustments to factory default settings.
Pic. Mode Adjusts to preset brightness and color settings.
Picture Adjusts white areas of picture.
Set
Standard
+30
0
0
0
+10
Cool
Off
Brightness Adjusts dark areas of picture.
Color Adjusts desired color intensity.
Tint Adjusts natural flesh tones.
Sharpness Adjusts clarity of outline detail.
Color Temp (Temperature) Increase or decrease warm (red) and cool (blue) colors to suit personal
preferences.
Color Mng. (Color Management) Setting this to On enables vivid color adjustment automatically.
28 HP Pavilion Plasma TV User’s Guide
Page 37

Pic. mode
Choose the preset picture mode that best suits the
program you are viewing. This feature also affects
Color Temp setting.
Press to select Pic. mode.
n
Each mode has its own picture settings
(Picture, Brightness, Color, Tint, and
Sharpness).
SELECT
Press to select the picture mode.
■ Vivid (default): Provides enhanced picture contrast and sharpness for viewing in a
well-lit room.
■ Standard: Recommended for normal viewing conditions with subdued room lighting.
■ Cinema: For watching movies in a darkened room. It provides a soft, film-like picture.
Zoom Adjust
Adjust the Zoom position. It works when Aspect mode
is Zoom.
Press to select Zoom Adjust menu.
SELECT
SELECT
Press to display the Zoom Adjust screen.
Press to adjust V-Position.
Press to adjust Size.
■ V-Position: Adjust the vertical position.
■ Size: Adjust the vertical size.
n
To return to the default setting, press the
Select button.
Picture 1/2
Default
Pic. mode
Picture
Brightness
Color
Tint
Sharpness
Picture 2/2
Color Temp
Color Mng.
Zoom Adjust
Other Adjust
Standard
Cool
Using the Menus
Set
+30
0
0
0
+10
Off
Using the Menus 29
Page 38

Other Adjust (Picture)
Set
+30
0
0
0
+10
Picture 2/2
Color Temp
Color Mng.
Zoom Adjust
Other Adjust
Other Adjust
Video NR
3D Y/C Filter
Color Matrix
MPEG NR
Black Level
SELECT
SELECT
Press to select Other Adjust.
Press to display the Other
Adjust menu.
Press to select the submenu.
Press to select or adjust the
submenu.
Picture 1/2
Default
Pic. mode
Picture
Brightness
Color
Tint
Sharpness
Standard
Item Explanations
Video NR Reduces noise, commonly called snow. Leave off when receiving a strong signal.
3D Y/C Filter Minimizes noise and cross-color in the picture.
Color Matrix Select SD or HD:
Cool
Off
Off
Off
SD
Off
Dark
■ SD: When the input signal is a normal TV system (NTSC).
■ HD: When the input signal is a high-definition system (ATSC).
Displays 480p input signals in natural color from digital equipment adapters connected to
Component Video Input (Y, P
B, PR) terminals.
Select HD or SD to adjust color parameters automatically for HD (high-definition) or SD
(standard definition).
Notes:
■ This feature is available only with 480p signal and not available with regular TV (NTSC)
programming.
■ When viewing a nonstandard DTV signal format, you can change color parameters
manually for the best picture quality.
MPEG NR Reduces noise to DVD, STB, or other device.
Black level Select Dark or Light.
Valid only for external input signals.
30 HP Pavilion Plasma TV User’s Guide
Page 39

Audio
Press the Menu button to display the Main menu.
Press to select Audio.
SELECT
Press to enter submenu.
Default/Bass/Treble/Balance
Press to select Default, Bass, Treble, or Balance.
SELECT
Item Explanations
Press to select or adjust the submenu.
Audio
Default
Bass
Treble
Balance
Other Adjust
Audio
Default
Bass
Treble
Balance
Other Adjust
Set
+ 7
+ 7
0
Set
+ 7
+ 7
0
Using the Menus
Default Reset Bass, Treble, and Balance adjustments to factory default settings.
Bass Increase or decrease the bass response.
Treble Increase or decrease the treble response.
Balance Emphasize the left/right speaker volume.
Using the Menus 31
Page 40

Other Adjust (Audio)
1
SELECT
2
SELECT
Press to select Other Adjust.
Press to display the submenu.
Press to select the submenu.
Press to select or adjust the submenu.
AI Sound
Equalize overall volume levels across all channels.
AI sound is not available in Video input mode. See
“Connecting the Video Input” on page 12.
Audio
Default
Bass
Treble
Balance
Other Adjust
Other Adjust
AI Sound
Surround
Speakers
HDMI In
Audio Leveler
n
AI Sound is Off when Speakers is set
to Off.
Set
+ 7
+ 7
0
On
Off
On
Auto
0
Press to select AI Sound.
SELECT
Press to select On or Off.
32 HP Pavilion Plasma TV User’s Guide
Other Adjust
AI Sound
Surround
Speakers
HDMI In
Audio Leveler
On
Off
On
Auto
0
Page 41

Surround
Enhances audio response when listening to stereo.
n
Surround is Off when Speakers is set
to Off.
Press to select Surround.
SELECT
Press to select On or Off.
■ On: For stereo audio.
■ Off: For monaural audio.
Speakers
This feature is used to turn TV speakers On or Off. See
“Connecting the Amplifier” on page 13.
Press to select Speakers.
SELECT
Press to select On or Off.
■ On: TV speakers operate normally.
■ Off: TV speakers off.
Other Adjust
AI Sound
Surround
Speakers
HDMI In
Audio Leveler
On
Off
On
Auto
n
AI Sound, Surround and Audio Leveler are
not available when Speakers is set to Off.
Other Adjust
AI Sound
Surround
Speakers
HDMI In
Audio Leveler
On
Off
On
Auto
0
Using the Menus
0
HDMI In
Set this option when using HDMI; see “Connecting
HDMI” on page 10. This feature lets you switch
between digital audio input (audio signal is taken from
Press to select HDMI In.
SELECT
Press to select the mode.
■ Auto: Automatically selects Audio signal.
■ Digital: selects Digital Input only.
■ Analog: selects Analog Input only.
the HDMI In connector) and analog audio input (audio
is taken from the HDMI R/L Audio In connectors when
using a DVI-HDMI adapter or cable).
Other Adjust
AI Sound
Surround
Speakers
HDMI In
Audio Leveler
On
Off
On
Auto
0
Using the Menus 33
Page 42

Audio Leveler
The audio leveler monitors the difference in audio
levels between input signals from external equipment
and minimizes the change in output volume that can
occur when switching input signals.
n
Audio Leveler is not available when
Speakers is set to Off.
Press to select Audio Leveler.
SELECT
Press to adjust Audio level.
Timer
Select Timer to turn the TV on and off at selected times
and on selected days. Press the Menu button to display
the Main menu.
Press to select Timer.
SELECT
Press to enter the submenu.
Other Adjust
AI Sound
Surround
Speakers
HDMI In
Audio Leveler
On
Off
On
Auto
0
Timer
Sleep
Timer 1
Timer 2
Timer 3
Timer 4
Timer 5
34 HP Pavilion Plasma TV User’s Guide
Page 43

Sleep Timer
Timer
Sleep
1
SELECT
Press to select Sleep.
Press to enter the Sleep set screen.
2
SELECT
Press to select off time (minutes).
Timer set
The clock must be set before On time/Off time settings
can be made.
Press to select Timer 1–Timer 5.
SELECT
Press to enter the Timer adjust screen.
Sleep
Sleep
60
0
30 60 90
Timer
Sleep
Timer 1
Timer 2
Timer 3
Channel
SELECT
Day
SELECT
Press to select CH.
Press to set CH.
Press to select Day.
Press to select appropriate day setting.
■ Selectable day items: Sun, Mon, Tue, Wed, Thu, Fri, Sat,
Mon–Fri, Sat–Sun, Daily, Evr Sun, Evr Mon, Evr Tue,
Evr Wed, Evr Thu, Evr Fri, Evr Sat
Timer 1
CH
Day
On time
Off time
Set
Timer 1
CH
Day
On time
Off time
Set
310 - 1
EVR FRI
10:00 AM
11:00 AM
On
310 - 1
EVR FRI
10:00 AM
11:00 AM
On
Using the Menus 35
Using the Menus
Page 44

On time/Off time
Perform the following operations for both On time
and Off time.
Press to select On time/Off time.
SELECT
Press to select hour (AM or PM) and the minutes of On time/
Off time.
Set
Press to select Set.
SELECT
Press to select On or Off.
n
■ The TV automatically turns off after
90 minutes when turned on by the Timer.
This operation is cancelled if the Off time
is selected or if a key is pressed.
■ When the power to the TV set is
disrupted due to a power outage or
similar problem, the off-timer is
deactivated, and the TV will be in
standby mode even after power is
restored.
Timer 1
CH
Day
On time
Off time
Set
Timer 1
CH
Day
On time
Off time
Set
310 - 1
EVR FRI
10:00 AM
11:00 AM
On
310 - 1
EVR FRI
10:00 AM
11:00 AM
On
To return to the previous screen
TV
RETURN
Press to exit any submenu and return to the
previous screen in the Timer.
36 HP Pavilion Plasma TV User’s Guide
Page 45

Setup
Press the Menu button to display the Main menu.
SELECT
CH list
SELECT
Press to select Setup.
Press to enter the submenu.
Press to select CH list.
Press to select Fav or All.
Setup
CH list
Language
Clock
Program channel
Input labels
CC
Setup
Other adjust
About
Reset
Setup
CH list
Language
Clock
Program channel
Input labels
CC
Fav.
Fav.
Language
SELECT
Press to select Language.
Press to display the Language screen.
Setup
CH list
Language
Clock
Program channel
Input labels
CC
Fav.
Using the Menus 37
Using the Menus
Page 46

Clock
Press to select Clock.
SELECT
Press to display the Clock screen.
Program channel
1
SELECT
2
SELECT
Press to select Program channel.
Press to enter the Program channel menu.
Press to select submenus.
Press to enter submenu.
Setup
CH list
Language
Clock
Program channel
Input labels
CC
Setup
CH list
Language
Clock
Program channel
Input labels
CC
Program channel
Auto
Manual
Signal meter
Fav.
Fav.
Auto program
Automatically scans all available channels.
1
SELECT
2
SELECT
Press to select ANT In.
Press to select Cable or Antenna.
Press to select Mode.
Press to select All or Analog.
■ All: Analog and Digital
■ Analog: Analog only
38 HP Pavilion Plasma TV User’s Guide
Auto program
ANT In
Mode
Start scan
Auto program
ANT In
Mode
Start scan
Cable
All
Cable
All
Page 47

3
SELECT
Press to select Start scan.
Press to start.
After Auto program is complete, the unit returns to
Manual program mode.
To make available a channel that has been located by
auto scan, in the Manual program mode, move the
cursor to Apply and press Select.
Manual program
To add or delete channels from channels list manually.
Auto program
ANT In
Mode
Cable
All
Start scan
Now scanning analog channel ...
Progress
SELECT
■ Program edit
1
SELECT
Press to select Manual.
Press to enter the Manual Program screen.
Press to select Edit.
Press to enter the edit mode.
Program channel
Auto
Manual
Signal meter
Edit
CH
1
2
3
4
5
6
7
8
9
10
Caption Favorite Add
- - -
- - -
- - -
- - -
- - -
- - -
- - -
- - -
- - -
Apply
- - -
2
- - -
- - -
- - -
- - -
- - -
- - -
- - -
- - -
No
Yes
No
No
No
No
No
No
No
No
Using the Menus
Using the Menus 39
Page 48

2
Press to select the desired preset channel line.
SELECT
TV
3
RETURN
4
SELECT
Edit (Caption)
1
SELECT
Press to select edit area, Caption, Favorite, Add.
Press to enter the preset screen.
Refer to the following for each adjustment.
Press to move cursor to Apply.
Press to enter your program.
Press to select Preset.
Press to select Broadcast st.
Caption select
Preset
Caption detail
Apply
----
2
3
4
SELECT
SELECT
SELECT
Press to select Caption detail.
Press to display the Caption input screen.
Press to move cursor to Caption.
Caption detail
Caption
Press to enter input field.
Press to select the character to input/change.
Press to move to next character. You can repeat this for up to 7 characters.
Press to enter your selection.
Apply
40 HP Pavilion Plasma TV User’s Guide
Page 49

5
Press to move cursor to Apply.
SELECT
■ Edit (Favorite)
1
SELECT
2
SELECT
Press to enter Caption.
Press to select Favorite.
Press to select Favorite number.
Press to move the cursor to Apply.
Press to enter Favorite and return to the Edit screen.
Edit (Add)
To register/delete in Program channel.
Favorite
Favorite
Apply
12
SELECT
Press to select Yes or No.
Using the Menus
Using the Menus 41
Page 50

Signal meter
(For digital channels only)
Displays the signal strength of the ATSC digital channel
in antenna.
1
SELECT
Press to select Signal meter.
Press to display Signal meter.
2
SELECT
Press to select desired channel.
Press to tune desired channel.
n
The signal meter works only for digital
signals input with the antenna.
Input labels
Program channel
Auto
Manual
Signal meter
Signal meter
CH
Signal strength
Current
Peak level
2 - 1
85 %
85 %
To label video input connections for onscreen display.
1
SELECT
2
SELECT
■ To skip the input, select Skip. The input is skipped
Press to select Input labels.
Press to enter the submenu field.
Press to select the Video input.
Press to select the input label.
when you press the Source button on the remote
control or TV.
42 HP Pavilion Plasma TV User’s Guide
■ Selectable input labels: Skip, VCR, DVD, Cable,
DBS, PVR, Game, Aux.
Page 51

CC (closed caption)
The television includes a built-in decoder that is
capable of providing a visual display of the audio
portion. The program viewed must provide closed
captioning (CC) for the television to display it.
CC Mode
Press to select Mode.
SELECT
■ Off: Recommended mode when closed captioning
Press to select the setting.
is not being used.
■ On: To display closed captioning.
n
■ The closed captioning is not displayed
when you use HDMI connection.
■ To control the closed caption of an analog
connected home entertainment device,
use the closed captions On/Off controls
for that home entertainment device.
■ The CC mode setting of the TV will not
affect the analog input.
CC
Mode
Analog
Digital
Digital setting
CC reset
Off
CC1
Primary
n
■ If a digital program is being output in
analog format, the CC data will also be
output in analog format.
■ If digital connected equipment is used for
input, CC should be set On on either the
connected equipment or the TV.
■ If CC is set On on both the connected
equipment and the TV, captions from
each unit will overlap.
Using the Menus
Using the Menus 43
Page 52

Analog
Choose the closed caption service of analog
broadcasting.
Press to select Analog.
SELECT
■ CC1: For video-related information that can be
Press to select the setting.
displayed (up to four lines of script on the screen,
where it does not disturb the relevant parts of the
picture). Script can be in any language.
■ CC2/CC3/CC4: Other modes used for video
related information.
Digital
The Digital CC menu lets you configure the way you
choose to view the digital captioning.
Press to select Digital.
SELECT
Press to select the setting:
■ Settings: Primary, Second, Service 3, Service 4, Service 5,
Service 6
CC
Mode
Analog
Digital
Digital setting
CC reset
■ T1: Blanks out a large portion of the picture on the
Off
CC1
Primary
television screen and displays program guide or
any other information currently being transmitted.
■ T2/T3/T4: Other modes that display information
and blank out a large portion of the picture of the
TV screen.
CC
Mode
Analog
Digital
Digital setting
CC reset
Off
CC1
Primary
44 HP Pavilion Plasma TV User’s Guide
Page 53

Digital setting
Selecting digital broadcast service and viewing
formats.
1
SELECT
2
SELECT
■ Size: Automatic, Normal, Small, Large
■ Font: Automatic, Default, Mono-serif, Prop-serif, Mono, Prop, Casual, Cursive,
Press to select Digital setting.
Press to enter the Digital setting menu.
Press to select the submenu.
Press to select the submenu:
Small caps
■ Style: Automatic, None, Raised, Depressed, Uniform, Drop shadow
■ Foreground: The color of the font (Automatic, Black, White, Red, Green, Blue,
Yellow, Magenta, Cyan)
■ Fore Opacity: The opacity of the font (Automatic, Transparent, Translucent,
Solid, Flashing)
■ Background: The color of the text box (Automatic, Black, White, Red, Green,
Blue, Yellow, Magenta, Cyan)
■ Back Opacity: The opacity of the text box (Automatic, Transparent, Translucent,
Solid, Flashing)
■ Outline: The outline of the text (if selected under style) (Automatic, Black, White,
Red, Green, Blue, Yellow, Magenta, Cyan)
CC
Mode
Analog
Digital
Digital setting
CC reset
Digital setting
Size
Automatic
Font
Automatic
Style
Automatic
Digital setting
Foreground
Automatic
Fore opacity
Automatic
Background
Automatic
Digital setting
Back opacity
Automatic
Outline
Automatic
Primary
Off
CC1
Using the Menus
CC Reset
Reset the CC settings.
Press to select CC reset.
SELECT
Press to reset CC settings.
CC
Mode
Analog
Digital
Digital setting
CC reset
Off
CC1
Primary
Using the Menus 45
Page 54

Other Adjust (setup)
Setup
CH list
Language
Clock
Program channel
Input labels
CC
Fav.
Setup
Other adjust
About
Reset
Auto Power On
Press to select Auto Power On.
SELECT
Press to select Set or Off.
Select Set to power the TV on at the same time as the cable
box or other connected components are powered on.
n
The sleep timer and on/off timer will not
function if Auto Power On is set.
Other Adjust
Auto Power On
Side Bar
Off
Off
Other Adjust
Auto Power On
Side Bar
Off
46 HP Pavilion Plasma TV User’s Guide
Page 55

Side Bar
Do not display a picture in 4:3 mode for an extended
period, as this can cause an afterimage to remain on
either or both sides of the display field.
To reduce the risk of such an afterimage, change the
brightness of the side bars.
Side bar
4:3
Screen
display
afterimages
n
■ To reduce the occurrence of afterimages,
set the Side Bar to Bright.
■ The side bar may flash (alternate black/
white) depending on the picture. Using
Cinema mode reduces such flashing. See
“Pic. mode” on page 29.
Press to select Side bar.
SELECT
Press to select Off, Dark, Mid, Bright.
About
Display the TV set version and Software License.
1
SELECT
2
SELECT
Press to select About.
Press to display the About screen.
Press to select Version or License.
Press to display Version or License.
Other Adjust
Auto Power On
Side Bar
Setup
CH list
Language
Clock
Program channel
Input labels
CC
Fav.
Setup
Other adjust
About
Reset
About
Version
License
Off
Bright
Using the Menus
off
Using the Menus 47
Page 56

Reset
1
SELECT
Press to select Reset.
Press to display the Password screen.
2 Enter your password by pressing the number
keys on the remote to reset the Setup settings.
The confirmation screen is displayed.
3 Select Yes, and press Select.
n
Performing a Reset clears all items set with
Setup, such as channel settings. Use Reset
with care.
Setup
CH list
Language
Clock
Program channel
Input labels
CC
Enter password.
Fav.
----
Setup
Other adjust
About
Reset
Lock
Press the Menu button to display the Main menu.
1
SELECT
48 HP Pavilion Plasma TV User’s Guide
Press to select Lock.
Press to display the Input password screen.
Page 57

2
Enter your password by pressing the number keys
on the remote.
Enter password.
----
3
Create a four-digit password to enter the Lock
menu.
4
1
4
7
23
6
5
8 9
LAST
0
Enter a four-digit password.
After entering your password for the first time,
Create password changes to Enter password.
n
Use a code that is easy to remember and
record it in a safe place.
Lock Mode
Select Lock mode to prevent viewing of video games,
VCR tapes, channels and Video modes.
Lock
Mode
Channel
Program
Change password
Create password.
----
Off
n
If you forget your secret code, the TV must
be serviced by a qualified technician to
clear the Lock setup.
Using the Menus
Press to select Mode.
SELECT
■ Off: Turns off Lock set functions.
■ All: All channels are locked regardless of the rating level.
■ Game: Locks out CH 3, CH 4, and Video inputs.
■ CH: Locks out specific analog and digital channels. Password is required to
Press to select the setting:
view any of the locked channels.
Lock
Mode
Channel
Program
Change password
Off
Using the Menus 49
Page 58

Channel (block channel selection)
Select up to seven (1–7) channels to be blocked out.
These channels are blocked out regardless of the
program rating.
1
SELECT
2
SELECT
Press to select Channel.
3
Press to display the channel block screen.
Press to select CH 1–CH 7.
Press to select the desired Block channel.
Blocking a program
This television incorporates V-Chip technology to block
the viewing of movies and television programs
according to the rating category. There are four
content advisory categories: MPAA (Motion Picture
Association of America), U.S. TV Program, Canadian
Lock
Mode
Channel
Program
Change password
Channel lock
CH 1
CH 2
CH 3
CH 4
CH 5
CH 6
CH 7
Off
3 - 0
English ratings, and Canadian French ratings. These
categories are used as guidelines for blocking
programs.
■ The default mode for the Lock category is the
Unlocked state.
1
Press to select Program.
Press to enter Program menu.
SELECT
2
Press to select MPAA, U.S.TV, C.E.L.R., or C.F.L.R.
Press to enter Block program adjust screen.
SELECT
■ MPAA: for U.S movie ratings
■ U.S.TV: for U.S TV program ratings
■ C.E.L.R.: for Canadian English ratings
■ C.F.L.R.: for Canadian French ratings
50 HP Pavilion Plasma TV User’s Guide
Lock
Mode
Channel
Program
Change password
Program lock
MPAA
U.S.TV
C.E.L.R.
C.F.L.R.
Monitor out
CH
On
Page 59

3
Press to highlight the desired rating level.
SELECT
4
SELECT
The Off rating is independent of other
ratings.
Press to select Monitor out.
Press to select On or Off.
■ Monitor out
■ On turns on the monitor terminal output for
programs that have been set to Blocked.
■ Off turns off the monitor terminal output for
programs that have been set to Blocked.
n
When placing a block on a specific age
based rating level, the Off rating and any
other more restrictive ratings are blocked.
n
U.S. Movie Ratings Chart
NR No Rating (Not Rated) and NA (Not Applicable) programs. Movie has not been rated or rating does
not apply.
Using the Menus
G General Audiences. All ages admitted.
PG Parental Guidance Suggested. Some material may not be suitable for children.
PG-13 Parents Strongly Cautioned. Some material may be inappropriate for children under 13.
R Restricted. Under 17 requires accompanying parent or adult guardian.
NC-17 No one 17 and Under Admitted.
X Adults Only.
Using the Menus 51
Page 60

U.S. TV Program Ratings Chart
The TV Parental Guidelines has seven levels of agebased ratings that can be selected. These seven levels
are split into two age-based groups:
Age-based
Group
NR
(Not Rated)
Youth TV-Y
Guidance TV-G
Age-based
Ratings
TV-NR
TV-Y7
TV-PG
Possible Content
Selections Description
■ Viewable
■ Blocked
■ Viewable
■ Blocked
■ FV Blocked
■ Viewable
■ Blocked
■ Viewable
■ Blocked
■ D,L,S,V
(all selected)
■
Any combination
of D,L, S, V
youth age-based ratings and guidance age-based
ratings. Some of these age-based ratings can also
have content-based ratings, denoted as D (dialogue),
L (language), S (sex), and V (violence). The table
below shows the age-based ratings selection.
Not Rated. See CAUTION under “Canadian French
Ratings Chart” on page 53.
All children. The themes and elements in this program
are specifically designed for a very young audience,
including children from ages 2–6.
Directed to older children. Themes and elements in
this program may include mild physical or comedic
violence, or may frighten children under the age of 7.
General audience. It contains little or no violence, no
strong language, and little or no sexual dialogue or
situations.
Parental guidance suggested. The program may
contain infrequent coarse language, limited violence,
some suggestive sexual dialogue and situations.
TV-14
TV-MA
■ D,L,S,V
■
■ D,L,S,V
■
FV: Fantasy/Cartoon Violence
V: Violence
S: Sex
L: Offensive Language
D: Dialogue with sexual content
52 HP Pavilion Plasma TV User’s Guide
(all selected)
Any combination
of D,L, S, V
(all selected)
Any combination
of D,L, S, V
Parents strongly cautioned. This program may contain
sophisticated themes, sexual content, strong language
and more intense violence.
Mature audiences only. This program may contain
mature themes, profane language, graphic violence,
and explicit sexual content.
Page 61

Canadian English Ratings Chart
E Exempt programming includes: news, sports, documentaries and other information programming,
talk shows, music videos, and variety programming.
C Programming intended for children under age 8. No offensive language, nudity or sexual content.
C8+ Programming generally considered acceptable for children 8 years and over. No profanity, nudity
or sexual content.
G General programming, suitable for all audiences.
PG Parental Guidance suggested. Some material may not be suitable for children.
14+ Programming contains themes or content which may not be suitable for viewers under the age of
14. Parents are strongly cautioned to exercise discretion in permitting viewing by pre-teens and
early teens.
18+ 18+ years old. Programming restricted to adults. Contains constant violence or scenes of extreme
violence.
Canadian French Ratings Chart
E Exempt programming.
G Programming intended for audience of all ages. Contains no violence, or the violence content is
minimal or is depicted appropriately.
8 ans+ 8+ general, not recommended for young children. Programming intended for a broad audience
but contains light or occasional violence. Adult supervision recommended.
13 ans+ Programming may not be suitable for children under the age of 13. Contains either a few violent
scenes or one or more sufficiently violent scenes to affect them. Adult supervision strongly
suggested.
16 ans+ Programming may not be suitable for children under the age of 16. Contains frequent scenes of
violence or intense violence.
18 ans+ Programming restricted to adults. Contains constant violence or scenes of extreme violence.
Customer Caution
The V-Chip system that is used in this set is capable of
blocking NR programs (non-rated, not applicable and
none) as per FCC Rules Section15.120(e)(2). If the
option of blocking NR programs is chosen unexpected
and possibly confusing results may occur, and you may
not receive emergency bulletins or any of the following
types of programming:
■ Emergency Bulletins (such as EAS messages,
weather warnings, and others)
■ Locally originated programming: news, political,
public service announcements, religious, sports,
and weather
Using the Menus
Using the Menus 53
Page 62

Blocking Messages
Various Blocking messages are displayed onscreen
depending upon the type of blocking you have
selected in the Lock menu.
Entering the password overrides the block
condition. However, the ratings selection
will be retained.
Message Possible cause
Game locked The Source button was pressed when the Game lock had been selected.
Channel Locked Tuned to the designated channel when the Channel lock had been selected.
Tuned to CH 3 or CH 4 when the Game lock had been selected.
All locked Lock All is selected.
Program locked Received program that exceeds the Block Program rating level.
n
Change password
Press to select Change password.
SELECT
Press to enter the Input Password screen.
Lock
Mode
Channel
Program
Change password
Enter new password.
CH
----
Enter new password,
again.
----
54 HP Pavilion Plasma TV User’s Guide
Page 63

Operating Peripheral Equipment
Programming the remote control code
Your HP remote control is programmable. You can
program the remote control to operate other home
entertainment devices such as your VCR, DVD player,
audio receiver, or set-top box. Manufacturer codes for
compatible brands are listed at the end of this chapter.
If the brand of your device is not listed, see “Searching
for the device code” on page 56.
Programming the device code
The following steps describe how to program a device
button if your brand is listed.
1 Turn on the TV. Turn on the device you would like
to program.
n
Please read steps 2 through 4 completely
before proceeding. Highlight or write down
the codes and device you wish to program
before performing step 2.
2 Hold down a device button on the remote control
for 5 seconds until the device button blinks, and
then release the device button. The device button
blinks one more time and then remains lit.
3 Locate the brand of your device and
manufacturer’s codes (see listing that follows).
4 Enter the first four-digit code. If the code is
accepted, the device button flashes twice. If the
code is not accepted, the device button flashes
three times.
n
If the device button did not blink twice,
then repeat steps 2 through 4, entering
either the same code or the next code if
provided.
5 Aim the remote control at the device, and press
the Power button once. The device should turn off.
If it does not respond, repeat steps 2 through 4,
trying each code for your brand until you find one
that works. If it still does not work, try searching
for the code; see “Searching for the device code”
on page 56.
n
If the device does not have a Power button,
press Play.
6 Repeat steps 1 through 5 for each device you
want to control with the remote control.
Operating Peripheral Equipment 55
Operating Peripheral Equipment
Page 64

Searching for the device code
If your device does not respond to the remote control
after trying all codes listed for your brand, or if your
brand is not listed at all, try searching for your code.
1 Turn on your home entertainment device.
2 Hold down a device button on the remote control
for 5 seconds until the device button blinks, and
then release the device button. The device button
blinks one more time and then remains lit.
3 Enter 1, 1, 1, 1, and the device button blinks once
and then remains lit.
4 Press and release the Power button once on the
remote control. Wait until the device button stops
blinking. Continue to press and release the Power
button, waiting each time for the device button to
stop blinking, until the home entertainment device
turns off.
Manufacturer’s codes
The following charts include manufacturer codes for
these home entertainment devices:
n
Each time you press the Power button it is
trying a different code. Be sure to wait until
the device button stops blinking before
pressing the Power button again. You may
need to press the Power button several
times before the correct code is found.
5 Once the home entertainment device turns off,
press the Select button on the remote control to
save the code.
■ VCR
■ DVD/VCR combo
■ Home Theater in a Box
■ DVD
■ Cable Box
■ Satellite Box
■ Satellite receiver/recorder
■ Amplifier
■ Audio Cassette
■ Audio System
■ Phono
■ Receiver/Tuner
■ PVR
56 HP Pavilion Plasma TV User’s Guide
Page 65

VCR manufacturer codes
Brand Code Brand Code Brand Code
Admiral 0073, 0074, 0101 Daytron 0067, 0083, 0102 JC Penney 0046, 0047, 0048,
Aiko 0056 Denon 0088 Jensen 0057, 0058, 0068
Aiwa 0055 Dimensia 0043, 0112 JVC 0000, 0019, 0046,
Akai 0044, 0045, 0068,
Audiovox 0051 Emerson 0044, 0049, 0051,
Bell & Howell 0048 Fisher 0048, 0089, 0105 Kodak 0051, 0053
Broksonic 0023, 0049 Fuji 0045, 0053 LG 0051
Calix 0051 Funai 0055, 0095 Lloyds 0077, 0095, 0105
Canon 0053, 0054 Garrard 0055 Logik 0059, 0085
Capehart 0067, 0083 GE 0040, 0043, 0050,
0069, 0080, 0093
Electrohome 0051, 0090 Kenwood 0046, 0047, 0048,
0052, 0053, 0055,
0061, 0069, 0087,
0090, 0106
0053, 0054, 0070,
0079, 0112
KLH 0059
LXI 0051
0049, 0050, 0051,
0053, 0054, 0057,
0058, 0059, 0060,
0065, 0079, 0085,
0088, 0090
0047, 0048, 0068,
0071, 0087, 0088
0068, 0071, 0077
Carver 0060, 0110 GoVideo 0021, 0024, 0026,
CCE 0056, 0059 Goldstar 0046, 0051, 0079,
Citizen 0050, 0051, 0052,
Colortyme 0046, 0096 Harman Kardon 0046, 0110 Matsushita 0053
Craig 0050, 0051, 0059,
Curtis Mathes 0043, 0046, 0050,
Daewoo 0052, 0055, 0056,
0056, 0095
0085, 0090, 0105
0053, 0054, 0077,
0079, 0112
0067, 0083, 0102
Gradiente 0055, 0090 Marantz 0046, 0047, 0048,
Harwood 0059 Memorex 0033, 0048, 0050,
Hitachi 0025, 0036, 0037,
JBL 0098 MGN 0079
0028, 0034, 0079,
0081, 0085, 0086
0090, 0092
0057, 0058, 0065,
0068, 0070, 0088
Magnasonic 0085, 0090, 0102
Magnavox 0008, 0053, 0054,
MGA 0061, 0069
0060, 0064, 0085,
0110
0053, 0060, 0077,
0092, 0110
0051, 0053, 0055,
0064, 0073, 0074,
0088, 0090, 0091,
0097, 0105
Operating Peripheral Equipment 57
Operating Peripheral Equipment
Page 66

VCR manufacturer codes (continued)
Brand Code Brand Code Brand Code
Minolta 0057, 0058, 0065,
Mitsubishi 0003, 0005, 0006,
Montgomery
War d
Motorola 0053, 0073, 0074 Proton 0085 Signature 2000 0097, 0101
MTC 0050, 0085 Quasar 0053, 0054 Singer 0053, 0059, 0072,
Multitech 0050, 0055, 0059 Radio Shack 0051, 0062, 0074,
NEC 0046, 0047, 0048,
Nikko 0051 Radix 0051 Sylvania 0030, 0032, 0053,
Noblex 0050 RCA 0012, 0016, 0043,
0088
0057, 0058, 0061,
0069, 0071, 0090
0073, 0074 Proscan 0043, 0112 Signature 0073, 0074
0068, 0071, 0077,
0092
Pioneer 0047, 0057, 0071,
Portland 0067, 0083 Shintom 0045, 0058, 0059,
Radio Shack/
Realistic
0075, 0078, 0104
0090
0048, 0050, 0051,
0053, 0054, 0055,
0062, 0073
0044, 0050, 0053,
0057, 0058, 0065,
0070, 0078, 0079,
0088, 0107, 0108,
0112
Sharp 0014, 0015, 0062,
Sony 0007, 0045, 0063,
STS 0053, 0065
Symphonic 0055, 0077, 0095,
0073, 0074, 0091,
0094, 0101
0085
0076, 0085
0080, 0082, 0084,
0098, 0099
0054, 0055, 0060,
0061, 0110
0105
Olympus 0053 Realistic 0048, 0050, 0051,
Optimus 0051, 0073, 0074,
Optonica 0062 Runco 0064 Tatung 0068
Orion 0087, 0090, 0106 Samsung 0029, 0031, 0035,
Panasonic 002, 004, 009, 020,
Pentax 0057, 0058, 0065,
Philco 0053, 0054, 0060,
Philips 0017, 0018, 0053,
0090, 0094
053, 054, 066, 085,
105
0070, 0077, 0088
0088, 0106
0060, 0062, 0110
Ricoh 0072, 0076 Tashiko 0051
Sansui 0047, 0068, 0071,
Sanyo 0022, 0048, 0050,
Scott 0049, 0052, 0061,
Sears 0048, 0051, 0053,
0052, 0053, 0054,
0055, 0062, 0073,
0074, 0079, 0090,
0094, 0097, 0105
0039, 050, 052,
079, 095
0085
0089, 0097, 0105
0090
0057, 0058, 0065,
0077, 0088, 0089,
0090, 0097, 0105
Tandy 0048
Teac 0055, 0068, 0107
Technics 0053, 0066
Teknika 0051, 0053, 0055,
Toshiba 0010, 0011, 0052,
Totevision 0050, 0051, 0090
58 HP Pavilion Plasma TV User’s Guide
0090
0057, 0061, 0069,
0100, 0102, 0105,
0109
Page 67

VCR manufacturer codes (continued)
Brand Code Brand Code Brand Code
Unitec 0095 Video Concepts 0046, 0047, 0052,
Unitech 0050 Wards 0050, 0051, 0052,
Vector Research 0046, 0047, 0052,
0077
White
West in gh ou se
0069, 0077
0053, 0055, 0057,
0058, 0059, 0062,
0065, 0073, 0074,
0079, 0090, 0091,
0094, 0105, 0108,
0110
0095 Zenith 0027, 0038, 0045,
XR-1000 0053, 0055, 0059
Yamaha 0046, 0047, 0048,
0068, 0077
0064, 0072, 0076,
0093
DVD/VCR combo manufacturer codes
Brand Code Brand Code Brand Code
GoVideo 0026, 0028, 0068,
Hitachi 0025, 0067 Samsung 0031, 0017 Zenith 0027, 0069
0070
JVC 0000, 0010 Sanyo 0022, 0063
Home Theater in a Box manufacturer codes
Brand Code Brand Code
Bose 0010, 0071 Philips 0022
Onkyo 0086 Toshiba 0025
Miscellaneous video manufacturer codes
Type Brand Code
DVR Philips 0042
Digital network recorder Sony 0041
PVR TiVo 0111
Operating Peripheral Equipment 59
Operating Peripheral Equipment
Page 68

DVD manufacturer codes
Brand Code Brand Code Brand Code
Aiwa 0073 Hitachi 0065, 0067 Pioneer 0027, 0032
Apex 0000, 0001, 0003,
0004, 0016, 0028,
0029, 0030
Audiovox 0074 JVC 0007, 0010, 0011,
Blaupunkt 0078 Kenwood 0097, 0100 RCA 0005, 0024, 0038
Bose 0062, 0071 Koss 0093 Sampo 0058
Broksonic 0045 Magnavox 0020, 0035 Samsung 0006, 0017, 0033,
Clarion 0046 Marantz 0085 Sansui 0060
Classic 0047 Memorex 0087 Sanyo 0059, 0063
Daewoo 0079, 0080 Mintek 0053 Sharp 0014, 0031
Denon 0075, 0095, 0096 Mitsubishi 0088, 0089, 0090,
Emerson 0048, 0049 NAD 0048, 0081 Sony 0015, 0018, 0034,
Fisher 0050, 0076 Nakamichi 0054 Sylvania 0049, 0072, 0077
Funai 0049, 0064 Norcent 0055, 0056 Techwood 0083
GE 0005, 0051, 0102 Onkyo 0082, 0086 Toshiba 0019, 0026, 0040,
GoVideo 0068, 0070 Oritron 0057 Yamaha 0084, 0098
GPX 0052 Panasonic 0008, 0036, 0037 Zenith 0069, 0094
Harman Kardon 0066 Philips 0002, 0009, 0021,
Irradio 0092 Proscan 0005, 0099
Qwestar 0057
0012, 0013
0041
Sherwood 0061
0091
0039
0042
0022, 0023, 0043
60 HP Pavilion Plasma TV User’s Guide
Page 69

Cable box manufacturer codes
Brand Code Brand Code Brand Code
ABC 0000, 0001, 0002,
Archer 0006, 0007 Movie Time 0039 Signature 0000
Cableview 0003 NEC 0033 Sprucer 0029
Contec 0034 NSC 0039 Standard
Eastern 0035 Oak 0034, 0041 Starcom 0012, 0030
GE 0000 Panasonic 0027, 0029 Stargate 0012
Gemini 0012, 0013 Philips 0008, 0009, 0010,
General
Instruments
Hamlin 0036, 0037, 0038,
Hitachi 0000 RCA 0003, 0029, 0032 Viewstar 0017, 0034, 0039
Jerrold 0000, 0012, 0015,
Magnavox 0017 Samsung 0022
0030
0000, 0032 Pioneer 0021, 0022 United Cable 0030
0040, 0044
0016, 0026, 0030,
0032
Motorola 0031 Scientific
0011, 0013, 0017,
0018, 0019, 0020
Proscan 0000 Universal 0004, 0006, 0007
Realistic 0006 Zenith 0028
Atlanta
Component
Tocom 0001, 0015
0002, 0023, 0024,
0025
0042, 0043
Satellite box manufacturer codes
Brand Code Brand Code Brand Code
Alphastar 0073 Hughes 0068 Samsung 0051, 0073
Chaparral 0069 Janeil 0067 Sony 0052, 0079
DirecTV 0046 JVC 0060 Star Choice 0076
Drake 0072 Mitsubishi 0047 Star Trak 0066
Echostar 0071 Panasonic 0050, 0056 STS 0065
Express Vu 0075 Philips 0045 Toshiba 0053, 0074
Fujitsu 0067 Proscan 0077, 0078 Uniden 0061, 0062
GE 0049, 0077, 0078 Radio Shack 0063, 0064 Zenith 0054, 0067
General
Instruments
Hitachi 0068 Realistic 0059
0063, 0064 RCA 0077, 0078
Operating Peripheral Equipment 61
Operating Peripheral Equipment
Page 70

Satellite receiver/recorder codes
Brand Code Brand Code
Philips 0057 Sony 0080
RCA 0055 Zenith 0058
Amplifier manufacturer codes
Brand Code Brand Code
Kenwood 0048 Pioneer 0041
Yamaha 0001, 0053 RCA 0069
Audio cassette manufacturer codes
Brand Code Brand Code Brand Code
Aiwa 0039 Onkyo 0055 RCA 0070
Curtis Mathes 0041 Optimus 0041, 0047 Sansui 0057
Denon 0052 Panasonic 0015, 0050 Sanyo 0044
Fisher 0042, 0049 Philips 0013 Sherwood 0047
GE 0070 Pioneer 0018, 0041, 0045 Sony 0043
Kenwood 0048, 0056 Proscan 0070 Technics 0050
NAD 0040 Quasar 0050 Yamaha 0053
Nakamichi 0054 Radio Shack 0047
Audio system manufacturer codes
Brand Code Brand Code Brand Code
Aiwa 0039 Nakamichi 0054 Scientific
Carver 0051 Panasonic 0015, 0016 Sony 0043
Curtis Mathes 0041 Philips 0013, 0014 Starcom 0066
Denon 0052 Pioneer 0018, 0041 Technics 0050
Harman Kardon 0046 RCA &
Dimensia
Jerrold 0066, 0068 Sansui 0057
0031, 0032, 0033,
0034, 0035
Atlanta
Yamaha 0053
0067
Kenwood 0048, 0056 Sanyo 0044
62 HP Pavilion Plasma TV User’s Guide
Page 71

Miscellaneous audio manufacturer codes
Type Brand Code Type Brand Code
Digital audio tape Sony 0043 Receiver/amplifier Yamaha 0001
Tuner Philips 0022 TV/VCR/tuner combo Panasonic 0012
Phono manufacturer codes
Brand Code Brand Code
Kenwood 0048 Sony 0043
Pioneer 0041 Yamaha 0053
Receiver/tuner manufacturer codes
Brand Code Brand Code Brand Code
Aiwa 0017, 0036, 0039 Luxman 0064 Radio Shack 0047
BOSE 0010 Marantz 0019 RCA 0071, 0072
Carver 0051 McIntosh 0058 Sansui 0057
Curtis Mathes 0041 NAD 0040 Sanyo 0042, 0044
Denon 0006, 0026, 0027,
Fisher 0042, 0044, 0049 NEC 0040 Sherwood 0047
Gradiente 0062 Nikko 0063 Sony 0000, 0024, 0043
Harman Kardon 0008, 0038, 0046 Onkyo 0003, 0021, 0055 Technics 0002, 0020, 0050
Hitachi 0059 Optimus 0041, 0047 Toshiba 0025
JBL 0038 Panasonic 0009, 0012, 0016,
Jensen 0061 Philips 0014 Zenith 0065
JVC 0007, 0030 Pioneer 0004, 0023, 0041,
Kenwood 0005, 0028, 0048,
0052
0056
Nakamichi 0054 Sharp 0060
Yamaha 0048, 0053
0029, 0050
0045
Quasar 0050
Operating Peripheral Equipment 63
Operating Peripheral Equipment
Page 72

PVR manufacturer codes
Brand Code Brand Code
Philips 0001, 0004 TiVO 0002
Sony 0000, 0005 Zenith 0003
Mode Operational Key Chart
This chart defines which keys are operational after
programming (if needed), while in the selected remote
control mode, DTV, CABLE, DBS, VCR, DVD, etc.
KEY NAME DTV MODE CABLE MODE
Power Power
Navigation Up/Down Cable channel Up/Down
SELECT
MENU
RECALL
1
4
7
EXIT
23
6
5
8 9
LAST
0
CH
+
CH
-
Navigation Right/Left –
OK –
DTV Menu –
PROGRAM INFO. –
Exit Electronic Program Guide –
Select Channel Select Channel
Info Electronic Program Guide –
––
64 HP Pavilion Plasma TV User’s Guide
Page 73

KEY
NAME
DVD/CD Mode AUX Mode
VCR
MODE
Power Power Power Power Power Power Power
RCVR
Mode(DVD) (CD) (PVR) (VCR2) (TAPE)
SOURCE
MENU
RECALL
1
4
7
MUTE
SELECT
EXIT
23
5
8 9
LAST
0
TV Mute TV Mute RCVR Mute TV Mute RCVR Mute RCVR Mute RCVR Mute
TV Input SW – – – TV Input SW – RCVR Input SW
– Navigation Up/
Down
Volume –/+ Navigation
Right/Left
Next/Previous
Track
RCVR
Volume –/+
Navigation Up/
Down
Navigation
Right/Left
––Tuner +/–
Volume –/+Volume –/+RCVR
Volume –/+
–––––––
–––PVR MENU–––
Onscreen VCR
Display
DVD Display Time Format – Onscreen VCR
Display
––
–––Exit PVR Menu–––
– 1.... AV1
2.... AV2
6
3.... AV3
4.... AV4
5.... CD
6.... TUNER
7.... PHONO
8.... TAPE
9.... AUX
VCR Rew/FF Skip Search
–Select Channel––1.... AV1
2.... AV2
3.... AV3
4.... AV4
5.... CD
6.... TUNER
7.... PHONO
8.... TAPE
9.... AUX
Search Rew/FF – VCR Rew/FF Tape Rew/FF Surround +/–
Rew/FF
Play Play Play Play Play Play –
SOURCE
CH
+
CH
-
Pause Still/Pause Pause Pause Pause Pause –
Stop Stop Stop – Stop Stop –
VCR Record – – PVR Record VCR Record Tape Record –
Source Switch – – – Source Switch – –
VCR Channel
Up/Down
––PVR Channel
Up/Down
VCR Channel
Up/Down
–RCVR
Operating Peripheral Equipment 65
Center +/–
Operating Peripheral Equipment
Page 74

Video/Component/HDMI Input Signals
HDMI input
AV I N
Y
Y
Y
PB
VIDEO
AUDIO
COMPONENT input
PB
PR
L
R
12
COMPONENT VIDEO
INPUT
PR
INPUT 2 INPUT 1
R L
AUDIO IN
S VIDEO
VIDEO
L
R
TO AUDIO AMP
PROGOUT
n
Signals without these horizontal and
vertical frequencies may not be displayed
properly.
VIDEO input
VIDEO input
Horizontal
Signal Name
Frequency (kHz)
1 NTSC 15.73 59.94/60
Vertical
Frequency (Hz)
Applicable input signals (* mark)
Horizontal
Signal Name
Frequency (kHz)
1 525 (480) /60i 15.73 59.94/60 * *
2 525 (480) /60p 31.47 59.94/60 * *
3 750 (720) /60p 45.00 59.94/60 * *
4 1125 (1080) /60i 33.75 59.94/60 * *
Vertical
Frequency (Hz)
Component HDMI
66 HP Pavilion Plasma TV User’s Guide
Page 75

Specifications
PE4200N
Power Source 120Vv, 50/60 Hz
Power Consumption Maximum: 390 W
Stand-by condition: 0.6 W
Plasma Display panel Drive method: AC type 42 in., 16:9 aspect ratio
Screen Size Approx. 36.2 in. (92 cm) (W) x 20.4 in. (51.8 cm) (H) x 41.6 in. (105.6 cm) (diagonal)
Dimensions (W x H x D) Approx. 44.8 in. (113.8 cm) x 28.78 in. (73.1 cm) x 5.41 in. (13.75 cm)
Mass (Weight) 86 lb. (39 kg)
Channel Capability-ATSC/
NTSC
Sound Speaker Woofer 3.1 in. (8 cm) x 2, Tweeter 0.63 in. (1.6 cm) x 2.9 in. (7.3 cm) x 4
Audio Output 26W [8W + 8W, 5W + 5W] (10% THD)
FEATURES 3D Y/C FILTER; Closed Caption; HDMI; V-Chip
Operating Conditions
Connection Terminals AV Input 1–2 VIDEO 1.0 Vp-p (75Ω)
VHF/UHF: 2–69, CATV:1–135
ο
Temperature: 32
Humidity: 20%–80% (non-condensing)
AV Prog. Out VIDEO 1.0 Vp-p (75Ω)
Component Video Y 1.0 Vp-p (Including Synchronization)
Input1–2 PB/PR ±0.35 Vp-p
HDMI HDMI type A Connector
Digital Audio Out PCM/Dolby Digital, Fiber Optic
F–104o F (0o–40oC)
(Phono Jack Type)
S-VIDEO Y: 1.0 Vp-p (75Ω), C: 0.286 Vp-p (75Ω)
(Mini DIN 4-pin)
AUDIO L/R 0.5 Vrms
(Phono Jack Type x2)
(Phono Jack Type)
AUDIO L/R 0.5 Vrms
(Phono Jack Type x2)
AUDIO L/R 0.5 Vrms
(Phono Jack Type x2)
AUDIO L/R 0.5 Vrms
(Phono Jack Type x2)
Specifications
All specifications represent the typical specifications
provided by HP’s component manufacturers; actual
performance may vary either higher or lower.
n
Design and specifications are subject to
change without notice. Weight and
dimensions shown are approximate.
Specifications 67
Page 76

Troubleshooting Chart
Refer to this sections if you are having viewing, picture,
or sound problems with your TV.
Symptoms
SolutionVideo Audio
Snowy Video Noisy Audio
Multiple Image Noisy Audio
Interference Noisy Audio
Normal Video No Audio
No Video with
Snow
No Video No Audio
Noisy Audio
■
Adjust the antenna location and connection.
■
Adjust the antenna location and connection.
■ Check the antenna lead-in cable.
■
Move the television away from electrical appliances, lights, vehicles,
and medical equipment.
Check to see if the volume is set at the minimum.
■
■ Verify that Mute mode is not set.
■ Check the speaker connection.
■ Check all audio inputs.
■ Change the channel.
Set Input Setup properly.
■
■ Check the antenna cables.
■
Check to see if the TV power cord is plugged into a power outlet.
■ Try another channel in case of station trouble.
■ Ensure the remote control codes are properly programmed.
■ Check cable connections.
■ Adjust brightness and audio controls.
■ Press the source button, to select the correct input source.
■ Make sure a PC is not connected with an HDMI input.
■ Unplug any HDMI connections, and plug them back in.
No Color Normal Audio
68 HP Pavilion Plasma TV User’s Guide
Adjust the Color settings.
■
■ Change the channel.
Page 77

Symptoms
Hewlett-Packard
SolutionVideo Audio
Digitalization of
image Image
freeze up
Normal Video Wrong Audio
Black Box on
Screen
Normal Video Normal Audio
Intermittent Remote Control Operation
Audio Break up
Normal Audio
Plasma Display panel
■
Reposition the ATSC (digital) antenna.
■ Check signal meter. If the signal is weak, add a signal booster to boost
the signal strength.
Verify that the Audio mode is set to Stereo or Mono, not SAP.
■
■ Check to see if there is a problem with the audio setting for HDMI. If
so, use analog audio.
■ Make sure the audio input matches the output. For example, set the
audio of HDMI to linear PCM.
■
Verify that the CC (closed caption) Analog settings are set to something
other than T1, T2, T3, or T4.
■
Replace the remote control batteries.
Symptoms Check
Some parts of the
screen do not
light up.
An afterimage
appears.
■ The plasma display panel is manufactured using an extremely high level of precision
technology; however, sometimes some parts of the screen may be missing picture
elements or have luminous spots. This is not a malfunction.
Do not allow a still picture to be displayed for an extended period, as this can cause a
permanent afterimage to remain on the Plasma TV. Examples of still pictures include logos,
video games, computer images, teletext, and images displayed in 4:3 mode.
Hewlett-Packard
NOTE: The permanent afterimage on the plasma TV resulting from fixed image use is not an
operating defect and as such is not covered by the warranty. This product is not designed to
display fixed images for extended periods of time.
Whirring sounds
can be heard
■ The TV includes a cooling fan to dissipate heat generated during normal use. The
rotating fan may cause a whirring sound which is normal.
from the
display unit.
Troubleshooting Chart
Troubleshooting Chart 69
Page 78

Customer’s Record
The product number and serial number of this product
can be found on the back cover of the television. You
should note this serial number in the space provided
below. Retain this User’s Guide, plus your purchase
receipt, as a permanent record of your purchase to aid
in identification in the event of theft or loss, and for
warranty service purposes.
Product Number: ________________________________
Serial Number:__________________________________
Page 79

Guide de l’utilisateur pour le téléviseur à
plasma HP Pavilion
Téléviseur à plasma HP Pavilion PE4200N 42 po (106 cm)
Avant d’effectuer une connexion, de faire fonctionner ou de régler cette télévision, veuillez lire ces instructions
dans leur intégralité.
Conservez ce guide de l’utilisateur à titre de référence ultérieure.
Page 80

Les garanties des produits et services HP sont exclusivement
présentées dans les déclarations expresses de garantie
accompagnant ces produits et services. Aucun élément de ce
document ne saurait être considéré comme une garantie
supplémentaire. La société HP ne saurait être tenue responsable des
erreurs ou omissions de nature technique ou rédactionnelle qui
pourraient subsister dans ce document.
La société HP n’assume aucune responsabilité quant à l’utilisation
ou à la fiabilité de ses logiciels sur un matériel qui n’est pas fourni
par HP.
Ce document contient des informations en propriété exclusive
protégées par copyright. Aucune partie de ce document ne peut être
photocopiée, reproduite ou traduite dans une autre langue sans
l’autorisation écrite préalable de HP.
Hewlett-Packard Company
P.O. Box 4010
Cupertino, CA 95015-4010
États-Unis
Copyright © 2005 Hewlett-Packard Development Company, L.P.
Fabriqué sous licence de Dolby Laboratories. Dolby et le symbole du
double-D sont des marques de commerce de Dolby Laboratories.
HDMI, le logo HDMI et High-Definition Multimedia Interface sont
des marques de commerce ou des marques déposées de HDMI
Licensing LLC.
Ce produit inclut une technologie de protection de copyright
protégée par des déclarations de méthode de certains brevets
américains et d’autres droits de propriété intellectuelle appartenant à
Macrovision Corporation et autres détenteurs de droits. L’utilisation
de cette technologie de protection de copyright doit être autorisée
par Macrovision Corporation et est destinée à l’usage des
particuliers ou d’autres utilisations de visualisation limitée dans
l’absence d’autre autorisation de Macrovision Corporation. La
rétroingénierie ou le désassemblage du produit sont interdits. Sous
couvert des brevets déposés aux États-Unis, numéros 4,631,603,
4,577,216, 4,819,098, 4,907,093, 6,381,747 et 6,516,132.
HP est en faveur d’une utilisation licite des technologies et n’appuie
pas ni n’encourage l’utilisation de produits pour d’autres fins que
celles autorisées par la loi sur les droits d’auteur.
Les informations contenues dans ce document peuvent faire l’objet
de modifications sans préavis.
Page 81

L’éclair avec la pointe fléchée
ATTENTION
Risque de secousse électrique
Ne pas ouvrir
dans un triangle indique à
l’utilisateur que les pièces
contenues dans le produit
représentent un risque de choc
électrique.
AVERTISSEMENT : Afin d’éviter tout risque de choc
électrique, n’enlevez ni le capot ni le panneau arrière. Le
téléviseur ne contient aucune pièce réparable par l’utilisateur.
Contactez un personnel technique qualifié pour toute
réparation.
Le point d’exclamation dans
un triangle indique à
l’utilisateur que d’importantes
instructions de fonctionnement
et de réparation sont stipulées
dans le présent guide
d’utilisateur.
AVERTISSEMENT : Pour réduire le risque d’incendie ou de choc électrique, n’exposez pas le
produit à la pluie ou l’humidité. Ne placez pas de récipients contenant du
liquide (tels que vase, tasse, produits de beauté, etc.) sur le téléviseur (y
compris les étagères au-dessus, etc.).
AVERTISSEMENT : 1) Pour éviter tout risque de choc électrique, n’enlevez pas le capot. Le téléviseur ne
contient aucune pièce réparable par l’utilisateur. Contactez un personnel technique qualifié
pour toute réparation.
2) N’enlevez pas la broche de mise à la terre sur la fiche d’alimentation. Cet appareil est
équipé d’une fiche d’alimentation à trois broches, mises à la terre. Cette fiche ne se
branche que dans une prise d’alimentation mise à la terre. Il s’agit d’une caractéristique de
sécurité. Si l’insertion de la fiche dans la prise est impossible, contactez un électricien.
N’essayez pas de mettre en échec la fiche de mise à la terre.
REMARQUE : Ne laissez pas d’image fixe affichée pendant une période prolongée sous risque de laisser
une image rémanente en permanence sur le téléviseur à plasma. Des exemples d’images
fixes incluent entre autres : logos, jeux vidéo, images informatiques, télétexte et images
affichés en mode 4:3.
R
Fabriqué sous licence de Dolby Laboratories.
« Dolby » et le symbole du double-D sont des marques de commerce de
Dolby Laboratories.
HDMI, le logo HDMI et High-Definition Multimedia Interface sont des marques
de commerce ou des marques déposées de HDMI Licensing LLC.
Description de la licence : Pour afficher les informations relatives à la licence du logiciel utilisé dans ce
produit, appuyez sur le bouton Menu et sélectionnez Configuration, A propos
de, Licence. (Voir la section A propos de à la page 51).
iii
Page 82

Importantes consignes de sécurité
1 Suivez ces instructions.
2 Conservez ces instructions.
3 Tenez compte de tous les avertissements.
4 Suivez toutes les instructions.
5 N’utilisez pas ce téléviseur à proximité de l’eau.
6 Nettoyez uniquement avec un chiffon sec.
7 Ne bloquez pas les ouvertures des ventilations. Effectuez une installation conforme aux instructions du fabricant.
8 N’effectuez pas d’installation près de sources de chaleur telles que radiateurs, registres de chaleur, fours ou
autres appareils (y compris les amplificateurs) dégageant de la chaleur.
9 Ne mettez pas en échec la mesure de sécurité de la fiche polarisée ou mise à la terre. Une fiche polarisée est
dotée de deux lames avec l’une plus large que l’autre. Une fiche de type mise à la terre est dotée de deux
broches et d’une troisième pour la mise à la terre. La broche la plus large ou celle de mise à la terre sont fournies
par mesure de sécurité. Si la fiche fournie ne correspond pas à votre prise, consulter un électricien afin qu’il
remplace la prise désuète.
10 Protégez le cordon d’alimentation du passage piétonnier ou de tout pincement plus particulièrement au niveau
des fiches, des prises de courant et au point où il sort de l’appareil.
11 Utilisez uniquement des équipements/accessoires spécifiés par le fabricant.
12 Utilisez uniquement avec le chariot, support, trépied, bride ou table spécifiés par le fabricant ou
vendus avec l’appareil. Avec un chariot, prenez toutes les précautions nécessaires lors du
déplacement de l’ensemble chariot/téléviseur afin d’éviter qu’il ne bascule.
13 Débranchez le téléviseur pendant les orages ou lorsqu’il ne sera pas utilisé pendant de longues
périodes.
14 Contactez un personnel technique qualifié pour toute réparation. Une réparation est nécessaire lorsque le
téléviseur a été endommagé d’une façon quelconque, tel que par exemple, le cordon d’alimentation ou la fiche,
lorsque du liquide a été renversé ou que des objets sont tombés dans le téléviseur, lorsque le téléviseur a été
exposé à la pluie ou l’humidité, qu’il ne fonctionne pas normalement ou qu’il est tombé.
15 Pour éviter tout choc électrique, assurez-vous que la broche de mise à la terre sur la fiche d’alimentation C.A. est
bien connectée dans la prise.
iv Guide de l’utilisateur pour le téléviseur à plasma HP Pavilion
Page 83

Déclaration FCC
Ce matériel a été testé et jugé conforme aux normes de la classe B concernant les équipements numériques, selon
l’alinéa 15 de la réglementation FCC. Ces limites sont conçues pour offrir une protection raisonnable contre les
interférences dans une installation résidentielle. Cet équipement produit, utilise et peut émettre de l’énergie sous
forme de radiofréquences. S’il n’est pas utilisé conformément aux instructions, il peut produire des interférences
nuisibles aux communications radio. Cependant, il n’existe aucune garantie assurant qu’il n’y aura pas
d’interférence dans une installation particulière. Si l’utilisateur constate des interférences lors de la réception
d’émissions de radio ou de télévision (il suffit pour le vérifier d’allumer et d’éteindre successivement l’appareil),
il devra adopter l’une des mesures suivantes pour les éliminer. À cette fin, il devra :
■ Réorienter ou déplacer l’antenne réceptrice.
■ Augmenter la distance entre l’équipement et le récepteur.
■ Branchez le matériel sur un circuit autre que celui du récepteur,
■ Consultez HP ou faire appel à un technicien spécialisé en radiotélévision.
Mesures de précaution de la FCC :
Pour garantir une conformité continue, utilisez uniquement des câbles gainés lors de la
connexion de la télévision aux périphériques. Tout changement ou modification ne bénéficiant
pas d’une autorisation expresse par la partie responsable peut engendrer une interférence
dangereuse et pourrait annuler le droit de l’utilisateur d’utiliser l’équipement.
PARTIE RESPONSABLE :
Hewlett-Packard Company
Digital TV Solutions
Attn: Product Regulations Manager
10435 N. Tantau Avenue
CAC 07, MS 4295
Cupertino, CA 95014 USA
AVIS CANADIEN :
Cet appareil numérique de classe B est conforme à la norme canadienne ICES-003.
Informations sur la
réglementation et la
sécurité
AVERTISSEMENT :
les règles d’ergonomie lorsque vous la déplacez.
Informations de sécurité
supplémentaires
Ce téléviseur n’a pas été évalué pour un raccordement
à un système électrique « IT » (c’est-à-dire un système
de distribution C.A. sans connexion directe à la terre,
selon la norme IEC 60950).
La télévision est lourde ; respectez
Avertissement de sécurité
concernant l’alimentation C.A.
AVERTISSEMENT : Installez le téléviseur à proximité
d’une prise C.A. Le câble d’alimentation C.A. est le
principal outil de débranchement et doit toujours être
facilement accessible. Pour votre sécurité, le câble
d’alimentation fourni avec votre télévision possède une
fiche mise à la terre. Branchez toujours le câble dans
une prise murale avec mise à la terre, afin d’éviter les
risques d’électrocution.
AVERTISSEMENT : N’utilisez pas le téléviseur
lorsque le capot est enlevé.
v
Page 84

AVERTISSEMENT : La télévision n’est pas réparable
par l’utilisateur. Pour éviter d’endommager la
télévision, faites-la réparer ou remplacer par un
technicien compétent.
AVERTISSEMENT : Pour plus de sécurité,
débranchez toujours la télévision de sa source
d’alimentation et de tout système de
télécommunications (comme CATV, SAT ou tout autre
périphérique) avant d’exécuter toute opération de
maintenance. Si vous ne respectez pas ces consignes,
vous risquez de vous blesser ou de causer des
dommages matériels. Le téléviseur contient des niveaux
de tension dangereux.
Protection des connecteurs pour
Lignes électriques
Aucun système d’antenne extérieure ne doit être
installé à proximité de lignes électriques aériennes ou
d’autres appareils électriques installés en hauteur, ni
dans un endroit où l’antenne pourrait tomber sur de
telles installations électriques.
AVERTISSEMENT : Lorsque vous installez une
antenne extérieure, vous devez faire très attention à ne
pas toucher les lignes et circuits d’alimentation, tout
contact pouvant être mortel.
antenne de téléviseur
Mise à la terre d’une antenne de
téléviseur extérieure
Si une antenne extérieure ou un système de
transmission par câble est raccordé à ce produit,
assurez-vous que l’antenne ou le système de
transmission par câble est électriquement mis à la
terre, de façon à vous protéger contre les surtensions et
les accumulations d’électricité statique. L’article 810 du
National Electrical Code des États-Unis,
(ANSI/NFPA 70) fournit des informations sur la mise à
la terre du mât et de la structure de base, sur la mise à
la terre du fil conducteur vers un système de décharge,
sur la taille des conducteurs de mise à la terre, sur
l’emplacement du système de décharge, sur le
raccordement des électrodes de mise à la terre et sur
les exigences applicables à l’électrode de mise à la
terre.
Protection contre la foudre
Pour mieux protéger vos appareils durant un orage
électrique, ou lorsque l’équipement demeure
longtemps inutilisé et sans surveillance, débranchez la
fiche de raccordement électrique, puis l’antenne ou le
câble. Vous éviterez ainsi que la foudre ou des
surtensions n’endommagent l’équipement.
7
6
5
4
1
Mise à la terre de l’antenne
Mise à la terre de l’antenne
Référence
1
2
3
4
5
6
7
Matériel de mise à la terre
Boîtier de distribution électrique
Systèmes d’électrodes de mise à la terre du
réseau électrique (art. 250 du NEC, Partie H)
Pince de mise à la terre
Conducteurs de mise à la masse (Section 810-21 du NEC)
Unité de décharge d’antenne (Section 810-20 du NEC)
Pince de mise à la terre
Fil conducteur de l’antenne
3
2
À nos client(e)s HP
Bienvenue dans la famille des clients HP. Nous
espérons que votre téléviseur à plasma vous donnera
des années de divertissements.
Pour optimiser l’avantage de votre téléviseur, veuillez
lire ces instructions avant d’effectuer des réglages.
Conservez ces instructions à titre de référence
ultérieure.
Placez le bon d’achat et enregistrez le numéro du
produit ainsi que le numéro de série de votre télévision
dans l’espace prévu à cet effet sur la dernière page de
ces instructions.
vi Guide de l’utilisateur pour le téléviseur à plasma HP Pavilion
Page 85

Table des matières
Importantes consignes de sécurité...iv
Déclaration FCC............................... v
Informations sur la réglementation et la sécurité.........v
Consignes de sécurité...................... 1
Réglage......................................................... 1
Cordon d’alimentation C.A.............................. 1
Si des problèmes surviennent
pendant l’utilisation......................................... 2
Lorsque le téléviseur à plasma est en marche ..... 2
Nettoyage et maintenance.....................................3
Accessoires ..................................... 4
Installation du socle ........................ 5
Montage et installation du téléviseur .......................5
Montage du socle........................................... 5
Installation du socle......................................... 6
Réglage .......................................... 7
Emplacement du récepteur..................................... 7
Equipement externe en option ................................7
Installation de la pile dans la télécommande............ 7
Installation de la fixation
de câbles ........................................ 9
Couvercle de câble.........................................9
Cordon C.A................................................... 9
Collier de câble............................................ 10
Connexion.....................................11
Connexion de l’antenne.......................................11
Connexion d’un décodeur câble...........................11
Connexion de HDMI ...........................................12
Connexion d’un décodeur ou d’un DVD ................14
Connexion de l’entrée vidéo ................................14
Connexion de l’amplificateur................................15
Connexion de la sortie d’un programme................16
Mise sur marche ou sur
arrêt du téléviseur.........................17
Boutons du téléviseur...........................................18
Utilisation de la télécommande......19
Ordinateurs MCPC et DEC de HP ...................22
Utilisation du Réglage initial ..........24
Langue ..............................................................24
Horloge.............................................................24
Programmation automatique ................................26
Regarder des émissions TV ............27
VHF et UHF........................................................27
Câblodistribution ................................................27
Contrôles des aspects..........................................28
Utilisation du menu de
navigation à l’écran ......................29
Table des matières
Table des matières vii
Page 86

Utilisation des menus ....................30
Image ............................................................... 30
Défaut/Image Normal/Image/Brillance/
Couleur/Nuances/Netteté/Temp. couleur/
Gestion couleur ............................................30
Mode image................................................ 32
Réglage Zoom.............................................. 32
Autres réglages (Image)................................. 33
Audio ...............................................................34
Normal/Graves/Aigus/Equilibre ...................34
Autres réglages (Audio)................................. 35
Minuterie........................................................... 38
Mode sommeil .............................................38
Réglage de la minuterie................................. 38
Réglage ............................................................40
Canaux....................................................... 41
Langue ........................................................ 41
Horloge....................................................... 41
Programmer une chaîne ................................ 42
Identification de prises ..................................46
CC (sous-titrage codé)................................... 47
Autres réglages ............................................ 50
A propos de ................................................ 51
Réinitialiser ..................................................52
Blocage.............................................................52
Mode Blocage..............................................53
Chaîne (blocage de plusieurs chaînes).............54
Blocage d’une émission .................................54
Avertissement aux clients ...............................57
Messages de blocage ...................................58
Modifier le mot de passe ...............................58
Utilisation de l’équipement
périphérique................................. 59
Programmation du code de la télécommande.........59
Programmation du code du périphérique .........59
Recherche du code du périphérique ................60
Tableau de modes de touches opérationnelles........68
Signaux d’entrée vidéo/
composant/HDMI.......................... 70
Caractéristiques techniques ........... 71
Tableau de dépannage ................. 72
viii Guide de l’utilisateur pour le téléviseur à plasma HP Pavilion
Page 87

Consignes de sécurité
w
Placez les petites pièces inutilisées et tout
autre objet hors de la portée des jeunes
enfants. Ils peuvent avaler ces objets par
accident. Prenez soin également de placer
le matériel d’emballage et les feuilles
plastiques.
Réglage
Ne placez pas la télévision Plasma sur une
surface inclinée ou instable.
■ Elle risque de tomber ou de basculer.
Ne placez pas d’objet sur le dessus de la
télévision Plasma.
■ Si de l’eau est renversée dans la télévision Plasma
ou que des objets étrangers y tombent, un courtcircuit pourrait se produire et déclencher un
incendie ou un choc électrique. Si des objets
étrangers tombent dans la télévision Plasma,
consultez un centre de service agréé.
Ne recouvrez pas les ouvertures des
ventilations.
■ Des ouvertures obstruées peuvent favoriser la
surchauffe de la télévision Plasma ce qui pourrait
déclencher un incendie ou endommager la
télévision à plasma.
Avec un socle, laissez un espace de
10 cm ou plus en haut, à gauche et à droite
de 6 cm ou plus en bas et de 7 cm ou plus
à l’arrière. Avec toute autre méthode, laissez
un espace de 10 cm ou plus en haut, en bas,
à gauche et à droite de 1,9 cm ou plus à
l’arrière.
Évitez d’installer ce produit près d’un
équipement électronique qui est déjà
facilement affecté par des ondes
électromagnétiques.
■ Cet équipement risque de causer des interférences
d’image, de son, etc. Maintenez ce produit à
l’écart d’équipement vidéo en particulier.
Cordon d’alimentation C.A.
Le téléviseur à plasma fonctionne sur
120 Vv, 50/60 Hz.
Insérez bien la fiche du cordon
d’alimentation en la poussant aussi loin que
possible et utilisez le collier pour la fixer.
(Voir Cordon C.A. à la page 9.)
■ Si la fiche n’est pas totalement insérée, elle risque
de chauffer et de déclencher un incendie. Si la
fiche est endommagée ou si la plaque murale est
desserrée, ne les utilisez pas.
Ne manipulez pas la fiche du cordon
d’alimentation avec des mains mouillées.
■ Des chocs électriques pourraient se produire.
Ne tentez rien qui puisse endommager le
câble. Lorsque vous déconnectez le câble,
maintenez la fiche et non le câble.
■ N’effectuez aucun changement, ne placez pas
d’objets lourds à l’équipement, ne placez pas
l’équipement à proximité d’objets chauds,
chaleur, ne pliez pas, ne tordez pas ni ne tirez
avec force sur le câble. Ces situations favorisent
effectivement la surchauffe de la télévision à
plasma ce qui pourrait déclencher un incendie ou
endommager la télévision Plasma. Si vous
suspectez que le câble est endommagé, contactez
un centre de service agréé.
Si le téléviseur à plasma n’est pas utilisé
pendant une longue période, débranchez le
cordon de la prise murale.
Consignes de sécurité
Consignes de sécurité 1
Page 88

Si des problèmes surviennent
Lorsque le téléviseur à plasma
pendant l’utilisation
En cas de problèmes (tels que l’absence
d’image ou de son) ou si de la fumée ou une
odeur anormale sont détectées du téléviseur
à plasma, débranchez immédiatement le
cordon d’alimentation.
■ Une utilisation continue du téléviseur dans ces
conditions peut déclencher un incendie ou des
dommages permanents au téléviseur. Contactez
un centre de service agréé pour faire évaluer le
téléviseur. Toute réparation effectuée sur le
téléviseur par un personnel non agréé est
fortement déconseillé en raison des tensions
élevées.
Si de l’eau ou des objets étrangers rentrent
dans le téléviseur à plasma, si le téléviseur à
plasma est tombé ou si l’armoire est
endommagée, débranchez immédiatement la
fiche du cordon d’alimentation.
■ Un court-circuit peut se produire et déclencher un
incendie. Contactez un centre de service agréé
pour toute réparation nécessaire.
est en marche
Ne placez pas vos mains, votre visage ni des
objets près des orifices de ventilation du
téléviseur à plasma.
■ Le dessus du téléviseur à plasma est généralement
chaud en raison de la température élevée
provenant de l’air s’échappant par les orifices de
ventilation. Les parties du corps qui
s’approcheraient trop près risquent de subir d’être
brûlées ou blessées. Tout objet placé près du
dessus du téléviseur peut également subir des
dommages provenant de la chaleur et le téléviseur
peut être endommagé si les trous de ventilation
sont obstrués.
Déconnectez toujours les câbles lorsque vous
déplacez le téléviseur à plasma.
■ Le déplacement du téléviseur avec ses câbles
connectés peut endommager les câbles qui
peuvent déclencher un incendie ou des chocs
électriques.
Déconnectez la fiche d’alimentation de la
prise murale par mesure de précaution avant
de procéder au nettoyage.
Nettoyez le câble régulièrement afin d’éviter
toute accumulation de poussière.
Ce téléviseur à plasma émet des rayons
infrarouges qui peuvent affecter les autres
équipements de communication infrarouge.
Installez votre capteur infrarouge à l’écart de
la lumière directe ou reflétée de votre
téléviseur à plasma.
2 Guide de l’utilisateur pour le téléviseur à plasma HP Pavilion
■ Des chocs électriques peuvent en résulter si vous
ne respectez pas cette mesure.
■ Toute accumulation de poussière sur la fiche du
cordon d’alimentation peut augmenter l’humidité
ce qui risque d’endommager l’isolation et
déclencher un incendie. Débranchez le cordon de
la prise et nettoyez-la avec un chiffon sec.
Page 89

Nettoyage et maintenance
La partie frontale du panneau d’affichage a
été traitée spécialement. Nettoyez la surface
du panneau avec précaution en utilisant
uniquement un chiffon de nettoyage ou un
chiffon doux non pelucheux.
■ Ne rayez pas la surface du panneau avec les
ongles et ne la heurtez pas avec des objets lourds.
Evitez également tout contact avec des substances
volatiles telles que les insecticides en
pulvérisation, les solvants et les diluants ; la
qualité de la surface pourrait effectivement subir
de sérieux dommages.
Nettoyez l’armoire avec un chiffon propre
et doux.
■ Ne mettez aucun détergent en contact direct avec
la surface du téléviseur à plasma. Si de gouttes
d’eau pénètrent le téléviseur, de sérieux
problèmes peuvent en résulter.
■ Evitez tout contact avec des substances volatiles
telles que les insecticides en pulvérisation, les
solvants et les diluants ; la qualité de la surface
pourrait effectivement subir de sérieux dommages
ou le revêtement risque de se détacher. En outre,
ne laissez pas d’articles fabriqués en caoutchouc
ou PVC trop longtemps en contact avec le
téléviseur à plasma.
n
Protection contre la rémanence d’image : Si
des images fixes s’affichent pendant
plusieures minutes, la fonction de
prévention d’images rémanentes s’active
automatiquement et l’image disparaît.
Changez soit l’image soit la source d’entrée
pour afficher une image.
n
Ne laissez pas d’image fixe affichée
pendant une période prolongée sous risque
de laisser une image rémanente en
permanence sur le téléviseur à plasma.
Des exemples d’images fixes incluent entre
autres : logos, jeux vidéo, images
informatiques, télétexte et images affichés
en mode 4:3.
Consignes de sécurité
Consignes de sécurité 3
Page 90

Accessoires
Assurez-vous que vous disposez des accessoires et
articles répertoriés dans ce tableau
Documentation
TV DVD STB PVR
AUX VCR HP
AUDIO
MUTE
RETURN
SOURCE
FAV
EXIT MENU
VOL CH
+
SELECT
VOL
CH
-
23
1
5
4
8 9
7
LAST
0
SAP
RECALL ASPECT
SLEEP
MTS
Télécommande
+
-
6
Socle et pièces
Cordon C.A.
Collier de câble (2)
Adaptateur pour antenne
type F
(pour 5C-2V)
4 Guide de l’utilisateur pour le téléviseur à plasma HP Pavilion
Page 91

Installation du socle
Montage et installation
du téléviseur
Eléments dont il faut tenir compte pendant
l’installation :
■ Sélectionnez l’emplacement pour le téléviseur
permettant un accès facile à la prise
d’alimentation C.A.
■ Garantissez une ventilation appropriée de
manière à ce que la température autour du
téléviseur ne dépasse pas les 40 °C. Si le
mouvement d’air est insuffisant à l’intérieur de
l’écran, la chaleur peut s’accumuler à l’intérieur
du téléviseur et déclencher un incendie. Pour de
plus amples informations sur la ventilation,
reportez-vous aux informations de la section
Réglage à la page 1.
■ En raison de la taille et du poids de l’écran et du
socle, il est recommandé que deux personnes se
chargent du montage et du déplacement du
téléviseur.
Accessoires pour le socle
Montage du socle
Faites correspondre chaque support (A) à la marque
(un cercle ou un triangle) sur le socle (D). Lorsque vous
vous trouvez devant le socle, la marque droite est un
triangle et la marque gauche est un cercle. Insérez les
deux vis courtes (B) pour chaque support.
“ “
A
B
C
D
A : Support (2)
B : Vis courte (4)
C : Vis longue (4)
D : Support
“O”
Installation du socle
Installation du socle 5
Page 92

2 Abaissez l’affichage du téléviseur sur les supports
du socle en faisant correspondre les marques :
Installation du socle
Procédez selon les étapes suivantes pour fixer le socle
au téléviseur. Pour enlever le socle, procédez dans le
sens inverse de l’installation.
c
ATTENTION : Ne jamais placer le téléviseur
ou l’écran d’affichage avec la surface en
bas à moins d’utiliser un tapis pour le
protéger.
1 Positionnez l’affichage et le socle :
■ Placez un tapis protecteur ou chiffon propre
sur une table lisse, stable. Placez l’affichage
avec le verre en bas sur le tapis protecteur.
■ Placez le socle avec l’arrière (partie épaisse
de la base du socle) vers vous sur une table
stable ou sur le sol.
Maintenez l’affichage avec l’arrière dirigé vers
vous. Alignez les orifices situés sur la partie
inférieure de l’affichage avec les supports du
socle en faisant correspondre les marques
imprimées sur l’arrière de l’affichage à celles du
socle. Abaissez doucement l’affichage sur le socle
en insérant les supports dans l’affichage.
3 Placez les deux vis longues (C, voir la figure sous
« Installation du socle ») de chaque support à
l’arrière de l’écran.
6 Guide de l’utilisateur pour le téléviseur à plasma HP Pavilion
Page 93

Réglage
Emplacement du
récepteur
Ce téléviseur doit être installé sur un support.
Contactez votre revendeur à propos des options
disponibles. Positionnez le téléviseur pour permettre
une visualisation confortable. Evitez que la lumière
directe du jour ou autre lumière vive (y compris les
reflets) ne donnent sur l’écran. L’utilisation de certains
types d’éclairage fluorescent peut réduire la plage de
l’émetteur de la télécommande.
Une ventilation appropriée est essentielle pour ne pas
endommager les composants internes. Tenez à l’écart
des zones particulièrement chaudes ou humides.
Equipement externe en
option
Vous pouvez établir les connexions vidéo et audio
entre les composants avec des câbles vidéo et audio
gainés. Pour optimiser la performance, les câbles
vidéo doivent utiliser un fil gainé coaxial de 75-ohm.
Les câbles sont disponibles auprès de votre revendeur
ou dans un magasin de fournitures électroniques.
Installation de la pile
dans la télécommande
1 Ouvrez le capot.
2 Installez les piles et refermez le capot.
Réglage
Prenez note de la polarité (+ et –).
n
Remplacez les piles usées par des piles
alcalines pour prolonger la vie utile.
Avant d’acheter des câbles, assurez-vous de bien
connaître le type de connecteurs de sortie et d’entrée
des divers composants. Déterminez également la
longueur du câble requise.
Réglage 7
Page 94

w
ATTENTION : Toute installation incorrecte
peut entraîner fuite et corrosion des piles ce
qui endommagerait l’émetteur de la
télécommande.
Respectez les précautions suivantes :
■ Les piles doivent toujours être remplacées
ensemble. Utilisez uniquement des piles
neuves lorsque vous remplacez les
anciennes.
■ Ne mettez pas une pile ancienne avec
une pile nouvelle.
■ Ne mélangez pas les types de pile (ex :
« carbonate de zinc » avec « alcaline »).
■ N’essayez pas de charger, court-circuiter,
démonter, chauffer ou brûler les piles
usées.
■ Le remplacement des piles est utile
lorsque la télécommande agit par
intermittence ou ne permet plus de
contrôler le téléviseur.
■ Lorsque vous n’utilisez pas la
télécommande pendant une période
prolongée, enlevez les piles afin d’éviter
tout dommage ou blessure provenant
d’une fuite potentielle des piles.
■ N’essayez pas de recharger les piles qui
ne sont pas censées être rechargées :
elles risquent de surchauffer et de
rompre. Procédez selon les instructions
du fabricant de pile.
8 Guide de l’utilisateur pour le téléviseur à plasma HP Pavilion
Page 95

Installation de la fixation de câbles
Couvercle de câble
Retrait
1 Appuyez sur les crochets et tirez le couvercle
légèrement vers vous pour dégager des griffes (au
deux points).
2 Tirez doucement vers le bas pour dégager.
121
Fixation
1 Insérez les griffes (à deux points) en bas.
Cordon C.A.
1 Branchez la fiche à la prise du corps principal.
2 Fixez le collier.
Attache-fils
Collier
Fermer Ouvrir
2 Poussez jusqu’à ce qu’il y ait enclenchement.
2
1
1
n
Les câbles et les connecteurs ne sont pas
fournis.
Installation de la fixation de câbles
Installation de la fixation de câbles 9
Page 96

Fermeture
Relâchement
Collier de câble
Fermez en poussant jusqu’à ce que
vous entendiez un déclic.
Pour éviter toute interférence à l’écran, ne mélangez
pas le câble de l’antenne avec le cordon
d’alimentation.
Tirez vers le bas tout en tirant sur le
bouton.
10 Guide de l’utilisateur pour le téléviseur à plasma HP Pavilion
Page 97

Connexion
Connexion de l’antenne
Le mode d’entrée Ant doit être sur Antenne. Pour plus d’informations, reportez-vous à la section Programmation
automatique à la page 26 ou Programmation automatique à la page 42.
Panneau arrière
du téléviseur
ANT
Borne d’antenne
Antenne VHF Antenne UHF
ANT
Connecteur d’antennes de type F
Câble coaxial 75 ohms
(5C-2V ou spécification plus élevée)
Connexion d’un décodeur câble
■ Pour la réception des chaînes câbles (01–135),
connectez le câble fourni par l’entreprise de
cablodistribution locale. Le mode d’entrée Ant doit
être sur Câble (voir la section Programmation
automatique à la page 26 ou Programmation
automatique à la page 42).
■ Certains systèmes de câble ignorent certaines
chaînes afin de réduire l’interférence ou permettre
la visualisation des chaînes Premium (cryptées).
Connexion d’un décodeur :
Panneau arrière
du téléviseur
ANT
ANT
(5C-2V ou spécification plus élevée)
OUTPUT
■ Réglez la chaîne de la télé sur 3 ou 4 lorsque vous
INPUT
Mélangeur
Un décodeur est requis pour garantir une bonne
réception. Contactez l’entreprise de
cablodistribution locale en ce qui concerne les
critères de compatibilité.
utilisez cette connexion.
Câble (75 ohms) d’arrivée de
câblodistribution
CÂBLOSÉLECTEUR
Connexion 11
Connexion
Page 98

Connexion d’un décodeur câble et d’un magnétoscope :
Panneau arrière
(5C-2V ou spécification plus élevée)
du téléviseur
ANT
ANT
ANT OUTPUT
OUTPUT
ANT INPUT
Connexion de HDMI
La High Definition Multimedia Interface (HDMI) est une
interface A/V de l’électronique grand public
entièrement numérique. Le terminal HDMI prend en
charge les informations vidéo et audio.
Câble HDMI
INPUT
Magnétoscope
Câble (75 ohms) d’arrivée de
câblodistribution
CÂBLOSÉLECTEUR
Vous pouvez connecter un périphérique d’électronique
grand public compatible à EIA/CEA-861/861B
†
, tel
qu’un décodeur de réception ou un lecteur de DVD
avec un terminal de sortie HDMI ou DVI au terminal
d’entrée HDMI. Sélectionnez le réglage audio entrée
HDMI dans le menu audio ; voir la section Autres
réglages (Audio) à la page 35.
Câble HDMI
AV IN
R L
AUDIO IN
Câble audio
• Lors d’une connexion avec un
câble HDMI, il n’est pas nécessaire
de connecter de câble audio.
• Lors de la connexion d’un appareil
Y
Y
AV IN
R L
Y
AUDIO IN
muni uniquement d’une prise de
P
B
P
VIDEO
AUDIO
†
La compatibilité des profils EIA/CEA-861/861B couvre les profils
B
P
R
L
R
12
COMPONENT VIDEO
INPUT
P
R
INPUT 2 INPUT 1
S VIDEO
L
R
TO AUDIO AMP
PROGOUT
VIDEO
de transmission d’une vidéo numérique non comprimée y compris la
protection du contenu numérique de la bande passante.
sortie DVI, un câble adapteur DVI
ou HDMI et un câble audio sont
nécessaires.
• Sélectionnez le réglage audio au
menu ENTR. HDMI.
‡
Câble de conversion HDMI-DVI : achetez séparément. Contactez
votre revendeur d’électronique grand public à propos des détails de
disponibilité.
12 Guide de l’utilisateur pour le téléviseur à plasma HP Pavilion
HDMI
OUT
AUDIO
OUT
LR
Sortie du signal HDMI
‡
Décodeur
Lecteur DVD
Page 99

Signal VIDEO compatible
Fréquence de
Nombre de
points (HxV)
1080i 1920x1080i 59.94/60
720p 1280x720p 59.94/60
balayage
vertical (Hz)
480p 720x480p,
640x480p
480i 720(1440)x480i 59.94/60
59.94/60,
59.94/60
n
Ce terminal d’entrée ne doit pas être utilisé
avec les ordinateurs.
Les signaux 1080i et 720p sont reformatés
pour l’affichage sur votre écran à plasma.
Fréquence d’échantillonnage compatible du signal
audio via HDMI (.PCM) : 48 kHz/44.1 kHz/32 kHz
n
■ Ce connecteur HDMI est de type A.
■ Si vous connectez des périphériques sans
terminal de sortie numérique, connectez
le terminal d’entrée vidéo en
composantes, S-vidéo ou Vidéo sur le
téléviseur de manière à pouvoir activer le
signal analogique.
Connexion 13
Connexion
Page 100

Connexion d’un décodeur ou d’un DVD
Ce téléviseur peut recevoir des signaux DTV de 1080i,
720p, 480p ainsi que des signaux 480i DTV lorsqu’il
est connecté à un décodeur de syntoniseur DVT (STB).
Ce téléviseur se sert également d’un redoubleur à
balayage progressif qui désentrelace le signal NTSC
et scanne progressivement l’image.
Câble vidéo en composantes
VIDEO EN
COMPOSANTES
SORTIE
Décodeur
Lecteur de DVD
Y
PB
PR
SORTIE AUDIO
L
R
■ Pour afficher les programmes DTV, connectez le
STB aux terminaux d’entrée vidéo des
composantes (Y, P
B, PR) du téléviseur. Les entrées
couleur des composantes fournissent la brillance
et séparent le signal de couleur.
■ Réglez la sortie de STB soit sur1080i, 720p,
480p soit sur 480i. Tous les signaux sont convertis
à un format 480p et sortent sur l’écran.
■ Un signal DTV doit être disponible dans votre
région.
Panneau arrière du
téléviseur
Y
VIDEO
AUDIO
COMPOSANTES ENTRÉE
PB
PR
L
R
VIDEO EN
VIDEO
AUDIO
L
R
AV IN
Y
Y
PR
12
COMPONENT VIDEO
INPUT
Y
PBPRPB
INPUT 2 INPUT 1
R L
AUDIO IN
S VIDEO
L
R
TO AUDIO AMP
PROGOUT
VIDEO
Câble audio
Connexion de l’entrée vidéo
Magnétoscope
Câble S-vidéo
Caméscope
Console de jeu vidéo
14 Guide de l’utilisateur pour le téléviseur à plasma HP Pavilion
SORTIE
S-VIDÉO
SORTIE
VIDÉO
SORTIE
AUDIO
Câble vidéo
L
R
Câble audio
ENTRÉE 1 / 2
VIDEO
AUDIO
AV IN
Y
Y
P
B
P
R
L
R
12
COMPONENT VIDEO
INPUT
Panneau arrière du
téléviseur
R L
INPUT 2 INPUT 1
AUDIO IN
S VIDEO
L
R
TO AUDIO AMP
PROGOUT
Y
P
B
P
R
VIDEO
 Loading...