

Page 1
WIRELESS TV CONNECT
QUICK SETUP
Before You Begin
With HP Wireless TV Connect, you can wirelessly stream high-denition
multimedia content from your computer to your home entertainment
center. Before setup, note the following conguration requirements:
• Your computer must have an available HDMI port and an available
USB port.
1
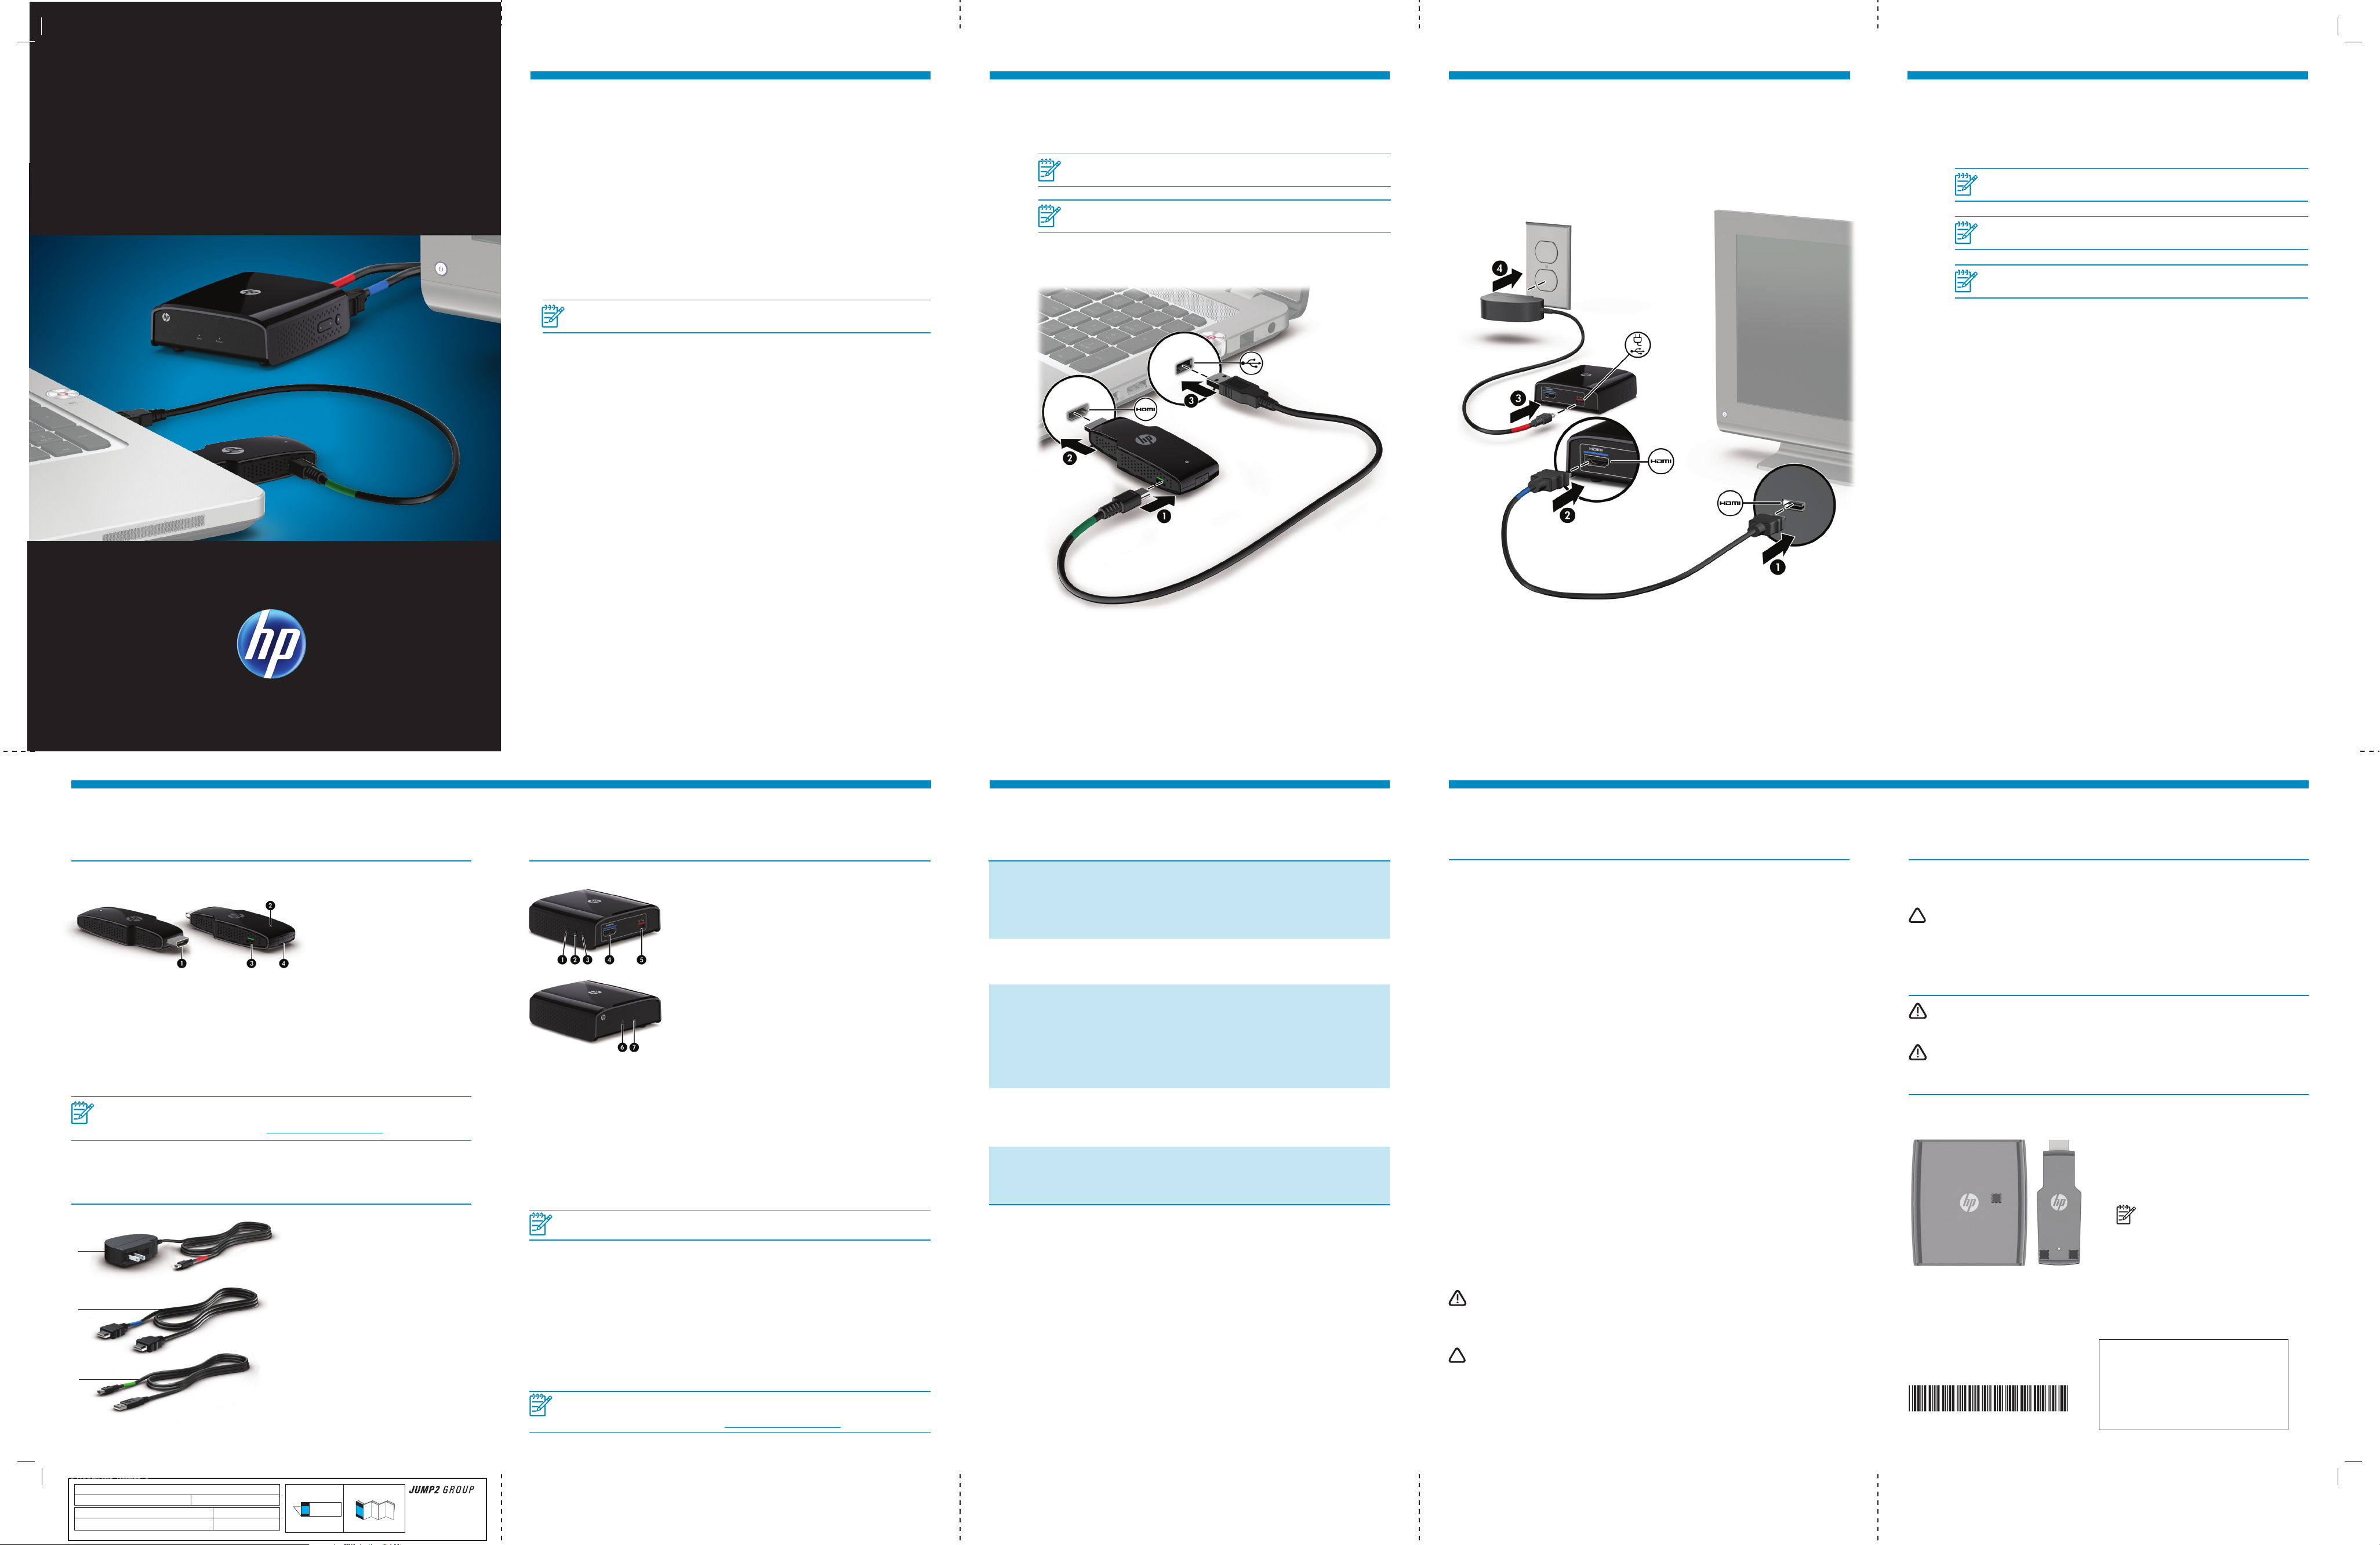
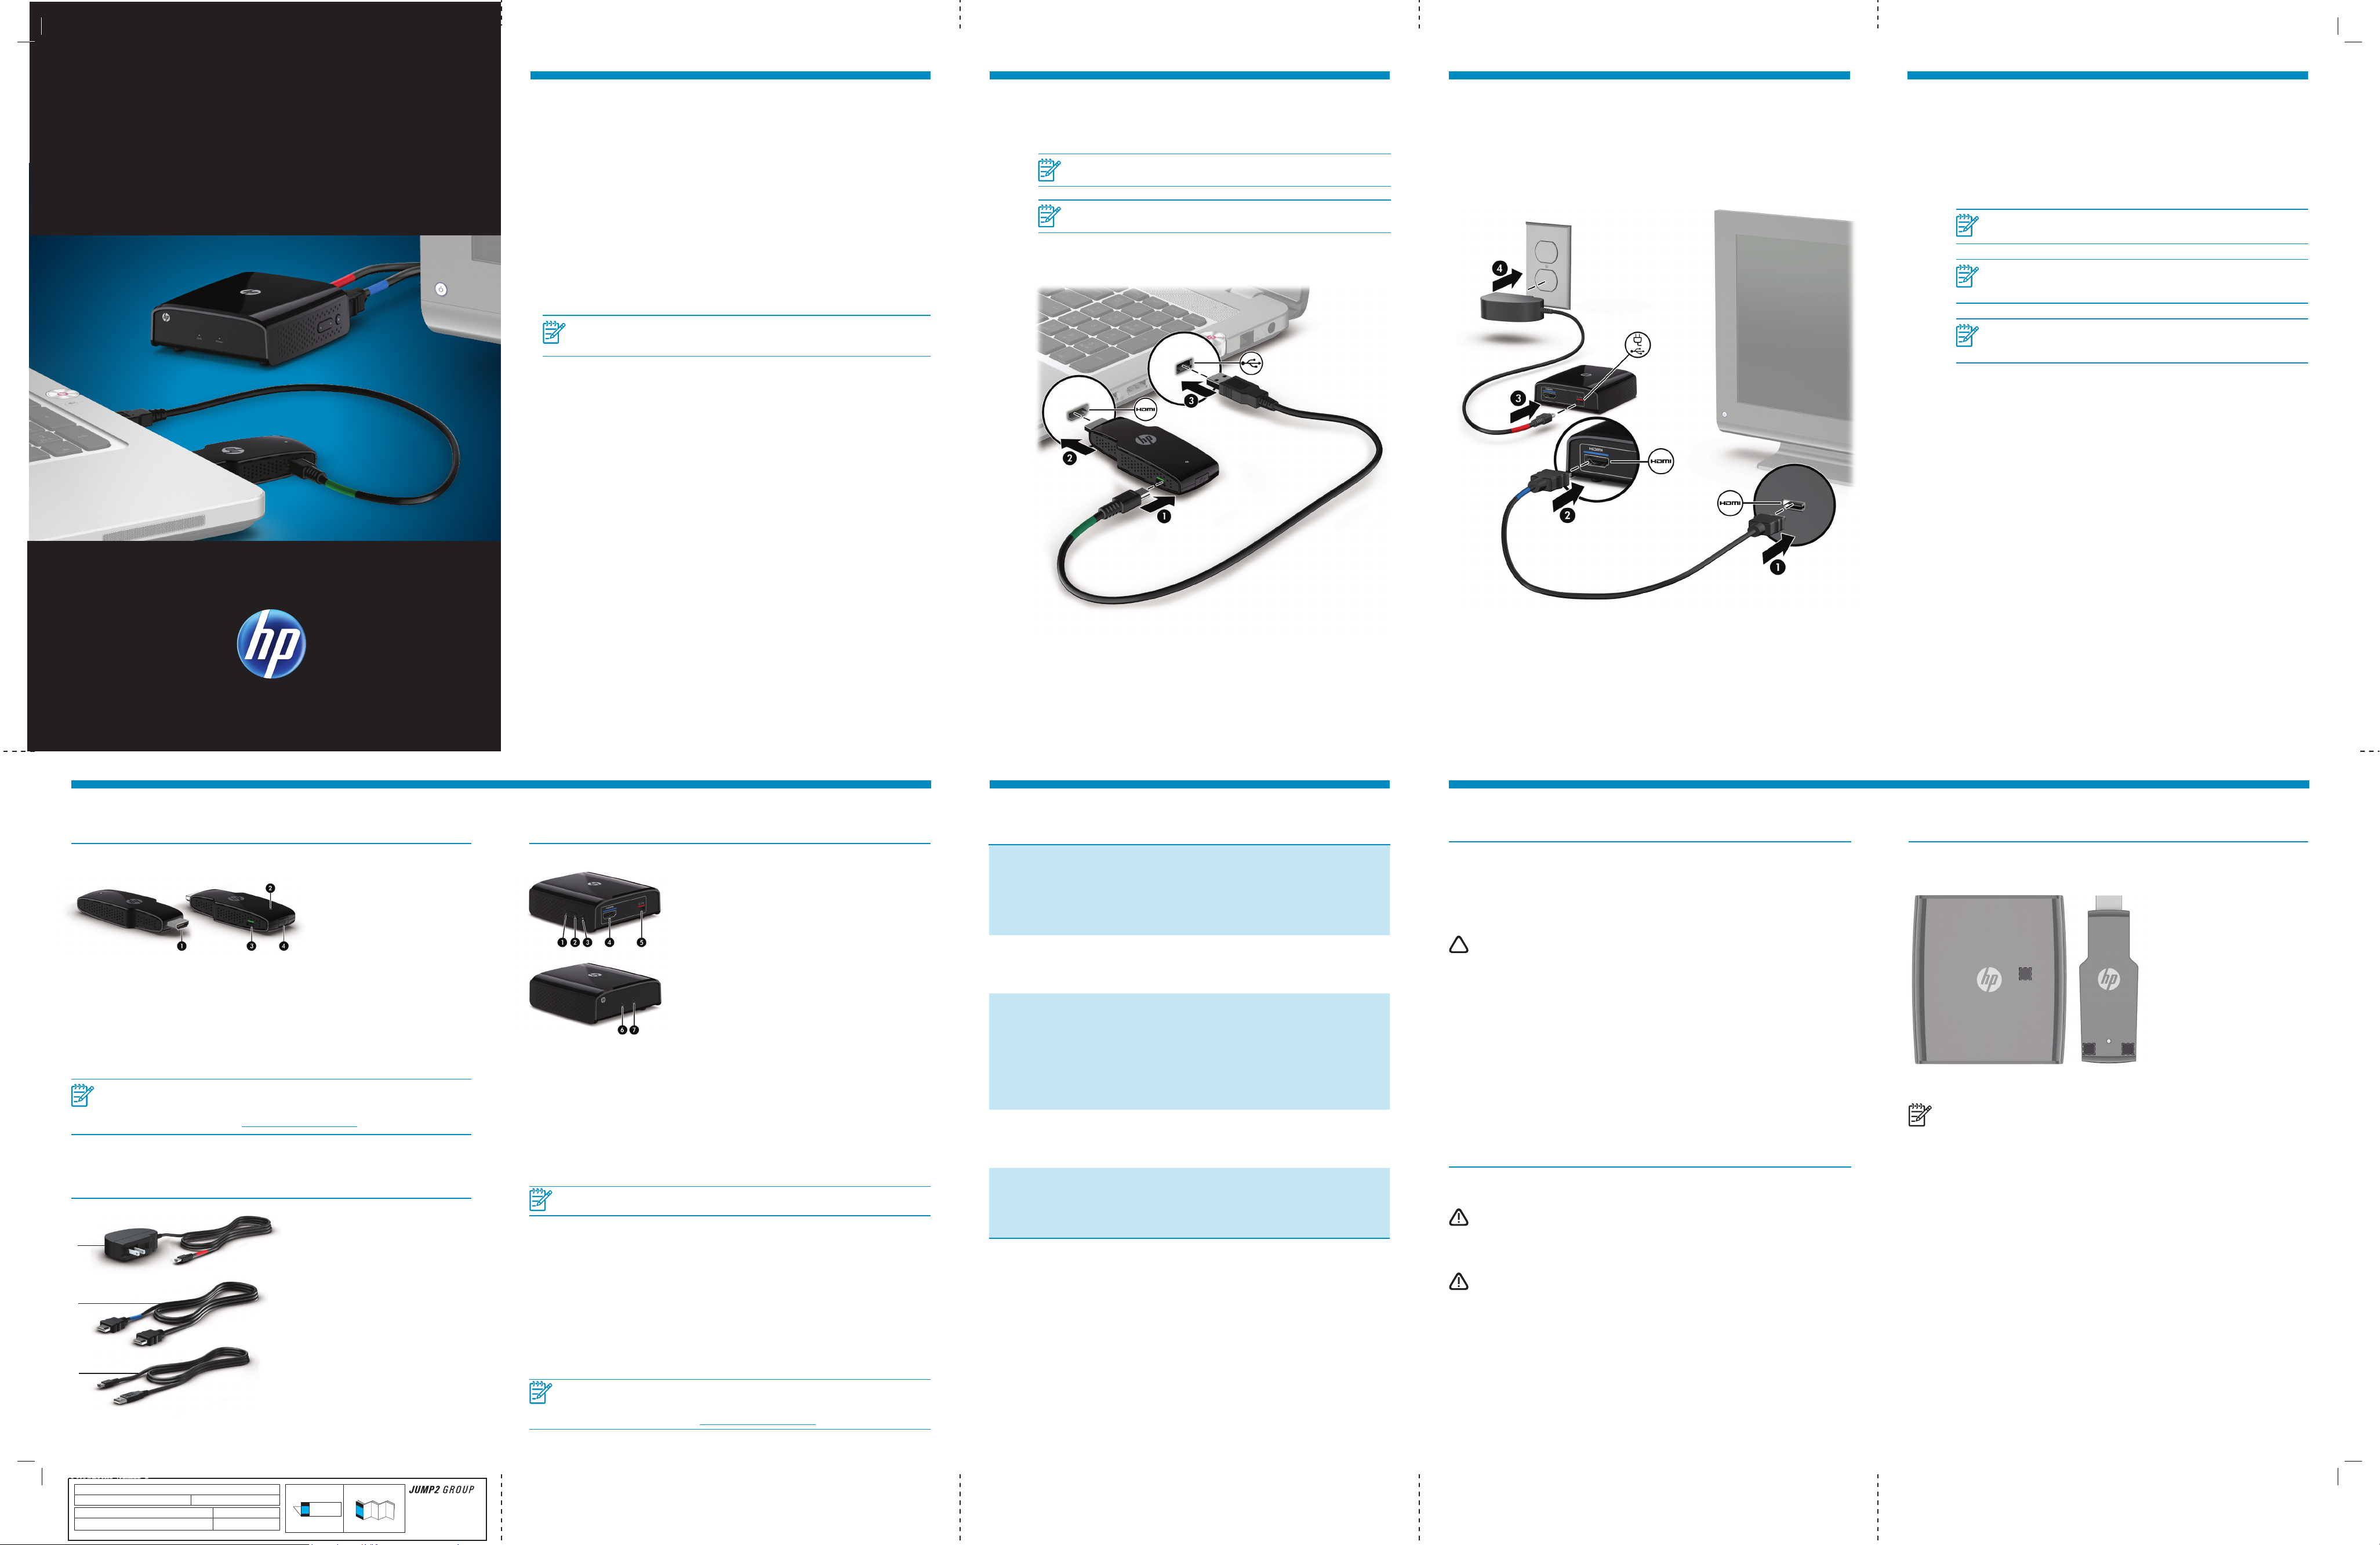
Connect the USB power cable to the PC adapter,
and then connect the PC adapter and the USB power
cable to the computer.
NOTE: The location of the computer ports may vary.
NOTE: If the PC adapter light does not turn on after inserting the adapter into the
HDMI port on the computer, pull it out and reinsert it.
2
Connect the TV adapter to your TV or other external display
and to external power.
3
If you connected to a TV, press the input source button on the TV
to select the HDMI input. When the components are connected
correctly and the correct source is selected, the image on the
computer display will be shown on the TV.
NOTE: Make sure that your computer and TV are both powered on.
NOTE: If you are using an external display other than a TV, the display may not
have an input source input button and the source may cycle automatically.
• Your TV (or other external display) must have an available HDMI port.
NOTE: If the HDMI port on your TV is occupied with another device, consider using an
HDMI switch purchased separately from an electronics retailer.
• For optimal performance, locate the TV adapter no further than 5 m (16.4 ft)
from the PC adapter.
NOTE: It may take a few seconds for the adapters to link to each other and for
the image on the computer to display on the TV (or other external display).
Components Troubleshooting Regulatory and Safety Notices
PC Adapter
1 HDMI connector: Connects the
PC adapter to your computer.
2 Link light
• On: The adapter is linked to
the TV adapter.
• Blinking: The adapter is
attempting to link to the TV
adapter.
3 USB connector: Connects
the USB power cable to the
PC adapter.
4
Reset button*
*The reset button on the PC adapter is used only during a software upgrade, along with the Micro
USB power port on the TV adapter.
NOTE: You may need to upgrade the software on your adapter to ensure compatibility with
devices produced by other manufacturers. When it’s available, you can download updated
software with installation instructions from http://www.hp.com/support.
Cables
1 Power adapter and cable:
Connects the TV adapter to
1
2
3
external power.
2 HDMI cable: Connects the TV
adapter to your TV or other
external display
3 USB cable: Connects the PC
adapter to your computer.
TV Adapter
1 Up button: Scrolls up through menu.
2 Down button: Scrolls down through menu.
3 Menu/Select button: Displays the
Setup menu* and selects items.
4 HDMI port: Connects the TV adapter
to your TV or display.
5 Micro USB power port: Connects the TV
adapter to external power, and can also be used
to upgrade the HP Wireless TV Connect rmware.
6 Link light
• Blinking blue: The TV adapter is attempting to
link to the PC adapter.
• Solid white: The TV adapter is linked to
the PC adapter.
7 Power light
• On: The adapter is on.
• Off: The adapter is off.
*The Setup menu allows you to add or remove a video source, modify a video source name,
disconnect a wireless link, and exit the menu.
To add or remove a video source, or disconnect a wireless link:
1. Press the Menu button twice.
2. Press the Down or Up button to highlight Add or Remove Video Source or
Disconnect Wireless Link.
3. Press the Menu button to select the item and execute the process.
4. Press the Menu button again to conrm adding or removing a video source, or
disconnecting a wireless link.
NOTE: To add a new video source after removing one, repeat the above process.
To modify the video source name:
1. Press the Menu button twice.
2. Press the Down button to highlight Modify Video Source name.
3. Press the Menu button to execute the naming process.
4. Press the Menu button to select the video source to be renamed.
5. Use the Up or Down buttons to move horizontally and highlight the character to be changed.
6. Press the Menu button to select the character to be changed.
7. Press the Up or Down buttons to change the character.
8. Press the Menu button to select the new character.
9. Press and hold the Menu button to select Save or Exit Video Source name.
After the Save or Exit function has been selected, the display returns to the main menu.
NOTE: You may need to upgrade the software on your adapter to ensure compatibility with
devices produced by other manufacturers. When it’s available, you can download updated
software with installation instructions from http://www.hp.com/support.
Issue Resolution
The power light on the TV
adapter does not turn on.
The link light on the TV
adapter does not turn on.
The link light turns on but
continues to blink.
The TV does not display
the image that is on the
computer.
Nothing happens when I
press the Reset button on
the PC adapter.
•Ensure that the power adapter is securely connected to
the TV adapter and to a wall outlet.
•Plug another device into the wall outlet to ensure that
the outlet is functioning.
•Ensure that the HDMI cables are securely connected to
the components.
•Wait a few minutes for the components to complete
initialization. You should see messages on the
computer and/or TV screen. It may take up to 5
minutes for initialization to complete.
•Ensure that you have connected the components
according to the instructions.
•Press the input source button on the TV to select the
HDMI input.
•The Reset button on the PC adapter is only used for
software upgrades.
Federal Communications Commission notice
This equipment has been tested and found to comply with the limits for a Class B digital device, pursuant to Part 15 of
the FCC Rules. These limits are designed to provide reasonable protection against harmful interference in a residential
installation. This equipment generates, uses, and can radiate radio frequency energy and, if not installed and used in
accordance with the instructions, may cause harmful interference to radio communications. However, there is no guarantee
that interference will not occur in a particular installation.
If this equipment does cause harmful interference to radio or television reception, which can be determined by turning the
equipment off and on, the user is encouraged to try to correct the interference by one or more of the following measures:
• Reorient or relocate the receiving antenna.
• Increase the separation between the equipment and receiver.
• Connect the equipment to an outlet on a circuit different from that to which the
receiver is connected.
• Consult the dealer or an experienced radio or television technician for help.
Modications
The FCC requires the user to be notied that any changes or modications made to this device that are not expressly
approved by HP may void the user’s authority to operate the equipment.
Cables
To maintain compliance with FCC Rules and Regulations, connections to this device must be made with shielded cables
having metallic RFI/EMI connector hoods.
Declaration of Conformity for products marked with the FCC logo
(United States only)
This device complies with Part 15 of the FCC Rules. Operation is subject to the following 2 conditions:
1. This device may not cause harmful interference.
2. This device must accept any interference received, including interference that may cause
undesired operation.
If you have questions about the product that are not related to this declaration, write to:
Hewlett-Packard Company
P. O. Box 692000, Mail Stop 530113
Houston, TX 77269-2000
For questions regarding this FCC declaration, write to:
Hewlett-Packard Company
P. O. Box 692000, Mail Stop 510101
Houston, TX 77269-2000
or call HP at 281-514-3333
To identify your product, refer to the part, series, or model number located on the product.
This device must not be co-located or operating in conjunction with any other antenna or transmitter.
WARNING! Exposure to Radio Frequency Radiation The radiated output power of this device is below the FCC radio
frequency exposure limits. Nevertheless, the device should be used in such a manner that the potential for human
contact is minimized during normal operation of tablet PCs and notebook computers.
To avoid the possibility of exceeding the FCC radio frequency exposure limits, human proximity to the antennas should not
be less than 20 cm (8 inches), including when the computer display is closed.
CAUTION: When using IEEE 802.11a wireless LAN, this product is restricted to indoor use, due to its operation in the
5.15- to 5.25-GHz frequency range. The FCC requires this product to be used indoors for the frequency range of 5.15
GHz to 5.25 GHz to reduce the potential for harmful interference to cochannel mobile satellite systems. High-power radar
is allocated as the primary user of the 5.25- to 5.35-GHz and 5.65- to 5.85- GHz bands. These radar stations can cause
interference with and/or damage to this device.
In some environments, the use of wireless devices may be restricted. Such restrictions may apply in hospitals, near
explosives, in hazardous locations, and so on. If you are uncertain of the policy that applies to the use of this product, ask
for authorization to use it before you turn it on.
Canada notices
This Class B digital apparatus meets all requirements of the Canadian Interference-Causing Equipment Regulations. The
device complies with Industry Canada license-exempt RSS standard(s). Wireless operation is subject to 2 conditions.
The rst is that the wireless device may not cause interference. The second is that the wireless device must accept any
interference, including interference that may cause undesired operation of the device.
CAUTION: When using IEEE 802.11a wireless LAN, this product is restricted to indoor use, due to its operation in
the 5.15 to 5.25 GHz frequency range. Industry Canada requires this product to be used indoors for the frequency
range of 5.15 GHz to 5.25 GHz to reduce the potential for harmful interference to co-channel mobile satellite systems.
High-power radar is allocated as the primary user of the 5.25 to 5.35 GHz and 5.65 to 5.85 GHz bands. These radar
stations can cause interference with and/or damage to this device.
The antennas for this device are not replaceable. Any attempt at user access will damage your computer.
AC adapter notices
WARNING! To reduce the risk of electric shock or damage to the equipment:
•Plug the AC adapter into an AC outlet that is easily accessible
•Disconnect power from the product by unplugging the AC adapter from the AC outlet (not
by unplugging the AC adapter from the product).
WARNING! To reduce potential safety issues, only the AC adapter provided with the product, a replacement AC
adapter provided by HP, or an AC adapter purchased as an accessory from HP should be used with the product.
Wireless Antennas
The wireless antennas transmit signals from the PC adapter to the TV adapter. These antennas are not visible from the
outside of the adapters.
NOTE: For optimal transmission, keep the areas
immediately around the antennas free from
obstructions.
© Copyright 2011 Hewlett-Packard Development Company, L.P.
The information contained herein is subject to change without notice. The only warranties for HP products and services are set forth
in the express warranty statements accompanying such products and services. Nothing herein should be construed as constituting an
additional warranty. HP shall not be liable for technical and editorial errors or omissions contained herein.
First Edition: September 2011
Replace this box with PI statement as per spec.
Replace this box with PI statement as per spec.
Replace this box with PI statement as per spec.
Replace this box with PI statement as per spec.
Replace this box with PI statement as per spec.
663694-001
663694-001 Barbossa_v32.indd 1 9/1/2011 4:34:08 PM
Product: Wireless HDMI
Document: Consumer QSP Part number: 6213 61-0 01
Color page 1: CMYK + PMS 640 Flat size: 27.5 x 17
Color page 2: CMYK + PMS 640 Finished size: 5.5 x 8.5
Fold 1: Horizontal,
in half
Fold 2: 5-panel
accordion
English on front (outside)English on front (outside)
6620 Cypresswood Drive
Suite 120
Spring, TX 77379
832.717.4331
Page 2
CONNECTEUR TV SANS
INSTALLATION RAPIDE
Avant de commencer
Avec le connecteur TV sans l HP, transmettez sans l en continu
du contenu multimédia haute dénition de votre ordinateur à votre centre
de divertissement personnel. Avant l’installation, consultez les exigences
de conguration suivantes :
• Votre ordinateur doit avoir un port HDMI et un port USB disponibles.
• Votre téléviseur (ou un autre écran externe) doit avoir un port
HDMI disponible.
1
Connectez le câble d’alimentation USB à l’adaptateur PC, puis
connectez l’adaptateur PC et le câble d’alimentation USB à
l’ordinateur.
REMARQUE : L’emplacement des ports de l’ordinateur peut varier.
REMARQUE : Si le voyant de l’adaptateur PC ne s’allume pas après avoir inséré
l’adaptateur dans le port HDMI sur l’ordinateur, sortez-le et réinsérez-le.
2
Connectez l’adaptateur TV à votre TV ou à un autre écran
externe et à l’alimentation externe.
3
Si vous êtes connecté à un téléviseur, appuyez sur le bouton
de la source d’entrée sur le téléviseur pour sélectionner l’entrée
HDMI. Lorsque les composants sont correctement connectés
et que la source est bien sélectionnée, l’image sur l’écran
de l’ordinateur sera afchée sur le téléviseur.
REMARQUE : Assurez-vous que votre ordinateur et le téléviseur sont tous les deux
sous tension.
REMARQUE : Si vous utilisez un écran externe autre qu’un téléviseur, l’écran
peut ne pas avoir un bouton de source d’entrée, mais la source peut changer
automatiquement.
REMARQUE : Si le port HDMI de votre téléviseur est déjà utilisé par un autre périphérique,
pensez à utiliser un commutateur HDMI acheté séparément chez un vendeur de produits
électroniques.
• Pour une performance optimale, ne placez pas l’adaptateur TV à plus
de 5 m (16.4 pd) de l’adaptateur PC.
REMARQUE : Cela peut prendre quelques secondes pour que les adaptateurs
se connectent les uns aux autres et pour que l’image de l’ordinateur s’afche
sur le téléviseur (ou un autre écran externe).
Composants Résolution des problèmes
Adaptateur PC
1 Connecteur HDMI : Connecte
l’adaptateur PC à votre
ordinateur.
2 Voyant de liaison
• Allumé : L’adaptateur est
connecté à l’adaptateur TV.
• Clignotant : L’adaptateur
tente de se connecter à
l’adaptateur TV.
3 Connecteur USB : Connectez
le câble d’alimentation USB
à l’adaptateur PC.
4
Bouton Réinitialiser*
*Le bouton de réinitialisation sur l’adaptateur PC est utilisé uniquement lors d’une mise à niveau
logicielle, ainsi que le micro-port d’alimentation USB sur l’adaptateur TV.
REMARQUE : Vous pouvez être amené à mettre à jour le logiciel sur votre adaptateur pour
assurer la compatibilité avec les périphériques produits par d’autres fabricants. En cas de
disponibilité, vous pouvez télécharger le logiciel mis à jour, accompagné des instructions
d’installation, à partir de l’adresse http://www.hp.com/support.
Câbles
1 Adaptateur et câble
d’alimentation : Connecte
1
2
3
l’adaptateur TV à une
alimentation externe.
2 Câble HDMI : Connecte
l’adaptateur TV à votre
téléviseur ou à un autre écran
externe.
3 Câble USB : Connecte
l’adaptateur PC à votre
ordinateur.
Adaptateur TV
1
Bouton Haut : Permet de faire déler le menu vers le haut.
2
Bouton Bas : Permet de faire déler le menu vers le bas.
3
Bouton Menu/Sélection : Afche le menu de
conguration* et permet de sélectionner des éléments.
4 Port HDMI : Connecte l’adaptateur TV à votre
afchage ou téléviseur.
5 Micro-port d’alimentation USB : Connecte
l’adaptateur TV à une alimentation externe,
et peut également être utilisé pour mettre à niveau
le microprogramme HP Wireless TV Connect.
6 Voyant de liaison
• Bleu clignotant : L’adaptateur TV tente de
se connecter à l’adaptateur PC.
• Blanc xe : L’adaptateur TV est connecté
à l’adaptateur PC.
7 Voyant d’alimentation
• Allumé : L’adaptateur est allumé.
• Éteint : L’adaptateur est éteint.
*Le menu de conguration permet d’ajouter ou de supprimer une source vidéo, de modier un nom
de source vidéo, de déconnecter une liaison sans l, et de quitter le menu.
Pour ajouter ou supprimer une source vidéo, ou pour déconnecter une liaison sans l :
1. Appuyez deux fois sur le bouton Menu :
2. Appuyez sur le bouton Bas ou Haut pour mettre en évidence Ajouter ou supprimer source vidéo
ou Déconnecter liaison sans l
3. Appuyez sur le bouton Menu pour sélectionner l’élément et exécuter le processus.
4. Appuyez à nouveau sur le bouton Menu pour conrmer l’ajout ou la suppression d’une source
vidéo, ou la déconnexion d’une liaison sans l.
REMARQUE : Pour ajouter une nouvelle source vidéo après en avoir supprimé une, répétez le
processus ci-dessus.
Pour modier le nom de la source vidéo :
1. Appuyez deux fois sur le bouton Menu.
2. Appuyez sur le bouton Bas pour mettre en surbrillance Modier nom de source vidéo.
3. Appuyez sur le bouton Menu pour exécuter le processus de nommage.
4. Appuyez sur le bouton Menu pour sélectionner la source vidéo à renommer.
5. Utilisez le bouton Haut ou Bas pour vous déplacer horizontalement et mettre en surbrillance
le caractère à modier.
6. Appuyez sur le bouton Menu pour sélectionner le caractère à modier.
7. Appuyez sur le bouton Haut ou Bas pour modier le caractère.
8. Appuyez sur le bouton Menu pour sélectionner le nouveau caractère.
9. Appuyez sur le bouton Menu et maintenez-le enfoncé pour sélectionner Enregistrer ou Quitter
nom de source vidéo.
Une fois la fonction Enregistrer ou Quitter sélectionnée, l’afchage revient au menu principal.
REMARQUE : Vous pouvez être amené à mettre à jour le logiciel sur votre adaptateur pour
assurer la compatibilité avec les périphériques produits par d’autres fabricants. En cas de
disponibilité, vous pouvez télécharger le logiciel mis à jour, accompagné des instructions
d’installation, à partir de l’adresse http://www.hp.com/support.
Problème Résolution
Le voyant d'alimentation
sur l'adaptateur TV ne
s'allume pas.
Le voyant de liaison sur
l'adaptateur TV ne s'allume
pas.
Le voyant de liaison
s'allume mais continue
de clignoter.
Le téléviseur n'afche
pas l'image qui est sur
l'ordinateur.
Rien ne se passe
lorsque j'appuie sur le
bouton Réinitialiser sur
l'adaptateur PC.
•Assurez-vous que l'adaptateur d'alimentation
est correctement connecté à l'adaptateur TV et
à une prise murale.
•Branchez un autre périphérique sur la prise murale
pour vous assurer qu'elle fonctionne.
•Assurez-vous que les câbles HDMI sont correctement
connectés aux composants.
•Patientez quelques minutes pour que les composants
terminent l'initialisation. Vous devriez voir des
messages sur l'écran de l'ordinateur et/ou du
téléviseur. Cela peut prendre jusqu'à 5 minutes
pour que l'initialisation se termine.
•Assurez-vous que vous avez connecté les composants
conformément aux instructions.
•Appuyez sur le bouton de la source d'entrée sur
le téléviseur pour sélectionner l'entrée HDMI.
•Le bouton Réinitialiser de l'adaptateur PC est utilisé
uniquement pour les mises à jour logicielles.
Informations sur la sécurité et les réglementations
Informations pour le Canada
Cet appareil numérique de classe B est conforme aux exigences des régulations canadiennes
sur les équipements causant des interférences. L’appareil est conforme aux normes RSS sans
licence d’Industry Canada. L’utilisation sans l est sujette à deux conditions. La première est que
le périphérique sans l ne doit pas causer d’interférences. La seconde est que le périphérique
sans l doit accepter toutes les interférences, y compris les interférences qui peuvent causer un
dysfonctionnement du périphérique.
ATTENTION : Si vous utilisez un réseau local sans l IEEE 802.11a, l’utilisation de ce produit
est limitée à une utilisation en intérieur, à cause de son fonctionnement dans une gamme de
fréquence de 5.15 à 5.25 GHz. Industry Canada exige que ce produit soit utilisé à l’intérieur
pour la gamme de fréquence de 5.15 à 5.25 GHz an de réduire le risque d’interférences
nuisibles avec les systèmes co-canal mobiles par satellite. Les radars à puissance élevée sont
les utilisateurs principaux des bandes de 5.25 à 5.35 GHz et de 5.65 à 5.85 GHz. Ces
stations de radar peuvent causer des interférences avec ce périphérique et/ou l’endommager.
Les antennes de ce périphérique ne sont pas remplaçables. Toute tentative d’accès utilisateur
endommagera votre ordinateur.
Avis Canadien
Cet appareil numérique de la classe B respecte toutes les exigences du Règlement sur le materiel
brouilleur du Canada.
Informations sur l’adaptateur secteur
Informations sur l’adaptateur secteur
AVERTISSEMENT ! Pour réduire les risques d’électrocution ou de détérioration du matériel :
• Branchez l’adaptateur secteur sur une prise secteur facile d’accès.
• Coupez l’alimentation du produit en débranchant l’adaptateur secteur de la prise secteur
(plutôt que du produit).
AVERTISSEMENT ! Pour limiter les risques liés à la sécurité, n’utilisez que l’adaptateur secteur
fourni avec le produit, un adaptateur secteur de rechange fourni par HP ou un adaptateur
secteur acheté comme accessoire auprès de HP.
Antennes sans l
Les antennes sans l transmettent des signaux de l’adaptateur PC à l’adaptateur TV. Ces antennes
ne sont pas visibles de l’extérieur des adaptateurs.
REMARQUE : Pour optimiser les transmission, évitez d’obstruer les zones situées
immédiatement autour de l’antenne.
663694-001 Barbossa_v32.indd 2 9/1/2011 4:34:19 PM
Product: Wireless HDMI
Document: Consumer QSP Part number: 6213 61-0 01
Color page 1: CMYK + PMS 640 Flat size: 27.5 x 17
Color page 2: CMYK + PMS 640 Finished size: 5.5 x 8.5
Fold 1: Horizontal,
in half
Fold 2: 5-panel
accordion
English on front (outside)English on front (outside)
6620 Cypresswood Drive
Suite 120
Spring, TX 77379
832.717.4331
 Loading...