

Page 1

HP PCIe IO Accelerator for ProLiant Servers
Part Number 607720-002
User Guide
November 2010 (Second Edition)
Page 2

© Copyright 2010 Hewlett-Packard Development Company, L.P.
The information contained herein is subject to change without notice. The only warranties for HP products and services are set forth in the express
warranty statements accompanying such products and services. Nothing herein should be construed as constituting an additional warranty. HP
shall not be liable for technical or editorial errors or omissions contained herein.
Confidential computer software. Valid license from HP required for possession, use or copying. Consistent with FAR 12.211 and 12.212,
Commercial Computer Software, Computer Software Documentation, and Technical Data for Commercial Items are licensed to the U.S.
Government under vendor’s standard commercial license.
Microsoft, Windows, Windows XP, Windows Vista, and Windows Server are U.S. registered trademarks of Microsoft Corporation. Java is a
registered trademark of Oracle and/or its affiliates. AMD is a trademark of Advanced Micro Devices, Inc.
Intended audience
This document is for the person who installs, administers, and troubleshoots servers and storage systems.
HP assumes you are qualified in the servicing of computer equipment and trained in recognizing hazards
in products with hazardous energy levels.
Page 3

Contents
About this guide ........................................................................................................................... 7
Contents summary ..................................................................................................................................... 7
Introduction .................................................................................................................................. 8
Overview ................................................................................................................................................. 8
Performance attributes ................................................................................................................................ 8
Packing list ............................................................................................................................................... 9
Required operating environment .................................................................................................................. 9
Supported firmware revisions .......................................................................................................... 10
Supported hardware ...................................................................................................................... 10
Hardware installation .................................................................................................................. 12
Installing the HP PCIe IO Accelerator ......................................................................................................... 12
Installing a half-height bracket ......................................................................................................... 15
Installing the HP PCIe IO Accelerator Duo ................................................................................................... 18
Linux environments ...................................................................................................................... 21
Linux installation requirements ................................................................................................................... 21
Downloading and installing the driver and utilities using Linux ...................................................................... 21
Installing the HP installer script ........................................................................................................ 22
Loading the IO Accelerator driver using Linux ............................................................................................. 23
Setting the driver options .......................................................................................................................... 24
Module parameters ....................................................................................................................... 24
One-time configuration ................................................................................................................... 25
Persistent configuration ................................................................................................................... 25
Controlling driver loading ............................................................................................................... 25
Upgrading firmware using Linux ................................................................................................................ 27
Uninstalling and upgrading the driver using Linux ........................................................................................ 28
Using the IO Accelerator as swap with Linux .............................................................................................. 30
Using the Logical Volume Manager ........................................................................................................... 30
Configuring RAID for Linux ....................................................................................................................... 30
RAID0/Striped .............................................................................................................................. 31
RAID1/Mirrored ............................................................................................................................ 31
RAID 10 ....................................................................................................................................... 31
Setting up SNMP for Linux ........................................................................................................................ 32
SNMP details for Linux ................................................................................................................... 32
SNMP master agent ....................................................................................................................... 32
Launching the SNMP master agent .................................................................................................. 32
Configuring the SNMP master agent ................................................................................................ 32
Running the SNMP master agent ..................................................................................................... 33
SNMP agentx subagent .................................................................................................................. 33
Troubleshooting SNMP ................................................................................................................... 37
SNMP MIB fields supporting Linux ................................................................................................... 37
Windows Server environments ..................................................................................................... 40
Uninstalling a previously-installed driver ..................................................................................................... 40
Installing software on a Windows system ................................................................................................... 40
Using the Setup Wizard ................................................................................................................. 41
Contents 3
Page 4

Manual installation on Windows Server ..................................................................................................... 45
Manual installation on Windows Server 2003 .................................................................................. 46
Manual installation on Windows Server 2008 .................................................................................. 47
Upgrading the device firmware using Windows .......................................................................................... 47
Checking for outdated or old firmware ............................................................................................. 47
Viewing the firmware version .......................................................................................................... 48
Performing the upgrade .................................................................................................................. 48
Upgrading driver software using Windows ................................................................................................. 49
Upgrading driver software using Windows in a non-RAID configuration ............................................... 49
Upgrading driver software using Windows in a RAID configuration ..................................................... 49
Defragmentation ..................................................................................................................................... 50
IO Accelerator naming ............................................................................................................................. 50
Adding a file system, formatting, and performing multi-disk configuration ....................................................... 51
Creating a RAID configuration .................................................................................................................. 52
Using the IO Accelerator as swap with Windows operating system ............................................................... 52
Setting up SNMP for Windows operating systems ....................................................................................... 52
SNMP details for Windows operating systems ................................................................................... 52
Using test mode registry values ........................................................................................................ 53
SNMP MIB fields supporting Windows Server ................................................................................... 54
Using installation logs .............................................................................................................................. 56
Windows Installer logging options ................................................................................................... 57
Creating an installation log ............................................................................................................. 57
Creating an uninstall log ................................................................................................................ 58
Creating a patch install log ............................................................................................................. 58
Automated logging with the Windows Installer Logging Policy ............................................................ 58
Troubleshooting event log messages ................................................................................................ 59
VMWare ESX environments ......................................................................................................... 61
Creating the ESX IO Accelerator driver CD ................................................................................................. 61
Installing the driver as part of a new ESX installation .................................................................................... 61
Installing the driver using vihostupdate ....................................................................................................... 61
Installing the driver using esxupdate .......................................................................................................... 62
Installing the IO Accelerator utilities using ESX ............................................................................................ 62
Configuring the IO Accelerator using ESX ................................................................................................... 63
Upgrading the firmware using ESX ............................................................................................................ 64
Working with IO Accelerator devices and PCI pass-through .......................................................................... 64
Using IO Accelerator Duos with PCI pass-through .............................................................................. 64
Using the IO Accelerator as swap with ESX ................................................................................................ 65
Disabling the driver using ESX .................................................................................................................. 65
Enabling the driver using ESX ................................................................................................................... 65
Uninstalling the driver utilities using ESX ..................................................................................................... 65
HP IO Accelerator Management Tool ............................................................................................ 66
Operating system support ......................................................................................................................... 66
Linux ............................................................................................................................................ 66
Windows ..................................................................................................................................... 66
Software installation ................................................................................................................................ 66
Installing software using Linux ......................................................................................................... 66
IO Accelerator management ..................................................................................................................... 67
Device report ................................................................................................................................ 67
Performance report ........................................................................................................................ 69
IO Accelerator Management Tool interface options ............................................................................ 69
Detached IO Accelerator after installation ......................................................................................... 70
Navigating the IO Accelerator Management Tool .............................................................................. 70
Contents 4
Page 5

Device Tree ............................................................................................................................................ 71
Drive status ................................................................................................................................... 72
Device Report panel ................................................................................................................................ 75
Saving IO Accelerator information ................................................................................................... 77
Performance monitoring ........................................................................................................................... 77
Operations ............................................................................................................................................. 78
Update firmware ........................................................................................................................... 79
Firmware already updated.............................................................................................................. 82
Attach Device ............................................................................................................................... 83
Attaching mixed attached/detached devices ..................................................................................... 84
Detach Device ............................................................................................................................... 84
Detaching mixed attached/detached devices .................................................................................... 85
Low level format ............................................................................................................................ 85
IO Accelerator Management Tool Menu ..................................................................................................... 87
Maintenance .............................................................................................................................. 89
Maintenance tools ................................................................................................................................... 89
PCIe IO Accelerator LED indicators ............................................................................................................ 89
Common maintenance tasks ..................................................................................................................... 90
Uninstalling the IO Accelerator driver package.................................................................................. 90
Disabling auto attach ..................................................................................................................... 90
Enabling auto attach ...................................................................................................................... 91
Unmanaged shutdown issues .......................................................................................................... 92
Utilities ...................................................................................................................................... 93
Utilities reference ..................................................................................................................................... 93
fio-attach ................................................................................................................................................ 94
fio-beacon .............................................................................................................................................. 94
fio-bugreport ........................................................................................................................................... 95
fio-config (Windows only)......................................................................................................................... 95
fio-config options ........................................................................................................................... 95
fio-detach ............................................................................................................................................... 96
fio-format ............................................................................................................................................... 96
fio-pci-check ........................................................................................................................................... 97
fio-read-lebmap (Linux only) ...................................................................................................................... 97
fio-snmp-agentx (Linux only) ...................................................................................................................... 97
fio-status ................................................................................................................................................. 98
fio-trim-config ........................................................................................................................................ 100
fio-update-iodrive .................................................................................................................................. 100
Monitoring IO Accelerator health ............................................................................................... 102
NAND flash and component failure ......................................................................................................... 102
Health metrics ....................................................................................................................................... 102
Health monitoring techniques .................................................................................................................. 102
Flashback substitution events ................................................................................................................... 103
Software RAID and health monitoring ...................................................................................................... 103
Trim support (Windows only) ..................................................................................................... 105
Introduction to Trim ................................................................................................................................ 105
Trim platforms ....................................................................................................................................... 105
Using Trim ............................................................................................................................................ 105
Starting and stopping Trim ............................................................................................................ 106
Enabling Trim .............................................................................................................................. 106
Controlling Trim aggressiveness..................................................................................................... 106
Trim configurations ................................................................................................................................ 107
Contents 5
Page 6

Using Windows page files with the IO Accelerator ....................................................................... 108
Introduction to Windows page files ......................................................................................................... 108
Configuring IO Accelerator paging support .............................................................................................. 108
RAM consumption ....................................................................................................................... 108
Non-paged memory pool ............................................................................................................. 109
Enabling and disabling paging support .......................................................................................... 109
Windows page file management ............................................................................................................. 110
Setting up page files .................................................................................................................... 110
System drive paging file configuration ............................................................................................ 111
Guaranteeing minimum commitable memory ................................................................................... 111
Verifying page file operation ........................................................................................................ 112
Virtual Memory performance .................................................................................................................. 112
Resources ................................................................................................................................ 113
Subscription service ............................................................................................................................... 113
For more information ............................................................................................................................. 113
Documentation feedback ........................................................................................................................ 113
Technical support ...................................................................................................................... 114
Before you contact HP ............................................................................................................................ 114
HP contact information ........................................................................................................................... 114
Customer Self Repair ............................................................................................................................. 114
Regulatory compliance notices ................................................................................................... 122
Regulatory compliance identification numbers ........................................................................................... 122
European Union regulatory notice ........................................................................................................... 122
Disposal of waste equipment by users in private households in the European Union ....................................... 123
Taiwan battery recycling notice ............................................................................................................... 123
Acronyms and abbreviations ...................................................................................................... 124
Index ....................................................................................................................................... 128
Contents 6
Page 7

About this guide
Contents summary
• Installing the IO Accelerator
• Downloading and installing the approved driver and utilities
• Maintaining the IO Accelerator
• Description of the following IO Accelerator models:
o HP PCIe IO Accelerator
o HP PCIe IO Accelerator Duo
This user guide is intended for IO Accelerator software release 2.1 or later. For version 1.2.7.x, see the
previous version of this user guide.
About this guide 7
Page 8

Introduction
Overview
Designed around ioMemory, a revolutionary storage architecture, HP PCIe IO Accelerator is an advanced
NAND flash storage device. With performance comparable to DRAM and storage capacity on par with
hard disks, PCIe IO Accelerator increases performance so that every server can contain internal storage
that exceeds the I/O performance of an enterprise SAN.
PCIe IO Accelerator is the first data accelerator designed specifically to improve the bandwidth for I/Obound applications.
In addition to the hardware driver, the IO Accelerator also includes a VSL. This hybrid of the RAM
virtualization subsystem and the disk I/O subsystem combines the best features of both systems. VSL
functions as a disk to interface well with block-based applications and software while also running like
RAM underneath to maximize performance. This produces the following benefits:
• Performance: The VSL offers direct and parallel access to multiple CPU cores, enabling near linear
performance scaling, consistent performance across different read/write workloads, and low latency
with minimal interruptions and context switching.
• Extensibility: The VSL enables flash-optimized software development, making each IO Accelerator
module a flexible building block for creating a flash-optimized data center.
Performance attributes
IO Accelerator capacity 160GB 320GB
NAND type Single level cell (SLC) Multi-level cell (MLC)
Read bandwidth 770 MB/s (64K packet size) 735 MB/s (64K packet size)
Write bandwidth 750 MB/s (64K packet size) 510 MB/s (64K packet size)
IOPS* 140,000 (512B read packet
size)
123,000 (75/25 r/w mix
512B
packet size)
Access latency 26 μs (read) 29 μs (read)
IO Accelerator Duo
capacity
NAND type Single level cell (SLC) Multi-level cell (MLC)
Read bandwidth 1.5 GB/s (64K packet size) 1.0 GB/s (64K packet size)
Write bandwidth 1.5 GB/s (64K packet size) 1.5 GB/s (64K packet size)
IOPS* 261,000 (512B read packet
320GB 640GB
size)
238,000 (75/25 r/w mix
100,000 (512B read packet size)
67,000 (75/25 r/w mix 512B
packet size)
196,000 (512B read packet size)
138,000 (75/25 r/w mix 512B
Introduction 8
Page 9

512B
packet size)
IO Accelerator Duo
capacity
Access latency 26 μs (read) 29 μs (read)
*Performance achieved using multiprocessor enterprise server
• Enterprise data integrity
• Field upgradeability
• Green footprint, 7.5 watts nominal per device
NOTE: MSI was disabled to obtain these statistics.
Packing list
• PCIe IO Accelerator Solid State Storage Device
• HP PCIe IO Accelerator for ProLiant Servers installation instructions
• PCIe IO Accelerator half-height bracket (used on low-profile systems)
320GB 640GB
packet size)
Required operating environment
The HP PCIe IO Accelerator is supported for use in the following operating environments:
• Red Hat Enterprise Linux 4 (AMD64/EM64T)
• Red Hat Enterprise Linux 5 (AMD64/EM64T)
• Red Hat Enterprise Linux 6 (AMD64/EM64T)
• SUSE LINUX Enterprise Server 10 (AMD64/EM64T)
• SUSE LINUX Enterprise Server 11 (AMD64/EM64T)
• Windows Server® 2003 (x86_64-bit only) SP2
• Windows Server® 2008 (x86_64-bit only) R1 with SP2 or higher
• Windows Server® 2008 (x86_64-bit only) R2
• VMWare ESX 4.0 Update 1
CAUTION: Version 2.2 of the driver software is not backward-compatible with any previous
driver version. When you install version 2.2, you cannot revert to any previous version.
IMPORTANT: All operating systems must be 64-bit architecture.
NOTE: IO Accelerators cannot be used as hibernation devices.
Introduction 9
Page 10

Supported firmware revisions
Release Firmware revision
1.2.4 17350
1.2.7 36867 or 42014
1.2.8.4 43246
2.2 43674
Supported hardware
NOTE: ESX supports a maximum of five IO Accelerators or two IO Accelerator Duos per
HP PCIe IO Accelerator minimum requirements:
• An open PCI-Express slot—The accelerator requires a minimum of one half-length, half-height slot
• 300 LFM of airflow at no greater than 50°C. To protect against thermal damage, the IO Accelerator
• Sufficient RAM to operate—The amount of RAM that the driver requires to manage the NAND flash
Average block
size(bytes)
8,192 250 400
4,096 (most common) 400 800
2,048 750 1,500
1,024 1,450 2,900
512 2,850 5,600
system.
with an x4 physical connector. All four lanes must be connected for full performance. HP PCIe IO
Accelerator Duo requires a minimum of a full-height, half-length slot with an x8 physical connection.
If your system is using PCI 1.1, all x8 signaling lanes must be connected for full performance. If your
system is using PCI 2.0, only x4 signaling lanes must be connected for full performance.
NOTE: For PCIe IO Accelerators, using PCIe slots greater than x4 does not improve
performance.
also monitors the junction temperature of its controller. This is the internal temperature of the
controller, and it is reported in fio-status. The IO Accelerator begins throttling write
performance when the junction temperature reaches 78 degrees C. If the junction temperature
continues to rise, the IO Accelerator shuts down when the temperature reaches 85 degrees C.
NOTE: If you experience write performance throttling due to high temperatures, see your
computer documentation for details on increasing airflow, including fan speeds.
varies according to the block size you select when formatting the device (filesystem format, not lowlevel format). The following table lists the amount of RAM required per 80GB of storage space, using
various block sizes. The amount of RAM used in driver version 2.1 is significantly less than the
amount used in version 1.2.x.
RAM usage (Megabytes)
per 80GB of storage for
version 2.x
RAM usage
(Megabytes) per
80GB of storage for
version 1.2.x
Introduction 10
Page 11

* The fio-format utility automatically formats the device to this block size unless specified differently.
You can reduce memory use by selecting a 4K sector size, forcing the average written block size to be 4K
or greater. For most systems, even when formatted with 512 byte sectors, actual memory use typically
tracks 4K or greater average I/O size.
The HP IO Accelerator Duo requires a PCIe Gen1 x8 slot or a PCIe Gen2 x4 slot. For maximum
performance, HP recommends that an external power source be connected to the IO Accelerator Duo,
through the Duo external power supply connector. If the external power supply connector is not used, the
PCIe slot holding the Duo must be capable of providing a power requirement of at least 25 watts. The
Duo power-throttles to an average of 25 watts to meet the 25-watt requirement of the PCIe slot when the
external power connector is not used. This power throttling might cause slower performance with the Duo.
Introduction 11
Page 12
Hardware installation
Installing the HP PCIe IO Accelerator
WARNING: To reduce the risk of personal injury or damage to the equipment, consult the
safety information and user documentation provided with the server before attempting the
installation.
Many servers are capable of providing energy levels that are considered hazardous and are
intended to be serviced only by qualified personnel who have been trained to deal with these
hazards. Do not remove enclosures or attempt to bypass any interlocks that may be provided
To install the IO Accelerator:
1. If you are installing the PCIe IO Accelerator in a low-profile system, use the half-height bracket. See
2. Locate the serial number on your PCIe IO Accelerator and record it.
for the purpose of removing these hazardous conditions.
CAUTION: Electrostatic discharge might damage electronic components. Be sure that you are
properly grounded (earthed) before beginning any installation procedure.
"Installing a half-height bracket (on page 15)."
3. Power off the server, and then disconnect the power cable.
4. Remove the server access panel.
5. Locate an available PCIe slot. For details on removing the panel and identifying PCIe slots, see your
server documentation.
Hardware installation 12
Page 13
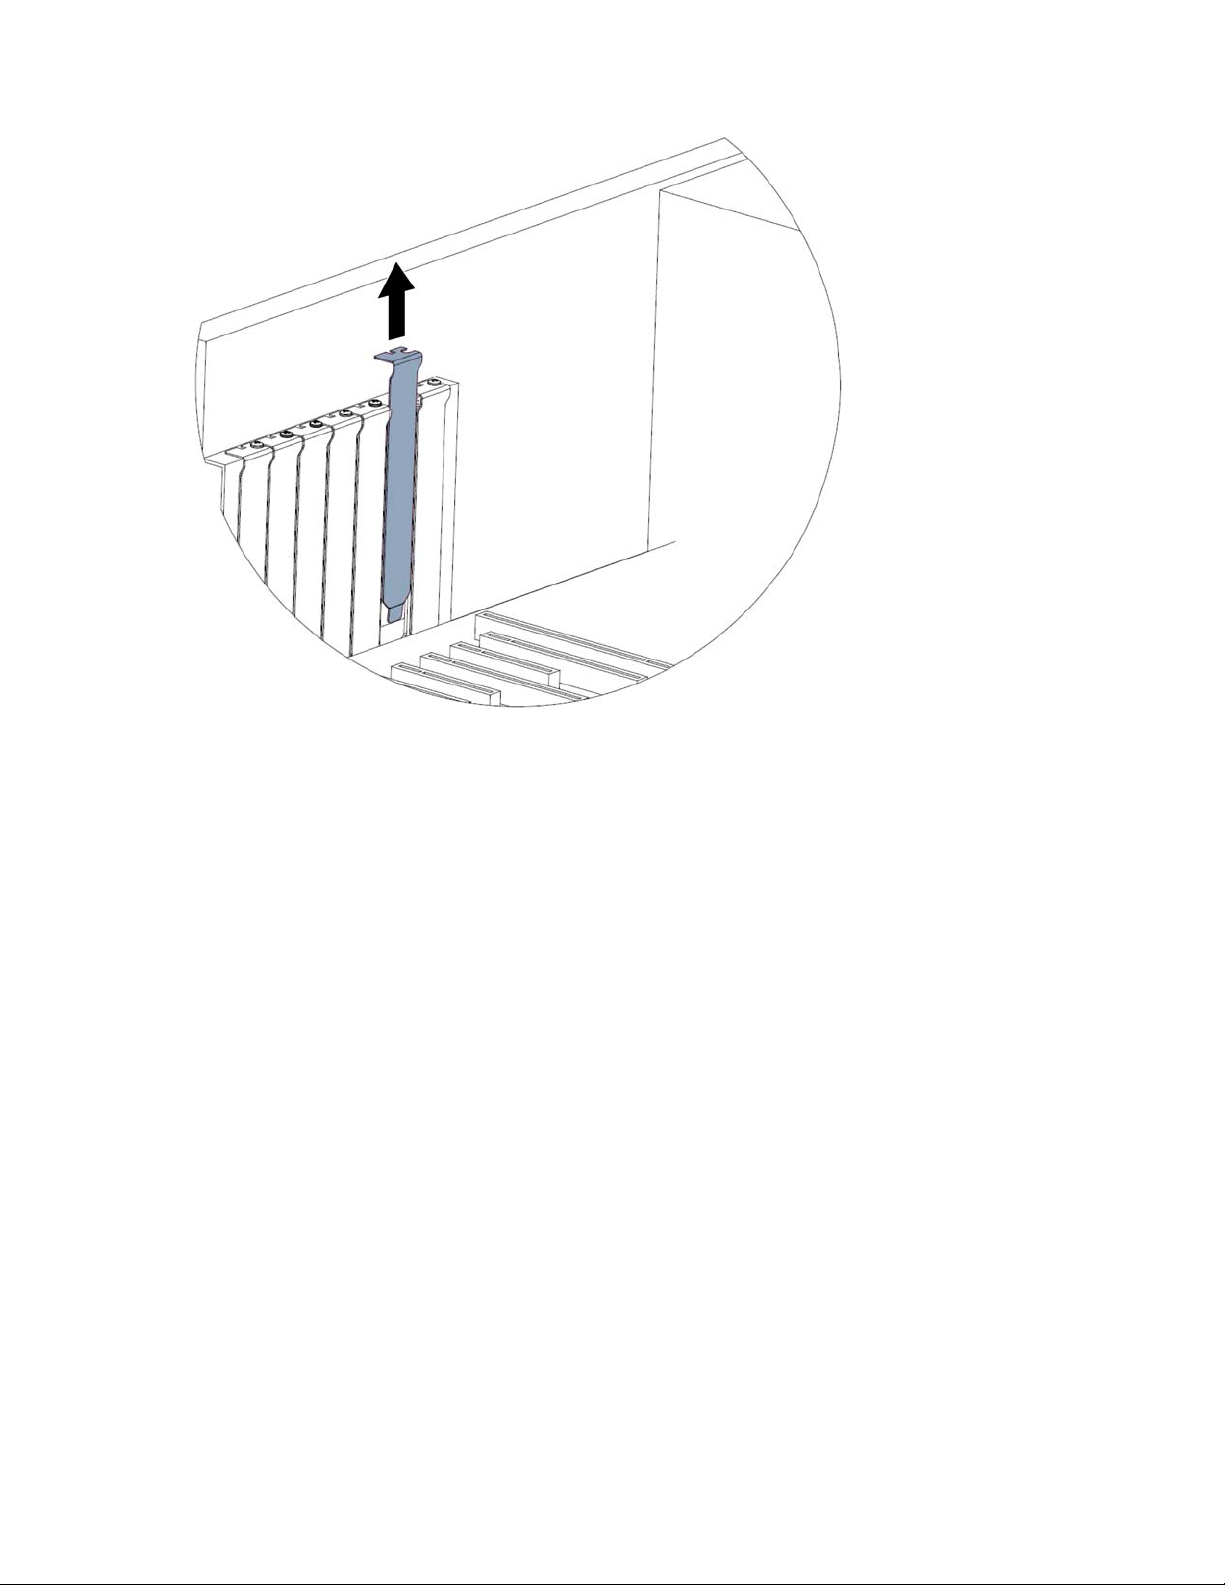
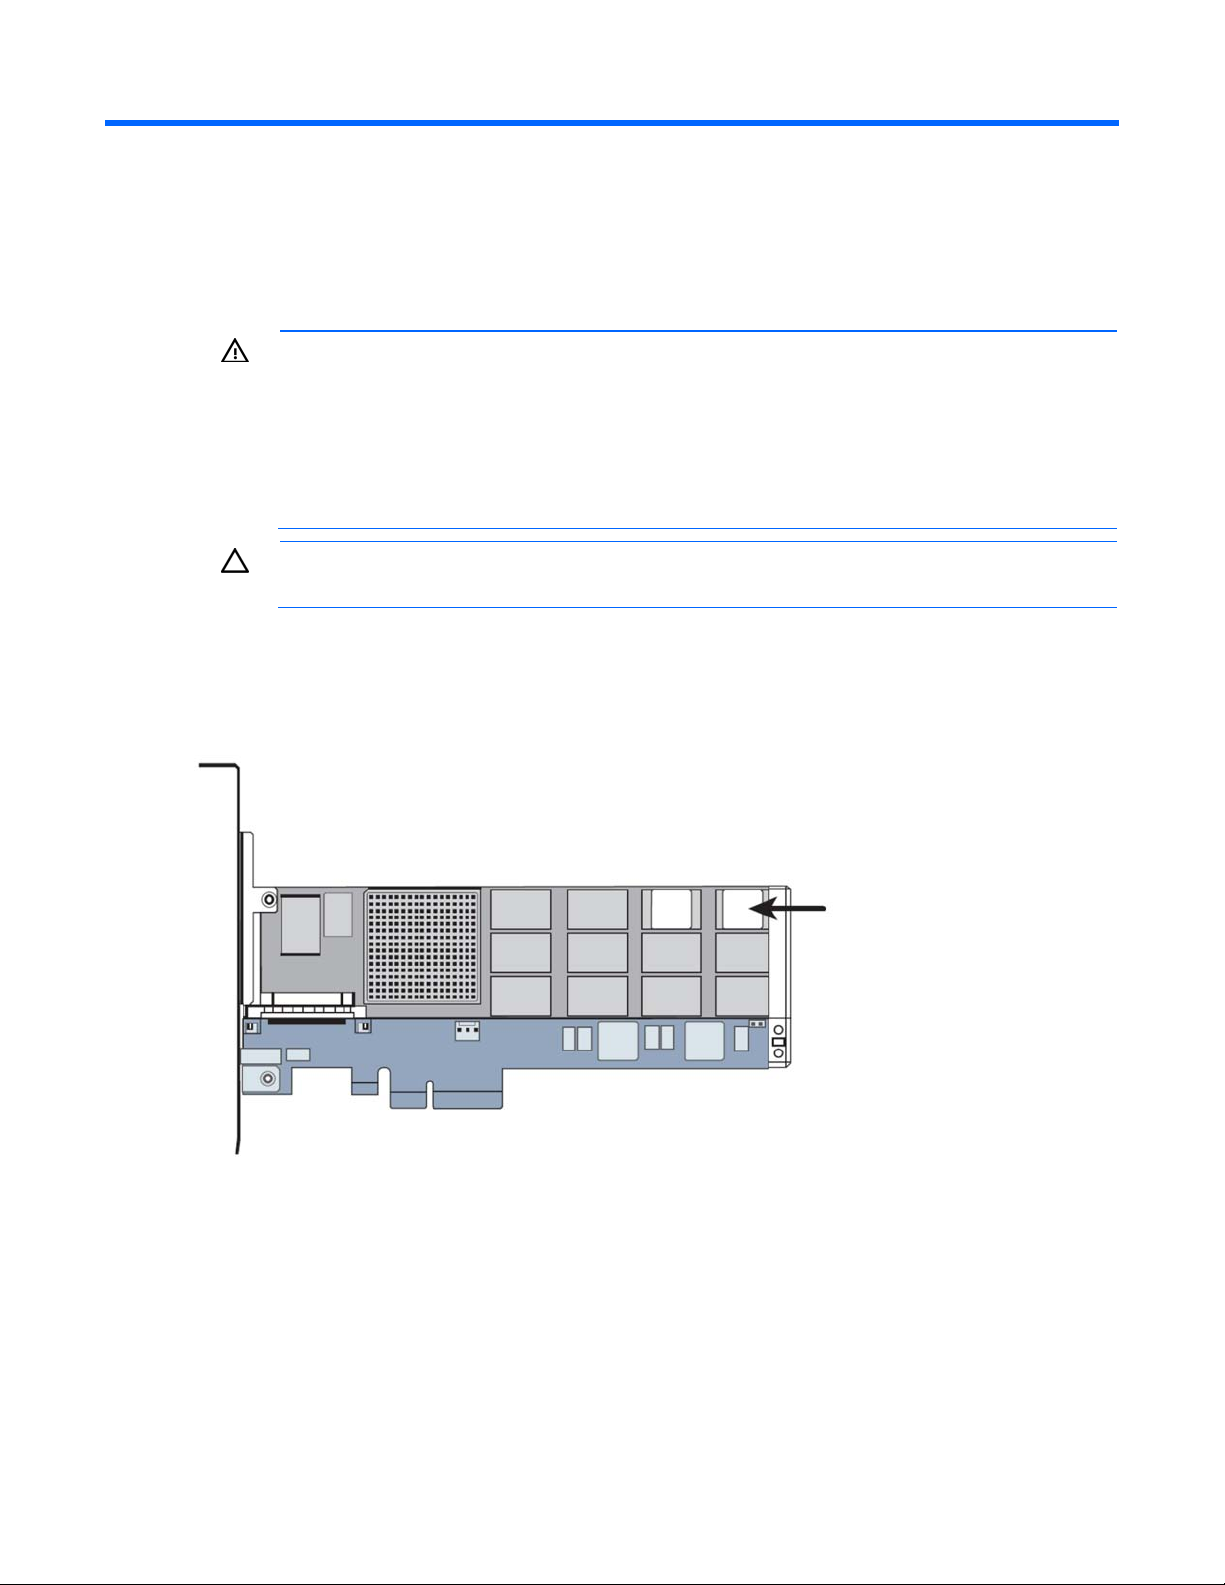
6.
If applicable, remove the cover slot.
Hardware installation 13
Page 14

7.
Grasp the PCIe IO Accelerator by the top edge and insert it gently, but firmly, into the available
PCIe slot.
Hardware installation 14
Page 15
8.
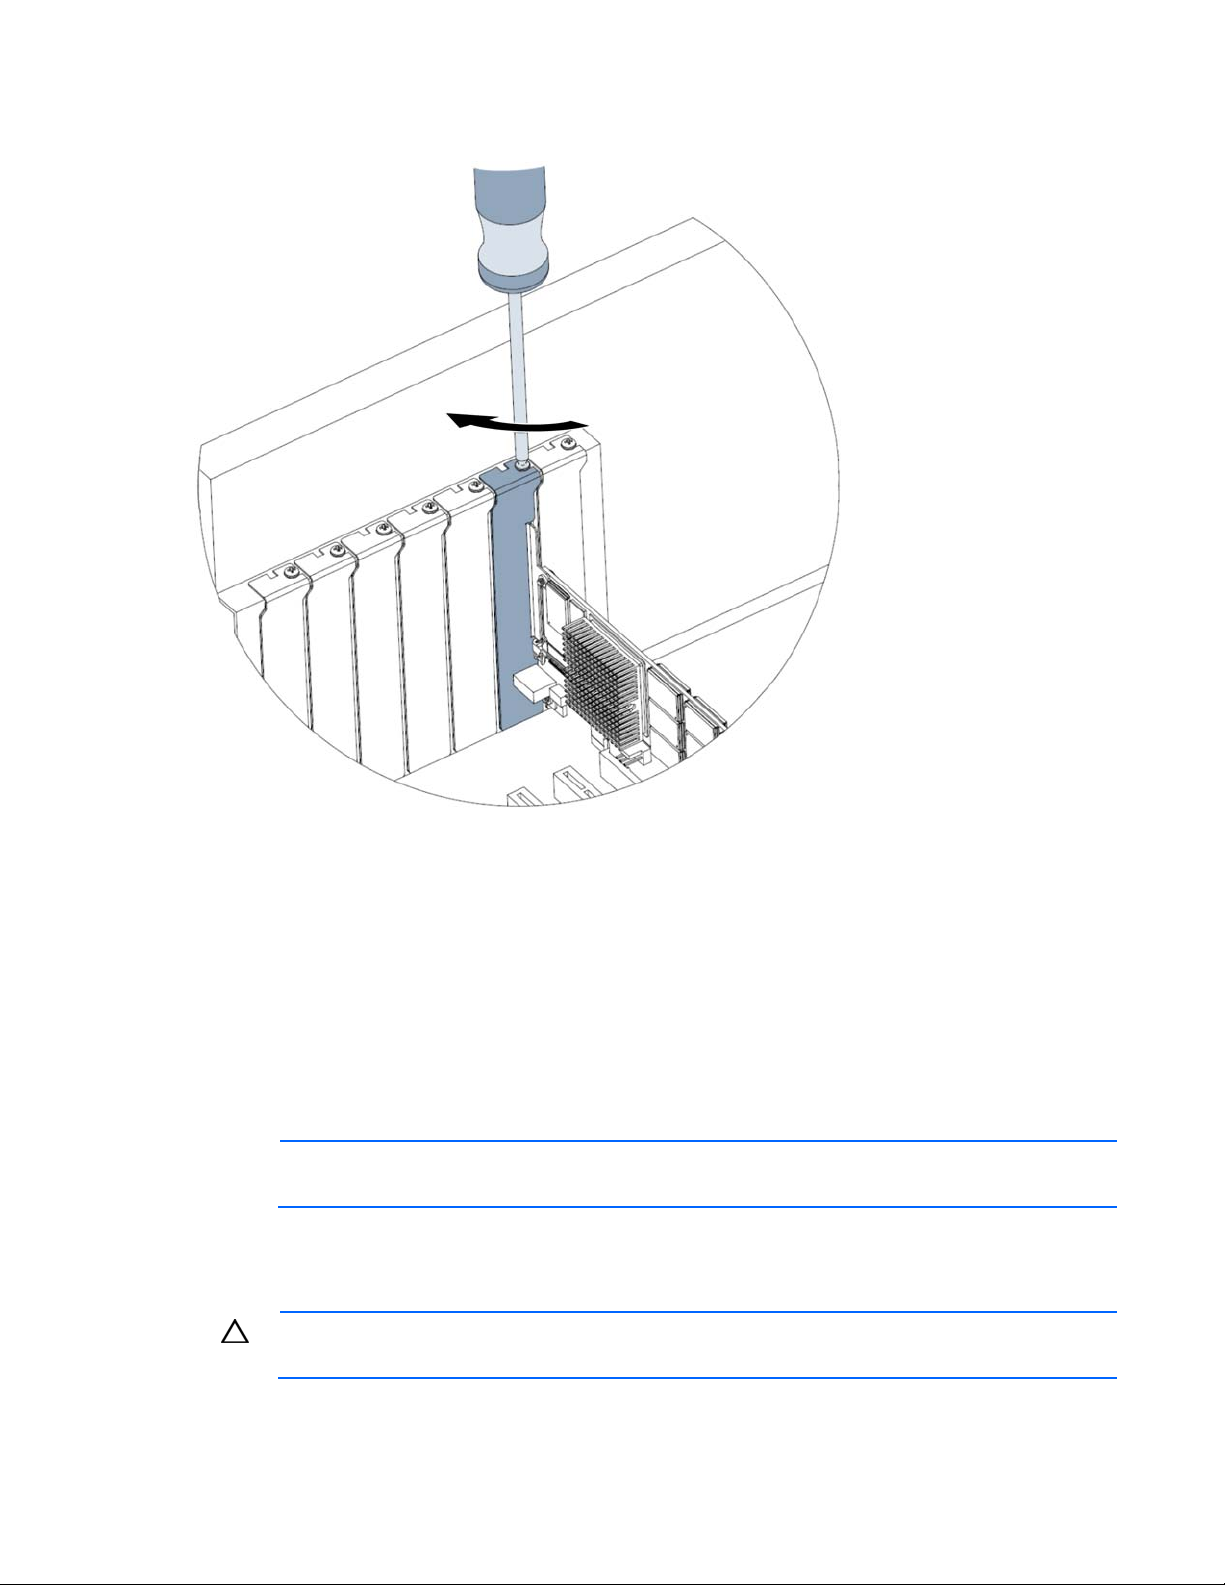
Secure the PCIe IO Accelerator retaining bracket using a screw or lever (depending on how your
hardware is configured).
9. Replace the server access panel.
10. Plug in the power cable.
11. Power on the server.
If your operating system detects the PCIe IO Accelerator and prompts you to install a driver for the
device, click Cancel.
12. Install the driver and utilities software. For instructions, see "Linux environments (on page 21),"
"Windows Server environments (on page 40)," "Solaris environments," or "VMware ESX and ESXi
environments ("VMWare ESX environments" on page 61)."
Installing a half-height bracket
NOTE: The PCIe IO Accelerator Duo is not compatible with the half-height bracket.
For half-height installation (such as in low-profile systems), replace the full-height retaining bracket with the
included half-height bracket.
CAUTION: Electrostatic discharge might damage electronic components. Be sure that you are
properly grounded (earthed) before beginning any installation procedure.
Hardware installation 15
Page 16
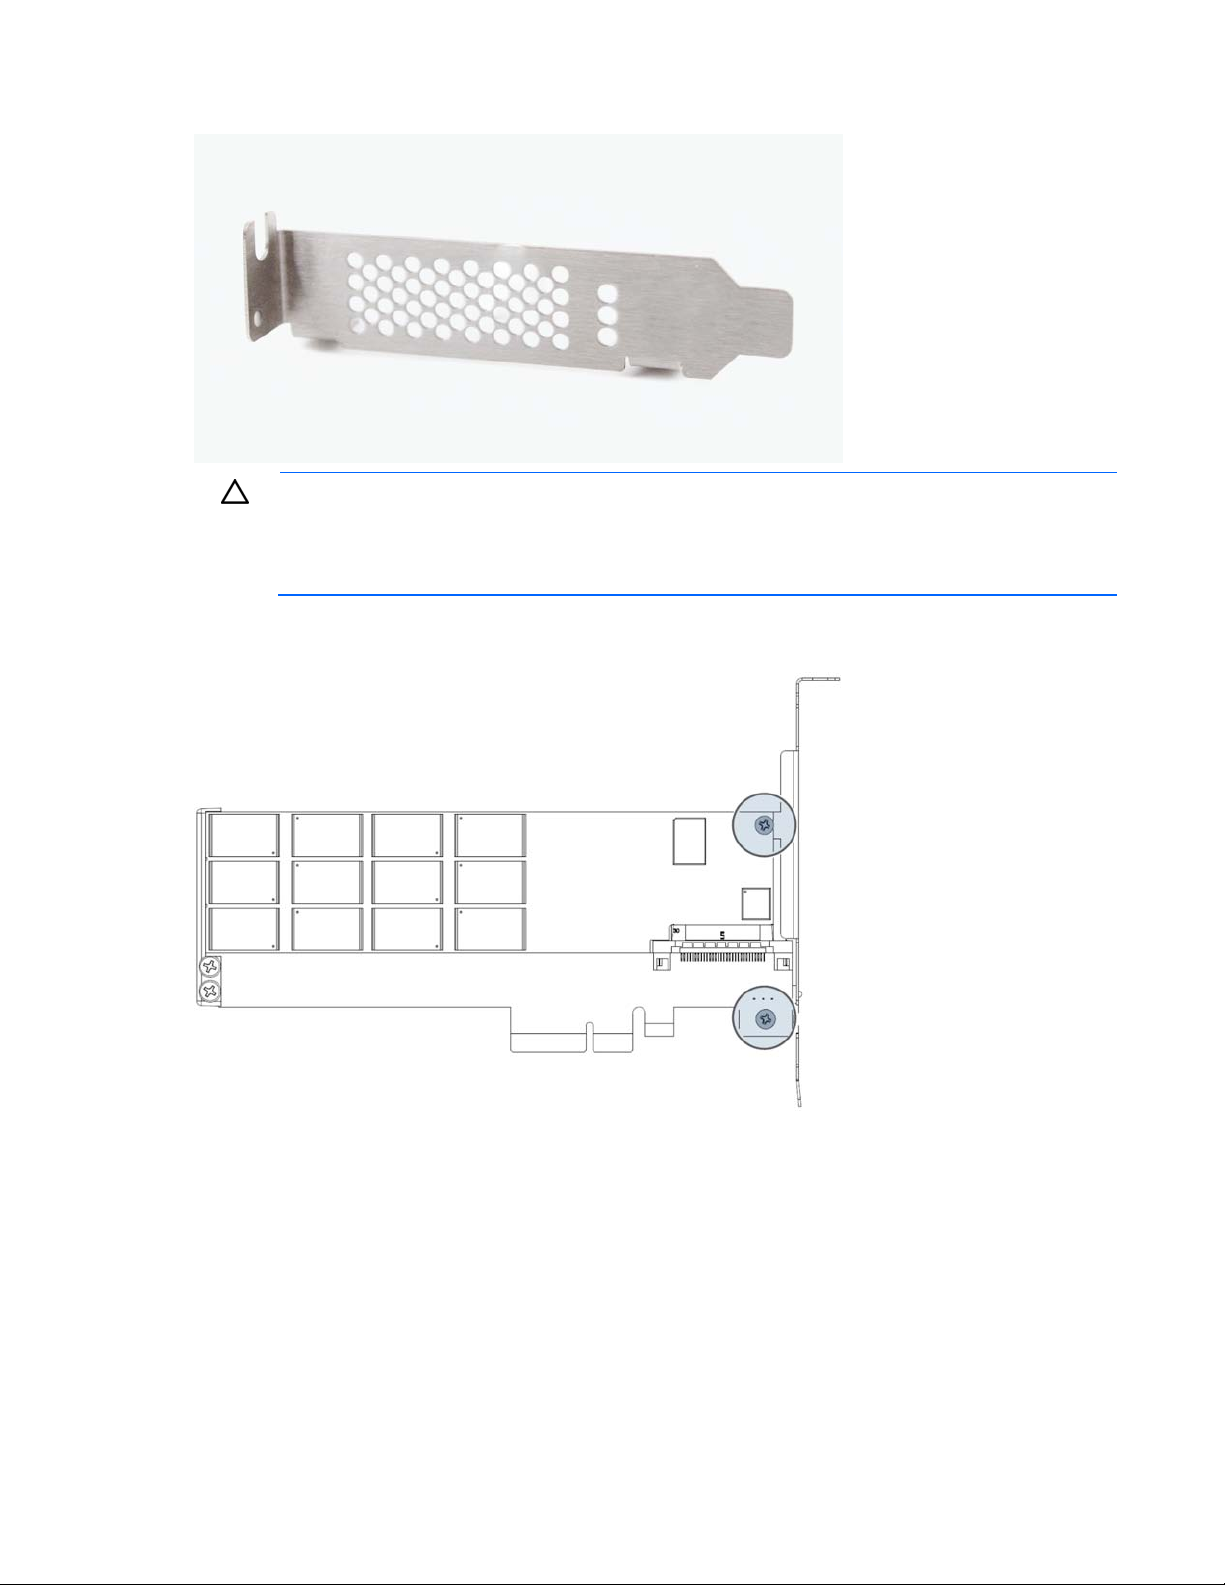
1.
Locate the half-height bracket in your PCIe IO Accelerator package.
CAUTION: Use care when removing the retaining screws. Do not twist or pull on the bracket
until both screws are out as this can cause damage to components.
To prevent damage to the PCIe IO Accelerator, use only a Philips #1 screwdriver.
2. Remove the two screws holding the full-height bracket to the PCIe IO Accelerator.
3. Remove the bracket carefully from the device.
Hardware installation 16
Page 17

4.
Align the LEDs on the PCIe IO Accelerator with the holes in the half-height bracket. Be sure the
bracket tabs are on the heat sink side of the device.
5. Attach the half-height bracket using a Philips #1 screwdriver to tighten the two screws.
Hardware installation 17
Page 18

CAUTION: Do not overly tighten screws. Overly tightening the screws might damage the
device.
6. Return to "Installing the HP PCIe IO Accelerator (on page 12)" and begin with step 2.
Installing the HP PCIe IO Accelerator Duo
1. Locate the serial and informational numbers on each side of your ioDrive Duo and record them.
2. Power off the computer and disconnect the power cable.
3. Remove the computer access panel.
4. Locate an available Gen1 x8 or Gen2 x4 PCIe slot. For details on removing the panel and
identifying PCIe slots, see your computer documentation.
NOTE: If you are not using an external power connection, choose a slot that provides ample
power for the IO Accelerator Duo. For more information, see "Supported hardware (on page
5. If applicable, remove the cover slot.
10)."
Hardware installation 18
Page 19

6.
Grasp the Duo by the top edge and seat it in the available PCIe slot.
Hardware installation 19
Page 20

7.
Secure the Duo retaining bracket using a screw or lever (depending on how your hardware is
configured).
8. If you are connecting to an external power supply, plug one end of the supplied cable into the Duo
power connection and the other into the external power source.
9. Replace the computer access panel.
10. Plug in the power cable and power on the computer.
11. Your operating system might detect the Duo and prompt you to install a driver for the device. If so,
click Cancel.
Hardware installation 20
Page 21

Linux environments
Linux installation requirements
The HP-provided Linux installers for the IO Accelerator do not contain binary driver modules. Instead, they
build the binary driver RPMs specific to the active Linux kernel by using a source RPM for the driver and
compiler or build tools. This action enables the use of customized kernels, but does place additional
requirements on the system used for initial installation (also known as the build system). After performing
an installation on the build system, the binary driver RPM can be deployed to other systems without
having to rebuild it.
The following table summarizes the base modules required for the build system.
Distribution Requirements
RHEL4 kernel (x86-64), kernel-devel (x86-64), rpm-build, rsync,
redhat-lsb, gcc, dialog
RHEL5, 6 kernel (x86-64), kernel-devel (x86-64), rpm-build, rsync,
redhat-lsb, gcc, dialog
SLES10 kernel-smp, kernel-source, rsync, lsb, gcc, dialog
SLES11 kernel-smp, kernel-source, rsync, lsb, gcc, dialog
These modules might have other dependencies that install automatically assuming you are using some
type of package manager or installer. The kernel-level (for RHEL4, 5, and 6) and kernel-source (for
SLES10 & SLES11) modules must match the kernel version in use.
To determine which kernel version is running on your system, enter the following command:
$ uname -r
All commands require administrator privileges. Log in as root or use the sudo command to run the
installation.
Downloading and installing the driver and utilities using Linux
CAUTION: Upgrading an IO Accelerator from Version 1.2.x to Version 2.x is a one-way
process. New firmware is required that is not compatible with 1.2.x systems. Be sure all data
The IO Accelerator software bundle includes the driver, firmware, utilities, and SNMP agent utilities. The
2.x software bundle also includes the Linux HP IO Accelerator Management Tool. You can download the
SMH web templates separately from the same location.
For Linux, the two software packages to download, run, and manage the IO Accelerator are:
is backed up before continuing with the upgrade.
• HP IO Accelerator production installation software: hp_io_accelerator-{version}.run or a .tar file
Linux environments 21
Page 22

• SMH webpage: hp_ioaccelerator_system_management_homepage_web_templates
To install the IO Accelerator software:
1. If you are upgrading your IO Accelerator, backup your data.
2. Install the hardware.
3. Download and install software version 2.2:
a. Go to the HP website (http://www.hp.com/support).
b. Search for HP IO Accelerator, and navigate to the IO Accelerator product page.
c. Select the appropriate files for your operating environment.
d. Download the files.
4. Load the driver by running the following command:
modprobe iomemory_vsl
5. To update the firmware (required on upgrades), open up the IO Accelerator Management Tool or
run the following command:
fio—update-iodrive /usr/share/fio/firmware/ioaccelerator_43674.fff (or
equivalent *.fff file)
6. Reboot the system.
7. If you plan to run SMH, install the SMH web templates.
Installing the HP installer script
You must uninstall any previous 1.2.x versions of the IO Accelerator software and RPMs, including the HP
IO Accelerator Management Tool, before installing the HP installer script. For more information, see
"Uninstalling and upgrading the driver using Linux (on page 28)." HP also recommends that you have
net-snmp installed prior to installing the IO Accelerator software.
To install the HP installer script:
1. Download the IO Accelerator installation software package. ("Downloading and installing the driver
and utilities using Linux" on page 21)
2. Insure that the system you are installing the HP installer script to has the necessary Linux components
installed. ("Linux installation requirements" on page 21)
3. Change the directory to the location where you placed the downloaded package.
4. At the command line, enter the following command:
gunzip -d <filename>.tar.gz
For example:
gunzip -d Linux_rhel-5.tar.gz
5. Enter the following command:
tar -xvf <filename>.tar
This command creates a directory called <filename>.
6. Open the <filename> directory to locate the .sh or .run installer script.
7. Enter the following command to begin installation (the filename might change with the release):
bash <filename>
where <filename> is the downloaded .sh or .run installer script.
Linux environments 22
 Loading...