

Page 1

Power
Document Part Number: 393525-002
December 2005
This guide explains how the computer uses power.
Page 2

Contents
1 Power controls and lights
2 Power sources
Connecting the AC adapter . . . . . . . . . . . . . . . . . . . . . . . 2–2
3 Standby and hibernation
Standby. . . . . . . . . . . . . . . . . . . . . . . . . . . . . . . . . . . . . . . 3–1
Hibernation. . . . . . . . . . . . . . . . . . . . . . . . . . . . . . . . . . . . 3–2
Initiating standby, hibernation or shutdown. . . . . . . . . . . 3–3
When you leave your work . . . . . . . . . . . . . . . . . . . . 3–3
When a reliable power supply is unavailable . . . . . . 3–4
When using wireless communication or readable or
writable media (select models only) . . . . . . . . . . . . . 3–5
4 Default power settings
Turning the computer or display on or off . . . . . . . . . . . . 4–2
Using emergency shutdown procedures. . . . . . . . . . . . . . 4–3
Initiating or resuming from standby. . . . . . . . . . . . . . . . . 4–4
Initiating or restoring from hibernation . . . . . . . . . . . . . . 4–5
5 Power options
Accessing Power Options Properties . . . . . . . . . . . . . . . . 5–1
Displaying the Power Meter icon. . . . . . . . . . . . . . . . . . . 5–2
Setting or changing a power scheme . . . . . . . . . . . . . . . . 5–3
Setting a security prompt . . . . . . . . . . . . . . . . . . . . . . . . . 5–4
Power ii
Page 3

6 Processor performance controls
7 Battery packs
Inserting or removing a battery pack . . . . . . . . . . . . . . . . 7–2
Charging a battery pack . . . . . . . . . . . . . . . . . . . . . . . . . . 7–4
Monitoring the battery pack charge . . . . . . . . . . . . . . . . . 7–5
Obtaining accurate charge information . . . . . . . . . . . 7–5
Displaying charge information on the screen . . . . . . 7–6
Managing low-battery conditions . . . . . . . . . . . . . . . . . . 7–6
Identifying low-battery conditions . . . . . . . . . . . . . . 7–7
Resolving low-battery conditions . . . . . . . . . . . . . . . 7–8
Calibrating a battery pack . . . . . . . . . . . . . . . . . . . . . . . . 7–9
When to calibrate. . . . . . . . . . . . . . . . . . . . . . . . . . . . 7–9
How to calibrate. . . . . . . . . . . . . . . . . . . . . . . . . . . . 7–10
Conserving battery power . . . . . . . . . . . . . . . . . . . . . . . 7–13
Conserving power as you work . . . . . . . . . . . . . . . . 7–13
Selecting power conservation settings. . . . . . . . . . . 7–14
Storing a battery pack. . . . . . . . . . . . . . . . . . . . . . . . . . . 7–14
Disposing of a used battery pack . . . . . . . . . . . . . . . . . . 7–14
Contents
Index
Power iii
Page 4
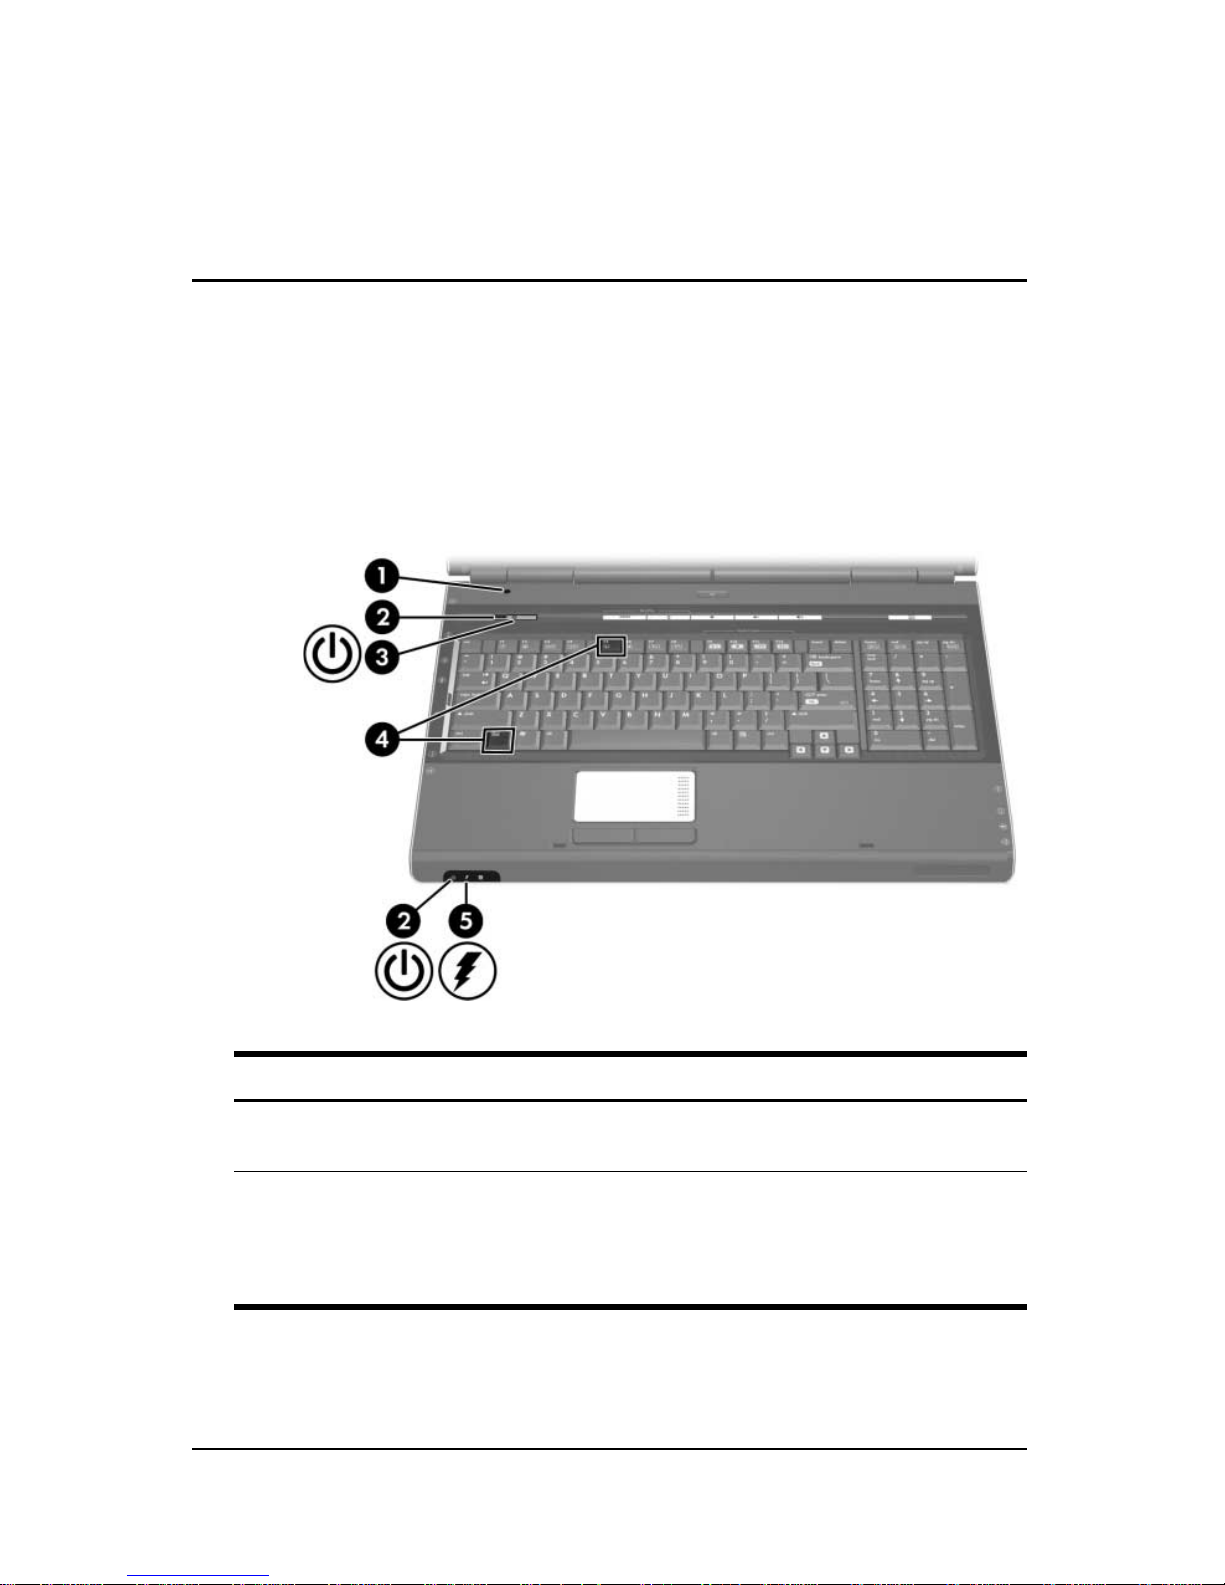
Power controls and lights
The following illustration and table identify and describe the
power control and light locations.
1
Component Description
1 Display switch Initiates standby if the display is closed
2 Power lights* (2) On: The computer is on.
Power 1–1
when the computer is on.
Blinking: The computer is in standby.
Off: The computer is off or in
hibernation.
(Continued)
Page 5

Power controls and lights
Component Description
Power button When the computer is
3
■ Off, press to turn on the computer.
■ On, press to enter hibernation.
■ In standby, briefly press to exit
standby.
■ In hibernation, briefly press to exit
hibernation.
If the computer has stopped
responding and Microsoft® Windows®
shutdown procedures cannot be used,
press and hold the power button for at
least 5
computer.
fn+f5 Initiates standby.
4
seconds to turn off the
5 Battery light On: A battery pack is charging or is
close to full charge capacity.
Off: If the computer is plugged into an
external power source, the light is
turned off when all batteries in the
computer are fully charged. If the
computer is not plugged into an
external power source, the light stays
off until the battery reaches a
low-battery condition.
Blinking: A battery pack that is the only
available power source has reached a
low-battery condition. When the
battery reaches a critical low-battery
condition, the battery light begins
blinking quickly.
*There are 2 power lights, which display the same information. The light on
the power button is visible only when the computer is open. The other power
light is always visible even when the computer is closed.
1–2 Power
Page 6

Power sources
The computer can run on internal or external AC power.
following table indicates the best power source for
The
common
Task Recommended Power Source
tasks.
2
Work in most software
applications
Charge or calibrate a battery
pack in the computer
Install or modify system
software or write to a CD
DVD
or
■ Charged battery pack in the computer
■ External power supplied through one of the
following devices:
❐ AC adapter
❐ Optional docking device
❐ Optional power adapter
External power supplied through
■ AC adapter
■ Optional docking device
■ Optional power adapter
External power supplied through
■ AC adapter
■ Optional docking device
■ Optional power adapter
Power 2–1
Page 7
Power sources
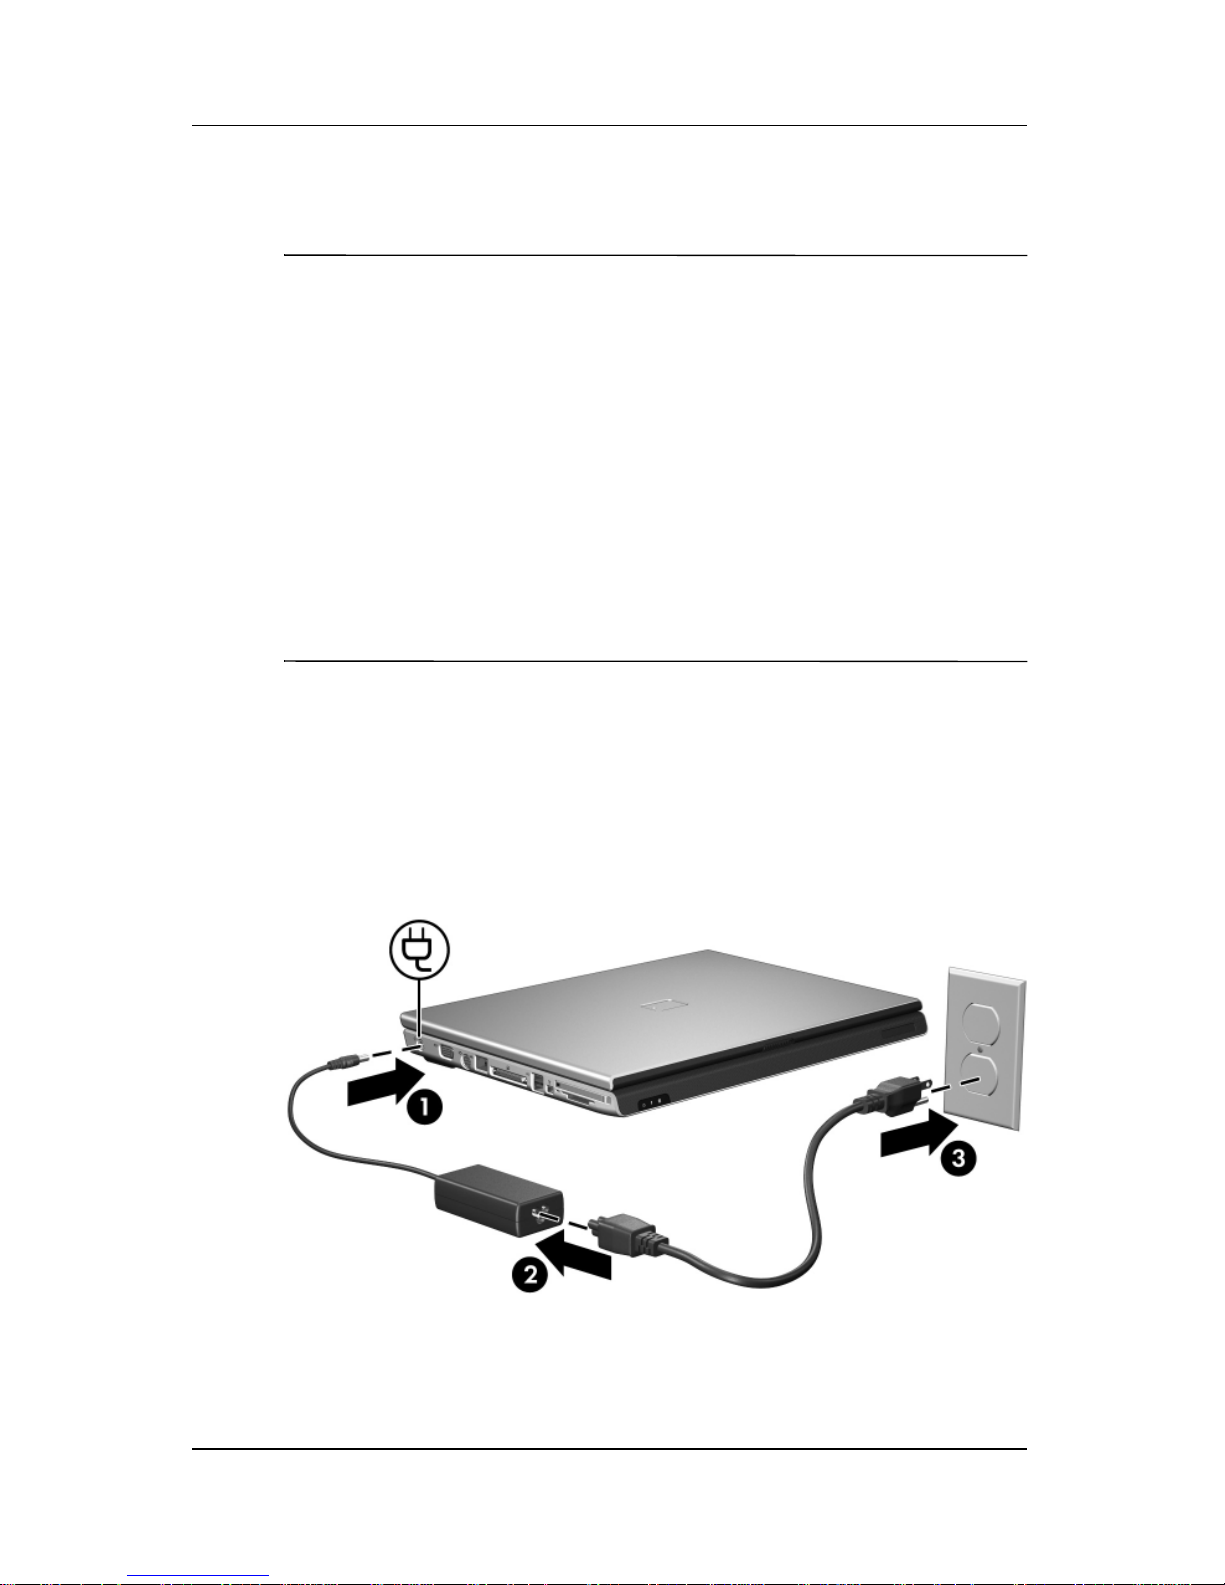
Connecting the AC adapter
WARNING: To reduce the risk of electric shock or damage to the
Å
equipment:
■ Plug the power cord into an AC outlet that is easily accessible at
times.
all
■ Disconnect power from the computer by unplugging the power
from the AC outlet (not by unplugging the power cord from
cord
computer.)
the
■ If provided with a 3-pin attachment plug on the power cord, plug
the cord into a grounded (earthed) 3-pin outlet. Do not disable the
power cord grounding pin; for example, by attaching a 2-pin
adapter. The grounding pin is an important safety feature. It is
possible to receive an electric shock from a system that is not
properly grounded.
To connect the computer to external AC power:
1. Plug the AC adapter into the power connector 1 on rear panel
of the computer.
2. Plug the power cord into the AC adapter 2.
3. Plug the other end of the power cord into an AC outlet 3.
2–2 Power
Page 8

Standby and hibernation
Standby and hibernation are energy-saving features that conserve
power and reduce startup time. They can be initiated by you or by
the system. For more information, refer to “
hibernation or shutdown.”
Standby
CAUTION: To avoid a complete battery discharge, do not leave the
Ä
computer in standby for extended periods. Connect the computer to an
external power source.
3
Initiating standby,
Ä
Standby reduces power to system components that are not in use.
When standby is initiated, your work is stored in random access
memory (RAM), and then the screen is cleared. When the
computer is in standby, the power lights blink. When you resume
from standby, your work returns to the screen where you left off.
CAUTION: To reduce the risk of information loss, save your information
before initiating standby.
Power 3–1
Page 9

Standby and hibernation
Hibernation
CAUTION: If the configuration of the computer is changed during
Ä
hibernation, resuming from hibernation may not be possible. When
computer is in hibernation:
the
■ Do not dock the computer in or undock the computer from a
docking device.
■ Do not add or remove memory modules.
■ Do not insert or remove hard drives or optical drives.
■ Do not connect or disconnect external devices.
■ Do not insert or remove an external media card such as a Digital
Media Slot card, a PC Card, or an ExpressCard.
Hibernation saves your work to a hibernation file on the hard
drive, and then shuts down the computer. The power lights are
turned off. When you restore from hibernation, your work returns
to the screen where you left off. If a power-on password has been
set, the password must be entered to restore from hibernation.
Ä
CAUTION: To reduce the risk of information loss, save your information
before initiating hibernation.
You can disable hibernation. However, if hibernation is disabled
and the system reaches a low-battery condition, the system will
not automatically save your work when power is on or when
standby has been initiated.
Use Power Options in Microsoft® Windows® Control Panel to
reenable hibernation:
» Select Start > Control Panel > Performance and
Maintenance > Power Options > Hibernate tab. Make
that the Enable hibernation check box is selected.
sure
To set the time interval after which the system initiates
hibernation:
1. Select Start > Control Panel > Performance and
Maintenance > Power Options.
2. Click one of the intervals in the System hibernates list.
3–2 Power
Page 10

Standby and hibernation
Initiating standby, hibernation or
shutdown
The following sections explain when to initiate standby or
hibernation and when to shut down the computer.
You cannot initiate any type of networking communications
✎
When you leave your work
perform any computer functions when the computer is in
or
standby or hibernation.
When standby is initiated, your work is stored in random access
memory (RAM), and then the screen is cleared. When the
computer is in standby, it uses less power than when it is on. Your
work returns instantly to the screen when you resume from
standby.
Hibernation saves your work to a hibernation file on the hard
drive, and then shuts down the computer. When the computer is
hibernation, it uses much less power than when it is in standby.
in
When the computer will be unused and disconnected from
external power for an extended period, shut down the computer
and remove the battery pack to extend the life of the battery
pack. For details on battery pack storage, refer to “
battery pack.”
Storing a
Power 3–3
Page 11

Standby and hibernation
When a reliable power supply is
unavailable
Make sure that hibernation remains enabled, especially if you are
operating the computer on battery power and do not have access
to an external power supply. If the battery pack fails, hibernation
saves your work to a hibernation file and shuts down the
computer.
If you pause your work when the power supply is uncertain, you
take one of the following actions:
■ Save your work, and then initiate standby.
■ Initiate hibernation.
■ Shut down the computer.
3–4 Power
Page 12

Standby and hibernation
When using wireless communication
readable or writable media
or
(select
CAUTION: To prevent possible audio and video degradation, or loss
Ä
of audio or video playback functionality, do not initiate standby or
hibernation when reading or writing to a CD, DVD, or external media
card. To prevent loss of information, do not initiate standby or
hibernation when writing to a CD or DVD.
Standby and hibernation interfere with the use of infrared and
Bluetooth communication, and media. Note the following
guidelines.
■ If the computer is in standby or hibernation, you cannot
■ If standby or hibernation is accidentally initiated during
models only)
initiate an infrared or Bluetooth transmission.
playback of a medium such as a CD, DVD, or external
media
❏ Your playback may be interrupted.
❏ You may see the following warning message: “Putting the
card:
computer into hibernation or standby may stop the
playback. Do you want to continue?” Click No.
❏ You may need to restart the CD or DVD to resume audio
and video playback.
Power 3–5
Page 13

Standby and hibernation
3–6 Power
Page 14

4
Default power settings
This section explains the default standby, hibernation, and
shutdown procedures.
The controls and lights discussed in this section are illustrated
Chapter 1, “Power controls and lights.”
in
Power 4–1
Page 15

Default power settings
Turning the computer or display on
off
or
Task Procedure Result
Turn on the
computer.
Shut down the
computer.
Turn off the
display when the
power is
on.
Press the power button. ■ The power lights are
turned on.
■ The operating system
loads.
Save your work and close all
open applications. Then shut
down the computer through the
operating system by selecting
> Turn Off Computer >
Start
Turn Of f.
If the system is
✎
unresponsive and you are
unable to shut down the
computer with these
procedures, refer to “
emergency shutdown
procedures.”
Close the computer. Closing the computer
Using
■ The power lights are
turned off.
■ The operating system
shuts down.
■ The computer is
turned
activates the display
switch, which initiates
standby.
off.
4–2 Power
Page 16

Using emergency shutdown
procedures
CAUTION: Emergency shutdown procedures result in the loss of
Ä
unsaved information.
If the computer is unresponsive and you are unable to use normal
Windows shutdown procedures, try the following emergency
procedures in the sequence provided:
■ Press ctrl+alt+delete. Then, select Shut Down > Turn Off.
■ Press and hold the power button for at least 5 seconds.
■ Disconnect the computer from external power and remove
battery pack.
the
Default power settings
Power 4–3
Page 17

Default power settings
Initiating or resuming from standby
Task Procedure Result
Initiate standby. ■ With the computer on,
fn+f5.
press
– or –
■ Select Start > Turn Off
Computer > Stand by.
In Windows XP Professional,
Stand by is not displayed.
if
1. Press the down arrow.
2. Select Stand by from
list.
the
3. Click OK.
– or –
■ Close the computer.
Resume from
user-initiated
standby.
■ Press the power button.
■ If the display was closed when
the computer was in standby,
open the display.
■ The power lights
blink.
■ The screen clears.
■ The power lights are
turned on.
■ Your work returns to
the screen.
4–4 Power
Page 18

Default power settings
Initiating or restoring from hibernation
Hibernation cannot be initiated unless it is enabled. Hibernation
is enabled by default.
To verify that hibernation remains enabled:
» Select Start > Control Panel > Performance and
Maintenance > Power Options > Hibernate tab. If
hibernation is enabled, the Enable hibernation check box
selected.
is
Task Procedure Result
Initiate
hibernation.
■ Press the power button.
– or –
■ Select Start > Turn Off
Computer. Then, hold down
the shift key as you select
Hibernate.
In Windows XP Professional,
hibernate is not displayed:
if
1. Press the up or down arrow.
2. Select Hibernate from
list.
the
3. Click OK.
■ The power lights are
turned off.
■ The screen clears.
(Continued)
Power 4–5
Page 19

Default power settings
Task Procedure Result
Allow the system
to initiate
hibernation (with
hibernation
enabled).
Restore from
user-initiated or
system-initiated
hibernation.
†
If the system initiated hibernation because of a critical low-battery condition,
connect external power or insert a charged battery pack before you press the
power button.
No action required. If the
computer is running on battery
power, the system initiates
hibernation
■ After 30 minutes of computer
inactivity.
■ When the battery pack(s)
reach a critical low-battery
condition.
Power settings and
✎
timeouts can be changed
using Power Options in
Windows Control Panel.
Press the power button.
†
■ The power lights are
turned off.
■ The screen clears.
■ The power lights are
turned on.
■ Your work returns to
the screen.
4–6 Power
Page 20

5
Power options
You can change many default power settings in Windows Control
Panel. For example, you can set an audio alert to warn you when
the battery pack reaches a low-power condition, or you can
change the default settings for the power button.
By default, when the computer is on:
■ Pressing fn+f5, called the “sleep button” by the operating
system, initiates standby.
■ By default, the display switch turns off the display and
initiates standby. The display switch is activated by closing
the display.
Accessing Power Options Properties
To access Power Options Properties:
■ Right-click the Power Meter icon in the notification area,
the far right of the taskbar, and then click Adjust Power
at
Properties.
– or –
■ Select Start > Control Panel > Performance and
Maintenance > Power Options.
Power 5–1
Page 21

Power options
Displaying the Power Meter icon
By default, the Power Meter icon appears in the notification area,
at the far right of the taskbar. The icon changes shape to indicate
whether the computer is running on battery or external power.
To add or remove the power meter icon from the notification area:
1. Right-click the Power Meter icon in the notification area,
and then click Adjust Power Properties.
2. Click the Advanced tab.
3. Select or clear the Always show icon on the taskbar
box.
✎
check
4. Click Apply, and then click OK.
If you cannot see an icon you have placed in the notification
area, at the far right of the taskbar, click the arrow in the
notification area to view hidden icons.
5–2 Power
Page 22

Power options
Setting or changing a power scheme
The Power Schemes tab in the Power Options Properties dialog
box assigns power levels to system components. You can assign
different schemes, depending on whether the computer is running
on battery or external power.
You can also set a power scheme that initiates standby or
hibernation, or turns off the display or hard drive after a time
interval that you specify.
To set a power scheme:
1. Right-click the Power Meter icon in the notification area,
and then click Adjust Power Properties.
2. Click the Power Schemes tab.
3. Select the power scheme you want to modify, and choose
from the options listed on the screen.
4. Click Apply.
Power 5–3
Page 23

Power options
Setting a security prompt
You can add a security feature that prompts you for a password
when the computer is turned on, resumes from standby, or
restores from hibernation.
To set a password prompt:
1. Right-click the Power Meter icon in the notification area,
and then click Adjust Power Properties.
2. Click the Advanced tab.
3. Select the Prompt for password when computer resumes
from standby check box.
4. Click Apply.
5–4 Power
Page 24

Ä
✎
6
Processor performance
controls
CAUTION: To prevent overheating, do not obstruct vents. Use the
computer only on a hard flat surface. Do not allow another hard
surface, such as an adjoining printer, or a soft surface, such as pillows
or thick rugs or clothing, to block airflow.
In some cases, the computer may operate at a higher speed on
external power than on battery power. If a battery pack is the
sole source of power and the battery power is extremely low,
the computer may attempt to conserve power by reducing
processor speed and graphics performance.
Windows XP enables you to manage the processor performance
controls by selecting a power scheme. The processing speed can
be set for optimal performance or for optimal power
conservation.
Power 6–1
Page 25

Processor performance controls
After a power scheme has been set, no other intervention is
required to control the performance of the computer processor.
The following table describes the processor performance on
external and battery power for the available power schemes.
Processor Performance
Power Scheme
Home/Office Desk Always runs at the highest
Portable/Laptop
(default)*
Presentation Performance state is
Always On Always runs at the highest
Minimal Power
Management
Max Battery Performance state is
While on External Power
performance state.
Performance state is
determined based on CPU
demand.
determined based on CPU
demand.
performance state.
Performance state is
determined based on CPU
demand.
determined based on CPU
demand.
Processor Performance
While on Battery Power
Performance state is
determined based on CPU
demand.
Performance state is
determined based on CPU
demand.
Runs at lowest possible
performance state.
Always runs at the highest
performance state.
Performance state is
determined based on CPU
demand.
Runs at lowest possible
performance state.
*It is recommended that you use the Portable/Laptop power scheme.
6–2 Power
Page 26

✎
7
Battery packs
When a charged battery pack is in the computer and the computer
is not plugged into external power, the computer runs on battery
power. When the computer is plugged into external AC power, the
computer runs on AC power.
If the computer contains a charged battery pack and is running
external AC power supplied through the AC adapter, the
on
computer switches to battery power if the AC adapter is
disconnected from the computer.
On select models, the display brightness is automatically
decreased to save battery life when you disconnect from AC
power. To increase display brightness, use the
reconnect your AC adapter.
fn+f8 hotkey or
You can keep a battery pack in the computer or in storage,
depending on how you work. Keeping the battery pack in the
computer whenever the computer is plugged into external AC
power enables the battery pack to charge and also protects your
work in case of a power outage.
However, battery packs in the computer slowly discharge when
the computer is turned off. For this reason, the battery pack is not
shipped inside the computer and must be inserted before the
computer can run on battery power.
Power 7–1
Page 27

Battery packs
Inserting or removing a battery pack
CAUTION: To prevent loss of work when removing a battery pack that
Ä
is the sole power source, initiate hibernation or turn off the computer
before removing the battery pack.
Battery packs may vary in appearance.
✎
To insert a battery pack:
1. Turn the computer upside down on a flat surface.
2. Insert the battery pack 1 into the battery bay and rotate it
down 2 until it is seated.
The battery pack release latch automatically locks the battery
into place.
7–2 Power
Page 28

Battery packs
To remove a battery pack:
1. Turn the computer upside down with the battery bay
facing
away from you.
2. Slide the battery pack release latch 1 to release the
battery
pack.
3. Pivot the battery pack away from the computer 2 and
remove
it from the battery bay 3.
Power 7–3
Page 29

Battery packs
Charging a battery pack
To prolong battery life and optimize the accuracy of battery
charge displays:
WARNING: Do not charge the computer battery pack on board
Å
aircraft. Charging the battery pack may damage aircraft electronic
systems.
■ If you are charging a new battery pack:
❏ Charge the battery pack while the computer is plugged
into external power through the AC adapter.
❏ When you charge the battery pack, charge it fully before
using the computer.
■ If you are charging an in-use battery pack:
❏ Allow the battery pack to discharge to about 10 percent
a full charge through normal use before charging it.
of
❏ When you charge the battery pack, charge it fully.
A battery pack inserted in the computer charges whenever the
computer is plugged into external power through an AC adapter,
an optional docking device, or an optional power adapter.
7–4 Power
Page 30

Battery packs
A battery pack inserted in the computer charges whether the
computer is off or in use, but the battery pack charges faster while
the computer is off. Charging may be delayed if a battery pack is
new, has been unused for 2 weeks or more, or is much warmer or
cooler than room temperature.
The battery light displays charge status:
■ On: the battery pack is charging.
■ Blinking: the battery pack has reached a low-battery
condition and is not charging.
■ Blinking rapidly: the battery pack has reached a critical
low-battery condition and is not charging.
■ Off: the battery pack is fully charged or not installed.
For information about determining the amount of charge in a
battery pack, refer to the “
Monitoring the battery pack charge”
section next in this chapter.
Monitoring the battery pack charge
This section explains several ways to determine the amount of
charge in a battery pack.
Obtaining accurate charge information
To increase the accuracy of all battery charge indicators:
■ Allow a battery pack to discharge to about 10 percent of a full
charge through normal use before charging it.
■ When you charge a battery pack, charge it fully.
The charge even in a new battery pack may be reported
✎
inaccurately until the battery pack has been fully charged
at least once.
■ If a battery pack has been unused for one month or more,
calibrate the battery pack instead of simply charging it. For
calibration instructions, refer to “
Calibrating a battery pack.”
Power 7–5
Page 31

Battery packs
Displaying charge information on the screen
This section explains how to access and interpret battery charge
indicators.
Viewing charge displays
To view information about the status of any battery pack in the
computer:
■ Double-click the Power Meter icon in the notification area,
the far right of the taskbar.
at
– or –
■ Select Start > Control Panel > Performance and
Maintenance > Power Options > Power Meter tab.
Interpreting charge indicators
Most charge indicators report battery status as both a percentage
and as the number of minutes of charge remaining:
■ The percentage indicates the approximate amount of charge
remaining in the battery pack.
■ The time indicates the approximate running time remaining
on the battery pack if the battery pack continues to provide
power at the current level. For example, the time remaining
will decrease when you start playing a DVD and will increase
when you stop playing a DVD.
Managing low-battery conditions
The information in this section describes the alerts and system
responses set at the factory. Some low-battery condition alerts
and system responses can be changed using Power Options in
Windows Control Panel. Preferences set in Power Options do not
affect lights.
7–6 Power
Page 32

Identifying low-battery conditions
This section explains how to identify low-battery and critical
low-battery conditions.
Low-battery condition
When a battery pack that is the sole power source for the
computer reaches a low-battery condition, the battery light blinks.
Critical low-battery condition
If a low-battery condition is not resolved, the computer enters
critical low-battery condition, and the battery light blinks
a
rapidly.
Battery packs
In a critical low-battery condition:
■ If hibernation is enabled and the computer is on or in standby,
the computer initiates hibernation.
■ If hibernation is disabled and the computer is on or in
standby, the computer remains briefly in standby, and then
down and may lose any unsaved information.
shuts
To verify that hibernation is enabled:
1. Select Start > Control Panel > Performance and
Maintenance > Power Options > Hibernate tab.
2. Make sure that the Enable hibernation check box is
selected.
Hibernation is enabled by default.
✎
Power 7–7
Page 33

Battery packs
Resolving low-battery conditions
CAUTION: To reduce the risk of losing information when the computer
Ä
When external power is available
reaches a critical low-battery condition and has initiated hibernation, do
not restore power until the power lights are turned off.
To resolve a low-battery condition when external power is
available, connect one of the following:
■ AC adapter
■ Optional docking device
■ Optional power adapter
When a charged battery pack is available
To resolve a low-battery condition when a charged battery pack is
available:
1. Turn off the computer or initiate hibernation.
2. Insert a charged battery pack.
3. Turn on the computer.
When no power source is available
To resolve a low-battery condition when no power source is
available:
■ Initiate hibernation.
– or –
■ Save your work and shut down the computer.
7–8 Power
Page 34

Battery packs
When the computer cannot restore from
hibernation
To resolve a low-battery condition when the computer lacks the
power to restore from hibernation:
1. Insert a charged battery pack or plug the computer into
external power.
2. Restore from hibernation by pressing the power button.
Calibrating a battery pack
Three steps are involved in calibrating a battery pack: fully
charging, fully discharging, and then fully recharging.
When to calibrate
Even if a battery pack is heavily used, it should not be necessary
to calibrate it more than once a month. It is not necessary to
calibrate a new battery pack. Calibrate a battery pack under the
following conditions:
■ When battery charge displays seem inaccurate
■ When you observe a significant change in battery run time
■ When the battery pack has been unused for one month
more
or
Power 7–9
Page 35

Battery packs
How to calibrate
Three steps are involved in calibrating a battery pack: fully
charging, fully discharging, and then fully recharging.
Step 1: Charging the battery pack
A battery pack can charge whether the computer is off or in use,
but it will charge faster when the computer is off.
To charge the battery pack:
1. Insert the battery pack into the computer.
2. Connect the computer to an AC adapter, optional power
adapter, or optional docking device, and then plug the adapter
or device into external power.
The battery light on the computer is turned on.
3. Leave the computer plugged into external power until the
battery pack is fully charged.
The battery light on the computer is turned off.
Step 2: Discharging the battery pack
Before you begin a full discharge, disable hibernation, which is
enabled by default.
To disable hibernation:
1. Select Start > Control Panel > Performance and
Maintenance > Power Options > Hibernate tab.
2. Clear the Enable hibernation check box.
3. Click Apply.
7–10 Power
Page 36

Battery packs
The computer must remain on when the battery pack is being
discharged. The battery pack can discharge whether or not you
are using the computer but will discharge faster when the
computer is in use.
■ If you plan to leave the computer unattended during the
discharge, save your information before beginning the
discharge procedure.
■ If you use the computer occasionally during the discharge
procedure and have set energy-saving timeouts, expect the
following performance from your system during the
discharge process:
❏ The monitor will not turn off automatically.
❏ Hard drive speed will not decrease automatically when the
computer is idle.
❏ System-initiated hibernation will not occur.
To fully discharge a battery pack:
1. Right-click the Power Meter icon in the notification area,
the far right of the taskbar, and then click Adjust Power
at
Properties.
– or –
Access the Power Schemes tab by selecting Start >
Control
Power
Panel > Performance and Maintenance >
Options > Power Schemes tab.
2. Record the 4 settings in the Running on batteries and
Plugged in columns so that you can reset them after the
calibration.
3. Set the 4 options to Never.
4. Click OK.
Power 7–11
Page 37

Battery packs
5. Disconnect the computer from its external power source, but
do not turn off the computer.
6. Run the computer on battery power until the battery pack is
fully discharged. The battery light begins to blink when the
battery pack has discharged to a low-battery condition. When
the battery pack is fully discharged, the battery light is turned
off and the computer shuts down.
Step 3: Recharging the battery pack
To recharge the battery pack:
1. Plug the computer into external power and maintain external
power until the battery pack is fully recharged. When the
battery pack is recharged, the battery light on the computer is
turned off.
Ä
You can use the computer when the battery pack is
recharging, but the battery pack will charge more quickly if
the computer is off.
2. If the computer is off, turn it on when the battery pack is fully
charged and the battery light is turned off.
3. Access the Power Schemes tab by selecting Start >
Control
Power
Panel > Performance and Maintenance >
Options > Power Schemes tab.
4. Reenter the settings that you recorded for the items in the
Plugged in column and the Running on batteries column.
5. Click OK.
CAUTION: After calibrating the battery pack, reenable hibernation.
Failure to reenable hibernation may result in a complete battery
discharge and potential information loss.
To reenable hibernation, select Start > Control Panel >
Performance and Maintenance > Power Options >
Hibernate tab. Select the Enable hibernation check box, and then
click Apply.
7–12 Power
Page 38

Conserving battery power
Using the battery conservation procedures and settings described
in this section extends the life of a battery pack.
Conserving power as you work
To conserve power as you use the computer:
■ Turn off wireless and local area network (LAN) connections
and exit modem applications when you are not using them.
■ Disconnect external devices that you are not using if they are
not plugged into an external power source.
■ Stop or remove any optional external media cards that you are
not using.
Battery packs
■ Remove a CD or DVD that you are not using.
■ Disable or remove an inserted digital card.
■ Use the fn+f7 hotkeys to reduce screen brightness.
■ Use optional powered speakers instead of the internal
speakers.
■ Turn off a device connected to the S-Video-out jack.
■ If you leave your work, initiate standby or hibernation, or
shut down the computer.
Power 7–13
Page 39

Battery packs
Selecting power conservation settings
To set the computer to conserve power:
■ Select a short wait for the screen saver and select a screen
saver with minimal graphics and motion.
To access screen saver settings:
Select Start > Control Panel > Appearance and Themes >
Choose a screen saver.
■ Select a Power Scheme with low-power-use settings. For
more information, refer to “
scheme.”
Setting or changing a power
Storing a battery pack
CAUTION: To prevent damage to a battery pack, do not expose it to
Ä
high temperatures for extended periods of time.
If a computer will be unused and disconnected from external
power for more than 2 weeks, remove the battery pack and store
separately.
it
To conserve the charge of a stored battery pack, place it in a cool,
dry place.
Disposing of a used battery pack
WARNING: To reduce the risk of fire or burns, do not disassemble,
Å
crush, or puncture a battery pack; short the external contacts on a
battery pack; or dispose of a battery pack in fire or water. Do not
expose a battery pack to temperatures above 60°C (140°F).
Refer to the Regulatory, Safety and Environmental Notices for
battery disposal information.
7–14 Power
Page 40

Index
B
battery charge information 7–5
battery light
displaying charge status
7–7
identifying
battery pack
battery power vs. AC
power
calibrating
charging
conserving power
disposing of
inserting
low-battery conditions
monitoring charge
recharging
removing
storing
using
battery pack release latch
button, power
7–1
1–2
7–1
7–9
7–4, 7–10
7–13
7–14
7–2
7–5
7–12
7–2
7–14
1–2
7–6
7–3
C
calibration, battery 7–9
charging battery packs
computer display, turning on
or off
4–2
7–4
conservation, power
critical low-battery condition
7–7
7–13
D
display switch, identifying 1–1
drive media
3–5
E
emergency shutdown
procedures
4–3
F
fn+f5 hotkey 1–2, 4–4
H
hibernation
defined
enabling/disabling
initiated during critical
low-battery condition
initiating
restoring from
when to use
hibernation file
hotkeys,
3–2
3–2
7–7
4–5
4–5
3–1
3–2
fn+f5 1–2, 4–4
L
lights, power 1–1
low-battery condition
7–6
Power Index–1
Page 41

Index
O
operating system 4–2
optional power adapter
7–10
P
passwords, security 5–4
power
conserving
control and light locations
1–1
schemes
setting preferences
sources
power button
power light
Power Meter icon
power settings
power supply
processor performance
controls
7–13
5–3
5–1
2–1
1–2
1–1
5–2
4–1
3–4
6–1
2–1,
resuming from
switch, display
4–4
1–1
T
temperature, storage, battery
7–14
pack
traveling with the computer,
battery pack temperature
considerations
turning off the computer
4–3
7–14
4–2,
U
unresponsive system,
emergency shutdown
procedures
4–3
W
writable media 3–5
R
readable media 3–5
release latch, battery pack
reset (emergency shutdown
procedures)
4–3
7–3
S
screen saver 7–14
security passwords
shutdown procedures
shutting down
software, Power Meter
standby
defined
initiating
Power Index–2
3–1
4–4
5–4
4–3
4–2
5–1
Page 42

© Copyright 2005 Hewlett-Packard Development Company, L.P.
Microsoft and Windows are U.S. registered trademarks of Microsoft
Corporation.
The information contained herein is subject to change without notice. The
only warranties for HP products and services are set forth in the express
warranty statements accompanying such products and services. Nothing
herein should be construed as constituting an additional warranty. HP shall
not be liable for technical or editorial errors or omissions contained herein.
Power
Second Edition December 2005
First Edition October 2005
Document Part Number: 393525-002
 Loading...