

HP Pavilion dv6-3100 User Manual

Notebook Essentials
For more information about HP products and services, see the HP Web site at
http://www.hp.com.
© Copyright 2010 Hewlett-Packard Development Company, L.P.
Windows and Windows Vista are U.S. registered trademarks of Microsoft Corporation.
The information contained herein is subject to change without notice. The only
warranties for HP products and services are set forth in the express warranty statements
accompanying such products and services. Nothing herein should be construed as
constituting an additional warranty. HP shall not be liable for technical or editorial
errors or omissions contained herein.
Part number: 605595-001
User Guides
HP is committed to reducing the environmental impact of our products. As part of this effort,
we provide user guides and learning centers on your computer hard drive in Help and
Support. Additional support and updates to the user guides are available on the Web.
Windows Users
Looking for more user guides? They are on your computer. Click: Start > Help
and Support > User Guides
Linux Users
Looking for more user guides? You can find them on the
came with your computer.
Subscription Services for Business Notebook
Keep this product up to date with the latest drivers, patches, and notifications.
Sign up now at
www.hp.com/go/alerts to receive e-mail alert notifications.
User Guides
disc that
End User License Agreement (EULA)
BY INSTALLING, COPYING, DOWNLOADING, OR OTHERWISE USING ANY
SOFTWARE PRODUCT PRE-INSTALLED ON THIS PC, YOU AGREE TO BE BOUND
BY THE TERMS OF THE HP EULA. IF YOU DO NOT ACCEPT THESE LICENSE
TERMS, YOUR SOLE REMEDY IS TO RETURN THE ENTIRE UNUSED PRODUCT
(HARDWARE AND SOFTWARE) WITHIN 14 DAYS FOR A REFUND SUBJECT TO
THE REFUND POLICY OF YOUR PLACE OF PURCHASE. For any further information
or for requesting a full refund of the PC, please contact your local point of sale (the seller).
Contacting Customer Support
If the information provided in your User Guide or Learning Center does not address your
questions, you can contact HP Customer Support at:
www.hp.com/go/contactHP
Here you can:
■ Chat online with an HP technician.
When technical support chat is not available in a particular language, it is
✎
available in English.
■ E-mail HP Customer Support.
■ Find HP Customer Support worldwide telephone numbers.
■ Locate an HP service center.
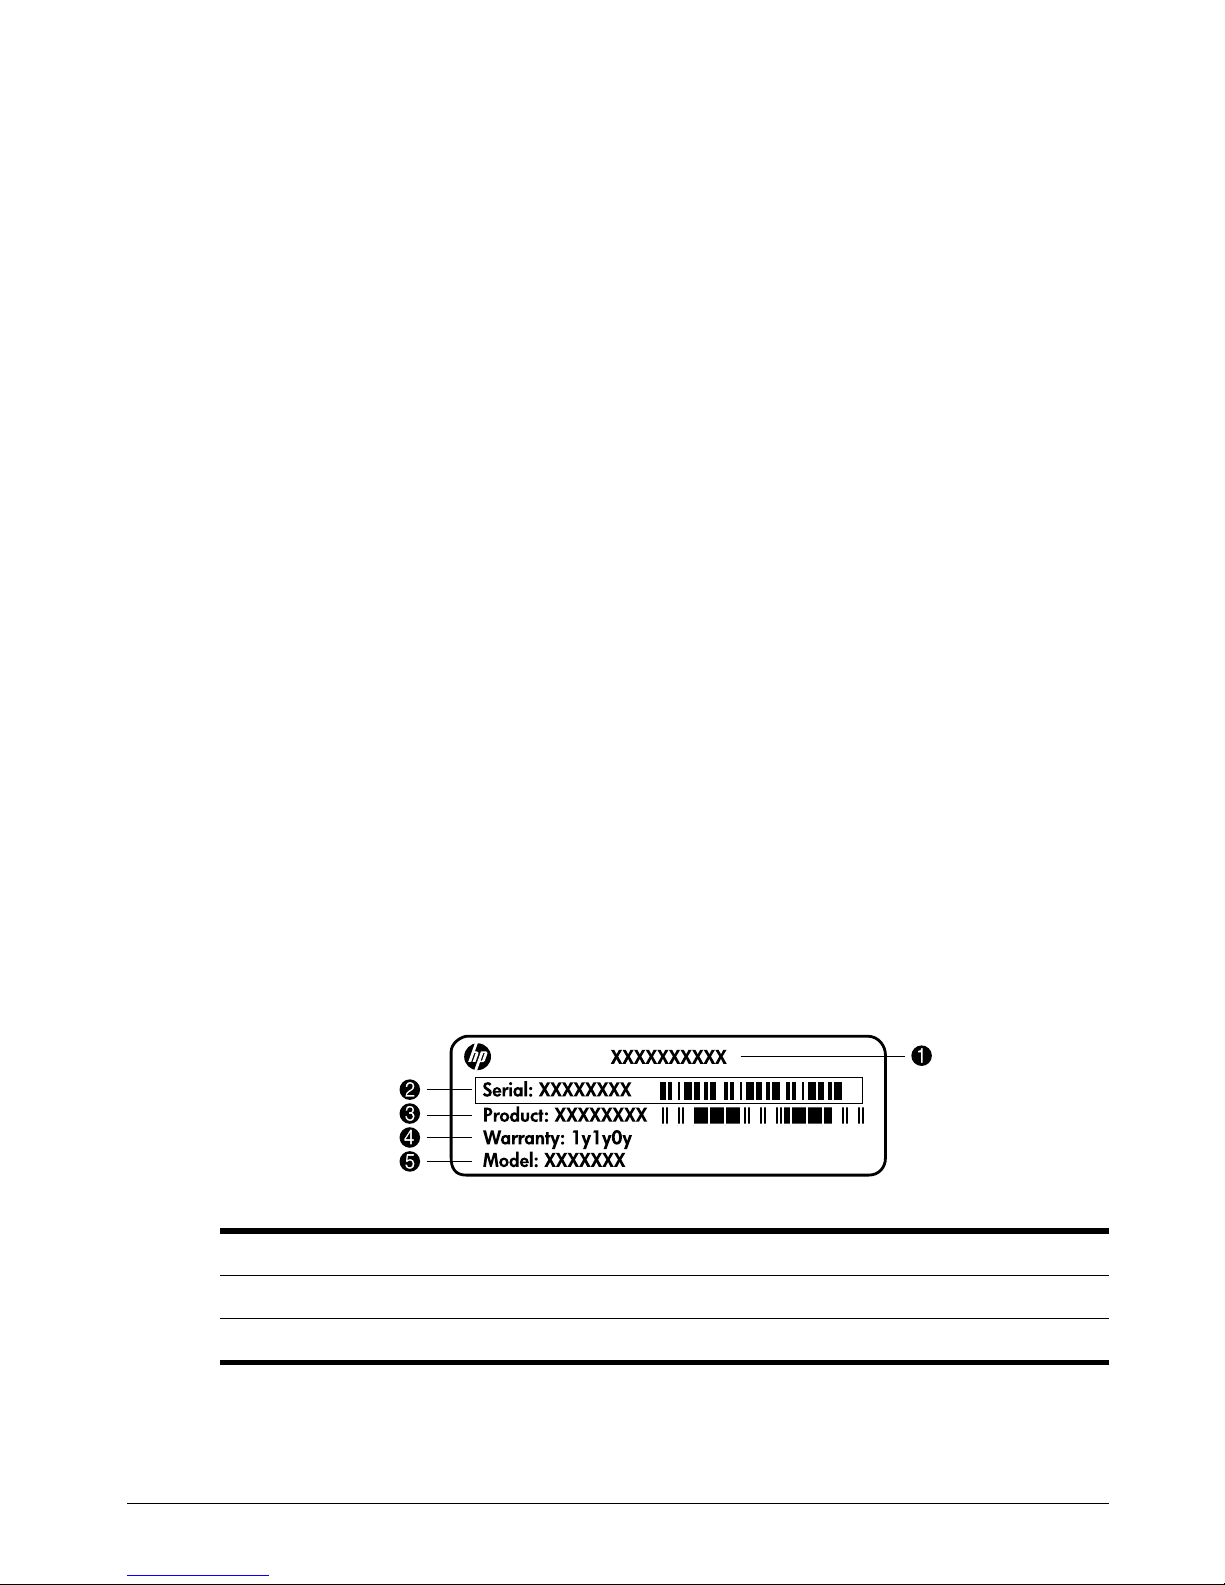
Serial Number Label Information
The serial number label, located on the bottom of the computer, provides important
information that you may need when contacting technical support.
1
2 Serial number 5 Model description (select models)
Product name 4 Warranty period
3 Product number

Warranty Information
You may find the expressly provided HP Limited Warranty applicable to your product in the
start menu on your PC and/or in the CD/DVD provided in the box. Some countries/regions
may provide a printed HP Limited Warranty in the box. In countries/regions where the
warranty is not provided in printed format, you may request a printed copy from
www.hp.com/go/orderdocuments or write to:
North America:
Hewlett Packard, MS POD, 11311 Chinden Blvd, Boise, ID 83714, USA
Europe, Middle East, Africa:
Hewlett-Packard, POD, Via G. Di Vittorio, 9, 20063, Cernusco s/Naviglio (MI), Italy
Asia Pacific:
Hewlett-Packard, POD, P.O. Box 200, Alexandra Post Office, Singapore 911507
Please include your product number, warranty period (found on your serial number label),
name and postal address.

Notebook Essentials 1
Contents
Contents
Chapter 1: What's next?
Introducing HP QuickWeb (select models only) . . . . . . . . . . . . . . . . . . . . . . . . . . . . . . . 1
Creating recovery discs . . . . . . . . . . . . . . . . . . . . . . . . . . . . . . . . . . . . . . . . . . . . . . . . . . . 1
Connecting to the Internet . . . . . . . . . . . . . . . . . . . . . . . . . . . . . . . . . . . . . . . . . . . . . . . . . 1
Updating your antivirus software . . . . . . . . . . . . . . . . . . . . . . . . . . . . . . . . . . . . . . . . . . . 1
Getting to know the computer . . . . . . . . . . . . . . . . . . . . . . . . . . . . . . . . . . . . . . . . . . . . . . 1
Chapter 2: What’s new?
TouchPad. . . . . . . . . . . . . . . . . . . . . . . . . . . . . . . . . . . . . . . . . . . . . . . . . . . . . . . . . . . . . . 3
Touchscreen (select models only). . . . . . . . . . . . . . . . . . . . . . . . . . . . . . . . . . . . . . . . . . . 7
Chapter 3: Using HP QuickWeb (select models only)
Setting up HP QuickWeb for the first time . . . . . . . . . . . . . . . . . . . . . . . . . . . . . . . . . . . 12
Using HP QuickWeb . . . . . . . . . . . . . . . . . . . . . . . . . . . . . . . . . . . . . . . . . . . . . . . . . . . . 12
Starting Microsoft Windows . . . . . . . . . . . . . . . . . . . . . . . . . . . . . . . . . . . . . . . . . . . . . . 13
Turning HP QuickWeb on and off . . . . . . . . . . . . . . . . . . . . . . . . . . . . . . . . . . . . . . . . . 13
Identifying the Quick Web control buttons . . . . . . . . . . . . . . . . . . . . . . . . . . . . . . . . . . . 13
Identifying the LaunchBar icons . . . . . . . . . . . . . . . . . . . . . . . . . . . . . . . . . . . . . . . . . . . 14
Identifying the notification icons . . . . . . . . . . . . . . . . . . . . . . . . . . . . . . . . . . . . . . . . . . 14
Using the Settings panel . . . . . . . . . . . . . . . . . . . . . . . . . . . . . . . . . . . . . . . . . . . . . . . . . 16
Configuring the network . . . . . . . . . . . . . . . . . . . . . . . . . . . . . . . . . . . . . . . . . . . . . . . . . 16
Playing music . . . . . . . . . . . . . . . . . . . . . . . . . . . . . . . . . . . . . . . . . . . . . . . . . . . . . . . . . 16
Browsing photos . . . . . . . . . . . . . . . . . . . . . . . . . . . . . . . . . . . . . . . . . . . . . . . . . . . . . . . 17
Creating instant messages with Chat. . . . . . . . . . . . . . . . . . . . . . . . . . . . . . . . . . . . . . . . 17
Making Internet phone calls with Skype . . . . . . . . . . . . . . . . . . . . . . . . . . . . . . . . . . . . 17
Chapter 4: Finding information
Locating the electronic manuals . . . . . . . . . . . . . . . . . . . . . . . . . . . . . . . . . . . . . . . . . . . 19
Finding more information . . . . . . . . . . . . . . . . . . . . . . . . . . . . . . . . . . . . . . . . . . . . . . . . 20
Chapter 5: Keeping the computer safe
Protecting the computer from viruses . . . . . . . . . . . . . . . . . . . . . . . . . . . . . . . . . . . . . . . 21
Protecting your system files . . . . . . . . . . . . . . . . . . . . . . . . . . . . . . . . . . . . . . . . . . . . . . 21
Protecting your privacy . . . . . . . . . . . . . . . . . . . . . . . . . . . . . . . . . . . . . . . . . . . . . . . . . . 21
Protecting the computer from power surges . . . . . . . . . . . . . . . . . . . . . . . . . . . . . . . . . . 22
Turning off the computer . . . . . . . . . . . . . . . . . . . . . . . . . . . . . . . . . . . . . . . . . . . . . . . . 22
Using the computer safely . . . . . . . . . . . . . . . . . . . . . . . . . . . . . . . . . . . . . . . . . . . . . . . . 22
Chapter 6: Networking
Choosing the type of Internet access. . . . . . . . . . . . . . . . . . . . . . . . . . . . . . . . . . . . . . . . 25
Choosing an ISP . . . . . . . . . . . . . . . . . . . . . . . . . . . . . . . . . . . . . . . . . . . . . . . . . . . . . . . 25

2 Notebook Essentials
Contents
Connecting to an existing wireless network . . . . . . . . . . . . . . . . . . . . . . . . . . . . . . . . . . 26
Setting up a wireless network . . . . . . . . . . . . . . . . . . . . . . . . . . . . . . . . . . . . . . . . . . . . . 27
Connecting to a wired network . . . . . . . . . . . . . . . . . . . . . . . . . . . . . . . . . . . . . . . . . . . . 29
Chapter 7: Using software
Identifying installed software . . . . . . . . . . . . . . . . . . . . . . . . . . . . . . . . . . . . . . . . . . . . . 31
Using HP TouchSmart software or HP MediaSmart software . . . . . . . . . . . . . . . . . . . . 31
Installing software from an optical disc . . . . . . . . . . . . . . . . . . . . . . . . . . . . . . . . . . . . . 32
Creating (burning) a CD or DVD . . . . . . . . . . . . . . . . . . . . . . . . . . . . . . . . . . . . . . . . . . 32
Updating the software installed on the computer . . . . . . . . . . . . . . . . . . . . . . . . . . . . . . 33
Chapter 8: Backup and recovery
Creating recovery discs . . . . . . . . . . . . . . . . . . . . . . . . . . . . . . . . . . . . . . . . . . . . . . . . . . 35
Backing up your information . . . . . . . . . . . . . . . . . . . . . . . . . . . . . . . . . . . . . . . . . . . . . 36
Performing a recovery. . . . . . . . . . . . . . . . . . . . . . . . . . . . . . . . . . . . . . . . . . . . . . . . . . . 38
Chapter 9: Routine care
Cleaning the display . . . . . . . . . . . . . . . . . . . . . . . . . . . . . . . . . . . . . . . . . . . . . . . . . . . . 41
Cleaning the TouchPad and keyboard. . . . . . . . . . . . . . . . . . . . . . . . . . . . . . . . . . . . . . . 41
Traveling and shipping . . . . . . . . . . . . . . . . . . . . . . . . . . . . . . . . . . . . . . . . . . . . . . . . . . 41
Appendix A: Troubleshooting
Troubleshooting resources . . . . . . . . . . . . . . . . . . . . . . . . . . . . . . . . . . . . . . . . . . . . . . . 43
Quick troubleshooting. . . . . . . . . . . . . . . . . . . . . . . . . . . . . . . . . . . . . . . . . . . . . . . . . . . 43
Appendix B: Specifications
Operating environment . . . . . . . . . . . . . . . . . . . . . . . . . . . . . . . . . . . . . . . . . . . . . . . . . . 47
Input power . . . . . . . . . . . . . . . . . . . . . . . . . . . . . . . . . . . . . . . . . . . . . . . . . . . . . . . . . . . 47
Expansion port 3 input/output signals (select models only) . . . . . . . . . . . . . . . . . . . . . . 48

Notebook Essentials 1
Chapter 1: What's next?
After setting up and registering the computer, it is important to follow the steps in this guide
before using the computer. This guide includes practical information to help you protect and
maintain the computer. First, read this chapter completely, because it explains what to do and
where to find additional information. Then, read specific chapters for additional information.
For help in identifying specific components of the computer, see the user guide, which is
located in Help and Support. To access Help and Support, select Start > Help and Support
> User Guides.
Introducing HP QuickWeb (select models only)
After you set up the computer, activate HP QuickWeb. It provides immediate access to your
music, digital photos, and the Web without launching the Windows® operating system. For
more information, see Chapter 3, “Using HP QuickWeb (select models only).”
After setting up the computer, one of the first and most important steps to take is to create a
set of recovery discs of the full factory image. The recovery discs are essential in case of
system instability or failure, when they are used to recover the operating system and software
to factory settings. For instructions, see Chapter 8, “Backup and recovery.”
After creating the recovery discs, set up your wired or wireless network and connect to the
Internet. For more information, see Chapter 6, “Networking.”
After connecting to the Internet, be sure to update your antivirus software. The software is
preinstalled on the computer and includes a limited subscription for free updates. Antivirus
software helps protect the computer from damage caused by viruses. For more information,
see Chapter 5, “Keeping the computer safe.”
After completing the preceding steps, familiarize yourself with the features of the computer
and set up any additional components, such as optional external audio devices.
Be sure to review the user guide located in Help and Support on the computer. The user guide
provides detailed information about using the computer. For instructions on accessing the
user guide, see Chapter 4, “Finding information.”
Creating recovery discs
Connecting to the Internet
Updating your antivirus software
Getting to know the computer

2 Notebook Essentials
Chapter 1: What's next?
The following list highlights the entertainment features of the computer and explains where
to get additional information for each feature.
■ Multimedia software—The computer comes with preinstalled multimedia software,
including HP TouchSmart (select models only) or MediaSmart, which turns the
computer into a mobile entertainment center. For details, see Chapter 7, “Using
software.”
■ Audio—The computer includes integrated speakers. For more information on using the
integrated speakers and setting up optional external audio devices, see the user guide in
Help and Support.
■ Video—Connect an optional display device or an HDMI (High Definition Multimedia
Interface) device to the computer. Use the optical drive to watch a high-definition movie
(select models only). For more information about the video features, see the user guide
in Help and Support.
✎
On select models, when watching movies, you must use TouchSmart (select models
only) or MediaSmart software.
■ Webca m —Adjustable camera with low-light image technology and built-in
microphones that make the webcam a perfect companion to your instant messaging
program. For more information on the webcam, see the user guide in Help and Support.

Notebook Essentials 3
Chapter 2: What’s new?
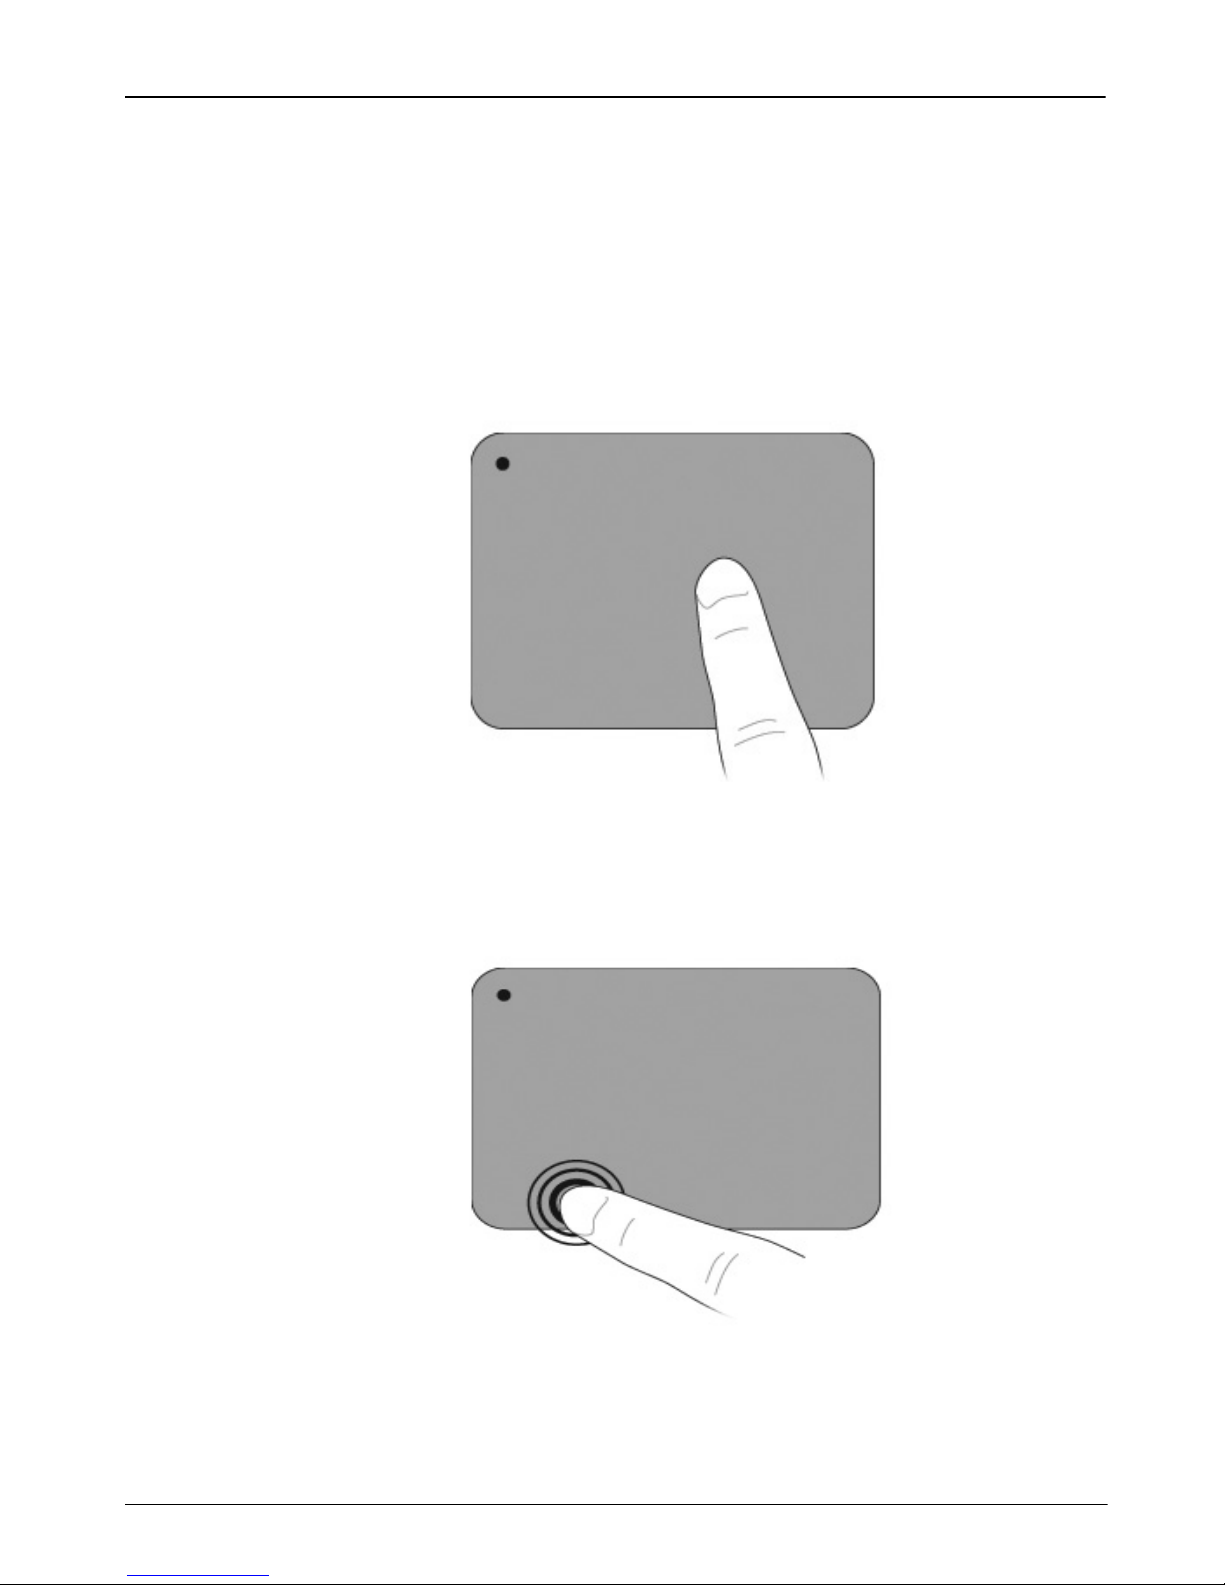
TouchPad
Identifying TouchPad components
Component Description
1
TouchPad off indicator Turns the TouchPad on and off. Press and hold the
button for two seconds to turn the TouchPad on and
off.
✎
When the TouchPad zone is active, the light is
off.
2
Left TouchPad button Functions like the left button on an external mouse.
3
Right TouchPad button Functions like the right button on an external
mouse.
4 Notebook Essentials
Chapter 2: What’s new?
Turning the TouchPad on and off
The TouchPad is turned on at the factory. When the TouchPad zone is active, the light is off.
To turn the TouchPad on and off, press and hold the TouchPad off indicator for two seconds.
Navigating
To move the pointer, touch and slide one finger across the TouchPad surface in the direction
you want the pointer to go.
Selecting
Use the left and right TouchPad buttons like the corresponding buttons on an external mouse.
Notebook Essentials 5
Chapter 2: What’s new?
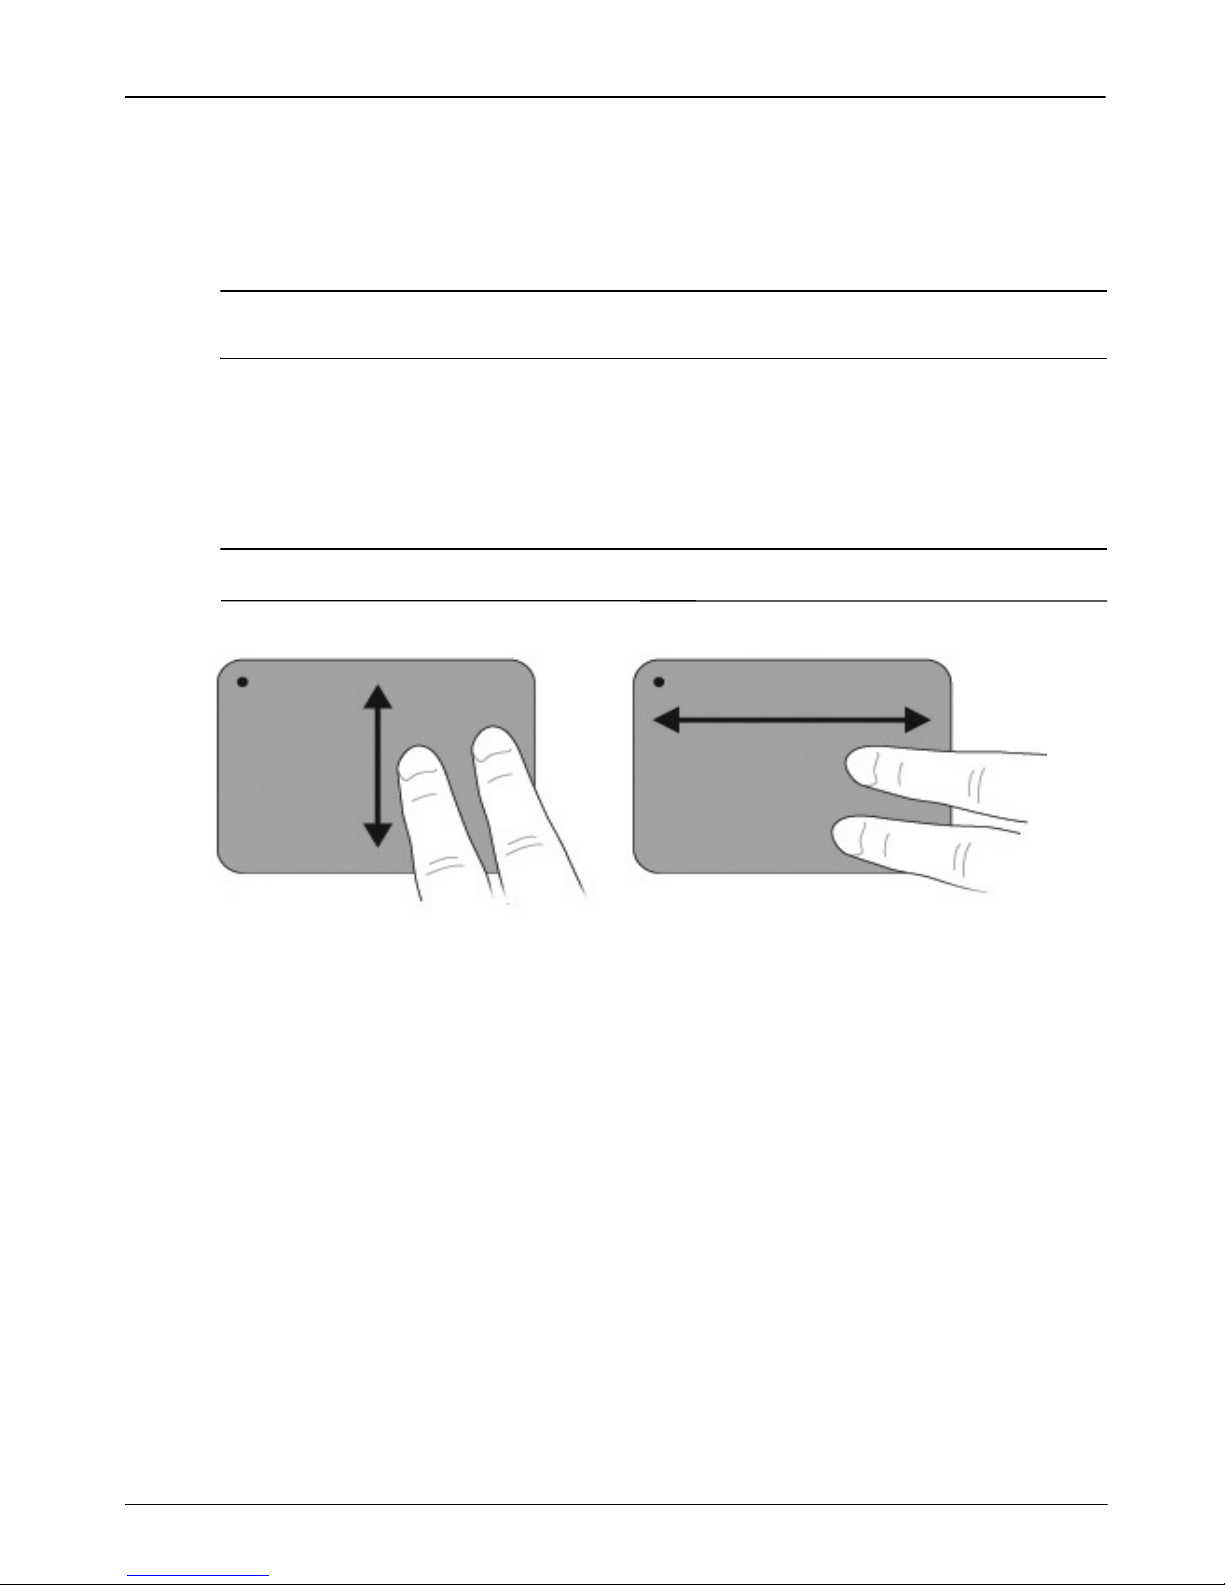
Using TouchPad gestures
The TouchPad supports a variety of gestures that make it easy and fun to work with images or
pages of text. To activate the TouchPad gestures, place two fingers on the TouchPad at the
same time as described in the following sections.
✎
Scroll and pinch anywhere on the TouchPad surface. The rotate gesture must be done
within the TouchPad zone.
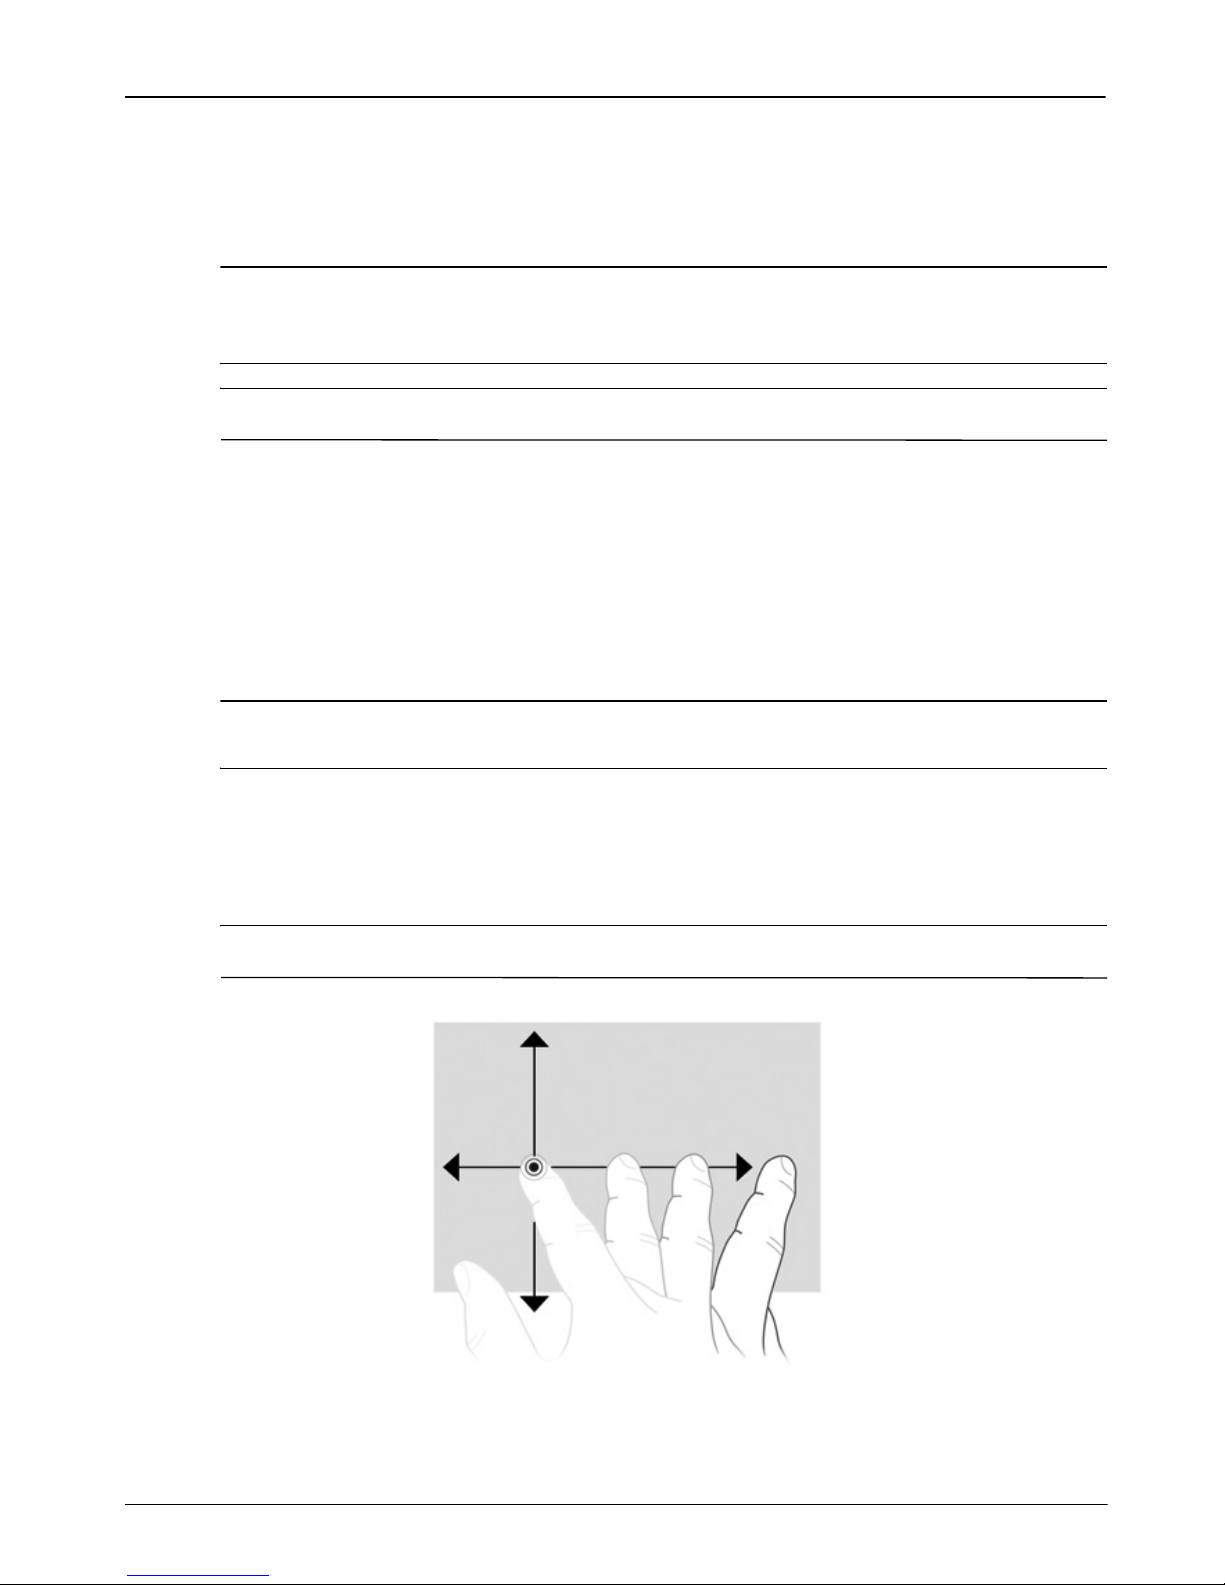
Scrolling
Scrolling is useful for moving around a page or image. To scroll, place two fingers slightly
apart on the TouchPad, and then drag them across the TouchPad in an up, down, left, or right
motion.
✎
Scrolling speed is controlled by finger speed.
6 Notebook Essentials
Chapter 2: What’s new?
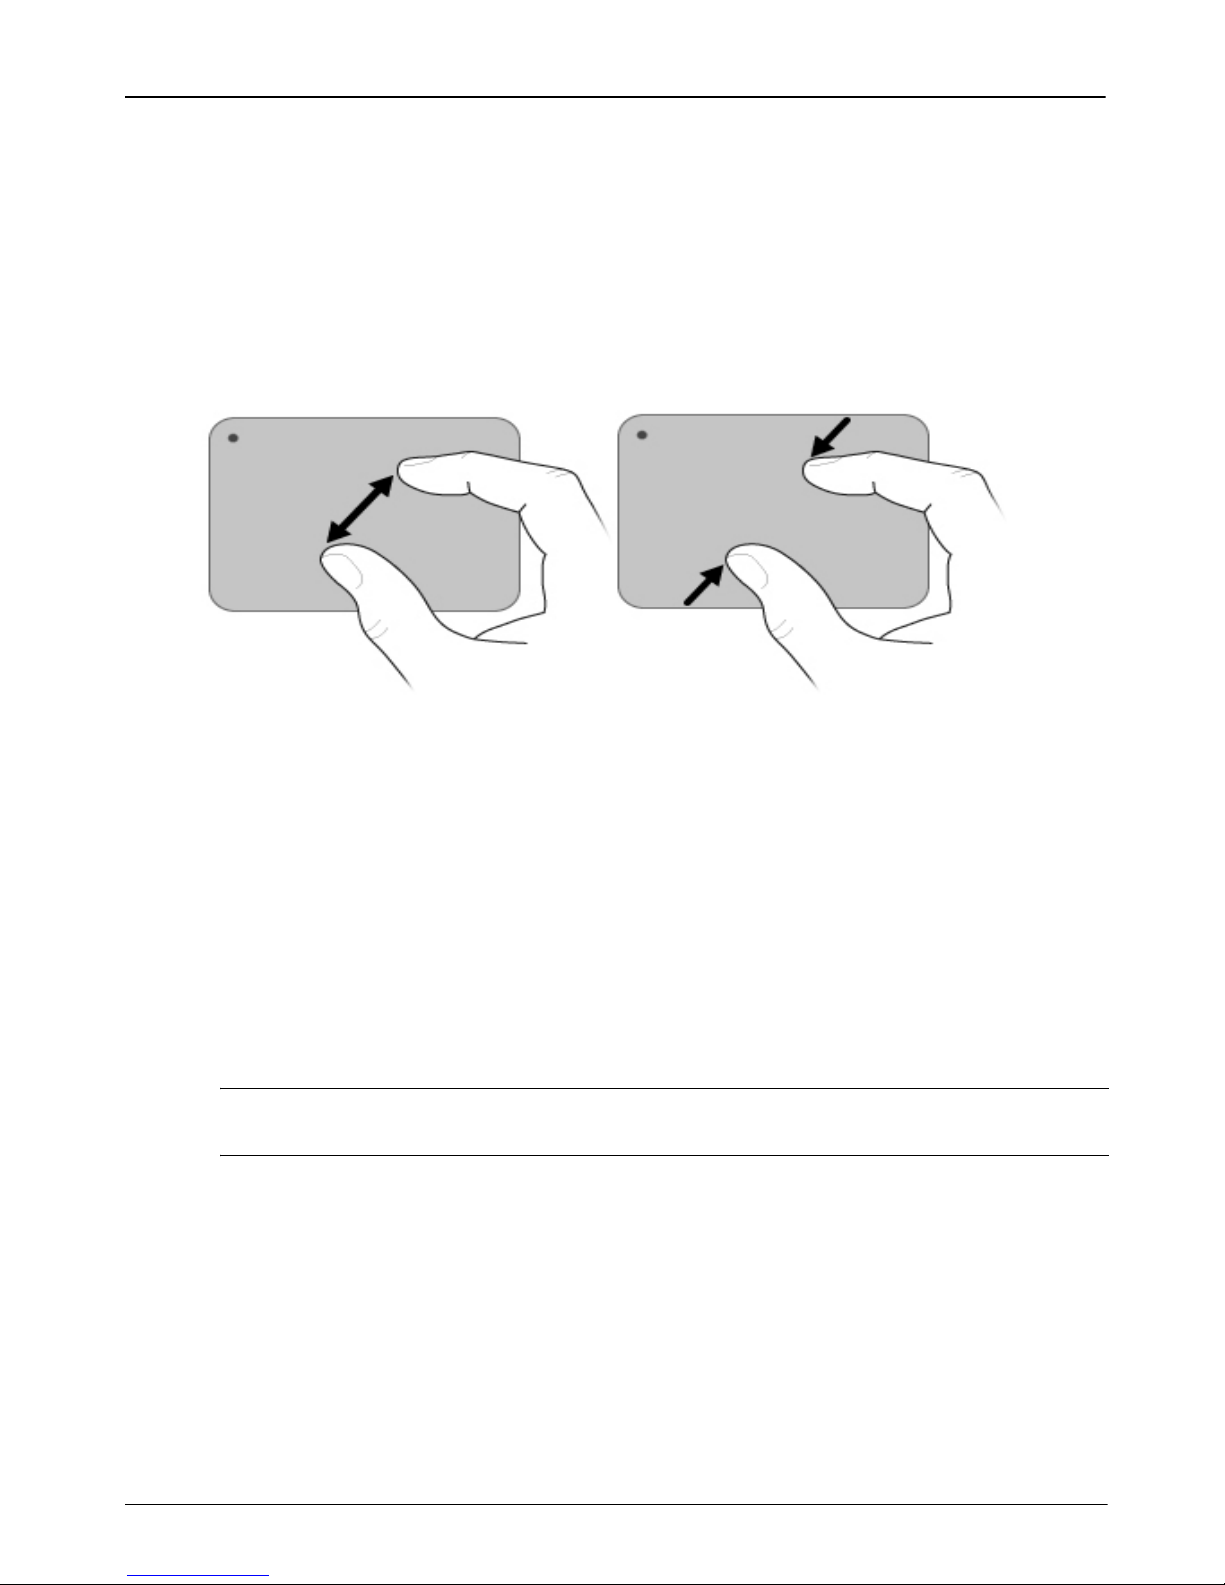
Pinching/Zooming
Pinching allows you to zoom in or out on images or text.
■ Zoom in by placing two fingers together on the TouchPad, and then moving them apart
to gradually increase the object’s size.
■ Zoom out by placing two fingers apart on the TouchPad, and then moving them together
to gradually decrease the object’s size.
Setting TouchPad preferences
Scrolling and pinching are enabled at the factory. The computer also supports additional
TouchPad gestures that are disabled at the factory.
To disable or reenable TouchPad gestures, or to explore other TouchPad gestures:
1. Double-click the Synaptics icon in the notification area, at the far right of the taskbar,
and then click the Device Settings tab.
2. Select the device, and then click Settings.
3. Select the gesture that you want to disable or reenable.
4. Click Apply, and then click OK.
✎
For additional information about using the TouchPad, see the user guide. To access this
guide, select Start > Help and Support > User Guides.
Notebook Essentials 7
Chapter 2: What’s new?
S
Use your fingers to perform certain actions on the touchscreen.
✎
The instructions in this section are based on the preferences set at the factory. To
modify settings for recognized clicks and flicks, select Start > Control Panel >
Hardware and Sound > Pen and Touch.
✎
Some gestures are not supported in all programs.
Using touchscreen gestures
Tapping (or clicking)
Tap or double-tap an item on the screen as you would click or double-click with the
TouchPad or an external mouse. Tap and hold an item to see the context menu as you would
with the right TouchPad button.
✎
Tap and hold your finger until the operating system draws a circle around the area you
are touching, and then the context menu appears.
Flicking
Touch the screen in a light, quick flicking motion up, down, left, or right to navigate through
screens or quickly scroll through documents.
✎
For the flick movement to work, a scrollbar must be present in the active window.
Touchscreen (select models only)
8 Notebook Essentials
Chapter 2: What’s new?
Dragging
Press your finger on an item on the screen, and then move your finger to drag the item to a
new location. Also use this motion to slowly scroll through documents.
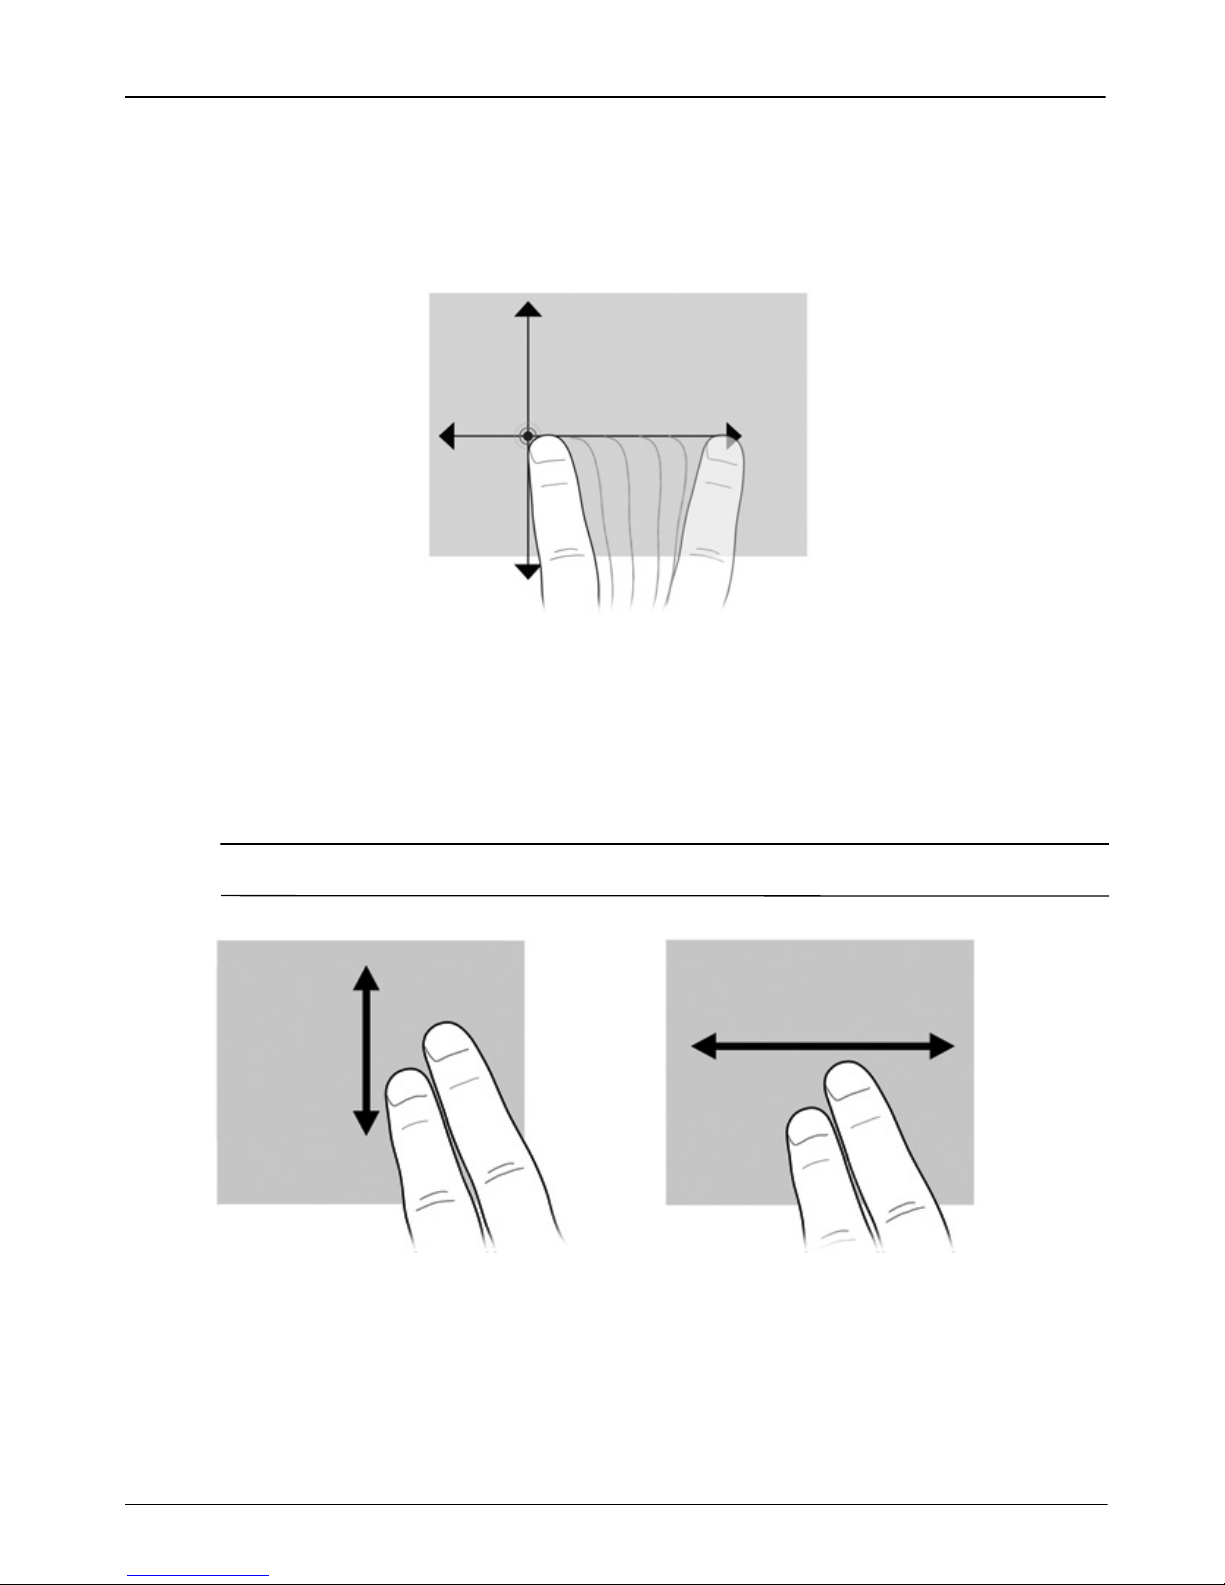
Scrolling
Scrolling is useful for moving up or down on a page or image. To scroll, place two fingers on
the screen, and then drag them across the screen in an up, down, left, or right motion.
✎
Scrolling speed is controlled by finger speed.
Notebook Essentials 9
Chapter 2: What’s new?
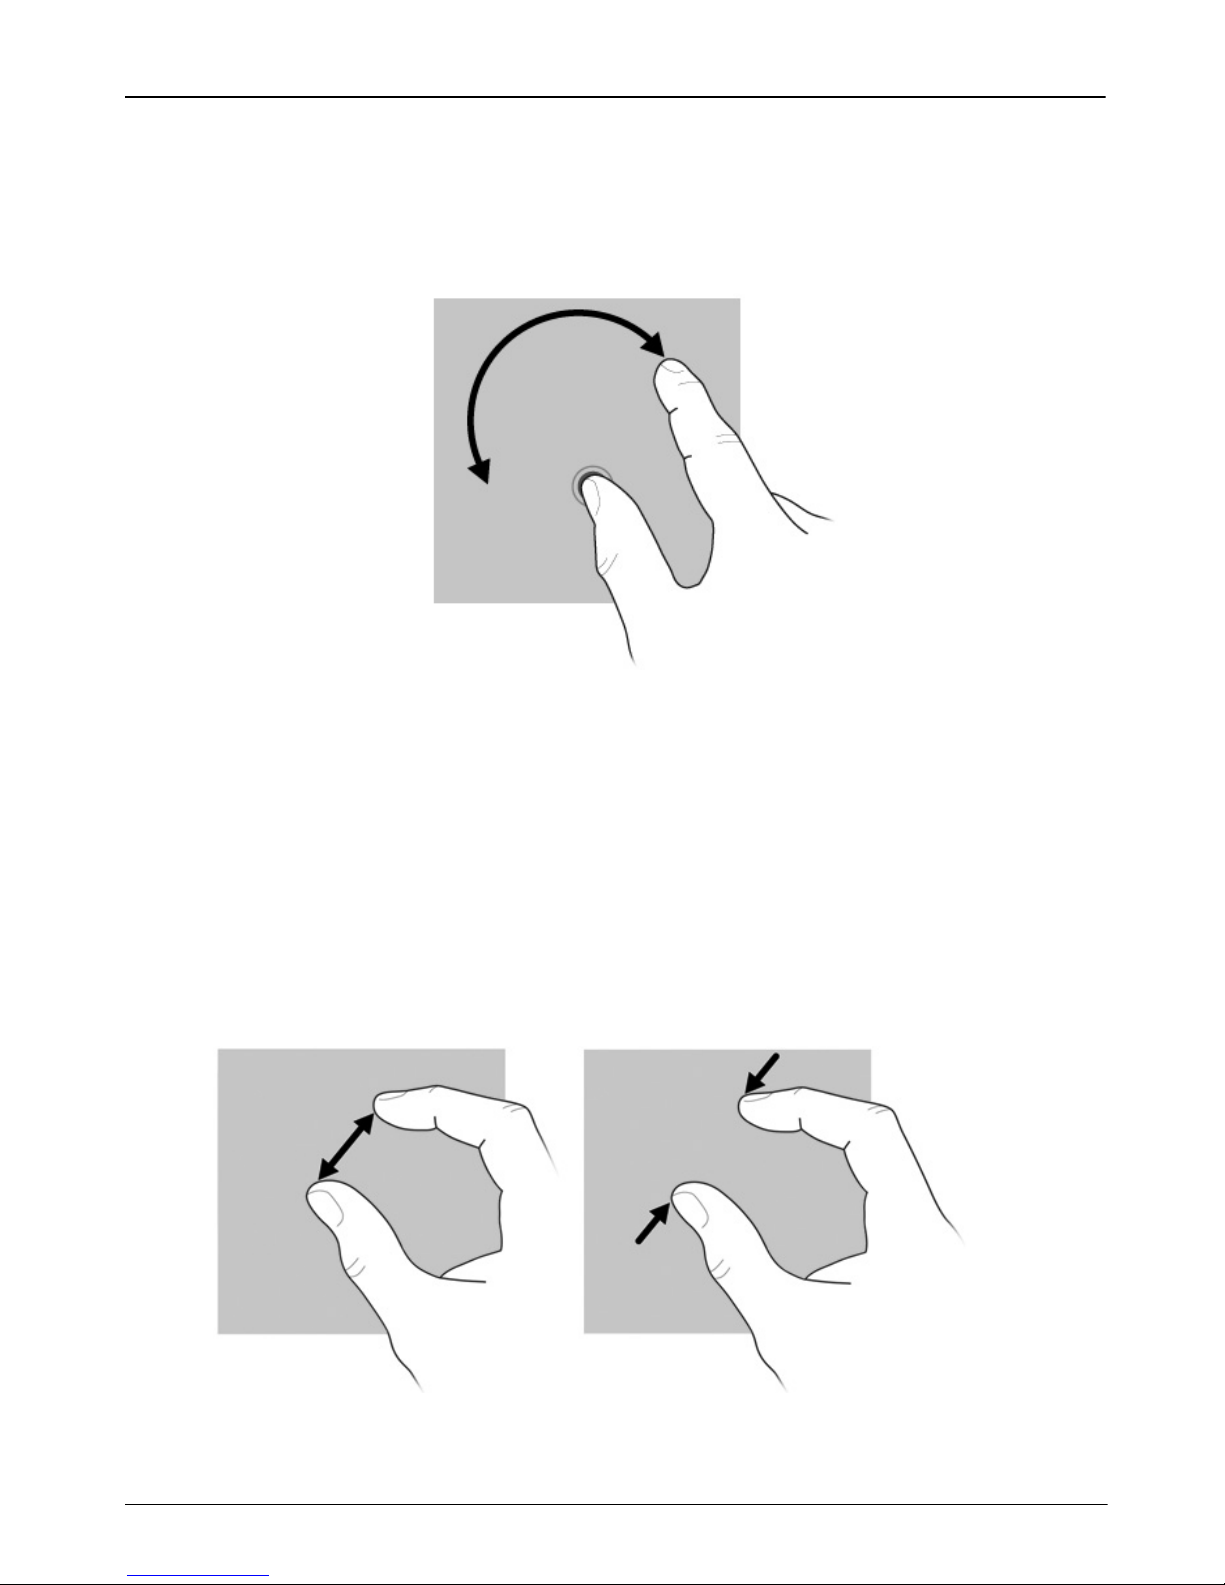
Rotating
Rotating allows you to rotate items such as photos and pages. To rotate, anchor your thumb
on the screen, and then move your forefinger in a semicircular motion around your thumb.
Pinching/Zooming
Pinching allows you to zoom in or out on items such as .pdf files, images, and photos.
To pinch:
■ Zoom out by holding two fingers apart on the screen, and then pull the fingers together
to decrease an object's size.
■ Zoom in by holding two fingers together on the screen, and then pull the fingers apart to
increase an object's size.

10 Notebook Essentials
Chapter 2: What’s new?
Setting touchscreen preferences
To set touchscreen preferences:
■ For clicks, flicks, and visual feedback, select Start > Control Panel > Hardware and
Sound > Pen and To uch . These preferences are specific to the touch screen and the
computer.
■ For left-handed or right-handed users, select Start > Control Panel, > Hardware and
Sound > Tab let PC Settings > General tab. These preferences are specific to the touch
screen and the computer.
■ For pointer speed, click speed, and mouse trails, select Start > Control Panel, >
Hardware and Sound > Mouse. These preferences apply to any pointing device in the
system.
To change or test click settings:
1. Select Start > Control Pane > Hardware and Sound > Pen and To uch > Pen
Options tab.
2. Under Pen Actions, select the action, and then click Settings.
3. Make changes or testing the settings, and then click OK.
To change or create flick assignments:
1. Select Start > Control Panel > Hardware and Sound > Pen and To uc h > Flicks tab.
2. Click Navigational flicks and editing flicks, and then click Customize.
3. Follow the on-screen instructions to change or create a flick assignment.
4. Click OK.

Notebook Essentials 11
Chapter 3: Using HP QuickWeb
(select models only)
HP QuickWeb is an optional, instant-on environment that is separate from your Windows
operating system. QuickWeb allows you to rapidly access a Web browser, and other
communication and multimedia programs without the need to start Windows. QuickWeb is
ready to go within seconds of pressing the power button and includes the following features:
■ Web browser—Search and browse the Internet, and create links to your favorite
Web sites.
■ Chat—Chat with friends on multiple instant messaging programs, such as Google Talk,
Windows Live Messenger, Yahoo! Messenger, or other providers.
■ Skype—Skype is a voice over Internet protocol (VoIP) that lets you communicate free
of charge with other Skype users. Skype offers conference calling and video chat, as
well as long-distance phone calls to land lines.
■ Web e-mail—View and send e-mail using Yahoo, Gmail, and other Web e-mail
providers.
■ Web calendar—Display, edit, and organize your schedule using your favorite online
calendar program.
■ Music Player—Listen to your favorite music and create playlists.
■ Photo Viewer—Browse through photos, create albums, and view slide shows.

12 Notebook Essentials
Chapter 3: Using HP QuickWeb (select models only)
The first time you start your system after completing the Windows setup process, the
QuickWeb setup screens appear. Follow the on-screen instructions to activate QuickWeb.
Click an icon on the QuickWeb Home screen to launch a program.
✎
The QuickWeb Home screen might look slightly different from the illustration in this
section.
✎
The following sections assume that you have completed the QuickWeb setup process
and enabled QuickWeb. For more information, see the HP QuickWeb software Help.
QuickWeb allows you to access a Web browser, and other communication and multimedia
programs, within seconds, without starting Windows. To start QuickWeb when the computer
is turned off:
1. Turn on the computer. The HP QuickWeb Home screen appears.
2. Click an icon on the QuickWeb Home screen to launch a program.
✎
If QuickWeb has been activated, it starts every time you turn on the computer and
displays an automatic timer above the Start Windows icon. If you do not move the
mouse or press a key for 15 seconds, the computer starts Microsoft® Windows. For
more information on the QuickWeb timer and changing the timer settings, see the HP
QuickWeb software Help.
Setting up HP QuickWeb for the first time
Using HP QuickWeb
 Loading...