

Page 1

Getting Help
Page 2

The information in this document is subject to change without notice.
Hewlett-Packard® Company makes no warranty of any kind with regard to this material, including, but not
limited to, the implied warranties of merchantability and fitness for a particular purpose.
HP shall not be liable for errors contained herein or for incidental or consequential damages in connection
with the furnishing, performance, or use of this material.
HP assumes no responsibility for the use or reliability of its software on equipment that is not furnished by HP.
This document contains proprietary information that is protected by copyright. All rights are reserved. No part
of this document may be photocopied, reproduced, or translated to another language without the prior written
consent of HP.
Hewlett-Packard Company
Home Products Division
P.O. Box 4010
Cupertino, CA 95015-4010
Printed in the USA.
© Copyright Hewlett-Packard Company, 1998. All rights reserved.
Hewlett-Packard is a registered trademark of Hewlett-Packard Company in the United States of America and
other countries.
Intel Connect is a registered trademark of Intel Corporation.
Microsoft and Windows are registered trademarks of Microsoft Corporation in the United States of America and
other countries.
Other brand or product names are trademarks of their respective holders.
Page 3

Contents
Chapter 1 Finding Information and
Solving Problems ..............................................1
Where to Go for Help...........................................................................................2
Getting Help from the HP Support Center............................................... 3
Using System Tools..............................................................................................4
Getting Help from the Internet.......................................................................5
Restoring Your Software.....................................................................................6
Calling HP Support...............................................................................................8
Chapter 2 Troubleshooting.........................9
General Problems................................................................................................10
Answering Machine..............................................................................................13
CD-ROM.................................................................................................................... 15
Display.......................................................................................................................16
Fax and Phone....................................................................................................... 16
Keyboard.................................................................................................................. 18
Mouse......................................................................................................................... 19
Sound........................................................................................................................20
Speakerphone........................................................................................................ 21
Windows Desktop................................................................................................ 22
Contents
iii
Page 4

Chapter 3 Upgrading and Servicing
Your Computer ............................................... 27
Connecting External Components ............................................................28
Removing the Computer Covers and Other Components ...........35
Replacing the Battery.........................................................................................41
Adding Memory...................................................................................................42
Installing Add-in Cards ...................................................................................46
Adding Drives........................................................................................................52
Replacing Computer Covers and Other Components....................54
Using the BIOS Setup Program....................................................................58
Index ...................................................................61
iv
Getting Help
Page 5

1 Finding Information and Solving Problems
Chapter 1 covers the following topics:
Where to go for help
•
Getting help from the HP Support Center
•
Using system tools
•
Getting help from the Internet
•
Restoring your software
•
Calling HP support
•
Chapter 1 • Finding Information and Solving Problems
1
Page 6

Where to Go for Help
Hewlett-Packard offers a number of support solutions
for HP Pavilion PC owners, and this guide describes
each of these options.
•
Personal Guide If you are having trouble with
Microsoft® Windows®, try running the tutorials in
Personal Guide. See “Learning About the
Windows Desktop” in the Getting Started guide.
You can also use the Windows Help system by
choosing the Help option on the Start menu.
•
HP Support Center The HP Support Center
offers help with your hardware and software,
contains support contact numbers, and includes
a collection of system tools. See “Getting Help
from the HP Support Center” on page 3.
•
HP At Home The HP At Home Web site includes
an online System Guide. See “Getting Help from
the Internet” on page 5.
•
HP Pavilion Recovery The Recovery CDs allow
you to restore the software that originally came
with your computer. See “Restoring Your
Software” on page 6.
•
Troubleshooting Chapter 2 of this guide
provides a list of problems, along with possible
solutions. Just look up the area or component
you are having trouble with, and try the solutions
listed. See page 9.
•
HP Customer Care Center If you are still
having problems, call the HP Customer Care
Center. See “Calling HP Support” on page 8.
2
Getting Help
Page 7

Getting Help from the HP
Support Center
If you are having trouble learning a new software
program or solving a problem, the HP Support
Center is the place to go. Your support contacts,
online documentation, tutorials, and system
maintenance tools have been grouped in this one
convenient location.
To go to the HP Support Center, choose
HP Support Center on the Start menu or
double-click the icon on the desktop.
Descriptions of HP Support Center options are listed
on the following page.
Chapter 1 • Finding Information and Solving Problems
3
Page 8

HP Support Center Options
Software Help
Hardware Help
HP Pavilion
Library
Tutorials
Common
Questions
Each software package shipped with your
computer is listed here, along with its
manual (if there is one), online Help, and a
support phone number.
Information on hardware components (such
as your keyboard) is located here.
Online manuals are found here. Software
manuals (also found under Software Help)
are found here as well.
Learn skills such as creating software
shortcuts and changing the color of your
screen background by taking the short
lessons found here.
Common questions that HP Customer Care
Center personnel are frequently asked are
listed and answered here. Subjects range
from modems to the Internet to MS-DOS
and more. Check here if you have a question
about your computer.
Using System Tools
All of your system maintenance tools are organized
in one convenient location – the HP Support Center.
You can run special utilities provided by HP, as well
as the Microsoft system tools.
To access system tools from the HP Support Center:
Double-click the HP
1
icon on the desktop.
Click
2
System Maintenance
tools are described in the following table. You
will also find links to the Microsoft system tools
(such as ScanDisk and Disk Defragmenter).
Support Center
. The HP-provided
System
Maintenance
Technical
Support
4
Getting Help
Here you will find system tools to clean up
your hard disk and remove viruses.
Find information about your technical
support options here.
Page 9

HP Utilities in the HP Support Center
Virus Protection
HP Pavilion
Recovery CDs
If your system is infected with a virus, it can
display any number of symptoms. When in
doubt, run this utility, especially if you
download software from the Internet or use
shareware.
Before you got your computer, HP did a
backup of your entire system. The backup
CDs are included with your system in case
you need to restore any software that was
originally on your computer.
To go to this Web site using the Easy Internet Access
browser:
Double-click the
1
Easy Internet Access
icon on your desktop, or press the
Internet button on your keyboard.
In the Browser Selector dialog box, click
2
Internet Access browser
Click
3
Start
.
.
Easy
Getting Help from the Internet
Hewlett-Packard has a Web site on the Internet
dedicated to HP Pavilion PC owners. The HP At Home
Web site includes the following:
An online System Guide with technical support
•
information
Software updates
•
Answers to frequently asked questions
•
4
Click the
HP At Home
button to go to the HP At
Home Web site.
If you are using another browser, you can go to the
Web site by entering the following address:
http://www.hp-at-home.com
Chapter 1 • Finding Information and Solving Problems
5
Page 10

Restoring Your Software
If your software accidentally gets erased or
corrupted, you can reinstall the software. You may
need to reinstall all the software on your hard disk
or just certain applications. These two recovery
methods are:
•
System Recovery – Performs a full recovery
with or without completely reformatting your
hard disk. It reinstalls all application programs
included with your HP Pavilion PC.
•
Application Recovery – Allows you to select
the applications or drivers to be recovered. This
method preserves all data files that you have
created on your hard disk.
An HP Pavilion Recovery CD is provided for each
method. The CDs contain a copy of the software
originally installed on your system and can be used
only on the HP Pavilion PC model that they
came with.
Running the System Recovery Program
Warning:
information on the hard disk. If you reformat, you lose all
installed software and files created since you bought your
computer. You must reinstall software not originally on the
computer.
To run the HP Pavilion System Recovery program:
1
With the computer turned on, insert the System
Recovery CD in the CD-ROM drive.
2
Restart your computer. (Click the Start button on
the taskbar, choose Shut Down and then
Restart.)
Formatting the hard disk removes all
6
Getting Help
Page 11

3
When the Recovery Options screen appears,
choose Recover.
4
In the Select a Recovery Option screen, do one of
the following:
Click the Format & Recover button to erase
•
your hard disk and reinstall the original
HP Pavilion PC software.
Click the Recover Only button to reinstall
•
the original software without erasing the
hard disk.
5
Click Yes to proceed.
6
When the recovery is complete, remove the
System Recovery CD.
7
Click OK to restart the computer.
Note:
The Advanced Options menu, which allows recovery of
specific files, is recommended for advanced users only.
Restoring Applications
To restore certain applications:
1
Turn on your computer.
2
When you are in Windows, close all application
programs and any open windows.
3
Insert the Application Recovery CD in the
CD-ROM drive. The Application Recovery
program starts automatically; it takes about
20 seconds for the program to load.
4
Make sure the Application tab is selected.
Note:
The Device Drivers tab allows you to restore
drivers.
5
Click the button for the application you wish to
install.
6
Click OK to begin recovery of the application.
7
Click Continue to install another application.
Chapter 1 • Finding Information and Solving Problems
7
Page 12

8
Repeat steps 5—7 until you have recovered all the
desired applications and drivers.
9
When you are finished restoring applications,
remove the Application Recovery CD, and click
Restart to restart the computer.
Warning:
restart the computer when you are finished recovering
applications.
Do not skip this last step! You must
Calling HP Support
If you need further support or your computer is
completely nonfunctional, call the HP Customer
Care Center. If you can, have your support ID
number ready. To find your support ID number, press
Alt+Ctrl+S or look for the sticker on the back or side
of your computer.
Refer to your HP Pavilion PC Support Path card for the
phone number to call.
8
Getting Help
Page 13

2 Troubleshooting
Chapter 2 covers the following topics:
Solving general computer problems
•
Solving problems with specific components
•
Solving Windows desktop problems
•
Chapter 2 • Troubleshooting
9
Page 14

General Problems
My computer won’t turn on at all.
•
When you press the On button on the front of
your computer, the following events should
happen:
1
The keyboard indicator lights should flash.
2
The light next to the 3.5-inch disk drive
should flash.
3
You should hear the hard disk spin or the
diskette drive make a noise.
4
You should hear one beep; one beep
indicates that your computer is operating
properly.
•
If the computer doesn’t go through the above
procedure, check the following:
•
Make sure that the power cord and all cables
are securely plugged into the computer.
•
Make sure that the power cord is plugged
into a grounded, three-prong outlet. Check
to see whether the outlet works by plugging
another item (such as a lamp) into the outlet.
•
Make sure your display is plugged in,
connected to your computer, and turned on.
My computer (or part of it) doesn’t seem to be
working.
If the system is “frozen” (no response to mouse or
keyboard actions), you may have had too many
application windows open at one time. Avoid this
overload in the future by closing applications when
you don’t need them. (To close a window, click the X
in the top right corner of the window.) For now, reset
the computer as follows:
10
Getting Help
Page 15

1
Press the On button to turn off the computer.
A “General Protection Fault” error occurred.
2
Wait a few seconds, and turn the computer
back on.
Note:
Using the On button to reset the system is not a
recommended practice and should be used only as a last
resort.
Also, a voltage spike, power outage, or brownout may
have occurred. Symptoms of voltage spikes include a
flickering video display, unexpected system startups,
and the system not responding to your commands. A
voltage spike can occasionally corrupt or destroy
files, so it is a good idea to consistently make backup
copies of your data files. Prevent voltage spikes by
installing a surge suppressor between the power
outlet and the system power cord.
If the problem persists, reload the software. (For
software that originally came with your system,
see “Restoring Your Software” on page 6.)
This error usually occurs when a program has
corrupted your random access memory (RAM)
resources. In some circumstances, you can close the
message box and continue working. However, the
environment may be unstable, causing additional
errors to occur. If this happens, you can recover as
follows:
1
Click Close on the message box announcing the
error.
2
Close the software program.
3
Click Start on the taskbar.
4
Click Shut Down.
5
Select Restart and then click OK.
Chapter 2 • Troubleshooting
11
Page 16

A “Non-System Disk” error occurred.
If you have a diskette in the drive, remove the
diskette, and then press any key to continue.
I need more space on my hard disk.
•
Run a hard disk space check to find out exactly
how much space you have. See “Using System
Tools” on page 4.
•
You can defragment your hard disk. That is, you
can rearrange your current files so that they are
packed in together and any little storage spaces
between them are removed to make empty space
on the hard disk. Results will vary. See “Using
System Tools” on page 4.
My computer is taking longer to start up than it
did before.
•
Before turning off the computer, make sure there
isn’t a CD in the drive, so that the computer won’t
have to spend time checking it the next time you
turn on the system.
•
You don’t have to wait for the virus scan each
time. Press the Spacebar to skip the scan. (Don’t
skip it all of the time; you should run a virus scan
occasionally.)
•
Your disk may need to be defragmented. See
“Using System Tools” on page 4.
12
Getting Help
Page 17

I think my computer has a virus.
Answering Machine
A virus check is run automatically when you start the
computer. However, you can run a more thorough
check by using your system tools. See “Using System
Tools” on page 4.
Note:
New types of viruses are invented all the time. Be sure
to get regular updates of your virus scanning software from
the software manufacturer so that you will be able to check
for these new viruses.
I installed a new printer or other device, and it
won’t work.
Be sure that you installed the device drivers that
came with the new device.
The computer’s answering machine never
answers the phone.
Make sure that the Intel Connect® software is
running. (The screen with the phone should be in an
open window.) If the software is running, make the
following adjustments from the Intel Connect main
window:
1
Click Setup.
2
Click Answering.
3
Choose either Answer as a voice mail system or
Answer as an answering machine.
Chapter 2 • Troubleshooting
13
Page 18

The computer’s answering machine grabs calls
before I can answer the phone.
•
Increase the number of rings before Intel
Connect automatically answers:
1
From the Intel Connect main window, click
Setup.
2
Click Ringing.
3
Enter a higher number in the Auto-answer
ring count box.
•
Make sure that the DND (Do Not Disturb) button
is not lit on the Intel Connect main window. If it is,
click the DND button to disable the Do Not
Disturb feature.
I can’t hear messages as they are left.
Check the following:
•
Make sure that the Screen button is lit on the
Intel Connect main window.
•
Make sure that the mute feature is not on.
Press the keyboard Mute button until Mute Off
briefly displays on your screen.
•
Adjust the Volume knob on the keyboard or use
the Multimedia Sound Mixer to increase just the
answering machine sound level:
1
Double-click the Volume icon on the
taskbar.
2
Adjust the slide control. Make sure that the
Volume Controls are set at least halfway.
14
Getting Help
Page 19

I can’t hear phone messages when I play
them back.
Make the following adjustments:
Make sure that the mute feature is not on. Press
•
the keyboard Mute button until Mute Off appears
on the screen.
Turn up the Volume knob on the keyboard.
•
Adjust the Sound Mixer volume:
•
1
Double-click the Volume icon on the
taskbar.
2
Make sure that the Volume Controls are not
muted and are set at least halfway.
I can’t record an outgoing message.
Use the phone you connected to your computer,
rather than the microphone in the display, to record
the message. If you haven’t connected a phone to the
computer, see your Set Up Poster for instructions.
CD-ROM
The message “System Error: Unable to read
drive” appears when I try to run a CD program.
Make sure that the CD is placed into the drive
•
with the label side up.
Wait 5 to 10 seconds after closing the drawer to
•
give the computer time to recognize the CD.
Are you trying to play a DVD in a CD-ROM drive?
•
A DVD will only play in a DVD drive, not in a
CD-ROM drive. If you aren’t sure what type of
drive you have, check the front of the drive; on
DVD systems, “DVD” appears on the drive.
The CD-ROM or DVD is playing erratically.
Dirt or smudges can cause a disk to skip.
Try cleaning the disk with a soft cloth.
•
If the disk has a bad scratch, it will have to be
•
replaced.
Chapter 2 • Troubleshooting
15
Page 20

Display
My display doesn’t work, even though the
computer appears to work.
•
Adjust the brightness and contrast controls on
the display. (The information may be there, but
you just can’t see it.)
•
Make sure that the power cord is securely
plugged into the display.
•
Make sure that the display is turned on – it has
its own power button.
•
Make sure that your power cord is plugged into a
grounded three-prong outlet. Check to see
whether the outlet works by plugging another
item (such as a lamp) into the outlet. (If the light
on the front of the display is lit, it is getting
power. Try the next item on this list.)
•
Check the cable connection between the display
and the computer. The cable connectors must be
pushed in all the way.
16
Getting Help
Fax and Phone
I can’t dial out.
Check to make sure that a telephone cable connects
from the back of the computer to the wall. The cable
must be plugged into the Line socket on the
computer (see illustration on page 28). The other
socket is there to plug in a phone if you want to.
I can’t correct typing mistakes when dialing a
phone number in Intel Connect.
The Backspace key doesn’t do anything here. If you
misdial a number, you must hang up and start over.
Page 21

The message “Invalid phone number” appears
when I use the Address Book.
You need to include the area code in the Properties
Description in the Address Book Manager window.
The message “Check error log” appears in the
status window.
Incoming faxes are not picked up automatically.
1
Click Setup on the Intel Connect main window.
2
Click Answering.
3
Choose either Answer as a voice mail system or
Answer as an answering machine.
Make the following adjustments:
1
Click Setup on the Intel Connect main window.
2
Click Error Log.
3
Read the error message.
4
Click Delete.
I can’t enter a name or a phone number in the
To: box when composing a fax.
In the Message Manager window:
1
Click To:
2
Choose a name from the Address Book; or click
Unlisted, and then enter a name and phone
number.
Chapter 2 • Troubleshooting
17
Page 22

The Address Book dials the person’s business
phone instead of the home phone (and vice
versa).
In the Address Book window:
1
Click Other Number.
2
Choose Home Phone or Business Phone.
Keyboard
My keyboard doesn’t work, even though the
computer and display seem to work.
•
If the PC beeps repeatedly or if nothing happens
when you press keys, it’s possible that the
keyboard is connected improperly. Make sure
that the keyboard is connected to the keyboard
port, not the mouse port. The colors of the cable
plugs and the colors of the connector labels
should match. If you need to reconnect these two
cables, you must turn the computer off,
reconnect the cables, and then turn the computer
back on.
•
It’s possible that your system has crashed. Try
rebooting your computer by pressing the On
button, waiting a few seconds, and turning the
computer back on.
18
Getting Help
Page 23

When I push one of the special buttons (such as
Internet) on the keyboard, nothing happens.
9
Select an application from the list, or click
Browse to find an application yourself.
The button may be disabled. To reconfigure the
button:
1
Click Start on the taskbar.
2
Select Settings.
3
Click Control Panel.
4
Double-click the Keyboard icon in
Control Panel.
5
Click the Keyboard Manager tab.
6
Make sure the Enable Multimedia Buttons and
Onscreen Display checkbox is selected.
7
Click the button you want to configure.
8
Make sure the Disable Button option is not
selected.
10
Click OK.
Mouse
My mouse doesn’t work, even though
everything else does.
Make sure that the mouse is connected to the
•
mouse port, not the keyboard port. The colors of
the cable plugs and the colors of the connector
labels should match. If you need to reconnect
these two cables, you must turn the computer
off, reconnect the cables, and then turn the
computer back on.
Chapter 2 • Troubleshooting
19
Page 24

•
Make sure that you are in the Windows desktop,
not MS-DOS. (The MS-DOS interface is a plain
screen with a prompt that looks like this: C:\>) If
you are in MS-DOS, type EXIT and press the
Enter key.
3
Use your finger to move the rollers in the
mouse ball housing.
4
Replace the mouse ball and screw on the
cover.
•
It’s possible that your system has crashed. Try
rebooting your computer by pressing the On
button, waiting a few seconds, and turning the
computer back on.
•
Does the pointer move on the screen when you
move your mouse? If not, try this:
1
Remove the mouse ball by unscrewing the
bottom of the mouse.
2
Clean the mouse ball with a damp cloth
(not paper).
20
Getting Help
Sound
My computer doesn’t make any sound.
•
Check the headphone and microphone cables at
the back of the computer to be sure they are not
switched. The colors should match. Be sure the
blue sound plug is pressed firmly into the jack.
•
Locate the Volume knob on the keyboard.
The knob is at the top of the keyboard, near the
center. Turn up the volume by turning the knob
clockwise. As you do this, you’ll see the volume
indicator increase on your screen.
Page 25

Make sure that you have the speakers connected
•
properly.
The Volume knob affects all sound on
•
your computer, but each input can be
turned up or down individually by
adjusting the sound/mixer settings. To adjust
these settings, double-click the Volume icon on
the taskbar.
Your audio system may be muted. Press the Mute
•
button on the keyboard. If the message Mute Off
appears, you just turned off the mute feature;
your system should now produce sound. If the
message Mute On appears, you just muted your
system; press the Mute button again to turn it off.
Make sure that headphones are not plugged into
•
the keyboard. If they are, sound goes to the
headphones.
Speakerphone
I’m getting a squealing noise from the speakers
or the microphone.
During a phone call, turn the Volume knob
•
on the keyboard counterclockwise to decrease
the volume.
Click the Volume icon on the taskbar
•
and drag the volume bar downward.
If your display is against a wall or other object,
•
pull it out a few inches.
If your display is underneath a shelf or large
•
object, pull the display out.
Chapter 2 • Troubleshooting
21
Page 26

The volume is either too loud or too soft.
•
Turn the Volume knob on the keyboard.
•
To set the sound on the phone only,
double-click the Volume icon on the
taskbar, choose the phone, and drag the
volume bar upward or downward.
I can’t hear the other person clearly or at all.
•
Turn the Volume knob on the keyboard
clockwise.
•
Adjust the Sound Mixer volume:
1
Double-click the Volume icon on the
taskbar.
2
Make sure that Mute is not checked.
Windows Desktop
I’m having trouble understanding the Windows
desktop.
•
You have Windows desktop tutorials on your
computer.
To access them:
1
Double-click the Personal Guide
icon on the desktop.
2
Click one of the first three buttons:
Organizing your Files, Changing Your
Desktop, or Managing Your Software.
22
Getting Help
Page 27

The Pavilion Library in HP Support Center has
•
online books that cover the Windows desktop.
To view these books:
1
Double-click the HP Support Center
icon on the desktop.
2
Click HP Pavilion Library.
3
Click Online Books.
The printed Microsoft book Introducing Microsoft
•
Windows is included with your computer.
My program window disappeared.
My taskbar disappeared.
You may have accidentally removed your taskbar.
To get it back:
1
Point the cursor at the bottom of the screen.
2
When the cursor changes to a double arrow,
click and hold down the left mouse button.
3
Drag the double arrows up and release the
mouse button.
I don’t use the Channel bar and would like to
remove it from my desktop.
Sometimes, when operating a program, you
accidentally click outside the program work surface
and switch to another program. Your program isn’t
gone; it’s just underneath something else. The
program button for your open program appears on
the taskbar – just click the button to switch to that
program.
To remove the Internet Explorer Channel bar:
1
Right-click an empty area of the desktop.
2
Choose Active Desktop and then Customize my
Desktop.
Chapter 2 • Troubleshooting
23
Page 28

3
Turn off the Internet Explorer Channel Bar
option.
4
Click OK.
•
To turn off single-click mode:
1
Click Start on the taskbar.
2
Choose Settings and then Folder Options.
The icon titles on my desktop and in my folders
are underlined.
When an icon’s descriptive text is underlined, singleclick mode is active.
•
To remove the underlining, but leave single-click
mode active:
1
Click Start on the taskbar.
2
Choose Settings and then Folder Options.
3
Click Custom and choose Settings.
4
Choose the Underline icon titles only when
I point at them option.
5
Close the dialog boxes.
24
Getting Help
3
Click Custom and choose Settings.
4
Choose the Double-click to open an item
option.
5
Close the dialog boxes.
Page 29

When I try to select a file name in My Computer
or Windows Explorer, the document opens. The
same is true for icons on my desktop.
You may have accidentally double-clicked the
•
item instead of clicking it once.
Single-click mode may be active on your
•
computer. To turn off single-click mode:
1
Click Start on the taskbar.
2
Choose Settings and then Folder Options.
3
Click Custom and choose Settings.
4
Choose the Double-click to open an item
option.
5
Close the dialog boxes.
My desktop has a toolbar that belongs in the
taskbar.
You may have accidentally dragged the toolbar off
the taskbar and dropped it onto the desktop. The
easiest way to fix this is to remove the toolbar and
open it again:
1
Click the X (Close) button on the toolbar.
2
Right-click an empty area of the taskbar and
choose Too lb ar s.
3
Select the toolbar you want to display in the
taskbar.
Chapter 2 • Troubleshooting
25
Page 30

26
Getting Help
Page 31

3 Upgrading and Servicing Your Computer
Chapter 3 covers the following topics:
Connecting external components
•
Removing computer covers and other
•
components
Replacing the battery
•
Adding memory
•
Installing add-in cards
•
Adding drives
•
Replacing computer covers and other
•
components
Using the BIOS Setup program
•
Chapter 3 • Upgrading and Servicing Your Computer
27
Page 32

Connecting External
Components
This illustration points out all the
connections on the back of your
computer. You may need to refer
to this drawing in case you ever
move your computer and need
to reconnect the components, or
if you purchase new accessories.
AC P o wer
Connector
Mouse
Keyboard
Universal
Serial Bus (USB)
Serial
Printer
Display
Composite
Video Output
S-Video
Output
Joystick
Phone
Line
SERIAL
VIDEO
OUT
S-VIDEO
OUT
Headphone
PHONE
LINE
Speaker
T
U
O
N
I
Audio Line Out
Audio Line In
Microphone
28
Getting Help
Page 33

Connecting to a Stereo System
Your computer can be connected to your stereo
system for games or multimedia applications. First,
you’ll need a cable that has a 3.5mm stereo plug on
one end and two RCA plugs on the other end. (You
can buy such a cable at most consumer electronics
stores.) Then, connect any unused line-level input
connector on the stereo system to the line output on
the audio card (see illustration).
When your computer and your stereo system are
connected, the volume levels can be adjusted with
either the computer keyboard Volume knob or the
stereo volume control.
PHONE
LINE
T
U
O
IN
Audio Line Out
Chapter 3 • Upgrading and Servicing Your Computer
29
Page 34

Creating Audio Files
Using your computer and sound-recording software,
you can record from a CD or your stereo system and
create a file on your hard disk.
1
If you want to record from your stereo system,
connect the stereo to the audio Line In at the
back of your computer.
2
Go to Control Panel, and choose the
Multimedia applet. In the Audio tab, set
recording properties for the desired recording
quality.
Note:
Be aware that the higher the recording quality, the
larger the resulting file will be. A CD-quality recording
requires approximately 11 MB per minute of recorded
material.
3
Start your sound recording software, either
Microsoft Sound Recorder or Media Rack. To start
the program:
•
Click Start on the taskbar.
•
Choose Programs, Accessories, and then
Entertainment.
•
Select either Sound Recorder or Media
Rack.
4
In the mixer’s recording panel, select the sound
source, such as Line (for stereo) or CD.
5
Start the recorder by clicking the red button on
the recorder.
6
Play the material to be recorded.
7
After the material has been recorded, stop the
recorder and save the file. The audio will be
saved on the hard drive as a .WAV file.
30
Getting Help
Page 35

Connecting to a Television Set
If your TV has either an S-video or a composite video
connector, you can connect your PC to your
television so that you can view your computer image
on your TV (to watch DVD movies if you have a DVD
drive, play games, and so forth). Determine which
type of connector your TV has, and then refer to the
appropriate drawing on the following pages.
To view your computer image on your TV:
1
Turn off your computer.
2
Connect the TV and computer as shown on pages
32 and 33.
Note:
The cables must be connected before you turn on
the computer.
3
Turn on your computer.
4
When your Windows desktop appears, right-click
an empty area of the desktop, choose Properties,
click the Settings tab, and then choose the
Television option. (The option should be
checked.)
5
Turn on the TV.
6
On the remote control, find the Video/TV button.
7
Press Video/TV until you see your computer
image on the television. You may have to press it
twice.
The sound will come from your computer unless you
connected the audio Line Out from the computer to
the audio input on the TV or stereo.
When you wish to disconnect the television from your
PC, you may need to unselect the Television option in
Display Properties in order to return your computer
display to its original resolution. (See step 4.)
Chapter 3 • Upgrading and Servicing Your Computer
31
Page 36

Connecting the PC to Your TV (Composite Connection)
V
ID
E
O
O
U
T
S-VIDEO
OUT
TELEVISION BACK PANEL ON YOUR COMPUTER
Composite
Video Out
Video In
T
U
O
R
O
T
I
N
O
M
O
E
D
I
V
O
E
D
I
V
L
T
U
O
V
T
L
O
I
D
U
A
O
I
D
U
A
R
R
F
H
T
U
U
/
F
P
T
H
U
V
O
O
E
ID
V
R
E
T
T
R
U
E
P
V
N
I
N
O
O
E
C
ID
O
V
T
X
U
A
I
N
O
U
T
Note:
The cables shown are not
provided with your system. You can
purchase these cables at an electronics
or computer store. The audio and
video jacks on your TV may be in
different locations than the ones
shown in the illustration.
32
Audio
Line In (L)
Getting Help
Audio
Line In (R)
Audio Out
Page 37

Connecting the PC to Your TV (S-Video Connection)
S
-
V
I
D
E
O
O
U
T
V
I
D
E
O
O
U
T
TELEVISION BACK PANEL ON YOUR COMPUTER
S-Video Out
S-Video In
T
U
O
R
ITO
N
O
M
O
E
ID
V
O
E
ID
V
L
T
U
O
V
T
L
IO
D
U
A
IO
D
U
A
R
R
F
H
T
F/U
PU
T
H
U
V
O
O
E
ID
V
R
TE
T
R
U
E
P
V
IN
N
O
O
E
C
VID
TO
X
U
A
I
N
O
U
T
Note:
The cables shown are not
provided with your system. You can
purchase these cables at an electronics
or computer store. The audio and
video jacks on your TV may be in
different locations than the ones
shown in the illustration.
Audio
Line In (L)
Audio
Line In (R)
Audio Out
Chapter 3 • Upgrading and Servicing Your Computer
33
Page 38

Connecting a Digital Camera
Digital cameras are simple to connect, disconnect,
and reconnect on your HP Pavilion PC. A Digital
Camera Port is conveniently located right on the
front of your computer.
Note:
Your system does not include a digital camera; it must
be purchased separately.
Digital Camera Port
Note:
The Digital Camera Port is a standard serial port to
which any serial device can connect.
34
Getting Help
Page 39

Removing the Computer Covers
and Other Components
Warning:
ergonomically correct lifting procedures when moving the
computer.
Avertissement :
suivez des procédures ergonomiques lorsque vous le déplacez.
Warning:
disk drives, add-in cards, and other components. If an ESD
station is not available, wear a wrist strap attached to a metal
part of the computer. Place cards on a conductive foam pad or
inside the conductive wrapper they came in; do not place the
cards on top of the wrapper.
The HP Pavilion PC is heavy; be sure to use
L’ordinateur HP Pavilion est lourd ;
Electrostatic discharge (ESD) can damage
Avertissement :
peuvent endommager les unités de disque, cartes d’expansion
et autres composants. Si vous ne disposez pas d’une station de
protection contre les décharges électrostatiques, portez un
bracelet antistatique relié à une partie métallique de
l’ordinateur. Placez les cartes sur tapis en mousse conducteur
ou dans leur emballage, mais ne les posez jamais sur
l’emballage.
Warning:
removed. Always replace the cover before turning on the
system.
Do not operate the system with the cover
Avertissement :
son capot est ouvert. Remettez toujours le capot en place
avant de mettre le système sous tension.
Les décharges électrostatiques
N’utilisez pas le système lorsque
Chapter 3 • Upgrading and Servicing Your Computer
35
Page 40

Before You Begin
Be sure to read the items below before you attempt
to upgrade or service your computer.
•
These procedures assume familiarity with the
general terminology associated with personal
computers and with the safety practices and
regulatory compliance required for using and
modifying electronic equipment.
•
Set up an equipment log to record the system
model and serial numbers, all installed options,
and other information about the system. If you
need this information, it will be easier to consult
the log than to open up and examine the system.
•
Disconnect the system from any
telecommunications links, networks, or modems,
and then disconnect the system power source
before performing any of the procedures
described in this chapter. Failure to do so before
you open the system or do any procedures can
result in personal injury or equipment damage.
Before you can add memory, replace or insert add-in
cards, change the battery, or add drives to your
system, you first need to remove the computer covers
and any components that may be in the way. The
following table summarizes what components need
to be removed for each task.
Task Components to remove
•
You will need a #2 Phillips screwdriver and a
medium flat-blade screwdriver. We recommend
that you use an antistatic wrist strap and a
conductive foam pad when working on the
system.
36
Getting Help
Add or remove memory Back panel, right side panel
Replace battery Back panel, right side panel
Add or replace add-in
cards
Add or replace drives Back panel, right side panel, left
Back panel, right side panel, fan,
expansion slot cover
side panel, bay insert
Page 41

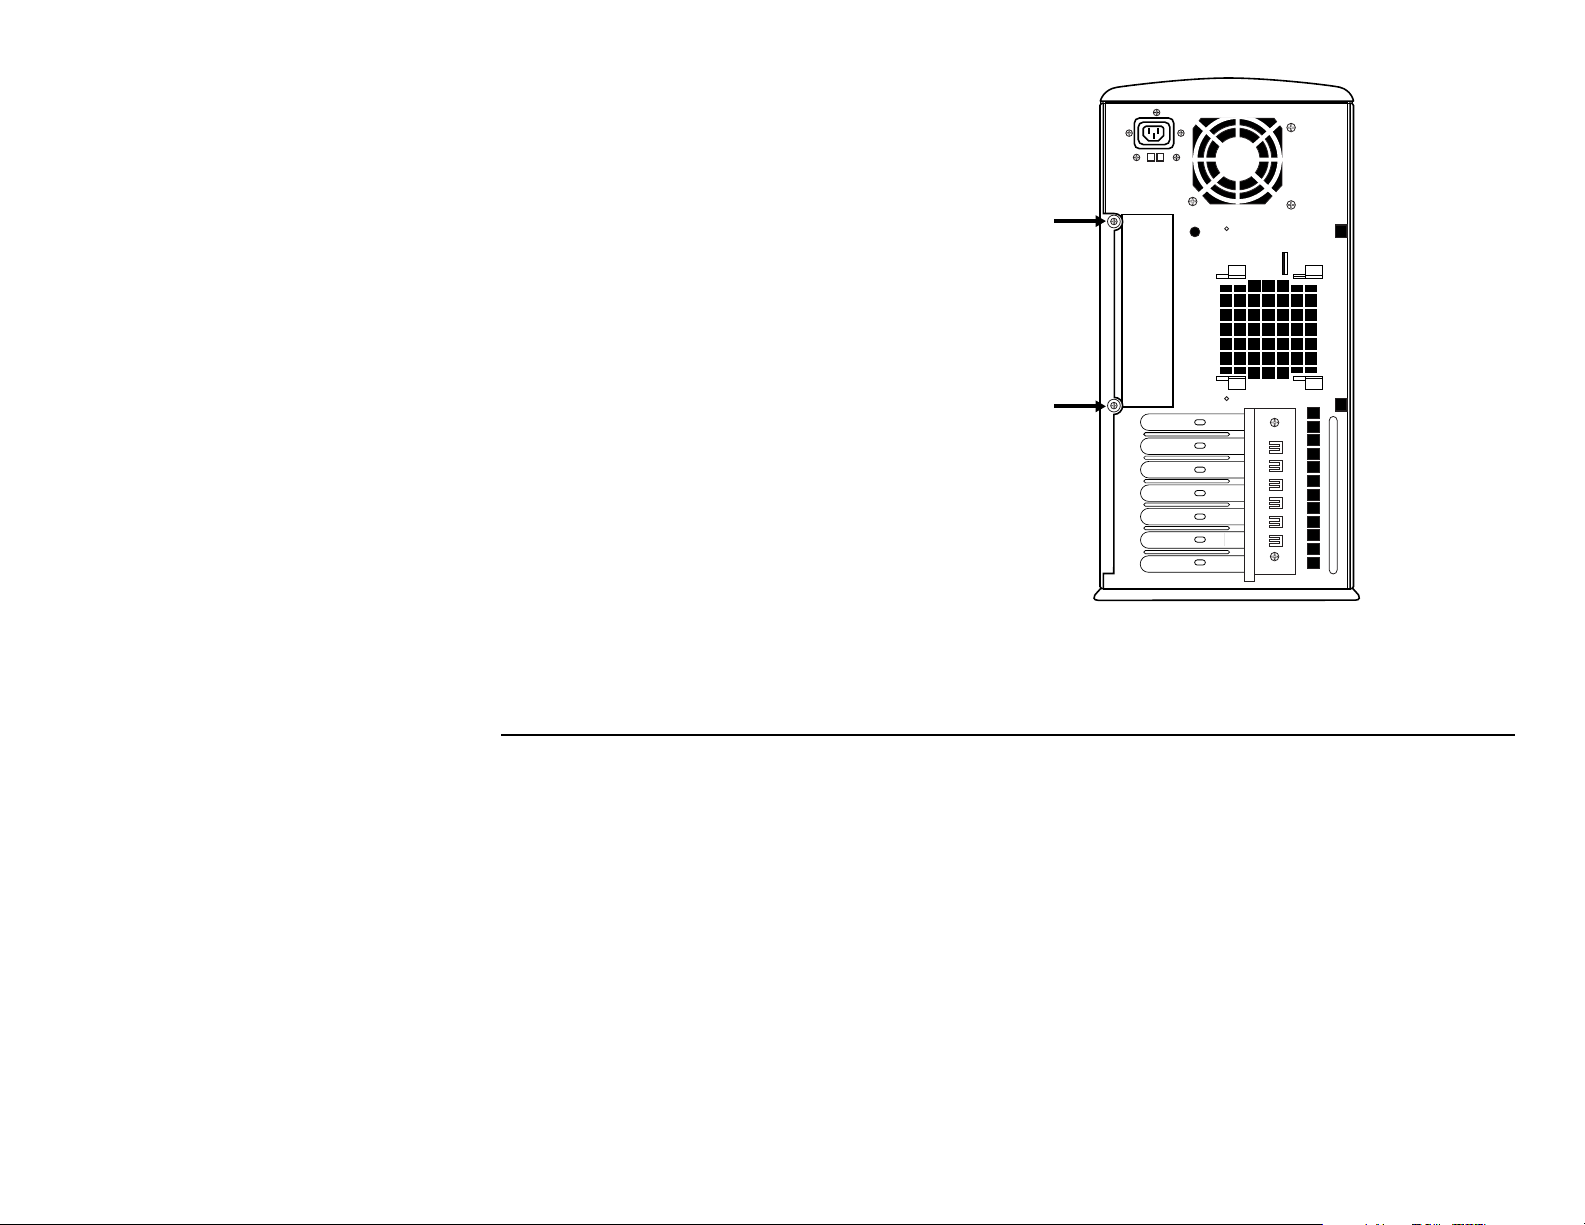
Removing the Back Panel
You will need to remove the back panel before you
can access the inside of your computer or remove
any of the other covers.
To remove the back panel:
1
Use a #2 Phillips screwdriver to remove the two
screws on the back panel (A).
2
Grasping the back panel at (B) and (C), remove
the back panel by lifting up and out.
A
CB
A
Chapter 3 • Upgrading and Servicing Your Computer
37
Page 42

Removing the Right Side Panel
You’ll need to remove the right side panel in order to
add memory, insert add-in cards, or change the
battery.
To remove the right side panel:
1
Make sure the back panel is removed.
2
Supporting the front edge of the panel, grasp the
rear edge of the panel and pull toward the back
of the computer.
3
Lift the side panel upward and out.
38
Getting Help
Page 43

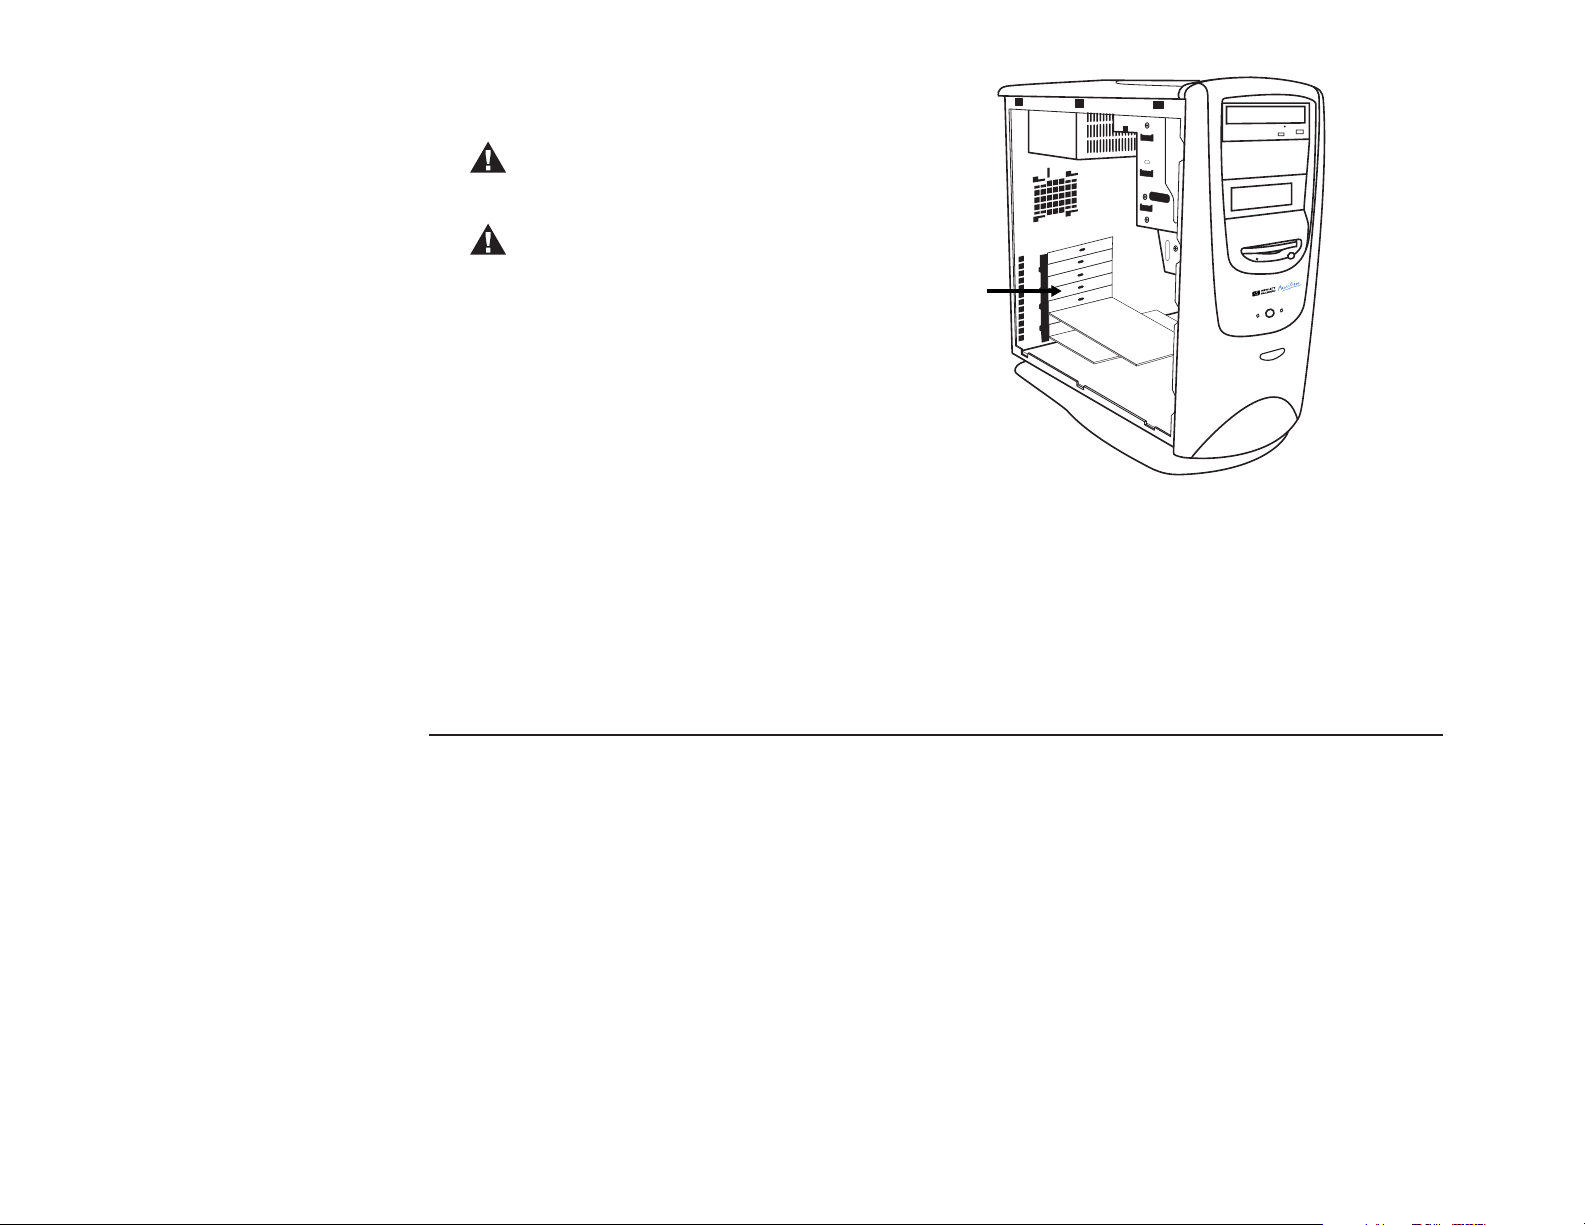
Removing the Left Side Panel
The left side panel must be removed before installing
new drives.
To remove the left side panel:
1
Use a #2 Phillips screwdriver to remove the two
screws that fasten the left side panel to the back
panel (H).
2
Supporting the front edge of the left side panel,
grasp the rear edge of the panel and pull toward
the back of the computer.
3
Lift the left side panel upward and out.
H
H
Chapter 3 • Upgrading and Servicing Your Computer
39
Page 44
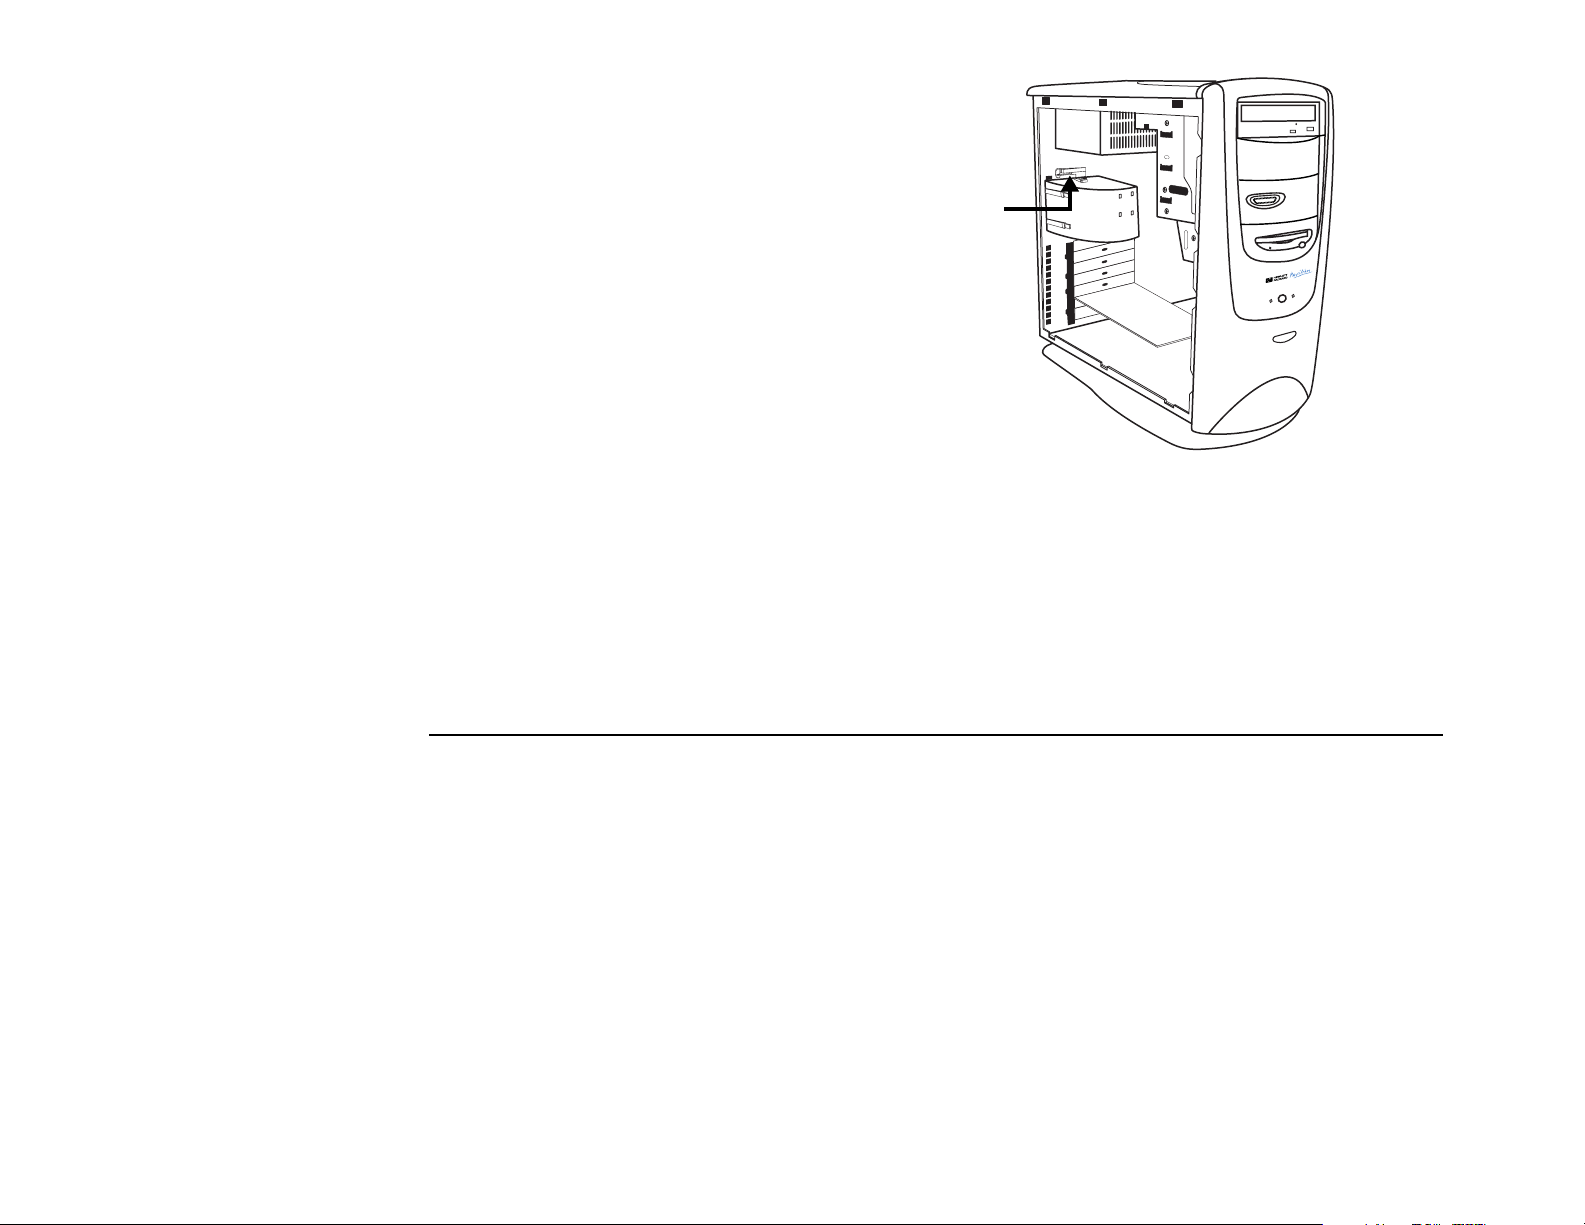
Removing the Fan
You may need to remove the fan to access removable
components from the motherboard, to add a card in
the top expansion slot, or to replace the fan.
Note:
The back panel and right side panel must be removed
before beginning this procedure.
1
With one hand below the fan for support, gently
pull the release mechanism on the top of the
fan (AA).
2
Slide the fan toward you approximately .5-inch.
3
Remove the fan from the frame and place out of
the way.
AA
40
Getting Help
Page 45

Replacing the Battery
A lithium battery on the motherboard provides
backup power for the computer’s timekeeping
capability. The battery has an estimated life
expectancy of seven years.
When the battery starts to weaken, the date and time
may be incorrect. If the battery fails, replace it with a
CR2032 lithium battery (3 volt, 220mAH rating) or an
equivalent battery.
To replace the battery:
1
Turn off the computer and all peripherals.
2
Disconnect the modem cable.
3
Disconnect the power cord.
4
Remove the back panel (see “Removing the Back
Panel” on page 37).
5
Remove the right panel (see “Removing the Right
Side Panel” on page 38).
Warning:
incorrectly replaced. Replace only with the same, or
equivalent, type of battery. Discard used batteries according
to the manufacturer’s instructions.
Attention :
remplacement incorrect batterie. Remplacer uniquement avec
une batterie du meme type ou d’un type equivalent
recommandé par le constructeur. Mettre au rebut les batteries
usagees conformement aux instructions du fabricant.
There is danger of explosion if the battery is
Il y a danger d’explosion s’il y a
6
Move any components that are restricting access.
7
Remove the battery from its socket.
8
Install the new CR2032 battery in the socket, with
the positive (+) side facing up.
9
Replace any components that were removed to
gain access.
Chapter 3 • Upgrading and Servicing Your Computer
41
Page 46

10
Replace the right panel (see “Replacing the Right
Side Panel” on page 56).
11
Replace the back panel (see “Replacing the Back
Panel” on page 57).
12
Reconnect the power cord.
13
Reconnect the modem cable.
14
Turn on the computer.
15
Run the BIOS (Basic Input Output System) Setup
program to reset the date and time.
(For instructions, see “Starting the BIOS
Setup Program” on page 58.)
Adding Memory
Your motherboard contains two or three 168-pin
DIMM sockets, depending on which model you have.
A DIMM is a dual inline memory module. You can
install these types of DIMMs in your system:
•
16 MB
•
32 MB
•
64 MB
•
128 MB
42
Getting Help
Page 47

All installed memory modules must be 168-pin
unbuffered SDRAM (synchronous dynamic random
access memory) DIMMs, and compliant with the Intel
“PC SDRAM Unbuffered DIMM Specification Revision
1.0.” This specification covers both 66-MHz and
100-MHz SDRAM DIMMs. Refer to your HP Pavilion
PC technical specifications on the HP online System
Guide to determine whether 66-MHz or 100-MHz
memory is required.
Installing a DIMM
To install a DIMM:
1
Turn off the computer and all peripherals.
2
Disconnect the modem cable.
3
Disconnect the power cord.
4
Remove the back panel (see “Removing the Back
Panel” on page 37.)
HP Pavilion PCs with two DIMM sockets can support
up to 256 MB of SDRAM, and HP Pavilion PCs with
three DIMM sockets can support up to 384 MB of
SDRAM.
Your HP Pavilion PC is shipped with one or more
DIMMs, but you can replace the existing DIMM(s) with
higher capacity ones.
5
Remove the right side panel (see “Removing the
Right Side Panel” on page 38).
6
Lay the computer gently on the left side panel.
7
Move any cabling out of the way, if necessary.
8
Push down on the two retaining clips on the ends
of the DIMM socket.
Chapter 3 • Upgrading and Servicing Your Computer
43
Page 48

9
Holding the new DIMM by its edges only, remove
it from its antistatic packaging. A DIMM has two
small notches on the lower edge that fit into
raised bumps in the DIMM socket.
11
Push straight down on top of the DIMM until it is
fully seated in the socket. The retaining clips on
the ends of the socket will automatically lock
into position when the DIMM is fully inserted.
10
Hold the DIMM perpendicular to the socket,
aligning the notches with the bumps.
44
Getting Help
12
Replace the right side panel (see “Replacing the
Right Side Panel” on page 56).
13
Replace the back panel (see “Replacing the Back
Panel” on page 57).
14
Reconnect the power cord.
15
Reconnect the modem cable.
16
Turn on your computer.
Page 49

Removing a DIMM
To remove a DIMM:
1
Turn off the computer and all peripherals.
2
Disconnect the modem cable.
3
Disconnect the power cord.
4
Remove the back panel (see “Removing the Back
Panel” on page 37).
5
Remove the right side panel (see “Removing the
Right Side Panel” on page 38).
6
Lay the computer gently on its left side.
7
Push down on the two retaining clips on the ends
of the DIMM socket until the DIMM pops out of
the socket.
Warning:
Use the retaining clips to eject the DIMM.
8
Holding the DIMM by its edges only, lift it away
from the socket. Store it in its antistatic
packaging.
9
To install a new DIMM in this socket, see
“Installing a DIMM” on page 43.
Do not pull the DIMM out of the socket.
Chapter 3 • Upgrading and Servicing Your Computer
45
Page 50

Installing Add-in Cards
At some point, you may add an ISA or PCI card to
your computer to accommodate a new component,
such as a scanner, or you may want to upgrade an
existing card.
Warning:
add-in cards that draw excessive current. The system is
designed to provide 2 amps (average) of +5V power for each
board/card in the computer. The total +5V current draw in a
fully loaded system (one with all add-in card slots filled) must
not exceed the total number of slots multiplied by 2 amps.
Do not overload the system by installing
You will need a #2 Phillips screwdriver and a medium
flat-blade screwdriver. You will also need any
software (for example, drivers) supplied with the card.
46
Getting Help
Avertissement :
installant des cartes d’expansion qui consomment trop de
puissance. Le système est conçu pour fournir une alimentation
(moyenne) de 2 ampères à +5V à chaque carte de l’ordinateur.
La puissance totale utilisée à +5V par un système chargé au
maximum de sa capacité (dont toutes les fentes d’introduction
de carte sont garnies) ne doit pas dépasser le nombre total de
fentes multiplié par 2 ampères.
Ne surchargez pas le système en
Page 51

To add or replace an add-in card:
1
Install any drivers supplied by the card
manufacturer.
2
Turn off the computer and all peripherals.
3
Disconnect the modem cable.
4
Disconnect the power cord.
5
Remove the back panel (see “Removing the Back
Panel” on page 37).
6
Remove the right side panel (see “Removing the
Right Side Panel” on page 38).
7
If necessary, remove the fan (see “Removing the
Fan” on page 40).
8
Remove the two screws (A) in the metal retaining
plate.
A
Chapter 3 • Upgrading and Servicing Your Computer
47
Page 52

9
Remove the retaining plate and put it aside.
10
If replacing a card, disconnect any cables
attached to the card. Then, holding the card by its
metal bracket and the far top corner of the card,
carefully pull the card straight out of the slot.
Continue with step 15.
Note:
If you’re adding a new card in a previously
unused slot, you will need to remove the expansion slot
cover as described in the following steps.
11
Remove any add-in boards that are next to the
expansion slot cover you want to remove.
12
Insert a screwdriver into the opening in the
expansion slot cover (B). Gently rock the
screwdriver up and down until the connecting
tabs at the top edge break.
48
Getting Help
B
Page 53

13
Insert the screwdriver into the area above the top
edge of the expansion slot cover (C) and press
down.
C
Chapter 3 • Upgrading and Servicing Your Computer
49
Page 54
14
Reach inside the frame and remove the
expansion slot cover (D).
Warning:
sharp edges.
Avertissement :
aigus du couvercle de la fente d’expansion.
15
Insert the new card in the slot and push straight
back. Make sure the card is properly seated.
16
Replace the retaining plate.
17
Reinstall the two screws in the metal retaining
plate.
18
If necessary, replace the fan (see “Replacing the
Fan” on page 54).
The expansion slot cover may have
Faites attention aux bords
D
50
Getting Help
Page 55

19
Replace the right side panel (see “Replacing the
Right Side Panel” on page 56).
20
Replace the back panel (see “Replacing the Back
Panel” on page 57).
21
Reconnect the power cord.
22
Reconnect the modem cable.
23
Turn on your computer.
What Is Plug and Play?
“Plug and Play” describes the ability to add and
remove add-in cards, memory, and peripherals
without any special procedures (like resetting jumpers
and testing for system conflicts). Your system BIOS
finds these components and adds them to the
system. You do not have to run the BIOS Setup
program.
If the New Card or Device Isn’t Working
Recheck all connections, including those to the card,
power supply, keyboard, and display. If the problem
still exists, run the BIOS Setup program and load the
default settings; and then save and exit. (Refer to
”Using the BIOS Setup Program” on page 58.)
Troubleshooting hints for add-in cards can be found
in the System Guide located on the HP At Home Web
site (http://www.hp-at-home.com).
Chapter 3 • Upgrading and Servicing Your Computer
51
Page 56

Adding Drives
Your HP Pavilion PC has three drive bays:
•
The top bay (bay 1) contains a DVD or CD-ROM
drive.
•
Bay 2 is empty; it can accommodate a 5.25-inch
drive.
•
Bay 3 contains the Digital Camera Port; it can
also accommodate an internal 3.5-inch drive
(such as a hard drive).
Note:
If the Digital Camera Port is removed, bay 3 can
accommodate a 5.25-inch removable-media drive.
This section describes how to access bays 2 and 3 so
that you can install drives in them.
To install a 5.25-inch drive in bay 2:
1
Remove the back panel (see “Removing the Back
Panel” on page 37).
2
Remove the right side panel (see “Removing the
Right Side Panel” on page 38).
3
Remove the left side panel (see “Removing the
Left Side Panel” on page 39).
4
If necessary, reach inside the drive bay and push
the bay 2 insert out.
Warning:
5
Install the drive in the bay 2 drive tray.
6
Install the two screws on each side of the bay 2
drive tray.
7
Attach the power cable to the back side of the
drive.
The insert may pop out forcefully.
52
Getting Help
Page 57

8
Attach the IDE ribbon cable to the back side of
the drive and to the motherboard.
5
Install the two screws on each side of the bay 3
drive tray.
9
Replace the left side panel (see “Replacing the
Left Side Panel” on page 55).
10
Replace the right side panel (see “Replacing the
Right Side Panel” on page 56).
11
Replace the back panel (see “Replacing the Back
Panel” on page 57).
To install an internal 3.5-inch drive in bay 3:
1
Remove the back panel (see “Removing the Back
Panel” on page 37).
2
Remove the right side panel (see “Removing the
Right Side Panel” on page 38).
3
Remove the left side panel (see “Removing the
Left Side Panel” on page 39).
4
Install the drive in the bay 3 drive tray.
6
Attach the power cable to the back side of the
drive.
7
Attach the IDE ribbon cable to the back side of
the drive and to the motherboard.
8
Replace the left side panel (see “Replacing the
Left Side Panel” on page 55).
9
Replace the right side panel (see “Replacing the
Right Side Panel” on page 56).
10
Replace the back panel (see “Replacing the Back
Panel” on page 57).
Chapter 3 • Upgrading and Servicing Your Computer
53
Page 58

Replacing Computer Covers and
Other Components
After you have finished changing the battery, adding
memory, installing add-in cards, or adding drives,
you will need to replace the computer cover(s) and
other components you have removed.
Replacing the Fan
Note:
The back panel and right side panel must be removed
before beginning this procedure.
1
Align the four fan latches to the perforations in
the frame (BB).
2
Slide the fan forward until the release mechanism
snaps into place.
3
Replace all parts that were removed or
disconnected to gain access to the fan.
BB
BB
54
Getting Help
Page 59
Replacing the Left Side Panel
Note:
The back and right side panels must be removed
before beginning this procedure.
To replace the left side panel:
1
Carefully lay the computer on its right side.
2
Aligning the bottom latches of the left side panel
to the frame, place the side panel flat against the
frame.
3
At the back edge, push the left side panel toward
the front panel until it snaps in place.
4
Check the latches at the back edge of the right
side panel to ensure that they are engaged.
5
Use a Phillips screwdriver to replace the two
screws that fasten the left side panel to the back
panel (H).
H
H
Chapter 3 • Upgrading and Servicing Your Computer
55
Page 60

Replacing the Right Side Panel
Note:
The back panel must be removed before beginning this
procedure.
To replace the right side panel:
1
Carefully lay the computer on its left side.
2
Aligning the bottom latches (F) of the side panel
to the frame, place the side panel flat against the
frame.
3
At the back edge, push the right side panel
toward the front panel until it snaps in place.
4
Check the latches at the back edge of the right
side panel (G) to ensure they are engaged.
56
Getting Help
G
F
F
F
G
Page 61

Replacing the Back Panel
To replace the back panel:
1
Align the bottom latches of the panel to the
frame (C) and tilt forward.
2
Press the top of the back panel to snap it into
place.
3
Use a #2 Phillips screwdriver to replace the two
screws on the back panel (A).
A
4
Reconnect the power connections.
5
Reconnect the telecommunications links,
networks, and modems.
A
C
Chapter 3 • Upgrading and Servicing Your Computer
57
Page 62

Using the BIOS Setup Program
The system BIOS (Basic Input Output System) on
your computer has a built-in setup program that lets
you control the special features of your computer.
Configuration information stored in the BIOS
includes the type of peripherals installed, the startup
sequence of the computer, and control for power
management. The battery maintains this information
when the system is turned off.
Starting the BIOS Setup Program
Start the BIOS Setup program by pressing the F1 key
after you see the blue HP logo screen during startup
but before the Windows desktop starts. You have only
a few seconds to press the F1 key before the startup
process continues.
We recommend that you keep a written copy of your
settings and keep it up to date. If you never change
the BIOS, you don’t need to keep a record. You can
always return to the original factory defaults by
choosing the Exit menu option, choosing Load
Setup Defaults, and then Exit Saving Changes.
BIOS Settings
The BIOS Setup program initially displays the Main
Menu screen. In each screen, there are options for
modifying the system configuration.
58
Getting Help
Page 63

Main
Advanced
Power
Set up and modify basic options such as time,
date, disk drives, and hard drives. Check the
amount of system memory and extended
memory here.
Modify advanced features such as Plug and Play
and memory settings. Configure your peripherals
and check your CPU type and speed here.
Enable power-saving mode and specify auto
suspend settings.
Setting Auto Suspend in the BIOS
With the Auto Suspend feature enabled, the computer
will automatically go into Suspend mode after a long
period of inactivity and will resuspend itself after it is
awakened by an application.
Note:
Some third-party software and hardware may
experience problems with Suspend mode.
Boot
Exit
Specify the sequence in which the system boots:
disk drive, hard drive, CD-ROM drive.
Save or discard changes.
Use the left arrow and right arrow keys to make a
selection, and then press the Enter key.
For a more detailed explanation, see the online
System Guide available on the HP At Home Web site
(http://www.hp-at-home.com).
Note:
We recommend that you keep a written copy of your
settings and keep it up to date.
To enable/disable the Auto Suspend feature:
Reboot your computer by shutting down and
1
restarting it.
When you see a blue screen with an HP logo,
2
press the F1 key on the keyboard; this starts the
BIOS Setup program.
Press → to go to the Power menu.
3
In the
4
Chapter 3 • Upgrading and Servicing Your Computer
Power Savings
category, press Enter.
59
Page 64

5
To disable Auto Suspend, choose Disable.
Or
To enable Auto Suspend, choose Customized. To
set the amount of time before your PC suspends
automatically, choose the Auto Suspend
Timeout option, press Enter, and then select a
time (such as 10 minutes).
6
Press the F10 key on the keyboard to save the
setting, then press Enter.
60
Getting Help
Page 65

Index
A
add-in cards, installing, 46
adding memory, 42
Address Book problems, 17, 18
answering machine problems, 13
Application Recovery program, 7
applications. See software
audio files, creating, 30
Auto Suspend feature, 59
B
battery, replacing, 41
bays. See drive bays
BIOS Setup program, 58
buttons, keyboard, 19
C
camera, connecting computer to, 34
cards, installing, 46
CD-ROM problems, 15
Channel bar, removing, 23
cleaning mouse, 20
components
connecting, 28
removing, 35
replacing, 54
computer
connecting components to, 28
problems turning on, 10
resetting, 10
connecting components, 28
cover
removing, 37, 38, 39
replacing, 55, 56, 57
D
desktop
removing Channel bar from, 23
troubleshooting, 22
Digital Camera Port, 34, 52
DIMMs
installing, 43
removing, 45
display problems, 16
drive bays, accessing, 52
drives, adding, 52
E
electrostatic discharge (ESD), 35
error messages. See messages
expansion slot cover, removing, 48
F
factory defaults, restoring, 58
fan
removing, 40
replacing, 54
fax problems, 16
files, making recordings to, 30
frozen system, 10
Index
61
Page 66

G
General Protection Fault error, 11
H
hard dsk, utilities for, 4
hardware help, 4
help
Windows Help, 2
HP At Home Web site, 5, 51, 59
HP Customer Care Center, 8
HP Pavilion Recovery CDs, 5, 6
HP Support Center, 3
I
icon problems, 24
installing
add-in cards, 46
DIMMs, 43
memory, 43
Intel Connect software, 13, 14
Internet, getting help from, 5
Invalid phone number message, 17
ISA cards, adding, 46
K
keyboard problems, 18
M
Media Rack, 30
memory
adding, 42
troubleshooting, 11
messages
Check error log, 17
General Protection Fault error, 11
Invalid phone number message, 17
Non-System Disk error, 12
System Error Unable to read
drive, 15
Microsoft Sound Recorder, 30
monitor problems. See display
problems
mouse problems, 19
MS-DOS, exiting, 20
N
Non-System Disk error, 12
P
panels
removing, 37
replacing, 55
Pavilion Library, 4, 23
PCI cards, 46
Personal Guide, 2
phone problems, 16
Plug and Play, 51, 59
printer problems, 13
problems. See troubleshooting
programs. See software
R
RAM. See memory
recording sound, 30
Recovery CDs, 6
removing
Channel bar, 23
components, 35
DIMMs, 45
expansion slot cover, 48
fan, 40
62
Getting Help
Page 67

replacing components, 54
resetting computer, 10
restoring software, 6
S
single-click mode, turning off, 24
software
help for, 4
restoring, 6
sound
adjusting, 14
recording, 30
troubleshooting, 20
speakerphone problems, 21
startup problems, 10
stereo system, connecting
computer to, 29
support. See HP Customer Care Center;
HP Support Center
Suspend mode, 59
system configuration, modifying, 58
System Error Unable to read drive
message, 15
System Recovery program, 6
system tools, 4
T
telephone problems, 16
television set, connecting
computer to, 31
toolbars, 25
troubleshooting
answering machine, 13
cards, 51
CD-ROM drive, 15
display, 16
fax, 16
frozen system, 10
general problems, 10
keyboard, 18
memory, 11
mouse, 19
printer, 13
program window disappeared, 23
sound, 20
speakerphone, 21
startup problems, 10
system tools and, 4
taskbar disappeared, 23
telephone, 16
troubleshooting (continued)
viruses, 4
where to go for help, 2
Windows desktop, 22
turning on computer, 10
tutorials, 2, 3, 4, 22
TV, connecting computer to, 31
V
virus protection, 4, 5, 12, 13
volume, adjusting, 14
W
WAV files, creating, 30
Web sites. See HP At Home Web site
Windows desktop. See desktop
Windows Help, 2
Index
63
Page 68

5967-6539
 Loading...