

Page 1

HP OmniBook 2100/3100
Reference Guide
Page 2

Notice
This manual and any examples contained herein are provided “as is” and are subject
to change without notice. Hewlett-Packard Company makes no warranty of any kind
with regard to this manual, including, but not limited to, the implied warranties of
merchantability and fitness for a particular purpose. Hewlett-Packard Co. shall not
be liable for any errors or for incidental or consequential damages in connection
with the furnishing, performance, or use of this manual or the examples herein.
Consumer transactions in Australia and the United Kingdom: The above disclaimers
and limitations shall not apply to Consumer transactions in Australia and the United
Kingdom and shall not affect the statutory rights of Consumers.
© Copyright Hewlett-Packard Company 1998. All rights reserved. Reproduction,
adaptation, or translation of this manual is prohibited without prior written
permission of Hewlett-Packard Company, except as allowed under the copyright
laws.
The programs that control this product are copyrighted and all rights are reserved.
Reproduction, adaptation, or translation of those programs without prior written
permission of Hewlett-Packard Co. is also prohibited.
Portions of the programs that control this product may also be copyrighted by
Microsoft Corporation, SystemSoft Corp., Crystal Semiconductor Corporation,
Phoenix Technologies, Ltd., and NeoMagic Corporation. See the individual programs
for additional copyright notices.
Microsoft, MS, MS-DOS, and Windows are registered trademarks of Microsoft
Corporation. Pentium and the Intel Inside logo are U.S. registered trademarks and
MMX is a U.S. trademark of Intel Corporation.
For warranty information, see the Support and Service booklet.
Hewlett-Packard Company
Mobile Computing Division
19310 Pruneridge Ave.
Cupertino, CA 95014
ii
Page 3
HP Software Product License Agreement
Your HP OmniBook PC contains factory-installed software programs. Please read the
Software License Agreement before proceeding.
Carefully read this License Agreement before proceeding to operate this
equipment. Rights in the software are offered only on the condition that the
customer agrees to all terms and conditions of the License Agreement.
Proceeding to operate the equipment indicates your acceptance of these terms
and conditions. If you do not agree with the terms of the License Agreement,
you must now either remove the software from your hard disk drive and destroy
the master diskettes, or return the complete computer and software for a full
refund.
Proceeding with configuration signifies your acceptance of the License Terms.
Unless otherwise stated below, this HP Software Product License Agreement
shall govern the use of all software that is provided to you, the customer, as part
of the HP computer product. It shall supersede any non-HP software license
terms that may be found online, or in any documentation or other materials
contained in the computer product packaging.
Operating System Software by Microsoft is licensed to you under the Microsoft
Note:
End User License Agreement (EULA) contained in the Microsoft documentation.
The following License Terms govern the use of the software:
Use.
Customer may use the software on any one computer. Customer may not
network the software or otherwise use it on more than one computer. Customer may
not reverse assemble or decompile the software unless authorized by law.
Copies and Adaptations.
(a) for archival purposes or (b) when copying or adaptation is an essential step in
the use of the software with a computer so long as the copies and adaptations are
used in no other manner.
Ownership.
software, other than ownership of the physical media. Customer acknowledges and
agrees that the software is copyrighted and protected under the copyright laws.
Customer acknowledges and agrees that the software may have been developed by
a third party software supplier named in the copyright notices included with the
software, who shall be authorized to hold the Customer responsible for any
copyright infringement or violation of this Agreement.
Product Recovery CD-ROM.
CD-ROM: (i) The product recovery CD-ROM and/or support utility software may only
be used for restoring the hard disk of the HP computer with which the product
recovery CD-ROM was originally provided. (ii) The use of any operating system
Customer agrees that he/she does not have any title or ownership of the
Customer may make copies or adaptations of the software
If your computer was shipped with a product recovery
iii
Page 4

software by Microsoft contained in any such product recovery CD-ROM shall be
governed by the Microsoft End User License Agreement (EULA).
Transfer of Rights in Software.
third party only as part of the transfer of all rights and only if Customer obtains the
prior agreement of the third party to be bound by the terms of this License
Agreement. Upon such a transfer, Customer agrees that his/her rights in the software
are terminated and that he/she will either destroy his/her copies and adaptations or
deliver them to the third party.
Sublicensing and Distribution.
distribute copies or adaptations of the software to the public in physical media or by
telecommunication without the prior written consent of Hewlett-Packard.
Termination.
comply with any of these terms provided Hewlett-Packard has requested Customer
to cure the failure and Customer has failed to do so within thirty (30) days of such
notice.
Updates And Upgrades.
updates and upgrades which may be available from Hewlett-Packard under a
separate support agreement.
Export Clause.
or adaptation in violation of the U.S. Export Administration regulations or other
applicable regulation.
U.S. Government Restricted Rights.
Government is subject to restrictions as set forth in subparagraph (c)(1)(ii) of the
Rights in Technical Data and Computer Software clause in DFARS 252.227-7013.
Hewlett-Packard Company, 3000 Hanover Street, Palo Alto, CA 94304 U.S.A. Rights
for non-DOD U.S. Government Departments and Agencies are as set forth in FAR
52.227-19(c)(1,2).
Hewlett-Packard may terminate this software license for failure to
Customer agrees not to export or re-export the software or any copy
Customer may transfer rights in the software to a
Customer may not lease, sublicense the software or
Customer agrees that the software does not include
Use, duplication, or disclosure by the U.S.
Edition History
Edition 1 ............................................ June 1998
This manual is printed on recycled paper
iv
Page 5

Contents
1. Introducing the OmniBook ............................... 1-1
Taking Inventory....................................... 1-3
Included in the OmniBook 2100/3100 box ................... 1-3
To buy OmniBook accessories ........................... 1-4
OmniBook features ................................... 1-5
Setting Up Windows .................................... 1-8
To set up the OmniBook for the first time .................... 1-9
Configuring the OmniBook with the BIOS Setup utility ............. 1-10
To run the BIOS Setup utility............................. 1-10
Configuring the OmniBook with TopTools ..................... 1-16
To install TopTools ................................... 1-16
To run TopTools ..................................... 1-16
To get more information about TopTools .................... 1-16
2. Operating the OmniBook ................................ 2-1
Starting and Stopping the OmniBook......................... 2-3
To start and stop the OmniBook .......................... 2-3
To reset the OmniBook ................................ 2-4
Using the OmniBook Touch Pad ............................ 2-5
To use the touch pad.................................. 2-5
To configure the touch pad ............................. 2-6
Using the OmniBook Display .............................. 2-7
To adjust the display brightness and contrast ................. 2-7
To extend the life of the display .......................... 2-7
Adjusting the Audio System ............................... 2-8
To adjust the volume manually ........................... 2-8
To adjust the volume in Windows ......................... 2-8
Using the OmniBook Keyboard............................. 2-9
To use the Fn hot keys ................................. 2-10
To use the Windows keys ............................... 2-11
To use the embedded keypad............................ 2-11
To use the ALT GR key................................. 2-12
Checking the Status of the OmniBook ........................ 2-13
To interpret the status lights ............................. 2-13
To interpret the status panel indicators...................... 2-14
Protecting the OmniBook................................. 2-16
To set or change a password............................. 2-17
To delete a password.................................. 2-18
Contents-1
Page 6

To install McAfee VirusScan ............................. 2-18
To attach a security cable............................... 2-19
To set PC identification ................................ 2-20
To enable hard disk drive lock ........................... 2-20
3. Managing Battery Power................................. 3-1
Monitoring Battery Power................................. 3-3
To check the battery status.............................. 3-4
To respond to a low-battery warning ....................... 3-5
To recharge a battery.................................. 3-5
To replace the main battery ............................. 3-7
To install a secondary battery ............................ 3-8
Conserving Battery Power ................................ 3-9
To optimize battery life ................................ 3-9
To set time-outs...................................... 3-10
To get the most from your battery ......................... 3-11
4. Making Connections .................................... 4-1
Using OmniBook Plug-In Modules ........................... 4-3
To replace a plug-in module............................. 4-4
To connect the floppy disk drive externally .................. 4-5
To insert or eject a floppy disk ........................... 4-5
To insert or remove a CD ............................... 4-6
To insert or eject a Zip disk.............................. 4-7
Connecting External Devices .............................. 4-8
To indentify the external ports ........................... 4-9
To connect an external display ........................... 4-10
To enable the built-in and external displays .................. 4-10
To change display settings in the BIOS Setup utility ............. 4-10
To connect a parallel device............................. 4-11
To connect a serial device .............................. 4-11
To connect an external keyboard or PS/2 mouse............... 4-11
To connect USB devices................................ 4-12
To connect audio devices .............................. 4-13
To make an infrared connection .......................... 4-14
Using PC Cards ........................................ 4-15
To insert a PC Card ................................... 4-15
To remove a PC Card.................................. 4-16
To find tested PC Cards ................................ 4-16
Using Docking Products.................................. 4-17
To install a docking tray................................ 4-17
To dock the OmniBook ................................ 4-18
To undock the OmniBook .............................. 4-19
Contents-2
Page 7

5. Expanding the OmniBook ................................ 5-1
Installing a Hard Disk Drive ............................... 5-3
To replace the hard disk drive............................ 5-3
To replace the hard disk drive holder ...................... 5-4
To create a Hibernate partition ........................... 5-5
Installing a RAM Expansion Module ......................... 5-6
To install a RAM expansion module ....................... 5-7
To remove a RAM expansion module ...................... 5-8
6. Using the Recovery CD .................................. 6-1
Recovering a Factory Software Installation ..................... 6-3
To recover the Windows 95 factory installation ................ 6-4
To recover the Windows NT factory installation ............... 6-5
Installing Retail Windows 95............................... 6-6
To install a retail version of Windows 95..................... 6-7
To install video support for retail Windows 95................. 6-9
To install audio support for retail Windows 95 ................ 6-10
To install PC Card support for retail Windows 95 ............... 6-11
To install infrared support for retail Windows 95 ............... 6-12
To install touch pad support for retail Windows 95 ............. 6-13
To disable automatic CD-ROM detection .................... 6-14
Installing Retail Windows NT 4.0 ............................ 6-15
To install a retail version of Windows NT 4.0.................. 6-16
To install Service Pack 3 for retail Windows NT 4.0 ............. 6-17
To install video support for retail Windows NT 4.0 .............. 6-18
To install audio support for retail Windows NT 4.0.............. 6-19
To install APM for Windows NT 4.0 ........................ 6-20
To install Card Executive 2.x for retail Windows NT 4.0 .......... 6-21
To disable automatic CD-ROM detection .................... 6-22
Recovering OmniBook Files ............................... 6-23
To install the online User’s Handbook ...................... 6-23
To replace a damaged Recovery CD........................ 6-23
To update the OmniBook BIOS ........................... 6-24
7. Troubleshooting ....................................... 7-1
Solving Problems ...................................... 7-3
Accessory Module Problems............................. 7-3
Audio Problems ..................................... 7-5
Display Problems .................................... 7-6
Hard Disk Drive Problems .............................. 7-7
Infrared Problems .................................... 7-8
Keyboard and Pointing Device Problems .................... 7-9
Memory Problems.................................... 7-10
PC Card (PCMCIA) Problems ............................ 7-11
Contents-3
Page 8

Performance Problems ................................ 7-12
Power and Battery Problems............................. 7-13
Printing Problems .................................... 7-15
Serial, Parallel, and USB Problems......................... 7-16
Startup Problems..................................... 7-17
Testing the Operation ................................... 7-18
To create a diagnostic floppy disk ......................... 7-18
To run the diagnostic test ............................... 7-19
8. Specifications and Regulatory Information ................... 8-1
Hardware Specifications ................................. 8-3
Software System Resources................................ 8-6
Safety Information...................................... 8-8
Regulatory Information .................................. 8-11
U.S.A. ............................................ 8-11
Canada ........................................... 8-12
Japan ............................................ 8-12
Europe............................................ 8-13
Contents-4
Page 9

1
Introducing the OmniBook
Page 10

Introducing the OmniBook
Congratulations! Your OmniBook sets a new standard in personal computing.
Although it’s compact and easy to carry, the OmniBook is infused with the quality
and attention to detail that are the hallmark of Hewlett-Packard.
The OmniBook Quick Start sheet shows how to get your OmniBook up and running
quickly. This Reference Guide shows how to set up and operate the OmniBook and it
also shows what to do if you run into trouble.
This table lists other sources of supplementary information about OmniBook
products.
Source Address or Number
Online
User’s Handbook
Online
OmniBook Notes
The introductory Microsoft
manual for Windows 95 or
Windows NT.
HP website http://www.hp.com/omnibook
Corporate Evaluator’s Guide
HP Support Assist CD-ROM See the
This introduces the OmniBook and shows you the OmniBook
basics. It also contains troubleshooting information (Start,
Programs, OmniBook Library).
For late-breaking information available after the manual print
date, see OmniBook Notes (Start, Programs, OmniBook
Library).
This ships with your OmniBook and contains information
about using the standard features of Windows 95 or Windows
NT 4.0.
(http://www2.hp.com/omnibook, European mirror)
The provides information about installing alternate operating
systems, as well as how to configure the OmniBook in a
corporate, networked environment. Located at the HP external
website.
Support and Service
booklet for telephone numbers.
1-2
Page 11

Introducing the OmniBook
Taking Inventory
Taking Inventory
The HP OmniBook 2100/3100 represents a new category of HP notebook computers
featuring the latest mobile technologies available. It uses high-speed Intel Pentium
and Pentium II processors with MMX technology, large TFT and DSTN displays, and
high-capacity hard drives.
This chapter describes
♦ What’s included in the OmniBook shipment.
♦ Available OmniBook accessories.
♦ Description of OmniBook features.
Included in the OmniBook 2100/3100 box
• HP OmniBook 2100 or OmniBook 3100.
• Floppy disk drive, installed in OmniBook (HP F1384A).
• 24× CD-ROM drive (HP F1587A).
• AC adapter (HP F1454A) and power cord.
• Main battery, nickel metal hydride (HP F1589A) or lithium ion (HP F1382A).
• This OmniBook Reference Guide.
• Quick Start sheet.
• Support and Service booklet.
• Working in Comfort booklet.
• List of optional OmniBook accessories.
• OmniBook Recovery CD, which includes Windows recovery,
operating system drivers, and online User’s Handbook.
• Microsoft Windows 95 manual and CD.
–or–
Microsoft Windows NT 4.0 manual.
1-3
Page 12

Introducing the OmniBook
Taking Inventory
To buy OmniBook accessories
Buy OmniBook accessories online! For the latest accessories and options, visit us at
http://www.hp.com/omnibook
them listed here.
At the time of this printing, HP offers a variety of docking solutions and the following
accessories and plug-in modules:
• Docking system and monitor stand (HP F1477A).
• Mini dock (HP F1452A).
• Port replicator (HP F1451A).
• 24 × CD-ROM drive (HP F1587A).
• Floppy disk drive and external cable (HP F1384A).
• Zip drive (HP F1388A).
• Secondary battery (HP F1383A).
• PC Cards.
• SmartCard.
• Auto / airline adapter.
• OmniBook carrying case.
. As new accessories become available, you’ll find
1-4
Page 13
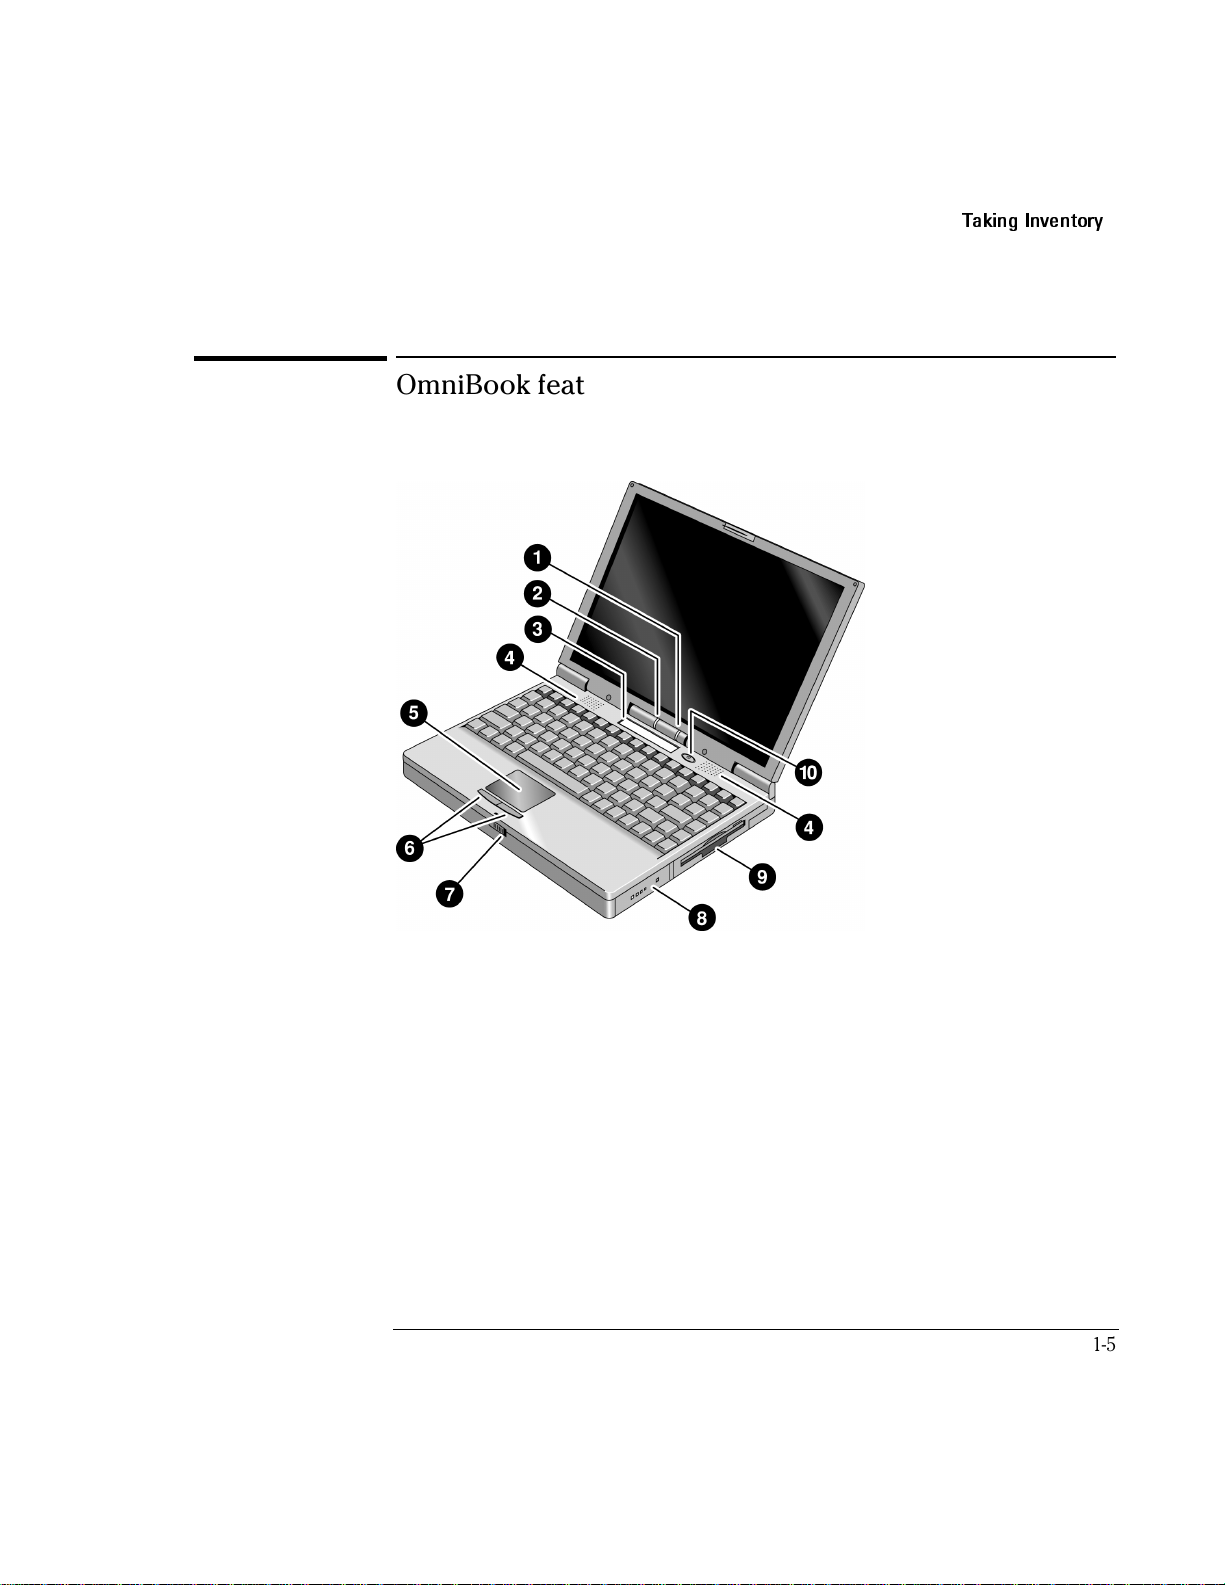
OmniBook features
OmniBook—Front View
Introducing the OmniBook
Taking Inventory
1. Power status light.
2. Built-in microphone.
3. Status panel.
4. Built-in speakers.
5. Touch pad (pointing device).
6. Click buttons.
7. Latch to open and close the OmniBook.
8. Main battery module.
9. Plug-in module bay (can contain floppy disk drive, CD-ROM drive, Zip drive, or
secondary battery).
10. Blue power button (suspends or shuts down the OmniBook).
1-5
Page 14
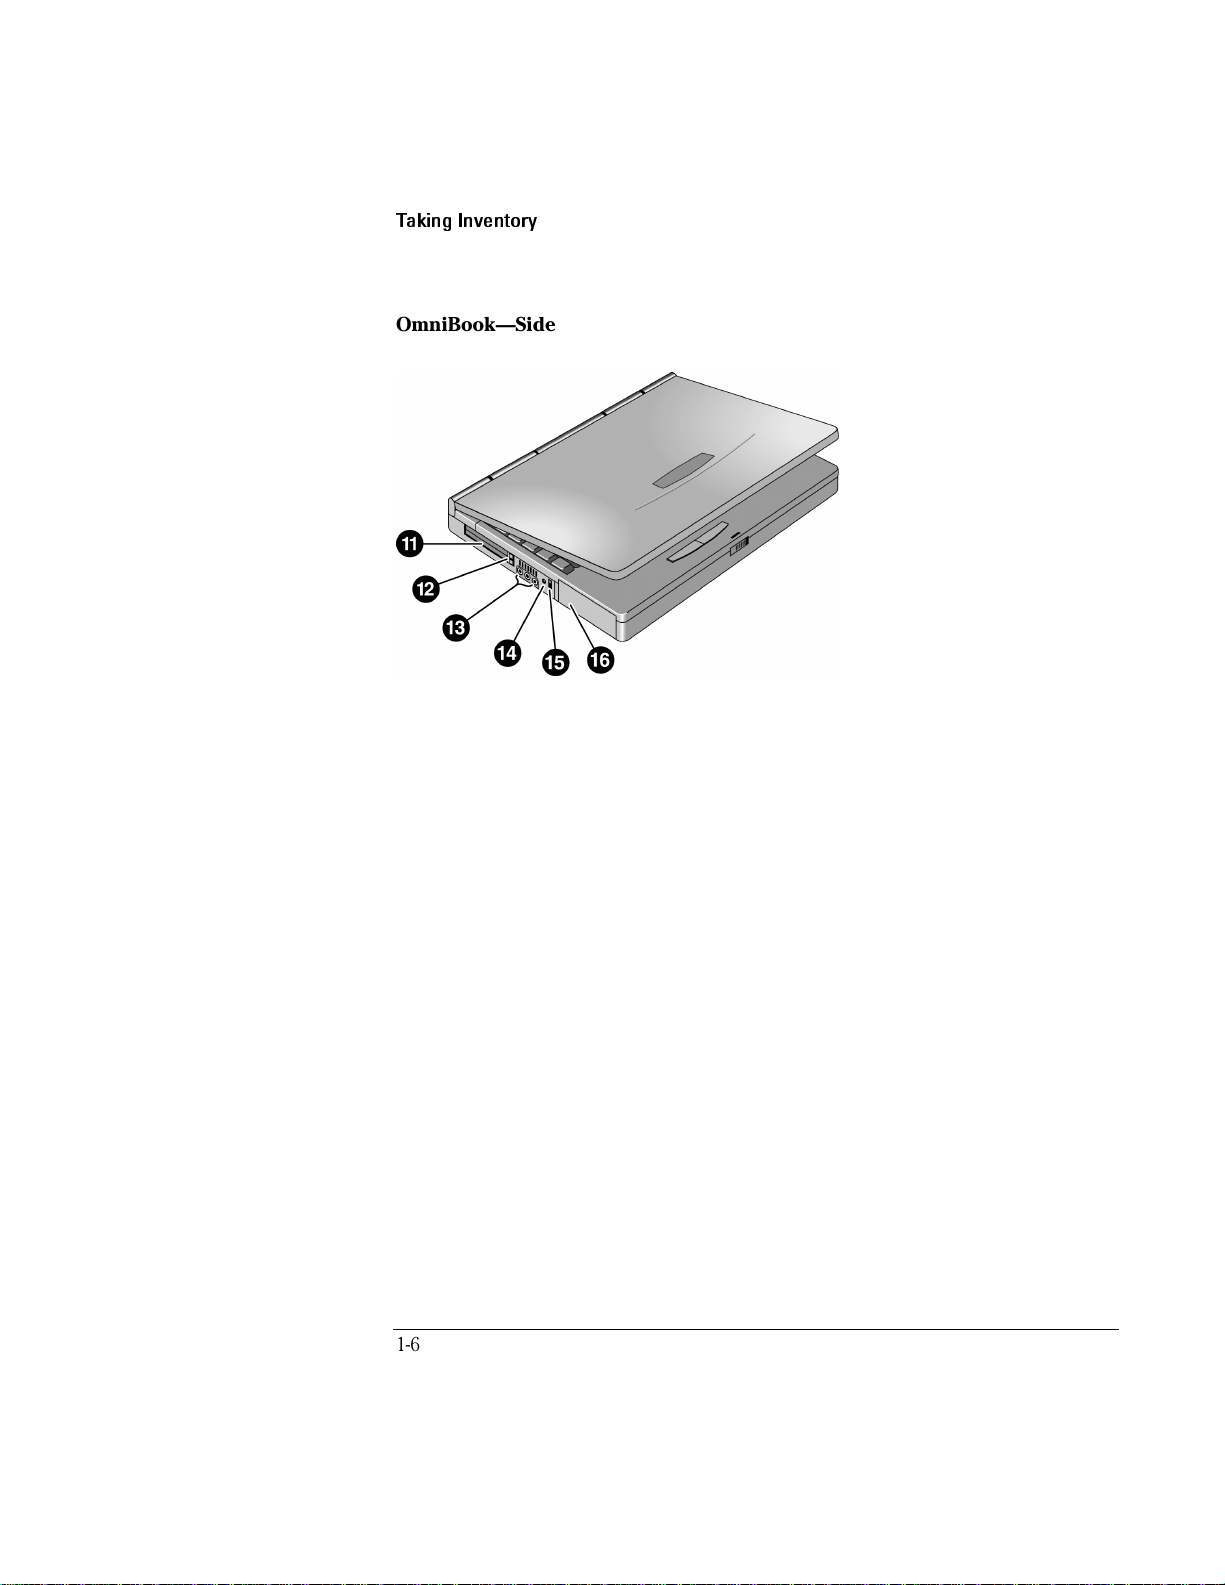
Introducing the OmniBook
Taking Inventory
OmniBook—Side View
11. PC Card slots (upper and lower). Accepts two Type II cards or one Type III card.
12. PC Card eject buttons (upper and lower PC Card slots).
13. Audio jacks (left to right): audio line-in, external microphone, audio line-out.
14. AC adapter jack.
15. Kensington lock slot (security connector).
16. Hard disk drive.
1-6
Page 15
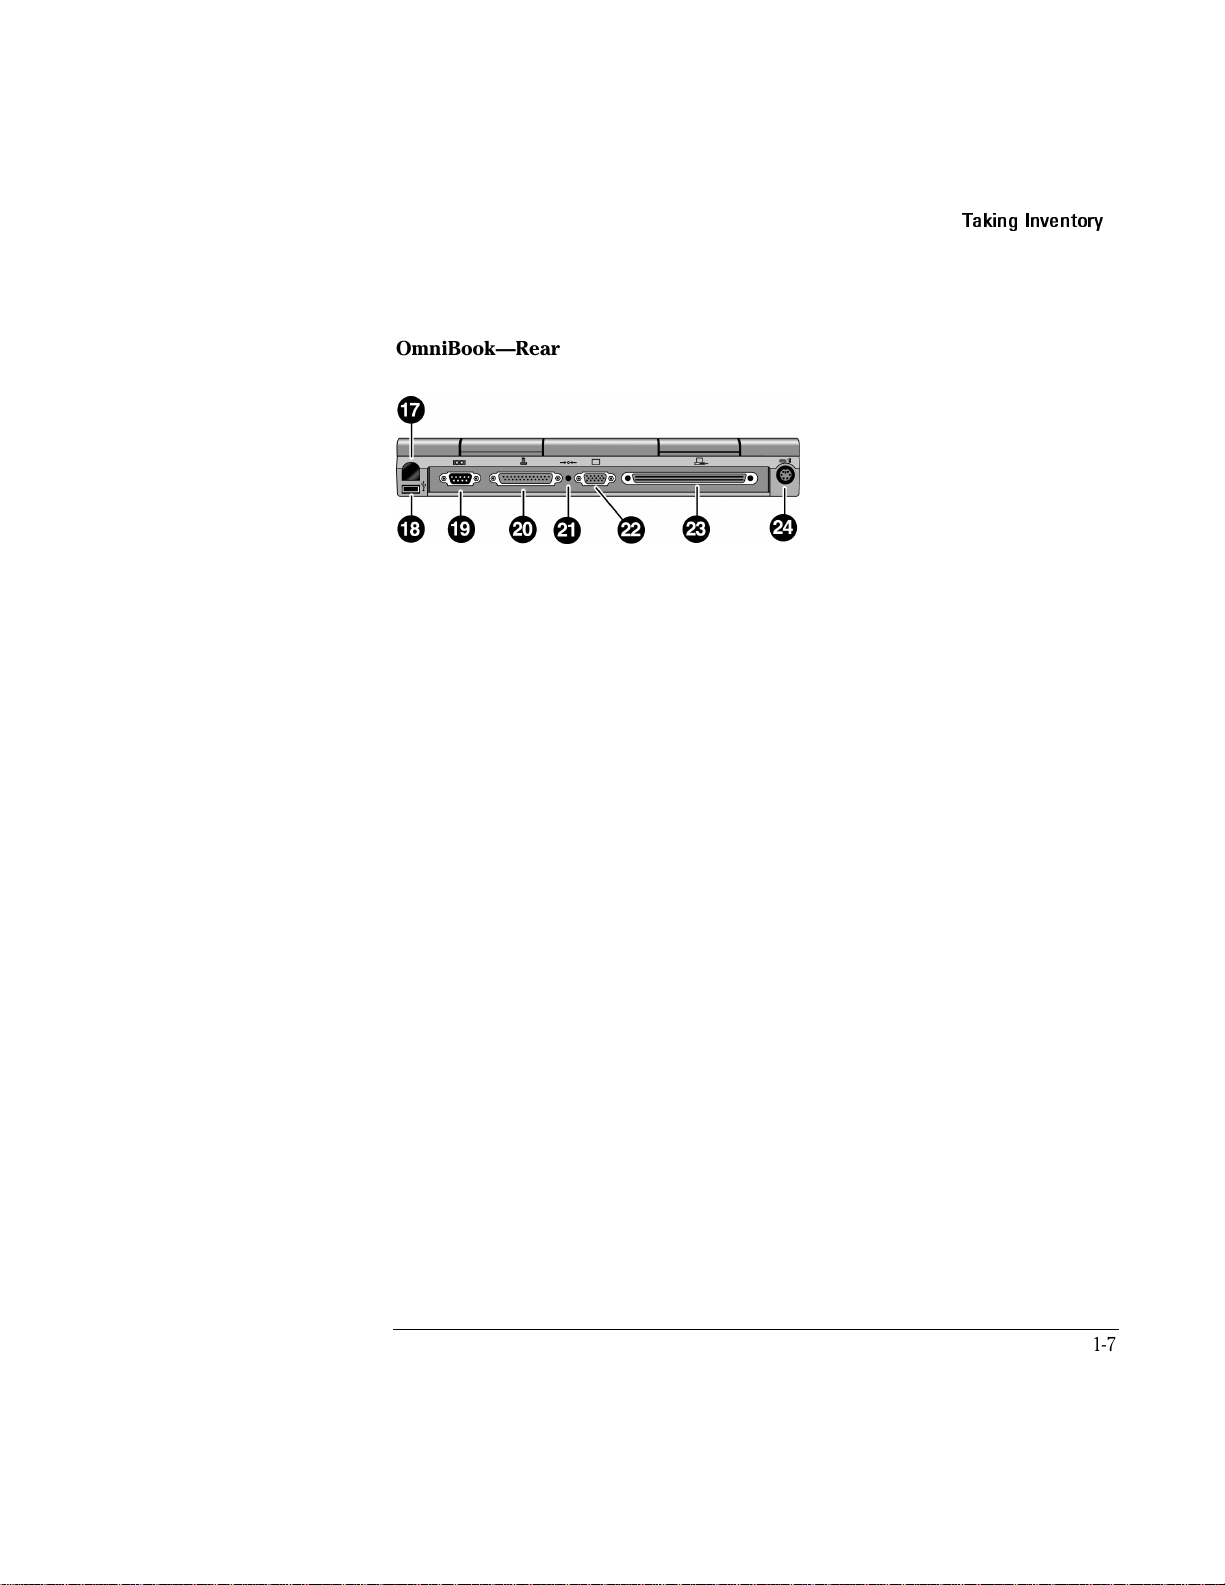
Introducing the OmniBook
Taking Inventory
OmniBook—Rear View
17. Infrared port. Use this port for wireless data transmission between the OmniBook
and another computer or a printer with an infrared port. You must install
infrared drivers. Windows NT 4.0 does not support infrared communciation.
18. Universal Serial Bus port (USB). Windows NT 4.0 does not support USB.
19. Serial port (COM1). Use this port for a serial mouse, a modem, or a serial printer.
20. Parallel port (LPT1). Use this port for a parallel printer.
21. System-off button (to shut down the OmniBook).
22. External monitor port.
23. Docking port.
24. PS/2 keyboard or PS/2 mouse port. Supports a Y adapter for both keyboard and
mouse.
1-7
Page 16

Introducing the OmniBook
Setting Up Windows
Setting Up Windows
The OmniBook has either Windows 95 or Windows NT 4.0 factory-installed on the
hard disk drive. When your OmniBook starts up the first time, it takes you through a
series of setup screens, including installation of the operating system.
This section describes how to set up the OmniBook with the factory-installed
Windows operating system.
♦ Setting up the OmniBook for the first time.
1-8
Page 17
To set up the OmniBook for the first time
Introducing the OmniBook
Setting Up Windows
CAUTION
Use only the HP adapter model F1454A with this product. Using any other ac
adapter could damage the OmniBook and may void your warranty. Refer to the
warranty statement for your product.
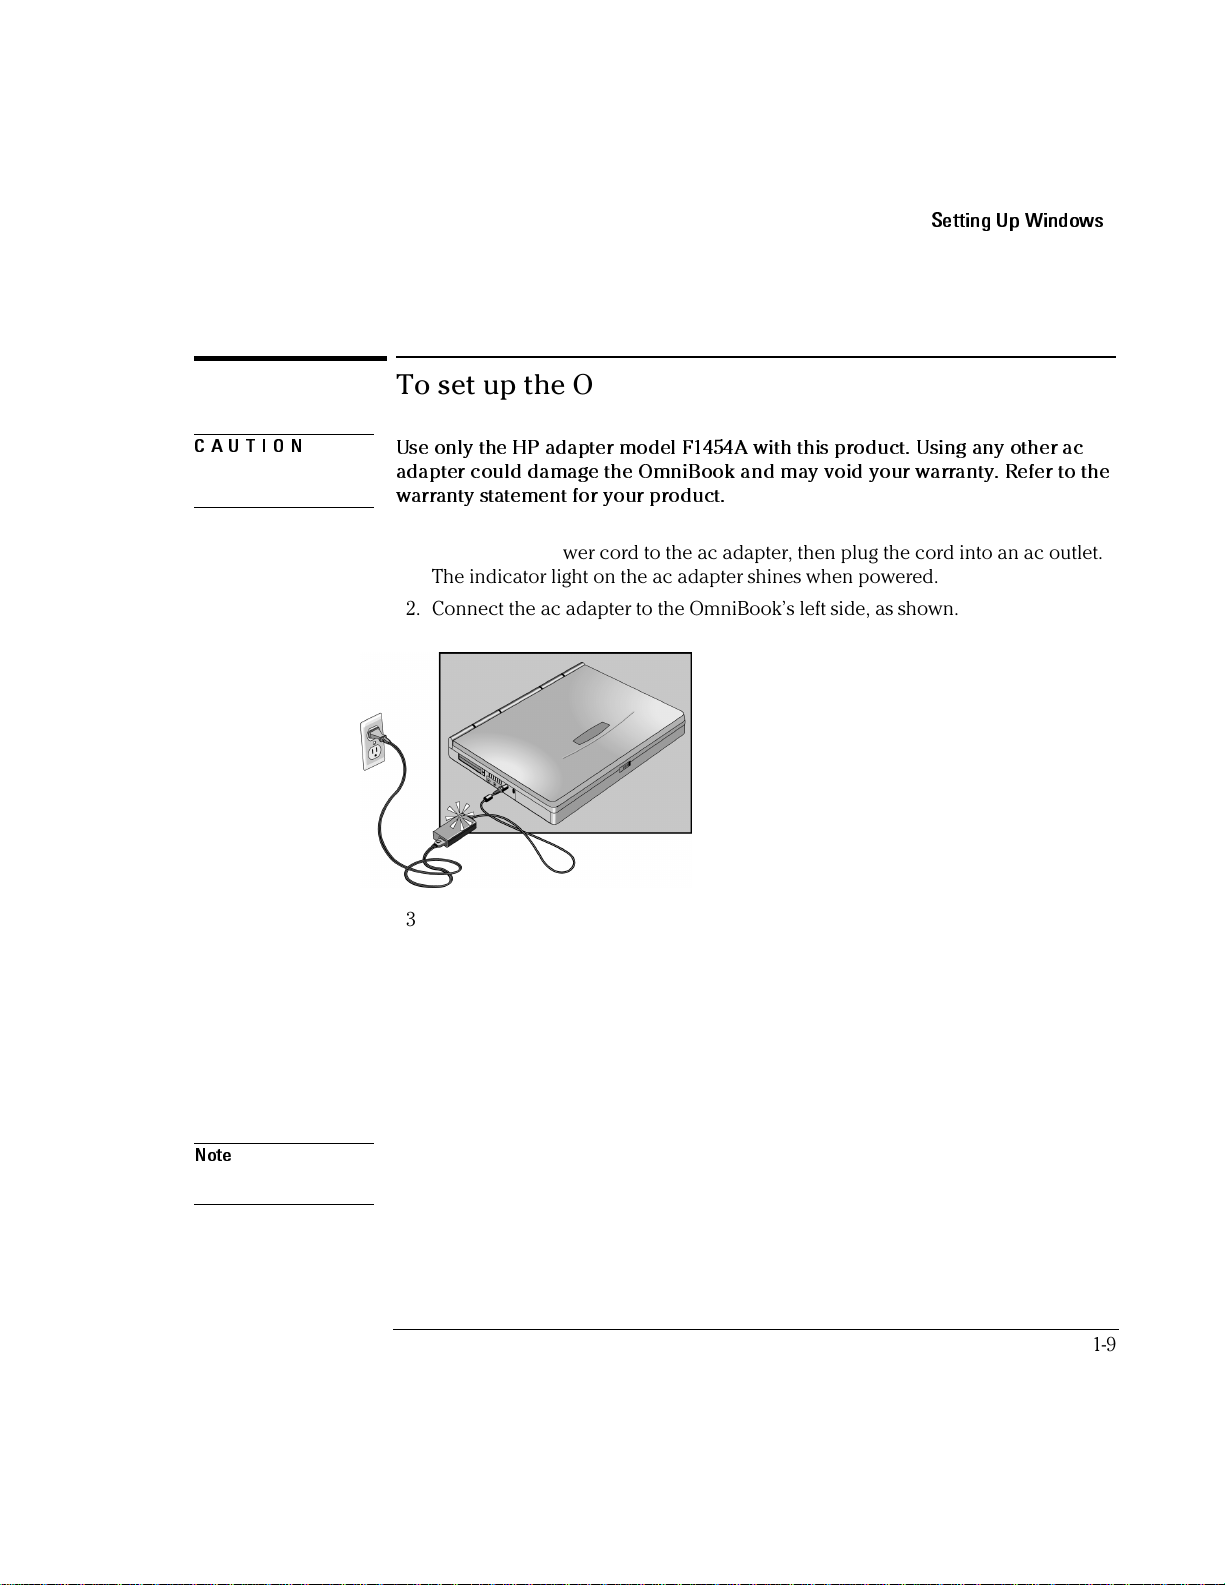
1. Connect the power cord to the ac adapter, then plug the cord into an ac outlet.
The indicator light on the ac adapter shines when powered.
2. Connect the ac adapter to the OmniBook’s left side, as shown.
3. Press the blue power button.
The Windows 95 or Windows NT Setup program starts automatically.
4. Follow the instructions as they appear on the screen.
During setup, you will be prompted to accept the License Agreement and enter
the Product ID (printed on the Certificate of Authenticity on the Microsoft
Windows manual). If you are prompted to set up a user account and password,
you can either set up the account, or press ESC to skip this step.
Note
If you installed Windows NT 4.0, see page 6-20 to install Advanced Power
Management (APM).
1-9
Page 18

Introducing the OmniBook
Configuring the OmniBook with the BIOS Setup utility
Configuring the OmniBook with the BIOS
Setup utility
The BIOS (Basic Input and Output System) Setup utility is a menu-driven utility that
enables you to make changes to the system configuration and tailor the operation of
your OmniBook to your individual work needs.
The settings made in the BIOS Setup utility generally control the hardware and
consequently have a fundamental effect on how the OmniBook operates.
This section describes the BIOS Setup utility menus and options in detail.
To run the BIOS Setup utility
1. Close all applications.
2. From the Start menu, click Shut Down, Restart the Computer.
3. When you see the HP logo, press F2 to enter the BIOS Setup utility.
4. Pointing devices are not active in the BIOS Setup utility. Press the RIGHT and
LEFT arrow keys to move among menus. Press the DOWN and UP arrow keys to
move among parameters in a menu. Press F5 or F6 to move through values for
the current parameter or press ENTER to change a setting. See the following
tables for more information.
5. After you select the options you want, press F10 or use the Exit menu to exit the
BIOS Setup utility.
If the settings cause a conflict between devices during reboot, the system prompts
you to run BIOS Setup and marks the conflicting settings.
1-10
Page 19

Introducing the OmniBook
Configuring the OmniBook with the BIOS Setup utility
Main Menu Default
Language Sets the language for this utility and for BIOS
messages.
BIOS Revision Shows the current BIOS version. Detected
System Time Sets the time using 24-hour format. Values set
take effect immediately.
System Date Sets the date using dd/mm/yy format (except
English, which is mm/dd/yy format).
Floppy Drive Sets the floppy drive type. Floppy disk drive
Same as
operating system.
automatically.
type detected and
set automatically.
Hard Disk Sets the hard disk drive type and various
parameters.
Quiet Boot When enabled, hides summary of
power-on self-test and messages during boot.
Video Display Device Sets whether the built-in display automatically
detects and switches to an external display.
System Memory Shows the system memory size. 640KB
Extended Memory Shows the extended memory size. Detected
* Setting Video Display Device to Both will prevent the OmniBook from suspending when you
close the lid.
Hard disk drive
detected and set
automatically.
Enabled
Auto
automatically.
1-11
Page 20

Introducing the OmniBook
Configuring the OmniBook with the BIOS Setup utility
System Devices Menu Default
External Fn Key Sets whether left-CTRL + left-ALT on an
external keyboard is interpreted as the Fn
key.
Enabled
IDE Controller Enables the primary (hard drive) and
secondary (optional CD-ROM drive)
controllers.
FDD Controller Enables the floppy disk drive. Enabled
Serial Port Sets how the BIOS configures the serial port
(user specified or automatic).
Base I/O address Sets the I/O address and interrupt. 3F8h, IRQ4
Infrared Port Sets how the BIOS configures the infrared
port (user specified or automatic).
Mode Sets the hardware to support SIR (Standard
IR), ASK IR (amplitude shift keyed IR), or FIR
(Fast IR) infrared communications. (Driver
installation required.)
Base I/O address Sets the I/O address and interrupt. 2F8h, IRQ3
DMA channel For Fast Ir mode, sets the DMA channel. DMA3
Parallel Port Sets how the BIOS configures the parallel
port (specified or automatic).
Mode Sets the port to normal, bi-directional, EPP, or
ECP.
Both
Enabled
Disabled
SIR
Enabled
ECP
Base I/O address Sets the I/O address. 378h
Interrupt Sets the interrupt. IRQ7
DMA channel For ECP mode, sets the DMA channel. DMA3
Audio Sets how the BIOS configures the audio
system (specified or automatic).
SB I/O address Sets the Sound Blaster I/O address. 220h
1-12
Enabled
Page 21

Introducing the OmniBook
Configuring the OmniBook with the BIOS Setup utility
WSS I/O address Sets the Windows Sound System I/O
address.
AdLib I/O address Sets the AdLib synthesizer I/O address. 388h
Interrupt Sets the interrupt. IRQ5
1st DMA channel Sets the DMA channel for playback. DMA1
2nd DMA channel Sets the DMA channel for recording. DMA0
Security Menu Default
User Password Is Shows if a user password is set. You must
set an administrator password before you can
set a user password.
Administrator Password Is Shows if an administrator password is set. Clear
Set User Password Press ENTER to set, change, or clear user
password. Password length can be no longer
than 8 characters, 0-9, A-Z.
Set Administrator Password Press ENTER to set, change, or clear
administrator password. This password
protects BIOS Setup settings.
Password Required To
530h
Clear
Boot Sets whether a user password is required
when the computer boots.
Resume* Sets whether a user password is required
when resuming from a suspended state.
Undock* Sets whether a user password is required
when undocking the OmniBook.
Hard Disk Drive Lock Encodes the current user password (or
administrator password if that is the only
password set), on the hard disk drive.
Floppy Boot Sets whether the floppy drive is a boot
device.
* Resume and Undock options are available only if Boot option is enabled.
Enabled
Enabled
Disabled
Disabled
Enabled
1-13
Page 22

Introducing the OmniBook
Configuring the OmniBook with the BIOS Setup utility
Power Menu Default
Power Management Mode Disables time-outs, selects a combination of
time-outs, or allows customized time-outs.
Max Power
Savings
Smart CPU Mode Enables automatic CPU power savings.
Absence of keyboard, mouse, and hard disk
activity could cause slower CPU response.
Standby Time-out Sets the period of inactivity after which the
computer goes from On to Standby power
mode.
Suspend Time-out Sets the period of inactivity after which the
computer goes from Standby to Suspend
power mode. (Skips Standby mode if that
time-out is disabled.)
Hibernate Time-out Sets whether the computer goes from
Suspend to Hibernate power mode after the
indicated period of inactivity. (Skips Suspend
mode if that time-out is disabled.)
Hard Disk Time-out Sets the period of hard disk inactivity after
which the hard disk stops spinning.
Time-out on AC Sets whether power management time-outs
occur while the ac adapter is connected.
Power Button Mode Sets the action of the blue power button
when pressed for less than 4 seconds.
Resume on Modem Ring Sets whether the system resumes from
Suspend if a ring signal is received.
Off
2 minutes
4 minutes
4 hours
2 minutes
Disabled
Suspend
Enabled
Resume on Time of Day Sets whether the system resumes from
Suspend at a defined time of day.
Resume Time Sets the 24-hour time when the system
resumes from Suspend if enabled.
Auto Suspend on Undock Sets whether the OmniBook suspends after
undocking.
1-14
Disabled
00:00:00
When Lid Closed
Page 23

Introducing the OmniBook
Configuring the OmniBook with the BIOS Setup utility
Boot Menu Default
Diskette Drive
Hard Drive
CD-ROM Drive
Exit Menu
Save Changes and Exit Saves Setup changes, exits, and reboots.
Discard Changes and Exit Discards Setup changes since last save, exits,
Get Default Values Restores default settings, stays in Setup.
Load Previous Values Discards Setup changes since last save, stays
Shows the order of boot devices. Move the
entries to change the order.
and reboots. Does not affect Security, date,
or time changes.
Does not affect Security, date, or time
changes.
in Setup. Does not affect Security, date, or
time changes.
1. Diskette drive
2. Hard drive
3. CD-ROM drive
Save Changes Saves Setup changes, and stays in Setup.
Security settings are saved when changed.
1-15
Page 24

Introducing the OmniBook
Configuring the OmniBook with TopTools
Configuring the OmniBook with TopTools
HP TopTools is for network managers and administrators with responsibilities for
computer system management. It offers additional configuration and security
options that allow you to check what hardware and software components are
installed on your computer and access how well they are working. This section
describes how to
♦ Install and run TopTools.
♦ Get more information about TopTools.
To install TopTools
The TopTools package is included with the OmniBook, but you must install it before
you can use it. On Windows NT systems you will need Administrator privileges to
install TopTools software
.
1. Start Windows, if it is not already running.
2. Click Start, Programs, HP DMI, Setup.
To run TopTools
TopTools may be run locally on a PC or remotely by a network administrator.
• To run TopTools locally, click Start, Programs, HP DMI, HP TopTools.
To get more information about TopTools
For information on manageable HP PCs, HP TopTools, DMI, and how they lower
PC operating costs, see the HP website at
1-16
http://www.hp.com/toptools
.
Page 25

2
Operating the OmniBook
Page 26

Operating the OmniBook
This chapter introduces the OmniBook and helps you get familiar with basic
operation including
♦ Starting and stopping the OmniBook.
♦ Using the OmniBook touch pad.
♦ Using the OmniBook display.
♦ Adjusting the audio system.
♦ Using the OmniBook keyboard.
♦ Checking the status of the OmniBook.
♦ Protecting the OmniBook.
2-2
Page 27

Operating the OmniBook
Starting and Stopping the OmniBook
Starting and Stopping the OmniBook
You can easily start and stop your OmniBook using the blue power button. However,
at certain times, you may want to use other methods for starting and stopping your
OmniBook—depending on power considerations, types of active connections, and
start-up time.
To start and stop the OmniBook
When you The OmniBook enters To exit this mode
Press Fn + S
–or–
allow time-out.
Press blue power button
–or–
click Start, Suspend**
–or–
close the lid***
–or–
allow time-out.
Press Fn + F12
–or–
allow time-out.
Click Start, Shut Down
(recommended)
–or–
Press and hold the blue
power button until the
display shuts down.
* A plug-and-play operating system, such as Windows 95, can restore network connections when you turn on the OmniBook. For
Windows NT 4.0 or a different operating system, you may have to reset the OmniBook or restart the operating system to
restore them.
** Windows 95 only.
*** If you set the Video Display Device to Both (in BIOS Setup), the OmniBook will not suspend when you close the lid.
Standby Mode
Saves minimal power.
Turns off the display only.
Restarts quickly.
Maintains network connections.
Suspend Mode
Saves significant power.
Turns off the display.
Saves current session to RAM.
Restarts quickly.
May restore network connections.
Hibernate Mode
Saves maximum power.
Saves current session to disk, shuts down.
May restore network connections.*
Off Mode
Saves maximum power.
Turns off without saving current session.
At startup, resets everything, starts a new session, and
restores network connections.
*
Press any key or move a pointing device
to display your current session
(“Instant-On”).
Press the blue power button to display
your current session
(“Instant-On“).
Press the blue power button to restart
and restore your previous session.
Press the blue power button to restart
with a new session.
2-3
Page 28

Operating the OmniBook
Starting and Stopping the OmniBook
To reset the OmniBook
If Windows or the OmniBook stops responding, you can reset the OmniBook.
1. If possible, from the Start menu, shut down the OmniBook.
2. Insert a pen or straightened paper clip into the recess on the rear of the
OmniBook, as shown.
–or, if this fails–
Press and hold the blue power button until the display shuts down.
3. After the computer shuts down, press the blue power button to turn it on.
2-4
Page 29
Operating the OmniBook
Using the OmniBook Touch Pad
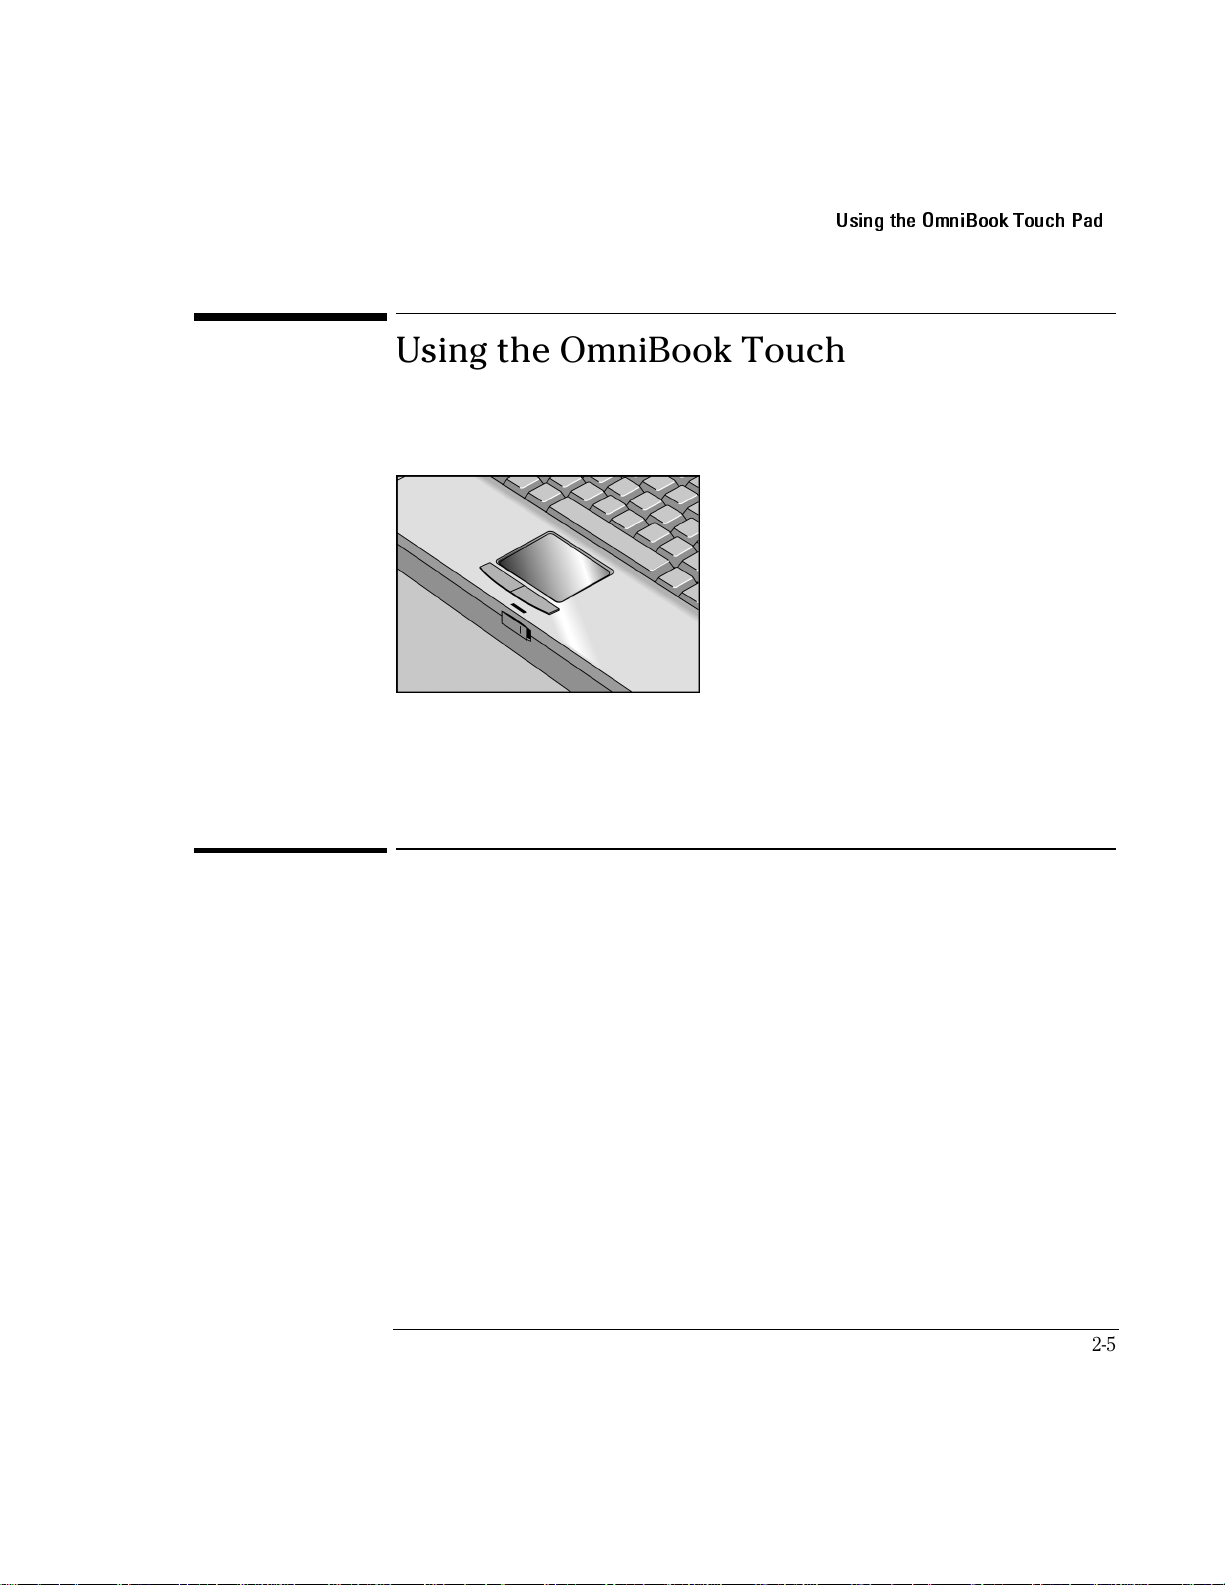
Using the OmniBook Touch Pad
The touch pad, a touch-sensitive pointing device which controls the motion and
speed of the pointer on the screen, is built into your OmniBook.
This section describes how to
♦ Use the touch pad.
♦ Configure the touch pad.
To use the touch pad
1. Move a thumb or finger across the touch pad in the direction you want the
pointer to move.
2. Use the left and right click buttons, which work like the left and right buttons on
a mouse, to make your selection. You can also tap on the touch pad instead of
clicking a button.
• To open an application, move the pointer over the icon, then press the left
button twice rapidly.
• To make menu selections, move the pointer to the item and press the left
button once.
• To open the shortcut menu for an item, move the pointer over the item and
click the right button.
• To drag an item, move the pointer over the item. Press and hold the left
button while you move the pointer to the new location. Release the button.
2-5
Page 30

Operating the OmniBook
Using the OmniBook Touch Pad
To configure the touch pad
To customize the operation of the touch pad (and an external PS/2 or serial mouse,
if installed), use the Windows Control Panel Mouse icon to access Mouse Properties.
Select the tab corresponding to the item you wish to configure. Among the items that
can be configured are
• Button configuration for right or left handed operation.
• Double-click speed, pointer speed, and pointer tail.
• Touch threshold. Click Help for more information on the use of the touch pad.
Note
The touch pad’s enhanced features are not available when an external mouse is
installed.
2-6
Page 31

Operating the OmniBook
Using the OmniBook Display
Using the OmniBook Display
This section describes how to
♦ Adjust the display brightness and contrast.
♦ Extend the life of the display.
To adjust the display brightness and contrast
Brightness affects battery time. To maximize your battery operating time, set the
brightness to the lowest comfortable setting.
Brightness
• Press Fn+F1 to decrease the brightness.
• Press Fn+F2 to increase the brightness.
Contrast (for DSTN displays only)
• Press Fn+F3 to decrease the contrast.
• Press Fn+F4 to increase the contrast.
To extend the life of the display
Observe the following guidelines to maximize the life of the backlight in the
OmniBook display.
• Set the brightness to the lowest comfortable setting (Fn+F1).
• When working at your desk, connect an external monitor and turn off the
internal display (Fn+F5).
• Avoid using a screen saver or other software that prevents the OmniBook from
changing to Suspend or Standby mode after a time-out period.
• Do not disable Suspend or Standby time-outs.
• If you are using ac power and have no external monitor attached, change to
suspend or standby when not in use.
2-7
Page 32

Operating the OmniBook
Adjusting the Audio System
Adjusting the Audio System
The OmniBook supports Sound Blaster Pro-compatible sound and the Microsoft
Windows Sound System. This section describes how to
• Adjust the volume manually.
• Adjust the volume in Windows.
To adjust the volume manually
• To increase the volume, press Fn+UP-ARROW.
• To decrease the volume, press Fn+DOWN-ARROW.
• To temporarily silence the speaker without changing the volume setting, press
Fn+F7. Press again to restore the speaker output.
To adjust the volume in Windows
1. Click the speaker symbol in the taskbar.
2. Drag the volume control bar up or down to adjust the volume.
3. To temporarily silence the speaker without changing the volume setting, click
Mute.
2-8
Page 33

Using the OmniBook Keyboard
Using the OmniBook Keyboard
Operating the OmniBook
WARNING
Improper use of keyboards and other input devices has been associated with
ergonomic injury. For information about reducing your risk, see the
in Comfort
document shipped with your OmniBook, or visit our ergonomics
Working
website, http://www.hp.com/ergo.
This section describes the OmniBook’s keyboard features including how to
♦ Use the Fn hot keys.
♦ Use the Windows keys.
♦ Use the embedded keypad.
♦ Use the ALT GR key on a non-US keyboard.
2-9
Page 34

Operating the OmniBook
Using the OmniBook Keyboard
To use the Fn hot keys
The combination of the Fn key plus another key creates a hot key—a
shortcut key sequence—for various system controls. The OmniBook
keyboard shows the Fn hot keys labeled in gray.
Pressing these keys Does this
Fn + F1 Decreases the display’s brightness.
Fn + F2 Increases the display’s brightness.
Fn + F3 Decreases the display’s contrast (DSTN displays only).
Fn + F4 Increases the display’s contrast (DSTN displays only).
Fn + F5 Toggles between auto detecting an external display and
simultaneous displays.
Fn + F6 (hold) For use with two batteries: Briefly displays the individual battery
status for each battery, then resumes displaying the combined
battery status. For complete information about battery status, see
page 2-14.
Fn + F7 Toggles the sound on and off (mutes sound).
Fn + F8 Toggles the built-in keypad on and off. Does not affect an external
keyboard. If Num Lock is on, then the numeric functions are active;
otherwise, cursor control is active.
Fn + F9 Toggles Num Lock (numeric functions for the keypad) on and off.
Fn + F10 Toggles Scroll Lock on and off.
Fn + F12 Enters Hibernate mode.
Fn + S Enters Standby mode.
Fn + R Enters Suspend mode.
Fn + Up-Arrow Increases volume.
Fn + Down-Arrow Decreases volume.
2-10
Page 35
Operating the OmniBook
Using the OmniBook Keyboard
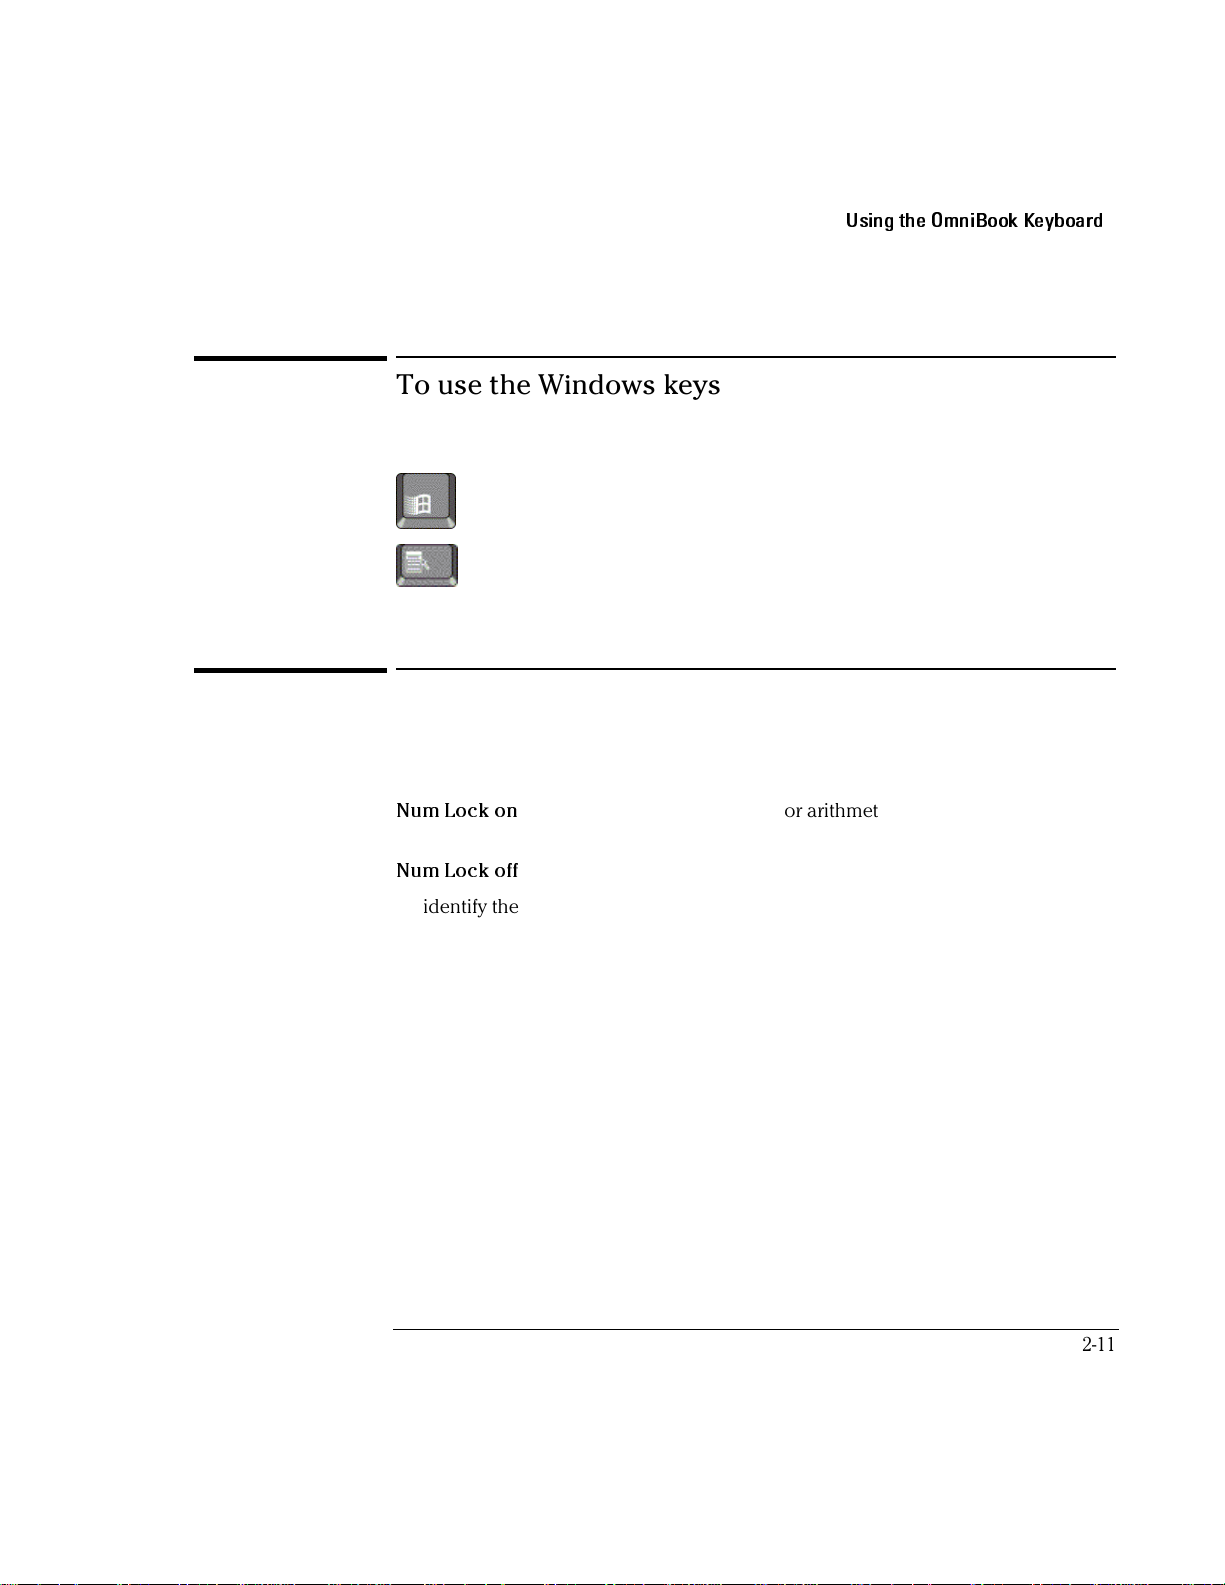
To use the Windows keys
Windows keys are located on the keyboard to the left and right of the spacebar.
Brings up the Windows Start menu. There are two of these, one to each
side of the spacebar.
Brings up the shortcut menu for the current application. This is the same
menu that appears when you click the right mouse button while
pointing at the application.
To use the embedded keypad
When the embedded keypad on the OmniBook’s built-in keyboard is active, two
options are possible.
Num Lock on
Num Lock off
To identify the icons that show the status of Num Lock and the embedded keypad,
go to page 2-14.
1. Press Fn+F9 to turn Num Lock on or off.
2. Press Fn+F8 to turn on the embedded keypad.
–or–
To temporarily turn on the embedded keypad, hold Fn while typing a key.
Keys change to the numeric or arithmetic designations printed on
the slanted faces of the keys.
Keys change to cursor control keys.
2-11
Page 36

Operating the OmniBook
Using the OmniBook Keyboard
To use the ALT GR key
Non-U.S. keyboards have an ALT GR key to the right of the spacebar. This is a shift
key providing access to certain keyboard characters.
• For a character in the lower-right corner of a key, press and hold ALT GR to type
the character.
• For a character in the upper-right corner of a key, press and hold SHIFT and
ALT GR to type the character.
Shift
Unshifted
ALT GR
2-12
Page 37

Operating the OmniBook
Checking the Status of the OmniBook
Checking the Status of the OmniBook
This section describes how to
♦ Interpret the status lights.
♦ Interpret the status panel indicators.
To interpret the status lights
The OmniBook has a power status light on the hinge, which is visible even when the
OmniBook is closed.
• Steady green light. OmniBook is on.
• Blinking green light. OmniBook is in Standby or Suspend mode.
• No light. OmniBook is Off or in Hibernate mode.
The battery itself has four lights that indicate charge status when you press the
square button on the battery. Each light represents a 25% charge.
2-13
Page 38

Operating the OmniBook
Checking the Status of the OmniBook
To interpret the status panel indicators
The OmniBook status panel, located above the keyboard, contains indicators that
show the current power status, drive status, and keyboard status.
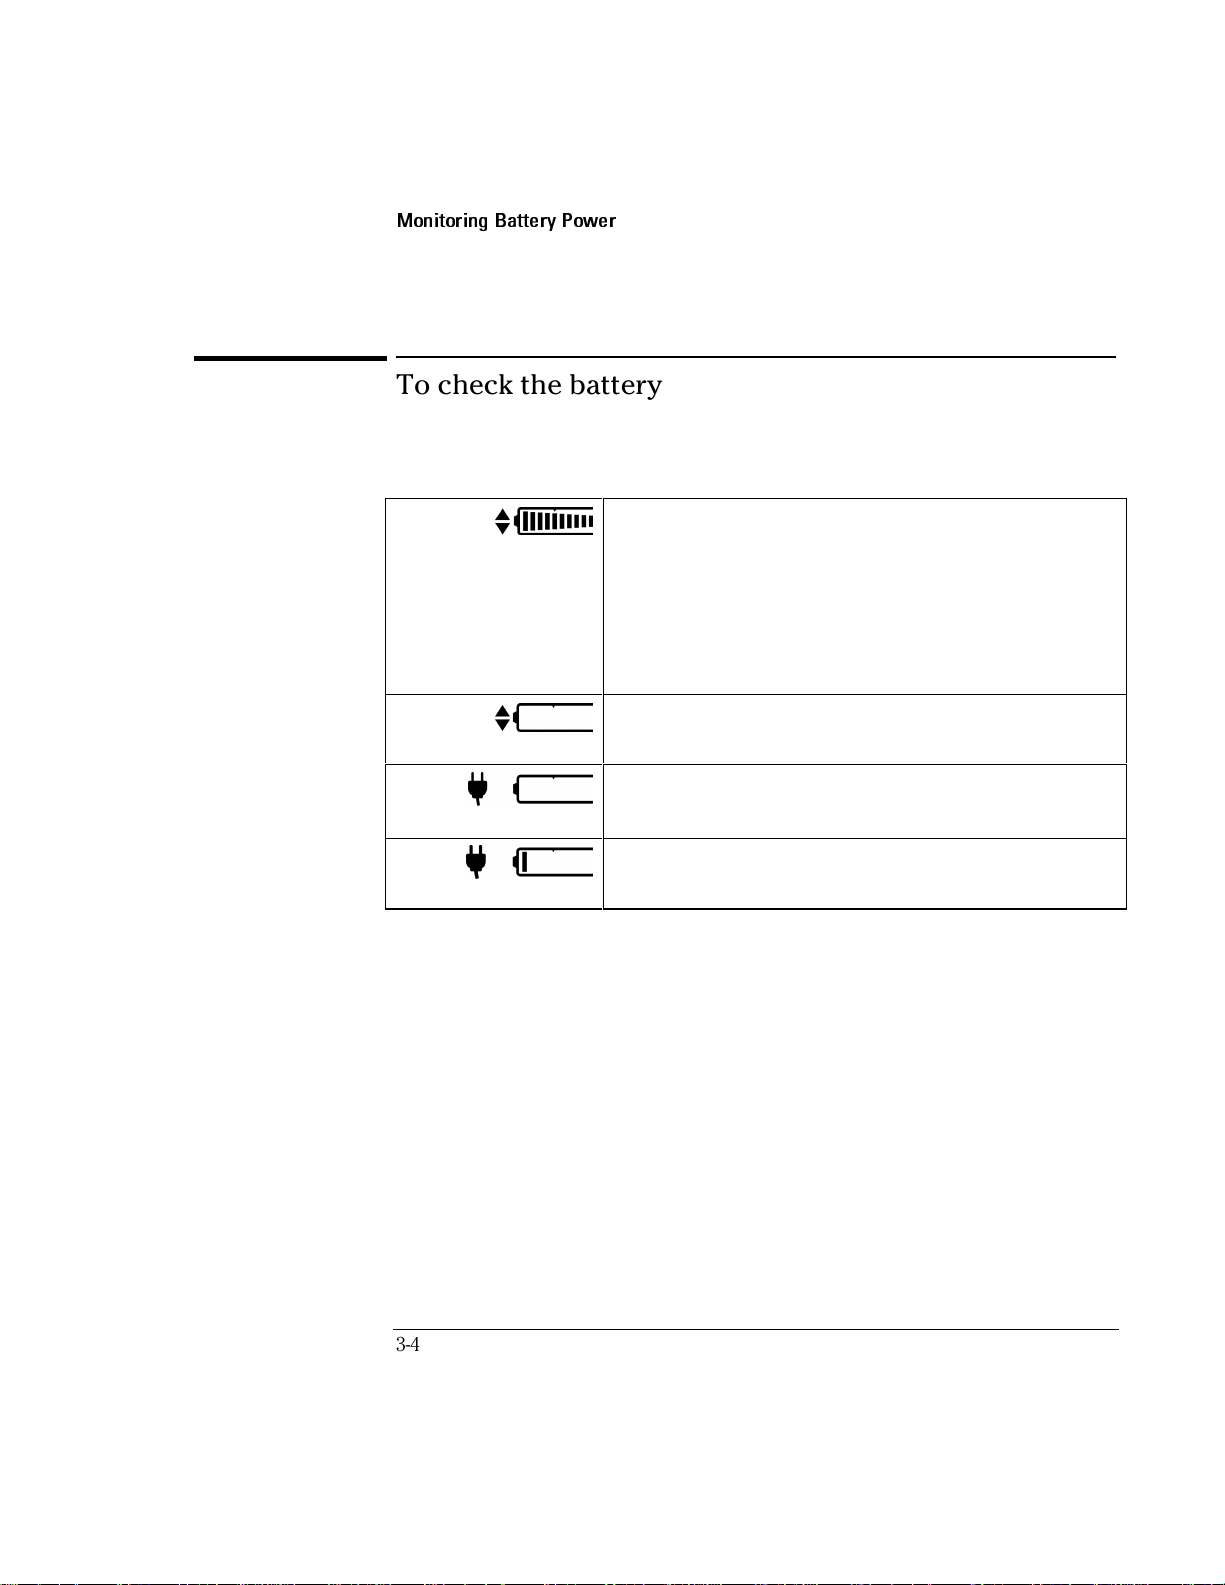
Power Status Icons
Indicator Meaning
AC power. The ac adapter is connected.
Battery status. Shows the approximate charge level of the battery
relative to a full charge. Each bar represents a 10% charge
(displayed from right to left).
Battery presence. The upper and lower triangles indicate the
presence of main (upper) and secondary (lower) batteries. A triangle
blinks slowly when that battery is charging. The main battery
charges first, discharges last.
If two batteries are installed, the gauge reports the percent of total
charge, where both batteries are included. For example, if the main
battery is 50% and the secondary battery is empty then the gauge
would read 25%. You can press
the status of each individual battery.
and hold
Fn + F6 at any time to see
2-14
Battery low. No battery bars showing; the triangles indicate the
presence of battery. The OmniBook also beeps.
Defective battery. No battery bars showing and no triangles
indicating presence of battery. No charging even though ac power is
present.
Overheated battery. The battery is too hot to charge. Not
necessarily a defective battery.
Page 39

Drive Status Icons.
Indicator Meaning
Keyboard Status Icons
Hard disk drive or plug-in drive. The OmniBook is accessing the
hard disk drive or one of the plug-in accessory drives.
Floppy disk drive. The OmniBook is accessing the floppy disk
drive.
PC Card. There is activity between the PC Card and the computer.
Indicator Meaning
Caps Lock. Caps Lock is active.
Num Lock. Num Lock is active (Fn + F9).
Keypad Lock. The built-in embedded keypad is active (Fn + F8).
Num Lock must also be on for the numeric keys. Otherwise, cursor
keys are active.
Operating the OmniBook
Checking the Status of the OmniBook
Scroll Lock. Scroll Lock is active (Fn + F10).
2-15
Page 40

Operating the OmniBook
Protecting the OmniBook
Protecting the OmniBook
Your OmniBook provides several ways for you to identify and protect your
computer.
This section describes how to
• Set or change a password.
• Delete a password.
• Install McAfee VirusScan.
• Attach a security cable.
• Set a PC identification number.
• Enable hard disk drive lock.
2-16
Page 41

Operating the OmniBook
Protecting the OmniBook
To set or change a password
The OmniBook provides two levels of password protection—user password
protection and administrator password protection. You cannot set the user password
until you set an administrator password.
If password protection is set, then you will be prompted to enter a password
whenever you reset or turn on the computer (depending on your setting). You
cannot use the computer until you enter the correct password.
To set, change, or delete password protection for this OmniBook, use the BIOS Setup
utility.
1. From the Start menu, shut down, then restart the OmniBook.
2. When you see the HP logo, press F2 to enter the BIOS Setup utility.
3. Select the Security menu.
4. Select Set Administrator Password, then press ENTER.
5. Type the new password, then press ENTER. The password can contain up to
eight alphanumeric characters, and it is not case-sensitive.
6. Type the password again to confirm, then press ENTER.
7. Under Password Required To, choose when the password will be required.
• Select Boot to require password when booting the OmniBook.
• Select Resume to require password when resuming from Suspend.
• Select Undock to require password when undocking the OmniBook.
8. If desired, repeat this procedure for Set User Password.
9. Press F10 to Save and Exit the BIOS Setup utility.
Note
If you forget a password, call Customer Support at the number listed in the Support
and Service booklet to determine the proper removal procedure.
2-17
Page 42

Operating the OmniBook
Protecting the OmniBook
To delete a password
You can use this procedure to delete either a User or an Administrator password. If
you delete an administrator password, the OmniBook automatically deletes the user
password as well.
1. From the Start menu, shut down, then restart the OmniBook.
2. When you see the HP logo, press F2 to enter the BIOS Setup utility.
3. Select the Security menu.
4. Select Set Administrator Password, then press ENTER.
5. Type the current password, then press ENTER.
6. Press ENTER at the Enter New Password prompt.
7. Press ENTER at the Confirm New Password prompt.
8. Press Continue.
9. Press F10 to Save and Exit the BIOS Setup utility.
To install McAfee VirusScan
The OmniBook comes equipped with McAfee VirusScan, which currently detects
over 13,500 viruses. As an HP OmniBook owner, you are entitled to 90 days free
support from McAfee and one free upgrade to VirusScan. For details, click Start,
Programs, McAfee VirusScan, Readme.
Before you can use VirusScan, you need to install it.
1. From the Start menu, click Programs, McAfee VirusScan, Setup.
2. Follow the instructions as they appear on the screen.
Once installed, you can get detailed online instructions under VirusScan Help. (Click
Start, Programs, McAfee VirusScan, VirusScan, Help.)
2-18
Page 43

Operating the OmniBook
Protecting the OmniBook
To attach a security cable
Your OmniBook has a built-in connector that allows you to secure the OmniBook
with a cable. The Kensington MicroSaver lock system works with this connector and
is available at many computer stores.
1. Wrap the cable around a stationary object, such as a table leg.
2. Loop the cable to create a slip knot around the stationary object—make sure it
can’t slip off.
3. Insert the lock into the OmniBook security connector and release the key. Store
the key in a safe place away from the OmniBook.
2-19
Page 44

Operating the OmniBook
Protecting the OmniBook
To set PC identification
You must have administrator password authority to set a PC identification number.
1. If you have not already installed HP TopTools, do so now (page 1-16).
2. Click Start, then click HP TopTools.
3. Click Tools, then click Protect Tools.
4. Type your administrator password.
5. Click Security.
6. In the “Tattooing String” box, type the unique set of characters which will
identify your PC.
You can type up to 80 characters including spaces and special characters. Do
not press ENTER when typing. The string wraps automatically.
CAUTION
To enable hard disk drive lock
Hard disk drive lock helps you keep your information secure.
When you enable hard disk drive lock, the current user password (or
administrator password if that is the only password set) is encoded on the hard
disk drive.
If you move the hard disk drive to another OmniBook, you can't access the drive
until you set the user (or administrator) password to match the drive's password
After you match the drive's password, you can change the OmniBook (and
drive) password. If you forget the password, you cannot recover your data.
1. From the Start menu, shut down, then restart the OmniBook.
2. When you see the HP logo, press F2 to enter the BIOS Setup utility.
3. From the Security menu, enable Password Required To Boot.
4. From the Security menu, enable Hard Disk Drive Lock.
5. Press F10 to save and exit the BIOS Setup utility.
2-20
.
Page 45

3
Managing Battery Power
Page 46

Managing Battery Power
The OmniBook conserves power by using Advanced Power Management (APM),
software that controls battery charging and power drain.
The OmniBook provides several safeguards so you won’t be surprised by a
dead-battery condition, including the following:
♦ The battery status indicator shows the remaining battery charge.
♦ Built-in warnings are displayed for low-battery conditions.
♦ The OmniBook automatically turns off when the battery charge gets too
low—your session continues when you start recharging the battery or insert
a fresh battery.
♦ Data previously saved on any of the drives is not affected by a low battery.
However, unsaved data could be affected if the battery runs down completely
while writing data to the drive.
3-2
Page 47

Managing Battery Power
Monitoring Battery Power
Monitoring Battery Power
The primary source of power for the OmniBook is its rechargeable battery pack. You
can use the ac adapter to recharge the battery—or to run on ac power to preserve
the battery.
Important
Running external connections is a power-intensive operation that significantly
shortens the length of a battery session. Whenever possible, connect the ac adapter
when using external connections.
In addition to the replaceable battery, there is a permanent, internal backup battery,
which recharges whenever the OmniBook is on or connected to ac. It maintains
certain internal settings, such as the clock.
This section describes how to
♦ Check the battery status.
♦ Respond to a low-battery warning.
♦ Recharge a battery.
♦ Replace the main battery.
♦ Install a secondary battery.
3-3
Page 48
Managing Battery Power
Monitoring Battery Power
To check the battery status
From the Status Panel
The following table explains the OmniBook status panel battery icons.
Shows the approximate charge level of the battery relative to a full
charge. Each bar (displayed from right to left), represents a 10%
Full battery
Low battery
Defective battery
charge.
The upper and lower triangles indicate the presence of main (upper)
and secondary (lower) batteries. A triangle blinks when that battery is
charging. The main battery charges first, discharges last.
See “Battery Status” on page 2-14 for more information about the
battery indicators.
The outline blinks when the battery charge is critically low. The
OmniBook also beeps.
No battery activity; no charging. If a left bar appears in the far left of
the battery cell, the battery is overheated, so charging stops.
The battery is too hot to charge. Not necessarily a defective battery.
Overheated battery
From the Windows Taskbar
• Move the pointer onto the power icon at the right end of the taskbar. The
approximate battery charge is displayed either as a percentage or in hours.
• Double-click the power icon on the taskbar to open the Battery Meter window.
From Windows
• Click My Computer, Control Panel, Power. This provides access to all options
associated with reporting of power information by Windows.
On the Battery
• Press the button on the battery. The lights show the approximate charge level—
each light representing 25% of a full charge.
3-4
Page 49

Managing Battery Power
Monitoring Battery Power
To respond to a low-battery warning
When battery power is critically low, you are alerted by one or more of the following:
• The battery indicator in the status panel appears empty.
• The computer emits a warning beep. This reminds you to save your work.
• If the OmniBook has been off, you will not be able to turn it on.
The OmniBook automatically hibernates to preserve your current session. (If
Hibernate is disabled in the BIOS Setup utility, then your data is not protected.)
However, unsaved data could be affected if the battery runs down completely while
writing data to the drive.
You won’t be able to restart until you restore power by one of the following actions:
• Plug in the ac adapter.
–or–
• Replace the main battery with one that is charged.
–or–
• Install a charged secondary battery in the plug-in module bay.
CAUTION
To recharge a battery
The ac adapter is normally warm to the touch whenever it s plugged into an ac
outlet. The OmniBook is normally warm while it
briefcase or other confined space as this may cause the battery to overheat.
1. Connect the power cord to the ac adapter, then plug the cord into an ac outlet.
The indicator light on the ac adapter shines when the adapter is powered. If the
ac adapter does not light, make sure the cord is not damaged.
2. Connect the ac adapter to the OmniBook’s left side, as shown in the following
illustration.
s charging. Don t charge it in a
3-5
Page 50

Managing Battery Power
Monitoring Battery Power
Charging time
Charging the battery takes about 1.5 hours.
Battery life
When the computer is in use, typical battery life can last up to 2 to 3 hours,
depending on your level of use and your power management settings (see
page 1-14).
Optimum Charging
To get the longest battery operating time, continue charging until the OmniBook
battery is fully charged. Because of rounding, a battery indicator can show a full
battery before it’s fully charged. The status panel battery indicator (up or down
triangle) stops blinking only when the battery is actually full.
You can continue working while the battery is charging.
3-6
Page 51

To replace the main battery
Managing Battery Power
Monitoring Battery Power
WARNING
CAUTION
Do not mutilate, puncture, or dispose of batteries in fire. A battery can burst or
explode, releasing hazardous chemicals. A rechargeable battery must be
recycled or disposed of properly.
1.
Important
2. Plug in the ac adapter.
or
From the Start menu, shut down the OmniBook.
3. Slide the safety latch for the battery compartment into its recess.
4. Slide the release latch forward, then pull out the battery, as shown.
5. Slide the charged battery into the OmniBook until it clicks into place.
Be sure the safety latch is open before you insert the battery. Otherwise, the
release latch could break if you force the battery in.
. Save your work.
6. Close the safety latch.
3-7
Page 52

Managing Battery Power
Monitoring Battery Power
To install a secondary battery
The OmniBook’s plug-in module bay accepts a secondary battery. See page
4-4 for more information about plug-in modules.
When a secondary battery is installed, a lower triangle appears next to the battery
icon in the status panel.
1. From the Start menu, shut down the OmniBook. (This is not necessary if you are
removing a battery from the plug-in module bay and inserting another battery.)
2. Slide the safety latch for the plug-in module into its recess.
3. Slide and hold the release latch, then pull out the module, as shown.
CAUTION
4. Slide the secondary battery into the module bay until it clicks into place.
Be sure the safety latch is open before you insert the battery. Otherwise, the
release latch could break if you force the battery in.
5. Close the safety latch.
3-8
Page 53

Managing Battery Power
Conserving Battery Power
Conserving Battery Power
The OmniBook uses Advanced Power Management (APM) to conserve battery
power. You can take steps to optimize your battery operating time. This section
describes how to
♦ Optimize battery life.
♦ Set time-outs.
♦ Handle and store the battery safely.
♦ Get the most from your battery.
To optimize battery life
Follow these suggestions to optimize your battery life (operating time).
• Plug in the ac adapter, especially while using the floppy disk drive, the CD-ROM
drive, or any external connections.
• Put the OmniBook in Suspend mode whenever you are not using it for a short
time. Press the blue power button for approximately 1 second, or (from
Windows 95), select Start menu, Suspend.
• Put the OmniBook in Hibernate mode whenever you want to save your current
session, but will not be using the computer for several hours or more (Fn+F12).
• Turn the OmniBook off whenever you will not be using it for several hours or
more: press the blue and hold the blue power button until the display shuts
down or select Start menu, Shut Down. The current session is not saved.
• Turn the brightness of the display down to lowest comfortable level. This
reduces backlight power, which can increase operating time by as much as 15%.
• Set the automatic time-out settings to emphasize saving power (page 3-10).
• If you have an I/O PC Card—that is, a PC Card having an external connection,
such as a modem or network card—remove it when you are not using it. Some
I/O cards use significant power, even while they’re inactive.
• If you work with an application that uses the serial port or a PC Card, exit the
application when you are done using it.
• Install a secondary battery in the plug-in module bay to double the operating
time.
3-9
Page 54

Managing Battery Power
Conserving Battery Power
To set time-outs
The BIOS Setup utility includes settings for automatic time-outs at specified periods
of inactivity. There are four different time-outs for different levels of power and
conservation.
1. From the Start menu, shut down then restart the OmniBook.
2. When you see the HP logo, press F2 to enter the BIOS Setup utility. Active keys
are described along the bottom of the screen. (The touch pad does not work in
Setup.) Help information for the highlighted item appears in the right-hand
sidebar in the display.
3. Select the Power menu.
4. Select Power Management Mode. (Press the spacebar, F5, or F6 to pick an
option other than Disabled.)
Maximum Power Savings
savings (relatively short time-outs).
Maximum Performance
some power conservation (relatively long time-outs).
Customized
Time-out, Suspend Time-out, Hibernate Time-out, and Hard Disk Time-out. For
definitions of these power modes, see page 2-3.
5. Optional. Choose a setting for Time-Out On AC. If you want the time-outs to
occur even when the OmniBook is connected to ac power, choose Enabled. To
prevent time-outs while the OmniBook is plugged in, choose Disabled (default
setting).
6. Press F10 to save and exit the BIOS Setup utility.
: You determine each setting for Smart CPU Mode, Standby
: The time-out settings are defined for best power
: The time-out settings are set for fast performance with
3-10
Page 55

Managing Battery Power
Conserving Battery Power
To get the most from your battery
The following are some further suggestions for the best management of your
OmniBook batteries.
• Do not leave batteries unused for long periods of time. If you have more than
one, rotate them.
• If you normally use ac power, make a practice of at least once a week using the
battery as your power source.
• Unplug the ac adapter when the computer is not in use.
• To preserve the life of your battery, be sure to charge the battery regularly.
• For long-term storage, the battery must be charged at 20-50% to save capacity
loss by self-discharge and to avoid deterioration of battery performance. In a
discharged condition, the battery voltage decreases faster. Storage in a 100%
charged condition can cause higher self-discharge and deterioration of
discharge capacity—even after recharging—compared to storage in a 20-50%
charged condition.
3-11
Page 56

Page 57

4
Making Connections
Page 58

Making Connections
This chapter describes procedures to expand the capabilities of your OmniBook,
including
♦ Using OmniBook plug-in modules.
♦ Connecting external devices.
♦ Using PC Cards.
♦ Using docking products.
4-2
Page 59

Making Connections
Using OmniBook Plug-In Modules
Using OmniBook Plug-In Modules
The plug-in module bay can hold a CD-ROM drive, floppy disk drive, Zip drive, or a
secondary battery.
This section describes how to
♦ Replace a plug-in module.
♦ Install the floppy disk drive externally.
♦ Insert or eject a floppy disk.
♦ Insert or remove a CD.
♦ Insert or eject an Zip disk.
Hint
The floppy drive module can also be connected externally via the parallel port. If
you want to do this, you’ll need to order the external floppy cable (HP F1380A). You
can order this online at http://www.hp.com/omnibook.
4-3
Page 60

Making Connections
Using OmniBook Plug-In Modules
To replace a plug-in module
Important
CAUTION
If you are inserting or removing a CD-ROM drive, floppy drive, or Zip drive, shut
down the OmniBook.
1. From the Start menu, shut down the OmniBook. (This is not necessary if you are
removing a battery from the plug-in module bay and inserting another battery.)
2. Slide the safety latch for the plug-in module bay into its recess.
3. Slide and hold the release latch, then pull out the module, as shown.
4. Slide the new plug-in module into the OmniBook until it clicks into place.
Be sure the safety latch is open before you insert the module. Otherwise, the
release latch could break if you force the module in.
5. Close the safety latch.
4-4
Page 61

Making Connections
Using OmniBook Plug-In Modules
To connect the floppy disk drive externally
When using the plug-in floppy disk drive externally, the plug-in module bay can be
used by another plug-in module—such as a CD-ROM drive, a Zip drive, or a
secondary battery.
• Connect the external floppy disk drive cable (optional accessory, HP F1380A) to
the OmniBook parallel port.
Note
CAUTION
Only one floppy disk drive is supported on the OmniBook. You cannot use both an
external floppy disk drive and a plug-in floppy disk drive.
To insert or eject a floppy disk
Do not insert or remove a floppy disk while the OmniBook is actively reading or
writing data. Otherwise, you could lose data or the OmniBook could stop
responding.
• Hold the disk with its face up, then slide it into the floppy disk drive slot until it
clicks into place.
• To remove the floppy disk, press the eject button on the front of the drive.
4-5
Page 62

Making Connections
Using OmniBook Plug-In Modules
To insert or remove a CD
CAUTION
Do not remove a CD while the OmniBook is actively reading data. Otherwise,
the OmniBook could stop responding and you could lose data.
1. Press the button on the face of the CD-ROM drive.
2. If one is present, remove the cardboard shipping insert.
3. Place the CD into the drive (label facing up) and gently press down to seat the
CD on the spindle.
--or--
Remove the CD.
4. Close the door to the drive.
If you lose power to the OmniBook, or if you have removed the CD-ROM module
from the OmniBook, you can manually open the CD-ROM drive to remove a CD.
• Carefully, insert a straightened paper clip into the recessed hole on the front of
the CD-ROM drive.
4-6
Page 63

To insert or eject a Zip disk
Making Connections
Using OmniBook Plug-In Modules
CAUTION
CAUTION
Do not remove a Zip disk while the OmniBook is actively reading or writing
data. Wait until the Zip drive is done. Otherwise, the OmniBook could stop
responding and you could lose data.
• Always turn on power to the OmniBook before inserting a Zip disk.
• To insert the Zip disk, hold the disk with its face up, then gently slide it into the
Zip drive.
• To remove the Zip disk, press the eject button on the front of the Zip drive. Do
not use force. It takes a few seconds to eject the disk and the green busy light
blinks during this process.
• The Zip drive automatically ejects the disk when you shut down your
OmniBook.
• Store all Zip disks in their protective cases when not in use.
If the Zip drive has no power and you need to remove a disk from it, carefully push a
straightened paper clip into the emergency eject hole located on the eject button.
Use the manual disk eject procedure only when OmniBook power is off. Do not
try to forcibly remove a Zip disk from the drive. If the disk does not eject
immediately, repeat the manual disk eject procedure.
4-7
Page 64

Making Connections
Connecting External Devices
Connecting External Devices
Your OmniBook is a powerful computer in its own right—but you can greatly
expand its capabilities by connecting other devices.
Note
Before you connect any device, check the documentation that came with the
equipment to see if you need to make any settings or adjustments to the equipment
before using it. This might include setting switches to configure the equipment so
that it will operate properly with the OmniBook and the software you plan to use.
This section describes how to
♦ Identify the external ports.
♦ Connect an external monitor.
♦ Enable the built-in and external displays.
♦ Change display settings in the BIOS Setup utility.
♦ Connect a parallel device.
♦ Connect a serial device.
♦ Connect an external PS/2 keyboard or PS/2 mouse.
♦ Connect universal serial bus (USB) devices.
♦ Connect audio devices.
♦ Make an infrared connection.
4-8
Page 65

Making Connections
Connecting External Devices
To indentify the external ports
The following graphic describes the available connectors for external devices. Refer
to it, if necessary, when following the procedures in this section.
1. Infrared port. Use this port for wireless data transmission between the OmniBook
and another computer or a printer with an infrared port. You must install
infrared drivers. Windows NT 4.0 does not support infrared communication.
2. Universal Serial Bus port (USB).
3. Serial port (COM1).
Use this port for a serial mouse, a modem, or a serial printer.
4. Parallel port (LPT1).
Use this port for a parallel printer.
5. System-off button (to reset the OmniBook).
6. External monitor port.
7. Docking port.
8. PS/2 keyboard or PS/2 mouse port.
4-9
Page 66

Making Connections
Connecting External Devices
To connect an external display
You can connect a VGA, SVGA, or XGA monitor to your OmniBook. OmniBook VGA
port supports standard XGA mode (1024 by 768 pixels).
1. From the Start menu, shut down the OmniBook.
2. Connect the monitor cable to the monitor, then to the VGA port on the back of
the OmniBook.
3. Connect the monitor to a power source and turn it on.
4. Press the blue power button to turn on the OmniBook.
5. If the external monitor has a different resolution from the internal display, adjust
the display properties (My Computer, Control Panel, Display, Settings).
To enable the built-in and external displays
• For a temporary change, press Fn+F5 to cycle through the display options
(Internal, External, Both).
–or–
For a permanent change, change the settings in the BIOS Setup utility (see the
following topic).
To change display settings in the BIOS Setup utility
1. From the Start menu, shut down, then restart the OmniBook.
2. When you see the HP logo, press F2 to enter the BIOS Setup utility.
3. From the Main menu, use the down arrow to highlight Video Display Device.
4. Press ENTER to view choices.
5. Select Auto or Both.
6. Press F10 to save settings and exit Setup.
4-10
Page 67

Making Connections
Connecting External Devices
To connect a parallel device
The parallel port uses a standard 25-pin connector, most commonly used for
connecting printers. These include dot matrix, ink-jet, and laser printers. The parallel
port supports either EPP or ECP.
The OmniBook has one parallel port. Its address and properties can be set in the
BIOS Setup utility.
• Connect the parallel printer cable or other parallel cable to the parallel port.
To connect a serial device
The OmniBook’s serial port uses a standard 9-pin serial port. Serial connections
typically are to external modems and fax modems.
The OmniBook has one serial port. Its address can be set in the BIOS Setup utility.
• Connect the serial cable to the serial port.
For a serial mouse, you need to select Standard Serial Mouse in Control Panel,
Mouse, General, Change.
To connect an external keyboard or PS/2 mouse
The 6-pin PS/2 port allows you to attach an external keyboard or a PS/2-compatible
mouse to the OmniBook.
1. From the Start menu, shut down the OmniBook.
2. Plug the mouse or keyboard PS/2 cable into the PS/2 port on the OmniBook.
• To connect both a mouse and a keyboard, use the HP F1469A PS/2
Y adapter.
• To connect a device that has a PC-type jack, first connect its cable to an
adapter cable with a PS/2 jack.
3. Press the blue power button to turn on the OmniBook.
4-11
Page 68

Making Connections
Connecting External Devices
To connect USB devices
Note
Note
Windows NT 4.0 does not support universal serial bus (USB) devices.
Universal serial bus (USB) provides a bi-directional serial interface for adding
peripheral devices such as game controllers, serial and parallel ports, and scanners
on a single bus. The OmniBook provides one USB port; the OmniBook docking
products provide two USB ports.
• Attach the USB cable to the USB port. Windows 95 automatically recognizes the
USB device. Some USB devices can be connected to the OmniBook in series
with other USB devices—this is called a “daisy-chain” connection.
If you have problems making this connection, contact the vendor of
the peripheral device, as well as Hewlett-Packard, for the latest versions of the USB
drivers. The USB technology is dynamic and continues to develop.
USB is disabled by default in the BIOS Setup utility.
4-12
Page 69

Making Connections
Connecting External Devices
To connect audio devices
Your OmniBook has a built-in microphone and two stereo speakers. The audio jacks
allow you to plug in external audio devices.
• Plug a stereo input source (such as a CD player) into the input (left) jack.
• Plug the microphone-into the microphone (middle) jack. The built-in
microphone turns off.
• Plug devices such as headphones or external (amplified) speakers into the
output (right) jack. The built-in speakers turn off.
CAUTION
Connecting a mono plug into the speaker-out jack may damage the OmniBook.
The audio jacks are three-terminal stereo jacks. They are not compatible with
two-terminal mono plugs.
4-13
Page 70

Making Connections
Connecting External Devices
To make an infrared connection
Note
Windows NT 4.0 does not support infrared communication.
By default, the infrared port is not enabled. You must enable it in the BIOS Setup
utility and then install the appropriate infrared driver. For details, refer to the driver’s
Readme file located in \OmniBook\drivers\Win95.
The infrared port is on the back panel. It provides wireless, serial communication
between the OmniBook and other infrared devices such as printers or other
OmniBooks.
• Line up the OmniBook’s infrared port and the other infrared port in as straight a
line as possible. The two ports should be no more than 1 meter apart, with no
obstructions in between. Noise from nearby equipment can cause transmission
errors.
• To check the status of communications, go to Infrared Monitor (Start, Settings,
Control Panel).
Printing to an Infrared Printer
• Install your printer and assign it to the OmniBook’s IR port. You can then print
from your applications as you would to any other printer. Be sure the OmniBook
and printer infrared ports are properly aligned.
Transferring Files with an Infrared Connection
To transfer files, you can use the Direct Cable Connection software built into
Windows 95. You need to install it first.
1. From Control Panel, click Add/Remove Programs.
2. Click Windows Setup, Communications, and select Direct Cable Connection.
See the Windows 95 online help for instructions about how to use Direct Cable
Connection.
4-14
Page 71

Using PC Cards
This section describes how to
♦ Insert a PC Card.
♦ Remove a PC Card.
♦ Find a list of tested PC Cards.
To insert a PC Card
Making Connections
Using PC Cards
Note
Windows NT 4.0 does not support zoomed video. If you are using Windows NT 4.0,
make sure you’ve installed Card Executive (see page 6-21 for instructions).
The OmniBook PC Card slots are available for storing data and expanding the
communication capabilities of the OmniBook. You can use two Type II cards or one
Type III card. The lower card slot (slot zero) supports zoomed video, which allows
high-quality multimedia presentations.
1. Be sure the eject buttons have been pushed in, flush with the case of the
OmniBook.
2. Hold the card with its face up and its connector holes toward the card slot.
3. Slide the PC Card into the slot until it is flush with the OmniBook.
4-15
Page 72

PC Card indicator
Making Connections
Using PC Cards
To remove a PC Card
Do not remove a PC Card while the OmniBook is actively reading or writing data.
Otherwise, you could lose data or the OmniBook could stop responding. When the
card is active, the PC Card indicator appears on the status panel.
1. To remove the card, click the PC Card indicator in the taskbar, then click Stop
(for Windows 95 only). This protects your data and avoids unexpected
problems. You can restart the card by removing it, then inserting again.
2. Press the ejector button once to pop the button out.
3. Press the eject button again to eject the PC Card.
The OmniBook beeps twice when the card pops out.
4. Push in the ejector button until it is flush with OmniBook case.
To find tested PC Cards
For the latest information about compatible cards, visit our website at
http://www.hp.com/omnibook and check the Accessories section. Or contact
Hewlett-Packard as described in the Support and Service booklet.
4-16
Page 73

Making Connections
Using Docking Products
Using Docking Products
A docking product provides external connections for the OmniBook that you can
leave in place whenever you remove the OmniBook from your desk. Instead of
disconnecting and reconnecting peripheral devices, simply undock and dock the
OmniBook. This section describes how to
• Install a docking tray.
• Dock the OmniBook.
• Undock the OmniBook.
For more information about using docking products, see the User’s Guide that
shipped with your dock.
To install a docking tray
Your dock requires a tray that accommodates your specific OmniBook model. Install
this tray prior to connecting the OmniBook to the dock.
1. Select the tray labeled for the OmniBook 2100 or 3100.
2. Slide the rear of the tray into the dock as shown on the dock label.
3. Push down firmly on both sides of the tray until it snaps into place.
To remove a tray from the dock, pull the latch (near the center front of the dock)
towards you until the tray pops free.
4-17
Page 74

Making Connections
Using Docking Products
To dock the OmniBook
CAUTION
Use only an HP F1454A ac adapter. This is the same adapter that the OmniBook
uses. Using any other ac adapter could damage the OmniBook and may void
your warranty. Refer to the warranty statement for your product.
1. If you’re using Windows NT, click Start, Shut Down.
2. Plug the power cord into the ac adapter, then into an ac outlet. Plug the ac
adapter into the dock.
3. On the rear of the OmniBook, slide the docking door to the left.
4. Place the OmniBook on the dock platform, with the rear of the computer facing
the dock’s docking connector.
5. Position your fingers on the platform grips as shown below. Use your thumbs to
push the computer into the dock until the computer slides into place.
4-18
Page 75

Making Connections
Using Docking Products
To undock the OmniBook
1. If you’re using Windows NT, click Start, Shut Down.
2. Press the undock button on the front of the dock and wait for the undock light to
turn green. Then position your thumb as shown and pull the release lever
forward.
3. Remove the OmniBook from the dock.
4-19
Page 76

Page 77

5
Expanding the OmniBook
Page 78

Expanding the OmniBook
This chapter describes some of the optional equipment that can be added to the
OmniBook—components installed inside the computer rather than connected to the
computer’s I/O ports.
This chapter describes procedures to expand or update the capabilities of your
OmniBook, including
♦ Installing a hard disk drive.
♦ Installing a RAM expansion module.
5-2
Page 79

Installing a Hard Disk Drive
This section describes how to
♦ Replace the hard disk drive.
♦ Replace the hard disk drive holder.
♦ Create a hibernate partition for a new hard disk drive.
To replace the hard disk drive
Expanding the OmniBook
Installing a Hard Disk Drive
CAUTION
Important
You must shut down the OmniBook, unplug the ac adapter, and remove the
battery before replacing the hard disk drive.
You’ll need a small Phillips screwdriver to remove the hard disk drive.
1. From the Start menu, shut down the OmniBook.
2. Unplug the ac adapter, if present, and remove the battery.
3. Remove the two screws from the bottom of the hard disk drive.
4. Pull out the hard disk drive.
5. Insert the new drive and replace the hard disk drive screws.
6. Insert the battery.
If you are installing a new hard disk drive, you should create a Hibernate partition on
the drive before loading any software—see page 5-5 for instructions.
5-3
Page 80

CAUTION
Expanding the OmniBook
Installing a Hard Disk Drive
To replace the hard disk drive holder
If you are installing a new hard drive that does not have a plastic holder, you can
remove the holder from the old hard drive.
You’ll need a small Phillips screwdriver for this procedure.
1. Remove the four screws from the sides of the case.
2. Remove the top shield (if present) and swing out the free end of the hard drive
about 90°, then gently pry off the connector from the hard drive.
Work the connector off the hard drive evenly, without pulling on the flex cable.
Otherwise you may bend connector pins or the hard drive or damage the flex
cable.
Note
Depending on the form factor of the replacement drive, the following hard disk drive
variations may exist:
• The hole placement for the four screws may vary.
• The hard drive may have either a one– or two–piece shield.
• If your original drive was a 9.5mm and you are replacing it with a 12.7mm,
remove the rubber spacers from the upper half of the hard disk drive shield
before installing the new drive.
5-4
Page 81

Expanding the OmniBook
Installing a Hard Disk Drive
To create a Hibernate partition
If you do not have an OmniBook Support Utility floppy disk, create one now. After
inserting a formatted floppy disk in the floppy drive, do one of the following:
• On a factory software installation, click Start, Programs, OmniBook, Create
support utility disk.
• On any computer with a CD-ROM drive, run
\Omnibook\Drivers\Hputils directory on the OmniBook Recovery CD. (Note:
Use the \Omnibook\Drivers\Hputils directory, not \OmniBook \Hputils).
• On any computer, download the Support Utility software package from the
OmniBook website (http://www.hp.com/omnibook). Follow the
instructions provided.
1. Connect the ac adapter to the OmniBook.
2. Insert the Support Utility disk in the floppy disk drive or insert the bootable
Recovery CD in your CD-ROM drive.
3. Reboot, press ESC twice and select the CD-ROM as the boot device.
4. Reset the OmniBook. The DOS Startup menu appears.
5. Choose option 3:
Create Hibernate Partition (erases Hard Disk).
6. Choose Y to Continue.
7. When prompted for “Hibernate” partition size, we recommend that you select
the default, which varies depending on whether your OmniBook has one or two
RAM slots.
Do not interrupt the Hibernate partition process or unplug the ac adapter until
complete.
makesupp.bat
from the
5-5
Page 82

Expanding the OmniBook
Installing a RAM Expansion Module
Installing a RAM Expansion Module
CAUTION
Hint
Your OmniBook s computer chips are extremely static-sensitive. Static
electricity can permanently damage computer chips. Handle the RAM module
only by its edges. Before installing the memory module, discharge your body
static electricity by touching the metal shielding around the connectors on the
rear of the OmniBook.
You must shut down the OmniBook, unplug the ac adapter, and remove the
battery before removing a RAM expansion module.
Depending on the OmniBook model, your computer has either one or two RAM
expansion slots. The following restrictions apply:
• If you have one RAM expansion slot, you can install either an SDRAM module
(such as F1456A, ...) or an EDORAM module (such as F1363A, ...).
• If you have two RAM expansion slots and a Pentium II processor, you can install
only SDRAM modules (F1456A, ...) in the slots.
• If you have two RAM expansion slots and a Pentium processor, you can install
either SDRAM modules (F1456A, ...) or EDORAM modules (F1363A, ...) in the
slots—but do not put a module larger than 32 MB in the slot nearest the corner
of the computer.
The easiest way to avoid RAM configuration problems is to use HP SDRAM modules
exclusively.
s
This section describes how to
♦ Install a RAM expansion module.
♦ Remove a RAM expansion module.
5-6
Page 83
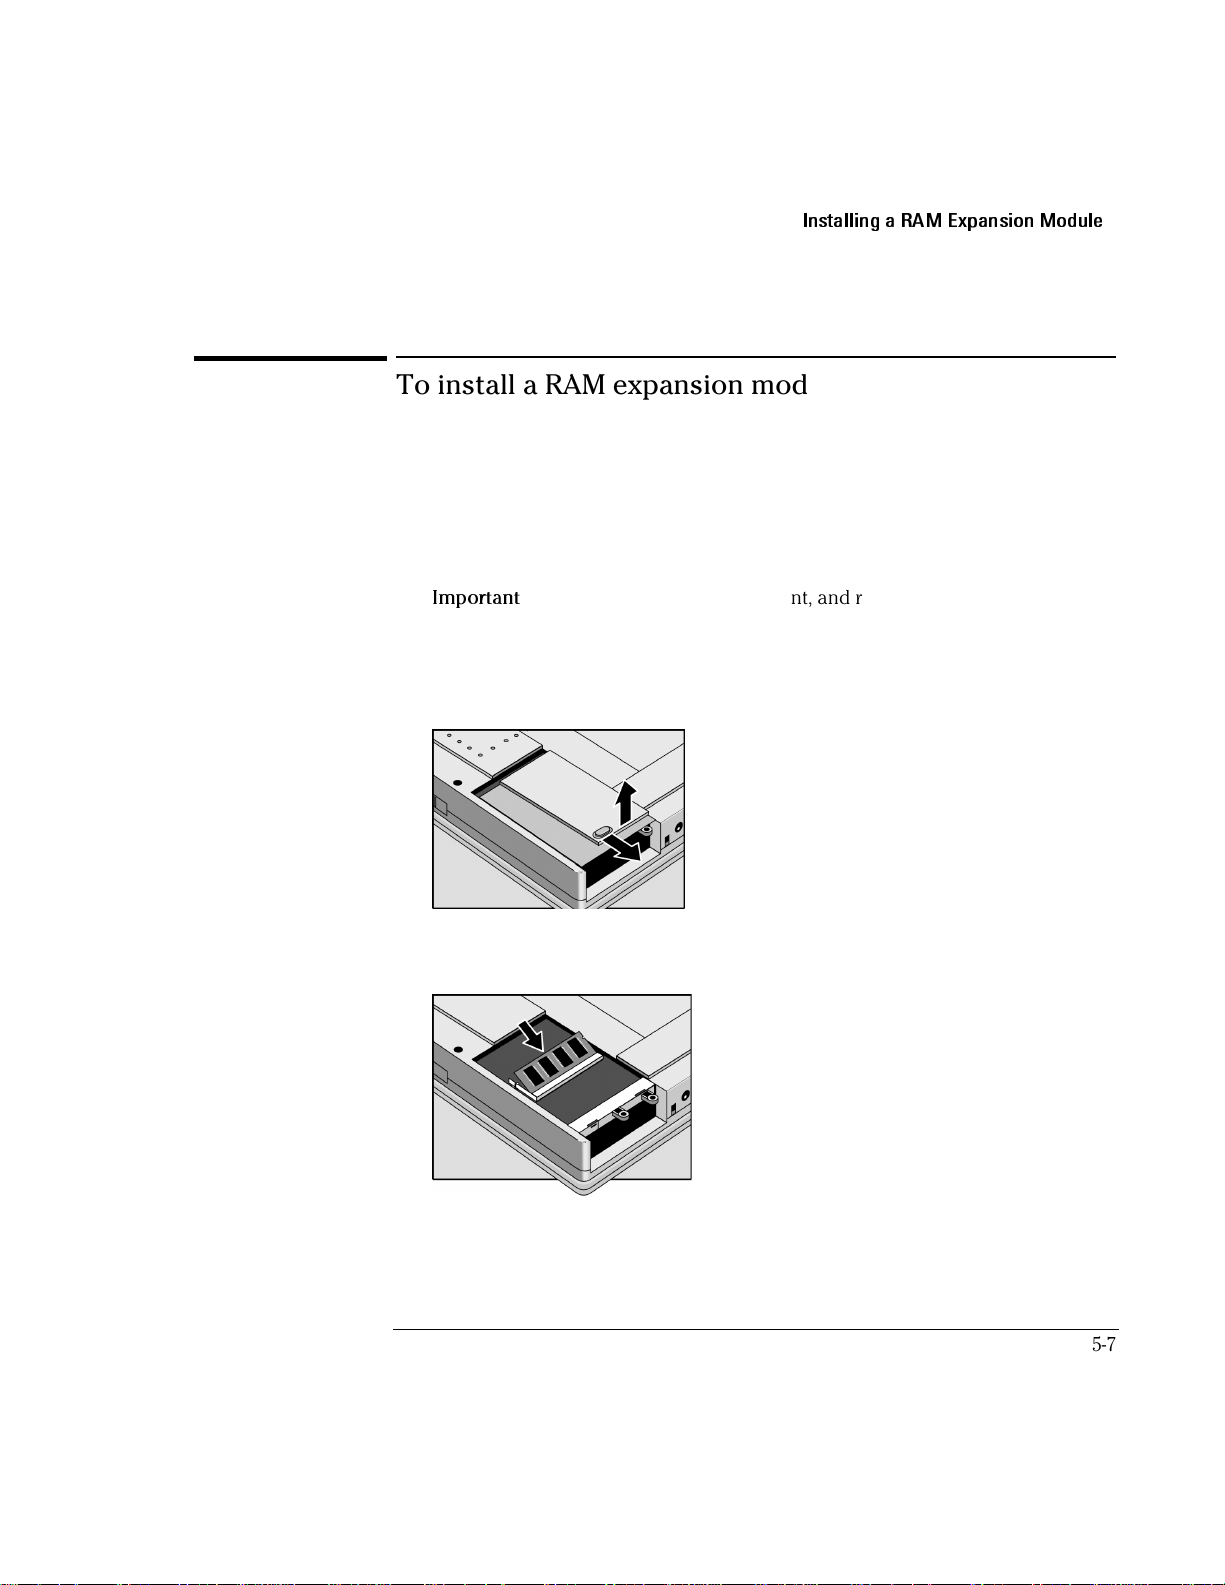
Expanding the OmniBook
Installing a RAM Expansion Module
To install a RAM expansion module
Your OmniBook’s computer chips are extremely static-sensitive. Static electricity can
permanently damage computer chips. Before starting, reading the caution on
page 5-6 about how to handle RAM expansion modules.
You’ll need a small Phillips screwdriver to complete this procedure.
1. From the Start menu, shut down the OmniBook.
Important
2.
3. Remove the hard disk drive (see page 5-3).
4. Slide the RAM cover about 3 mm toward the hard disk drive opening, then lift off
the cover.
. Unplug the ac adapter, if present, and remove the battery.
5. Insert the RAM board into the connector at about a 30° angle, then press down
at both sides until it latches. Make sure it is properly seated.
See the Hint about RAM size
and type on previous page.
6. Place the RAM cover about 3 mm from its closed position, then slide it closed.
7. Insert the hard disk drive and battery.
5-7
Page 84

Expanding the OmniBook
Installing a RAM Expansion Module
To remove a RAM expansion module
Your OmniBook’s computer chips are extremely static-sensitive. Static electricity can
permanently damage computer chips. Before starting, reading the caution on
page-5-6 about how to handle RAM expansion modules.
You’ll need a small Phillips screwdriver to complete this procedure.
1. From the Start menu, shut down the OmniBook.
Important
2.
3. Remove the hard disk drive (see page 5-3).
4. Slide the RAM cover about 3 mm toward the hard disk drive opening, then lift off
the cover.
. Unplug the ac adapter, if present, and remove the battery.
5. Release the two latches at the sides of the RAM board by pushing them outward
and away from the sides of the module. When you release the latches, the free
edge of the board pops up.
6. Pull the board out of the connector.
7. Insert the hard disk drive and battery.
5-8
Page 85

6
Using the Recovery CD
Page 86

Using the Recovery CD
You can use the OmniBook Recovery CD to recover an original OmniBook build, or
you can use it to install the HP custom software over a user-installed alternate
operating system.
The Recovery CD provides the OmniBook-specific drivers to configure your custom
system. The drivers for Windows 95, Windows NT 4.0, and Windows for Workgroups
are located in these places:
• On the Recovery CD ROM, under \Omnibook\Drivers.
• On the OmniBook hard drive under C:\Omnibook\Drivers.
• On the OmniBook website at
http://www.hp.com/omnibook
contains the latest updates of software drivers.
The OmniBook Recovery CD contains the following:
Directory Contains
. This website
README.TXT text file Instructions for using the
RECOVER\
Recovery CD
.
ENC Encoded image of the factory load—either Windows 95 or Windows NT 4.0.
BOOTDISK For creating your own copy of a boot disk (like the
Support Utility
disk).
FILE.CHK Checksum list. Used to verify that software recovery was successful.
OMNIBOOK\
HPUTILS Use this to install the online
and Support files to the \OmniBook directory on your hard drive.
DRIVERS
Use this to manually install individual audio, video, infrared, and PC-Card
(PCMCIA) drivers for Windows NT 4.0, Windows 95, and Windows for
Workgroups. Look for the specific driver for the specific version of your operating
system. Each driver has a README file with instructions.
MANUALS Use this for viewing of the online
installation.
User’s Handbook
User’s Handbook
or to copy the OmniBook Notes
from the CD, not for its
6-2
Page 87

Using the Recovery CD
Recovering a Factory Software Installation
Recovering a Factory Software Installation
If you’ve deleted or lost files on the OmniBook, causing the system to work
improperly, you may need to recover the original factory build.
This section describes how to
♦ Recover the OmniBook factory installation of Windows 95.
♦ Recover the OmniBook factory installation of Windows NT 4.0.
6-3
Page 88

Hint
Using the Recovery CD
Recovering a Factory Software Installation
To recover the Windows 95 factory installation
The following procedure describes how to recover the original Windows 95
operating system that came with your OmniBook.
Requirements
♦ OmniBook 2100/3100.
♦ OmniBook 2100/3100 Recovery CD.
This procedure will format the hard disk drive. If possible, back up any files you
would like to save before installing Windows 95.
1. Shut down the OmniBook and insert the CD-ROM drive in the module bay.
2. Connect the ac adapter and turn on the OmniBook.
3. When you see the HP logo, press F2 to enter the BIOS Setup utility.
4. Open the Boot menu and select CD-ROM as the first boot device. (You may want
to change the boot order back to Diskette Drive after completing this procedure.)
5. Insert the Recovery CD into the CD-ROM drive.
6. Press F10, then press Yes to save and exit the BIOS Setup utility.
7. When the menu appears, choose “Recover Windows 95.”
8. When prompted, select Y to erase the hard disk and continue.
9. When prompted, select a file system (FAT16 or FAT32).
FAT 32 is the factory default. After the hard drive is erased and partitioned, the
OmniBook reboots and begins copying files from the Recovery CD.
The recovery process can take up to an hour. Do not interrupt the recovery
process or unplug the ac adapter until recovery is completed.
10. When the Recovery process is complete, reset the OmniBook. See page 2-4.
6-4
Page 89

Hint
Using the Recovery CD
Recovering a Factory Software Installation
To recover the Windows NT factory installation
The following procedure describes how to use the Recovery CD to recover the
original Windows NT 4.0 factory-installation that came with your OmniBook.
Requirements
♦ OmniBook 2100/3100.
♦ OmniBook 2100/3100 Recovery CD.
This procedure will format the hard disk drive. Back up any files you would like to
save before installing Windows NT 4.0.
1. Shut down the OmniBook and insert the CD-ROM drive in the module bay.
2. Connect the ac adapter and turn on the OmniBook.
3. When you see the HP logo, press F2 to enter the BIOS Setup utility.
4. Open the Boot menu and select CD-ROM as the first boot device. (You may want
to change the boot order back to Diskette Drive after completing this procedure.)
5. Insert the Recovery CD into the CD-ROM drive.
6. Press F10, then press Yes to save and exit the BIOS Setup utility.
7. When the menu appears, choose “Recover Windows NT.”
8. When prompted, select Y to erase the hard disk and continue.
After the hard drive is erased and partitioned, the OmniBook reboots and begins
copying files from the Recovery CD.
The recovery process can take up to an hour. Do not interrupt the recovery
process or unplug the ac adapter until recovery is completed.
9. When the Recovery process is complete, reset the OmniBook. See page 2-4.
6-5
Page 90

Using the Recovery CD
Installing Retail Windows 95
Installing Retail Windows 95
If you install a retail version of Windows 95, you’ll also need to manually install
video, audio, touch pad, PC Card, and infrared drivers.
This section describes how to
♦ Install a retail version of Windows 95.
♦ Install video support for retail Windows 95.
♦ Install audio support for retail Windows 95.
♦ Install PC Card support for retail Windows 95.
♦ Install infrared support for retail Windows 95.
♦ Install touch pad support for retail Windows 95.
6-6
Page 91

Using the Recovery CD
Installing Retail Windows 95
To install a retail version of Windows 95
Requirements
• OmniBook 2100/3100 with internal CD-ROM drive.
• OmniBook Recovery CD.
• Retail Windows 95 CD.
1. Shut down the OmniBook and insert the CD-ROM drive in the module bay.
2. Connect the ac adapter and turn on the OmniBook.
3. When you see the HP logo, press F2 to enter the BIOS Setup utility.
4. Open the Boot menu and select CD-ROM as the first boot device. (You may want
to change the boot order back to Diskette Drive after completing this
procedure.)
5. Insert the Recovery CD into the CD-ROM drive.
6. Press F10, then select Yes to save and exit the BIOS Setup utility.
7. From the menu, select Create Hibernation Partition and select ‘Y’ to options.
8. From the A drive, type FDISK.
9. When prompted to enable large disk support, choose N for FAT16.
10. Press Enter to continue.
11. When prompted, create Primary DOS partition (and Extended DOS partition, if
needed). You will need at least 300 MB for the Primary Partition.
12. Make the C drive an active partition.
13. Press ESC to exit FDISK.
14. Press CRTL+ALT+ DEL.
15. Choose Exit to MS-DOS.
16. From the A: prompt, type Format C:, then type SYS C:.
17. Create a C:\Windows\Options\Cabs directory by typing the following:
Mkdir C:\Windows
Mkdir C:\Windows\Options
Mkdir C:\Windows\Options\Cabs
6-7
Page 92

Using the Recovery CD
Installing Retail Windows 95
18. Insert the Windows 95 CD into the CD-ROM drive.
19. Copy the Windows 95 installation files to your hard drive by typing:
C:
Copy D:\Win95\*.* C:\Windows\Options\Cabs
20. Restart the OmniBook, then begin the installation by typing:
C:\Windows\Options\Cabs\Setup
21. Press Enter to begin a routine check of the system.
22. When the following error appears, press the ESC key to continue.
This version of Microsoft Scandisk will work only with MS-DOS version 5.0 and
later. Setup found a compressed volume or a disk-cache utility on your
computer. Quit setup and check your compressed volume with your disk
compression software or remove the disk cache utility. Then run setup again or
choose Esc to continue with setup.
23. Click Yes to accept the license.
24. When prompted, select Other Directory and click Next. Enter C:\Windows
the path, click Next, and then click Yes to continue with the specified directory.
25. Choose Portable on the Setup Options screen, then click Next.
26. Enter the appropriate User Information, then click Next.
27. Enter the Product Identification Number, then click Next. The Product
Identification Number is located on the Certificate of Authenticity that you
received with your retail version of Windows 95.
28. Do not detect any Network, Sound, MIDI, or Video Capture Card devices, then
click Next.
29. Follow the prompts until the end of the installation, and then reboot.
30. Copy the files in D:\Omnibook from the OmniBook 2100/3100 Recovery CD to
C:\Omnibook.
31. Insert the OmniBook Recovery CD.
32. Open Windows Explorer.
33. Click View, then Options.
34. Select Show all files, uncheck Hide MS-DOS extensions, then click OK.
35. Copy the files from the Recovery CD in \OMNIBOOK\DRIVERS\WIN95\PIIX4UPD
to C:\WINDOWS\INF. (If prompted, click Yes to All to replace all files.)
36. From Control Panel, double-click System, then click Device Manager.
for
6-8
Page 93

Using the Recovery CD
Installing Retail Windows 95
37. Remove any PCI devices (Cards or Bridges) from the Other devices category.
38. Close the System Properties window.
39. Shut down and restart Windows 95.
40. If you are prompted for a PCI Card driver, select Do Not Install A Driver, then
click OK.
To install video support for retail Windows 95
If you’ve installed a retail version of Windows 95, you’ll need to install video support.
The driver is located on the OmniBook’s hard drive or on the Recovery CD in the
\Omnibook\Drivers\Win95\Video directory.
1. From Control Panel, double-click Display, then click Settings.
2. Click Change Display Type.
3. Under Adapter Type, click Change.
4. Click Have Disk.
5. Enter the directory of the video drivers, then click OK.
6. Click OK to select NeoMagic MagicGraph 128XD.
7. Under Monitor Type, click Change.
8. Choose Laptop Display Panel.
For 2100, choose 800 x 600.
For 3100, choose 1024 x 768.
9. Click OK, then Close.
10. Set the Desktop Area.
For 2100, True Color (24 Bit).
For 3100, choose High Color (16 Bit).
11. Click Close in Display Properties, then click Yes to restart the computer now.
6-9
Page 94

Using the Recovery CD
Installing Retail Windows 95
To install audio support for retail Windows 95
If you’ve installed a retail version of Windows 95, you’ll need to install audio support.
This driver is located on the OmniBook’s hard drive or on the Recovery CD in
\Omnibook\Drivers\Win95\Audio.
1. From Control Panel, double-click Systems, then click Device Manager.
2. Open the MS Windows Sound System Compatible device under Sound, Video,
and Game Controllers, and confirm the following resources in the Resource tab:
Direct Memory Access 01
Direct Memory Access 00
Interrupt Request 05
Input/Output Range 0530-0537
Input/Output Range 0388-038B
Input/Output Range 0220-022F
3. Click Driver, then click Change Driver.
4. Click Have Disk.
5. Enter the directory of the audio drivers (Omnibook\Drivers\Win95\Audio), then
click OK.
6. Click OK to accept Crystal PnP Audio System CODEC.
7. Click OK to close the Unknown Device Properties window.
8. When prompted to shut down, click No.
9. Open the Unknown device under Other devices.
10. Click on the Driver tab, then click Change Driver.
11. Select Other detected devices then click OK.
12. Click OK to accept Crystal PnP Audio System Control Registers.
13. Click OK to close the Unknown Device Properties window.
14. Click Yes to shut down and restart Windows 95.
6-10
Page 95

Using the Recovery CD
Installing Retail Windows 95
To install PC Card support for retail Windows 95
If you’ve installed a retail version of Windows 95, you’ll need to install PC Card
support. This driver is located on the OmniBook’s hard drive or on the Recovery CD
in \Omnibook\Drivers\Win95\Pccard\950aonly.
1. From Control Panel, double-click System.
2. Click Device Manager.
3. Under PCMCIA Socket, double-click on the device with the red X.
4. Under General, Properties, check Device Usage to enable this device in the
current profile called Original Configuration (Current).
5. Click OK.
6. The PCMCIA Installation Wizard starts.
7. Follow the on-screen instructions.
8. From Control Panel, double-click System, then click Device Manager.
9. Open PCMCIA socket then PCIC or compatible PCMCIA controller.
10. Click Resources.
11. Uncheck Use automatic settings.
12. Change the Setting based on to Basic configuration 1.
13. Confirm the Input/Output Range is 03E0 - 03E1 and there is no Interrupt setting.
14. Click OK then click Yes to confirm the manual setting.
15. Close the System Properties window.
16. From the Start menu, shut down and restart the OmniBook.
6-11
Page 96

Using the Recovery CD
Installing Retail Windows 95
To install infrared support for retail Windows 95
If you’ve installed a retail version of Windows 95, you’ll need to install infrared
support. This drivers are located on the OmniBook’s hard drive or on the Recovery
CD in \Omnibook\Drivers\Win95\Irda and in \Omnibook\Drivers\Win95\Fastir.
1. Go to the infrared drivers directory (\Omnibook\Drivers\Win95\Irda) and copy
the .INF files to C:\Windows\Inf.
2. If prompted to overwrite old files, click Yes.
3. Reboot the OmniBook.
4. When you see the HP logo, press F2 to enter the BIOS Setup utility.
5. Go to the System Devices menu.
6. Set the Infrared Port to Enabled.
7. Set the Mode to FIR.
8. Set the Base I/O address to either 2F8 IRQ3 or 3F8 IRQ4.
9. If necessary, set the DMA Channel to DMA 3.
10. For best performance, set the Parallel Port Mode to EPP.
11. Save and exit the BIOS Setup utility.
12. When prompted for a driver disk, select the driver disk provided by the
hardware manufacturer, then click OK.
13. Enter the directory of the infrared drivers (\Omnibook\Drivers\Win95\Fastir) and
click OK.
14. Go to \Omnibook\Drivers\Win95\Irda and run SETUP.
15. Click Next to run the Add Infrared Device Wizard.
16. Click Next to accept the built-in infrared port on laptop.
17. Select SMC IrCC (Fast Infrared) Hardware and Driver, then click Next.
18. Click Next to accept the default ports (COM4 and LPT3).
19. Click Finish.
20. Run Windows Explorer.
21. From the View menu click Options.
6-12
Page 97

Using the Recovery CD
Installing Retail Windows 95
22. Select Show all Files and deselect Hide MS-DOS file extensions for file types that
are registered, then click OK.
23. Right-click on SMCIRLAP.INF in the \Omnibook\Drivers\Win95\Fastir directory.
24. Click Install off the pop-up menu.
25. If prompted for the location of SMCIRLAP.INF enter
\Omnibook\Drivers\Win95\Fastir, then click OK.
26. Shut down and restart Windows 95.
To install touch pad support for retail Windows 95
The touch pad works with the built-in Windows 95 mouse driver. This driver supports
the basic features of the touch pad, but not the enhanced features. To activate full
touch pad capabilities, you’ll need to install touch pad support.
1. Shut down any programs that are currently open.
2. Click Start, Run, enter the path of SETUP.EXE (for example,
C:\Omnibook\Drivers\Win95\Touchpad\Setup.Exe).
3. Click Next, and then next again to continue.
4. Click Next to select the recommended installation directory.
5. Click Next to verify current settings.
6. Shut down and restart Windows 95 to activate the touch pad driver. (If you need
to install other components, do not restart at this time.)
6-13
Page 98

Using the Recovery CD
Installing Retail Windows 95
To disable automatic CD-ROM detection
Windows 95 automatically detects a CD when you insert it. However, this prevents
the OmniBook from automatically turning off after a period of inactivity if the
CD-ROM drive is installed. You can disable this feature with the following
procedure.
1. From Control Panel, double-click System, then click Device Manager.
2. Double-click CD-ROM drive.
3. Select the CD-ROM driver displayed, then click Properties.
4. Click Settings, then uncheck Auto Insert Notification.
5. Click OK to close the CD-ROM Properties window.
6. Click OK to close the System Properties window.
7. Click Yes to restart Windows 95.
6-14
Page 99

Using the Recovery CD
Installing Retail Windows NT 4.0
Installing Retail Windows NT 4.0
If you install a retail version of Windows NT 4.0 you’ll also need to manually install
video, audio, touch pad, Advanced Power Management (APM), and Card Executive
drivers.
This section describes how to
♦ Install a retail version of Windows NT 4.0.
♦ Install Service Pack 3 for Windows NT 4.0.
♦ Install video support for retail Windows NT 4.0.
♦ Install audio support for retail Windows NT 4.0.
♦ Install Phoenix Advanced Power Management for Windows NT 4.0.
♦ Install Phoenix Card Executive 2.x for retail Windows NT 4.0.
6-15
Page 100

Using the Recovery CD
Installing Retail Windows NT 4.0
To install a retail version of Windows NT 4.0
If you are installing Windows NT networking, install it after fully installing Windows
NT. Follow the instructions in the application note for the network card you are
using. The application notes are available on the OmniBook website:
http://www.hp.com/omnibook.
Requirements
• OmniBook 2100/3100 with internal CD-ROM drive.
• 32 MB memory (64 MB recommended).
• OmniBook Recovery CD.
• Retail Windows NT Workstation CD.
1. Shut down the OmniBook and insert the CD-ROM drive in the module bay.
2. Connect the ac adapter and turn on the OmniBook.
3. When you see the HP logo, press F2 to enter the BIOS Setup utility.
4. From the Boot menu, select CD-ROM as the first boot device. (You may want to
change the boot order back to Diskette Drive after completing this procedure.)
5. Insert the Recovery CD into the CD-ROM drive.
6. Press F10, then ENTER to save and exit the BIOS Setup utility.
7. When prompted, select “Create Hibernate Partition.”
8. Select “Y” to erase the hard disk and create a hibernate partition.
9. When prompted for “Hibernate” partition size, we recommend that you select
the default, which varies depending on whether your OmniBook has one or two
RAM slots.
10. When finished, removed the Recovery CD and insert the Windows NT
Workstation CD in the CD-ROM drive.
11. Press CTRL+ALT+DEL to reboot the OmniBook.
12. Follow the on-screen instructions. Select the setup defaults unless this procedure
notes otherwise.
6-16
 Loading...