

Page 1

HP Scanjet N6350
User Guide
Page 2

Page 3

Contents
1 Use the scanner
HP scanning software overview.................................................................................................4
Scanner overview.......................................................................................................................5
Scanner control panel...........................................................................................................6
Automatic document feeder (ADF).......................................................................................7
Transparent materials adapter (TMA)...................................................................................7
Scanner settings.........................................................................................................................7
Language..............................................................................................................................8
Power Mode..........................................................................................................................8
Tools.....................................................................................................................................8
Network.................................................................................................................................8
Restore Defaults...................................................................................................................8
Load originals.............................................................................................................................9
Use the automatic document feeder (ADF)..........................................................................9
Document loading tips....................................................................................................9
How to load documents................................................................................................10
Use the scanner glass........................................................................................................12
Use the transparent materials adapter (TMA)....................................................................14
Load slides or negatives...............................................................................................14
Tips for scanning transparent items.............................................................................15
Start a scan...............................................................................................................................15
Use the Scan button...........................................................................................................15
Tips on using the Scan button......................................................................................16
Use the HP scanning software...........................................................................................16
Use other software programs.............................................................................................17
Make copies..............................................................................................................................18
2 Configure and manage the scanner on a network
Connect the scanner to a network............................................................................................19
Change the scanner name.......................................................................................................20
Connect to additional network scanners...................................................................................21
Install the scanner software on additional computers...............................................................21
1
Page 4

Manage the network scanner...................................................................................................22
Management and administration tools................................................................................22
HP Scanner Tools Utility.....................................................................................................22
Network settings.................................................................................................................23
View network settings...................................................................................................23
Change network setup type..........................................................................................24
Set the link speed.........................................................................................................24
Change the IP address.................................................................................................24
Restore the network defaults........................................................................................25
Embedded Web Server......................................................................................................25
Embedded Web Server requirements .........................................................................26
Start the Embedded Web Server..................................................................................26
Embedded Web Server options....................................................................................26
3 Useful scanning features
Work with scan shortcuts..........................................................................................................28
Automatically rotate landscape pages......................................................................................28
Automatically remove blank pages...........................................................................................29
Automatically straighten scanned images ...............................................................................29
Filter out color from a document (color channel dropout).........................................................29
Scan without reviewing.............................................................................................................29
4 Care and maintenance
Clean the scanner glass...........................................................................................................31
Clean the transparent materials adapter (TMA) ......................................................................32
Clean the automatic document feeder (ADF)...........................................................................32
HP Scanner Tools Utility scanner maintenance information....................................................34
Replace the feed roller and separation pad..............................................................................35
Order maintenance and scanner supplies................................................................................35
5 Troubleshooting
Basic troubleshooting tips.........................................................................................................36
Scanner LEDs..........................................................................................................................37
Scanner installation troubleshooting.........................................................................................37
Check the cables................................................................................................................38
Uninstall and reinstall the software.....................................................................................38
Problems installing third-party applications that shipped with the scanner........................39
Scanner initialization or hardware problems.............................................................................39
Check the USB or Ethernet connection..............................................................................39
Check that the scanner has power.....................................................................................40
Reset the scanner..............................................................................................................41
Test the scanner hardware.................................................................................................41
Scanner has stopped working properly..............................................................................42
Additional troubleshooting information...............................................................................42
2
Page 5

Contents
Scanner operation problems....................................................................................................42
Scanner will not turn on......................................................................................................43
Scanner lamp stays on.......................................................................................................43
Scanner does not start scan right away.............................................................................43
Scanner is scanning items very slowly...............................................................................43
Custom scan shortcut names do not display correctly on the LCD....................................43
Vertical white stripes appear on the printed page..............................................................44
Scan files are too large.......................................................................................................44
The bottom of the image is cut off when scanning from the scanner glass........................44
Issues with scanning documents or text (OCR).................................................................44
Scanner button issues..............................................................................................................45
Buttons do not work............................................................................................................45
An unexpected program opens when a button is pressed.................................................45
Wrong shortcut is used when the Scan button is pressed..................................................46
Automatic document feeder (ADF) problems...........................................................................46
Scanned image is fuzzy......................................................................................................47
Scanned images contain streaks or scratches...................................................................47
Scanner scans only one side of a double-sided page........................................................47
Scanned pages are out of order at the scan destination....................................................48
Scanned pages are missing at the scan destination..........................................................48
The image is completely black or completely white............................................................48
Scanned images are not straight........................................................................................48
Clear a jam from the automatic document feeder (ADF)....................................................49
Automatic document feeder (ADF) does not feed paper....................................................50
The bottom of the scanned image is cut off........................................................................50
Slides, negatives, and TMA issues...........................................................................................51
The image cannot be enlarged...........................................................................................51
Incorrect colors print, or the image is too light or dark........................................................51
The scanned images are dark............................................................................................51
The transparent materials adapter (TMA) does not work at all..........................................51
No light or only dim light is visible in the transparent materials adapter (TMA) after
selecting a slides or negatives scanning shortcut..............................................................52
Networking problems................................................................................................................52
General network troubleshooting........................................................................................52
Check network status.........................................................................................................52
Problems connecting to a wired network............................................................................53
Additional troubleshooting information.....................................................................................53
6 Product support......................................................................................................................54
Index..............................................................................................................................................55
3
Page 6

1 Use the scanner
The following topics describe the HP Scanjet scanner as well as how to scan or copy
original documents.
•
HP scanning software overview
Scanner overview
•
Scanner settings
•
Load originals
•
Start a scan
•
Make copies
•
HP scanning software overview
When you install the HP scanning software, the following icons are added to your desktop.
These icons open programs for scanning, copying, and editing your scans.
HP Scanning is the program to use for scanning pictures and documents. Use
HP Scanning for all of the following:
Perform scanning functions
•
Access help and troubleshooting information
•
Access the HP Scanning preview window to edit your scans before saving them
•
Scan slides and negatives with the transparent materials adapter (TMA)
•
Modify settings and preferences, such as assigning third-party software (through
•
scan shortcuts) to the Scan (
HP Copy is the program to use for printing copies on a printer.
) button
To start a scan, double-click the HP Scanning icon. When the HP Scanning shortcuts
dialog box is displayed, select a scanner from the Device menu if you are connected to
multiple scanners, and then follow the onscreen instructions.
NOTE: You can modify scan settings in the HP Scanning shortcuts dialog box. For
more information, click Help in the HP Scanning shortcuts dialog box.
To start a copy, double-click the HP Copy icon and follow the onscreen instructions.
NOTE: You can assign the Scan ( ) or Copy ( ) buttons to other applications
as long as Windows recognizes the application as button-aware. To do so, use the
HP Scanner Tools Utility.
4 Use the scanner
HP Scanner Tools Utility is the program to use for recording maintenance information
and performing some networking tasks. In addition, if you do not use HP Scanning,
HP Scanner Tools Utility allows you to configure the Scan (
buttons for third-party software.
) and Copy ( )
Page 7
See also
• “
Load originals” on page 9
Use the HP scanning software” on page 16
• “
Make copies” on page 18
• “
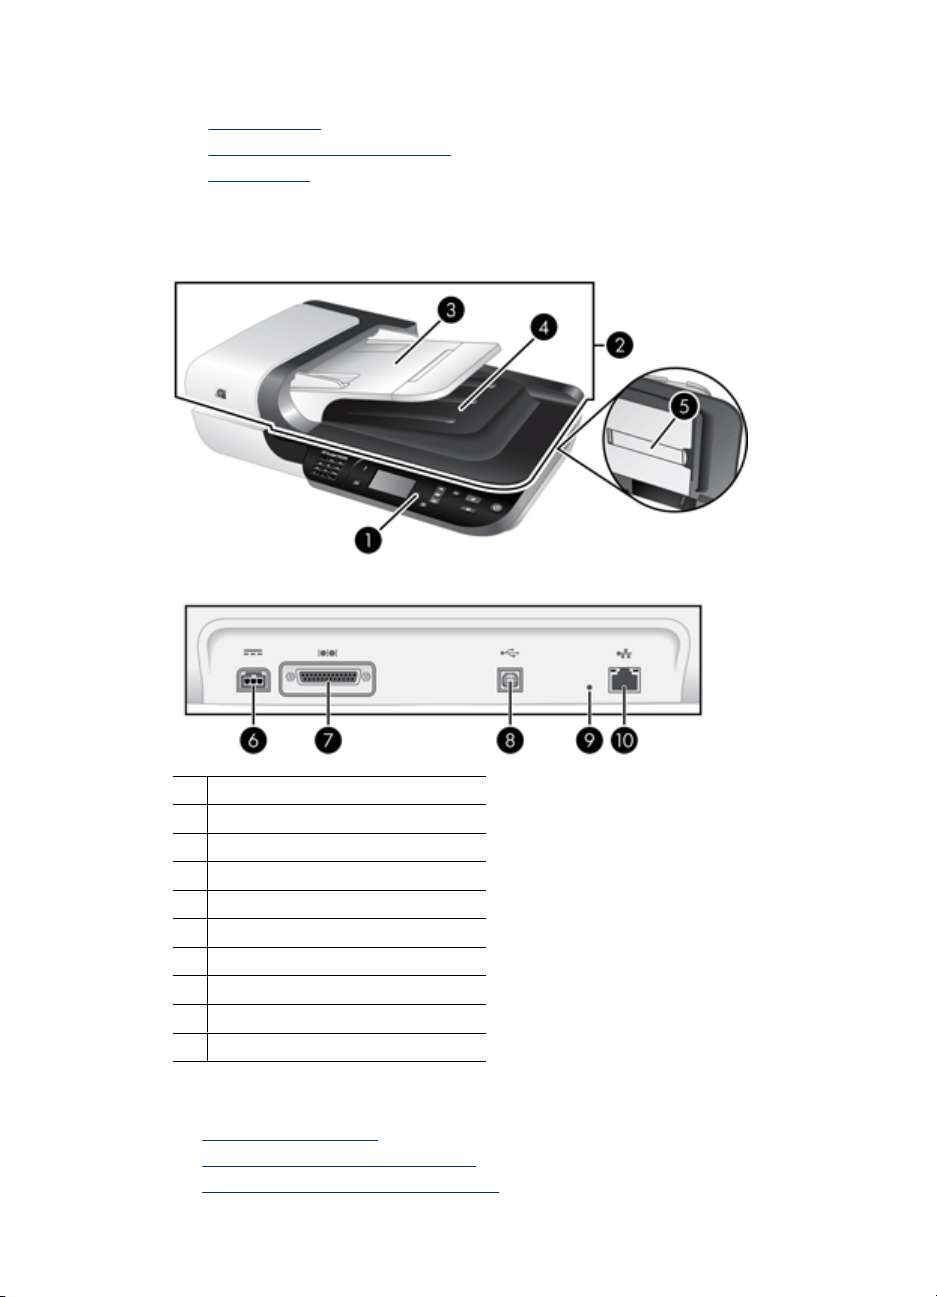
Scanner overview
1 Scanner control panel
2 Automatic document feeder (ADF)
3 ADF input tray
4 ADF output tray
5 Transparent materials adapter (TMA)
6 Power supply input
7 TMA/ADF cable input
8 USB cable port
9 Ethernet reset port
10 Ethernet port
See also
•
Scanner control panel
Automatic document feeder (ADF)
•
Transparent materials adapter (TMA)
•
Scanner overview 5
Page 8
Chapter 1
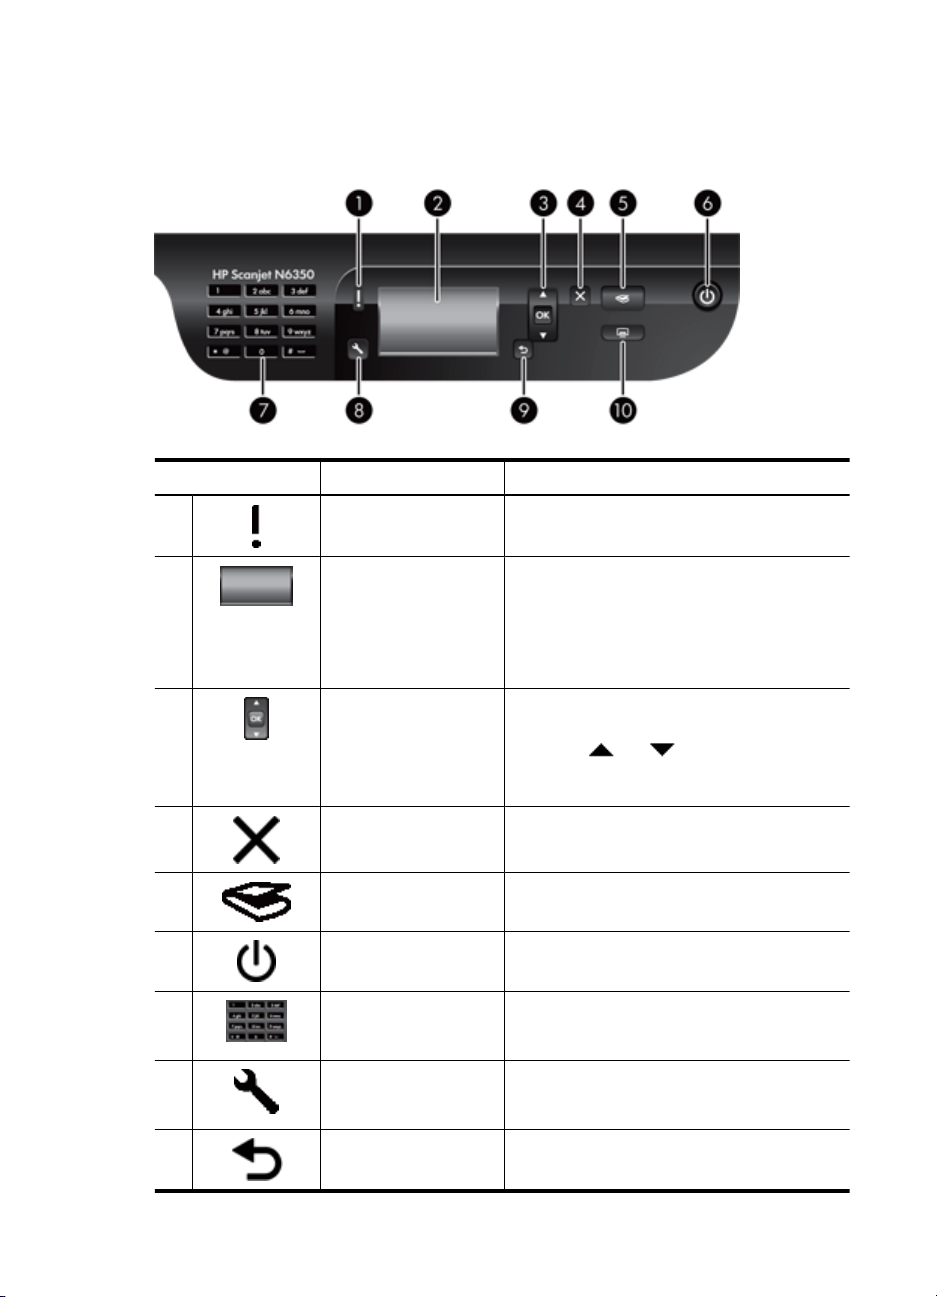
Scanner control panel
Use the buttons on the scanner control panel to start a scan and to configure some
scanner settings.
Icon Button name Description
1 Attention LED In combination with the Power LED, indicates
2 LCD
3 OK/Select Allows you to scroll through and select options
4 Cancel
5 Scan Starts a scan.
6 Power Turns the scanner on and off.
7 Keypad Allows you to enter network address
8 Setup Allows you to set preferences for the behavior
9 Back Displays the previous menu on the LCD.
scanner functions and error conditions.
Displays available scan shortcuts that
•
users can select.
Shows menu options and status and error
•
messages.
If the scanner is networked, displays
•
computers networked to the scanner.
in the LCD.
Press and to scroll through the
•
menu options.
Press OK to select the option.
•
Cancels a scan or copy in progress.
•
Cancels menus on the LCD.
•
information and PIN when your scanner is
networked.
of the scanner and enter network connection
specifications.
6 Use the scanner
Page 9

(continued)
Icon Button name Description
10 Copy Starts a copy, displaying the HP Copy dialog
See also
• “
Start a scan” on page 15
Make copies” on page 18
• “
Scanner settings” on page 7
• “
Scanner LEDs” on page 37
• “
Configure and manage the scanner on a network” on page 19
• “
Automatic document feeder (ADF)
You can use the automatic document feeder (ADF) to scan single pages or multipage
documents quickly and easily.
See also
• “
Use the automatic document feeder (ADF)” on page 9
Start a scan” on page 15
• “
Make copies” on page 18
• “
Transparent materials adapter (TMA)
You can use the transparent materials adapter (TMA) to scan 35 mm slides or negatives.
See also
• “
Use the transparent materials adapter (TMA)” on page 14
Start a scan” on page 15
• “
box on the computer.
Scanner settings
The Setup ( ) button allows you to modify the following scanner settings:
•
Language
Power Mode
•
Tools
•
Network
•
Restore Defaults
•
NOTE: You can change additional settings through the HP scanning software.
Double-click the HP Scanning icon on the desktop, select a scanner from the
Device menu if you are connected to multiple scanners, and then select an option
from the Options menu. For more information, click Help in the HP Scanning
shortcuts dialog box.
Scanner settings 7
Page 10

Chapter 1
Language
To select the language shown on the LCD, follow these steps:
1.
2. Use
Power Mode
You can reduce the scanner's energy consumption with the following settings:
• Energy Savings: Reduces energy consumption but increases the time it takes to
• Instant Warm-up: Reduces the time it takes to begin a scan or copy, but increases
To change energy consumption settings, follow these steps:
1.
2. Use
Tools
This menu option starts the HP Scanner Tools Utility on the connected computer. This
utility allows you to associate any button-aware application with the Scan (
Copy (
and access network options.
Press the Setup (
OK.
and until the language you want is selected, press OK to confirm the
language selection, and then press OK to exit.
begin a scan or copy.
energy consumption.
Press the Setup (
OK.
and until the setting you want is selected, press OK, and then press
twice.
) buttons, monitor usage of certain scanner parts for maintenance purposes,
) button, use and to select Language, and then press
) button, use and to select Power Mode, and then press
) and
NOTE: You can also start the HP Scanner Tools Utility by double-clicking the
HP Scanner Tools Utility icon on the desktop.
See also
• “
HP Scanner Tools Utility scanner maintenance information” on page 34
Configure and manage the scanner on a network” on page 19
• “
Network
The Network menu allows you to view and set network settings such as IP address and
link speed.
See also
“
Configure and manage the scanner on a network” on page 19
Restore Defaults
The Restore Defaults menu allows you to reset all hardware settings to their factory
defaults.
8 Use the scanner
Page 11
Load originals
You can load your originals into your scanner using one of the following methods:
•
Use the automatic document feeder (ADF)
Use the scanner glass
•
Use the transparent materials adapter (TMA)
•
Use the automatic document feeder (ADF)
For helpful information on loading your documents properly, refer to the following topics.
•
Document loading tips
How to load documents
•
Document loading tips
• The automatic document feeder (ADF) supports the following paper types.
Width: 148-216 mm (5.8-8.5 in)
Length: 148-356 mm (5.8-14 in)
Weight: 50-120 g/m2 (13-32 lb)
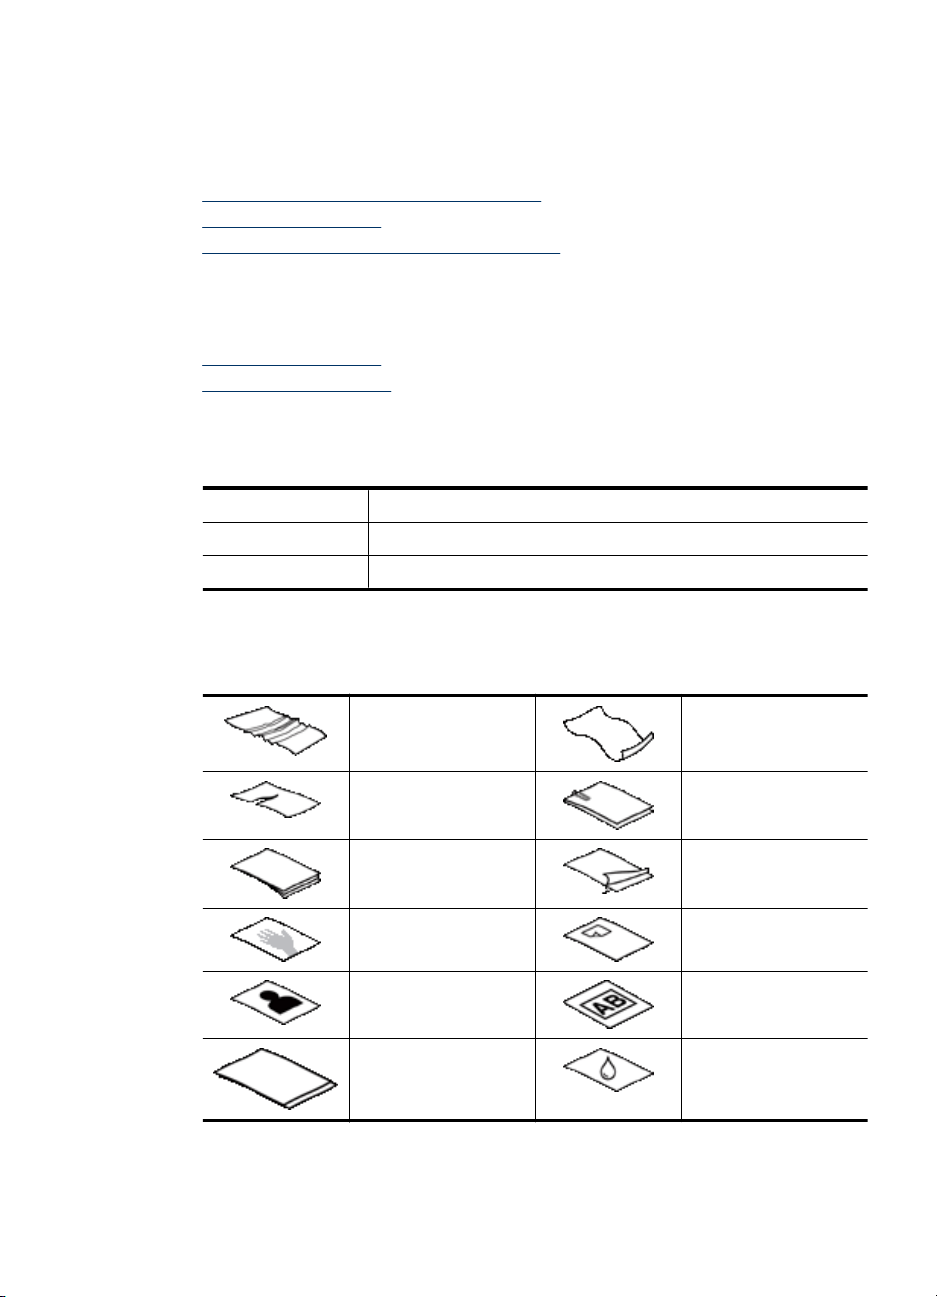
• Scanning the following types of documents with the ADF might result in paper jams
or damage to the documents. To scan these documents, use the scanner glass
instead of the ADF.
Wrinkled or creased
documents
Torn documents Documents with paper
Carbon paper Coated paper
Extremely thin,
translucent paper
Photos Overhead
Papers that are stuck
together
Curled documents
clips or staples
Paper with adhesive
notes or flags attached
transparencies
Paper with wet
substances such as
glue or correction fluid
• Before loading documents, make sure that the ADF access door is securely latched.
Load originals 9
Page 12
Chapter 1
• When loading a stack of documents, make sure that all of the documents are the
same width.
• When loading pages in landscape orientation, make sure that the top of the pages
point toward the back of the scanner. Doing so ensures that the scanner automatically
rotates the page correctly, if you have set the HP scanning software to rotate
landscape pages automatically.
• The maximum capacity of the ADF is 50 sheets of 75 g/m
2
(20 lb) paper. When using
heavier paper, the maximum capacity is decreased.
• When loading small pages, such as A5 paper size (148 x 210 mm or 5.8 x 8.3 in),
load a stack of at least five pages to ensure that the ADF properly detects and feeds
the stack. When scanning fewer than five small pages, scan the pages by placing
them on the scanner glass.
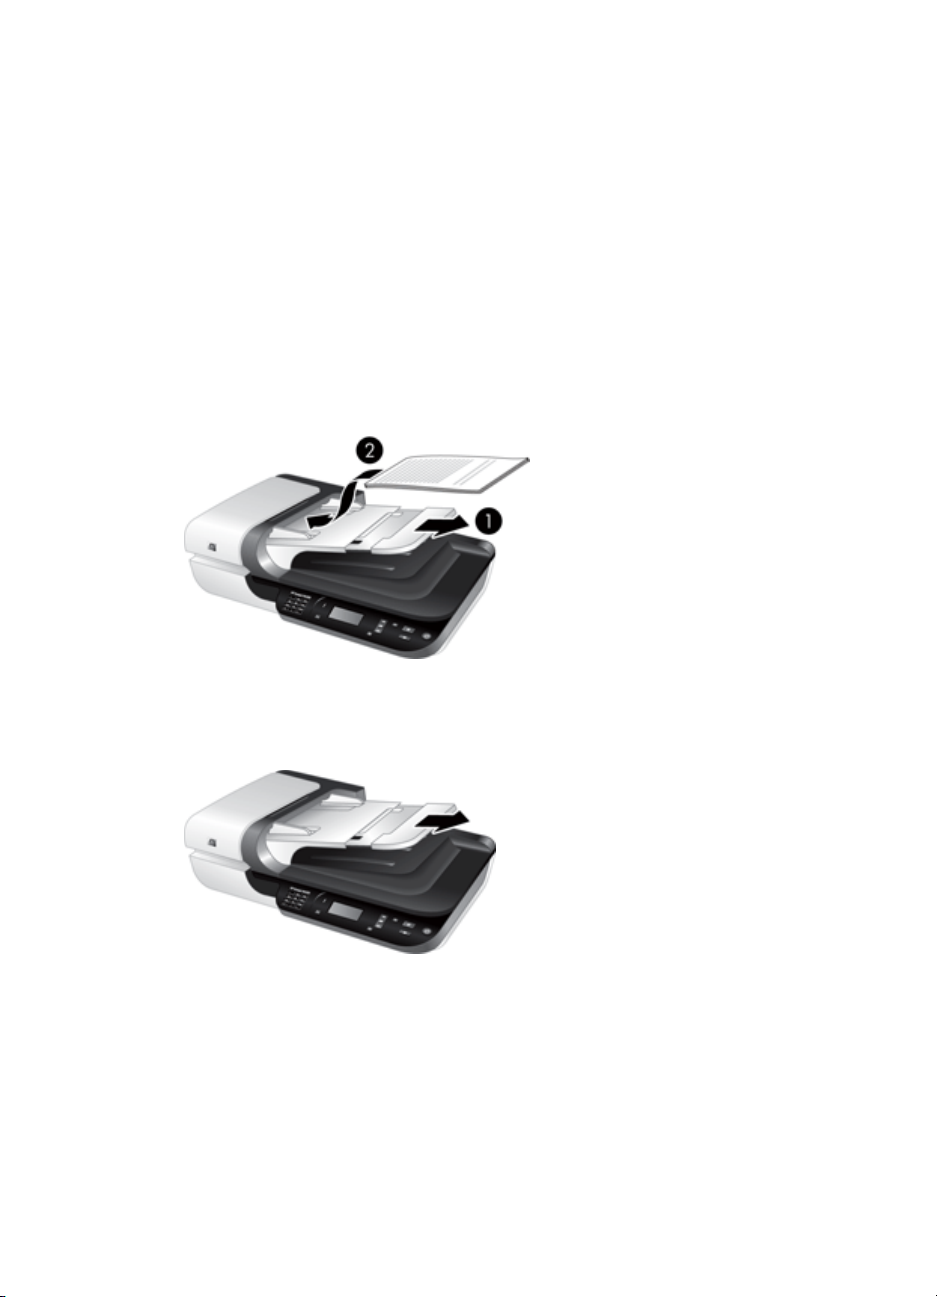
• When loading long documents that hang over the end of the input tray, pull out the
input tray extender (1), and then load the documents (2).
How to load documents
1. If the original pages are long, pull out the input tray extender.
10 Use the scanner
Page 13
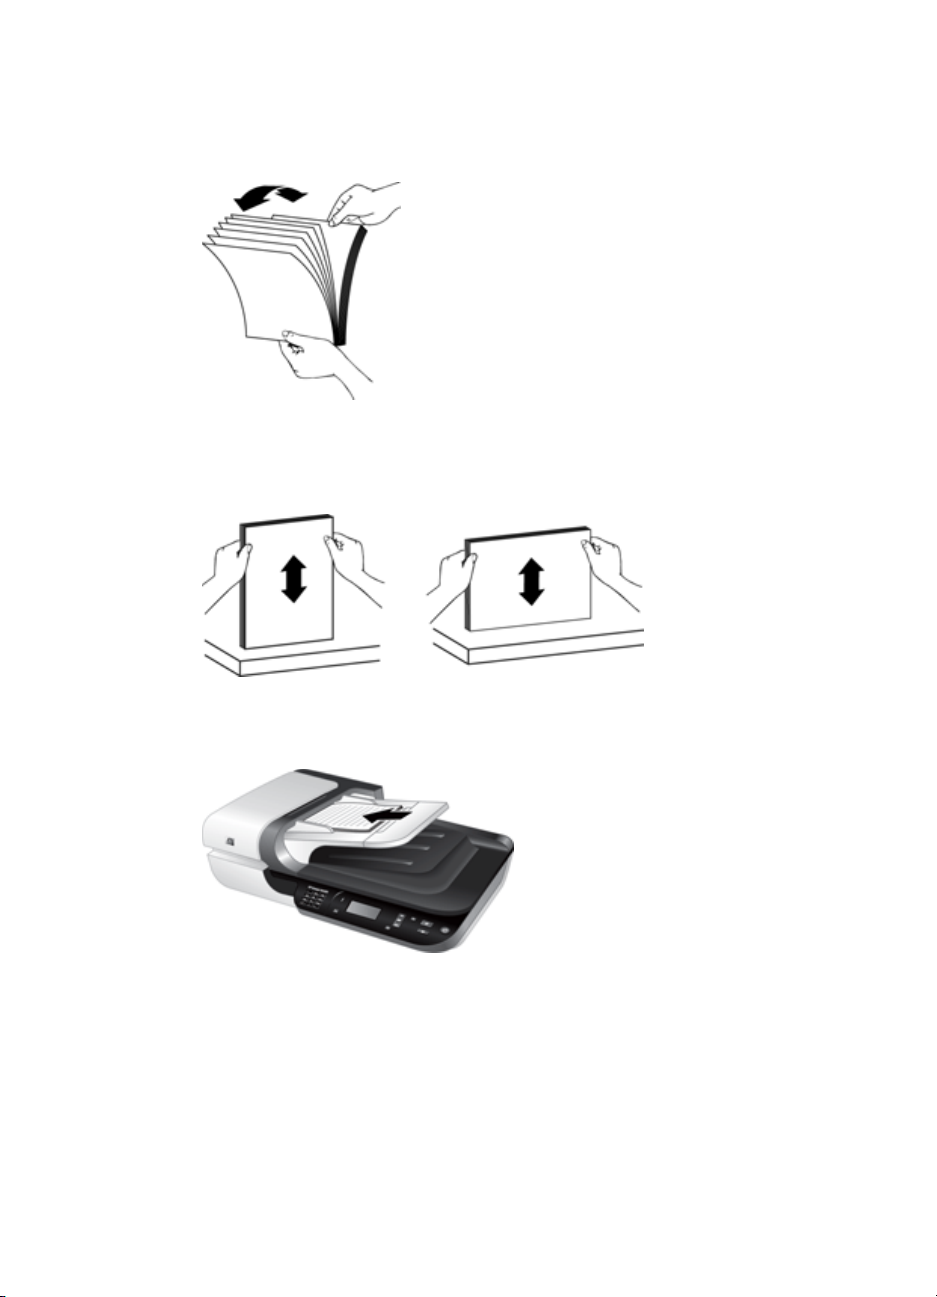
2. Fan the stack of document pages to ensure that the pages do not stick together. Fan
the edge that will be pointing into the ADF in one direction, and then fan that same
edge in the opposite direction.
3. Align the edges of the documents by tapping the bottom of the stack against the table
top. Rotate the stack 90 degrees and repeat.
4. Place the stack in the middle of the input tray. Load the stack face up.
Load originals 11
Page 14
Chapter 1
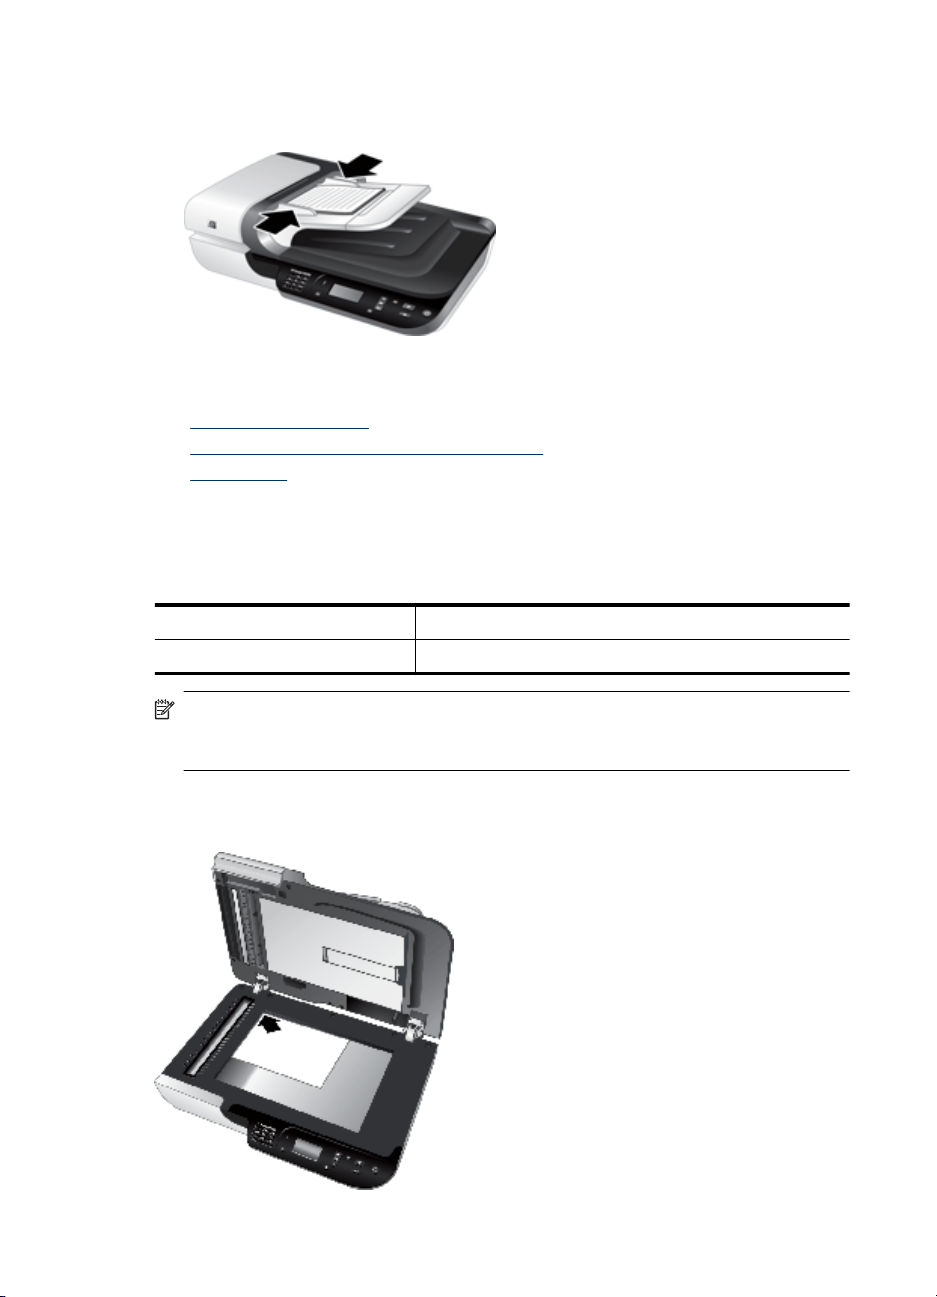
5. Adjust the paper guides to the width of the documents. Take care not to overtighten
the guides, which can restrict paper feeding, but make sure that the paper guides
touch the edges of the documents.
6. Gently push the stack forward to activate the tray sensor.
See also
• “
Document loading tips” on page 9
Automatic document feeder (ADF) problems” on page 46
• “
Start a scan” on page 15
• “
Use the scanner glass
Place items that do not meet the specifications for the automatic document feeder (ADF)
directly onto the scanner glass.
Minimum size: No minimum size
Maximum size: 216 x 300 mm (8.5 x 11.8 in)
NOTE: Not all the length of the scanner glass is in the active imaging area, so make
sure to position your originals as indicated by the reference mark on the edge of the
scanner glass.
Place the original face down on the scanner glass, as indicated by the reference mark.
For landscape pages, place the pages face down with the top of the page pointing toward
the back of the scanner.
12 Use the scanner
Page 15

TIP: To scan multiple pictures at the same time, arrange the pictures that you want
to scan on the scanner glass with at least 6 mm (0.25 in) of space between items.
See also
“
Start a scan” on page 15
Load originals 13
Page 16
Chapter 1
Use the transparent materials adapter (TMA)
This section contains information about using the transparent materials adapter (TMA)
to scan slides, including 35 mm slides, and negatives.
•
Load slides or negatives
Tips for scanning transparent items
•
NOTE: You must use the HP scanning software to scan slides and negative frames
using the TMA.
Load slides or negatives
The transparent materials adapter (TMA) enables you to scan two 35 mm slides or three
negative frames at one time.
Figure 1-1 Load slides
Figure 1-2 Load negatives
To load slides or negatives in the TMA, follow these steps:
1. Open the scanner lid.
2. Remove the negative strip holder from the slide holder.
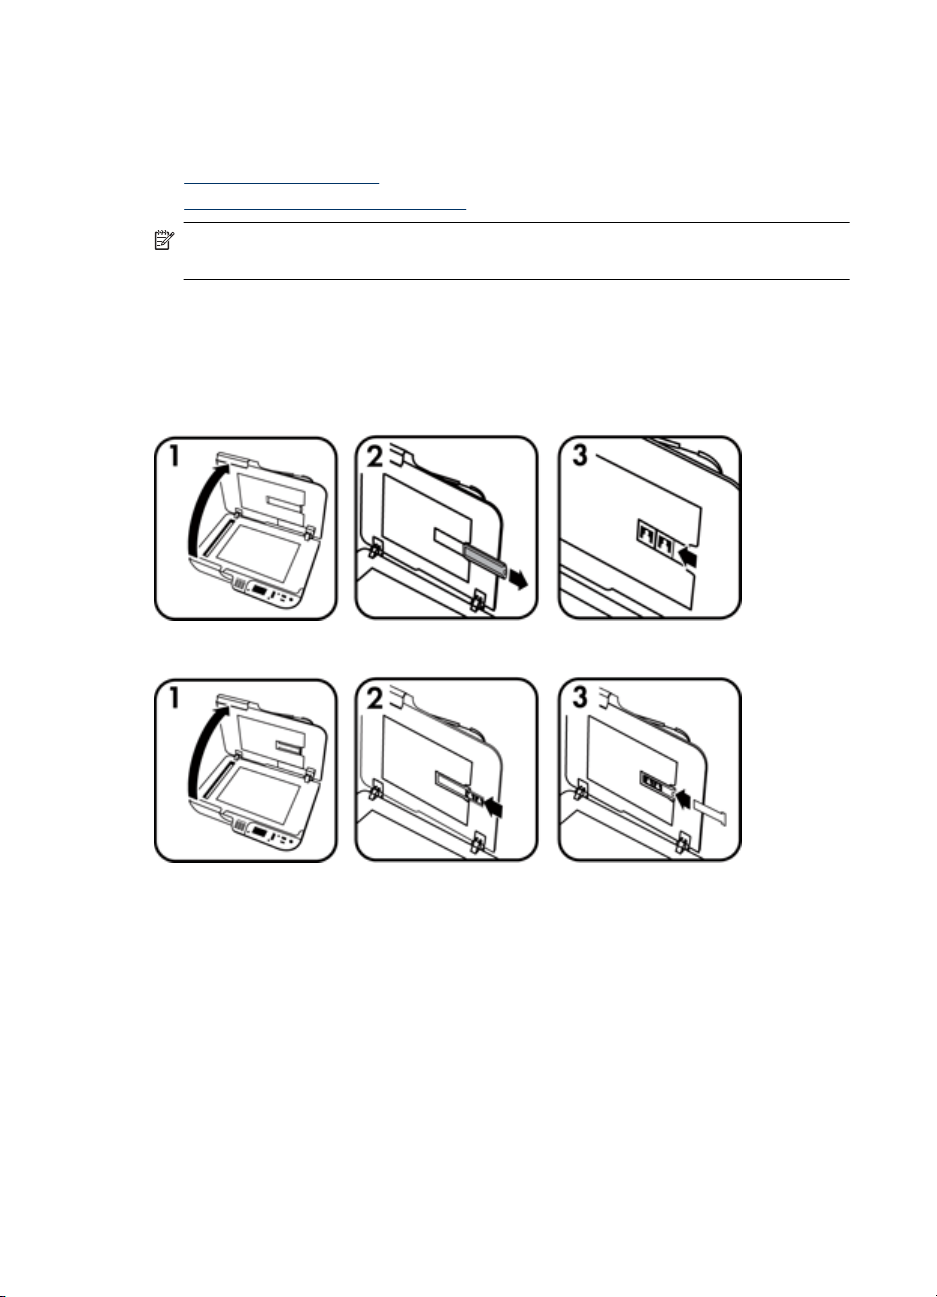
3. Do one of the following to load the slides or negatives:
• If you are scanning slides, place the slides into the slide holder. Insert the slides
with the top of the slides pointing up and with the front of the slides facing you,
making sure that the slides are flat and do not overlap.
• If you are scanning negatives, do the following:
a. Remove the light-shield from the negative strip holder.
b. Slide a negative strip into the negative strip holder so that the shiny side of the
negative faces you. Negatives are easily damaged, so you should touch them
only on their edges.
14 Use the scanner
Page 17

c. If the negative strip has fewer than three frames, insert the negatives light-shield
d. Insert the negative strip holder back into the slide holder.
4. Close the scanner lid.
See also
• “
Start a scan” on page 15
Slides, negatives, and TMA issues” on page 51
• “
Tips for scanning transparent items
• To scan non-negative transparent items larger than those that the transparent
materials adapter (TMA) accepts, place the transparency on the scanner glass, place
a white sheet of paper on top of the tranparency, select a scan shortcut that does not
use the TMA, and then scan.
• When scanning a negative, the default scan shortcut automatically enlarges the
image to approximately 6.7 x 10 cm (2.64 x 4 in). If you want the final image to be
larger or smaller, start the scan with the HP scanning software and then use the
Resize tool in the HP Scanning preview window to set the scaling to the final size
that you want. The scanner will scan the item to the size that you select and adjust
the scan resolution as appropriate. For more information, see the scanner software
help.
Start a scan
into the negative strip holder, making sure the edge of the light-shield touches the
last frame.
Start scanning in one of these ways:
•
Use the Scan button
Use the HP scanning software
•
Use other software programs
•
Use the Scan button
To scan using the Scan ( ) button on the scanner, follow these steps:
1. Load the originals.
2. If your scanner LCD displays computer names:
a.Use
press OK.
b. If prompted, enter your PIN and then press OK.
3. If the scanner LCD indicates there are no scan shortcuts on the scanner, press the
Scan (
and on the scanner control panel to select your computer, and then
) button. The Scan To...Setup dialog box displays on the computer screen,
Start a scan 15
Page 18

Chapter 1
allowing you to transfer the scan shortcuts you want to use to the scanner control
panel scan shortcuts list.
a.In the Available Scan Shortcuts list, select a shortcut, and then click Add.
b.Use the Move (up) and Move (down) arrows in the dialog box to arrange the
shortcut sequence in the Front Panel List.
The shortcuts will appear in this order as you scroll through the list on the control
panel of your scanning device.
c. When the list is complete, click Update the Device, and then close the HP
Scanning software. For more information about uploading scan shortcuts, see the
printed Getting Started Guide.
4. Use
5. Press the Scan (
and to select the scan shortcut.
) button on the scanner control panel. The scanner sends the
scan to the computer.
Tips on using the Scan button
• Before you use the Scan (
) button for the first time, you must select the shortcuts
you want displayed in the scan shortcuts menu.
• To cancel a scan, press the Cancel (
•
You can associate the Scan (
) button.
) and Copy ( ) buttons with any button-aware
scanning software. For more information, see the printed Getting Started Guide.
• If you want to preview and edit your scan before sending it, double-click the
HP Scanning icon on the desktop, click Change Settings..., and select Show a
preview scan. You can also set the Scan button to show a preview before sending
the scan. For more information, see the scanner software help.
• If you are scanning 35 mm slides or negatives, select a scan shortcut for slides or
negatives. If you do not, the transparent materials adapter light does not turn on.
• If you want to create a custom scan shortcut, double-click the HP Scanning icon on
your computer. In the HP Scanning shortcuts dialog box, highlight the scan shortcut
that is most like the one you want to create, and then click Change Settings. Modify
the settings, and then save the scan shortcut. For more information, see the scanner
software help. You can also specify a scan shortcut as the default so that you do not
need to select it from the list each time.
See also
• “
Load originals” on page 9
Use the HP scanning software” on page 16
• “
Use other software programs” on page 17
• “
Use the HP scanning software
Start the scan from the HP scanning software when you want more control during the
scanning process, such as when you want to preview the image before the final scan,
use more advanced features, or change scan settings.
To scan using the HP scanning software, follow these steps:
1. Load the originals.
2. Double-click the HP Scanning icon.
16 Use the scanner
Page 19

3. If your computer is networked to multiple HP N6350 scanners, select the scanner you
want to use from the Device menu, and then click OK.
4. In the HP Scanning shortcuts dialog box:
a. Select the scan shortcut you want to use.
b. If you want to change scan settings or show a preview before you scan, click
Change Settings... and make the changes you want. For more information, see
the scanner software help.
c. Click Scan.
5. If you chose to show a preview, the HP Scanning preview window is displayed. Make
the changes you want. When you are done, click Finish. For more information, see
the scanner software help.
NOTE: If you did not select Show a preview, you might be prompted to scan
additional documents. Click Yes to scan additional documents, or click No to send
the scanned image(s) to the specified location.
When you click Finish, the HP scanning software sends the scanned page(s) to the
specified location.
TIP: The HP Scanning shortcuts dialog box continues to display after you scan
so that you can scan additional originals. When you are done scanning, click
Close.
See also
• “
Load originals” on page 9
Useful scanning features” on page 28
• “
Use other software programs
You can scan an image or document directly into a software program if the program is
WIA- or TWAIN-compliant. Generally, the program is compliant if it has a menu option
such as Acquire, Scan, Import New Object, or Insert. If you are unsure whether the
program is compliant or what the option is, see the documentation for that program.
To scan using WIA- or TWAIN-compliant scanning software, follow these steps:
1. Start the scanning software, and then select the WIA or TWAIN data source.
2. Complete the appropriate actions to complete the scan.
3. Select the settings that are appropriate for the originals that you are scanning.
For more information, see the online help for the scanning software.
NOTE: If your application is ISIS-compliant or you want streamlined document
scanning when using TWAIN-compliant software programs, you can install the EMC
ISIS/TWAIN driver. To do so, insert the installation CD that came with your scanner
and select the EMC ISIS/TWAIN option. When scanning documents, select the
HP Scanjet N6350 Doc TWAIN driver from the application. However, when scanning
images from other software programs, select the HP Scanjet N6350 TWAIN driver.
See also
“
Load originals” on page 9
Start a scan 17
Page 20

Chapter 1
Make copies
Use the Copy ( ) button to scan an original and send it to a printer.
To make copies, follow these steps:
1. Load the originals.
2. If your scanner is networked:
a.Use
press OK.
b. If prompted, enter your PIN and then press OK.
3.
Press the Copy (
box displays on the connected computer.
4. If you want to change the settings, such as number of copies or output type, follow
these steps:
a. Click Cancel in the progress dialog box.
b. Make the changes you want in the HP Copy dialog box.
c. Click Start. The copy is sent to the printer.
TIP: You can also make copies by clicking the HP Copy icon on the desktop.
and on the scanner control panel to select your computer, and then
) button. The copy is sent to the printer and the HP Copy dialog
18 Use the scanner
Page 21

2 Configure and manage the
scanner on a network
This section is intended for the administrator or individual responsible for managing the
network scanner.
You have the option to install the HP Scanjet N6350 on a network, where it can be shared
by up to 20 computers.
The following topics describe how to configure and manage your networked scanner.
•
Connect the scanner to a network
Change the scanner name
•
Connect to additional network scanners
•
Install the scanner software on additional computers
•
Manage the network scanner
•
Connect the scanner to a network
To connect the scanner to a host computer on an existing network, complete the following
steps.
1. Press the Power button to turn off the scanner.
2. Disconnect the USB cable from the scanner if it is connected.
3. Connect the scanner to a router (shown), Ethernet jack, or Ethernet switch using the
Ethernet cable.
4. Press the Power button to turn on the scanner.
Configure and manage the scanner on a network 19
Page 22

Chapter 2
5. If there is more than one HP Scanjet N6350 scanner on the network, locate the serial
number and IP address of the scanner to which you want to connect.
a.
Press the Setup (
Network, and then press OK.
b.Use
c.Use
view the information without scrolling.
6. Complete the network connection.
If you have already installed the HP scanning software, complete these steps:
a. Start the HP Scanner Tools Utility.
b. Click the Network tab, click Connect Scanner, and then follow the onscreen
instructions.
If you have not installed the HP scanning software, insert the scanning software CD
into the CD drive and complete the network connection.
a. When you see the Found Network Scanner dialog box, select the scanner you
are installing, and then click Next.
b. On the Computer Name dialog box, enter the computer name to be listed on the
scanner control panel, and then click Next.
c.On the Adding Device dialog box, click Next when the status bar indicates that
the new device has been added.
to select View Settings, and then press OK.
to scroll to the serial number and IP address settings, then press OK to
NOTE: This scanner supports a maximum of 20 network users. If there are
already 20 network users, you will see a Computer List Full dialog box. If
you have scanner administrator privileges, you can remove a computer from
the list and continue with the network installation.
) button on the scanner control panel, use to select
See also
“
Change the scanner name” on page 20
Change the scanner name
To change the scanner name later, complete these steps:
1. In Windows Explorer, click My Computer, click Control Panel, and then click
Scanners and Cameras.
2. Right-click the network scanner you want to rename, and then select Rename.
3. Enter a new name for the network scanner.
NOTE: This name change is reflected in your scan application and in the
HP Scanner Tools Utility on this computer only. The change is not reflected on all
computers which have access to this network scanner.
20 Configure and manage the scanner on a network
Page 23

Connect to additional network scanners
To connect to additional scanners on the network, complete these steps.
1. Start the HP Scanner Tools Utility.
2. Click the Network tab, click Connect Scanner, and then follow the onscreen
instructions.
NOTE: If you do not see the scanner to which you want to connect, make sure the
scanner is not connected to a computer via the USB cable.
Install the scanner software on additional computers
Before a computer can use the network scanner, you must install the scanner software
on that computer.
You are limited to three installations of the third-party applications that shipped with your
scanner. To purchase additional licenses, see
model, find the product overview page, and then click the Specifications or
Accessories tab.
NOTE: This scanner supports a maximum of 20 network users. If there are already
20 network users, you will see a Computer List Full dialog box. If you have scanner
administrator privileges, you can remove a computer from the list and continue with
the network installation.
1. Decide what software to install.
• If you will be using the scanner with document-management or scanning software
that you already own, you only need to install the HP Scanjet drivers and Scanner
Tools Utility.
• If you do not already have document-management and scanning software, you
can use the HP scanning software that shipped with the scanner. Read the
onscreen descriptions of the software during the installation to decide what
software to install.
2. Insert the HP Scanning Software CD that came with the scanner into the computer
CD drive.
Wait for the installation dialog box to appear, and then follow the onscreen
instructions.
www.hp.com, search on your scanner
TIP: Once the software has been installed, you can connect to additional scanners
on the network using the HP Scanner Tools Utility.
See also
“
Connect to additional network scanners” on page 21
Install the scanner software on additional computers 21
Page 24

Chapter 2
Manage the network scanner
This section is intended for the administrator or individual responsible for managing the
network scanner.
•
Management and administration tools
HP Scanner Tools Utility
•
Network settings
•
Embedded Web Server
•
Management and administration tools
Use the following tools to manage and administer the device.
Scanner control panel (LCD) Manage: Obtain information about the status of jobs that are
HP Scanning software Manage: Use to scan pictures and documents, access help
HP Copy software Manage: Use to print copies on a printer.
HP Scanner Tools Utility
Embedded Web Server Manage: Manage which computers have access to which
being processed, operating status of the scanner (including
error conditions), select scan shortcuts, initiate a scan or copy,
and set preferences for the behavior of the scanner.
Administer: Use the Setup (
and power mode, access the HP Scanner Tools Utility, and
view and set network settings.
and troubleshooting information, access HP Scanning
preview window to edit scans before saving them, scan slides
and negatives, and modify scan settings and preferences
(such as assigning scan shortcuts to control panel buttons).
Manage: Assign scanning software to the Scan ( ) and
Copy (
maintenance information, set or change the PIN code, connect
to a different scanner, and check status of scanner network
connection.
scanners, and obtain scanner status information.
Administer: View status information, change settings, and
manage the scanner from your computer.
) buttons on the scanner control panel, record
) button to set the language
See also
• “
Scanner control panel” on page 6
HP Scanner Tools Utility” on page 22
• “
Embedded Web Server” on page 25
• “
HP Scanner Tools Utility
You can use the HP Scanner Tools Utility to:
• Connect to a different scanner on the network.
• Assign or reset your PIN code.
22 Configure and manage the scanner on a network
Page 25

• Check the status of the network or the connection to an individual scanner.
• Disconnect from a networked scanner and remove your computer from the scanner's
list of computers.
For information on completing these tasks, see the HP Scanner Tools Utility Help system.
To start the HP Scanner Tools Utility and access the network functions, complete these
steps.
1.
Press the Setup (
2. Press
on your computer, and then click the Network tab on the Scanner Tools Utility dialog
box which is displayed on your computer.
TIP: You can also start the HP Scanner Tools Utility through the Windows taskbar
or from the HP Scanner Tools Utility icon on the desktop.
From the Windows taskbar: Click Start, point to Programs or All Programs, point to
HP, point to Scanjet, point to HP Scanjet N6350, and then click Scanner Tools
Utility.
From the HP Scanner Tools Utility icon on the desktop:
1. Double-click the HP Scanner Tools Utility icon.
2. If prompted, highlight the HP Scanjet N6350 scanner you want, and then click OK.
Network settings
Use the Network menu on the scanner control panel LCD to view and set network settings
such as link speed and IP address.
•
View network settings
Change network setup type
•
Set the link speed
•
Change the IP address
•
Restore the network defaults
•
) button.
until Tools is highlighted, press OK to start the HP Scanner Tools Utility
View network settings
To view the network settings, follow these steps:
1.
Press the Setup (
2. Use
3. Use
• Status: Connected or Disconnected
• Serial Number
• Automatic: Status of automatic network setup (On or Off).
• IP Address
• Netmask
to select View Settings, and then press OK.
and to scroll through the following network settings.
NOTE: You cannot change network settings here. You can change network
settings using the Network Setup option on the Tools menu, the HP Scanner
Tools Utility, or the Embedded Web Server.
) button, use to select Network, and then press OK.
Manage the network scanner 23
Page 26

Chapter 2
• Gateway
• Link Speed: Automatic, 10–Full, 10–Half, 100–Full, 100–Half
• Type: DCHP or Static
• Hostname
See also
HP Scanner Tools Utility” on page 22
• “
Network settings” on page 23
• “
Embedded Web Server” on page 25
• “
Change network setup type
Use the Network Setup menu on the control panel LCD Network menu to change the
network setup type for the scanner.
TIP: For example, if you want to ensure that the IP address remains static, set
Automatic to Off and specify the IP address in the IP Address field.
1. From the Network Setup menu, use to select Automatic, and then press OK.
2. Use
to select On or Off, and then press OK.
NOTE: Setting Automatic to Off enables two additional network options: Set
Link Speed and IP Address.
See also
• “
Set the link speed” on page 24
Change the IP address” on page 24
• “
Set the link speed
Use the Set Link Speed menu on the control panel LCD Network menu to change link
speed for the networked scanner.
1. From the Network Setup menu, use
OK.
2. Use
to select the link speed (Automatic (default), 10–Full, 10–Half, 100–Full,
100–Half), and then press OK.
Change the IP address
Use the IP Address menu on the control panel LCD Network menu to change the IP
address for the networked scanner.
NOTE: Changes to the IP address are automatically transmitted to the computers
which access the scanner.
24 Configure and manage the scanner on a network
to select Set Link Speed, and then press
Page 27

1. From the Network Setup menu, use to select IP Address, and then press OK.
2. Use
• Select Automatic if you want the system to automatically change the IP address.
• Select Manual if you want to manually enter a new IP Address, subnet mask, or
3. Press OK.
If you selected Automatic, press OK again to confirm the IP address change.
If you selected Manual, complete the following steps:
a. Enter the new IP address, and then press OK.
b. Enter the new subnet mask value, and then press OK.
c. Enter the new Gateway value, and then press OK.
d. At the Save changes? prompt, press OK.
Restore the network defaults
Use the Restore Network Defaults menu on the control panel LCD Network menu to
restore network settings to their defaults.
NOTE: Restored default settings are automatically transmitted to the computers
which access the scanner.
1. From the Network Setup menu, use to select Restore Network Defaults, and
then press OK.
2. Press OK again to restore network defaults, or press any other button to retain the
current settings.
to select the way you want to change the IP address.
gateway.
NOTE: If you press OK without entering new values for any of the following, the
original values are retained.
Embedded Web Server
When the HP Scanjet N6350 scanner is connected to a network, you can use the
Embedded Web Server to view status information, change settings, and manage the
scanner from your computer.
NOTE: Some Embedded Web Server options are only available to the network
administrator, and some settings might require a password.
You can use the Embedded Web Server without being connected to the Internet;
however, some features will not be available.
This section contains the following topics:
•
Embedded Web Server requirements
Start the Embedded Web Server
•
Embedded Web Server options
•
Manage the network scanner 25
Page 28

Chapter 2
Embedded Web Server requirements
Your network environment must meet the following requirements to use the Embedded
Web Server.
• A TCP/IP-based network.
• Microsoft Internet Explorer 5.0 or higher or Mozilla Firefox 2.0 or higher installed on
the host computer.
• An Ethernet connection.
• An Internet connection is required to access support from the Embedded Web Server.
• Your computer must be on the same subnet as the HP Scanjet N6350 to be able to
discover, connect to, and scan from the device.
NOTE: You can use the Embedded Web Server to manage the HP Scanjet N6350
from any computer on the network as long as you can access the IP address of the
device from that computer.
Start the Embedded Web Server
In a supported web browser on your computer, type the IP address that has been
assigned to the HP Scanjet N6350, and then press Enter.
TIP: The device IP address might not be static, depending on your environment. Use
the View Settings display on the control panel LCD Network menu to find the IP
address for the device.
After opening the Embedded Web Server, you can bookmark it so that you can return to
it quickly in the future.
See also
• “
View network settings” on page 23
Embedded Web Server options” on page 26
• “
Embedded Web Server options
The Embedded Web Server contains tabs that you click use to view product information
and change device settings.
Tabs Description
Information Shows the following information about the device.
Device information
•
Network information
•
Status
•
Usage
•
Settings Shows the settings that have been configured for the
device and gives you the ability to change these
settings.
Security
•
Asset Tracking
•
Language
•
26 Configure and manage the scanner on a network
Page 29

(continued)
Tabs Description
Power Options
•
Device Services
•
Networking Shows network status and allows you to change the
network settings that have been configured for the
device.
NOTE: Network pages only appear if the device is
connected to a network.
Device Host Name
•
Wired (802.3) Interface
•
Advanced settings (link settings, IP address
•
source)
HTTPS
•
Manage the network scanner 27
Page 30

3 Useful scanning features
Experienced document management professionals might be interested in the following
scan features. Many of these features are also available from any ISIS- or TWAINcompliant document scanning software that allows you to modify the scan settings.
•
Work with scan shortcuts
Automatically rotate landscape pages
•
Automatically remove blank pages
•
Automatically straighten scanned images
•
Filter out color from a document (color channel dropout)
•
Scan without reviewing
•
Work with scan shortcuts
Scan shortcuts provide a way to store a set of scan settings for tasks that you perform
regularly.
You can create, delete, and modify scan shortcuts in the HP Scanning shortcuts dialog
box. If you are using HP Scanning, you can assign third-party software with a scan
shortcut. For information about using and managing scan shortcuts, see the scanner
software Help.
NOTE: You must upload your scan shortcuts to each network scanner on which you
wish to have the shortcuts available.
Automatically rotate landscape pages
By default, document pages fed through the automatic document feeder (ADF) or placed
on the scanner glass appear in the scan output in the same orientation as the originals.
The scanner can rotate the scan data to produce portrait orientation output for landscape
orientation originals.
To enable portrait output of landscape document originals, follow these steps:
1. Double-click the HP Scanning icon on the desktop, and then select Scan
Preferences on the Options menu.
2. On the Document tab of the Scan Preferences dialog box, select Automatically
rotate landscape pages, and then click OK.
NOTE: In other scanning software, the options for rotating pages are on the
Layout tab of the ISIS or TWAIN Advanced Settings dialog box.
28 Useful scanning features
Page 31

Automatically remove blank pages
To set your scan preferences to automatically remove blank pages from the automatic
document feeder (ADF) output scan, follow these steps:
1. Double-click the HP Scanning icon on the desktop, select a document scan shortcut,
click Change Settings..., select Document (Glass or Feeder) as the scan type
under Scan Shortcut Settings, and then click Advanced Document Settings....
2. Select Automatically remove blank pages (from feeder) on the Advanced
Document Settings dialog box, and then click OK.
3. Click Save Shortcut..., accept the default shortcut name or enter a new shortcut
name, and then click Save to save this as a new scan shortcut.
Automatically straighten scanned images
Items fed through the automatic document feeder (ADF) or placed on the scanner glass
may not be aligned with the scanner glass. The software can automatically detect skewed
items, and correct for up to 20 degrees of skew in the output image.
To automatically straighten the scan output, follow these steps:
1. Double-click the HP Scanning icon on the desktop, select a document scan shortcut,
then select Scan Preferences on the Options menu.
2. On the Document tab of the Scan Preferences dialog box, select Automatically
straighten scanned images, and then click OK.
3. Click Save Shortcut..., accept the default shortcut name or enter a new shortcut
name, and then click Save to save this as a new scan shortcut.
Filter out color from a document (color channel dropout)
You can filter out a color channel (red, green, or blue) from a scan, which might reduce
the scan file size and improve optical character recognition (OCR) results.
To select a color channel to eliminate from a scanned image, follow these steps:
1. Double-click the HP Scanning icon on the desktop and initiate a scan.
2. In the Final Images area, select the thumbnail to adjust.
3. Under Output Type in the HP Scanning preview window, select Black and White.
4. In the image toolbar, select Adjust Black and White, select the color to drop out,
and then click Finish.
For more information on dropping out colors, see the scanner software Help.
Scan without reviewing
To scan with minimal user intervention, always initiate a scan using the Scan ( ) button
on the scanner control panel.
Scan without reviewing 29
Page 32

Chapter 3
If you are shown a scan preview when you scan from the Scan ( ) button, complete
the following steps:
1. Double-click the HP Scanning icon on your desktop to start the HP Scanning software.
2. On the HP Scanning shortcuts dialog box, click the Options menu, and then click
Button Settings.
3. Click the Front Panel Scan Button Settings tab, clear the Show preview scan
check box, and then click OK.
30 Useful scanning features
Page 33

4 Care and maintenance
This section presents information about how to care for and maintain the scanner.
Clean the scanner glass
•
Clean the transparent materials adapter (TMA)
•
Clean the automatic document feeder (ADF)
•
HP Scanner Tools Utility scanner maintenance information
•
Replace the feed roller and separation pad
•
Order maintenance and scanner supplies
•
Occasional cleaning of your scanner helps ensure higher-quality scans. The amount of
care necessary depends upon several factors, including the amount of use and the
environment. You should perform routine cleaning as necessary.
Routine cleaning and maintenance should include cleaning the automatic document
feeder (ADF), the scanner glass, and the transparent materials adapter (TMA).
CAUTION: Avoid placing items that have sharp edges, paper clips, staples, wet
glue, correction fluid, or other substances in the scanner. Document pages should
not be curled, wrinkled, or stuck together.
Clean the scanner glass
Clean the scanner glass under the following conditions:
• Streaks, scratches, or spots appear in images.
• After scanning a document that is dusty or dirty.
• The environment is dusty.
To clean the scanner glass, follow these steps:
1. Turn off the scanner and then disconnect the USB or Ethernet cable and power cable
from the scanner.
2. Open the scanner lid.
3. Clean the glass by using a soft, lint-free cloth that has been sprayed with a mild glass
cleaner, and dry the glass with a dry, soft, lint-free cloth.
CAUTION: Use only glass cleaner to clean the scanner glass. Avoid cleaners
that contain abrasives, acetone, benzene, and carbon tetrachloride, all of which
can damage the scanner glass. Avoid isopropyl alcohol because it can leave
streaks on the glass.
Do not spray the glass cleaner directly on the glass. If you apply too much glass
cleaner, the cleaner might leak under the glass and damage the scanner.
4. When you have finished, reconnect the USB or Ethernet cable and power cable to
the scanner.
Care and maintenance 31
Page 34

Chapter 4
NOTE: If cleaning the top surface of the glass does not remove all dirt and smudges
from the glass, you can also clean the underside of the glass. Cleaning the underside
of the glass requires that you disassemble the scanner. For instructions on how to
clean the underside of the scanner glass, see
www.hp.com/support.
Clean the transparent materials adapter (TMA)
Clean the TMA with a dry, soft cloth. If necessary, lightly spray the cloth with glass cleaner
and wipe the TMA.
Clean the automatic document feeder (ADF)
The automatic document feeder (ADF) requires periodic maintenance depending on the
amount of use and the type of paper that is fed through it. Clean the ADF under the
following conditions:
• The ADF rollers are visibly dirty.
• The ADF has trouble feeding documents.
• Vertical streaks appear in images scanned by the ADF.
• After scanning a document that is dusty, dirty, or has pencil writing on it through the
ADF.
• The environment is dusty.
If you use the ADF several times per week, monthly cleaning is recommended. Set up a
cleaning routine that is appropriate for the scanner.
NOTE: If cleaning the automatic document feeder does not improve performance,
you might need to replace the feed roller. To order a Roller Replacement Kit, see
www.hp.com/buy/parts.
32 Care and maintenance
Page 35

To clean the ADF, follow these steps:
1. Turn off the scanner and then disconnect the USB or Ethernet cable and power cable
from the scanner.
2. Open the scanner lid.
3. Clean the white strip on the inside of the scanner cover and the clear scanning strip
on the scanner bed. Wipe these items with a clean, damp, lint-free cloth.
Clean the automatic document feeder (ADF) 33
Page 36

Chapter 4
4. Open the ADF access door (1) and the roller cover (2) inside the ADF.
5. Wipe the ADF rollers with a clean, damp, lint-free cloth.
6. Wait several minutes for the rollers to dry, and then close the ADF roller cover and
access door.
7. Reconnect the USB or Ethernet cable and power cable to the scanner.
HP Scanner Tools Utility scanner maintenance information
The Maintenance tab of the HP Scanner Tools Utility displays the scanner usage and
maintenance history. You can use this tab to record ADF feed roller and separation pad
replacement. The utility tracks the number of pages fed through the ADF since the last
replacement and notifies you when you should replace the feed roller and separation pad.
To view the Maintenance tab, follow these steps:
1. On the Windows taskbar, click Start, point to Programs or All Programs, point to
HP, point to Scanjet, point to HP Scanjet N6350, and then click Scanner Tools
Utility.
2. Click the Maintenance tab on the HP Scanner Tools Utility dialog box.
TIP: You can also start the HP Scanner Tools Utility from the scanner control
panel. Press the Setup (
press OK. If prompted, select your computer name and, if required, your PIN.
34 Care and maintenance
) button, press until Tools is highlighted, and then
Page 37

For detailed information on using the HP Scanner Tools Utility, see the HP Scanner Tools
Utility help.
Replace the feed roller and separation pad
Replace the feed roller and separation pad under either of the following conditions:
• Streaks on scans or paper jams occur repeatedly and cleaning the automatic
document feeder does not help.
• The HP Scanner Tools Utility Maintenance tab indicates that maintenance is due.
The feed roller replacement kit contains a feed roller, separation pad, and installation
instructions. To order replacement kits, go to
To replace the feed roller and separation pad, follow these steps:
1. Turn off the scanner, and then disconnect the USB or Ethernet cable and power cable
from the scanner.
2. Open the ADF access door and roller cover, and then replace the feed roller and
separation pad as described in the installation instructions that were included with the
replacement kit.
3. Close the roller cover and ADF access door, and then reconnect the USB or Ethernet
cable and power cable to the scanner.
4. Turn on the scanner, and then update the scanner maintenance history:
a.
Press the Setup (
Tools Utility. If prompted, select your computer name and, if required, your PIN.
Click the Maintenance tab.
b.In the Feed Roller and Separation Pad Maintenance area, click Record
Replacement and then click Yes.
For more information, see the HP Scanner Tools Utility help.
) button on the scanner control panel to open the HP Scanner
www.hp.com/support.
Order maintenance and scanner supplies
You can purchase maintenance parts online at the scanner support website at
www.hp.com/buy/parts or from your local HP dealer.
Order maintenance and scanner supplies 35
Page 38

5 Troubleshooting
This section contains solutions for common problems with the scanner, automatic
document feeder (ADF), and transparent materials adapter (TMA).
•
Basic troubleshooting tips
Scanner LEDs
•
Scanner installation troubleshooting
•
Scanner initialization or hardware problems
•
Scanner operation problems
•
Scanner button issues
•
Automatic document feeder (ADF) problems
•
Slides, negatives, and TMA issues
•
Networking problems
•
Additional troubleshooting information
•
For additional troubleshooting, see the online help for the scanning software that you are
using or see
Basic troubleshooting tips
Simple issues such as smudges on the scanner glass or loose cables can cause your
scanner to produce fuzzy scans, operate in an unexpected manner, or fail to operate.
Always check the following items when you encounter scanning problems.
• If scans are fuzzy, check to see if the scanner glass or TMA is dirty or smudged. If
so, clean the glass or TMA.
• If you are scanning a document using an OCR shortcut, make sure that the original
document is clear and crisp enough to be scanned.
• Make sure that the TMA/ADF, USB or Ethernet, and power cables are firmly seated
in their respective connectors on the back of the scanner, and that the power cord is
plugged into a working electrical outlet.
• If you have connected the scanner to the computer through a USB hub or through a
USB port on the front of the computer, disconnect the scanner and then reconnect it
to a USB port on the back of the computer.
• Make sure the scanner is not connected to both a computer with the USB cable and
to a network with the Ethernet cable. If the scanner is connected with both cables,
the USB connection disables the Ethernet (network) connection.
• If you have connected the scanner to a network, disconnect the Ethernet cable from
the network and connect it to a different network connection (for example, to a
different port on a network router). If this does not work, reboot the router.
• Turn off the scanner, wait 60 seconds, and then turn on the scanner.
• Restart the computer.
If you continue to have problems, it is possible that your HP scanning software, firmware,
or associated drivers are out of date or have become corrupted. See
support to locate software, firmware, and driver updates for your scanner.
www.hp.com/support for updated information about the scanner.
www.hp.com/
36 Troubleshooting
Page 39

See also
• “
Care and maintenance” on page 31
Reset the scanner” on page 41
• “
Check that the scanner has power” on page 40
• “
Check the cables” on page 38
• “
Check the USB or Ethernet connection” on page 39
• “
Scanner LEDs
The scanner has two LEDs on the control panel that indicate scanner functions and error
conditions. The LED in the shape of an exclamation point (!) is the Attention LED, and
the LED in the Power button is the Power LED. The table below explains how to interpret
the indicator LEDs.
The Attention LED
quickly blinks amber.
The Attention LED is lit
with a steady amber
light.
Error condition. Check the scanner LCD for
The Power LED is
lit with a steady green
light.
The Power LED is
lit with a steady green
light.
The Power LED
slowly blinks green.
The Power LED is
lit with a steady, dim
amber light.
The Power LED is
lit with a steady green
light.
Both LEDs are off. There is no power to the scanner.
an error message.
Fatal error condition. The scanner LCD
indicates that you should turn off the
scanner, then turn it on after 60 seconds.
The scanner is warming up or scanning an
original.
The scanner is in Sleep mode.
The scanner is on and ready to scan.
Scanner installation troubleshooting
This section contains solutions for installation and setup problems.
Check the cables
•
Uninstall and reinstall the software
•
Problems installing third-party applications that shipped with the scanner
•
Scanner installation troubleshooting 37
Page 40

Chapter 5
Check the cables
Cable type Action
Power cable The power cable is connected between the scanner and a power outlet.
USB cable The USB cable is connected between the scanner and the computer.
Ethernet cable If your scanner is on a network, the Ethernet cable is connected between
TMA/ADF cable The TMA/ADF cable is connected between the scanner lid and the
Ensure that the power cable is securely connected between the
•
scanner and a live electrical outlet or surge protector.
If the power cable is connected to a surge protector, ensure that the
•
surge protector is plugged into an outlet and turned on.
Turn off the scanner power switch and turn off the computer. After
•
60 seconds, turn the scanner back on and then turn on the computer,
in that order.
If the scanner is on a network, make sure that the scanner is not also
•
connected to a computer with the USB cable.
Use the cable that was included with the scanner. Another USB cable
•
might not be compatible with the scanner.
Ensure that the USB cable is securely connected between the
•
scanner and the computer.
If the USB cable is connected to a USB port on the front of the
•
computer, move it to a USB port on the back of the computer.
For additional USB troubleshooting information, see
support, select your country/region, and then use the search tool to find
USB troubleshooting topics.
the scanner and the network.
Make sure the scanner is not also connected to a computer with the
•
USB cable.
Use the Ethernet cable that was included with the scanner. Another
•
Ethernet cable might not be compatible with the scanner.
Ensure that the Ethernet cable is securely connected between the
•
scanner and a network router, Ethernet jack, or Ethernet switch.
For additional Ethernet troubleshooting information, see
support, select your country/region, and then use the search tool to find
Ethernet or network troubleshooting topics.
scanner base.
Ensure the cable is securely connected in the back of the scanner.
www.hp.com/
www.hp.com/
Uninstall and reinstall the software
An incomplete software installation could cause the scanner not to be recognized or the
software not to launch correctly. Try uninstalling and then reinstalling the HP scanning
software. To reinstall the HP scanning software, you must have the HP Scanning
Software CD.
To uninstall and reinstall the software, follow these steps:
1. Click Start, click Settings, and then click Control Panel (in Windows XP and Vista,
click Start, and then click Control Panel).
2. Click Add or Remove Programs (in Windows Vista, the Programs and Features
tool) and then select HP Scanjet N6350.
38 Troubleshooting
Page 41

3. Click Remove.
4. Disconnect the USB or Ethernet cable.
5. Reinstall the software using the HP Scanning Software CD that came with your
scanner. When you insert the CD, an installation interface launches automatically.
Choose the software to install.
6. Reconnect the USB or Ethernet cable when prompted to do so during the software
installation.
See also
“
Check the cables” on page 38
Problems installing third-party applications that shipped with the scanner
You are limited to three installations of the third-party applications that shipped with your
scanner. To purchase additional licenses, see
model, find the product overview page, and then click the Specifications or
Accessories tab.
www.hp.com, search on your scanner
Scanner initialization or hardware problems
If the scanner does not work after installation or if the scanner has stopped working
correctly, you might see a message on the computer screen that is similar to one of the
following:
• The scanner could not be initialized.
• The scanner could not be found.
• An internal error has occurred.
• The computer cannot communicate with the scanner.
To fix the problem, check the scanner cables and software as described in the following
sections:
•
Check the USB or Ethernet connection
Check that the scanner has power
•
Reset the scanner
•
Test the scanner hardware
•
Scanner has stopped working properly
•
Additional troubleshooting information
•
Check the USB or Ethernet connection
Check the physical connection to the scanner.
TIP: If using a USB connection, connect the scanner to the computer through a USB
port on the back of the computer.
Scanner initialization or hardware problems 39
Page 42

Chapter 5
• Use the USB or Ethernet cable that was included with the scanner. Another USB or
Ethernet cable might not be compatible with the scanner.
• USB connection: Ensure that the USB cable is securely connected between the
scanner and the computer.
• Ethernet connection: Ensure that the Ethernet cable is securely connected between
the scanner and a network router, Ethernet jack, or Ethernet switch.
If the problem persists after verifying the above items, follow these steps:
1. Do one of the following tasks depending on how the scanner is connected to the
computer:
• If the USB cable is connected to a USB hub or a docking station for a laptop,
disconnect the USB cable from the USB hub or the docking station, and then
connect the USB cable to a USB port on the back of the computer.
• If the USB cable is directly connected to the computer, plug it into a different USB
port on the back of the computer.
• Remove all other USB devices from the computer except for the keyboard and
the mouse.
• If the Ethernet cable is connected to a network router, try connecting it to a
different port on the router.
2. Press the Power button to turn off the scanner, wait 30 seconds, and then turn on
the scanner.
3. Restart the computer.
4. When the computer is restarted, try using the scanner.
If the scanner works and you changed the way it was connected to the computer in Step
1, the communication problem might involve the USB hub, the docking station, a USB
port, or another USB device. Leave the scanner directly connected to the computer
through a USB port on the back of the computer. Try using the scanner after reconnecting
each additional USB device, and disconnect any USB devices that prevent the scanner
from working correctly.
If the scanner does not work, uninstall and then reinstall the HP scanning software.
See also
“
Uninstall and reinstall the software” on page 38
Check that the scanner has power
The power cable is connected between the scanner and a power outlet.
• Ensure that the power cable is securely connected between the scanner and a live
electrical outlet.
• If the power cable is connected to a surge protector, ensure that the surge protector
is plugged into an outlet and turned on.
• Ensure that the Power button on the scanner panel is on; when on and no error or
attention conditions exist, the Power LED is lit with a steady green light.
40 Troubleshooting
Page 43

If the problem persists after verifying the above items, follow these steps:
1. Press the Power button to turn off the scanner, and then disconnect the power cable
from the scanner.
2. Wait 30 seconds.
3. Reconnect the power cable to the scanner, then turn on the scanner.
After 30 seconds, the Power LED is lit with a steady green light and the Attention LED
is off.
See also
• “
Basic troubleshooting tips” on page 36
Scanner LEDs” on page 37
• “
Check the cables” on page 38
• “
Reset the scanner
If you receive an error message similar to Scanner initialization failed or Scanner not
found when trying to use the scanner, you should reset the scanner.
To reset the scanner, follow these steps:
1. Close the HP scanning software, if it is open.
2. Disconnect the USB or Ethernet cable from the scanner.
3. Turn the computer off, wait 60 seconds, and then turn on the computer.
4. Reconnect the USB or Ethernet cable.
If you are using a USB connection, complete these steps:
a. Make sure that the USB cable is connected to the back of the scanner correctly.
The trident icon on the USB cable faces up when the cable is properly connected
to the scanner.
b. Try connecting the USB cable to a different USB port on the back of the computer.
5. Ensure that the TMA/ADF cable is securely connected.
Test the scanner hardware
If you think that the scanner has a hardware problem, verify that the cables are firmly
connected to the scanner, the computer, and the power source. If the cables are correctly
connected, verify that the scanner is turned on.
To test the scanner hardware, follow these steps:
1. Disconnect the USB or Ethernet, power, and TMA/ADF cables from the scanner.
2. Reconnect the USB or Ethernet, power, and TMA/ADF cables to the scanner.
When you turn on the scanner, the carriage will move forward and backward
approximately 25 mm (1 inch), and the lamp will turn on.
If the carriage does not move and the scanner lamp does not turn on, a problem might
exist with the scanner hardware.
See also
• “
Scanner has stopped working properly” on page 42
Check the cables” on page 38
• “
Check the USB or Ethernet connection” on page 39
• “
Scanner initialization or hardware problems 41
Page 44

Chapter 5
Scanner has stopped working properly
If the scanner stops scanning, complete the following steps, in order. After each step,
start a scan to see if the scanner is working. If the problem continues, proceed with the
next step.
1. A cable might be loose. Ensure that the USB or Ethernet, power, and TMA/ADF
cables are securely connected.
2. Turn off the scanner, wait 60 seconds, and then turn on the scanner.
3. Restart your computer.
4. A software conflict might exist on your computer. You might need to uninstall and then
reinstall the HP scanning software.
a. Click Start, click Settings, and then click Control Panel (in Windows XP and
Vista, click Start, and then click Control Panel).
b. Click Add or Remove Programs (in Windows Vista, the Programs and
Features tool) and then select HP Scanjet N6350.
c. Click Remove.
d. Click Add or Remove Programs (in Windows Vista, the Programs and
Features tool) and then select the HP Photosmart software.
e. Click Remove.
5. Reinstall using the HP Scanning Software CD that came with your scanner. When
you insert the CD, an installation interface launches automatically. Choose the
software to install.
If the scanner still does not work, see
Support.
www.hp.com/support or contact HP Customer
Additional troubleshooting information
If you have the HP scanning software installed, you can use the onscreen Help to solve
other problems with the scanner. To gain access to the Help, start the HP scanning
software, and then click Help in the HP Scanning shortcuts dialog box menu. The Help
system provides information about the scanner hardware as well as information about
the and HP scanning software. Also, see Scan troubleshooting in the general
Troubleshooting and support section of the Help.
Scanner operation problems
• Scanner will not turn on
Scanner lamp stays on
•
Scanner does not start scan right away
•
Scanner is scanning items very slowly
•
Custom scan shortcut names do not display correctly on the LCD
•
Vertical white stripes appear on the printed page
•
Scan files are too large
•
The bottom of the image is cut off when scanning from the scanner glass
•
Issues with scanning documents or text (OCR)
•
42 Troubleshooting
Page 45

Scanner will not turn on
If the scanner will not turn on when you press the scanner buttons, verify the following:
• Verify that the power cable has not become disconnected from the scanner or
unplugged from the power source.
• Ensure that the scanner is turned on.
See also
“
Check the cables” on page 38
Scanner lamp stays on
The scanner lamp should time out and turn off automatically after 14 minutes of inactivity.
If the scanner lamp remains on after a long period of inactivity, turn off the scanner, wait
30 seconds, and then turn on the scanner.
NOTE: The scanner lamp does not turn off when paper is in the automatic document
feeder (ADF) input tray, when Instant Warm-up is turned on, and when Energy
Savings is turned off.
Scanner does not start scan right away
Make sure the scanner is turned on.
If the scanner has not been used recently, the scanner lamp might need to go through a
warm-up period before scanning can begin. If the scanner lamp needs to warm up, it
takes a moment after starting the software or pressing a scanner button for scanning to
begin.
You can enable Instant Warm-up mode in the HP Scanner Tools Utility, or by a Scan
Preferences (Device tab) setting.
Scanner is scanning items very slowly
• If you are scanning to edit text, the optical character recognition (OCR) software
requires more processing time than for non-OCR scans, which is normal. Wait for the
item to scan.
NOTE: For the best OCR results, scanner compression should be set to the
minimum compression level or be disabled.
• Scanning at a higher resolution than necessary increases scanning time and creates
a larger file with no additional benefit. If you are scanning at a high resolution, set the
resolution to a lower level to increase scanning speed.
Custom scan shortcut names do not display correctly on the LCD
In some languages, you might see blank characters instead of certain special characters
in your custom scan shortcut names. To solve this problem, use English/Basic Latin
characters to enter the abbreviated LCD name for your custom shortcuts. Alternatively,
you can preface the abbreviated LCD name with a numeral, which you can then use to
reference the shortcut.
Scanner operation problems 43
Page 46

Chapter 5
Vertical white stripes appear on the printed page
The destination printer might be out of toner or ink. Print a non-scanned item such as a
file, or scan the same original to a scan destination other than the printer.
If you still see the problem, clean the automatic document feeder, scanner glass, or TMA
(if scanning slides or negatives).
See also
• “
Clean the automatic document feeder (ADF)” on page 32
Clean the scanner glass” on page 31
• “
Clean the transparent materials adapter (TMA)” on page 32
• “
Scan files are too large
If the saved scans have very large file sizes, try the following:
• Verify the scan resolution setting:
◦ 200 dpi is sufficient for storing documents as images.
◦ For most fonts, 300 dpi is sufficient for using optical character recognition (OCR)
to create editable text.
◦ For Asian fonts and small fonts, 400 dpi is the recommended resolution.
Scanning at a higher resolution than necessary creates a larger file with no additional
benefit.
• Color scans create larger files than do black and white scans.
• If you are scanning a large number of pages at one time, consider scanning fewer
pages at a time to create more, smaller files.
The bottom of the image is cut off when scanning from the scanner glass
Not all the length of the scanner glass is in the active imaging area. When scanning from
the scanner glass, make sure to position your originals as indicated by the reference mark
on the edge of the scanner glass.
Issues with scanning documents or text (OCR)
The scanner uses optical character recognition (OCR) to convert text on a page to text
that you can edit on your computer.
• If you scan text but cannot edit it, make sure that you make the following selections
during scanning:
◦ From the HP scanning software, select Document.
◦ On the HP Scanning shortcuts dialog box, select a word-processing program or
Save to File from the Scan to... Setup dialog box.
NOTE: If you select Save to File, select a text file type from the File Type
drop-down list.
• Scanned text might not appear on your computer exactly as it appeared on the
original, especially if the original contains faint or smudged text. For example, some
characters might be incorrect or missing. As you edit the text, compare the scanned
text against the original, and then make corrections as necessary.
44 Troubleshooting
Page 47

• To change text scanning options, click Change Settings... in the HP Scanning
shortcuts dialog box.
• The OCR software is installed by default when you install the HP scanning software
during scanner setup. If you use the Custom option when installing the software, you
can choose not to install the OCR software. Try reinstalling the software using the
default install options.
Scanner button issues
• Buttons do not work
An unexpected program opens when a button is pressed
•
Wrong shortcut is used when the Scan button is pressed
•
Buttons do not work
After each step, press a button to see if it is working correctly. If the problem persists,
proceed with the next step.
1. A cable might be loose. Ensure that the USB or Ethernet and power cables are
securely connected.
2. Turn off the scanner, wait 30 seconds, and then turn on the scanner.
3. Restart your computer.
If the problem persists, the buttons might be disabled. Try the following procedure:
1. Open Control Panel, select Scanners and Cameras, and then select your scanner
model from the list.
2. Display the scanner properties:
• Windows 2000: Click Properties.
• Windows XP and Vista: Right-click your scanner model, and then click
Properties.
3. Examine the buttons setting for your scanner:
• Windows 2000: Ensure that the Disable Device Events option is not selected.
• Windows XP and Vista: Ensure the Take No Action option is not selected.
An unexpected program opens when a button is pressed
NOTE: The Scan ( ) and Copy ( ) button settings can be changed in the
HP Scanner Tools Utility , and with the Button settings menu item in the HP
Scanning dialog box. You cannot change the settings for the Cancel (
), Back ( ), or Power buttons.
(
), Setup
Scanner button issues 45
Page 48

Chapter 5
After each step, press a button to see if it is working correctly. If the problem persists,
proceed with the next step.
1. On the Buttons tab of the HP Scanner Tools Utility, determine the associations for
the Scanner Front Panel Buttons.
If necessary, change the software that is assigned to a button.
2. Verify that the expected program is installed on the computer by looking at the
Start menu.
If necessary, install the program.
If the problem persists, the buttons might be assigned outside of the HP Scanner Tools
Utility. Try the following procedure:
1. Open Control Panel, select Scanners and Cameras, and then select your scanner
model from the list.
2. Display the scanner properties:
• Windows 2000: Click Properties.
• Windows XP and Vista: Right-click your scanner model, and then click
Properties.
3. Ensure that the Start this program option is selected and that the correct application
is selected in the drop-down list.
Wrong shortcut is used when the Scan button is pressed
If you are using the HP scanning software, you can change the scan shortcut assigned
to the Scan (
See the scanner software Help for information on assigning scan shortcuts to the Scan
(
) button.
) button.
Automatic document feeder (ADF) problems
Use this section to help resolve issues that might occur when scanning from the automatic
document feeder (ADF).
Paper jams usually result from inappropriate paper being fed into the ADF. Review the
tips for using the ADF. If misfeeds occur frequently, perform ADF maintenance.
This section contains the following topics:
•
Scanned image is fuzzy
Scanned images contain streaks or scratches
•
Scanner scans only one side of a double-sided page
•
Scanned pages are out of order at the scan destination
•
Scanned pages are missing at the scan destination
•
The image is completely black or completely white
•
Scanned images are not straight
•
Clear a jam from the automatic document feeder (ADF)
•
Automatic document feeder (ADF) does not feed paper
•
The bottom of the scanned image is cut off
•
46 Troubleshooting
Page 49

See also
• “
How to load documents” on page 10
Care and maintenance” on page 31
• “
Scanned image is fuzzy
When scanning with the automatic document feeder (ADF), follow these steps:
1. Verify that the document original is not fuzzy.
2. Check for any obstructions in the scanner paper path and make sure that the paper
guides are positioned appropriately. Try another scan.
3. If the scanned image is still of poor quality, clean the ADF.
When scanning from the scanner glass, follow these steps:
1. Verify that the document original is not fuzzy.
2. Check to see that the item is in full contact with the scanner glass.
3. If the scanned image is still of poor quality, clean the scanner glass.
When scanning from the transparent materials adapter (TMA), follow these steps:
1. Verify that the slide or negative is not damaged or dirty.
2. Verify that the slide or negative is properly installed in the holder. Try another scan.
3. If the scanned image is still of poor quality, clean the TMA.
See also
Clean the automatic document feeder (ADF)” on page 32
• “
Clean the scanner glass” on page 31
• “
Clean the transparent materials adapter (TMA)” on page 32
• “
Scanned images contain streaks or scratches
When scanning with the automatic document feeder (ADF), follow the steps below. After
each step, try another scan to see if the streaks or scratches are still apparent. If so, try
the next step.
1. Check that the originals are clean and unwrinkled.
2. Clean the ADF or the scanner glass.
3. Replace the separation pad and the feed roller.
See also
• “
Clean the automatic document feeder (ADF)” on page 32
Clean the scanner glass” on page 31
• “
Replace the feed roller and separation pad” on page 35
• “
Scanner scans only one side of a double-sided page
• Scan double-sided pages through the automatic document feeder (ADF).
•In the Advanced Document Settings for the scan shortcut, select Scan Both Sides
From Feeder.
Automatic document feeder (ADF) problems 47
Page 50

Chapter 5
Scanned pages are out of order at the scan destination
• Verify that the page order of the original document is correct before inserting into the
automatic document feeder (ADF).
• Make sure that there are no staples, paper clips, or any other attached material (such
as adhesive notes) that may cause the pages to feed incorrectly.
• Verify that pages are not stuck together.
See also
“
Document loading tips” on page 9
“
How to load documents” on page 10
Scanned pages are missing at the scan destination
When scanning with the automatic document feeder (ADF), pages that stick together are
scanned as one item. The hidden pages are not scanned.
To minimize the chance of pages sticking together, fan the pages in a multipage
document before placing the document in the ADF input tray.
The image is completely black or completely white
Make sure pages are print-side up in the automatic document feeder (ADF).
When scanning from the scanner glass, the item might not be placed correctly on the
scanner glass. Make sure that the item you are trying to scan is placed face down on the
glass and the lid is closed.
See also
“
Load originals” on page 9
Scanned images are not straight
When scanning with the automatic document feeder (ADF), make sure that the paper
guides touch the edges of the original. Make sure that all documents are of the same
width.
When scanning from the scanner glass, the item might have shifted when you closed the
lid. Straighten the original on the scanner glass, and then scan again.
See also
“
Automatically straighten scanned images” on page 29
48 Troubleshooting
Page 51

Clear a jam from the automatic document feeder (ADF)
To clear a jam from the ADF, follow these steps:
1. Remove any loose pages from the ADF input tray.
2. Open the ADF access door (1) and the roller cover (2) inside the ADF.
3. Remove any jammed pages from inside the ADF.
4. Remove any jammed pages from the ADF output tray.
5. Close the ADF roller cover and access door.
6. At the scan destination, examine the scan output to determine which page was the
last to be completely scanned.
Automatic document feeder (ADF) problems 49
Page 52

Chapter 5
7. Reload the unscanned pages in the ADF input tray. If any pages are damaged, do
one of the following:
• Scan the damaged page from the scanner glass.
• Reprint the original document.
Prepare the stack as follows:
a. Fan the stack of document pages to ensure that the pages do not stick together.
Fan the edge that will be pointing into the ADF in one direction, and then fan that
same edge in the opposite direction.
b. Align the edges of the documents by tapping the bottom of the stack against the
table top. Rotate the stack 90 degrees and repeat.
8. Resume scanning.
Automatic document feeder (ADF) does not feed paper
• The ADF access door might not be securely latched. Open the ADF access door, and
then close the door by pressing firmly.
• There might be a problem with the ADF hardware. Use the following procedure to test
the ADF:
◦ Disconnect the USB or Ethernet cable and the power cable from the scanner.
Check that the power cable is still connected to the power source.
◦ Ensure that the ADF has at least one piece of paper in the input tray.
◦ Reconnect the cables to the scanner, and then turn on the scanner.
◦ Try to scan another page through the ADF.
The bottom of the scanned image is cut off
By default, the scanner can scan paper that is up to 356 mm (14 in) long. For longer
pages, the end of the document is not included in the scanned image.
50 Troubleshooting
Page 53

Verify that you have specified an appropriate page size in the scanning software.
Slides, negatives, and TMA issues
Use this section to help resolve issues with 35 mm slides or 35 mm negatives that have
been scanned by using the TMA.
•
The image cannot be enlarged
Incorrect colors print, or the image is too light or dark
•
The scanned images are dark
•
The transparent materials adapter (TMA) does not work at all
•
No light or only dim light is visible in the transparent materials adapter (TMA) after
•
selecting a slides or negatives scanning shortcut
The image cannot be enlarged
Use Resize to change the size of the final scanned image. For more information, go to
the Index tab in the onscreen help. Type resize in the keyword field and click scanned
images.
Incorrect colors print, or the image is too light or dark
• The software might be setting the exposure for the entire area instead of for one slide
or negative. Select and drag the handles around the selection area until you see the
image area you want to scan.
• Verify that you are using a scan shortcut appropriate for the transparent media type
(slides or negatives).
The scanned images are dark
• Check to see if the transparent materials adapter (TMA) light is on before you click
Scan or Finish.
• The bulb in the TMA light source might be broken or not working. If the bulb is broken,
service is required.
• The selection area might not be correct. Make a selection area that only includes the
image, without borders.
The transparent materials adapter (TMA) does not work at all
The cable might not be connected correctly. Ensure that the TMA/ADF cable is connected
securely to the TMA port on the back of the scanner.
Slides, negatives, and TMA issues 51
Page 54

Chapter 5
No light or only dim light is visible in the transparent materials adapter (TMA) after
selecting a slides or negatives scanning shortcut
After each step, start a scan to see if the scanner is working. If not, proceed with the next
step.
1. Make sure that the TMA is connected to the scanner.
2. The bulb in the TMA might not be working. Press the Scan (
illumination. If the bulb is broken, service is required.
3. The TMA might need to warm up. Wait a few seconds to see if the light turns on. For
the best scanning quality, let the TMA light warm up for at least 30 seconds.
) button and look for
Networking problems
Use the following information to solve networking issues. After correcting each set of
items, run the installation program again.
•
General network troubleshooting
Check network status
•
Problems connecting to a wired network
•
General network troubleshooting
• If you are unable to install the device software, verify that:
◦ All cable connections to the computer and the device are secure.
◦ The network is operational and the network router is turned on.
◦ All applications, including virus protection programs, spyware protection
programs, and firewalls, are closed or disabled for computers running Windows.
◦ Make sure the device is installed on the same subnet as the computers that will
be using the device.
• Make sure you are connecting to the correct scanner.
◦
Verify the scanner serial number. Press the Setup (
Network, press OK, use
to scroll down to Serial Number.
◦ Start the HP Scanner Tools Utility.
◦ Click the Network tab, click Connect Scanner, and then follow the onscreen
instructions; make sure to select the scanner whose serial number matches the
serial number you verified.
See also
“
View network settings” on page 23
Change the IP address” on page 24
“
to select View Settings, press OK, and then use
) button, use to select
Check network status
If you are not able to scan to a network scanner, check the network status using the
HP Scanner Tools Utility.
1. Double-click the HP Scanner Tools Utility icon on your desktop.
2. If prompted, highlight the HP Scanjet N6350 scanner you want, and then click OK.
52 Troubleshooting
Page 55

3. Click the Network tab.
4. Click the Check Status button.
Problems connecting to a wired network
• If the Link light on the network connector does not turn on, make sure you have
completed the items listed under Basic troubleshooting tips in this chapter.
• Though it is not recommended that you assign the device with a static IP address,
you might resolve some installation problems (such as a conflict with a personal
firewall) by doing so.
See also
“
Basic troubleshooting tips” on page 36
“
Change network setup type” on page 24
Additional troubleshooting information
For additional troubleshooting information, see the following resources:
• To look for updated information about the scanner, see
◦ Select your country/region, and then select your language.
◦ Enter the scanner model number, and then press Enter.
• If you do not have Internet access, see the information about getting assistance in
the printed Getting Started Guide for information on contacting HP support.
www.hp.com/support.
Additional troubleshooting information 53
Page 56

6 Product support
In order to get the best results from your HP product, please consult the following HP
support offerings:
1. See the product documentation that came with the product.
• Review the troubleshooting section in this user guide.
• Review the scanner software help (click Start, point to Programs or All
Programs, point to HP, point to Scanjet, point to N6350, point to User Guide,
and then select your preferred format).
2. See the HP online support website at
purchase.
HP online support is available to all HP customers. It is the fastest source for up-todate product information and expert assistance, including the following features:
• Online chat and email access to qualified online support specialists
• Software, firmware, and driver updates for your product
• Valuable product and troubleshooting information for technical issues
• Proactive product updates, support alerts, and HP newsletters (available when
you register your product)
3. HP support by phone
• Support options and fees vary by product, country/region, and language.
• Fees and policies are subject to change without notice. Please see
support for the latest information.
4. Post-warranty period
After the limited warranty period, help is available online at
5. Extending or upgrading your warranty
If you would like to extend or upgrade the product’s warranty, please contact your
point of purchase or see the HP Care Pack Services at
6. If you already purchased an HP Care Pack Service, please check the support
conditions in your contract.
www.hp.com/support, or contact your point of
www.hp.com/
www.hp.com/support.
www.hp.com/support.
54 Product support
Page 57

Index
A
ADF
clean 32
clear jams 49
cut-off images 50
feeding, troubleshoot 50
load paper 9
maintenance 32
streaks, troubleshoot 47
administer the scanner
using Embedded Web
Server 25
using HP Scanner Tools
Utility 22
Attention LED 37
automatic document feeder
(ADF) 7
B
Back button 6
black scans, troubleshoot 48
blank pages 29
bottom of image missing 44
buttons
scanner control panel 6
troubleshoot 45
C
cables
troubleshoot 38
Cancel button 6
Care Pack Services 54
CDs, software
install 21
change IP address 24
change network settings 23
clean
ADF 32
scanner glass 31
TMA 32
clear jams, ADF 49
color dropout 29
control panel, scanner 6
copy 18
Copy button 7, 18
crooked images,
troubleshoot 48
customer support 53
cut-off images, troubleshoot 50
D
document feeder. See ADF
double-sided scans
troubleshoot 47
E
editable text
troubleshoot 44
Embedded Web Server
options 26
requirements 26
start 26
F
features
color dropout 29
page rotation 28
remove blank pages 29
scan shortcuts 28
scanner hardware 5
scanning 28
straighten scanned
images 29
feed roller
replace 35
film
load 14
scanning tips 15
troubleshoot 51
fuzzy images, troubleshoot 47
G
glass, clean 31
H
hardware test 41
HP Care Pack Services 54
HP Copy, start 4
HP Photosmart software
install 21
HP Scanner Tools Utility
Maintenance tab 34
HP scanning software
about 4
scan from 16
uninstall 38
HP Scanning, start 4
I
image, bottom cut off 44
indicator lights 37
install software
troubleshoot 37
IP address 24
J
jams, ADF 49
L
lamp, scanner 43
language, set 8
LCD
scan shortcut names 43
LEDs 37
lights 37
lines
troubleshoot 44
link speed 24
M
maintenance
clean ADF 32
clean scanner glass 31
clean TMA 32
HP Scanner Tools Utility
Maintenance tab 34
replace feed roller 35
replace separation pad 35
manage the scanner
using Embedded Web
Server 25
using HP Scanner Tools
Utility 22
missing bottom of image 44
55
Page 58

N
negatives
load 14
scanning tips 15
troubleshoot 51
Network menu 8
network settings 23
networking problems
connecting to a wired
network 52
O
OCR
troubleshoot 44
OK/select button 6
order
feed roller replacement 35
separation pad
replacement 35
order maintenance supplies 35
P
page orientation 28
pages
out of order 48
troubleshoot 48
parts, order 35
Power button 6
Power LED 37
Power Mode, set 8
power supply
troubleshoot cable 38
power-on, troubleshoot 43
product support 54
R
remove blank pages 29
remove software 38
replace feed roller 35
replace separation pad 35
requirements, Embedded Web
Server 26
reset scanner 41
Restore Defaults 8
rotate pages 28
S
scan
files too large 44
from the HP scanning
software 16
from WIA or TWAIN
software 17
start 15
with one button press 29
Scan button
scan from 15
troubleshoot 45, 46
scan shortcuts
troubleshoot 46
scanner
automatic document
feeder 7
control panel 6
features 5
hardware test 41
lamp, troubleshoot 43
LEDs 37
panel buttons 6
reset 41
settings 7
transparent materials
adapter 7
troubleshoot 42
troubleshooting 36
scanner glass
clean 31
load original 12
scanner management and
administration
using Embedded Web
Server 25
using HP Scanner Tools
Utility 22
using the Network menu 23
Scanner Tools Utility 22
scanning features 28
separation pad
replace 35
set
language 8
Power Mode 8
set link speed 24
Setup button 6
shortcuts 28
slides
load 14
scanning tips 15
troubleshoot 51
software
scan from 17
troubleshoot installation 37
uninstall 38
solving problems 36
speed
troubleshoot 43
status lights 37
straighten scanned images 29
streaks, troubleshoot 47
stripes, troubleshoot 44
supplies, maintenance 35
support 53, 54
T
technical support 53
test scanner hardware 41
text, editable
troubleshoot 44
TMA
clean 32
load 14
scanning tips 15
troubleshoot 51
TMA/ADF cable
troubleshoot 38
transparent materials adapter
(TMA)
clean 32
load 14
troubleshoot 51
troubleshoot
ADF 46
ADF feeding 50
basic tips 36
black scans 48
bottom cut off 44
buttons 45
cables 38
check power 40
crooked images 48
custom scan shortcut
names 43
cut-off images 50
double-sided scans 47
Ethernet connection 39
fuzzy images 47
installation 37
lamp stays on 43
large scan files 44
LCD 43
LEDs 37
negatives 51
networking 52
page order 48
pages missing 48
power 43
reset scanner 41
56
Page 59

Index
Scan button 45, 46
scan shortcut names 43
scanner 42
scanner glass 44
slides 51
speed 43
streaks 47
test scanner hardware 41
TMA 51
USB connection 39
white lines 44
white scans 48
troubleshooting 36
turn on, troubleshoot 43
TWAIN
scan from 17
U
uninstall software 38
USB cable
troubleshoot 38
useful scanning features 28
V
vertical white stripes
troubleshoot 44
view network settings 23
W
warranty
extended 54
Web sites
order maintenance
supplies 35
replacement parts 35
white scans, troubleshoot 48
white stripes
troubleshoot 44
WIA
scan from 17
57
Page 60

58
 Loading...