

Page 1

HP Latex 850 & 820
HP SCITEX LX850 & LX820 Printers
User’s guide
Page 2

© Copyright 2011, 2015 HP
Development Company, L.P.
First edition
Legal notices
The information contained herein is subject
to change without notice.
The only warranties for HP Products and
services are set forth in the express warranty
statement accompanying such products and
services. Nothing herein should be
construed as constituting an additional
warranty. HP shall not be liable for technical
or editorial errors or omissions contained
herein.
Safety notice
Read and follow the operating and safety
instructions before starting the printer.
Trademarks
Microsoft® and Windows® are U.S.
registered trademarks of Microsoft
Corporation.
Page 3

Table of contents
1 Introduction ...................................................................................................................... 1
The printer's main features ........................................................................................................ 1
Documentation ......................................................................................................................... 2
Main components .................................................................................................................... 2
The front panel ........................................................................................................................ 4
Printer software ........................................................................................................................ 6
Safety precautions .................................................................................................................... 6
2 Basic setup options ......................................................................................................... 12
Turn the printer on and off ....................................................................................................... 12
Change the language of the front-panel display ......................................................................... 14
Change the units of measurement ............................................................................................. 14
Turn the buzzer on and off ...................................................................................................... 15
Change the front-panel display contrast .................................................................................... 15
Start the HP Internal Print Server ............................................................................................... 15
Change the language of the HP Internal Print Server ................................................................... 15
Set the HP Internal Print Server preferences ................................................................................ 15
3 Handle the substrate ...................................................................................................... 18
Overview .............................................................................................................................. 18
Substrate tips ......................................................................................................................... 21
Substrate configurations .......................................................................................................... 24
Set the carriage beam position ................................................................................................ 25
Prepare to print ...................................................................................................................... 26
The substrate edge holders ...................................................................................................... 27
The ink collector kit (LX850 only) .............................................................................................. 28
The curing plates .................................................................................................................... 32
Load a roll onto the spindle ..................................................................................................... 33
Load a roll into the printer ....................................................................................................... 38
Load a roll with the 'Substrate Loading Tool' .............................................................................. 56
Double-sided printing ............................................................................................................. 58
Unload a roll ......................................................................................................................... 62
View information about the substrate ........................................................................................ 63
Substrate presets .................................................................................................................... 63
ENWW iii
Page 4

Create a new substrate preset .................................................................................................. 64
Edit a substrate preset ............................................................................................................. 73
Remove a substrate preset ....................................................................................................... 73
4 Handle the ink system .................................................................................................... 74
Ink system components ............................................................................................................ 74
How to work with ink system components .................................................................................. 75
How to order supplies ............................................................................................................ 80
How to recycle supplies .......................................................................................................... 81
5 Printing options .............................................................................................................. 82
HP Internal Print Server menus ................................................................................................. 82
Manage print jobs ................................................................................................................. 83
Layout method ....................................................................................................................... 87
CallMe@HP ........................................................................................................................... 98
6 Accessories ..................................................................................................................... 99
How to order accessories ........................................................................................................ 99
7 Printer specifications ..................................................................................................... 100
Functional specifications ....................................................................................................... 100
Physical specifications .......................................................................................................... 102
Memory specifications .......................................................................................................... 102
Power specifications ............................................................................................................. 102
Air supply requirements (pneumatic spindle) ............................................................................ 103
Ecological specifications ....................................................................................................... 104
Environmental specifications .................................................................................................. 104
Acoustic specifications .......................................................................................................... 104
Appendix A Preset creation flowchart .............................................................................. 105
Glossary ........................................................................................................................... 106
Index ............................................................................................................................... 109
iv ENWW
Page 5

1 Introduction
The printer's main features
Your printer is a color latex printer designed for printing high-quality images on flexible substrates from
914 mm (36 in) to 3.20 m (126 in) wide. Some major features of the printer are shown below:
Printing speeds of up to 133 m²/h (1432 ft²/h) for outdoor-quality prints, or 45 m²/h (484 ft²/h)
●
for indoor-quality prints
Environmentally friendly, odorless, aqueous latex inks in six colors
●
No hazardous waste
●
Three-liter ink cartridges which can be changed while printing
●
Introduction
Print on a wide range of substrates—including most low-cost, uncoated, low-solvent-compatible
●
substrates, and polyester fabrics including unlined flags (unlined flags only supported on LX850).
Durable prints with outdoor display permanence up to three years unlaminated, five years
●
laminated
Accurate and consistent color reproduction with automatic color calibration (built-in
●
spectrophotometer)
The HP Internal Print Server, see
●
to-use interface including:
Print job management
◦
Full printer status information
◦
Printer alerts
◦
Printer calibrations and adjustments
◦
Management and installation of substrate presets
◦
Printer firmware upgrades
◦
Access to the online HP Printing Knowledge Center
◦
Start the HP Internal Print Server on page 15, provides an easy-
ENWW
The printer's main features
1
Page 6
Introduction
Documentation
The following documents are provided with your printer, and can also be downloaded from
http://www.hp.com/go/LX820/manuals/ or http://www.hp.com/go/LX850/manuals/.
Site preparation guide
●
User's guide
●
Maintenance and troubleshooting guide
●
Legal information
●
See the Solutions Web site for information about new substrates, at
solutions/ or http://www.hp.com/go/LX850/solutions/. A new Web-based Media Finder application
is being developed to collect available substrate configurations for latex printers.
Main components
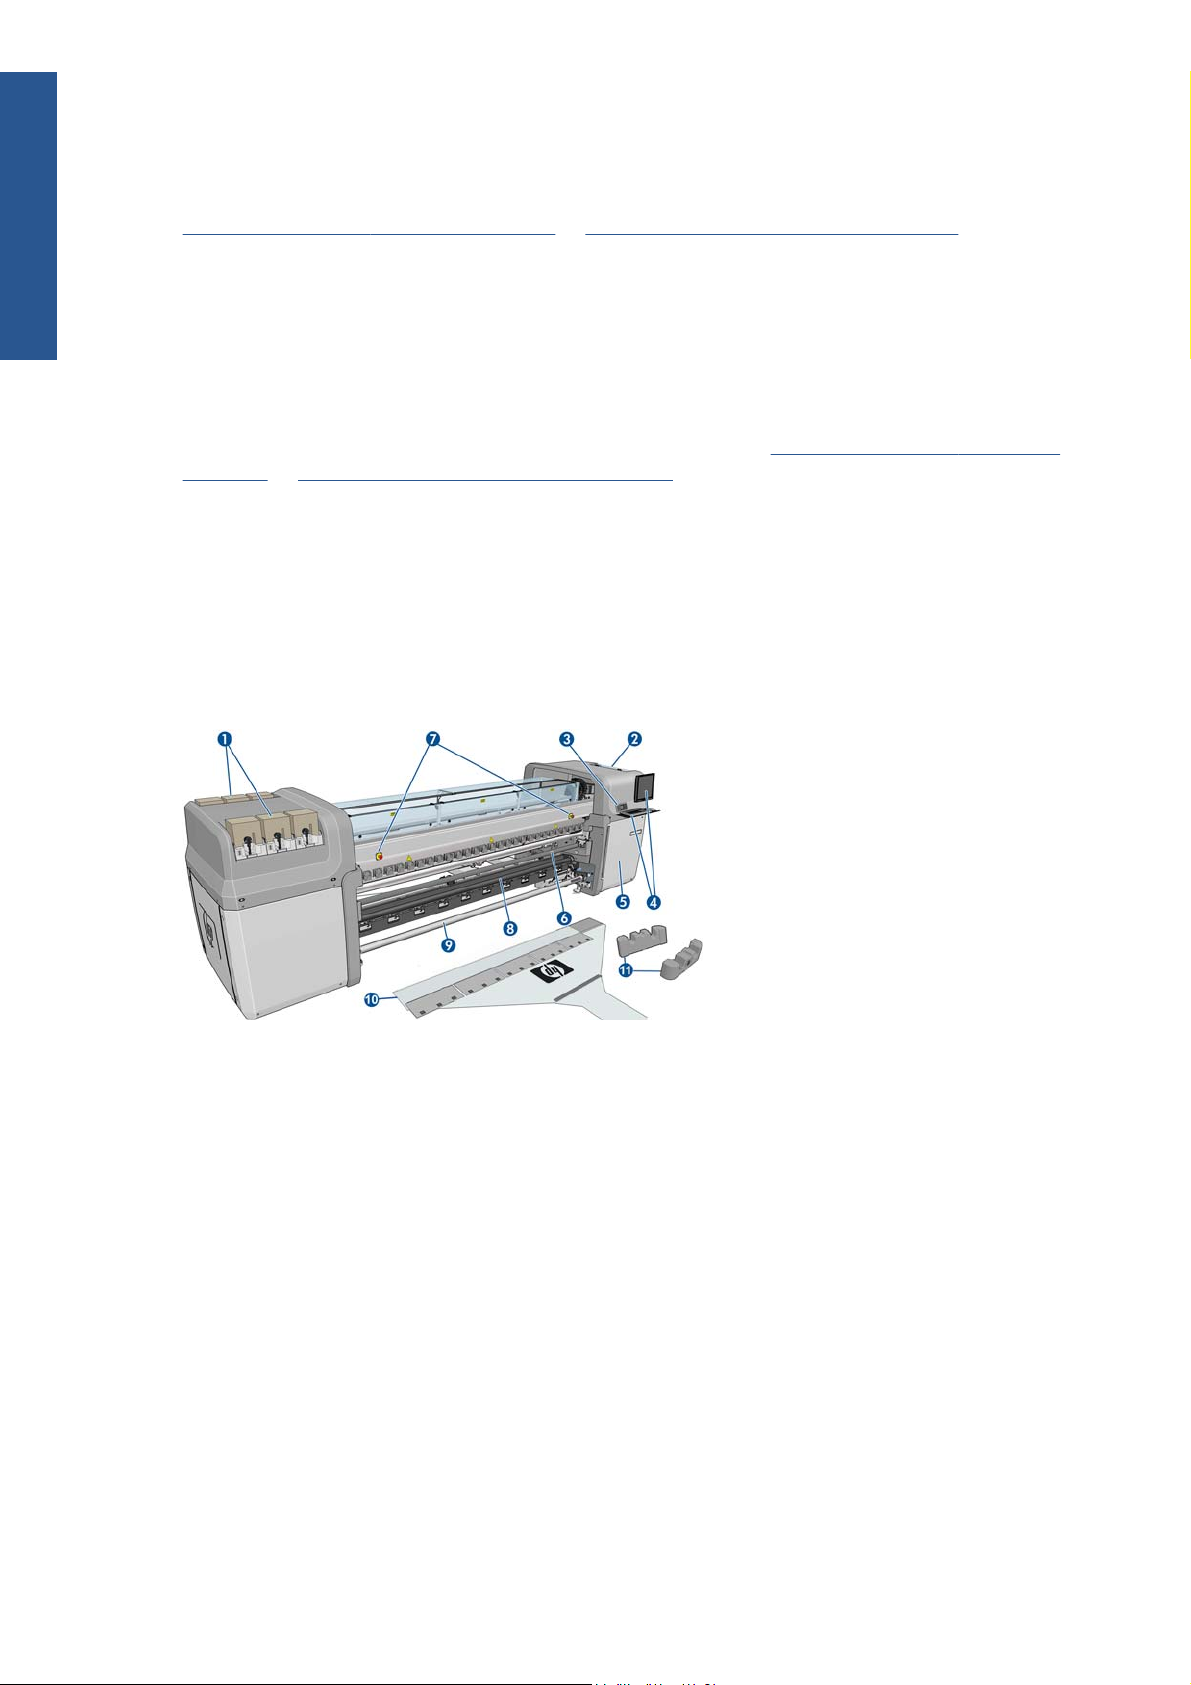
The following front and rear views of the printer illustrate the main components.
Front view
http://www.hp.com/go/LX820/
1. Ink cartridges
2. Printhead access door
3. Front panel
4. HP Internal Print Server display and keyboard
5. Front door to access computer and printhead cleaner roll
6. Front Diverter roller
7. Emergency stop buttons
8. LX850 only: Tension roller
9. Substrate output spindle
10. Substrate Loading Tool
11. Spindle Supports
2 Chapter 1 Introduction ENWW
Page 7
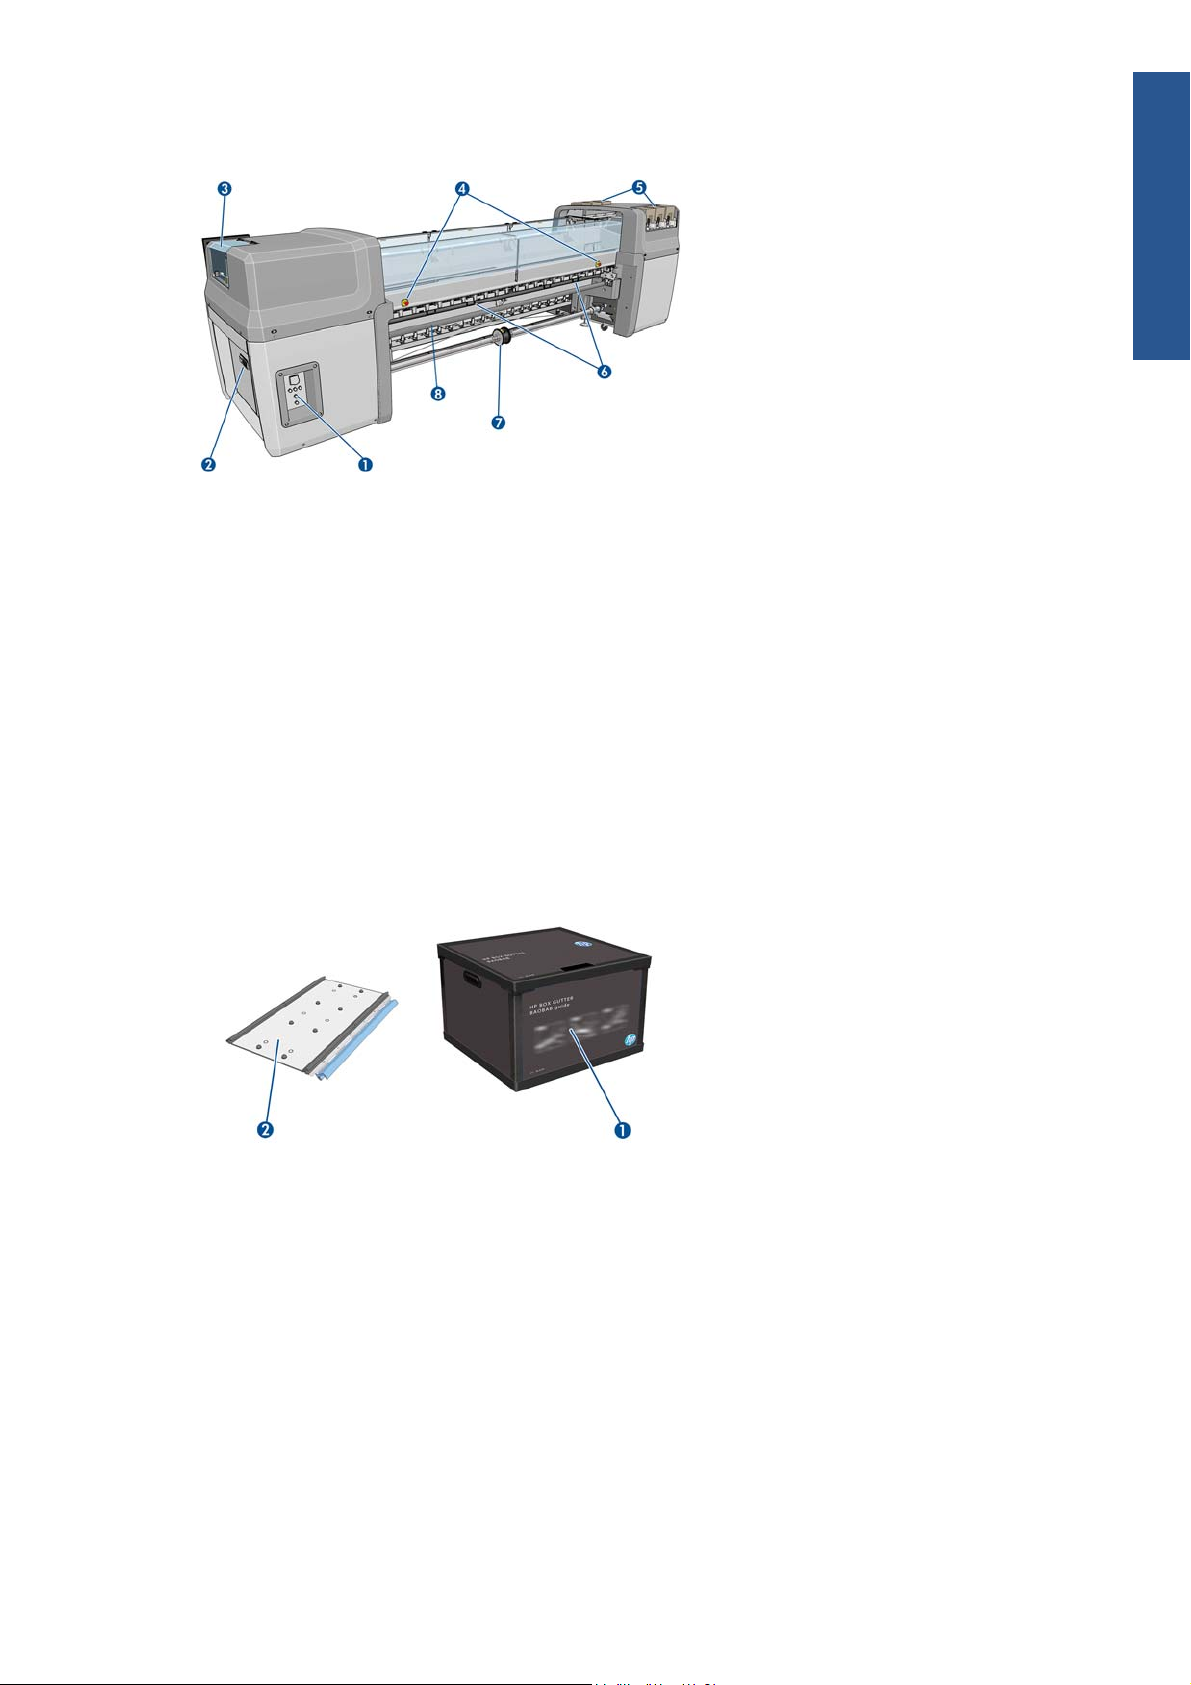
Rear view
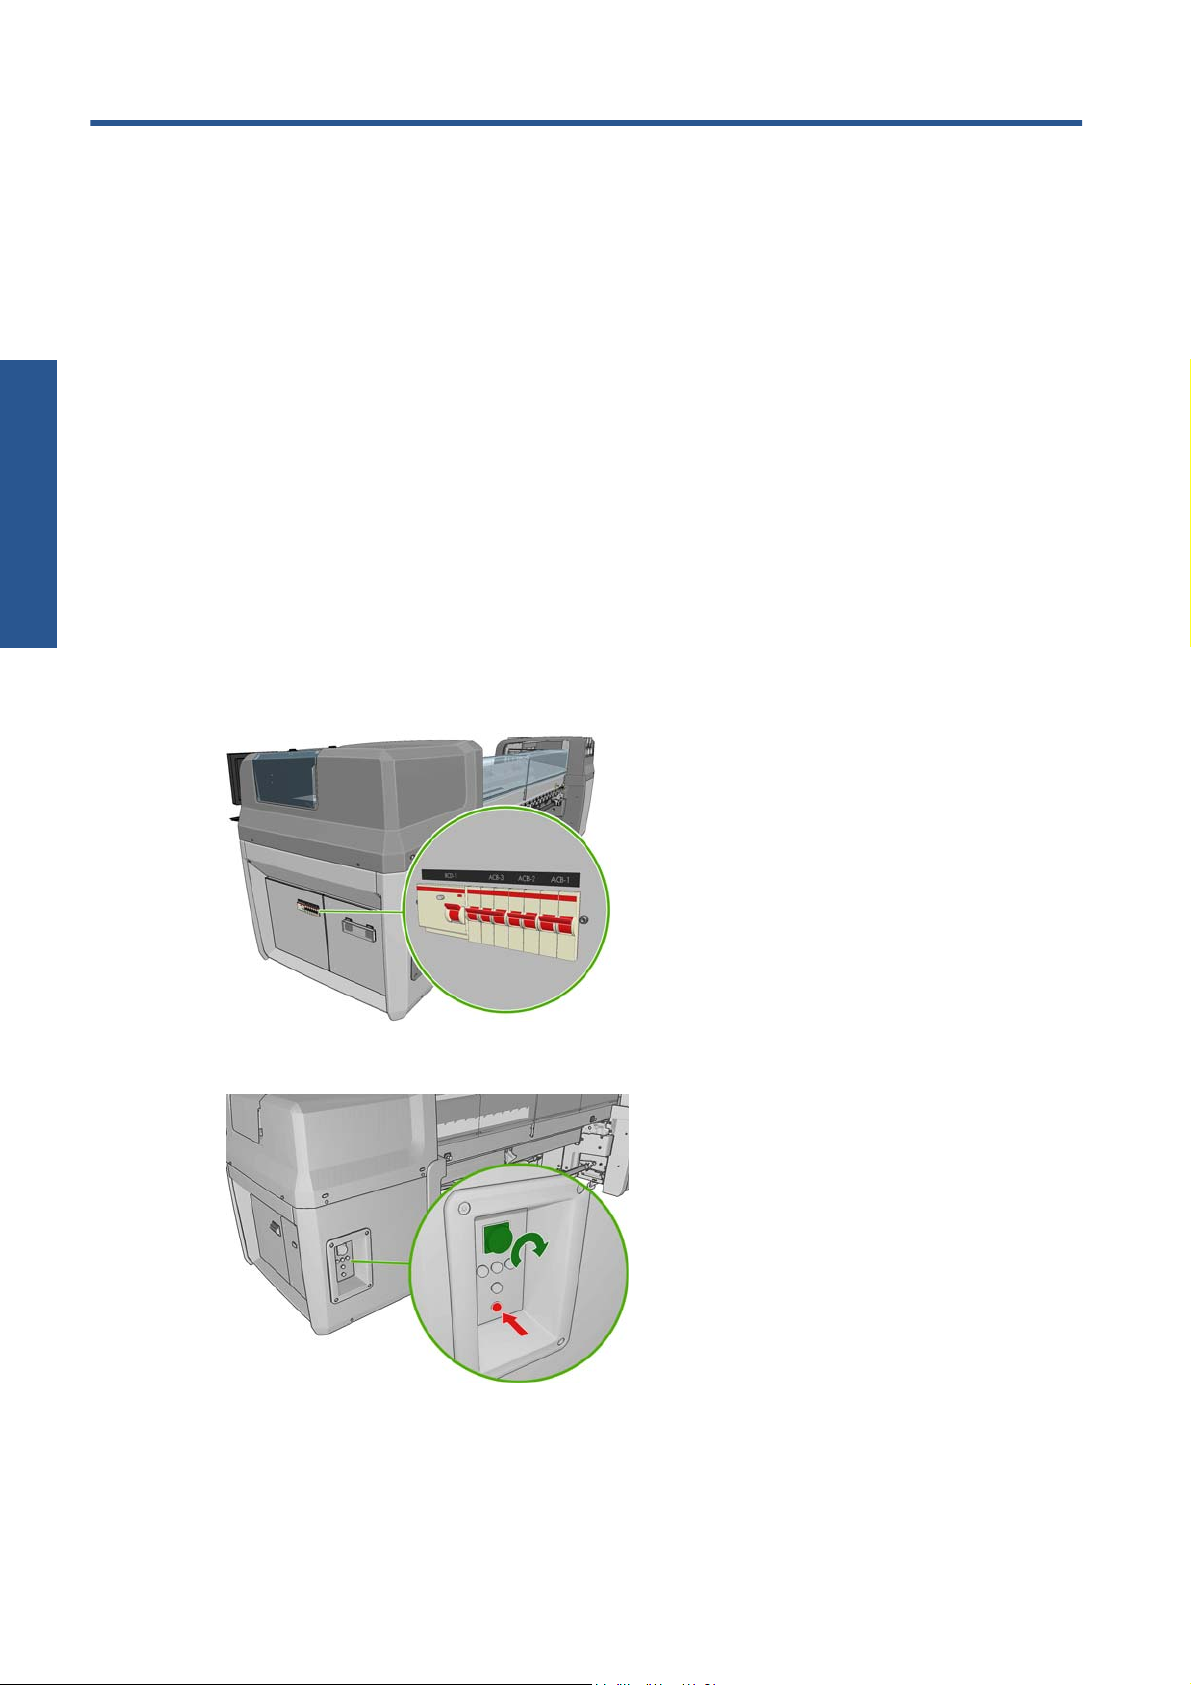
1. Power switches and lights
2. Circuit breakers: ACB-1, ACB-2, ACB-3, RCB-1
3. Printhead access door
4. Emergency stop buttons
5. Ink cartridges
6. Substrate pressure handles
Introduction
7. LX850 only: Dual-roll spindle with differential hub (LX820 is an accessory, part number
Q6705A)
8. Rear Diverter Roller
Ink collector kit (LX850 only)
1. Ink collector container
2. 8 ink collectors with replaceable foams
ENWW
Main components
3
Page 8

Introduction
Printer Configuration
Shown below is a table describing the configuration of the HP Scitex family of printers.
HP LX610 Inks * HP LX600 Inks **
Printer
config.
Roll-toRoll
Roll-toFree-Fall
Roll-toCollector
Ink
Collector
Dual Roll √ Accessory√ AccessoryAccessory√ Accessory√ AccessoryAccessor
Other Features
Substrate
Loading
Tool
Spindle
Supports
Doublesided
Printing
LX850 LX820 LX800 LX600 L65500LX850 LX820 LX800 LX600 L6550
0
√√√√√√√√√√
√ X √ XX√ X √ XX
√ X √ XX√ X √ XX
√ X √ XX√ X √ XX
y
√√XXX√√XXX
√√XXX√√XXX
√√√√√XXXXX
Productivi
ty
Improvem
ents
Diverters √√√XX√√ √XX
*Part numbers: CN673A/CN670A/CN671A/CN672A/CN674A
& CN675A refer to
√√√√√XXXXX
How to order supplies on page 80
The front panel
Your printer's front panel is located at the front right of the printer. It has the following important
functions:
It assists you in troubleshooting issues.
●
It is used when performing certain physical operations, such as raising the carriage beam, moving
●
spindles and rollers, and maintaining the printer.
It displays information in brief about the status of the printer (more information is available from
●
the HP Internal Print Server).
It displays warning and error messages, when appropriate, with audio alerts to call attention to a
●
warning or message.
**Part numbers: CC582A/CC583A/CC584A/
CC588A/CC589A & CC590A
4 Chapter 1 Introduction ENWW
Page 9

The front panel has the following components:
Introduction
1. Power key - To turn the printer off. See
2. Power light - Indicates the printer's power status. If the light is off, the printer is off. If it is solid
green, the printer is on. If it is flashing green, the printer is in transition between on and off.
3. Status light - Indicates the printer's operational status. If the light is off, the printer is not ready. If it
is solid green, the printer is ready and idle. If it is flashing green, the printer is busy: receiving
data, processing or printing. If it is flashing amber, your intervention is required. If it is solid
amber, a serious error has occurred.
4. Front-panel display - Displays error, warnings and information on using your printer.
5. Back key - To go to the previous step in a procedure or interaction. To go to the upper level, or
leave the option in the menu, or when given an option.
6. Up key - To go up in a menu or option, or to increase a value.
7. OK key - To confirm an action while in a procedure or interaction. To enter in a submenu in the
menu. To select a value when given an option.
8. Down key - To go down in a menu or option, or to decrease a value.
9. Cancel key - To cancel a procedure or interaction.
10. Move substrate key - To move the loaded substrate forwards or backwards, or rewind the whole
roll.
Turn the printer on and off on page 12.
ENWW
To highlight an item in the front-panel display, press the Up or Down key until the item is highlighted.
To select an item in the front-panel display, first highlight it and then press the OK key.
When this guide shows a series of front-panel display items like this: Item1 > Item2 > Item3, it
means that you should select Item1, then select Item2, then select Item3.
Information about specific uses of the front panel can be found throughout this guide.
The front panel
5
Page 10

Introduction
Printer software
Your printer requires the following software:
The HP Internal Print Server is provided with your printer and runs in a computer inside the printer.
●
You can use it to perform the following tasks.
Load and unload substrate
◦
Select a substrate load configuration (online help is provided)
◦
Manage print jobs
◦
Display printer status information
◦
Display printer alerts
◦
Perform printer calibrations and adjustments
◦
Install and manage substrate presets
◦
Upgrade the printer's firmware
◦
Access the Solutions Web site for information about new substrates
◦
A Raster Image Processor (RIP) should be run on a separate computer; it cannot be installed on the
●
same computer as the HP Internal Print Server.
Safety precautions
Before using your printer, read the following safety precautions to make sure you use the equipment
safely.
Users are expected to have appropriate technical training and experience necessary to be aware of
hazards to which that person may be exposed to in performing a task and to take appropriate
measures to minimize the risks to that person or other persons.
General safety guidelines
Refer to installation instructions before connecting the printer to the supply.
●
There are no operator-serviceable parts inside the printer. Refer servicing to qualified service
●
personnel.
Turn off the printer, using both Branch Circuit Breakers located in the building's Power Distribution
●
Unit (PDU), and call your service representative in any of the following cases:
The power cord is damaged.
◦
Liquid has entered the printer.
◦
There is smoke or an unusual smell coming from the printer.
◦
The printer has been dropped or the drying or curing module damaged.
◦
The printer's built-in Residual Current Circuit Breaker (Ground Fault Circuit Interrupter) has
◦
been repeatedly tripped.
6 Chapter 1 Introduction ENWW
Page 11

Fuses have blown.
◦
The printer is not operating normally.
◦
Turn off the printer using both Branch Circuit Breakers in either of the following cases:
●
During a thunderstorm
◦
During a power failure
◦
Electrical shock hazard
WARNING! The internal circuits and drying and curing modules operate at hazardous voltages
capable of causing death or serious personal injury.
Turn off the printer using both Branch Circuit Breakers located in the building's Power Distribution Unit
(PDU) before servicing the printer. The printer must be connected to earthed mains outlets only.
To avoid the risk of electric shock:
Do not attempt to dismantle the drying and curing modules or the electrical control cabinet.
●
Do not remove or open any other closed system covers or plugs.
●
Do not insert objects through slots in the printer.
●
Introduction
Test the functionality of the Residual Circuit Breaker (RCCB) every year (refer to the procedure
●
below).
NOTE: A blown fuse may indicate malfunctioning electrical circuits within the system. Call your
service representative, and do not attempt to replace the fuse yourself.
Checking the functionality of the Residual Circuit Breaker (RCCB
Following standard Residual Current Circuit Breaker (RCCB) recommendations, it is recommended that
the RCCB is test on a yearly basis. The procedure is as follows:
1. Switch off the printer from the Front Panel (do not switch off the printer from the mains switch or
the circuit breakers).
2. When the printer is switched off, test that the RCCB functions correctly by pressing the test button.
If the RCCB does not trip when the test button is pressed, this indicates that the component
●
has failed. The device must be replaced for safety reasons, call HP Support to remove and
replace the RCCB.
If the RCCB trips, this indicates it is working correctly, return the printer to the original status
●
and switch the printer on.
Heat hazard
ENWW
The drying and curing subsystems of the printer operate at high temperatures and can cause burns if
touched. To avoid personal injury, take the following precautions.
Do not touch the internal enclosures of the printer's drying and curing modules.
●
Take special care when accessing the substrate path.
●
Safety precautions
7
Page 12

Introduction
Fire hazard
The drying and curing subsystems of the printer operate at high temperatures. Call your service
representative if the printer's built-in Residual Current Circuit Breaker (Ground Fault Circuit Interrupter) is
repeatedly tripped.
To avoid the risk of fire, take the following precautions.
Use the power supply voltage specified on the nameplate.
●
Connect the power cords to dedicated lines, each protected by a branch circuit breaker according
●
to the information detailed in the Site Preparations documentation.
Do not insert objects through slots in the printer.
●
Take care not to spill liquid on the printer.
●
Do not use aerosol products that contain flammable gases inside or around the printer.
●
Do not block or cover the openings of the printer.
●
Do not attempt to dismantle the drying or curing module, or the electrical control cabinet.
●
Ensure that the operating temperature of the substrate loaded recommended by the manufacturer
●
is not exceeded. If this information is not available by the manufacturer, do not load substrates
that cannot be used at an operating temperature under 125°C (257°F).
Do not load substrates with auto-ignition temperatures below 250°C (482°F). See note below.
●
NOTE: Test method based on EN ISO 6942:2002; Evaluation of materials and material
assemblies when exposed to a source of radiant heat, method B. The test conditions, to determine
the temperature when the substrate starts ignition (either flame or glow) were: Heat flux density:
30 kW/m2, Copper calorimeter, K type thermocouple.
Mechanical hazard
The printer has moving parts that could cause injury. To avoid personal injury, take the following
precautions when working close to the printer.
Keep your clothing and all parts of your body away from the printer's moving parts.
●
Avoid wearing necklaces, bracelets and other hanging objects.
●
If your hair is long, try to secure it so that it will not fall into the printer.
●
Take care that sleeves or gloves do not get caught in the printer's moving parts.
●
Avoid standing close to the fans, which could cause injury and could also affect print quality (by
●
obstructing the air flow).
Do not touch gears or moving rolls during printing.
●
8 Chapter 1 Introduction ENWW
Page 13
Heavy substrate hazard
Special care must be taken to avoid personal injury when handling heavy substrates.
Handling heavy substrate rolls always requires two people. Care must be taken to avoid back
●
strain and/or injury.
Always use a forklift, pallet truck or other handling equipment to lift substrates.
●
Always wear personal protective equipment including boots and gloves.
●
Ink handling
Your printer does not use solvent inks and does not have the traditional problems associated with them.
However, HP recommends that you wear gloves when handling ink system components.
Warnings and cautions
The following symbols are used in this manual to ensure the proper use of the printer and to prevent the
printer from being damaged. Follow the instructions marked with these symbols.
WARNING! Failure to follow the guidelines marked with this symbol could result in serious personal
injury or death.
Introduction
CAUTION: Failure to follow the guidelines marked with this symbol could result in minor personal
injury or damage to the product.
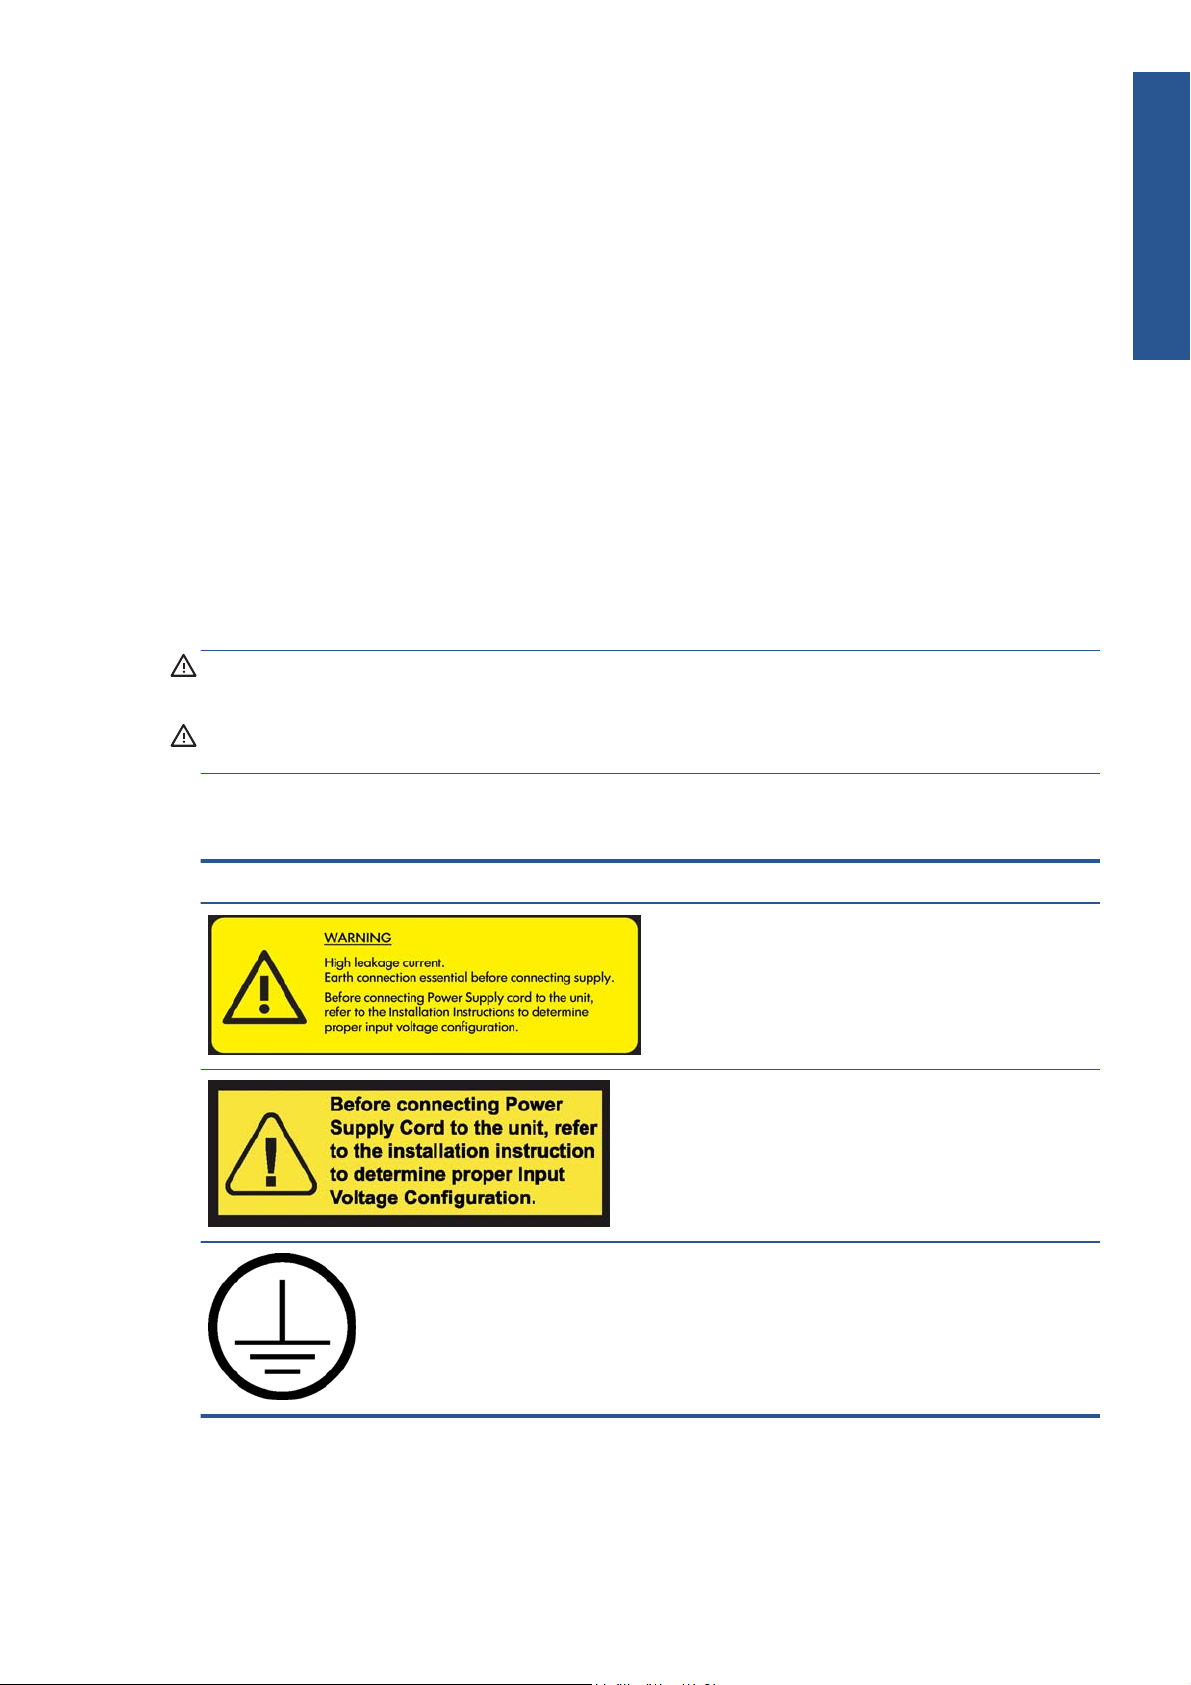
Warning labels
Label Explanation
Current leakage may exceed 3.5 mA.
See installation instructions before connecting to the supply.
Ensure that the input voltage is within the printer's rated
voltage range. The printer requires two dedicated lines, each
protected by a branch circuit breaker according to site
Preparation Requirements The printer must be connected to
earthed mains outlets only.
Identifies the Protective Earth (PE) terminal. It is located inside
the electrical control cabinet.
ENWW
Safety precautions
9
Page 14
Introduction
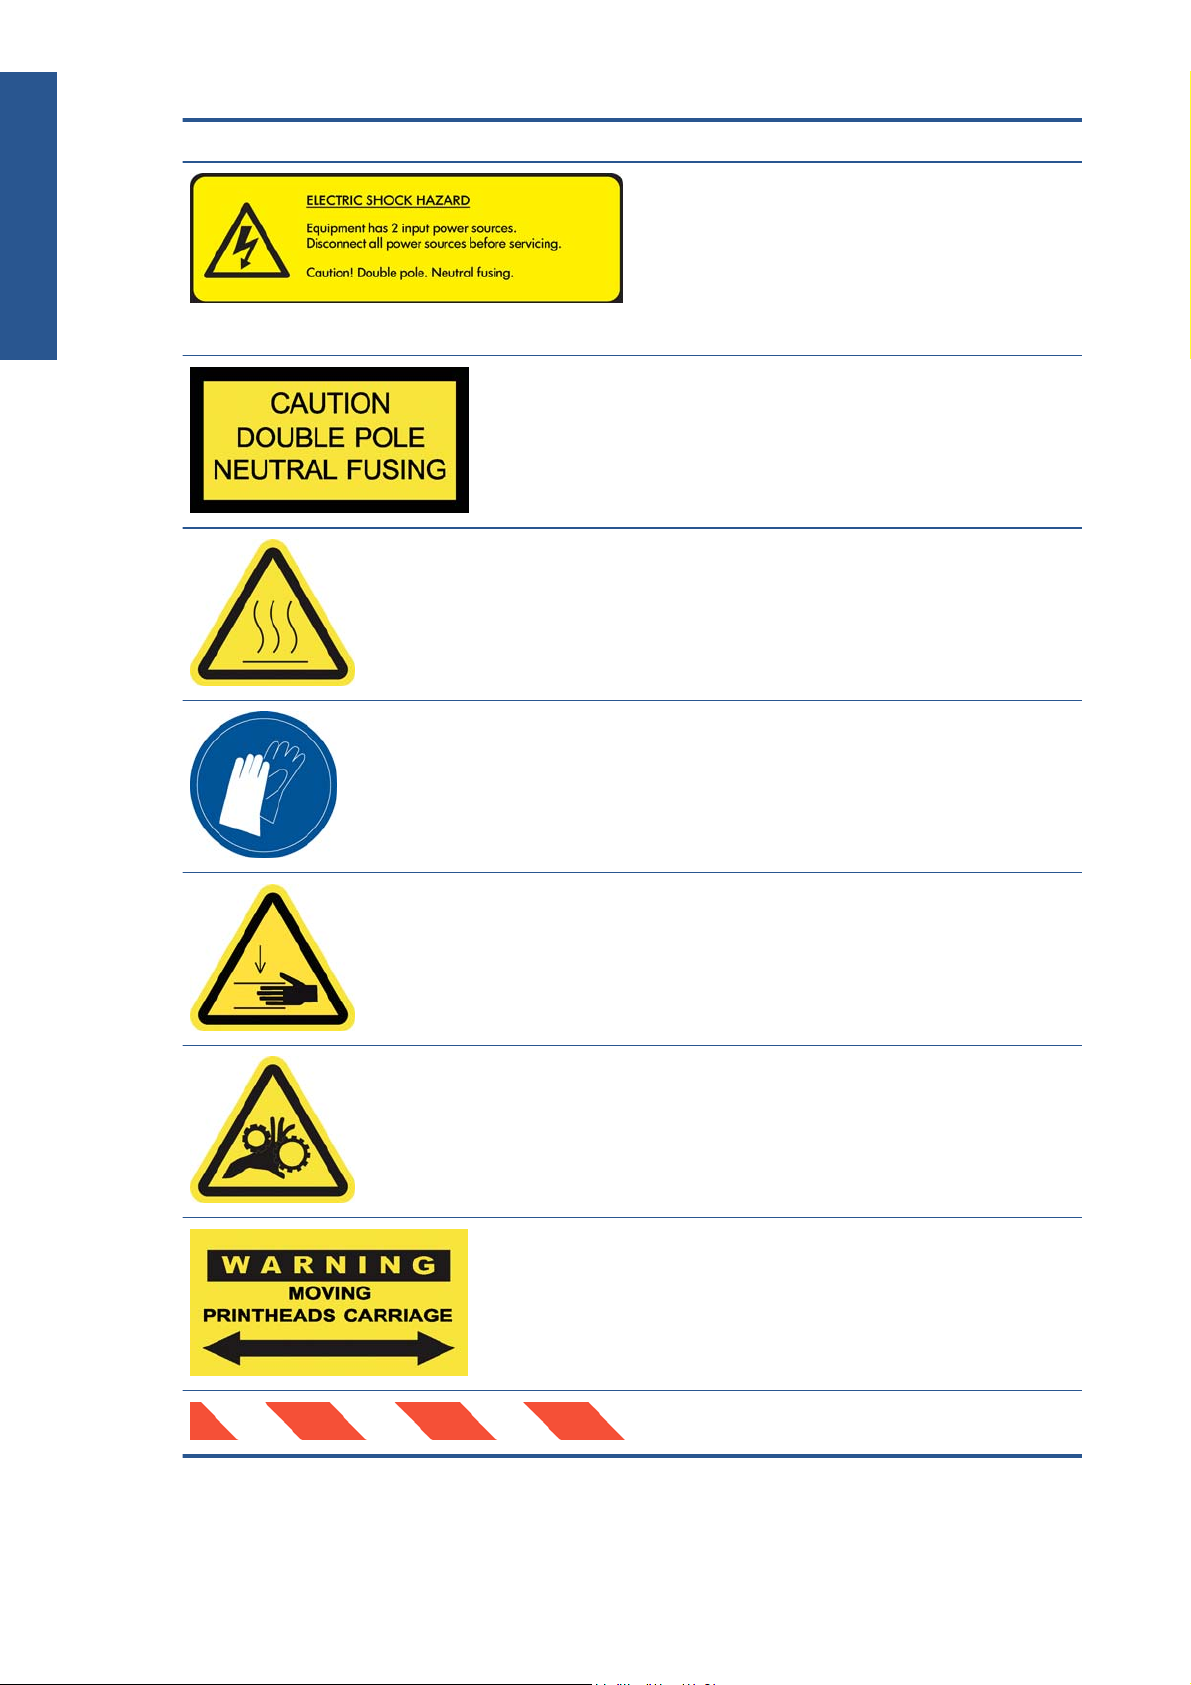
Label Explanation
Electric shock hazard. The printer has two mains supplies.
There are no operator-serviceable parts inside the printer. In
case of operation of the fuse, parts of the printer that remain
energized may represent a hazard during servicing. Refer
servicing to qualified service personnel. Turn off the printer
using both Branch Circuit Breakers located in the building's
Power Distribution Unit (PDU) before servicing. See installation
instructions before connecting to the supply.
Danger of electric shock. In case of operation of the fuse,
parts of the printer that remain energized may represent a
hazard during servicing. Therefore, ensure that the printer is
completely turned off before servicing.
Risk of burns. Do not touch the internal enclosures of the
printer's drying and curing modules.
You are recommended to wear gloves when handling ink
cartridges, printhead cleaning cartridges and the printhead
cleaning container.
When substrate has been loaded, the carriage descends into
its normal position, and could crush your hand or anything
else left underneath it.
Danger that your hands may become trapped between
gearwheels
When the printer is printing, the printhead carriage travels
back and forth across the substrate.
Beware of this moving part.
10 Chapter 1 Introduction ENWW
Page 15

Emergency stop buttons
There are four emergency stop buttons distributed around the printer. If an emergency occurs, simply
push one of the emergency stop buttons to stop all printing processes. A system error message is
displayed on the front panel, and the fans turn at maximum speed. Ensure that all emergency stop
buttons are released before restarting the printer.
Introduction
ENWW
Safety precautions
11
Page 16
Personal settings
2 Basic setup options
Turn the printer on and off
The printer has two levels of power consumption.
Electronics on: The electronic components that use relatively little power are turned on.
●
Everything on: All components are turned on, including the mechanical and drying components
●
that use more power.
To turn on the printer:
1. Make sure that all the circuit breakers are in the up position (ACB1, ACB2, ACB3, RCB1).
2. Turn the big switch at the rear left of the printer to the on position.
3. Check that all four red lights are on (three for the three-phase line and one for the single-phase). In
normal operation these lights should always be on. If any of them are off, check the front panel in
case there is a system error, and consult the Maintenance and troubleshooting guide or check with
your electrician.
12 Chapter 2 Basic setup options ENWW
Page 17

4. Go to the front panel. In some circumstances, the front-panel display comes on automatically; if
not, press the Power key on the front panel and hold it down for a few seconds to turn on the
printer's electronics.
5. Wait for the front panel to display the message, “Printer waiting for rearm. Press the power
button.”
6. Press the Power Enable button at the rear left of the printer. This enables all of the printer's high-
power subsystems.
7. Check that the orange light in the button comes on. In normal operation this light should always be
on. If at any time you notice that this light is off, check the front panel in case there is a system
error, and consult the Maintenance and troubleshooting guide.
8. Wait for the front panel to indicate that the printer is ready. This can take several minutes. The
printer beeps if some problem is encountered. When initialization is complete, the front panel
displays a Ready message. If a system error message is displayed, consult the Maintenance and
troubleshooting guide.
To turn off the printer and the HP Internal Print Server computer:
1. Wait for the front panel to indicate that the printer is ready.
NOTE: If the printer fails to reach the Ready state because of a fault, continue to the next step.
2. Turn off the HP Internal Print Server computer from the Windows start button, and wait until you
see a black screen with the message No input signal.
CAUTION: The computer may be damaged if it is turned off incorrectly.
NOTE: If the HP Internal Print Server fails to display No input signal because of a fault,
continue to the next step.
3. Press the Power key on the front panel and wait for the front-panel display to turn black; this
usually takes about a minute. However, after some error conditions (such as after a substrate jam),
you may need to wait up to four minutes.
NOTE: After the printer electronics have been turned off at the front panel, the fans turn at
maximum speed, for safety reasons. This is normal behavior and not a cause for concern.
NOTE: If you have waited more than five minutes and the front-panel display has not turned
black because of a fault, continue to the next step.
4. Turn the big switch at the rear left of the printer to the off position. The fans should stop.
Personal settings
ENWW
TIP: If you are not planning to use the printer for some days, you are recommended to disconnect all
ink cartridge connectors.
Turn the printer on and off
13
Page 18

To turn off the printer but not the HP Internal Print Server computer:
1. Wait for the front panel to indicate that the printer is ready.
2. Press the Power key on the front panel and wait for the front-panel display to turn black; this
usually takes about a minute. However, after some error conditions (such as after a substrate jam),
you may need to wait up to four minutes.
NOTE: After the printer electronics have been turned off at the front panel, the fans turn at
maximum speed, for safety reasons. This is normal behavior and not a cause for concern.
Personal settings
3. Turn circuit breakers ACB-1 (mono-phase) and ACB-3 (three-phase) to the down position. The fans
should stop.
To turn off the HP Internal Print Server computer but not the printer, turn off the computer from the
Windows start button, and wait until you see a black screen with the message No input signal.
Then turn circuit breaker ACB-2 to the down position.
To stop the printer in emergency, hit one of the emergency stop buttons at the front or rear of the
printer. A system error message is displayed on the front panel, and the fans turn at maximum speed.
Ensure that all emergency stop buttons are released before restarting the printer.
Change the language of the front-panel display
There are two possible ways to change the language of the front-panel menus and messages.
If you can understand the current front-panel display language, go to the main menu and select the
●
Setup menu icon
If you cannot understand the current front-panel display language, start with the printer powered
●
off. At the front panel, press the OK key and hold it down. While holding the OK key down, press
the Power key and hold it down. Continue to hold down both keys until the green light on the left
side of the front-panel display starts flashing, and then release both keys. You can expect a delay
of about one second. If the green light starts flashing without any delay, you may need to start
again.
, then Front panel options > Select language.
Whichever method you used, the language selection menu should now appear on the front-panel
display. Highlight your preferred language with the Up and Down keys, then press the OK key.
When you have selected your preferred language, turn off the printer with the Power key and then turn
it on again. The front panel will appear in the selected language.
Change the units of measurement
To change the units of measurement in the HP Internal Print Server, select the Tools menu, then
Preferences, then the General tab. You can change the units of length and temperature.
To change the units of measurement in the front-panel display, select the Setup menu icon
Front panel options > Select units, and select English or Metric. By default the units are set to
metric.
14 Chapter 2 Basic setup options ENWW
, then
Page 19

Turn the buzzer on and off
To turn the printer's buzzer on or off, go to the front panel's main menu and select the Setup menu icon
, then Front panel options > Enable buzzer, highlight on or off and press the OK key. The
default buzzer is set to on.
NOTE: For safety reasons, the buzzer always sounds when the carriage beam is raised or lowered.
Change the front-panel display contrast
To change the contrast of the front-panel display, select the Setup menu icon , then Front panel
options > Select display contrast, and enter a value using the Up or Down key. Press the OK key
to set the value. The default contrast is set to 50.
Start the HP Internal Print Server
You can start the HP Internal Print Server from the Windows start menu or by double-clicking its icon
on the desktop.
Change the language of the HP Internal Print Server
When the HP Internal Print Server starts, it uses the language selected in the Windows Regional and
Language Options. To change the selected language:
1. Open the Control Panel from the start menu.
2. If you are using the Category View of the Control Panel, open the Clock, Language, and
Region category.
3. Open the Regional and Language Options.
4. In the Formats tab, change the current format to correspond with the language you want.
5. Press the OK button.
Personal settings
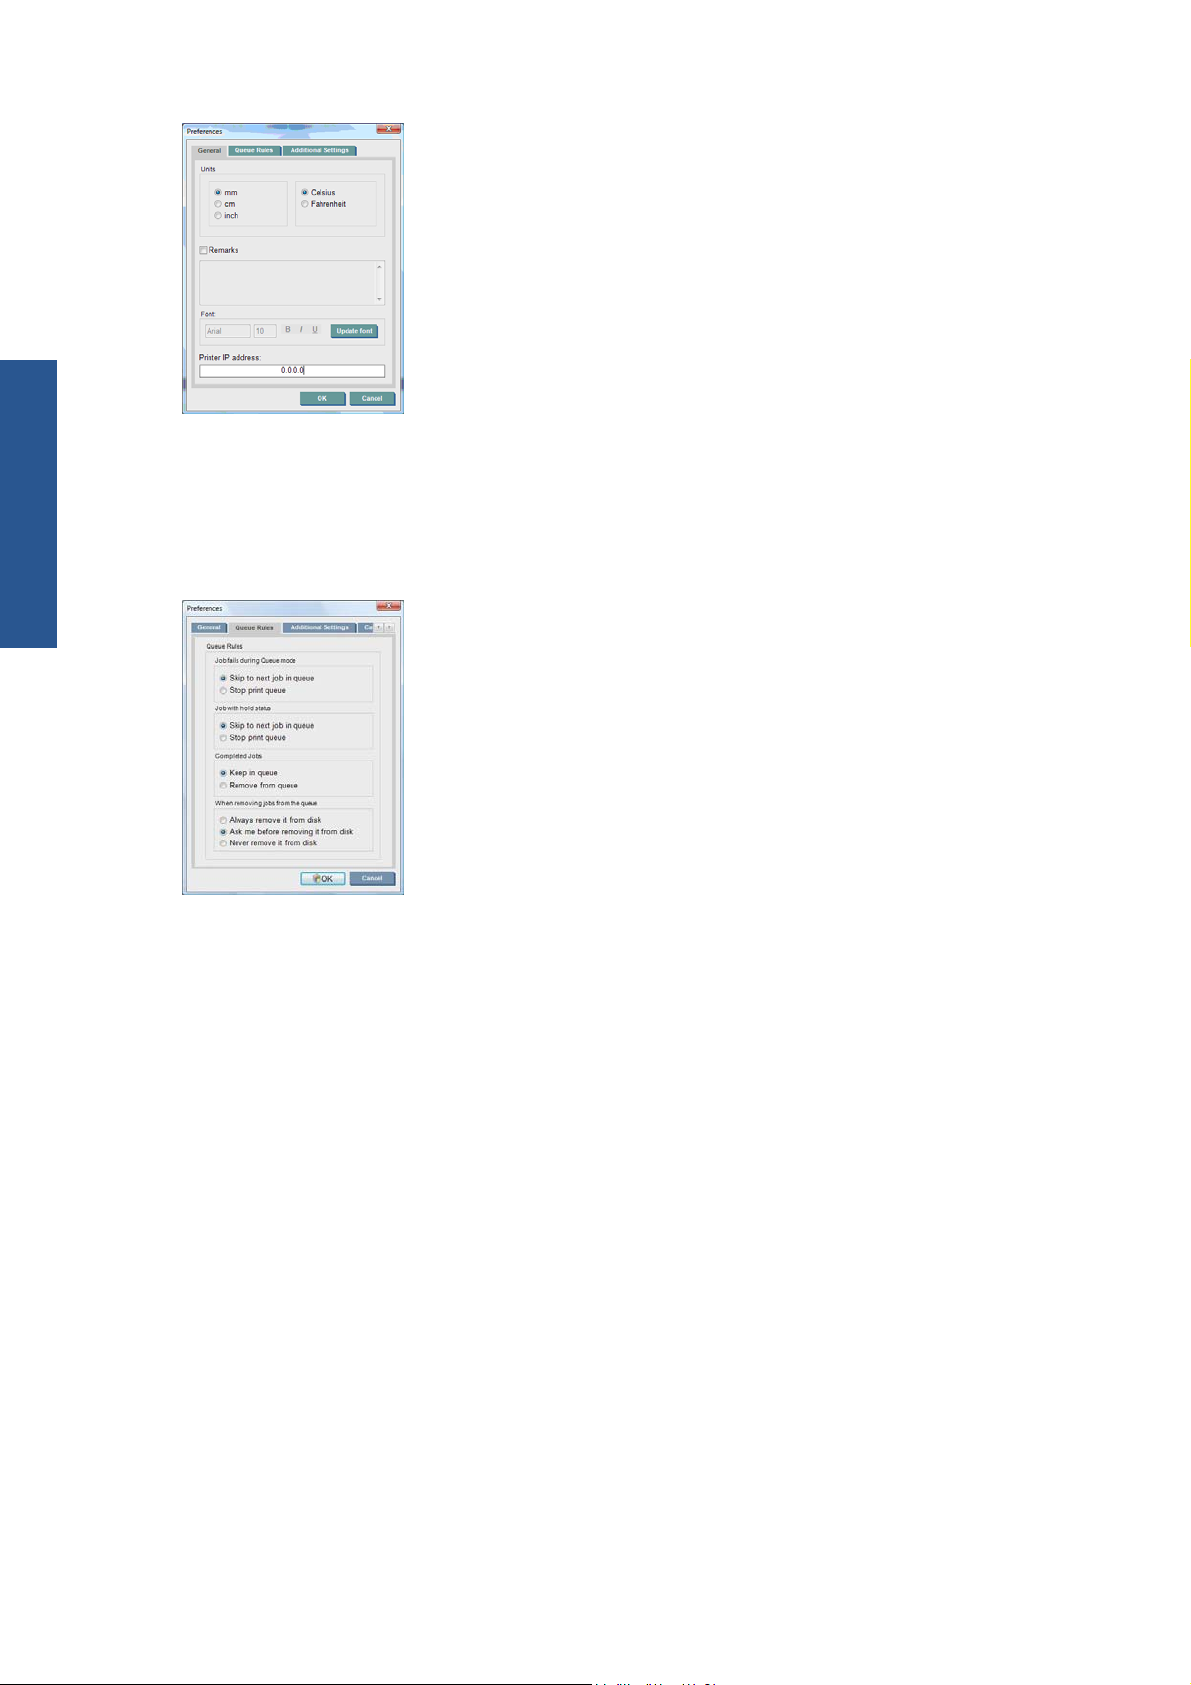
Set the HP Internal Print Server preferences
To change the HP Internal Print Server's preferences, select Preferences from the Tools menu. In the
Preferences window, you will see four tabs.
ENWW
Turn the buzzer on and off
15
Page 20
Personal settings
Units of length and temperature
●
Remarks (to add as a footer to the printed file)
●
Font of footer text
●
Printer's IP address
●
Action when job fails
●
Action when job is put on hold
●
Action when job has been printed
●
Action when job is removed from the queue
●
16 Chapter 2 Basic setup options ENWW
Page 21

Maximum roll length
●
Gap between jobs
●
Margins:
●
RIP: Margins are set as defined in the RIP.
◦
Center: The image is horizontally centered on the loaded substrate.
◦
Default: The default margins are set to 5.0 mm (0.02 in). You can define the default left
◦
margin in the Job Properties window.
The above fields are to be filled in by your service representative.
Personal settings
ENWW
Set the HP Internal Print Server preferences
17
Page 22

3 Handle the substrate
Overview
Applications
For each printing application, some substrate types are more appropriate than others.
POP applications
Handle the substrate
Banners: Free-hanging, horizontally or vertically. Usually vinyl, but can be fabric.
●
Backlit: Usually inside a light box, visible by day and night.
●
Posters: Various sizes of flat pictures, usually framed or mounted on a rigid substrate.
●
Boards: A rigid substrate with logo, name, directional sign, etc. Long- and short-term usage.
●
Windows: Covering all or part of a window for messaging and advertising. Usually exposed to
●
sunlight.
Floors: Stuck to the floor for directional or promotional purposes. Exposed to extreme rub
●
conditions.
3D: Usually laminated.
●
Vehicle wrap applications
Cars: Self-adhesive vinyl used to cover all or part of a vehicle. Has many uses from simple
●
lettering and shapes to complex graphics. Can also be used for irregular shapes with vinyl cutting.
Usually single cars, sometimes fleets.
Trucks: Covering all or part of a truck for naming or advertising purposes. Can be applied to a
●
rigid surface with self-adhesive vinyl or flexible curtains. Usually done for fleets.
Trains: Covering single track or full train with self-adhesive vinyl. Window areas covered with
●
perforated substrate to “see through”.
Buses/taxis: Some are fully covered like cars; some fleets have side panels of either adhesive
●
vinyl or framed image boards, made of rigid or flexible substrate.
18 Chapter 3 Handle the substrate ENWW
Page 23

Other applications
Airport light boxes: Continuously lit from inside the box. Size varies from medium to very
●
large images. Directional and advertising content.
Bus shelters: Inside light box, visible by day and night. Changed very often (e.g. every week).
●
Street signs: Various materials from blue back paper for billboards through light boxes and
●
rigid boards. Some are fixed for medium periods and some changed very often.
Billboards: Very large boards covered with tiles of images, long viewing distance and low
●
picture resolution but vivid colors. Lately changing from tiles to banners of vinyl or polyethylene.
Interior decoration: Walls covered with graphics to create a unique atmosphere. Usually
●
printed on blue back paper and mounted directly on walls or rigid boards. May also be printed
on vinyl or fabric.
Building wrap: Part of a building covered with vinyl or mesh substrate, which is stretched and
●
mounted on a frame. It is often necessary to weld or sew strips of substrate together.
Art: Very high quality images printed on canvas or other flexible or rigid substrates.
●
Directional signs: Short or long term signs, usually on rigid boards.
●
OEM: Decals of names or graphics associated with the equipment. Used for home and garden
●
equipment, appliances, vehicles, vending machines, ATM, light and heavy machinery, etc.
Flags: Banners of fabric and textile that hang down or are mounted on poles. Used indoors and
●
outdoors. Also used as balloons of different shapes.
Match applications to substrate types
The following table identifies the substrate types that are appropriate for each application.
Application Substrate (see key below)
ABCDE FGHI JKLMNOPQRS T UV
POP posters ●●●●●● ● ●● ● ●●●●●●
Light boxes ● ●●● ●●
Vehicle graphics ●●●
Wall murals ● ●●●●●●● ● ●
Outdoor and event banners ●● ● ● ●●
Double-sided banners ●●●●
Exhibition and event graphics ●●●●●●●●
Billboards ●● ●●●
Textiles and carpets ●●
Handle the substrate
ENWW
Photos and digital fine arts ●●●
Building coverings ●
Overview
19
Page 24

Key to substrates
F. Vinyl Cast
L. BlueBack
R. Photo
A. Frontlit
B. Opaque
C. Backlit
D. Green
E. Vinyl Calendered
Supported substrate types
For information on new substrates, see http://www.hp.com/go/LX820/solutions/ or
http://www.hp.com/go/LX850/solutions/.
Category Type Color
Banners
Handle the substrate
G. Perforated Material
H. Polyester
I. Polypropylene
J. Woven Polyester
K. Knitted Polyester
M. Backlit Paper
N. Offset
O. Yupo
P. Mesh
Q. Canvas
calib.
HP HDPE Reinforced Banner
1
Yes Banners, POP, flags, track
PVC Scrim Banner Frontlit – 100%, 150%, 250% Yes
PVC Scrim Banner Backlit – 100%, 150%, 250% No
Green Banner – 100%, 150%, 250% Yes
S. Uncoated Tyvek
T. Surface Treated Tyvek
U. Static Cling
V. Woven Polyethylene
Applications
covers, wall murals
HP Durable Frontlit Scrim Banner Yes
Self-adhesive Vinyl – Calendared – 100%, 150%, 250% Yes Vehicle wraps, car/bus/track
fleets, floors, signs
Vinyl – Cast – 100%, 150%, 250% Yes
Perforated Vinyl/Punch Window – 100%, 150%, 250% No
HP Permanent Gloss Adhesive Vinyl Yes
HP Permanent Matte Adhesive Vinyl Yes
HP Air Release Adhesive Gloss Cast Vinyl Yes
HP One-view Perforated Adhesive Window Vinyl No
Film Polyester Film – 100%, 150%, 250% No Bus shelters, airport ads, POP,
HP Backlit Polyester Film
1
Yes
street ads
Fabric Polyester Fabric – 100%, 150%, 250% No Indoor flags, wall murals,
interior decoration
Paper
1
HP Heavy Textile Banner (Oeko-Tex certified)
HP Light Textile Display Banner – 150%, 250% (Oeko-Tex
certified)
HP PVC-free Wall Paper (FSC certified)
1
2 3
No
No
Yes POP indoor and outdoor,
windows, bus shelters,
Blue back – 100%, 150%, 250% Yes
billboards, wall decorations
HP Blue Back Billboard Paper Yes
HP Photo-realistic Poster Paper
HP White Satin Poster Paper
1
1
Yes
Yes
Mesh Scrim banner – 100%, 150%, 250% No Building wraps
20 Chapter 3 Handle the substrate ENWW
Page 25

Category Type Color
calib.
Speciality Canvas Polyester – 100%, 150%, 250% Yes Fine arts, large photographs,
Tyvek – 100%, 150%, 250% No
HP Satin Canvas Yes
Applications
floor covering
HP DuPont Tyvek Banner
1
HP Large-format Media take-back program availability varies. Some recyclable HP papers can be recycled through commonly
available recycling programs. Recycling programs may not exist in your area. See
2
HP PVC-free Wall Paper printed with HP Latex Inks is GREENGUARD Children & Schools Certified. See
http://www.greenguard.org/.
3
HP PVC-free Wall Paper printed with HP Latex Inks meets AgBB criteria for health-related evaluation of VOC emissions of
indoor building products. See
http://www.umweltbundesamt.de/produkte-e/bauprodukte/agbb.htm.
1
No
http://www.hp.com/recycle/ for details.
The Color Calib. column indicates for each substrate whether color calibration is recommended.
NOTE: The printer does not support substrates narrower than 914 mm (36 in).
NOTE: Porous substrates require the use of the ink collector kit.
NOTE: The fabric specifications supported are the following: Grammage > 100 g/m²; Fabrics
"mesh" style with Porosity/Open areas < 20%; "Mesh Substrates" with Porosity/Open areas < 20%;
Elasticity < 5%. For best results, print textile applications on fabric that does not stretch. Performance
may vary depending on the substrate. Please consult your substrate supplier for compatibility details.
Substrate tips
General tips
Handle unprinted and printed substrates with care, and preferably with cotton gloves, to avoid
fingerprints. For heavy rolls, use a forklift, and two people wearing security shoes.
Before loading a roll:
Check that temperature and humidity in the room are within the recommended ranges for the
●
printer. See
Check that neither the roll nor its core are bent or deformed, which may cause the substrate to jam
●
in the printer.
If the roll has been stored in a place not offering the recommended environmental conditions,
●
allow some time for it to adapt to the temperature and humidity of the printer's environment.
Handle the substrate
Environmental specifications on page 104.
ENWW
Substrate tips
21
Page 26

Check which is the correct side for printing, by reading the label inside the core or the note
●
inserted into the package (or see
Check that the substrate is correctly attached to the input core. Otherwise, you will see poor print
●
quality due to substrate advance errors.
You may find it easier to load a roll if you first move the carriage beam to its highest position.
●
While loading a roll, make sure the leading edge is parallel and straight across the output core, and
attached evenly (start taping the substrate to the core at the center, then move towards the edges).
After you have loaded a roll:
Make sure that the edge holders are set on both sides of the roll. Do not use any other Edge
●
holder from another printer, only use the edge holders that came with the printer. An incorrectly
loaded roll may cause waves or cockles in the substrate, leading to ink smearing and printhead
crashes.
Check the correct carriage beam position for printing: high for thick substrates, normal for others.
●
See
Set the carriage beam position on page 25.
Check that you are using the correct substrate preset in the HP Internal Print Server and the correct
●
Handle the substrate
ICC profile and other settings in the RIP.
HP substrates are optimized to provide the best out-of-the-box printing experience with your
●
printer. However, you may want to modify the ink limits or the number of passes; in which case,
temperature, vacuum or tensions may need to be adjusted. You can create a new substrate preset
from the default preset you are using and make your changes.
Tips for specific substrates on page 23).
Use the HP Internal Print Server to check that any required calibrations have been done: color
●
calibration, substrate-advance compensation, printhead alignment. See the Maintenance and
troubleshooting guide.
For the best print quality, the substrate should stay flat and unwrinkled in the printing zone, the
●
substrate advance should be constant and the substrate should move straight.
Do not cut off pieces of substrate while the substrate is loaded into the printer. This may cause the
●
remaining substrate to jam.
After printing, try to allow 24 hours before stacking, folding or rolling printed substrates.
NOTE: Printing on porous substrates may result in visible vapor being generated from the water-
based ink.
You can find further information on the Web:
The specifications, finishing, processing and warranty information for each individual HP substrate
●
are available from
HP Image Permanence information is available from
●
printpermanence/.
HP offers recyclable substrates such as HP HDPE Reinforced Banner, HP Wrinkle-free Flag with
●
liner, HP Heavy Textile Banner, HP Photo-realistic Poster Paper and HP DuPont™ Tyvek® Banner.
Recycling opportunities for these products may not exist in all areas. You should consult local
recycling resources about recycling these products. For recycling in the USA, please go to the HP
recycling services site,
http://www.hp.com/go/designjet/supplies/latex/.
http://www.hp.com/go/supplies/
http://www.hp.com/go/recycleLFmedia/.
22 Chapter 3 Handle the substrate ENWW
Page 27

Tips for specific substrates
Substrate Printing side Printing tips
HP Durable Frontlit Scrim
Banner
HP Outdoor Frontlit Scrim
Banner
HP HDPE Reinforced Banner Inside (matte side) This substrate is sensitive to high temperatures. Printing and
HP Permanent Gloss Adhesive
Vinyl
HP Permanent Matte
Adhesive Vinyl
HP Air Release Adhesive
Gloss Cast Vinyl
HP One View Perforated
Adhesive Window Vinyl
HP PVC-free Gloss Adhesive
Film
HP Wrinkle-free Flag with
liner
Inside (smooth side) Use the right settings to avoid printing issues described in
Table 3-1 Substrate preset settings on page 64.
Inside (smooth side) Use the right settings to avoid printing issues described in
Table 3-1 Substrate preset settings on page 64.
curing temperatures are set to minimize material deformation.
If the ambient temperature is high and you see excessive
deformation of the substrate, raise the carriage beam to its
highest position. Recyclable (see above).
Outside (glossy side) Use the right settings to avoid printing issues described in
Table 3-1 Substrate preset settings on page 64.
Outside Use the right settings to avoid printing issues described in
Table 3-1 Substrate preset settings on page 64.
Outside
Outside
Outside
Outside (fabric side) Take care to load the substrate and select settings correctly to
avoid liner delamination while printing. Recyclable (see
above).
HP Heavy Textile Banner Inside Recyclable (see above).
HP Light Textile Display
Banner
HP Blue Black Billboard Paper Outside (white side) Use the right settings to avoid printing issues described in
HP Photo-realistic Poster
Paper
HP White Satin Poster Paper Outside
HP PVC-free Wall Paper Outside
HP DuPont Tyvek Banner Inside This substrate is sensitive to high temperatures. Printing and
HP Satin Canvas Outside (smooth side) Use the right settings to avoid printing issues described in
Both sides; inside
recommended
Both sides This substrate is sensitive to high temperatures. Printing and
You are recommended to clean the platen after printing 50 m
(164 ft) of substrate.
Table 3-1 Substrate preset settings on page 64.
curing temperatures are set to avoid material deformation.
This substrate is recyclable: you can dispose of it together with
cardboard.
curing temperatures are set to minimize material deformation.
Recycleable (see above).
Table 3-1 Substrate preset settings on page 64.
Handle the substrate
ENWW
Substrate tips
23
Page 28

Substrate configurations
The substrate can be loaded in a variety of different configurations to suit your different needs. Before
loading, you must go to the HP Internal Print Server and select Substrate > Load/Unload, then
select the configuration you intend to use.
Handle the substrate
The basic configurations are illustrated below. These configurations can be used for single-roll or dualroll printing, and for porous or non-porous substrates. Porous substrates require the use of the ink
collector kit: see
The roll-to-roll configuration is suitable when you intend to print a whole roll without cutting
●
it until the input roll is empty. The substrate cannot be cut in mid-roll unless printing double-sided,
and then it must be reloaded afterwards.
The roll-to-free-fall configuration (LX850 only) is suitable when you want to cut and
●
remove each print as soon as it comes out of the printer. The substrate is kept under tension
between the input roll and the tension roller; but it can be cut after the tension roller because then
it is no longer under tension.
The ink collector kit (LX850 only) on page 28.
24 Chapter 3 Handle the substrate ENWW
Page 29
The roll-to-free-fall with collector configuration (LX850 only) is suitable when you may
●
want to cut the substrate and remove the output roll before the input roll is empty. The substrate is
kept under tension between the input roll and the tension roller; but it can be cut after the tension
roller because then it is no longer under tension.
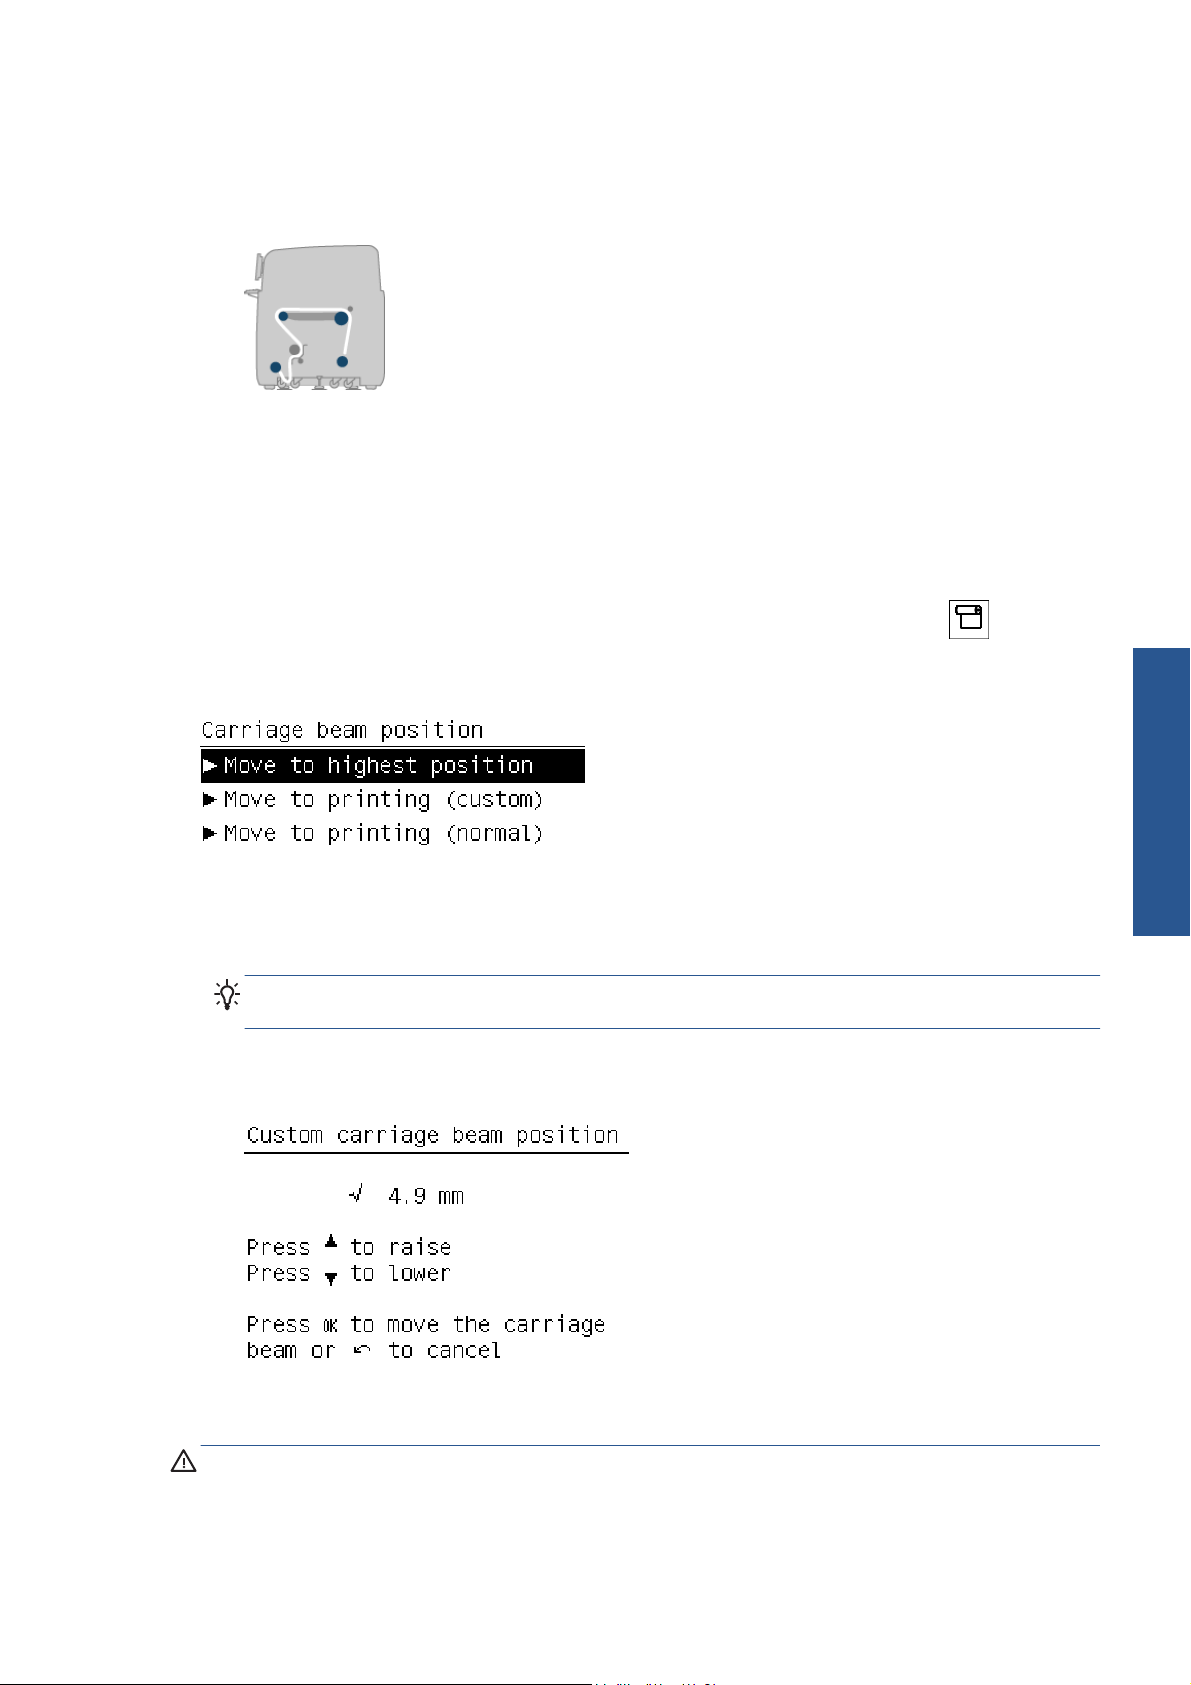
Set the carriage beam position
The carriage beam position determines the vertical distance between the printheads and the platen. If it
is too great, print quality will be impaired. If it is too small, there is a risk that the printheads will come
into contact with the substrate, causing smears or damage.
To set the carriage beam position, go to the front panel and select the Substrate menu
Substrate management, and press OK. Select Carriage beam position. You can choose the
highest position, a custom position or the normal position.
The highest position is not used for printing: it may be used for loading substrate or for
●
maintenance tasks.
A custom position is used for thick substrates, or for substrates that wrinkle slightly due to heating.
●
TIP: Try to avoid wrinkling by using substrates that do not wrinkle, or by using a slower print
mode that will allow you to lower the drying temperature.
We recommend setting the custom position to the thickness of the substrate plus two or three
millimeters. The current setting is indicated in the front panel by a √ mark.
, then
Handle the substrate
ENWW
The normal position is suitable for unwrinkled substrates up to 0.7 mm (0.03 in) thick.
●
WARNING! Keep away from the printer's moving parts until the carriage beam has reached its new
position.
Set the carriage beam position
25
Page 30
NOTE: LX850 only: If you have installed the ink collector kit, the normal position and the lowest
custom position are automatically adjusted to take account of that.
Prepare to print
The following steps that must be followed before the printer can print:
1. Ensure that the ink collector kit is installed for porous substrates, and not installed for non-porous
substrates. See
The ink collector kit (LX850 only) on page 28.
2. Start the printer. See
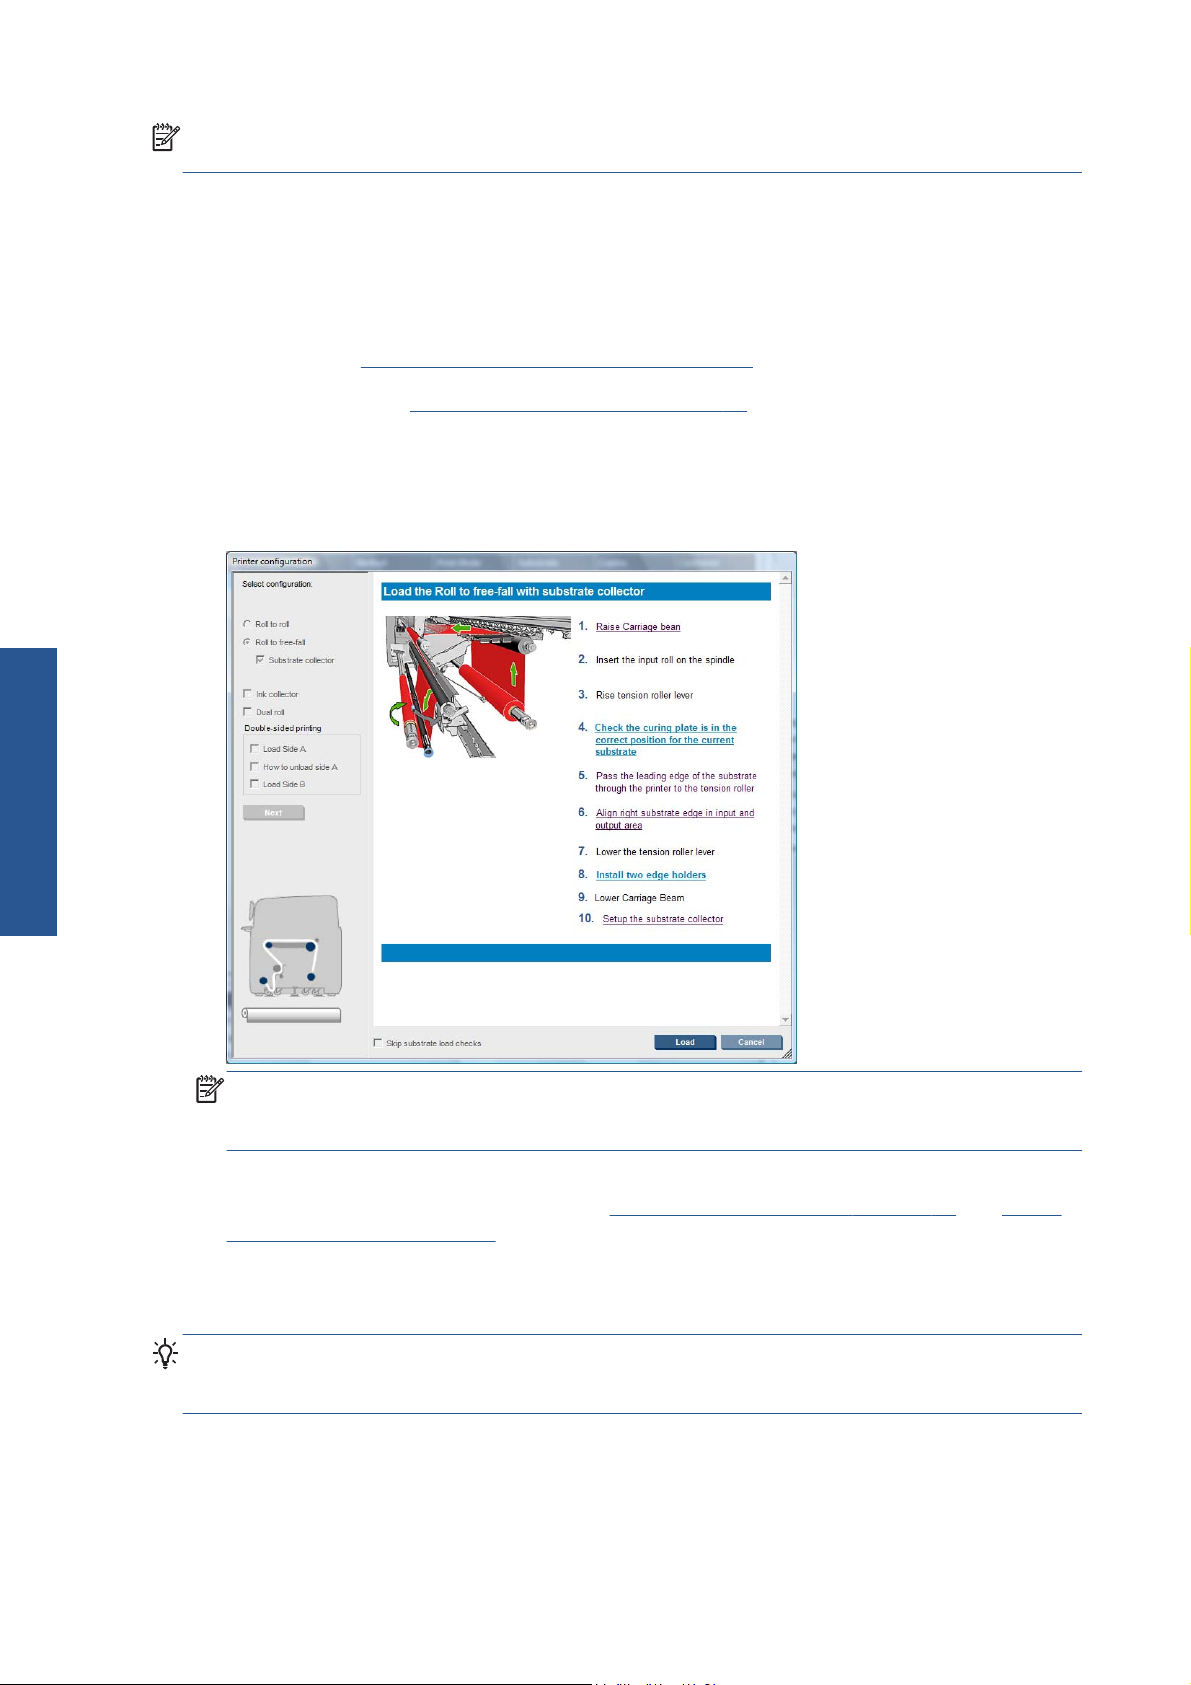
3. Go to the HP Internal Print Server and select Substrate > Load/Unload to open the Printer
Configuration window.
4. Select the printer configuration that you intend to use, and press Next to see the on-screen help.
Handle the substrate
Turn the printer on and off on page 12.
NOTE: The Skip Substrate load check box should be checked only if the printer has just
previously had the same configuration (i.e. the same substrate, same profile), and because of a
severe system error, you had to restart the printer.
5. Load the substrate. Substrate loading instructions are displayed in the HP Internal Print Server
window. For more detailed instructions, see
roll into the printer on page 38.
6. Press the Load button in the HP Internal Print Server to start the substrate check, then enter the
substrate type in the Loaded Substrate window.
TIP: If the printer has been idle overnight with substrate loaded, and exposed to high or low
temperatures, advance the substrate 13 to 25 cm (5 to 10 in) before printing, to avoid printhead
crashes or ink smears on the substrate.
26 Chapter 3 Handle the substrate ENWW
Load a roll onto the spindle on page 33 and Load a
Page 31

The substrate edge holders
The purpose of the substrate edge holders is to prevent the substrate edges from lifting up and jamming
while printing.
Standing in front of the printer, you should see the two edge holders on either side of the top surface of
the substrate. Slide the edge holders to the edges of the substrate and make sure that they are properly
positioned and not bent (which could cause a carriage crash).
TIP: The edge holders are easy to deploy with the carriage beam at its highest position.
The correct position is illustrated below, where (1) indicates the edge of the substrate. The substrate
should be free to move, and should not touch the ends of the edge holder.
CAUTION: Wrongly positioned edge holders could severely damage the printheads and carriage.
Removal and replacement
When the printer is delivered, the edge holders are already installed on the print platen, and there is
no need to remove them. When they are not being used they can be pushed to the side. However, the
central edge holders used for dual-roll printing must be removed for single-roll printing and for the LX
850 when printing on textiles, as the ink collector kit must also be installed.
Handle the substrate
ENWW
To install an edge holder, stand at the front of the printer and attach the rear of the edge holder to the
rear of the platen, then pull the front of the edge holder towards you and attach it to the front of the
platen.
CAUTION: Do not bend the edge holder. It should remain perfectly straight, otherwise it could
damage the printheads and carriage.
The substrate edge holders
27
Page 32

The ink collector kit (LX850 only)
Before printing on porous substrates, such as textile substrates, you must install the ink collector kit
provided with your printer, to protect the printer from the ink that falls through the substrate. The kit must
be removed before printing on non-porous substrates.
Kit components
1. Ink collector container
2. 8 ink collectors with replaceable foams
Handle the substrate
Install the kit
The ink collector kit must be installed before printing on porous substrates.
WARNING! Do not touch the internal enclosures of the printer's drying and curing modules while
installing the ink collector kit: they can be hot enough to cause burns.
CAUTION: Do not install the ink collector kit without declaring the configuration to the HP Internal
Print Server.
1. If any substrate is loaded, unload it.
2. Raise the carriage beam to its highest position.
3. Remove the edge holders from the substrate path.
4. If necessary, clean the platen and the curing plates with a cloth dampened with an all-purpose
cleaner.
5. Open the ink collector container and check that the ink collector foams are dry.
6. Follow the instructions in the HP Internal Print Server to complete the installation. If you need further
information, read the steps below.
CAUTION: If you install the kit incorrectly, some parts of the printer may be damaged.
28 Chapter 3 Handle the substrate ENWW
Page 33

7. When the carriage beam has stopped rising, go to the rear of the printer and check the
configuration of the Ink Collector, you will have to remove cut-outs from the foam material of the
Ink Collector so that the holes align correctly with the locators on the ink collector. Insert the first
ink collector on the left.
There is a stop that marks the position of the first ink collector.
Handle the substrate
ENWW
The ink collector kit (LX850 only)
29
Page 34

8. Moving gradually to the right, install the other ink collectors.
To install the last ink collector on the right, you have to move a blue spring-loaded clip.
Handle the substrate
9. Check that all the ink collectors are aligned with each other and that there are no gaps between
them.
10. Check that there are no gaps between the foams.
11. Check that the foams fit into the spaces provided for them. If they have expanded and no longer
fit, replace them.
12. Install the two diverter rollers.
30 Chapter 3 Handle the substrate ENWW
Page 35

In the roll-to-free-fall configuration, the output diverter is not needed.
●
In the roll-to-roll configuration, you are recommended to use both diverters, but in some cases
●
you may be able to minimize wrinkles by changing the position of a diverter or even by
removing one or both of them.
13. Check that the curing plates are in the correct position for the substrate you are loading (see
curing plates on page 32).
14. Load the substrate, which should pass outside the input diverter and inside the output diverter.
15. Deploy the edge holders.
16. If you have not already done so, go to the HP Internal Print Server and select Substrate > Load/
Unload. In the load configuration, ensure that the Ink collector box is checked.
17. Lower the carriage beam to the normal position.
18. You may need to enter the left edge position and the substrate width into the HP Internal Print
Server, if the printer cannot detect them.
Uninstall the kit
The ink collector kit must be uninstalled before printing on non-porous substrates.
1. Raise the carriage beam to its highest position.
2. If any substrate is loaded, unload it. Take care that it does not touch the ink collector foams, which
may be wet with ink.
3. Remove the edge holders, and clean them if necessary.
The
Handle the substrate
ENWW
4. Remove the diverter rollers.
The ink collector kit (LX850 only)
31
Page 36

5. Remove the ink collectors by pressing on the grips that secure them to the printer. To remove the
rightmost ink collector, first move aside the blue spring-loaded clip.
6. Store the ink collectors correctly in their box. If you stack them in a pile, they may warp.
Handle the substrate
7. Before lowering the carriage beam to the normal position, go to the HP Internal Print Server and
select Substrate > Load/Unload. In the load configuration, ensure that the Ink collector box
is unchecked.
The curing plates
For efficient drying and curing, you are recommended to keep the curing plates up (horizontal) for
textile and backlit substrates, and down (inclined downwards) for all other substrates.
Textile and backlit substrates
To raise a curing plate into the horizontal position, just lift it; it clicks into place.
32 Chapter 3 Handle the substrate ENWW
Page 37

All other substrates
To lower a curing plate into the inclined position, you must pull the black knobs underneath the plate.
TIP: If you find that you cannot get sufficient curing for a particular substrate with the curing plates
down, you could try raising them to the horizontal position.
Load a roll onto the spindle
Single-roll printing and double-sided printing
The spindle has a pneumatic connector at one end and a gear at the other.
1. Rest the roll securely on the Spindle Supports.
2. Check that the gear is on the correct side (which depends on the intended winding direction).
3. Insert the spindle into the roll.
TIP: The spindle is quite heavy in order to ensure stiffness and so avoid skew and wrinkles, so
two people are recommended for this operation. With only one person, you are recommended to
put the roll on the Spindle Supports, lift one end of the spindle and insert it into the roll, then lift the
other end carefully so that the first end does not fall out, and push the spindle into the roll.
4. Connect the air gun to the pneumatic connector on the spindle, and inflate the spindle so that it
cannot move inside the roll.
Handle the substrate
ENWW
Load a roll onto the spindle
33
Page 38

5. Note the position of the end of the roll on the scale marked at the geared end of the spindle. Its
position should be not less than 3.2 cm (1.25 in) on that scale, otherwise the substrate may go out
of the print zone and start touching the printer covers. The input and output rolls should be
positioned identically on their respective spindles.
TIP: When loading heavy rolls of inelastic substrates that are approximately half the spindle
length, you may find it useful to load the substrate closer to the center of the spindle, to reduce the
risk of skew, wrinkles and telescoping.
Handle the substrate
TIP: If the substrate is telescoped on the input roll, there is a risk of substrate jams and damage to the
printheads. Try to straighten the edges of the substrate to minimize telescoping on the input roll before
loading it into the printer.
TIP: Check that the substrate is attached to the input core.
The roll is now ready to be loaded into the printer.
TIP: If you are a regular user of different substrate types, you can change rolls more quickly if you
preload rolls of different substrate types on different spindles. Extra spindles are available for purchase,
Accessories on page 99.
see
Dual-roll printing
You can print on two rolls at the same time by using the dual-roll spindles provided with your LX850
printer or available as accessories for your LX820 printer.
The dual-roll spindle is marked to assist you in positioning the differential hub.
34 Chapter 3 Handle the substrate ENWW
Page 39

Loading the dual-roll spindles
1. With the spindles inserted into the Spindles Supports, Ensure that the differential hubs on the input
and output spindles are aligned with each other.
2. When both differential hubs are correctly positioned, use an Allen key 4 to tighten the screws and
secure them in place. If a differential hub is loose, the substrate could become skewed during
printing.
TIP: You should tighten the screw until the washer touches the bolt. If you can still see the yellow
spring, tighten the screw further.
TIP: It will be easier to load the roll onto the spindle if you lock the differential.
Handle the substrate
ENWW
Load a roll onto the spindle
35
Page 40

3. At each end of the spindle, unscrew and remove the outer parts of the hub, using an Allen key 4.
4. Unscrew and remove the inner part of each hub.
Handle the substrate
5. Insert the first roll on the spindle.
6. Replace the hub, and secure it with the Allen key.
7. Insert the second roll on the spindle.
8. Replace the hub, and secure it with the Allen key.
36 Chapter 3 Handle the substrate ENWW
Page 41

9. Ensure that the end of the right-hand roll is located within the maximum allowed distance from the
right-hand end of the spindle: it should be between the gear and the dashed line.
10. Ensure that the roll core fits tightly on the hub.
11. Ensure that the roll core fits tightly on the differential hub.
12. Load the spindle at the rear of the printer, and secure the spindle latches.
13. Use the same process to load the output spindle at the front of the printer, but load the spindle with
two empty cores to receive the printed substrate.
Handle the substrate
ENWW
Load a roll onto the spindle
37
Page 42

Load a roll into the printer
The objective when loading substrate is to get a uniform tension across its width and along the
substrate path to minimize the risk of skew, wrinkles and telescoping. There are three configuration of
loading the substrate into the printer:
Roll-to-Roll configuration
●
Dual Roll-to-Roll configuration (LX850 only, an accessory for the LX820)
●
Roll-to-Free-Fall configuration (LX850 only)
●
In each of these types of configuration there is a Substrate Loading Tool available that will help
you to load the substrate quicker and easier, refer to
on page 56
Load a roll (roll-to-roll configuration)
Handle the substrate
Load a roll with the 'Substrate Loading Tool'
The substrate roll is mounted on the rear spindle and will be collected on the front spindle. The substrate
goes from the rear spindle (1) over the main roller (2), over the platen (3), over the front roller (4) and
then to the front spindle (5).
NOTE: The above illustration shows the substrate loaded with the printed face outwards on both input
and output rolls. You can also load substrate with the printed face inwards on either or both rolls, in
which case the spindle will turn in the opposite direction. The printer asks you for the winding direction
if it cannot detect it automatically.
Each of the spindles has its own motor. The motors maintain tension on the substrate. Some vacuum is
applied at the level of the platen to keep the substrate flat. The substrate is moved forwards by the drive
roller motor, on which there is a pinch mechanism to stop the substrate from slipping. The pinches must
be up when moving the carriage beam, and down when printing or checking the substrate, otherwise a
message is displayed. The accuracy of the advance is controlled by the substrate-advance sensor, or,
for substrates that the sensor cannot see, by tracking the main roller movement.
Before loading a roll into the printer, you must have a roll loaded onto a spindle (the input roll) and an
empty core loaded onto another spindle (the output roll). See
38 Chapter 3 Handle the substrate ENWW
Load a roll onto the spindle on page 33.
Page 43

NOTE: For the output roll, use a single empty core the same length as the input core. Do not place
two or more shorter cores on the same spindle, which could cause substrate-advance problems.
TIP: The spindle by itself is quite heavy, and a roll of substrate can be much heavier. You are
recommended to use a forklift or some other equipment to move it into position; otherwise, lift one end
into the printer, and then the other end.
1. Go to the HP Internal Print Server and select Substrate > Load/Unload, then select the correct
configuration.
2. Remove the substrate edge holders in the print platen, or move them aside, so that they do not get
in the way while loading the substrate.
CAUTION: Loading the substrate on top of the edge holders could severely damage the
printheads and carriage.
3. Lift the substrate pressure handles at the rear of the printer.
4. Go to the front panel and select Carriage beam position > Move to highest position.
The printer raises the carriage beam, making it easy to insert the substrate. This process takes
about two minutes to complete. During this period, you can load the input and output rolls.
NOTE: While the carriage beam is rising, you can stop it by pressing the Cancel key.
TIP: If you use the Substrate loading tool, you do not need to raise the Carriage beam.
5. Bring the new roll on its spindle to the rear of the printer, with the geared end of the spindle on the
left.
6. Rest the ends of the spindle on the platforms provided at the rear of the printer; plastic pads are
provided to absorb the impacts.
Handle the substrate
ENWW
Load a roll into the printer
39
Page 44

7. Open the latches at both ends of the spindle (if they were closed) and push the roll on its spindle
into the printer.
8. Close the latches to secure the spindle in place.
TIP: If you cannot close the gear side latch, try sliding the spindle towards the side plate to make
sure the end flange is not sitting on the bearings.
Handle the substrate
9. In the same way, load the spindle with the empty core into the front of the printer. In this case, the
geared end of the spindle should be on the right.
10. Check that the printer has finished raising the carriage beam.
11. Check that the curing plates are in the correct position for the substrate you are loading (see
curing plates on page 32).
12. Pass the leading edge of the substrate through the printer to the output roll.
The
40 Chapter 3 Handle the substrate ENWW
Page 45

13. Once in front of the printer, if you find that you haven't unrolled enough substrate, select Start
main roller motion from the front panel to unroll some more. The substrate unrolls only when
you pull it.
14. If you are loading a vinyl substrate on an LX850 printer, you are recommended to use the output
diverter from the ink collector kit, to minimize wrinkles.
15. At the rear of the printer, measure the distance between the printer's left side plate and the left
edge of the substrate. This distance should be at least 145 mm (5.7 in), otherwise the edge of the
substrate may go out of the print zone and start touching the printer covers.
16. At the front of the printer, the right edge of the substrate on the empty core should be at the same
distance (A) from the right side plate as the distance measured on the input side.
NOTE: When loading non-elastic substrates, a difference of 2-3 mm (0.01 in) between the
measurements from the rear side plate and front side plate may be acceptable without problems of
skew or wrinkles.
Rear Front
TIP: It is important that tension is uniform across the width of the substrate. One way of
achieving this is to take the front substrate edge by its center and shake it alternately to right and
left several times while at the same time pulling the substrate until it reaches the core on the output
spindle.
17. When the substrate is evenly tensioned, attach it to the empty core with adhesive tape. Tape it first
in the center, and then at the left and right sides, making sure not to pull the substrate excessively
or leave it wrinkled.
Handle the substrate
ENWW
Load a roll into the printer
41
Page 46

18. Go to the front panel and select Carriage beam position > Move to printing (normal) to
lower the carriage beam into its normal position, close to the substrate. This process takes about
two minutes to complete.
NOTE: The Move to printing (custom) position allows you to set the printhead-to-substrate
distance for thick substrates or substrates that may wrinkle in the print zone, to avoid ink smearing.
Be aware that raising the printhead from the substrate may give poorer print quality.
WARNING! Do not insert your hands or anything else into the printer while the carriage beam
is descending.
19. Lower the substrate pressure handles at the rear of the printer. If you forget to do this, an alert will
remind you.
Handle the substrate
20. If you intend to use full bleed, do not use the substrate edge holders, but use Move to printing
(custom) to raise the carriage. Do not remove the edge holders; just move them aside at each
end of the platen.
21. If you do not intend to use full bleed, use the substrate edge holders to prevent the substrate edges
from lifting up and jamming while printing. See
22. Go to the HP Internal Print Server and press the Load button. The printer rotates both rolls to
check their diameters, and it also checks the width of the roll, the winding direction, the vacuum
and the substrate advance calibration (this takes 1–2 min).
NOTE: Some substrates (such as transparent substrates) cannot be measured by the printer in
this way. In such cases, you will be asked to enter the required information manually. Use the
scale on the curing module to see the value for the right-hand edge that must be entered manually
in the HP Internal Print Server.
The substrate edge holders on page 27.
42 Chapter 3 Handle the substrate ENWW
Page 47

23. In the HP Internal Print Server, choose from the list of substrate types the type that you have
loaded.
The contents of the Loaded Substrate window are determined automatically when the substrate is
loaded and checked. However, if the printer is unable to detect the edges of the substrate (for
instance, in the case of a transparent substrate), you will have to measure the distance of the left
edge from the printer's side plate, and complete the Left Edge and Width fields yourself.
For more information on when you might want to change the carriage beam position, see
Substrate tips on page 21.
An alert regarding substrate advance tracking may appear at this point. For more information on
when you might want to turn off automatic tracking, see
on page 67 and the Maintenance and troubleshooting guide.
The printer is now ready to print.
Load a roll (dual roll-to-roll configuration)
The two substrate rolls are mounted on the rear dual-roll spindle and will be collected on the front dualroll spindle. The substrate goes from the rear spindle over the main roller, over the platen, over the front
roller and then to the front spindle.
Fine-tune the settings in your new preset
Handle the substrate
ENWW
Load a roll into the printer
43
Page 48

NOTE: You can load substrate with the printed face inwards or outwards on the spindle, in which
case the spindle will turn in the opposite direction. The printer asks you for the winding direction if it
cannot detect it automatically.
Before loading two rolls into the printer, you must have both rolls loaded on the rear dual-roll spindle
and two empty cores loaded on the front dual-roll spindle. See
1. Go to the HP Internal Print Server and select Substrate > Load/Unload, then select the correct
configuration.
2. Remove the substrate edge holders in the print platen, or move them aside, so that they do not get
in the way while loading the substrate.
CAUTION: Loading the substrate on top of the edge holders could severely damage the
printheads and carriage.
3. Lift the substrate pressure handles at the rear of the printer.
4. If you need to raise the carriage beam, go to the front panel and select Carriage beam
position > Move to highest position. This process takes about 2 minutes to complete.
Handle the substrate
Load a roll onto the spindle on page 33.
The printer raises the carriage beam, making it easy to insert the substrate. This process takes
about 2 minutes to complete. During this period, you can load the input and output rolls.
NOTE: While the carriage beam is rising, you can stop it by pressing the Cancel key.
5. You may find it helpful to lock the differentials on the input and output spindles while loading.
6. Bring the new rolls on their spindle to the rear of the printer, with the geared end of the spindle on
the left.
44 Chapter 3 Handle the substrate ENWW
Page 49

7. If the two rolls are of unequal lengths, the longer roll should be on the right as seen from the front
of the printer; on the left as seen from the rear.
8. Rest the ends of the spindle on the platforms provided at the rear of the printer; plastic pads are
provided to absorb the impacts.
9. Open the latches at both ends of the spindle (if they were closed) and push the roll on its spindle
into the printer.
10. Close the latches to secure the spindle in place.
TIP: If you cannot close the gear side latch, try sliding the spindle towards the side plate to make
sure the end flange is not sitting on the bearings.
11. In the same way, load the spindle with the empty cores into the front of the printer. In this case, the
geared end of the spindle should be on the right.
12. Check that the printer has finished raising the carriage beam.
Handle the substrate
ENWW
Load a roll into the printer
45
Page 50

13. Pass the leading edges of both rolls through the printer to the output spindle.
TIP: Two people are recommended for this operation (one per roll).
14. Once in front of the printer, if you find that you haven't unrolled enough substrate, select Start
main roller motion from the front panel's Substrate menu
substrate unrolls only when you pull it.
Handle the substrate
15. Before taping the leading edges of the two substrate rolls to the empty cores on the output spindle,
check by measurement that they are in the same positions on the output spindle as on the input
spindle.
16. Tape the leading edges of both rolls to the empty cores on the output spindle.
17. Install the four edge holders. See
to unroll some more. The
The substrate edge holders on page 27.
46 Chapter 3 Handle the substrate ENWW
Page 51

18. Unlock the differentials on the input and output spindles.
19. Go to the front panel and select Carriage beam position > Move to printing (normal) to
lower the carriage beam into its normal position, close to the substrate. This process takes about 2
minutes to complete.
NOTE: The Move to printing (custom) position allows you to set the printhead-to-substrate
distance for thick substrates or substrates that may wrinkle in the print zone, to avoid ink smearing.
Be aware that raising the printhead from the substrate may give reduced print quality.
WARNING! Do not insert your hands or anything else into the printer while the carriage beam
is descending.
NOTE: If you are printing on a heavy roll, such as Self Adhesive, in order to reduce the risk of
substrate jam, we recommend adding an output diverter and increasing the vacuum level.
20. Go to the HP Internal Print Server and press the Load button. The printer rotates the rolls to check
their diameters, and it also checks the width of the roll, the winding direction, the vacuum and the
substrate advance calibration (this takes 1–2 min).
NOTE: Some substrates (such as transparent substrates) cannot be measured by the printer in
this way. In such cases, you will be asked to enter the required information manually. Use the
scale on the curing module to see the value for the right-hand edge that must be entered manually
in the HP Internal Print Server.
Handle the substrate
ENWW
Load a roll into the printer
47
Page 52

21. In the HP Internal Print Server, choose from the list of substrate types the type that you have
loaded.
The contents of the Loaded Substrate window are determined automatically when the substrate is
loaded and checked. However, if the printer is unable to detect the edges of the substrate (for
instance, in the case of a transparent substrate), you will have to measure the distance of the left
edge from the printer's side plate, and complete the Left Edge and Width fields yourself.
Handle the substrate
For more information on when you might want to change the carriage beam position, see
Substrate tips on page 21.
An alert regarding substrate advance tracking may appear at this point. For more information on
when you might want to turn off automatic tracking, see
on page 67 and the Maintenance and troubleshooting guide.
The printer is now ready to print.
Load a roll (roll-to-free-fall configuration) (LX850 only)
The substrate roll is mounted on the rear spindle; the printed substrate will be deposited on the floor in
front of the printer. The substrate goes from the rear spindle (1) over the main roller (3), over the platen,
over the front roller (5) and then to the tension roller (7), after which it continues to the floor. The
diverter rollers (2 and 6) and the ink collectors (4) are installed when printing on porous substrates.
Fine-tune the settings in your new preset
48 Chapter 3 Handle the substrate ENWW
Page 53

NOTE: You can load substrate with the printed face inwards or outwards on the spindle, in which
case the spindle will turn in the opposite direction. The printer asks you for the winding direction if it
cannot detect it automatically.
Before loading a roll into the printer, you must have a roll loaded onto the input spindle. See Load a
roll onto the spindle on page 33.
TIP: The spindle by itself is quite heavy, and a roll of substrate can be much heavier. You are
recommended to use a forklift or some other equipment to move it into position; otherwise, lift one end
into the printer, and then the other end.
1. Go to the HP Internal Print Server and select Substrate > Load/Unload, then select the correct
configuration.
2. Remove the substrate edge holders in the print platen, or move them aside, so that they do not get
in the way while loading the substrate.
CAUTION: Loading the substrate on top of the edge holders could severely damage the
printheads and carriage.
3. Lift the substrate pressure handles at the rear of the printer.
4. Go to the front panel and select Carriage beam position > Move to highest position.
The printer raises the carriage beam, making it easy to insert the substrate. This process takes
about 2 minutes to complete. During this period, you can load the input roll.
NOTE: While the carriage beam is rising, you can stop it by pressing the Cancel key.
5. Bring the new roll on its spindle to the rear of the printer, with the geared end of the spindle on the
left.
6. Rest the ends of the spindle on the platforms provided at the rear of the printer; plastic pads are
provided to absorb the impacts.
Handle the substrate
ENWW
Load a roll into the printer
49
Page 54

7. Open the latches at both ends of the spindle (if they were closed) and push the roll on its spindle
into the printer.
8. Close the latches to secure the spindle in place.
TIP: If you cannot close the gear side latch, try sliding the spindle towards the side plate to make
sure the end flange is not sitting on the bearings.
Handle the substrate
9. Check that the printer has finished raising the carriage beam.
10. Go to the rear of the printer and ensure that the tension roller lever is raised.
NOTE: The tension roller lever should always be raised unless the tension roller is in use.
50 Chapter 3 Handle the substrate ENWW
Page 55

11. Pass the leading edge of the substrate through the printer, over the main roller and the front roller
to the tension roller.
12. Once in front of the printer, if you find that you haven't unrolled enough substrate, select Start
main roller motion to unroll some more. The substrate unrolls only when you pull it.
TIP: When passing the substrate's leading edge behind the tension roller, it is important to have
no excess substrate between the front roller and the tension roller, although you can leave excess
substrate before the front roller at this stage. Once the leading edge has been passed behind the
tension roller, you can roll a stiff substrate downwards at the front roller or pull a flexible substrate
from under the tension roller through the holes provided in the substrate guide around the roller.
13. At the rear of the printer, measure the distance between the printer's left side plate and the left
edge of the substrate. This distance should be at least 145 mm (5.7 in), otherwise the edge of the
substrate may go out of the print zone and start touching the printer covers.
14. At the front of the printer, the right edge of the substrate on the tension roller should be at the
same distance (A) from the right side plate as the distance measured on the input side.
NOTE: There is a square indentation in the right side plate in front of the tension roller. You
should measure the distance between the substrate edge and the inside of this indentation.
NOTE: When loading non-elastic substrates, a difference of 2-3 mm (0.01 in) between the
measurements from the rear side plate and front side plate may be acceptable without problems of
skew or wrinkles.
Handle the substrate
ENWW
Load a roll into the printer
51
Page 56

15. When the substrate edge is correctly positioned and the substrate is evenly tensioned, lower the
tension roller lever.
Handle the substrate
Rear Front
16. Go to the front panel and select Carriage beam position > Move to printing (normal) to
lower the carriage beam into its normal position, close to the substrate. This process takes about 2
minutes to complete.
NOTE: The Move to printing (custom) position allows you to set the printhead-to-substrate
distance for thick substrates or substrates that may wrinkle in the print zone, to avoid ink smearing.
Be aware that raising the printhead from the substrate may give poorer print quality.
WARNING! Do not insert your hands or anything else into the printer while the carriage beam
is descending.
17. Lower the substrate pressure handles at the rear of the printer. If you forget to do this, an alert will
remind you.
52 Chapter 3 Handle the substrate ENWW
Page 57

18. If you intend to use full bleed, do not use the substrate edge holders, but use Move to printing
(custom) to raise the carriage. Do not remove the edge holders; just move them aside at each
end of the platen.
19. If you do not intend to use full bleed, use the substrate edge holders to prevent the substrate edges
from lifting up and jamming while printing. See
20. Go to the HP Internal Print Server and press the Load button. The printer rotates the input roll to
check its diameter, and it also checks the width of the roll, the winding direction, the vacuum and
the substrate advance calibration (this takes 1–2 min).
NOTE: Some substrates (such as transparent substrates) cannot be measured by the printer in
this way. In such cases, you will be asked to enter the required information manually. Use the
scale on the curing module to see the value for the right-hand edge that must be entered manually
in the HP Internal Print Server.
21. In the HP Internal Print Server, choose from the list of substrate types the type that you have
loaded.
The substrate edge holders on page 27.
The contents of the Loaded Substrate window are determined automatically when the substrate is
loaded and checked. However, if the printer is unable to detect the edges of the substrate (for
instance, in the case of a transparent substrate), you will have to measure the distance of the left
edge from the printer's side plate, and complete the Left Edge and Width fields yourself.
For more information on when you might want to change the carriage beam position, see
Substrate tips on page 21.
An alert regarding substrate advance tracking may appear at this point. For more information on
when you might want to turn off automatic tracking, see
on page 67 and the Maintenance and troubleshooting guide.
The printer is now ready to print.
Fine-tune the settings in your new preset
Load a roll (roll-to-free-fall with collector configuration) (LX850 only)
Handle the substrate
ENWW
Load a roll into the printer
53
Page 58

This configuration is similar to the roll-to-free-fall configuration, but with the addition of a collector roller
and loop shaper.
The following illustration shows a completed configuration with a single roll of porous substrate, so the
ink collector kit has been installed.
TIP: Do not try to load or unload the collector while printing.
Before starting to load the substrate, select a loop shaper of the correct length to match the substrate
Handle the substrate
width. The following tubes are supplied so that you can make up loop shapers of many different
lengths.
One 152-mm (6-in) tube
●
Two 203-mm (8-in) tubes
●
One 305-mm (12-in) tube
●
One 610-mm (24-in) tube
●
Two 1067-mm (42-in) tubes
●
Two end flanges, to be placed at each end to avoid lateral displacement of the loop shaper
●
during printing
For example, you can make up the following loop shapers.
914 mm (36 in): 610-mm (24-in) and 305-mm (12-in) tubes
●
1016 mm (40 in): 610-mm (24-in) and two 203-mm (8-in) tubes
●
1270 mm (50 in): 1067-mm (42-in) and 203-mm (8-in) tubes
●
1372 mm (54 in): 1067-mm (42-in) and 305-mm (12-in) tubes
●
1524 mm (60 in): 1067-mm (42-in), 305-mm (12-in) and 152-mm (6-in) tubes
●
1829 mm (72 in): 1067-mm (42-in), 610-mm (24-in) and 152-mm (6-in) tubes
●
1981 mm (78 in): 1067-mm (42-in), 610-mm (24-in) and two 152-mm (6-in) tubes
●
2032 mm (80 in): 1067-mm (42-in), 610-mm (24-in), 203-mm (8-in) and 152-mm (6-in) tubes
●
2489 mm (98 in): two 1067-mm (42-in), 203-mm (8-in) and 152-mm (6-in) tubes
●
54 Chapter 3 Handle the substrate ENWW
Page 59

2642 mm (104 in): two 1067-mm (42-in), 305-mm (12-in) and 203-mm (8-in) tubes
●
3200 mm (126 in): two 1067-mm (42-in), 610-mm (24-in), 305-mm (12-in) and 152-mm (6-in)
●
tubes
1. Follow the whole loading procedure for the roll-to-free-fall configuration.
2. Load an empty substrate core onto the collector spindle. For dual-roll printing, load two cores of
the same diameter onto a single spindle (it is not recommended to use a dual-roll spindle as the
collector).
3. Use the buttons on the front panel to advance the substrate's leading edge until it reaches the core
on the collector.
4. Tighten the substrate so that it is evenly tensioned, then attach the leading edge to the core with
tape, first at the center and then at the sides. There should be no wrinkles or slackness across the
substrate.
5. Use the buttons on the front panel again to advance the substrate so that a substrate loop is
produced between the tension roller and the collector.
6. Place the loop shaper into the substrate loop.
NOTE: Loop detection is done on the right-hand side of the printer; so avoid putting your foot or
any other object under the collector on the right-hand side.
7. Go to the HP Internal Print Server and press the Enable collector button.
8. Select the winding direction: Outwards is recommended, as it permits an output roll up to 230
mm (9 in) in diameter. If you select Inwards, the diameter of the output roll is limited to 150 mm
(5.9 in).
Handle the substrate
ENWW
NOTE: The winding direction cannot be changed on the fly: the collector has to be deactivated
and reactivated.
Load a roll into the printer
55
Page 60

Load a roll with the 'Substrate Loading Tool'
The Substrate loading tool enables you to load a substrate into the printer quicker as the Carriage
Beam does not need to be raised. In the example described here the substrate is loaded through the
path, but the tool can also be used to load the substrate through the Roll-to-free-fall configuration.
1. Use the buttons on the front panel to advance the substrate's leading edge until it reaches the
ground.
2. On the loading tool are substrate flaps held with magnets, open the flaps and insert the leading
edge of the substrate into the flaps.
Handle the substrate
3. Close the flaps over the leading edge of the substrate.
NOTE: Ensure the Substrate Edge Holders are moved to the side before pushing the substrate
through the substrate path.
56 Chapter 3 Handle the substrate ENWW
Page 61

4. Insert the tab of the Substrate Loading Tool into the substrate path and keep pushing it until it
emerges on the other side. You can advance some more substrate using the Move substrate key or
by turning the substrate input spindle manually.
5. Pull the tab of the Substrate loading Tool through the substrate path, and the substrate will follow.
If more substrate is required to pull it through using the Move substrate key to advance more
substrate.
WARNING! Do not pull the tool using the hole in the tab, grasp the edges.
Handle the substrate
ENWW
Load a roll with the 'Substrate Loading Tool'
57
Page 62

6. Pull the tab of the Substrate loading Tool through the substrate path. Once the substrate is fully
pulled through the printer's substrate path, open the magnetic substrate flaps to release the
substrate.
The Substrate Loading Tool can be stored under the printer.
Handle the substrate
Double-sided printing
Selecting the double-sided printing option will provide you with guidance and help specific to doublesided printing during the load process.
The roll-to-roll configuration is recommended for double-sided printing. You cannot perform doublesided printing if the dual-roll spindle or the ink collector kit is in use.
A double-sided job must be defined as a pair of images.
Side A is the first image to be printed.
●
Side B is the second image to be printed, on the reverse of Side A.
●
On Side A, after each row of images a black continuous line called a “registration line” is
automatically printed: (a) and (b) below. These registration lines are used while printing Side B to
minimize any registration errors in the direction of substrate movement.
When the whole of Side A has been printed, a space (c) is normally left blank for calibrations (the
substrate is already warmed up), and a further space (d) is left blank so that the substrate can be
loaded for printing Side B. However, these blank spaces are optional: you can turn them off.
58 Chapter 3 Handle the substrate ENWW
Page 63

Side A: Load and print
1. Load the Roll-to-Roll configuration: see Load a roll (roll-to-roll configuration) on page 38.
NOTE: Neither the dual-roll spindle nor the ink collector kit can be used while printing double-
sided jobs.
2. Before printing Side A we recommend performing the standard calibrations such as the Substrate
Advance Calibration and the Dynamic Color Registration (refer to the Maintenance and
troubleshooting guide).
3. Define side A preferences (see
4. Before unloading the substrate, select the Load/Unload button in the IPS, select How to
unload side A and follow the on-screen instructions.
NOTE: Jobs must be defined for double-sided printing, side A and side B, this information is
available while a job is printing in Print Properties.
NOTE: Selecting the check boxes Side B: loading space and Side B: Calibrations space
is highly recommended, refer to
Double-sided on page 89) and select the Print button.
Define double-sided job on page 90.
Handle the substrate
ENWW
Double-sided printing
59
Page 64

Side A: Unload
1. Cut the substrate close to the output roll.
2. Collect substrate onto the output spindle. Check the substrate is collecting correctly on to the
Handle the substrate
spindle to avoid telescoping.
3. Remove the input spindle.
60 Chapter 3 Handle the substrate ENWW
Page 65

4. Remove the output spindle (1), carry it around to the input side with the same orientation (2) and
install it into the input position (3). Maintain the same orientation: Left edge always on the
left, as indicated below with the colors blue and red.
5. When completed, click Done in the IPS window to confirm.
Side B: Load and print
1. Load Roll-to-Roll configuration Load a roll (roll-to-roll configuration) on page 38.
NOTE: By default the left edge of the substrate is detected to minimize registration errors along
the scan axis when printing double-sided. When printing on translucent substrates or types of
substrate with irregular edges you can disable this option by clicking Substrate Edge
Detection.
2. Align the registration line with the beginning of the platen.
If Side B: Calibration space was selected:
●
Handle the substrate
ENWW
Align the dotted line.
◦
Double-sided printing
61
Page 66

●
Handle the substrate
Perform the calibrations: Dynamic Color Registration and Substrate Advance
◦
Compensation (Refer to the Maintenance and Troubleshooting Guide)
Align the Image Registration Line (continuous line).
NOTE: To help make the alignment we recommend making a mark with a pen or pencil at the
registration line (1), but on Side B (2). Do not make a mark by cutting with scissors as this can
cause the substrate to come into contact with the printheads.
3. Define Side B (refer to Double-sided on page 89) and press the Print button.
NOTE: Before pressing Print, ensure that the correct side is selected.
The printer will automatically detect the Image Registration Line and the Side B image will be
positioned to minimize registration errors. This detection occurs automatically after each row
detected and an adjustment is made accordingly.
4. Unload the roll (see next).
Unload a roll
1. Go to the HP Internal Print Server and select Substrate > Load/Unload > Unload.
2. Lift the substrate pressure handles at the rear of the printer.
62 Chapter 3 Handle the substrate ENWW
Page 67

3. If you need to raise the carriage beam, go to the front panel and select Carriage beam
position > Move to highest position. The printer raises the carriage. This process takes
about 2 minutes to complete.
TIP: If you feel that the carriage beam is high enough, you can press the Cancel key at any time
to stop the movement.
TIP: This step is optional. It may be feasible to unload some substrates without raising the
carriage beam.
4. When the carriage has been raised, cut the substrate
5. At the front panel, select Turn output spindle to wind the substrate onto the output roll. Press
the Cancel key to stop winding.
6. Open the front latches and remove the output roll from the printer.
7. Remove the spindle from the roll.
8. At the front panel, select Turn input spindle to rewind the substrate onto the input roll. Press the
Cancel key to stop rewinding.
9. Open the rear latches and remove the input roll from the printer.
10. Remove the spindle from the roll.
The printer is now ready for new input and output rolls to be loaded.
View information about the substrate
Information about the loaded substrate is displayed at the bottom of the main screen of the HP Internal
Print Server.
To see more information, select the Substrate menu and then Settings.
Substrate presets
Each supported substrate type has its own characteristics. For optimum print quality, the printer changes
the way it prints on each different substrate type. For example, some may need more ink and some
may require higher temperatures for drying and curing. So the printer must be given a description of
the requirements of each substrate type. This description is called a substrate preset. The printer is
supplied with substrate presets for some specific substrate types, and also with presets for some generic
types. Each generic preset comes in three variations: with 100%, 150%, and 250% ink density.
As it is inconvenient to scroll through a list of all substrate types available, your printer contains
substrate presets for only the most commonly used substrate types.
For your convenience, substrate settings from many substrate vendors have been collected at
http://www.hp.com/go/LX850/solutions/ and http:// www.hp.com/go/LX820/solutions/. You can
check substrate availability using the Media Finder application that you will find there.
Handle the substrate
ENWW
To install a new substrate preset that you have downloaded, go to the HP Internal Print Server and
select Substrate > Presets management.
View information about the substrate
63
Page 68

Create a new substrate preset
Whenever you load a new substrate type into your printer, you must choose a substrate preset for it.
1. If possible, select a preset for the specific substrate type that you intend to load.
2. If no specific preset is available, select a generic preset that corresponds to the specific type that
you intend to load. You may be able to get better results by creating a specific preset for your
substrate type.
3. If no specific nor generic preset matches your substrate, select whatever preset seems to resemble
it most closely. You will probably get better results by creating a specific preset for your substrate
type.
Creating a new preset has several purposes.
You can assign a name of your own choice to a particular substrate.
●
You can adjust the preset to suit the precise characteristics of your substrate.
●
You can adjust the preset to your intended use of the substrate, which may range from highest-
●
Handle the substrate
quality printing to fast production output.
NOTE: You can change only the presets that you have created yourself. The presets supplied by HP
cannot be changed.
Before creating a new preset, it is useful to understand a little about how the printer works. Here are
some of the available settings.
Table 3-1 Substrate preset settings
Setting If too low If too high
Number of passes
The number of passes specifies how
many times the printheads will print over
the same area of substrate.
Curing temperature
Curing is needed to coalesce the latex,
creating a polymeric film which acts as
a protective layer, while at the same
time removing the remaining co-solvents
from the print. Curing is vital to ensure
the durability of the printed images.
Drying temperature
The heat applied in the printing zone
removes water and fixes the image to
the substrate.
The printer cannot deposit enough ink
over a given area, so colors are muted.
Because larger substrate advances are
required and ink has to be placed faster
on the substrate, the boundaries
between passes are more visible and
may be seen as horizontal lines across
the image. However, printing speed is
relatively high.
The print may emerge not fully dry, so
that the ink smears when rubbed with a
finger. The print may appear dry
immediately after printing and then
become wet to touch some seconds
later. If the curing temperature is very
low, the latex film is not created, in
which durability is drastically reduced.
Print quality defects such as bleeding
and coalescence may occur. Boundaries
between colors are not well defined.
Single-color area fills are not uniform:
ink is concentrated at the edges or in
clusters within the area fill.
Colors are vivid, print quality is high,
and printhead health is well maintained.
However, printing speed is relatively
low.
The substrate may wrinkle on the platen,
causing vertical banding or ink smears,
with substrate jams in extreme cases.
Fragile substrates may be damaged.
Thermal marks may be seen on the
substrate; they may appear as vertical
bands in some colors. The substrate may
wrinkle on the platen, causing vertical
banding or ink smears, with substrate
jams in extreme cases.
64 Chapter 3 Handle the substrate ENWW
Page 69

Table 3-1 Substrate preset settings (continued)
Setting If too low If too high
Substrate tension
Tension is applied at the input and the
output side. It needs to be evenly
distributed along the whole width of the
substrate, thus substrate load is a critical
operation.
TIP: Input tension should be higher
than output tension.
TIP: Output tension should be
increased whenever vacuum pressure is
increased.
Airflow power
The airflow generated by the fans in the
curing module is split into two air layers,
one reaching the print zone and the
other at the end of the curing zone. This
is needed to help remove the moisture
and co-solvents while the substrate is
being heated by the drying and curing
modules.
Vacuum pressure
The vacuum applied to the substrate in
the printing zone helps to hold the
substrate down on the print platen,
keeping the distance to the printheads
constant.
The substrate may be poorly wound onto
the output roll, with sagging and skew,
in which case it is likely to become
increasingly wrinkled in the printing
zone. Also, substrate advance could be
irregular, resulting in horizontal bands.
The printer will be less able to dry the
ink. In certain printing conditions (fast
print modes with fewer than 5 passes
and ink densities below 150%), there
could be print-quality defects such as
bleeding and coalescence and/or
incomplete drying of the prints.
The substrate can lift up off the platen
and touch the printheads. This can
smear the printed image, cause a
substrate jam or even damage the
printheads.
The substrate may be permanently
deformed or damaged.
With certain substrates and printing
conditions, an excessive airflow in the
print zone could cause print-quality
defects such as vertical banding. Also,
with some substrates, too high an
airflow could prevent the printer from
reaching the drying and/or curing
target temperatures, causing potential
system power errors.
Vertical bands can appear in some
colors. Also, for sticky substrates, friction
could be too high and substrate
advance irregular, resulting in horizontal
bands.
Ink restrictions
A way of specifying the maximum
amount of each color of ink that can be
laid down on the substrate.
Carriage beam position
The distance between the printing heads
and the substrate is a critical
determinant of print quality. It can be
adjusted by modifying the height of the
carriage beam above the platen.
Some colors may be too pale. The print may suffer from coalescence,
The substrate may touch the printheads.
This can smear the printed image, cause
a substrate jam or even damage the
printheads.
Prepare the printer for a new substrate
1. Whenever possible, try to ensure that your printer is in an optimum state before you create a new
preset: run any pending maintenance task, in particular printhead checks and alignment.
2. Stop the print queue and wait for the printer to finish the current job. No jobs should be sent to the
printer until the new substrate preset is complete.
3. Load your new substrate. The process of loading a substrate into the printer has been designed to
be completely independent of the substrate type. When loading, follow the correct procedure and
ensure that the roll width is specified, either automatically by the printer or by yourself. You may
Handle the substrate
wrinkles and insufficient curing,
depending on the substrate and the
other settings.
Print quality defects such as graininess,
shadows and worm-shaped dark areas
may occur.
ENWW
Create a new substrate preset
65
Page 70

not experience the best possible results if there are significant differences between the specified
and the actual roll width.
NOTE: You are recommended to use the roll-to-roll configuration when creating a new preset.
4. Choose a suitable carriage beam printing position: see Set the carriage beam position
on page 25.
Create and name the new preset
To create a new preset, you must copy an existing preset, then rename and modify it.
1. Select Substrate > Create in the HP Internal Print Server.
2. Choose a name for your substrate.
Handle the substrate
TIP: To avoid confusing other users, it is a good idea to use the substrate's commercial name.
TIP: If you plan to use more than one ink density with this substrate, or more than one number of
print passes, include the ink density and/or number of passes in the name.
66 Chapter 3 Handle the substrate ENWW
Page 71

3. Select the parent substrate. Show details can help you to choose one that's similar to the new
substrate. If you choose a generic substrate, select the ink density according to the expected
behaviour and applications for your substrate.
TIP: Use 100% ink density for substrates such as PVC Scrim Banner Frontlit, Green Banner,
Vinyl-Calendared, Vinyl-Cast, Blue back and Scrim banner.
TIP: Use 150 or 250% ink density for substrates such as PVC Scrim Banner Backlit, Perforated
Vinyl, Polyester Film, Polyester Fabric, Canvas Polyester and Tyvek.
4. You can now press the Create button to create a new entry in the substrates list, in the Custom
substrates category, with all its characteristics inherited from the parent substrate. Press Finish
if you do not plan to modify any substrate setting for now.
Consider how you plan to use your new substrate. If you require high-quality printing, you will need
more passes; if you require fast printing, you will need fewer passes. Make a list of the print modes you
are most likely to use.
Fine-tune the settings in your new preset
In the Settings pane you can modify various settings used in the printing process.
NOTE: The changes in the Settings pane apply only to the highlighted print mode, so you must
adjust each print mode independently. Any setting you have changed is indicated by an asterisk (*).
1. Select the number of print passes that you want to use. Color calibration uses six passes with
100% ink density, eight passes with 150% ink density, or fourteen passes with 250% ink density.
You are recommended to create a preset suitable for color calibration; for normal printing, you
may want to create other presets with different numbers of passes.
The recommended print modes for normal printing are as follows.
Maximum ink density Print quality Passes
Handle the substrate
ENWW
250%
High quality plus 18
High quality 14
Production plus 10
Create a new substrate preset
67
Page 72

Maximum ink density Print quality Passes
High quality plus 10
150%
100%
85% Production 4
70%
50% Draft 1
2. Press the Print test button with the printer adjustments inherited from the parent substrate. Look
for any potential problems during printing, such as:
Handle the substrate
●
●
TIP: In order to see better what is happening in the printing area, stand behind the printer, and
look towards the print platen through the pinch wheels: you will find it easy to see wrinkles, risk of
ink smearing or substrate deformation.
High quality 8
Production plus 6
High quality plus 8
High quality 6
Production plus 5
Billboard plus 3
Billboard 2
Potential head crashes or ink smears between the carriage and the substrate. Cancel the job
and/or turn off the printer if necessary to avoid damaging the printheads or any other
sensitive printer components.
Potential substrate deformation and/or wrinkles caused by too much heat.
3. Wait five minutes after the last part of the sample emerges from the printer.
4. Evaluate the sample, directly from the output area:
68 Chapter 3 Handle the substrate ENWW
Page 73

Brush your fingertip over the full squares in the upper part of the sample to check that the ink
●
is dry and firmly bonded to the substrate.
Look for coalescence problems in the middle part of the sample (see the Maintenance and
●
troubleshooting guide).
Look for ink bleeding problems in the lower part of the sample (see the Maintenance and
●
troubleshooting guide).
You are recommended to check the sample for problems and make adjustments to the settings in the
following sequence. After making any adjustment, reprint the sample to see the current situation.
Handle the substrate
ENWW
1. If an alert tells you that the substrate advance cannot be tracked automatically with the current
substrate, select Substrate > Settings and set the Automatic tracking (OMAS) field to Off. You
will need to adjust the substrate advance manually (see the Maintenance and troubleshooting
guide).
NOTE: This alert may appear if the substrate-advance sensor is dirty. See the Maintenance and
troubleshooting guide.
Create a new substrate preset
69
Page 74

2. If you experience printhead crashes, ink smears, substrate deformation, wrinkles or cockle, try
these adjustments in this order:
a. Check that the substrate is correctly loaded.
b. LX850 only: If there are wrinkles on self-adhesive vinyl substrates, install the Output
Diverter Roller.
c. Decrease the curing and drying temperatures. Use the following table as a guide.
Curing (°C) 80 80 85 85 90 90 95 95 100 100
Drying (°C) 55 60 55 60 55 60 55 60 55 60
d. Increase the Vacuum and/or the Tension settings.
If you increase the vacuum pressure, also increase the tension. The input tension should be
the output tension + 15 N/m.
Handle the substrate
e. Set the carriage beam to its highest position.
3. If the sample is damp or easily scratched, try these adjustments in this order:
a. Check that the ambient temperature is within the optimal range. See
b. Increase the curing and drying temperatures, unless you have already decreased them in a
c. Decrease the airflow in increments of 20%. If the edges of the substrate are still not fully
i. Try increasing the Vacuum setting by 10 mmH
0.
2
ii. Try increasing the Tension settings by 10 N/m.
iii. Try increasing the Tension settings by another 10 N/m.
iv. Try increasing the Vacuum setting by another 5 mmH
0.
2
Environmental
specifications on page 104.
previous step. Use the following table as a guide.
Curing (°C) 80 80 85 85 90 90 95 95 100 100
Drying (°C) 55 60 55 60 55 60 55 60 55 60
cured, turn off the curing fans using the switch at the side of the fans.
d. If your current ink density is 150% or above, decrease airflow in steps of 20%.
70 Chapter 3 Handle the substrate ENWW
Page 75

e. If all test sample blocks are damp in the 100% to 80% columns, adjust the total ink limit in
the RIP, or use the ink restrictions in the Color pane.
f. If any test sample block is damp in the 70% to 10% columns, increase the number of passes.
g. Decrease the ink density by adjusting the total ink limit in the RIP, or using the ink restrictions
in the Color pane.
4. If you see ink bleeding or coalescence, such as the coalescence shown below, try these
adjustments in this order:
a. Check that the ambient temperature is within the optimal range. See Environmental
specifications on page 104.
b. Check that the curing temperature has not been wrongly set.
c. If the curing fans were turned off at the switch by the side, turn them on now. If the airflow is
not already at 100%, increase the airflow in increments of 20% and check the status of the
curing after each increment.
d. Increase the drying temperature in steps of 5 degrees, unless you have already decreased it
in a previous step.
e. If your current ink density is 100%, increase airflow in steps of 20%.
f. Increase the number of passes.
g. Decrease the ink density by adjusting the total ink limit in the RIP, or using the ink restrictions
in the Color pane.
Handle the substrate
ENWW
Create a new substrate preset
71
Page 76

5. If you see vertical banding, try these adjustments in this order:
a. Decrease the Vacuum setting in steps of 5 mmH
b. Decrease the drying temperature, unless you have already increased it in a previous step.
c. Decrease airflow in steps of 20%, unless you have already decreased it in a previous step.
6. If you see horizontal banding, check the substrate advance pattern in the test sample (the fine
horizontal lines).
Handle the substrate
●
0, unless you have already increased it in
2
a previous step.
If you see magenta above the black lines, press the Print adjustment button in the Create
Substrate window and increase the substrate-advance setting.
If you see magenta below the black lines, press the Print adjustment button in the Create
●
Substrate window and decrease the substrate-advance setting.
If the lines are simply black, proceed to the next step.
●
7. If you see irregular horizontal banding, try these adjustments in this order:
a. Decrease the Vacuum setting in steps of 5 mmH
0, unless you have already increased it in
2
a previous step.
b. Adjust substrate tension according to the following recommendations:
The input tension should be the output tension + 15 N/m.
●
First increase tensions by 20 N/m. If results are unsatisfactory, decrease tensions in
●
steps of 10 N/m.
c. Increase the number of passes.
8. If colors are misaligned, try realigning the printheads manually. See the Maintenance and
troubleshooting guide.
When you have adjusted the settings for one print mode, you can proceed to other print modes.
However, it's not necessary to deal with them all at once: you can edit the substrate preset at any time
by selecting Substrate > Edit in the HP Internal Print Server.
TIP: Note the settings that you used with the first print mode. You can probably use the same settings
for other modes.
There is also a possibility to change the different settings while printing (in case the substrate preset
selected is a custom one). This can be done while printing, click the Print Adjustment button, and
then the different settings can be fine-tuned. Note that some changes might take some time to have an
impact (for example: increases or decreases in temperature).
72 Chapter 3 Handle the substrate ENWW
Page 77

Adjust the printing workflow for optimum color performance
1. Check your substrate's color calibration status and calibrate it if recommended, by selecting
Substrate > Color calibration in the HP Internal Print Server. See the 'Printer calibration'
chapter in the Maintenance and troubleshooting guide for more information.
2. Create ICC profiles for your substrate; see your RIP documentation for instructions. Normally, the
procedure includes setting the total ink limit as well as creating the profiles. When setting the total
ink limit in the RIP, bear in mind the basic problems to be avoided: ink bleeding and coalescence,
and damp prints caused by incomplete curing.
Export your new preset and profiles
Your substrate has been fully characterized from both the printer and the RIP points of view: a substrate
preset is present in the printer, and one or more ICC profiles are present in the computer hosting your
RIP. To export the ICC profiles, see your RIP documentation. To export your substrate preset, go to the
HP Internal Print Server and follow these steps:
1. Select Substrate preset management.
2. Select the Export tab. A file with the extension oms will be saved, which can be imported by
another printer.
To import your substrate preset into another printer:
1. Select Substrate preset management.
2. Select the Import tab, then select the correct file with the extension oms.
Edit a substrate preset
To edit the technical characteristics of a custom substrate type, go to the HP Internal Print Server and
select Substrate > Edit. This allows you to change the settings in the substrate preset, exactly as when
creating a new preset. See
NOTE: Only custom substrates can be edited.
Fine-tune the settings in your new preset on page 67.
Remove a substrate preset
To remove a substrate preset from your printer, go to the HP Internal Print Server and select Substrate
> Remove. Then select the category and type of the substrate you wish to remove from a list of
removable substrates.
Handle the substrate
ENWW
Edit a substrate preset
73
Page 78

4 Handle the ink system
Ink system components
Ink cartridges
Ink cartridges store the ink and are connected to the printheads, which deposit the ink on the substrate.
You can purchase ink cartridges for your printer, see
How to order supplies on page 80.
Ink and printheads
CAUTION: Observe precautions when handling ink cartridges because they are ESD-sensitive
devices (see the
Each cartridge contains 3 liters of HP Latex Ink, which requires no special ventilation and creates no
hazardous waste. The cartridge consists of a bag contained in a recyclable cardboard box.
Printheads
The printheads take ink from the ink cartridges and deposit it on the substrate. You can purchase
printheads for your printer, see
Glossary on page 106). Avoid touching pins, leads and circuitry.
How to order supplies on page 80.
74 Chapter 4 Handle the ink system ENWW
Page 79

CAUTION: Observe precautions when handling printheads because they are ESD-sensitive devices
(see the
The printer's six-color writing system uses three dual-color printheads with a total of 31,680 nozzles
(5,280 per color).
Glossary on page 106). Avoid touching pins, leads and circuitry.
Printhead cleaner roll
The printhead cleaner roll is a roll of absorbent material used to clean surplus ink from the printheads
after each pass over the substrate.
To change the printhead cleaner roll when necessary, see the Maintenance and troubleshooting guide.
A new roll is provided in the Maintenance Kit (see
TIP: You should not touch the printhead cleaner roll except when you need to replace it. Any
interference with the roll may prevent the printer from keeping track of roll usage, in which case you
may see spurious error messages, and a printing job may be cancelled unnecessarily.
Aerosol filters
The printheads produce many fine droplets of ink, most of which are placed accurately on the
substrate. However, a small proportion of these droplets escape sideways; the two aerosol filters are
placed on either side of the printhead carriage to intercept them.
How to order supplies on page 80).
To change the filters when necessary, see the Maintenance and troubleshooting guide. New filters are
provided in the Maintenance Kit (see
How to order supplies on page 80).
Ink deposits
In order to check the status of the printhead nozzles, the printer expels a few drops of ink from each
nozzle of each printhead into the ink deposits. This is done at the start of each print job, whenever a
printhead is replaced, and whenever you request a printhead check from the HP Internal Print Server.
To clean the ink deposits when necessary, see the Maintenance and troubleshooting guide.
How to work with ink system components
Remove an ink cartridge
An ink cartridge should be removed and replaced when it is empty or past its expiry date. An empty
cartridge is indicated in the HP Internal Print Server and by an orange blinking light beside the
cartridge itself. You may also decide to remove a cartridge if it contains little ink and you want to
provide for a long period of unattended printing.
The printer can continue printing without any ink cartridges for at least 20 minutes, depending on the
print mode and the job being printed. Therefore, cartridges can be replaced while printing continues. A
functional ink cartridge is required in order to start a new job.
Ink and printheads
ENWW
1. Go to the cartridge that you intend to remove. The black, yellow and cyan cartridges sit at the
front of the printer; the magenta, light magenta and light cyan cartridges are at the rear.
How to work with ink system components
75
Page 80

2. Disconnect the cartridge connector by pressing the tabs on each side of it and pulling it gently
away from the cartridge.
3. Remove the empty cartridge from the printer.
4. If the cartridge does not seem to be empty, please refer to the Maintenance and troubleshooting
guide. Some stranded ink can be expected, ranging from 2% to 5% of the original content.
Insert an ink cartridge
1. Check that the new cartridge is of the correct color.
Ink and printheads
2. Place the cartridge on a flat surface and turn it four times (rotating it through 360 degrees) as
indicated on the label, to ensure that the ink is well mixed before use.
3. Tear off the colored label, then remove the packaging and the red protective cap.
4. Put the new cartridge into its correct place on the printer. The black, yellow and cyan cartridges sit
at the front of the printer; the magenta, light magenta and light cyan cartridges are at the rear.
5. Check that the rubber part around the needle in the cartridge connector is clean. Clean gently if
necessary.
76 Chapter 4 Handle the ink system ENWW
Page 81

6. Connect the cartridge connector to the cartridge.
NOTE: The cartridge connectors will refuse connection to the wrong type or color of cartridge. If
you cannot connect the connector easily to the cartridge, please check that you have the correct
cartridge.
7. Ensure that the side buttons on the cartridge connector are in the 'out' position, showing successful
connection.
8. A few seconds after you have connected the cartridge, the green LED should be lit. If it is not lit
after 10 seconds, please reconnect the cartridge. The LED will turn red if the supply is expired or
not valid; please refer to the HP Internal Print Server or to the front panel for further details and
corrective action.
Remove a printhead
If a printhead develops an electrical fault or overheats, the HP Internal Print Server will indicate that it
should be reseated or replaced. In addition, you may wish to replace a printhead if its warranty has
expired or if you feel that its performance is not adequate.
1. Ensure that the printer is not trying to print: stop the job queue.
2.
At the front panel, select the Ink System icon
3. Open the printhead access door in the side of the printer.
and then Replace printheads.
Ink and printheads
ENWW
How to work with ink system components
77
Page 82

4. Lift the carriage cover.
5. Lift the cover of the printhead that you intend to remove. It should be indicated by a flashing red
light.
6. Lift the handle provided with the printhead, and pull the handle gently upwards to disconnect the
printhead from the carriage, as shown in the illustration below.
Ink and printheads
NOTE: The yellow/magenta printhead is more difficult to remove, because it is located partly
underneath the carriage structure. Remove it carefully.
7. Remove the printhead from the printer. The original packaging materials can be used to discard
the old printhead or in case there is a need to return it to HP.
Insert a printhead
1. Check that the new printhead is of the correct colors.
NOTE: Each printhead has a unique shape and cannot be inserted into the wrong slot.
78 Chapter 4 Handle the ink system ENWW
Page 83

2. Shake the printhead according to the instructions on the packaging.
3. Remove its packaging and protective caps.
TIP: You may wish to keep the protective caps for later reuse, in case you ever want to remove
a printhead from the printer.
4. Put the new printhead into its correct place in the printer, and lower its handle.
CAUTION: Insert the printhead slowly and vertically, straight down. It may be damaged if you
insert it too fast, or at an angle, or if you rotate it as you insert it.
5. Close the cover of the new printhead.
6. Close the carriage cover.
7. Close the printhead access door. The printer checks that the new printhead has been correctly
inserted, and recommends printhead alignment (this is optional).
Ink and printheads
ENWW
8. Restart the job queue.
How to work with ink system components
79
Page 84

Check the status of the ink system
The status lights in front of each ink cartridge (on the left side) give a quick indication of its status.
Green steady light: no problems
●
Green slowly blinking light: cartridge in use, do not touch
●
Orange blinking light: cartridge is empty
●
Red steady light: there is a problem, check the HP Internal Print Server for more information
●
All lights off: no cartridge, cartridge not connected, or unknown problem
●
Ink and printheads
The level of ink remaining in each color is displayed at the bottom right of the HP Internal Print Server's
main screen. You can see more details of ink cartridge and printhead status by selecting Information
> Supplies.
The level of ink remaining in each color can be displayed on the front panel by selecting the Ink System
icon
NOTE: The ink level estimates are not guaranteed to be accurate.
. This screen is usually displayed by default.
How to order supplies
There are several alternative ways to order supplies for your printer.
Visit
●
●
●
The following ink supplies can be ordered for your printer.
Table 4-1 Ink cartridges
http://www.hp.com/go/scitexlx_order/.
Call your service representative (see the Maintenance and troubleshooting guide) or visit your
local reseller.
Customers in some countries can use HP Direct.
Cartridge Part number
HP LX610 3-liter Black Latex Scitex Ink Cartridge CN673A
HP LX610 3-liter Cyan Latex Scitex Ink Cartridge CN670A
HP LX610 3-liter Magenta Latex Scitex Ink Cartridge CN671A
80 Chapter 4 Handle the ink system ENWW
Page 85

Table 4-1 Ink cartridges (continued)
Cartridge Part number
HP LX610 3-liter Yellow Latex Scitex Ink Cartridge CN672A
HP LX610 3-liter Light Cyan Latex Scitex Ink Cartridge CN674A
HP LX610 3-liter Light Magenta Latex Scitex Ink Cartridge CN675A
Table 4-2 Printheads
Printhead Part number
HP LX610 Yellow/Magenta Scitex Printhead CN667A
HP LX610 Cyan/Black Scitex Printhead CN668A
HP LX610 Lt Magenta/Lt Cyan Scitex Printhead CN669A
Table 4-3 Cleaning and maintenance kits
Name Product number
HP Scitex LX Printer Cleaning Kit CK832A
HP LX600 Maintenance Kit CC591A
For more information about cleaning and maintenance kits, see the Maintenance and troubleshooting
guide.
How to recycle supplies
For information on recycling used printer supplies, please visit http://www.hp.com/recycle/.
Ink and printheads
ENWW
How to recycle supplies
81
Page 86

5 Printing options
HP Internal Print Server menus
The HP Internal Print Server provides the following menus.
The File menu
Add New Job
●
Add Existing Job
●
Edit Job
●
Delete Job
●
Exit
●
The Substrate menu
Load/Unload
●
Rename
●
Find new presets
●
Properties
●
Create
●
Edit
●
Remove
●
The Information menu
Alerts
●
Supplies
●
Service Information
●
Maintenance
●
Accounting
●
The Tools menu
Preferences
●
Proactive Support
●
Firmware update
●
CallMe@HP
●
The Printer menu
Printing adjustments
●
Printhead alignment
●
Printhead cleaning
●
Advance calibration
●
Dynamic color registration
●
Enable/Disable collector
●
The Help menu
About
●
Color calibration
●
Presets management
●
Settings
●
Printing
82 Chapter 5 Printing options ENWW
Page 87

Manage print jobs
Add a job from the RIP
When the RIP has generated a print job, its output folder will contain at least three files:
An XML file containing job settings
●
A low-resolution TIFF file for use in previews
●
At least one high-resolution TIFF file containing the image to be printed
●
The output folder should be the shared folder on the HP Internal Print Server computer that was created
during printer installation. The HP Internal Print Server cannot take files directly from the network
because access would not be fast enough.
1. Go to the HP Internal Print Server.
ENWW
Manage print jobs
Printing
83
Page 88

2. Select the Add New Job icon or File > Add New Job. Navigate across the network to the
folder containing the print job files, and click Open to import the job into the HP Internal Print
Server.
3. The next dialog box displays information about the job.
You can change the default job name the first time you open its properties window. Once you
save the job name, it cannot be changed. Use the Save As button to create a copy of an existing
job with a different name.
Although you can change the substrate and print mode from this window by using the Change
button, you are recommended not to do so, because it may adversely affect print quality. It is
better to make such changes from the RIP.
Printing
The Job Info tab can be used to select annotations and special marks to be printed alongside the
image.
The Job Notes field can be used to add some text to be printed in the bottom of each copy with
the annotations, if any.
4. Click the Save button to store the job in the HP Internal Print Server for further processing.
84 Chapter 5 Printing options ENWW
Page 89

Rotate a job
A job can be rotated by 90 degrees in either direction by using the rotation icons at the top right of the
Job Properties window.
NOTE: Rotation is available only when the printer is not printing.
The effect of rotation is shown in the preview. After you press the Save or Save As button in the Job
Properties window, the actual rotation of the job takes place. This could take a few minutes, depending
on the image size and resolution, during which the job can be neither printed nor edited, and the job
status is shown as Rotating. When it is done, the job is ready for printing.
Manage the print queue
The main screen of the HP Internal Print Server displays the queue of print jobs and various icons that
can be used to manage the queue.
ENWW
Manage print jobs
Printing
85
Page 90

Above the print queue are the following icons:
Printing
Add New Job
●
Add Existing Job
●
available unless deleted manually.
Edit Job
●
Proof
●
image before printing.
Activate
●
Hold
●
Up
●
Down
●
Remove
●
To the left of the print queue are the following buttons:
Single: If this is pressed, you can select and print only one job at a time. You can request multiple
●
copies of it.
Queue: If this is pressed, all listed jobs are queued for printing.
●
: Proof a job in the queue (not available for nested jobs). This can be used to crop the
: Hold a job in the queue.
: Select the next job upwards in the queue.
: Select the next job downwards in the queue.
: See Add a job from the RIP on page 83.
: Return a job to the queue that has been printed already. Printed jobs remain
: Edit the properties of a job in the queue.
: Activate a job in the queue.
: Delete the selected job from the queue.
Print Job/Print Queue: Prints a single job (if Single has been pressed) or the whole queue (if
●
Queue has been pressed).
86 Chapter 5 Printing options ENWW
Page 91

Abort: Stop printing the current job immediately. The job status changes to Finishing, and the
●
printer will dry the partially-printed job before continuing with the next job in the queue.
If you press Abort again, the drying process also stops, and the queue is halted.
Print adjustment: Display the substrate-advance compensation (which can be changed).
●
Settings: Display information on the loaded substrate.
●
Rows to Register: This option enables you to choose which registration lines are scanned by
●
the printer. If you select 1 (the default), the printer stops printing and checks every registration line.
If you select 2 (for example), the printer scans every second registration line, which increases the
printing speed, but also slightly increases the chances of misregistration. If you select 0 (zero), the
printer does not scan the registration lines.
TIP: You may need to select 0 if the substrate advance sensor cannot detect the registration
lines, in which case a system error 78.7:01 is displayed.
Delete a job
This is the correct procedure to delete a job.
1.
Remove the job from the queue by using the Remove icon
selecting the option Remove. When deleting a job in this way, the files may or may not be left
on the printer's hard disk, and the file may or may not still be available from the list in the Add
Existing Job window, depending on the settings in Tools > Preferences > Queue Rules, in the
section “When removing jobs from the queue”.
or by right-clicking the file and
2. Remove the job with File > Delete job, select the job and press the Delete button. Now the file
cannot be retrieved from the Add existing job window.
Layout method
The Job Properties window is displayed when you import a job into the HP Internal Print Server, or
when you right-click the job queue in the HP Internal Print Server.
This window contains a Method list that allows you to choose among the following alternatives:
Simple: one or more copies of a single job are printed on the substrate one after the other, each
●
copy below the previous one. You can specify the vertical gap between successive copies of the
same job.
Step and Repeat: multiple copies of a single job are printed one after the other, across the
●
width of the substrate if there is room. See
Tiling: a single job is printed in sections, to be put together later. See
●
Nesting (Multi-image): the selected jobs are printed one after the other, across the width of
●
the substrate if there is room. You can use the Advanced Nesting Arrangement window to alter the
layout manually. See
All layout methods give you the opportunity to define a left margin that will be left blank, or to center
your jobs on the substrate so that there is an equal amount of white space on both sides.
Step and Repeat on page 88.
Tiling on page 88.
Nesting on page 96.
Printing
ENWW
All layout methods can be used with dual-roll printing. In this case, the software will warn you if your
layout involves printing in the gap between rolls; but it will allow you to do it if you disregard the
warning.
Layout method
87
Page 92

Step and Repeat
Step and Repeat is a layout method that allows you to print multiple copies of a job side by side across
the width of the substrate, if there is room.
Tiling
Printing
This method has the following options:
Steps: the number of copies to print horizontally, across the width of the substrate.
●
Step gap: the horizontal gap between copies.
●
Repeat gap: the vertical gap between copies.
●
Fit Substrate Width: if this option is checked, the number of steps will be set to the maximum that
●
will fit into the substrate width.
The Repeats field (the number of rows of copies to be printed) is calculated automatically and cannot
be altered directly.
Tiling is a layout method that allows you to print a large image in sections, and then put the sections
together later.
88 Chapter 5 Printing options ENWW
Page 93

This method will automatically cut your image into sections and print the sections separately. There are
two alternative ways to select the size of the sections:
Select the width and height of each section. The number of sections is then calculated
●
automatically.
Select the number of horizontal and vertical sections. The width and height of each section is then
●
calculated automatically.
If you choose a non-zero overlap, the size of each section will be increased by that amount so that the
printed sections will overlap when put together.
If you have requested multiple copies, you can specify the vertical gap between copies.
The drop-down list at the top of the preview field allows you to preview all sections or just one of the
sections to be printed.
Double-sided
Double-sided printing helps you to print rows of images on both sides of the substrate.
Double-sided printing functionality is a process to guide you when printing a substrate in both
●
sides.
Double-sided printing can be used to print the same image or different images in each side.
●
ENWW
The functionality automatically compensates for any registration errors, of the position of the plot,
●
along both axes (along the substrate width + substrate advance) to minimize any errors.
Select double-sided printing when printing a single roll of a non-porous substrate, using LX610
●
inks only.
Layout method
Printing
89
Page 94

NOTE: Neither the dual-roll spindle nor the ink collector kit can be used with this option.
Even though double-sided printing uses the same substrate, each side must be considered as
●
printing on different substrates due to the different mechanical properties. This is the main reason
why calibrating each side of the substrate is highly recommended; and it can be done easily.
NOTE: The images of Side A and Side B must have approximately the same dimensions. The
image that you select for each side must be the same image for the entire side.
Create a job
Any image created in the RIP can be printed in either side A or side B, without any special
requirements. However, side A and side B must have the same dimensions when printed on the
substrate.
NOTE: In order to minimize registration errors on some substrates, you are recommended to
compensate for substrate contraction in the RIP when the image is generated.
Select images to print
1. Select Create a double-sided job in the Internal Print Server.
2. In the 'Add a double-sided job' window, press the upper Browse button to select a filename
containing the image to be printed on Side A (the first side to be printed).
Define double-sided job
Printing
3. Press the lower Browse button to select a filename containing the image to be printed on Side B
(the second side to be printed).
4. Press the Next button.
The following screen is displayed. This is where you can define the properties of the double-sided job.
90 Chapter 5 Printing options ENWW
Page 95

1. Select from the drop-down menu the side whose properties you want to define or view.
NOTE: The side you select here is the side that will be printed. To print side B, select B.
For side A you can define the following properties:
●
Copies: One or more copies of a single job are printed on the substrate one after the
◦
other, each copy below the previous one
Repeats: The Repeats field (the number of rows of copies to be printed) is calculated
◦
automatically and cannot be altered directly.
Steps: the number of copies to print horizontally, across the width of the substrate.
◦
Step gap: the horizontal gap between copies.
◦
Repeat gap: the vertical gap between copies.
◦
Center: All layout methods give you the opportunity to define a left margin that will be
◦
left blank, or to center your jobs on the substrate so that there is an equal amount of
white space on both sides.
ENWW
NOTE: To compensate for any possible registration errors that may occur, centering
the images is highly recommended.
For side B you can define the following and also review all of the above properties:
●
Rows to Register: This option enables you to choose which Image Registration Lines are
◦
scanned by the printer, if you select 1 (the default), the printer stops printing and checks
Layout method
Printing
91
Page 96

every Image Registration Line, if you select a higher number, for example 2, the printer
only scans every second Image Registration Line. This increases the speed of the job, but
also slightly increases the chances of misregistration.
◦
Rotate: This option enables you to rotate the image 180
o
.
2. In the Layout tab are the following options, we recommend using these options when printing
double-sided:
Side B calibration space: When this check box is selected the printer leaves an area of
●
substrate empty after the images have been printed (the substrate is warmed-up), this is to
give space to perform certain calibrations on side B that are recommended, such as the
Dynamic Color Registration and the Substrate Advance Compensation. At the end of the
empty space a dotted line is printed.
Side B loading space: When this check box is selected the printer will advance the
●
substrate so that there is sufficient substrate to load side B.
Preview (Image/Layout/Preview both)
There are three different previews:
1. Click the Image button and preview the selected images.
2. Click the Layout button and preview how the printer will print each side.
Printing
92 Chapter 5 Printing options ENWW
Page 97

Print
3. Click the Preview both button to see a simulation of how both images will print on side A and
on side B. You can use this simulation preview to check that the orientation of the images relative
to each other is how you expect the finished result to be.
1. Select Side A from the drop down menu
2. Select Save or Save As.
ENWW
3. Select Print Job and print the selected images.
Layout method
Printing
93
Page 98

The number of copies will be automatically distributed according the parameters defined in the
Define double-sided job on page 90 (number of rows, column, centered). .
step
At the end of each row a black registration line will be printed automatically (a). This
●
registration line will be used while printing the side B, to position the side B rows and
minimize the registrations errors.
It is recommended to mark with a marker the back side of the last Image Registration Line (b)
●
to position the substrate during the side B loading process.
When the side A has been printed, after the last continuous black registration line, the printer
●
will automatically provide an area to perform the side B calibrations (c) and side B loading
(d) area.
Printing
NOTE: The area dedicated to calibrations, between the continuous registration line and the
dotted line (c), must be advanced at the same speed as the printed area, and at the same
temperature, to ensure an effective calibration.
4. When Side A has finished printing, unload side A, refer to Side A: Unload on page 60.
94 Chapter 5 Printing options ENWW
Page 99

5. Check that the optical advance sensor is clean, do not hesitate to clean it, refer to the
Maintenance & Troubleshooting Guide -> Hardware Maintenance -> Clean the substrate-advance
sensor.
6. Load Side B refer to
NOTE: For accurate printing we recommend that Substrate Edge Detection is selected.
7. When Side B is loaded perform the following, for more details of these procedures refer to Side B:
Load and print on page 61:
a. Align the dotted line with the platen
b. Perform the calibrations (advance calibrations and dynamic color registration, refer to the
Maintenance & Troubleshooting Guide).
Side B: Load and print on page 61
c. Select Side B from the drop menu.
d. Ensure that the Image Registration Line is aligned with the platen and start printing side B.
e. Configure Rows to register, refer to
f. Select save or save as.
g. Select Print Job and print the selected image.
While printing Side B the printer will automatically read each registration line and Side B will
be positioned to minimize the registration errors
NOTE: To activate the side you want to print, always select it from the drop down menu first,
make any changes to the image and select save.
NOTE: If you select Print Job and the printer cannot detect the Image Registration Line, refer to
the Maintenance and Troubleshooting Guide.
Define double-sided job on page 90.
Printing
ENWW
Layout method
95
Page 100

TIP: In case a particular substrate is often used for double-sided printing, to avoid having to
redo the calibration between side A and side B, a second specific substrate could be used based
on the initial one. Apply the advance and dynamic color registration of the side B: select this new
substrate preset each time the side B is loaded (and select the previous one each time the side A is
used).
Nesting
Nesting is a layout method that allows you to choose the layout of your printed jobs on the substrate,
relative to one another, instead of simply printing them one after another as usual. Jobs can be printed
side by side if there is room.
TIP: Printing jobs side by side on the substrate gives you faster throughput and uses less substrate.
You can use nesting in the HP Internal Print Server, from the Choose Image File window or the Job
Properties window.
The Choose Image File window
From the HP Internal Print Server's main window, click the Add New Job icon to open the Choose
Image File window. You will see the Nesting check box on the bottom left of the window. If you select
only one job, nesting is impossible and the box is grayed out. If you select more than one job, you can
click the box to enable nesting.
NOTE: To be nested together, jobs must be of the same resolution and printed on the same substrate.
Any incompatible job is added to the queue as a separate, non-nested job, and an explanatory
message is displayed.
When you press the Open button with nesting enabled, the Advanced Nesting Arrangement window
opens (see
The Advanced Nesting Arrangement window on page 97).
The Job Properties window
From the HP Internal Print Server's main window, right-click the print queue to open the Job Properties
window. In this window, you can click the Add New Job icon
Printing
96 Chapter 5 Printing options ENWW
will see a Nesting section in the Layout pane.
to add more jobs, in which case you
 Loading...