

Page 1

HP StorageWorks LUN
Configuration Manager XP
user’s guide
XP48
XP256
XP512
fourth edition (November 2003)
part number: B9335-96002
This guide explains how to use the HP StorageWorks LUN Configuration Manager XP software.
Page 2

© 2003, Hewlett-Packard Development Company, L.P.
Hewlett-Packard Company makes no warranty of any kind with regard to this material, including, but not limited to,
the implied warranties of merchantability and fitness for a particular purpose. Hewlett-Packard shall not be liable for
errors contained herein or for incidental or consequential damages in connection with the furnishing, performance,
or use of this material.
This document contains proprietary information, which is protected by copyright. No part of this document may be
photocopied, reproduced, or translated into another language without the prior written consent of Hewlett-Packard.
The information contained in this document is subject to change without notice.
All product names mentioned herein may be trademarks of their respective companies.
Hewlett-Packard Company shall not be liable for technical or editorial errors or omissions contained herein. The
information is provided “as is” without warranty of any kind and is subject to change without notice. The warranties
for Hewlett-Packard Company products are set forth in the express limited warranty statements accompanying such
products. Nothing herein should be construed as constituting an additional warranty.
Printed in the U.S.A.
HP StorageWorks LUN Configuration Manager XP: user’s guide
fourth edition (November 2003)
part number: B9335-96002
2 HP StorageWorks LUN Configuration Manager XP: user’s guide
Page 3

About this guide 5
Intended audience 5
Disk arrays 5
Related documentation 5
Conventions 6
Getting help 6
HP technical support 7
HP storage website 7
HP authorized reseller 8
Revision history 9
Warranty statement 10
1Introduction13
Installation requirements 14
Important terms and concepts 15
2 Installation 17
Installing LUN Manager on the XP256 18
Installing LUN Manager on the XP512 20
Contents
3Operation23
Starting LUN management operations 24
Adding and deleting SCSI/Fibre Channel paths 27
Adding SCSI/Fibre Channel paths 27
Deleting SCSI/Fibre Channel paths 31
Setting the host mode 36
Setting/resetting a command device 41
Contents 3
Page 4

Configuring Fibre Channel ports 47
Setting the Fibre Channel port address 47
Setting Fibre Channel topology 55
LU size expansion 59
Creating expanded LUNs 61
Expanding dispersed LUNs 67
Releasing an expanded LUN 74
Changing the size of an expanded LUN 78
4 VSC operations 79
VSC parameters 81
VSC specifications 81
Custom volume capacity 82
Storage subsystem ID (SSID) requirements 82
XP256 VSC operations 83
Starting VSC operations 84
Viewing VSC configuration information 85
Converting a normal volume to a VSC volume 86
Configuring new volumes 91
Installing custom volumes 97
Deinstalling custom volumes 102
Converting a VSC volume to a normal volume 108
XP512 VSC operations 113
Starting VSC operations 113
Viewing VSC configuration information 115
Converting logical volumes to space 120
Defining and installing custom-sized volumes 125
Configuring new volumes 128
Deleting VSC volumes 133
Converting a VSC volume to a normal volume 134
5Troubleshooting137
Error conditions 138
Calling the HP Support Center 138
Glossary 139
Index 143
4 HP StorageWorks LUN Configuration Manager XP: user’s guide
Page 5

About this guide
This guide explains how to use the HP StorageWorks LUN Configuration
Manager XP option.
Intended audience
Intended users of this guide are system administrators who have expertise
with the associated systems and software and these related topics:
• data processing concepts
• direct-access storage device subsystems and their basic functions
• disk arrays and RAID technology
• operating system commands and utilities
Disk arrays
Unless otherwise noted, the term disk array refers to any of these products:
HP Surestore Disk Array XP256
HP Surestore Disk Array XP512
HP Surestore Disk Array XP48
Related documentation
HP provides the following related documentation:
• HP StorageWorks Command View XP for XP Disk Arrays: User Guide
• HP StorageWorks Remote Control XP: User’s Guide
For information about operating system commands and third-party
products, refer to the manufacturer’s documentation.
About this guide 5
Page 6

Conventions
This guide uses the following text conventions.
Figure 1 Blue text represents a cross-reference. For the online
version of this guide, the reference is linked to the
target.
www.hp.com
Underlined, blue text represents a website on the
Internet. For the online version of this guide, the
reference is linked to the target.
literal Bold text represents literal values that you type exactly
as shown, as well as key and field names, menu items,
buttons, file names, application names, and dialog box
titles.
variable
Italics indicates that you must supply a value. Italics is
also used for manual titles.
input/output Monospace font denotes user input and system
responses, such as output and messages.
Example Denotes an example of input or output. The example
may not exactly match your configuration.
[ ] Indicates an optional parameter.
{ } Indicates that you must specify at least one of the listed
options.
| Separates alternatives in a list of options.
Getting help
If you still have a question after reading this guide, contact an HP
authorized service provider or access our website:
www.hp.com
6 HP StorageWorks LUN Configuration Manager XP: user’s guide
Page 7

HP technical support
In North America, call technical support at 1-800-652-6672, available 24
hours a day, 7 days a week.
Outside North America, call technical support at the nearest location.
Telephone numbers for worldwide technical support are listed on the HP
website under support:
Be sure to have the following information available before calling:
For continuous quality improvement, calls may be recorded or monitored.
thene w.hp.com/country/us/eng / su pport.html
• technical support registration number (if applicable)
• product serial numbers
• product model names and numbers
• applicable error messages
• operating system type and revision level
• detailed, specific questions
HP storage website
The HP website has the latest information on this product, as well as the
latest drivers. Select the appropriate product or solution from this website:
thenew.hp.com/country/us/eng/prodserv/storage.html
About this guide 7
Page 8

HP authorized reseller
For the name of your nearest HP authorized reseller, you can obtain
information by telephone:
United States 1-800-345-1518
Canada 1-800-263-5868
elsewhere See the HP website for locations and telephone
numbers:
www.hp.com
8 HP StorageWorks LUN Configuration Manager XP: user’s guide
Page 9

Revision history
May 5, 1999 Published original edition for XP256.
June 1, 2000 Added support for XP512.
November, 2003 General update.
Reformatted as a separate manual.
About this guide 9
Page 10

Warranty statement
HP warrants that for a period of ninety calendar days from the date of
purchase, as evidenced by a copy of the invoice, the media on which the
Software is furnished (if any) will be free of defects in materials and
workmanship under normal use.
DISCLAIMER
EXTENT ALLOWED BY LOCAL LAW, THIS SOFTWARE IS
PROVIDED TO YOU “AS IS” WITHOUT WARRANTIES OF ANY
KIND, WHETHER ORAL OR WRITTEN, EXPRESS OR IMPLIED.
HP SPECIFICALLY DISCLAIMS ANY IMPLIED WARRANTIES
OR CONDITIONS OF MERCHANTABILITY, SATISFACTORY
QUALITY, NON-INFRINGEMENT, TITLE, ACCURACY OF
INFORMATIONAL CONTENT, AND FITNESS FOR A
PARTICULAR PURPOSE. Some jurisdictions do not allow exclusions of
implied warranties or conditions, so the above exclusion may not apply to
you to the extent prohibited by such local laws. You may have other rights
that vary from country to country, state to state, or province to province.
WA R NI N G
THAT USE OF THE SOFTWARE IS AT YOUR SOLE RISK. HP
DOES NOT WARRANT THAT THE FUNCTIONS CONTAINED IN
THE SOFTWARE WILL MEET YOUR REQUIREMENTS, OR THAT
THE OPERATION OF THE SOFTWARE WILL BE UNINTERRUPTED,
VIRUS-FREE OR ERROR-FREE, OR THAT DEFECTS IN THE
SOFTWARE WILL BE CORRECTED. THE ENTIRE RISK AS TO THE
RESULTS AND PERFORMANCE OF THE SOFTWARE IS ASSUMED
BY YOU. HP DOES NOT WARRANT OR MAKE ANY
REPRESENTATIONS REGARDING THE USE OR THE RESULTS OF
THE USE OF THE SOFTWARE OR RELATED DOCUMENTATION IN
TERMS OF THEIR CORRECTNESS, ACCURACY, RELIABILITY,
CURRENTNESS, OR OTHERWISE. NO ORAL OR WRITTEN
INFORMATION OR ADVICE GIVEN BY HP OR HP’S AUTHORIZED
REPRESENTATIVES SHALL CREATE A WARRANTY.
. EXCEPT FOR THE FOREGOING AND TO THE
! YOU EXPRESSLY ACKNOWLEDGE AND AGREE
10 HP StorageWorks LUN Configuration Manager XP: user’s guide
Page 11

LIMITATION OF LIABILITY. EXCEPT TO THE EXTENT
PROHIBITED BY LOCAL LAW, IN NO EVENT INCLUDING
NEGLIGENCE WILL HP OR ITS SUBSIDIARIES, AFFILIATES,
DIRECTORS, OFFICERS, EMPLOYEES, AGENTS OR
SUPPLIERS BE LIABLE FOR DIRECT, INDIRECT, SPECIAL,
INCIDENTAL, CONSEQUENTIAL, PUNITIVE OR OTHER
DAMAGES (INCLUDING LOST PROFIT, LOST DATA, OR
DOWNTIME COSTS), ARISING OUT OF THE USE, INABILITY
TO USE, OR THE RESULTS OF USE OF THE SOFTWARE,
WHETHER BASED IN WARRANTY, CONTRACT, TORT OR
OTHER LEGAL THEORY, AND WHETHER OR NOT ADVISED
OF THE POSSIBILITY OF SUCH DAMAGES. Your use of the
Software is entirely at your own risk. Should the Software prove defective,
you assume the entire cost of all service, repair or correction. Some
jurisdictions do not allow the exclusion or limitation of liability for
incidental or consequential damages, so the above limitation may not apply
to you to the extent prohibited by such local laws.
NOTE
. EXCEPT TO THE EXTENT ALLOWED BY LOCAL LAW,
THESE WARRANTY TERMS DO NOT EXCLUDE, RESTRICT OR
MODIFY, AND ARE IN ADDITION TO, THE MANDATORY
STATUTORY RIGHTS APPLICABLE TO THE LICENSE OF THE
SOFTWARE TO YOU; PROVIDED
, HOWEVER, THAT THE
CONVENTION ON CONTRACTS FOR THE INTERNATIONAL
SALE OF GOODS IS SPECIFICALLY DISCLAIMED AND SHALL
NOT GOVERN OR APPLY TO THE SOFTWARE PROVIDED IN
CONNECTION WITH THIS WARRANTY STATEMENT.
About this guide 11
Page 12

12 HP StorageWorks LUN Configuration Manager XP: user’s guide
Page 13

1
Introduction
LUN Configuration Manager XP enables you to define the SCSI-to-logical
device (LDEV) paths for the disk array using the remote console PC. Each
LDEV can be mapped for access from multiple ports or multiple target IDs
to provide alternate paths for continuous data availability.
LUN Configuration Manager XP allows you to reconfigure the SCSI/Fibre
Channel paths at any time to optimize disk array performance and
accommodate system configuration changes, such as adding a host.
To maximize data access capabilities, the logical unit size expansion
(LUSE) feature allows you to create virtual logical units that are larger than
standard LUNs. These logical units can also be released.
Introduction 13
Page 14

Installation requirements
See your HP account representative for specific requirements.
The system requirements for the LUN Configuration Manager XP software
are as follows:
• HP StorageWorks Remote Control XP installed on system
• LUN Configuration Manager XP software license keys needed to
enable the feature—LUNM and LUSE
• HP Surestore Disk Array
• Remote console PC with Windows 95, Windows 98, Windows NT,
Windows 2000, or Windows XP
14 HP StorageWorks LUN Configuration Manager XP: user’s guide
Page 15

Important terms and concepts
You should be familiar with the following terms and concepts:
• controller
The disk array has one controller which controls data access and
storage operations. The disk array controller supports OPENemulation modes.
• CU (control unit)
Each CU controls up to 256 LDEVs (XP256) or 512 LDEVs (XP512).
The CUs are numbered sequentially from 0 to E.
• LDEV (logical device)
An LDEV results when a RAID group is divided into parts according
to the emulation mode selection (OPENLDEVs depends upon the selected emulation mode.
• parity group
A parity group is a set of hard disk drives that have the same capacity
and are treated as one group. For example, a parity group of 18-GB
disk drives in a RAID5 configuration consists of four disk drives
(three data and one parity).
x
x). The number of resulting
•volume
An LDEV can also be called a volume. The LDEV ID is internal to the
disk array and is not related to the volume serial number (volser) or
LUN number.
•path
A SCSI or Fibre Channel port ID, a SCSI target ID (TID), and a LUN
number.
Introduction 15
Page 16

16 HP StorageWorks LUN Configuration Manager XP: user’s guide
Page 17

2
Installation
LUN Configuration Manager XP is an option and requires a license key.
You must have either the LUNM and LUSE key floppy disks (XP256) or
text string keys for LUMN and LUSE (XP512).
To perform the installation, HP StorageWorks Remote Control XP (RC)
software must be installed, and you must have RC administrator privileges.
LUN Configuration Manager XP must be installed before you can install
the LUSE (LUN Size Expansion) or LUN Security options.
The installation procedure for LUN Configuration Manager is different for
the XP256 and the XP512. See the section in this chapter that matches your
system.
Installation 17
Page 18
Installing LUN Manager on the XP256
LUN Manager is an option and the license keys must be purchased. Before
you begin, be sure you have the key disk for LUN Configuration Manager
and LU Size Expansion.
To install the LUN Manager on an XP256:
1. Log in as an administrator.
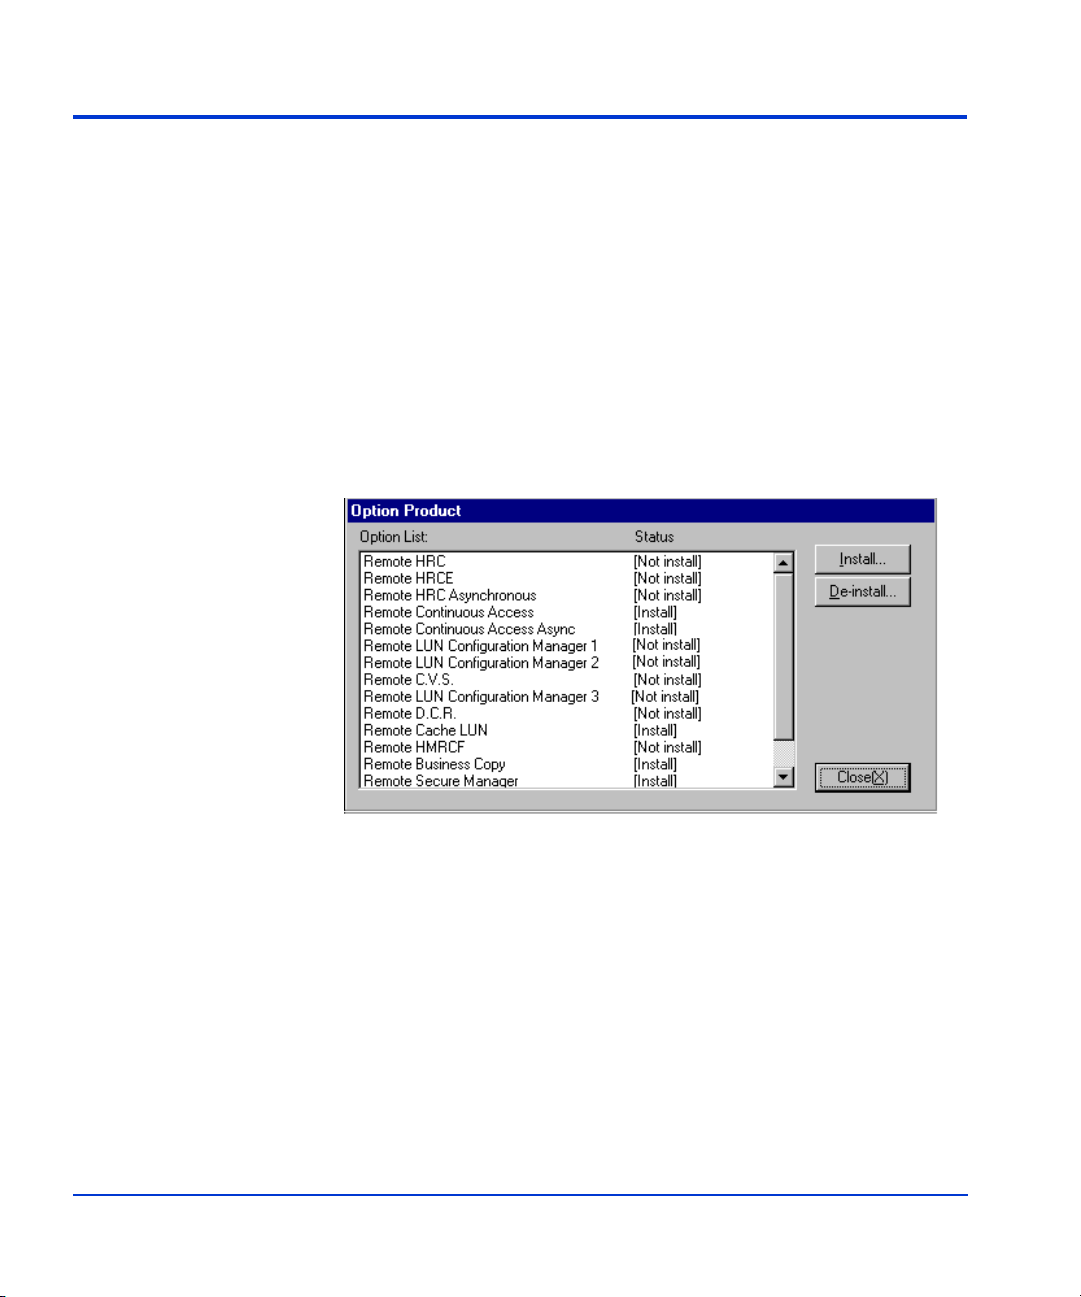
2. On the Remote Console Main window, select Option to open the Option
Product window.
This window shows the current installation status of the RC options.
3. Select “Remote LUN Configuration Manager 1” (LUN Configuration
Manager) and “Remote LUN Configuration Manager 2” (LU Size
Expansion) from the option list. These options install both LUN
Manager and LU Size Expansion.
4. Select the Install button.
5. Select the Close button.
You are prompted to insert the LUNM and LUSE key floppy disks.
6. Insert the LUMN key disk in the floppy drive.
7. Select OK.
18 HP StorageWorks LUN Configuration Manager XP: user’s guide
Page 19

8. Insert the LUSE key disk in the floppy drive.
9. Select OK.
When this option installation is complete, the Option Product window
opens and the displayed status of the selected option changes from Not
install to Install.
10. Select Close to return to the Remote Console Main window.
Installation 19
Page 20
Installing LUN Manager on the XP512
LUN Manager is an option and the license keys must be purchased. Before
you begin, be sure you have the license keys for LUN Configuration
Manager and LU Size Expansion.
To install the LUN Manager on an XP512:
1. Log in as an administrator.
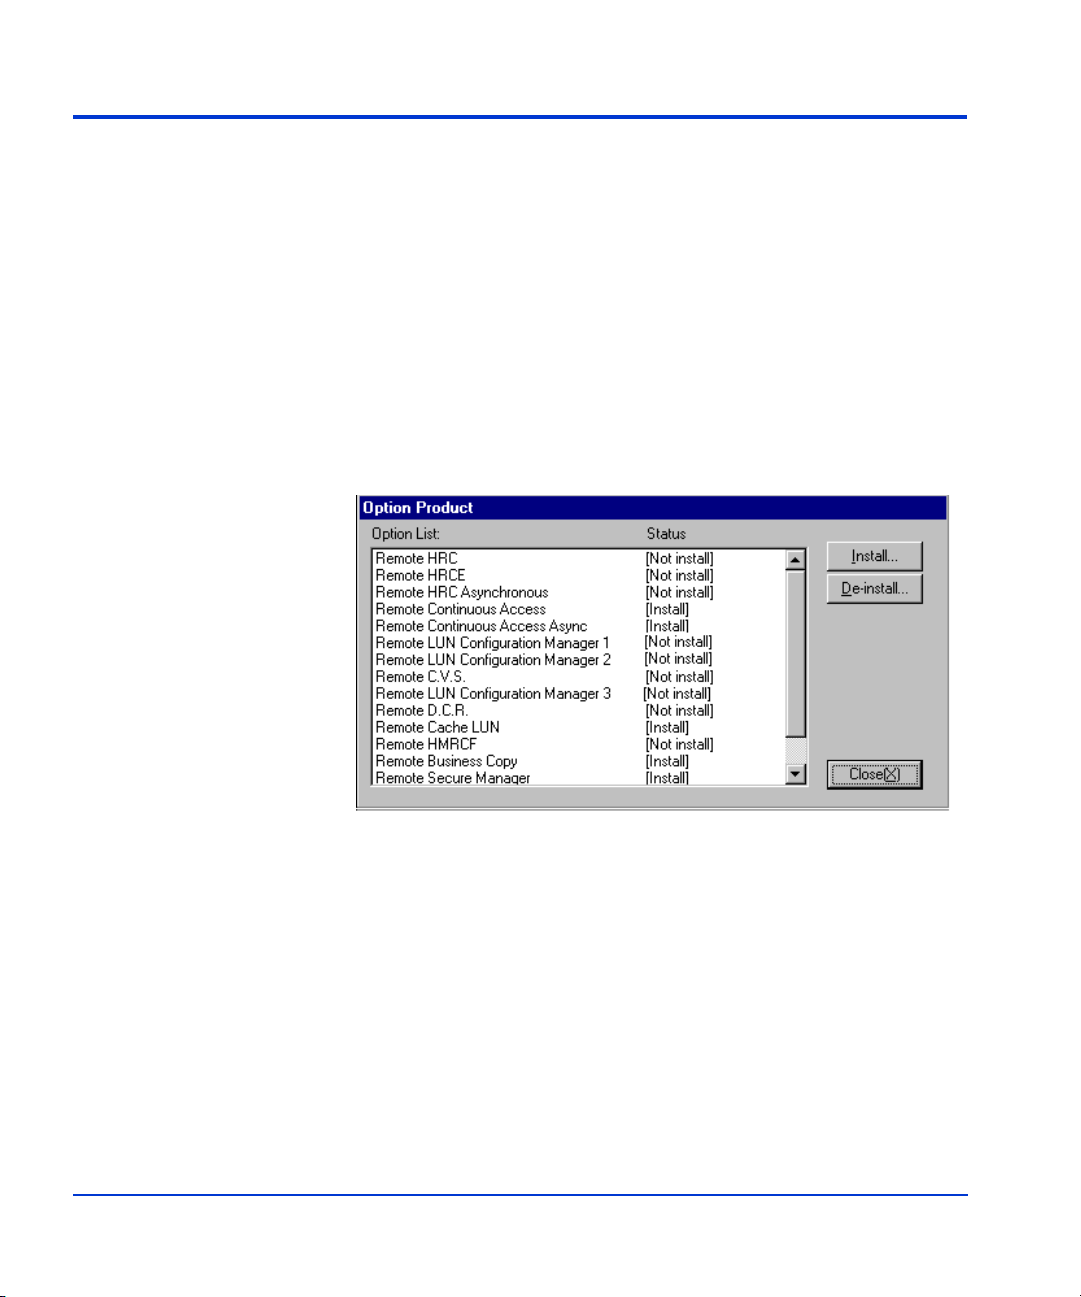
2. On the Remote Console Main window, select Option to open the Option
Product window.
This window shows the current installation status of the RC options.
3. Select “Remote LUN Configuration Manager 1” from the option list to
install LUN Configuration Manager.
4. Select the Install button.
The Input Key Code window opens.
20 HP StorageWorks LUN Configuration Manager XP: user’s guide
Page 21
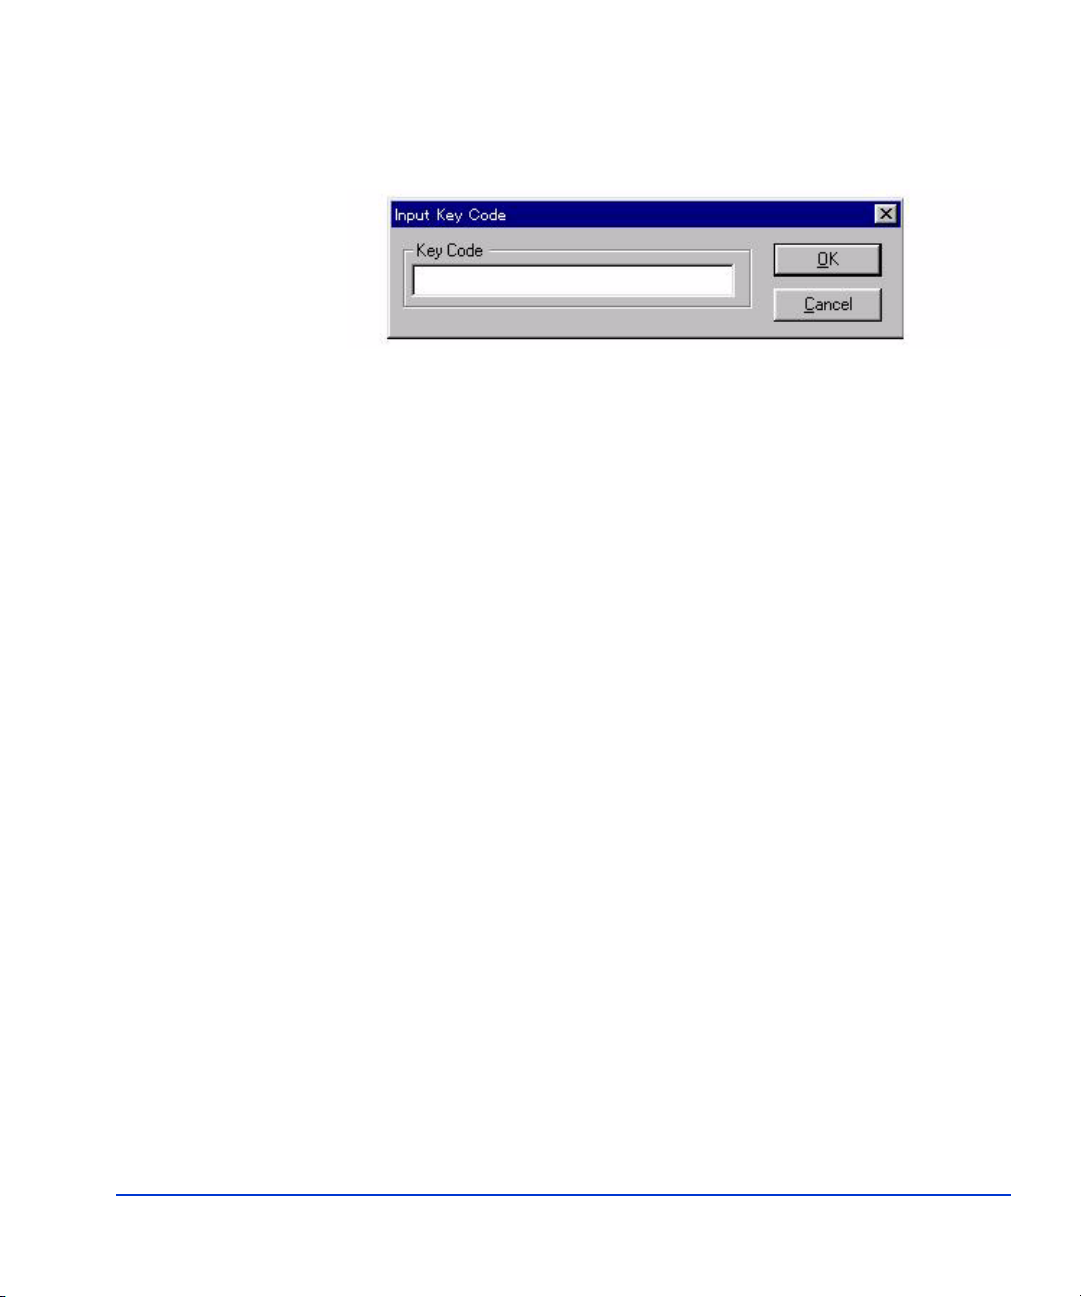
5. Enter the license key (password) in the Key Code text box for LUN
Configuration Manager.
6. Select OK
If the password is approved, the Program Product window opens.
This window shows the product name—LUNM, model name (for
example, P-242R-E4241), key kind (for example, Permanent), and
effective term (for example, Free).
7. After confirming the content of the Program Product window, select
OK.
When this option installation is complete, the Option Product window
opens and the displayed status of the selected option changes from Not
install to Install.
8. Select “Remote LUN Configuration Manager 2” from the option list to
install LU Size Expansion.
9. Repeat steps 5 through 7 for LU Size Expansion.
10. Select Close to return to the Remote Console Main window.
Installation 21
Page 22

22 HP StorageWorks LUN Configuration Manager XP: user’s guide
Page 23

3
Operation
LUN management operations can be performed by users with administrator
or custom access privileges. Users without these privileges can only view
the SCSI path information for attached disk arrays.
LUN management operations include:
• starting LUN Manager
• adding and deleting SCSI paths
• setting the host mode
• setting and resetting the command device
• configuring the Fibre Channel
• creating and releasing expanded LUNs
Operation 23
Page 24
Starting LUN management operations
To start LUN management operations:
1. Start and log in to the HP StorageWorks Remote Control XP (RC)
program.
2. Select the Connect button.
3. Select a disk array to be managed in the Connect window.
4. Select the Connect button to connect the disk array.
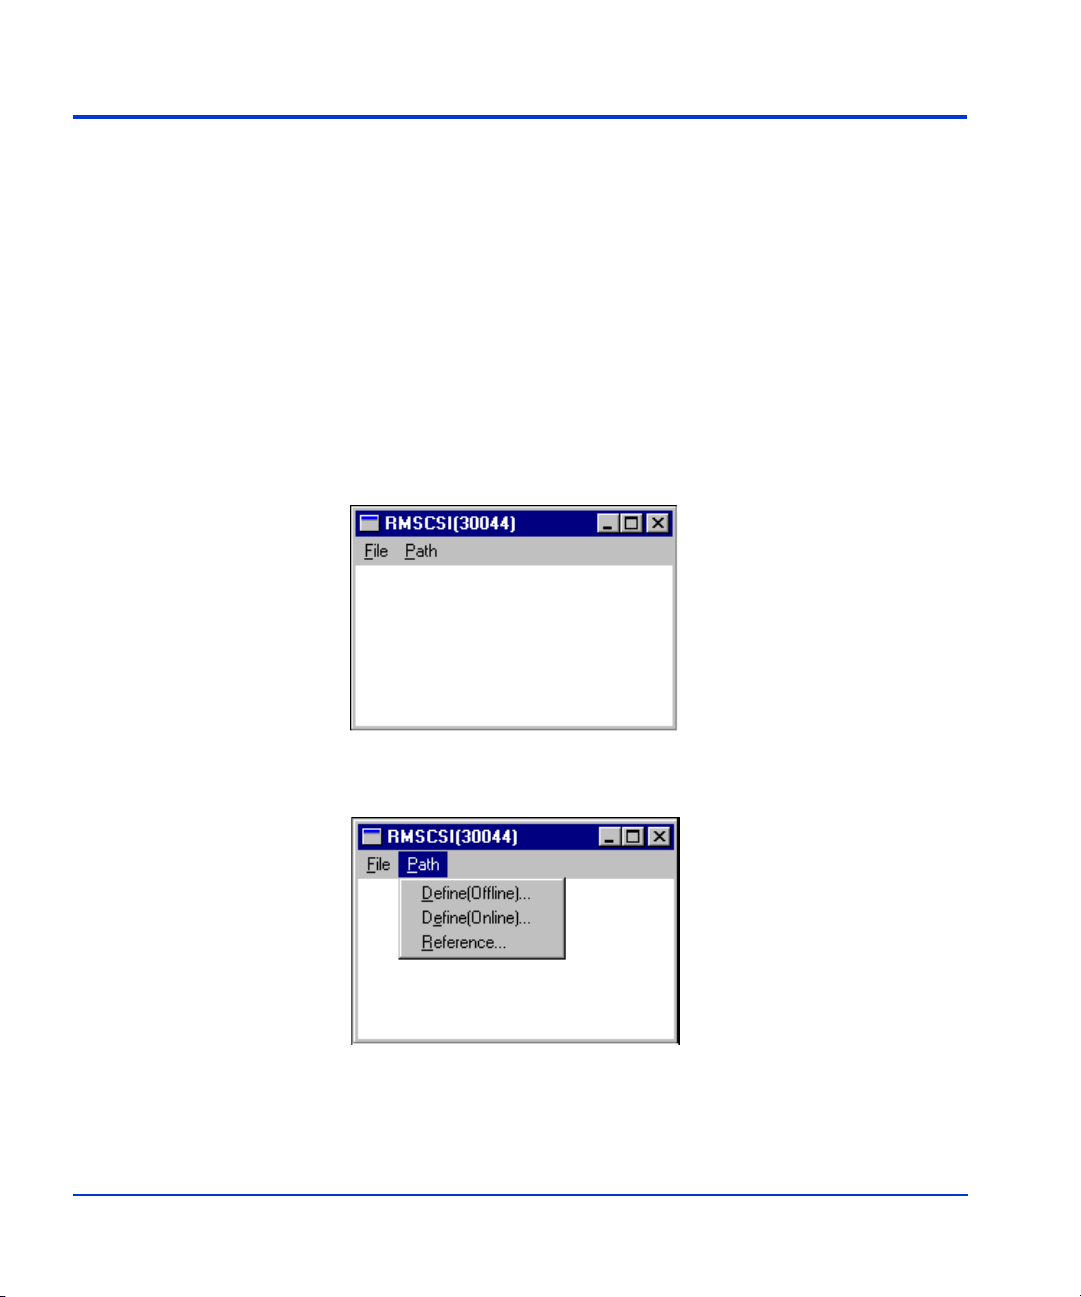
5. Select LUN Management to start LUN management operations.
After the disk array is connected, the RMSCSI window opens.
24
6. Select a mode from the Path pull-down menu.
HP StorageWorks LUN Configuration Manager XP: user’s guide
Page 25
7. The LUN Management-LDEV Configuration window opens.
Define(Offline) The disk array is not servicing I/Os-to-LUNs on
ports that are being modified. You can add or
delete paths and modify port configurations.
Define(Online) The disk array continues to service all I/Os. You
can only add new paths.
Reference The array continues to service all I/Os. No
changes are allowed. You can only view path and
port information.
This window provides access to all LUN management operations.
Operation 25
Page 26

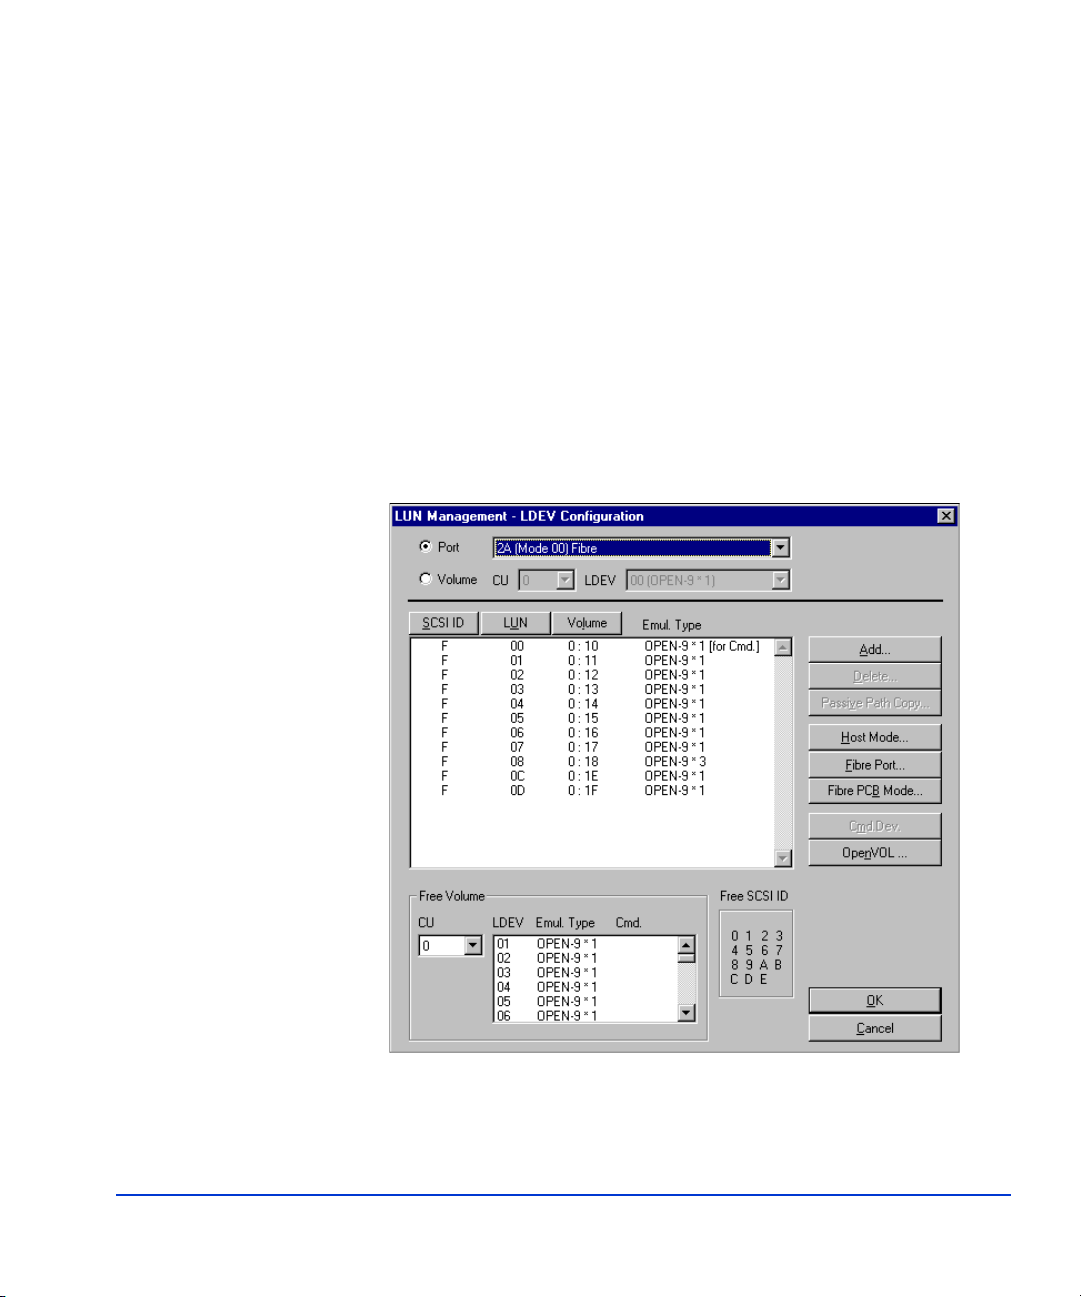
The LUN Management-LDEV Configuration window displays SCSI path
information for the connected disk array and provides access to SCSI path
functions. This window opens at the beginning of LUN management operations, and also at the end of LUN management operations so you can view
and confirm changes. The following options are accessible from the LUN
Management-LDEV Configuration window:
Option Description
Port button and pull-down
selection box
Volume button and CU and
LDEV pull-down selection
boxes
Path List box Displays the path configuration for the selected port or volume. A plus sign
Port SCSI ID, LUN, and
Vo l u m e b u t t o n s
Host Mode button Opens the Port Mode Information window to allow you to set the host mode
Fibre button Provides access to the Fibre Channel configuration functions.
OpenVOL button Opens the LU Expansion Define window to allow you to create expanded vol-
Add button Opens the Set LUN Management Parameter window to allow you to create
Selects a particular port to display the SCSI path IDs for that port. The information can be sorted by numerical order or by type using the SCSI ID, LUN,
or Volume buttons
Selects a particular CU and then selects an LDEV within that CU to display
the SCSI path IDs for that volume. If you select this option, only the SCSI
path for that device will be displayed, and the SCSI ID, LUN, and Volume
buttons are unavailable.
next to an LDEV ID (for example, 0:01+) indicates that there is a path to that
LDEV. Two plus signs (for example, 0:01++) indicate that there are multiple
SCSI paths to that LDEV. If there are no plus signs next to the LDEV ID, there
are no SCSI paths defined to that LDEV.
Sorts the path information in different ways for volume view.
for one or more ports.
umes.
new paths.
Delete button Opens the Delete LUN Management window to allow you to delete paths.
Cmd.Dev button A toggle switch that allows you to set or unset a volume as a command device
for Command Control Interface operations.
Free SCSI ID and Free Volume boxes
26
Displays the unassigned SCSI target IDs for the selected port and free LDEVs
in the disk array. The window shows information based on the selected port or
the selected volume.
HP StorageWorks LUN Configuration Manager XP: user’s guide
Page 27

Adding and deleting SCSI/Fibre Channel paths
LUN management operations on the remote console PC enable you to add
and delete paths to LDEVs in the array. Each LDEV can have multiple
paths defined to support failover or load-balancing configurations.
Caution Before assigning a SCSI path to a LDEV, make sure that the LDEV is not an
Auto LUN XP Reserved Device. If the volume has been reserved, it will be
write-protected and any writes to that volume will fail. Use Auto LUN XP to
verify the reserve status of the LDEVs.
Adding SCSI/Fibre Channel paths
SCSI and Fibre Channel paths can be added in both online (with concurrent
I/Os) or offline (no I/O) modes.
To add SCSI/Fibre Channel paths:
1. Select either online or offline mode from the RMSCSI Path menu.
Operation 27
Page 28
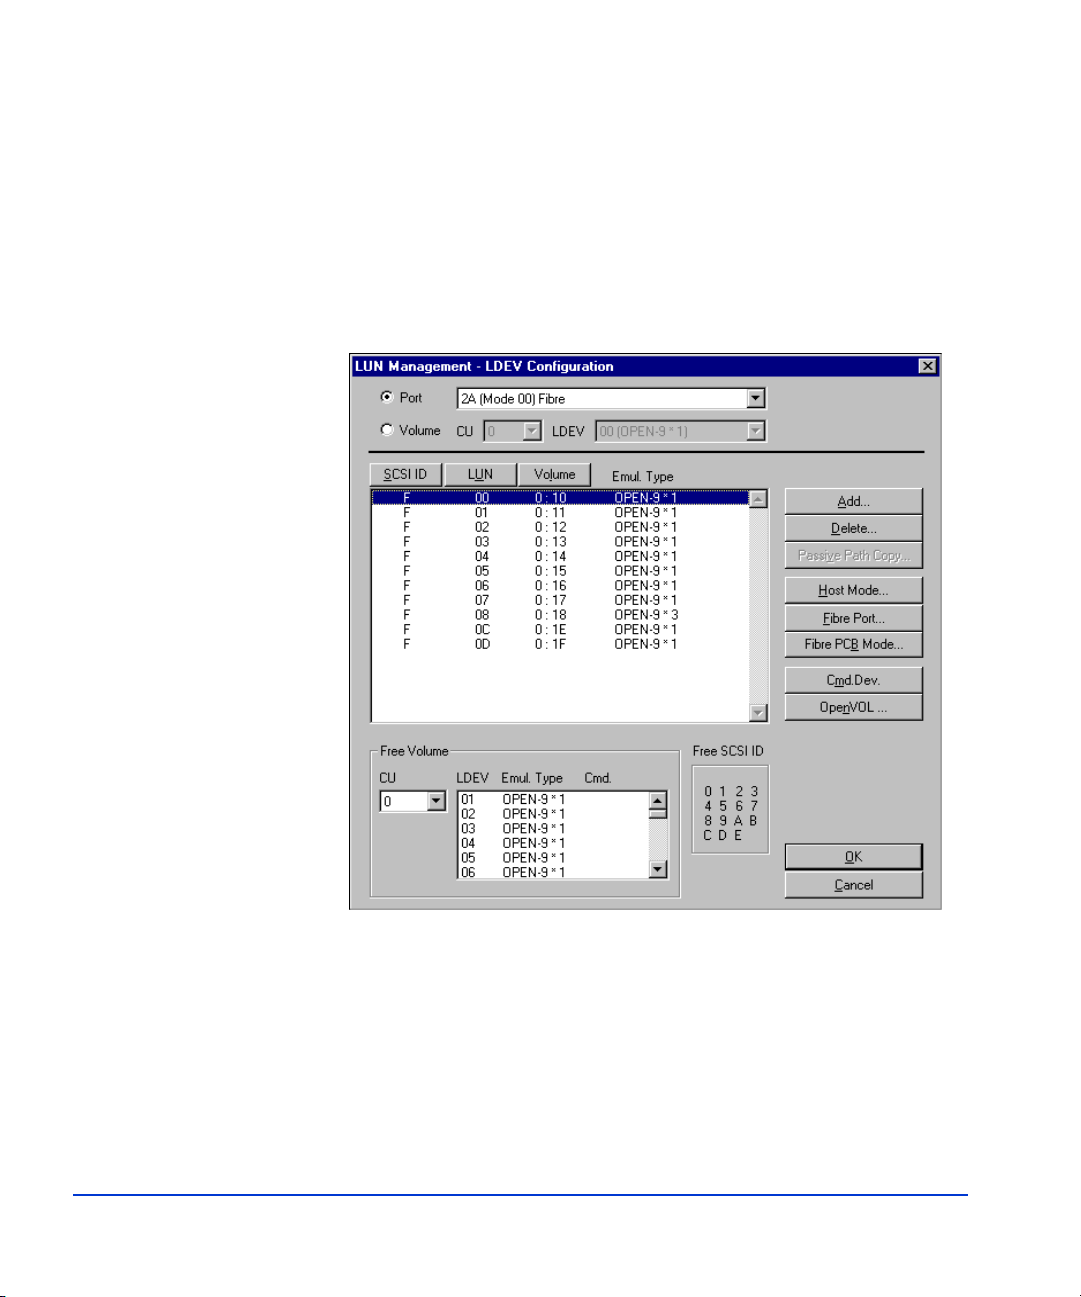
2. Review the information displayed on the LUN Management-LDEV
Configuration window to see which paths have already been assigned.
A single plus sign (+) next to an LDEV ID (listed under the Volume
attribute) indicates that there is an assigned SCSI/fibre path to that
LDEV. Two plus signs (++) next to an LDEV ID indicates that there is
more than one SCSI path to that LDEV. The label for CMD.Dev next
to an LDEV ID indicates that volume is being used as a command
device and is not available for SCSI path definition.
28
3. Select Add to open the Set SCSI Path Parameter window.
HP StorageWorks LUN Configuration Manager XP: user’s guide
Page 29

4. Paths can be defined individually (individual mode) or in a group (bulk
mode).
(Individual Mode) Select PORT, SCSI ID, and LUN one by one for
each LDEV ID.
(Bulk Mode) Select the desired CU number; then select the SCSI ports,
TIDs, and LUN IDs you want to assign; and then select the corresponding LDEV IDs. Select the first LDEV ID and LUN Manager
assigns the remaining paths sequentially, or select the specific LDEV
IDs you want to assign.
A bulk mode operation will fail if the number of LUNs defined
exceeds the number of LDEVs available.
To calculate the number of LUNs to select, multiply the number of
selected ports, the number of selected SCSI TIDs, and the number of
selected LUN IDs. For example, if you select one port, four SCSI
TIDs, and two LUN IDs, you must select eight LUNs (1 × 4 × 2 = 8).
Operation 29
Page 30
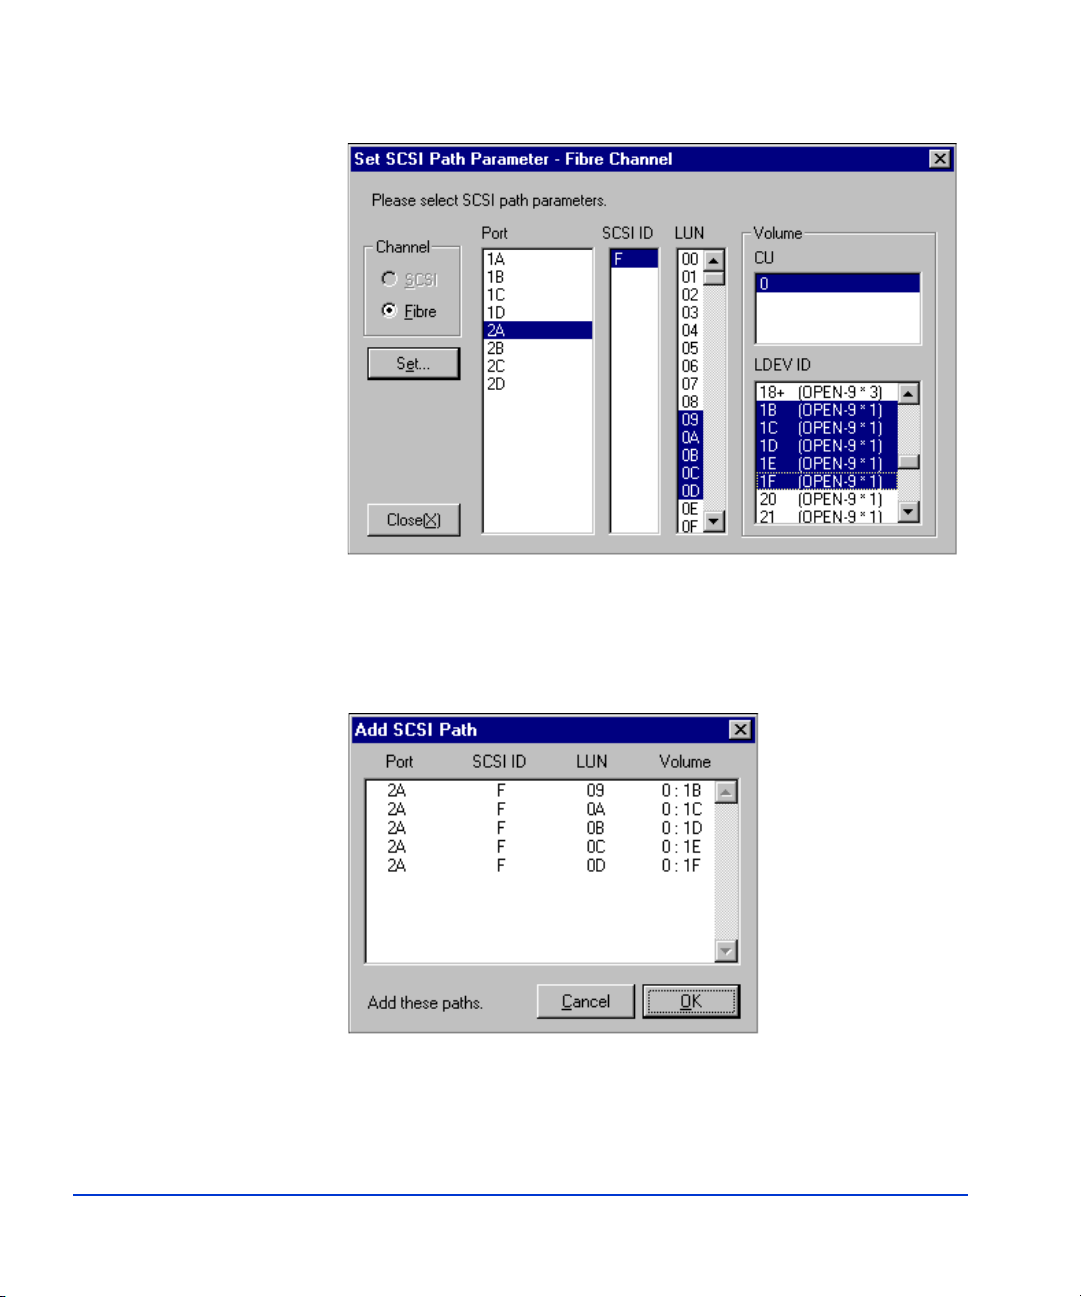
5. When you have completed setting the paths, select Set.
The Add SCSI Path window opens and displays the SCSI paths to be
added.
30
HP StorageWorks LUN Configuration Manager XP: user’s guide
Page 31

6. Verify that the information presented on the Add SCSI Path window is
correct. If the information is not correct, select Cancel to return to the
Set Path window. If the information is correct, select OK to save the
new path information and return to the LUN Management-LDEV
Configuration window.
7. To configure the new paths in the array, select OK on the LUN
Management-LDEV Configuration window.
To cancel your request to add new paths, select Cancel.
Deleting SCSI/Fibre Channel paths
SCSI/FC paths can be deleted only in offline mode.
To delete SCSI paths:
1. Select Define (Offline) from the RMSCSI Path menu to go to offline
mode.
Operation 31
Page 32

The LUN Management-LDEV Configuration window displays.
2. Review the information displayed on the LUN Management-LDEV
Configuration window and select the SCSI paths you want to delete in
the LUN Management box.
32
HP StorageWorks LUN Configuration Manager XP: user’s guide
Page 33

Use the Ctrl key to select more than one path.
3. Select Delete to open the Delete LUN Management window.
Operation 33
Page 34

The Delete LUN Management window displays the selected SCSI
paths to be deleted.
4. Verify that the information presented on the Delete LUN
Management-LDEV Configuration window is correct.
5. If the information is correct, select OK.
If the information is not correct, select Cancel.
The LUN Management-LDEV Configuration window opens.
34
HP StorageWorks LUN Configuration Manager XP: user’s guide
Page 35

6. To delete the selected paths, select OK on the LUN Management-LDEV
Configuration window.
To cancel your request to delete the selected paths, select Cancel.
Operation 35
Page 36

Setting the host mode
LUN Configuration Manager XP allows you to set the host mode for each
SCSI port on the disk array. The following table describes each host mode.
Host
Mode
FWD
0x00 Standard mode–
Description
Host
Mode
Ultra
Description
0x10 Standard mode and Ultra SCSI mode
fast-wide differential SCSI (FWD)
Fibre Channel (FC)
Linux, SGI IRIX host mode
0x01 IBM-7135 host mode (FWD) 0x11 IBM-7135 host mode and Ultra SCSI
mode
0x02 NCR host mode (FWD) 0x12 NCR host mode and Ultra SCSI mode
0x03 HP-UX Extension host mode 0x13 Not used
0x04 Sequent host mode (FWD) 0x14 Sequent host mode and Ultra SCSI mode
0x05 Open VMS host mode 0x15 Not used
0x07 Tru64 host mode
0x08 HP-UX mode (FWD or FC)
0x18 HP-UX and Ultra SCSI mode
Queue depth: 1024
LUNs per port: 120
HP NetServer with HP host bus adapters
(HBAs)
0x09 VxVM-DMP (FWD) 0x19 VxVM-DMP and Ultra SCSI mode
0x0A Netware host (FWD) 0x1A Netware host and Ultra SCSI mode
0x0C PC Server, Windows NT/2000,
MS Cluster Server (Wolfpack)–Non-HP
0x1C MS Cluster Server (Wolfpack) and Ultra
SCSI mode–Non-HP HBAs
HBAs (FWD)
0x0D I/O TRACE mode
0x0F AIX host mode Others Not used
36
HP StorageWorks LUN Configuration Manager XP: user’s guide
Page 37

To set the host mode:
Caution Before changing the host mode, back up the data on the port of the host
mode you want to change. The set host mode operation is not destructive;
however, data integrity cannot be guaranteed without a backup.
1. Select Define (Offline) from the RMSCSI Path menu to go to offline
mode.
2. Select Host Mode on the LUN Management-LDEV Configuration
window to open the Host Mode Information window.
The Host Mode Information window displays the current host mode
setting for each port.
Operation 37
Page 38

3. Select Set to open the Set Host Mode window.
4. Select the mode in the Mode box, then select the desired ports in the
Port box.
38
5. Select Confirm.
The Mode Confirmation window now opens.
HP StorageWorks LUN Configuration Manager XP: user’s guide
Page 39

6. Make sure the mode and ports are displayed correctly in the Mode
Confirmation window.
If not, select Cancel and repeat this procedure.
If so, select OK.
The Host Mode Information window now displays the new host mode
settings.
Operation 39
Page 40

7. If the new settings in the Set Port Mode window are not correct, select
Cancel and repeat steps 2 through 4.
If the new settings are correct, select OK.
The LUN Management-LDEV Configuration window now displays
the new host mode settings.
8. To implement the new host mode settings, select OK.
To cancel the new host mode settings, select Cancel.
40
HP StorageWorks LUN Configuration Manager XP: user’s guide
Page 41

Setting/resetting a command device
A volume that is configured as a command device allows applications such
as RAID Manager to communicate with a disk array.
To set a command device:
1. Select Define (Offline) from the RMSCSI Path menu to go to offline
mode.
Operation 41
Page 42

2. From the LUN Management-LDEV Configuration window, select the
SCSI paths in the SCSI path list.
42
HP StorageWorks LUN Configuration Manager XP: user’s guide
Page 43

3. Select the Cmd.Dev. button.
The label “[for Cmd.]” displays in the SCSI path list next to the path.
Operation 43
Page 44

To reset a command device:
1. Select Define (Offline) from the RMSCSI Path menu to go to offline
mode.
44
HP StorageWorks LUN Configuration Manager XP: user’s guide
Page 45

2. From the LUN Management-LDEV Configuration window, select the
SCSI paths with the
“[for Cmd.]” label in the SCSI path list.
Operation 45
Page 46

3. Select the Cmd.Dev. button.
The label “[for Cmd.]” is deleted in the SCSI path list.
46
HP StorageWorks LUN Configuration Manager XP: user’s guide
Page 47

Configuring Fibre Channel ports
Fibre Channel configuration includes setting the port address and topology.
Setting the Fibre Channel port address
To set the Fibre Channel port address:
1. Select Define (Offline) from the RMSCSI Path menu to go to offline
mode.
Operation 47
Page 48

The SCSI Path-LDEV Configuration menu displays.
48
2. On the SCSI Path-LDEV Configuration menu, select the Fibre button.
The Fibre Information window displays.
HP StorageWorks LUN Configuration Manager XP: user’s guide
Page 49

3. Select the Port Address button in the Fibre Information window.
The Fibre-Port Address Information window opens to displays port
names, arbitrated loop physical addresses, and Loop IDs. If a port has
not defined an address yet, its address value will be EF.
4. Select the ports to be changed.
5. Select the Set button.
Operation 49
Page 50

The Set Fibre Port Address window displays.
6. Select AL-PA or Loop ID and input the address from the following table.
50
If you select AL_PA, input a value in hexadecimal (01 through EF). If
you input only a one-digit number, the function will convert it to a
two-digit number. For example, if you input A, it is converted to 0A.
If you select Loop ID, input a decimal number (0 to 125). The AL_PA,
which is assigned to the Loop ID, is displayed.
HP StorageWorks LUN Configuration Manager XP: user’s guide
Page 51

AL
PA
Loop ID
AL
PA
Loop ID
AL
PA
Loop ID
AL
PA
Loop ID
EF 0 B2 32 72 64 3A 96
E8 1 B1 33 71 65 39 97
E4 2 AE 34 6E 66 36 98
E2 3 AD 35 6D 67 35 99
E1 4 AC 36 6C 68 34 100
E0 5 AB 37 6B 69 33 101
DC 6 AA 38 6A 70 32 102
DA 7 A9 39 69 71 31 103
D9 8 A7 40 67 72 2E 104
D6 9 A6 41 66 73 2D 105
D5 10 A5 42 65 74 2C 106
D4 11 A3 43 63 75 2B 107
D3 12 9F 44 5C 76 2A 108
D2 13 9E 45 5A 77 29 109
D1 14 9D 46 59 78 27 110
CE 15 9B 47 56 79 26 111
CD 16 98 48 55 80 25 112
CC 17 97 49 54 81 23 113
CB 18 90 50 53 82 1F 114
CA 19 8F 51 52 83 1E 115
C9 20 88 52 51 84 1D 116
C7 21 84 53 4E 85 1B 117
C6 22 82 54 4D 86 18 118
Continued
Operation 51
Page 52

AL
PA
Loop ID
AL
PA
Loop ID
AL
PA
Loop ID
AL
PA
Loop ID
C5 23 81 55 4C 87 17 119
C3 24 80 56 4B 88 10 120
BC 25 7C 57 4A 89 0F 121
BA 26 7A 58 49 90 08 122
B9 27 79 59 47 91 04 123
B6 28 76 60 46 92 02 124
B5 29 75 61 45 93 01 125
B4 30 74 62 43 94
B3 31 73 63 3C 95
7. Select the OK button.
The Fibre Information window displays the results of the address
change.
52
8. If the address change displayed is correct, select the OK button to
execute the change.
If the address change is incorrect, select Cancel.
HP StorageWorks LUN Configuration Manager XP: user’s guide
Page 53

The Fibre Information window displays.
9. Select the Close button on the Fibre Information window.
Operation 53
Page 54

The LUN Management-LDEV Configuration window displays.
54
10. To implement the change, select the OK button on the LUN
Management-LDEV Configuration window.
To cancel the change, select Cancel.
HP StorageWorks LUN Configuration Manager XP: user’s guide
Page 55

Setting Fibre Channel topology
To set Fibre Channel topology:
1. Select Define (Offline) from the RMSCSI Path menu to go to offline
mode.
The LUN Management-LDEV Configuration menu displays.
2. On the LUN Management-LDEV Configuration menu, select the Fibre
button.
The Fibre Information window displays.
Operation 55
Page 56

3. Select the Topology button.
The Fibre-Topology Information window displays. If a port topology
is not set, the fabric setting is OFF and the connection type is FC-AL.
4. Select a port to change its topology. You can select several ports by
pressing Ctrl or Shift keys while selecting the ports.
5. Select the Set button.
56
The Set Fibre Topology window displays.
HP StorageWorks LUN Configuration Manager XP: user’s guide
Page 57

6. Set the topology by selecting an item in both the Fabric (ON or OFF)
and Connection (FC-AL or Point to Point) boxes.
7. Select the OK button.
The information in the remote console changes and the Fibre
-Topology Information window displays with the new information.
8. Select OK.
Operation 57
Page 58

The LUN Management-LDEV Configuration window displays.
58
9. To implement the change, select the OK button.
To cancel the change, select the Cancel button.
HP StorageWorks LUN Configuration Manager XP: user’s guide
Page 59

LU size expansion
The LU Size Expansion (LUSE) feature allows you to create volumes that
are larger than standard OPEN-x LDEVs. This capability enables hosts to
access the data in the array using fewer logical units. The following tables
list the OPEN-x sizes, LUSE size limitations, and (for comparison) VSC
size limitations. VSC volumes may also be used with LUSE.
Parameter OPEN-3 OPEN-8 OPEN-9 OPEN-E OPEN-K OPEN-L OPEN-M
Size of LDEV 2.4 GB 7.3 GB 7.3 GB 14.5 GB 1.8 GB 36.4 GB 47.1 GB
LUSE Parameters OPEN-3 OPEN-8 OPEN-9 OPEN-E OPEN-K OPEN-L OPEN-M
Possible number of
LDEVs in
expanded volume
Size of expanded
LDEVs
LUSE Designation
(n = number of
LDEVs in
expanded volume)
VSC Parameters
Size of LDEV 35 MB to
Possible number of
LDEVs in
expanded volume
Size of expanded
LDEVs
VSC Designation
(n = number of
LDEVs in
expanded volume)
2 - 36
LDEVs
4.8 GB to
88.6 GB
OPEN-3*n OPEN8*n OPEN-9*n OPEN-E*n OPEN-K*n OPEN-L*n OPEN-M*n
OPEN-3
VSC
2.4 GB
2 - 36
LDEVs
70 MB to
84.2 GB
OPEN-3*n
VSC
2 - 36
LDEVs
14.6 to
264.4 GB
OPEN-8
VSC
35 MB to
7.3 GB
2 - 36
LDEVs
70 MB to
250.2 GB
OPEN8*n
VSC
2 - 36
LDEVs
14.7 to
265.8 GB
OPEN-9
VSC
35 MB to
7.3 GB
2 - 36
LDEVs
70 MB to
252.6 GB
OPEN-9*n
VSC
2 - 36
LDEVs
29.1 to
524.4 GB
OPEN-E
VSC
35 MB to
14.5 GB
2 - 36
LDEVs
70 MB to
524.4 GB
OPEN-E*n
VSC
2 - 36
LDEVs
3.7 to
67.7 GB
OPEN-K
VSC
35 MB to
1.8 GB
2 - 36
LDEVs
70 MB to
64.1 GB
OPEN-K*n
VSC
2 - 36
LDEVs
72.9 to
1312.2 GB
N/A N/A
N/A N/A
N/A N/A
N/A N/A
N/A N/A
2 - 36
LDEVs
94.3 to
1698.6 GB
Operation 59
Page 60

Note the following limitations:
• You cannot combine LDEVs from different control units.
• Windows NT hosts cannot access more than 32 logical units.
• Some operating systems may experience slow disk access times with
large logical units.
The following are guidelines for LU Size Expansion:
• A maximum of 256 expanded LUNs can be configured on the same
port.
• The LDEVs that will become members of the LUSE must not have
SCSI paths assigned. These are known as free (or available) LDEVs.
• To make an LDEV free, it must have its SCSI paths deleted, which
requires that it be offline (unmounted from all hosts).
• Combining nonsequential LDEVs into a LUSE is supported, provided
they are on the same CU.
• Combining customized volumes into a LUSE is supported, provided
they have the same size, emulation type, and CU. The order of
operations is important: you must first create the volumes, and then
combine those volumes into a LUSE volume.
60
• Combining customized volumes and normal volumes into the same
LUSE is not supported.
• Combining command devices into a LUSE is not supported.
• Combining RAID1 and RAID5 into the same LUSE is not supported.
• Combining emulation types (OPEN-x) into the same LUSE is not
supported.
• Factors relevant to recommended LUSE size include the following:
Some operating systems may exhibit slow disk access times with large
logical units if they contain too many high usage files. The size of a
LUSE can also affect the amount of time required to perform backups.
• The queue depth for open systems can vary depending on the platform.
HP StorageWorks LUN Configuration Manager XP: user’s guide
Page 61

Creating expanded LUNs
When creating expanded volumes, LDEVs with assigned paths cannot be
used. All assigned SCSI paths must be deleted before a selected LDEV can
be used for expansion.
To configure an expanded LUN:
1. Select either online or offline mode from the RMSCSI Path menu.
Operation 61
Page 62

2. Select OpenVol on the LUN Management-LDEV Configuration
window to open the LU Expansion Define window.
The CU drop-down list allows you to choose the control unit for the
LDEVs you want to expand. The list box displays the control unit,
LDEV, open volume type (OPEN-x), and path status.
If an asterisk (*) appears under the path listing, this indicates that the
path has already been set. If there is no asterisk (*), the path has not
been set.
62
Caution LUN size expansion is a data destructive operation. Back up data before
continuing.
HP StorageWorks LUN Configuration Manager XP: user’s guide
Page 63

3. Select the CU that controls the LDEV to be expanded from the CU
drop-down list. In the list box, select the LUN you want to expand.
4. Select Expand to open the LU Expansion window.
Operation 63
Page 64

The following information is displayed:
OPEN-x*1 Displays the emulation type. All available LDEVs are
displayed as OPEN-X*1 indicating that only one LDEV
is present. Volumes that have already been expanded are
displayed as OPEN-X*n, where n is the number of
LDEVs combined. For example if the volume is displayed as OPEN-3*16, there are 16 LDEVs in that
OPEN-3 expanded volume. LDEVs with an asterisk (*)
in either the Path or CVS columns are not available for
size expansion.
Open VOL Displays the LDEV that will be expanded.
Valid VOL
count
Count displays the available number of LDEVs to combine.
Size [Mbyte] Overall capacity of the new volume.
5. Enter the number of combined LDEVs in the Enter VOL count box.
6. Select OK to expand the volume.
64
HP StorageWorks LUN Configuration Manager XP: user’s guide
Page 65

The LU Expansion Define window now opens again displaying the
newly expanded volume.
7. To expand another volume repeat steps 3 through 6.
8. To return to the LUN Management-LDEV Configuration window,
select OK.
Operation 65
Page 66

The LUN Management-LDEV Configuration window now displays
the new expanded volumes.
66
9. Assign a SCSI path to the expanded volume. For the procedure to assign
SCSI paths, see “Adding SCSI/Fibre Channel paths” (page 27).
The LUN Management-LDEV Configuration window displays the
new expanded volumes.
10. To implement the expanded LUNs, select OK.
To cancel the expanded LUNs, select Cancel.
HP StorageWorks LUN Configuration Manager XP: user’s guide
Page 67

Expanding dispersed LUNs
Caution LU size expansion is a destructive operation. Back up all data.
To configure an expanded dispersed LUN:
1. Select either online or offline mode from the RMSCSI Path menu.
The LUN Management-LDEV Configuration window opens.
2. Select the OpenVOL button.
The LUN Expansion Define window displays
.
Operation 67
Page 68

3. In the CU:LDEV list box, select the LDEV you want to expand.
4. Select the Exp (Disperse) button.
68
HP StorageWorks LUN Configuration Manager XP: user’s guide
Page 69

The LU Expansion (Disperse) window displays.
All available LDEVs are displayed as OPEN-X*1 indicating that only
one LDEV is present. Existing LUSE volumes are displayed as
OPEN-X*n (n indicates the number of LDEVs in the LUSE volume).
LUNs with an asterisk (*) in the Path column are not available for size
expansion. Only LDEVs with no SCSI paths assigned can be
candidates for LUSE. If these LDEVs must be used, their SCSI paths
must be deleted first.
Operation 69
Page 70

5. Select the LDEVs to be used from the list. To select a series of LDEVs,
press the Shift or Ctrl key during selection.
6. Select the OK button.
The LU Expansion Define window displays.
70
HP StorageWorks LUN Configuration Manager XP: user’s guide
Page 71

7. Select the expanded LDEV in the volume list.
8. Select the Detail button.
The Open Vol Detail window displays.
Operation 71
Page 72

9. Verify the settings are correct and then select the Close button.
The LU Expansion Define window displays.
10. Select OK.
The LUN Management-LDEV Configuration window displays. The
newly configured volume is displayed as OPEN-X*n, where n is the
number of LDEVs contained in the volume.
72
11. Assign a SCSI path to the expanded volume. For the procedure to assign
SCSI paths, see “Adding SCSI/Fibre Channel paths” (page 27).
The LUN Management-LDEV Configuration window displays the
new expanded volumes.
HP StorageWorks LUN Configuration Manager XP: user’s guide
Page 73

12. Select OK to implement the change.
Select Cancel to cancel the change.
Operation 73
Page 74

Releasing an expanded LUN
Caution Releasing an expanded LUN is a destructive operation. Back up all data.
To release an expanded LUN:
1. Select Define (Offline) from the RMSCSI Path menu to go to offline
mode.
74
HP StorageWorks LUN Configuration Manager XP: user’s guide
Page 75

The LUN Management-LDEV Configuration menu displays.
2. Delete the expanded LUN from its SCSI path before releasing it. See
“Deleting SCSI/Fibre Channel paths” (page 31).
3. Select OpenVol on the LUN Management-LDEV Configuration
window to open the LU Expansion Define window.
4. Select the control unit that controls the desired LUN from the CU
drop-down list.
In the list box, select the volume you want to release.
5. Select the Free button.
Operation 75
Page 76

The LU Expansion Define window now displays the newly released
LDEVs.
6. To release another volume, repeat steps 2 though 5.
7. To return to the LUN Management-LDEV Configuration window,
select OK.
76
HP StorageWorks LUN Configuration Manager XP: user’s guide
Page 77

The LUN Management-LDEV Configuration window now displays
the newly released LDEVs.
8. To implement the released volumes, select OK.
To cancel the released LDEVs, select Cancel.
Operation 77
Page 78

Changing the size of an expanded LUN
If you have an expanded LUN that you want to make larger or smaller, you
must first delete all SCSI paths to that LUSE volume, release the expanded
LUN, and then create a new expanded LUN. Then you will need to recreate
SCSI paths to the new expanded LUN.
78
HP StorageWorks LUN Configuration Manager XP: user’s guide
Page 79

4
VSC operations
Volume Size Configuration (VSC) allows you to configure custom size
volumes that are smaller than normal volumes. VSC improves data access
performance by reducing logical device contention as well as host I/O
queue times, which can occur when several frequently accessed files are
located on the same volume. VSC enables better utilization of the physical
storage capacity of the disk array while reducing the amount of
administrative effort required to balance storage device I/O work loads.
VSC can be used in conjunction with Cache LUN XP while maintaining
flexibility in the cache configuration.
VSC operations can be performed by users with administrator or custom
VSC access privileges. Users without administrator or VSC access
privileges can only view the VSC configuration information for each
attached disk array. VSC operations can only be performed when the VSC
option is enabled.
The procedures for performing VSC operations are different depending on
whether you have an XP256 or and XP512. The procedures are divided into
two sections. Make sure you are using the correct set of instructions.
VSC operations 79
Page 80

This chapter covers VSC parameters and procedures. The chapter contains
three sections:
• “VSC parameters” (page 81)
• “XP256 VSC operations” (page 83)
• “XP512 VSC operations” (page 113)
80
HP StorageWorks LUN Configuration Manager XP: user’s guide
Page 81

VSC parameters
This section covers
• VSC specifications
• custom volume capacity
• storage subsystem ID (SSID) requirements
VSC specifications
The following table lists VSC specifications. Each CV has its own assigned
unit control block (UCB), and multiple VSC types can be configured within
each parity group. The user can add and delete VSC at any time and has
complete control over the number of user cylinders and the emulation type
of each CV.
Parameter Specification
Emulation type OPEN-x
Minimum size of CV 35 MB
Maximum size of CV OPEN-3: 2.3 GB
OPEN-8: 7.0 GB
OPEN-9: 7.0 GB
OPEN-E: 13.8 GB
OPEN-K: 1.7 GB
Size increment 1 MB
Maximum number of volumes
(custom and normal) per parity group
Maximum number of volumes
(custom and normal) per disk array
Control (overhead) capacity required
per CV
VSC operations 81
128
4096
OPEN-3: 5 MB
OPEN-8 & 9: 19 MB
OPEN-E: 13 MB
OPEN-K: 6 MB
Page 82

Custom volume capacity
Open system volumes are composed of 512-byte pieces called logical
blocks. Logical Block Addresses (LBAs) are used for referring to locations
within open system volumes. Use the following table when you configure
custom volumes.
Vol ume Type Logical Blocks
Capacity
(GB = 1000
3
Bytes)
Capacity
(GB = 1024
OPEN-K 3,661,920 1.875 GB 1.831 GB
OPEN-3 4,806,720 2.461 GB 2.292 GB
OPEN-8 14,423,040 7.384 GB 6.877 GB
OPEN-9 14,423,040 7.384 GB 6.877 GB
OPEN-E 28,452,960 14.568 GB 14.226 GB
Storage subsystem ID (SSID) requirements
Each CU contains four logical subsystems, each of which contain 64
logical devices. It may be necessary to specify an SSID when creating
custom volumes. Any value can be used for the SSID of OPEN-x devices.
The only constraint is that the lowest SSID number used must be evenly
divisible by four.
3
Bytes)
82
HP StorageWorks LUN Configuration Manager XP: user’s guide
Page 83

XP256 VSC operations
The first step in performing VSC operations is to convert one or more
normal-size volumes to VSC volumes. When you convert a normal volume
to a VSC volume, all of the logical blocks in the volume become available
for use in custom size volumes (CVs). You can define the first CU during
the normal-to-VSC conversion process, and you can define additional CVs
as needed under that VSC volume up to a maximum of 32 volumes per
parity group (array group) using the install CV process.
If your disk array was configured with one or more VSC volumes during
installation, you can bypass the normal-to-VSC conversion process and
begin installing new CVs immediately.
VSC operations include:
• viewing the current VSC information
• converting a normal volume to a VSC volume
• installing a CV
• deinstalling a CV
• converting a VSC volume to a normal volume
The following operations are for the XP256 only.
VSC operations 83
Page 84

Starting VSC operations
The following procedure describes how to start VSC operations from the
Function Select window.
To start VSC operations:
1. Start and log in to the Remote Control software.
2. Connect to the desired controller.
3. Select Volume Size Configuration to start VSC operations.
4. Select OK to continue.
The Option Select window opens automatically.
The VSC warning message appears to remind you that VSC operations (except Install CV) are destructive.
The Function Select window now opens.
84
5. Select one of the VSC functions:
Refer Configuration View the current VSC of the connected disk
array. You cannot request changes.
Normal Volume Convert a normal volume to a VSC volume.
Install CV Define a new CV under a CV volume. This
operation can only be performed on an existing
CV volume.
Deinstall CV Deinstall a CV.
CV to Normal Volume Convert a CV volume back to a normal volume.
HP StorageWorks LUN Configuration Manager XP: user’s guide
Page 85

Viewing VSC configuration information
The Refer Configuration function allows you to view the VSC information
for the connected disk array. This function can be used to view the disk
array configuration information before making changes and to verify
changes. When you select Refer Configuration, all VSC functions will be
disabled, and you will not be able to request any configuration changes.
Using Refer Configuration, you can view the following information:
• parity group configuration of each CU, including the number of
LUNs, emulation type, and RAID level of each parity group. This
information is displayed on the Device Emulation Configuration
window.
• device configuration of each parity group, including the LUN ID,
emulation type, and current VSC configuration of each LUN in the
parity group. This information is displayed on the Device Emulation
Detail window.
• CV configuration of each VSC volume, including the capacity (user
and total) and emulation type of each CV. This information is
displayed on the Volume Size Configuration Define window.
• LUN ID configuration for each parity group, including LUN IDs
assigned to normal volumes and CVs. This information is displayed on
the Logical Device ID Configuration and Logical Device ID Define
windows.
• storage subsystem ID (SSID) configuration within each CU. This
information is displayed on the Subsystem ID Configuration window.
VSC operations 85
Page 86

Converting a normal volume to a VSC volume
Caution The conversion function is a destructive operation. The data on the volume
being converted will be lost when the operation is complete. Back up your
data as needed before performing this operation.
The Normal Volume to CV function allows you to convert a normal volume
to a VSC volume. Some windows appear more than once during the
process to present new information or allow you to perform different
functions. The conversion operation does not occur until you select OK on
the VSC Confirmation window at the end of the procedure.
To convert a normal volume to a VSC volume:
1. Open the Function Select window. See “Starting VSC operations”
(page 84).
.
86
2. Choose Normal Volume to CV on the Function Select window, and
select OK.
LUN Configuration Manager now loads the configuration
information.
HP StorageWorks LUN Configuration Manager XP: user’s guide
Page 87

This process can take several minutes. The Device Emulation Configuration window displays.
3. Select the parity group that contains the volume you want to convert.
4. Select Detail.
The Device Emulation Detail window opens and displays the LUN
configuration of the selected parity group.
VSC operations 87
Page 88

5. Select the volume you want to convert.
6. Select Define.
88
HP StorageWorks LUN Configuration Manager XP: user’s guide
Page 89

The Volume Size Configuration Define window opens.
7. Select the desired Emulation type, enter the desired Size, and select Add.
If you make a mistake, select the volume, select Delete, and re-enter
the correct information.
The Volume Size Configuration Define window displays the space
used, the space remaining, and number of logical devices in the parity
group.
8. When you are finished adding information about the first CV, select OK
to continue.
The manual normal-to-VSC volume change allows you to define only
the first CV.
VSC operations 89
Page 90

The Device Emulation Detail window now displays the requested
normal-to-VSC volume change.
90
9. To convert another volume, go back to step 5.
10. When the desired new VSC volumes are listed, select Define to
continue.
HP StorageWorks LUN Configuration Manager XP: user’s guide
Page 91

The Device Emulation Configuration window opens.
11. Select the parity group containing the requested new VSC volumes, and
select Next.
12. Complete the procedure for configuring the new VSC volumes. See the
procedure “Configuring new volumes” (page 91).
Configuring new volumes
To configure new volumes:
The procedure begins with the Logical Device ID Configuration window
open.
VSC operations 91
Page 92

1. Select the incomplete parity group (group status displayed as ------), and
select the LDEV ID assignment scheme:
92
HP StorageWorks LUN Configuration Manager XP: user’s guide
Page 93
Linear Assigns the LDEV IDs in sequential order for all
unassigned logical addresses within the parity group.
The Linear option is appropriate for users who
actively balance their disk array work loads.
Disperse Randomly rotates the LDEV IDs among multiple
groups across the disk array, eliminating hot spots and
improving data access. The Disperse option is appropriate for users who do not actively balance their disk
array work loads.
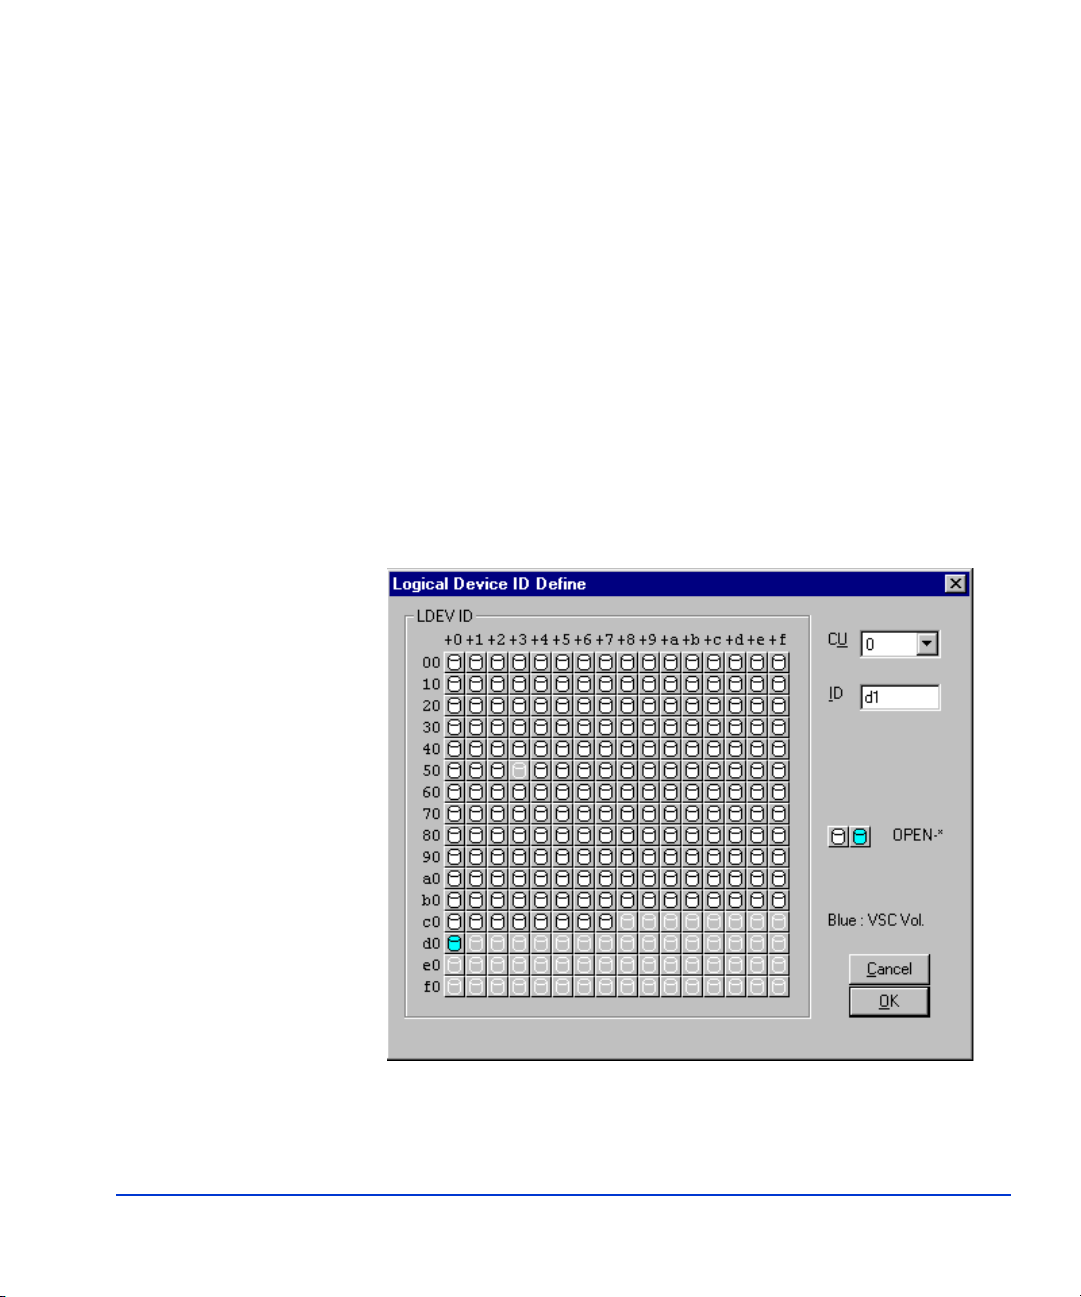
Detail Allows manual selection of LDEV IDs.
The Logical Device ID Define window opens and displays the
assigned LDEV IDs for each CU.
2. Select the CU, enter the LDEV ID, and select OK.
VSC operations 93
Page 94

The Logical Device ID Configuration window now displays the status
of the parity group as Complete.
3. Select Next to continue.
94
HP StorageWorks LUN Configuration Manager XP: user’s guide
Page 95

The Subsystem ID Configuration window now opens to allow you to
assign one or more SSIDs.
4. If you do not need to assign an SSID, go to step 8.
5. To assign an SSID to a disk array, select the desired disk array and select
the SSID button.
Each installed disk array (64 LDEVs) is displayed by LDEV range
(for example, 40-7f).
The Subsystem ID Define window opens.
6. Enter the desired SSID. The SSID must be unique.
7. Select OK. The specified SSID is assigned to the selected disk array.
VSC operations 95
Page 96

The Subsystem ID Configuration window displays.
8. Select Next to complete the normal-to-VSC conversion operation.
The Volume Size Configuration window displays.
96
9. Select OK to implement the conversion.
Caution This operation is destructive. If in doubt, select Cancel to cancel the
operation.
HP StorageWorks LUN Configuration Manager XP: user’s guide
Page 97

Installing custom volumes
The Install CV function allows you to define one or more new CVs under
an existing VSC volume. If there are no VSC volumes, you must convert a
normal volume to a VSC volume before installing any CVs.
The install operation does not occur until you select OK on the
confirmation window at the end of the procedure.
To install custom volumes:
1. Open the Function Select window. See “Starting VSC operations”
(page 84).
2. Choose Install CV on the Function Select window.
3. Select OK.
The remote console now loads the configuration information.
VSC operations 97
Page 98

This process can take several minutes. When the process is finished,
the Number of CU Configuration window displays.
4. Select the CU number, and select Next.
The Device Emulation Configuration window opens.
98
5. Select the parity group that contains the VSC volume, and select Detail.
The Device Emulation Detail window opens.
HP StorageWorks LUN Configuration Manager XP: user’s guide
Page 99

6. Select the VSC volume in which you want to install the CVs.
7. Select Define.
VSC operations 99
Page 100

The Volume Size Configuration Define window opens.
8. Select the emulation type for the new CV, enter the size. and select Add
to add the requested CV to the list box.
100
If you make a mistake, select the incorrect CV, and select Delete to
remove it from the list box.
9. Repeat step 8 until you are finished adding the CVs.
The Cancel button restores this window to its original configuration.
10. When the information displayed on the Volume Size Configuration
Define window is correct, select OK to continue.
HP StorageWorks LUN Configuration Manager XP: user’s guide
 Loading...