

Page 1
User Guide
HP LaserJet M207-M212 series
Page 2

HP company notices
THE INFORMATION CONTAINED HEREIN IS SUBJECT TO CHANGE WITHOUT NOTICE.
ALL RIGHTS RESERVED. REPRODUCTION, ADAPTATION, OR TRANSLATION OF THIS MATERIAL IS PROHIBITED WITHOUT PRIOR WRITTEN PERMISSION OF
HP, EXCEPT AS ALLOWED UNDER THE COPYRIGHT LAWS. THE ONLY WARRANTIES FOR HP PRODUCTS AND SERVICES ARE SET FORTH IN THE EXPRESS
WARRANTY STATEMENTS ACCOMPANYING SUCH PRODUCTS AND SERVICES. NOTHING HEREIN SHOULD BE CONSTRUED AS CONSTITUTING AN ADDITIONAL
WARRANTY. HP SHALL NOT BE LIABLE FOR TECHNICAL OR EDITORIAL ERRORS OR OMISSIONS CONTAINED HEREIN.
© Copyright 2020 HP Development Company, L.P.
Microsoft and Windows are either registered trademarks or trademarks of Microsoft Corporation in the United States and/or other countries.
Mac, OS X, macOS, and AirPrint are trademarks of Apple Inc., registered in the U.S. and other countries.
ENERGY STAR and the ENERGY STAR mark are registered trademarks owned by the U.S. Environmental Protection Agency.
Android is a trademark of Google LLC.
iOS is a trademark or registered trademark of Cisco in the U.S. and other countries and is used under license.
Safety information
Always follow basic safety precautions when using this product to reduce risk of injury from re or electric shock.
- Read and understand all instructions in the documentation that comes with the printer.
- Observe all warnings and instructions marked on the product.
- Unplug this product from wall outlets before cleaning.
- Do not install or use this product near water, or when you are wet.
- Install the product securely on a stable surface.
- Install the product in a protected location where no one can step on or trip over the line cord, and the line cord cannot be damaged.
- If the product does not operate normally, see Solve problems.
- There are no user-serviceable parts inside. Refer servicing to qualied service personnel.
Page 3

Table of contents
1 Get started .................................................................................................................................................... 1
Printer views .......................................................................................................................................................... 2
Control panel features ........................................................................................................................................... 4
Use the HP Smart app to print, scan, and manage ................................................................................................ 6
2 Connect your printer ...................................................................................................................................... 7
Connect your printer to a Wi-Fi network using HP Smart ..................................................................................... 8
Connect your printer to a Wi-Fi network using Wi-Fi Protected Setup (WPS) ...................................................... 9
Connect your printer to an Ethernet network ..................................................................................................... 10
Connect your printer using a USB cable .............................................................................................................. 11
Change wireless settings ..................................................................................................................................... 12
Change the connection type ................................................................................................................................ 14
3 Load media ................................................................................................................................................. 15
Load paper ........................................................................................................................................................... 16
Load envelopes .................................................................................................................................................... 18
Load labels ........................................................................................................................................................... 19
4 Print ........................................................................................................................................................... 20
Print from a Windows computer .......................................................................................................................... 21
Print from a Mac computer .................................................................................................................................. 22
Print with mobile devices .................................................................................................................................... 23
5 Congure your printer .................................................................................................................................. 24
Use Web Services ................................................................................................................................................. 25
Update the printer ............................................................................................................................................... 26
Congure the printer using the Embedded Web Server (EWS) ........................................................................... 27
6 Supplies, accessories, and parts ................................................................................................................... 31
Order supplies, accessories, and parts ................................................................................................................ 32
Congure the HP toner-cartridge-protection supply settings ........................................................................... 34
ENWW iii
Page 4

Enable or disable the Cartridge Policy feature .................................................................................................... 35
Replace the toner cartridge ................................................................................................................................. 36
7 Solve problems ............................................................................................................................................ 38
HP support ........................................................................................................................................................... 39
Interpret control-panel light patterns ................................................................................................................. 40
Print printer reports ............................................................................................................................................. 45
Restore original factory defaults and settings ................................................................................................... 46
Cartridge low ........................................................................................................................................................ 47
Printer does not pick up paper or misfeeds ........................................................................................................ 48
Clear paper jams .................................................................................................................................................. 51
Improve print quality ........................................................................................................................................... 60
Resolving print quality problems ........................................................................................................................ 64
Solve wireless network problems ....................................................................................................................... 71
Solve Ethernet connection problems .................................................................................................................. 75
Appendix A Printer specications .................................................................................................................... 76
Technical specications ....................................................................................................................................... 76
System requirements .......................................................................................................................................... 76
Printer dimensions .............................................................................................................................................. 77
Power consumption, electrical specications, and acoustic emissions ............................................................. 77
Operating-environment range ............................................................................................................................ 77
Warning icons ....................................................................................................................................................... 78
Laser Warning ...................................................................................................................................................... 79
Appendix B Service and support ...................................................................................................................... 80
HP limited warranty statement ........................................................................................................................... 81
HP's Premium Protection Warranty: LaserJet toner cartridge limited warranty statement .............................. 94
HP policy on non-Original HP supplies ................................................................................................................ 95
HP anticounterfeit Web site ................................................................................................................................. 96
Data stored on the toner cartridge ...................................................................................................................... 97
End User License Agreement ............................................................................................................................... 98
Customer self-repair warranty service ............................................................................................................. 103
Customer support .............................................................................................................................................. 104
Appendix C Environmental product stewardship program ................................................................................ 105
Protecting the environment .............................................................................................................................. 106
Ozone production .............................................................................................................................................. 106
Power consumption ........................................................................................................................................... 106
Toner consumption ............................................................................................................................................ 106
iv ENWW
Page 5

Paper use ........................................................................................................................................................... 107
Plastics ............................................................................................................................................................... 107
HP LaserJet print supplies ................................................................................................................................. 107
Paper .................................................................................................................................................................. 107
Material restrictions .......................................................................................................................................... 107
Disposal of waste equipment by users (EU and India) ...................................................................................... 108
Electronic hardware recycling ........................................................................................................................... 108
Hardware recycling information (Brazil) ........................................................................................................... 109
Chemical substances ......................................................................................................................................... 109
Product Power Data per European Union Commission Regulation 1275/2008 ............................................... 109
SEPA Ecolabel User Information (China) ........................................................................................................... 110
The regulation of the implementation on China energy label for printer, and copier ..................................... 110
Restriction of Hazardous Substances statement (India) .................................................................................. 110
WEEE (Turkey) .................................................................................................................................................... 110
The Table of Hazardous Substances/Elements and their Content (China) ....................................................... 111
Material Safety Data Sheet (MSDS) ................................................................................................................... 111
EPEAT ................................................................................................................................................................. 112
Declaration of the Presence Condition of the Restricted Substances Marking (Taiwan) ................................. 113
For more information ........................................................................................................................................ 114
Appendix D Regulatory information ............................................................................................................... 115
Regulatory statements ..................................................................................................................................... 116
Wireless statements .......................................................................................................................................... 122
Index ........................................................................................................................................................... 126
ENWW v
Page 6

vi ENWW
Page 7

1 Get started
●
Printer views
●
Control panel features
●
Use the HP Smart app to print, scan, and manage
ENWW 1
Page 8
Printer views
●
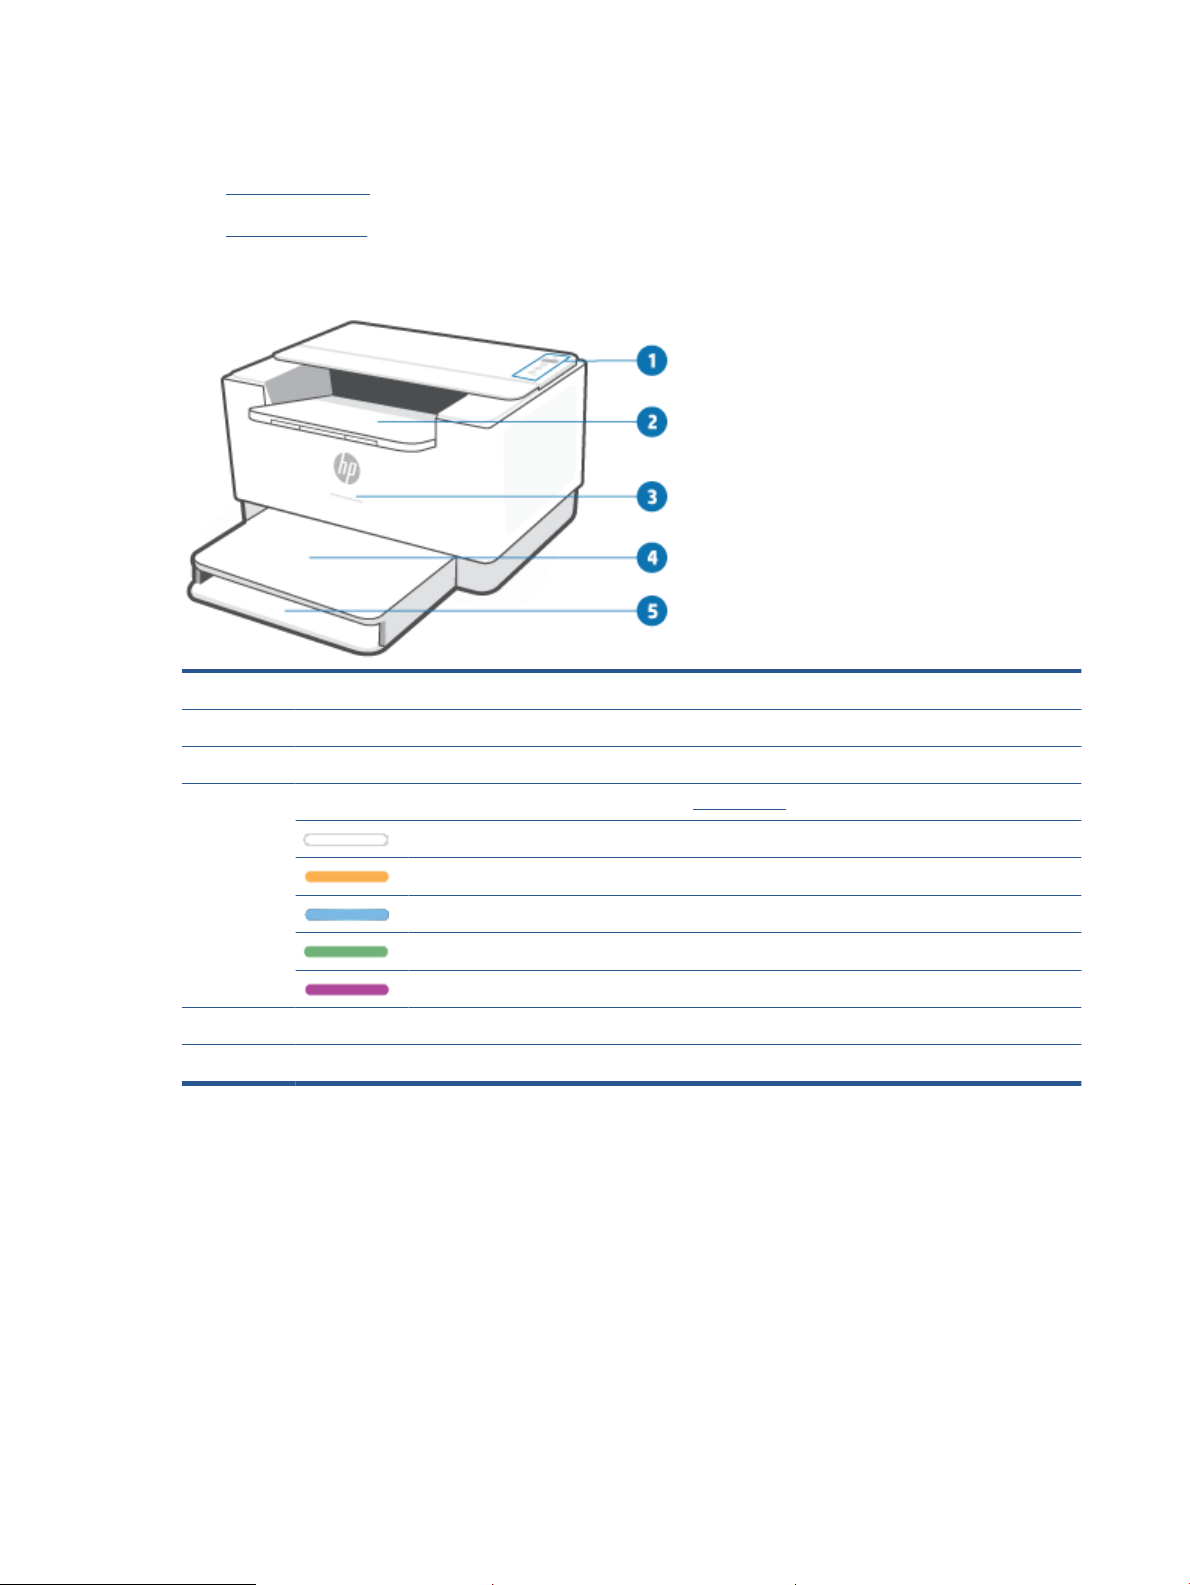
Printer front view
●
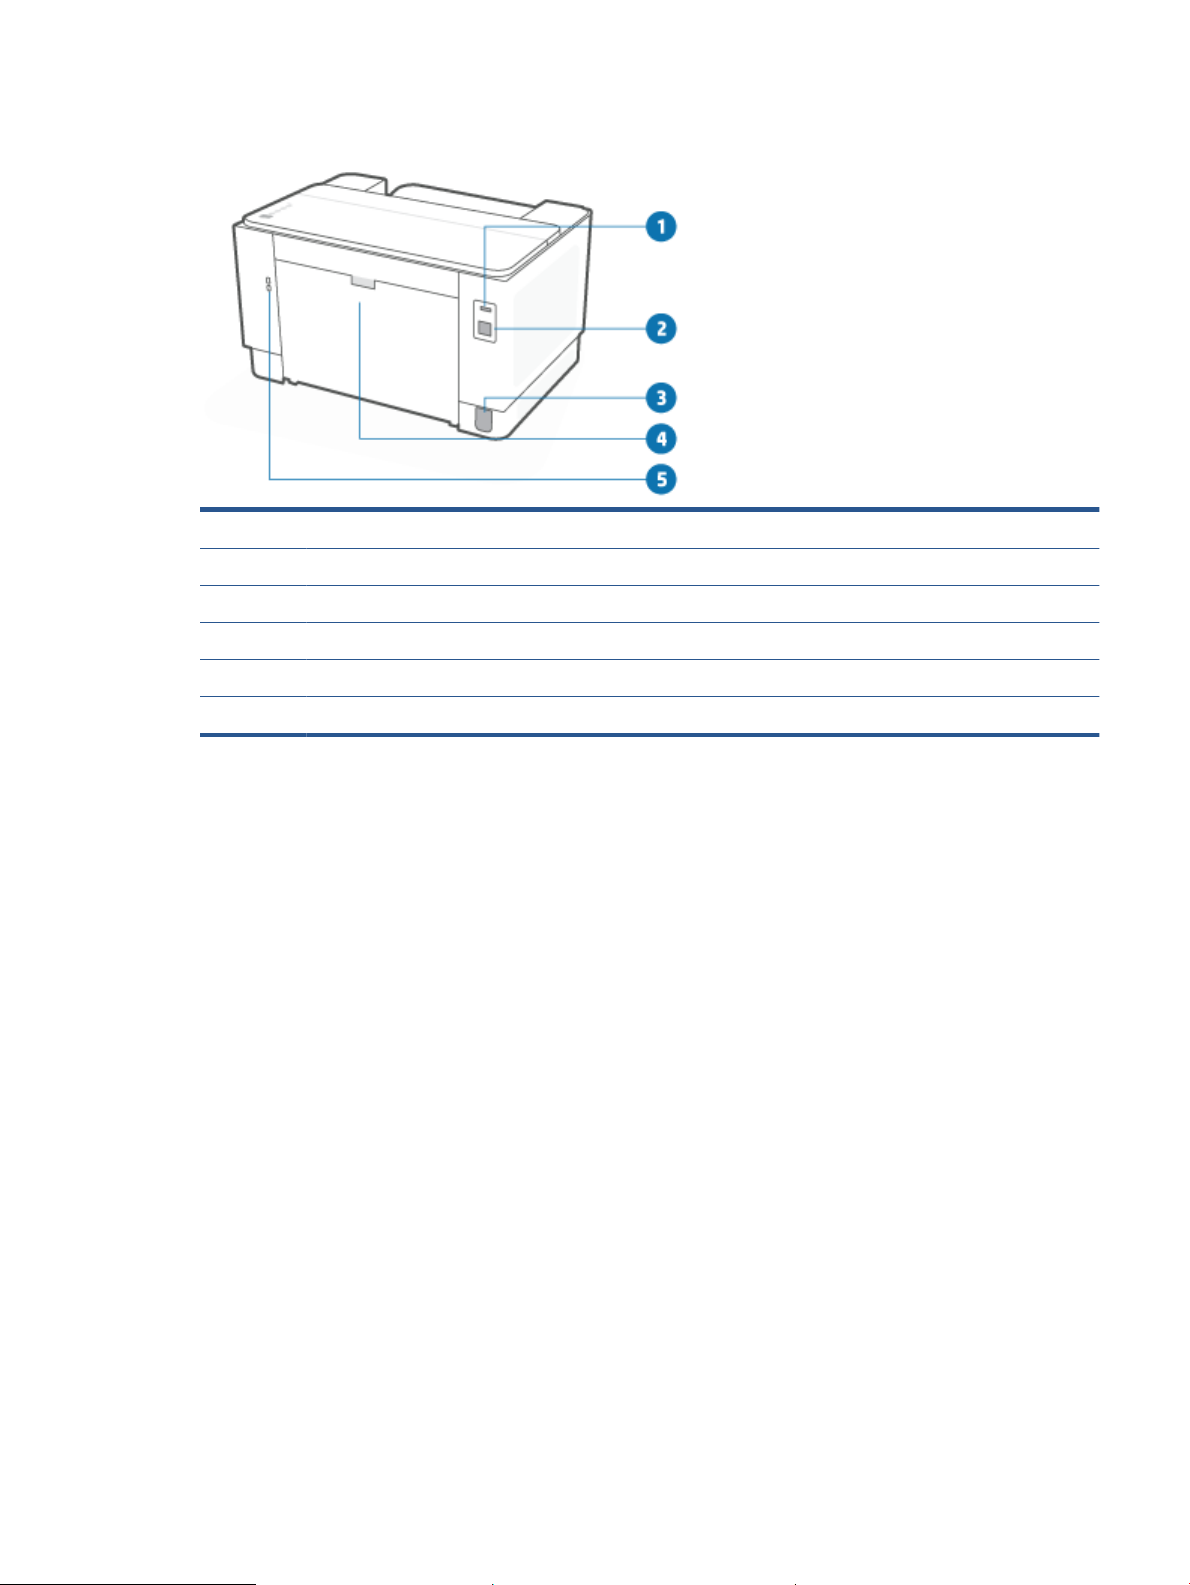
Printer back view
Printer front view
Feature Description
1 Control panel
2 Output tray/cartridge access door
3 Status light (some models only). For more information, see Light patterns.
White Idle, sleep, or working
Amber Needs attention because an error has occurred
Blue Wireless network connection status
Green Starting up, processing, or updating
Purple Wireless setup mode
4 Tray cover
5 Input tray
2 Chapter 1 Get started ENWW
Page 9
Printer back view
Feature Description
1 Rear USB port
2 Ethernet port (some models only)
3 Power input
4 Rear access door
5 Security slot
ENWW Printer views 3
Page 10
Control panel features
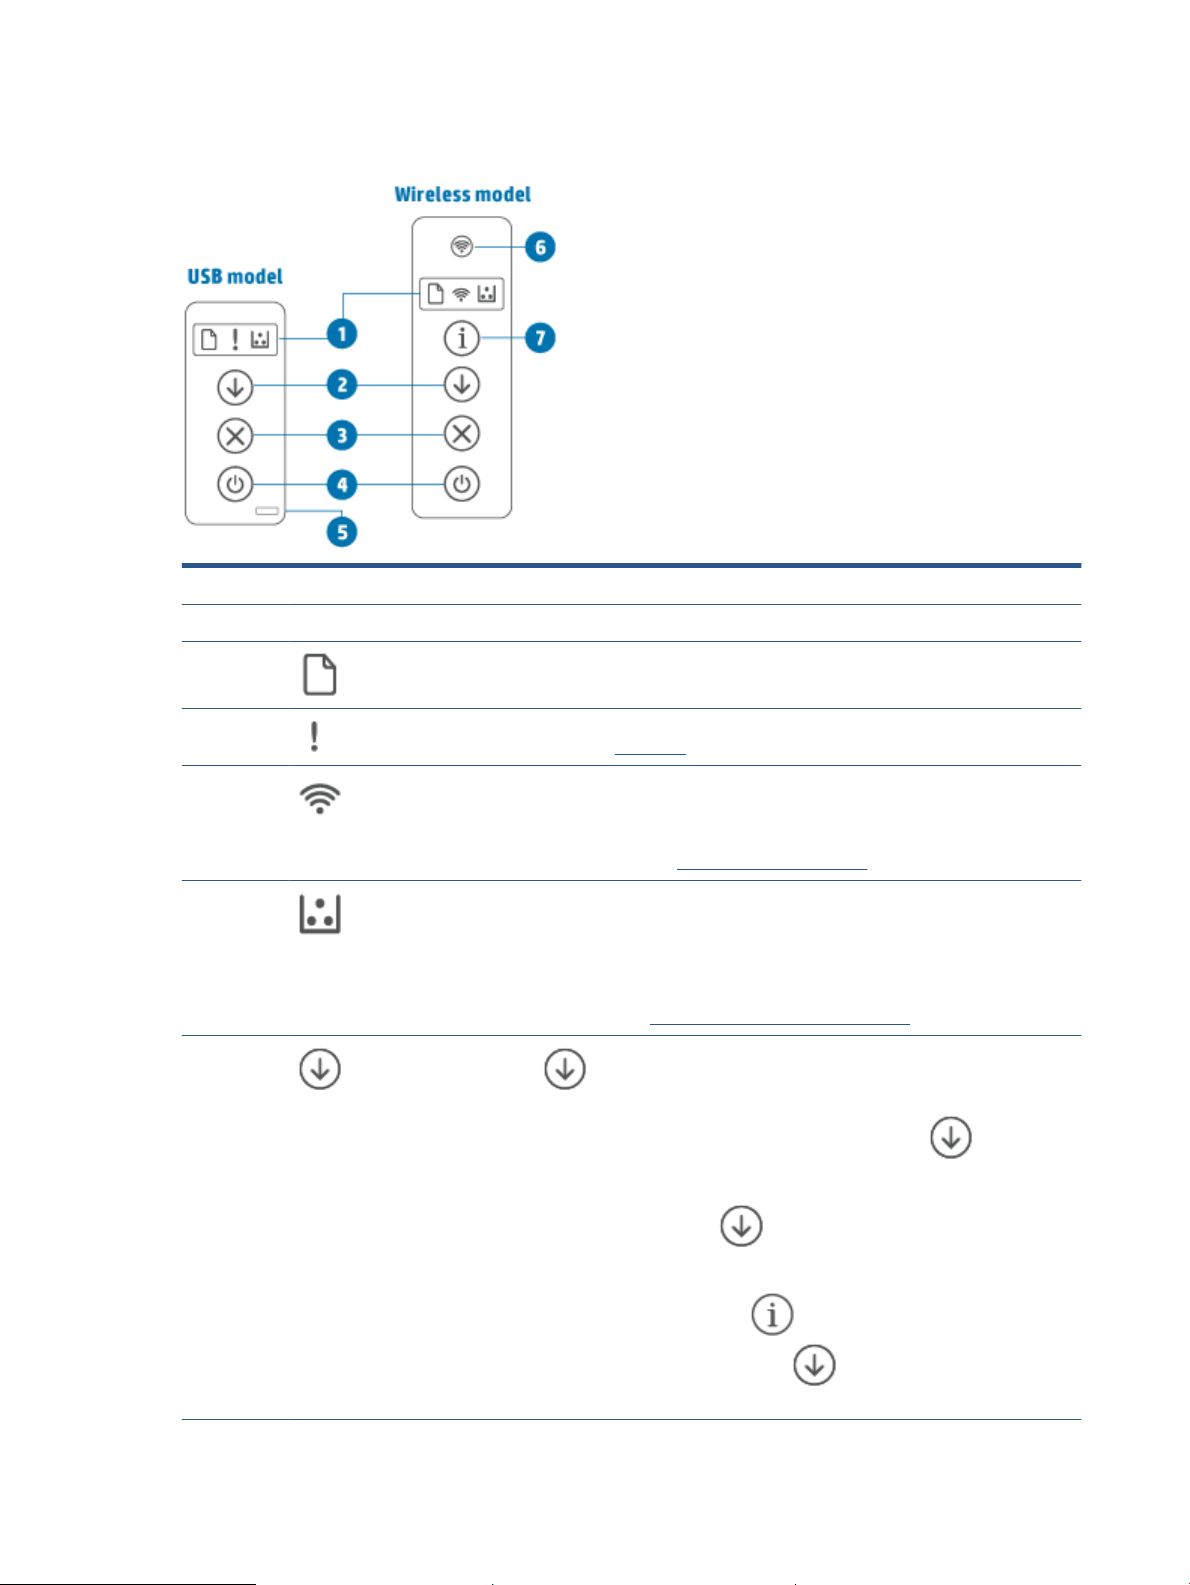
Feature Description
1 Control panel light
Paper light The Paper light blinks when the input tray is out of paper, or when there is a paper
error.
Attention light
(USB model)
Wireless light
(Wireless
model)
Cartridge light When the Cartridge light is on, it indicates that the cartridge is low on toner. If the
2 Resume button/
light
The Attention light is on or blinks when the printer requires user attention. For more
information, see USB model in the "Interpret control-panel light patterns" section.
If the Wireless light is on, the printer is connected with a stable wireless connection. If
it blinks, the printer is in wireless connection setup mode or WPS conguration is in
progress, or the printer is not connected to network.
For more information, see Wireless status of the printer.
Cartridge light blinks, you can continue printing until the Attention light blinks or the
status light shows amber.
If the Cartridge light blinks and the Attention light is on or the status bar shows amber,
a problem with the cartridge has occurred. Reinstall or replace the cartridge to
continue printing. See Remove and replace the toner cartridge.
Press (the Resume button) to perform the following actions:
● If the Resume light is on, the printer needs attention. Press (the Resume
button) to acknowledge and resume printing.
● USB model: Press and hold (the Resume button) for 3 seconds to print a
conguration report.
● Wireless model: Press and hold (the Information button) for 3 seconds
until all buttons are lit, and then press (the Resume button) to print a
conguration report.
4 Chapter 1 Get started ENWW
Page 11
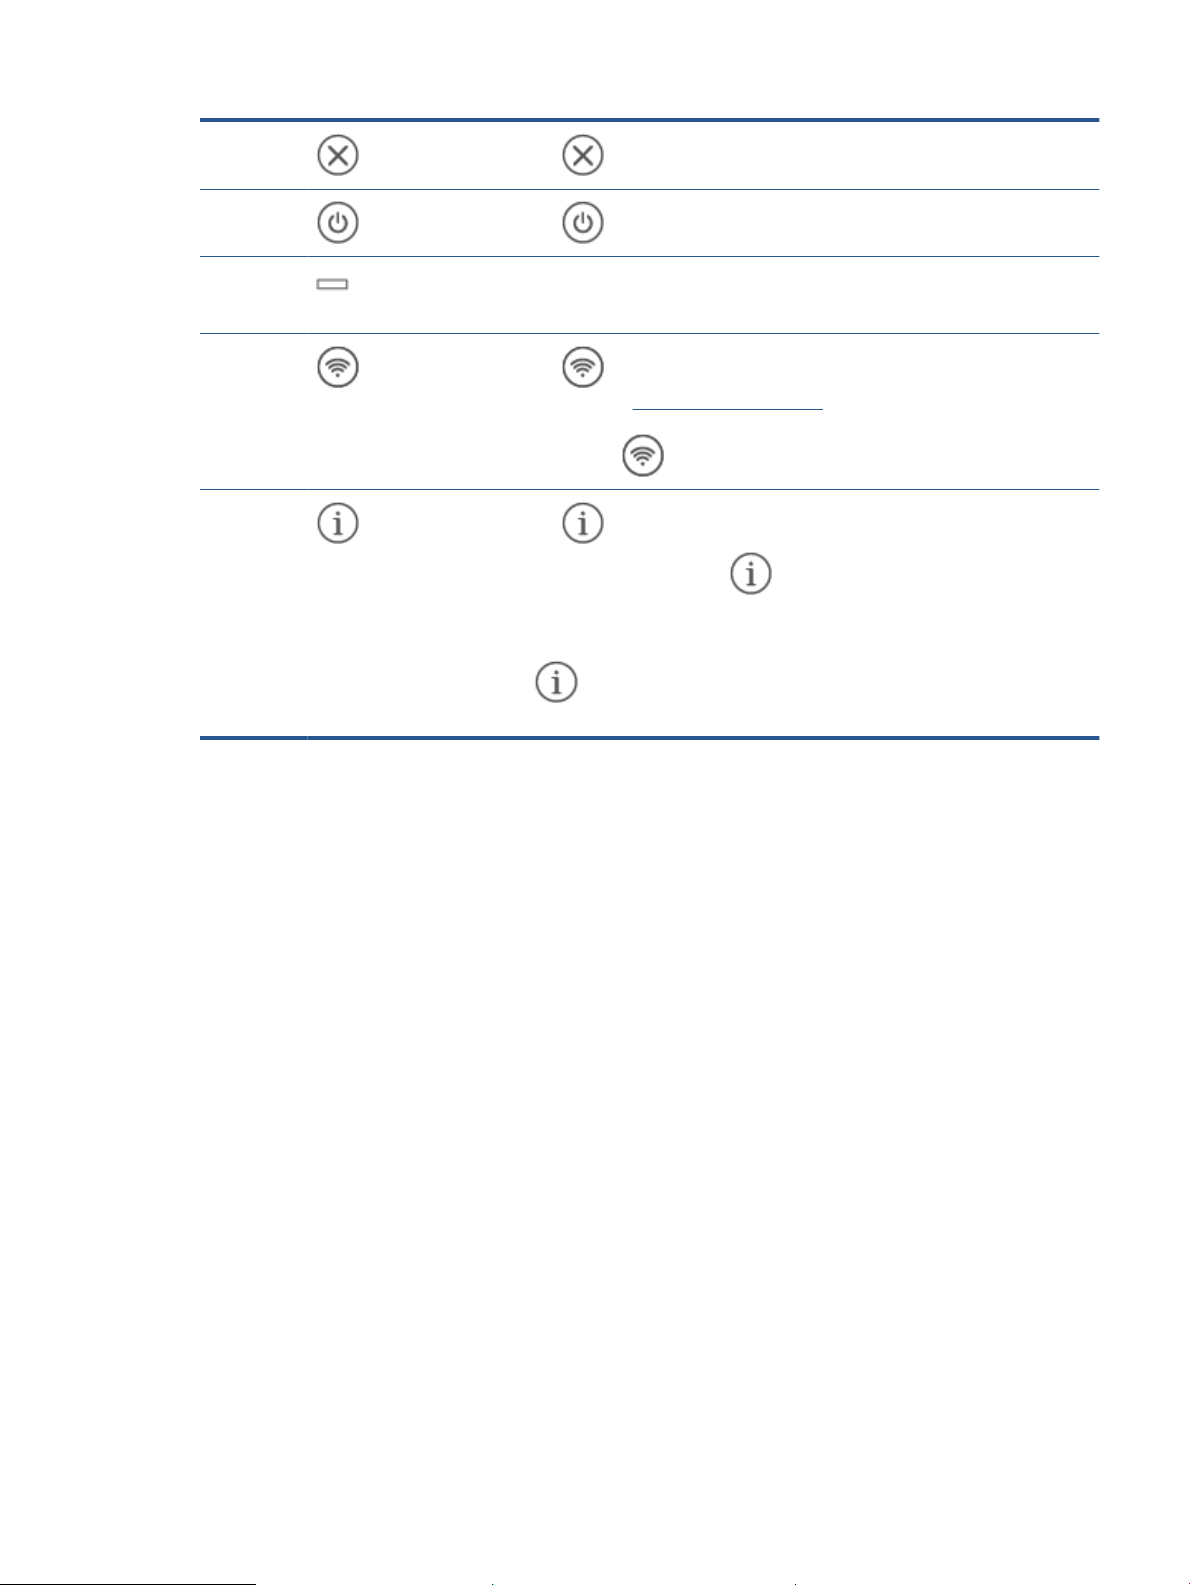
3 Cancel button/
light
Press (the Cancel button) to cancel a job.
4 Power button
5 Status light
(USB model)
6 Wireless button
(Wireless
model)
7 Information
button/light
(Wireless
model)
Press (the Power button) to turn the printer on or o.
When the Status light is on, the printer is ready to print. When the light is blinking, the
printer is starting up, receiving print data, or canceling a job. When the light dims, the
printer is in Sleep Mode (a low-power state).
Press (the Wireless button) to turn wireless capability on or o. For more
information, see
Press and hold (the Wireless button) to set up wireless using WPS.
Press (the Information button) to print a summary of printer settings and
status. If a printer error occurs,
Press the button, check and follow the instructions on the printed page to resolve the
error.
If (the Information button) blinks while setting up wireless, press this button to
complete authorization.
Wireless status of the printer.
(the Information button) lights up or blinks.
ENWW Control panel features 5
Page 12

Use the HP Smart app to print, scan, and manage
The HP Smart app can help you perform many dierent printer tasks, including the following:
● Set up and connect your printer.
● Print and scan documents and photos.
● Share documents through email and other applications.
● Manage printer settings, check printer status, print reports, and order supplies.
HP Smart is supported on mobile devices and computers running on iOS, Android, Windows 10, and macOS
10.13 and later.
NOTE: At this time, the HP Smart app might not be available in all languages. Some features are available
only on specic printers or models. HP Smart does not support all le formats. See Get more information
about HP Smart.
To install HP Smart and open the app
Complete the following steps to install and open HP Smart, connect your printer, and begin using the app.
1. Visit 123.hp.com to download and install HP Smart on your device.
NOTE:
● iOS, Android, Windows 10, and macOS devices: You can also download HP Smart from the
respective app stores for the device.
● Windows 7: You can download the HP printer software from 123.hp.com , install the software, and
connect the printer wirelessly using the software.
2. Open HP Smart after installation.
● iOS/Android: From the mobile device desktop or app menu, tap HP Smart.
● Windows 10: From the computer desktop, click Start, and then select HP Smart from the app list.
● macOS: From the Launchpad, select HP Smart.
3. Connect your printer wirelessly using HP Smart. See Connect your printer to a Wi-Fi network using HP
Smart.
4. When prompted, create an HP account and register the printer.
Get more information about HP Smart
To learn how to connect, print, and scan using HP Smart, visit the website for your device:
● iOS/Android: www.hp.com/go/hpsmart-help
● Windows 10: www.hp.com/go/hpsmartwin-help
● macOS: www.hp.com/go/hpsmartmac-help
6 Chapter 1 Get started ENWW
Page 13

2 Connect your printer
●
Connect your printer to a Wi-Fi network using HP Smart
●
Connect your printer to a Wi-Fi network using Wi-Fi Protected Setup (WPS)
●
Connect your printer to an Ethernet network
●
Connect your printer using a USB cable
●
Change wireless settings
●
Change the connection type
ENWW 7
Page 14

Connect your printer to a Wi-Fi network using HP Smart
NOTE: This section is applicable to wireless printers only.
Install the HP Smart app on your computer or mobile device and use the app to set up or connect the printer
to your Wi-Fi network.
For information about HP Smart including where to download the app, see Use the HP Smart app to print,
scan, and manage.
1. Make sure your computer or mobile device is connected to your Wi-Fi network. On your mobile device,
turn on Bluetooth and location services.
NOTE: HP Smart uses Bluetooth for printer setup. It does not support Print using Bluetooth.
2. If your printer Wi-Fi was previously turned o, make sure to turn it on. For more information about
wireless status, see To turn on or o the wireless capabilities of the printer.
3. If the printer is no longer in wireless setup mode, restore the printer network settings. See To restore
network settings to default settings.
NOTE: For some printers or models, the purple light will start pulsing in the Status light bar or the
Wireless light will blink when the printer is in wireless setup mode.
4. Open the HP Smart app on your computer or mobile device. See Use the HP Smart app to print, scan, and
manage.
5. From HP Smart, click or tap (the Plus icon) or Add Printer, and then choose the option to select or
add a printer. If prompted, allow Bluetooth and location permissions.
Follow the instructions to add the printer to your network.
6. When prompted, create an HP account and register the printer.
NOTE: When the printer is connected successfully, the Wireless light stops blinking and remains lit (for all
Wireless models). See Printer views.
8 Chapter 2 Connect your printer ENWW
Page 15

Connect your printer to a Wi-Fi network using Wi-Fi Protected Setup (WPS)
This wireless setup method can be used if your router has a WPS button. If the router does not have this
button, it is recommended that you connect the printer using the HP Smart app. See Connect your printer to a
Wi-Fi network using HP Smart.
1. Make sure your router and printer are not too far from each other.
2.
From the printer control panel, press and hold (the Wireless button) for at least 3 seconds to start
WPS.
The Wireless light blinks.
3. Press the WPS button on your router.
NOTE:
● Be sure to press the WPS button on the router within 2 minutes.
● When the printer is connected successfully, the Wireless light stops blinking and remains lit (for all
Wireless models). See Printer views.
4. Open the HP Smart app on your computer or mobile device. See Use the HP Smart app to print, scan, and
manage.
5. From HP Smart, click or tap (the Plus icon) or Add Printer, and then choose the option to select or
add a printer.
Follow the instructions to add the printer to your network.
6. When prompted, create an HP account and register the printer.
ENWW Connect your printer to a Wi-Fi network using Wi-Fi Protected Setup (WPS) 9
Page 16

Connect your printer to an Ethernet network
If your Ethernet network does not have an Internet connection, connect the printer wirelessly to the HP Smart
app. See Connect your printer to a Wi-Fi network using HP Smart.
1. Make sure your computer is connected to the router.
2. Connect your printer and router using an Ethernet cable. (Ethernet cable sold separately.)
NOTE:
● The Wi-Fi connection is automatically disabled when you connect the Ethernet cable.
● To connect the printer wirelessly, disconnect the Ethernet cable and connect the printer to your
wireless network using HP Smart. See Connect your printer to a Wi-Fi network using HP Smart.
3. Open the HP Smart app on your computer or mobile device. See Use the HP Smart app to print, scan, and
manage.
4. From HP Smart, click or tap (the Plus icon) or Add Printer, and then choose the option to select or
add a printer.
Follow the instructions to add the printer to your network.
5. When prompted, create an HP account and register the printer.
10 Chapter 2 Connect your printer ENWW
Page 17

Connect your printer using a USB cable
1. Connect the printer and computer using a USB cable.
2. Open the HP Smart app on your computer. See Use the HP Smart app to print, scan, and manage.
3.
From HP Smart, click or tap (the Plus icon) or Add Printer, and then choose the option to select or
add a printer.
Follow the instructions to add the printer.
4. When prompted, create an HP account and register the printer.
ENWW Connect your printer using a USB cable 11
Page 18
Change wireless settings
You can set up and manage the wireless connection for your printer. This includes printing information about
network settings, turning the wireless function on or o, and restoring wireless settings.
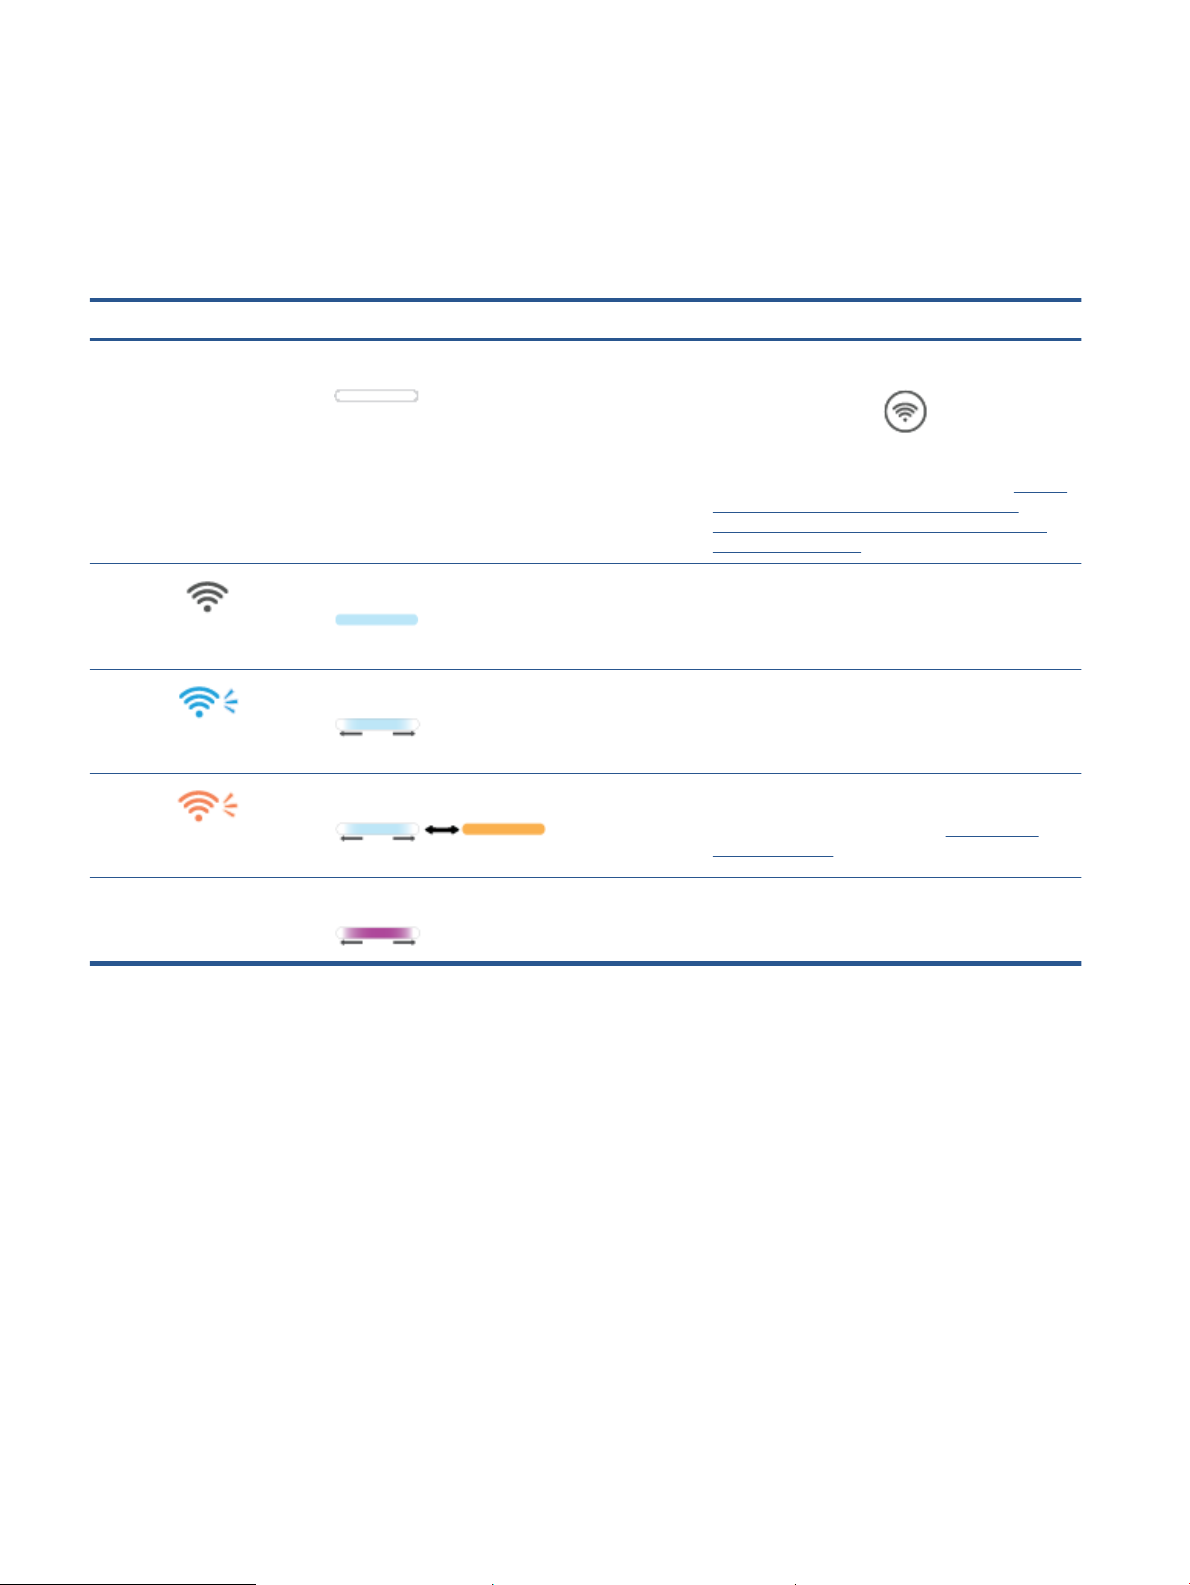
Wireless status of the printer
Wireless light Status light Wi-Fi Status
O Solid white light on the bar. The printer is not connected to the network.
Solid light blue light on the bar. The printer is connected to the network.
On
The bar pulses light blue. The printer is trying to connect to a wireless network.
To turn on wireless, press (the Wireless
button).
To connect the printer to a Wi-Fi network, see Connect
your printer to a Wi-Fi network using HP Smart or
Connect your printer to a Wi-Fi network using Wi-Fi
Protected Setup (WPS).
Blinks quickly in blue
Solid blue light pulses and then ashes amber. The printer is unable to connect to a wireless network.
To resolve wireless connection, see Solve wireless
Blinks in amber
O Purple light pulses on the bar. The printer is in wireless setup mode.
network problems.
12 Chapter 2 Connect your printer ENWW
Page 19

To turn on or o the wireless capabilities of the printer
Press (the Wireless button) to turn on or o the printer wireless capabilities.
To restore network settings to default settings
1.
Press and hold (the Information button) for 3 seconds, and then release the button. All control
panel buttons will light up.
Press and hold (the Wireless button) and (the Cancel button). The printer restarts and,
2.
depending on your printer model, the Status light pulses purple or
blinking blue. This indicates that the printer is in wireless setup mode. You can now set up a wireless
connection between the printer and your device.
NOTE: Use the HP Smart app to connect the printer wirelessly.
(the Wireless button) starts
ENWW Change wireless settings 13
Page 20

Change the connection type
USB to a wireless connection
Windows 10/macOS
1. Unplug the USB cable from the printer.
2. Make sure your computer or mobile device is connected to your Wi-Fi network. On your mobile device,
turn on Bluetooth and location services.
3. If your printer Wi-Fi was previously turned o, make sure to turn it on. For more information about
wireless status, see To turn on or o the wireless capabilities of the printer.
4. If the printer is no longer in wireless setup mode, restore the printer network settings. See To restore
network settings to default settings.
5. Open the HP Smart app on your computer or mobile device. See Use the HP Smart app to print, scan, and
manage.
6. When prompted, create an HP account and register the printer.
7. Follow the on-screen instructions to connect the printer to your Wi-Fi network.
Windows 7
1. Open the HP printer software.
If you have not installed the HP printer software on your computer, visit 123.hp.com to download and
install the printer software.
2. In the printer software, click Tools, and then click Device Setup & Software.
3. Select Convert a USB connected device to wireless. Follow the on-screen instructions.
Wireless to a USB connection
Windows/macOS
1. Connect the printer and computer using a USB cable.
2. Open the HP Smart app on your computer. See Use the HP Smart app to print, scan, and manage.
3. From HP Smart, click or tap (the Plus icon) or Add Printer, and then choose the option to select or
add a printer. Follow the instructions to add the printer.
4. When prompted, create an HP account and register the printer.
14 Chapter 2 Connect your printer ENWW
Page 21

3 Load media
●
Load paper
●
Load envelopes
●
Load labels
ENWW 15
Page 22
Load paper
The following information describes how to load paper into the input tray.
NOTE: To avoid paper jams:
● Never add or remove paper from the input tray during printing.
● Before loading the input tray, remove all of the paper from the input tray and straighten the stack.
● Use paper that is not wrinkled, folded, or damaged.
● Always use 1 size paper. For example, do not place A5 paper over A4 size paper.
● Always push the paper guides to ensure paper does not slant/skew while picking up by printer.
To load paper
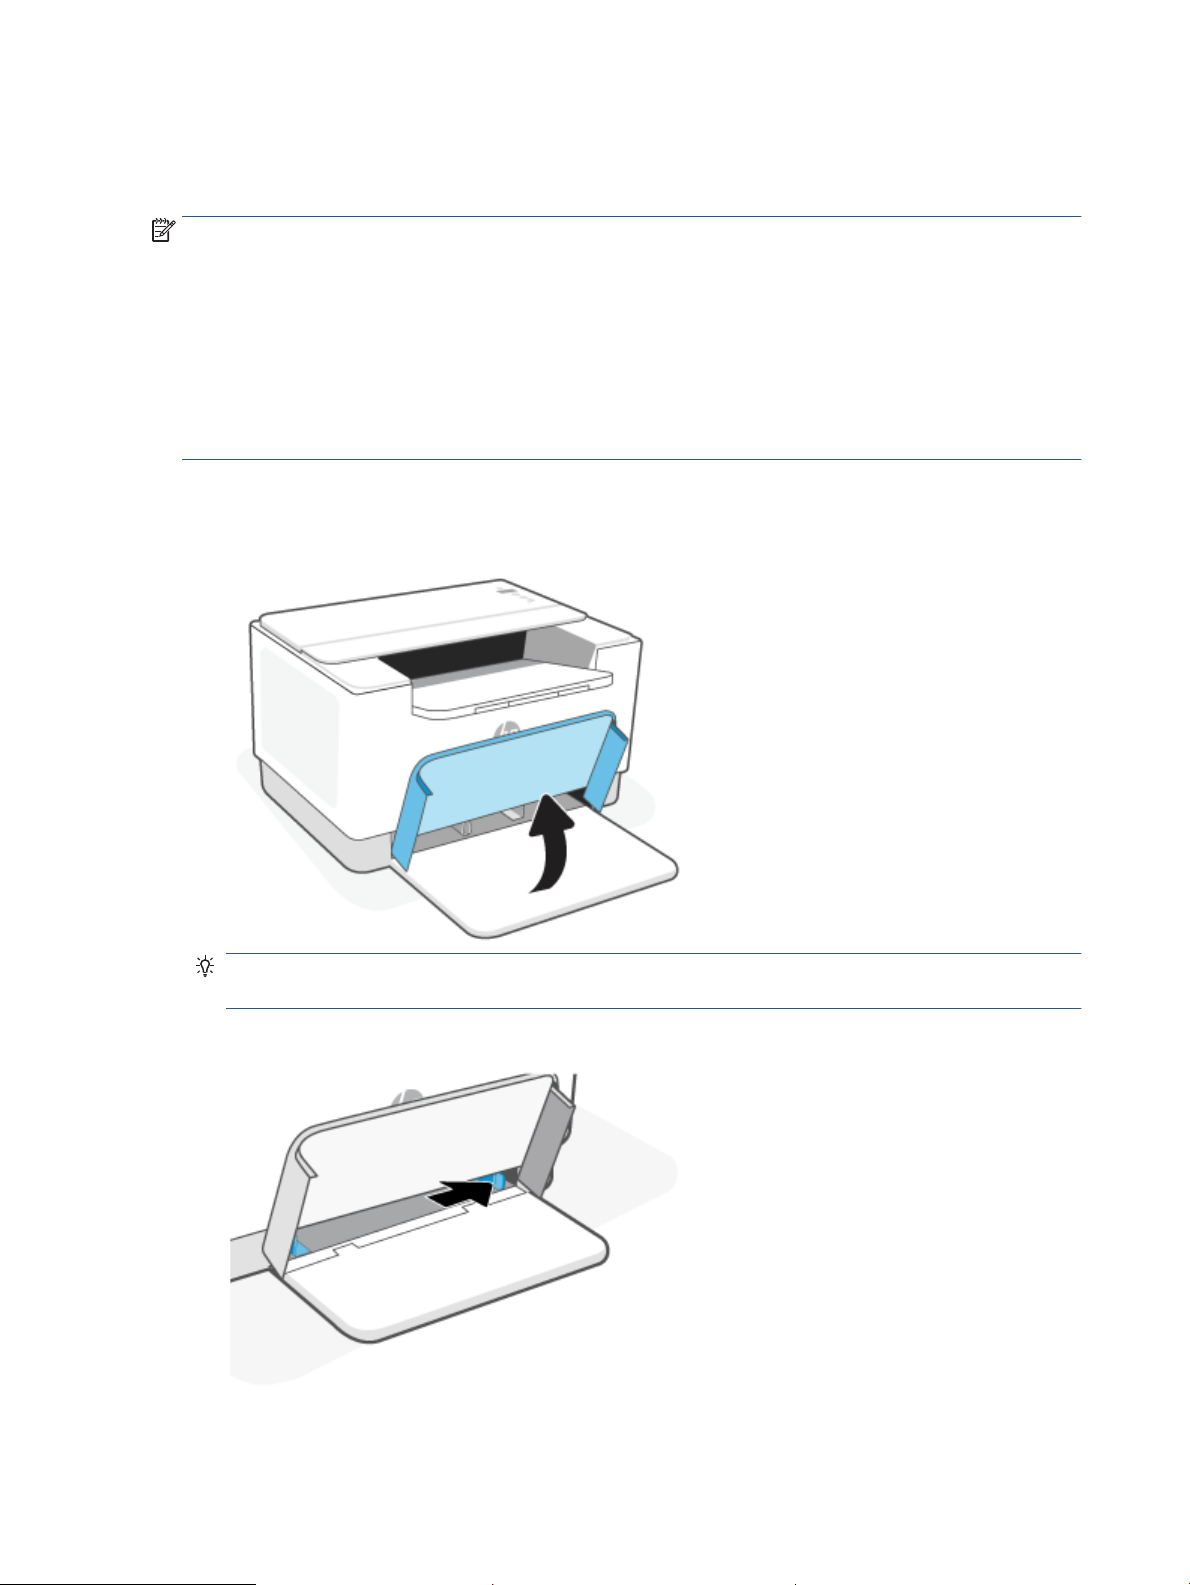
1. Remove paper from the input tray, if any.
TIP: To load Legal-size paper, lift the printer cover and, if necessary, leave it open. Depending on your
printer model, you might also need to lower the tray door.
2. Slide the paper guides to the edges of the input tray.
16 Chapter 3 Load media ENWW
Page 23
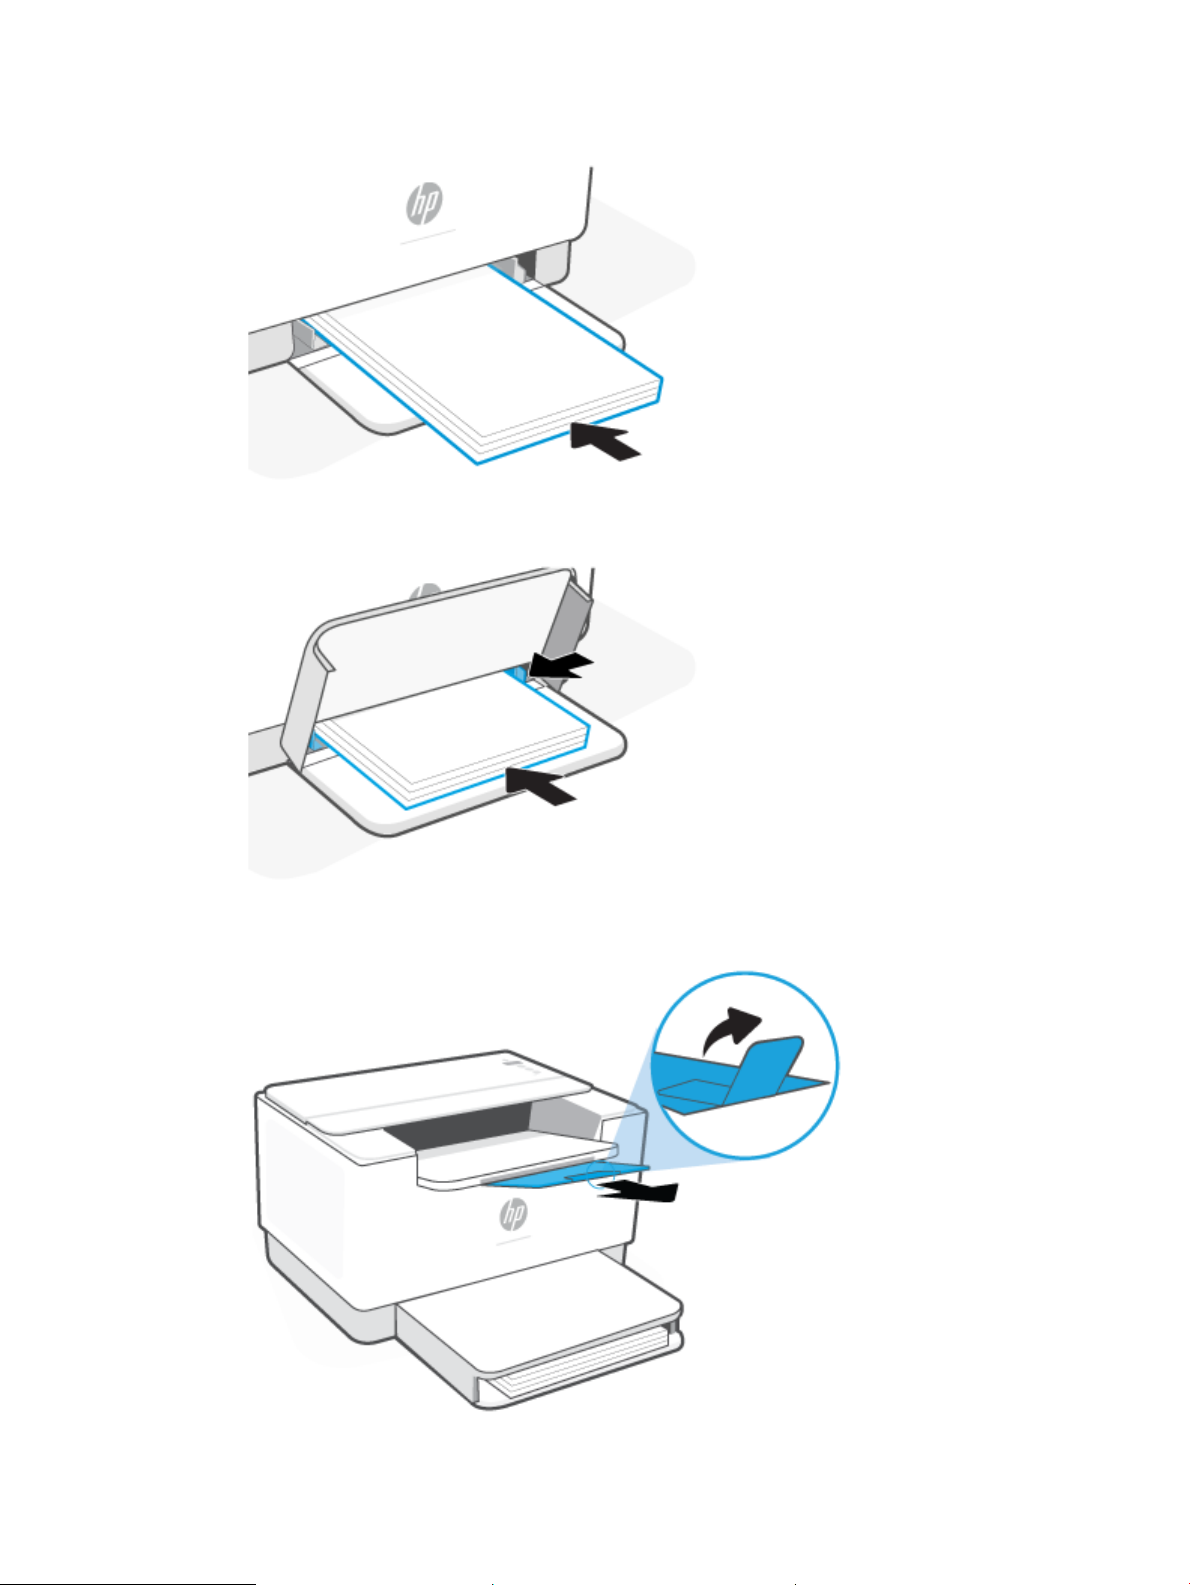
3. Insert the stack of paper into the input tray with the top forward and the side to be printed on facing up.
4. Slide the paper guides until they touch the edges of the media.
5. Lower the tray cover and extend the output tray.
ENWW Load paper 17
Page 24
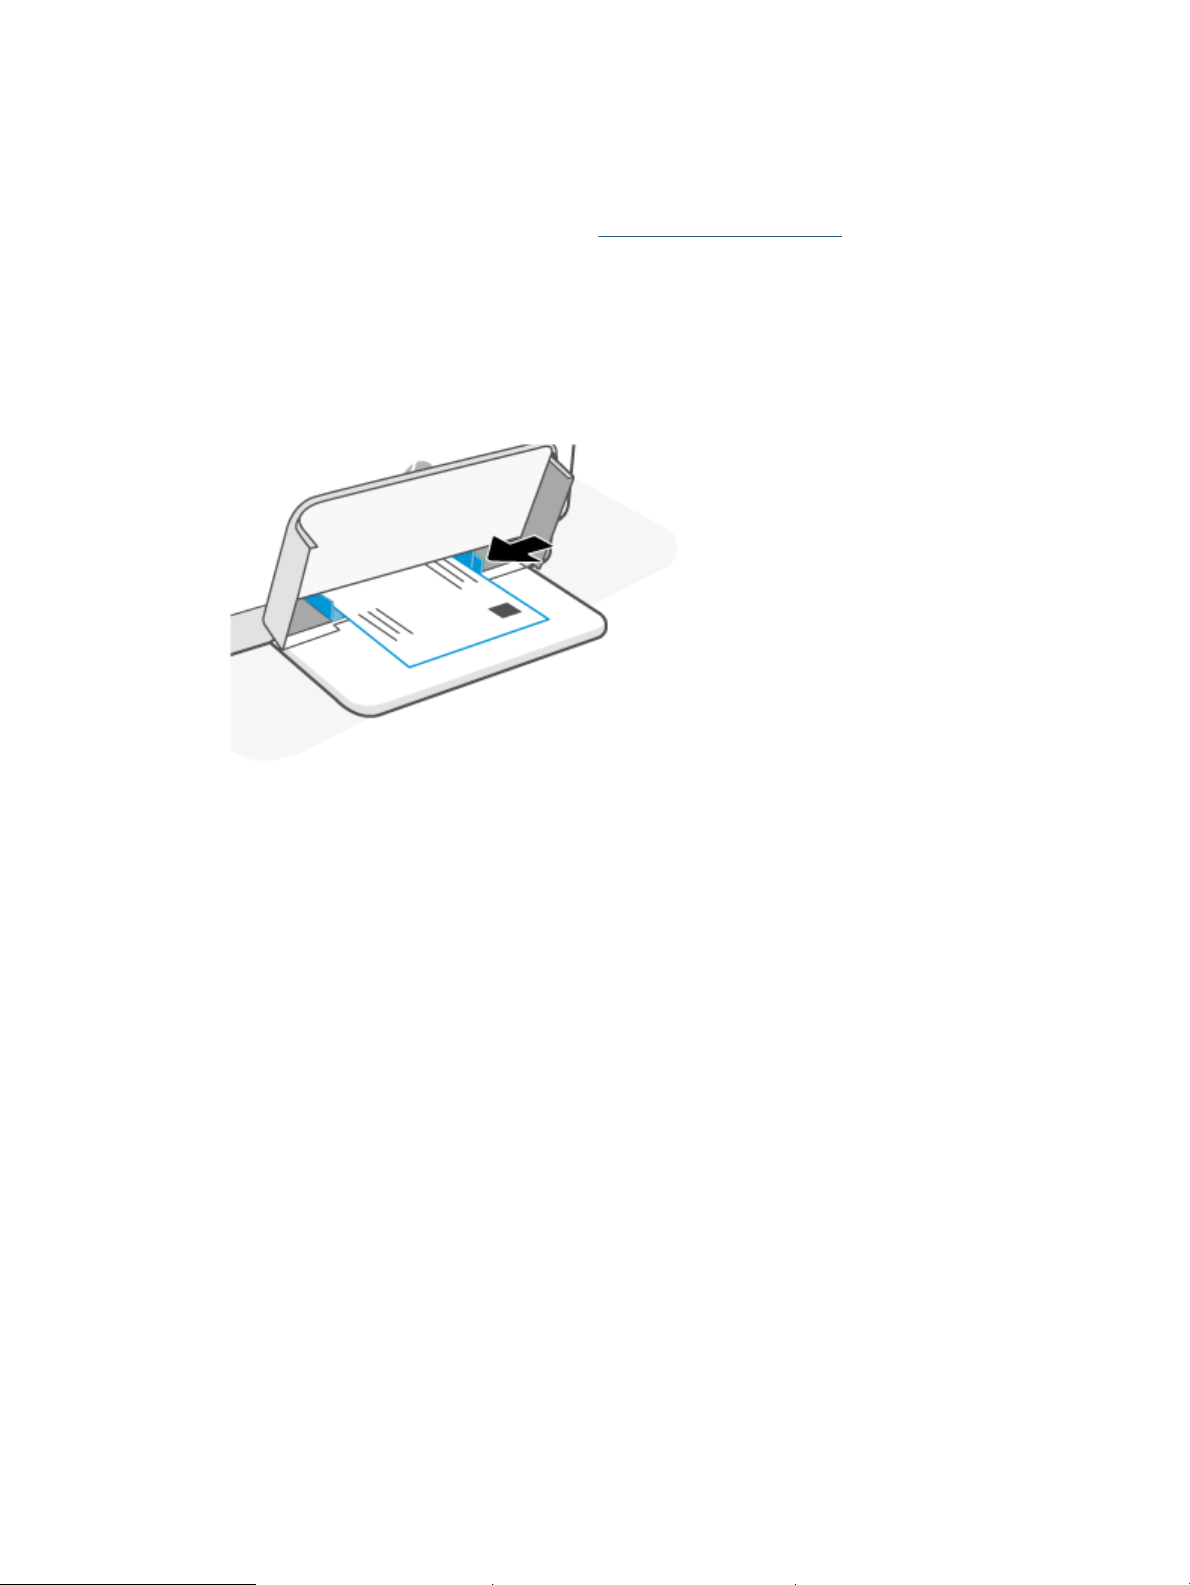
Load envelopes
The following information describes how to load paper into the input tray.
For a list of supported sizes and tray capacity, visit www.hp.com/support/ljM207 . Click Product information,
and then click the product specications for your printer.
To load envelopes
1. Remove all paper from the input tray.
2. Insert the envelope into the middle of the input tray, with the short, postage end toward the back of the
tray. The side to be printed on should face up.
3. Slide the paper guides until they touch the edges of the media.
4. Lower the tray cover and extend the output tray.
18 Chapter 3 Load media ENWW
Page 25

Load labels
The following information describes how to load paper into the input tray.
For a list of supported sizes and tray capacity, visit www.hp.com/support/ljM207 . Click Product information,
and then click the product specications for your printer.
To load labels
1. Remove all paper from the input tray.
2. Insert the sheet of labels into the middle of the input tray, with the top edge of the sheet toward the
back of the tray. The side to be printed on should face up.
3. Slide the paper guides until they touch the edges of the media.
4. Lower the tray cover and extend the output tray.
ENWW Load labels 19
Page 26

4 Print
●
Print from a Windows computer
●
Print from a Mac computer
●
Print with mobile devices
NOTE: Depending on your printer, the Status light blinks or a solid green light appears on the bar when the
printer is initializing, cooling down, performing automatic cleaning routines, or shutting down.
To provide productive printing, this printer may automatically enter cool-down mode under certain
environmental conditions. This process might take several minutes. When the printer is cooling down, print
jobs might pause, but these jobs will continue when the engine is ready.
20 Chapter 4 Print ENWW
Page 27

Print from a Windows computer
1. Make sure you have installed the HP Smart app. See Use the HP Smart app to print, scan, and manage.
2. Open the document you wish to print.
3. From the File menu in your software program, select the Print option.
4. Click the button that opens the Properties dialog box.
Depending on your software application, this button might be called Properties, Options, Setup, or
Preferences.
5. Make sure your printer is selected.
6. Change any print settings, and Click OK.
7. Click Print or the OK button to print the job.
ENWW Print from a Windows computer 21
Page 28

Print from a Mac computer
1. Make sure you have installed the HP Smart app. See Use the HP Smart app to print, scan, and manage.
2. From the computer, open System Preference, and select Printers and Scanners.
3. Click + (the Add button/icon), select the printer from the printer list, and then click Add.
4. Once connected, open the document you wish to print and use the Print command.
5. Make sure the desired printer is selected.
6. Change any print settings.
7. Click Print to print the document.
22 Chapter 4 Print ENWW
Page 29

Print with mobile devices
You can use the HP Smart app to print documents and photos from your mobile device, social media account,
or cloud storage. See Use the HP Smart app to print, scan, and manage.
You can also print directly from your mobile devices using AirPrint (iOS) or HP Print Service Plugin (Android):
● iOS: Devices running iOS 4.2 or later have AirPrint pre-installed.
● Android: Download the HP Print Service Plugin from the Google Play Store or your favorite app store,
and then enable it on your device.
NOTE: You can print using HP Smart or AirPrint/HP Print Service Plugin when the mobile device is on the
same network as the printer or a dierent network (using Wi-Fi Direct).
Print while connected to same Wi-Fi network
You can print documents and photos from your mobile device when the device is on the same Wi-Fi network
as the printer.
Visit www.hp.com/go/mobileprinting for more information on mobile printing.
NOTE: Make sure your mobile device and printer are connected to the same Wi-Fi network. See Connect your
printer to a Wi-Fi network using HP Smart.
Print without connecting to same Wi-Fi network (Wi-Fi Direct)
With Wi-Fi Direct, you can directly connect your computer or mobile device to the printer and print wirelessly
—without connecting your computer or mobile device to an existing wireless network.
Visit www.hp.com/go/widirectprinting for more information on Wi-Fi Direct.
NOTE:
● Make sure Wi-Fi Direct on your printer is turned on. To check, open the EWS (see To access and use the
Embedded Web Server (EWS)), click the Networking tab, and then select Wi-Fi Direct Setup.
● Up to 5 computers and mobile devices can connect to the printer using Wi-Fi Direct connection.
To turn Wi-Fi Direct on or o from the control panel:
1. Press and hold (the Information button) for three seconds and then release the button.
All control panel buttons will light up.
2. Press (the Resume button) and (the Wireless button) at the same time.
TIP: Press (the Information button) to print a report to check Wi-Fi Direct status and password.
ENWW Print with mobile devices 23
Page 30

5 Congure your printer
●
Use Web Services
●
Update the printer
●
Congure the printer using the Embedded Web Server (EWS)
24 Chapter 5 Congure your printer ENWW
Page 31

Use Web Services
The printer oers innovative, cloud-based solutions, such as print anywhere, scan-and-save to cloud, and
other services (including supplies auto replenishment). For more information, visit the HP Smart website
(www.hpsmart.com).
NOTE: To use these cloud-based solutions, the printer must be connected to the Internet. Unless otherwise
agreed, HP can modify or cancel these cloud-based solution oerings at its discretion.
Set up Web Services
1. Before you set up Web Services, make sure your printer is connected to the Internet.
2. Open the printer home page (the embedded web server or EWS). See To access and use the Embedded
Web Server (EWS).
3. Click the HP Web Services tab.
4. In Web Services Settings, click Enable, and follow the on-screen instructions to accept the terms of use.
5. If prompted, choose to allow the printer to check for and install printer updates.
NOTE:
● If prompted for a password, enter the PIN from the label on your printer. See Things to note when
accessing EWS.
● If prompted for proxy settings and if your network uses proxy settings, follow the on-screen
instructions to set up a proxy server. If you do not have the details, contact your network
administrator or the person who set up the network.
● If a printer update is available, the printer downloads and installs the update and then restarts
automatically. Repeat the instructions above to set up HP Web Services.
6. After the printer is connected to the HP server, the printer prints an information sheet. Follow the
instructions on the information sheet to nish setting up Web Services.
Remove Web Services
1. Open the printer home page (the embedded web server or EWS). See To access and use the Embedded
Web Server (EWS).
2. Click the HP Web Services tab.
3. In Web Services Settings, click Disable Web Services.
ENWW Use Web Services 25
Page 32

Update the printer
HP oers periodic printer updates to improve printer performance, x issues, or protect your printer against
potential security threats.
If your printer is connected to a Wi-Fi or Ethernet network with Internet access, the printer automatically
updates the printer when new updates are available. By default, the printer automatically checks for updates.
TIP: You can check to see if an update is available for the printer at any time. Learn more about checking for
printer updates.
26 Chapter 5 Congure your printer ENWW
Page 33
Congure the printer using the Embedded Web Server (EWS)
Use the Embedded Web Server (EWS) to manage printing functions from your computer.
● View printer status information
● Check the information and status of the printing supplies
● Receive notication of printer and supplies events
● View and change the network and the printer settings
To access and use the Embedded Web Server (EWS)
You can open EWS using one of the following:
● HP Smart app
● HP printer software
● Web browser using IP address
● Web browser using Wi-Fi Direct connection
Things to note when accessing EWS
● If the web browser displays a message indicating that the website is unsafe, select the option to
continue. Accessing the website will not harm your device.
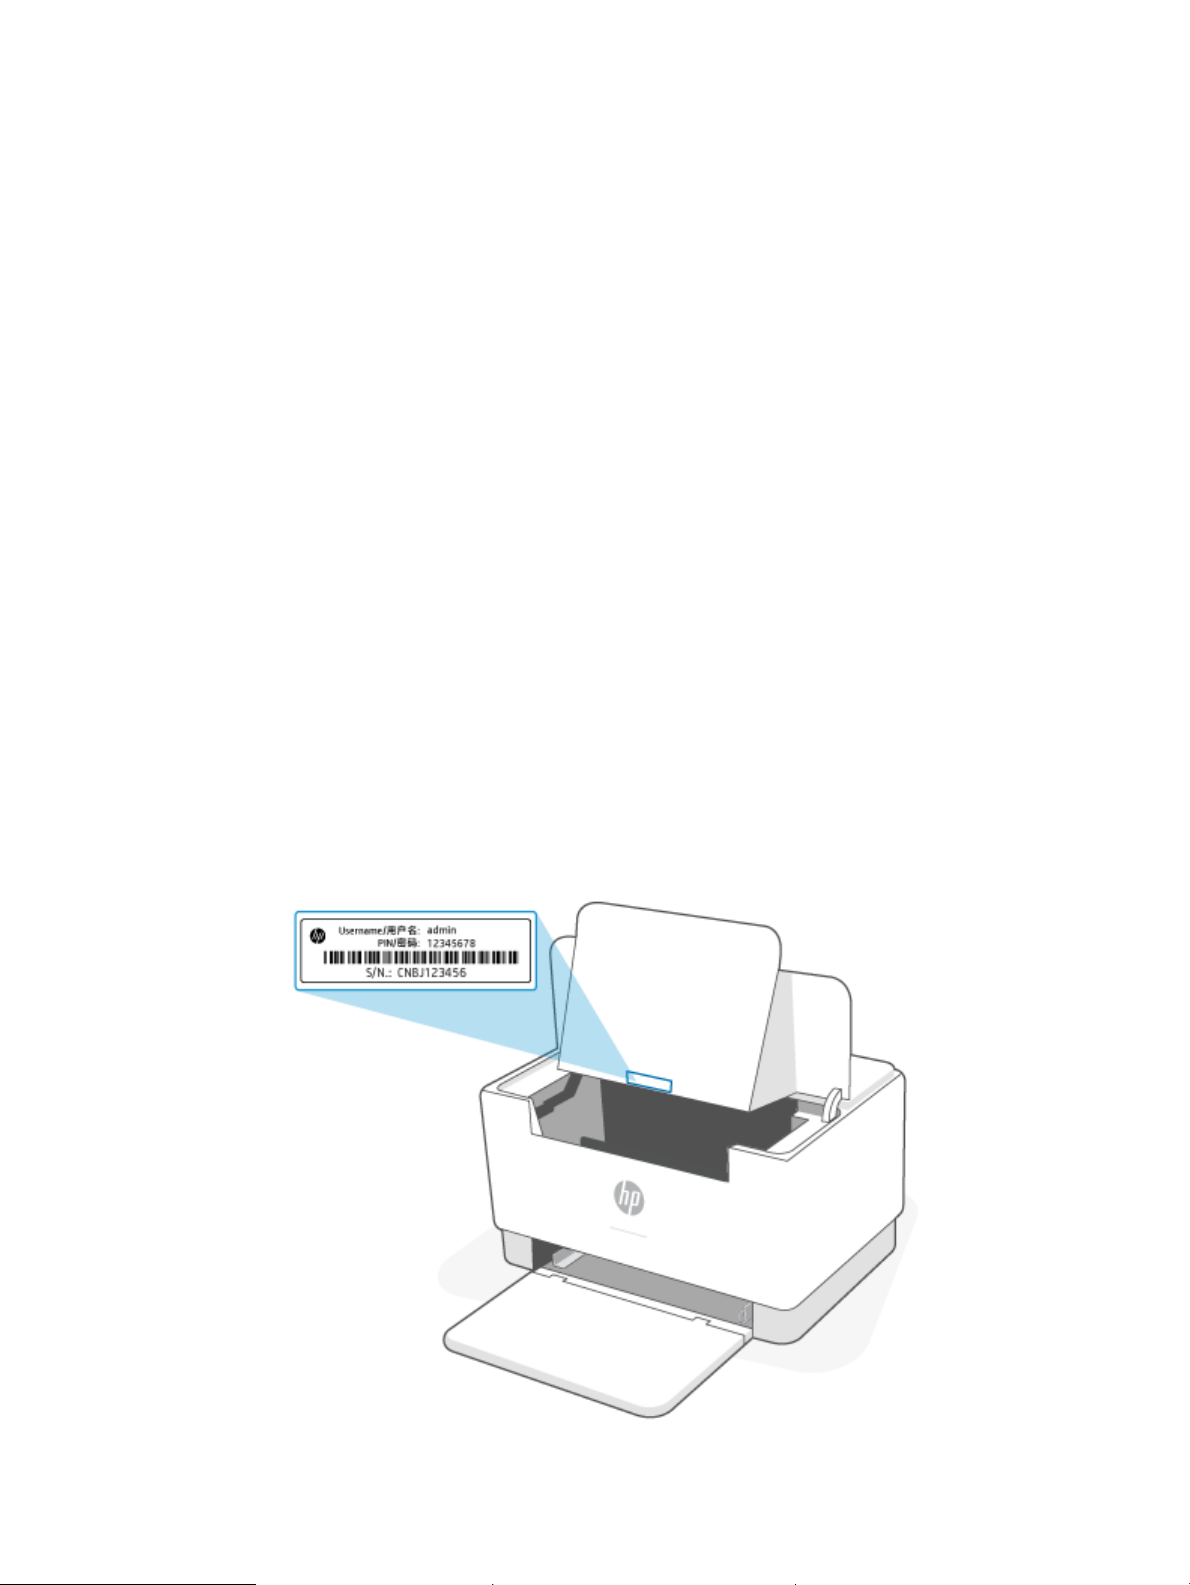
● If prompted, enter the default user name and password of the printer.
– User Name: admin
– Password: Open the cartridge access door, and see the label inside the printer.
ENWW Congure the printer using the Embedded Web Server (EWS) 27
Page 34

● Depending on how the printer is connected, some features in EWS might not be available.
● EWS is not accessible beyond the network rewall.
To open EWS using HP Smart (iOS, Android, and Windows 10)
1. Open the HP Smart app on your computer or mobile device. See Use the HP Smart app to print, scan, and
manage.
2. From HP Smart, select your printer, and then click or tap Advanced Settings.
To open EWS using an IP address (Wi-Fi or Ethernet connection)
Find out the IP address. Press (the Information button) on the printer to print an information page.
1.
2. Open a web browser, type the IP address or hostname in the address bar, and then click or tap Enter.
To open EWS using an IP address (Wi-Fi Direct connection)
1. Make sure your device and the printer are connected using Wi-Fi Direct. See Print without connecting to
same Wi-Fi network (Wi-Fi Direct).
2. Open a web browser, type the following IP address or hostname of the printer in the address bar, and
then click or tap Enter.
IP Address: 192.168.223.1
To open EWS using HP Printer software (Windows 7)
1. From the computer desktop, click Start, select All Programs, click HP, click the folder for the printer,
select the icon with the printer's name, and then open HP Printer Assistant.
2. In the HP Printer Assistant, select Print tab.
3. Select Printer Home Page (EWS).
28 Chapter 5 Congure your printer ENWW
Page 35

Congure IP network settings
Use the following sections to congure the printer network settings.
View or change network settings
Use the Embedded Web Server to view or change IP conguration settings.
1. Open EWS. See To access and use the Embedded Web Server (EWS).
2. Click the Networking tab to obtain network information. Change settings as needed.
Rename the printer on a network
To rename the printer on a network so that it can be uniquely identied, use the Embedded Web Server.
1. Open EWS. See To access and use the Embedded Web Server (EWS).
2. Open the System tab.
3. On the Device Information page, the default printer name is in the Device Description eld. You can
change this name to uniquely identify this printer.
NOTE: Completing the other elds on this page is optional.
4. Click the Apply button to save the changes.
Manually congure IPv4 TCP/IP parameters
Use the EWS to manually set an IPv4 address, subnet mask, and default gateway.
1. Open EWS. See To access and use the Embedded Web Server (EWS).
2. On the Networking tab, click IPv4 Conguration in the left navigation pane.
3. From the IP Preferred Address Method drop-down, select Manual, and then edit the IPv4 conguration
settings.
4. Click the Apply button.
Assign or change the system password using the Embedded Web Server
Assign an administrator password for access to the printer and the HP Embedded Web Server so that
unauthorized users cannot change the printer settings.
1. Open EWS. See To access and use the Embedded Web Server (EWS).
2. On the System tab, click the Administration link in the left navigation pane.
3. In the area labeled Product Security, enter the password in the Password eld.
4. Re-enter the password in the Conrm Password eld.
5. Click the Apply button.
NOTE: Make note of the password and store it in a safe place.
ENWW Congure the printer using the Embedded Web Server (EWS) 29
Page 36

Change energy-conservation settings
The printer includes several economy features to conserve energy and supplies.
Set the Sleep/Auto O After Inactivity setting
Use the EWS to set the amount of idle time before the printer enters sleep mode.
Complete the following procedure to change the Sleep/Auto O After Inactivity setting:
1. Open EWS. See To access and use the Embedded Web Server (EWS).
2. Click the System tab, and then select Energy Settings.
3. From the Sleep/Auto O After Inactivity drop-down, select the time for the delay.
4. Click the Apply button.
Set the Shut Down After Inactivity delay and congure the printer to use 1 watt or less of power
Use the EWS to set the amount of time before the printer shuts down.
NOTE: After the printer shuts down, the power consumption is 1 watt or less.
Complete the following procedure to change the Shut Down After Inactivity setting:
1. Open EWS. See To access and use the Embedded Web Server (EWS).
2. Click the System tab, and then select Energy Settings.
3. From the Shut Down After Inactivity drop-down, select the time for the delay.
NOTE: The default value is 4 hours.
4. Click the Apply button.
Set the Delay Shut Down setting
Use the EWS to select whether or not the printer delays shutting down after (the Power button) is
pressed.
Complete the following procedure to change the Delay Shut Down setting:
1. Open EWS. See To access and use the Embedded Web Server (EWS).
2. Click the System tab, and then select Energy Settings.
3. Select or clear the Delay when ports are active option.
NOTE: When this option is selected the printer will not shut down unless all ports are inactive. An
active network link will prevent the printer from shutting down.
30 Chapter 5 Congure your printer ENWW
Page 37

6 Supplies, accessories, and parts
●
Order supplies, accessories, and parts
●
Congure the HP toner-cartridge-protection supply settings
●
Enable or disable the Cartridge Policy feature
●
Replace the toner cartridge
ENWW 31
Page 38

Order supplies, accessories, and parts
Order
Order supplies and paper www.hp.com/go/suresupply
Order genuine HP parts or accessories www.hp.com/buy/parts
Order through service or support providers Contact an HP-authorized service or support provider.
Order using the HP Embedded Web Server (EWS) To access, in a supported Web browser on the computer, enter the
printer IP address in the address/URL eld. The EWS provides
options for purchasing Original HP supplies.
NOTE: You can also order using the HP Smart app. For information about this app, see Use the HP Smart app
to print, scan, and manage.
32 Chapter 6 Supplies, accessories, and parts ENWW
Page 39

Supplies and accessories
Item Description Cartridge number Part number
Supplies
For use in North America, Australia, and New Zealand only
HP 134A Black Original LaserJet Toner
Cartridge
HP 134X High Yield Black Original
LaserJet Toner Cartridge
For use in the European Economic Area, Switzerland, UK, and Israel only*
HP 135A Black Original LaserJet Toner
Cartridge
HP 135X High Yield Black Original
LaserJet Toner Cartridge
For use in Africa, Latin America, Middle East, CIS, non-EU Balkan countries/regions, and Asia Pacic (except China, India, Australia, and New
Zealand) only
HP 136A Black Original LaserJet Toner
Cartridge
HP 136X High Yield Black Original
LaserJet Toner Cartridge
For use in China and India only
HP 137A Black Original LaserJet Toner
Cartridge
HP 137X High Yield Black Original
LaserJet Toner Cartridge
Standard-capacity replacement black toner
cartridge
High-capacity replacement black toner
cartridge
Standard-capacity replacement black toner
cartridge
High-capacity replacement black toner
cartridge
Standard-capacity replacement black toner
cartridge
High-capacity replacement black toner
cartridge
Standard-capacity replacement black toner
cartridge
High-capacity replacement black toner
cartridge
134A W1340A
134X W1340X
135A W1350A
135X W1350X
136A W1360A
136X W1360X
137A W1370A
137X W1370X
*The product is regionalized for the regions and countries listed above. However, nothing herein must be
deemed as an authorization from HP to import products into the European Economic Area, Switzerland, and
the UK from any country outside that region.
ENWW Order supplies, accessories, and parts 33
Page 40

Congure the HP toner-cartridge-protection supply settings
Use HP Cartridge Policy and Cartridge Protection to control which cartridges are installed in the printer and
protect the cartridges that are installed from theft.
● Cartridge Policy: This feature protects the printer from counterfeit toner cartridges by allowing only
genuine HP cartridges to be used with the printer. Using genuine HP cartridges ensures the best possible
print quality. When someone installs a cartridge that is not a genuine HP cartridge, the printer control
panel displays a message that the cartridge is unauthorized and it provides information explaining how
to proceed.
● Cartridge Protection: This feature permanently associates toner cartridges with a specic printer, or
eet of printers, so they cannot be used in other printers. Protecting cartridges protects your
investment. When this feature is enabled, if someone attempts to transfer a protected cartridge from
the original printer into an unauthorized printer, that printer will not print with the protected cartridge.
The printer control panel displays a message that the cartridge is protected, and it provides information
explaining how to proceed.
CAUTION: After enabling cartridge protection for the printer, all subsequent toner cartridges installed
in the printer are automatically and permanently protected. To avoid protecting a new cartridge, disable
the feature before installing the new cartridge.
Turning the feature o does not turn o protection for cartridges that are currently installed.
Both features are o by default. Follow these procedures to enable or disable them.
34 Chapter 6 Supplies, accessories, and parts ENWW
Page 41

Enable or disable the Cartridge Policy feature
The Cartridge Policy feature can be enabled or disabled using the embedded web server (EWS).
NOTE: Enabling or disabling this feature might require entering an administrator password.
1. Open EWS. See To access and use the Embedded Web Server (EWS).
2. Click the System tab, and then select Supply Settings.
3. From the Cartridge Policy drop-down menu, select o or Authorized HP.
4. Click the Apply button.
ENWW Enable or disable the Cartridge Policy feature 35
Page 42
Replace the toner cartridge
Cartridge information
Continue printing with the current cartridge until redistributing the toner no longer yields acceptable print
quality. To redistribute the toner, remove the toner cartridge from the printer and gently rock the cartridge
back and forth about its horizontal axis. For graphical representation, see cartridge replacement instructions.
Reinsert the toner cartridge into the printer and close the cover.
Remove and replace the toner cartridge
When a print cartridge approaches the end of useful life, you can continue printing with the current cartridge
until redistributing the toner no longer yields acceptable print quality.
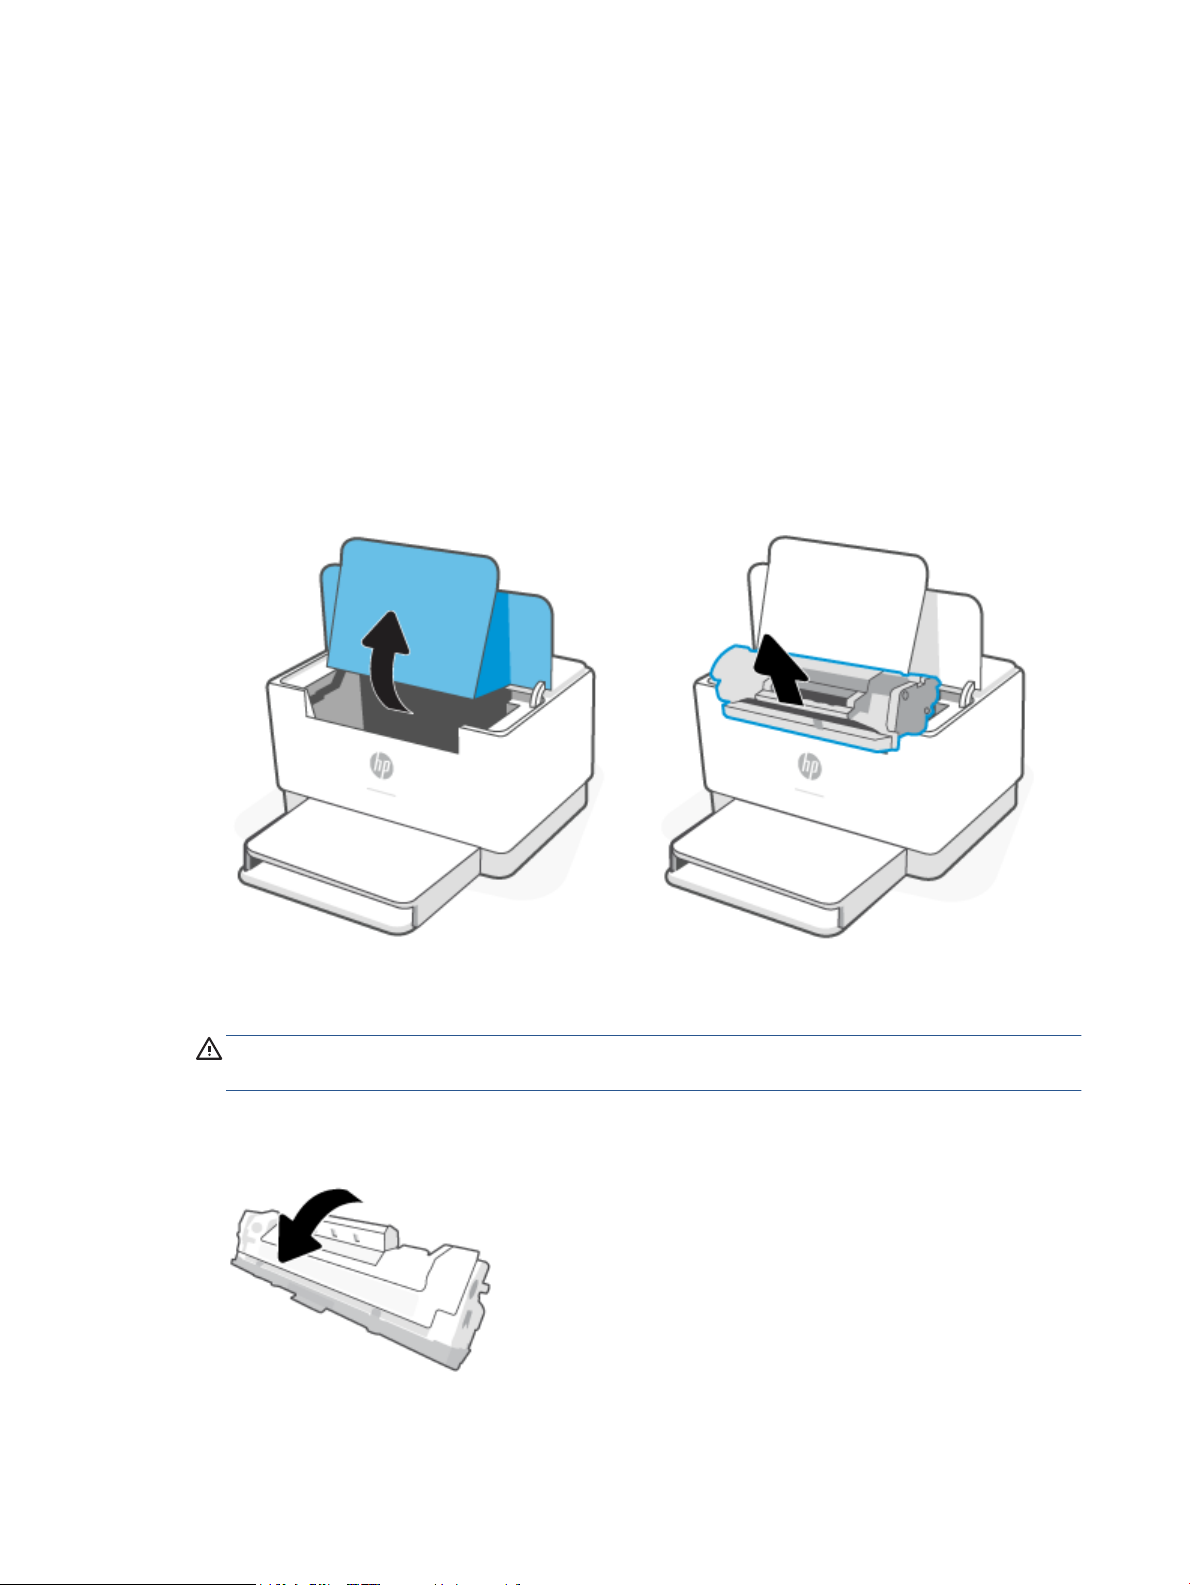
1. Open the cartridge access door, and then remove the old print cartridge.
2. Remove the new print cartridge from the packaging. Place the used print cartridge in the bag and box
for recycling.
CAUTION: To prevent damage to the print cartridge, hold the print cartridge at each end. Do not touch
the protective cover or roller surface.
3. Grasp both sides of the print cartridge and gently rock the print cartridge to distribute the toner evenly
inside the cartridge.
36 Chapter 6 Supplies, accessories, and parts ENWW
Page 43
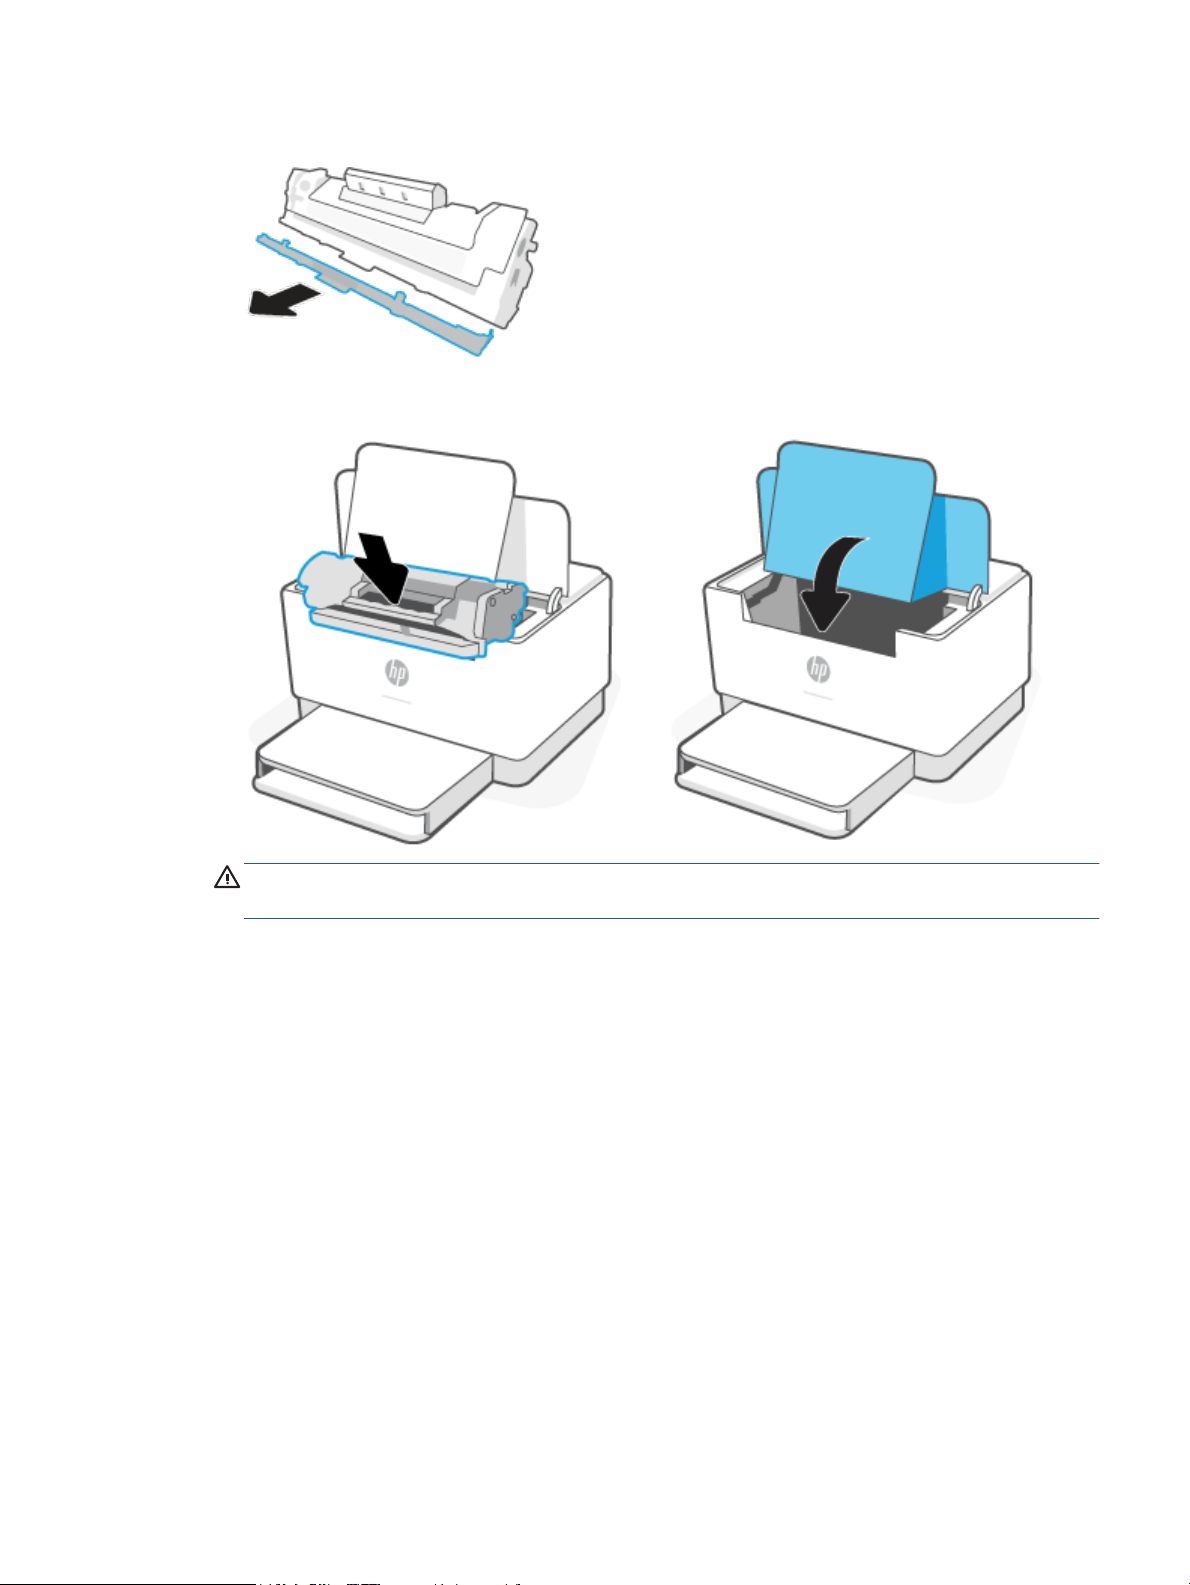
4. Remove the cover from the print cartridge.
5. Insert the print cartridge in the product, and then close the cartridge access door.
CAUTION: If toner gets on your clothing, wipe it o with a dry cloth and wash the clothing in cold
water. Hot water sets toner into the fabric.
ENWW Replace the toner cartridge 37
Page 44

7 Solve problems
●
HP support
●
Interpret control-panel light patterns
●
Print printer reports
●
Restore original factory defaults and settings
●
Cartridge low
●
Printer does not pick up paper or misfeeds
●
Clear paper jams
●
Improve print quality
●
Resolving print quality problems
●
Solve wireless network problems
●
Solve Ethernet connection problems
38 Chapter 7 Solve problems ENWW
Page 45
HP support
For the latest product updates and support information, visit the product support website at www.hp.com/
support/ljM207 . HP online support provides a variety of options for help with your printer:
Contact HP
If you need help from an HP technical support representative to solve a problem, visit the
www.support.hp.com. The following contact options are available at no cost for in-warranty customers (HP
agent-assisted support for out-of warranty customers may require a fee):
Get software and drivers: Download software, drivers, and rmware you need for the printer.
Ask the community: Join the community forums to nd solutions, ask questions, and share tips.
HP Diagnostic Tools: Use HP online tools to detect your printer and nd recommended solutions.
Chat with an HP support agent or the HP Virtual Agent online.
Call an HP support agent.
When contacting HP support, be prepared to provide the following information:
● Product name (located on the printer)
● Product number (located on a label inside the printer)
● Serial number (located on a label inside the printer)
Register printer
By taking just a few minutes to register, you can enjoy quicker service, more eicient support, and product
support alerts. If you did not register your printer while installing the software, you can register now at
www.register.hp.com
Additional warranty options
Extended service plans are available for the printer at additional costs. Go to www.hp.com/support/ljM207 ,
select your country/region and language, then explore the service plan options available for your printer.
ENWW HP support 39
Page 46
Interpret control-panel light patterns
●
USB model
●
Wireless model
USB model
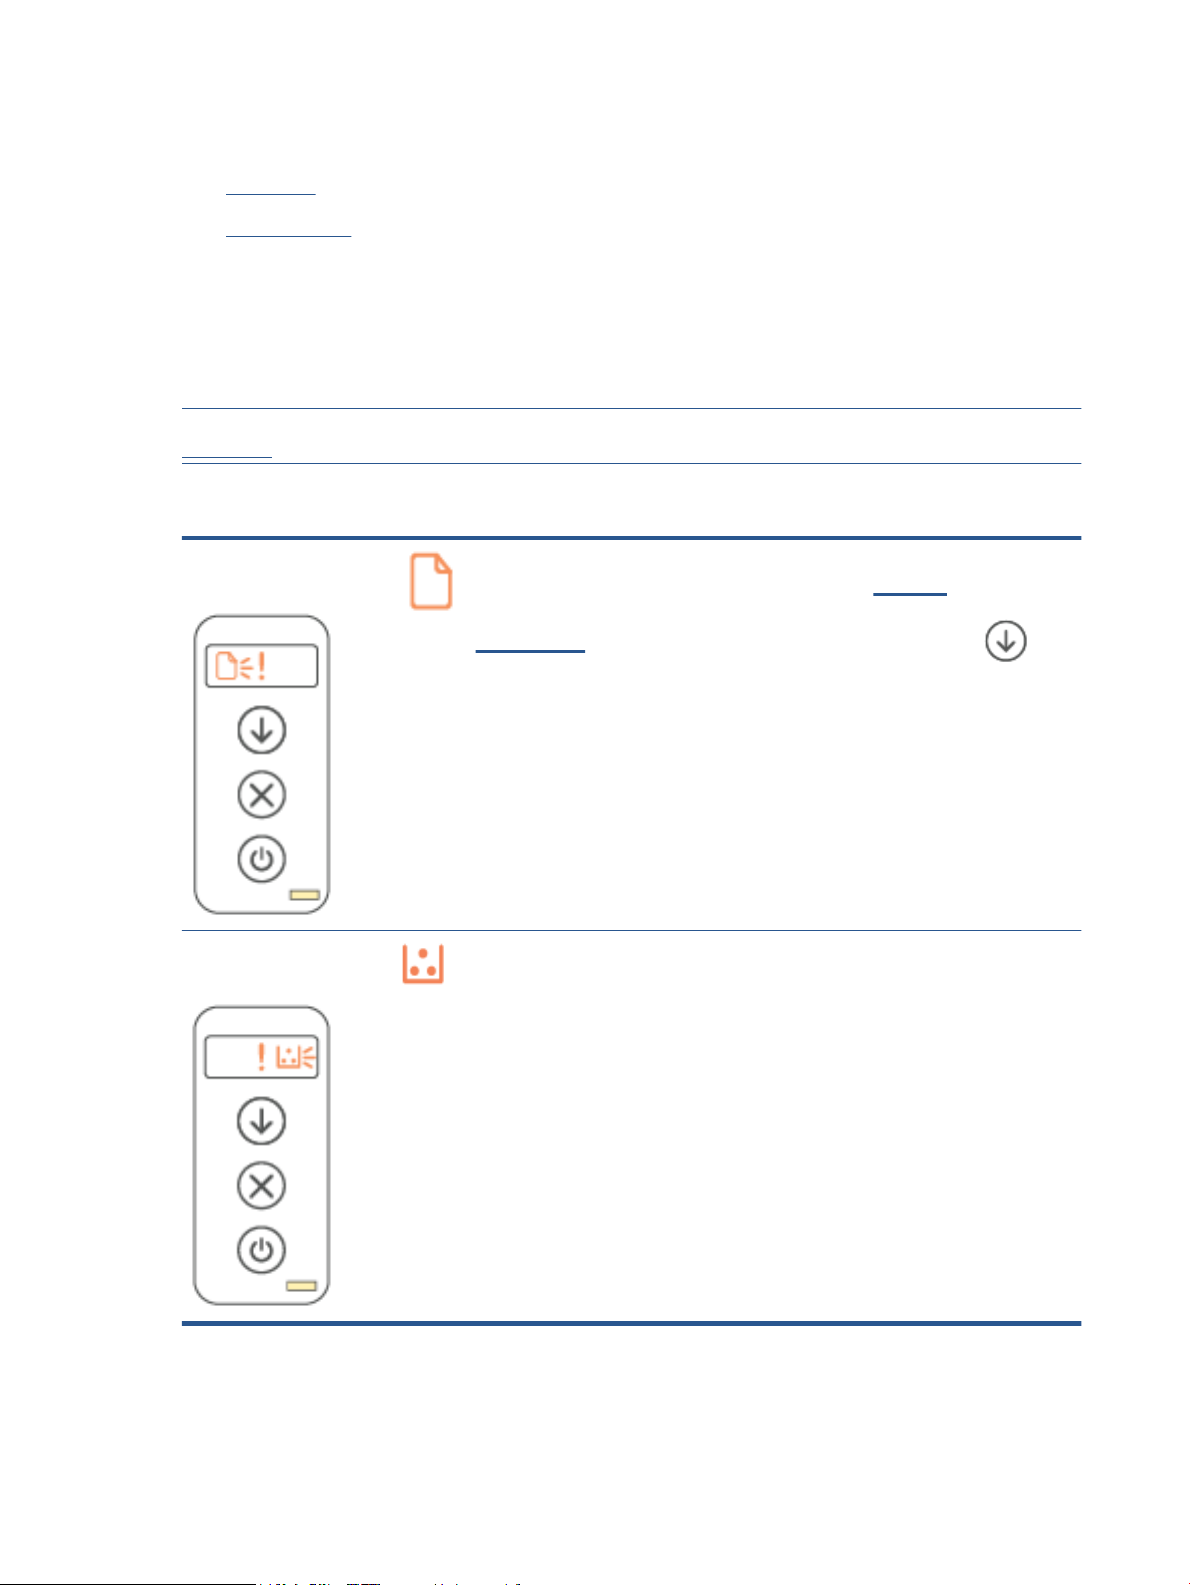
The Status light on the printer blinks
The printer is processing a job or is initializing, restarting, cooling, or cleaning. No action is required.
NOTICE: If the Status light blinks quickly, turn o the printer and then turn it on again. If problem persists,
Contact HP.
The Attention light is on
Attention light on, Paper
light blinks.
If (the Paper light) blinks, the printer might be out of paper (see Load paper) or paper might be
Attention light on,
Cartridge light blinks.
jammed (see
Resume button) to continue.
If (the Cartridge light) blinks, the cartridge might be very low or there is a cartridge error (such as
incompatible, unauthorized, protected). Replace the toner cartridge.
NOTE: There will be no Attention state if the printer is congured to continue printing when the toner
cartridge is very low.
Clear paper jams). If you are sending a manual feed job, load paper, and press (the
40 Chapter 7 Solve problems ENWW
Page 47
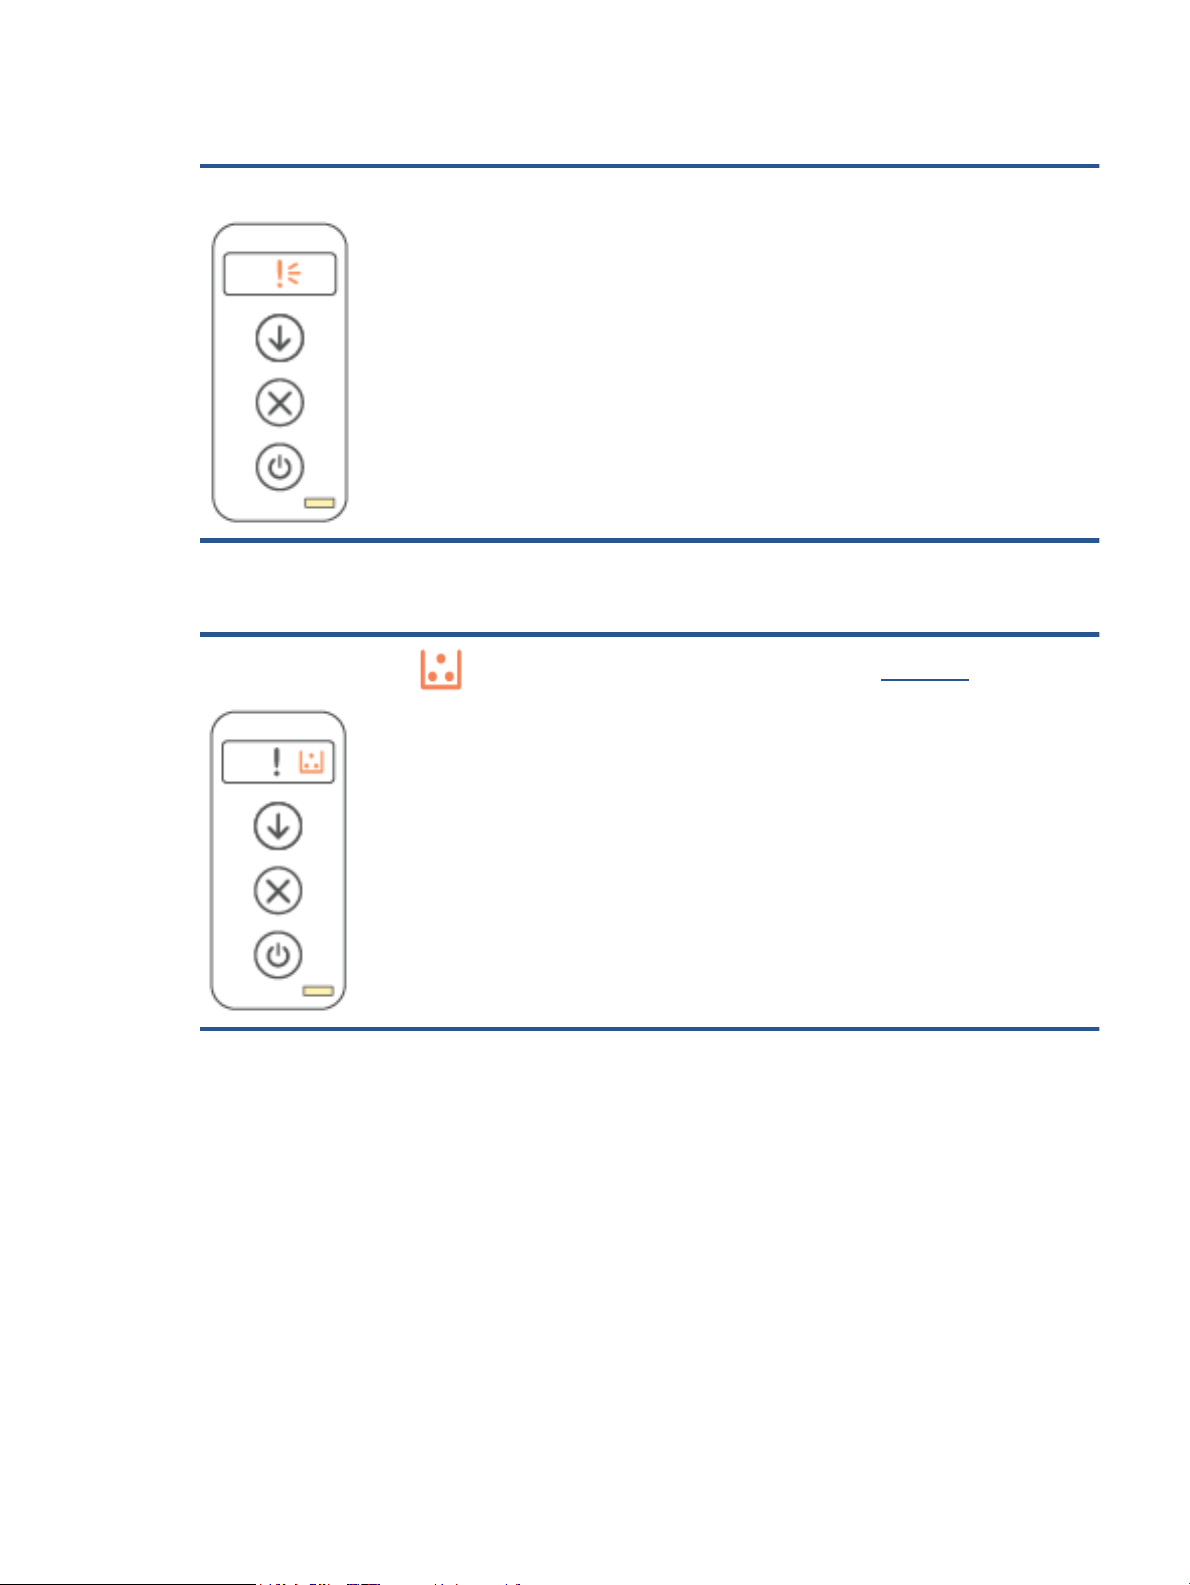
The Attention light blinks
Attention light blinks. Verify that the printer cartridge access door or the rear access is correctly closed.
The Attention light is o
Attention light o,
Cartridge light on.
If (the Cartridge light) is on, the printer cartridge level is low. See Cartridge low.
ENWW Interpret control-panel light patterns 41
Page 48
Wireless model
●
Overview
●
Light patterns
Overview
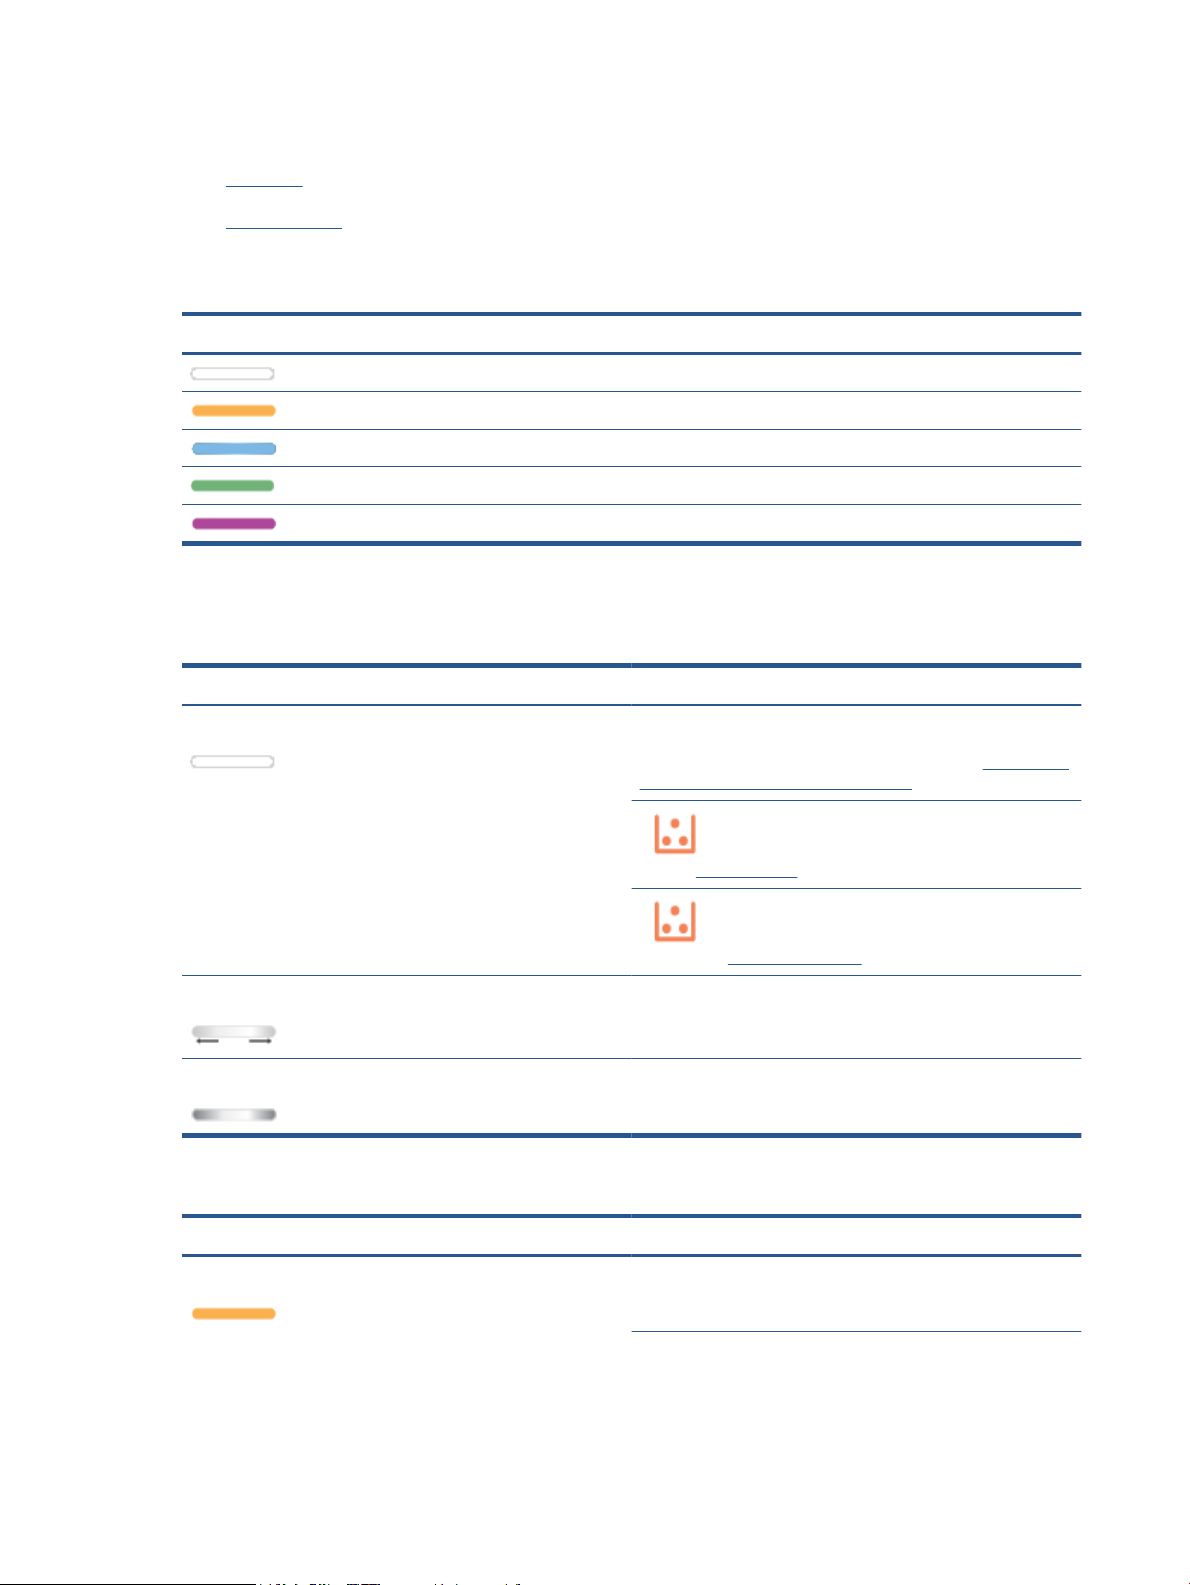
Status light overview Description
Light patterns
Table 7-2 White
Light behavior Description
White Idle, sleep, or working
Amber Needs attention because an error has occurred
Blue Wireless network connection status
Green Starting up, processing, or updating
Purple Wireless setup mode
Solid white light on the bar. The printer is idle and not connected to a wireless network.
To connect the printer to your wireless network, see Connect your
printer to a Wi-Fi network using HP Smart.
If (the Cartridge light) is on, the printer cartridge level is
low, see
Cartridge is low.
If (the Cartridge light) blinks, the printer cartridge level is
very low, see
White light ashes on the bar. The printer is processing and printing a print job.
White light in the center of the bar. The printer is in the sleep mode.
Cartridge is very low.
Table 7-3 Amber
Light behavior Description
Solid amber light on the bar. The printer door might not be closed properly. Make sure the
cartridge access and rear access doors are closed properly.
42 Chapter 7 Solve problems ENWW
Page 49

Table 7-3 Amber (continued)
Light behavior Description
If (the Paper light) blinks, the printer might be out of
paper or not loaded properly (see
press (the Resume button) to continue.
Or there could be a paper jam. Clear jam (see Clear paper jams),
and press (the Resume button) to continue.
If (the Cartridge light) blinks, the cartridge might be very
low or there is a cartridge error (such as incompatible,
unauthorized, or protected). Replace the toner cartridge.
NOTE: No notication is provided if the printer has been
congured to continue printing when the toner cartridge is very
low.
Solid amber light ashes fast on the bar. The printer has encountered some problem. Turn o the printer,
and then turn it on again after 30 seconds. If problem persists,
visit www.hp.com/support/ljM207
Load paper). Load paper, and
Table 7-4 Blue
Light behavior Description
Solid light blue light on the bar. The printer is idle and connected to a wireless network. A
computer or mobile device is directly connected to the printer
using Wi-Fi Direct.
If (the Cartridge light) is on, the printer cartridge level is
low, see
Cartridge is low.
If (the Cartridge light) blinks, the printer cartridge level is
very low, see
The bar pulses light blue. The printer is trying to connect to a wireless network.
Solid blue light pulses and then ashes amber. The printer is unable to connect to a wireless network.
To resolve wireless connection, see Solve wireless network
problems.
Cartridge is very low.
ENWW Interpret control-panel light patterns 43
Page 50
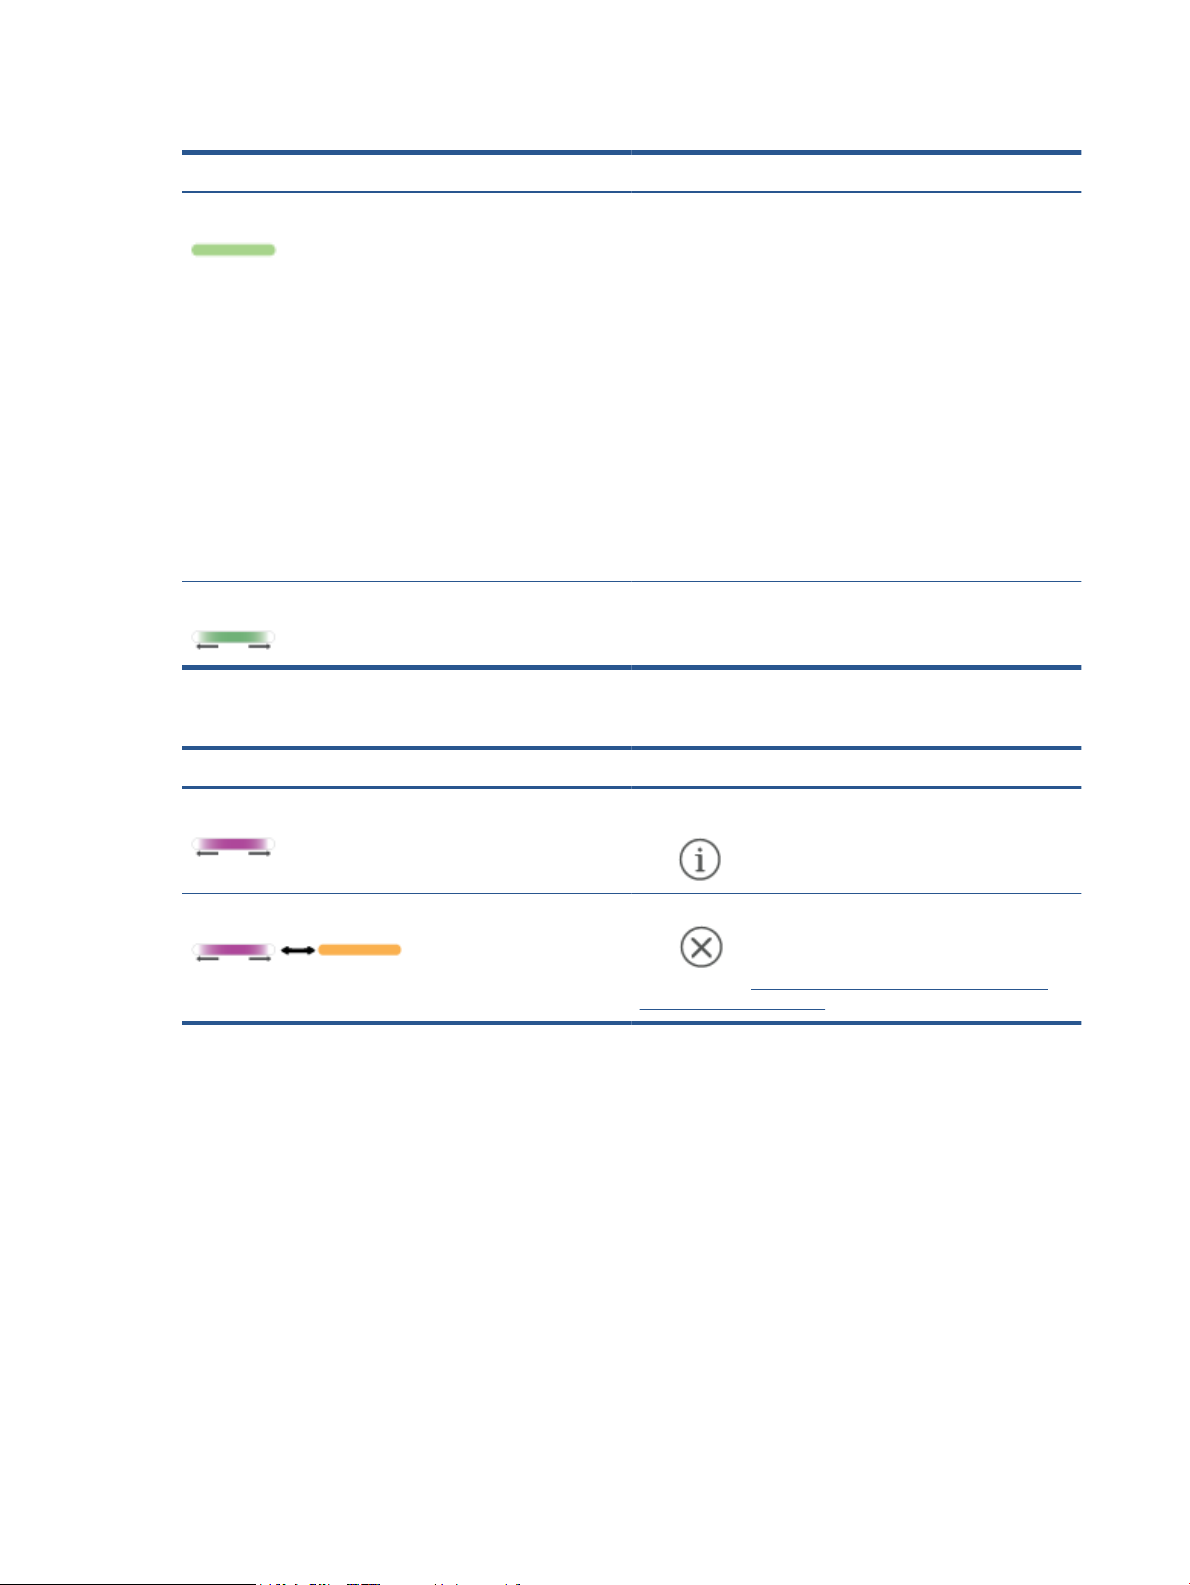
Table 7-5 Green
Light behavior Description
Solid green light on the bar. The printer is initializing, waiting for conrmation, performing
Green light pulses on the bar. The printer is performing routine maintenance.
automatic cleaning routines, downloading and installing a printer
update, or cooling down. (To provide productive printing, the
printer may automatically enter the cool-down mode under
certain environmental conditions.)
NOTICE: The printer must be turned on during the updating
process. Do not turn o the printer or disconnect the power
before the update is complete.
NOTE:
● If a problem occurs while installing the printer update, the
printer will restart and try to update automatically (with an
active Internet connection).
● When the printer is cooling down, print jobs might pause.
Print jobs will continue when the engine is ready. This might
take several minutes.
Table 7-6 Purple
Light behavior Description
Purple light pulses on the bar. The printer is in wireless setup mode.
If the (the Information button) blinks, press it to connect.
Solid purple light blinks fast and then ashes amber. Time is running out for the Wi-Fi Protected Setup (WPS) mode.
Press
information, see
Wi-Fi Protected Setup (WPS).
(the Cancel button) to clear the error. For more
Connect your printer to a Wi-Fi network using
44 Chapter 7 Solve problems ENWW
Page 51
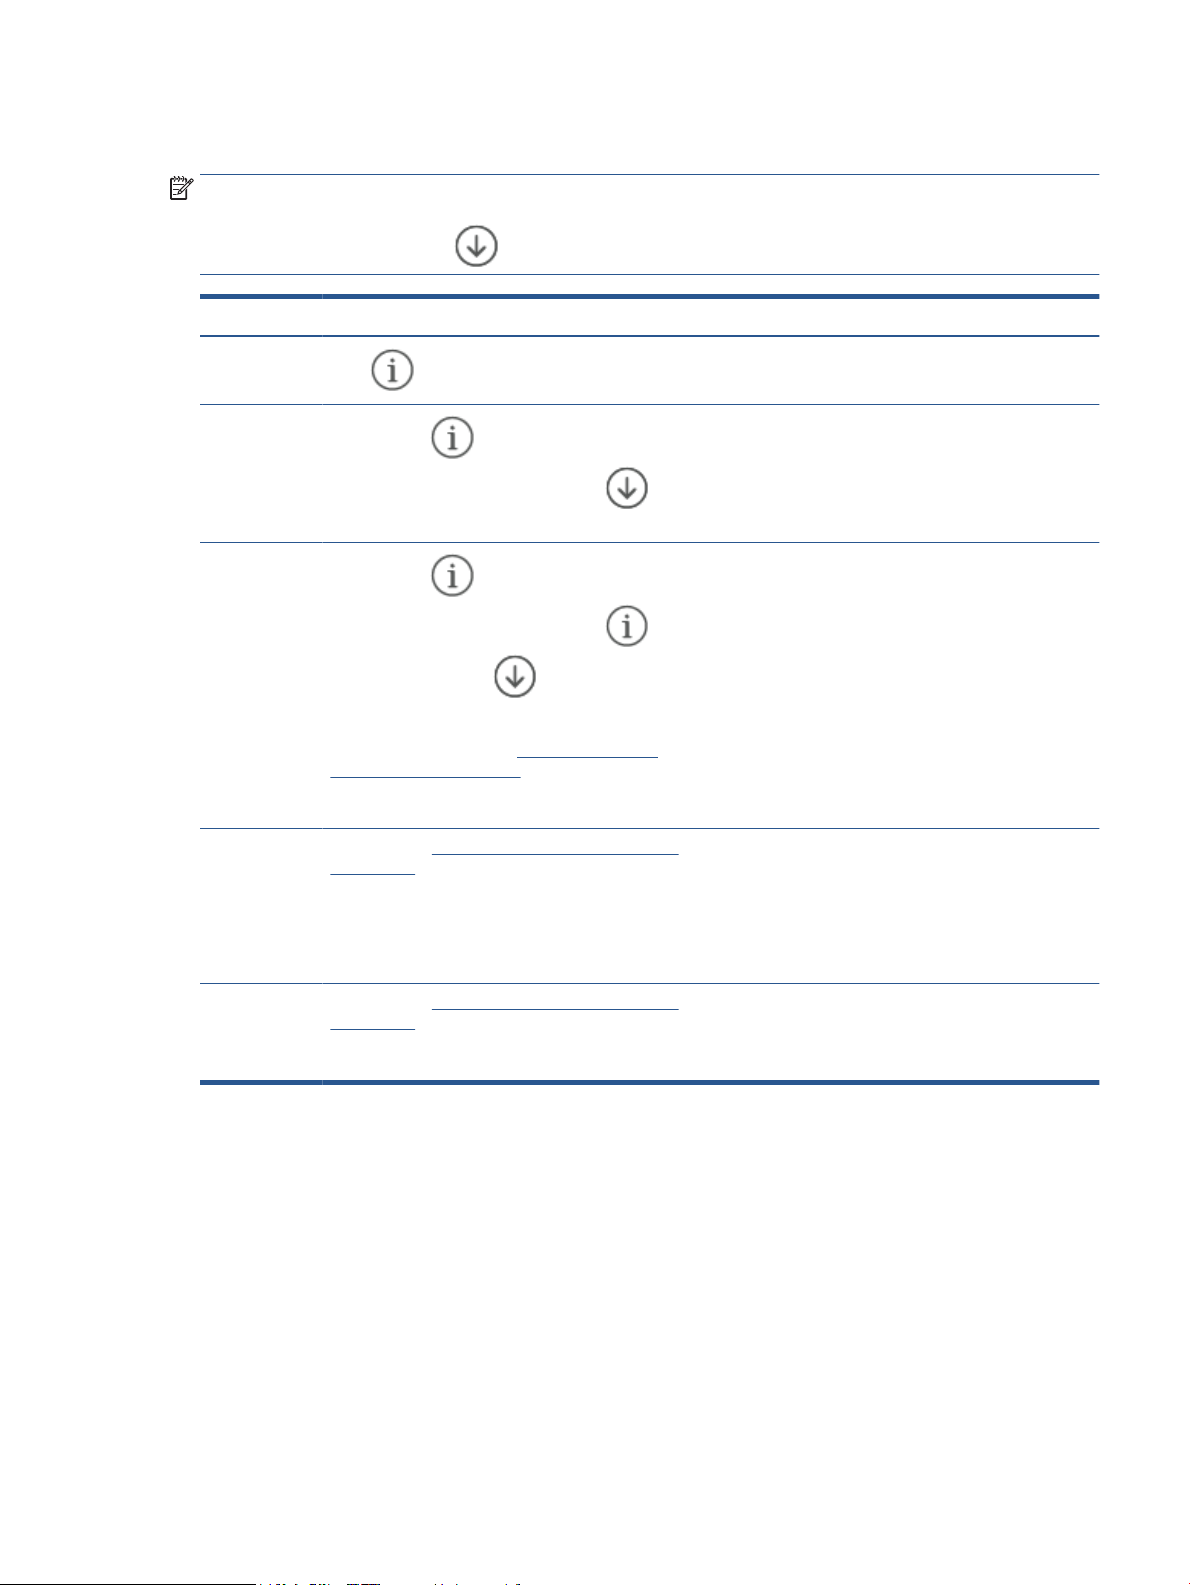
Print printer reports
NOTE: This section is applicable to wireless printers only.
For USB model, press and hold (the Resume button) for 3 seconds to print a conguration report.
Printer report How to print Description
Information
Report
Conguration
Report
Wireless
Network Test
Report
Web Service
information
page
Press (the Information button).
Press and hold (the Information button) for 3
seconds until all the buttons are lit. Press
Resume button) to print a conguration report.
Press and hold (the Information button) for 3
seconds until all the buttons are lit. Press
Information button) and (the Resume button) at
the same time.
Alternatively, open EWS. SeeTo access and use the
Embedded Web Server (EWS), click Networking tab, and
click Wireless Conguration, and then click Print Test
Report.
Open EWS. See To access and use the Embedded Web
Server (EWS), click HP Web Services tab, and click Web
Services Settings and then click Print Information
Sheet.
(the
(the
Printer Information Report provides a summary of the
printer information and its current status.
Conguration report shows the printer usage log (pages
printed, images scanned), event logs, copy/energy
settings, network status and more.
Wireless Network Test Report shows the diagnostics
results for the status of the wireless network, wireless
signal strength, detected networks, and more.
Depending on the Web Services status, Web Services
Reports provide dierent instructions to help you turn
on Web Services, set up Web Services, x connection
issues, and more.
If you have not enabled the Web Services, click Enable
to Print Information Sheet.
Adjust
Alignment Test
Page
Open EWS. See To access and use the Embedded Web
Server (EWS), click System tab, and click Service, follow
the on-screen instructions in Adjust Alignment to
position the image on desired location on the paper.
The printer prints an alignment page.
ENWW Print printer reports 45
Page 52

Restore original factory defaults and settings
If you disable some functions or change some settings and want to change them back, you can restore the
printer to the original factory settings or network settings.
1. Open EWS. See To access and use the Embedded Web Server (EWS).
2. On the System tab, click Service.
3. In the Restore Defaults area, click the Restore defaults button.
The printer automatically restarts.
46 Chapter 7 Solve problems ENWW
Page 53

Cartridge low
Cartridge is low
Actual cartridge life remaining may vary. Consider having a replacement available to install when print quality
is no longer acceptable. The cartridge does not need to be replaced now.
Continue printing with the current cartridge until redistributing the toner no longer yields acceptable print
quality. To redistribute the toner, remove the toner cartridge from the printer and gently rock the cartridge
back and forth about its horizontal axis. For graphical representation, see cartridge replacement instructions.
Reinsert the toner cartridge into the printer and close the cover.
Cartridge is very low
Actual cartridge life remaining may vary. Consider having a replacement available to install when print quality
is no longer acceptable. The cartridge does not need to be replaced now unless the print quality is no longer
acceptable.
Once an HP toner cartridge has reached Very Low, HP’s Premium Protection Warranty on that toner cartridge
has ended.
Change the “Very Low” settings
You can change the way the printer reacts when supplies reach the Very Low state. You do not have to reestablish these settings when you install a new toner cartridge.
1. Open EWS. See To access and use the Embedded Web Server (EWS).
2. Select the System tab, and then select Supply Settings.
3. Select one of the following options from the Very Low Setting (Black Cartridge): drop-down list:
● Select the Stop option to set the printer to stop printing until you replace the cartridge.
● Select the Continue option to set the printer to alert you that the cartridge is very low, but to
Order supplies
Order supplies and paper www.hp.com/go/suresupply
Order through service or support providers Contact an HP-authorized service or support provider.
Order using the HP Embedded Web Server (EWS) To access, in a supported Web browser on your computer, enter
continue printing.
the printer IP address in the address/URL eld. The EWS provides
options for purchasing Original HP supplies.
ENWW Cartridge low 47
Page 54
Printer does not pick up paper or misfeeds
Introduction
The following solutions can help solve problems if the printer is not picking up paper from the input tray or is
picking up multiple sheets of paper at one time. Either of these situations can result in paper jams.
●
The product does not pick up paper
●
Clean the pickup roller
●
The product picks up multiple sheets of paper
The product does not pick up paper
If the product does not pick up paper from the input tray, try these solutions.
1. Open the product and remove any jammed sheets of paper.
2. Load the tray with the correct size of paper for your job.
3. Make sure the paper size and type are set correctly.
4. Make sure the paper guides in the tray are adjusted correctly for the size of paper. Adjust the guides to
the appropriate indentation in the tray.
5. Clean the pickup roller.
NOTE: If the problem persists, visit the support site for this printer at www.hp.com/support/ljM207 to learn
more about solving paper problems.
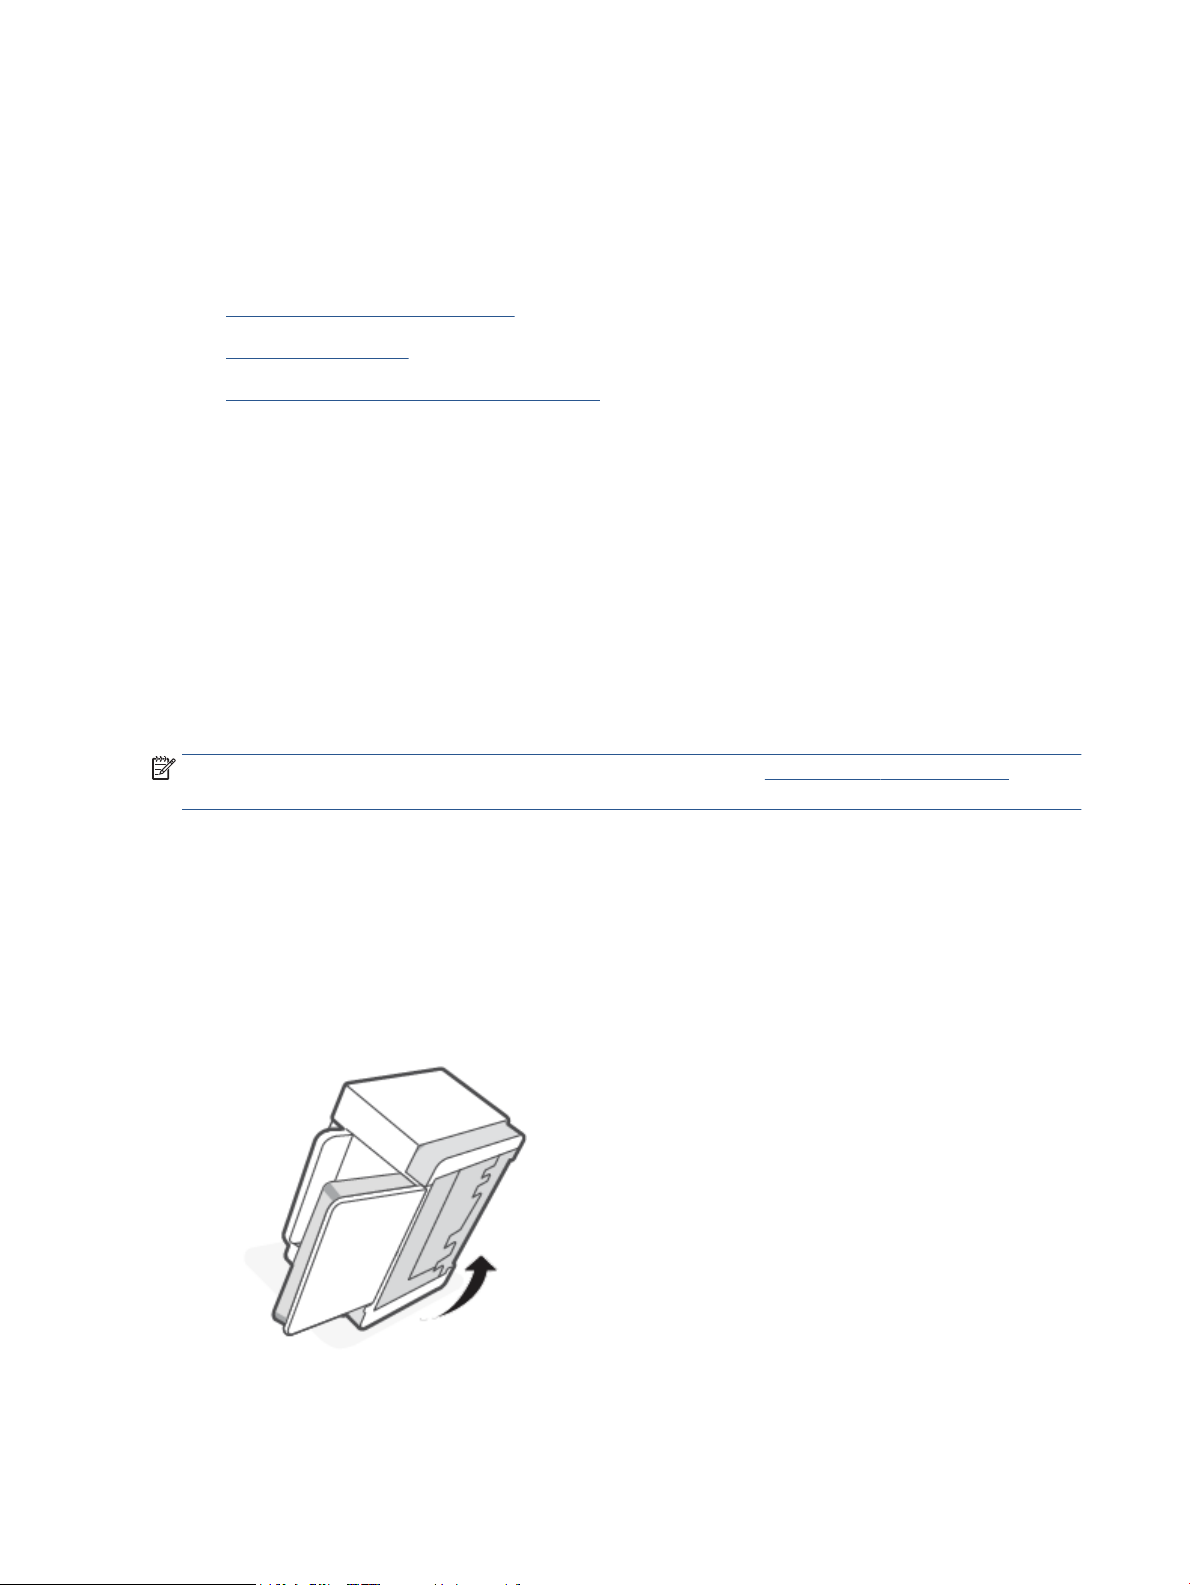
Clean the pickup roller
1. Turn o the printer.
2. Unplug the power cord from the back of the printer.
3. Remove the stack of paper from the input tray.
4. Flip the printer on its side, as shown.
48 Chapter 7 Solve problems ENWW
Page 55
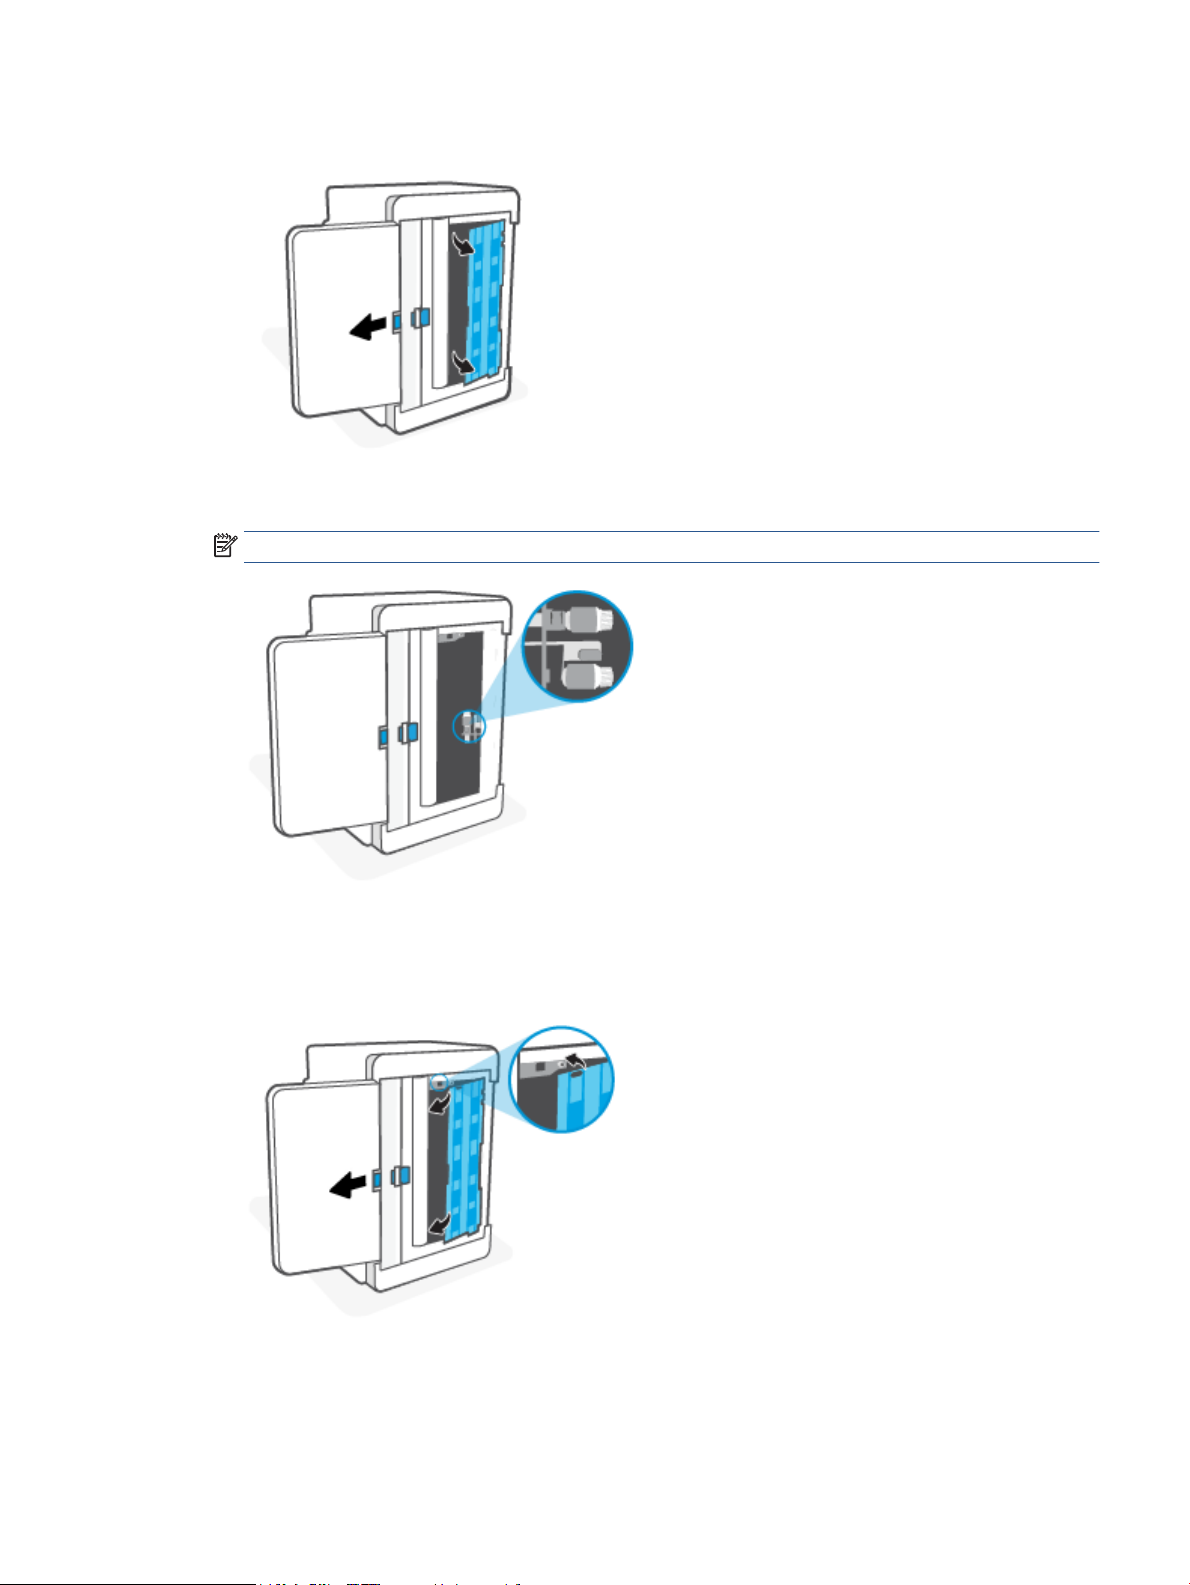
5. Release and hold on to the blue latch, and then remove the panel.
6. Dampen a soft, lint-free cloth with alcohol or water, and then wipe each roller.
NOTE: Apply a moderate amount of pressure to each roller to ensure that they are completely cleaned.
7. Wait approximately 10 minutes to allow the pickup roller to dry completely.
8. While holding onto the blue latch, align and insert the panel as shown. Release the blue latch to lock the
panel in the place.
ENWW Printer does not pick up paper or misfeeds 49
Page 56
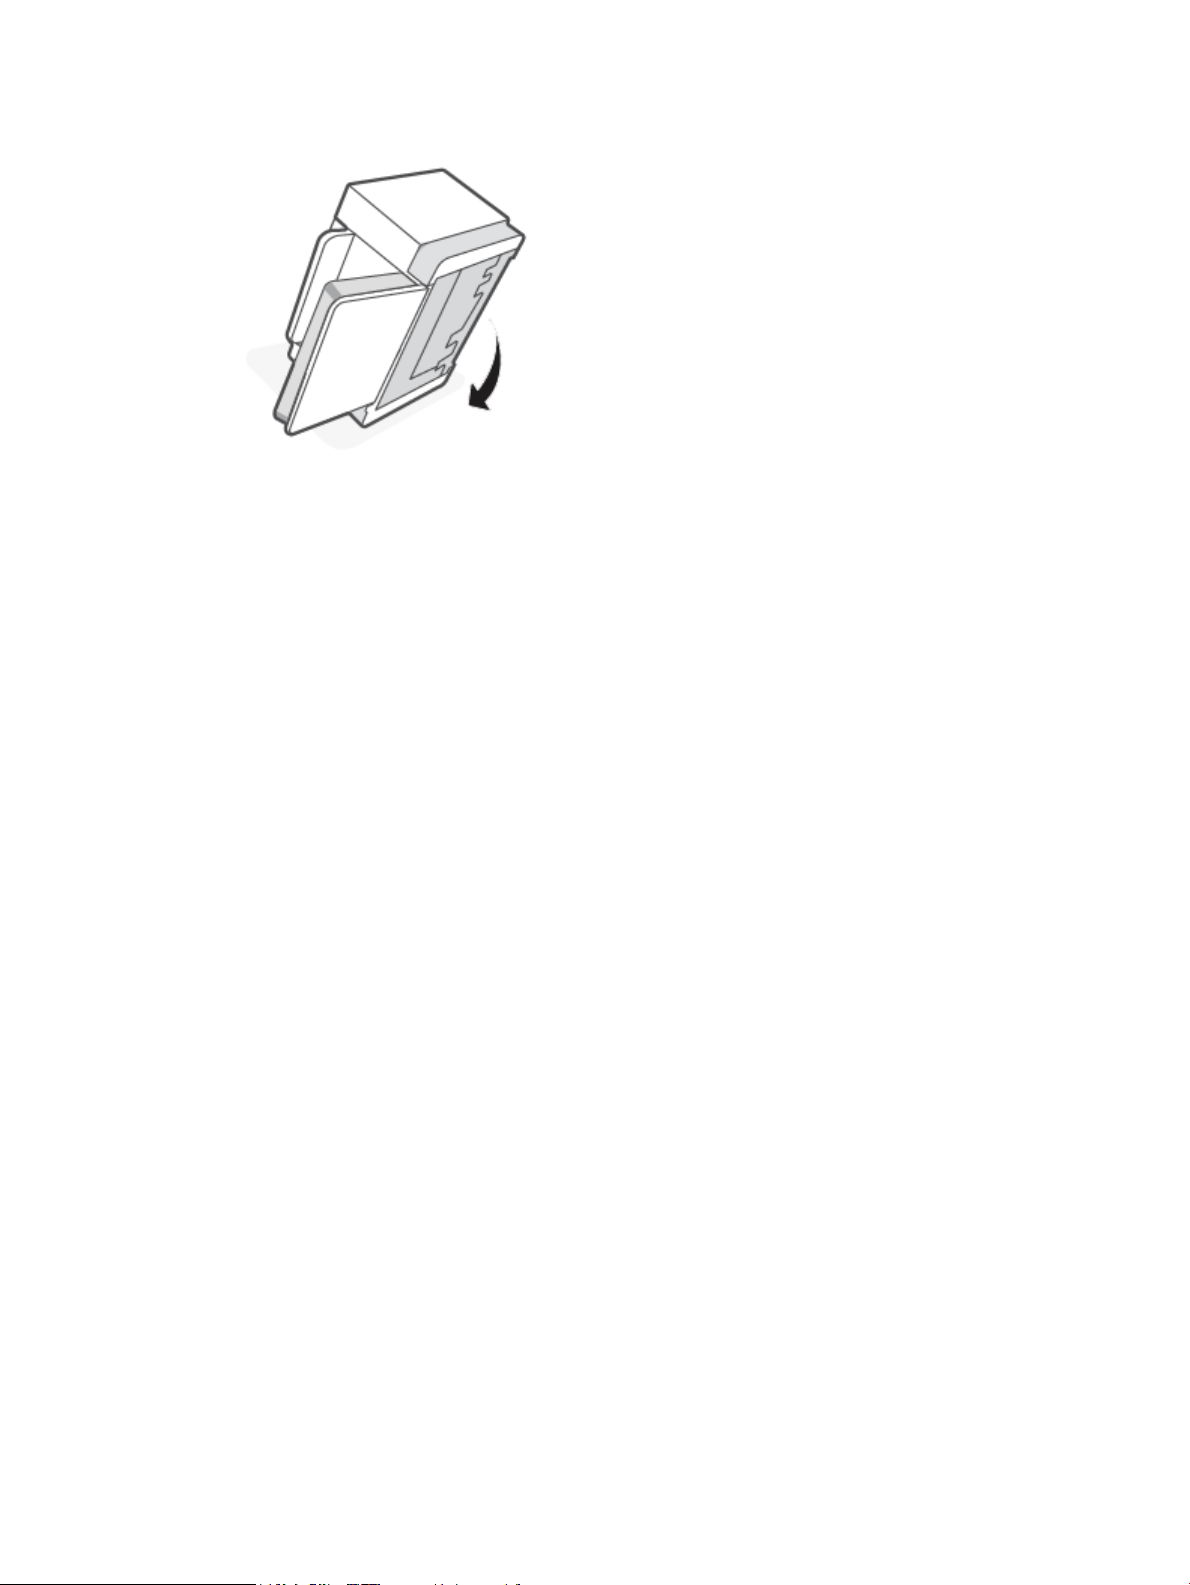
9. Flip the printer back to the original, upright position.
10. Reload the stack of paper into the input tray.
11. Plug the power cord back into the printer, and then turn on the printer.
The product picks up multiple sheets of paper
If the product picks up multiple sheets of paper from the input tray, try these solutions.
1. Remove the stack of paper from the input tray and rotate it 180 degrees, and ip it over. Return the
stack of paper to the input tray.
2. Use only paper that meets HP specications for this product.
3. Use paper that is not wrinkled, folded, or damaged. If necessary, use paper from a dierent package.
4. Make sure the input tray is not overlled. If it is, remove the entire stack of paper from the tray,
straighten the stack, and then return some of the paper to the input tray.
5. Make sure the paper guides in the tray are adjusted correctly for the size of paper. Adjust the guides to
the appropriate indentation in the tray.
6. Make sure the printing environment is within recommended specications.
50 Chapter 7 Solve problems ENWW
Page 57
Clear paper jams
Introduction
The following information includes instructions for clearing paper jams from the printer.
●
Jam locations
●
Frequent or recurring paper jams?
●
Clear jams from the input tray
●
Clear jams in the printer base
●
Clear jams from the print cartridge area
●
Clear jams from the output areas
●
Clear jams in the rear duplexer
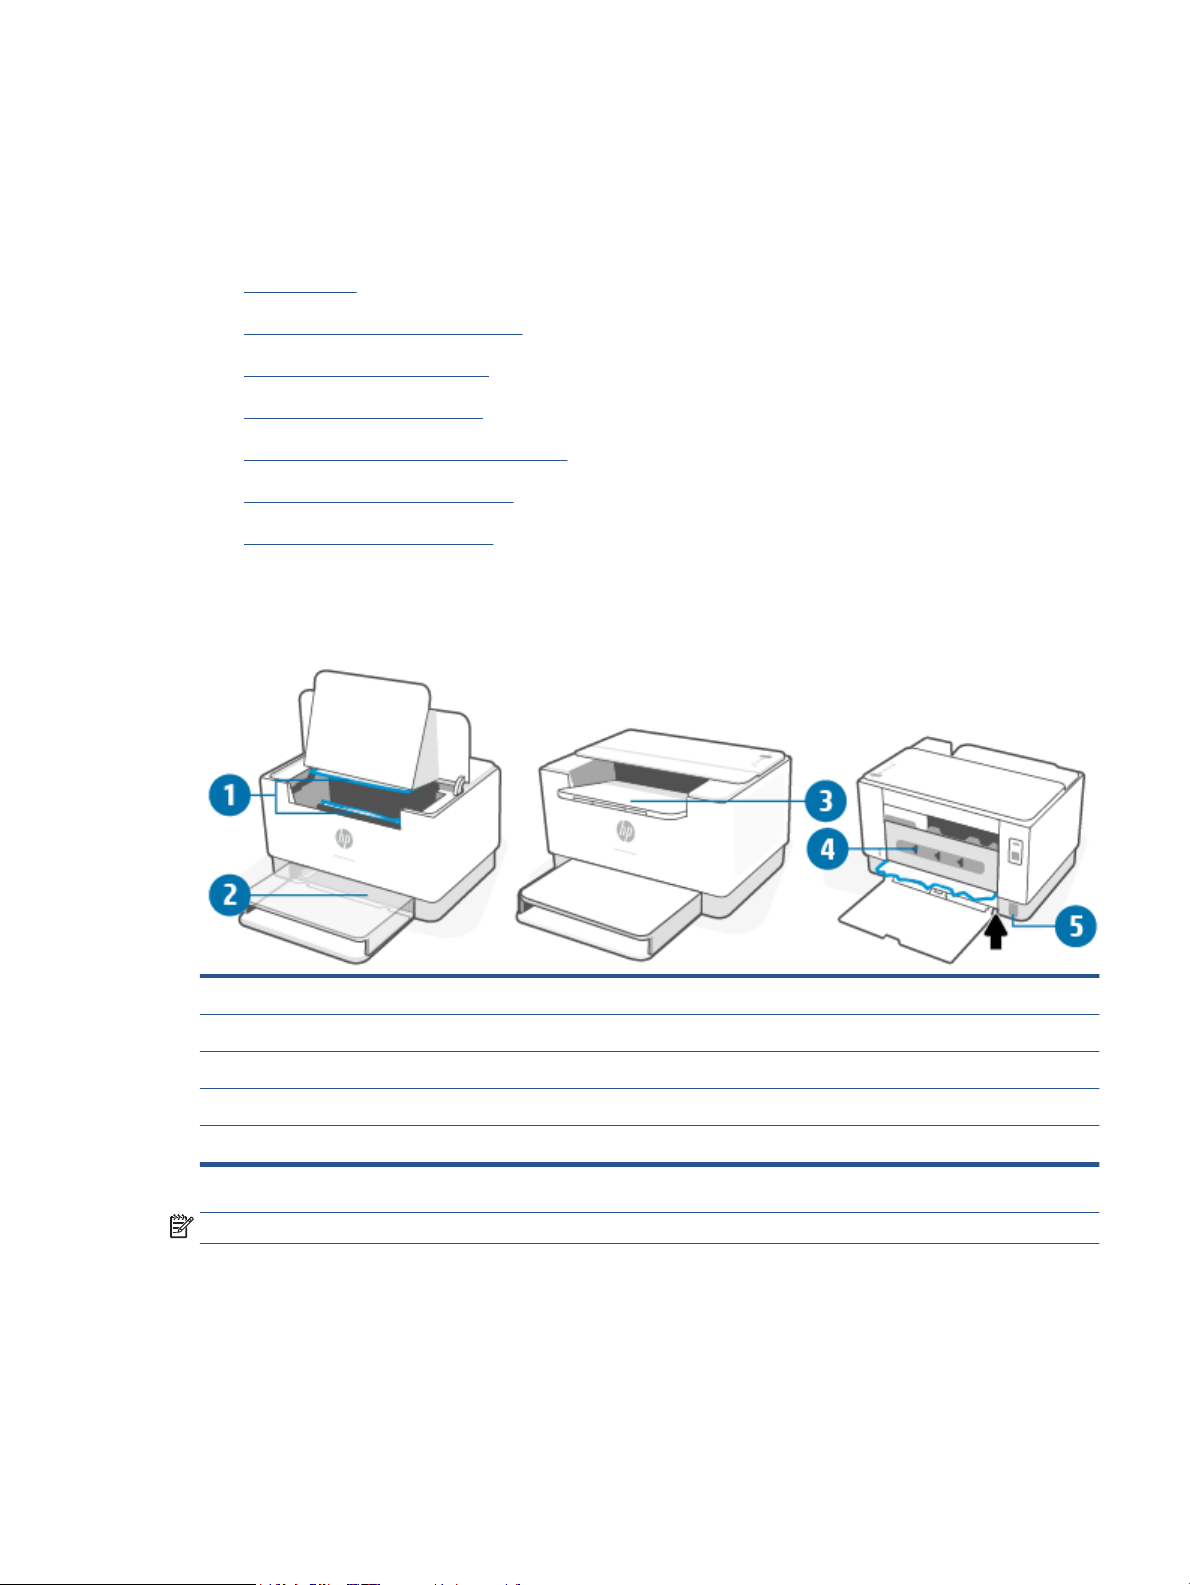
Jam locations
Jams can occur at the following locations in the product.
1 Internal areas
2 Input tray
3 Output bin
4 Rear duplex area
5 Printer base
NOTE: Jams can occur in more than one location.
ENWW Clear paper jams 51
Page 58

Frequent or recurring paper jams?
Follow these steps to solve problems with frequent paper jams. If the rst step does not resolve the problem
continue with the next step until you have resolved the problem.
1. If paper has jammed in the printer, clear the jam and then print a test page to test the printer.
2. Check that the tray is congured for the correct paper size and type.
a. Open EWS. See To access and use the Embedded Web Server (EWS).
b. Click the System tab, and then click the Paper Setup page.
c. Select the type of paper that is in the tray.
3. Turn the printer o, wait 30 seconds, and then turn it on again.
4. Print a cleaning page to remove excess toner from inside the printer.
5. Print a test page to test the printer.
If none of these steps resolves the problem, the printer might need service. Contact support.
52 Chapter 7 Solve problems ENWW
Page 59
Clear jams from the input tray
CAUTION: Do not use sharp objects, such as tweezers or needle-nose pliers, to remove jams. Damage
caused by sharp objects will not be covered by the warranty.
When removing jammed media, pull the jammed media straight away from the product. Pulling jammed
media out of the product at an angle can damage the product.
NOTE: Depending on where the jam is located, some of the following steps might not be necessary.
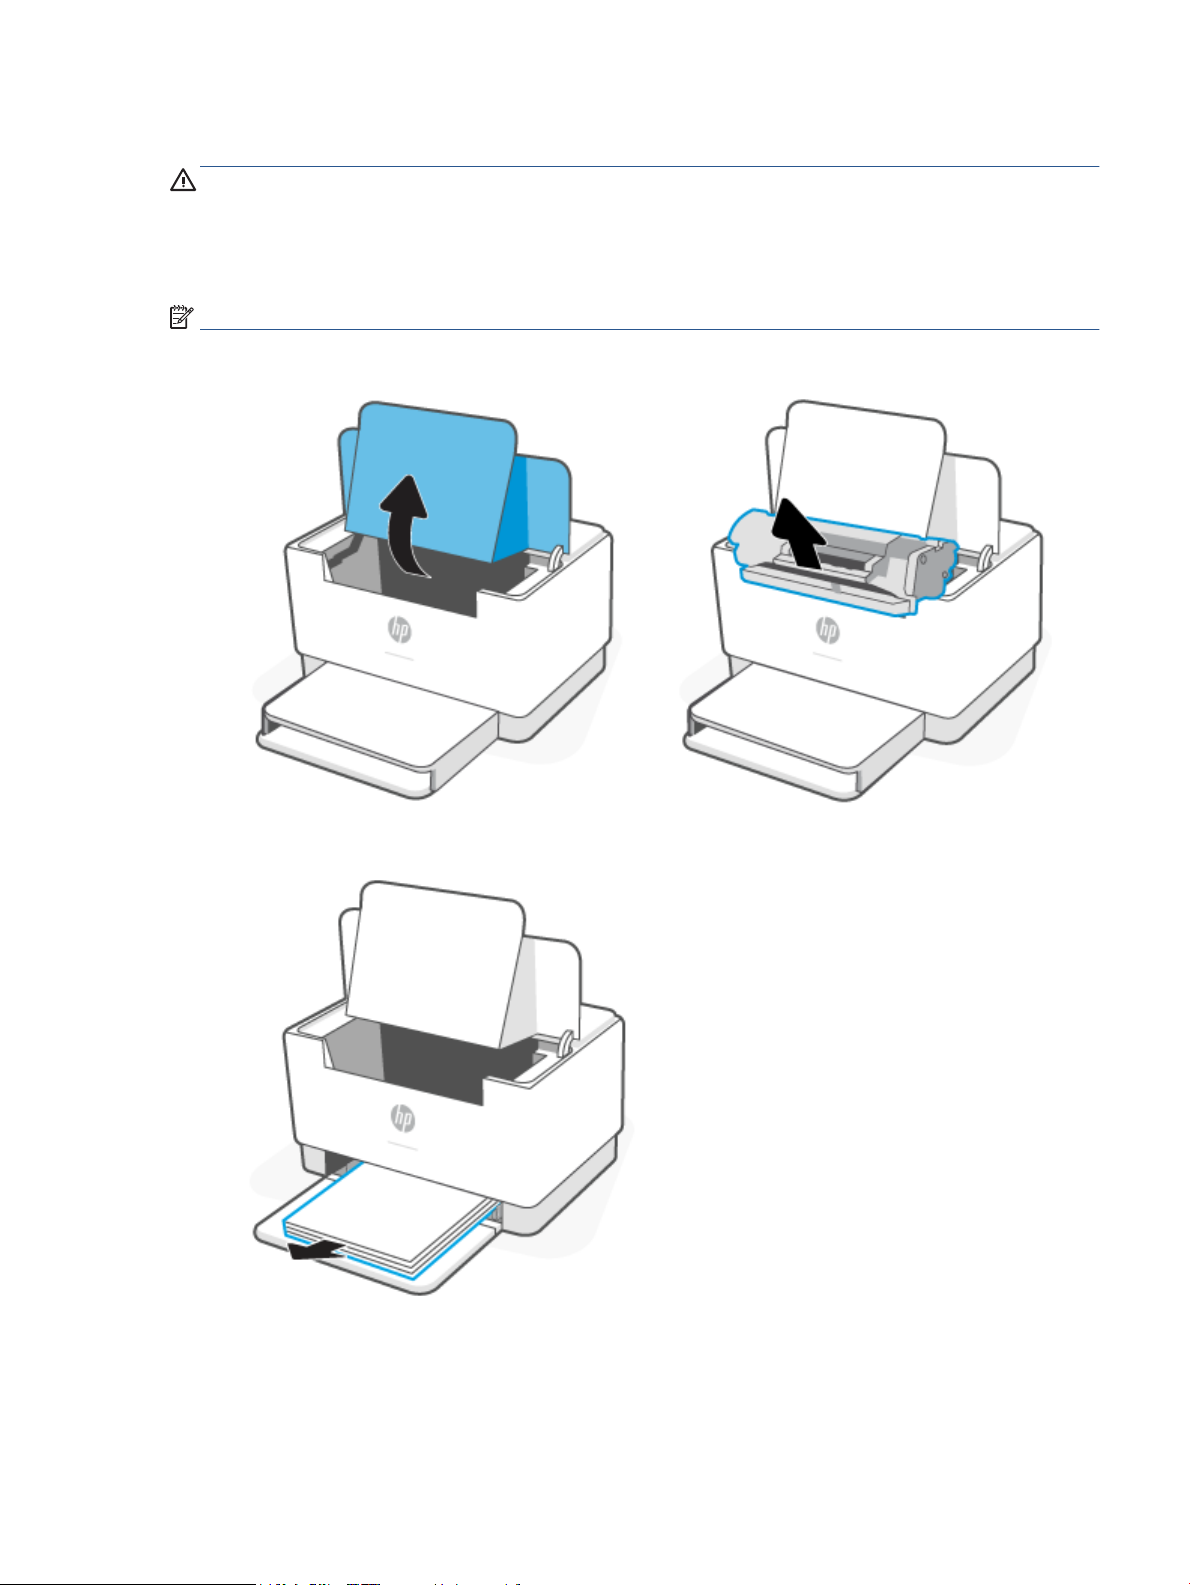
1. Open the cartridge access door, and then remove the print cartridge.
2. Remove the media stack from the input tray.
ENWW Clear paper jams 53
Page 60
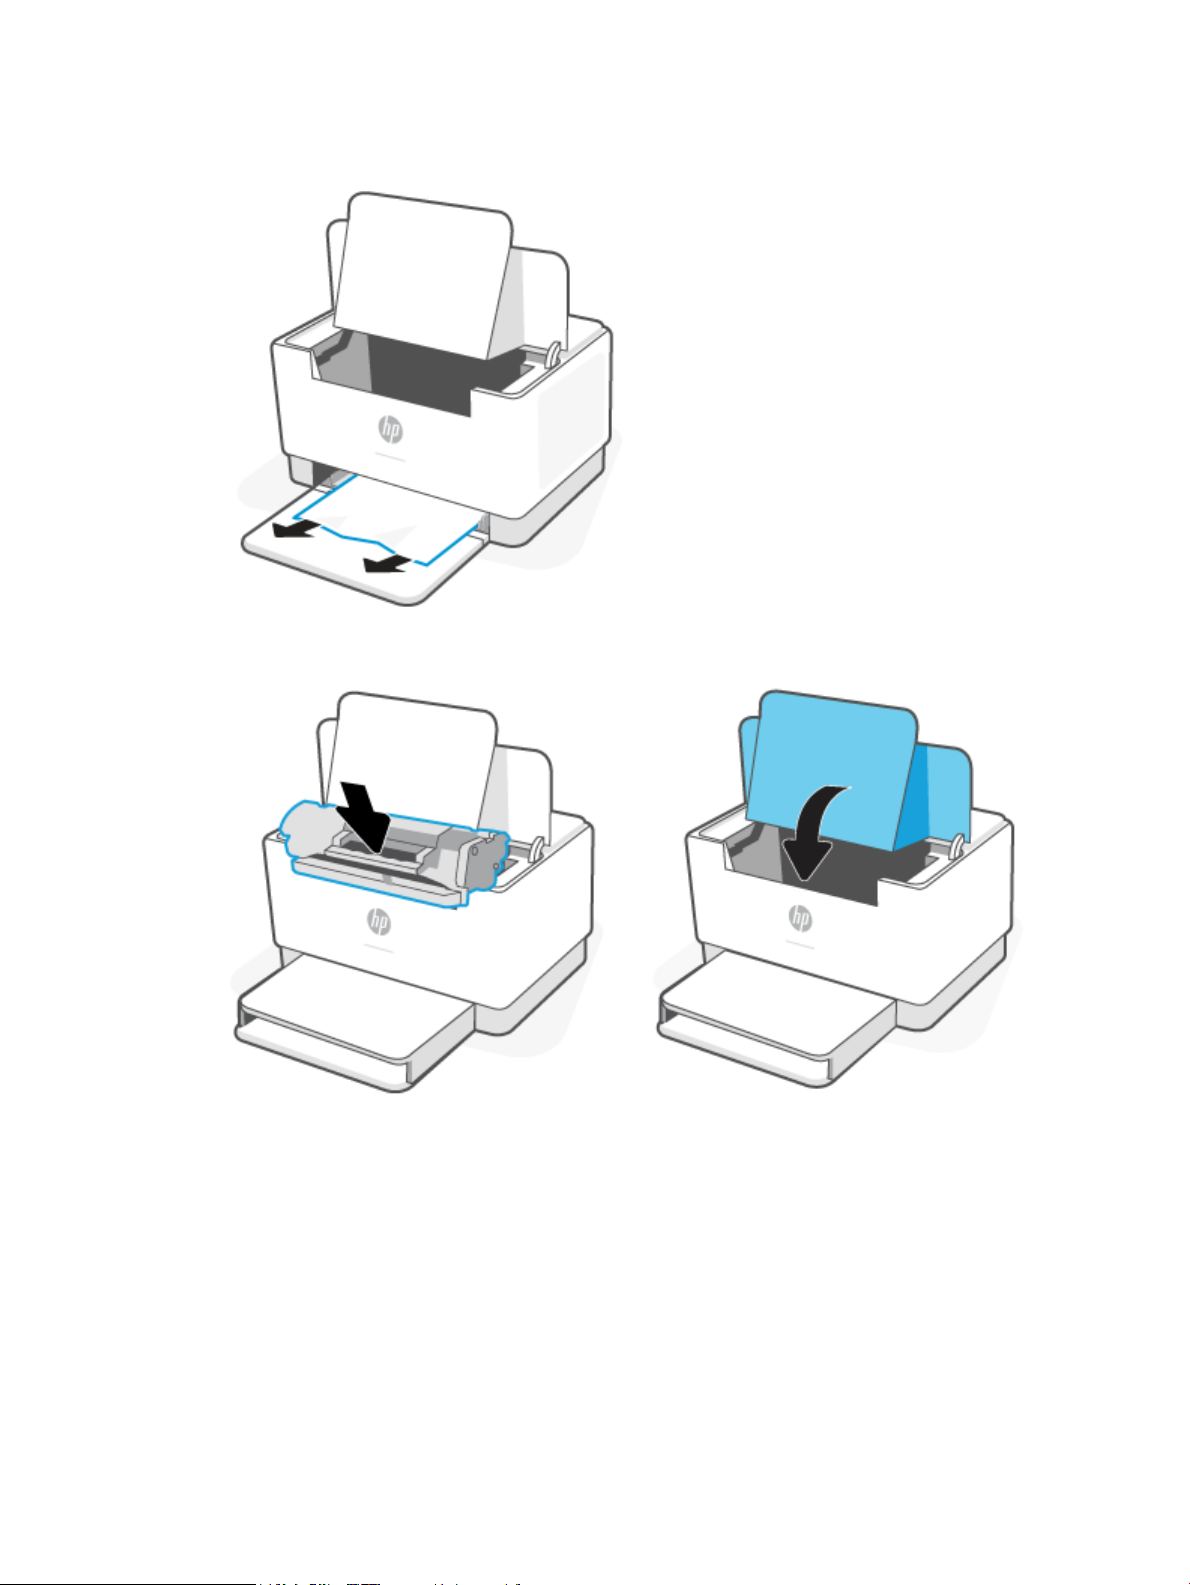
3. With both hands, grasp the side of the jammed media that is most visible (this includes the middle), and
carefully pull it free from the printer.
4. Reinstall the print cartridge, and then close the cartridge access door.
54 Chapter 7 Solve problems ENWW
Page 61
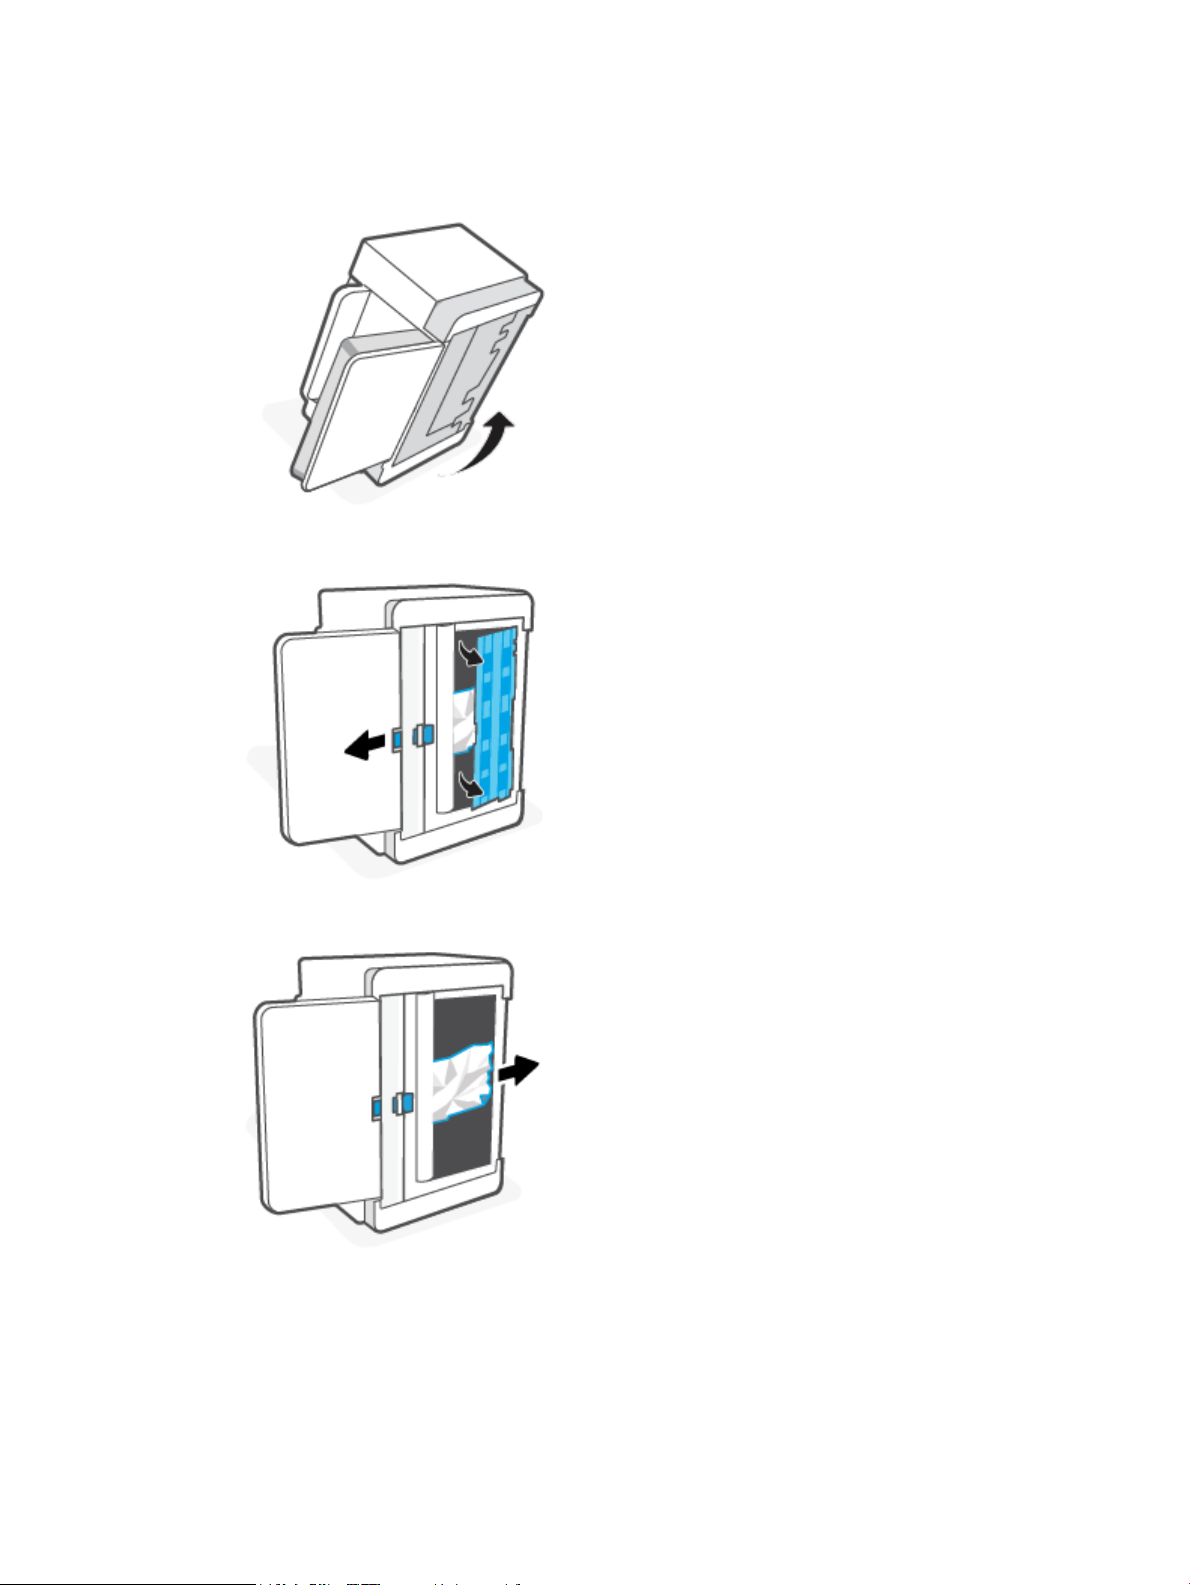
Clear jams in the printer base
1. Flip the printer on its side, as shown.
2. Release and hold on to the blue latch, and then remove the panel.
3. Remove the jammed media.
ENWW Clear paper jams 55
Page 62
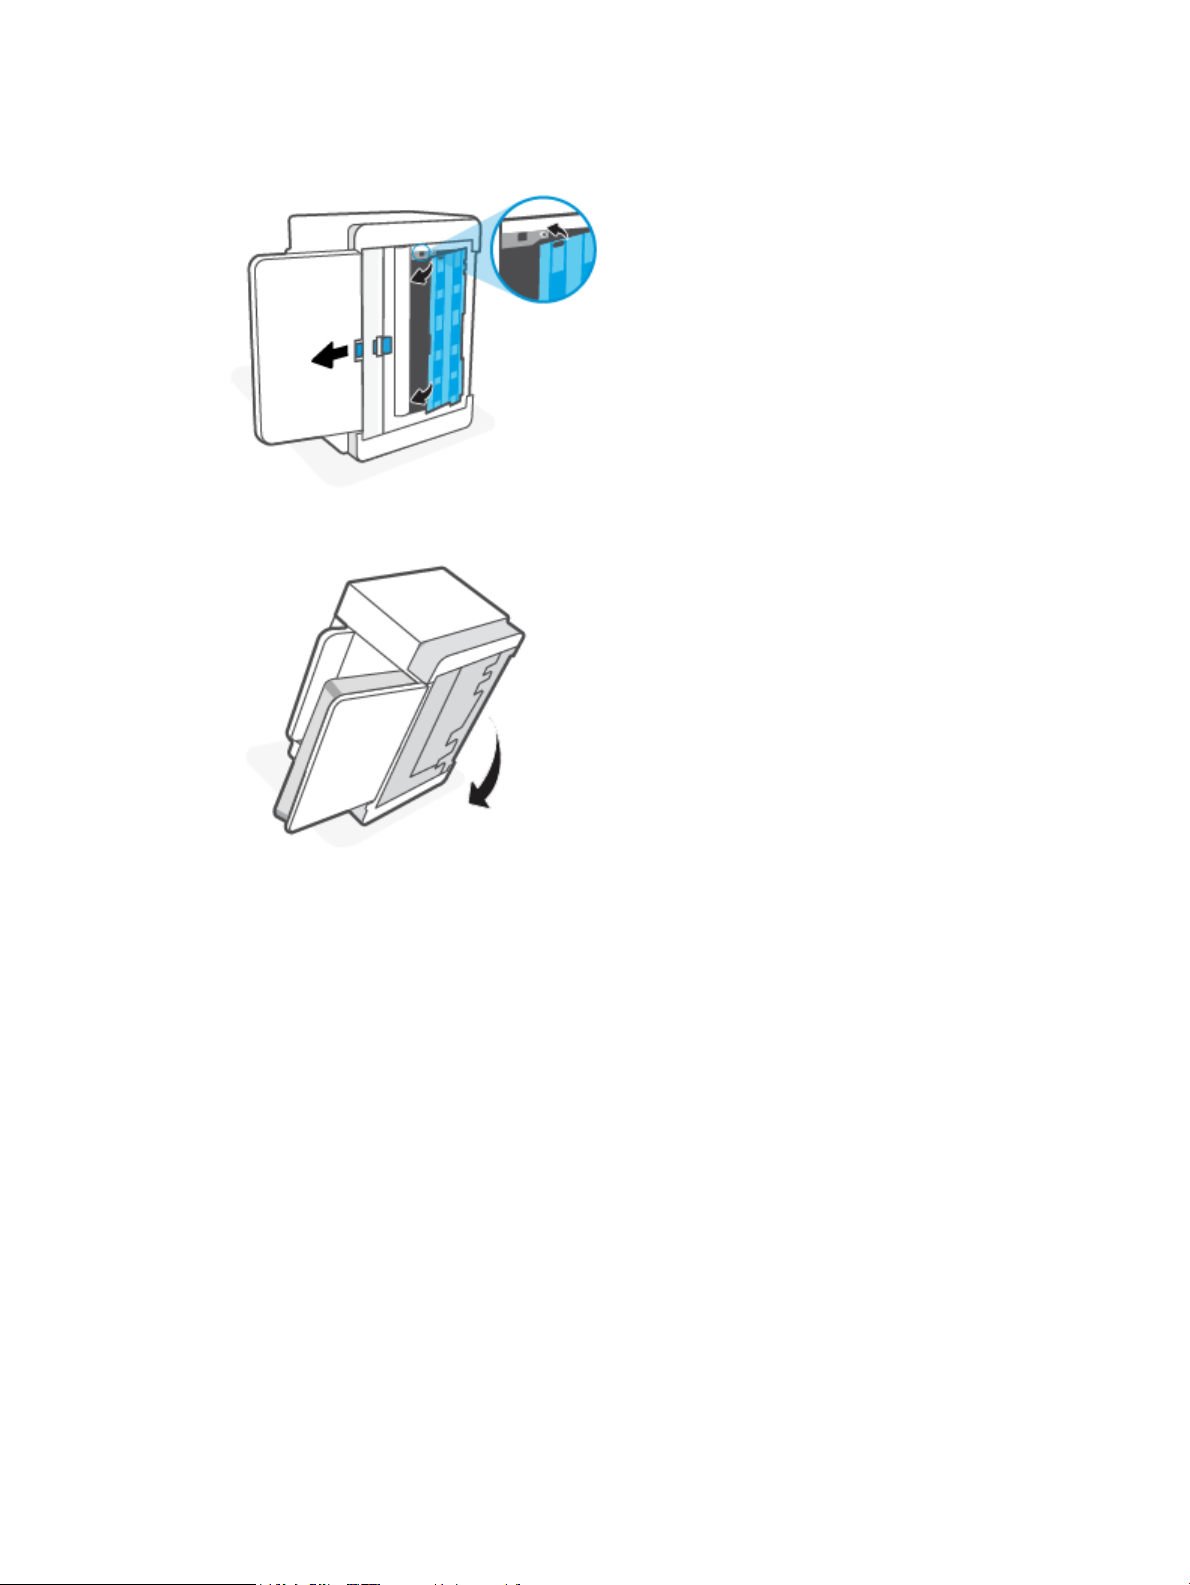
4. While holding onto the blue latch, align and insert the panel as shown. Release the blue latch to lock the
panel in the place.
5. Flip the printer back to the original, upright position.
56 Chapter 7 Solve problems ENWW
Page 63
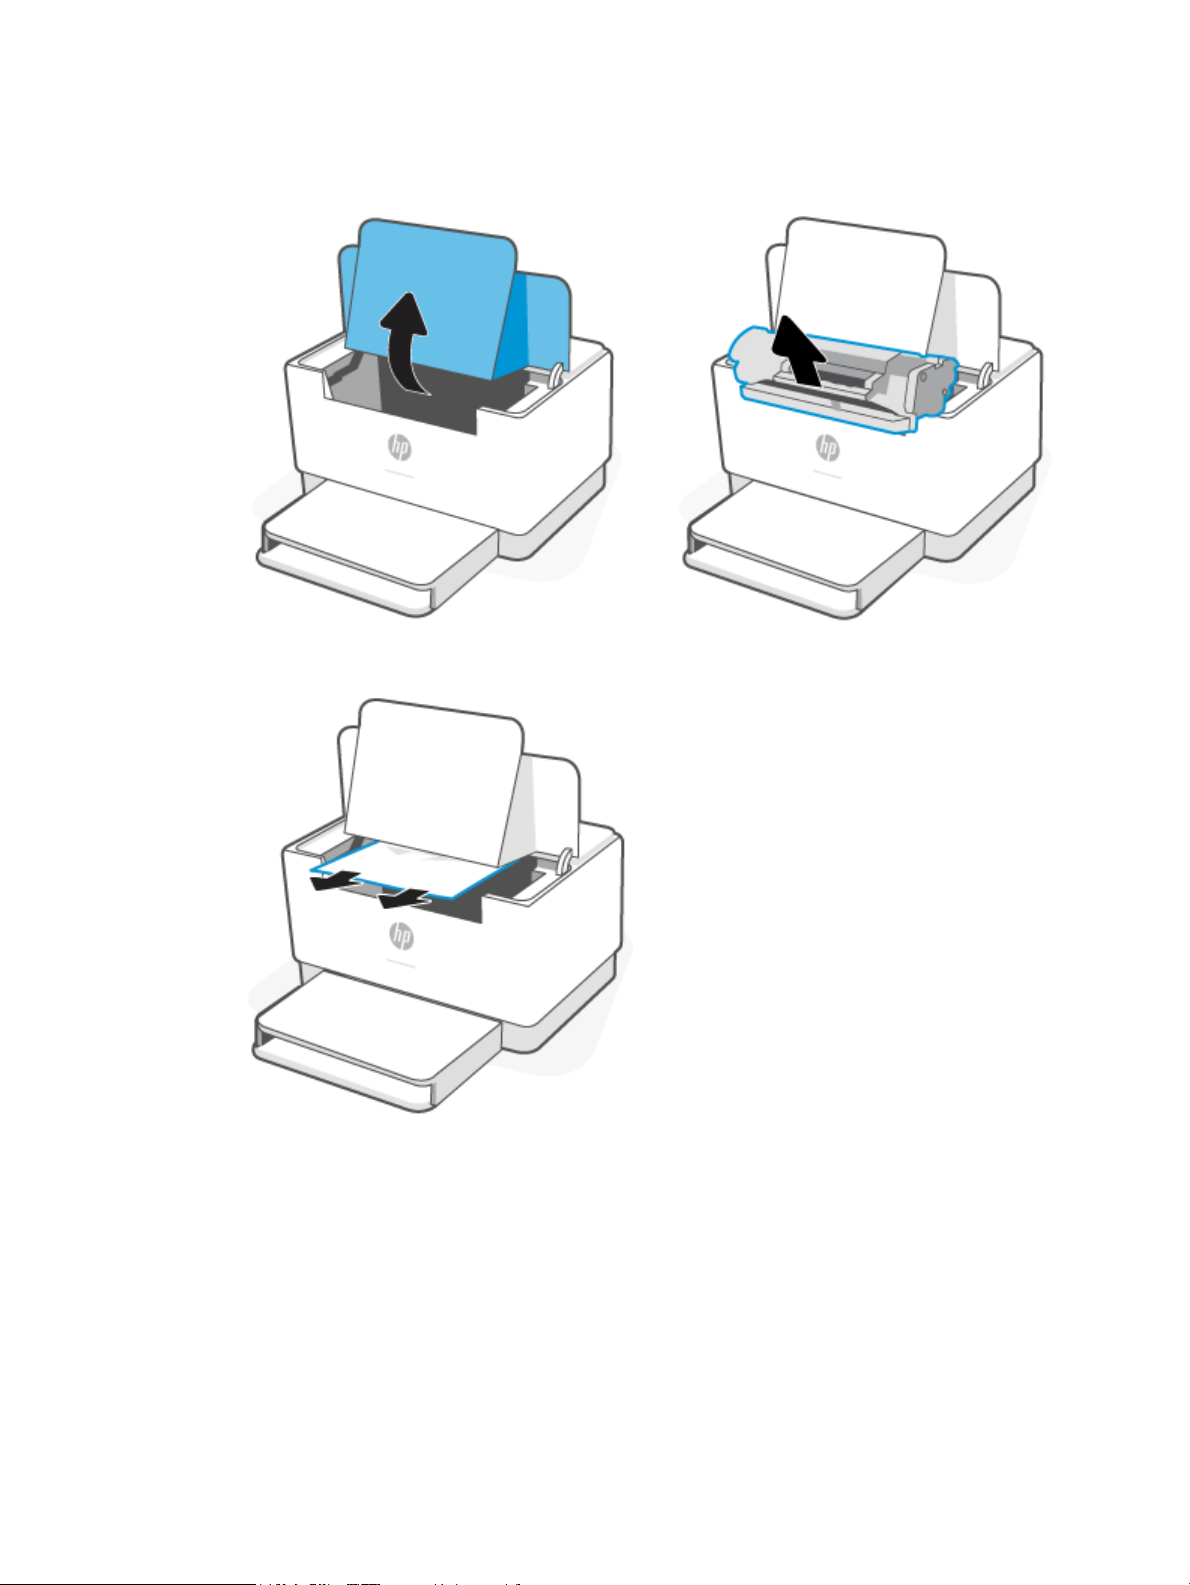
Clear jams from the print cartridge area
1. Open the cartridge access door, and then remove the print cartridge.
2. If you can see the jammed paper, carefully grasp the jammed paper, and slowly pull it out of the printer.
ENWW Clear paper jams 57
Page 64
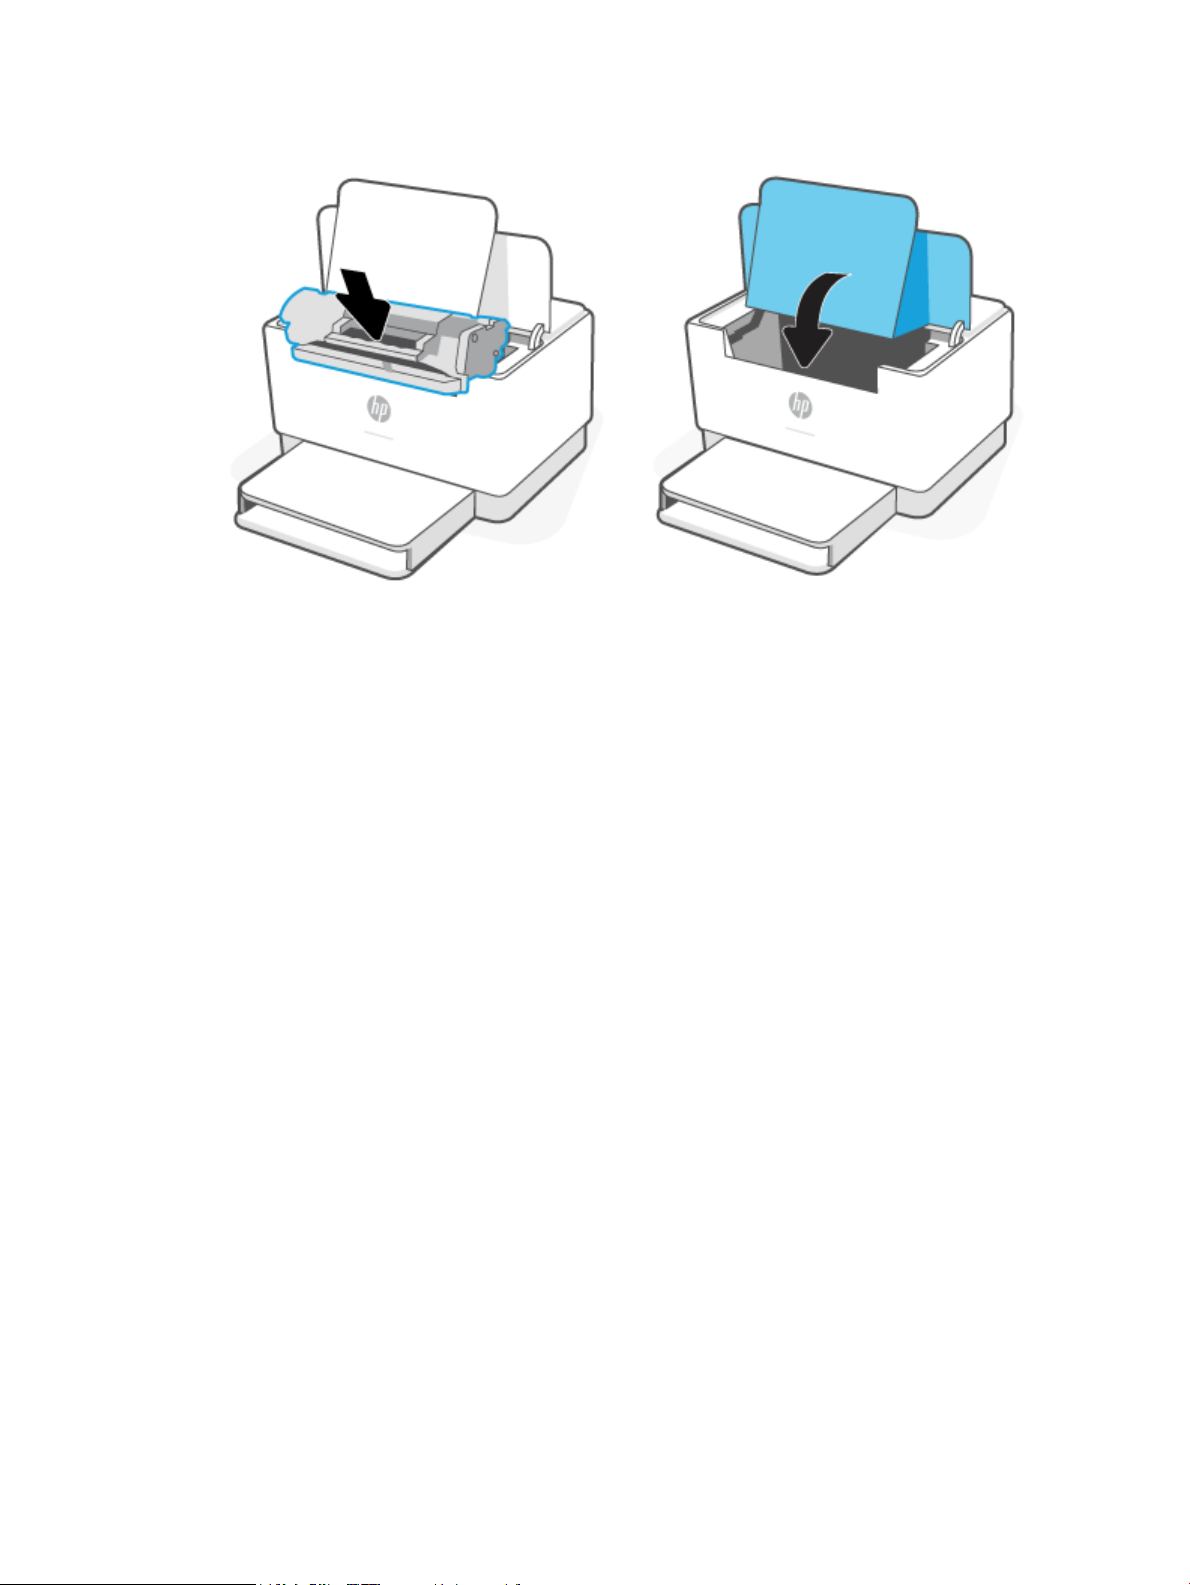
3. Reinstall the print cartridge, and then close the cartridge access door.
58 Chapter 7 Solve problems ENWW
Page 65
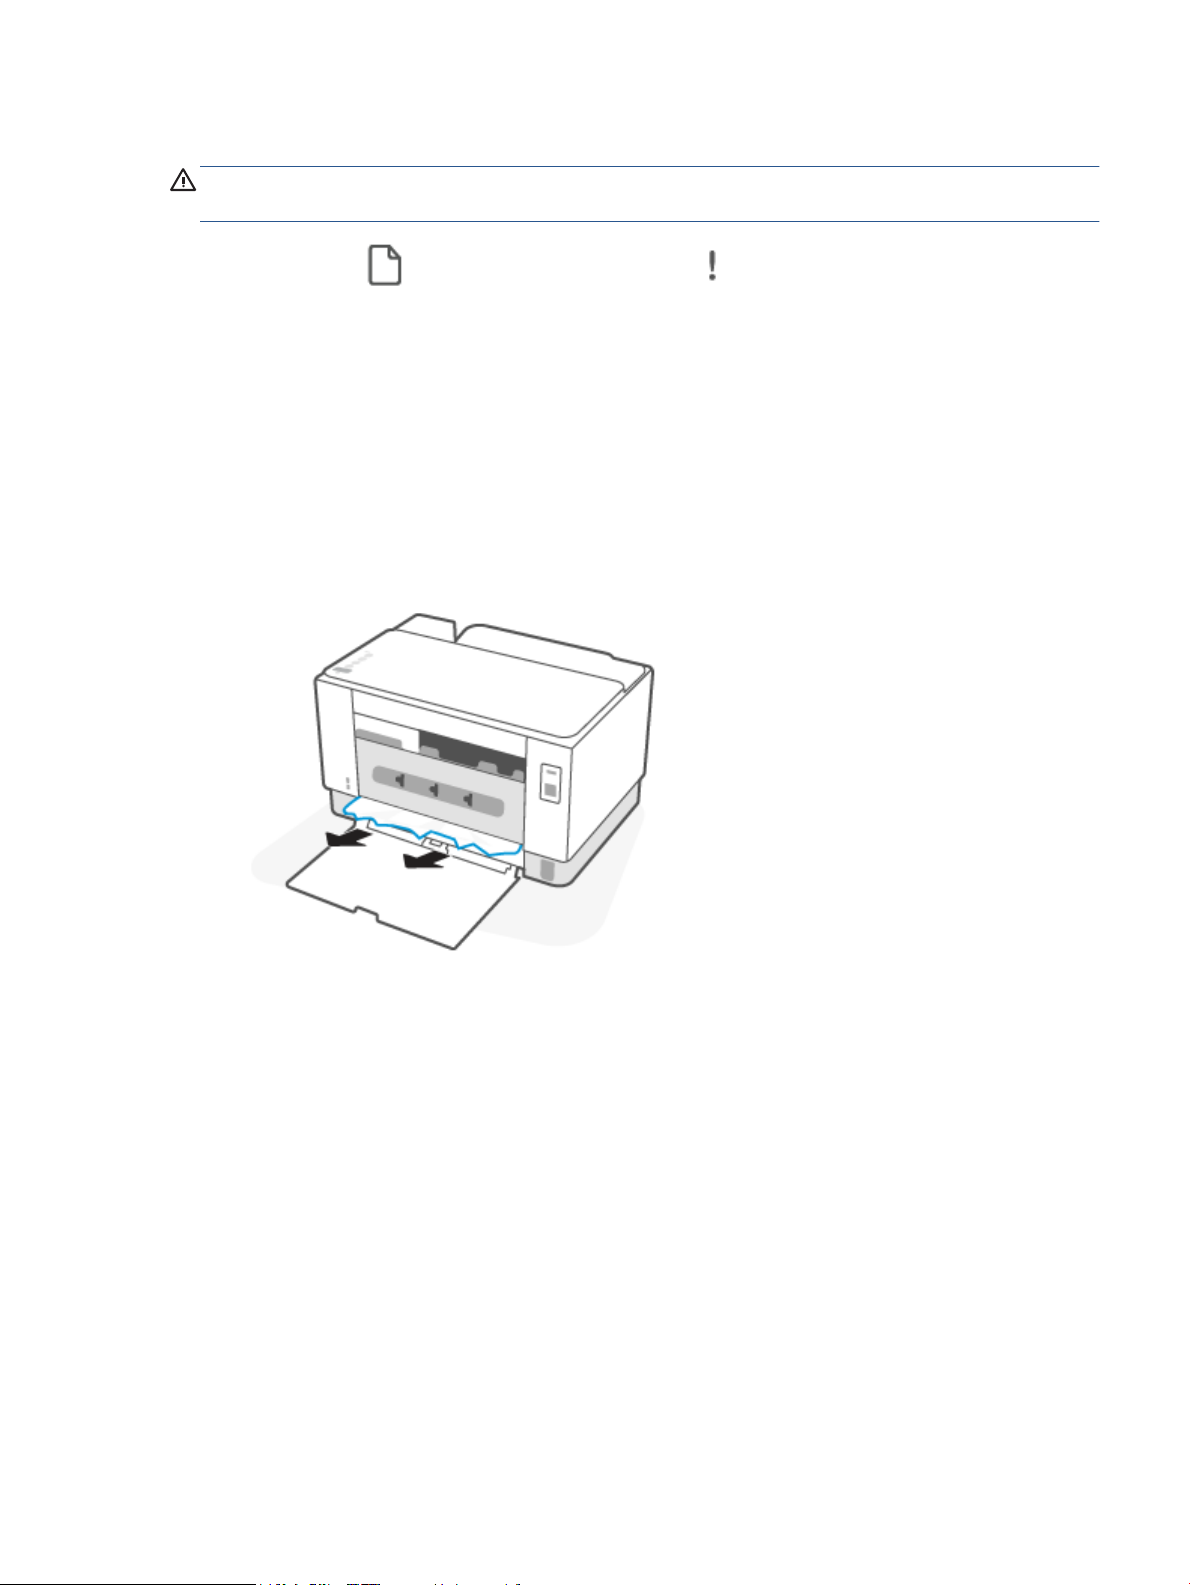
Clear jams from the output areas
CAUTION: Do not use sharp objects, such as tweezers or needle-nose pliers, to remove jams. Damage
caused by sharp objects is not covered by the warranty.
When a jam occurs, (the Paper light) blinks, and either (the Attention light) blinks or a solid amber
light appears on the bar (depending on the printer).
Remove any visible jammed paper from the output tray area. Use both hands to remove jammed paper to
avoid tearing the paper.
Clear jams in the rear duplexer
Use the following procedure to check for paper in all possible jam locations in the rear duplexer.
1. Open the rear access door.
2. If you can see the jammed paper, carefully grasp the jammed paper, and then slowly pull it out of the
printer.
3. Close the rear access door.
ENWW Clear paper jams 59
Page 66

Improve print quality
●
Introduction
●
Print from a dierent software program
●
Check the paper-type setting for the print job
●
Check toner-cartridge status
●
Clean the cartridge
●
Print a cleaning page
●
Visually inspect the toner cartridge
●
Check paper and the printing environment
●
Adjust Print Density
Introduction
The following information provides troubleshooting steps to resolve print-quality problems, including the
following problems:
● Smears
● Fuzzy print
● Dark print
● Light print
● Streaks
● Missing toner
● Scattered dots of toner
● Loose toner
● Skewed images
To resolve these or other print-quality problems, try the following solutions in the order presented.
For information about resolving specic image defects, see Resolving print quality problems.
Print from a dierent software program
Try printing from a dierent software program. If the page prints correctly, the problem is with the software
program from which you were printing.
If the page does not print correctly, try updating the printer and print again. See Update the printer.
Check the paper-type setting for the print job
Check the paper type setting when printing from a software program and the printed pages have smears,
fuzzy or dark print, curled paper, scattered dots of toner, loose toner, or small areas of missing toner.
60 Chapter 7 Solve problems ENWW
Page 67

Check the paper type setting on the printer
Verify that the tray is loaded with the correct type of paper.
Check the paper type setting (Windows)
1. From the software program, select the Print option.
2. Select the printer, and then click the Properties or Preferences button.
3. Check the paper settings.
Check the paper type setting (OS X)
1. Click the File menu, and then click the Print option.
2. In the Printer menu, select the printer.
3. By default, the print driver displays the Copies & Pages menu. Open the menus drop-down list, and then
click the Finishing menu.
4. Select a type from the Media Type drop-down list.
Check toner-cartridge status
Follow these steps to check the estimated life remaining in the toner cartridges and if applicable, the status
of other replaceable maintenance parts.
Step one: Find supplies information
● USB model: From the printer control panel, press and hold (the Resume button) for 3 seconds to
print a conguration report.
● Wireless model: From the printer control panel, press (the Information button) to print an
information report.
Step two: Check supplies status
1. Open EWS (see To access and use the Embedded Web Server (EWS)) to look at the supplies status report
of the toner cartridges and if applicable, the status of other replaceable maintenance parts.
Print quality problems can occur when using a toner cartridge that is at its estimated end of life. The
conguration report indicates when a supply level is very low.
Once an HP toner cartridge has reached Very Low, HP’s Premium Protection Warranty on that toner
cartridge has ended.
The toner cartridge does not need to be replaced now unless the print quality is no longer acceptable.
Consider having a replacement available to install when print quality is no longer acceptable.
ENWW Improve print quality 61
Page 68

If you determine that you need to replace a toner cartridge or other replaceable maintenance parts, the
conguration report lists the genuine HP part numbers.
2. Check to see if you are using a genuine HP cartridge.
A genuine HP toner cartridge has “HP” on it, or has the HP logo on it. For more information on identifying
HP cartridges go to www.hp.com/go/learnaboutsupplies
Clean the cartridge
During the printing process, cartridges might be contaminated by paper dust and cause print quality issues
such as background issues, vertical dark bands, or repetitive horizontal banding.
Follow these steps to improve the above mentioned print quality issues:
1. Open EWS. See To access and use the Embedded Web Server (EWS).
2. Click the System tab, and then click Service.
3. In the Cartridge Cleaning Mode area, click Start to begin the cleaning process.
Print a cleaning page
During the printing process paper, toner, and dust particles can accumulate inside the printer and can cause
print-quality issues such as toner specks or spatter, smears, streaks, lines, or repeating marks.
Use the following procedure to print a cleaning page.
1. Open EWS. See To access and use the Embedded Web Server (EWS).
2. On the System tab, click Service.
3. In the Fuser Cleaning mode area, click Start to begin the cleaning process.
Visually inspect the toner cartridge
Follow these steps to inspect the toner cartridge.
1. Remove the toner cartridges from the printer, and verify that the sealing tape has been removed.
2. Check the memory chip for damage.
3. If you see any damage on the toner cartridge, replace the toner cartridge.
4. Reinstall the toner cartridge, and print a few pages to see if the problem has resolved.
Check paper and the printing environment
Step one: Use paper that meets HP specications
Some print-quality problems arise from using paper that does not meet HP specications.
● Always use a paper type and weight that this printer supports.
● Use paper that is of good quality and free of cuts, nicks, tears, spots, loose particles, dust, wrinkles,
voids, staples, and curled or bent edges.
● Use paper that has not been previously printed on.
62 Chapter 7 Solve problems ENWW
Page 69

● Use paper that does not contain metallic material, such as glitter.
● Use paper that is designed for use in laser printers. Do not use paper that is designed only for use in
Inkjet printers.
● Use paper that is not too rough. Using smoother paper generally results in better print quality.
Step two: Check the environment
The environment can directly aect print quality and is a common cause for print-quality or paper-feeding
issues. Try the following solutions:
● Move the printer away from drafty locations, such as open windows or doors, or air-conditioning vents.
● Make sure the printer is not exposed to temperatures or humidity outside of printer specications.
● Do not place the printer in a conned space, such as a cabinet.
● Place the printer on a sturdy, level surface.
● Remove anything that is blocking the vents on the printer. The printer requires good air ow on all sides,
including the top.
● Protect the printer from airborne debris, dust, steam, grease, or other elements that can leave residue
inside the printer.
Adjust Print Density
Complete the following steps to adjust the print density.
1. Open EWS. See To access and use the Embedded Web Server (EWS).
2. Click the System tab, and then select System Setup from the left navigation pane.
3. Select the correct density settings.
4. Click Apply to save the changes.
ENWW Improve print quality 63
Page 70
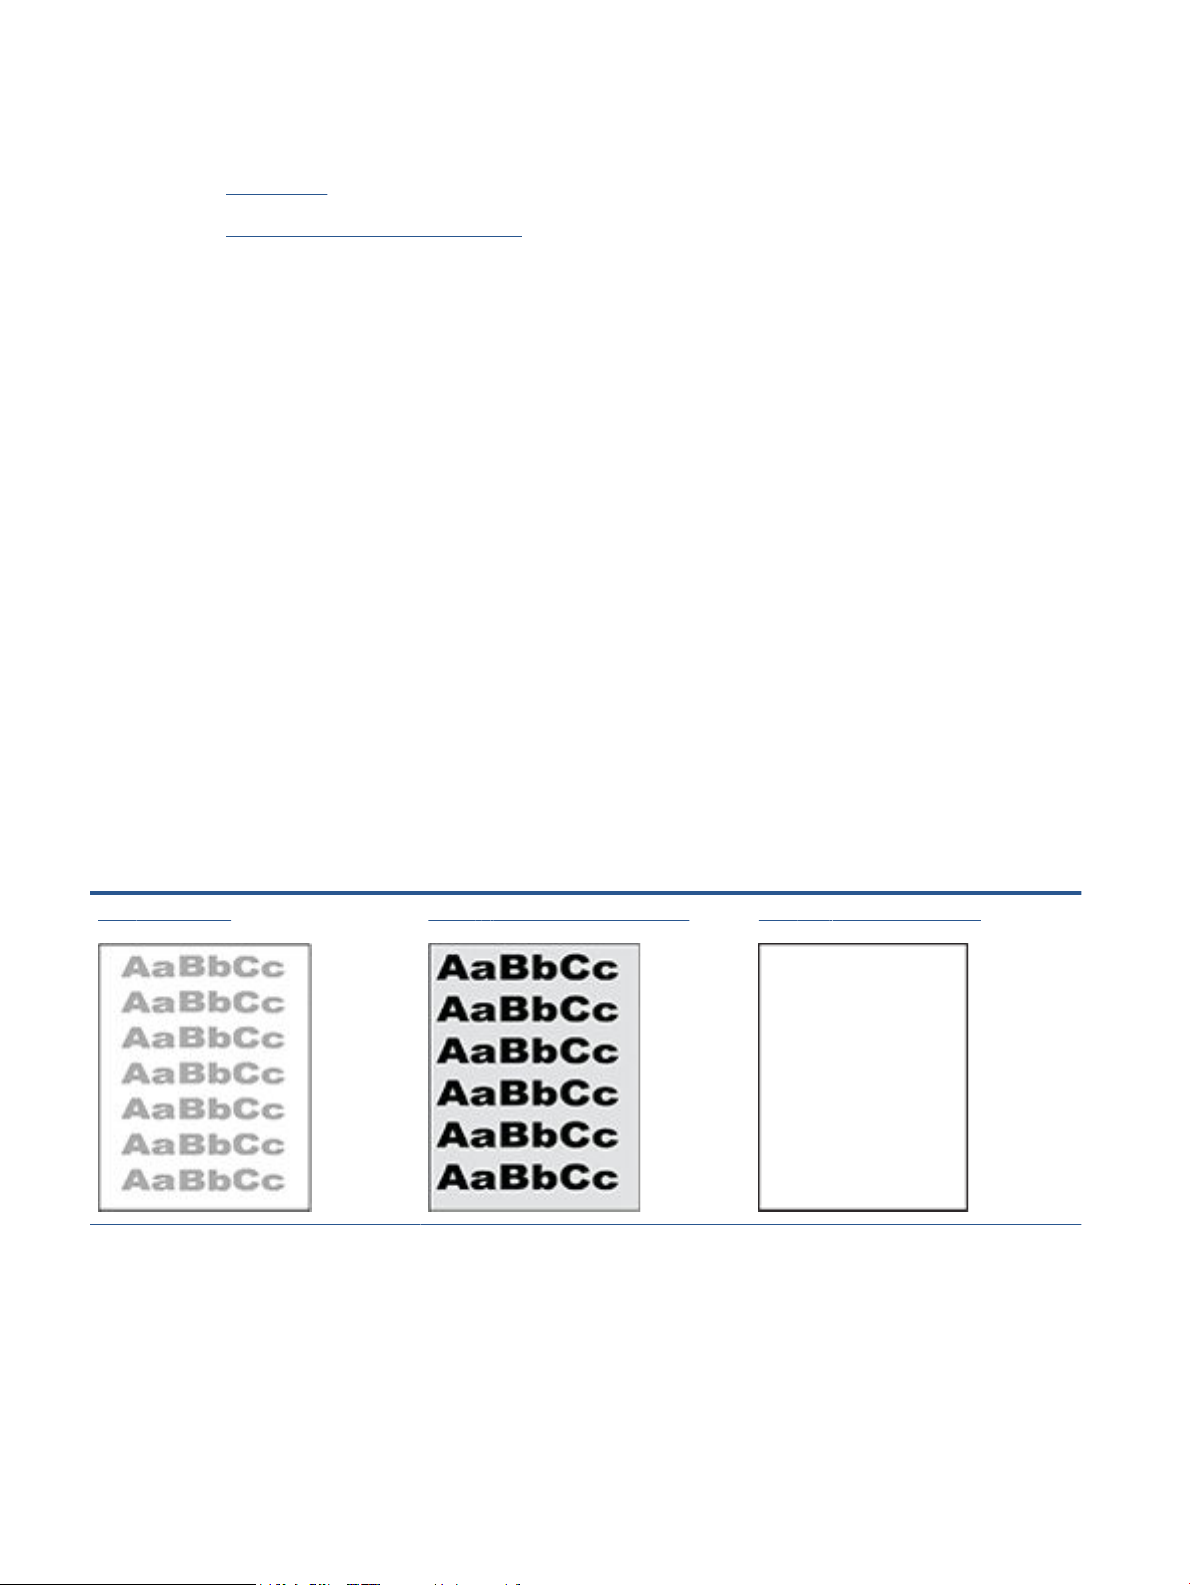
Resolving print quality problems
●
Introduction
●
Troubleshoot print quality problems
Introduction
The following information provides troubleshooting steps for solving image defect issues, including the
following defects:
● Light print
● Gray background or dark print
● Blank pages
● Black pages
● Dark or light bands
● Dark or light streaks
● Missing toner
● Skewed images
● Colors that do not align
● Curled paper
Troubleshoot print quality problems
Table
7-7 Image defects table quick reference
Table 7-8 Light print Table 7-9 Gray background or dark print Table 7-10 Blank page — No print
64 Chapter 7 Solve problems ENWW
Page 71
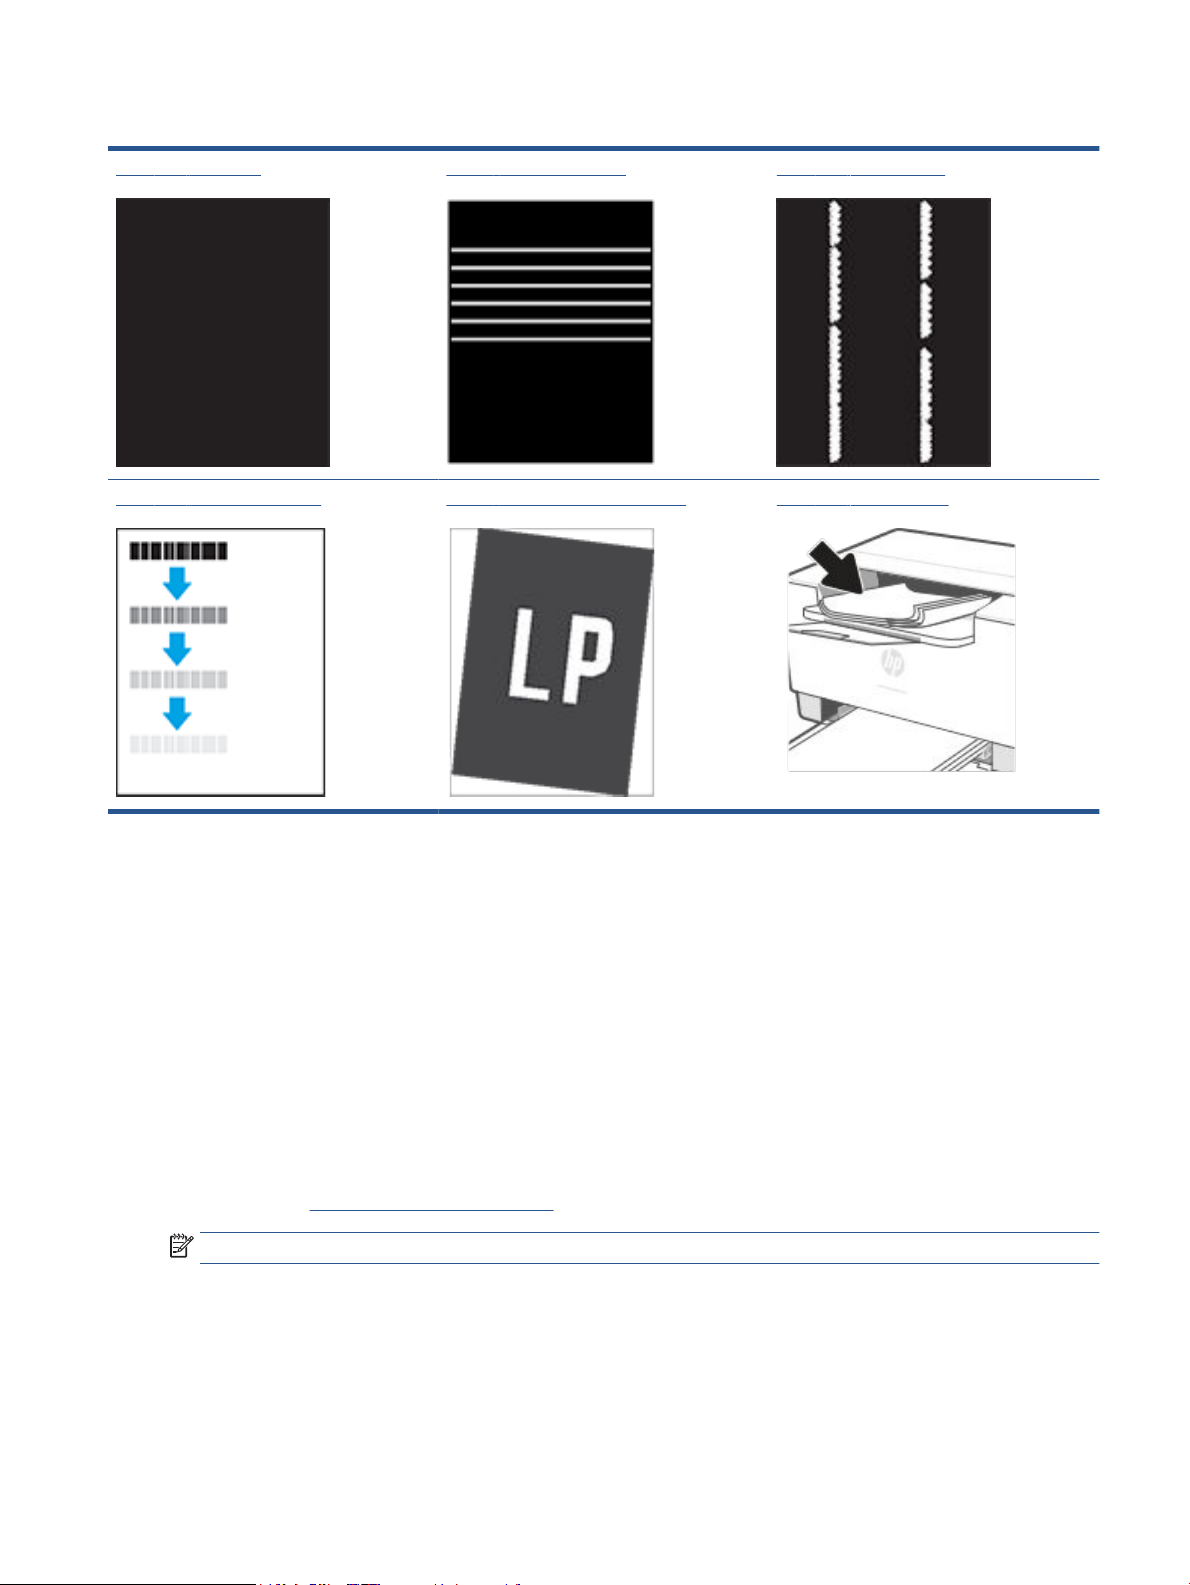
Table 7-7 Image defects table quick reference (continued)
Table 7-11 Black page Table 7-12 Banding defects Table 7-13 Streak defects
Table 7-14 Fixing/fuser defects Table 7-15 Image placement defects Table 7-16 Output defects
Image defects, no matter the cause, can often be resolved using the same steps. Use the following steps as a
starting point for solving image defect issues.
1. Reprint the document. Print quality defects can be intermittent in nature or can go away completely
with continued printing.
2. Check the condition of the cartridge. If a cartridge is in a Very Low state (it has passed the rated life),
replace the cartridge.
3. Make sure that the driver and tray print mode settings match the media that is loaded in the tray. Try
using a dierent ream of media or a dierent tray. Try using a dierent print mode.
4. Make sure that the printer is within the supported operating temperature/humidity range.
5. Make sure that the paper type, size, and weight are supported by the printer. See the printer support
page at www.hp.com/support/ljM207 for a list of the supported paper sizes and types for the printer.
NOTE: The term “fusing” refers to the part of the printing process where toner is aixed to paper.
The following examples depict letter-size paper that has passed through the printer short-edge rst.
ENWW Resolving print quality problems 65
Page 72
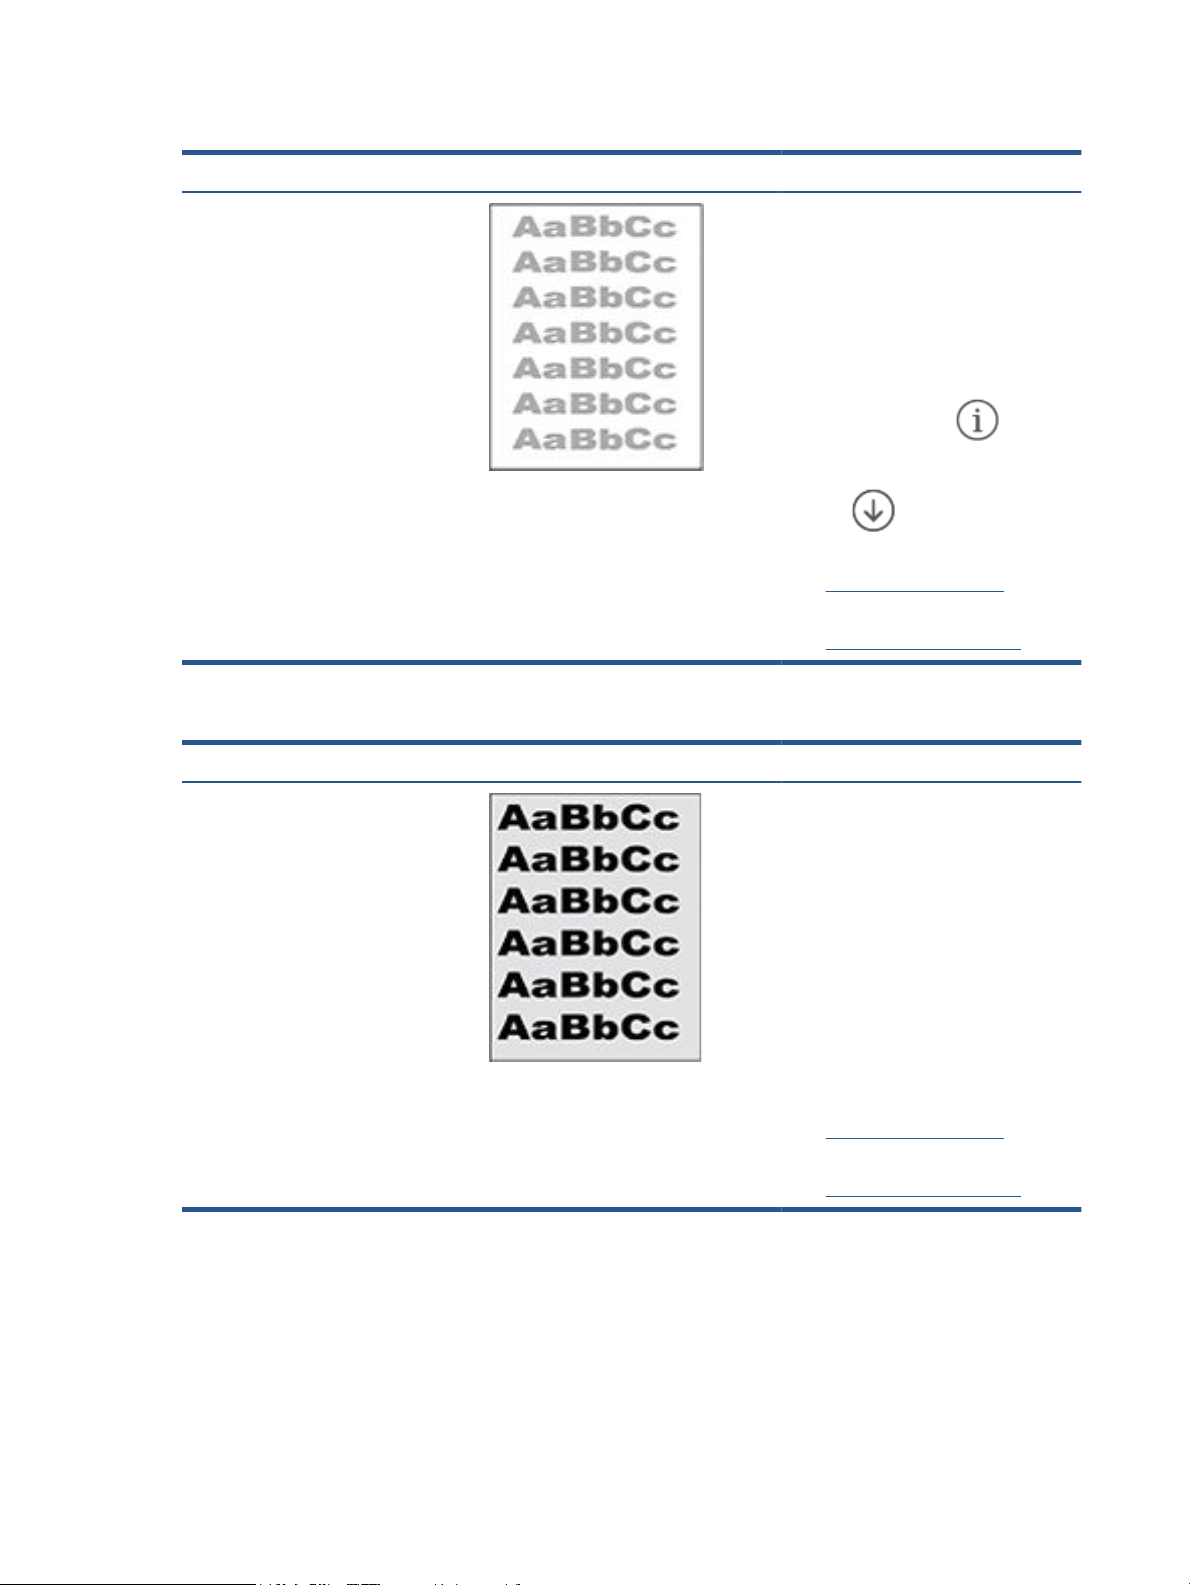
Table 7-8 Light print
Description Sample Possible solutions
Light print:
The printed content on the entire page is
light or faded.
1. Reprint the document.
2. Remove the cartridge, and then
shake it to redistribute the toner.
3. Make sure that the cartridge is
installed correctly.
4. Print a conguration report and check
for life and usage of the cartridge
(Press and hold the
Information button) for 3 seconds
until all the buttons are lit, then press
the
print a conguration report).
5. Replace the toner cartridge.
6. If the problem persists, go to
www.hp.com/support/ljM207
Table 7-9 Gray background or dark print
Description Sample Possible solutions
(the
(the Resume button) to
Gray background or dark print:
The image or text is darker than expected.
1. Make sure that the paper in the trays
has not already been run through the
printer.
2. Use a dierent paper type.
3. Reprint the document.
4. Mono models only: From the printer
EWS, go to the Adjust Toner Density
menu, and then adjust the toner
density to a lower level.
5. Make sure that the printer is in within
the supported operating temperature
and humidity range.
6. Replace the toner cartridge.
7. If the problem persists, go to
www.hp.com/support/ljM207
66 Chapter 7 Solve problems ENWW
Page 73
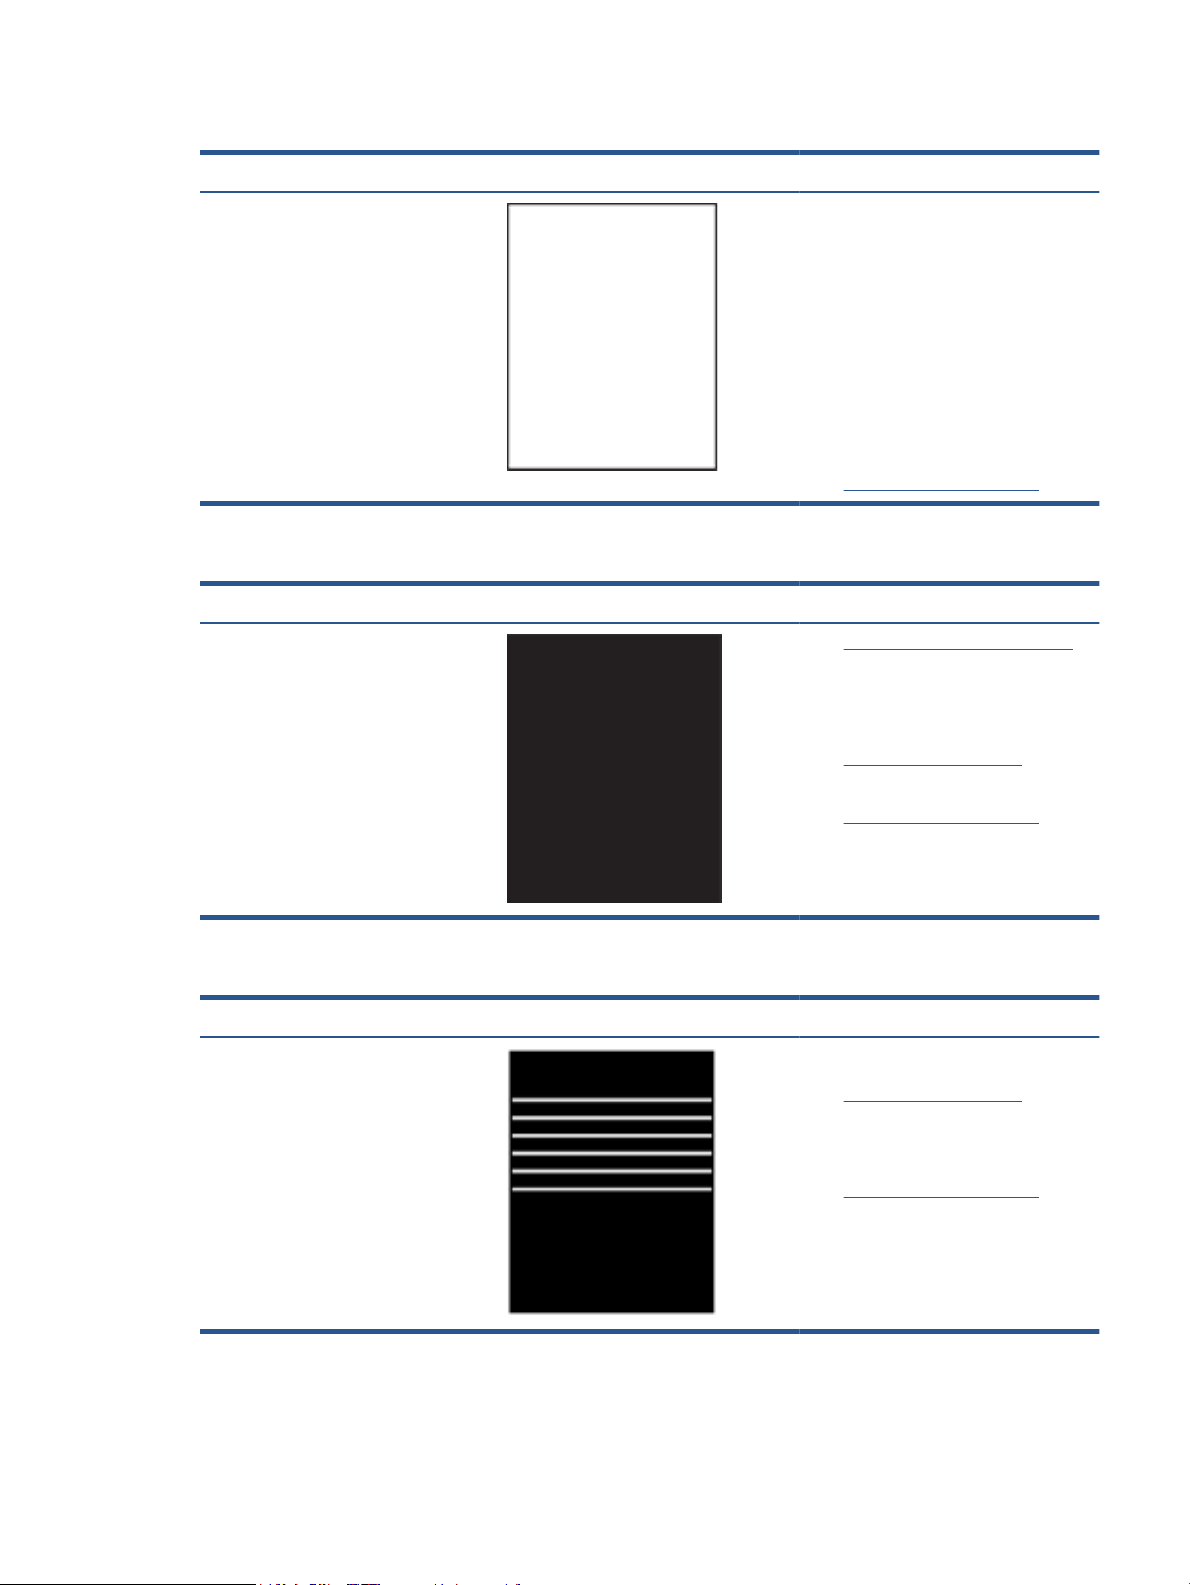
Table 7-10 Blank page — No print
Description Sample Possible solutions
Blank page — No print:
The page is completely blank and contains
no printed content.
1. Make sure that the cartridge is
genuine HP cartridges.
2. Make sure that the cartridge is
installed correctly.
3. Print with a dierent cartridge.
4. Check the paper type in the paper
tray and adjust the printer settings to
match. If necessary, select a lighter
paper type.
5. If the problem persists, go to
www.hp.com/support/ljM207
Table 7-11 Black page
Description Sample Possible solutions
Black page:
The entire printed page is black.
1. Visually inspect the toner cartridge to
check for damage.
2. Make sure that the cartridge is
installed correctly.
3. Replace the toner cartridge.
4. If the problem persists, go to
www.hp.com/support/ljM207
Table 7-12 Banding defects
Description Sample Possible solutions
Repetitive wide-pitch banding and
Impulse bands:
Dark or light lines which repeat down the
length of the page. They might be sharp or
soft in nature. The defect displays only in
areas of ll, not in text or sections with no
printed content.
1. Reprint the document.
2. Replace the toner cartridge.
3. Use a dierent paper type.
4. If the problem persists, go to
www.hp.com/support/ljM207
ENWW Resolving print quality problems 67
Page 74
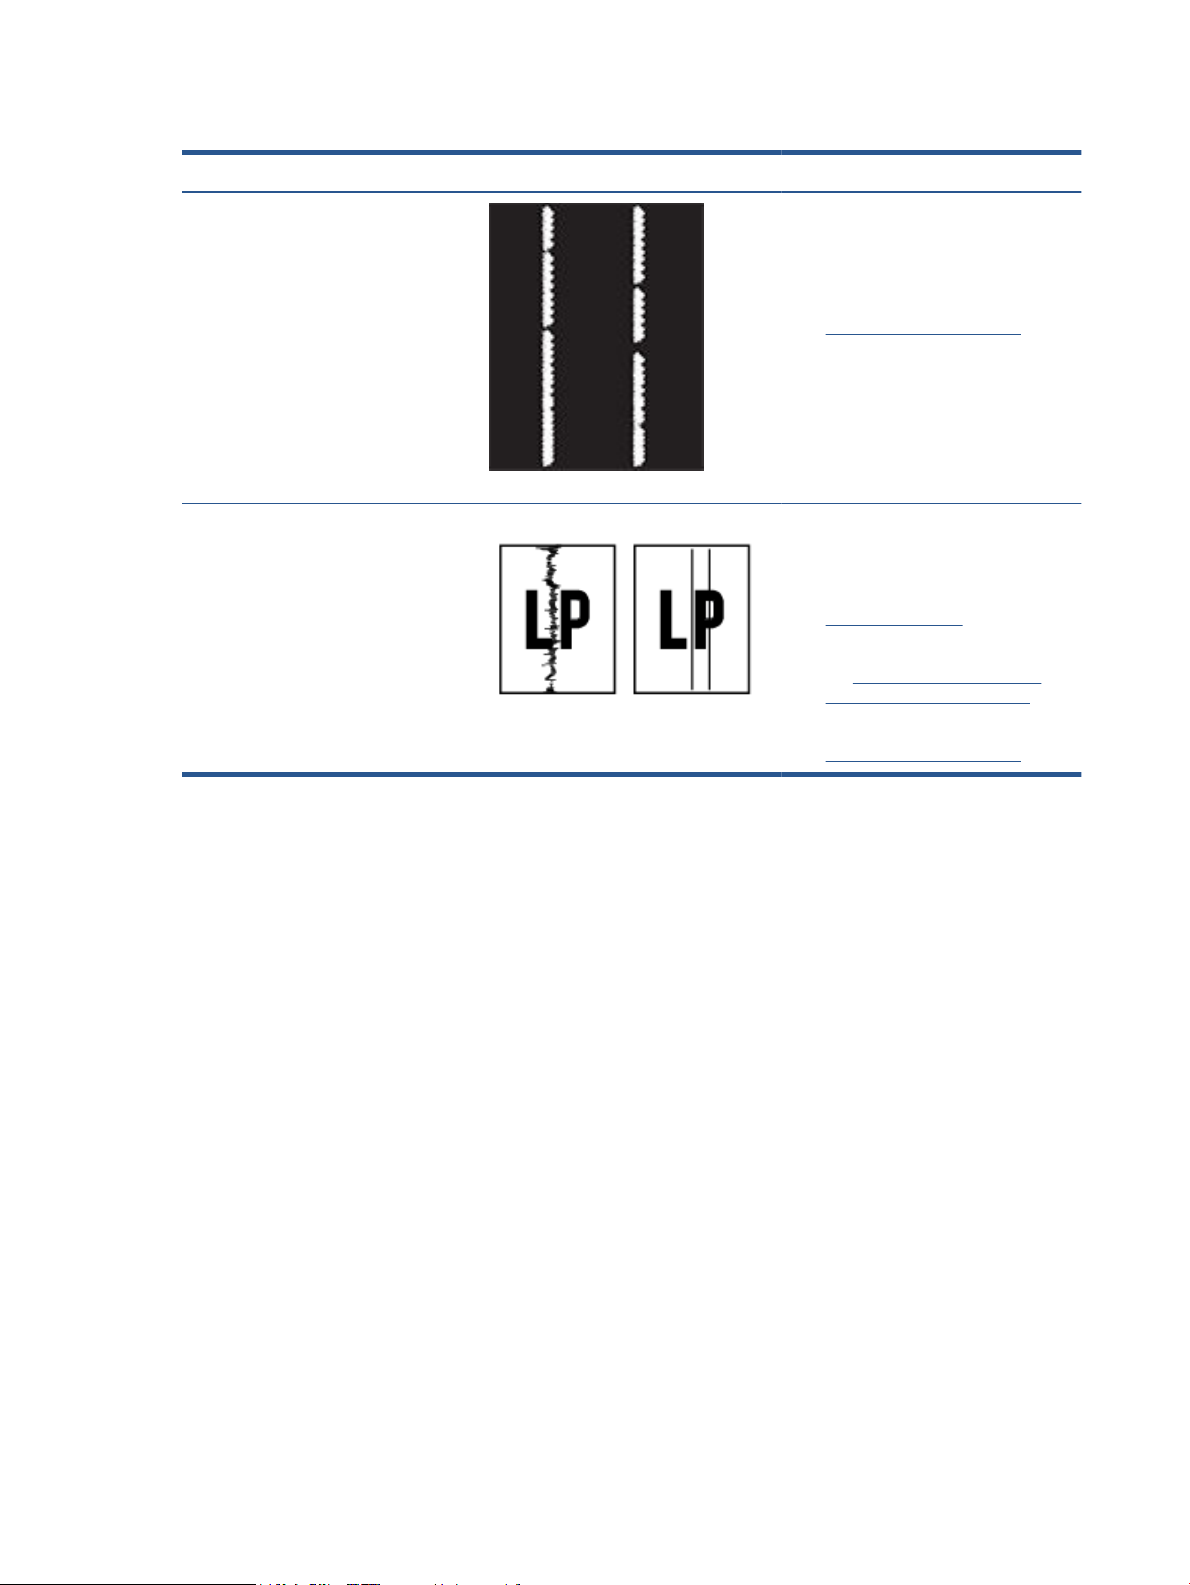
Table 7-13 Streak defects
Description Sample Possible solutions
Light vertical streaks:
Light streaks that usually span the length
of the page. The defect displays only in
areas of ll, not in text or sections with no
printed content.
Dark vertical streaks and ITB cleaning
streaks (color models only):
Dark lines which occur down the length of
the page. The defect might occur anywhere
on the page, in areas of ll or in sections
with no printed content.
1. Reprint the document.
2. Remove the cartridge, and then
shake it to redistribute the toner.
3. If the problem persists, go to
www.hp.com/support/ljM207
NOTE: Both light and dark vertical
streaks can occur when the printing
environment is outside the specied range
for temperature or humidity. Refer to your
printer's environmental specications for
allowable temperature and humidity
levels.
1. Reprint the document.
2. Remove the cartridge, and then
shake it to redistribute the toner.
3. Print a cleaning page.
4. Check the toner level in the cartridge.
See To open EWS using HP Smart
(iOS, Android, and Windows 10).
5. If the problem persists, go to
www.hp.com/support/ljM207
68 Chapter 7 Solve problems ENWW
Page 75
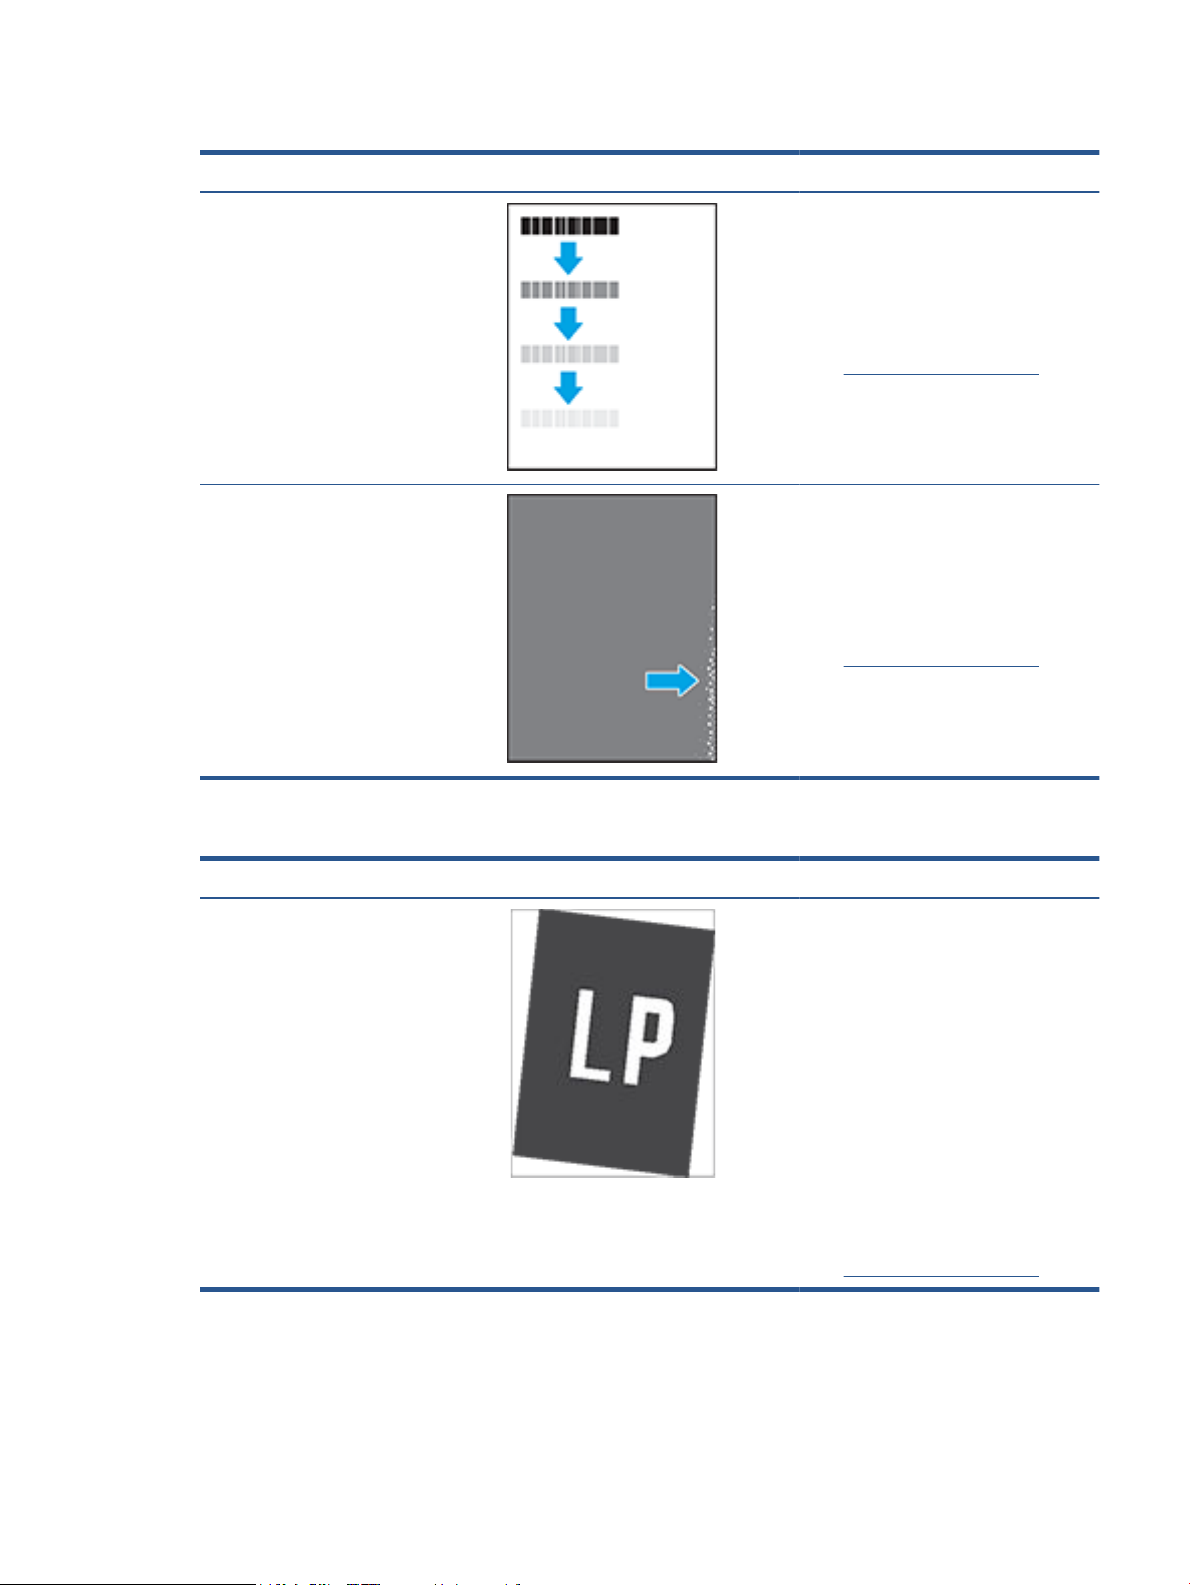
Table 7-14 Fixing/fuser defects
Description Fixing/fuser Possible solutions
Hot fuser oset (shadow):
Slight shadows, or osets, of the image
repeated down the page. The repeated
image might fade with each recurrence.
Poor fusing:
Toner rubs o along either edge of page.
This defect is more common at the edges
of high-coverage jobs and on light media
types but can occur anywhere on the page.
1. Reprint the document.
2. Check the paper type in the paper
tray and adjust the printer settings to
match. If necessary, select a lighter
paper type.
3. If the problem persists, go to
www.hp.com/support/ljM207
1. Reprint the document.
2. Check the paper type in the paper
tray and adjust the printer settings to
match. If necessary, select a heavier
paper type.
3. If the problem persists, go to
www.hp.com/support/ljM207
Table 7-15 Image placement defects
Description Sample Possible solutions
Margins and skew:
The image is not centered, or is skewed on
the page. The defect occurs when the
paper is not positioned properly as it is
pulled from the tray and moves through
the paper path.
1. Reprint the document.
2. Remove the paper and then reload
the tray. Make sure that all the paper
edges are even on all sides.
3. Make sure that the top of the paper
stack is below the tray full indicator.
Do not overll the tray.
4. Make sure that the paper guides are
adjusted to the correct size for the
paper. Do not adjust the paper guides
tightly against the paper stack.
Adjust them to the indentations or
markings in the tray.
5. If the problem persists, go to
www.hp.com/support/ljM207
ENWW Resolving print quality problems 69
Page 76
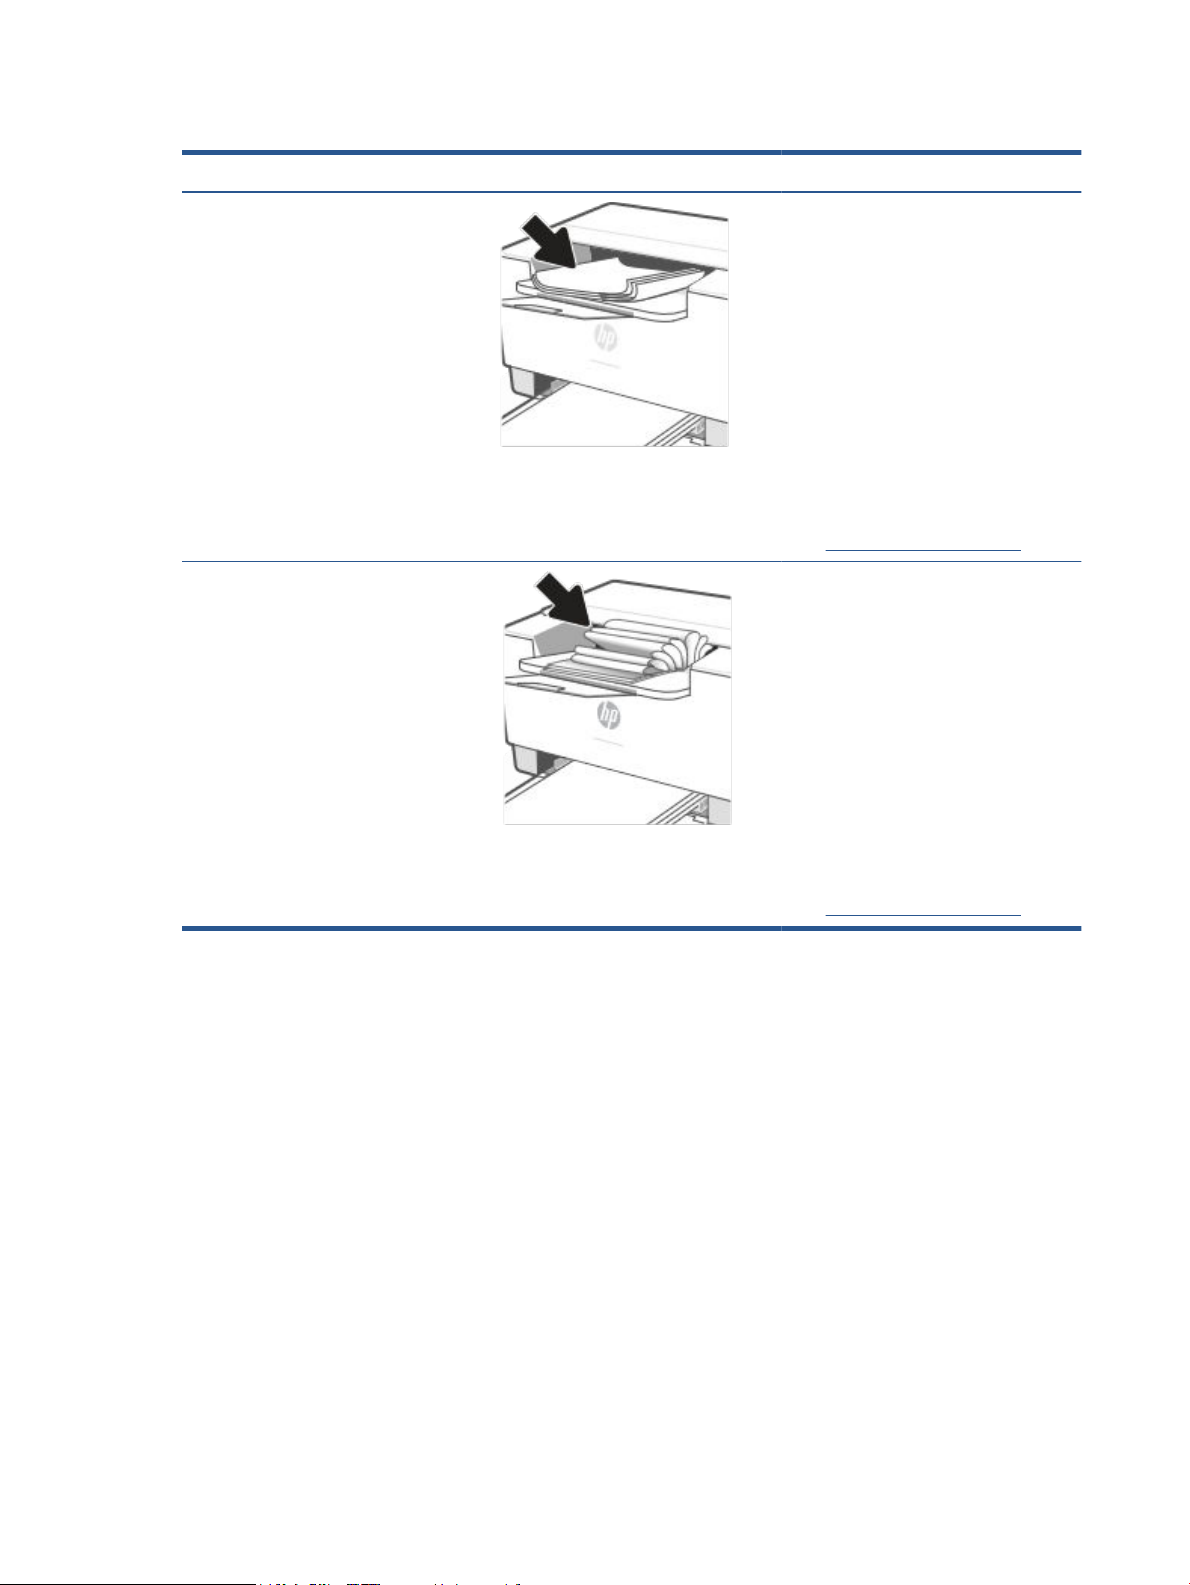
Table 7-16 Output defects
Description Sample Possible solutions
Output curl:
Printed paper has curled edges. The curled
edge can be along the short or long side of
the paper. Two types of curl are possible:
● Positive curl: The paper curls toward
the printed side. The defect occurs in
dry environments or when printing
high coverage pages.
● Negative curl: The paper curls away
from the printed side. The defect
occurs in high-humidity
environments or when printing low
coverage pages.
Output stacking:
The paper does not stack well in the output
tray. The stack might be uneven, skewed,
or the pages might be pushed out of the
tray and onto the oor. Any of the
following conditions can cause this defect:
● Extreme paper curl
● The paper in the tray is wrinkled or
deformed
1. Reprint the document.
2. Positive curl: From the printer EWS,
select a heavier paper type. The
heavier paper type creates a higher
temperature for printing.
Negative curl: From the printer EWS,
select a lighter paper type. The
lighter paper type creates a lower
temperature for printing. Try storing
the paper in a dry environment prior
or use freshly opened paper.
3. Print in duplex mode.
4. If the problem persists, go to
www.hp.com/support/ljM207
1. Reprint the document.
2. Extend the output bin extension.
3. If the defect is caused by extreme
paper curl, complete the
troubleshooting steps for Output
curl.
4. Use a dierent paper type.
5. Use freshly opened paper.
● The paper is a non-standard paper
type, such as envelopes
● The output tray is too full
6. Remove the paper from the output
tray before the tray gets too full.
7. If the problem persists, go to
www.hp.com/support/ljM207
70 Chapter 7 Solve problems ENWW
Page 77

Solve wireless network problems
●
Introduction
●
Wireless connectivity checklist
●
The printer does not print after the wireless conguration completes
●
The printer does not print, and the computer has a third-party rewall installed
●
The wireless connection does not work after moving the wireless router or printer
●
Cannot connect more devices to the wireless printer (Wi-Fi Direct)
●
The wireless printer loses communication when connected to a VPN
●
The network does not appear in the wireless networks list
●
The wireless network is not functioning
●
Perform a wireless network diagnostic test
●
Reduce interference on a wireless network
Introduction
Use the troubleshooting information to help resolve issues.
NOTE: To determine if Wi-Fi Direct printing is enabled on your printer, print an information report from the
printer control panel
Wireless connectivity checklist
● Verify that the printer and the wireless router are turned on and have power. Also make sure that the
wireless radio in the printer is turned on.
● Verify that the service set identier (SSID) is correct. Print an information report to determine the SSID.
On the printer control panel, press (the Information button).
If you are not sure the SSID is correct, run the wireless setup again.
● With secured networks, verify that the security information is correct. If the security information is
incorrect, run the wireless setup again.
● If the wireless network is working correctly, try accessing other computers on the wireless network. If
the network has Internet access, try connecting to the Internet over a wireless connection.
● Verify that the encryption method (AES or TKIP) is the same for the printer as it is for the wireless access
point (on networks using WPA security).
● Verify that the printer is within the range of the wireless network. For most networks, the printer must
be within 30 m (100 ft) of the wireless access point (wireless router).
● Verify that obstacles do not block the wireless signal. Remove any large metal objects between the
access point and the printer. Make sure poles, walls, or support columns containing metal or concrete do
not separate the printer and wireless access point.
ENWW Solve wireless network problems 71
Page 78

● Verify that the printer is located away from electronic devices that might interfere with the wireless
signal. Many devices can interfere with the wireless signal including motors, cordless phones, security
system cameras, other wireless networks, and some Bluetooth devices.
● Verify that the print driver is installed on the computer.
● Verify that you have selected the correct printer port.
● Verify that the computer and printer connect to the same wireless network.
● For OS X, verify that the wireless router supports Bonjour.
The printer does not print after the wireless conguration completes
1. Make sure that the printer is turned on and in the ready state.
2. Turn o any third-party rewalls on your computer.
3. Make sure that the wireless network is working correctly.
4. Make sure that your computer is working correctly. If necessary, restart the computer.
5. Verify that you can open the printer EWS from a computer on the network.
The printer does not print, and the computer has a third-party rewall installed
1. Update the rewall with the most recent update available from the manufacturer.
2. If programs request rewall access when you install the printer or try to print, make sure you allow the
programs to run.
3. Temporarily turn o the rewall, and then install the wireless printer on the computer. Enable the
rewall when you have completed the wireless installation.
The wireless connection does not work after moving the wireless router or printer
1. Make sure that the router or printer connects to the same network that your computer connects to.
2. Print a information report.
3. Compare the service set identier (SSID) on the information report to the SSID in the printer
conguration for the computer.
4. If the numbers are not the same, the devices are not connecting to the same network. Recongure the
wireless setup for the printer.
Cannot connect more devices to the wireless printer (Wi-Fi Direct)
1. Make sure that the other computers are within the wireless range and that no obstacles block the signal.
For most networks, the wireless range is within 30 m (100 ft) of the wireless access point.
2. Make sure that the printer is turned on and in the ready state.
3. Make sure there are not more than 5 concurrent Wi-Fi Direct users.
4. Turn o any third-party rewalls on your computer.
72 Chapter 7 Solve problems ENWW
Page 79

5. Make sure that the wireless network is working correctly.
6. Make sure that your computer is working correctly. If necessary, restart the computer.
The wireless printer loses communication when connected to a VPN
● Typically, you cannot connect to a VPN and other networks at the same time.
The network does not appear in the wireless networks list
● Make sure the wireless router is turned on and has power.
● The network might be hidden.
● Make sure that the printer is within wireless range of the wireless router, and that there are no obstacles
blocking the signal.
● The printer operates on the 2.4 GHz and 5 GHz wireless bands.
● Refresh the wireless networks list.
● Try restarting the printer.
The wireless network is not functioning
1. To verify if the network has lost communication, try connecting other devices to the network.
2. Test network communication by pinging the network.
a. Open a command-line prompt on your computer.
● For Windows, click Start, click Run, type cmd, and then press Enter.
● For OS X, go to Applications, then Utilities, and open Terminal.
b. Type ping followed by the router IP address.
c. If the window displays round-trip times, the network is working.
3. Make sure that the router or printer connects to the same network that the computer connects to.
a. On the printer control panel, press (the Information button) to print an information report.
b. Compare the service set identier (SSID) on the information report to the SSID in the printer
information for the computer.
c. If the numbers are not the same, the devices are not connecting to the same network. Recongure
the wireless setup for the printer.
Perform a wireless network diagnostic test
A wireless network diagnostic test can be performed using the printer control panel or the Embedded Web
Server (EWS). The wireless network diagnostic test provides information about the wireless network settings.
ENWW Solve wireless network problems 73
Page 80

Method one: Perform a wireless network diagnostic test using the printer control panel
● From the printer control panel, press and hold (the Information button) for 3 seconds, and then
press (the Information button) (the Resume button) at the same time.
Method two: Perform wireless network diagnostic test using the EWS
1. Open EWS. See To access and use the Embedded Web Server (EWS).
2. Select the Networking tab.
3. On the Wireless Conguration page, verify that the On option is selected.
4. Click the Print Test Report button to print a test page that shows test results.
Reduce interference on a wireless network
The following tips can reduce interference in a wireless network:
● Keep the wireless devices away from large metal objects, such as ling cabinets, and other
electromagnetic devices, such as microwaves and cordless telephones. These objects can disrupt radio
signals.
● Keep the wireless devices away from large masonry structures and other building structures. These
objects can absorb radio waves and lower signal strength.
● Position the wireless router in a central location in line of sight with the wireless printers on the
network.
74 Chapter 7 Solve problems ENWW
Page 81

Solve Ethernet connection problems
Check the following:
● The network is operational and the network hub, switch, or router is turned on.
● The Ethernet cable is properly connected between the printer and the router. The Ethernet cable is
plugged into the Ethernet port on the printer and the light near the connector lights up when connected.
● Antivirus programs, including spyware protection programs, are not impacting your network connection
to the printer. If you know that antivirus or rewall software is preventing your computer from
connecting to the printer, use the HP online rewall troubleshooter to help solve the problem.
● Run the HP Print and Scan Doctor to troubleshoot the issue automatically. The utility will try to diagnose
and x the issue. The HP Print and Scan Doctor may not be available in all languages.
ENWW Solve Ethernet connection problems 75
Page 82

A Printer specications
IMPORTANT: The following specications are correct at the time of publication, but they are subject to
change. For current information, see www.hp.com/support/ljM207
●
Technical specications
●
System requirements
●
Printer dimensions
●
Power consumption, electrical specications, and acoustic emissions
●
Operating-environment range
●
Warning icons
●
Laser Warning
Technical specications
For more information, visit www.hp.com/support/ljM207 . Select your country or region. Click Product
Support & Troubleshooting. Enter the name shown on the front of the printer, and then select Search. Click
Product Information, and then select Product specications.
System requirements
For information about software and system requirements or future operating system releases and support,
visit the HP online support website at www.hp.com/support/ljM207
76 Appendix A Printer specications ENWW
Page 83
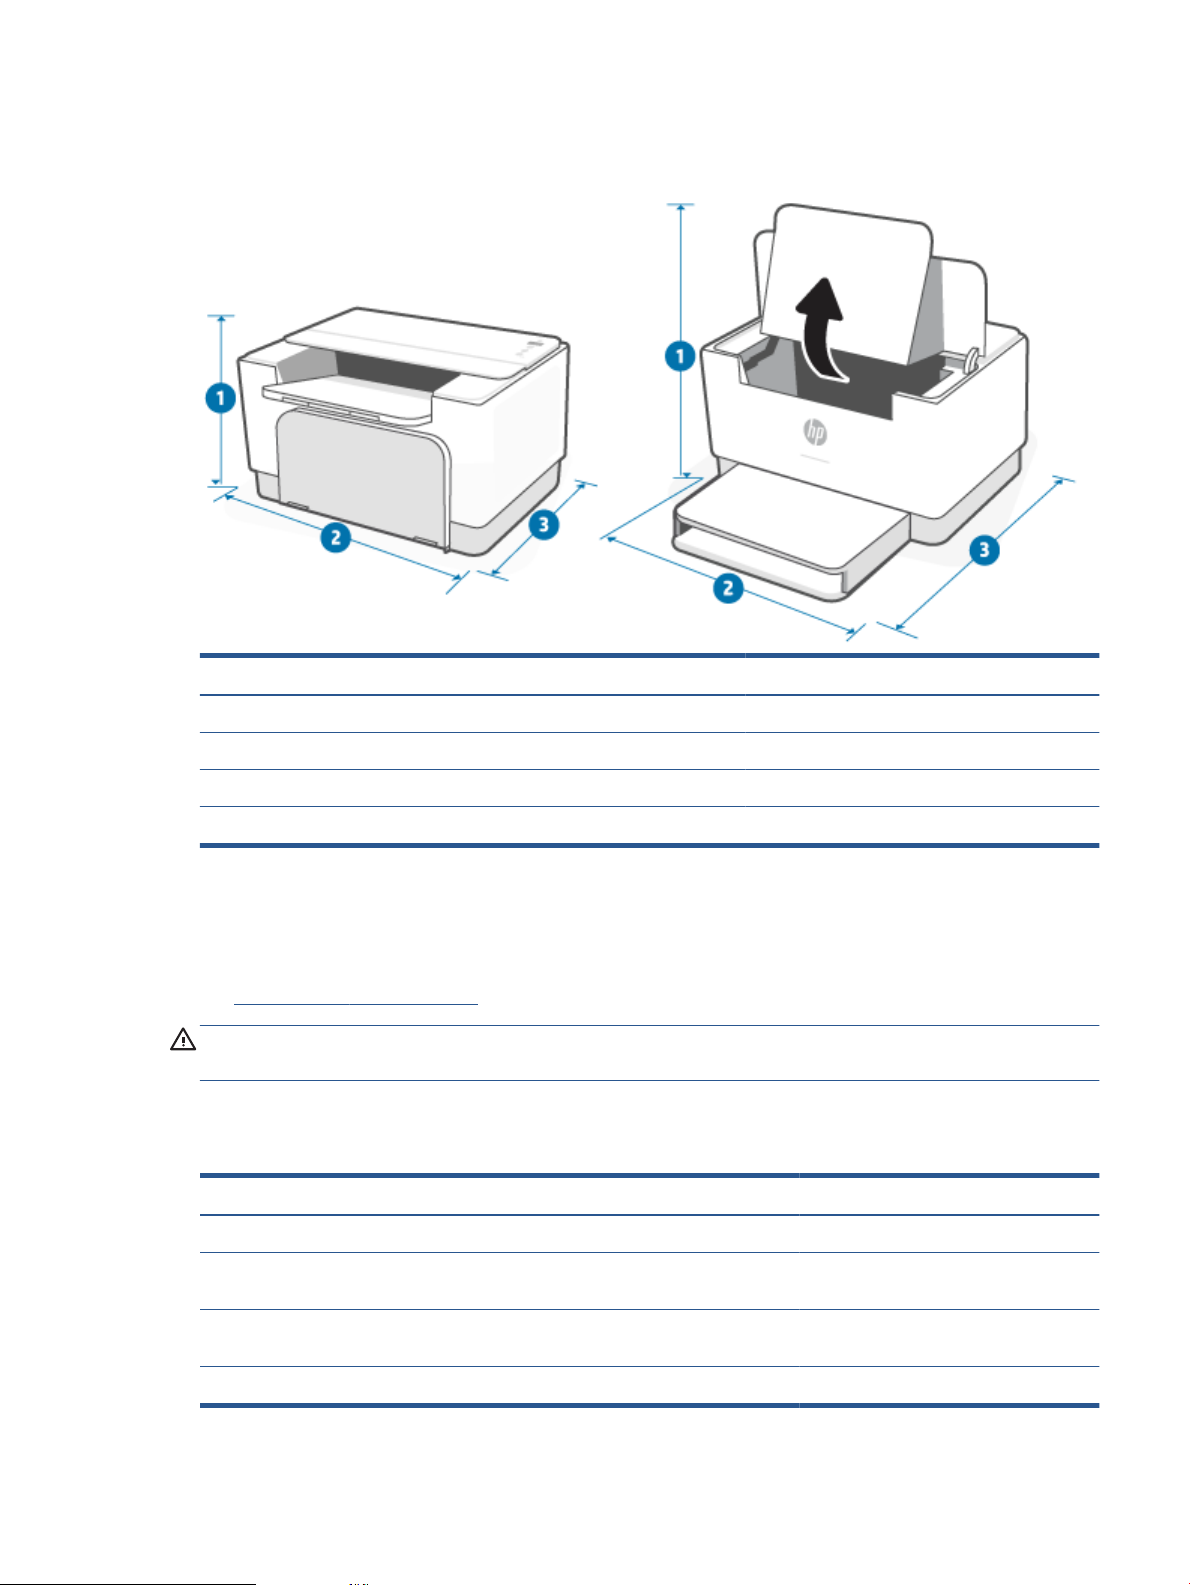
Printer dimensions
Figure A-1 Dimensions for the printer
1. Height 205.45 mm (8.08 in) 362.80 mm (14.28 in)
Printer fully closed Printer fully open
2. Width 355.10 mm (13.98 in) 355.10 mm (13.98 in)
3. Depth 281.28 mm (11.07 in) 396.80 mm (15.62 in)
Weight (with cartridges) 5.6 kg (12.34 lb)
Power consumption, electrical specications, and acoustic
emissions
See www.hp.com/support/ljM207 for current information.
CAUTION: Power requirements are based on the country/region where the printer is sold. Do not convert
operating voltages. This will damage the printer and void the printer warranty.
Operating-environment range
Environment Recommended Allowed
Temperature 17.5° to 25°C (63.5° to 77°F) 15° to 32°C (59° to 90.5°F)
Operating humidity 30% to 70% relative humidity (RH), non-
condensing
Relative humidity 20% to 70% relative humidity (RH), non-
condensing
10% to 80% (RH), non-condensing
10% to 80% (RH), non-condensing
Altitude Not applicable 0 to 3048 m (0 to 10,000 ft)
ENWW Printer dimensions 77
Page 84

Warning icons
Warning icon denitions: The following warning icons may appear on HP products. Apply appropriate caution
where applicable.
●
Caution: Electric shock
●
Caution: Hot surface
●
Caution: Keep body parts away from moving parts
●
Caution: Sharp edge in close proximity
●
Warning
78 Appendix A Printer specications ENWW
Page 85
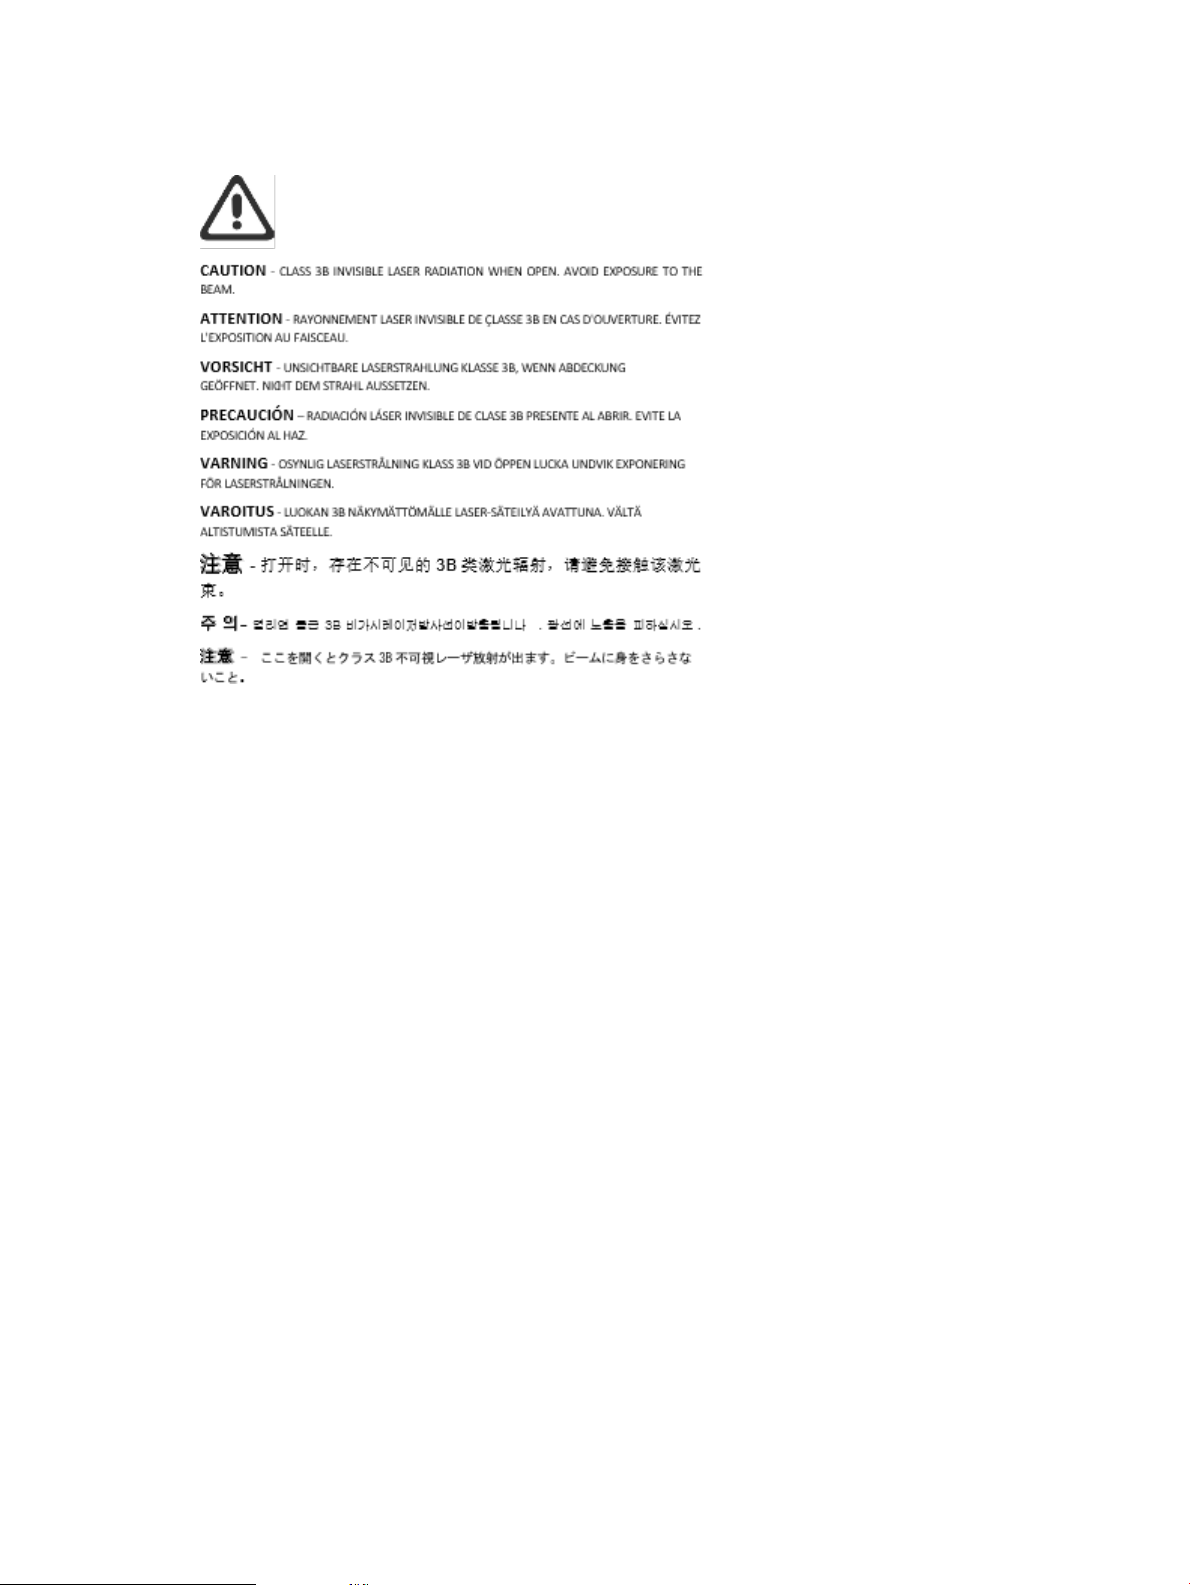
Laser Warning
ENWW Laser Warning 79
Page 86

B Service and support
●
HP limited warranty statement
●
HP's Premium Protection Warranty: LaserJet toner cartridge limited warranty statement
●
HP policy on non-Original HP supplies
●
HP anticounterfeit Web site
●
Data stored on the toner cartridge
●
End User License Agreement
●
Customer self-repair warranty service
●
Customer support
80 Appendix B Service and support ENWW
Page 87

HP limited warranty statement
HP PRODUCT DURATION OF LIMITED WARRANTY*
HP LaserJet M207–M212 series One-year limited warranty
NOTE: *Warranty and support options vary by product, country, and local legal requirements. Go to
www.support.hp.com to learn about HP award-winning service and support options in your region. For details
on the HP limited warranty policy on supplies, go to www.hp.com/go/learnaboutsupplies
HP warrants to you, the end-user customer, this HP Limited Warranty applies only to HP branded products
sold or leased a) from HP Inc., its subsidiaries, ailiates, authorized resellers, authorized distributors, or
country distributors; and, b) with this HP Limited Warranty, that HP hardware and accessories will be free
from defects in materials and workmanship after the date of purchase, for the period specied above. If HP
receives notice of such defects during the warranty period, HP will, at its option, either repair or replace
products which prove to be defective. Replacement products may be either new or equivalent in performance
to new. HP products presented for repair may be replaced by refurbished goods of the same type rather than
being repaired. Refurbished parts may be used to repair the goods. Repair of goods may result in lost usergenerated data.
HP warrants to you that HP software will not fail to execute its programming instructions after the date of
purchase, for the period specied above, due to defects in material and workmanship when properly installed
and used. If HP receives notice of such defects during the warranty period, HP will replace software which
does not execute its programming instructions due to such defects.
HP does not warrant that the operation of HP products will be uninterrupted or error free. If HP is unable,
within a reasonable time, to repair or replace any product to a condition as warranted, you will be entitled to a
refund of the purchase price upon prompt return of the product.
HP products may contain remanufactured parts equivalent to new in performance or may have been subject
to incidental use.
Warranty does not apply to defects resulting from (a) improper or inadequate maintenance or calibration, (b)
software, interfacing, parts or supplies not supplied by HP, (c) unauthorized modication or misuse, (d)
operation outside of the published environmental specications for the product, or (e) improper site
preparation or maintenance.
TO THE EXTENT ALLOWED BY LOCAL LAW, THE ABOVE WARRANTIES ARE EXCLUSIVE AND NO OTHER
WARRANTY OR CONDITION, WHETHER WRITTEN OR ORAL, IS EXPRESSED OR IMPLIED AND HP SPECIFICALLY
DISCLAIMS ANY IMPLIED WARRANTIES OR CONDITIONS OF MERCHANTABILITY, SATISFACTORY QUALITY, AND
FITNESS FOR A PARTICULAR PURPOSE. Some countries/regions, states or provinces do not allow limitations on
the duration of an implied warranty, so the above limitation or exclusion might not apply to you. This
warranty gives you specic legal rights and you might also have other rights that vary from country/region to
country/region, state to state, or province to province. Please refer to the Country Specic statements at the
end of this document.
HP's limited warranty is valid in any country/region or locality where HP has a support presence for this
product and where HP has marketed this product. The level of warranty service you receive may vary
according to local standards. HP will not alter form, t or function of the product to make it operate in a
country/region for which it was never intended to function for legal or regulatory reasons.
TO THE EXTENT ALLOWED BY LOCAL LAW, THE REMEDIES IN THIS WARRANTY STATEMENT ARE YOUR SOLE AND
EXCLUSIVE REMEDIES. EXCEPT AS INDICATED ABOVE, IN NO EVENT WILL HP OR ITS SUPPLIERS BE LIABLE FOR
LOSS OF DATA OR FOR DIRECT, SPECIAL, INCIDENTAL, CONSEQUENTIAL (INCLUDING LOST PROFIT OR DATA), OR
OTHER DAMAGE, WHETHER BASED IN CONTRACT, TORT, OR OTHERWISE. Some countries/regions, states or
ENWW HP limited warranty statement 81
Page 88

provinces do not allow the exclusion or limitation of incidental or consequential damages, so the above
limitation or exclusion may not apply to you.
THE WARRANTY TERMS CONTAINED IN THIS STATEMENT, EXCEPT TO THE EXTENT LAWFULLY PERMITTED, DO
NOT EXCLUDE, RESTRICT OR MODIFY AND ARE IN ADDITION TO THE MANDATORY STATUTORY RIGHTS
APPLICABLE TO THE SALE OF THIS PRODUCT TO YOU. PLEASE REFER TO THE COUNTRY SPECIFIC STATEMENTS
AT THE END OF THIS DOCUMENT (IF APPLICABLE) FOR FURTHER INFORMATION ON YOUR CONSUMER RIGHTS.
Country Specic Terms
In some jurisdictions, you may have other statutory rights. Please see below.
Australia
Your rights as an Australian consumer are dierent to those stated in the document above.
You should disregard any limitations or exclusions in the above document and refer to the information below.
1. When you buy a good from HP as a consumer, the goods come with guarantees that cannot be excluded
under the Australian Consumer Law. You are entitled to a replacement or refund for a major failure and
for compensation for any other reasonably foreseeable loss or damage. You are also entitled to have the
goods repaired or replaced if the goods fail to be of acceptable quality and the failure does not amount
to a major failure.
2. This means that there is no dened warranty period for HP goods supplied to Australian consumers.
3. Instead, the goods should, for example, be t for the purposes for which they are commonly supplied for
such a period as a reasonable consumer fully acquainted with the state and condition of the goods
would expect. This period may vary depending on the product.
4. You should contact HP if you are concerned that one of HP's products fails to satisfy any of the
guarantees listed below. HP will discuss with you the specic nature and circumstances of that good and
whether the particular fault/issue falls within the scope of the statutory guarantees.
Nothing in HP’s Limited Warranty excludes, restricts or modies any condition, warranty, guarantee,
right or remedy you may have at law (including a consumer guarantee under the Australian Consumer
Law) which cannot be lawfully excluded or limited.
The relevant guarantees are as follows:
1. Quality — goods supplied by HP must be of acceptable quality. The test for acceptable quality is
whether a reasonable consumer, fully aware of the state and condition of the goods, would nd them:
● safe, durable and free from defects;
● acceptable in appearance and nish; and
● t for all the purposes for which goods of that kind are commonly supplied.
This must take into account the nature and price of the goods, and any statements on packaging or
labeling.
2. Disclosed Purpose — goods or services supplied by HP that HP represents are reasonably t for a
purpose expressly disclosed by a consumer must be reasonably t for that purpose.
3. Description — goods supplied by HP must match the description provided by HP.
4. Sample — goods supplied by HP must match any sample shown to you by HP.
82 Appendix B Service and support ENWW
Page 89

5. Title — a consumer who purchases a good from HP must receive clear title to the good.
6. Due care and skill — services provided to you by HP must be provided with due care and skill.
7. Express warranties — HP will be legally required to comply with the express warranty that is set out in
its terms and conditions.
8. Reasonable time — repair services provided by HP must be provided within a reasonable time.
If you think that you are entitled to any of the above remedies or any remedy under the HP Worldwide Limited
Warranty and Technical Support Document, please contact HP:
HP PPS Australia Pty Ltd
Rhodes Corporate Park, Building F, Level 5
1 Homebush Bay Drive
Rhodes, NSW 2138
Australia
To initiate a support request, please use the numbers below or visit www.hp.com.au and select the “Customer
Service” option for the most current list of phone support numbers.
Product Phone
Support for all HP Products except those listed separately below 13 10 47
If dialing internationally: +61 2 8278-1039
DeskJet, Oice Jet, PSC, All-in-One, Photosmart & Personal
LaserJet Series 1000, P1000, M1000 and Colour LaserJet CP1000
Series and model CM1415
1300 721 147
If dialing internationally: +61 2 8934 4380
For further information on consumer rights, visit www.consumerlaw.gov.au and www.accc.gov.au/
consumerguarantees.
ENWW HP limited warranty statement 83
Page 90

New Zealand
In New Zealand, the hardware and software comes with guarantees that cannot be excluded under the New
Zealand consumer law. In New Zealand, Consumer Transaction means a transaction involving a person who is
purchasing goods for personal, domestic or household use or consumption and not for the purpose of a
business. New Zealand consumers who are purchasing goods for personal, domestic or household use or
consumption and not for the purpose of a business ("New Zealand Consumers") are entitled to repair,
replacement or refund for a failure and compensation for other reasonably foreseeable loss or damage. A
New Zealand Consumer (as dened above) may recover the costs of returning the product to the place of
purchase if there is a breach of the New Zealand consumer law; furthermore, if it will be of signicant cost to
the New Zealand Consumer to return the goods to HP then HP will collect such goods at its own cost.
Product Phone
Support for all HP Products except those listed separately below 0800 449 553
If dialing internationally: +61 2 8031-8317
DeskJet, Oice Jet, PSC, All-in-One, Photosmart & Personal
LaserJet Series 1000, P1000, M1000 and Colour LaserJet CP1000
Series and model CM1415
0800 441 147
If dialing internationally: +61 2 8934 4380
84 Appendix B Service and support ENWW
Page 91

UK, Ireland, and Malta
The HP Limited Warranty is a commercial guarantee voluntarily provided by HP. The name and address of the
HP entity responsible for the performance of the HP Limited Warranty in your country/region is as follows:
UK: HP Inc UK Limited, Cain Road, Amen Corner, Bracknell, Berkshire, RG12 1HN
Ireland: Hewlett-Packard Ireland Limited, Liey Park Technology Campus, Barnhall Road, Leixlip, Co.Kildare
Malta: Hewlett-Packard Europe B.V., Amsterdam, Meyrin Branch, Route du Nant-d'Avril 150, 1217 Meyrin,
Switzerland
United Kingdom: The HP Limited Warranty benets apply in addition to any legal rights to a guarantee from
seller of nonconformity of goods with the contract of sale. These rights expire six years from delivery of
goods for products purchased in England or Wales and ve years from delivery of goods for products
purchased in Scotland. However various factors may impact your eligibility to receive these rights. For further
information, please consult the following link: Consumer Legal Guarantee (www.hp.com/go/eu-legal) or you
may visit the European Consumer Centers website (ec.europa.eu/info/live-work-travel-eu/consumers/
resolve-your-consumer-complaint/european-consumer-centres-network-ecc-net_en). Consumers have the
right to choose whether to claim service under the HP Limited Warranty or against the seller under the legal
guarantee.
Ireland: The HP Limited Warranty benets apply in addition to any statutory rights from seller in relation to
nonconformity of goods with the contract of sale. However various factors may impact your eligibility to
receive these rights. Consumer statutory rights are not limited or aected in any manner by HP Care Pack. For
further information, please consult the following link: Consumer Legal Guarantee (www.hp.com/go/eu-legal)
or you may visit the European Consumer Centers website (ec.europa.eu/info/live-work-travel-eu/consumers/
resolve-your-consumer-complaint/european-consumer-centres-network-ecc-net_en). Consumers have the
right to choose whether to claim service under the HP Limited Warranty or against the seller under the legal
guarantee.
Malta: The HP Limited Warranty benets apply in addition to any legal rights to a two-year guarantee from
seller of nonconformity of goods with the contract of sale; however various factors may impact your eligibility
to receive these rights. Consumer statutory rights are not limited or aected in any manner by the HP Limited
Warranty. For further information, please consult the following link: Consumer Legal Guarantee
(www.hp.com/go/eu-legal) or you may visit the European Consumer Centers website (ec.europa.eu/info/live-
work-travel-eu/consumers/resolve-your-consumer-complaint/european-consumer-centres-network-eccnet_en). Consumers have the right to choose whether to claim service under the HP Limited Warranty or
against the seller under two-year legal guarantee.
Austria, Belgium, Germany, and Luxemburg
Die beschränkte HP Herstellergarantie ist eine von HP auf freiwilliger Basis angebotene kommerzielle
Garantie. Der Name und die Adresse der HP Gesellschaft, die in Ihrem Land für die Gewährung der
beschränkten HP Herstellergarantie verantwortlich ist, sind wie folgt:
Deutschland: HP Deutschland GmbH, Schickardstr. 32, D-71034 Böblingen
Österreich: HP Austria GmbH., Technologiestrasse 5, A-1120 Wien
Luxemburg: Hewlett-Packard Luxembourg S.C.A., 75, Parc d'Activités Capellen, Rue Pafebruc, L-8308 Capellen
Belgien: HP Belgium BVBA, Hermeslaan 1A, B-1831 Diegem
Die Rechte aus der beschränkten HP Herstellergarantie gelten zusätzlich zu den gesetzlichen Ansprüchen
wegen Sachmängeln auf eine zweijährige Gewährleistung ab dem Lieferdatum. Ob Sie Anspruch auf diese
Rechte haben, hängt von zahlreichen Faktoren ab. Die Rechte des Kunden sind in keiner Weise durch die
ENWW HP limited warranty statement 85
Page 92

beschränkte HP Herstellergarantie eingeschränkt bzw. betroen. Weitere Hinweise nden Sie auf der
folgenden Website: Gewährleistungsansprüche für Verbraucher (www.hp.com/go/eu-legal) oder Sie können
die Website des Europäischen Verbraucherzentrums (ec.europa.eu/info/live-work-travel-eu/consumers/
resolve-your-consumer-complaint/european-consumer-centres-network-ecc-net_en) besuchen. Verbraucher
haben das Recht zu wählen, ob sie eine Leistung von HP gemäß der beschränkten HP Herstellergarantie in
Anspruch nehmen oder ob sie sich gemäß der gesetzlichen zweijährigen Haftung für Sachmängel
(Gewährleistung) sich an den jeweiligen Verkäufer wenden.
Belgium, France, and Luxemburg
La garantie limitée HP est une garantie commerciale fournie volontairement par HP. Voici les coordonnées de
l'entité HP responsable de l'exécution de la garantie limitée HP dans votre pays:
France: HP France SAS, société par actions simpliée identiée sous le numéro 448 694 133 RCS Evry, 1
Avenue du Canada, 91947, Les Ulis
G.D. Luxembourg: Hewlett-Packard Luxembourg S.C.A., 75, Parc d'Activités Capellen, Rue Pafebruc, L-8308
Capellen
Belgique: HP Belgium BVBA, Hermeslaan 1A, B-1831 Diegem
France: Les avantages de la garantie limitée HP s'appliquent en complément des droits dont vous disposez au
titre des garanties légales applicables dont le bénéce est soumis à des conditions spéciques. Vos droits en
tant que consommateur au titre de la garantie légale de conformité mentionnée aux articles L. 211-4 à L.
211-13 du Code de la Consommation et de celle relatives aux défauts de la chose vendue, dans les conditions
prévues aux articles 1641 à 1648 et 2232 du Code de Commerce ne sont en aucune façon limités ou aectés
par la garantie limitée HP. Pour de plus amples informations, veuillez consulter le lien suivant : Garanties
légales accordées au consommateur (www.hp.com/go/eu-legal). Vous pouvez également consulter le site
Web des Centres européens des consommateurs (ec.europa.eu/info/live-work-travel-eu/consumers/resolve-
your-consumer-complaint/european-consumer-centres-network-ecc-net_en). Les consommateurs ont le
droit de choisir d’exercer leurs droits au titre de la garantie limitée HP, ou auprès du vendeur au titre des
garanties légales applicables mentionnées ci-dessus.
POUR RAPPEL:
Garantie Légale de Conformité:
« Le vendeur est tenu de livrer un bien conforme au contrat et répond des défauts de conformité existant lors
de la délivrance.
Il répond également des défauts de conformité résultant de l'emballage, des instructions de montage ou de
l'installation lorsque celle-ci a été mise à sa charge par le contrat ou a été réalisée sous sa responsabilité ».
Article L211-5 du Code de la Consommation:
« Pour être conforme au contrat, le bien doit:
1° Etre propre à l'usage habituellement attendu d'un bien semblable et, le cas échéant:
- correspondre à la description donnée par le vendeur et posséder les qualités que celui-ci a présentées à
l'acheteur sous forme d'échantillon ou de modèle;
- présenter les qualités qu'un acheteur peut légitimement attendre eu égard aux déclarations publiques faites
par le vendeur, par le producteur ou par son représentant, notamment dans la publicité ou l'étiquetage;
2° Ou présenter les caractéristiques dénies d'un commun accord par les parties ou être propre à tout usage
spécial recherché par l'acheteur, porté à la connaissance du vendeur et que ce dernier a accepté ».
86 Appendix B Service and support ENWW
Page 93

Article L211-12 du Code de la Consommation:
« L'action résultant du défaut de conformité se prescrit par deux ans à compter de la délivrance du bien ».
Garantie des vices cachés
Article 1641 du Code Civil : « Le vendeur est tenu de la garantie à raison des défauts cachés de la chose vendue
qui la rendent impropre à l'usage auquel on la destine, ou qui diminuent tellement cet usage que l'acheteur ne
l'aurait pas acquise, ou n'en aurait donné qu'un moindre prix, s'il les avait connus. »
Article 1648 alinéa 1 du Code Civil:
« L'action résultant des vices rédhibitoires doit être intentée par l'acquéreur dans un délai de deux ans à
compter de la découverte du vice. »
G.D. Luxembourg et Belgique: Les avantages de la garantie limitée HP s'appliquent en complément des droits
dont vous disposez au titre de la garantie de non-conformité des biens avec le contrat de vente. Cependant,
de nombreux facteurs peuvent avoir un impact sur le bénéce de ces droits. Vos droits en tant que
consommateur au titre de ces garanties ne sont en aucune façon limités ou aectés par la garantie limitée
HP. Pour de plus amples informations, veuillez consulter le lien suivant : Garanties légales accordées au
consommateur (www.hp.com/go/eu-legal) ou vous pouvez également consulter le site Web des Centres
européens des consommateurs (ec.europa.eu/info/live-work-travel-eu/consumers/resolve-your-consumer-
complaint/european-consumer-centres-network-ecc-net_en). Les consommateurs ont le droit de choisir de
réclamer un service sous la garantie limitée HP ou auprès du vendeur au cours d'une garantie légale de deux
ans.
Italy
Spain
La Garanzia limitata HP è una garanzia commerciale fornita volontariamente da HP. Di seguito sono indicati
nome e indirizzo della società HP responsabile della fornitura dei servizi coperti dalla Garanzia limitata HP nel
vostro Paese:
Italia: HP Italy S.r.l., Via G. Di Vittorio 9, 20063 Cernusco S/Naviglio
I vantaggi della Garanzia limitata HP vengono concessi ai consumatori in aggiunta ai diritti derivanti dalla
garanzia di due anni fornita dal venditore in caso di non conformità dei beni rispetto al contratto di vendita.
Tuttavia, diversi fattori possono avere un impatto sulla possibilita’ di beneciare di tali diritti. I diritti spettanti
ai consumatori in forza della garanzia legale non sono in alcun modo limitati, né modicati dalla Garanzia
limitata HP. Per ulteriori informazioni, si prega di consultare il seguente link: Garanzia legale per i clienti
(www.hp.com/go/eu-legal), oppure visitare il sito Web dei Centri europei per i consumatori (ec.europa.eu/
info/live-work-travel-eu/consumers/resolve-your-consumer-complaint/european-consumer-centresnetwork-ecc-net_en). I consumatori hanno il diritto di scegliere se richiedere un servizio usufruendo della
Garanzia limitata HP oppure rivolgendosi al venditore per far valere la garanzia legale di due anni.
Su Garantía limitada de HP es una garantía comercial voluntariamente proporcionada por HP. El nombre y
dirección de las entidades HP que proporcionan la Garantía limitada de HP (garantía comercial adicional del
fabricante) en su país es:
España: Hewlett-Packard Española S.L. Calle Vicente Aleixandre, 1 Parque Empresarial Madrid - Las Rozas,
E-28232 Madrid
Los benecios de la Garantía limitada de HP son adicionales a la garantía legal de 2 años a la que los
consumidores tienen derecho a recibir del vendedor en virtud del contrato de compraventa; sin embargo,
varios factores pueden afectar su derecho a recibir los benecios bajo dicha garantía legal. A este respecto, la
Garantía limitada de HP no limita o afecta en modo alguno los derechos legales del consumidor
ENWW HP limited warranty statement 87
Page 94

(www.hp.com/go/eu-legal). Para más información, consulte el siguiente enlace: Garantía legal del
consumidor o puede visitar el sitio web de los Centros europeos de los consumidores (ec.europa.eu/info/live-
work-travel-eu/consumers/resolve-your-consumer-complaint/european-consumer-centres-network-eccnet_en). Los clientes tienen derecho a elegir si reclaman un servicio acogiéndose a la Garantía limitada de HP
o al vendedor de conformidad con la garantía legal de dos años.
Denmark
Den begrænsede HP-garanti er en garanti, der ydes frivilligt af HP. Navn og adresse på det HP-selskab, der er
ansvarligt for HP's begrænsede garanti i dit land, er som følger:
Danmark: HP Inc Danmark ApS, Engholm Parkvej 8, 3450, Allerød
Den begrænsede HP-garanti gælder i tillæg til eventuelle juridiske rettigheder, for en toårig garanti fra
sælgeren af varer, der ikke er i overensstemmelse med salgsaftalen, men forskellige faktorer kan dog påvirke
din ret til at opnå disse rettigheder. Forbrugerens lovbestemte rettigheder begrænses eller påvirkes ikke på
nogen måde af den begrænsede HP-garanti. Se nedenstående link for at få yderligere oplysninger:
Forbrugerens juridiske garanti (www.hp.com/go/eu-legal) eller du kan besøge De Europæiske
Forbrugercentres websted (ec.europa.eu/info/live-work-travel-eu/consumers/resolve-your-consumer-
complaint/european-consumer-centres-network-ecc-net_en). Forbrugere har ret til at vælge, om de vil gøre
krav på service i henhold til HP's begrænsede garanti eller hos sælger i henhold til en toårig juridisk garanti.
Norway
HPs garanti er en begrenset og kommersiell garanti som HP selv har valgt å tilby. Følgende lokale selskap
innestår for garantien:
Sweden
Norge: HP Norge AS, Rolfbuktveien 4b, 1364 Fornebu
HPs garanti kommer i tillegg til det mangelsansvar HP har i henhold til norsk forbrukerkjøpslovgivning, hvor
reklamasjonsperioden kan være to eller fem år, avhengig av hvor lenge salgsgjenstanden var ment å vare.
Ulike faktorer kan imidlertid ha betydning for om du kvaliserer til å kreve avhjelp iht slikt mangelsansvar.
Forbrukerens lovmessige rettigheter begrenses ikke av HPs garanti. Hvis du vil ha mer informasjon, kan du
klikke på følgende kobling: Juridisk garanti for forbruker (www.hp.com/go/eu-legal) eller du kan besøke
nettstedet til de europeiske forbrukersentrene (ec.europa.eu/info/live-work-travel-eu/consumers/resolve-
your-consumer-complaint/european-consumer-centres-network-ecc-net_en). Forbrukere har retten til å
velge å kreve service under HPs garanti eller iht selgerens lovpålagte mangelsansvar.
HP:s begränsade garanti är en kommersiell garanti som tillhandahålls frivilligt av HP. Namn och adress till det
HP-företag som ansvarar för HP:s begränsade garanti i ditt land är som följer:
Sverige: HP PPS Sverige AB, SE-169 73 Stockholm
Fördelarna som ingår i HP:s begränsade garanti gäller utöver de lagstadgade rättigheterna till tre års garanti
från säljaren angående varans bristande överensstämmelse gentemot köpeavtalet, men olika faktorer kan
påverka din rätt att utnyttja dessa rättigheter. Konsumentens lagstadgade rättigheter varken begränsas eller
påverkas på något sätt av HP:s begränsade garanti. Mer information får du om du följer denna länk:
Lagstadgad garanti för konsumenter (www.hp.com/go/eu-legal) eller så kan du gå till European Consumer
Centers webbplats (ec.europa.eu/info/live-work-travel-eu/consumers/resolve-your-consumer-complaint/
european-consumer-centres-network-ecc-net_en). Konsumenter har rätt att välja om de vill ställa krav enligt
HP:s begränsade garanti eller på säljaren enligt den lagstadgade treåriga garantin.
88 Appendix B Service and support ENWW
Page 95

Portugal
A Garantia Limitada HP é uma garantia comercial fornecida voluntariamente pela HP. O nome e a morada da
entidade HP responsável pela prestação da Garantia Limitada HP no seu país são os seguintes:
Portugal: HPCP – Computing and Printing Portugal, Unipessoal, Lda., Edicio D. Sancho I, Quinta da Fonte,
Porto Salvo, Lisboa, Oeiras, 2740 244
As vantagens da Garantia Limitada HP aplicam-se cumulativamente com quaisquer direitos decorrentes da
legislação aplicável à garantia de dois anos do vendedor, relativa a defeitos do produto e constante do
contrato de venda. Existem, contudo, vários fatores que poderão afetar a sua elegibilidade para beneciar de
tais direitos. Os direitos legalmente atribuídos aos consumidores não são limitados ou afetados de forma
alguma pela Garantia Limitada HP. Para mais informações, consulte a ligação seguinte: Garantia legal do
consumidor (
(ec.europa.eu/info/live-work-travel-eu/consumers/resolve-your-consumer-complaint/european-consumer-
centres-network-ecc-net_en). Os consumidores têm o direito de escolher se pretendem reclamar assistência
ao abrigo da Garantia Limitada HP ou contra o vendedor ao abrigo de uma garantia jurídica de dois anos.
www.hp.com/go/eu-legal) ou visite o Web site da Rede dos Centros Europeus do Consumidor
Greece and Cyprus
Η Περιορισμένη εγγύηση HP είναι μια εμπορική εγγύηση η οποία παρέχεται εθελοντικά από την HP. Η
επωνυμία και η διεύθυνση του νομικού προσώπου ΗΡ που παρέχει την Περιορισμένη εγγύηση ΗΡ στη χώρα
σας είναι η εξής:
Ελλάδα /Κύπρoς: HP Printing and Personal Systems Hellas EPE, Tzavella 1-3, 15232 Chalandri, Attiki
Hungary
Ελλάδα /Κύπρoς: HP Συστήματα Εκτύπωσης και Προσωπικών Υπολογιστών Ελλάς Εταιρεία Περιορισμένης
Ευθύνης, Tzavella 1-3, 15232 Chalandri, Attiki
Τα προνόμια της Περιορισμένης εγγύησης HP ισχύουν επιπλέον των νόμιμων δικαιωμάτων για διετή εγγύηση
έναντι του Πωλητή για τη μη συμμόρφωση των προϊόντων με τις συνομολογημένες συμβατικά ιδιότητες,
ωστόσο η άσκηση των δικαιωμάτων σας αυτών μπορεί να εξαρτάται από διάφορους παράγοντες. Τα νόμιμα
δικαιώματα των καταναλωτών δεν περιορίζονται ούτε επηρεάζονται καθ’ οιονδήποτε τρόπο από την
Περιορισμένη εγγύηση HP. Για περισσότερες πληροφορίες, συμβουλευτείτε την ακόλουθη τοποθεσία web:
Νόμιμη εγγύηση καταναλωτή (www.hp.com/go/eu-legal) ή μπορείτε να επισκεφτείτε την τοποθεσία web των
Ευρωπαϊκών Κέντρων Καταναλωτή (ec.europa.eu/info/live-work-travel-eu/consumers/resolve-your-
consumer-complaint/european-consumer-centres-network-ecc-net_en). Οι καταναλωτές έχουν το δικαίωμα
να επιλέξουν αν θα αξιώσουν την υπηρεσία στα πλαίσια της Περιορισμένης εγγύησης ΗΡ ή από τον πωλητή
στα πλαίσια της νόμιμης εγγύησης δύο ετών.
A HP korlátozott jótállás egy olyan kereskedelmi jótállás, amelyet a HP a saját elhatározásából biztosít. Az
egyes országokban a HP mint gyártó által vállalt korlátozott jótállást biztosító HP vállalatok neve és címe:
Magyarország: HP Inc Magyarország Kft., H-1117 Budapest, Alíz utca 1.
A HP korlátozott jótállásban biztosított jogok azokon a jogokon felül illetik meg Önt, amelyek a termékeknek
az adásvételi szerződés szerinti minőségére vonatkozó kétéves, jogszabályban foglalt eladói szavatosságból,
továbbá ha az Ön által vásárolt termékre alkalmazandó, a jogszabályban foglalt kötelező eladói jótállásból
erednek, azonban számos körülmény hatással lehet arra, hogy ezek a jogok Önt megilletik-e. További
információért kérjük, keresse fel a következő webhelyet: Jogi Tájékoztató Fogyasztóknak (www.hp.com/
go/eu-legal) vagy látogassa meg az Európai Fogyasztói Központok webhelyét (ec.europa.eu/info/live-work-
travel-eu/consumers/resolve-your-consumer-complaint/european-consumer-centres-network-ecc-net_en).
A fogyasztóknak jogában áll, hogy megválasszák, hogy a jótállással kapcsolatos igényüket a HP korlátozott
ENWW HP limited warranty statement 89
Page 96

jótállás alapján vagy a kétéves, jogszabályban foglalt eladói szavatosság, illetve, ha alkalmazandó, a
jogszabályban foglalt kötelező eladói jótállás alapján érvényesítik.
Czech Republic
Omezená záruka HP je obchodní zárukou dobrovolně poskytovanou společností HP. Názvy a adresy
společností skupiny HP, které odpovídají za plnění omezené záruky HP ve vaší zemi, jsou následující:
Česká republika: HP Inc Czech Republic s. r. o., Za Brumlovkou 5/1559, 140 00 Praha 4
Výhody, poskytované omezenou zárukou HP, se uplatňuji jako doplňek k jakýmkoli právním nárokům na
dvouletou záruku poskytnutou prodejcem v případě nesouladu zboží s kupní smlouvou. Váš nárok na uznání
těchto práv však může záviset na mnohých faktorech. Omezená záruka HP žádným způsobem neomezuje ani
neovlivňuje zákonná práva zákazníka. Další informace získáte kliknutím na následující odkaz: Zákonná záruka
spotřebitele (
spotřebitelského centra (ec.europa.eu/info/live-work-travel-eu/consumers/resolve-your-consumer-
complaint/european-consumer-centres-network-ecc-net_en). Spotřebitelé mají právo se rozhodnout, zda
chtějí službu reklamovat v rámci omezené záruky HP nebo v rámci zákonem stanovené dvouleté záruky u
prodejce.
Slovakia
Obmedzená záruka HP je obchodná záruka, ktorú spoločnosť HP poskytuje dobrovoľne. Meno a adresa
subjektu HP, ktorý zabezpečuje plnenie vyplývajúce z Obmedzenej záruky HP vo vašej krajine:
www.hp.com/go/eu-legal) případně můžete navštívit webové stránky Evropského
Poland
Slovenská republika: HP Inc Slovakia, s.r.o., Galvaniho 7, 821 04 Bratislava
Výhody Obmedzenej záruky HP sa uplatnia vedľa prípadných zákazníkových zákonných nárokov voči
predávajúcemu z vád, ktoré spočívajú v nesúlade vlastností tovaru s jeho popisom podľa predmetnej zmluvy.
Možnosť uplatnenia takých prípadných nárokov však môže závisieť od rôznych faktorov. Služby Obmedzenej
záruky HP žiadnym spôsobom neobmedzujú ani neovplyvňujú zákonné práva zákazníka, ktorý je
spotrebiteľom. Ďalšie informácie nájdete na nasledujúcom prepojení: Zákonná záruka spotrebiteľa
(www.hp.com/go/eu-legal), prípadne môžete navštíviť webovú lokalitu európskych zákazníckych stredísk
(ec.europa.eu/info/live-work-travel-eu/consumers/resolve-your-consumer-complaint/european-consumer-
centres-network-ecc-net_en). Spotrebitelia majú právo zvoliť si, či chcú uplatniť servis v rámci Obmedzenej
záruky HP alebo počas zákonnej dvojročnej záručnej lehoty u predajcu.
Ograniczona gwarancja HP to komercyjna gwarancja udzielona dobrowolnie przez HP. Nazwa i adres
podmiotu HP odpowiedzialnego za realizację Ograniczonej gwarancji HP w Polsce:
Polska: HP Inc Polska sp. z o.o., Szturmowa 2a, 02-678 Warszawa, wpisana do rejestru przedsiębiorców
prowadzonego przez Sąd Rejonowy dla m.st. Warszawy w Warszawie, XIII Wydział Gospodarczy Krajowego
Rejestru Sądowego, pod numerem KRS 0000546115, NIP 5213690563, REGON 360916326, GIOŚ
E0020757WZBW, kapitał zakładowy 480.000 PLN.
Świadczenia wynikające z Ograniczonej gwarancji HP stanowią dodatek do praw przysługujących nabywcy w
związku z dwuletnią odpowiedzialnością sprzedawcy z tytułu niezgodności towaru z umową (rękojmia).
Niemniej, na możliwość korzystania z tych praw mają wpływ różne czynniki. Ograniczona gwarancja HP w
żaden sposób nie ogranicza praw konsumenta ani na nie nie wpływa. Więcej informacji można znaleźć pod
następującym łączem: Gwarancja prawna konsumenta (www.hp.com/go/eu-legal), można także odwiedzić
stronę internetową Europejskiego Centrum Konsumenckiego (ec.europa.eu/info/live-work-travel-eu/
consumers/resolve-your-consumer-complaint/european-consumer-centres-network-ecc-net_en).
Konsumenci mają prawo wyboru co do możliwosci skorzystania albo z usług gwarancyjnych przysługujących
90 Appendix B Service and support ENWW
Page 97

Bulgaria
Romania
w ramach Ograniczonej gwarancji HP albo z uprawnień wynikających z dwuletniej rękojmi w stosunku do
sprzedawcy.
Ограничената гаранция на HP представлява търговска гаранция, доброволно предоставяна от HP.
Името и адресът на дружеството на HP за вашата страна, отговорно за предоставянето на
гаранционната поддръжка в рамките на Ограничената гаранция на HP, са както следва:
HP Inc Bulgaria EOOD (Ейч Пи Инк България ЕООД), гр. София 1766, район р-н Младост, бул.
Околовръстен Път No 258, Бизнес Център Камбаните
Предимствата на Ограничената гаранция на HP се прилагат в допълнение към всички законови права за
двугодишна гаранция от продавача при несъответствие на стоката с договора за продажба. Въпреки
това, различни фактори могат да окажат влияние върху условията за получаване на тези права.
Законовите права на потребителите не са ограничени или засегнати по никакъв начин от Ограничената
гаранция на HP. За допълнителна информация, моля вижте Правната гаранция на потребителя
(www.hp.com/go/eu-legal) или посетете уебсайта на Европейския потребителски център (ec.europa.eu/
info/live-work-travel-eu/consumers/resolve-your-consumer-complaint/european-consumer-centresnetwork-ecc-net_en). Потребителите имат правото да избират дали да претендират за извършване на
услуга в рамките на Ограничената гаранция на HP или да потърсят такава от търговеца в рамките на
двугодишната правна гаранция.
Garanția limitată HP este o garanție comercială furnizată în mod voluntar de către HP. Numele și adresa
entității HP răspunzătoare de punerea în aplicare a Garanției limitate HP în țara dumneavoastră sunt
următoarele:
Romănia: HP Inc Romania SRL, 5 Fabrica de Glucoza Str., Building F, Ground Floor and Floor 8, 2nd District,
Bucureşti
Beneciile Garanției limitate HP se aplică suplimentar faţă de orice drepturi privind garanţia de doi ani oferită
de vânzător pentru neconformitatea bunurilor cu contractul de vânzare; cu toate acestea, diverşi factori pot
avea impact asupra eligibilităţii dvs. de a benecia de aceste drepturi. Drepturile legale ale consumatorului nu
sunt limitate sau afectate în vreun fel de Garanția limitată HP. Pentru informaţii suplimentare consultaţi
următorul link: garanția acordată consumatorului prin lege (www.hp.com/go/eu-legal) sau puteți accesa site-
ul Centrul European al Consumatorilor (ec.europa.eu/info/live-work-travel-eu/consumers/resolve-your-
consumer-complaint/european-consumer-centres-network-ecc-net_en). Consumatorii au dreptul să aleagă
dacă să pretindă despăgubiri în cadrul Garanței limitate HP sau de la vânzător, în cadrul garanției legale de doi
ani.
Belgium and the Netherlands
De Beperkte Garantie van HP is een commerciële garantie vrijwillig verstrekt door HP. De naam en het adres
van de HP-entiteit die verantwoordelijk is voor het uitvoeren van de Beperkte Garantie van HP in uw land is
als volgt:
Nederland: HP Nederland B.V., Startbaan 16, 1187 XR Amstelveen
België: HP Belgium BVBA, Hermeslaan 1A, B-1831 Diegem
De voordelen van de Beperkte Garantie van HP vormen een aanvulling op de wettelijke garantie voor
consumenten gedurende twee jaren na de levering te verlenen door de verkoper bij een gebrek aan
conformiteit van de goederen met de relevante verkoopsovereenkomst. Niettemin kunnen diverse factoren
een impact hebben op uw eventuele aanspraak op deze wettelijke rechten. De wettelijke rechten van de
ENWW HP limited warranty statement 91
Page 98

Finland
Slovenia
consument worden op geen enkele wijze beperkt of beïnvloed door de Beperkte Garantie van HP. Raadpleeg
voor meer informatie de volgende webpagina: Wettelijke garantie van de consument (www.hp.com/go/eu-
legal) of u kan de website van het Europees Consumenten Centrum bezoeken (ec.europa.eu/info/live-work-
travel-eu/consumers/resolve-your-consumer-complaint/european-consumer-centres-network-ecc-net_en).
Consumenten hebben het recht om te kiezen tussen enerzijds de Beperkte Garantie van HP of anderzijds het
aanspreken van de verkoper in toepassing van de wettelijke garantie.
HP:n rajoitettu takuu on HP:n vapaaehtoisesti antama kaupallinen takuu. HP:n myöntämästä takuusta
maassanne vastaavan HP:n edustajan yhteystiedot ovat:
Suomi: HP Finland Oy, Piispankalliontie, FIN - 02200 Espoo
HP:n takuun edut ovat voimassa mahdollisten kuluttajansuojalakiin perustuvien oikeuksien lisäksi sen
varalta, että tuote ei vastaa myyntisopimusta. Saat lisätietoja seuraavasta linkistä: Kuluttajansuoja
(www.hp.com/go/eu-legal) tai voit käydä Euroopan kuluttajakeskuksen sivustolla (ec.europa.eu/info/live-
work-travel-eu/consumers/resolve-your-consumer-complaint/european-consumer-centres-network-eccnet_en). Kuluttajilla on oikeus vaatia virheen korjausta HP:n takuun ja kuluttajansuojan perusteella HP:lta tai
myyjältä.
Omejena garancija HP je prostovoljna trgovska garancija, ki jo zagotavlja podjetje HP. Ime in naslov poslovne
enote HP, ki je odgovorna za omejeno garancijo HP v vaši državi, sta naslednja:
Croatia
Slovenija: Hewlett-Packard Europe B.V., Amsterdam, Meyrin Branch, Route du Nant-d'Avril 150, 1217 Meyrin,
Switzerland
Ugodnosti omejene garancije HP veljajo poleg zakonskih pravic, ki ob sklenitvi kupoprodajne pogodbe izhajajo
iz dveletne garancije prodajalca v primeru neskladnosti blaga, vendar lahko na izpolnjevanje pogojev za
uveljavitev pravic vplivajo različni dejavniki. Omejena garancija HP nikakor ne omejuje strankinih z zakonom
predpisanih pravic in ne vpliva nanje. Za dodatne informacije glejte naslednjo povezavo: Strankino pravno
jamstvo (www.hp.com/go/eu-legal); ali pa obiščite spletno mesto evropskih središč za potrošnike
(ec.europa.eu/info/live-work-travel-eu/consumers/resolve-your-consumer-complaint/european-consumer-
centres-network-ecc-net_en). Potrošniki imajo pravico izbrati, ali bodo uveljavljali pravice do storitev v skladu
z omejeno garancijo HP ali proti prodajalcu v skladu z dvoletno zakonsko garancijo.
HP ograničeno jamstvo komercijalno je dobrovoljno jamstvo koje pruža HP. Ime i adresa HP subjekta
odgovornog za HP ograničeno jamstvo u vašoj državi:
Hrvatska: HP Computing and Printing d.o.o. za računalne i srodne aktivnosti, Radnička cesta 41, 10000
Zagreb
Pogodnosti HP ograničenog jamstva vrijede zajedno uz sva zakonska prava na dvogodišnje jamstvo kod bilo
kojeg prodavača s obzirom na nepodudaranje robe s ugovorom o kupnji. Međutim, razni faktori mogu utjecati
na vašu mogućnost ostvarivanja tih prava. HP ograničeno jamstvo ni na koji način ne utječe niti ne ograničava
zakonska prava potrošača. Dodatne informacije potražite na ovoj adresi: Zakonsko jamstvo za potrošače
(www.hp.com/go/eu-legal) ili možete posjetiti web-mjesto Europskih potrošačkih centara (ec.europa.eu/info/
live-work-travel-eu/consumers/resolve-your-consumer-complaint/european-consumer-centres-networkecc-net_en). Potrošači imaju pravo odabrati žele li ostvariti svoja potraživanja u sklopu HP ograničenog
jamstva ili pravnog jamstva prodavača u trajanju ispod dvije godine.
92 Appendix B Service and support ENWW
Page 99

Latvia
HP ierobežotā garantija ir komercgarantija, kuru brīvprātīgi nodrošina HP. HP uzņēmums, kas sniedz HP
ierobežotās garantijas servisa nodrošinājumu jūsu valstī:
Latvija: HP Finland Oy, PO Box 515, 02201 Espoo, Finland
HP ierobežotās garantijas priekšrocības tiek piedāvātas papildus jebkurām likumīgajām tiesībām uz
pārdevēja un/vai rażotāju nodrošinātu divu gadu garantiju gadījumā, ja preces neatbilst pirkuma līgumam,
tomēr šo tiesību saņemšanu var ietekmēt vairāki faktori. HP ierobežotā garantija nekādā veidā neierobežo un
neietekmē patērētāju likumīgās tiesības. Lai iegūtu plašāku informāciju, izmantojiet šo saiti: Patērētāju
likumīgā garantija (
vietni (ec.europa.eu/info/live-work-travel-eu/consumers/resolve-your-consumer-complaint/european-
consumer-centres-network-ecc-net_en). Patērētājiem ir tiesības izvēlēties, vai pieprasīt servisa
nodrošinājumu saskaņā ar HP ierobežoto garantiju, vai arī pārdevēja sniegto divu gadu garantiju.
Lithuania
HP ribotoji garantija yra HP savanoriškai teikiama komercinė garantija. Toliau pateikiami HP bendrovių,
teikiančių HP garantiją (gamintojo garantiją) jūsų šalyje, pavadinimai ir adresai:
Lietuva: HP Finland Oy, PO Box 515, 02201 Espoo, Finland
HP ribotoji garantija papildomai taikoma kartu su bet kokiomis kitomis įstatymais nustatytomis teisėmis į
pardavėjo suteikiamą dviejų metų laikotarpio garantiją dėl prekių atitikties pardavimo sutarčiai, tačiau tai, ar
jums ši teisė bus suteikiama, gali priklausyti nuo įvairių aplinkybių. HP ribotoji garantija niekaip neapriboja ir
neįtakoja įstatymais nustatytų vartotojo teisių. Daugiau informacijos rasite paspaudę šią nuorodą: Teisinė
vartotojo garantija (www.hp.com/go/eu-legal) arba apsilankę Europos vartotojų centro internetinėje
svetainėje (ec.europa.eu/info/live-work-travel-eu/consumers/resolve-your-consumer-complaint/european-
consumer-centres-network-ecc-net_en). Vartotojai turi teisę prašyti atlikti techninį aptarnavimą pagal HP
ribotąją garantiją arba pardavėjo teikiamą dviejų metų įstatymais nustatytą garantiją.
www.hp.com/go/eu-legal) vai arī Eiropas Patērētāju tiesību aizsardzības centra tīmekļa
Estonia
Russia
HP piiratud garantii on HP poolt vabatahtlikult pakutav kaubanduslik garantii. HP piiratud garantii eest
vastutab HP üksus aadressil:
Eesti: HP Finland Oy, PO Box 515, 02201 Espoo, Finland
HP piiratud garantii rakendub lisaks seaduses ettenähtud müüjapoolsele kaheaastasele garantiile, juhul kui
toode ei vasta müügilepingu tingimustele. Siiski võib esineda asjaolusid, mille puhul teie jaoks need õigused
ei pruugi kehtida. HP piiratud garantii ei piira ega mõjuta mingil moel tarbija seadusjärgseid õigusi. Lisateavet
leiate järgmiselt lingilt: tarbija õiguslik garantii (www.hp.com/go/eu-legal) või võite külastada Euroopa
tarbijakeskuste veebisaiti (ec.europa.eu/info/live-work-travel-eu/consumers/resolve-your-consumer-
complaint/european-consumer-centres-network-ecc-net_en). Tarbijal on õigus valida, kas ta soovib kasutada
HP piiratud garantiid või seadusega ette nähtud müüjapoolset kaheaastast garantiid.
Срок службы принтера для России
Срок службы данного принтера HP составляет пять лет в нормальных условиях эксплуатации. Срок
службы отсчитывается с момента ввода принтера в эксплуатацию. В конце срока службы HP
рекомендует посетить веб-сайт нашей службы поддержки по адресу www.support.hp.com и/или
связаться с авторизованным поставщиком услуг HP для получения рекомендаций в отношении
дальнейшего безопасного использования принтера.
ENWW HP limited warranty statement 93
Page 100

HP's Premium Protection Warranty: LaserJet toner cartridge limited warranty statement
This HP product is warranted to be free from defects in materials and workmanship.
This warranty does not apply to products that (a) have been relled, refurbished, remanufactured or
tampered with in any way, (b) experience problems resulting from misuse, improper storage, or operation
outside of the published environmental specications for the printer product or (c) exhibit wear from ordinary
use.
To obtain warranty service, please return the product to place of purchase (with a written description of the
problem and print samples) or contact support. At HP's option, HP will either replace products that prove to be
defective or refund your purchase price.
TO THE EXTENT ALLOWED BY LOCAL LAW, THE ABOVE WARRANTY IS EXCLUSIVE AND NO OTHER WARRANTY OR
CONDITION, WHETHER WRITTEN OR ORAL, IS EXPRESSED OR IMPLIED AND HP SPECIFICALLY DISCLAIMS ANY
IMPLIED WARRANTIES OR CONDITIONS OF MERCHANTABILITY, SATISFACTORY QUALITY, AND FITNESS FOR A
PARTICULAR PURPOSE.
TO THE EXTENT ALLOWED BY LOCAL LAW, IN NO EVENT WILL HP OR ITS SUPPLIERS BE LIABLE FOR DIRECT,
SPECIAL, INCIDENTAL, CONSEQUENTIAL (INCLUDING LOST PROFIT OR DATA), OR OTHER DAMAGE, WHETHER
BASED IN CONTRACT, TORT, OR OTHERWISE.
THE WARRANTY TERMS CONTAINED IN THIS STATEMENT, EXCEPT TO THE EXTENT LAWFULLY PERMITTED, DO
NOT EXCLUDE, RESTRICT OR MODIFY AND ARE IN ADDITION TO THE MANDATORY STATUTORY RIGHTS
APPLICABLE TO THE SALE OF THIS PRODUCT TO YOU.
94 Appendix B Service and support ENWW
 Loading...