

Page 1
www.hp.com/support/ljM182MFP
Lea esto primero
Color LaserJet Pro MFP M182-M185
*7KW54-90915*
*7KW54-90915*
www.register.hp.com
7KW54-90915
© Copyright 2019 HP Development Company, L.P.
www.hp.com
Co
lo
r
Lase
rJet
Pro
M
F
P
M
18
2-M
1
85
ww
w
.
hp.
co
m
/s
u
pp
o
rt
/
ljM
*G
1
8
2
M
3Q
FP
7
4-9097
L
e
ww
a
es
w
*G
to
.
re
pr
g
is
i
m
3Q
t
e
e
r
ro
.
h
p
.c
74-90978
8
o
m
©
C
o
py
r
i
g
h
t
2
0
19
H
P
D
w
e
w
w.
h
p
.c
o
m
*
ve
*
l
o
pm
e
nt
Co
mp
an
y
,
L.P
.
C
o
l
o
r
L
a
s
e
r
J
e
t
P
r
o
M
F
P
M
1
8
2
M
1
8
5
w
w
w
.
h
p
L
.
c
e
o
a
m
e
/
s
s
©
t
o
u
p
C
p
p
o
r
i
o
p
m
w
r
y
t
e
w
r
/
r
i
l
g
w
o
j
M
w
h
.
h
1
w
t
*
p.
8
2
w
G
0
2
c
.
M
1
o
r
3
e
9
m
F
g
*
Q
P
H
i
s
G
P
7
t
e
D
3
4
r
.
e
h
Q
-
v
p
e
7
.
9
c
l
o
o
4
0
p
m
m
9
e
9
7
n
t
0
8
C
9
o
*
m
7
p
8
a
n
*
y
,
L.
P
.
0Q
0QZ
0IZ
Page 2
1
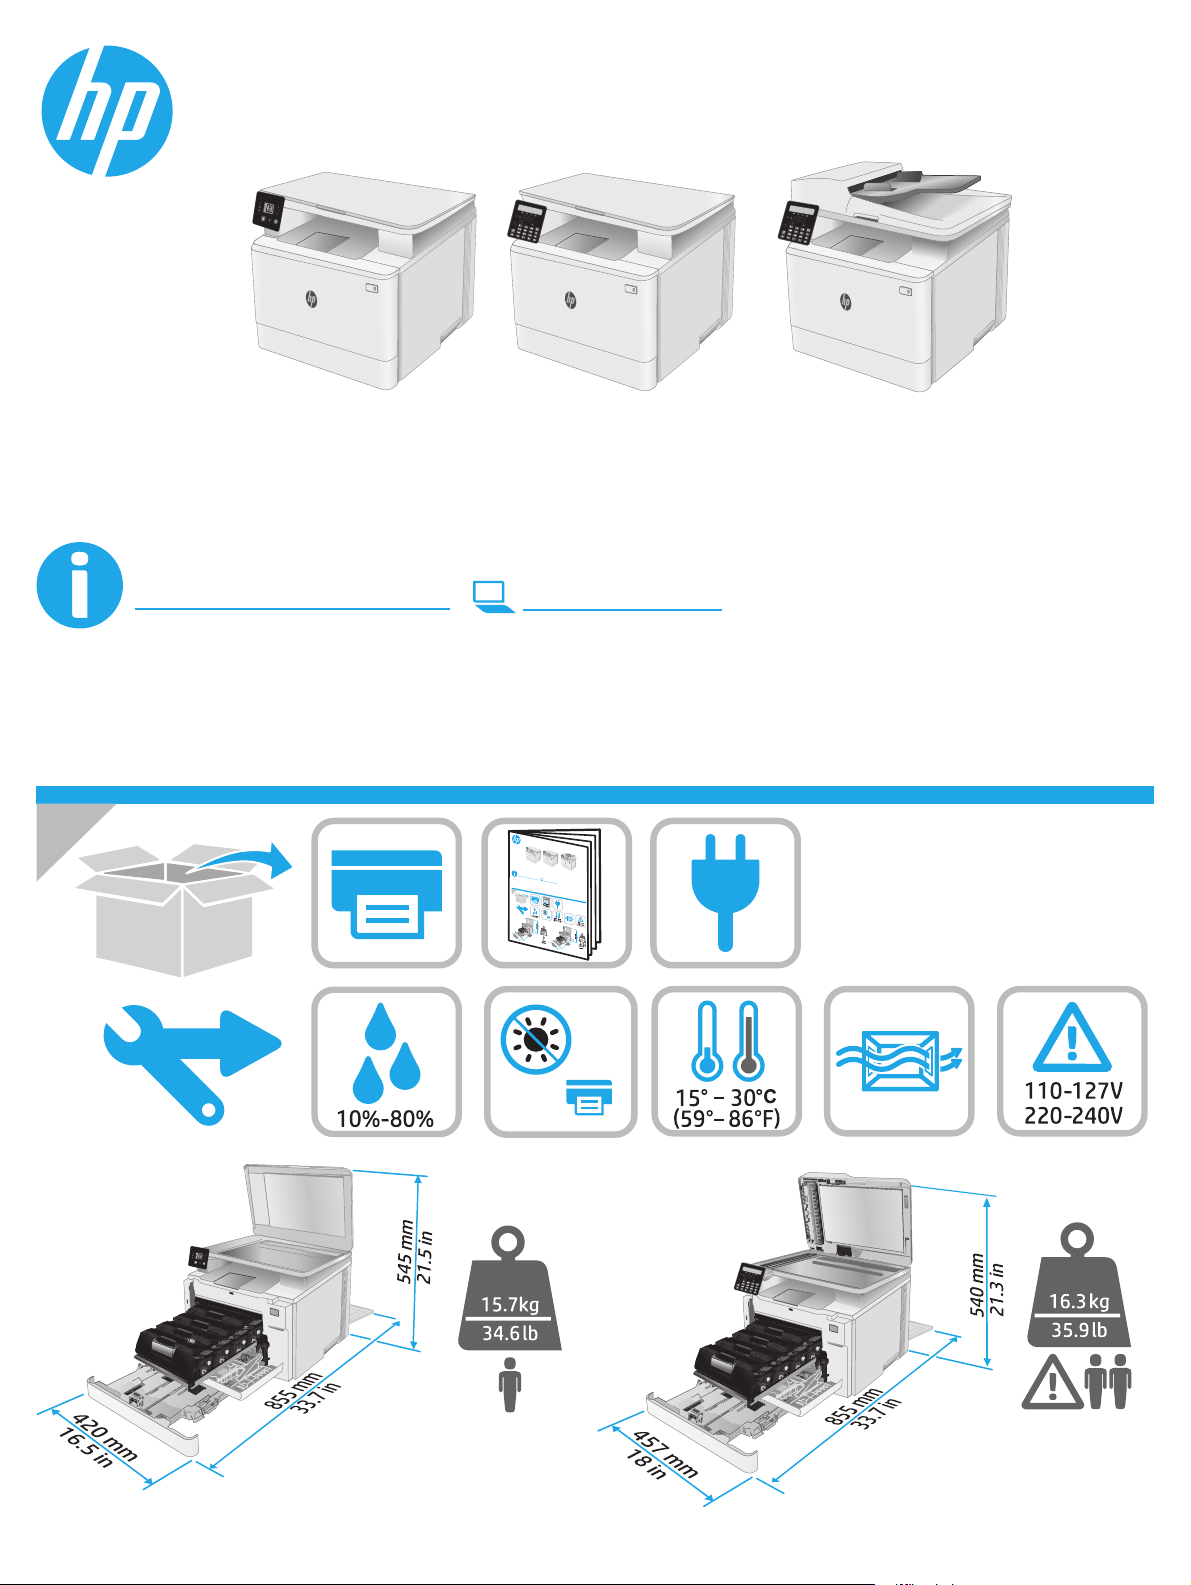
1.1
1.2
2
1.3
1.4
ES
ADVERTENCIA: Para evitar daños en el producto, en áreas en las que se utilice 110 V y 220 V, verique el voltaje del enchufe.
PT
AVISO: Para impedir danos ao produto, em áreas onde 110 V e 220 V estiverem em uso, verique a tensão da tomada.
3
HP Smart
HP Smart
2
Page 3
Color LaserJet Pro MFP M182-M185
Reference Guide
Need Help? - FAQ
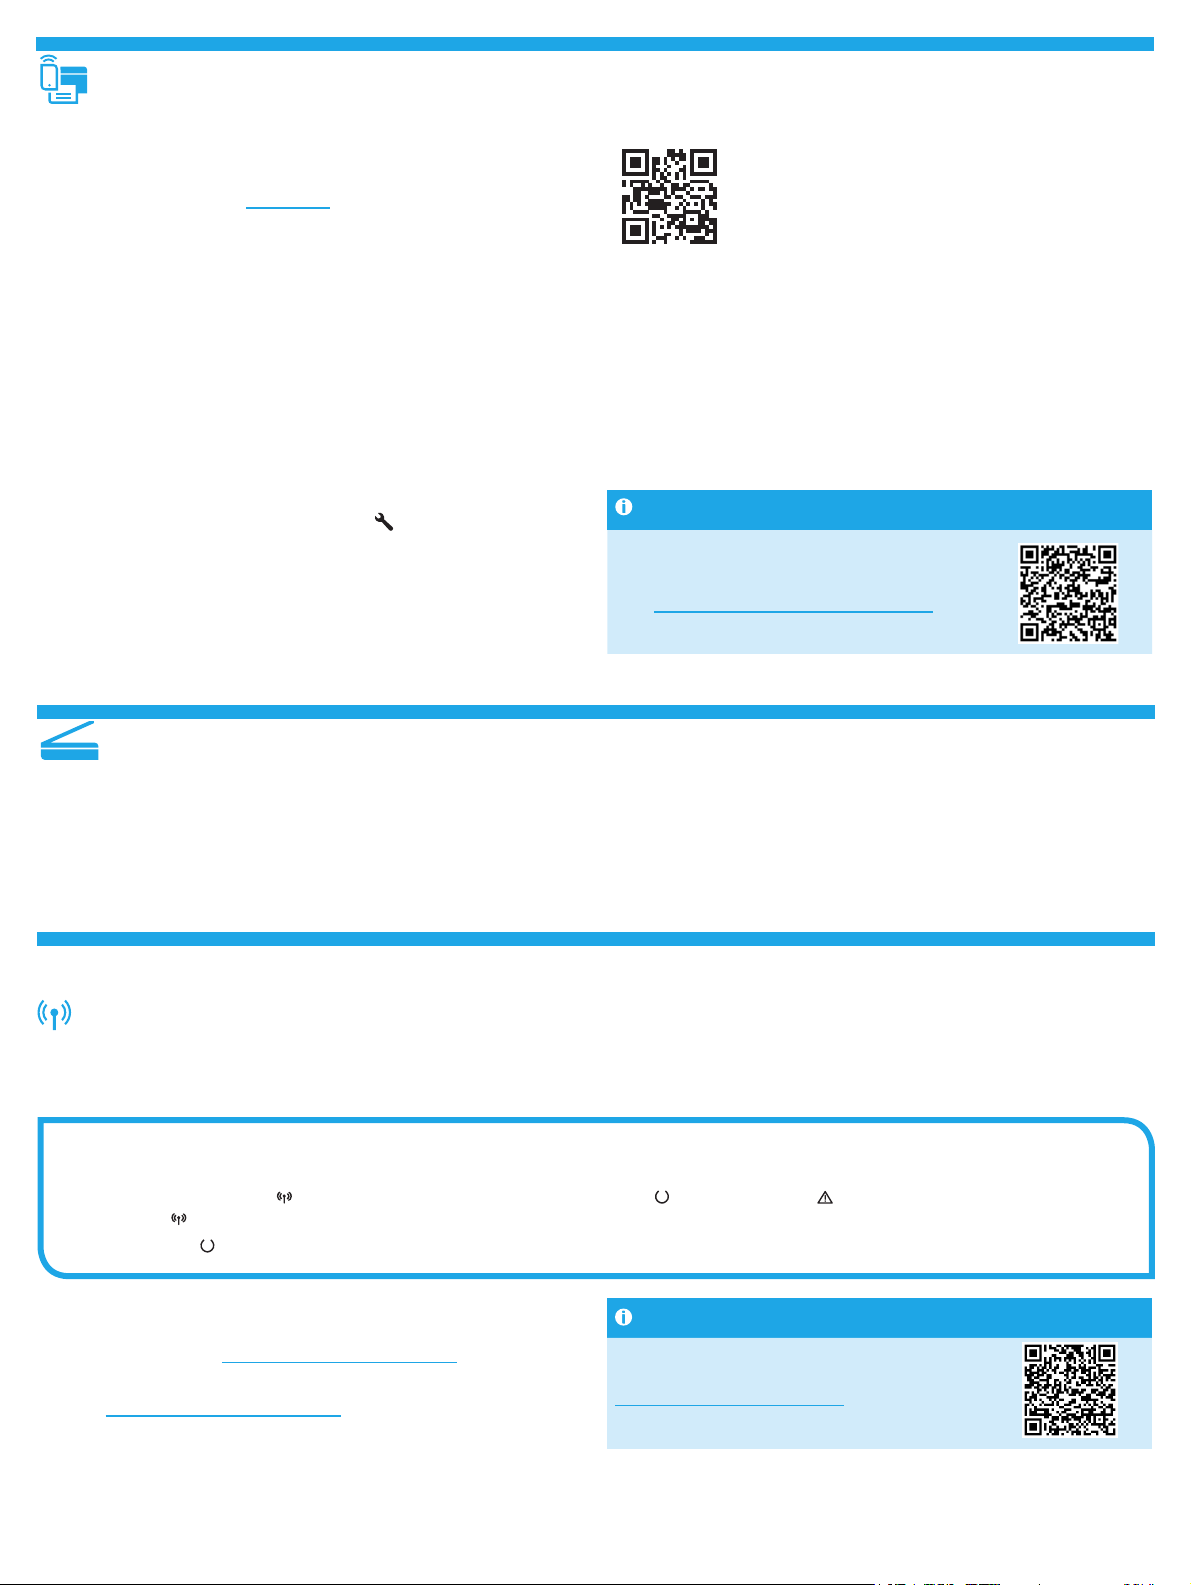
For frequently asked questions, go to
www.hp.com/support/ljM182MFPFAQ
orscantheQR code.
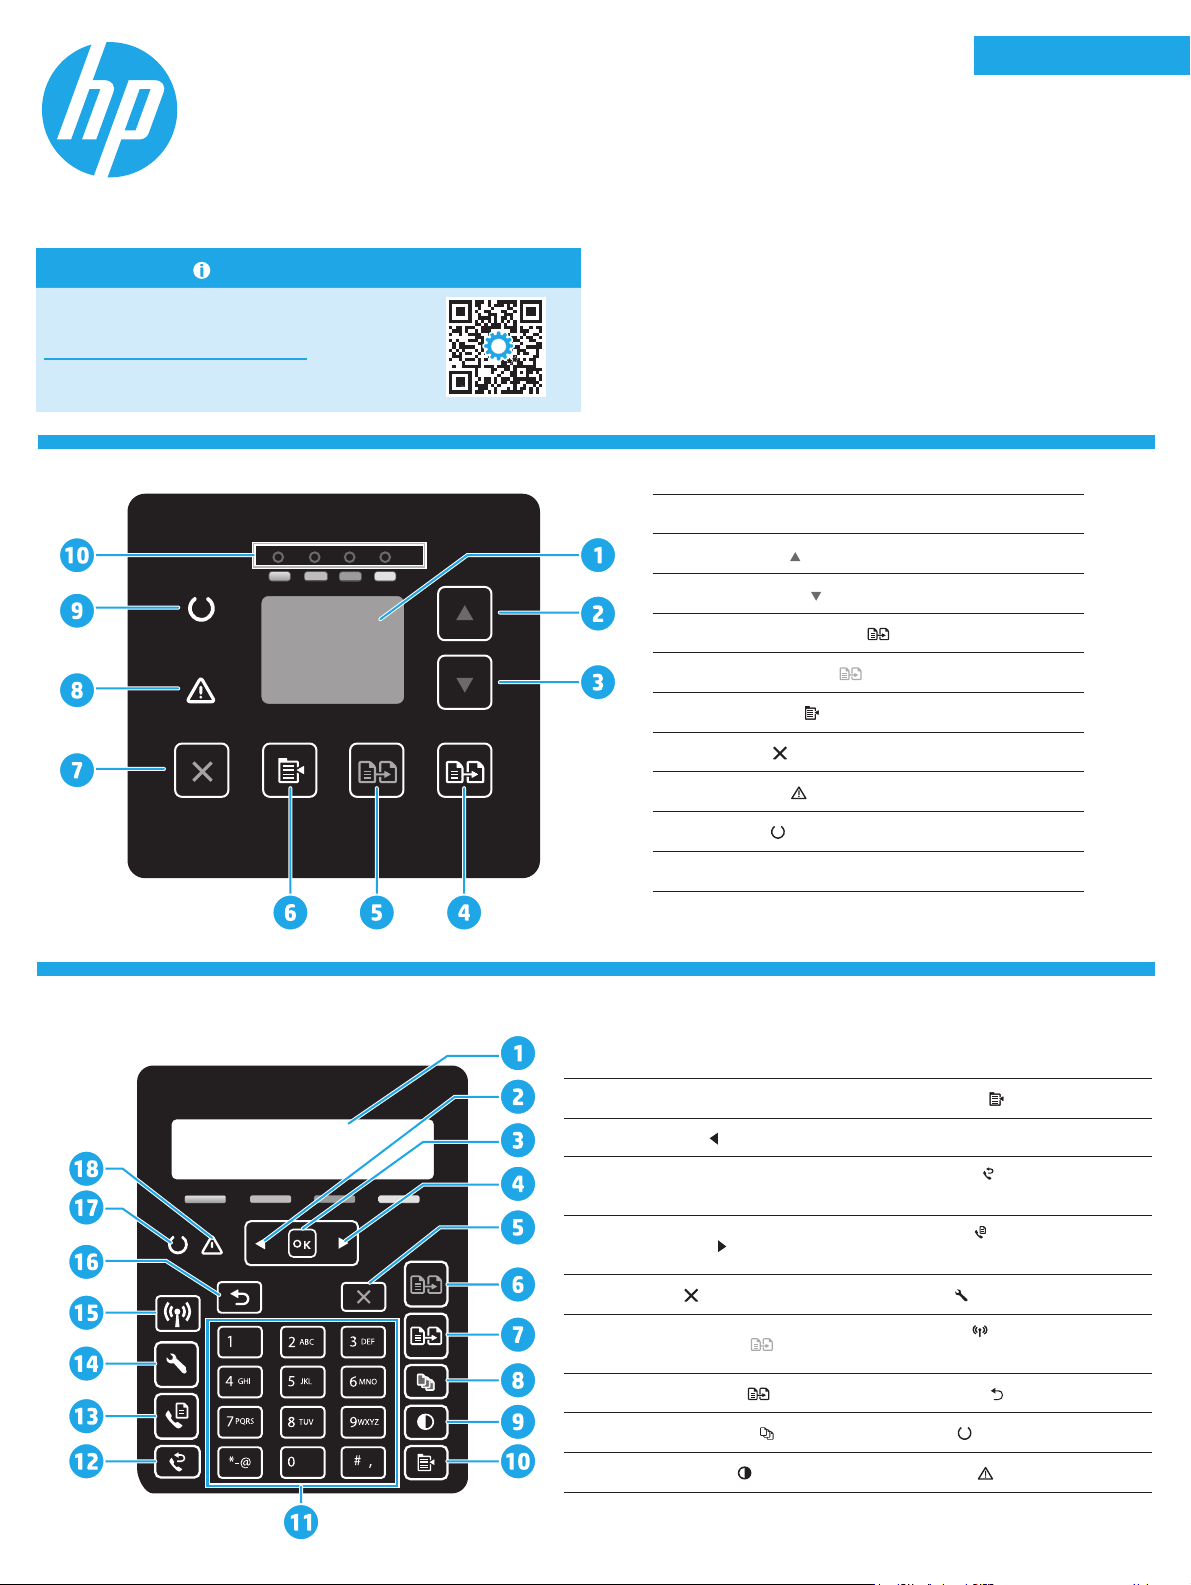
LED control panel view
English................. 3
Français ............... 6
Español ............... 9
Português ......... 12
1 Control panel LED display
2-line LCD control panel view
2 Up arrow
3 Down arrow
4 Start Color Copy / OK
5 Start Mono Copy
6 Copy Setup
7 Cancel
8 Attention
9 Ready
10 Supplies LEDs
1 2-line control panel display 10 Copy Menu button
button
button
button
button
button
button
LED
LED
2 Left arrow
3 OK button 12
4 Right arrow
5 Cancel
6 Start Mono Copy
7 Start Color Copy
8 Number of Copies
9 Lighter/Darker
3
button 11 Alphanumeric keypad
button 13
button 14 Setup button
button 15
button 16 Back arrow button
button 17 Ready LED
button 18 Attention LED
Fax Redial
(fax models only)
Start Fax
(fax models only)
Wireless
(wireless model only)
button
button
button
Page 4
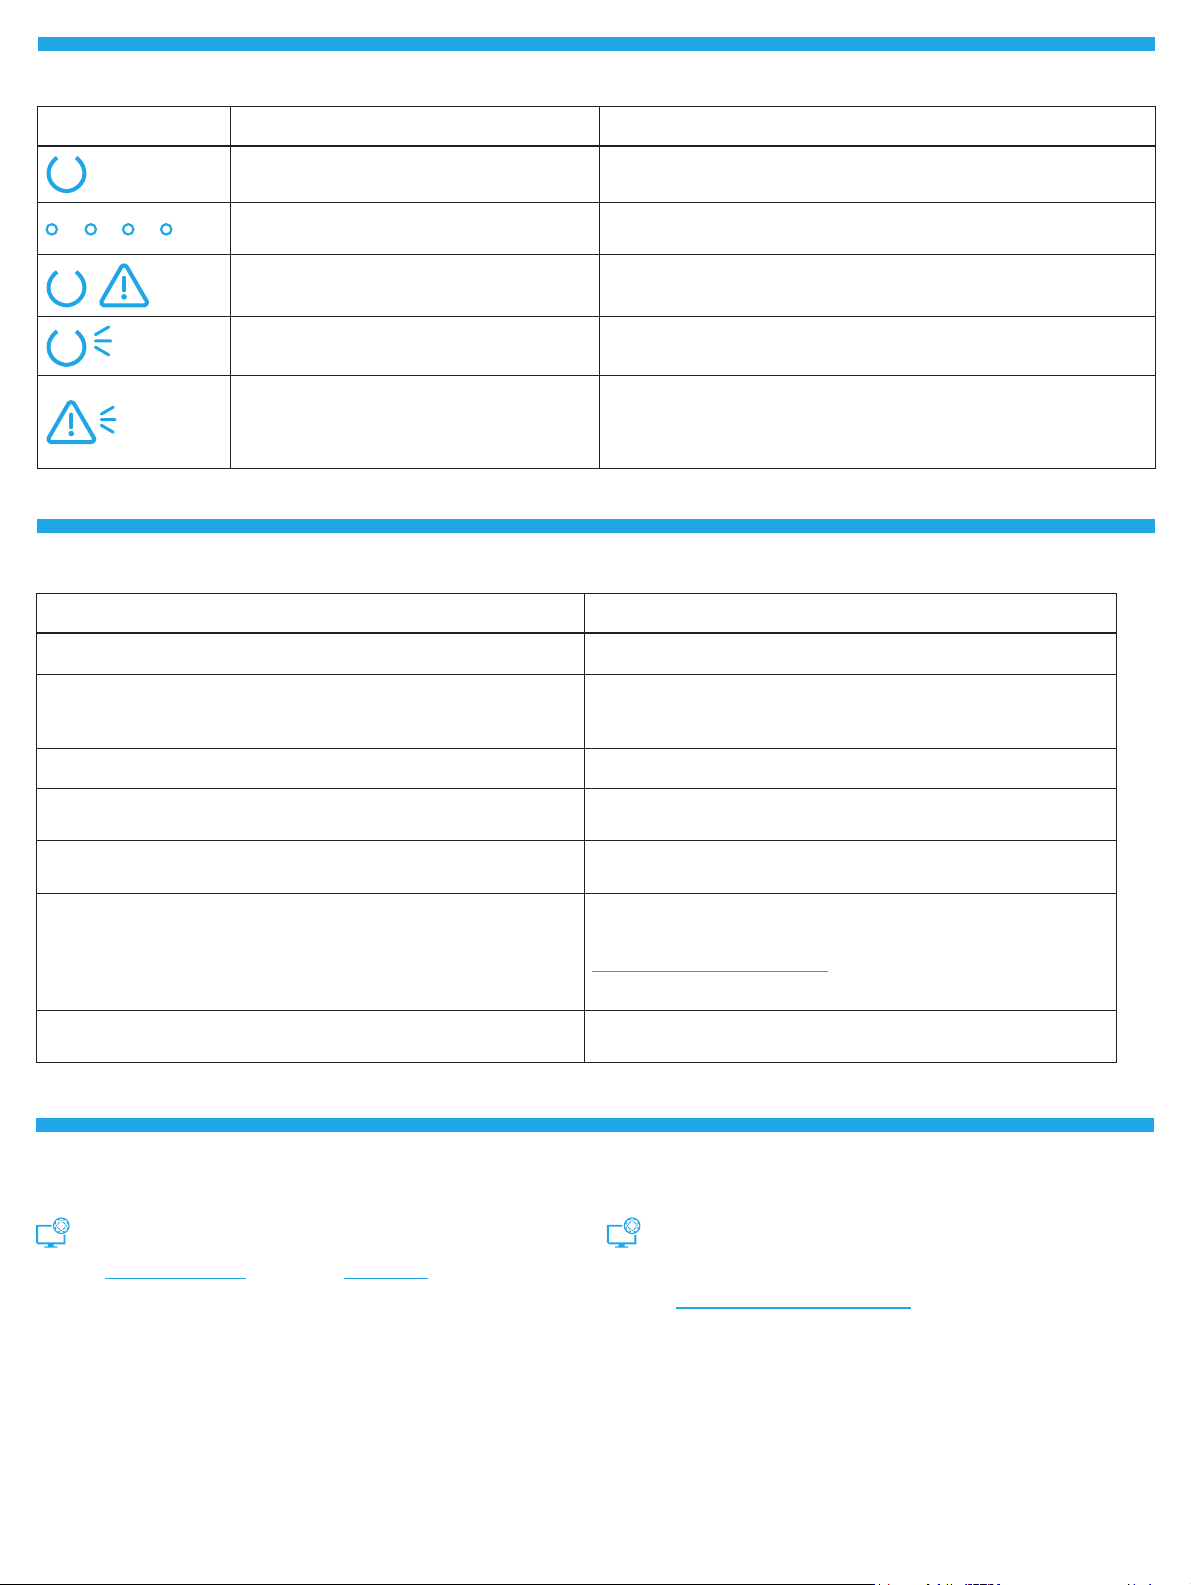
Control panel light patterns
Lights Description Solution
Ready No action to take.
Toner cartridge is at end of life
Fatal error Power cycle. If error still appears, call HP customer service.
Processing No action to take.
Error/Manual Feed/Manual Duplex/Out of paper/
Door open/Jam
A Supplies light blinks when a supply error occurs, and it glows without blinking
when the supply is very low.
• Manual Feed/Manual Duplex - Press the OK button when ready.
• Out of paper - Insert paper.
• Door open - Secure all doors.
• Error/Jam - Refer to User Guide.
Control panel error message
Error Message Solution
Load Paper Insert paper.
• Initializing...
• Cleaning...
• Printing... Cool down mode
Door is open Secure all doors.
No action to take.
• Jam in tray 1. Clear jam and then press OK.
• Jam in cartridge area. Open top cover and remove cartridge. Clear jam.
• Manual Feed. Plain, Letter. Or press OK to use available media.
• Manual Duplex. Load tray 1. Press OK to continue.
• Supply problem.
• Install cartridge.
• Incompatible cartridge.
• Protected cartridge.
• Unauthorized cartridge.
• Cartridge is very low.
• Used or counterfeit cartridge in use.
Download and install the software
NOTE: Do not connect the USB cable until you are prompted to do so.
Method 1: Download from 123.hp.com/laserjet
1. Go to 123.hp.com/laserjet (Windows) or 123.hp.com (OS X), and click
Download.
2. Follow the onscreen instructions and then prompts to save the le to the
computer.
3. Launch the software le from the folder where the le was saved.
4. Follow the onscreen instructions to install the software.
5. When prompted to select a connection type, select the appropriate option
for the type of connection.
Refer to User Guide.
Press the OK button when ready.
Take out and reinsert the toner cartridge. If error still appears, go to
www.hp.com/support/ljM182MFP.
Replace with a new cartridge.
Method 2: Download from printer support website
(Windows)
1. Go to www.hp.com/support/ljM182MFP.
2. Select Software and Drivers.
3. Download the software for your printer model and operating system.
4. Launch the software le from the folder where the le was saved.
5. Follow the onscreen instructions to install the software.
6. When prompted to select a connection type, select the appropriate option
for the type of connection.
4
Page 5
Mobile printing
Method 1: HP Smart
Use the HP Smart app to set up, print, and more.
1. Scan the QR code or go to 123.hp.com.
2. Install the HP Smart app.
3. Run the HP Smart app and follow the onscreen instructions to connect,
setup, print, and more.
Method 2: Wi-Fi Direct (wireless models only)
Wi-Fi Direct allows Wi-Fi capable devices, such as smart phones, tablets, or
computers, to make a wireless network connection directly to the printer
without using a wireless router or access point. Connect to the printer’s Wi-Fi
Direct signal the same way Wi-Fi capable devices are connected to a new
wireless network or hotspot.
Enable Wi-Fi Direct
To set up Wi-Fi Direct from the control panel, complete the following steps:
1. On the printer control panel, press the Setup
Network Setup menu.
2. Open the following menus:
• Wi-Fi Direct
• On/O
3. Touch the On menu item.
button, and then open the
Discover the printer
1. From the mobile device, turn on the Wi-Fi, and search for wireless
networks.
2. Select the printer as shown on the printer control panel.
Example printer name: Direct-bb-HP M182 Laserjet
Learn more about mobile printing
For further information about these and other
operating systems (Chrome/Google Cloud Print),
goto www.hp.com/go/LaserJetMobilePrinting
orscan the QR code.
Use the scan feature
Use the HP Scan software on your computer to start a scan job at the printer.
Windows
Click Start, select Programs or All Programs, select HP, and then select
HPScan.
OS X
Go to the Applications folder and open HP Smart.
Troubleshooting
Wireless connection troubleshooting
Verify that the printer is within the range of the wireless network. For most networks, the printer must be within 30 m (100 ft) of the wireless access
point (wireless router). A USB cable might be required for temporary connection between the printer and the computer. To ensure that the wireless setup
information synchronizes correctly, do not connect the USB cable until prompted to do so.
Follow these steps to restore the network settings:
1. Remove the USB cable from the printer.
2. Press and hold the Wireless
the Wireless button. Printer will restore network default automatically and restart.
3. When the Ready
User guide and additional support resources
The user guide includes printer usage and troubleshooting information. It is
available on the web: Go to www.hp.com/support/ljM182MFP.
Check for rmware updates
1. Go to www.hp.com/support/ljM182MFP.
2. Select a printer or category from the list, and then click Drivers.
3. Select the operating system, and click the Next button.
4. Select Firmware, and click the Download button.
LED is on, continue to install the software.
button on the printer control panel. When the Ready LED and the Attention LED start blinking simultaneously, release
Wireless printing
For more information about wireless
printing and wireless setup, go to
www.hp.com/go/wirelessprinting.
5
Page 6

English................. 3
Français ............... 6
Color LaserJet Pro MFP M182-M185
Manuel de référence
Español ............... 9
Português ......... 12
Besoin d'aide? - FAQ
Pour consulter les questions fréquemment
posées, rendez-vous à l'adresse
www.hp.com/support/ljM182MFPFAQ
ouscannezle code QR.
Vue de panneau de commande LED
1 Écran du panneau de commande LED
Vue du panneau de commande LCD à 2 lignes
1
2 Bouton Flèche vers le haut
3 Bouton Flèche vers le bas
4 Bouton
5 Bouton
6 Bouton
7 Bouton
8 Voyant
9 Voyant
10 Voyants des consommables
Écran du panneau de
commande à 2lignes
Démarrer copie couleur / OK
Démarrer copie mono
Paramètres de copie
Annuler
Attention
Prêt
10 Bouton Menu Copie
2 Bouton Flèche gauche
3 Bouton OK 12
4 Bouton Flèche droite
5 Bouton
Bouton
6
mono
Bouton
7
couleur
8 Bouton
9 Bouton
6
Annuler 14 Bouton Conguration
Démarrer copie
Démarrer copie
Nombre de copies 17 Voyant Prêt
Clair / Foncé 18 Voyant Attention
11 Clavier alphanumérique
13
15
16 Bouton Flèche Retour
Bouton
télécopie
(modèles télécopie uniquement)
Bouton
(modèles télécopie uniquement)
Bouton
(modèle sans l uniquement)
Renumérotation
Lancer télécopie
Réseau sans l
Page 7

Etat des voyants dans le panneau de commande
Voyant Description Solution
Prête Aucune action à prendre.
Un voyant des consommables clignote lorsqu'une erreur de
La cartouche de toner est en n de vie
consommable se produit. Il reste allumé sans clignoter lorsque le niveau
du consommable est très bas.
Erreur fatale Réinitialisation. Si l'erreur persiste, appelez le service clientèle HP.
Traitement Aucune action à prendre.
• Alimentation manuelle / Duplex manuel - Appuyez sur le bouton OK
Erreur / Alimentation manuelle / Duplex manuel /
Manque de papier / Porte ouverte / Bourrage
lorsque vous êtes prêt.
• Manque de papier - Insérer du papier.
• Porte ouverte - Verrouillez toutes les portes.
• Erreur / Bourrage - Voir le Guide de l'utilisateur.
Message d'erreur du panneau de commande
Message d'erreur Solution
Chargement du papier Insertion du papier.
• Initialisation...
• Nettoyage...
• Impression... Mode refroidissement
La porte est ouverte Sécurisez toutes les por tes.
• Bourrage dans le bac1. Eliminez le bourrage puis appuyez sur OK.
• Bourrage dans la zone des cartouches. Ouvrez le capot supérieur
etretirez la cartouche. Éliminez le bourrage.
• Alimentation manuelle. Ordinaire, Lettre. Ou appuyez sur OK pour
utiliser lesupport disponible.
• Recto verso manuel. Chargez bac 1. Appuyez sur OK pour continuer.
• Problème de consommable.
• Installer cartouche.
• Cartouche incompatible.
• Cartouche protégée.
• Cartouche non autorisée.
• Le niveau de la cartouche est très bas.
• Cartouche utilisée ou contrefaite en cours d'utilisation.
Aucune action à prendre.
Reportez-vous au Guide de l'utilisateur.
Appuyez sur OK lorsque vous êtes prêt.
Retirez et réinsérez la cartouche de toner. Si l’erreur persiste, accédez
àwww.hp.com/support/ljM182MFP.
Remplacez-la par une nouvelle cartouche.
Télécharger et installer le logiciel
REMARQUE : Ne connectez pas le câble USB avant d'y avoir été invité.
Méthode 1 : Téléchargement à partir
de 123.hp.com/laserjet
1. Accédez à 123.hp.com/laserjet (Windows) ou 123.hp.com (OS X), puis
cliquez sur Télécharger.
2. Suivez les instructions puis les indications à l'écran pour enregistrer
lechier sur l'ordinateur.
3. Lancez le chier du logiciel à partir du dossier dans lequel il a été
enregistré.
4. Suivez les instructions à l’écran pour installer le logiciel.
5. Lorsque vous êtes invité à sélectionner un type de connexion, sélectionnez
l'option appropriée pour le type de connexion.
Méthode 2 : Téléchargement à partir du site Web
d'assistance de l’imprimante (Windows)
1. Accédez à www.hp.com/support/ljM182MFP.
2. Sélectionnez Pilotes et logiciels.
3. Téléchargez le logiciel adapté à votre modèle d'imprimante et à votre
système d'exploitation.
4. Lancez le chier du logiciel à partir du dossier dans lequel il a été
enregistré.
5. Suivez les instructions à l’écran pour installer le logiciel.
6. Lorsque vous êtes invité à sélectionner un type de connexion,
sélectionnez l'option appropriée pour le type de connexion.
7
Page 8

Impression mobile
Méthode 1: HP Smart
Utilisez l'application HP Smart pour la conguration, l'impression et plus.
1. Scannez le code QR ou consultez 123.hp.com.
2. Installez l'application HP Smart.
3. Exécutez l'application HP Smart et suivez les instructions à l'écran pour
connecter, congurer, imprimer et plus.
Méthode 2: Wi-Fi Direct (modèles sans l uniquement)
Wi-Fi Direct permet aux périphériques Wi-Fi (smartphones, tablettes ou
ordinateurs) d'eectuer une connexion réseau sans l directement vers
l'imprimante sans utiliser de routeur sans l ou de point d'accès. Les
utilisateurs se connectent au signal d'impression directe Wi-Fi de l'imprimante
de la même manière qu'ils connectent un périphérique Wi-Fi à un nouveau
réseau sans l ou à une borne d'accès.
Activer Wi-Fi Direct
Pour congurer Wi-Fi Direct depuis le panneau de commande, procédez
comme suit:
1. Sur le panneau de commande de l'imprimante, appuyez sur le bouton
Conguration
2. Ouvrez les menus suivants:
• Wi-Fi Direct
• Activé / Désactivé
3. Appuyez sur l'élément de menu Activé.
, puis ouvrez le menu Conguration réseau.
Détecter l'imprimante
1. Depuis le périphérique mobile, activez le Wi-Fi, puis recherchez des réseaux
sans l.
2. Sélectionnez l'imprimante tel qu'illustré sur le panneau de commande
del'imprimante. Exemple de nom d'imprimante: Direct-bb-HP M182
Laserjet
En savoir plus sur l'impression mobile
Pour obtenir de plus amples informations
sur ces systèmes et les autres systèmes
d'exploitation (Chrome/Google Cloud Print),
accédez àwww.hp.com/go/LaserJetMobilePrinting
ounumérisez le code QR.
Utiliser la fonction de numérisation
Utilisez le logiciel HP Scan sur votre ordinateur pour lancer un travail de
numérisation sur l'imprimante.
Windows
Cliquez sur Démarrer, sélectionnez Programmes ou Tous les programmes,
puis HP, et sélectionnez HP Scan.
OS X
Accédez au dossier Applications et ouvrez HP Smart.
Dépannage
Dépannage de la connexion sans l
Vériez que l'imprimante se trouve dans la plage du réseau sans l. Pour la plupart des réseaux, l'imprimante doit se trouver dans une plage de 30m (100pi)
du point d'accès sans l (routeur sans l). Un câble USB pourrait être requis pour la connexion temporaire entre l'imprimante et l'ordinateur. Pour garantir une
bonne synchronisation des informations liées à la conguration sans l, ne branchez le câble USB que lorsque vous y êtes invité.
Suivez ces étapes pour restaurer les paramètres réseau.
1. Retirez le câble USB de l'imprimante.
2. Appuyez sur le bouton Sans l
à clignoter simultanément, relâchez le bouton
3. Dès que la diode électroluminescente de l'état
Guide de l'utilisateur et ressources d'assistance supplémentaires
Le guide de l'utilisateur comprend des informations relatives à l'utilisation
de l'imprimante et au dépannage. Il est disponible sur le Web: Accédez
àwww.hp.com/support/ljM182MFP.
Recherche des mises à jour de micrologiciels
1. Accédez à www.hp.com/support/ljM182MFP.
2. Sélectionnez une imprimante ou une catégorie dans la liste, puis cliquez
sur Pilotes.
3. Sélectionnez le système d'exploitation et cliquez sur le bouton Suivant.
4. Sélectionnez le micrologiciel et cliquez sur le bouton Télécharger.
du panneau de commande de l'imprimante et maintenez-le enfoncé. Lorsque les voyants Prêt et Attention commencent
Sans l. L’imprimante rétablit automatiquement les paramètres réseau par défaut et redémarre.
Prêt est allumée, poursuivez l'installation du logiciel.
Impression sans l
Pour en savoir plus sur l'impression sans
l et la conguration sans l, accédez
àwww.hp.com/go/wirelessprinting.
8
Page 9

Color LaserJet Pro MFP M182-M185
Guía de referencia
¿Necesita ayuda? - Preguntas frecuentes
Para acceder a las preguntas frecuentes,
acceda awww.hp.com/support/ljM182MFPFAQ
oescaneeel código QR.
Vista del panel de control LED
English................. 3
Français ............... 6
Español ............... 9
Português ......... 12
1 Pantalla LED del panel de control
Vista del panel de control LCD de 2líneas
2 Botón de echa hacia arriba
3 Botón de echa hacia abajo
4 Botón Iniciar copia en color/Aceptar
5 Botón Iniciar copia en escala de grises
6 Botón Congurar copia
7 Botón Cancelar
8 Indicador LED Aviso
9 Indicador LED Preparada
10 Indicadores LED de consumibles
Pantalla del panel de control
1
de 2líneas
10 Botón Menú de copia
2 Botón de echa izquierda 11 Teclado alfanumérico
3 Botón Aceptar 12
4 Botón de echa derecha
5 Botón Cancelar
Botón Iniciar copia en escala
6
de grises
Botón Iniciar copia
7
en color
8 Botón Número de copias 17 Indicador LED Preparada
Botón Más claro/
9
Más oscuro
9
Botón Rellamada de fax
(solo modelos con fax)
Botón Iniciar fax
13
(solo modelos con fax)
14 Botón Conguración
Botón de conexión inalámbrica
15
(solo para el modelo inalámbrico)
16 Botón de echa hacia atrás
18 Indicador LED Aviso
Page 10

Patrones de luces del panel de control
Luz Descripción Solución
Preparada No es necesario llevar a cabo una acción.
El cartucho de tóner alcanzó el límite de su vida útil.
Error grave
En proceso No es necesario llevar a cabo una acción.
Error/Alimentación manual/Dúplex manual/
Faltadepapel/Puerta abierta/Atasco
El indicador de consumibles parpadea cuando se produce un error con un
consumible, y se ilumina sin parpadear cuando el nivel del consumible es
muy bajo.
Apagar y encender. Si el error persiste, póngase en contacto con atención
al cliente de HP.
• Alimentación manual/Dúplex manual - Presione el botón Aceptar cuando
esté preparada la impresora.
• Falta de papel - Inserte papel.
• Puerta abierta - Asegure todas las puertas.
• Error/Atasco - Consulte la Guía del usuario.
Mensaje de error del panel de control
Mensaje de error Solución
Cargar papel Cargue papel.
• Inicializando...
• Limpiando...
• Imprimiendo… Modo de enfriamiento
No es necesario llevar a cabo una acción.
Puerta abierta Asegure todas las puertas.
• Atasco en la Bandeja1. Elimine el atasco y presione Aceptar.
• Atasco en el área del cartucho. Abra la cubierta superior y retire
elcartucho. Elimine el atasco.
• Alimentación manual. Normal, carta. O presione Aceptar para usar
elmaterial disponible.
• Dúplex manual. Cargue la bandeja 1. Pulse Aceptar para continuar.
• Problema del consumible.
• Instale el cartucho.
• Cartucho no compatible.
• Cartucho protegido.
• Cartucho no autorizado.
• El nivel del cartucho es muy bajo.
• Cartucho negro usado o falsicado en uso.
Consulte la Guía del usuario.
Pulse el botón Aceptar cuando esté preparada la impresora.
Retire e inserte nuevamente el cartucho de tóner. Si el error persiste, acceda
a www.hp.com/support/ljM182MFP.
Reemplace el cartucho con uno nuevo.
Descarga e instalación del software
NOTA: No conecte el cable USB hasta que se le indique.
Método 1: Descarga desde 123.hp.com/laserjet
1. Acceda a 123.hp.com/laserjet (Windows) o 123.hp.com (OS X). Haga clic
enDescargar.
2. Siga las indicaciones e instrucciones en la pantalla para guardar el archivo
en el equipo.
3. Inicie el archivo de software desde la carpeta en la que lo guardó.
4. Siga las instrucciones en la pantalla para instalar el software.
5. Cuando se le indique que seleccione un tipo de conexión, seleccione
laopción correspondiente para el tipo de conexión.
Método 2: Descarga desde el sitio web de asistencia
de la impresora (Windows)
1. Acceda a www.hp.com/support/ljM182MFP.
2. Seleccione Software y controladores.
3. Descargue el software para su modelo de impresora y sistema operativo.
4. Inicie el archivo de software desde la carpeta en la que lo guardó.
5. Siga las instrucciones en la pantalla para instalar el software.
6. Cuando se le indique que seleccione un tipo de conexión, seleccione
laopción correspondiente para el tipo de conexión.
10
Page 11

Impresión móvil
Método 1: HP Smart
Utilice la aplicación HP Smart para congurar, imprimir y mucho más.
1. Escanee el código QR o acceda a 123.hp.com.
2. Instale la aplicación HP Smart.
3. Ejecute la aplicación HP Smart y siga las instrucciones en la pantalla para
conectar, congurar, imprimir y mucho más.
Método 2: Wi-Fi Direct (solo modelos inalámbricos)
Wi-Fi Direct permite que los dispositivos con capacidad Wi-Fi, como por ejemplo,
los teléfonos inteligentes, las tablets o los equipos, realicen conexiones de red
inalámbricas directamente a la impresora sin utilizar un router ni un punto de
acceso inalámbrico. Conéctese a la señal directa de Wi-Fi Direct de la impresora
del mismo modo que conecta un dispositivo con capacidad Wi-Fi a una red
inalámbrica nueva o a un punto de acceso inalámbrico.
Activar Wi-Fi Direct
Para congurar Wi-Fi Direct desde el panel de control, realice estos pasos:
1. En el panel de control de la impresora, pulse el botón Conguración
y,acontinuación, abra el menú Conguración de red.
2. Abra los siguientes menús:
• Wi-Fi Direct
• Activado/desactivado
3. Toque el elemento del menú Activado.
Detección de la impresora
1. En el dispositivo móvil, active la conectividad Wi-Fi y busque redes
inalámbricas.
2. Seleccione la impresora que se muestra en el panel de control de la
impresora. Nombre de impresora de ejemplo: Direct-bb-HP M182 Laserjet
Obtener más información sobre la impresión móvil
Para obtener más información acerca
de este y otros sistemas operativos
(Chrome/Google Cloud Print) acceda
awww.hp.com/go/LaserJetMobilePrinting
oescaneeel código QR.
Uso de la función de escaneo
Utilice el software HP Scan en el equipo para iniciar un trabajo de escaneo en la
impresora.
Windows
Haga clic en Inicio y seleccione Programas o Todos los programas. Luego,
seleccione HP y, por último, HP Scan.
OS X
Acceda a la carpeta Aplicaciones y abra HP Smart.
Solución de problemas
Solución de problemas de la conexión inalámbrica
Compruebe que la impresora se encuentre dentro del alcance de la red inalámbrica. Para la mayoría de las redes, la impresora debe encontrarse dentro de
un alcance de 30m (100pies) del punto de acceso inalámbrico (direccionador inalámbrico). Es posible que necesite un cable USB para realizar una conexión
temporal entre la impresora y el equipo. Para asegurarse de que la información de la conguración inalámbrica se sincronice correctamente, no conecte el
cable USB hasta que se le indique.
Siga estos pasos para restablecer la conguración de la red:
1. Retire el cable USB de la impresora.
2. Presione y mantenga pulsado el botón de conexión inalámbrica
indicador LED Aviso comiencen a parpadear al mismo tiempo, suelte el botón de conexión inalámbrica . La impresora restaurará la conguración
predeterminada de la red automáticamente y se reiniciará.
3. Cuando el LED Preparada
Guía del usuario y recursos adicionales de soporte
En la Guía del usuario se incluye información acerca del uso de la
impresora y la solución de problemas. Está disponible en la web.
awww.hp.com/support/ljM182MFP.
Comprobar las actualizaciones del rmware
1. Acceda a www.hp.com/support/ljM182MFP.
2. Seleccione una impresora o una categoría en la lista y, a continuación, haga
clic en Controladores.
3. Seleccione el sistema operativo y haga clic en el botón Siguiente.
4. Seleccione Firmware y haga clic en el botón Descargar.
esté encendido, continúe con la instalación del software.
en el panel control de la impresora. Cuando el indicador LED Preparada y el
Impresión inalámbrica
Acceda
Para obtener más información sobre la
impresión y la conguración inalámbrica, acceda
awww.hp.com/go/wirelessprinting.
11
Page 12

English................. 3
Français ............... 6
Color LaserJet Pro MFP M182-M185
Guia de referência
Español ............... 9
Português ......... 12
Precisa de ajuda? - Perguntas frequentes
Para ver as perguntas frequentes, acesse
www.hp.com/support/ljM182MFPFAQ
ou leia o código QR.
Exibição do painel de controle LED
1 Visor LED do painel de controle
Exibição do painel de controle LCD de 2 linhas
1
2 Botão Seta para cima
3 Botão Seta para baixo
4 Botão Iniciar cópia colorida/OK
5 Botão Iniciar cópia mono
6 Botão Conguração de cópia
7 Botão Cancelar
8 LED de atenção
9 LED Pronto
10 LEDs de suprimentos
Visor do painel de controle
de 2 linhas
10 Botão menu Copiar
2 Botão seta para a esquerda 11 Teclas alfanuméricas
3 Botão OK 12
4 Botão seta para a direita
5 Botão Cancelar
6 Botão Iniciar cópia mono
Botão iniciar cópia
7
colorida
8 Botão Número de cópias 17 LED Pronto
Botão Mais claro/
9
Mais escuro
12
Botão Rediscar fax
(somente para modelos com fax)
Botão Iniciar fax
13
(somente para modelos com fax)
14 Botão Conguração
Botão sem o
15
(somente para o modelo sem o)
16 Botão seta voltar
18 LED de atenção
Page 13

Padrões das luzes do painel de controle
Luzes Descrição Solução
Pronto Nenhuma ação a ser tomada.
Cartucho de toner está acabando
Erro fatal
Processamento Nenhuma ação a ser tomada.
Erro/Alimentação manual/Duplo manual/
Sempapel/Porta aberta/Atolamento
Uma luz de Suprimentos pisca quando ocorre um erro de suprimento e acende
sem piscar quando o suprimento está com nível muito baixo.
Desligue e ligue. Se o erro ainda aparecer, ligue para o atendimento
aocliente daHP.
• Alimentação manual/Duplo manual - Pressione o botão OK quando
estiver pronto.
• Sem papel - Inserir papel.
• Porta aberta - Travar todas as portas.
• Erro/Atolamento - Consultar o Guia do Usuário.
Mensagem de erro do painel de controle
Mensagem de erro Solução
Carregar papel Inserir papel.
• Inicializando...
• Limpeza...
• Imprimindo... Modo Resfriamento
Porta aberta Trave todas as portas.
Nenhuma ação a ser tomada.
• Congestionamento na bandeja 1. Elimine o congestionamento e depois
pressione OK.
• Congestionamento na área do cartucho. Abra a tampa e remova
ocartucho. Eliminar atolamentos.
• Alimentação manual. Reto, Carta. Ou pressione OK para usar mídia
disponível.
• Duplex manual. Carregue a bandeja 1. Pressione OK para continuar.
• Problema de suprimentos.
• Instale o cartucho.
• Cartucho incompatível.
• Cartucho protegido.
• Cartucho não autorizado.
• Cartucho com pouquíssima tinta.
• Cartucho usado ou falsicado em uso.
Download e instalação do software
NOTA: Conecte o cabo USB somente quando for solicitado.
Método 1: Download de 123.hp.com/laserjet
1. Acesse 123.hp.com/laserjet (Windows) ou 123.hp.com (OS X) e clique
emDownload.
2. Siga as instruções na tela e os comandos para salvar o arquivo
nocomputador.
3. Inicie o arquivo de software a partir da pasta em que ele foi salvo.
4. Siga as instruções exibidas na tela para instalar o software.
5. Quando a seleção de um tipo de conexão for solicitada, selecione a opção
apropriada para o tipo de conexão.
Consulte o Guia do Usuário.
Pressione o botão OK quando estiver pronto.
Retire e reinsira o cartucho de toner. Se o erro continuar a aparecer, acesse
www.hp.com/support/ljM182MFP.
Substitua por um novo cartucho.
Método 2: Faça download no site de suporte
daimpressora (Windows)
1. Acesse www.hp.com/support/ljM182MFP.
2. Selecione Software e Drivers.
3. Faça o download do software para seu modelo de impressora e sistema
operacional.
4. Inicie o arquivo de software a partir da pasta em que ele foi salvo.
5. Siga as instruções exibidas na tela para instalar o software.
6. Quando a seleção de um tipo de conexão for solicitada, selecione a opção
apropriada para o tipo de conexão.
13
Page 14

Impressão móvel
Método 1: HP Smart
Use o aplicativo HP Smart para congurar, imprimir e muito mais.
1. Escaneie o código QR ou acesse 123.hp.com.
2. Instale o aplicativo HP Smart.
3. Execute o aplicativo HP Smart e siga as instruções na tela para conectar,
congurar, imprimir e muito mais.
Método 2: Wi-Fi Direct (somente modelo sem o)
O Wi-Fi Direct permite que dispositivos compatíveis com Wi-Fi, como
smartphones, tablets ou computadores, façam uma conexão de rede sem o
diretamente com a impressora sem o uso de um ponto de acesso ou roteador
sem o. Conecte-se ao sinal Wi-Fi Direct da impressora da mesma maneira
que dispositivos compatíveis com Wi-Fi se conectam a uma nova rede sem o
ou hotspot.
Ativar o Wi-Fi Direct
Para congurar o Wi-Fi Direct a partir do painel de controle, siga estas etapas:
1. No painel de controle da impressora, pressione o botão de Conguração
e, em seguida, abra o menu Conguração de Rede.
2. Abra os seguintes menus.
• Wi-Fi Direct
• Ligar/Desligar
3. Toque no item de menu Ligar.
Descobrir a impressora
1. No dispositivo móvel, ative a conexão Wi-Fi e procure redes sem o.
2. Selecione a impressora conforme mostrado no painel de controle dela.
Nome da impressora de exemplo: Direct-bb-HP M182 Laserjet
Saiba mais sobre a impressão móvel
Para obter mais informações sobre esses e outros
sistemas operacionais (Chrome/Google Cloud Print)
acesse www.hp.com/go/LaserJetMobilePrinting
ouescaneie o código QR.
Uso do recurso Digitalizar
Use o software HP Scan em seu computador para iniciar um trabalho
dedigitalização na impressora.
Windows
Clique em Iniciar, selecione Programas ou Todos os Programas, selecione
HPe depois HP Scan.
OS X
Vá para a pasta Aplicativos e abra o HP Smart.
Solução de problemas
Solução de problemas de conexão sem o
Verique se a impressora está dentro do alcance da rede sem o. Na maioria das redes, a impressora deve estar a 30 m (100 pés) do ponto de acesso sem
o (roteador sem o). Um cabo USB pode ser necessário para conexão temporária entre a impressora e o computador. Para garantir que as informações de
conguração sem o sincronizem corretamente, não conecte o cabo USB até ser avisado para fazê-lo.
Siga estas etapas para restaurar as congurações de rede:
1. Remova o cabo USB da impressora.
2. Pressione o botão Sem o
Sem o
3. Quando o LED Pronto
Guia de usuários e recursos de suporte adicionais
O guia do usuário inclui o uso da impressora e informações sobre solução de
problemas. Está disponível na Web: Acesse www.hp.com/support/ljM182MFP.
Vericar atualizações de rmware
1. Acesse www.hp.com/support/ljM182MFP.
2. Selecione uma impressora ou uma categoria na lista e então clique
emDrivers.
3. Selecione o sistema operacional e clique no botão Avançar.
4. Selecione Firmware e clique no botão Download.
. A impressora restaurará a rede padrão automaticamente e reiniciará.
no painel de controle do produto. Quando LED Pronto e LED Atenção começam a piscar simultaneamente, libere o botão
estiver aceso, prossiga para instalar o software.
Impressão sem o
Para obter mais informações sobre impressão
sem o e conguração sem o, acesse
www.hp.com/go/wirelessprinting.
14
Page 15

Page 16

© Copyright 2019 HP Development Company, L.P.
Reproduction, adaptation or translation without prior written permission
isprohibited, except as allowed under the copyright laws.
The information contained herein is subject to change without notice.
The only warranties for HP products and services are set forth in the express
warranty statements accompanying such products and services. Nothing herein
should be construed as constituting an additional warranty. HP shall not be liable for
technical or editorial errors or omissions contained herein.
Trademark Credits
Windows® is a U.S. registered trademark of Microsoft Corporation.
© Copyright 2019 HP Development Company, L.P.
La reproduction, l’adaptation ou la traduction sans autorisation écrite préalable est
interdite, sauf dans le cadre des lois sur le droit d’auteur.
Les informations contenues dans ce document peuvent être modiées sans préavis.
Les seules garanties pour les produits et services HP sont décrites dans les
déclarations de garantie expresses accompagnant ces mêmes produits et services.
Les informations contenues dans ce document ne constituent en aucun cas une
garantie supplémentaire. HP ne pourra être tenu responsable des erreurs ou
omissions de nature techni que ou rédactionnelle qui pourraient subsister dans
leprésent document.
Apple and the Apple logo are trademarks of Apple Inc., registered in the U.S. and
other countries.
App Store is a service mark of Apple Inc.Android, Google Play, and the Google Play
logo are trademarks of Google Inc.
OS X is a trademark of Apple Inc., registered in the U.S. and other countries.
AirPrint is a trademark of Apple Inc., registered in the U.S. and other countries.
Trademark Credits
Windows® est une marque déposée de Microsoft Corporation aux Etats-Unis.
Apple et le logo Apple sont des marques commerciales d’Apple, Inc. aux Etats-Unis
etdans d’autres pays/régions.
App Store est une marque de service d’Apple Inc. Android, Google Play et le logo
Google Play sont des marques commerciales de Google Inc.
OS X est une marque commerciale d’Apple Inc. aux États-Unis et dans d’autres pays/
régions.
AirPrint est une marque commerciale d’Apple Inc. aux États-Unis et dans d’autres
pays/régions.
www.hp.com
 Loading...