


HP Designjet L25500 printer series
Maintenance and troubleshooting guide (first edition)

Legal notices
Trademarks
© 2009 Hewlett-Packard Development
Company, L.P.
The information contained herein is subject
to change without notice.
The only warranties for HP Products and
services are set forth in the express warranty
statement accompanying such products and
services. Nothing herein should be
construed as constituting an additional
warranty. HP shall not be liable for technical
or editorial errors or omissions contained
herein.
Microsoft® and Windows® are U.S.
registered trademarks of Microsoft
Corporation.

Table of contents
1 Safety precautions
General safety guidelines ..................................................................................................................... 1
Electrical shock hazard ........................................................................................................................ 1
Heat hazard .......................................................................................................................................... 2
Fire hazard ........................................................................................................................................... 2
Mechanical hazard ............................................................................................................................... 2
Heavy substrate hazard ....................................................................................................................... 3
Ink handling .......................................................................................................................................... 3
Warnings and cautions ......................................................................................................................... 3
Warning labels ...................................................................................................................................... 3
2 Printer status
Check printer status ............................................................................................................................. 5
Check the status of the ink system ....................................................................................................... 5
Check the status of the ink cartridges .................................................................................................. 5
Check the status of a printhead ............................................................................................................ 6
Check the file system ........................................................................................................................... 7
Check printer usage statistics .............................................................................................................. 7
Printer alerts ......................................................................................................................................... 7
3 Firmware update
4 Hardware maintenance
Align the printheads ............................................................................................................................ 10
Clean the electrical connections on a printhead ................................................................................. 11
Clean the exterior of the printer .......................................................................................................... 14
Clean the platen ................................................................................................................................. 14
Clean (recover) the printheads ........................................................................................................... 16
Clean the substrate-advance sensor window ..................................................................................... 16
Lubricate the printhead carriage ......................................................................................................... 17
Lubricate the platen rollers ................................................................................................................. 18
Maintain the ink cartridges ................................................................................................................. 20
Move or store the printer .................................................................................................................... 20
Service maintenance .......................................................................................................................... 20
Use the printhead status plot .............................................................................................................. 21
ENWW iii

5 Troubleshoot print-quality issues
General advice ................................................................................................................................... 23
Graininess .......................................................................................................................................... 24
Horizontal banding ............................................................................................................................. 24
Vertical banding .................................................................................................................................. 26
Misaligned colors ................................................................................................................................ 26
Lack of sharpness .............................................................................................................................. 27
Black areas look hazy ........................................................................................................................ 27
Subtle stains or uneven appearance .................................................................................................. 27
The ink smudges when touched, or looks oily .................................................................................... 27
The total length of the print is wrong or inconsistent .......................................................................... 27
6 Troubleshoot substrate issues
The substrate cannot be loaded successfully .................................................................................... 29
The substrate has jammed ................................................................................................................. 29
The substrate is deformed or wrinkled ............................................................................................... 31
The automatic cutter does not work ................................................................................................... 31
Take-up reel substrate jam ................................................................................................................. 32
Take-up reel does not wind ................................................................................................................ 32
7 Troubleshoot ink-system issues
Cannot insert an ink cartridge ............................................................................................................ 34
Cannot insert a printhead ................................................................................................................... 34
Cannot insert the printhead cleaning cartridge ................................................................................... 34
Front panel recommends reseating or replacing a printhead ............................................................. 34
Clean the printheads .......................................................................................................................... 34
Align the printheads ............................................................................................................................ 35
8 Troubleshoot other issues
The printer cannot get an IP address ................................................................................................. 38
Cannot access the Embedded Web Server ....................................................................................... 38
The printer is not printing .................................................................................................................... 39
The software program slows down or stalls while generating the print job ........................................ 39
The printer seems slow ...................................................................................................................... 39
Cannot access files on the hard disk .................................................................................................. 39
Communication failures between computer and printer ..................................................................... 40
“Out-of-memory” error message ......................................................................................................... 40
The platen rollers squeak ................................................................................................................... 40
9 Front-panel error messages
10 When you need help
Introduction ......................................................................................................................................... 46
Documentation ................................................................................................................................... 46
HP Instant Support ............................................................................................................................. 46
HP Customer Care Centers ............................................................................................................... 47
iv ENWW

Service information ............................................................................................................................. 52
Index ................................................................................................................................................................... 53
ENWW v

vi ENWW

1 Safety precautions
Before using your printer, read the following safety precautions to make sure you use the equipment
safely.
General safety guidelines
Refer to installation instructions before connecting the printer to the supply.
●
There are no operator-serviceable parts inside the printer. Refer servicing to qualified service
●
personnel.
Turn off the printer, unplug both power cords from the power outlets, and refer servicing to HP
●
qualified service personnel in any of the following cases:
The power cord or plug is damaged.
◦
Safety precautions
Liquid has entered the printer.
◦
There is smoke or an unusual smell coming from the printer.
◦
The printer has been dropped or the drying or curing module damaged.
◦
The printer's built-in Residual Current Circuit Breaker (Ground Fault Circuit Interrupter) has
◦
been repeatedly tripped.
Fuses have blown.
◦
The printer is not operating normally.
◦
Turn off the printer and unplug both power cords from the power outlets in either of the following
●
cases:
During a thunderstorm
◦
During a power failure
◦
Electrical shock hazard
WARNING! The drying and curing modules operate at hazardous voltages capable of causing death
or serious personal injury.
The printer uses two power cords. Unplug both power cords before servicing the printer. The printer
must be connected to earthed mains outlets only.
To avoid the risk of electric shock:
Do not attempt to dismantle the drying and curing modules or the electrical control cabinet.
●
Do not remove or open any other closed system covers or plugs.
●
Do not insert objects through slots in the printer.
●
ENWW General safety guidelines 1

Safety precautions
NOTE: A blown fuse may indicate malfunctioning electrical circuits within the system. Have the system
checked by qualified HP service personnel, and do not attempt to replace the fuse yourself.
Heat hazard
The drying and curing subsystems of the printer operate at high temperatures and can cause burns if
touched. To avoid personal injury, take the following precautions.
Do not touch the internal enclosures of the printer's drying and curing modules. Even after opening
●
the window latch that disconnects drying and curing power, the internal surfaces could be hot.
Take special care when accessing the substrate path.
●
Fire hazard
The drying and curing subsystems of the printer operate at high temperatures. Contact qualified HP
service personnel if the printer's built-in Residual Current Circuit Breaker (Ground Fault Circuit
Interrupter) is repeatedly tripped.
To avoid the risk of fire, take the following precautions.
Use the power supply voltage specified on the nameplate.
●
Connect the power cords to dedicated lines, each protected by a branch circuit breaker according
●
to the rating of the wall socket. Do not use a power strip (relocatable power tap) to connect both
power cords.
Use only the power cords supplied by HP with the printer. Do not use a damaged power cord. Do
●
not use the power cords with other products.
Do not insert objects through slots in the printer.
●
Take care not to spill liquid on the printer.
●
Do not use aerosol products that contain flammable gases inside or around the printer.
●
Do not block or cover the openings of the printer.
●
Do not attempt to dismantle the drying or curing module, or the electrical control cabinet.
●
Load substrates that can be used at an operating temperature of up to 125°C (257°F), and have
●
auto-ignition temperatures above 250°C (482°F).
Mechanical hazard
The printer has moving parts that could cause injury. To avoid personal injury, take the following
precautions when working close to the printer.
Keep your clothing and all parts of your body away from the printer's moving parts.
●
Avoid wearing necklaces, bracelets and other hanging objects.
●
If your hair is long, try to secure it so that it will not fall into the printer.
●
Take care that sleeves or gloves do not get caught in the printer's moving parts.
●
Avoid standing close to the fans, which could cause injury and could also affect print quality (by
●
obstructing the air flow).
Do not touch gears or moving rolls during printing.
●
2 Chapter 1 Safety precautions ENWW
Heavy substrate hazard
Special care must be taken to avoid personal injury when handling heavy substrates.
Handling heavy substrate rolls may require more than one person. Care must be taken to avoid
●
back strain and/or injury.
Consider using a forklift, pallet truck or other handling equipment.
●
When handling heavy substrate rolls, wear personal protective equipment including boots and
●
gloves.
Ink handling
Your printer does not use solvent inks and does not have the traditional problems associated with them.
However, HP recommends that you wear gloves when handling ink system components.
Warnings and cautions
The following symbols are used in this manual to ensure the proper use of the printer and to prevent
the printer from being damaged. Follow the instructions marked with these symbols.
WARNING! Failure to follow the guidelines marked with this symbol could result in serious personal
injury or death.
Safety precautions
CAUTION: Failure to follow the guidelines marked with this symbol could result in minor personal injury
or damage to the product.
Warning labels
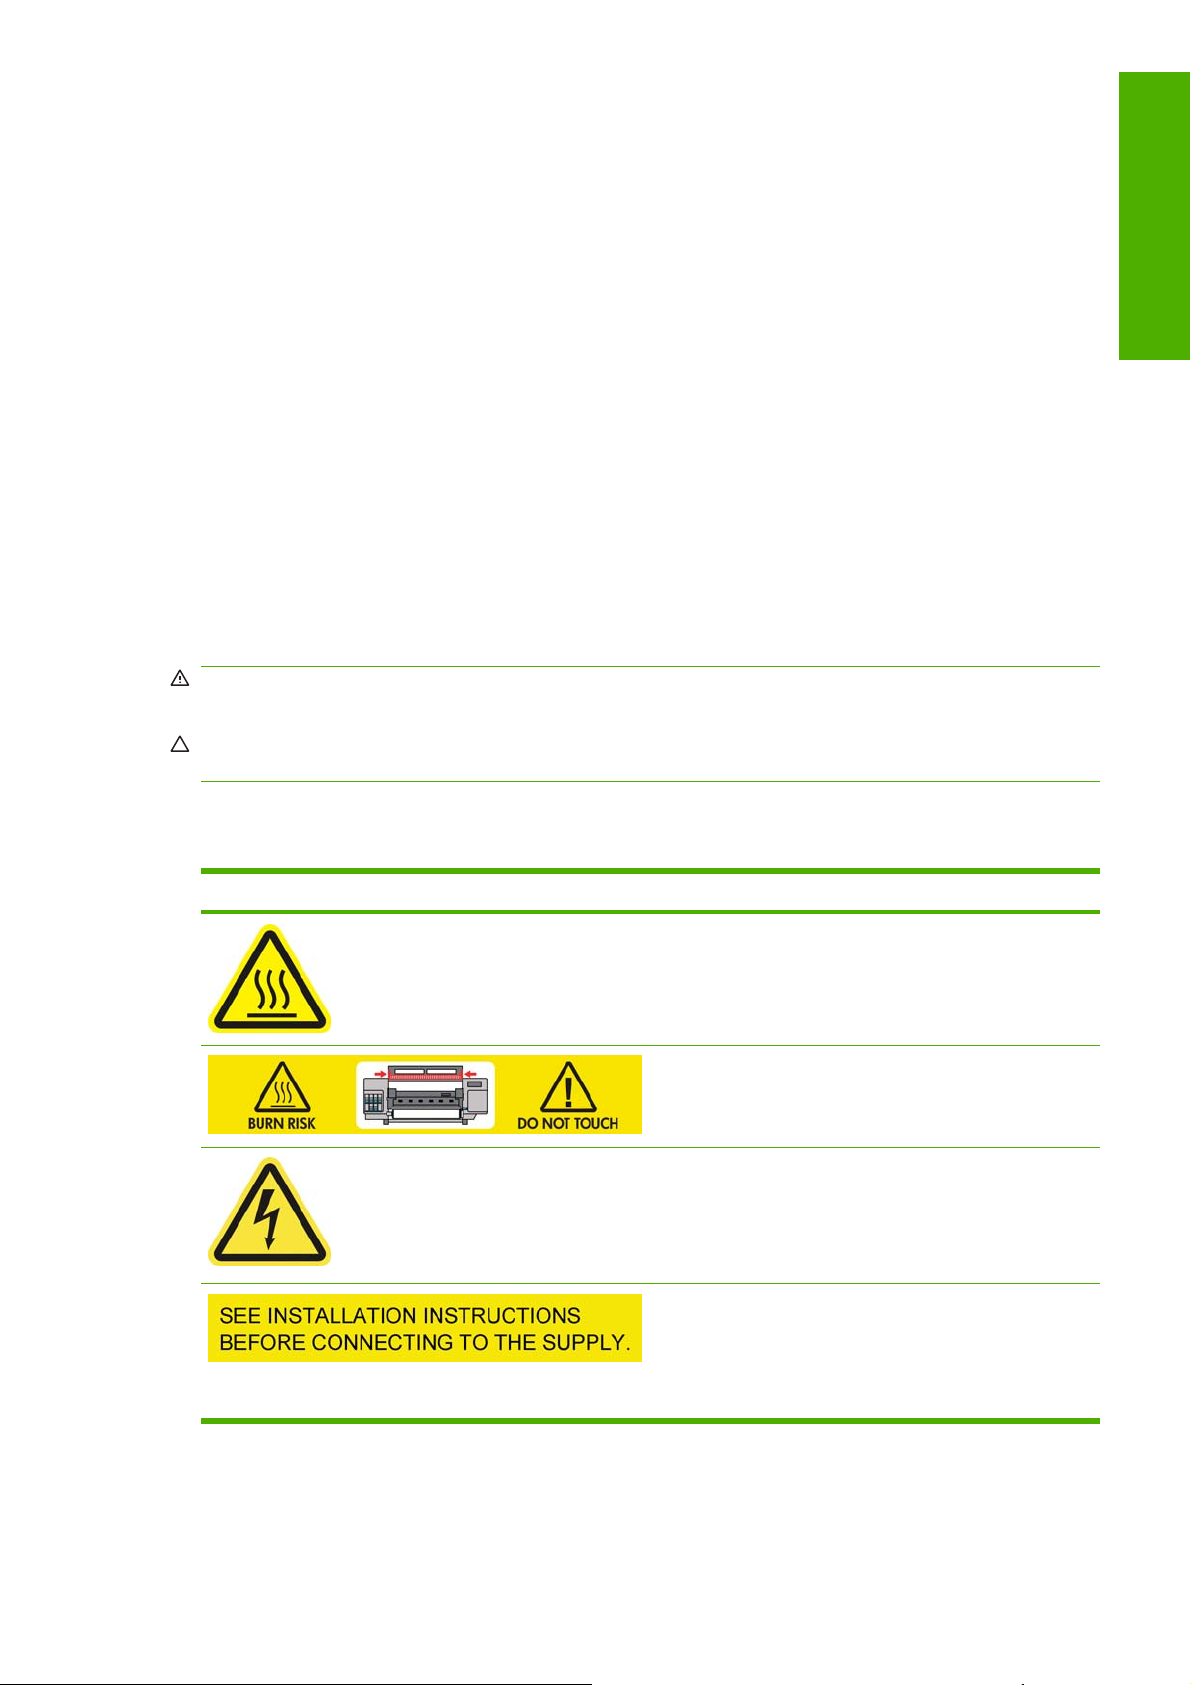
Label Explanation
Risk of burns. Do not touch the internal enclosures of drying
and curing modules of the printer.
Risk of burns. Do not touch the drying enclosure of the printer.
Even after opening the window latch, which disconnects the
power to the drying and curing modules, the internal surfaces
could be hot.
Electric shock hazard. The printer has two input power cords.
A voltage is still present in the drying and curing modules after
the main switch is turned off. There are no operatorserviceable parts inside the printer. Refer servicing to qualified
service personnel. Disconnect all power cords before
servicing.
See installation instructions before connecting to the supply.
Ensure that the input voltage is within the printer's rated voltage
range. The printer requires two dedicated lines, each protected
by a branch circuit breaker according to the rating of the wall
socket outlet. Use only earthed mains outlets and the power
cords supplied by HP with the printer.
ENWW Heavy substrate hazard 3
Safety precautions
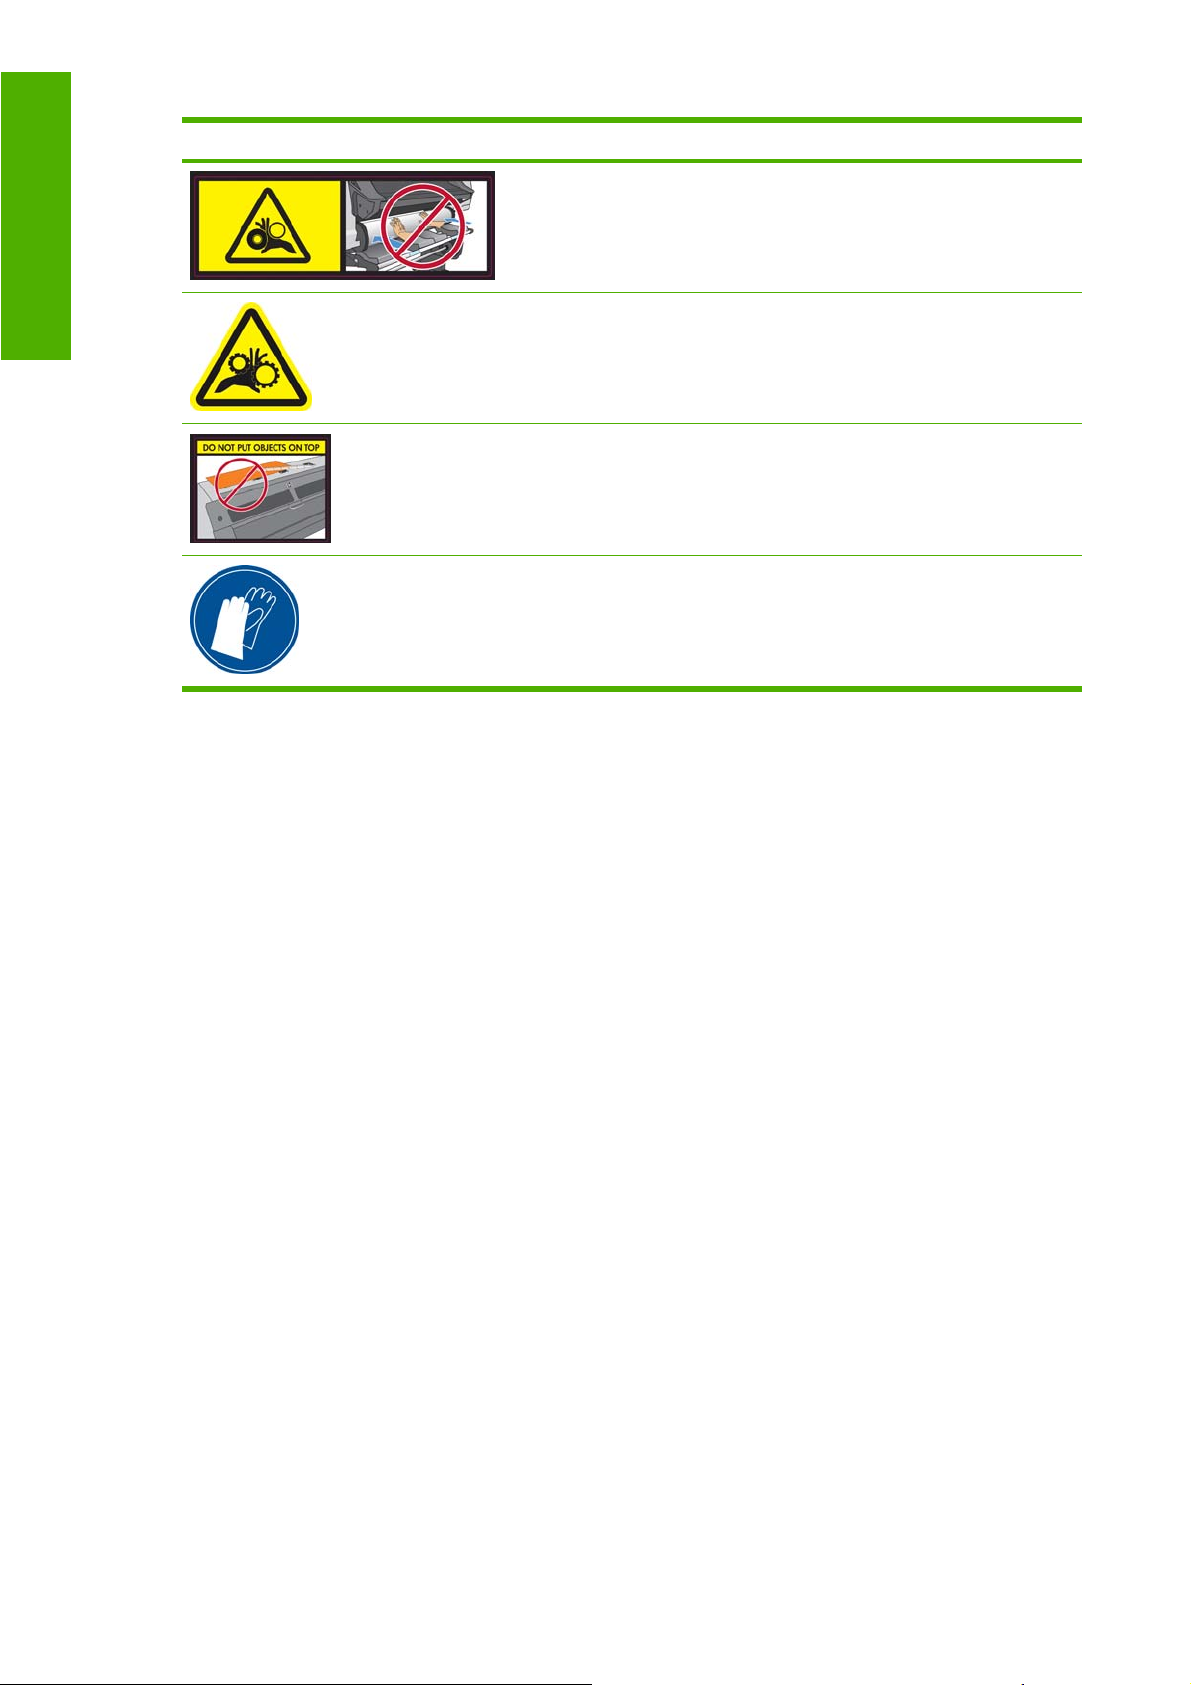
Label Explanation
Risk of trapped hands. Do not push the roll while loading. Lift
the loading table to ease the spindle into the printer.
Risk of trapped fingers. Do not touch spindle gears while
moving.
Do not put objects on top of the printer. Do not cover the fans.
You are recommended to wear gloves when handling ink
cartridges, printhead cleaning cartridges and the printhead
cleaning container.
4 Chapter 1 Safety precautions ENWW
2 Printer status
Check printer status
You can check the current status of the printer in the following ways:
The Embedded Web Server displays the status of the printer, the loaded substrate and the ink
●
system.
The front panel displays the ink levels by default; otherwise, you can see the ink levels by selecting
●
the the Ink System icon
front panel.
. In addition, the most important current alert, if any, is displayed in the
Check the status of the ink system
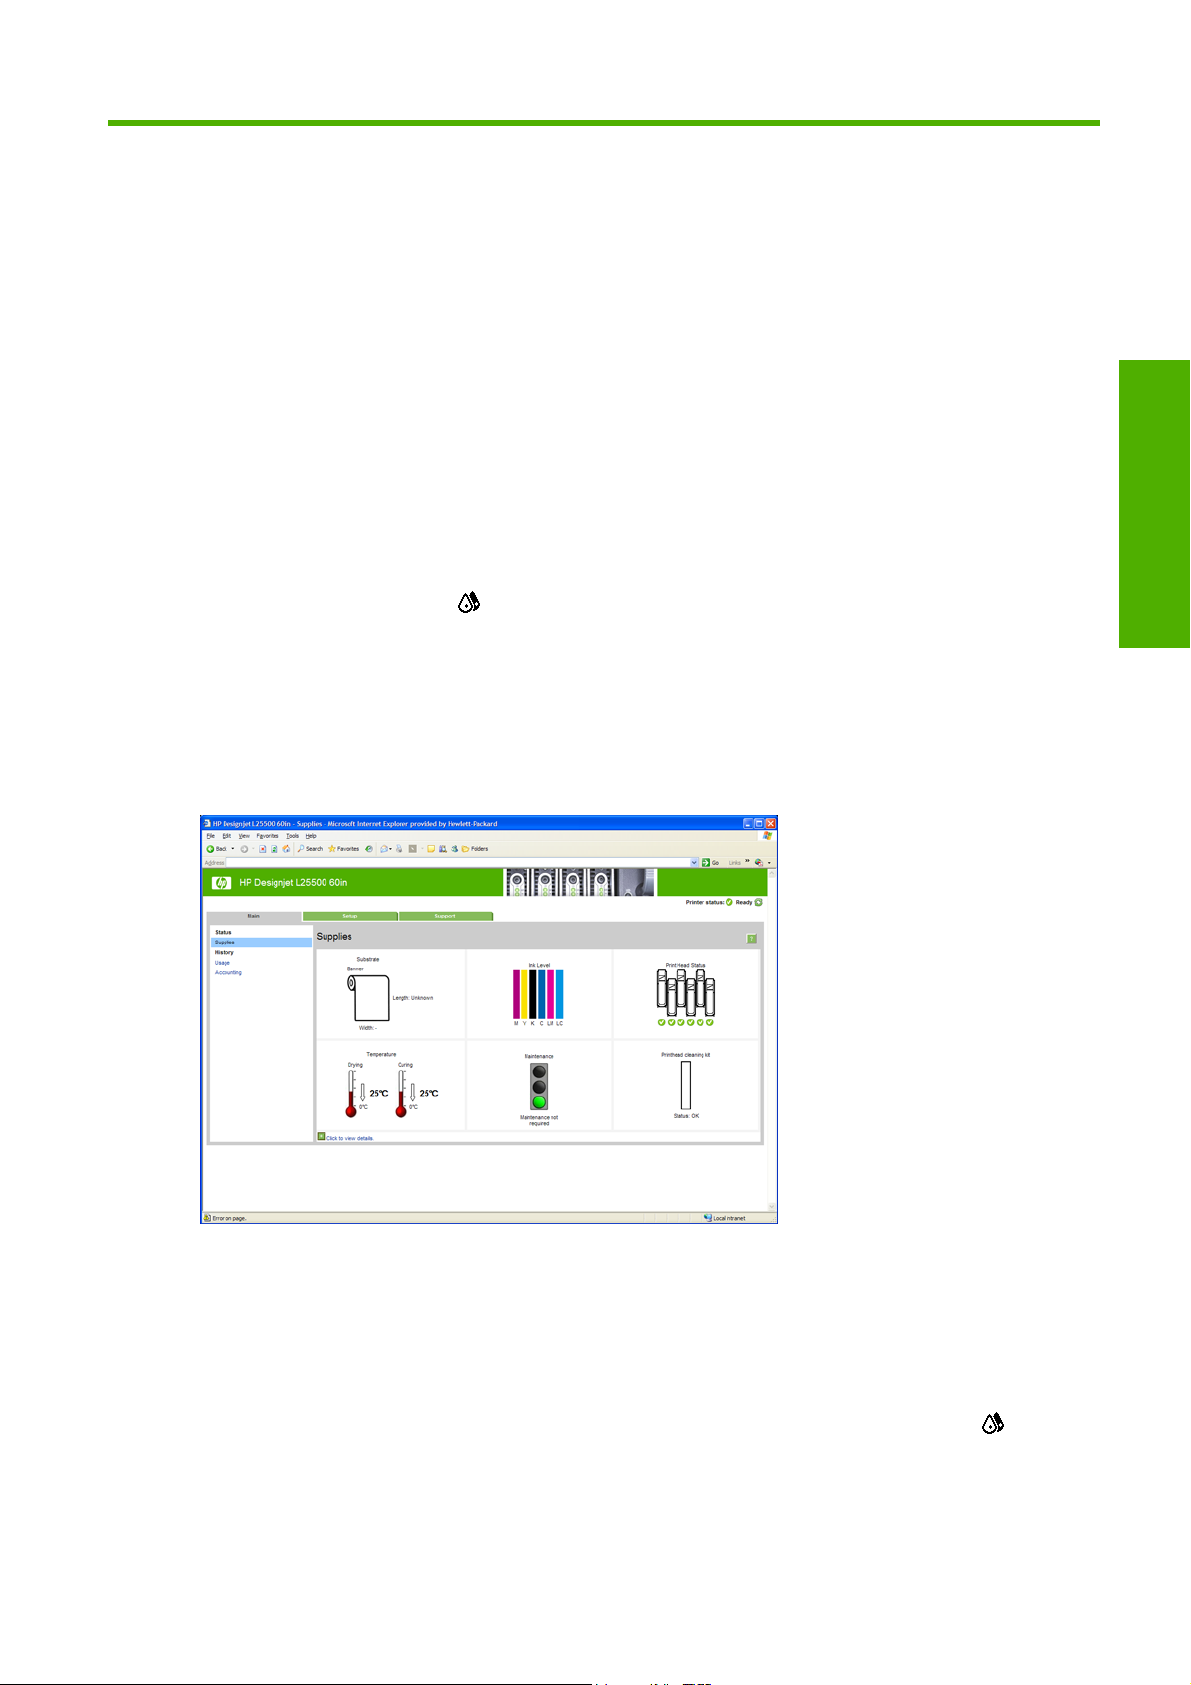
1. Access the Embedded Web Server (see the User's guide).
2. Go to the Supplies page on the Main tab.
Printer status
The Supplies page shows you the status of the ink cartridges (including the ink levels), the printheads,
the printhead cleaning cartridge, and the loaded substrate.
The traffic light shows whether maintenance is required. For further information, click View details.
Check the status of the ink cartridges
To view the ink levels in your ink cartridges, go to the printer's front panel and select the icon.
Click the + sign for more details, or use the ink menu.
You can also view the status of the ink cartridges in the Embedded Web Server.
ENWW Check printer status 5

Ink menu procedure
Printer status
1. On the front panel, select the icon, then select Ink cartridge information.
2. Select the cartridge about which you want information.
3. The front panel shows the following information:
Color
●
Product name
●
Product number
●
Serial number
●
Status
●
Ink level, if known
●
Total ink capacity in milliliters
●
Expiration date
●
Warranty status
●
Manufacturer
●
Check the status of a printhead
The printer automatically checks and services the printheads after each print. Follow these steps to get
more information on your printheads.
1. On the front panel, select the
2. Select the printhead for which you want to see information.
3. The front panel shows the following information:
Colors
●
Product name
●
Product number
●
Serial number
●
Status (See
●
Volume of ink it has used
●
Warranty status
●
You can also use the Embedded Web Server to check the printhead status and the warranty status.
NOTE: If the warranty status is See warranty note, this indicates that non-HP ink is being used. Printer
service or repairs required as a result of using "non-HP" ink are not covered under warranty. See the
Legal Information document for detailed warranty implications.
Front-panel error messages on page 41.)
icon, then select Printhead information.
6 Chapter 2 Printer status ENWW
Check the file system
It is possible to check the integrity of the file system on the printer's hard disk, and automatically correct
any errors. You are recommended to do this about once every six months, or if you notice any trouble
in accessing files on the hard disk.
To execute the file system check, go to the front panel and select the
check.
If the printer is aware of damage to the file system, for instance after a severe software problem, it may
start a file system check automatically. This can take about half an hour.
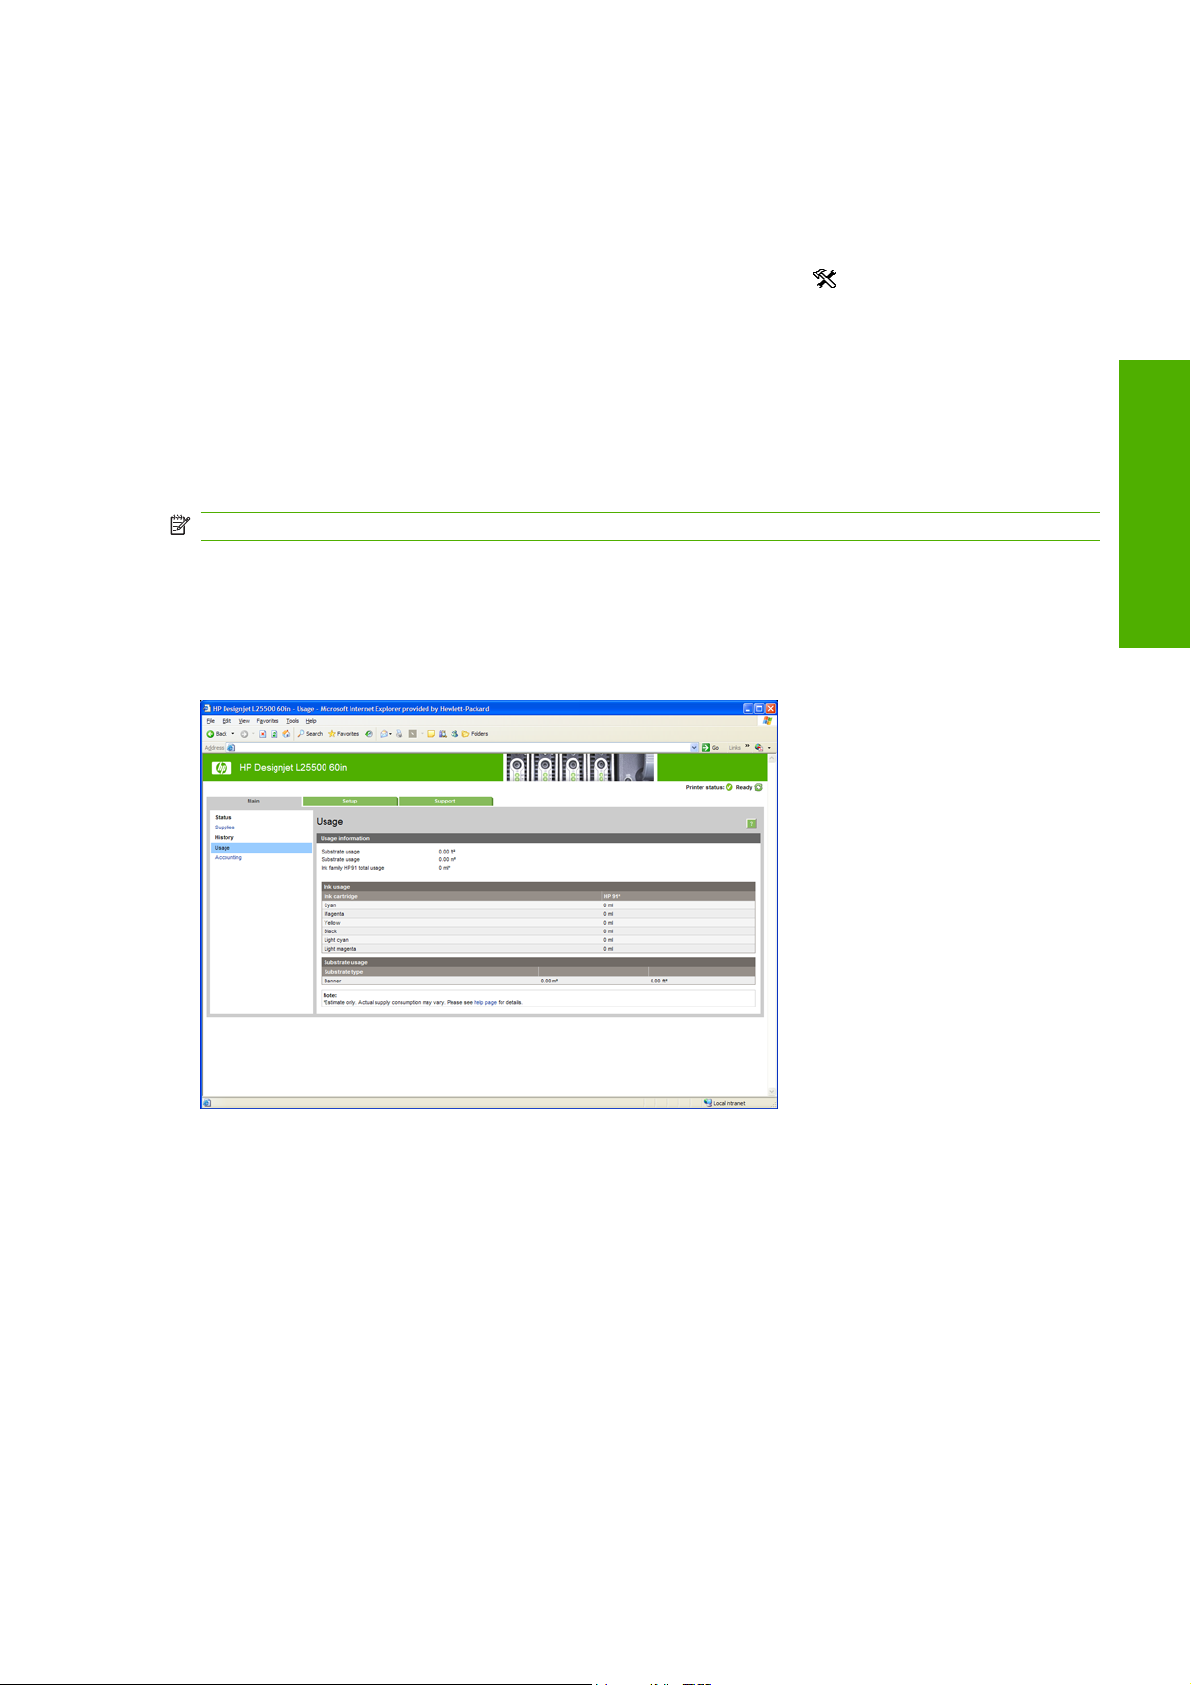
Check printer usage statistics
To check your printer-usage, statistics are available.
NOTE: The accuracy of the usage statistics is not guaranteed.
Printer statistics with the Embedded Web Server
1. Access the Embedded Web Server (see the User's guide).
2. Go to the Usage page on the Main tab.
icon, then select File system
Printer status
Printer alerts
The printer can communicate two types of alerts:
Errors: When the printer is unable to print.
●
Warnings: When the printer needs attention for an adjustment, such as a calibration, preventive
●
maintenance or ink cartridge replacement.
ENWW Check the file system 7

Printer alerts appear in the front panel and in the Embedded Web Server.
Front-panel display: The front panel shows only one alert at a time, which is judged to be the
●
most important. It generally requires the user to press the OK key for confirmation, but in the case
of a warning, it disappears after a while. Some alerts reappear when the printer is idle and there
is nothing more important to report.
Embedded Web Server: The alert displayed in the front panel also appears in the top right corner
●
of the Embedded Web Server window.
Printer status
An alert may require you to perform a maintenance operation; see
on page 10.
The following alerts require a service engineer:
Service Maintenance Kit 1
●
Service Maintenance Kit 2
●
Service Maintenance Kit 3
●
Hardware maintenance
8 Chapter 2 Printer status ENWW
3 Firmware update
The printer's various functions are controlled by software that resides in the printer, also known as
firmware.
From time to time, firmware updates from Hewlett-Packard become available. These updates increase
the printer's functionality and enhance its features.
Firmware updates can be downloaded from HP's Web site (
installed in your printer using the printer's Embedded Web Server.
To use the Embedded Web Server on any computer, open your Web browser and type the printer's
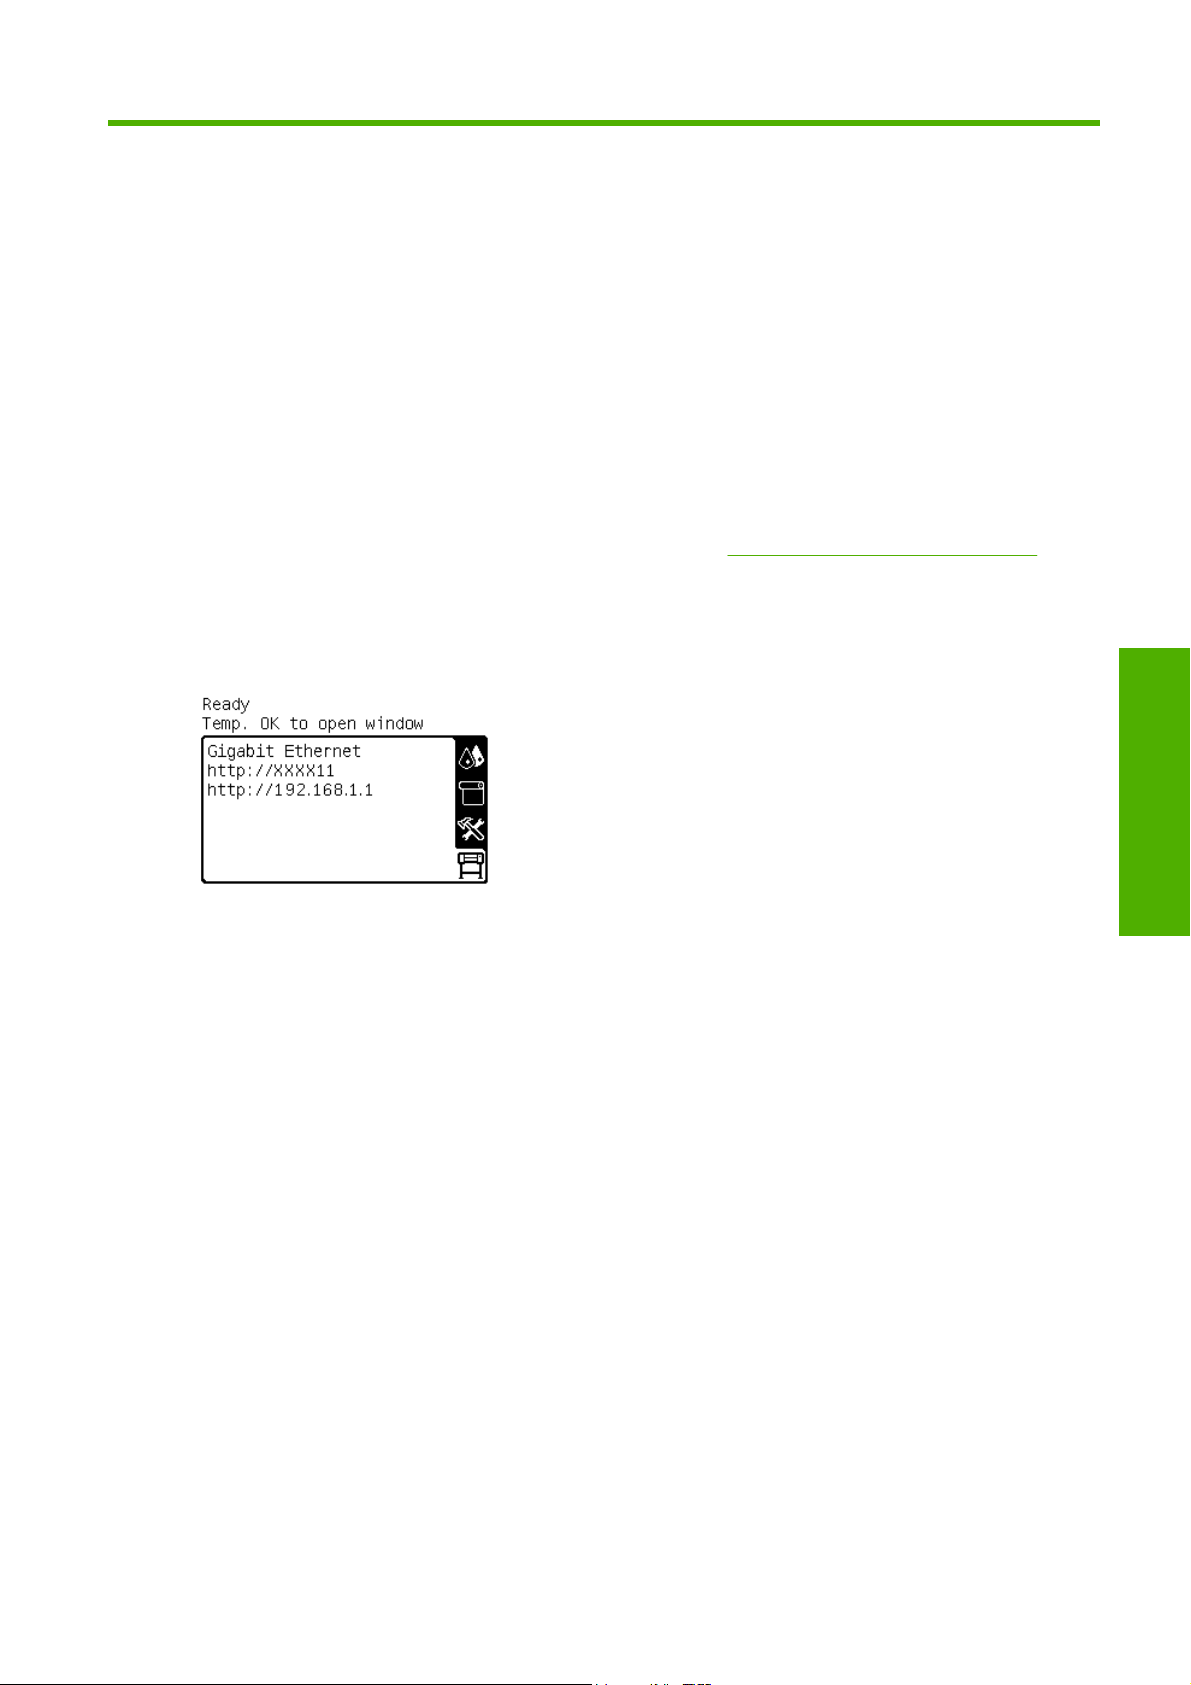
URL. The printer's URL appears on the status screen on the printer's front panel (http://192.168.1.1 in
this example):
In the Embedded Web Server, select the Setup tab and then Firmware update.
Follow the on-screen instructions to download the firmware file and store it on your hard disk. Then
select the downloaded file and click Update.
If you experience very slow progress while uploading the firmware file to the printer, the reason could
be that you are using a proxy server. In that case, try bypassing the proxy server and accessing the
Embedded Web Server directly.
In Internet Explorer 6 for Windows, go to Tools > Internet Options > Connections > LAN
●
Settings, and select the Bypass proxy server for local addresses check box. Alternatively, for
more precise control, click the Advanced button and add the printer's IP address to the list of
exceptions, for which the proxy server is not used.
http://www.hp.com/go/graphic-arts/) and
Firmware update
In Firefox 3.0 for Windows, go to Tools > Options > Network > Connection > Settings, and select
●
the Direct connection to the Internet check box. Alternatively, when the Manual proxy
configuration check box is selected, add the printer's IP address to the list of exceptions, for which
the proxy server is not used.
In Firefox 2.0 for Linux, go to Edit > Preferences > Network > Connection > Settings, and select
●
the Direct connection to the Internet check box. Alternatively, when the Manual proxy
configuration check box is selected, add the printer's IP address to the list of exceptions, for which
the proxy server is not used.
ENWW 9

4 Hardware maintenance
For the tasks in this chapter, you may need the User Maintenance Kit that was provided with your printer.
Align the printheads
The printer performs printhead alignment whenever printheads are replaced. If no substrate is loaded
when a printhead is replaced, the printer will perform the alignment the next time you load substrate.
You may also be recommended to align the printheads to solve a print-quality problem.
Automatic alignment
First make sure that you have a roll of opaque, white substrate loaded in the printer. Colored substrates,
glossy canvas, and transparent materials such as translucent bond, clear film, tracing substrate, and
vellum are not suitable for automatic printhead alignment; for these substrates, you should align the
printheads manually (see
Manual alignment on page 10).
To request printhead alignment from the front panel (if the alignment is not performed automatically),
select the
alignment.
To request printhead alignment from the Embedded Web Server, select the Setup tab, then select Align
printheads > Automatic PH alignment > Print.
Hardware maintenance
The process takes about 10 minutes and starts immediately, unless an image is currently being printed.
If a print job is in process, the alignment will be done as soon as the current print job is finished.
Manual alignment
To request a manual printhead alignment from the front panel, select the icon, then select Image
quality maintenance > Align printheads > Manual PH alignment > Print alignment pattern.
To request manual printhead alignment from the Embedded Web Server, select the Setup tab, then
select Align printheads > Manual PH alignment > Print.
The printer prints 17 rows labelled from A to Q. Inspect the print and write down the number of the
straightest line in each row (for example, A:9).
icon, then select Image quality maintenance > Align printheads > Auto PH
10 Chapter 4 Hardware maintenance ENWW

When you have done this, enter the correction values into the front panel or the Embedded Web Server.
To enter the correction values in the front panel, select the
maintenance > Align printheads > Manual PH alignment > Enter correction values. Enter each
value into the window labelled with the same letter as the corresponding pattern.
To enter the correction values in the Embedded Web Server, select the Setup tab, then select Align
printheads > Manual PH alignment, and enter each value into the window labelled with the same letter
as the corresponding pattern.
icon, then select Image quality
Clean the electrical connections on a printhead
It is possible that the printer will not recognize a printhead after it has been installed. This can happen
when ink builds up on the electrical connections between the printhead and the printhead carriage.
Under these circumstances, HP recommends that you clean the electrical connections on the printhead.
However, routine cleaning of the connections when no problems are apparent is not recommended.
A carriage interconnect wiper is included with your printer in the User Maintenance Kit.
Use this to clean the electrical interconnects on both the printhead carriage and the printhead if the
Reseat or Replace message persists next to the printhead on the front-panel display.
1. Remove a new pre-moistened replacement sponge from its pouch.
A supply of sponges is included in the box with the wiper. If all sponges have been used, more can
be obtained by calling your service representative.
ENWW Clean the electrical connections on a printhead 11
Hardware maintenance

2. Open the carriage interconnect wiper.
3. Load the sponge by positioning the sponge on the face of the carriage interconnect wiper with the
shorter tab in the locating slot.
4. Close the carriage interconnect wiper, trapping the sponge in place.
Hardware maintenance
5. Open the printhead carriage latch and extract the printhead that is causing the problem, as
indicated on the front panel. See the User's guide.
6. Insert the carriage interconnect wiper into the printhead slot at the back. Wipe the electrical contacts
by inserting the tool between the electrical connections at the back of the slot and the steel spring,
with the sponge facing away from you and towards the electrical contacts. Try to avoid picking up
any ink deposit that may have accumulated on the bottom surface of the slot.
CAUTION: If the carriage remains in the central part of the printer for more than 7 minutes, it
attempts to return to its home position to the right.
12 Chapter 4 Hardware maintenance ENWW

7. Rub the sponge against the contacts with a light force along the entire depth of the flex connector,
inserting the wiper as far as allowed by the mechanical stop on the tool.
8. Take special care to clean all contacts thoroughly, including the ones at the lowest point of the
connector.
9. Using the same sponge, clean the lower strip of electrical contacts on the printhead (unless the
printhead is new). Avoid touching the upper set of electrical contacts.
CAUTION: Do not touch the surface of the printhead that contains the nozzles, because the
nozzles are easily damaged.
10. After waiting a few moments to allow both connectors to dry, replace the printhead into the printhead
carriage. See the User's guide.
11. After completing the cleaning process, open the carriage interconnect wiper by pulling on the
sponge tab.
Hardware maintenance
ENWW Clean the electrical connections on a printhead 13

12. Remove the soiled sponge from the carriage interconnect wiper.
13. Dispose of the soiled sponge in a safe place to prevent the transfer of ink onto hands and clothing.
If the front panel continues to show the Reseat or Replace message, replace the printhead or call your
service representative.
Clean the exterior of the printer
Use a damp sponge or a soft cloth and a mild household cleaner such as non-abrasive liquid soap to
clean the outside of the printer and all other parts of the printer that you regularly touch as part of normal
operation (for example, ink cartridge drawer handles).
There may be some dampness from condensation under the fans of the curing module, which should
be wiped with a dry cloth.
Hardware maintenance
WARNING! To avoid an electric shock, make sure that the printer is turned OFF and unplugged before
you clean it. Do not let water get inside the printer.
CAUTION: Do not use abrasive cleaners on the printer.
Clean the platen
You should clean your printer's platen every few months, or when necessary.
NOTE: If you print on wide substrate after having printed on narrower substrate, you might find that
the left side of the platen has become dirty. If this contaminated section of the platen is not cleaned, it
might leave marks on the back of the substrate.
WARNING! Be careful not to damage the substrate-advance sensor when cleaning the platen. The
sensor is the very small rectangular window (less than 1 square centimeter) found close to the third
pinchwheel from the right. See
Clean the substrate-advance sensor windowon page 16.
Follow these instructions to clean the platen.
1. Unload all substrate from the printer. See the User's guide.
14 Chapter 4 Hardware maintenance ENWW

2. Turn off the printer and wait until it has cooled down, then unlock and open the printer window.
3. With a dry brush, remove ink deposits from the cutter groove. A brush is available in the User
Maintenance Kit.
4. With the same dry brush, remove ink deposits from the platen surface.
5. Use a clean, absorbent lint-free cloth that has been slightly dampened with isopropyl alcohol to
wipe loosened ink deposits from the platen.
NOTE: Isopropyl alcohol is not provided in the User Maintenance Kit.
Hardware maintenance
CAUTION: Do not use commercial cleaners or abrasive cleaners. Do not wet the platen directly,
because you will leave too much moisture behind.
ENWW Clean the platen 15

6. Use the damp cloth to clean the cutter ramp.
7. Use a dry cloth to clean the exposed part of the wheels. Ideally, you should clean the entire
circumference of these wheels.
8. Remove the isopropyl alcohol and the cloth from the vicinity of the printer.
9. Wait three or four minutes to let the alcohol evaporate, before turning on the printer and reloading
the substrate.
Clean (recover) the printheads
To clean the printheads (which often enables them to recover from problems), go to the printer's front
Hardware maintenance
panel and select the
which printheads you would like to clean. You can clean all of the printheads or only some of them.
Select from these options:
Print test plot
●
Clean all
●
Clean LC-C
●
Clean Y-MK
●
Clean LM-M
●
Cleaning all printheads takes about 5 minutes. Cleaning any two printheads takes about 3 minutes.
NOTE: Cleaning all printheads uses more ink than cleaning a single pair.
icon, then select Image quality maintenance > Clean printheads. Specify
Clean the substrate-advance sensor window
The substrate-advance sensor is the very small rectangular window (less than 1 square centimeter in
size) close to the third pinchwheel from the right.
16 Chapter 4 Hardware maintenance ENWW

HP recommends that you clean the substrate-advance sensor window whenever you clean the print
platen and if you are experiencing print quality issues.
1. Unload the substrate by using the front panel procedure. See the User's guide.
2. Turn off the printer and wait until it has cooled down.
3. Wipe the sensor with one of the cotton swabs provided in the User Maintenance Kit, slightly
dampened with isopropyl alcohol, to remove dried ink.
If the sensor window is heavily coated with dried ink, you may need to apply some pressure while
wiping, helping the cotton to absorb the ink. Continue cleaning with fresh swabs until the cotton
stays clean and the sensor window looks clean. When reflecting ambient light, a clean sensor
shows a blue-colored reflection that should extend uniformly across its whole surface. You can see
this reflection by moving closer and slightly changing your angle of view.
4. Remove the isopropyl alcohol and the cotton swabs from the vicinity of the printer.
5. Wait three or four minutes to let the alcohol evaporate, before turning on the printer and reloading
the substrate.
Lubricate the printhead carriage
The printhead carriage occasionally (about twice a year) needs lubrication so that it continues to slide
easily along the slider rod. This is recommended by the front panel when the time comes.
1. To gain access to the carriage, go to the front panel and select the
roller lubrication. The carriage slides to the middle section of the printer.
CAUTION: If the carriage remains in the central part of the printer for more than 7 minutes, it
attempts to return to its home position on the right.
2. Take the bottle of oil from the User Maintenance Kit that is supplied with your printer. A replacement
kit can be ordered if necessary.
3. Unlock and open the printer window, and apply a few drops of the oil to the pads on either side of
the carriage.
icon, then select Carriage
Hardware maintenance
ENWW Lubricate the printhead carriage 17

4. Apply a few drops of oil directly to the slider rod on either side of the carriage.
Press OK when this has been done.
5. Clean the substrate jam reflector using a lint-free cloth dampened with distilled water. If you find
dried ink that you cannot remove, try using a lint-free cloth dampened with isopropyl alcohol.
Press OK when this has been done.
6. If the front panel prompts you to oil the rollers, see
Press OK when this has been done.
7. Close and lock the printer window.
Lubricate the platen rollers
Hardware maintenance
If you notice that the platen rollers are squeaking, it is time to lubricate them. Locate the oil bottle in the
User Maintenance Kit that came with your printer.
1. Unlock and open the printer window.
Lubricate the platen rollers on page 18.
18 Chapter 4 Hardware maintenance ENWW

2. Locate the small holes in the platen near some of the rollers.
3. Put three drops of oil into each hole in the platen.
NOTE: Be careful not to spill oil onto the platen.
4. If oil spills onto the platen, wipe the platen clean by using the cloth that was supplied with the User
Maintenance Kit.
5. Close and lock the printer window.
Hardware maintenance
ENWW Lubricate the platen rollers 19

Maintain the ink cartridges
During the normal lifetime of a cartridge, no specific maintenance is required. You should replace a
cartridge when it has reached its expiration date. See the ink cartridge information on the front panel for
the expiration date.
Move or store the printer
If you need to move your printer or store it for an extended period of time, prepare it correctly to avoid
possible damage.
1. Do not remove the ink cartridges, printheads or printhead cleaning cartridge.
2. Make sure that no substrate is loaded.
3. Make sure that the printhead carriage is located in the service station (at the right end of the printer).
4. Make sure that the Ready message appears on the front panel.
5. Turn off the power by using the Power button on the front panel.
6. Also switch off the two power switches at the rear of the printer.
7. Disconnect the two power cables and any cables that connect the printer to a network, a computer,
or a scanner.
8. If you have a take-up reel installed, remove the take-up reel sensor and cable-housing unit from
the foot of the printer stand. For your convenience, you can place the sensor and cable-housing
unit on the printer-stand crossbar and use the blue, plastic screw to affix the housing unit to the
leg of the stand, while you move the printer (see the following graphic). When reinstalling the
housing unit, make sure that the wheel on the foot of the printer stand is pointing forward.
Hardware maintenance
NOTE: If the printer or ink cartridges are moved from a cold location to a warm and humid location,
water from the atmosphere can condensate on the printer parts and cartridges and can result in
ink leaks and printer errors. In this case, HP recommends that you wait at least 3 hours before
turning on the printer or installing the ink cartridges, to allow the condensate to evaporate.
9. To avoid ink leakage, keep the printer upright at all times and do not turn it upside down or on its
side. Cover the top of the ink funnel with tape, and clean the tube from the printhead cleaning
container.
10. For correct environmental storage conditions, see the specifications in the User's guide.
Service maintenance
During the life of your printer, components that are used constantly can wear out.
To avoid having these components degrade to the point that the printer breaks down, the printer keeps
track of the number of cycles that the printer carriage makes across the axis of the printer, and also
monitors the total quantity of ink used.
20 Chapter 4 Hardware maintenance ENWW

The printer uses these numbers to track the need for service maintenance, and displays one of the
following messages on the front panel:
Service Maintenance Kit 1
●
Service Maintenance Kit 2
●
Service Maintenance Kit 3
●
These messages mean that some components are nearing the end of their lives. You can continue
printing for quite some time, depending on your use of the printer. However, HP strongly recommends
that you call your service representative and arrange for a service maintenance visit. The service
engineer can then replace the worn parts on-site, which will prolong the life of the printer.
The benefits of arranging a service engineer's visit when these messages appear on the front panel are
two-fold:
The printer components can be replaced at a time that is convenient for you, and so will not disturb
●
your daily workflow.
During a service maintenance visit, the service engineer replaces several parts at once. This
●
eliminates the need for repeat visits.
Use the printhead status plot
The printhead status plot consists of patterns that are designed to highlight printhead-reliability
problems. It helps you to check the performance of the printheads that are currently installed in your
printer, and to determine whether any printhead is experiencing clogging or other problems.
Print the printhead status plot
To print the printhead status plot:
1. Use the same substrate type that you were using when you detected a problem.
2. Check that the selected substrate type is the same as the substrate type that is loaded into the
printer.
3. On the printer's front panel, select the
test plots.
It takes about 2 minutes to print the printhead status plot.
Interpret the printhead status plot
The print consists of small dashes, one for each nozzle on each printhead.
For each individual colored pattern, make sure that most of the dashes are present.
icon, then select Image quality maintenance > Print all
Hardware maintenance
ENWW Use the printhead status plot 21

Corrective action
1. Clean any faulty printheads. See Clean the printheads on page 34. Then reprint the printhead
status plot to see whether the problem has been solved.
2. If the problem persists, clean the printheads again, and reprint the printhead status plot to see
whether the problem has been solved.
3. If the problem continues to persist, replace any persistently faulty printheads. See the User's
guide.
What to do if problems persist
If you still experience print-quality problems after applying the advice in this chapter, here are some
additional tips to consider:
Try selecting a higher print-quality option in your RIP software.
●
Check that your printer firmware is up to date. See
●
Check that you have the correct settings in your software program.
●
Call your service representative. See
●
Hardware maintenance
Firmware update on page 9.
When you need help on page 46.
22 Chapter 4 Hardware maintenance ENWW

5 Troubleshoot print-quality issues
General advice
Use the following approach when you have any print-quality problem:
To achieve the best performance from your printer, use only genuine HP supplies and accessories,
●
whose reliability and performance have been thoroughly tested to give trouble-free performance
and best-quality prints. For details of recommended substrates, see the User's guide.
Make sure that the substrate type that you select on the front panel, and in your RIP software, is
●
the same as the substrate type that is loaded in the printer. Make sure that the substrate type has
been calibrated.
CAUTION: If you have the wrong substrate type selected, you could experience poor print quality
and incorrect colors, and perhaps even damage to the printheads.
Make sure that you are using appropriate print-quality settings in your RIP software.
●
Make sure that you are using the correct ICC profile for your substrate and print-quality settings.
●
Make sure that your environmental conditions (temperature, humidity) are in the recommended
●
range. See the User's guide.
Make sure that your ink cartridges and printheads have not passed their expiration dates. See
●
Maintain the ink cartridges on page 20.
Avoid touching the substrate while printing is in progress.
●
ENWW General advice 23
Troubleshoot images

Graininess
The printheads may be misaligned. This is likely if you have not aligned the printheads for a long
●
time, or if there has been a substrate jam. Align the printheads if necessary (see
printheads on page 10). You can check whether it is necessary by using the printhead status plot
(see
If you are printing with eight or more passes, the substrate advance may need adjustment. See
●
Adjust the substrate advance on page 25.
If graininess is more visible in dark or saturated colors, there may be a problem of ink coalescence.
●
Try the following suggestions.
◦
◦
Align the
Use the printhead status plot on page 21).
Use a higher number of passes: you will probably see less grain with ten or more passes.
Lower the ink quantity.
If the problem persists, call your service representative. See
Horizontal banding
Try the following remedies if your printed image suffers from added horizontal lines as shown (the color
may vary).
If bands affect mostly dark or saturated colors, or only area fills near the edges of the substrate,
●
the cause could be insufficient drying of the ink. Try the following suggestions.
◦
Troubleshoot images
◦
If bands affect all colors across the width of the printed image, and you are using no more than six
●
passes, the cause is probably a substrate advance problem. Use the front panel to adjust the
substrate advance on the fly. If you have dark bands, increase the substrate advance; if you have
light bands, decrease it. When you find the right adjustment, store the value in the RIP for future
prints on the same substrate.
When you need help on page 46.
Reduce the ink quantity.
Increase the number of passes.
Another cause could be a fiber attached to one of the printheads. Remove the printheads one at
a time and remove any fibers that you see attached to them.
24 Chapter 5 Troubleshoot print-quality issues ENWW

If bands affect only some colors, the cause could be a defective printhead.
●
Print the printhead status plot (see
◦
clean the printheads (see
clean them again.
If the problem persists, try aligning the printheads (see
◦
necessary, try aligning them manually.
If the problem persists, print the printhead status plot again. Identify the printhead with the
◦
greatest number of blocked nozzles, and replace it.
If bands affect most of the colors, the printheads could be misaligned. This is likely if you have not
●
aligned the printheads for a long time, or if there has been a substrate jam. Align the printheads if
necessary (see
the printhead status plot (see
If banding occurs mostly in black areas, create a new color profile using pure black and not a mixture
●
of other colors. See your RIP documentation.
If the problem persists, call your service representative (see the User's guide).
Align the printheads on page 10). You can check whether it is necessary by using
Adjust the substrate advance
The substrate advance sensor measures the advance of the substrate and compensates for
irregularities at every pass of the printheads. However, to fine-tune the quality of your print, you may
need to calibrate the rate at which the substrate advances. The substrate advance determines the
placement of dots on the substrate. If the substrate is not advanced correctly, light or dark bands appear
in the printed image and the grain in the print may increase.
Use the printhead status plot on page 21). If necessary,
Clean (recover) the printheads on page 16). If the problem persists,
Align the printheads on page 10). If
Use the printhead status plot on page 21).
You can modify the substrate advance with the Substrate Advance parameter in the RIP's substrate
preset.
1. On the front panel, select the
advance calibration > Print adjustment plot. The printer prints a substrate-advance adjustment
image.
2. The calibration image consists of several columns with a number at the bottom of each one. Locate
the lightest of the columns and enter its number into the RIP's Substrate Advance parameter for
the current substrate preset. The value chosen in this example should be “–6”.
icon, then select Image quality maintenance > Substrate
Substrate advance adjustment on the fly
If you are using no more than six passes, you can fine-tune the substrate advance while printing: select
icon, then select Image quality maintenance > Substrate advance calibration > Adjust
the
substrate advance. Select a value of change from –10 mm/m to +10 mm/m (or mils/inch). To correct
light banding, decrease the value. To correct dark banding, increase the value.
If you are using eight passes or more, a wrong advance adjustment will not produce banding but
graininess, which is harder to assess visually. Therefore, in this case you are recommended to use only
the adjustment plot.
ENWW Horizontal banding 25
Troubleshoot images

When you have chosen a value and pressed OK, the rest of your job will be printed with that value, but
it will be reset to zero at the end of the job. Add the value found to the Substrate Advance value in the
RIP preset to print all future jobs with the new setting.
A simpler and faster way to adjust the substrate advance while the printer is printing is by pressing
the Move Substrate button on the front panel, which then displays the following instructions.
As you modify the setting, the new setting is applied immediately to the current job by the printer. When
you press OK to save the value, it is saved in the printer to be used throughout the current job.
Vertical banding
If vertical bands of different colors (and sometimes of different graininess) appear in the first 200 mm of
the print, this is probably caused by the curing process of the previous print, which may have distorted
the substrate. In this case:
1. Set the extra bottom margin to 100 mm.
2. If the problem persists, set the extra bottom margin to 200 mm. This margin will apply only to jobs
that start printing when the printer is idle, and when the cutter is disabled.
3. If the problem persists, decrease the warm-up drying temperature in steps of 5°C.
If vertical banding affects the whole of the print, the drying temperature may be too high.
1. Reduce the drying temperature in steps of 5°C, down to a minimum of 40°C.
2. If the problem disappears but then there is bleeding, coalescence or not enough durability, try using
more passes or less ink.
3. If the problem persists, restore the drying temperature to its original value and select unidirectional
printing in the RIP.
Misaligned colors
Troubleshoot images
If the colors are misaligned in any direction, the printheads may be misaligned. This is likely if you have
not aligned the printheads for a long time, or if there has been a substrate jam. Align the printheads if
necessary (see
printhead status plot (see
26 Chapter 5 Troubleshoot print-quality issues ENWW
Align the printheads on page 10). You can check whether it is necessary by using the
Use the printhead status plot on page 21).

Lack of sharpness
If text, lines or solid areas are rough or blurred, the printheads may be misaligned. This is likely if you
have not aligned the printheads for a long time, or if there has been a substrate jam. Align the printheads
if necessary (see
printhead status plot (see
Align the printheads on page 10). You can check whether it is necessary by using the
Use the printhead status plot on page 21).
Black areas look hazy
If black areas look hazy or not sufficiently black, try these suggestions.
Increase the number of passes.
●
Laminate the print.
●
Subtle stains or uneven appearance
Subtle color differences may be seen on some substrates if they are stored partially covered after
printing. In the period immediately after printing, such substrates should be stored either totally covered
or totally uncovered. It may be advisable to avoid the prolonged contact of two printed faces. This
problem tends to disappear if the substrate is left uncovered for some time.
Alternatively, some individual rolls of substrate may have a defective coating. The solution in this case
is to use another roll.
The ink smudges when touched, or looks oily
These symptoms suggest that the curing temperature was too low.
If you see the problem only in the first 200 mm of the print, increase the warm-up curing temperature in
steps of 5°C until the problem disappears. If you cannot solve the problem this way, increase the number
of passes.
If the problem affects the whole print, increase the curing temperature in steps of 5°C until the problem
disappears. If you cannot solve the problem this way, increase the number of passes.
If the oily finish appears minutes or hours after printing, do not store the prints with printed faces touching
each other. Consider using the take-up reel.
The total length of the print is wrong or inconsistent
As the substrate is heated during the drying and curing processes, some substrates will shrink after the
image has been printed. This may be inconvenient if the print has to be framed or if several prints are
to be to be tiled one next to the other.
As a general rule, you can expect the following percentages of shrinkage:
Photorealistic: less than 0.4%
●
Paper-Solvent, Paper-Aqueous: less than 0.5%
●
Self-adhesive: less than 1.2%
●
Banner: less than 3% shrinkage (if you disable the substrate-advance sensor, less than 7%)
●
The framing problem may be solved by printing a sample and adjusting the length of the image in the
RIP. You may reuse this value for all your future prints with the same substrate, although special care
ENWW Lack of sharpness 27
Troubleshoot images

must be taken when using banners, as the shrinkage may vary up to 1% depending on the amount of
ink used in the print.
You can expect the following variations from one print to another:
Photorealistic, Paper-Solvent, Paper-Aqueous: less than 0.4%
●
Self-adhesive: less than 0.7%
●
Banner: less than 1%
●
To solve the tiling problem and improve the repeatability of the printed length, you are recommended
to ensure that the substrate-advance sensor is enabled in the RIP's substrate preset, as this will improve
the stability of the prints over time. You are also recommended to tile together areas with similar amounts
of ink. If this is not possible, print the areas with different amounts of ink as different jobs and modify the
length of the job with less ink in the RIP to match its length with the job with high ink content.
Troubleshoot images
28 Chapter 5 Troubleshoot print-quality issues ENWW

6 Troubleshoot substrate issues
The substrate cannot be loaded successfully
Here are a few things to check if you cannot successfully load the substrate.
The substrate might be loaded at an angle (skewed or mislocated). Make sure that the right edge
●
of the substrate is aligned with the roll on the input spindle.
The substrate might be crumpled or warped, or have irregular edges.
●
If the substrate jams in the substrate path to the platen, the leading edge of the substrate might
●
not be straight or clean. Remove the initial 2 cm (1 in) of substrate from the roll and try again. This
might be necessary even with a new roll of substrate.
Make sure that the spindle is correctly inserted.
●
Troubleshoot substrate
Make sure that the substrate is correctly loaded on the spindle, and that it loads over the roll towards
●
you.
Make sure that the substrate is wound tightly.
●
The substrate has jammed
When a jam occurs, the Possible substrate jam message usually appears in the front panel, with one
of several error codes (see
If you are trying to load a very thin or very thick substrate, remember to follow the special procedure
described in the User's guide for loading such substrates.
Check the substrate path
This problem can occur when a roll has finished and the end of the roll is stuck to the cardboard
●
core. If this has happened, cut the end of the roll away from the core. Then feed the substrate
through the printer, and load a new roll.
Front-panel error messages on page 41).
Otherwise, follow the procedure described under
●
ENWW The substrate cannot be loaded successfully 29
Check the printhead path on page 30

Troubleshoot substrate
Check the printhead path
1. Turn off the printer at the front panel, then also switch off the power switch at the rear.
2. Wait for the printer to cool down, then unlock and open the printer window.
3. Try to move the printhead carriage out of the way.
4. Lift the substrate-adjustment lever as far up as it will go.
30 Chapter 6 Troubleshoot substrate issues ENWW

5. Carefully remove any of the jammed substrate that you can lift up and out from the top of the printer.
Cut the substrate if necessary.
6. Carefully pull the remainder of the roll down and out of the printer.
7. Lower the substrate-adjustment lever, check that there is no substrate left in the printer (especially
not in the curing module), then close and lock the window.
8. Turn on the printer.
9. Reload the roll.
10. If some substrate continues to cause an obstruction within the printer, it can often be cleared by
loading a rigid substrate type into the printer.
Troubleshoot substrate
11. If you find that you have print-quality problems after a jam, try realigning the printheads. See
the printheads on page 10.
Avoiding substrate jams
Substrate jams may be caused by loading the substrate with too much skew: do not ignore the warning
message that appears during the loading process in this case.
They may also be caused by not enough vacuum suction in the printing zone. If you decide to increase
the suction, do not exceed the following limits: 20 mmH
O for other substrate families.
mmH
2
O for banners, 35 mmH2O for vinyl, and 50
2
The substrate is deformed or wrinkled
If your substrate is deformed or wrinkled by the drying and curing process, change the temperature
settings before printing the next job, and advance the substrate, using the Move Substrate key on the
front panel, so that the next job will be printed on undamaged substrate.
If the problem appears only at the beginning of the print, try the following suggestions.
Disable the automatic cutter.
●
Go to the front panel and select the
●
margin. Set the margin 100 mm. If that is not enough, try 200 mm. This extra margin will apply
only to jobs that start printing when the printer is idle and when the cutter is disabled.
icon, then Substrate handling options > Extra bottom
Align
Decrease the warm-up drying temperature in steps of 5°C, without reducing it below the drying
●
temperature.
The automatic cutter does not work
The automatic cutter is disabled when the take-up reel is in use. To use the cutter, disable the take-up
reel on the front panel by selecting the
ENWW The substrate is deformed or wrinkled 31
icon, then selecting Take-up reel > Disable take-up reel.

Troubleshoot substrate
Also check that the cutter is enabled: select the icon, then Substrate handling options
.
NOTE: The cutter is automatically disabled for some of the heaviest substrate types, which it cannot
cut.
Take-up reel substrate jam
If the substrate is severely damaged on the take-up reel spindle, do not use the printer's cutter to cut
and remove the substrate. Instead, cut the substrate manually as close as possible to the printer window,
then remove the roll.
If the problem remains after removing the substrate jam, unload the take-up reel from the front panel
and load it again.
Take-up reel does not wind
Predictably, if the take-up reel is not winding as anticipated, the printed output is likely to end up on the
floor. If the printer recognizes a problem with the take-up reel, it interrupts the print job until the issue is
corrected. If the printer does not recognize a problem, the job continues to print. The following table
highlights possible issues and solutions.
Take-up reel LED
status
Blinking quickly Take-up reel is not
Blinking slowly Take-up reel is not
Solid red Take-up reel is not
Issue Print job interrupted? Possible cause Possible solution
winding
winding
winding
Yes The sensor beam was
blocked for more than 3
seconds.
No The sensor cables are
loose or unplugged.
No There is too much
resistance on the takeup reel motor.
Make sure that the
take-up reel sensors
are not blocked by a
strip of substrate or any
objects. See the
following graphic.
Make sure that the
collection bin is placed
behind the foot brace.
Also ensure that the
take-up reel power
switch is in the On
position.
Ensure that the sensor
cables are correctly
secured.
Ensure that the
substrate is not winding
too tightly. A loopshaping core should be
inserted and hanging
as shown in the User's
guide.
32 Chapter 6 Troubleshoot substrate issues ENWW

Take-up reel LED
status
Issue Print job interrupted? Possible cause Possible solution
Solid green Take-up reel is not
winding
Solid green Take-up reel is winding
in the wrong direction
No The take-up reel power
switch is in the Off
position
No The take-up reel wind-
direction switch is in the
wrong winding position.
After 3 seconds, the
printer recognizes the
problem and interrupts
the print job. See the
first error listed in this
table.
The following graphic shows the take-up reel sensors and cable.
Ensure that the take-up
reel power switch is in
the On position.
Flip the take-up reel
wind-direction switch to
the correct position.
Troubleshoot substrate
1. Take-up reel sensor
2. Take-up reel sensor and cable housing unit
ENWW Take-up reel does not wind 33

7 Troubleshoot ink-system issues
Troubleshoot ink
Cannot insert an ink cartridge
1. Check that you have the correct type of cartridge (model number).
2. Check that the colored label on the cartridge is the same color as the label on the slot.
3. Check that the cartridge is correctly oriented, the arrow on the front of the ink cartridge should face
CAUTION: Never clean inside the ink cartridge slots.
Cannot insert a printhead
1. Check that you have the correct type of printhead (model number).
upwards.
2. Check that you have removed the orange protective caps from the printhead.
3. Check that the colored label on the printhead is the same color as the label on the slot.
4. Check that the printhead is correctly oriented (compare with the others).
5. Check that you have closed and latched the printhead cover.
Cannot insert the printhead cleaning cartridge
Check that the printhead cleaning cartridge has the correct model number and is correctly oriented.
Front panel recommends reseating or replacing a printhead
1. Remove the printhead and check that it is free from physical damage and from ink stains on the
electrical connections.
2. If necessary, clean the electrical connections between the printhead and the carriage. See
the electrical connections on a printhead on page 11.
3. Reinsert the printhead into the carriage and check the front panel message.
4. If the problem persists, insert a new printhead.
Clean
Clean the printheads
Periodic printhead cleaning is performed automatically, as long as the printer is kept turned on. However,
you should clean the printheads if you are experiencing poor image quality and cannot resolve the issues
by other methods. This ensures that there is fresh ink in the nozzles and helps to prevents nozzle clogs.
34 Chapter 7 Troubleshoot ink-system issues ENWW

If you have printed the printhead status plot, you know which colors are failing. Clean the pair of
printheads that are not performing adequately. If you are not sure which printheads to clean, clean all
of the printheads.
To clean the printheads, go to the printer's front panel and select the
maintenance > Clean printheads, then select which printheads you want to clean. You can clean all
of the printheads or only some of them. Your choices are:
Print test plot
●
Clean all
●
Clean LC-C
●
Clean Y-MK
●
Clean LM-M
●
Cleaning all printheads takes about 5 minutes. Cleaning any two printheads takes about 3 minutes.
NOTE: Cleaning all printheads uses more ink than cleaning a single pair.
Align the printheads
Precise alignment between printheads is essential for color accuracy, smooth color transitions, and
sharp edges in graphical elements. Your printer has an automatic printhead alignment process which
runs whenever a printhead has been reseated or replaced.
In the case of a substrate jam, if you have used a custom substrate, or if you are experiencing problems
with color accuracy; you might need to align the printheads. See
icon, select Image quality
Troubleshoot ink
Align the printheads on page 10.
NOTE: If you experience a substrate jam, HP recommends that you reseat and align the printheads.
TIP: Use the same substrate you intend to print on to align the printheads.
WARNING! Colored substrates, glossy canvas, and transparent materials such as translucent bond,
clear film, tracing paper, and vellum are not suitable for aligning the printheads. However, if you must
perform printhead alignment with a material that is not supported, make sure you use a material with
the same thickness as the material you are going to use for printing.
Reinsert printheads procedure
1. If the printhead alignment process is running and the wrong substrate is loaded, press the
Cancel button on the front panel.
CAUTION: Do not print if the printhead alignment process has been canceled.
2. Load the substrate you want to use. Photo paper is recommended for the best results.
WARNING! Colored substrates, glossy canvas, and transparent materials such as translucent
bond, clear film, tracing paper, and vellum are not suitable for aligning the printheads. However, if
you must perform printhead alignment with a material that is not supported, make sure you use a
material with the same thickness as the material you are going to use for printing.
ENWW Align the printheads 35

3. Remove and reinsert all of the printheads. See the User's guide. This starts the printhead alignment
Troubleshoot ink
4. The process takes about 6 minutes. Wait until the front panel shows that the process is complete
Image Quality Maintenance menu procedure
1. Load the substrate you want to use. Photo paper is recommended for the best results. Plain; bond;
process.
NOTE: Make sure the printer window is closed during printhead alignment.
before using the printer.
NOTE: A calibration image is printed during the printhead alignment process. The front panel
shows if there were any errors in the process.
and thin, coated substrates are acceptable, but provide marginal results.
WARNING! Colored substrates, glossy canvas, and transparent materials such as translucent
bond, clear film, tracing paper, and vellum are not suitable for aligning the printheads. However, if
you must perform printhead alignment with a material that is not supported, make sure you use a
material with the same thickness as the material you are going to use for printing.
2. Go to the front panel and select the icon, then select Image quality maintenance > Align
printheads > Auto PH alignment. The printer verifies that a sufficient amount of substrate exists
to perform printhead alignment.
3. If the substrate type that is loaded is acceptable for printhead alignment, the printer performs the
alignment and prints an alignment pattern.
NOTE: Make sure the printer window is closed during printhead alignment.
4. The process takes about 5 minutes. Wait until the front panel shows that the process is complete
before using the printer.
Scan errors during alignment
If the alignment process fails, a Scanning problems message appears on the front panel. This indicates
that the alignment was not completed successfully. Therefore, the printheads are not aligned and the
36 Chapter 7 Troubleshoot ink-system issues ENWW

alignment should be repeated before printing. The problem might be because of one of the following
scenarios:
The type of substrate used in the printhead alignment process was not acceptable. Repeat the
●
alignment process using one of the recommended substrate types.
The printheads are not clean. Clean the printheads. See
●
The printer window was open during the printhead alignment process. Repeat the alignment
●
process with the printer window closed.
If the problem persists after following the recommended remedies, try replacing all of the printheads. If
the problem persists after replacing the printheads, a failure in the scanning system may exist.
Clean the printheads on page 34.
Troubleshoot ink
ENWW Align the printheads 37

8 Troubleshoot other issues
The printer cannot get an IP address
If your network has no DHCP server, the printer cannot automatically retrieve an IP address. In this
case, you must set the printer's IP address manually, in the following way.
1. Select the
IP > IPV4 settings > Config method > Manual.
2. From the IPV4 Settings menu, select Manual settings > IP address.
3. Enter the IP address that you wish to use, and press the OK key when finished.
Troubleshoot other
Cannot access the Embedded Web Server
If you have not done so already, please read the instructions in the User's guide.
1. Go to the front panel and select the
2. Select Connectivity > Advanced > Embedded Web Server > Allow EWS > On.
3. Go to the front panel and select the
information.
4. The information should read: IP enabled: Yes. If it does not, you might need to use a different
connection.
If you still cannot access the Embedded Web Server, turn the printer off with the Power button on the
front panel and then turn it on again.
If you experience very slow progress while trying to access the Embedded Web Server, the problem
could be that you are using a proxy server. Try bypassing the proxy server and accessing the Embedded
Web Server directly.
icon, then select Connectivity > Gigabit Ethernet > Modify information > TCP/
icon.
icon, then select Connectivity > Gigabit Ethernet > View
In Internet Explorer 6 for Windows, go to Tools > Internet Options > Connections > LAN
●
Settings, and select the Bypass proxy server for local addresses check box. Alternatively, for
more precise control, click the Advanced button and add the printer's IP address to the list of
exceptions, for which the proxy server is not used.
In Firefox 3.0 for Windows, go to Tools > Options > Network > Connection > Settings, and select
●
the Direct connection to the Internet check box. Alternatively, when the Manual proxy
configuration check box is selected, add the printer's IP address to the list of exceptions, for which
the proxy server is not used.
In Firefox 2.0 for Linux, go to Edit > Preferences > Network > Connection > Settings, and select
●
the Direct connection to the Internet check box. Alternatively, when the Manual proxy
configuration check box is selected, add the printer's IP address to the list of exceptions, for which
the proxy server is not used.
38 Chapter 8 Troubleshoot other issues ENWW

The printer is not printing
Possible reasons why a file you have sent from your computer is not printing when expected, include
the following:
There may be a problem with the electrical power. If the printer is not performing and the front panel
●
does not respond, check that the power switch at the rear is on, the residual current circuit breakers
are up, the power cable is correctly connected, and the electrical socket is providing power.
Unusual electromagnetic phenomena may exist, such as strong electromagnetic fields or severe
●
electrical disturbances. Such occurrences can cause the printer to behave strangely, or even stop
working. Turn off the printer by using the Power button on the front panel, wait until the
electromagnetic environment has returned to normal, then turn the printer on again. If the problems
persist, call your service representative.
One of the following substrate scenarios may exist:
●
The substrate name that appears on the front panel does not reflect the substrate that is
◦
loaded in the printer.
There is not a sufficient amount of substrate on the loaded roll to print the entire job.
◦
Under these conditions, one print job might be printed, while another print job is held in the print
queue. To resolve this issue, unload the roll from the printer and load a new roll, using the front
panel to guide you through the process.
The software program slows down or stalls while generating the print job
Large quantities of data might be necessary to generate a high-quality large-format print job. This can
cause your software program to slow down significantly or stall. Lowering the print resolution may help
to avoid this scenario, however, lowering the print resolution reduces image quality.
The printer seems slow
Here are some possible explanations.
If you request the highest possible print quality in the RIP, printing will be relatively slow compared
●
with draft-quality printing.
Check that the substrate loaded in the printer belongs to the substrate family that appears on the
●
front panel.
Is your printer connected to a network? Check that all components used in the network (network
●
interface cards, hubs, routers, switches, and cables) are capable of high-speed operation. Is there
a lot of traffic from other devices on the network?
Are the printheads in good condition? Printing time tends to increase when a printhead needs
●
cleaning. Check the printhead status on the front panel or through the Embedded Web Server.
Clean or replace printheads if necessary.
Troubleshoot other
Does your image contain high-density black fills? That may increase printing time.
●
See also the information about printer states in the User's guide.
Cannot access files on the hard disk
If you have trouble accessing files on the printer's hard disk, consider running a file system check.
Check the file system on page 7.
See
ENWW The printer is not printing 39

Communication failures between computer and printer
Some symptoms are:
The front-panel display does not show the Receiving message when you have sent an image to
●
the printer.
Your computer shows an error message when you try to print.
●
Your computer or printer stalls when transferring data.
●
Your printed output shows random or inexplicable errors (misplaced lines, partial graphics, and so
●
on).
To solve a communication problem:
Make sure that you have selected the correct printer in your RIP.
●
Remember that large images usually require more time to receive, process, and print.
●
If the printer is connected to your computer through any other intermediate devices, such as switch
●
boxes, buffer boxes, cable adapters, or cable converters, remove the intermediate device and try
connecting the printer directly to your computer.
Try another interface cable.
Troubleshoot other
●
“Out-of-memory” error message
There is no direct relationship between the size of a file in your computer and the amount of memory
needed to print the file. Because of file compression and other factors, it is difficult to estimate how much
memory is needed to print a job. It is possible that the printer will lack sufficient memory to print a certain
job, despite having printed larger jobs in the past. Adding memory to your printer is one solution.
The platen rollers squeak
See Lubricate the platen rollers on page 18.
40 Chapter 8 Troubleshoot other issues ENWW

9 Front-panel error messages
Under certain circumstances, a front-panel error message appears. Follow the advice in the
Recommendation column to resolve the error.
If an error message appears on the front panel that is not included in this list, and you are in doubt of
the correct response, call your service representative. See
Table 9-1 Text messages
Message Recommendation
[Color] cartridge has expired Replace the cartridge. See When you need help on page 46.
[Color] cartridge is missing Insert a cartridge of the correct color. See When you need help on page 46.
[Color] cartridge is out of ink Replace the cartridge. See When you need help on page 46.
[Color] printhead #[n] error: not present Insert the correct printhead. See When you need help on page 46.
When you need help on page 46.
[Color] printhead #[n] error: please
remove
[Color] printhead #[n] error: replace Remove and reinsert the same printhead, or try cleaning the electrical connections.
[Color] printhead #[n] error: reseat Remove and reinsert the printhead; try cleaning the electrical connections. If
[Color] printhead #[n] out of warranty The printhead's warranty has ended, because of the length of time it has been in
[Color] printhead #[n] warranty warning The printhead's warranty may be invalidated by the use of the wrong kind of ink. See
[Warning] internal failure: Unable to
create print
Clean OMAS or disable it at the RIP Either the substrate-advance sensor is covered with dried ink or dust and needs to
IO error Restart the printer. If the problem persists, call your service representative. See
IO warning Try again; if the problem persists, call your service representative. See When you
PDL Error: Ink system not ready Clean the printheads. See Clean the printheads on page 34.
Remove the incorrect printhead and insert a new printhead of the correct type (color
and number). See
If the problem persists, remove the non-functional printhead and insert a new
printhead. See the User's guide.
necessary, insert a new printhead. See
replacing a printhead on page 34.
operation or because of the volume of ink used. See the Legal Information.
the Legal Information.
The internal print files are not available in the printer. Load the internal print files
through the Embedded Web Server.
be cleaned, or the current substrate is not supported by the substrate-advance
sensor, and you are advised to disable it for this substrate.
When you need help on page 46.
need help on page 46.
When you need help on page 46.
Front panel recommends reseating or
Error messages
PDL Error: Job clipped The image is too large for the substrate or for the printer. Load larger substrate if
possible, or reduce the image size.
PDL Error: memory full Restart the printer and try resending the job; if necessary, reduce the complexity of
the job.
PDL Error: out of substrate Load more substrate.
ENWW 41

Table 9-1 Text messages (continued)
Message Recommendation
PDL Error: parsing error The print job is unintelligible to the printer. Try to recreate and resend it. Check your
cable connections.
PDL Error: print mode error The substrate type or print quality specified for the job are incorrect. Change the
loaded substrate type or the print settings.
PDL Error: printing error Try sending the job again.
PDL Error: virtual memory full Restart the printer and try resending the job; if necessary, reduce the complexity of
the job.
Replace [color] cartridge Replace the cartridge. See When you need help on page 46.
Reseat [color] cartridge Remove and reinsert the same cartridge. See When you need help on page 46.
Update: failed. Invalid file Make sure that you have selected the correct firmware update file. Then try again to
Under certain circumstances, a front-panel numeric error message appears. Follow the advice in the
Recommendation column to resolve the error.
If an error message appears on the front panel that is not included in this list, turn off the printer and
then turn it back on. If the problem persists, call your service representative. See
help on page 46.
Table 9-2 Numeric error messages
Error code Recommendation
15.1 The printer is unable to warm up within a preset time limit. Check that the ambient temperature
15.2 The printer is unable to cool down within a preset time limit. Check that the ambient temperature
15.3 Excessive heat in the drying module. Check that all fans are working and unblocked. If the
Error messages
15.4 Insufficient heat in the drying module. Check that the ambient temperature is within printer
perform the update.
When you need
and input voltage are within printer specifications. If the problem persists, call your service
representative. See When you need help on page 46.
is within printer specifications. Check that all fans are working and unblocked. If the problem
persists, call your service representative. See When you need help on page 46.
problem persists, call your service representative. See
specifications. If the problem persists, call your service representative. See
help on page 46.
When you need help on page 46.
When you need
15.5 Infrared sensor error. Check that all fans are working and unblocked. If the problem persists,
call your service representative. See
15.6 The drying module has been operating at maximum power for too long. Check that the ink
density is not too high. Check that the ambient temperature is within printer specifications. If
the problem persists, call your service representative. See
on page 46.
15.7 The ambient temperature is too low for the printer to work reliably.
16.1 The printer is unable to warm up within a preset time limit. Check that the ambient temperature
and input voltage are within printer specifications. If the problem persists, call your service
representative. See When you need help on page 46.
16.2 The printer is unable to cool down within a preset time limit. Check that the ambient temperature
is within printer specifications. Check that all fans are working and unblocked. If the problem
persists, call your service representative. See
16.3 Excessive heat in the curing module. Check that all fans are working and unblocked. If the
problem persists, call your service representative. See
When you need help on page 46.
When you need help
When you need help on page 46.
When you need help on page 46.
42 Chapter 9 Front-panel error messages ENWW

Table 9-2 Numeric error messages (continued)
Error code Recommendation
16.4 Insufficient heat in the curing module. Check that the ambient temperature is within printer
specifications. If the problem persists, call your service representative. See
help on page 46.
16.5 Infrared sensor error. Check that all fans are working and unblocked. If the problem persists,
call your service representative. See
16.6 The curing module has been operating at maximum power for too long. Check that the ink
density is not too high. Check that the ambient temperature is within printer specifications. If
the problem persists, call your service representative. See
on page 46.
16.7 The ambient temperature is too low for the printer to work reliably.
21:03 Turn off the printer using the front panel and the power switch at the rear. Disconnect the power
cords. Reconnect the power cords and turn the printer on again. If the problem persists, call
your service representative. See When you need help on page 46.
21.2:10 Printhead cleaning cartridge error. Turn the printer off, remove the printhead cleaning cartridge
and check whether the cloth can be manually advanced by using the white gears on its righthand side. If so, reinsert it. If not, try a new printhead cleaning cartridge. Turn the printer on. If
the problem persists, call your service representative. See
on page 46.
When you need help on page 46.
When you need help
When you need help
When you need
24:03 The setup procedure has been not been completed. Restart the printer, then restart the setup
26.n:01 (where n = the ink
cartridge number)
26.n:10 (where n = the ink
cartridge number)
29:01 The printhead cleaning cartridge is not inserted correctly. Open the printhead cleaning cartridge
32:01 The take-up reel is disconnected. If you want to use the take-up reel, turn off the printer and
32:01.1 This error occurs when there is a small amount of substrate printed, less than 79 in (200 cm)
32:01.2 This error occurs when there is a small amount of substrate printed, less than 70 in (178 cm)
procedure from the beginning.
Remove the ink cartridge and reinstall it in the printer. If the error persists, replace the cartridge
with a new one. If the problem persists, call your service representative. See
help on page 46.
A bad contact has been detected in the ink cartridge. Remove the cartridge and reinstall it in
the printer. If the problem persists, replace the cartridge with a new one. If problem still persists,
call your service representative. See
door on the right side of the printer, make sure that the printhead cleaning cartridge is correctly
seated, then close the door. If the problem persists, replace the printhead cleaning cartridge.
If the problem persists, call your service representative. See
on page 46.
ensure that all take-up reel cables are connected (sensor cables, printer cable). If you do not
want to use it, you may need to unload the substrate manually from the take-up reel. Remember
to cut the paper first, either manually or by pressing the Move substrate key.
long. Check that there is no obstacle between the take-up reel optical sensors; that the
substrate is attached to the take-up reel spindle; and that the take-up reel switch is in the correct
position. If necessary, use the take-up reel arrow keys to wind the substrate; then press OK to
resume printing.
long. The take-up reel sensor detects that the loop shaper is (incorrectly) at the bottom of its
path, even though the spindle motor has been rotating for more than 3 seconds. The most
probable cause of this error is that you have forgotten to set the switch direction or tape the
substrate to the spindle core, when the substrate reaches the floor and blocks the take-up reel's
infrared sensors. Check that there is no obstacle between the take-up reel optical sensors; that
the substrate is attached to the take-up reel spindle; and that the take-up reel switch is in the
correct position. If necessary, use the take-up reel arrow keys to wind the substrate; then
press OK to resume printing.
When you need help on page 46.
When you need help
When you need
Error messages
32:02 This error occurs during printer initialization, to warn you that the take-up reel has been
disconnected while the printer was turned off. It also occurs if you try to enable the take-up reel,
but it is not connected to the printer. Connect the take-up reel to the printer and press OK to
continue.
32.1:01 A take-up reel error has occurred. Make sure that the substrate is adequately taped to the takeup reel spindle core, then make sure that the winding direction is correctly set.
ENWW 43

Table 9-2 Numeric error messages (continued)
Error code Recommendation
32.2:01 The take-up reel can not be detected. Make sure that the take-up reel sensor cable is correctly
connected.
41:03 Turn off the printer using the front panel and the power switch at the rear. Disconnect the power
cords. Open the window and check for any visible obstacles restricting the movement of the
drive roller. If there is a wrinkled mass of substrate in the substrate path, lift the substrate
adjustment lever and clear the obstruction. Reconnect the power cords and turn the printer on
again. If the problem persists, call your service representative. See
on page 46.
42:03 Turn off the printer using the front panel and the power switch at the rear. Disconnect the power
cords. Open the window and check for any visible obstacles restricting the movement of the
printhead carriage. If there is a wrinkled mass of substrate blocking the carriage, lift the
substrate adjustment lever and clear the obstruction. Reconnect the power cords and turn the
printer on again. If the problem persists, call your service representative. See
help on page 46.
46:03 Turn off the printer using the front panel and the power switch at the rear. Disconnect the power
cords. Reconnect the power cords and turn the printer on again. If the problem persists, call
your service representative. See When you need help on page 46.
61:01 The file format is incorrect and the printer cannot process the job. Try the following remedies:
Turn off the printer by using the Power key on the front panel and the power switch at the
●
back of the printer. Disconnect the power cord, then reconnect the power cord and turn
on the printer.
When you need help
When you need
63:04 An input/output problem has occurred with the network card. Try the following remedies:
Error messages
71:03 An “out of memory” failure has occurred. HP recommends that you remove any unnecessary
73:03 Turn off the printer using the front panel and the power switch at the rear. Disconnect the power
74:01 An error occurred when uploading the firmware update file. Try the following remedies:
Make sure that the graphic language setting is correct. See the User's guide.
●
Resubmit the file to the printer.
●
Check that your printer firmware is up to date. See
●
If the problem persists, call your service representative. See
on page 46.
Make sure that the network cable is correctly connected to the network card.
●
Check that your printer firmware is up to date. See
●
If the problem persists, call your service representative. See
on page 46.
files from the printer's hard disk through the Embedded Web Server.
cords. Reconnect the power cords and turn the printer on again. Check that the printer has the
latest firmware version. If not, update the firmware to the latest version. If the problem persists,
call your service representative. See
Turn off the printer by using the Power key on the front panel and the power switch at the
●
back of the printer. Disconnect the power cord, then reconnect the power cord and turn
on the printer.
When you need help on page 46.
Firmware update on page 9.
When you need help
Firmware update on page 9.
When you need help
Try again to upload the firmware update file to the printer. See
●
on page 9.
If the problem persists, call your service representative. See
on page 46.
Firmware update
When you need help
44 Chapter 9 Front-panel error messages ENWW

Table 9-2 Numeric error messages (continued)
Error code Recommendation
76:03 A “disk out of space” has occurred. Try the following remedies:
Turn off the printer by using the Power key on the front panel and the power switch at the
●
back of the printer. Disconnect the power cord, then reconnect the power cord and turn
on the printer.
Resubmit the file to the printer.
●
HP recommends that you remove any unnecessary files from the printer's hard disk
●
through the Embedded Web Server.
Perform an Electrically Erasable Read-Only Memory (EEROM) reset and then resubmit
●
the file to the printer.
If the problem persists, call your service representative. See
on page 46.
77:04 An Embedded Web Server internal software error has occurred. Try the following remedies:
Turn off the printer by using the Power key on the front panel and the power switch at the
●
back of the printer. Disconnect the power cord, then reconnect the power cord and turn
on the printer.
Check that your printer firmware is up to date. See
●
If the problem persists, call your service representative. See
on page 46.
78.1:04 The printer has no substrate preset for this substrate. Follow the firmware upgrade procedure
78.2:01 The end of roll has been detected. If this is not the case, unload and reload the substrate.
81:01, 81:03, 86:01 Open the printer window and make sure that there are no obstacles restricting the movement
86:11 Open the window and check for any visible obstacles restricting the movement of the printhead
91:02 The HP Instant Support troubleshooting tool has detected that at least one printhead has been
to update the printer with the latest substrate presets.
of the drive roller. If the substrate has jammed and is restricting the movement of the drive roller,
see
The substrate has jammed on page 29. If the problem persists, call your service
representative. See
carriage. If there is a wrinkled mass of substrate blocking the carriage, lift the substrate
adjustment lever and clear the obstruction. If the problem persists, call your service
representative. See
replaced without any specific error, and without having been cleaned. You are advised to try
cleaning a printhead before replacing it.
When you need help on page 46.
When you need help on page 46.
When you need help
Firmware update on page 9.
When you need help
ENWW 45
Error messages

10 When you need help
Introduction
HP Customer Care offers award-winning support to ensure that you get the most from your HP Designjet.
HP Customer Care provides comprehensive, proven support expertise and new technologies to give
you unique end-to-end support. Services include setup and installation, troubleshooting tools, warranty
upgrades, repair and exchange services, phone and Web support, software updates, and selfmaintenance services. For more information about HP Customer Care, go to:
graphic-arts/.
Documentation
The following documents are provided with your printer, and can also be downloaded from
http://www.hp.com/go/L25500/manuals/.
http://www.hp.com/go/
When you need help
Site preparation guide
●
Installation guide
●
User's guide
●
Maintenance and troubleshooting guide (this document)
●
Legal information
●
HP Instant Support
HP Instant Support Professional Edition is HP's suite of troubleshooting tools that collect diagnostic
information from your printer and match it with intelligent solutions from HP's knowledge bases, allowing
you to resolve problems as quickly as possible.
To start an HP Instant Support session, click on the link in the Support tab of your printer's Embedded
Web Server.
To use HP Instant Support, the following conditions must be met:
Because HP Instant Support is accessible only through the Embedded Web Server, you must have
●
a TCP/IP connection to your printer.
Because HP Instant Support is a Web-based service, you must have access to the World Wide
●
Web,
HP Instant Support is currently available in English, Korean, Simplified Chinese, and Traditional
Chinese.
For more information about HP Instant Support, go to:
46 Chapter 10 When you need help ENWW
http://www.hp.com/go/ispe/.

HP Customer Care Centers
Help is available to you by telephone. What to do before you call:
Review the troubleshooting suggestions in this guide.
●
Review your RIP's documentation, if relevant.
●
Please have the following information available:
●
The printer you are using: the product number and the serial number, found on the label on
◦
the door of the electrical compartment
If there is an error code on the front panel, note it down; see
◦
Front-panel error messages
on page 41
The printer's Service ID
◦
The RIP you are using, and its version number
◦
The software application you are using, and its version number
◦
The text displayed by the Embedded Web Server when you select Help > About
◦
You can find the appropriate telephone number for your country in the list below.
Country Telephone number Operating hours
North America
USA and Canada
Europe, Middle East and Africa
Algeria
Austria 08 1000 1000 8:00–17:00
Bahrain 800 00 171 8:00–18:00
Belgium 078 600 600 8:00–17:00
+1 800 334 5144 Mon–Sun, 0:00–23:59 for most products
021 67 67 67 8:30–18:00 GMT
Bulgaria 2 976 95 62 9:00–18:00
Croatia 1 6060 200 8:30–17:30
Cyprus 800 9 2649 (toll-free) 9:00–17:00
Czech Republic 2 61 307 310 8:00–18:00
Denmark 70 11 77 00 8:00–17:00
Egypt 202 532 5222 7:00–17:00
Estonia 6 813 823 9:00–17:00
Finland 0203 53 232 8:00–17:00
France 0826 10 4949 8:00–18:00
Germany 01805 25 81 43 8:00–18:00
Greece 800 9 2649 (toll-free)
801 11 CALL HP (225547)
Hungary 1 382 1111 8:30–18:00
Iceland +45 70 10 80 25 (no local number) Mon–Sun, 0:00–23:59
9:00–17:00
When you need help
ENWW HP Customer Care Centers 47

Country Telephone number Operating hours
Ireland 1890 946 500 8:00–18:00
Israel 09 830 4848 9:00–18:00
Italy, San Marino, Vatican City 02 3859 1212 8:00–17:00
Kuwait +971 4 366 2020 (no local number) 9:00–19:00 GMT+4
Latvia 7 030 721
800 80 12 (toll-free)
Lebanon +971 4 366 2020 (no local number) 9:00–19:00 GMT+4
Liechtenstein 0848 802 020 8:00–17:00
Lithuania 5 210 3333
800 10 000 (toll-free)
Luxembourg 27 303 303 8:00–17:00
Monaco
+33 1 7301 8475
Morocco 22 40 47 47 8:30–18:00 GMT
Netherlands 0900 117 0000 8:00–17:00
Nigeria 01 271 1999 7:00–16:00 GMT+1
Norway 800 62 800 8:00–17:00
Oman +971 4 366 2020 9:00–19:00 GMT+4
Poland 22 5666 000 8:00–17:00
Portugal 213 164 164 9:00–18:00
Qatar +971 4 366 2020 (no local number) 9:00–19:00 GMT+4
9:00–18:00
8:00–17:00
8:00–18:00
When you need help
Romania 21 315 4442 8:00–17:00
Russia (Moscow) 495 797 3520 9:00–18:00
Russia (St Petersburg) 812 346 7997 9:00–18:00
Saudi Arabia 800 897 1444 8:00–18:00
Slovak Republic 2 6820 8080 8:00–17:00
Slovenia 1 230 74 20 8:00–16:00
South Africa 086 000 1030 8:00–17:00
Spain 902 010 333 8:30–17:30
Sweden 077 130 3000 8:00–17:00
Switzerland 0848 802 020 8:00–17:00
Tunisia 23 926 000 8:30–18:00 GMT
Turkey 212 444 71 71 8:30–18:00
Ukraine 44 490 3520 8:00–17:00
United Arab Emirates 800 4520
04 366 2020
United Kingdom, Gibraltar 0870 842 2339 8:00–18:00
9:00–19:00
48 Chapter 10 When you need help ENWW

Country Telephone number Operating hours
West African and other French-speaking
countries
West African and other English-speaking
countries
Yemen +971 4 366 2020 (no local number) 9:00–19:00 GMT+4
Asia and Pacific
Australia
China 800 810 3888 Mon–Fri, 8:30–17:30
Hong Kong +852 3002 8555 Mon–Fri, 8:30–17:30
India 1800 112 267 (toll-free)
Indonesia +62 21 350 3408 Mon–Fri, 8:00–17:00
Japan (hardware) 0120 742 594 (toll-free)
Japan (software) 0120 014 121 (toll-free)
+212 22 40 47 47 9:00–17:30 GMT
+234 1 271 1999 8:30–17:30
13 10 47
+61 3 8877 5000 (international)
+91 80 3030 6363 (international)
03 3335 9810 (from mobile)
+81 3 3335 9810 (international)
Mon–Fri, 9:00–17:00
Mon–Fri, 9:00–18:00
Mon–Fri, 8:45–17:30
Mon–Fri, 9:00–17:00
03 5347 3089 (from mobile)
+81 42 643 4007 (international)
Korea 1588 3003 Mon–Fri, 9:00–18:00, Sat 9:00–13:00
Malaysia 1800 88 8588 (toll-free)
+603 7712 4458 (international)
New Zealand 0800 664 747
+64 0800 449 553 (international)
Philippines +63 2 867 3551 Mon–Fri, 8:30–17:30
Singapore 6272 5300 Mon–Fri, 8:30–17:30
Taiwan (02) 8722 8000
0800 010 055 (toll-free)
Thailand +66 2 353 9000 Mon–Fri, 8:30–17:30
Vietnam +84 8 823 4530 Mon–Fri, 8:00–12:00, 13:00–17:00
Latin America and Caribbean
Anguila
Antigua 1 800 711 2884
1 800 711 2884
Mon–Fri, 8:30–17:30
Mon–Fri, 8:30–18:00
Mon–Sat, 9:00–18:00
Argentina 0800 555 5000
54 11 4708 1600
Aruba 800 8000
800 711 2884
ENWW HP Customer Care Centers 49
When you need help

Country Telephone number Operating hours
Bahamas 1 800 711 2884
Barbados 1 800 711 2884
Belize 811 1 800 711 2884
Bermuda 1 800 711 2884
Bolivia 800 100 193
5411 4708 1050 (Arg)
Brasil 0 800 709 7751
11 4004 7751
British Virgin Islands 1 800 711 2884
Cayman Islands 1 800 711 2884
Chile 800 360 999
562 436 2610 (Santiago)
Colombia 01 8000 51 HP INVENT (01 8000 51
4746 8368)
571 602 9191 (Bogota)
Costa Rica 0 800 011 0524
When you need help
Curaçao 001 800 872 2881
800 711 2884
Dominica 1 800 711 2884
Dominican Republic 1 800 711 2884
Ecuador 1 999 119 (Andinatel)
1 800 225 528 (Pacifitel)
800 711 2884
El Salvador 800 6160
1 800 711 2884
French Antilles 0 800 990 011
800 711 2884
French Guiana 0 800 990 011
800 711 2884
Grenada 1 800 711 2884
Guadeloupe 0 800 990 011
800 711 2884
Guatemala 1 800 999 5105
Guyana 159
800 711 2884
Haiti 183
800 711 2884
50 Chapter 10 When you need help ENWW

Country Telephone number Operating hours
Honduras 800 0 123
800 711 2884
Jamaica 1 800 711 2884
Martinique 0 800 990 011
877 219 8671
Mexico 01 800 4746 8368 (01 800 HP INVENT)
52 55 5258 9922
Montserrat 1 800 711 2884
Netherlands Antilles 001 800 872 2881
800 711 2884
Nicaragua 1 800 0164
800 711 2884
Panama 001 800 711 2884
Paraguay 009 800 541 0006
5411 4708 1050 (Arg)
Peru 0 800 10 111
511 411 2443 (Lima)
Puerto Rico 1 877 232 0589
787 474 8570
1 281 927 4301
St Kitts & Nevis 1 800 711 2884
St Lucia 1 800 478 4602
St Martin 1 800 711 2884
St Vincent and the Grenadines 1 800 711 2884
Suriname 156
800 711 2884
Trinidad & Tobago 1 800 711 2884
Turks & Caicos Islands 01 800 711 2884
US Virgin Islands 1 800 711 2884
Uruguay 0004 054 177
5411 4708 1050 (Arg)
Venezuela 0 800 HP INVENT (4746 8368)
58 212 278 8666 (Caracas)
Caribbean (contingency) 1 281 927 4300 (not toll-free; call-back
may be available)
Central America (contingency) 1 281 927 4303
ENWW HP Customer Care Centers 51
When you need help

Service information
The printer can produce on request a list of many aspects of its current status, some of which may be
useful to a service engineer trying to fix a problem. There are two different ways to request this list:
In the Embedded Web Server, select the Support tab and then Troubleshooting > Printer
●
information.
From any computer with Internet access, enter the URL of your printer into a Web browser, followed
●
by /hp/device/webAccess/allServicePlot.htm. For instance, if the URL of your printer
is http://123.123.123.123, enter http://123.123.123.123/hp/device/webAccess/
allServicePlot.htm.
You can request the whole list, which takes a significant time to generate; or you can request specific
parts of it. If in doubt, you are recommended to request the whole list (select All pages).
If you need to send the list by e-mail, you can save the page as a file from your Web browser, and later
send the file. Alternatively, from Internet Explorer you can send the page directly: select File > Send
> Page by E-mail.
When you need help
52 Chapter 10 When you need help ENWW

Index
A
alerts
errors 7
alerts, warnings 7
application hangs up 39
C
cannot load substrate 29
carriage lubrication 17
caution 3
clean the platen 14
clean the printer 14
Clean the substrate-advance
sensor window 14
communication problems 40
Customer Care 46
cutter does not work 31
D
DHCP not available 38
documentation 46
E
Embedded Web Server
cannot access 38
ink system status 5
printer usage statistics 7
F
file system check 7
firmware update 9
front panel error messages
all 6
front panel option
align printheads 36
allow EWS 38
ink cartridge information 6
printhead information 6
G
graininess 24
H
HP Customer Care 46
HP Instant Support 46
I
ink cartridge
cannot insert 34
maintenance 20
status 5
ink system status 5
Instant Support 46
IP address, set manually 38
L
labels, warning 3
loading substrate problems 29
lubricate the carriage 17
lubricating the platen rollers 18
M
maintenance, service 20
manuals 46
memory error 40
move the printer 20
O
out-of-memory error 40
P
print-quality problems
black areas look hazy 27
general 23
graininess 24
horizontal banding 24
ink smudges 27
lack of sharpness 27
misaligned colors 26
stains or uneven print 27
vertical banding 26
wrong length 27
printer does not print 39
printer status 5
printhead
align 35
aligning 10
cannot insert 34
clean; purge 22
cleaning 16
cleaning connections 11
recovery 16
reseat, reseat 34
status 6
printhead cleaning cartridge
cannot insert 34
printhead status plot 21
R
roller lubrication 18
S
safety labels 3
safety precautions 1
service information print 52
service maintenance 20
slow printing 39
squeaky rollers 18
statistics
ink cartridge 5
printer usage 7
store the printer 20
substrate
advance 24
cannot load 29
substrate jam
take-up reel 32
substrate wrinkled 31
substrate-advance adjustment 24
support services
HP Customer Care 46
HP Instant Support 46
T
take-up reel
doesn't rewind 32
telephone support 47
W
warning 3
warning labels 3
ENWW
Index 53
 Loading...