

Page 1

L2314 IPS LED Backlit Monitor
User Guide
Page 2

© 2012 Hewlett-Packard Development
Company, L.P.
Microsoft® and Windows® are U.S.
registered trademarks of Microsoft
Corporation.
The only warranties for HP products and
services are set forth in the express
warranty statements accompanying such
products and services. Nothing herein
should be construed as constituting an
additional warranty. HP shall not be liable
for technical or editorial errors or omissions
contained herein.
This document contains proprietary
information that is protected by copyright.
No part of this document may be
photocopied, reproduced, or translated to
another language without the prior written
consent of Hewlett-Packard Company.
First Edition (October, 2012)
Document Part Number: 703186-001
Page 3

About This Guide
This guide provides information on setting up the LCD monitor, operating features, and technical
specifications.
WARNING! Text set off in this manner indicates that failure to follow directions could result in bodily
harm or loss of life.
CAUTION: Text set off in this manner indicates that failure to follow directions could result in
damage to equipment or loss of information.
NOTE: Text set off in this manner provides important supplemental information.
TIP: Tips provide helpful hints or shortcuts.
iii
Page 4

iv About This Guide
Page 5

Table of contents
1 Product Features ............................................................................................................................................ 1
LCD Monitor ......................................................................................................................................... 1
Shipping the Monitor ............................................................................................................................ 2
2 Setting Up the Monitor ................................................................................................................................... 3
Unpacking the Monitor ......................................................................................................................... 3
Assembling the Monitor ........................................................................................................................ 3
Connecting Monitor Cables .................................................................................................................. 4
Connecting the VGA Video Cable ....................................................................................... 5
Connecting the DVI-D Video Cable ..................................................................................... 5
Connecting the HDMI Cable ................................................................................................ 6
Getting HDMI Sound ........................................................................................... 6
Connecting the Power Cord ................................................................................................. 7
Installing the Cable Management Clip ................................................................................. 8
High-Bandwidth Digital Content Protection (HDCP) select models ...................................................... 8
Front-Panel Controls ............................................................................................................................ 9
Turning on the Monitor ......................................................................................................................... 9
HP Watermark and Image Retention Policy ....................................................................................... 10
Selecting Video Input Connectors ...................................................................................................... 10
Adjusting The Tilt ................................................................................................................................ 11
3 Finding More Information ............................................................................................................................. 12
Reference Guide ................................................................................................................................ 12
Product Support ................................................................................................................................. 12
4 Technical Specifications .............................................................................................................................. 13
HP L2314 IPS Monitors ...................................................................................................................... 13
Preset Video Modes ........................................................................................................................... 13
Entering User Modes .......................................................................................................................... 14
Power Adapters .................................................................................................................................. 14
Power-Saver Feature ......................................................................................................................... 15
LCD Monitor Quality and Pixel Policy ................................................................................................. 15
v
Page 6

vi
Page 7

1 Product Features
LCD Monitor
Figure 1-1 LCD Monitor
The HP LCD (liquid crystal display) monitor has an active matrix, thin-film transistor (TFT) screen with
an LED backlight and the following features:
Large 58.42 cm (23-inch) diagonal viewable area display with 1920 x 1080 resolution, plus full-
●
screen support for lower resolutions
Video graphics array (VGA) input signal with cable provided
●
Digital visual interface (DVI) digital input signal with cable provided
●
High-definition multimedia interface (HDMI) input signal (cable not included)
●
Tilt and Slide adjustment for easy viewing from a sitting or standing position, or while moving
●
from one side of the monitor to the other
Dynamic contrast ratio (DCR)
●
Plug and Play capability, if supported by your operating system
●
On-screen display (OSD) adjustments for ease of setup and screen optimization (choose
●
English, Simplified Chinese, Traditional Chinese, French, German, Italian, Spanish, Dutch,
Japanese, or Brazilian Portuguese)
● Power Saver to reduce energy consumption
Quick View Settings to optimize the picture based on the different types of content.
●
Text mode (optimizes e-mail and Web surfing)
◦
Movie and Game modes (highlights the picture for motion video)
◦
LCD Monitor 1
Page 8

Photo mode (improves images)
◦
◦ Custom mode (allows you to create your own optimized profile)
High-bandwidth digital content protection (HDCP) on DVI and HDMI inputs
●
Software and utilities CD, containing the following:
●
◦ Drivers
◦ Documents
Certifications and agency notices for this monitor are available in the HP LCD Monitors
●
Reference Guide on the CD included with this monitor
Shipping the Monitor
Keep the original packing box in a storage area. You might need it later if you move or ship the
monitor.
To prepare the monitor for shipping:
1. Disconnect the power and video cables from the monitor.
2. Press the button on the front of the pedestal (1) and lift the monitor panel from the base (2).
Figure 1-2 Removing the Monitor Panel
3. Set the panel on a soft, protected surface.
4. Carefully pull the pedestal away from the base to release and separate them.
5. Place the monitor, pedestal, and base in the original packing box.
Refer to the HP LCD Monitors Reference Guide for information on safety and maintenance
guidelines.
2 Chapter 1 Product Features
Page 9

2 Setting Up the Monitor
Unpacking the Monitor
1. Unpack the monitor. Make sure all contents are included. Store the packing box.
2. Turn off the computer and other attached devices.
3. Prepare a flat area to assemble the monitor. You may need a flat, soft, protected area for placing
the monitor screen-down while preparing it for installation.
Assembling the Monitor
Place the monitor in a convenient, well-ventilated location near your computer. Connect the monitor
cables after you have assembled the monitor.
CAUTION: The screen is fragile. Avoid touching or applying pressure to the LCD screen; doing so
can cause damage.
TIP: For monitor displays with glossy bezels, consider the placement of the display, because the
bezel might cause interfering reflections from surrounding light and bright surfaces.
1. Set the monitor panel down on a flat, soft, protected table or desk surface.
2. Slide the pedestal into the slot on the base until the pedestal clicks into the base.
Figure 2-1 Assembling the Base and Pedestal
Unpacking the Monitor 3
Page 10

3. Slide the hinge bracket on the monitor into the opening on top of the pedestal. The panel will
click into place when fully inserted.
Figure 2-2 Inserting the Monitor Panel
Connecting Monitor Cables
CAUTION: Before connecting cables to the monitor, ensure that the computer and monitor are
powered off.
NOTE: When using a DVI, VGA, or HDMI signal, you must connect your audio output to external
speakers.
The video source is determined by the video cable used. The monitor will automatically determine
which inputs have valid video signals. The inputs can be selected by pressing the source button on
the front panel.
4 Chapter 2 Setting Up the Monitor
Page 11

Connecting the VGA Video Cable
Connect one end of the VGA video cable to the back of the monitor and the other end to the VGA
video connector on the computer. The VGA cable is included.
Figure 2-3 Connecting the VGA Cable (cable provided)
Connecting the DVI-D Video Cable
Connect one end of the DVI-D video cable to the back of the monitor and the other end to the DVI-D
video connector on the computer. You can use this cable only if your computer has a DVI compliant
graphics card that is either integrated or installed. The DVI-D cable is included.
Figure 2-4 Connecting the DVI-D Cable (cable provided)
Connecting Monitor Cables 5
Page 12
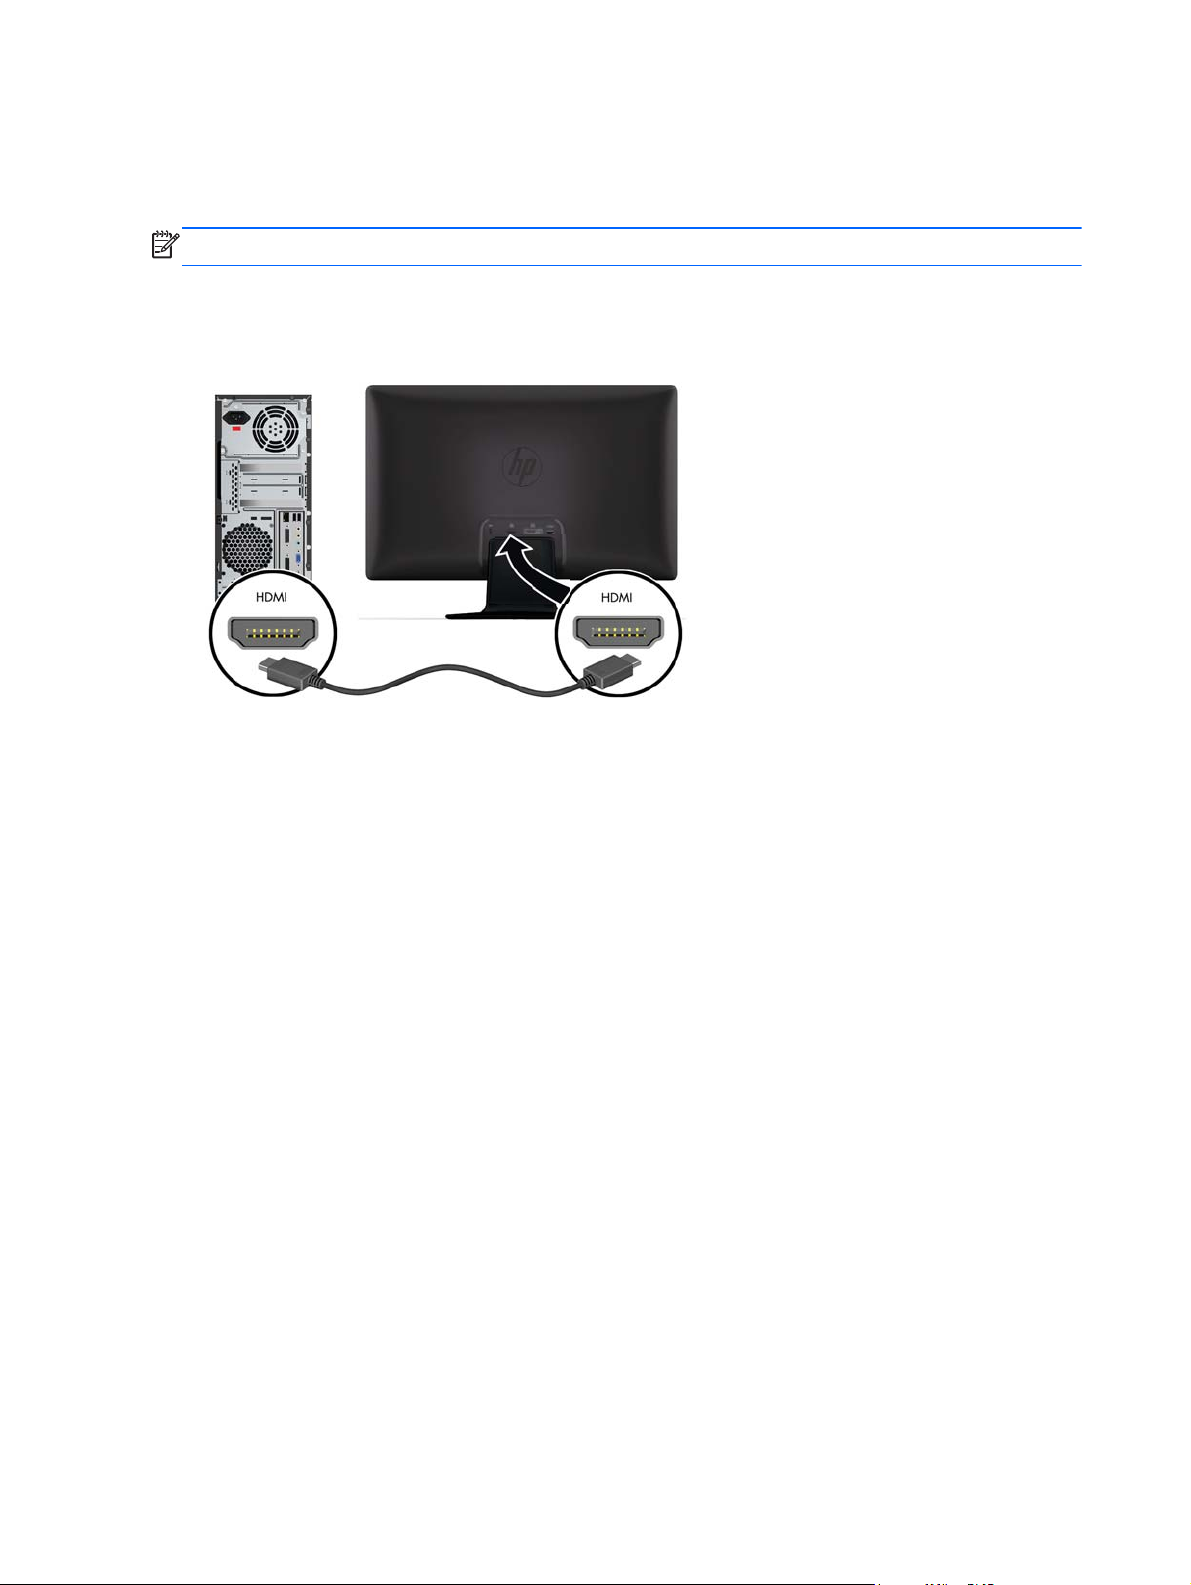
Connecting the HDMI Cable
Connect one end of the HDMI cable to the back of the monitor and the other end connector to the
input device. The HDMI cable is not included.
NOTE: The audio stream must be connected directly to external speakers or to an audio receiver.
Figure 2-5 Connecting the HDMI Cable (cable not provided)
Getting HDMI Sound
If you use HDMI to connect to a monitor model without speakers, you must activate HDMI sound by
adjusting the setting in Microsoft Windows. If HDMI is not activated, you can not hear any sound. To
activate HDMI sound on your computer:
1. Right-click on the volume icon in the Windows system tray.
2. Click Playback Devices. The sound window opens.
3. On the Playback tab, click the HDMI output audio device that is listed.
4. Click Set Default.
5. Click Apply.
6. Click OK to close the window.
6 Chapter 2 Setting Up the Monitor
Page 13

Connecting the Power Cord
1. Follow all electrical and power warnings
WARNING! To reduce the risk of electric shock or damage to your equipment:
Do not disable the power-cord grounding plug. The grounding plug is an important safety
feature. Plug the power cord into a grounded (earthed) electrical outlet.
Be sure that the grounded power outlet you plug the power cord into is easily accessible to the
operator and located as close to the equipment as possible. A power cord should be routed so
that it is not likely to be walked on or pinched by items that are placed on it or against it.
Do not place anything on power cords or cables. Arrange them so that no one might accidentally
step on or trip over them. Do not pull on a cord or cable.
See
Technical Specifications on page 13 for additional information.
2. Connect the round end of the power supply cord to the monitor, and then connect one end of the
power cord to the power supply and the other end to a grounded electrical outlet.
WARNING! To prevent injury from electrical shock, you should do one of the following if a
properly grounded electrical outlet is not available: (1) You should use an electrical outlet
adapter that provides proper grounding. (2) You should have a properly grounded electrical
outlet installed.
Figure 2-6 Connecting the Power Cord
Connecting Monitor Cables 7
Page 14

Installing the Cable Management Clip
Install the cable management clip over the input cable and power cord to gather them together
behind the monitor.
Figure 2-7 Installing the Cable management Clip
High-Bandwidth Digital Content Protection (HDCP) select models
Your monitor supports HDCP and can receive high-definition content. High-definition content is
available in many sources, such as Blu-ray disc devices or HDTV air or cable broadcasts. If you do
not have an HDCP-enabled monitor, you will see a blank screen or a lower resolution picture when
playing high-definition protected content. Your computer graphics card and monitor must both support
HDCP to display protected content.
8 Chapter 2 Setting Up the Monitor
Page 15
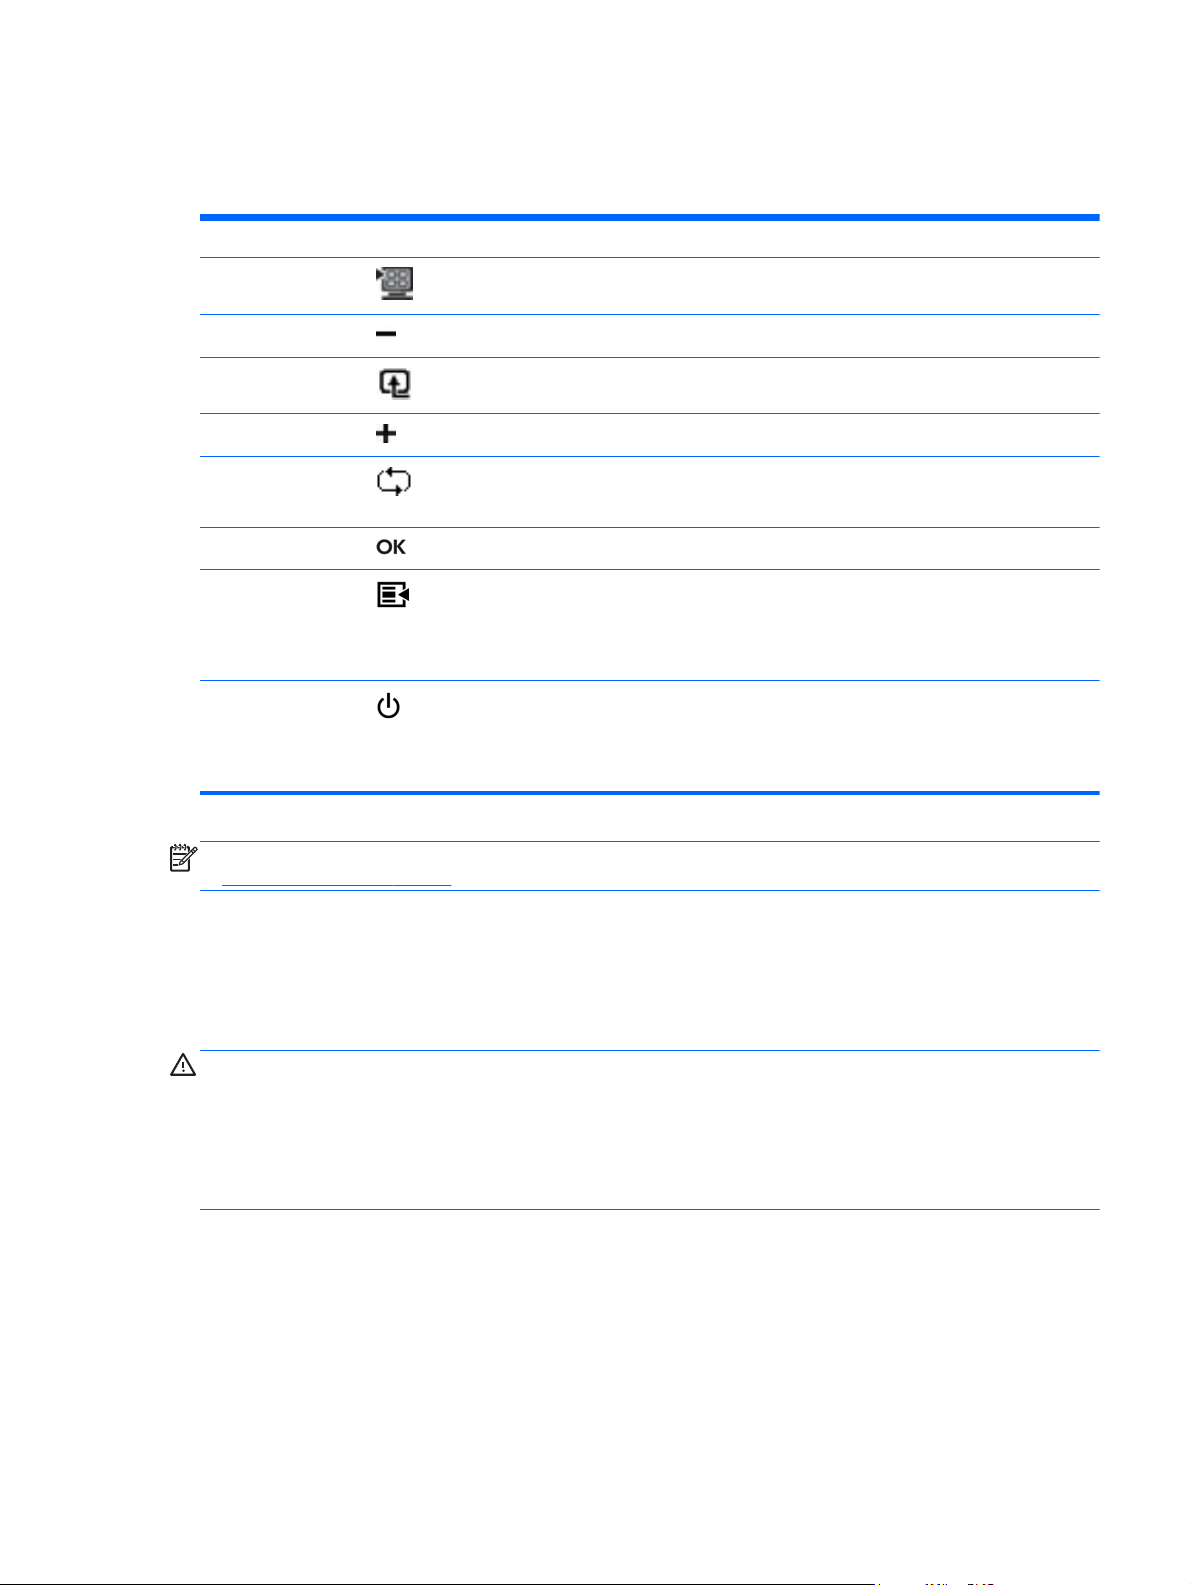
Front-Panel Controls
Control buttons (represented by icons) are located on the bottom right of the monitor.
Button Icon Description
Quick View
Minus
Source
Plus
Auto Adjustment
OK
Menu
Power
Opens the OSD Quick View menu where you can select a viewing mode
which compliments or optimizes the content you are viewing.
Navigates down through the OSD menu and decreases adjustment levels.
Chooses the video input source from the computer.
Navigates up through the OSD menu and increases adjustment levels.
Press to automatically adjust the screen image.
NOTE: This item can only be used with a VGA input signal.
Enters the selected option in the OSD.
Opens, selects, or exits the OSD menu.
NOTE: Pressing the Menu button for 10 seconds will disable operation of the
remaining OSD buttons. Pressing it again for 10 seconds will re-enable
functionality.
Turns the monitor on or off. The Power button is located on the bottom-right of
the monitor.
NOTE: Pressing the Power button for 10 seconds will disable operation of
the Power button. Pressing it again for 10 seconds will re-enable functionality.
NOTE: To view an OSD menu simulator, visit the HP Customer Self Repair Services Media Library
http://www.hp.com/go/sml.
at
Turning on the Monitor
1. Press the power button on the front of the monitor to turn it on.
2. Press the power button on the computer to turn it on.
CAUTION: Burn-in image damage might occur on monitors that display the same static image on
screen for a prolonged period of time.* To avoid burn-in image damage on the monitor screen, you
should always activate a screen saver application or turn off the monitor when it is not in use for a
prolonged period of time. Image retention is a condition that might occur on all LCD screens. Monitors
with a "burned-in image" are not covered under HP warranty.
* A prolonged period of time is 12 consecutive hours of non-use.
When the monitor is powered on, a Monitor Status message is displayed for five seconds and the
power source LED on the rear of the monitor is green. The message shows which input is the current
active signal, the status of the auto-switch source setting (On or Off), the default source signal, the
current preset display resolution, and the recommended preset display resolution.
Front-Panel Controls 9
Page 16

HP Watermark and Image Retention Policy
The HP L2314 IPS monitor is designed with IPS (In-Plane Switching) display technology which
provides ultra-wide viewing angles and advanced image quality. IPS monitors are suitable for a wide
variety of advanced image quality applications. This panel technology, however, is not suitable for
applications that exhibit static, stationary or fixed images for long periods of time without the use of
screen savers. These types of applications may include camera surveillance, video games, marketing
logos, and templates that are displayed on the screen for a prolonged period of time. Static images
may cause image retention damage that could look like stains or watermarks on the monitor's screen.
Monitors in use for 24 hours per day that result in image retention damage are not covered under the
HP warranty. To avoid image retention damage, always turn off the monitor when it is not in use or
use the power management setting, if supported on your system, to turn off the display when the
system is idle.
Selecting Video Input Connectors
The input connectors are:
VGA (analog)
●
DVI-D connector (digital)
●
HDMI connector (digital)
●
The monitor automatically scans the signal inputs for an active input and uses that input for the
display. If two inputs are active, the monitor will display the default input source. If the default source
is not an active input, then the monitor will display the other input if it is active. You can change the
default source in the OSD by pressing the front-panel Menu button and selecting Source Control >
Default Source.
10 Chapter 2 Setting Up the Monitor
Page 17

Adjusting The Tilt
For optimal viewing, adjust the screen tilt to your own preference, as follows:
CAUTION: To avoid breakage or other damage, avoid applying pressure to the LCD screen while
changing the tilt.
1. Face the front of the monitor and hold the base so that you do not topple the monitor while
changing the tilt.
2. Adjust the tilt by moving the top edge of the monitor either toward or away from you, without
touching the screen.
Figure 2-8 Tilt Adjustment
Adjusting The Tilt 11
Page 18

3 Finding More Information
Reference Guide
Refer to the HP LCD Monitors Reference Guide included on the CD with your monitor for additional
information on:
● Optimizing monitor performance
Safety and maintenance guidelines
●
Installing software from the CD
●
● Using the OSD menu
Downloading software from the Web
●
Agency and regulatory notices
●
Troubleshooting and recommended solutions to common problems
●
For additional information on using and adjusting your monitor, go to
Select your country or region, select Product Support & Troubleshooting, and then enter your monitor
model in the SEARCH window.
Product Support
NOTE: The monitor user guide, reference guide, and drivers are available at http://www.hp.com/
support.
If the information provided in the guide or in the HP LCD Monitors Reference Guide do not address
your questions, you can contact support. For U.S. support, go to
For worldwide support, go to
Chat online with an HP technician
●
NOTE: When support chat is not available in a particular language, it is available in English.
● E-mail support
Find support telephone numbers
●
Locate an HP service center
●
http://www.hp.com/support.
http://www.hp.com/go/contactHP.
http://welcome.hp.com/country/us/en/wwcontact_us.html. Here you can:
12 Chapter 3 Finding More Information
Page 19

4 Technical Specifications
All specifications represent the typical specifications provided by HP component manufacturers;
performance might vary either higher or lower.
HP L2314 IPS Monitors
Table 4-1 L2314 Specifications
Specifications
Input Terminals: VGA, DVI, and HDMI
Maximum Weight (unpacked): 4.5 kg (9.9 lb)
Dimensions (w x d x h): 558.0 x 158.9 x 417.10 mm (21.97 x 6.26 x 16.42 in)
Maximum Graphics Resolution: 1920 x 1080 @ 60 Hz
Optimum Graphics Resolution: 1920 x 1080 @ 60 Hz
Power Source (adapter): 100-240 VAC (ca), 50/60 Hz
Power Source (monitor): 12V dc, 50/60 Hz
Preset Video Modes
The monitor automatically recognizes many preset video input modes that will appear properly sized
and centered on the screen.
Table 4-2 L2314 Factory Preset Video Input Modes
Preset Resolution Horizontal Frequency (kHz) Vertical Frequency (Hz)
1 640 x 480 31.469 59.94
2 720 x 400 31.469 70.087
3 800 x 600 37.879 60.317
4 1024 x 768 48.363 60.004
5 1280 x 720 45.00 60.00
6 1280 x 1024 63.98 60.02
7 1440 x 900 55.94 59.89
8 1680 x 1050 65.29 60.00
9 1920 x 1080 67.50 60.00
HP L2314 IPS Monitors 13
Page 20

Table 4-3 HDMI High Definition Factory Preset Video Modes
Preset HD Video Display
1 480p 720 x 480 31.469 60
2 720p60 1280 x 720 45 60
3 576p 720 x 576 31.25 50
4 720p50 1280 x 720 37.5 50
5 1080p60 1920 x 1080 67.5 60
6 1080p50 1920 x 1080 56.25 50
Resolution
Entering User Modes
The video controller signal might occasionally call for a mode that is not preset if:
You are not using a standard graphics adapter.
●
You are not using a factory preset mode.
●
It this occurs, you might need to readjust the parameters of the monitor screen by using the onscreen display. Your changes can be made to any or all of these factory preset modes and saved in
memory. The monitor automatically stores the new setting, then recognizes the new mode just like it
does a factory preset mode. Also there are at least ten user modes that can be entered and stored.
Resolution Horizontal Frequency
(kHz)
Vertical Frequency
(Hz)
Power Adapters
Table 4-4 Power Adapters
Manufacturer Model Number
LiteOn PA-1041-03TA-LF, PA-1041–0
Delta ADP-40DD B Series
14 Chapter 4 Technical Specifications
Page 21

Power-Saver Feature
When the monitor is in normal operating mode, the Power light is Aqua white and the monitor uses
the normal watts of power.
The monitor also supports a power-saver mode that is controlled by the computer. When the monitor
is in the reduced-power state, the monitor screen is blank, the backlight is off, the Power light is
amber, and the monitor uses minimum power. When the monitor is "awakened," a brief warm-up
period occurs before the monitor returns to normal operating mode. The energy-saving reduced
power state activates if the monitor does not detect either the horizontal sync signal or the vertical
sync signal. The power-saver feature must be activated on your computer for this feature to work.
Refer to your computer documentation for instructions on setting energy-saver features (sometimes
called power-management features).
NOTE: The energy-saver feature works only when the monitor is connected to computers that have
energy-saver features.
LCD Monitor Quality and Pixel Policy
Your LCD monitor uses high-precision technology, manufactured according to high standards, to help
guarantee trouble-free performance. Nevertheless, the display might have cosmetic imperfections
that appear as small bright or dark spots. This is common to all LCD monitor displays used in
products supplied by all vendors and is not specific to your LCD monitor. These imperfections are
caused by one or more defective pixels or subpixels.
A pixel consists of one red, one green, and one blue subpixel. A defective whole pixel is always
turned on (a bright spot on a dark background), or it is always off (a dark spot on a bright
background). The first is the more visible of the two. A defective subpixel (dot defect) is less visible
than a defective whole pixel, and is small and only visible on a specific background.
To locate defective pixels, the monitor should be viewed under normal operating conditions and in
normal operating mode at a supported resolution and refresh rate, from a distance of approximately
50 cm (16 in). We expect that, over time, the industry will continue to improve its ability to produce
displays with fewer cosmetic imperfections, and we will adjust guidelines as improvements are made.
For more information about your LCD monitor and pixel policy, refer to the HP Web site at:
www.hp.com/support. To find pixel policy information on the HP Web site, type in "HP Pixel Policy" in
the search box and press Enter.
Power-Saver Feature 15
 Loading...