

Page 1

Installation and
Configuration Guide
HP FastRAID
Page 2

Francais
Notice
The information contained in this document is subject to change without notice.
Hewlett-Packard makes no warranty of any kind with regard to this material, including, but not limited to, the implied warranties of merchantability and fitness
for a particular purpose.
Hewlett-Packard shall not be liable for errors contained herein or for incidental or consequential damages in connection with the furnishing, performance, or
use of this material.
Hewlett-Packard assumes no responsibility for the use or reliability of its software on equipment that is not furnished by Hewlett-Packard.
This document contains proprietary information that is protected by copyright. All rights are reserved. No part of this document may be photocopied,
reproduced, or translated to another language without the prior written consent of Hewlett-Packard Company.
Adaptec®, ArrayConfig
TM
, AROTM, CI/OTM, Array1000TM, and RAIDportTM are trademarks of Adaptec Incorporated.
Windows NT
TM
is a trademark of Microsoft Corporation.
Hewlett-Packard France
Performance Desktop Computing Operation
38053 Grenoble Cedex 9
France
© 1998 Hewlett-Packard Company
Page 3

Contents
English i
HP FastRAID Installation and Configuration Guide
Introduction . . . . . . . . . . . . . . . . . . . . . . . . . . . . . . . . . . . . . . . . . . . . . . . . 2
Installing HP FastRAID. . . . . . . . . . . . . . . . . . . . . . . . . . . . . . . . . . . . . . . 3
Configuring HP FastRAID . . . . . . . . . . . . . . . . . . . . . . . . . . . . . . . . . . . . 4
Installing the HP RAID Device Manager. . . . . . . . . . . . . . . . . . . . . . . . . 8
Optimizing Performance. . . . . . . . . . . . . . . . . . . . . . . . . . . . . . . . . . . . . . 9
Resolving Problems. . . . . . . . . . . . . . . . . . . . . . . . . . . . . . . . . . . . . . . . . 18
Frequently Asked Questions . . . . . . . . . . . . . . . . . . . . . . . . . . . . . . . . . 20
Technical Information. . . . . . . . . . . . . . . . . . . . . . . . . . . . . . . . . . . . . . . 22
HP Hardware Warranty. . . . . . . . . . . . . . . . . . . . . . . . . . . . . . . . . . . . . . 23
Regulatory . . . . . . . . . . . . . . . . . . . . . . . . . . . . . . . . . . . . . . . . . . . . . . . . 24
Page 4

1
HP FastRAID
Installation and Configuration Guide
Page 5

2 English English
Introduction
HP FastRAID uses RAID technology to accelerate the performance of
your PC’s hard drives. Rather than focusing on data protection, as with
server-based RAID technologies, HP FastRAID brings top performance
to your computer.
With HP FastRAID
Pre-Installed on Your
PC Workstation
With HP FastRAID already installed on your PC Workstation, you will
receive the following components:
•
Windows NT installation CD-ROM & 3 Setup diskettes,
•
a Windows NT Service Pack CD-ROM, and
•
an HP Kayak Drivers and Utilities CD-ROM.
To find out more about configuring HP FastRAID, refer to “Configuring
HP FastRAID” on page 4.
HP FastRAID
Accessory Kit
The HP FastRAID Accessory Kit provides the components necessary to
implement FastRAID on suitably equipped PCs or PC Workstations.
The HP FastRAID accessory kit includes the following components:
•
an Adaptec®ARO-1130 PCI RAIDportTM adapter,
•
CI/OTM Array Management software (3 HP RAID Device Manager
diskettes),
•
an ArrayConfig utility diskette, and
•
an Array 1000 Family manager drivers diskette
You will also need the Windows NT installation CD-ROM & Setup
diskettes, and the Windows NT Service Pack CD-ROM that came with
your XU or XW PC Workstation.
To find out how to install and configure HP FastRAID, refer to
“Installing HP FastRAID” on page 3, and “Configuring HP FastRAID” on
page 4.
NOTE The HP FastRAID Accessory Kit is intended for use only with HP Kayak
XU and XW PC Workstations equipped with a RAIDport connector
running Windows NT 4.0.
Page 6
English English 3
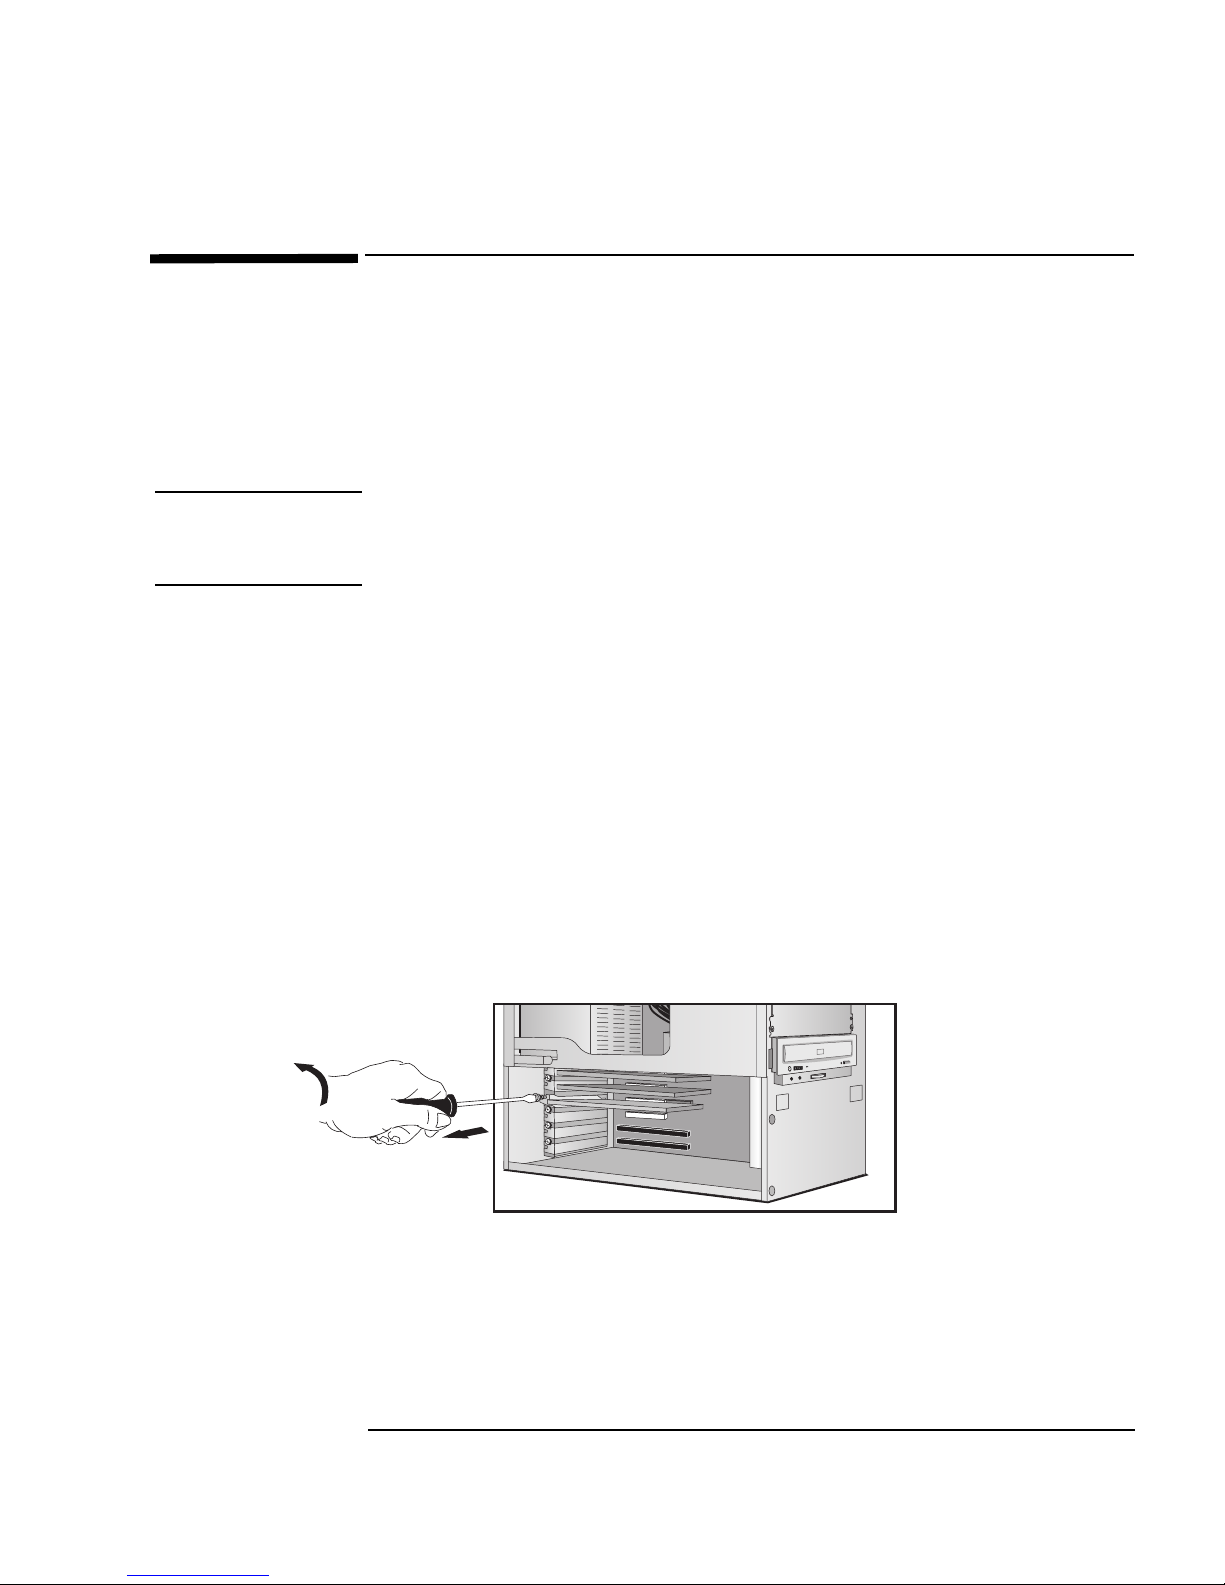
Installing HP FastRAID
To install the Adaptec® ARO-1130 accessory in your PC, follow the
step-by-step instructions below.
1 Remove the computer’s cover. Refer to the User’s Guide that came
with your PC or PC Workstation, if necessary.
WARNING For your safety, never remove the computer’s cover without first
removing the power cord and any connection to a telecommunications
network. Always replace the cover before switching on the computer.
2 Locate the RAIDport slot on the PC Workstation’s system board.
Refer to the User’s Guide that came with your PC or PC
Workstation, if necessary.
3 Unscrew and remove the slot cover. If the slot cover is hard to
remove, loosen the screws on the adjacent slots.
4 Hold the adapter board horizontally by its “top” edge. Slide it into the
board guide of the RAIDport socket. Do not bend the board.
5 Align the board’s connector with the slot’s socket. Firmly press the
board into the socket. Make sure that the board’s connector is fully
seated in the socket and does not touch components on other
boards.
6 Secure the board by replacing the slot cover screw. If you loosened
the screws on adjacent slots, tighten them.
7 Replace the cover and connect all cables and power cords.
Your PC, and the location
of its accessory board
slots, may be different to
the one shown here.
Page 7

4 English English
Configuring HP FastRAID
You can configure HP FastRAID to:
•
Create a new array, and
•
Manage existing arrays on your system’s hard disk drives.
Before you create a new array, you may need to do the following:
With FastRAID
Pre-installed
1 Create an ArrayConfig bootable utility diskette from the HP Kayak
XU/XW PC Workstation Drivers and Utilities CD-ROM.
a Insert the Drivers and Utilities CD-ROM into the CD-ROM drive
and a blank, formatted diskette into the floppy disk drive.
b Use Explorer to locate either the
\FASTRAID\ARCONFIG\
oooor
r r
r tttthhhheeee
\FASTRAID\ArcfgDRV\
directory on the Drivers and Utilities
CD-ROM.
c Double click on the file
DISKIMG.BAT.
..
.
The ArrayConfig bootable utility diskette has been created.
2 Create an Array 1000 Family driver diskette from the HP Kayak
XU/XW PC Workstation Drivers and Utilities CD-ROM.
a Insert the Drivers and Utilities CD-ROM into the CD-ROM drive
and a blank, formatted diskette into the floppy disk drive.
b Use Explorer to locate the
\FASTRAID\DRIVERS\ directory on
the Drivers and Utilities CD-ROM.
c Copy all the files and subdirectories in this directory to drive
A:\.
..
.
Ensure that the files
DISK1 and TXTSETUP.OEM
and the
directory
\WINNT containing the files CDA1000.SYS and
OEMSETUP.INF,
,,
, have been successfully copied.
The Array 1000 Family driver diskette has been created.
Page 8

English English 5
All HP FastRAID Users
1 Back up any existing data that you wish to save on your hard disk
drives. Once the drives have been configured and the operating
system re-installed, you can restore your backed up data.
2 Disable or remove any non-SCSI disks on your computer before
running the ArrayConfig utility, or ensure that the Array 1000
adapter is set to the highest priority in the Setup program
(
Boot>Boot Order).
3 Some HP FastRAID configurations require two hard drives. If you
need to install an additional drive, we strongly recommend that you
select an drive that matches the original drive in both capacity and
performance (consult an authorized HP dealer for the appropriate
HP accessory drive). HP does not provide support for this accessory
when used with drives other than HP accessory drives.
4 Make sure that when you install a new drive, you assign the drive a
unique SCSI ID. This can be checked through the SCSISelect Utility
by selecting
SCSI Disk Utilities.
Creating a New Array
You can create a new array using either of the following options.
Express Setup - use this if you want to create an array (up to two
drives) quickly and easily. ArrayConfig asks you a few simple
questions and uses your answers to create the kind of array that best
meets your needs. This process is similar to the “Wizards” used in
many applications. You do not need to know the technical details of
how arrays are configured. Refer to “Using Express Setup” on page 6.
Custom Setup - this option allows advanced users to create arrays
(with more than two drives) with customized configurations. You
will need to know more technical details about how arrays are
configured to benefit from this option. Refer to “Using Custom
Setup” on page 11.
Page 9

6 English English
Using Express Setup
To create an array using Express Setup, you will need to do the
following:
1 Select the ArrayConfig menu option by pressing the hot key
—
the
letter that appears in a different color. (The hot key letters are
underlined in the following instructions). You can also press the
↑
and
↓
keys until the option is highlighted and then press .
2 Insert the ArrayConfig utility disk in drive A and reboot your
computer. The ArrayConfig utility will start automatically.
3 Read the text that appears on the initial ArrayConfig screens. Press
any key to view the next screen, or press to return to the
previous screen.
4 When you see the Setup Type Selection Menu, select
Express Setup.
5 When the next screen appears, select the type of array you want to
create:
•
Select
Optimized for Performance
if you want the fastest possible data
input and output from the new array. This type of array does not
have special data protection features, however.
•
Select
Optimized for Data Protection
if your main concern is to protect
the files on the array from disk failure. This type of array
safeguards files in the array even if one of the array disks fails. To
use this option, two disk drives are required.
6 At the prompt, enter the number of drives to use in the array. You
can create either a one- or two-drive array with the Express Setup.
NOTE When you select a single hard drive for RAID 0, the drive will be striped
and optimized using the ARO-1130’s cache memory, but no actual array
will be created. A single drive optimized in this way, although
significantly faster, will not provide the same level of performance as a
two-drive RAID 0 array.
Page 10

English English 7
7 When the next menu appears, select the type of application that you
will run on your computer. (Select
Other Applications if you are not sure
what type of application you will use.) ArrayConfig will use your
answer to create the best array configuration for your applications.
8 When the next menu appears, select a boot order for the new array.
•
Select Disk Array will be Boot Drive if you want your computer to boot
from the new array. If you selected
Optimized for Data Protection
in
Step 4, booting from an array safeguards the information on your
boot drive.
•
Select Disk Array will not be a Boot Drive if you do not want your
computer to boot from the new array. (If you only have one array,
it will automatically be the boot drive.)
9 When you have finished all these menu selections, wait while
ArrayConfig creates the array. This may take up to 30 minutes,
especially if the disk drives are large.
A message appears when the array has been created. An error
message appears if the ArrayConfig encounters some problems (for
example, an array already exits). If this happens, run ArrayConfig
again and use the Custom Setup option.
10 Press until you’re back at the Main Menu, and exit ArrayConfig.
Installing Windows
NT 4.0
11 Insert the Windows NT setup disk #1 and restart your PC
Workstation.
NOTE Do not boot from the Windows NT CD-ROM as the hard drive will not be
detected.
12 When prompted, insert Windows NT Setup Disk 2 and press
.
13 From the Welcome to Setup screen, press to continue
installing Windows NT.
14 Press to have Setup detect the mass storage devices on
your computer.
15 At the prompt, insert Setup Disk 3 and press .
Page 11

8 English English
16 When the Setup program has finished detecting storage devices,
press
S to configure additional SCSI adapters.
17 From the list of adapters, select
Other and press to install
a custom driver.
18 Insert the Adaptec Array1000 driver diskette in drive A and press
.
19 Press to select the Adaptec Array1000 driver.
20 When the driver has finished loading, press to continue
installing Windows NT.
21 At the prompt, re-insert Setup Disk 3 and press .
22 Continue installing Windows NT following the on-screen
instructions.
23 When prompted, insert your drivers diskette into drive A and press
. When the driver has finished loading, you can continue
with the Windows NT installation. For more information, refer to
your operating system’s documentation on your Drivers and Utilities
CD-ROM.
Page 12

English English 9
Installing the HP RAID Device Manager
After installing Windows NT 4.0 on your computer, continue by
installing the HP RAID Device Manager. You can use the HP RAID
Device Manager to provide configuration and performance information,
and to change array settings. For instructions on using the HP RAID
Device Manager, refer to the HP RAID Device Manager’s online Help.
To install the HP RAID Device Manager:
1 Start Windows NT and either,
•
insert the HP RAID Device Manager Disk 1 in drive A, or
•
the Drivers and Utilities CD-ROM in the CD-ROM drive.
2 To continue the installation, either:
•
Select Run from the
Start
menu, type A:\setup.exe and press
, or
•
Use Explorer to find the \FASTRAID\CIO\DISK1\ directory on
the CD-ROM and double-click on
setup.exe.
3 Follow the instructions that appear on the screen.
4 When the installation is complete, reboot your computer. From the
Start menu, select
HP RAID Device Manager
to display the HP RAID
Device Manager tools. Select
RAID Device Manager
to start the program.
The HP RAID Device Manager (the title bar displays “Adaptec CI/O
Workstation Array Management Software”) monitors the configuration
and performance of your HP FastRAID system.
Be sure to install any other device drivers required by your system
configuration, including those from the Windows NT 4.0 Service Pack.
For more information, refer to the Windows NT installation notes
available from the HP’s World Wide Web support site:
http://www.hp.com/go/kayaksupport/
You can also find more information on the HP Kayak XU/XW PC
Workstation Drivers and Utilities CD-ROM provided with your system
in the
!INSTALL directory.
Page 13

10 English English
Optimizing Performance
Check HP’s World Wide Web site for more information on how to
optimize the performance of HP FastRAID on your system. Refer to
http://www.hp.com/go/kayaksupport/.
To change HP FastRAID settings:
•
Click the Start button, select Programs, then HP RAID Device Manager, then
RAID Device Manager. To modify the caching parameters, you must set a
password. In the HP RAID Device Manager window, select the
View
menu, then
Change Password.
NOTE You can install the HP RAID Device Manager from the Drivers and
Utilities CD-ROM or the HP Web site.
The first time you use the HP RAID Device Manager, no password is set.
When requested to enter the Old Password, press
TAB to go to the New
Password box.
1 In the Storage Configuration window, select the RAID icon.
2 In the window that appears, select
Operations..., and then Optimize
Performance.
..
.
If an Adaptec
®
software window appears click Cancel....
3 In the Optimize Performance window, ensure that
Caching Enabled is
checked
.
4 Click on the dropdown menu and select the type of application
nearest to the one you are using.
If you want to change the values already set, select
Edit
and perform
the changes required.
Page 14

English English 11
Using Custom Setup
To create an array using Custom Setup, you will need to do
the following:
NOTE You can also perform most of these advanced options with the HP RAID
Device Manager once you’ve completed the installation and the HP
RAID Device Manager has been installed. Refer to the HP RAID Device
Manager’s online Help for more information on using this utility.
1 Insert the ArrayConfig diskette in drive A and reboot your
computer. Wait until ArrayConfig starts automatically.
2 Read the text that appears on the initial ArrayConfig screens. Press
any key to view the next screen, or press to return to the
previous screen.
3 When you see the Setup Type Selection Menu, select
Custom Setup.
Then wait while ArrayConfig scans your system for information
about your host adapter and SCSI devices.
4 When the Main Menu appears, select
Disk Array Operations.
5 Select
Create New Array from the Disk Array Operations menu.
6 Type a name for the array and press . The name can be up
to 15 characters long and can include spaces and any other printable
characters.
7 Select an array type from the following options:
•
RAID 0: Data is striped across the disks in a RAID 0 array,
allowing for faster data input and output than a single disk.
RAID 0 arrays do not store redundant data; if any disk in the array
fails, all data is lost.
•
RAID 1: Data is mirrored on one pair of disks. If one disk fails, data
is still safe. The actual usable data capacity of the array equals
half the available disk space.
Page 15

12 English English
8 Type the number of drives you want in the array, not including spare
drives, and press . The number of drives available for
assignment is listed on the screen. (You will not be prompted for the
number of drives if you are creating a RAID 1 array, because RAID 1
arrays have two drives by definition.)
NOTE When you select a single hard drive for RAID 0, the drive will be striped
and optimized using the ARO-1130’s cache memory, but no actual array
will be created. A single drive optimized in this way, although
significantly faster, will not provide the same level of performance as a
two-drive RAID 0 array.
9 When the next screen appears, press
to highlight a channel.
Select drives for the array by pressing the
↑
and ↓ keys until the drive
name is highlighted, and then press
Ins or . The names of
selected drives appear in the box on the right side of the screen. To
select drives on a different channel (if necessary) press to
select another channel and then select the drives from the SCSI IDs
on Channel menu. To deselect the drive you most recently added,
press .
CAUTION A warning appears if you select a disk that has partitions. Do not select
disks with partitions if they contain data you want to keep, because any
existing data will be erased when the disk becomes part of the array.
When you have selected the number of drives you specified in
Step 8, the next screen appears automatically. If you are creating a
RAID 1 array and if there are any unassigned drives, the screen
prompts you to define spare drives for the array.
10 If you do not want a spare, type
n and continue with step 12. If you
want to select dedicated spares, follow these steps:
a At the prompt, type
y.
b At the next prompt, type 1 or 2.
c Select one or two spares, using the same method you used to
select disks for the array.
Page 16

English English 13
11 When the Initialize Mode menu appears, select
Initialize Array to Zero.
This operation begins immediately. A graph on the screen shows the
progress of this operation.
CAUTION If the drives contain data, all the data is lost when you initialize
the array.
Select
Low-Level Format only if the drives were previously formatted on
another system or if you are using drives other than new HP
accessory drives (where there’s a possibility of surface defects).
Low-level formatting takes a long time for large disk drives. (Refer
to the section “Initializing an Array” on page 17 for more
information.)
12 When the menu of block sizes appears, select a block size. (This
menu does not appear for RAID 1 arrays.)
The default block size (64 KBytes) gives the best overall
performance. The allowable block sizes are 8, 16, 32, 64, and 128
KBytes.
13 When you see the message
Initialization of [array name] is complete, press
any key to return to the Disk Array Operations menu.
14 To create additional arrays (if disks are available), return to Step 5.
When all arrays are created, exit from ArrayConfig, remove the
ArrayConfig diskette, and reboot the computer. After you reboot
you can write data to the arrays.
15 Press until you’re back at the Main Menu, and exit ArrayConfig.
16 Begin the installation of Windows NT 4.0 by booting from the
Windows NT Setup diskettes.
NOTE Do not boot from the Windows NT CD-ROM as the hard drive will not be
detected.
17 When prompted, insert Windows NT Setup Disk 2 and press
.
18 From the Welcome to Setup screen, press to continue
installing Windows NT.
Page 17

14 English English
19 Press to have Setup detect the mass storage devices on
your computer.
20 At the prompt, insert Setup Disk 3 and press .
21 When the Setup program has finished detecting storage devices,
press
S to configure additional SCSI adapters.
22 From the list of adapters, select
Other and press to install a
custom driver.
23 Insert the Adaptec Array1000 driver diskette in drive A and press
.
24 Press to select the Adaptec Array1000 driver.
25 When the driver has finished loading, press to continue
installing Windows NT.
26 At the prompt, re-insert Setup Disk 3 and press .
27 Continue installing Windows NT following the on-screen
instructions.
28 When prompted, insert your drivers diskette into drive A and press
. When the driver has finished loading, you can continue
with the Windows NT installation. For more information, refer to
your operating system’s documentation on your Drivers and Utilities
CD-ROM.
Managing an Existing Array
You can manage an existing array in the following ways:
•
Making a bootable array
•
Displaying array information
•
Deleting an array
•
Initializing an array
•
Adding or deleting a spare disks
Page 18

English English 15
Making the Array Bootable
Follow these steps if you want your computer to boot from the newly
created array or if you want to change the boot order of existing arrays:
1 Select
Display Boot Order from the Main Menu. The Boot Order for
Singles and Arrays window appears.
2 If the newly created array is listed as Unit 0 at the top of the list, no
changes are necessary; if it has some other unit number, highlight
the array name and press to select it.
3 Use the arrow keys to move the selected array to the top of the list.
Then press to deselect it.
4 When you are finished, press to return to the Main Menu.
NOTE You cannot use this procedure to change the boot order of a non-striped
SCSI disk drive (see the “Resolving Problems” on page 20 for notes on
booting from the Narrow SCSI BIOS). If you want to do this, create a
one-drive RAID 0 “array” from the disk.
Displaying Array Information
Follow these steps to display information about existing arrays defined
in your computer:
1 Select
Disk Array Operations
from the Custom Setup Main Menu.
2 Select
Display Arrays from the Disk Array Operations menu.
3 When the list of arrays appears, highlight the array for which you
want information and press .
4 View the information that appears on the screen. This includes array
type and status, array size, and information about each disk in the
array.
5 Press any key to return to the Disk Array Operations menu.
Deleting an Array
CAUTION All data is lost when you delete an array! Before you delete an array,
back up any data you want to keep.
Page 19

16 English English
Follow these steps to delete an array:
1 Select Disk Array Operations from the Main Menu.
2 Select
Delete Array from the Disk Array Operations menu.
3 When the list of arrays appears, select the array you want to delete.
CAUTION A warning appears if you select an array that has partitions. Do not
delete an array with partitions if it contains data you want to keep,
because any existing data will be erased. Be especially careful not to
select your boot array!
4 View information about the array and make sure you really want to
delete it. Press any key to continue.
5 Type
y to delete the array (or n to cancel the operation).
6 When the message
[Array name] deleted appears, press any key to
continue.
The drives that were formerly part of the array can now be used as
stand-alone drives or as members of another array. Deleting an array
may change the boot order and the drive assignment of other arrays
and disks.
NOTE You can identify individual drives by blinking the drive lights while you
are running the HP RAID Device Manager software. Refer to the HP
RAID Device Manager Software online documentation for more
information.
Page 20

English English 17
Initializing an Array
When you create a new array in Custom Setup, you are automatically
prompted to initialize (format) it. You can also select the
Format/Initialize Array option as a separate Custom Setup command.
This could be necessary to re-initialize an array that has become
corrupted. Here is some additional information on the two initialization
methods:
• Initialize Array to Zero
: (Recommended method) Fills the array with
zeroes. This option is faster than a low-level format, but it does not
verify the integrity of the disks.
• Low-level Format
: Performs a low-level SCSI format. This writes a
consistent pattern to the disks, checks the disks for defects, and fills
the array with zeroes. Low-level formatting can take some time (up
to 1 hour) if the disks are large. You cannot abort a low-level format
once it has started.
CAUTION Formatting or initializing an array erases all data on the array and
cannot be aborted once it has started. If the array contains data you
want to keep, be sure to back it up first!
Follow these steps to initialize an array:
1 Select
Disk Array Operations
from the Main Menu.
2 Select
Format/Initialize Array from the Disk Array Operations menu.
3 When the list of arrays appears, select the array you want to
initialize.
4 Type
y to confirm that you want to format the array.
CAUTION A warning appears if you select an array that has partitions. Do not
initialize an array with partitions if it contains data you want to keep,
because any existing data will be erased. Be especially careful not to
initialize your boot array!
5 When the Select Format Mode menu appears, select
Initialize Array to
Zero
(recommended) or Low-Level Format.
Page 21

18 English English
6 When the list of block sizes appears, select a block size. The
allowable block sizes are 8, 16, 32, 64 (the default), or 128 KBytes.
(This menu does not appear if the array is a RAID 1 array with only
two drives.) The default block size gives the best overall
performance. Formatting begins immediately.
7 When you see the message
Initialization of [array name] is complete, press
any key to return to the Disk Array Operations menu.
NOTE You will need to install the operating system after the array is initialized.
Refer to “Installing Windows NT 4.0” on page 7.
Adding and Deleting Spares
Dedicated spare disks (spares) are an important data protection and
real-time recovery feature of RAID 1 arrays (RAID 0 arrays do not
support spares). Up to two dedicated spares can be defined for each
array. If a disk in an array fails while the computer is running, a spare is
activated immediately to take its place. The array software
automatically reconstructs the necessary data on the new disk, and
array operation continues uninterrupted.
Adding a Dedicated Spare.
When you create an array you have the option of adding one or two
dedicated spares. You can also add dedicated spares to an existing
array at a later time. You cannot add dedicated spares to an array if:
•
The array already has two dedicated spares
•
The remaining single disks are not at least as large as the smallest
disk in the selected array
Follow these steps to add one or two dedicated spares to an alreadyexisting array:
1 Select
Disk Array Operations from the Main Menu.
2 Select
Add/Delete Spare Drive
from the Disk Array Operations menu.
3 Select the array to which you want to add the dedicated spare.
4 Select
Add Spare Drive from the Add/Delete Spare menu.
Page 22

English English 19
5 Select a SCSI channel on the left, if necessary, and then press →
to
move to the list of disks on the right. Disks are grayed out if they are
already used in an array, or if they are smaller than the members of
the array. Highlight an available disk and press . Then
select another disk for the second spare, if necessary. The new
dedicated spare is added immediately.
CAUTION A warning appears if you select a disk that has partitions. Do not select
disks with partitions if they contain data you want to keep, because any
existing data will be erased. Be especially careful not to select your boot
disk as a spare!
6 Press any key to continue.
Deleting a Dedicated Spare.
Follow these steps to delete a dedicated spare:
1 Select
Disk Array Operations from the Main Menu.
2 Select
Add/Delete Spare Drive from the Disk Array Operations menu.
3 When the list of spare drives appears, select the one you want to
delete and press .
4 Select
Delete Spare Drive from the Add/Delete Spare Drive menu. The
dedicated spare is deleted immediately.
5 Press any key to continue. The disk that was formerly a dedicated
spare can now be used as a spare for another array or as a member
of a new array.
Page 23

20 English English
Resolving Problems
If you experience problems using the HP FastRAID option, check that:
1 The ARO-1130 adapter BIOS sign-on message appear
during bootup? If not, check that the ARO-1130 adapter is properly
seated in the RAIDport slot.
2 All SCSI bus cables and power cables are connected.
If you are having trouble booting from the FastRAID array:
1 Check the settings in the HP Setup program that the Array1000
Family Raid Adapter is selected in position one. To do this:
a From the HP Setup program, select the Boot menu group, then
the Hard Disk Drive item. If the Array1000 Family Raid Adapter
is already in position one, then no changes are necessary.
Otherwise, select the Array1000 Family Raid Adapter by using
the up and down arrows, then press the
+ key to move it up the
list. Save your changes before you exit the Setup program.
2 Check that the array has been selected as the boot device using the
ArrayConfig utility:
a Insert the ArrayConfig utility disk in drive A.
b Reboot your computer and when the ArrayConfig Main menu
appears, select Display Boot Order. If the array is at the top of the
list, preceded by the words Unit 0, no changes are necessary.
Otherwise, highlight the array name and press , then
use the arrow keys to move it to the top of the list.
c Exit the ArrayConfig utility and reboot your computer.
3 Check the HP Setup settings to make sure that each drive has a
unique SCSI ID.
Page 24

English English 21
4 The External 16/8-bit Symbios BIOS and the FastRAID BIOS cannot
be loaded at the same time in BIOS setup. The Symbios BIOS should
be disabled (from the
Advanced/External and Internal Wide
16/8-bit SCSI
window, disable Option ROM Scan). This may be
fixed in a later version of the BIOS. Check the World Wide Web at the
following site:
http://www.hp.com/go/kayaksupport/ to see if
this has been corrected.
Consequence: you cannot boot from devices connected to the
Symbios controller at the same time as Wide SCSI devices. It is,
however, possible to manually switch from bootable SCSI devices,
connected to the Symbios controller, to Wide SCSI devices.
5 Ensure that you boot from the Windows NT diskettes provided and
not from the CD-ROM. If you boot from the CD-ROM, the hard drive
will not be found (problem relating to Windows NT).
6 Ensure that the FastRAID/Array1000 drivers are installed. To install
these drivers:
a Shut down your PC Workstation, remove the ARO-1130 adapter,
and restart your system.
b Click the Start menu, point to Settings, and then click Control
Panel.
c Double-click the SCSI Adapters icon, then the Drivers tab.
d Click Add, Have Disk..., and insert the Adaptec Array1000 driver
diskette.
e When requested to enter the driver path, type A:\winnt and
follow the installation instructions (the Windows NT 4.0 CD-ROM
may be needed).
f Shut down your computer and re-install the FastRAID card.
Page 25

22 English English
Frequently Asked Questions
Q: Can I boot from an array?
A: Yes, you can boot without any problem from an array.
Q: If you have two UltraWide SCSI drives connected to the RAID
controller, does one of them have to be the bootable drive?
A: No, the entire RAID array is bootable rather than the individual
drives that make up the array. If there are two drives configured in a
RAID 0 array, the array will automatically be bootable.
Q: Can a third UltraWide SCSI hard drive be added to be used as
the boot device, as defined in the support boundaries?
A: Yes, you can add a third drive, but the third drive cannot be included
in the same RAID array. For example, you could create a RAID 1 array
with two drives plus a third drive configured as a spare. Or, you could
configure two arrays: one with two drives and one with one drive.
Q: Can I connect a third SCSI drive to the Narrow SCSI controller
.
A: You can connect a third drive to the Symbios controller, but both the
Symbios BIOS and FastRAID BIOS cannot be loaded at the same time.
That means that you cannot boot from both SCSI devices at the same
time. If you only need to boot from the Symbios SCSI occasionally, then
you can disable (from BIOS setup) the Internal Wide 16-bit SCSI
Option ROM Scan and enable the Symbios SCSI Option ROM Scan to
boot on the Symbios SCSI. When you’re finished, disable the Symbios
SCSI
Option ROM Scan and enable the Internal Wide 16-bit SCSI
Option ROM Scan.
NOTE
You cannot change the priority of RAID and non-RAID devices through
the ArrayConfig utility’s Custom Setup routine. RAID devices will
always have the highest priority even if the SCSI address of the
non-RAID device is set to 0.
Page 26

English English 23
The only way to boot on the non-RAID device is to go to the SCSISelect
Utility, then select Configure/View Interface Settings. Use the arrow
keys to select the SCSI Device Configuration, then in the Include in
BIOS Scan option, move to the SCSI Device ID to be disabled and press
the key.
Q: After I installed the FastRAID card, I could not boot Windows NT
from my non-striped wide SCSI drive. I get a blue screen with the
message “BOOT DEVICE NOT FOUND”.
A: Even if the drive is not configured in a RAID array, you can boot on
it before installing the FastRAID card provided that the required SCSI
drivers are installed.
Page 27

24 English English
Technical Information
Technical Specifications
Physical and Environmental Specifications
Specification Description
Advanced RAID features • RAID coprocessor
• Array status monitoring and event notification
• Adjustable stripe width
SCSI channels AIC-7880 system board SCSI chip connected to RAIDport
connector
Array support 1 or 2 10 krpm drives can be configured for RAID levels
0 or 1.
Additional drives can also be supported in non-array
configurations
Operating system support Windows NT 4.0
Specification Description
Dimensions 7.008 inches in length by 3.58 inches in height
17.8 cm in length by 9.1 cm in height
Operating temperature 5
o
C to 55oC
40
o
F to 130oF
Humidity (operating) 20% to 90%, non condensing
Page 28

English English 25
HP Hardware Warranty
This HP accessory is covered by a limited hardware warranty for a
period of one year from the date of purchase by the original end-user.
The type of service provided is return to an HP or repair-authorized
reseller service-center.
At Hewlett-Packard’s discretion, a defective accessory will be repaired
or replaced by a new unit, either of the same type or of an equivalent
model.
If this accessory is purchased and used together with an HP Vectra
personal computer or an HP Kayak PC Workstation, it will be covered
by the warranty of this computer or workstation, under the same
conditions of service and duration.
Please refer to the warranty statement provided with your HP personal
computer or PC Workstation for warranty limitations, customer
responsibilities, and other terms and conditions.
FOR CONSUMER TRANSACTIONS IN AUSTRALIA AND NEW
ZEALAND: THE WARRANTY TERMS CONTAINED IN THIS
STATEMENT, EXCEPT TO THE EXTENT LAWFULLY PERMITTED,
DO NOT EXCLUDE, RESTRICT OR MODIFY AND ARE IN ADDITION
TO THE MANDATORY STATUTORY RIGHTS APPLICABLE TO THE
SALE OF THIS PRODUCT TO YOU.
Page 29

26 English English
Regulatory
FCC (for USA only)
Federal Communications Commission Radio Frequency Interference Statement
Warning:
This equipment has been tested and found to comply with the limits for a Class B digital device, pursuant to Part
15 of the FCC Rules. These limits are designed to provide reasonable protection against harmful interference in
a residential installation. This equipment generates and uses, and can radiate radio frequency energy and, if not
installed and used in accordance with the instructions, may cause harmful interference to radio
communications. However, there is no guarantee that interference will not occur in a particular installation. If
this equipment does cause harmful interference to radio or television reception, which can be determined by
turning the equipment off and on, the user is encouraged to correct the interference by one or more of the
following measures:
• reorient or relocate the receiving antenna
• increase the separation between the equipment and the receiver
• connect the equipment into an outlet on a circuit different from that to which the receiver is connected
• consult the dealer or an experienced radio/TV technician for help.
Hewlett-Packard’s FCC Compliance Tests were conducted with HP-supported peripheral devices and HP
shielded cables, such as those you receive with your system. Changes or modifications not expressly approved
by Hewlett-Packard could void the user’s authority to operate the equipment.
Notice for Canada
This Class B digital apparatus meets all requirements of the Canadian Interference-Causing Equipment
Regulations.
Cet appareil numérique de la Class B respecte toutes les exigences du Règlement sur le matériel brouilleur du
Canada.
Notice for Japan (class B)
Page 30

Part Number D6690-90001
Revision 1.1 (US only)
 Loading...