

Page 1

MS Windows Printing
The HP ColorSmart printer driver supports MS Windows 3.x and MS
Windows 95. Access to the HP ColorSmart printer driver to change
specific settings is available from within your software application
programs. The steps to access the printer driver vary depending upon the
application software program. Generally, the printer driver is found under
“File” in the “Print” menu.
Note
Access to select the printer driver is through MS Windows’ “Printers”
control panel. The Printers control panel allows you to:
To open the Printers control panel:
1. Double-click Main in the Program Manager.
2. Double-click Control Panel.
Although MS Windows come with printer drivers that work
with HP DeskJet printers, the drivers do not provide access to
some of the more advanced capabilities of HP DeskJet
850C/855C series printers. Only the HP ColorSmart printer
driver takes full advantage of all features.
Select the default printer from a list of loaded printer drivers.
Add Microsoft printer drivers.
Remove unneeded printer drivers.
Set various printer options (which may be superseded by the
printer settings selected in the software application program).
Confirm the port which the printer is using.
3. Double-click Printers.
The default printer is listed in the text box at the top of the dialog box. To
select a different default printer, double-click a printer from the list of
installed printers.
Although the Printers control panel provides access to various printer
settings, like paper type and page orientation, these settings are
overridden by settings made from within an application. The Printers
control panel settings are used when an application does not specify
certain defaults.
Page 2

Because you can connect your printer to either an LPT or a COM port, it is
important to make sure the proper port is selected before printing. The
steps below describe how to select or change a printer port from the
Printers control panel.
To select a port:
1. Open the Printers control panel.
2. Click Connect.
3. Select the port from the list.
The default printer’s name is followed by the name of the port to which it is
is connected.
Page 3
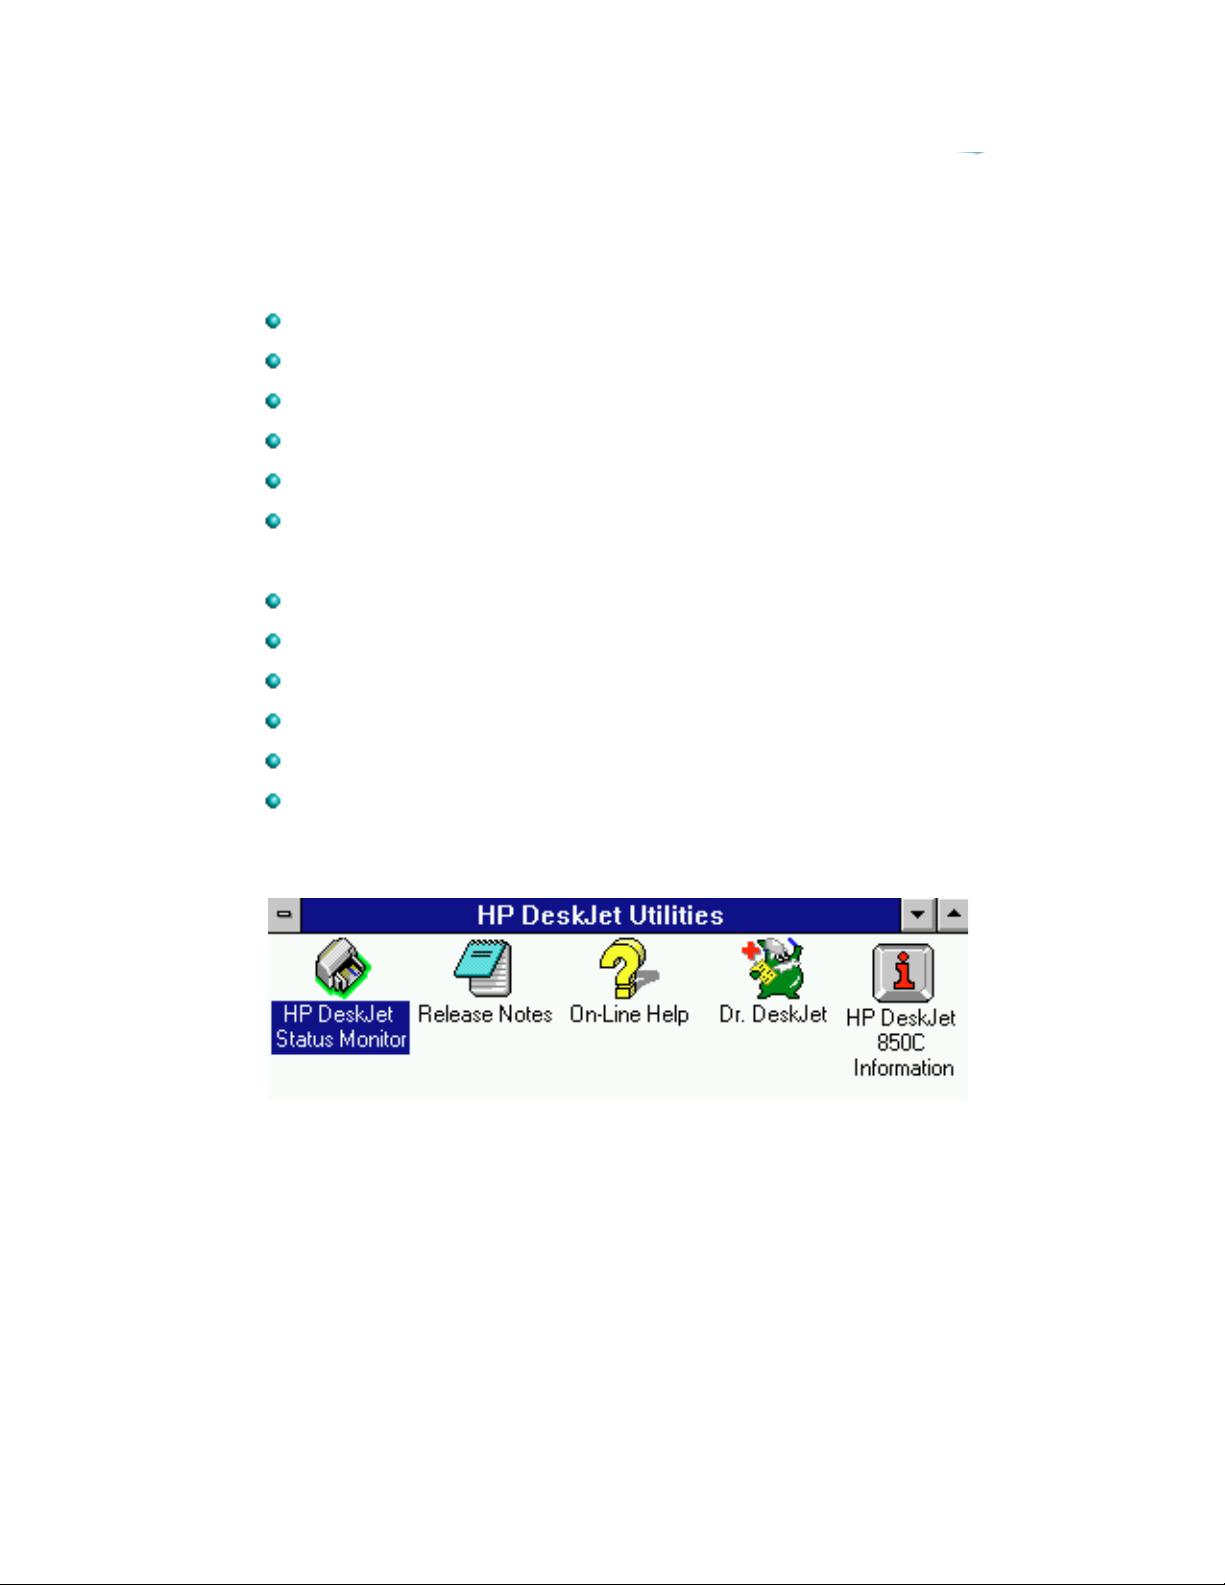
HP Printing System for Windows
The HP Printing System for Windows includes:
HP ColorSmart Printer Driver
HP DeskJet Status Monitor
HP DeskJet Utilities program group
14 TrueType Fonts
Quick Tour (available during installation only)
HP Control Panel for DOS
The HP DeskJet Status Monitor allows you to:
Monitor a current print job
Monitor the printer’s status at any time
Print a self-test page
Clean the print cartridges
Align the print cartridges
Cancel the current print job
The HP DeskJet Status Monitor Dialog Box
Page 4

The DeskJet Utilities include:
Online information about the HP DeskJet 850C/855C series
printers. To access the online information: click Help in the
ColorSmart dialog box or the ColorSmart Options dialog box, or
double-click the HP DeskJet 850C/855C Printer Information icon in
the HP DeskJet Utilities program group in the Program Manager.
Dr. DeskJet diagnostic program (HP DeskJet 850C only), which
contains detailed information about common printing problems
and easy to understand solutions. To access Dr. DeskJet: click
Dr.DeskJet in the Online Information, or double-click the Dr.
DeskJet icon in the HP DeskJet Utilities program group in the
Program Manager.
Late-breaking release notes in the ReadMe.txt file.
Page 5

Installing the Printer Driver
The minimum system requirements to run the HP Printing System for
Windows are:
Windows version 3.1
An 80386 processor
2 MB of RAM to print in black or 4 MB of RAM to print in color
10 MB free hard disk space
Before you install the printer software:
1. Unpack the printer and set it up with the procedures described in
“User Documentation/Setup Guide.”
2. Make sure the computer and the printer are both turned on and
connected with the proper cable.
3. Close any screen savers or other software running in the
background on your computer.
To install the HP Printing System for Windows
1. Insert Installation Disk 1 into the computer’s disk drive.
2. Click File in the menu bar of the Program Manager window.
3. Choose Run in the File menu to open the Run dialog box.
4. Type A:\SETUP or B:\SETUP (depending on the computer’s
configuration) in the text box and click OK.
5. Follow the on-screen instructions during the installation process
and provide appropriate computer system information.
6. Restart Windows to activate the HP DeskJet 850C/855C printer
driver.
Page 6

After installing the software, the print cartridges need to be aligned before
beginning any print jobs.
To align the print cartridges:
1. Double-click the HP DeskJet Status Monitor icon in the HP
DeskJet Utilities program group.
2. Click Maintenance on the Status Monitor menu bar.
3. Choose Align Print Cartridges and follow the on-screen
instructions.
Page 7

About the Printer Driver
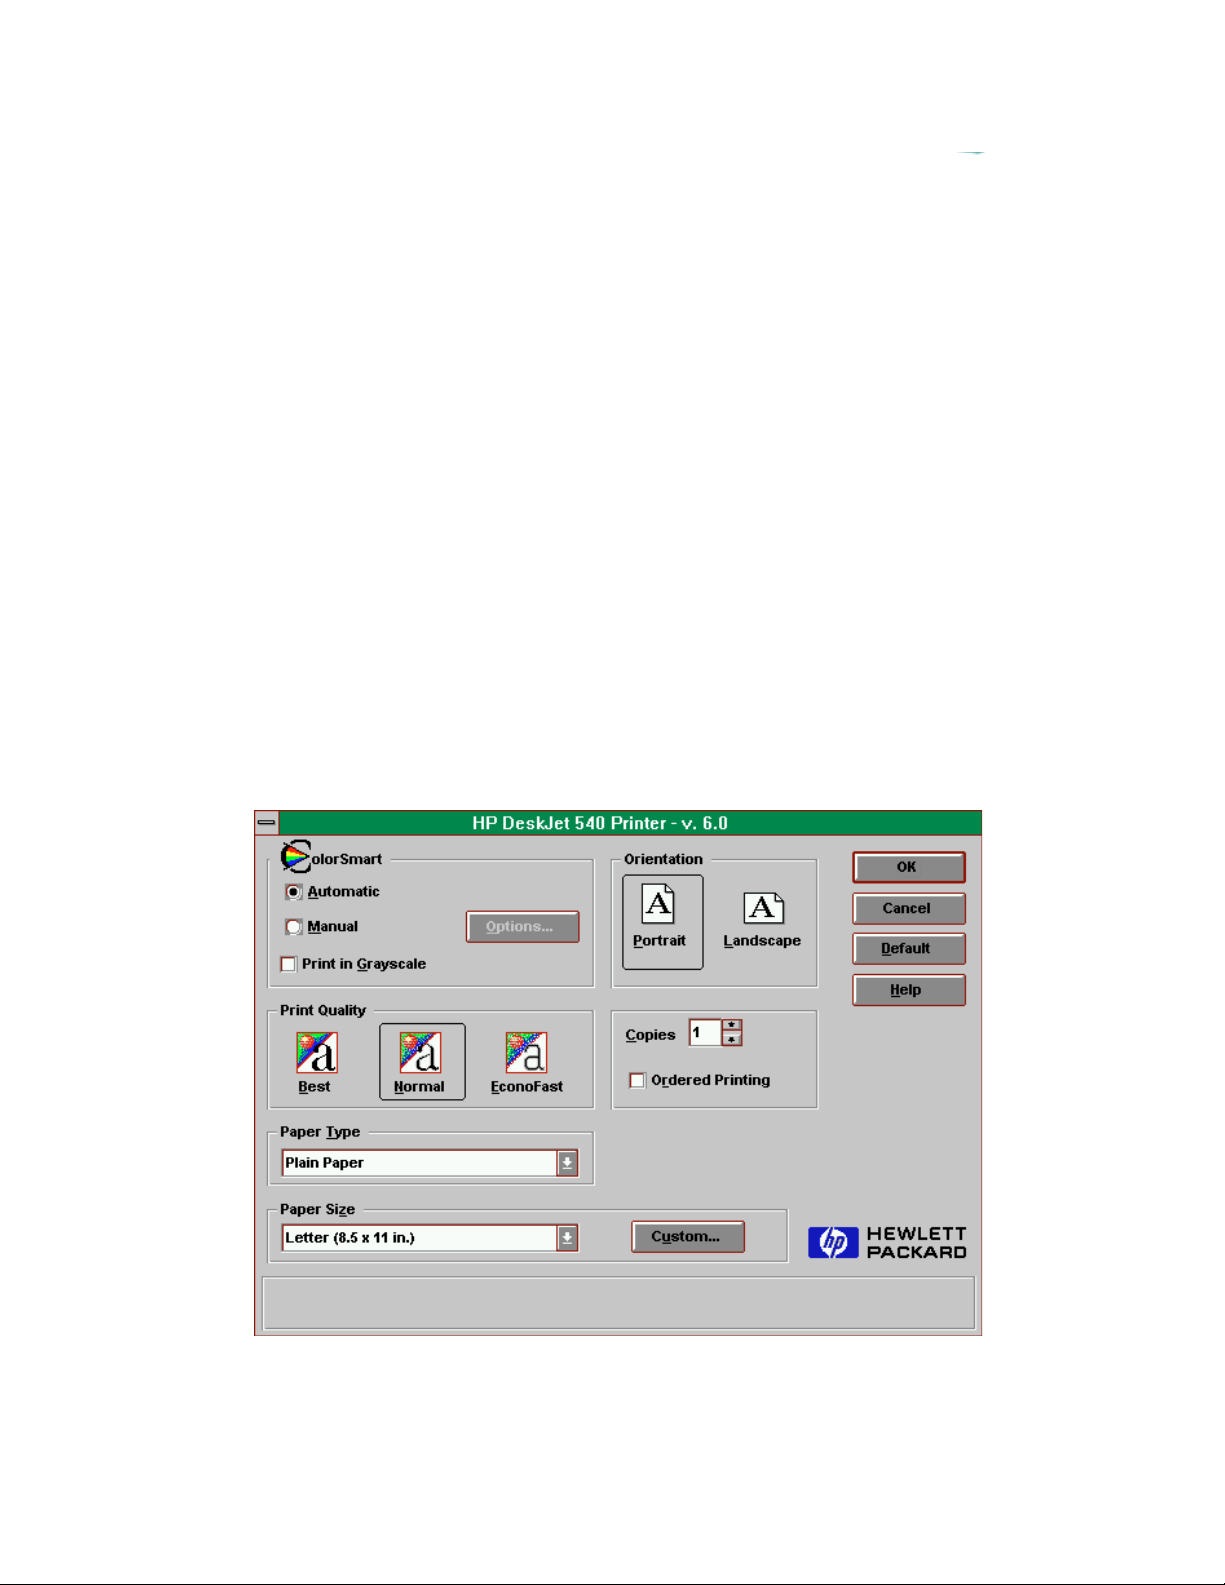
The HP ColorSmart Printer driver software provides access to all the
capabilities of HP DeskJet 850C/855C series printers when used with
Windows applications. The following options are available from the
ColorSmart dialog box:
Automatic or Manual printing
Color or Grayscale printing
Best, Normal, or EconoFast print quality
Paper Type
Paper Size
Number of Copies
Ordered printing
Portrait or Landscape print orientation
The HP ColorSmart Printer Driver has built-in, context-sensitive help.
When an option in the dialog box is clicked, an explanation of that option
appears at the bottom of the dialog box. For more detailed help, click the
Help button in the ColorSmart dialog box.
Page 8
Using the Printer Driver
To use the ColorSmart Printer Driver with the HP DeskJet 850C/855C
series printers from within a Windows application:
1. Choose Print (or Print Setup, depending on the application)
from the File menu.
2. Click the Setup button.
To use the ColorSmart printer driver with the HP DeskJet 850C/855C
series printer from the Windows Control Panel:
1. Double-click Main in the Program Manager window.
2. Double-click Control Panel.
3. Double-click Printers.
4. Select the HP DeskJet 850C/855C series printer in the
Installed Printers list and click the Setup button.
The ColorSmart Dialog box appears.
ColorSmart Printer Driver Dialog Box
Page 9
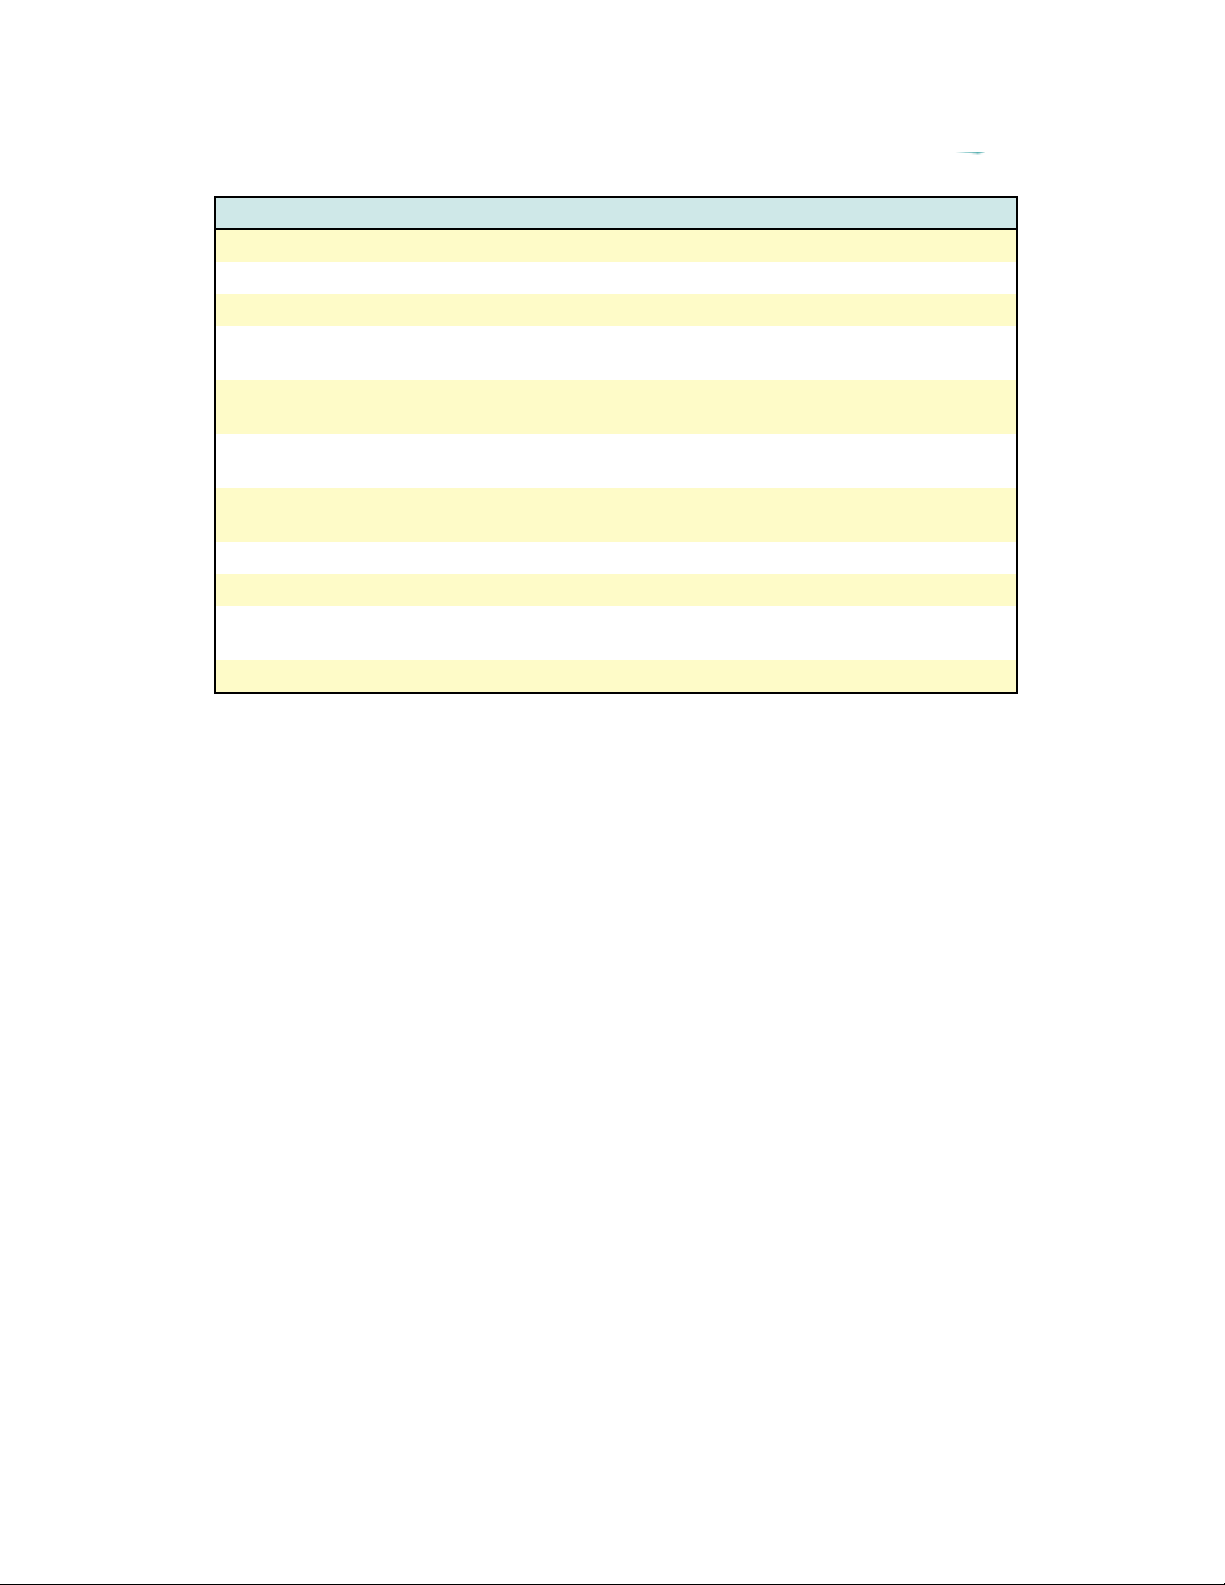
HP DeskJet 850C/855C ColorSmart Dialog Box Options
Option Description
ColorSmart Automatic or Manual screen-to-printer color mapping.
Options Opens the ColorSmart Options dialog box.
Orientation Portrait (tall) or landscape (wide).
Print Quality Best (presentation quality), Normal (letter quality), or
EconoFast (draft quality).
Copies Set the number of copies to be printed. Click the Ordered
Printing box to collate the printed pages of multiple copies.
Paper Type The media may be either plain paper, one of HP’s special media
types, or transparency film.
Paper Size The pop-up menu displays selections supported by the printer.
Click the Custom button to specify a custom paper size.
OK Accept changes.
Cancel Cancel changes.
Default Save the current settings as the default settings for the
ColorSmart Dialog Box.
Help Opens the online help.
ColorSmart: Automatic vs. Manual Printing
In most cases the best print output is obtained by choosing Automatic
ColorSmart printing. In automatic mode, the printer driver uses HP’s
ColorSmart technology to intelligently analyze each element in a
document at the time of printing to provide the best color output.
If the color output obtained using the Automatic ColorSmart option is not
satisfactory, use the Manual option.
Page 10
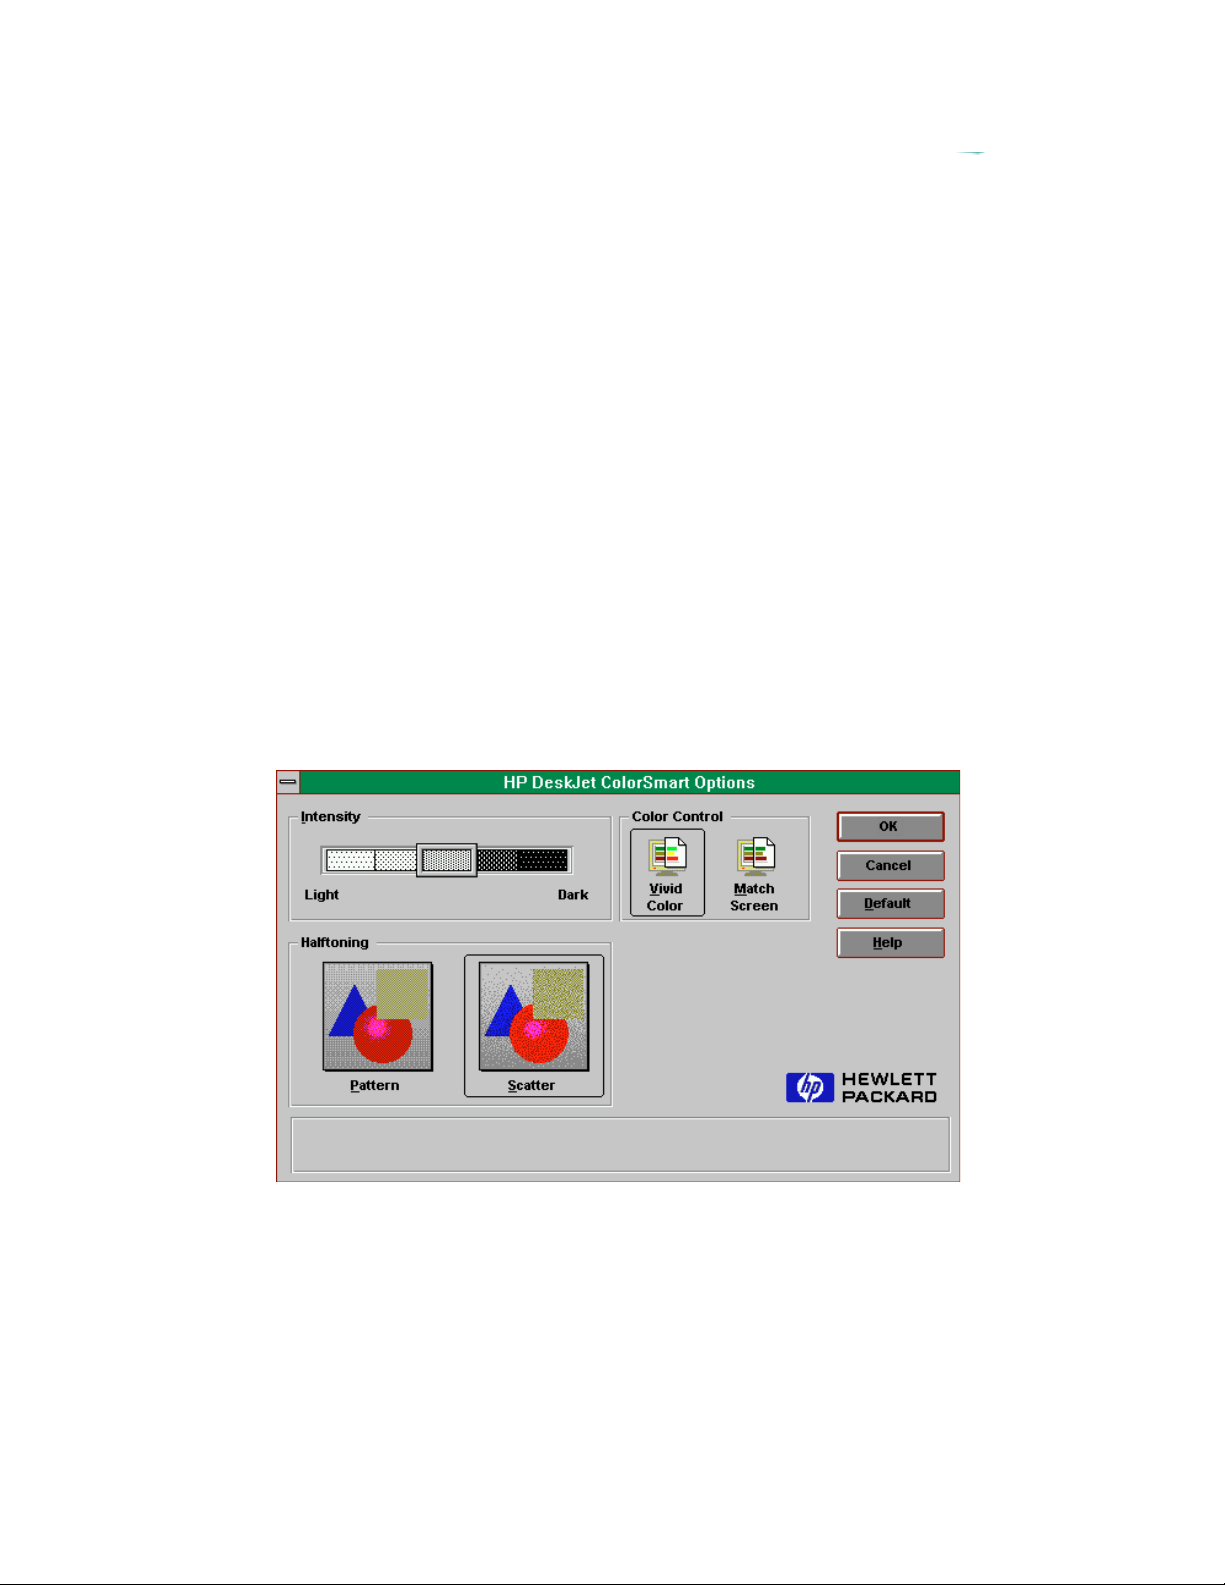
To print in Manual ColorSmart mode:
1. Select the Manual button.
2. Click the Options button, which opens the ColorSmart Options
dialog box.
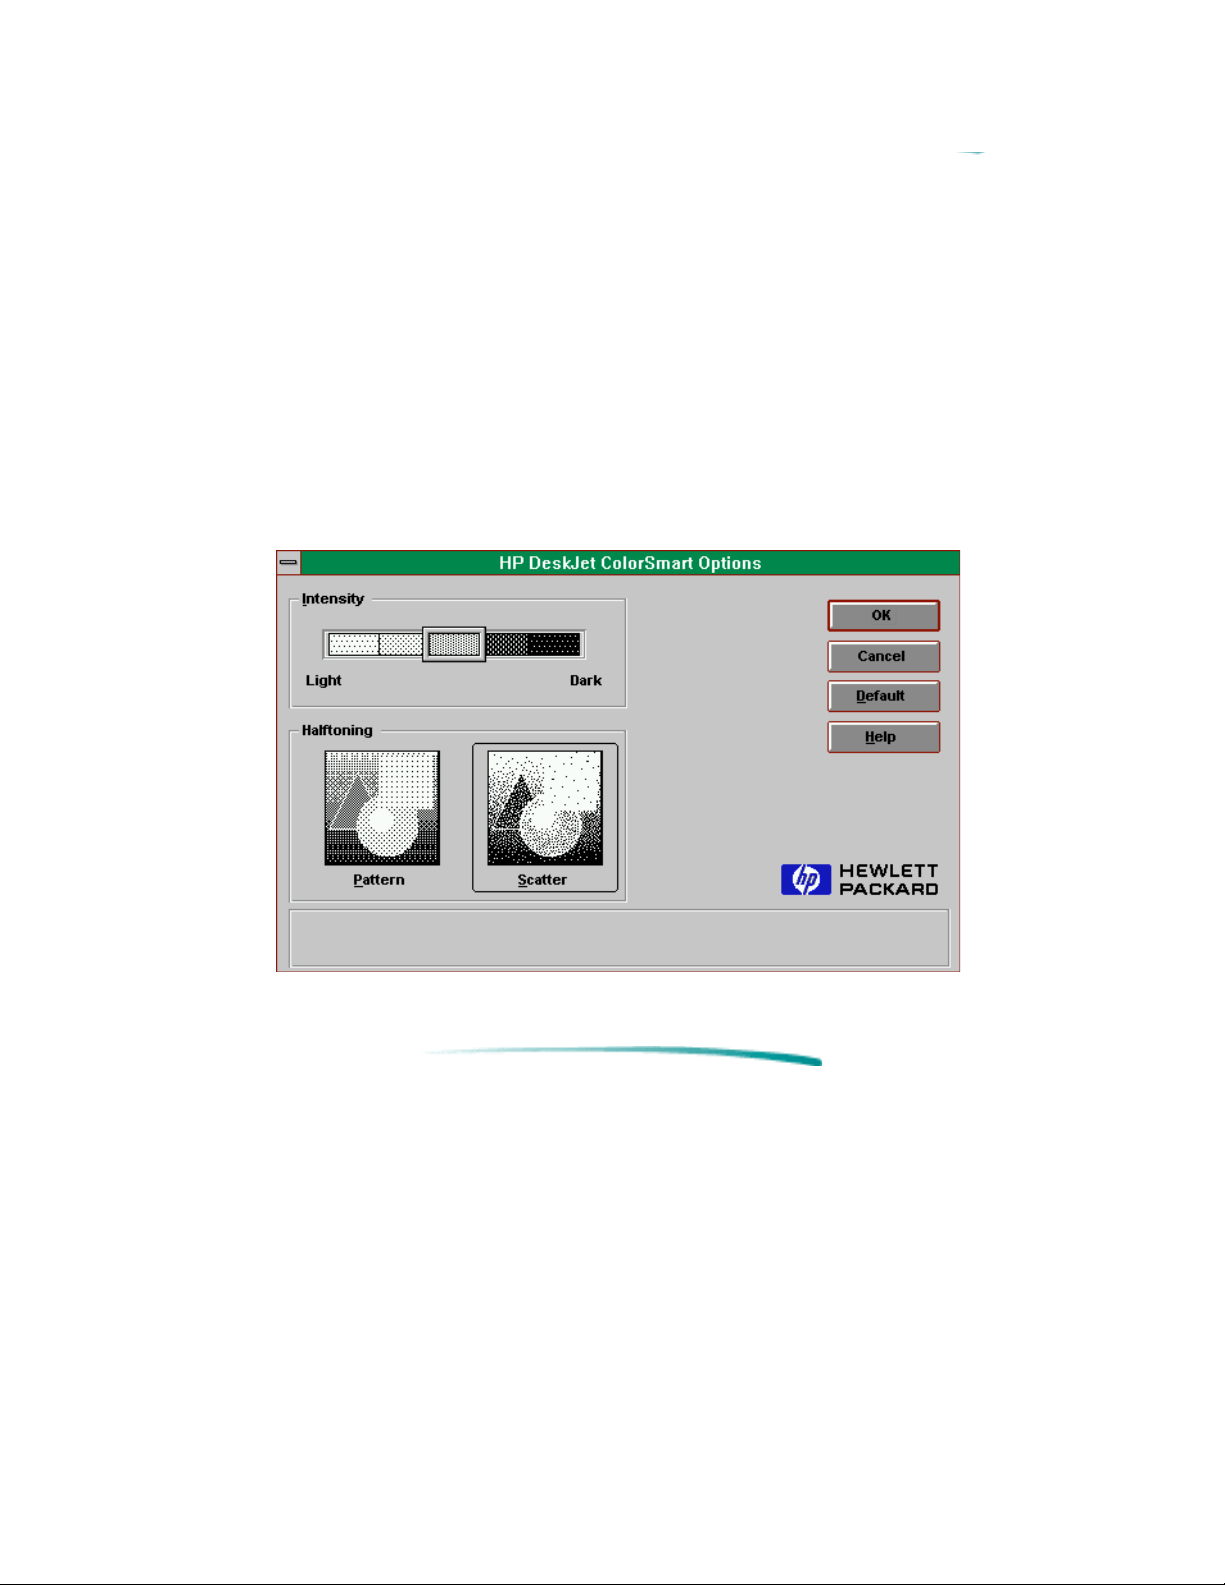
The Manual ColorSmart Options dialog box provides control over
Intensity, Halftoning, and Color Control.
The Intensity slider bar adjusts the amount of ink applied to the paper—
Darker means more ink, Lighter means less ink. Halftoning describes how
the driver places individual drops of ink on the page to reproduce different
shades of the same color. Scatter halftoning, the default setting, usually
gives the best results. Pattern halftoning applies different patterns of dots
for different shades of a color.
The Color Control offers two options: Vivid Color and Match Screen. To
print the document so it looks like it looks on the computer screen, choose
Match Screen. To make the colors of the printed output brighter and more
vivid than they appear on the screen, choose Vivid Color.
Manual ColorSmart Options Dialog Box
Page 11
Grayscale Printing
To economize on the use of the color print cartridge, print draft copies of
color documents in grayscale. Grayscale printing is significantly faster than
color printing, and it gives a good approximation of the final output. To
print in grayscale, select the Print in Grayscale option in the
ColorSmart dialog box.
The Grayscale Option dialog box provides control over intensity and
halftoning.
Grayscale Options Dialog Box
Page 12

Optimizing Performance
The print speed and overall performance of HP DeskJet 850C/855C series
printers can be affected by several things:
The amount of RAM can determine how fast documents are sent to
the printer. Increasing RAM can speed up this process as well as
make the computer work more efficiently at other things besides
printing.
The printer driver used to print documents can make a significant
difference in the quality of the printed output. Make sure an up-todate version of an HP printer driver designed specifically for the
HP DeskJet 850C/855C series printer is installed. To check this:
1. Double-click the Printers icon in the Windows Control Panel.
2. Select the HP DeskJet 850C/855C series printer in the
Installed Printers list.
3. Click Setup to check the version number. The version number
is located in the title bar of the HP ColorSmart dialog box.
The size and complexity of the documents printed can make a
difference in the printer's performance. Graphics are usually more
complex - especially color graphics - and print more slowly than
text.
The processing speed of the computer will determine how fast a
document is sent to the printer. For example, a computer with a
486 processor runs faster than a computer with a 386 or a 286
processor.
Running numerous software programs at one time slows down
printing; each open program uses RAM. Therefore, limit the
number of programs or documents open at one time.
Screen fonts are stored in RAM, which means they use up memory
that the printer may need in order to print. Delete screen fonts or
printer fonts that are not needed.
Page 13
Using Online Help
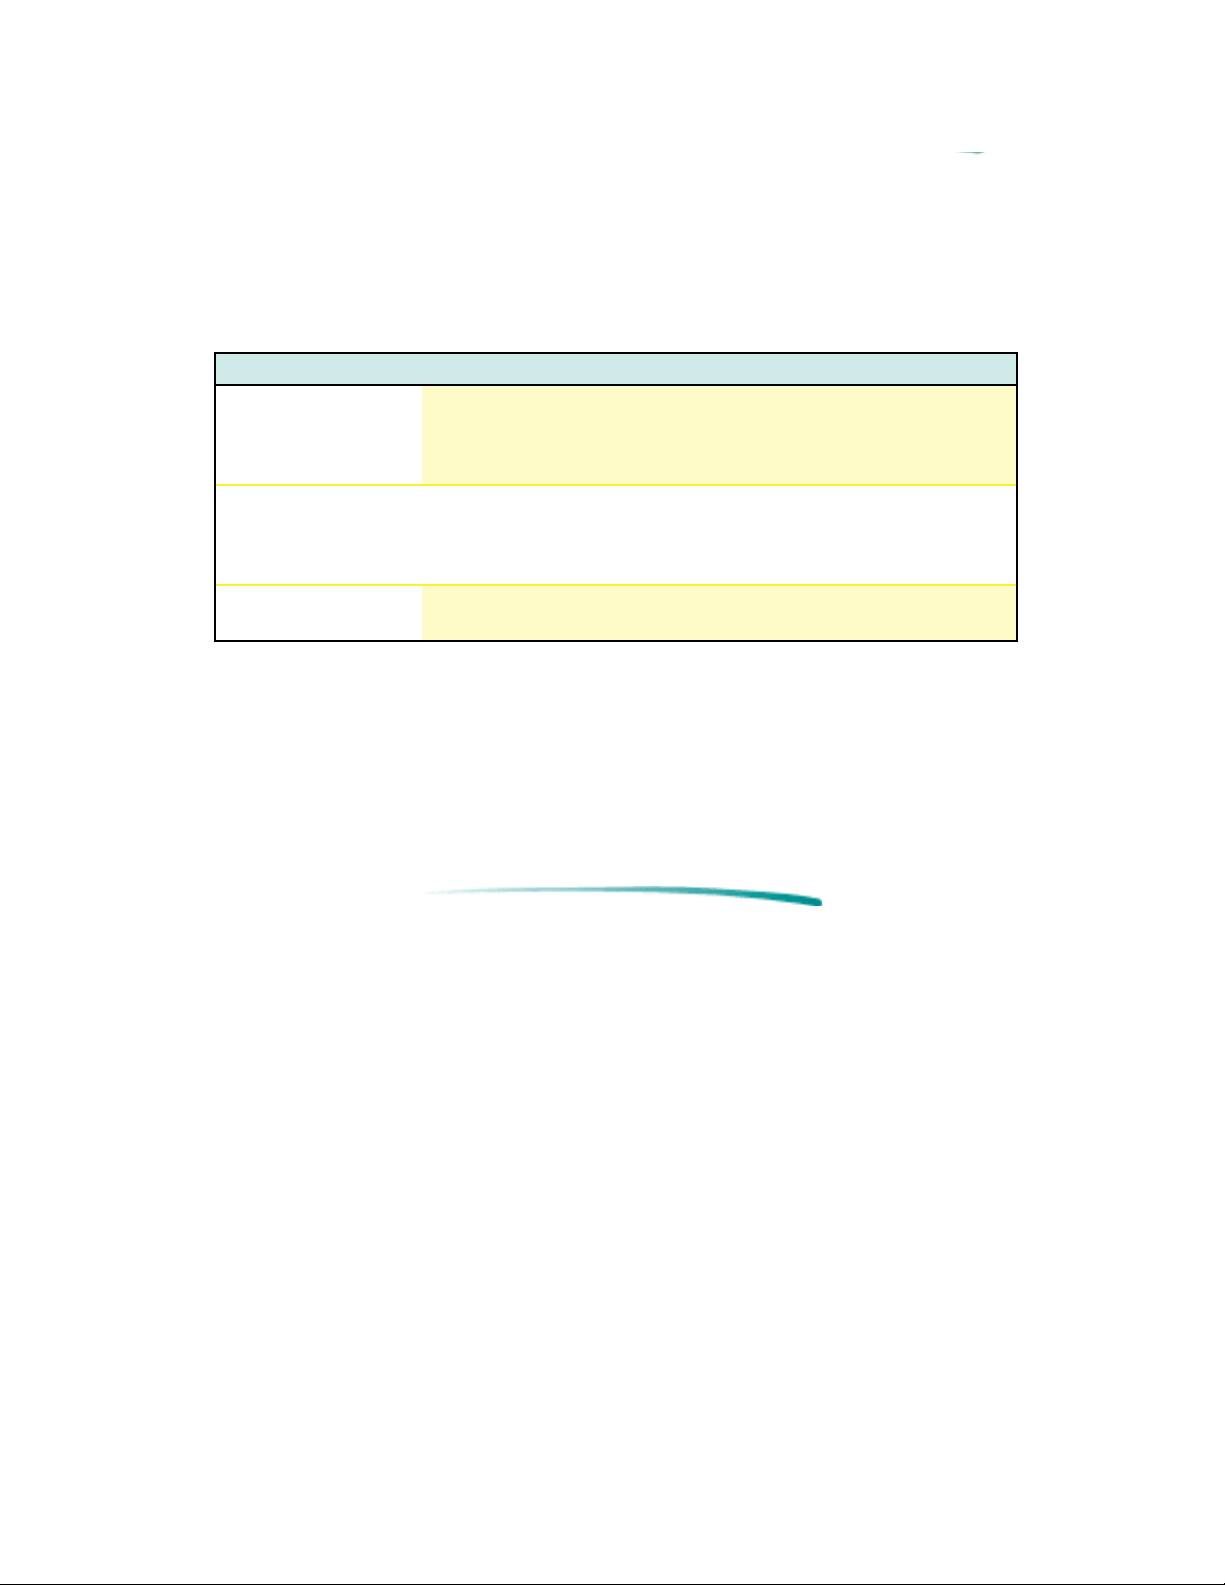
Two types of online help provide information about the printer software.
Printer Software Help
Type of help Provides How to access/where to find
Context Sensitive
Help
Online Help Comprehensive
Information about
options in the dialog box
when you click on certain
parts of the screen.
information about the
printer software and
hardware.
Available within the ColorSmart Printer
Driver dialog box.
Click the Help button within the
ColorSmart Printer Driver dialog box.
ReadMe Files Release notes and
current information.
On the Driver Installation Disk.
Cleaning and Aligning Print Cartridges
All of these functions are available from within the HP DeskJet Status
Monitor. For more information on printer cartridge services, refer to “Print
Cartridge Information.”
Page 14

DOS Printing
Printer Drivers Available
Since DOS applications are developed independently under different
standards, each DOS application requires its own printer driver. Current
software drivers for most HP DeskJet printers are available from the
individual software manufacturers. A list of DOS software manufacturers is
in the DOS Printing Guide, part of the User’s Guide Kit. Information on
installing a DOS printer driver for a particular DOS application is supplied
by the software manufacturer.
If there is no driver available for your DeskJet 850C/855C series printer,
use a driver for a different HP DeskJet printer. In some cases, the
substitute driver will not provide access to all of the DeskJet 850C/855C
series printer’s capabilities. The following table outlines usable drivers
and their capabilities when used with DeskJet 850C/855C series printers.
Substituting Printer Drivers
Printer Driver Supported Features
HP DeskJet 855C Color Printing
HP DeskJet 660C Color Printing
HP DeskJet 560C Color Printing
HP DeskJet 540 Color Printing
HP DeskJet 500C Color Printing
HP DeskJet 320 Color Printing
HP DeskJet 310 Color Printing
HP DeskJet 520 Monochrome Printing Only
HP DeskJet 510 Monochrome Printing Only
HP DeskJet 500 Monochrome Printing Only
HP DeskJet PLUS Monochrome Printing Only
HP DeskJet Monochrome Printing Only
Page 15

DeskJet Control Panel for DOS
The HP DeskJet Control Panel for DOS is software that replaces the front
panel switches found on older printers. The Control Panel for DOS does
not replace printer drivers; it must be used along with DOS software printer
drivers. When there is no specific DeskJet 850C/855C series printer driver
available for an application, the HP Control Panel for DOS gives the user
access to print settings and features not available through the DOS
application. If settings are available in the DOS application printer driver
and the DOS Control Panel, the settings made in the DOS application
usually override those made in the HP Control Panel for DOS.
The HP Control Panel for DOS lets the user monitor the printer’s status,
and clean and align the print cartridges.
Minimum System Requirements
DOS version 3.3 (or newer)
An 80286 (or better) processor
2 MB of RAM to print in black or 4 MB of RAM to print in color
Installation
Before you install the HP Control Panel for DOS:
1. Unpack the printer and set it up.
2. Make sure the computer and the printer are both turned on and
connected with the proper cable.
To install the Control Panel for DOS:
1. Insert the disk containing the control panel software into the disk
drive.
2. At the DOS prompt, type A:\Install (or B:\Install depending on
the floppy drive configuration) and press Enter.
3. Follow the on-screen instructions.
After installing the software, the print cartridges need to be aligned before
beginning any print jobs.
Page 16

To align the print cartridges:
1. Type DJCP at the DOS prompt to open the stand-alone DOS
Control Panel.
2. Select Align Print Cartridges and follow the on-screen instructions.
Two Ways to Use the HP Control Panel for DOS
The DOS Control Panel can run either as a stand-alone application or as
a memory resident application. To run the DOS Control Panel as a standalone application: type DJCP at the DOS prompt.
The DOS Control Panel must be loaded into memory at start-up to work as
a memory resident application.
To set up the HP Control Panel for DOS as a memory resident
application:
1. Type DJCP at the DOS prompt to open the stand-alone DOS
Control Panel.
2. Select More Settings.
3. Select Memory Resident Functions.
4. Select Make Memory Resident.
5. Select Done and reboot the computer.
To open the memory resident DOS Control Panel: type the DOS Control
Panel hot key.
T h e m e m o r y r e s i d e n t D O S C o n t r o l P a n e l i s a s u b s e t o f t h e s t a n d - a l o n e
application due to memory considerations.
Page 17

Memory Resident DOS Control Panel
Whether stand-alone or memory resident, the DOS Control Panel allows
the user to control or view the following:
Pen Services (clean, prime, and align the pens)
Print Quality
Page Orientation
Font Width (normal or compressed)
Status Reports (limited in the resident Control Panel for DOS)
Context-Sensitive Help
In addition to these, the stand-alone DOS Control Panel provides
access to:
Paper Size
Media Type (paper or transparencies)
Character Set
Lines per Page
Line Termination
Reset All Settings
Memory Resident Controls
Page 18

Troubleshooting
Problems with the DOS Control Panel
Problem Cause Solution
Installation was
unsuccessful
Disk error Reinstall Control Panel
Bad floppy disk Contact authorized HP dealer
Page 19

OS/2
The HP ColorSmart printer driver for the HP DeskJet 540 printer can be
accessed through OS/2 by using Windows 3.1 in OS/2.
Page 20

Macintosh Printing
The printer driver software enables your computer to communicate with
your printer. The Hewlett-Packard printer software is easy to install and
features:
Printer drivers for Macintosh’s QuickDraw and QuickDraw GX
environments.
27 TrueType fonts, plus compatibility with PostScript fonts.
Deciding Which Printer Driver to Install
Before using the printer you must install the printer driver software
appropriate for your computer. The printer driver software works with
Apple’s QuickDraw or QuickDraw GX.
To check if QuickDraw GX is installed in your system:
1. Open the System Folder.
2. Open the Extensions Folder.
3. Look for the QuickDraw GX icon (no icon appears for QuickDraw).
QuickDraw GX is only available on system 7.5 or greater. To identify your
system software, select About This Macintosh in the Apple menu.
QuickDraw GX Driver Special Features
QuickDraw GX is an extension to QuickDraw, and provides:
Background or foreground printing.
Desktop printer icons.
Drag and drop printing.
Printing status messages, allowing you to view the jobs in the
queue; stop, pause, or remove jobs; change the printing order of
the queued jobs.
Added options to the Print and Page Setup dialog boxes allowing
print quality control.
Page 21
Hewlett-Packard recommends installing the printer driver software for
QuickDraw GX if your system supports it. However, you decide whether to
install the QuickDraw or the QuickDraw GX printer driver.
Font Information
The printer driver software includes two disks containing fonts and a font
installer.
1. The HP Fonts Install Disk
2. The HP Series Fonts Disk
Available Fonts
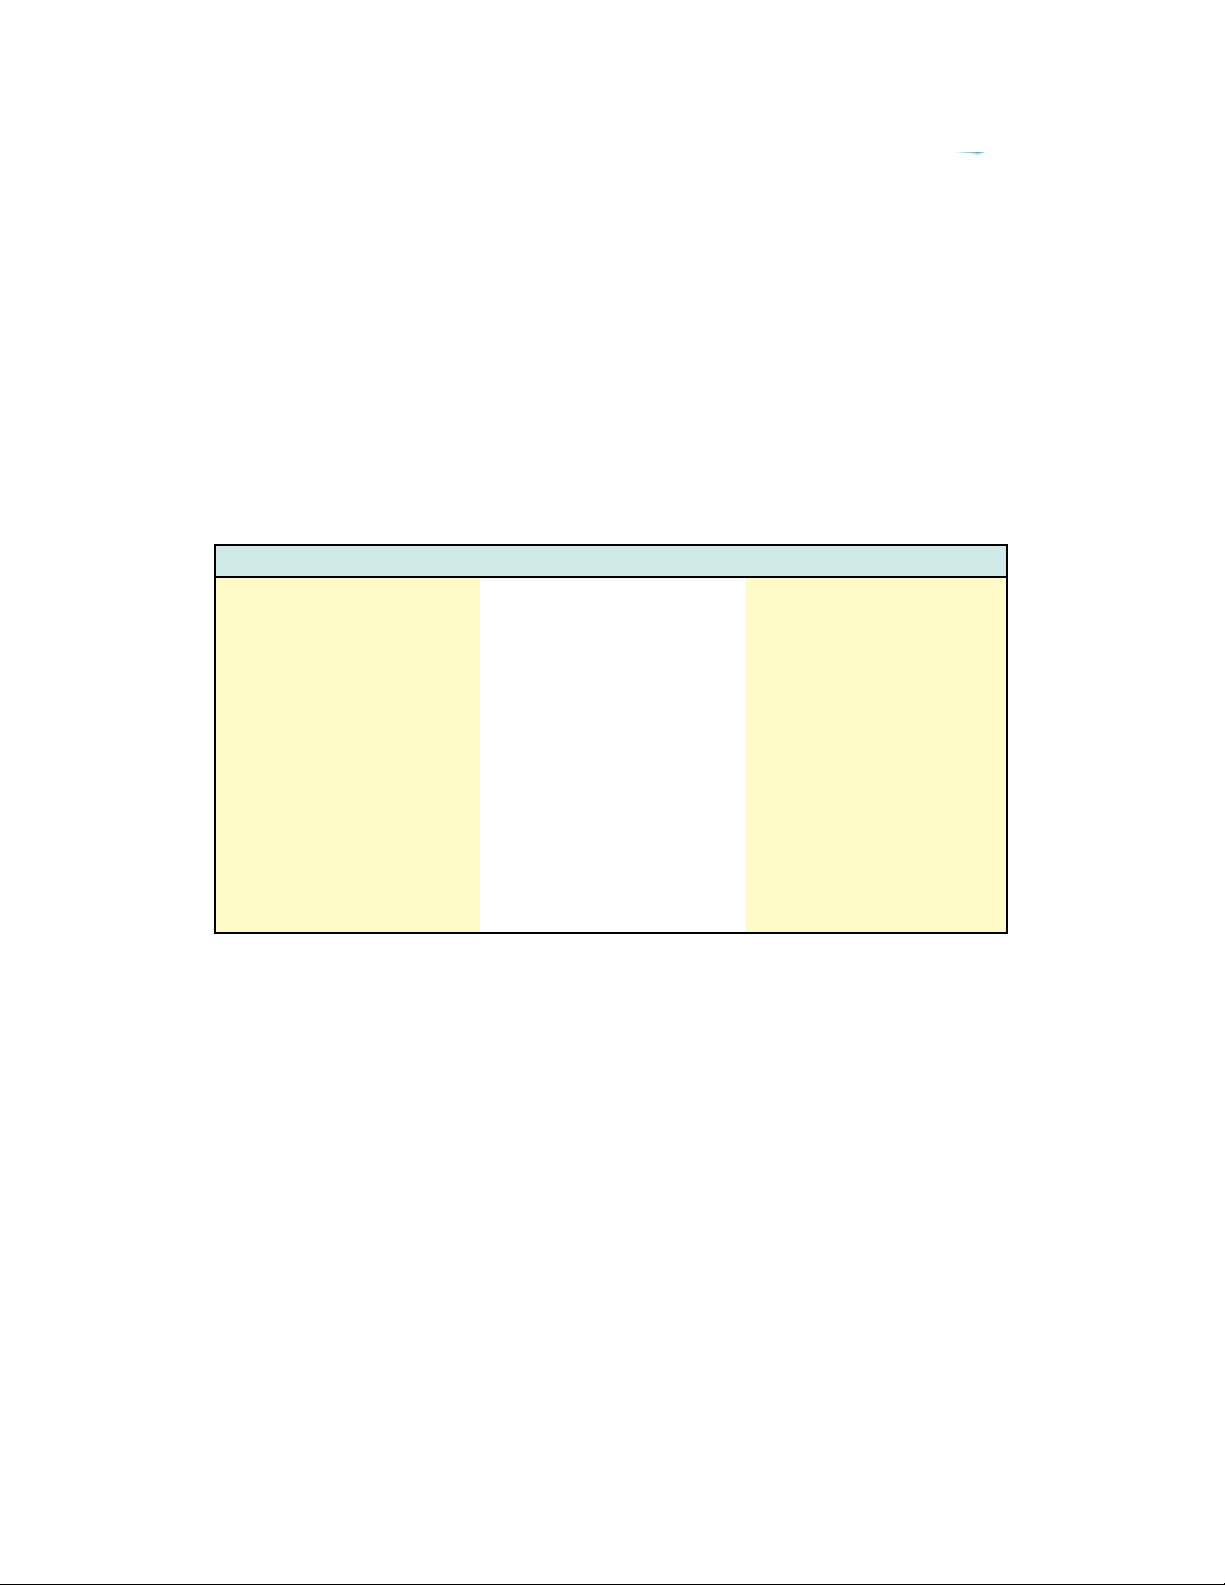
The HP 27 TrueType fonts
Avant Garde Dom Casual New Century Schoolbook
Bold
Avant Garde Bold Graphite Light New Century Schoolbook
Italic
Benguiat Frisky Graphite Light Narrow New Century Schoolbook
Bold/Italic
Bernhard Modern Helvetica Narrow Phyllis
Bookman Helvetica Narrow Bold Poster Bodoni
Bookman Bold Lucida Casual Signet Roundhand
Bookman Italic Lucida Casual Italic Torino Outline
Bookman Italic/Bold Milestones Zapf Chancery
Cooper Black New Century Schoolbook Zapf Dingbats
You can choose to install any or all of the 27 TrueType fonts contained on
these disks. Each font requires between 36K and 64K of hard disk space.
Page 22
Installing and Using Fonts
To install the fonts:
1. Insert the HP Series Fonts Install disk.
2. Double-click the Installer icon.
3. Follow the instructions.
4. You must select your printer in the Chooser before you can print
using the newly installed fonts. (See instructions under the topic:
Using the Printer Driver.)
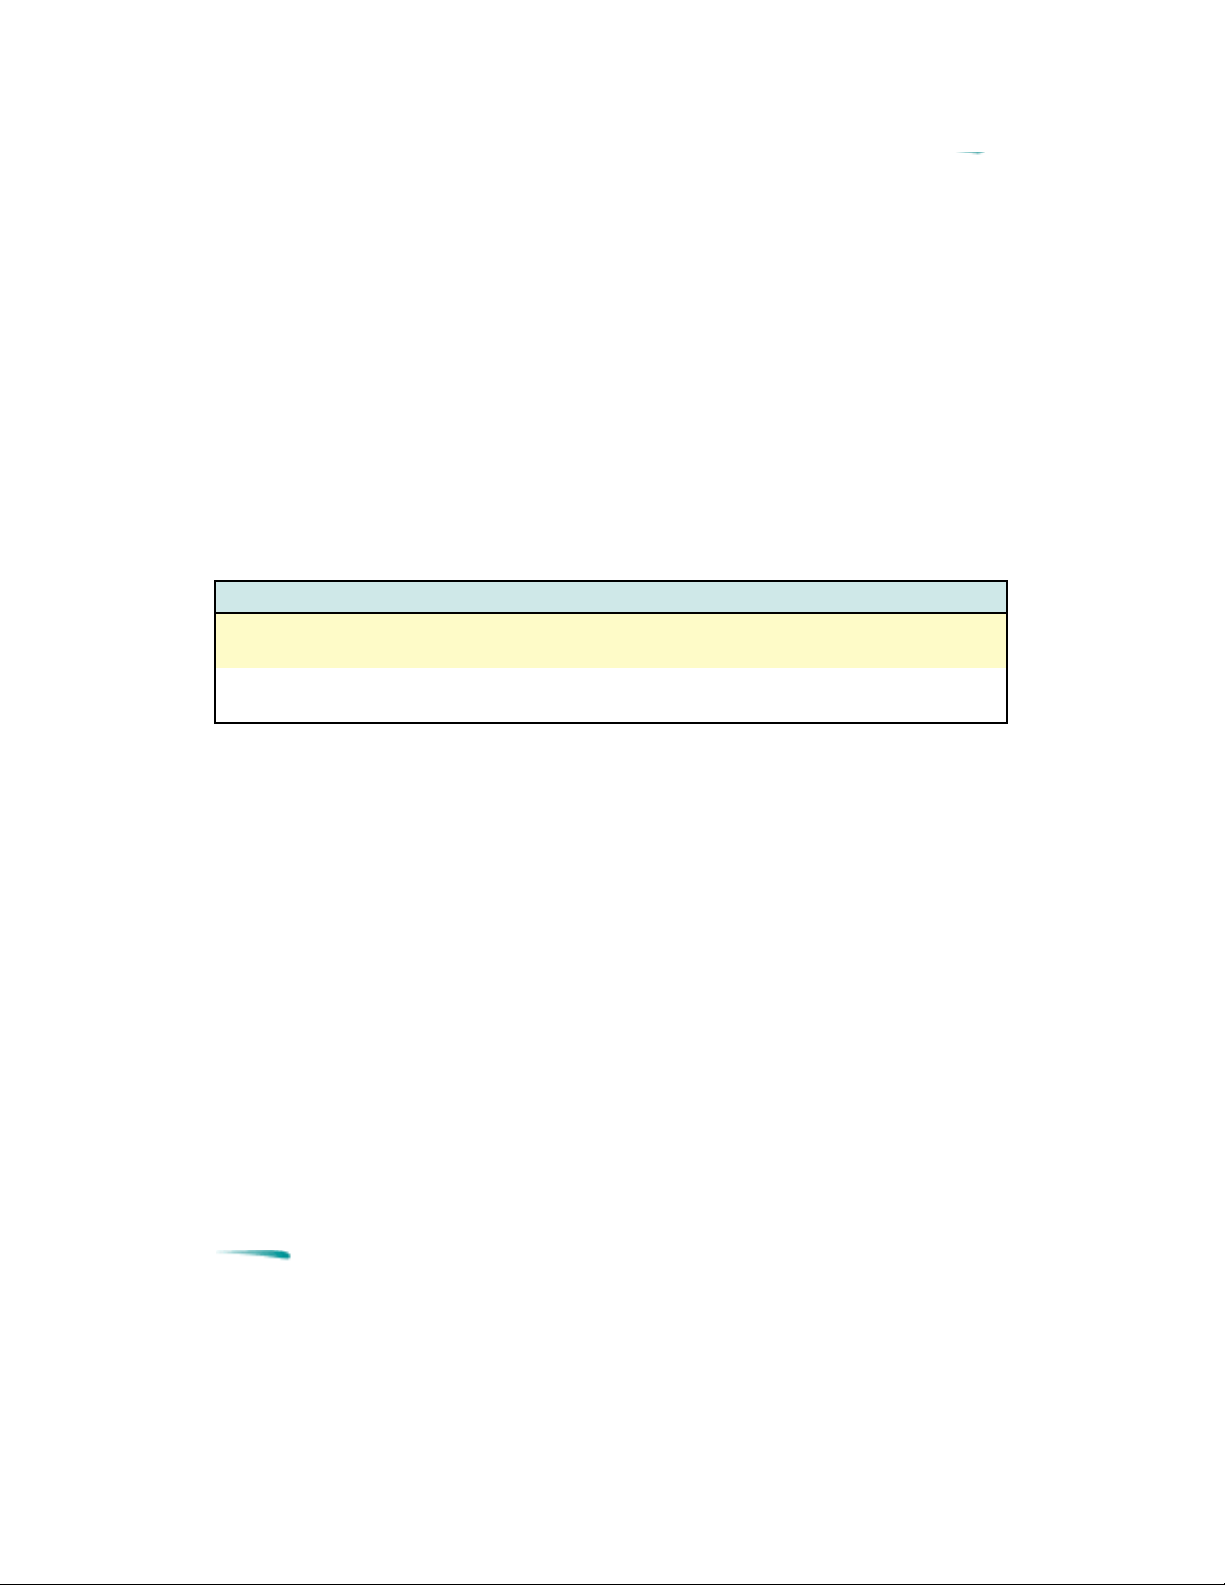
Installation Results
How the Font Installer Works
System 7.0 The Font Installer copies the font files to the System File in
the System Folder.
System 7.1 and greater The Font Installer copies the font files to the Fonts Folder in
the System Folder.
PostScript Compatibility
PostScript fonts are also compatible with your printer. Creating highquality output using Type 1 fonts requires Adobe Type Manager (ATM).
Font Priorities
If a system has both ATM and TrueType fonts installed, the printer driver
uses the following order to choose fonts for printing.
1. ATM fonts
2. TrueType fonts
3. Screen fonts (when no printer outline fonts are available.)
Note
TrueType (and Type 1) fonts are variable-sized fonts,
sometimes called outline fonts. Bitmapped or screen fonts
are fixed size fonts.
Page 23

Removing Fonts
If you have used previous HP printer drivers you may have fonts that you
no longer need.
To delete unneeded font folders:
1. Open the System Folder.
2. Open the Preferences Folder.
3. If you see a DeskWriter Fonts Folder or an HP Fonts Folder drag it
to the trash.
4. Choose Empty Trash from the Special menu.
Page 24

Installing the Printer Driver
Before the printer can print, the software that enables the computer to
communicate with the printer must be installed; this software is the printer
driver.
HP DeskJet 850C/855C series printers come with a Driver Installation Disk
which contains printer drivers for both the QuickDraw and QuickDraw GX
environments. You need to decide which is appropriate for your printer
depending on your Macintosh system software and memory. Refer to
QuickDraw and QuickDraw GX under: Printing with the Macintosh for help
deciding which driver to install.
This section provides instructions for installing the QuickDraw printer
all
driver. The default installation procedure copies
background printing files contained on the HP Driver Installation Disk to
the correct locations in the System folder. If the installer finds a file with the
same name, it replaces it with the most current version.
System Requirements
the printer drivers and
HP DeskJet 850C/855C series QuickDraw printer drivers require a hard
disk, system software 7.0 or later, and at least 4 MB of RAM.
Installation Instructions
The Installer provides both easy and custom installation options. Easy
Install is the default. The Easy Install procedure installs all printer drivers
contained on the Driver Installation Disk. Use the Customize option to
install only specific drivers.
Page 25
Printer Driver Installation Instructions
Installation
Procedure
Easy Install Installs all the printer
Customize Installs only specified
Results Steps
1. Insert the Driver Installation Disk.
drivers on the disk into
the Extensions Folder.
printer drivers into the
Extensions Folder.
2. Double-click the Installer icon.
3. Verify that the hard disk indicated
4. Click Install to proceed with the
5. After the installation is complete,
6. Insert the Driver Installation Disk.
7. Double-click the Installer icon.
8. Verify that the hard disk indicated
9. Select Customize.
10. Select the driver(s) for your
11. Click Install.
12. After the installation is complete,
is correct. If necessary, use the
Switch Disk button until the correct
hard disk appears.
Easy Install option.
restart the computer.
is correct. If necessary, use the
Switch Disk button until the correct
hard disk appears.
printer(s).
restart the computer.
Depending on the system software, the QuickDraw printer driver may
increase the Finder’s memory allocation.
Removing Extra Printer Drivers
Users with limited hard disk space may choose to remove printer drivers
not being used.
To remove extra printer drivers:
1. Open the System Folder.
2. Locate and open the Extensions Folder in the Systems Folder.
3. Click the icon for the printer driver you want to remove.
4. Drag the icon to the Trash, then choose Empty Trash from the
Special menu.
5. Close the Extensions Folder and the System Folder.
Page 26
Choosing a Printer
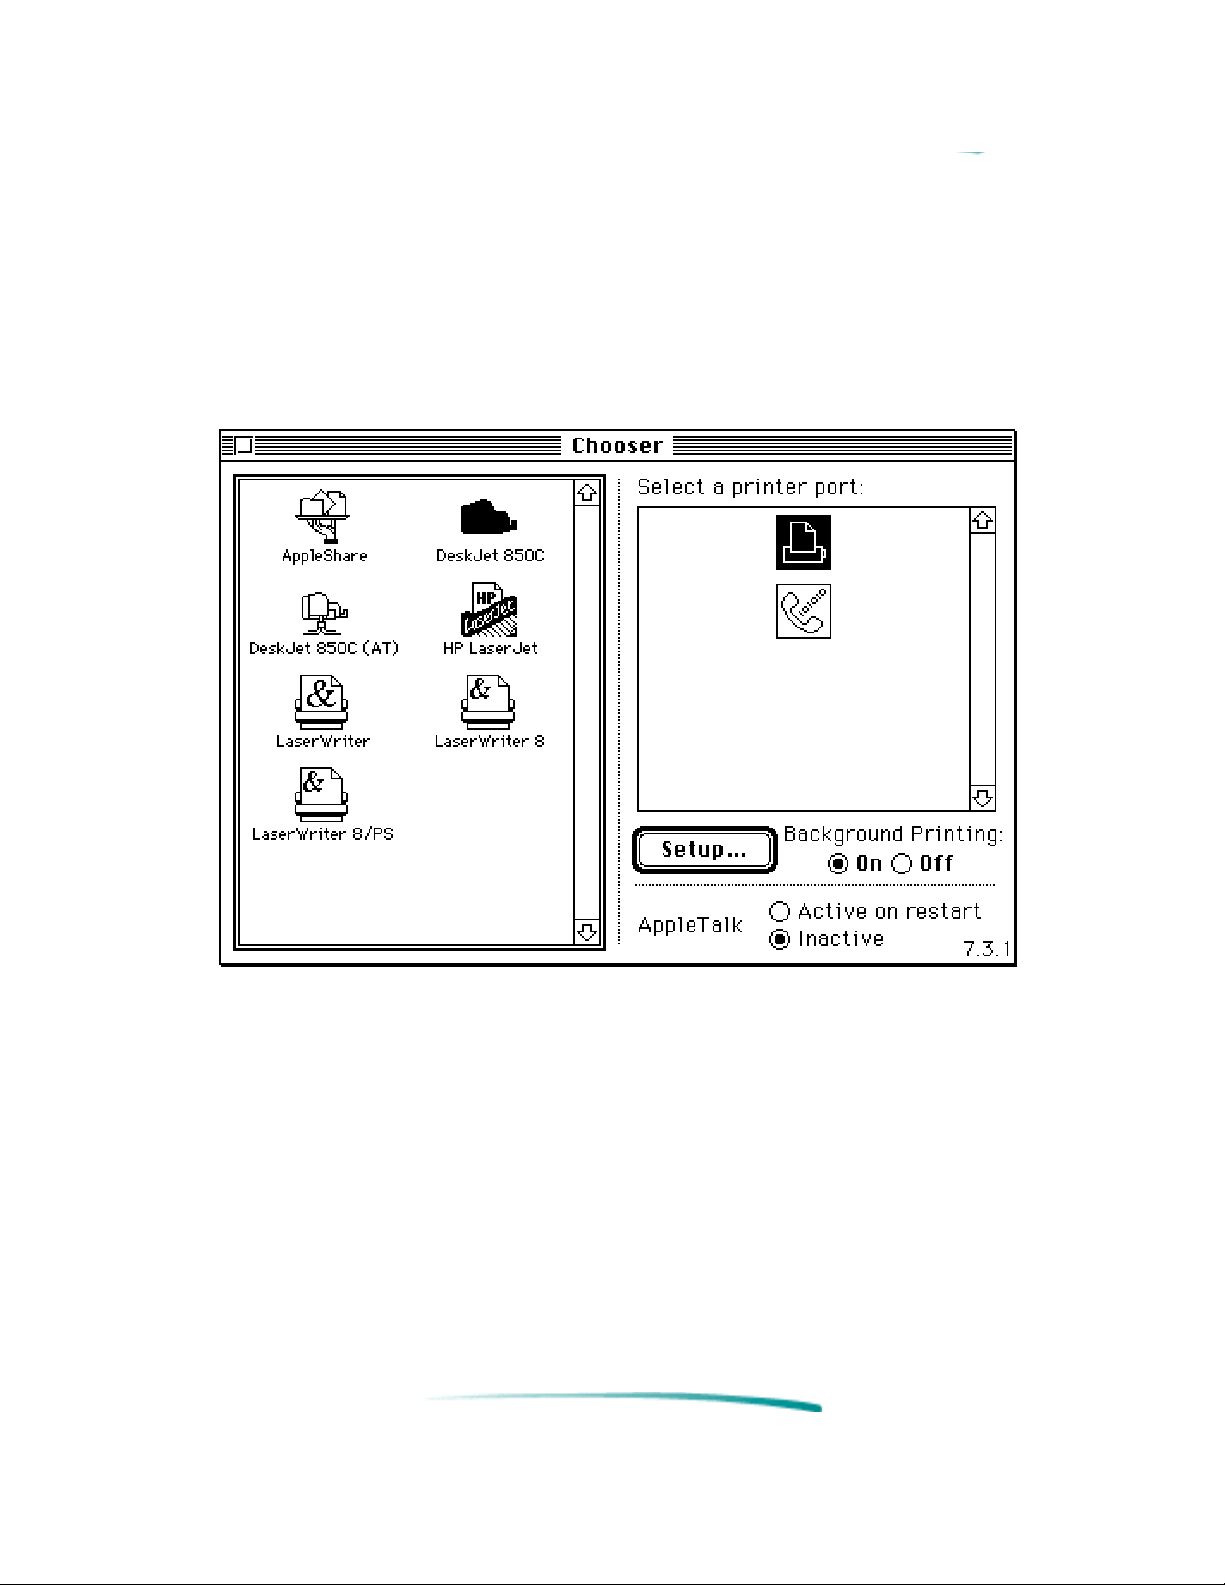
Before printing, you must choose the HP DeskJet 850C/855C as the
printer you wish to use, even if it’s the only printer connected to your
computer. To do this, select Chooser from the Apple menu.
The QuickDraw Chooser Dialog Box
If the printer is connected directly to your computer:
1. Click the icon for the HP DeskJet 850C/855C.
2. Click the icon indicating to which port you connected the printer.
(Both the printer and modem ports are serial ports.)
If the printer is connected via a network:
1. Make sure AppleTalk is active.
2. Click the icon for the HP DeskJet 850C/855C.
3. If your network is divided into zones click the zone for your printer.
4. Select HP DeskJet 850C/855C.
Page 27
About the Printer Driver
The print driver software communicates the printer’s features and design
to your computer. The HP ColorSmart technology within the HP printer
driver analyzes your documents for the best quality printout every time you
print. ColorSmart identifies each element on a page - text, graphics,
photographs - and automatically applies the appropriate colors and ink
amounts to each of them.
The DeskJet 850 C QuickDraw Printer Driver Provides:
27 TrueType fonts.
Laser-quality text and graphics printing in portrait and landscape
orientations.
Exceptional print quality even when mixing text and graphics on
the same page.
Near photographic quality when printing images. HP color printers
use ColorSmart technology allowing halftone pattern removal,
edge sharpening, and tone smoothing.
Print preview.
“Back to front” printing.
Multiple copy printing.
A default save for the print settings so that documents print the
same way every time.
Reduce or enlarge options. Reducing a document allows you to fit
the document’s contents to sizes corresponding to the printer’s
media capabilities . Enlarging a document allows you to more
easily see the documents contents. Reducing or enlarging a
document for printing does not affect the page dimensions in the
application.
Languages Supported
The QuickDraw and QuickDraw GX Printer Drivers Support:
English Italian Dutch
French Spanish Swedish
German Portuguese Japanese
Page 28
Using the Printer Driver
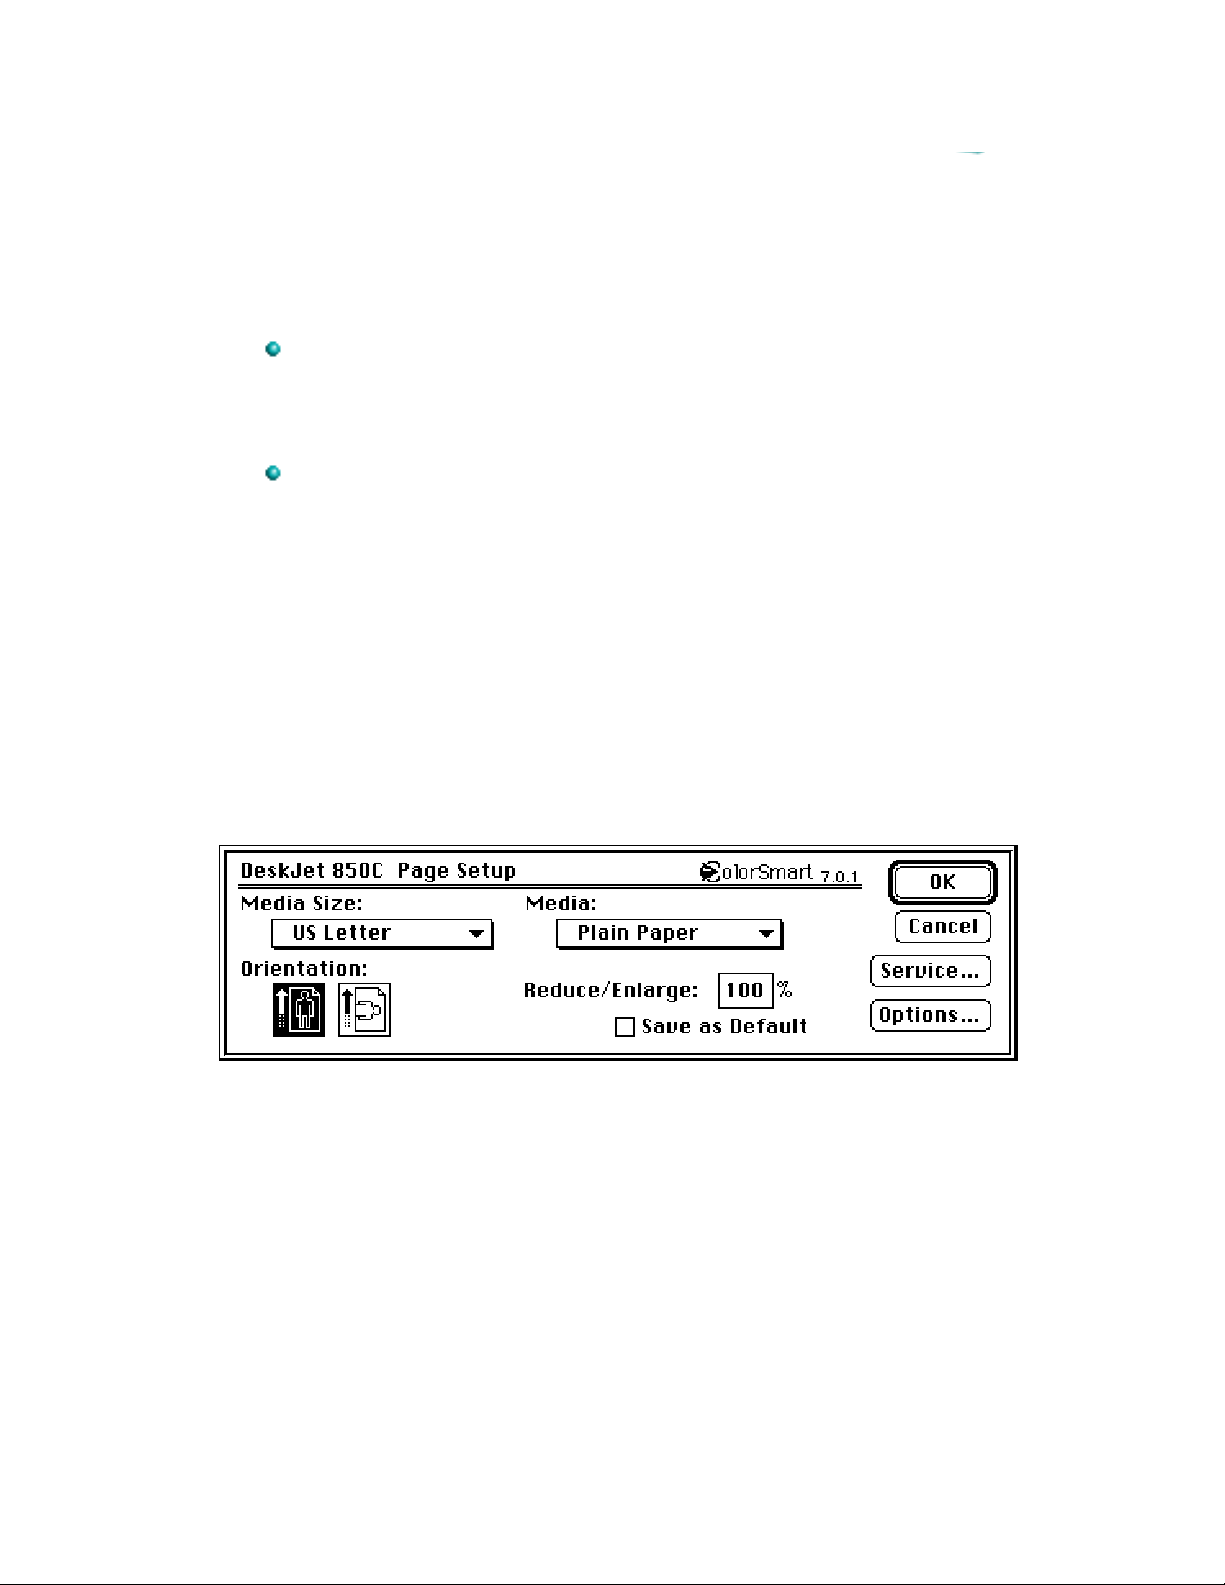
The printer driver provides dialog boxes for communicating specific
printing instructions to the printer.
Select the general print settings, such as the paper size and type,
and the page orientation from within a software application by
choosing Page Setup from the File menu. This displays the Page
Setup dialog box.
Select specific print settings, such as intensity, halftoning patterns,
and color matching, from within the software application by
choosing Options from either the Page Setup or the Print dialog
boxes. This displays the Options dialog box. In general, leaving
the Options settings at Auto allows ColorSmart to provide the best
printing possible.
Page Setup
Before printing choose Page Setup from the File menu.
The Page Setup Dialog Box
Page 29
Page Setup Options
HP DeskJet 850C/855C Page Setup Options
Media Size The pop-up menu displays selections supported by the
printer.
Media The media may be either plain paper or one of HP’s special
media types.
Orientation Portrait or landscape.
Reduce/Enlarge Valid range: 25% – 400%.
Save as Default Save the current settings as the default settings for the Page
Setup and ColorSmart options.
Service Opens the Service dialog box, which is used for print cartridge
maintenance.
Options Opens the ColorSmart Options dialog box which is used to
change some of the ColorSmart options.
Printing Documents
When printing from the Finder, you can select multiple documents for
printing in succession. These documents need not have the same
specifications nor have been created with the same software application.
The printing specifications for each document are used when that
document is printed. However, the printer does not notify you if the
documents require different sizes or types of paper. Choose Print from the
File menu to see the Print Dialog box.
How to Print
Two Ways to Access the Print Dialog
From within an application Choose Print from the File menu.
From the Finder Select the document you want to print by clicking on the
document icon(s) and choosing Print from the File menu.
Page 30
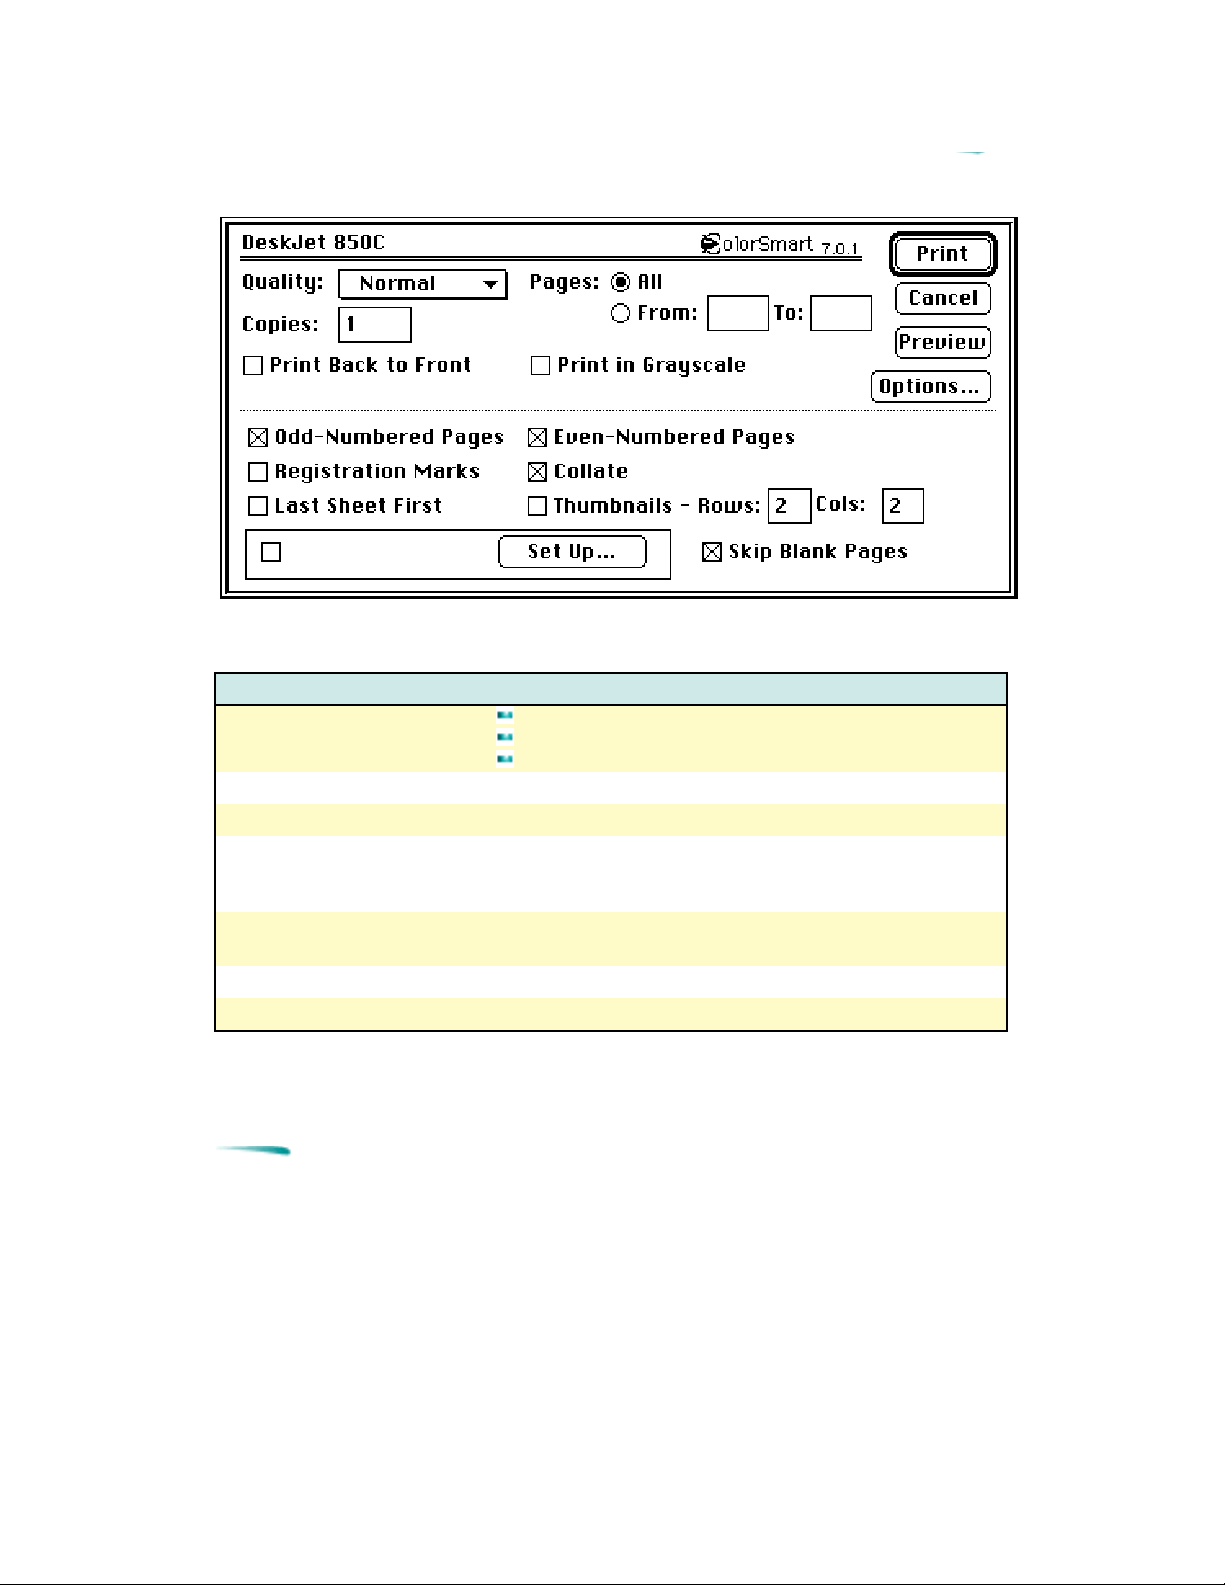
The Print Dialog Box
Printing Options
HP DeskJet 850C/855C Print Options
Quality
Pages Print all pages or a specified range of pages.
Copies Print multiple copies of a document. (The range is 1 to 9999.)
Print Back to Front Print the last page of a document first so that the first page is
Print in Grayscale Print color documents in grayscale (black and white and
Preview Display a preview of the printer output.
Options Provides access to the ColorSmart Options dialog.
Best
Normal
EconoFast
on top of the stack in the output tray. This provides
documents in the correct order when printing is complete
shades of gray).
Note If you choose the printing back to front option in both your
software application and the Print dialog box, the commands
cancel each other and the document prints front to back.
Page 31

Background Printing
The background printing option enables you to work on other documents
while printing. When background printing is on, a copy of your document is
saved in the PrintMonitor Documents folder, a temporary folder in the
Systems folder on your hard disk. This copy is then sent to the printer.
Although background printing lets you regain control of your computer
sooner; the actual printing of the document is slower.
If you send several documents to the printer, a queue forms in the
PrintMonitor Documents folder. Documents print in the order received.
To use background printing, select the Chooser from the Apple menu,
select the printer you are using, and turn on background printing.
The HP PrintMonitor
Use the HP PrintMonitor during background printing to:
See which file is currently printing.
View and re-arrange the order of files waiting to be printed.
Cancel a file from printing.
Note
Remove a file from the print queue.
Establish preferences for the level of notification used when the
printer needs attention.
You cannot directly print a file from the HP PrintMonitor. The
HP PrintMonitor prints in the background until the
PrintMonitor Documents folder is empty.
Page 32

Using the PrintMonitor
To open the HP PrintMonitor
During background printing: Select HP PrintMonitor from the Application menu in the top
right corner of the menu bar.
When the printer is inactive: Double-click the HP PrintMonitor icon in the Extensions
folder.
Once the HP PrintMonitor is displayed, change the settings by choosing
Preferences from the File menu.
Note
By default, the HP PrintMonitor is not displayed during
printing. To automatically display the HP PrintMonitor during
printing change the settings in the Preferences dialog box.
Page 33

Optimizing Performance
The printer driver is designed to deliver the best possible performance.
However, printer output speed can be affected by the amount of available
system memory (RAM) and the amount of available disk space.
The following list provides ideas on how to enhance the printer’s
performance:
Increase the amount of RAM in your computer. The QuickDraw
printer driver requires at least 4 MB of RAM. Use additional
memory (5 MB or more) to increase the printer’s flexibility in using
applications.
Limit the number of documents and programs that you open at one
time.
Free system memory (RAM) by removing start-up screens, INITs,
and control panels from the System Folder.
Turn off background printing.
Decrease the Disk Cache in the Memory Control Panel.
Remove unneeded fonts.
Servicing the Print Cartridge
The printer software Service dialog box provides access to cleaning and
alignment routines. Use the cleaning routines only when necessary
because they use large amounts of ink.
To access the Service dialog box:
1. Choose Page Setup from the File menu.
2. Click Service.
Alternatively, select the desktop printer icon and click Print Cartridge
Cleaning or Print Cartridge Alignment from the Print menu.
Page 34
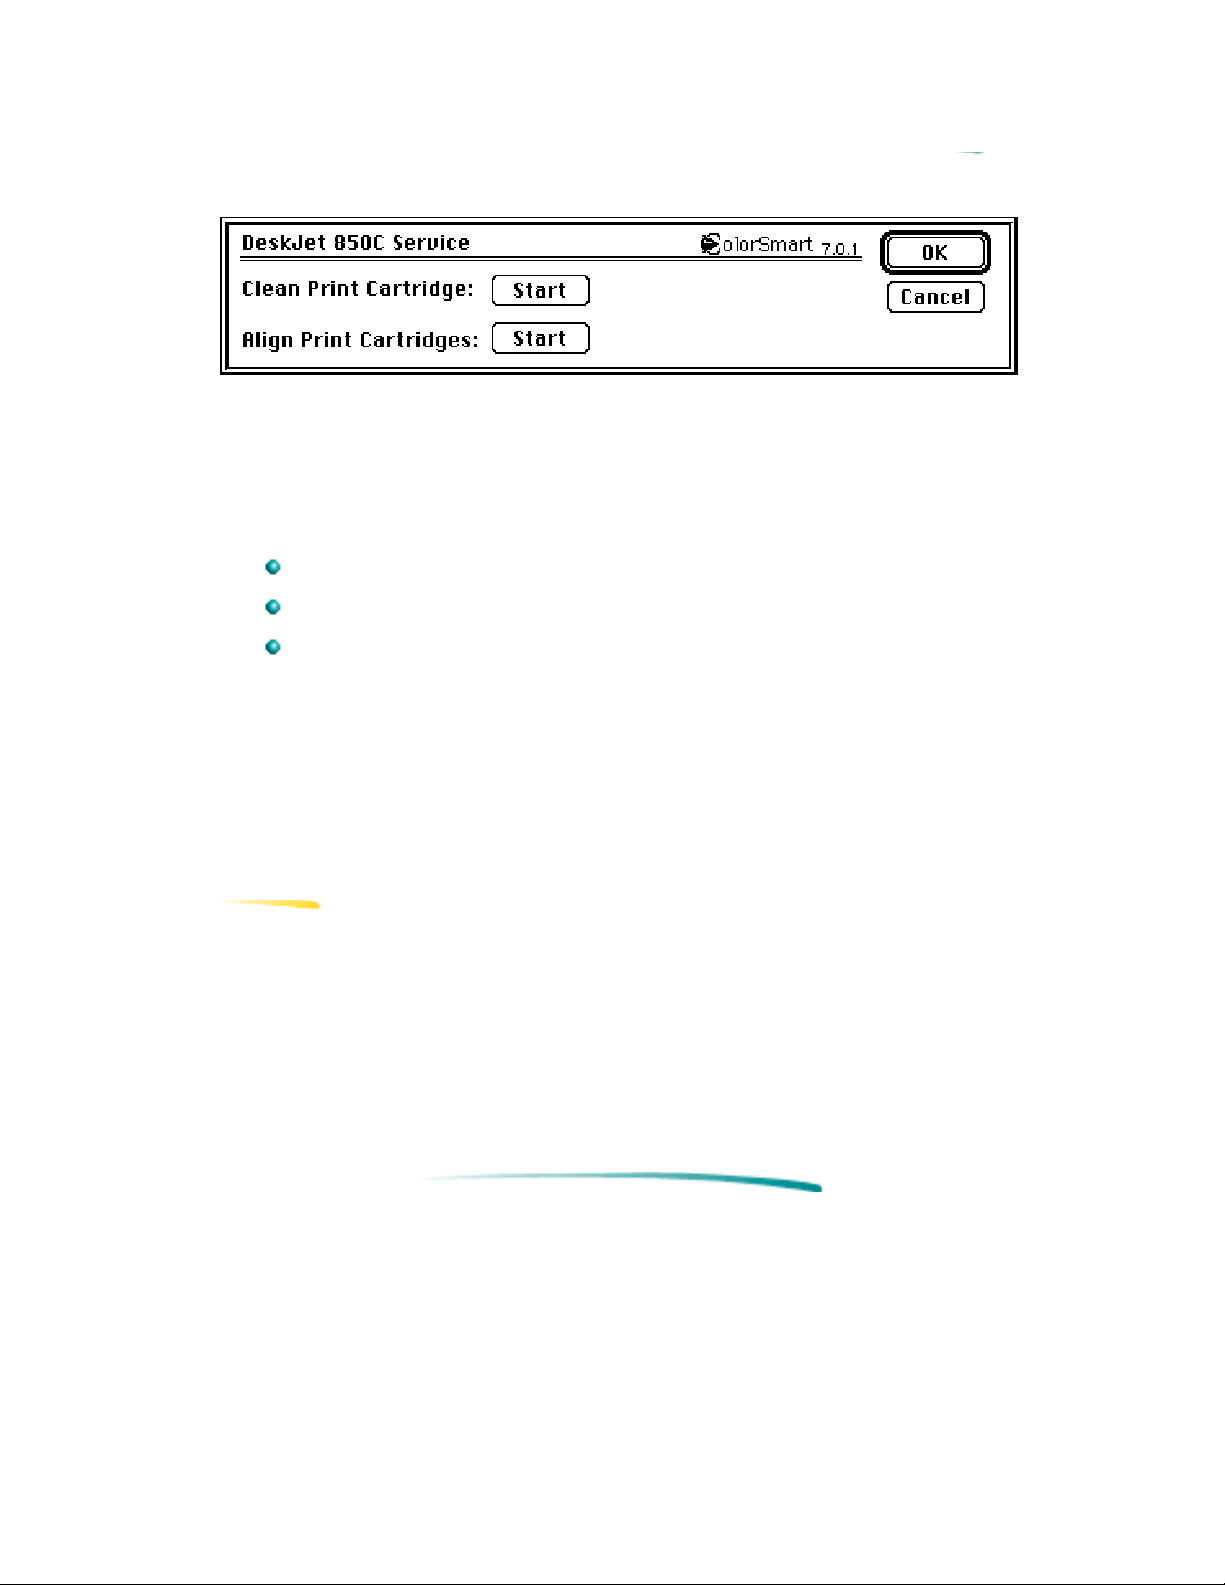
The Service Dialog Box
Cleaning
HP DeskJet 850C/855C series printers provide multiple levels of
maintenance for cleaning the printer cartridge.
Clean, also referred to as “Surface Clean”
Standard Clean
Prime
Click Start to initiate the Clean process, then click Clean to initiate the
clean cycle. A test page prints after the cycle finishes.
If not satisfied with the results, continue with the Standard Clean cycle. A
test page prints after the Standard Clean finishes.
If still not satisfied, continue with the Prime procedure.
Caution
Priming extracts large amounts of ink and should not be
performed as a routine operation.
Aligning
If necessary, click Align in the Service dialog box to align the color and
black cartridges with one another. HP recommends aligning each time
one of the cartridges is changed.
Page 35
Troubleshooting
HP periodically provides updates of the printer software. These updates
may include enhancements that improve printer performance.
Problems and Solutions
Problem Solution
Printer won’t print. Open the Chooser and verify that the correct printer is
selected.
Printer icon does not appear
on the left side of the
Chooser.
The printer name does not
appear on the right side of
the Chooser or the HP
DeskWriter family printer is
not listed.
Power light is On, the
Resume light is Off.
Make sure that the printer is turned on.
Make sure that the printer driver icon is in the Extensions
Folder.
Make sure the printer is turned on.
Open the Chooser and make sure AppleTalk is active if
connecting to a network printer.
Check that the printer appears in the Chooser then close all
applications and restart. If this doesn’t work it may be
necessary to reinstall the printer driver software.
Using Online Help
Two types of online help provide information about the printer software.
Printer Software Help
Type of help Provides How to access/where to find
Balloon Help Pop-up information about
options in the dialog
boxes when you move
the mouse cursor over
certain parts of the
screen.
ReadMe Files Release notes and
current information.
1. Choose Show Balloons from the Help
menu in the upper right corner of the
menu bar. (If this option is not
available Balloon help is already on.)
2. To turn off Balloon help, choose Hide
Balloons from the Help menu.
1. On the Driver Installation Disk.
2. On the Fonts Installation Disk.
Page 36

Installing the Printer Driver
Before you print you must install the software that enables your computer
to communicate with the printer. This software is called the printer driver.
HP DeskJet 850C/855C series printers come with a Driver Installation Disk
which contains printer drivers for both the QuickDraw and QuickDraw GX
environments. You need to decide which is appropriate for your printer
depending on your Macintosh system software and memory. Refer to the
topic: QuickDraw and QuickDraw GX under the category: Printing with the
Macintosh for help deciding which driver to install.
This section provides instructions for installing the QuickDraw GX printer
all
driver. The default installation procedure copies
background printing files contained on the HP Driver Installation Disk to
the correct locations in the System folder. If the installer finds a file with the
same name it replaces it with the most current version
System Requirements
the printer drivers and
HP DeskJet 850C/855C series QuickDraw GX printer drivers require a
hard disk, system software 7.5 or later, and at least 8 MB of RAM.
Installation Instructions
The Installer provides both easy and custom installation options. Easy
Install is the default. The Easy Install procedure installs all printer drivers
contained on the Driver Installation Disk. Use the Customize option to
install only specific drivers.
Page 37
Driver Installation Instructions
Installation
Procedure
Easy Install Installs all the printer
Results Steps
drivers on the disk into
the Extensions Folder.
1. Insert the Driver Installation Disk.
2. Double-click the Installer icon.
3. Verify that the hard disk indicated
is correct. If necessary, use the
Switch Disk button until the correct
hard disk appears.
4. Click Install to proceed with the
Easy Install option.
5. After the installation is complete,
restart the computer.
Customize Installs only specified
printer drivers into the
Extensions Folder.
1. Insert the Driver Installation Disk.
2. Double-click the Installer icon.
3. Verify that the hard disk indicated
is correct. If necessary, use the
Switch Disk button until the correct
hard disk appears.
4. Select Customize.
5. Select the driver(s) for your
printer(s).
6. Click Install.
7. After the installation is complete,
restart the computer.
Removing Extra Printer Drivers
Users with limited hard disk space may choose to remove printer drivers
not being used.
To remove extra printer drivers:
1. Open the System Folder.
2. Locate and open the Extensions Folder in the Systems Folder.
3. Click the icon for the printer driver you want to remove.
4. Drag the icon to the Trash, then choose Empty Trash from the
Special menu.
5. Close the Extensions Folder and the System Folder.
Page 38
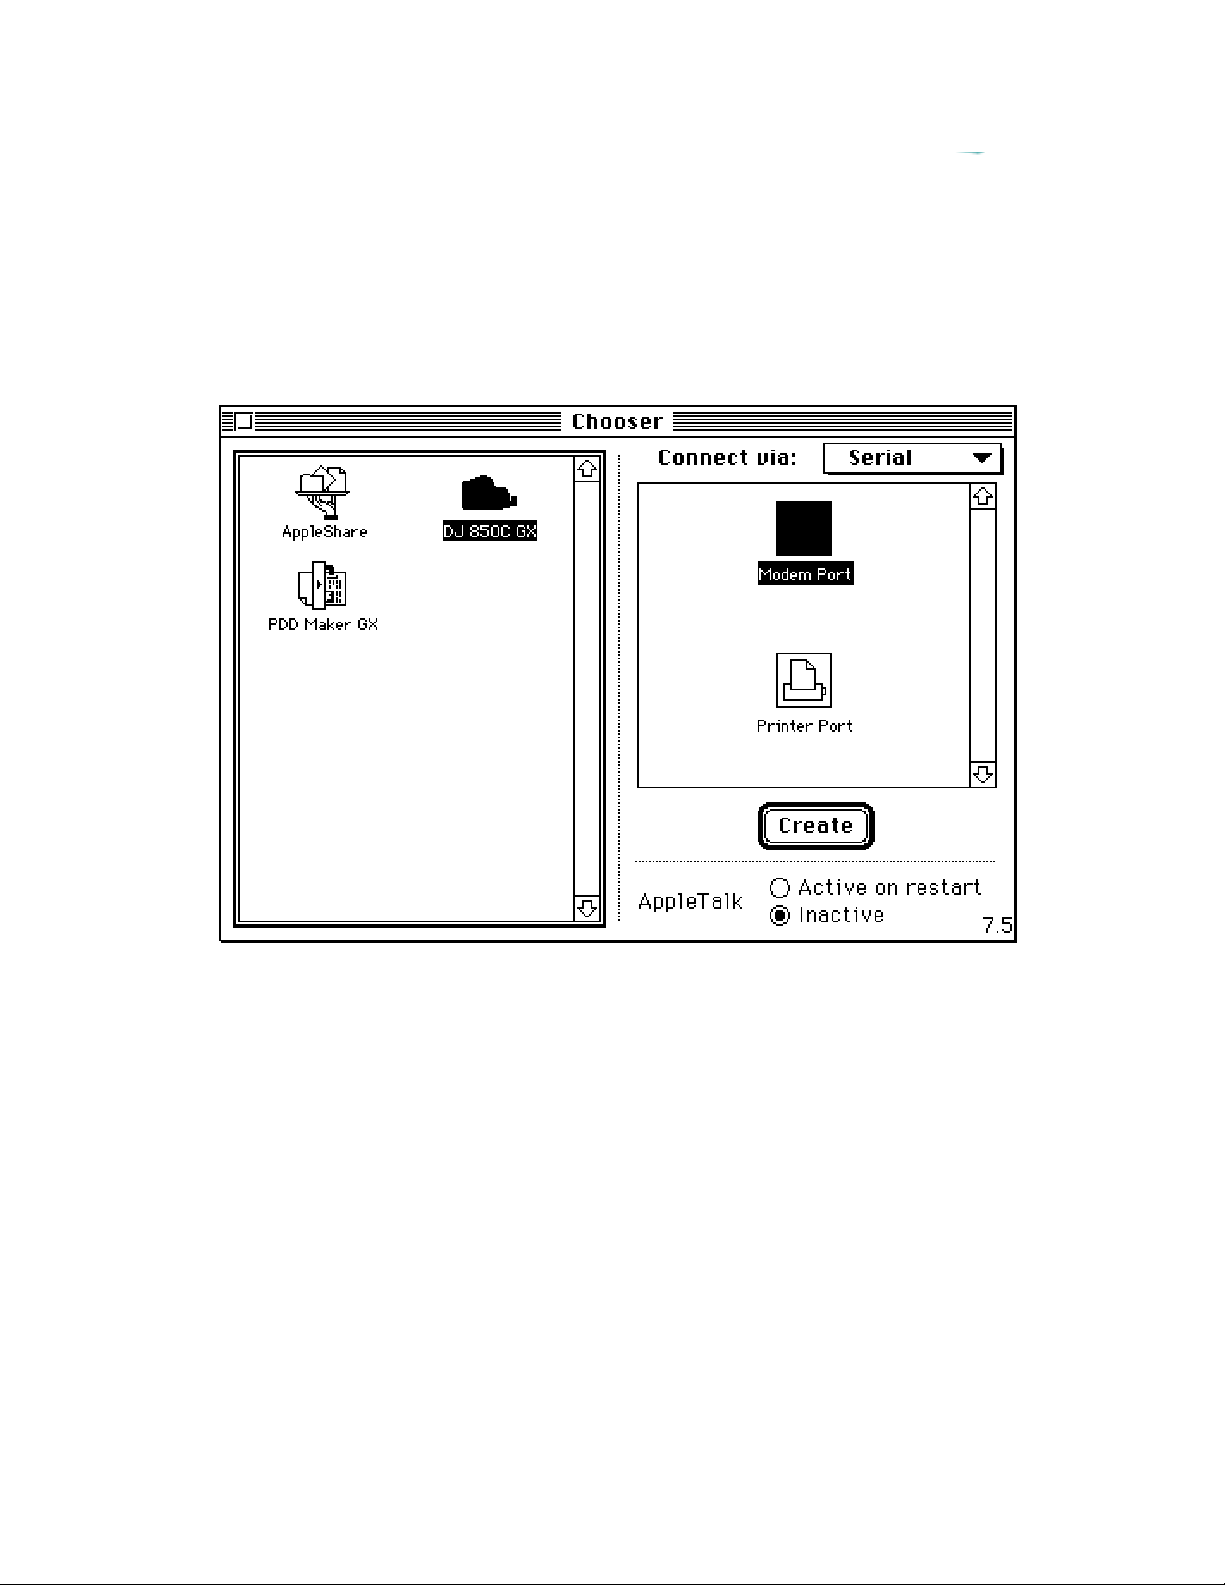
Choosing a Printer
Before printing you must choose the HP DeskJet 850C/855C as the printer
you wish to use, even if it’s the only printer connected to your computer.
1. Choose Chooser from the Apple menu.
The QuickDraw GX Chooser Dialog Box
2. Click the icon for the HP DeskJet 850C/855C printer.
3. If trying to connect to a network or Server printer, make sure
AppleTalk is active.
4. Use the Connect via: pull-down menu to select the type of I/O used
to communicate with the printer: Serial, AppleTalk, or Server.
Page 39

Printer Connection Pull-down Menu
Connect via: When applicable:
Serial The printer is connected directly to the printer or modem port.
AppleTalk The printer is connected by a network.
Servers The printer is connected directly to another computer and is being shared
across the network.
4. If the computer is directly connected to the computer, specify
which port.
5. Close the Chooser.
Sharing Printers
With QuickDraw GX you can place an icon representing the printer on your
desktop. Desktop printer icons are necessary in order to share printers
with other network users. It is also a convenient way to use a printer no
matter where it is physically located.
Creating a Desktop Printer Icon
To create a desktop printer icon:
1. Choose Chooser from the Apple menu.
2. Select a printer.
3. Click Create. A printer icon appears on your desktop.
4. Close the Chooser.
To share the printer:
1. Click the icon for the printer to be shared.
2. Choose Sharing from the File menu.
3. Specify whether non-QuickDraw GX users can use the printer or
not.
Page 40
Printer Icon Sharing Options
Sharing options
Non-QuickDraw GX systems may also use this
printer
Share this printer Provides access only to specified QuickDraw
User/Group, Guest Use the Users and Groups Control Panel
Provides access to all specified network
users, groups, and guests.
GX users, groups, and guests.
dialog box to restrict access to unqualified
users.
Deleting a Desktop Printer Icon
To delete a desktop printer, make sure the print queue is empty, then drag
the icon to the Trash.
Page 41

About the Printer Driver
The print driver software communicates the printer’s features and design
to your computer. The HP ColorSmart technology within the HP printer
driver analyzes your documents for the best quality printout every time you
print. ColorSmart identifies each element on a page - text, graphics,
photographs - and automatically applies the appropriate colors and ink
amounts to each of them.
HP DeskJet 850C/855C series QuickDraw GX printer drivers provide:
Background or foreground printing.
Desktop printer icons.
Drag and drop printing to the desktop printer icon.
Printing status messages, allowing you to view the jobs in queue;
stop, pause, or remove jobs; change the printing order of the jobs
in queue.
Added options to the Print and Page Setup dialog boxes allowing
print quality control.
27 TrueType fonts.
Laser-quality text and graphics printing in portrait and landscape
orientations.
Exceptional print quality even when mixing text and graphics on
the same page.
Near photographic quality when printing images. HP color printers
use ColorSmart technology allowing halftone pattern removal,
edge sharpening, and tone smoothing.
Print preview.
“Back to front” printing.
Multiple copy printing.
A default save for the print settings so that documents print the
same way every time.
Reduce or enlarge options. Reducing a document allows you to fit
the document’s contents to sizes corresponding to the printer’s
media capabilities . Enlarging a document allows you to more
easily see the documents contents. Reducing or enlarging a
document for printing does not affect the page dimensions in the
application.
Page 42

Languages Supported
The QuickDraw and QuickDraw GX Printer Drivers Support:
English Italian Dutch
French Spanish Swedish
German Portuguese Japanese
Page 43
Using the Printer Driver
The printer driver provides dialog boxes for communicating specific
printing instructions to the printer.
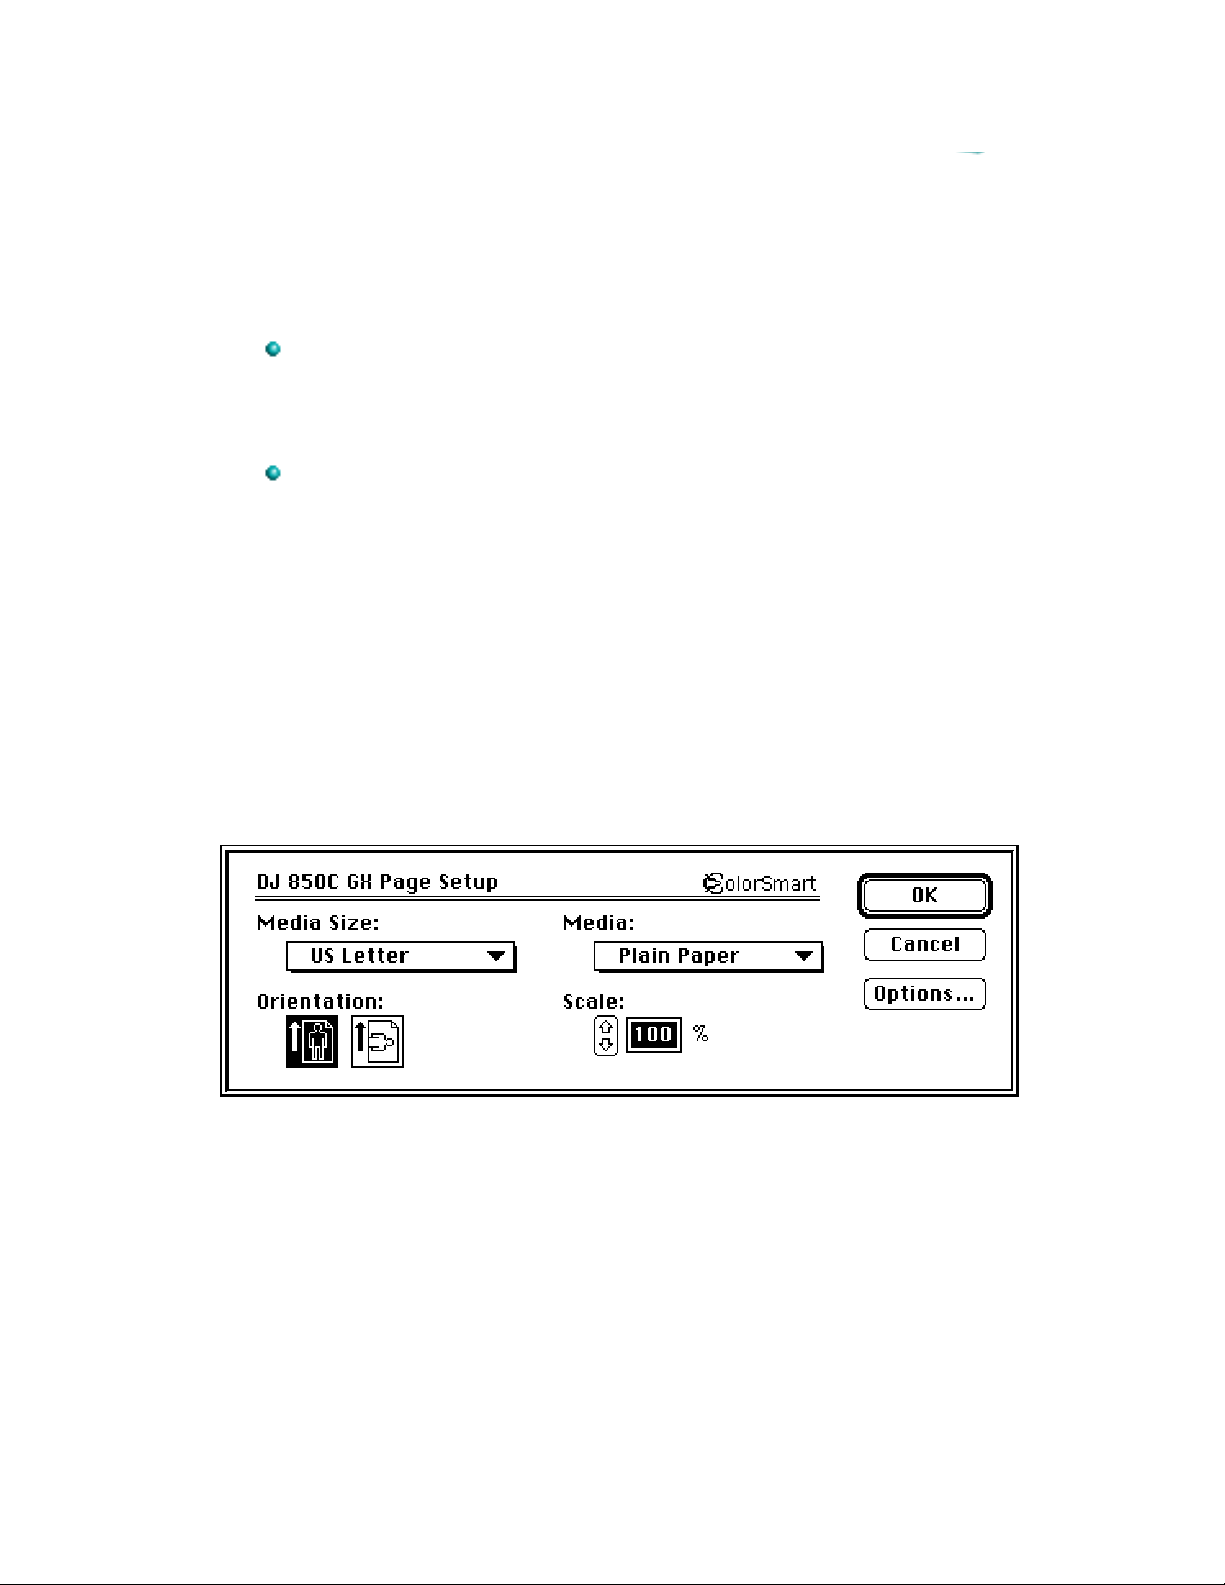
Select the general print settings, such as the paper size and type,
and the page orientation from within a software application by
choosing Page Setup from the File menu. This displays the Page
Setup dialog box.
Select specific print settings, such as intensity, halftoning patterns,
and color matching, from within the software application by
choosing Options from either the Page Setup or the Print dialog
boxes. This displays the Options dialog box. In general, leaving
the Options settings at Auto allows ColorSmart to provide the best
printing possible.
Page Setup
Before printing choose Page Setup from the File menu.
The Page Setup Dialog Box
The page setup dialog box may look different depending on whether or
not the application being used recognizes QuickDraw GX. The QuickDraw
GX printer driver offers extra features.
Page 44
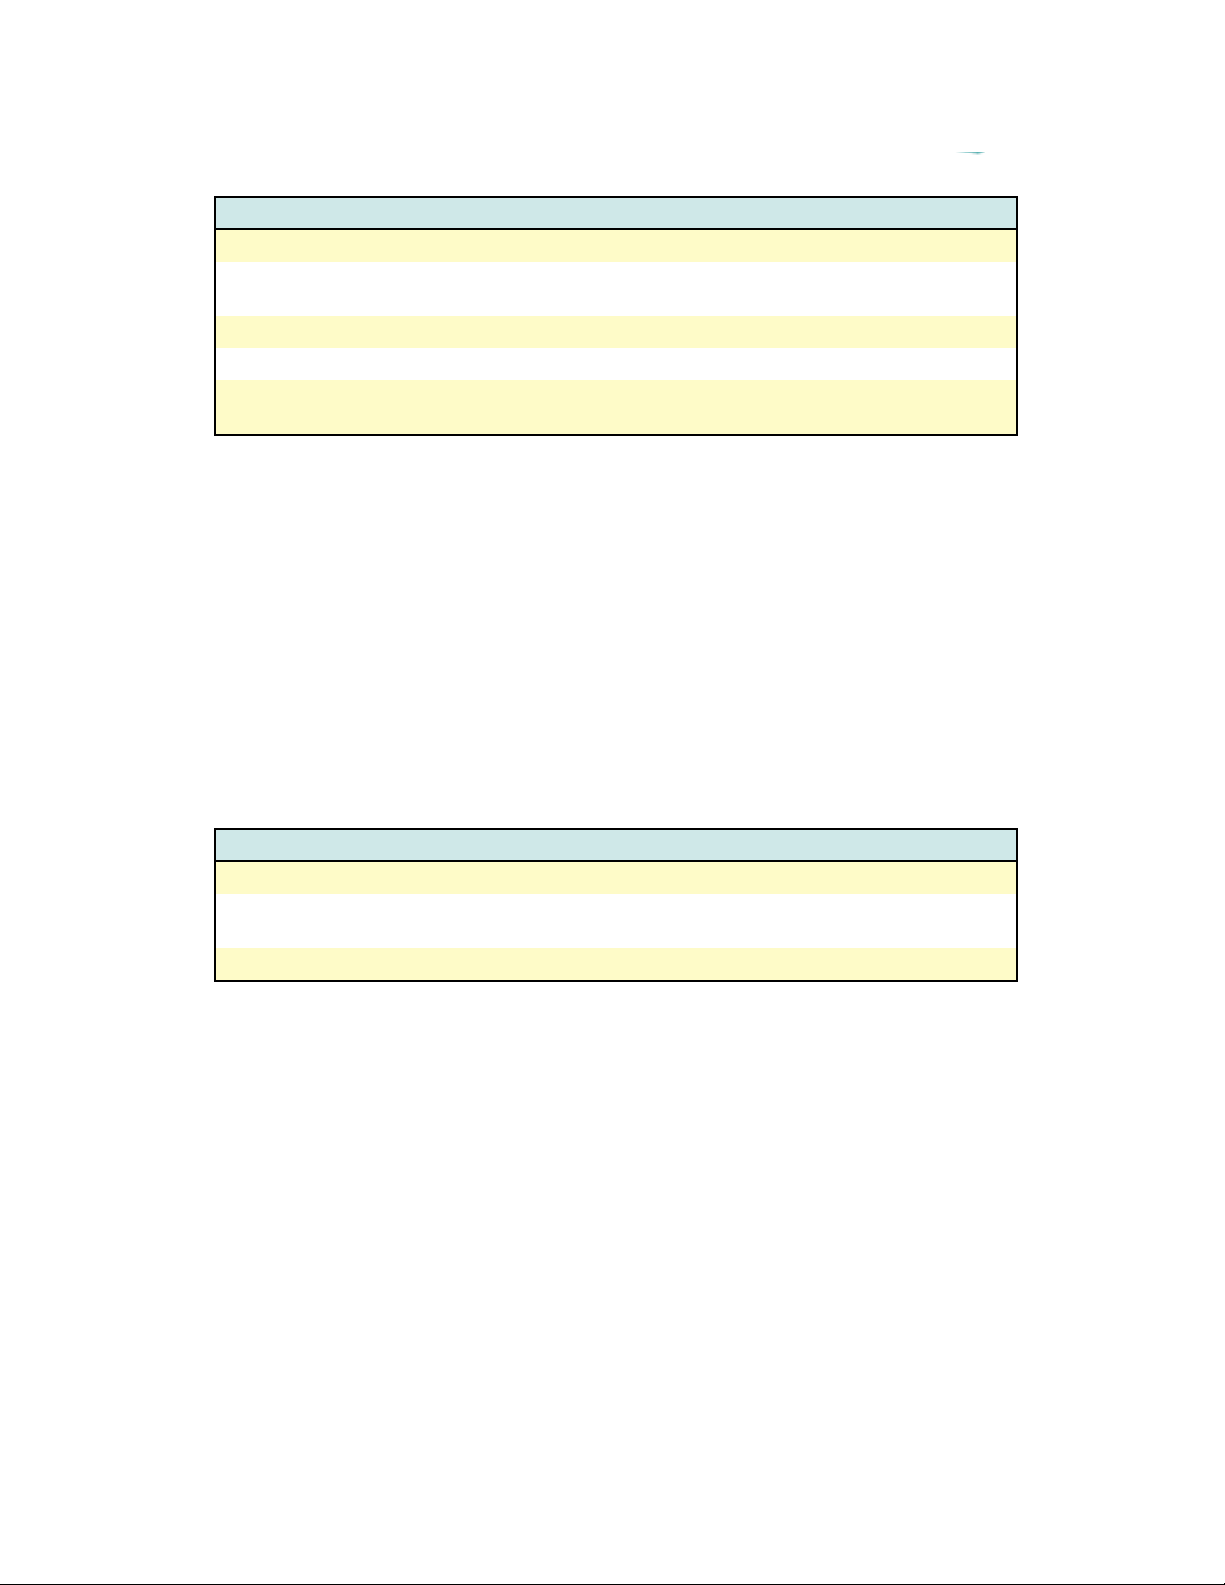
Page Setup Options
HP DeskJet 850C/855C Page Setup Options
Media Size The pop-up menu displays selections supported by the printer.
Media The media may be either plain paper or one of HP’s special
media types.
Orientation Portrait or landscape.
Reduce/Enlarge Valid range: 25% – 400%.
Options Opens the ColorSmart Options dialog which is used to change
some of the ColorSmart options.
Printing Documents
When printing from the Finder you can select multiple documents for
printing in succession. These documents need not have the same
specifications nor do they need to have been created with the same
software application. The printing specifications for each document are
used when that document is printed. However, the printer does not notify
you if the documents require different sizes or types of paper. Choose Print
from the File menu to see the Print dialog box.
How to Print
Three Ways to Access the Print Dialog
From within an application Choose Print from the File menu.
From the Finder Select the document you want to print by clicking on the
document icon(s) and choosing Print from the File menu.
Drag and Drop Drag one or more files to the desktop printer icon.
Page 45
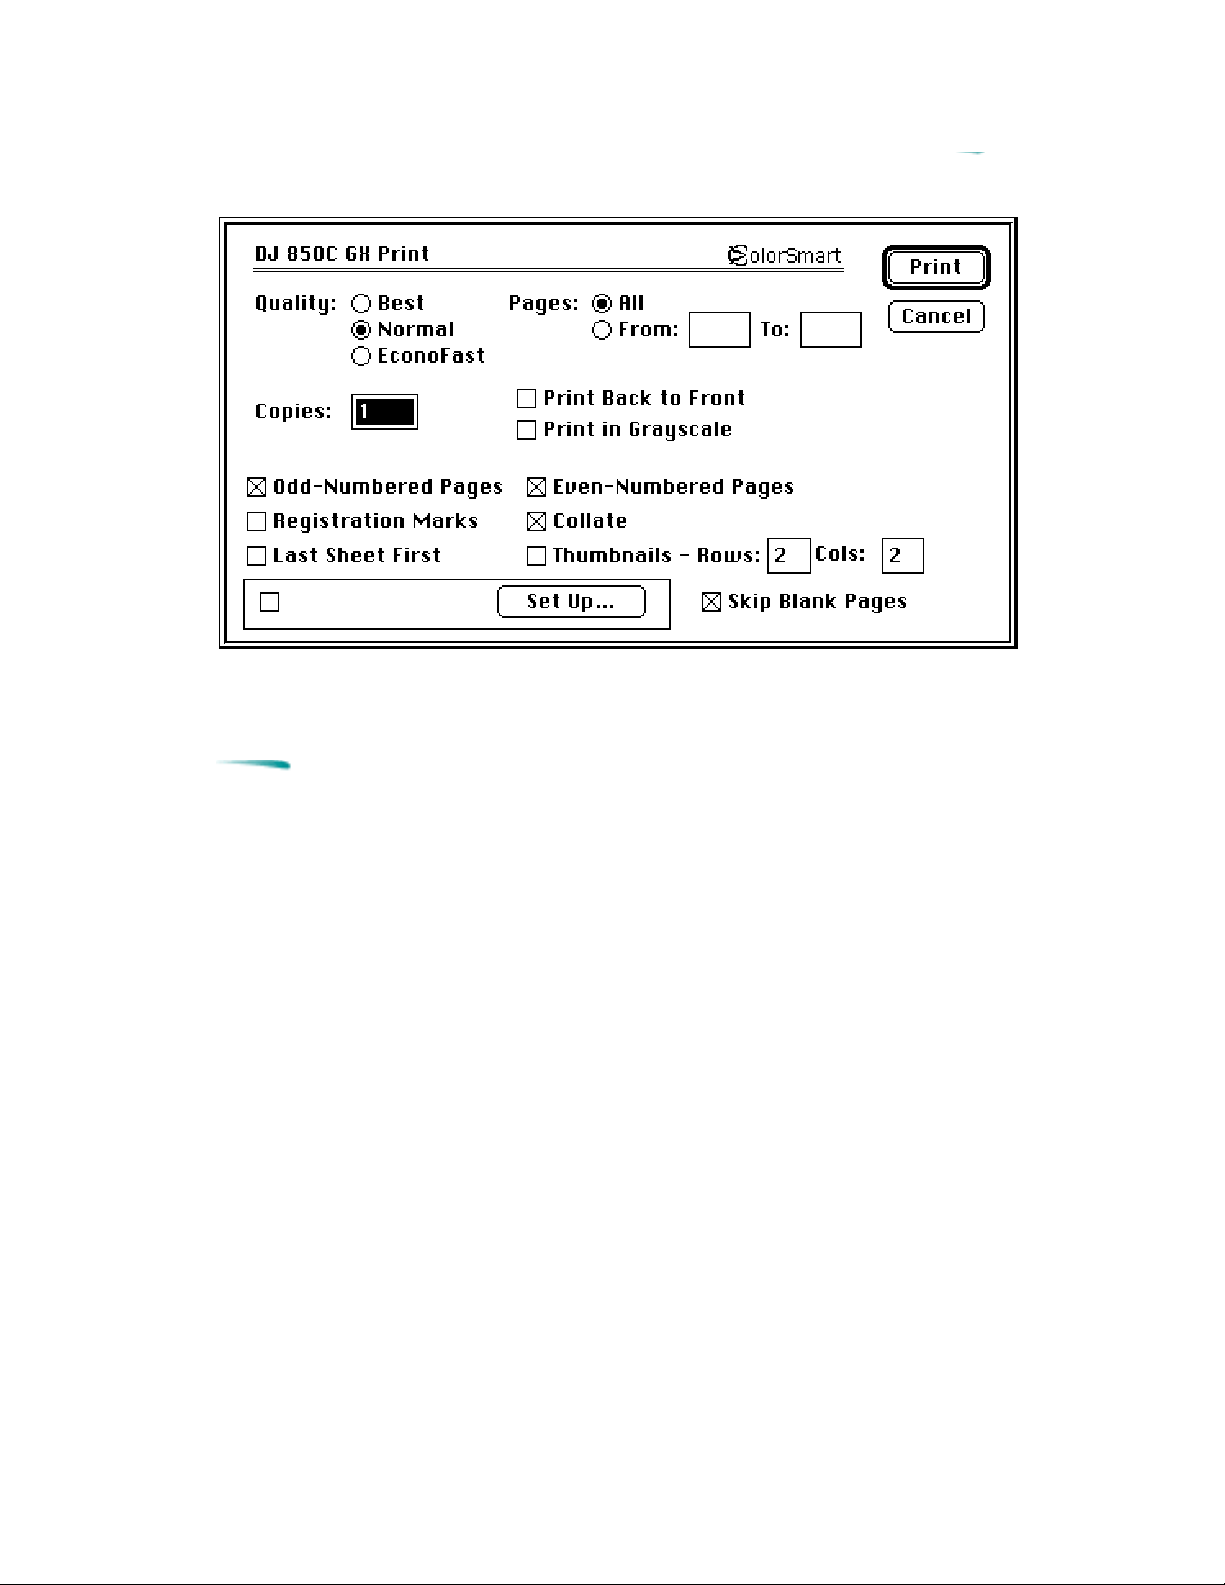
The Print Dialog Box
Note If you choose the printing back to front option in both your
software application and the Print dialog box, the commands
cancel each other and the document prints front to back.
Page 46

Background Printing
Turning the background printing option on enables you to work on other
documents while printing. When background printing is on, a copy of your
document is saved in the PrintMonitor Documents folder, a temporary
folder in the Systems folder on your hard disk. This copy is then sent to the
printer. Although background printing lets you regain control of your
computer sooner; the actual printing of the document is slower.
If you send several documents to the printer, a queue forms in the
PrintMonitor Documents folder. Documents print in the order received.
To use background printing, select the Chooser from the Apple menu,
select the printer you are using, and turn on background printing.
The HP PrintMonitor
With QuickDraw GX, access the PrintMonitor by double clicking the icon
for the printer. Use the HP PrintMonitor during Background Printing to:
See which file is currently printing.
View and re-arrange the order of files waiting to be printed.
Note
Cancel a file from printing.
Remove a file from the print queue.
Establish preferences for the level of notification used when the
printer needs attention.
You cannot directly print a file from the HP PrintMonitor. The
HP PrintMonitor prints in the background until the
PrintMonitor Documents folder is empty.
Page 47

Using the PrintMonitor
To open the HP PrintMonitor
During background printing: Select HP PrintMonitor from the Application menu in the top
right corner of the menu bar.
When the printer is inactive: Double-click the HP PrintMonitor icon in the Extensions folder.
Under QuickDraw GX with
desktop printer icons:
Double-click the desktop printer icon while printing.
Once the HP PrintMonitor is displayed, change the settings by choosing
Preferences from the File menu.
Note
By default, the HP PrintMonitor is not displayed during
printing. To automatically display the HP PrintMonitor during
printing change the settings in the Preferences dialog box.
Page 48

Optimizing Performance
The print driver is designed to deliver the best possible performance.
However, printer output speed can be affected by the amount of available
system memory (RAM) and the amount of available disk space.
The following list provides ideas on how to enhance the printer’s
performance:
Increase the amount of RAM in your computer. The QuickDraw GX
printer driver requires at least 8 MB of RAM. Use additional
memory (5 MB or more) to increase the printer’s flexibility in using
applications.
Limit the number of documents and programs that you open at one
time.
Free system memory (RAM) by removing start-up screens, INITs,
and control panels from the System Folder.
Turn off background printing.
Decrease the Disk Cache in the Memory Control Panel.
Remove unneeded fonts.
Servicing the Print Cartridge
The printer software Service dialog box provides access to cleaning and
alignment routines. Use the cleaning routines only when necessary
because they cause the print cartridges to use large amounts of ink.
To access the Service dialog box:
1. Choose Page Setup from the File menu.
2. Click Service.
Alternatively, select the desktop printer icon and click Print Cartridge
Cleaning or Print Cartridge Alignment from the Print menu.
Page 49
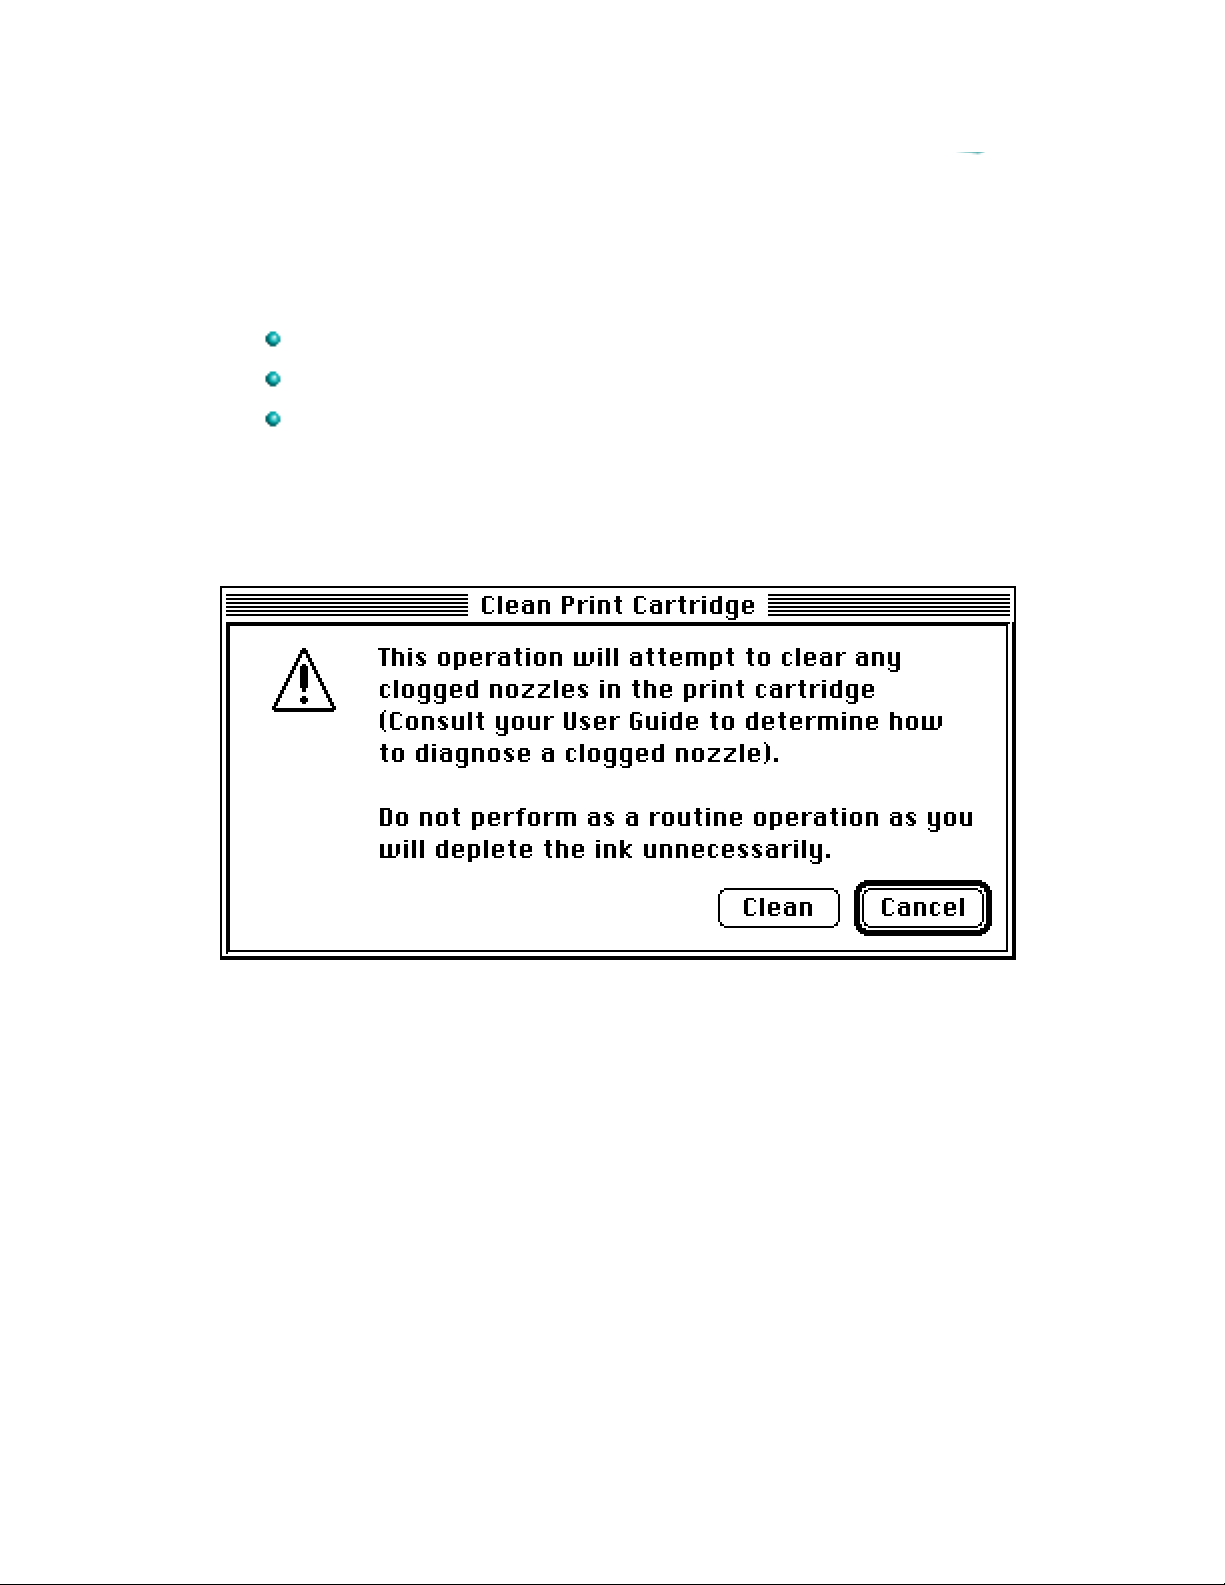
Cleaning
HP DeskJet 850C/855C series printers provide multiple levels of
maintenance for cleaning the printer cartridge.
Clean, also referred to as “Surface Clean.”
Standard Clean
Prime
Click Start to initiate the Clean process, then Click Clean to initiate the
clean cycle. A test page prints after the cycle finishes.
Clean Print Cartridge Dialog Box
If not satisfied with the results, continue with the Standard Clean cycle. A
test page prints after the Standard Clean finishes.
Page 50
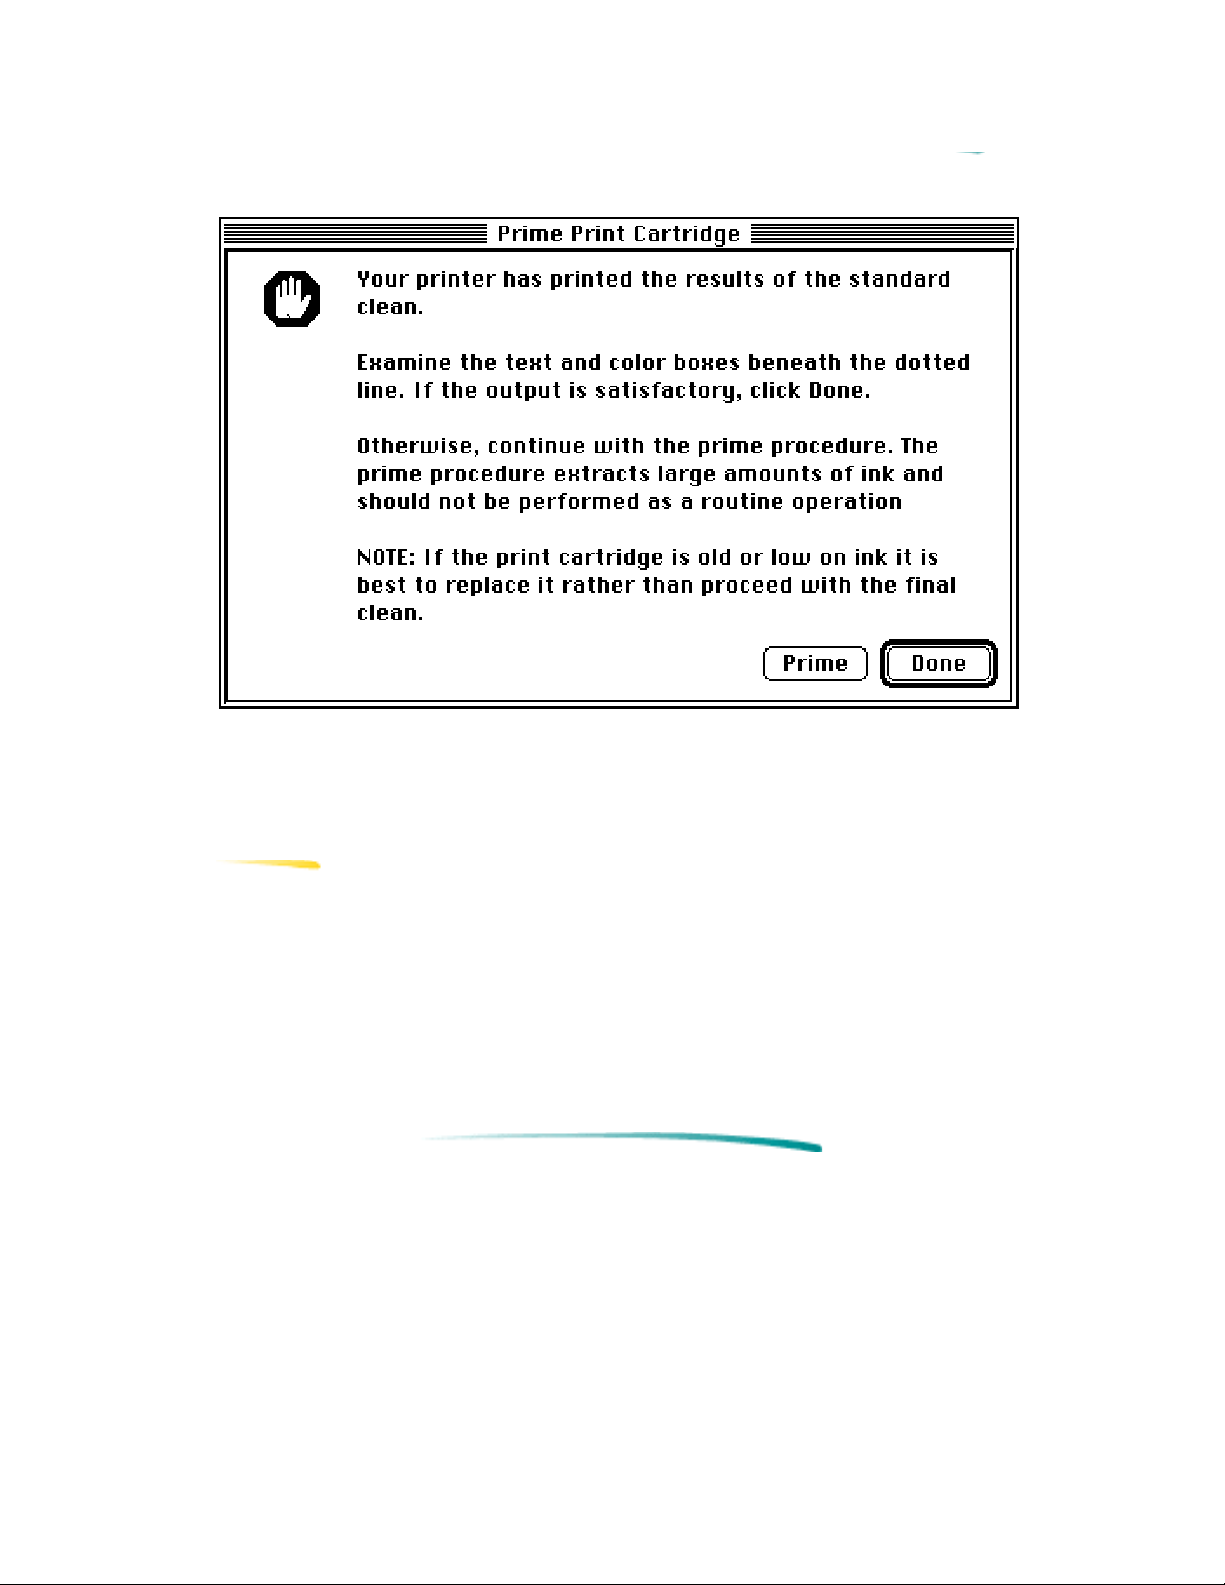
Prime Print Cartridge Dialog Box
If still not satisfied, continue with the Prime procedure.
Caution
Priming extracts large amounts of ink and should not be
performed as a routine operation.
Aligning
If necessary, click Align in the Service dialog to align the color and black
cartridges with one another. HP recommends aligning each time one of
the cartridges is replaced.
Page 51
Troubleshooting
HP periodically provides updates of the printer software. These updates
may include enhancements that improve printer performance.
Problems and Solutions
Problem Solution
Printer does not print Open the Chooser and verify that the correct printer is
selected.
Printer icon does not appear
on the left side of the
Chooser.
The printer name does not
appear on the right side of
the Chooser.
Power light is On, the
Resume light is Off.
Make sure the printer is turned on.
Make sure that the printer driver icon is in the Extensions
Folder.
Make sure the printer is turned on.
Open the Chooser and make sure AppleTalk is active.
Check that the printer appears in the Chooser then close all
applications and restart. If this doesn’t work it may be
necessary to reinstall the printer driver software.
Using Online Help
Two types of online help provide information about the printer software.
Printer Software Help
Type of help Provides How to access/where to find
Balloon Help Pop-up information about
options in the dialog
boxes when you move
the mouse cursor over
certain parts of the
screen.
ReadMe Files Release notes and
current information.
1. Choose Show Balloons from the Help
menu in the upper right corner of the
menu bar. (If this option is not
available Balloon help is already on.)
2. To turn off Balloon help, choose Hide
Balloons from the Help menu.
1. On the Driver Installation Disk.
2. On the Fonts Installation Disk.
 Loading...