

Page 1

Installation and
Reference Guide
HP J4091A
HP ProCurve 100Base-T Hub 8
Page 2

© Copyright 1998 Hewlett-Packard Company
All Rights Reserved
Reproduction , adap ta tion , or transla tio n wi tho ut prior writte n perm ission is prohib ited, except as allowed under the copyright laws.
Publication Number
J4091-90001
Edition 1
June 1998
Applicable Product
HP J4091A ProCurve 100Base-T Hub 8
Disclaimer
The information contained in this document is subject to change without notice.
HEWLETT-PACKARD COMPANY MAKES NO WARRANTY OF ANY KIND
WITH REGARD TO THIS MATERIAL, INCLUDING, BUT NOT LIMITED TO,
THE IMPLIED WARRANTIES OF MERCHANTABILITY AND FITNESS FOR
A PARTICULAR PURPOSE. Hewlett-Packard shall not be liable for errors contained herein or for incidental or consequential damages in connection with the furnishing, performance, or use of this material
.
Hewlett-Packard assumes no responsi bil ity for the use or reliabil ity of its software
on equipment that is not furn ished by Hewlett-P ack ard .
Wa rranty
See the warranty booklet included with the product.
A copy of the specific warrant y terms applicable to your Hewlett-Packard product
and replacement parts can be obtained from your HP sales and service office or HP
authorized reseller.
Hewlett-Packard Company
8000 Foothills Boulevard , m/s 5551
Roseville, California 95747-5551
http://www.hp.com/go/network_city
Page 3

Package Contents
Carefully unpack the contents of the package and verify them against the
checklist given below.
Package Checklist
HP ProCurve 100Base-T Hub 8 (Part No. HP J4091A)
æ
Your hub is shipped with one of these AC power adapters:
æ
Australia/New Zealand/Argentina (0950-3269)
Europe/Russia (0950-3268)
China (0950-2809)
Japan (0950-3267)
United Kingdom/Hong Kong (0950-3270)
U.S./Canada/Mexico/Taiwan/Brazil/Columbia (0950-3274)
Four rubber foot pads
æ
Installation and Reference Guide (J4091-90001)
æ
Warranty booklet
æ
README notice
æ
Please inform your dealer immediately should there be any wrong, missing,
or damaged parts.
If possible, retain the carton, including the original packing materials. Use
them again to repack the unit in case there is a need to return it for repair.
Package Contents iii
Page 4

Page 5

Quick Installation
The HP J4091A ProCurve 100Base-T Hub 8 contains 8 100Base-T Fast
Ethernet ports. The smart design built into the front display panel provides
a friendly interface that simplifies installation and network troubleshooting.
If you are already familiar with basic network operations, you should be
able to install this hub as desc ribed below:
1. Unpack the HP 100Base-T Hub 8.
2. Find a location close to the network devices you need to connect, and
within easy reach of an electrical outlet.
3. Attach the footpads and then place the hub on a desktop or any oth er flat
surface. If you are installing multiple hubs, you can stack them on top of
each other. A mounting kit is available (5183-7210).
4. Connect any devices that use a standard network interface to the RJ-45
(MDI-X) ports (e.g., a workstation, server, bridge or router). Use 100Ω
Category 5 STP or 100Ω Category 5 UTP cable to connect to the hub,
and be sure the length of any twisted-pair connection does not exceed
100 meters. Refer to Chapter 3 for sample configurations.
5. To cascade to anothe r hub or switch, run stra ight-through twisted -pair
cable from the (8MDI) cascade port on this hub to any ( M DI-X) po rt on
the other device (or vice versa). Refer to Figure 3.2.
6. If necessary, you can also cascade between two ports using a crossover
cable. However, be sure not to exceed the maximum length between
end nodes as described in Chapter 2.
7. This hub can serve as a standalone repeater for small networks, can be
cascaded with compatible devices (e.g., Fast Ethernet hub or switch), or
can be connected to a network interconnection device (e.g., Fast
Ethernet bridge or router).
Quick Installation v
Page 6

HP 100Base-T Hub 8 Installation and Reference Guide
8. Verify network communications by ensuring that:
■ you have made all the necessary connections
■ you can access any connected resources
■ the hub’s indicators show lin k st atu s
9. If you encounter any problems in installing the HP 100Base-T Hub 8,
refer to Chapter 2 for a detailed description of installation procedures,
Chapter 3 for sample configurations, or Appendix A for help in
troubleshooting.
Note: Refer to Chapter 2 for a more detailed description of calculating the maximum
cable length permitted between two end nodes for Fast Ethernet.
vi Quick Installation
Page 7

About this Guide
This guide is designed for the experienced network installer. It describes
how to install and operate the HP ProCurve 100Base-T Hub 8.
This manual covers the following topics:
Chapter 1 - Product Overview
Brief description of this hub and a summary of its important features and
specifications.
Chapter 2 - Installing the Sy stem
Installing an HP 100Base-T Hub 8 and making basic network connections.
Chapter 3 - Configuring the Network
Sample network configurations for a local area network.
Chapter 4 - Hardware Reference
Detailed description of indicator panel a nd ports.
AppendicesTroubleshooting, cable assignments, and product specifications.
About this Guide vii
Page 8

Page 9

Content s
Chapter 1: Product Overview ........... ...............................1-1
Introduction to Fast Ethernet ................................................................................1-1
HP ProCurve 100Base-T Hub 8 ...........................................................................1-1
Basic Features .......................................................................................................1-1
Chapter 2: Installing the System ............................ .........2-1
Pre-Installation Re qu ire men ts .................. .................. .................. .... .................. ..2-1
Connecting the Hub System .................................................................................2-2
Making a Connection via an MDI-X Port ......................................................2-2
Making a Connection via the MDI Cascade Port ...........................................2-3
Distance Limit for Fast Ethernet Cabling .......................................................2-3
Providing Power to the Hub .................................................................................2-4
Verifying Port Status ............................................................................................2-4
Verifying System Operation .................................................................................2-5
Chapter 3: Configuring the Network ........... .. ..................3-1
Standalone .............................................................................................................3-1
Connecting Multiple Hubs ....................................................................................3-2
Chapter 4: Hardware Reference ......................................4-1
Front Panel ............................................................................................................4-1
Pwr ..................................................................................................................4-2
Statistical Display for System Performance ...................................................4-2
Port Status Display ............... ... .... .................. .................. .... .................. .... .....4-3
RJ-45 100Base-T Ports ...................................................................................4-5
Rear Panel .............................................................................................................4-5
Power Connector ............................................................................................4-5
Appendix A: Troubleshooting .............................. .. .. .. .. .. A-1
Diagnosing Hub Indicators ..................................................................................A-1
System Diagnostics ..............................................................................................A-2
Installation ..................................................................................................... A-2
Physical Configura tio n . .... .... .................. ... ................... ... .................. ............A-2
Contents ix
Page 10

HP 100Base-T Hub 8 Installation and Reference Guide
Hub Integrity .................................................................................................A-3
Appendix B: Port Assignments ............. ................ ........B-1
RJ-45 Port ................ .... .... .................. ... ................... ... .................. ................... ... .B-1
Appendix C: Specifications ................................ ............C-1
Appendix D: Safety and Regulatory Statements ..........D-1
Mounting Precautions ..........................................................................................D-1
Power Precautions ...............................................................................................D-2
Safety Information ...............................................................................................D-3
Informations conce rn an t la sécuri té .............. ... .... .... .................. .................. .... ....D-4
Hinweise zur Sicherheit ..................... ... ................... ... .................. .... .................. .D-5
Considerazioni sulla sicurezza .............................................................................D-6
Consideraciones sobre seguridad .........................................................................D-7
Safety Information (Chinese) ..............................................................................D-8
Safety Information (Japanese) .............................................................................D-9
Regulatory Statem ents . .... ... .................. .... .................. .................. .... .................D-10
Declaration of Conformity .................................................................................D-14
Glossary
Index
x Contents
Page 11

HP 100Base-T Hub 8 Installation and Reference Guide
Figures
Figure 3.1 Standalone Configuration ....................................................................3-1
Figure 3.2 Multiple Hub Configuration Using the Cascade Port .........................3-2
Figure 4.1 Front Panel ....................... ... .... .... .................. .................. .... ................4-1
Figure 4.2 Indicators .............................................................................................4-2
Figure 4.3 Rear Panel ............................... .... .................. .................. .... ................4-5
Figure B.1 RJ-45 Connector (on the Hub Side) .................................................. B-1
Tables
Table A.1 Problems and Solutions ......................................................................A-1
Table B.1 RJ-45 Pin Assignments ....................................................................... B-1
Contents xi
Page 12

Page 13

Chapter 1: Product Overview
Introduction to Fast Ethernet
Standard 10 Mbits/s Ethernet has served well for past generations of 286
and 386 machines performing simple file transfers. However, with the
inevitable growth in corporate network size and the introduction of fullyfunctional 32-bit PC architectures, and operating systems running complex
applications, 10 Mbits/s Ethernet has become a serious bottleneck.
With the recent flood of choices for upgrading media bandwidth, 100
Mbits/s Fast Ethernet has become the most p opu lar b ecause of its low cost,
compatibility with existing Ethernet applications, and the fact that it can
run on top of an installed base of twisted-pair cabling. Fast Ethernet can be
easily integrated into an existin g 10 Mbits/s Ethernet environment with no
need for protocol translation or changes to network soft ware.
HP ProCurve 100Base-T Hub 8
The HP J4091A ProCurv e 100Base-T Hub 8 is an 8-port Clas s I I repeat er.
With this type of hub, you can connect computers and other devices
together in an twisted-pair cable network. This hub is compliant with the
IEEE 802.3u 100Base-T standard.
Basic Featur es
■ Transmits data at 100 Mbits/s
■ Conforms to the IEEE 802.3u Class II repeater specification for
100Base-T
■ Provides 8 RJ-45 100Base-T ports (using MDI-X wiring)
■ Port 8 can serve as an MDI-X port (for connection to network devices
such as workstations or servers) or as an MDI daisy-chain port (for
connection to network devices s uch as h ubs o r sw i tc hes) , eli min ati n g the
need for crossover cables
■ Supports 10 0Ω Category 5 shielded or unsh ielded cable (STP or UTP)
Product Overview 1-1
Page 14

HP 100Base-T Hub 8 Installation and Reference Guide
■ Friendly design that monitors net work utilization, collisions, link and
port partition status
■ LED indicator panel includes Utilization rate indicators and Collision
indicator for reporting hub activity and facilitating problem diagnosis
■ Automatically partitions bad ports to protect the netwo rk system
■ Automatic polarity detection and co rrecti on perm its automatic adjust-
ment for wiring errors
■ Plug-and-pl ay oper a tio n
The HP 100Base -T Hub 8 also su pport s bas ic syst em safeg uards, includi ng
automatic partitioning and reconnection, jabber lockup protection, and
automatic polarity detection for network cabling.
■ With automatic partitionin g and reconnection, any port is automatically
isolated if excessive collisions occur on it. When the condition is corrected, the port is automatically reconnected.
■ With the jabber lock-up function, the hub automatically stops transmis-
sion of abnormal Ethernet frames that may cause data loss for all netw ork
users. (Jabber refers to abnormal Ethernet frames which are much too
long and may come from a malfunctioning Ethernet card.)
■ With automatic polarity detection, the hub recognizes and adjusts for
attached cable assemblies which may be wired with incorrect polarity on
the receive pair.
1-2 Product Overview
Page 15
Chapter 2: Installing the System
This chapter provides information on installing the HP 100Base-T Hub 8,
establishing network connections, and configuring the system. You may
install this hub on any level surface (e.g., a table or shelf) or in a standard
EIA equipment rack. A mounting kit is available (5183-7210).
Please take note of the following minimum site requirements before you
begin.
Pre-Installation Requirements
Before you start actual hardware installation, make sure you can provide
the right operating environment, including pow er requirements, sufficient
physical space, and proximity to other network devices that are to be
connected. Verify the following installation req uirements:
■ Power connector requirements: 13-19 Vdc, 800 mA.
■ Power source: One of the following external power adapters.
Country Adapter P/N Input Specs.* Output Specs.*
China 0950-3269 220-240 Vac, 50 Hz 19 Vdc, 800 mA
USA 0950-3274 110-127 Vac, 60 Hz 19 Vdc, 800 mA
Europe 0950-3268 230 Vac, 50 Hz 19 Vdc, 800 mA
Australia 0950-3269 220-240 Vac, 50 Hz 19 Vdc, 800 mA
Japan 0950-3267 100 Vac, 50/60 Hz 19 Vdc, 0.8 A
UK 0950-3270 220-240 Vac, 50 Hz 19 Vdc, 800 mA
Switzerland 0950-3268 230 Vac, 50 Hz 19 Vdc, 800 mA
Denmark 0950-3268 230 Vac, 50 Hz 19 Vdc, 800 mA
* Specifications shown on adapter label.
■ The hub should be located in a cool dry place, with at least 10 cm. of
space at the front and back for ventilation.
■ Place the hub out of direct sunlight, and away from heat sources or areas
with a high amount of electromagnetic interference.
Installing the System 2-1
Page 16

HP 100Base-T Hub 8 Installation and Reference Guide
■ Check if network cables and connectors needed for installation are
available.
■ Find a suitable location at the center of the devices you want to link, and
near a power outlet.
Connecting the Hub System
The HP 100Base-T Hub 8 has 8 RJ-45 ports and 1 RJ -45 cascade port. The
ports allow you to make connections to devices such as a workstation or
server. You can also cascade to another compatible hub or switch by connecting an MDI port on one device (e.g., port 8MDI on this hub) to an
MDI-X port on the other device. Or yo u can cascade from an MDI port o n
another device to any MDI-X port on this hub. See Figure 4.1.
Making a Connection via an MDI-X Port
You can connect an RJ-45 port on the hub to any device that uses a standard network interface such as a workstation or server , or also to a network
interconnection device such as a bridge or router (depending on the port
type implemented).
1. Prepare the network devices you wish to network. Make sure you have
installed suitable 100Base-T network interface cards for making a
connection to any of the hub’s ports. You also need to prepare straightthrough shielded or unshielded twisted-pair cables with RJ-45 p lug s at
both ends. Use 100Ω Category 5 cable for all connections.
2. Connect one end of the cable to the RJ-45 port of the network interface
card, and the other end to any available (MDI-X) port on the hub. When
inserting an RJ-45 pl ug, be sure the tab on the plug clicks into position
to ensure that it is properly seated. Using the hub in a standalone
configuration, you can network up to 8 nodes.
Caution: Do not plug a phone jack connector into the RJ-45 port. This may damage
the hub. Use only twisted-pair cables with RJ-45 connectors that conform
with FCC standards.
Notes: 1. When connecting to port 8MDI-X, do not use port 8MDI.
2. Make sure each twisted-pair cable does not exceed 100 meters.
2-2 Installing the System
Page 17

HP 100Base-T Hub 8 Installation and Reference Guide
Making a Connection via the MDI Cascade Port
1. To make a direct connection to another compatible Class II repeater or
switch, use the 8MDI cascade port. When connecting to this port,
remember not to use port 8MDI-X.
2. Prepare straight-through shielded or unshielded twisted-pair cables with
RJ-45 plugs at both ends. Use 100Ω Category 5 cable for all
connections. Connect one end of the cable to Port 8MDI on this hub,
and the other end to a standard MDI-X port on the other device. When
inserting an RJ-45 pl ug, be sure the tab on the plug clicks into position
to ensure that it is properly seated.
Notes: 1. When connecting to port 8MDI, do not use port 8MDI-X.
2. Make sure the length of twisted-pair cable does not exceed 100 meters.
3. To connect to another hub or switch, you may also run straight-through
twisted-pair cabling from an MDI-X port on this hub to a cascade port on
another device. However, if you must connect to another hub or switch
via similar port types at both ends of the cable, use crossover cabling.
Distance Limit for Fast Ethernet Cabling
For 100Base-T, network diameter is very important, because each packet
must propagate through the Ethernet collisio n domain before the next
packet is sent. Every 100Base-T hub (repeater) adds a small propagation
delay to the packet, which can be equated to a certain numb er of bit tim es.
The propagation delay (repeater de lay) of the HP 100Base-T Hu b 8 is 80
bit times, or a cable equivalent length of 72 meters.
The 100Base-T maximum cable distance ("network diameter") is 367
meters. And the maximum distance from a hub to an end-node is 100
meters. To cascade two HP 100Base-T Hub 8s together, we must do this
calculation:
For an end-node on one hu b to commun icate with an end-no de on the ot her
hub, the cable distance from end-nodes to hubs would be 100m + 100m
(perhaps a bit less, but we should consider the "worst case"). The packets
would traverse through both hubs, for a cable equivalent length of 72m +
72m. This gives:
Installing the System 2-3
Page 18

HP 100Base-T Hub 8 Installation and Reference Guide
100m
100m
72m
+ 72m
-------344m
The maximum "networ k diameter" f or 100Base-T is 367m, so we can use a
maximum of 367m - 344m, or 23m between the two hubs.
Providing Power to the Hub
1. Plug the adapter’s power cord into the hub’s receptacle.
2. Plug the AC adapter into an AC power source. When installing the HP
100Base-T Hub 8, note that the AC outlet must be located near the
equipment and should be easily accessible.
Note: The hub does not have a power switch; it is powered on when the power
adapter is plugged in.
Caution: Use only the power adapter that is supplied with the hub. Use of other
adapters, including those meant for other HP network products, may result
damage to the equipment and will void the warranty.
Verifying Port Status
Check each connection by viewing the port status indicators listed below.
(For a more detailed description of these indicators, refer to Chapter 4.)
Link/Activity Steady green indicates a valid link. Blinking green
indicates network activity.
Partition Indicates that the port has been isolated from the hub
because excessive collisions have been detected.
If the Link status indicator is not functioning properly, or you experience
any other difficulties in setting up the hub, refer to Appendix A.
2-4 Installing the System
Page 19

HP 100Base-T Hub 8 Installation and Reference Guide
Verifying System Operation
Verify that all attached devices have a valid connection. The hub mon itors
link status for each port. If any device is prop erly connected to the hu b and
transmitting a link beat signal, the Link indicator lights up for the corresponding port. If the Link indicator fails to light up when you connect a
device to the hub, check the following items:
■ Be sure the twisted-pair cable is properly attached to the connected
device and the hub. Verify that the RJ-45 plug snaps into place when
attached.
■ Verify that if the cable is connected to an MDI-X port on the hub, the
other end must be to an MDI port of the network device and vice versa.
Test by alternately connecting to the 8MDI and 8MDI-X ports.
■ See if the twisted-pair cable is functioning properly by using it for
another port and attached device that already displays valid indications
when connected to the network.
■ Check the length of the twisted-pair connection to be sure it does not
exceed 100 meters.
■ Verify that the cable is Category 5.
■ Test the adapter for an attached workstation by trying it in another com-
puter that has been successfully connected to the network.
If you still can’t resolve the problem, please refer to Troubleshooting in
Appendix A.
Installing the System 2-5
Page 20

Page 21

Chapter 3: Configuring the Network
The HP ProCurve 100Base-T Hub 8 allows great flexibility in configuring
your network. Y ou can use it in a standalone or multiple hub configuration.
Some of the common applications for this Fast Ethernet hub are described
in this chapter.
Standalone
This hub can be used in a simple standalo ne configuration as illustrate d
below. In compliance with IEEE 802.3u standards, the maximum cable
distance between the hub and any workstation is 100 meters for twistedpair cable.
Figur e 3.1 Stand alo ne Co n fig ur at ion
Configuring the Network 3-1
Page 22

HP 100Base-T Hub 8 Installation and Reference Guide
Connecting Multiple Hubs
You can easily connect to another hub via the MDI cascade port. Figure
3.2 shows a sample configuration.
Figure 3.2 Multiple Hub Configuration Using the Cascade Port
3-2 Configuring the Network
Page 23

Chapter 4: Hardware Reference
Before connecting any network device to this hu b, please review Chapter 2
for information on system installation and Chapter 3 for a brief look at
common network architectures. This chapter describes the hardware
features of the HP ProCurve 100Base-T Hub 8. For easier management
and control of the hub, familiarize yourself with the display indicators and
ports.
Front Panel
There are 8 RJ-45 MDI-X ports and 1 RJ-45 MDI cascade port on the front
panel. Moreover, the system indicators provide a simple interface for
monitoring the hub. The front panel includes a power indicator, a
statistical display for network traffic, a collision indicator and port status
indicators as shown below.
The indicator panel simpl ifies moni toring of va rious networ k conditio ns by
providing LEDs that indicate the status of each port and the overall
condition of the hub. It provides all th e key information required to
manage your network on a daily basis. The following pages list the
indicators and their functions.
Figure 4.1 Front Panel
Hardware Reference 4-1
Page 24

HP 100Base-T Hub 8 Installation and Reference Guide
The front panel array provides indicators that show the utilization of
network bandwidth and indicate the status of port connections as shown
below.
Figure 4.2 Indicators
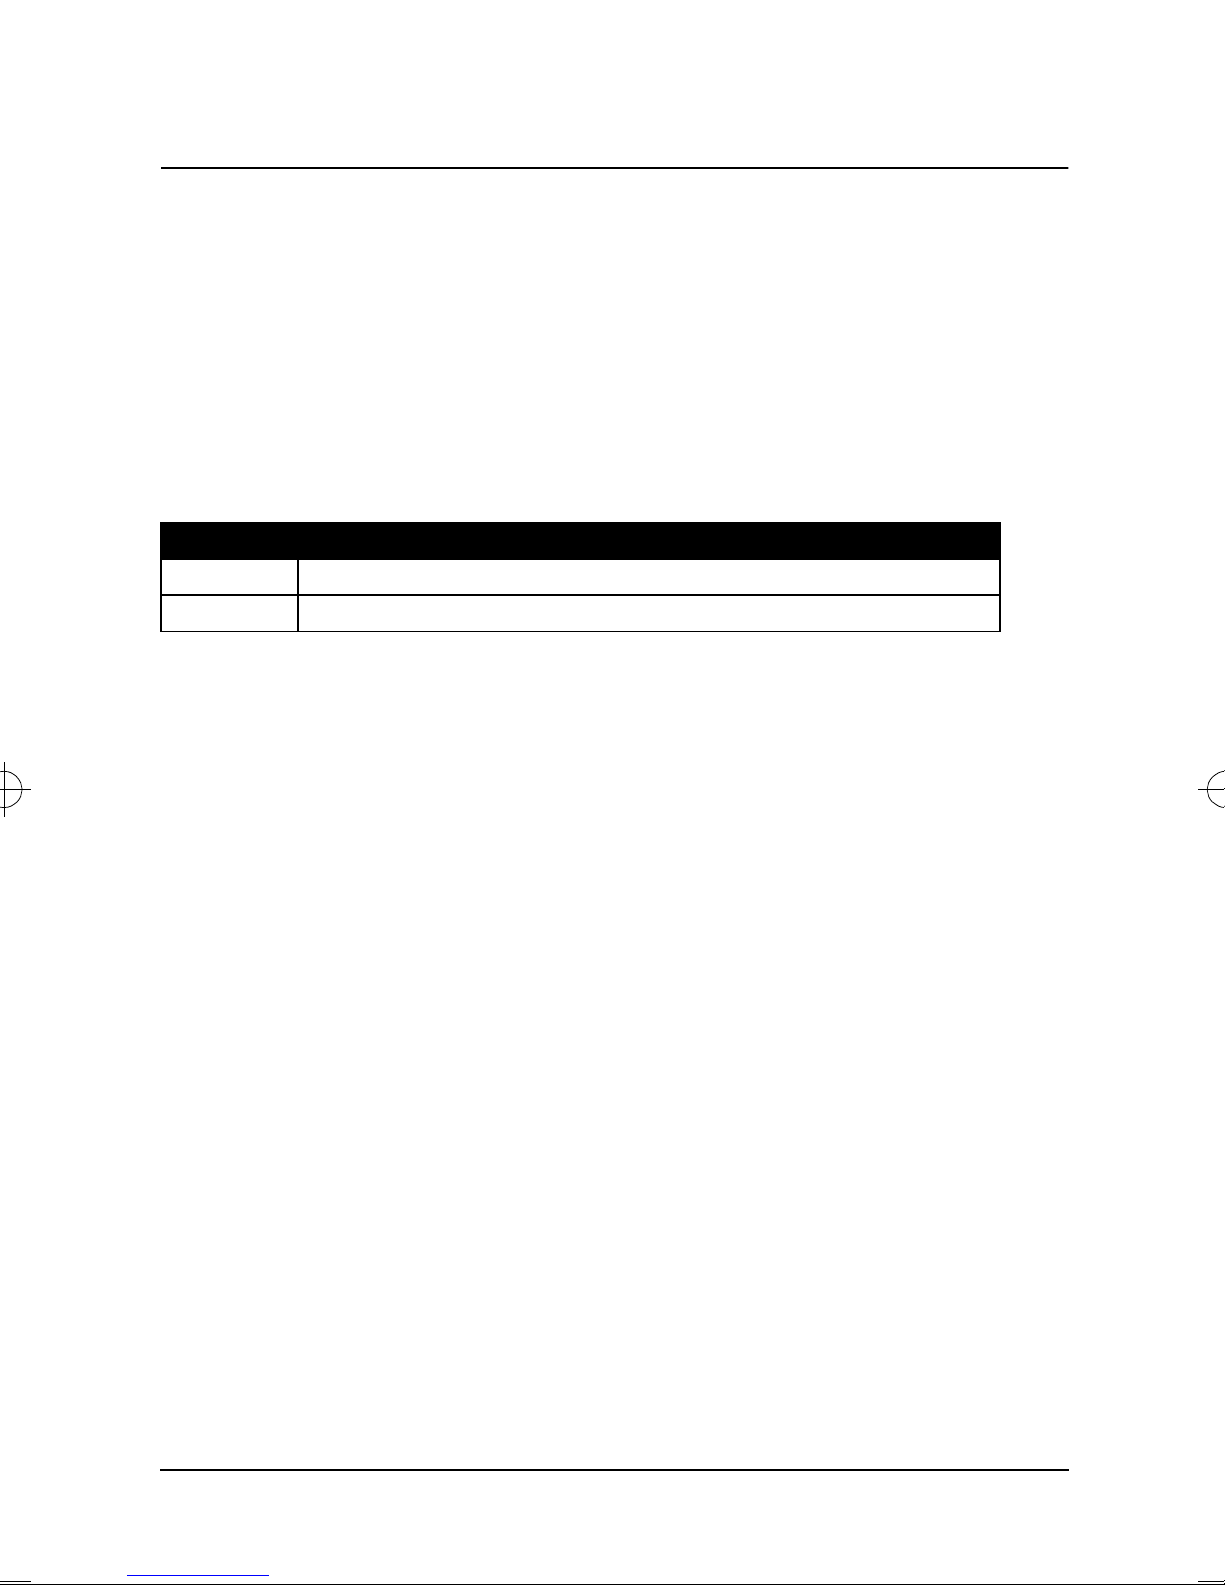
Pwr
Color: Green
Function: Power indicator
Condition Indication
ON Unit is receiving power.
OFF Power is disconnected, no power received.
Statistical Display for System Performance
Utilization - (Utilization%) The statistical ind icators show the percentage
of valid data passing throug h all ports compared to overall network
bandwidth (updated every 0.5 seconds). There are 6 LEDs representing the
percentage of network utilization . The co rresponding LEDs light up to
show that the utilization of LAN bandwidth has reached this level. When
active, these LEDs behave like a stereo’s equalizer display.
4-2 Hardware Reference
Page 25

HP 100Base-T Hub 8 Installation and Reference Guide
For example, if network utilization reaches 1%, the LED labeled 1% will
light up. However, if network utilization rises above 1% (e.g., 12%), the
LED labeled 12 and all the other LEDs before it (i.e., 1 and 6) will also
light up in rapid succession. These indicators monitor the share of valid
network frames handled by the h ub within a 100 Mbit/s bandwidth. They
provide a quick way to monitor the current traffic load relative to the
network’s capacity.
Col
Color: Yellow
Function: Intrahub packet collision
Condition Indication
ON/BLINKING Hub has detected two or more packets on the hub have run into each
other, blocking successful arrival at their destination.
OFF No collisions have been detected.
The relative rate of collision is indicated by the degree of brightness and
blinking of the Col indicator.
Note: If the hub displays a high collision rate, check to see if any of the connected
devices are malfunctioning or if a loop has been formed in your network
connections. Otherwise, you may need to reconfigure your network to balance
the traffic load.
Port Status Display
Link/Activity
Color: Green
Function: Detects a successful connection to another hub o r end node on
this port.
Detects packets being passed to a port on the hub.
Condition Indication
ON Hub detects a connection to another hub or end node on this port.
OFF Hub does not detect a connection to another hub or end node on this port.
BLINKING Hub detects packets being passed to this port.
Hardware Reference 4-3
Page 26
HP 100Base-T Hub 8 Installation and Reference Guide
Troubleshooting: If the Link LED does not light up when a device is connected to its
corresponding port, check that both the hub and connected device are powered on.
Check that the cable length does not exceed 100 meters. You should have standard,
straight-through cables and not crossover or other specialized cables.
Partitio n
Color: Yellow
Function: Detects that a port was disabled because of bad packets being
passed
Condition Indication
ON Hub has disabled the port because of excessive collisions detected at the port.
OFF Hub port is enabled.
A port is temporarily partitioned wh en a line error or too many collisions
are detected on the attached segment. While it is automatically partitioned,
the port continues to receive data from the segment. However, data is not
transmitted onto the segment. When the problem is corrected or a valid
data packet is received through the port, the port is automatically
reconnected. When partitioning occurs, th e port’s corresponding Partition
LED will be continually lit (yellow light). Otherwise, this LED should be
OFF (unlit).
Note: When a long run of collisions occur on the cable connected to a hub port (i.e.,
64 collisions), that port is automatically partitioned by the hub. It is
automatically reconnected when a collision-free data packet at least 512 bits
long (i.e., a minimum size legal packet) passes through the port.
4-4 Hardware Reference
Page 27

HP 100Base-T Hub 8 Installation and Reference Guide
RJ-45 100Base-T Ports
This HP 100Base-T Hub 8 includes 8 100Base-T ports on the front panel;
of which Port 8 can also serve as a cascade port. Connect the MDI-X ports
to network devices such as workstations or servers, and the MDI port to a
network interconnection device such as another hub or switch. Remember
that you cannot connect to port 8 MDI-X and port 8 MDI at the same time.
Note: Use Category 5 straight-through twisted-pair cable (STP or UTP) for all
standard connections. However, if you must cascade between two hubs using
similar port types at both ends of the cable, use a crossover cable.
Rear Panel
The rear panel on the hub includes a power connector.
Figure 4.3 Rear Pane l
Power Connector
The power connector accepts range (13-19 Vdc), 800 mA minimum.
Caution: Use only the power adapter supplied with the hub. Using other power
adapters, including those meant for other HP networking products, may
result in damage to the equipment and will void the warranty.
Hardware Reference 4-5
Page 28

Page 29

Appendix A: Troubl eshooting
Diagnosing Hub Indicators
This Fast Ethernet hub can be easily monitored throug h its comprehe nsive
panel indicators. This section desc ribes common problems yo u may
encounter and possible solu tions.
Problem Cause Solution
One of the users on
the network cannot
communicate with
another network
device through the
hub
I have tried everything, but the hub
still does not appear
to be working
Bad cable, bad connector, bad
LAN adapter, cable length violation
The hub or power supply may
have failed
Several possible solutions are:
Find the port to which the user is currently
connected. Check that the Link/Activity LED
is on.
If it is not, remove the cable from the port
and connect it to another port. If the LED is
still not on, connect it to another port. If the
LED is still not on, use the "Test Link" option
in the user’s LAN Adapter test program to
verify the communication path between two
PCs (connected to the hub) is working.
Connect a different cable from the end user
to the hub.
Perform a self-test on the LAN adapter in the
user’s computer and/or the device that cannot be reached.
Verify cable lengths do not exceed 100
meters.
Try removing the AC adapter and reinserting
it to see if the LEDs begin normal operation. Try a different electrical outlelt. If the
problem persists, return the hub and AC
adapter to your HP-authorized dealer or
reseller following the instructions in the warranty booklet.
Partition indicator
lights up
Hub has partitioned a port If port partitioning has occurred, the hub will
automatically enable the port when the faulty
condition disappears.
Table A.1 Problems an d So lu tion s
Troubleshooting A-1
Page 30

HP 100Base-T Hub 8 Installation and Reference Guide
Use the diagnostic procedures describ ed in the following section to verify
that all other system components are functioning properly. If you still
cannot resolve the problem, contact your HP-authorized dealer or reseller.
System Diagnostics
Installation
Verify that all system components have been properly installed. If one or
more components appear to be malfunctioning (e.g., the power cord or
network cabling), test them in an altern ate env iron ment wh ere y ou are sure
that all the other components are functioning properly.
Cabling
1. Verify that the cabling type is correct. Be sure all cable connectors are
securely seated in the required ports. Use 100Ω Category 5 straightthrough cable for all standard twisted-pair connections.
2. Make sure all devices are connected to the network. Equipment may
have been unintentionally disconnected from the network.
3. When cascading two devices using RJ-45 ports at both ends of the cable
(i.e., not the MDI port), make sure a crossover cable is used. A crossover cable should only be used if a cascade port is not available.
LAN Adapters
Make sure the network interface hardware and software drivers for the
attached devices are functioning properly and are 100Base-T. Check the
LAN adapters and associated drivers used in any attached workstation or
server.
Physical Configuration
If problems occur after altering the network configuration, restore the
original connections , then try to track the problem down by implementing
the new changes, one step at a time. Ensure that cable distances and other
physical aspects of the installation do not exceed 100Base-T specifications.
A-2 Troubleshooting
Page 31

HP 100Base-T Hub 8 Installation and Reference Guide
Hub Integrity
As a last resort verify the hub’s integrity with a power-on reset. Turn the
power to the hub off and then on a few times. If the problem still persists
and you have completed all the preceding diagnoses, contact your HPauthorized dealer or reseller for further assistance.
Troubleshooting A-3
Page 32

Page 33
Appendix B: Port Assignment s
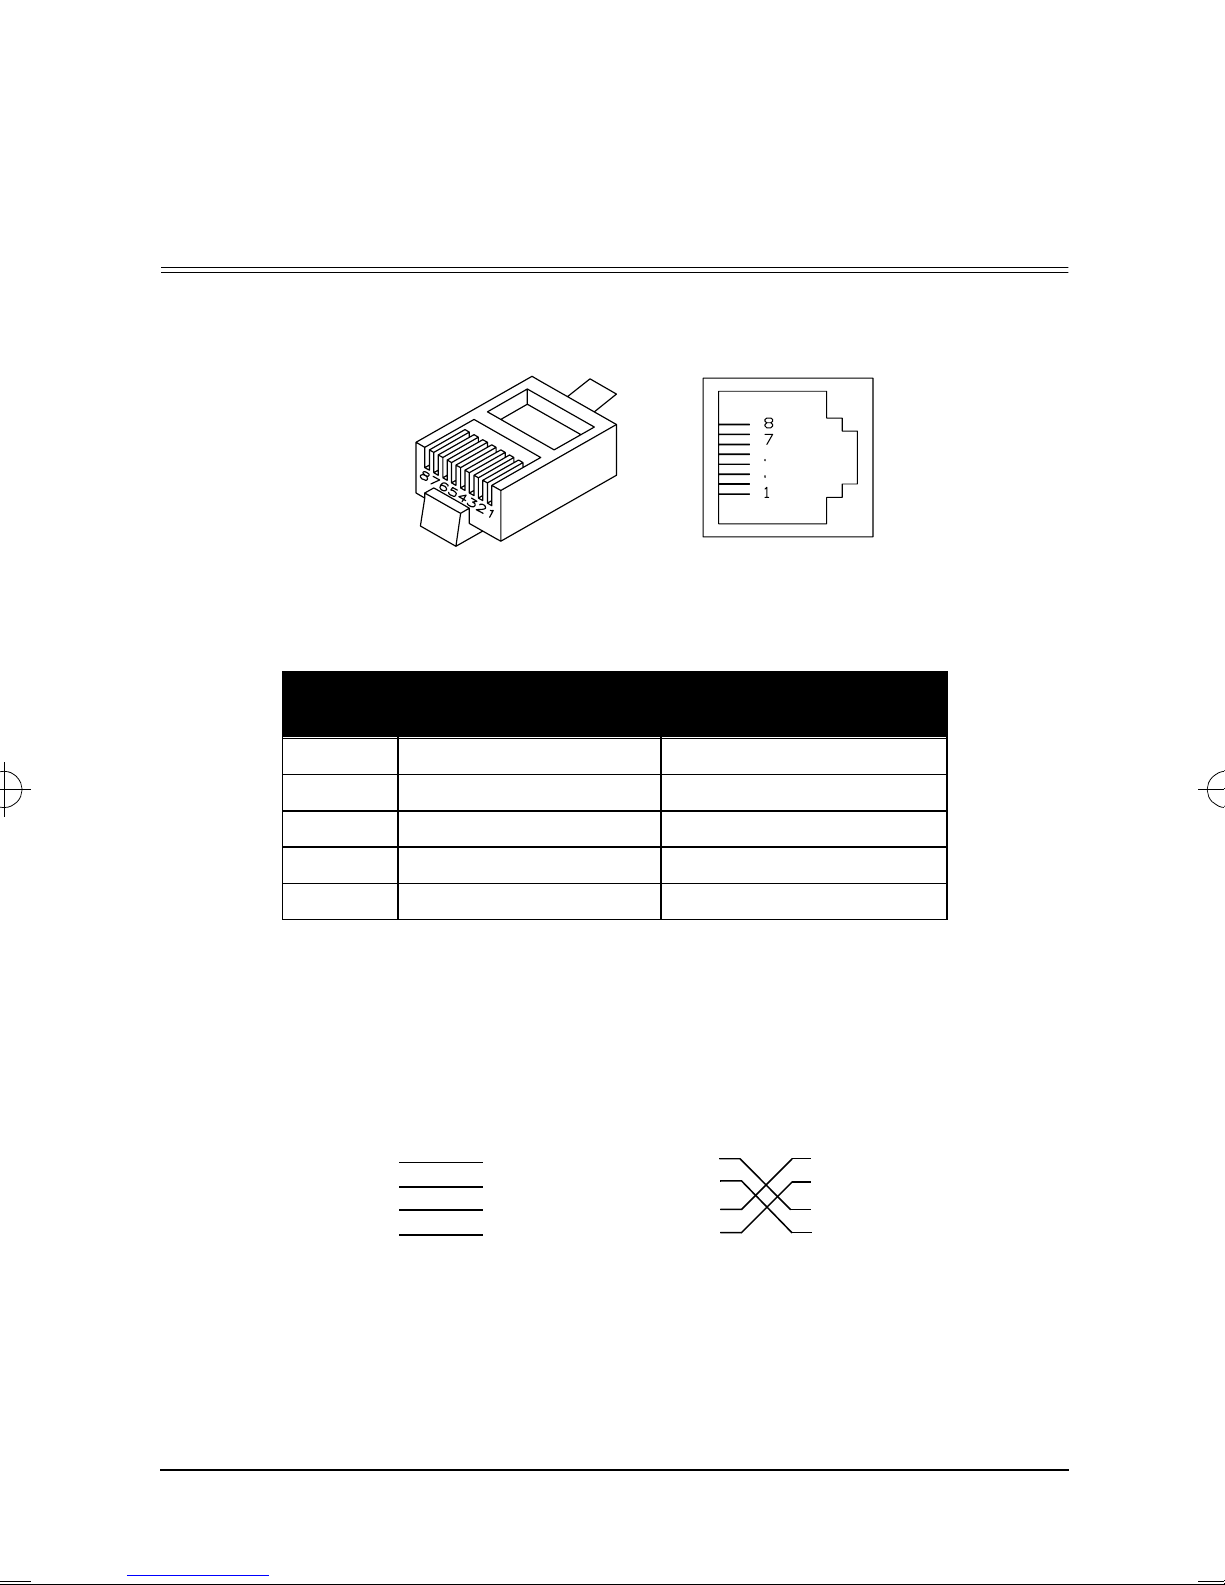
RJ-45 Port
Figure B.1 RJ-45 Conn ector (on the Hub Side)
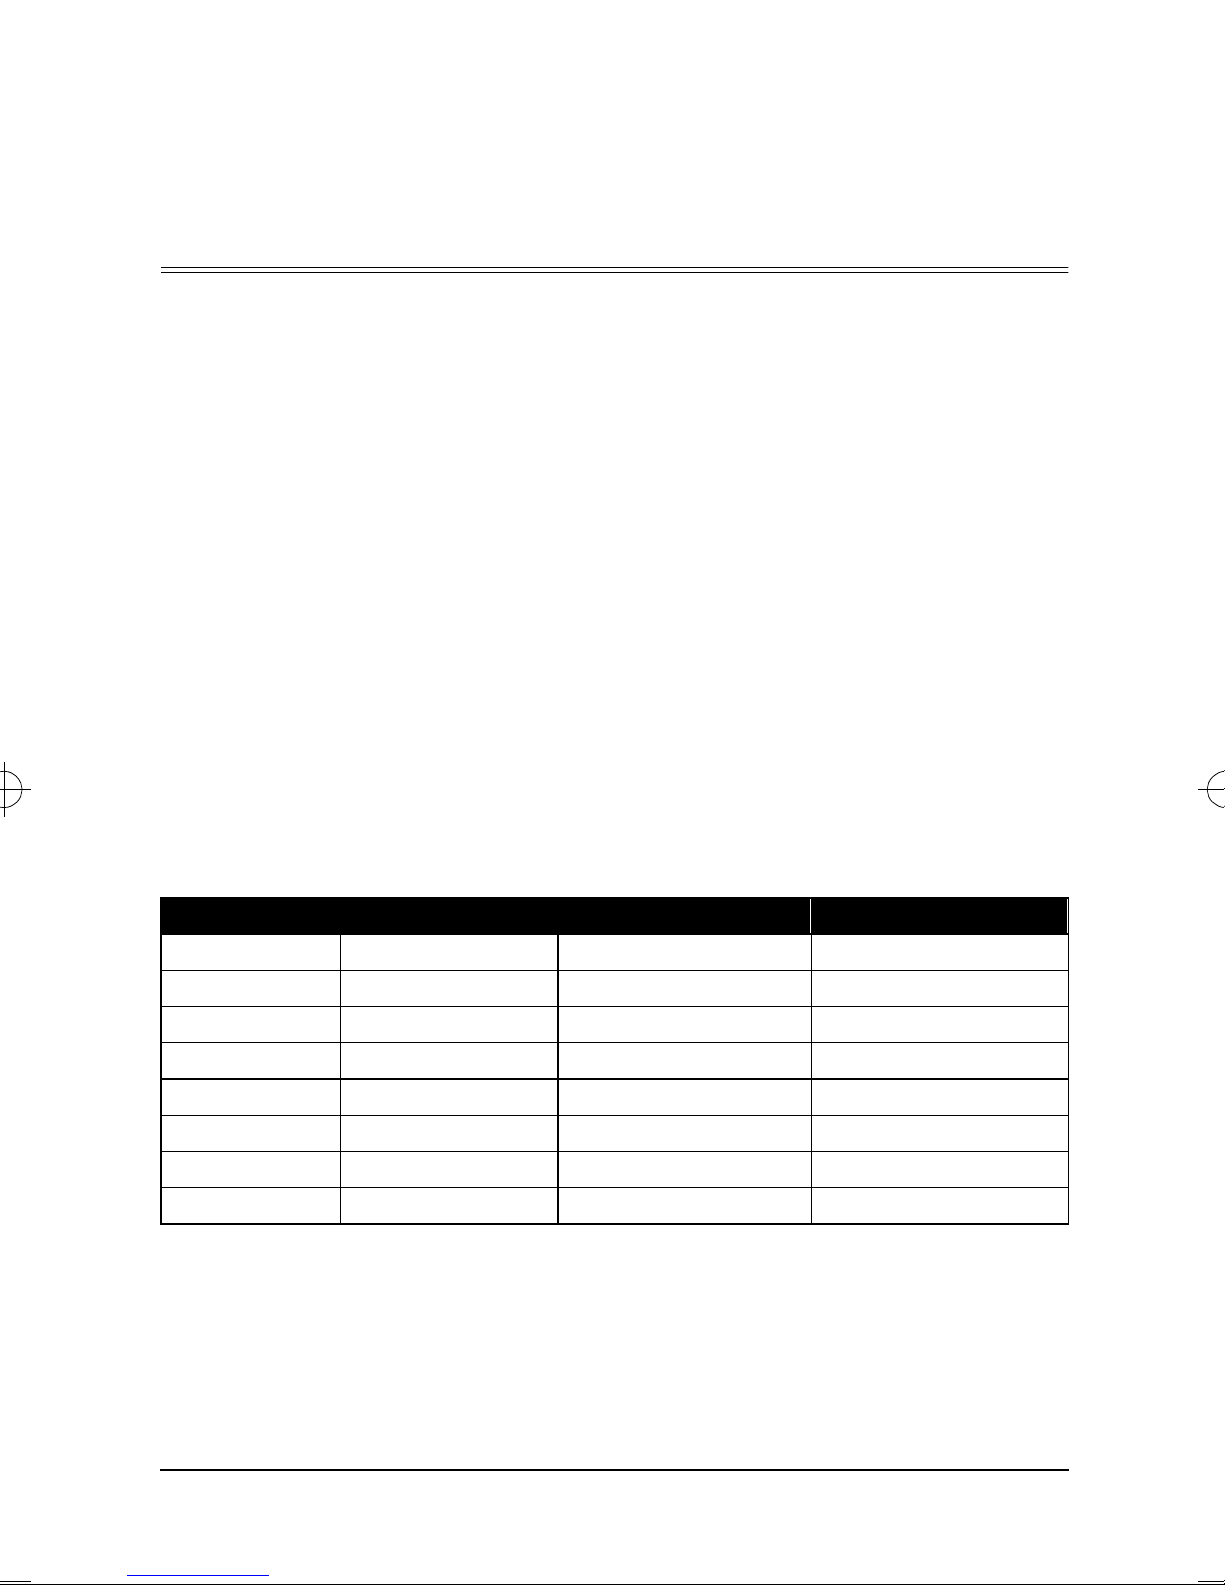
Pin MDI-X Assignment
(Port 1-8)
1 Receive Data + Transmit Data +
2 Receive data - Transmit Data 3 Transmit Data + Receive Data +
6 Transmit Data - Receive data -
4,5,7,8 Not Used Not Used
MDI Assignment
(Cascade Port 8)
Table B.1 RJ-45 Pin Assignments
Schematics for both straight and crossover twisted-pair cable are shown
below.
Straight-Through Crossover
(Hub)
1 IRD+
2 IRD3 OTD+
6 OTD-
(Adapter) (Hub)
1 OTD+
2 OTD3 IRD+
6 IRD-
1 IRD+
2 IRD3 OTD+
6 OTD-
(Hub)
1 OTD+
2 OTD3 IRD+
6 IRD-
Port Assignments B-1
Page 34

Page 35

Appendix C: Specifications
Transmission Technique Baseband
Topology Star or Tree
Access Method CSMA/CD, 100Mbit/s
Standards Conformance IEEE 802.3u 100BASE-T
Media Supported Unshielded or shielded twisted-pair cable
(100Ω Category 5 STP/UTP)
Interfaces 8 RJ-45 MDI-X ports,
1 RJ-45 MDI cascade port
Hub-to-Workstation Distance 100 meters maximum
Cascade Distance (2 hubs) 5 meters maximum
Dimensions 196 mm x 116 mm x 36 mm
(7.72" x 4.57" x 1.42")
Weight 635 grams (1.4 pounds)
Power Input Range (13-19 Vdc), 0.8 Amp max.,
Temperature 0°C to 55°C/32° to 131°F (Operating)
-40°C to 70°C/-40° to 158°F (Non-Operating)
Humidity (Noncondensing) 15% to 80% at 40°C / 104°F (Operating)
15% to 95% at 40°C / 104°F (Non-Operating)
Maximum Altitude 4.6 km / 15,000 ft (Operating)
4.6 km / 15,000 ft (Non-Operating
Certification CE Mark
Emissions FCC Class A, VCCI Class A, CISPR Class A
Safety IEC 950: (1991)+A1, A2/EN609501(1992)+A1, A2
UL1950
CSA9SO
NOM-019-SCFI-1993
NOM-009-SCFI-1993
TÜV/GS
Acoustic Noise Geraeuschemission LwA= 50 dB
fik tiven Arbeit Splatz nach
DIN 4S635T.19
Specifications C-1
Page 36

Page 37

Appendix D:
Safety and Regulatory Statements
This chapter covers the following topics:
■ mounting precautions
■ power precautions
■ safety and regulatory statements
■ Declaration of Conformity
Mounting Precautions
When you put a hub into a rack, follow these mounting precautions:
■ The rack or cabinet should be adequately secured to prevent it from
becoming unstable and /or falling over. The hub should be mounted in a
position toward the botto m of the rack for stability and to make it easier
to stack the other hubs on top.
■ Before mounting a hub, plan its location and orientation relative to other
devices and equipment. Also consider the cabling that will be attached to
the hub and the ports that will be us ed. Verify that there is room for the
grouped cables to trail out from the side of the hub. Allow at least 2.5 4
cm (1 inch) in the front of the hub. In the back of the hub, allow at least
3.8 cm (1 1/2 inches) of space for the power cord.
■ Ensure that the HP 100Base-T Hub 8 does not overload the power cir-
cuits, wiring, and over-current protection. To determine the possibility of
overloading the supply circuits, add together the ampe rag e rat ings from
the nameplates of all your hubs (and other equipment) installed on the
same circuits and compare the total with th e rating lim its for the supply
circuits.
■ Make sure that the p ower source circuits are properly grou nd ed, then use
the supplied power cord to connect the HP 100Base-T Hub 8s to the circuit. See the Safety Statements in this chapter.
■ Do not block airflow around the sides and the back of the unit.
Safety and Regulatory Statements D-1
Page 38

HP 100Base-T Hub 8 Installation and Reference Guide
Note: If your installation requires a different power cord than the one supplied with
the hub, be sure to use a power cord displaying the mark of the safety agency
that defines the regulations for power cords in your country. The mark is your
assurance that the power cord can be used safely with the hub.
Do not install the hub in an environment where the operating ambient tempera-
ture might exceed 45×C (113×F).
Power Precautions
Follow these precautions when unplugging and plugging in power to the
hub.
Caution
Use only the power adapter supplied with the HP 100B ase-T Hub 8. Using
other adapters, including those meant for other HP networking equipment,
may result in damage to the equipment and will void the warranty.
Note
The hub does not have a power switch; it is powered on when the power
connector is plugged in.
When installing the hub, note that an AC outlet must be installed near the
equipment and should be easily accessible.
D-2 Safety and Regulatory Statements
Page 39

HP 100Base-T Hub 8 Installation and Reference Guide
Safety Information
Documentation reference symbol. If the product is marked with this symbol, refer to
the product documentation to get more information about the product.
WARNING A WARNING in the manual denotes a hazard that can cause injury or death.
CAUTION A CAUTION in the manual denotes a hazard that can damage equipment.
Do not proceed beyond a WARNING or CAUTION notice until you have understood
the hazardous conditions and have taken appropriate steps.
Grounding
These are safety class I products and have protective earthing terminals.
There must be an uninterruptible safety earth ground from the main power
source to the product’s input wiring terminals, power cord, or supplied
power cord set. Whenever it is likely that the protection has been impaired,
disconnect the power cord until the ground has been restored.
For LAN cable grounding:
■ If your LAN covers an area served by more than one power distribution
system, be sure their safety grounds are securely interconnected.
■ LAN cables may occasionally be subject to hazardous transient voltages
(such as lightning or distu r bances in the electrical utilities power grid).
Handle exposed metal components of the network with caution.
Servicing
There are no user-serviceable parts inside these products. Any servicing,
adjustment, maintenance, or repair must be performed only by servicetrained personnel.
These products do not have a power switch; they are powered on when the
power cord is plugged in.
Safety and Regulatory Statements D-3
Page 40

HP 100Base-T Hub 8 Installation and Reference Guide
Informations concernant la sécurité
Symbole de référence à la documentation. Si le produit est marqué de ce symbole,
reportez-vous à la documentation du produit afin d'obtenir des informations plus
détaillées.
WARNING Dans la documentation, un WARNING indique un danger susceptible d'entraîner des
dommages corporels ou la mort.
CAUTION Un texte de mise en garde intitulé CAUTION indique un danger susceptible de
causer des dommages à l'équipement.
Ne continuez pas au-delà d'une rubrique WARNING ou CAUTION avant d'avoir bien
compris les conditions présentant un danger et pris les mesures appropriées.
Cet appareil est un produit de classe I et possède une borne de mise à la
terre. La source d'alimentation principale do it être munie d'une prise de
terre de sécurité installée aux bornes du câblage d'entrée, sur le cordon
d'alimentation ou le cordon de raccordement fourni avec le produit.
Lorsque cette protection semble avoir été endommagée, débrancher le
cordon d'alimentation jusqu'à ce que la mise à la terre ait été réparée.
Mise à la terre du câble de réseau local:
■ si votre ré seau local s'ét end su r un e z one d ess ervi e par pl us d'un sy st ème
de distribut i on de pu is s ance, ass ur ez-vo us que les pri ses de t erre de s écurité soient convenablement interconnectées.
■ Les câbles de réseaux locaux peuvent occasionnellement être soumis à
des surten sions tran sitoires dang ereuses (t elles que la foudre ou des perturbations dans le réseau d'alimentatio n public). Manipulez les com-
posants métalliques du réseau avec précautions.
Aucune pièce contenue à l'intérieur de ce produit ne peut être réparée par
l'utilisateur. Tout dépannage, réglage, entretien ou réparat ion devra être
confié exclusivement à un personnel qualifié.
Cet appareil ne comporte pas de commutateur principal ; la mise sous
tension est effectuée par branchement du cordon d'alimentation.
D-4 Safety and Regulatory Statements
Page 41

HP 100Base-T Hub 8 Installation and Reference Guide
Hinweise zur Sicherheit
Symbol für Dokumentationsverweis. Wenn das Produkt mit diesem Symbol markiert
ist, schlagen Sie bitte in der Produktdokumentation nach, um mehr Informationen
über das Produkt zu erhalten.
WARNING Symbol für Dokumentationsverweis. Wenn das Produkt mit diesem Symbol markiert
ist, schlagen Sie bitte in der Produktdokumentation nach, um mehr Informationen
über das Produkt zu erhalten.
CAUTION Symbol für Dokumentationsverweis. Wenn das Produkt mit diesem Symbol markiert
ist, schlagen Sie bitte in der Produktdokumentation nach, um mehr Informationen
über das Produkt zu erhalten.
Fahren Sie nach dem Hinweis WARNING oder CAUTION erst fort, nachdem Sie den
Gefahrenzustand verstanden und die entsprechenden Maßnahmen ergriffen haben.
Dies ist ein Gerät der Sicherheitsklasse I und verfügt über einen
schützenden Erdungsterminal. Der Betrieb des Geräts erfordert eine
ununterbrochene Sicherheitserdung von der Hauptstromquelle zu den
Geräteingabeterminals, den Netzkabeln od er dem mit Strom belieferten
Netzkabelsatz voraus. Sobald Grund zur Annahme besteht, daß der Schutz
beeinträchtigt worden ist, das Netzkabel aus der Wandsteckdose
herausziehen, bis die Erdung wiederhergestellt ist.
Für LAN-Kabelerdung:
■ Wenn Ihr LAN ein Geb i et umfaßt, das von mehr a l s einem Stromvertei-
lungssystem beliefert wird, müssen Sie sich vergewissern, daß die
Sicherheitserdungen fest untereinander verbunden sind.
■ LAN-Kabel können gelegentlich gefährlichen Übergangsspannungen
ausgesetzt werden (beispielsweise durch Blitz oder Störungen in dem
Starkstromnetz des Elektrizitätswerks). Bei der Handhabung exponierter
Metallbestandteile des Netzwerkes Vorsicht walten lassen.
Dieses Gerät enthält innen keine durch den Benutzer zu wartenden Tei le.
Wartungs-, Anpassungs-, Instandhaltungs- oder Reparaturarbeiten dürfen
nur von geschultem Bedienungspersonal durchgeführt werden.
Dieses Gerät hat keinen Netzschalter; es wird beim Anschließen des
Netzkabels eingeschaltet.
Safety and Regulatory Statements D-5
Page 42

HP 100Base-T Hub 8 Installation and Reference Guide
Considerazioni sulla sicurezza
Simbolo di riferimento alla documentazione. Se il prodotto è contrassegnato da
questo simbolo, fare riferimento alla documentazione sul prodotto per ulteriori infor-
mazioni su di esso.
WARNING La dicitura WARNINGdenota un pericolo che può causare lesioni o morte.
CAUTION La dicituraCAUTION denota un pericolo che può danneggiare le attrezzature.
Non procedere oltre un avviso di WARNING o di CAUTIONprima di aver compreso le
condizioni di rischio e aver provveduto alle misure del caso.
Questo prodotto è omologato nella classe di sicurezza I ed ha un terminale
protettivo di collegamento a terra. Dev'essere installato un collegamento a
terra di sicurezza, non interrompibile che vada dalla fonte d'alimentazione
principale ai terminali d'entrata, al cavo d'alimentazione oppure al set cavo
d'alimentazione fornito con il pr odotto. Ogniqualvolta vi sia probabilità di
danneggiamento del la p rot ezi on e, dis i nseri te il cavo d'al iment azion e fi no a
quando il collegaento a terra non sia stato ripristinato.
Per la messa a terra dei cavi LAN:
■ se la vostra LAN copre un'area servita da più di un sistema di distribuzi-
one elettrica, accertatevi che i collegamenti a terra di sicurezza siano ben
collegati fra loro;
■ i cavi LAN possono occasionalmente andare soggetti a pericolose ten-
sioni transitorie (ad esempio, provocate da lampi o disturbi nella griglia
d'alimentazione della società elettrica); siate cauti nel toccare parti
esposte in metallo della rete.
Nessun com ponente di questo prodotto può essere riparato dall' ute nte.
Qualsiasi lavoro di riparazione, messa a punto, manutenzione o assistenza
va effettuato esclusivamente da personale specializzato.
Questo apparato non possiede un com m utatore principale; si mette scotto
tensione all'inserirsi il cavo d'al imentazione.
D-6 Safety and Regulatory Statements
Page 43

HP 100Base-T Hub 8 Installation and Reference Guide
Consideraciones sobre seguridad
Símbolo de referencia a la documentación. Si el producto va marcado con este símbolo, consultar la documentación del producto a fin de obtener mayor información
sobre el producto.
WARNING Una WARNING en la documentación señala un riesgo que podría resultar en
lesiones o la muerte.
CAUTION Una CAUTION en la documentación señala un riesgo que podría resultar en averías
al equipo.
No proseguir después de un símbolo de WARNING o CAUTION hasta no haber
entendido las condiciones peligrosas y haber tomado las medidas apropiadas.
Este aparato se enmarca dentro de la clase I de seguridad y se encuentra
protegido por un a borna de pu esta a tierra. Es precis o que exis ta una puest a
a tierra continua desde la toma de alimentación eléctrica hasta las bornas de
los cables de entrada del aparato, el cable de alimentación o el juego de
cable de alimentación suministrado. Si existe la probabilidad d e que la
protección a tierra haya sufrido desperfectos, desenchufar el cable de
alimentación hasta haberse subsanado el problema.
Puesta a tierra del cable de la red local (LAN):
■ Si la LAN abarca un área cuyo suministro eléctrico proviene de más de
una red de distribución de electricidad, cerciorarse de que las puestas a
tierra estén conectadas entre sí de modo seguro.
■ Es posible que los cables de la LAN se vean sometidos de v ez en cuand o
a voltajes momentáneos que entrañen peligro (rayos o alteraciones en la
red de energía eléctrica). Manejar con precaución los componentes de
metal de la LAN que estén al descubierto.
Este aparato no contiene pieza alguna susceptible de reparación por parte
del usuario. Todas las reparaciones, ajustes o servicio de mantenimiento
debe realizarlos solamente el técnico.
Este product o n o t ie ne in terruptor de po t enci a; s e act iv a cuan do se enchufa
el cable de alimentación.
Safety and Regulatory Statements D-7
Page 44
HP 100Base-T Hub 8 Installation and Reference Guide
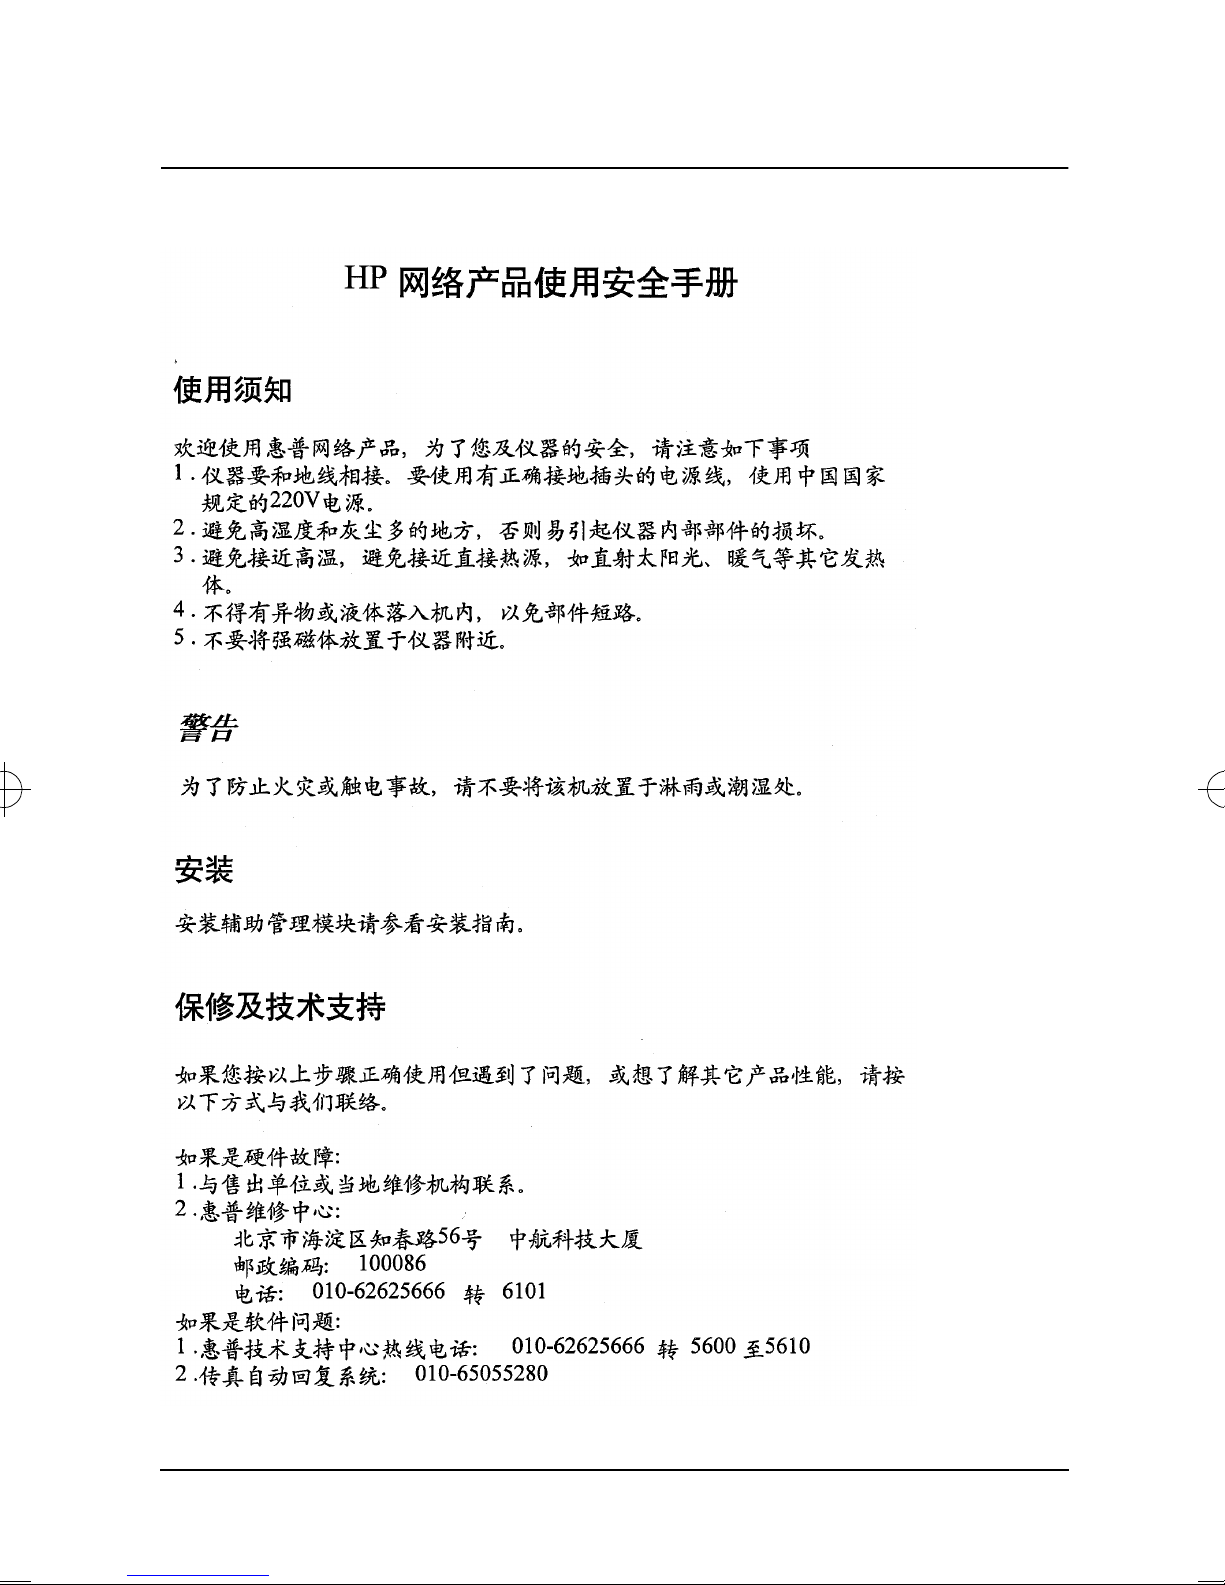
Safety Information (Chinese)
D-8 Safety and Regulatory Statements
Page 45
HP 100Base-T Hub 8 Installation and Reference Guide
Safety Information (Japanese)
Safety and Regulatory Statements D-9
Page 46

HP 100Base-T Hub 8 Installation and Reference Guide
Regulatory Statements
FCC Class A Statement (for U.S.A. Only)
This equipment has been tested and found to comply with the li mi ts for a
Class A digital device, pursuant to Part 15 of the FCC Rules. These limits
are designed to provide reasonable protection against harmful interference
when the equipment is operated in a commercial environment. This
equipment generates, uses, and can radiate radio frequency energy and, if
not installed and used in accordance with the instruction manual, may
cause interference to radio communications. Operation of this equipment
in a residential area may cause interference in which case th e user will be
required to correct the interference at his own expense.
FCC Class B Statement (for U.S.A. Only) when using
shielded cables:
This equipment has been tested and found to comply with the li mi ts for a
Class B digital device, pursuant to Part 15 of the FCC Rules. These limits
are designed to provide reasonable protection against interference in a
residential installation. This equipment generates, uses and can radiate
radio frequency ener gy and, if not installed and u sed in accordance with the
instructions, may cause interference to radio communications. However,
there is no guarantee that interference will not occur in a particular
installation. If this equipment does cause interference to radio or television
reception, which can be determined by turning the equipment off and on,
the user is encouraged to try to correct the interference by one or more of
the following measures:
■ Reorient or relocate the receiving antenna.
■ Increase the separation between the equipment and receiver.
■ Connect the equipment into an outlet on a circuit different from that to
which the receiver is connected.
■ Consult the dealer or an experienced radio/TV technician for help.
D-10 Safety and Regulatory Statements
Page 47

HP 100Base-T Hub 8 Installation and Reference Guide
Japan
VCCI Class A (For Japan Only)
VCCI Class B (For Japan Only)
Canada
This product complies with Class A Canadian EMC requirements when
using unshielded cables and Class B EMC requirements when using
shielded cables.
Safety and Regulatory Statements D-11
Page 48

HP 100Base-T Hub 8 Installation and Reference Guide
Korea
The top statement is for Class A products. The bottom statement is for
Class B products.
European Community
This equipment complies with ISO/IEC Guide 22 and EN55022 Class A
with unshielded cables and EN55022. In a domestic environment, this
product may cause radio interfe ence, in which case the user may be
required to take adequate measures.
D-12 Safety and Regulatory Statements
Page 49

HP 100Base-T Hub 8 Installation and Reference Guide
Taiwan
Australia/New Zealand
Complies with Australia/New Zealand
EMC Class A requirements.
Safety and Regulatory Statements D-13
Page 50

HP 100Base-T Hub 8 Installation and Reference Guide
Declaration of Conformity
The following Declaration of Conformity for the HP J4091A ProCurve
100Base-T Hub 8 complies with ISO/IEC Guide 22 and EN 45014. The
declaration identifies the product, the manufacturer’s name and address,
and the specifications that are recognized in the European community.
D-14 Safety and Regulatory Statements
Page 51

Glossary
100Base-T
IEEE’s specifications for 100 Mbit/s Ethernet using twisted-pair cable (100Ω STP
or UTP). The maximum lengt h of cable for a hub to end-n ode connection is 100
meters.
Collision
A condition in which two packets transmitted over a medium interfere with each
other. Their interference makes both unintelligible.
Configuration
The way to set up a comput er, server, or local area network.
Connection
A logical binding between two or more users of an interconnection service.
Cascade Port
An MDI RJ-45 port used to cascade compatible devices in a cascade configuration
using straight-through twisted-p air cable. To cascade two devices, either run a
connection from the cascade port on one device to an MDI-X port on the other
device, or cascade the two devices by running crossover cable between similar port
types on both devices.
Fast Ethernet
100 Mbit/s network communication system based on Ethernet and the CSMA/CD
access method.
IEEE 802.3 Standard
Standard for the physical and el ectrical connections in local area networks
developed by the IEEE. The IEEE 802.3u standard covers these same issues for
100 Mbit/s networks.
Glossary 15
Page 52

HP 100Base-T Hub 8 Installation and Reference Guide
LED
Light emitting diode on the front panel of the hub used for monitoring a hub or
network condition. An LED display co rrespon d s to a hub cond iti on .
Local Area Network (LAN)
A group of interconnecte d computers and support devi ces.
MDI Port (Medium Dependent Interface)
MDI is the IEEE standard for the twisted-pair interface. This RJ-45 port can be
used with straight-through cable to connect the hub to a network interconnection
device, such as ano ther hub or a swit ch. Pin-out assi gnments are shown in
Appendix B.
MDI-X Port (Medium Dependent Interface - Crossed)
This RJ-45 port, which crosses the receive and transmit signals internally, can be
used with straight-through cable to connect the hub to any device that has a standard
network interface (e.g., workstation, server, bridge or router). Pin-out assignments
are shown in Appendix B.
RJ-45 Connector
Most common terminator for twisted-pair wiring.
Shielded Twisted-Pair (STP)
Twisted-pair wire covered with an external aluminum-foil or woven-copper shield
designed to reduce ex cessive noise pick up or radiation. The STP cable refered to
in this manual is also sometimes called screened twisted-pair (ScTP). Its
impedance is 100Ω and has the same pin assignment as UTP. This cable should not
be confused with t he older 150Ω cab le type designed by IBM.
Star Topology
Physical connections for this hub are limited to a star configuration (i.e., similar to a
hub and spoke arr angement). This topology also requires that only one path exists
between any two nodes, and that data transmitted by any node is concurrently
available to all oth e r no des with in t he same loca l ne twork (i.e ., imme di at e co llisio n
domain).
16 Glossary
Page 53

HP 100Base-T Hub 8 Installation and Reference Guide
Unshielded Twisted-Pair (UTP)
Cable composed of two insulated wires twisted together to reduce electrical
interference; used in common telephon e cord.
Glossary 17
Page 54

Page 55

Index
A
automatic partitioning • 1-2
automatic polarity detection • 1-2
C
cables
category 5 twisted-pair • 2-2
crossover • B-1
distance limit • 2-3, 3-2
troubles hooting • A-2
verifyin g l en gth • 2-5
cascade port connections • 2-3
configurations
multiple hu bs • 3-2
standalone • 3-1
connec ti ng the hub syste m • 2-2
connections
cascadin g hu bs • 3- 2
MDI port • 2-3
MDI-X ports • 2-2
procedure s • 2-2
verifying • 2-5
crossover cable • B-1
D
front panel • 4-1
H
hardware description • 4-1
hub power • 2-4
hub specifications • C-1
I
indicator pa nel • 4-2
installation requirements • 2-1
J
jabber lockup • 1-2
L
LED indicators
Col • 4-3
Link • 2-5
Link/Activity • 4-3
Partition • 4-4
Pwr • 4-2
Link indicator • 2-5
Link status, verifying • 2-4
daisy-chain port • 1-1
E
Ethernet ports • 4-5
F
Fast Ethernet, introduc tio n • 1-1
features, product • 1-1
M
MDI port • 1-1
N
network conf igurations • 3-1
network connection
MDI daisy-chain port • 2 -3
MDI-X station ports • 2-2
Index 1
Page 56

HP 100Base-T Hub 8 Installation and Reference Guide
network utilization • 4-2
P
port assignments • B-1
port connections • 2-2
port status indicators • 4- 2, 4-3
port status , verifying • 2- 4
ports
MDI • 1-1
MDI-X • 1-1, 2- 2
power connector • 4-5
power precauti ons • D-2
powerin g on the hub • 2- 4
product fea tures • 1-1
R
rear panel • 4-5
regulatory information • D-1
repeater delay • 2-3
requirements
environme nt a l • 2-1
location • 2-2
power • 2-1
resetting the hub • A-3
installation • A-2
twisted-pair cable • 2-2
U
Utilization LEDs • 4-2
V
verifying port status • 2-4
verifying system operation • 2-5
S
safety information • D-1
specifications • C-1
standalone configuration • 3-1
status LEDs • 4-2
system operation, verifying • 2-5
system performance display • 4- 2
T
troubleshooting
cabling • A-2
configuration • A-2
hub indica t ors • A - 1
2 Index
 Loading...