

Page 1

Designjet SmartStream
User’s Guide
Page 2

Edition 2
Legal notices
Trademarks
© 2014 Hewlett-Packard Development
Company, L.P.
The information contained herein is subject to
change without notice.
The only warranties for HP products and
services are set forth in the express warranty
statements accompanying such products and
services. Nothing herein should be construed
as constituting an additional warranty. HP shall
not be liable for technical or editorial errors or
omissions contained herein.
Microsoft® and Windows® are U.S. registered
trademarks of Microsoft Corporation.
Page 3

Table of contents
1 Introduction .................................................................................................................................................. 1
What is it for? ......................................................................................................................................................... 1
Getting started ....................................................................................................................................................... 2
What do I see on the screen? ................................................................................................................................. 2
2 Installation ................................................................................................................................................... 5
Requirements ........................................................................................................................................................ 5
How to install ......................................................................................................................................................... 6
3 Printers ........................................................................................................................................................ 9
Add a printer .......................................................................................................................................................... 9
Change a printer’s IP address .............................................................................................................................. 10
Remove a printer ................................................................................................................................................. 10
The printers pane ................................................................................................................................................ 11
4 Set preferences ........................................................................................................................................... 15
General preferences ............................................................................................................................................ 15
Printer-specific preferences ................................................................................................................................ 15
5 Job preparation ........................................................................................................................................... 18
HP Designjet SmartStream Preflight Manager ................................................................................................... 19
Edit a job .............................................................................................................................................................. 22
Job options ........................................................................................................................................................... 22
Page options ........................................................................................................................................................ 23
Filter pages .......................................................................................................................................................... 24
Sort pages ............................................................................................................................................................ 25
Move a job to another printer .............................................................................................................................. 25
Remove a job ....................................................................................................................................................... 26
Print settings ....................................................................................................................................................... 26
6 Print preview .............................................................................................................................................. 30
Image, page, and roll ........................................................................................................................................... 30
Preview features .................................................................................................................................................. 31
Crystal Preview .................................................................................................................................................... 31
ENWW iii
Page 4

7 Printing ...................................................................................................................................................... 34
Submit jobs for printing ....................................................................................................................................... 34
Filtered and unchecked pages ............................................................................................................................. 34
Printing queue ..................................................................................................................................................... 34
Printing interruptions .......................................................................................................................................... 35
Cancel jobs ........................................................................................................................................................... 36
Exit the application while printing ...................................................................................................................... 36
8 Color management ...................................................................................................................................... 37
9 The job history ............................................................................................................................................ 38
Search the job history .......................................................................................................................................... 38
Reprint a job ......................................................................................................................................................... 38
Reconfigure a job ................................................................................................................................................. 38
Remove jobs from the job history ....................................................................................................................... 39
10 Folding ..................................................................................................................................................... 40
11 Scanning ................................................................................................................................................... 42
12 Troubleshooting ........................................................................................................................................ 43
Index ............................................................................................................................................................. 44
iv ENWW
Page 5

1 Introduction
What is it for?
HP Designjet SmartStream is a professional software solution for technical-production environments, which
offers true PDF management, allows you to cut job preparation time by 50%, and achieves total control
across the printing workflow.
●
With HP Designjet SmartStream, true PDF management is fully guaranteed and you will no longer
spend time solving PDF issues.
The latest Adobe Libraries embedded in HP Designjet Smartstream ensure fully reliable reproduction of
your PDF files. Accurate rendering and printing are achieved at a higher speed, even for the most
complex PDFs. You do not have to convert PDF files into TIFF anymore, and, in addition, you can
anticipate potential PDF issues faster thanks to automatic error warnings.
●
With HP Designjet SmartStream, you can reduce job preparation time by up to 50% on multi-page
jobs.
A single screen view provides all the information at a glance and helps you manage all your printing
workflow. A user-friendly interface enables you to easily process large jobs while getting fast and
accurate previews of complex PDFs. And HP Designjet SmartStream, which can connect simultaneously
to more than one HP Designjet production printer, allows you to prepare and send jobs easily to any of
them.
With HP Designjet SmartStream you can manage printing settings per page, while working on
simultaneous print jobs. Automatically identify page size and page color so that you can extract and
save jobs. You can also make extra copies of particular pages, remove unwanted white areas, or change
the order in which documents will be printed.
●
HP Designjet SmartStream helps you gain total control of your printing workflow.
HP Crystal Preview Technology shows what and how content will be printed with true accuracy so that
you can avoid reprints. You can see exactly how graphical content will be printed, because the preview
is color soft-proofed to the paper type on which it will be printed.
HP Designjet SmartStream easily integrates production hardware accessories, and therefore offers
total control of the entire printing workflow.
Finally, you can rely on end-to-end assistance right from job preparation to printing, which will monitor
job and printer status, and warn you of potential issues with printer alerts.
With HP Designjet SmartStream, you have professional software to boost your productivity. You gain true
PDF management, big savings in job preparation time, and full control of your printing workflow.
HP Designjet SmartStream does not need or use any printer driver. However, you may want to keep printer
drivers installed for some particular purposes.
ENWW What is it for? 1
Page 6

Getting started
1. Install the application. See Installation on page 5.
2. Create a job in the job preparation pane, which gives you many tools for manipulating and setting up
each job before printing. You can preview pages in the preview pane. See Job preparation on page 18.
To create your first job, select the printer that you want to use, and drag and drop one or more files
onto the job preparation pane (or press the icon to browse for files).
3. Send your job to the printing queue (using the Print Job button), where you can monitor its progress.
See Printing on page 34.
4. Conveniently reprint past jobs from the job history. See The job history on page 38.
IMPORTANT: If you close the application or shut down the computer while there are still jobs printing or
waiting to print, those jobs are canceled and moved to the job history.
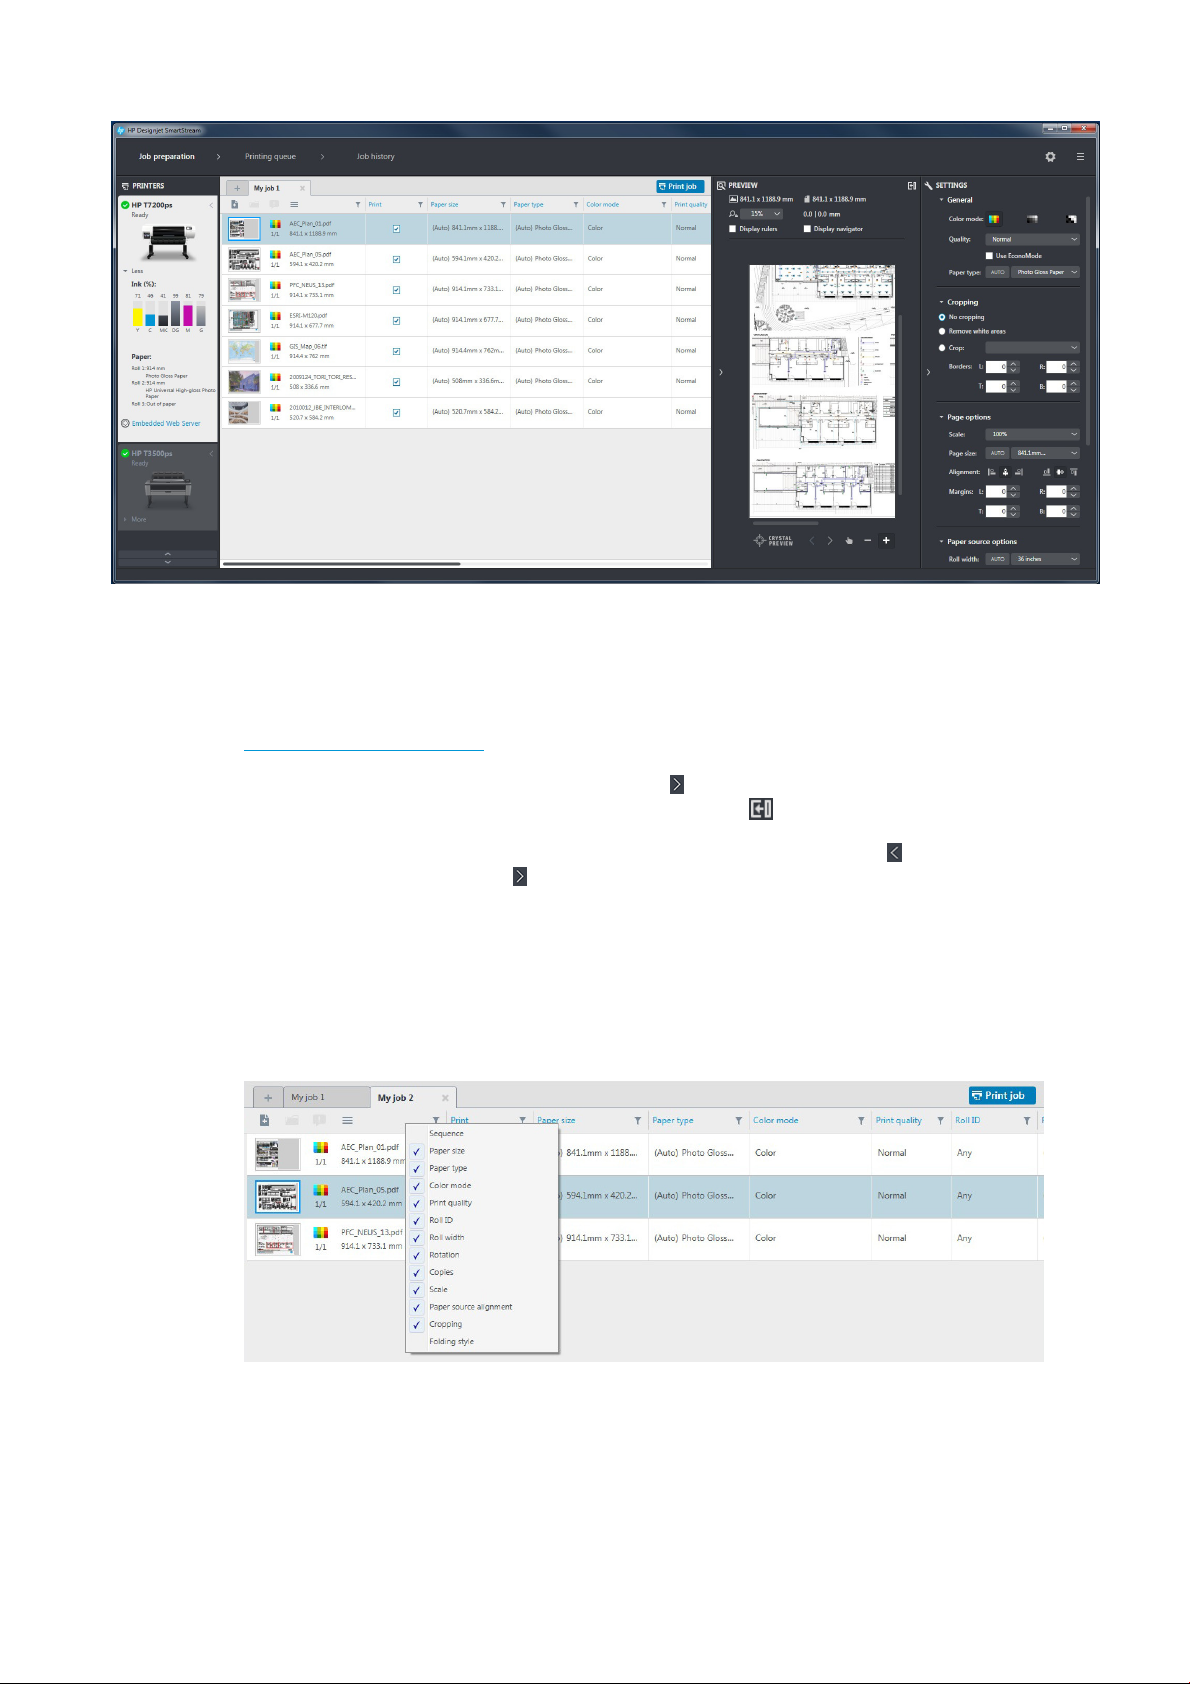
What do I see on the screen?
HP Designjet SmartStream provides three tabs, only one of which is visible at a time:
●
The job preparation tab, in which you prepare each job. This contains:
◦
The printers pane, showing the printers available to the application and their status.
◦
The job preparation pane, showing the pages of the job.
◦
The preview pane, showing a preview of the selected page.
◦
The settings pane, which lists the print settings for the selected page.
●
The printing queue tab, in which you can monitor the progress of each job.
◦
The printers pane.
◦
The printing queue pane, showing the jobs in the printing queue and their status.
◦
The preview pane.
●
The job history tab, from which you can reprint any past job.
◦
The printers pane.
◦
The job history pane, showing the old jobs in the job history.
The printers pane, preview pane, and settings pane can be minimized.
2 Chapter 1 Introduction ENWW
Page 7
How can I adjust the HP Designjet SmartStream window?
The widths of each area can be changed according to your requirements.
●
The printers pane is minimized by default, but can be widened by clicking the active printer. See also
The printers pane on page 11.
●
The preview pane can be minimized by pressing the icon or the PREVIEW title, or widened by dragging
the left pane border to the left, or maximized by pressing the icon in the top right corner of the pane.
●
The settings pane is minimized by default, but can be widened by pressing the icon and then
minimized again by pressing the icon.
●
The job preparation pane includes a horizontal scroll bar if necessary, so that all columns can be
accessed.
You can change the order of the columns by dragging the column headings.
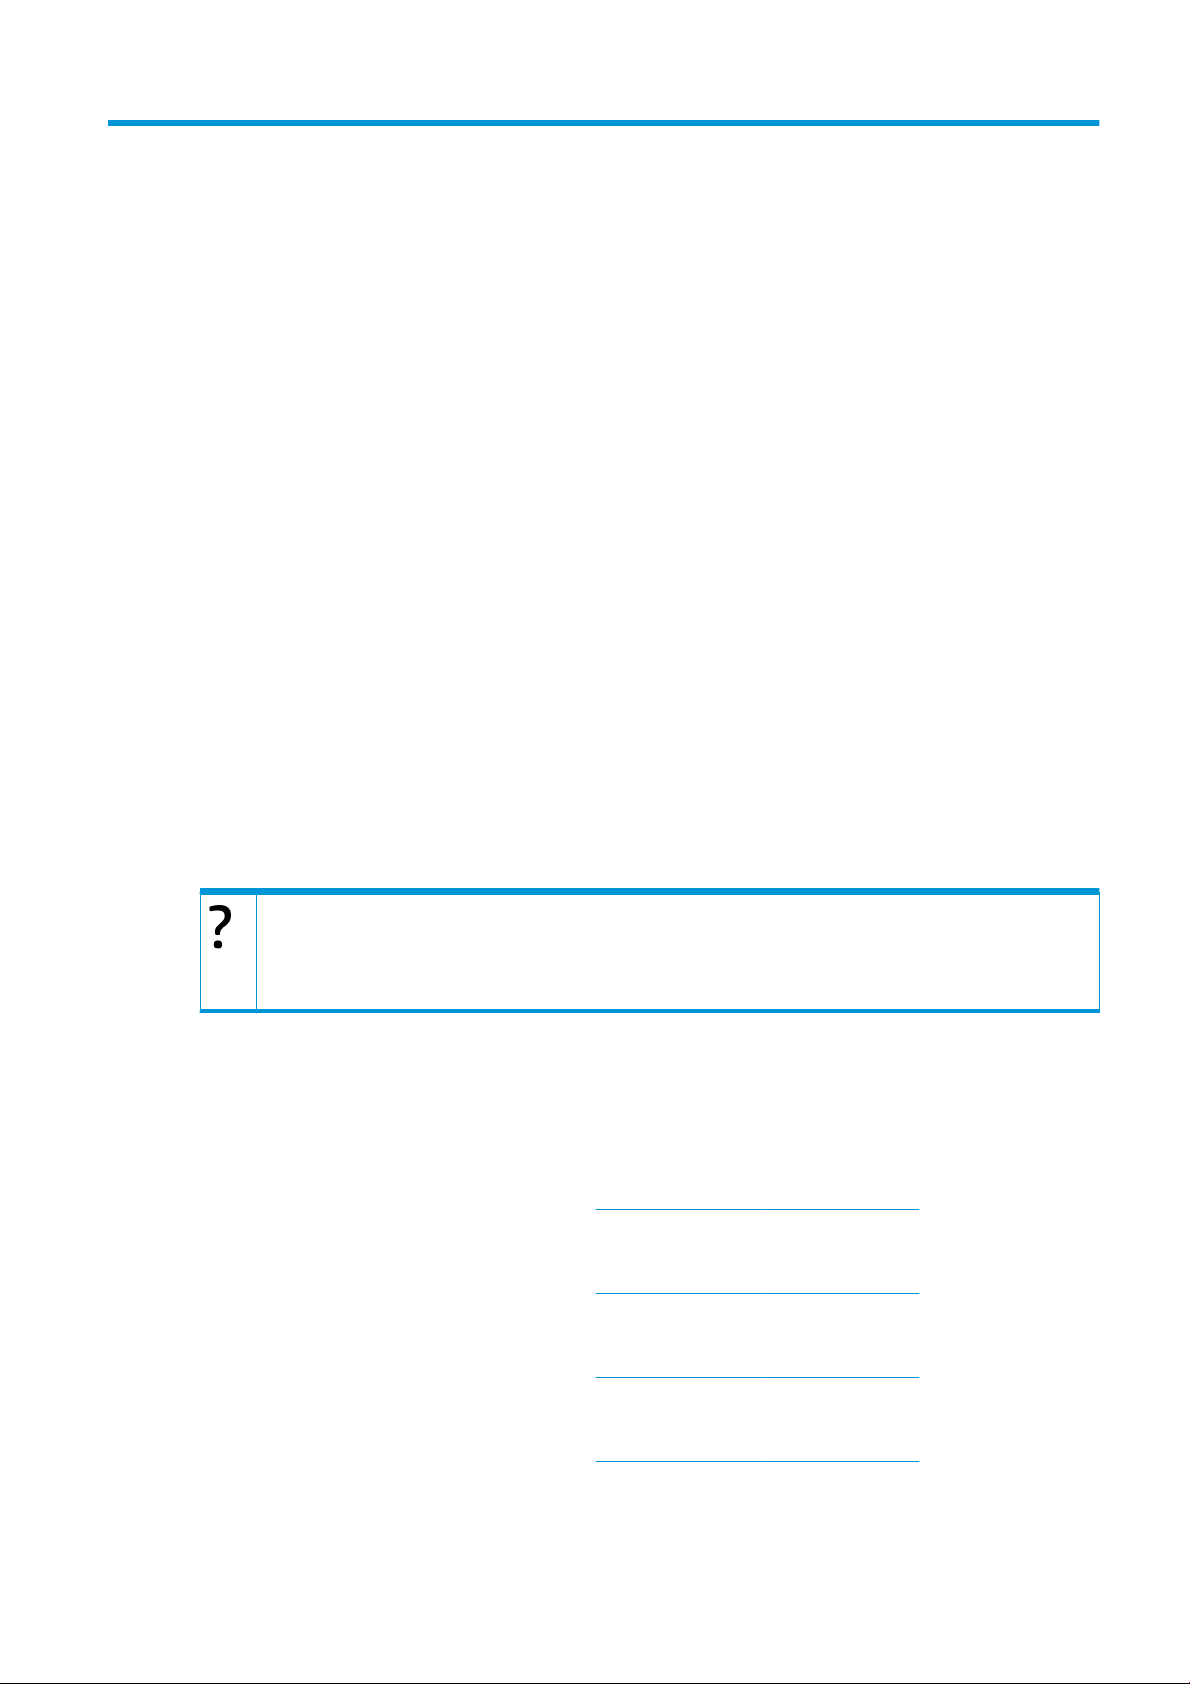
You can show or hide columns by right-clicking anywhere in the column heading row, and then checking
or unchecking column names in the menu.
Notifications
A notification is displayed briefly on the screen when certain events occur, such as:
ENWW What do I see on the screen? 3
Page 8

●
A job moves from the job preparation pane to the printing queue.
●
A job moves from the printing queue to the job history (when it has been printed).
●
Scanned pages are available for importing.
●
A stacker or folder has been installed or uninstalled.
The notification normally fades in, remains for 5 seconds, and then fades out. You can stop it from fading by
hovering over it, or see it again by hovering over the notification icon in the icon tray (if you have enabled it).
4 Chapter 1 Introduction ENWW
Page 9
2 Installation
Requirements
Computer hardware and software
●
Intel Core i3 2.4 GHz with 4 virtual cores/threads, or equivalent or better processor
●
4 GB of RAM, or more
●
3.5 GB of free space on hard disk, or more, plus 100 MB for each additional printer added
●
Screen resolution of 1280 × 1024 pixels, or more, tuned or calibrated to sRGB for optimal Crystal
Preview performance
●
Ethernet network, IPv4 or IPv6, 100 Mb/s or faster
●
Microsoft Windows 7 or 8 (32- or 64-bit)
Ensure that your computer is connected to the same subnet as your printers. Otherwise, ensure that
computer and printers are able to communicate through the 8080, 8085, 8086, 9100 TCP, and 161 UDP
ports.
How can I improve the performance of HP Designjet SmartStream?
If you feel the need of improvement, the performance of the application can be improved by exceeding the minimum
specifications above: more than 4GB of RAM (which requires a 64-bit operating system), a faster processor with more cores, a
faster network, and a faster hard disk drive (ideally a solid-state drive).
Supported printers
HP Designjet SmartStream currently supports the following printers:
●
HP Designjet T7200 Production printer
For documentation and other support, see http://www.hp.com/go/T7200/support.
●
HP Designjet T7100 printer (but not HP Designjet T7100 Monochrome)
For documentation and other support, see http://www.hp.com/go/T7100/support.
●
HP Designjet T3500 Production eMFP
For documentation and other support, see http://www.hp.com/go/T3500/support.
●
HP Designjet Z6200 Photo Production printer (42 in and 60 in)
For documentation and other support, see http://www.hp.com/go/Z6200/support.
●
HP Designjet Z6600 Production printer
ENWW Requirements 5
Page 10

For documentation and other support, see http://www.hp.com/go/Z6600/support.
●
HP Designjet Z6800 Photo Production printer
For documentation and other support, see http://www.hp.com/go/Z6800/support.
NOTE: HP Designjet SmartStream supports only PostScript printers. If your printer requires an accessory to
handle PostScript, you must install the accessory to use the printer with HP Designjet SmartStream.
For further up-to-date information, see http://www.hp.com/go/designjetsmartstream.
Supported file types
HP Designjet SmartStream supports PDF, TIFF, JPEG, and HP-GL/2 files.
Licensing
In order to use HP Designjet SmartStream, you must own at least two licenses:
●
One license for the HP SmartStream Preflight Manager for HP Designjet
●
One license per printer for the HP SmartStream Print Controller
Thus, one of your printers should have both licenses installed: the Preflight Manager and the Print Controller.
Furthermore, the printer with both licenses must always be connected and turned on.
The application may be installed on multiple computers.
How to install
Update your printer’s firmware
Ensure that your printer has the latest firmware version installed, following the instructions in your printer
documentation; or see http://www.hp.com/go/model/support, where model is the model number of your
printer (such as T7200).
Install the licenses
Licenses are installed in the form of USB dongles attached to your printers. HP Designjet SmartStream will
not work at all unless it finds both a Preflight Manager license and a Print Controller license installed in a
connected printer; further printers may be added with only a Print Controller license. HP Designjet
SmartStream may check at any time for the presence of the appropriate licenses.
The license dongles have been designed to be used only with a supported HP Designjet PostScript printer
(see Supported printers on page 5).
However, their use is not restricted to one printer. After installing a license in an HP Designjet printer, you can
uninstall it and then install it in another supported HP Designjet printer.
You should install the Preflight Manager license first, before installing any Print Controller license.
How to install the Preflight Manager license
1. Ensure that your printer is supported by HP Designjet SmartStream, and turned on.
2. Insert the HP SmartStream Preflight Manager license dongle into a USB port on the printer, marked with
the USB symbol:
The front panel displays a message confirming that the license is ready for installation, and asks you to
press OK to continue.
6 Chapter 2 Installation ENWW
Page 11
3. Press OK. Please wait, and do not remove the dongle.
4. The front panel asks you to press OK to restart the printer.
5. Press OK.
6. Remove the dongle from the USB port.
IMPORTANT: Keep the dongle: you will need it if you ever want to uninstall the license from this
printer.
Now you are ready to install the Print Controller license.
How to install the Print Controller license
1. Ensure that your printer is supported by HP Designjet SmartStream, and turned on.
2. Insert the HP SmartStream Print Controller license dongle into a USB port on the printer.
The front panel displays a message confirming that the license is ready for installation, and asks you to
press OK to continue.
3. Press OK. Please wait, and do not remove the dongle.
4. The front panel asks you to press OK to restart the printer.
5. Press OK.
6. Remove the dongle from the USB port.
IMPORTANT: Keep the dongle: you will need it if you ever want to uninstall the license from this
printer.
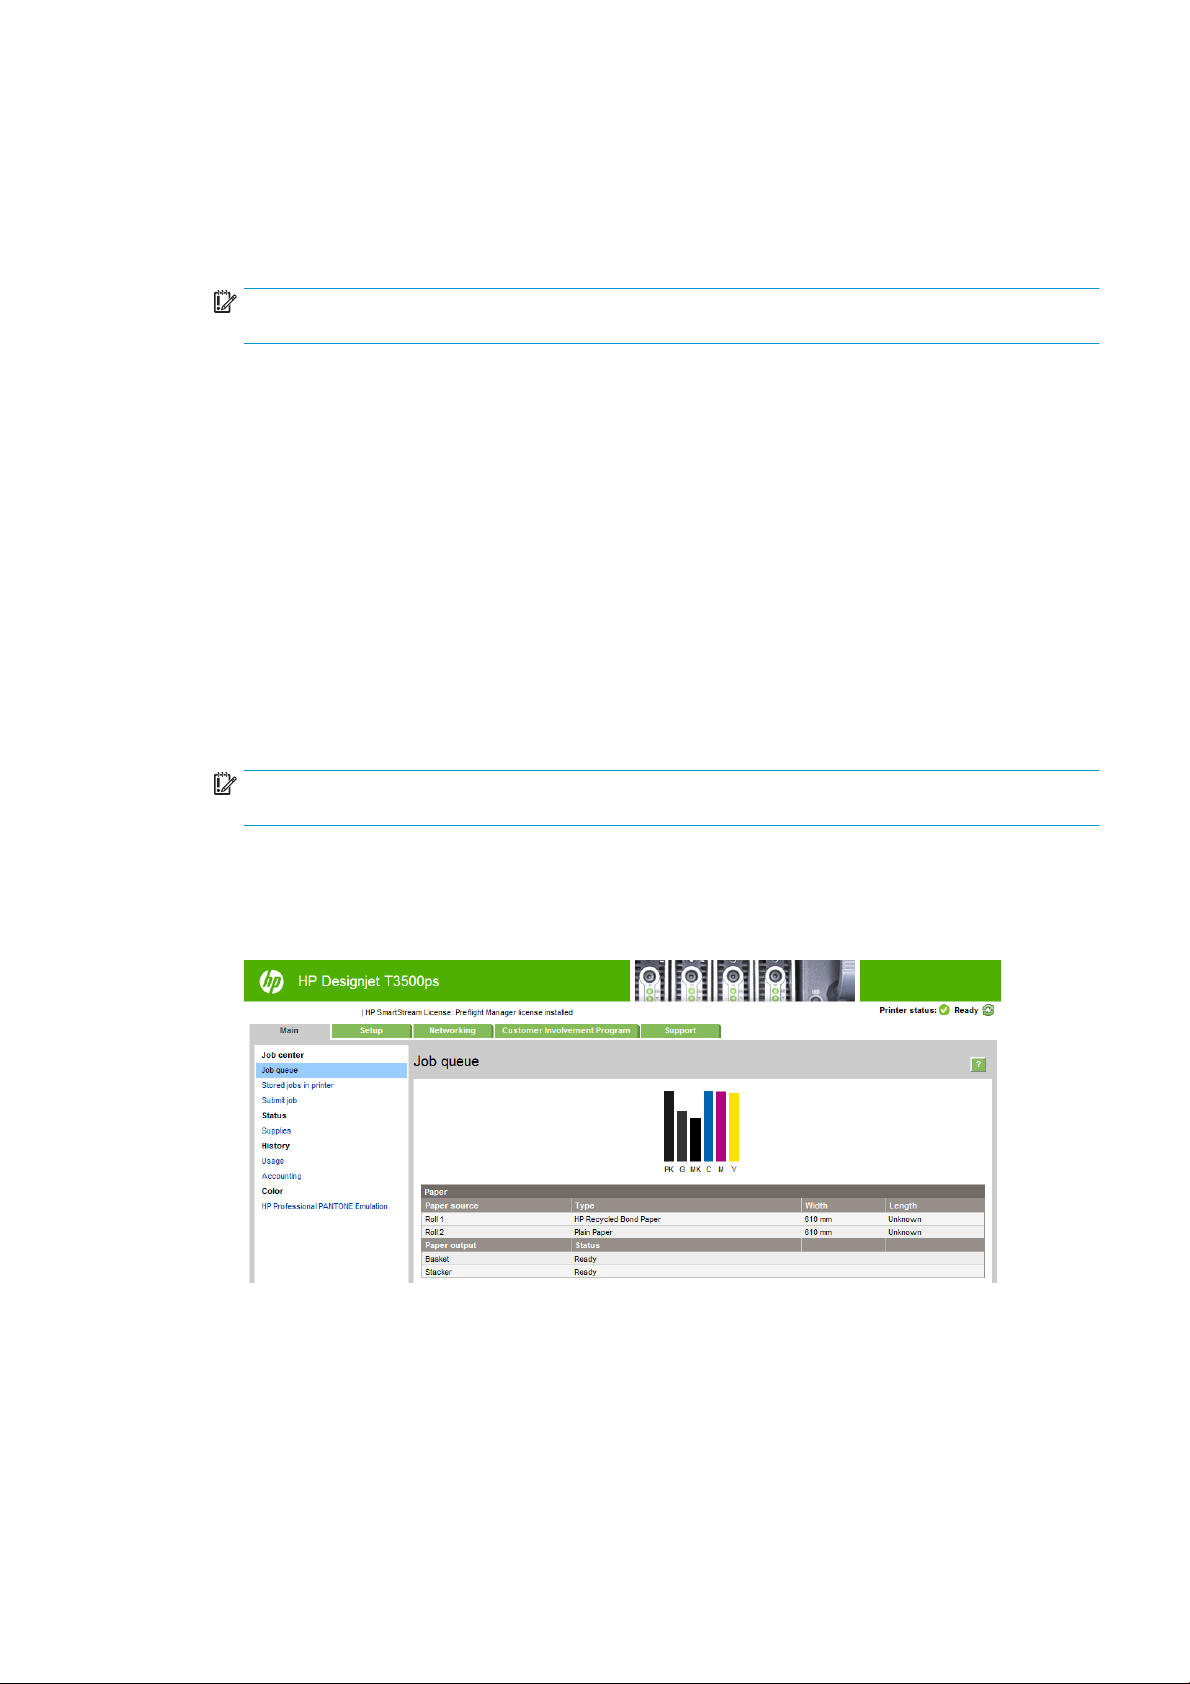
7. To check that the license has been correctly installed, you can use the printer’s front panel to view
general information about the printer (see the printer user’s guide). It should tell you which HP
Designjet SmartStream licenses have been installed, if any. The printer’s Embedded Web Server also
displays this information, near the top of the window, just under the green header bar:
8. The printer is now ready for use with HP Designjet SmartStream.
How to uninstall a Preflight Manager or Print Controller license
1. Ensure that the printer is turned on.
2. Insert the license dongle into a USB port on the printer.
The front panel displays a message confirming that the license can be uninstalled, and asks you to
press OK to continue.
ENWW How to install 7
Page 12
3. Press OK and wait; do not remove the dongle.
4. When the uninstallation is complete, remove the dongle and store it in a safe place. You may want to
install it again later in the same printer or in another one.
Install the HP Designjet SmartStream application
1. Download the correct installer for your operating system (32- or 64-bit) from http://www.hp.com/go/
designjetsmartstream/software.
2. Start the installer, and follow the instructions on the screen.
3. When the installation has finished, start the application.
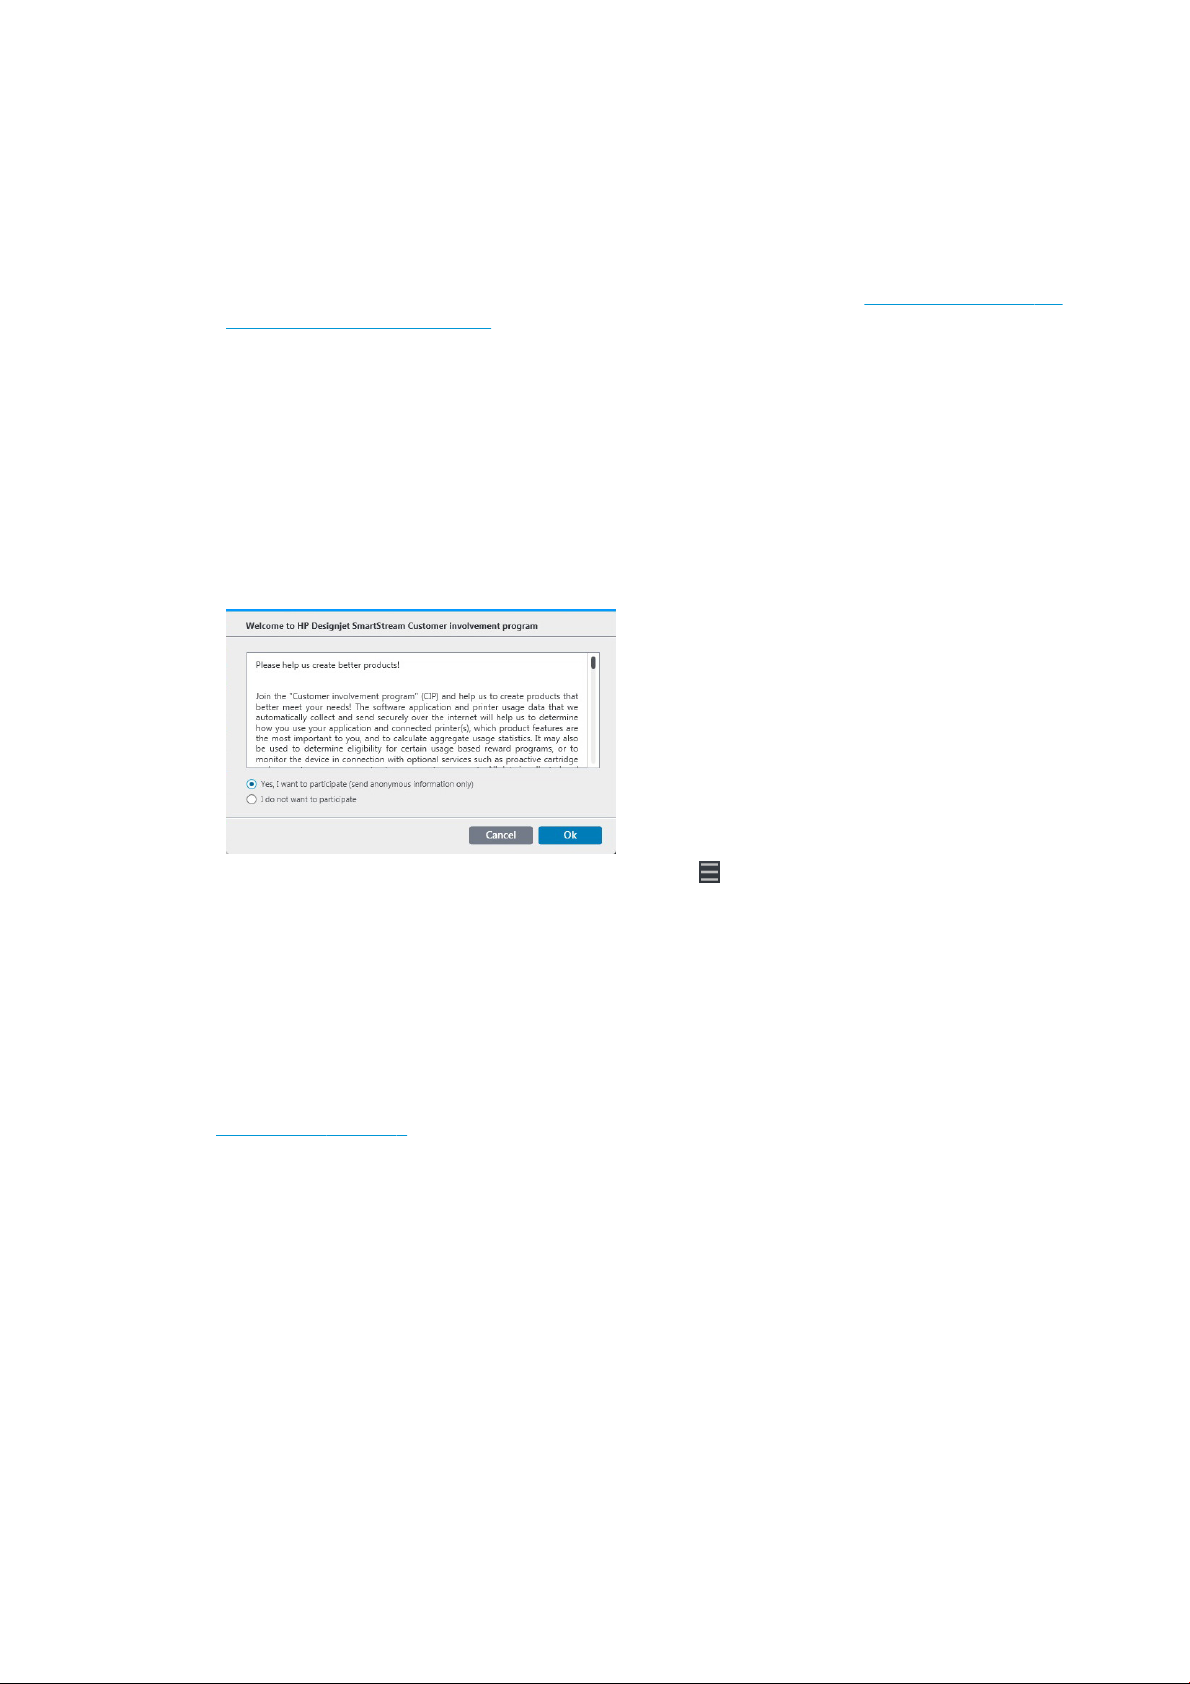
4. Choose whether to participate in the Customer Involvement Program.
The Customer Involvement Program allows HP to collect anonymous usage data from your product in
order to improve the quality of the product. Fuller information about it is displayed automatically during
installation.
In the Welcome window, read the text, select your answer, and press the OK button.
This window can be displayed at any time by pressing the icon near the top right of the window, then
Customer Involvement Program.
Add the first printer
If you start the application with no printer in the printers pane, you are prompted to add a printer. You must
add at least one printer in order to use the application, and the first printer that you add must have the HP
Designjet SmartStream Preflight Manager and Print Controller licenses installed.
You can add as many printers as you like, as long as they all have the Print Controller license installed.
See Add a printer on page 9 for details of the process.
8 Chapter 2 Installation ENWW
Page 13
3 Printers
Add a printer
1. Ensure that the printer you want to add is turned on, awake, and accessible from your computer.
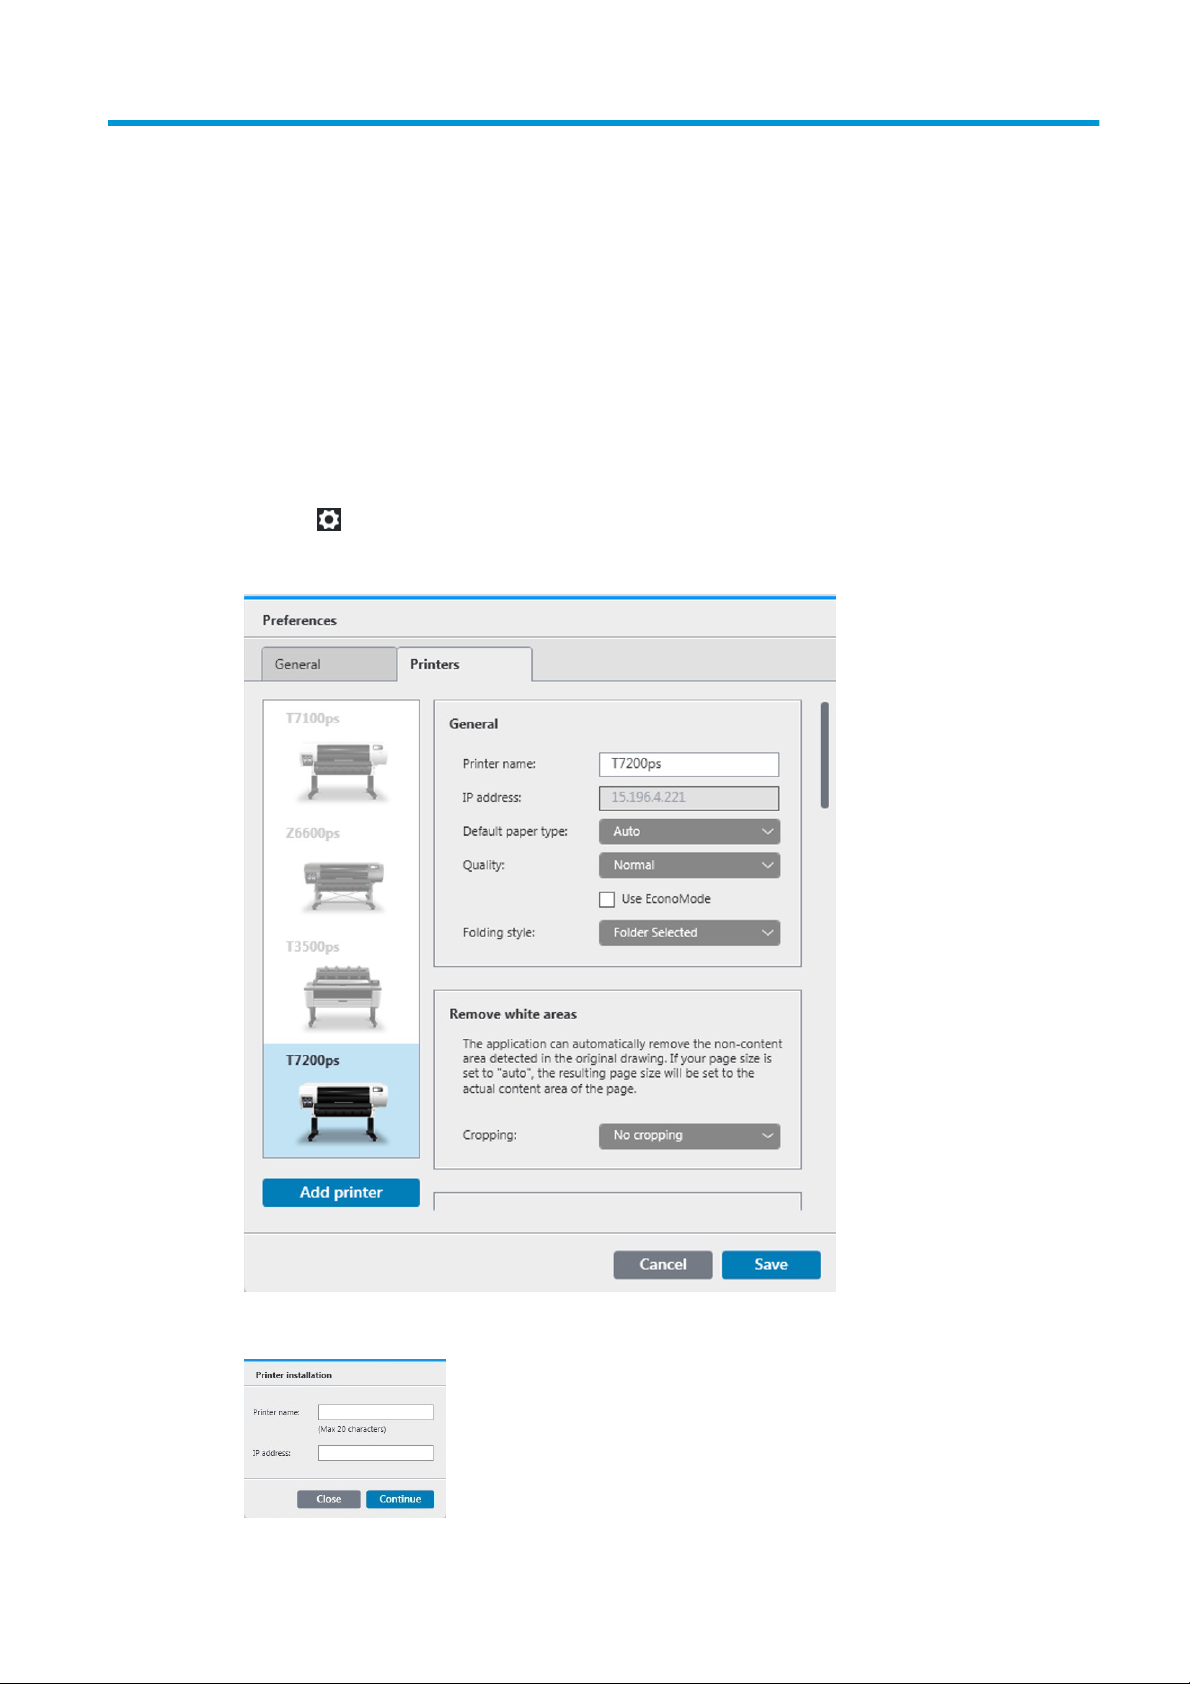
2. Click the icon near the top right of the window.
3. Click the Printers tab.
4. Click the Add Printer button.
ENWW Add a printer 9
Page 14
5. Give the printer a name and enter its IP address, then press Continue. You can choose any name you like
to assign to the printer; it will be used only in the printers pane. If you do not know the printer’s IP
address, the printer’s own documentation will tell you how to find it. It is normally available from the
Connectivity menu in the printer’s front panel.
NOTE: Only supported printers are detected (see Supported printers on page 5), and only licensed
printers can be added to the application; any attempt to add an unlicensed printer will fail (see Licensing
on page 6).
6. The application downloads a set of color profiles for the new printer, and a window appears with the
progress bar. When the profiles have been downloaded, press the Finish button.
The name you have given the new printer should now appear in the printers pane.
You can add more printers, in which case their names all appear in the printers pane. If the pane is too small
to show all of the printers, you can move up and down the list by clicking the and buttons at the bottom
of the pane.
Change a printer’s IP address
If the IP address of a printer changes, it is removed from HP Designjet SmartStream. To add it again with the
new IP address, see Add a printer on page 9.
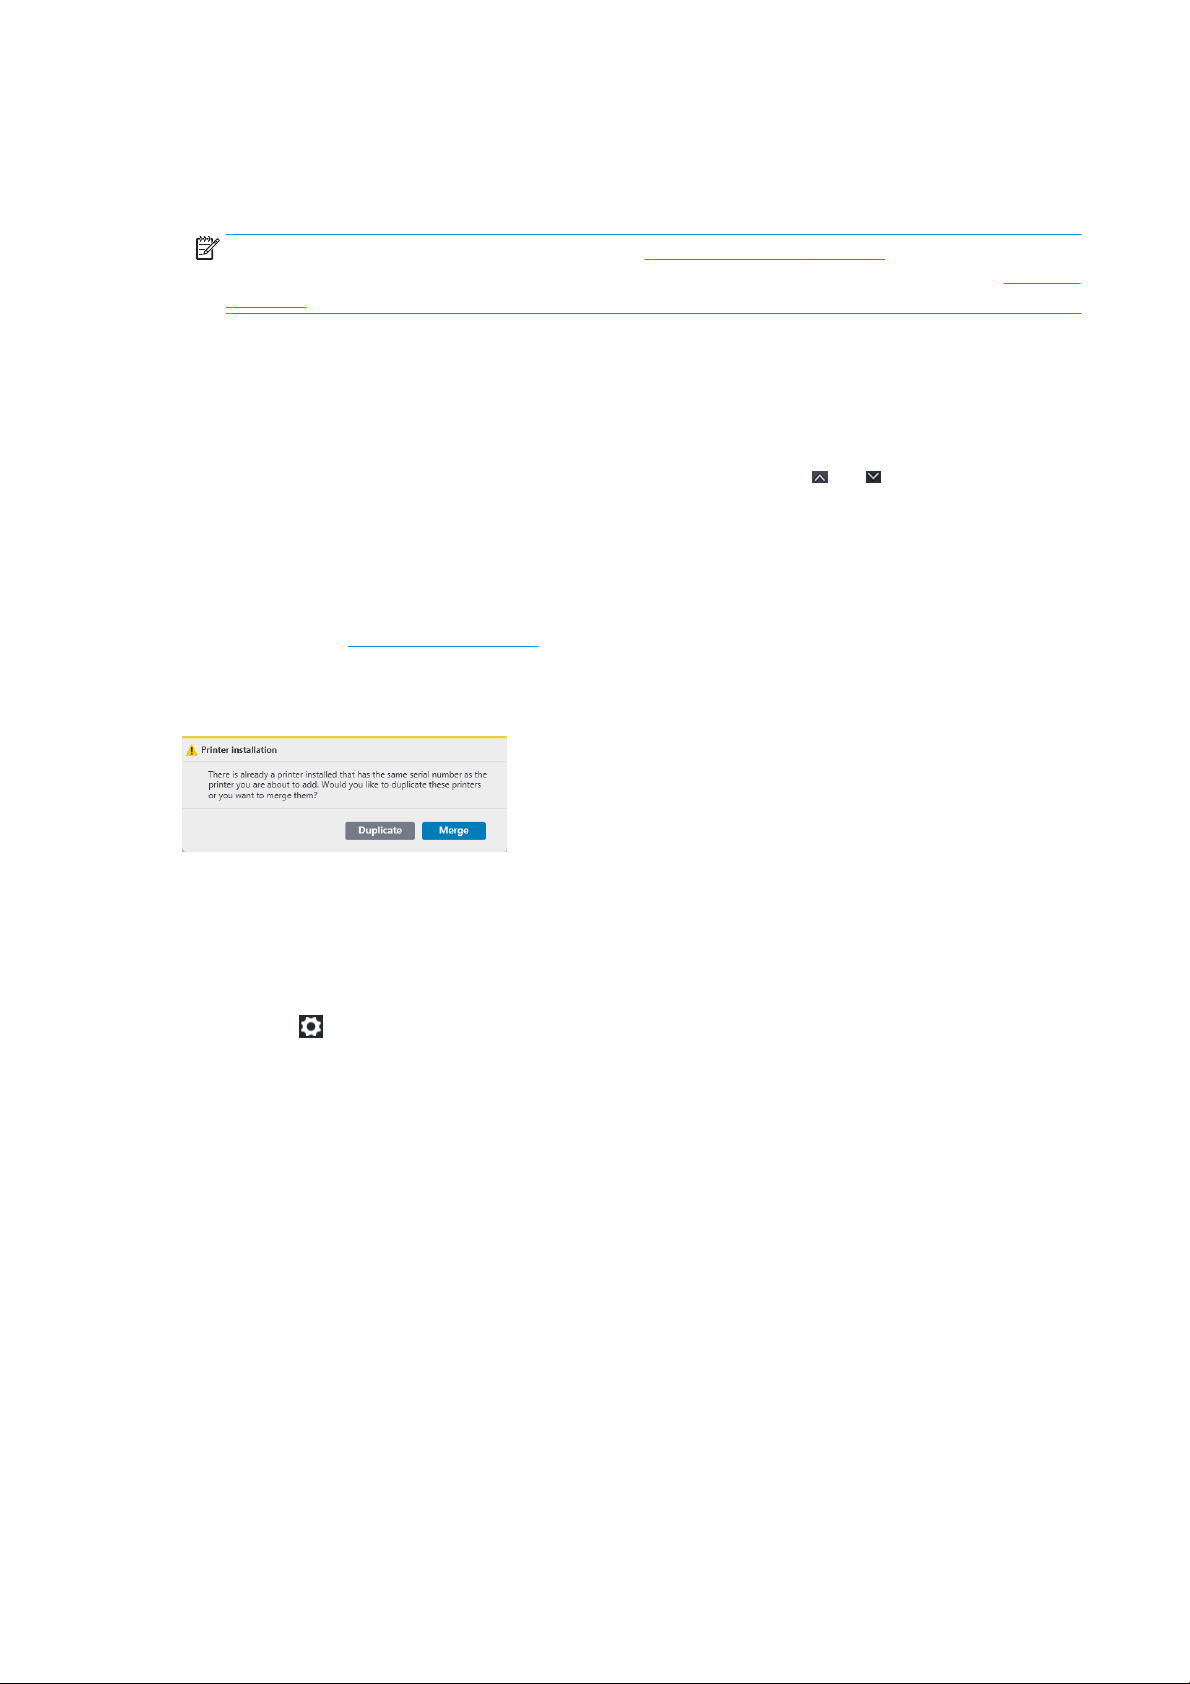
When you add it with the new IP address, HP Designjet SmartStream detects that it is the same printer with a
new IP address, and asks whether you would like to merge the two printers.
●
Press Merge to merge the two printers: the new printer keeps the history of the old printer.
●
Press Duplicate not to merge the printers: the new printer’s history starts off empty.
Remove a printer
1. Click the icon near the top right of the window.
2. Click Preferences in the drop-down menu
10 Chapter 3 Printers ENWW
Page 15
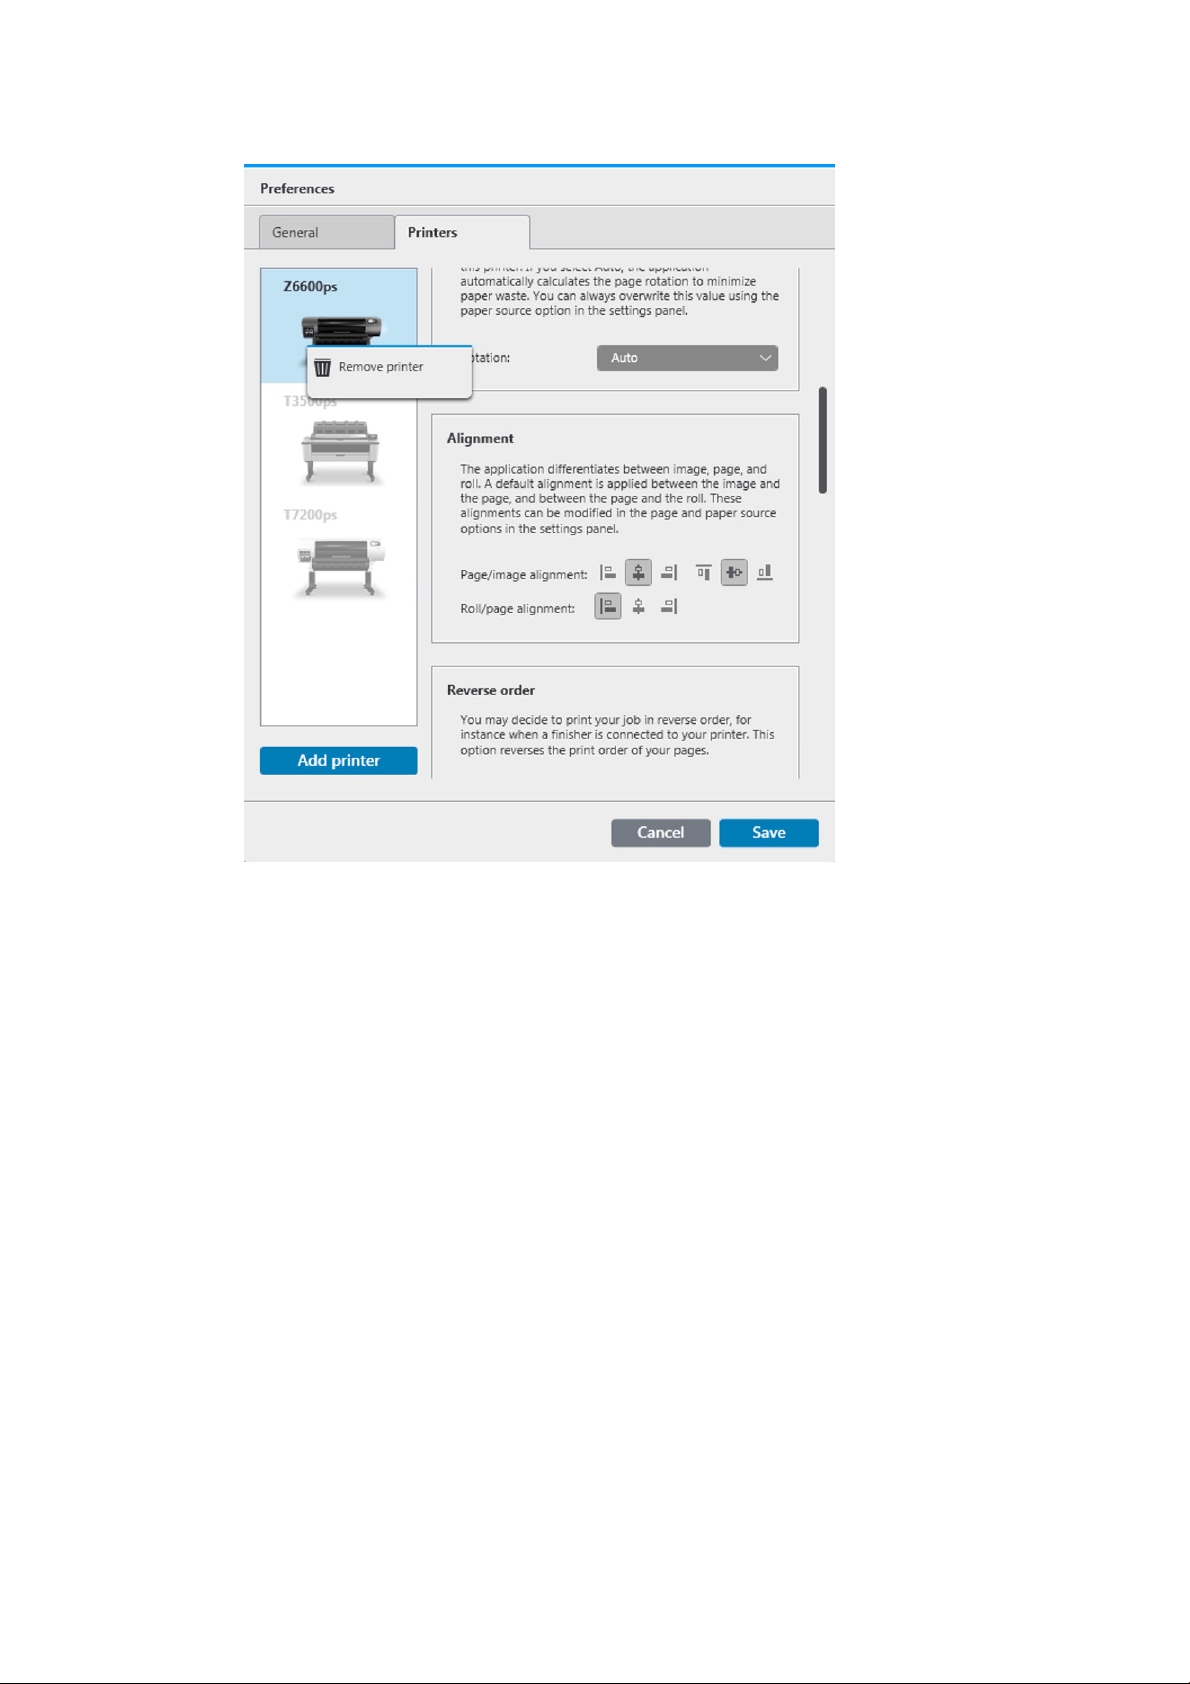
3. Right-click the printer that you want to remove, and click Remove printer in the popup window.
4. Another window warns you of the implications of removing the printer, and offers you the chance to
Cancel or Remove printer.
The printers pane
The printers pane is at the far left of the window. By default, it shows only the names of the printers that you
have added.
Click a printer name to select the active printer; the rest of the window always shows the jobs for the active
printer, in any of the three tabs.
The active printer is highlighted with dark text on a light background.
ENWW The printers pane 11
Page 16

To widen the pane and see more information about each printer, click the active printer or double-click an
inactive printer (which also activates it). You can now see up-to-date status information on the printer and its
accessories.
NOTE: There may be a short delay while the application retrieves the status information from the printer.
To return to the default narrow pane, click the close icon in the top right corner.
To see more details about the active printer, click More.
12 Chapter 3 Printers ENWW
Page 17

Accessory status
Folder status
When fully expanded, the printers pane contains the following items:
1. The name of the printer
2. The overall status of the printer
3. A picture of the printer
4. An expander button to increase or decrease the number of details shown
5. The ink level in each ink cartridge
6. The dimensions and type of paper loaded on each roll, and a warning or error
message if necessary
7. The status of the folder, if any
8. The status of the stacker, if any
9. A link that opens the printer’s Embedded Web Server
The unexpanded printers pane (before pressing More) contains only items 1 to 4 above.
If a printer has a folder installed, its status may be described in the following ways. However, the status
values depend on the folder you are using: for more detail, check the documentation provided with the
folder.
●
●
●
●
●
●
●
●
●
Stacker status
Initializing: The folder is initializing and will be ready soon.
Ready: The folder is ready or folding.
Full: The folder is full, and you must remove the folded paper in order to continue printing.
Jam: The folder is jammed, and you must clear the jam in order to continue printing.
Open: A folder door is open, and you must close the door in order to continue printing.
Detached: The folder is detached from the printer, and you must attach it in order to continue printing.
Disabled: The folder is disabled, and you must enable it in order to continue printing.
Communication error: The printer cannot communicate with the folder; there are various possible
reasons (door open, folder turned off, communication cable disconnected).
Internal error: The folder is not working correctly; there are various possible reasons (door open, folder
jammed or offline). An error code is displayed on the front panel; check the service documentation for
an explanation of it.
If a printer has a stacker installed, its status may be described in the following ways. However, the status
values depend on the stacker you are using: for more details, check the documentation provided with the
stacker.
●
Initializing: The stacker is initializing and start warming up soon.
●
Warming up: The stacker is warming up and will be ready soon.
●
Ready: The stacker is ready or stacking.
●
: The printer is in manual mode: the stacker door is open.
ENWW The printers pane 13
Page 18

●
Full: The stacker is full, and you must remove the stacked paper in order to continue printing.
●
Busy: The stacker is being cleaned, and you must wait for the cleaning procedure to finish.
●
Upgrading firmware: The stacker firmware is being updated, and you must wait for the updating
procedure to finish.
●
Jam: The stacker is jammed, and you must clear the jam in order to continue printing.
●
Open: The stacker door is open, and you must close it in order to continue printing.
●
Detached: The stacker is detached from the printer, and you must attach it in order to continue printing.
●
Disabled: The stacker is disabled, and printing will continue without using the stacker.
●
Communication error: The printer cannot communicate with the stacker; the stacker may be turned off
or disconnected from the printer.
●
Internal error: The stacker is not working correctly for some unknown reason. An error code is
displayed on the front panel; follow the instructions there.
14 Chapter 3 Printers ENWW
Page 19

4 Set preferences
General preferences
The general preferences apply to all printers in the printers pane. To set them, click the icon near the top
right of the window.
You can set:
●
The language of the text displayed by the application
●
The units of measurement displayed by the application
●
The default zoom option used in the print preview, and whether to display the folding size in the
preview
●
How long jobs should be retained in the job history
●
Which standard page sizes should be displayed in lists of page sizes
Printer-specific preferences
There are a number of preferences that you can set separately for each printer. Click the icon near the top
right of the window, then select the Printers tab in the Preferences window. On the left side of the Printers
tab, you can see a list of your printers: click the printer whose preferences you would like to set.
ENWW General preferences 15
Page 20

You may be able to select the following preferences, although the list of preferences can vary, depending on
your printer and its accessories:
●
Default paper type
●
Quality: Choose the default print quality.
●
Folding style: Choose the default folding style.
●
Cropping: If you choose Remove white areas, your pages are automatically cropped to remove white
areas at the edges. The alternative is No cropping.
●
Rotation: Choose the page rotation to be applied by default (Original, Auto, Landscape, or Portrait).
●
Page/image alignment: Choose how the image is aligned with respect to the page.
●
Roll/page alignment: Choose how the page is aligned with respect to the roll.
●
Reverse order: You can request printing in reverse order when using the stacker, when using the folder,
and when using neither.
●
Content in the printer margins: The printer margins are normally 5 mm, but in some circumstances you
may be able to choose a printer margin of 3 mm, depending on the printer, the printer firmware, and the
paper type.
◦
You can set the kind of clipping the application should notify you about (never, when clipping
occurs, or when it occurs or may occur). “May occur” means that there is possible clipping that the
application cannot determine before the file is printed, because the limits of the content area of
the page are very close to where the printer margins begin.
16 Chapter 4 Set preferences ENWW
Page 21

NOTE: Enabling this option may yield some false positives, and avoiding clipping on those pages
will add extra margins to the print that are not actually needed.
◦
If content is detected in the printer margin, the application can try to fix the problem automatically
by adjusting the paper source margins (never, when clipping occurs, or when it occurs or may
occur).
◦
When adding margins, you can choose between the exact distance needed to avoid clipping and
the whole width of the printer margin.
●
Roll switching: If you choose Non-stop printing (see Job options on page 22), the application will try
to carry on printing even if a roll runs out of paper while printing and there is no roll of the same paper
type and roll width loaded. In this case, it will look for a roll of the same paper type with a wider roll. The
narrowest suitable roll is selected. If there are multiple narrowest suitable rolls, the application can
choose between them according to one of the following rules:
◦
Minimize roll switches
◦
Use roll with less paper
●
Color options: You can select Relative colorimetric, the default setting, or Perceptual, which emulates
the output of a PostScript driver. See Color management on page 37.
●
Hot folder: You can define a hot folder that is automatically monitored by HP Designjet SmartStream,
which will import files from that folder when you click the icon in the job header. If the printer has a
scanner, this folder may be used to receive scanned pages.
ENWW Printer-specific preferences 17
Page 22

5 Job preparation
You can create and edit jobs in the job preparation pane.
1. Select the printer that you want to use to print your job.
2.
Create a new job by pressing the button at the top left of the job preparation pane, or by dragging
files or folders directly onto an empty job preparation pane.
NOTE: Whenever you add a new printer, an empty job is created automatically.
3. To add files or folders to a job, you can press the icon, or drag and drop the files or folders onto the
job preparation pane.
4. A Preflight Manager window is displayed while the application is checking each file for problems. This
window disappears when the job is ready. See File error detection on page 19.
If problems are found, a report window appears with a summary of the problems. This window remains
open until you click Close. More details can be seen in the Resolution Center. See Resolution Center
on page 20.
18 Chapter 5 Job preparation ENWW
Page 23

5. After checking the files, the application automatically suggests the paper type (unless the preferences
indicate to use one specific paper type), the page size, the rotation of the page on the roll, and the roll
width. See Automatic attribute detection and setting assignment on page 21.
6. You can review and modify the settings using the job preparation pane and/or the settings pane. See
Edit a job on page 22.
You can also sort and/or filter the content of the grid. See Sort pages on page 25 and Filter pages
on page 24.
7. Use the print preview to see how a page will look when printed, how it will be positioned on the roll, and
whether your image will be clipped with your present settings. See
8. When you are ready to print, press the Print Job button. See Printing on page 34.
If you decide to print the job on a printer different from the one you originally selected, you can drag the job
tab to another printer tab.
HP Designjet SmartStream Preflight Manager
The Preflight Manager analyzes each file to check for errors, issue warnings, and propose various page
settings automatically.
File error detection
Print preview on page 30.
When files are added to a job, the Preflight Manager checks them for possible problems. If a problem means
that a page cannot be printed, it is not added to the job preparation pane and is not included in the job.
All supported file types are checked. The Adobe Libraries are used for fast and accurate checking of PDF files.
Problems that prevent printing
In these cases, the file is not added to the job.
●
The file format is not supported by HP Designjet SmartStream.
●
The file is corrupted.
●
A certificate is needed to open the file.
●
You do not have enough free memory or enough free hard disk space to process the file.
The author of a PDF file can specify an Open password that you must provide to open the file, and/or a
Permissions password that you must provide to print the file. If you try to add a password-protected PDF file
ENWW HP Designjet SmartStream Preflight Manager 19
Page 24

to a job, an Action Required window is displayed, in which you can enter the required password(s). If you
cannot provide a required password, the file is not added to the job.
A PDF file with a Permissions password but no Open password is treated as being in error, and is not added to
the job.
Problems that do not prevent printing
In these cases, an explanation is added to the resolution center for your information, but the page is added to
the job and can be printed, unless you decide to exclude it.
●
The page and/or image will be clipped. You can ask the application to try to fix this problem
automatically, or you can fix it manually after viewing the preview to see what will be clipped and
where.
●
Some layers are not printable. You can check what will be printed in the preview.
●
Some layers are not visible, but can be printed. You can check what will be printed in the preview.
●
The following problems are found only in PDF files:
◦
Fonts are missing. The application can automatically substitute other fonts for the missing fonts.
Alternatively, you may be able to recreate the PDF file with the correct fonts embedded in it.
◦
There are references to external items, which will not be printed. If you want to print these items,
they must be embedded in the file.
◦
The file contains one or more embedded PostScript objects that will not be printed.
When a page has a warning error, its thumbnail is outlined in yellow. When it is selected, its background color
changes to blue. Examples are shown below.
Resolution Center
Each job header contains a Resolution Center button. If there are no warnings about a job (everything is
fine), this button is disabled.
If there are any warnings about the job, you can click the button to see them. In addition, a warning icon is
displayed over the page thumbnail.
The warnings may consist of the following types:
●
Information: These give you information but require no action.
●
Warnings: These warn you of a possible problem that may require action.
●
Actions: These explain a situation and offer you options for responding to it.
20 Chapter 5 Job preparation ENWW
Page 25

In the resolution center, you can choose to see all the issues on a page, or you can choose a specific type of
issue and browse through the pages that have that issue.
Warnings are shown per page, and you can navigate from page to page by using the buttons at the top right.
If I get a warning that the image will be clipped, what can I do about it?
You can press the Solve all button, in which case HP Designjet SmartStream will try to solve the problem automatically.
Alternatively, you can use the preview to see exactly what the problem is, and solve it manually. For more details, see Print
preview on page 30.
Automatic attribute detection and setting assignment
The following attributes are detected automatically for each page that is added to a job:
●
The document name and the number of pages that it contains
●
The original image size of the page
●
Whether the page is in color or grayscale
The following settings are automatically assigned for each page:
●
The paper type, which is limited to the paper types currently loaded in the printer
NOTE: In the Preferences window, you can choose to use a specific default paper type when adding
pages, instead of using the paper type proposed by the application. See Printer-specific preferences
on page 15.
●
The roll width
●
The roll ID
NOTE: The roll ID is assigned automatically only if you have set it to Any in the paper source options.
See Paper source options on page 28.
NOTE: Your printer may enable you to set a roll to protected status. In this case, the roll ID is not
available for automatic assignment; you can print on that roll only by requesting it explicitly.
ENWW HP Designjet SmartStream Preflight Manager 21
Page 26

●
●
You can modify these proposed settings. If you have changed a setting and want to restore the automatic
value, press the
Edit a job
The page size
The page rotation, if any
NOTE: In the paper source options, you can turn automatic rotation on or off by means of a check box.
See Paper source options on page 28.
AUTO button.
You can edit a job in various ways to print the pages that you want, in the order that you want, and with the
print settings that you want.
●
By selecting one or more pages and changing the print settings
You can change print settings in the job preparation pane or in the settings pane; the effect is the same.
The difference is that the display of settings in the job preparation pane can be customized: you can
change the order of the columns and remove columns that you don’t normally use. The settings pane
displays all available settings in a fixed order: it cannot be customized.
●
By clicking the colum header to change the settings of the whole job
●
By sorting the pages into a different sequence (see Sort pages on page 25)
●
By applying a filter to one or more columns in the job preparation pane, and thus hiding some pages
(see
●
By selecting one or more pages and dragging manually them up or down to a different position: this
changes the sequence in which the pages will be printed
This is not a complete list of the possibilities. For further options, see the subsequent sections in this chapter.
Job options
You can see the job options for any job by clicking the icon.
Filter pages on page 24)
22 Chapter 5 Job preparation ENWW
Page 27

●
Copies: You can print multiple copies of a job by changing the value in the Copies field.
●
Collate: If you choose to print more than one copy of the job, you can choose to collate the copies;
otherwise, the printer will print multiple copies of the first page, then multiple copies of the second
page, and so on.
●
Reverse order: You can choose to print the job in reverse order, which may be convenient if you are
stacking the pages face-up as they emerge.
NOTE: You can choose in the Preferences window whether the reverse-order option is on or off by
default. See Printer-specific preferences on page 15.
●
Disable cutter: If the paper is cuttable and the cutter is turned on at the printer’s front panel, you can
turn it off here. If the paper is not cuttable or the cutter is turned off at the front panel, you cannot turn
it on from HP Designjet SmartStream.
●
Restore original position: Restore the original sequence of pages in the job, as they were when you
created the job.
●
Restore manual position: Restore the last manual sequence of pages in the job, as they were when you
last manually reordered them.
●
Extract: You can extract a whole job and store it, in the same way that individual pages can be
extracted. See Extract pages on page 24.
●
Print job: Send the job to the printing queue.
●
Remove job: Remove the job from the job preparation pane.
●
Non-stop printing: The application checks the selected roll ID, roll width, and paper type for each page
against the currently loaded rolls in the printer. If a roll with the correct characteristics is not loaded, a
window appear asking you how to proceed. However, just before printing the page, if a roll is detected
of the correct paper type but wider than specified, printing will continue.
Page options
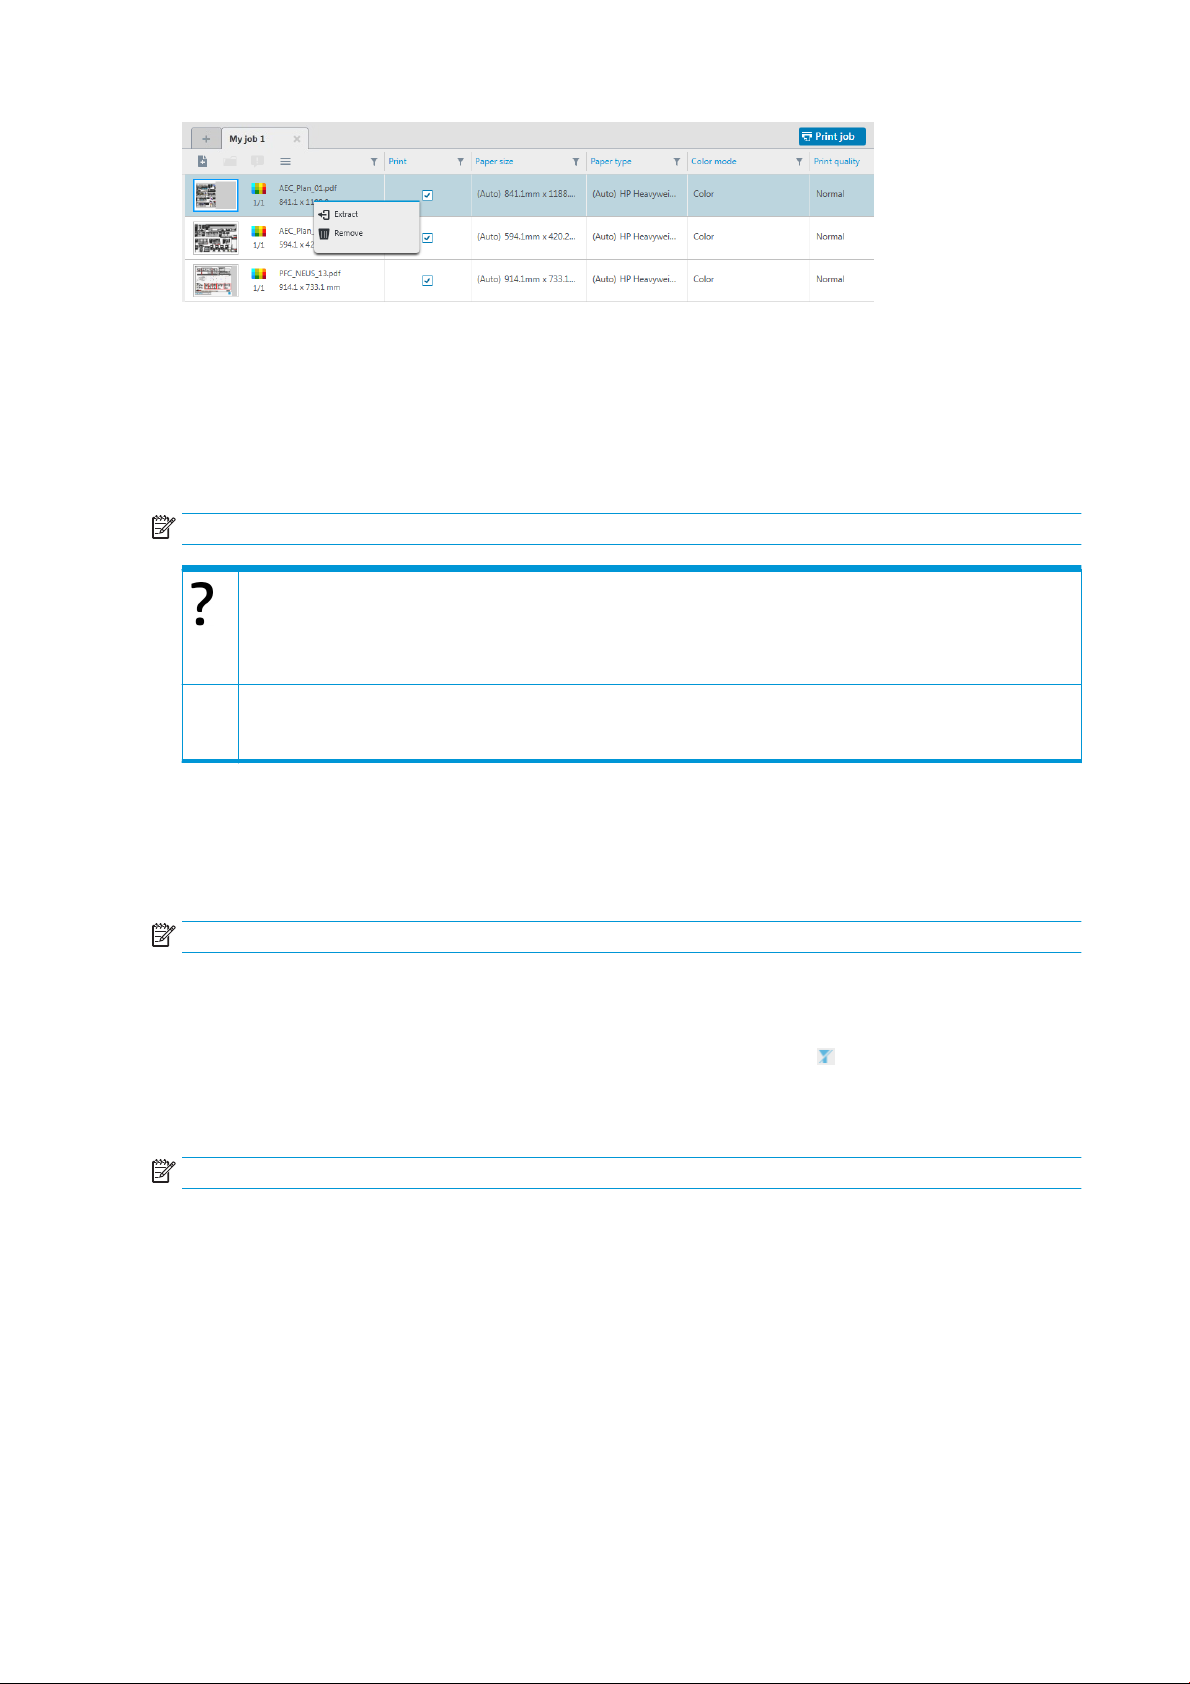
You can right-click any selected pages to see a menu of options for those pages. The page options enable you
to extract or remove the selected pages.
ENWW Page options 23
Page 28
Extract pages
You can extract pages from a job and store them elsewhere, to be printed later on another printer. This may
be useful for small-format or monochrome pages.
First select the pages that you want to extract, then right-click the selection and click Extract. Then choose a
folder in which the extracted pages will be stored.
NOTE: You can extract pages from PDF files only if extraction is not password-protected.
How can I extract small-format pages?
Use a filter to remove large-format pages from the job preparation grid, and extract the whole job.
Alternatively, sort the pages by page size, select the smallest pages manually, and extract those pages.
How can I separate color and black-and-white pages?
Again, you can filter or sort the page.
Remove pages
To remove one or more pages permanently from a job, select the pages, then right-click the selection and
select Remove.
NOTE: The pages are removed from the job only: they are not removed from the original document.
Filter pages
You can hide a particular category of document or page by clicking one of the icons in the column headers,
unchecking one or more of the boxes in the menu, and pressing the Apply button. All unchecked categories
are then hidden and do not appear on the screen. Thus, you can hide items of a particular page size, paper
type, print quality, and so on.
NOTE: Only categories that are actually present in the job are shown in the filter menu.
24 Chapter 5 Job preparation ENWW
Page 29

For example, if you want to see only the pages assigned to print on glossy paper, in order to apply a superior
print quality, you can use the filter to do so quickly and easily.
Multiple filters can be applied simultaneously to different columns.
You can click the icon in a column header to see what filter is active for that column. If all boxes are
unchecked, no filter is applied. When a specific filter has been applied, the filter icon changes to indicate that
at a glance.
IMPORTANT: If you press the Print Job button while one or more filters are active, only the visible pages
(and not the hidden pages) are transferred to the printing queue. See Printing on page 34.
Sort pages
When you click a filter icon, you can also sort the items in the job preparation pane.
Sorting by document name is in alphabetical order. When there is a list of items in the popup window, they
are sorted into the order in which they appear in the list. When there are checkboxes, the ticked boxes are
sorted first and the unticked boxes afterwards (or the reverse, if you select reverse order).
After sorting, you can use the job options to restore either the original sequence in which the documents
were added to the job (Restore original position), or the last sequence into which they were arranged
manually (Restore manual position).
Move a job to another printer
To move a job to another printer, click the job tab (containing the job name) and drag it to the other printer in
the printers pane.
ENWW Sort pages 25
Page 30

Remove a job
To remove a job, click the icon to the right of the job name.
Alternatively, you can select Remove job from the job option menu in the job header.
Print settings
For supported T-series printers For supported Z-series printers
Print settings can be changed either in the job preparation pane or in the settings pane. The changes are
applied to the currently selected item(s), which can be a single page, multiple pages, a document, or a job.
NOTE: When a setting has been determined automatically by the application, such as the roll number,
paper type, page size, or rotation, (Auto) is displayed before the setting in the job preparation pane.
26 Chapter 5 Job preparation ENWW
Page 31

General settings
●
●
●
Color mode: With supported T-series printers, you can select color, grayscale, or pure black and white
(initially set automatically from the color mode detected in the image).
With supported Z-series printers, you can select color, grayscale with gray and black inks only, or
grayscale with the full set of inks (initially set automatically from the color mode detected in the
image).
Print quality: The available options are Fast, Normal, and Best. The default value is Normal. There may
also be a check box for EconoMode in the Settings pane, unchecked by default. The job preparation
pane does not show whether EconoMode is on or off.
Paper type: Your options are those provided by the printer. For each printer, you can choose in the
preferences dialog whether the paper type can be set automatically or not. If not, you can choose the
default paper type to be used by the printer.
◦
If the paper type is set automatically (which is the default behavior), it works in the same way as
the other automatic settings, and you can still choose to set the paper type manually for one or
more pages.
◦
If the paper type is not set automatically, it remains set to the default type unless you change it
manually.
How can I change and assign paper types?
Cropping
●
Page options
●
In the print settings (general settings).
You can select no cropping, crop white areas around the edges of the image, or crop to a particular page
size.
TIP: The ability to crop white border areas automatically can save you a lot of work compared with
doing the same task manually for each page.
If the page size is set automatically and you crop to a different page size, that becomes the new page
size. However, if you have set the page size manually, cropping does not change it.
After cropping, you can select no cropping to restore the original image size.
Scale: You can rescale the image to a different size—to a percentage of its original size, to fit a
particular page size, or to fit the current roll.
ENWW Print settings 27
Page 32

◦
When you rescale the image, the page margins are also rescaled.
◦
When the page size is set automatically, it will change automatically if you rescale the image.
◦
However, when you set the page size manually and then rescale the image, the page size is not
affected.
●
Page size: This is initially set automatically, but you can change it. The page-size list enables you to
select portrait or landscape mode. You can also press AUTO at any time to return to the automatic page
size.
NOTE: Setting the page size never changes the scale.
You can create, modify, and delete custom page sizes by selecting Create at the end of the page size
drop-down.. A custom page size is specific to a particular printer: it is not available for use with all
printers.
●
Alignment: You can align the image to the left, right, center, top, or bottom of the page.
●
Margins: In the Settings pane, you can change the margins between the printed image and the page
boundaries.
●
You can rotate the page 90° counter-clockwise by pressing the D key, or 90° clockwise by pressing the F
key.
How can I assign a specific page size?
In the print settings (page options).
Paper source options
With these options, you can specify how the page should be printed on the available rolls.
●
Roll ID: You can select the roll number, or tell HP Designjet SmartStream to select the roll automatically.
●
Roll width: You can select the desired roll width, or tell HP Designjet SmartStream to select the roll
automatically.
●
Rotation: You can rotate the page and image by multiples of 90°, or select automatic rotation, which
seeks to minimize the use of paper.
●
Alignment: You can specify how pages should be aligned on the roll.
●
Margins: You can change the margins between the roll edges and and the page.
●
Cutting lines: In the Settings pane, you can add dashed lines to show where the paper should be cut to
achieve the correct page size. Cutting lines can be printed only if they fall within the printable area of
the paper.
Cutting lines are turned off by default, but you can turn them on for particular pages, or change the
preferences to turn them on by default.
28 Chapter 5 Job preparation ENWW
Page 33

Advanced options
●
Page copies: You can select how many copies are printed of that page.
●
Destination: You can select the destination of the printed output if the printer offers a choice. For
example, you may be able to choose between a basket and a stacker. If no choice is available, this
option is not shown.
A Manual mode checkbox may be provided if the printer has a stacker that offers this option. If you
check the box, before the page is printed you will be reminded to put the printer into manual mode (it
cannot be done automatically).
●
Folding style: If the printer has a folder installed, you can assign a folding style, display the folding style
in the preview, or create a new folding style (if the folder allows you to do that). For more information
on folding styles, see the printer or folder user’s guide. This option is not shown if no folder is available.
How can I use the stacker options?
In the print settings (advanced options). In some cases, you may see no stacker options, because your stacker offers no
options.
ENWW Print settings 29
Page 34

6 Print preview
The preview pane shows what your final print will look like, and adds a visual indication of margins and
clipping (if any). While the preview is being generated, the waiting icon
pane is animated.
at the bottom left of the preview
The preview pane can be enlarged by dragging the left pane border further to the left, or maximized by
clicking the maximize button in the top right corner of the pane.
You can zoom in or out by using the Zoom drop-down menu (above the preview), or by pressing the Ctrl key
and moving the mouse wheel. You can also zoom in on a particular section of the preview by clicking and
dragging to form a rectangle enclosing that section.
If you have zoomed in so that the preview is too big to fit in the available space, you can view different parts
of it by using the scroll bars, or by pressing the space bar and dragging the image with the mouse (panning).
If you have a mouse wheel, you can use it to pan vertically or (with the Shift key) horizontally.
Image, page, and roll
HP Designjet SmartStream distinguishes between the image, the page, and the roll.
The documents you want to print consist of one or more pages, called original pages. For each original page,
you can select it completely or crop it to select a particular part of it. The part of the original page selected
for printing is called the image.
Images are laid out on destination pages, called simply pages in HP Designjet SmartStream. The destination
page is the output you want to print. If cutting lines are requested, they will be drawn around this page. By
default, the destination page size is the same as the image size, but you can define a different page size
30 Chapter 6 Print preview ENWW
Page 35

which may create margins between the image and the page. When there is a difference between the image
size and the page size, you can set how the image is aligned within the page in the page options in the
Settings pane: see Print settings on page 26.
Pages are printed on rolls of paper. The roll can be wider than the page, in which case you can set how the
page is aligned within the roll in the paper source options in the Settings pane: see Print settings on page 26.
Preview features
A preview shows the whole roll width (not just the page), and it shows the page boundaries and image
boundaries if they are different. All previews are marked with boundaries in various ways:
●
The background color of the page is white; any part of the roll outside the page is colored light gray.
●
Printer margins are shown as dashed gray lines.
●
If the image size differs from the page size, the boundaries of the image are shown as blue lines.
The printed image may be clipped for different reasons; these are indicated by warning icons in the job
preparation pane, and visually marked in the preview:
●
Part of the image falls outside the page: The image is cropped, and the cropped edge is shown with a
solid yellow line. Also, the page options in the Settings pane include a negative margin.
●
Part of the page falls outside the roll: That part of the page is highlighted in yellow. Also, the paper
source options in the Settings pane include a negative margin.
If the clipping indicated in the preview is not acceptable, there are various ways to avoid it, such as:
●
Choose a wider roll.
●
Reduce the widths of the margins (if possible).
●
Rotate the page and/or the image.
●
Rescale the page and/or the image.
If part of the page falls outside the roll, a Solve button appears in the inline warning about the clipping; if you
press this button, the printer tries to solve the problem automatically.
If the folder style does a cross and fan fold, the preview shows a green rectangle in the appropriate corner. If
the folder style only does a fan fold, the rectangle is shown at the top or bottom, across the whole width of
the roll.
How can I use the color proofing preview to see the real colors that will be printed?
Press the button.
How can I remove white areas from the edges of the page?
You can do this easily and automatically by selecting Remove white areas, which is one of the cropping options in the print
settings. See Print settings on page 26.
Crystal Preview
If HP Designjet SmartStream finds problems in a PDF file, in some cases it can continue and print the file, but
the thumbnail and preview may not correctly represent the final print. In these cases, you can display an
accurate soft-proofing preview by pressing the button near the bottom left of the preview pane.
The following scenarios require the Crystal Preview, which uses the Adobe Libraries:
ENWW Preview features 31
Page 36

●
Fonts are used but not found in the PDF file nor in the system.
●
Some PDF layers are enabled or disabled differently, depending on whether they are viewed or printed.
●
There are references to external documents or images.
●
Embedded PostScript (EPS) is contained in the PDF file.
The Crystal Preview provides an accurate preview whatever the characteristics of the file, showing you
exactly what will be printed, so that you can evaluate the printed colors, and judge for yourself the effect of
any problems in the file. However, the Crystal Preview may take longer to generate than the default preview.
It performs full color management (see
Color management on page 37), and can understand and handle
the following PDF features correctly:
●
Output intent
●
Transparency
●
Overprinting
●
Rendering spot colors with the HP Professional PANTONE Emulation Library
The examples below illustrate two uses of soft proofing, to judge colors and to see what will actually be
printed.
Crystal Preview for glossy paper Crystal Preview for plain paper
32 Chapter 6 Print preview ENWW
Page 37

PDF file with unprintable layers
Crystal Preview showing what will be printed
ENWW Crystal Preview 33
Page 38

7 Printing
Submit jobs for printing
From the job preparation pane, you can submit the selected job(s) for printing by pressing the Print job
button at the top right.
Jobs are checked for possible problems before being added to the printing queue. If any problems are found,
you can choose between the following options:
●
Modify settings: The job is not added to the printing queue but is kept in the job preparation pane so
that you can try to solve the problems.
●
Send anyway: The job is added to the printing queue without modification. If the problem consists of
clipping an image, the image will be clipped. Other problems, such as a paper type mismatch, may cause
a pause and notification while printing.
Filtered and unchecked pages
If you have hidden some pages by using a filter (see Filter pages on page 24), they disappear from the screen
and are not printed. However, if you remove the filter, those pages reappear in the job preparation pane.
If you have excluded some pages by unchecking the box in the Print column, they remain visible on the
screen. When you press Print job and the job is printed, the excluded pages are not printed, but they are
added to the job history together with the printed pages.
Printing queue
You can monitor the printing process by clicking Printing queue near the top of the window. There is a
separate printing queue for each printer.
34 Chapter 7 Printing ENWW
Page 39

Job status
In the printing queue tab, you can see the progress of each job and document in the active printer queue,
including the destination of the print, which may be the stacker, the folder, or the basket.
At the top of the printing queue are the Cancel all and Hold all buttons, which can be pressed to cancel or put
on hold all jobs in the queue. There is also a Release all button to release all jobs that have been held.
In the Actions column, at job level only, there is a Cancel button to cancel the job. If the job has not started
printing, there is also a Hold button to put the job on hold, and a Modify settings button that returns the job
to the job preparation pane so that you can modify the print settings.
The job at the top of the queue is printed first, and any jobs added to the queue are added at the bottom. You
can change the order of the jobs in the queue by dragging a job into a different position. You cannot drag a
job to a different printer.
Before printing, each page of a job is checked for mismatches between the job settings and the loaded roll
(for instance, the wrong paper type is loaded). If there is a mismatch, you can resolve the problem by
modifying the print settings, loading a different roll, or canceling the job.
●
The current status of a job is displaying below the printing progress bar. A normal, successful job passes
through the following states: Waiting to render, Rendering, Waiting to print, About to print, Printing,
Printed.
●
If the job encounters some problem, you may see: Paused, Failed.
●
If you interrupt the job in some way, you may see: On hold, Canceling, Canceled.
●
In the Finishing column, you may see: Stacking, Folding, Completed.
Printing interruptions
There are various situations in which printing may be interrupted, such as:
●
A paper jam in the printer
●
A problem with the cutter, stacker, or folder
●
The printer runs out of paper
●
The printer runs out of ink
●
The connection to the printer has been lost
ENWW Printing interruptions 35
Page 40

●
A page cannot be rendered for one of various possible reasons
●
The printer is paused, perhaps because a cover is open
In such situations, a popup window explains what has happened, and offers options depending on the
situation. For example:
●
Paper jam: If there is a paper jam, you will have to clear the jam and restart the printer. This means that
the job that was printing when the jam occurred will be left uncompleted, and the whole job will appear
in the job history with the unprinted pages marked as failed.
●
Out of paper: If the current roll runs out of paper, there are various possible consequences. These
depend on the validation mode (see Printer-specific preferences on page 15) and the job settings (such
as roll ID) that you assigned. In some cases, if the printer finds another roll of the required paper type
and roll width, it will continue printing automatically; in these cases, a page that was interrupted while
printing is normally reprinted in full on the second roll. Such a page is marked with a warning in the job
history.
You may see the following buttons in an out-of-paper situation:
◦
Cancel: This cancels the job and moves it to the job history.
◦
Modify settings: This cancels the job and moves it back to the job preparation pane.
If the connection to the printer is lost or printing is impossible for some other reason, the current job is
canceled and the jobs remaining in the queue are put on hold. You can chose to print the jobs when the
printer problem has been fixed.
Cancel jobs
There are three ways of canceling print jobs:
●
In the printing queue, press the Cancel button in the Actions column, next to the job name, to cancel
that job.
●
In the printing queue, press the Cancel all button at the top of the queue to cancel all jobs for a
particular printer.
●
Use the printer’s front panel to cancel the job that is currently printing. Any other jobs for that printer in
the HP Designjet SmartStream queue are also canceled.
Exit the application while printing
If you try to close the HP Designjet SmartStream application while there are still jobs in the printing queues,
you are warned and offered the opportunity to change your mind. If you go ahead and close the application,
any jobs in the printing queues are canceled and moved to the job history.
36 Chapter 7 Printing ENWW
Page 41

8 Color management
HP Designjet SmartStream provides many advanced color management features with a very simple user
interface. ICC V4 and V2 color profiles are fully supported for all supported file types, plus black point
compensation, PDF output intent, HP Professional PANTONE emulation, and Crystal Preview soft-proofing
(see Crystal Preview on page 31).
HP Professional PANTONE Emulation (HP PPE) is a technology that replaces PANTONE color names with RGB
or CMYK colors calculated specifically for your printer and paper at print time, in the same way that
professional graphic artists and prepress professionals prepare PANTONE emulations by hand. The results
are professional-quality emulations of PANTONE colors that look as similar to the originals as possible with a
given combination of printer and paper.
Crystal Preview soft-proofing uses the Adobe Libraries to emulate on your screen what your print will look
like on paper, using color profiles provided with your printer to take account of the characteristics of paper,
ink, and printing mode.
Supported color spaces
●
PDF: Any color space supported by PDF 1.7
●
JPEG: Gray, RGB, CMYK, and ITU/Fax CIE L*a*b
●
TIFF: Monochrome, indexed, gray, RGB, CMYK, and CIE L*a*b
●
HPGL2: Adobe RGB, sRGB, and Device RGB
Color options
Color management is automatically applied by HP Designjet SmartStream to provide optimal color output.
However, you can choose between two color management options in the Preferences window (see Printer-
specific preferences on page 15):
●
Relative colorimetric: This is the default option. It favors more saturated colors and modern CMYK
standards. It uses relative colorimetric rendering intent and black point compensation, sRGB IEC
61966-2.1 as the default RGB color space, and ISO Coated v2 as the default CMYK color space.
●
Perceptual: This option provides color consistency with a printer using a PostScript driver. It uses
perceptual rendering intent, sRGB IEC 61966-2.1 as the default RGB color space, and SWOP as the
default CMYK color space.
*
*
ENWW 37
Page 42

9 The job history
The job history preserves a record of printed jobs in case you want to reprint any of them later; perhaps with
changed settings.
The job history contains a tab for each printer, which has its own separate job history.
The job history includes various items of information about the original job, including its success or failure. If
a page has failed to print, or has been printed twice because of a technical problem, a warning icon is
displayed, which you can click for details. Examples of warnings:
●
This page might have been duplicated.
●
This page or a copy of it might have been duplicated.
●
This page has failed to print.
●
This page or a copy has failed to print.
To manage the size of the job history, you can set a time limit in the general preferences: jobs older than this
are deleted from the history. See General preferences on page 15.
How can I reprint from the job history in case of a mismatch?
Press the Reprint button, and correct the mismatch by changing the loaded paper or changing the print settings in the job
preparation tab.
Search the job history
There is a search field that you can use to search for past jobs or documents by name.
Reprint a job
To reprint a job, press the Reprint button in the job action column. This puts the job back into the job
preparation pane for error detection; if there are no errors, the job moves automatically to the printing
queue. The job is sent to the active printer. If you want to change the printer, press and hold the Prepare to
print button, which displays a menu of all the available printers; select the one you want.
NOTE: You can reprint only a whole job; you cannot select part of a job. You can select the number of
copies.
NOTE: If the printer no longer has the same rolls available, there may be a mismatch between the job and
the available rolls, in which case you are offered the opportunity to modify the job settings.
Reconfigure a job
To change settings or revalidate an old job, press the Prepare to print button in the job action column. The
job is moved to the job preparation pane.
38 Chapter 9 The job history ENWW
Page 43

Any settings that were originally set automatically are recalculated, which may change the settings,
depending on the rolls loaded. Settings that were set manually remain unchanged. You may change any of
the settings manually.
Remove jobs from the job history
You can remove an individual job by pressing the Remove button in the job action column.
ENWW Remove jobs from the job history 39
Page 44
10 Folding
If your printer has a folder installed, you can select the folding style as one of the print options. See Advanced
options on page 29. At the same time, you can choose to print jobs in reverse order whenever the folder is in
use.
If the folder permits custom folding styles, you can create them by selecting Create from the folding style
print option and then filling in the specifications of your custom folding style.
You can specify in the application preferences whether you want to see the dimensions of the folded paper
indicated in green in the preview. See General preferences on page 15.
NOTE: In some cases, the folded dimensions may not be shown because the application does not know
them.
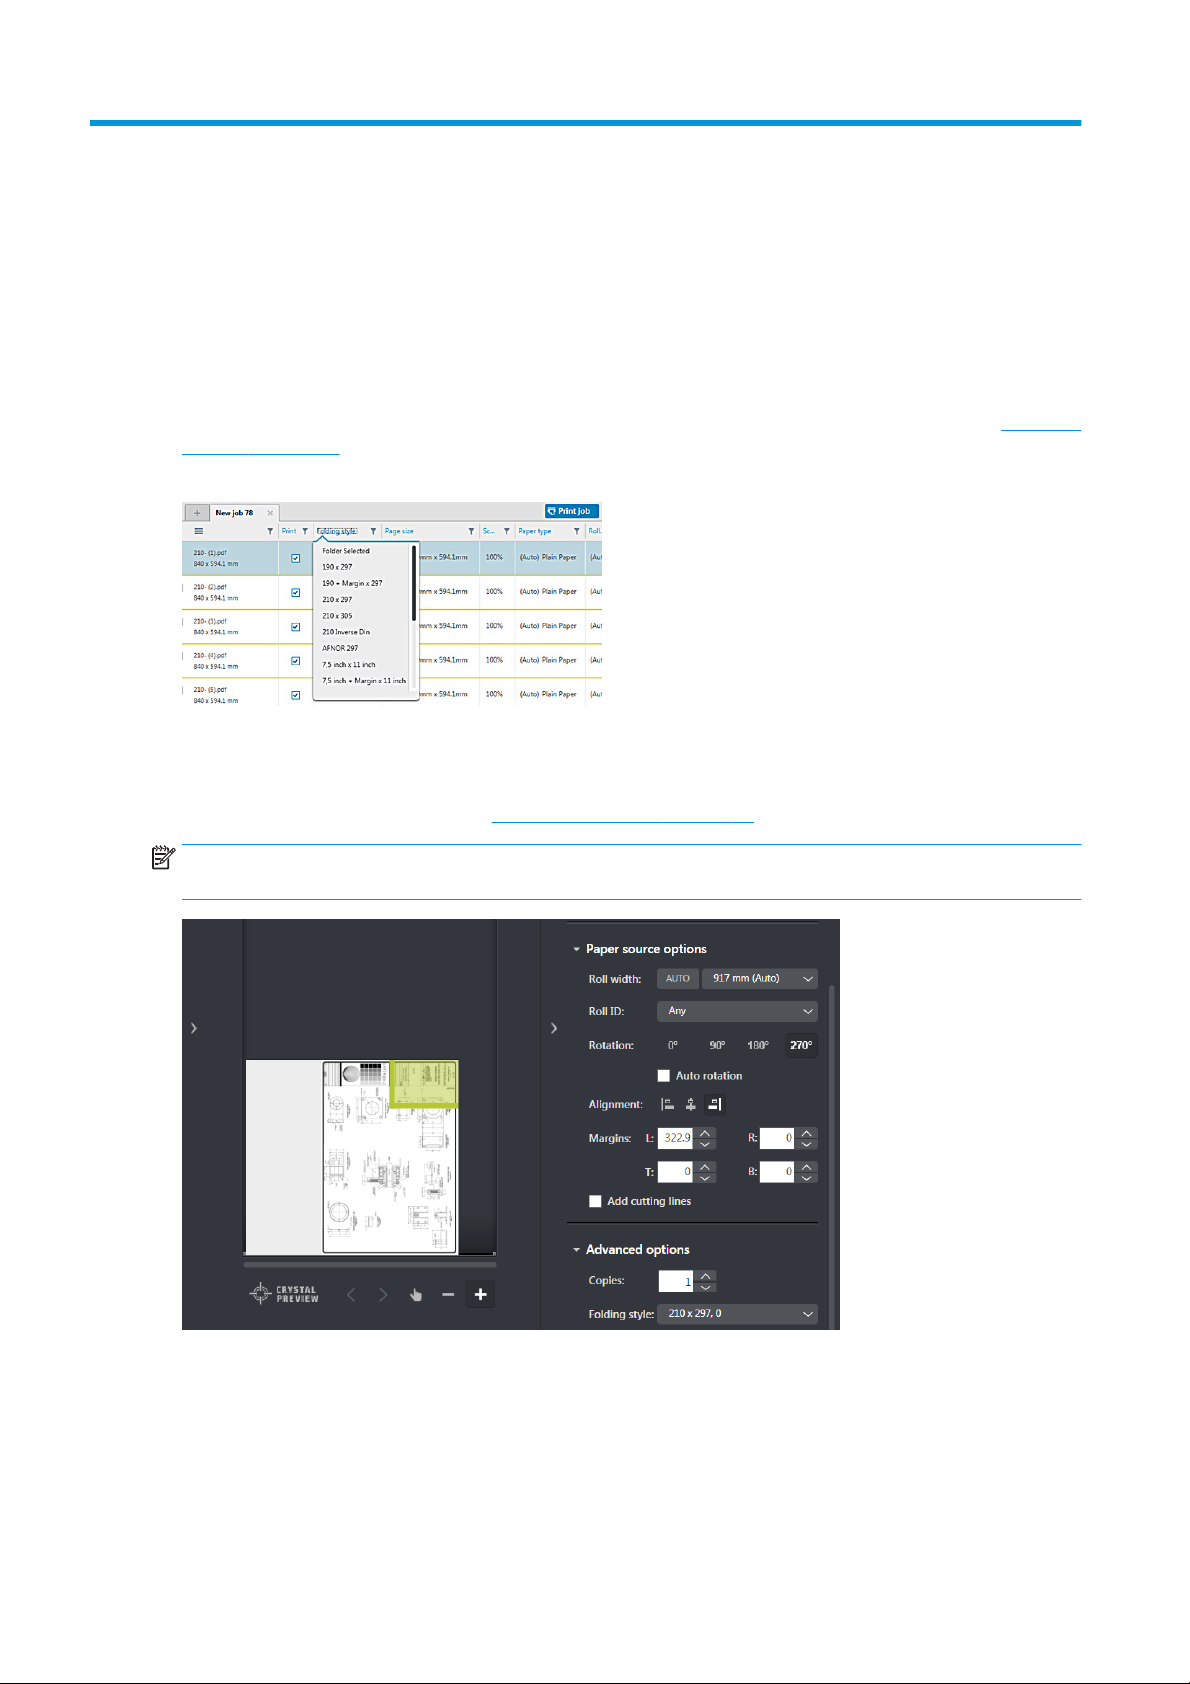
The green rectangle in the preview indicates which part of the page will be on top after folding. If the page
contains some header or summary information describing its contents, you may want to ensure that this is in
the green rectangle, so that it will be easily visible once the page has been folded. To move the contents of
the page, you can use the rotation, alignment, and/or margins options (among the paper source options in
the settings pane).
The following steps are recommended to check that the required content is in the green rectangle, and to
adjust the page if necessary:
40 Chapter 10 Folding ENWW
Page 45

1. Set the default alignment between page and roll in the preferences so that the page is placed on the
correct side of the roll (see Printer-specific preferences on page 15). You need to do this only once.
2. Select the first page of the job to see it in the preview.
3. Zoom in on the green rectangle. You may want to maximize the preview.
4. If required, use the D key on the keyboard to rotate the page 90° counterclockwise or the F key to rotate
90° clockwise.
5. Use the down-arrow navigation key to select and preview the next page.
ENWW 41
Page 46

11 Scanning
If you have a multifunction device with a scanner in the printers pane, you can scan directly into HP Designjet
SmartStream.
1. Use the Embedded Web Server of your multifunction device to set up a scan folder in which scanned
pages will be stored for use by HP Designjet SmartStream.
Every printer compatible with HP Designjet SmartStream includes an Embedded Web Server that you
can use to monitor printing activity and perform various other functions from any Web-connected
device. You can access the Embedded Web Server by clicking the link in the printers pane.
2. In the HP Designjet SmartStream preferences for your multifunction device, set the scan folder to the
same folder that you selected in step 1. See Printer-specific preferences on page 15.
3. Use the front panel of your multifunction device to send a scanned page as a file to HP SmartStream.
4. The application automatically detects the incoming file and displays a notification (see Notifications
on page 3).
5.
To import the files into a job, click the icon in the job header. All files are imported that have not
already been imported into a job. The files remain in the scan folder.
NOTE: If you hover over the icon, it tells you how many files are waiting to be imported. If there
are no new files, the icon is disabled.
TIP: If you have no scanner connected, you can still use the printer-specific preferences to set up a hot
folder from which you can import files conveniently into a job. See Printer-specific preferences on page 15.
42 Chapter 11 Scanning ENWW
Page 47

12 Troubleshooting
There are some issues that may cause an application error window to be displayed, showing one or more
error codes and descriptions. These are listed in the table below.
Error code Short description Full description
2001-0199 Non-recoverable generic database
error
2002-0186 Disk error: can't create temporary
storage in infrastructure
2002-1086 Disk error in analysis The application does not have sufficient system resources to perform the
2002-1097 Analysis: application or resources
not found or no access permissions
2002-2086 Disk error: can't create temporary
storage in job processing
2002-2097 Application or resources not found
or no access permissions
An internal database error has occurred. Restart the application.
If the problem persists, contact your reseller.
The application does not have sufficient system resources to create
temporary data. You are recommended to restart the application. Before
restarting the application, check that, for example, your hard disk has
sufficient free space.
file analysis. It is recommended to restart the application. Before restarting
the application you can check if for example your system has sufficient disk
space.
The application stopped working. One of its resources is not responding.
You are recommended to restart the application.
If the problem persists, the application may need to be reinstalled. Contact
your reseller if necessary.
The application does not have sufficient system resources to process a job
you want to print. You are recommended to restart the application. Before
restarting the application, check that, for example, your hard disk has
sufficient free space.
The application stopped working. One of its resources is not responding.
You are recommended to restart the application.
If the problem persists, the application may need to be reinstalled. Contact
your reseller if necessary.
2002-5086 Disk error: HP-GL/2 can't write to
disk
2002-6186 Disk Error in PDF Library The application does not have sufficient system resources to analyze a PDF
2202-5160 Disk error: can't create temporary
storage in imaging library
2202-8089 Unsupported printer or required
license
The application does not have sufficient system resources to process an
HP-GL/2 file. You are recommended to restart the application. Before
restarting the application, check that, for example, your hard disk has
sufficient free space.
document. You are recommended to restart the application. Before
restarting the application, check that, for example, your hard disk has
sufficient free space.
The application does not have sufficient system resources.You are
recommended to restart the application. Before restarting the application,
check that, for example, your hard disk has sufficient free space.
Check that the printer you are trying to use is supported by the application
(see Supported printers on page 5). In particular, check that it is a
PostScript printer.
Check that the required licenses are installed (see Licensing on page 6).
ENWW 43
Page 48

Index
A
application error 43
automatic settings 21
C
cancel jobs 36
clipping 31
collate 22
columns
hide 2
resequence 2
show 2
copies 22
create a job 18
Crystal Preview 31
E
edit a job 22
error detection 19
errors 20
exit while printing 36
extract pages 24
F
file types, supported 6
filter pages 24
firmware update 6
folder 40
G
general preferences 15
getting started 2
H
hardware requirements 5
history 38
hot folder 42
HP Designjet SmartStream
installation 8
I
image 30
install the application 5
interrupted printing 35
J
job
edit 22
job history 38
job preparation 18
L
language 15
license installation 6
licensing 6
M
main window 2
move a job to another printer 25
P
page 30
pane widths 2
PDF
password protection 20
preferences
general 15
printer-specific 15
preview 30
print settings 26
printer
add 9
remove 10
printer-specific preferences 15
printers pane 11
printers, supported 5
printing 34
printing queue 34
Q
queue 34
R
remove a job 26
remove pages 24
requirements 5
resolution center 20
roll 30
S
scanning 42
send to print 34
settings 26
soft proofing 31
software installation 8
software requirements 5
sort pages 25
supported file types 6
supported printers 5
U
units of measurement 15
user interface 2
W
warnings 20
44 Index ENWW
 Loading...