

Page 1

HP
DesignJet ColorPro Series
Getting Started Guide
HP DesignJet ColorPro CAD (C7777A)
Wide-Format Printers
HP DesignJet ColorPro GA (C7778A)
HP DesignJet ColorPro Series: Getting Started Guide
Page 2

Acknowledgments
Notice
HP ColorSmart II, HP PhotoR Et II and HP ZoomSmart Scaling
Technology are trademarks of Hewlett-Packard Company.
Microsoft is a U.S. registered trademark of Microsoft Corporation.
Windows is a trademark of Microsoft Corporation.
Adobe is a U.S. registered trademark of Adobe Systems
Incorporated.
PostScript is a trademark of Adobe Systems Incorporated.
NetWare and Novell are registered trademarks of Novell
Corporation.
The information contained in this document is subject to change
without notice.
Hewlett-Packard makes no warranty of any kind with regard to this
material, including, but not limited to, the implied warranties of
merchantability and fitness for a particular purpose .
Hewlett-Packard shall not be liable for errors contained he rein or
for incidental or consequential damages in connection with the
furnishing, performance, or use of this material.
No part of this document may be photo copied, printed, or translated
to another language without the prior written consent of HewlettPackard Company.
HP DesignJet ColorPro Series: Getting Started Guide 2
Page 3

Contents
Contents
Step 1 – Unpack the Printer 4
Step 2 – Remove All Tapes from the Printer 5
Step 3 – Connect Cables 5
Step 4 – Install Ink Cartridges 5
Step 5 – Install Printheads 6
Step 6 – Insert Paper in Tray 2 7
Step 7 – Insert Paper in Tray 3 9
Step 8 – Install the Printer Software 10
Step 9 – Change the Language Displayed on the Printer’s
Control Panel 11
Step 10 – Install Additional Memory 11
About HP Customer Care 13
What to Do Before You Call 13
HP Supplies 14
Printer Spec ifications 16
Hewlett-Packard Limited Warranty Statement 22
Regulatory Notices 25
HP DesignJet ColorPro Series: Getting Started Guide 3
Page 4
Step 1 – Unpack the Printer
Step 1 – Unpack the Printer
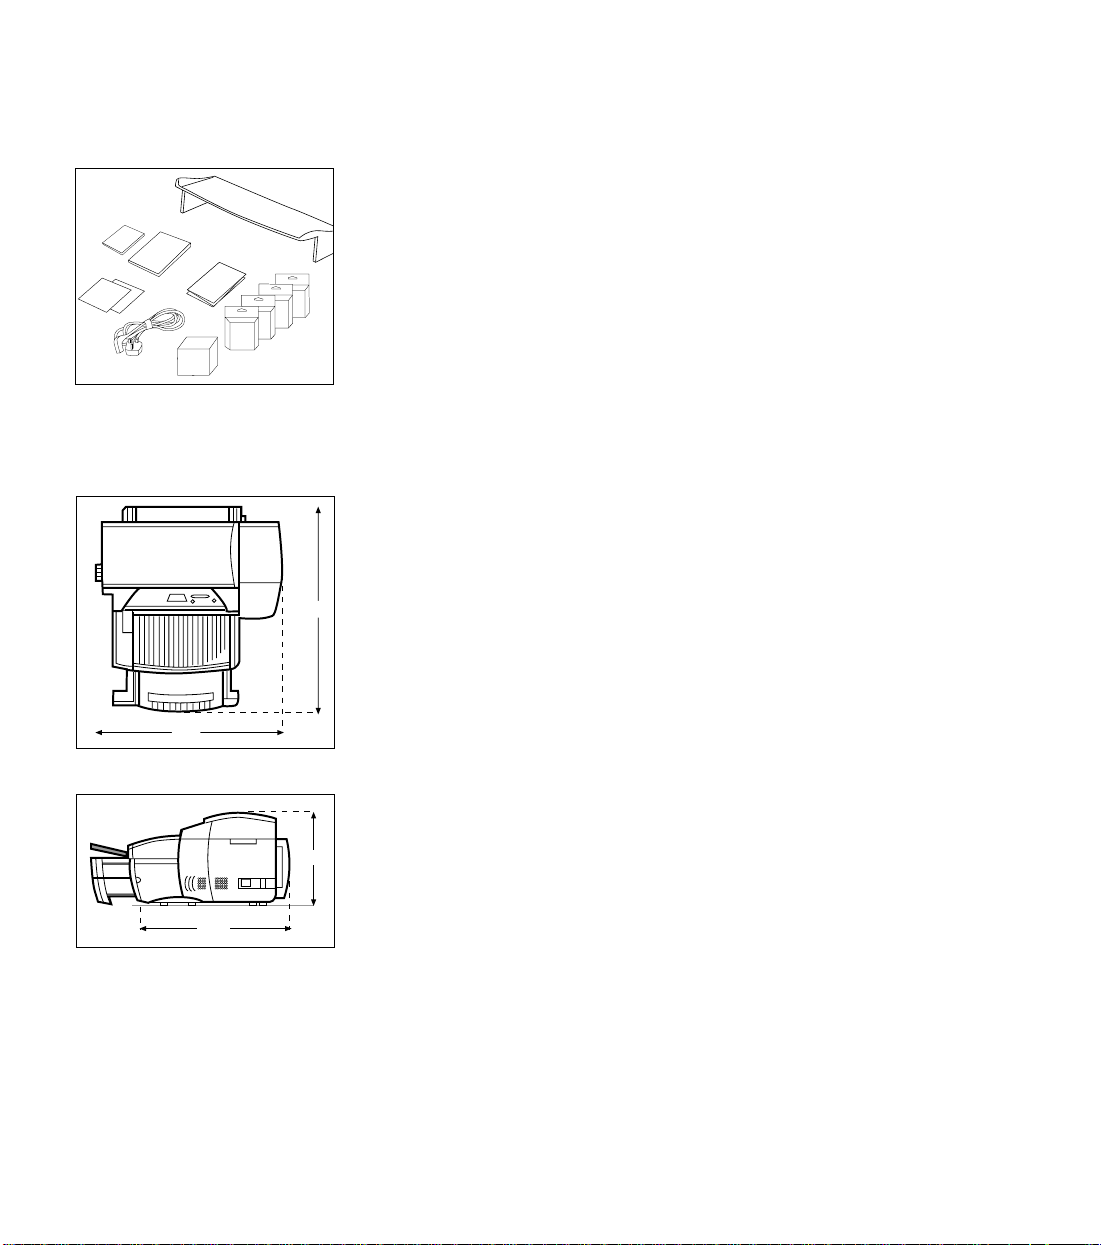
1. Check that the following items are included with the printer:
a. Power Cord
b. Four HP No. 10 Ink Cartridges
c. Four HP No. 10 Printheads
d. Extended Tray Cover
e. Setup Poster
f. Getting Started Guide
g. Quick Reference Guide
h. Connectivity software (drivers, etc. on CD or diskettes)
i. HP JetDirect CD (HP DesignJet ColorPro GA printer only).
2. Prepare printer location.
The location requirements for the printer are:
• A st ur dy, level surface for placement
• A space allowance around the printer
• A well ventilated room
• No exposure to direct sunlight or chemicals, including
• An adequate power supply
• A stable environment – no abrupt temperature or humidity
• Relative humidity 20% to 80%
• R oom temperature 59° to 95° F (15° to 35° C).
h,i
d
g
f
e
a
b
c
745
685
337
(black, cyan, magenta and yellow)
(black, cyan, magenta and yellow)
ammonia based cleaning solutions
changes
532
HP DesignJet ColorPro Series: Getting Started Guide 4
Page 5
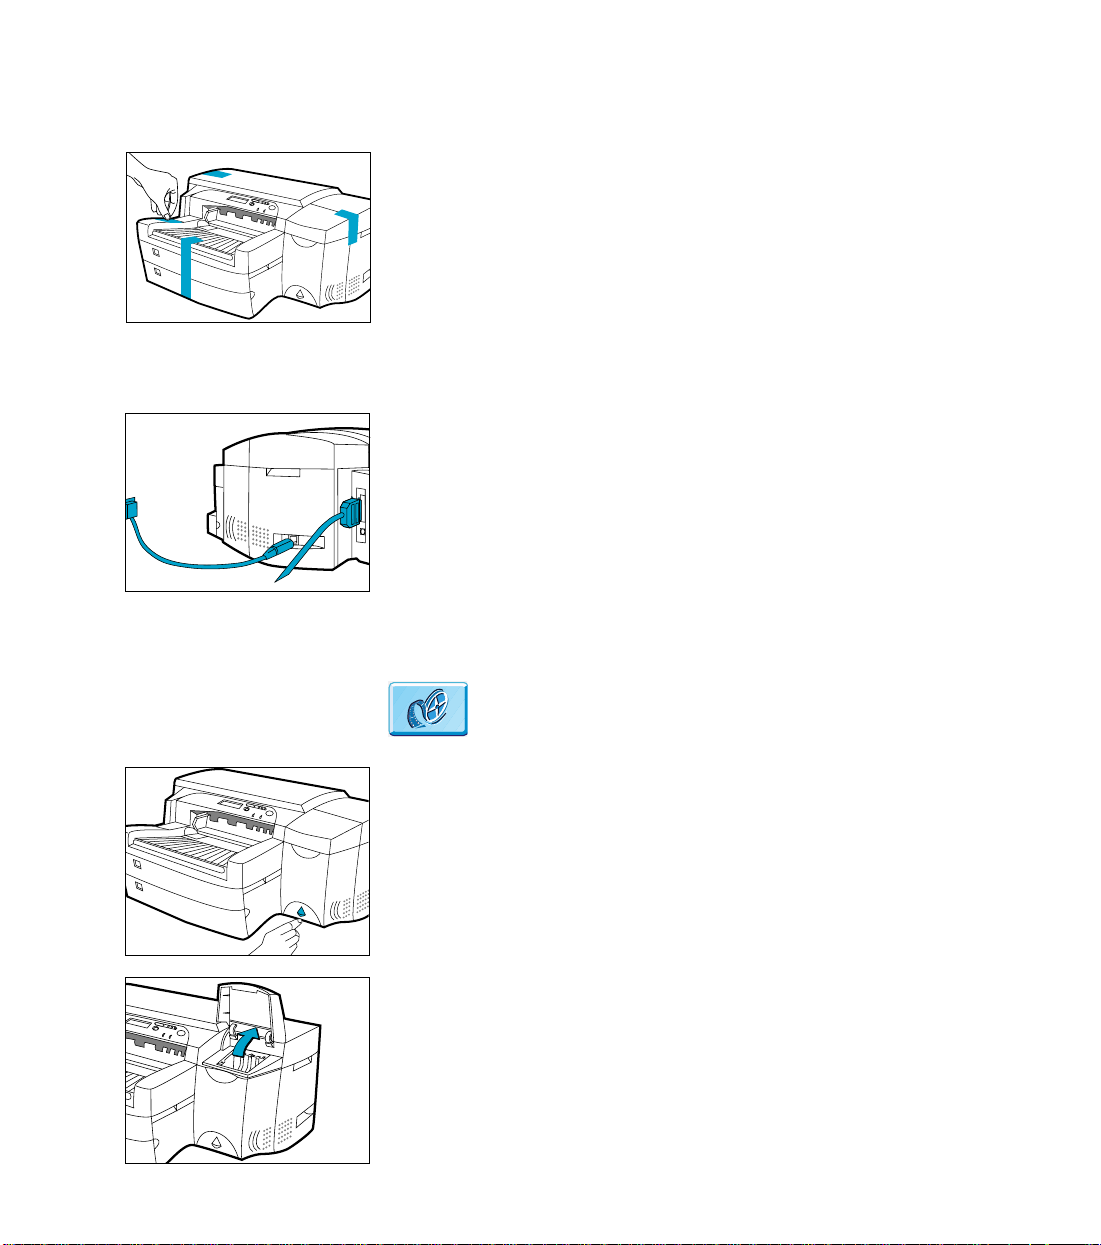
S tep 2 – Remove All Tapes from the Printer
1. Remove the four tapes securing the printer . Open the top cover
and remove the fifth tape from the inside of the printer.
Step 3 – Connect Cables
1. Ensure that the computer is turned off.
2. Plug the power connector firmly into the printer’s power
socket.
3. Plug the power plug into an electrical outlet.
4. Connect the printer end of the parallel cable firmly to the
parallel port on the printer.
5. Snap both clips onto the notches on the connector.
Step 2 – Remove All Tapes from the Printer
Step 4 – Install Ink Cartridges
1. Press the Pow er button to turn on the printer.
2. Lift to open the Ink Cartridge door.
In the online edition, click to see a video clip of the
following procedure:
HP DesignJet ColorPro Series: Getting Started Guide 5
Page 6
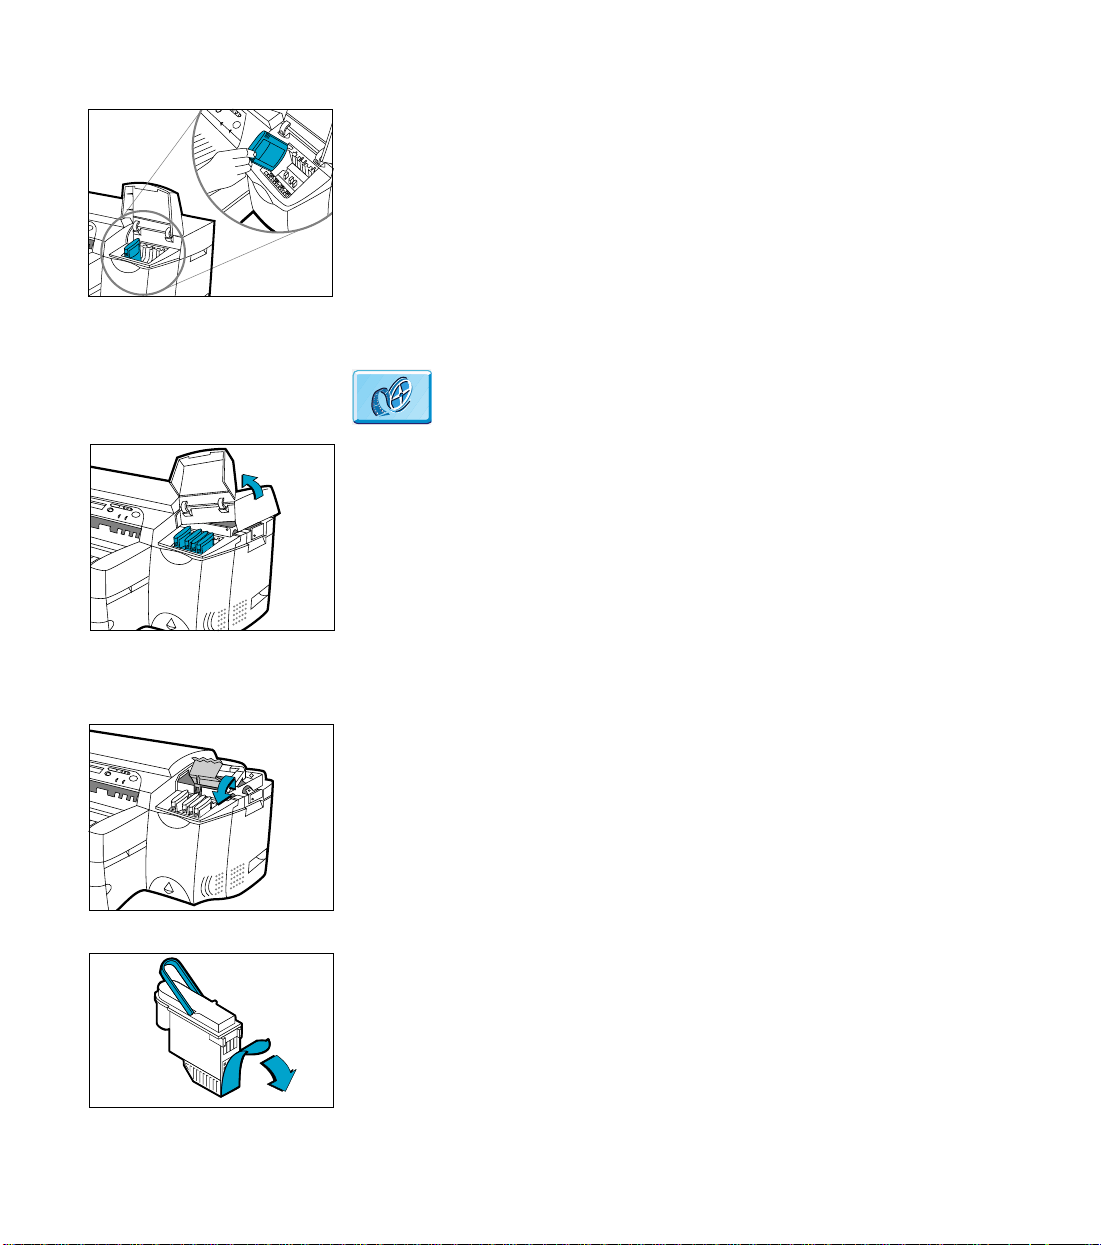
Step 5 – Install Printheads
3. Remove all four ink cartridges from their packaging and insert
each ink cartridge into its own color-coded slots. Make sure
that each cartridge is pressed firmly into place.
Step 5 – Install Printheads
1. Make sure that the Ink Cartridge Door is open. Grasp the side
of the Printhead Access Cover and lift up firmly to snap the
cover open and completely remove it from the printer. You
may have to use some force to open the cover.
Note: If the cradle cannot be found under the cover, it means
that the tape securing the cradle has not been removed. Open
the top cover, remove the tape securing the cradle, turn off the
printer and turn on again.
In the online edition, click to see a video clip of the
following procedure:
2. Make sure the printer is turned ON.
Open the purple printhead latch by lifting the latch from the
rear. Pull the latch f orward and down to release the latch hook
from the purple carriage lock. Then lift and push the latch
toward the back of the printer.
3. Remove each printhead from its package.
Remove the protective tape from each printhead.
HP DesignJet ColorPro Series: Getting Started Guide 6
Page 7
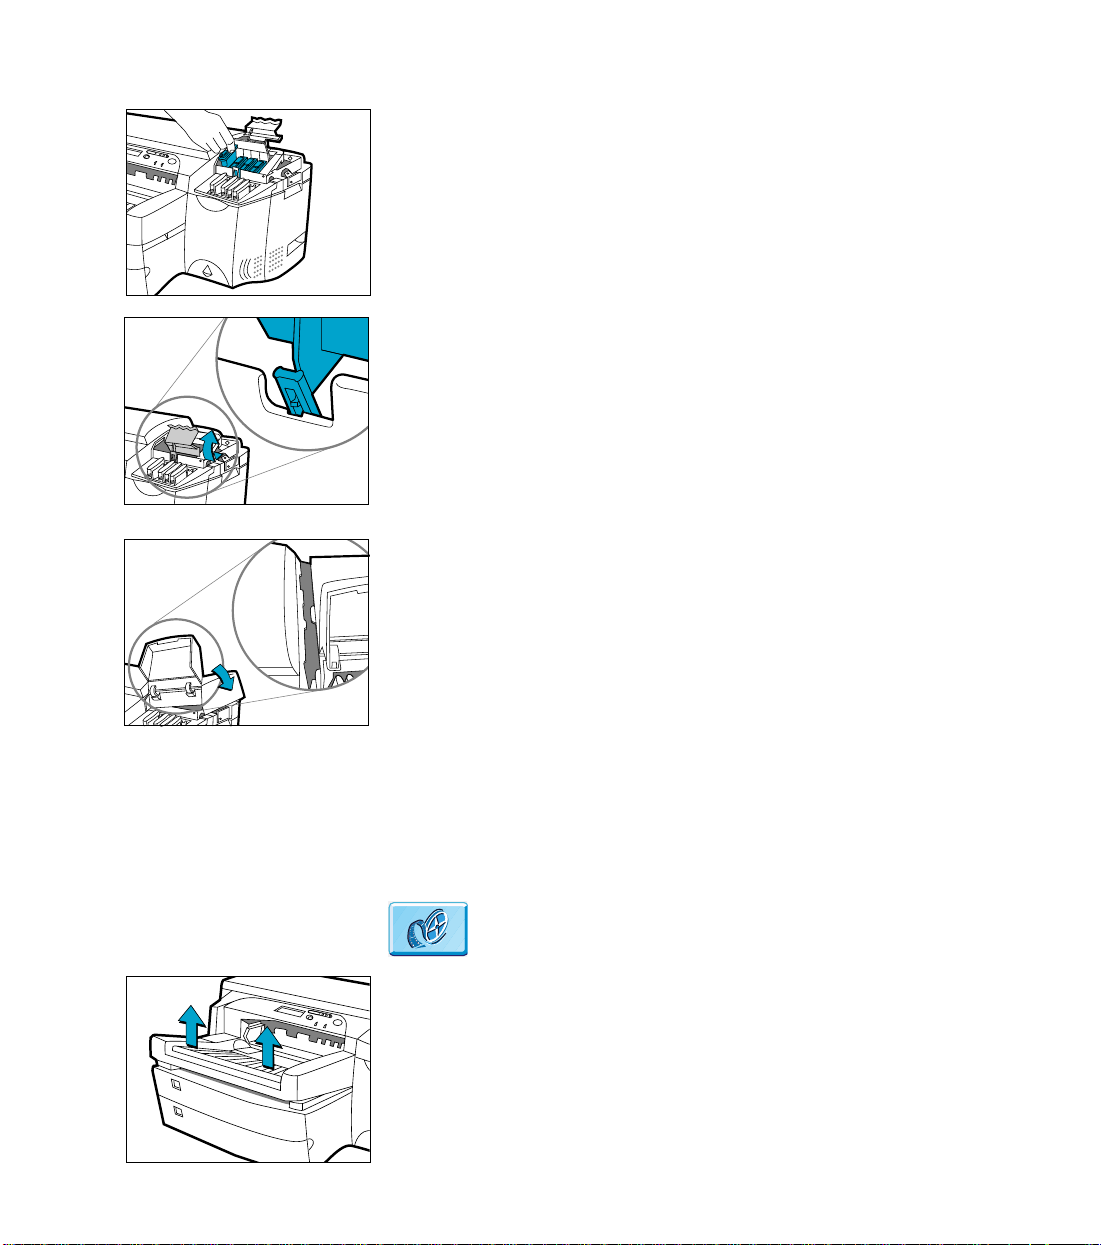
Step 6 – Insert Paper in Tray 2
Insert each printhead into its own color-coded socket.
Push the printh ead s dow n fir mly.
4. Close the printhead latch. Be sure that the hook on the
printhead latch catches the carriage lock.
Note: You may have to use some force to close the printhead
latch.
5. Ensure that the Ink Cartridge Door is lifted. Align the tabs of
the cover with the tabs on the printer.
6. Lower and snap to close the cover.
7. Close the Ink Cartridge Door .
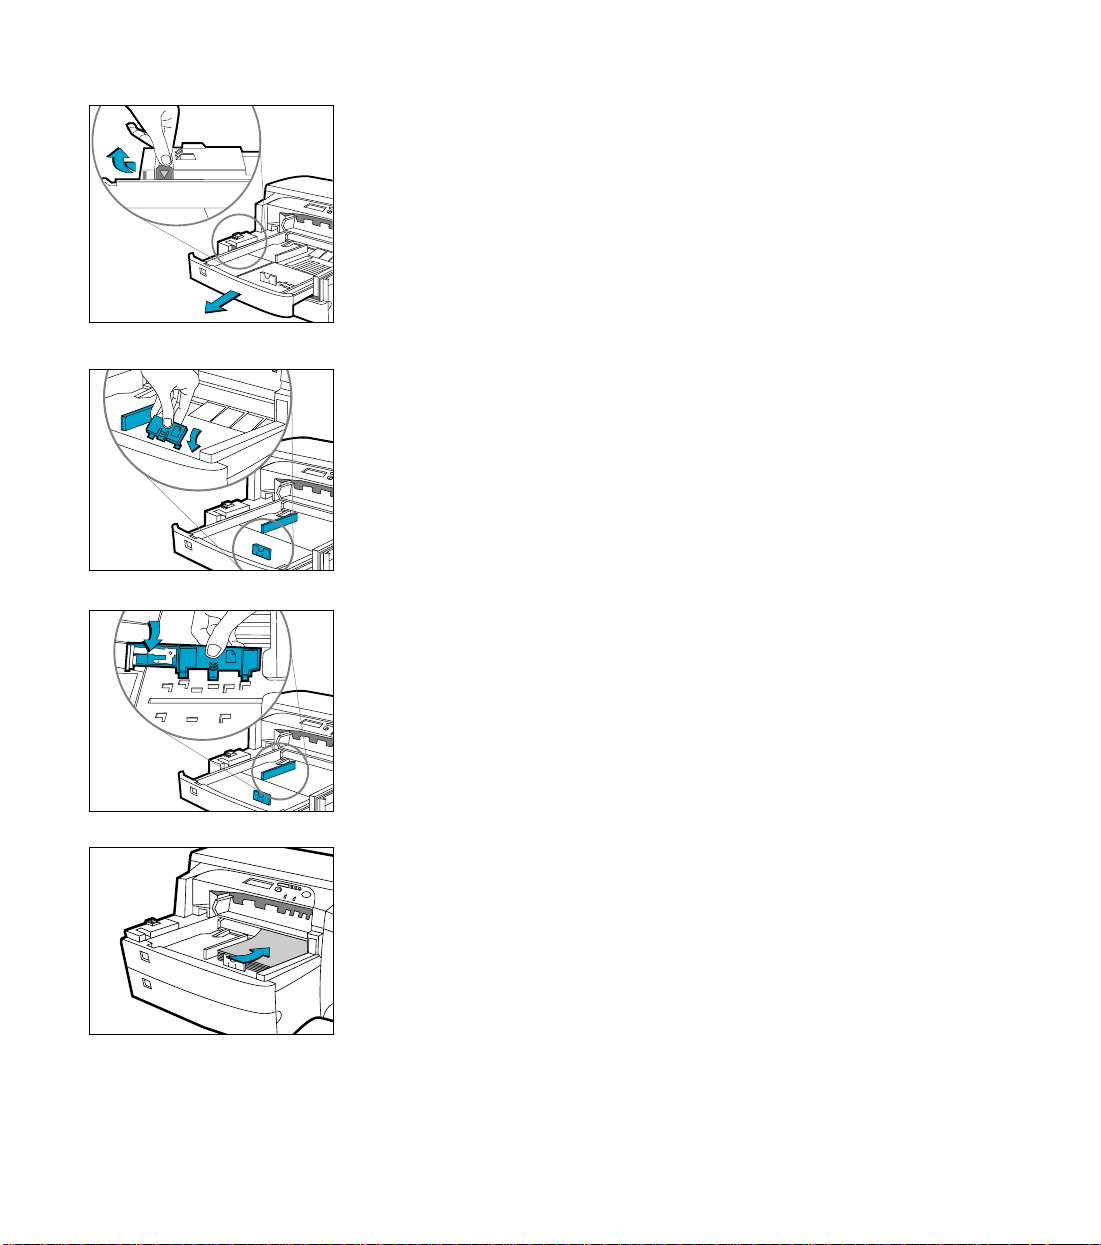
Step 6 – Insert Paper in Tray 2
Note: Tray 2 is a fixed tray . T ray 1 has to be removed before Tray
2 can be accessed.
1. Remove Tray 1 and set it aside.
In the online edition, click to see a video clip of the
following procedure:
HP DesignJet ColorPro Series: Getting Started Guide 7
Page 8
Step 6 – Insert Paper in Tray 2
2
2
2. If you are loading A3-size or T abloid-size paper, unlock the
tray lock, extend the tray and re-lock the tray.
3. Unpack the Paper Length and Width guides.
4. Insert the Paper Length guide into the slot of the paper size you
wish to load.
5. Insert the Paper Width guide into the slot of the paper size you
wish to load.
6. Insert paper, print side down into the printer.
7. T ap the left side of the st ack of paper to ensure that it is flush to
the right side of the tray.
HP DesignJet ColorPro Series: Getting Started Guide 8
Page 9
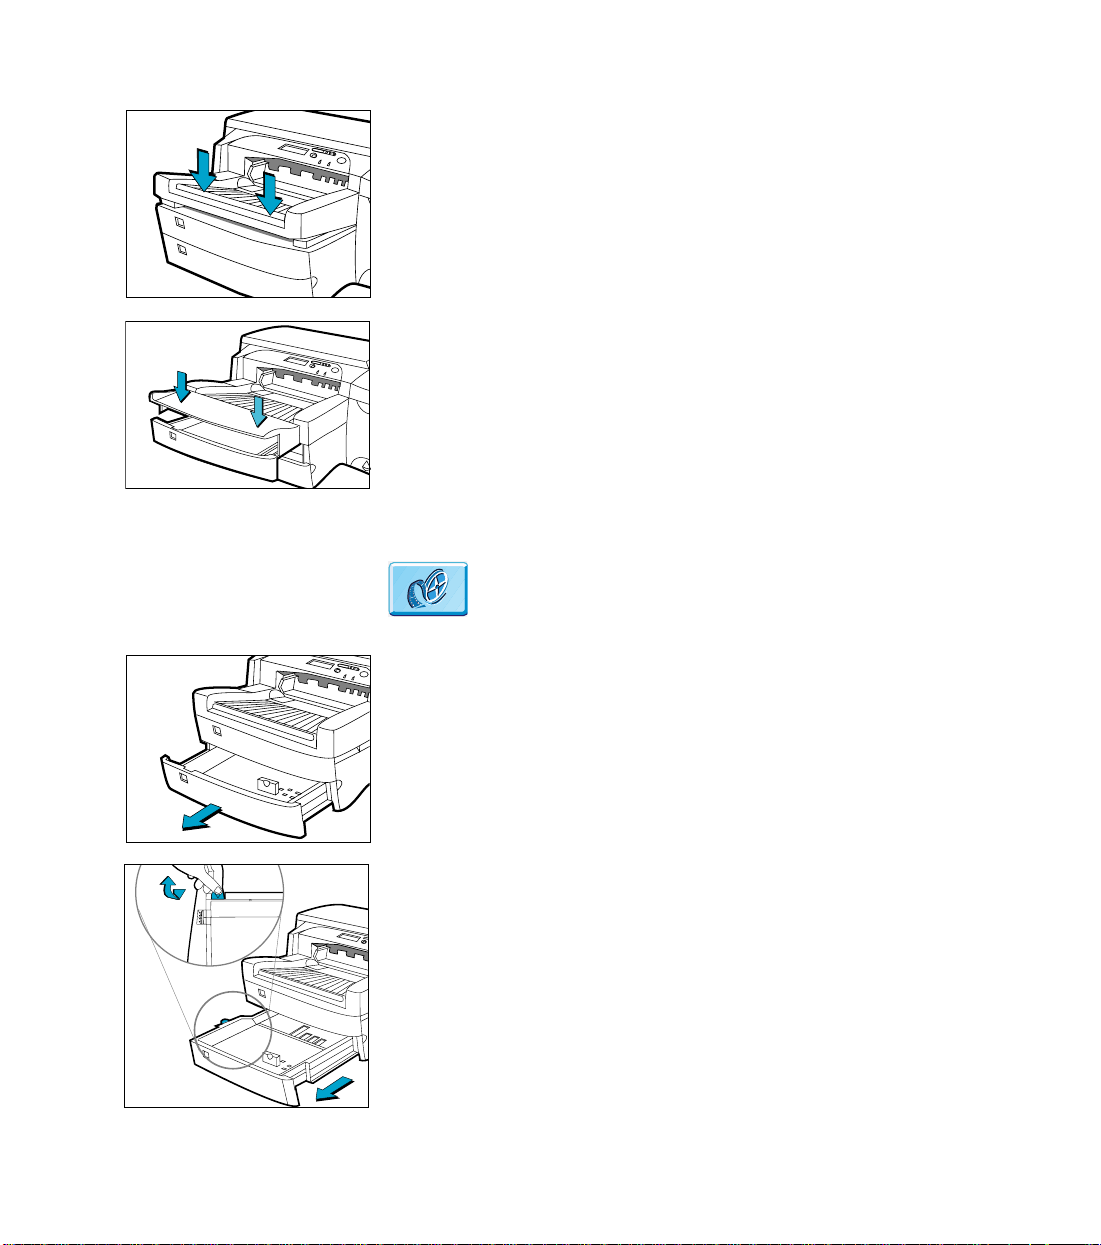
8. Replace Tray 1. If Tray 2 is extended, place the Extended Tray
Cover over the tray.
9. On the Control Panel, press [Menu] until P APER HANDLING
MENU appears.
10.Press [Item] to select TRAY 2 TYPE=
11.Press [Value] to select the media type you have loaded into the
tray and press [Select].
Step 7 – Insert Paper in Tray 3
Step 7 – Insert Paper in Tray 3
In the online edition, click to see a video clip of the
following procedure:
1. Grasp the sides of Tray 3 and pull it out of the printer.
2. If you are loading A3-size or T abloid-size paper, unlock the
tray lock, extend the tray and re-lock the tray.
HP DesignJet ColorPro Series: Getting Started Guide 9
Page 10
Step 8 – Install the Printer Software
3
3
3
A3
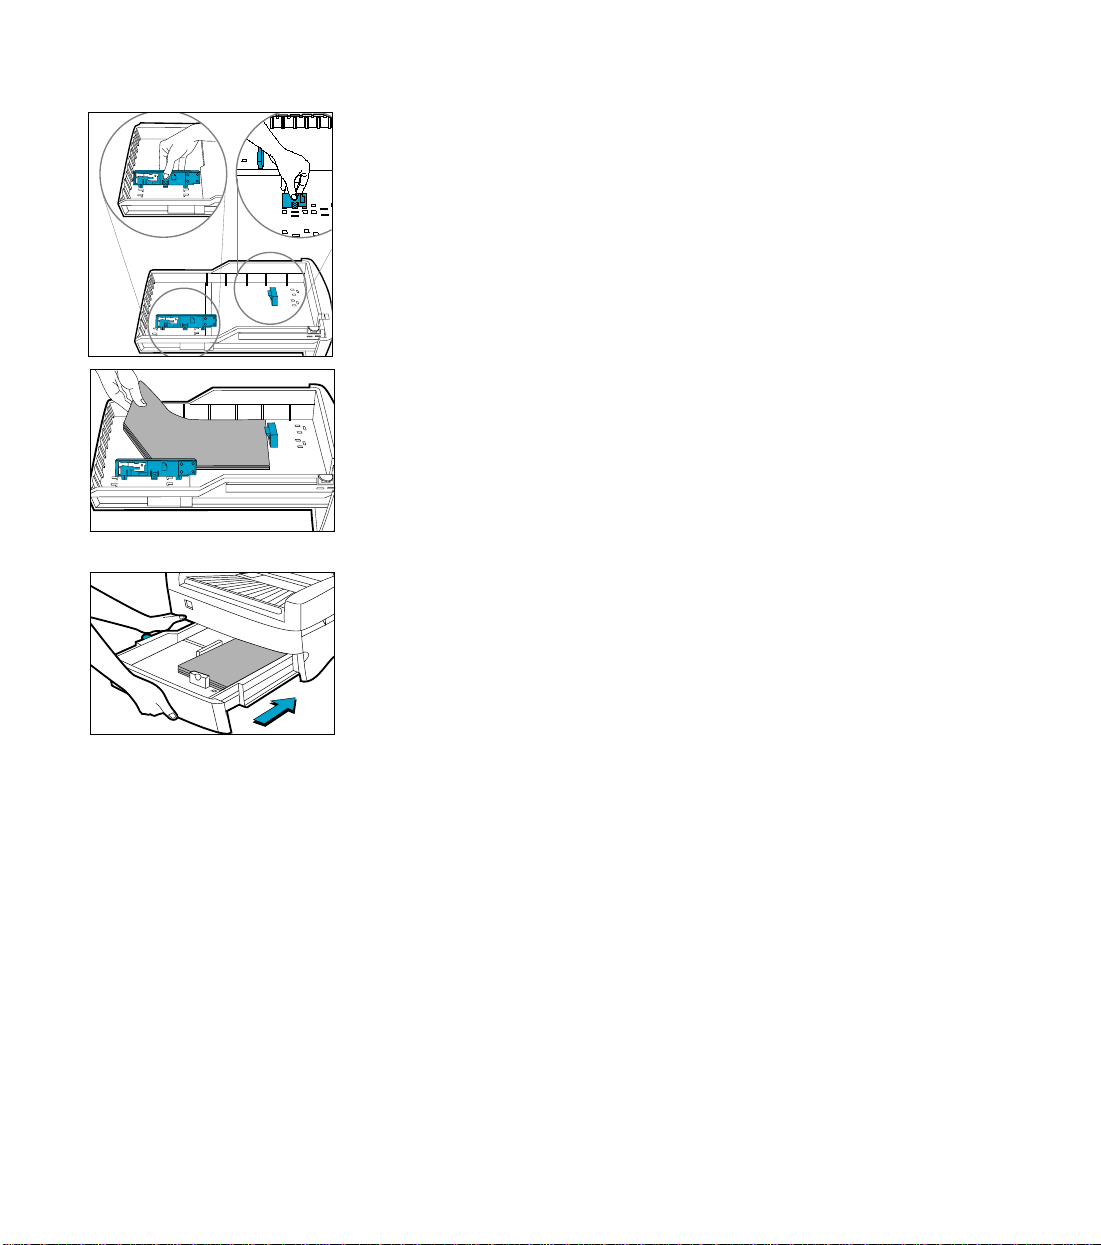
3. Unpack the Paper Length and Width guides.
4. Insert the Paper Length guide into the slot of the paper size you
wish to load.
5. Insert the Paper Width guide into the slot of the paper size you
wish to load.
A3
3
6. Load paper by aligning the paper edge to the Paper Length
guide first. Tap the other end of the paper to ensure that the
paper is properly loaded.
7. Re-insert Tray 3 back into the printer.
8. On the Control Panel, press [Menu] until P APER HANDLING
MENU appears.
9. Press [Item] to select TRAY 3 TYPE=
10.Press [Value] to select the media type you have loaded into the
tray and press [Select].
Step 8 – Install the Printer Software
Before you can use the printer, you must install the printer software.
To install the printer software, you need at least the amounts of
memory listed in the User’s Guide installed in your computer.
For the HP DesignJet ColorPro GA printer, software supplied
includes:
• Adobe PressReady driver for PostScript
• HP ColorSync color profiles (for you to install if your
operating system does not contain HP ColorSync)
HP DesignJet ColorPro Series: Getting Started Guide 10
Page 11

Step 9 – Change the Language Displayed on the Printer’s Control Panel
For the HP DesignJet ColorPro CAD printer, software supplied
includes:
• ADI driver for AutoCAD
• HP- GL/2 driver for Windows applications
Follow the instructions supplied with the printer software.
Step 9 – Change th e Language Displ ayed on the Printer’s Control Panel
You can change the printer’s control panel display to the
following languages:
• E nglish, German, French, Italian, Spanish, Norwegian, Dutch,
Portuguese, Finnish, Swedish, Danish, Polish, Czech or
Russian.
To do so:
1. Power off your printer.
2. Press and hold [Menu] and power on your printer.
3. Wait until the display shows “LANG=X” (where “X” is the
current language setting and is in that language).
4. Release the [Menu] button.
5. Press [Value] to scroll through the language list.
6. Press [Select] to choose and confirm your language selection.
Step 10 – Install Additional Memo ry
If you find that the amount of memory in your printer is
insufficient for your requirements, you can install additional
memory modules.
CAUTION: Make sure the printer is switched off at the power isolator
switch at the front of the printer, and that the power cord and
the interface cable are disconnected.
• The memory expansion module contains electrical components
that are easily damaged by small amounts of static electricity.
Please read the following information carefully before you
handle the memory expansion module:
HP DesignJet ColorPro Series: Getting Started Guide 11
Page 12

Step 10 – Install Additional Memory
• Leave the memory expansion module in the antistatic bag until
you are ready to install it.
• I f possible, use an antistatic wrist strap and a grounding mat.
• Before you remove the memory expansion module from the
antistatic bag, touch a grounded, unpainted metal surface to
discharge static electricity.
1. Switch the printer off at the front of the printer and disconnect
the power cord (at the side of the printer) and the interface
cable (at the back).
2. Release the two latches on either side of the back of the printer,
so that the back hinges down to open.
3. Put on a grounding wrist strap and attach the other end to the
metal chassis of the printer.
4. Unscrew the four screws and remove the cover plate at the
back of the printer. To prevent loss of these screws, loosely reinstall them in the printer.
5. Take the memory expansion module out of its ba g. Hold the
memory expansion module by its edges with the non-metallic
edges toward you.
6. Carefully push the top edge of the memory expansion module
into the slot.
7. Continue pushing the top edge of the memory expansion
module until you feel it “click” into position. At the same time
you will see that the top locking tab locks into position.
8. Carefully push the bottom edge of the memory expansion
module into the slot until you feel it “click” into position.
Again, you will see that the bottom locking tab locks into
position.
9. Remove the grounding wrist strap and re-install the cover plate
on the back of the printer, using the four screws.
10.Reconnect the power cord and the interface cable and switch
on the power isolator switch at the front of the printer.
11.Replace the metal panel and close the back of the printer.
In the online edition, click to see a video clip of the
following procedure:
HP DesignJet ColorPro Series: Getting Started Guide 12
Page 13

About HP Customer Care
As your strategic support partner, we make it our business to help
keep your business running smoothly. HP Customer Care offers
award-winning support to ensure you ge t the most from your HP
DesignJet.
HP Customer Care provides comprehensive, proven support
expertise and leverages new technologies to give customers
unique end-to-end support. Services include setup and
installation, troubleshooting tools, warranty upgrades, repair and
exchange services, phone and W eb support, software updates, and
self-maintenance services. To find out more about HP Customer
Care, please visit us at: www.hp.com/go/support.
What to Do Before You Call
1. Review the troubleshooting suggestions in this document:
About HP Customer Care
- In the relevant driver documentation supplied with this
printer (for users sending PostScript files or those using
Microsoft Windows).
- If you have installed third party software drivers and RIPs
refer to that user documentation.
- If the problem appears to be related to your software
application, first contact your software vendor .
2. If you still have difficulty, refer to the HP Support Services
booklet shipped with this printer. This document contains a
comprehensive list of various support se rvices available to
help solve printer problems.
3. If you do call one of the Hewlett-Packard offices, please have
the following information available to help us answer your
questions more quickly:
- The printer you are using (the product number and the serial
number, found on the label at the back of the printer).
- The computer you are using.
- Any special equipment or software you are using (for
example, spoolers, networks, switch-boxes, modems, or
special software drivers).
HP DesignJet ColorPro Series: Getting Started Guide 13
Page 14

HP Supplies
- The cable you are using (by part number) and where you
purchased it.
- The type of interface used on your printer (parallel, or
network).
- The software name and version you are currently using.
- The information (base firmware version, and so on) displayed
in the Information Menu.
- If possible print out the Diagnostic Test and FAX it to the
support center helping you.
HP Supplies
Number Description
Accessories C2950A IEEE 1284-compliant A-B parallel cable 2m
C2951A IEEE 1284-compliant A-B parallel cable 3m
Any HP JetDirect MIO print server cards
Printheads C4800A HP Black No. 10 Printhead
C4801A HP Cyan No. 10 Printhead
C4802A HP Magenta No. 10 Printhea d
C4803A HP Yellow No. 10 Printhead
Ink Cartridges C4844A HP No. 10 Large Black ink Cartridge
C4840A HP No. 10 Black ink Cartridge 26.5 ml
C4841A HP No. 10 Cyan ink Cartridge 28 ml
C4842A HP No. 10 Yellow ink Cartridge 28 ml
C4843A HP No. 10 Magenta ink Cartridge 28 ml
HP Memory Expansion
Modules
D3647B HP 16 MB (2x8 MB ) 60ns EDO SIMM
D3648B HP 32 MB (2x16 MB ) 60ns EDO SIMM
D4543A HP 64 MB (2x32 MB) 60ns EDO SIMM
HP Bright White Inkjet
Paper
C1857A U.S. 11x17, 200 sheets
C1858A European A3, 200 sheets
C1824A U.S. Letter, 500 sheets
C1825A European A4, 500 sheets
HP DesignJet ColorPro Series: Getting Started Guide 14
Page 15

HP Pre mium Inkjet
Paper
HP Supplies
C1855A U.S. 11x17, 100 sheets
C1856A European A3, 100 sheets
51634Y U.S. Letter size, 200 sheets
51634Z European A4 size, 200 sheets
HP Pre mium
Heavyweight Inkjet
Paper
HP Premium Photo
Paper
HP Pre mium
Transparency Film
HP Pre mium Inkjet
Rapid-Dry
Transparencies
HP Iron-On T-Shirt
Transfers
C1852A U.S. Letter size, 100 sheets
C1853A European A4 size, 100 sheets
C6058A U.S. 11x17, 20 sheets
C6059A European A3, 20 sheets
C6039A U.S. Letter size, 15 sheets
C6040A European A4 size, 15 sheets
C6043A Asian A4 size, 15 sheets
C3834A U.S. Letter size, 50 sheets
C3828A U.S. Letter size, 20 sheets
C3835A European, A4 size, 50 sheets
C3832A European A4 size, 20 sheets
C6051A U.S. Letter size, 50 sheets
C6053A European, A4 size, 50 sheets
C6049A U.S. Letter size, 10 sheets
C6050A European A4 size, 10 sheets
HP B+ Media C6790A HP Design Heavyweight paper
C6791A HP Design Photo paper
HP Greeting Card Paper C1812A HP Greeting Card Paper
C6042A HP Greeting Card Paper (Europe only)
HP White Labels 92296A 1" x 2
92296B 1
5
/
" Addressing Labels
8
1
/
" x 4" Addressing Labels
3
92296C 1" x 4" Addressing Labels
92296D 2" x 4" Shipping Labels
92296E 3
92296F
1
/
" x 4" Shipping Labels
3
" x 1¾" Return Address La bels
92296K 8½" x 11" White Full Sheet Labels
HP DesignJet ColorPro Series: Getting Started Guide 15
Page 16

Printer Specifications
Addressing Labels 92296L 99.1 x 38.1mm Addressing Labels
92296M 99.1 x 33.8mm Addressing Labels
92296N 63.5 x 38.1mm Addressing Labels
92296P 100 x 51mm Addressing Labels
92296R 199.6 x 289mm, Full Sheet Labels
C4296A 99.1 x 67.7mm, Parcel Labels
C4297A 63.5 x 46.6mm Addressing Labels
Printer Specifications
Print Method Plain paper drop on-dema nd thermal inkjet printing
Print Speed Black
Black Text Letter / A4 11x17 / A3
Econofast Mode 9 ppm 5 ppm
Approximate figures.
Exact speed dependent
Normal Mode 7 ppm 3 ppm
Best Mode 7 ppm 3 ppm
on the system
configuration, software
program, and document
complexity
Print Speed Color
Color Highlights Letter / A4 11x17 / A3
Econofast Mode 9 ppm 5 ppm
Approximate figures.
Exact speed dependent
Normal Mode 6 ppm 3 ppm
Best Mode 5 ppm 2 ppm
on the system
configuration, software
program, and document
complexity
Mixed Text & Graphics Letter / A4 11x17 / A3
Econofast Mode 7 ppm 4 ppm
Normal Mode 3.5 ppm 2 ppm
Best Mode 1.2 ppm 0.5 ppm
Full Page Color Highlights Letter / A4 11x17 / A3
Econofast Mode 3.5 ppm 1 ppm
Normal Mode 1.8 ppm 0.8 ppm
Best Mode 0.4 ppm 0.2 ppm
Black Resolution Up to 600x600 dpi
Color Resolution PhotoREt II for photo quality
Printhead Nozzles 304 black, 912 color (304 per color printhead)
HP DesignJet ColorPro Series: Getting Started Guide 16
Page 17

Printer Specifications
Memory 4 Mbytes on main board
Two 72-pin SIMM slots for additional memory (EDO, 60ns)
expansion up to a total of 76 Mbytes
Paper Handling Standard input capacity of 400 sheets through two trays of 150
sheet and 250 sheet capacity .
Standard output capacity of 150 sheets (face-up)
Rear Manual feed – single sheet only
Tray 1 (Input / Output Tray) – Sheets: up to 10, Cards: up to 4
Tray 2 (Upper Tray) – Sheets: up to 150, Cards: up to 60
Tray 3 (lower Tray) – Sheets: up to 250
All input paths handle standard media sizes (as listed below) up
to 13"x19" (Super A3)
Additional, Tray 1 and the r ear manual feed support media sizes
as small as 4" x 6" (101.6mm x 152.4mm)
Built-in media-size sensors prevent printing on the wrong type
of media.
Paper Size Handling Minimum Width: 76.2 mm (4 in.) x 127.0 mm (6 in.)
Maximum Width: 330.2 mm (13 in.) x 482.6 mm (19 in.)
Maximum Print Width 320 mm (12.61 in.) x 470 mm (18.49 in.) on 13 in. x 19 in. media.
Recommended Media
Weight
All input paths handle the following paper weights with the rear
straight-through paper path handling up to 0.3mm thickness of
paper
Paper: 60 to 135 g/m2 (16 to 36 lb. Bond)
Cards: 110 to 200 g/m2 (110 lb. Index)
Straight-through path: up to 0.3 mm thickness (0.012 in.) /
220 g/m2 (110 lb.Index)
HP DesignJet ColorPro Series: Getting Started Guide 17
Page 18

Printer Specifications
Connectivity / Network
Management
HP DesignJet ColorPro CAD:
Network-capable printer for DOS and Windows environments
HP-GL/2 and AutoCAD Driver Support for Windows NT 4.0,
Windows 3.1x/95/98
Centronics parallel, IEEE 1284 compliant
One network interface slot accepts optional HP MIO Print
Servers with support for Novell Netware, Microsoft LAN
Manager, W indo ws for Workgroups, Windows NT, IBM LAN
Server, Unix environment and AppleTalk (EtherTalk and
LocalTalk)
HP DesignJet ColorPro GA:
Network-ready printer for DOS, Windows and Macintosh
environments
Centronics parallel, IEEE 1284 compliant
HP MIO 10/100Base-TX print server with support for Novell
Netware, Microsoft LAN Manager, Windows for Workgroups,
Windows NT, IBM LAN Server, Unix environment and
AppleT alk (EtherTalk and LocalTalk)
Supports networking protocols IPX/SPX, TCP/IP, DLC/LLC,
AppleTalk and NetBEUI
Adobe PostScript 3 driver for Windows
Automatic switching between languages and ports.
HP JetAdmin printer management software provides easy printer
setup and configuration. Latest versions available from HP’ s web
site (http://www.hp.com/go/jetadmin)
HP WebJetAdmin printer management software available from
HP’s web site ( http://www.hp.com/go/webjetadmin ) for s imple
installation and configuration from a common web browser.
HP DesignJet ColorPro Series: Getting Started Guide 18
Page 19

Printer Specifications
Media Size/Type Paper: Super B 13 x 19 in., U.S. Tabloid 11 x 17 in., U.S. Legal
8.5 x 14 in., U.S. Letter 8.5 x 11 in., European A3 297 x 420 mm,
A4 210 x 297 mm, B4 257 x 364 mm
Transparencies: U.S. Letter 8.5 x 11 in. , European A4 210 x 297
mm Envelope: U.S. No. 10, 4.12 x 9.5 in.; European DL 220 x
110 mm, C6 1 14 x 162 mm; Japanese #2 11 1.1 x 146 mm, #3 120
x 235 mm
Cards: U.S. Index card 4 x 6 in., Index card 5 x 8 in.; European
A6 card 105 x 148.5 mm; Postcard 100 x 148mm
Labels: U.S. Labels, 8.5 x 1 1 in.; European A4 labels, 210 x 297
mm
Control Panel Intuitive operation and complete, easy-to-understand messages
Two-line LCD display and 2 LEDs
Buttons: (Go), Job Cancel, Menu, Item, Value, Select
Indicators: Attention, Ready
Messages can be displayed in 14 languages: English, French,
Italian, German, Spanish, Portuguese, Dutch, Norwegian,
Finnish, Swedish, Danish, Polish, Czech and Russian
Operating
Operating temperature: 5° to 40° C (41° to 104° F)
Environmen t
Recommended operating conditions: 15° to 35° C (59° to 95° F)
Storage temperature: -40° to 60° C (-40° to 140° F)
Relative Humidity: 20 to 80% RH non-condensing
Noise levels per ISO 9614-1: Sound Pressure, LwAM 62 dB(A)
Power Supply Built-in Universal Power Supply
Power Requirements Input Voltage 100 – 240 AC (±10%), 50/60 Hz (±3 Hz)
Power Consumption Less than 2 watts when off, 8 watts maximum non-printing, 35
watts average printing, 65 watts printing
HP DesignJet ColorPro Series: Getting Started Guide 19
Page 20

Printer Specifications
System Requirements HP DesignJet ColorPro GA
Minimum: Macintosh System 7.6.1 or later: Power PC –
48Mb RAM
Windows 95/98: Pentium, 48Mb RAM
Windows NT 4.0: Pentium, 64Mb RAM
150Mb free hard disk space for 11"x17" (279mm
x 432mm) or A3 size printing.
CD-ROM drive.
Recommended: Macintosh System 8 or later:Power PC –
64Mb RAM
Windows 95/98, P entium 150/166, 64 Mb RAM
Windows NT 4.0, Pentium 150/166 64Mb RAM
Graphics intensive files may require more disk space.
HP DesignJet ColorPro CAD
Minimum: Windows 3.1x: Pentium 100, 8Mb RAM
Windows 95/98 and NT 4.0: Pentium 100,
16Mb RAM
100Mb free hard disk space for 11"x17" (279mm
x 432mm) or A3 size printing.
Recommended: Windows 3.1x: Pentium 200, 16Mb RAM
Windows 95/98: Pentium 200, 32Mb RAM
Windows NT 4.0: Pentium 200, 64Mb RAM
300Mb free hard disk space for 11"x17" (279mm
x 432mm) or A3 size printing.
Graphics intensive files may require more disk space.
Windows NT users—ensure that your system has a suitably
defined amount of virtual memory (set using Settings > Control
Panel > System > Performance).
HP DesignJet ColorPro Series: Getting Started Guide 20
Page 21
Printer Specifications
Dimensions With paper tray closed:
685 mm (26.97 in.) W x 610 mm (24.02 in.) D x 337 mm (13.27
in.) H
With paper tray fully extended:
685 mm (26.97 in.) W x 745 mm (29.33 in.) D x 337 mm (13.27
in.) H
Desk Space Required:
685 mm (26.97 in.) W x 532 (20.94 in.) D
Weight 26.5 kg (58.48 lb.) without ink cartridges and printheads
27.0 kg (59.2 lb.) with ink cartridges and printheads
Reliability & Estimated
12,000 pages/month
Usage
Warranty 1 year on site warranty
Product Certifications Safety Certifications: CCIB (China), CSA (Canad a), PSB
(Singapore), UL (USA), NOM1(Mexico), TUV-GS (Germany),
SABS (South Africa), JUN (Korea), LS (Lithuania), EEI
(Estonia)
EMI Certificati ons: FC C Class B when used with a Class B
computing device (USA), FCC Part 15B Class A when connected
to Local Area Network (LAN) Devices, CTICK (Australia &
New Zealand), VCCI (Japan), CE (European Union), B mark
(Poland), GOST (Russia), BCIQ (Taiwan), RRL (Korea)
Brands and product names listed are trademarks or registered
trademarks of their respective companies. Information in this
document is subject to change without notice.
HP DesignJet ColorPro Series: Getting Started Guide 21
Page 22

Hewlett-Packard Limited Warranty Statement
Hewlett-Packard Limited Warranty Statement
HP Product Duration of Limited Warranty
Software 90 Days
Ink Cartridges 90 Days
Printheads 1 Year
Printer 1 Year
A. Extent of Limited Warranty
1. Hewlett-Packard (HP) warrants to the end-user customer that
the HP products specified above will be fr ee from defects in
materials and workmanship for the duration specified above,
which duration begins on the date of purchase by the customer.
Customer is responsible for maintaining proof of date of
purchase.
2. For software products, HP’s limited warranty applies only to a
failure to execute programming instructions. HP does not
warrant that the operation of any product will be uninterrupted
or error fre e.
3. HP’s limite d warranty covers only those defects which arise as
a result of normal use of the product, and do not apply to any:
a. Improper or inadequate maintenance or modification;
b. Software, interfacing, media, parts, or supplies not provided
or supported by HP; or
c. Operation outside the product’s specifications.
4. For HP printer products, the use of a non-HP ink cartridge or a
refilled ink cartridge does not affe ct either the warranty to the
customer or any HP support contract with the customer.
However, if printer failure or damage is attributable to the use
of a non-HP or refilled ink cartridge, HP will charge its
standard time and materials charges to service the printer for
the particular failure or damage.
5. If HP receives, during the applicable warranty period, notice of
a defect in any software, media, or ink cartridge product which
is covered by HP’s warranty, HP shall replace the defective
product. If HP receives, during the applicable warranty period,
notice of a defect in any hardware product which is covered by
HP’s warranty, HP shall either repair or replace the defective
HP DesignJet ColorPro Series: Getting Started Guide 22
Page 23

Hewlett-Packard Limited Warranty Statement
product, at HP’s option.
6. If HP is unable to repair or replace, as applicable, a defective
product which is covered by HP’s warranty, HP shall, within a
reasonable time after being notified of the defect, refund the
purchase price for the product.
7. HP shall have no obligation to repair, replace, or refund until
the customer returns the defective product to HP.
8. Any replacement product may be either new or like-new,
provided that it has functionality at least equal to that of the
product being replaced.
9. HP’s limited warranty is valid in any country where the
covered HP product is distributed by HP except for the
Middle-East, Africa, Argentina, Brazil, Mexico, Venezuela,
and France’s “Départements D’Outre-Mer”; for those excepted
areas, the warranty is valid only in the country of purchase.
Contracts for additional warranty services, such as on-site
service, may be available for any authoriz ed HP service facility
where the listed HP product is distributed by HP or an
authorized importer.
B. Limitations of Warranty
1. TO THE EXTENT ALLOWED BY LOCAL LAW, NEITHER
HP NOR ITS THIRD PARTY SUPPLIERS MAKE ANY
OTHER WARRANTY OR CONDITION OF ANY KIND,
WHETH ER EXPRES S OR IMPLIED, WITH RESPECT TO
THE HP PRODUCTS, AND SPECIFICALLY DISCLAIM
THE IMPLIED WARRANTIES OR CONDITIONS OF
MERCHANTABILITY, SATISFACTORY QUALITY, AND
FITNESS FOR A PARTICULAR PURPOSE.
C. Limitations of Liability
1. To the extent allowed by local law, the remedies provided in
this Warranty Statement are the customer’s sole and exclusive
remedies.
2. TO TH E EX TENT ALLOWED BY LO C A L LAW, EXCEPT
FOR THE OBLIGATIONS SPECIFICALLY SET FORTH IN
THIS WARRANTY STATEMENT , IN NO EVENT SHALL
HP OR ITS THIRD PARTY SUPPLIERS BE LIABLE FOR
HP DesignJet ColorPro Series: Getting Started Guide 23
Page 24

Hewlett-Packard Limited Warranty Statement
DIRECT, INDIRECT, SPECIAL, INCIDENTAL, OR
CONSEQUENTIAL DAMAGES, WHETHER BASED ON
CONTRACT, TORT, OR ANY OTHER LEGAL THEORY
AND WHETHER ADVISED OF THE POSSIBILITY OF
SUCH DAMAGES.
D. Local Law
1. This Warranty Statement gives the customer specif i c legal
rights. The customer may also have other rights which vary
from state to state in the United States, from province to
province in Canada, and from country to country elsew here in
the world.
2. To the extent that this Warranty Statement is inconsistent with
local law , this Warranty Statement shall be deemed modifi ed to
be consistent with such local law. Under such local law,
certain disclaimers and limitations of this Warranty Statement
may not apply to the customer . For example, some states in the
United States, as well as some governments outside the United
States (including provinces in Canada), may:
a. Preclude the disclaimers and limitations in this W a r ranty
Statement from limiting the statutory rights of a consumer
(e.g. the United Kingdom);
b. Otherwise restrict the ability of a manufacturer to enforce
such disclaimers or limitations; or
c. Grant the customer additional warranty rights, specify the
duration of implied warranties which the manfacturer
cannot disclaim, or not allow limitations on the duration of
implied warranties.
3. FOR CONSUMER TRANSACTIONS IN AUSTRALIA AND
NEW ZEALAND, THE TERMS IN THIS WARRANTY
ST ATEMENT, EXCEPT TO THE EXTENT LAWFULL Y
PERMITTED, DO NOT EXCLUDE, RESTRICT, OR
MODIFY, AND ARE IN ADDITION TO, THE
MANDATORY STATUTORY RIGHTS APPLICABLE TO
THE SALE OF HP PRODUCTS TO SUCH CUSTOM ERS.
HP DesignJet ColorPro Series: Getting Started Guide 24
Page 25

Regulatory Notices
WARNING
Safety Information
Regulatory Notices
Note that additional notices appear in the appe ndix at the back of
this document.
Always follow basic safety
precautions when using
this product to reduce risk
of injury from fire or
electric shock.
1. Use only a grounded electrical outlet when connecting this
product to a power source. If you do not know whether the
outlet is grounded, check with a qualified electrician.
2. Read and understand instructions in the User’s Guide.
3. Observe all warnings and instructions marked on the product.
4. Unplug this product from wall outlets before cleaning.
5. Do not install product or use this product near water, or when
you are wet.
6. Install the product securely on a stable surface.
7. Install the product in a protected location where no one can
step on or trip over the line cord, and the line c ord will not be
damaged.
8. If the product does not operate normally, see the
“Troubleshooting” section in the User’s Guide.
To Obtain a Material Safe ty Da ta She e t (M SD S)
You can obtain current Material Safety Data Sheets for the ink
systems used in the printer by mailing a request to this address:
Hewlett-Packard Customer Information Center, 19310
Pruneridge Avenue, Dept. MSDS, Cupertino, CA 95014, U.S.A.
There is also a web page: http://www.hp.com/abouthp/envrnmnt/
contents/envfacts/hpmsds.htm
Power Cord Statement
The power cord cannot be repaired. If it is defective it should be
discarded or returned to the supplier.
HP DesignJet ColorPro Series: Getting Started Guide 25
Page 26

Page 27

Appendix—Regulatory Notices
FCC Regulations
The U.S. Federal Communications Commission (in 47 cfr 15.105)
has specified that the following notices be brought to the attention
of users of this product.
Produ ct Ide ntification Numbers:
Printer HP DesignJet ColorPro CAD HP DesignJet ColorPro GA
Model C7777A C7778A
This device complies with part 15 of the FCC rules. Operation is
subject to the following two conditions: (1) This device may not
cause harmful interference, and (2) this device must accept any
interference received, including interference that may cause
undesired operation.
Shielded cables
Appendix—Regulatory Notices
Use of a shielded data cables is re quired to comply with the Class
B limits of Part 15 of the FCC Rules.
CAUTION Pursuant to Part 15.21 of the FCC Rules, any changes or
modifications to this equ ipment not expr ess ly appr oved b y t he
Hewlett-Packard Company, may cause harmful interference
and void the FCC auth orization to operate this equipment.
This equipment has been tested and found to comply with the
specifications of Part 15 of the FC C rules. These limits are designed
to provide reasonable protection against harmful interference in a
residential installation. This equipment gene rates, uses, and can
radiate radio frequency energy, and if not installed and used in
accordance with the instructions, may cause harmful interferenc e
to radio communications. However, there is no guarantee that
interference will not occur in a particular installation. If this
equipment does cause harmful interference to radio or television
reception, which can be determined by turning the equipment off
and on, the user is encouraged to try to correct the interference by
one or more of the following measures :
• Reorient or relocate receiving antenna.
HP DesignJet ColorPro Series: Getting Started Guide: Appendix—1
Page 28

Appendix—Regulatory Notices
• Increase separation between equipment and receiver.
• Connect equipment to an outlet on a circuit different from that
to which the receive is connected.
• Consult your dealer or an experienced radio/TV technician.
When connected to LAN
cables using print server
accessories…
This equipment has been tested and found to comply with the limits
for a Class A digital device, pursuant to part 15 of the FCC Rules.
These limits are designed to provide reasonable protection against
harmful interferenc e in a commercial environment. This equipment
generates, uses and can radiate radio frequency energy and, if not
installed and used in accordance with the instructions, may cause
harmful interference to radio communications. Operation of this
equipment in a residential area is likely to cause harmful
interference in which case the user will be required to correct the
interference at their own expense.
Normes de sécurité (Canada)
Le présent appareil numérique n'émet pas de bruits radioélectriques
dépassant les limites applicables aux appareils numériques de
Classe B prescrites dans le réglement sur le brouillage
radioélectrique édicté par le Ministére des Communications du
Canada.
Connecté à un réseau par des accessoires de serveur, l’appareil
n'émet pas de bruits radioélectriques dépassant les limites
applicables aux appareils numériques de Classe A prescrites dans
le réglement sur le brouillage ra dioélectrique édicté par le Ministère
des Communications du Canada.
DOC statement (Canada)
This digital apparatus does not exceed the Class B limits for radio
noise emissions from digital apparatus set out in the Radio
Interference Regulations of the Canadian Department of
Communications.
When connected to LAN cables using print server accessories, this
digital apparatus does not e xceed the Class A limits for radio noise
emissions from digital apparatus set out in the Radio Interference
Regulations of the Canadian Department of Communications.
HP DesignJet ColorPro Series: Getting Started Guide: Appendix—2
Page 29

VCCI Class A and Class B (Japan)
Appendix—Regulatory Notices
EMI statement (Korea)
EMI st a tement (Taiwan)
HP DesignJet ColorPro Series: Getting Started Guide: Appendix—3
Page 30

Appendix—Regulatory Notices
LEDs Classification
Energy Consumption
Energy Star is a US
registered service m ark of
United States
Environmental Proctection
Agency
Geräuschemission (Germany)
LpA < 70 dB, am Arbeitsplatz, im Normalbetrieb, nach DIN 45635
T. 19.
Telecommunications General Approval (UK)
The HP DesignJet ColorPro CAD and GA printers, models C7777
and C7778, are approved under Approval Number NS/G/1234/5/
100003 for indirect connection to public telecommunication
systems within the United Kingdom.
Address
Hewlett-Packard Company
Manager of Corporate Product regulations
3000 Hanover Street
Palo Alto, CA 94304
415/857-1501
HP DesignJet ColorPro Series: Getting Started Guide: Appendix—4
Page 31

Declaration of Conformity
Declaration of Conformity
HP DesignJet ColorPro Series: Getting Started Guide: Appendix—5
 Loading...