

Page 1

HP StorageWorks
FC1142SR and FC1242SR DC 4Gb
PCI Express host bus adapters for Linux
and Windows installation guide
Part number: AA–RWEQA–TE
First edition: December 2005
Page 2

Legal and notice information
© Copyright 2005 Hewlett-Packard Development Company, L.P.
Hewlett-Packard Company makes no warranty of any kind with regard to this material, including, but not limited to, the implied
warranties of merchantability and fitness for a particular purpose. Hewlett-Packard shall not be liable for errors contained herein or
for incidental or consequential damages in connection with the furnishing, performance, or use of this material.
This document contains proprietary information, which is protected by copyright. No part of this document may be photocopied,
reproduced, or translated into another language without the prior written consent of Hewlett-Packard. The information is provided
“as is” without warranty of any kind and is subject to change without notice. The only warranties for HP products and services are
set forth in the express warranty statements accompanying such products and services. Nothing herein should be construed as
constituting an additional warranty. HP shall not be liable for technical or editorial errors or omissions contained herein.
Linux® is a U.S. registered trademark of Linus Torvalds.
Microsoft® and Windows® are U.S. registered trademarks of Microsoft Corporation.
Red Hat is a U. S. registered trademark of Red Hat, Inc.
SUSE is a trademark of SUSE LINUX Products GmbH, a Novel business.
FC1142SR and FC1242SR DC 4Gb PCI Express host bus adapters for Linux and Windows installation
guide
Page 3

Contents
About this guide . . . . . . . . . . . . . . . . . . . . . . . . . . . . . . . . . . . . . . . . . . . . . . . . . 5
Intended audience . . . . . . . . . . . . . . . . . . . . . . . . . . . . . . . . . . . . . . . . . . . . . . . . . . . . . . . . . 5
Related documentation . . . . . . . . . . . . . . . . . . . . . . . . . . . . . . . . . . . . . . . . . . . . . . . . . . . . . . 5
Document conventions and symbols . . . . . . . . . . . . . . . . . . . . . . . . . . . . . . . . . . . . . . . . . . . . . 6
HP technical support . . . . . . . . . . . . . . . . . . . . . . . . . . . . . . . . . . . . . . . . . . . . . . . . . . . . . . . . 7
Subscription service . . . . . . . . . . . . . . . . . . . . . . . . . . . . . . . . . . . . . . . . . . . . . . . . . . . . . . 7
Helpful web sites . . . . . . . . . . . . . . . . . . . . . . . . . . . . . . . . . . . . . . . . . . . . . . . . . . . . . . . . 7
1 HBA features . . . . . . . . . . . . . . . . . . . . . . . . . . . . . . . . . . . . . . . . . . . . . . . . . 9
Performance specifications. . . . . . . . . . . . . . . . . . . . . . . . . . . . . . . . . . . . . . . . . . . . . . . . . . . 10
Environmental specifications . . . . . . . . . . . . . . . . . . . . . . . . . . . . . . . . . . . . . . . . . . . . . . . . . 10
Physical specifications. . . . . . . . . . . . . . . . . . . . . . . . . . . . . . . . . . . . . . . . . . . . . . . . . . . . . . 11
2 Installing the HBAs . . . . . . . . . . . . . . . . . . . . . . . . . . . . . . . . . . . . . . . . . . . . 13
Installation prerequisites . . . . . . . . . . . . . . . . . . . . . . . . . . . . . . . . . . . . . . . . . . . . . . . . . . . . 14
Installation procedure . . . . . . . . . . . . . . . . . . . . . . . . . . . . . . . . . . . . . . . . . . . . . . . . . . . . . . 14
LED indicators . . . . . . . . . . . . . . . . . . . . . . . . . . . . . . . . . . . . . . . . . . . . . . . . . . . . . . . . . 14
3 Installing the Windows drivers . . . . . . . . . . . . . . . . . . . . . . . . . . . . . . . . . . . . 15
Installation prerequisites . . . . . . . . . . . . . . . . . . . . . . . . . . . . . . . . . . . . . . . . . . . . . . . . . . . . 16
Installing the Windows device drivers using the HP Smart Component kit . . . . . . . . . . . . . . . . . . 16
Contents
4 Installing the Linux drivers. . . . . . . . . . . . . . . . . . . . . . . . . . . . . . . . . . . . . . . . 17
Installing the driver kit . . . . . . . . . . . . . . . . . . . . . . . . . . . . . . . . . . . . . . . . . . . . . . . . . . . . . . 18
Using the RPM to install drivers . . . . . . . . . . . . . . . . . . . . . . . . . . . . . . . . . . . . . . . . . . . . . 18
Installing the RPM . . . . . . . . . . . . . . . . . . . . . . . . . . . . . . . . . . . . . . . . . . . . . . . . . . . . . . 18
Upgrading the RPM . . . . . . . . . . . . . . . . . . . . . . . . . . . . . . . . . . . . . . . . . . . . . . . . . . . . . 18
Uninstalling the RPM . . . . . . . . . . . . . . . . . . . . . . . . . . . . . . . . . . . . . . . . . . . . . . . . . . . . 18
Using the fibreutils RPM. . . . . . . . . . . . . . . . . . . . . . . . . . . . . . . . . . . . . . . . . . . . . . . . . . . . . 19
Changing driver parameters . . . . . . . . . . . . . . . . . . . . . . . . . . . . . . . . . . . . . . . . . . . . . . . 19
Loading and unloading the qla2300 driver manually. . . . . . . . . . . . . . . . . . . . . . . . . . . . . . 19
5 Troubleshooting . . . . . . . . . . . . . . . . . . . . . . . . . . . . . . . . . . . . . . . . . . . . . . 21
Troubleshooting checklists . . . . . . . . . . . . . . . . . . . . . . . . . . . . . . . . . . . . . . . . . . . . . . . . . . . 22
Hardware checklist . . . . . . . . . . . . . . . . . . . . . . . . . . . . . . . . . . . . . . . . . . . . . . . . . . . . . 22
System configuration checklist . . . . . . . . . . . . . . . . . . . . . . . . . . . . . . . . . . . . . . . . . . . . . . 22
Fibre Channel checklist. . . . . . . . . . . . . . . . . . . . . . . . . . . . . . . . . . . . . . . . . . . . . . . . . . . 22
Using the Event Viewer . . . . . . . . . . . . . . . . . . . . . . . . . . . . . . . . . . . . . . . . . . . . . . . . . . . . . 23
Linux driver events . . . . . . . . . . . . . . . . . . . . . . . . . . . . . . . . . . . . . . . . . . . . . . . . . . . . . . . . 23
A Configuring the HBAs . . . . . . . . . . . . . . . . . . . . . . . . . . . . . . . . . . . . . . . . . . 25
Running Fast!UTIL . . . . . . . . . . . . . . . . . . . . . . . . . . . . . . . . . . . . . . . . . . . . . . . . . . . . . . . . . 26
Configuration Settings. . . . . . . . . . . . . . . . . . . . . . . . . . . . . . . . . . . . . . . . . . . . . . . . . . . . . . 26
FC1142SR and FC1242SR DC 4Gb PCI Express host bus adapters for Linux and Windows installation guide 3
Page 4

Adapter Settings . . . . . . . . . . . . . . . . . . . . . . . . . . . . . . . . . . . . . . . . . . . . . . . . . . . . . . . 26
Selectable Boot Settings . . . . . . . . . . . . . . . . . . . . . . . . . . . . . . . . . . . . . . . . . . . . . . . . . . 27
Advanced Adapter Settings . . . . . . . . . . . . . . . . . . . . . . . . . . . . . . . . . . . . . . . . . . . . . . . 28
Restore Default Settings . . . . . . . . . . . . . . . . . . . . . . . . . . . . . . . . . . . . . . . . . . . . . . . . . . 29
Raw NVRAM Data. . . . . . . . . . . . . . . . . . . . . . . . . . . . . . . . . . . . . . . . . . . . . . . . . . . . . . 29
Scan Fibre Channel Devices . . . . . . . . . . . . . . . . . . . . . . . . . . . . . . . . . . . . . . . . . . . . . . . . . 30
Fibre Disk Utility . . . . . . . . . . . . . . . . . . . . . . . . . . . . . . . . . . . . . . . . . . . . . . . . . . . . . . . . . . 30
Loopback Data Test . . . . . . . . . . . . . . . . . . . . . . . . . . . . . . . . . . . . . . . . . . . . . . . . . . . . . . . 30
Select Host Adapter . . . . . . . . . . . . . . . . . . . . . . . . . . . . . . . . . . . . . . . . . . . . . . . . . . . . . . . 30
B Regulatory compliance and safety . . . . . . . . . . . . . . . . . . . . . . . . . . . . . . . . . . 31
Laser device . . . . . . . . . . . . . . . . . . . . . . . . . . . . . . . . . . . . . . . . . . . . . . . . . . . . . . . . . . 31
Laser safety warning . . . . . . . . . . . . . . . . . . . . . . . . . . . . . . . . . . . . . . . . . . . . . . . . . . 31
Certification and classification information. . . . . . . . . . . . . . . . . . . . . . . . . . . . . . . . . . . 31
Laser product label . . . . . . . . . . . . . . . . . . . . . . . . . . . . . . . . . . . . . . . . . . . . . . . . . . . 31
International notices and statements . . . . . . . . . . . . . . . . . . . . . . . . . . . . . . . . . . . . . . . . . . . . 32
Canadian notice (avis Canadien) . . . . . . . . . . . . . . . . . . . . . . . . . . . . . . . . . . . . . . . . . . . 32
Class A equipment . . . . . . . . . . . . . . . . . . . . . . . . . . . . . . . . . . . . . . . . . . . . . . . . . . . 32
European Union notice . . . . . . . . . . . . . . . . . . . . . . . . . . . . . . . . . . . . . . . . . . . . . . . . . . . 32
BSMI notice . . . . . . . . . . . . . . . . . . . . . . . . . . . . . . . . . . . . . . . . . . . . . . . . . . . . . . . . . . 32
Japanese notice. . . . . . . . . . . . . . . . . . . . . . . . . . . . . . . . . . . . . . . . . . . . . . . . . . . . . . . . 33
Korean notice . . . . . . . . . . . . . . . . . . . . . . . . . . . . . . . . . . . . . . . . . . . . . . . . . . . . . . . . . 33
Safety . . . . . . . . . . . . . . . . . . . . . . . . . . . . . . . . . . . . . . . . . . . . . . . . . . . . . . . . . . . . . . . . . 34
Electrostatic discharge . . . . . . . . . . . . . . . . . . . . . . . . . . . . . . . . . . . . . . . . . . . . . . . . . . . 34
Preventing electrostatic damage . . . . . . . . . . . . . . . . . . . . . . . . . . . . . . . . . . . . . . . . . . 34
Grounding methods . . . . . . . . . . . . . . . . . . . . . . . . . . . . . . . . . . . . . . . . . . . . . . . . . . 34
Index . . . . . . . . . . . . . . . . . . . . . . . . . . . . . . . . . . . . . . . . . . . . . . . . . . . . . . . . 35
Figures
1 Class 1 laser product label . . . . . . . . . . . . . . . . . . . . . . . . . . . . . . . . . . . . . . . . . . . . . . . . 31
Tables
1 Document conventions . . . . . . . . . . . . . . . . . . . . . . . . . . . . . . . . . . . . . . . . . . . . . . . . . 6
2 HBA environmental specifications . . . . . . . . . . . . . . . . . . . . . . . . . . . . . . . . . . . . . . . . 10
3 HBA physical specifications . . . . . . . . . . . . . . . . . . . . . . . . . . . . . . . . . . . . . . . . . . . . 11
4 LED indicators . . . . . . . . . . . . . . . . . . . . . . . . . . . . . . . . . . . . . . . . . . . . . . . . . . . . . . 14
5 Adapter Settings . . . . . . . . . . . . . . . . . . . . . . . . . . . . . . . . . . . . . . . . . . . . . . . . . . . . 26
6 Advanced Adapter Settings . . . . . . . . . . . . . . . . . . . . . . . . . . . . . . . . . . . . . . . . . . . . 28
4
Page 5

About this guide
This guide provides information about:
• Installing, configuring, and troubleshooting the HP StorageWorks FC1142SR single-channel
Peripheral Component Interconnect Express (PCIe) 4Gb host bus adapter (HBA) and the HP
StorageWorks FC1242SRSR DC dual-channel PCIe 4Gb HBA for Linux® and Microsoft®
Windows® operating systems (hereafter called the FC1142SR HBA and the FC1242SR DC
HBA, or “the HBAs”)
• Contacting technical support for additional assistance
Intended audience
This guide is intended for system administrators who are experienced with the following:
• Linux operating systems
• Windows operating systems
• HBAs
Related documentation
In addition to this guide, see the HP StorageWorks FC1142SR and FC1242SR DC 4Gb PCI
Express host bus adapters for Linux and Windows release notes.
These and other HP documents are available on the HP web site: http://www.docs.hp.com
FC1142SR and FC1242SR DC 4Gb PCI Express host bus adapters for Linux and Windows installation guide 5
.
Page 6
Document conventions and symbols
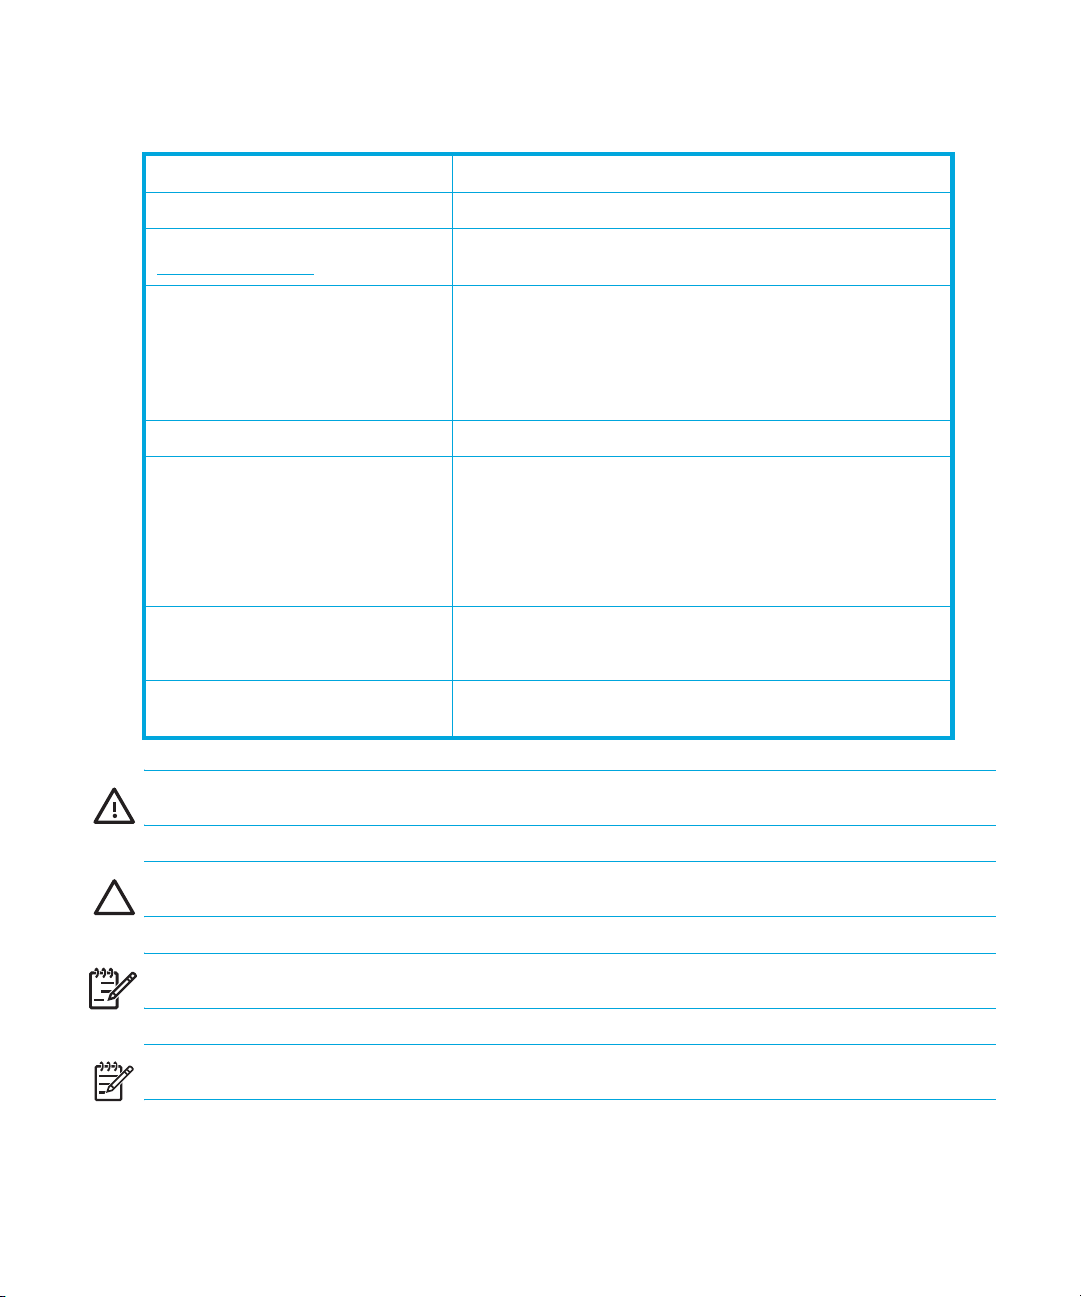
Table 1 Document conventions
Convention Element
Medium blue text: Figure 1 Cross-reference links and e-mail addresses
Medium blue, underlined text
(http://www.hp.com
Bold font • Key names
Italics font Text emphasis
Monospace font • File and directory names
Monospace, italic font • Code variables
Monospace, bold font Emphasis of file and directory names, system output, code, and
)
Web site addresses
• Text typed into a GUI element, such as into a box
• GUI elements that are clicked or selected, such as menu
and list items, buttons, and check boxes
• System output
• Code
• Text typed at the command-line
• Command-line variables
text typed at the command-line
WARNING! Indicates that failure to follow directions could result in bodily harm or death.
CAUTION: Indicates that failure to follow directions could result in damage to equipment or data.
IMPORTANT: Provides clarifying information or specific instructions.
!
NOTE: Provides additional information.
6
Page 7

TIP: Provides helpful hints and shortcuts.
HP technical support
Telephone numbers for worldwide technical support are listed on the HP web site:
http://www.hp.com/support
Collect the following information before calling:
• Technical support registration number (if applicable)
• Product serial numbers
• Product model names and numbers
• Applicable error messages
• Operating system type and revision level
• Detailed, specific questions
For continuous quality improvement, calls may be recorded or monitored.
HP strongly recommends that customers sign up online using the Subscriber's choice web site
http://www.hp.com/go/e-updates
• Subscribing to this service provides you with e-mail updates on the latest product enhancements,
newest versions of drivers, and firmware documentation updates as well as instant access to
numerous other product resources.
• After signing up, you can quickly locate your products by selecting Business support and
then Storage under Product Category.
.
.
Subscription service
HP strongly recommends that customers register online using the Subscriber's choice web site:
http://www.hp.com/go/e-updates
Subscribing to this service provides you with e-mail updates on the latest product enhancements,
newest driver versions, and firmware documentation updates as well as instant access to numerous
other product resources. After subscribing, locate your products by selecting Business support
and then Storage under Product Category.
.
Helpful web sites
For product information, see the following web sites:
• http://www.hp.com
• http://www.hp.com/go/storage
• http://www.hp.com/support/
• http://www.docs.hp.com
FC1142SR and FC1242SR DC 4Gb PCI Express host bus adapters for Linux and Windows installation guide 7
Page 8

8
Page 9

1HBA features
This chapter describes the features of the FC1142SR (part number AE311A) and FC1242SR DC
(part number AE312A) HBAs.
• Performance specifications, page 10
• Environmental specifications, page 10
• Physical specifications, page 11
FC1142SR and FC1242SR DC 4Gb PCI Express host bus adapters for Linux and Windows installation guide 9
Page 10

Performance specifications
The FC1142SR HBA and the FC1242SR DC HBA are 4 Gb/s Fibre Channel PCIe HBAs. The HBAs’
Fibre Channel controller incorporates a multifunction native PCIe core that is compliant to the PCIe
Base Specification 1.0a and PCI e CEM Specification 1.0a. The supported physical PCIe connector
is x4, x8 or x16.
These HBAs have the following performance features:
• Auto-negotiation between 1, 2, or 4Gb/s link attachments
• High-performance Fibre Channel host bus adapter
• Full support for all Fibre Channel topologies: point-to-point, arbitrated loop, and fabric
• Full support for Fibre Channel Service Class 2 and Service Class 3
• Compliance with the PCIe Base and CEM 1.0a specifications:
• x1 or x4 lane link interface (auto negotiated with system) at 2.5 Gb/s
• Support for VC0 (1 Virtual Channel) and TC0 (1 Traffic Class)
• Configuration, I/O, memory, read/write, completion, and message support
• Support for 64-bit addressing
• ECRC for all transmitted PCIe data packets
• Link CRC on all PCIe packets and message information
• Support for large payload size (2048 bytes for read/write)
• Support for large read request size (4096 bytes)
• Internal high-speed static RAM (SRAM)
• Error correcting code (ECC) protection of local memory, including single-bit correction and
double-bit protection
• Small form factor (SFF) multimode optic with LC connector
• Parts and construction compliant to the European Union Directive of Restriction of Hazardous
Substances (RoHS)
Environmental specifications
Table 2 lists the environmental specifications.
Table 2 HBA environmental specifications
Environmental feature Minimum Maximum
Operating temperature 0°C/32°F55°C / 131 °F
Storage temperature –20°C/-4°F70°C/158°F
Relative humidity (non-condensing) 10% 90%
Storage humidity (non-condensing) 5% 95%
HBA features10
Page 11

Physical specifications
Table 3 lists the physical specifications.
Table 3 HBA physical specifications
Component Specification
Host bus Complies with:
PCI Express Base Specification 1.0a
PCI Express Card Electromechanical Specification 1.0
PCI Bus Power Management Interface Specification 1.1
Fibre Channel Bus type: fiber optic media
Bus transfer rate:
• FC1142SR single channel—4 Gb/s Fibre Channel increases
• FC1242SR DC dual channel—4 Gb/s Fibre Channel
aggregate throughput rate to 800 MB/s in full-duplex mode
increases aggregate throughput rate to 1.6 GB/s in
full-duplex mode
Central processing unit
(CPU)
Memory 1 MB SRAM, 1 MB flash (SPI), and 2 KB NVRAM (SPI)
Signal voltage 3.3 V (mode 1), 3.3 V/1.5 V (mode 2)
Distance 1 Gb/s: 500 meters 50/125 µm fiber, 300 meters 62.5/125
Cable 50/125μm multimode fiber, 62.5/125 μm multimode fiber
Connectors LC connectors that support non-OFC, multimode fiber optic
Form factor Low-profile PCIe: 16.765 cm × 6.89 cm
Bracket Standard: 1.84 cm × 12.08 cm (.73 in. × 4.76 in.)
Power consumption ~11.0 watts
Single-chip design that includes a RISC processor, Fibre Channel
protocol manager, PCI-e DMA controller, integrated
serializer/deserializer (SERDES), and electrical transceivers that
can auto negotiate a data rate of 1, 2, or 4 Gb/s.
µm fiber
2 Gb/s: 300 meters 50/125 µm fiber, 150 meters 62.5/125
µm fiber
4 Gb/s: 150 meters 50/125 µm fiber, 70 meters 62.5/125 µm
fiber
cabling using a SFF optical transceiver module
(6.6 in. × 2.713 in.)
Low-profile: 1.84 cm × 8.01 cm (.73 in. × 3.15 in.)
FC1142SR and FC1242SR DC 4Gb PCI Express host bus adapters for Linux and Windows installation guide 11
Page 12

HBA features12
Page 13

2 Installing the HBAs
This chapter describes how to install the FC1142SR and FC1242SR DC HBAs.
• Installation prerequisites, page 14
• Installation procedure, page 14
See your host documentation for installation instructions.
WARNING! Disconnect the host from the power source before installing the HBA. To reduce the
risk of personal injury from hot surfaces, allow the internal server or workstation components to
cool before touching.
WARNING! Electrostatic discharge (ESD) can damage electronic components. Before you begin,
ensure that you are properly grounded, as described in ”Electrostatic discharge” on page 34.
FC1142SR and FC1242SR DC 4Gb PCI Express host bus adapters for Linux and Windows installation guide 13
Page 14

Installation prerequisites
Before you begin, ensure that:
• You have an optical multimode cable with an LC duplex connector.
• You record the HBA’s serial number, in the unlikely event that the NVRAM is corrupted. Each
HBA has a unique serial number located on the bottom of the HBA.
Installation procedure
To install the HBA:
1. Check the motherboard and make any necessary configuration changes to accommodate the
HBA.
2. Turn off the computer.
3. Disconnect the power cable.
4. Open and remove the computer cover and save the screws.
5. Locate the slot in which you will install the HBA, and remove the slot cover.
6. Place the HBA in the slot and press carefully until it is seated properly.
7. Secure the HBA to the chassis, following the server manufacturer’s instructions.
8. Connect the appropriate cable from the devices to the corresponding LC connector.
9. Close the computer cover. Insert and tighten the computer cover screws.
10. Plug in the power cable.
11 . Turn on the computer and observe the monitor and the LED indicators to ensure proper
operation (see ”LED indicators” on page 14).
LED indicators
Table 4 describes the LED indicators.
Table 4 LED indicators
Yellow LED Green LED Amber LED Activity
Off Off Off Power off
On On On Power on before or after firmware
Flashing Flashing Flashing Power on after firmware initialization
Alternately flashing Alternately flashing Alternately flashing Firmware fault
Off Off Flashing Activity at 1 Gb/s
Off Flashing Off Activity at 2 Gb/s
Flashing Off Off Activity at 4 Gb/s
Flashing Off Flashing Beacon
Installing the HBAs14
initialization
Page 15

3 Installing the Windows drivers
This chapter describes how to install the Windows SCSIPORT miniport driver and Storport miniport
driver.
• Installation prerequisites, page 16
• Installing the Windows device drivers using the HP Smart Component kit, page 16
FC1142SR and FC1242SR DC 4Gb PCI Express host bus adapters for Linux and Windows installation guide 15
Page 16

Installation prerequisites
Before you install the Windows drivers:
• Obtain the HP StorageWorks FC1142SR and FC1242SR DC 4 Gb PCI Express host bus
adapters for Linux and Windows release notes from the following HP web site:
http://h18006.www1.hp.com/storage/saninfrastructure.html
• Obtain the HP Smart Component kit with the latest drivers from the following HP web site:
http://h18006.www1.hp.com/storage/saninfrastructure.html
• Familiarize yourself with the operating system on which the HBA will operate, and obtain
standard system documentation.
• Review any restrictions or mandatory hot fixes that apply to your configuration and operating
system.
.
.
Installing the Windows device drivers using the HP Smart Component kit
This section describes how to install the Windows SCSIPORT miniport and Storport miniport drivers.
To install the latest SCSIPORT or Storport driver, you must use the HP Smart Component kit.
NOTE: HP does not support Device Manager to update drivers. Using Device Manager can delete
registry parameters and cause erratic behavior.
1. Select the FC1142SR or FC1242SR DC HBA from the Fibre Channel Host Bus Adapters list on
the SAN infrastructure web page described in ”Installation prerequisites”.
The web page for the HBA appears.
2. Click Software and drivers.
3. Select a language from the drop-down list.
4. Select a Windows operating system.
5. In the Driver Storage Controllers - FC HBA section, click Download in the row for either the
SCSIPORT or Storport driver component.
6. Open or save .zip file that contains the installation program:
•Click Open to extract the driver software installation program immediately.
•Click Save to save the .zip file containing the HP Smart Component executable to your
system and run the installation at a later time.
7. Extract the HP Smart Component executable to your computer.
8. Double-click the HP Smart Component executable (cp00xxxx.exe) file to start the installation.
9. Click Install to install the driver software.
10. Click Reboot to complete the installation.
Installing the Windows drivers16
Page 17

4 Installing the Linux drivers
This chapter describes how to install the Linux qla2300 device drivers for the FC1142SR HBA and
FC1242SR DC HBA on an installed Red Hat Enterprise Linux (RHEL) system or on a SUSE Linux
Enterprise Server (SUSE SLES) system.
You can obtain the software kit for the driver from the following HP web site
http://h18006.www1.hp.com/storage/saninfrastructure.html
To install the drivers, you must be familiar with the operating system on which the HBA is to operate,
and have access to standard system documentation. Use the procedures and information in the
following sections:
• Installing the driver kit, page 18
• Using the fibreutils RPM, page 19
.
FC1142SR and FC1242SR DC 4Gb PCI Express host bus adapters for Linux and Windows installation guide 17
Page 18

Installing the driver kit
HP recommends that you install the complete driver kit for the FC1142SR and FC1143SR HBAs.
The kit contains the driver and utilities you need to deploy HBAs on Linux.
NOTE: You must install the gcc compiler and the kernel sources or the kernel development
package on your system before installing the driver kit.
To install the complete driver kit, copy the .gz file to your system and enter the following
commands:
# gunzip hp_qla2300version_info.tar.gz
# tar -xvf hp_qla2300version_info.tar
# cd hp_qla2300
# ./INSTALL
See the README file included with the driver kit for more information.
Using the RPM to install drivers
The RPM Package Manager (RPM) is a package management system that facilitates the installation
of Linux software. Using RPM, you can install software in prebuilt bundles called RPM packages. The
driver RPM packages have the driver source code and driver utilities.
NOTE: This section is provided as a reference for future RPM installations.
Installing the RPM
To install the RPM, copy the RPM package file to your system and enter the following command:
# rpm -ivh package_name.rpm
For example, to install the Linux HBA driver RPM manually, enter the following command:
# rpm -ivh hp_qla2300-version.rpm
Upgrading the RPM
To upgrade the RPM, copy the RPM package file to your system and enter the following command:
# rpm -Uvh package_name.rpm
Uninstalling the RPM
To uninstall the RPM, enter the following command:
# rpm -e package_name
Installing the Linux drivers18
Page 19

Using the fibreutils RPM
HP recommends using the fibreutils RPM that is included with the driver kit. It contains useful
utilities for managing fibre-connected storage. To install this RPM manually, enter the following
command:
# rpm -ivh fibreutils-version.rpm
For more information about fibreutils, see the file /opt/hp/hp_fibreutils/README.
Changing driver parameters
To change driver parameters:
1. Run the set_parm script, located in the /opt/hp/src… directory.
2. Reboot the server; otherwise, you may not be able to unload the qla2300 driver if there is a
process or file system using a device connected to the HBA.
Loading and unloading the qla2300 driver manually
By loading the qla2300 driver manually, you can access the devices and unload the driver without
rebooting the system.
To load the qla2300 driver, enter the following command:
# modprobe qla2300
NOTE: HP recommends using the modprobe command to load the driver so that any driver
parameter value specified in the /etc/modules.conf file takes effect.
Alternatively, you can load the driver by entering the following command from the directory that
contains the qla2300.o file:
1. Enter the insmod command. For example:
# insmod qla2300.o
2. If your system has a previous version of the qla driver, rename the old binary included in the
original distribution to ensure that it does not interfere with the new version as follows:
# cd /lib/modules/kernel_release_version/kernel/drivers/addon/qla2300
# mv qla2300.o qla2300_rh.o
3. After renaming the old driver, update the dependency file, then load the new driver using the
modprobe command.
4. To unload the qla2300 driver manually, enter the command as shown in the following example:
# modprobe –r qla2300
FC1142SR and FC1242SR DC 4Gb PCI Express host bus adapters for Linux and Windows installation guide 19
Page 20

Installing the Linux drivers20
Page 21

5 Troubleshooting
This chapter provides troubleshooting information that you can use in the event of an HBA problem.
• Troubleshooting checklists, page 22
• Using the Event Viewer, page 23
• Linux driver events, page 23
FC1142SR and FC1242SR DC 4Gb PCI Express host bus adapters for Linux and Windows installation guide 21
Page 22

Troubleshooting checklists
Three basic types of installation problems can cause HBAs to malfunction: hardware problems,
system configuration problems, and Fibre Channel problems. This section provides checklists to help
you determine why the HBA is not functioning properly.
Hardware checklist
Check the following:
• Are circuit cards installed securely in the system?
• Are cables connected securely to the correct connectors? For example, the optical transmit
connector on the HBA must be connected to the optical receive connector on the device. An
easy way to check for correct seating is to switch the connectors on the HBA or the device, then
reboot your system. If the BIOS is enabled, devices connected to the HBA are displayed on the
screen.
• Is the HBA installed correctly and seated firmly in the PCIe slot?
• Is there interference due to nonstandard PCIe connectors?
• Is the Fast!UTIL data rate setting correct? See ”Adapter Settings” on page 26 for information
about setting the data rate.
System configuration checklist
Check the following:
• Is the motherboard properly connected?
• Did you check the motherboard for proper configuration? All PCI-compliant and PCI-X-compliant
systems automatically detect 32-bit or 64-bit adapters and set the appropriate bus speed (for
example, 33 MHz or 133 MHz).
See the documentation for your computer or contact your computer dealer to determine if the
motherboard requires special configuration.
Fibre Channel checklist
Check the following:
• Did you power up the Fibre Channel devices before powering up the server?
• Are cables connected properly?
• Did you configure the RAID controller using the utilities provided by the manufacturer?
• If the Fibre Channel switch supports zoning, is the switch configured correctly?
Troubleshooting22
Page 23

Using the Event Viewer
The SCSIPORT and Storport miniport drivers verify the HBA’s power-on self-test (POST) LED states. If
there is a failure or a suspected failure, an error log entry is written to the Windows event log.
To view the event log:
1. Select Start > Programs > Administrative Tools > Event Viewer, or right-click My
Computer and select Manage.
2. Click Event Viewer in the Computer Management dialog box.
The Event Viewer window appears.
3. Review the miniport driver event codes. See the following web site for information about
interpreting the event codes: http://www.qlogic.com/support/logs/evlogV9xxx_error.asp
Linux driver events
If the Linux driver detects any fabric or driver events, the information is written to in the
/var/log/messages file. Check this file periodically to review fabric or Linux driver events.
.
FC1142SR and FC1242SR DC 4Gb PCI Express host bus adapters for Linux and Windows installation guide 23
Page 24

Troubleshooting24
Page 25

AConfiguring the HBAs
This appendix provides detailed configuration information for advanced users who want to
customize the configuration of the HBAs and connected devices.
CAUTION: If the configuration settings are incorrect, the HBA may not function properly.
This appendix describes the following Fast!UTIL options:
• Running Fast!UTIL, page 26
• Configuration Settings, page 26
• Scan Fibre Channel Devices, page 30
• Fibre Disk Utility, page 31
• Loopback Data Test, page 30
• Select Host Adapter, page 30
FC1142SR and FC1242SR DC 4Gb PCI Express host bus adapters for Linux and Windows installation guide 25
Page 26

Running Fast!UTIL
You configure the HBAs using Fast!UTIL, HP’s BIOS-resident configuration tool. To run Fast!UTIL:
1. Press ALT+Q during HBA BIOS initialization (it may take a few seconds for the Fast!UTIL
Options menu to display).
2. If you have more than one HBA, Fast!UTIL asks you to select the HBA you want to configure.
3. Change the settings and exit the utility. Fast!UTIL reboots the system to load the new parameters.
Configuration Settings
Use Configuration Settings to configure the Fibre Channel devices and the HBA to which they
connect.
Adapter Settings
From the Configuration Settings menu in Fast!UTIL, select Adapter Settings. Table 5 lists the
default settings for the HBA.
Table 5 Adapter Settings
Setting Values Default
Host Adapter BIOS Enabled, Disabled Disabled
Frame Size 512, 1024, 2048 2048
Loop Reset Delay 0–60 seconds 5 seconds
Adapter Hard Loop ID Enabled, Disabled Disabled
Hard Loop ID 0–125 0
Spin Up Delay Enabled, Disabled Disabled
Connection Options 0, 1, 2 2
Fibre Channel Tape Support Enabled, Disabled Enabled
Data Rate 0, 1, 2, 3 2
Configuring the HBAs26
Page 27

A description of each setting follows:
• Host Adapter BIOS—When this setting is disabled, the ROM BIOS on the HBA is disabled,
freeing space in upper memory. This setting must be enabled if you are booting from an Fibre
Channel hard disk connected to the HBA. The default is Disabled.
• Frame Size—Specifies the maximum frame length supported by the HBA. The default 2048
provides maximum performance for F_Port (point-to-point) connections.
• Loop Reset Delay—After resetting the loop, the firmware refrains from initiating any loop
activity for the number of seconds specified by this setting. The default is 5 seconds.
• Adapter Hard Loop ID—Forces the HBA to attempt to use the ID specified in the Hard Loop
ID setting. The default is Disabled.
• Hard Loop ID—When this setting has a Loop ID other than 0, the HBA uses the ID specified
by this setting. The default is 0.
• Spin Up Delay—When this setting is enabled, the BIOS waits up to two minutes to find the
first drive. The default is Disabled.
• Connection Options—Defines the connection type. The default is 2. The options are:
•0–Loop
•1–Point-to-point
• 2–Loop preferred, then point-to-point
• Fibre Channel Tape Support—When this setting is enabled, FCP-2 recovery can occur. The
default is Enabled.
• Data Rate—This setting determines the data rate. The default is 2. The options are:
•0–Runs at 1 Gb/s
•1–Runs at 2 Gb/s
• 2–Auto negotiates and determines the data rate
•3–Runs at 4 Gb/s
Selectable Boot Settings
This option lets you select the node from which you want to the system to boot. When enabled, this
option forces the system to boot from the selected Fibre Channel hard disk, ignoring any IDE hard
disks connected to the system. When disabled, the system looks for a boot device (specified in the
system BIOS). When disabled, the Boot ID and Boot LUN parameters have no effect.
NOTE: This option applies only to hard disks; it does not apply to tape drives and other nondisk
devices.
FC1142SR and FC1242SR DC 4Gb PCI Express host bus adapters for Linux and Windows installation guide 27
Page 28

You can select the boot device as follows:
Enable Selectable Boot? Boot WWPN/LUN list Boot device
No N/A (xxx appears) BIOS configures the first disk drive it finds as
the boot device.
Yes Not specified BIOS configures the first disk drive it finds that
is LUN 0 as the boot device.
Yes Specified BIOS scans the specified WWPN and LUN list
until it finds a disk drive. This drive is configured
as the boot device.
To enable the Selectable Boot option:
1. From the Configuration Settings menu, select Adapter Settings.
2. Enable the HBA BIOS, and then press ESC to return to the Configuration Settings menu.
Use the menu as follows:
• Use the arrow keys to select Selectable Boot Settings.
•Press ENTER to enable or disable (toggle) the Selectable Boot option.
3. Move to the primary location of the Selectable Boot List menu.
4. Press ENTER to view a list of accessible devices (these are the devices in the Select Fibre
Channel Device menu).
5. Using the arrow keys to select the device you want to add to the Selectable Boot List menu. Press
ENTER to select the device.
Repeat step 5 to specify up to three alternate boot devices.
Advanced Adapter Settings
From the Configuration Settings menu in Fast!UTIL, select Advanced Adapter Settings. Table 6
lists the default settings for the HBA.
Table 6 Advanced Adapter Settings
Setting Options Default
Execution Throttle 1–256 16
Luns per Target 0, 8, 16, 32, 64, 128, 256 128
Enable LIP Reset Yes, No No
Enable LIP Full Login Yes, No Yes
Enable Target Reset Yes, No Yes
Login Retry Count 0–255 8
Port Down Retry Count 0–255 16
Link Down Timeout 0–255 8
Configuring the HBAs28
Page 29

Table 6 Advanced Adapter Settings (continued)
Setting Options Default
Operation Mode 0, 5, 6 0
Interrupt Delay Timer 0–255 0
A descriptions of each setting follows:
• Execution Throttle—The maximum number of commands executing on one port. When a
port’s execution throttle value is reached, no new commands are executed until the current
command finishes executing. Values for this setting are 1–256. The default is 16.
• Luns per Target—The number of LUNs per target. Multiple LUN support is typically for RAID
arrays that use LUNs to map drives. The default is 128. If you do not need multiple LUN support,
set the number of LUNs to 0.
• Enable LIP Reset—The type of loop initialization process (LIP) reset used when the operating
system initiates a bus reset routine. When this setting is Yes, the driver initiates a global LIP reset
to clear the target device reservations. When this setting is No, the driver initiates a global LIP
reset with full login. The default is No.
• Enable LIP Full Login—Instructs the ISP chip to log in to all ports after LIP. The default is Yes.
• Enable Target Reset—Enables drivers to issue a Target Reset command to all devices on
the loop when a SCSI Bus Reset command is issued. The default is No.
• Login Retry Count—The number of times the software tries to log in to a device. The default
is 8.
• Port Down Retry Count—The number of times the software issues a command to a port
returning port down status. The default is 16 retries.
• Link Down Timeout—The number of seconds the software waits for a link to come up or go
down. Values for this setting are 0–255 seconds. The default is 8.
• Operation Mode—Specifies the reduced interrupt operation (RIO) mode, if supported by the
driver. The RIO mode allows multiple command completions in a single interrupt. The modes
are:
• 0–Interrupt for every I/O completion (default)
• 5–Interrupt when Interrupt Delay timer expires
• 6–Interrupt when Interrupt Delay timer expires or there is no active I/O
• Interrupt Delay Timer—The wait time in 200-microsecond increments used by the timer to
set the wait time between interrupts. Values for this setting are 0–255 seconds. The default is 0.
Restore Default Settings
This option restores the HBA default settings.
Raw NVRAM Data
This option displays the HBA’s NVRAM contents in hexadecimal format. This is a troubleshooting
tool; you cannot modify the data.
FC1142SR and FC1242SR DC 4Gb PCI Express host bus adapters for Linux and Windows installation guide 29
Page 30

Scan Fibre Channel Devices
This option scans the Fibre Channel loop and lists all connected devices by loop ID. Information
about each device is listed, such as the vendor name, product name, and revision. This information
is useful when configuring the HBA and connected devices.
Fibre Disk Utility
This option scans the Fibre Channel loop and lists all connected devices by loop ID. You can select
a hard disk and perform a low-level format or verify the hard disk.
CAUTION: Performing a low-level format destroys all data on the hard disk.
Loopback Data Test
This option lets you perform a loopback test. Ensure that the Fibre Channel loop is up or that a
loopback plug is connected to the HBA before starting the test.
Select Host Adapter
If your system has multiple HBAs, use this option to select and then configure or view the settings for
an HBA.
Configuring the HBAs30
Page 31

B Regulatory compliance and safety
Laser device
All HP systems equipped with a laser device comply with safety standards, including International
Electrotechnical Commission (IEC) 825. With specific regard to the laser, the equipment complies
with laser product performance standards set by government agencies as a Class 1 laser product.
The product does not emit hazardous light.
Laser safety warning
WARNING! To reduce the risk of exposure to hazardous radiation:
• Do not try to open the laser device enclosure. There are no user-serviceable components inside.
• Do not operate controls, make adjustments, or perform procedures to the laser device other
than those specified herein.
• Allow only HP-authorized service technicians to repair the laser device.
Certification and classification information
This product contains a laser internal to the fiber optic (FO) transceiver for connection to the Fibre
Channel communications port.
In the USA, the FO transceiver is certified as a Class 1 laser product conforming to the
requirements contained in the Department of Health and Human Services (DHHS) regulation 21
CFR, Subchapter J. A label on the plastic FO transceiver housing indicates the certification.
Outside the USA, the FO transceiver is certified as a Class 1 laser product conforming to the
requirements contained in IEC 825-1:1993 and EN 60825-1:1994, including Amendment
11:1996 and Amendment 2:2001.
Laser product label
The optional label in Figure 1 or equivalent may be located on the surface of the HP-supplied laser
device.
Figure 1 Class 1 laser product label
FC1142SR and FC1242SR DC 4Gb PCI Express host bus adapters for Linux and Windows installation guide 31
Page 32

International notices and statements
Canadian notice (avis Canadien)
Class A equipment
This Class A digital apparatus meets all requirements of the Canadian Interference-Causing
Equipment Regulations.
Cet appareil numérique de la classe A respecte toutes les exigences du Règlement sur le matériel
brouilleur du Canada.
European Union notice
Products bearing the CE marking comply with the EMC Directive (89/336/EEC) and the Low
Voltage Directive (73/23/EEC) issued by the Commission of the European Community, and if this
product has telecommunication functionality, the R&TTE Directive (1999/5/EC).
Compliance with these directives implies conformity to the following European Norms (in
parentheses are the equivalent international standards and regulations):
• EN55022 (CISPR 22) - Electromagnetic Interference
• EN55024 (IEC61000-4-2, IEC61000-4-3, IEC61000-4- 4, IEC61000-4-5, IEC61000-4-6,
IEC61000-4-8, IEC61000-4-11) - Electromagnetic Immunity
• Power Quality:
• EN61000-3-2 (IEC61000-3-2) - Power Line Harmonics
• EN61000-3-3 (IEC61000-3-3) - Power Line Flicker
• EN60950 (IEC60950) - Product Safety
• Also approved under UL 60950/CSA C22.2 No. 60950-00, Safety of Information Technology
Equipment.
BSMI notice
Regulatory compliance and safety32
Page 33

Japanese notice
Korean notice
FC1142SR and FC1242SR DC 4Gb PCI Express host bus adapters for Linux and Windows installation guide 33
Page 34

Safety
Electrostatic discharge
To prevent damage to the system, be aware of the precautions you need to follow when setting up
the system or handling parts. A discharge of static electricity from a finger or other conductor may
damage system boards or other static-sensitive devices. This type of damage may reduce the life
expectancy of the device.
Preventing electrostatic damage
To prevent electrostatic damage, observe the following precautions:
• Avoid hand contact by transporting and storing products in static-safe containers.
• Keep electrostatic-sensitive parts in their containers until they arrive at static-free workstations.
• Place parts on a grounded surface before removing them from their containers.
• Avoid touching pins, leads, or circuitry.
• Always be properly grounded when touching a static-sensitive component or assembly (see
”Grounding methods” on page 34).
Grounding methods
There are several methods for grounding. Use one or more of the following methods when handling
or installing electrostatic-sensitive parts:
• Use a wrist strap connected by a ground cord to a grounded workstation or computer chassis.
Wrist straps are flexible straps with a minimum of 1 megohm (±10 percent) resistance in the
ground cords. To provide proper ground, wear the strap snug against the skin.
• Use heel straps, toe straps, or boot straps at standing workstations. Wear the straps on both feet
when standing on conductive floors or dissipating floor mats.
• Use conductive field service tools.
• Use a portable field service kit with a folding static-dissipating work mat.
If you do not have any of the suggested equipment for proper grounding, have an HP authorized
reseller install the part.
NOTE: For more information on static electricity, or assistance with product installation, contact
your HP authorized reseller.
Regulatory compliance and safety34
Page 35

Index
A
audience 5
B
BSMI, regulatory compliance notice 32
C
certification and classification information, laser 31
Class A equipment, Canadian compliance
statement 32
configuring HBAs 26
conventions
document 6
text symbols 6
D
document, conventions 6
documentation, HP web site 5
drivers
changing parameters on Linux 19
installing from RPM 18
installing Windows 16
manually loading on Linux 19
qla2300 17
troubleshooting 23
E
electrostatic damage prevention 34
environmental specifications 10
ESD (electrostatic discharge) 34
European Union, regulatory compliance
notice 32
event log 23
Event Viewer, using 23
F
Fast!UTIL
Adapter Settings 26
Advanced Adapter Settings 28
configuring HBAs 26
Fibre Disk Utility 30
Raw NVRAM Data 29
Restore Default Settings 29
Scan Fibre Channel Devices 30
Select Host Adapter 30
fibreutils RPM 19
G
gcc compiler 18
German noise declaration 34
grounding methods 34
H
HBAs
configuring 26
environmental specifications 10
installation prerequisites 14
performance specifications 10
physical specifications 11
help, obtaining 7
HP
storage web site 7
Subscriber’s choice web site 7
technical support 7
I
IEC EMC, worldwide regulatory compliance notice
32
installing
Linux drivers 18
prerequisites for HBAs 14
RPM 18
Windows drivers 16
J
Japan, regulatory compliance notice 33
K
Korean, regulatory compliance notice 33
FC1142SR and FC1242SR DC 4Gb PCI Express host bus adapters for Linux and Windows installation guide 35
Page 36

L
label, laser 31
laser
international certification and classification
information 31
product label 31
radiation, warning 31
Linux
.gz file 18
changing driver parameters 19
fibreutils RPM 19
gcc compiler 18
installing drivers 18
manually loading drivers 19
RPM 18
set_parm script 19
troubleshooting 23
log, event 23
N
noise declaration, German 34
P
parameters, Linux drivers 19
performance specifications 10
power-on self-test (POST) 23
preventing electrostatic damage 34
problems
configuration 22
Fibre Channel 22
hardware 22
Q
qla2300 drivers 17
R
regulatory compliance
notices
BSMI 32
European Union 32
IEC EMC statement, worldwide 32
Japan 33
Korean 33
RPM
fibreutils 19
installing 18
uninstalling 18
upgrading 18
S
SCSIPORT miniport drivers
installing 16
troubleshooting 23
set_parm script 19
specifications
environmental 10
performance 10
physical 11
Storport miniport drivers
installing 16
troubleshooting 23
Subscriber’s choice, HP 7
symbols in text 6
T
technical support, HP 7
text symbols 6
troubleshooting
configuration problems 22
event log 23
Fibre Channel problems 22
hardware problems 22
Linux 23
Windows Event Viewer 23
U
uninstalling the RPM 18
upgrading the RPM 18
W
warnings, lasers, radiation 31
web sites
HP documentation 5
HP storage 7
HP Subscriber’s choice 7
Windows
drivers, installing 15
event log 23
Event Viewer 23
SCSIPORT miniport driver 16
Storport miniport driver 16
36
 Loading...