

Page 1

Important SATA RAID Controller
Installation Information
HP Workstation xw Series
Please review the following HP-specific installation instructions for your FastTrak S150 TX4 RAID
controller.
The FastTrak S150 TX4 User Manual, that includes general installation and troubleshooting information
from the manufacturer, is included in the Drivers and Installation Instructions CD. Use this document and
the User Manual to successfully install your SATA RAID controller on your HP workstation xw series.
Warranty Information
Your FastTrak S150 TX4 RAID controller is warranted under terms of the HP warranty included in this kit.
Kit Contents
Your FastTrak S150 TX4 RAID controller kit includes the following items:
■ FastTrak S150 TX4 RAID controller
■ HP product warranty
■ Drivers and Installation Instructions CD
■ Important SATA RAID Controller Installation Information card
■ Regulatory Information card
■ Enabling PCI Information card
■ One 4 to 2 pins LED cable (225537-001)
■ One 4 to 4 pins LED cable (308385-001)
1
Page 2

Installation Information
The Promise FastTrak S150 TX4 RAID controller is supported on the HP Workstations xw4100, xw6000,
xw8000, and xw8200 with Microsoft® Windows® 2000 and Microsoft Windows XP operating systems
only. If you have a workstation with an operating system that is not listed here, please check the HP
support website at
the latest product support information and drivers.
Use this document and the FastTrak S150 TX4 User Manual to complete your installation.
NOTE: This installation information and the FastTrak S150 TX4 User Manual (located on the drivers CD)
are intended for those who have background experience with computer hardware and software installation.
IMPORTANT: For optimal system performance, use the same capacity drives for your workstation RAID
array. For example, if you use a 40GB 7200 RPM hard drive, then all drives in the array should be the same
type.
Review the technical reference guides for your workstation for additional information about installing and
working with SATA drives.
www.hp.com/go/workstationsupport/ for a “systems supported” list. This site has
Installation Scenarios
There are two possible installation scenarios.
Scenario 1
This procedure involves the installation of the operating system on the disk array connected to the
controller. This process restores the operating system to a factory ship condition and may take several
hours to complete depending on the speed of your system. To complete this installation, complete the
following sections:
■ Pre-Installation Preparation
■ Installing the Hardware
■ Configuring the RAID Array
■ Restoring the System
■ Updating the Controller BIOS and Driver
Scenario 2
This procedure involves the creation of a single data array on an existing system. This option is an easier
and a shorter process, but your operating system will not be on the RAID array. To complete this
installation, complete the following sections:
NOTE: For this process, the operating system must be on a separate controller.
■ Pre-Installation Preparation
■ Installing the Hardware
■ Configuring the RAID Array
■ Installing the Driver
■ Updating the Controller BIOS and Driver
2
Page 3

Pre-Installation Preparation
Before you begin the installation confirm the following information.
Verify Your System BIOS
Verify your workstation has the latest system BIOS installed. Check the HP support website at
www.hp.com/go/workstationsupport/ for the latest system BIOS. If your system BIOS is not the
latest, download and upgrade to the most current release before installing the SATA RAID controller.
Verify SATA Cable Requirements
Make sure you have enough SATA cables to accommodate the number of hard drives that you will install.
If you ordered your SATA drives from HP or an HP-approved reseller, SATA cables have been included in
your hard drive kits.
NOTE: For optimal system performance, use only HP hard drives in your RAID array.
Verify SATA Power Connector Requirements
Make sure you have enough SATA power connectors to accommodate the number of hard drivers that you
will install or you will not be able to continue with installation. If your system did not come with SATA
Power Connectors or not enough SATA Power Connectors, SATA Power Adapter Cable part number
DN733A can be order from HP.
NOTE: One SATA Power Adapter Cable (DN733A) can accommodate 2 SATA hard drives.
Verify Restore CD Date (Scenario 1 Only)
Locate the System Restore CD set that shipped with your workstation. Check the date printed on the
Restore CD and verify the date is October 2003 or newer.
IMPORTANT: If you have a Restore CD with an older date, you cannot continue this installation. Contact
HP Support to request a new System Restore CD set.
NOTE: If you are installing this card on an HP Workstation xw8200, visit the HP support website at
www.hp.com/go/workstationsupport/ to download the Promise FastTrak S150 TX4 RAID card
drivers.
3
Page 4

Installing the Hardware
After you have completed all of the pre-installation preparations, you can begin the hardware installation.
1. Back up the data on the workstation where you will install the RAID array.
CAUTION: The following steps will wipe out all data and information on the hard drive where the RAID
Ä
array is created.
2. Shut down the workstation.
3. Disconnect the main power cord from the rear of the workstation and from the electrical wall outlet.
4. Open the access panel of the workstation.
IMPORTANT: When installing the RAID controller card on the HP Workstation xw8200, note the
following location configuration options in order of recommended preference:
■ For optimal performance, install the RAID controller card in PCI-X slot 5.
■ Install the RAID controller card in PCI-X slot 6 or 7 (unless you have onboard SCSI or the other
PCI-X slot is being used).
■ Install the RAID controller card in PCI slot 1 or 3. If you select this option, visit www.hp.com and
download the necessary driver to enable the use of these two PCI slots.
5. Install the FastTrak S150 TX4 RAID adapter in one of the available PCI slots. The card is universal
and may be installed in either 32-bit or 64-bit PCI slots.
NOTE: For optimal cable routing on the HP workstation, install the RAID controller in the PCI slot
closest to the graphics slot (AGP or PCI-Express).
6. Connect the hard drives to the FastTrak S150 TX4 RAID controller using the appropriate cables. Use
the following information to help you select the correct cables:
NOTE: Data cables ship with the hard drives (if purchased from HP) and are not included in this SATA
RAID controller kit.
❏ For xw8000 and xw8200 systems, it is recommended that hard drives connected to data ports 1
and 3 on the SATA RAID card be positioned in the upper drive bays (closest to the floppy bay).
Hard drives connected to ports 2 and 4 must be positioned in the lower bays so the data cables
will reach. Use the longest SATA data cable (326965-002 or 326965-006) for all drives. Connect
the 4-4 pin LED cable (308385-001) from the RAID card header “JP1” (4 pin header) to the
system board header labeled “SCSI LED” (4 pin header).
❏ For xw4100 systems, use the SATA data cables with the 90 degree connector (326965-001) for
the hard drive bays. The 90 degree connector goes to the hard drive. Use the longest data cable
with the straight connectors (326965-002) if installing a hard drive in an optical bay (with
adaptor). Connect the 4-2 pin LED cable (225537-001) from the RAID card header “JP1” (4 pin
header) to the system board header labeled “SCSI LED” (2 pin header).
❏ For xw6000 systems use the 14 inch SATA data cable with a straight connectors (326965-004)
for the hard drive bays. Use the longest data cable with the straight connectors (326965-002) if
installing a hard drive in an optical bay (with adaptor). Connect the 4-2 pin LED cable
(225537-001) from the RAID card header “JP1” (4 pin header) to the system board header
labeled “SCSI LED” (2 pin header).
NOTE: On the HP Workstation xw8000, make sure you do not connect the 4 to 4 pin SCSI LED cable to
the system board header labeled “SCSI-DIS”; doing so will disable the SCSI controller.
4
Page 5
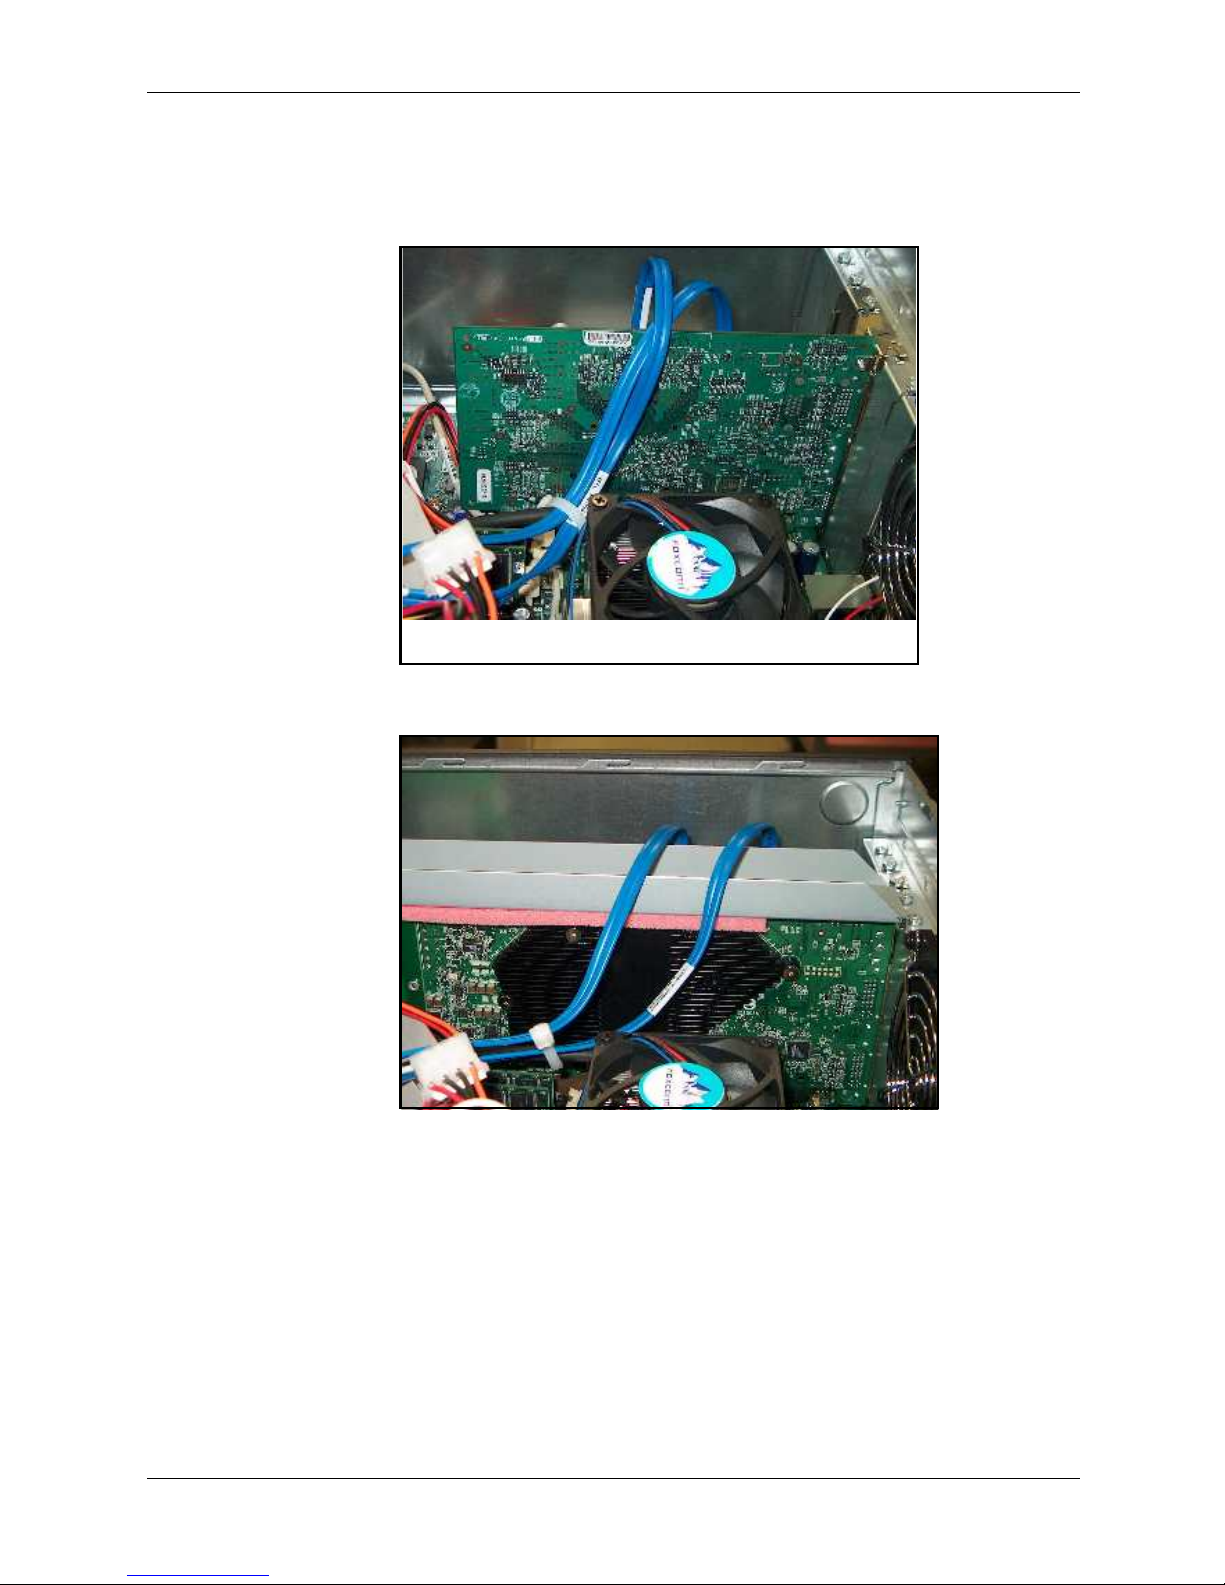
To maintain Class B standards for radiated emissions, SATA cables on HP Workstation xw6000
systems must be routed so they do not contact the access panel. Loosely tie-wrap the SATA cables to
the audio cable as shown in the following illustrations
HP Workstation xw6000 cable routing (shown with a standard graphics card)
HP Workstation xw6000 cable routing (shown with AGP support bracket)
7. Connect the power cable to each drive.
8. Close the access panel.
9. Reconnect the main power cord to the rear of the workstation and to the electrical wall outlet.
5
Page 6

Configuring the RAID Array
After completing the hardware installation, perform the following steps:
1. Turn on the workstation.
NOTE: Step 2 and 3 do not apply to the HP Workstation xw8000 or xw8200. If you have an xw8000 or
xw8200, proceed to Step 4.
2. Press F10 when you see the HP logo screen to access the BIOS setup utility.
3. Enable POST Messages by doing the following:
a. Navigate to Advance and press Enter to access the Power On Options using the arrow key.
b. Navigate down to POST Messages and change the setting to Enable using the left and right arrow
keys.
c. Press F10 to save the Power On Option.
d. Navigate to File > Save Changes and Exit and press Enter.
e. Press F10 again to reboot the system.
4. (Scenario 1 only; skip to the next step if you are doing Scenario 2) Your system may come with an
IDE, SCSI, or other SATA drive connected to the motherboard controller. To be able to boot from the
RAID array, you must access the system setup and set the boot device priority so that:
❏ the Bootable Add in Card is set as the boot device in the xw8000 (as opposed to hard drives
connected directly to the system board) or,
❏ the controller is listed first under Controller Order in the xw4100, xw6000 and xw8200.
Save the configuration changes and exit the setup utility. The system will reboot.
NOTE: The BIOS settings may differ depending on your system model. Refer to the system manual for
specific BIOS instructions.
5. Hold down the Ctrl key then press F to access the RAID configuration utility when you see the
Option ROM message, “FastTrak S150 TX4™ Utility”.
NOTE: If you do not see the Option ROM message, go into your system BIOS setup and enable the
Option ROM Scan setting. (Follow the on-screen instructions or refer to your system user manual for
reference). Save the system configuration and exit. The system will reboot. After the reboot, perform
step 5 again.
6. In the menu, select “2” for View Drive Assignments. This displays a list of drives connected to the
FastTrak S150 controller. Make sure the disk you want to create the RAID array for is listed as “Free”
under the Assignment column.
7. If the drive is not listed as “Free”, delete the array association with that drive to make it “Free”. For
information on how to delete the drive association, refer to the “Deleting an Array” section in the
FastTrak S150 TX4 User Manual.
8. Press Esc once to go back to the main menu.
9. Select “1” for Auto Setup.
6
Page 7

10. Using the arrow keys, select Performance or Security from the Optimize Array For: field. Depending
on the number of available drives connected to the controller, the following RAID array options are
available:
Drive
Options Mode Description
Number
1Performance
Only
2Performance or
Security
3Performance or
Security
4Performance or
Security
For more information about RAID levels refer to the FastTrak S150 TX4 User Manual.
11. After selecting your options, hold down Ctrl and press Y to save your configuration.
CAUTION: Initializing a drive destroys any existing data.
Ä
12. When the “Do you want to do quick initialize or create only?” message displays, press Y, if you
selected the Performance option. Press I, if you selected the Security option to Create and Quick
Initialize.An additional prompt displays confirming your Quick Initialize selection. Press Y to
confirm and begin the quick initialization.
1+0 stripe
2+0 stripe or 1x2 mirror
3+0 stripe or 1x2 mirror + 1
spare
4+0 stripe or 2x2 mirror/stripe
Single Drive. No actual RAID
performance benefit and not
recommended.
2 Drives Stripe for Performance.
Drives Mirror for Security.
3 Drives Stripe for Performance.
Mirror with a spare failover drive.
4 Drives Stripe for Performance.
2 sets of 2 mirror drives for
security.
Security option gives both
Performance and Security.
13. Press any key to reboot the system.
Restoring the System
These instructions apply only to installation Scenario 1. If you have an installation Scenario 2, proceed to
the “Installing the Driver” later in this document.
1. Insert the first Restore CD that came with your system into the CD drive.
2. Select the language and type of operating system for your system and follow the on-screen
instructions to finish the system restore process.
NOTE: During this process, the system reboots a couple of times and may ask for the operating system
CD and other supplemental CDs. This process could take up to a few hours.
3. When you see the Microsoft Windows “Welcome” screen, you have successfully completed the
restore process.
7
Page 8

Installing the Driver
These instructions apply only to installation Scenario 2. If you have an installation Scenario 1, do not
perform these steps.
1. After you install the RAID card and boot to Windows 2000 or Windows XP for the first time, the
“Welcome to the Found New Hardware Wizard” displays.
2. Insert the Drivers and Installation Instructions CD into the CD drive.
3. Click Next on the “Welcome to the Found New Hardware Wizard” and follow the on-screen
instructions to complete the installation.
Updating the Controller BIOS and Driver
For optimal performance and reliability, update the controller BIOS and driver to the latest version. The
BIOS and driver for your controller may have been updated since you bought the controller. The latest and
most recent BIOS and driver version for the controller is posted on the HP support website at:
www.hp.com/go/workstationsupport/
1. Check the controller BIOS version, by rebooting your system. During the option ROM scan of the
SATA RAID controller, write down the BIOS version.
2. Go to the HP support website and compare the version number.
3. If your controller has the same BIOS version as the one posted on the Web or no BIOS has been
posted on the HP website, your controller has the latest BIOS and no update is necessary and you can
skip to step 5.
4. If your controller has an older BIOS version, download the new BIOS and follow the instructions in
the downloaded package.
5. Check the driver version of the controller using the following steps:
a. Right-click My Computer.
b. Click Manage in the drop down menu. The Computer Management windows displays.
c. Double-click on SCSI and RAID controllers in the right-hand window.
d. Double-click on FastTrak S150 TX4 controller.
e. Click the Driver tab on the pop-up window to view the driver information.
6. Compare the driver version with the one on the HP website and update the driver if your driver is older
by downloading and following the on-screen instructions of the downloaded application.
8
Page 9

お使いの FastTrak S150 TX4 RAID コント ローラに関しては、 以下の HP 固有の イ ン ス ト ール手
順を確認して く だ さ い。
『FastTrak S150 TX4 User Manual』には、製造元から提供されるインストールおよびトラブル
シューテ ィ ングについての全般的な情報が含まれてお り、 Drivers and Installation Instructions CD
に収録さ れてい ます。 本書と 『FastTrak S150 TX4
Workstation xw シリーズにSATA RAID コン トローラをインス トールしてください。
保証内容
お使いの FastTrak S150 TX4 RAID コ ン ト ロ ーラ は、 こ のキ ッ ト に付属の HP 保証書の条件で保
証されます。
キッ トの内容
FastTrak S150 TX4 RAID コン トローラ キッ トには、 以下が含まれています。
■ FastTrak S150 TX4 RAID コン トローラ
■ HP 製品保証書
■ Drivers and Installation Instructions CD
■ 『SATA RAID コン トローラの重要なインストール情報』 カード
■ Regulatory Information card
■ Enabling PCI Information card
■ 4 ピン -2 ピン LED ケーブル (225537-001) 1 本
■ 4 ピン -4 ピン LED ケーブル (308385-001) 1 本
SATA RAID コントローラの
重要な イ ン ス ト ール情報
HP Workstation xw シリーズ
User Manual』 を使用 して、 お使いの HP
9
Page 10

イ ン ス ト ール情報
Promise FastTrak S150 TX4 RAID コント ローラは、 Microsoft® Windows® 2000 およびMicrosoft
Windows XP オペレ ーテ ィ ング シ ステ ムで稼動する HP Workstation xw4100、 xw6000、 xw8000、
および xw8200 でのみサポー ト されて いま す。 上記以外のオペ レーシ ョ ン システムでワークス
テーシ ョ ン を稼動 し て い る場合は、 以下の HP のサポー ト Web サイ トの 「systems supported」
リ ス ト を ご確認 く だ さ い。 こ のサ イ ト では、 最新の製品サポー ト 情報お よ びド ラ イ バを提供 し
ています。
www.hp.com/go/workstationsupport/ (英語)
本書 と 『FastTrak S150 TX4 User Manual』を使用して、インストールを行ってください。
注記 : こ の イ ン ス ト ール情報お よび 『FastTrak S150 TX4 User Manual』(ドライバCD に収録)
は、 コ ン ピ ュータ のハード ウ ェ アおよびソ フ ト ウ ェ アの イ ン ス ト ールの知識 と 経験のあ る方を
対象 と し てい ます。
重要 : システム パフォーマンス を最適にするには、 お使いのワーク ステーシ ョ ンの RAID アレ
イ と同 じ容量の ド ラ イ ブを使用 し て く だ さ い。 た と えば、 40GB 7200 RPM ハー ド ドライブを使
用する 場合、 すべて の アレ イ で同じ タ イプの ド ラ イブ を 使用す る必要があ り ます。
SATA ド ラ イ ブの イ ン ス ト ールおよび使用の詳細については、 お使いのワー ク ス テーシ ョ ンに
付属の技術 リ フ ァ レ ン ス ガ イ ド を確認 し て く だ さい。
イ ン ス ト ールの方法
以下の 2 種類の イ ン ス ト ールの方法が あ り ま す。
ケース 1
こ の手順には、 コ ン ト ロー ラ に接続 さ れてい るデ ィ ス ク アレイへのオーペレーテ ィ ング システ
ムのイ ンス ト ールが含まれます。 このプロセスでは、 オペレーテ ィ ング シ ス テ ム を出荷時の状
態に復元 し、 シ ステ ムの性能速度に よ っ ては、 完了ま でに数時間かか る場合があ り ま す。 以下
の手順で、 イ ン ス ト ールを完了し ます。
■ インストール前の準備
■ ハー ド ウ ェ アの イ ンス ト ール
■ RAID アレイの設定
■ システムの復元
■ コント ローラ BIOS およびド ラ イバのアップデート
ケース 2
こ の手順には、 既存の シ ス テ ムへの単一データ アレイの作成が含まれています。 ケース 2 は、
ケース 1 に比べ容易で処理時間 も短いですが、 お使いのオペ レ ーテ ィ ング システムはRAID ア
レ イ上にはイ ン ス ト ールされません。 以下の手順で、 イ ン ス ト ールを完了し ます。
注記 : このプロセスでは、 オペレーティング システムは別のコン ト ローラ上にインス トールさ
れて い る必要があ り ま す。
■ インストール前の準備
10
Page 11

■ ハー ド ウ ェ アの イ ンス ト ール
■ RAID アレイの設定
■ ドライバのインストール
■ コント ローラ BIOS およびド ラ イバのアップデート
イ ンス ト ール前の準備
イ ン ス ト ールを開始す る 前に、 以下の情報を確認し て く だ さ い。
システム BIOS の確認
お使いの ワー ク ステーシ ョ ンに最新のシ ステ ム BIOS がインス トールされているこ とを確認し
てください。最新のシステム BIOS については、 以下の HP のサポー ト We b サイ ト で確認して
ください。
www.hp.com/go/workstationsupport/ (英語)
システム BIOS が最新でない場合は、 SATA RAID コン トローラをインストールする前に、 最新
のシス テム BIOS をダウンロードして、 アップグレードしてください。
SATA ケーブル要件の確認
SATA ケーブルは、 イ ンス ト ールするハード ディスク ドライブの数だけ用意してください。
HP または HP 公認代理店か ら SATA ドライブを購入した場合は、ハード ドライブ キッ トに
SATA ケーブルが同梱さ れてい ます。
注記 : システム パフォーマンスを最適にするには、 HP 製品以外のハー ド ディ スク ドライブを
RAID アレイに使用しないでください。
SATA 電源 コネ ク タ 要件の確認
インストールするハード ディスク ドライブの数だけSATA 電源コ ネク タがあ る こ と を確認 し
て く だ さ い。 コ ネク タが不足 し て い る場合、 イ ン ス ト ールは続行で き ません。 シ ス テ ム に
SATA 電源コネク タが付属していないか、 SATA 電源コ ネ ク タ が不足し てい る場合は、 SATA
電源ア ダプ タ ケ ーブル (製品番号 DN733A)をHP か らお求めい た だ け ます。
注記 : SATA 電源ア ダプ タ ケーブル (DN733A) 1 本で、 2 台の SATA ハード ディスク ドライ
ブに対応でき ます。
Restore CD の日付の確認 (ケース 1 の場合のみ)
お使いの ワー ク ステーシ ョ ンに付属の System Restore CD セ ッ ト をお手元に用意 し ます。 Restore
CD に印刷さ れてい る日付を確認し、 日付が 2003 年 10 月以降であ る こ と を確認 し て く ださ い。
重要 : Restore CD が 2003 年 10 月以前の も ので ある 場合は、 こ の イ ン ス ト ールを続行で き ませ
ん。 HP のサポー ト 窓口に連絡 し て、 新 し い System Restore CD セッ ト をお求めください。
注記 : このカードを HP Workstation xw8200 にインス トールする場合は、 以下のHP のサポー ト
Web サイ トから Promise FastTrak S150 TX4 RAID カー ド ドライバをダウンロードしてください。
www.hp.com/go/workstationsupport/ (英語)
11
Page 12

ハー ド ウ ェ アのイ ンス ト ール
イ ン ス ト ール前の準備がすべて完了する と、 ハー ド ウ ェ アの イ ン ス ト ールを開始で き ます。
1. RAID アレ イ を イ ンス ト ールする ワーク ステーシ ョ ン上のデータのバッ クア ッ
プを取り ます。
Ä
注意 : 以下の手順を行 う と 、 RAID アレ イが作成 されるハー ド デ ィ スク ドライブ上のデータおよび
情報はすべて消去さ れま す。
2. ワーク ステーシ ョ ンをシャ ッ ト ダウン します。
3. メインの電源コードをワークステーショ ンの背面から抜き、 コンセントから抜きます。
4. ワーク ステーシ ョ ンのアクセス パネルを開けます。
重要 : HP Workstation xw8200 に RAID コン トローラ カー ド を イ ン ス ト ールす る場合、 以下の位
置構成オプシ ョ ン を確認 して く ださ い。 オ プ シ ョ ンは推奨す る 順に記載 されて い ます。
■ パフォーマンス を最適にするためには、PCI-X スロッ ト 5 に RAID コン ト ローラ カー ド を イ
ンス トールします。
■ PCI-X スロッ ト 6 または7 にRAID コント ローラ カード をイ ンス ト ール し ます(SCSI がボード
に内蔵さ れていない場合、 ま たは、 他の PCI-X ス ロ ッ ト が未使用の場合)。
■ 上記以外の場合は、PCI スロッ ト1 または3 に RAID コント ローラ カー ドを インス ト ールし ま
す。 こ のオプ シ ョ ンを選択す る 場合は、 以下の HP の Web サイ トから必要なド ライバをダ
ウンロード し、 これら 2 つの PCI スロッ トが使用できるよう設定してください。
www.hp.com (英語)
5. 使用可能な PCI スロッ トのいずれか 1 基に、 FastTrak S150 TX4 RAID アダプタ を インス
トールします。 カードはユニバーサル対応であるため、 32 ビッ ト スロッ トまたは 64 ビッ
ト スロッ トのどちらにもインストールできます。
注記 : HP ワ ー ク ス テーシ ョ ンの ケーブルを最適に配線する には、 グ ラ フ ィ ッ ク スロッ ト
(AGP または PCI-Express)に最も近いPCI スロッ トにRAID コント ローラをインス トールして
ください。
6. 適切な ケーブルを使用し て、 FastTrak S150 TX4 RAID コント ローラにハード ディスク ドラ
イブを接続します。 以下の情報を参考にして、 正しいケーブルを選択し て く だ さ い。
注記 : データ ケーブルはハード ディ ス ク ドライブに同梱されています (HP からご購入いただ
いた場合)。 こ の SATA RAID コント ローラ キッ トには含まれておりません。
❏ xw8000 およびxw8200 シ ステ ムをお使いの場合、SATA RAID カード のデータ ポー ト 1 お
よび 3 に接続さ れたハード デ ィ ス ク ドライブを上部のドライブ ベイ (フロ ッピー ベ
イの最も近く) にインス トールするこ と をおすすめします。 ポート 2 および 4 に接続
されたハード ディ スク ドライブは、データ ケーブルが届 く よ う に、 下部のベイにイ ン
ス ト ールする 必要があ り ます。 すべての ド ラ イブに、 最 も 長い SATA データ ケーブル
(326965-002 または326965-006)を使用します。4-4 ピン LED ケーブル (308385-001)
を、 RAID カード ヘッダー 「JP1」(4 ピン ヘッダー) から、 「SCSI LED」のラベルが付
いている システム ボー ド ヘッダー (4 ピン ヘッダー) に接続して く ださい。
❏ xw4100 システムをお使いの場合は、 SATA データ ケーブルに直角コネ ク タ
(326965-001) を取 り 付けてハード ディスク ドライブ ベイに使用します。 直角コネク タ
はハード ディスク ドライブ側に取り付けます。オプティカル ベイに (アダプタを用い
て) ハード デ ィ ス ク ドライブをインストールする場合は、 ストレート コネク タ
(326965-002)を取り付けた最も長いデータ ケーブルを使用し ます。 4-2 ピン LED ケー
12
Page 13

ブル (225537-001)を、RAID カー ド ヘッダー 「JP1」(4 ピン ヘッダー) から、 「SCSI
LED」のラベルが付いているシステム ボー ド ヘッダー (2 ピンヘッダー) に接続しま
す。
❏ xw6000 システムをお使いの場合は、14 インチSATA データ ケーブルにス ト レー ト コネ
クタ (326965-004)を取り付けてハード ディスクド ラ イブ ベイに使用し ます。 オプ
ティカル ベイに (アダプタ を用いて) ハード ディ スク ドライブをインストールする場
合は、 ス ト レー ト コネクタ (326965-002) を取 り 付け た一番長いデータ ケーブルを使
用します。 4-2 ピン LED ケーブル (225537-001)を、RAID カード ヘッダー 「JP1」(4
ピン ヘッダー) から、 「SCSI LED」のラベルが付いているシステム ボー ド ヘッダー
(2 ピン ヘッダー) に接続して く ださい。
注記 : HP Workstation xw8000 をお使いの場合は、 4-4 ピン SCSI LED ケーブルを、 「SCSI-DIS」
のラベルが付いているシステム ボード ヘ ッ ダーに接続 し な いで く ださ い。 接続する と 、 SCSI
コント ローラが使用できなくなり ます。
放射妨害波規定の ク ラ ス B を維持す る ため、 HP Workstation xw6000 シ ス テ ムに接続す る
SATA ケーブルは、 ア ク セス パネルに触れない よ う 配線す る 必要があ り ます。 下図の よ う
に、 SATA ケーブルをオーデ ィオ ケーブルにゆ る く ま とめます。
HP Workstation xw6000 ケーブルの配線 (標準のグ ラ フ ィ ッ ク カ ード の場合)
13
Page 14

HP Workstation xw6000 ケーブルの配線 (AGP サポー ト ブ ラケ ッ ト の場合)
7. 電源ケーブルを各 ド ラ イブに接続 し ます。
8. アクセス パネルを閉じ ます。
9. メ イン の電源コ ード を ワー ク ス テーシ ョ ン の背面に再接続 し、 コ ン セ ン ト に差し 込み ます。
14
Page 15

RAID アレ イの設定
ハー ド ウ ェ アの取 り 付け完了後、 以下の手順を 行い ま す。
1. ワーク ステーシ ョ ンを起動し ます。
注記 : HP Workstation xw8000 またはxw8200 の場合、 手順 2 および3 は行い ません。 xw8000 ま
たは xw8200 をお使いの場合は、 手順 4 に進みます。
2. HP のロゴ画面が表示されたら、 [F10] キーを押し て、 BIOS 設定ユーテ ィ リ テ ィ にア クセ ス
します。
3. 以下の手順で、 [POST Messages] を有効にし ます。
a. [Advance] に移動し て矢印キーを使用し て [Power On] オプシ ョ ンに移動し、 [Enter] キー
を押し てアク セス します。
b. [POST Messages] まで移動 し、 左矢印キー と 右矢印キーを使用し て、 設定を [Enable] に
変更し ま す。
c. [F10] キーを押して、 [Power On] オプシ ョ ンを保存し ます。
d. [File] 、 [Save Changes and Exit] の順に移動し て、 [Enter] キーを押し ます。
e. 再び [F10] キーを押し て、 システム を再起動し ます。
4. (ケース 1 にのみ適用。 ケース 2 の場合は、 次の手順に進んで く だ さい) お使いのシ ステ ム
には、 マザーボード コン トローラに接続されている IDE、 SCSI、あるいは、その他の
SATA ドライブが付属している場合があります。 RAID アレイからブート できるよ う、 シス
テム設定にアクセス して、 ブー ト デバ イ ス優先順位を以下の よ う に設定し ます。
❏ xw8000 の場合は、[Bootable Add in Card] をブート デバイ スに設定し ます(システム ボー
ド に直接接続さ れる ハー ド ドライブとは逆です)。
❏ xw4100、 xw6000、 xw8200 の場合は、 [Controller Order] の下の一覧にコ ン ト ローラ が最
初に表示されます。
設定の変更を保存 して、 設定ユーテ ィ リ テ ィ を終了 し ます。 シ ス テ ムを再起動 し ます。
注記 : BIOS 設定は、 シ ステ ム モデルによ って異な り ます。 個々の BIOS 設定手順につい て は、
システム マニュアルを参照して ください。
5. 「FastTrak S150 TX4™ Utility」という[Option ROM] メ ッ セージが表示 さ れた ら 、 [Ctrl] キー
を押し なが ら [F] キーを押し、 RAID 設定ユーテ ィ リ テ ィ にア ク セス し ます。
注記 : [Option ROM] メ ッ セージが表示されない場合は、 システム BIOS 設定に ア クセ ス し て、
[Option ROM Scan] 設定を有効にし ます。 (画面上の指示に従 う か、 ま たは、 お手元の リ フ ァ レ
ンス用ユーザー マニ ュ ア ル を 参照 し て く だ さ い)。 シ ス テ ム設定を保存 して終了 し ます。 シ ス
テム を再起動 し ます。 再起動 し た ら、 再び、 手順 5 を行います。
6. メニューから 「2」の[View Drive Assignments] を選択し ます。 FastTrak S150 コン ト ローラ
に接続さ れてい る ド ラ イ ブが一覧表示 さ れます。 RAID ア レ イの作成に使用する ド ラ イブ
の [Assignment] 欄が 「Free」 と 表示さ れてい る かど う かを確認 し ます。
15
Page 16

7. ドライブに 「Free」 と表示されていない場合は、 そのド ラ イブと関連付けられているアレ
イを削除して、 ドライブを 「Free」 にし て く だ さ い。 ド ラ イ ブの関連付け を 削除す る方法
の詳細については、 『FastTrak S150 TX4 User Manual』の「Deleting an Array」の項を参照し
てください。
8. [Esc] キーを一度押して、 メ イ ン メニューに戻ります。
9. 「1」の[Auto Setup] を選択し ます。
10. 矢印キーを使用 し て、 [Optimize Array For:] フィールドで[Performance] または [Security] を
選択し ま す。 コ ン ト ロー ラ に接続で き る ド ラ イ ブの数に よ っ て、 以下の RAID アレイ オプ
シ ョ ン が選択で き ます。
ドライブ数 オプション モード 説明
1[Performance]
のみ
2[Performance]
または
[Security]
3[Performance]
または
[Security]
4[Performance]
または
[Security]
RAID レベルに関す る詳 しい情報は、 『FastTrak S150 TX4 User Manual』を参照してくださ
い。
11. オプシ ョ ン を選択 し た後、 [Ctrl] キーを押し ながら [Y] キーを押して、 設定を保存し ます。
1+0 ストライプ 単一ドライブ。 RAID による性
能的利点はあ り ません。
おすすめし ません。
2+0 ストライプ、 または1x2
ミラー
3+0 ストライプ、 または1x2
ミラー+1 スペア
4+0 ストライプ、 または2x2
ミラー/ ストライプ
[Performance] 用の 2 ストライ
プ ドライブ。
[Security] 用のミ ラー ドライ
ブ。
[Performance] 用の 3 ストライ
プ ドライブ。
スペア フェールオーバー ドラ
イブのミラー。
[Performance] 用の 4 ストライ
プ ドライブ
[Security] 用の 2 ドライブ ミ
ラー 2 セット。
[Security] オプシ ョ ンは、
[Performance] と [Security] の
どちらも含みます。
Ä
注意 : ド ラ イ ブを初期化す る と、 既存のデー タがすべて消去 されま す。
12. 「Do you want to do quick initialize or create only?」 の メ ッ セージ が表示さ れた ら 、
[Performance] オプシ ョ ンを選択 した場合は [Y] キーを押し ます。 [Security] オプシ ョ ンを選
択した場合は、 [I] キーを押して、 [Create and Quick Initialize] を実行し ます。 プロ ンプ ト に、
[Quick Initialize] を 選択し た こ と を確認する メ ッ セージが表示 され ます。 [Y] キーを押して確
認し、 クイ ッ ク初期化を開始します。
13. いずれかのキーを押 して、 シ ステム を リ ブー ト し ます。
16
Page 17

シス テムの復元
以下の手順は、 ケース 1 の方法でイ ンス ト ールを行 う 場合にのみ実行し ます。 ケース 2 の方法
でインス トールを行っている場合は、 次の項の 「ドラ イバのインス トール」 に進んでくださ
い。
1. お使いの シス テムに付属の Resotre CD の 1 枚目を CD ドライブに挿入します。
2. システムのオペレーティ ング シ ステムの言語 と 種類を選択し、 画面上の指示に従ってシス
テム復元プロセスを完了し ます。
注記 : こ の処理中に、 シ ステ ムを数回再起動する 場合があ り ます。 その際に、 オペ レ ーテ ィ ン
グ システム CD およびその他の補足 CD が要求 さ れる 場合があ り ます。 こ の処理に数時間かか
る場合があ り ます。
3. Microsoft Windows の「Welcome」 画面が表示 され る と 、 復元プ ロセ スは完了です。
ドライバのインストール
以下の手順は、 ケース 2 の方法で イン ス ト ールす る場合にのみ実行 し ます。 ケース 1 の方法で
イ ンス ト ール を 行 ってい る場合は、 こ の手順は実行 し ません。
1. RAID カー ド を イン ス トールし た後、 Windows 2000 または Windows XP を最初に起動する
と、 「Welcome to the Found New Hardware Wizard」が表示されます。
2. Drivers and Installation Instructions CD を、 CD ドライブに挿入します。
3. 「Welcome to the Found New Hardware Wizard」画面で[Next] を ク リ ッ ク し 、 画面上の指示に
従って イ ンス ト ールを完了し ます。
コントローラ BIOS およびド ラ イバのアッ プデー ト
パフ ォーマン スお よび信頼性を最適にする ため、 コ ン ト ロー ラの BIOS およびド ラ イバを最新
版にア ッ プデー ト し ます。 お使いの コ ン ト ロー ラ の BIOS およびド ライバが、 コン ト ローラ購
入時以降ア ッ プデー ト さ れて い る場合があ り ま す。 コ ン ト ロー ラ の最新の BIOS およびド ラ イ
バは、 以下の HP のサポー ト Web サ イ ト に掲載 さ れ て い ます。
www.hp.com/go/workstationsupport/ (英語)
1. システム再起動して、 コン ト ローラ BIOS のバージ ョ ンを確認し ます。 SATA RAID コン ト
ローラのオプシ ョ ン ROM 検出の間に、 BIOS のバージ ョ ン を書き 留めます。
2. HP のサポー ト We b サイ ト で、 バージ ョン番号を比較します。
3. コント ローラの BIOS が、 Web ページに掲載されている ものと同じバージ ョ ンであるか、
BIOS が HP の Web サイ ト に掲載されていない場合は、 最新の BIOS がコン ト ローラに使用
されており、 ア ップデート は必要あり ませんので手順 5 に進みます。
4. コント ローラの BIOS バージ ョ ンが古い場合は、 新 し い BIOS をダウンロード して、 その
パッケージの指示に従ってください。
5. 以下の手順に従っ て、 コ ン ト ローラ の ド ラ イバ バージ ョ ン を 確認 し ます。
a. [ マイ コンピュータ ] を右ク リ ッ ク し ます。
b. ドロップ ダウン メニューから [ 管理 ] をク リ ックします。 [ コンピュータの管理] ウィ
ン ド ウが表示 さ れ ます。
c. 右側の ウ ィ ン ド ウ で [SCSI と RIAD コン ト ローラ ] をダブルク リ ッ クします。
17
Page 18

d. FastTrak S150 TX4 コント ローラをダブルク リ ッ ク します。
e. ポップアップ ウィンドウの[ ドライバ] タブを ク リ ッ ク し、 ド ラ イバ情報を確認し ま
す。
6. ドライバのバージョンをHP の Web サ イ ト に掲載 さ れてい る ド ラ イ バ と 比較し 、 お使いの
ド ラ イバが古い場合は、 ド ラ イ バを ダウ ン ロー ド し て、 そ の ア プ リ ケーシ ョ ンの画面指示
に従っ て、 ド ラ イバをア ッ プデー ト し ます。
348930-002
18
© 2004 Hewlett-Packard Development Company, L.P. The HP Invent logo is a registered
trademark of Hewlett-Packard Development Company, L.P. Microsoft and Windows are U.S.
registered trademarks of Microsoft Corporation. All other product names mentioned herein may
be trademarks or registered trademarks of their respective companies.
 Loading...