

Page 1
user’s guide
version 3.0
fabric manager
www.hp.com
Page 2

Notice
© Hewlett-Packa rd C om pa n y, 2001. All rights reser v ed .
Edition: E1201
Hewlett-Packard Company makes no warranty of any kind with
regard to this material, including, but not limited to, the implied
warranties of merchantability and fitness for a particular purpose.
Hewlett-Packard shall not be liable for errors contained herein or for
incidental or consequential damages in connection with the
furnishing, performance, or use of this material.
This document co nta in s proprietary information, whic h is p rote c te d
by copyright. No part of this document may be photocopied,
reproduced, or translated into another language without the prior
written consent of Hewlett-Packard. The information contained in
this document is subject to change without notice.
Use, duplication, or disclosure by government is subject to
restrictions as set forth in subdivision (c) (1) (ii) of the Rights in
Technical Data and Computer Software Clause at DFARS
252.227.7013.
Warranty
If you have any questions about the warranty for this produc t,
contact your dealer or local Hewlett-Packard sales representative
Trademarks
BROCADE, the Brocade B weave logo, Brocade: the Intelligent
Platform for Networking Storage, SilkWorm, and SilkWorm
Express, are trademarks or registered trademarks of Brocade
Communications Systems, Inc. or its subsidiaries in the United
States and/or in other countries.
All other bran ds, pro duct or serv ice na mes are or may b e trade marks
or service marks of, and ar e used to identify pr oducts of services of
their respective owners.
Safety notic es
Any servicing, adjustment, maintenance, or repair must be
performed only by authorized service-trained personnel.
Page 3

Fabric Manager User’s Guide iii
Contents
Preface
About This Guide . . . . . . . . . . . . . . . . . . . . . . . . . . . . . . . . . . . . . . . . . . ix
Related Publications . . . . . . . . . . . . . . . . . . . . . . . . . . . . . . . . . . . . . . . . x
Getting Help . . . . . . . . . . . . . . . . . . . . . . . . . . . . . . . . . . . . . . . . . . . . . . xi
Getting Software Updates. . . . . . . . . . . . . . . . . . . . . . . . . . . . . . . . . . . . xi
Chapter 1 Introducing Fabric Manager
Overview. . . . . . . . . . . . . . . . . . . . . . . . . . . . . . . . . . . . . . . . . . . . . . . . . 1-1
Advantages . . . . . . . . . . . . . . . . . . . . . . . . . . . . . . . . . . . . . . 1-1
Capabilities . . . . . . . . . . . . . . . . . . . . . . . . . . . . . . . . . . . . . . 1-2
Features. . . . . . . . . . . . . . . . . . . . . . . . . . . . . . . . . . . . . . . . . . . . . . . . . . 1-2
Core Features . . . . . . . . . . . . . . . . . . . . . . . . . . . . . . . . . . . . 1-2
Advanced Management Features . . . . . . . . . . . . . . . . . . . . . 1-3
Fabric OS Integration . . . . . . . . . . . . . . . . . . . . . . . . . . . . . . . . . . . . . . . 1-5
Concepts . . . . . . . . . . . . . . . . . . . . . . . . . . . . . . . . . . . . . . . . . . . . . . . . . 1-6
Logical Groups . . . . . . . . . . . . . . . . . . . . . . . . . . . . . . . . . . . 1-6
Local Files. . . . . . . . . . . . . . . . . . . . . . . . . . . . . . . . . . . . . . . 1-6
Import/Export . . . . . . . . . . . . . . . . . . . . . . . . . . . . . . . . . . . . 1-7
ISL Checking . . . . . . . . . . . . . . . . . . . . . . . . . . . . . . . . . . . . 1-7
Security. . . . . . . . . . . . . . . . . . . . . . . . . . . . . . . . . . . . . . . . . 1-7
Chapter 2 Installing Fabric Manager
Requirements . . . . . . . . . . . . . . . . . . . . . . . . . . . . . . . . . . . . . . . . . . . . . 2-1
Switch Requirements . . . . . . . . . . . . . . . . . . . . . . . . . . . . . . 2-1
Workstation Requirements . . . . . . . . . . . . . . . . . . . . . . . . . . 2-1
Page 4

iv Fabric Manager User’s Guide
Installing Fabric Manager. . . . . . . . . . . . . . . . . . . . . . . . . . . . . . . . . . . . 2-2
Installing the Java Plug-in on the Workstation . . . . . . . . . . . 2-2
Installing a Web Browser . . . . . . . . . . . . . . . . . . . . . . . . . . . 2-3
Configuring the Web Browser . . . . . . . . . . . . . . . . . . . . . . . 2-3
Installing Fabric Manager on the Windows Workstation . . . 2-4
Launching the Switch through Windows . . . . . . . . . . . . . . . . . . . . . . . . 2-7
Adding the Browser Pathname to the Properties File. . . . . . . . . . . . . . . 2-7
Uninstalling Fabric Manager . . . . . . . . . . . . . . . . . . . . . . . . . . . . . . . . . 2-8
Chapter 3 Fabric Manager View
Overview. . . . . . . . . . . . . . . . . . . . . . . . . . . . . . . . . . . . . . . . . . . . . . . . . 3-1
Accessing Fabric Manager View . . . . . . . . . . . . . . . . . . . . . 3-1
Options available in the Fabric Manager View. . . . . . . . . . . . . . . . . . . . 3-2
Menus . . . . . . . . . . . . . . . . . . . . . . . . . . . . . . . . . . . . . . . . . . 3-2
Tool Bar . . . . . . . . . . . . . . . . . . . . . . . . . . . . . . . . . . . . . . . . 3-5
SAN Elements Panel. . . . . . . . . . . . . . . . . . . . . . . . . . . . . . . 3-6
Switch View . . . . . . . . . . . . . . . . . . . . . . . . . . . . . . . . . . . . . 3-9
Chapter 4 File Menu
New. . . . . . . . . . . . . . . . . . . . . . . . . . . . . . . . . . . . . . . . . . . . . . . . . . . . . 4-1
Close . . . . . . . . . . . . . . . . . . . . . . . . . . . . . . . . . . . . . . . . . . . . . . . . . . . . 4-2
Fabric Login . . . . . . . . . . . . . . . . . . . . . . . . . . . . . . . . . . . . . . . . . . . . . . 4-2
Groups. . . . . . . . . . . . . . . . . . . . . . . . . . . . . . . . . . . . . . . . . . . . . . . . . . . 4-4
Options . . . . . . . . . . . . . . . . . . . . . . . . . . . . . . . . . . . . . . . . . . . . . . . . . . 4-6
File Transfer Tab. . . . . . . . . . . . . . . . . . . . . . . . . . . . . . . . . . 4-7
Log Parameters Tab . . . . . . . . . . . . . . . . . . . . . . . . . . . . . . . 4-7
ISL Status Tab. . . . . . . . . . . . . . . . . . . . . . . . . . . . . . . . . . . . 4-8
Fabric Change Tab . . . . . . . . . . . . . . . . . . . . . . . . . . . . . . . . 4-10
Print. . . . . . . . . . . . . . . . . . . . . . . . . . . . . . . . . . . . . . . . . . . . . . . . . . . . . 4-12
Page 5

Fabric Manager User’s Guide v
Fabric Manager Log . . . . . . . . . . . . . . . . . . . . . . . . . . . . . . . . . . . . . . . . 4-12
Search Dialog Box . . . . . . . . . . . . . . . . . . . . . . . . . . . . . . . . 4-14
Filter Dialog Box . . . . . . . . . . . . . . . . . . . . . . . . . . . . . . . . . 4-15
Exit . . . . . . . . . . . . . . . . . . . . . . . . . . . . . . . . . . . . . . . . . . . . . . . . . . . . . 4-16
Chapter 5 View Menu
Detail. . . . . . . . . . . . . . . . . . . . . . . . . . . . . . . . . . . . . . . . . . . . . . . . . . . . 5-2
Summary. . . . . . . . . . . . . . . . . . . . . . . . . . . . . . . . . . . . . . . . . . . . . . . . . 5-3
Table . . . . . . . . . . . . . . . . . . . . . . . . . . . . . . . . . . . . . . . . . . . . . . . . . . . . 5-3
Chapter 6 Actions Menu
Switch View . . . . . . . . . . . . . . . . . . . . . . . . . . . . . . . . . . . . . . . . . . . . . . 6-2
Events . . . . . . . . . . . . . . . . . . . . . . . . . . . . . . . . . . . . . . . . . . . . . . . . . . . 6-2
Admin . . . . . . . . . . . . . . . . . . . . . . . . . . . . . . . . . . . . . . . . . . . . . . . . . . . 6-3
Fabric Watch . . . . . . . . . . . . . . . . . . . . . . . . . . . . . . . . . . . . . . . . . . . . . . 6-4
Telnet. . . . . . . . . . . . . . . . . . . . . . . . . . . . . . . . . . . . . . . . . . . . . . . . . . . . 6-4
Security. . . . . . . . . . . . . . . . . . . . . . . . . . . . . . . . . . . . . . . . . . . . . . . . . . 6-4
Switch Connection Controls. . . . . . . . . . . . . . . . . . . . . . . . . 6-4
Device Connection Controls. . . . . . . . . . . . . . . . . . . . . . . . . 6-6
Management Access Controls . . . . . . . . . . . . . . . . . . . . . . . 6-7
Fabric Configuration Servers . . . . . . . . . . . . . . . . . . . . . . . . 6-11
Options . . . . . . . . . . . . . . . . . . . . . . . . . . . . . . . . . . . . . . . . . 6-13
Zone Admin . . . . . . . . . . . . . . . . . . . . . . . . . . . . . . . . . . . . . . . . . . . . . . 6-14
Name Server . . . . . . . . . . . . . . . . . . . . . . . . . . . . . . . . . . . . . . . . . . . . . . 6-14
ISL . . . . . . . . . . . . . . . . . . . . . . . . . . . . . . . . . . . . . . . . . . . . . . . . . . . . . 6-14
Set Time . . . . . . . . . . . . . . . . . . . . . . . . . . . . . . . . . . . . . . . . . . . . . . . . . 6-15
Fabric Checking . . . . . . . . . . . . . . . . . . . . . . . . . . . . . . . . . . . . . . . . . . . 6-15
Chapter 7 Tools Menu
Download Firmware . . . . . . . . . . . . . . . . . . . . . . . . . . . . . . . . . . . . . . . . 7-2
Page 6

vi Fabric Manager User’s Guide
Reboot. . . . . . . . . . . . . . . . . . . . . . . . . . . . . . . . . . . . . . . . . . . . . . . . . . . 7-3
Create Reboot Sequence. . . . . . . . . . . . . . . . . . . . . . . . . . . . 7-4
Sequenced Reboot. . . . . . . . . . . . . . . . . . . . . . . . . . . . . . . . . 7-4
Config . . . . . . . . . . . . . . . . . . . . . . . . . . . . . . . . . . . . . . . . . . . . . . . . . . . 7-5
Licensing. . . . . . . . . . . . . . . . . . . . . . . . . . . . . . . . . . . . . . . . . . . . . . . . . 7-6
Fabric Merge. . . . . . . . . . . . . . . . . . . . . . . . . . . . . . . . . . . . . . . . . . . . . . 7-7
Chapter 8 Help Menu
Help. . . . . . . . . . . . . . . . . . . . . . . . . . . . . . . . . . . . . . . . . . . . . . . . . . . . . 8-1
Sample Help Window. . . . . . . . . . . . . . . . . . . . . . . . . . . . . . 8-1
Context Help. . . . . . . . . . . . . . . . . . . . . . . . . . . . . . . . . . . . . . . . . . . . . . 8-2
Context Sensitive Help Sample Window . . . . . . . . . . . . . . . 8-2
Status Legend . . . . . . . . . . . . . . . . . . . . . . . . . . . . . . . . . . . . . . . . . . . . . 8-3
About . . . . . . . . . . . . . . . . . . . . . . . . . . . . . . . . . . . . . . . . . . . . . . . . . . . 8-4
Chapter 9 Tool Bar
Address Window. . . . . . . . . . . . . . . . . . . . . . . . . . . . . . . . . . . . . . . . . . . 9-1
Fabric Login Icon . . . . . . . . . . . . . . . . . . . . . . . . . . . . . . . . . . . . . . . . . . 9-2
Login Setup Window . . . . . . . . . . . . . . . . . . . . . . . . . . . . . . 9-2
Open FM Log . . . . . . . . . . . . . . . . . . . . . . . . . . . . . . . . . . . . . . . . . . . . . 9-4
Fabric Manager Log Window. . . . . . . . . . . . . . . . . . . . . . . . 9-4
Print Table Icon. . . . . . . . . . . . . . . . . . . . . . . . . . . . . . . . . . . . . . . . . . . . 9-5
Download Firmware Icon. . . . . . . . . . . . . . . . . . . . . . . . . . . . . . . . . . . . 9-6
Download Firmware Window. . . . . . . . . . . . . . . . . . . . . . . . 9-6
Sequenced Reboot Icon . . . . . . . . . . . . . . . . . . . . . . . . . . . . . . . . . . . . . 9-8
Sequenced Reboot Window . . . . . . . . . . . . . . . . . . . . . . . . . 9-8
Context Sensitive Help Icon . . . . . . . . . . . . . . . . . . . . . . . . . . . . . . . . . . 9-10
Context Sensitive Help Sample Window . . . . . . . . . . . . . . . 9-10
Help. . . . . . . . . . . . . . . . . . . . . . . . . . . . . . . . . . . . . . . . . . . . . . . . . . . . . 9-11
Page 7

Fabric Manager User’s Guide vii
Chapter 10 Switch View
Web Tools . . . . . . . . . . . . . . . . . . . . . . . . . . . . . . . . . . . . . . . . . . . . . . . . 10-1
Access. . . . . . . . . . . . . . . . . . . . . . . . . . . . . . . . . . . . . . . . . . 10-1
Capabilities . . . . . . . . . . . . . . . . . . . . . . . . . . . . . . . . . . . . . . 10-1
Chapter 11 Administrative Task Examples
Create a Logical Group. . . . . . . . . . . . . . . . . . . . . . . . . . . . . . . . . . . . . . 11-1
Share a Group(s) with Another Host . . . . . . . . . . . . . . . . . . . . . . . . . . . 11-2
Filter a Fabric . . . . . . . . . . . . . . . . . . . . . . . . . . . . . . . . . . . . . . . . . . . . . 11-2
Save a Baseline Configuration . . . . . . . . . . . . . . . . . . . . . . . . . . . . . . . . 11-2
Download and Apply a Baseline Configuration. . . . . . . . . . . . . . . . . . . 11-3
Download and Apply a Baseline Configuration from a File 11-3
Download and Apply Baseline Configuration from a Switch 11-4
Validate Merge-ability of Two Fabrics . . . . . . . . . . . . . . . . . . . . . . . . . . 11-5
Monitor ISLs. . . . . . . . . . . . . . . . . . . . . . . . . . . . . . . . . . . . . . . . . . . . . . 11-5
Download Firmware . . . . . . . . . . . . . . . . . . . . . . . . . . . . . . . . . . . . . . . . 11-6
Create a Reboot Group . . . . . . . . . . . . . . . . . . . . . . . . . . . . . . . . . . . . . . 11-6
Setup a Sequenced Reboot . . . . . . . . . . . . . . . . . . . . . . . . . . . . . . . . . . . 11-7
Implementing Security . . . . . . . . . . . . . . . . . . . . . . . . . . . . . . . . . . . . . . 11-8
Glossary
Index
Page 8

viii Fabric Manager User’s Guide
Page 9

Fabric Manager User’s Guide ix
Preface
Fabric Manager v3.0 is an optionally licensed product and requires a valid license key to function.
It is supported for HP Brocade switches (HP Surestore FC 1Gb/2Gb Entry Switch 8B, HP
Surestore FC 1Gb/2Gb Switch 8B, HP Surestore FC 1Gb/2Gb Switch 16B, HP Brocade 2400 and
2800 switches, and HP Surestore FC Switch 6164) using Fabric OS version 3.0.1b or later.
Note: This software uses the Java Open JCE Framework, part of the resulting software is
shareware made available by the Australian Business Access (ABA).
About This Guide
This guide provides the following information:
Chapter 1
Introducing Fabric Manager
Provides an overview with descriptions about its advantages
and functions.
Chapter 2
Installing Fa bric Manager
Provides requirements and instructions for installing the switch.
Chapter 3
Fabric Manager View
Provides information about configuring and using the Fabric
View.
Chapter 4
File Menu
Provides information about configuring and using the File
Menu.
Chapter 5
View Menu
Provides information about configuring and using the View
Menu.
Chapter 6
Actions Menu
Provides information about configuring and using the Actions
Menu.
Chapter 7
Tools Menu
Provides information about configuring and using the Tools
Menu.
Page 10

x Fabric Manager User’s Guide
Related Publications
Related product information can be found in the followi ng pub licati on s.
Provided with the FC Entry Switch 8B and FC Switch 8B:
• HP Surestore FC 1Gb/2Gb Entry Switch 8B and FC 1Gb/2Gb Switch 8B Getting Started
Guide (A7346-90902)
• HP Surestore FC 1Gb/2Gb Entry Switch 8B and FC 1Gb/2Gb Switch 8B Documentation
CD (A7346-11001)
Provided on the FC Entry Switch 8B and FC Switch 8B Documentation CD, and at the HP Web site
at
http://www.hp.com/support/fc8B:
• HP Surestore FC 1Gb/2Gb Entry Switch 8B and FC 1Gb/2Gb Switch 8B Getting Started
Guide (A7346-90902)
• HP Surestore FC 1Gb/2Gb Entry Swit ch 8B and FC 1Gb/2Gb Switch 8B Installation and
Reference Guide
• Fabric OS Reference Manual, version 3.0
• Fabric OS Procedures Guide, version 3.0
• Fabric OS Version 3.0.1b Release Notes
• Fabric Watch User’s Guide, version 3.0
• QuickLoop User’s Guide, version 3.0
• Web Tools User’s Guide, vers ion 3.0
• Distributed Fabrics User’s Guide, version 3.0
• Zoning User ’s Guide, version 3.0
• MIB Reference Manual, version 3.0
• ISL Trunking User’s Guide , version 3.0
• Advanced Performance Monitoring User’s Guide, version 3.0
• Merging Heteroge neou s Fabr i c s Ins t ru ctions
Provided with the FC 16B:
• HP Surestor e FC 1Gb/2Gb Switch 16B Quick Start Gui de (A7340-96002)
• HP Surestore FC 1Gb/2Gb Switch 16B Documentation CD (A7340-11001)
Chapter 8
Help Menu
Provides information about configuring and using the Help
Menu.
Chapter 9
Tool Bar
Provides information about configuring and using the T ool Bar.
Chapter 10
Switch View
Provides information about configuring and using the Switch
View, which, with proper licensing, al lows you to use Web T ools
capabilities.
Chapter 11
Administrative Task Examples
Provides information about configuring and using the
Administrative Task Examples that can help you implement the
capabilities of Fabric Manager.
Page 11

Fabric Manager User’s Guide xi
Provided on the FC 1Gb/2Gb Switch 16B Documentation CD and at the HP Web site at
http://www.hp.com/support/fc16B:
• HP Surestor e FC 1Gb/2Gb Switch 16B Quick Start Gui de (A7340-96002)
• HP Surestor e FC 1Gb/2Gb Switch 16B I nstallation and Referen ce Guide
• Fabric OS Reference Manual, version 3.0
• Fabric OS Procedures Guide, version 3.0
• Fabric OS Version 3.0.1 Release Notes
• Fabric Watch User’s Guide, version 3.0
• QuickLoop User’s Guide, version 3.0
• Web Tools User’s Guide, versi on 3.0
• Distributed Fabrics User’s Guide, version 3.0
• Zoning User ’s Guide, version 3.0
• MIB Reference Manual, version 3.0
• ISL Trunking User’s Guide , version 3.0
• Advanced Performance Monitoring User’s Guide, version 3.0
• Merging Heterogeneous Fabrics Instructions
Information about Fi b re Channel standards and Fibre Channel i n gen eral can be found on the Fibre
Channel Industry Association Web site, located at
http://www.fibrechannel.com.
Getting Help
For information for the FC Entry Switch 8B and FC Switch 8B, visit the HP Web site at
http://www.hp.com/support/fc8B. For the most current technical support information for the FC
16B, visit the HP Web site at
http://www.hp.com/support/fc16B. This includes hardware and
software support, all repairs, and spare components.
Be prepared to provide the following information to the support personnel:
• Switch serial number
• Switch world wide name
• Output from the supportShow telnet command
• Detailed description of the problem
• Topology configuration
• Troubleshooting steps already performed
Getting Software Updates
For information on obtaining sof tware up dates co n tact you r HP acco unt r e pres entative or technical
support.
Page 12

xii Fabric Manager User’s Guide
Page 13

Fabric Manager User’s Guide 1-1
Chapter
1
Introducing Fabric Manager
Fabric Manager provides a graphical interface that is run from a workstation computer and, in
cooperation with Web Tools, allows the administrator to monitor and manage HP Brocade Fabri cs
in addition to individual FC Entry Switch 8B and FC Switch 8B switches.
This chapter provides the following information:
• Overview on page 1-1
• Advantages on page 1-1
• Capabilities on page 1-2
• Features on page 1-2
• Fabric OS Integration on page 1-5
• Concepts on page 1-6
Overview
Fabric Manager provides a graphical interface that allows the administrator to monitor and manage
an entire fabric from a standard workstation. Fabric Manager can be used to manage fabrics
containing integrated Fabrics, in addition to individual FC Entry Switch 8B and FC Switch 8B
switches.
Fabric Manager provides high-level information about all switches in the fabric, launching the W eb
Tools application when more detailed information is required. The launching of Web Tools is
transparent, providing a seamless user interface. In addition to the ability to view the switches in a
as a group, Fabric Manager provides improved performance over Web Tools alone.
Fabric Manager is installed on t he workstation , and can be used to manag e any FC Entry Sw itch 8B
and FC Switch 8B sw it c hes t h at hav e F abri c OS version 3.0.1b or later and Web Tools v3.0 or later
installed. All switches in the fabric are represented in the main window of Fabric Manager, but only
those with a Web Tools license can be managed through Fabric Manager.
Advantages
Fabric Manager is the complete SAN management power tool, and provides the following
advantages to administrators:
• Provides a highly scalable Java-based application that manages multiple switches and multiple
fabrics (up to 8) in real-time.
• Assists SAN administrators with the configuration, monitoring, dynamic provisioning and
daily management of Storage Area Networks.
Page 14

1-2 Fabric Manager User’s Guide
Introducing Fabric Manager
1
• Lowers the cost of SAN ownership by intuitively facilitating SAN management tasks.
• Saves time by enabling the global integration and execution of processes across multiple
fabrics, through its single-point SAN management platform.
• Allows more effective management by providing rapid access to critical SAN information
across both Fabric OS SANs and enhanced Fabric OS SANs.
Capabilities
In cooperation with Web Tools, the FC Entry Switch 8B and FC Switch 8B provide the following
information and capabilities:
• Configure and manage the fabric on multiple efficient levels.
• Intelligently group multip le SAN object s and SAN man a gement fu nct ions t o pro vide eas e and
time-efficiency in administering tasks.
• Identify, isolate and manage SAN events across multiple switches and fabri c s.
• Provide drill-down capability to individual SAN components through tightly coupled Web
Tools and Fabric Watch integration.
• Discover all SAN components and view the real-time state of all fabrics.
• Execute multi-fabric administration of Secure Fabric OS SANs through a single encrypted
console.
• Implement scalable SAN management tasks through f unc tionality and tools that intelligently
span 8 fabrics and 200 switches.
• Monitor Inter Switch Links (ISLs)
• Manage switch licenses
• Perform Fabric Stamping
Features
Core Features
Fabric Manager delivers enhanced levels of efficiency to administrators and has the unique ability
to provide real-time information and facilitate rapid SAN management.
Improved Scalability
Fabric Manager is high ly scalable an d can mana ge up to eigh t fabric s and 200 switches in real-time.
A Single Console Global SAN Management Platform
Fabric Manager has the intelligence to manage multiple SAN objects spanning up to 8 fabrics. It
dynamically collects (in real time) all SAN fabric elements and portrays them within the single
console, allowing intuitive iconic and explorer tree operations.
For more informati on, see Fabric View with th e Fabric Icon Selected on page 3-2.
Page 15

Fabric Manager User’s Guide 1-3
Introducing Fabric Manager
1
Enhanced SAN Visibility
Fabric Manager can globally capture and present reliable statuses across all SAN objects. These are
projected throughout the entire SAN management environment. This context sensitive feature
allows the status of all SAN components to be dynamically discovered and controlled by Fabric
Manager.
For more information, see Events on page 6-2 or Fabric Manager Log on page 4-12.
Intuitive and Functional Object Management Platform
Fabric Managers visual display is tailored to facilitate a high degree of efficiency when working
with multiple storage area networks (SANS), medium to large SANs and up to 200 HP Brocade
fabric switches. Fabric Manager provides object status of critical fabric elements such as Fabric
Events, capturing this information in real-time across multiple fabrics and fabric security policies.
For more information, see Events on page 6-2.
Secure Fabric OS Policy Management
Fabric Manager is the premiere p latform for cont rolling a Secure Fabric OS SAN. It assists with the
mission critical functions necessary to deploy and administrate high security fabric topologies
within an enterprise. Its infrastructure is intelligently integrated into the Secure Fab r ic OS Trusted
Switch Model. It dynamically and intelligently manages both encrypted and non-encrypted fabrics
from within its single console.
For more information, see Telnet on page 6-4.
Advanced Management Features
Fabric Manager provides unique and intuitive advanced methods for managing storage area
networks (SANs).
User Controllable SAN Object Grouping
Fabric Manager enables the SAN manager with the power to group fabric switches in any logical
user defined group. These groups are dynamically and intelligently propagated throughout Fabric
Manager. User-defined groups can be utili zed at any time an d ultim ately lower the cost of SAN
management.
For more information, see Logical Groups on page 1-6.
ISL Monitoring
Fabric Manager enables the user to monitor the physical connections (known as Inter Switch Links ,
or ISLs) between switches and ports. Specific alarm settings may be chosen, and changes in the ISL
topology, such as moves and disconnects can be monitored in the Events window as well as by the
status color of the switch icon.
For more information, refer to ISL Status Tab on page 4-8 and ISL on page 6-14.
Page 16

1-4 Fabric Manager User’s Guide
Introducing Fabric Manager
1
Fully Controllable Sequenced and Timed Reboot
For SAN administrators immersed in the complexities of hardware and firmware management,
Fabric Manager provides a totally flexible environment for controlling the availability of fabric
switches. The ability to control switch availability is tightly controlled using logical groupings and
global pass word control.
For more information, refer to Reboot on page 7-3.
Global Password Control
Fabric Manager provides the advanced ability to manage a user definable set of fabric switch
passwords. Secure and Encrypted objects can be utilized across all secure features within the
platform and across logical groups.
For more information, refer to Telnet on page 6-4.
Highly Flexible Firmware Download
The Firmware Download feature is dynamically configurable and scalable across logical groups,
password controls, multiple fabrics, and multi-personality security SAN infrastr u ctures. When
utilized with the Sequenced Reboot functionality, it provides a fully configurable environment to
SAN administrators for controlling the Fabric OS firmware download process.
For more information, refer to Download Firmware on page 7-2.
Advanced License Key Management
Fabric Manager provides a powerful environment to manage license keys across all SAN fabrics
under its control. Fabric Manager can receive licenses from HP support (via e-mail), enabling the
user to perform pre and post installation cross-checking of License keys. License management is
fully integrated to all advanced features, particularly Security, Groups, and Password Control.
For more information, refer to Licensing on page 7-6.
Configuration Control Through Intelligent Baseline
Profiling
This function allows SAN managers to capture a detailed, customizable profile of a switch within
any fabric. Once the snapshot has been acquired, it can optionally be stored in any user definable
location, external Configuration Control Database, or Management Framework. At any point in
time, a static profile can be reviewed and analyzed against an active fabric or switch within a SAN.
For more information, refer to Sequence Reboot Window of the Reboot Menu on page 7-5.
Enhanced Merge Control
Storage Area Network Administrators can easily control the merging details of SAN management
through the Fabric Manager multi-fabric platform. When merging fabrics and zones within fabrics,
Fabric manager does most of the work for the administrator. Fabric Manager delivers a detailed
transaction report of the proposed zone merge operation that identifies any inconsistencies or
underlying issues that may exist within the topology or operatio n.
Page 17

Fabric Manager User’s Guide 1-5
Introducing Fabric Manager
1
For more information, see Fabric Merge Check Window on page 7-8.
Tight Integration of Management Products
Fabric Manager is tightly integrated with the following SAN management products. It has the
native ability to work with:
• Web Tools for a rapid drill-down to individual SAN elements within a fabric.
• Fabric Watch for advanced fabric wide status reporting, threshold gathering and information
analysis. Provides rapid access to Fabric Watch allows reporting of conditions across multiple
fabrics.
The ability to work easily with these management tools is unique and highly functional, effectively
reducing the time and costs of managing SANs.
Fabric OS Integration
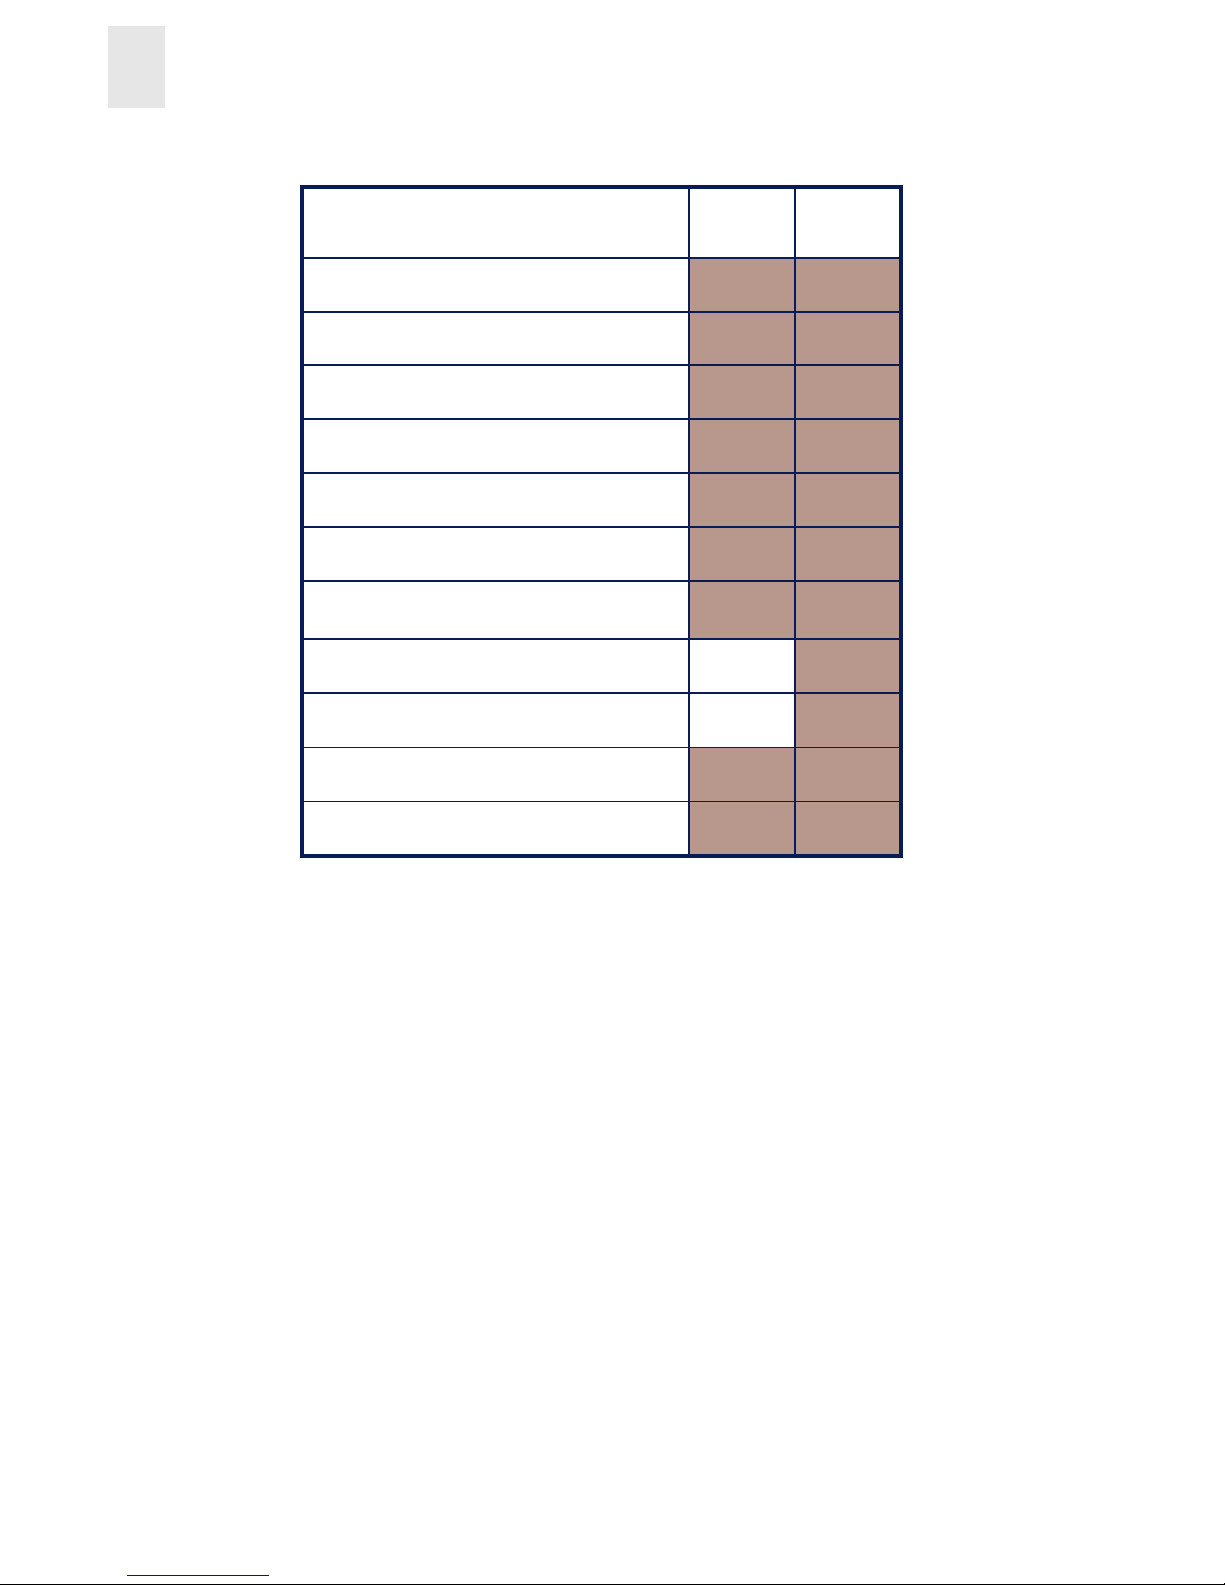
The Fabric OS version running on the switch will determine what functionality is sup por ted by
Fabric Manager. A matrix that outlines the features and what version of the Fabric OS they are
supported on is shown in Figure 1-1 on page 1-6.
The cell contents indicate the access method being used by Fabric Manager to implement the
features:
Page 18
1-6 Fabric Manager User’s Guide
Introducing Fabric Manager
1
Figure 1-1 Outline of Feature Support in Fabric OS Versions
Concepts
Logical Groups
A “logical” group can be created to monitor the status of their component switches and propagate
actions over the chosen group of switches. A SAN administrator can also use this feature to quickly
determine the status of a large number of switches without looking through each one. A logical
group differs from a physical group in that they do not necessarily represent a physically grouped
set of switches.
For information on creating a logical group, see Groups on page 4-4.
Local Files
Fabric Manager persists groups and other information to “local” files. Fabric Manager stores these
files in the user’s home directory. Log files are under user home/Fabric Manager/log.
Switch Status Detail (starts 2.5)
FA 2.0
Security
FA 2.0FA 2.0
Set Time
ISL Monitoring
Logical Groups
Multi-Fabric Support
Configuration Handling
License Management
Fabric Merge
Sequenced Reboot
Firmware Download
2.62.2-
2.5
(Unshaded = not supported)
Switch Status Detail (starts 2.5)
FA 2.0
Security
FA 2.0FA 2.0
Set Time
ISL Monitoring
Logical Groups
Multi-Fabric Support
Configuration Handling
License Management
Fabric Merge
Sequenced Reboot
Firmware Download
2.62.2-
2.5
(Unshaded = not supported)
Page 19

Fabric Manager User’s Guide 1-7
Introducing Fabric Manager
1
Import/Export
Logical groups and other configuration information can be saved to local files and shared between
hosts through the Import and Export options. Additionally, configuration information can be
imported from files.
For more information about Import/Export, see Groups on page 4-4 or Sequence Reboot Window of
the Reboot Menu on page 7-5 or Config on page 7-5.
ISL Checking
ISL checking is done by stamping or taking a “snapshot” of a topology. When a user turns on ISL
checking for a fabric, a stamp is taken of the topology of the ISLs. Then when a change occurs in
these ISLs, the status of the switch will change and the detailed information will be shown on the
Events page, as well as causing the status color of the switch to change during an event.
For information about setting up ISL checking, see ISL on page 6-14 and Monitor ISLs on page
11-5.
Security
Note: This feature is not available without Secure Fabric OS.
Security is implemented on a policy basis. Secure Fabric OS enables sensitive operations to be
restricted to a few “trusted” switches. It allows administrators to designate a small number of
switches (known as Fabric Configuration Servers) for fabric wide management operations.
Individual switches will still be accessed for local configuration. It is possible to configure Secure
Fabric OS in such a way that Fabric Manager is unable to access most of the switches. In this case
Fabric Manager can only be used in a reduced mode without most monitoring features and lacking
many of the administration launch points.
For security information specific to Fabric Manager, see Telnet on page 6-4 .
Page 20

1-8 Fabric Manager User’s Guide
Introducing Fabric Manager
1
Page 21

Fabric Manager User’s Guide 2-1
Chapter
2
Installing Fabric Manager
This chapter provides the following information:
• Requirements on page 2-1
• Installing Fabric Manager on page 2-2
• Launching the Switch through Windows on page 2-7
• Adding the Browser Pathname to the Properties File on page 2-7
• Uninstalling Fabric Mana ger on page 2-8
Requirements
The computer workstation and the switch must both meet specific requirements for the correct
installation and operation of Fabric Manager.
Switch Requirements
Fabric Manager can be used to manage HP Broca de s witches that mee t th e foll owing requirements:
• One of the following switches: FC Entry Switch 8B, FC Switch 8B, HP Brocade 2400/2800
switches, FC 16B, and FC 6164.
• Fabric OS version 3.0.1b or later required.
Fabric Manager can be used to manage switches with earlier versions of Fabric OS, but status
and event information will not be available.
Workstation Requirements
The following items are required for the correct installation and op eration of F abric Manager on the
computer workstation:
• One of the following operating systems:
- Windows 2000
- Windows NT 4.0
• Adequate RAM:
- 128 MB for fabrics of 21 switches or less
- 256 MB for fabrics containing more than 21 switches
Page 22

2-2 Fabric Manager User’s Guide
Installing Fabric Manager
2
• 30 MB of free disk space
• One of the following Web browser s:
- Netscape Communicator 4.51 or later
- Internet Explorer 4.01 or later
Note: The browser must be specifically configured to work with Fabric Manager. For
information about how to do this, see Configuring the Web Browser on page 2-3.
• Java
TM
Plug-in version 1.2.2-005
Installing Fabric Manager
Preparing to use Fabric Manager to manage your fabric requires the following steps:
• Installation of the required Java Plug-in on the workstation, if not already installed.
• Installation of one of the supported Web browsers on the workstation, if not already installed.
• Configuration of the Web browser for use with Fabric Manager.
• Installation of the FC Entry Switch 8B or FC Switch 8B on the computer to be used as a
workstation.
• Exit and relaunch the browser.
Installing the Java Plug-in on the Workstation
A Java Plug-in must be installed on the workstation for the Fabric Manager installer to function, in
addition to the correct operation of the FC Entry Switch 8B or FC Switch 8B and Web Tools.
Windows 2000 and NT workstations require Java Plug-in version 1.2.2-005 and higher.
T o determine the version of the Java Plug-in installed on Windows 2000 or NT, and
install the Java Plug-in if necessary:
1. Launch the Java Plug-in control panel by selecting Start > Pr ogra ms > Java Plug -in Cont r ol
Panel and turning on the Java Console.
2. Launch the Web browser, enter the name or IP address of a switch running Fabric OS version
3.0.1b or later, and press <Enter>.
The switch l aunches the Java Plug-in console, which displays the Java Plug-in version
currently installed.
3. Determine whether the correct Java Plug-in version is installed, and install if necessary:
• If the correct version is installed, the FC Entry Switch 8B or FC Switch 8B is ready for
use.
• If no Java Plug-in is installed, point the browser towards a switch running Fabric OS
version 3.0.1b or later, follow the link to the Sun Microsystems Web site, and download
the correct Java Plug-in, and then double-click the downloaded file to install the Java
Plug-in.
If an outdated version is currently installed, uninstall it, relaunch the browser, en ter the address of a
switch running Fabric OS version 3.0.1b or later, follow the link to the Sun Web site, and download
the new Java Plug-in.
Page 23

Fabric Manager User’s Guide 2-3
Installing Fabric Manager
2
Installing a Web Browser
Install one of the following browsers, if not already installed:
• Netscape Communicator 4.51 or later (available at http://www.netscape.com).
• Internet Explorer 4.01 or later (available at http://www.microsoft.com).
Configuring the Web Browser
Specific browser settings are required for the correct operation of Fabric Manager with either
Netscape Communicator or Internet Explorer.
Configuring Netscape Communicator
The Web browser cache must be cleared after the installation of Fabric OS. The browser may use
local cache copies of jar files and/or image files to improve performance (depending on options
selected in the browser), which can cause incorrect display.
To remove cached files from Netscape Communicator:
1. Select Edit > Preferences.
2. Click Advanced in the left text box to expand it, and then click Cache.
3. On the Cache panel, click Clear Memory Cache.
4. Click Clear Dis k Cache.
5. Click OK.
Configuring Internet Explorer
Correct operation of the FC Entry Switch 8B or FC Switch 8B with Internet Explorer requires
clearing the Web browser cache after installation and specifying the appropriate settings for the
browser refresh frequency and process model.
The browser cache must be cleared after the installation of Fabric OS. The browser may use local
cache copies of jar files and/or image files to improve performance (depending on optio ns selected
in the browser), which can cause incorrect display.
T o remove cached files from Internet Explorer:
1. Select Internet Options from the View menu if using Internet Explorer 4.x, or from the
Tools menu if using 5.x.
2. Select the General tab.
3. Click Delete Files (under “Temporary Internet Files”).
4. Click OK.
5. Exit and relaunch the browser.
Browser pages must be refreshed at every visit to ensure the corr ect operation of the Switch Admin
feature.
Page 24

2-4 Fabric Manager User’s Guide
Installing Fabric Manager
2
T o set the refresh frequency:
1. Select Internet Options from the View menu if using Internet Explorer 4.x, or from the
Tools menu if using 5.x.
2. Select the General tab and click Settings (under “Temporary Internet Files”).
3. Under “Check for newer versions of stored pages”, select “Every visit to the page”.
The correct Browser Process Model must be selected.
To select the Browser Process Model (only required for Windows NT):
1. Select View > Internet Options if using Internet Explorer 4.x, or Tools > Internet
Options if using Internet Explorer 5.x.
2. Select the Advanced tab and click to expand the Browsing category.
3. Under “Browsing”, select “Browse in a new process” if using Internet Explorer 4.x, or
“Launch browser windows in a separate process” if using Internet Explorer 5.x.
Installing Fabric Manager on the Windows
Workstation
The Fabric Manager 3.0 installation package includes the following items:
• ReadMe.txt file, providing product name, version, and late-breaking news.
• Java Plug-in
• FabricManager.Jar file, containing the required Java classes.
• FabricManager.properties file, containing configuration information.
To install Fabric Manager 3.0:
1. Insert the Fabric Manager CD-ROM in the CD drive of the computer workstation.
If Fabric Manager is already installed on the computer, a window displays at this point to
indicate this. If this window displays, you must exit the installer and uninstall the existing
version.
The installer searches the local system for the correct version of the Java Plug-in. If this
version is not installed, a window displays warning that the correct version of the Java Plug-in
is missing. If the installer warns that the Java Plug-in is missing, perform step 3 before
continuing. Otherwise, continue with step 4.
The Welcome window displays, providing product information and vers i on.
2. Click Next.
3. If the installer warns that the Java Plug-in is missing:
a. Click Exit to close the Fabric Manager installer, and then click Exit Install in the warning
dialog tha t displays.
b. View the local drives, right-click the icon for the Fabric Manager CD-ROM, and select
Explore.
c. Click to open the JRE folder, and then click the file jre-1_2_2_007-win.exe.
Page 25

Fabric Manager User’s Guide 2-5
Installing Fabric Manager
2
The Java Plug-in installer launches.
d. Read the license agreement, and click Next if you accept the agreement.
A window displays to allow selection of the installation location.
e. Click Next to accept the default installation location, or browse for a custom location and
then click Next.
The installation completes and the Java Plug-in installer window closes.
f. Relaunch the Fabric Manager installer by double-clicking the icon for your CD-ROM
drive.
The Welcome window displays again.
g. Click Next to dismiss the Welcome window.
Once the Java Plug-in has been successfully located, a window listing Fabric Manager’s Web
browser requirements displays.
4. Determine whether a compatible browser is installed. If a compatible browser is not installed,
exit the Fabric Manager installation, install the browser, and then relaunch the Fabric Manager
installation.
Note: The browser should be installed before Fabric Manager is installed so that the
pathname for the browser can be written to the Fabric Manager properties file.
5. Click Next to continue.
A window that allows selection of the installation location disp lays.
6. Click Install to accept the default installation location, or browse for a custom location and
then click Install.
Once Install is clicked, a window showing the progress of the installation displays, with the
name of the file currently being installed in the lower portion of the window.
The installer searches the registry for the Web browser and adds the complete pathname to the
FabricManager.properties file. If the installer is unable to locate a Web browser, a window
displays warning that no browser was found. If th is win dow di sp la ys , exit the Fabric Manager
installation, install the browser, and then relaunch the Fabric Manager installation.
Note: If the browser is installed or moved afte r Fabric Manager is in stalled, see “Addi ng the
Browser Path name to the Properties File”.
Once the installation of Fabric Manager is complete, the following window displays:
7. Check the checkbox if you want to view the ReadMe file, and then click Done to close the
installer.
Note: Clicking Exit at this point does not undo the installation, but does prevent the ReadMe
file from being displayed.
Configuring a Browser for Secure Telnet
Once you have Secure Telnet software installed, you can configure a browser to use Secure Telnet
Page 26

2-6 Fabric Manager User’s Guide
Installing Fabric Manager
2
Netscape Navigator 3.0
1. Select Options on the top menu bar.
2. Select General Preferences.
3. Select the Applications or Apps tab.
Look for the space for entering a Telnet application.
4. Use the Browse button to select your T eln et application, or enter the full path and file name of
the Telnet application on your computer.
Netscape Communicator (Navigator 4.03 and above)
1. Select Edit on the top menu bar.
2. Select Preferences.
3. Select the Navigator: Applications.
4. Scroll down the list at the right.
5. Select URL: Telnet Protocol, and then click Edit.
In the “Handled by:” area, make sure Application is selected. Use the Browse button to select
your Telnet application, or enter the full path and file name of the Telnet application on your
computer.
After the full path and file name has been added, place the cursor at the end of the path.
Type a space and %1
Example: “C:\Program Files\CRT\Crt.exe” %1
Microsoft Internet Explor er 3.0
Note: When you first install Internet Explorer, it should already be able to open a telnet
application (called RUNDLL.32). Follow these instructions if you wish to change the
default telnet application, or if a default telnet application is not set.
1. Select View on the top menu bar.
2. Select Options.
The Options dialog box appears.
3. Select the Programs tab.
4. Click the File Types button the scroll down the list of registered file types.
5. Select URL: Telnet Protocol, and then click Edit.
The Edit File Type box appears.
6. Select Open from the Actions box by clicking on it, and then choose the Edit button.
7. Use the Browse button to select your T eln et application, or enter the full path and file name of
the Telnet application on your computer.
Microsoft Internet Explorer 4.0 or higher
Note: When you first install Internet Explorer, it should already be able to open a telnet
application (called RUNDLL.32). Follow these instructions if you wish to change the
default telnet application, or if a default telnet application is not set.
Page 27

Fabric Manager User’s Guide 2-7
Installing Fabric Manager
2
1. Go to your Desktop.
2. Double-click the My Computer icon.
3. Choose Option from the View menu
4. Choose File Types tab then scroll down list of registered file types.
5. Select URL: Telnet Protocol and then click Edit.
6. Choose the Edit button from the Edit File Type dialog box.
7. Select the Browse button to select your Telnet application, or enter the full path and file name
of the Telnet application on your computer. Your telnet application will appear in the
Application used to perform action box.
Launching the Switch through Windows
You can launch the FC Entry Switch 8B or FC Switch 8B once Fabric Manager and the Java
Plug-in are both installed on the workstat ion .
To launch the switch:
1. Select Start > Programs > Fabric Manager > Fabric Manager.
The Address window displays.
2. Enter the switch name or IP address in the Switch URL field.
Note: This switch is assumed to be the local domain. If you want information specific to
QuickLoop to be available, the QuickLoop switch must be the local domain.
3. Press Enter to submit the address.
Note: If an incorrect address or format is used, a n error message displays, listing the formats
that can be used. If this message displays, determine and enter the correct address.
Once a correct address is entered, the switch launches, displaying the default view, Fabric
View.
Adding the Browser Pathname to the Properties
File
This is an optional step, and usually not necessary. However, if your browser isn’t working, you
may need to edit the properties file to show the correct path for the browser.
Note: Editing any information other than the browser pathname in the properties file is n ot
recommended.
Page 28

2-8 Fabric Manager User’s Guide
Installing Fabric Manager
2
To add the browser pathname to the properties file:
1. Open the directory where Fabric Manager is installed. The default directory is:
c:\Program Files\Fabric Manager\ , where “c” is the local drive.
2. Double-click the FabricManager.Properties file, and select a text editor (such as Notepad) as
the application for this file.
3. Enter a new line starting with “Brow serPath=”, followed by the correct pathname for the
browser, in quot es .
Example: BrowserPath=“C\:\\Program Files\\Internet Explorer \\iexplore.exe”
This line can be added anywhere in the file, provided it does not interrupt another line.
Uninstalling Fabric Manager
Note: The uninstaller can only access the most recent installation. To uninstall an additional
installation, open the corresponding installation folder, open the subdirectory
UninstallerData, and double-click Uninstall FabricManager.exe to launch the uninstaller.
To uninstall Fabric Manager:
1. Select Start > Settings > Control Panel.
2. Double-click the Add/Remove control panel.
3. On the Install/Uninstall tab of the control panel, select Fabric Manager and click
Add/Remove.
A window displays warning that you are about to uninstall Fabric Manager.
4. Click Uninstall to continue.
A window showing the progress of the uninstallation displays. When the unin stallation is
complete, the Uninstall Complete window displays.
5. Click Exit to close the Uninstall Complete window.
Page 29
Fabric Manager User’s Guide 3-1
Chapter
3
Fabric Manager View
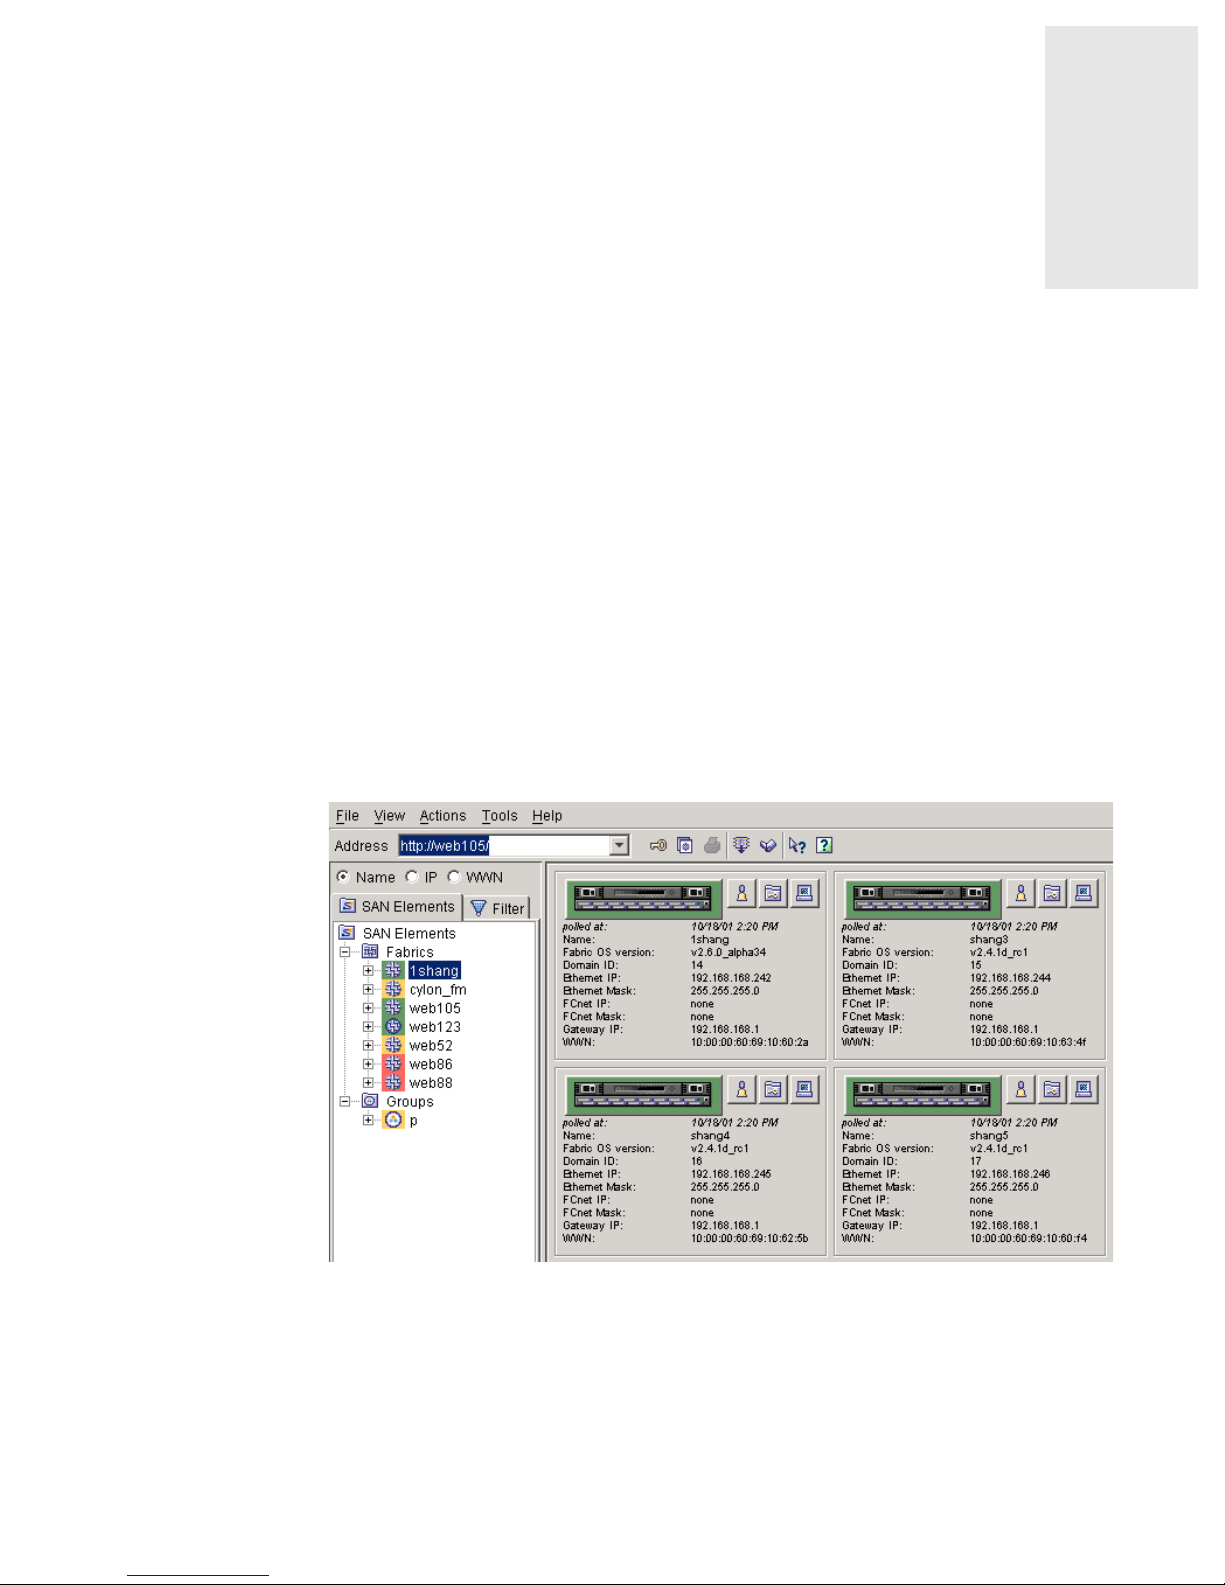
Overview
Fabric Manager “detail” View is the first view that displays when you launch Fabric Manager, and
it provides access to specific information about the fabric and switches through a panel
representing each switch. Every switch in the fabric is represented by a switch panel in Fabric
View.
Accessing Fabric Manager View
T o launch the switch and access the Fabric Manager View:
1. Launch Fabric Manager. For information about launching Fabric Manager, see Launching the
Switch through Windows on page 2-7.
The FC Entry Switch 8B or FC Swit ch 8B launches , displayi ng the Fabric View (default), as shown
in Figure 3-1.
Figure 3-1 Fabric View
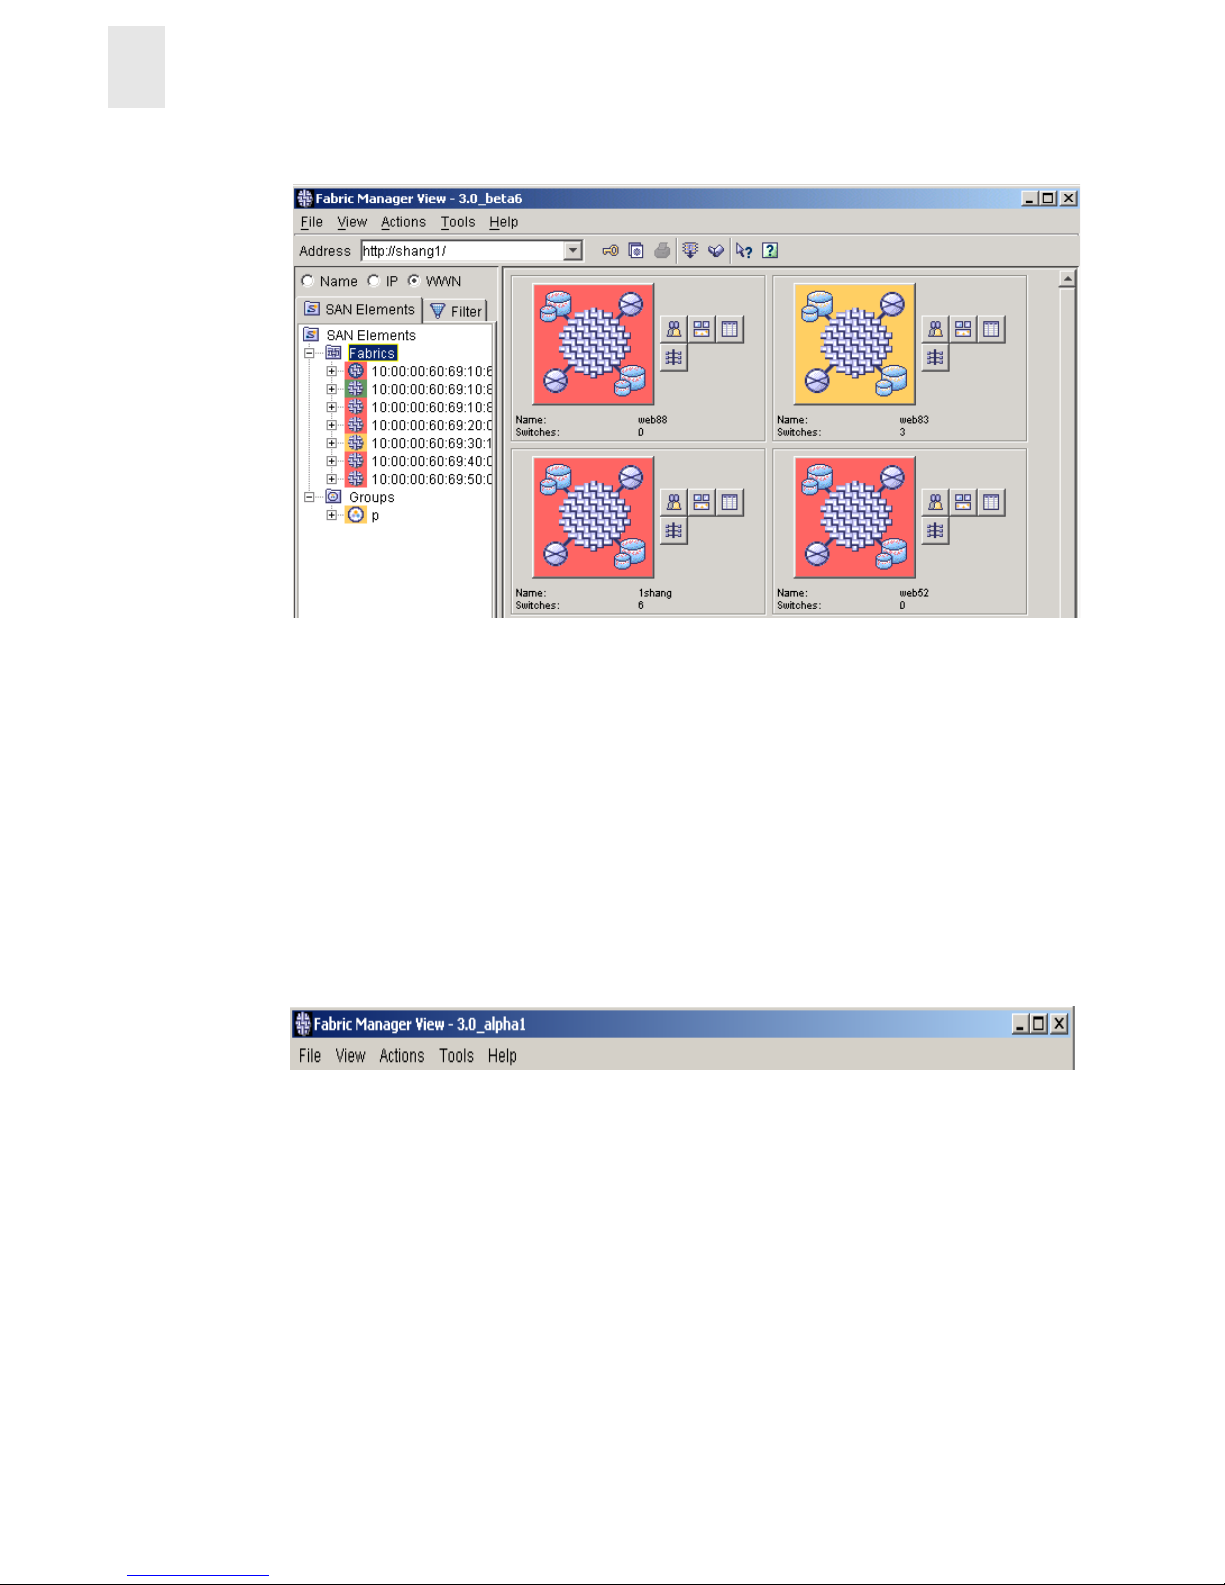
The following is the Fabric View with the Fabric Icon selected. Refer to San Elements Tab Icons on
page 3-7.
Page 30
3-2 Fabric Manager User’s Guide
Fabric Manager View
3
Figure 3-2 Fabric View with the Fabric Icon Selected
Options available in the Fabric Manager View
The following section provides an overview of the options available through the Fabric View area
of Fabric Manager.
Menus
The Menus portion of the Fabric View is shown in Figure 3-3.
Pull-Down Menus
Figure 3-3 Fabric View Pull-Down Menus
The following is a description of the options available in the Pull-Down menus. For more
information about these options, see File Menu on page 4-1 , View Menu on page 5-1, Actions Menu
on page 6-1, Tools Menu on page 7-1, or Help Menu on page 8-1.
Page 31

Fabric Manager User’s Guide 3-3
Fabric Manager View
3
File > The File pull-down menu provides the followi ng options:
• New
• Close
• Fabric Login
• Groups
- Create
- Import
- Export
• Options
• Log
• Print
• Exit
For more information about these options, see File Menu on page
4-1.
View > The View pull-down menu provides the following options:
• Detail
• Summary
• Table
For more information about these options, see View Menu on page
5-1.
Actions > The Actions pull-down menu provides the following options:
• Switch View
• Events
• Admin
• Fabric Watch
• Telnet
• Security
• Zone Admin
• Name Server
• ISL
- ISL Checking
- Restamp
• Set Time
• Fabric Checking
For more information about these options, see Actions Menu on
page 6-1.
Page 32

3-4 Fabric Manager User’s Guide
Fabric Manager View
3
Tools > The Tools pull-down menu provides the following options:
• Download Firmware
• Reboot
- Create Reboot Sequence
- Sequence Reboot
• Config
- Save Baseline
- Compare/Download From File
- Compare/Download From Switch
• Licensing
- Import From File
- Load From Switch
• Fabric Merge
For more information about these options, see Tools Menu on page
7-1.
Help > The Help pull-do wn menu pro vides the following options:
• Help
• Context Help
• Status Legend
• About
For more information about these options, see Help Menu on page
8-1.
Page 33

Fabric Manager User’s Guide 3-5
Fabric Manager View
3
Tool Bar
Following is a brief description of the icons available in the Fabric View Tools Bar. For more
information about the available in Fabric Manager, see Tool Bar on page 9-1.
Address window
h
Enter the IP address, name, or WWN of the switch
that you want to manage or monitor. Once the
switch information has been entered, the address
can be chosen automatically from the pull-down
menu.
Fabric Login Icon Select the switches that you want to login to. For
more information about this option, see Fabric
Login Icon on page 9-2.
Open FM Log Icon Select to open the Fabric Manager Log. For more
information about this option, see Fabric Manager
Log on page 4-12.
Print Table Icon Select to print a table report. For more information,
see Print Table Icon on page 9-5 or Print on page
4-12.
Download Firmware Icon Select to setup firmware downloads for multiple
switches at once. For more information about this
option, see Download Firmware on page 7-2.
Sequenced Reboot Icon Select to set up switches to reboot in a chosen
order. For more information, refer to Sequenced
Reboot on page 7-4 or Setup a Sequenced Reboot
on page 11-7.
Context Sensitive Help Icon Select to view Context Sensitive Help. For more
information about this options, refer to Context
Sensitive Help Icon on page 9-10.
Help Icon Select to view the Help section. For more
information, refer to Help Icon on page 9-11 or
Help Menu on page 8-1.
Page 34

3-6 Fabric Manager User’s Guide
Fabric Manager View
3
SAN Elements Panel
Use the SAN Elements Panel to view, select, and search for the elements of a SAN (Fabrics and/or
Groups) by their IP address, Name, or WWN.
SAN Elements Tab
The SAN Elements tab of the SAN Elements Panel is shown in the default view in Figure 3-4.
Figure 3-4 SAN Eleme nts Panel
The Navigation Tree control of the SAN Elements Panel displays various nodes, such as Fabrics,
Groups, Reboot Groups, Devices, Switches, Ports, etc. Some views in Fabric Manager may show
only some nodes, but not others. A filter tab may be displayed on some views so that a user to
search for switches by their properties.
Page 35

Fabric Manager User’s Guide 3-7
Fabric Manager View
3
San Elements Tab Icons
Fabric Icon Select the Fabric Icon from the San Elements
column to view a fabric view of the entire fabric,
rather than individual switches. See Fabric View
with the Fabric Icon Selected on page 3-2.
ISL Checking
A. B. C. D.
Displays the status of ISL Checking.
A - Displays by default when ISL Checking is OFF
and Fabric Checking is OFF.
B - Displays when ISL Checking is ON, but Fabric
Checking is OFF.
C - Displays when ISL Checking is OFF, but
Fabric Checking is ON.
D - Displays when ISL Checking is On, and Fabric
Checking is ON.
For more information, see ISL on page 6-14 and
ISL Status Tab on page 4-8.
Clicking on the word “Fabrics” in the navigation tree will cause the following icons to appear in
the right-hand window:
Fabric Events
Click to open Fabric Events V iew. For information
about this view, see Events on page 6-2.
Zone Admin Click to open the Zone Admin View. For
information about this view, see Switch
Connection Controls Tab of the Security Menu on
page 6-5.
Page 36

3-8 Fabric Manager User’s Guide
Fabric Manager View
3
Filter tab
Use the Filter tab of the SAN Elements Panel to search for switches by IP Address, Name, Type,
Version (FOS), WWN, or Domain ID. The Filter tab is shown in Figure 3-5.
Name Server Click to open the Name Server. For information
about this view, see Name Server on pag e 6-14.
Fabric Topology Click to open the Fabric Topology view. For
information, see the Web Tools User’s Guide.
Clicking on the word “Groups” in the navigation tree causes the following icons appear in the
right-hand window:
Group Events
Click to open Fabric Events V iew. For information
about this view, see Events on page 6-2.
Group Creation Click to open the Group Creation window. For
information about this option, see Creating
Logical Groups on page 4-5.
Group Exportation Click to open the Group Exportation window. For
information about this option, see Exporting a
Group on page 4-6.
Page 37

Fabric Manager User’s Guide 3-9
Fabric Manager View
3
Figure 3-5 Filter Tab of the SAN Elements Panel
Switch View
Use the Switch View portion of the Fabric View to manage individual switches. Launching the
Switch View in Fabric Manager actually launches a partner management tool called Web Tools.
For more information about the Switch View, see Switch View on page 10-1.
The Switch View is shown in Figure 3-6.
Figure 3-6 Switch View
Page 38

3-10 Fabric Manager User’s Guide
Fabric Manager View
3
Switch and Fabric Icons Available in Fabric View
Fabric and Group Select Icon Select this icon in either Fabric or Group to view
the associated Fabric or Group. The Fabric or
Group will be selected in the navigation-tree.
Individual Switch Panel The Switch Panel representing an individual
switch in the fabric. A Switch Panel displays for
each individual switch in the fabric.
SilkWorm Integrated Fabric Panel
The Switch Panel representing a SilkWorm
Integrated Fabric.
The components of the control panel are describ ed
in the following rows.
Individual Switch Icon Click to open Switch View for the switch. Each
switch type is represented by a different icon. The
background color around the icon indicates the
status of the switch (for information about this
view, see Fabric Manager View on page 3-1.
Fabric Events Button Click to open Fabric Events V iew. For information
about this view, see Events on page 6-2.
Events Click to open Switch Events View to display the
Switch Events log.
Page 39

Fabric Manager User’s Guide 3-11
Fabric Manager View
3
Admin Click to open Switch Administration View.
Telnet Click to launch the Telnet Interface for the switch.
Switch View field descriptions:
polled at:
(or unreachable since:)
Displays the time of the last status check.
If the switch is unavailable, this shows the time of
the last successful status check.
Name: Displays the name of the switch.
Type: Displays the type of switch configuration.
Fabric OS version: Displays the version of Fabric OS installed on the
switch.
Domain ID: Displays a number that uniquely identifies the
switch within the fabric.
Ethernet IP: Displays the Ethernet IP address.
Ethernet Mask: Displays the Ethernet subnetmask.
FCnet IP: Displays the Fibre channel IP address.
FCnet Mask: Displays the Fibre channel subnetmask.
Gateway IP: Displays the Gateway IP address.
WWN: Displays the unique numeric identifier for the
switch; assigned by manufacturer.
Page 40

3-12 Fabric Manager User’s Guide
Fabric Manager View
3
Page 41

Fabric Manager User’s Guide 4-1
Chapter
4
File Menu
This chapter provides information on the options available through the pull-down menus of Fabric
Manager.
The File option of the pull-down menu provides the following options:
• New
• Close
• Fabric Login
• Groups
• Options
• Log
• Print
• Exit
The File menu is shown in Figure 4-1.
Figure 4-1 The File Menu
New
Use the New option in the File menu to open a new window to view fabric information. Any
windows that are currently active will remain open.
Page 42

4-2 Fabric Manager User’s Guide
File Menu
4
Close
Use the Close option in the File menu to close the window you are currently viewing. Any other
windows that are currently active will remain open.
Fabric Login
Use the Fabric Login option in the File menu to select and setup a switch, or group of switches, to
login to.
The Fabric Login window is shown in Figure 4-2.
Figure 4-2 Fabric Login Window
The following is a description of the fields available in the Fabric Login Window.
Page 43

Fabric Manager User’s Guide 4-3
File Menu
4
Setting up a Login for Multiple Switches
1. Select File > Fabric Login.
The Login Setup window appears.
2. Select the SAN Elements tab to list the available elements by IP, Name, or WWN.
3. Select a switch to setup and click it to highlight.
User Id Enter the User Id for a selected switch.
Password Enter the Password for a selected switch.
IP, Name, WWN Click the appropriate radio button to display a selected group of
switches by IP address, name, or World Wide Name.
SAN Elements Displays the fabrics or groups that belong to the Storage Area
Network that the Admin is logged into.
Filter Allows you to search for switches by IP addres s, Name, Type, FOS
Version, WWN, or Domain ID.
Selected Switches:
IP Address Displays the IP address of the selected switch.
Switch Name Displays the name of the selected switch.
Firmware Version Displays the version of Fabric OS that is installed on the switch.
Userid Displays the UserID of the individual who is logged into the
switch.
Status Displays the status of the switch login. Possible statu s re por ts ar e:
Ready, Success, or Authorization Failed.
When Success is displayed, the background will be green and
UserID and Password will be saved for performing admin
operations until the session is terminated.
When Authorization Failed is displayed, the background will be red
and the UserID and Password will not be saved in memory.
Test & Apply Select to check Userid and Password login on the listed switches.
OK Select to save configuration and exit window.
Cancel Click to cancel all changes made since changes were last applied,
and to exit Fabric Login. Changes cannot be cancelled once they
are applied.
Apply Select to save configuration but leave window open.
Page 44

4-4 Fabric Manager User’s Guide
File Menu
4
4. Hold down the Control key and select any additional switches by clicking on them.
5. Click the right-ar rrow button.
The switch will be displayed in the Selected Switch area.
6. Type User ID and Password at the top of the window.
7. Select Test & Apply to determine if login is accepted:
or
Select OK to save configuration and exit window.
or
Select Cancel to exit the window without saving changes.
or
Select Apply to save configuration and keep window open.
Groups
Use the Groups option in the File menu to Create, Import, and Export groups of SAN elements.
The File > Groups > Create window is displayed in Figure 4-3.
Page 45

Fabric Manager User’s Guide 4-5
File Menu
4
Figure 4-3 The Create Group Window
Creating Logical Groups
To create a group of controllable SAN objects:
1. Select File > Group > Create.
The Create Group window appears.
2. Highlight the word Groups (that you want to create a new group in) from the navigation-tree.
3. Select the Create button from the bottom of the navigation-tree window.
The Create Groups dialog box appears.
4. Type in a name for the group and press OK.
The name of your group appears in the navigation-tree.
5. Highlight the name of your group from the navigation-tree by clicking on it.
6. Select switches from the left navigation tree to be added to the Group.
Page 46

4-6 Fabric Manager User’s Guide
File Menu
4
To select multiple switches, use Shift/Click.
7. Add selected switches to your group by clicking on the right-arrow butt on, o r by drag gi ng an d
dropping selections from the navigation-tree to the Group.
Importing a Group
To import a group of controllable SAN objects:
1. Select File > Group.
2. Select Import.
A browser window appears.
3. Browse to the XML file that was previously exported and select it.
The imported groups will appear in the navigation tree under Groups.
Exporting a Group
To export a group of controllable SAN objects:
1. Select File > Group.
2. Select Export.
The Export window appears.
3. Use the Browse button at the top of the screen to locate and select the file to export.
The name of the file should appear in the File field.
4. Select the groups that you want to export from the navigation-tree. Use Shift/Click to select
multiple groups.
5. Move the selected groups to the Export table by using the left-arrow or by dragging and
dropping.
6. Select OK.
The file is created.
Options
Use the Options function under the File menu to do:
• File Transfers
• Check Logging Parameters
• Check ISL Status
• Fabric Change
Page 47

Fabric Manager User’s Guide 4-7
File Menu
4
File Transfer Tab
The File Transfer tab of the Options window is shown in Figure 4-4 on page 4-7.
Figure 4-4 The File Transfer Tab of the Options Menu
Transferring Files
To transfer files from a host IP to a remote IP by either Remote Shell or FTP:
1. Select File > Options.
The Options window appears.
2. Select the File Transfer tab.
3. Enter the name of the Host Name or Host IP that FTP/RSH daemon are running on.
4. Enter the user name of the RSH or FTP program.
5. Enter the path that the RSH or FTP program used for the file.
6. Select either Remote Shell or FTP protocol from Select Protocol drop-down menu.
7. If FTP is the des i red protocol , enter a password in the Password Required field.
8. Select OK.
Log Parameters Tab
Use the Log Parameters tab of the File > Options window to set the path and priority levels for
events in the fabric.
The Log Parameter tab is shown in Figure 4-5 on page 4-8.
Page 48

4-8 Fabric Manager User’s Guide
File Menu
4
Figure 4-5 Log Parameters Tab of the Options Window
Setting Log Parameters
T o set log parameters:
1. Select File > Options.
The Options window appears.
2. Select the Log Parameters tab.
3. Browse to locate and select the path that will be used to create a log sub-directory.
4. Choose a priority for the Fabric Manager Log Level from the drop-down menu.
5. Choose a priority for the Console Log Level from the drop-down menu.
6. Choose a priority f or the File Log Level from t he drop-down menu.
7. Select OK to apply the settings.
or
Select Cancel to close the window without saving changes.
or
Select Restore to Defaults to remove changes and restore the settings to the default state.
or
Select Help for further details about this window.
ISL Status Tab
Use the ISL Status tab in the File > Options menu to set various ISL status parameters.
The ISL Status tab is shown in Figure 4-6 on page 4-9.
Page 49

Fabric Manager User’s Guide 4-9
File Menu
4
Figure 4-6 ISL Status Tab in the Options Window.
The following is a description of the fields available in the ISL Status tab.
Incorporate Adds into
Stamp
Check box if:
You want the ISL Stamp to change when additions are made
to the fabric.
Uncheck box if:
You do not want the ISL Stamp to change when additions are
made to the fabric.
Add Conflict Status Select Yellow or Red, depending on which color you want to
appear when Fabric Manager detects that one o r more ISLs can not
be monitored due to conflicting ISL Add events.
An Add Conflict occurs when two valid ISLs are set to be
monitored for the same port in the stamp.
Add Status Select Yellow or Red, depending on which color you want to
appear when an ISL connection has been added.
Remove Status Select Yellow or Red, depending on which color you want to
appear when an ISL connection is removed.
Note: Because Remove Direct Connection Status is considered
a high priority, the Remove Status priority cannot be set
higher than the Remove Direct Connection Status.
Remove Direct Connection
Status
Select Yellow or Red, depending on which color you want to
appear when a Fabric Manager detects that a direct physical
connection has been removed.
A Remove Direct Connection occurs when no direct path exists,
although there is still an indirect path between switches.
Page 50

4-10 Fabric Manager User’s Guide
File Menu
4
Setting ISL Status Parameters
To set ISL status levels to be reported in ISL checking:
1. Select File > Options.
The Options window appears.
2. Select the ISL Status tab.
3. Click the Yellow or Red radio buttons to select the desir ed color to appear when Add, Rem ove,
or Move events occur (Fabric and switch events will appear in the Fabric Events win dow).
4. Select OK to apply the settings.
or
Select Cancel to close the window without saving changes.
Fabric Change Tab
Use the Fabric Change tab in the File > Options menu to enable or disable automatic Fabric
checking.
The Fabric Checking tab is shown in Figure 4-7.
Move Status Select Yellow or Red, depending on which color you want to
appear when a Move event occurs.
A Move event occurs when one end of an ISL is moved from one
port to another, but is still connecting the same switches and one
end of the connection has not moved.
OK Select to save ISL status parameters.
Cancel Select to exit without saving changes.
Page 51

Fabric Manager User’s Guide 4-11
File Menu
4
Figure 4-7 Fabric Change Tab in the Options Window
The following is a description of the fields available in the Fabric Change tab.
Enabling Automatic Fabric Checking
To enable automatic Fabric Checking and to set Fabric Change handling:
1. Select File > Options.
The Options window appears.
2. Select the Fabric Change tab.
3. Check the Automatically Check Fabrics box to automatically check new fabrics that are
discovered.
4. Select Allow Adds if you want additions in the fabric to cause a change in the Fabric View.
5. Select No Change if you do not want additions in the fabric to cause a change in the Fabric
View.
6. Select OK to save and apply changes.
or
Automatically check
fabrics
Check box to automatically check for new fabrics that are
discovered.
Fabric Change Handling
Allow Adds Select if you want switches to be added to the Fabric View when
the fabric is checked.
No Changes Select if you do not want the fabric to change (due to additions)
after the fabric is checked.
OK Select to save changes to Fabric Change Handling.
Cancel Select to exit window without saving changes.
Page 52

4-12 Fabric Manager User’s Guide
File Menu
4
Select Cancel to exit window without saving changes.
Print
Use the Print option in the File menu to print table reports for review.
Printing Reports
1. Select View > Table.
The Fabric View will change from an icon view to a table format.
Note: You can only print reports from the Table View.
2. Select File > Print.
Fabric Manager Log
Use the Fabric Manager Log in the File menu to view events occurring within the fabric.
The Fabric Manager Log is shown in Figure 4-8.
Page 53

Fabric Manager User’s Guide 4-13
File Menu
4
Figure 4-8 Fabric Manager Log Window
The following is a description of the fields available in Fabric Manager Log.
Severity Displays the log levels, such as Debug, Info (information),
Warning, or Error.
Time Displays the time an event occurred.
Module Displays which sub-module (or service), such as Discovery, or
License generated the log entry.
Page 54

4-14 Fabric Manager User’s Guide
File Menu
4
Search Dialog Bo x
Use the Search Dialog box to locate specific events. The Search Dialog box is shown in Figure 4-9.
Figure 4-9 Search Dialog Box
Searching for Fabric Data
T o locate specific events, messages, or time ranges within the fabric:
1. Select File > Fabric Manager Log.
The Fabric Manager Log window appears.
2. Select the Search button at the bottom of the window.
The Search Dialog box appears.
3. Enter a message to search the fabric for (specifying Case or Whole Word, if desired).
and/or
Select a severity from the Severity drop-down menu.
and/or
Message Displays messages regarding events occurring within the fabric,
such as switch removal and discovery.
Search Select to launch the Search Dialog box and search for particular
data, such as specific messages, severities, modules, and time
ranges. The Search Dialog box is shown in Figure 4-9 on page
4-14.
Filter Select to choose which aspects you want to have shown in the FM
Log. This keeps the log from getting crowded with unwanted
information. The Filter Dialog box is shown in Figure 4-10 on page
4-15.
Close Select to close the window.
Page 55

Fabric Manager User’s Guide 4-15
File Menu
4
Enter a Module to search the fabric for.
and/or
Select a time range from both Time Range dr op-down menus.
4. Select Search to begin a search using the assigned parameters.
or
Select Next to select the next switch in the Fabric Manager Log list.
or
Select Prev to select the previous switch in the Fabric Manager Log list.
or
Select Close to exit the window without saving changes.
Filter Dialog Box
Use the Filter Dialog box to determine which events you want to appear in Fabric Events. This
prevents the Fabric Events window from becoming cluttered with unnecessary information.
The Filter Dialog box is shown in Figure 4-10.
Figure 4-10 Filter Dialog Box
Filtering Fabric Events
T o filter specific events such as messages, and time ranges within the fabric:
1. Select File > Fabric Manager Log.
The Fabric Manager Log window appears.
2. Select the Filter button at the bottom of the window.
The Filter Dialog box appears.
3. Enter a message to filter the fabric for (specifying Case or Whole Word, if desired).
and/or
Page 56

4-16 Fabric Manager User’s Guide
File Menu
4
Select a severity from the Severity drop-down menu.
and/or
Enter a Module to filter within the fabric for.
and/or
Select a time range from both Time Range dr op-down menus.
4. Select Filter to begin filtering the assigned parameters.
or
Select Close to exit the window without saving changes.
Exit
Use the Exit option in the File menu to close the Fabric Manager program.
Page 57

Fabric Manager User’s Guide 5-1
Chapter
5
View Menu
This chapter provides information on the options available through the View pull-down menu of
Fabric Manager.
The View option of the pull-down menu provides the following options:
• Detail
• Summary
• Table
The View Menu is shown in Figure 5-1.
Figure 5-1 View Menu
Page 58

5-2 Fabric Manager User’s Guide
View Menu
5
Detail
Use the Detail option in the View Menu to see a Fabric View of the switches that includes
information such as the Domain ID and the IP Address.
The Detailed option of the View menu is shown in Figure 5-2.
Figure 5-2 Detailed Option of the View Menu
Page 59

Fabric Manager User’s Guide 5-3
View Menu
5
Summary
Use the Summary option in the View Menu to see a Fabric View that provides a brief overview of
the fabric information, rather than more detailed information.
The Summary window is shown in Figure 5-3.
Figure 5-3 Summary Option of the View Menu
Table
Use the Table option in the View menu to view and sort switch inform ation in a table-form, rather
than in a graphic-form.
The Table option of the View menu is shown in Figure 5-4.
Figure 5-4 Table Window of the View Menu
Page 60

5-4 Fabric Manager User’s Guide
View Menu
5
Printing Table Reports
The Tab le V iew is the only view that allows you to use the print option. For more information, refer
to Print on page 4-12.
Page 61

Fabric Manager User’s Guide 6-1
Chapter
6
Actions Menu
This chapter provides information on the options available through the Actions pull-down menu of
Fabric Manager.
The Actions pull-down menu provides the following options:
• Switch View on page 6-2
• Events on page 6-2
• Admin on page 6-3
• Fabric Watch on page 6-4
• Telnet on page 6-4
• Security on page 6-4
• Zone Admin on page 6-14
• Name Server on page 6-14
• ISL on page 6-14
• Set Time on page 6-15
• Fabric Checking on page 6-15
Note: The options that are available in the Actions menu will vary depending on what has been
selected on the tree control. For more information about tree control, see the SAN Elements
Panel on page 3-6.
The Action Menu is seen in Figure 6-1.
Figure 6-1 Actions Menu
Page 62

6-2 Fabric Manager User’s Guide
Actions Menu
6
Switch View
Use the Switch View option of the Actions Menu to open a Web Tools window. For more
informations, refer to Switch View on page 10-1 or the Web Tools User’s Guide.
Events
Use the Events option of the Actions Menu to view a log of events for all switches in the fabric.
The Events window is shown in Figure 6-2.
Figure 6-2 Events Window
Note: T o sort the events by a particular column, click the column header . T o resize a column, d rag
the column divider.
The following is a description of the fields available in the Events option.
Page 63

Fabric Manager User’s Guide 6-3
Actions Menu
6
.
Admin
When using the Actions > Admin option, you are actually accessing Web Tools.
For more detailed information regarding Web Tools, refer to the appropriate version of the Web
Tools User’s Guide.
Status Reason Section: The upper area of the Events window describes events that have
changed the status of a switch. Entries in this area will no longer
appear once the issue has been resolved. Some of the events are
generated by Fabric Manager, and not by the switch.
Print Select to print the Fabric Events window.
Status Displays the status this event caused.
Switch Displays the name of the switch that has had a change in status.
Status Reason Displays the reason that the switch has had a change in status.
Event Log Section: The lower area of the Events window is a log of all the events that
have been detected by the switch.
Status Displays the status this event caused.
Switch Displays the name of switch.
Status Reason Displays the reason for a noted event.
Num... (number) Displays the event number for affected switch.
Time Displays the time of the event.
Count Displays the number of consecutive occurrences of the same event.
Level Displays the severity level of the event:
0 panic (switch reboots)
1 critical
2 error
3 warning
4 information
5debug
Message Displays a description of the event.
Page 64

6-4 Fabric Manager User’s Guide
Actions Menu
6
Fabric Watch
When using the Actions > Fabric Watch option, you are actually accessing Fabric Watch through
Web Tools.
For more detailed information regarding Web Tools, refer to the appropriate version of the Web
Tools User’s Guide or the Fabric Watch User’s Guide.
Telnet
When using the Actions > Telnet option, you are actually accessing telnet through Web Tools,
which is an optionally licensed software.
For more detailed information regarding Web Tools, refer to the appropriate version of the Web
Tools User’s Guide or the Fabric OS Reference Guide.
Security
Use the Security option of the Actions Menu to configure and manage fabric securit y po licies f rom
chosen access points. For more information regarding security policies, refer to Security on page
1-7.
The Security option of the Actions menu consists of the following tabs:
• Switch Connection Controls
• Device Connection Controls
• Management Access Controls
• Fabric Configuration Serv ers
• Options
Switch Connection Controls
The Switch Connection Controls tab of the Actions > Security menu is shown in Figure 6-3.
Page 65

Fabric Manager User’s Guide 6-5
Actions Menu
6
Figure 6-3 Switch Connection Controls Tab of the Security Menu
Adding a Switch to a Secure Fabric
T o add a switch to a secure fabric:
1. Highlight a secure switch in the SAN Elements tab.
2. Select Actions > Security.
3. Log into the secure switch.
For more information, refer to Fabric Login on page 4-2.
4. Select the Switch Connection Controls tab.
5. Enter th e new switch WWN in the empty field.
When switches already exist in the fabric, you can specify a “*” (do not include quotes) in
place of a switch WWN. When saved, the “*” will expand to include all switches in the fabric.
6. Select Add Switch or use drag and drop to move the switch to the Fabric Switches window.
The Enforce Policy box will be checked automatically.
7. Select Activate to add the new switch to secure fabric, implement the security policy and exit
the window.
or
Select Save to save changes without implementing policies. You can come back later to make
changes.
Page 66

6-6 Fabric Manager User’s Guide
Actions Menu
6
For information regarding changing security policies, refer to the Fabric OS Reference or the
Fabric OS Procedures Guide.
Device Connection Controls
The Device Connection Controls tab of the Actions > Security menu is shown in Figure 6-4.
Figure 6-4 Device Connection Controls Tab of the Security Menu
Creating a Security Policy
1. Highlight a secure switch in the SAN Elements tab.
2. Select Actions > Security.
3. Log into a secure switch.
For more information, refer to Fabric Login on page 4-2.
4. Select the Device Connection Controls tab.
5. Select an existing policy from the drop-down window and select the Rename butt on.
or
Select the Create Policy button.
A dialog box appears.
6. Type new policy name.
Page 67

Fabric Manager User’s Guide 6-7
Actions Menu
6
7. Highlight switches from the Switches/Devices column and use the Add Member button (or
drag and drop) to include them in the Device/Switch Binding Rule column. Use shift/click to
select multiple switches.
and/or
Select the Add Device WWN button to add a device WWN not already in fabric.
Note: When you add switch ports with devices already connected, those devices will be
automatically added to the rhs device ports folder, when the switch is added.
8. Select Activate to save, implement the policy to the selected switches and exit the secu ri ty
dialog box.
or
Select Save to save changes without implementing policies. You can come back later to make
changes.
Management Access Controls
The Management Access Controls tab of the Actions > Security menu is shown in Figure 6-5.
Note: T o us e FM 30 secur ity policy management, the ho st must b e allowed access to bo th HTTP
and API interfaces. If the FM3.0 host ip is excluded from either MAC policies security
policy management will not work correctly.
Figure 6-5 Management Access Controls Tab of the Security Menu
The following are samples of the SES tab and FRONTPANEL tab of Management Control Access
window:
Page 68

6-8 Fabric Manager User’s Guide
Actions Menu
6
Figure 6-6 SES Sub-Tab of the Management Access Control Tab
Figure 6-7 FRONTPANEL Sub-Tab of the Management Access Controls Tab
Page 69

Fabric Manager User’s Guide 6-9
Actions Menu
6
The following table describes the states of the Enforce Policy check box (epcb):
Adding Individual Switch Permissions
Follow the steps below to allow additional individual switch access to specific secure areas for:
• SNMP-RO
• SNMP-RW
• TELNET
• HTTP
• API
These policies require IP Addresses of management workstations. Only those workstations whose
IPs are in the member list are allowed access to the interface.
Note: When the SERIAL, TELNET, HTTP and API are all enforced with empty membersets,
there is no remaining way of managing security.
1. Highlight a secure switch in the SAN Elements tab.
2. Select Actions > Security.
3. Log into a secure switch.
For more information, refer to Fabric Login on page 4-2.
4. Select the Management Access Controls tab.
5. Select the tab of interest from the bottom of the window.
For instance, select the SNMP-RO tab to allow the chosen switch to access SNMP Read-Only
policies.
6. Type the IP address of the management workstation in the Enter IP Address field.
You may use “0” (without quotes) as a wildcard character in an IP address so that 0.0.0.0
includes all IP addresses, implying no rest rictions.
You may use 255.5.0.0, implying that any IP with the first two bytes 255.5 are allowed.
7. Select the Add IP button (or drag and drop address).
The Enforce Policy box will be checked automatically. Uncheck box to remove policies.
Enforce Policy Description Table
Condition Policy Result
Epcb is checked but no members exist Interface is prohibited to all.
Epcb is not checked The policy does not exist and
implies unrestricted access.
Epcb is not checked, and members exist Policy will be deleted once
configuration is saved, implying
unrestricted access to listed
members.
Page 70

6-10 Fabric Manager User’s Guide
Actions Menu
6
8. Select Activate to save, implement the policy to the selected switches and exit the secu ri ty
dialog box.
or
Select Save to save changes without implementing policies. You can come back later to make
changes.
Adding Individual Switch Permissions
Follow the steps below to allow additional individual switch access to:
• SES
• MGT_SERVER
These policies have device port WWNs as members. Nodes with device ports that are members are
allowed access to this interface.
1. Highlight a secure switch in the SAN Elements tab.
2. Select Actions > Security.
3. Log into a secure switch.
For more information, refer to Fabric Login on page 4-2.
4. Select the Management Access Controls tab.
5. Select the tab of interest from the bottom of the window.
For instance, select the SES tab to allow the chosen switch to access SES policies.
6. Select a device. Use Shift/Click to select multiple devices.
7. Select the Add Device button (or drag and drop the device).
The Enforce Policy box will be checked automatically when you have added a device.
Uncheck to remove policies.
8. Select Activate to save, implement the policy to the selected switches and exit the secu ri ty
dialog box.
or
Select Save to save changes without implementing policies. You can come back later to make
changes.
Adding Individual Switch Permissions
Follow the steps below to allow additional individual switch access to the specific secure areas:
• SERIAL
• FRONTPANEL
Note: When the SERIAL, TELNET, HTTP and API are all enforced with empty member sets,
there is no remaining way of managing security.
These policies have switches as members. Member switches allows access to their SERIAL port
and FRONTPANEL.
Page 71

Fabric Manager User’s Guide 6-11
Actions Menu
6
1. Highlight a secure switch in the SAN Elements tab.
2. Select Actions > Security.
3. Log into a secure switch.
For more information, refer to Fabric Login on page 4-2.
4. Select the Management Access Controls tab
5. Select the tab of interest from the bottom of the window.
For instance, select the SERIAL tab to allow the chosen switch to access SERIAL policies.
6. Select a switch from the Available Access Points column.
7. Select the Add Switch button or drag and drop the switch.
The Enforce Policy box will be checked automatically when you have chosen a switch.
Uncheck to remove policies.
8. Select Activate to save, implement the policy to the selected switches, and exit the security
dialog box.
or
Select Save to save changes without implementing policies. You can come back later to make
changes.
Fabric Configuration Servers
The Fabric Configuration Servers tab of the Actions > Security menu is shown in Figure 6-8.
Page 72

6-12 Fabric Manager User’s Guide
Actions Menu
6
Figure 6-8 Fabric Configuration Servers Tab of the Security Menu
Adding a FCS Switch
T o select a switch to be a secure access point for the fabric:
1. Select Actions > Security.
2. Select the Fabric Configuration Servers tab.
3. Highlight the switch in the Available Switch List column.
4. Use the Add FCS button to add the switch to the FCS Switch List (or drag and drop).
and/or
Use the Add Other button to add a switch WWN not already in fabric.
5. Use the Up/Down arrows to reorder the list of switches. The list is ordered so that the first
member is the primary, the second is the first backup, the third, the second backup and so on.
Note: Changing the primary FCS causes updates in the fabric that may take time to complete,
depending upon fabric size.
6. Select Activate to save the FCS switch configuration, implement the policy, and exit the
security dialog box.
or
Select Save to save changes without implementing policies. You can come back later to make
changes.
Page 73

Fabric Manager User’s Guide 6-13
Actions Menu
6
Options
The Options tab of the Actions > Security Menu is shown in Figure 6-9.
Figure 6-9 The Options Tab of the Security Menu
Changing the Security Password
T o change the password that is used to implement security:
1. Highlight a secure switch in the SAN Elements tab.
2. Select Actions > Security.
3. Log into a secure switch.
For more information, refer to Fabric Login on page 4-2.
4. Select the Options tab.
5. Enter the old Administrative Password.
6. Enter the new Administrative Password.
7. Verify by entering the new pa ssword again.
8. Select the FCS Switches or non-FCS Switches radio button.
Note: Select the FCS switches radio button to make a password change to the secure access
switch(es).
9. Select Change Password.
Page 74

6-14 Fabric Manager User’s Guide
Actions Menu
6
10. Check the No Node WWN Zoning box if you want Node WWNs to be excluded from WWN
based Zoni ng.
11. Select Activate to save and apply changes.
Zone Admin
When using the Actions > Zone Admin option, you are actually accessing Web Tools, which is an
optionally licensed software.
For more detailed information regarding Web Tools, refer to the appropriate version of the Web
Tools User’s Guide or the Zoning User’s Guide.
Administrative privileges are required to access this view.
Name Server
When using the Actions > Name Server option, you are actually accessing Web Tools, which is an
optionally licensed software.
For more detailed information regarding Web Tools, refer to the appropriate version of the Web
Tools User’s Guide.
ISL
Use the ISL option of the Actions menu to record and monitor the ISL configuration for a fabric.
There are two separate actions that can be taken when using the ISL option:
• ISL Checking
• Restamp (available only when ISL Checking is enabled)
Note: ISL Checking requires FOS 2.6 or later. The ISL feature will be grayed out if the launch
switch is running a version of FOS prior to 2.6 (even if switches under the launch switch
are running newer versions of FOS).
Enabling ISL Checking
When ISL Checking is enabled, a snapshot (or stamp) is taken of the topology. When a change
occurs in the ISLs, the detailed information will be shown on the Status Reason section of the
Events page. For more information about Events, refer to Events on page 6-2.
To enable ISL ch ecki ng:
1. Select Actions.
2. Select ISL.
3. Select ISL Checking.
Page 75

Fabric Manager User’s Guide 6-15
Actions Menu
6
A check mark should appear, showing that ISL checking is enabled and the node icon will
change.
When ISL checking is turned on, the following changes will take place:
• If an event occurs, the Status Legend color will change to represent the appropriate Event.
• Any events will be shown in the Fabric Events window.
For more information, refer to the San Elements Tab Icons on page 3-7 and the ISL Status Tab on
page 4-8.
Note: To disable ISL checking, repeat steps 1 - 3 to remove the check mark.
Using Restamp
To restamp the fabric topology, and have the most current topology information noted in Fabric
Events, use the Restamp option. This option is only available when ISL Checking has already been
enabled.
1. See Enabling ISL Checking and the following instructions.
2. Select Actions > ISL.
3. Select Restamp.
A snapshot is taken of the fabric
4. Select Actions > Fabric Events.
View the latest changes within the fabric in the top of the Fabric Events window.
Set Time
Use the Set Time option set and change the time on a fabric or an individual switch.
The Set Time window is shown in Figure 6-10.
Figure 6-10 Set Time Window
Fabric Checking
Use the Fabric Checking option of the Actions menu to determine what changes or updates appear
in the Fabric View.
Page 76

6-16 Fabric Manager User’s Guide
Actions Menu
6
Enable Fabric Checking
• Select Actions > Fabric Checking.
A check mark appears.
Repeat this step to disable Fabric Checking.
Page 77

Fabric Manager User’s Guide 7-1
Chapter
7
Tools Menu
This chapter provides information on the options available through the Tools pull-down menu of
Fabric Manager.
The Tools pull-down menu provides the following options:
• Download Firmware
• Reboot
- Create Reboot Sequence
- Sequence Reboot
• Config
- Save Baseline
- Compare/Download From File
- Compare/Download From Switch
• Licensing
- Import From File
- Import From Switch
• Fabric Merge
The Tools Menu is shown in Figure 7-1, Figure 7-2, and Figure 7-3.
Figure 7-1 Tools Menu with Reboot Options
Figure 7-2 Tools Menu With Config Options
Page 78

7-2 Fabric Manager User’s Guide
Tools Menu
7
Figure 7-3 Tools Menu With Licensing Options
Download Firmware
Use the Download Firmware option of the Tools menu to download new firmware to the fabric.
The Download Firmware window is shown in Figure 7-4. The Download Firmware window can
also be displayed by selecting the Download Firmware icon located in the Tool Bar. For more
information, see Open FM Log on page 9-4.
Page 79

Fabric Manager User’s Guide 7-3
Tools Menu
7
Figure 7-4 Download Firmware Window
Downloading Firmware to Mul t iple Switches
For instructions on downloading firmware, see Downloading Firmware to Multiple Switches on
page 9-7.
Reboot
Use the Reboot option of the Tools menu to manage switch reboots and minimize interruption of
switch access. The Reboot option provides the following detailed options:
• Create Reboot Sequence
• Sequence Reboot
Page 80

7-4 Fabric Manager User’s Guide
Tools Menu
7
Create Reboot Sequence
Use the Tools > Reboot > Create Reboot Sequence option to cr eat e a rebo ot gro up and sequence.
The Create Reboot Sequence window is shown in Figure 7-5.
Figure 7-5 Create Reboot Sequence Window of Reboot Menu
Sequenced Reboot
Use the Tools > Reboot > Sequence Reboot option to set up a group of switches to be rebooted in
a chosen sequence.
Page 81

Fabric Manager User’s Guide 7-5
Tools Menu
7
The Sequence Reboot window is shown in Figure 7-6.
Figure 7-6 Sequence Reboot Window of the Reboot Menu
Config
Use the Config option of the Tools menu to create and apply “Baseline” configurations across
multiple switches. The Config option provides the following sub-menus:
• Save Baseline
• Compare/Download from File
• Compare/Download from Switch
Creating a Baseline Switch Configuration
For information on creating a Baseline Switch Configuration, see Save a Baseline Configuration on
page 11-2.
Page 82

7-6 Fabric Manager User’s Guide
Tools Menu
7
Comparing or Downloading a Switch Configuration From a
File
For information, see Download and Apply a Baseline Configuration from a File on page 11-3.
Comparing or Downloading a Switch Configuration From a
Switch
For information, see Download and Apply Baseline Configuration from a Switch on page 11-4.
Licensing
Use the Licensing option of the Tools menu to administer and manage licensing information. The
Licensing option provides the following sub-menus:
• Import From File
• Load From Switch
Importing a License From a File
T o import a license from a local file:
1. Select Tools.
2. Select Licensing > Import From File.
A browser window appears.
3. Browse to select the file that contains the license to be imported.
Loading a License From a Switch
T o view and change licensing information on a switch or fabric, use the License
Admin window:
1. Select Tools.
2. Select Licensing > Load From Switch.
The License Admin - Switch Selection window appears.
3. Select the switch from which you want to load a license
4. Select the Login button and log in to switch (if you have not already done so).
5. Select OK.
The License Admin window appears, as shown in Figure 7-7.
6. Select the Switch tab.
7. Select the Load From Switch button.
Page 83

Fabric Manager User’s Guide 7-7
Tools Menu
7
Figure 7-7 License Admin Window of the License Menu
Fabric Merge
Use the Fabric Merge option of the Tools menu to facilitate the process of merging two fabrics.
Performing a Fabr ic Merge
To select two fabrics as merge candidates:
1. Select Tools.
2. Select Fabric Merge.
The Fabric Merge Check window appears, as shown in Figure 7-8.
Page 84

7-8 Fabric Manager User’s Guide
Tools Menu
7
Figure 7-8 Fabric Merge Check Window
3. Select two fabrics to merge from the drop-down menus.
4. Select the Check button.
T esting is initiated to compare configurations that are currently active. Results are displayed in
the Merge Check Results window, as shown in Figure 7-8.
Page 85

Fabric Manager User’s Guide 7-9
Tools Menu
7
Figure 7-9 Merge Check Results Window
If incompatibilities are found between fabrics, the Zone Merge window appears, as shown in
Figure 7-10.
Page 86

7-10 Fabric Manager User’s Guide
Tools Menu
7
Figure 7-10 Fabric Merge Window
5. Select options to remove conflicts.
For more information about merging fabrics, see Validate Merge-ability of Two Fabrics on page
11-5.
Page 87

Fabric Manager User’s Guide 8-1
Chapter
8
Help Menu
This chapter provides the following information:
• Help
• Context Help
• Status Legend
• About
The Help menu is shown in Figure 8-1.
Figure 8-1 Help Drop- Down Menu
Help
Use the Help option to view selected information about Fabric Manager features.
Sample Help Window
A sample of the Help window is shown in Figure 8-2.
Page 88

8-2 Fabric Manager User’s Guide
Help Menu
8
Figure 8-2 Sample Help Window of the Help Drop-down Menu
Using Help
To use Help:
1. Select Help > Help
The Help window appears.
2. Select a folder from the navigation-tree in the left column.
Information appears in the right-hand window.
3. Open a folder and select a file to view sub-topics.
Context Help
Context Sensitive Help Sample Window
A sample of what you will see when using context sensitive help is shown in Figure 8-3.
Page 89

Fabric Manager User’s Guide 8-3
Help Menu
8
.
Figure 8-3 Sample Context Sensitive Help Window
Using Context Sensitive Help
T o use Context Sensitive Help:
1. Select the Context Sensitive Help icon.
A question mark appears on screen.
2. Use your mouse to click an object of interest on screen.
A window appears with information about that object.
Status Legend
The Status Legend defines the meaning of colors visible in the background of the switch icons.
Each color indicates a different operational state:
Blue Unknown
Green Healthy
Yellow Marginal (mix of good and faulty readings)
Red Down (more than two faulty readings)
Page 90

8-4 Fabric Manager User’s Guide
Help Menu
8
Gray Unmonitored
Note: If the status of the switch is Unmonitored, the status will not change during that Fabric
Manager session.
If no data is available from a switch, the most recent background color remains displayed.
Note: For all statuses that are based on errors per time interval, any errors will cause the status to
show faulty until the entire sample interval has passed.
The Status Legend is shown in Figure 8-4.
Figure 8-4 Status Legend
Using the Status Legend
An individual switch icon is shown in Figure 8-5.
Figure 8-5 Individual Switch
The background color of the switch indicates that the status of the switch is down.
About
Note: This option is not currently available.
Page 91

Fabric Manager User’s Guide 9-1
Chapter
9
Tool Bar
This chapter provides information regarding options that are available through the Tool Bar of the
Fabric View.
The following icons and windows are available through the Fabric Manager Tool Bar:
• Address Wind ow on page 9-1
• Fabric Login Icon on page 9-2
• Open FM Log on page 9-4
• Print Table Icon on page 9-5
• Download Firmware Icon on page 9-6
• Sequenced Reboot Icon on page 9-8
• Context Sensitive Help Icon on page 9-10
• Help on page 9-11
The Tool Bar is shown in Figure 9-1.
Figure 9-1 Tool Bar in Fabric View
Address Window
Use the Address Window to enter the IP address, name, or WWN of the switch that you want to
manage or monitor. Once the switch information ha s been entered, the address can be chosen
automatically from the pull-down menu. The Address window is available through the Fabric
View. For more information, see Fabric View with the Fabric Icon Selected on page 3-2.
The Address Window is shown in Figure 9-2.
Figure 9-2 Address Window in Fabric View
Page 92

9-2 Fabric Manager User’s Guide
Tool Bar
9
Fabric Login Icon
Use the Fabric Login icon to access the Fabric Logi n window, which allows you to select a group of
switches to login to. The Fabric Login icon is available through the Fabric View. For more
information, see Fabric View with the Fabric Icon Selected on pa ge 3-2.
The Login Setup window is shown in Figure 9-3.
Figure 9-3 Fabric Login Icon
When the Fabric Login Setup Icon is selected, the Login Setup window appears.
Login Setup Window
Use the Login Setup Window to select a group of switches to login to simultaneously.
The Login Setup window is shown in Figure 9-4.
Page 93

Fabric Manager User’s Guide 9-3
Tool Bar
9
Figure 9-4 Login Setup Window
Logging into Multiple Switches
T o login to multiple switches simultaneously:
1. Launch the Login Setup window through one of the following options:
• Select the Multiple Switches Login Setup Icon, as shown in Figure 9-3.
• Select the Login Setup button from the Firmware Download dialog box, as shown in
Figure 9-9 on page 9-7.
• Select the Login Setup butto n from the Sequ enced R e boo t dialog box, as shown in Figure
9-11 on page 9-9.
2. Highlight switches or groups of switches to be selected.
• Use mouse clicks in combination with Shift/Control to highlig ht multiple switches.
3. Use the Add/Delete arrows in the middle column to select the switches.
The selected switches will be applied in a table with all their details.
4. Enter the User Name and Password that apply to the switches you selected.
5. Choose the Test and Apply button to check your login and apply the login.
Page 94

9-4 Fabric Manager User’s Guide
Tool Bar
9
or
Choose the Apply button to login to the selected switches.
or
Choose the Cancel button to close the Login Setup window without saving changes.
Open FM Log
Use the FM Log icon to view events occurring within the fabric.
The FM Log icon is shown in Open FM Log on pa ge 9-4.
Figure 9-5 Open FM Log Icon
For more information, refer to Fabric Manager Log on page 4-12.
Fabric Manager Log Window
The Fabric Manager Log window is shown in Figure 9-6.
Page 95

Fabric Manager User’s Guide 9-5
Tool Bar
9
Figure 9-6 FM Log Window
Print Table Icon
Use the Print Table Icon to print table reports for review.
The Print Table Icon is available through the Fabric View. For more information about the Fabric
View, refer to the Tool Bar on page 3-5.
The Print Table icon is shown in Figure 9-8.
Figure 9-7 Print Table Icon
For more information about the Print Table option, refer to Print on page 4-12.
Page 96

9-6 Fabric Manager User’s Guide
Tool Bar
9
Download Firmware Icon
Use the Download Firmware icon to access the Download Firmware window, and select multiple
switches to be upgraded simultaneously. The Download Firmware Icon is available through the
Fabric View. For more information about the Fabric View, see Fabric View with the Fabric Icon
Selected on page 3-2.
The Download Firmware Icon is shown in Figure 9-8.
Figure 9-8 Download Firmware Icon
When the Download Firmware icon is selected, the Download Firmware window appears, as
shown in Figure 9-9.
Download Firmware Window
Use the Download Firmware window to upgrade the firmware of multiple switches simultaneously.
The Download Firmware window is shown in Figure 9-9.
Page 97

Fabric Manager User’s Guide 9-7
Tool Bar
9
Figure 9-9 Download Firmware Window
Downloading Firmware to Mul t iple Switches
T o use the Download Firmware window to upgrade the firmware to multiple switches:
1. Select the Download Firmware icon, as discussed in Open FM Log on page 9-4.
2. Highlight switches or groups of switches to be selected for firmware upgrade.
Use mouse clicks in combination with Shift/Control to highlig ht multiple switches.
3. Use the Add/Delete arrows in the middle column to select the switches or drag and drop from
the navigation window to the table.
4. The selected switches will be applied in a table with all their details.
5. Enter the Host Name or Host IP address.
6. Enter the Remote User Name.
Page 98

9-8 Fabric Manager User’s Guide
Tool Bar
9
7. Use the Browse button to select a firmware file from the local host, or if the firmware is
located on the remote host, then type the full path to the firmware on the remote host.
8. Select downl oad protocol (RSHD or FTP).
If FTP is the chosen protocol, enter FTP password.
9. Choose the Download button to begin firmware download.
or
Choose the Close button to close the window without saving changes.
Sequenced Reboot Icon
The Sequenced Reboot icon is shown in Figure 9-10.
Figure 9-10 Sequenced Reboot Icon
Sequenced Reboot Window
Use the Sequenced Reboot window to configure switches to reboot in a specified order. This
prevents unexpected lapses in fabric availability . For more information, refer to Reboot on page 7-3
or Setup a Sequenced Reboot on page 11-7.
The Sequenced Reboot window is shown in Figure 9-11.
Page 99

Fabric Manager User’s Guide 9-9
Tool Bar
9
Figure 9-11 Sequenced Reboot Window
Rebooting Switches
To reboot switches without creating a Reboot Group, perform the following steps:
1. Select Tools > Reboot.
2. Select Sequence Reboot.
The Sequence Reboot window appears.
3. Select the switches to be rebooted from the navigation-tree. Move switches to the right-hand
table by using the right-arrow, or by dragging and dropping.
Use Shift/Click to select multiple switches.
4. Select Fastboot to reboot selected switches without performing a POST test.
or
Select Reboot to reboot selected switches with POST test.
Page 100

9-10 Fabric Manager User’s Guide
Tool Bar
9
Context Sensitive Help Icon
Use the Context Sensitive Help icon to access help on the Fabric Manager screen. The Context
Sensitive Help icon is shown in Figure 9-12.
Figure 9-12 Context Sensitive Help Icon
Context Sensitive Help Sample Window
A sample of what you will see when using context sensitive help is shown in Figure 9-13.
Figure 9-13 Sample Context Sensitive Help Wind ow
Using Context Sensitive Help
To use Context Sensitive Help:
1. Select the Context Sensitive Help icon.
A question mark appears on screen.
 Loading...