

Page 1

Page 2

1
About this Guide
The content in this document is for information purpose and is subject to change
without prior notice. We have made every effort to ensure that this User Guide is
accurate and complete.
However, no liability is assumed for any errors or omissions that may have
occurred.
The manufacturer reserves the right to change the technical specifications or
accessories without prior notice.
Battery Warning
Never dismantle, crush, or pierce the battery, or allow the battery to
short-circuit. Do not expose battery being placed in high temperature
environment, if battery leaks or bulges, stop continue to use.
Always charge using the system. Risk of explosion if battery is replaced by an
incorrect type.
Keep the battery out of reach of children.
Batteries may explode if exposed to open fire. Never dispose of batteries in a
fire.
Never replace the battery on your own; have the dealer do it for you.
Disposed of used batteries observing local regulations.
Notes on Installation
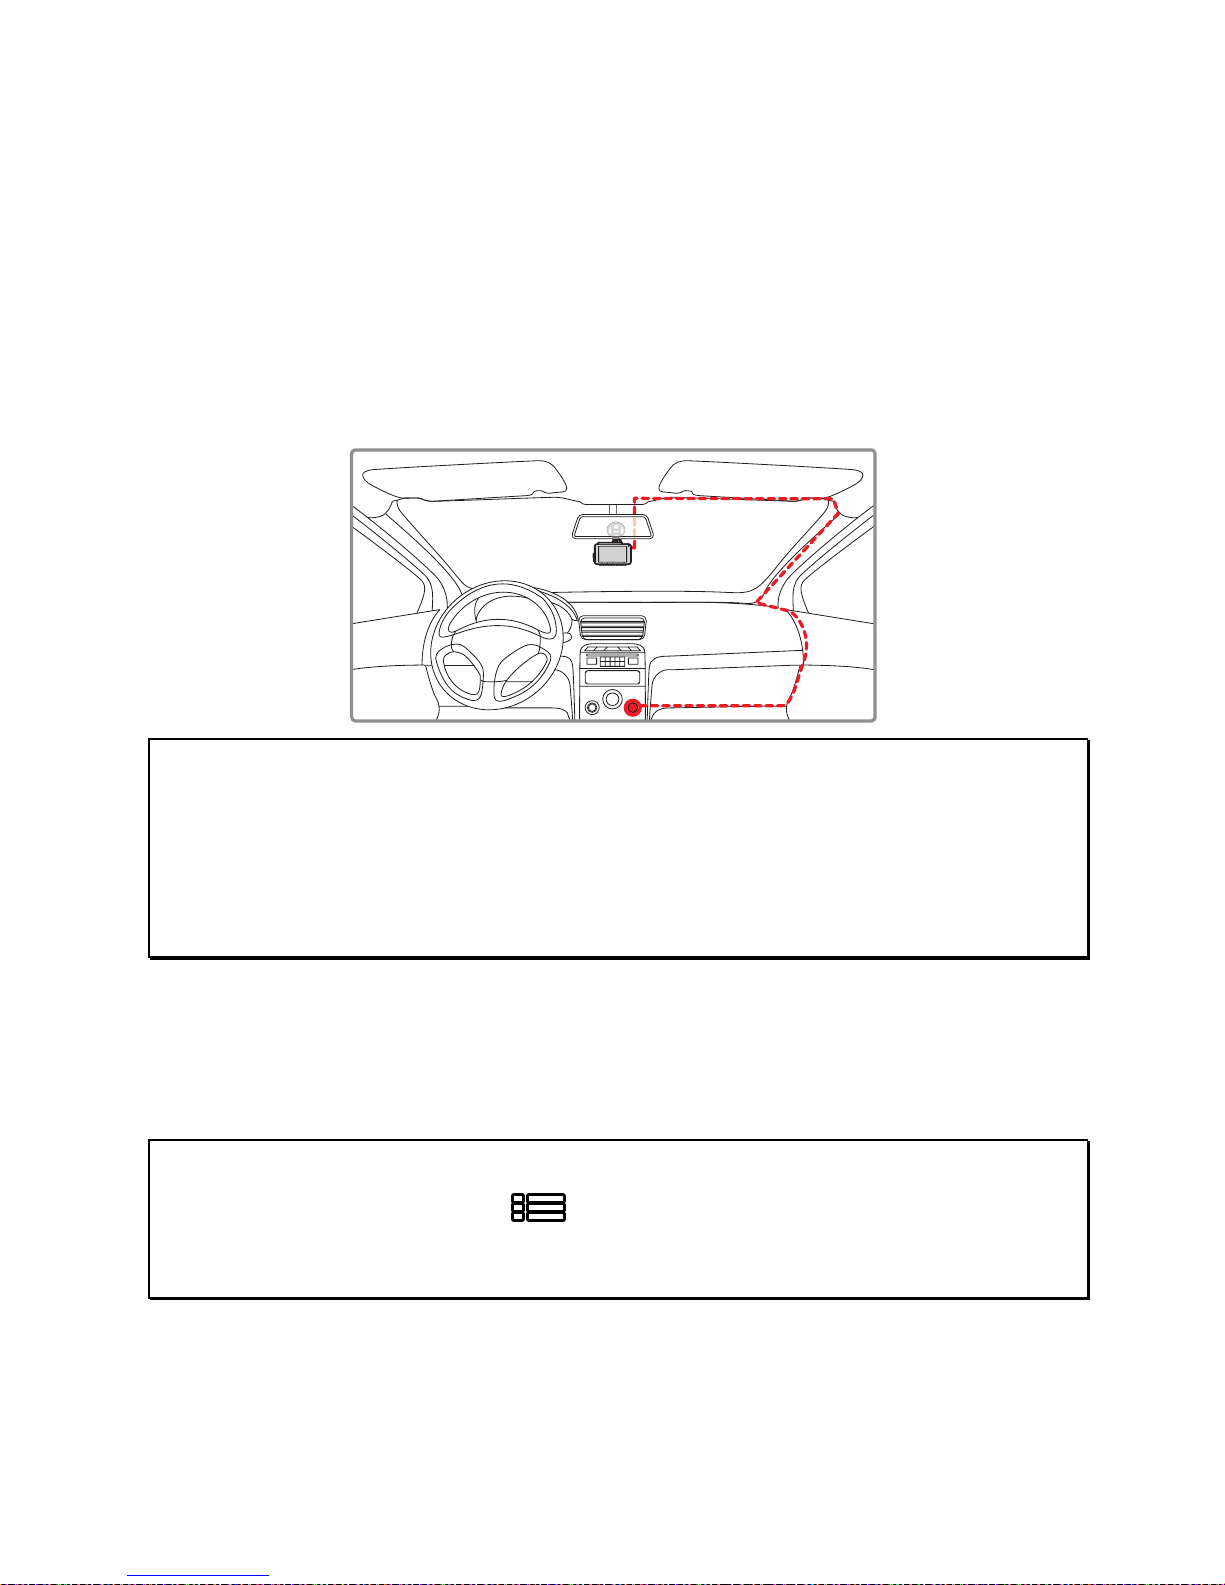
1. Please measure the front windshield viewing area, make sure not to block
driver's front view, install the camcorder below the rearview mirror (the
central, higher right position of the front windshield). And we recommend that
the sky and the land occupied by the screen 50%, fix the car holder and then
adjust the camcorder so that the lane is aligned with the screen. Proper
installation enables the camcorder to maximize the efficiency.
2. Make sure that the lens is within the wiping range of the windscreen wiper to
ensure a clear view even when it rains.
3. Do not touch the lens with your fingers. Finger grease may be left on the lens
and will result in unclear videos or pictures. Clean the lens on a regular basis.
4. Do not install the camcorder on a tinted window. Doing so may damage the
tint film.
5. Make sure that the installation position is not hindered by the tinted window.
6. This product is suitable for light windshield or light color heat-resistant film
windows , it will affect video quality if install it on the dark windows or dark
heat-resistant film windows.
7. Use the products of the attached power charger only, please do not use other
brand power charger, in order to avoid equipment burn or cause the battery
explosion.
For more operation details, please refer to CD-ROM.
Page 3
2
Caution
Due to local laws and vehicles safety considerations, do not operate the
camcorder while driving.
Set up time and date accurately before you use this camcorder.
The firmware function in the camcorder is for reference only, drivers are
advised to exercise discretion based on actual road conditions.
This product is used only for non-commercial use, within the maximum limits
permitted by applicable law. We do not take any responsibilities for the loss of
use of the product.
This camcorder gets warm when in use; this is normal.
Improper use or operation of the product may result in damage of the product
or its accessories and void the warranty.
HP Inc. is NOT responsible for the loss of any data/content during operation.
1 Introduction
Thank you for purchasing this advanced Car Camcorder. This product is specifically
designed for real time video recording when driving. It also supports a HP rear
camera. You might ask distributor for further information.
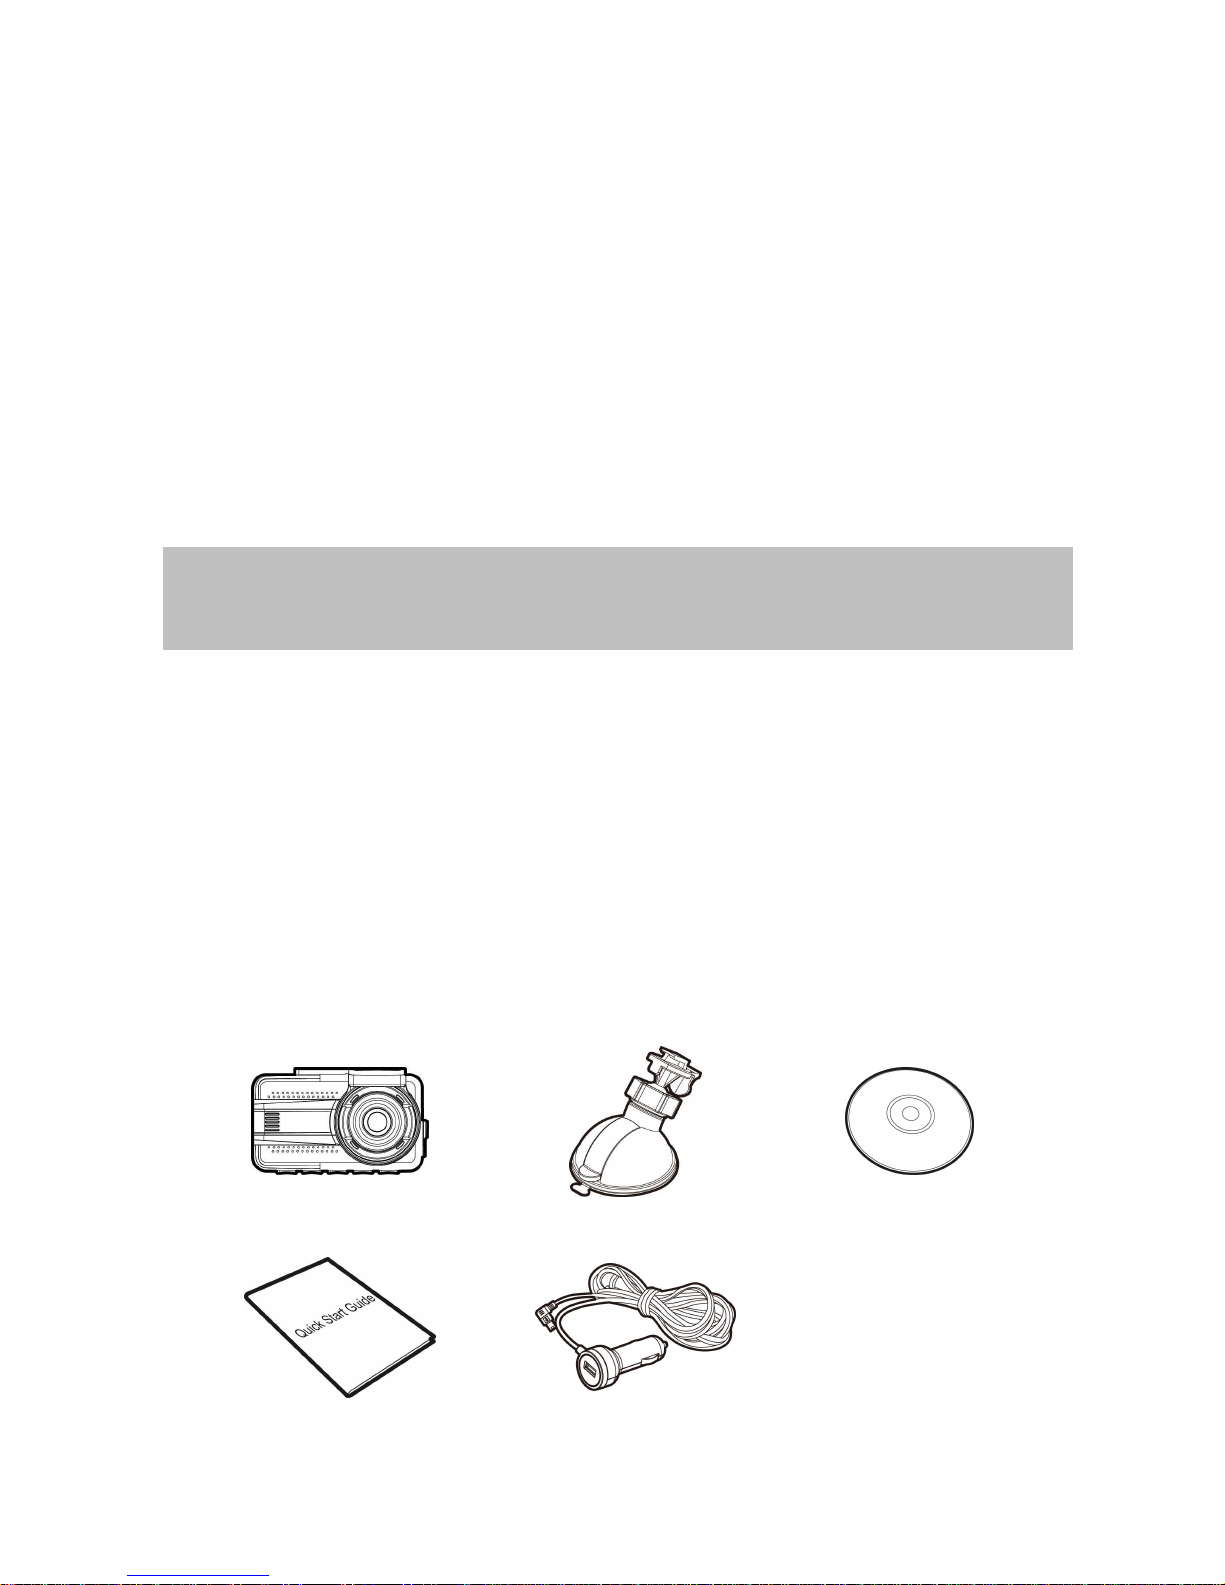
1.1 Package Contents
The package contains the following items. In case there is any missing or damaged
item, contact your dealer immediately.
Car Camcorder Bracket CD-ROM
Quick Start Guide Car Adapter
Before you start using the product, it is assumed that you agree to
the above statement.
Page 4
3
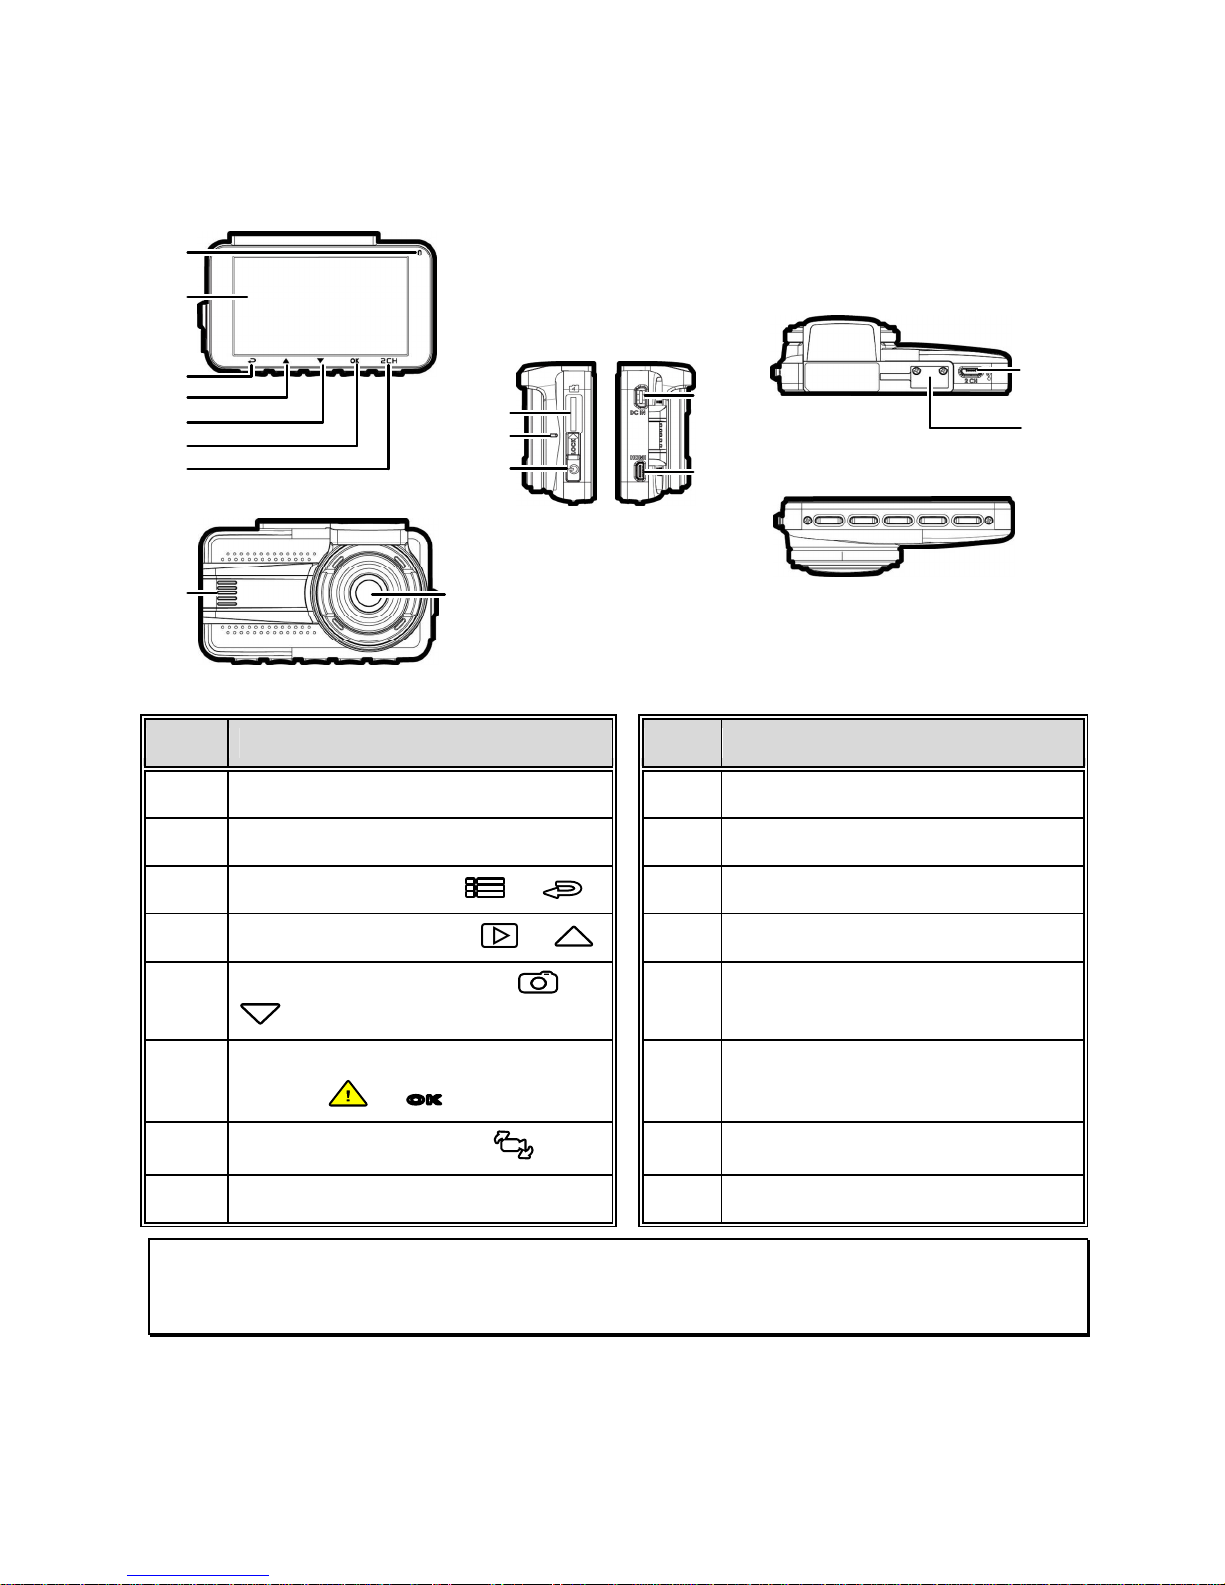
1.2 Product Overview
No. Item
No. Item
1 LED Indicator
9 Wide Angle Lens
2 LCD Color Screen
10 Memory Card Slot
3 Menu / Back Button ( / )
11 Microphone
4 Playback / Up Button ( / )
12 Power Switch
5
Snapshot / Down Button ( /
)
13 Power Connector Port
6
Emergency Recording / Confirm
Button ( /
OK
)
14 HDMI Connector Port
7
Switch Camera Button ( )
15 Micro USB Connector Port
8 Speaker
16 Bracket Socket
Note:
Please press the button (3~7) according to the diagram notice shown on screen.
3
4
5
6
7
1
2
9
8
12
13
14
10
11
16
15
Page 5
4
2 Getting Started
2.1 Storage Media
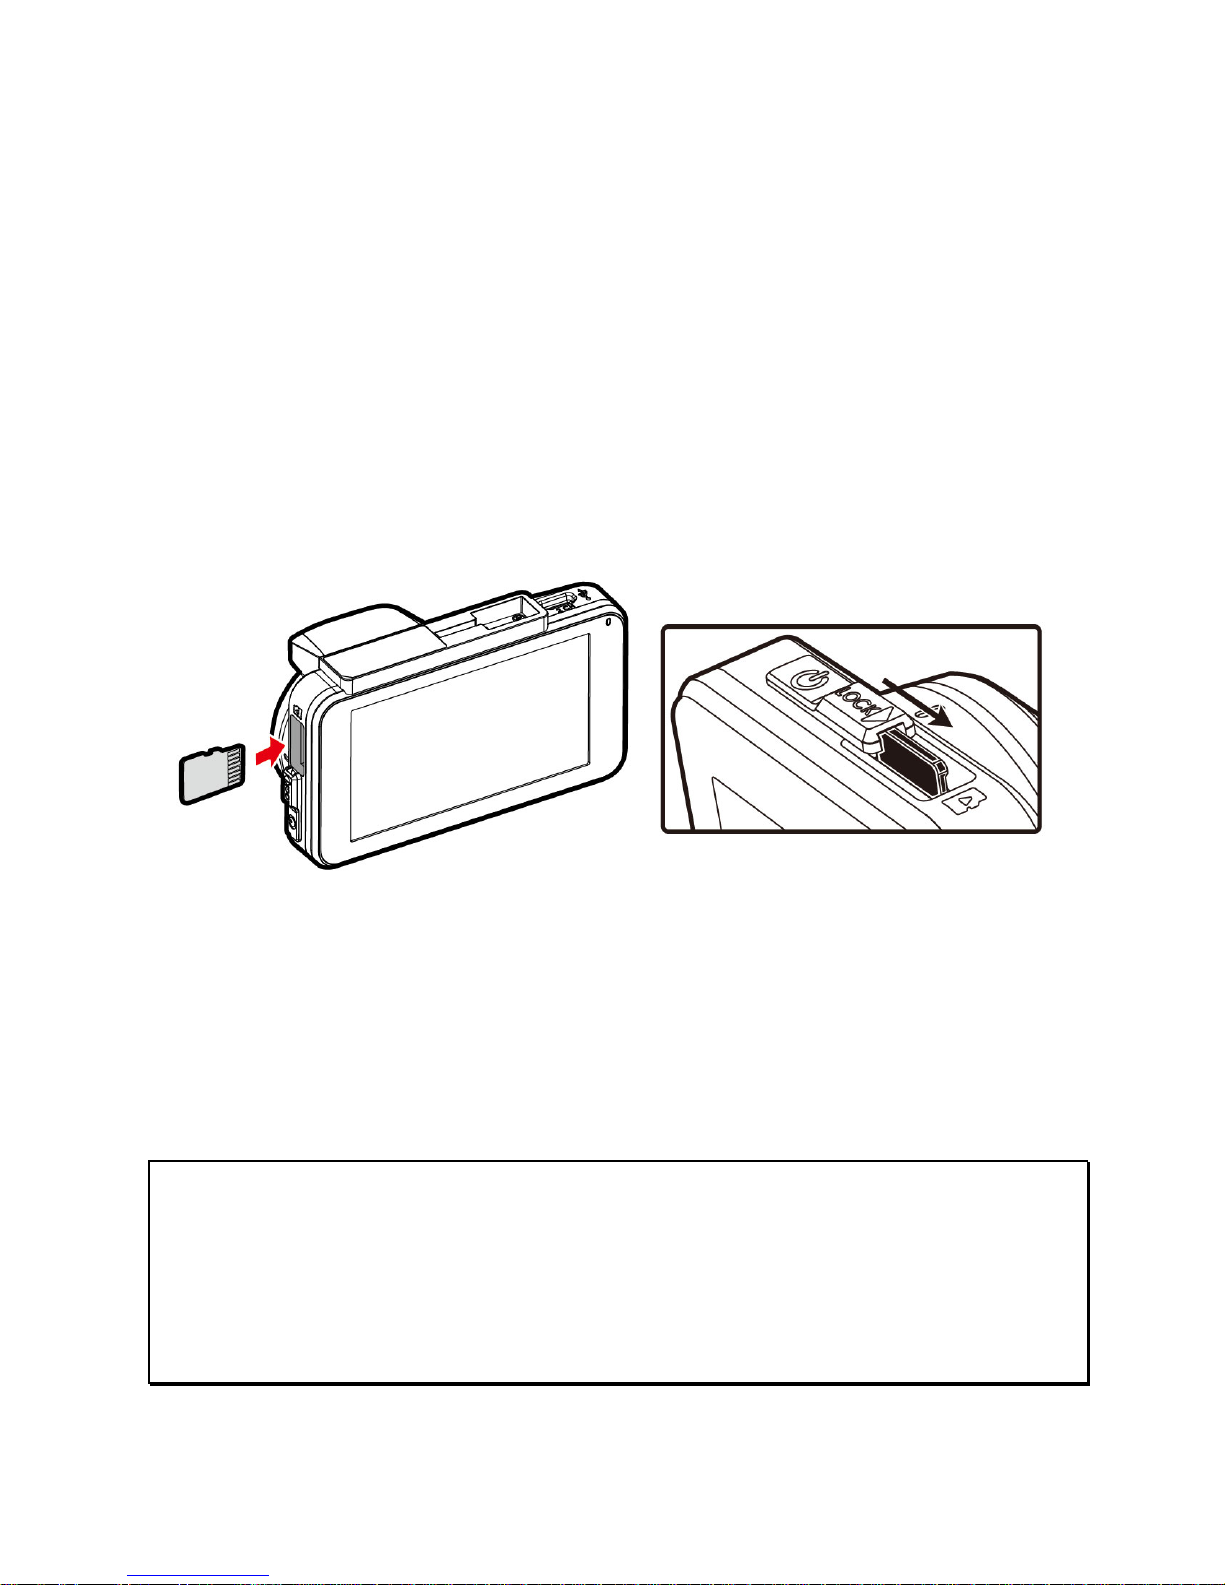
2.1.1 Insert the Memory Card
Insert memory card with the pins facing forward and the screen of the
camcorder facing forward too, see the picture as below:
Also, insert the SD card into the camcorder until the lock can be smoothly
slid. Card will be protruding in normal use, and damage may occur if
pressed too hard. Please read the instructions carefully on the screen
layer.
2.1.2 Remove the Memory Card
If the camcorder is power on, please power off first and wait for the
procedure of switching off the camcorder completed before removing
the memory card.
Note:
1. Do not remove or insert the memory card when the camcorder is turned on. This
may damage the memory card.
2. Support SDHC class 10 and memory storage 16GB or above (support up to 32GB).
3. Please format the micro SD cards before the initial use. The formatted file type for
this camcorder is FAT32 file.
Page 6
5
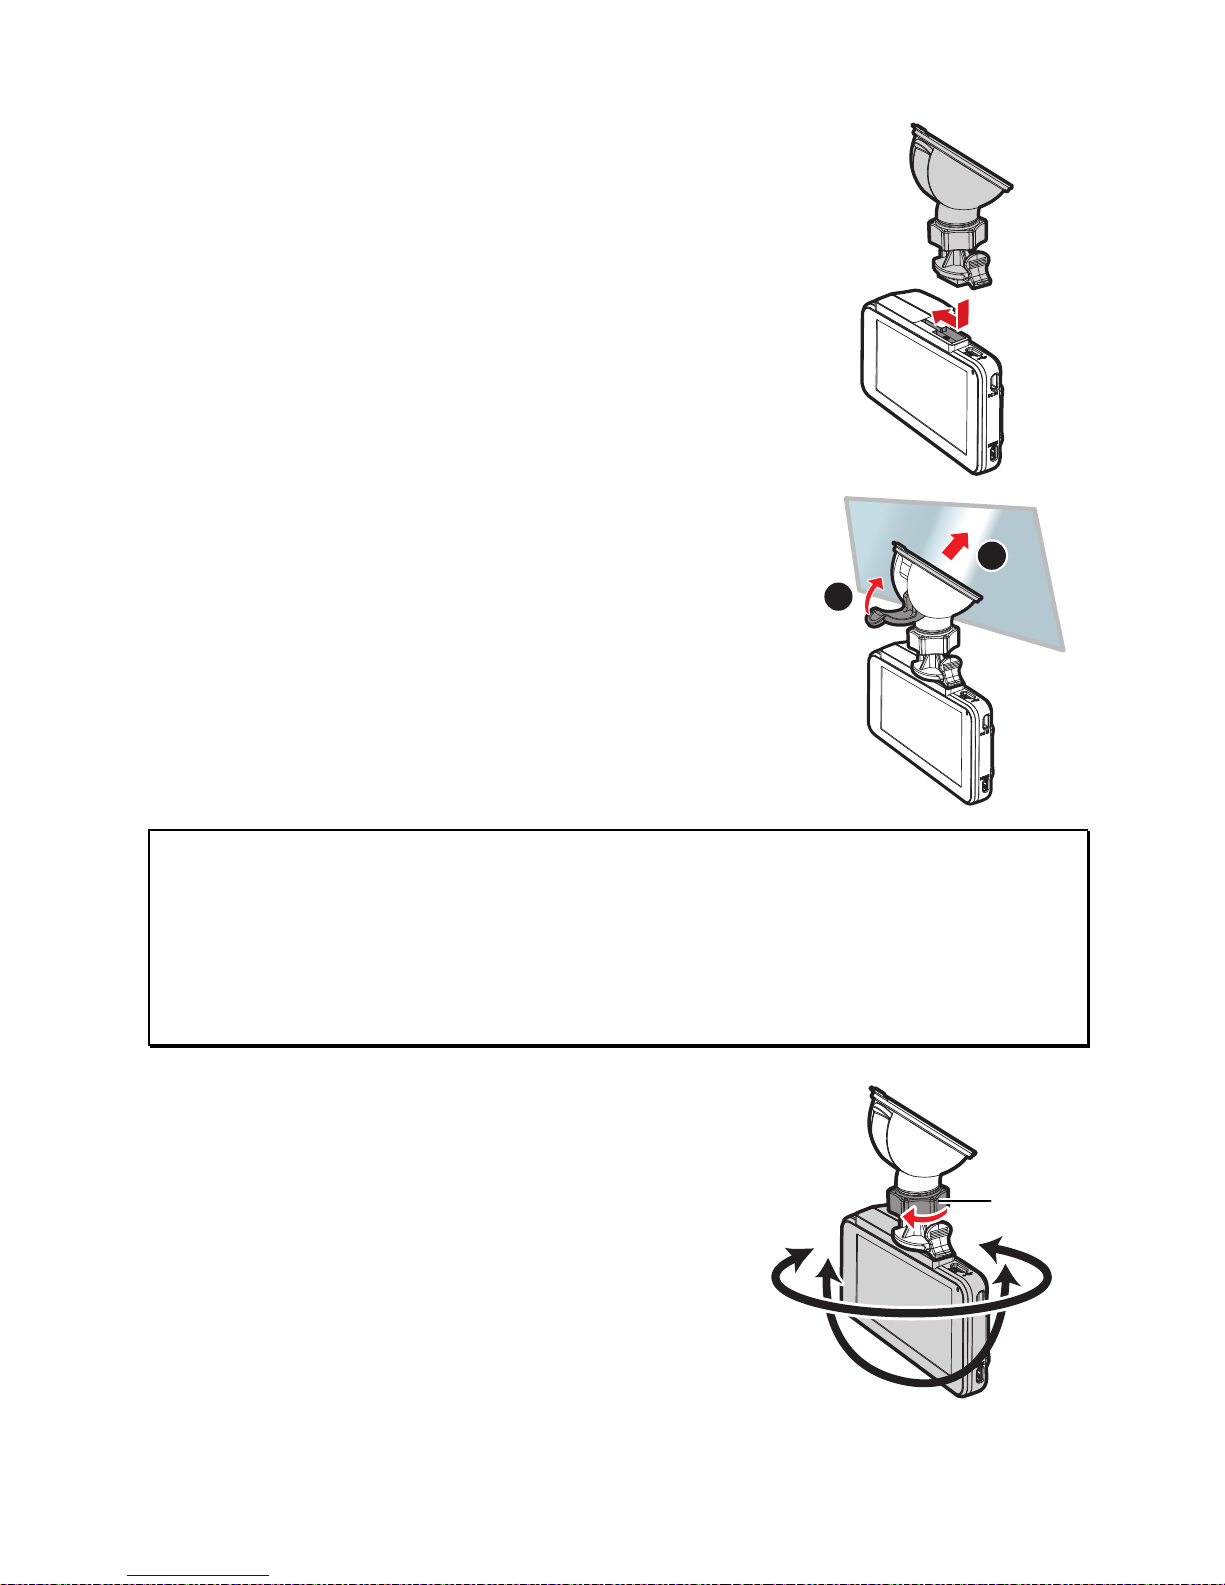
2.2 Installing in Vehicles
2.2.1 Mount the Camcorder to
Windshield
1. Push the bracket into bracket slot on top of
camcorder until a click sound is heard.
2. Connect the power cable then power on to enter
preview screen and confirm the field of view.
Then clean the surface of the windshield with
alcohol to ensure that the adhesion surface is
clean.
3. Remove the protective layer on the bottom of
the bracket.
4. Release the lever of the bracket, install the
bracket onto the windshield, then lock the
lever to complete the installation.
5. Make sure the bracket is firmly installed onto
the windshield.
Note:
1. Do not install the camcorder on a tinted window. Doing so may damage the tint film.
2. This product is suitable for light windshield or light color heat-resistant film
windows, it will affect video quality if install it on the dark windows or dark
heat-resistant film windows.
3. Remove the protective layer on the bottom of the bracket.
2.2.2 Adjust the Camcorder
1. Loosen the knob to swivel the camcorder
vertically or horizontally.
2. Then tighten the knob to make sure the
camcorder is securely locked in place.
Knob
1
2
Page 7
6
2.3 Connecting to Power
Use only the attached power connector for activating the camcorder and
charging the built-in battery.
1. Connect one end of power connector to power connector port on the
camcorder. USB port input: DC 5V / 1.0A.
2. Plug the other end of the car adapter to the cigarette lighter socket of
your vehicle. Once the vehicle engine is started, the camcorder
automatically turns on. Car charger input: DC 12 / 24V.
Note:
Please measure front windshield viewing area, so as not to block the driver's field of
view, and install the camcorder under the driving mirror (upper central of the front
windshield). And we recommend that the sky and the land occupied by 50% in the
recording screen, please adjust the camcorder so that the alignment icon is aligning
the driving lane. Proper installation enables the camcorder to maximize the efficiency.
2.4 Initial Settings
Before using the camcorder, we recommend you setup the correct Date
and Time.
Note:
Please note that if you press the button during recording, the system will stop
recording and enter OSD menu. Make sure the recording is already stopped then
continue operating the menu.
Page 8

7
3 Using the Car Camcorder
3.1 Automatic Record
If the camcorder is connected to the vehicle power supply and slide the
power switch, once start the car engine, the camcorder will automatically
power on and start recording.
Recording will automatically stop when the engine is switched off.
Note:
1. Some vehicle power supply would not turn on / off automatically with the car engine
start, if the camcorder cannot automatically power on/off with the car engine,
please manually connect the power supply with the vehicle power, and then power
on, or manually power off the camcorder and then release the connector with the
car power supply.
2. It can be configured to save a video file for every 1 or 3 minutes of recording.
3. All the videos and photos are saved in the memory card, if memory card is full, loop
recording will be generally overwrite the oldest video file.
3.1.1 Emergency Recording
To start the Emergency Recording, do the following:
1. During Video Recording, press the
OK
button to enter emergency
recording mode, the
“Emergency” message will be
shown immediately on the upper
left corner of the screen, and the
recorded file will be protected.
2. The emergency video recording length is same as the recording
interval setting. When the emergency recording length reaches the
setting, the system will return to the general recording mode.
Note:
1. The emergency recording file is created as a new file, which will be protected to
avoid being overwritten by normal loop recording. A memory card can save up to 20
emergency video files if record interval time is 1 minute, and save up to 10
emergency video files if record interval time is set as 3 minutes.
2. The notice message of “Emergency files are full” will pop up on the screen when
the emergency recording folder is full, and the later emergency files will be saved in
the Normal Video folder which will be over written if memory is full. Thus, if you
want to keep newest emergency video file, please manually delete the oldest files
in the emergency video folder to release more capacity.
Page 9

8
3.2 Picture in Video
You can also use this camcorder to take snapshots of the current scene.
1. In recording status, press
to capture recording screen
shots from the front lens.
2. When the icon shows in
the central of screen, it means
the screenshots is completed.
Note:
1. The screen shots image resolution quality is depending on the video resolution
setting.
2. The definition of picture in video by this product, the picture resolution is limited by
the speed of the target object and changes in ambient lighting. The photograph
function is better used for taking still pictures in accident scenes or when the car is
stopped to wait for a traffic light.
3. It is available only for the front camera if user wants to take pictures during
recording.
Page 10

9
3.3 Driving Safety
Menu option Description
Parking Mode
To monitor the vehicle when it is parked, you can activate
Vibration Detection, or Motion and Collision Detection.
Collision
Detection
If Collision Detection is activated, this camcorder starts
emergency recording once it detects any collision.
Driver Fatigue
Alert
When Driver Fatigue Alert is enabled, audible alert and
screen message will be activated 1 hour after the
camcorder is powered on, with a repetition every 30
minutes.
Headlight
Warning
When Headlight Warning is activated, camcorder will issue
an audible alert and screen message reminding that
insufficient brightness is sensed on the recording face.
FCMD
If FCMD function is enabled, the camcorder will determine
it from front car about 3 ~ 4 meters. When the front object
moves about 3 ~ 5 seconds and the car did not start to
drive forward, the camcorder will issue audible alert and
screen message.
Note:
1. The Driving Safety function is limited to triggering no more than two alarms at the
same time. If a voice and alert message have been triggered, any other alarm will
be ignored until either of the two is settled.
2. The detections of FCMD may be inaccurate when used in rain, at night or in
environments of insufficient lighting. Drivers are advised to exercise discretion
based on actual road conditions.
The following driving safety function is for reference only.
Drivers are advised to exercise discretion based on actual road
Page 11
10
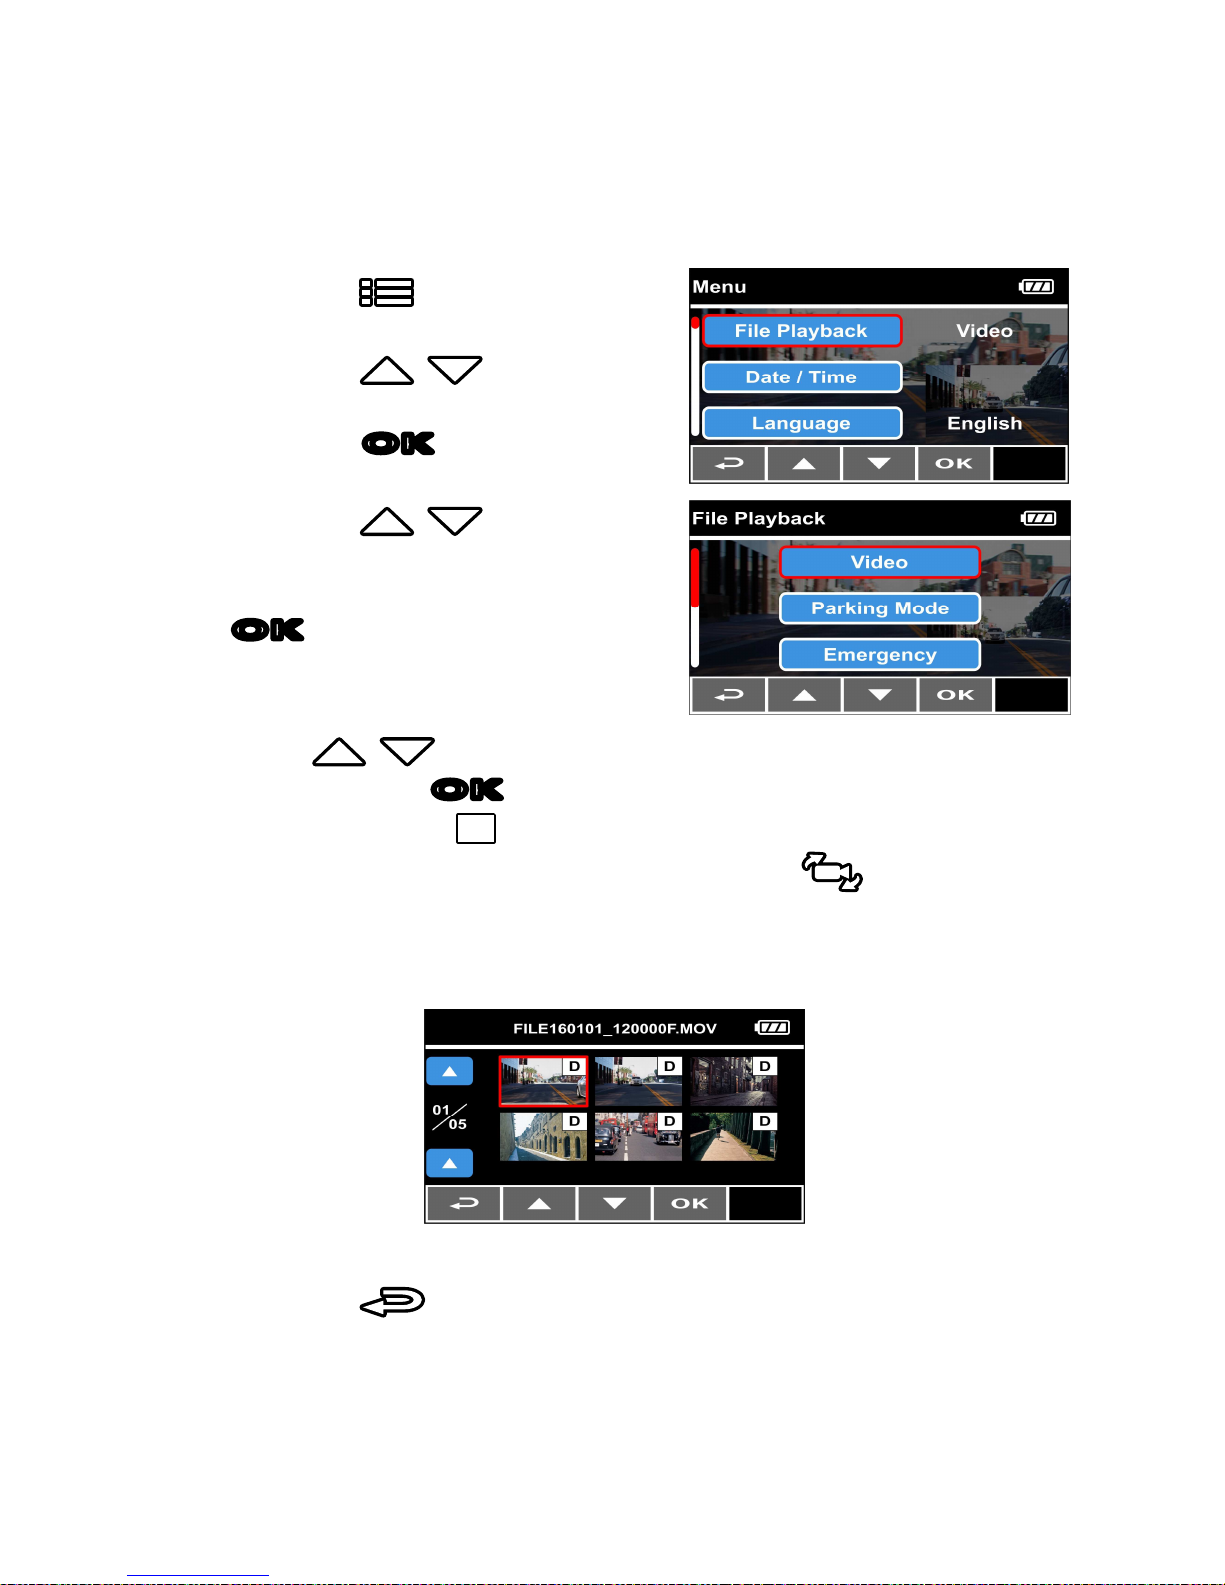
3.4 File Playback
3.4.1 Playing Videos
Playback video record files as follows:
1. Press the button to enter
the OSD menu.
2. Press the / button to
select File Playback, and then
press the
OK
button for
entering function menu.
3. Press the / button to
select Video / Parking Mode /
Emergency, and then press the
OK
button for entering menu.
4. Press / button to browse video files, select the video file
and then press
OK
button to enter Playback Mode. If
thumbnail shows
D
icon, it indicates that the file is dual-lens
recording. In the playback mode, you can use
button to
switch the front and rear lens recording file. (Rear Camera is not
included in standard package. Please contact distributor for further
information.)
5. Press the repetitively to return recording screen.
Page 12
11
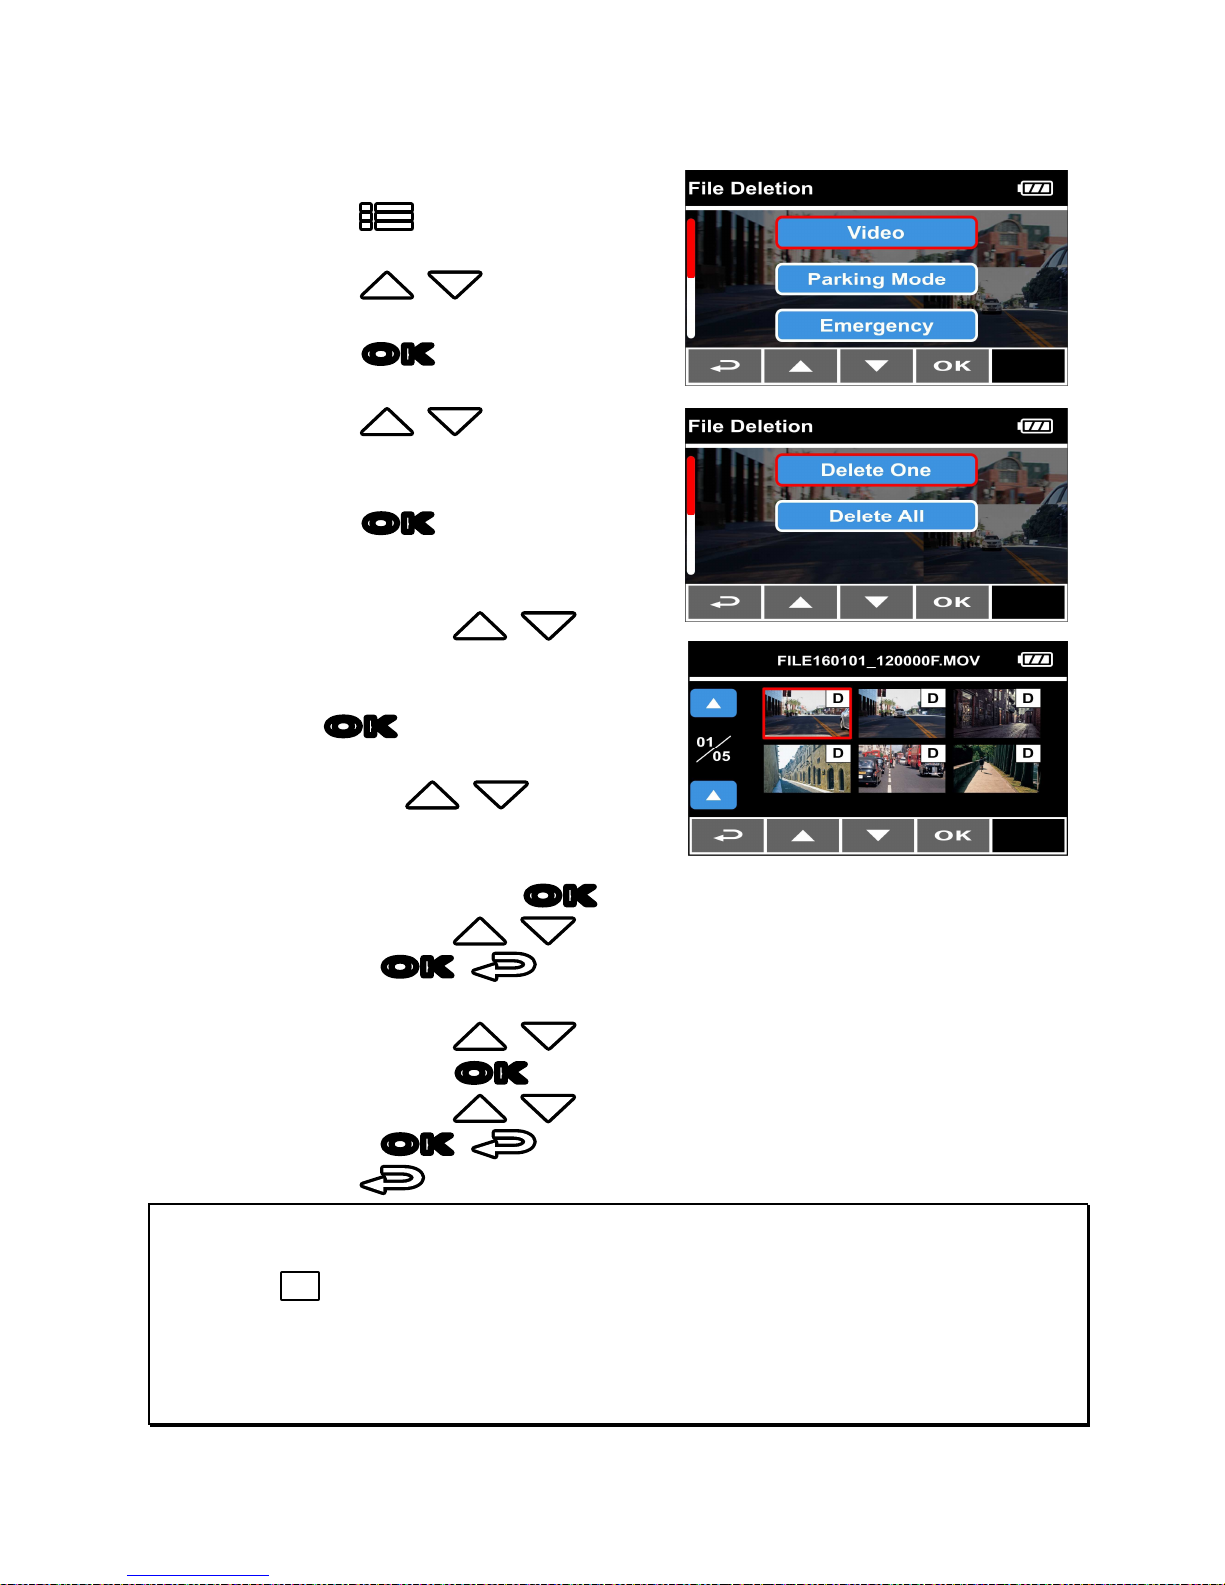
3.5 Deleting Files
To delete file(s), do the following:
1. Press the button to enter
the OSD menu.
2. Press the / button to
select File Deletion, and then
press the
OK
button for
entering function menu.
3. Press the / button to
select Video / Parking Mode /
Emergency / Picture, and then
press the
OK
button for
entering menu.
• Delete One:
- Press the /
button to select Delete
One, and then press the
OK
button to enter
the menu.
- Press / button
to browse files , select the
files you want to delete
and then press
OK
button to enter the menu.
- Press the / button to select item, and then press
the
OK
/ button to confirm or cancel the selection.
• Delete All:
- Press the / button to select Delete All, and then
press the
OK
button to enter the menu.
- Press the / button to select item, and then press
the
OK
/ button to confirm or cancel the selection.
4. Press the repetitively to return recording screen.
Note:
1. Only front camera thumbnails will be display in Menu, if you choose to delete the file
has the
D
icon, and then the files records with rear lens will be deleted. (Rear
Camera is not included in standard package. Please contact distributor for further
information.)
2. Deleted files cannot be recovered. Ensure the files have already backup before
deletion.
Page 13

12
4 Specifications
Item Description
Image Sensor 1/3” CMOS sensor
Effective Pixels 2688 (H) x 1520 (V)
Storage Media Support SDHC class 10 and 16GB micro SD card (up to 32GB)
LCD Display 3.0" TFT LCD color screen
Lens Wide Angle Fixed Focus lens F1.8, f=2.94mm
Focus Range 1.5m~Infinity
Movie Clip
Resolution: 2K HD@30 (1440P 30fps) / FHD@60 (1080P 60fps) /
FHD HDR (1080P HDR 30fps) / FHD@30 (1080P 30fps) / HD@120
(720P 120fps)
Format: MOV
Still Image
Resolution: 4M (2688 x 1520)
Format: JPEG
Shutter
Electronic shutter
Auto: 1/120 ~1/2000 sec.
G-Sensor 3-Axis G-Force sensor
ISO Auto
White Balance Auto
Microphone Yes
Speaker Yes
Interface Mini USB; Micro USB; Mini D Type HDMI
Battery Built-in 470mAh Li-polymer rechargeable
Operating
Temperature
0° ~ 60° C
Operating Humidity 20 ~ 70% RH
Storage Temperature -20° ~ 70° C
Dimensions 89 x 28.5 x 53 mm
Weight Approx. 86g (without memory card)
Page 14

1
有關本手冊
有關本手冊有關本手冊
有關本手冊
本文件之內容只供參考,並得以隨時變更不需要事先通知。本公司已盡全力確
保本使用者手冊正確與完整。但有任何錯誤或遺漏概不負責。製造廠保留不需
事先通知,逕自變更技術規格或配件之權利。
電池注意事項
電池注意事項電池注意事項
電池注意事項
嚴禁拆解、撞擊、穿刺、擠壓電池,或使電池短路。請勿將電池放置於
高溫環境中,若電池出現漏液或鼓脹,請勿繼續使用。
請務必使用本系統進行充電。未正確處理電池或更換不正確之電池型式
會有引發爆炸的風險。
請將電池放在孩童拿不到的地方。
電池接觸明火可能會引起爆炸,請勿將電池丟棄到火中。
嚴禁自行更換電池
嚴禁自行更換電池嚴禁自行更換電池
嚴禁自行更換電池,,,,欲更換電池
欲更換電池欲更換電池
欲更換電池請洽經銷商
請洽經銷商請洽經銷商
請洽經銷商。
。。
。
請根據當地法規妥善處理使用過的電池。
安裝須知
安裝須知安裝須知
安裝須知
1.
請衡量前擋風玻璃的可視面積,以不遮擋駕駛前方的視野為原則,將本
設備安裝在汽車後視鏡的正下方 (前擋風玻璃中央偏上方的位置)。並建
議天空與地面佔據錄影畫面各 50%,固定托架後再調整設備使車道對齊
圖示與行駛車道對齊。正確的安裝可使設備發揮最大功效。
2.
確定鏡頭是在擋風玻璃雨刷的範圍內,確保視野良好,即使雨天依然清
晰。
3.
不要用手指碰觸鏡頭。手指上的油垢可能會留在鏡頭上,導致影片或照
片不清楚。請定期清潔鏡頭。
4.
請勿將本設備安裝在深色車窗上,否則將使隔熱紙受損。
5.
安裝設備之前請確認安裝位置不會受有色車窗阻礙。
6.
本產品僅適用於淺色擋風玻璃或貼附淺色隔熱紙的車窗,若使用深色車
窗或車窗貼附有色隔熱紙,將影響錄影成像的效果。
7.
本設備僅適用產品隨附之電源連接器,請勿使用其他廠牌以免設備燒毀
或導致電池爆炸。
欲瞭解更多的操作訊息
欲瞭解更多的操作訊息欲瞭解更多的操作訊息
欲瞭解更多的操作訊息,,,,請參閱
請參閱請參閱
請參閱 CD-ROM。。。。
Page 15

2
安全
安全安全
安全注意
注意注意
注意事項
事項事項
事項
使用者須遵守當地法律並以行車安全為優先考量,請勿於行車中操作本
設備。
使用設備前請先確認日期與時間已設定完成。
本設備內建的韌體功能僅供使用者參考,道路駕駛請依實際路況作判
斷。
本產品僅供使用於非商業用途,適用法律允許的最大限度內。本公司對
於使用本產品所造成的損失不承擔任何責任。
本設備在使用時會略微變熱,純屬正常現象不代表故障。
不正確地使用本產品或操作不當導致設備或配件損壞,您的保固將會無
效。
HP Inc.對於操作中任何資料/內容的損失概不負責。
1 導論
導論導論
導論
謝謝惠顧此套先進的行車記錄器。本產品專用於行車時之即時錄影。本機種支
援惠普高清後置鏡頭,可洽經銷商選購,保障您的行車安全。
1.1 包裝
包裝包裝
包裝內容
內容內容
內容
以下為包裝內容物。若有任何遺漏或損壞項目,請立即聯絡您的經銷商。
行車記錄器 托架 光碟
快速使用手冊 電源連接器
開始使用本
開始使用本開始使用本
開始使用本產品
產品產品
產品視為同意以上聲明事項
視為同意以上聲明事項視為同意以上聲明事項
視為同意以上聲明事項。
。。
。
Page 16

3
1.2 產
產產
產品概要
品概要品概要
品概要
編號
編號編號
編號
項目
項目項目
項目
編號
編號編號
編號
項目
項目項目
項目
1
LED 指示燈
9
廣角鏡頭
2
LCD 彩色螢幕
10
記憶卡插槽
3
目錄 / 返回按鍵 ( / )
11
麥克風
4
播放 / 向上按鍵 ( / )
12
電源開關
5
影片截圖 / 向下按鍵 ( /
)
13
電源連接埠
6
緊急錄影 / 確認按鍵 ( /
OK
)
14
HDMI 連接埠
7
鏡頭切換按鍵 ( )
15
Micro USB 連接埠
8
揚聲器
16
托架插孔
註註註註::::
使用設備時請依據螢幕顯示的圖示,操作相應的按鍵
(3~7)
。
3
4
5
6
7
1
2
9
8
12
13
14
10
11
16
15
Page 17

4
2 開始
開始開始
開始
2.1 使用儲存媒體
使用儲存媒體使用儲存媒體
使用儲存媒體
2.1.1 插入記憶卡
插入記憶卡插入記憶卡
插入記憶卡
將記憶卡之金色接腳面朝前,以及設備螢幕面朝前,如圖示插入記憶
卡:
輕輕地將記憶卡插入卡槽直到開關可以輕易地滑動。正常使用上,記
憶卡會稍微突出相機本身。為預防卡片損毀,請勿重壓卡片進卡槽中。
請務必詳讀並遵循螢幕保護貼上步驟使用本產品。
2.1.2 取出記憶卡
取出記憶卡取出記憶卡
取出記憶卡
若設備在開機狀態請先關閉電源,並等待設備完成關機程序後再取出
記憶卡。
註註註註::::
1.
設備在開機狀態時,不要取出或插入記憶卡,以免損壞記憶卡。
2.
限使用
SDHC
速度等級
10
以上,且記憶體容量
16GB
以上的
micro SD 卡
(
最高支援
32GB)。
3.
使用前請先格式化
micro SD
卡。
Page 18

5
2.2 安裝於車內
安裝於車內安裝於車內
安裝於車內
2.2.1 固定設備在
固定設備在固定設備在
固定設備在擋風玻璃上
擋風玻璃上擋風玻璃上
擋風玻璃上
1. 將托架卡榫推入設備上方的托架插孔中,直
到聽到咔嗒聲固定。
2. 連接電源連接器並開啟設備電源預覽錄影畫
面,確認錄影範圍之後再以酒精清潔擋風玻
璃的表面,確保黏著表面乾淨無污。
3. 撕除托架底部的透明保護膜。
4. 開啟托架的壓力閥,將托架按壓於擋風玻
璃上,使托架的吸盤與擋風玻璃緊密貼
合,再關閉壓力閥以固定托架。
5. 確認托架已牢牢吸附於擋風玻璃。
註註註註::::
1.
請勿將本設備安裝在深色車窗上,否則將使隔熱紙受損。
2.
本產品僅適用於淺色擋風玻璃或貼附淺色隔熱紙的車窗,若使用深色車窗或車
窗貼附有色隔熱紙,將影響錄影成像的效果。
3.
使用設備前請先將鏡頭保護膜撕除。
2.2.2 調整設備
調整設備調整設備
調整設備
1. 鬆開旋鈕,將設備垂直或水平方向調
整。
2. 鎖緊旋鈕,並確認設備已牢牢固定。
1
2
旋鈕
旋鈕旋鈕
旋鈕
Page 19

6
2.3 連接電源
連接電源連接電源
連接電源
限使用產品隨附之電源連接器啟動設備與充電。
1. 將電源連接器的一端連接到設備的電源連接埠。電源連接埠輸入
直流電壓 5V / 1.0A。
2. 將電源連接器的另一端插接汽車內的香煙點火器插孔。汽車引擎
一旦發動,設備即自動開機。車充輸入直流電壓 12 / 24V。
註註註註::::
請衡量前擋風玻璃的可視面積,以不遮擋駕駛前方的視野為原則,將本設備安裝
在汽車後視鏡的正下方
(
前擋風玻璃中央偏上方的位置)。並建議天空與地面佔據
錄影畫面各
50%
,固定托架後再調整設備使車道對齊圖示與行駛車道對齊。正確
的安裝可使設備發揮最大功效。
2.4 首次設定
首次設定首次設定
首次設定
在使用設備之前,我們建議先設定正確的日期與時間
日期與時間日期與時間
日期與時間。
註註註註::::
請注意若在錄影期間按
按鍵,系統將會停止錄影並進入
OSD
目錄。請先確
認錄影可以中止再操作目錄選單。
Page 20

7
3 使用行車記錄器
使用行車記錄器使用行車記錄器
使用行車記錄器
3.1 自動
自動自動
自動錄影
錄影錄影
錄影
首次操作請確認設備處於開機狀態並連接車用電源,汽車引擎一旦發
動設備將自動開機並啟動錄影。
當引擎熄火時設備會自動停止錄影。
註註註註::::
1.
某些汽車的車用電源並不會隨著汽車引擎的發動
/
熄火而自動開啟
/
關閉電
源,若設備無法隨汽車引擎自動開啟與關閉電源時,請以手動方式將電源連接
器與車用電源連接,再開啟設備電源,或是以手動方式關閉設備的電源,再將
電源連接器從車用電源卸除。
2.
可設定每個影片檔案錄影的時長為
1 或 3
分鐘。
3.
設備會儲存影片或照片於記憶卡中,若記憶卡空間已滿時,循環錄影會將一般
錄影中最舊的檔案覆蓋掉。
3.1.1 緊急錄影
緊急錄影緊急錄影
緊急錄影
啟動緊急錄影,其方式如下:
1. 在錄影期間按
OK
按鍵將會
進入緊急錄影模式
緊急錄影模式緊急錄影模式
緊急錄影模式,並於螢幕左
上角顯示 "
緊急錄影
緊急錄影緊急錄影
緊急錄影
" 的字樣。
在緊急錄影模式中錄製的影片會
被保護起來。
2. 緊急錄影的時長同錄影間隔的設定。當緊急錄影達設定的時
間,系統會回復到一般的錄影模式。
註註註註::::
1.
緊急錄影的檔案會另外儲存成受保護的檔案,避免檔案被循環錄影所覆蓋。若
錄影間隔設定為
1
分鐘,記憶卡可儲存約
20
組緊急錄影的檔案;若錄影間
隔設定為
3
分鐘,記憶卡可儲存約
10
組緊急錄影的檔案。
2.
當緊急錄影檔案已滿,螢幕會出現
"
緊急錄影檔案已滿
"
的警示,在此之後以
緊急錄影錄製下來的檔案都會被儲存為一般錄影
(
若記憶卡空間已滿時,循環
錄影會將一般錄影中最舊的檔案覆蓋掉)。因此如欲留存較新的緊急錄影檔案,
請於系統發出警示時以手動的方式刪除舊有的緊急錄影檔案。
Page 21

8
3.2 錄影中拍照
錄影中拍照錄影中拍照
錄影中拍照
您可以使用本設備拍攝現場。
1. 請於錄影期間按 按鍵擷取
前鏡頭的錄影畫面。
2. 當螢幕中央顯示 圖示,
表示前鏡頭的錄影畫面已擷取
完成。
註註註註::::
1.
錄影中擷取的照片尺寸取決於影像解析度的設定。
2.
行駛中若執行錄影中拍照,其照片的清晰度可能會受限於標的物的移動速度與
外在環境光源的變化,因此拍照功能較適用於事故發生時或路口紅綠燈停駛
時,採用靜態的方式拍照存查。
3.
錄影中拍照僅適用於前鏡頭。
Page 22

9
3.3 行車安全
行車安全行車安全
行車安全
目錄選項
目錄選項目錄選項
目錄選項
說明
說明說明
說明
停車模式
若啟用震動偵測
震動偵測震動偵測
震動偵測或移動與碰撞偵測
移動與碰撞偵測移動與碰撞偵測
移動與碰撞偵測,可透過本設備監控
車輛停置時的狀況。
碰撞偵測
若啟用碰撞偵測,當設備感測到碰撞時,設備會自動啟
動緊急錄影。
駕駛休息提醒
若啟用駕駛休息提醒,當開機達
1
小時設備會發出警
示音與警示畫面提醒,並每隔三十分鐘重複警示。
大燈開燈提醒
若啟用大燈開燈提醒,當設備感測到前鏡頭錄影畫面的
亮度不足時,會發出語音與警示畫面提醒。
前車起步提醒
若啟用前車起步提醒,設備將在本車輛處於靜止狀態且
與前方車距約 3 ~ 4 公尺時啟動判定。當前方車輛已駛
離約 3 ~ 5 秒而本車輛沒有起步時,設備會發出語音與
警示畫面提醒。
註註註註
:
1.
行車安全的各項功能無法同時觸發兩項以上的警示,若設備已觸發語音與警示
畫面,在當下警示未停止之前,其他的語音與警示畫面會被忽略。
2.
在陰雨、夜晚或光線不足的環境下啟用
前車起步提醒
等功能,設備可能會發
生誤判,道路駕駛請依實際路況作判斷。
下列的行車
下列的行車下列的行車
下列的行車安全
安全安全
安全功能僅提供
功能僅提供功能僅提供
功能僅提供參考
參考參考
參考,,,,道路駕駛請依實際路況作判斷
道路駕駛請依實際路況作判斷道路駕駛請依實際路況作判斷
道路駕駛請依實際路況作判斷。。。。
Page 23

10
3.4 檔案播放
檔案播放檔案播放
檔案播放
3.4.1 播放
播放播放
播放影片
影片影片
影片
播放錄影,其方式如下:
1. 按 按鍵,進入 OSD 目
錄。
2. 按 / 按鍵選擇檔案播
檔案播檔案播
檔案播
放
放放
放,再按
OK
按鍵進入功能
選單。
3. 按 / 按鍵選擇一般錄
一般錄一般錄
一般錄
影影影影
/
/ /
/ 停車模式
停車模式停車模式
停車模式 /
/ /
/ 緊急錄影
緊急錄影緊急錄影
緊急錄影,
再按
OK
按鍵進入選單。
4. 按 / 按鍵瀏覽影片檔
案,選擇檔案後再按
OK
按
鍵進入影片播放模式
影片播放模式影片播放模式
影片播放模式。檔案縮圖中若有顯示
D
圖示,指示該
檔案為雙鏡頭影片,在影片播放模式中,您可以利用
按
鍵來切換前、後鏡頭的錄影檔案。(本機可支援後置高清鏡頭,
包裝中並無附贈,欲瞭解更多資訊,請洽經銷商諮詢。)
5. 重複按
按鍵返回錄影畫面。
Page 24

11
3.5 檔案
檔案檔案
檔案刪除
刪除刪除
刪除
檔案刪除,其方式如下:
1. 按 按鍵,進入 OSD 目錄。
2. 按 / 按鍵選擇檔案刪
檔案刪檔案刪
檔案刪
除
除除
除,再按
OK
按鍵進入功能
選單。
3. 按 / 按鍵選擇一般錄影
一般錄影一般錄影
一般錄影
/
/ /
/ 停車模式
停車模式停車模式
停車模式 /
/ /
/ 緊急錄影
緊急錄影緊急錄影
緊急錄影 /
/ /
/ 照片
照片照片
照片,
再按
OK
按鍵進入選單。
• 刪除單檔
刪除單檔刪除單檔
刪除單檔:
::
:
- 按 / 按鍵選擇
刪除單檔
刪除單檔刪除單檔
刪除單檔,再按
OK
按鍵進入選單。
- 按 / 按鍵瀏覽
檔案,選取欲刪除的檔案
後再按
OK
按鍵進入
選單。
- 按 / 按鍵選取
項目,再按
OK
/ 按鍵確認或取消。
• 刪除全部
刪除全部刪除全部
刪除全部:
::
:
- 按 / 按鍵選擇刪除全部
刪除全部刪除全部
刪除全部,再按
OK
按鍵進
入選單。
- 按 / 按鍵選取項目,再按
OK
/ 按鍵確
認或取消。
4. 重複按 按鍵返回錄影畫面。
註註註註
:
1.
六宮格瀏覽介面中僅顯示前鏡頭的檔案縮圖,若選擇刪除具有
D
圖示的影片
檔案,則與其對應的後鏡頭檔案會一併被刪除。(本機可支援後置高清鏡頭,包
裝中並無附贈,欲瞭解更多資訊,請洽經銷商諮詢。
)
2.
刪除的檔案不能回復,刪除前請確認檔案留有備份。
Page 25

12
4 規格
規格規格
規格
項目
項目項目
項目
說明
說明說明
說明
影像感應器
1/3” CMOS
感應器
有效像素
2688 (H) x 1520 (V)
儲存媒體
支援
SDHC
速度等級
10
以上,且記憶體容量
16GB
以上的
micro SD 卡 (最高支援 32GB)
LCD
顯示器
3.0” TFT LCD
彩色螢幕
鏡頭
廣角固定焦距鏡頭
F1.8, f=2.94mm
對焦範圍
1.5m ~
無限
影像檔
解析度:
2K HD@30 (1440P 30fps) / FHD@60 (1080P 60fps) /
FHD HDR (1080P HDR 30fps) / FHD@30 (1080P 30fps) / HD@120
(720P 120fps)
格式:MOV
靜態圖像
解析度:
4M (2688 x 1520)
格式:JPEG
快門
電子快門
自動:1/120 ~1/2000 秒
重力感應器
3-Axis G
-
Force
感應器
ISO
自動
白平衡
自動
麥克風
是
揚聲器
是
界面
Mini USB; Micro USB; Mini D Type HDMI
電池 內建 470mAh Li-polymer 可充電型
操作溫度
0° ~ 60° C
操作濕度
20 ~ 70% RH
儲存溫度
-20° ~ 70° C
尺寸
89 x 28.5 x 53
公釐
重量
約
86
克
(
不含記憶卡
)
Page 26

1
有关本手册
有关本手册有关本手册
有关本手册
本文件中的内容信息仅供参考,并得以随时变更不需要事先通知。本公司已尽
量确保本使用手册的正确与完整。但有任何错误或遗漏概不负责。厂家保留不
需事先通知,径自更改技术规格或配件之权利。
电池警告
电池警告电池警告
电池警告
禁止拆解、撞击、挤压或投入火中,切勿使电池短路。请勿将电池放置于
高温环境中,若出现严重鼓胀请勿继续使用。
请务必使用本系统进行充电。电池处置不当可能导致爆炸。
请将电池置于儿童无法触及之处。
电池暴露在明火下可能爆炸。处理电池时切勿放入火中。
切勿自行更换电池,更换不当会有爆炸危险,请交由经销商进行更换。
切勿自行更换电池,更换不当会有爆炸危险,请交由经销商进行更换。切勿自行更换电池,更换不当会有爆炸危险,请交由经销商进行更换。
切勿自行更换电池,更换不当会有爆炸危险,请交由经销商进行更换。
请按照当地法规处理废电池。
安装需知
安装需知安装需知
安装需知
1.
请衡量前挡风玻璃的可视面积,以不遮挡驾驶前方的视野为原则,将本设
备安装在汽车后视镜的正下方 (前挡风玻璃中央偏上方的位置)。并建议天
空与地面占据摄像画面各 50%,固定托架后再调整设备使车道对齐图标与
行驶车道对齐。正确的安装可使设备发挥最大功效。
2.
确定镜头是在挡风玻璃雨刷的范围内,确保摄像画面良好,即使雨天也依
然清晰。
3.
不要用手指触摸镜头。手指上的油脂可能会留在镜头上,导致视频或照片
不清楚,并请定期清洁镜头。
4.
请勿将本设备安装在深色车窗上,否则将使防晒膜受损。
5.
安装设备之前请确认安装位置不会受有色车窗阻碍。
6.
本产品适用于浅色挡风玻璃或贴附浅色防晒膜的车窗,若使用深色车窗或
车窗贴附有色防晒膜,将影响摄像的成像效果。
7.
本设备仅适用产品随附之电源适配器,请勿使用其他厂牌以免设备烧毁或
导致电池爆炸。
欲了解更多操作信息,请参阅
欲了解更多操作信息,请参阅欲了解更多操作信息,请参阅
欲了解更多操作信息,请参阅 CD-ROM。。。。
Page 27

2
注意事项
注意事项注意事项
注意事项
用户须遵守当地法律并以行车安全为优先考量,请勿于行车中操作本设
备。
使用设备前请先确认日期与时间已设置完成。
本产品内建的固件功能仅供用户参考,道路驾驶请依实际路况作判断。
本设备仅供使用于非商业用途,适用法律允许的最大限度内,本公司对用
户因使用本设备造成之损失不承担任何责任。
本设备使用时会变热,这属于正常现象。
产品使用或操作不当,可能导致设备或其附件损坏,并使保修失效。
HP Inc.对操作过程中出现的任何数据/内容丢失问题不承担责任。
1 介绍
介绍介绍
介绍
谢谢惠顾这套先进的行车记录仪。本产品专用于行车时的实时摄像。本机种支
持惠普高清后置镜头,可洽经销商选购,保障您的行车安全。
1.1 包装清单
包装清单包装清单
包装清单
以下为包装清单。如果有任何遗漏或损坏的项目,请立即联系您的经销商。
行车记录仪 托架 光盘
快速入门手册 电源适配器
开始使用本产品视为同意以上声明事项。
开始使用本产品视为同意以上声明事项。开始使用本产品视为同意以上声明事项。
开始使用本产品视为同意以上声明事项。
Page 28

3
1.2 产品概要
产品概要产品概要
产品概要
编号
编号编号
编号
项目
项目项目
项目
编号
编号编号
编号
项项项项目目目目
1
LED 指示灯
9
广角镜头
2
LCD 彩色屏幕
10
存储卡插槽
3
菜单 / 返回按键 ( / )
11
麦克风
4
播放 / 向上按键 ( / )
12
电源开关
5
视频截图 / 向下按键 ( /
)
13
电源端口
6
紧急摄像 / 确认按键 ( /
OK
)
14
HDMI 端口
7
镜头切换按键 ( )
15
Micro USB 端口
8
扬声器
16
托架插孔
注:
注:注:
注:
使用设备时请依据屏幕显示的图标,操作相应的按键 (
3~7
)。
3
4
5
6
7
1
2
9
8
12
13
14
10
11
16
15
Page 29

4
2 入门
入门入门
入门
2.1 使用
使用使用
使用存储装置
存储装置存储装置
存储装置
2.1.1 插入存储卡
插入存储卡插入存储卡
插入存储卡
将存储卡之金色接脚面朝前,以及设备屏幕面朝前,如图示插入存储
卡。
轻轻地将记忆卡插入卡槽直到开关可以轻易地滑动。正常使用上,记
忆卡会稍微突出相机本身。为预防卡片损毁,请勿重压卡片进卡槽中。
请务必详读并遵循屏幕保护贴上步骤使用本产品。
2.1.2 取出存储卡
取出存储卡取出存储卡
取出存储卡
若设备在开机状态请先关闭电源,并等待设备完成关机程序后再取出
存储卡。
注:
注:注:
注:
1.
设备在开机状态时,不要取出或插入存储卡,以免损坏存储卡。
2.
限使用
SDHC
速度等级 10 以上,且内存容量
16GB
以上的
micro SD
卡
(最高支持
32GB
)。
3.
使用前请先格式化
micro SD
卡。
Page 30

5
2.2 安装在车内
安装在车内安装在车内
安装在车内
2.2.1 固定
固定固定
固定设备
设备设备
设备在挡风玻璃上
在挡风玻璃上在挡风玻璃上
在挡风玻璃上
1. 将托架卡榫推入设备上方的托架插孔中,直到听
到咔嗒声固定。
2. 连接车用电源并开启设备电源预览摄像画面,确
认摄像范围之后再以酒精清洁挡风玻璃的表面,
确保黏着表面干净无污。
3. 撕除托架底部的透明保护膜。
4. 开启托架的压力阀,将托架按压于挡风玻璃
上,使托架的吸盘与挡风玻璃紧密贴合,再关
闭压力阀以固定托架。
5. 确认托架已牢牢吸附于挡风玻璃。
注:
注:注:
注:
1.
请勿将本设备安装在深色车窗上,否则将使防晒膜受损。
2.
本产品仅适用于浅色挡风玻璃或贴附浅色防晒膜的车窗,若使用深色车窗或车
窗贴附有色防晒膜,将影响摄像成像的
成像的成像的
成像的效果。
3.
使用设备前请先将镜头保护膜撕除。
2.2.2 调调调调整设备
整设备整设备
整设备
1. 松开旋钮,将设备垂直或水平方向调整。
2. 锁紧旋钮,并确认设备已牢牢固定。
旋钮
旋钮旋钮
旋钮
1
2
Page 31

6
2.3 连接电源
连接电源连接电源
连接电源
限使用产品随附之电源适配器启动设备与充电。
1. 将电源适配器的一端连接到设备的电源端口。电源端口输入直
流电压 5V / 1.0A。
2. 将电源适配器的另一端插接汽车内的香烟点火器插孔。汽车引
擎一旦发动,设备即自动开机。车充输入直流电压 12 / 24V。
注:
注:注:
注:
请衡量前挡风玻璃的可视面积,以不遮挡驾驶前方的视野为原则,将本设备安装
在汽车后视镜的正下方 (前挡风玻璃中央偏上方的位置)。并建议天空与地面占据
摄像画面各
50%
,固定托架后再调整设备使车道对齐图标与行驶车道对齐。正确
的安装可使设备发挥最大功效。
2.4 初始设置
初始设置初始设置
初始设置
在使用设备之前,我们建议先设置正确的日期与时间
日期与时间日期与时间
日期与时间。
注:
注:注:
注:
请注意若在摄像期间按
按键,系统将会停止摄像并进入
OSD
菜单。请先确
认摄像可以中止再操作菜单选项。
Page 32

7
3 使用行车记录仪
使用行车记录仪使用行车记录仪
使用行车记录仪
3.1 自动
自动自动
自动摄像
摄像摄像
摄像
首次操作请确认设备处于开机状态并连接车用电源,汽车引擎一旦发
动设备将自动开机并启动摄像。
当引擎熄火时设备会自动停止摄像。
注:
注:注:
注:
1.
某些汽车的车用电源并不会随着汽车引擎的发动 / 熄火而自动开启 / 关闭电
源,若设备无法随汽车引擎自动开启与关闭电源时,请以手动方式将电源适配
器与车用电源连接,再开启设备电源,或是以手动方式关闭设备的电源,再将
电源适配器从车用电源卸除。
2.
可设置每个视频文件录制的时间为 1 或 3 分钟。
3.
设备会存储视频或照片于存储卡中,若存储卡容量已满时,循环摄像会将一般
摄像中最旧的文件覆盖掉。
3.1.1 紧急摄像
紧急摄像紧急摄像
紧急摄像
启用紧急摄像,其方式如下:
1. 在摄像期间按
OK
按键将会
进入紧急摄像模式
紧急摄像模式紧急摄像模式
紧急摄像模式,并于屏幕左
上角显示 "
紧急摄像
紧急摄像紧急摄像
紧急摄像
" 的字样。在
紧急摄像模式中录制的视频会被
保护起来。
2. 紧急摄像的时长同摄像间隔的设置。当紧急摄像达设置的时间,
系统会恢复到一般的摄像模式。
注:
注:注:
注:
1.
紧急摄像的文件会另外存储成受保护的文件,避免文件被循环摄像所覆盖。若
摄像间隔设置为 1 分钟,存储卡可存储约
20
组紧急摄像的文件;若摄像间
隔设置为
3
分钟,存储卡可存储约
10
组紧急摄像的文件。
2.
当紧急摄像的文件已满,屏幕会出现 “
紧急摄像文件已满
紧急摄像文件已满紧急摄像文件已满
紧急摄像文件已满
” 的警示,在此之
后以紧急摄像录制下来的文件都会被存储为一般摄像
一般摄像一般摄像
一般摄像 (若存储卡内存容量已
满时,循环摄像会将一般摄像
一般摄像一般摄像
一般摄像中最旧的文件覆盖掉)。因此如欲留存较新的紧
急摄像文件,请于系统发出警示时以手动的方式删除旧有的紧急摄像文件。
Page 33

8
3.2 摄像中拍照
摄像中拍照摄像中拍照
摄像中拍照
您可以使用本设备拍摄现场。
1. 请于摄像期间按 按键撷取前
镜头的摄像画面。
2. 当屏幕中央显示 图标,表
示前镜头的摄像画面已撷取完
成。
注:
注:注:
注:
1.
摄像中撷取的照片尺寸取决于图像分辨率的设置。
2.
行驶中若执行摄像中拍照,其照片的清晰度可能会受限于标的物的移动速度与
外在环境光源的变化,因此拍照功能较适用于事故发生时或路口红绿灯停驶
时,采用静态的方式拍照存查。
3.
摄像中拍照仅适用于前镜头。
Page 34

9
3.3 行车安全
行车安全行车安全
行车安全
菜单选项
菜单选项菜单选项
菜单选项
说明
说明说明
说明
停车模式
若启用震动侦测
震动侦测震动侦测
震动侦测或运动与碰撞侦测
运动与碰撞侦测运动与碰撞侦测
运动与碰撞侦测,可透过本设备监控
车辆停置时的状况。
碰撞侦测
若启用碰撞侦测,当设备感测到碰撞时,设备会自动启
动紧急摄像。
驾驶休息提醒
若启用驾驶休息提醒,当开机达
1
小时设备会发出警
示音与警示画面提醒,并每隔三十分钟重复警示。
车前灯警示音
若启用车前灯警示音,当设备感测到前镜头摄像画面的
亮度不足时,会发出语音与警示画面提醒。
前车发动
警示音
若启用前车发动警示音 ,设备将在本车辆处于静止状态
且与前方车距约 3 ~ 4 公尺时启动判定。当前方车辆已
驶离约 3 ~ 5 秒而本车辆没有起步时,设备会发出语音
与警示画面提醒。
注:
注:注:
注:
1.
行车安全的各项功能无法同时触发两项以上的警示,若设备已触发语音与警示
画面,在当下警示未停止之前,其他的语音与警示画面会被忽略。
2.
在阴雨、夜晚或光线不足的环境下启用
前车发动警示音
前车发动警示音前车发动警示音
前车发动警示音
等功能,设备可能会
发生误判,道路驾驶请依实际路况作判断。
下列的行车安全功能仅提供参考,道路驾驶请依实
下列的行车安全功能仅提供参考,道路驾驶请依实下列的行车安全功能仅提供参考,道路驾驶请依实
下列的行车安全功能仅提供参考,道路驾驶请依实际路况作判
际路况作判际路况作判
际路况作判
断。
断。断。
断。
Page 35

10
3.4 文件播放
文件播放文件播放
文件播放
3.4.1 播放视频
播放视频播放视频
播放视频
播放视频,其方式如下:
1. 按 按键,进入 OSD 菜单。
2. 按 / 按键选择文件播
文件播文件播
文件播
放放放放,再按
OK
按键进入功能选
项。
3. 按 / 按键选择一般摄像
一般摄像一般摄像
一般摄像
/ 停车模式
停车模式停车模式
停车模式 / 紧急摄像
紧急摄像紧急摄像
紧急摄像,再按
OK
按键进入选项。
4. 按 / 按键浏览视频文件,选取文件后再按
OK
按键进
入视频播放模式
视频播放模式视频播放模式
视频播放模式。文件缩图中若有显示
D
图标,指该文件为双
镜头视频,在视频播放模式中,您可以利用 按键来切换前、
后镜头的视频文件。
5. 重复按 按键返回摄像画面。
Page 36

11
3.5 文件删除
文件删除文件删除
文件删除
删除文件,其方式如下:
1. 按 按键,进入 OSD 菜单。
2. 按 / 按键选择文件删
文件删文件删
文件删
除除除除,再按
OK
按键进入功能选
项。
3. 按 / 按键选择一般摄像
一般摄像一般摄像
一般摄像
/ 停车模式
停车模式停车模式
停车模式 / 紧急摄像
紧急摄像紧急摄像
紧急摄像,再按
OK
按键进入选项。
• 刪除单档
刪除单档刪除单档
刪除单档
- 按 / 按键选择
删除单档
删除单档删除单档
删除单档,再按
OK
按键进入选项。
- 按 / 按键浏览
文件,选取欲删除的文件
后再按
OK
按键进入
选项。
- 按 / 按键选取
项目,再按
OK
/ 按键确认或取消。
• 刪除全部
刪除全部刪除全部
刪除全部
- 按 / 按键选择刪除全部
刪除全部刪除全部
刪除全部,再按
OK
按键進入
選項。
- 按 / 按键选取项目,再按
OK
/ 按键确
认或取消。
4. 重复按 按键返回摄像画面。
注:
注:注:
注:
1.
六宫格浏览界面中仅显示前镜头的文件缩图,若选取删除具有
D
图标视频文
件,则与其对应的后镜头文件会一并被删除。(仅示意本机可支持后置高清镜
头,包装中并无附赠,欲了解更多信息,请洽经销商咨询。)
2.
删除的文件不能恢复。删除前,确保文件留有备份。
Page 37

12
4 规格
规格规格
规格
项目
项目项目
项目 说明
说明说明
说明
影像传感器
1/3” CMOS
传感器
有效像素
2688 (H) x 1520 (V)
保存媒体
支持
SDHC
速度等级 10 以上,且内存容量
16GB
以上的
micro SD 卡 (最高支持 32GB)
LCD
屏幕
3.0” TFT LCD
彩色屏幕
镜头 广角固定焦距镜头 F1.8, f=2.94mm
对焦范围
1.5m
~ 无限
视频文件
图像分辨率:
2K HD@30 (1440P 30fps) / FHD@60 (1080P 60fps)
/ FHD HDR (1080P HDR 30fps) / FHD@30 (1080P 30fps) /
HD@120 (720P 120fps)
格式:MOV
图像文件
图像分辨率:
4M (2688 x 1520)
格式:JPEG
快门
电子快门
自动:1/120 ~1/2000 秒
G
-
传感器
3-Axis G
-
Force
传感器
ISO
自动
白平衡 自动
麦克风 是
扬声器 是
界面
Mini USB; Micro USB; Mini D Type HDMI
电池 内建
470mAH Li
-
polymer
可充电型
操作温度
0° ~ 60° C
操作湿度
20 ~ 70% RH
保存温度
-20° ~ 70° C
尺寸
89 x 2
8.5 x 53
毫米
重量 约
86
克 (不含存储卡)
Page 38

 Loading...