

Page 1

HP Omnibook 500 (FA)
Corporate Evaluator’s Guide
Page 2

Notice
This manual and any examples contained herein are provided “as is” and are subject to
change without notice. Hewlett-Packard Company makes no warranty of any kind with
regard to this manual, including, but not limited to, the implied warranties of
merchantability and fitness for a particular purpose. Hewlett-Packard Co. shall not be
liable for any errors or for incidental or consequential damages in connection with the
furnishing, performance, or use of this manual or the examples herein.
Consumer transactions in Australia and the United Kingdom: The above disclaimers and
limitations shall not apply to Consumer transactions in Australia and the United Kingdom
and shall not affect the statutory rights of Consumers.
© Copyright Hewlett-Packard Company 2000–2001. All rights reserved. Reproduction,
adaptation, or translation of this manual is prohibited without prior written permission of
Hewlett-Packard Company, except as allowed under the copyright laws.
The programs that control this product are copyrighted and all rights are reserved.
Reproduction, adaptation, or translation of those programs without prior written
permission of Hewlett-Packard Co. is also prohibited.
Portions of the programs that control this product may also be copyrighted by Microsoft
Corporation, SystemSoft Corp., Phoenix Technologies, Ltd., ATI Technologies Inc., and
Adobe Systems Incorporated. See the individual programs for additional copyright
notices.
This product incorporates copyright protection technology that is protected by method
claims of certain U.S. patents and other intellectual property rights owned by
Macrovision Corporation and other rights owners. Use of this copyright protection
technology must be authorized by Macrovision Corporation and is intended for home and
other limited viewing uses only unless otherwise authorized by Macrovision Corporation.
Reverse engineering or disassembly is prohibited.
Microsoft®, MS-DOS®, and Windows® are U.S. registered trademarks of Microsoft
Corporation. Pentium® and the Intel Inside logo are U.S. registered trademarks and
Celeron™ and SpeedStep™ are U.S. trademarks of Intel Corporation. TrackPoint™ is a
U.S. trademark of International Business Machines. Adobe® and Acrobat® are
trademarks of Adobe Systems Incorporated.
Hewlett-Packard Company
HP Notebook Customer Care
1000 NE Circle Blvd., MS 425E
Corvallis, OR 97330, U.S.A.
2 Corporate Evaluator’s Guide
Page 3

CAUTION
Important Safety Information
To reduce the risk of fire, use only No. 26 AWG or larger telecommunications line
cord to connect a modem to the telephone wall jack.
When using your computer with a telephone connection, always follow basic safety
precautions to reduce the risk of fire, electric shock, and injury to persons:
• Do not use this product with a telephone connection near water (for example, near a
bathtub, sink, swimming pool, or in a wet basement).
• Avoid using a telephone connection (other than a cordless type) during an electrical
storm. There may be a remote risk of electric shock from lighting.
• Do not use a telephone connection to report a gas leak in the vicinity of the leak.
• Use only the power cord and batteries indicated in this manual. Do not dispose of
batteries in a fire. They may explode. Check with local codes for possible special
disposal instructions.
HP Software Product License Agreement
Your HP product contains software programs. CAREFULLY READ THIS LICENSE
AGREEMENT BEFORE PROCEEDING TO OPERATE THIS EQUIPMENT. RIGHTS
IN THE SOFTWARE ARE OFFEREDONLY ON THE CONDITION THAT THE
CUSTOMER AGREES TO ALL TERMS AND CONDITIONS OF THE LICENSE
AGREEMENT. PROCEEDING TO OPERATE THE EQUIPMENT INDICATES
YOUR ACCEPTANCE OF THESE TERMS AND CONDITIONS. IF YOU DO NOT
AGREE WITH THE TERMS OF THE LICENSE AGREEMENT, YOU MUST NOW
EITHER REMOVE THE SOFTWARE FROM YOUR HARD DISK DRIVE AND
DESTROY THE MASTER DISKETTES, OR RETURN THE COMPLETE HP
PRODUCT AND SOFTWARE FOR A FULL REFUND. PROCEEDING WITH
CONFIGURATION SIGNIFIES YOUR ACCEPTANCE OF THE LICENSE TERMS.
UNLESS OTHERWISE STATED BELOW, THIS HP SOFTWARE LICENSE
AGREEMENT SHALL GOVERN THE USE OF ALL SOFTWARE THAT IS
PROVIDED TO YOU AS PART OF THE HP PRODUCT AND SHALL SUPERSEDE
ANY OTHER SOFTWARE WARRANTY STATEMENT THAT MAY BE INCLUDED
IN THIS HP PRODUCT OR MAY BE FOUND ONLINE.
Corporate Evaluator’s Guide 3
Page 4

Operating system and software applications by Microsoft are licensed to you under the
Microsoft License Agreement contained in the Microsoft documentation or displayed on
your screen when Microsoft Software Products are launched. Other non-HP Software and
Operating Systems are covered by the appropriate vendor license. The following License
Terms govern the use of the HP software:
USE. Customer may use the software on any one HP product. Customer may not network
the software or otherwise use it on more than one HP product. Customer may not reverse
assemble or decompile the software unless authorized by law.
COPIES AND ADAPTATIONS. Customer may make copies or adaptations of the
software a) for archival purposes or (b) when copying or adaptation is an essential step in
the use of the software with an HP product so long as the copies and adaptations are used
in no other manner.
OWNERSHIP. Customer agrees that he/she does not have any title or ownership of the
software, other than ownership of the physical media. Customer acknowledges and
agrees that the software is copyrighted and protected under the copyright laws. Customer
acknowledges and agrees that the software may have been developed by a third party
software supplier named in the copyright notices included with the software, who shall be
authorized to hold the Customer responsible for any copyright infringement or violation
of this Agreement.
PRODUCT RECOVERY CD-ROM. If your HP product was shipped with a product
recovery CD-ROM: (i) The product recovery CD-ROM and/or support utility software
may only be used for restoring the hard disk of the HP product with which the product
recovery CD-ROM was originally provided. (ii) The use of any operating system
software by Microsoft contained in any such product recovery CD-ROM shall be
governed by the Microsoft License Agreement.
TRANSFER OF RIGHTS IN SOFTWARE. Customer may transfer rights in the software
to a third party only as part of the transfer of all rights and only if Customer obtains the
prior agreement of the third party to be bound by the terms of this License Agreement.
Upon such a transfer, Customer agrees that his/her rights in the software are terminated
and that he/she will either destroy his/her copies and adaptations or deliver them to the
third party.
SUBLICENSING AND DISTRIBUTION. Customer may not lease, sublicense the
software or distribute copies or adaptations of the software to the public in physical
media or by telecommunication without the prior written consent of Hewlett-Packard.
TERMINATION. Hewlett-Packard may terminate this software license for failure to
comply with any of these terms provided Hewlett-Packard has requested Customer to
cure the failure and Customer has failed to do so within thirty (30) days of such notice.
UPDATES AND UPGRADES. Customer agrees that the software does not include
updates and upgrades which may be available from Hewlett-Packard under a separate
support agreement.
EXPORT CLAUSE. Customer agrees not to export or re-export the software or any copy
or adaptation in violation of the U.S. Export Administration regulations or other
applicable regulation.
4 Corporate Evaluator’s Guide
Page 5

U.S. GOVERNMENT RESTRICTED RIGHTS. Use, duplication, or disclosure is subject
to HP standard commercial license terms and for non-DOD Departments and Agencies of
the U.S. Government, the restrictions set forth in FAR 52.227-19(c)(1-2) (June 1987)
Hewlett-Packard Company, 3000 Hanover Street, Palo Alto, CA 94304 U.S.A. Copyright
(c) 2000 Hewlett-Packard Company. All Rights Reserved. Customer further agrees that
Software is delivered and licensed as “Commercial computer software” as defined in
DFARS 252-227-7014 (June 1995) or as a “commercial item” as defined in FAR
2.101(a), or as “Restricted computer software” as defined in FAR 52.227-19 (or any
equivalent agency regulation or contract clause), whichever is applicable. The Customer
agrees that it has only those rights provided for such Software by the applicable FAR or
DFARS clause or the HP standard software agreement for the product involved.
Support Policy for Support Pack of Operating Systems. HP provides end user support for
HP PCs that use Microsoft Operating Systems, including its latest service packs. This
support will be available within 30 days of the software being released.
Edition History
Edition 4 (FA)...................................... November 2001
This manual is printed on recycled paper.
Corporate Evaluator’s Guide 5
Page 6

Page 7

Contents
Getting Started with Your HP Notebook .....................................................................13
Taking Inventory.........................................................................................................14
What’s in the Box?................................................................................................14
To buy accessories ................................................................................................15
To find more information...................................................................................... 15
Identifying Parts of the Computer...............................................................................16
Front View ............................................................................................................16
Back View............................................................................................................. 17
Bottom View......................................................................................................... 18
Status Lights.......................................................................................................... 19
Expansion Base – Front ........................................................................................21
Expansion Base – Back.........................................................................................22
Setting Up Your Computer......................................................................................... 23
Step 1: Install the battery.......................................................................................23
Step 2: Connect AC power....................................................................................25
Step 3: Connect a phone line.................................................................................26
Step 4: Turn on the computer................................................................................ 27
Step 5: Set up Windows ........................................................................................27
Step 6: Register your notebook .............................................................................28
What to do next..................................................................................................... 29
To connect to the Internet......................................................................................29
To connect the floppy disk drive...........................................................................30
Basic Operation ..............................................................................................................31
Operating Your Computer ..........................................................................................32
To turn the computer on and off............................................................................32
To reset the computer............................................................................................ 33
To change the boot device.....................................................................................34
To use the pointing stick .......................................................................................34
To use the Fn hot keys ..........................................................................................36
To use the One-Touch buttons ..............................................................................37
To use the Windows and Applications keys..........................................................38
To use the embedded keypad ................................................................................38
To use the ALT GR key........................................................................................ 39
To adjust the display .............................................................................................39
To adjust the volume.............................................................................................40
To change computer settings for a presentation.................................................... 41
To use a multimedia expansion base..................................................................... 42
To work with CDs and DVDs ...............................................................................42
Securing Your Computer............................................................................................ 43
To set up password protection...............................................................................43
To attach a security cable......................................................................................44
To protect against viruses......................................................................................45
To set PC identification......................................................................................... 45
Corporate Evaluator’s Guide 7
Page 8

To lock the hard disk drive....................................................................................46
Working in Comfort with a Notebook PC.................................................................. 47
Taking Care of Your Computer.................................................................................. 49
To protect your hard disk drive............................................................................. 49
To maintain your computer................................................................................... 49
To safeguard your data.......................................................................................... 50
To extend the life of the display............................................................................ 50
To clean your computer.........................................................................................51
Batteries and Power Management ................................................................................53
Managing Power Consumption...................................................................................54
How the computer manages power automatically.................................................54
To manage power manually.................................................................................. 57
Using Battery Power...................................................................................................58
To check battery status.......................................................................................... 58
To respond to a low-battery warning ....................................................................59
To recharge the battery..........................................................................................59
To use additional batteries.....................................................................................60
To get the most from your batteries ......................................................................60
To maximize processor speed ...............................................................................61
Modem and Network Connections................................................................................ 63
Using the Modem........................................................................................................64
To connect the modem.......................................................................................... 64
To connect to the Internet......................................................................................66
To disconnect from the Internet ............................................................................67
To dial in to a network ..........................................................................................67
To change your modem settings............................................................................68
To send and receive e-mail....................................................................................69
To send and receive faxes (Windows 98)..............................................................70
To send and receive faxes (Windows 2000)..........................................................71
To send and receive faxes (Windows XP) ............................................................72
Connecting to a LAN..................................................................................................73
To connect to a LAN............................................................................................. 73
Making Wireless Connections ....................................................................................74
To prepare for connections (Windows 98 or 2000)...............................................74
To prepare for connections (Windows XP)...........................................................76
To turn wireless communication on and off..........................................................77
Add-On Devices ..............................................................................................................79
Using an Expansion Base............................................................................................80
To dock the computer............................................................................................80
To undock the computer........................................................................................82
To play audio CDs ................................................................................................83
To use the status panel ..........................................................................................84
Using Plug-In Modules...............................................................................................86
To install hot-swap support (Windows 98) ...........................................................86
8 Corporate Evaluator’s Guide
Page 9

To replace a plug-in module..................................................................................86
To insert or remove a CD or DVD........................................................................ 89
To play DVD movies ............................................................................................90
To create or copy CDs...........................................................................................91
Connecting PC Cards.................................................................................................. 92
To insert or remove a PC Card.............................................................................. 92
Connecting External Devices......................................................................................94
To identify connectors for external devices ..........................................................94
To connect a printer or other parallel device.........................................................95
To connect an external keyboard or mouse...........................................................95
To connect a USB device......................................................................................96
To connect an audio device................................................................................... 96
To use an external monitor.................................................................................... 97
To use a TV set as a monitor................................................................................. 99
To connect a serial device................................................................................... 100
To connect an infrared device............................................................................. 100
Installing Additional RAM .......................................................................................102
To install a RAM expansion module...................................................................102
To remove a RAM expansion module ................................................................103
To replace the system RAM module...................................................................104
Replacing the Hard Disk Drive................................................................................. 107
To replace the hard disk drive............................................................................. 107
To replace the hard disk drive holder.................................................................. 107
To prepare a new hard disk drive........................................................................ 108
Using Windows XP....................................................................................................... 111
Installing Retail Windows XP...................................................................................112
Requirements ......................................................................................................112
To prepare for software installation ....................................................................113
To install retail Windows XP..............................................................................113
To install video (ATI) support ............................................................................115
To install modem (3COM) support.....................................................................115
To install TrackPoint support (HP)..................................................................... 116
To install wireless LAN (Actiontech) support ....................................................116
To install infrared support...................................................................................116
To install the HP Display Settings and Configuration Interface (HPCI) utility ..117
To install HP Presentation Ready utility............................................................. 117
To install HP One-Touch utility.......................................................................... 118
To install the Java Virtual Machine ....................................................................118
To enable SpeedStep........................................................................................... 118
Using Windows 2000 ....................................................................................................119
Installing Retail Windows 2000................................................................................ 120
Requirements ......................................................................................................120
To prepare for software installation ....................................................................121
To install retail Windows 2000 Professional.......................................................122
To install video support.......................................................................................123
Corporate Evaluator’s Guide 9
Page 10

To install audio support.......................................................................................123
To install modem support....................................................................................123
To install 3Com 10/100 Mini PCI Ethernet adapter support...............................125
To install wireless LAN adapter support.............................................................125
To install pointing stick support..........................................................................126
To install Hewlett-Packard Configuration Interface (HPCI) and HP display
settings ................................................................................................................127
To install the Intel® SpeedStep™ Technology Applet....................................... 128
To install infrared support...................................................................................128
To install the OneTouch utility ...........................................................................129
To install USB FDD support............................................................................... 129
Windows 2000 power management.................................................................... 130
Using Windows 98 ........................................................................................................131
Installing Retail Windows 98 Second Edition.......................................................... 132
Requirements ......................................................................................................132
To prepare for software installation ....................................................................133
To install retail Windows 98 Second Edition......................................................135
To install video support.......................................................................................136
To install DirectX version 7.0a ...........................................................................136
To install audio support.......................................................................................136
To install modem support....................................................................................137
To install 3Com 10/100 Mini PCI Ethernet adapter support...............................138
To install wireless LAN adapter support.............................................................139
To install pointing stick support..........................................................................139
To enable the infrared port..................................................................................140
To install the Intel® SpeedStep™ utility ............................................................ 141
To install USB FDD support............................................................................... 142
To install the Bay Manager software ..................................................................142
To install software patches.................................................................................. 143
Using Windows NT 4.0................................................................................................. 145
Installing Retail Windows NT 4.0 ............................................................................146
To install retail Windows NT 4.0 and Service Pack 6a....................................... 146
Requirements ......................................................................................................147
To prepare for software installation ....................................................................148
To install retail Windows NT 4.0........................................................................ 148
To install Service Pack 6a for retail Windows NT 4.0........................................151
To install video support.......................................................................................151
To install audio support.......................................................................................152
To install IDE support......................................................................................... 152
To install pointing stick support..........................................................................153
To install modem support....................................................................................154
To install 3Com 10/100 Mini PCI Ethernet adapter support...............................155
To install mobile enhancements.......................................................................... 158
To install the 3Com Power Management TDI service........................................ 160
To disable automatic CD-ROM detection........................................................... 160
10 Corporate Evaluator’s Guide
Page 11

To install the Intel® SpeedStep™ Technology Applet....................................... 161
To install the Euro Key patch..............................................................................161
To create NT 4.0 profiles for docked and undocked configurations................... 162
Troubleshooting and Maintenance..............................................................................163
Troubleshooting Your Computer..............................................................................164
Audio problems................................................................................................... 164
CD and DVD problems.......................................................................................165
Display problems ................................................................................................167
Expansion base problems....................................................................................168
Hard disk drive problems.................................................................................... 169
Heat problems .....................................................................................................170
Infrared Problems................................................................................................ 170
Keyboard and pointing device problems.............................................................171
LAN problems.....................................................................................................172
Memory problems ...............................................................................................174
Modem problems ................................................................................................174
PC card (PCMCIA) problems .............................................................................177
Performance problems ........................................................................................178
Power and battery problems................................................................................179
Printing problems................................................................................................ 182
Serial, parallel, and USB problems .....................................................................182
Startup Problems................................................................................................. 184
Wireless Problems............................................................................................... 185
Testing the Hardware................................................................................................ 187
To run the e-Diagtools diagnostic test.................................................................187
Configuring the Computer........................................................................................ 189
To run the BIOS Setup utility .............................................................................189
To set up TopTools .............................................................................................195
Reinstalling and Updating Software ......................................................................... 196
To recover the factory installation of your hard disk ..........................................196
To create a Support Utility disk ..........................................................................197
To create a boot disk (Windows 98 or 2000) ......................................................198
To replace a damaged Recovery CD ...................................................................198
To update the BIOS............................................................................................. 198
To update Windows drivers ................................................................................199
HP Support and Service............................................................................................... 201
Corporate Evaluator’s Guide 11
Getting Assistance for Your Computer..................................................................... 202
To get help from the web ....................................................................................202
To contact HP for support or service...................................................................203
To receive repair service ..................................................................................... 205
To prepare your computer for shipment.............................................................. 205
Hewlett-Packard Limited Warranty Statement .........................................................206
Page 12

Reference Information .................................................................................................209
Hardware Specifications........................................................................................... 210
Modem Reference Information................................................................................. 214
Modem Reference (3Com, US Robotics)............................................................214
Safety Information ....................................................................................................219
Power Cords........................................................................................................219
Ergonomics .........................................................................................................220
Battery Safety...................................................................................................... 220
Laser Safety.........................................................................................................221
LED Safety.......................................................................................................... 221
Exposure to Radio Frequency Radiation.............................................................222
Regulatory Information.............................................................................................223
U.S.A...................................................................................................................223
Canada.................................................................................................................224
European Union ..................................................................................................224
Japan ...................................................................................................................227
Russia.................................................................................................................. 227
International ........................................................................................................227
Index .............................................................................................................................. 231
12 Corporate Evaluator’s Guide
Page 13

Getting Started with Your HP Notebook
Corporate Evaluator’s Guide 13
Page 14

Getting Started with Your HP Notebook
Taking Inventory
Taking Inventory
Congratulations! Your notebook computer sets a new standard in personal computing.
Although compact and easy to carry, your computer is made with the quality and
attention to detail that are the hallmark of Hewlett-Packard.
Your computer has several features that make it convenient to use:
• Two buttons provide convenient options for starting and stopping the computer.
• Volume controls are located within easy reach on the computer’s right side, and the
audio-off button and light let you cut off all sound quickly when needed.
• All cable connectors are near the back of the computer, keeping cables away from
your working area.
This manual shows how to set up and operate your computer, as well as what to do if you
run into trouble.
What’s in the Box?
Your HP notebook computer is shipped with these items:
• Main battery (installed).
• Floppy disk drive module.
• Floppy disk drive USB cable (models without expansion base only).
• AC adapter and power cord.
• Quick Start sheet.
• Startup Guide.
• Recovery CD, for restoring Windows and all software included with your computer.
• Microsoft Windows manual.
• Multimedia expansion base and plug-in drive module (certain models only).
• Phone cord (modem models only).
In addition, your HP notebook includes preinstalled software. (The exact software
installed depends on your particular notebook model.)
14 Corporate Evaluator’s Guide
Page 15

Getting Started with Your HP Notebook
Taking Inventory
To buy accessories
You can buy accessories for your computer online. For the latest accessories and options,
visit the HP Notebook web site (www.hp.com/notebooks).
HP currently offers plug-in modules and other accessories, such as the following:
• AC adapter.
• Plug-in drives, such as CD-ROM, DVD, and similar drives, floppy drive, Zip drive,
and second hard disk drive.
• Main battery and secondary battery plug-in module.
To find more information
The following table lists other sources of information about your computer and related
products.
Source Description and Location
Startup Guide
Online Reference
Guide
Online HP Notes
Microsoft Windows
manual
HP Notebook Web
Site
HP Customer Care
Web Site
Corporate
Evaluator’s Guide
This printed manual introduces your computer. It also contains setup instructions,
basic operation guidelines, troubleshooting information, and warranty information.
The full Reference Guide is shipped on the computer’s hard drive, and provides a
complete source for operating and maintaining the computer. Look in the online HP
Library, or on the Recovery CD in \hp\Library. For Windows XP, the HP Library is in
the Help and Support Center.
For late-breaking information available after the manuals were completed, see the
HP Notes in the online HP Library, or on the Recovery CD in \hp\Library.
This is shipped with your computer and contains information about using the version
of Microsoft Windows shipped with your computer.
www.hp.com/notebooks.
www.europe.hp.com/notebooks (European mirror).
www.hp.com/go/support.
This provides information about installing alternate operating systems, as well as
how to configure your notebook computer in a corporate, networked environment.
Located at the HP Customer Care web site.
Corporate Evaluator’s Guide 15
Page 16
Getting Started with Your HP Notebook
Identifying Parts of the Computer
Identifying Parts of the Computer
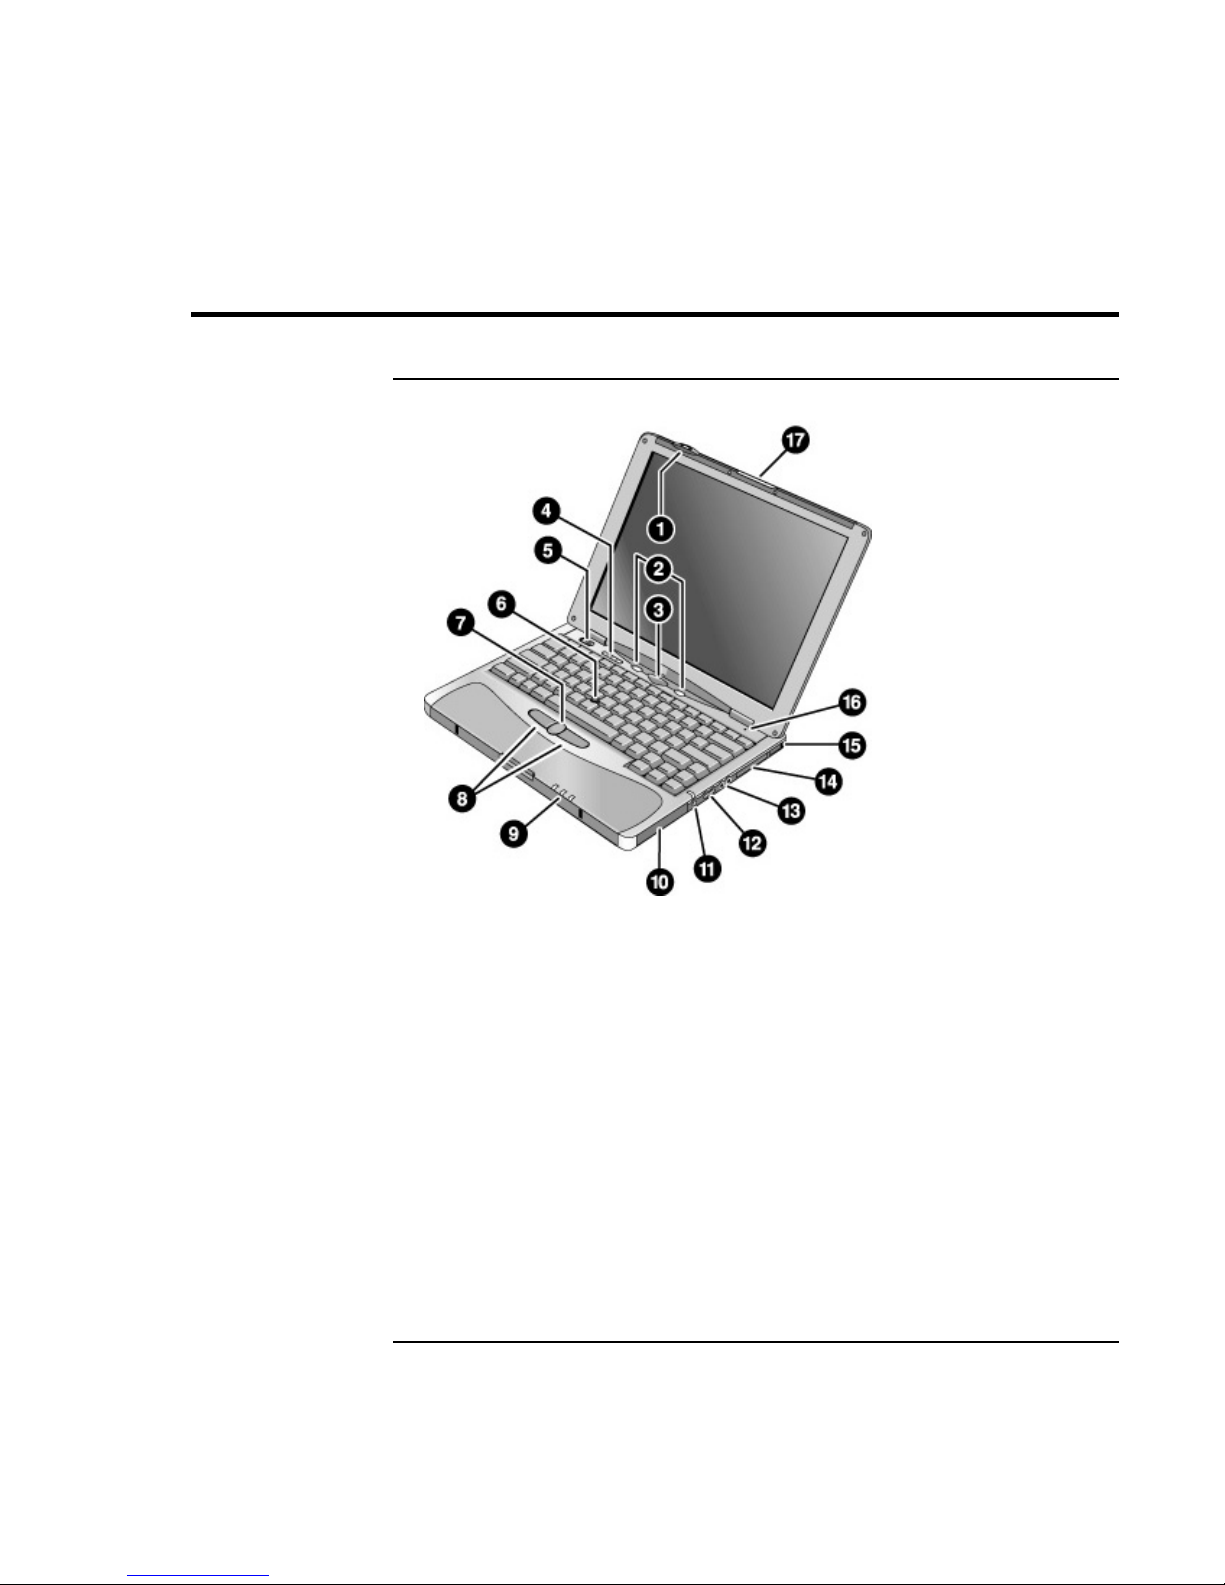
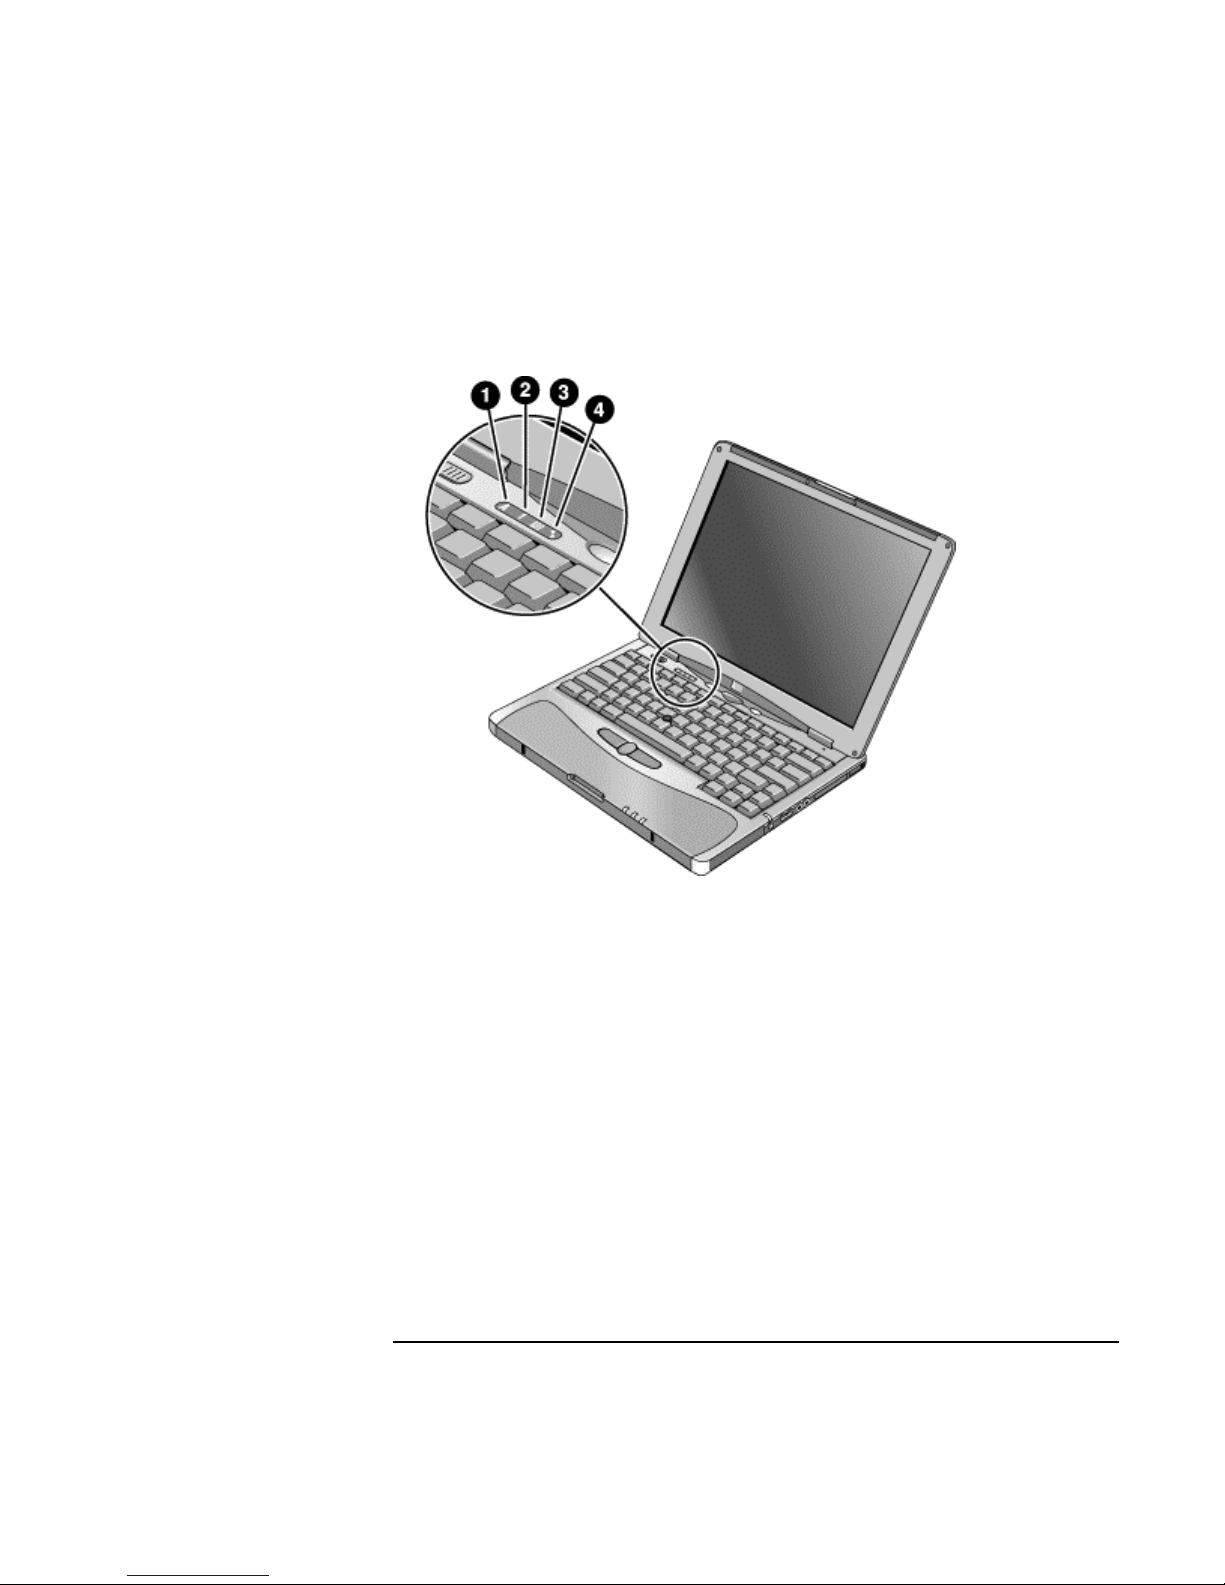
Front View
1. Wireless on-off button and indicator light
(on certain models).
2. Left and right One-Touch buttons (programmable).
3. Sleep button. Suspends and resumes operation.
4. Keyboard status lights: Caps Lock, Num Lock,
Keypad Lock, Scroll Lock.
5. Power slide button. Turns the computer on and off.
6. Pointing stick (pointing device).
7. Scroll button.
8. Left and right click buttons.
16 Corporate Evaluator’s Guide
9. Main status lights: power mode, hard disk activity,
main battery charge.
10. Hard disk drive.
11. Audio-off button and audio-off light.
12. Volume control.
13. Audio jacks: audio out (headphones), external
microphone.
14. PC Card slot.
15. PC Card eject button.
16. Built-in microphone.
17. Latch for opening the computer.
Page 17
Getting Started with Your HP Notebook
Identifying Parts of the Computer
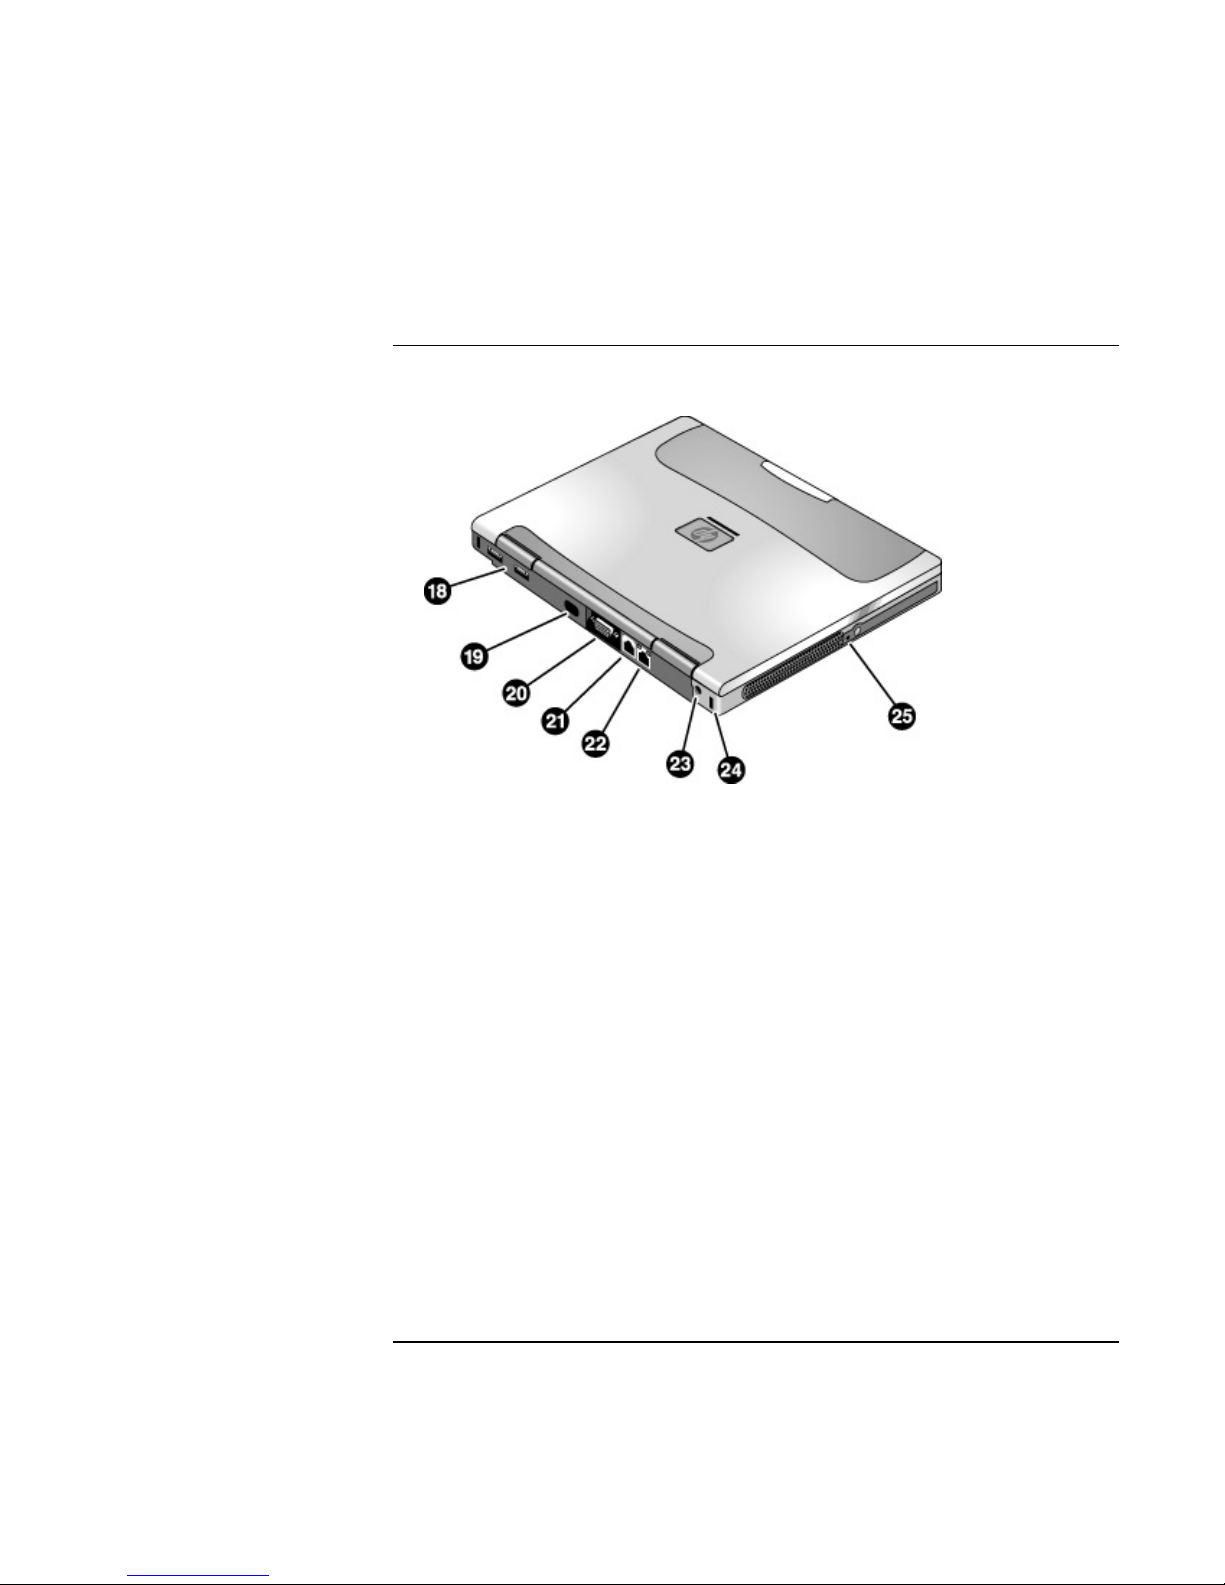
Back View
18. Universal serial bus ports (USB).
19. Infrared port (on certain models).
20. External monitor port.
21. Modem port (on certain models).
22. LAN port (on certain models).
23. AC adapter jack.
24. Kensington lock slot (security connector).
25. System-off switch.
Corporate Evaluator’s Guide 17
Page 18
Getting Started with Your HP Notebook
Identifying Parts of the Computer
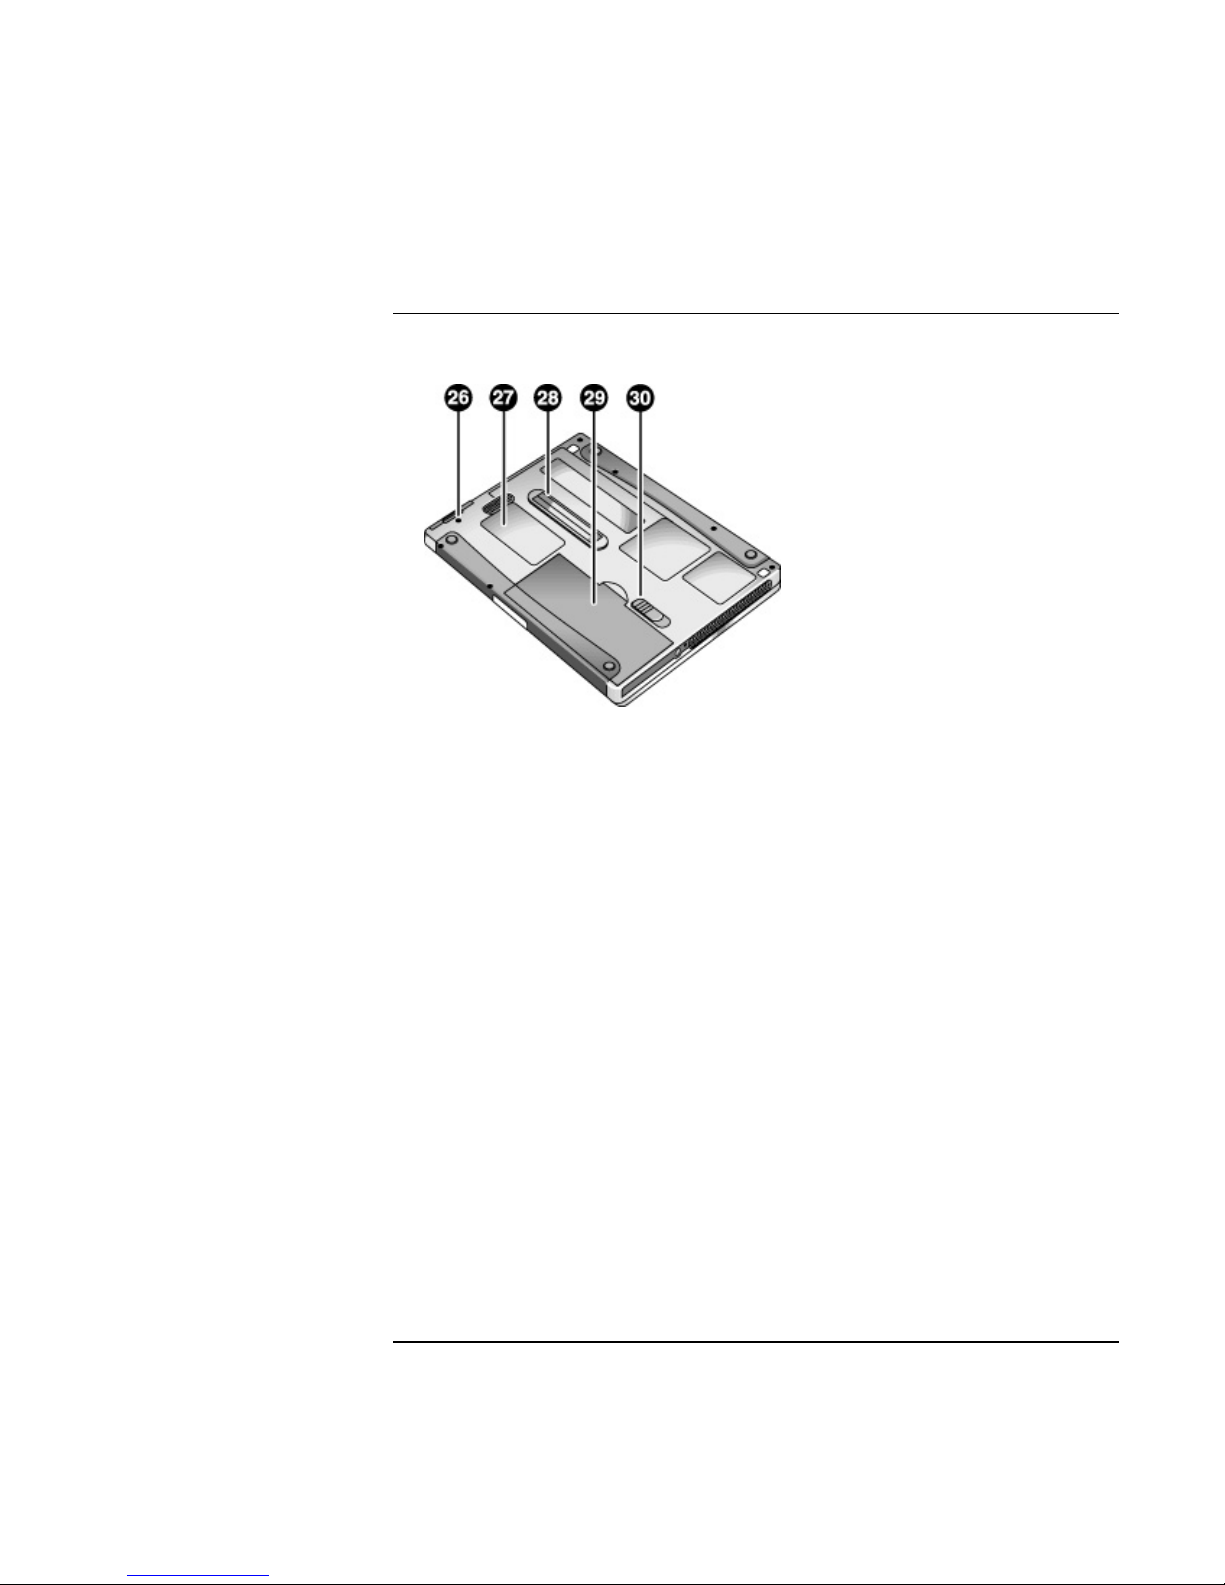
Bottom View
26. Hard disk drive retaining screw.
27. RAM cover.
28. Docking port.
29. Main battery.
30. Main battery latch.
18 Corporate Evaluator’s Guide
Page 19
Getting Started with Your HP Notebook
Identifying Parts of the Computer
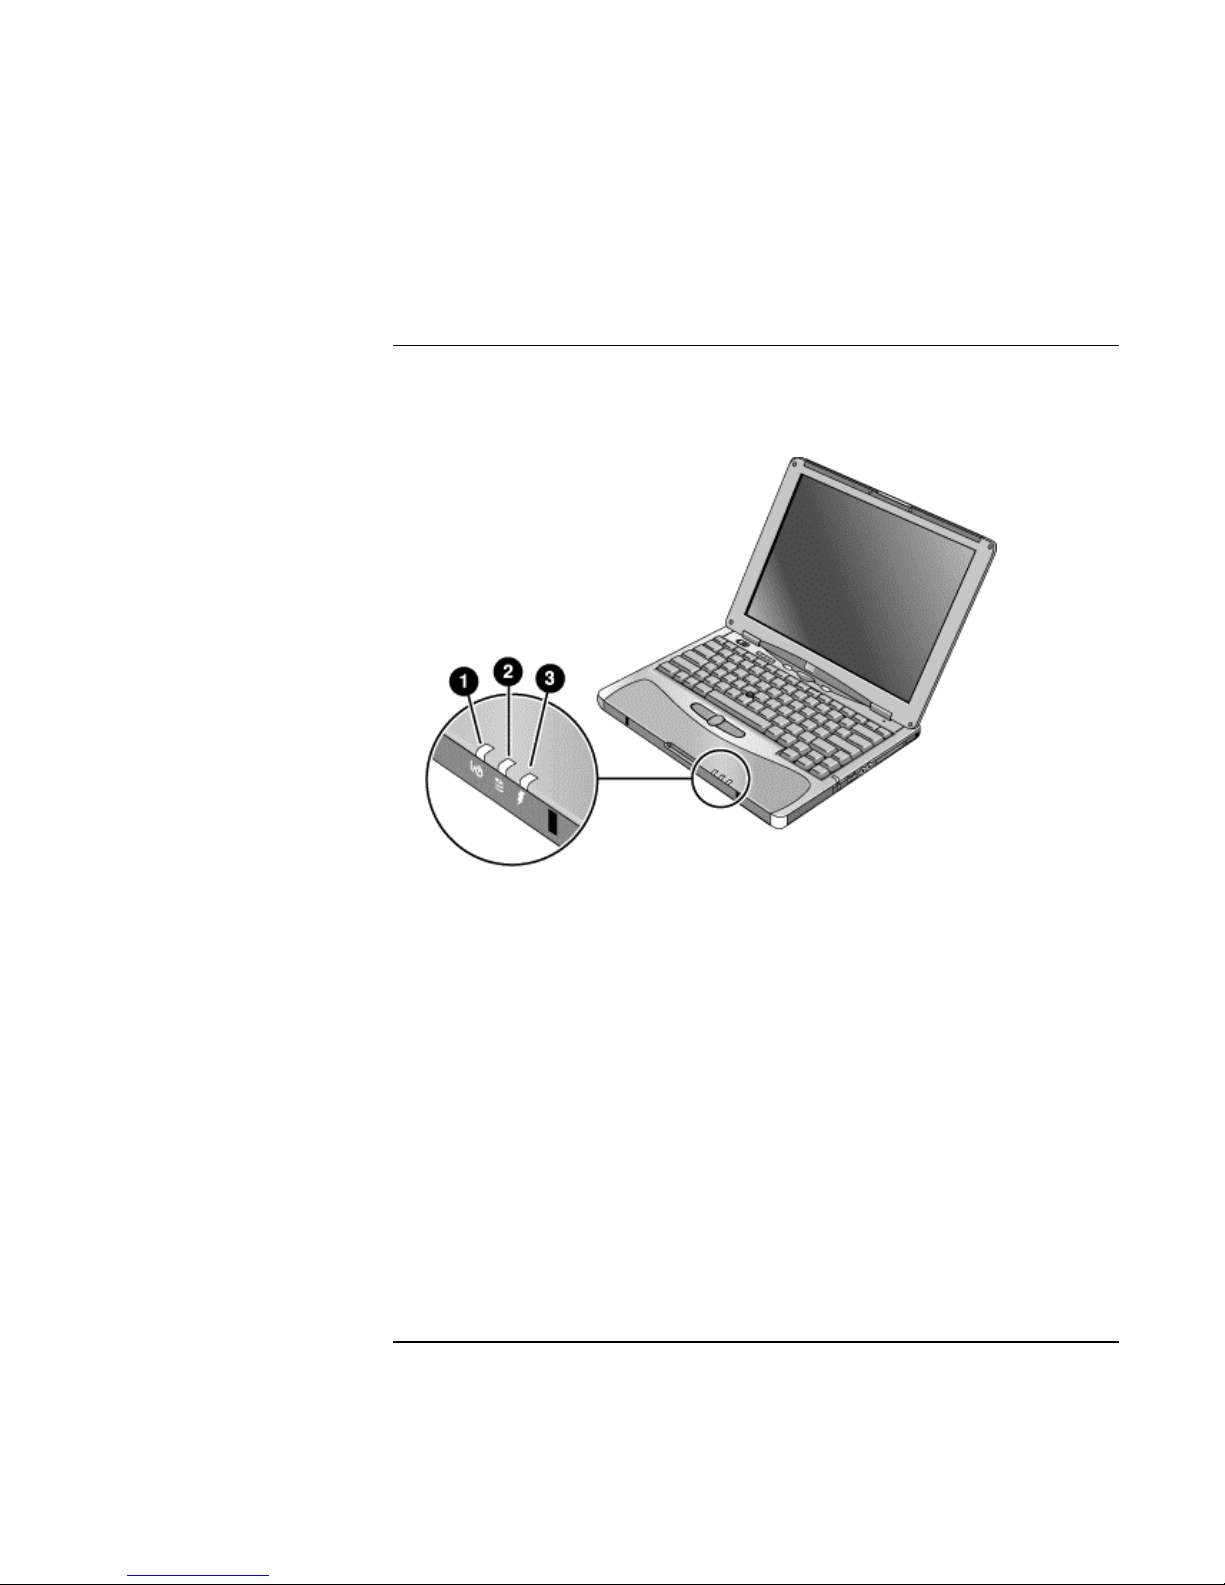
Status Lights
The main status lights report power and battery status and drive activity.
1. Power mode.
• On: the computer is on (even if the display is off).
• Blinking: the computer is in Standby mode. (Steady amber light on some models.)
• Off: the computer is off or in Hibernate mode.
2. Hard disk drive activity.
• Blue: the computer is accessing the hard disk drive.
3. Main battery charge status.
• Green: the AC adapter is connected and the battery is fully charged.
• Amber: the AC adapter is connected and the battery is charging.
• Blinking: the AC adapter is connected and the battery is missing or has a fault.
(Steady red light on some models.)
• Off: the AC adapter is not connected.
Corporate Evaluator’s Guide 19
Page 20
Getting Started with Your HP Notebook
Identifying Parts of the Computer
The keyboard status lights, located above the keyboard, indicate the states of the
keyboard locks.
1. Caps Lock. Caps Lock is active.
2. Num Lock. Num Lock is active (Fn+F9). (The Keypad Lock must also be on to use
the embedded keypad.)
3. Keypad Lock. The embedded keypad is active (Fn+F8). Num Lock must also be on
for the numeric keys—otherwise, cursor control is active (as marked on an external
keyboard).
4. Scroll Lock. Scroll Lock is active (Fn+F10).
20 Corporate Evaluator’s Guide
Page 21

Getting Started with Your HP Notebook
Identifying Parts of the Computer
Expansion Base – Front
1. Docking connector.
2. Status panel.
3. Status panel button.
4. Speaker (one on each side).
5. Left plug-in module bay. Can contain a CD-ROM
or DVD drive, floppy disk drive, secondary battery,
or other plug-in module.
6. CD status light.
7. CD player power button.
Corporate Evaluator’s Guide 21
8. CD player controls: previous track, play/pause,
stop, next track, volume.
9. Right plug-in module bay. Used with CD player
controls. Can contain any plug-in module.
10. Module eject latch.
11. Undock switch.
12. Audio jacks: audio out (headphones), external
microphone, audio in.
13. Kensington lock slot (security connector).
14. Emergency undock latch.
Page 22
Getting Started with Your HP Notebook
Identifying Parts of the Computer
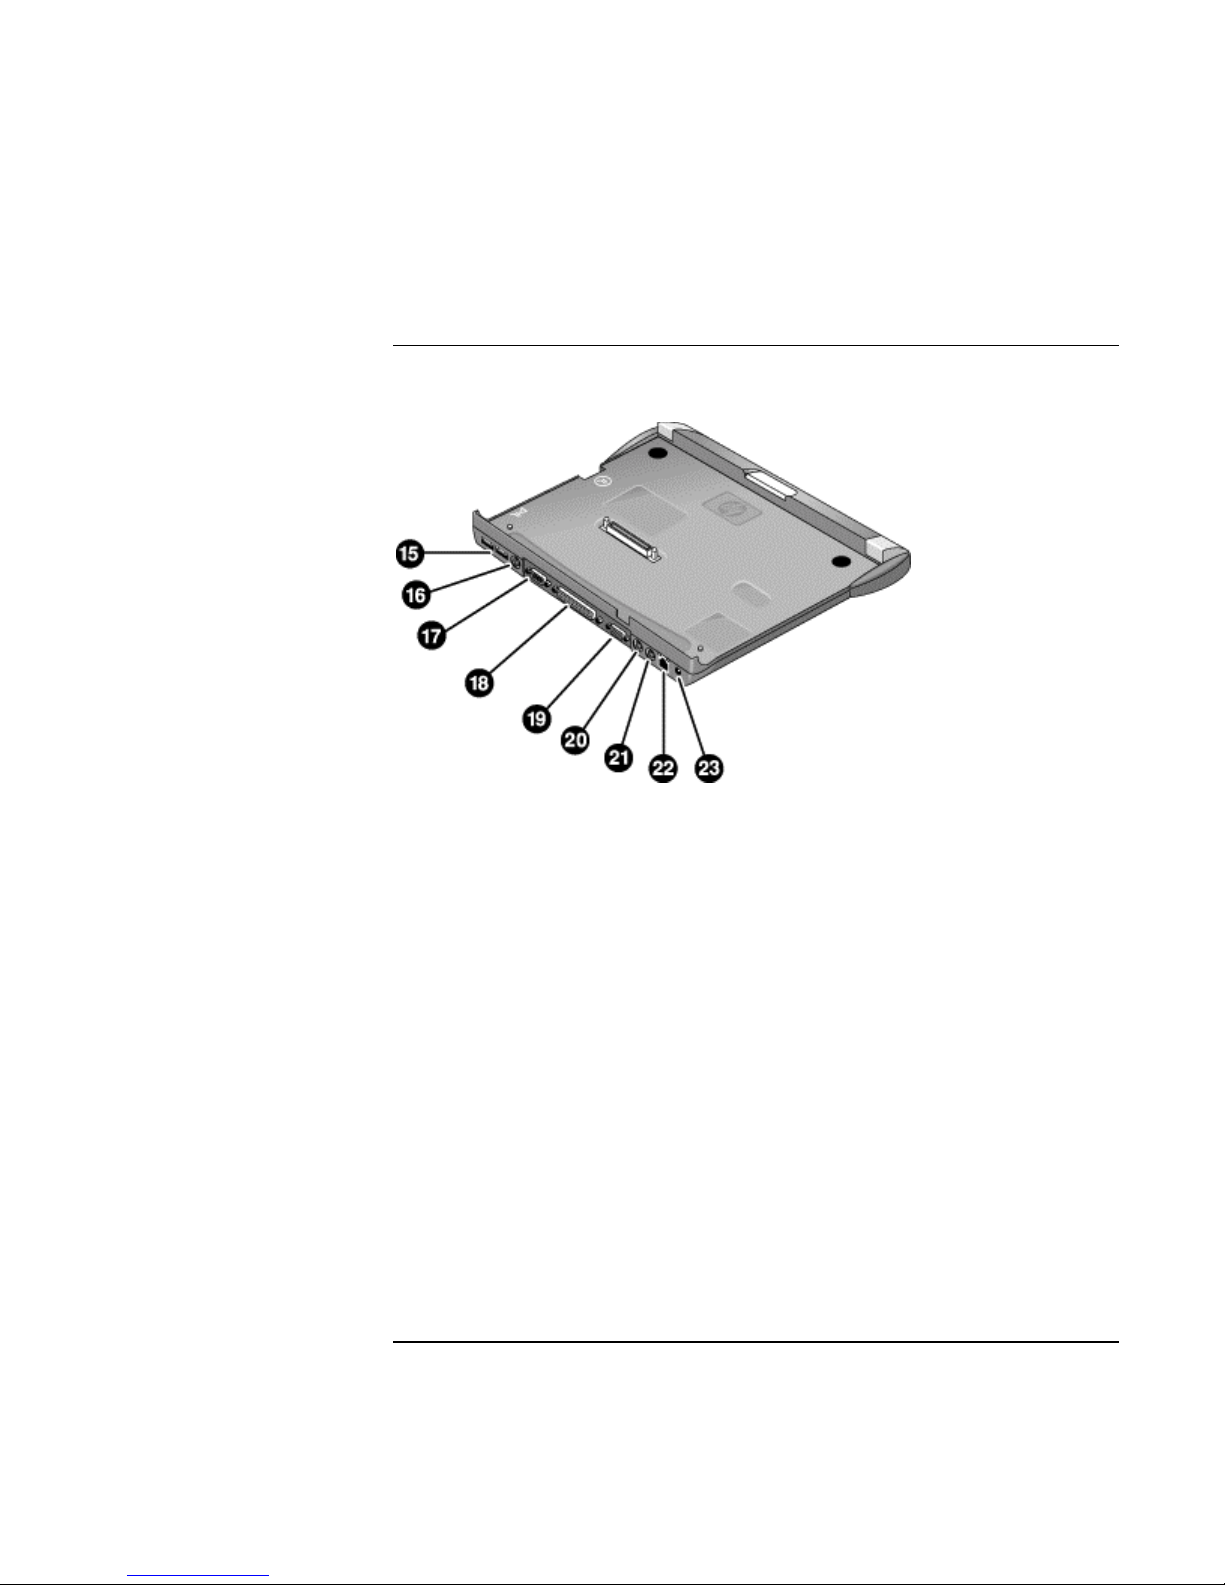
Expansion Base – Back
15. Universal serial bus ports (USB).
16. S-video (TV out) port.
17. Serial port (COM1).
18. Parallel port (LPT1). Use this port for a parallel
printer or other parallel device.
19. External monitor port.
20. PS/2 mouse port.
21. PS/2 keyboard port.
22. LAN port (works only if the computer has a built-in
LAN port).
23. AC adapter jack.
22 Corporate Evaluator’s Guide
Page 23

Getting Started with Your HP Notebook
Setting Up Your Computer
Setting Up Your Computer
WARNING
WARNING
Improper use of keyboards and other input devices has been associated with
ergonomic injury. For information about reducing your risk, see Working in
Comfort in the online HP Library, or visit our ergonomics web site,
www.hp.com/ergo. For a summary about working with a notebook computer, see
“Working in Comfort with a Notebook PC“ on page 47.
If you are using your notebook computer as your primary computer, or using it for
extended periods, you should use it with a full-size keyboard, monitor, and mouse.
This can reduce the risk of ergonomic injury. See Working in Comfort in the online
HP Library.
When you set up your computer for the first time, you’ll need to install and charge the
battery, connect the AC adapter, turn on the computer, and run the Windows setup
program.
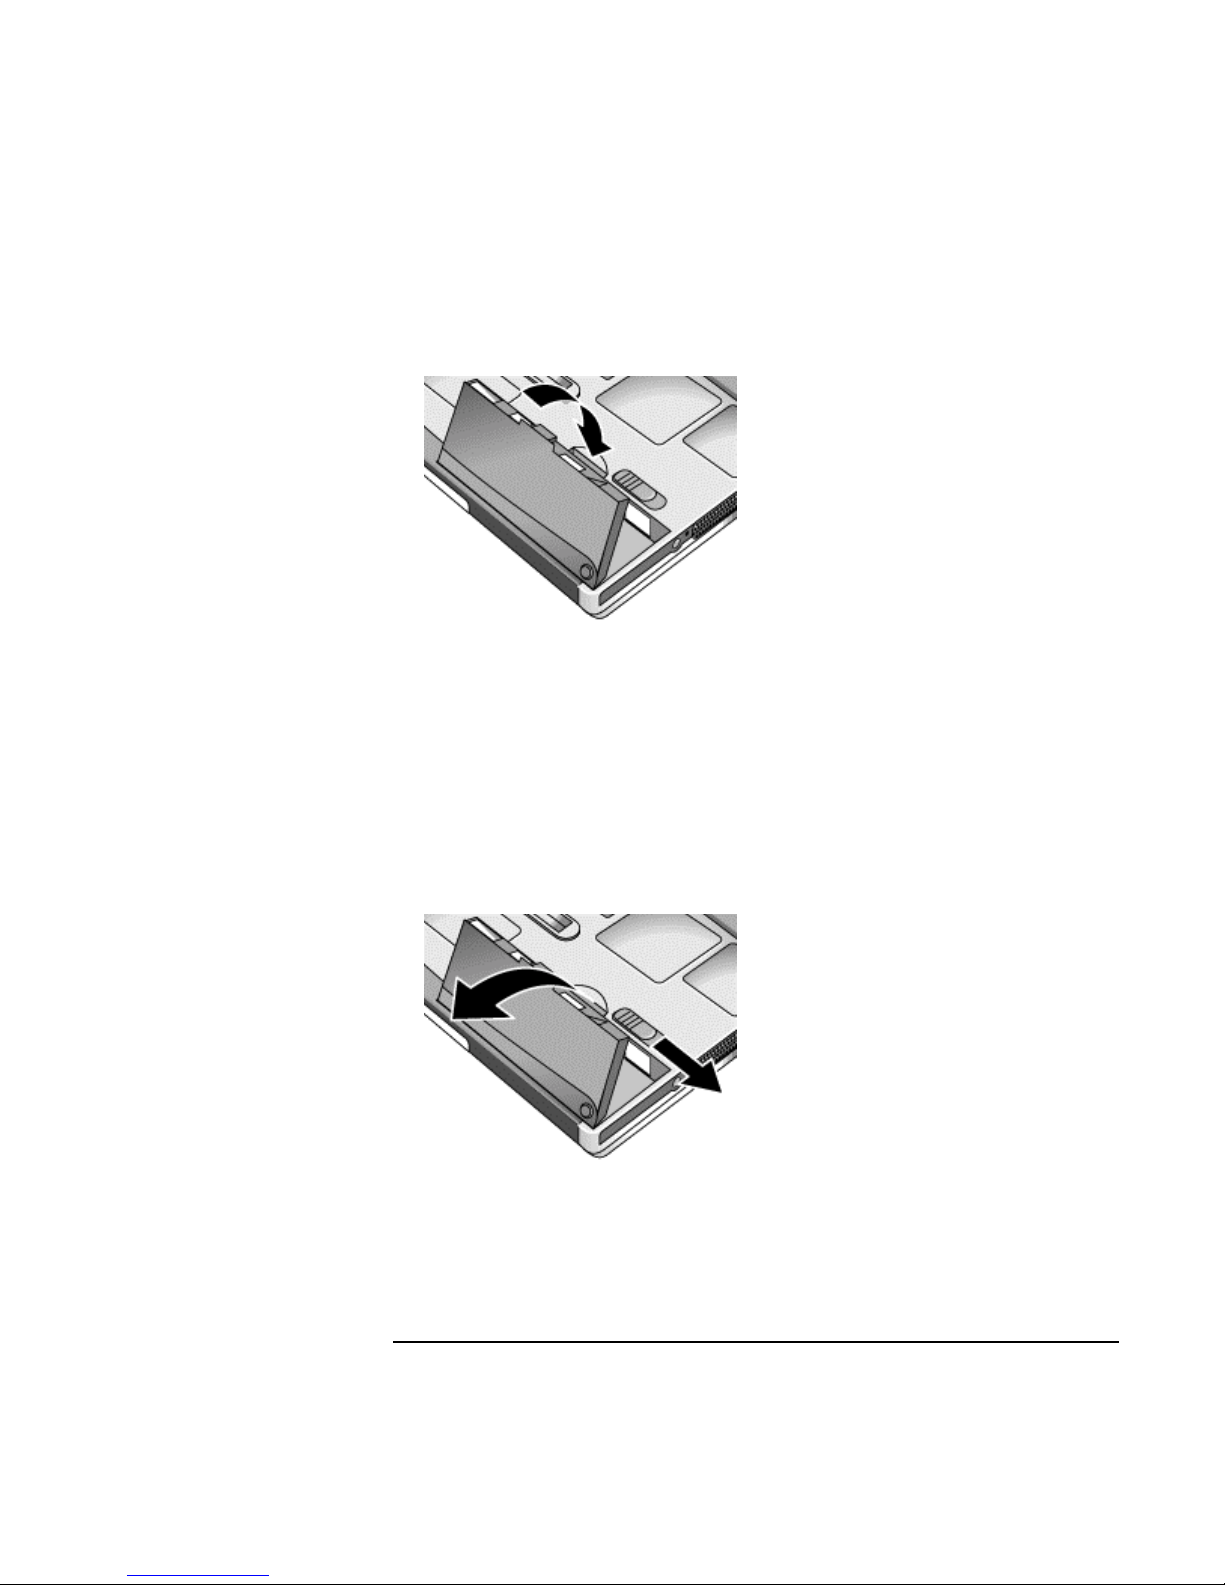
Step 1: Install the battery
Do not mutilate or puncture batteries. Do not dispose of batteries in fire, or they
can burst or explode, releasing hazardous chemicals. Rechargeable batteries must
be recycled or disposed of properly.
Your computer is shipped with the battery installed. If the battery has been removed, you
should install it:
1. Turn the computer upside down.
Corporate Evaluator’s Guide 23
Page 24
Getting Started with Your HP Notebook
Setting Up Your Computer
2. Insert the front end of the battery into the battery compartment on the bottom of the
computer, then press the back end in until it clicks into place.
To remove the battery
1. Do one of the following:
• Plug in the AC adapter.
• Press the blue sleep button to put the computer into Standby mode. While the
computer is in this mode, you must insert the replacement battery within two
minutes of removing the discharged battery.
• Shut down the computer or put it into Hibernate mode.
2. Slide the battery’s release latch, then lift the battery out of its compartment.
24 Corporate Evaluator’s Guide
Page 25
Getting Started with Your HP Notebook
Setting Up Your Computer
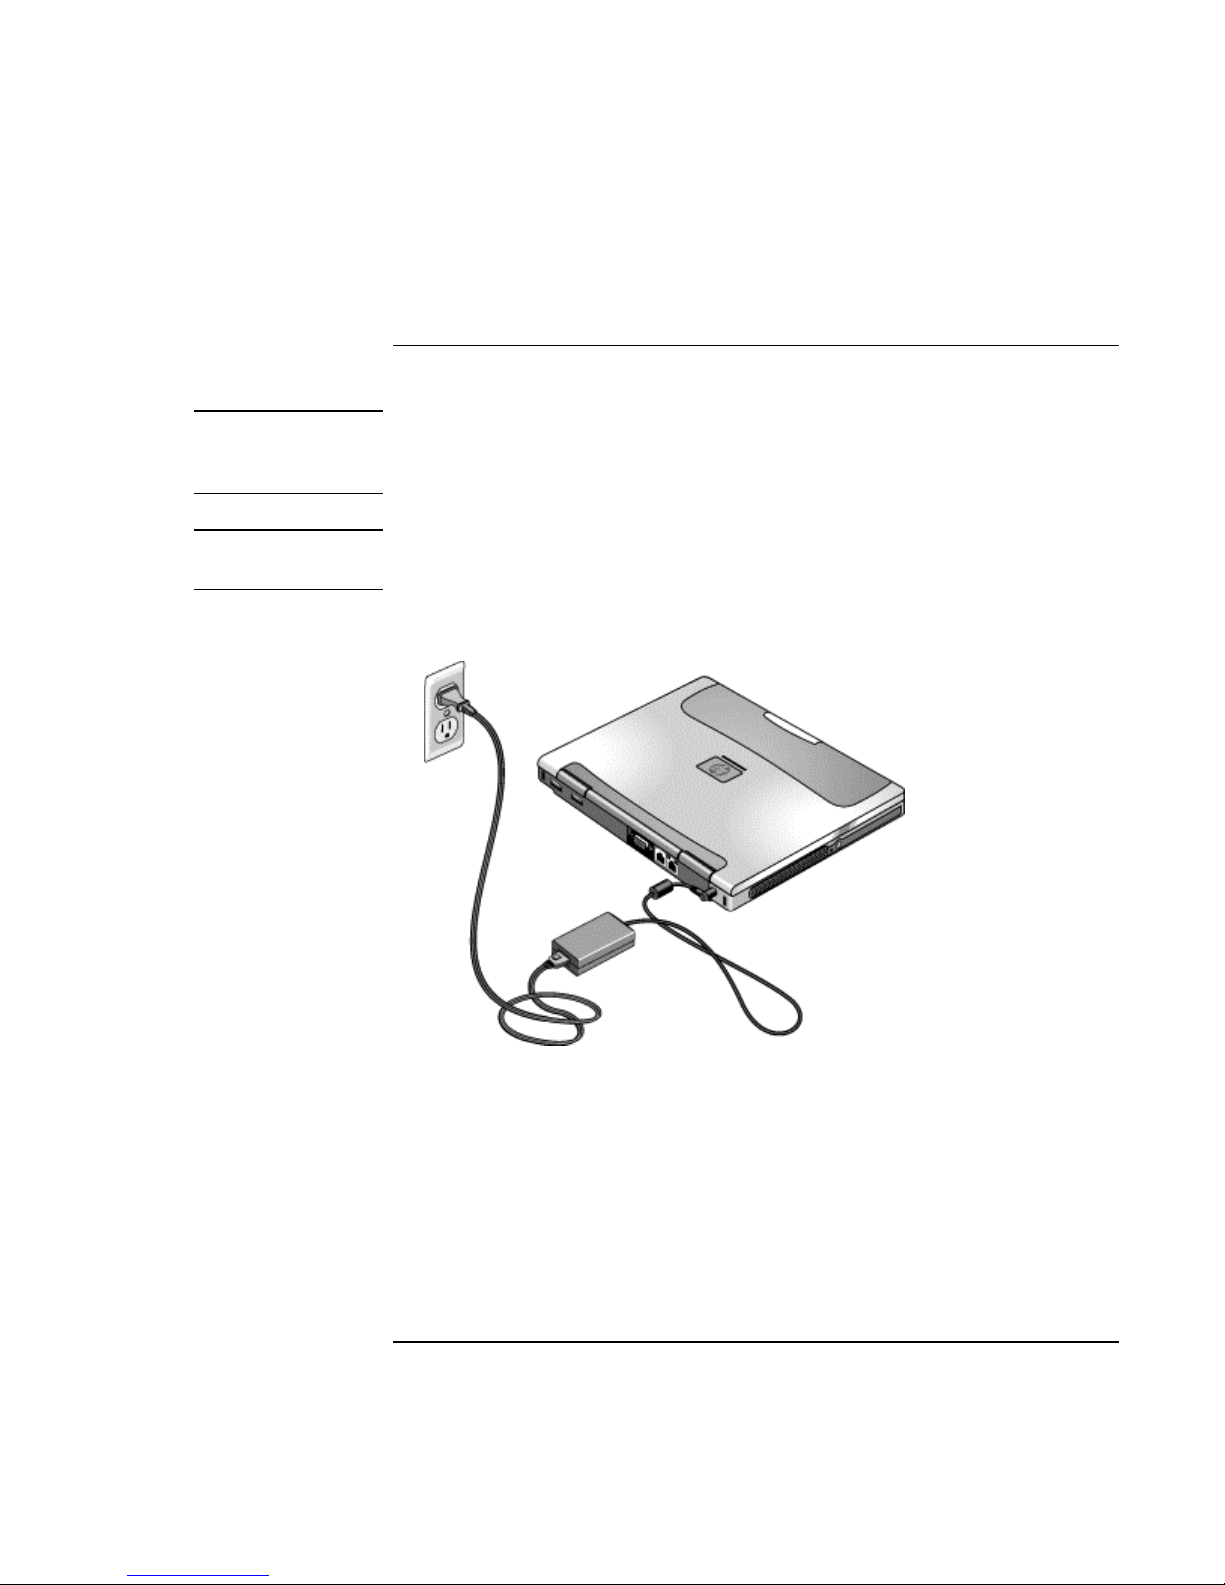
Step 2: Connect AC power
CAUTION
Important
Use only the HP AC adapter included with your computer (or other approved
adapter). Using any other AC adapter could damage the computer and may void
your warranty (see the warranty statement in this manual).
If you have an expansion base, do not dock your computer in it until after the computer
boots up for the first time.
• Plug in the AC adapter, and connect it to the AC adapter jack on the back of the
computer. The computer’s battery then starts charging.
While the battery is charging, you can continue with step 3.
Corporate Evaluator’s Guide 25
Page 26
Getting Started with Your HP Notebook
Setting Up Your Computer
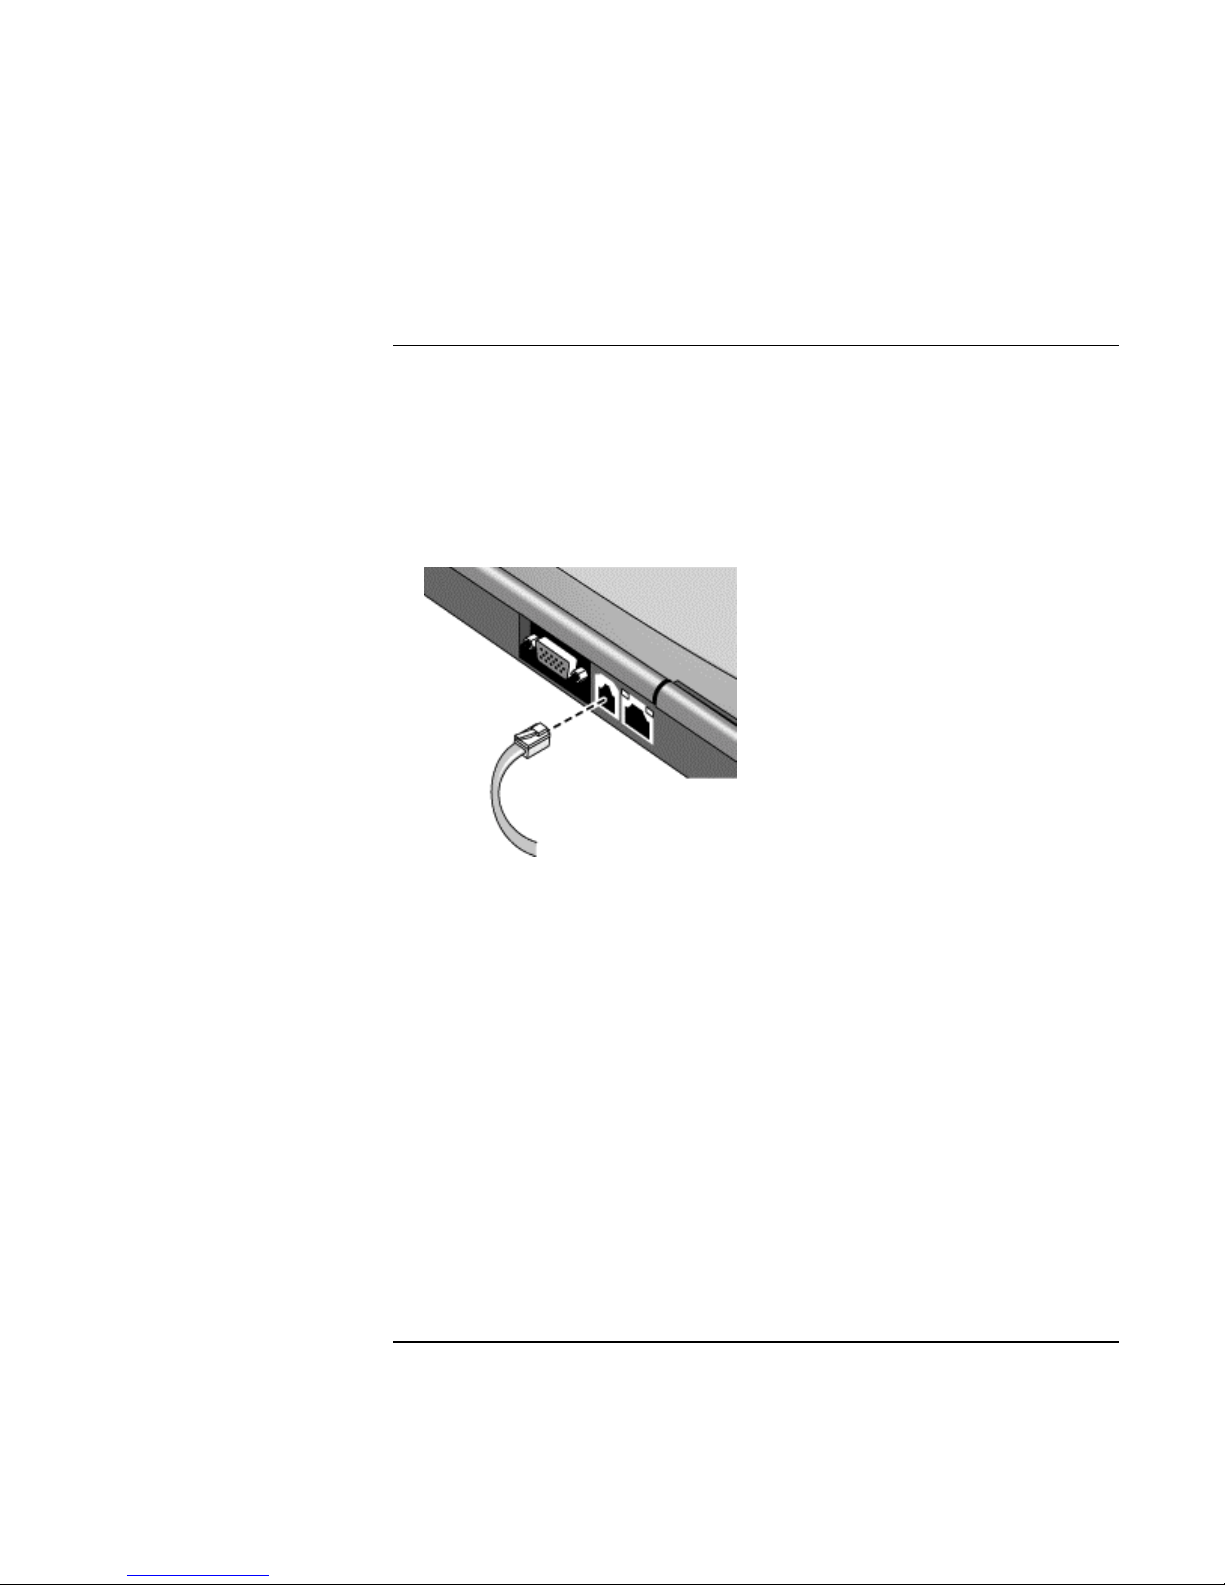
Step 3: Connect a phone line
If your computer does not include a built-in modem, you can skip this step. Also, if you
prefer, you can instead connect to a PC Card modem or an external modem.
1. Make sure the telephone line is an analog line, sometimes called a data line. (You
must not use a digital line.)
2. Connect the telephone cord to the built-in modem.
3. Plug the other end of the phone cord into a telephone jack. If the plug on the phone
cord doesn’t fit the jack, you may need to use an adapter.
For details about using the modem, see “Using the Modem“ on page 64.
26 Corporate Evaluator’s Guide
Page 27
Getting Started with Your HP Notebook
Setting Up Your Computer
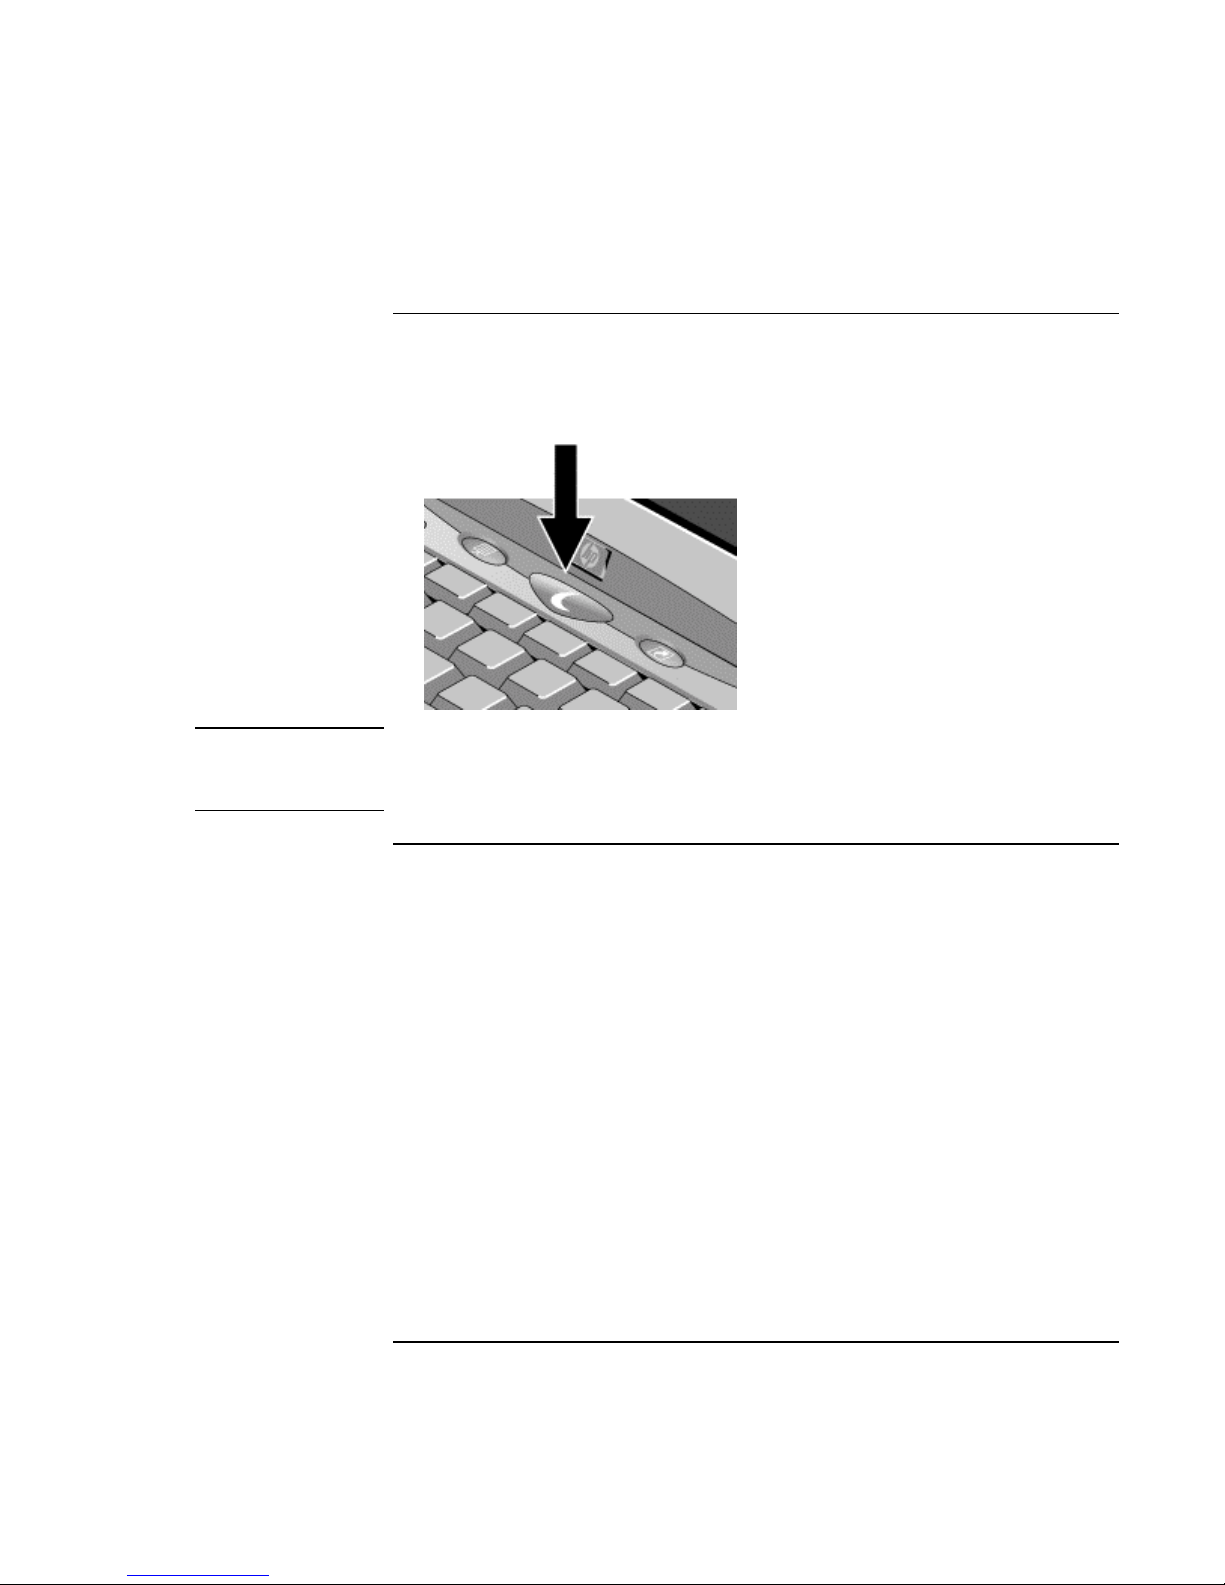
Step 4: Turn on the computer
• Press the blue sleep button above the keyboard. The computer then boots up, and
Windows starts automatically.
Hint
If your computer does not turn on when operating on battery power, the battery may be
out of power. Plug in the AC adapter and press the blue sleep button again. Leave the
AC adapter plugged in for at least an hour.
Step 5: Set up Windows
Your computer has Microsoft Windows preinstalled on its hard disk drive. The first time
you turn on your computer, the Windows Setup program runs automatically so you can
customize your setup.
1. Follow the Setup program’s instructions as they appear on the screen. If the program
prompts you to enter the Product ID code, you will find this code on the bottom of the
computer.
2. If your computer has a modem, check the modem’s country or region settings:
• Windows 98: click Start, Settings, Control Panel, double-click Modems, then
click Dialing Properties.
• Windows 2000: click Start, Settings, Control Panel, double-click Phone and
Modem Options, then click Edit on the Dialing Rules tab.
• Windows XP: click Start, Control Panel, Printers and Other Hardware, Phone and
Modem Options, then click Edit on the Dialing Rules tab.
Corporate Evaluator’s Guide 27
Page 28

Getting Started with Your HP Notebook
Setting Up Your Computer
Step 6: Register your notebook
Be sure to register your computer. Registering is free and fast, and ensures you will
receive quicker, more personalized support. The information you provide during
registration allows us to provide you with better products and services.
Registering your computer does the following:
• Records your ownership of the computer with Hewlett-Packard and provides access
to service, support, and information.
• Records your ownership of the Windows 98 or XP operating system with Microsoft.
If you have Windows 2000, please contact Microsoft separately to register the
operating system.
You can register while setting up Windows, or later in any of three ways: by modem, by
phone, or by fax. For some countries and models, an HP notebook registration icon is
available on the desktop.
By modem
If your computer does not have a built-in modem, you can register after you set up a PC
Card modem or an external modem—or you can register by phone or fax.
• If you are not prompted to register, you can click the Register button in the welcome
screen. Make sure the phone line is connected to the modem port and follow the
onscreen instructions.
If you choose not to register right away, you can do so by modem later by doubleclicking the Registration icon on the desktop (if available). Make sure the phone line is
connected and follow the onscreen instructions. The icon disappears after you register.
By phone
You can register by calling your HP Customer Care Center. See “To contact HP for
support or service“ on page 203 for the phone number.
By fax
If you have a printer connected to your computer, you can print a registration form and
fax it to HP. Double-click the HP Notebook Registration icon on the desktop (if
available), and print the registration form. You will find the fax number on the form.
28 Corporate Evaluator’s Guide
Page 29

Getting Started with Your HP Notebook
Setting Up Your Computer
What to do next
Here are a few things you may want to try at this point:
• If you’re not familiar with the version of Windows installed on your computer, click
Start, Help (Windows 98 or 2000) or Start, Tour Windows XP, or check the Windows
manual to discover what’s new.
• If your computer shipment includes an expansion base and CD-ROM drive or similar
drive, insert the drive in the right module bay—see “To replace a plug-in module“ on
page 86 for details. Then turn on the computer and insert it into the expansion base—
see “To dock the computer“ on page 80 for details.
• If your expansion base includes a DVD drive or CD-RW drive, you also received
special software for the drive—find the software CD in the box. Click Start, Programs
(Windows 98 or 2000) or Start, All Programs, Multimedia (Windows XP)—if the
software isn’t listed, install it by inserting the CD in the drive. Follow the instructions
displayed—run Setup on the CD if it doesn’t run automatically.
See the online Reference Guide to learn more about using and maintaining your
computer—click Start, Programs, HP Library (Windows 98 or 2000) or Start, Help and
Support, HP Library (Windows XP).
To connect to the Internet
If your computer has a modem (built-in, PC Card, or external), LAN port, or wireless
LAN, you can use it to connect to the Internet. For details, see “Using the Modem“ on
page 64, “Connecting to a LAN“ on page 73, or “Making Wireless Connections“ on
page 74.
Corporate Evaluator’s Guide 29
Page 30
Getting Started with Your HP Notebook
Setting Up Your Computer
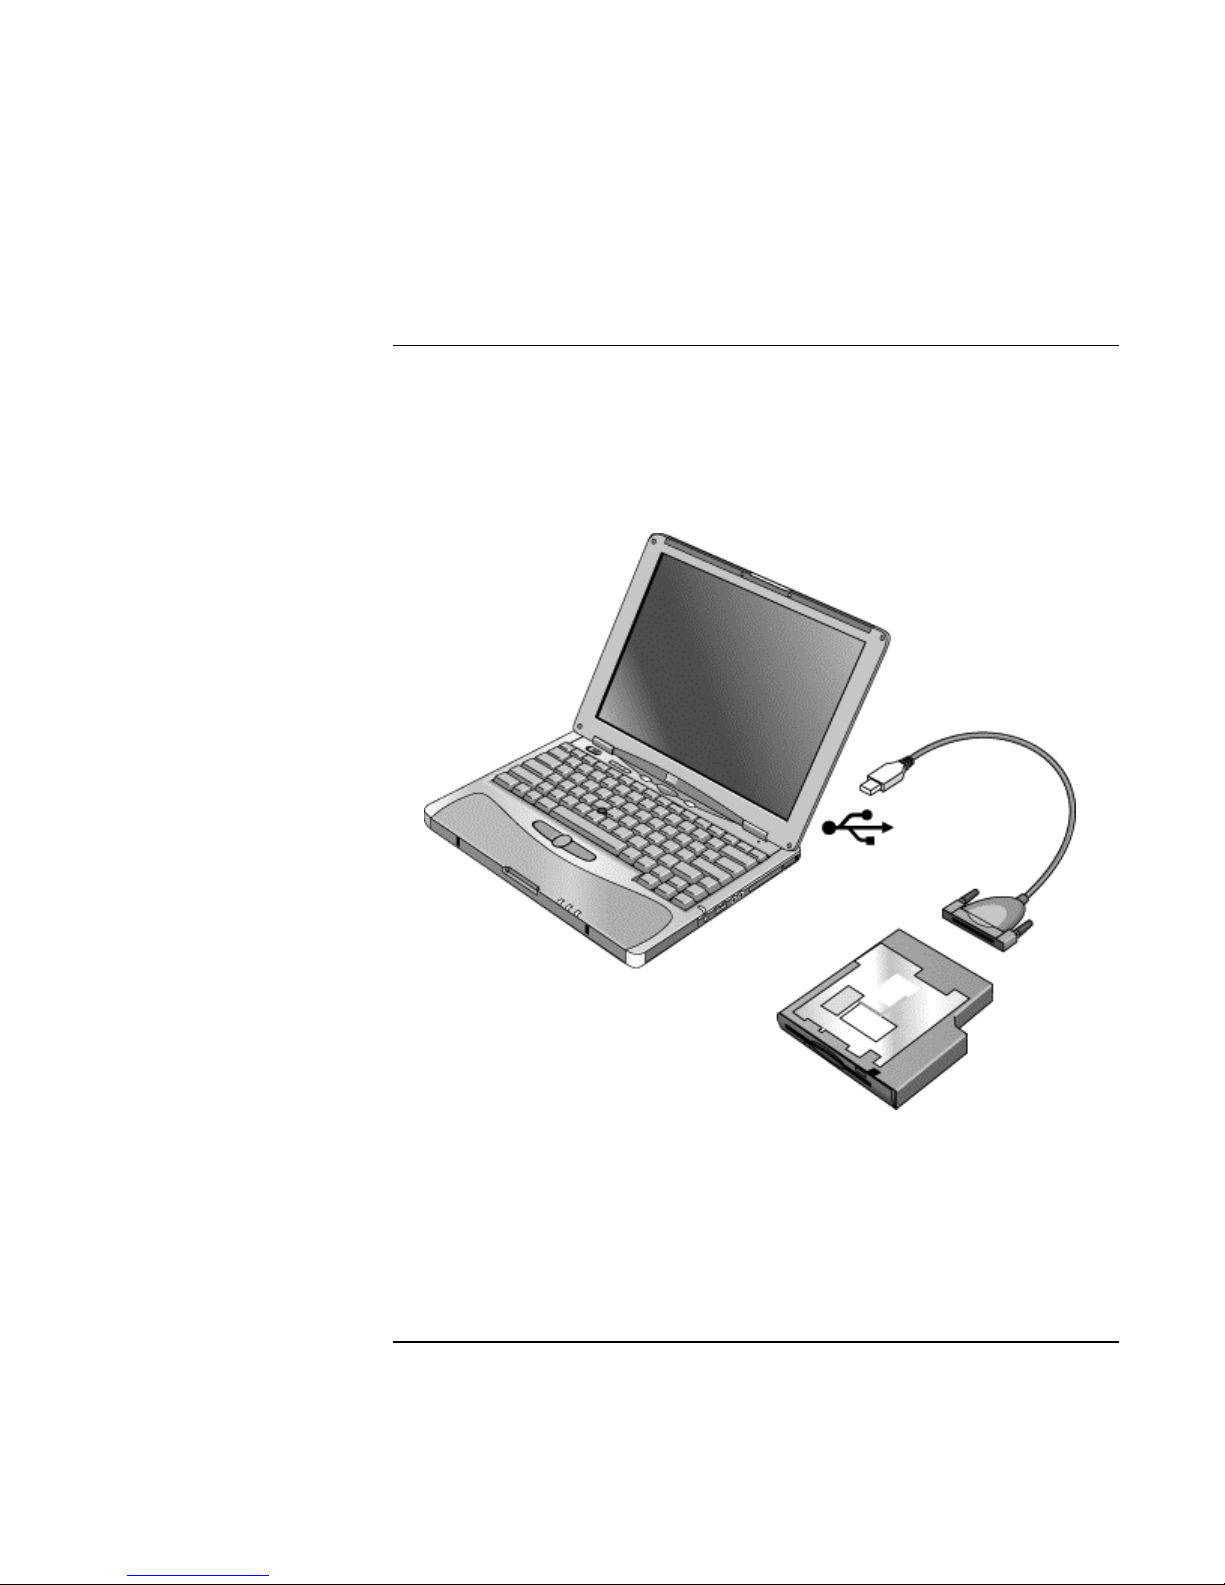
To connect the floppy disk drive
If you don’t have an expansion base, you can connect the floppy disk drive to a USB
port.
• Connect the F2101A USB floppy cable directly to the floppy drive and to the USB
port.
If you have an expansion base, you can insert the floppy drive in a module bay—see “To
replace a plug-in module“ on page 86.
You cannot use the USB floppy cable to connect any other type of drive module, such as
a CD-ROM or DVD drive. The USB floppy cable is for floppy drives only.
30 Corporate Evaluator’s Guide
Page 31

Basic Operation
Corporate Evaluator’s Guide 31
Page 32

Basic Operation
Operating Your Computer
Operating Your Computer
You can start and stop your computer using its blue sleep button. However, at certain
times you may want to use other methods to start or stop the computer—depending on
power considerations, types of active connections, and start-up time.
To turn the computer on and off
Power mode To enter this mode
On mode
Power mode status light is green.
Standby mode
Saves significant power.
Turns off the display and other components.
Maintains current session in RAM.
Restarts quickly.
Restores network connections.
Power mode status light is amber.
Hibernate mode
Saves maximum power.
Saves current session to disk, then shuts down.
Restores network connections.
Power mode status light is off.
Shut down (off)
Saves maximum power.
Turns off without saving current session.
At startup, resets everything, starts a new
session, and restores network connections.
Power mode status light is off.
To turn on: press the blue sleep button to restart, or to resume your session from Standby or Hibernate mode.
You can also customize the way these power modes work. See “How the computer
manages power automatically“ on page 54.
Press the blue sleep button.
Press blue sleep button
–or–
click Start, Shut Down, Standby (Windows 98 or 2000)
–or–
click Start, Turn Off Computer, Stand By (Windows XP)
–or–
allow timeout.
Press Fn+F12
–or–
click Start, Hibernate (Windows 98)
–or–
click Start, Shut Down, Hibernate (Windows 2000)
–or–
allow timeout.
Click Start, Shut Down, Shut down (Windows 98 or 2000)
–or–
click Start, Turn Off Computer, Turn Off (Windows XP)
–or–
slide the power button (only if the Start menu procedure
doesn’t work).
32 Corporate Evaluator’s Guide
Page 33

Basic Operation
Operating Your Computer
To reset the computer
Occasionally, you may find that Windows or the computer has stopped responding, and
will not let you turn the computer off. If this happens, try the following in the order listed.
• If possible, shut down Windows:
Windows 98 or 2000: press CTRL+ALT+DEL, click Shut Down, and press the blue
sleep button to restart.
Windows XP: press CTRL+ALT+DEL, then click Shut Down, Restart.
–or, if this fails–
• Slide and hold the power button for 4 seconds, until the display shuts down, then
press the blue sleep button to restart.
–or, if this fails–
• Insert a straightened paper clip into the system-off switch on the left side of the
computer, then press the blue sleep button to restart.
To reset an expansion base—and the computer, if docked—insert a straightened paper
clip into the reset hole on the bottom of the expansion base. You can also reset the
expansion base by undocking the computer and removing all AC and battery power from
the base.
Corporate Evaluator’s Guide 33
Page 34

Basic Operation
Operating Your Computer
To change the boot device
The computer normally boots from its internal hard disk. You can also boot the computer
from a floppy disk drive connected to a USB port, an external drive in an expansion base
module bay, or an internal network interface card (NIC).
1. Click Start, Shut Down (or Turn Off Computer), Restart.
2. When the HP logo appears, press ESC to display the Boot menu.
3. Use the arrow keys to select the boot device, and press ENTER.
If you want to boot from a specific device whenever it is present, change the boot order
using the BIOS Setup utility—see “To run the BIOS Setup utility“ on page 189.
To use the pointing stick
Your computer includes a built-in pointing stick and click and scroll buttons.
1. Pointing stick (pressure-sensitive pointing device).
2. Left click button—works like the left button on a standard mouse.
3. Scroll button—works with the pointing stick to scroll the contents of a window.
4. Right click button—works like the right button on a standard mouse.
34 Corporate Evaluator’s Guide
Page 35

Basic Operation
Operating Your Computer
You can use Mouse in Control Panel to customize the operation of your computer’s
pointing stick: you can change the left, right, and scroll button actions, double-click
speed, pointer speed, and more.
Moving and selecting
1. Place your hands in a normal typing position.
2. With your index finger, press the pointing stick in the direction you want the pointer
to move.
3. Use the left and right click buttons, which function like the left and right buttons on a
mouse, to make your selection:
• To open an application, move the pointer over the icon and double-click the left
button.
• To make menu selections, move the pointer to the menu item and click the left
button.
• To open the shortcut menu for an item, move the pointer over the item and click
the right button.
• To drag an item, move the pointer over the item. Then press and hold the left
button while you move the pointer to the new location, and release the button.
Scrolling with the scroll button
• Hold down the scroll button and press the pointing stick. The contents of the window
then scroll in that direction.
Corporate Evaluator’s Guide 35
Page 36

Basic Operation
Operating Your Computer
To use the Fn hot keys
The combination of the Fn key plus another key creates a hot key—a shortcut key
sequence—for various system controls. To use a hot key, press and hold Fn, press the
appropriate second key, then release both keys.
This hot key Does this
Fn+F1 Decreases the display brightness.
Fn+F2 Increases the display brightness.
Fn+F5
Fn+F7 Audio mute.
Fn+F8
Fn+F9 Toggles Num Lock on and off.
Fn+F10 Toggles Scroll Lock on and off.
Fn+F11 Pause.
Fn+F12 Enters Hibernate mode.
Fn+HOME Print screen.
Toggles among the built-in display, an external display, and simultaneous display on
both. Does not affect a TV connected to the expansion base S-video port.
Toggles the built-in keypad on and off. Does not affect an external keyboard. If Num
Lock is on, the numeric functions are active; otherwise, cursor control is active (as
marked on an external keyboard).
External PS/2 keyboards support only Fn+F5, Fn+F7, and Fn+F12. To use these, press
and hold left CTRL+left ALT, press the appropriate second key, then release both keys.
A USB keyboard does not support Fn hot keys.
36 Corporate Evaluator’s Guide
Page 37

Basic Operation
Operating Your Computer
To use the One-Touch buttons
Your computer includes two One-Touch buttons that can start any application or open a
document or web site with a single press.
• Press the One-Touch button to open the corresponding application, document, or
web site.
1. Left One-Touch button (preconfigured with HP Presentation Ready).
2. Right One-Touch button (preconfigured with HP information).
To reprogram a One-Touch button
1. Click Start, Settings, Control Panel, then double-click Keyboard (Windows 98 or
2000), or click Start, Control Panel, Printers and Other Hardware, Keyboard
(Windows XP).
2. On the One-Touch buttons tab, click the button you want to reprogram.
3. Type a label for the button, then select the application, document, folder, or web site
you want the button to open.
4. If you want a label to appear onscreen when you press a One-Touch button, select that
option on the Onscreen Display tab.
Corporate Evaluator’s Guide 37
Page 38

Basic Operation
Operating Your Computer
To use the Windows and Applications keys
The Windows key brings up the Windows Start menu. This is the same as clicking the
Start button on the taskbar.
The Applications key brings up the shortcut menu for the current application. This is the
same menu that appears when you right-click while pointing at the application.
This key combination Does this
Windows key+E Runs Windows Explorer.
Windows key+F1 Runs Windows Help.
Windows key+F Runs Windows Find: File or Folders (Windows 98 or 2000) or Search (Windows XP).
Windows key+M Minimizes all displayed windows.
Shift+Windows key+M Returns all minimized windows to original size.
Windows key+R Runs the Windows Run dialog box.
Windows key+U Runs the Windows Utility Manager (Windows 2000 and XP).
To use the embedded keypad
Your computer’s built-in keyboard includes an embedded keypad you can use to type
numbers and arithmetic operators. The keys in this keypad are marked using light gold
characters.
• Press Fn+F8 to turn on the embedded keypad.
• Hold Fn while typing a key to turn the embedded keypad on temporarily.
When the embedded keypad is active, you can use Num Lock to change how the keypad
functions:
• Num Lock on: the keys enter the numbers and arithmetic operator printed in light
gold on the keyboard.
• Num Lock off: the keys act as cursor control keys, as marked on an external
keyboard.
38 Corporate Evaluator’s Guide
Page 39

Basic Operation
Operating Your Computer
To use the ALT GR key
Non-U.S. keyboards have an ALT GR key to the right of the spacebar. This is a shift key
that provides access to certain special keyboard characters.
• For a character in the lower-right corner of a key, press and hold ALT GR to type the
character.
Hint
1. Shifted.
2. Unshifted.
3. ALT GR.
To adjust the display
Changing the brightness
• Press Fn+F1 or Fn+F2 to decrease or increase (respectively) the display’s brightness.
–or–
• Click Start, Programs, HP Display Settings, HP Display Settings (Windows 98 or
2000), or Start, All Programs, Hewlett-Packard, Notebook, HP Display Settings, HP
Display Settings (Windows XP). You have the option of adding a display settings
icon in the taskbar for quick access.
To maximize your battery operating time, set the brightness to the lowest level you can
view comfortably.
Changing display settings
You can customize a number of display settings for your computer, such as color depth
and screen area.
1. Click Start, Settings, Control Panel, then double-click Display (Windows 98 or 2000),
or click Start, Control Panel, Appearance and Themes, Display (Windows XP).
2. Click the Settings tab, then make the settings you want.
The computer has an LCD display, which behaves differently from a normal computer
monitor. If you change the display resolution, the desktop changes size, but the objects on
it do not. You normally won’t change the resolution except to use an external monitor.
Corporate Evaluator’s Guide 39
Page 40

Basic Operation
Operating Your Computer
Using an external monitor
If you want, you can attach an external monitor to your computer. See “To use an
external monitor“ on page 97.
To adjust the volume
From the computer
• To increase the volume, press the rear half of the volume control on the right side of
the computer.
• To decrease the volume, press the front half of the volume control.
• To toggle the standard mute function, press Fn+F7.
With the audio-off button
Your computer includes an audio-off button you can use to temporarily disconnect the
speakers without changing the volume or mute settings. This feature is handy when you
want to block all speaker output regardless of what your computer is doing.
• To toggle the speaker connection on and off, press the audio-off button on the right
side of the computer. The audio-off light turns on when the speakers are
disconnected.
In Windows
1. Click the Volume icon in the taskbar (if not present, see Windows Help).
2. Drag the volume control bar up or down to adjust the volume.
3. To temporarily silence the speakers without changing the volume setting, click Mute.
From an expansion base
• Press the volume control above the right module bay.
40 Corporate Evaluator’s Guide
Page 41

Basic Operation
Operating Your Computer
To change computer settings for a presentation
When you show a presentation to an audience, you’ll often want to adjust some of your
video and power settings for the show. You can easily do this with HP Presentation
Ready, an application that automatically adjusts your computer for slide shows and
similar presentations, and also opens the presentation itself. Once the presentation is
through, HP Presentation Ready automatically returns your computer to its normal
settings.
To prepare for the presentation
1. Click Start, Programs (or All Programs), Hewlett-Packard, Notebook, HP
Presentation Ready, Configure.
–or–
Click the HP Presentation Ready icon in the taskbar (if present), then click Configure.
2. Select the presentation you want to show. If you don’t select one, you can choose one
when you start the show.
3. If you want to change the video or power settings for the show, click Settings.
To show the presentation
• Press the HP Presentation Ready One-Touch button.
–or–
Click Start, Programs (or All Programs), Hewlett-Packard, Notebook, HP
Presentation Ready, Start Presentation.
–or–
Click the HP Presentation Ready icon in the taskbar (if present), then click Start
Presentation.
To adjust settings during the presentation, press the One-Touch button or click the
taskbar icon and choose Configure.
To end the presentation and restore the computer’s normal settings, close the presentation
application or click the taskbar icon and choose Stop Presentation.
Corporate Evaluator’s Guide 41
Page 42

Basic Operation
Operating Your Computer
To use a multimedia expansion base
The multimedia expansion base provides connections for peripheral devices that you can
leave in place whenever you remove the computer from your desk. Instead of
disconnecting and reconnecting the devices, you can simply undock and dock the
computer. For details, see “Using an Expansion Base“ on page 80.
In addition, the expansion base is very portable. You can easily set up your computer and
expansion base as a flexible multimedia system that’s convenient for travel.
The expansion base also includes a built-in CD player that uses a CD-ROM or DVD
drive in the right module bay—see “To work with CDs and DVDs,” below.
To work with CDs and DVDs
The expansion base includes a built-in CD player that uses a CD-ROM or DVD drive in
the right module bay. If you have an expansion base and a CD-ROM or DVD drive
module, you can play audio CDs with or without the computer—see “Using Plug-In
Modules“ on page 86 and “To play audio CDs“ on page 83.
If you have a DVD drive module, you can also use your computer to watch DVD
movies—see “To play DVD movies“ on page 90.
42 Corporate Evaluator’s Guide
Page 43

Basic Operation
Securing Your Computer
Securing Your Computer
To set up password protection
You can protect your computer from access by another user when you set up password
protection, which is available through Windows and through the BIOS Setup utility. For
complete protection, set passwords in Windows and through BIOS Setup.
To cancel password protection, set an empty password.
BIOS Setup Utility
1. Click Start, Shut Down (or Turn Off Computer), Restart.
2. When the HP logo appears, press F2 to enter BIOS Setup.
3. From the Security menu, enter or modify the Administrator Password or User
Password as needed—see “Security Menu“ on page 192.
4. Press F10 to save and exit BIOS Setup.
Windows 98
1. Click Start, Settings, Control Panel, then double-click Passwords.
2. Click the Change Passwords tab, then click Change Windows Password and set a
password.
3. Click Start, Settings, Control Panel, then double-click Power Options or Power
Management.
4. On the Advanced tab, select the option to prompt for a password when the computer
leaves Standby mode.
Windows 2000
1. Press CTRL+ALT+DEL, then click Change Password.
2. Create or modify your Windows password.
3. Click Start, Settings, Control Panel, then double-click Power Options.
4. On the Advanced tab, select the option to prompt for a password when the computer
leaves Standby mode.
Corporate Evaluator’s Guide 43
Page 44

Basic Operation
Securing Your Computer
Windows XP
1. Click Start, Control Panel, User Accounts, then select your account.
2. Click Create a Password, then set the password.
3. Click Start, Control Panel, Performance and Maintenance, Power Options.
4. On the Advanced tab, select the option to prompt for a password when the computer
leaves Standby mode.
To attach a security cable
Your computer includes a built-in connector you can use to secure the computer with a
cable and a lock (such as the Kensington MicroSaver lock system, available at many
computer stores).
1. Wrap the cable around a secure object, such as a table leg.
2. Loop the cable to create a slip knot around the stationary object, and make sure it
can’t slip off.
3. Insert the lock into the security connector on the back of the computer, and release the
key. Store the key in a safe place away from the computer.
44 Corporate Evaluator’s Guide
Page 45

Basic Operation
Securing Your Computer
The expansion base also includes a security connector. When the expansion base is
secured in this way, you will not be able to use the emergency undock latch. To further
prevent the computer from being undocked while the expansion base is secured, add a
password for undocking—see “To run the BIOS Setup utility“ on page 189.
To protect against viruses
Virus-protection software can help protect the integrity of your data. This is especially
important if you use the Web.
Your computer includes VirusScan (Windows 98 or 2000 only) or Norton AntiVirus
software. If you have VirusScan, you must install it before you can use it.
1. Click Start, Programs, VirusScan, Setup.
2. Follow the instructions as they appear on the screen.
Once installed, you can get detailed instructions from the software’s online Help.
Pavilion models
To set PC identification
HP TopTools and PC identification are not supported on Pavilion models.
You must have BIOS administrator password authority to set a PC identification number.
1. If you have not already installed HP TopTools, do so now—see “To set up TopTools“
on page 195.
2. Click Start, Programs (or All Programs), HP TopTools, HP TopTools, then click
Security.
3. In the “Identification String” box, type a unique set of characters that will identify
your PC. You can type up to 80 characters including spaces and special characters.
Do not press ENTER when typing. The string wraps automatically.
4. Click Apply.
5. Type your BIOS administrator password and press ENTER.
Corporate Evaluator’s Guide 45
Page 46

CAUTION
Basic Operation
Securing Your Computer
To lock the hard disk drive
The computer enables you to lock its internal hard disk drive to help keep your
information secure. Hard disk drive lock does not protect a second hard disk drive
installed in an expansion base module bay.
When you enable hard disk drive lock, the current BIOS user password (or
administrator password if that is the only password set) is encoded on the hard
disk drive.
If you move the hard disk drive to another computer, you can’t access the drive until
you set the user (or administrator) password to match the drive’s password. After you
match the drive’s password, you can change the computer (and drive) password. If
you forget the password, you cannot recover your data.
1. Click Start, Shut Down (or Turn Off Computer), Restart.
2. When the HP logo appears, press F2 to enter the BIOS Setup utility.
3. From the Security menu, enable Password Required to Boot.
4. From the Security menu, enable Internal hard disk drive lock.
5. Press F10 to save and exit BIOS Setup.
46 Corporate Evaluator’s Guide
Page 47

Basic Operation
Working in Comfort with a Notebook PC
Working in Comfort with a Notebook PC
WARNING
Note
Improper use of keyboards and other input devices has been associated with
ergonomic injury. For more information about reducing your risk, visit our
ergonomics web site at www.hp.com/ergo—or see Working in Comfort in the
online HP Library.
You can use your HP notebook computer virtually anywhere, anytime. The following
recommendations should help you work more comfortably.
Note that if you are using your portable computer as your primary computer, or using it
for extended periods, you should use it with a full-size keyboard, monitor, and mouse.
This will give your portable computer the adjustability and comfort features of a desktop
unit. The multimedia expansion base offers quick, easy connections to these devices.
More information on how to prepare your workspace environment and set up your HP
equipment is available in Working in Comfort, which is preloaded on the hard disk in the
HP Library and available on the Recovery CD in \hp\Library—as well as at
www.hp.com/ergo.
Your Mobile Work Environment
• Use a chair that provides good support for your lower back. If an adjustable chair is
not available, you can use a pillow or rolled-up towel to provide lower back support.
• Try to keep your thighs parallel to the floor and your feet flat on the floor. In a mobile
environment, you can do this by using a phone book or briefcase to support your feet.
• Adjust the height of either your work surface or chair to keep your arms in a neutral
position. Your arms should be relaxed and loose, elbows at your sides, with the
forearms and hands parallel with the floor.
• Position your notebook computer display to minimize glare and reflection. For
Corporate Evaluator’s Guide 47
example, on an airplane, lower the window shade, or in a hotel room, draw the
curtains. You also should maintain a comfortable viewing distance–approximately 40
to 60 cm (16 to 24 inches). Adjust the angle of your display to help keep your head
angled slightly downward in a comfortable position.
Page 48

Basic Operation
Working in Comfort with a Notebook PC
Using Your Mobile Computer
• Position the computer so your wrists and hands are in a neutral position. Your wrists
should be as straight as possible and should not have to bend sideways or more than
10 degrees up or down. If your notebook computer does not have a built-in palm rest,
you can use a rolled-up towel.
• Try to type as lightly as possible. The notebook keyboard requires little force to
activate.
• Take frequent, short rest breaks–this is especially important in a mobile computing
environment.
• Portable computers weigh between approximately 1.4 and 3.7 kilos (3 and 8 pounds).
When traveling, be sure to carry your computer properly to minimize strain on your
body. Shift the bag containing your notebook equipment frequently between your left
and right hands and shoulders.
48 Corporate Evaluator’s Guide
Page 49

Basic Operation
Taking Care of Your Computer
Taking Care of Your Computer
Use the following recommendations to maintain your computer during everyday use and
prevent potential physical damage or data loss.
To protect your hard disk drive
Hard disk drives, as well as other internal components, are not indestructible and can be
damaged by inappropriate handling and operation.
• Avoid bumps or jolts.
• Do not operate the computer while traveling over bumpy terrain.
• Suspend or shut down the computer before transporting it. This turns off the hard
drive. A drop of a few inches onto a rigid surface while the hard drive is operating
could destroy data or damage the drive.
• Carry the computer in a padded case to protect against bumps and jolts.
To maintain your computer
• Provide adequate ventilation around the computer. Always set the computer on a flat
surface, so that air can flow freely around and underneath it.
• Always shut down the computer or put it in Hibernate mode before putting it in a
carrying case or other enclosed space.
• Do not pick up or carry the computer by its display.
• Observe the temperature limits and other specifications listed in “Hardware
Specifications“ on page 210. Do not use the computer outside in the rain or snow
(inclement weather). If the computer is cold, warm it gradually to avoid condensation.
Corporate Evaluator’s Guide 49
Page 50

Basic Operation
Taking Care of Your Computer
To safeguard your data
• Do not use the pointing stick or activate any other device that interrupts operation
while the system is starting or stopping.
• Back up your work regularly. Copy files to floppy, tape, CD-R, or network drives.
• Use a virus-scanning program (such as the VirusScan or Norton AntiVirus program
included with your computer) to check the integrity of your files and operating
system. Since new viruses appear frequently, you will also want to update the
program’s virus definitions from time to time; updates are on the Web at
www.networkassociates.com for VirusScan, or www.symantec.com for Norton
AntiVirus.
• Check your disk periodically using the Scandisk utility (Windows 98) or the Tools tab
in the disk’s Properties window (Windows 2000 or XP).
To extend the life of the display
• Set the display brightness to the lowest comfortable level (Fn+F1).
• When working at your desk, connect an external monitor and turn off the internal
display (Fn+F5).
• If you are not using an external monitor, set the Turn off monitor timeouts (for both
AC and battery operation) to the shortest comfortable interval.
• Avoid using a screen saver or other software that prevents the computer from
changing to Standby mode after a timeout period. If you use a screen saver, enable the
option to shut off the display after a time delay.
• Do not disable the Standby timeout.
• If you are using AC power and have no external monitor attached, put the computer in
Standby mode when not in use.
50 Corporate Evaluator’s Guide
Page 51

Basic Operation
Taking Care of Your Computer
To clean your computer
• You can clean the computer with a soft cloth dampened with clean water or with
water containing a mild detergent. Do not use an excessively wet cloth, and take care
to keep water out of the case.
• Do not use abrasive cleaners, especially on the display. Do not apply any cleaner
directly to the display. Instead, apply the cleaner to a soft cloth and then gently wipe
the display.
• You can clean the keyboard with a vacuum cleaner to remove accumulated dust.
Corporate Evaluator’s Guide 51
Page 52

Page 53

Batteries and Power Management
Corporate Evaluator’s Guide 53
Page 54

Batteries and Power Management
Managing Power Consumption
Managing Power Consumption
When you’re running your computer on battery power, you will want to maximize
operating time without compromising performance. Your computer is designed to help
you reduce power consumption and extend battery life without needing to turn it off.
• During idle periods, the computer automatically enters power-saving modes after
specified timeout periods. You can adjust these timeouts to suit your working habits.
• You can manually send the computer into a power-saving mode at any time by
pressing the appropriate key—see “To manage power manually“ on page 57.
How the computer manages power automatically
Your computer automatically enters Hibernate mode and Standby mode, and turns off the
hard disk and display based on values set in Power Options or Power Management in
Control Panel or in the BIOS Setup utility.
Automatic action Occurs after… To resume…
Turns off hard disk.
Turns off the hard disk drive. This is usually
set to occur shortly after the display is turned
off.
Turns off display.
Turns off the display to conserve battery
power and extend the life of the display.
Enters Standby mode.
Maintains your current session in RAM, and
turns off the display and other components to
conserve battery power.
Enters Hibernate mode.
Saves your current session to the hard disk,
then turns off the computer.
Lowers CPU speed (SpeedStep only).
Switches to the lower CPU speed to use
power more efficiently. See below.
The hard disk is not accessed
for the specified interval.
No keyboard, pointing device, or
other input activity occurs for the
specified interval.
No pointing devices are used,
no disk drive is accessed, and
no port (serial or parallel) is
active for the specified interval.
The computer stays in Standby
mode for the specified interval.
The AC adapter is unplugged. Plug in the AC adapter.
Begin using the computer:
the hard disk turns on when
needed.
Press any key or move a
pointing device to turn on
the display.
Press the blue sleep button
to return to your current
session.
Press the blue sleep button
to restore your previous
session.
54 Corporate Evaluator’s Guide
Page 55

Batteries and Power Management
Managing Power Consumption
CAUTION
Make a habit of saving your work before allowing your computer to enter Standby
mode. If power is interrupted while the computer is in Standby mode, any
information that was not saved will be lost.
The computer can also enter Hibernate mode if battery power reaches a critically low
level. (See “To respond to a low-battery warning“ on page 59.) If this happens, you will
find on resuming that all your data has been saved, but some functions may be disabled.
To resume normal operation, restore power by connecting an AC adapter or installing a
charged battery, then shut the computer off and restart it.
Changing timeout settings and creating power schemes
You can adjust the periods of non-use after which your computer automatically shuts
down components or enters a power-saving mode. You can also save these settings as a
power scheme.
1. Open Power Options or Power Management in Control Panel:
• Windows 98 or 2000: click Start, Settings, Control Panel, then double-click
Power Options (Windows 2000) or Power Management (Windows 98).
• Windows XP: click Start, Control Panel, Performance and Maintenance, Power
Options.
2. Click the Power Schemes tab, and enter the settings you want. If you don’t want a
particular timeout to occur, set the value to Never. See Windows Help for details.
If you want to save the settings as a power scheme, click Save As and enter a name
for the scheme.
CAUTION
For Windows 98, change the Hibernate timeout in BIOS Setup—see “To run the BIOS
Setup utility“ on page 189.
For Windows 2000 or XP, do not disable Hibernate support in the Power settings,
or you will lose any unsaved data if the computer’s battery runs down completely.
Corporate Evaluator’s Guide 55
Page 56

Batteries and Power Management
Managing Power Consumption
Managing CPU power
If your computer contains a multispeed processor with Intel SpeedStep Technology, the
taskbar in Windows 98 or 2000 contains an Intel SpeedStep Technology icon. This
feature enables the processor to automatically switch to lower, power-saving speeds or to
higher-performance speeds according to its workload and power source.
You can customize SpeedStep to best suit your working environment.
• Windows 98 or 2000: double-click the Intel SpeedStep Technology icon in the
taskbar, then select the battery and AC options you want. The Max Battery option
uses the lowest processor speeds for maximum battery time. The Auto option uses
medium and high processor speeds.
• Windows XP: click Start, Control Panel, Performance and Maintenance, Power
Options. On the Power Schemes tab, select a power scheme. This scheme
automatically controls the processor speeds:
• The Max Battery scheme uses the lowest processor speeds while running on
battery power, but uses medium and high processor speeds on AC power.
• The Portable/Laptop option uses medium and high processor speeds on battery
and AC power.
See Windows Help for additional information about power schemes.
56 Corporate Evaluator’s Guide
Page 57

Batteries and Power Management
Managing Power Consumption
To manage power manually
In addition to allowing the computer to enter its power-saving modes automatically, you
can also put it into any of the following three modes whenever you need to.
Power mode Does this… Use when… To enter this mode…
Standby Maintains your current
session in RAM, and turns off
the display and other
components.
Hibernate Saves the current session to
disk, then shuts down.
Provides maximum power
savings while still allowing you
to recover the current session.
Off Turns off your computer,
providing maximum power
savings. The current session
will not be saved, and any
unsaved data will be lost.
You will be away
from your computer
for up to several
hours.
You will be away
from your computer
for a day or more,
but want to continue
your session.
You’re done with
your work.
Press blue sleep button
–or–
click Start, Shut Down,
Standby (Windows 98 or 2000)
–or–
click Start, Turn Off Computer,
Stand By (Windows XP).
Press Fn+F12
–or–
click Start, Hibernate
(Windows 98)
–or–
click Start, Shut Down,
Hibernate (Windows 2000).
Click Start, Shut Down, Shut
down (Windows 98 or 2000)
–or–
click Start, Turn Off Computer,
Turn Off (Windows XP)
–or–
slide the power button (only if
the Start menu procedure
doesn’t work).
You can also turn off the display by closing the display lid.
Corporate Evaluator’s Guide 57
Page 58

Batteries and Power Management
Using Battery Power
Using Battery Power
To check battery status
The computer contains one battery: the main battery. An expansion base can contain one
or two secondary batteries in the module bays.
From the battery charge light
The main battery charge light on the front of the computer shows whether the computer’s
main battery is charging or fully charged—see “Status Lights“ on page 19.
From the Windows taskbar
The Windows taskbar can display a power icon that provides detailed battery status
information (see Windows help for details). The icon looks like a battery when AC is not
connected.
• Place the pointer over the power icon to display the remaining charge of all batteries
combined. This value is shown as either a percentage of charge remaining, or as time
remaining.
• Double-click the power icon to open the Power Meter window.
From the Windows Control Panel
• Windows 98 or 2000: click Start, Settings, Control Panel, then double-click Power.
This shows the status of each battery, and provides access to all of Windows’ powerinformation options.
• Windows XP: click Start, Control Panel, Performance and Maintenance, Power
Options, then click the Power Meter tab to see battery status. The Alarms and
Advanced tabs provide additional Windows’ power-information options.
From the expansion base status panel
• Press the status panel button several times to display the percent charge remaining for
each secondary battery.
58 Corporate Evaluator’s Guide
Page 59

Batteries and Power Management
Using Battery Power
On the battery
1. Remove the battery from the computer (see “Step 1: Install the battery“ on page 23)
or from the expansion base.
2. Press the contact pad on the back of the battery. The number of lights that turn on
indicates the remaining charge (each light represents 20% of a full charge).
To respond to a low-battery warning
The computer automatically alerts you when the battery power drops to a critically low
level. If you do not restore power within a short time, the computer then goes into
Hibernate mode.
Once the computer enters Hibernate mode in this way, you won’t be able to turn it on
again until you restore power by doing one of the following:
• Replace the battery with a charged one. See “Step 1: Install the battery“ on page 23.
• Plug in the AC adapter.
Note
CAUTION
• Install a charged secondary battery in one of the expansion base’s plug-in module
bays—see “To use additional batteries,” below.
If you plug in the AC adapter, you can continue to work while your battery recharges.
To recharge the battery
The AC adapter is normally warm whenever plugged into an AC outlet. The
computer is normally warm while recharging. Don’t recharge the computer in a
briefcase or other confined space, or its battery could overheat.
• To recharge the main battery, plug the AC adapter into the computer, or dock the
computer and plug the AC adapter into the dock.
• To recharge a secondary battery, plug the AC adapter into the expansion base and
insert the battery.
Batteries charge in this order: main battery, secondary battery in the left module bay,
secondary battery in the right module bay.
Corporate Evaluator’s Guide 59
Page 60

Batteries and Power Management
Using Battery Power
To get the longest operating time, wait until the battery’s charge is below 50% before
recharging, then charge it fully (100%). Charging can take up to approximately 2 hours.
You can continue working while the battery charges.
A fully charged battery can operate the computer for up to approximately 4 hours,
depending on your computer’s model, power management settings, and level of use.
To use additional batteries
You can install a secondary battery in either or both of the expansion base’s plug-in
module bays. See “Using Plug-In Modules“ on page 86 for information about installing
plug-in modules.
For instructions on replacing the main battery, see “Step 1: Install the battery“ on
page 23.
To get the most from your batteries
Follow these suggestions to make your battery’s power last as long as possible.
• Plug in the AC adapter, especially when using a drive in the expansion base’s module
bays, or any external connections such as a PC Card or a modem.
• Set the display brightness to the lowest comfortable level (Fn+F1).
• Put the computer in Standby mode whenever you are not using it for a short while:
press the blue sleep button for approximately one second, or click Start, Shut Down
(or Turn Off Computer), Standby.
• Put the computer in Hibernate mode whenever you want to save your current session,
but will not be using the computer for several hours: press Fn+F12.
• Set the automatic timeout settings to emphasize saving power. If your computer has a
multispeed processor and uses Windows 98 or 2000, use the lower speed on battery
power (the default settings conserve battery power)—see “How the computer
manages power automatically“ on page 54.
• If your computer has a wireless on-off button, turn off the wireless function when
you’re not using it. Press the wireless on-off button so the light turns off.
• If you have an I/O PC Card—that is, a PC Card having an external connection, such
as a network card—remove it when you’re not using it. Some I/O cards use
significant power even while they’re inactive.
60 Corporate Evaluator’s Guide
Page 61

Batteries and Power Management
Using Battery Power
• If you work with an application that uses the serial port or an I/O PC Card, exit the
application when you finish using it.
• Install another battery—see “To use additional batteries“ on page 60.
• If your main battery is rated at 14.8 volts (check its label), purchase a replacement
main battery, which is rated at 11.1 volts.
In addition, follow these suggestions to extend the life of your batteries.
• Do not leave batteries unused for long periods. If you have more than one, rotate
them.
• If you normally use AC power, make a practice of using the battery as your power
source at least once a week.
• Unplug the AC adapter when the computer is not in use.
• To preserve the life of a battery, be sure to charge it regularly.
• For long-term storage, the battery must be charged 20–50% to minimize capacity loss
by self-discharge and to avoid deterioration of performance. Storing a fully charged
battery can cause higher self-discharge and reduce its discharge capacity—even after
recharging—as compared to a battery stored when charged 20–50%.
• To maintain maximum battery capacity and accuracy of the battery gauge, perform
this procedure about once a month:
1. Charge the battery to 100%.
2. Disconnect the AC adapter, and use the computer until the battery is fully
discharged and the computer goes into hibernation.
3. Connect the AC adapter and charge the battery to 100% with no power
interruptions.
To maximize processor speed
If your computer contains a multispeed processor with Intel SpeedStep Technology, the
processor can automatically switch to lower, power-saving speeds or to higherperformance speeds according to its workload. See “How the computer manages power
automatically“ on page 54.
Corporate Evaluator’s Guide 61
Page 62

Page 63

Modem and Network Connections
Corporate Evaluator’s Guide 63
Page 64

Modem and Network Connections
Using the Modem
Using the Modem
If your computer has a modem port, you can connect your modem to a telephone line and
communicate with other computers throughout the world. You can explore the Internet,
send and receive e-mail messages, and use your computer to send and receive faxes. Your
computer contains several software programs that work with your modem:
• Internet Explorer, for browsing the World Wide Web.
• Outlook Express, for sending and receiving e-mail messages.
• Windows XP Fax Console, Windows 2000 fax software, or QuickLink with Windows
98, for sending and receiving faxes.
The modem is a high-speed 56-Kbps modem. It allows you to connect to any Internet
Service Provider (ISP) or modem network that has V.90 interoperable modems. Check
with your ISP for a list of telephone numbers that support V.90.
Note that the maximum speed for faxing is 14.4 Kbps. Even though the modem is
capable of downloading at 56 Kbps, your ISP or modem network may not operate at this
speed or support this technology. Please check with your service provider for information
on its capabilities. Furthermore, download transmission rates depend on the condition of
the telephone line.
CAUTION
To connect the modem
To reduce the risk of fire, use only No. 26 AWG or larger telecommunications line
cord to connect the modem to the telephone wall jack.
1. Make sure the telephone line is an analog line (sometimes called a data line). You
must not use a digital line.
64 Corporate Evaluator’s Guide
Page 65

Modem and Network Connections
Using the Modem
2. Connect the telephone cord to the built-in modem.
CAUTION
3. Plug the other end of the phone cord into a telephone jack. If the plug on the phone
cord doesn’t fit the jack, you may need to use an adapter.
4. Check your modem’s country or region settings:
• Windows 98: click Start, Settings, Control Panel, double-click Modems, then
click Dialing Properties.
• Windows 2000: click Start, Settings, Control Panel, double-click Phone and
Modem Options, then click Edit on the Dialing Rules tab.
• Windows XP: click Start, Control Panel, Printers and Other Hardware, Phone and
Modem Options.
Your built-in modem may not work with multiple phone lines or a private branch
exchange (PBX), cannot be connected to a coin-operated telephone, and does not
work with party lines. Some of these connections may result in excess electrical
voltage and could cause a malfunction in the internal modem. Check your
telephone line type prior to connecting your phone line.
Special restrictions in certain countries
• The pulse dialing feature may be disabled in certain countries, possibly because Loop
Disconnect is not certified there. If pulse dialing is disabled, you should use tone
dialing connections only.
• Many countries impose a blackout period after a modem repeatedly fails to connect to
a service provider. The number of failed attempts and the period you must wait before
trying again differ from country to country: check with your telephone company.
Corporate Evaluator’s Guide 65
Page 66

Modem and Network Connections
Using the Modem
For example, if you are dialing from Italy and fail to connect to your server or cancel
the connection, you must wait one minute before dialing that number again. If you
dial before then, you will get an error message that says “delay.” After the fourth
failed connection, you must wait one hour before trying the number again. If you dial
before the hour is up, you will get a message that says “black list.”
• When using a modem in the Republic of South Africa, an external surge protector
may be necessary in order to prevent computer damage by lightning or other electrical
surges. Connect any approved surge protector to the modem cable whenever you are
using the modem.
To connect to the Internet
Signing up with an Internet Service Provider
Before you can connect to the Internet, you need to set up an account with an Internet
Service Provider (ISP). In some countries, Hewlett-Packard provides easy Internet signup
so that you can connect quickly to an ISP.
1. Connect your built-in modem—see the previous topic. (If your computer does not
have a built-in modem, you can instead use a PC Card modem or an external modem.)
2. If available, double-click the Connect to the Internet or Easy Internet Signup icon on
the desktop. This launches the Internet Connection or New Connection wizard, which
helps you locate an ISP in your area, transfer an existing Internet account to this
computer, or set up an Internet connection manually.
–or–
If available, click Start, Programs, Online Services (Windows 98 or 2000) or Start,
All Programs, Easy Internet Signup (Windows XP), and select one of the listed ISPs.
This begins the registration process for the ISP you choose.
Connecting to the Internet
1. Double-click the Internet Explorer icon on the desktop (if available), or click Start,
Programs, Internet Explorer (Windows 98 or 2000) or Start, Internet Explorer
(Windows XP). For your first connection, you’ll be prompted for information about
your connection.
2. Click the Connect button in the Dial-up Connection or Network Connection window.
66 Corporate Evaluator’s Guide
Page 67

Modem and Network Connections
Using the Modem
For Windows 98 or 2000, when you are successfully connected to the Internet, you’ll see
a connect icon (two connected computers) in the taskbar. For Windows XP, to display an
icon for your connection, open Network Connections in Control Panel, right-click the
connection, select Properties, and select the icon option.
Using AOL as your ISP (Windows 98)
If you signed up with AOL as your ISP, you can access the Internet only with AOL’s
own software—you can’t use a standard browser such as Internet Explorer. As a result,
you cannot view web sites by clicking on links in documents, and you cannot go to a web
site by entering the address in Windows Explorer.
If you try to access the Internet without using the AOL software, the Internet Connection
wizard automatically launches, asking you to sign up for an ISP. In that case, cancel the
wizard and launch AOL.
To disconnect from the Internet
You remain connected to the Internet until you shut down the computer, disconnect the
phone line from the computer, or give a command to hang up the connection.
• Double-click the connect icon in the taskbar, and click Disconnect. (For Windows
XP, you can enable this icon as described in “To connect to the Internet,” above.)
–or–
For Windows XP, click Start, Control Panel, Network and Internet Connections,
Network Connections, then right-click the connection and select Disconnect.
To dial in to a network
You can use the modem to dial in to a LAN (local area network) that supports dial-in
connections. This gives you access to network resources from a remote location.
• See Windows Help for information about setting up and using dial-in network
connections—click Start, Help (or Help and Support).
Corporate Evaluator’s Guide 67
Page 68

Modem and Network Connections
Using the Modem
To change your modem settings
The modem is already set up to be compatible with telephone systems and modems in
most areas. However, in some situations, you may have to change modem settings to
match local conditions. If you have questions about local requirements, contact your
telephone company.
• Control Panel. Open Modems (Windows 98) or Phone and Modem Options
(Windows 2000 or XP) in Control Panel to change many modem settings.
For Windows 98, on the General tab click Properties to set connection speeds or
special dialing options.
For Windows 2000 or XP, on the Modems tab click Properties to set connection
speeds, or on the Dialing Rules tab click Edit to set dialing options.
• Communications software. Many communications applications provide options for
controlling modem settings. See the help for your software.
• AT commands. You can control many aspects of modem operation using modem AT
commands. AT commands are special strings of characters sent to the modem to set
up specific conditions. Those command strings normally start with “AT”. For a list of
AT commands for the built-in modem, see “Modem Reference Information“ on
page 214.
For Windows 98, open Modems in Control Panel. On the General tab, click
Properties, then on the Connection tab click Advanced. You can type AT commands
in the space for extra settings.
For Windows 2000 or XP, open Phone and Modem Options in Control Panel. On the
Modems tab, click Properties. You can type AT commands on the Advanced tab in
the space for extra settings.
For example, to force a built-in 3Com modem to connect using the V.42 data
compression protocol, you can use the &K command as shown in table of AT
commands—type AT&K2 in the space for extra settings.
68 Corporate Evaluator’s Guide
Page 69

Modem and Network Connections
Using the Modem
To send and receive e-mail
Sending and receiving e-mail requires an e-mail account with an Internet Service
Provider or with your company’s communications system. If you are using AOL, e-mail
services are part of your AOL service. For another ISP, you can use Outlook Express
(included with your computer) or an e-mail system of your choice. This topic includes
instructions for using Outlook Express.
To start Outlook Express
1. Click Start, Programs (or All Programs), Outlook Express, or double-click Outlook
Express on the desktop (if available).
2. If you are not currently connected to the Internet, the Dial-up Connection window
appears. Choose Connect to connect to the Internet.
To send an e-mail message
1. In Outlook Express, click the New Mail or Create Mail tool on the toolbar.
2. Fill in the information in the New Message window.
3. When you’re finished, click the Send button.
To receive e-mail messages
1. In Outlook Express, click the Send/Recv tool on the toolbar to have Outlook deliver
new messages.
2. Click the Inbox folder to view the list of messages. Unread messages appear bold on
the screen.
3. To view a message, click it once. (Or double-click to view the message in its own
window.)
Corporate Evaluator’s Guide 69
Page 70

Modem and Network Connections
Using the Modem
To send and receive faxes (Windows 98)
Sending and receiving faxes requires just a telephone connection—you don’t need an
Internet connection. You can use the modem and fax software to send and receive faxes
on your computer. QuickLink fax software is included with Windows 98 on the hard
disk.
To start QuickLink
• Click Start, Programs, QuickLink, QuickLink.
The first time you start QuickLink, the Setup Wizard steps you through the process of
setting options and customizing the program for your personal use. Follow the onscreen
instructions. If you’re not sure which setting to choose, accept the default choice.
To send a fax
1. In QuickLink, click the QuickFax tool on the toolbar.
2. Enter the fax number and the recipient’s name and company.
3. Type the message body in the QuickFax Note area.
4. Click Send Fax.
If instead you want to send a document as a fax, open the document in its application
window, then open the Print dialog box. Change the selected printer to QuickLink, then
print it.
To receive faxes
Faxes are automatically received when QuickLink is running in an open or minimized
window. New faxes are indicated in the status box in the QuickLink window. To receive
a fax manually, follow these steps.
1. When a fax call is coming in, click Start on the QuickLink menu bar.
2. Click Manual Fax Receive.
To view and print a fax
1. In QuickLink, click the Fax Viewer tool on the toolbar.
2. Click Yes to view the fax now.
3. Click the printer icon to print the fax.
70 Corporate Evaluator’s Guide
Page 71

Modem and Network Connections
Using the Modem
To send and receive faxes (Windows 2000)
Sending and receiving faxes requires just a telephone connection—you don’t need an
Internet connection. You can use the modem and fax software to send and receive faxes
on your computer. Fax software is built into Windows 2000.
To set up for faxing
1. Click Start, Settings, Control Panel, then double-click Fax. Enter your fax
information.
2. On the Advanced Options tab, add a fax printer.
If you do not want to receive faxes, stop here.
3. On the Advanced Options tab, open the Fax Service Management Console.
4. In the list under Fax Service on Local Computer, double-click Devices, then rightclick the modem and click Properties.
5. On the General tab, enable the modem to receive faxes.
6. On the Received Faxes tab, select the option to save faxes in a folder.
To send a fax
• Click Start, Programs, Accessories, Communications, Fax, Send Cover Page Fax.
Follow the instructions to create and send the fax.
If instead you want to send a document as a fax, open the document in its application
window, then open the Print dialog box. Change the selected printer to the fax printer,
then print it.
To receive, view, and print faxes
If you enabled the modem to receive faxes, they are automatically received.
1. Click Start, Programs, Accessories, Communications, Fax, My Faxes.
2. In the Received Faxes folder, double-click the fax.
3. To print, click File, Print.
Corporate Evaluator’s Guide 71
Page 72

Modem and Network Connections
Using the Modem
To send and receive faxes (Windows XP)
Sending and receiving faxes requires just a telephone connection—you don’t need an
Internet connection. You can use the modem and fax software to send and receive faxes
on your computer. Fax Console fax software is included with Windows XP.
To set up Fax Console
Before you can use Fax Console, you need to install it.
1. Click Start, Control Panel, Add or Remove Programs.
2. Click Add/Remove Windows Components, select Fax Services, and follow the
instructions on the screen. You may need the Windows CD to complete installation.
To start Fax Console
• Click Start, All Programs, Accessories, Communications, Fax, Fax Console.
The first time you start Fax Console, the Fax Configuration Wizard steps you through the
process of setting options and customizing the program for your personal use. Follow the
onscreen instructions. If you’re not sure which setting to choose, accept the default
choice.
To send a fax
• Click Start, All Programs, Accessories, Communications, Fax, Send a Fax, then
follow the instructions that appear on the screen.
If instead you want to send a document as a fax, open the document in its application
window, then open the Print dialog box. Change the selected printer to Fax, then print it.
To receive faxes
Faxes are automatically received when Fax Console is running in an open or minimized
window. New faxes are indicated in the status box in the Fax Console window. To
receive a fax manually, follow these steps.
• When a fax call is coming in, click Receive now on the Fax Console menu bar.
To view and print a fax
1. In Fax Console tree, click Inbox, then double-click the fax you want to view.
2. Click the printer icon to print the fax.
72 Corporate Evaluator’s Guide
Page 73

Modem and Network Connections
Connecting to a LAN
Connecting to a LAN
Connecting to a local area network (LAN) gives you access to network resources, such as
printers and file servers on your corporate network, and possibly to the Internet.
To connect to a LAN
Important
If your computer does not have a LAN port, the LAN port on an expansion base will not
work.
1. Make sure the existing LAN supports Ethernet 10Base-T (10 Mbps) or 100Base-TX
(100 Mbps) connections.
2. Plug the LAN cable (not supplied) into the built-in LAN port on the computer or on
the expansion base. The cable must have an RJ-45 connector.
3. Windows 98: open Network in Control Panel to set up support for a LAN connection
on your network. For example, you can add the Microsoft TCP/IP protocol.
Windows 2000 or XP: automatically detects and sets up a LAN connection. To edit
the settings, open Network Connections in Control Panel.
See Windows Help for information about setting up and using LAN connections—click
Start, Help (or Help and Support). Contact your network administrator for network
information.
Two lights next to the LAN port indicate the status of the connection (see the figures
above): the green light indicates that a link is established to the network, and the yellow
light indicates network activity.
Corporate Evaluator’s Guide 73
Page 74

Modem and Network Connections
Making Wireless Connections
Making Wireless Connections
If your computer includes a wireless on-off button—located at the top of the computer’s
display—you can connect by radio to a wireless local area network (LAN) and access
computers and other resources on the network.
A wireless network provides all the functions of a typical “wired” network, but also
provides for “roaming.” Since your computer connects to the network by radio rather
than through cables, you can move from place to place within the network—from your
office to a conference room, for example—and remain on the network the entire time.
To prepare for connections (Windows 98 or 2000)
Before you can connect your computer to a particular 802.11 wireless network, you have
to install the required software and configure the computer for the specific type of
connection: “AdHoc” or “Infrastructure.”
Computer-to-Computer Connection (AdHoc)
An AdHoc network provides a wireless connection from your computer directly to one or
more computers with wireless capabilities, even if they aren’t connected to a LAN. You
can then share resources such as shared files, printers, and Internet connections with the
other computers.
1. Click the wireless link icon in the taskbar and select Advanced Configuration.
–or–
Click Start, Programs, HP Wireless LAN, Configuration Utility.
2. On the Configuration tab, set these parameters:
Mode: AdHoc.
SSID: any name; must be identical for all computers connecting to each other. Do not
use a name that is used by a nearby access point.
AdHoc Channel: must be identical for all computers connecting to each other. Do not
use a channel that is the same as or adjacent to a channel used by a nearby access
point.
74 Corporate Evaluator’s Guide
Page 75

Modem and Network Connections
Making Wireless Connections
3. If the computers use encrypted communication, use the Encryption tab to set the
following parameters, which must be identical for all computers connecting to each
other:
• Encryption: 64-bit or 128-bit.
• Key: see the hint below.
The computers automatically connect whenever they’re within range of each other and
wireless communication is turned on—see “To turn wireless communication on and off,”
below.
LAN Connection (Infrastructure)
In an infrastructure network, your computer connects to a LAN (local area network)
through a wireless access point. This gives you access to the resources on the network,
such as printers, file servers, and possibly the Internet. Your network administrator can
provide the settings you’ll need to connect to the wireless access point, as well as the
additional settings you’ll need for the network itself.
1. Set up your computer for your local network:
Windows 98: open Network in Control Panel to set up support for a LAN connection
on your network. For example, you can add the Microsoft TCP/IP protocol.
Windows 2000: automatically detects and sets up a LAN connection.
2. Click the wireless link icon in the taskbar and select Advanced Configuration.
–or–
Click Start, Programs, HP Wireless LAN, Configuration Utility.
3. On the Configuration tab, set these parameters:
Mode: Infrastructure.
SSID: the ID used by the access point. “ANY” connects to the access point with the
strongest signal, regardless of its SSID.
4. If your wireless network uses encrypted communication, use the Encryption tab to set
these parameters—see the network administrator for the required settings:
• Encryption: 64-bit or 128-bit.
• Key: see the hint below.
The computer automatically connects to the infrastructure network whenever it’s within
range of an access point and wireless communication is turned on—see “To turn wireless
communication on and off,” below.
Corporate Evaluator’s Guide 75
Page 76

Modem and Network Connections
Making Wireless Connections
Hint
If you are connecting to an access point or computer that is using Lucent/Agere-based
software, you must set up compatible encryption on your computer. You can use the
same hexadecimal encryption key on all units. If you know only the Lucent/Agere
passphrase, you must convert it to the corresponding hexadecimal key. If this option is
not available on the Encryption tab, click Start, Programs, HP Wireless LAN, and use
the encryption key converter.
To prepare for connections (Windows XP)
Before you can connect your computer to a particular 802.11 wireless network, you have
to configure the computer for the specific wireless connection.
Connecting to an Existing Wireless Network
You can connect to an access point that gives you access to a local area network, or you
can connect directly to other computers in an AdHoc network.
1. Click Start, Control Panel, Network and Internet Connections, Network Connections.
2. Double-click the wireless connection to show its status, then click Properties.
3. On the General tab, edit network settings as needed for your local network. See your
network administrator. You can also display an icon in the taskbar when connected to
a network.
4. On the Wireless Networks tab, view the wireless networks available within range.
Each network SSID is listed. Click the network you want and click Configure.
5. If the wireless network uses standard encrypted communication, uncheck the
automatic key option, then select the following parameters—see your network
administrator for the required settings:
• Key: ASCII passphrase or hexadecimal key string.
• Key format: ASCII for passphrase, hexadecimal for key string.
• Key length: smaller number for 64-bit encryption, larger number for 128-bit.
6. Click OK to save the configuration. This network is added to your list of preferred
networks.
The computer automatically connects to the first preferred network that’s within range if
wireless communication is turned on—see “To turn wireless communication on and off,”
below.
76 Corporate Evaluator’s Guide
Page 77

Modem and Network Connections
Making Wireless Connections
Hint
If you are connecting to non-Windows XP access points or computers that are using
software from different manufacturers, you must set up compatible encryption on your
computer. You can use the same hexadecimal encryption key on all units. If you know
only an ASCII passphrase, you should convert it to the corresponding hexadecimal key.
Click Start, All Programs, HP Wireless LAN, and use the encryption key converter.
Creating a New Computer-to-Computer Network (AdHoc)
You can set up a new network available to other local computers.
1. Click Start, Control Panel, Network and Internet Connections, Network Connections.
2. Double-click the wireless connection to show its status, then click Properties.
3. On the Wireless Networks tab, click Add to create a new network.
4. Type a name for the new network.
5. If you want to use encrypted communication, uncheck the automatic key option, then
select the following parameters:
• Key: ASCII passphrase or hexadecimal key string.
• Key format: ASCII for passphrase, hexadecimal for key string.
• Key length: smaller number for 64-bit encryption, larger number for 128-bit.
6. Mark the option to make this a computer-to-computer (adhoc) network.
7. Click OK to save the configuration. This network is added to your list of preferred
networks and becomes available to other computers.
Important
To turn wireless communication on and off
Wireless communication may be restricted in some situations or environments, such as
when traveling in an airplane. If in doubt, be sure to ask for authorization before turning
on your computer’s wireless networking.
In Italy, Singapore, and possibly other countries, you are required to ask the responsible
authority for a license paid for by you before using the wireless function.
Turning on communication and making a connection
1. If the computer isn’t on, turn it on.
Corporate Evaluator’s Guide 77
Page 78

Modem and Network Connections
Making Wireless Connections
2. The wireless indicator light is lit whenever the wireless function is on. If the indicator
isn’t lit, do one of the following:
Press the wireless on-off button.
–or–
Click the wireless link icon in the taskbar (if present) and select Wireless Radio On.
If you’re within range of your wireless network, your computer automatically connects.
To check the status of your wireless connection, click the wireless link icon in the taskbar
and select Wireless Status (Windows 98 or 2000), or open Network Connections in
Control Panel and double-click the connection (Windows XP).
Turning off communication and ending a connection
1. Important: close any files that reside on other network computers.
2. To turn off the wireless function without turning off the computer, do one of the
following:
Press the wireless on-off button.
–or–
Click the wireless link icon in the taskbar (if present) and select Wireless Radio Off.
Suspending or shutting down the computer also turns off the wireless function.
78 Corporate Evaluator’s Guide
Page 79

Add-On Devices
Corporate Evaluator’s Guide 79
Page 80

Add-On Devices
Using an Expansion Base
Using an Expansion Base
The multimedia expansion base enhances your computer’s capabilities as a portable
computer system. It provides space for additional drives and batteries, as well as
expanded multimedia performance.
The expansion base also makes your computer more convenient for desktop use. By
making a single connection—docking your computer into the base—you get easy access
to these devices:
• Printer or other parallel device.
• Universal serial bus (USB) devices.
• External keyboard and mouse.
• External monitor and television.
• Local area network (LAN) if your computer includes a LAN port.
• Audio devices such as external speakers, headphones, or stereo inputs.
Note
• Plug-in modules.
To dock the computer
1. For desktop use, plug the AC adapter into the expansion base.
For portable use, you can use power from the computer’s battery or from a secondary
plug-in battery module in the expansion base.
Use the AC adapter that comes with your computer. If you want, you can buy an
additional AC adapter—see “To buy accessories“ on page 15.
80 Corporate Evaluator’s Guide
Page 81

Add-On Devices
Using an Expansion Base
2. Insert the back of the computer into the expansion base so it’s held by the hooks at the
back corners. Then lower the front end into the base. Press firmly near the centerfront until it latches into the base.
If the computer doesn’t latch, plug in the AC adapter.
You can dock or undock the computer in any power state: on, off, Standby mode, or
Hibernate mode. Make sure, however, that the computer is not entering or resuming from
Standby or Hibernate mode when you dock or undock, or the computer could lock up.
By default, the computer automatically turns on when you dock it. (You can change this
setting using BIOS Setup—see “To run the BIOS Setup utility“ on page 189.)
The first time you dock, the computer automatically configures itself to operate with the
expansion base.
After the computer docks, the blue sleep button on the left side of the expansion base
operates the same way as the blue sleep button on the computer.
If you have trouble inserting the computer or the docking latches stick, use the
emergency undock latch, or press and hold the undock switch for 5 seconds to release the
latches.
Corporate Evaluator’s Guide 81
Page 82

Add-On Devices
Using an Expansion Base
To undock the computer
1. Important: close any files that reside on network drives or module drives in the
expansion base.
2. Press the undock switch on the right side of the expansion base.
–or–
Click Start, Eject PC.
You can use the undock switch when the computer is on, off, or in Standby or Hibernate
mode.
When undocking the computer, you may need to wait 10 seconds or more for the
computer to undock—the computer may not respond while it is updating its
configuration.
82 Corporate Evaluator’s Guide
Page 83

Add-On Devices
Using an Expansion Base
Using the emergency undock latch
If you cannot undock the computer using the undock switch or the Start menu, use the
emergency undock latch on the right side of the expansion base.
1. If a security cable is attached to the expansion base, remove it.
2. Slide the button down, then move the entire latch forward to undock the computer.
To play audio CDs
The multimedia buttons on the front of the expansion base control the CD-ROM or DVD
drive in the right module bay. Power is provided by the computer battery, the AC adapter,
or a secondary battery in the left module bay.
• If the computer is docked and turned on, use the multimedia buttons to control the
Windows player.
• If the computer is off, in Standby or Hibernate mode, or not docked, you can still play
audio CDs. Slide the multimedia power switch to the left to activate the player
(without turning on the computer), then use the multimedia buttons to control play.
• To load or eject a CD, press the eject button on the drive, or press the Stop button on
the expansion base if the computer is off, in Standby or Hibernate mode, or undocked.
Corporate Evaluator’s Guide 83
Page 84

Add-On Devices
Using an Expansion Base
1. Multimedia power switch (and indicator light)—turns the CD player on and off.
Works only when the computer is turned off, in Standby or Hibernate mode, or not
docked.
2. Previous track.
3. Play/Pause.
4. Stop (when computer is on), or Stop/Eject (when computer is off, in Standby or
Hibernate mode, or not docked).
5. Next track.
6. Volume.
To use the status panel
The expansion base’s status panel can show the time and date, the docking status, the
status of the CD player built into the expansion base, and the status of secondary batteries
in the expansion base.
• Press the status panel button several times to display the information you want. The
first press turns on the backlight. Subsequent presses cycle through the available
information in the following order:
• Time.
• Date.
• CD player status (if CD player is running).
• Audio volume (if CD player is running).
84 Corporate Evaluator’s Guide
Page 85

Add-On Devices
Using an Expansion Base
• Percent charge remaining for the battery in the left bay (if present).
• Percent charge remaining for the battery in the right bay (if present).
AC power, battery indicators, and docking status are always shown.
1. Status panel button.
2. Status panel.
For more information about the status panel, see the following table.
Status Description
AC indicator Appears when an AC adapter is connected to the expansion base.
Battery indicator
Docking indicator Shows whether a computer is docked in the expansion base.
Time, Date Formats are defined in BIOS Setup.
CD player
Volume Shows volume (off to full), in eight steps.
Battery charge Shows remaining charge as a percentage.
Appears when a secondary battery is installed in a module bay. Shows when the
battery is charging. Flashes if the battery has a problem.
Shows the track, play status (playing, paused, or stopped), and time counter. For
information about the CD player, see “To play audio CDs“ on page 83.
Corporate Evaluator’s Guide 85
Page 86

Add-On Devices
Using Plug-In Modules
Using Plug-In Modules
You can use any compatible plug-in module with the multimedia expansion base’s
module bays, such as:
• CD-ROM, DVD, or similar drive.
• Zip drive.
• Second hard drive.
• Floppy disk drive.
• Secondary battery.
CAUTION
Never install or remove a plug-in module without first notifying Windows, or you
could lose data. See “To replace a plug-in module“ on page 86.
To install hot-swap support (Windows 98)
If your computer uses Windows 98, it also includes the BayManager “hot-swap” software
that lets you disconnect most modules from a plug-in bay in the expansion base without
needing to shut down and reboot the computer.
If a plug-in module icon is displayed in the taskbar, BayManager is already installed. If
the icon is not present, you can install the software as follows:
• Click Start, Programs, Softex BayManager, Setup, then follow the onscreen
instructions.
To replace a plug-in module
Windows 98 uses “hot-swap” software to let you remove or replace most plug-in
modules without shutting down the computer. Before replacing a hard drive module,
however, you must first shut down the computer.
When a drive module is present, Windows 2000 displays the Unplug or Eject Hardware
icon—and Windows XP displays the Safely Remove Hardware icon—at the right end of
the taskbar.
86 Corporate Evaluator’s Guide
Page 87

Add-On Devices
Using Plug-In Modules
CAUTION
Before disconnecting a CD-ROM drive, DVD drive, or any other type of drive, you
must either stop the drive using the icon in the taskbar or shut down the
computer—otherwise, you could lose data.
Exception: for Windows 98, you MUST shut down the computer before connecting
or disconnecting a hard disk drive.
Handle and store modules carefully. Do not drop it or apply excessive pressure to
its surfaces—this could damage its internal mechanisms. Do not touch the metallic
pins on the computer connectors, module connectors, or cable connectors. Static
electricity can damage internal components.
1. Close any open files that reside on the plug-in module.
2. Windows 98: if the BayManager icon is present in the taskbar, right-click the icon,
then click Remove/Swap Bay Device. When prompted, remove the module (if
present). Don’t click OK until you’ve inserted the desired module, if any (see step 6).
Windows 2000 or XP: left-click the Unplug or Eject Hardware or Safely Remove
Hardware icon on the taskbar, and select the module you want to remove. When
prompted to remove the module, click OK. (You don’t have to do this if the bay is
empty or contains a battery.)
–or–
For any system: shut off the computer. Click Start, Shut Down, Shut down
(Windows 98 or 2000) or Start, Turn Off Computer, Turn Off (Windows XP).
Important: for Windows 98, you must shut off the computer if you are removing or
inserting a hard disk drive in the module bay.
–or–
For any system: undock the computer.
Corporate Evaluator’s Guide 87
Page 88

Add-On Devices
Using Plug-In Modules
3. Press the button on the module release latch, and slide the latch toward the front of
the expansion base.
4. Grasp the module and pull it out.
5. Slide the new plug-in module into the computer until it clicks into place.
6. For Windows 98, click OK to close the BayManager window.
If needed, you can connect the floppy disk drive to the USB port on the computer or
expansion base—see “To connect the floppy disk drive“ on page 30.
If you need to format a hard disk drive module, see “To prepare a new hard disk drive“
on page 108.
88 Corporate Evaluator’s Guide
Page 89

Add-On Devices
Using Plug-In Modules
To insert or remove a CD or DVD
CAUTION
Do not remove a CD or DVD while the computer is reading it. Otherwise, the
computer could stop responding and you could lose data. Before opening the drive,
press the Stop button to make sure the drive is not running.
Be sure to press the CD or DVD onto the spindle. You can damage the disk or
drive if you just lay the disc on the tray.
1. Press the button on the face of the drive. (If you are using this drive for the first time,
be sure to remove the cardboard packing insert.)
2. Place the CD into the drive (label facing up) and gently press down to seat it on the
spindle.
–or–
Remove the CD.
Corporate Evaluator’s Guide 89
Page 90

Add-On Devices
Using Plug-In Modules
3. Slide the tray back into the module to close it.
If your expansion base loses power, or if you have removed the CD-ROM or DVD
module from the base, you can manually open the drive to remove a CD.
• Insert a straightened paper clip into the recessed hole on the front of the drive.
To play DVD movies
If your computer came with a DVD drive, it also includes DVD player software that lets
you play DVD movies. Click Start, Programs (Windows 98 or 2000) or Start, All
Programs, Multimedia, DVD Player (Windows XP)—if InterVideo WinDVD or DVD
Express is not listed, do the following:
• Run Setup on the software CD to install the player software.
For Windows XP, if the DVD software is installed, you can also use Windows Media
Player to play DVD movies.
To play DVD movies on a TV, see “To use a TV set as a monitor“ on page 99.
90 Corporate Evaluator’s Guide
Page 91

Add-On Devices
Using Plug-In Modules
To create or copy CDs
If your computer came with a CD-RW drive, it also includes software that lets you copy
or create CDs. Click Start, Programs (Windows 98 or 2000) or Start, All Programs,
Multimedia, CD Writer (Windows XP)—if Adaptec Easy CD, Veritas CDRW, or
RecordNow is not listed, do the following:
• Run Setup on the software CD to install the CD-RW software.
For Windows XP, you can use Windows Media Player to create audio CDs, and
Windows Explorer to create data CDs using a CD-RW drive.
Refer to the software’s help for details about creating or copying CDs. HP recommends
using HP C4403A (CD-R) or C4404A (CD-RW) media—read and write quality may
vary for other media.
Corporate Evaluator’s Guide 91
Page 92

Add-On Devices
Connecting PC Cards
Connecting PC Cards
The computer’s PC Card slot is available for expanding the computer’s data storage and
communication capabilities. The computer supports standard Type II PC Cards
(PCMCIA and CardBus).
The slot also supports Zoomed Video, which allows a Zoomed Video card to show highquality multimedia presentations.
To insert or remove a PC Card
Inserting a PC Card
1. Hold the PC Card with its face up and its connector holes toward the card slot.
2. Slide the PC Card all the way into the slot. Most cards are properly seated when the
outer edge is flush with the casing of the computer, but some cards are designed to
protrude from the case.
92 Corporate Evaluator’s Guide
Page 93

CAUTION
Add-On Devices
Connecting PC Cards
Removing a PC Card
Before removing a PC Card, you must use the PC Card, Eject Hardware, or Safely
Remove Hardware icon in the taskbar, or else shut down the computer. Otherwise,
you could lose data.
1. Before removing the card, click the PC Card, Eject Hardware, or Safely Remove
Hardware icon in the taskbar, then click Stop. This protects your data and helps avoid
unexpected problems.
If needed, you can restart the card by removing and then reinserting it.
2. Flip the eject button out (so that it stands out from the side of the computer), then
press the button and remove the PC Card.
Finding tested PC Cards
For the current listing of PC Cards that have been tested and approved for use with your
computer, visit the Accessories section of the HP Notebook web site
(www.hp.com/notebooks).
Corporate Evaluator’s Guide 93
Page 94

Add-On Devices
Connecting External Devices
Connecting External Devices
To identify connectors for external devices
The diagrams below shows the connectors for external devices on the computer and
expansion base.
Note
Before you connect any device, check its documentation to see if you need to make any
settings or adjustments to the equipment before using it. This might include setting
switches so the equipment will operate properly with your computer or expansion base
and the software you plan to use.
Locating connectors on the computer
1. Universal serial bus (USB) ports.
2. Infrared port (on certain models).
3. External monitor port.
4. Modem port (on certain models).
5. LAN port (on certain models).
6. Audio jacks: audio out (headphones), external microphone.
7. PC Card slot.
94 Corporate Evaluator’s Guide
Page 95

Add-On Devices
Connecting External Devices
Locating connectors on the expansion base
1. Universal serial bus (USB) ports.
2. S-video (TV out) port.
3. Serial port (COM1).
4. Parallel port (LPT1).
5. External monitor port.
6. PS/2 mouse port.
7. PS/2 keyboard port.
8. LAN port (works only if the computer has a built-in LAN port).
To connect a printer or other parallel device
The expansion base’s parallel port has a standard 25-pin connector, most commonly used
for connecting dot-matrix, ink-jet, and laser printers. You can also use it to connect a
parallel Zip drive.
• Connect the cable from the parallel printer or other parallel device to the expansion
base’s parallel port.
To connect an external keyboard or mouse
• Plug a USB mouse or keyboard into a USB port on the computer or expansion base.
The pointing stick is normally disabled while an external PS/2 mouse is connected.
Corporate Evaluator’s Guide 95
–or–
Plug a PS/2 mouse or keyboard into a PS/2 port on the expansion base.
Page 96

Add-On Devices
Connecting External Devices
Note
Note
CAUTION
To use hot keys from an external PS/2 keyboard, substitute left CTRL+left ALT for the
computer Fn key. For example, to access Fn+F12, press left CTRL+left ALT+F12.
External PS/2 keyboards support only Fn+F5, Fn+F7, and Fn+F1. USB keyboards do
not support Fn hot keys.
To connect a USB device
The universal serial buses (USB) on the computer and expansion base provide a
bi-directional serial interface for adding peripheral devices such as a mouse, keyboard,
game controller, serial and parallel port, and scanner on a single bus.
• Attach the device’s USB cable to a USB port. Windows automatically recognizes the
USB device. Some USB devices can be connected to the computer in series—this is
called a daisy-chain connection.
If you have problems making this connection, contact the device manufacturer and the
HP Customer Care web site (www.hp.com/go/support) for the latest version of the
driver for the device.
To connect an audio device
Your computer includes a built-in microphone (in front of the right display hinge) that
you can use to record voice, sound, and music. You can also plug in headphones, external
speakers, an external microphone, or—if docked—a stereo input source (such as a CD
player).
The audio jacks are three-terminal stereo jacks. They are not compatible with twoterminal mono plugs. Connecting a mono plug into the speaker-out jack may
damage your notebook.
96 Corporate Evaluator’s Guide
Page 97

Add-On Devices
Connecting External Devices
• Attach the audio cable to the corresponding audio port on the computer or expansion
base.
Note
When you plug a device into the external microphone port, the built-in microphone
automatically turns off. When you plug a device into the audio out port, the built-in
speakers automatically turn off.
To use an external monitor
Connecting an external monitor
1. Click Start, Shut Down, Shut down (Windows 98 or 2000) or Start, Turn Off
Computer, Turn Off (Windows XP).
2. Connect the monitor cable from the monitor to the monitor port on the rear of the
computer (if undocked) or expansion base (if docked).
3. Connect the monitor to a power source and turn it on.
4. Press the blue sleep button to turn on the computer.
Switching the display to the external monitor
• Press Fn+F5 (or CTRL+ALT+F5 on an external keyboard) to cycle through the
display options: notebook display, external monitor, both.
–or–
Corporate Evaluator’s Guide 97
Click Start, Programs, HP Display Settings, HP Display Settings (Windows 98 or
2000), or Start, All Programs, Hewlett-Packard, Notebook, HP Display Settings, HP
Display Settings (Windows XP).
You can also add a display settings icon in the taskbar for quick access.
Page 98

Add-On Devices
Connecting External Devices
• If you need to use both displays at once, press Fn+F5 repeatedly until the image
shows on both displays. However, by default, the image is limited by the internal
display to 1024 × 768 pixels, so at a higher resolution you will see only part of the
desktop on both displays. This doesn’t happen if you use only the external monitor. If
you need to increase the refresh rate on the external monitor, you can switch to only
the external monitor, or make the internal or external display a “secondary” display:
1. Click Start, Settings, Control Panel, then double-click Display (Windows 98 or
2000), or click Start, Control Panel, Appearance and Themes, Display
(Windows XP).
2. On the Settings tab, click the Advanced button, then the Displays or Monitor tab.
Adjusting monitor resolution and other settings
1. Click Start, Settings, Control Panel, then double-click Display (Windows 98 or 2000),
or click Start, Control Panel, Appearance and Themes, Display (Windows XP).
2. On the Settings tab, adjust the Screen area. Other settings are also available.
The internal display supports settings of up to 1024 × 768 resolution with 16M colors
(24-or 32-bit).
For high-resolution external monitors, the computer supports 1280 × 1024 resolution
with 16M colors (24-bit for Celeron models, 32-bit for Pentium models) at a maximum
refresh rate of 85 Hz. It supports 1600 × 1200 resolution with 64K colors for Celeron
models and 16M colors (24-bit) for Pentium models at a maximum refresh rate of 60 Hz.
Using dual display mode (Windows 98 or XP)
You can extend your desktop by connecting an external monitor to your computer.
1. Click Start, Settings, Control Panel, then double-click Display (Windows 98), or click
Start, Control Panel, Appearance and Themes, Display (Windows XP).
2. Click the Settings tab.
3. Windows 98: right-click display 2, and select Enabled.
Windows XP: click the second display, then select the option to extend the desktop.
You can set different resolutions and numbers of colors for each display. However, using
the Extended Desktop requires video memory to be shared. For this reason, higher
resolutions and higher numbers of colors may cause unexpected behavior on the displays.
Try starting with 1024 × 768 resolution on the external display and 64 K colors (16-bit)
on both displays. You can then try higher settings to see whether they work for your
applications. In addition, certain operations such as playing DVDs and running 3D
graphics require extra video memory, so you may have to use lower display settings.
98 Corporate Evaluator’s Guide
Page 99

Add-On Devices
Connecting External Devices
Changing display actions
You can use the BIOS Setup utility to change certain display behaviors, such as
stretching the image to fill the screen at lower resolutions. See “To run the BIOS Setup
utility“ on page 189.
To use a TV set as a monitor
You can connect a television set or other video device to your computer to use as a
display. The computer’s built-in display remains active when you connect a TV set.
To connect a TV set
You can connect a TV set using a standard S-video cable, or an HP F1459A compositevideo adapter with a standard RCA-type video cable.
1. Connect a video cable from the TV set to the expansion base’s S-video port. (You
don’t need to turn the computer off to do this.)
2. Connect the TV set to a power source and turn it on.
To activate the TV display
• Restart the computer: click Start, Shut Down (or Turn Off Computer), Restart.
–or–
1. Click Start, Settings, Control Panel, then double-click Display (Windows 98 or 2000),
or click Start, Control Panel, Appearance and Themes, Display (Windows XP).
2. On the Settings tab, click Advanced.
3. On the Displays tab, activate the TV output.
To play DVD movies on the TV
• Open Display in Control Panel, click the Settings tab, then click Advanced and make
the TV a “primary” display.
• Optional: connect an audio cable from the computer’s audio out jack to the TV audio
input.
Corporate Evaluator’s Guide 99
Page 100

Add-On Devices
Connecting External Devices
To connect a serial device
The expansion base includes a standard 9-pin serial port that you can use to connect
devices such as external modems and fax modems. If needed, you can set the serial port’s
address in the BIOS Setup utility.
• Connect the device’s serial cable to the expansion base’s serial port.
To connect an infrared device
If your computer includes an infrared port, you can use it to provide serial
communication between the computer and other infrared devices, such as printers or
other computers.
By default, the infrared port is not enabled, so you must enable it before you can use it.
1. Enable the infrared port in the BIOS Setup utility—see “To run the BIOS Setup
utility“ on page 189.
2. Windows 98 only: click Start, Run, and type c:\hp\drivers\fir\quikbeam\setup.exe to
install the QuickBeam software. For more information, see the Readme file in the
same directory.
Using the infrared port
• Make sure the infrared ports of your computer and the other device lie in as straight a
line as possible. The two ports should be no more than 1 meter apart, with no
obstructions between them.
• To check the status of communications, open Infrared (Windows 98) or Wireless Link
(Windows 2000 or XP) in Control Panel.
Disabling the infrared port
You should generally disable infrared communication when you aren’t using it.
1. Close any applications that are using infrared, and any folders on an infrared link.
2. Click Start, Settings, Control Panel (Windows 98 or 2000) or Start, Control Panel,
Printers and Other Hardware (Windows XP).
100 Corporate Evaluator’s Guide
 Loading...