

Page 1

HP Jornada
HP Jornada
HP JornadaHP Jornada
700 Series Handheld
700 Series Handheld
700 Series Handheld 700 Series Handheld
PC
PC
PCPC
User’s Guide
User’s Guide
User’s GuideUser’s Guide
Part number Fxxxx-xxxxx
Printed in Singapore
Edition 1
Page 2

ii HP Jornada 700 Series Handheld PC
Copyright
Copyright
CopyrightCopyright
The information contained in this document is provided “as is”
and is subject to change without notice.
Hewlett-Packard Company makes no warranty of any kind with
regard to this manual, including, but not limited to, the implied
warranties of merchantability and fitness for a particular
purpose. Hewlett-Packard Co. shall not be liable for any errors
contained herein or for incidental or consequential damages in
connection with the furnishing, performance, or use of this
manual or the examples herein.
© Hewlett-Packard Co. 2001.
This document contains proprietary information that is protected
by copyright. All rights are reserved. No part of this document
may be photocopied, reproduced, adapted, or translated to
another language without the prior written consent of HewlettPackard Co., except as allowed under the copyright laws.
The programs that control this product are copyrighted and all
rights are reserved. Reproduction, adaptation, or translation of
those programs without prior written permission of HewlettPackard Co. is also prohibited.
Microsoft, ActiveSync, Outlook, Pocket Outlook, Expedia,
AutoRoute Express, MapPoint, Windows, Windows NT, the
Windows logo, and the MS Windows for H/PC 2000 logo are
either registered trademarks or trademarks of Microsoft
Corporation in the United States and/or other countries.
Microsoft products are licensed to OEMs by Microsoft Licensing,
Inc., a wholly owned subsidiary of Microsoft Corporation.
All other brand names and product names used in this document
are trade names, service marks, trademarks, or registered
trademarks of their respective owners.
Hewlett-Packard Singapore (Pte) Ltd.
Asia Pacific Personal Computer Division
452 Alexandra Road
Singapore 119961
Page 3

Table of Contents
Table of Contents
Table of ContentsTable of Contents
iii
1111 | Welcome
| Welcome ................................
| Welcome| Welcome
Using this guide.............................................................2
Learning about HP Jornada..........................................4
2 | Getting started
2 | Getting started................................
2 | Getting started2 | Getting started
HP Jornada hardware features...................................12
Setting up your HP Jornada .......................................16
Using your HP Jornada...............................................24
3333 | Connecting to your desktop PC
| Connecting to your desktop PC ................................
| Connecting to your desktop PC| Connecting to your desktop PC
Connecting for the first time.......................................31
Connecting to your desktop PC...................................43
Connecting to another PC ...........................................45
Browsing your HP Jornada desktop...........................46
Synchronizing data......................................................47
Transferring files.........................................................54
4 | Staying organized
4 | Staying organized ................................
4 | Staying organized4 | Staying organized
Using Microsoft Pocket Outlook..................................55
Using HP viewer..........................................................60
Capturing data with HP quick pad.............................63
Infrared send/receive of PIM data ..............................64
Recording and playing voice memos...........................67
5555 | Getting down to business
| Getting down to business................................
| Getting down to business| Getting down to business
Working with Microsoft Pocket Office........................72
Using Microsoft InkWriter..........................................78
Backing up and restoring data....................................78
Using OmniSolve from LandWare..............................82
Using Yahoo! Messenger.............................................82
6 | Accessing e
6 | Accessing e----mail
6 | Accessing e6 | Accessing e
Deciding how and why you want to connect...............85
Creating Connections..................................................88
Running the HP dialup Setup Wizard........................91
Using your connections..............................................102
7 | Optimizing your HP Jornada
7 | Optimizing your HP Jornada ................................
7 | Optimizing your HP Jornada7 | Optimizing your HP Jornada
Adding programs, fonts, sounds, and images...........114
Accessories .................................................................118
Using PC Cards, CompactFlash Cards, and Smart
Cards..........................................................................119
................................................................
................................................................
................................................................
................................................................
................................................................
................................................................
mail................................
................................................................
mailmail
................................................................
................................................................
................................................................
....................................................
................................................................
...................................................
................................................................
.............................................
................................................................
................................................................
................................................................
................................................
................................................................
.......................................................
................................................................
...................................
................................................................
....................
........................................
...................
......................................
................................
................................................................
.......................
..............................................
.............
..........................
................
................................
...
......
11
31
55
71
85
113
1
Page 4

iv HP Jornada 700 Series Handheld PC
Managing memory.....................................................123
Managing battery power ...........................................125
Fine-tuning performance...........................................132
Security ......................................................................139
HP security control panel..........................................140
Traveling with your HP Jornada..............................144
8 | Troubleshooting
8 | Troubleshooting................................
8 | Troubleshooting8 | Troubleshooting
Maintaining your HP Jornada..................................147
Troubleshooting basic problems................................149
Troubleshooting remote connections ........................157
Display........................................................................159
Resetting ....................................................................159
9 | Support and service
9 | Support and service ................................
9 | Support and service9 | Support and service
Web site......................................................................163
Customer support ......................................................163
Service........................................................................163
Contacting Hewlett-Packard worldwide...................164
Appendix A | Ergonomics
Appendix A | Ergonomics ................................
Appendix A | ErgonomicsAppendix A | Ergonomics
Setting up and using equipment...............................167
What is RSI? .............................................................. 167
What causes RSI? ......................................................167
RSI symptoms............................................................168
Avoiding RSI..............................................................168
Setting up your working environment......................168
Reducing eye strain ...................................................169
Preventing muscle stiffness.......................................169
Taking frequent short breaks....................................169
Appendix B | Migrating data from other devices
Appendix B | Migrating data from other devices........................
Appendix B | Migrating data from other devicesAppendix B | Migrating data from other devices
Transferring data from a palm-sized, pocket or
handheld PC...............................................................171
Migrating data from Palm devices............................173
Appendix C | Using the Keyboard in Terminal Server Client
Appendix C | Using the Keyboard in Terminal Server Client
Appendix C | Using the Keyboard in Terminal Server ClientAppendix C | Using the Keyboard in Terminal Server Client
Creating extended keyboard characters in the
Terminal Server Client window (TSC) .....................175
Glossary
Glossary ................................
GlossaryGlossary
Index
Index................................
IndexIndex
Warranty
Warranty................................
WarrantyWarranty
................................................................
................................................................
................................................................
................................................................
................................................................
................................................................
One year limited hardware warranty....................... 193
Limitation of warranty..............................................193
Limitation of liability and remedies .........................194
HP software product license agreement and HP
software product limited warranty...........................196
................................................................
................................................................
................................................................
................................................................
................................................................
................................................................
................................................................
................................................................
................................................................
................................................................
................................................................
................................................................
..............................................
................................................................
.......................................
................................................................
...................................
................................................................
........................
................................................
...................................
................................................................
..........................................
................................................................
...................................
................................................................
..............
............................
.......
..............
...
......
...
......
..........
....................
...
......
147
163
167
171
175
177
183
193
Page 5

Chapter 1 | Welcome | 1
1111 | Welcome
| Welcome
| Welcome| Welcome
Congratulations on purchasing the Hewlett-Packard Jornada 700
Series Handheld PC (H/PC), a mobile device powered by the
Microsoft® Windows® for Handheld PC (H/PC) 2000 operating
system. The size and capabilities of the HP Jornada H/PC let you
keep your most important business and personal information
current and close at hand. Your HP Jornada supports the latest
version of Microsoft Pocket Outlook, so you can check e-mail and
manage your appointments and contacts while on the road. Your
HP Jornada is also the perfect companion to your desktop or
notebook PC. It allows you to take vital business data and
documents with you when away from the office, then easily
transfer updated information back to your PC upon return. A
powerful, reliable, mobile business partner, HP Jornada offers
you the highest quality in performance and battery life as well as
rich programs and utilities designed by Hewlett-Packard.
If you are familiar with Microsoft Windows products and
notebook PCs, you will notice that your HP Jornada has many of
the same characteristics, making it easy for you to be productive
quickly.
In this chapter, you will find:
•
An overview of this User’s Guide and other sources of help and
information
•
A list and brief descriptions of the built-in applications,
including MS Windows for H/PC 2000 software and special HP
applications
•
An introduction to HP Jornada features and a description of
the advantages of using the HP Jornada
Page 6
2 HP Jornada 700 Series Handheld PC
Using this guide
Using this guide
Using this guideUsing this guide
This User’s Guide will give you a quick and effective introduction
to your HP Jornada. Although great care has been taken to
ensure the accuracy of procedures and artwork, some of the
screens displayed on your HP Jornada may differ from the ones
that appear in this User’s Guide.
Detailed, step-by-step instructions for using the programs on
your HP Jornada are also included in online Help, so you do not
have to carry this guide when you travel. (For more information
on using online Help, see the Using Help on your HP Jornada
section in chapter 2.)
Conventions
This User’s Guide includes certain visual cues that will help you
find the information you want easily.
A shortcut, another way to do
something, or expanded
information about the topic.
Caution or warning information
about the topic. This is important
information that should be
observed to prevent loss of data or
damage to the HP Jornada.
Helpful information related to the
topic.
Finding information
This guide describes what is included with your HP Jornada,
provides an overview of the installed programs, and describes
how to set up communications between your device and desktop
PC and between your device and the Internet. The following table
lists the different types of information available to help you use
your HP Jornada. Note that although this book introduces the
programs on your device, it does not describe them completely.
For more information, see the comprehensive online Help for
each program.
Page 7

Information Source
Programs This User’s Guide
–or–
Online Help on your device. On the
Start menu, tap Help.
Chapter 1 | Welcome | 3
Unfamiliar technical
terms
Synchronizing and
exchanging files with
a desktop PC
(including
information on
The glossary located at the end of this
User’s Guide.
This User’s Guide.
–or–
Online Help on your device. On the
Start menu tap Help.
connecting while
traveling)
–or–
Microsoft ActiveSync online Help on
your desktop PC. In the ActiveSync
window, click Help, and then click
Microsoft ActiveSync Help.
Tool tips Any toolbar button. Tap and hold the
button and the button name will
appear. (To avoid activating the
toolbar button, drag off the button
before lifting the stylus.) For more
information, see the Using your
HP Jornada section in chapter 2.
Troubleshooting
information on
connections
This User’s Guide
–or–
The ActiveSync Troubleshooter on
your desktop PC. In the ActiveSync
window, click File, Click Connection
Settings, and then click Help to
activate the ActiveSync
Troubleshooter.
For more troubleshooting help visit
the Microsoft Mobile Devices Web site
at www.microsoft.com/mobile
.
Page 8

4 HP Jornada 700 Series Handheld PC
Software updates,
device drivers, and
lists of compatible
accessories
Up-to-date
information on MS
Windows for H/PC
2000–based devices
Information on this
release of MS
Windows for H/PC
2000
The complete text of this User’s Guide is available on the HP
Web site at www.hp.com/jornada. You can download the User’s
Guide to your desktop PC and view it using the Adobe™
Acrobat Reader, available from the Adobe Web site at
www.adobe.com
.
The HP Jornada Web site at
www.hp.com/jornada
The Microsoft Windows Mobile
Devices Web site at
http://www.microsoft.com/mobile/
Readme.doc file (located in the
Microsoft ActiveSync folder on your
Windows desktop PC).
.
.
Learning about HP Jornada
Learning about HP Jornada
Learning about HP JornadaLearning about HP Jornada
Hewlett-Packard has taken mobile computing to new levels of
compatibility and convenience. With HP Jornada, you will notice
many benefits not found in other, similar computers. For
example, you can:
· Move the data you already have on an older palmtop or
handheld PC to your HP Jornada. You can transfer
information from older Windows CE devices and even some
non-Windows CE devices. (See the Transferring PIM data
from older palmtop PCs section in
Appendix B.)
· Use e-mail without a modem. Conveniently send e-mail
automatically when you synchronize with your desktop PC.
(See the Synchronizing data section in chapter 3.)
· Take more data with you. A desktop Microsoft Word file may
take up to 85 percent less space on your HP Jornada. (See
the Transferring files section in chapter 3.)
· Send voice messages to friends and colleagues—even those
who do not have H/PC 2000 devices. You can save voice
Page 9

Chapter 1 | Welcome | 5
messages in the compatible Wave audio format. (See the
Recording voice memos section in chapter 4.)
· Keep Word, Access, and Excel files stored at work and at
home synchronized. Update any file in any location, and once
you synchronize, the file will be updated in every place it is
stored. (See the Synchronizing data section in chapter 3.)
· Read online news and information while offline, or download
Web pages for viewing later. (See the Browsing the Web
section in Chapter 6.)
· Work any time, any place, with up to 9 hours of battery life.
(See the Managing battery power section in chapter 7.)
· Synchronize mail messages, contacts, appointments, and
tasks with your desktop or notebook PC in just a few steps.
(See the Synchronizing data section in chapter 3.)
· Carry your HP Jornada with you. The HP Jornada weighs
only 510 g (1.1 lb.), including batteries.
· Expand your functionality with PC Card accessories.
(See the Accessories section in chapter 7.)
HP Jornada is your mobile computing companion. Several
valuable features allow you to stay organized and in touch while
you are on the road. For instance:
· The HP Jornada viewer application displays PIM data
(contacts, calendar, and tasks) at a glance, allowing you to
navigate to or view the data you need immediately. You
can even view notes attached to appointments.
· The HP Jornada dialup application leads you through
the steps required to configure a dial-up connection and
to access your e-mail and the Web. When you are ready to
connect, just use the convenient dialup window on your
HP Jornada desktop.
· The HP Jornada quick pad provides a convenient place to
jot down notes, names, telephone numbers, and other data
for short-term storage. Information can be saved in quick
pad for fast retrieval or sent to the appropriate database
for long-term storage.
· The HP Jornada backup application can back up and
restore information to/from an optional CompactFlash
Page 10

6 HP Jornada 700 Series Handheld PC
Card or PC Card, safeguarding against loss of data while
you are on the road—even if power is lost.
HP Jornada programs
Your HP Jornada already includes the full suite of software that
you need to function as a mobile professional. Detailed
information can be found in later chapters.
The programs listed below are pre-installed in ROM, so you
will never need to reinstall them.
Microsoft Pocket Office
On the Start menu, point to Programs, point to Office, and
then tap one of the following choices.
· Pocket Word—Take notes and compose documents, or
transfer Microsoft Word files from your desktop PC to read
and review while you are away from your office.
· Pocket Excel—View and edit price lists or financial
forecasts on your HP Jornada, or fill out your expense form
before you even land at the home office.
· Pocket Access—Take database information with you
on the road, and fill in custom forms to update Access
databases when you return to your office.
· Pocket PowerPoint—Create professional presentations
on your desktop, and then take them with you to show on
your HP Jornada. Or, use a PC Card VGA adapter
(F1252A) to project them to an external monitor or VGA
projector.
Microsoft Pocket Outlook
On the Start menu, point to Programs, point to Pocket
Outlook, and then tap one of the following choices.
· Calendar—Never miss a meeting. Keep track of
important dates and events or manage your schedule.
· Contacts—Take your address book with you so that you
always have access to names, addresses, and telephone
numbers. If you update your HP Jornada contacts list, just
synchronize with your desktop PC and your contacts will
Page 11

always be up to date.
Chapter 1 | Welcome | 7
· Inbox—Send and receive e-mail messages and
synchronize your HP Jornada Inbox with Microsoft
Outlook™ or Exchange™ on your desktop PC partner in a
matter of minutes
· Tasks—Keep track of to-do lists. Set an alarm or a
reminder and HP Jornada will make sure you do not
forget a task!
Microsoft Explorers
On the Start menu, point to Programs, and then tap Internet
Explorer or Windows Explorer. Or, double-tap the Internet
Explorer or My Handheld PC icons on the desktop.
· Microsoft Internet Explorer 4.01 for Handheld PC—
Browse the Web from your HP Jornada or subscribe to
channel content with this version of Microsoft Internet
Explorer 4.01 developed specifically for the H/PC.
· Windows Explorer—Browse the files and folders on your
HP Jornada.
Communication
On the Start menu, point to Programs, point to
Communication, and then tap one of the following choices.
· ActiveSync™—Synchronize your HP Jornada with your
desktop or notebook PC over a network or dial-up
connection from a remote location.
· PC Link—Establish the connection between your
HP Jornada and desktop PC partner with a single tap.
· Yahoo Messenger—Send and receive messages
instantly. Stay in touch with friends, family and associates
whenever you are on line.
· Remote Networking—Connect to a dial-up server, RAS
account, or Internet service provider.
· Terminal—Connect to online services that require
VT-100 or TTY terminal emulation.
Page 12

8 HP Jornada 700 Series Handheld PC
Special HP Applications
On the Start menu, point to Programs, point to HP
Applications, and then tap one of the following choices.
·
HP viewer
information (Pocket Outlook) in as much detail as you
need so that you are always in control of your schedule.
Month View, Week View, and Day View help you manage
your calendar even more efficiently. (HP viewer is also
accessible through a desktop icon and an HP hot key.)
·
HP dialup
mail accounts or corporate network, and then dial in from
a convenient pop-up window on your HP Jornada desktop.
(
HP dialup
·
HP quick pad
electronic notepad, and then move the important
information to Pocket Outlook or a Word document.
·
HP security
important information you have stored on it. Set
passwords for accessing your device.
·
HP info exchange
devices with IrDA capability (e.g., Palm PDA devices)
—Display Calendar, Task, and Contact
—Configure connections to the Internet and e-
is also accessible through a desktop icon.)
—Write simple notes and reminders on this
—Control access to your HP Jornada and the
—Exchange PIM data with PDA
·
HP backup
are away from your office by backing up your Pocket
Outlook data or your entire device to a CompactFlash or
PC Card.
·
HP ChaiVM
Explorer on your HP Jornada and provides developers
with a complete runtime environment for integrating Java
applications on the H/PC.
—Protect your valuable data even when you
—Allows you to view Java applets in Internet
On the Start menu, point to Programs, point to HP
Utilities, and then tap one of the following choices.
·
HP settings
suit any work environment. Or, choose from four preset
profiles for different environments, and change all options
with the touch of a button.
—Adjust screen controls and sound volume to
Page 13

· HP hot keys—Open programs, files, or folders with a
single keystroke. The HP Jornada hot keys and hard icons
are fully customizable, so you can configure them for onetouch access to your favorite programs or frequently used
documents.
Accessories
Chapter 1 | Welcome | 9
On the
Start
menu, point to
Accessories
, and then tap
one of the following choices.
· Microsoft InkWriter®—Jot quick notes or create
sketches while in a meeting.
· Microsoft Voice Recorder—Record voice memos,
reminders or other vital information for later playback.
· Calculator—Perform simple calculations in an on-screen
calculator, and then copy the results to any open
document.
· World Clock—Keep track of the time anywhere in the
world and display useful travel information for both your
home city and the city you are visiting.
· OmniSolve®—Perform complex mathematical and
business calculations with this full-featured calculator
from LandWare.
Games
· Solitaire—Pass the time at the airport, on the train, or
during a not-so-interesting meeting or lecture with this
classic game.
Additional H/PC-compatible software is available for download
from the HP Jornada Web site at
http://www.hp.com/jornada/solutions.
Page 14

10 HP Jornada 700 Series Handheld PC
Page 15

Chapter 2 | Getting started | 11
2 | Getting s
2 | Getting started
2 | Getting s2 | Getting s
This section will help you start using your Hewlett-Packard
Jornada 700 Series Handheld PC (H/PC). You will learn how to
set up your HP Jornada, receive a brief introduction to MS
Windows for H/PC 2000 operating system, and discover how to
customize its features to work for you. When you have finished
this chapter, you will have all the information you need to begin
working with your HP Jornada.
tarted
tartedtarted
This chapter includes step-by-step instructions to help you:
· Identify the hardware features of your HP Jornada
· Connect the ac adapter
· Install the main battery
· Install the backup battery
· Complete the MS Windows for H/PC 2000 Welcome Wizard
· Put your HP Jornada to work for you
Page 16
12 HP Jornada 700 Series Handheld PC
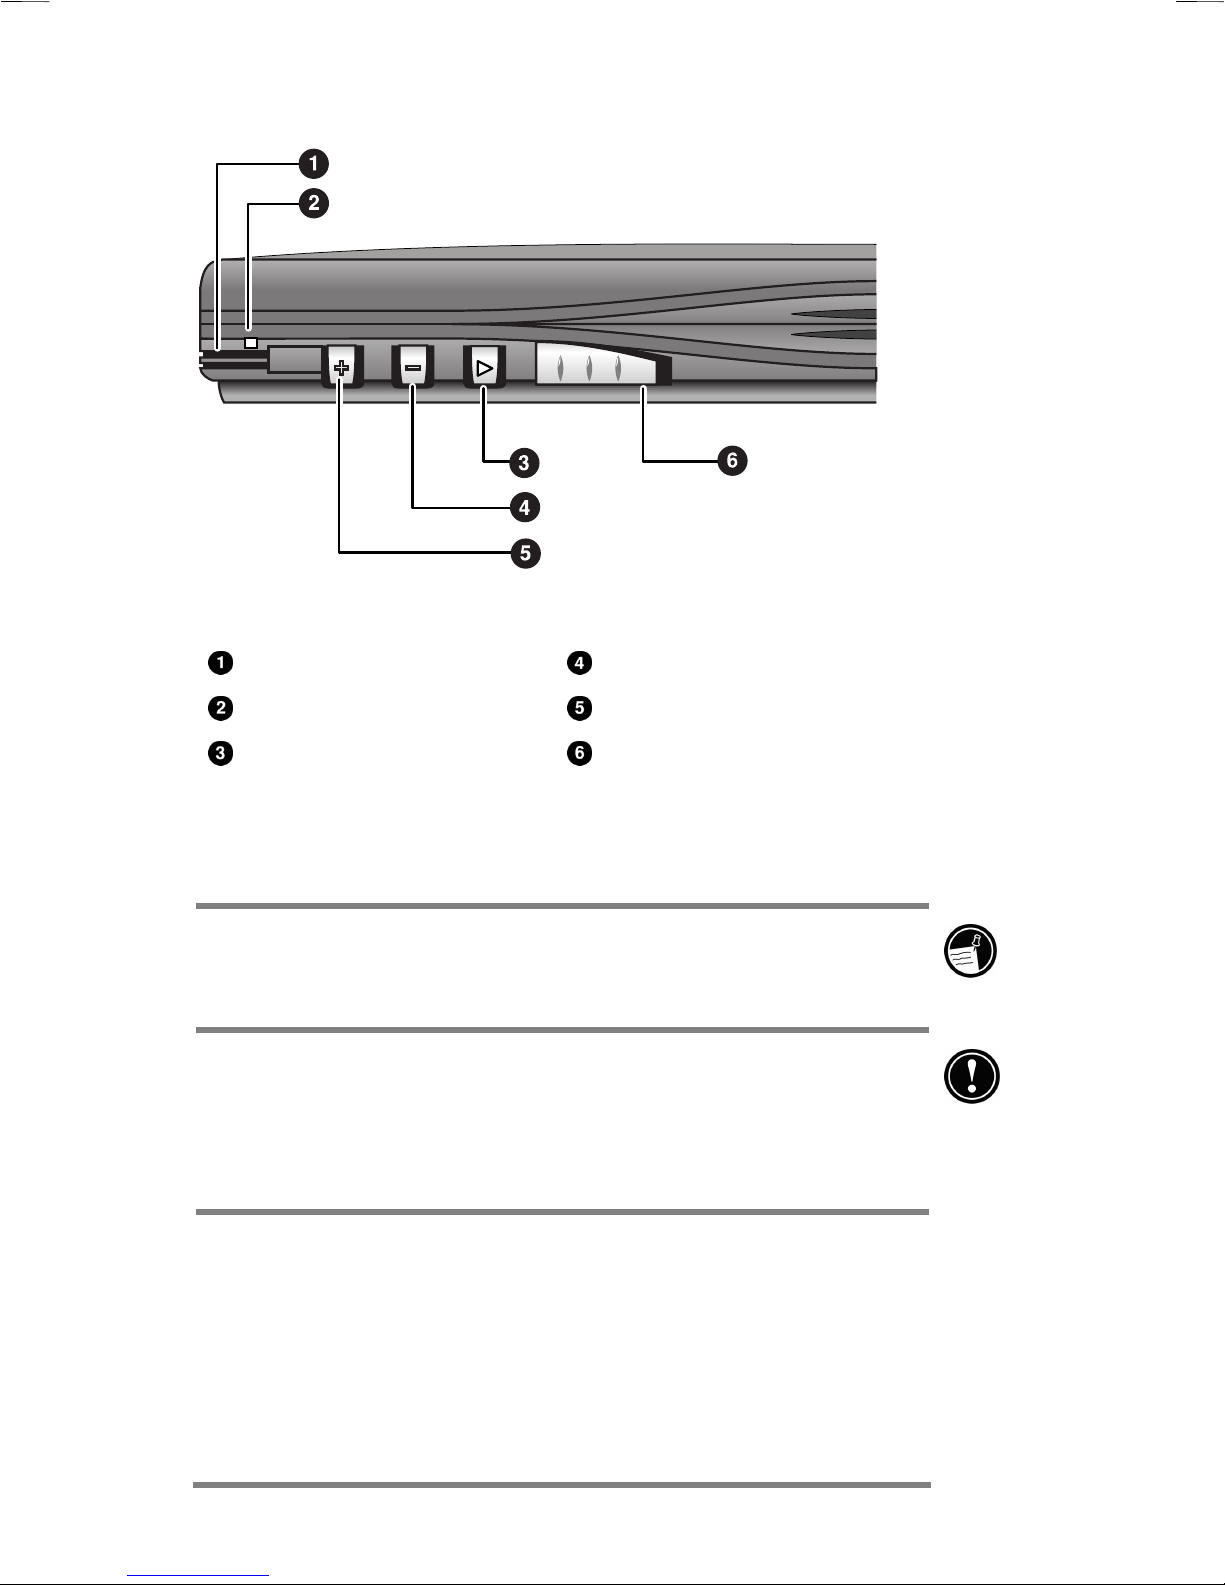
HP Jornada hardware features
The views below will introduce you to the various connectors,
ports, and other features of your HP Jornada.
Appointment notification LED—Notifies you of
scheduled appointments, alarms, and reminders. (For
more information on setting alarms and reminders, see the
Using Microsoft Pocket Outlook section in
chapter 4.)
HP hot keys—Allow one-touch access to your favorite
programs, folders, documents, or frequently used settings.
(See the Customizing the HP hot keys and hard icons
section in chapter 7.)
Reset button—Restart your Jornada with the touch of a
button.
The Reset button quickly reinitializes the MS Windows for
H/PC 2000 operating system. (Warning: When you reset your
HP Jornada, you will lose all unsaved data in any open
documents. See the Resetting section in chapter 8.)
Page 17

Chapter 2 | Getting started | 13
Status LED—A steady red light indicates that Voice
Recorder is recording a voice memo; a flashing green light
indicates that your Jornada display is off but the device is
still turned on.
Microphone—Allows you to record voice memos.
Audio buttons—Enable you to listen to your favorite MP3
or WMA music files with Windows Media Player
Stylus and stylus slot—Keeps your stylus within easy
reach. (For more information, see the Using the stylus
and touch screen section in this chapter.)
dc jack for ac power adapter—Connect your
HP Jornada to ac power to charge the main battery.
Battery charging LED—Indicates the charging status of
the main battery while connected to ac power.
Telephone connector (RJ-11)—Enables you to connect
a telephone line to the built-in modem (on models
equipped with a built-in modem), keeping you in touch
with the world. (For more information, see the
Connecting the telephone line section in chapter 6.)
Instant-on/off—No waiting for the Jornada to start up or
shut down. Just press the on/off button to suspend
operation, and later when you turn it back on again, you
can start working exactly where you left off.
HP hard icons—Adjust display and volume settings,
check system status, backup your data, open a dialup
connection, or play music files with just a tap of your
stylus. (See the Customizing the HP hot keys and
hard icons section in chapter 7.)
Page 18
14 HP Jornada 700 Series Handheld PC
CompactFlash Type I card slot—Enables you to add
storage memory or use accessories on CompactFlash cards.
(For more information, see the Using PC Cards,
CompactFlash Cards and Smart Cards section in
chapter 7. For a list of recommended accessory cards, go to
the HP Jornada Web site at www.hp.com/jornada.)
Backup battery compartment—Holds a 3-V CR2032
coin-cell backup battery. (For information on replacing the
backup battery, see chapter 7.)
CompactFlash door release tab—Slide the tab in the
direction of the arrow to insert CompactFlash Cards or
access the backup battery compartment.
PC Card Type II card slot—Enables you to use PC
Cards (also called PCMCIA Cards) to expand memory,
connect to an external monitor, or add other functionality
to your HP Jornada. For information on how to use PC
Card accessories, see the Using PC Cards,
CompactFlash Cards and Smart Cards section in
chapter 7. (For a list of recommended PC Cards, go to the
HP Jornada Web site at www.hp.com/jornada.)
Page 19

Chapter 2 | Getting started | 15
Smart Card reader slot— Smart Cards are designed
with embedded chip technology that enables the highest
standard in device security for HP Jornada owners. For
information about using Smart Cards, see the Using PC
Cards, CompactFlash Cards and Smart Cards section
in chapter 7, or go to the HP Jornada Web site at
http:/www.hp.com/jornada.
PC Card release tab—Flip the tab out and depress it to
eject a PC Card from the Type II PC Card slot.
Earphone jack—listen to your favorite music via the
stereo earphone jack.
Security cable slot—Allows you to keep your
HP Jornada safe with the connection of an optional thinwire security cable.
Infrared port (SIR IrDA–compliant transceiver)—
Enables you to send and receive files by infrared beam
between your HP Jornada and another HP Jornada or
palmtop PC, or between your HP Jornada and an infraredequipped printer or desktop PC. (For more information,
see the Connecting by infrared section in chapter 3 and
the Infrared transfer section in chapter 8.)
Main battery—Provides power to your HP Jornada for up
to 9 hours of use. Optional Extended battery is available
for up to 24 hours of use.
Main battery release tab—Slide the tab to release the
main battery for removal or replacement.
Serial Port (RS-232C)—Connect your HP Jornada to
your desktop PC to transfer files or synchronize Pocket
Outlook data, or connect your HP Jornada directly to a
printer, external modem, or other device. (For more
information, see the Connecting for the first time
section in chapter 3.)
Page 20

16 HP Jornada 700 Series Handheld PC
Setting up your HP Jornada
Follow the steps in this section to start using your
HP Jornada for the first time. As part of the setup process,
you will connect the ac power adapter, install the main
battery, install the backup battery, and complete the MS
Windows for H/PC 2000 Welcome Wizard. To set up your
HP Jornada, you will need to have your HP Jornada, the ac
adapter, the HP Jornada Standard Battery, the backup
battery (attached to the Quick Start Card), and the power
cable.
Follow these steps in the order they are presented. Do not
install the backup battery before connecting ac power and
installing the main battery.
Connecting the ac adapter
To avoid running out of battery power, you can operate your HP
Jornada on ac power using the supplied ac adapter. The ac
adapter accepts 100 to 240 V, enabling you to connect to ac power
anywhere in the world. When you travel, you may need adapters
to accommodate different electrical outlets, but the HP Jornada
ac adapter will safely convert ac line voltage to the dc voltage
required by your HP Jornada.
Use only the supplied ac adapter (model HP F1279B, input
specifications 100-240 V ac, 50-60 Hz, 1.5 A).
While your HP Jornada is connected to ac power, the main
battery is charged automatically. The color of the LED indicates
the status of the battery: Amber indicates that battery is
charging, and green indicates that the battery is fully charged.
Page 21
Chapter 2 | Getting started | 17
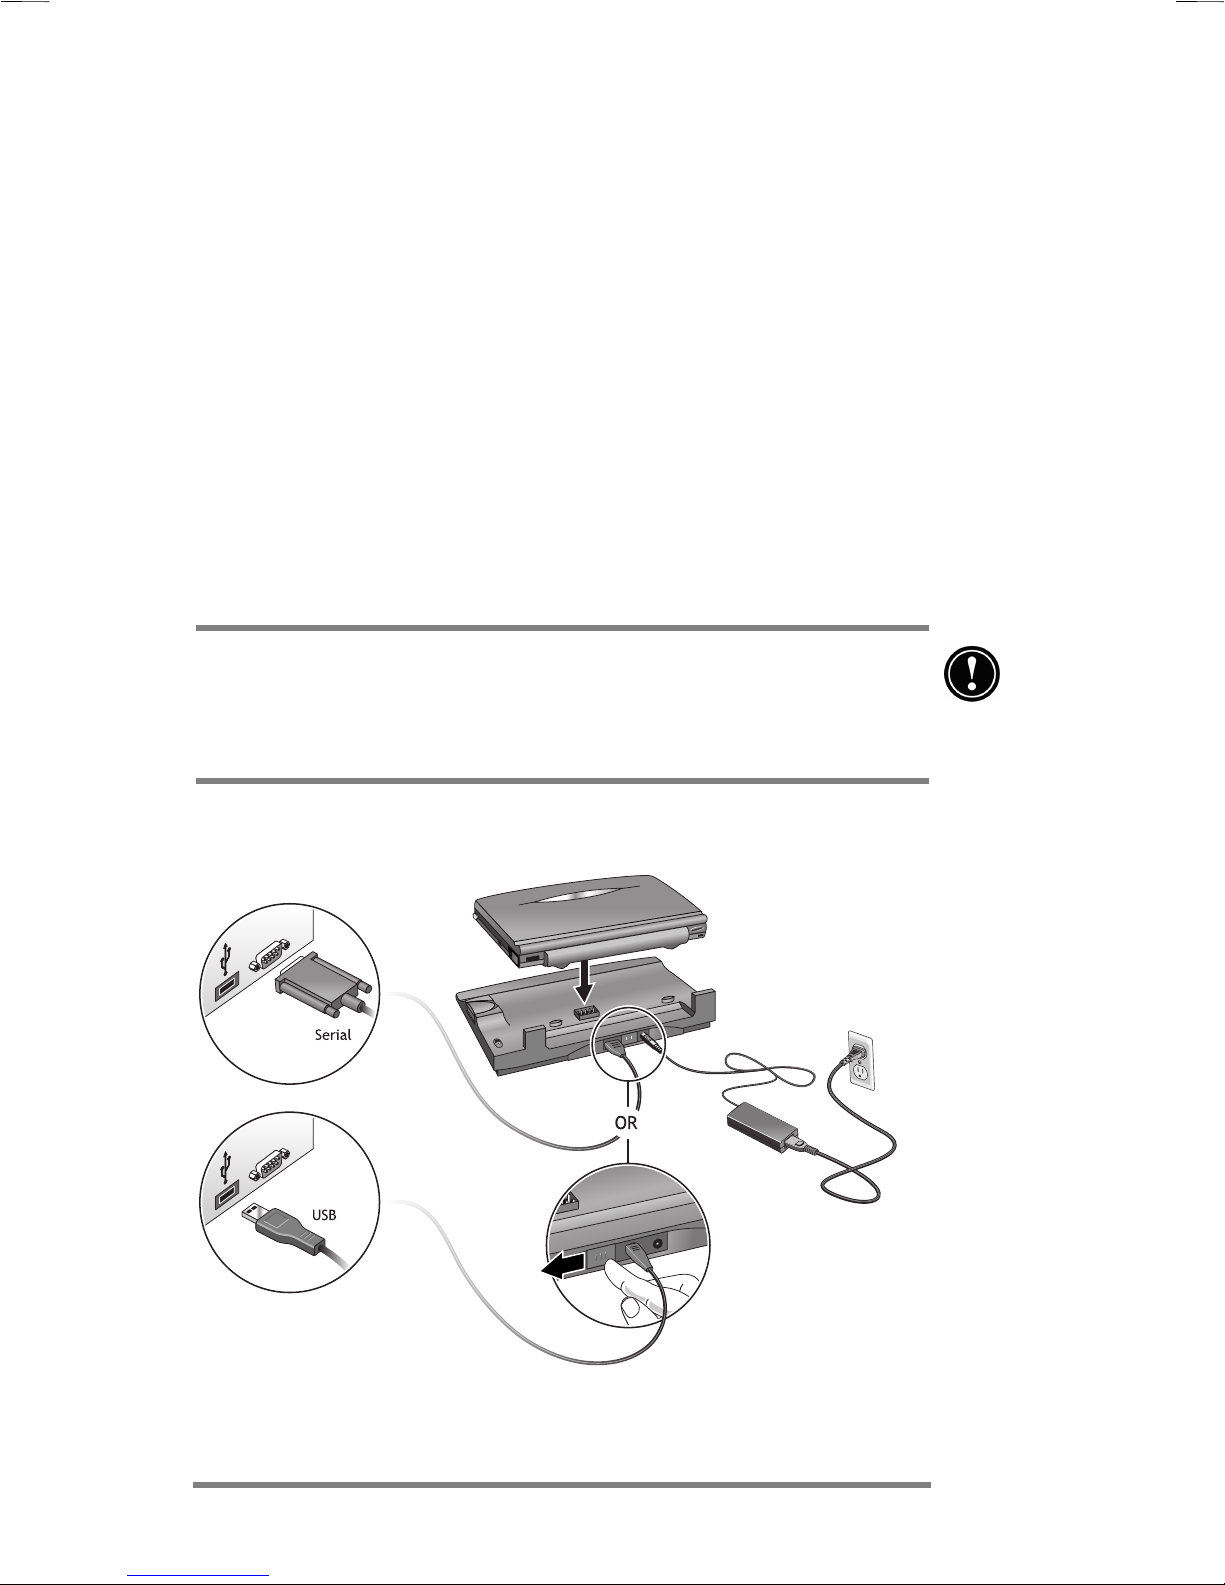
The ac adapter components: dc plug, ac adapter, and
power cable.
To connect to ac power
1. Connect the cable from the ac adapter to the dc jack on
the right side of your HP Jornada.
2. Connect the power cable to the ac adapter.
3. Plug the power cable into an ac power outlet.
After you connect the ac adapter your HP Jornada will turn on
automatically. However, you should install the main battery
and install the backup battery before using your device.
Installing the main battery
The HP Jornada Lithium-Ion Battery provides power to your HP
Jornada while it is not connected to ac power. Under normal
operating conditions, the fully charged battery should provide
power for up to 9 hours of continuous use; however, battery life
will vary depending on how you use your HP Jornada.
Page 22
18 HP Jornada 700 Series Handheld PC
Rechargeable Lithium-Ion batteries, unlike NiCD and NiMH
batteries, are not subject to "memory effect," allowing you to
fully recharge your batteries at any time regardless of battery
power level.
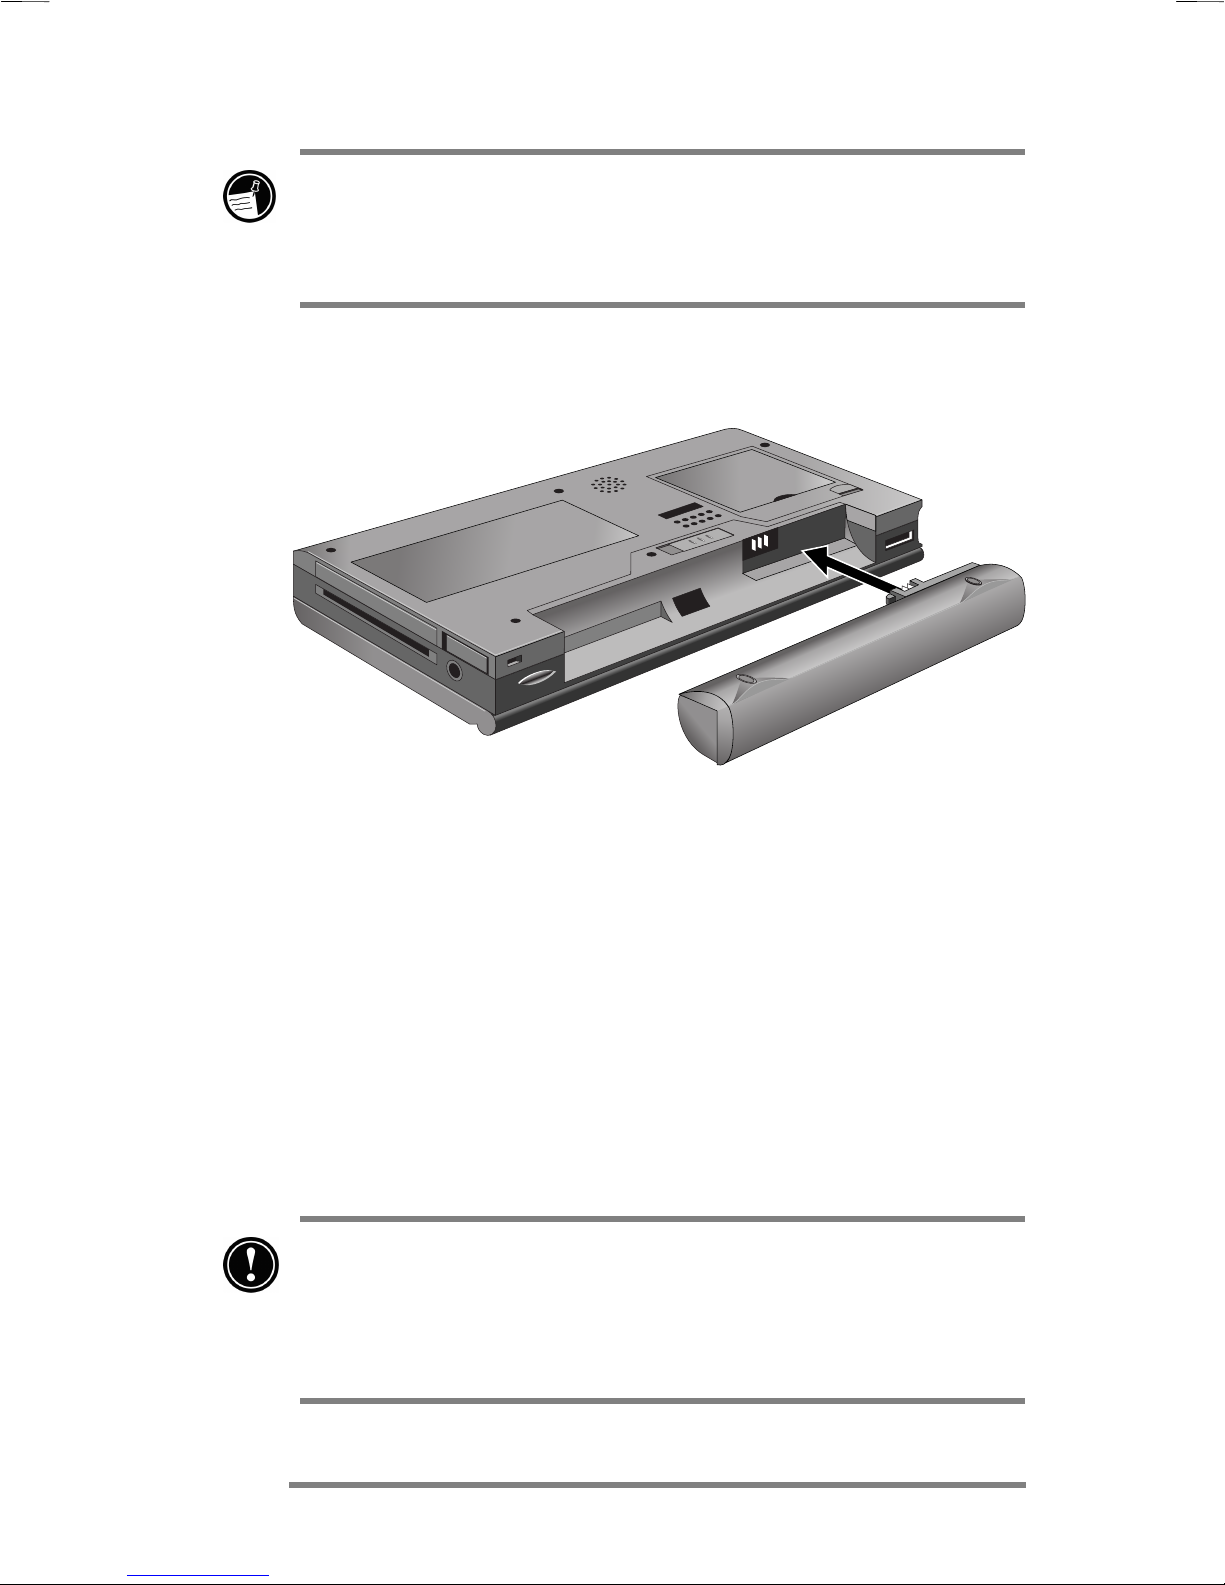
The main battery fits into the bottom of your HP Jornada, as
shown in the following diagram.
This bottom view of the HP Jornada shows how to install
the main battery.
To install the main battery
· Place the main battery in the battery slot on the bottom of
your HP Jornada and push firmly until it snaps into place.
The main battery should be partially charged when removed from
the box. However, you should charge the main battery fully
before operating your HP Jornada on battery power. Charging
the main battery takes approximately 3.5 hours. When the
battery is fully charged, charging stops automatically; the battery
will not overcharge if left connected to ac power.
When the main battery charge is low, a low battery warning is
displayed. If you see a low battery warning message
displayed, connect ac power and charge your main battery
immediately to avoid draining your backup battery, and
possible data loss.
Page 23
Chapter 2 | Getting started | 19
Do not mutilate, puncture, or dispose of batteries in fire. The
batteries can burst or explode, releasing hazardous chemicals.
Replace batteries only with the types recommended in this
User’s Guide. Discard used batteries according to the
manufacturer’s instructions.
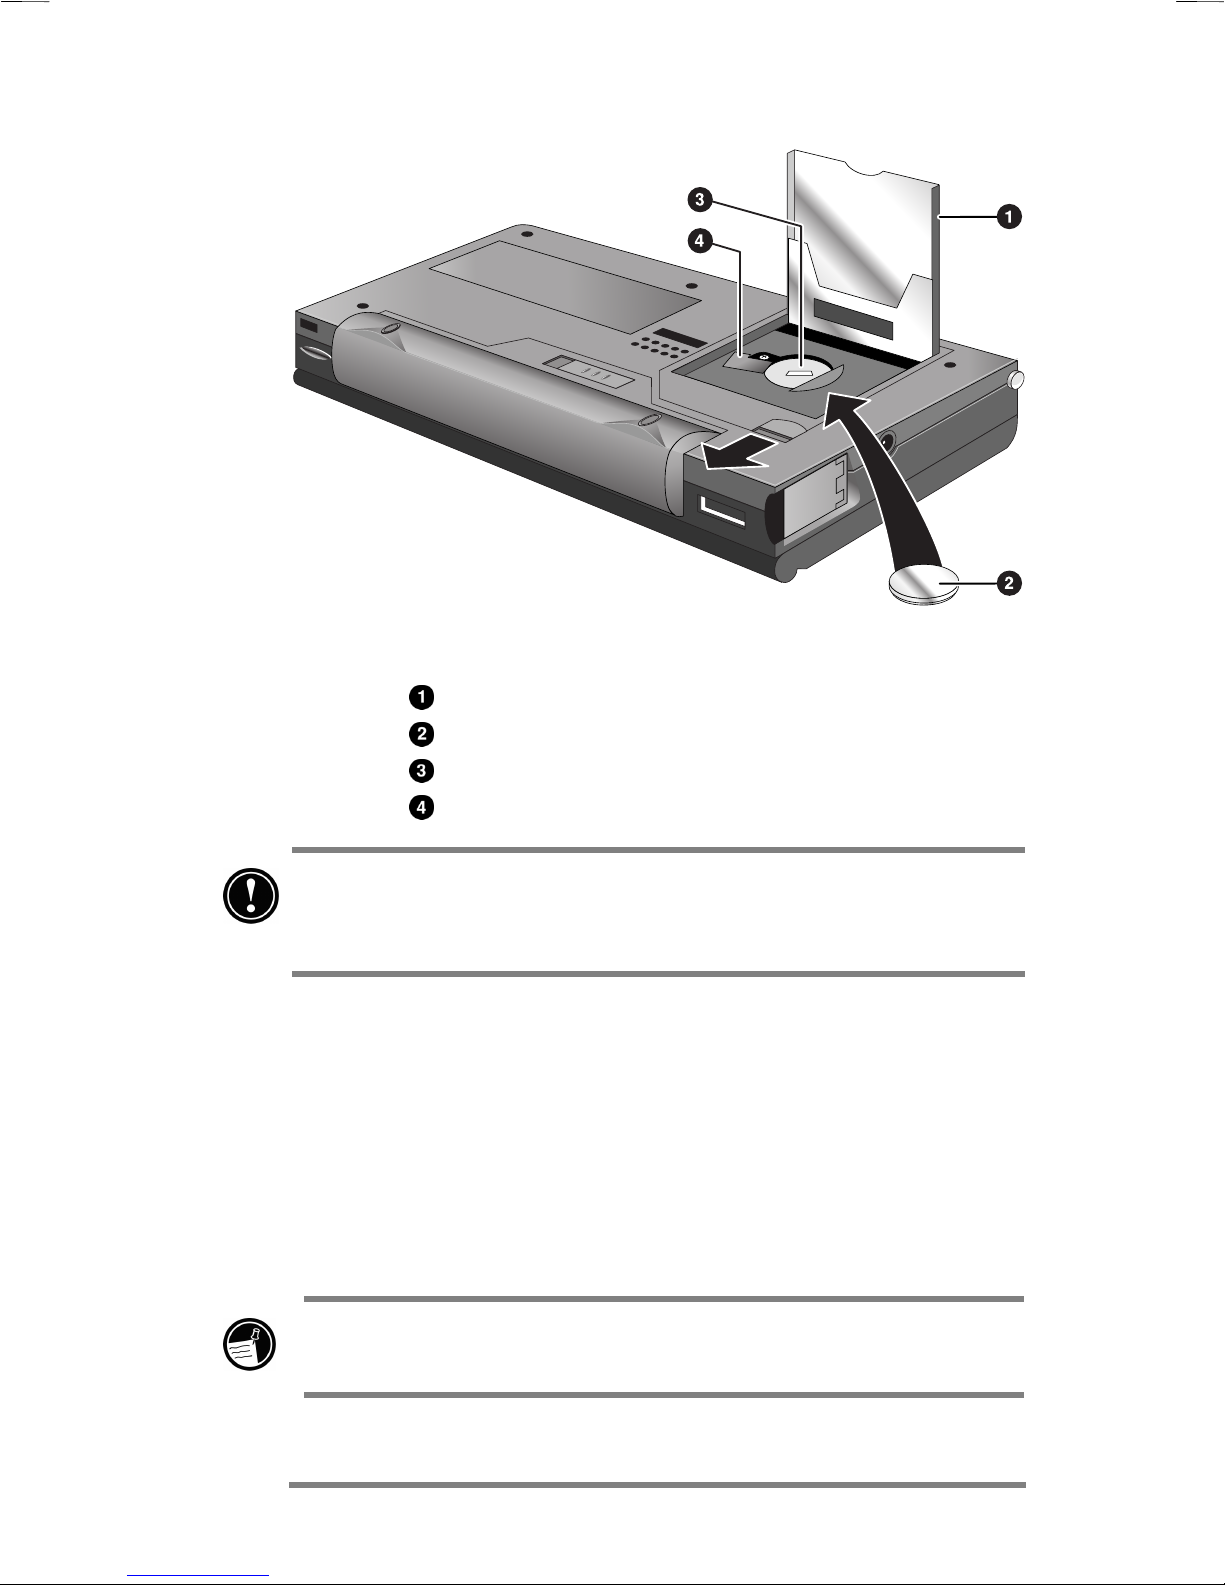
Installing the backup battery
The backup battery protects your data when the main battery
runs out of power. The backup battery does not provide enough
power to operate your HP Jornada, but it will preserve your data
while you replace the main battery or while you connect to ac
power to recharge. The 3-V CR2032 coin-cell backup battery is
attached to the HP Jornada Quick Start Card. Follow the
procedure outlined below to install the backup battery.
To prevent loss of data, replace the backup battery as soon as a
warning message appears on your screen indicating that
backup battery power is low. (For detailed instructions on
replacing the backup battery, see the Managing battery
power section in chapter 7.)
To install the backup battery
1. Remove the backup battery from the HP Jornada Quick
Start Card.
2. Turn the Jornada upside-down and open the
CompactFlash door.
3. Use the tip of the stylus to carefully open the backup
battery cover.
4. Insert the battery printed side up in the battery
compartment.
5. Using the stylus tip, close the backup battery cover to
secure the coin-cell battery, and then close the
CompactFlash door.
Page 24
20 HP Jornada 700 Series Handheld PC
Installing the backup battery
CompactFlash door shown open
Coin-cell 3V CR2032 backup battery
Backup battery compartment
Backup battery cover in open position
Be sure to close the backup battery cover before closing
the CompactFlash door in order to avoid damaging these
components.
Using the stylus and touch screen
Use the stylus in much the same way you would use a mouse to
navigate and select objects on screen. You can also use your
fingertip to tap the touch screen, but the stylus provides the
greatest accuracy.
For convenience, the stylus is stored in the stylus slot on the
front of the HP Jornada. To remove the stylus, push on the stylus
to release the catch as you slide it out of the slot.
The top of the stylus pops up to make it easy to remove the
stylus. Pressing the top has no effect on the stylus function.
Page 25
Chapter 2 | Getting started | 21
To navigate by using the stylus, follow these tips:
· Where you would normally click a mouse, simply tap the
stylus on the touch screen to select an icon or activate a
button.
· Double-tap instead of double-clicking on a mouse.
· Hold down the
a mouse.
To replace the stylus, insert the pointed end of the stylus into the
slot and push until it clicks into place.
key as you tap instead of right-clicking on
Following the Welcome Wizard
After you install the main battery, your HP Jornada will turn on
automatically. At startup, the Hewlett-Packard welcome screen
appears. Then, after a few moments, the MS Windows for H/PC
2000 Welcome Wizard begins. The Welcome Wizard presents a
brief orientation that helps you to calibrate the touch screen and
configure device settings such as the World Clock and Owner
Identification.
Before you begin working, you may need to adjust the brightness
and contrast of the display to compensate for different lighting
conditions and viewing angles. You can use the keyboard to
adjust both contrast and brightness.
To adjust screen brightness and contrast
1. To adjust the contrast, hold down the key as you
press or .
2. To adjust the brightness, hold down the
press or .
To maximize battery life, minimize the brightness setting and
then adjust contrast to achieve greater readability
The following sections describe the Welcome Wizard. To complete
the Welcome Wizard, follow the instructions displayed in the
taskbar area at the bottom of your screen. After you complete the
Welcome Wizard, you can begin using your HP Jornada.
key as you
Page 26

22 HP Jornada 700 Series Handheld PC
If your HP Jornada freezes during operation, you may need to
perform a soft reset. To reset, use the stylus to press the reset
button located on the left side of the HP Jornada keyboard.
Your HP Jornada will restart automatically. Unsaved data in
any open documents will be lost. For more information, see the
Resetting section in chapter 8.
Calibrating the touch screen
Before you can use the stylus to navigate, you must calibrate the
touch screen to align the image on the screen with the touchsensitive coating. The first screen of the Welcome Wizard
prompts you to calibrate the touch screen by tapping a series of
targets at different locations on the screen.
From time to time, you might notice that the accuracy of your
stylus tap diminishes. When this happens, you can return to this
screen to calibrate your touch screen.
To calibrate the touch screen
· On the Start menu, point to Settings, tap Control Panel,
and then double-tap the Stylus icon.
–or–
Press
You can also use the Stylus control panel to set options for
double-tap rate and physical distance between taps.
.
Page 27

Chapter 2 | Getting started | 23
Selecting your Home City
MS Windows for H/PC 2000 displays current time and regional
information for the city you designate as your “Home City.” Tap
the city nearest your home from the drop-down list on the Home
City tab. If your city is not listed, you can use the World Clock
control panel to add it later. (See the World Clock topic in online
Help.)
Setting the World Clock
MS Windows for H/PC 2000 uses the system clock to monitor
your alarms and appointments as well as to ensure proper
synchronization of the most current files and appointments with
your desktop PC. So make sure you set the correct time and date.
To set the time, type the current time in the box below the clock
face, or drag the hands on one of the clocks to the correct time. To
set the date, tap the current date on the calendar. (Tap
to change month or tap the month or year.)
You can set the clock settings again later using the World Clock
control panel. (See the World Clock topic in online Help or tap
the clock in the status area of the taskbar.)
or
Page 28

24 HP Jornada 700 Series Handheld PC
Adding owner information
You can set MS Windows for H/PC 2000 to display owner
information, such as your name, address, and telephone number.
You can also type a note to be displayed; for example, offering a
reward for the safe return of your HP Jornada. To display your
owner information each time you start your HP Jornada, tap
Start, then tap Settings, and then tap Control Panel. Open the
Owner control panel and select the Display Owner
Identification check box under At Power On.
You can change the information you type here at any time using
the Owner control panel. (See the Settings topic in online Help.)
Using your HP Jornada
Using your HP Jornada
Using your HP JornadaUsing your HP Jornada
After you complete the Welcome Wizard, you can begin using
your HP Jornada and its built-in programs.
Welcome to MS Windows for H/PC 2000
Congratulations on purchasing a mobile device powered by MS
Windows for H/PC 2000. The size and capabilities of your HP
Jornada let you keep your most important business and personal
information up to date and close at hand. Microsoft ActiveSync
increases the power of your HP Jornada by letting you
synchronize the information on your desktop or notebook PC with
your device.
Using the Start menu and Taskbar
Use the Start menu to open settings, online Help, recently used
documents, and programs such as the HP Applications. Just tap
Start, and then tap the program or item you want to open. In
addition to the Start menu, the taskbar contains buttons for the
programs you have running, a status area, and a desktop icon.
Page 29

Chapter 2 | Getting started | 25
Using the command bars
Each program has a command bar located at the top of the
program window. The command bar displays both menu names
and toolbar buttons. Tap the slider and drag to switch between
displaying toolbar buttons only or menu names and toolbar
buttons. You can drag the slider to display only the buttons and
menu names you want. You can also drag the slider down to
move the toolbar buttons under the menus.
Using Help on your HP Jornada
You can get Help for specific programs, including MS Windows
for H/PC 2000, as follows:
• For detailed procedures and overview information about a
program, on the Start menu, tap Help, and then tap the
program name.
• For MS Windows for H/PC 2000 Help, tap the
any program or dialog box where it appears.
• To learn the function of a specific button or control, tap and
hold on a toolbar button and its name will appear in a ToolTip.
Drag the stylus off the toolbar button before lifting to avoid
activating the button.
button in
Page 30

26 HP Jornada 700 Series Handheld PC
Online Help uses the same font setting as Internet Explorer.
Changing the font size in Internet Explorer will also change
the font size in Help.
Turning your HP Jornada on and off
One of the most convenient features of MS Windows for H/PC
2000 and HP Jornada is “instant on.” With instant on, there is no
waiting for HP Jornada to start up or shut down; you can start
working immediately by pressing the On/Off key on the upper
right corner of the keyboard. When you are finished, turn off your
HP Jornada by pressing the On/Off key or by tapping Suspend
on the Start menu. Turning off your HP Jornada simply
suspends operation. When you turn it on again, you can resume
working.
You can also set options in the Power control panel to turn your
HP Jornada on and off automatically. For example, you can set
your HP Jornada to turn on when you tap the touch screen with
the stylus. To conserve battery power, you can set HP Jornada to
auto-suspend or to turn itself off after a preset period of
continuous idle time. By default, your HP Jornada will autosuspend after 3 minutes while running on battery power. (For
more information on these options and tips for conserving battery
power, see the Managing battery power section in chapter 7.)
If the HP Jornada wakes up from a suspended state and there
is no user activity for one minute, the Jornada will return to a
suspended state. To avoid this, simply use any of the Jornada's
functions or programs within the one-minute interval.
Using the HP Jornada keyboard
To provide full functionality in a smaller size, the HP Jornada
keyboard lets you accomplish common tasks with a few
convenient key combinations:
• To turn the caps lock on or off, press and hold the
you press the left
symbol appears in the status area of the taskbar.
key. While caps lock is on, the
key as
Page 31

Chapter 2 | Getting started | 27
• To activate (or deactivate) the numeric keypad, press and hold
the key as you press the key. While the numeric
keypad is activated, the
symbol appears in the status area
of the taskbar.
Be sure the numeric keypad is deactivated and caps lock is off
while you set your password and before you turn off your HP
Jornada. Check for either the
or
symbols in the status
area of the task bar at the lower right of the Jornada display
screen. If either of these symbols appear, be sure to deactivate
them before setting or re-entering your password.
• To type accented or international characters, press and hold
the
key as you press the keys corresponding to the
character (international versions only). International versions
of the HP Jornada have slightly different keyboard layouts.
When using Terminal Server Client, the
key is not
available for use in typing extended or international keyboard
characters. See Appendix C for information on alternative
keystroke combinations in Terminal Server Client.
• To generate extended characters or keyboard commands, hold
down
or as you press a key. Holding down the
key will activate the character or command printed in yellow,
while pressing will activate the character or command
printed in blue.
You can also use the Keyboard control panel to adjust how
quickly characters repeat when you hold down a key. To open
the Keyboard control panel, press .
Page 32

28 HP Jornada 700 Series Handheld PC
Using HP Jornada settings
The HP Jornada settings application gives you access to many
useful controls. Use the HP Jornada settings control panel to:
• Adjust your screen brightness and contrast in different
lighting conditions
• Adjust speaker volume or quickly mute all sounds
• Check the remaining battery power
• Check the amount of system memory available
HP Jornada settings also enable you to save your preferred
sound, contrast, and brightness settings in a custom profile, so
you can change all your options with a single tap.
To open HP settings
· On the Start menu, point to Programs, point to HP
Utilities, and then tap HP settings.
–or–
Tap the HP Jornada settings hard icon on the left side of
the screen.
For more information about the HP Jornada settings application,
refer to the Using the HP settings application section in
chapter 7 or the HP settings topic in online Help.
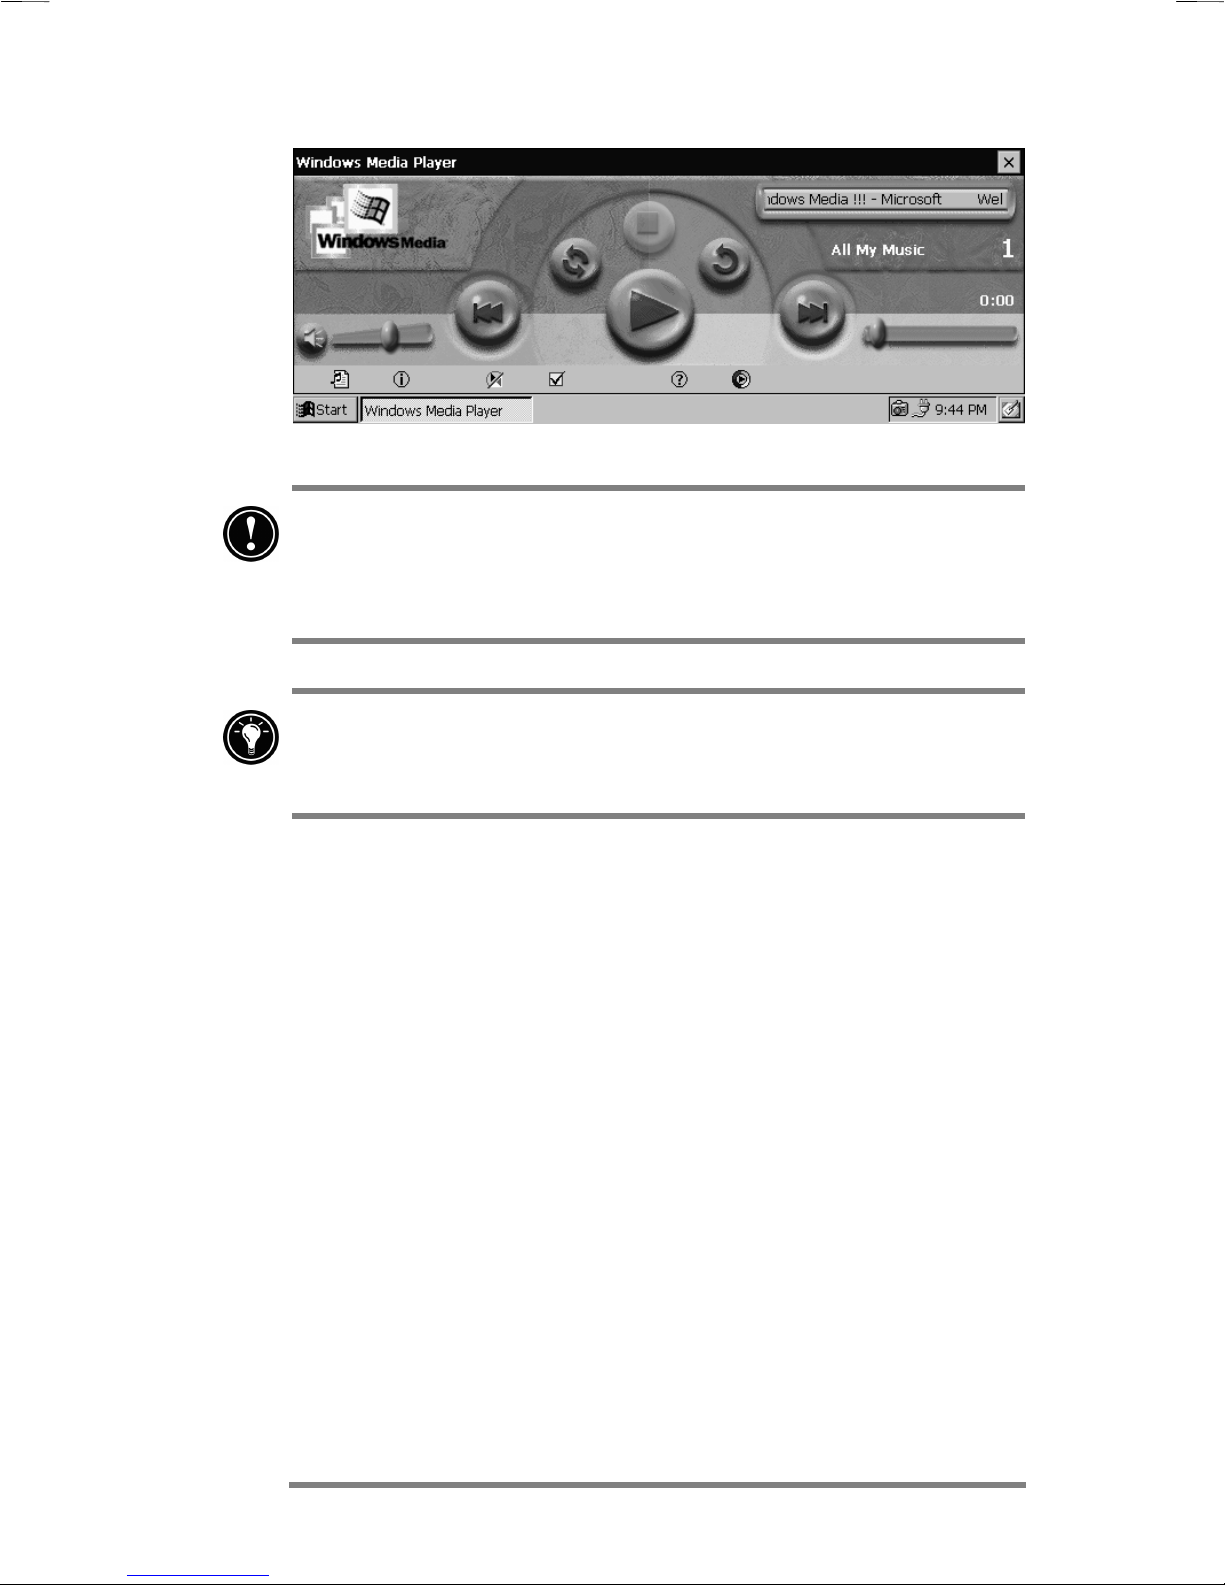
Using the audio buttons
The audio buttons on the front of your HP Jornada enable
you to play Windows Media Audio and MP3 music files
using
There are three audio buttons and a sliding audio lock.
Windows Media Player
When locking the audio buttons, be sure to slide the audio lock
button to the fully locked position to avoid accidental
activation of Windows Media Player in your pocket or luggage.
.
When using Windows Media Player, the buttons control
volume and play/stop functions.
Page 33
HP Jornada Audio buttons
Chapter 2 | Getting started | 29
Microphone
Status LED
Play/Pause button
Volume decrease button
Volume increase button
Audio button lock
When you press the Play button, Windows Media Player plays
the currently selected play list. Play lists are selected from within
the Windows Media Player application.
For more information about play lists and using Windows
Media Player in general, see the Windows Media Player online
help files.
Playback volume levels may vary considerably between
different recording formats. To avoid uncomfortably high
sound levels when listening to music via earphone, turn down
the volume before you start playback. Then, adjust the volume
to the desired listening level.
Page 34
30 HP Jornada 700 Series Handheld PC
When an audio file is being played, appointment notification
will not sound (even if sound and reminders have been set in
the control panel), however, the appointment notification light
will still flash.
When playing MP3 music files through the HP Jornada builtin speaker, reduce the bass setting. See Setting bass and treble
levels in Chapter 7.
Page 35

Chapter 3 | Connecting to your desktop PC | 31
3333 | Connecting to your
| Connecting to your
| Connecting to your | Connecting to your
desktop PC
desktop PC
desktop PCdesktop PC
Your HP Jornada 700 Series Handheld PC works perfectly as a
standalone computer. But to get the most out of your
HP Jornada, you will want to connect to your desktop or notebook
PC. This chapter describes how to establish a connection between
your HP Jornada and a desktop PC, and how to use your HP
Jornada with a desktop PC—or with any PC that has Microsoft
ActiveSync installed. You will learn to:
• Connect to your desktop PC
• Set up Microsoft ActiveSync
• Establish a partnership between your HP Jornada and your
desktop PC
• Use Microsoft ActiveSync to browse the contents of your
HP Jornada
• Synchronize Microsoft Pocket Outlook data and e-mail
messages with Microsoft Outlook or Exchange
• Transfer files between your HP Jornada and a desktop PC
• Connect to and transfer files between your HP Jornada and a
corporate network or home desktop PC over the Internet or by
telephone line
Connecting for the first time
Connecting for the first time
Connecting for the first timeConnecting for the first time
You can connect your HP Jornada to a desktop PC using a serial
connection (with either the docking cradle—optional for the HP
Jornada 710—or the serial sync cable), a USB connection (using
the cradle only, USB A-to-B cable not included) or a network
connection (with an optional PC Card network interface card).
You can also connect to an infrared-equipped desktop or notebook
PC (using the infrared port). Before you connect, you must install
Microsoft ActiveSync on the desktop PC. Then, you can connect
your HP Jornada and establish a partnership.
Page 36

32 HP Jornada 700 Series Handheld PC
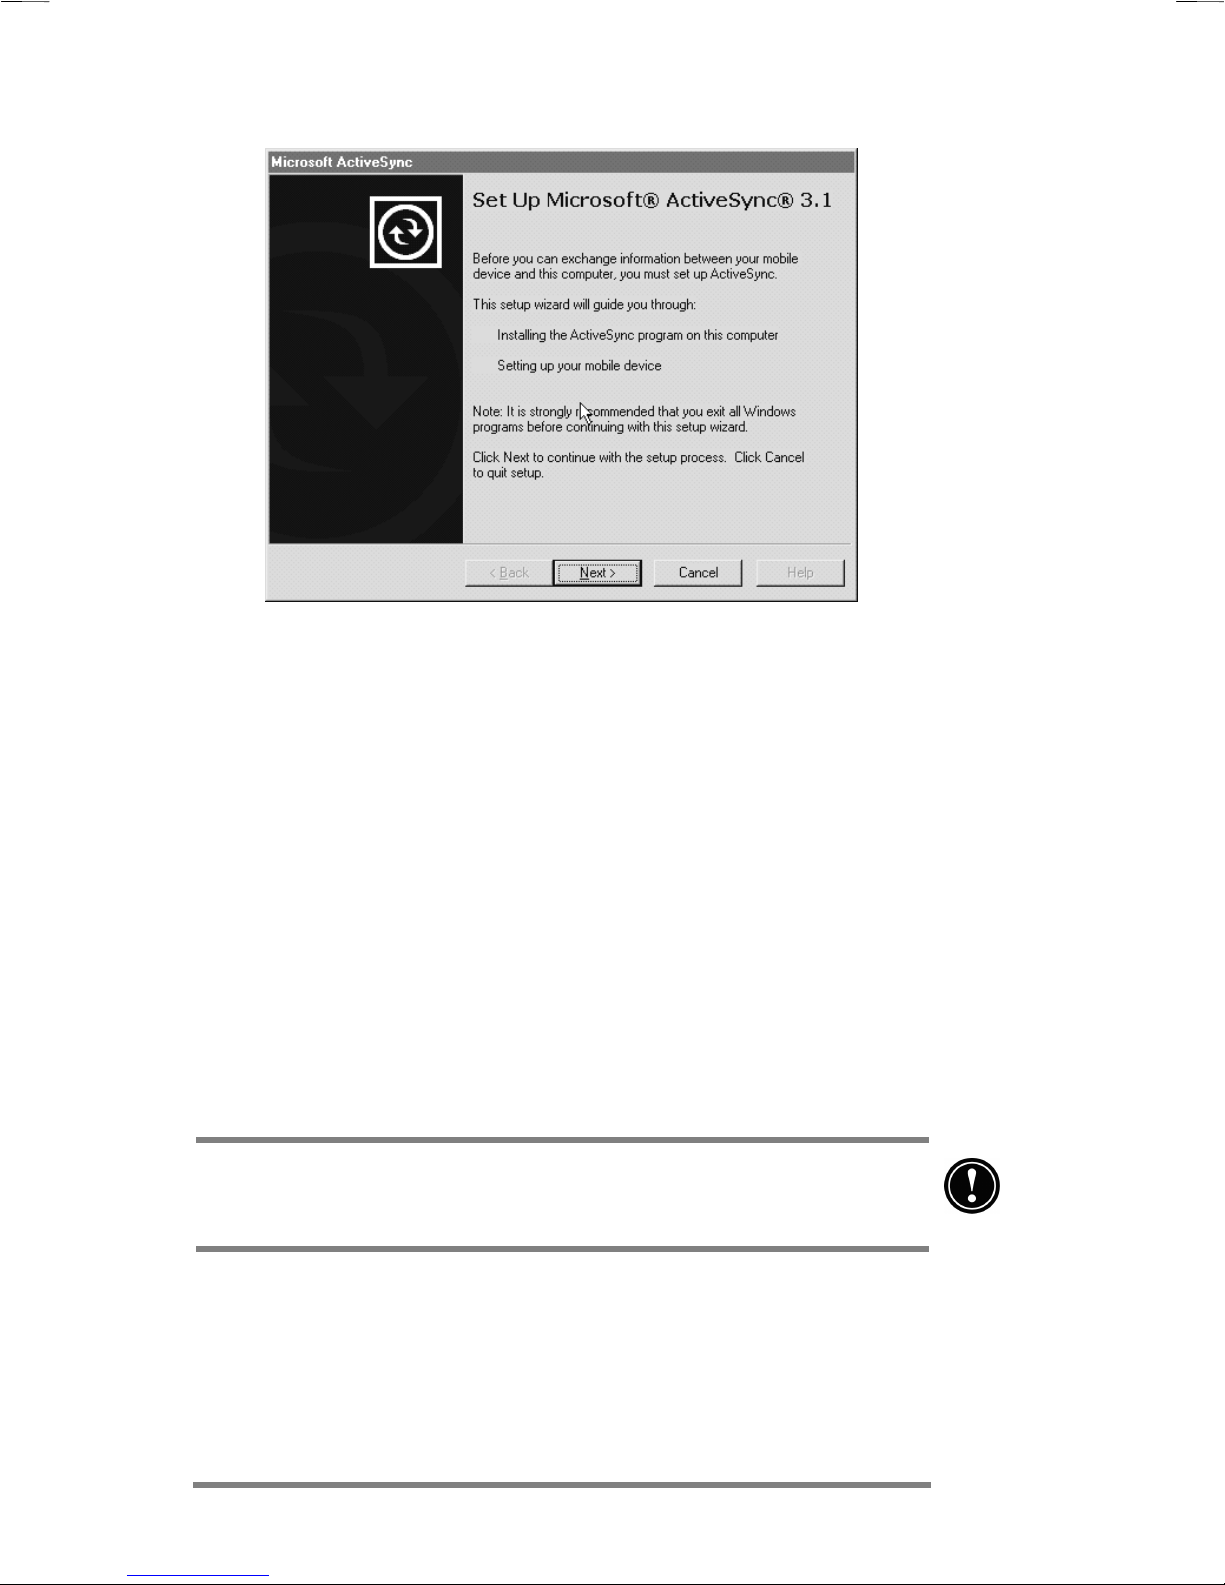
Setting up Microsoft ActiveSync and establishing
a partnership
Microsoft ActiveSync enables you to synchronize the information
on your desktop PC with the information on your HP Jornada.
Synchronization compares the data on your device with your
desktop PC and updates both computers with the most recent
information. For example:
• Keep your Pocket Outlook data current by synchronizing your
HP Jornada with Microsoft Outlook 2000 on your desktop PC.
(Inbox synchronization with Outlook Express is not
supported.)
• Synchronize Word and Excel documents, Access and other
ODBC databases and tables, Mobile channels, and InkWriter
documents between your HP Jornada and desktop PC. Your
files are automatically converted to the correct format.
With Microsoft ActiveSync, you can:
• Back up and restore your HP Jornada data
• Add and remove programs on your HP Jornada
• Move and copy files (rather than synchronize files)
between your device and your desktop PC
Microsoft ActiveSync includes several components. The Microsoft
ActiveSync Setup Wizard detects which software components are
needed and prompts you to set up only the necessary components.
For instance:
• If you do not already have Outlook installed, the Setup Wizard
will attempt to install Outlook 2000.
• The Setup Wizard can add Inbox extensions to enable
you to transfer messages to your desktop mail client—
Exchange or Outlook.
Page 37
Chapter 3 | Connecting to your desktop PC | 33
The Microsoft ActiveSync compact disc includes the following
software options for your desktop PC.
• Microsoft® ActiveSync—Enables you to connect your
HP Jornada to a desktop or notebook PC running Windows
95/98/NT/2000.
• Microsoft® Outlook 2000—Desktop PC software for
managing your contacts, appointments, tasks, e-mail, and
important documents, keeping them synchronized with your
HP Jornada.
• Microsoft® Internet Explorer —Browse the Web with the
latest version of the Microsoft browser software for your
desktop PC.
• Microsoft® Money 2000—Synchronize the accounts on your
HP Jornada with the US version of Microsoft Money 2000 on
your desktop PC.
Please Note: Some software programs on the Microsoft
CD-ROM are designed for Pocket PC devices, and are not
compatible with your HP Jornada 700 Series Handheld PC.
Page 38

34 HP Jornada 700 Series Handheld PC
There are many MS Windows for H/PC 2000 programs
available, including freeware and shareware. Go to
www.microsoft.com/mobile
keyword “MS Windows for H/PC 2000” to find additional
programs for your HP Jornada. Be sure to install only
programs that are compiled for the StrongARM SA111X
processor family.
Installing Microsoft ActiveSync
The minimum PC requirements for running Microsoft ActiveSync
are as follows:
• Microsoft® Windows® 2000, Microsoft® Windows NT®
Workstation 4.0 with Service Pack 3 or greater, or Microsoft®
Windows 95/98..
, or try searching the Web on the
• Pentium processor for Windows NT (166 MHz required for
Windows 2000)
—or—
486/66 DX or higher processor (Pentium® P90 recommended)
for Windows 95/98.
• 16 MB of memory for Windows 95/98 (more memory will
improve performance), or 32 MB of memory for Windows NT
4.0 or Windows 2000 (64 MB recommended).
• Hard disk drive with 10 to 50 MB of available hard disk space
(actual requirements will vary, based on selection of features
and current system configuration).
• Available 9 or 25-pin communications port (adapter required
for 25-pin communication port), Infrared port, or USB port
(available for Windows 95/98 or Windows 2000 only).
• CD-ROM drive.
• VGA or higher resolution graphics card (SVGA 256-color
recommended).
• Keyboard.
• Microsoft® Mouse or compatible pointing device.
Page 39

Chapter 3 | Connecting to your desktop PC | 35
Optional components:
• Audio card/speakers for sound.
• Modem and/or Ethernet LAN connection for remote
synchronization.
• Microsoft Internet Explorer 4.0 or higher for Mobile Channels
or Mobile Favorites support. (Internet Explorer 5.0 is included
on the ActiveSync CD-ROM.)
• Additional 153 MB of disk space for Microsoft Outlook® 2000.
24MB system RAM recommended. (Microsoft Outlook 2000 is
included on the ActiveSync CD-ROM.)
To install Microsoft ActiveSync
1. Insert the Microsoft ActiveSync compact disc into the
CD-ROM drive on your desktop PC.
2. The Microsoft ActiveSync Setup Wizard should start
automatically. If it does not start, click Run on the
Start menu, and then type d:\setup, where d is the
letter assigned to your CD-ROM drive.
3. Follow the instructions that appear on your screen to set
up Microsoft ActiveSync.
4. After you complete the installation, the Microsoft
ActiveSync Get Connected dialog box appears,
prompting you to connect your HP Jornada.
• If you connect via serial port using the docking cradle
(optional on the HP Jornada 710) or sync cable, connect
your device as described below in Connecting by serial
port, and then click Next.
• If you connect via USB port with the docking cradle,
connect your device as described below in Connecting
by USB port, and then click Next.
• If you connect by infrared, click Cancel, and then skip to
the section Connecting by infrared, later in this
chapter.
Your HP Jornada will automatically detect the connection
method (serial or USB) that you have used to connect to your
desktop PC. Connect the cable type of your choice according to
the instructions below, click Next, and ActiveSync will prompt
you to complete the New Partnership Wizard.
Page 40
36 HP Jornada 700 Series Handheld PC
Connecting by serial port
The HP Jornada uses a serial port to communicate with a
desktop PC. Use the serial sync cable that was included
with your HP Jornada to connect either the device or the
cradle (optional on the HP Jornada 710) to a 9-pin serial
communications port on your desktop PC. If the 9-pin
serial port on your PC is in use by another device, or if your
computer has no 9-pin serial port, you can obtain an
adapter from your computer’s manufacturer.
Turn on your desktop PC before connecting the sync cable or
placing your HP Jornada in the docking cradle (optional on the
HP Jornada 710). If the desktop PC is off, your HP Jornada or
desktop PC may freeze on startup, forcing you to reset or
restart. For information on resetting your HP Jornada, see
Resetting in chapter 8.
To connect directly (without the docking cradle)
1. If it is attached, disconnect the telephone cable from
your HP Jornada.
2. Connect the ac adapter to the dc jack on the right side of
the HP Jornada, and then plug in the power cable.
3. Insert the 9-pin end of the serial sync cable into a serial
port on your desktop PC.
4. Fully insert the flat end of the serial sync cable, arrow
side up, into the serial port on your HP Jornada.
HP Jornada serial port connection
Page 41
Chapter 3 | Connecting to your desktop PC | 37
To connect via serial port using the docking
cradle (optional on the HP Jornada 710)
1. Connect the 9-pin end of the sync cable to a serial port
on your desktop PC.
2. Slide the port cover on the back of the docking cradle to
the right to expose the Serial port.
3. Fully insert the flat end of the sync cable, arrow side
up, into the serial port on the back of the docking cradle.
4. Turn off your HP Jornada and disconnect any cables
(telephone cable, ac adapter, sync cable, etc.) from your
HP Jornada.
5. Connect the ac adapter to the dc jack on the back of the
docking cradle, and then plug in the power cord.
Do not connect your HP Jornada to more than one source of ac
power. You must disconnect the ac adapter from your HP
Jornada before placing in it in the docking cradle to avoid
damaging your HP Jornada.
6. Align your HP Jornada in the docking cradle, and push
down firmly until the HP Jornada snaps into place.
HP Jornada shown with docking cradle, ac adapter, and
serial/USB methods of connection to a desktop PC
Page 42

38 HP Jornada 700 Series Handheld PC
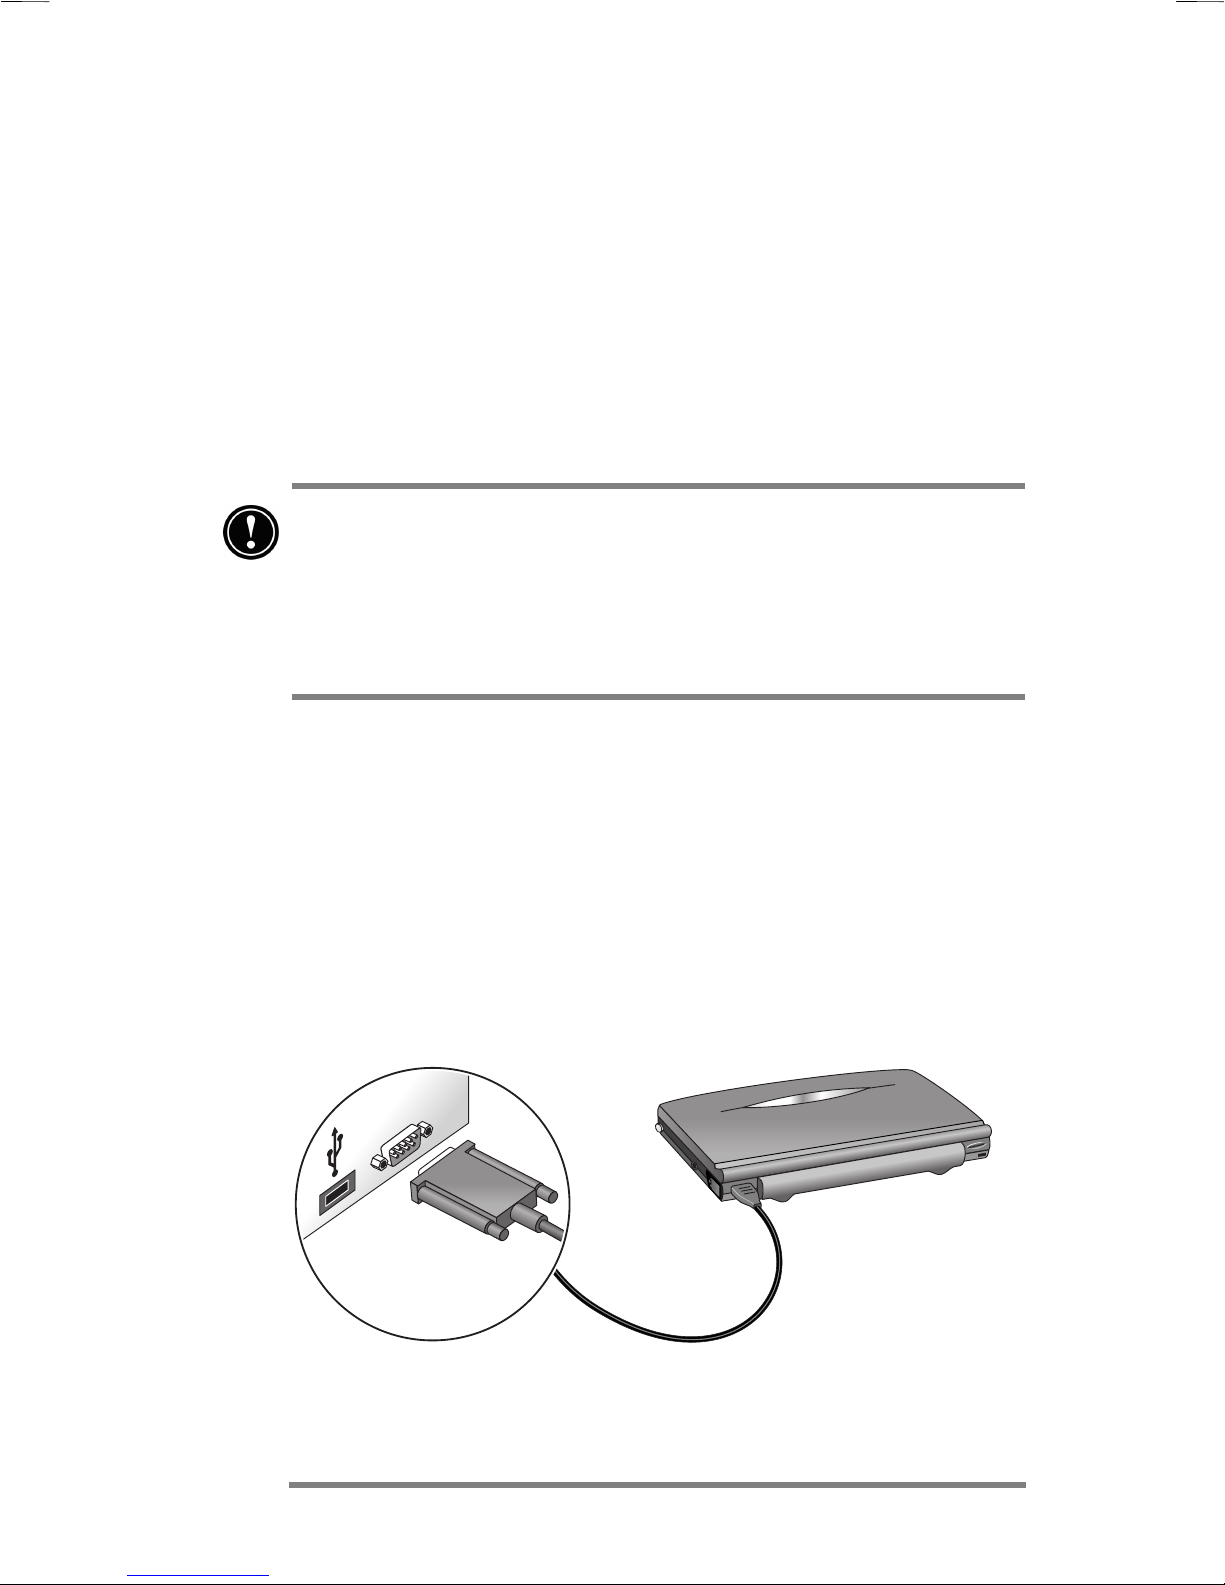
Connecting by USB port
Using the cradle (optional on the HP Jornada 710) you can
also make a USB connection to your desktop PC. A
standard USB A-to-B cable (not included) is required in
order to make a USB connection.
To connect via USB port using the docking cradle
1. Connect the flat USB "A" connector to an available USB
port on your desktop PC (cable not included).
2. Slide the port cover on the back of the docking cradle to
the left to expose the USB port.
3. Insert the square USB "B" connector into the USB port
on the back of the docking cradle
4. Turn off your HP Jornada and disconnect any cables
(telephone cable, ac adapter, sync cable, etc.) from your
HP Jornada.
5. Connect the ac adapter to the dc jack on the back of the
docking cradle, and then plug in the power cord.
6. Align your HP Jornada in the docking cradle, and push
down firmly until the HP Jornada snaps into place.
Your HP Jornada should start automatically and establish a
connection to the desktop computer. To remove your HP Jornada
from the docking cradle, push the release button on the cradle,
and carefully lift your HP Jornada from the cradle.
If you are traveling without your docking cradle or you need to
synchronize files with your home computer while the docking
cradle is connected to your office PC, you can connect your HP
Jornada directly to a desktop PC using only the serial sync cable.
(See Connecting by serial port earlier in this chapter.)
You can also connect and synchronize by infrared. For more
information, see the Connecting by infrared section in this
chapter.
Establishing a partnership
After you set up Microsoft ActiveSync on your desktop PC, you
are prompted to establish a partnership between your desktop PC
Page 43

Chapter 3 | Connecting to your desktop PC | 39
and your HP Jornada. The partnership enables your desktop PC
to recognize your HP Jornada when transferring files or
synchronizing data.
You can establish partnerships between your HP Jornada and up
to two desktop PCs; for example, your home PC and your office
PC. If you regularly synchronize your HP Jornada with both
desktop PCs, you can ensure that important files, contacts, and
calendar information are always up-to-date and identical on both
desktop PCs, as well as on your HP Jornada.
Although you can establish partnerships with two desktop
PCs, you can synchronize e-mail messages with only one
desktop PC.
A single desktop PC can partner with many H/PCs or palmtop
PCs. This is useful if you have more than one MS Windows for
H/PC 2000 device, or if several mobile professionals share a
single desktop PC.
The New Partnership Wizard
The first time you connect, the New Partnership Wizard on your
desktop PC helps you establish a partnership and set options for
synchronizing Pocket Outlook data, e-mail messages, and files
between your HP Jornada and desktop PC.
To establish a partnership
1. When the New Partnership dialog box appears on your
desktop PC screen, click Yes to synchronize, and then follow
the instructions to complete the New Partnership Wizard.
2. At the prompt, type a name and description for your HP
Jornada. The name must start with a letter, and it can be
anything you choose (up to 15 characters, no spaces).
3. Select whether you want your HP Jornada to synchronize
through a single partnership or multiple partnerships
desktop PCs, by selecting the appropriate button.
4. Select the personal information manager (PIM) application
you plan to use from the list boxes.
5. Set options for synchronization, indicating the types of files
and information you want to synchronize.
Page 44

40 HP Jornada 700 Series Handheld PC
If you choose to establish partnerships with more than one
desktop PC, the desktop PCs must be configured with the
same synchronization settings. In addition, each desktop PC
must use the same PIM program (for example, Microsoft
Outlook).
Regardless of the options you choose while completing the
wizard, you can also synchronize at any moment by choosing
the Synchronize Now command from the File menu of the
ActiveSync window. For more information, see the
Synchronizing data section in this chapter.
Troubleshooting partnerships
Your HP Jornada is designed to automatically detect the
connection type and configure itself to communicate with you
desktop PC. However, if you are unable to establish a connection
between your HP Jornada and your desktop PC, double-tap the
connection icon in the status area of the taskbar on your HP
Jornada. The Connection Status dialog box may provide
information about the problem.
Connection Methods
Each of these connection methods works with the HP Jornada
H/PC; however, USB and infrared connectivity are not supported
by Windows NT. A serial sync cable and cradle (optional on the
HP Jornada 710) with serial/USB capability are included with
your Jornada. Additional cables and cradles are available as
optional accessories.
Page 45

Chapter 3 | Connecting to your desktop PC | 41
Connection
Desktop PC operating system
method
Windows
95
Windows
98
Windows
2000
Windows
NT
USB No Yes Yes No
Serial Yes Yes Yes Yes
Infrared Yes Yes Yes No
Checking connection methods on your H/PC and desktop PC
One possible source of trouble with making connections may be
incompatible connection settings on either your HP Jornada or
your desktop PC.
To check and set the desired connection method
on your HP Jornada
1. From the Start menu, tap Settings, tap Control Panel, then
double-tap Communications.
2. On the PC Connection tab, under Connect using make
sure that the connection method you wish to use is displayed.
If the correct connection method is not displayed, tap
Change.
3. In the Change Connection dialog box, choose the desired
connection method from the drop-down list.
Page 46

42 HP Jornada 700 Series Handheld PC
4. Tap OK twice to save your settings and exit.
To check the connection settings in ActiveSync
1. Depending upon your connection method, verify that the sync
on your desktop Computer
cable from your docking cradle (optional on the HP Jornada
710) or HP Jornada is connected to the listed serial port in
the Connection Settings dialog box, or that Allow USB
Connection with this desktop computer is selected.
2. If you are connecting via infrared, be sure that Allow serial
or infrared connection to this COM port is selected
and that the correct IrDA COM port is displayed.
3. If you continue to have difficulty synchronizing, in the
Connection Settings dialog of the Microsoft ActiveSync
window, clear the Allow check box for the type of connection
you are using, and then click OK.
4. After the connection is disabled, re-select the appropriate
Allow check box and click OK to enable the connection again.
Page 47

Chapter 3 | Connecting to your desktop PC | 43
If these steps fail to correct the problem, use the ActiveSync
Troubleshooter. The ActiveSync Troubleshooter provides detailed
diagnostic steps to identify and correct common problems.
To start the ActiveSync Troubleshooter
1. On the desktop PC Start menu, point to Programs,
click on Microsoft ActiveSync, and then choose
Connection Settings from the File menu.
2. In the Connection Settings window, click Help to
open the ActiveSync Troubleshooter.
Connecting to your desktop PC
Connecting to your desktop PC
Connecting to your desktop PC Connecting to your desktop PC
After you have established a partnership, you have several
options for connecting your device to your desktop PC in the
future. You can set Microsoft ActiveSync to automatically detect
your HP Jornada and establish a connection whenever you
connect a sync cable. Using the COM port on your desktop PC is
the easiest way for you to connect, unless the port is in use for
other peripherals.
To enable automatic connection
1. On the desktop PC Start menu, point to Programs and
click on Microsoft ActiveSync.
2. On the Tools menu in the Microsoft ActiveSync window,
click Options.
Page 48

44 HP Jornada 700 Series Handheld PC
3. On the Sync Mode tab, select either the "Continuously
while the device is connected" or the "Only on
connection" check box to activate automatic connection.
If you use the COM port of your desktop PC for other devices, or
if you have disconnected your HP Jornada and need to reestablish the connection, you can establish a manual connection
using the PC Link program on your HP Jornada.
1. On the HP Jornada Start menu, point to Programs,
point to Communications, and then tap PC Link.
2. The Connection Status dialog box appears.
3. After a few moments a sound indicates that the
connection has been established.
To close the connection
To connect manually
1. On your HP Jornada, double-tap the connection
icon in the status area of the task bar.
2. In the Connection Status dialog box, tap
Disconnect.
Connecting by infrared
The infrared port on your HP Jornada provides a
convenient way to connect to an IrDA-equipped PC without
using a cable or cradle (optional on the HP Jornada 710).
Many notebook computers have built-in infrared ports;
however, you may need to install and configure an infrared
port on a desktop PC. To install the port, follow the
manufacturer’s instructions. More information about
infrared drivers for Windows 95/98 or Windows 2000 is
available on the MS Windows for H/PC 2000 Web site at
www.microsoft.com/mobile
available for Windows NT.)
. (Infrared connection is not
Page 49

Chapter 3 | Connecting to your desktop PC | 45
Once connected, you can transfer files and synchronize Pocket
Outlook data and e-mail messages just as if you had connected
using a sync cable or a docking cradle.
To configure Microsoft ActiveSync for infrared
connection
1. Open the ActiveSync window.
2. Choose Connection Settings from the File menu.
3. Click on Allow serial cable or infrared connection
to this COM port.
To configure your HP Jornada for infrared
connection
1. On your HP Jornada Start menu, point to Settings, tap
Control Panel, and then double-tap the
Communications icon.
2. On the PC Connection tab, if it does not say Connect
using Infrared Port, tap Change, and then select
Infrared Port from the list of available connections.
To establish an infrared connection
1. Line up the infrared port on your HP Jornada with the
infrared device on your notebook or desktop PC.
2. On your HP Jornada Start menu, point to Programs,
point to Communications, and then tap PC Link.
Connecting to another PC
Connecting to another PC
Connecting to another PC Connecting to another PC
In some cases, you may need to connect your HP Jornada to a
desktop PC other than your partner. Or, if you have logged on to
your desktop PC under a different user name or performed a
factory default reset of your H/PC, your desktop PC will not
recognize your HP Jornada as its partner.
In these cases, when you connect your HP Jornada to the desktop
PC, the New Mobile Device Detected dialog box appears,
offering you the option to synchronize, browse, or to restore data
from an existing backup file.
If you choose Synchronize, the New Partnership Wizard will
begin, and your HP Jornada will be designated as a partner of
Page 50

46 HP Jornada 700 Series Handheld PC
the desktop PC. Contacts, Calendar, and Task information and
information from any other services you choose to synchronize
will be copied from the desktop PC to your HP Jornada.
If you choose Browse, your HP Jornada will be connected as a
guest. As a guest, you can view files and folders on the
HP Jornada, transfer files and folders, and manually back up or
restore; however, you cannot synchronize data or automatically
back up and restore data.
If you choose Restore, you are given the option to restore data
from an existing backup file on the desktop PC. Restoring data in
this way will replace all existing data on the HP Jornada with the
data in the backup file on your PC.
If you have lost your HP Jornada or replaced it with another HP Jornada,
you can use the Restore function to set up a new device with the exact
same data and settings as the old one, provided you had previously
performed a full backup to the desktop PC. When you connect the new
device to your desktop PC for the first time, choose Restore rather than
Synchronize or Browse. For more information, see the Backing up and
restoring data section in chapter 5.
Browsing your HP Jornada desktop
Browsing your HP Jornada desktop
Browsing your HP Jornada desktopBrowsing your HP Jornada desktop
While your HP Jornada is connected to a desktop PC, you can use
Microsoft ActiveSync to browse the contents of your HP Jornada
from your desktop. The ActiveSync window has an Explore icon
on the toolbar. When you click the Explore icon, the contents of
your HP Jornada are displayed just like any other folder on your
desktop PC. You can cut, paste, and copy files between folders on
your HP Jornada or transfer files between your HP Jornada and
your desktop PC simply by dragging the file icons between the
appropriate folders.
For more information about transferring files, including details
on converting file types between Pocket Office and Office 2000
programs, see the Transferring files section later in this
chapter.
You cannot open files or start programs stored on your
HP Jornada by double-clicking their icons in the Mobile Device
window on your desktop PC. When you double-click the icon for a
file or program that is stored on your HP Jornada, Microsoft
Page 51
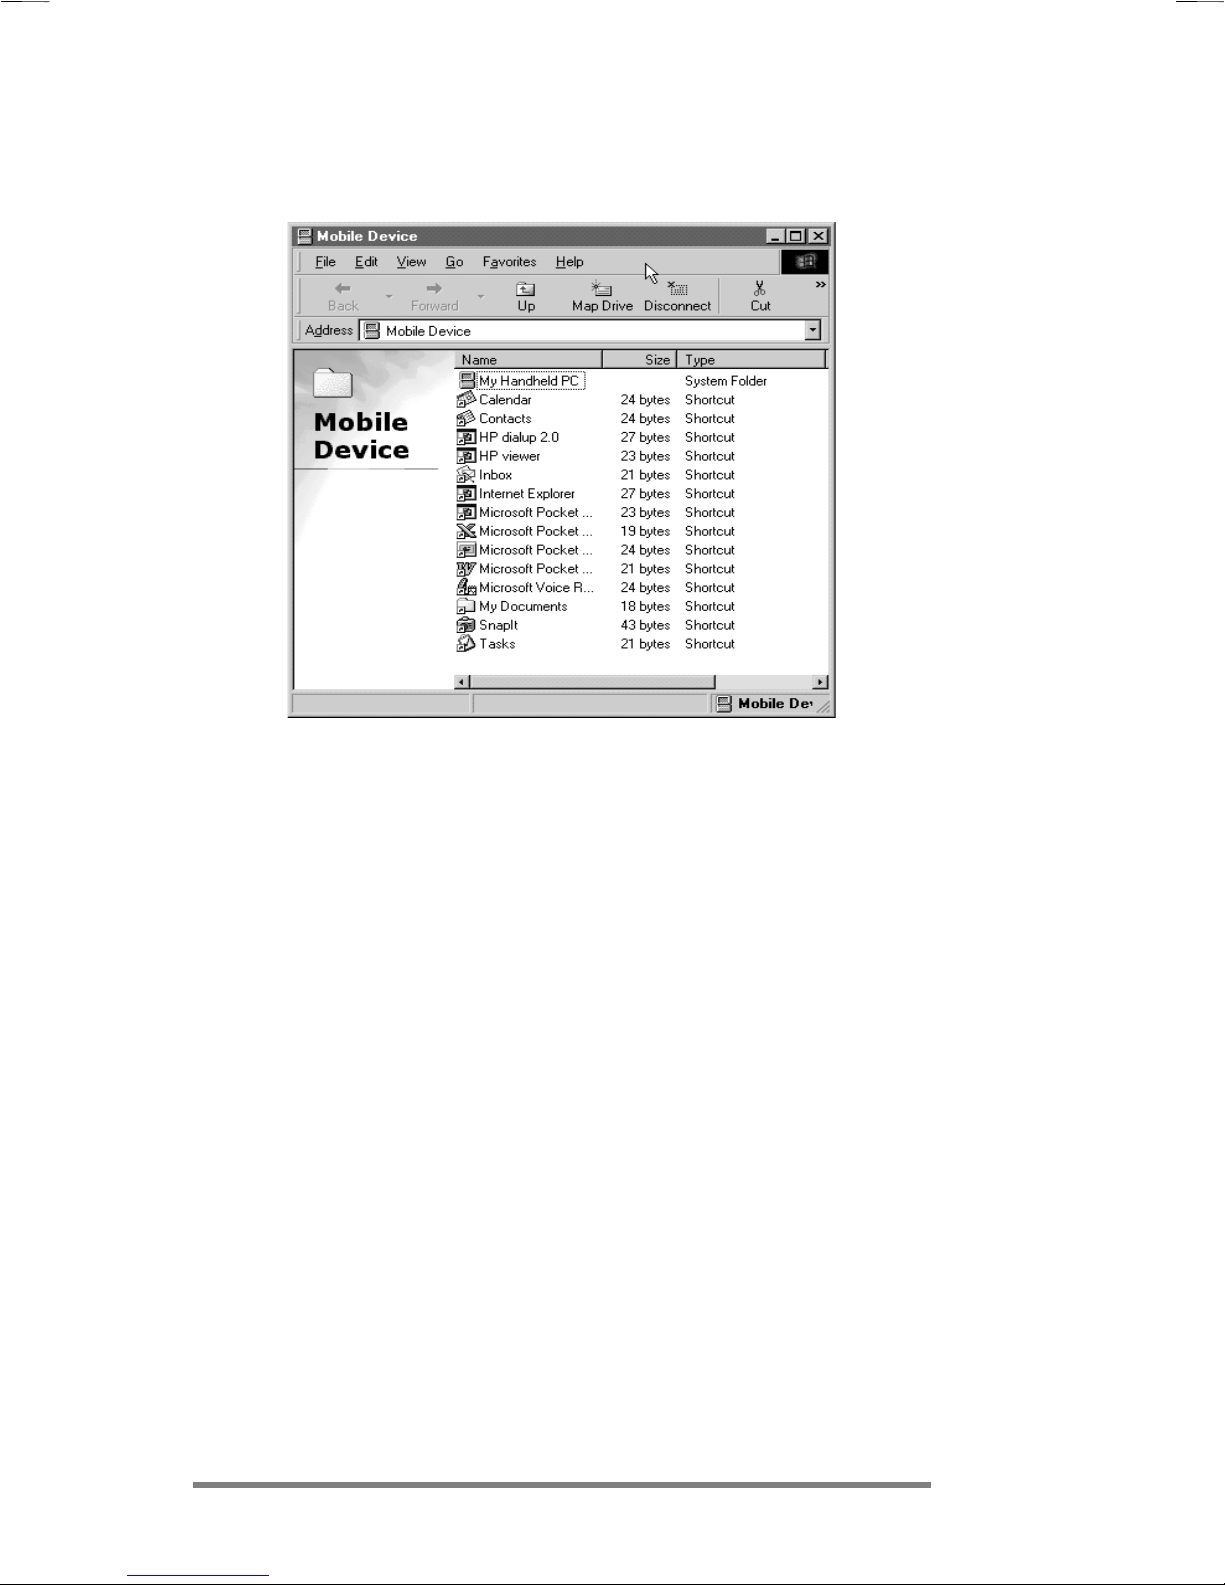
Chapter 3 | Connecting to your desktop PC | 47
ActiveSync displays the properties for that file or program, as if
you had clicked Properties on the File menu.
The Mobile Device window on your desktop PC displays
the contents of your HP Jornada.
Synchronizing data
Synchronizing data
Synchronizing dataSynchronizing data
Microsoft ActiveSync enables you to synchronize data
between your HP Jornada and desktop PC, so the names
you add to your Contacts database and the appointments
you add to your Calendar while traveling can be
automatically updated on your desktop PC when you
return. You can also synchronize messages in your
HP Jornada Inbox with Microsoft Outlook or Microsoft
Exchange on your desktop PC. And, you can synchronize
files in the Synchronized Files folder on your HP Jornada.
with files in a Synchronized Files folder inside your My
Documents folder (Windows 95/98) or Personal folder
(Windows NT and Windows 2000) on your desktop PC.
You can set ActiveSync either to synchronize automatically
each time you connect your HP Jornada to your desktop PC
or to synchronize continuously whenever the synchronized
information changes, for as long as the computers are
Page 52

48 HP Jornada 700 Series Handheld PC
connected. You can also synchronize at any moment by
choosing clicking on the Synchronize button on the
toolbar in the ActiveSync window.
Do not remove your HP Jornada from the docking cradle,
disconnect the sync cable, or turn off your HP Jornada while
synchronization is in progress.
Synchronizing selected data
You can synchronize some or all of the following items:
•
Pocket Outlook data
or Tasks information on your HP Jornada with information
stored in Outlook 2000 on your desktop PC.
•
E-mail messages
in your HP Jornada Inbox and Microsoft Exchange or Outlook
2000 on your desktop PC. For more information, see the
Synchronizing e-mail messages
•
—Synchronize the contents of the Synchronized Files
Files
folder (inside My Documents) on your HP Jornada with files
stored in your My Documents folder (Windows 95/98) or in
your Personal folder (Windows NT) on your desktop PC.
—Synchronize the Calendar, Contacts,
—Share messages between selected folders
section in this chapter.
To specify data to synchronize
1. On your desktop PC, open the
2. On the
3. On the
dialog box, select the check boxes beside the services you
want to synchronize.
Tools
Sync Options
menu, click
tab of the ActiveSync
ActiveSync
Options
.
window.
Options
4. To set specific options (for example, to indicate how
many weeks of Calendar data to synchronize or to
synchronize only active tasks), select the appropriate
service, and then click
Reducing the amount of data to synchronize, for example, by
synchronizing only 1 or 2 weeks of Calendar data, can
significantly speed up the synchronization process. If you use
Microsoft Outlook, Microsoft ActiveSync synchronizes only 2
weeks of calendar data by default.
Settings
.
Page 53

Chapter 3 | Connecting to your desktop PC | 49
Resolving synchronization conflicts
If the same item (for example, an appointment or a task) has
been modified on both the desktop PC and on the HP Jornada,
ActiveSync will indicate that a Synchronization conflict has
occurred. When the Resolve Conflicts dialog box appears, you
can either resolve the conflict by selecting one of the items to
replace or you can ignore the conflict, leaving the data on both
computers unchanged.
You can resolve each conflict manually, at the time of
synchronization, or you can resolve conflicts automatically by
setting a default option for conflict resolution.
To set a default option for conflict resolution
1. Open the Microsoft ActiveSync window.
2. On the Tools menu, click Options.
3. Click on the Rules tab of the Options dialog box.
4. Under Conflict Resolution, select the option you prefer
to resolve conflicts.
Synchronizing e-mail messages
You can synchronize your HP Jornada Inbox with the e-mail
program (Microsoft Outlook or Exchange) on your desktop PC
partner. By synchronizing, you can take important messages with
you when you travel, or you can use your desktop PC to send
messages that you create on your HP Jornada.
Page 54

50 HP Jornada 700 Series Handheld PC
When you synchronize:
• Messages are copied from the Inbox folder on your desktop
computer to the Inbox folder on your HP Jornada (by default,
only the messages received in the past 3 days are
synchronized, and no attachments are copied).
• Messages on the two computers are linked. So, for instance, if
you delete a message on your HP Jornada, it will also be
deleted on your desktop PC the next time you synchronize.
• Messages in the Outbox folder on your HP Jornada are
transferred to the Outbox on your desktop PC and then sent
from that program.
Synchronizing from a remote location
The ActiveSync program on your HP Jornada enables you
to synchronize files, e-mail messages, and Pocket Outlook
data with your desktop PC, even when you are away from
the office. You can do this by remote dial-up connection or
LAN connection to your desktop PC. You can also connect
to a computer not on a network (such as your home
computer) and synchronize using a modem.
You can quickly and easily make connections to the Internet or
a corporate network from remote locations using HP dialup.
For more information on using HP dialup see Creating
Connections in Chapter 6.
Before you can synchronize remotely, the desktop PC or network
server must be configured for Remote Access Services (Windows
NT) or Dial-Up Networking (Windows 95/98), and you must
create a connection on your HP Jornada by using either the HP
Jornada dialup application or the Remote Networking program.
For information about setting up connections with HP dialup,
see the Setting up a remote connection to your network
section in chapter 6. For Remote Networking information, see the
Accessing a computer not on a network section in this
chapter. After you have set up for either type of connection, you
can synchronize data. See the To start remote
synchronization procedure later in this chapter.
Page 55

Chapter 3 | Connecting to your desktop PC | 51
Accessing a computer on your corporate network
To access a PC on your corporate network from a remote location,
you must have an account provided by your network
administrator, and you must set up a connection to your network
server using HP dialup (see chapter 6). In addition, you must set
up the target PC to receive your calls as follows.
• The target PC must be turned on.
• Microsoft ActiveSync must be set up on the target PC. (See the
Installing Microsoft ActiveSync section earlier in this
chapter.) Also, the synchronize setting on the Sync Mode tab
under ActiveSync Options should be set to one of the
automatic options.
• Microsoft ActiveSync must be running, and the Waiting for
mobile device to connect status message must be shown in
the ActiveSync window.
• In the Microsoft ActiveSync Connection Settings dialog box,
the Allow network (Ethernet) and Remote Access
Service (RAS) server connection with this desktop
computer checkbox must be selected.
• Any folders or drives you want to access must be shared.
If you will be dialing in to a desktop PC running Windows 95,
you must also have Dial-up Networking components set up on
the target desktop PC.
Accessing a computer not on a network
If you want to dial in to a computer that is not on a network (such
as your home PC with Windows 95/98), you must set up the
target PC to receive your calls as follows.
• The target desktop PC must be turned on.
• The target desktop PC must have a modem installed and
configured and must be set to receive incoming calls. (Refer to
the instructions from the manufacturer of your desktop PC
modem.)
• Dial-up Networking (Windows 95/98) or Remote Access
Service (Windows NT) must be set up and configured so that
your target PC can act as a server. (See your Windows
documentation for further instructions.)
Page 56

52 HP Jornada 700 Series Handheld PC
• Microsoft ActiveSync must be set up on the target PC (for
instructions, see the Installing Microsoft ActiveSync
section in this chapter). The synchronize setting on the Sync
Mode tab under ActiveSync Options should be set to one of
the automatic options.
• Microsoft ActiveSync must be running, and the Waiting for
mobile device to connect status message should appear in
the ActiveSync window.
• In the Microsoft ActiveSync Connection Settings dialog
box, the Allow network (Ethernet) and Remote Access
Service (RAS) server connection with this desktop
computer checkbox must be enabled.
• Any folders or drives you want to access must be shared.
You need the following information to establish a Remote
Networking connection:
• Your Windows user name and password, if you are required to
log on to your computer
• Telephone number of the modem
To create a connection to a computer not on a network (such as a
home computer), you will need to create a new connection using
Remote Networking on your HP Jornada.
To create a Remote Networking connection
1. On the Start menu, point to Programs, point to
Communication, and then tap Remote Networking.
2. In the Remote Networking folder, double-tap Make New
Connection.
3. In the Make New Connection dialog box, tap
Dial-up, and then tap Next.
4. If your HP Jornada is equipped with a built-in modem,
select Built-In Modem from the list of modems. If you
use a PC Card modem
the PC card modem you have installed
∗
Modem purchased separately. Some Web sites/content may not be
available.
∗
, select the appropriate option for
Page 57

Chapter 3 | Connecting to your desktop PC | 53
5. Tap TCP/IP Settings, and then tap the General tab.
Make sure the Use Server-assigned IP Address check
box is selected.
6. On the Name Servers tab, tap Server-assigned
addresses, and then tap OK.
7. Tap Next, and then fill in the telephone number you
wish to dial. Tap Finish. A new icon appears, labeled
with the name you chose, in your Remote Networking
folder. This connection will also appear in your remote
synchronization dialog box.
To set a dialing location for a Remote Networking connection,
double-tap the icon for the connection in the Remote
Networking folder. In the Dial-up Connection dialog box, tap
Dial Properties, and then fill in the information as you would
for a network or ISP connection using the HP Jornada dialup
application.
To start remote synchronization
1. On your HP Jornada Start menu, point to Programs,
point to Communication, and then tap ActiveSync.
2. If you are connecting using a modem or dial-up
connection, select the connection you will use from the
list. All connections you have created either with the HP
Jornada dialup application or Remote Networking will
appear in this list.
–or–
If you are connecting over a network, tap Network
Connection.
3. In the Connect to list, select the name of the desktop
PC to which you will connect. The Connect to list
displays only the PCs with which you have already
established a partnership.
4. In the User Logon dialog box, type your user name,
password, and domain if necessary, and then tap
Connect.
Page 58

54 HP Jornada 700 Series Handheld PC
Transferring files
Transferring files
Transferring filesTransferring files
You can copy files between your HP Jornada and desktop PC by
dragging icons to or from the folders in the Mobile Device
Explorer window, or by using the Cut, Copy, and Paste
commands on the Edit menu.
Some files may need to be converted before you can use them on
your HP Jornada. By default, Microsoft ActiveSync automatically
converts files to the appropriate file type. However, you can
choose not to convert files, or you can specify the conversions for
each file type by changing options in the File Conversion
Properties dialog box.
To set file conversion options
1. Open the ActiveSync window.
2. On the Tools menu, click Options, click the Rules tab, and
then click Conversion Settings.
3. Click either the Device to Desktop or Desktop to Device
tab.
4. Select the file type, and then click Edit to change conversion
options. In most cases, you will be offered a single conversion
option or no conversion at all.
When Microsoft Office files are converted to their corresponding
Pocket Office formats, the Pocket Office files are compressed, so
they require much less storage memory than they do on your
desktop PC. During conversion, certain formatting or attributes
may also be removed from the Pocket Office version; however, all
formatting should be restored when the file is returned to the
desktop PC. For specific details, see the sections on Microsoft
Office programs in chapter 5 or refer to online Help for that
program on your HP Jornada. Only Microsoft PowerPoint® 97
and 2000 files can be converted to Pocket PowerPoint.
Page 59

Chapter 4 | Staying organized | 55
4 | Staying organized
4 | Staying organized
4 | Staying organized4 | Staying organized
With your Hewlett Packard Jornada Handheld PC (H/PC), you
can keep in touch with your office, home, and clients through email and the Internet. You can connect in many ways using your
HP Jornada and various accessories. This chapter will guide you
through the options best suited to your needs.
Pocket Outlook also lets you set alarms and reminders so that
you never forget an appointment or meeting. And, if you want a
personal reminder, you can record voice memos to yourself with
Microsoft Voice Recorder.
In this chapter you will find program information and basic
procedures for:
• Pocket Outlook
• HP viewer
• HP quick pad
• Voice Recorder
For more information on these and other programs that come
with your HP Jornada, see online Help.
Using Microsoft Pocket Outlook
Using Microsoft Pocket Outlook
Using Microsoft Pocket OutlookUsing Microsoft Pocket Outlook
Your HP Jornada comes with Microsoft Pocket Outlook, which
includes Calendar, Contacts, Tasks, and Inbox. Using Microsoft
ActiveSync, you can synchronize information on your HP Jornada
with information in Microsoft Outlook or Microsoft Exchange on
your desktop computer. Each time you synchronize, Microsoft
ActiveSync compares the changes you made to data on your
device and desktop PC and updates both computers.
With Inbox, you can send and receive e-mail messages, either by
synchronizing with the mail program on your desktop PC (either
Outlook or Exchange) or by connecting directly to your mail
server through an Internet or network account.
Page 60

56 HP Jornada 700 Series Handheld PC
To start Pocket Outlook
· On the Start menu, point to Programs, point to Pocket
Outlook, and tap either Calendar, Contacts, Inbox, or
Tasks.
–or–
Press one of the Calendar, Contacts, Inbox, or Tasks hot
keys.
To switch quickly from one Pocket Outlook applications to
another, tap the Go menu on the toolbar of the current Pocket
Outlook application.
Keeping appointments with Calendar
Use Calendar to schedule appointments, meetings, and other
events. Quickly check your appointments in one of several views
(Day, Week, Month, Year, and Agenda).
To create a new appointment
1. On the Start menu, point to Programs, point to Pocket
Outlook, and tap Calendar.
–or–
Tap the Calendar hot key.
2. On the File menu, tap New Appointment.
3. Type a description and the location of your appointment.
4. Select the time and date of your appointment.
5. To add notes, tap the Notes button, and then tap once in
the notes area. Type your notes.
6. To assign the appointment to a category, tap the
Categories button, and then select a category from the
list.
7. Select other desired options, and when you are finished
tap OK.
If you need to schedule a meeting with other people who use
Outlook or Pocket Outlook, you can use Calendar to schedule the
meeting. When attendees receive a meeting request, they can
Page 61

Chapter 4 | Staying organized | 57
choose to accept or decline the meeting. If they accept, the
meeting is automatically placed in their schedule. In addition,
their response is automatically sent back to you, and your
calendar is updated.
Before you can send a meeting request, you must enter e-mail
addresses in Contacts and set up Inbox to send and receive
messages (see the Using Inbox section in chapter 6).
To create a meeting request
1. On the Start menu, point to Programs, point to Pocket
Outlook, and then tap Calendar.
–or–
Tap the Calendar hot key.
2. On the Tools menu, tap Options, and then choose a
mail transport:
• If you send and receive messages using
synchronization, select ActiveSync.
• If you connect to an ISP or network, select the
service you set up in Inbox or the HP Jornada dialup
application.
3. Tap OK.
4. On the File menu, tap Make Meeting.
5. Enter the meeting information.
6. Select the contacts you want to invite.
Select other desired options, and then tap OK.
Inbox automatically creates a meeting request and sends it to the
attendees the next time you connect to your mail server or
synchronize with your desktop PC.
Your HP Jornada will remind you about your appointments
and meetings by playing a sound, flashing the notification
light, and/or displaying a message on the screen. To choose the
way you prefer to be notified, open the appointment or
meeting, tap
, and then tap Reminder Options. You can
silence an alarm without even opening your HP Jornada by
pressing the blinking alarm-notification LED on the cover.
Page 62

58 HP Jornada 700 Series Handheld PC
Managing names and addresses with Contacts
The Contacts program maintains a list of your friends and
colleagues so that you can easily find the information you
are looking for, whether you are at home or on the road.
Using the infrared port, you can also quickly share
Contacts information with other MS Windows for H/PC
2000–based mobile device users.
To create a new contact
1. On the Start menu, point to Programs, point to Pocket
Outlook, and tap Contacts.
–or–
Tap the Contacts hot key.
2. On the File menu, tap New Contact.
3. Type a name.
4. Tap Business or Personal and type information in the
appropriate fields. Supply an e-mail address to send
meeting requests and e-mail messages to this contact.
5. To add a note or assign the contact to a category, tap
Notes/Categories. Then, select the notes area and
enter your notes, or select a category from the list.
6. When you are finished, tap OK.
You can send groups of contacts to another IrDA-equipped
H/PC 2000–based device. To do this, line up the infrared ports
on the two devices so that they are within 1 meter (3 feet) of
one another. On the Contacts list, select the item(s) you want
to send, and then on the File menu, tap Send. If you are
receiving items, tap Receive. Category information and notes
are not transmitted with the contact.
Keeping track of your workload with Tasks
The Tasks program helps you keep track of what you need
to do. Enter the details for a task on the task card, and
Page 63

Chapter 4 | Staying organized | 59
then assign a category. You can even associate a date with
the task and then set a reminder for yourself.
You can sort the list on any column by tapping the column
heading (the column used for sorting the list displays a triangle
in the heading). If you sort by status, active tasks are listed
before completed tasks. Or, you can filter your list to show only a
specific status of a task or tasks belonging to a specific category.
When your list is filtered, the filter button is selected. Overdue
tasks are displayed in red, bold text.
To create a new task
1. On the Start menu, point to Programs, point to Pocket
Outlook, and tap Tasks.
–or–
Tap the Tasks hot key.
2. On the File menu, tap New Task.
3. Type a description of the task.
4. Select the start date, due date, and other information.
5. To add a note to a task, tap the Notes button, and then
tap once in the note-taking area. Type your note, and
then tap OK.
6. When you are finished, tap OK.
Managing your e-mail with Inbox
Use Inbox to send and receive e-mail messages. You can access
your e-mail by synchronizing with your desktop PC or by
connecting to a mail server through an Internet or network
account. (For more information, see the Using Inbox section in
chapter 6 and the Synchronizing e-mail messages section in
chapter 3.)
Page 64
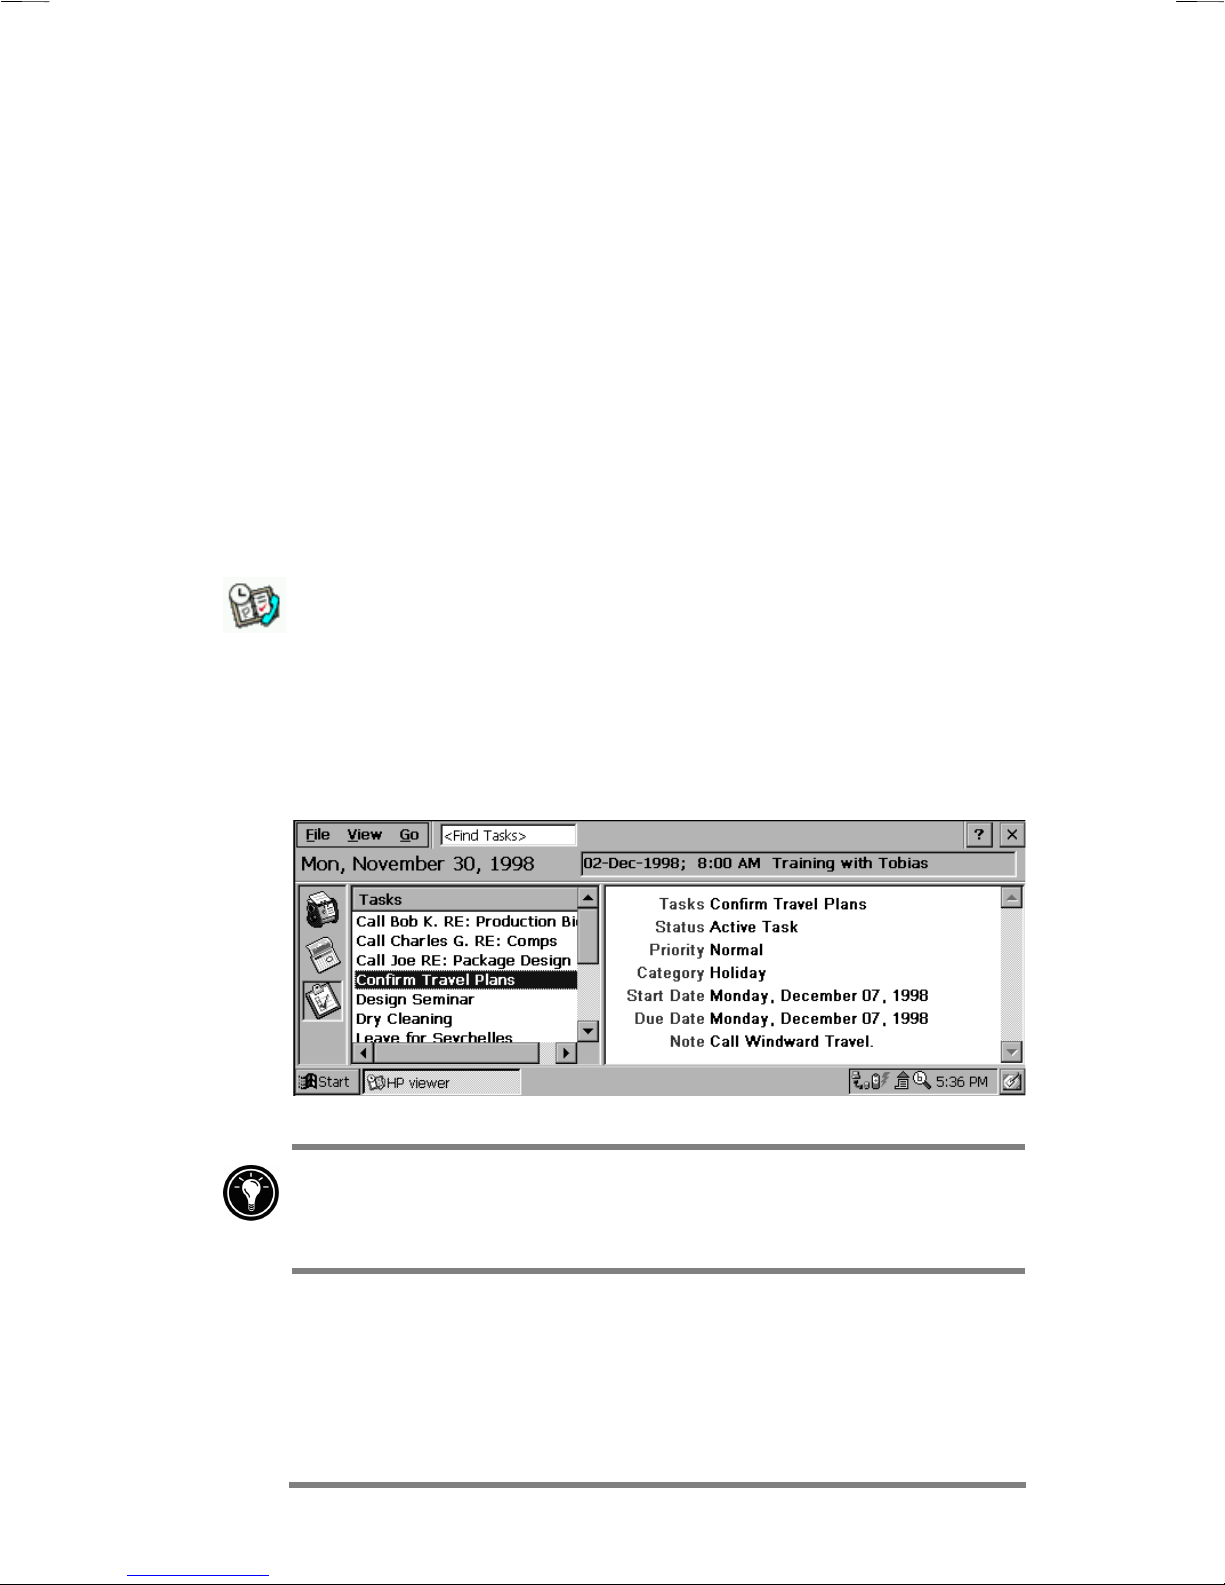
60 HP Jornada 700 Series Handheld PC
Using HP viewer
Using HP viewer
Using HP viewerUsing HP viewer
HP viewer gives you a quick and versatile way to view the
information in your Pocket Outlook Calendar, Contacts, and
Tasks databases. HP viewer displays the information you choose
in as much detail as you want, including detailed contact
information, tasks and notes on a single screen, or all the
appointments and tasks scheduled for a single day, a week, or up
to 6 months at a time. HP viewer also enables you to view a
single field for any record or to switch instantly to Pocket Outlook
for editing.
By default, the HP viewer icon is displayed on the MS Windows
for H/PC 2000 desktop.
· On the Start menu, point to Programs, point to HP
To start HP viewer
Applications, and then tap HP viewer.
–or–
Press the HP viewer hot key.
HP viewer shows your Pocket Outlook information quickly.
HP viewer uses the same font settings as Internet Explorer.
Changing the font or font size in Internet Explorer will also
change the way information is displayed in HP viewer.
You can quickly switch from HP viewer to Pocket Outlook to look
at the selected date in all Calendar views.
To switch to Pocket Outlook
· On the Go menu, tap the appropriate program or view.
Page 65
Chapter 4 | Staying organized | 61
HP viewer displays the current date and your next scheduled
appointment below the toolbar in the Today Banner of the HP
viewer window. To quickly view detailed information about the
appointment, tap the appointment title in the Today Banner.
To switch between Calendar, Contacts, and Task
information
· Tap the appropriate icon on the left side of the HP viewer
window.
Viewing Calendar information
HP viewer lets you view your calendar in Day, Week, Month, or
n-Month view.
· Tap the Calendar icon on the left side of the HP viewer
window to display Calendar information.
· Tap a View button on the toolbar to change views.
· Tap the Go to Date button on the toolbar to view information
for a specific date.
n-month (displays up to 6 months)
Month
Week
Day
Today (GoTo Today command)
Date (GoTo Date command)
Day View offers a fast way to browse your schedule for the
current day or up to 7 days that you select.
Page 66
62 HP Jornada 700 Series Handheld PC
To enable Day Zoom in n-Month View, Month View, or Week
View, press the spacebar to display appointments and tasks for
the selected date(s). Tap an icon next to an appointment or event
to expand a note or to display more information about that
appointment or event.
You can set HP viewer to always display Day Zoom for the date
you select by tapping on the toolbar.
Week View enables you to display 1, 2, or 3 weeks of your
calendar at a time. Press
scroll bar to increase or decrease the number of weeks displayed.
Tap an event to display detailed information about that event.
Use Month View to display 5 weeks of data on a single screen, or
use n-Month View to display calendars for up to 6 months at a
time. Tap a day to display detailed information about
appointments or events scheduled on that day.
To show six months in n-month view, set the Task bar to auto-
hide. Tap Start, Settings, then tap Task Bar to access the
Task Bar settings dialog.
as you tap or on the
Viewing Contacts information
HP viewer lets you view all information for a particular contact
on a single screen.
• Type in the Find File As box to display only contacts
matching the letter(s) you type.
• Tap a tab on the left side of the contact list to jump to contacts
that begin with a letter on the tab. To jump to contacts that
begin with the second letter on the tab, tap the tab again.
• To change the field on which the contact list is sorted, tap the
field name at the top of the list, and then choose a field from
the Select Primary Key dialog box.
Viewing Tasks information
You can also use HP viewer to view task information for any
field, including Notes.
Page 67

Chapter 4 | Staying organized | 63
• Type in the Find Task box to display only tasks that match
the letter(s) you type.
Capturing data with HP quick pad
Capturing data with HP quick pad
Capturing data with HP quick padCapturing data with HP quick pad
Use HP quick pad to enter all the notes and information
you acquire during your day. Quickly record names,
telephone numbers, and quick notes to yourself. You can
save this information in HP quick pad or create
appointments, tasks, e-mail messages, and even Pocket
Word documents from a single application.
With quick pad, you can check the date and time at a glance,
review your current appointments and tasks, and quickly find a
telephone number or address from your contact list.
Quickly jot notes and reminders or new contact information on
the notepad. Then, save your notes in quick pad or send them to
the appropriate database, such as your Contacts or Tasks list.
To start HP quick pad
· On the Start menu, point to Programs, point to HP
Applications, and tap HP quick pad.
–or–
Press the HP quick pad hot key.
Page 68

64 HP Jornada 700 Series Handheld PC
To save information in HP quick pad
· On the File menu, tap New Page to create a blank notepad
page.
· Tap once in the notepad area, and then type the information
you want to save.
· On the File menu, tap Rename Page, and then type a
descriptive name for the information.
· On the File menu, tap Save.
You can create as many pages as you like. Retrieve information
by selecting the page title from the drop-down list, or by tapping
Find in Page on the Edit menu, and then typing a word or
words to search for.
To organize information for use in other programs
1. In HP quick pad, open the page containing the information,
and select the text you want to export.
2. On the Send menu, select the program in which you want to
use the information:
• Tap As E-mail Message to create an e-mail message
containing the selected text.
• Tap To Calendar, To Contacts, or To Tasks to
create an entry in one of the Pocket Outlook
databases.
• Tap As New Pocket Word Document to create a
Pocket Word document containing the selected text.
3. In the dialog box that appears, add any necessary
information (for example, the start or end date of a task or
appointment, or addressees for an e-mail message), and then
tap OK.
Infrared send/receive of PIM data
Infrared send/receive of PIM data
Infrared send/receive of PIM data Infrared send/receive of PIM data
HP info exchange allows you to send and receive Contacts,
Calendar and Task items between your HP Jornada and
other IrDA-equipped, non-Windows powered PDA devices
(i.e., Palm devices). You can also receive (but not send)
Page 69

Chapter 4 | Staying organized | 65
memos from some PDA devices and store them as a text
file in the "My Documents" folder of your HP Jornada.
Using HP info exchange with non-Windows powered
PDA devices
HP info exchange allows you to send and receive PIM data
to and from non-Windows powered PDA devices from
within Pocket Outlook Calendar, Contacts and Tasks. (HP
info exchange is not available in Pocket Outlook Inbox.)
HP info exchange runs only on your HP Jornada – no
additional software is required for IrDA equipped PDA devices.
Sending data to a non-Windows PDA device
To send PIM information from your HP
Jornada to a non-Windows PDA device:
1. Highlight items to send in your PIM application.
2. Make sure the PDA device is powered on. Align the IR
windows of the two devices so that they are aimed directly at
each other.
3. Select Send(non-Windows) from the Tools menu of a PIM
application on your HP Jornada. The HP info exchange
Send window will appear indicating that it is looking for a
receiving device.
4. The PDA device will receive the transmitted items
automatically.
Page 70
66 HP Jornada 700 Series Handheld PC
HP info exchange menu items in Pocket Outlook Contacts
Receiving data from a non-Windows PDA device
To receive PIM information on your HP
Jornada from a non-Windows PDA device:
1. Set the PDA device to beam selected item(s).
2. Align the PDA device IR window so that it is aimed directly
at the IR window on the rear of your HP Jornada.
3. Select Recv(non-Windows) from the Tools menu of a PIM
application on your HP Jornada. The HP info exchange
Receive window will appear indicating that it is looking for
a sending device.
4. The PIM item(s) sent by the PDA device will be received and
automatically placed in the appropriate location.
5. Messages will be displayed confirming the number and type
of items transferred.
Page 71

Chapter 4 | Staying organized | 67
About the data being transferred
HP info exchange makes it easy to send and receive essential
information to or from non-Windows PDA devices. The important
data fields of your HP Jornada PIM applications are mapped to
the data fields on the PDA device to allow capture of important
PIM information. Supported field mappings include:
• Supports sending and receiving multiple contacts,
appointments and tasks.
• A number of Pocket Outlook fields are not used (e.g. Children,
Spouse) since they are not used by non-Windows PDA devices,
or are not supported by the VCard standard.
• Multiple entries of important field types will be placed in the
Notes section.
• For standard Contact fields multi-line text is converted into a
single line with spaces for line breaks
• Supports a 'Business Card' beamed over from a Palm device
and treats it as another contact.
For more information about field mappings and data exchange,
see HP info exchange online help.
Recording and playing voice memos
Recording and playing voice memos
Recording and playing voice memosRecording and playing voice memos
You can use Microsoft Voice Recorder to quickly capture
thoughts, reminders, and ideas. Since your recordings are
captured in the compatible Wave (.wav) format, you can send
personalized voice messages to friends and colleagues as e-mail
attachments that can be opened in most Web browsers on a
desktop PC.
Voice Recorder is intended for recording personal voice memos
and is not suitable for recording presentations, music, or
lectures. Some static or electrical noise may be heard during
playback.
Page 72

68 HP Jornada 700 Series Handheld PC
To record and to play a voice memo with Voice
Recorder
1. On the Start menu, point to Programs, point to
Accessories, and then tap Voice Recorder.
–or–
Press the Voice Recorder hot key.
2. Tap the Record button on the toolbar. A beep sounds when
recording begins, and the red Status LED indicates that
recording is in progress.
3. Speak into the microphone to record your voice memo.
4. To stop recording, tap the Stop button on the toolbar. The
new recording appears in the recording list.
5. To play a recording, double-tap it in the recording list. To
pause playback, tap Play/Pause. Tap Play/Pause again to
resume playback.
You can play all of your recordings, one after another. Select
the recording you want to play first, tap Control and then tap
Play Sequential. The selected recording and following
recordings will be played. A short beep will sound between
recordings.
Recording formats
Your HP Jornada supports several formats for voice notes. The
formats vary in both the quality of the recording and the size of
the sound file. When selecting a recording format, you should
consider the quality you need as well as how much storage
memory the recording will use on your HP Jornada.
In addition, not all recording formats are compatible with other
software or computers. If you will share your recordings with
others or transfer a recording to your desktop PC, be sure to
choose a recording format that is supported by the software used
to play recordings on the other computer.
To select a recording format
1. On the Start menu, point to Programs, then point to
Accessories and then tap the Microsoft Voice Recorder
icon.
Page 73

Chapter 4 | Staying organized | 69
—or—
Press the Voice Recorder hot key on the HP Jornada
keyboard.
2. On the Tools menu tap Recording Format…, and then
select a recording format from the drop-down list.
The table below lists the compatibility of various recording
formats with other computers. The list of recording formats on
your HP Jornada indicates the sample rate, whether the format
is stereo or mono, and how much storage memory is required per
second of recording. You may need to experiment with different
sample rates and formats to determine which format best suits
your voice.
Compatibility
Format Quality
PCM High yes yes yes yes
GSM 6.10 Medium yes yes no no
HP Jornada
700 Series
Windows
CE 2.0
device
PC with
ActiveSync
installed
Windows
95/98/NT
Conserving memory
Voice memos may consume large amounts of storage memory on
your HP Jornada. If you record or store lots of voice memos, you
may need to take steps to conserve memory.
• Delete voice memos you no longer need. Select the recording in
the list, and then tap Delete on the File menu. Note that
voice memos are deleted immediately; they are not moved to
the Recycle Bin and cannot be recovered.
• Adjust the amount of storage memory available on your HP
Jornada using the Memory tab in the System control panel.
• Add more memory to your device with a CompactFlash Card
or PC Card. (For a list of recommended cards, go to the
Hewlett-Packard Web site at www.hp.com/jornada
.)
Page 74

70 HP Jornada 700 Series Handheld PC
Page 75

Chapter 5 | Getting down to business | 71
5555 | Getting
| Getting down to
| Getting| Getting
business
business
businessbusiness
Your Hewlett-Packard Jornada 700 Series Handheld PC can help
you stay productive and be efficient, even when you are away
from your desktop or notebook PC. You have access to Microsoft
Pocket Office and other pre-installed programs to help you
calculate expenses and conduct searches. Your HP Jornada also
includes the HP Jornada backup application, which keeps things
running smoothly.
down to
down to down to
In this chapter, you will learn more about:
· Microsoft Pocket Office, which includes:
- Microsoft Pocket Word
- Microsoft Pocket Excel
- Microsoft Pocket PowerPoint
- Microsoft Pocket Access
· Microsoft InkWriter
· HP Jornada backup application
· OmniSolve from LandWare
Page 76

72 HP Jornada 700 Series Handheld PC
Working with Microsoft Pocket Office
Working with Microsoft Pocket Office
Working with Microsoft Pocket OfficeWorking with Microsoft Pocket Office
Microsoft Pocket Office makes it easy to work in the familiar
Office environment, even when you are away from your desktop
or notebook PC. You can start any of the Pocket Office programs
by double-tapping the appropriate icon on the desktop or by
pressing the appropriate HP hot key. For more detailed
information about these programs, see the Microsoft Pocket
Office topic in online Help.
Using Microsoft Pocket Word
You can create and edit documents or templates in Pocket Word
just as you do in Microsoft Word on your desktop computer. Begin
by placing the cursor in the document page and start typing in
either Outline or Normal view. A spelling checker is provided to
verify spelling accuracy, and you can quickly format text using
buttons and menu commands similar to those found in Microsoft
Word on your desktop PC. You can access international
characters and symbols for currencies from the Tools menu.
Pocket Word allows you to save documents in several file formats
so that your files can be opened by other users or other programs.
If you transfer documents between your HP Jornada and desktop
PC, Microsoft ActiveSync automatically converts the files to the
appropriate file type. If you send files by e-mail, be sure you save
your document in a format that can be opened by the recipient:
file type extension open with
Pocket Word document .pwd Pocket Word
Pocket Word template .pwt Pocket Word
Word 6.0/95/97/2000
document
Word 6.0/95/97/2000
template
Rich Text Format .rtf most word
ASCII text .txt any text editor
.doc Microsoft Word
2000
.dot Microsoft Word
2000
processing
programs
Page 77

Chapter 5 | Getting down to business | 73
To start Pocket Word
· On the Start menu, point to Programs, point to Office, and
then tap Microsoft Pocket Word.
–or–
Press the Microsoft Pocket Word hot key.
To create a document using Pocket Word
1. On the File menu, point to New, and then tap Document.
2. Type the document.
3. On the File menu, tap Save.
4. Type a name for your file, and then tap OK.
To see more of your document, on the View menu, tap
Full Screen.
Using Microsoft Pocket PowerPoint
You can deliver professional online presentations with Pocket
PowerPoint. Simply create the presentation in Microsoft
PowerPoint 97 on your desktop PC and transfer the presentation
to your device. You cannot create slides on your HP Jornada;
however, you can customize the title slide in the presentation and
change the order of the subsequent slides to suit a particular
client or audience.
You can show the presentation directly on your HP Jornada, or
you can use an HP VGA out card to connect an external monitor
or a projector and show the presentation to a large group. This
option allows you to view PowerPoint speaker notes on the HP
Jornada display while your presentation is showing on the
external monitor. Your Pocket PowerPoint file will include the
text, pictures, notes, and layout position of the original Microsoft
PowerPoint presentation, but will not include animations or slide
transitions. Animations are displayed as a single, still frame.
Page 78

74 HP Jornada 700 Series Handheld PC
To start Pocket PowerPoint
· On the Start menu, point to Programs, point to Office,
and tap Microsoft Pocket PowerPoint.
–or–
Double-tap the Microsoft Pocket PowerPoint icon on the
desktop.
To show a presentation
1. Using Microsoft ActiveSync, copy the presentation from your
desktop PC to your HP Jornada.
2. On the Start menu, point to Programs, point to Office, and
tap Microsoft Pocket PowerPoint.
3. In the Open Presentation dialog box, select the
presentation you want to show, and then tap OK.
4. To change the presentation display and slide-advance
options, on the Tools menu, tap Set Up Show.
5. To show the presentation, tap View Show on the View
menu. If you chose Manual under Presentation Display in
step 4, use the Previous and Next buttons to control the
slides.
You can tailor a presentation by adding a new title slide to
your presentation. To do so, tap Title Slide on the
Tools menu.
To show a slide presentation on a VGAcompatible monitor
1. Insert an HP VGA out card into your HP Jornada, and then
connect the card to a monitor or projector according to the
instructions that came with the card.
2. Start PowerPoint, and open the presentation (see To show a
presentation earlier in this chapter).
3. On the Tools menu, tap Set Up Show.
4. From the View Show On list, select one of the VGA out
options.
Page 79

Chapter 5 | Getting down to business | 75
5. To start the show, tap View Show on the View menu.
You can make the display fade to black during a presentation.
To do so, press
. Press or again to resume the presentation.
. To make the screen fade to white, press
Using Microsoft Pocket Excel
You can use Pocket Excel to create workbooks, such as expense
reports and mileage logs. Pocket Excel provides fundamental
spreadsheet tools, such as formulas, functions, sorting, and
filtering. You can split panes to easily view different areas of a
large worksheet. You can also “freeze” the top and leftmost panes
in a worksheet to keep row and column labels or other data
visible as you scroll through a sheet.
Pocket Excel allows you to save workbooks in several file formats
so that your files can be opened by other users or other programs.
If you transfer workbooks between your HP Jornada and desktop
PC, Microsoft ActiveSync automatically converts the files to the
appropriate file type. If you send files by e-mail, be sure you save
your workbook in a format that can be opened by the recipient.
To start Pocket Excel
· On the Start menu, point to Programs, point to Office,
and then tap Microsoft Pocket Excel.
–or–
Double-tap the Microsoft Pocket Excel icon on the desktop.
To create a workbook using Pocket Excel
1. On the File menu, point to New, and then tap Workbook.
2. Create your worksheet.
3. On the File menu, tap Save.
4. Type a name for your file, and then tap OK.
If your workbook contains sensitive information, you can
protect it with a password. To do so, open the workbook and
Page 80
76 HP Jornada 700 Series Handheld PC
workbooks cannot be synchronized.
Using Microsoft Pocket Access
You can use Pocket Access to view and update data derived from
Microsoft Access, Microsoft SQL Server, and other ODBC
databases on your HP Jornada. You can open the database and
update data in the corresponding tables or you can fill out
electronic forms. Eventually, you should synchronize the new
information with a larger database on your desktop PC or your
corporate network. You can also use Pocket Access to create new
databases, tables, and SQL procedures directly on your device.
Programmers can use Microsoft ActiveX™ Data Objects for MS
Windows for H/PC 2000 (ADOCE) and Microsoft Visual
Basic™ or Microsoft Visual C++™ to develop custom database
solutions. For more information on creating custom database
solutions, go to the Microsoft Web site at
www.microsoft.com/mobile
.
To create a new database and table
1. On the Start menu, point to Programs, point to Office, and
then tap Microsoft Pocket Access.
–or–
Double-tap the Microsoft Pocket Access icon on the desktop.
2. On the View menu, tap Database View, and then tap
Open/New Database on the File menu.
3. Type a name for the database and tap OK.
4. Double-tap the Create a New Table icon.
5. In the Field Name box, type a name.
6. From the Data Type list, select a data type.
· The data type of a field cannot be changed after the table is
saved.
· Text boxes have a size limit of 255 characters. To enter
longer notes, select the Memo data type.
· To enter numbers with decimal points, select the Float data
type.
· To enter numbers between -32,768 and +32,767, select the
Integer data type.
Page 81

Chapter 5 | Getting down to business | 77
· To enter smaller numbers, select the Small Integer data
type.
7. To set the size limit of a field, enter an amount in the Field
Size box. You cannot change field sizes after the table is
saved.
8. To index the field, select Yes from the Indexed list. Indexing
a field allows Pocket Access to find and sort information
faster for that field.
9. Repeat these steps until you have created all the fields you
want for your table.
10. On the File menu, tap Save Table.
If you have tables that you do not want to keep updated on the
device (such as product catalogs), mark them as read-only
when transferring them from the desktop to the device to save
time during future synchronization sessions. Microsoft
ActiveSync will not check for updates the next time you
synchronize.
Printing your Pocket Office documents
You can print your Pocket Office and other documents from your
HP Jornada in three different ways:
· By connecting directly to a PCL printer using the optional
HP parallel printer cable (F1274A). For a list of compatible
printers, refer to the HP parallel printer cable User’s Guide
that came with your HP Jornada.
· By connecting via infrared port (only with an infraredequipped PCL printer).
· By transferring the file to your desktop PC and printing it
from within a program on the desktop PC.
For instructions on printing directly to a printer using the HP
parallel printer cable, see the HP parallel printer cable User’s
Guide.
To print directly to a printer via infrared
1. Open the file or document you want to print.
2. On the File menu, tap Print. The Print dialog box appears.
Page 82

78 HP Jornada 700 Series Handheld PC
3. Choose the PCL printer you will be printing to and select the
IrDA port option.
4. Set other print options as necessary.
5. Tap OK, and then line up the infrared port on your HP
Jornada with the infrared port on the printer.
Using Microsoft InkWriter
Using Microsoft InkWriter
Using Microsoft InkWriterUsing Microsoft InkWriter
InkWriter, a text, graphics, and ink processor with Rich Ink
technology, makes it easy to write and draw the way you do on
paper, but with the benefit of being able to edit and format your
writings and drawings. With InkWriter, you can enter
information in the way that is easiest for you: type using the
keyboard or write or draw on screen using the stylus.
1. On the Start menu, point to Programs, point to
2. Create your document:
·
·
3. When you are finished, tap Save on the File menu.
Backing up and restoring data
Backing up and restoring data
Backing up and restoring dataBacking up and restoring data
To prevent loss of data, you should back up your HP Jornada
data frequently. You can back up your HP Jornada two
convenient ways:
To create an InkWriter document
Accessories, and then tap InkWriter.
To type, tap Writing on the View menu, and then use the
keyboard.
To draw, tap Drawing on the View menu, and then drag the
stylus to draw on the touch screen. You can also create a
drawing in Writing view by crossing three of the ruled lines on
the first stroke of the drawing.
· Use Microsoft ActiveSync to back up all data to your desktop
PC.
· Use the HP Jornada backup application to back up all data
or only PIM data (Contacts, Calendar, Tasks and Inbox
Page 83

Chapter 5 | Getting down to business | 79
databases) to a PC Card or CompactFlash Card or to internal
memory.
Using Microsoft ActiveSync Backup
The Microsoft ActiveSync Backup feature creates a complete
duplicate of all data stored on your HP Jornada. If you routinely
connect to your desktop PC, this is the best method of data
backup. The backup file is saved on the hard disk of your desktop
PC.
Backing up data with ActiveSync on your desktop PC
If you have established a partnership between your HP Jornada
and desktop PC, you can set ActiveSync to back up data
automatically each time you connect. You can also back up your
HP Jornada manually any time you want. ActiveSync lets you
decide whether to back up all information each time, or only new
and updated information.
To back up data with ActiveSync
1. Connect your HP Jornada to your desktop PC.
2. In the ActiveSync window on your desktop PC, on the
Tools menu, tap Backup/Restore, and then tap the
Backup tab.
3. Select either Full Backup (to back up all information
every time) or Incremental Backup (to backup only
new or updated information).
4. Click Change to change the name of your backup file or
to specify a location for your backup file.
5. Tap Back Up Now.
Restoring data with ActiveSync from your desktop PC
When you restore data from a backup file created by ActiveSync,
all data on your HP Jornada is replaced by the data in the
backup file, including files you have created, programs you have
installed, and any system settings and options you have set.
Restoring data from ActiveSync replaces all information stored
on your HP Jornada. Any data added after the backup file was
Page 84

80 HP Jornada 700 Series Handheld PC
created will be lost.
To restore data with ActiveSync
1. Connect your HP Jornada to your desktop PC.
2. Close all running applications on your HP Jornada.
3. In the ActiveSync window on your desktop PC, on the
Tools menu, click Backup/Restore, and then click the
Restore tab.
4. Click Restore Now. Do not use your device until the
restore process is complete.
5. Disconnect the serial sync cable or remove your HP
Jornada from the cradle (optional on the HP Jornada
710), remove the CompactFlash card (if installed), and
perform a soft reset on your HP Jornada. See the
Resetting your HP Jornada section in chapter 9.
Using the HP Jornada backup application
To ensure the complete safety of your data, use the HP Jornada
backup application to back up to an optional CompactFlash Card.
By backing up to a CompactFlash Card, you can safeguard your
data even while you are traveling or while you are away from
your desktop PC. HP backup lets you choose to back up all data
or only PIM data (Calendar, Contacts, and Tasks, and Inbox). For
information on using CompactFlash Card accessories with your
HP Jornada, see the Using PC Cards, CompactFlash Cards
and Smart Cards section in chapter 7.
If you have both a CompactFlash Card and a PC Card
installed, two folders appear in the My Handheld PC folder.
The folders appear in My Handheld PC in the order in which
the storage cards are inserted.
You can also back up data to a folder on your HP Jornada;
however, this will not preserve the information in case you lose
power or need to perform a factory default reset. (See the
Resetting section in chapter 8.)
Page 85

Backing up data with HP backup
Chapter 5 | Getting down to business | 81
To back up data
1. On the Start menu, point to Programs, point to HP
Applications, and then tap HP backup.
2. Tap Backup.
3. Choose what you want to backup:
·
Select Full backup to back up all information stored in RAM,
including files you have created and programs you have
installed. (Certain system settings and passwords are not backed
up.)
·
Select Backup only databases to back up only your Contacts,
Tasks, and Calendar databases and/or Inbox databases
4. Choose other Backup options to password protect or
encrypt your backup file.
5. Tap Backup Now and choose a file name and folder location
for your backup file. Then tap OK to complete the backup
process.
For additional protection, you can copy the backup file (*.dbe
or *.dbb) from your HP Jornada to your desktop PC.
Restoring data with HP backup
To restore from a backup file
1. First, remove the backup battery, the main battery, and the
ac Power adapter. Wait for five full minutes, then reinstall ac
power and the batteries in the reverse order.
2. On the Start menu, point to Programs, point to HP
Applications, and then tap HP backup.
3. Choose what you want to restore, Full restore or Restore
only databases, then tap Restore Now.
4. Select the backup file you want to restore from, and then tap
OK to complete the restore process.
Page 86

82 HP Jornada 700 Series Handheld PC
5. After completion, perform a soft reset before using your HP
Jornada (see the Resetting section in chapter 8).
When you restore, your HP Jornada must have the same
regional settings as when you completed the backup.
Otherwise, you will not be able to restore the files. To change
regional settings, on the Start menu, point to Settings, tap
Control Panel, and then double-tap the Regional Settings
icon. Select your region from the drop-down list.
Using OmniSolve from LandWare
Using OmniSolve from LandWare
Using OmniSolve from LandWareUsing OmniSolve from LandWare
OmniSolve is a financial application that offers the same features
as the HP business calculator. It is designed specifically for real
estate, retail, and business professionals who use Handheld PCs
to make financial decisions quickly and accurately. OmniSolve
employs a “form filling” metaphor to provide you with a rich
problem-solving environment that is unparalleled in its ease of
use, power, and flexibility.
To start OmniSolve
· On the Start menu, point to Programs, point to
Accessories, and then tap OmniSolve.
For detailed procedures about using OmniSolve, refer to
OmniSolve online Help.
Using Yahoo! Messenger
Using Yahoo! Messenger
Using Yahoo! MessengerUsing Yahoo! Messenger
To get started using Yahoo! Messenger
1. To activate Yahoo! Messenger you must create a free Yahoo
account by visiting the Yahoo! Messenger Web site at:
http://messenger.yahoo.com/messenger/
for your free account you will create a login ID and password.
2. Open Yahoo! Messenger and enter your login information at
the login screen.
. When you sign up
3. Next, choose your connection preference (you will be
prompted for this after you login). Enter the username and
password for your ISP, and click "Connect".
Page 87

Chapter 5 | Getting down to business | 83
That's all there is to it! Now you are ready to share instant
messages with family, friends and associates. For more detailed
information about using Yahoo! Messenger, go to the Yahoo!
Messenger help page on the Web at:
http://help.yahoo.com/help/us/mesg/
Page 88

84 HP Jornada 700 Series Handheld PC
Page 89

Chapter 6 | Accessing e-mail | 85
6 |
6 | Accessing e
6 |6 |
With your HP Jornada Handheld PC (H/PC), you can keep in
touch with your office, home, and clients through e-mail and the
Internet. You can connect in many ways using your HP Jornada
and various accessories. This chapter will guide you through the
options best suited to your needs.
This chapter provides information that allows you to:
• Decide why and how you want to connect
• Set up your HP Jornada to access personal or e-mail and the
Internet
Accessing e----mail
Accessing e Accessing e
mail
mailmail
• Set up your HP Jornada to access corporate e-mail and your
network or PC when you are away from the office (offsite)
• Set up your HP Jornada to access corporate e-mail and
network resources when you are in the office (onsite)
• Set up additional connections with the HP Jornada dialup
application or Remote Networking
• Use your connections with Inbox and Microsoft Internet
Explorer 4.01 for H/PC
Deciding how and why you want to connect
Deciding how and why you want to connect
Deciding how and why you want to connectDeciding how and why you want to connect
The method you use for sending and receiving your e-mail,
browsing the Internet, and accessing other remote resources
depends on your goals and situation. Do you:
• Need access to personal (non-corporate) e-mail and the
Internet?
• Need access to corporate e-mail and network services when
you are on the road or out of the office?
• Need access to corporate e-mail and network services when
you are onsite at your company?
Page 90

86 HP Jornada 700 Series Handheld PC
• Have more than one e-mail account (for example, personal and
business)?
Your answers to these questions will help you determine which
equipment you can use in combination with your HP Jornada to
keep in touch online. The following illustration depicts the
different solutions to your online needs.
Which connection options are right for you?
For explanation of some of the terms used in the descriptions
that follow or in the HP dialup application, check the glossary
at the end of this User’s Guide.
Accessing e-mail, the Internet, and corporate
intranets
Typical personal Internet connection
If you want e-mail and Internet service only (with no access to a
company network), you will need:
• An installed modem—If your HP Jornada is equipped with a
built-in modem, you are ready to go. If not, you can choose
Page 91

Chapter 6 | Accessing e-mail | 87
from a variety of available PC Card modems∗, Bluetooth
devices, and LAN cards. (For more information about
compatible PC Card modems and other PC Card
communication devices, go to the HP Jornada Accessories page
on the HP Jornada Web site at www.hp.com/jornada
.)
• A PPP (Point-to-Point Protocol) or SLIP (Serial Line
Internet Protocol) account—An Internet service provider
(ISP) will provide you with important information, such as a
user name, password, dial-up telephone number, server
names, and so on.
• A dial-up connection set up on your HP Jornada—HP
dialup makes this step easy.
• Access to a telephone line—You can connect to an analog
telephone line if your HP Jornada has a built-in modem. If you
use a PC card modem, check the manufacturer’s instructions
for telephone line compatibility.
If you use the HP Jornada internal modem, you must use an
analog telephone line to connect your modem. Connecting to a
digital telephone line can damage your modem.
Connecting to corporate e-mail and network from
off-site
Typical corporate LAN remote (off-site) connection
If you want dial-up access to corporate e-mail and Internet
services when you are offsite, then, in addition to the items
necessary for a personal internet connection listed above, you will
need:
∗
Modem purchased separately. Some Web sites/content may not be
available.
Page 92

88 HP Jornada 700 Series Handheld PC
• An account with your corporate network set for dialing
in to your network server—Your network administrator
can provide you with important information, such as a user
name, password, dial-up telephone number(s), server names,
and so on.
Connecting to corporate e-mail and network
resources on-site
Typical corporate LAN on-site network connection
If you want corporate e-mail and Internet service only (with no
access offsite), you will need:
• An installed network interface card (NIC)—that is
properly configured with the IP address of your DNS and
WINS servers (your network administrator can give you this
information)
• An account with your corporate network—including an
IP address for your HP Jornada, if it is not dynamically
assigned
• A network (LAN) connection—a network cable with the
appropriate connector for your NIC
• For detailed instructions on how to connect your HP Jornada
to a network via LAN cable, see Connecting directly to
corporate e-mail and network resources through a
network interface card (NIC) later in this chapter.
Creating Connections
Creating Connections
Creating ConnectionsCreating Connections
Once you have decided what type of connection method you need,
you easily create and configure a Internet, intranet or network
connection by following the instructions in the following pages.
Since personal Internet and off-site corporate dialup connections
methods are quite similar they are addressed first, followed by
Page 93

Chapter 6 | Accessing e-mail | 89
instructions for creating an on-site connection to a local area
network (LAN).
Personal and corporate dialup connections
Installing and configuring a modem
If you purchased an HP Jornada with a built-in 56K V.90 modem,
it is already setup for easy communication. No installation is
required.
The 56Kbps modem complies with V90 ITU 56K specifications
and has a design capability of receiving data at up to 56Kbps
from a compatible service provider, and transmitting data at
up to 31.2Kbps. Public networks currently limit maximum
download speeds to about 53Kbps. Actual speeds depend upon
many factors and are often less than the maximum possible.
Note that the UK version of HP Jornada does not support certain
dialing properties. The HP Jornada built-in modem (on models
equipped with a built-in modem) does not detect a dial tone
before dialing. By default, the Wait for dial tone before dialing
box is checked. The modem will dial even if there is no dial tone.
It also does not support the pulse dial option. The modem dials
using tone dial only. By default, tone dialing is selected.
The HP Jornada supports a variety of available PC Card
modems
*
. (Check www.hp.com/jornada for more information on
compatible PC card modems.) Follow the manufacturer’s
instructions included with the PC Card modem to install and
configure it for use with your HP Jornada.
Getting an account with an Internet service provider
To access the Internet and e-mail, you will need to contact an ISP
to set up a PPP account. SLIP accounts are offered by some ISPs
instead of PPP accounts. Your HP Jornada supports the use of
SLIP as well as PPP.
*
Modem purchased separately. Some Web sites/content may not be
available.
Page 94

90 HP Jornada 700 Series Handheld PC
Your ISP will be able to give you all the configuration information
you need to connect your HP Jornada to the Internet and e-mail
service. Be sure to note the following:
• Your account user name.
• Your account password.
• Telephone number of your ISP modem.
• IP and DNS addresses, if necessary (most dial-up accounts are
assigned addresses dynamically each time you connect).
• Your e-mail user name or ID. (This may be the same as the
user name for your ISP account.)
• Your e-mail password. (This may be the same as the password
for your ISP account.)
• The POP3 or IMAP4 host name of your ISP.
• The SMTP host name of your ISP (if required by your ISP).
Setting up a dial-up connection to your ISP
Use HP dialup to create a dial-up connection to the Internet or to
a corporate network and to configure e-mail and Web services.
After you have established an account with an ISP, you can set
up a connection on your HP Jornada and connect to the Internet
and your e-mail whenever you want. To make this configuration
process easier, use the HP Jornada dialup application. The HP
dialup Setup Wizard leads you through the process of
configuring your connections.
The first time you start HP dialup, the Setup Wizard leads you
step-by-step through the processes of creating and configuring:
• a connection to your service provider
• a dialing location
• an e-mail service
• a Web service.
The settings you create in HP dialup are used by several
programs, including Remote Networking, Inbox, and Internet
Explorer.
Page 95

Chapter 6 | Accessing e-mail | 91
Starting HP dialup
To start HP dialup
· On your Jornada desktop, double-click the HP dialup icon.
—or—
On the Start menu, tap Programs, tap HP
Applications, and then tap HP dialup.
If you have already created a connection, use the Connect!
screen to connect to your service provider or to add or modify a
connection or location.
Running the HP dialup Setup Wizard
Running the HP dialup Setup Wizard
Running the HP dialup Setup WizardRunning the HP dialup Setup Wizard
If this is the first time you have used HP dialup, follow the
instructions on your screen to complete the Setup Wizard and
create a connection to your Internet service provider or corporate
network, and set up e-mail and Web services. Each tab on the HP
dialup window has a corresponding section in the setup wizard
Service Provider
If you use several locations for connecting to the same service,
create a unique service provider setup with settings for each
location.
Page 96

92 HP Jornada 700 Series Handheld PC
Domain
If your service provider requires you to specify a domain when
you log on (for example, when connecting to a Windows® NT®
network), select the Network Domain check box, and then type
the domain name in the box.
Internet Service Provider (ISP)
If your ISP is listed, select it from the Service Provider list,
and then select your country, state, and city to ensure you get the
local dialup number for your ISP.
When you select an ISP from the list, the country code, area code,
and telephone number fields are automatically filled in. If you
need to make any changes, you can edit the numbers in the box
where they appear
If you are connecting to a corporate network or if your ISP is not
listed, select (Not in the list), and then enter the country code,
area code, and telephone number for your service provider
directly into the boxes provided.
If your country or city (area code) is not on the list, you can
edit the database in World Clock. To do this, go to the Control
Panel, and double-tap the World Clock icon. On the Options
tab, tap Add. The dialog boxes will guide you through adding
your customized city information to the database.
Modem Settings
On the Port Settings tab, enter your connection preferences. (If
you are not sure about these settings, check with your service
provider or network administrator.)
On the Call Options tab, set your preferences for canceling the
call, and enter any extra modem commands to add to the dialing
string.
TCP/IP
Tap TCP/IP to set the IP addresses for your HP Jornada and
your service provider's DNS and WINS servers.
If your ISP assigns IP addresses each time you connect (dynamic
connection), choose the Server-assigned IP address in the IP
Page 97
Chapter 6 | Accessing e-mail | 93
Address section, and Server-assigned address under Name
Server Configuration.
If you selected an ISP from the list, the IP addresses will be
filled in automatically
If you are connecting to a corporate network, or your ISP
was not in the list, you will need to provide the IP
addresses. Contact your ISP or network administrator for more
information. Tap OK to return to the setup wizard.
You also have the option to choose software and IP header
compression options. Ask your ISP if these options are
recommended for your account.
If you have created one Service Provider using HP dialup, you
can create another by tapping the New button on the HP
dialup Service Provider Tab. Then, follow the Setup Wizard to
create a new ISP connection.
E-mail Service
Select your service provider's e-mail protocol from the drop-down
list. Inbox supports both the POP3 and IMAP4 protocols. POP3
OpenMail is not supported.
The default options represent the settings used by many ISPs.
If you are not sure, or you do not have guidance from your ISP,
try the default settings.
If your service provider requires you to specify a domain when
you log on (for example, when connecting to a Windows NT
network), select the Network Domain check box, and then type
the domain name in the box.
Depending on your service provider, you may have different
addresses for your incoming mail (POP3 or IMAP4) server and
your outgoing mail (SMTP) server.
Under Connection Options you can choose a variety of settings
for connecting to your e-mail account.
By default, Inbox checks for new messages every 15 minutes
while connected. If you want to change this setting, or if you wish
Page 98

94 HP Jornada 700 Series Handheld PC
to change other connection options, click Change to display the
Connection Options dialog box.
You can also change the connection settings and download
settings later from within the Inbox program. For more
information, see Inbox Help.
Under Download Options you can choose settings for
downloading message headers, full messages, meeting requests
and attachments. By default, Inbox downloads only message
headers and the first 100 lines of text in a message, as well as
any file attachments. If you want to use different settings, tap
Change to display the Download Options dialog box.
Web Service
If you are required to use a proxy server, select the Use proxy
server check box, and then type the server address and port
number, then tap Next.
If you connect to the Internet over a corporate network, you
may need to use a proxy server. Your network administrator
can tell you whether you need to use a proxy server, and if so,
the server address and port settings.
Your home page is displayed when you start Internet Explorer
using this service. It can be a page on the Internet or on a
corporate intranet.
Your search page is displayed when you click the search button
on the IE toolbar.
Get Connected
After you have completed the Setup Wizards, use HP dialup to
quickly select your dialing location and the connection you want
to dial, then connect to your service provider. You can also use
HP dialup to add or modify connections, dialing locations, and email or Web services
Page 99
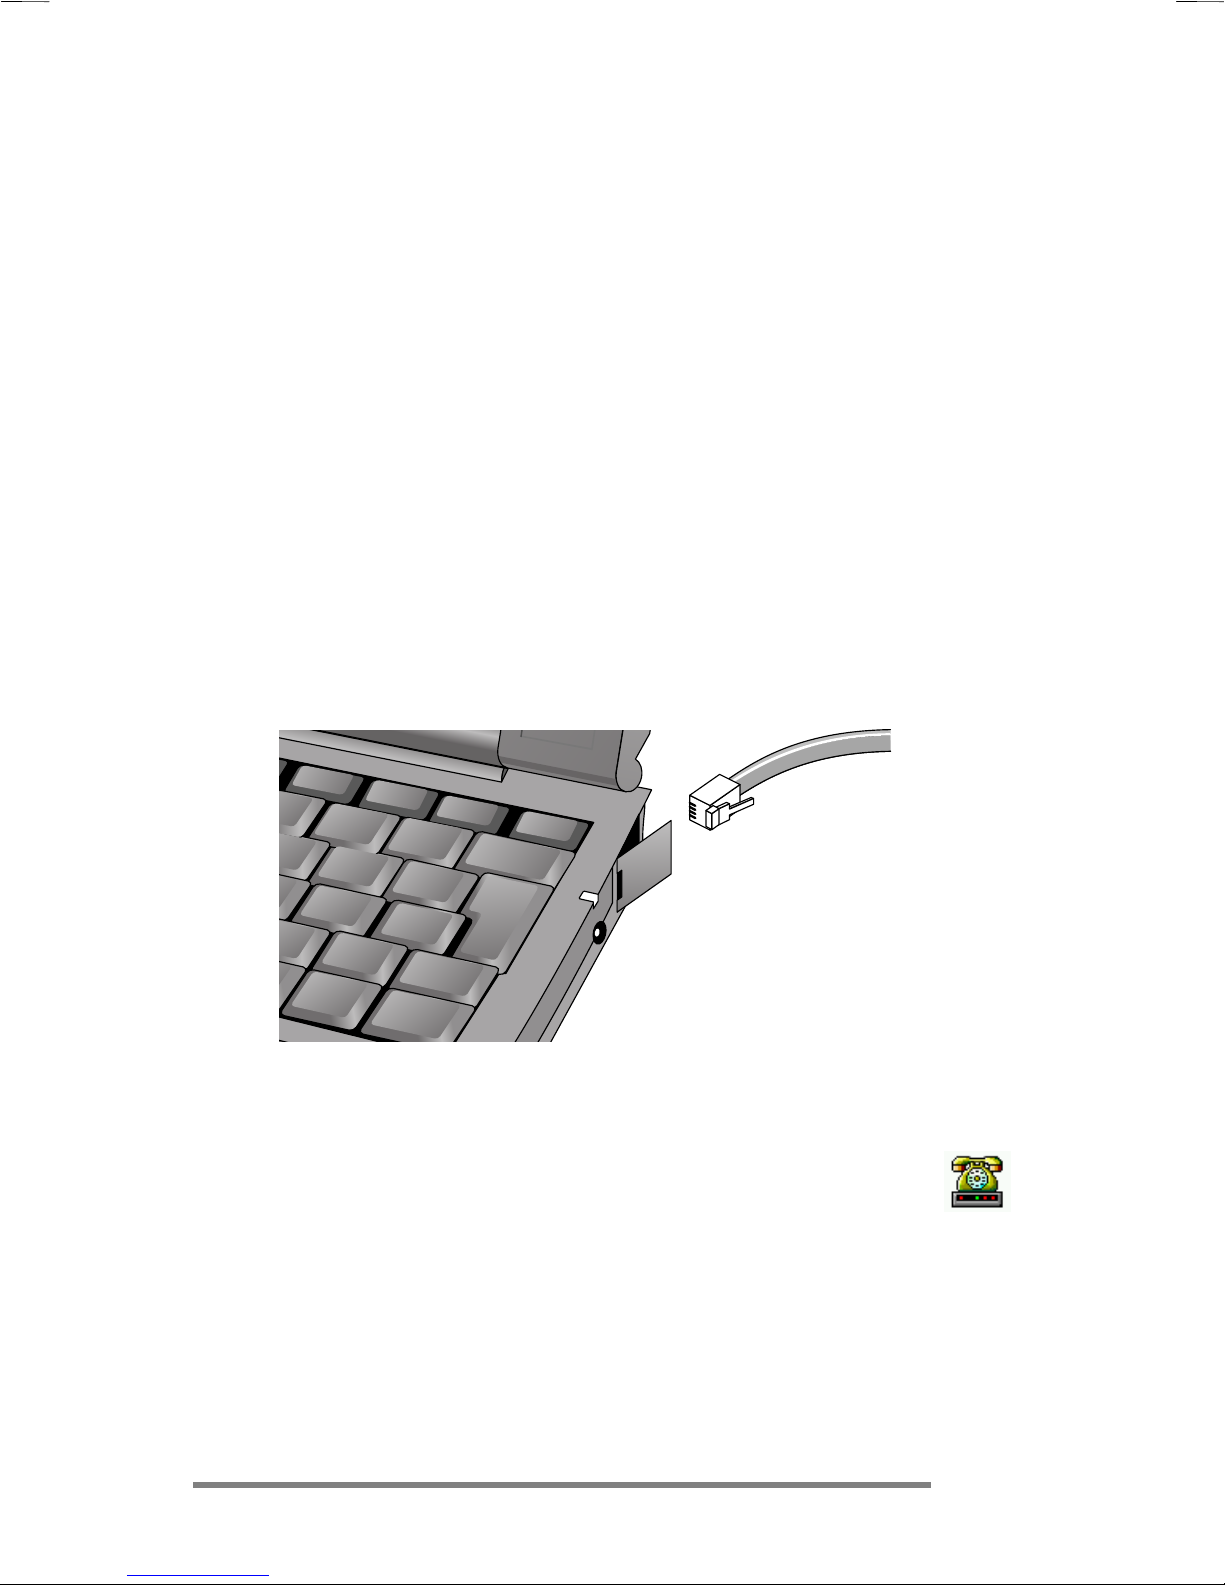
Chapter 6 | Accessing e-mail | 95
Connecting the telephone line
After you have configured your connection to your ISP or LAN,
you are ready to connect your telephone line to your built-in
modem (on models equipped with a built-in modem) or PC Card
modem and then dial in. Use this procedure to connect to an
analog telephone line. If you are using a PC Card modem, follow
the instructions provided by your modem manufacturer for
connecting to a telephone line type supported by your modem.
To connect an analog telephone line to your HP
Jornada
1. Connect the telephone cord to the telephone jack.
2. Connect the other end of the telephone cord to the telephone
connector on the side of your HP Jornada or to your PC Card
modem (following the instructions provided by your modem
manufacturer).
Connecting to your Service Provider
To establish a connection
1. On your Jornada desktop, double-click the HP dialup
icon.
Page 100
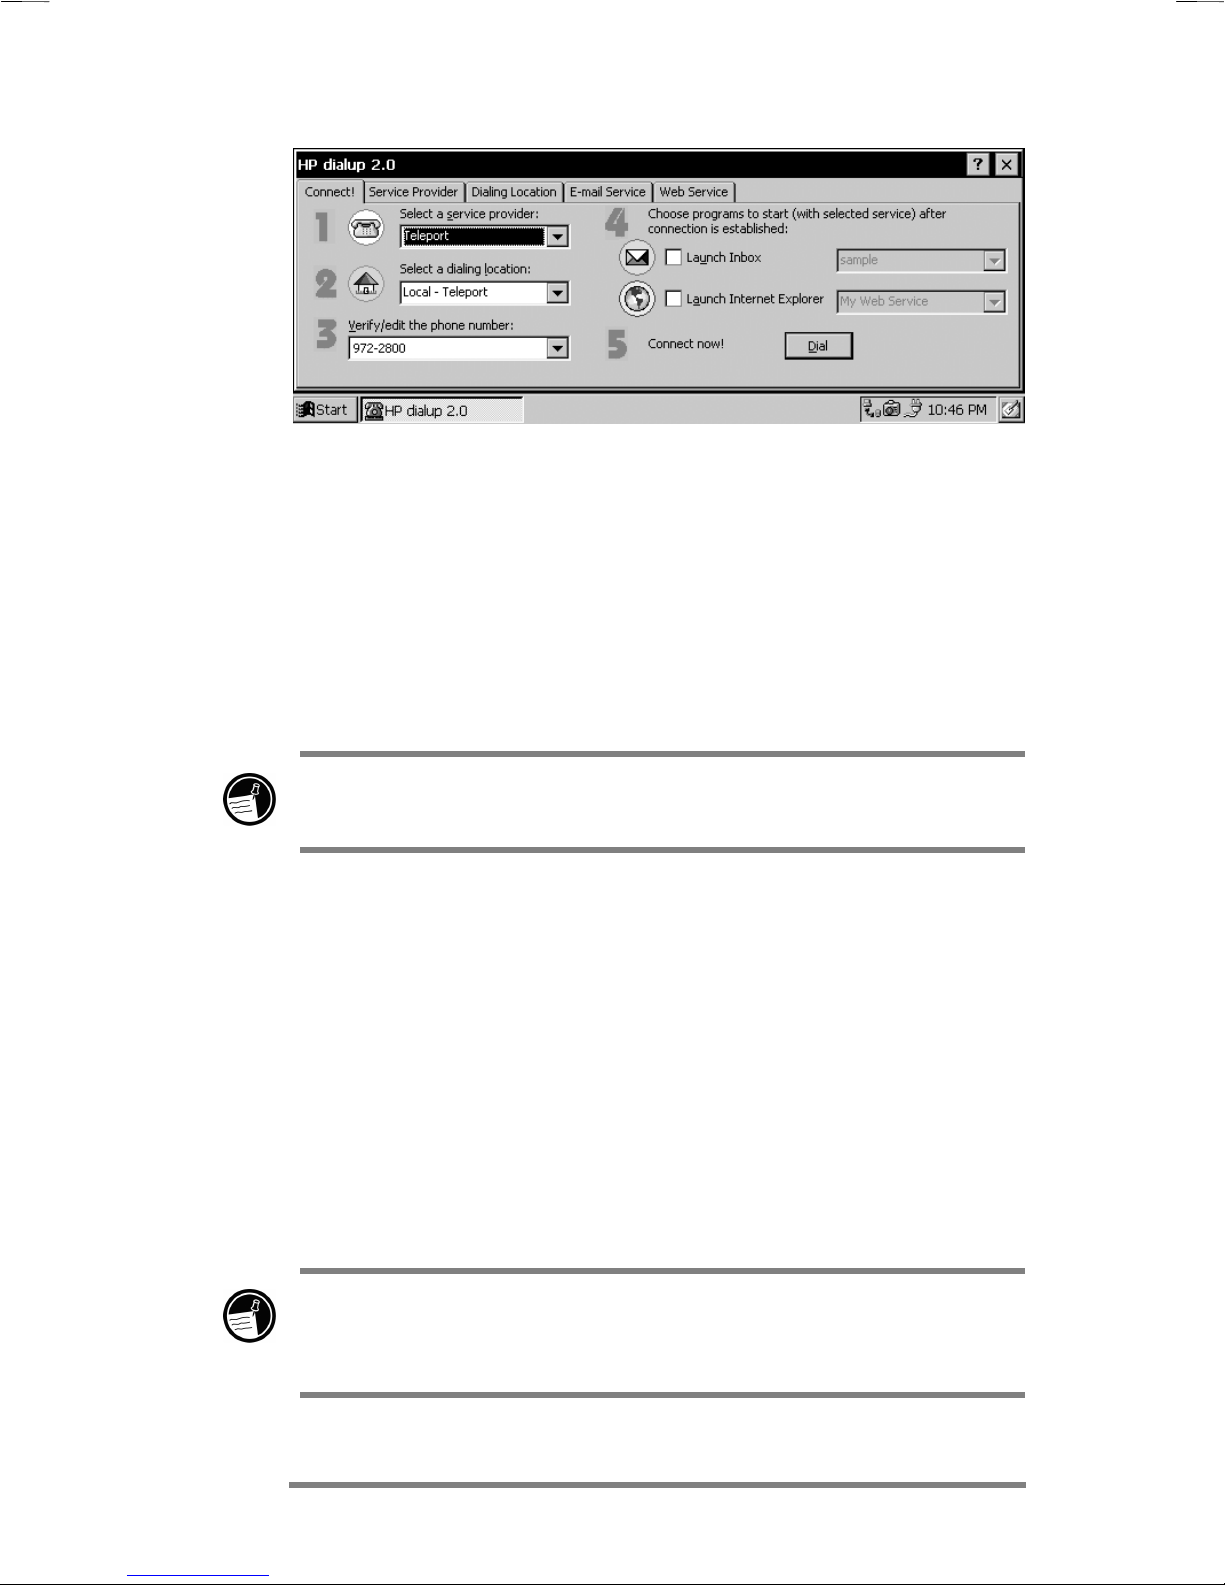
96 HP Jornada 700 Series Handheld PC
2. Select your service provider from the list. (A service
provider may be either an Internet Service Provider
(ISP) or a corporate network.)
3. Select your dialing location from the list.
4. Verify that the phone number box displays the dialing
string exactly as it should be dialed, including any
special dialing codes (for example, codes that are
required to reach an outside line or to disable call
waiting).
For more information on dialing codes, see the Dialing strings
topic in HP dialup online help.
5. If you want to check your e-mail when you are
connected, select the Launch Inbox check box, and then
select your e-mail service from the list. When a dial-up
connection is established, Inbox will start automatically
and download any new messages.
6. If you want to browse the Web or your corporate intranet
using Internet Explorer, select the Launch Internet
Explorer check box, and then select the Web service to
use. When a dial-up connection is established, Internet
Explorer will automatically open the Home page
associated with this Web service.
7. Click Dial.
When you use HP dialup to connect to your ISP, the Web
options you set in HP dialup take precedence over any options
you may have set in Internet Explorer.
 Loading...