

Page 1

hp
e-diagtools 3.5x
user’s guide
www.hp.com/desktops/diagtools
hp business pcs
hp e-pc hp brio hp vectra
hp workstations
including: hp visualize hp kayak
hp notebook pcs
hp omnibook hp pavilion
Page 2

Notice
The information contained in this document is subject to change without notice.
Hewlett-Packard makes no warranty of any kind with regard to this material, including,
but not limited to, the implied warranties of merchantability and fitness for a particular
purpose. Hewlett-Packard shall not be liable for errors contained herein or for incidental
or consequential damages in connection with the furnishing, performance, or use of this
material.
This document contains proprietary information that is protected by copyright. All rights
are reserved. No part of this document may be photocopied, reproduced, or translated
to another language without the prior written consent of Hewlett-Packard Company.
Adobe
®
, Acrobat® and Acrobat® Reader™ are trademarks of Adobe Systems
Incorporated.
Microsoft
®
, MS®, MS-DOS®, Windows®, and Windows NT® are U.S. registered
trademarks of Microsoft Corporation.
Intel
®
and Pentium® is a registered trademark of Intel Corporation.
HP France
Business Desktop Division
38053 Grenoble Cedex 9
France
© 1998-2001 Hewlett-Packard Company
Version of 07/2001 for e-Diagtools 3.5x
Page 3

3
HP e-Diagtools 3.5x User’s Guide
Who Should Read This Book?
This manual is for anyone who wants to:
•
Diagnose hardware problems on an HP computer
•
Understand the purpose of e-Diagtools
•
Learn how to use e-Diagtools
•
Know what to do when an e-Diagtools test fails
•
Provide their support provider with more information for solving problems quickly
and effectively
•
Find out where to get more information and support.
Other e-Diagtools Documentation
Apart from this User’s Guide, the following documentation is also available:
•
HTML Quick Tour
Provides a useful online introduction and overview of e-Diagtools. It is available
on the
Diagtools web site
www.hp.com/desktops/diagtools
.
•
e-Diagtools Administrator’s Guide
Explains to IT or MIS personnel how to configure the HP e-Diagtools diagnostic
solution to obtain optimal e-support and remote capabilities. It is available
on your HP
computer’s support web site (refer to
page 6
for web addresses).
•
Virtual Call Assistant User’s Guide
Explains how to install, configure and use the Virtual Call Assistant, an e-Diagtools
diagnostic aid that is capable of detecting and recognizing audio error signals from
remote computers. It is available
on your HP computer’s support web site (refer to
page 6
for web addresses).
•
HP Utility Partition Whitepaper
Describes the HP Utility Partition, a hard disk partition provided on most HP
computers that contains most of the e-Diagtools software. It is available
on the Vectra
support web site
www.hp.com/go/vectrasupport
.
What is e-Diagtools?
The first step in solving a problem with a computer is diagnosis.
HP’s e-Diagtools helps you diagnose hardware-related problems on a HP computer.
It is a series of tools designed to help you to:
• Distinguish between software and hardware problems
• Diagnose hardware-related problems
• Provide precise information to support providers so that they can solve any problem quickly
and effectively.
e-Diagtools is not a repair tool.
Page 4

4 English
Overview of e-Diagtools
e-Diagtools has three main components:
❒ The e-Diagtools pre-boot diagnostic capability. This generates an audible set of beeps
that helps diagnose a problem manually or automatically when the computer cannot
boot. You can also present the beep error code to your support provider for remote
diagnosis and enhanced problem solving. Available on HP Business PCs and
Workstations only.
❒ The e-Diagtools core tests, which provide hardware detection, basic and advanced
system tests, and a Support Ticket with a complete record of the test results and the
computer’s configuration.
❒ A set of functions to forward the Support Ticket to your authorized support provider
via email, and to retrieve and flash the latest BIOS version for your computer.
What’s New in e-Diagtools Version 3.5x
Version 3.5x of e-Diagtools has these new features:
•
Supports the latest HP computers
•
Incorporates new, more efficient hardware diagnostics tests
•
Has an improved user interface, especially for advanced tests
•
Available in these languages: English, French, German, Italian, Spanish, Portuguese,
Simplified Chinese and Japanese
•
Has a context sensitive help system
•
Minimizes the number of reboots (restarts) required
•
For HP Business PCs, provides a new activation from the HP logo screen
(using
<F8>
key)
•
Provides step-by-step troubleshooting recommendations if there is a test warning or
error
•
Issues a warning message in the basic tests if any main hardware components are
missing.
•
Provides more information in the support ticket, such as the history of the computer’s
configuration from the first time e-Diagtools was run up to the last time e-Diagtools
was run.
Page 5

5
Media
This version of HP e-Diagtools is supplied on the following media:
•
The Utility Partition pre-installed on your hard disk — on most new HP computers.
•
The recovery CD supplied with your computer:
• The
HP PC Image Engineer - Image Library and Diagnostics CD-ROM
for e-pc and
Vectra PCs.
• The
Recovery CD
for HP Notebook PCs.
•
The HP Diagtools CD-ROM for Linux HP computer models.
•
The generic HP Diagtools CD-ROM — this CD contains all e-Diagtools versions to
cover a wide range of HP e-pc, Vectra, Kayak, Brio, Notebook and Visualize
computers. This CD-ROM can be ordered from the Diagtools web site
www.hp.com/desktops/diagtools
.
e-Features
The “e-features” of e-Diagtools are network functions that enable you to do remote
BIOS updates, and send the Support Ticket by email to your support provider.
These e-features can be extended using HP Toptools or HP Instant Support to include
remote troubleshooting and diagnosis via your LAN.
NOTE Only the HP Utility Partition version of e-Diagtools 3.5x supports the full range of
e-features. When you run e-Diagtools 3.5x from a CD-ROM you will not be able to update
the BIOS.
Compatibility
e-Diagtools version 3.5x can run on the latest models of HP computers.
Other versions of e-Diagtools are available for older HP Business PCs, Notebook PCs
and Workstations.
To learn which version of e-Diagtools to use for your HP computer, refer to the HP
Support web sites, described on page 6.
Upgrading e-Diagtools on your computer’s Utility Partition
For HP Business PCs
You can download the latest version of the HP Utility Partition version of e-Diagtools
from the support web site for your HP Business PC (refer to page 6 for web addresses).
For HP Notebook PCs
You can upgrade the HP Utility Partition version of e-Diagtools using e-Diagtools for
Windows, described in chapter 8, “e-Diagtools for Windows“.
Page 6

6 English
HP Instant Support
For selected HP computers, e-Diagtools can also be run as part of the HP Instant
Support framework.
This e-Diagtools capability is not described in this manual. For more information on HP
Instant Support, refer to:
www.hp.com/go/instantsupport
More Information and HP Support Web Sites
For more information about e-Diagtools, refer to the e-Diagtools web site:
www.hp.com/desktops/diagtools
For more information about support for your HP computer, including e-Diagtools
information, refer to the HP Support web sites:
For more information about HP Customer Care Service and Support, refer to chapter 9,
“HP Customer Care Service and Support“.
HP Support www.hp.com/go/support
HP Vectra Support www.hp.com/go/vectrasupport
HP Brio Support www.hp.com/go/briosupport
HP Kayak Support www.hp.com/go/kayaksupport
HP e-pc Support www.hp.com/go/e-pcsupport
HP Workstation Support www.hp.com/workstations/support
HP Notebook Support www.hp.com/go/support
Page 7

Contents
7
1 Pre-Boot Diagnostics and BIOS Errors
Overview . . . . . . . . . . . . . . . . . . . . . . . . . . . . . . . . . . . . . . . . . . . . . . . . . . . . . . . . . . 12
Pre-Boot Audio Signal and Beeps . . . . . . . . . . . . . . . . . . . . . . . . . . . . . . . . . . . . . . 12
BIOS Error Messages . . . . . . . . . . . . . . . . . . . . . . . . . . . . . . . . . . . . . . . . . . . . . . . . 13
What to Do if You Get a Pre-boot, BIOS, or e-Diagtools Error . . . . . . . . . . . . . . 14
Calling Your Support Provider . . . . . . . . . . . . . . . . . . . . . . . . . . . . . . . . . . . . . . . . . . . . 14
Troubleshooting the Error Yourself . . . . . . . . . . . . . . . . . . . . . . . . . . . . . . . . . . . . . . . . 14
e-Diagtools Online Troubleshooting. . . . . . . . . . . . . . . . . . . . . . . . . . . . . . . . . . . . 15
2 Starting e-Diagtools
Before Starting e-Diagtools . . . . . . . . . . . . . . . . . . . . . . . . . . . . . . . . . . . . . . . . . . . 18
Starting e-Diagtools from the Utility Partition on your Hard Disk . . . . . . . . . . . 19
Option 1: Starting e-Diagtools on new HP Business PCs . . . . . . . . . . . . . . . . . . . . . . . 19
Option 2: Starting e-Diagtools on Other HP Computers
(Including HP Notebook PCs) . . . . . . . . . . . . . . . . . . . . . . . . . . . . . . . . . . . . . . . . . . . . 22
If You Are Unable to Start e-Diagtools From the Hard Disk . . . . . . . . . . . . . . . . 23
Starting e-Diagtools from a CD-ROM . . . . . . . . . . . . . . . . . . . . . . . . . . . . . . . . . . . 23
Which CD-ROM to Use . . . . . . . . . . . . . . . . . . . . . . . . . . . . . . . . . . . . . . . . . . . . . . . . . . 23
How to Start e-Diagtools . . . . . . . . . . . . . . . . . . . . . . . . . . . . . . . . . . . . . . . . . . . . . . . . . 23
The e-Diagtools Main Menu . . . . . . . . . . . . . . . . . . . . . . . . . . . . . . . . . . . . . . . . . . 25
Help . . . . . . . . . . . . . . . . . . . . . . . . . . . . . . . . . . . . . . . . . . . . . . . . . . . . . . . . . . . . . . . . . 25
Update BIOS (when available) . . . . . . . . . . . . . . . . . . . . . . . . . . . . . . . . . . . . . . . . . . . . 25
Update BIOS, Clearing its Settings (when available) . . . . . . . . . . . . . . . . . . . . . . . . . . 25
Run e-Diagtools . . . . . . . . . . . . . . . . . . . . . . . . . . . . . . . . . . . . . . . . . . . . . . . . . . . . . . . . 26
Support Ticket (when available) . . . . . . . . . . . . . . . . . . . . . . . . . . . . . . . . . . . . . . . . . . 27
Select Language. . . . . . . . . . . . . . . . . . . . . . . . . . . . . . . . . . . . . . . . . . . . . . . . . . . . . . . . 27
Exit . . . . . . . . . . . . . . . . . . . . . . . . . . . . . . . . . . . . . . . . . . . . . . . . . . . . . . . . . . . . . . . . . . 27
3 Updating the BIOS and Sending the Support Ticket
Overview of e-Diagtools e-Features . . . . . . . . . . . . . . . . . . . . . . . . . . . . . . . . . . . . 30
HP Business PCs and HP Workstations . . . . . . . . . . . . . . . . . . . . . . . . . . . . . . . . . . . . . 30
HP Notebook PCs . . . . . . . . . . . . . . . . . . . . . . . . . . . . . . . . . . . . . . . . . . . . . . . . . . . . . . 30
Basic to Intermediate Users: Setting Up the e-Features . . . . . . . . . . . . . . . . . . . 31
Page 8

Contents
8 English
Before You Begin . . . . . . . . . . . . . . . . . . . . . . . . . . . . . . . . . . . . . . . . . . . . . . . . . . . . . . 31
Step 1: Open the e-Diagtools Networking Parameters Screen. . . . . . . . . . . . . . . . . . . 32
Step 2: Set the BIOS Update Parameters . . . . . . . . . . . . . . . . . . . . . . . . . . . . . . . . . . . 32
Step 3: Set the Parameters for Sending the Support Ticket . . . . . . . . . . . . . . . . . . . . 33
Step 4: Save the Parameters . . . . . . . . . . . . . . . . . . . . . . . . . . . . . . . . . . . . . . . . . . . . . 33
Advanced Users: Setting Up the e-Features. . . . . . . . . . . . . . . . . . . . . . . . . . . . . . 34
Before You Begin . . . . . . . . . . . . . . . . . . . . . . . . . . . . . . . . . . . . . . . . . . . . . . . . . . . . . . 34
Step 1: Open the e-Diagtools Networking Parameters Screen. . . . . . . . . . . . . . . . . . . 34
Step 2: Enter the Basic Network Parameters or Set to DHCP. . . . . . . . . . . . . . . . . . . 35
Step 3: Set the BIOS Update Parameters . . . . . . . . . . . . . . . . . . . . . . . . . . . . . . . . . . . 35
Step 4: Set the Parameters for Sending the Support Ticket . . . . . . . . . . . . . . . . . . . . 36
Step 5: Save the Parameters . . . . . . . . . . . . . . . . . . . . . . . . . . . . . . . . . . . . . . . . . . . . . 36
HP Toptools. . . . . . . . . . . . . . . . . . . . . . . . . . . . . . . . . . . . . . . . . . . . . . . . . . . . . . . . . . . 36
Information About The LAN Configuration Agent . . . . . . . . . . . . . . . . . . . . . . . . 37
Updating the BIOS. . . . . . . . . . . . . . . . . . . . . . . . . . . . . . . . . . . . . . . . . . . . . . . . . . . 38
How To Update the BIOS . . . . . . . . . . . . . . . . . . . . . . . . . . . . . . . . . . . . . . . . . . . . . . . . 38
Sending the Support Ticket . . . . . . . . . . . . . . . . . . . . . . . . . . . . . . . . . . . . . . . . . . . 40
How To Send the Support Ticket . . . . . . . . . . . . . . . . . . . . . . . . . . . . . . . . . . . . . . . . . 40
4 e-Diagtools Hardware Detection
Overview of Hardware Detection . . . . . . . . . . . . . . . . . . . . . . . . . . . . . . . . . . . . . . 44
Hardware Detection Results . . . . . . . . . . . . . . . . . . . . . . . . . . . . . . . . . . . . . . . . . . 45
If a Component is Not Detected . . . . . . . . . . . . . . . . . . . . . . . . . . . . . . . . . . . . . . . 46
5 e-Diagtools Basic System Test
Overview of the Basic System Test. . . . . . . . . . . . . . . . . . . . . . . . . . . . . . . . . . . . . 48
How to Run the Basic System Test . . . . . . . . . . . . . . . . . . . . . . . . . . . . . . . . . . . . . 48
Test Result: PASSED. . . . . . . . . . . . . . . . . . . . . . . . . . . . . . . . . . . . . . . . . . . . . . . . . 50
Test Result: WARNING or FAILED. . . . . . . . . . . . . . . . . . . . . . . . . . . . . . . . . . . . . 51
Important Recommendation . . . . . . . . . . . . . . . . . . . . . . . . . . . . . . . . . . . . . . . . . . . . . 52
What is Tested . . . . . . . . . . . . . . . . . . . . . . . . . . . . . . . . . . . . . . . . . . . . . . . . . . . . . . 53
6 Advanced System Tests
Overview of the Advanced System Tests . . . . . . . . . . . . . . . . . . . . . . . . . . . . . . . . 56
How to Enter the Advanced System Tests . . . . . . . . . . . . . . . . . . . . . . . . . . . . . . . 56
Page 9

Contents
9
How to Run an Advanced System Test. . . . . . . . . . . . . . . . . . . . . . . . . . . . . . . . . . 57
Test Result: PASSED . . . . . . . . . . . . . . . . . . . . . . . . . . . . . . . . . . . . . . . . . . . . . . . . 59
Test Result: WARNING or FAILED. . . . . . . . . . . . . . . . . . . . . . . . . . . . . . . . . . . . . 60
Important Recommendation . . . . . . . . . . . . . . . . . . . . . . . . . . . . . . . . . . . . . . . . . . . . . . 61
7 The Support Ticket
What is the Support Ticket?. . . . . . . . . . . . . . . . . . . . . . . . . . . . . . . . . . . . . . . . . . . 64
Using the Support Ticket Functions . . . . . . . . . . . . . . . . . . . . . . . . . . . . . . . . . . . . 65
Accessing the Support Ticket Screen. . . . . . . . . . . . . . . . . . . . . . . . . . . . . . . . . . . . . . . 65
Performing Actions in the Support Ticket Screen . . . . . . . . . . . . . . . . . . . . . . . . . . . . . 66
8 e-Diagtools for Windows
What is e-Diagtools for Windows? . . . . . . . . . . . . . . . . . . . . . . . . . . . . . . . . . . . . . 68
“e-Diagtools for Windows” Commands . . . . . . . . . . . . . . . . . . . . . . . . . . . . . . . . . 70
Support Ticket . . . . . . . . . . . . . . . . . . . . . . . . . . . . . . . . . . . . . . . . . . . . . . . . . . . . . . . . . 70
BIOS Options . . . . . . . . . . . . . . . . . . . . . . . . . . . . . . . . . . . . . . . . . . . . . . . . . . . . . . . . . .71
Download and Update . . . . . . . . . . . . . . . . . . . . . . . . . . . . . . . . . . . . . . . . . . . . . . . . . . . 71
Connection Parameters . . . . . . . . . . . . . . . . . . . . . . . . . . . . . . . . . . . . . . . . . . . . . . 72
Info . . . . . . . . . . . . . . . . . . . . . . . . . . . . . . . . . . . . . . . . . . . . . . . . . . . . . . . . . . . . . . . . . . 74
9 HP Customer Care Service and Support
Your HP Authorized Reseller. . . . . . . . . . . . . . . . . . . . . . . . . . . . . . . . . . . . . . . . . . 76
Hewlett-Packard Support and Information Services . . . . . . . . . . . . . . . . . . . . . . 76
HP Customer Care Center Phone Numbers. . . . . . . . . . . . . . . . . . . . . . . . . . . . . . 77
Glossary . . . . . . . . . . . . . . . . . . . . . . . . . . . . . . . . . . . . . . . . . . . . . . . . . . . . 79
Page 10

Contents
10 English
Page 11

this chapter applies to
hp business pcs
✔✔✔✔
hp workstations
✔✔✔✔
hp notebook pcs
✘✘✘✘
1
Pre-Boot Diagnostics and BIOS Errors
This chapter describes Pre-boot Diagnostics and BIOS errors, which help you
troubleshoot hardware problems when your HP Business PC or HP Workstation cannot
boot (start) properly. Pre-boot diagnostics are not provided on all HP Workstations.
It also describes a web-based troubleshooting tool related to pre-boot diagnostics, BIOS
EMU errors, and e-Diagtools for HP Business PCs or HP Workstations.
Page 12

1 Pre-Boot Diagnostics and BIOS Errors
Overview
12 English
Overview
What do you do if your computer does not start properly and you cannot run e-Diagtools
to diagnose the problem? The answer is to use e-Diagtools’ pre-boot diagnostic
capabilities or BIOS error messages.
If your computer powers on but does not start properly, it attempts to report the error
in two ways:
•
It emits a modulated audio signal followed by one or more distinct beeps – this is
pre-boot diagnostics
•
It displays an error message on the screen – this is a BIOS error.
Pre-Boot Audio Signal and Beeps
NOTE Pre-boot diagnostics are not provided on all HP Workstations.
The pre-boot audio signal can be used to identify the hardware component that needs
troubleshooting or replacement:
•
The modulated audio signal can be interpreted by a support provider equipped with
the Virtual Call Assistant. (For more information about the Virtual Call Assistant,
refer to the Virtual Call Assistant User’s Guide, available on your HP computer’s
support web site – refer to page 6 for web addresses
)
.
•
The distinct beeps form a beep code that you can interpret using the following table:
Problem Number of beeps
If there is a buzzing sound:
•
If you pushed the power button for more than 5 seconds, this is
normal; there is no error
•
The power button may be stuck.
If there is no buzzing sound, the computer has no power. This could
mean:
•
Computer is not plugged in
•
Power supply failure
•
System board failure.
0
Absent or incorrectly connected processor 1
Power supply in protected mode 2
Memory failure 3
Video controller failure 4
PCI device initialization failure 5
Corrupted BIOS 6
BIOS terminal error 7
Page 13

13
1 Pre-Boot Diagnostics and BIOS Errors
BIOS Error Messages
If you miss the beep code, press and hold the power button for at least five seconds
until the modulated sound is emitted again. This “playback” of the memorized code can
also be used to diagnose an intermittent fault on a computer that appears to be working
again.
NOTE Avoid disconnecting the computer’s power cord as this will delete some of the
computer’s error diagnostic information encoded in the modulated audio signal.
BIOS Error Messages
Error Message on
Screen
If your computer encounters a BIOS error, it will display a BIOS error message on the
screen, such as:
Error message 1 of 1: Error code 0103
Keyboard not detected - Keyboard error
Sometimes, recommendations for troubleshooting are also displayed below the error
message, or you need to press
<Enter>
to get the recommendations.
The error message and recommendations (if provided) can be used to troubleshoot the
problem.
Audio Error Signal
For many errors, some HP computers can also emit the modulated audio signal that
corresponds to the displayed error. This can be especially useful when you call your
support provider (this feature is described below in “Calling Your Support Provider”).
To emit the audio error signal, press
<Enter>
then
<F11>
.
Page 14

1 Pre-Boot Diagnostics and BIOS Errors
What to Do if You Get a Pre-boot, BIOS, or e-Diagtools Error
14 English
What to Do if You Get a Pre-boot, BIOS, or e-Diagtools Error
There are two ways to deal with the error. You can call your support provider or
troubleshoot the error yourself.
Calling Your Support Provider
A service provider equipped with the Virtual Call Assistant kit can interpret modulated
audio error signals to determine the source of the error, whether from pre-boot
diagnostics (beep errors), from the BIOS (BIOS error messages), or from e-Diagtools.
The audio signal should contain all the necessary information, including computer
model and serial number.
To do this, simply call your service provider and, when prompted, play the audio error
signal into the telephone handset. To play the audio error signal:
•
For BIOS error messages, press
<Enter>
then
<F11>
•
For pre-boot errors (beep errors), press the computer’s power button for at least five
seconds
•
For e-Diagtools errors, press
<F11>
when indicated on the screen.
The support provider can then decode the signal and provide a solution.
For more information about Virtual Call Assistant, refer to the Virtual Call Assistant
User’s Guide, available in PDF format on your HP computer’s support web site (refer to
page 6 for web addresses).
Troubleshooting the Error Yourself
If you got a pre-boot error, you can count the number of beeps then determine the
problem by referring to the table on page 12.
For extensive web-based troubleshooting, use e-Diagtools online troubleshooting,
described on page 15.
NOTE Ensure you are using the most recent BIOS version for your computer. This will help to
ensure that you have full BIOS error message reporting.
Page 15

15
1 Pre-Boot Diagnostics and BIOS Errors
e-Diagtools Online Troubleshooting
e-Diagtools Online Troubleshooting
You can use the e-Diagtools web-based troubleshooting tools if your computer has:
•
Pre-boot diagnostic errors (beep errors)
•
BIOS EMU error messages (also called “configuration diagnostics”)
•
e-Diagtools hardware diagnostic errors (described on page 51 and page 60).
These web-based troubleshooting tools can provide valuable support information and
help you solve your problem.
The tools are available for HP e-pc, HP Brio, HP Vectra, and HP Kayak computers.
You can access e-Diagtools online troubleshooting by connecting to your computer’s
support web site (refer to page 6 for web addresses).
Page 16

1 Pre-Boot Diagnostics and BIOS Errors
e-Diagtools Online Troubleshooting
16 English
Page 17

2
Starting e-Diagtools
This chapter describes how to start and run e-Diagtools from the HP Utility Partition or
from a CD-ROM.
this chapter applies to
hp business pcs
✔✔✔✔
hp workstations
✔✔✔✔
hp notebook pcs
✔✔✔✔
Page 18

2 Starting e-Diagtools
Before Starting e-Diagtools
18 English
Before Starting e-Diagtools
This section applies to HP Business PCs and Workstations. If you have an HP Notebook
PC, you can ignore this section.
Before you start e-Diagtools, do the following:
1 Enter the computer’s BIOS Setup program.
•
To enter the Setup program on new HP Business PCs, restart the computer, press
F8
when the logo screen appears, then press F2.
•
To enter the Setup program on other HP computers (including HP Notebook PCs),
restart the computer and press
F2
when the HP logo appears.
2 If present, ensure all
Hardware Protection
items in the
Security
menu are set to
Enabled
or
Unlocked
.
3 If you are using a CD-ROM to run e-Diagtools, ensure the option to start from the
CD-ROM is enabled and the CD-ROM is configured to be the first device to boot from.
After running e-Diagtools, you can restore the original Setup values on your computer.
Page 19
19
2 Starting e-Diagtools
Starting e-Diagtools from the Utility Partition on your Hard Disk
Starting e-Diagtools from the Utility Partition on your Hard Disk
How you start e-Diagtools depends on your HP computer model. Most of the latest HP
Business PCs have a new configuration and diagnostics startup menu.
Option 1: Starting e-Diagtools on new HP Business PCs
1 Restart your computer.
2 When the HP logo appears, press
<F8>
to enter the Configuration and Diagnostics
menu.
If you do not have the screen shown below, refer to "Option 2: Starting e-Diagtools
on Other HP Computers (Including HP Notebook PCs)", on page 22.
Page 20

2 Starting e-Diagtools
Starting e-Diagtools from the Utility Partition on your Hard Disk
20 English
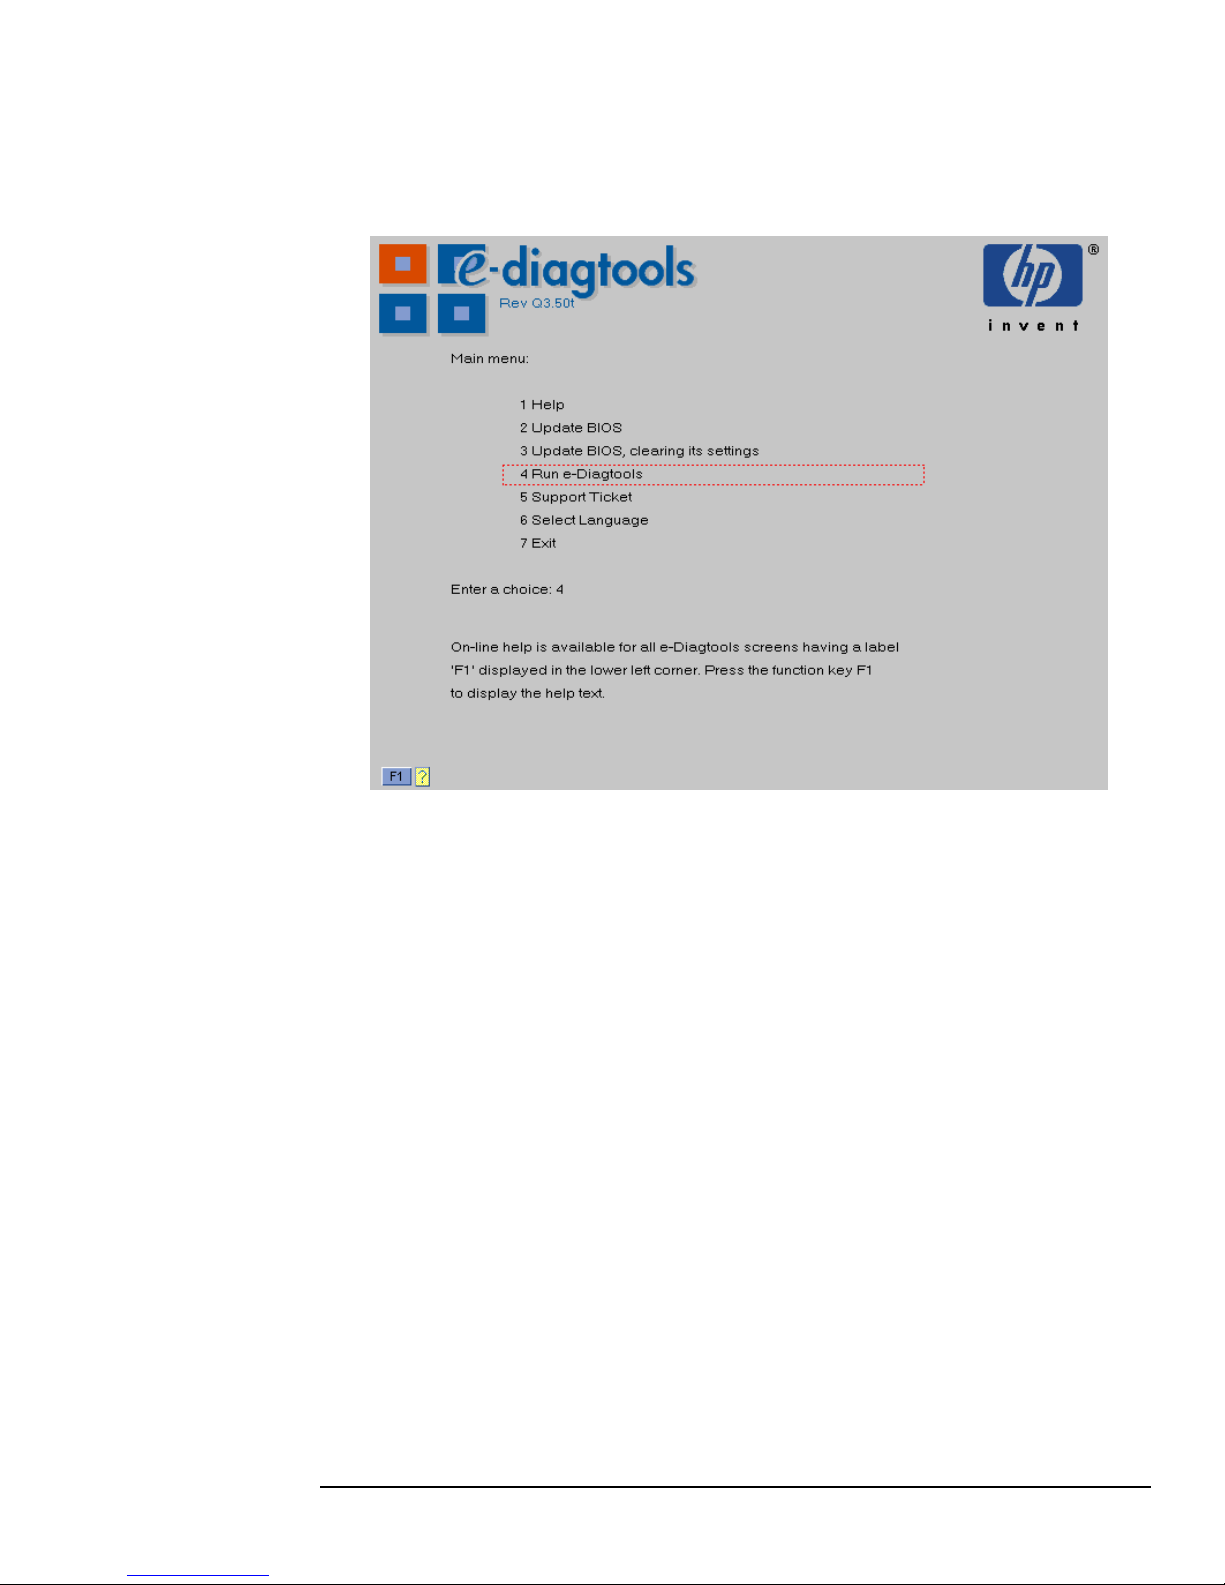
3 In the Configuration and Diagnostics menu, use the arrow keys to select HP
Diagnostics and press
<Enter>
. On some computers you can also press
<F10>
to run
e-Diagtools.
If you get an error message after choosing the option to run e-Diagtools, it probably
means that the Utility Partition has been disabled. Refer to "If You Are Unable to Start
e-Diagtools From the Hard Disk", on page 23.
The actual
Configuration
and
Diagnostics
screen may
differ
between
computer
models
Page 21
21
2 Starting e-Diagtools
Starting e-Diagtools from the Utility Partition on your Hard Disk
4 The e-Diagtools main menu appears. Highlight the desired option and press
<Enter>
.
This menu is described in more detail on "The e-Diagtools Main Menu", on page 25.
Some menu
options are
not available
on all HP
computers
Page 22
2 Starting e-Diagtools
Starting e-Diagtools from the Utility Partition on your Hard Disk
22 English
Option 2: Starting e-Diagtools on Other HP Computers
(Including HP Notebook PCs)
1 Restart your computer.
2 After the initial splash screen with the HP logo, a message is displayed. The exact
message may vary; here are two examples:
Press <F10> to enter HP Utility Partition ...
or any other key to proceed
Press <F10> to start diagnostics
Press the <
F10
> key.
If this message does not appear, it probably means that the Utility Partition has been
disabled or deleted. Refer to "If You Are Unable to Start e-Diagtools From the Hard
Disk", on page 23.
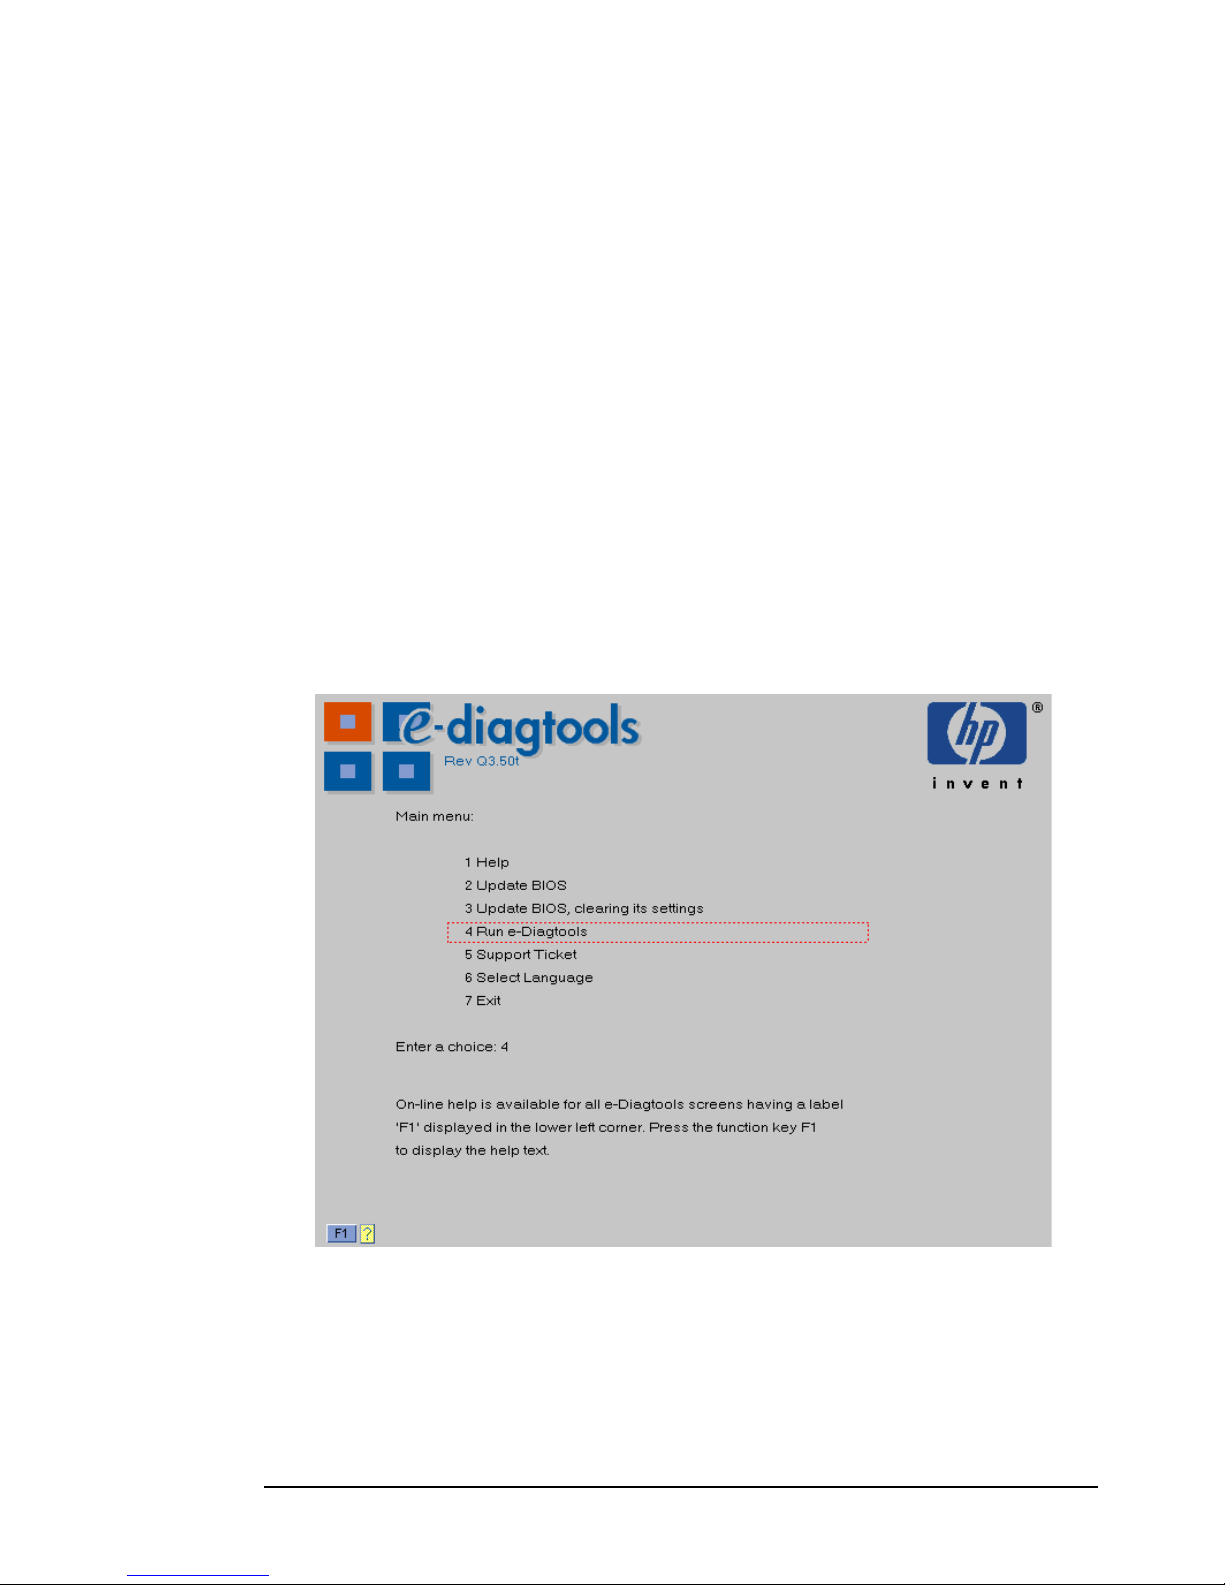
3 The following menu appears: Select the desired option. This menu is described in
more detail in "The e-Diagtools Main Menu", on page 25.
Some menu
options are
not available
on all HP
computers
Page 23

23
2 Starting e-Diagtools
If You Are Unable to Start e-Diagtools From the Hard Disk
If You Are Unable to Start e-Diagtools From the Hard Disk
If you are unable to start e-Diagtools from the hard disk, it probably means that the
Utility Partition where e-Diagtools is stored has been deleted. Try running e-Diagtools
from a CD-ROM instead (refer to "Starting e-Diagtools from a CD-ROM", on page 23).
Starting e-Diagtools from a CD-ROM
When you run e-Diagtools from a CD-ROM you will have all the features available in the
hard disk version, with the exception of the BIOS update feature. However, you can
always update your computer’s BIOS using other standard methods described on the
HP computer’s support web site (refer to page 6 for web addresses).
Which CD-ROM to Use
Different CD-ROMs are provided with each type of HP computer. To know which
CD-ROM to use for running e-Diagtools on your computer, refer to the section "Media",
on page 5.
How to Start e-Diagtools
To start e-Diagtools from the recovery CD-ROM provided with your computer:
1 Insert the HP CD-ROM in your CD-ROM drive. Restart your computer.
2 For HP Business PCs and Workstations, ensure that the option to start from the
CD-ROM drive is enabled and that the CD-ROM is configured to be the first device to
boot from (refer to “Before Starting e-Diagtools” on page 18 for more information).
For HP Notebook PCs, press
<Esc>
during startup and set computer to boot from the
CD-ROM first.
3 e-Diagtools either starts automatically or, depending on the HP CD-ROM used, a
menu appears. In the latter case, select the option to run the hardware diagnostics.
Page 24
2 Starting e-Diagtools
Starting e-Diagtools from a CD-ROM
24 English
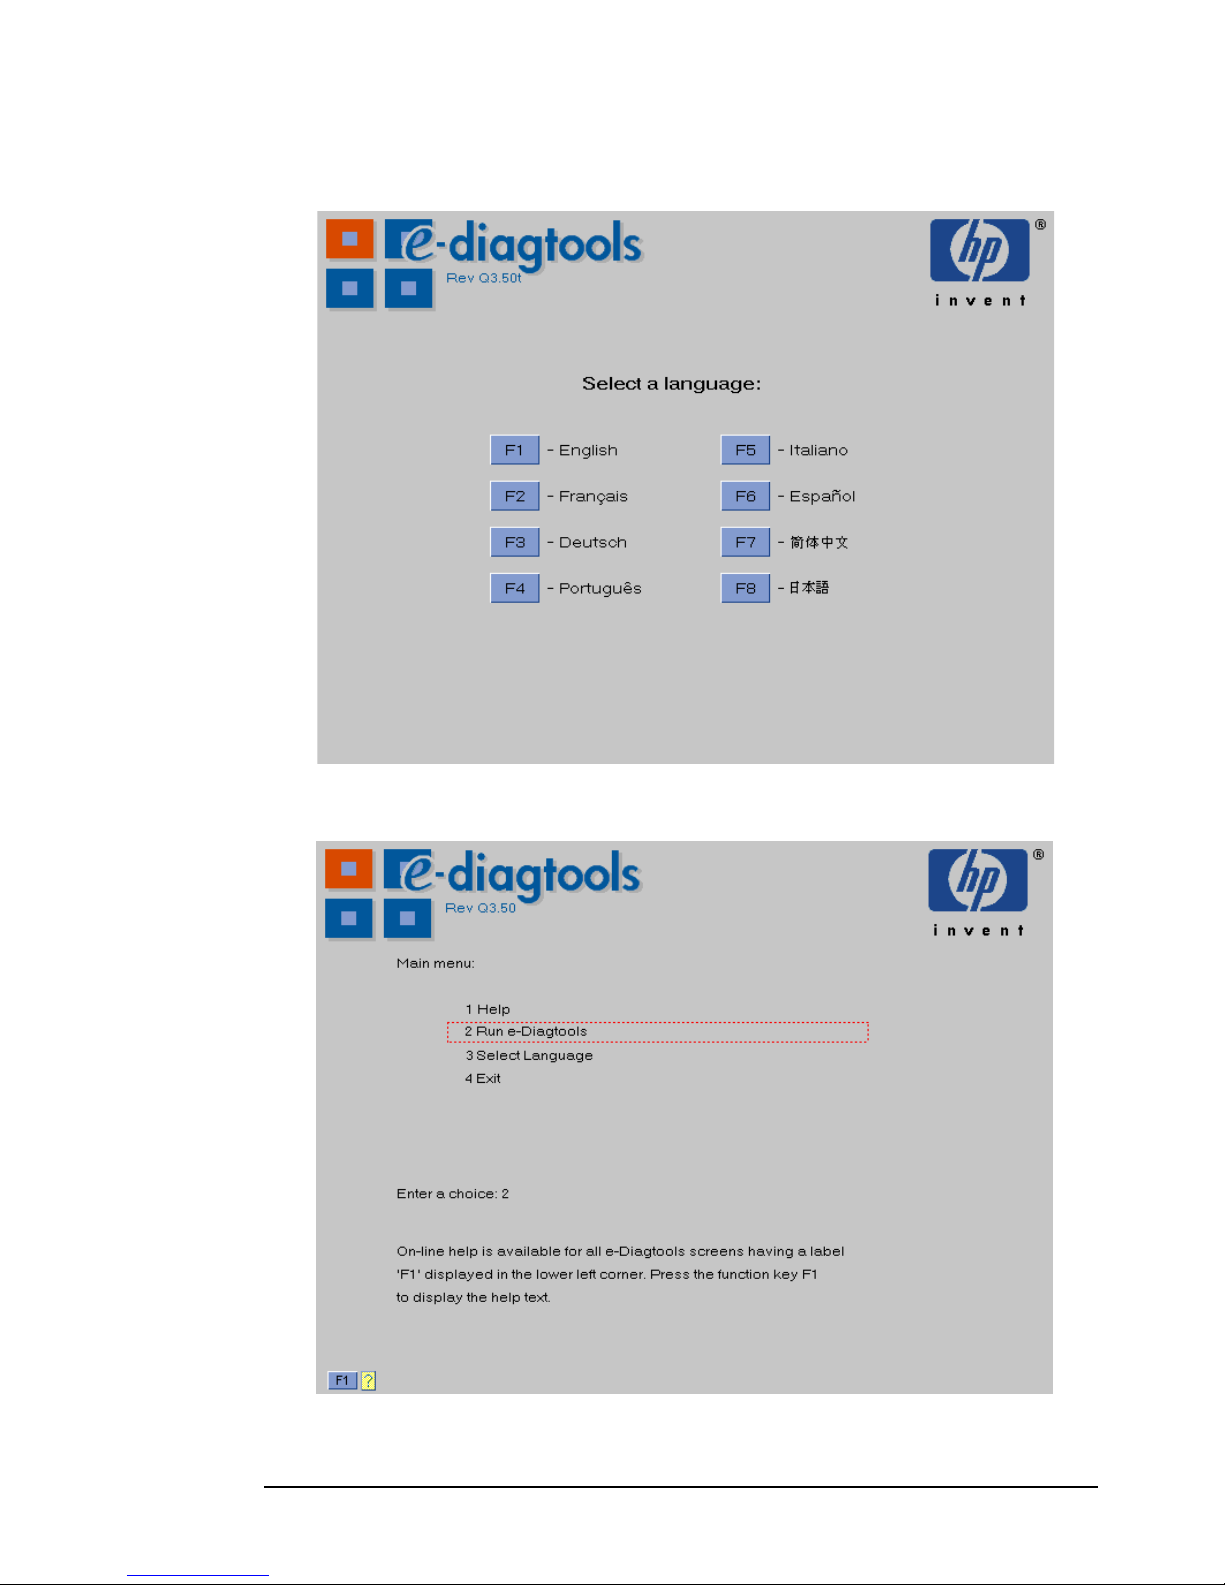
4 In the next screen, select the desired language:
5 The main menu appears. Select the desired option. This menu is described in more
detail on "The e-Diagtools Main Menu", on page 25.
Page 25

25
2 Starting e-Diagtools
The e-Diagtools Main Menu
The e-Diagtools Main Menu
Help
Gives a brief explanation of menu options.
In all e-Diagtools screens where appears, you can get help information by
pressing
<F1>
.
Update BIOS (when available)
Checks for a BIOS update and, if available, installs it on your system. Your system’s
BIOS settings are retained.
Refer to "Updating the BIOS", on page 38 to learn how to do this.
For information on how to configure e-Diagtools to update the BIOS, refer to chapter 3.
Update BIOS, Clearing its Settings (when available)
Checks for a BIOS update and, if available, installs it on your system and resets the
BIOS settings to their default values. For HP Notebook PCs, the BIOS update must
already be present in the utility partition (you can download the latest BIOS into the
utility partition using e-Diagtools for Windows, described in chapter 8).
Some menu
options are
not available
on all HP
computers
Page 26

2 Starting e-Diagtools
The e-Diagtools Main Menu
26 English
Refer to "Updating the BIOS", on page 38 to learn how to do this.
For information on how to configure e-Diagtools to update the BIOS refer to chapter 3.
Run e-Diagtools
Runs e-Diagtools hardware diagnostics, and optionally sends the Support Ticket to your
support provider by email. This process is described in subsequent chapters of this
manual.
Select this option and the welcome screen appears:
Press
<F2>
to continue running e-Diagtools hardware diagnostics. You will enter the
first phase, hardware detection, described in chapter 4, “e-Diagtools Hardware
Detection“.
Page 27

27
2 Starting e-Diagtools
The e-Diagtools Main Menu
Support Ticket (when available)
Allows you to:
•
View the last available Support Ticket.
•
Copy the last available Support Ticket onto floppy disk.
•
Send the last available Support Ticket to your support provider by e-mail. Your
support provider can be an Authorized Support Provider, an internal helpdesk, or HP.
To learn more about sending the Support Ticket to your support provider, refer to
"Sending the Support Ticket", on page 40.
For more information on how to configure e-Diagtools to send the support ticket via
email refer to chapter 3.
For an up-to-date Support Ticket, run e-Diagtools first. If you do not run e-Diagtools
first, the last available Support Ticket will be sent.
This main menu option is only available on the hard disk version. However, if you are
using the CD-ROM version, run Diagtools first, then you can send, view or save the
support ticket as needed.
Select Language
Allows you to choose the language for the e-Diagtools screens.
Exit
Exits the e-Diagtools and restarts the system.
Page 28

2 Starting e-Diagtools
The e-Diagtools Main Menu
28 English
Page 29

3
Updating the BIOS and Sending the Support
Ticket
This chapter describes how to set up and use the e-features of e-Diagtools: updating the
BIOS and sending the Support Ticket.
If you have a HP Notebook PC, refer to chapter 8, “e-Diagtools for Windows“ for all
information about setting up and using e-features.
this chapter applies to
hp business pcs
✔✔✔✔
hp workstations
✔✔✔✔
hp notebook pcs
✘✘✘✘
Page 30

3 Updating the BIOS and Sending the Support Ticket
Overview of e-Diagtools e-Features
30 English
Overview of e-Diagtools e-Features
e-Diagtools has powerful e-support features that use your computer’s networking and
Internet facilities. These features include:
•
Sending the Support Ticket to your support organization via email
•
Updating the computer’s BIOS.
HP Business PCs and HP Workstations
You can perform the e-support tasks from the e-Diagtools main menu (described on
page 25). Also, you also have the opportunity to send the Support Ticket several times
when using e-Diagtools to diagnose your computer’s hardware.
Most of the parameters necessary to accomplish these operations are collected
automatically by the HP e-Diagtools LAN Configuration Agent, described on page 34.
NOTE For HP Business PCs and HP Workstations, the e-features of e-Diagtools do not work
over a modem connection or if using automatic proxy server configuration.
HP Notebook PCs
For HP Notebook computers, use e-Diagtools for Windows to configure and perform all
e-support tasks. e-Diagtools for Windows allows you to use a modem or local network
connection for e-support.
If you have a HP Notebook computer, refer to chapter 8, “e-Diagtools for Windows“ for
all information about setting up and using e-features.
Page 31

31
3 Updating the BIOS and Sending the Support Ticket
Basic to Intermediate Users: Setting Up the e-Features
Basic to Intermediate Users: Setting Up the e-Features
For most users, follow the instructions in this section to easily set up the e-support
features.
The e-Diagtools LAN Configuration Agent automatically sets up most of the required
network parameters. For more information about the LAN Configuration Agent, refer to
page 37.
HP Notebook PCs
If you have an HP Notebook computer, refer to chapter 8, “e-Diagtools for Windows“ for
all information about setting up and using e-features.
Before You Begin
Before you begin, your computer should have:
❒ An HP Utility Partition on the hard disk (or e-Diagtools on CD-ROM if you do not need
the use the e-Diagtools BIOS update feature).
❒ One of these supported operating systems:
•
Microsoft Windows 95 OSR 2.0 or higher
•
Microsoft Windows 98 and Windows 98 Second Edition
•
Microsoft Windows NT 4.0 SP4 through 7
•
Microsoft Windows 2000
•
Microsoft Windows XP.
❒ One of these supported web browsers:
•
Microsoft Internet Explorer 4.x and 5.x
•
Netscape Communicator 4.5 or higher.
❒ One of these supported mail clients:
•
Microsoft Outlook Express (Windows 98 or Windows 2000/IE5 version)
•
Microsoft Outlook 97 and 98
•
Microsoft Outlook 2000
•
Netscape Messenger (in Netscape Communicator 4.x).
These requirements do not apply if you set up your computer using the advanced
configuration, as described in “Advanced Users: Setting Up the e-Features” on page 34.
Page 32

3 Updating the BIOS and Sending the Support Ticket
Basic to Intermediate Users: Setting Up the e-Features
32 English
Step 1: Open the e-Diagtools Networking Parameters Screen
You can do this by running e-Diagtools as usual (for instructions, refer to chapter 2,
“Starting e-Diagtools“), then clicking the menu option to update the BIOS or send the
Support Ticket. The Networking Parameters screen will open automatically.
Step 2: Set the BIOS Update Parameters
Check the
Update server URL
parameter. This should already be correct and set to
the location of the BIOS packages on HP’s server, as follows.
•
For HP Business PCs and Workstations:
http://ftp.hp.com/pub/ccd/epackages/master.ini
•
For HP Notebook PCs:
http://ftp.hp.com/pub/mobile_computing/software/edtpackages/
master.ini
If this parameter is not correct, press
<F5>
and then type in the correct FTP address.
Page 33

33
3 Updating the BIOS and Sending the Support Ticket
Basic to Intermediate Users: Setting Up the e-Features
Step 3: Set the Parameters for Sending the Support Ticket
Enter your email address and your support provider’s email address in the space
provided.
NOTE It is important that you have a prior agreement with your support provider before
sending the Support Ticket.
Step 4: Save the Parameters
At this stage, all networking parameters should be correct. Press
<F2>
to continue; this
will ensure that these parameters are saved.
Page 34

3 Updating the BIOS and Sending the Support Ticket
Advanced Users: Setting Up the e-Features
34 English
Advanced Users: Setting Up the e-Features
This section is recommended for advanced users.
HP Notebook PCs
If you have an HP Notebook computer, refer to chapter 8, “e-Diagtools for Windows“ for
all information about setting up and using e-features.
Before You Begin
Before you begin, your computer should have the HP Utility Partition on the hard disk
(or e-Diagtools on CD-ROM if you do not need to use the e-Diagtools BIOS update
feature).
Step 1: Open the e-Diagtools Networking Parameters Screen
You can do this by running e-Diagtools as usual (for instructions, refer to chapter 2,
“Starting e-Diagtools“), then clicking the menu option to update the BIOS or send the
Support Ticket. The Networking Parameters screen will open automatically.
Page 35

35
3 Updating the BIOS and Sending the Support Ticket
Advanced Users: Setting Up the e-Features
Step 2: Enter the Basic Network Parameters or Set to DHCP
If the computer has a fixed IP address:
Press
<F5>
and manually enter the basic network parameters:
❒ Web proxy IP address and port number
❒ SMTP mail relay address and host name
❒ Domain name and server address
❒ TCP/IP properties (local IP address/DHCP, IP Subnet Mask, default gateway,
DNS).
This can also be performed automatically by the LAN Configuration Agent. However,
you must satisfy the prerequisites described in “Before You Begin” on page 31. For
more information about the LAN Configuration Agent, refer to page 37.
If the computer does not have a fixed IP address, press
<F5>
to enter the advanced
configuration screen, then press
<F12>
to get the DHCP setting:
Step 3: Set the BIOS Update Parameters
Check the
Update server URL
parameter. This should already be correct and set to
the location of the BIOS packages on HP’s server, as follows.
•
For HP Business PCs and Workstations:
http://ftp.hp.com/pub/ccd/epackages/master.ini
•
For HP Notebook PCs:
http://ftp.hp.com/pub/mobile_computing/software/edtpackages/
master.ini
Page 36

3 Updating the BIOS and Sending the Support Ticket
Advanced Users: Setting Up the e-Features
36 English
If this parameter is not correct, press
<F5>
and then type in the correct FTP address.
Step 4: Set the Parameters for Sending the Support Ticket
Enter your email address and your support provider’s email address in the space
provided.
NOTE It is important that you have a prior agreement with your support provider before
sending the Support Ticket.
Step 5: Save the Parameters
At this stage, all networking parameters must be correct. Press
<F2>
to continue; this
will ensure that these parameters are saved.
HP Toptools
It is also possible to enter all the network parameters needed by e-Diagtools using HP
Toptools Device Manager (version 5.0 or higher) or Toptools Agents (version 5.0 or
higher). For more information, refer to the e-Diagtools Administrator’s Guide,
available on your HP computer’s support web site (refer to page 6 for web addresses).
Page 37

37
3 Updating the BIOS and Sending the Support Ticket
Information About The LAN Configuration Agent
Information About The LAN Configuration Agent
The LAN Configuration Agent is a Windows-based utility that automatically records
your computer’s network parameters (every time Windows starts) and stores them in
the Utility Partition. Note that since some of the network parameters listed above are
user-dependent, the values associated with the last user who logged into Windows will
be used.
In Windows, you can also access the LAN Configuration Agent setup screen. You can
use this to:
•
Make an immediate copy of the current network settings (for use by e-Diagtools)
•
Choose whether or not the agent copies your network settings every time Windows
starts up. If you use HP Toptools to set up e-Diagtools network configuration, this
option should be set so the agent copies your network settings at every startup. By
default, this option is set so that Windows copies your network settings every time it
starts up.
•
Choose whether or not the
F5 - Advanced Config
button is enabled in the Network
Parameters screen. This allows users to set or modify the basic network parameters
when sending the support ticket or updating the BIOS.
To access the agent in Windows, click
Start > Programs > HP e-Diagtools > HP
e-Diagtools LAN Configuration Agent
.
Page 38

3 Updating the BIOS and Sending the Support Ticket
Updating the BIOS
38 English
Updating the BIOS
Using the Utility Partition version of e-Diagtools, you can update the computer’s BIOS.
To do this, e-Diagtools looks for the latest BIOS version for your computer on HP’s
server. If a more recent version is available, e-Diagtools downloads the new BIOS, and
then, after a few checks with the user, installs (or “flashes”) the new BIOS.
Two BIOS update options are available:
•
Update BIOS and keep all BIOS settings.
•
Update BIOS and reset all BIOS settings to default values.
If you use this option, note down all your computer’s BIOS settings before updating
the BIOS. You can then recover any of the original settings, if needed.
This option is recommended if you have a hardware error.
Prerequisites
For the BIOS update feature to work correctly, your computer must satisfy the
prerequisites described in “Before You Begin” on page 31. Additionally, your computer’s
networking parameters must be set correctly, as described in “Advanced Users: Setting
Up the e-Features” on page 34.
CD-ROM Versions
The CD-ROM versions of e-Diagtools do not have the BIOS update feature.
HP Notebook PCs
BIOS updates for HP Notebook PCs are performed by e-Diagtools for Windows; refer
to “BIOS Options” on page 71 for instructions.
How To Update the BIOS
CAUTION During the BIOS update do not turn off your computer.
1 If your computer has an Administrator password, enter this password during startup.
You must enter the Administrator password before BIOS upgrading is permitted.
2 Start the Utility Partition version of e-Diagtools and enter the main menu. This is
described in detail in “Starting e-Diagtools from the Utility Partition on your Hard
Disk” on page 19.
3 In the main menu, select the required BIOS update option.
Page 39

39
3 Updating the BIOS and Sending the Support Ticket
Updating the BIOS
4 The Networking Parameters screen appears. All settings should already be correct, in
particular the
Update server URL
parameter. Refer to the section “Advanced Users:
Setting Up the e-Features” on page 34 for more information.
Click
<F2>
to continue.
5 e-Diagtools retrieves the latest BIOS update for your computer (if available), and
then, after a few checks with the user, updates the BIOS.
Once completed, you may be asked to restart your computer.
Page 40

3 Updating the BIOS and Sending the Support Ticket
Sending the Support Ticket
40 English
Sending the Support Ticket
You can automatically email the Support Ticket produced by e-Diagtools to your
support provider. Your support provider could be an HP-Authorized support provider,
an internal help desk, or HP.
NOTE It is important that you have a prior agreement with your support provider before
sending the Support Ticket.
To send the Support Ticket successfully, your computer must satisfy the prerequisites
described in “Before You Begin” on page 31. Additionally, your computer’s networking
parameters must be set correctly, as described in “Advanced Users: Setting Up the eFeatures” on page 34.
HP Notebook PCs
For HP Notebook PCs, use e-Diagtools for Windows to send the Support Ticket. Refer
to “Support Ticket” on page 70 for instructions.
How To Send the Support Ticket
1 Start e-Diagtools and enter the main menu. This is described in detail in “Starting e-
Diagtools from the Utility Partition on your Hard Disk” on page 19.
2 If you ran the Utility Partition version of e-Diagtools and you want to send the latest
Support Ticket (produced when you last ran e-Diagtools), select the Support Ticket
option.
If you have not yet run e-Diagtools, you must do this before sending the Support
Ticket. In this case, select the option to run e-Diagtools. (Running e-Diagtools is
described in chapters 4, 5 and 6.) Once you have completed the tests, you can select
the Support Ticket option to enter the Support Ticket screen.
Page 41

41
3 Updating the BIOS and Sending the Support Ticket
Sending the Support Ticket
3 The Support Ticket screen appears. Press
<F2>
to send the Support Ticket.
For information about the other the Support Ticket options, refer to page 66.
Page 42

3 Updating the BIOS and Sending the Support Ticket
Sending the Support Ticket
42 English
4 The Networking Parameters screen appears. All settings should already be correct, in
particular your email address and your support provider’s email address. Refer to the
section “Advanced Users: Setting Up the e-Features” on page 34 for more
information.
Click
<F2>
to continue.
5 e-Diagtools emails the Support Ticket to your support provider.
Once completed, exit e-Diagtools.
Page 43

4
e-Diagtools Hardware Detection
This chapter describes the hardware detection phase of e-Diagtools.
this chapter applies to
hp business pcs
✔✔✔✔
hp workstations
✔✔✔✔
hp notebook pcs
✔✔✔✔
Page 44

4 e-Diagtools Hardware Detection
Overview of Hardware Detection
44 English
Overview of Hardware Detection
Once launched, e-Diagtools begins by detecting the hardware components of your
computer.
Hardware detection finds and lists the computer’s major hardware components. It also
determines which tests are appropriate for your computer. For example, if your
computer has an IDE or SCSI hard disk drive, it will be checked as part of the basic
system test.
NOTE Hardware detection may be so fast that the above screen simply flickers on and off,
without giving you time to read it. This is normal. The time required for hardware
detection varies greatly between the different systems and different configurations.
Page 45

45
4 e-Diagtools Hardware Detection
Hardware Detection Results
Hardware Detection Results
The following is an example of the screen that appears after the hardware detection
phase. All main hardware components are listed after the computer product name and
model.
You can use the arrow keys to scroll through the list of detected components.
Page 46

4 e-Diagtools Hardware Detection
If a Component is Not Detected
46 English
If a Component is Not Detected
If one of your computer’s hardware components does not appear in the hardware
detection screen:
•
The component may not be working. Consult your computer’s documentation
(available on the HP support web site, described on page 6) for information about
troubleshooting for this component.
•
The component is not an HP component.
•
You are not using an up-to-date version of e-Diagtools. If this is the case, you can
download the latest version from the HP support web site (described on page 6).
•
The keyboard and mouse are tested, even though they do not appear in the hardware
detection screen.
NOTE e-Diagtools does not test components that have not been detected. However, we
recommend that you continue with the basic system test to verify that the underlying
components are functioning correctly.
Page 47

5
e-Diagtools Basic System Test
This chapter describes the basic system test performed by e-Diagtools.
this chapter applies to
hp business pcs
✔✔✔✔
hp workstations
✔✔✔✔
hp notebook pcs
✔✔✔✔
Page 48

5 e-Diagtools Basic System Test
Overview of the Basic System Test
48 English
Overview of the Basic System Test
The basic system test is performed after hardware detection. The purpose of test is to
verify the correct operation of the computer’s main hardware components. For each
detected hardware component, the test will confirm that:
•
The component is powered on
•
The component has been initialized for use
•
The component is operating correctly under MS-DOS.
Unlike the advanced system tests, the basic system test is done automatically and no
user input or guidance is needed. This test phase is suitable for all types of users,
including novice and non-technical users.
Most of the computer’s components are tested during the basic system test. To test
each component individually, use the advanced system tests (described in chapter 6).
How to Run the Basic System Test
The basic system test is performed after the hardware detection phase. To run the basic
system test:
1 Start e-Diagtools. To learn how to do this, refer to chapter 2.
2 Follow the instructions on the screen to proceed with hardware detection. Hardware
detection is described in chapter 4.
Page 49

49
5 e-Diagtools Basic System Test
How to Run the Basic System Test
3 Once hardware detection is complete, this screen appears:
4 Press <F2> and the basic system testing starts.
NOTE The screen image may become momentarily corrupted during the basic system test. This
is normal when the graphics system is being tested. Do not restart your system. The
image will be restored after the test is complete.
Page 50

5 e-Diagtools Basic System Test
Test Result: PASSED
50 English
Test Result: PASSED
The following actions are recommended:
•
If you are running e-Diagtools for verification purposes only, there is no need to
continue with the Advanced Tests. (If desired, you can view or send the support
ticket by pressing <
F4
>.) Press
<F3>
to exit e-Diagtools.
•
Follow the on-screen recommendations.
Support Ticket
If you are investigating a problem with your computer, press <F4> to view or send the
support ticket. Although no failure was detected, the Support Ticket will be effective for
communicating the test results and computer configuration to your support provider.
To learn more about the Support Ticket, refer to chapter 7.
Advanced System Tests
Intermediate and experienced users should proceed to the Advanced System Tests by
pressing <
F2
>, since no problem was found using the basic system test. If you are a less
experienced user, contact your support provider for assistance. You may be asked by
your support agent to conduct an advanced system test.
Page 51

51
5 e-Diagtools Basic System Test
Test Result: WARNING or FAILED
Test Result: WARNING or FAILED
NOTE A test warning or failure does not necessarily mean that a component needs
replacement. For example, it may simply mean that there is a configuration error or that
there is a loose cable.
Here are a few recommended actions and tips:
•
Follow any on-screen recommendations that may appear.
•
Check the component, update the computer’s BIOS if necessary, and run the Basic
System Test again.
To learn how to update the BIOS for Business PCs and Workstations, refer to
“Updating the BIOS” on page 38; for Notebook PCs, refer to “BIOS Options” on page
71.
•
Run the Advanced Tests to investigate the error in greater depth.
•
Send the Support Ticket to your service provider by email or fax.
You can use e-Diagtools to email the Support Ticket. To learn how to do this for
Business PCs and Workstations, refer to “Sending the Support Ticket” on page 40; for
Notebook PCs, refer to “Support Ticket” on page 70.
The Support Ticket is a complete record of the test results. It is the most effective
way to communicate the problem to your support provider. To learn more about the
Support Ticket, refer to chapter 7.
Example of a
test error
Page 52

5 e-Diagtools Basic System Test
Test Result: WARNING or FAILED
52 English
•
For Business PCs and some Workstations:
If the
F11 - Emit Code
button appears on the screen, you can press
<F11>
to emit
the audio error code signal for the error. This is useful if your Service Provider is
equipped with a Virtual Call Assistant, because you can emit the audio signal over the
phone so your Support Provider can analyze the audio signal to help solve your
problem.
Important Recommendation
Since e-Diagtools displays only one error at a time whereas the Support Ticket will list
all errors, it is recommended that:
1 You consult the Support Ticket to see the full list of errors. It may help you determine
the source of the error more easily.
2 After fixing the problem detected by the hardware diagnostics, run e-Diagtools again.
Page 53

53
5 e-Diagtools Basic System Test
What is Tested
What is Tested
The tests vary to some extent from platform to platform. For the most up-to-date list of
tests, refer to the Readme or Whatsnew file provided with the e-Diagtools software.
The following components are included in the basic tests.
❒ System board: timer and real time clock
❒ Main memory
❒ IDE hard disk drives
❒ SCSI hard disk drives
❒ Optical drives (CD-ROM, DVD, CD-RW drives)
❒ Floppy disk drive
❒ Graphics system
❒ Audio system
❒ LAN
❒ Keyboard
❒ Mouse
❒ Modem (PCI modem only)
❒ Serial and parallel ports.
Each test listed above is performed only if it is appropriate for your computer’s
configuration. For example, if your computer does not have a SCSI controller, or no
SCSI hard disk is connected to the SCSI controller, no SCSI tests will be done.
NOTE e-Diagtools does not test components that have not been detected (refer to “If a
Component is Not Detected” on page 46 for more information).
Page 54

5 e-Diagtools Basic System Test
What is Tested
54 English
Page 55

6
Advanced System Tests
This chapter describes the advanced system tests. Individual computer components can
be thoroughly tested using the advanced system tests.
this chapter applies to
hp business pcs
✔✔✔✔
hp workstations
✔✔✔✔
hp notebook pcs
✔✔✔✔
Page 56

6 Advanced System Tests
Overview of the Advanced System Tests
56 English
Overview of the Advanced System Tests
The advanced system tests can be used to test each of the computer’s components.
These tests are more thorough and cover a wider range of functionality than the basic
system tests. Some of the advanced tests require user interaction.
Unlike the basic system test which tests numerous components automatically, you must
manually select each test you want to run. You can run the test just once or, in many
cases, select the loop option to run the test repeatedly until you choose to stop it. Loop
mode is useful for hardware problems that occur intermittently.
How to Enter the Advanced System Tests
The advanced system tests can only be entered after the basic system tests have been
completed. To enter the advanced system tests:
1 Start e-Diagtools. To learn how to do this, refer to chapter 2, “Starting e-Diagtools“.
2 Follow the instructions on the screen to proceed with hardware detection. Hardware
detection is described in chapter 4.
3 Follow the instructions on the screen to complete the basic system test. The basic
system test is described in chapter 5.
4 Press <
F2
> to enter the advanced system tests.
Example of an
advanced system
test screen
For Notebook PCs:
Unlike the screen
shown, the advanced
system test screen
for Notebook PCs
contains check
boxes. This allows
you to select multiple
tests.
Page 57

57
6 Advanced System Tests
How to Run an Advanced System Test
How to Run an Advanced System Test
To perform an advanced test:
1 Highlight the test by using the keyboard arrow keys, then select the test by pressing
the
Enter
key or the keyboard space bar.
If you have an HP Notebook, you can select more than one test at a time.
Some tests may not be available for your HP computer. These will appear in grey.
2 Select loop mode (if you want to run the test many times) by pressing
F12
. Loop
mode is very useful if there are intermittent problems with a component.
You can press
F12
again to deselect loop mode.
3 Press
F2
to start the test.
Example of a
test without
loop mode
Page 58

6 Advanced System Tests
How to Run an Advanced System Test
58 English
To Stop a Test
You can press <
Esc
> to stop the test. This is especially useful to stop testing in loop
mode. Note that some test sequences are critical and must be completed before testing
can be stopped.
If you press
Esc
, you may have to wait several moments before testing is stopped.
Example of a test
in loop mode
Page 59

59
6 Advanced System Tests
Test Result: PASSED
Test Result: PASSED
Once the test is finished, the test results screen appears.
At this stage you can:
•
If applicable, follow the onscreen recommendations.
•
Press
<F2>
to do further advanced tests.
•
Press
<F3>
to exit e-Diagtools.
•
Press
<F4>
to go to the Support Ticket screen.
Example of a
results screen
with no errors
Page 60

6 Advanced System Tests
Test Result: WARNING or FAILED
60 English
Test Result: WARNING or FAILED
Here are a few recommended actions and tips:
•
Follow any on-screen recommendations that may appear.
•
Check the component, update the computer’s BIOS if necessary, and run the
Advanced System Test again.
To learn how to update the BIOS for Business PCs and Workstations, refer to
“Updating the BIOS” on page 38; for Notebook PCs, refer to “BIOS Options” on page
71.
•
Send the Support Ticket to your service provider by email or fax.
You can use e-Diagtools to email the Support Ticket. To learn how to do this for
Business PCs and Workstations, refer to “Sending the Support Ticket” on page 40; for
Notebook PCs, refer to “Support Ticket” on page 70.
The Support Ticket is a complete record of the test results. It is the most effective way
to communicate the problem to your support provider. To learn more about the
Support Ticket, refer to chapter 7.
Example of a
test warning
Page 61

61
6 Advanced System Tests
Test Result: WARNING or FAILED
•
For Business PCs and some Workstations:
If the
F11 - Emit Code
button appears on the screen, you can press
<F11>
to emit
the audio error code signal for the error. This is useful if your Service Provider is
equipped with the Virtual Call Assistant because you can emit the audio signal over
the phone so your Support Provider can analyze the audio signal to help solve your
problem.
Important Recommendation
Since e-Diagtools displays only one error at a time whereas the Support Ticket will list
all errors, it is recommended that:
1 You consult the Support Ticket to see the full list of errors. It may help you determine
the source of the error more easily.
2 After fixing the problem detected by the hardware diagnostics, run e-Diagtools again.
Page 62

6 Advanced System Tests
Test Result: WARNING or FAILED
62 English
Page 63

7
The Support Ticket
This chapter describes the Support Ticket, which is a record of the test results and the
computer’s configuration.
this chapter applies to
hp business pcs
✔✔✔✔
hp workstations
✔✔✔✔
hp notebook pcs
✔✔✔✔
Page 64

7 The Support Ticket
What is the Support Ticket?
64 English
What is the Support Ticket?
The Support Ticket is a text file that contains a complete record of the test results and
the computer’s configuration information. It is the most effective way of communicating
this essential information to your support provider. If necessary, you can email or fax
the Support Ticket to your support provider.
e-Diagtools Error Codes
The Support Ticket contains the list of all errors encountered. Each error message is
listed with error code and recommended actions. By contrast, the e-Diagtools screen
displays only one error message with its corresponding recommendations. No error
code is displayed. For a full list of error codes and recommendations, refer to the
e-Diagtools Administrator’s Guide, available on the support web site (refer to page 6
for web addresses).
Hardware Traceability
Feature
This is a new feature of e-Diagtools and is reported in the Support Ticket. It is useful for
tracking changes to the computer’s hardware. e-Diagtools compares the computer’s
current hardware configuration with the system configuration history. It then reports:
•
Changes to the hardware configuration since the first time e-Diagtools was run
•
Changes to the hardware configuration since the last time e-Diagtools was run.
For example, if you install or remove an add-on accessory card, this will be reported in
the Support Ticket.
Page 65

65
7 The Support Ticket
Using the Support Ticket Functions
Using the Support Ticket Functions
Accessing the Support Ticket Screen
To access the Support Ticket screen and use these functions, start e-Diagtools as
normal (refer to chapter 2, “Starting e-Diagtools“ for more information). During the
hardware diagnostic process you will have the opportunity to access the Support Ticket
screen several times.
Page 66

7 The Support Ticket
Using the Support Ticket Functions
66 English
Performing Actions in the Support Ticket Screen
The Support Ticket screen in e-Diagtools enables you to:
•
Send the Support Ticket to your service provider via email.
For more information about setting up and using this feature, refer to chapter 3,
“Updating the BIOS and Sending the Support Ticket“.
If you have a HP Notebook computer, you must use e-Diagtools for Windows to send
the Support Ticket (refer to chapter 8, “e-Diagtools for Windows“).
•
View the Support Ticket.
•
Save the Support Ticket to floppy disk (if your computer has a floppy disk drive) for
later faxing, printing or consultation.
The default filename for the Support Ticket file is
HPSUPPT.TXT
.
NOTE If you choose to store the Support Ticket on a floppy disk, ensure that the disk is
formatted and empty. If you want to keep a Support Ticket, ensure that you copy it to a
safe place before creating the new one. You can do this by copying the Support Ticket
file to another floppy disk or to a suitable directory on your hard disk drive.
Page 67

8
e-Diagtools for Windows
This chapter describes e-Diagtools for Windows, the Windows-based application for HP
Notebook PCs.
this chapter applies to
hp business pcs
✘✘✘✘
hp workstations
✘✘✘✘
hp notebook pcs
✔✔✔✔
Page 68

8 e-Diagtools for Windows
What is e-Diagtools for Windows?
68 English
What is e-Diagtools for Windows?
A new component of e-Diagtools named “e-Diagtools for Windows” is designed to
extend Internet connectivity to HP notebook PCs, featuring Internet access via modem
or LAN connection. This Windows application is available in conjunction with
e-Diagtools Version 3.x for Notebook PCs.
e-Diagtools for Windows includes the e-Diagtools LAN Configuration Agent and enables
the user to get the Support Ticket from the HP Utility Partition, edit it, and send it to
the Support Provider or copy it to hard disk.
From the operating system, e-Diagtools for Windows will download the BIOS, copy it to
the Utility Partition and update the BIOS. When updating the BIOS, automatic reboots
are necessary to complete the operation.
e-Diagtools for Windows also enables you to update the e-Diagtools hardware
diagnostics software in the hard disk’s Utility Paritition.
When you run e-Diagtools for Windows on an HP Notebook PC, an e-Diagtools splash
screen opens briefly, followed by the application’s main window.
The image above shows the main window of “e-Diagtools for Windows”. The principal
functions of the program are available via the Command Bar at the top of the window.
Page 69

69
8 e-Diagtools for Windows
What is e-Diagtools for Windows?
Click on a command on the Command Bar to open a pulldown list of options associated
with that command.
In addition to the Command Bar, the main window features a Toolbar of icons located
just below the Command Bar. A function can be opened by clicking on the
corresponding icon. This offers rapid, intuitive access to key “e-Diagtools for Windows”
program functions. The option View Support Ticket has already been selected in the
example shown, and the GUI displays the support Ticket and related information.
NOTE When a function is not available at any stage of the program the icon which represents it
is greyed out on the Icon Bar. In the illustration, all the icons are shown active
simultaneously to facilitate their recognition.
Place the mouse pointer over an icon for a short explanation of the icon’s function.
Page 70

8 e-Diagtools for Windows
“e-Diagtools for Windows” Commands
70 English
“e-Diagtools for Windows” Commands
This section describes the e-Diagtools for Windows commands available on the
Command Bar.
Support Ticket
The
Support Ticket
command opens a drop-down menu with options to view the latest
Support Ticket, send the Support Ticket to the service provider’s support address via
email, or to generate a new Support Ticket and update the stored Support Ticket data.
The
Comments
option permits a user to create or update text in dedicated comment fields,
which supplement the information provided by the Support Ticket. This can be useful
where notes or special explanations are required.
The Support ticket can also be printed or saved to a file.
The Icon Bar contains icons to view the Support Ticket (
View
), to add comments
(
Comments
) to save the Support Ticket to file (
Save As
) and to print out the Support
Ticket (
Print
).
Page 71

71
8 e-Diagtools for Windows
“e-Diagtools for Windows” Commands
BIOS Options
•
Download to Utility Partition
•
Update
•
Info
The BIOS can be updated, by LAN or by modem connection, from an HP server
containing new BIOS versions for specific HP notebook computers.
When you choose
Update BIOS
you are first prompted to select either “
Download new
” or “
Use
current
” to determine the source of the local version to be flashed. You can either
download the latest BIOS from the server, or update the BIOS using the files you
previously downloaded to your notebook.
If you select
Download new
you will be asked if you want to connect to the web to check
for the latest BIOS version. Click on
Yes
to launch the connection process.
NOTE The option “Use Current
” can be used, for instance, to repair a corrupted BIOS.
Download and Update
The icons
Download
and
Update
provide rapid access to each of the two steps needed to
carry out a BIOS update:
•
downloading a new BIOS from the sever
•
updating the existing BIOS in the local Notebook PC.
Page 72

8 e-Diagtools for Windows
Connection Parameters
72 English
Connection Parameters
You can verify the connection parameters for the download in the
Connect / Download Options
window before attempting to connect to the Server. Click on the
Change Settings
button if you want to alter any parameters.
For HP Notebook PCs, the update server URL should be:
http://ftp.hp.com/pub/mobile_computing/software/edtpackages/
master.ini
To check the connection parameters for sending the Support Ticket, open the
Connection
Options /Connection
window.
This window includes an option for Dial-up or for LAN connection to the support
provider (via a choice of radio button). If you set
Dial-up
as the active option, you need
only add the
Dial-up Location
.
Page 73

73
8 e-Diagtools for Windows
Connection Parameters
If you select LAN connection (Internet), then you must ensure that the SMTP-Mailer
Relay service name is included.
For the Support Ticket you must provide your email address and the support provider
email address.
For BIOS download you must have a valid Update Server URL and the correct Proxy
Server name and port number.
Page 74

8 e-Diagtools for Windows
Connection Parameters
74 English
Info
The BIOS Info window provides:
•
the version number of the currently installed BIOS
•
the version number of the downloaded BIOS stored in the HP Utility Partition
•
the version number and download size in Kbytes of the BIOS available on the HP
Server suitable for download and installation on this type HP Notebook PC.
Page 75

9
HP Customer Care Service and Support
this chapter applies to
hp business pcs
✔✔✔✔
hp workstations
✔✔✔✔
hp notebook pcs
✔✔✔✔
Page 76

9 HP Customer Care Service and Support
Your HP Authorized Reseller
76 English
Your HP Authorized Reseller
HP Authorized Resellers have been trained on HP equipment and are familiar with its
configuration and environment. Authorized Resellers can also answer questions
regarding non-HP hardware, software and systems as well as answer queries about
usage intended for, or not commonly used with HP computers.
HP Authorized Resellers can also offer consulting services tailored to your specific
needs regarding product development or custom installations, as will third party
support services, or the HP Customer Support organization in your country.
Hewlett-Packard Support and Information Services
The HP Web site gives you access to information about HP, its products, including
product data sheets, service and support information, electronic newsletters and
technical tips. You can also download the latest versions of drivers, BIOS and software
utilities.
HP Home Page www.hp.com
HP e-Diagtools Page www.hp.com/desktops/diagtools
HP Toptools Page www.hp.com/toptools
HP Instant Support www.hp.com/go/instantsupport
HP Brio Support www.hp.com/go/briosupport
HP Vectra Support www.hp.com/go/vectrasupport
HP Kayak Support www.hp.com/go/kayaksupport
HP e-pc Support www.hp.com/go/e-pcsupport
HP Notebook Support www.hp.com/go/support
HP Workstation Support www.hp.com/workstations/support
Page 77

77
9 HP Customer Care Service and Support
HP Customer Care Center Phone Numbers
HP Customer Care Center Phone Numbers
HP Customer Care Centers can help you solve issues related to HP products and, if
necessary, initiate appropriate service procedures. In the U.S.A, telephone support is
available 24 hours a day, 7 days a week. Elsewhere, it is available during normal office
hours.
North & Latin America Europe, Middle East & Africa
Argentina (54 11) 4778 8380 (international
and Buenos Aires area)
0810 555 5520 (other locations)
Austria (+43) 0711 420 10 80
Brazil (011) 3747 7799 (Sao Paulo)
0800 157751 (other locations)
Belgium Dutch (+32) 02 626 88 06
French (+32) 02 626 88 07
Canada 905-206-4663 Denmark (+45) 39 29 40 99
Chile 800 360 999 English International (+44) 0171 512 52 02
Mexico 800 427 6684 Finland (+358) 0203 472 88
United States (970) 635-1000 France (+33) 01 43 62 34 34
Venezuela 800 477 7777 Germany (+49) 0180 525 81 43 (24PF/min)
Asia Pacific
Israel Tel. (+972) 9-9524848
Fax. (+972) 0 9 9524849
Australia (+61-3) 8877-8000 Italy (+39) 02-264 10350
China +86 (0) 10 6564 5959
(800) 810-5959
Middle-East Tel.+971 4 883 8454
Fax +971 4 883 9495
Hong Kong (+852) 3002 8555 Netherlands (+31) 020 606 87 51
India (+91-11) 682-6035 Norway (+47) 22 11 62 99
Indonesia (+62-21) 350-3408 Poland Tel. (+48) 22 519 0600;
Fax. (+48) 22 519 0601
Japan (+81-3) 5344 7181 Portugal +(351) 21 317 6333
Korea, Republic of(+82-2) 3270 0700 (Seoul)
(+82) 80 999 0700 (outside
Seoul)
Russian Federation (+7) 095 797 3520 (Moscow)
(+7) 812 346 7997(St-Peter)
Fax. (+7) 095 916 98 35
Malaysia (+60-3) 2695 2566 South Africa (+27) 11 258 9301 (outside RSA)
086 000 1030 (inside RSA)
Penang 1 300 88 00 28 Spain (+34) 902 32 11 23
New Zealand (+64-9) 356-6640 Sweden (+46) 08 619 21 70
Philippines (+63-2) 867-3551 Switzerland (+41) 084 880 11 11
Singapore (+65) 272-5300 Turkey (+90) (216) 579 71 71
Taiwan (+886) 2- 2717-0055 United Kingdom (+44) 0207 512 5202
Thailand (+66-2) 661-4000
Viet Nam (+84-8) 823-4530
Page 78

9 HP Customer Care Service and Support
HP Customer Care Center Phone Numbers
78 English
Page 79

79
Glossary
advanced system
tests
Together with the basic
system tests, the advanced
system tests comprise the
complete suite of hardware
diagnostic tests in e-Diagtools.
The advanced system tests are
available after the basic tests.
basic system
tests
Together with the advanced
system tests, the basic system
tests comprise the complete
suite of hardware diagnostic
tests in e-Diagtools.
The complete set of basic
system tests are done
automatically after the
hardware detection phase.
e-diagtools for
Windows
This is part of the e-Diagtools
family of tools. It runs under
Windows and is used
exclusively for HP Notebook
PCs.
e-features
The ability of e-Diagtools to
email support tickets and
update the BIOS using your
computer’s networking and
Internet facilities.
EMU
Error Message Utility. This is a
utility that the computer’s
BIOS uses to display BIOS
error messages on the screen.
hp business pcs
Family of HP computers
consisting of HP e-pcs, HP Brio
PCs, and HP Vectra PCs.
hp notebook pcs
Family of HP computers
consisting of HP Pavillion
Notebook PCs and HP
Omnibook PCs.
hp workstations
Family of HP computers
consisting of many
workstation models, including
HP Visualize Workstations and
HP Kayak Workstations.
LAN
configuration
agent
A Windows-based utility that
automatically gathers
networking information and
stores it in the Utility Partition.
This helps simplify setting up
your computer to use the
e-support features of
e-Diagtools.
pre-boot
diagnostics
A processor that diagnoses the
computer’s hardware prior to
starting the operating system.
It typically reports any errors
using a series of audio signals.
It is available on HP Business
PCs and HP Workstations.
support ticket
This is the text file that
contains a complete record of
the test results and computer’s
configuration. It can be
viewed, saved onto floppy disk
or, more typically, emailed or
faxed to your support
provider.
virtual call
assistant
A software utility that can
automatically detect and
analyze audio signals emitted
by a remote computer for
troubleshooting purposes.
Support provider’s may have
the Virtual Call Assistant to aid
them with support.
utility partition
This is a small, hidden hard
disk partition provided on
most HP computers. It is used
to store and run e-Diagtools. It
is also used to store any
e-Diagtools work files and
BIOS updates downloaded by
e-Diagtools. e-Diagtools LAN
Configuration Agent and
e-Diagtools for Windows are
not in the utility partition.
Page 80

Glossary
80 English
Page 81

Page 82

 Loading...