

Page 1

www.hp.com/desktops/diagtools
hp e-diagtools
administrator’s
guide
hp business pcs
hp e-pc hp brio hp vectra hp kayak
hp workstations
including: hp visualize hp kayak
hp notebook pcs
hp omnibook hp pavilion
Page 2

Notice
The information contained in this document is subject to change without notice.
Hewlett-Packard makes no warranty of any kind with regard to this material,
including, but not limited to, the implied warranties of merchantability and fitness for
a particular purpose. Hewlett-Packard shall not be liable for errors contained herein
or for incidental or consequential damages in connection with the furnishing,
performance, or use of this material.
This document contains proprietary information that is protected by copyright. All
rights are reserved. No part of this document may be photocopied, reproduced, or
translated to another language without the prior written consent of Hewlett-Packard
Company.
Adobe
Incorporated.
Microsoft
trademarks of Microsoft Corporation.
DynaMetric™ is a trademark of DynaMetric Inc.
PartitionMagic
Other brand and product names may be registered trademarks or trademarks of their
respective holders.
®
, Acrobat® and Acrobat® Reader™ are trademarks of Adobe Systems
®
, MS®, MS-DOS®, Windows®, and Windows NT® are U.S. registered
®
is a registered trademark of PowerQuest Corporation.
HP France
Business Desktop Division
38053 Grenoble Cedex 9
France
© 2000 – 2001 Hewlett-Packard Company
Version of 08/2001 for e-Diagtools 3.0x - 3.5x
Page 3

HP e-Diagtools Administrator’s Guide
Who Should Read This Book?
This manual is intended for MIS or IT personnel and it describes how to configure the
HP e-Diagtools diagnostic solution to obtain optimal e-support and remote capabilities.
It covers e-Diagtools versions 3.0 to 3.5x.
Other e-Diagtools Documentation
Apart from this Administrator’s Guide, the following documentation is also available:
• HTML Quick Tour
Provides a useful online introduction and overview of e-Diagtools. It is available on the
Diagtools web site www.hp.com/desktops/diagtools.
•
e-Diagtools User’s Guide
Explains how to start and use e-Diagtools to diagnose your computer’s hardware. It
also explains how to set up and use the BIOS update feature and sending the support
ticket. It is available on your HP computer’s support web site (refer to page 4 for web
addresses).
•
Virtual Call Assistant User’s Guide
Explains how to install, configure and use the Virtual Call Assistant (VCA). The VCA
is an e-Diagtools diagnostic aid that is capable of detecting and recognizing audio
error signals from remote computers, which are especially useful when a remote
computer cannot start (boot). It is available on your HP computer’s support web site
(refer to page 4 for web addresses).
3
Page 4

More Information and HP Support Web Sites
For more information about e-Diagtools, refer to the e-Diagtools web site:
www.hp.com/desktops/diagtools
For more information about support for your HP computer, including e-Diagtools
information, refer to the HP Support web sites:
HP Support www.hp.com/go/support
HP Vectra Support www.hp.com/go/vectrasupport
HP Brio Support www.hp.com/go/briosupport
HP Kayak Support www.hp.com/go/kayaksupport
HP e-pc Support www.hp.com/go/e-pcsupport
HP Workstation Support www.hp.com/workstations/support
HP Notebook Support www.hp.com/go/support
4 English
Page 5

Contents
1 Introduction
Overview of this Manual . . . . . . . . . . . . . . . . . . . . . . . . . . . . . . . . . . . . . . . . . . . . . 10
What is e-Diagtools? . . . . . . . . . . . . . . . . . . . . . . . . . . . . . . . . . . . . . . . . . . . . . . . . . 10
What’s New in e-Diagtools Version 3.5x?. . . . . . . . . . . . . . . . . . . . . . . . . . . . . . . . 11
Where to Find e-Diagtools – e-Diagtools Media . . . . . . . . . . . . . . . . . . . . . . . . . . 12
Which of these Media Should You Use? . . . . . . . . . . . . . . . . . . . . . . . . . . . . . . . . . . . . . 12
Limitations of CD-ROM Versions . . . . . . . . . . . . . . . . . . . . . . . . . . . . . . . . . . . . . . . . . . 13
e-Diagtools and HP Business PC Support Toolbox . . . . . . . . . . . . . . . . . . . . . . . 14
Software Components in and around the e-Diagtools Solution . . . . . . . . . . . . . 15
2 Parameters and Settings
e-Diagtools Configuration . . . . . . . . . . . . . . . . . . . . . . . . . . . . . . . . . . . . . . . . . . . . 20
Utility Partition INI Files . . . . . . . . . . . . . . . . . . . . . . . . . . . . . . . . . . . . . . . . . . . . . . . . . 20
3 The Utility Partition
What is the Utility Partition? . . . . . . . . . . . . . . . . . . . . . . . . . . . . . . . . . . . . . . . . . . 22
What is it for?. . . . . . . . . . . . . . . . . . . . . . . . . . . . . . . . . . . . . . . . . . . . . . . . . . . . . . . 22
Benefits of the Utility Partition and Diagtools . . . . . . . . . . . . . . . . . . . . . . . . . . . 23
Utility Partition Properties . . . . . . . . . . . . . . . . . . . . . . . . . . . . . . . . . . . . . . . . . . . 24
Hidden Partition . . . . . . . . . . . . . . . . . . . . . . . . . . . . . . . . . . . . . . . . . . . . . . . . . . . . . . . 24
Configuring the Utility Partition . . . . . . . . . . . . . . . . . . . . . . . . . . . . . . . . . . . . . . . 25
Tools to Configure the Utility Partition . . . . . . . . . . . . . . . . . . . . . . . . . . . . . . . . . . . . . 25
Startup Activation Message . . . . . . . . . . . . . . . . . . . . . . . . . . . . . . . . . . . . . . . . . . . . . . 25
e-Diagtools Startup Menu Options . . . . . . . . . . . . . . . . . . . . . . . . . . . . . . . . . . . . . . . . . 26
Utility Partition HiPaConf.INI File . . . . . . . . . . . . . . . . . . . . . . . . . . . . . . . . . . . . . . . . . 26
Recovering the Utility Partition . . . . . . . . . . . . . . . . . . . . . . . . . . . . . . . . . . . . . . . 27
Updating the Utility Partition . . . . . . . . . . . . . . . . . . . . . . . . . . . . . . . . . . . . . . . . . 27
Recreating the Utility Partition . . . . . . . . . . . . . . . . . . . . . . . . . . . . . . . . . . . . . . . . 28
Gold Disks and the HP Utility Partition . . . . . . . . . . . . . . . . . . . . . . . . . . . . . . . . . . . . . 28
5
Page 6

Contents
4 Network Configuration for e-Diagtools
Network Parameters . . . . . . . . . . . . . . . . . . . . . . . . . . . . . . . . . . . . . . . . . . . . . . . . . 30
What is the LAN Configuration Agent? . . . . . . . . . . . . . . . . . . . . . . . . . . . . . . . . . . . . . 31
LAN Configuration Agent, Local Interface . . . . . . . . . . . . . . . . . . . . . . . . . . . . . . . . . . 32
E-mail Addresses for Sending Support Ticket. . . . . . . . . . . . . . . . . . . . . . . . . . . . 33
Master Catalog Address for BIOS Updates . . . . . . . . . . . . . . . . . . . . . . . . . . . . . . 33
Network.INI . . . . . . . . . . . . . . . . . . . . . . . . . . . . . . . . . . . . . . . . . . . . . . . . . . . . . . . . 33
Limitations . . . . . . . . . . . . . . . . . . . . . . . . . . . . . . . . . . . . . . . . . . . . . . . . . . . . . . . . . 34
5 BIOS Update Mechanisms
The BIOS Update Feature . . . . . . . . . . . . . . . . . . . . . . . . . . . . . . . . . . . . . . . . . . . . 36
How the BIOS Update Works. . . . . . . . . . . . . . . . . . . . . . . . . . . . . . . . . . . . . . . . . . 37
Security . . . . . . . . . . . . . . . . . . . . . . . . . . . . . . . . . . . . . . . . . . . . . . . . . . . . . . . . . . . . 38
Disabling BIOS Updates . . . . . . . . . . . . . . . . . . . . . . . . . . . . . . . . . . . . . . . . . . . . . . . . . 38
BIOS Packages, Signed ZIP Format. . . . . . . . . . . . . . . . . . . . . . . . . . . . . . . . . . . . . . . . 38
Master Catalogue Web Location . . . . . . . . . . . . . . . . . . . . . . . . . . . . . . . . . . . . . . . 39
Local Web/FTP Server . . . . . . . . . . . . . . . . . . . . . . . . . . . . . . . . . . . . . . . . . . . . . . . . . . 39
6 Integration with HP Toptools
Toptools Control of e-Diagtools on Multiple Computers . . . . . . . . . . . . . . . . . . . 42
1. Update/Hardware Diagnostics . . . . . . . . . . . . . . . . . . . . . . . . . . . . . . . . . . . . . . . . . . 42
2. Configure e-Diagtools Settings. . . . . . . . . . . . . . . . . . . . . . . . . . . . . . . . . . . . . . . . . . 43
3. Remote Execution of e-Diagtools . . . . . . . . . . . . . . . . . . . . . . . . . . . . . . . . . . . . . . . 43
Toptools Properties Page for e-Diagtools
(Targeting One Computer at a Time) . . . . . . . . . . . . . . . . . . . . . . . . . . . . . . . . . . . 44
Settings: e-Diagtools Startup and Internet Settings (when available) . . . . . . . . . . . . 46
Synchronize Parameters with Windows LAN Configuration . . . . . . . . . . . . . . . . . . . . 47
Diagnose and TroubleShoot . . . . . . . . . . . . . . . . . . . . . . . . . . . . . . . . . . . . . . . . . . . . . . 48
The e-Diagtools Tab in the Toptools Agent . . . . . . . . . . . . . . . . . . . . . . . . . . . . . . 50
1. Startup Options (when available) . . . . . . . . . . . . . . . . . . . . . . . . . . . . . . . . . . . . . . . 50
2. Network Settings . . . . . . . . . . . . . . . . . . . . . . . . . . . . . . . . . . . . . . . . . . . . . . . . . . . . 51
3. Diagnose and Troubleshoot . . . . . . . . . . . . . . . . . . . . . . . . . . . . . . . . . . . . . . . . . . . . 52
6 English
Page 7

7 Virtual Call Assistant
What is the Virtual Call Assistant? . . . . . . . . . . . . . . . . . . . . . . . . . . . . . . . . . . . . . 54
How it Works. . . . . . . . . . . . . . . . . . . . . . . . . . . . . . . . . . . . . . . . . . . . . . . . . . . . . . . 54
How to Use the VCA . . . . . . . . . . . . . . . . . . . . . . . . . . . . . . . . . . . . . . . . . . . . . . . . . 56
VCA Availability . . . . . . . . . . . . . . . . . . . . . . . . . . . . . . . . . . . . . . . . . . . . . . . . . . . . 56
Glossary . . . . . . . . . . . . . . . . . . . . . . . . . . . . . . . . . . . . . . . . . . . . . . . . . . . . 57
7
Page 8

8 English
Page 9

1
this chapter applies to
hp business pcs
hp workstations
hp notebook pcs
✔
✔
✔
Introduction
This chapter introduces e-Diagtools, and describes the latest version of e-Diagtools,
the media it comes on, and the various related software components.
Page 10

1 Introduction
Overview of this Manual
Overview of this Manual
This manual is targeted at IT and MIS personnel having responsibility for system
administration and end-user support. This manual describes:
•
Setting up e-Diagtools
Explains how to configure the HP e-Diagtools diagnostics solution in order to
obtain optimal e-support capabilities
• HP Utility Partition parameters
•
LAN Configuration Agent
• BIOS update mechanisms
•
Creating and Sending Support Tickets Remotely
Shows how to configure your remote computers to produce a Support Ticket and
send it via SMTP-based e-mail to your own help-desk or your Authorized
Support Provider.
•
Integration with HP Toptools
Describes the remote capabilities of e-Diagtools, with details on how to execute
e-Diagtools on managed computer’s from Toptools Device Manager. (The
remote configuration of e-Diagtools Start-up and Internet options from Toptools
Device Manager requires Device Manager 5.0 or higher on the Toptools server.
In addition it requires Toptools Agent 5.0 or higher on the client computer.)
This manual covers e-Diagtools versions 3.0x to 3.5x
What is e-Diagtools?
The first step in solving a problem with a computer is diagnosis.
HP’s e-Diagtools helps you diagnose hardware-related problems on an HP
computer.
It is a series of tools designed to help you to:
• Distinguish between software and hardware problems
• Diagnose hardware-related problems
•
Provide precise information to support providers so that they can solve any
problem quickly and effectively.
For more information about e-Diagtools 3.5x, refer to the e-Diagtools User’s
Guide, available
addresses).
e-Diagtools is not a repair tool.
on your HP computer’s support web site (refer to page 4 for web
10
Page 11

1 Introduction
What’s New in e-Diagtools Version 3.5x?
What’s New in e-Diagtools Version 3.5x?
Version 3.5x of e-Diagtools has these new features:
• Supports the latest HP computers
• Incorporates new, more efficient hardware diagnostics tests
• Has an improved user interface, especially for advanced tests
• Has a context sensitive help system
•
Minimizes the number of reboots (restarts) required
•
For HP Business PCs, provides a new activation from the HP logo screen
(using
•
Provides step-by-step troubleshooting recommendations if there is a test
warning or error
•
Issues a warning message in the basic tests if any main hardware components are
missing.
<F8> key)
•
Provides more information in the support ticket, such as the history of the
computer’s configuration from the first time e-Diagtools was run up to the last
time e-Diagtools was run
•
Available in these languages: English, French, German, Italian, Spanish,
Portuguese, Simplified Chinese and Japanese.
e-Diagtools for Windows is additionally available in Traditional Chinese.
11
Page 12

1 Introduction
Where to Find e-Diagtools – e-Diagtools Media
Where to Find e-Diagtools – e-Diagtools Media
Version 3.5x of HP e-Diagtools is supplied on the following media:
•
The Utility Partition pre-installed on your hard disk — on most new HP
computers.
• The recovery CD supplied with your computer:
• The HP PC Image Engineer - Image Library and Diagnostics CD-ROM for
e-pc, Brio and Vectra PCs, as well as Kayak PC Workstations.
•
The Recovery CD for HP Notebook PCs.
• The HP Diagtools CD-ROM for Linux HP computer models.
•
The generic HP Diagtools CD-ROM — this CD contains all e-Diagtools versions
to cover a wide range of HP e-pc, Vectra, Kayak, Brio, Notebook and Visualize
computers. This CD-ROM can be ordered from the Diagtools web site
www.hp.com/desktops/diagtools.
The generic HP Diagtools CD-ROM also contains:
• The e-Diagtools Quick Tour
• Self-paced training for e-Diagtools, Virtual Call Assistant, and HP Instant
Support
•
The e-Diagtools User’s Guide for each version of e-Diagtools provided on the
CD-ROM
•
A utility to update the e-Diagtools Utility Partition (available on recent HP
Diagtools CD-ROMs only.
Which of these Media Should You Use?
e-Diagtools 3.5x is provided on several different media (described above). You
should use the media that is most suited to you, taking into account the advantages
and limitations of each.
However, here are some recommendations:
•
In general, use the Utility Partition version of e-Diagtools. This provides the most
complete feature set.
For recent HP Business PCs, press
select the option to run e-Diagtools.
For all other computers, press
appears during startup.
• For HP Notebook PCs, use e-Diagtools in conjunction with e-Diagtools for
Windows. (For more information about e-Diagtools for Windows, refer to the
e-Diagtools User’s Guide, available on your HP support web site – refer to
4 for web addresses).
F8 when the startup HP logo appears, then
F10 when the “Press <F10>...” message
page
•
If the computer’s Utility Partition is not intact, use the HP recovery CD-ROM
provided with the computer.
12
Page 13

1 Introduction
Where to Find e-Diagtools – e-Diagtools Media
• For HP computers provided with Linux, use only the HP e-Diagtools CD-ROM for
Linux models.
•
If you have a range of HP computers, such as HP Business PCs, HP Workstations,
and HP Notebook PCs, use the generic HP Diagtools CD-ROM.
Limitations of CD-ROM Versions
e-Diagtools Version 3.5x on CD-ROM has these limitations:
• BIOS updates are not possible. Use the Utility Partition version of e-Diagtools for
this.
e-Diagtools Version 3.0x on CD-ROM has these limitations:
•
BIOS updates are not possible.
• You cannot send support tickets.
•
You need to set the computer’s BIOS setup so that the Plug ‘n Play field is set to
no.
• There is no F11 facility to play back the audio error code (when you encounter
an e-Diagtools error) to VCA-equipped support providers.
13
Page 14

1 Introduction
e-Diagtools and HP Business PC Support Toolbox
e-Diagtools and HP Business PC Support Toolbox
The e-Diagtools solution is a large part of a complete set of support tools provided
for HP Business PCs. This “Support Toolbox” provides a range of solutions to
satisfy the diverse needs you may experience during the life of the PC:
•
Pre-boot diagnostics
Enables troubleshooting when the screen is blank and the PC cannot start.
This is described in the e-Diagtools User’s Guide, available on your HP
computer’s support web site (refer to page 4 for web addresses).
• HP e-Diagtools hardware diagnostics
Allows complete and effective diagnosis of the PC’s hardware.
Described in this manual and in the e-Diagtools User’s Guide, available on your
HP computer’s support web site (refer to page 4 for web addresses).
• Serviceability
Allows quick and easy repair of HP Business PCs, for example, replacing the hard
drive of an e-pc.
•
HP Toptools
For remote management of HP Business PCs and other devices on the network.
Toptools management of e-Diagtools is described in chapter 6, ”Integration with
HP Toptools”.
For more information about Toptools, refer to the Toptools web site
www.hp.com/go/toptools
•
HP Instant Support
.
For web-based automated diagnostics and solutions, as well as the
troubleshooting knowledge base.
For more information refer to the Instant Support web site
www.hp.com/go/instantsupport
•
Recovery CDs.
.
Allow full recovery of the PC’s operating system, drivers and utilities, and can
also help create disk images for later deployment.
• HP Virtual Call Assistant
The VCA is an e-Diagtools diagnostic aid that is capable of detecting and
recognizing audio error signals from remote computers. Refer to chapter 7,
”Virtual Call Assistant” for more information.
14
Page 15
1 Introduction
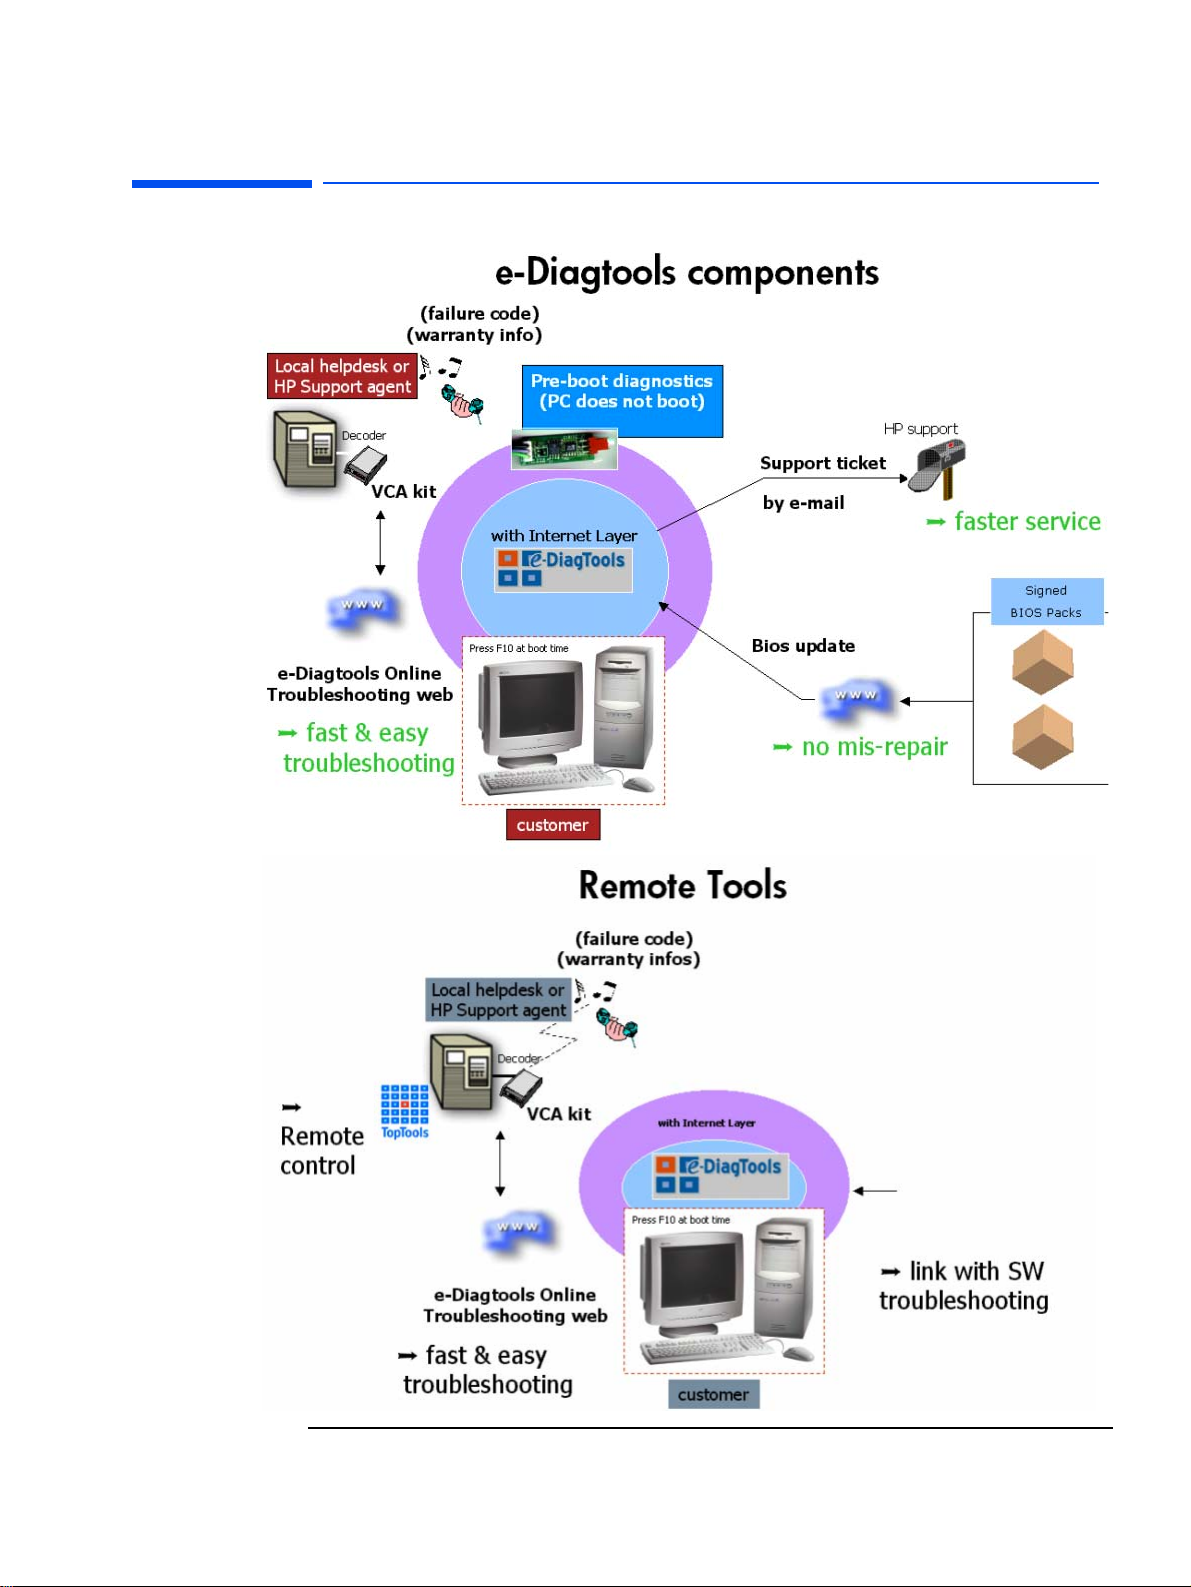
Software Components in and around the e-Diagtools Solution
Software Components in and around the e-Diagtools Solution
Toptools
Device
Manager
HP Instant Support
www.hp.com/go/instantsupport
15
Page 16

1 Introduction
Software Components in and around the e-Diagtools Solution
This is a list of the software components which together comprise the e-Diagtools
solution for remote BIOS updates and remote troubleshooting and diagnosis of
your managed computers
Software Component Detail
e-Diagtools, the diagnosis and troubleshooting software solution, is pre-loaded on most new HP
Business PCs, HP Workstations, and HP Notebook PCs (in the HP Utility Partition).
e-Diagtools
e-Diagtools for Windows
(for HP Notebook PCs only)
e-Diagtools
Pre-boot Diagnostics
The latest version of e-Diagtools can be downloaded from your HP support web site.
For more information, refer to the e-Diagtools User’s Guide, also available on your HP support
web site. HP support web site addresses are on page 4.
e-Diagtools for Windows brings the Internet-related e-Diagtools features to HP Notebooks PCs.
Upgrading the BIOS, sending the support ticket, and upgrading the diagnostic software can be
done using the Notebook’s modem or LAN connection.
For more information, refer to the e-Diagtools User’s Guide, available on your HP support web site
(refer to page 4 for web addresses).
Pre-boot diagnostics helps you to troubleshoot problems when your HP Business PC or HP
Workstation cannot start properly. It includes an audio error signal that can be played back to a
support provider (equipped with the Virtual Call Assistant) for prompt, effective solutions.
For more information, refer to the e-Diagtools User’s Guide, available on your HP support web site
(refer to page 4 for web addresses).
BIOS Update and
Sending Support Ticket
LAN Configuration
Agent
Virtual Call
Assistant
Utility Partition
Tools
Using your computer’s Internet connection, you can download the latest BIOS from HP’s server
and install it on your computer. You can also email your support ticket to your support provider
with ease.
For HP Business PCs and HP Workstations, these features are available within e-Diagtools
hardware diagnostics. For HP Notebooks PCs, these features are available using e-Diagtools for
Windows.
For more information about using these features, refer to the e-Diagtools User’s Guide, available
on your HP support web site (refer to page 4 for web addresses).
This is a Windows-based utility that automatically records your computer’s network parameters
(every time Windows starts) and stores them in the Utility Partition. This network information is
used when you update your BIOS or send a support ticket via e-Diagtools.
HP Notebooks PCs use e-Diagtools for Windows to perform this task.
For more information, refer to chapter 4, ”Network Configuration for e-Diagtools”.
The LAN Configuration Agent is available from HP’s support web site (refer to page 4 for web
addresses).
The Virtual Call Assistant (VCA) is hardware and software kit that automatically detects and
decodes audio warning signals emitted by e-Diagtools Pre-Boot Diagnostics, BIOS EMU error
codes, and e-Diagtools hardware diagnostic errors. The encoded signals from the remote computer
indicate the nature of a failure state.
For more information, refer to chapter 7, ”Virtual Call Assistant” or refer to the Virtual Call
Assistant User’s Guide, available from HP’s support web site (refer to page 4 for web addresses).
This is a set of tools for configuring or recreating the HP Utility Partition.
For more information, refer to chapter 3, ”The Utility Partition”.
16
Page 17

1 Introduction
Software Components in and around the e-Diagtools Solution
Software Component Detail
The Toptools Device Manager for the remote operation of single or multiple managed PCs.
Toptools
Device Manager
Toptools Agent
(Toptools for PCs)
HP Instant Support
For more information, refer to chapter 3, ”The Utility Partition”.
The Toptools Device Manager is available from the HP Toptools web site,
www.hp.com/go/toptools
The Toptools Agent is provided on HP Business PCs and HP Omnibook Notebooks. It must be
present for you to use Toptools Device Manager remotely to control the PC.
For more information, refer to chapter 6, ”Integration with HP Toptools”.
The Toptools Agent software is available from the HP Toptools web site.
This web-based tool provides automated diagnostics and solutions, software solutions, and the
troubleshooting knowledge base. In some cases, it can remotely launch certain e-Diagtools
diagnostic features for automated troubleshooting.
For more information, refer to the web site
.
www.hp.com/go/instantsupport
.
The e-Diagtools functions may be accessed locally on each computer.
The Toptools Device Manager can interface with e-Diagtools on managed
computers equipped with the Toptools Agent. The Toptools Device Manager can, if
required, configure e-Diagtools parameters and run e-Diagtools diagnostics
remotely. A Support Ticket containing the diagnostics results may be sent by e-mail
to your Authorized Support Provider, or by LAN to the Toptools Server.
17
Page 18

1 Introduction
Software Components in and around the e-Diagtools Solution
18
Page 19

2
this chapter applies to
hp business pcs
hp workstations
hp notebook pcs
✔
✔
✔
Parameters and Settings
This section introduces the parameters you are most likely to use when working with
the e-Diagtools solution on managed computers either locally or via the Toptools
Device Manager. These parameters and settings control the behavior and the
onscreen attributes of the different software tools that comprise the e-Diagtools
solution and Toptools utilities.
A short description is given for each topic. Where necessary, there is also a page
reference to a more detailed explanation in this Guide.
Page 20

2 Parameters and Settings
e-Diagtools Configuration
e-Diagtools Configuration
A number of parameters can be configured in e-Diagtools. The parameters listed
can be configured locally, or alternatively they can be configured remotely using
the HP Toptools Device Manager:
•
The Network Parameters
These are displayed whenever you update the BIOS or send a support ticket in
e-Diagtools (HP Business PCs and HP Workstations only).
• The Client Internet Protocol (IP) configuration
• Customer and Support Provider e-mail addresses
•
Master Catalogue URLs.
For more information, refer to chapter 4, 'Network Configuration for
e-Diagtools'.
•
The e-Diagtools Startup Options
•
Startup activation message
(“Press F10 to enter the HP Utility Partition, or any other key to proceed”)
Available on some HP Business PCs only.
•
Startup menu options.
For more information about setting these options, refer to “Configuring the
Utility Partition” on page 25.
To remotely configure e-Diagtools using Toptools, both e-Diagtools and the
Toptools Agent must be installed on each remote computer, and Toptools Device
Manager must be installed on the Toptools server.
Utility Partition INI Files
All e-Diagtools configuration data is stored in two files. These are named
HiPaConf.INI
and
Network.INI
Utility Partition.
The file HiPaConf.INI is described in “Utility Partition HiPaConf.INI File” on
page 26.
The file Network.INI is described on page 33.
. These two files are located at the root of the
20
Page 21

3
this chapter applies to
hp business pcs
hp workstations
hp notebook pcs
✔
✔
✔
The Utility Partition
This chapter describes the HP Utility Partition, its benefits, and the tools IT or MIS
personnel can use to modify, restore and deploy it.
Page 22

3 The Utility Partition
What is the Utility Partition?
What is the Utility Partition?
All recent HP e-pc, Vectra, Kayak and Brio PC models are delivered with a special
hard disk partition, called the HP Utility Partition, already pre-installed in addition
to the standard partition(s) on the hard disk.
This “hidden” partition is not accessible to the PC’s operating system and is not
listed by your file manager. It is completely transparent to the user in normal PC
operation.
The Utility Partition does not affect normal PC use, and occupies little disk space.
What is it for?
Currently, the Utility Partition contains either Diagtools, HP’s powerful hardware
diagnostics solution, or the new version, e-Diagtools, which adds a number of
networking functions to Diagtools.
A simple keypress to select a boot option will call the pre-loaded diagnostics
solution. Because of its location on the hard disk, the diagnostics program is ready
for use without delay and can function securely and rapidly.
Carrying out diagnostic actions from the Utility Partition avoids the need to locate
a CD-ROM or floppy disks, or search the Internet, as the required files are all there
on the Utility Partition ready to use. In a few minutes, e-Diagtools will test the
hardware components of your computer hardware to help you determine if a
problem is hardware-related and to localize it. Finally, e-Diagtools can
communicate the results directly to your help desk or support provider.
HP intends that in the future, the partition will contain additional software utilities
to further enhance desktop management.
The Utility Partition is a valuable addition to the arsenal of tools provided by
Hewlett Packard to help improve your desktop management and maintenance.
22
Page 23

3 The Utility Partition
Benefits of the Utility Partition and Diagtools
Benefits of the Utility Partition and Diagtools
• Ever-present
You have an ever-present, powerful hardware diagnostics utility at your
fingertips. No need to locate a CD-ROM or floppy disks, or search the Internet; it
is all there, ready to use.
•
Easy to employ
Simply restart the PC and press the required function key to launch the
diagnostics software. (In recent PCs, press
PCs just press
•
Enables remote support
F10.)
When you use Diagtools or e-Diagtools to diagnose the PC’s hardware, it can
produce a full report called a Support Ticket. This report can be sent to your
support provider to help provide a speedy, effective solution to the problem.
•
Transparent
The Utility Partition is transparent to the user and therefore does not hinder or
confuse the user when carrying out their normal tasks on the PC.
F8 and select diagnostics; for other
•
Unobtrusive
Approximately 15-22 MB of disk space are used for the Utility Partition – this is
a negligible amount for the current generation of massive multi-gigabyte hard
disks.
• Easy to manage
System administrators can easily produce gold disks that safely include the
Utility Partition, easily duplicating its benefits across the numerous HP PCs in
the network.
23
Page 24

3 The Utility Partition
Utility Partition Properties
Utility Partition Properties
The HP Utility Partition is a DOS partition located at the beginning of your HP PC’s
bootable hard disk (as shipped by HP).
The HP Utility Partition has these properties:
• FAT12 DOS partition
• Size: 15 to 22 MB
•
Partition type value: 12h (12 hexadecimal) which means that the utility partition
is detected as an "unknown partition type" by most common operating systems.
Hidden Partition
The value type 12h means that during normal use of the PC, the Utility Partition is
invisible. But when using some advanced program as the disk administrator in
Windows NT4.0, you can see the Utility Partition.
Also, when using disk utilities such as Fdisk or PartitionMagic you can see and
manipulate the HP Utility Partition.
24
Page 25

3 The Utility Partition
Configuring the Utility Partition
Configuring the Utility Partition
NOTE You cannot configure the utility partition startup options for the latest HP Business
PCs. These PCs use a new activation method and the
Diagnostics menu to launch e-Diagtools.)
Tools to Configure the Utility Partition
Utility Partition Manager
The Utility Partition Manager is a compact stand-alone utility distributed on the HP
support web site (refer to page 4 for web addresses). It is for use on a single
computer at a time.
You can use the Utility Partition Manager to configure the e-Diagtools startup
activation message.
F8 Configuration and
Applies to some
Business PCs
HP Toptools
You can use HP Toptools to remotely configure the Utility Partition of multiple
computers on a network. You can configure:
•
The e-Diagtools startup activation message
•
The e-Diagtools startup menu options.
For prerequisites and further information refer to chapter 6, Integration with HP
Toptools.
Startup Activation Message
The e-Diagtools startup activation message (the activation prompt) is shown just
after the BIOS has completed the power-on self-tests.
You can configure:
•
Whether an activation message is displayed (Yes/No option). If set to ‘No’,
marching dots (one per second) are shown instead of the message.
•
The message delay. You can set any value from three to ten seconds.
25
Page 26

3 The Utility Partition
Configuring the Utility Partition
e-Diagtools Startup Menu Options
If a computer has e-Diagtools on the Utility Partition, you can set either a full or
menu or a simplified start menu. The full menu has these options:
•
Help
•
Update BIOS
•
Update BIOS, clear settings
•
Run e-Diagtools
•
Send Support Ticket to support provider
•
Exit
The simplified menu omits the two BIOS related options, “Update BIOS” and “Update
BIOS, clear settings”.
Utility Partition HiPaConf.INI File
NOTE The parameters in the
activation message for launching e-Diagtools, commonly using the
(The latest HP Business PCs do not use an activation message; instead they use the
F8 Configuration and Diagnostics
You can manually configure several parameters in the
these parameters cannot be set using the Utility Partition Manager.
The
HiPaConf.INI
file is located at the root of the Utility Partition. It is used to
define:
• The text for the Utility Partition activation message
• The time-out value for the Utility Partition activation message
•
The key to be used to enter the Utility Partition when the activation message is
shown.
The default values in this file are:
Message1=Press <F10> to enter the HP Utility Partition
Message2=or any other key to proceed
Timeout=5
Key=F10
These values are interpreted as follows:
At startup, the activation message of two lines (Message1 & Message2) is displayed
for the established time period (Time-out). Press (Key)
open a boot menu of e-Diagtools local options.
HiPaConf.INI file are used only if the computer uses an
function key.
F10
menu to launch e-Diagtools.)
HiPaConf.INI
during this time to
F10
file. Some of
26
Page 27

Recovering the Utility Partition
3 The Utility Partition
Recovering the Utility Partition
Applies to some
Business PCs
For HP Business PCs
In some cases, you may want to restore the Utility Partition after it has become
disabled. The Utility Partition becomes disabled when the hard disk’s master boot
record gets overwritten. This can happen when you install certain software or
operating systems, such as Windows 98 or Windows 2000. In some cases, the utility
partition can be accessed locally (to launch e-Diagtools), but not remotely.
To recover use of the Utility Partition in this case, use the Utility Partition
Restoration Tool, available on the HP support web site (refer to page 4 for web
addresses). The web site also contains instructions for use.
Updating the Utility Partition
You are strongly advised to update e-Diagtools on the Utility Partition for the most
up-to-date, effective diagnostic aid.
You can download the latest version of the HP Utility Partition version of
e-Diagtools from the support web site for your HP Business PC (refer to page 4 for
web addresses).
If you have a recent HP Diagtools CD-ROM, you can also select the option to
automatically detect the version of e-Diagtools you are using and update it.
For HP Notebook PCs
You can upgrade the HP Utility Partition version of e-Diagtools using e-Diagtools
for Windows, described in the e-Diagtools User’s Guide, available on your HP
computer’s support web site (refer to page 4 for web addresses).
27
Page 28

3 The Utility Partition
Recreating the Utility Partition
Recreating the Utility Partition
You can recreate the Utility Partition by using the recovery CD kit that was
delivered with your HP business PC.
By using the HP Brio assist CD for HP Brio PCs, or the HP Image Creation &
Recovery CD-ROM and HP Image Library & Diagnostics CD-ROM for other PCs,
you can delete the entire contents of the hard disk and replace it with the
preloaded contents as delivered by HP. At the same time, you can restore the
Utility Partition.
Depending on your e-Diagtools version, you can also use a utility available from the
HP support web site (refer to page 4 for web addresses) to create the Utility
Partition on a blank formatted hard disk without restoring the HP preloaded
software. This standalone utility program simply boots from floppy disk to create
an empty Utility Partition on your blank hard disk.
Gold Disks and the HP Utility Partition
Your deployment process may require the Utility Partition to be created as part of
the automated process. In this case, please contact your HP representative for
information.
We also recommend that you keep the HP Utility Partition intact when you create
your gold disk. To do this, follow these basic guidelines:
• On the new HP PC, run your partition software (such as Fdisk) and remove the
main operating system partition. Leave the HP Utility Partition intact.
•
Using the remaining free disk area, create any new partition (or partitions) as
required for your gold disk
•
Create your gold disk in the newly created partition (or partitions) using your
usual procedures.
• Once complete, you will have a gold disk with a fully integrated Utility Partition.
28
Page 29

4
this chapter applies to
hp business pcs
hp workstations
hp notebook pcs
✔
✔
✘
Network Configuration for e-Diagtools
This chapter shows you how to configure the e-Diagtools network parameters. This
will enable e-Diagtools to update the BIOS and send the support ticket to your
support provider.
This chapter applies to HP Business PCs and HP Workstations only. For HP Notebook
PCs, consult the information about e-Diagtools for Windows in the e-Diagtools User’s
Guide, available on the HP support web site (refer to page 4 for web addresses).
Page 30

4 Network Configuration for e-Diagtools
Network Parameters
Network Parameters
This Network Parameters section applies to HP Business PCs and HP
Workstations. For HP Notebook PCs, refer to the e-Diagtools for Windows
information in the e-Diagtools User’s Guide (available on the HP support web site
– refer to page 4 for web addresses).
The client computer network parameters are stored on the HP Utility Partition.
These parameters identify the computer and are required to send the Support
Ticket by e-Mail to the Support Provider or update the BIOS.
Example of a Network
Parameters screen from
e-Diagtools 3.50b
30
Page 31

4 Network Configuration for e-Diagtools
Network Parameters
Three methods are available for setting or updating the client computer network
parameters:
•
Locally and manually in the e-Diagtools network parameters screen.
This method is useful when the prerequisites for using the LAN Configuration
Agent are not met, or when running e-Diagtools 3.5x from CD-ROM.
• Locally and automatically, using the LAN Configuration Agent.
By default, this is done automatically on each computer that has e-Diagtools and
the LAN Configuration Agent correctly installed. However, the e-mail addresses
must still be entered manually (in the e-Diagtools network parameters screen)
before you can send a support ticket.
•
Remotely, using Toptools Device Manager to force an update of the LAN
Configuration Agent (see page 47).
What is the LAN Configuration Agent?
The LAN Configuration Agent is part of the e-Diagtools solution. It is a software
application pre-loaded on HP computers able to make use of e-Diagtools. You can
also download it from the HP support web site (refer to page 4 for web addresses).
When active, the LAN Configuration Agent runs each time Windows starts. It
gathers the IP configuration of the client computer and stores this in the
configuration file Network.INI on the Utility Partition. This permits e-Diagtools
to make use of the same IP configuration used under Windows.
31
Page 32

4 Network Configuration for e-Diagtools
Network Parameters
LAN Configuration Agent, Local Interface
The Agent is provided with a Windows-based user interface for ease of operation.
To access the LAN Configuration Agent interface locally, select:
Start > Programs > HP e-Diagtools > e-Diagtools LAN Configuration
Agent
•
The first checkbox allows you to selected whether or not the network settings
are copied at every startup.
When this checkbox is selected (default value), the network settings detected
by the Agent are copied to the Utility Partition IP configuration file
Network.INI
at each Windows startup.
If the checkbox is not selected, the LAN Configuration Agent does not copy new
data to the Utility Partition file. This means that settings already stored in the
file are not overwritten and remain valid.
NOTE When you are using HP Toptools to remotely configure the e-Diagtools network
configuration, the Agent must not be set to Copy Network Settings at each system
startup.
•
The second checkbox allows you to choose whether or not the F5 - Advanced
Config
button is enabled in the Network Parameters screen. This allows users
to set or modify the basic network parameters when sending the support ticket
or updating the BIOS.
•
The Copy Now button immediately detects and copies the computer’s current
network settings.
32
Page 33

4 Network Configuration for e-Diagtools
E-mail Addresses for Sending Support Ticket
E-mail Addresses for Sending Support Ticket
Before sending the Support Ticket by e-mail you must set two e-mail addresses:
•
Your own (end-user’s) e-mail address
•
The Support Provider’s e-mail address, to which the Support Ticket will be sent.
These addresses may be set manually by entering the information in the address
fields of the Network Parameters page of e-Diagtools, or set using the Toptools
Device Manager Master Catalog Address
NOTE Do not send the support ticket to your support provider without prior agreement
with them.
Master Catalog Address for BIOS Updates
The Master Catalogue web server address is used by e-Diagtools when updating the
BIOS. For more information refer to page 39.
Network.INI
The file
provided by the LAN Configuration Agent (the Windows-based e-Diagtools utility)
or the HP Toptools Device Manager. The values in this configuration file are
displayed (and can be modified) in the e-Diagtools Network Parameters screen
(this screen is shown on page 29).
In cases where DHCP is used for the e-Diagtools networking facilities, most values
in the
addresses will be used.
This is one of the two INI files stored in the root directory of the Utility Partition
(
HiPaConf.INI and Network.INI).
Network.INI
Network.INI file are ignored. Only the web proxy and SMTP mail relay
has no default settings. The values defined in this file are
33
Page 34

4 Network Configuration for e-Diagtools
Limitations
Limitations
•
The e-Diagtools network features (BIOS update and sending the support ticket)
are not available when using a modem.
•
You cannot update the BIOS with e-Diagtools version 3.5x on CD-ROM.
• You can neither update the BIOS nor send the support ticket with e-Diagtools
version 3.0x and 3.1x on CD-ROM.
•
The automatic proxy server configuration is not supported.
• e-Diagtools is not able to detect that a proxy server should be bypassed when
accessing local addresses. This means that if there is a proxy server e-Diagtools
will always use it, which may cause the connection to fail. In this case, you have
to manually clear the proxy server parameter every time you use the e-Diagtools
network features.
34
Page 35

5
this chapter applies to
hp business pcs
hp workstations
hp notebook pcs
✔
✔
✔
BIOS Update Mechanisms
Page 36

5 BIOS Update Mechanisms
The BIOS Update Feature
The BIOS Update Feature
Flashing an updated BIOS or re-flashing the current BIOS may cure problems with
the motherboard in a number of cases. Flashing or re-flashing can:
•
Install the latest or best version of a BIOS for higher performance, augmented
functionality and/or improved stability
• Reset the BIOS configuration data to restore default values (if you select the
option to update the BIOS and clear the settings).
A BIOS update utility is included in e-Diagtools to simplify this task. This
software will automatically check for BIOS updates on HP’s web site, download and
install the updates.
For HP Business PCs and HP Workstations, the BIOS update utility is available
from the e-Diagtools hardware diagnostics main menu (when it starts).
For HP Notebook PCs, the BIOS update utility is available from e-Diagtools for
Windows. For more information refer to the e-Diagtools User’s Guide, available
on your HP support web site (refer to
page 4 for web addresses).
The BIOS update feature is not available when running e-Diagtools from a
CD-ROM.
NOTE The BIOS update utility is able to pass through web proxies used at customers’ sites,
as this parameter is set either by the LAN Configuration Agent (refer to page 29) or
by the Toptools Device Manager (refer to “2. Configure e-Diagtools Settings” on
page 43).
36
Page 37

How the BIOS Update Works
5 BIOS Update Mechanisms
How the BIOS Update Works
When one of the Boot Menu options
Update BIOS
or
Update BIOS, clearing settings
is
selected, e-Diagtools starts the BIOS update program.
The update program connects to the update server either by Internet or Intranet,
and checks for BIOS updates:
1 The web update client program connects to the Master Catalog web site specified
in the configuration parameters. (By default, this is the HP BIOS server web
site.)
2 The master catalog supplies the web update client versions which are available
on the web update server, plus a map showing which product-specific catalog
must be used with each computer model.
3 The web update client copies the master catalog to a local location, and
compares its own client version with the latest web update client available on the
web site. The web update client will then update itself if necessary.
4 The web update client then obtains the ID and the Product String of the
computer. These together define the client computer model. The version
number of the currently installed BIOS is also determined. These three values
are obtained from the BIOS. The web update client uses the client computer
model to establish which specific catalog within the master catalog is used for
this platform.
5 The specific catalog lists the correct packages for this computer platform which
are available for download. It also lists the conditions under which each package
is applicable to the platform.
NOTE In e-Diagtools, only BIOS packages are available.
6 The web update client retrieves the specific catalog for its client computer and
then parses it to determine if an update BIOS package is available. If an updated
package is present, it is downloaded and the contents of the BIOS package are
installed.
37
Page 38

5 BIOS Update Mechanisms
Security
Security
Disabling BIOS Updates
If you want to prevent managed computers from using this feature, these two
BIOS-related menu options can be disabled using the Toptools Device Manager.
Moreover, on HP computers with the hardware monitoring BIOS features, the
Update BIOS options will only execute on successful entry of the BIOS
administrator password by the user.
BIOS Packages, Signed ZIP Format
The BIOS packages for e-Diagtools are in the form of signed ZIP files. When the
web update client downloads the updated BIOS package, it unzips the package and
verifies the signature.
If the signature is not authenticated, the BIOS of the client computer is not
updated.
If the signature is authenticated, then the BIOS is updated. The BIOS configuration
information is reset if this BIOS option was selected from the boot menu.
The system must be restarted once the BIOS update is complete; e-Diagtools will
prompt you for a keypress to initiate the system reboot.
38
Page 39

5 BIOS Update Mechanisms
Master Catalogue Web Location
Master Catalogue Web Location
By default, the Master Catalogue web sites used by e-Diagtools when updating the
BIOS are as follows:
•
For HP Business PCs and Workstations:
http://ftp.hp.com/pub/ccd/epackages/master.ini
•
For HP Notebook PCs:
http://ftp.hp.com/pub/mobile_computing/software/edtpackages/
master.ini
The address of the Master Catalogue web site is stored in the
Network.INI
file
located in the root directory of the Utility Partition.
Local Web/FTP Server
Your network configuration may include a firewall which prevents the reception of
BIOS updates from the HP server. In this case you may want to install a local
Web/FTP server inside the firewall. The easiest method of creating a local server is
to download the file structure of the HP server commencing with the Master
Catalog location (
master.ini
it, together with the BIOS subdirectories for each platform and the BIOS packages
they contain. Copy the specific catalogs, e.g. vl400.ini, evectra.ini, etc. Check the
contents, in particular the fields packagename, fieldlocation and version. Copy the
sub-directories and contents to your local server inside the firewall, to exactly
recreate the server file structure.
To verify your installation, use the client computer, open the web browser on the
client computer and check that you can access all the files mentioned above using
the IP address of the server for the URL.
) and the entire directory sub-tree structure beneath
39
Page 40

5 BIOS Update Mechanisms
Master Catalogue Web Location
40
Page 41

6
this chapter applies to
hp business pcs
hp workstations
hp notebook pcs
✔
✔
✔
Integration with HP Toptools
This chapter describes how to remotely configure and run e-Diagtools on client
computers in the network using HP Toptools.
Page 42

6 Integration with HP Toptools
Toptools Control of e-Diagtools on Multiple Computers
Toptools Control of e-Diagtools on Multiple Computers
Several ‘through-actions’ to run e-Diagtools functions on managed computers are
included in the Toptools Device Manager. These will configure or execute
e-Diagtools functions on all the managed computers targeted.
1. Update/Hardware Diagnostics
Toptools Device Manager can automatically detect the currently installed version
of e-Diagtools on a managed computer, and is capable of distributing a new
version of e-Diagtools whenever such an update becomes available.
From the Device Manager, select
Hardware Diagnostics
box.
Manage Drivers / Firmware
, then check the
This option can be used to update e-Diagtools on all targeted computers. The
target computers must have the Toptools Agent and e-Diagtools (in the Utility
Partition) installed.
42
Page 43

6 Integration with HP Toptools
Toptools Control of e-Diagtools on Multiple Computers
The e-Diagtools packages used for these updates by Toptools will be downloaded
from HP’s FTP server using the Toptools RMDB (Revision Management Database)
mechanism.
2. Configure e-Diagtools Settings
The e-Diagtools network parameters and the e-Diagtools startup options can be set
from Toptools Device Manager for all targeted computers. The remote
configuration of these options requires Device Manager 5.0 or higher on the
Toptools server, plus Toptools Agent 5.0 or higher on the client computers.
The Toptools Device Manager can be used to disable the LAN Configuration Agent
on a managed computer and manually enter the IP configuration information.
This allows you to configure a managed computer to use a different IP
configuration for e-Diagtools from that used under Windows.
Additionally, the Toptools Device Manager can configure the e-Diagtools computer
to use Dynamic Host Configuration Protocol (DHCP) to find its IP configuration
information. In this case the Device Manager must still be used to enter the webproxy details and SMTP mail relay address.
To remotely configure e-Diagtools Internet and Startup options, use the Device
Manager action:
Note that the options available in
provided for single managed computers in the
page. For the full options, go to the
e-Diagtools > Configure Settings
Configure Settings
e-Diagtools
are very similar to the options
e-Diagtools
tab on the Parameters Page.
tab on the Parameters
3. Remote Execution of e-Diagtools
To run e-Diagtools remotely on managed computers from the Toptools Device
Manager, select the Device Manager function:
e-Diagtools > Launch e-Diagtools
The “
Launch e-Diagtools
or the Operator. In all other cases this button is disabled.
NOTE The above functions are available via the Toptools Device Manager on the Toptools
server. In addition, a subset of these functions is also available locally via the
Toptools Agent installed on each of the managed computers.
” button is enabled only when the user is the Administrator
43
Page 44

6 Integration with HP Toptools
Toptools Properties Page for e-Diagtools (Targeting One Computer at a Time)
Toptools Properties Page for e-Diagtools
(Targeting One Computer at a Time)
A Properties page in Toptools Device Manager is dedicated to e-Diagtools actions
that target a single managed computer. In most system configurations, the
Properties page will be the most useful choice for carrying out e-Diagtools actions
targeting single computers.
To run e-Diagtools functions or to set e-Diagtools parameters remotely on a single
managed computer from Toptools Device Manager:
1 Open
2 Select the folder
3 Click on the folder
Devices > Device Types.
Devices by Type
PCs and Workstations
in the directory tree on the left of the screen.
to open a list of all managed computers.
This list details the Name and Type of each network computer, together with
other individual computer parameters (see figure below).The
Refresh
button at
the top right of the Device Types window can be used to update the display of
information on networked computers.
4 Double-click on an individual computer in the listing to open the Properties page
for this machine.
44
Page 45

Toptools Properties Page for e-Diagtools (Targeting One Computer at a Time)
The Parameters Page contains the Tabs:
•
dentity
I
• Status
• Configuration
• Security
• Reports
• e-Diagtools
• Support
6 Integration with HP Toptools
The
Identity
window details the individual specifications, OS software, and
network address of the selected machine:
Select
e-Diagtools
to open the page of remote e-Diagtools functions for the selected
computer as shown on page 46. Two tabs are available in the e-Diagtools window
for a single targeted computer:
• Settings
• Diagnose and Troubleshoot.
45
Page 46

6 Integration with HP Toptools
Toptools Properties Page for e-Diagtools (Targeting One Computer at a Time)
Settings
• On remote HP Business computers that use the F10 startup message, you can
: e-Diagtools Startup and Internet Settings (when available)
configure the e-Diagtools startup options. The configuration options are as
follows:
• Display the “Press F10 to enter the Utility Partition” message
• Silent Startup (no message, display marching dots)
•
Hide BIOS Related Menu Options (show Simplified or Full menu)
• “Wait ... seconds” (countdown configuration, set in the range 3 to 10
seconds)
•
The
Settings
Internet options in the
tab also provides remote single-PC configuration of e-Diagtools
Internet Options area. Enter the following data for the
managed computer:
• Support Ticket destination (Support Provider e-mail address)
•
Sender e-mail address
•
Master Catalog web page address
•
Web Proxy address
•
SMTP Server address
46
Page 47

6 Integration with HP Toptools
Toptools Properties Page for e-Diagtools (Targeting One Computer at a Time)
Synchronize Parameters with Windows LAN Configuration
Applies to:
— HP Business PCs and
— HP Workstations
When the LAN Configuration Agent is active on an e-Diagtools computer, the LAN
configuration parameters used by e-Diagtools will be synchronized with those used
by Windows each time the operating system is started. The LAN configuration
agent will store the LAN configuration parameters in the
HiPaConf.INI
configuration file in the Utility Partition root directory.
In addition, the page
Configuration
to re-synchronize the LAN configuration. This allows the e-Diagtools
e-Diagtools Properties
includes the option
Use Windows
configuration to be updated before the next system reboot, to ensure that the next
system reboot will start e-Diagtools correctly. This eliminates the need to reboot
once to synchronize the LAN configuration and then reboot again to use eDiagtools with the updated configuration.
47
Page 48

6 Integration with HP Toptools
Toptools Properties Page for e-Diagtools (Targeting One Computer at a Time)
Diagnose and TroubleShoot
The
Diagnose and Troubleshoot
tab of the
e-Diagtools Properties
options if the target machine is either ON or OFF.
page presents different
Remote Machine ON:
• Launch e-Diagtools: this command enables the Administrator to remotely execute
e-Diagtools on this computer. Clicking this button will force the target computer
to reboot, execute e-Diagtools, and when complete will restart Windows. This
button is only enabled when the user is the Administrator or the Operator; for all
other users it is disabled.
• e-Diagtools system tests results
Diagtools Support Ticket from a targeted computer and display a summary in its
Properties Page
for e-Diagtools. Toptools also includes a brief explanation of the
Support Ticket information.
48
: Toptools Device Manager is able to retrieve the e-
Page 49

Remote Machine OFF
6 Integration with HP Toptools
Toptools Properties Page for e-Diagtools (Targeting One Computer at a Time)
• VCA compatibility
: if there is a preboot diagnostics, BIOS EMU or e-Diagtools error
on a target computer, and the Virtual Call Assistant software is configured to
connect to the Toptools Device Manager, the results are displayed in the
e-Diagtools Properties Page
under the tab
Diagnose and Troubleshoot
. For details on the
use of the Virtual Call Assistant, refer to the e-Diagtools Virtual Call Assistant
User’s Guide, available on the HP support web site (refer to page 4 for web
addresses).
• Connect to HP Instant support: this command connects you directly to the web
troubleshooting e-support tool.
49
Page 50

6 Integration with HP Toptools
The e-Diagtools Tab in the Toptools Agent
The e-Diagtools Tab in the Toptools Agent
The Toptools Agent installed on each managed computer offers a subset of the
features available in the Toptools Device Manager:
1. Startup Options (when available)
From
Startup Options
you can configure e-Diagtools startup options for HP Business
computers that use the F10 startup message:
•
Display the screen message “Press F10 to enter the Utility
Partition”.
•
Silent Startup option, displays marching dots only, without the activation
message.
• Wait the set number of seconds before launching the operating system. The
Countdown
value is in seconds, in the range 3-10.
50
Page 51

2. Network Settings
6 Integration with HP Toptools
The e-Diagtools Tab in the Toptools Agent
From
Network Settings
you can view and configure all the network parameters
necessary so that user’s can update the BIOS or email a support ticket using
e-Diagtools.
51
Page 52

6 Integration with HP Toptools
The e-Diagtools Tab in the Toptools Agent
3. Diagnose and Troubleshoot
From
Diagnose and Troubleshoot
• Information about e-Diagtools
•
The steps to launch e-Diagtools
• The address of the e-Diagtools web site
• The last diagnostic results (the support ticket).
the Toptools Agent displays:
You can also launch e-Diagtools directly from this page. The computer will reboot
and automatically run e-Diagtools.
52
Page 53

7
this chapter applies to
hp business pcs
hp workstations
hp notebook pcs
✔
✔
✔
Virtual Call Assistant
Page 54

7 Virtual Call Assistant
What is the Virtual Call Assistant?
What is the Virtual Call Assistant?
The Virtual Call Assistant (VCA) is designed to provide a valuable diagnostic aid
for Help Desks and Support Providers. It consists of decoder hardware
(DynaMetric Plus) and software.
Once installed on a Support or Help Desk computer, it can automatically detect
and recognize audio error signals emitted by Pre-Boot Diagnostics, BIOS EMU
errors, and some e-Diagtools errors. The encoded signals from the remote
computer indicate the nature of a failure state and also contain information about
the computer itself, such as its serial number. Using the information extracted by
the VCA, support personnel can provide more effective, timely solutions to reduce
downtime and improve service.
How it Works
On the helpdesk side, you need a computer with:
• A hardware decoder, the Dynametric Plus
•
The VCA software.
On the user side, the computer could encounter several types of error that
produce an audio error signal that can be decoded by the VCA:
• Pre-boot errors (or “beep” errors)
These occur before the computer’s Power-On Self-Test (POST). Most new HP
Business PCs and some HP Workstations have pre-boot diagnostics.
•
BIOS EMU errors
These occur during the computer’s POST. The computer displays an error
message on the screen. For many of these errors, some HP computers can also
emit the modulated audio signal that corresponds to the displayed error. To emit
the audio error signal, press
<Enter>
then
. Most new HP Business PCs
<F11>
and some HP Workstations have this feature.
• e-Diagtools errors
For some e-Diagtools errors encountered during hardware diagnostic testing,
you can press
to emit the audio error code. Most HP computers support
<F11>
this feature.
54
Page 55

7 Virtual Call Assistant
℡
End UserSupport / Helpdesk
Computer
Computer
VCA Software
Hardware Decoder
℡
How it Works
When the end user calls to report the problem, they emit the audio signal into the
telephone handset. The audio signal is transmitted by telephone from the buzzer
on the computer’s system board to the helpdesk computer.
On the receiving end, the audio signal is picked up by a DynaMetric decoder fitted
to the telephone receiver, which is connected to the microphone input of the
computer’s sound card.
The Virtual Call Assistant at the helpdesk or support site records the modulated
signal emitted by the computer buzzer, then analyzes this audio signal to decode:
• The model of computer
• The computer serial number
•
The type of failure detected.
55
Page 56

7 Virtual Call Assistant
How to Use the VCA
How to Use the VCA
The Virtual Call Assistant is intended to be installed and used by helpdesk
personnel supporting HP Business PCs, HP Workstations and HP Notebooks PCs.
Typically, the user of the remote computer will call the helpdesk to report a
computer malfunction or to report the presence of a warning signal from the
computer. During this initial call, the buzzer signal can be recorded by the
helpdesk computer and quickly analyzed by the VCA software.
The VCA provides immediate and accurate diagnostic information available at the
helpdesk/support location, often eliminating the need for the support personnel to
visit the remote site unprepared, or to rely on an uncertain verbal report.
VCA Availability
For information about ordering the DynaMetric decoder, or to download the VCA
software, connect to the HP Diagtools home page at:
www.hp.com/desktops/diagtools
For more detailed information about using the VCA, refer to the Virtual Call
Assistant User’s Guide, available on the your computer’s HP support web site
(refer to page 4 for web addresses).
.
56
Page 57

Glossary
advanced system
tests
basic system
tests
DHCP
Together with the basic
system tests, the advanced
system tests comprise the
complete suite of hardware
diagnostic tests in e-Diagtools.
The advanced system tests are
available after the basic tests.
Together with the advanced
system tests, the basic system
tests comprise the complete
suite of hardware diagnostic
tests in e-Diagtools.
The complete set of basic
system tests are done
automatically after the
hardware detection phase.
Dynamic Host Configuration
Protocol. This is a network
configuration protocol. Instead
of configuring your computer
with a fixed IP address in the
network, DHCP allows the host
computer (the server) to
dynamically configure your
computer as needed so it can
function in the network.
hp notebook pcs
hp workstations
LAN
configuration
agent
pre-boot
diagnostics
Family of HP computers
consisting of HP Pavillion
Notebook PCs and HP
Omnibook PCs.
Family of HP computers
consisting of many
workstation models, including
HP Visualize Workstations and
HP Kayak Workstations.
A Windows-based utility that
automatically gathers
networking information and
stores it in the Utility Partition.
This helps simplify setting up
your computer to use the
e-support features of
e-Diagtools.
A processor that diagnoses the
computer’s hardware prior to
starting the operating system.
It typically reports any errors
using a series of audio signals.
It is available on HP Business
PCs and HP Workstations.
e-diagtools for
Windows
e-features
EMU
hp business pcs
This is part of the e-Diagtools
family of tools. It runs under
Windows and is used
exclusively for HP Notebook
PCs.
The ability of e-Diagtools to
email support tickets and
update the BIOS using your
computer’s networking and
Internet facilities.
Error Message Utility. This is a
utility that the computer’s
BIOS uses to display BIOS
error messages on the screen.
Family of HP computers
consisting of HP e-pcs, HP Brio
PCs, and HP Vectra PCs.
support ticket
toptools
virtual call
assistant
This is the text file that
contains a complete record of
the test results and computer’s
configuration. It can be
viewed, saved onto floppy disk
or, more typically, emailed or
faxed to your support
provider.
An HP-provided tool that
manages network resources,
such as HP Business PCs, HP
Notebooks PCs, and HP
Workstations.
A software utility that can
automatically detect and
analyze audio signals emitted
by a remote computer for
troubleshooting purposes.
Support provider’s may have
the Virtual Call Assistant to aid
them with support.
57
Page 58

Glossary
utility partition
utility partition
manager
This is a small, hidden hard
disk partition provided on
most HP computers. It is used
to store and run e-Diagtools. It
is also used to store any
e-Diagtools work files and
BIOS updates downloaded by
e-Diagtools. e-Diagtools LAN
Configuration Agent and
e-Diagtools for Windows are
not in the utility partition.
A standalone software utility
used to configure certain
parameters for the utility
partition.
58 English
Page 59

Page 60

 Loading...