

Page 1

HP NetServer E 800
Installation Guide
HP Part Number D9394-90000
Printed June 2000
Page 2

Notice
The information contained in this document is subject to change without notice.
Hewlett-Packard makes no warranty of any kind with regard to this
material, including, but not limited to, the implied warranties of
merchantability and fitness for a particular purpose. Hewlett-Packard shall
not be liable for errors contained herein or for incidental or consequential
damages in connection with the furnishing, performance, or use of this material.
Hewlett-Packard assumes no responsibility for the use or reliability of its software
on equipment that is not furnished by Hewlett-Packard.
This document contains proprietary information that is protected by copyright.
All rights are reserved. No part of this document may be photocopied,
reproduced, or translated to another language without the prior written consent of
Hewlett-Packard Company.
Intel® and Pentium® are registered trademarks of Intel Corporation. Microsoft®,
Windows NT®, Windows 95® and Windows 2000® are registered trademarks of
Microsoft in the U.S. and other countries. Novell® and NetWare® are registered
trademarks of Novell, Incorporated in the U.S. and other countries. Symantec® is a
registered trademark of Symantec, Incorporated. pcANYWHERE32™ is a trademark
of Symantec, Incorporated. Torx® is a registered trademark of CamCar/Textron,
Incorporated.
Hewlett-Packard Company
Network Server Divisi on
Technical Communications / MS 45SLE
10955 Tantau Avenue
Cupertino, California 95014 USA
© Copyrigh t 2000, Hewlett-Packard Company.
Audience Assumptions
This guide is for the person who installs, administers, and troubleshoots LAN
servers. Hewlett-Packard Company assumes you are qualified in the servicing of
computer equipment and trained in recognizing hazards in products with
hazardous energy levels.
ii
Page 3

Contents
Setting Up the HP NetServer E 800 ................................................................. 1
Introduction ...................................................................................................1
Step 1: Attaching all the Cables ................................................................. 2
Step 2: Opening the HP NetServer............................................................ 3
Step 3: Installing Memory.......................................................................... 5
Step 4: Installing Mass Storage Devic es.................................................... 6
Step 5: Installing Adapt er B oar ds............................................................. 10
Step 6: Installing a Second P r oc essor ..................................................... 14
Step 7: Configuring t he HP NetServer..................................................... 19
iii
Page 4

Page 5

Setting Up the HP NetSe rver E 800
Key Lock
External SCSI
Unlocked Position
Introduction
This installation guide is a quick reference for HP NetServer E 800 installation.
Skip any steps that do not apply to your installation. Refer to the figures below
for connection and operating information. For more information, refer to the
HP NetServer E 800 User Guide.
Flexible
Disk Drive
CD-ROM Drive
Optional Back-Up
Tape Drive
Power ON/OFF/
Sleep Switch
Power ON/
OFF/Sleep LED
SCSI Drive
Activity LED
Locked Position
Power
Mouse
Keyboard
USB(2)
Serial A
Parallel
Serial B
Video
(SVGA)
LAN
(Optional)
Fold-Ou t
Feet (4)
1
Page 6
Setting Up the HP NetServer E 800
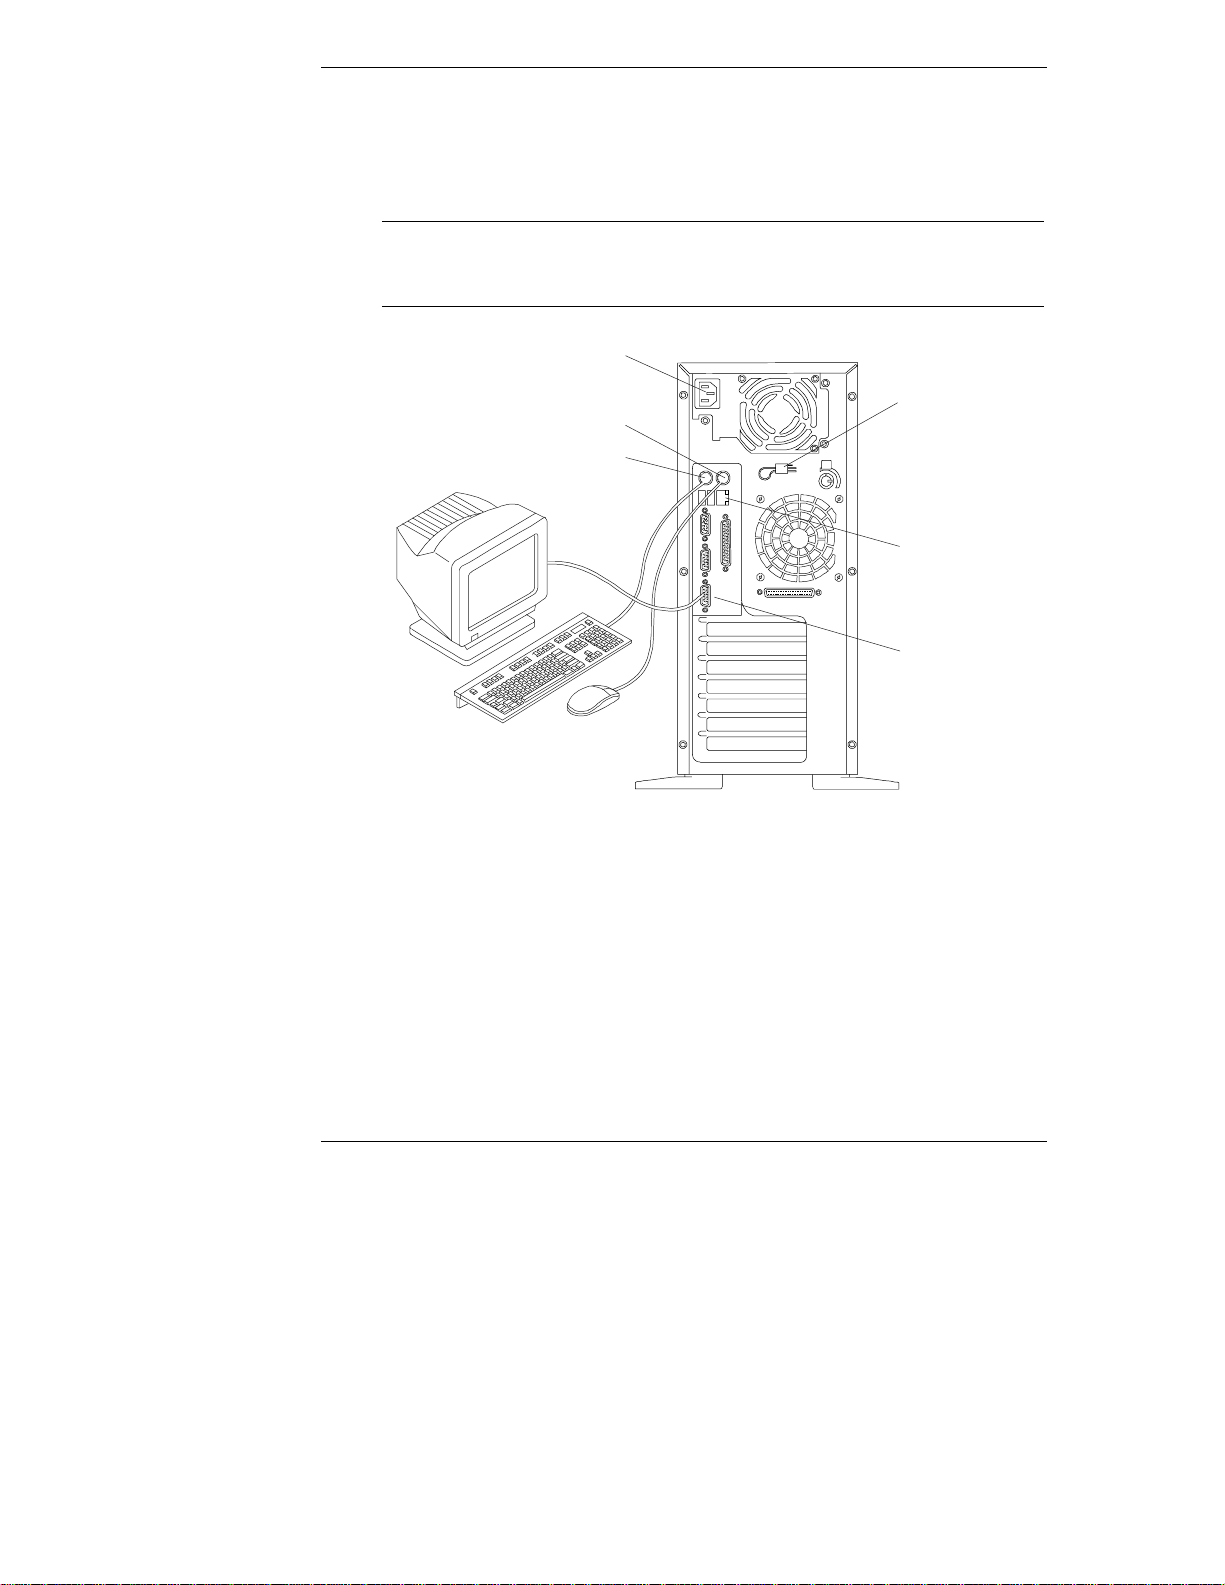
Step 1: Attachin g all the Cables
If you are not installing any accessories, attach all available cables to the
respective connectors, then go to "Step 7: Configuring the HP NetServer."
NOTE The two USB connectors are reserved for printers, scanners,
and external m odems. The NetServer does not support USB
connections for the keyboard and mouse.
Power
Mouse
Keyboard
Power Cord
Strain Relief
LAN
Video
SVGA
2
Page 7

Step 2: Opening th e HP NetS erv er
Key-
Lock
Tools Required:
• ¼ inch flat-blade screwdriver
• Torx T-15 driver
WARNING Before removing the cover, always disconnect the power cord
and remove the telephone cable.
Discon nect the power cord to avoid ex posure t o high energy
levels that may cause burns when parts are short-circuited by
metal objects such as tools or jewelry. Disconnect telephone
cables to avoid exposure to shock hazard from telephone
ringing voltages.
Setting Up the HP NetServer E 800
Slotted
Thumbscrews(6)
3
Page 8

Setting Up the HP NetServer E 800
Front of C hassis
Latch Opening
Cover
Cover
Bottom of Chassis
Air Duct
Latch
4
Page 9

Setting Up the HP NetServer E 800
System Board
Step 3: Installing M emory
• Use only HP DIMMs, which are 3.3V, 168-pin, PC133 (133 MHz),
buffered SDRAM DIMMs in 128 MB, 256 MB, or 512 MB.
• DIMMs may be installed in any slot, in any combination (sizes mixed), in
any order, but HP recommends starting at slot 0 and filling the slots in
order with the largest size first: 0, 1, 2, and 3.
• Ensure both latches close on the DIMM when completely installed.
Notches
Keys
Reta ining Latc he s
DIMM Slot
0
1
2
3
5
Page 10

Setting Up the HP NetServer E 800
Step 4: Installing M ass Storage Dev ices
• The NetServer is internally limited to 7 mass storage shelves.
The flexible disk drive and CD-ROM drive, which are standard on all
models of the HP NetServer E 800, occupy shelves 1 and 2 respectively.
• If a backup tape drive is used, it will occupy shelf 3.
• Shelves 4, 5, 6, and 7 are available for up to four SCSI hard drives and at
lea s t on e is require d for the boot drive.
• IDE dri ves are not supported in this NetServer.
CAUTION Do not connect high voltage differential (HVD) SCSI devices
on the SCSI bus or you will damage the other devices.
1. Remove the Drive Ca ge by loosenin g the t hree captive screws.
Top of Chassis (Side view)
Shelf 1
Hard Disk
Drive Cage
(removable)
2. Install the SCSI hard disk drive.
6
Shelf 2
Shelf 3
Captive Screws (3)
Shelves 4-7 (4)
Front of
HP NetServer
Page 11

3. Connect the cables (data & power).
4. Replace t he dr ive cage.
Setting Up the HP NetServer E 800
Slot s f or Tabs
Tabs(2)
Captive
Screws (3)
First insert screws through
round holes in back
(one on each side).
CAUTION All mounting screws used to thread into the hard disk drive
must be #6-32 and not exceed ¼-i nch in l ength. Lon g er
screws may cause internal damage to the mass storage device.
Damage caused by incorrect mounting screws is not covered
by the HP warranty.
7
Page 12

Setting Up the HP NetServer E 800
SCSI B
Connector
SCSI
Connectors (2)
5. If necessary, install the internal accessory SCSI cable int o SCSI channel B
and connect to the SCSI drives or optional backup tape drive.
Use HP NetServer E 800 External/Internal SCSI Cable Kit, part number
P1773A.
Terminator
NOTE The slower speed of the tape drive may slow disk access time
for the Ultra-2 SCSI drives. You may connect the tape drive
separately from the Ultra-2 SCSI drives using the optional
internal accessory SCSI cable.
8
Page 13

Setting Up the HP NetServer E 800
6. If necessary, install the external/internal SCSI cable into SCSI channel B
and connect to the knock-out in the rear of the chassis.
Use HP NetServer E 800 External/Internal SCSI Cable Kit, part number
P1774A.
WARNING Ensure you do not touch the sharp metal edges from the
knock-out once you have removed it. The empty knock-out
leaves sharp metal on the edges.
External
SCSI
Connection
SCSI B
Connector
9
Page 14

Setting Up the HP NetServer E 800
Step 5: Installing A dapter Boards
• Th e NetServer E 800 has two PCI (Primary and Secondary) busses and
both are pear-to-pear, which provides approximately equal performance,
except when usin g t he two 64-bit slots versus the 32-bit slots.
PCI Slots PCI Bus
Slots 1 through 4 Primary PCI Bus
Slots 5 through 7 Secondary PCI Bus
NOTE Some full-length PCI boards may need a plastic "handle"
(board extension) on one end to stabilize the board in the
NetServer. If the board requires one and it is not installed, you
may need to install the handle on the board before installing it
in the HP NetServer.
10
WakeOn-LAN
PCI Board’s Plastic Extension
Page 15

Setting Up the HP NetServer E 800
System Board (Top View)
FullLength
32-bit
32-bit
64-bit
64-bit
32-bit
PCI Slot 1
PCI Slot 2
PCI Slot 5
PCI Slot 6
PCI Slot 7
WakeOnLAN
11
Page 16

Setting Up the HP NetServer E 800
Slot Cover
Chassis
CrossSection
View
12
Page 17

Setting Up the HP NetServer E 800
13
Page 18

Setting Up the HP NetServer E 800
Step 6: Installing a S econd Processor
• Both pr ocessors must ha ve t he sam e clock speed a nd cache siz e.
• Use only processor upgrade kits with the same HP product number.
This ensures the product numbers are compatible and the processor type,
clock speed, an d cache s ize are th e s ame.
CAUTION Do not open the new pr oc e s s or’s protective bag or remove it
from the bag until you are ready to install it.
Always wear a wrist-strap and use a static-dissipating work
surfa ce connect ed to the chas sis when handli ng components.
Ensure the metal of the wrist strap contacts your skin.
Before you remove a processor from the anti-static container,
touch a grounded, unpainted metal surface on the HP
NetServer to discharge static electricity.
14
NOTE Some processor speeds listed for this HP NetServer may not be
supported. For the latest support information, visit the HP
web site:
http:/www.hp.com/go/netserver
Page 19

Setting Up the HP NetServer E 800
Processor Socket
1. Open the ZIF ( Zero Ins ertion Force) lever on the processor sock et.
The ZIF lever must open completely to a full 90° before removing the
terminator from the socket.
2. Remove the terminator from the processor socket.
Terminator
ZIF
Lever
NOTE Retain the terminator for future use. The NetServer will not
operate properly if using only one processor with no
terminator installed.
15
Page 20

Setting Up the HP NetServer E 800
3. Insert the processor into socket, matching pin-1 to marker.
Pin-1
Marker
4. Close the ZIF lever with a click.
The ZIF lever should click when closed.
16
Page 21
Setting Up the HP NetServer E 800
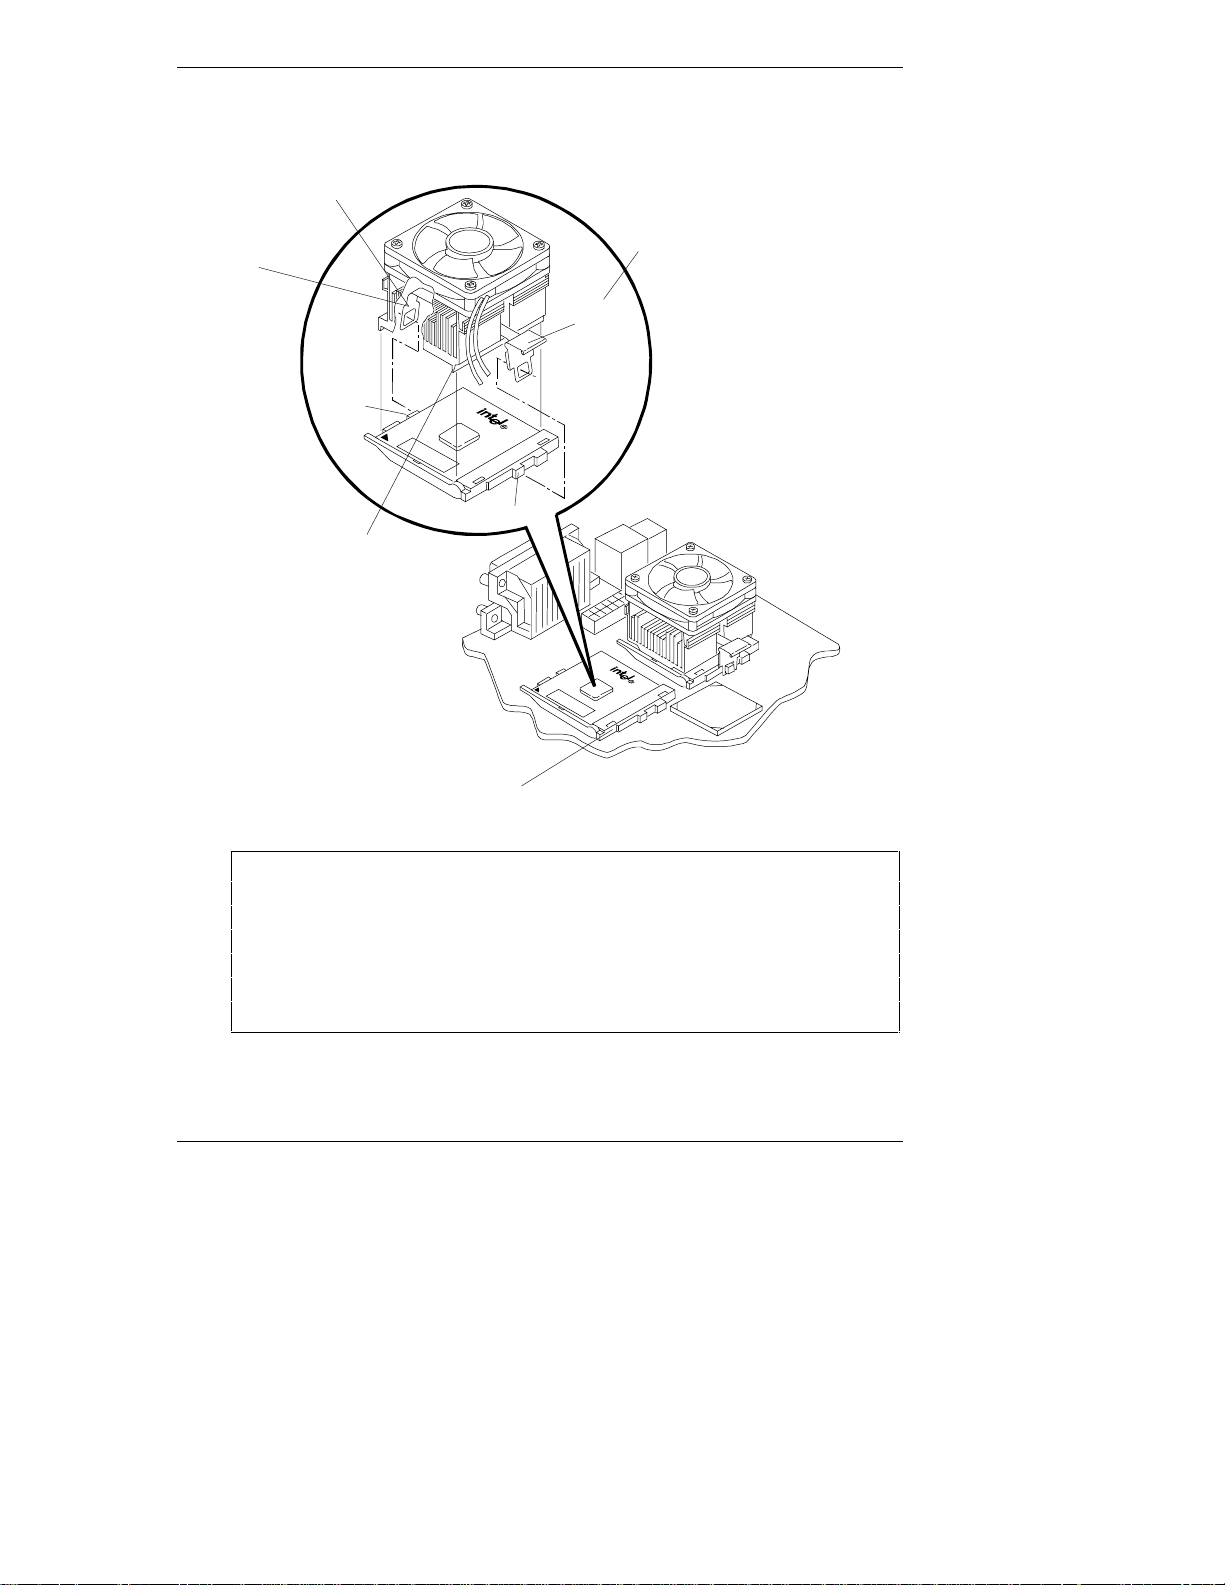
B. Rotate back and
hook the Thumb Latch.
5. Place the Heatsink-Fan on top of processor and follow the steps A-C in the
figure below.
Hook Latch
(hidden)
A. Rotate and
hook.
Thumb
Latch
Tab
Tab
C. Ensure this ridge
rests between the
CPU and the edge
of the processor socket.
Processor
Socket
Base
CAUTION Failure to properly seat the heatsink-fan assembly on the
processor will cause it to overheat and shutdown the
NetServer within 20 seconds of powerin g on. It i s possible
there would be no messages displayed or the monitor may not
have come on fully in time to see a message if it were
displayed. The processor may be damaged if it is allowed to
overheat.
17
Page 22

Setting Up the HP NetServer E 800
6. Connect the fan connect or to the resp ective connector on th e s ystem
board.
System
Fan
Power
Connector
Processor 2
(CPU 2)
CPU 2 Fan
Processor 1 (CPU 1)
CPU 1 Fan
18
CAUTION Failure to connect the fan connector will cause the processor
to overheat and the NetServer will shut down without any
messages being displayed. If the processor is allowed to
overheat, damage may occur.
Page 23

Setting Up the HP NetServer E 800
Step 7: Configur ing the H P NetSer ver
1. Power on the HP NetServer and the monitor:
◊ Insert the HP NetServer Navigat or CD-ROM in t he CD-ROM drive.
◊ The server s hould boot from the HP N e tServer N avig ator CD on its
own, if not, turn the power off, wait 10 seconds and turn the power
back on again.
◊ If the system fails to boot, follow the i nstru c tions on the screen .
◊ Press [F2] to enter Setup, or
◊ Press [F4] to accept automatic configuration update
2. Configure the NetServer and Install the Network Operating System
(NOS):
◊ From the HP NetServer Navigat or Main Menu, view the system
Readme from the HP Navigator main menu for the most current
installation information.
◊ Use the HP NetServer Navigator to configure the server. Start with
either the "Configuration/Installation Assistant" or "C on figu re the
Server" option from the Main Menu (you will see one or the other
depending upon your version of the CD). If you use Navigator’s
Express or Guided modes you will be prompted through the process.
◊ During the configuration process you will be asked to select the NOS
Installation Mode.
NOTE If certain versions of the Novell NetWare or Microsoft
Windows NT Server are used, a prompt will appear indicating
selections of automated or manual NOS installation.
◊ Choose the automated mode for first-time installation of Novell
NetWare or Microsoft Windows 2000 (NT) Server on a
factor y-configured HP E-Series NetServer. You will be guided through
the process by a series of HP display screens.
◊ Perform a manual install if you are installing a NOS other than Novell
NetWare or Microsoft Windows 2000 (NT) Server, you have replaced
HP components (for example, replacing an HP Network Interface Card
(NIC) with a NIC not on HP’s Tested Products List (TPL) or adding a
19
Page 24

Setting Up the HP NetServer E 800
SCSI controller board from a third-par t y).
You will n eed to use the NOS vendor’s in stallation process. Be sure to
first view and print the HP-customized NOS installation instructions
and create th e driver disk (s) for t he NOS you are installin g before
leaving Navigator and installing your NOS.
3. Install or Configure Tape Backup Software:
◊ If your NetServer includes a preinstalled tape backup device, install
and/or configure the tape backup software now.
Refer to the Tape Backup Getting Started Guide for instructions on
installing and configuring the tape backup software.
4. Refer to the HP NetServer Online Documentation CD-ROM:
◊ Use this CD-ROM for updated information about your HP NetServer
and as reference for any additional information not provided in this
Installation Guide.
NOTE If you plan to use the Remote Console feature to run
HP TopTools utilities remotely, the Utility Partition must be
created using the HP NetServer Navigator . If you choose the
Express or Guided mode of configuration, the partition will be
created automatically. Otherwise, you will need to choose
Install/Update Utility Partition during the custom
configuration process.
5. Run DiagTools: (Optional)
◊ Create the HP DiagTools diskettes from the NetServer Utilities (or
Diskette Library) on the HP NetServer Navigator CD-ROM.
◊ Run HP DiagTools and after completing all the configuration topics,
save the support ticket to a diskette for future reference.
20
 Loading...