

Page 1

HP E5000 Messaging System for Microsoft Exchange Installation Checklist
Abstract
Use this document to plan your HP E5000 Messaging System for Microsoft Exchange deployment.
HP Part Number: 5697-1787
Published: June 2012
Edition: 2
Page 2

© Copyright 2012 Hewlett-Packard Development Company, L.P.
Page 3
Before you begin
Moving to Exchange 2010 entails the following:
• Use a Database Availability Group (DAG) to establish high availability for the Exchange 2010
environment. The E5000 software tools will guide you through the setup. Be prepared with inputs
for the Exchange Deployment Tool wizard as outlined in “Using the Exchange Deployment Tool
(EDT)” (page 9).
• Deploy all roles on each server, per HP's best practice. As a result, the E5000 has the Client
Access Server (CAS), HUB transport, and mailbox roles on each server.
NOTE: If all roles are assigned to one server, Windows Network Load Balancing will not work.
In this situation, an external hardware or software load balancer is strongly recommended to
route client connections.
• Download the HP E5000 Messaging System for Microsoft Exchange Administrator Guide and
the HP E5000 Messaging System for Microsoft Exchange Quick Start Guide at:
http://www.hp.com/support/manuals
Under Solutions, select Solution Appliances and then select your E5000 model to display the
manuals page.
• Check for and download the latest software updates on the HP Support & Drivers website at:
http://www.hp.com/go/support
Select Drivers & Software. Enter E5000 in the Enter a product name/number box and click Search.
Navigate to your product and download any applicable files.
NOTE:
• The tables in this document include an Acknowledgment and/or Decision column. After reading
the task, put a check mark in the Acknowledgment column to indicate your understanding. In the
Decision column, enter how you plan to address the task.
• Use the table in “Recording network details” (page 9) to enter the networking details needed to
complete the installation.
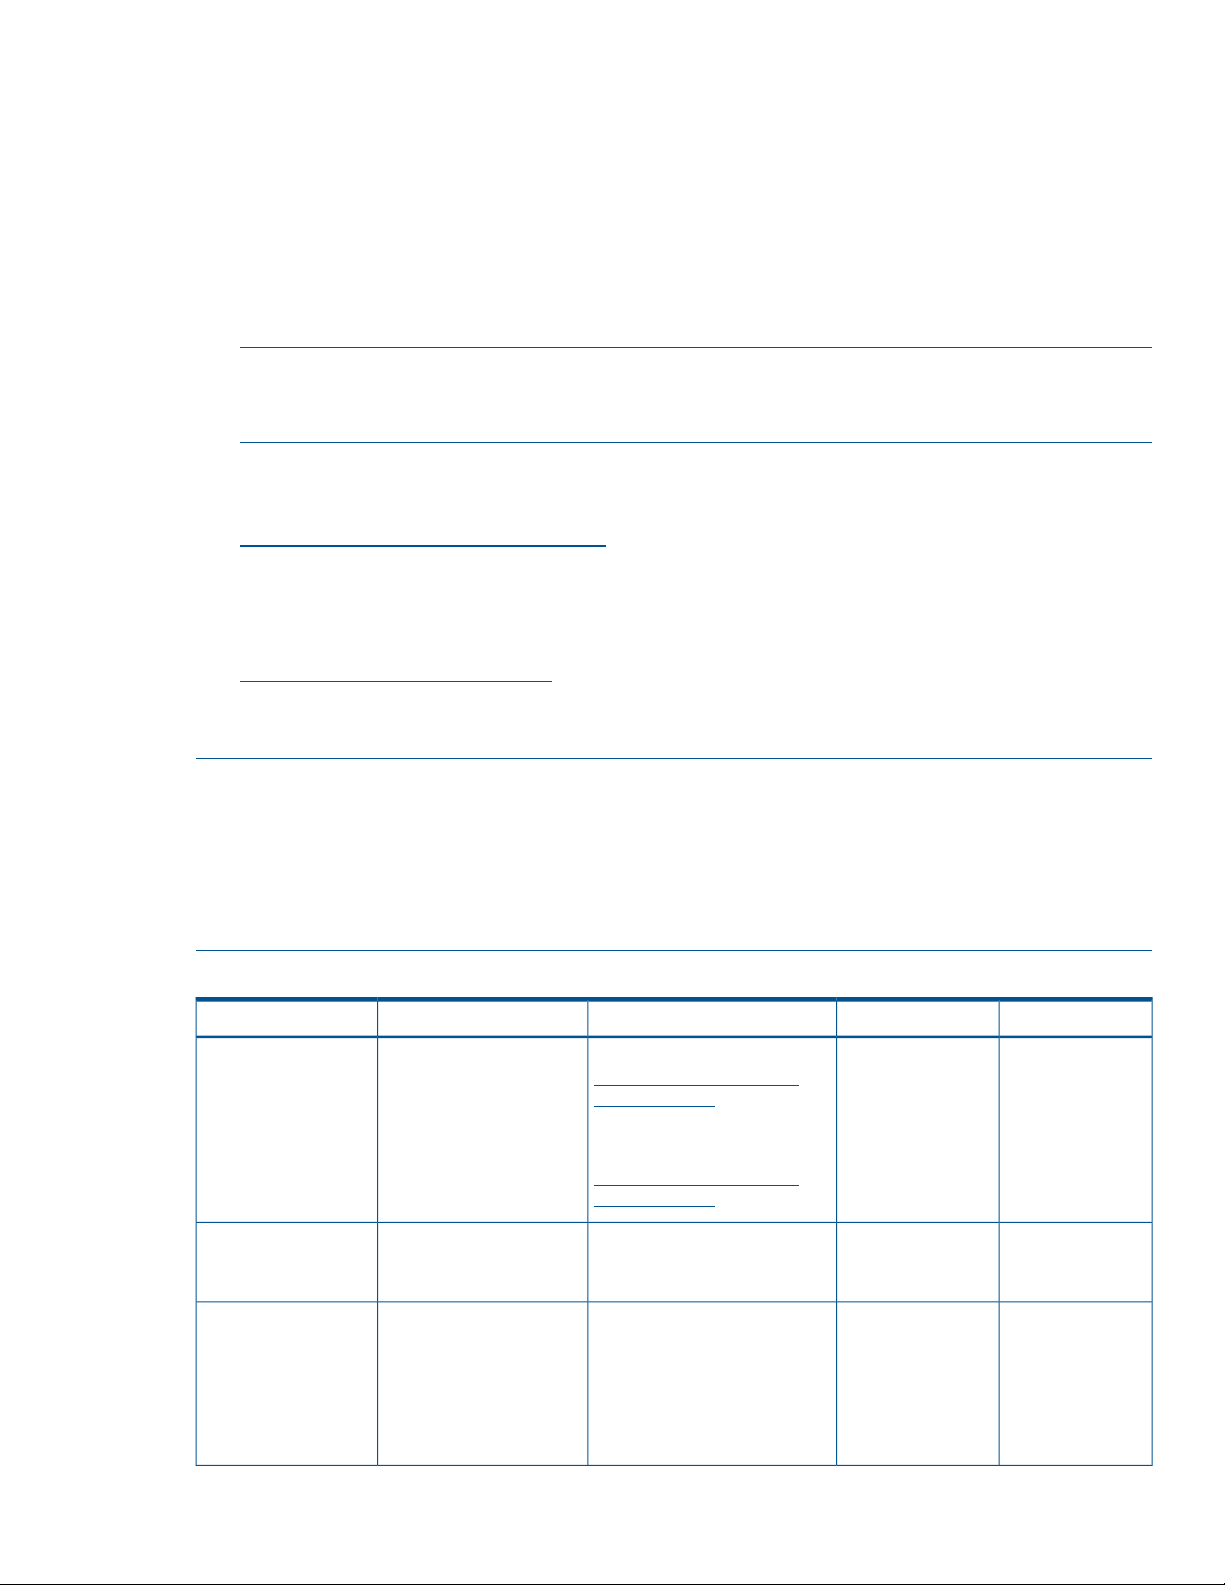
Table 1 Pre-installation checklist
DecisionAcknowledgmentResourcesDescriptionStep
Plan integration with
legacy systems
(Exchange 2003).
Determine the DAG
naming convention.
Obtain the IP address
to be used for the
for the E5000 servers. (page 5) for additional
Identify the bridgehead
server name. Decide
whether to run the
Microsoft Exchange 2010
Pre-Deployment Analyzer
and/or the Exchange
Deployment Assistant.
Consider whether there
are naming conventions
in your organization.
Work with your network
administrator to reserve
these IP addresses. SeeDAG and the IP
“Network planning”addresses and names
information about other
networks.
Pre-Deployment Analyzer:
http://go.microsoft.com/?
linkid=9738616
Exchange Deployment
Assistant:
http://go.microsoft.com/?
linkid=9738615
The tool suggests a default
name of DAG1.
Before you begin 3
Page 4

Table 1 Pre-installation checklist (continued)
DecisionAcknowledgmentResourcesDescriptionStep
Determine the
database prefix
naming.
Determine the location
(server and directory)
for the witness file
share for the
Exchange 2010
DAG.
Determine the load
balancing approach.
Determine the CAS
array name and
whether it will be
Internet facing.
Consider whether there
are naming conventions
in your organization.
This can be a file server
in your domain.
HP recommends that you
let the Exchange
Deployment Tool create
the file share and set
permissions.
External hardware or
software load balancers
are not included with the
E5000.
Review the Load
balancing best practices
for the HP E5000
Messaging System white
paper.
Review Microsoft's list of
qualified load balancers.
Enter the name of the
load-balanced CAS array
that will be set on your
database property.
The tool suggest a default
name of DB1.
A permissions change to the
witness server may be
necessary. See Microsoft
TechNet article:
http://technet.microsoft.com/
en-us/library/dd351107.aspx
http://
h20195.www2.hp.com/v2/
GetPDF.aspx/
4AA3-3433ENW.pdf
http://technet.microsoft.com/
en-us/exchange/
gg176682.aspx
You will need the domain
name to be used with your
external CAS (for example,
mail.contoso.com).
For more information, see:
http://go.microsoft.com/?
linkid=9746236
Ensure that you have
SSL certificates.
Set the DNS name of the
CAS array to be the IP
balanced array. and load balancing with HP
SSL certificates are
required for any client
protocol using SSL
security.
For more information, see
“Defining a CAS array” in the
Best practices for networkingaddress of the load
E5000 Messaging Systems
white paper at:
http://
h20195.www2.hp.com/v2/
GetPDF.aspx/
4AA3-3433ENW.pdf
See the Microsoft TechNet
article, “Managing SSL for a
Client Access Server (applies
to Exchange 2010 SP2)” at:
http://technet.microsoft.com/
en-us/library/bb310795.aspx
This article contains links to
related topics, such as digital
certificates, Certification
Authorities, SSL, and
configuring SSL certificates.
4 Before you begin
Page 5

Table 1 Pre-installation checklist (continued)
DecisionAcknowledgmentResourcesDescriptionStep
Ensure that you have
two legally licensed
copies of Exchange
2010 (either Standard
or Enterprise Edition).
Ensure that Active
Directory is prepared.
Standard Edition is limited
to five databases. As a
result, it is not compatible
with some E5000 models.
During installation, you
will enter the license key
for each server in the
E5000.
Exchange 2010 requires
certain updates to your
Active Directory that if not
completed will complicate
or block a successful
Exchange 2010
installation.
For more information about
Microsoft Exchange licensing
requirements, see:
http://www.microsoft.com/
exchange/en-us/
licensing-exchange-server-email.aspx
On your AD server, use
Exchange setup, which takes
approximately 20–30 minutes:
“setup.exe /p /
on:<your_org_name>”
• setup /pl: Use for
Legacy interoperability
only.
• setup /ps: Prepares
schema, which is included
in prepareAD.
• setup /pd: Prepare a
local domain but only when
setting up child domain. (or
run setup /pad).
Microsoft Technet article:
http://technet.microsoft.com/
en-us/library/bb125224.aspx
Network planning
The E5000 Configuration Wizard will request information about your network preferences, but there
is some additional planning before using the wizard:
• MAPI (static or DHCP): Static addressing is recommended for this client access network.
• EMU/iLO (static or DHCP): Determined by your approach for remote server management.
• EMU to server connectivity: The E5000 Configuration Wizard will request that this connectivity
exist and will ask for the EMU password. EMU connectivity is necessary for E5000 monitoring
and maintenance.
You will need to select a physical network port from each server (see Figure 1 (page 6) and
Figure 2 (page 6)) that will be used to provide this connectivity. This network port will then need
to be configured (using the E5000 Configuration Wizard or standard Windows networking
configuration tools) to match the network you assigned to the EMU.
• If you purchased an E5300, be aware that it has fewer NIC ports for network connectivity than
the E5500 or E5700 (see Figure 1 (page 6) and Figure 2 (page 6) for comparison). If you
require more network connectivity for the E5300, you must purchase additional hardware, which
consists of two (2) NC382m mezzanine NICs and two (2) Ethernet 1 GbE I/O modules (BV897A).
Before you begin 5
Page 6

Figure 1 Typical E5300 network configuration
1. Client/MAPI network
2. Replication network cable
3. Domain controller
4. Connection to EMU
Figure 2 Typical E5500/E5700 network configuration
4. Domain controller1. Client/MAPI network
5. Connection to EMU2. Replication network cable
6. Management network3. Connection to management network
Complete hardware installation (rack and cable)
Complete the steps described in Table 2 (page 7).
6 Complete hardware installation (rack and cable)
Page 7

Table 2 Hardware installation
AcknowledgmentDescriptionStep
Record the serial number of the E5000
and expansion disk enclosures, if any.
If you are deploying multiple messaging
systems, confirm that any expansion
disk enclosures are matched to the
appropriate messaging system as noted
on the rear label before you install them
in the rack.
Install the messaging system components
into the rack.
Plug in the messaging system.
Connect the messaging system network
cables.
Power on the messaging system.
Configure the iLO and EMU network
ports.
Once the E5000 components are installed in a rack, it is
difficult to read serial numbers.
Ensure that the disk drives are fully seated in the disk drive
drawer and in the expansion disk enclosures.
If possible, ensure that redundant power supplies in the
E5000 enclosure and any expansion disk enclosures are
provided power from separate power distribution units
(PDUs) and a separate power infrastructure.
Physical connections may include iLO/EMU, MAPI,
replication, and other management networks.
Power on the expansion disk enclosures, if any. Power on
the messaging system by pushing the power button on the
back of the chassis. Once the messaging system power is
on, the server blades should automatically power on within
a few minutes.
See “Configure the EMU and iLO management processors”
in the HP E5000 Messaging System for Microsoft Exchange
Administrator Guide for instructions.
NOTE: There are passwords for the iLO and EMU. The
iLO Administrator password is located on the blade pull-out
tab in the front of the E5000. The EMU administrator
password is located on the tear-away label attached to the
top rear of the enclosure.
For iLO documentation, go to the following website and
select More iLO Documentation:
http://www.hp.com/go/iLO
Connect to the messaging system using
either the remote console (iLO) or a
direct (KVM) connection.
See “Accessing the messaging system” in the HP E5000
Messaging System for Microsoft Exchange Administrator
Guide.
Running the E5000 Configuration Wizard (ECW)
Complete all steps on Server 1, including those for the Exchange Deployment Tool (EDT) before starting
on Server 2. Note that Server 2 should be powered up when configuring Server 1.
Running the E5000 Configuration Wizard (ECW) 7
Page 8

IMPORTANT: Prior to running the ECW, disable local User Access Control (UAC). If UAC is enabled
as a policy on the domain controller for the domain you will be joining, put the E5000 servers in an
organizational unit that has blocked the application of the domain policy. You can apply a different
group policy that will not apply any UAC policies on the E5000 server.
AcknowledgmentDescriptionStep
Enter your locale information in the
Windows setup dialog and accept the
license terms.
Enter and confirm the server
Administrator password.
NOTE: You will set the new
Administrator password on both servers.
Determine if there is an organization
convention that needs to be considered.
Complete each menu option in the
wizard to complete the minimum
required configuration.
After you enter your EMU Administrator
password, the wizard displays the status
of tasks it must complete before
continuing.
When the Summary screen appears,
review the summary report.
When you are ready to accept the
settings, click Finish to reboot the server.
If you do not want to reboot at this time,
clear the check box next to Reboot after
exiting the wizard.
IMPORTANT: The ECW joins the
server to your domain. Log in as the
domain administrator when it reboots
(not the local administrator).
The Windows setup completes in
approximately 15 minutes, and the HP
E5000 Configuration Wizard starts.
The Administrator password is required
only the first time you run the wizard.
Press Next.
NOTE: Password complexity rules will
be enforced.
If the wizard finds errors, it reports them
and stops. Exit the wizard, fix the
errors, and restart the wizard from the
Program Files menu on your system.
Click Apply Settings to apply the
configuration settings or click Back to
modify them.
After running the ECW, but before
running the EDT:
• Avoid simple errors by running some
networking tests (such as ping or
tracert) to confirm that networking
and name resolution are configured
properly.
• Open Disk Management (in the
Server Manager, click Storage and
select Disk Management) to verify
that database volumes and the
recovery volume have been
formatted and mounted. If not, you
must do this manually or call HP
Support for assistance.
Review “Using the Exchange
Deployment Tool (EDT)” (page 9)
before you use the tool on Server 1.
Run the EDT on Server 1 to configure
Exchange 2010.
8 Running the E5000 Configuration Wizard (ECW)
The servers do not have to be on the
same IP subnet as the domain
controllers. Networking must be
configured so that the E5000 servers
can communicate with the domain
controller.
Page 9

Using the Exchange Deployment Tool (EDT)
Verify that you have the appropriate permissions, correct operating system version, and Active Directory
schema before proceeding to deploy Exchange 2010. The Prerequisite Checks screen runs a series
of tests to verify your configuration is set up correctly. If any test displays a Fail or Warning status,
you must fix the issue before you can continue.
AcknowledgmentResourceDescriptionStep
Review and accept the end
user license agreement for
Exchange.
Review and accept the end
user license agreement for
Microsoft Jetstress.
Optional but recommended:
Run Jetstress test.
Follow the screens of the EDT
to complete deployment.
Verifying the installation
Complete the following steps:
1. After exiting the EDT, you have the option to run the Exchange Best Practices Analyzer (ExBPA).
HP recommends running the analyzer after you have completed deployment on both servers.
2. Use the E5000 System Manager to monitor the messaging system. See the HP E5000 Messaging
System for Microsoft Exchange Administrator Guide for more information.
3. Launch the Exchange Management Console.
The wizard reminds you to obtain
your Exchange license if you have
not already done so.
Accept the Microsoft Exchange
Jetstress 2010 end user license
agreement to proceed.
Jetstress 2010 can verify the
stability and performance of the
disk subsystem prior to putting the
Exchange server into production.
Select either the Normal or Quick
option.
For more information, see:
http://go.microsoft.com/?
linkid=9744747
Migrating data and settings
If you are migrating from an existing Exchange 2003 or 2007 deployment, you may need a tool to
migrate your data and settings (mailboxes, settings, public folders) before deploying Exchange 2010.
Some available tools are:
• Quest Recovery Manager for Exchange (good for migrating public folders and permissions)
• Binary tools
• Exchange has built-in tools for migrating mailboxes.
Recording network details
Use the following table to record the various network details you will need for installation.
MAPI Network
Subnet mask:
Default gateway:
DNS:
DNS2:
Server 1 IP address:
Using the Exchange Deployment Tool (EDT) 9
Page 10

Server 2 IP address:
DAG IP address:
Replication Network (if changing from defaults)
Subnet mask:
Server 1 IP address:
Server 2 IP address:
Management Network
Subnet mask:
Default gateway:
DNS:
DNS2:
Server 1 IP address:
Server 2 IP address:
Database Information
Existing or new DAG?
DAG name:
Database naming prefix:
10 Recording network details
 Loading...