

Page 1

Dynamic Root Disk
October 2011
http://www.hp.com/go/DRD
©2011 Hewlett-Packard Development Company, L.P.
©2011 Hewlett-Packard Development Company, L.P.
The information contained herein is subject to change without notice
The information contained herein is subject to change without notice
Page 2

Agenda
• DRD overview
• DRD use models
– Recovery
– Maintenance
– Provisioning/Rehosting
– Update
• DRD status & sync
• Real-life examples
• Wrap-up
Page 3

DRD overview
Mission/benefits
Significantly reduce the downtime needed to perform
HP-UX software maintenance
Reduce the downtime required for recovery from
administrative errors
Perform software update work during normal business
DRD is supported on 11i v2
and v3; the orange lightning
bolt on future slides indicates
areas of increased feature
support on 11i v3
hours, or whenever convenient
Provision systems quickly and efficiently
Simplify testing
3
Page 4

DRD use models
Page 5

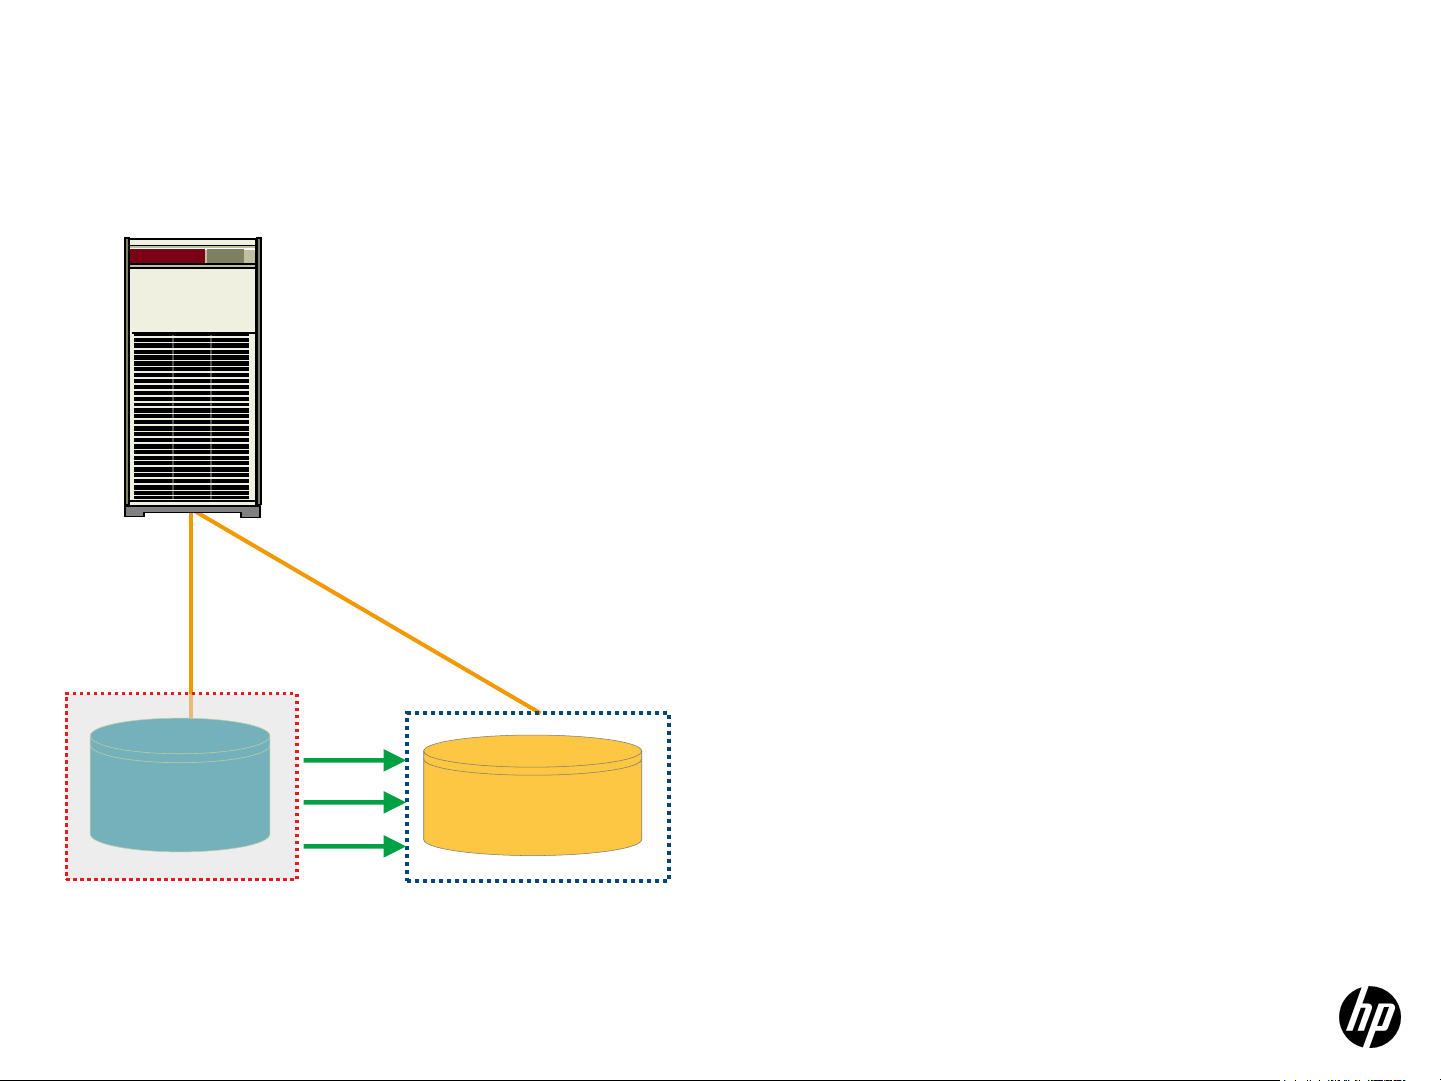
DRD use case
Recovery
1. Original system image is active
2. Create a clone of the original system
image (drd clone)
3. When clone completes, two copies
of system image exist (drd status)
4. If a problem is encountered with
original image, boot clone
(drd activate)
clone
Active
5
Page 6
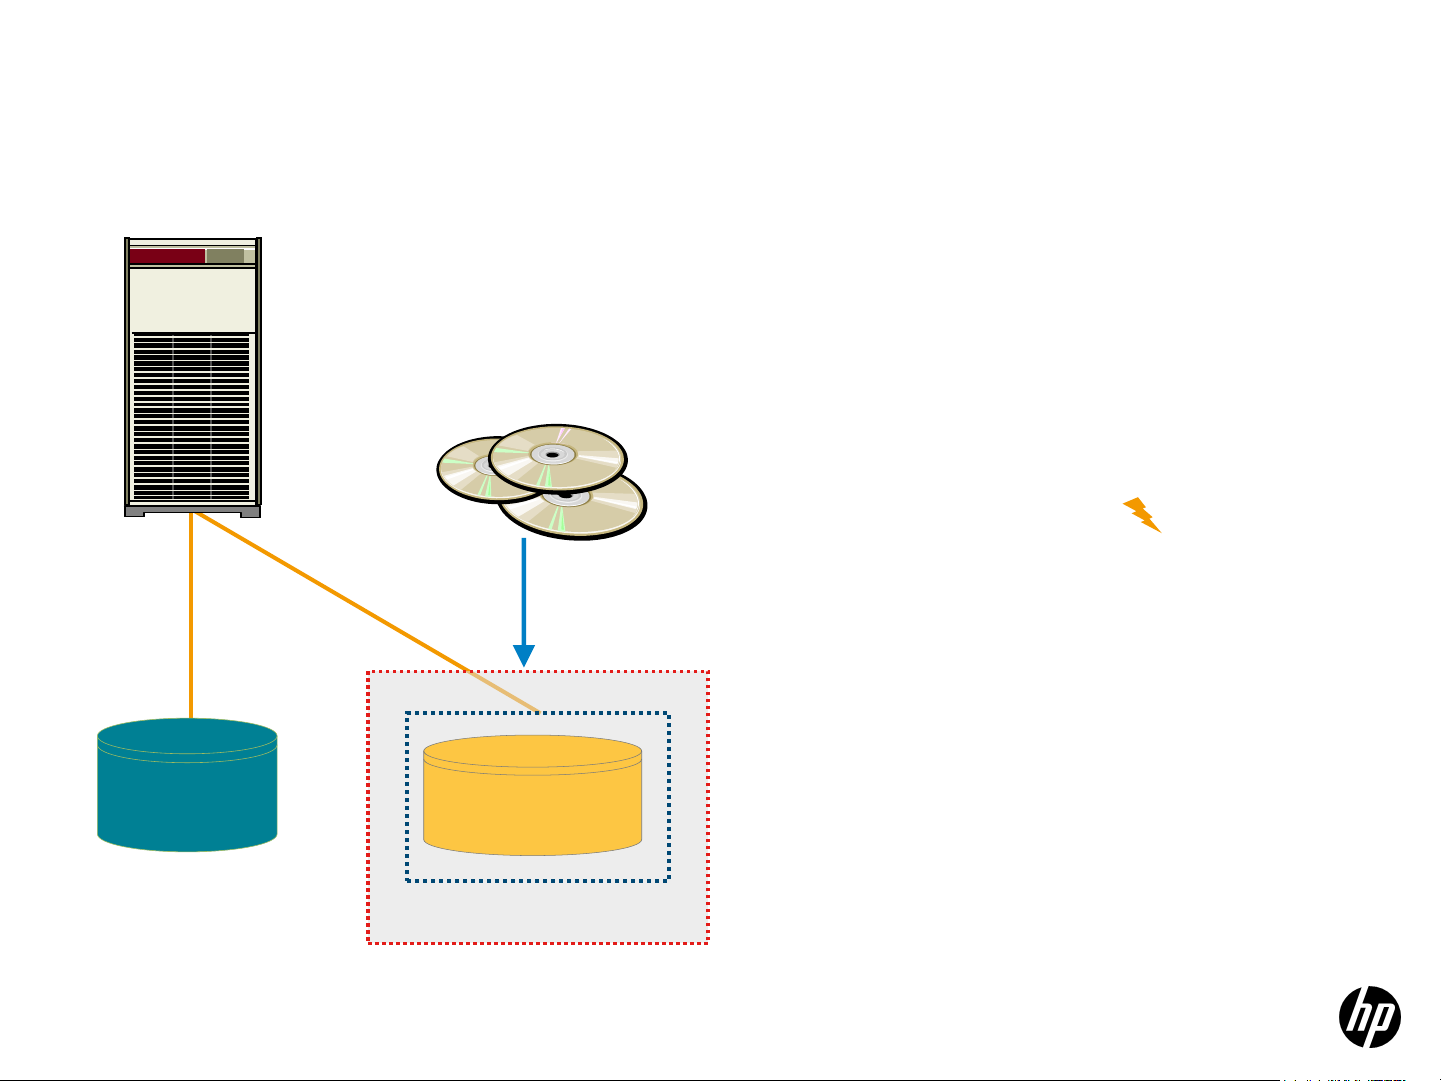
DRD use case
Maintenance (slide 1 of 3)
1. Original system image is active
2. Create a clone of the original system image
(drd clone)
3. When complete, two copies of system image
exist (drd status)
clone
Active
6
Page 7
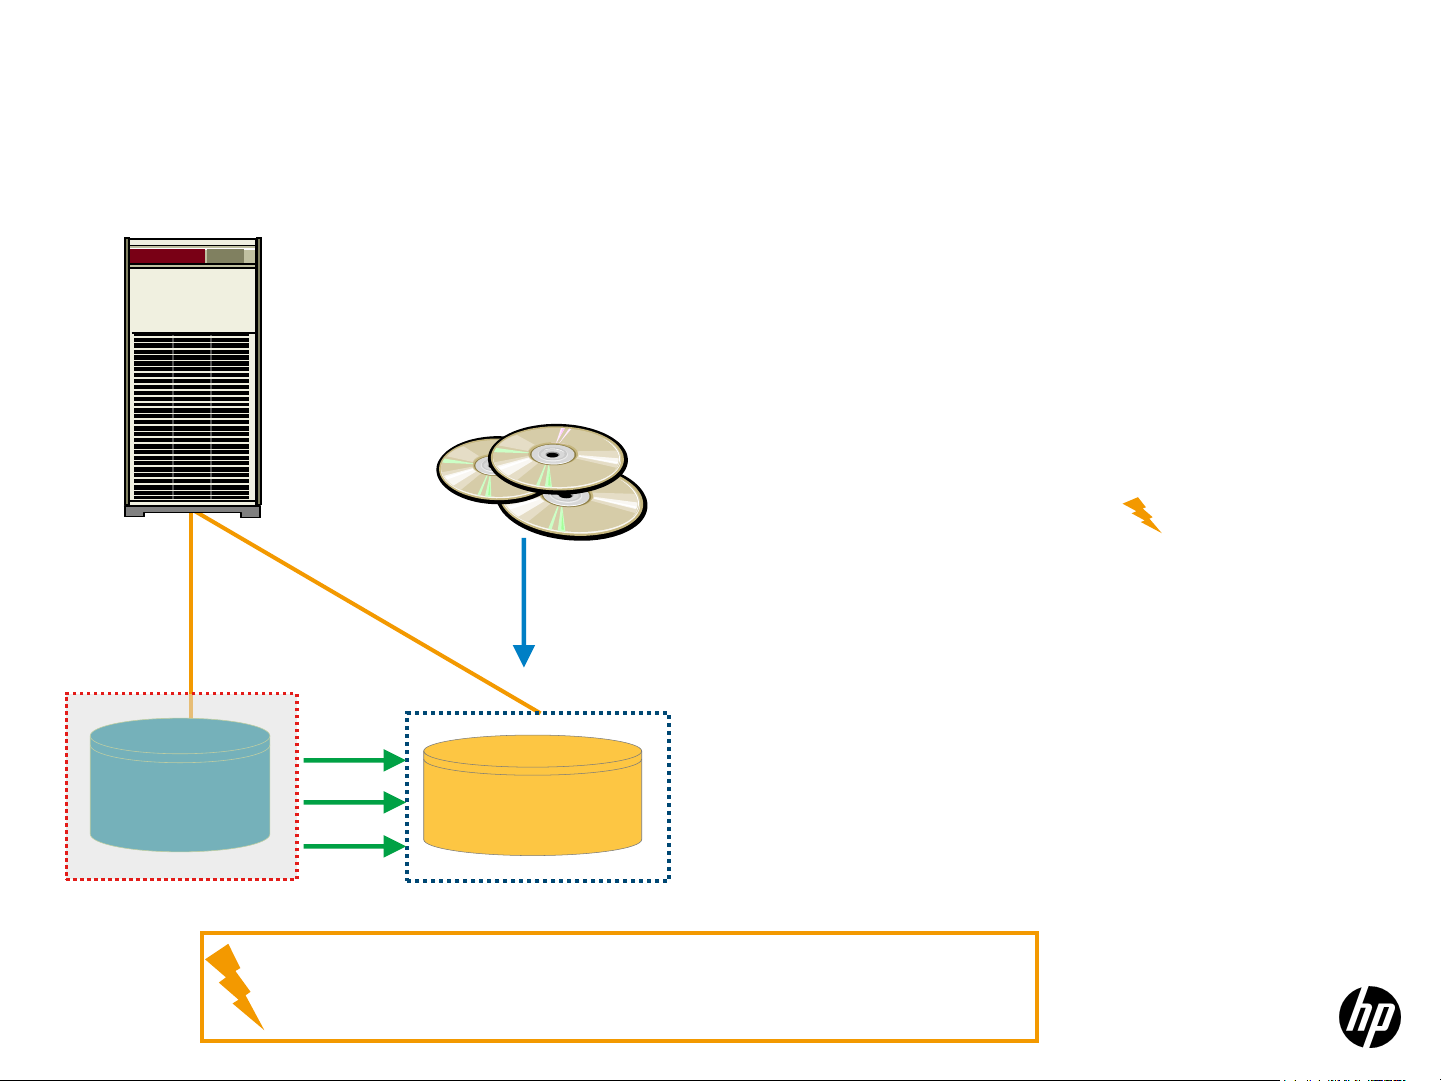
DRD use case
Maintenance (slide 2 of 3)
1. Original system image is active
2. Create a clone of the original system image
(drd clone)
3. When complete, two copies of system image
exist (drd status)
4. Modify inactive image to reach desired state
– install patches & products (drd runcmd
swinstall)
Apply patches
& products
5. When modification completes, have an
unmodified original image and a modified
clone
6. Synchronize files from the active image to the
clone – password files, log files, etc. (drd sync)
sync
Active
The orange lightning bolt identifies increased feature support for 11i v3;
in this case, product installation on a clone is supported only on 11i v3,
with patch installation supported on 11i v3 and 11i v2
7
Modified clone
Page 8
DRD use case
Maintenance (slide 3 of 3)
1. Original system image is active
2. Create a clone of the original system image
(drd clone)
3. When complete, two copies of system image
exist (drd status)
4. Modify inactive image to reach desired state
– install patches & products (drd runcmd
swinstall)
Apply patches
& products
5. When modification completes, have an
unmodified original image and a modified
clone
6. Synchronize files from the active image to the
clone – password files, log files, etc. (drd sync)
7. Boot the clone when ready (drd activate)
8. If original system preferred, boot the
unmodified original image to return to
Modified clone
Active
8
original state (drd activate)
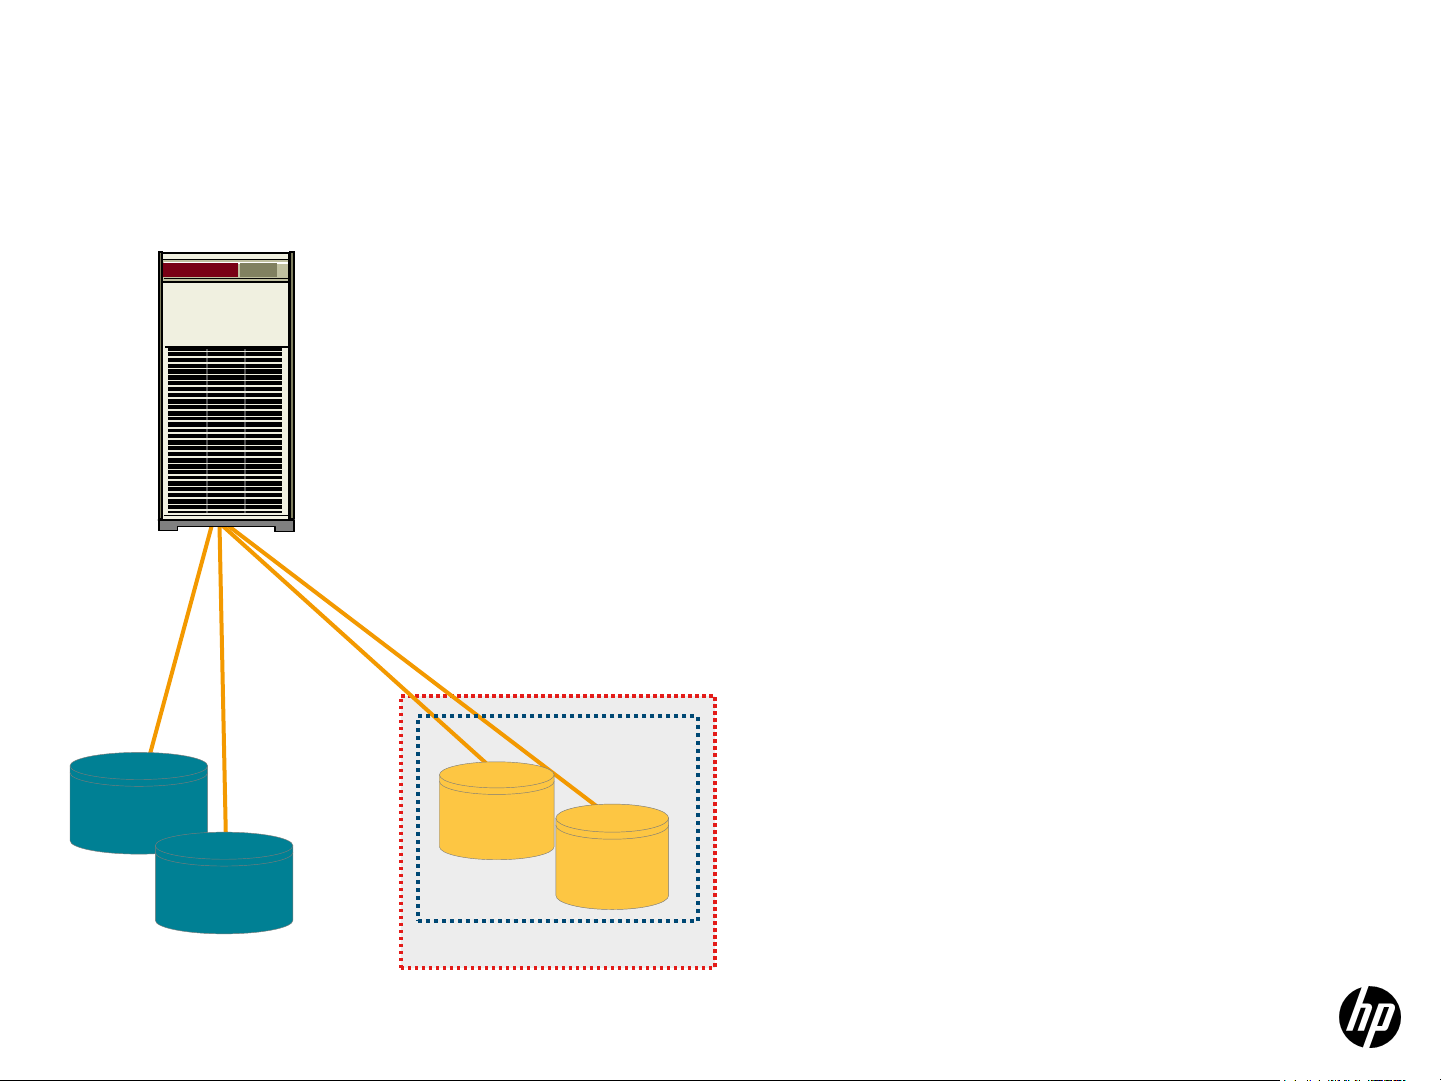
Page 9
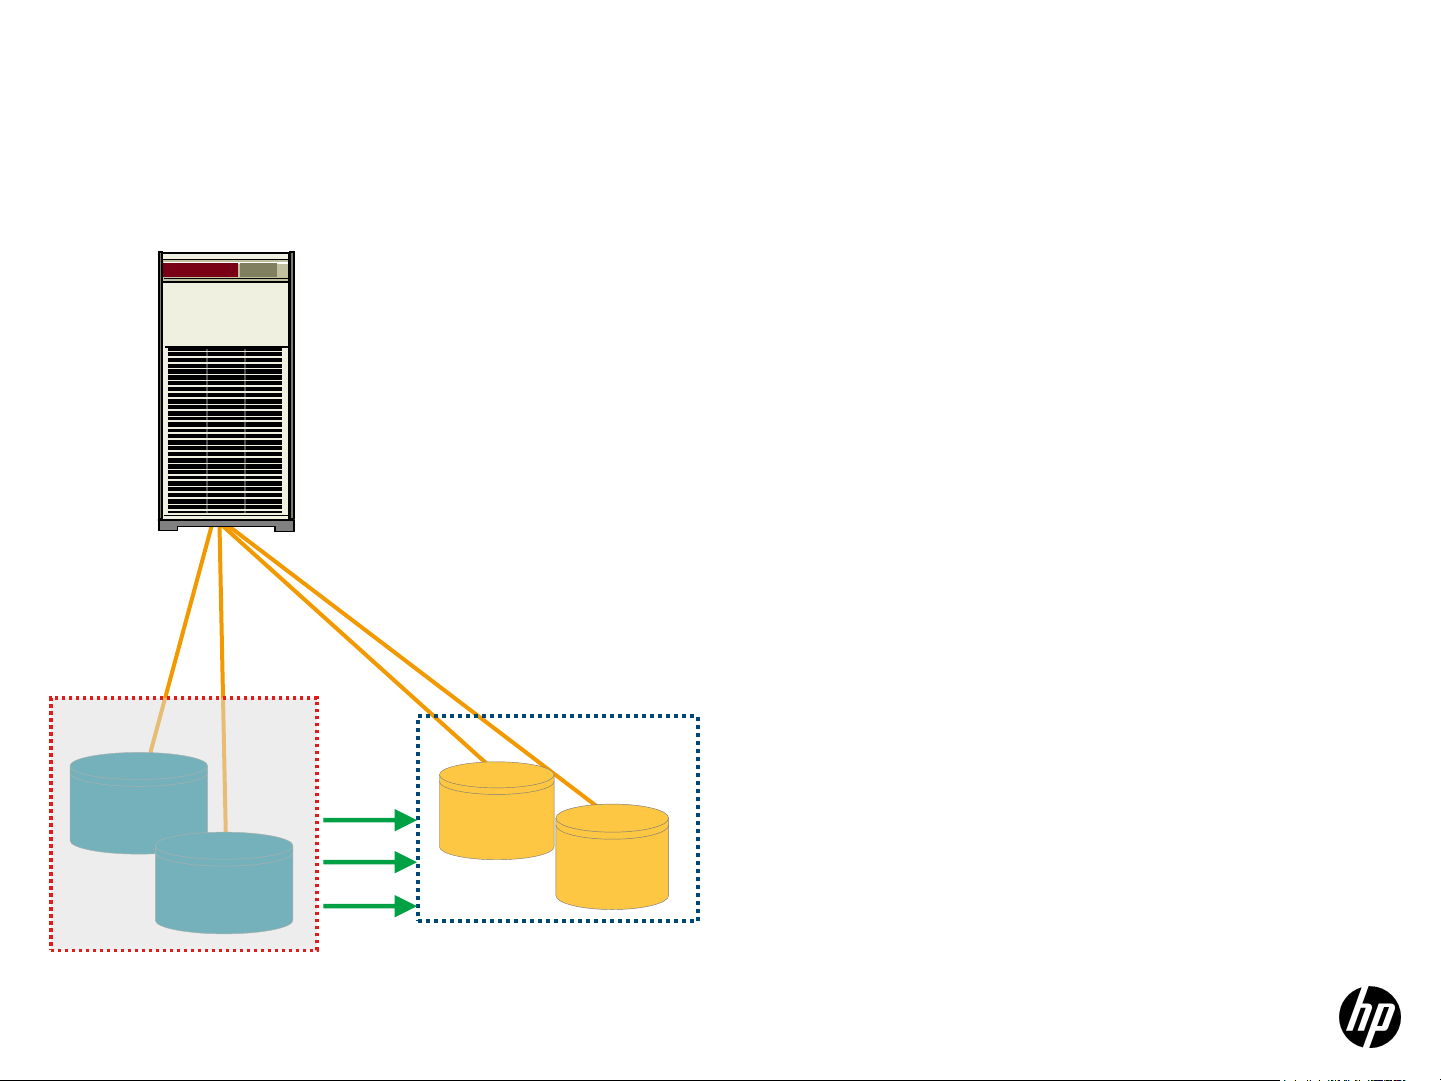
DRD use case
High Availability with DRD and MirrorDisk/UX (slide 1 of 3)
1. Original mirrored system image is active
2. Create mirrored clone of the original system
image (drd clone)
3. When complete, four copies of system image
exist (drd status)
clone
Active
9
Page 10
DRD use case
High Availability with DRD and MirrorDisk/UX (slide 2 of 3)
1. Original mirrored system image is active
2. Create mirrored clone of the original system
image (drd clone)
3. When complete, four copies of system image
exist (drd status)
4. Patch inactive image (drd runcmd swinstall)
5. When modification completes, have an
unmodified original image and a modified
clone
10
Active
sync
Apply patches
& products
Modified clone w/patches
6. Synchronize files from the active image to the
clone – password files, log files, etc. (drd sync)
Page 11
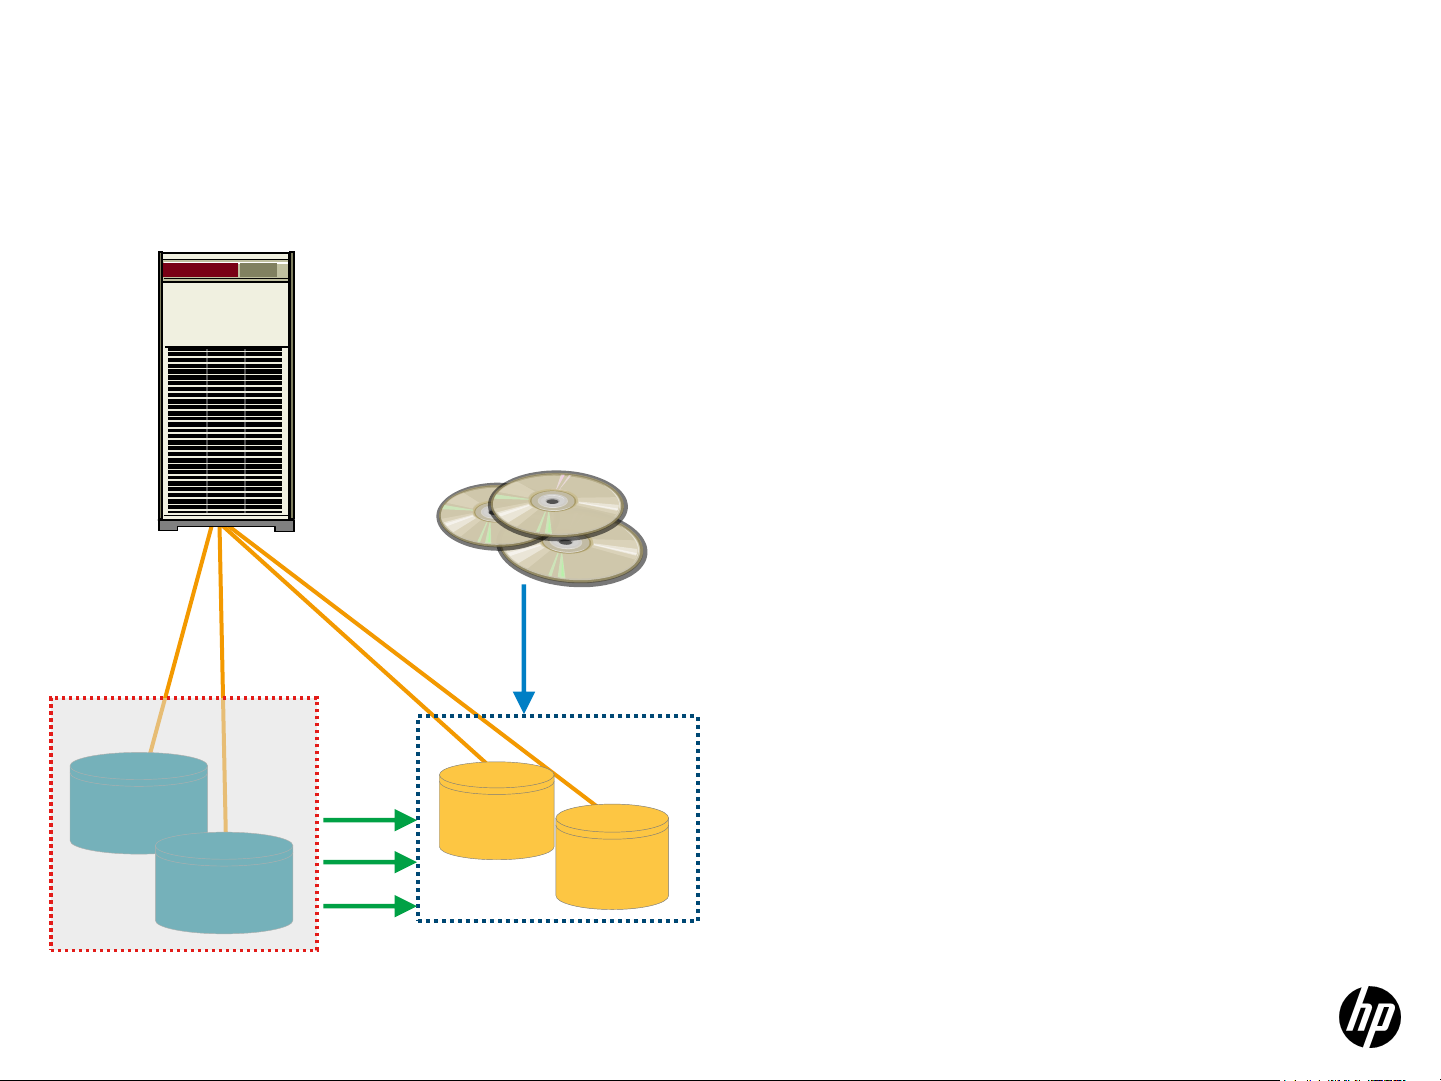
DRD use case
High Availability with DRD and MirrorDisk/UX (slide 3 of 3)
1. Original mirrored system image is active
2. Create mirrored clone of the original system
image (drd clone)
3. When complete, four copies of system image
exist (drd status)
4. Patch inactive image (drd runcmd swinstall)
5. When modification completes, have an
unmodified original image and a modified
clone
6. Synchronize files from the active image to the
clone – password files, log files, etc. (drd sync)
11
7. Boot the clone when ready (drd activate)
8. In event of a sw problem, boot the unmodified
original image to return to original state
(drd activate)
9. In the event of a hw problem, run from mirror
Modified clone w/patches
Active
Page 12

DRD Customer use models
High Availability with DRD and MirrorDisk/UX
Requires 4 LUNs
Requires a MirrorDisk/UX license
Enables fast mirrored recovery
Easy to implement
12
drd clone –t/dev/dsk/c3t15d0 –x
mirror_disk=/dev/dsk/c4t15d0
Provides protection against both
hardware and software failures
Page 13

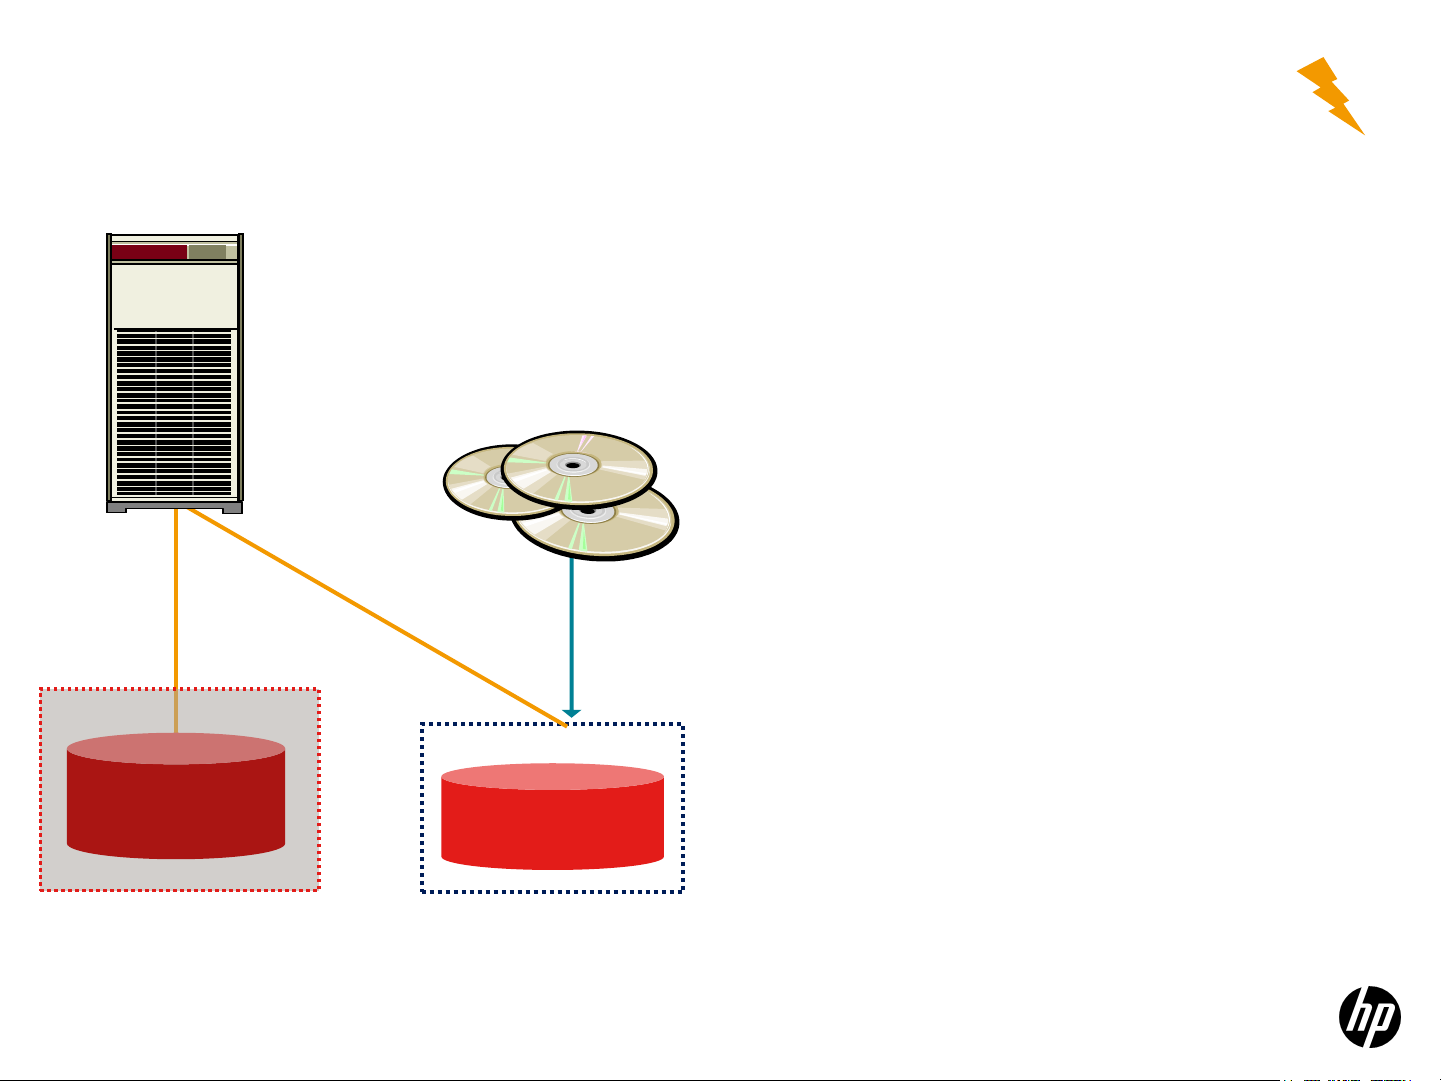
DRD use case
Updating from HP-UX 11i v3 0903 to HP-UX 11i v3 1103 (slide 1 of 3)
1. Original system image is active
2. Create a clone of the original system image
(drd clone)
3. When complete, two copies of system image
exist (drd status)
HP-UX 11i v3 0903
Active
13
HP-UX 11i v3 0903
clone
Page 14
DRD use case
Updating from HP-UX 11i v3 0903 to HP-UX 11i v3 1103 (slide 2 of 3)
1. Original system image is active
2. Create a clone of the original system image
(drd clone)
3. When complete, two copies of system image
HP-UX 11i v3 1103
exist (drd status)
4. Update the inactive image to HP-UX 11i v3
March 2009 or later (1103 or March 2011 in
this case) (drd runcmd update-ux)
5. When modification completes, have an
original image with HP-UX 11i v3 0903,
HP-UX 11i v3 0903
Active
14
update
HP-UX 11i v3 1103
Modified clone
and a modified clone with HP-UX 11i v3 1103
Page 15

DRD use case
Updating from HP-UX 11i v3 0903 to HP-UX 11i v3 1103 (slide 3 of 3)
1. Original system image is active
2. Create a clone of the original system image
(drd clone)
3. When complete, two copies of system image
exist (drd status)
4. Update the inactive image to HP-UX 11i v3
March 2009 or later (1103 or March 2011 in
this case) (drd runcmd update-ux)
HP-UX 11i v3 0903
15
Patches
SWA
Report
HP-UX 11i v3 1103
Modified clone
Active
5. When modification completes, have an
original image with HP-UX 11i v3 0903,
and a modified clone with HP-UX 11i v3 1103
6. Use SWA to identify patches & fixes to security
issues (drd mount, swa report, drd umount)
7. Install required patches (swa get, drd runcmd
swinstall)
8. Boot the clone when ready (drd activate)
9. If original system preferred, boot the
unmodified original image to return to
original state (drd activate)
Page 16

DRD use case
Updating from HP-UX 11i v2 to HP-UX 11i v3 1103 (slide 1 of 4)
1. Create a clone of the original system image
(drd clone)
2. Run update-ux in preview mode on the active disk
(update-ux -p)
3. Adjust file system sizes on the clone as needed
(www.hp.com/go/drd-docs)
HP-UX 11i v2
Active
16
HP-UX 11i v2
clone
Modified clone
Page 17

DRD use case
Updating from HP-UX 11i v2 to HP-UX 11i v3 1103 (slide 2 of 4)
1. Create a clone of the original system image
(drd clone)
2. Run update-ux in preview mode on the active disk
(update-ux -p)
HP-UX 11i v2 0712
HP-UX 11i v3 1103
update
HP-UX 11i v3 1103
Modified clone
Active
3. Adjust file system sizes on the clone as needed
(www.hp.com/go/drd-docs)
4. Activate the clone & boot when ready (drd activate)
5. Update the active image to HP-UX 11i v3 1103
(update-ux)
6. When update completes, have an active image with
11i v3 1103, and a clone with 11i v2 (drd status)
Could stop here, OR…
17
Page 18

DRD use case
Updating from HP-UX 11i v2 to HP-UX 11i v3 1103 (slide 3 of 4)
1. Create a clone of the original system image
(drd clone)
2. Run update-ux in preview mode on the active disk
(update-ux -p)
3. Adjust file system sizes on the clone as needed
(www.hp.com/go/drd-docs)
4. Activate the clone & boot when ready (drd activate)
5. Update the active image to HP-UX 11i v3 1103
(update-ux)
SWA
Report
6. When update completes, have an active image with
11i v3 1103, and a clone with 11i v2 (drd status)
Could stop here, OR…
1. Create a clone of the active image
(drd clone –x overwrite=true)
HP-UX 11i v3 1103
18
clone
HP-UX 11i v3 1103
Active
2. Use SWA to identify patches & fixes to security
issues (drd mount, swa report, drd unmount)
Page 19

DRD use case
Updating from HP-UX 11i v2 to HP-UX 11i v3 1103 (slide 4 of 4)
1. Create a clone of the original system image
(drd clone)
2. Run update-ux in preview mode on the active disk
(update-ux -p)
3. Adjust file system sizes on the clone as needed
(www.hp.com/go/drd-docs)
4. Activate the clone & boot when ready (drd activate)
5. Update the active image to HP-UX 11i v3 1103
(update-ux)
HP-UX 11i v3 1103
Active
19
Patches
HP-UX 11i v3 1103
6. When update completes, have an active image with
11i v3 1103, and a clone with 11i v2 (drd status)
Could stop here, OR…
1. Create a clone of the active image
(drd clone –x overwrite=true)
2. Use SWA to identify patches & fixes to security
issues (drd mount, swa report, drd unmount)
3. Install required patches
(swa get, drd runcmd swinstall)
4. Boot the clone when ready (drd activate)
Page 20

DRD use case
Rehosting – Provisioning (blade example, slide 1 of 2)
1. Original system image is the
BL2
BL6
active image
2. Create clone of the original system
image (drd clone)
3. When clone completes, two copies
of system image exist (drd status)
4. Rehost the clone to be BL6:
a. Create a system information file
b. Copy the system info file to the EFI partition
of the clone (drd rehost)
sys_info_BL6 SYSINFO.TXT
clone
Active
20
Page 21
DRD use case
Rehosting – Provisioning (blade example, slide 2 of 2)
1. Original system image is the
BL2
BL6
active image
2. Create clone of the original system
image (drd clone)
3. When clone completes, two copies
of system image exist (drd status)
4. Rehost the clone to be BL6:
a. Create a system information file
b. Copy the system info file to the EFI partition
of the clone (drd rehost)
sys_info_BL6
Active Active
21
SYSINFO.TXT
5. Optional: Create a Virtual Connect
Profile for BL6
6. Unpresent the LUN from BL2 and
present it to BL6
7. Choose the new LUN from the EFI
Boot Menu, and boot the BL6 blade
Page 22

Rehosting: Is
• Provided by sysinfo file management:
− Ability to change hostname, IP @, network cfg
• Provided by 11i v3 storage agility:
− Persistence of agile device files
• E.g./dev/disk/disk10 linked to WWN in kernel
registry
22
• Provided by 11i v3 LVM
− Ability to boot from different disk from boot disk
recorded in/etc/lvmtab
Page 23

Rehosting: Is not
• Additional software is not installed by “drd
rehost”:
− Use “drd runcmd swinstall“ for all drivers needed
for target before rehost
− Use “drd runcmd mk_kernel to configure all drivers
needed for target into kernel
• For 11iv2, do not get
23
− Storage agility
− LVM Boot resiliency
23
Page 24

Rehosting: Additional information
• Rehosting can be done between VMs, blades
and even different systems on 11i v3 – similar
systems will be more straightforward, and
different systems will require more manual work
• You may need to do kernel work on the target
system for different systems, including different
24
types of blades. The “Migrating an Integrity HP-
UX 11i v3 Instance to New Hardware”
whitepaper has additional information
Page 25

DRD use case
Maintaining a mixed 11i v2/v3 VM environment (slide 1 of 2)
1. Install VM Host, VM1 and VM2 via Ignite
2. VM3 needs to be added
3. On host, setup resources:
a. Add disk to VM2
VM Host
VM1
VM2
VM3
11i v3
11i v2
11i v3
sys_info_vm3
clone
11i v3
SYSINFO.TXT
b. Create VM3 with just a network interface
4. On VM2, create and rehost the new
boot disk:
a. Create clone of the VM‟s system image (drd
clone)
b. When clone completes, two copies of system
image exist (drd status)
c. Create the system info file with VM3‟s personality
d. Copy the system info file to the EFI partition of the
clone (drd rehost)
25
Page 26

DRD use case
Maintaining a mixed 11i v2/v3 VM environment (slide 2 of 2)
1. Install VM Host, VM1 and VM2 via Ignite
2. VM3 needs to be added
3. On host, setup resources:
a. Add disk to VM2
VM Host
VM1
VM2
VM3
11i v3
11i v2
11i v3
sys_info_vm3
11i v3
SYSINFO.TXT
Active
b. Create VM3 with just a network interface
4. On VM2, create and rehost the new
boot disk:
a. Create clone of the VM‟s system image (drd
clone)
b. When clone completes, two copies of system
image exist (drd status)
c. Create the system info file with VM3‟s personality
d. Copy the system info file to the EFI partition of the
clone (drd rehost)
5. On the host, activate VM3:
a. Move the clone disk from VM2 to VM3
b. Boot VM3, choosing clone from
EFI menu
26
Page 27

DRD Status & DRD Sync
Page 28

DRD status
======= 9/23/11 22:09:00 MDT BEGIN Displaying DRD Clone Image
Information (user=root) (jobid=drdtest10)
* Clone Disk: /dev/disk/disk8
* Clone EFI Partition: AUTO file present, Boot loader present
* Clone Rehost Status: SYSINFO.TXT not present
* Clone Creation Date: 10/24/10 16:41:56 MDT
* Last Sync Date: 10/25/10 14:26:16 MDT
* Clone Mirror Disk: /dev/disk/disk10
* Mirror EFI Partition: AUTO file present, Boot loader present
* Mirror Rehost Status: SYSINFO.TXT not present
* Original Disk: /dev/disk/disk7
* Original EFI Partition: AUTO file present, Boot loader present
* Original Rehost Status: SYSINFO.TXT not present
* Booted Disk: Clone Disk (/dev/disk/disk8)
* Activated Disk: /dev/disk/disk13
======= 9/23/11 22:09:13 MDT END Displaying DRD Clone Image
Information succeeded. (user=root) (jobid=drdtest10)
#
28
Page 29

DRD sync
Without DRD Sync
1. A system administrator creates a DRD
clone on a Thursday
2. The administrator applies a collection
of software changes to the clone on
Friday using the drd runcmd
command
3. On Friday, several log files are
updated on the booted system
4. On Saturday, the clone is booted,
however the log files are not up to
date, so the administrator must copy
over the log files and any other files
from the original system that changed
With DRD Sync
1. A system administrator creates a DRD
clone on a Thursday
2. The administrator applies a collection
of software changes to the clone on
Friday using the drd runcmd
command
3. On Friday, several log files are
updated on the booted system
4. On Saturday, the clone is synced
then booted – log files and other files
that have changed on the original
system have automatically been
copied to the clone
29
after the clone was created – for
example,/etc/passwd
Page 30

DRD sync
File 1
File 2 File 2 File 2
File 3 File 3
File 4 File 4
File 1
File 1.1 File 1.1
File 2
File 3.1 File 3.1
File 4
File 4 File 4 File 4
File 1.1 File 1.1
File 2 File 2
File 3.2 ♥ File 3.2 ♥
Active Image
File 5 File 5 File 5 File 5 File 5 File 5
File 1
File 2
File 3
File 4 File 4 File 4 File 4
Inactive Image
File 5 File 5 File 5 File 5
File 1.2 ♠
File 3
File 1.2 ♠
File 2 File 2 File 2
File 3.1
File 1.2 ♠
File 3.2 ♥
30
Time
drd clone
drd sync 1
drd sync 2
Page 31

DRD sync – algorithm
• The list of files on the active system in the root group is the initial list of
files to be synchronized
Trimming the list of files to be synchronized
The following locations are not synchronized: /var/adm/sw/, /var/tmp/,
/var/opt/drd/tmp/, /stand/, /tmp, /etc/lvmconf, /etc/vx/,
/etc/vxvmconf/, /dev/<clone_group>, plus files specified by adminstrator
Files that have changed on the clone because of operations other than „drd
sync‟ are not synchronized
Nonvolatile files in the Software Distributor Installed Products Database (IPD)
are not synchronized
31
Volatile files in the Software Distributor Installed Products Database (IPD) are
only synchronized if templates match
Files that are copies by a special “repair” mechanism such as/etc/fstab
or/etc/lvmtab
Page 32

DRD real-life examples
Page 33

Scenario 1: Maintenance of an 11i v3
IA system
• System setup
− rx3600, 8 GB RAM
− HP-UX 11i v3, initial release
• Without DRD:
− Quiesce the system
− Load:
• Quality Pack (QPK)
• Hardware Enablement (HWE)
• Feature11i
• HP SIM, Software Assistant,
MD5Checksum
− Reboot system
− Verify system
• Total downtime: 32:07 (min:sec)
33
Downtime
33
Page 34

Scenario 1: Maintenance of an 11i v3
IA system (Continued)
• System setup
− rx3600, 8 GB RAM
− HP-UX 11i v3, initial release
• With DRD:
− Create clone
− Load:
• Quality Pack (QPK)
• Hardware Enablement (HWE)
• Feature11i
• HP SIM, Software Assistant, MD5Checksum
− Reboot system
Downtime
− Verify system
• Total downtime: 13:29 (min:sec)
• Downtime reduction: ~58%
34
34
Page 35

Scenario 2: Updating an HP-UX 11i v3
IA system
• System setup
− rx3600, 4 GB RAM
− HP-UX 11i v3, March 2008
• Without DRD:
− Quiesce the system
− Update to HP-UX 11i v3,
March 2009
− Reboot system
− Verify system
• Total downtime: 1:14:49
(hrs:min:sec)
35
Downtime
35
Page 36

Scenario 2: Updating an HP-UX 11i v3
IA system (continued)
• System setup
− rx3600, 4 GB RAM
− HP-UX 11i v3, March 2008
• With DRD:
− Create clone
− Update to HP-UX 11i v3,
March 2009
− Reboot system
Downtime
− Verify system
• Total downtime: 35:53 (min:sec)
• Downtime reduction: ~52%
36
36
Page 37

DRD sample timeline with command examples
I am interrupted by a
call– I need to submit my
trip report for HP Discover
today or I won‟t get
reimbursed…
6.13.2011
@ 3:30 pm
6.13.2011
@ 3 pm
I have just returned from HP
Discover and have decided to
use DRD when installing the
latest QPK plus a security
patch! I create a clone of my
root volume.
drd clone –t/dev/disk/disk7
6.13.2011
@ 4:00 pm
Now that I know I created
the clone, I will install the
QPK & a security patch.
drd runcmd swinstall –s
hostname:/depot_loc
QPK1131 PHKL_12345
6.13.2011
@ 4:01 pm
6.13.2011
@ 4:30 pm
Back to my
system
maintenance –
did I actually
create the clone
earlier?
drd status
The clone is ready
to go – I‟ll activate
it now!
drd activate
6.13.2011
@ 4:35 pm
I need to delete a file
from the clone.
drd mount; rm –
rf/var/opt/drd/mnts/sy
simage_001/var/adm/
lp/request; drd umount
Reboot
6.14.2011
@ 7:00 am
My system
rebooted last
night and now
contains the latest
QPK and a new
security patch
37
Page 38

Wrap-up
Page 39

More information
• Get the DRD Toolset!
− DRD tools and documentation are available as a
no-cost download:
http://www.hp.com/go/drd
http://www.hp.com/go/drd-docs
• Documentation includes Administrator‟s
Guide, manpages, FAQ and the following
Whitepapers:
− Quick Start & Best Practices
− Dynamic Root Disk and Mirrordisk/UX
− Exploring DRD Rehosting in HP-UX 11i v2
and 11i v3
− Migrating an Integrity HP-UX 11iv3 Instance
to New Hardware
− DRD-safe Concepts for HP-UX 11i v2 and Later
− Using DRD Activate and Deactivate Commands
39
Page 40

THANK YOU
 Loading...