

Page 1

HP OpenView Storage Data Protector
Integration Guide for HP OpenView
Manual Edition: August 2002
Manufacturing Part Number: B6960-90069
Release A.05.00
© Copyright 2002 Hewlett-Packard Company.
Page 2

Legal Notices
Hewlett-Packard makes no warranty of any kind with regard to this
manual, including, but not limited to, the implied warranties of
merchantability and fitness for a particular purpose. Hewlett-Packard
shall not be held liable for errors contained herein or direct, indirect,
special, incidental or consequential damages in connection with the
furnishing, performance, or use of this material.
Warra n t y. A copy of the specific warranty terms applicable to your
Hewlett- Packard product and replacement parts can be obtained from
your local Sales and Service Office.
Restricted Rights Legend. All rights are reserved. No part of this
document may be photocopied, reproduced, or translated to another
language without the prior written consent of Hewlett-Packard
Company. The information contained in this document is subject to
change without notice.
Use, duplication or disclosure by the U.S. Government is subject to
restrictions as set forth in subparagraph (c) (1) (ii) of the Rights in
Technical Data and Computer Software clause at DFARS 252.227-7013
for DOD agencies, and subparagraphs (c) (1) and (c) (2) of the
Commercial Computer Software Restricted Rights clause at FAR
52.227-19 for other agencies.
HEWLETT-PACKARD COMPANY
United States of America
Copyright Notices. ©Copyright 1983-2002 Hewlett-Packard Company,
all rights reserved.
Reproduction, adaptation, or translation of this document without prior
written permission is prohibited, except as allowed under the copyright
laws.
©Copyright 1979, 1980, 1983, 1985-93 Regents of the University of
California
This software is based in part on the Fourth Berkeley Software
Distribution under license from the Regents of the University of
California.
©Copyright 1986-1992 Sun Microsystems, Inc.
ii
Page 3

©Copyright 1985-86, 1988 Massachusetts Institute of Technology
©Copyright 1989-93 The Open Software Foundation, Inc.
©Copyright 1986-1997 FTP Software, Inc. All rights reserved
©Copyright 1986 Digital Equipment Corporation
©Copyright 1990 Motorola, Inc.
©Copyright 1990, 1991, 1992 Cornell University
©Copyright 1989-1991 The University of Maryland
©Copyright 1988 Carnegie Mellon University
©Copyright 1991-1995 by Stichting Mathematisch Centrum,
Amsterdam, The Netherlands
©Copyright 1999, 2000 Bo Branten
Trademark Notices. UNIX® is a registered trademark in the United
States and other countries, licensed exclusively through X/Open
Company Limited.
X Window System is a trademark of the Massachusetts Institute of
Technology.
Motif is a trademark of the Open Software Foundation, Inc. in the U.S.
and other countries.
Windows NT™ is a U.S. trademark of Microsoft Corporation. Microsoft®,
MS-DOS®, Windows® and MS Windows® are U.S. registered
trademarks of Microsoft Corporation.
Oracle®, SQL*Net®, and Net8® are registered U.S. trademarks of
Oracle Corporation, Redwood City, California. Oracle Reports™,
Oracle7™, Oracle7 Server™, Oracle7 Backup Utility™, Oracle8™,
Oracle8 Server Manager™ and Oracle8 Recovery Manager™ are
trademarks of Oracle Corporation, Redwood City, California.
Java™ is a U.S. trademark of Sun Microsystems, Inc.
Adobe® and Acrobat® are trademarks of Adobe Systems Incorporated.
ARM® is a registered trademark of ARM Limited.
X/Open® is a registered trademark, and the X device is a trademark of
X/Open Company Ltd. in the UK and other countries.
VisiCalc® is a U.S. registered trademark of Lotus Development Corp.
iii
Page 4

HP-UX Release 10.20, HP-UX Release 11.00 and later (in both 32 and
64-bit configurations) on all HP 9000 computers are Open Group UNIX
95 branded products.
Netscape and Netscape Navigator are U.S. trademarks of Netscape
Communications Corporation.
OpenView® is a registered U.S. trademark of Hewlett-Packard Company.
Other reserved names are trademarks of the respective companies.
iv
Page 5

Contents
1. Introduction
Overview. . . . . . . . . . . . . . . . . . . . . . . . . . . . . . . . . . . . . . . . . . . . . . . . . . . . . . . . . . . . . . . 2
Data Protector . . . . . . . . . . . . . . . . . . . . . . . . . . . . . . . . . . . . . . . . . . . . . . . . . . . . . . . . 2
OpenView Products Integrated with Data Protector . . . . . . . . . . . . . . . . . . . . . . . . . . 2
OpenView Service Information Portal . . . . . . . . . . . . . . . . . . . . . . . . . . . . . . . . . . . . 2
OpenView Service Desk . . . . . . . . . . . . . . . . . . . . . . . . . . . . . . . . . . . . . . . . . . . . . . . 2
OpenView Reporter . . . . . . . . . . . . . . . . . . . . . . . . . . . . . . . . . . . . . . . . . . . . . . . . . . . 3
OpenView Operations . . . . . . . . . . . . . . . . . . . . . . . . . . . . . . . . . . . . . . . . . . . . . . . . . 3
Service Level Management Integrations. . . . . . . . . . . . . . . . . . . . . . . . . . . . . . . . . . . . 3
Data Protector-SIP . . . . . . . . . . . . . . . . . . . . . . . . . . . . . . . . . . . . . . . . . . . . . . . . . . . 3
Data Protector-OVO-SIP. . . . . . . . . . . . . . . . . . . . . . . . . . . . . . . . . . . . . . . . . . . . . . . 3
Data Protector-OVO-OVR. . . . . . . . . . . . . . . . . . . . . . . . . . . . . . . . . . . . . . . . . . . . . . 3
Data Protector-OVO-OVSD . . . . . . . . . . . . . . . . . . . . . . . . . . . . . . . . . . . . . . . . . . . . 3
2. Data Protector-SIP Integration
Introduction . . . . . . . . . . . . . . . . . . . . . . . . . . . . . . . . . . . . . . . . . . . . . . . . . . . . . . . . . . . . 6
Prerequisites . . . . . . . . . . . . . . . . . . . . . . . . . . . . . . . . . . . . . . . . . . . . . . . . . . . . . . . . . . 6
Product Capabilities and Integration Benefits . . . . . . . . . . . . . . . . . . . . . . . . . . . . . . . 6
Component List. . . . . . . . . . . . . . . . . . . . . . . . . . . . . . . . . . . . . . . . . . . . . . . . . . . . . . . . 6
Dependencies . . . . . . . . . . . . . . . . . . . . . . . . . . . . . . . . . . . . . . . . . . . . . . . . . . . . . . . . . 7
Data Protector/SIP Integration . . . . . . . . . . . . . . . . . . . . . . . . . . . . . . . . . . . . . . . . . . . 8
Data Protector Integration Module . . . . . . . . . . . . . . . . . . . . . . . . . . . . . . . . . . . . . . 8
Cell Request Server (CRS) . . . . . . . . . . . . . . . . . . . . . . . . . . . . . . . . . . . . . . . . . . . . . 8
How Data Protector Integrates with SIP . . . . . . . . . . . . . . . . . . . . . . . . . . . . . . . . . . . 8
Deployments . . . . . . . . . . . . . . . . . . . . . . . . . . . . . . . . . . . . . . . . . . . . . . . . . . . . . . . . . 10
Deployment A . . . . . . . . . . . . . . . . . . . . . . . . . . . . . . . . . . . . . . . . . . . . . . . . . . . . . . 10
Deployment B . . . . . . . . . . . . . . . . . . . . . . . . . . . . . . . . . . . . . . . . . . . . . . . . . . . . . . 11
Deployment C . . . . . . . . . . . . . . . . . . . . . . . . . . . . . . . . . . . . . . . . . . . . . . . . . . . . . . 11
Setup Process . . . . . . . . . . . . . . . . . . . . . . . . . . . . . . . . . . . . . . . . . . . . . . . . . . . . . . . . . . 13
Installation Procedures . . . . . . . . . . . . . . . . . . . . . . . . . . . . . . . . . . . . . . . . . . . . . . . . 13
Prerequisite Information . . . . . . . . . . . . . . . . . . . . . . . . . . . . . . . . . . . . . . . . . . . . . 13
On the Data Protector Server. . . . . . . . . . . . . . . . . . . . . . . . . . . . . . . . . . . . . . . . . . 13
Establishing Data Protector/SIP Communication. . . . . . . . . . . . . . . . . . . . . . . . . . 14
Installing on a SIP Server . . . . . . . . . . . . . . . . . . . . . . . . . . . . . . . . . . . . . . . . . . . . . . 14
Installing on a Windows NT SIP Server . . . . . . . . . . . . . . . . . . . . . . . . . . . . . . . . . 14
Installing on an HP-UX SIP Server . . . . . . . . . . . . . . . . . . . . . . . . . . . . . . . . . . . . . 14
Installing on a Web Server . . . . . . . . . . . . . . . . . . . . . . . . . . . . . . . . . . . . . . . . . . . . . . 15
Installing on a Windows Web Server . . . . . . . . . . . . . . . . . . . . . . . . . . . . . . . . . . . . 16
v
Page 6

Contents
Installing on an HP-UX Web Server . . . . . . . . . . . . . . . . . . . . . . . . . . . . . . . . . . . . 16
Customization . . . . . . . . . . . . . . . . . . . . . . . . . . . . . . . . . . . . . . . . . . . . . . . . . . . . . . . 17
Setting Up Backup Groups on Data Protector . . . . . . . . . . . . . . . . . . . . . . . . . . . . 17
Editing ConfigSpec.xml. . . . . . . . . . . . . . . . . . . . . . . . . . . . . . . . . . . . . . . . . . . . . . . 18
Creating Customer Models and Portal Views . . . . . . . . . . . . . . . . . . . . . . . . . . . . . . . . 22
Customer Models . . . . . . . . . . . . . . . . . . . . . . . . . . . . . . . . . . . . . . . . . . . . . . . . . . . . . 22
Importing the Customer Model . . . . . . . . . . . . . . . . . . . . . . . . . . . . . . . . . . . . . . . . 23
Management Data Filter . . . . . . . . . . . . . . . . . . . . . . . . . . . . . . . . . . . . . . . . . . . . . . . 24
Adding and Removing Services in a Portal View . . . . . . . . . . . . . . . . . . . . . . . . . . . . 25
Error Messages Module . . . . . . . . . . . . . . . . . . . . . . . . . . . . . . . . . . . . . . . . . . . . . . . . . . 26
Understanding Data Protector Error Messages . . . . . . . . . . . . . . . . . . . . . . . . . . . . . 26
Data Protector Error Messages . . . . . . . . . . . . . . . . . . . . . . . . . . . . . . . . . . . . . . . . 26
Editing Data Protector Message Modules . . . . . . . . . . . . . . . . . . . . . . . . . . . . . . . . . . 27
Editing the PortalView.XML File Directly . . . . . . . . . . . . . . . . . . . . . . . . . . . . . . . . 28
Protection Status Module . . . . . . . . . . . . . . . . . . . . . . . . . . . . . . . . . . . . . . . . . . . . . . . . 29
Understanding the Protection Status Module . . . . . . . . . . . . . . . . . . . . . . . . . . . . . . 29
Protection Status Gauge. . . . . . . . . . . . . . . . . . . . . . . . . . . . . . . . . . . . . . . . . . . . . . . . 29
All Hosts Backup Statistics Report . . . . . . . . . . . . . . . . . . . . . . . . . . . . . . . . . . . . . 30
Client Host Backup Report . . . . . . . . . . . . . . . . . . . . . . . . . . . . . . . . . . . . . . . . . . . . 30
Host Statistics Report. . . . . . . . . . . . . . . . . . . . . . . . . . . . . . . . . . . . . . . . . . . . . . . . . . 32
Detail View . . . . . . . . . . . . . . . . . . . . . . . . . . . . . . . . . . . . . . . . . . . . . . . . . . . . . . . . 32
Editing the Backup Health Module . . . . . . . . . . . . . . . . . . . . . . . . . . . . . . . . . . . . . . . 33
Using the Backup Health - Edit page . . . . . . . . . . . . . . . . . . . . . . . . . . . . . . . . . . . 33
Backup Health Criteria . . . . . . . . . . . . . . . . . . . . . . . . . . . . . . . . . . . . . . . . . . . . . . 34
Directly Editing the PortalView.xml File . . . . . . . . . . . . . . . . . . . . . . . . . . . . . . . . . 34
Data Protector Reports Module. . . . . . . . . . . . . . . . . . . . . . . . . . . . . . . . . . . . . . . . . . . . 35
Understanding Data Protector Reports. . . . . . . . . . . . . . . . . . . . . . . . . . . . . . . . . . . . 35
Data Protector Reports . . . . . . . . . . . . . . . . . . . . . . . . . . . . . . . . . . . . . . . . . . . . . . . 35
Editing the Data Protector Reports Module . . . . . . . . . . . . . . . . . . . . . . . . . . . . . . . . 36
Using the Reports - Edit page . . . . . . . . . . . . . . . . . . . . . . . . . . . . . . . . . . . . . . . . . 36
Directly Editing the PortalView.xml File . . . . . . . . . . . . . . . . . . . . . . . . . . . . . . . . . 37
Establishing Global Settings for Reports . . . . . . . . . . . . . . . . . . . . . . . . . . . . . . . . . . 37
Internationalization Issues . . . . . . . . . . . . . . . . . . . . . . . . . . . . . . . . . . . . . . . . . . . . . . . 38
Language Support. . . . . . . . . . . . . . . . . . . . . . . . . . . . . . . . . . . . . . . . . . . . . . . . . . . . . 38
Troubleshooting . . . . . . . . . . . . . . . . . . . . . . . . . . . . . . . . . . . . . . . . . . . . . . . . . . . . . . . . 39
Error Messages . . . . . . . . . . . . . . . . . . . . . . . . . . . . . . . . . . . . . . . . . . . . . . . . . . . . . . . 39
Data Unavailable . . . . . . . . . . . . . . . . . . . . . . . . . . . . . . . . . . . . . . . . . . . . . . . . . . . 39
Parse Rest of Config . . . . . . . . . . . . . . . . . . . . . . . . . . . . . . . . . . . . . . . . . . . . . . . . . 39
vi
Page 7

Contents
3. Data Protector-OVO-SIP Integration
Introduction . . . . . . . . . . . . . . . . . . . . . . . . . . . . . . . . . . . . . . . . . . . . . . . . . . . . . . . . . . . 42
Prerequisites . . . . . . . . . . . . . . . . . . . . . . . . . . . . . . . . . . . . . . . . . . . . . . . . . . . . . . . . . 42
Product Capabilities and Integration Benefits . . . . . . . . . . . . . . . . . . . . . . . . . . . . . . 42
Component List . . . . . . . . . . . . . . . . . . . . . . . . . . . . . . . . . . . . . . . . . . . . . . . . . . . . . . . . 44
Data Mappings . . . . . . . . . . . . . . . . . . . . . . . . . . . . . . . . . . . . . . . . . . . . . . . . . . . . . . . . . 45
Dependencies . . . . . . . . . . . . . . . . . . . . . . . . . . . . . . . . . . . . . . . . . . . . . . . . . . . . . . . . . . 46
Setup Process . . . . . . . . . . . . . . . . . . . . . . . . . . . . . . . . . . . . . . . . . . . . . . . . . . . . . . . . . . 48
Installation . . . . . . . . . . . . . . . . . . . . . . . . . . . . . . . . . . . . . . . . . . . . . . . . . . . . . . . . . . 48
Configuration . . . . . . . . . . . . . . . . . . . . . . . . . . . . . . . . . . . . . . . . . . . . . . . . . . . . . . . . 49
Sample Configuration Files . . . . . . . . . . . . . . . . . . . . . . . . . . . . . . . . . . . . . . . . . . . 49
Editing Configurations . . . . . . . . . . . . . . . . . . . . . . . . . . . . . . . . . . . . . . . . . . . . . . . 49
Configuring the Management Stations . . . . . . . . . . . . . . . . . . . . . . . . . . . . . . . . . . 50
Updating the Customer Model . . . . . . . . . . . . . . . . . . . . . . . . . . . . . . . . . . . . . . . . . 51
Creating a SIP User/Role Package . . . . . . . . . . . . . . . . . . . . . . . . . . . . . . . . . . . . . . 52
Add Password Authentication (optional) . . . . . . . . . . . . . . . . . . . . . . . . . . . . . . . . . 54
Finalize the Configuration . . . . . . . . . . . . . . . . . . . . . . . . . . . . . . . . . . . . . . . . . . . . 56
Troubleshooting . . . . . . . . . . . . . . . . . . . . . . . . . . . . . . . . . . . . . . . . . . . . . . . . . . . . . . 59
4. Data Protector-OVO-OVR Integration
Introduction . . . . . . . . . . . . . . . . . . . . . . . . . . . . . . . . . . . . . . . . . . . . . . . . . . . . . . . . . . . 62
Prerequisites . . . . . . . . . . . . . . . . . . . . . . . . . . . . . . . . . . . . . . . . . . . . . . . . . . . . . . . . . 62
Product Capabilities and Integration Benefits . . . . . . . . . . . . . . . . . . . . . . . . . . . . . . 62
Component List . . . . . . . . . . . . . . . . . . . . . . . . . . . . . . . . . . . . . . . . . . . . . . . . . . . . . . . . 64
Data Mappings . . . . . . . . . . . . . . . . . . . . . . . . . . . . . . . . . . . . . . . . . . . . . . . . . . . . . . . . . 65
Dependencies . . . . . . . . . . . . . . . . . . . . . . . . . . . . . . . . . . . . . . . . . . . . . . . . . . . . . . . . . . 66
Setup Process . . . . . . . . . . . . . . . . . . . . . . . . . . . . . . . . . . . . . . . . . . . . . . . . . . . . . . . . . . 67
Configuration . . . . . . . . . . . . . . . . . . . . . . . . . . . . . . . . . . . . . . . . . . . . . . . . . . . . . . . . 67
Troubleshooting . . . . . . . . . . . . . . . . . . . . . . . . . . . . . . . . . . . . . . . . . . . . . . . . . . . . . . 67
Creating Custom Reports . . . . . . . . . . . . . . . . . . . . . . . . . . . . . . . . . . . . . . . . . . . . . . . . 69
Introduction. . . . . . . . . . . . . . . . . . . . . . . . . . . . . . . . . . . . . . . . . . . . . . . . . . . . . . . . . . 69
Creating Data Protector Custom Reports . . . . . . . . . . . . . . . . . . . . . . . . . . . . . . . . . . 69
Data Source . . . . . . . . . . . . . . . . . . . . . . . . . . . . . . . . . . . . . . . . . . . . . . . . . . . . . . . . 70
Message Format . . . . . . . . . . . . . . . . . . . . . . . . . . . . . . . . . . . . . . . . . . . . . . . . . . . . 73
5. Data Protector-OVO-OVSD Integration
Introduction . . . . . . . . . . . . . . . . . . . . . . . . . . . . . . . . . . . . . . . . . . . . . . . . . . . . . . . . . . . 76
Prerequisites . . . . . . . . . . . . . . . . . . . . . . . . . . . . . . . . . . . . . . . . . . . . . . . . . . . . . . . . . 76
vii
Page 8

Contents
Product Capabilities and Integration Benefits . . . . . . . . . . . . . . . . . . . . . . . . . . . . . . 76
Component List . . . . . . . . . . . . . . . . . . . . . . . . . . . . . . . . . . . . . . . . . . . . . . . . . . . . . . . . 78
Import Mapping and Data Exchange . . . . . . . . . . . . . . . . . . . . . . . . . . . . . . . . . . . . . . . 79
Integration feature for backup operations . . . . . . . . . . . . . . . . . . . . . . . . . . . . . . . . . 80
Dependencies . . . . . . . . . . . . . . . . . . . . . . . . . . . . . . . . . . . . . . . . . . . . . . . . . . . . . . . . . . 81
Setup Process . . . . . . . . . . . . . . . . . . . . . . . . . . . . . . . . . . . . . . . . . . . . . . . . . . . . . . . . . . 82
Installation and Configuration for General Integration. . . . . . . . . . . . . . . . . . . . . . . 82
On the Service Desk application server: . . . . . . . . . . . . . . . . . . . . . . . . . . . . . . . . . 83
On your OVO Server running on UNIX: . . . . . . . . . . . . . . . . . . . . . . . . . . . . . . . . . 83
Installation and Configuration for a Backup-Specific Integration . . . . . . . . . . . . . . 83
On your OVO Management Server running on UNIX . . . . . . . . . . . . . . . . . . . . . . 83
On the Service Desk application server . . . . . . . . . . . . . . . . . . . . . . . . . . . . . . . . . . 85
Customization . . . . . . . . . . . . . . . . . . . . . . . . . . . . . . . . . . . . . . . . . . . . . . . . . . . . . . . . 86
Example . . . . . . . . . . . . . . . . . . . . . . . . . . . . . . . . . . . . . . . . . . . . . . . . . . . . . . . . . . . 86
On the Service Desk Application Server . . . . . . . . . . . . . . . . . . . . . . . . . . . . . . . . . 87
On your OVO Server running on UNIX: . . . . . . . . . . . . . . . . . . . . . . . . . . . . . . . . . 88
viii
Page 9

Printing History
The manual printing date and part number indicate its current edition.
The printing date will change when a new edition is printed. Minor
changes may be made at reprint without changing the printing date. The
manual part number will change when extensive changes are made.
Manual updates may be issued between editions to correct errors or
document product changes. To ensure that you receive the updated or
new editions, you should subscribe to the appropriate product support
service. See your HP sales representative for details.
Table 1 Edition History
Part Number Manual Edition Product
B6960-90069 August 2002 HP OpenView Storage Data
Protector A.05.00
ix
Page 10

x
Page 11

Table 2
Conventions
The following typographical conventions are used in this manual.
Convention Meaning Example
Italic Book or manual
titles, and manual
page names
Provides emphasis You must follow these steps.
Specifies a variable
that you must supply
when entering a
command
Bold New terms The Data Protector Cell
Computer Text and items on the
computer screen
Command names Use the grep command ...
File and directory
names
Process names Check to see if Data
Refer to the HP OpenView
Storage Data Protector
Integration Guide for more
information.
At the prompt type:
rlogin your_n ame where
you supply your login name.
Manager is the main ...
The system replies: Press
Enter
/usr/bin/X11
Protector Inet is
running.
Window/dialog box
names
Computer
Bold
Keycap Keyboard keys Press Return.
xi
Text tha t you must
enter
In the Backup Options
dialog box...
At the prompt, type: ls -l
Page 12
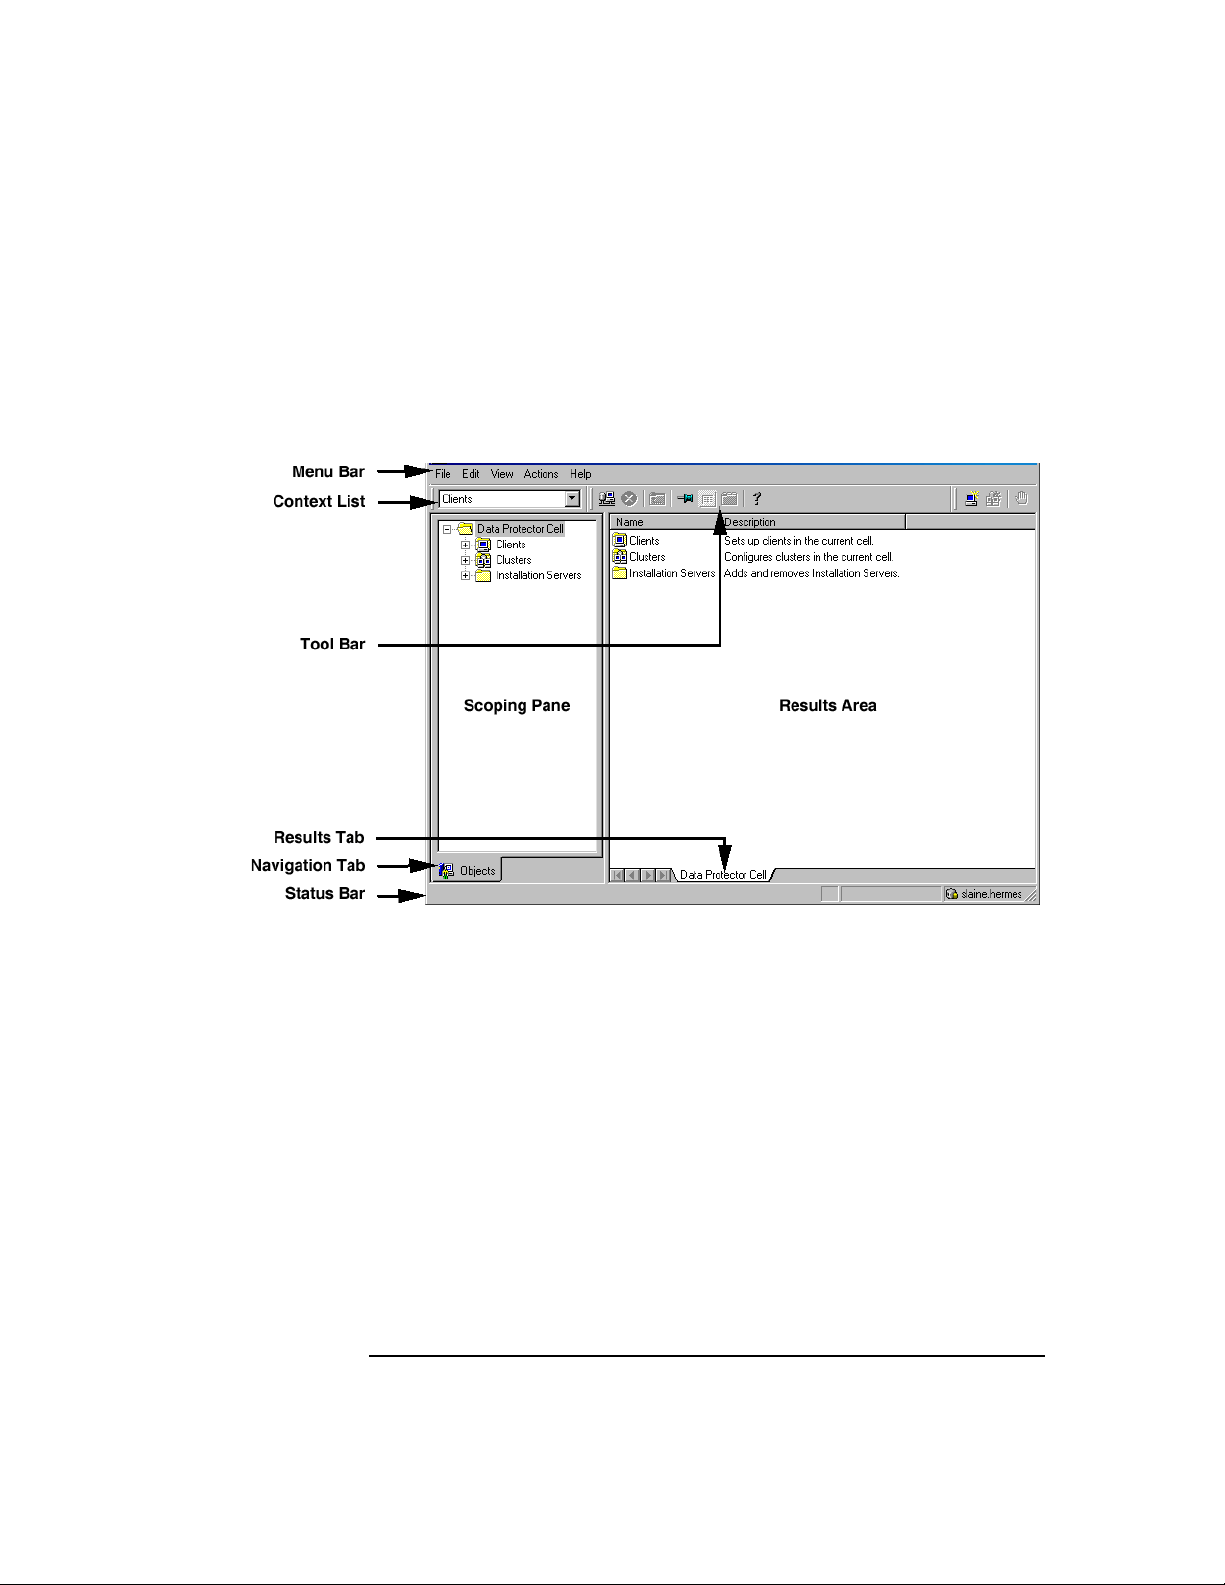
Data Protector provides a cross-platform (Windows and UNIX) graphical
user interface. Refer to the HP OpenView Storage Data Protector
Administrator’s Guide for information about the Data Protector
graphical user interface.
Figure 1 Data Protector Graphical User Interface
xii
Page 13

Contact Information
General
Information
Technical Support Technical support information can be found at the HP Electronic Support
Documentation
Feedback
Training
Information
General information about Data Protector can be found at
http://www.openview.hp.com/products/dataprotector/
Centers at
http://support.openview.hp.com/support.jsp
Information about the latest Data Protector patches can be found at
http://support.openview.hp.com/patches/patch_index.jsp
For information on the Data Protector required patches, see the HP
OpenView Storage Data Protector Software Release Notes
HP does not support third-party hardware and software. Contact the
respective vendor for support.
Your comments on the documentation help us to understand and meet
your needs. You can provide feedback at
http://ovweb.external.hp.com/lpe/doc_serv/
For information on currently available HP OpenView training, see the
HP OpenView World Wide Web site at
http://www.openview.hp.com/training/
Follow the links to obtain information about scheduled classes, training
at customer sites, and class registration.
xiii
Page 14

xiv
Page 15

Data Protector Documentation
Data Protector documentation comes in the form of manuals and online
Help.
Manuals Data Protector manuals are available in printed format and in PDF
format. Install the PDF files during the Data Protector setup procedure
by selecting the User Interface component on Windows or the
OB2-DOCS component on UNIX. Once installed, the manuals reside in the
\<Data_Protector_home>docs directory on Windows and on the
/docs/C/ directory on UNIX. You can also find the manuals in PDF
format at http://ovweb.external.hp.com/lpe/doc_serv/
HP OpenView Storage Data Protector Administrator’s Guide
This manual describes typical configuration and administration tasks
performed by a backup administrator, such as device configuration,
media management, configuring a backup, and restoring data.
HP OpenView Storage Data Protector Installation and Licensing
Guide
This manual describes how to install the Data Protector software, taking
into account the operating system and architecture of your environment.
This manual also gives details on how to upgrade Data Protector, as well
as how to obtain the proper licenses for your environment.
HP OpenView Storage Data Protector Integration Guide
This manual describes how to configure and use Data Protector to back
up and restore various databases and applications.
There are two versions of this manual:
• HP OpenView Storage Data Protector Windows Integration Guide
This manual describes integrations running the Windows operating
systems, such as Microsoft Exchange, Microsoft SQL, Oracle, SAP
R/3, Informix, Sybase, NetApp Filer, HP OpenView Network Node
Manager and Lotus Domino R5 Server.
• HP OpenView Storage Data Protector UNIX Integration Guide
This manual describes integrations running on the UNIX operating
system, such as: Oracle, SAP R/3, Informix, Sybase, NetApp Filer, HP
OpenView Network Node Manager and Lotus Domino R5 Server.
xv
Page 16

HP OpenView Storage Data Protector Concepts Guide
This manual describes Data Protector concepts and provides background
information on how Data Protector works. It is intended to be used with
the task-oriented HP OpenView Storage Data Protector Administrator’s
Guide.
HP OpenView Storage Data Protector EMC Symmetrix/Fastrax
Integration Guide
This manual describes how to install, configure, and use the EMC
Symmetrix and EMC Fastrax integrations. It is intended for backup
administrators or operators.
• The first part describes the integration of Data Protector with the
EMC Symmetrix Remote Data Facility and TimeFinder features for
Symmetrix Integrated Cached Disk Arrays. It covers the backup and
restore of filesystems and disk images as well as online databases,
such as Oracle and SAP R/3.
• The second part describes the integration of Data Protector with the
EMC Fastrax. It covers the backup and restore of disk images as well
as Oracle8i and SAP R/3 systems, using direct disk to tape technology.
HP OpenView Storage Data Protector HP SureStore Disk Array
XP Integration Guide
This manual describes how to install, configure, and use the integration
of Data Protector with HP SureStore Disk Array XP. It is intended for
backup administrators or operators. It covers the backup and restore of
Oracle, SAP R/3, Microsoft Exchange, and Microsoft SQL.
HP OpenView Storage Data Protector HP SureStore Virtual Array
Integration Guide
This manual describes how to install, configure, and use the integration
of Data Protector with HP SureStore Virtual Array. It is intended for
backup administrators or operators. It covers the backup and restore of
Oracle, SAP R/3 and Microsoft Exchange.
xvi
Page 17

HP OpenView Storage Data Protector Integration Guide for HP
OpenView
This manual describes how to install, configure, and use the integration
of Data Protector with HP OpenView Service Information Portal, HP
OpenView Service Desk, and HP OpenView Reporter. It is intended for
backup administrators. It discusses how to
for Data Protector
HP OpenView Storage Data Protector Software Release Notes
This document gives a description of new features of HP OpenView
Storage Data Protector A.05.00. It also provides information on
supported configurations (devices, platforms and online database
integrations, SAN configurations, EMC split mirror configurations, and
HP SureStore XP configurations), required patches, limitations, as well
as known problems and workarounds. An updated version of the
supported configurations is available at
http://www.openview.hp.com/products/data_protector/specifications/inde
x.asp.
Online Help Data Protector provides online Help for Windows and UNIX platforms.
service management.
use the OpenView applications
xvii
Page 18

xviii
Page 19

In This Book
The HP OpenView Storage Data Protector HP SureStore Virtual Array
Integration Guide describes how to install, configure, and use the
integration of Data Protector with HP OpenView Service Information
Portal, HP OpenView Service Desk, and HP OpenView Reporter.
NOTE This manual describes Data Protector functionality without specific
information on particular licensing requirements. Some Data Protector
functionality is subject to specific licenses. The related information is
covered in the HP OpenView Storage Data Protector Installation and
Licensing Guide.
Audience
This manual is intended for backup administrators or operators who
plan to install and configure the integration of Data Protector with HP
OpenView Service Information Portal, HP OpenView Service Desk, and
HP OpenView Reporter.
Conceptual information can be found in the HP OpenView Storage Data
Protector Concepts Guide, which is recommended in order to fully
understand the fundamentals and the model of Data Protector.
Organization
The manual is organized as follows:
Chapter 1 “Introduction” on page 1.
Chapter 2 “Data Protector-SIP Integration” on page 5.
Chapter 3 “Data Protector-OVO-SIP Integration” on page 41.
Chapter 4 “Data Protector-OVO-OVR Integration” on page 61.
Chapter 5 “Data Protector-OVO-OVSD Integration” on page 75.
The integrations of Data Protector with the following database
applications are described in the HP OpenView Storage Data Protector
Integration Guide:
xix
Page 20

• Microsoft SQL Server 7.0/2000
• Microsoft Exchange
• Microsoft Exchange 2000
The integrations of Data Protector with the following applications is
described in the HP OpenView Storage Data Protector Administrator’s
Guide:
•OmniStorage
• Microsoft Cluster Server
• MC/ServiceGuard
• Data Source Integration
• Application Response Measurement
•ManageX
xx
Page 21

1 Introduction
Chapter 1 1
Page 22

Introduction
Overview
Overview
This chapter provides a brief overview of Data Protector, the HP
OpenView products integrated with it to create an enterprise-wide
solution that provides service level management, and the integrations,
themselves.
Data Protector
HP OpenView Storage Data Protector is a backup and recovery solution
that provides reliability and protection for your fast growing business
data. Data Protector offers comprehensive backup and restore
functionality designed specifically for enterprise wide and distributed
environments.
Data Protector also provides information that can be used, through
reports and messaging tools, to help you monitor the status of your
processes, in addition to providing backup and recovery functionality.
OpenView Products Integrated with Data Protector
Data Protector is designed to allow the integration of other HP
OpenView products, in order to provide you with an enterprise-wide
solution for your IT environment. Integrations with the following
products are described in this manual:
OpenView Service Information Portal
Service Information Portal (SIP) is a tool that lets you present data from
your internal applications such as Data Protector, OVIS, OVR, and
OVO/OVSN as reports on custom web pages for each of your clients.
OpenView Service Desk
OpenView Service Desk is a central problem management point for
systems, applications, and services (which are defined as configuration
items by OVSD). OVSD registers incidents and monitors their resolution
for its configuration items. OVSD manages problem resolution to ensure
compliance with a configuration item specific SLA.
Chapter 12
Page 23

Introduction
Overview
OpenView Reporter
OpenView Reporter is a reporting service that further analyzes, inspects,
and collects data gathered by OVO and formats them into a human
readable and usable web-based presentation.
OpenView Operations
OpenView Operations is a central management point for various remote
OpenView applications. Collects and analyzes data, automates critical
response, as well as message forwarding to other services.
Service Level Management Integrations
Data Protector and the HP OpenView products listed above are
integrated to create an enterprise-wide solution that provides service
level management. The integrations are introduced below:
Data Protector-SIP
The integration of Data Protector with SIP helps you achieve a specific,
consistent, measurable level of service by offering pertinent information
to backup service managers. This integration provides additional
network visibility to Data Protector and allows integration of Data
Protector-specific information with other SIP services.
Data Protector-OVO-SIP
The integration of Data Protector with SIP (with OVO) offers pertinent
information to the managers of the backup service of a specific group. It
provides additional network visibility to Data Protector and allows
integration of Data Protector-specific data with other SIP services.
Data Protector-OVO-OVR
The integration of Data Protector with OpenView Reporter provides
additional capabilities for monitoring and reporting on backup and
recovery processes. It provides detailed, in depth information concerning
the health and status of Data Protector’s data protection services.
Data Protector-OVO-OVSD
This integration provides support and network-wide availability for Data
Protector’s backup and recovery tools.
Chapter 1 3
Page 24

Introduction
Overview
Chapter 14
Page 25

2 Data Protector-SIP Integration
Chapter 2 5
Page 26

Data Protector-SIP Integration
Introduction
Introduction
This section describes how to install, configure, and use Data Protector
with OpenView Service Information Portal to serve customer-defined
reports in the portal.
Prerequisites
The integration requires the following licensed components:
•Data Protector
• OpenView Service Information Portal
Product Capabilities and Integration Benefits
The integration of Data Protector and OpenView Service Desk (Service
Desk) helps enable Service Level Management (SLM) to help you achieve
a specific, consistent, measurable level of service. In short, this
integration helps you achieve maximum service availability by providing
a simple, effective way to:
• Convenient data protection service monitoring through web access
from any machine.
• Specification of resource in terms of machine and group names.
• Segmentation of accessible data by the different backup
administrators.
• Information aggregation from other services (not related to Data
Protector) to the portal, using SIP's configuration mechanisms. Single
presentation format for all modules.
• Easy configuration: GUI configuration editor and XML document
editing only.
• Stability and reliability. The integration modifies very little code and
relies upon SIP customization features and components.
Component List
• Data Protector - A backup solution that provides reliable data
protection and maximum accessibility for your business data. Data
Chapter 26
Page 27

Data Protector-SIP Integration
Introduction
Protector offers comprehensive backup and restore functionality
specifically tailored for enterprise-wide and distributed
environments.
• OV SIP (OpenView Service Information Portal) - A tool that
aggregates information collected from various services. The
information is presented and formatted through various portal
components and is made available through a web page. Portal
components and modules include Service Browser, Service Graph,
and Service Cards.
Dependencies
• Sun's Java Developer's Kit 1.3 is required for SIP.
• Some OpenView components require that Netscape Navigator 4.7 be
installed. This step is unnecessary and may be skipped as long as
alternative means of browsing HTML pages is available (e.g., a web
browser on a separate machine, or an alternative compatible web
browser).
• Successful configuration must also comply with the software
requirements as described in the table below.
• The environment must be properly set and configured prior to the
installation of the integration components. This may include patches,
environment variables, kernel parameters, and other software
components as required. For detailed information about the specific
requirements, please refer to the installation guides for those
components.
• This integration uses Data Protector backup specification groups.
Refer to the HP OpenView Storage Data Protector Administrator’s
Guide and the Data Protector online help for more information about
backup specification groups and how to configure them.
Table 2-1 Software Requirements
Component Version Operating System
Data
Protector
SIP 3.0 HP-UX 11.0, Windows 2000
Chapter 2 7
5.0 HP-UX 11.0, 11.11, Windows NT 4.0,
Windows 2000
Page 28

Data Protector-SIP Integration
Introduction
Data Protector/SIP Integration
The Data Protector/SIP integration consists of two major elements:
•The Data Protector Integration module, installed on the SIP server or
on a separate web server.
•The Cell Request Server process, installed on the Data Protector cell
server.
These elements are described in detail in the sections that follow.
Data Protector Integration Module
The Data Protector Integration module components are automatically
installed along with SIP, and are located either on your SIP web server or
on a separate web server, depending on your deployment.
This integration module consists of two primary elements:
• SIP components, including SIP XML, XSL, and module definitions.
• SIP-Data Protector servlets, including the Java servlets described
below, as well as the Configuration Specifications, ConfigSpec.xm l.
This integration uses three Java servlets to communicate between SIP
and Data Protector.
•The CustomerGroup servlet provides the customer model to the SIP
Management Data Filter.
•The Reporter servlet generates and creates XML reports, and also
includes a configurable threading option.
•The StatusGauge servlet generates status gauges.
Cell Request Server (CRS)
The other main element of the Data Protector-SIP integration is the Cell
Request Server (CRS) process in Data Protector cell server. The CRS
serves reports to SIP via the socket. For information on configuring this
module, see “Setup Process” on page 13.
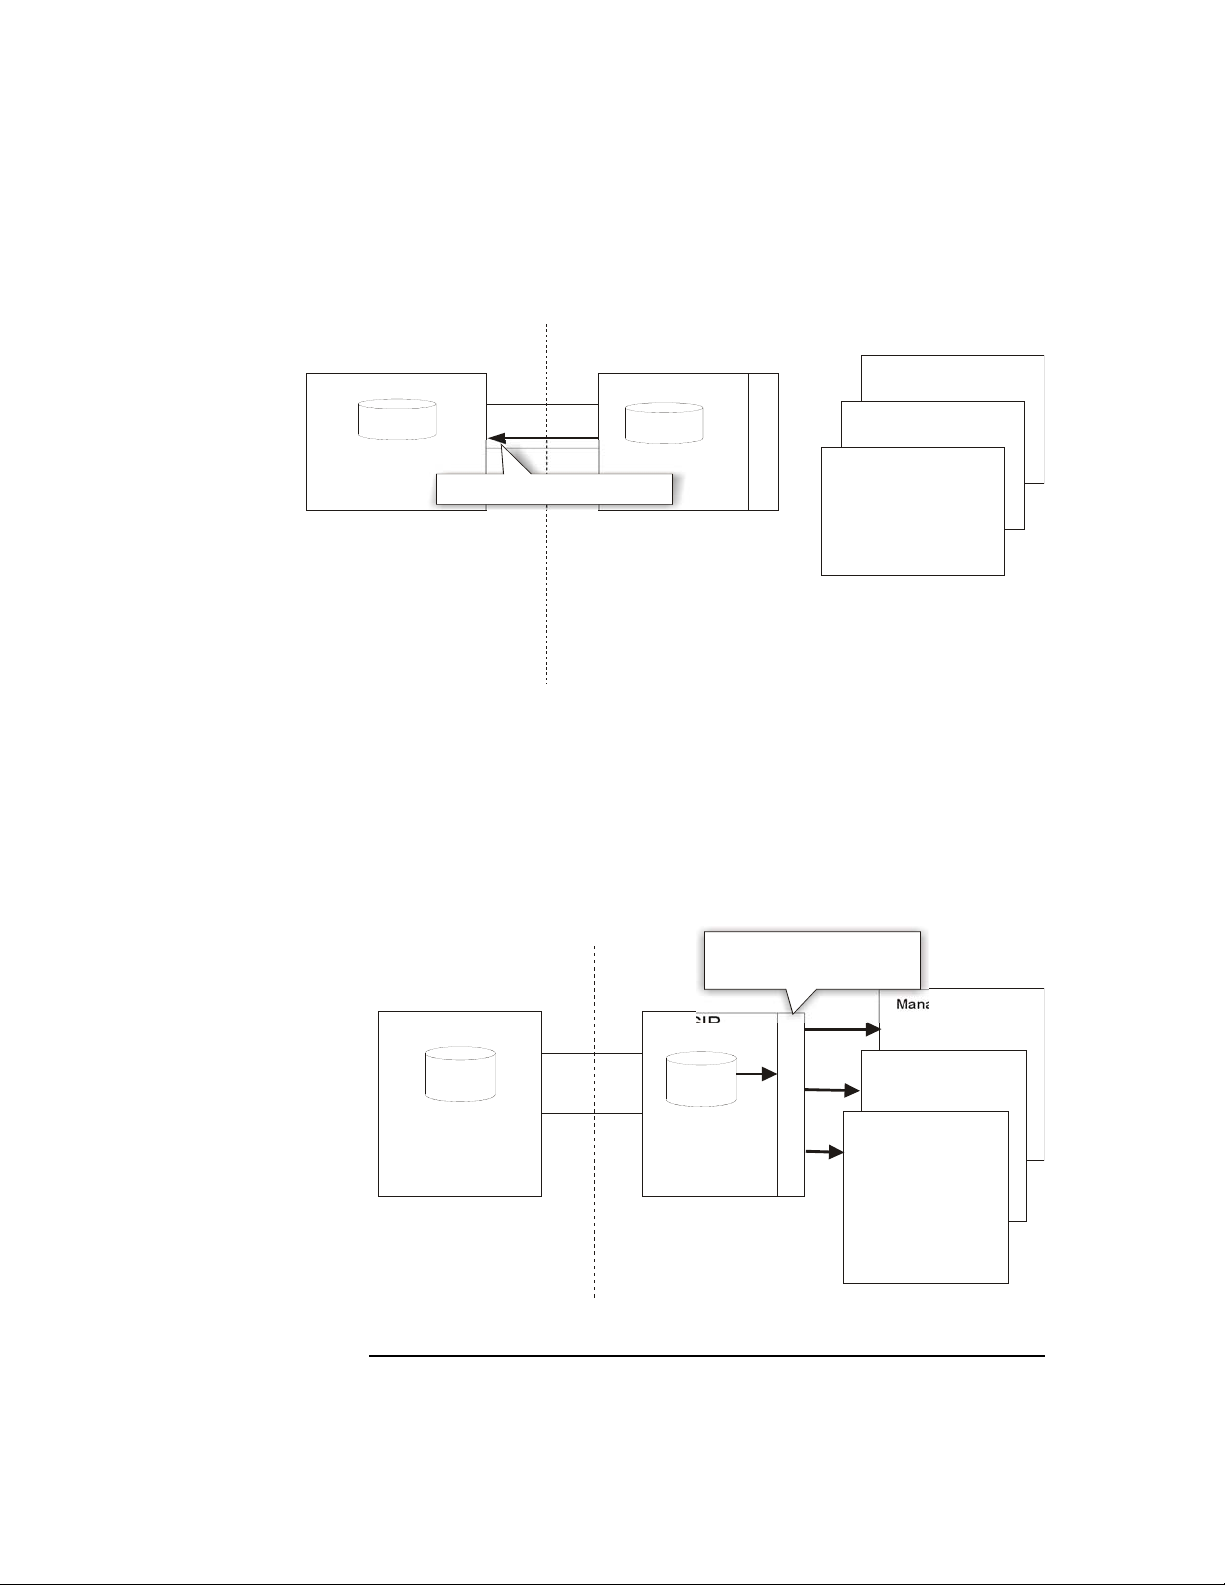
How Data Protector Integrates with SIP
To integrate with SIP, Data Protector’s CRS daemon serves reports to the
Java servlets on the SIP or web server, as shown in the following
illustrations.
Chapter 28
Page 29
Data Protector-SIP Integration
Introduction
Data Protector
Reports
socket
SIP sends a request for your configured
reports to Data Protector via the socket
connection
l
l
a
w
e
r
i
f
Reports
SIP
s
l
e
d
o
M
r
e
m
o
t
s
u
C
Manager Portal
Administrator Portal
User Portal
When a user requests a report, as in the illustration above, the request
goes to the Customer Group servlet, which then maps that user to the
group or groups in his or her customer profile. The Customer Group
servlet then sends the request to Data Protector’s report database via the
socket connection between the SIP portal and Data Protector.
After Data Protector receives the user request for data, it sends report
data via the socket connection to the Docs servlet and/or the Gauges
servlet to be formatted.
SIP filters the Data Protector reports
according to your configured Customer
Models and returns them to your users
based on their profiles
Manager Portal
Administrator Portal
User Portal
Data Protector
Reports
socket
SIP
Reports
s
l
e
d
o
M
r
e
m
o
t
s
u
C
l
l
a
w
e
r
i
f
Chapter 2 9
Page 30

Data Protector-SIP Integration
Introduction
Finally, the information is formatted, then the final reports and gauges
pass through the security filter, and are returned to the user who
initially requested them.
See “Deployments” on page 10 for more detailed information about how
SIP and Data Protector work together.
Deployments
The first step in setting up your Data Protector cell server with SIP is to
determine which deployment model to use. There are three basic models
you can use to deploy your services, each of which is described in this
chapter.
• Deployment A describes a deployment option in which Data Protector
and SIP communicate through a socket that runs through a firewall.
The SIP portal host may also be exposed through the firewall and
accessed by an external customer.
• Deployment B describes a deployment option in which the Data
Protector integration module resides on a web server, which then
communicates with SIP via HTTP through the firewall.
• Deployment C describes an option in which Data Protector and SIP
communicate through a socket completely contained within the
firewall.
Deployment A
This option can be implemented either completely behind a firewall or
with access to SIP via port 8080 to a user portal outside the firewall.
Figure 2-1 Deployment A
Chapter 210
Page 31

This option is for cases in which all customers are internal. In this model,
the Data Protector module runs on the SIP server and communicates
with the cell server and intranet users via socket. The SIP portal host
may also be exposed through the firewall via the web server’s port (i.e.,
8080) and accessed by an external customer.
Deployment B
In this deployment option, the Data Protector module for SIP is run on a
web server within the firewall. This module communicates with SIP
remotely through the firewall via HTTP, and communicates with the
Data Protector cell server through sockets that are completely contained
within the firewall.
Figure 2-2 Deployment B
Data Protector-SIP Integration
Introduction
The benefits of this model are that socket connections are secured and
deployment functions are compartmentalized. It does, however, require
that you run a separate web server for the Data Protector module.
Deployment C
In this deployment, the Data Protector module for SIP is run on the SIP
server, outside of the corporate firewall, and it communicates with the
Data Protector cell server via socket on port 5555 through the firewall.
Chapter 2 11
Page 32

Data Protector-SIP Integration
Introduction
Figure 2-3 Deployment C
This deployment model is simple, effective, and accessible to users, but it
can be difficult to secure due to the socket connection running through
the firewall.
Chapter 212
Page 33

Data Protector-SIP Integration
Setup Process
Setup Process
This section describes how to install and configure the integration
modules that let Data Protector 5.0 and Service Information Portal
communicate and work together.
The following sections are included in this chapter:
• Installation Procedures
•Customization
Installation Procedures
The Data Protector server and the SIP server communicate by way of a
socket connection, which provides a dedicated two-way channel through
which SIP can request reports from the Data Protector cell server, and
Data Protector can send them. See “Deployments” on page 10 for more
information on the architecture of a Data Protector-SIP integration.
This section describes the procedures for installing the integration
modules that let Data Protector and SIP communicate and work
together.
For instructions on installing SIP, refer to the Service Information Portal
Installation Guide.
For instructions on installing Data Protector, refer to the HP OpenView
Storage Data Protector Installation and Licensing Guide.
Prerequisite Information
Before you begin the installation (on any platform or server), you should
be sure that you know the following:
• Base language of the SIP server.
• Fully qualified path name of each cell server you want to track.
• Fully qualified path name of the SIP server.
On the Data Protector Server
Data Protector can communicate with SIP without any additional
modules. There are no integration-specific installation procedures.
Chapter 2 13
Page 34

Data Protector-SIP Integration
Setup Process
However, the Data Protector Administrator must configure backup
groups which must then be associated with a SIP role and user.
Establishing Data Protector/SIP Communication
After the installation you must establish communication with the Data
Protector server from the SIP side. To do this, you must associate the
Data Protector organizations (imported via the customer model) with
Roles. Refer to the SIP Deployment and Integration Guide for more
information.
Installing on a SIP Server
To install the Data Protector integration servlets on a SIP server, follow
the steps below. Note that the steps are different depending on the
operating system of the server.
Installing on a Windows NT SIP Server
1. Insert the Data Protector Windows installation CD-ROM.
2. CD to DP_Service_Mgmt_Int egr.
3. Run DP-SIP-WIN.ex e.
4. Follow the steps in the Setup Wizard.
5. Import the Customer Model, as described in “Creating Customer
Models and Portal Views” on page 22
6. Create users and user roles, as described in the SIP Deployment and
Integration Guide.
7. Customize ConfigSpec.xml as described in “Customization” on
page 17.
Installing on an HP-UX SIP Server
1. Insert the Data Protector HP-UX installation CD-ROM.
2. As root, use swinstall to install the following depot:
DP-SIP-HPUX.dep ot
3. Select and install all the components.
4. When the installation is complete, run the following setup script:
Chapter 214
Page 35

Data Protector-SIP Integration
Setup Process
/opt/OV/SIP/dp_ setup.sh
Follow the on screen instructions.
5. Import the Customer Model, as described in “Creating Customer
Models and Portal Views” on page 22
6. Create users and user roles, as described in the SIP Deployment and
Integration Guide.
7. Customize ConfigSpec.xml as described in “Customization” on
page 17.
8. Customize the communication between the web server (Apache) and
the servlet container (TOMCAT) by doing the following:
a. Edit the file APACHE_HOME/apache/c onf/jk.co nf
b. Find the line:
JkMount/ovporta l/* ajp12
c. Add the following lines:
JkMount/dprepor ter/*
JkMount/dprepor ter
d. Stop and restart Apache and TOMCAT.
Installing on a Web Server
To install the Data Protector integration servlets on a web server, follow
the steps below. The steps are different depending on the operating
system of the server.
If you install this integration on a web server, only the Java servlets are
installed on that server. The other components must be installed
subsequently on the SIP server.
NOTE If you have chosen this installation option, it is assumed that you have
IIS with TOMCAT running on Windows and Apache with TOMCAT
running on HP-UX. You are responsible for configuring the application
server that hosts these servlets. The servlets must be directly accessible
via http://host name/ser vlet and not via a specified port
(http://hostname :8080/se rvlet).
This may mean that you must perform special configuration steps for
Chapter 2 15
Page 36

Data Protector-SIP Integration
Setup Process
your application server and may need to restart both the web server and
the application server. These special configuration steps are not
addressed in this installation. Refer to your application server and web
server documentation.
Installing on a Windows Web Server
1. Insert the Data Protector Windows installation CD-ROM.
2. CD to DP_Service_Mgmt_Integr.
3. Run DP-SIP-WIN.exe.
4. Follow the steps in the Setup Wizard, selecting SIP Servlet Only.
On the SIP portal machine, insert the Data Protector Windows
installation CD.
1. CD to DP_Service_Mgmt_Integr.
2. Run DP-SIP-WIN.exe.
3. Follow the steps in the Setup Wizard, selecting the SIP Module
Component option.
4. Import the Customer Model, as described in “Creating Customer
Models and Portal Views” on page 22
5. Create users and user roles, as described in the SIP Deployment and
Integration Guide.
6. Customize ConfigSpec.xml as described in “Customization” on
page 17.
Installing on an HP-UX Web Server
To install the integration on an HP-UX web server:
1. Insert the Data Protector HP-UX installation CD-ROM.
2. As root, use swinstall to install the following depot:
DP-SIP-HPUX.dep ot
3. Select and install the Java Servlets and Setup Scripts
components.
4. When the installation is complete, run the following setup script:
Chapter 216
Page 37

Data Protector-SIP Integration
Setup Process
/opt/OV/SIP/dp_ setup.sh
Follow the on screen instructions.
5. Customize ConfigSpec.xml as described in “Customization” on
page 17.
6. Customize the communication between the web server (Apache) and
the servlet container (TOMCAT) by doing the following:
a. Edit the file APACHE_HOME/apache/conf/jk.conf
b. Find the line:
JkMount/ovporta l/* ajp12
c. Add the following lines:
JkMount/dprepor ter/*
JkMount/dprepor ter
d. Stop and restart Apache and TOMCAT.
On the SIP portal machine, insert the Data Protector HP-UX CD.
1. As root, use swinstall to install the following depot:
DP-SIP-HPUX.dep ot
2. Select and install the HP-UX SIP component.
3. Import the Customer Model, as described in “Creating Customer
Models and Portal Views” on page 22
4. Create users and user roles, as described in the SIP Deployment and
Integration Guide.
Customization
This section describes how to customize the integration.
Setting Up Backup Groups on Data Protector
In order to receive reports via SIP, you must set up appropriate backup
groups on Data Protector. These groups are mapped to Organizations
within SIP, which then maps those Organizations to Roles, and Roles to
users, as shown in Figure 2-4. For more information about configuring
groups, refer to the HP OpenView Storage Data Protector Administrator’s
Guide.
Chapter 2 17
Page 38

Data Protector-SIP Integration
r
Setup Process
Figure 2-4 Backup Group Mappings
SIP Customer Model
User Role Organization
User OrganizationRole
Data Protecto
Backup
Group
IMPORTANT Use the following guidelines when setting up Data Protector backup
specification groups:
1. Backup specification group names may NOT include periods (.) or
question marks (?).
2. If you define a role containing overlapping backup groups, users with
that role will see redundant data in their reports.
Editing ConfigSpec.xml
The ConfigSpec.xml file, located in $SIP_HOME/weba pps/dpsi p (for
servlets installed on the SIP server) or $TOMCAT_Home/webapps/dpsip
directory (for servlets installed on a web server), provides you with
several options for customizing your integration. The following sections
describe these options.
Log Location, Log
Level
The log level you set in your configuration determines the level at which
events will be logged. In the example below, the log level is 3, so events
with a severity of 3, 2, or 1 will be logged. Valid event severities are 1 - 5.
The log location parameter determines the name and location of your log
file. You must specify an existing directory. To set the refresh rate, edit
the following line:
<LogLoc logLevel = "x">qua lified_p ath/l og_file_n ame</Log Loc>
In the example below, the log file msgtxt is located in the directory
d:/tmp/logging/.
<LogLoc logLevel = "3">d:/ tmp/logg ing/m sgtxt</Lo gLoc>
Chapter 218
Page 39

Data Protector-SIP Integration
Setup Process
Filter Level The filter level you set in your SIP configuration determines which types
of messages are delivered. You must set each of the message types as true
(delivered) or false (not delivered).
In the following example, messages tagged as Major and Critical are
delivered, while messages tagged as Minor and Warning are not.
<FilterLevel Warning = "false" Minor = "false " Major =
"true" Critical = "true" />
NOTE Message filters in the ConfigSpec.xml file are applied at the system level.
That is, any message levels you choose to filter out here will not be
logged to your SIP or web server.
Refresh Rate By default, Data Protector reports refresh when SIP requests a report
from the servlet (which it does every time a user logs on). You can,
however, set the refresh rate variable so that reports refresh
automatically at specified intervals. In this case, the reports are
gathered at each refresh interval and are archived on the system. Note
that this is a universal parameter, so setting a value for it will cause all
reports to refresh and expire at the specified rate.
To set the refresh rate, edit the following line:
<RefreshRate upda te_rate = "time" archi ve_rate = "time"
file_loc = "pat h"/>
Note that this variable has three parameters:
• update_ rate determines the refresh rate for the report, in minutes.
It is recommended that you refresh reports no more than once every
ten minutes.
• archive _rate determines the rate at which archived reports are
expired from the system. The value you enter here is the amount of
time, in minutes, that a recently accessed report will be maintained
on your system. The recommended minimum is five minutes.
Archive_rate should be greater than update_rate.
• file_lo c specifies the location of the files that are gathered and
archived to support RefreshRate. The location you specify must be a
valid, existing directory. Note that this repository may need to be very
large if you anticipate large numbers of users to be logging on at the
same time.
Chapter 2 19
Page 40

Data Protector-SIP Integration
Setup Process
In the example below, the refresh rate for updates is set to ten minutes
and the archive rate for archived reports is set to thirty minutes.
<RefreshRate update _rate = "10" archive_rate = "30" file_l oc
= "d:/tmp/"/>
Gauge Settings System gauges display your Data Protector system’s health graphically
using a gauge that has three ranges: green, yellow, and red, indicating
the status of backup health.
You may, however, choose to change the default settings to reflect the
sensitivity of your data or the critical nature of the systems you are
backing up. To do this, change the ranges according to the health
percentage you would like to fit into each range.
To set the gauges, edit the following line:
<BackupGauge gree n_band = "range" yello w_band = "range"
red_band = "ran ge"/>
Note that you must not overlap different color bands, so if the green band
ranges from 0 to 70, you must also change the lower value for the yellow
band range in order not to overlap. For example:
<BackupGauge gree n_band = "0-60" y ellow _band = " 60-80"
red_band = "80- 100"/>
NOTE Gauge settings in Config Spec.xml are applied at the system level. That
is, any gauge settings you enter here will be applied to your entire
system. If you want some settings to be specific to a given module view,
see “Editing the Backup Health Module” on page 33 for instructions. You
may still change the bands for each gauge that you create.
Cell Server Setting The CellServer variable provides the integration with information about
your Cell Servers, including the language, the port number, and the Java
user password. If the Data Protector Administrator has changed either
the Data Protector port or added a password for a Java user, you must
edit this variable in order for the integration servlets to communicate
with Data Protector.
To identify a cell server, edit the following line:
<CellServer loc ale = "la nguage" port = "xxxx" password =
"pwd">host_name </CellSer ver>
Chapter 220
Page 41

Data Protector-SIP Integration
Setup Process
where:
• locale is a required parameter that specifies the language of the cell
server.
• port identifies the port the integration will use to communicate with
the cell server. Port defaults to 5555 if there isn’t a specified number.
• password is an optional parameter necessary only if the Data
Protector Administrator wants to create a Java user account. The
parameter defaults to no password.
• host_name is a required value that identifies the cell server using a
fully qualified host name or IP address.
NOTE If you edit the cell server setting directly, you must verify that the cell
server is visible to the Data Protector/SIP integration. Ping the fully
qualified host name or IP address to make sure that the integration can
resolve the host name and find the cell server.
In the following example, cellserver_1.example.com has English as its
language, uses port 5555, and has a password of pwd.
<CellServer loc ale = "en glish" p ort = "5555" p assword =
"pwd">cellserve r_1.examp le.com</ CellSe rver>
Chapter 2 21
Page 42

Data Protector-SIP Integration
Creating Customer Models and Portal Views
Creating Customer Models and Portal Views
Once you have set up a communications socket between SIP and Data
Protector, you can start setting up your customer models and configuring
SIP to display custom portal views for each customer group.
This chapter provides a brief overview of the concept of customer models,
and a description of how SIP uses these models to filter the data a user
sees.
For more information on customer models, see the SIP Deployment and
Integration Guide.
This section discusses:
•“Customer Models”
This section describes the concept of customer models and how they
are used within Data Protector and SIP.
• “Management Data Filter”
This section describes the Management Data Filter and how it is used
to serve the appropriate information to your users.
• “Adding and Removing Services in a Portal View”
This section describes how to configure Data Protector services for
display within a SIP portal view.
Customer Models
To help you present exactly the right information to all of your users, SIP
employs an expandable concept of customer models, which allows you to
create and fine-tune different portals for users according to the
department they work in, their job functions, security considerations, or
anything else you would like to sort by.
Each cell server is used to create a basic organization where the host is
specified; the name of the organization is group@cellserver. This
mapping is required to properly generate reports. For detailed
instructions for segmenting data and creating customer models, refer to
the SIP Deployment and Integration Guide.
A customer model maps users to different hosts, interfaces, and services.
Chapter 222
Page 43

Figure 2-5 Customer Model
r
Data Protector-SIP Integration
Creating Customer Models and Portal Views
SIP Customer Model
User Role Organization
User OrganizationRole
Data Protecto
Backup
Group
Importing the Customer Model
Import the customer model from the SIP servlet by following these steps:
1. Log in to SIP as admin
2. Navigate to the Customer Model tab
3. Scroll to the Customer Model Sources section
4. In the New Customer Model Source URL field enter the following:
http:\\servlet_ host.com\ dpreport er\cus tomer
where
servlet_host.co m is the fully qualified host name of the web server
on which the servlets are installed.
5. Click Add
6. Click Apply at the bottom of the page.
Chapter 2 23
Page 44

Data Protector-SIP Integration
Creating Customer Models and Portal Views
Management Data Filter
After SIP receives reports from Data Protector, it passes them through
management data filtering.
Figure 2-6 Management Data Filter Overview
Da ta P ro te cto r
Reports
Data Protector returns the
requested data to the servlet. The
portal then formats the data into
xml and converts it to html.
Customers are mapped to a user and the user is mapped to a role. The
role has organization information that maps a backup group to a cell
server. The role can include multiple organizations.
SIP Server
Customer Group
Servlet
Reporter
Servlet
Status
Servlet
MDF
Security
The portal passes
Backup_group.cellserver
organizations (as defined in the
customer model and associated
with the user’s role) to the servlets
Manager Portal
Administrator
Portal
User Portal
Filtering uses organizations to return only report data that is applicable
to the defined customer.
For a more detailed explanation of SIP’s filtering process, see the SIP
Deployment and Integration Guide.
Chapter 224
Page 45

Data Protector-SIP Integration
Creating Customer Models and Portal Views
Adding and Removing Services in a Portal View
To add a Data Protector module to a portal view:
1. Access the portal view by logging on to SIP as a user with access to
the appropriate role. If this user has access to multiple roles, switch
to the appropriate role (one with ViewAdmin editing permissions).
2. Navigate to the Storage tab.
3. At the bottom of either wide column, either:
• Select a Data Protector module from the Select Module to Add
list box, and click [Add], or
• Click Edit to access the Modify Co lumn page. Insert the Data
Protector module and place it in the desired location among other
modules in the column. Click OK to save the changes and return to
the main portal page.
A copy of the default version of the Data Protector module you chose is
inserted into your PortalView.xml file and is displayed in the portal view.
For instructions on how to edit the modules, refer to “Error Messages
Module” on page 26, “Protection Status Module” on page 29, or “Data
Protector Reports Module” on page 35.
Chapter 2 25
Page 46

Data Protector-SIP Integration
Error Messages Module
Error Messages Module
This chapter provides an overview of what Data Protector Messages are
and how to configure and use them.
This chapter contains the following sections:
• “Understanding Data Protector Error Messages”
This section describes what Data Protector Messages are and how
you can use them in your organization.
• “Editing Data Protector Message Modules”
This section describes how to set up new Data Protector message
modules, as well as how to edit and eliminate existing messages.
Understanding Data Protector Error Messages
The Messages module presents backup and recovery process messages
from Data Protector running on one or more Data Protector stations
within your management domain.
This module displays changes each time the portal view is displayed or
refreshed. The message lists are continually updated in SIP memory.
Data Protector Error Messages
The Data Protector Error Messages module provides access to the
following messages from your SIP portal:
•Alarm
• Backup error
• Database corrupted
• Database purge needed
• Database space low
• Device error
•End of session
• Health check failed
• License will expire
Chapter 226
Page 47

Data Protector-SIP Integration
Error Messages Module
• Mail slots full
• Mount request
• Not enough free media
• Unexpected events
For more information on these messages and how to configure them, see
the chapter “Monitoring, Reporting, Notifications and the Event Log” in
the HP OpenView Storage Data Protector Administrator’s Guide.
Adding a Data Protector Error Message Module to your Portal
View - GUI To add a Data Protector message module to a SIP portal,
follow the steps below.
1. Access the portal view by logging on to SIP as a user with access to
the appropriate role. If this user has access to multiple roles, switch
to the appropriate role (one with ViewAdmin editing permissions).
2. Navigate to the Storage tab.
3. At the bottom of the right column, either:
• Select Data Protector 5. 0 Error Messages from the Select
Module to Add list box, and click Add, or
• Click Edit to access the Modify Co lumn page. Choose Data
Protector 5.0 E rror Mess ages from the list of Available
Modules and place it in the desired location among other modules
in the column. Click OK to save the changes and return to the main
portal page.
4. If the module displays no messages, click on the Edit button on the
upper right corner of the module and configure the module to point to
the correct servlet for a suitable timeframe.
If the timeframe you select does not provide any messages, a message
appears indicating that no messages were available for that
timeframe.
Editing Data Protector Message Modules
To modify the Message module in your SIP portal, follow the steps below.
1. Access the portal view by logging on to SIP as a user with access to
the appropriate role. If this user has access to multiple roles, switch
to the appropriate role (one with ViewAdmin editing permissions).
Chapter 2 27
Page 48

Data Protector-SIP Integration
Error Messages Module
2. Navigate to the Storage tab.
3. Scroll to the Error Message module you want to edit.
4. Click on the Edit button on the upper right corner of the module.
5. From the Over the last: menu, choose a timeframe.
6. In the Data Protector Servlet host: field, enter the qualified
host name and port of the appropriate servlet.
7. Click OK to apply the changes and return to the main portal view.
Editing the PortalView.XML File Directly
Refer to the SIP Deployment and Integration Guide for more
information.
Chapter 228
Page 49

Data Protector-SIP Integration
Protection Status Module
Protection Status Module
This chapter provides an overview of what Protection Status gauges are
and how to configure and use them.
Understanding the Protection Status Module
The Data Protector Protection Status module displays a visual
representation of the success rates of your backups.
This module has two components: Protection Status gauge and Host
Status report.
Gauges appear when the tab first displays in your portal. They indicate
the overall health rating for selected or all services that are being
monitored by that particular gauge. You can view the details by clicking
on a gauge or a health title link to display information about the
backups.
Protection Status Gauge
The Protection Status Gauge provides a visual depiction of the status of
the backup statistics for all organizations associated with the current
role. This is calculated by averaging information from all the
organizations.
Figure 2-7 Protection Status Gauge
Chapter 2 29
Page 50

Data Protector-SIP Integration
Protection Status Module
All Hosts Backup Statistics Report
If you click on a Protection Status Gauge from the main portal window,
you can see the All Hosts Backup Statistics report, a detailed listing
of information about your system’s backup health.
Figure 2-8 All Hosts Report
The table below describes the fields displayed on this screen.
Table 2-2 Fields in the All Hosts Backup Statistics Report
Client Host The name of the cell server.
User Group The name of the customer group.
% Success The percentage of successful backup requests.
The number in this field is expandable. See the
following section for detailed information about
this expanded information.
Data Written The amount of backup data written (in
gigabytes).
# Completed
Objects
# Failed Objects The number of failed backup jobs.
# Running DA The number of disk agents currently running.
# Pending Objects The number of backup jobs that are pending.
Client Host Backup Report
When you click on the % Suc cess field in the All Hosts Back up
Statistics page, you can see the Client Host Backup R eport, an
expanded detail view of the backup health for the selected customer
group on the selected cell server.
The number of completed backup jobs.
Chapter 230
Page 51

Figure 2-9 Client Host Backup Report
The fields on this screen are described in the table below.
Table 2-3 Client Host Backup fields
Details: The name of the cell server to which the report
applies.
Group The name of the customer group.
Data Protector-SIP Integration
Protection Status Module
% Success The percentage of successful backup requests. The
number in this field is expandable. See the
following section for detailed information about
this expanded information.
Data Written The amount of backup data written.
# Files The number of files backed up.
# Backup
Objects
# Completed
Jobs
# Failed Objects The number of failed backup jobs.
# Running DA The number of disk agents currently running.
# Pending
Objects
Chapter 2 31
The number of objects backed up. A backup
object is any data selected for a backup, such as a
disk, a file, a directory, a database, or a part of the
database.
The number of completed backup jobs.
The number of backup jobs that are pending.
Page 52

Data Protector-SIP Integration
Protection Status Module
Host Statistics Report
The Host Statistics report provides backup statistics for all hosts
associated with the current role.
Figure 2-10 Host Statistics Report
The table below describes the fields displayed on this screen.
Table 2- 4 Host Sta t i s tics fields
Host Statistics
Report
Time Frame
(i.e., over the
last 30 days
in Figure 2-10)
Client Host The qualified host name of the cell server.
% Success The percentage of successful backup requests. The
Detail View
If you click on a percentage in the main portal window, you can see the
All Hosts Backup Stati stics report, a detailed listing of information
about your system’s backup health. Refer to “All Hosts Backup Statistics
Report” on page 30 for more information about this report.
The name of the report.
The time frame for which data is
collected/displayed.
number in this field is expandable. See the
following section for information about the detailed
view.
Chapter 232
Page 53

Clicking on a percentage in the All Hosts Backup Statistics report
displays the Client Ho st Ba ckup Repo rt and a further level of detail.
Refer to “Client Host Backup Report” on page 30 for more information
about this report.
Editing the Backup Health Module
The Backup Health Module provides a gauge or a report that displays
information about the overall health of the backup process for all of a
customer’s groups. You can use the Edit page to customize the Backup
Health module.
Using the Backup Health - Edit page
To customize the Backup Health module, click on the Edit
button in the title bar. The Data Protector 5.0 Pr otect ion
Status - Edit pane is displayed.
Figure 2-11 Data Protector 5.0 Protection Status - Edit
Data Protector-SIP Integration
Protection Status Module
Table 2- 5 Edit Fields
Data Protector
Servlet host:
Module A drop down menu from which you can choose
Chapter 2 33
The fully qualified name of the host on which the
servlets are running and the port on which the
servlets are communicating.
which version of the module to display, Status
Gauge or Host Status.
Page 54

Data Protector-SIP Integration
Protection Status Module
Table 2- 5 Edit Fields
Over the last: The time frame from which to display results.
Warni n g % At
and Below:
Critical % At
and Below:
Backup Health Criteria
The criteria for gauging backup health have been pre-configured in this
system, so no additional steps are necessary for you to configure these
gauges. You can, however, configure the thresholds for the general
backup health status, or severity.
Backup health statuses are generally defined as described in the table
below.
Table 2-6 Backup Health Status
Normal A safe health range, in which the severity and
Minor Although there is probably no imminent danger of
The success percentage at (and below) which the
protection status is considered to be warning.
Anything above this is considered to be
normal/successful.
The success percentage at (and below) which the
protection status is considered to be critical.
incidence of errors is acceptable.
data loss from system errors, the administrator
should look into the situation.
Critical Loss of data is likely imminent, and the situation
should be resolved immediately.
You can change the thresholds for these statuses globally based on
factors within your unique environment. See “Editing ConfigSpec.xml”
on page 18 for more information on setting these thresholds.
Directly Editing the PortalView.xml File
You can edit the PortalView.xml file directly. You should be careful, if you
choose to edit directly, as incorrect editing may cause anomalous results
in the integration. Refer to the SIP Deployment and Integration Guide
for more information about direct editing.
Chapter 234
Page 55

Data Protector-SIP Integration
Data Protector Reports Module
Data Protector Reports Module
This chapter provides an overview of what Data Protector Reports are
and how to configure and use them.
This chapter contains the following sections:
• “Understanding Data Protector Reports”
• “Editing the Data Protector Reports Module”
• “Establishing Global Settings for Reports”
Understanding Data Protector Reports
The Reports module provides a variety of information from Data
Protector on one or more cell servers in your management domain.
Data Protector Reports
The following Data Protector reports are pre-configured for SIP:
Data List Trees This basic report has information on all directory trees
backed up by the cell server, but is limited to the directories of the groups
associated with the SIP customer. Note that this option provides one
report per group; customers with multiple groups get multiple reports
Figure 2-12 Data List Tree Report
Chapter 2 35
Page 56

Data Protector-SIP Integration
Data Protector Reports Module
Object Last Back Up This is a basic report showing all objects owned
by a group and the data of the last full and partial backup for that group.
Note that this option provides one report per group, so customers with
multiple groups get multiple reports.
Figure 2-13 Object Last Back Up Report
Editing the Data Protector Reports Module
You can use the Edit page to customize the Reports module.
Using the Reports - Edit page
To customize the Reports module, click on the Edit button in the
title bar. The Data Protector 5.0 Reports - Edit pane is
displayed.
Chapter 236
Page 57

Figure 2-14 Data Protector 5.0 Reports - Edit
Table 2- 7 Edit Fields
Data Protector-SIP Integration
Data Protector Reports Module
Data
Protector
Servlet host:
Report A drop down menu from which you can choose which
Warni n g % At
and Below:
Critical % At
and Below:
Directly Editing the PortalView.xml File
It is possible to edit the PortalView.xml file directly. You should be
careful, if you choose to edit directly, as incorrect editing may cause
anomalous results in the integration. Refer to the SIP Deployment and
Integration Guide for more information about direct editing.
The fully qualified name of the host on which the
servlets are running and the port on which the
servlets are communicating.
report to display, Data List Trees or Object
Last Backup.
The success percentage at (and below) which the
protection status is considered to be warning.
Anything above is considered to be normal/successful.
The success percentage at (and below) which the
protection status is considered to be critical.
Establishing Global Settings for Reports
For more information about establishing global settings for reports, refer
to “Editing ConfigSpec.xml” on page 18.
Chapter 2 37
Page 58

Data Protector-SIP Integration
Internationalization Issues
Internationalization Issues
This chapter describes internationalization issues with the Data
Protector-SIP integration.
Language Support
Both Data Protector and SIP are supported for multiple languages. This
version of the Data Protector-SIP integration, however, returns reports
only in English.
If your implementation includes cell servers running with different
languages, the directory and files names are returned to the integration
in the character set that is native to the cell server on which the
information originated. If the machine on which you are running the
Data Protector/SIP integration supports that character set, the report
information is displayed correctly. If the machine on which you are
running the integration does not support that character set, the report
information may be unreadable.
For example, if the cell server is running in Japanese and the integration
server is in English (without the appropriate wide-bit character set) the
report information will be illegible.
Chapter 238
Page 59

Data Protector-SIP Integration
Troubleshooting
Troubleshooting
Error Messages
This section lists some error messages you may see while using this
integration and discusses how to respond to them.
Data Unavailable
If, while viewing reports, you get a Data Unavailable error message after
adding a module, you are missing either a valid servlet host or data
within the specified timeframe.
Check the following in the ConfigSpec.xml file, located in
$SIP_HOME/webap ps/dpsip (for servlets installed on the SIP server) or
$TOMCAT_Home/we bapps/dps ip directory (for servlets installed on a web
server):
• The hostname (including port number) is valid.
• The set timeframe is reasonable in size to have data.
Parse Rest of Config
If, while using this integration, you get the Java exception message
Exception: parse Rest of Config, the log directory may not have been
installed correctly. Verify that the log directory is present (at the location
specified in the ConfigSpec.xml file) and that read/write access for the
directory is set to all.
Chapter 2 39
Page 60

Data Protector-SIP Integration
Troubleshooting
Chapter 240
Page 61

3 Data Protector-OVO-SIP
Integration
Chapter 3 41
Page 62

Data Protector-OVO-SIP Integration
Introduction
Introduction
The integration of Data Protector with the OpenView Service
Information Portal (SIP) offers pertinent information to the managers of
the backup service of a specific group. The portal allows for tailoring of
the page for each user.
This chapter describes how SIP and OpenView Operations integrate
with Data Protector to provide additional network visibility to Data
Protector and to allow integration of Data Protector-specific information
with other SIP services.
Prerequisites
The integration requires the following licensed components:
•Data Protector
• OpenView Operations
• OpenView Service Information Portal
• Oracle 8i (third party software)
• Data Protector Integration for OVO/UNIX
Product Capabilities and Integration Benefits
This integration provides the following capabilities:
• Convenient data protection service monitoring through web access
from any machine.
• Various forms of data presentation: service health gauges, service
graphs, service cards, and a service browser.
• The specification of resource in terms of machine and backup
specification group names.
• Segmentation of accessible data by the different backup
administrators.
• Support for various authentication mechanisms including a generic
authentication mechanism.
• Information aggregation from other services (not related to Data
Chapter 342
Page 63

Data Protector-OVO-SIP Integration
Introduction
Protector) to the portal, using SIP's configuration mechanisms. A
single presentation format for all modules.
• Easy configuration: GUI configuration editor and XML document
editing only.
Chapter 3 43
Page 64

Data Protector-OVO-SIP Integration
Component List
Component List
• Data Protector - A backup solution that provides reliable data
protection and maximum accessibility for your business data. Data
Protector offers comprehensive backup and restore functionality
specifically tailored for enterprise-wide and distributed
environments.
• OVO (OpenView Operations) - A central data collection and
management point capable of reading messages from a variety of
modules on various machines, acting on them when such action is
defined, and transmitting them (the messages) further if asked. OVO
has the potential of serving as a central management point for
various remote systems. OVO offers both command line and graphical
user interfaces for local and remote administration.
• OVO DP SPI (Data Protector Integration for OVO/UNIX) - A
component that implements the data passing interface between Data
Protector and OVO. This component resides on both ends and is
integrated into both products.
• OVO SN (OpenView Service Navigator) - A system that maps
messages to services to ease the control of complicated systems.
• OV SIP (OpenView Service Information Portal) - A tool that
aggregates information collected from various services. The
information is presented and formatted through various portal
components and is made available through a web page. Portal
components and modules include Service Browser, Service Graph,
and Service Cards.
Chapter 344
Page 65

Data Protector-OVO-SIP Integration
Data Mappings
Data Mappings
The illustration below shows the data mappings for this integration.
3
1
Open View Operations Service Navigator Service Info rmation Porta l
2
filters
4
Data P r o tector 5 .0
OVO
DP
SPI
5
1. OVO receives information from Data Protector via the OVO DP SPI.
2. OVO stores the information locally in its database.
3. SN receives the Data Protector records from OVO.
4. SIP queries SN about the OVO information.
5. SN filters the records received from OVO by service name, according
to the SIP query.
If the customer also integrates OV Reporter in this configuration, SIP
may provide URLs to the reports as generated by Reporter. It is up to the
administrator to configure the links. The Reporter-Data Protector
integration generates these reports as statically linked HTML
documents
Chapter 3 45
Page 66

Data Protector-OVO-SIP Integration
Dependencies
Dependencies
• If Reporter is included in the integration, the configuration of the
URL links for the reports depend on the names that Reporter gives to
those reports.
• The Backup Service pie chart module will only be available if the
OpenView Reporter integration is installed
• If you choose to use the Backup Service pie chart module, the Data
Protector backup specification group names must be names that
Windows NT accepts for file names. A folder named
“machinename.DPServiceName” is created for them on the Reporter
machine, which is a Windows machine. The names must contain only
ASCII characters.
• OVO requires Oracle 8i to be installed. The exact version depends on
the OVO version. For more information, refer to the OVO Installation
Guide.
• Sun's Java Developer's Kit 1.3 is required for SIP, OVO, and SN.
• Some OpenView components require that Netscape Navigator 4.7 be
installed. This step is unnecessary and may be skipped as long as
alternative means of browsing HTML pages is available (e.g., a web
browser on a separate machine, or an alternative compatible web
browser).
• Successful configuration must also comply with the software
requirements as described in the table below.
• The environment must be properly set and configured prior to the
installation of the integration components. This may include patches,
environment variables, kernel parameters, and other software
components as required. For detailed information about the specific
requirements, please refer to the installation guides for those
components.
• This integration uses Data Protector backup specification groups.
Refer to the HP OpenView Storage Data Protector Administrator’s
Guide and the Data Protector online help for more information about
backup specification groups and how to configure them.
Chapter 346
Page 67

Table 3-1 Software Requirements
Component Version Operating System
OVO 6.0, 7.0, 7.10 HP-UX 11.0
Data Protector-OVO-SIP Integration
Dependencies
Data
Protector
5.0 HP-UX 11.0, 11.11,
Windows NT 4.0, Windows
2000
OVO Agent 6.05, 7.0, 7.10 HP-UX 11.0, 11.11,
Windows NT 4.0, Windows
2000
OVO DB Oracle 8i HP-UX 11.0, 11.11
SIP 3.0 HP-UX 11.0, Windows 2000
SN 6.0 HP-UX 11.0
Chapter 3 47
Page 68

Data Protector-OVO-SIP Integration
Setup Process
Setup Process
The setup process for this integration consists of two main procedures:
• Installation of the components
• Configuration of those components
Installation
SN, OVO, SIP, and Data Protector can be installed on a mix of HP-UX
and Windows machines. All the necessary and required components
should be installed and working.
1. Data Protector 5.0 should be installed on the data protection cell
manager. If the cell manager is an HP-UX machine, the
DCE-KT-Tools component must also be installed.
See the Data Protector 5.0 Installation Guide for detailed
instructions.
2. Install the following Oracle products, version 8.1.6.0.0, on the cell
manager:
• Oracle8i Server (Optional components not required)
• Net8 Products (All components are required)
• Oracle Utilities (All components are required)
• Oracle Installation Products (All components are required)
3. Use swinstall to install the ITOEngDoc and ITOEngOraAll OVO
components (assuming the chosen language is English) on the
management station. See the OpenView Operations Installation
Guide for detailed instructions.
4. Install Service Navigator (SN) on the management station. See the
HP OpenView Operations and Service Navigator Integration with SIP
document for detailed instructions.
5. Install DPSPI on the cell manager. This component is located on the
Data Protector CD. (This step includes various related patches for SN
and OVO.) See the HP OpenView Storage Data Protector Integration
Guide for HP OpenView Operations for detailed instructions.
Chapter 348
Page 69

Data Protector-OVO-SIP Integration
Setup Process
6. Install the OVO agent on the cell server. See the OpenView
Operations Installation Guide for detailed instructions.
7. Install SIP on the portal server. See the Service Information Portal
Installation Guide for detailed instructions.
8. Install the integration package (listed below) on the OVO server.
•Windows
a. Insert the Windows installation CD.
b. Run the following executable:
\DP_SERVICE_MAN AGEMENT_I NTEGR\DP -OVO-S IP-WIN.e xe
c. Follow the on-screen instructions
•HP-UX
a. Insert the HP-UX installation CD.
b. Use swinstall to install the following depot:
/OV_INTEGRATION S/DP-OVO- SIP-HPUX .depot
c. Follow the on-screen instructions.
Configuration
SIP maintains its configuration documents in XML format. The XML
must be modified to present customized portal views, implement user
data segmentation and separation, and map resources to the users.
Sample Configuration Files
The integration package will place sample configuration files in the
following directory:
Windows 2000 <SIP>\ovo\SIP\i ntegratio n\DP
HP-UX <SIP>/ovo/SIP/i ntegratio n/DP
See the readme file for details about the sample files.
Editing Configurations
There are three basic ways to create and update the configuration. You
can use any of the following methods:
Chapter 3 49
Page 70

Data Protector-OVO-SIP Integration
Setup Process
• The SIP Administrator view can be used to restart the engine, to
accept new customer models, and to help design the portal page when
viewing a role with ViewAdmin.
• The configuration editor is a Java tool supplied with SIP that guides
the user through the process of configuration, including user/role
mapping and management station declarations.
• The XML files can be edited by hand. The customer model must be
defined via manual XML editing. You can also perform any other
configuration tasks by editing the XML files directly.
Configuring the Management Stations
1. On the portal machine, use the SIP configuration editor to select and
right click the ManagementStation folder. From the shortcut menu,
click New…
2. Type the fully qualified hostname in the New Management Station
Window.
3. Select the OVO tab and check the "OVO Is Installed On Th is
System" and "SN Is Installe d On This Sys tem" boxes. (where SN
stands for Service Navigator).
4. Accept the default values, or change the values and continue.
The configuration file itself is located as follows:
Windows 2000. SIP\conf\..
HP-UX. /SIP/conf/share /stations /mgmtSta tions.xm l
Following is an example of a management station element in the
mgmtStations.xm l file. Notice that it contains the definitions of all the
OVO stations SIP communicates with.
<ManagementStat ion hostn ame="ovo .examp le.com">
<OVOStat ion
serv iceNavPor t="7278"
serv iceDataSo urce="ye s"
dbPo rt="1521"
dbUs er="opc_o p"
dbPa ssword="O pC_op"
Chapter 350
Page 71

Data Protector-OVO-SIP Integration
Setup Process
maxC onnection s="10"
minC onnection s="5"
maxC achedStmt s="10"/>
</Managemen tStation>
For more information about management stations, refer to
mgmtStations.dt d, ovoConfig.d td, and the online help in the SIP
configuration editor.
Updating the Customer Model
The customer model is where Organizations are defined in terms of
accessible resources. The file that describes the model is:
Windows 2000 <SIP>\conf\shar e\Custome rModel.x ml
HP-UX <SIP>/conf/shar e/Custome rModel.x ml
Make a copy of the existing model and amend CustomerModel.xml to
include the organization you want your users to access. Add
<Organization> tags as an element in <SimpleCu stomerMo del>. The
specification of backup services requires neither <NodeList> nor
<InterfaceList>, so those tags will be empty if present at all. If you
include resources other than Data Protector backup services as described
in this integration, you may need to use the <NodeList > and
<InterfaceList> tags.
For more information, consult the chapter “Segmenting Data by
Customer Organization” in the SIP Deployment and Integration Guide.
The example below shows a description of a backup service. The
<ServiceLevel> tag is used to describe the service level. The <Service>
tag is where the backup service is referenced. Its name must be specified
as software name (e.g., “Data Protector”), fully qualified machine name,
backup specification group name (if defined in Data Protector), and
service name with full hierarchy (full hierarchy means the path in the
service graph starting at the root and ending in the required node). The
service navigator requires a format of a service description to be topnode
separated by a dot followed by its child node, and so on till the last node
to be described All items should be separated by a dot.
<Organization n ame="firs tOrg" ty pe="cu stomer">
<ServiceLevel>G old Servi ce</Serv iceLev el>
<NodeList/>
Chapter 3 51
Page 72

Data Protector-OVO-SIP Integration
Setup Process
<InterfaceL ist/>
<ServiceLis t>
<Service name=
"Data Protector .example. com.grou p1.Bac kupSessi ons"
type="server"/>
<Service name="Dat a Protec tor. . .." type ="server "/>
</ServiceList>
</Organization>
Creating a SIP User/Role Package
The SIP security model is based on segmentation. Services are mapped
to roles (not necessarily uniquely) and users are given access to those
roles (each user may have more than one role). The information about
the user/role model is then processed and saved in a format SIP can use.
To create a new user/role package:
1. Highlight User Role Packages
2. Select New in the drop down menu in the Configuration Editor
The list of active user/role packages is located in:
Windows 2000 <SIP>\conf\share\roles\index.xml
HP-UX <SIP>/conf/share/roles/index.xml
NOTE Remove any packages you do not use. Each package contains doors
through which one may enter your system. Leaving unused packages on
your system can create unnecessary risk by introducing security holes.
To define a SIP user/role package, follow the steps below. In this
example, the SIP configuration editor is used.
For more information about user role/model and definition, use the
online help in the SIP configuration editor.
Define the management data
1. Create the managementData items in the package you defined.
Chapter 352
Page 73

Data Protector-OVO-SIP Integration
Setup Process
2. Select the “Show Data for the Following Organizations:” button,
select the name for the management data, and click Add.
3. The list of available organizations is displayed in a new window.
Select all organizations (previously defined in the customer model)
and click OK. (You may later remove organizations from the
management data, e.g. for security purposes.)
4. Repeat the previous steps for each group of resources.
Define user roles
1. Select Roles from the package you created. Right click and select New
from the shortcut menu.
2. In the General tab, choose a Role Name (the name used in the
configuration to reference the role) and a Display Name (the name
appearing on SIP for that role).
3. Select a setting from the drop down menu for the Edit Permissions
field. User Preferences is the recommended setting, as it allows users
to select their own skins--or predefined display settings--for their
pages.
4. Select Portal View File. This file may be any portal view you have
already defined or one of the demo portal views, such as
samples/liveDemo.xml (Use the browse button to help you navigate
through these files.)
5. Type a new name in Modified View File field. The name should have
the extension .xml. When you do this, the file used in the Portal View
File is copied and the role has its own portal view. If you do not want
to do this (for example if you would like any change to a portal view of
one role to be reflected by all roles who share that view), do not
specify a Modified View File.
6. Click the Management Data tab and select “Use specific management
data.”
7. Choose the management data you would like to associate with the
role.
8. Click OK.
You now have a new role.
Chapter 3 53
Page 74

Data Protector-OVO-SIP Integration
Setup Process
Define a User
1. Select Users in the package, right click and select “New...” from the
shortcut menu to add the user.Choose the user login name (the name
used to refer to that user in the configuration) and display name.
2. Click the Roles tab and choose the user's roles and initial role. You
may override the edit preferences of a role for a user by specifying the
role in the Other Roles block, adding the role there and editing its
“Override Permissions” field.
3. To allow easy editing of the portal views for all roles, you may want to
either give an existing administrator access to those roles or create a
new portal view administrator. To create a new portal view
administrator, create a new user with access to all the Roles you want
the user to be able to configure portals for. Make sure the Override
Permission field for these roles is set to ViewAdmin for this user. (See
the Roles tab in the user definition window).
4. Click the save button in the SIP portal configuration editor.
The configuration is saved.
Design portal views
1. Now that your users are set, you must restart the SIP engine before
the changes take effect.
2. To design portal views, log in as a portal views administrator (a user
with ViewAdmin permission to the configured role) and design the
portal views for the various roles. You may add, remove, and edit any
module that has access to the information spanned by the role's
management data. When finished, log out, then log back on as a user
with access to the role to view your new view as users will see it.
3. Please refer to the “Designing a Custom Look and Feel to Your
Portals” section of the “Customizing Portal View” chapter in the SIP
Deployment and Integration Guide for more details on customizing
your portal view.
Add Password Authentication (optional)
The system configured so far offers little security. Access to a user's view
is given upon request with only a user name.
To add a level of security to the system, you can configure password
authentication to the portal.
Chapter 354
Page 75

Data Protector-OVO-SIP Integration
Setup Process
This step is optional as the customer may choose to have a different
security model, or no security at all.
Enable password authentication
Follow the steps below to add a user/password authentication scheme to
the portal. For all other authentication options, or for further
information, refer to the “Configuring Authentication” chapter in the SIP
Deployment and Integration Guide.
1. Enable user password authentication in SIP. Authentication is a
portal-wide setting configured in the OVPortalConfig.xml file, located
in the following directory:
Windows 2000 <SIP>\conf\fram ework\
HP-UX <SIP> /opt/OV/S IP/conf/f ramework /
Find the Authentication element and change it as shown
below:<Authentication
LoginPage=" /ovportal /jsp/sec urity/ login_ht ml.jsp"
Authenticat ionProvid erClass=
"com.hp.ov.port al.securi ty.FileA uthent icationP rovider"
ShowLogoutB utton="ye s"
LogoutPage= "/ovporta l/jsp/se curity /logout_ html.jsp "/>
Once you enable password authentication you can begin to add
authorized users to SIP.
Add authorized users to SIP
SIP provides a program, htpassw d, for configuring user logins. It also
comes with a password file containing one user:
username: ovuser
password: ovuser
1. The password file is manipulated the same way a UNIX password file
is. You must add a user and its password to the password file to allow
users access their SIP accounts. To add a user:
Windows 2000:
%SIP_HOME%\bin\ htpasswd
Chapter 3 55
Page 76

Data Protector-OVO-SIP Integration
Setup Process
%SIP_HOME%\etc\ passwd <u sername>
UNIX: (as root)
/opt/OV/SIP/bin /htpasswd
/opt/OV/SIP/etc /passwd < username >
where <username> is the user you want to add to the portal.
2. Enter a password for the user when prompted.
The location of the default password file is:
Windows 2000: %SIP_HOME %\etc\pa sswd
UNIX: <SIP>/etc/passwd
Once you have created new user accounts, you may remove ovus er
from the password file by deleting its entry and saving the file.
Finalize the Configuration
1. If an authentication module was configured, restart the engine.
2. Log on to the system from the web and access the admin view for the
configured role.
3. If the reporting system (OVR) is integrated into the system, you
should now associate users with reports.
NOTE It is important to note that only the Backup Health Report is currently
customized per group. None of the other included OVR reports have been
customized and so will contain information regarding all groups. Users
who have access to these reports can easily gain information regarding
other services. It is recommended, in the interest of segmentation, that
you do not give regular users not designated as administrators links to
the non-customizable reports. You should give these users a link to their
respective group report only.
Backup Administrators with jurisdiction over all backups may be
given a link to all reports. These references are represented as URL
links in the portal.
4. To add a reference, log in as a user with ViewAdmin privilege for the
role you want to add a report for.
Chapter 356
Page 77

Data Protector-OVO-SIP Integration
Setup Process
5. In the new window, click the Add Bookmark button.
6. Complete the following fields:
Bookmark Name The name the portal will display for the link. In
most cases, you can use Backup Health Report
(unless it is a different report you give a link to).
HREF The URL itself.
Window Name (optional) A title for the new window the user will
open by clicking that link.
7. Click OK.
8. Return to the bookmarks window and click OK again.
The bookmark will now display in the portal view for this role.
NOTE OVR reports are not secured, and unless special actions are taken, can be
accessed by any user who has the link names. If there is a concern about
the security and sensitivity of the displayed information, OVR should not
be integrated with SIP
SIP is delivered with a generic demo portal that includes graphics files of
sample logos. You may want to remove these samples.
To remove these files, follow the procedure below.
1. On the machine with the web server installed, go to the directory
where the default header is stored.
Windows 2000 <SIP>\webapps\ovportal\jsp\core
UNIX <SIP>/webapps/ovportal/jsp/core
2. Save a copy of header.jsp and edit header.jsp to eliminate the
link to generic_net.gif or hplogo.gif or, alternatively, replace
them with links to your favorite logos.
The portal view has many details that can be customized. For more
information on this, refer to the SIP Deployment and Integration
Guide.
If the OVR Data Protector integration has also been installed, then there
is a Backup Service Health pie chart module available. The following
steps will activate the module.
Chapter 3 57
Page 78

Data Protector-OVO-SIP Integration
Setup Process
1. Verify that the OVR Data Protector integration is installed correctly
by locating <…>HP OpenView\bin\split.exe on the OVR machine.
2. Open the file <SIP>/registration/defaults/OVDefaultOVRRep.xml. It
should contain the following content and can be found in the release
package:
<Generic>
<Submodule>
<Url href=
"http://<report erAddress >/hpov_r eports /DP/Sess ionHealt hSt
atus_m/SIP_USER S/$OVROLE [OVName] .jpg"
displayMethod="in line" inlineHe ight="400"
anchorText="Bac kup Servi ce Healt h Stat us"/>
...</Submodule>
</Generic>
NOTE The “_m” that precedes SessionHealthStatus in the link above specifies
the 30 days period report. If you want the daily or weekly period report,
you can redefine the link to SessionHealthS tatus_d or
SessionHealthSt atus_w provided that the corresponding steps on the
OVR side are taken, too. By default, OVR is only configured to split the
monthly report.
Substitute <reporterAddress> with the machine name and the port
number, if required, of your reporting station.
3. Restart the SIP engine. Verify that the configuration of the Backup
Service Health pie chart module is correct by viewing the log file as a
SIP administrator. The log should show details if the configuration
has problems.
4. You can now add the Backup Service Health pie chart module by
modifying a Data Protector user's portal view. If the pie chart does not
appear and an error message is displayed, please refer to the
Troubleshooting section.
Chapter 358
Page 79

Troubleshooting
Table 3-2 Troubleshooting
Problem Resolution
Data Protector-OVO-SIP Integration
Setup Process
The module in the portal displays an error
description.
The module displays a message: Currently
not configured - the management station is
not connected to SIP or attempt to use
information from service outside the
resources defined for the given role.
Click the refresh button.
Reconfigure and reprocess
configuration. (Run
create_role_db if the
customer model changed.
Otherwise, restart the
engine.)
Chapter 3 59
Page 80

Data Protector-OVO-SIP Integration
Setup Process
Chapter 360
Page 81

4 Data Protector-OVO-OVR
Integration
Chapter 4 61
Page 82

Data Protector-OVO-OVR Integration
Introduction
Introduction
The integration of OpenView Reporter, via OpenView Operations, with
Data Protector provides additional capabilities for monitoring and
reporting on the backup and recovery processes.
Data Protector deals effectively with the backup, recovery, and protection
of valuable data, but problems occur that are beyond the control of an
administrator. Media goes bad, storage runs low, and machines die, get
disconnected, or lose power. The administrator or IT staff must be able to
deal with these situations in a timely manner and requires that
pertinent information be available easily, quickly, and immediately in the
most accessible manner.
This chapter describes how Reporter integrates with Data Protector to
provide detailed and in depth information concerning the health and
status of Data Protector’s data protection services.
Prerequisites
The integration requires the following licensed components:
•Data Protector
• OpenView Operations
•OpenView Reporter
• Oracle 8i (third party software)
• Data Protector Integration for OVO/UNIX
Product Capabilities and Integration Benefits
This integration maximizes the potential of OVO, OVR, and Data
Protector, providing all of the following benefits:
• Enterprise-level data is presented in easy to read charts, tables, and
graphs, making it simpler to review and analyze.
• Information is available through any compatible web browser on your
network, so administrators aren’t tied to a single location for
accessing the Data Protector or Operations machines.
• Additional reports can be generated, customized, or modified using
Chapter 462
Page 83

Data Protector-OVO-OVR Integration
Introduction
Crystal Reports (a tool that can be used to create interactive content
from data sources, to publish reports to the Web in a variety of
formats, and to integrate reports with applications). This product is
not included with OVO, OVR, or Data Protector. Refer to the Crystal
Reports documentation for template and configuration information.
• The administrator has convenient access to critical information
concerning Data Protector services.
• Information is collected in convenient report formats.
• The reports provide a high-level view of the data protection services
for the whole enterprise.
Chapter 4 63
Page 84

Data Protector-OVO-OVR Integration
Component List
Component List
Data Protector A data protection service that handles
data backup and recovery across
various systems and media types.
OpenView Operations A central management point for
various remote OpenView applications.
Collects and analyzes data, automates
critical response, as well as message
forwarding to other services.
OpenView Reporter A reporting service that further
analyzes, inspects, and collects data
gathered by OVO and formats them
into a human readable and usable
web-based presentation.
Data Protector
Integration for
OVO/UNIX
A software package that helps you to
monitor and manage the health and
performance of your Data Protector
environment with HP OpenView
Operations (OVO), HP OpenView
Service Navigator, and the HP
OpenView Performance (OVP) Agent.
Chapter 464
Page 85

Data Mappings
Data Protector-OVO-OVR Integration
Data Mappings
1. OVO receives information from Data Protector via the DP-OVO
integration.
2. The information is stored in the OVO database.
3. OVR extracts necessary Data Protector-specific data from the OVO
database.
4. OVR also collects performance related data from the Data Protector
server using the OV performance agent.
5. OVR collects data from Data Protector using DP-OVO integration via
port 5555.
6. OVR generates Data Protector reports using data collected in steps 3,
4, and 5.
Chapter 4 65
Page 86

Data Protector-OVO-OVR Integration
Dependencies
Dependencies
• OVO requires Oracle 8i. Refer to the OVO Installation Guide
• Java Developers Kit 1.3 is required for OVO
• Netscape Navigator 4.7 is listed as a required component at some
points, but this is unnecessary if a web browser on another machine is
available
• The proper environment is required prior to installation of the
components of the integration. This may include various patches,
software, and settings to be made. Please refer to the corresponding
installation guides for more information.
Table 4-1 Software Requirements
Application Version Platform
OVO 6.0, 7.0 HP-UX 11.0, and 11.11
Data
Protector
OVO Agent 6.05, 7.0, 7.10 HP-UX 10.20, 11.0, 11.11, Windows
OVO DB Oracle 8i HP-UX 10.20, 11.0, 11.11
OVR 3.0 Windows 2000 and Windows NT
5.0 HP-UX 11.0, 11.11, Windows NT
4.0, Windows 2000
NT 4.0, Windows 2000
Chapter 466
Page 87

Data Protector-OVO-OVR Integration
Setup Process
Setup Process
Setup and install of the OVR Report package is very simple, assuming
you have a working Data Protector-OVO integration and a working
OVO-OVR installation. Please refer to the HP OpenView Data Protector
Integration Guide for HP OpenView Operations or the OVR installation
documents for more information.
To install the Data Protector-OVO-OVR integration:
1. On the OVR system, insert the Data Protector Windows CD
2. Run:
\DP_Service_Management_Integr\DP-OV-Reporter-WIN.exe
3. Follow the on screen instructions
Configuration
If you have followed the suggested order of installation and the Data
Protector-OVO integration has already been installed and configured, no
configuration of the Data Protector-OVR integration should be necessary,
as the integration installs a set of complete report templates that should
work out of the box. The report package include a set of reports tailored
for a working Data Protector-OVO integration, so if the reports don't
work, please check the Data Protector-OVO integration.
To manually configure a transaction report, you must integrate Data
Protector with ARM by linking the libarm.sl files in Data Protector and
OVPA. For detailed instructions, see the HP OpenView Storage Data
Protector Administrator’s Guide.
Troubleshooting
Table 4-2 Troubleshooting Tips
Problem Resolution
While attempting to install the
report package, setup was unable
to detect HP OpenView Reporter
on the machine
Chapter 4 67
Make sure the machine you're
installing on has HP OpenView
Reporter A.03.01.00 or above. If it
does not, install it.
Page 88

Data Protector-OVO-OVR Integration
Setup Process
Table 4-2 Troubleshooting Tips
Problem Resolution
HP OpenView Reporter was not
installed properly on this
machine
Installed HP OpenView Reporter
version is not A.03.01.00
Not enough free disk space on
Drive selected drive. Available
disk space on drive selecte d
drive is space MB. Required
disk space is 5MB
Reinstall or repair HP OpenView
Reporter A.03.01.00
Upgrade or install HP OpenView
Reporter A.03.01.00 or above
Free up 5 or more MB of disk
space on the selected drive and
continue installing the OpenView
Reporter Data Protector report
package.
Chapter 468
Page 89

Data Protector-OVO-OVR Integration
Creating Custom Reports
Creating Custom Reports
Introduction
The Data Protector integration with OpenView Reporter comes with a
carefully chosen set of reports on the general health of the backup
system and overall backup statistics. Reporter also offers a high degree
of flexibility in changing the default report settings. If, however, you
want to report on data from new or modified metric lists, new custom
report templates are necessary.
You can create or modify report templates with Seagate Crystal Reports
to customize the default report templates or create your own templates.
NOTE For detailed instructions on how to create custom reports and software
requirements, refer to:
• OpenView Reporter online Help “Creating Your Own Reports” topics
• HP OpenView Reporter Concepts Guide
• Customizing HP OpenView VantagePoint Reporter With Seagate
Crystal Reports (found on the Reporter product CD).
Crystal Reports Professional 8.5 was used to develop the default
templates.
Creating Data Protector Custom Reports
When you create a new Data Protector report template in Crystal
Reports, you must select a data source that defines where the data for
each metric list is stored. You also need to understand the data format in
order to retrieve appropriate performance data and use it to the best
effect.
This section provides an overview of the main database tables and data
format used for Data Protector-specific messages.
Chapter 4 69
Page 90

Data Protector-OVO-OVR Integration
Creating Custom Reports
Data Source
The Data Protector Integration with OpenView Operations (DP-OVO)
generates a wide variety of messages that enables you to monitor and
manage the health and performance of your Data Protector environment
with OpenView Operations (OVO).
Messages are stored in two sets of OVO message tables: active messages
and history messages. The active and history messages, although they
have the same attributes, are kept separate to improve performance
when loading and inserting active messages. Acknowledged and
unacknowledged messages are first marked and then moved in groups of
50 by an asynchronous process to reduce the impact on GUI. The
message text and original message text are also stored in separate text
tables for performance reasons.
OVO message tables include:
• OPC_ACT_MESSAGES
This table contains the main entry for messages that are currently in
the Message Browser window. This table can also contain a maximum
of 50 acknowledged messages. When more than 50 messages have the
ackn_flag set to Yes, they are moved to the history table.
• OPC_ANNO_TEXT
This table contains the annotation text for messages in
OPC_ACT_MESSAGE S.
• OPC_ANNOTATION
This table contains the main entry of message annotations for
messages in OPC_ACT_ MESSAGES.
• OPC_ESCAL_ASSIGN_M
This table contains the message numbers of the owned messages and
messages that were escalated to or from another management server.
• OPC_FORWARD_MSGS
This table contains list of messages that have been forwarded to other
management servers.
• OPC_HIST_ANNO_TEXT
This table contains the annotation text for history messages in
OPC_HIST_MESSAG ES.
Chapter 470
Page 91

Data Protector-OVO-OVR Integration
Creating Custom Reports
• OPC_HIST_ANNOTATION
This table contains the annotations for a history message in
OPC_HIST_MESSAG ES.
• OPC_HIST_MESSAGES
This table contains the main entry for history messages (messages
that were acknowledged or are log-only). Some acknowledged
messages may still be in OPC_ACT_M ESSAGE S.
• OPC_HIST_MSG_TEXT
This table contains the message text, divided into 254-byte parts, for
messages in OPC_HIST _MESSAGES table.
• OPC_HIST_ORIG_TEXT
This table holds the original message text, divided into 254-byte
parts, of a history message in OPC_ HIST_MES SAGES.
• OPC_INSTR_INTERF
This table contains the definition of instruction text interfaces.
• OPC_INSTRUCTIONS
This table contains the text of normal instructions.
• OPC_MSG_TEXT
This table contains the message text for messages in the
OPC_ACT_MESSAGE S table. To allow for various text lengths, the text is
split into chunks of 254 characters.
• OPC_ORIG_MSG_TEXT
This table contains the original (unprocessed) text of messages in
OPC_ACT_MESSAGE S.
NOTE For detailed definitions and contents of the OVO database tables, please
refer to HP OpenView VantagePoint Operations for UNIX Reporting and
Database Schema.
The following four OVO message tables are among the most frequently
used in the default report templates provided by this integration:
OPC_ACT_MESSAGE S, OPC_MSG_TEX T, OPC_HIST_ MESSA GES, and
OPC_HIST_MSG_TE XT.
Chapter 4 71
Page 92

Data Protector-OVO-OVR Integration
Creating Custom Reports
Most message tables contain the field node_id, which identifies the node
where the event occurred. If the node is in an internet network, you can
get each node's IP address and the identifying name from another table:
OPC_NODE_NAMES.
The relationship between these tables is illustrated in Figure 4-1:
Figure 4-1 Relationship Diagram
Chapter 472
Page 93

Message Format
The DP-OVO integration installs six message groups that are specifically
designed to handle messages generated by the templates and monitors
started by the DP-OVO integrations. The messages generated by Data
Protector are assigned to the six message groups where appropriate:
Table 4-3 Data Protector Message Groups
DP_Backup Backup session related messages
DP_Restore Restore session related messages
DP_Mount Mount request related messages
DP_Misc All other important Data Protector related
messages
DP_SPI Messages from the DP-OVO integration
DP_Interactive Detailed messages that are normally
displayed only in the Data Protector interface.
This message group is disabled by default.
Enable this message group if you want to
receive the greatest level of details about Data
Protector 's operation.
Data Protector-OVO-OVR Integration
Creating Custom Reports
An OVO message includes the following parameters:
Table 4-4 OVO Message Parameters
Message Group
The following
message groups
are available:
Applications Set to Data Protector
Node Set to the hostname of the Data Protector system
Chapter 4 73
DP_Backup Backup session messages
DP_Restore Restore session messages
DP_Mount Mount request messages
DP_Misc All other important Data Protector
DP_SPI DP-OVO integration messages
where the event occurred.
messages
Page 94

Data Protector-OVO-OVR Integration
Creating Custom Reports
Table 4-4 OVO Message Parameters
Severity Reflection of the impact that the event has on
Data Protector. For messages derived from SNMP
traps, the severity value of the SNMP trap is used
as the severity level of the message.
Service Name This depends on the impact the event has on a
service. This value needs to map with a node in
Data Protector's service tree.
Object This depends on the impact the event has on a
service. This value needs to map with a node in
Data Protector's service tree.
Data Protector SNMP traps set the object
parameter to NOTIFICATION
Messages that originate from a:
• monitored logfile set the Object parameter to
the name of the logfile.
• monitor set the Object parameter to the name
of the monitor.
NOTE For a detailed description of different message formats based on Message
Group, Service Name, and Object , please refer to the HP OpenView
Data Protector Integration Administrator's Reference for HP OpenView
Operations.
Chapter 474
Page 95

5 Data Protector-OVO-OVSD
Integration
Chapter 5 75
Page 96

Data Protector-OVO-OVSD Integration
Introduction
Introduction
Data backup and recovery are critical elements in Information
Technology Service Delivery and Management. Proactive management
and monitoring of service quality and continuity is fundamental to any
successful IT business.
HP OpenView Storage Data Protector automates the backup and
recovery process for all your enterprise systems. This integration
maximizes the potential of the Service Desk and OpenView Operations
applications by adding seamless backup and recovery to their
capabilities.
This chapter describes how OpenView Service Desk and OpenView
Operations integrate with Data Protector to provide support and
network-wide availability for Data Protector’s backup and recovery tools.
Prerequisites
The integration requires the following licensed components:
•Data Protector
• OpenView Operations
• OpenView Service Desk
• Oracle 8i (third party software)
Product Capabilities and Integration Benefits
The integration of Data Protector, OpenView Operations (OVO), and
OpenView Service Desk (Service Desk) lets you use Service Desk as a
trouble ticket interface for Data Protector, and enables Service Level
Management (SLM) to help you achieve a specific, consistent,
measurable level of service. In short, this integration helps you achieve
maximum service availability by providing a simple, effective way to do
all of the following:
• Manage backup operations across geographical boundaries.
• Diagnose problems across firewall.
• Extend management perspectives beyond standard operational
events and up to a business service level.
Chapter 576
Page 97

Data Protector-OVO-OVSD Integration
Introduction
• Provide Service Level Management (SLM) to help you ensure that
services are up and running. Also returns information you can use to
monitor services, to react to outages, and to document conformance to
SLAs.
Chapter 5 77
Page 98

Data Protector-OVO-OVSD Integration
Component List
Component List
OpenView Operations A central data collection and management point
for various remote OpenView applications.
Collects and analyzes data, automates critical
response, as well as message forwarding to other
services.
OpenView Service Desk A central problem management point for
systems, applications, and services. Systems,
applications, and services are defined as
“configuration items” by OVSD. OVSD registers
incidents and monitors their resolution for its
configuration items. OVSD manages problem
resolution to ensure compliance with a
configuration item specific SLA.
Chapter 578
Page 99

Data Protector-OVO-OVSD Integration
Import Mapping and Data Exchange
Import Mapping and Data Exchange
1
DP
Cell
DP
Cell
2
Service Desk
Configuration Items
OVO Station
3
4,5
1. The administrator imports/maps Data Protector nodes managed by
OVO into Service Desk as configuration items.
2. The administrator imports/maps selected OVO services,
dependencies, and relations into Service Desk as configuration items.
3. OVO forwards selected events to Service Desk as incidents for the
associated configuration items.
4. Service Desk sends an annotation to OVO when an incident is created
for an OVO event.
5. Service Desk sends an acknowledgement to OVO when an incident
associated with an OVO event is closed.
Chapter 5 79
Page 100

Data Protector-OVO-OVSD Integration
Import Mapping and Data Exchange
Integration feature for backup operations
Data Protector normally generates two Simple Network Management
Protocol (SNMP) traps for each backup session; the two traps correspond
to StartOfSession and EndOfSession events in OVO. In the default
configuration Data Protector forwards these event pairs to Service Desk
as independent incidents, requiring operator intervention and activity to
correlate the StartOfSession and EndOfSession incidents.
The following remedy not only automatically correlates the two incidents
for each session, it also enables proactive management of the backup
operations:
• Forward the StartOfSession event to Service Desk.
• Do not forward any EndOfSession event (completed successfully,
completed with failure, session aborted, etc.); instead configure them
to invoke a post-event script.
This post-event script takes four parameters: session id, backup
specification, completion time, and completion status. It searches the
sd_event log file for a matching StartOfSession event, retrieves its
message id, and sends a request to Service Desk to update the incident
associated with the StartOfSession event.
The update includes modification of:
• status (from registered to completed)
• actual finish (completion time)
• actual duration (automatically calculated based on actual
start/finish)
• closure code (successful, failed, aborted)
Chapter 580
 Loading...